1
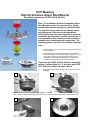
S197 Mustang
High Performance Upper Strut Mounts
Installation Instructions for 555-8120 & 555-8121
Note: The installation of these Competition Upper
Strut Mounts requires the removal of the factory
mounts that have the springs in a preloaded state.
The potential energy stored in the springs can be
very dangerous if not properly disassembled.
Follow the factory service procedures or have this
installation performed by a qualified technician. It
is recommended that a factory service manual be
available when installing these new mounts. The
provided grease is used for the urethane bushings
only!
Follow the factory service procedures and remove the strut and
spring assembly.
2.
Disassemble the strut and spring assembly. This should be
performed using the correct strut/spring clamping device. If you
do not have the spring removal equipment, take your strut
assemblies to a technician for disassembly. External spring
compressors may be used, but is not recommended.
If you have part # 555-8120 for tapered, stock-style
springs, perform Steps 3-5. If you have part # 5558121 from the coilover kit, skip to Step 6.
Spring Seat For Coilover
Springs (555-8121)
Spring Seat For StockStyle Springs (555-8120)
1
4.
1.
3.
Remove the rubber spring insulator from the stock strut mount
Pics 1&2
2
Remove the spring seat base from the new assembly. Insert the new spring base into the factory rubber spring
seat. Be sure to keep the billet spring seat base face up to prevent disturbing the bearing inside. Pics 3 & 4
3
4
5.
Return the seat base to the assembly. Pic 5
5
6.
Slide the entire assembly over the shaft of the strut Pic 6 and align the pig tail of the spring with the coil pattern of
the spring seat. (only kit 555-8120) Pic 7
7.
Torque the upper strut nut to 46 lb-ft. Take care when tightening the nut so that the assembly stays together as
shown above.
6
7
8.
Remove the four upper strut mount nuts from the new assembly. Then align the Steeda logo with the outside of
the vehicle.
9.
Reinstall the strut assembly following the factory installation procedures.
10. Repeat steps 1-9 for the opposite side.
11. Take a slow test drive and recheck all the fasteners before resuming normal driving.
Recommended Camber setting for
S197 Mustangs
Street
-.7 to -1.0
Aggressive Street
-1.0 to -1.25
Race
-1.25 to -2.5
*Note stock calls for -.7
Steeda Autosports Inc. All Rights Reserved 2006
555-8120.doc
Thank you for choosing STEEDA. Any questions on these instructions contact us at (954) 960-0774 or e-mail us at [email protected]