1
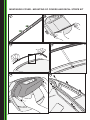
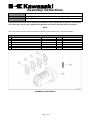
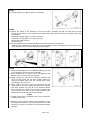
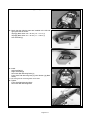
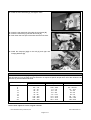
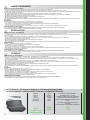
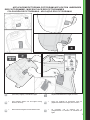
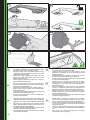
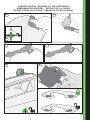
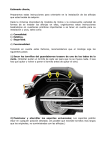
COVERS 99994-0422 DECAL STRIPE KIT 99994-0423 ISTRUZIONI DI MONTAGGIO - MOUNTING INSTRUCTIONS 05/07/2013 99994-0422 99994-0423 © Copyright AR - Rev00 KAWASAKI SIDE CASE MONTAGGIO COVER - MOUNTING OF COVERS AND DECAL STRIPE KIT 1 2b 3a 2 2a 2c 3b IT 1. 2. 3. EN 1. 2. 3. DE 1. 2. 3. Rimuovere le pellicole delle strisce biadesive (Fig.1); Applicare le decorazioni mediante le 4 strisce biadesive (Fig. 2a-2b-2c); Applicare la cover seguendo il montaggio riportato nelle figure (Fig. 3a-3b). FR 1. 2. ; ; ; Remove films of the bi-adhesive strips (Picture 1); Apply the decorations through the four bi-adhesive strips (Pictures 2a-2b-2c); Fix the cover following the instructions (Pictures 3a-3b) ES 1. 2. ; ; ; Entfernen den Schutzfilm vom doppelseitigen Klebeband der Dekorstreifen; Fixieren und bringen Sie die Dekorstreifen mit den 4 Klebestreifen wie auf den Abbildungen gezeigt an Bei der Montage der oberen Abdeckungen verfahren wie auf den Abbildungen gezeigt; P 1. 2. ; ; ; 3. 3. 3. This manual is produced by GIVI Srl, Flero (BS) Italy 3 Assembly Instructions Models: Description: Part Number: ZX1000M Lock Cylinder Set 99994-0407 Approximate Assembly Time: 15 min. Study these instructions before attempting to install the Lock Cylinder Set. Check tob e sure all parts are present after opening the package and install them by carefully following these instrucitons. NOTE This note symbol indicates points of particular interest for more efficient and convenient operation. Parts List No. 1 2 3 4 5 6 Component Name Tumbler #1 Tumbler #2 Tumbler #3 Tumbler #4 Lock Cylinder Spring Part No. 13272-1536 13272-1537 13272-1538 13272-1539 21007-0587 92145-0979 Installation Instructions Page 1 of 6 Qty 10 10 10 10 2 20 Remarks Assembly Procedure NOTE ○ This kit must be installed with the Kawasaki Quick Release Saddlebag Kit (P/N) for the Ninja® 1000. ○ This kit combines four different tumblers [1-4] placed into the five grooves [A] in the lock cylinder [5] to make a saddlebag lock that uses the motorcycle’s stock ignition key. ○ The four tumblers have different lengths [B] as shown below. Tumbler #1 [2]: 2.5 mm (0.098 in.) Tumbler #2 [3]: 3.0 mm (0.12 in.) Tumbler #3 [4]: 3.5 mm (0.14 in.) Tumbler #4 [5]: 4.0 mm (0.16 in.) ○ The tumblers are packaged in four separate colored plastic bags for easy identification. ○ Assemble the two lock cylinders using the same procedures. ○ When assembling the first lock cylinder, record the tumbler color combination on the Lockset Tumbler Color Reference since the tumbler combination for both lock cylinders is identical. ○ Work on a dark, non-slip surface such as a mouse pad or neoprene to help prevent losing small parts. Step 1 Remove the contents of the Lock Cylinder Kit and separate the four colored bags. ○ Work with one colored bag [A] of tumblers at a time so that tumblers do not become mixed. Since the difference in lengths is very small it is difficult to differentiate the tumblers. ○ Empty the tumblers from one colored bag onto your work surface. Step2 Install a spring [6] into the lock cylinder [5] and insert a tumbler [1] with the projection over the spring. Press the tumbler into the groove until it seats. Working one slot at time, repeat until all five grooves are filled. Page 2 of 6 Step3 Insert the ignition key [B] into the lock cylinder [5]. Step4 Inspect the height of the tumblers in the lock cylinder. Tumblers [A] that are flush with the lock cylinder [2] will remain in the cylinder and tumblers that project above or below the cylinder surface will be removed. Projecting High [B] (Upper or Lower) (Incorrect) Projecting Low [C] (Upper or Lower) (Incorrect) No Projection [D] (Correct) Ignition Key [E] NOTE: It is possible that no tumblers will be flush and that more than one will flush. • Mark the flush tumblers with a black pen. Use the lockset Tumbler Color Reference to record the color of the bag from which the flush tumblers were packaged. Step5 While pressing lightly on the installed tumblers [A] in the lock cylinder [5], remove the ignition key [B]. ○ If the tumblers are not held in place, the tumblers and springs may pop out to of the lock cylinder. Using a blunt tool, remove the unmarked tumblers that were not flush when the key was inserted. Return all removed tumblers back into the colored bag before proceeding to the next color. Using another color bag, repeat the procedure with the empty slots in the lock cylinder. Continue the procedure with each colored bag until all of the tumblers remain flush with the lock cylinder when the key is inserted. Be sure to record each color on the Lockset Tumbler Color Reference for use on the second lock cylinder. NOTE ○ Tumblers from every colored bag may not be required to complete the lockset. ○ Referring to the Lockset Tumbler Color Reference, insert the springs and tumblers, one colored bag at time into the second lock cylinder. Insert the key confirm that the plates are flush. Page 3 of 6 Step6 Make sure that the stopper [A] of the saddlebag is in the position shown. ★ If the stopper position other than shown, push down on the stopper until it is seated as shown. Page 4 of 6 Step7 Make sure that the knob [A] in the saddlebag is in the position as shown, and remove it. ★ If the knob is positioned other than shown, turn the knob counterclockwise until it stops in the locked position. Step8 Pull the handle [A] on the saddlebag to confirm it is locked. Step9 Insert the ignition key [C] and make sure that the installed tumblers [A] are flush with the lock cylinder. The stopper tumbler [B] will always project from the lock cylinder. Step10 Line up the stopper tumbler [A] at the end of the lock cylinder [1] with the groove in the saddlebag, and insert the lock cylinder. The key and stopper will be at about the 1 o’clock position. Slowly turn the key clockwise with slight downward pressure until the cylinder slides down into the saddlebag. This will be about the 4 o’clock position [D]. DO NOT TURN THE KEY AND CYLINDER CLOCKWISE ANY FURTHER AT THIS POINT OR THE KEY WILL NOT BE ABLE TO BE REMOVED. Carefully press the cylinder down while turning the key counterclockwise to seat the lock cylinder into place. You should hear a click when it is fully seated and key will be around the 12 o’clock position. If the lock cylinder can not be installed using this procedure, make sure that all tumblers, except for the stopper tumbler, are flush with the lock cylinder. Page 5 of 6 Step11 After installing the lock cylinder [5], make sure that removing the ignition key [A] does not lift the lock cylinder out of the saddlebag and that the ignition key operates the lock correctly. 2013 Kawasaki Heavy Industries, Ltd. P/No. 99929-0856 Page 6 of 6 Assembly Instructions Models: Description: ZX1000M Lockset Tumbler Color Reference Assembly Instructions Models: Description: Part Number: ZX1000L/M Tandem Grip Set 99994-0420 Approximate Assembly Time: 45 min. Before you begin, read through these instructions and check that all parts are present. Please note that Kawasaki cannot assume any responsibility for damage resulting from incorrect installation. Kawasaki recommends that all genuine accessories should be fitted by an authorised Kawasaki dealer. Parts List No. Component Name 1 Left Grab Rail* Part No. 35063-0908 Qty 1 2 3 4 5 Right Grab Rail* Washer Bolt Damper 35063-0909 92022-1317 130CA0820 92161-1550 1 2 2 1 6 7 Damper Pad 92161-1551 39156-0748 1 2 *: The following parts are installed to the left and right grab rails. Tapes [A] (38 × 18 mm (1.5 × 0.71 in.)) (P/No. 39188-0036) Tapes [B] (27 × 16 mm (1.1 × 0.63 in.)) (P/No. 39188-0035) Page 1 of 7 Remarks L = 20 mm (0.79 in.) For Left Side For Right Side Refer to the service manual for detailed procedures. Installation Instructions Assembly Procedure Wrap the remote preload adjuster and mounting bracket with a soft cloth to prevent scratching the rear fender. Insert the ignition switch key [A] into the seat lock. Pull up the front part of the rear seat [B] while turning the key clockwise, and remove it forward. Remove the bolts [A]. Remove the front seat [B] by pulling the rear of it up and backward. Remove: Grab Rail Mounting Bolts [A] (Both Sides) Grab Rail [B] (Both Sides) Dampers and Collars (Both Sides) The front grab rail mounting bolts are reused for installation. Remove: Bolts and Washers [A] Seat Cover [B] Owner’s Tool Kit Page 2 of 7 z Remove: Rear Fender Mounting Bolts [A] z Remove: Bolts [A] Bracket [B] z Lower the rear fender [A] downward. z Remove: ECU [B] with Relay Box [C] z Disconnect: Turn Signal Light Lead Connectors [D] License Plate Light Lead Connector [E] Tail/Brake Light Lead Connector [F] z Remove the rear fender rearward. z Cut holes [A] on both sides according to the grooves [B] in the rear fender [C] with a suitable tool. z After cutting the holes, remove any burrs, sharp edges, etc. with a suitable tool. Page 3 of 7 z Connect: Turn Signal Light Lead Connectors [A] License Plate Light Lead Connector [B] Tail/Brake Light Lead Connector [C] z Install: ECU [D] with Relay Box [E] Rear Fender [F] z Install: Bracket [A] Bolts [B] z Apply a non-permanent locking agent to the threads of the rear fender mounting bolts [A], and tighten them securely. z Install the owner’s tool kit. z Insert the hooks [A] of the seat cover into the slots [B] of the rear fender on both sides. Page 4 of 7 z Install the bolts and the washers [A], and tighten the bolts. z Check that the following parts are installed to the left and right grab rails as shown. Tape [A] (Both Sides: 38 × 18 mm (1.5 × 0.71 in.)) Tape [B] (Both Sides: 27 × 16 mm (1.1 × 0.63 in.)) Left Grab Rail [1] z Install: Left Grab Rail [1] Right Grab Rail [2] Rear Grab Rail Mounting Bolts [4] Front Grab Rail Mounting Bolt [A] with Washer [3] (Both Sides) ○ The front grab rail mounting bolts are reused. z Tighten: Front Grab Rail Mounting Bolts Rear Grab Rail Mounting Bolts Page 5 of 7 z Prepare the rear frame [B] surface around the front grab rail mounting bolt ends [A] using a suitable cleaning fluid to remove any oil or dirt on the frame near the mounting bolt ends, and dry with a clean cloth. z Remove adhesive backing and stick the pad [7] over the front grab rail mounting bolt end [A] and rear frame [B]. ○ Repeat the same procedure for other pad. z After applying the pads, make sure that the pads do not touch the wiring harness. z Insert the front seat hooks [A] under the fuel tank bracket [B]. Page 6 of 7 z Install the front seat bolts [A], and tighten them. z Insert the rear seat hook [A] under the rear frame [B]. z Insert the seat hook [C] into the latch hole [D]. z Push down the front part of the seat until the lock clicks. z Install the dampers [5][6] to the left [A] and right rear footpeg brackets [B]. Basic Torque for General Fasteners The table below, relating tightening torque to thread diameter, lists the basic torque for the bolts and nuts. Use this table for only the bolts and nuts which do not require a specific torque value. All of the values are for use with dry solvent-cleaned threads. Threads dia. (mm) 5 6 8 10 12 14 16 18 20 Torque kgf·m 0.35 ∼ 0.50 0.60 ∼ 0.80 1.4 ∼ 1.9 2.6 ∼ 3.5 4.5 ∼ 6.2 7.4 ∼ 10.0 11.5 ∼ 16.0 17.0 ∼ 23.0 23.0 ∼ 33.0 N·m 3.4 ∼ 4.9 5.9 ∼ 7.8 14 ∼ 19 25 ∼ 34 44 ∼ 61 73 ∼ 98 115 ∼ 155 165 ∼ 225 225 ∼ 325 ft·lb 30 ∼ 43 in·lb 52 ∼ 69 in·lb 10 ∼ 13.5 19 ∼ 25 33 ∼ 45 54 ∼ 72 83 ∼ 115 125 ∼ 165 165 ∼ 240 Please check / adjust all screws at regular intervals. 2013 Kawasaki Heavy Industries, Ltd. P/No. 99929-0857-01 Page 7 of 7 SADDLEBAG SET 99969-3106/ 99969-3107 (US VERSION) (EU VERSION) MANUALE D’UTILIZZO - OWNER’S MANUAL - GEBRAUCHSANLEITUNG MANUEL D’UTILISATION - MANUAL DE UTILIZACION - MANUAL DO USUÁRIO ATTENZIONE IT PREVENZIONE DI INCIDENTI: Tutti gli accessori e i bagagli devono essere fissati correttamente; • • • • • • • • Verificare il corretto tiraggio delle viti che fissano i supporti alla moto; Aggiungere accessori e bagagli alla moto può influenzare,o ridurre, la stabilità le performance e una corretta velocità di marcia; Non inserire nella valigia materiale infiammabile o esplsoivo e neppure contenitori di gas; Non guidare mai la motocicletta con le valigie aperte o sovraccariche (MAX 5Kg per valigia); Bilanciare il peso delle valigie; Non oltrepassare i limiti di velocità130 km/h; Non sedersi sulle valigie; Leggere attentamente il manule, le limitazioni della motocicletta e tutte le istruzioni di montaggio dei supporti. ATTENZIONE: Si può incorrere in gravi danni se: • I bauletti sono caricati con materiale esplosivo o infiammabile; • • • • • I bauletti sono sovraccarichi; Il peso nei bauletti non è bilanciato; I bauletti non sono montati correttamente; La motocicletta è guidata oltre i 130 Km/h; Il passeggero si siede sui bauletti. ACCORGIMENTI PER LA PULIZIA: • Per la pulizia dei bauletti non usare solventi, benzina o altri prodotti chimicia che potrebbero danneggiarli; • E’ raccomandato l’uso di prodotti neutri (solamente acqua e saponi neutri). WARNING EN ACCIDENT PREVENTION: All accessories and luggage must be fitted securely / correctly. • Verify that the bolts that fix the system to the motorcycle are firmly tightened during regular service. • Addition of accessories and luggage to the motorcycle can influence / reduce the stability, performance and safe operating speed of a motorcycle. • Never put flammable / explosive materials, or gas cylinders into the saddlebags. • Never ride the motorcycle with the saddlebags unlocked or overloaded (5 kg / 11 lb per saddlebag max.) • Equalise the load/weight to both saddlebags. • Never exceed the recommended max speed of 130 km/h or 80 mph. • Never sit on the saddlebags. • Carefully read the owners manual, the limitations of your motorcycle and all mounting instructions of the saddlebag system. CAUTION: Serious injury or death may occur if: • The saddlebags are loaded with explosive or flammable materials • The saddlebags are overloaded • The saddlebags are not loaded with equal weight (causing imbalance) • The saddlebags are not mounted correctly • The motorcycle with saddlebags is ridden at speeds over 130km/h or 80mph • Passengers sit on the saddlebag. NOTE FOR CLEANING: • For the cleaning of the top box never use solvents, petrol or other chemical products that could damage it; • We advise the use of a neutral cleaner (just water with mild soap). WARNUNG DE UNFALLVERHÜTUNG: Das gesamte Zubehör und Gepäck muss sicher/korrekt befestigt werden. • Im Rahmen der regelmäßigen Wartungsarbeiten überprüfen, dass die Schrauben zur Befestigung des Systems am Motorrad fest angezogen sind. • Zusätzliches Zubehör und Gepäck am Motorrad kann die Stabilität, die Leistung und die Geschwindigkeit des Motorrads für sicheres Fahren beeinflussen/senken. • Niemals entzündliche/explosive Stoffe oder Gasflaschen in den Koffern transportieren. • • • • Das Motorrad niemals mit entriegelten oder überladenen Koffern (max. 5 kg / 11 lb pro Koffer) fahren. Gewicht gleichmäßig auf die beiden Koffer verteilen. Die Richtgeschwindigkeit von 130 km/h bzw. 80 MPH niemals überschreiten. Niemals auf den Koffern sitzen.• Die Gebrauchsanleitung, die Beschränkungen für das Motorrad und alle Montagehinweise für die Koffer sorgfältig lesen. ACHTUNG: Folgendes kann zu schweren oder tödlichen Verletzungen führen: • Die Koffer sind mit explosiven oder entzündlichen Stoffen beladen. • Die Koffer sind überladen. • Das Gewicht ist nicht gleichmäßig auf die Koffer verteilt (Ungleichgewicht ist die Folge) • Die Koffer sind nicht richtig befestigt. • Das Motorrad mit montierten Koffern wird mit einer Geschwindigkeit von über 130 km/h bzw. 80 MPH gefahren.• Beifahrer sitzen auf den Koffern. HINWEIS ZUR REINIGUNG: • Verwenden Sie zur Reinigung der Koffer kein Lösungsmittel, kein Benzin und keine Chemikalien, da die Koffer beschädigt werden könnten .• Wir empfehlen, ein neutrales Reinigungsmittel (Wasser mit Neutralseife) zu verwenden. • We advise the use of a neutral cleaner (just water with mild soap). ATTENZIONE - CAUTION - VORSICHT - ATTENTION - ATENCIÓN - CUIDADO ! La valigia laterale può staccarsi se non correttamente ancorata ai supporti. Prima dell’utilizzo controllare scrupolosamente il fissaggio delle valigie ai telai. Saddlebags may fall off the motorcycle if not locked correctly to the brackets. Before use check carefully that the fitting of the saddlebags to brackets is correct and secure. Die Koffer können vom Motorrad fallen sofern sie nicht korrekt befestigt wurden. Überprüfen Sie vor Fahrtantritt alle mechanischen Verbindungen auf deren Festigkeit. Le valises laterales peuvent tomber s’il n’est pas correctement arrimé. Avant de partir, verifiez scrupuleusement le bon verrouillage du valises laterales sur son support. Las maletas laterales pueden caerse si no está bien enganchada. Antes que empezar el viaje controlar el correcto montaje de todas las conexiones mecánicas. As valises laterales podem se desprender se não estiver travado no suporte. antes de usar, verifique cuidadosa¬mente se a fixação do baú está correta. ! 2 MAX 130 Km/h - 80 miles/h VELOCITÀ MASSIMA A CARICO PIENO • MAXIMUM SPEED AT FULL LOAD ANGEGEBENE RICHTGESCHWINDIGKEIT NICHT ÜBERSCHREITEN VITESSE PLEIN CHARGEMENT MAXIMUM • VELOCIDAD MÁXIMA A PLENA CARGA VELOCIDADE MÁXIMA COM CARGA TOTAL AVERTISSEMENT fr PRÉVENTION DES ACCIDENTS : Tous les accessoires et les bagages doivent être fixés correctement/en toute sécurité. • Vérifiez que les boulons de fixation du système sur la moto sont fermement serrés pendant l’entretien régulier. • L’ajout d’accessoires et de bagages sur la moto peut influencer/réduire la stabilité, les performances et le régime maximal de fonction- nement sans danger de la moto. • • • • • • Ne placez jamais des substances inflammables/explosives ou des bouteilles de gaz dans les valises. Ne pilotez jamais la moto alors que les valises ne sont pas fermées ou sont surchargées (5 kg maximum par valise). Équilibrez le chargement/poids dans les deux valises. Ne dépassez jamais la vitesse maximale recommandée de 130 km/h. Ne vous asseyez jamais sur les valises. Lisez attentivement le manuel d’utilisation, les limitations de votre moto ainsi que l’intégralité des instructions de montage du système des valises. ATTENTION: Risques de blessures graves voire mortelles dans les cas suivants : • Les valises contiennent des substances explosives ou inflammables • Les valises sont surchargées• Le poids des valises est mal réparti (provoquant un déséquilibre) • Les valises ne sont pas montées correctement • La moto équipée des valises roule à une vitesse supérieure à 130 km• Les passagers sont assis sur les valises. NOTE RELATIVE AU NETTOYAGE : • Pour nettoyer le top-case, n’utilisez jamais de solvants, d’essence ou autres produits chimiques qui pourraient l’endommager ; • Nous vous recommandons d’utiliser un nettoyant neutre (eau et savon doux). Es PRECAUCIÓN PREVENCIÓN DE ACCIDENTES: • Compruebe que los tornillos que fijan el sistema a la motocicleta estén bien apretados durante el uso normal. • La adición de accesorios y equipaje a la motocicleta puede influir / reducir la estabilidad, el rendimiento y la velocidad de seguridadde una motocicleta. • Nunca deposite materiales inflamables / explosivos o cilindros de gas en las alforjas. • Nunca conduzca la motocicleta con las alforjas abiertas o con una carga excesiva (5 kg por alforja como máximo) • Equilibre la carga/peso entre ambas alforjas. • Nunca sobrepase la velocidad máxima recomendada de 130 km/h. • Nunca se siente sobre las alforjas. • Lea atentamente el manual del propietario, las limitaciones de la motocicleta y las instrucciones de montaje del sistema de alforjas. PRECAUCIÓN: Pueden producirse heridas graves o la muerte si: • Las alforjas se cargan con materiales explosivos o inflamables • Las alforjas se cargan demasiado • El peso de las alforjas no se equilibra (lo que causaría desequilibrio) • Las alforjas no se montan correctamente• Se conduce la motocicleta con las alforjas montadas a más de 130 km/h • Los pasajeros se sientan en las alforjas. NOTE RELATIVE AU NETTOYAGE : • Pour nettoyer le top-case, n’utilisez jamais de solvants, d’essece ou autres produits chimiques qui pourraient l’endommager ; • Nous vous recommandons d’utiliser un nettoyant neutre (eau et savon doux). P ATENÇÃO PREVENÇÃO DE ACIDENTES: Todos os acessórios e bagagens devem estar ajustados firme e corretamente. • Durante a manutenção regular, verifique que os parafusos que prendem o sistema à motocicleta estejam bem apertados. • A adição de acessórios e bagagens à motocicleta pode influenciar ou reduzir a estabilidade, o desempenho e a velocidade de operação segura da mesma. • Nunca coloque materiais inflamáveis, explosivos ou cilindros de gás dentro dos baús laterais. • Nunca dirija a motocicleta com os baús laterais destravados ou sobrecarregados (5 kg / 11 libras no máximo por baú lateral). • Equalize a carga/peso em ambos os baús laterais. • Nunca ultrapasse a velocidade máxima recomendada de 130 km/h (80 mph). • Nunca sente sobre os baús laterais. • Leia atentamente o manual do proprietário, os limites da sua motocicleta e todas as instruções de montagem do sistema de baús laterais. CUIDADO: Podem ocorrer ferimentos graves ou morte se: • Os baús laterais estiverem carregados com materiais explosivos ou inflamáveis • Os baús laterais estiverem sobrecarregados • Os baús laterais não estiverem carregados com pesos iguais (causado desequilíbrio) • Os baús laterais não estiverem montados corretamente • A motocicleta com baús laterais for pilotada a velocidades superiores a 130 km/h (80 mph) • Os passageiros sentarem-se sobre os baús laterais.. OBSERVAÇÃO PARA LIMPEZA: • Para a limpeza do baú superior, nunca use solventes, gasolina ou outros produtos químicos que possam danificá-lo; • Recomendamos o uso de um limpador neutro (apenas água com um detergente suave). NOTE TECNICHE • TECHNICAL INFORMATION • TECHNISCHE INFORMATIONEN NOTES TECHNIQUES • INFORMACIONES TÉCNICAS • INFORMAÇÕES TÉCNICAS CAPACITÀ CAPACITY INHALT CAPACITÉ CAPACIDAD CAPACIDADE 28 LT 7.4 gallon (u.s.) 6.2 gallon (u.K.) PESO WEIGHT GEWICHT POIDS PESO PESO CAPACITA’ DI CARICO MASSIMA (CONTENUTO NELLA VALIGIA) MAXIMUM LOADING CAPACITY (CONTENTS) MAXIMALE NUTZLAST (KOFFERINHALT) CAPACITE DE CHARGEMENT (CONTENU DE LA VALISE) CAPACIDAD DE CARGA MÁXIMA (CARGA INTERIOR) CAPACIDADE DE CARGA MÁXIMA (CONTEúDO) 4 KG 8.8 lb 5 KG 11 lb 3 RACCOMANDAZIONI IMPORTANTI PER LA GUIDA - IMPORTANT CAUTIONS WHILE DRIVING ! IT WICHTIGE FAHRHINWEISE - RECOMMANDATIONS IMPORTANTE POUR LA CONDUITE RECOMANDACION IMPORTANTE PARA LA CONDUCCION - CUIDADOS IMPORTANTES AO PILOTAR 1. 2. 3. 4. 5. EN 1. 2. 3. 4. 5. DE 1. 2. 3. 4. 5. 6. fr 1. 2. 3. 4. 5. Es 1. 2. 3. 4. 5. P 1. 2. 3. 4. 5. 4 Guidare la motocicletta con prudenza soprattutto quando le valigie sono a pieno carico. ll montaggio delle valigie può influenzare il comportamento su strada del motociclo soprattutto in funzione del peso trasportato che comunque non può eccedere i limiti indicati. Prima di partire accertarsi che il carico del bauletto sia fissato per evitare che si sposti. A causa del comportamento di guida modificato, prima di intraprendere un viaggio verificare la stabilità e le condizioni di guida del mezzo con un giro di prova. Di conseguenza adattare lo stile di guida alle condizioni del motociclo. Durante le manovre di guida in uno spazio ristretto fate attenzione alla larghezza del carico. Fate attenzione se il vento è forte. La sensibilità al vento laterale aumenta in seguito al fissaggio di bauletti. Osservate le disposizioni d’immatricolazione valide nel Vostro Paese. Always take care when riding the motorcycle, above all when the cases are at full load. The mounting of motorcycle luggage can influence the handling characteristics of the motorcycle. This is due to the extra load applied to the vehicle. Under no circumstances should the gross weight of the luggage exceed that recommended by GIVI or the motorcycle manufacturer. We therefore recommend that you consider the loading of the vehicle when riding. Before leaving always check that the load is secure to avoid its movement. Because of the higher loading, please always check the stability of your motorbike when you leave for a trip, driving for a short way. Always take extra care when using motorcycle luggage that is fitted to your bike. When driving in a narrow space pay attention to the width of the bike. Please pay attention if the wind is strong. The sensitivity of your motorbike to lateral wind increases after the fitting of cases. Respect the registration regulations in force in your Country. Vorsichtig fahren, vor allem bei voller Beladung. Bei der Montage von Koffern wird das Fahrverhalten des Motorrads beeinflusst, vor allem wegen des zugeladenen Gewichtes. Keinesfalls die zugelassene Richtgewindigkeit von 130 km/h oder 80 MPH überschreiten. Vor der Abfahrt prüfen Sie, ob die Ladung im Koffer gegen Verrutschen gesichert ist. Aufgrund des geänderten Fahrverhaltens, prüfen Sie die Stabilität und Fahreigenschaften des Motorrads. Passen Sie Ihre Fahrweise den veränderten Fahreigenschaften des Motorrads an und tasten Sie sich langsam an die Richtgeschwindigkeit heran. Vorsicht bei Fahrmanövern auf beengtem Raum. Vorsicht bei starkem Wind, die Seitenwindempfindlichkeit erhöht sich durch den Anbau von Gepäckbehältern. Beachten Sie Eintragungsvorschriften die in Ihrem Land gelten. Conduire la moto avec prudence surtout quand les valises sont chargées au maximum. Le montage des valises peut influencer le comportement de la moto pendant la conduite surtout en fonction du poids total qui ne doit pas être supérieur à celui qui est autorisé. Avant de partir assurez-vous que le chargement dans la valise soit bien fixé pour éviter qu’ il se déplace. À cause du changement du comportement de la conduite, avant de commencer votre voyage, faites un tour d’essai pour vérifier la stabilité et les conditions de conduite. Adaptez votre conduite en conséquence. En manoeuvrant dans un espace étroit, faites attention à la largeur du chargement. Faites attention si le vent est fort. La sensibilité au vent latéral augmente en raison de la présence des valises. Respectez les mesures de circulation en vigueur dans votre pays. Conduzca siempre la moto con cuidado, aumentando la atención cuando las maletas lleven la carga máxima. El montaje del baúl puede influir en el pilotaje de la moto durante la marcha, sobre todo en función del peso transportado, que de todo modo no puede exceder el límite indicado. Antes de iniciar la marcha compruebe de que la carga del baúl este bien aseguranda, para evitar que se desplace. A causa del comportamiento modificado durante la conducción, recomendamos que antes de comenzar un viaje compruebe la estabilidad y las condiciones de marcha con una vuelta de prueba y adopte el estilo de conducción consecuente. Durante las maniobras en espacios reducidos preste mucha atención a la anchura de la carga. En condiciones de viento fuerte aumente el nivel de atención. La sensibilidad al viento lateral aumenta sensiblemente con el montaje del baúl. Respete siempre las normas de circulación vigentes en su país. Sempre tome cuidado ao pilotar a motocicleta, especialmente quando os baús estiverem com carga máxima. A colocação da bagagem na motocicleta pode influenciar sua dirigibilidade. Isso se deve à carga extra aplicada ao veículo. Em nenhuma circunstância o peso bruto da bagagem deve exceder o recomendado pela GIVI ou pelo fabricante da motocicleta. Portanto, é recomendável prestar atenção na carga do veículo ao pilotar. Antes de sair, verifique sempre se a carga está presa com segurança para evitar que se mova. Se a carga for pesada, sempre verifique a estabilidade da motocicleta antes de viajar, fazendo um trajeto curto. Sempre tome cuidado adicional quando estiver com bagagem presa na motocicleta. Ao pilotar em local estreito, preste atenção na largura da motocicleta. Preste atenção se o vento está forte. A sensibilidade da motocicleta a ventos laterais aumenta após a fixação de baús. A fixação e o uso de baús podem estar sujeitos a restrições legais, dependendo das leis do seu país ou do país em que está dirigindo. Verifique essas restrições antes de viajar. MANUTENZIONE IT 1. 2. I nostri prodotti non necessitano di manutenzione specifica. In caso di caduta della moto o di urto violento del bauletto, anche se trasportato a mano, si raccomanda comunque di verificare attentamente che non si siano verificate rotture o danneggiamenti al sistema di aggancio. Per la pulizia utilizzate solamente acqua e sapone neutro. Non usate mai solventi, benzina o altri prodotti chimici che possono danneggiare il bauletto. MAINTENANCE EN 1. 2. Our cases and related products do not require any specific maintenance. Although, in the event of an accident with the motorcycle or any violent impact to the case, even when carried by hand, we recommend careful inspection to ensure that no damage has occurred to the securing or locking mechanism. For the cleaning of the top box use a neutral cleaner (just water with mild soap). Never use solvents, petrol or other chemical products that could damage the case. WARTUNG DE 1. 2. Dieses Produkt braucht keine spezifische Wartung. Im Falle eines Sturzes mit dem Motorrad oder einem heftigem Stoß gegen die Koffer, auch wenn Sie den Koffer in der Hand tragen, empfehlen wir immer sorgfältig zu überprüfen, dass sich kein Schaden oder Bruch am Befestigungssystem des Koffers befindet. Das Befestigungssystem besteht aus der Platte, die Halterungen, der Kralle und dem Riegel am Kofferunterteil. Sollten Sie unsicher sein, ersetzen Sie die Platte. Zur Pflege und Reinigung benutzen Sie ein neutrales Reinigungsmittel (Wasser mit Neutralseife). Keinesfalls sind Lösungsmittel, Benzin oder Chemikalien zu verwenden, da die Koffer beschädigt werden könnten. ENTRETIEN fr 1. 2. Nos produits ne nécessitent pas d’entretien particulier. En cas de chute de la moto ou d’un choc violent du top case, même en le portant à la main, il est toutefois recommandé de vérifier attentivement qu’il n’y ait pas casse ou endommagement du système d’accrochage de la platine. Pour le nettoyage, utiliser seulement de l’eau avec du savon neutre. Ne pas employer de solvants, d’essence ou autres produits chimiques qui pourraient endommager les top cases. MANTENIMIENTO Es 1. 2. Nuestros productos no necesitan mantenimiento. Si se producen caídas de la moto o fuertes golpes al baúl, también si el producto es transportado a mano, se recomienda controlar igualmente que no se hayan producidos roturas o daños al sistema de enclaje. Para limpiar el baúl utilice sólo agua y jabón neutro. No utilice nunca solventes, gasolina o productos químicos ya que pueden dañar el baúl irreparablemente. MANUTENÇÃO P 1. 2. Nossos baús e produtos relacionados não exigem manutenção específica. No entanto, em caso de um acidente com a motocicleta ou qualquer impacto violento contra o baú, mesmo quando transportado na mão, recomenda-se uma inspeção cuidadosa para garantir que o mecanismo de fixação ou de travamento não foi danificado. Para a limpeza do baú superior, use um detergente neutro (apenas água com sabão suave). Nunca use solventes, gasolina ou outros produtos químicos que podem danificar o baú. 5 IT ALCUNE PRECAUZIONI • AL FINE DI NON PREGIUDICARE LA NORMALE TENUTA ERMETICA DELLA VALIGIA, ASSICURARSI CHE LA STESSA SI CHIUDA SENZA CHE IL COPERCHIO SFORZI CONTRO IL CONTENUTO. • LE VALIGIE NON SONO STATE COSTRUITE PER SEDERCISI SOPRA. UN CARICO ILLECITO DELLA SUPERFICIE DELLE VALIGIE NONCHÉ IL RIEMPIRLE CON OGGETTI INGOMBRANTI O TROPPO VOLUMINOSI POTREBBE AMPIAMENTE DANNEGGIARE LA VALIGIA COMPROMETTENDONE L’IMPERMEABILITÀ. EN SOME PRECAUTIONARY MEASURES • IN ORDER NOT TO PREjUDICE THE WATERTIGHT SEAL OF THE CASE, BE SURE THAT IT IS CLOSED IN A WAY THAT THE LID DOES NOT FORCE AGAINST THE CONTENT. • THE CASES HAVEN’T BEEN CONSTRUCTED TO SIT ON. AN EXCESSIVE LOAD ON THEIR UPPER SURFACE AS WELL AS LOADING THE CASE WITH BULKY OR VOLUMINOUS OBjECTS MAY CAUSE CONSIDERABLE DAMAGE THE CASE AND COMPROMISE ITS WATERTIGHTNESS. DE SICHERHEITSHINWEISE • UM DIE DICHTIGKEIT DER KOFFER NICHT ZU BEEINTRäCHTIGEN, DÜRFEN DIE DECKEL BEIM VERSCHLIESSEN DER KOFFER NICHT GEGEN DEN INHALT DRÜCKEN. • DIE KOFFER WURDEN NICHT ENTWICKELT, UM DARAUF ZU SITZEN. EINE UNZULäSSIGE BELADUNG AUF DEM KOFFER SO WIE EINE ÜBERLADUNG MIT GROSSEN GEGENSTäNDEN, KöNNTE DIE KOFFER ERHEBLICH BESCHäDIGEN UND DAMIT DIE WASSERDICHTIGKEIT BEEINTRäCHTIGEN. fr QUELQUES PRÉCAUTIONS • AFIN DE NE PAS COMPROMETTRE LA FERMETURE ET L’ÉTANCHÉITÉ DE LA VALISE, S’ASSURER qU’ELLE SE REFERME SANS qUE LE COUVERCLE FORCE SUR LE CONTENU. • LES TOP CASES NE SONT PAS FAITS POUR S’ASSEOIR DESSUS. UN POIDS EXESSIF SUR LE DESSUS AINSI qU’UN CHARGEMENT TROP ENCOMBRANT OU VOLUMINEUX PEUVENT ENDOMMAGER CONSIDÉRABLEMENT LA VALISE ET COmPROmETTRE SON ÉTANCHÉITÉ. Es ALGUNAS PRECAUCIONES • CON EL FIN DE NO PERjUDICAR LA ESTABILIDAD DEL BAúL, ES INDISPENSABLE AVERIGUAR qUE ESTE BIEN CERRADO Y qUE LA TAPA NO MODIFIqUE SU POSICIóN A CAUSA DEL CONTENIDO. • LOS BAúLES NO HAN SIDO FABRICADOS PARA SENTARSE ENCIMA. UNA CARGA IMPROPIA PUESTA SOBRE LA SUPERFICIE DE LOS BAúLES O INCLUSO LA INTRODUCCIóN DE OBjETOS PESADOS O VOLUMINOSOS PUEDE DAñAR GRAVEMENTE EL MISMO BAúL COMPROMETIENDO SU ESTABILIDA Y SEGURIDAD . P ALGUMAS MEDIDAS DE PRECAUÇÃO • PARA NãO PREjUDICAR A VEDAçãO À PROVA D’ÁGUA DO BAú, CERTIFIqUE-SE DE qUE ELE ESTÁ FECHADO DE FORMA qUE A TAMPA NãO PRESSIONE O CONTEúDO. • OS BAúS NãO FORAM CONSTRUíDOS PARA SERVIREM DE ASSENTO. UMA CARGA EXCESSIVA SOBRE A PARTE SUPERIOR, BEM COMO CARREGAR O BAú COM OBjETOS GRANDES OU VOLUMOSOS PODE CAUSAR DANOS GRAVES AO BAú E COMPROMETER SUA IMPERMEABILIDADE. 6 APPLICAZIONE PICTOGRAM - PICTOGRAMS APPLICATION ANBRINGEN DER PIKTOGRAMME - MISE EN PLACE DES PICTOGRAMMES COLOCACIÓN DE PICTOGRAMAS - APLICAÇÃO DOS PICTOGRAMAS IT EN 1. Se necessario, applicare gli adesivi, sopra quelli premontati (in inglese), come indicato in figura. fr 1. Glue pictogram stickers over the English warning stickers, if necessary. Es DE 1. Kleben Sie die Pictogramme auf die Warnhinweise. P 1. Apposez les pictogrammes autocollants sur les étiquettes d’avertissement en anglais, au besoin; 1. Pegue las pegatinas de pictogramas sobre las pegatinas de advertencia en inglés, si es necesario. 1. Se necessário, cole os adesivos com os pictogramassobre os adesivos de advertência em inglês. 7 APERTURA - OPENING - ÖFFNEN - OUVERTURE - APERTURA - ABERTURA 2 1 IT 2. Sollevare la linguetta (Fig. 2). 1. Ruotare la chiave verso destra (Fig. 1). 1. Tournez la clé vers la droite de 90° (image 1). fr 2. Soulevez la poignée d’ouverture (image 2). 3. Ouvrez le couvercle supérieur. 1. Rotate the key to the right by 90° (Picture 1); EN 2. Lift the opening tab (Picture 2); 3. Open the top cover; 1. Gire la llave 90° hacia la derecha (imagen 1). Es 2. Levante la pestaña de apertura (imagen 2). 3. Abra la cubierta superior. 1. Drehen Sie den Schlüssel 90° nach rechts (Fig1). DE 2. Heben Sie die öffnungsriegel (siehe Abb) (Fig. 2) 3. öffnen Sie den Kofferdeckel. P 3. Liberare il coperchio. 1. Gire a chave 90° para a direita (figura 1). 2. Levante a aba de abertura (figura 2). 3. Abra a tampa superior. CHIUSURA - CLOSING - SCHLIESSEN - FERMETURE CIERRE - FECHAMENTO 1 2a 2 2b IT 1. 2. 3. EN 1. 2. 3. DE 1. 2. 3. 8 Chiudere il coperchio e verificare che la chiave sia in posizione di “aperto” (Fig. 1). Spingere la linguetta di chiusura verso il coperchio (Fig 2a) e quindi farla scattare verso il basso fino al clack (Fig 2b). Verificare il corretto aggancio. 1. Close the cover and check the key is on the “Open” position (Picture 1); Push the closing tab towards the lid (Picture 2a) and push down till it makes a “click” noise (Picture 2b); 3. Check the correct coupling; Prüfen Sie, ob sich der Schlüssel in der Position ‘öffnen’ befindet und schliessen Sie den Deckel (Fig. 1). Pressen Sie das Verschlussteil (Fig. 2a) in Richtung des Deckels bis Sie es ‘klicken’ hören (Fig. 2b). Überprüfen Sie, ob die Verbindung einwandfrei ist.. fr 1. 2. 3. Es 1. 2. 3. P 1. 2. 3. Refermez le couvercle et vérifiez que la clé se trouve sur la position ouverte (image 1). Poussez la poignée de fermeture vers le couvercle (image 2a) et abaissez-la jusqu’à ce que vous entendiez un cliquetis (image 2b). Vérifiez que la valise est correctement fermée. Cierre la tapa y compruebe que la llave esté en la posición de apertura (imagen 1). Presione la pestaña de cierre hacia la tapa (imagen 2a) y empuje hasta que escuche un “clic” (imagen 2b). Compruebe que esté bien cerrada. Feche a tampa e verifique que a chave esteja na posição “Abrir” (figura 1); Pressione a aba de fechamento em direção à tampa (fig. 2a) e pressione-a para baixo até ouvir um clique (fig. 2b); Verifique se encaixou corretamente; AGGANCIO VALIGIA - COUPLING OF THE BAG BEFESTIGEN DES KOFFERS - FIXATION DE LA VALISE COLOCACIÓN DE LA ALFORJA - ENCAIXE DO BAÚ 1 2 3 ! IT 1. 2. 3. 1. EN 2. 3. 1. DE 2. 3. Girare la chiave in posizione “aperto”; Sollevare la leva che aziona il cursore di sgancio (Fig. 1-2); ATTENZIONE: La corretta configurazione per l’aggancio è indicata dal bollino colorato, visibile solamente se il cursore di sgancio è arretrato. (Fig.3) Turn the key in the “Open” position; Lift the lever which operates the fixing push (Pictures 1-2); NOTE: The correct configuration of the coupling is indicated from the colored label, which is visible only if the cursor release is in the right position (Picture 3); Den Schlüssel in die Position “Offen” drehen; Den Hebel zur Betätigung der Klemme anheben (Bilder 1-2); HINWEIS: Die korrekte Konfiguration der Befestigung wird mit dem farbigen Aufkleber angezeigt, der nur dann sichtbar ist, wenn sich die Klemme in der richtigen Position befindet (Bild 3); 1. fr 2. 3. 1. Es 2. 3. P 1. 2. 3. Tournez la clé sur la position ouverte Soulevez le levier qui actionne la butée de fixation (images 1 et 2). ATTENTION : La configuration correcte pour fixer la valise est indiquée sur l’étiquette colorée, qui n’est visible que si le curseur de désenclenchement se trouve dans la position appropriée (image 3). Gire la llave hacia la posición de apertura. Eleve la palanca que activa el pulsador de fijación (imágenes 1-2). NOTA: La colocación correcta se indica mediante la etiqueta de color, la cual se muestra solo si el pestillo está en la posición correcta (imagen 3). Gire a chave para a posição “Abrir”; Levante a alavanca que opera o fixador (figuras 1 e 2); OBSERVAçãO: a configuração correta do encaixe é indicada por uma etiqueta colorida, visível somente se a liberação do indicador estiver na posição correta (figura 3); 9 1 2a 2 2b 3 ! IT 1. 2. 3. 4. EN 1. 2. 3. 4. DE 1. 2. 3. 4. 10 Infilare i denti di aggancio del bauletto nelle apposite fessure del maniglione, controllando di rimanere in battuta alle pareti del maniglione rivolte verso il retro della moto (Fig 1); Spingere la valigia verso la parte anteriore della moto (Fig 2), centrando contemporaneamente il gommino posto sulla pedalina del passeggero (Fig 2b); Verificare che i denti di aggancio della valigia siano ora in battuta con le pareti del maniglione rivolte verso la parte anteriore della moto (Fig 2a); Ultimare l’aggancio bloccando la valigia con il cursore di sgancio schiacciando la leva (Fig 3). Slip on the hooking rubber of the case in the handle space provided, checking they fill up the space correctly, facing the front part of the motorbike (Picture 1); Push the bag towards the front of the motorbike (Picture 2) , fitting at the same time the damper of the passenger pillion footrest rail (Picture 2b); Verify that the hooking rubbers fill up the space correctly, facing the back part of the motorbike (Picture 2a); To finish, use the fixing push to hook the saddlebag by pressing the lever (Picture 3); Das Formteil zum Einhaken des Koffers in den vorgesehenen Griffbereich einschieben, dabei darauf achten, dass das Teil richtig sitzt, zum vorderen Ende des Motorrads gerichtet (Bild 1); Den Koffer zum vorderen Ende des Motorrads schieben (Bild 2), dabei gleichzeitig den Dämpfer der Schiene für die Beifahrersitz-Fußraste anbringen (Bild 2b); Formteile zum Einhaken auf richtigen Sitz, zum hinteren Ende des Motorrads gerichtet, überprüfen (Bild 2a); Zum Abschluss den Koffer mit der Klemme durch Drücken des Hebels einhaken (Bild 3); fr 1. 2. 3. 4. Es 1. 2. 3. 4. P 1. 2. 3. 4. Insérez les crans du porte-valise en caoutchouc dans la fente prévue à cet effet, en vérifiant qu’ils sont bien mis en place et qu’ils sont orientés vers l’avant de la moto (image 1); Poussez la valise vers l’avant de la moto (image 2) et fixez simultanément l’amortisseur du rail du repose-pied pour siège passager (image 2b); Vérifiez que les crans du porte-valise en caoutchouc sont bien mis en place et orientés vers l’arrière de la moto (image 2a); Pour terminer, utilisez la butée de fixation pour accrocher la valise en appuyant sur le levier (image 3). Coloque la goma de enganche de la carcasa en el espacio destinado para el asa, asegurándose de que ocupe el espacio correctamente y de que mire hacia la parte delantera de la motocicleta (imagen 1); Presione la alforja hacia la parte delantera de la motocicleta (imagen 2), encajando al mismo tiempo el amortiguador de la barra del apoyapiés del asiento trasero del pasajero (imagen 2b); Asegúrese de que las gomas de enganche ocupen todo el espacio correctamente y de que miren hacia la parte delantera de la motocicleta (imagen 2a); Por último, utilice el pulsador de fijación para enganchar la alforja presionando la palanca (imagen 3). Deslize sobre a borracha de engate do baú no espaço fornecido para a alça, verificando que preencha corretamente o espaço, voltada para a parte dianteira da motocicleta (figura 1); Empurre o baú em direção à frente da motocicleta (figura 2), ao mesmo tempo encaixando o amortecedor do trilho do pedal do passageiro (figura 2b); Verifique que as borrachas de engate preencham corretamente o espaço, voltadas para a parte traseira da motocicleta (figura 2a); Para concluir, use o fixador para enganchar o baú lateral pressionando a alavanca (figura 3); SGANCIO VALIGIA - RELEASE OF THE SADDLEBAG ABNEHMEN DES KOFFERS - RETRAIT DE LA VALISE EXTRACCIÓN DE LA ALFORJA - LIBERAÇÃO DO BAÚ LATERAL 1b 1c 1a 2a 2b 3 4 ! 11 1. IT 2. 3. 4. 5. EN 1. 2. 3. 4. 5. 1. DE 2. 3. 4. 5. Girare la chiave in posizione “aperto” (Fig. 1a); Sollevare la leva che aziona il cursore di sgancio (Fig 1b1c); Verificare che il cursore di sgancio liberi il maniglione (Fig. 2b); ATTENZIONE: La corretta configurazione per lo sgancio è indicata dal bollino colorato, visibile solamente se il cursore di sgancio è arretrato (Fig. 3). Sganciare il bauletto tirandolo verso il retro della moto (Fig. 4). Turn the key to the “Open” position (Picture 1a); Lift the lever to operate the fixing push (Pictures 1b-1c); Verify that the fixing push detach the tandem grip (Picture 2b). NOTE: The correct configuration of the coupling is indicated from the colored label, which is visible only if the fixing push is in the right position (Picture 3); Detach the saddlebag pulling towards the rear of the bike (Picture 4); Den Schlüssel in die Position “Offen” drehen (Bild 1a); Den Hebel zur Betätigung der Klemme anheben (Bilder 1b-1c); Freigabe des Tandemgriffs durch die Klemme überprüfen (Bild 2b). HINWEIS: Die korrekte Konfiguration der Befestigung wird mit dem farbigen Aufkleber angezeigt, der nur dann sichtbar ist, wenn sich die Klemme in der richtigen Position befindet (Bild 3); Den Koffer durch Ziehen zum hinteren Ende des Motorrads abnehmen (Bild 4); 1. fr 2. 3. 4. 5. 1. Es 2. 3. 4. P 5. 1. 2. 3. 4. 5. Tournez la clé sur la position ouverte (image 1a). Soulevez le levier permettant d’actionner la butée de fixation (images 1b et 1c). Vérifiez que la butée de fixation se détache de la poignée double (image 2b). ATTENTION : La configuration correcte pour retirer la valise est indiquée sur l’étiquette colorée, qui n’est visible que si la butée de fixation se trouve dans la position appropriée (image 3). Enlevez la valise en la tirant vers l’arrière de la moto (image 4). Gire la llave hacia la posición de apertura (imagen 1a). Levante la palanca para activar el pulsador de fijación (imágenes 1b-1c). Compruebe que el pulsador de fijación se desengancha de la empuñadura (imagen 2b). NOTA: La colocación correcta se indica mediante la etiqueta de color, la cual se muestra solo si el pulsador de fijación está en la posición correcta (imagen 3). Extraiga la alforja tirando hacia la parte trasera de la motocicleta 4). Gire a chave(imagen para a posição “Abrir” (figura 1a); Levante a alavanca para operar o fixador (figuras 1b e 1c); Verifique que o fixador solte o punho paralelo (figura 2b). OBSERVAçãO: a configuração correta do encaixe é indicada por uma etiqueta colorida, visível somente se o fixador estiver na posição correta (figura 3); Solte o baú lateral pressionando na direção da parte traseira da moto (figura 4) ATTENZIONE - NOTE - HINWEIS - ATTENTION - ATENCIÓN - CUIDADO 1a 1b 2 IT ATTENZIONE 1: Nel caso in cui la chiave si blocchi (Fig1a), verificare che la linguetta di apertura sia completamente abbassata (Fig 1b). ATTENZIONE 2: Nel caso in cui il cursore di sgancio si blocchi, sollevarlo aiutandosi con entrambe le mani (Fig. 2). EN NOTE 1: If the key gets stuck (Picture 1a), please check that the opening tab is completely lowered (Picture 1b). NOTE 2: If the fixing push is blocked, please lift it with both hands (Picture 2). HINWEIS 1: Wenn sich der Schlüssel nicht drehen lässt (Bild 1a), sicherstellen, dass die Verschlussklappe vollständig DE geschlossen ist (Bild 1b). fr HINWEIS 2: Wenn die Klemme blockiert ist, mit beiden Händen anheben (Bild 2). ATTENTION 1 : Si la clé se bloque (image 1a), vérifiez que la poignée d’ouverture est abaissée au maximum (image 1b). ATTENTION 2 : Si la butée de fixation est coincée, soulevez-la manuellement (image 2). NOTA 1: Si se atasca la llave (imagen 1a), compruebe que la pestaña de apertura esté totalmente bajada (imagen 1b). Es NOTA 2: Si el pulsador de fijación está bloqueado, levántelo con ambas manos (imagen 2). OBSERVAÇÃO 1: se a chave ficar presa (figura 1a), verifique se a aba de abertura está completamente abaixada (fig. 1b) P .OBSERVAÇÃO 2: se o fixador estiver preso, levante-o com ambas as mãos (fig. 2). 12


![[4] para - Riso.com](http://vs1.manualzilla.com/store/data/006041379_1-f987c63d0f56da21f929a771461d5686-150x150.png)