1
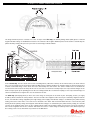
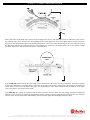
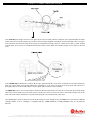
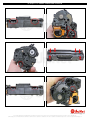
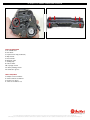
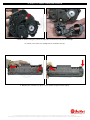
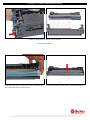
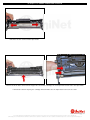
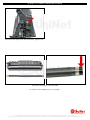
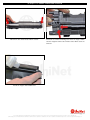
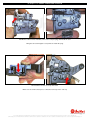
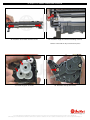
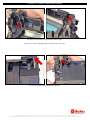
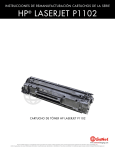
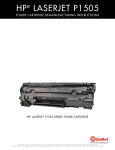
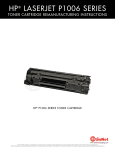
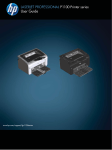
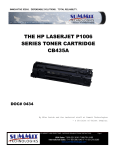
HP LASERJET P1102
®
CARTRIDGE REMANUFACTURING INSTRUCTIONS
HP LASERJET P1102 TONER CARTRIDGE
www.uninetimaging.com
© 2010 UniNet Imaging Inc. All trademark names and artwork are property of their respective owners. Product brand names mentioned are intended to show compatibility only.
UniNet Imaging does not warrant downloaded information. Unauthorized sale, reproduction or distribution of this article is prohibited. For additional support, please contact [email protected]
HP LASERJET P1102 CARTRIDGE REMANUFACTURING INSTRUCTIONS
REMANUFACTURING THE HP LASERJET P1102
SERIES TONER CARTRIDGE CE285A
By Mike Josiah and the Technical Staff at UniNet
In May 2010, Hewlett Packard released the LaserJet P1102 printer. The HP P1102 series of laser printers are based on a 19ppm,
400 x 600dpi Canon engine. These cartridges use a chip that controls the toner low functions. The CE285A is rated for 1,600
pages.
The printer itself has a very small foot print. It’s a nice small office/home machine. The memory is fixed and not expandable at
8MB. The recommended monthly volume is from 250-1,500 pages/month. These machines also have a new feature called
“Smart install” in which the printer driver is built into the printer, so no drivers need to be installed. Just plug in the USB or
Ethernet cable and you can start printing!
The printer when new comes with a starter cartridge that is rated for 700 pages at 5% coverage, so your customers will be
coming to you fairly quickly!
There are currently four printers based on this engine. The P1102, P1102W, M1130 and the M1212NF.
The new cartridge is a modified version of the older P1505 cartridge. In fact, many parts for the P1505 work in this new cartridge
as well.
Cartridge troubleshooting as well as running test pages, cleaning pages, and some simple printer troubleshooting will be covered
at the end of this article.
The theory for these cartridges is a little different from past versions so we have covered it here. You don’t have to know the
theory to remanufacture cartridges, but it sure helps if you have a problem. Troubleshooting time can be dramatically reduced.
CARTRIDGE THEORY
This figure gives a nice block diagram of the printing process:
www.uninetimaging.com
© 2010 UniNet Imaging Inc. All trademark names and artwork are property of their respective owners. Product brand names mentioned are intended to show compatibility only.
UniNet Imaging does not warrant downloaded information. Unauthorized sale, reproduction or distribution of this article is prohibited. For additional support, please contact [email protected]
HP LASERJET P1102 CARTRIDGE REMANUFACTURING INSTRUCTIONS
The image formation process consists of a series of steps: in the first step, the Primary Charge Roller (PCR) places a uniform
negative DC Bias voltage on the OPC drum surface. The amount of the negative DC Bias placed on the drum is controlled by the
printer intensity setting. This process is part of the Latent Image Formation Block.
In the second step, the laser beam is fired onto a rotating mirror (called the scanner). As the mirror rotates, the beam reflects
into a set of focusing lens. The beam then strikes the OPC surface, which neutralizes the negative charge on the drum and leaves
a latent electrostatic image on the drum. The laser unit actually fires two beams. The service manual does not mention the
second laser beam at all, but at this point we are not sure if the second laser actually helps erase any residual charges on the
drum or helps speed up the printing process. We are leaning towards the second laser helping to erase any residual images as
other recent Canon based engines also use the dual laser for this.
The third step (Developing Block) is where the toner image is developed on the drum by the developing section, (or supply
chamber), which contains the toner particles. The toner is held to the magnetic roller sleeve by the stationary magnet inside the
sleeve, and a DC bias voltage supplied by the high voltage power supply. This DC bias voltage is controlled by the printer density
setting, and causes either more or less toner to be attracted to the drum. This in turn will either increase or decrease the print
density. Both the primary charge and magnetic roller DC Bias voltages are controlled by the printer density setting. The amount
of toner on the magnetic roller sleeve is also controlled by the rubber doctor blade, which uses pressure to keep the amount of
toner on the magnetic roller sleeve constant. This blade also causes a static charge to build up on the toner, which helps keep
the coating of toner even, and allows easy transfer to the OPC drum.
www.uninetimaging.com
© 2010 UniNet Imaging Inc. All trademark names and artwork are property of their respective owners. Product brand names mentioned are intended to show compatibility only.
UniNet Imaging does not warrant downloaded information. Unauthorized sale, reproduction or distribution of this article is prohibited. For additional support, please contact [email protected]
HP LASERJET P1102 CARTRIDGE REMANUFACTURING INSTRUCTIONS
At the same time an AC signal is also placed on the magnetic roller sleeve. This signal decreases the attraction of the toner to
the magnetic roller sleeve, and increases the repelling action of toner against the areas of the drum that was not exposed to the
laser beam. This AC potential improves the density and contrast of the toner on the printed page. As the laser-exposed areas of
the OPC drum approach the magnetic roller, the toner particles are attracted to the drums surface due to the opposite voltage
potentials of the toner, and laser-exposed surface of the OPC drum.
In the fourth step (Transfer Block) the toner image is then transferred to the paper as it passes below the drum by the transfer
charge roller, which places a positive charge on the back of the paper. This positive charge causes the negatively charged toner
on the drum’s surface to be attracted to the page. The small diameter of the drum, combined with the stiffness of the paper
causes the paper to peel away from the drum.
In the fifth step (also part of the transfer block) the paper separates from the drum. The static charge eliminator weakens the
attractive forces between the negatively charged drum surface, and the positively charged paper. This prevents toner dropouts
onto the paper at low temperatures and humidity, and also prevents paper from wrapping around the drum.
www.uninetimaging.com
© 2010 UniNet Imaging Inc. All trademark names and artwork are property of their respective owners. Product brand names mentioned are intended to show compatibility only.
UniNet Imaging does not warrant downloaded information. Unauthorized sale, reproduction or distribution of this article is prohibited. For additional support, please contact [email protected]
HP LASERJET P1102 CARTRIDGE REMANUFACTURING INSTRUCTIONS
In the sixth step, the image is fused on to the paper by the fuser-assembly, which is comprised of the upper fixing film assembly
and the lower fuser roller. The paper passes between a heated upper fixing film assembly and a soft lower rubber roller. The upper
heated element then melts the toner into the paper. The fixing film assembly consists of a Teflon sleeve with a ceramic heating
element inside. These fusers are a bit different in that they have a brush, which has a DC Bias charge on it to help keep the film
clean.
In the seventh step the OPC drum is cleaned. On average, approximately 95% of the toner is transferred to the paper during the
print cycle. As the drum rotates during printing, the remaining 5% of the toner is cleaned off the drum by the wiper blade. It is
then guided into the waste chamber by the recovery blade and stored in the waste chamber.
The eighth step is where the residual charge is eliminated. Both the PCR and the laser unit are used for this. The primary charge
roller places an AC voltage across the drum surface and the laser unit’s second beam erases and residual charges left on the
drum. This drum charge elimination is only turned on during the last rotation period of the drum.
The following figures show the differences from another newly released cartridge for the HP P1606 series of printers: the CE278A
cartridge. Neither of these cartridges is compatible with the P1006 (CB435A) or P1505 (CB436A). They are all physically
different.
www.uninetimaging.com
© 2010 UniNet Imaging Inc. All trademark names and artwork are property of their respective owners. Product brand names mentioned are intended to show compatibility only.
UniNet Imaging does not warrant downloaded information. Unauthorized sale, reproduction or distribution of this article is prohibited. For additional support, please contact [email protected]
HP LASERJET P1102 CARTRIDGE REMANUFACTURING INSTRUCTIONS
SUPPLIES REQUIRED
1. HP P1102 toner
2. New drum
3. Replacement chip (dedicated)
4. Wiper blade
5. Doctor blade
6. Magnetic roller
7. Sealing strip
9. Cotton swabs
10. Isopropyl alcohol
11. Drum padding powder
12. Conductive grease
TOOLS REQUIRED
1. Phillips head screwdriver
2. Small common screwdriver
3. Needle nose pliers
4. Jewelers screwdriver set
www.uninetimaging.com
© 2010 UniNet Imaging Inc. All trademark names and artwork are property of their respective owners. Product brand names mentioned are intended to show compatibility only.
UniNet Imaging does not warrant downloaded information. Unauthorized sale, reproduction or distribution of this article is prohibited. For additional support, please contact [email protected]
HP LASERJET P1102 CARTRIDGE REMANUFACTURING INSTRUCTIONS
1. With the handle facing you, remove the right side screw and end cap from the cartridge.
Be careful of the drum cover spring! Remove it with the end cap.
2. With the pair of needle nose pliers, release both the hopper tension springs.
www.uninetimaging.com
© 2010 UniNet Imaging Inc. All trademark names and artwork are property of their respective owners. Product brand names mentioned are intended to show compatibility only.
UniNet Imaging does not warrant downloaded information. Unauthorized sale, reproduction or distribution of this article is prohibited. For additional support, please contact [email protected]
HP LASERJET P1102 CARTRIDGE REMANUFACTURING INSTRUCTIONS
3. Slide the waste/drum section over to the left side.
Separate the two halves.
4. On the waste/drum section, lift the drum up from the gear
side. Twist and remove from the hopper.
5. Remove the PCR and clean with your standard PCR cleaner.
www.uninetimaging.com
© 2010 UniNet Imaging Inc. All trademark names and artwork are property of their respective owners. Product brand names mentioned are intended to show compatibility only.
UniNet Imaging does not warrant downloaded information. Unauthorized sale, reproduction or distribution of this article is prohibited. For additional support, please contact [email protected]
HP LASERJET P1102 CARTRIDGE REMANUFACTURING INSTRUCTIONS
6. Remove the two screws and the wiper blade.
7. Clean out all the waste toner from the hopper. Be careful not to damage the recovery blade located next to the wiper blade.
If this blade is bent in any way, the cartridge will leak. Make sure the wiper blade foam seals are clean.
www.uninetimaging.com
© 2010 UniNet Imaging Inc. All trademark names and artwork are property of their respective owners. Product brand names mentioned are intended to show compatibility only.
UniNet Imaging does not warrant downloaded information. Unauthorized sale, reproduction or distribution of this article is prohibited. For additional support, please contact [email protected]
HP LASERJET P1102 CARTRIDGE REMANUFACTURING INSTRUCTIONS
8. Coat the new/cleaned wiper blade with your preferred
lubricant. Install the wiper blade and two screws.
9. Install the cleaned PCR. Place a small amount of conductive
grease on to the black holder side of the shaft. Just a small
amount of grease is more than sufficient.
10. Place another small amount of conductive grease on to
the metal drum axle.
11. Install the new/cleaned drum hub side first.
Place the waste/drum section aside.
www.uninetimaging.com
© 2010 UniNet Imaging Inc. All trademark names and artwork are property of their respective owners. Product brand names mentioned are intended to show compatibility only.
UniNet Imaging does not warrant downloaded information. Unauthorized sale, reproduction or distribution of this article is prohibited. For additional support, please contact [email protected]
HP LASERJET P1102 CARTRIDGE REMANUFACTURING INSTRUCTIONS
12. On the toner supply chamber right side, remove the two
screws and end cap.
13. Remove the gears from the hopper as shown.
Leave the large auger gear in place.
www.uninetimaging.com
© 2010 UniNet Imaging Inc. All trademark names and artwork are property of their respective owners. Product brand names mentioned are intended to show compatibility only.
UniNet Imaging does not warrant downloaded information. Unauthorized sale, reproduction or distribution of this article is prohibited. For additional support, please contact [email protected]
HP LASERJET P1102 CARTRIDGE REMANUFACTURING INSTRUCTIONS
14. Remove the single screw and end from the opposite side.
15. Remove the magnetic roller assembly.
Be careful of the bushings! They are very fragile.
www.uninetimaging.com
© 2010 UniNet Imaging Inc. All trademark names and artwork are property of their respective owners. Product brand names mentioned are intended to show compatibility only.
UniNet Imaging does not warrant downloaded information. Unauthorized sale, reproduction or distribution of this article is prohibited. For additional support, please contact [email protected]
HP LASERJET P1102 CARTRIDGE REMANUFACTURING INSTRUCTIONS
16. Remove the doctor blade and two screws.
17. Clean out all the remaining toner from the hopper. Make
sure the magnetic roller seals and the doctor blade seals are
all clean.
18. Fill the hopper with P1102 toner.
www.uninetimaging.com
© 2010 UniNet Imaging Inc. All trademark names and artwork are property of their respective owners. Product brand names mentioned are intended to show compatibility only.
UniNet Imaging does not warrant downloaded information. Unauthorized sale, reproduction or distribution of this article is prohibited. For additional support, please contact [email protected]
HP LASERJET P1102 CARTRIDGE REMANUFACTURING INSTRUCTIONS
19. When a seal becomes available, remove the seal port plug, and install the seal.
Bring the tail out through the seal porthole. Install the plug.
20. Install the left side end cap and screw.
Make sure the small contact piece is installed correctly on the end cap.
www.uninetimaging.com
© 2010 UniNet Imaging Inc. All trademark names and artwork are property of their respective owners. Product brand names mentioned are intended to show compatibility only.
UniNet Imaging does not warrant downloaded information. Unauthorized sale, reproduction or distribution of this article is prohibited. For additional support, please contact [email protected]
HP LASERJET P1102 CARTRIDGE REMANUFACTURING INSTRUCTIONS
21. Install the doctor blade and two screws.
22. Install the magnetic roller black bushing side first.
Turn the roller until the keyed end locks in place.
23. Install the gears as shown.
24. Install the end cap and screws.
www.uninetimaging.com
© 2010 UniNet Imaging Inc. All trademark names and artwork are property of their respective owners. Product brand names mentioned are intended to show compatibility only.
UniNet Imaging does not warrant downloaded information. Unauthorized sale, reproduction or distribution of this article is prohibited. For additional support, please contact [email protected]
HP LASERJET P1102 CARTRIDGE REMANUFACTURING INSTRUCTIONS
25. Place the drum/waste hopper into the toner hopper.
Slide it over so the round hinge pins fit into their respective holes.
26. Set the hopper tension springs back in place.
www.uninetimaging.com
© 2010 UniNet Imaging Inc. All trademark names and artwork are property of their respective owners. Product brand names mentioned are intended to show compatibility only.
UniNet Imaging does not warrant downloaded information. Unauthorized sale, reproduction or distribution of this article is prohibited. For additional support, please contact [email protected]
HP LASERJET P1102 CARTRIDGE REMANUFACTURING INSTRUCTIONS
27. With the drum cover spring as shown on the end cap, install the end cap.
Lift up the tail of the spring to fit onto the hopper.
28. Lift up the drum cover spring tail to fit as shown on the drum cover.
Install the screw into the cover.
www.uninetimaging.com
© 2010 UniNet Imaging Inc. All trademark names and artwork are property of their respective owners. Product brand names mentioned are intended to show compatibility only.
UniNet Imaging does not warrant downloaded information. Unauthorized sale, reproduction or distribution of this article is prohibited. For additional support, please contact [email protected]
HP LASERJET P1102 CARTRIDGE REMANUFACTURING INSTRUCTIONS
29. Replace the chip.
REPETITIVE DEFECT CHART
OPC Drum:
Upper Fuser Film:
Lower Pressure Roller:
Transfer Roller:
Magnetic Roller:
PCR:
75mm
57mm
56mm
39mm
34mm
27mm
RUNNING TEST PAGES
Test pages must be run from the P1102 menu. Access the Printer Preferences menu, then Services, and Information pages.
There are three test pages that can be selected. The Demo, Config, and Supply Status Page.
RUNNING THE CLEANING PAGE
The cleaning page for these machines can only be run from the Printer menu.
HP recommends that for best results, a transparency be used.
If a transparency is not available, user copier grade paper with a smooth surface.
1. To run this page, access the printer preferences.
2. Click on DEVICE SETTINGS.
3. In the Cleaning Page area, press START.
4. The cleaning cycle takes up to two full minutes. The page will start and stop.
Do not turn the printer off until the cleaning page has finished printing.
www.uninetimaging.com
© 2010 UniNet Imaging Inc. All trademark names and artwork are property of their respective owners. Product brand names mentioned are intended to show compatibility only.
UniNet Imaging does not warrant downloaded information. Unauthorized sale, reproduction or distribution of this article is prohibited. For additional support, please contact [email protected]