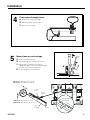
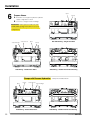
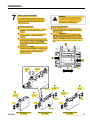
1
S ERVICE MANUAL 20R Carton Clamp Manual includes: Operation Installation Service Troubleshooting Manual Number 6043694 cascade corporation Cascade is a Registered Trademark of Cascade Corporation Index INDEX 1 1.1 1.1.1 INTRODUCTION ......................................................................................................................................1 PREMISE............................................................................................................................................................. 1 TYPOGRAPHICAL CONVENTIONS ......................................................................................................... 1 2 2.1 2.1.1 2.1.2 2.2 2.2.1 2.2.2 APPLIANCES CLAMP .............................................................................................................................2 PRODUCT PURPOSE....................................................................................................................................... 2 MANUFACTURER’S INTENDED USE...................................................................................................... 2 IMPROPER AND FORBIDDEN USE......................................................................................................... 2 MACHINE IDENTIFICATION............................................................................................................................ 3 ID PLATE ....................................................................................................................................................... 3 TECHNICAL FEATURES ............................................................................................................................ 3 3 3.1 3.2 GENERAL SAFETY REGULATIONS......................................................................................................4 SAFETY PLATES AND PICTOGRAMS.......................................................................................................... 5 RESIDUAL HAZARDS....................................................................................................................................... 5 4 4.1 4.2 4.2.1 4.2.2 4.2.3 4.3 OPERATION ............................................................................................................����������������������������.....6 DESCRIPTION OF MANOEUVRES................................................................................................................ 6 IMPORTANT RECOMMENDATIONS FOR CORRECT DEVICE INSTALLATION.................................. 6 PRELIMINARY INFORMATION ................................................................................................................. 6 SCALING THE HYDRAULIC SYSTEM ..................................................................................................... 6 REGULATION AND CALIBRATION WORKING PRESSURE............................................................... 6 INSTALLATION................................................................................................................................................... 8 5 5.1 5.2 5.3 5.4 5.5 5.6 5.7 5.7.1 5.7.2 5.8 5.8.1 ������E ....................................................................................................................................�����������...15 PRECAUTIONS .................................................................................................................................................. 15 UNAUTHORISED ALTERATIONS .................................................................................................................. 15 CLEANING .......................................................................................................................................................... 15 CHECK ON ROD AND TUBING ...................................................................................................................... 15 ROUTINE MAINTENANCE ............................................................................................................................... 15 BOLT TORQUE WRENCH SETTING ............................................................................................................. 16 SLIDERS.............................................................................................................................................................. 16 GREASING .................................................................................................................................................... 16 REPLACING THE SLIDERS ....................................................................................................................... 17 REPLACING AND DISMANTLING THE OPENING AND CLOSING CYLINDERS ................................. 18 GREASE LUBRICATION............................................................................................................................. 20 6 6.1 TROUBLESHOOTING .............................................................................................................................21 WORK CYCLE PROBLEMS ............................................................................................................................. 21 i 6043694 2 Introduction 1 INTRODUCTION This manual contains instructions and warnings and must be kept with the product, as it represents one of the device’s fundamental safety requisites. The manual should be kept carefully and should be diffused and made available to all interested parties. Warnings are aimed at safeguarding the safety of those exposed to the product against residual risks. The instructions herein provide indications on the most suitable behaviour to be adopted for the correct use of the APPLIANCES CLAMP as intended by the manufacturer. No part of this manual may be copied, reproduced or transmitted in any way using any electronic, mechanical or photographical means without express permission to do so by Cascade Corporation. 1.1 Premise 1.1.1 TYPOGRAPHICAL CONVENTIONS This user manual uses the following typographical conventions: NOTE Symbol Meaning i The notes contain important information outside the main text and should be read carefully. CAUTION Caution messages contain the procedures described in the manual that must be observed, non-compliance may cause damage to the device. ATTENTION Attention messages indicate the particular procedures that must be observed to avoid harm to the operator. The text, pictures and drawings contained in this manual are exclusive property of Cascade Corporation No part of this document may be copied, reproduced or transmitted in any way using any electronic, mechanical or photographic means without express permission to do so from Cascade Corporation 6043694 3 1 Appliance Clamps 2 APPLIANCES CLAMP 2.1 2.1.1 Product purpose Manufacturer’s intended use The horizontal camping device for appliances has been designed and manufactured to consent the handling of loads that are not pallet-mounted. The arms have rubber contact pads and the dimensions of the gripping arms vary according to the type of load to be handled. 2.1.2 Improper and forbidden use The purpose of horizontal gripping devices is to grip, handle, unload and stock boxed material. Such devices may feature incorporated or semiincorporated side shift for lateral load regulation. � to manoeuvre groups of cartons with missing cartons � repeated use of the lifting lever on the control panel when the load gripped between the arms is in contact with a horizontal surface; � lifting or lowering the load when in movement. One operation only may be performed at any one time; Horizontal gripping devices must not be used in the following ways: 2 � to manoeuvre loads sideways with the outside of the arms using the open/close or shift functions; � to drag or push loads on the floor or stocked loads; � to manoeuvre surfaces; � to manoeuvre people or animals; � to manoeuvre bodies gripped by the tip of the arm only; bodies with cylindrical � manoeuvring loads when people or animals are present in the device’s work area; � manoeuvring unstable loads; � manoeuvring groups of different sized cartons at the same time; 4 6043694 Appliance Clamps � Manoeuvring the truck when the load is not in line with the forklift truck’s centre line; � 2.2 2.2.1 Machine identification Calibrating the device’s relief valve to a pressure value grater than that indicated on the device’s ID plate. ID plate The ID plate is the only means of identifying the horizontal gripping device recognised by the Manufacturer. The ID plate must be legible at all times and must not be tampered with. 6043694 3 5 General Safety 3 GENERAL SAFETY REGULATIONS � THE SAFETY INDICATIONS INCLUDED IN THIS MANUAL AND ON THE MACHINE ITSELF MUST BE OBSERVED. DO NOT TAMPER WITH SAFETY DEVICES AND USE THE MACHINE AS INTENDED BY THE MANUFACTURER. � NON-COMPLIANCE TO SAFETY INDICATIONS MAY CAUSE HAZARD RISKS TO YOU AND TO OTHERS. � THESE INSTRUCTIONS AND WARNINGS ARE NOT INTENDED AS A SUBSTITUTE FOR SAFETY STANDARDS CURRENTLY IN FORCE, BUT RATHER AS AN INTEGRATION OF THEM AIMED AT ENCOURAGING COMPLIANCE. � We recommend that maintenance programmes be followed according to the indications given in this manual. � Attention: warnings alone do not eliminate hazards! � The indications included in this manual do not refer to new machines only, but also apply to used ones. � The device may prove overloaded when driven on uneven ground or when driven very fast on smooth and slippery floorings. � Passageways must permit good visibility and easy truck steering; steep ramps, narrow passageways and low ceilings should be avoided. Passageways must be clearly delimited, defined and kept in good conditions in order to avoid damage to the truck, device and load and to avoid instability. � Work areas must be well lit. � Do not introduce hands, arms or any other part of the body near moving organs. � Do not transport or lift people. � It is strictly forbidden to stand under to pass beneath the raised part of the truck (device), irrespective of whether it is loaded or not. � Do not transport unstable loads. � It is forbidden to handle loads exceeding the nominal capacity of the truck plus device. � Restrict load side shift and truck manoeuvres with the upright partially or totally raised. 4 � Stable and well-distributed loads only may be manoeuvred. � Particular attention must be paid when manoeuvring a truck bearing loads that cannot be positioned centrally. � The load must be grasped by entire arm: the load should rest on the load backrest of the frame and on the protection devices on the sliding rail � When the truck is moving with the device but without a load, keep the arms in the least open position possible, or however in a position that is globally narrower than the device’s frame. � It is forbidden to stop or turn the truck on ramps. � When a truck is left unattended, gripping organs must be completely lowered, controls must be in the 0 position, the electricity supply must be switched off, the park brake must be used and all measures required for preventing accidental or unauthorised manoeuvre of the truck and the device must be adopted. � Unauthorised operators must not eliminate any function errors or defects of the horizontal gripping device and/or alter function and operative modes. . � All safety devices installed on forklift trucks such as: - the anti-shearing net or plate fixed to the load lifting uprights; - the protective canopy over the driver’s seat - devices that prevent load descent in the event of a lack of driving force; - devices fitted with protections against accidental operation; must always be kept in perfect and constantly efficient conditions, even during the installation of horizontal gripping devices. Indication, advice and hazard plates must be well kept and in place. � When investigating any cause of error or malfunction of the horizontal gripping device, adopt the precautions described in the manual that are suitable for preventing damage to people and objects. � Remember to tighten each screw, bolt or ring nut for each mechanical element adjusted or regulated. ATTENTION: any alterations made to the horizontal gripping device will result in the expiry of the EC mark and the product guarantee. 6043694 11 General Safety 3.1 Safety plates and pictograms The horizontal gripping device is fitted with the pictogram shown below, which bears the main safety warnings and precautions that should be observed for machine use. Read the warnings and instructions for use carefully before using the machine or performing maintenance operations. It is strictly forbidden to stand underneath the forks, to stand on top of them and to stand in the lift truck’s range of action. It is absolutely forbidden to clean, oil, grease, repair or adjust parts with the machine in movement. 3.2 Residual hazards � � � � � � � 6043694 Hazard of crushing between the truck’s front structure and that of the lifting set when completely tilted backwards. Hazard of shearing between the truck’s front structure and that of the parts that move vertically with the lifting set completely tilted backwards. Hazard of shearing between the fixed frame and the device’s moving arms. Hazard of crushing between: o The chains and the relative pulleys and the transversal connections of the uprights themselves. o Between the fixed frame and the device’s moving arms. Hazard of crushing during arm dismantling and replacement phases. Hazard of crushing during cylinder dismantling and replacement phases. Hazard of crushing during installation and maintenance operations. 5 Operation 4 OPERATIVE INSTRUCTIONS 4.1 Description of manoeuvres ATTENTION: all lifting operations must be performed by qualified and authorised personnel only. 4.2 � The number shown in brackets refer to the “Set maps”. Important recommendations for correct device installation 4.2.1 Preliminary information In order for the device to function correctly, connections to the truck’s hydraulic system must be performed perfectly. In order to facilitate this task, a list of information that will help correct installation is given below. It should be pointed out that back pressure in closure, which is shown on the tube opposite that under pressure, must not exceed 20 bar. Back pressure exceeding this limit will jeopardise device performance. In the event of malfunctions, the first check to make is that of the back pressure. Roncari recommends that the following hydraulic capacities and working pressures be observed in order to optimise device functioning and to avoid problems during operation or start-up. The values shown below are to be considered a rough guide and can vary from one device to another. Recommended Recommended Class of hook Nominal truck capacity Load’s centre hydraulic capacity (l/min) working pressure ISO 2328 (Kg) of gravity (BAR) Min Med Max Max 1 Up to 999 400 10 15 25 150 * 2 from 1000 to 2500 500 15 30 50 150 * 3 from 2501 to 4999 500 20 40 60 150 * 4 from 5000 to 8000 600 45 60 80 150 * 5 from 8000 to 10999 600 60 80 100 150 * * Pressure values valid unless shown otherwise on the device’s plate (and EC certificate). 4.2.2 Scaling the hydraulic system In addition to the pressure and hydraulic capacity values sent by the truck, correct device functioning depends on the type of supply system used between the truck distributor and the device. The fundamental parameters that influence device behaviour are the diameter and length of the tubing, for example, tubes with a diameter that is too small compared to the relative length and to a given capacity can cause excessive load losses that jeopardise the correct functioning of the truckdevice system. The connection hoses are scaled according to the capacity actually supplied by the truck to activate the device and the length of the relative tubing. 6 The difficulty of creating a perfect hydraulic system in other words, one that complies with the laws of hydraulics, is obvious, as it would provide tubing of an excessive diameter and a very bulky system that would be very difficult to obtain. The next paragraph contains a table with the absorption values for the various tube dimensions, lengths and hydraulic capacities. This table may help the operator who prepares the system that links the truck to the device to install a system that has the correct dimensions and is optimal for system functioning, in other words, one that is capable of obtaining back pressures of approximately 20 bar. 13 6043694 Operation Pressure losses of tubes with hydraulic oil with a viscosity of 20 cSt at regime temperature (system warm) and of 100 cSt during start-up from cold. The assumption of viscosity is obviously arbitrary, but similar to real conditions. The table below gives the pressure loss values (Bar) per linear meter of tube. 1/4 G - 6,4 mm approx. Oil viscosity 20 Cts L= 5 m L=10 m litres/1' L=1 m 10 0.85 4.2 15 1.72 8.6 Oil viscosity 100 Cts L= 5 m L=10 m L=20 m L=1 m 8.5 16.9 3.3 16.5 33.0 66.0 17.2 34.4 5.0 24.8 49.5 99.1 L=20 m 20 2.9 14.3 28.5 57.0 6.6 33.0 66.0 132.0 30 5.8 29.0 58.0 116.0 9.9 49.5 99.0 198.0 40 9.6 48.0 96.0 192.0 14.3 71.5 143.0 286.0 50 14.2 71.0 142.0 284.0 21.2 106.0 212.0 424.0 60 19.5 97.5 195.0 390.0 29.1 145.5 291.0 582.0 5/16 G - 8,0 mm approx. L=1 m Oil viscosity 20 Cts L= 5 m L=10 m L=20 m L=1 m Oil viscosity 100 Cts L= 5 m L=10 m L=20 m 10 0.29 1.5 2.9 5.9 1.4 6.8 13.5 27.0 15 0.60 3.0 6.0 11.9 2.0 10.1 20.3 40.6 20 1.0 5.0 9.9 19.8 2.7 13.5 27.0 54.0 30 2.0 10.0 20.0 40.0 4.1 20.3 40.6 81.2 40 3.3 16.6 33.2 66.4 5.4 27.0 54.0 108.0 50 4.9 24.6 49.1 98.2 7.3 36.7 73.4 146.8 60 6.8 33.8 67.5 135.0 10.1 50.5 101.0 202.0 70 8.9 44.3 88.5 177.0 13.2 66.1 132.2 264.4 3/8 G - 9,5 mm approx. L=1 m Oil viscosity 20 Cts L= 5 m L=10 m L=20 m L=1 m Oil viscosity 100 Cts L= 5 m L=10 m L=20 m 20 0.4 2.2 4.4 8.8 1.4 6.8 13.6 27.2 30 0.9 4.5 8.9 17.8 2.1 10.3 20.5 41.0 40 1.5 7.4 14.7 29.4 2.7 13.6 27.2 54.4 50 2.2 10.9 21.7 43.4 3.4 17.0 34.0 68.0 60 3.0 15.0 29.9 59.8 4.5 22.3 44.6 89.2 70 3.9 19.6 39.1 78.2 5.9 29.3 58.5 117.0 80 4.9 24.7 49.4 98.8 7.4 36.9 73.8 147.6 90 6.1 30.5 61.0 122.0 9.1 45.5 91.0 182.0 100 7.3 36.5 73.0 146.0 10.9 54.5 109.0 218.0 1/2 G - 12,7 mm approx. 30 L=1 m 0.2 40 0.4 Oil viscosity 20 Cts L= 5 m L=10 m 1.1 2.2 1.9 3.7 L=20 m 4.5 L=1 m 0.6 7.4 0.9 Oil viscosity 100 Cts L= 5 m L=10 m 3.2 6.4 4.3 8.5 L=20 m 12.8 17.0 50 0.6 2.8 5.5 11.0 1.1 5.3 10.7 21.3 60 0.8 3.8 7.5 15.0 1.3 6.4 12.8 25.6 70 1.0 5.0 9.9 19.8 1.5 7.5 14.9 29.8 80 1.3 6.3 12.5 25.0 1.9 9.3 18.6 37.2 90 1.5 7.7 15.3 30.6 2.3 11.5 22.9 45.8 100 1.8 9.2 18.4 36.8 2.8 13.8 27.5 55.0 14 6043694 7 � ����������������� Installation ������������������������������������� ������������������������������������������������� ������������������������������������������� �������������������������������������������� ���������������������������� �������������������� ������������������������������ �������������������������� ������������������� ��R � � � ���� � ����������� ������ ����� ����������� ������� ����������� ������ ����������� ��������Carton����������������������������������� ��������������������������������������������������������������� �������������������������������������������������������������� ������������������������������������������������������������������� ��������������������������������������������� �������������������������������������������������������� ������������ ���������������������������������������������������������� ������������������������������������������������������������� ���������� ���������������������������� ��������� � ������� ������� �������� �������������������� ��������� �������������������� �������������������� �������������������� �������� ����������������������������������� ��������������� ���������� ������������������������� ���������������������������������������������� ���� ������� ���������� ���������� �������� ��������� � 8 ������� ��������� ���� ��������� ����� ����� 6043694 �������������� Installation 1 4.3 Installation Before proceeding with device installation it is necessary: � to remove wrapping � to remove the device’s lower brackets Remove the screws clamping the lower brackets (n°14). ATTENTION: all loading and manoeuvring operations made using the truck must be performed central to the centre of gravity on the fork, compared to its dimension and weight distribution. 6043694 9 Installation 2 3 Assemble the device on the forklift truck’s plate by handling it with the tilting of the upright in order that the fork holder plate’s upper cone hooks up with the device (see detailed figure). Line up the device’s central retainer (8) with the central niche of the forkholder plate. Reposition the lower brackets (n°14) and tighten the screws with the torque wrench setting as shown in point 5.6. 10 6043694 17 � ����������� Installation � 4 ���������������������������� � ����������������������������������� � ������������������������������������ � ���������������������� ���������� � 5 ����������������������������� � �������������������������� � ���������������������������������������������� � ������������������������������������ � ��������������������������������������������� ������������������������������������� � � ��������������������������������������� ���������� ���������������������������������������� ���������������������������������������� ������ ����� ������ ����� ��������������� ������������ �������������������������������������� ���������������������������������������� ����� �������� 6043694 �������������� ���������� ���������� 11 � � Installation ����������� 6 � ������������� � ��������������������������������������������� ���� ����� ������������������������������ � ������������������������������������������ ���������� ������������������������������� ������������������������������������������� ������������������������������������������������ ��������������� ���������� ��������������� �������������� ���� ����� ����������������������������������� ���������� ���������� ������������������������������������������� �������������������������������� ��������������������������������� ���������������������������� ���� ����� �������������� ��������������� ���������� �������������������������������� � 12 ���������� ������������������������������������������� 6043694 �������������� Installation ����������� � 7� ������������������������ ���������������������������������������� �������������������������������� �������������������������������������� ����������������������������������������� ��������������������������������������� ��������������������������������� ���������������������������������������������� ������������������������������������������� ������������������������������������������� ������������������� ����������������������� ��������������������������� � �������������������������������������������� ������������������������������������������ ��������� � ����������������������������������������������������� �������������������������������������������������� ����������������� � ���������������������������������������������� ������������������������������������������ ���������� � � ����������������������������������������������� ��������������������������������������������� ������������������������������������������ ������������������������������������� ��������������������������������������������� �������������� ����������� ������������������������������������������������ ���������������������������� ��������������������������������������������������� ����������������������������������������������� ������������������������������������������������� ��������������������������������������������������� ������������������������������������������������� ���� � � ����������������� ����������������������������������������������� ������������������������� ���������������������������������������������� �������������������������������������������� �������������������������������������� �������������������� � �������� �������� ���� � � �������� �������� ����� ���������� � ���������� � ������������ ��������� � ���������������� ��������� � ������������ ��������� � ���������������� ��������� ������������ ��������� ����� ��������� ����� ����� ��������� ������� 6043694 � ������������������� �������� ������������������ �������� ������������������ �������� 13 �������������� Installation 4.2.3 Regulation and calibration working pressure The regulation of device working pressure is performed by Cascade’s Factory Testing Division. A copy of the factory Test for this device is annexed. 20R Device code Serial No. Testing conditions Test bench Oil flow (l/min) Pump max pressure (bar) Oil temperature (°C) BNC03 50 210 40 Force and pressure diagram in varius conditions Clamping force (daN) Pressure (bar) Counter-pressure (bar) 290 80 10 769 100 10 1120 120 10 1574 130 10 1884 150 10 Pressure regulation Clamping force (daN) Pressure (bar) 1120 120 14 Counter-pressure (bar) 10 6043694 Service 5 MAINTENANCE ATTENTION: careful maintenance is essential for good device functioning. Failure to perform maintenance as and when foreseen may cause danger to people and objects. It is the user’s responsibility to choose the device and ropes, bands or chains deemed most suitable, with regards to both functionality and capacity, for UEC handling and lifting. We recommend that all manoeuvring and lifting operations be performed with the utmost caution, in order to avoid collisions that may jeopardise good functioning or cause damage to components or personnel. . 5.1 Precautions 5.2 Unauthorised alterations 5.3 Cleaning 5.4 Check on rod and tubing It is strictly forbidden: � To use the positioner without any one of the components of which it is composed. � To weld, install or add any optional accessory not foreseen by Roncari. � To remove material.. ATTENTION: any alteration or modification made to the UEC that has not been authorised by Cascade in writing, will cause the invalidation of the EC mark and product guarantee. i Do not wash the UEC using jets of water at high pressure. After each wash, all the parts must be greased once more. Every day, check that the rod and the surface are free from damage, marks or any other fault that could jeopardise correct cylinder functioning. Check the condition of the tubing and joints according to the hydraulic system’s technical data and features. 5.5 Routine maintenance Hours 100 500 1000 2000 604369418 Description - Check that the camping screws on the upper and lower brackets are tightened properly. - Check any damage to the hydraulic system’s tubes or joints. - Check arm synchronism in opening and closure. In addition to the abovementioned checks: - Grease arm sliders as indicated in the following paragraph. - Check the arm’s gripping surface for wear - Check that the arm opening and closing cylinders are tightened correctly. In addition to the abovementioned checks: - check that the clamping screws of the sliding rails are tightened properly. In addition to the abovementioned checks: - replace the upper and lower sliders. 15 Service 5.6 5.7 Bolt torque wrench setting 8.8 10.9 12.9 M (N*m) M (N*m) M (N*m) 36,6 25 37 44 1,5 58 50 73 86 1,75 84,3 86 127 148 Rh pitch (mm) Sr (mm²) 8 x 1,25 10 x 12 x Sliders 5.7.1 Greasing Greasing the sliders is a routine operation that must be performed in order to guarantee correct lubrication and therefore safe and easy usage of the Horizontal Gripping Device. 16 The guides are pre-lubricated in the production phase and therefore do not require lubrication when the device is installed for the first time. ATTENTION: lubrication operations must only be performed with truck power off. 6043694 Service 5.7.2 Replacing the sliders In order to replace the sliders, dismantle the arms: � � � � Lower truck upright as far as possible. Open arms as wide as possible. Switch off truck power supply. Remove the semi-spherical joint and the washer that attaches it to the rod. Fix the arms using a winch by means of the eyebolt provided and slide the arms off manually in the direction indicated by the arrow. ATTENTION: the utmost attention must be paid when sliding the arms off the frame guides, because it could move and collide with the operator. � Pull the cylinder rod off completely. � Replace worn sliders with original Roncari spares. � Clean and grease the internal surface of the sliders with a brush. � Re-assemble the arms by performing above mentioned steps in reverse order. � Screw the rod partially on to the ring nut or joint. � Apply a film (10mm of thread for rods with diameters less than 50mm, 20 mm for diameters from 50 to 80 mm and the entire thread for diameters greater than 80mm) of medium mechanical resistance thread-locking glue (e.g. loctite� 243) as shown in diagram. � Fully tighten the rod � Check that the device functions properly. First try using without a load and then with a load. � Perform opening and closing cycles without load. � Repeat the same operations for the other arm. 6043694 20 RING NUT the ROD 17 Service 5.8 Replacing and dismantling opening and closing cylinders the � Remove both arms as described above. � Close the cylinders completely � Disconnect the device’s hydraulic system from that of the truck (paying careful attention to oil leaking from the tube, place a container below to catch it) � � Remove the device’s lower brackets (n°14), hook the ropes up to the device’s frame and dismantle the truck plate. For convenience, place a pallet below the device. � Remove the hydraulic connections between the cylinder buds and the device’s hydraulic system. Pay careful attention to oil leaks from the joints. Remove the cylinder blocking nut ATTENTION: switch off truck power before commencing cylinder dismantling and reassembling operations. Pay careful attention to oil leaks from tubing and joints on cylinder. Place a container beneath to receive any leaks. i 18 NOTE: before replacing the rod, check its condition to ensure that it is not damaged or scratched and that there are no impurities on its surface that could hinder perfect sliding of the parts and therefore the functioning of the UEC. Check that the inner surface of the cylinder jacket is clean. 6043694 Service � Slide the cylinders off the device’s frame and replace with new cylinders as shown on the spares diagram (see point 2.3.1). � If the cylinders require maintenance, replace the gaskets as described in the next paragraph. � Replace the cylinders and fix the nut with medium mechanical resistance threadlocking glue (e.g. loctite� 243) � Reassemble the hydraulic connections between the cylinder buds and the device’s hydraulic system. 6043694 � Reassemble the device on the forkholder plate of the truck as described in 4.2.3. � Replace the arms as described in 5.4. � Reconnect the device’s hydraulic connection to the truck and perform a few opening and closing cycles and side shift cycles (if present) without a load 19 Service 5.8.1 Grease lubrication The table below defines the products to be used to lubricate the various device components. Type of coupling Sliding of arm sliders on sliding rail Type of product to be used at room temperature SHELL SUPER GREASE AM or equivalent lithium based grease with an NLGI 2 consistency. ATTENTION: different products may only be mixed if sure of absolute compatibility. 20 6043694 Troubleshooting 6 TROUBLESHOOTING 6.1 Work Cycle problems PROBLEMS CAUSE SOLUTION Clamp not synchronised 1.1 Truck capacity out of valve capacity Measure the capacity of the forklift range. truck and if necessary make it be within the field of capacities foreseen for device functioning. The clamp is not synchronised in opening and closing movements when empty. 2.1 The 1Lh and 1Rh regulators are not Adjust one of the two regulators, never balanced. both. In order to avoid errors, always adjust 1Rh using the following criteria: The clamp’s Rh arm is faster than the other. Turn the 1Rh adjuster a quarter of a turn and then try again. If it is still faster than the other turn a little more until perfect synchronisation is obtained. If a quarter of a turn slows it too much, turn 1Dx in the other direction until perfect synchronisation is obtained. The clamp’s Rh arm is slower than the other: Unscrew the 1Dx adjuster a quarter of a turn and try again. If it is still slower than the other, unscrew a little more until perfectly synchronised. If a quarter of a turn speeds it up too much, screw 1Rh until perfect synchronisation is obtained. 2.2 There is mechanical friction on the guides and/or of the cylinder of one of the two arms. The slower of the two arms is the one with problems. 6043694 26 Carefully lubricate guides. If the problem is not resolved, censure that there are no foreign bodies trapped in the guide of the slower arm. Excessive dirt may also cause problems and requires thorough cleaning and lubrication of the guides. If it depends on the cylinder grip, the clamp is not able to hold the load, and may also leak around the rod of the slower cylinder. 21 Troubleshooting PROBLEMS The clamp does not move CAUSES 3.1 Oil lacking SOLUTION Top up the oil level using oil indicated by the forklift truck manufacturer. 3.2 Oil from the truck distributor does not Contact Truck manufacturer for arrive. Assistance. 3.3 If there are quick connections for Connect connection to the truck, one or more correctly. may be partially inserted. quick connections 3.4 The quick connections would all appear to be properly connected, but the problem persists due to a faulty connection. If possible, eliminate quick connections and replace with standard joints. If it is not possible to eliminate the quick connectors, replace that which would appear faulty (replace male and female). Repeat the operation until the problem is solved. 3.5 Truck’s system absorption is excessive and simultaneous calibration of distributor’s max pressure valve too low. Increase the calibration of the distributor’s maximum pressure valve: the distributor’s calibration pressure must be greater than absorption by the hydraulic system. The clamp is slow in side shift. Other truck movements are regular and the clamp holds the load. 4.1 Needle valve position 2 is too open. Tighten the needle valve position 2 a quarter of a turn and recover desired speed. The Clamp is slow in opening and closing movements and grip is insufficient. 5.1 The relief valve position 4 is under- Tighten valve position 4 enough to calibrated compared to requirements. hold the load. Calibrate checking the temperature using a full scale 250 bar pressure gauge introduced in the place of plug M. Careful attention should be paid not to tighten the valve beyond the calibration of the truck’s general relief valve. The clamp does not have sufficient force to hold the load. 6.1 Relief valve position 4 is calibrated too Having introduced the pressure low. gauge in position M, release the relief valve. If it is calibrated too high, the truck’s general relief valve will intervene. 6.2 Overpressure valve position 4 has Dismantle the valve in order to excessive blow-bys. clean thoroughly, removing any foreign bodies. Check that gaskets are intact. In case of doubt, replace gaskets. 6.3 The pump or other truck components Introduce a pressure gauge on the prevent the desired pressure being pump line and at the end of the achieved. run activate the lift to check the pressure that can be reached. If the pressure recorded is lower than that declared by the Manufacturer, call for assistance. 6.4 If the previous check was satisfactory, The seal of devices positioned there are no pressure losses due to between the clamp and the truck can be checked. In particular, equipment on the clamp control line check any capacity regulators on the line. 22 6043694 27 Troubleshooting PROBLEMS CAUSES SOLUTION The clamp does not have sufficient force to hold the load. 7.1 See point 3.5 The clamp does not close, or closes slowly. 8.1 Relief valve position 4 has excessive Dismantle the valve in order to blow-bys clean thoroughly, removing any foreign bodies. Check that gaskets are intact. In case of doubt, replace gaskets. See point 3.5 8.2 Block valves 5Rh and/or 5Lh are Dismantle the valve in order to dirty. clean thoroughly, removing any foreign bodies. Check that gaskets are intact. In case of doubt, replace gaskets. The clamp does not open 9.1 Drained block valve position 7 is dirty Dismantle the valve in order to and/or blocked. clean thoroughly, removing any foreign bodies. Check that gaskets are intact. In case of doubt, replace gaskets. Ensure that the piloting piston and the check valve slide. 9.2 Check valve position 6 is dirty and/or Dismantle the valve in order to blocked. clean thoroughly, removing any foreign bodies. Check that gaskets are intact. In case of doubt, replace gaskets. Check that the check valve slides. After a certain interval the clamp does not hold the load. 10.1 Drained block valve position 7 and/or Introduce a pressure gauge at M check valve position 6 are dirty and/or and check that with the load blocked. gripped and the control distributor in the centre, the drop in pressure is not higher than 5 bar every 3 minutes. If the drop in pressure is higher than this value, the lock valve must be dismantled and the check valve must be thoroughly cleaned in order to remove any foreign bodies. Check that the gaskets are intact and if in doubt replace them. Ensure that the piloting piston and the check valve slide. The clamp loses the load when translating to the left or to the right. 11.1 One of the two cylinders that holds and side shifts the load gets to end of run before the other. By Insisting on the end of the side shift run, the other jack that has not come to end of run is over loaded and due to the section differences between the rod and the cylinder an movement is caused that results in clamp opening. It should be pointed out that this phenomenon is most frequent with closure pressures lower than 100 Bar. 6043694 28 Intervene on throttle position 2 unscrewing it until a compromise is obtained between the closure force and translation speed. If this does not resolve the problem, contact out Customer Assistance Service. 23 Troubleshooting PROBLEMS Clamp use causes the oil to overheat. 24 CAUSES SOLUTIONS 12.1 Too frequent use of the clamp with The 1Lh and 1Rh throttle are too closed. Open pump with capacity higher than 60 both half a turn at a time until the desired effect 3 dm /1’. is obtained. If adjusting the throttle does not resolve the problem, it should be pointed out that the clamp is dimensioned for performing typical warehouse manoeuvres and therefore, if the truck is used as a manufacturing machine (for example as though it were a small digger), oil overheating is inevitable. If it is not possible to avoid using the truck as a manufacturing machine, the pump capacity should be reduced. Contact the Assistance Service of truck Manufacturer. 6043694 29 Do you have questions you need answered right now? Call your nearest Cascade Service Department. Visit us online at www.cascorp.com AMERICAS Cascade Corporation U.S. Headquarters 2201 NE 201st Fairview, OR 97024-9718 Tel: 800-CASCADE (227-2233) Fax: 888-329-8207 Cascade do Brasil Rua João Guerra, 134 Macuco, Santos - SP Brasil 11015-130 Tel: 55-13-2105-8800 Fax: 55-13-2105-8899 Cascade Canada Inc. 5570 Timberlea Blvd. Mississauga, Ontario Canada L4W-4M6 Tel: 905-629-7777 Fax: 905-629-7785 EUROPE-AFRICA Cascade Italia S.R.L. European Headquarters Via Dell’Artigianato 1 37030 Vago di Lavagno (VR) Italy Tel: 39-045-8989111 Fax: 39-045-8989160 Cascade (Africa) Pty. Ltd. PO Box 625, Isando 1600 60A Steel Road Sparton, Kempton Park South Africa Tel: 27-11-975-9240 Fax: 27-11-394-1147 ASIA-PACIFIC Cascade Japan Ltd. 2-23, 2-Chome, Kukuchi Nishimachi Amagasaki, Hyogo Japan, 661-0978 Tel: 81-6-6420-9771 Fax: 81-6-6420-9777 Cascade Korea 121B 9L Namdong Ind. Complex, 691-8 Gojan-Dong Namdong-Ku Inchon, Korea Tel: +82-32-821-2051 Fax: +82-32-821-2055 Cascade-Xiamen No. 668 Yangguang Rd. Xinyang Industrial Zone Haicang, Xiamen City Fujian Province P.R. China 361026 Tel: 86-592-651-2500 Fax: 86-592-651-2571 Cascade Australia Pty. Ltd. 1445 Ipswich Road Rocklea, QLD 4107 Australia Tel: 1-800-227-223 Fax: +61 7 3373-7333 Cascade New Zealand 15 Ra Ora Drive East Tamaki, Auckland New Zealand Tel: +64-9-273-9136 Fax: +64-9-273-9137 Sunstream Industries Pte. Ltd. 18 Tuas South Street 5 Singapore 637796 Tel: +65-6795-7555 Fax: +65-6863-1368 Cascade India Material Handling Private Limited No 34, Global Trade Centre 1/1 Rambaugh Colony Lal Bahadur Shastri Road, Navi Peth, Pune 411 030 (Maharashtra) India Phone: +91 020 2432 5490 Fax: +91 020 2433 0881 c Cascade Corporation 2004 5-2004 Part Number 6043694