1
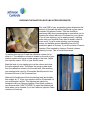
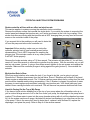
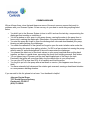
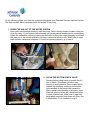
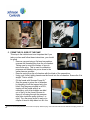
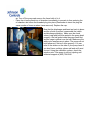
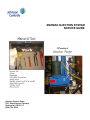
SNOMAX INJECTION SYSTEM
SERVICE GUIDE
Johnson Control Snow
7527 South Revere Parkway
Centennial, CO 80117
(800) 724-0046
CHECKING THE INJECTION RATE (MILILITERS PER MINUTE)
The total GPM of your snowmaking plant determines the
amount of Snomax that will be injected at a given rate to
nucleate 1M gallons of water. This test should be
performed daily during snowmaking to ensure that you’re
injecting the correct amount of Snomax into your system.
If you’re over-injecting, you’re wasting money. Injecting
more than your Injection Chart calls for doesn’t result in
more snow. If you’re under-injecting, you’re leaving
money on the table and not benefiting from the full
production gains of Snomax. If you do not have a Custom
Injection Chart created by Johnson Controls, please
contact your rep. This is a critical document.
To perform this test you’ll want the calibration column full or
close to it. The calibration column is located on the side of your
injection system and has a number gauge on the tube. Adjust
your injection rate to 100% on your control panel.
Mark the level of your starting point on the column and close
the main isolation valve. This allows the pump to draw water
from the calibration column, not the main tank. After marking
your starting level count for 30 seconds. Mark the level in the
column at the end of the 30-second test.
Subtract the finishing level from the starting level and multiply
this number by “2” to get your injection rate for 60 seconds—or
your milliliters per minute. This injection rate should be
consistent with your Snomax Injection Chart that’s posted on
your Snomax tank. DON’T FORGET to open the isolation ball
valve when you’re finished. If you don’t have an Injection Chart,
contact your local rep.
POTENTIAL INJECTION SYSTEM PROBLEMS
Stroke controller will turn with no effect on injection rate
This section applies to systems running the automatic stroke controllers.
Remove the actuator covers that conceal the stroke knob. If you switch the system to manual at the
control panel and change the injection rate, you'll notice movement at the Love Joy coupling. If the
stroke controllers are turning and the injection rate is NOT changing then you may have a loose setscrew on the controller inside of the pump.
If you suspect this is the problem you will need to drain the
oil from the pump and remove the controller out.
2
1
Important: Before starting, make sure you stroke the
controller actuator back to one hundred percent before
disassembling. This is VERY important for resetting the
plunger stop. If the actuator combo is in any other position
it will NOT stroke properly.
Remove the Jordan actuator using a 7/16 box wrench. The actuator will then slide off. You will then
need a 4.5 mm Allen wrench to remove the controller from the pump. With the controller out you will
see two set screws, (picture 1) using a 2mm Allen wrench tighten up the set screws and replace the
controller. Make sure the controller plunger is sitting against the gear (picture 2). Now reinstall the
actuator.
My Injection Rate is Slow
Close your main isolation valve under the tank. If you forget to do this, you’re going to get wet.
Remove the Y-Strainer downstream from the ball valve. Some Y-Strainers can be spun off by hand;
others require an adjustable wrench. The Y-Strainer catches some debris that’s coming from the tank
and should be cleaned weekly during snowmaking. If the Y-Strainer is clogged, the amount of water
the pump is receiving becomes restricted, reducing your injection rate. Your check balls may have
debris in them causing the balls not to seat well. This will cause a low pressure build and low flows.
Liquid is Oozing Out the Top of My Pump
If you have a liquid solution bubbling out of the top of your pump where the oil breather valve is or
you’ve noticed a large amount of oil on the floor under your pump, the diaphragm in the pump face is
cracked. This allows water to pass into the pump chamber mixing with oil until the chamber becomes
full. As the system continues to pump, the water/oil mixture has nowhere to go other than out the top
of the pump. If this is the case you’ll need to drain the oil, replace it with Snomax Oil, replace the
diaphragm, and prime the pump. Refer to Step 4 of the service manual.
Motor is not Running
Check to make sure you have the correct power to the system. This is the most common problem.
Running the motor under 30% of capacity over extended periods of time may cause the motor to fail
prematurely. If running in manual mode on a VFD system, be sure to monitor this.
If the motor has burned out and needs to be replaced, contact Johnson Controls or Grainger or
McMaster Carr. The motor is common and generally in stock.
Required Motor Specs:
• 3/4 HP to 2.0 HP
• 110 Volt /220 volt three phase
• 56 Frame
• C Face motor
• F rating to handle heat (or a substantial fan). F rating is preferred but not an absolute
necessity.
Motor is running but pump is not working
Chances are good, the key or keyway has broken on the motor shaft. If the keyway has broken, the
motor will need to be replaced. You could also have a broken main shaft in the pump. This is normally
the result of freezing or binding. If this is the case depending on the extent of the damage you will
have to replace the pump.
Erratic flow
Close your discharge line and check the rise and fall of the calibration tube. If the water is rising and
falling with the discharge closed, check the upper and lower check balls for debris. Also check the
suction line at the fitting for any cracks. If the line is bent, over a period of time it will break.
COMMON MISHAPS
We’ve all been there, done that and these are some of the most common causes that result in
problems with your Snomax System. All we can say, do your best to avoid doing anything listed
below.
•
•
•
•
•
•
•
•
•
You didn’t get to the Snomax System in time to refill it and ran the tank dry, compromising the
diaphragm and cracking or stretching it.
You left a window or door open in your pump house, causing the water in the pump face to
freeze solid, cracking the diaphragm. Remember—Snomax enhances the freezing process.
You start the pump but forget to open the discharge ball valve and dead-headed your pump,
blowing out and cracking your diaphragm.
You check the calibration of the system but forget to open the main isolation valve under the
tank preventing the pump from getting solution. It’s OK for a few minutes but running the pump
without water for an extended period of time will compromise the diaphragm.
You cleaned the debris out of the check valves on your pump head and when putting back
together, put them in upside down, preventing the pump from building pressure. See sticker.
You cut open a bag of Snomax over the tank and dropped part of the bag in the tank.
Eventually, that piece will more than likely clog the check valve in your pump head.
You ran your VFD at less than 30% of its capacity and fried the motor.
You forgot to put oil in the pump after a tear down or service. (this happens more than you
think).
You have automatic ball valves and the rotation gets reversed, causing a dead-head situation
or a non-pressure building situation.
If you can add to this list, please let us know. Your feedback is helpful.
Johnson Control Snow
7527 South Revere Parkway
Centennial, CO 80117
(800) 724-0046
On the following pages you’ll find the troubleshooting guide for a Standard Snomax Injection System.
The step numbers below correspond with the picture of the pump.
1. BLEED THE AIR OUT OF THE WATER SYSTEM
Open valve on discharge plumbing, start the pump. Once a steady stream of water is bled out,
close the valve. (If your system has automatic ball valves manual bleeding is not needed)Now
isolate the calibration column by closing the ball valve on the main supply plumbing and check
the draw out of the vertical calibration column to determine injection rate. MAKE sure to open
main isolation valve when complete. If it’s still not injecting properly, go to step 2.
2. CLEAN THE BOTTOM CHECK VALVE
Remove bottom check valve to ensure that it’s
free of debris. This allows the ball to seat
properly to build pressure. Remove any debris;
reattach the plumbing, making sure the white
nylon washers in the pump head remains in
place; reattach the plumbing, start pump, close
main ball valve to isolate the calibration column
to check injection rate. Make sure to open ball
valve when complete. Nine times out of ten, this
is the problem. If not, continue to step 3.
3. CLEAN THE TOP CHECK VALVE
Remove top check valve to ensure it’s free of debris and that the ball can seat properly. If it’s
plugged, remove debris, reattach plumbing, start the pump, close main ball valve to isolate
calibration column to check injection rate. Make sure to open ball valve when complete. If still
not injecting, continue to step 4.
4. CHECK THE DIAPHRAGM
Remove the intake and discharge plumbing
from the pump head, then remove the
pump head to check the integrity of the
diaphragm and to clean the inside of the
pump face. A small amount of oil will drain
as you remove the head.
- If the diaphragm is cracked, you’ll
need to drain and change the pump
oil. It’s likely that water entered the
pump case through the crack in the
diaphragm.
- If the diaphragm is only warped it’s
not necessary to change the oil but
you’ll need to replace the
diaphragm.1
- Reattach the head with the new diaphragm in place, paying attention to the arrow
stamped on the outside of the pump face. This arrow indicates the direction of flow.
Tighten all bolts securely.
1
Cracked diaphragms are caused by freezing, starting the pump with the discharge valve closed, running the tank dry, or constant back
pressure from the discharge line when the Snomax Pump is off.
5. PRIME THE OIL SIDE OF THE PUMP
This step is the trickiest and most important but if you
take your time and follow these instructions, you should
1
be good.
- Remove cap and using a flat head screwdriver,
unscrew the threaded plug from the oil chamber.
Taking care to count the number of turns to
remove the plug. This is used for calibration
purposes and needs to be put as close to the
same place as possible.
- Remove spring from the oil chamber with the blade of the screwdriver.
- Using your funnel, tightly place/screw the funnel into the oil chamber. Ensure the fit is
airtight. This is critical.
Fill the funnel with Snomax Pump Oil. 2
- Start the pump to prime the oil chamber
by bleeding out all the trapped air in the
head. Run the pump stroked in at 30%,
topping off the funnel with oil as
necessary, until all air bubbles are bled
out of the oil in the funnel. Be sure to
there oil is flowing through the pressure
relief tube inside the pump (picture 1 to
right). Turn the pump stroke in and out a
couple of times to help bleed out ALL the
2
There is an oil level plug/window on the side of the pump. Remove plug—the oil level should be at the bottom of the plug; drain if too
full.
-
air. Turn off the pump and remove the funnel with oil in it.
Place the oil spring back into oil chamber immediately to prevent air from entering the
oil chamber and screw the threaded plug into place (Remember to insert the plug the
same number of turns as when it was removed). Replace the cap.
Now that the diaphragm and head are back in place
and the oil side is primed, reassemble the intake
and discharge plumbing. Make sure the check
valves (cage and ball) are seated in the pump head
properly—the ball goes inside the pump head first,
and the cage is placed over the ball. Make sure the
white nylon washers are in place. The pump will not
build pressure if this isn’t done properly. You can
refer to the sticker on the side of your pump head. If
you don’t have a sticker, please call and we’ll send
one out. Using the calibration column, check the
injection rate. If the pump is still not injecting call
technical support at (800) 724-0046.