1
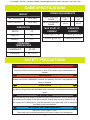
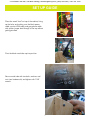
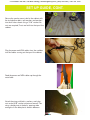
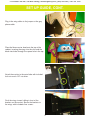
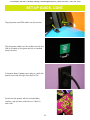
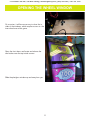
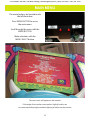
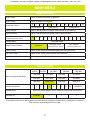
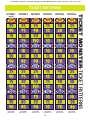
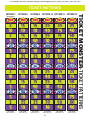
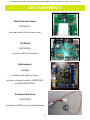
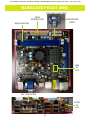
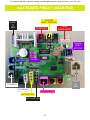
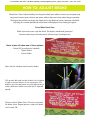
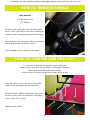
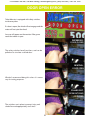
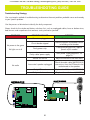
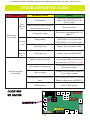
1
To Purchase This Item, Visit BMI Gaming | www.bmigaming.com | (800) 746-2255 | +561.391.7200
TABLE OF CONTENTS
FACTORY CONTACT INFORMATION. . . . . . . . . . . . . . . . . . . . . . . . . . . . . . 2
WELCOME TO: TICKET MONSTER . . . . . . . . . . . . . . . . . . . . . . . . . . . . . . . 4
HOW TO PLAY . . . . . . . . . . . . . . . . . . . . . . . . . . . . . . . . . . . . . . . . . . . . . . . . 5
SPECIFICATIONS. . . . . . . . . . . . . . . . . . . . . . . . . . . . . . . . . . . . . . . . . . . . . . 6
SAFETY PRECAUTIONS. . . . . . . . . . . . . . . . . . . . . . . . . . . . . . . . . . . . . . . . 6
SETUP GUIDE . . . . . . . . . . . . . . . . . . . . . . . . . . . . . . . . . . . . . . . . . . . . . . 7-10
OPENING THE WHEEL WINDOW. . . . . . . . . . . . . . . . . . . . . . . . . . . . . . . . 11
MAIN MENU FUNCTIONS . . . . . . . . . . . . . . . . . . . . . . . . . . . . . . . . . . . . 12-16
TICKET PATTERNS . . . . . . . . . . . . . . . . . . . . . . . . . . . . . . . . . . . . 14-15
KEY COMPONENTS. . . . . . . . . . . . . . . . . . . . . . . . . . . . . . . . . . . . . . . . . . . 17
MOTHERBOARD PINOUT. . . . . . . . . . . . . . . . . . . . . . . . . . . . . . . . . . . . . . 18
AUX BOARD PINOUT. . . . . . . . . . . . . . . . . . . . . . . . . . . . . . . . . . . . . . . . . . 19
HOW TO: CALIBRATE ENCODER SENSOR. . . . . . . . . . . . . . . . . . . . . . . . 20
HOW TO: ADJUST BRAKE. . . . . . . . . . . . . . . . . . . . . . . . . . . . . . . . . . . . . . 21
HOW TO: REMOVE HANDLE. . . . . . . . . . . . . . . . . . . . . . . . . . . . . . . . . . . . 22
HOW TO: TIGHTEN ARM BRACKET. . . . . . . . . . . . . . . . . . . . . . . . . . . . . . 22
DOOR OPEN ERROR. . . . . . . . . . . . . . . . . . . . . . . . . . . . . . . . . . . . . . . . . . 23
PUPPY VIDEO WIZARD ERROR. . . . . . . . . . . . . . . . . . . . . . . . . . . . . . . . . 24
POWER SUPPLY DIAGNOSTICS . . . . . . . . . . . . . . . . . . . . . . . . . . . . . . . . 25
TROUBLESHOOTING GUIDE . . . . . . . . . . . . . . . . . . . . . . . . . . . . . . . . . 26-34
MAINTENANCE LOG. . . . . . . . . . . . . . . . . . . . . . . . . . . . . . . . . . . . . . . . . . 35
TECHNICAL SUPPORT . . . . . . . . . . . . . . . . . . . . . . . . . . . . . . . . . . . . . . . . 36
WARRANTY . . . . . . . . . . . . . . . . . . . . . . . . . . . . . . . . . . . . . . . . . . . . . . . . . 37
COMPLIANCE CERTIFICATE . . . . . . . . . . . . . . . . . . . . . . . . . . . . . . . . . . . 38
3
To Purchase This Item, Visit BMI Gaming | www.bmigaming.com | (800) 746-2255 | +561.391.7200
WELCOME TO: TICKET MONSTER
Congratulations on your Ticket Monster purchase!
Larger than life and not-so-creepy, Ticket Monster is sure to roll in scary big revenues!
With a progressive jackpot, fresh theme and brightly colored cabinet, Ticket Monster
will lure in players from across the room.
Please take a moment to read through this manual and be sure to contact our factory if
you have any questions, or would like some more information.
Thank you for your purchase! Your business is important to us and we hope you enjoy
this game as much as we do!
Your Friends at Bay Tek Games
GAME INSPECTION
Inspect the game for any damaged, loose, or missing parts.
If damage is found, please contact your freight carrier first.
Then, contact Bay Tek Games’ Service Department at 920.822.3951
or e-mail them at [email protected] for further assistance.
4
To Purchase This Item, Visit BMI Gaming | www.bmigaming.com | (800) 746-2255 | +561.391.7200
HOW TO PLAY
Lift up on the handle and push it down
hard.
Roll the monster’s tongue around.
Win tickets where the arrow points.
Land on the Jackpot space to win scary
big tickets!
5
To Purchase This Item, Visit BMI Gaming | www.bmigaming.com | (800) 746-2255 | +561.391.7200
GAME SPECIFICATIONS
POWER REQUIREMENTS
WEIGHT
NET WEIGHT
1000 LBS
INPUT VOLTAGE
RANGE
100 to 120
VAC
/
220 to 240
VAC
SHIP WEIGHT
1200 LBS
INPUT FREQUENCY
RANGE
50 HZ
/
60 HZ
DIMENSIONS
WIDTH
32”
MAX START UP
CURRENT
OPERATING
CURRENT
DEPTH
90”
3 AMPS @ 115 VAC
0.7 AMPS @ 115 VAC
HEIGHT
117”
1.5 AMPS @ 230 VAC
.35 AMPS @ 230 VAC
OPERATING
TEMPERATURE
FAHRENHEIT
80-100
CELSIUS
26.7-37.8
SAFETY PRECAUTIONS
!
DANGER
!
WARNING
!
CAUTION
!
DO NOT perform repairs or maintenance on this game with the power ON.
Unplug the unit from the wall outlet or shut off the power strip located inside the
cabinet.
!
Use of flammable subtances can cause sever burns or serious injury.
Always use NON-FLAMMABLE solvents for cleaning. DO NOT use gasoline kerosene or thinners.
!
Lifting heavy objects can cause back, neck or other injuries. Be sure adequate lifting and moving devices are available when unloading, unpacking and moving this
game.
!
ATTENTION
!
Be sure the electrical power matches the game requirements. See the serial number located on the back of the game cabinet. Always plug into a grounded circuit. If
the supply cord is damaged, it must be replaced by an approved cord or assembly
provided by the manufacturer.
!
IN CASE OF EMERGENCY
UNPLUG THE POWER CORD.
The power cord must be accesible at all times in case of an emergency.
6
!
To Purchase This Item, Visit BMI Gaming | www.bmigaming.com | (800) 746-2255 | +561.391.7200
SET UP GUIDE
Place the wood “sled” on top of the cabinet, lining
up the holes and making sure the black power
cable, monitor VGA cable, and grey phone cable
with splitter jumper feed through to the top without
getting pinched.
Pivot the black metal tube up into position.
Secure metal tube with two bolts, washers and
nuts from hardware kit, and tighten with 7/16”
wrench.
7
To Purchase This Item, Visit BMI Gaming | www.bmigaming.com | (800) 746-2255 | +561.391.7200
SET UP GUIDE, CONT.
Secure the monitor mount sled to the cabinet with
the included hex bolts, split washers and washers
into the 4 holes shown using a 7/16” ratchet. No
nuts are required; T-nuts are built into the top of the
cabinet.
Plug the power and VGA cables from the cashbox
into the cables coming out the top of the cabinet.
Feed the power and VGA cables up through the
metal tube.
Attach the wings with bolts, washers, and nylon
nuts and a 9/16” ratchet socket and wrench. The
wings should pivot at the bolts, opening wide
enough to fit the blue plastic head in between.
8
To Purchase This Item, Visit BMI Gaming | www.bmigaming.com | (800) 746-2255 | +561.391.7200
SET UP GUIDE, CONT.
Plug in the wing cables to the jumper on the grey
phone cable.
Place the blue monster head onto the top of the
cabinet, inserting the wings into the slots and the
black metal tube through the square hole in the top.
Attach the monitor to the metal tube with included
lock nuts and a 1/2” nut driver.
Push the wings inward, sliding in front of the
brackets on the monitor. Secure the brackets to
the wings with included silver screws.
9
To Purchase This Item, Visit BMI Gaming | www.bmigaming.com | (800) 746-2255 | +561.391.7200
SET UP GUIDE, CONT.
Plug the power and VGA cables into the monitor.
Plug the power cable from the cashbox into the line
filter on the back of the game and into a standard
electrical outlet.
If the game doesn’t power up on plug in, switch the
power strip inside the right front door to ON.
Attach the side guards with the included bolts,
washers, split washers and lock nuts; 4 bolts in
each side.
10
To Purchase This Item, Visit BMI Gaming | www.bmigaming.com | (800) 746-2255 | +561.391.7200
OPENING THE WHEEL WINDOW
On occasion, it will be neccessary to clean the insides of the windows, which requires access to the
inner wheel area of the game.
Open the front doors and locate and release the
two latches near the top inside corners.
Slide the plexiglass window up and away from you.
11
To Purchase This Item, Visit BMI Gaming | www.bmigaming.com | (800) 746-2255 | +561.391.7200
MAIN MENU
The menu buttons are located inside
the left front door.
Press MENU BUTTON to access
the main menu.
Scroll through the menu with the
MENU BUTTON.
Make selections with the
MENU SELECT button.
The main menu will appear on the monitor.
If the angle of view makes menu options slightly hard to see,
we recommend dimming the ambient lighting to better see the monitor.
12
To Purchase This Item, Visit BMI Gaming | www.bmigaming.com | (800) 746-2255 | +561.391.7200
MAIN MENU
GAME SETTINGS
Reset Tickets
Clears all tickets waiting to be paid out
Reset Credits
Clears all credits on the game
Credits per Game
0
1
2
3
4
$5 bill bonus:
5
6
7
8
9
6 plays for $5
10
Adjusts the volume of the game while coined up and playing
Attract Volume
Adjusts the volume of the game while in attract mode
available alternate patterns)
1
2
3
4
20
3 plays for $5
Game Volume
Ticket Pattern (see page 14 for
12
5
Jackpot Menu
see table below
Player Timeout Option
No Timeout
Abandon Game
Auto Spin
(required for New Jersey)
(required for WA state)
Game History
Opens a new screen with detailed game play and payout log
Set Time & Date
Opens a new screen with date and time selections
Exit Menu
Returns game to normal function
JACKPOT MENU
50/250
Monster Jackpot (Min/Max)
Jackpot Increment
1
50/500
50/1000
100/500
100/1000
100/2500
250/1000
250/2500
250/5000
250/9999
500/1000
500/2500
500/5000
500/9999
1000/2500
1000/5000
1000/9999
2
3
4
5
6
7
8
9
10
DISABLED
Jackpot Reset
Reset the jackpot payout to the minimum value established above
Machine ID*
1 (master)
2
3
4
*If you plan to link two or more games to increment their jackpots simultaneously, a linkage kit is required.
Please call our service department to order.
13
To Purchase This Item, Visit BMI Gaming | www.bmigaming.com | (800) 746-2255 | +561.391.7200
TICKET PATTERNS
4
PATTERN 2
PATTERN 3
PATTERN 4
PATTERN 5
PATTERN 6
32-35
TICKETS/GAME
50-53
TICKETS/GAME
60-63
TICKETS/GAME
14-17
TICKETS/GAME
74-77
TICKETS/GAME
40-45
TICKETS/GAME
PART #: AATP0201
PART #: AATP0202-P
PART #: AATP0203-P
PART #: AATP0204-P
PART #: AATP0205-P
PART #: AATP0206-P
DEFAULT
4
4
4
4
4
4
4
4
4
4
4
4
4
4
4
14
TICKET MONSTER-TICKET PATTERNS
PATTERN 1
To Purchase This Item, Visit BMI Gaming | www.bmigaming.com | (800) 746-2255 | +561.391.7200
TICKET PATTERNS
PATTERN 8
PATTERN 9
7-9
TICKETS/GAME
23-26
TICKETS/GAME
19-22
TICKETS/GAME
27-30
TICKETS/GAME
38-41
TICKETS/GAME
23-26
TICKETS/GAME
PART #: AATP0207-P
PART #: AATP0208-P
PART #: AATP0209-P
PART #: AATP0210-P
PART #: AATP0211-P
PART #: AATP0212-P
(CEC Franchise)
PATTERN 10 PATTERN 11 PATTERN 12
15
TICKET MONSTER-TICKET PATTERNS
PATTERN 7
To Purchase This Item, Visit BMI Gaming | www.bmigaming.com | (800) 746-2255 | +561.391.7200
MAIN MENU, CONT.
DIAGNOSTICS
Door Open Warning
Indicates when any of the 5 access doors is open
Software Version
Indicates which version of software is installed on the game
Total Credits
Indicates how many credits are available on the game
Tickets Left to Dispense
Indicates number of tickets waiting to pay out
Wheel Position
Indicates wheel position for calibration and diagnosing problems
Inputs
Indicates how many inputs (buttons, etc.) are active
Outputs
Indicates how many outputs are active
Brake Status
Indicates if the brake is OK, too tight or too loose
Wheel Speed
Indicates how fast the wheel is spinning
DIAGNOSTICS
Total Games
Number of games played since last statistics reset
Total Tickets
Number of tickets dispensed since last statistics reset
Tickets per Game
Average number of tickets dispensed per game
Total Motor Assists
Number of games in which the motor spun the wheel for the player
16
To Purchase This Item, Visit BMI Gaming | www.bmigaming.com | (800) 746-2255 | +561.391.7200
KEY COMPONENTS
Wheel Encoder Sensor
(AACB1901)
Located inside left side access door.
I/O Board
(AACB1900)
Located inside left front door.
Motherboard
(AAMB8)
Located inside right front door.
Includes software hard drive (A5HD1800)
and RAM (A5CB1904).
Software Hard Drive
(A5HD1800)
Located in a SATA port on the Motherboard.
17
To Purchase This Item, Visit BMI Gaming | www.bmigaming.com | (800) 746-2255 | +561.391.7200
MAINBOARD PINOUT (MB8)
SOFTWARE HARD DRIVE
FROM
POWER SUPPLY
FROM POWER
SUPPLY
RAM (A5CB1904)
MB8
TO
AUX
VGA TO MONITOR
AUDIO
TO
AUX
18
To Purchase This Item, Visit BMI Gaming | www.bmigaming.com | (800) 746-2255 | +561.391.7200
AUX BOARD PINOUT (A5CB1900)
TO DOOR
SAFETY SWITCHES
AUDIO
TO
MB8
FROM
POWER SUPPLY
TO SPEAKERS
TO LOW TIX
SWITCH
TO MENU/
SELECT
BUTTONS
TO COIN
DOOR
TO DBA
TO ENCODER
TO MOTOR
AUX
TO
MB8
TO SOLENOID
TO COUNTERS
TO WING LIGHTS
LEFT TICKET TRAY
RIGHT TICKET TRAY
19
To Purchase This Item, Visit BMI Gaming | www.bmigaming.com | (800) 746-2255 | +561.391.7200
HOW TO: CALIBRATE ENCODER SENSOR
The Encoder Sensor communicates the position of the wheel in comparison to the orange arrow,
telling the game how many tickets the player has won.
There is a small margin between scoring spaces that allows for slight miscalibration of the encoder sensor.
If the arrow lands between spaces, the game will always award the player with the higher ticket value.
This also applies on the bonus spaces.
Open the wheel window (see page 11) and access
the main menu.
Manually turn the wheel downward and make sure
the ticket value displayed on the screen matches the
space the arrow is pointing to. Make sure to turn the
wheel one complete revolution so the game can find
the home position.
Turn the wheel as it approaches a bonus section.
Watch the display closely, and stop the wheel as
soon as it turns from a 4 to the bonus value. The
arrow should be right on the line between 4 and the
bonus space.
If the pointer is more than 1/2” off:
Open the left side door and locate the two Phillips
head screws on the sensor bracket which hold it
securely in the adjustment slots.
Loosen the screws and move the bracket slightly,
then retighten and restest.
Repeat as neccessary.
20
To Purchase This Item, Visit BMI Gaming | www.bmigaming.com | (800) 746-2255 | +561.391.7200
HOW TO: ADJUST BRAKE
Wheel Coast Time is determined by how long the wheel spins before it comes to a complete stop.
Long coast time increases the time per game, while a short coast time makes the game quicker.
The higher the number, the longer the wheel coasts; the ideal coast time is between 30 and 40.
Adjusting this number periodically will prevent skilled players from sharking the game.
To test Wheel Coast Time:
While in the main menu, spin the wheel. The display should read “good spin”.
Once the wheel stops, the brake status will come up in the diagnostics.
Brake status will show one of three options:
• Brake OK (no adjustment needed)
• Tighten Brake
• Loosen Brake
Open the left side door and locate the brake.
Pull up each bolt and turn the locknuts left to tighten
or right to loosen. Move in 2-turn increments; the
brake is sensitive and needs very little adjustment to
make a difference. Make sure each bolt is adjusted
equally.
Perform another Wheel Coast Time test and check
the brake status. Repeat previous steps until brake
status reads OK.
21
To Purchase This Item, Visit BMI Gaming | www.bmigaming.com | (800) 746-2255 | +561.391.7200
HOW TO: REMOVE HANDLE
Tools Needed:
1/2” Socket & rachet
1/2” Wrench
Located on the underside of the metal front panel,
there is a bolt, split washer, and locknut holding the
handle into the square pipe attached to the linkage.
Remove the bolt by turning the rachet on the locknut
and holding the bolt still with the wrench.
Pull the handle out from the front of the game.
HOW TO: TIGHTEN ARM BRACKET
It is important to keep the arm bracket securely tightened;
failure to do so may cause injury to players or damage to the game.
We recommend checking the bolts monthly,
and more often if the game accumulates a high volume of play.
Open the right front door and remove the acrylic
shield using a 90 degree drill and square bit.
Check the 6 bolts holding the bracket in place- 3 on
the front surface and 3 on the bottom- and tighten
all nuts with a 7/16” socket.
Replace acrylic shield.
22
To Purchase This Item, Visit BMI Gaming | www.bmigaming.com | (800) 746-2255 | +561.391.7200
DOOR OPEN ERROR
Ticket Monster is equipped with safety switches
inside every door.
If a door is open, the wheel will not engage and the
motor will not spin the wheel.
An error will appear on the monitor if the game
reads that a door is open.
DEPRESSEDDOOR CLOSED
The safety switches have 3 positions, and can be
pulled out to simulate a closed door.
NEUTRALDOOR OPEN
We don’t recommend doing this unless it is necessary for testing purposes.
PULLED OUTOPEN BUT READ
AS CLOSED
The switches are in place to prevent injury and
should be used appropriately at all times.
23
To Purchase This Item, Visit BMI Gaming | www.bmigaming.com | (800) 746-2255 | +561.391.7200
PUPPY VIDEO WIZARD ERROR
If the monitor has been replaced or reset, a Puppy Video Wizard will appear on the screen at power up.
The settings will have to be reset and saved before the game can be played.
Puppy Video Wizard screen will appear.
Open the front door of the cabinet and plug a PS/2 keyboard into the purple port on the motherboard.
Hit < ENTER >.
Make sure a resolution of 1024 x 768 x16 is selected, then hit < ENTER >.
The game software should now boot. Wait 10 secnds, then press < Q > on the keyboard.
Once the black screen with white and red code appears, type REBOOT and hit < ENTER >.
The game will save the video settings and boot up normally.
24
To Purchase This Item, Visit BMI Gaming | www.bmigaming.com | (800) 746-2255 | +561.391.7200
POWER SUPPLY DIAGNOSTICS
1.) Verify AC power to front of game.
Check power strip in bottom front of game for light ON inside rocker switch.
If light is not ON, remove back panel of cabinet and check AC power in and
Power Strip in that location.
2.) Check AC power connection to power supply.
3.) Ensure Power Supply switch is set to 115V (or 230V)
(Some model power supplies may not have this)
4.) Ensure Power switch is on.
5.) Examine top left corner of motherboard. There is green LED ON.
If LED is not ON, replace power supply. (AAPS4600)
6.) Check connections from power supply.
Make sure these 2 connections are secure.
7.) “Jump Start” Motherboard:
If green LED is ON, but monitor is not ON, you may
start motherboard by quickly touching these 2 red pins
at the same time.
25
Large power supply
connection
2 Black and 2 yellow wires
(12 Volts DC)
To Purchase This Item, Visit BMI Gaming | www.bmigaming.com | (800) 746-2255 | +561.391.7200
TROUBLESHOOTING GUIDE
Troubleshooting Strategy
Use a systematic method of troubleshooting to determine the exact problem, probable cause and remedy
to your specific problem.
Use the process of elimination to identify the faulty component.
Always check for the simple and obvious solutions first, such as unplugged cables, loose or broken wires,
bad sensors, and components that are bent, stuck, pinched or jammed.
PROBLEM
No power to the game
No lights on at all
No audio
PROBABLE CAUSE
REMEDY
Game is unplugged
Check the wall outlet
Circuit breaker tripped
Reset the power strip breaker switch
or building circuit breaker
Faulty power strip
Change the plug position, replace
power strip if needed
Faulty cable/ power supply
See “power supply diagnostic” on
page 21
Volume set too low
Adjust the volume in the main menu
Loose wire/ speaker unplugged
Check the audio cable (AACEAU010)
connections from the I/O board to the
motherboard to the speakers
Faulty I/O board
Replace the I/O board (AACB1900)
Faulty motherboard
Replace the motherboard (AAMB8)
26
To Purchase This Item, Visit BMI Gaming | www.bmigaming.com | (800) 746-2255 | +561.391.7200
TROUBLESHOOTING GUIDE
PROBLEM
PROBABLE CAUSE
REMEDY
Cable problem
Check the connections from the
jumper cable (AACE1620) to the
power supply
Both
sides are Large POWER IN cable connection
with motherboard is loose
out
Wheel lights
not working
One side
is out
Some
lights are
out
Dollar bill acceptor
not working
Reseat connector
Faulty power supply
See “power supply diagnostics” on
page 21
Cable problem
Check the cables from the light strip
(AACE1622) to the jumper cable
(AACE1620) to the power supply.
Faulty light strip
Replace light strip (AACE1622)
Faulty light strip
Replace light strip (AACE1622)
DBA not getting 110 VAC
Acceptor should cycle at power up. If
not, check the cable connections to
the power strip. CAUTION: 110 VAC
Dirt or debris in acceptor slot
Run a cleaning card (A5CC9000)
through the acceptor
Dips set wrong
The dips on the acceptor should be
set to “always enable”
Pinched, broken or disconnected
wires
Check wiring from DBA to I/O board.
Repair or replace wire (AACE1611)
DBA problems
Refer to DBA manual
27
To Purchase This Item, Visit BMI Gaming | www.bmigaming.com | (800) 746-2255 | +561.391.7200
TROUBLESHOOTING GUIDE
PROBLEM
Monitor not
working
Shows
“no
signal”
for 5
seconds,
then
goes
dark
PROBABLE CAUSE
REMEDY
12 volt power connector unplugged
on motherboard (A)
Reseat connector
Monitor VGA cable unplugged (B)
Reseat connector
Large power connector unplugged
on motherboard (C)
Reseat connector
Faulty/loose RAM (D)
Reinsert RAM stick
Faulty power supply (E)
See “power supply diagnostics” on
page 21
Faulty motherboard
Replace motherboard (A5MB8)
Power cable unplugged from
monitor
Ensure the monitor power cable is
securely seated into the monitor and
power strip
Faulty monitor
Replace monitor (A5DBDI030)
Display shows “no bootable deviceinsert boot disk and press any key”
USB software flash drive loose,
missing, or faulty
First:
Power down,
wait 10
seconds, then
power up
again
Black
screen
Error on
screen
Game is not recognizing monitor.
Display shows “puppy video wizard”
Ensure VGA cable is secure to the I/O
or “Xorg”
board or replace monitor.
(reboot
to see if
problem Display shows “kernel panic- unable
persists)
to mount root”
28
Faulty or loose RAM
To Purchase This Item, Visit BMI Gaming | www.bmigaming.com | (800) 746-2255 | +561.391.7200
TROUBLESHOOTING GUIDE
PROBLEM
PROBABLE CAUSE
REMEDY
Remove fish head
Monitor issues;
Too bright, too dim,
blurry, etc.
Monitor settings out of adjustment
Remove wood blocks holding monitor
in place
Take the monitor out of the wood
frame
Use buttons to adjust settings
Game plays, but not all
the functions work
Inputs not working; no coin-up,
buttons don’t work, display reads
“door open”
I/O serial cable unplugged between
I/O and motherboard
Display does not show some
screens, no audio
USB software flash drive loose or
faulty
Game freezes or locks up
Faulty RAM or motherboard
One of the coin switches is jammed
Un-jam coin switch. If one is closed,
the other won’t work either.
Short in coin door harness
Unplug red spade connector from
door and jump between white and
black wires to simulate coin up;
replace harness if needed
Game doesn’t coin up
I/O serial cable unplugged between Check connections and reseat cables;
I/O and motherboard
replace I/O serial cable if needed
“Low tickets” displayed
on monitor, despite being
filled
Faulty I/O board
Replace I/O board (AACB1900)
Ticket stack not resting properly on
the low ticket switches
Adjust ticket stack so it holds the
switch down
Faulty low ticket switch
Replace low ticket switch (A5SW200)
Faulty wire or connection
Check the connection between the
switch and the I/O board
Faulty I/O board
Replace I/O board (AACB1900)
29
To Purchase This Item, Visit BMI Gaming | www.bmigaming.com | (800) 746-2255 | +561.391.7200
TROUBLESHOOTING GUIDE
PROBLEM
PROBABLE CAUSE
REMEDY
Game set to “abondon game” under
the player timeout option in the
game menu
Change setting to “motor assist”
Game displaying “motor watchdog
error” in the diagnostics
Change setting to “motor assist”,
power down for 10 seconds and
restart to clear the error
Door open
Motor will not engage if the game
thinks a door is open. Close all doors;
check door switches if issue persists.
Motor does not engage
to assist a slow spin.
Faulty encoder sensor
Motor assist will try for 2 seconds, not
see the wheel, then deactivate.
Troubleshoot encoder sensor and
replace if necessary.
This does not apply to
Washington State
games
Auto spin catch is broken
Inspect mechanism inside left side
door. Replace spring if needed
(A5SREX040).
Drive chain broken
Inspect drive chain that powers the
wheel; replace if needed (A5CH1003)
Cable problem
Inspect and reseat cable from the
motor to the I/O board.
Faulty I/O board
Replace I/O board
Game is in New Jersey mode
New Jersey law does not allow the
game to spin for the player; call Bay
Tek Service Dept. for assistance
Wheel Motor Information
As the motor starts, 5 volts is present at the connector.
As the wheel gains speed, this increases to 12 volts.
Phone cable to I/O board is double-crimped in the
housing for redundancy; motor will still work if one
wire happens to fall out or break.
30
To Purchase This Item, Visit BMI Gaming | www.bmigaming.com | (800) 746-2255 | +561.391.7200
TROUBLESHOOTING GUIDE
PROBLEM
Wheel spins
continuously
Spin meter does not
read a good spin.
PROBABLE CAUSE
REMEDY
Brake assembly is loose or broken
Adjust the brake or replace it
Solenoid assembly is faulty or
broken, causing the wheel to spin
at any time
Spin motor reads 12 volts at all
times; spin meter screen always on
Faulty I/O board, replace if needed
Encoder sensor not seeing the
wheel spin
Faulty or miscalibrated encoder
sensor; calibrate or replace sensor
Encoder sensor dirty or faulty
Clean sensor; replace if necessary
(AACB1901)
Pinched, broken or disconnected
wires
Inspect wiring and reseat or replace
cable if needed (AACE1608)
Faulty I/O board
Replace I/O board (AACB1900)
Door is open
Wheel not spinning
when the handle is
pushed down.
Replace the wheel engaging solenoid
Faulty solenoid assembly
Cable problem
Faulty I/O board
Solenoid Information
The solenoid should output 12 VDC at game start.
Phone cable is double crimped in housing for redundancy;
solenoid should still work if one wire happens to
fall out or break.
31
Wheel will not engage if the game
thinks a door is open.
Close all doors & inspect door
switches; replace if needed
Inspect the mechanism inside the right
side access door for intact springs
and engaging action. Replace
assembly if needed (AASO4150).
Inspect cable connecting the solenoid
to the I/O board; replace if needed
Replace I/O board (AACB1900)
To Purchase This Item, Visit BMI Gaming | www.bmigaming.com | (800) 746-2255 | +561.391.7200
TROUBLESHOOTING GUIDE
PROBLEM
PROBABLE CAUSE
REMEDY
Solenoid is always on,
allowing the wheel to
spin at any time.
Jammed solenoid
Inspect solenoid to make sure it’s
working properly
Missing or broken springs
Look for missing springs; replace
assembly if needed (AASO1450)
Pinched cable
Inspect phone cables; replace if
needed
Faulty I/O board
Replace I/O board (AACB1900)
Cable unplugged
Check and reseat cable into I/O board
Meters do not click as tickets are
vended and games are played
Replace counters (AACO1000)
Faulty I/O board
Replace I/O board (AACB1900)
One or more doors is open
Make sure all doors are closed
Faulty door switch
Check the limit switch inputs; replace
switches if necessary (A5SW7000)
I/O serial cable unplugged
Reseat the cable from the motherboard to the I/O board
Faulty I/O board
Replace I/O board (A5CB1900)
Faulty encoder sensor
Clean, calibrate or replace encoder
sensor
Faulty motor
Refer to page 29 for motor help
During attract mode,
a loud clicking sound
occurs when the
wheel spins.
Analog game & ticket
counters do not work
Monitor shows “Out of
Order- Door Open”
After a solution is found:
Motor watchdog error
Enter the main menu and make sure player timeout is set to “motor assist”
Power down game and reboot, then coin up and allow the motor
to spin the wheel
Re-enter the menu and verify that “motor watchdog error”
is no longer present.
32
To Purchase This Item, Visit BMI Gaming | www.bmigaming.com | (800) 746-2255 | +561.391.7200
TROUBLESHOOTING GUIDE
PROBABLE CAUSE
REMEDY
Game scores while wheel
is still spinning
Weak encoder sensor
Replace encoder sensor (AACB1901)
Game dispenses tickets
upon coin up
Brake too loose; game sees wheel
spinning after coinup and scores as
if it were played
Tighten the brake. See page 17
Game ends after a slow
spin and gives no tickets
Motor assist not kicking in
Make sure player assist is not set to
“abandon game”. If correct, see page
29 to troubleshoot motor
VALUES MATCH IN DIAGNOSTIC MENU
Game reads incorrect
ticket value
Open menu and turn
wheel downward; check
ticket value display
Motor watchdog error
See page 29
Encoder sensor not
reading properly
Clean, calibrate or replace sensor
VALUES DO NOT MATCH IN DIAGNOSTIC MENU
Manually spin the wheel for one complete revolution so the home
sensor can read. Always spin the wheel downward.
Check the cable between sensor and
I/O board; reseat or replace
if necessary
Encoder sensor not reaching
I/O board
Clean, calibrate or replace sensor
Replace I/O board
Encoder sensor continually sees
home position
Game pays out 10 or 75
tickets every game
Encoder signal not reaching I/O
board
Check green LED home indicators
on sensor board; if always on as the
wheel spins, replace the sensor
Check the cable between the sensor
and the I/O board; reseat or replace if
necessary
Replace sensor or I/O board
33
To Purchase This Item, Visit BMI Gaming | www.bmigaming.com | (800) 746-2255 | +561.391.7200
TROUBLESHOOTING GUIDE
PROBLEM
PROBABLE CAUSE
Make sure the game is not reading
an open door
Winning value should be displayed on
the monitor; see page 32 for encoder
sensor troubleshooting
Close all doors; inspect and replace
door switches if necessary
Faulty cables between I/O board
and ticket dispensers
Inspect cables; reseat or replace if
needed
Faulty I/O board
Replace I/O board (AACB1900)
Less than 5 tickets were won
No issue; less than 5 tickets will always vend from one dispenser only
Faulty cable between I/O board and
affected ticket dispenser
Inspect cable; reseat or replace if
needed
Faulty I/O board
Replace I/O board (AACB1900)
Game is not registering a win
Tickets not dispensing
from either of the two
dispensers
One ticket dispenser is
working, while the other
is not
REMEDY
GAME DISPLAYS DIFFERENT TICKET VALUE
Verify the ticket pattern in the main
Incorrect ticket pattern selected
menu
Clean, calibrate or replace encoder
sensor
GAME DISPLAYS CORRECT TICKET VALUE
Disconnected, loose or broken
Inspect cables; reseat or replace if
wires
necessary
Refer to blue Ticket Dispenser pages
at the end of this manual; blow dust
Ticket dispenser OPTO sensor dirty
from OPTO sensor and wipe clean
with isopropyl alcohol.
Wheel position not read correctly
Wrong ticket amount
dispensed
Faulty ticket dispenser
Replace ticket dispenser
Notches between tickets are too
small
Flip the ticket stack and load upsidedown, causing the larger notches to
alight with the sensor.
34
To Purchase This Item, Visit BMI Gaming | www.bmigaming.com | (800) 746-2255 | +561.391.7200
MAINTENANCE LOG
If repairs are necessary, it is good practice to keep a log of repairs done and parts ordered.
The chart below will assist you in tracking your game’s maintenance.
DATE
MAINTENANCE PERFORMED
PARTS ORDERED
35
INITIALS
To Purchase This Item, Visit BMI Gaming | www.bmigaming.com | (800) 746-2255 | +561.391.7200
TECHNICAL SUPPORT
Excellent customer service is very important to Bay Tek Games!
We know that keeping your games in great operating condition is important to your business.
When you need us, we are here to help. You can call us for free technical assistance, and you can
count on us to have parts on-hand to support your game. We offer options that fit your needs.
Electronics / Circuit Boards - Repair Options
Repair & Return – If you have Circuit Board issues with your Bay Tek game, you can send the board
to us and we’ll repair it right away. Most items sent to us are repaired and returned to you within two
days. This option is your best value as we offer this fast turn-around service at the most reasonable
price.
Advance Replacement – If you have Circuit Board issues with your Bay Tek game, but you don’t
have time to send in your board in for repair, give us a call and ask for an Advance Replacement.
We’ll send you a replacement board that same day (pending availability). When you get your new
board, just repackage the defective board in the same box and send it back to us. We make it easy by
including a UPS Return Shipping label for you to put on the box (not available for international shipments). This is your best option when you need to get your game up and running as quickly as possible!
Spare Parts – Take matters into your own hands and purchase new spare Circuit Boards for your
Bay Tek games. Many of our games share the same main-board electronics. This means you can buy
one set of spare electronics to support many of your Bay Tek games. Spare boards allow you to get
your game up and running the quickest and provide you a valuable troubleshooting option. Call our
technicians to get recommendations for what you should keep on hand for spare parts!
Technical Support:
“You” are the best tool for troubleshooting! Your abilities to understand the game and your skills to
repair the game are invaluable to us! If you need help, you know you can call us. It’s not easy to diagnose a game remotely by phone, but our technicians do a great job. They’ll need your help to perform
some troubleshooting steps and convey to them exactly what’s happening with your game.
Returns, Credits, & Fees:
NOTICE! ALL ITEMS being sent to Bay Tek Games for repair or return, etc. require prior Return
Authorization! Bay Tek Games will provide a Product Return Form with an authorizing Ticket Number
for each item to be returned. Please be certain to include this document with all shipments!
Late Fees and Non-Return Fees - Advance Replacement and Warranty Replacement items require
the defective items to be returned by Bay Tek games promptly to avoid Late Fees. We expect items to
be returned with 10 working days. Late fees are invoiced monthly. Late fees are non-refundable under
any circumstance! Any item not returned within 90 days will be invoiced in full as a replacement part.
Bench Fees - Bench fees will apply for each electronic item returned to Bay Tek Games (this includes
unused Advance Replacement items). This charge covers our cost to inspect, evaluate and retest
each item. Please note that returned items that do not pas our tests will be charged accordingly as
replacement items or advance replacements.
Restocking Fees - Unused items returned for credit will be credited minus a restocking fee. Items
must be returned with in 30 days of purchase in order to qualify for any credit amount. No shipping
charges will be credited.
36
To Purchase This Item, Visit BMI Gaming | www.bmigaming.com | (800) 746-2255 | +561.391.7200
WARRANTY
Bay Tek Games warrants to the original purchaser that all component parts will be free of defects in
workmanship and materials for a period of 6 months from the date of purchase. An additional 3 month
warranty extension can be obtained by filling out and submitting the Warranty Registration for each
machine. Warranty Registration cards may be found as shipped with each machine or online at our
website. These must be filled out and submitted to Bay Tek Games within 30 days of purchase to be
valid.
For any game/machine we manufacture that is within its warranty period, with notification to our Parts
& Service Department, Bay Tek Games will, without charge, repair or replace defective component
parts. It is the owner’s responsibility to diagnose, remove and replace any faulty component part at
their own expense & peril. As needed, at no charge, Bay Tek Games can provide reasonable telephone technical support during our normal business hours.
All claims of defective parts are subject to review upon our inspection of the faulty item. This warranty
does not apply in the event of any misuse or abuse to the product, or as a result of any unauthorized
repairs or alterations. The warranty does not apply if any serial number decal is altered, replaced or
removed from its original position.
To process warranty replacement claims, customers may be charged for the replacement item at the
time of shipment and later credited the same amount when the faulty item is returned and has passed
our inspection. Bay Tek Games will provide the customer a pre-paid return shipping label which is
sent along with the replacement item. The customer is responsible for properly packaging and shipping the faulty item back to Bay Tek Games.
!
ATTENTION
!
In order to maintain the safety & compliance certifications of this
game, ONLY approved parts may be used. For approved
replacement parts, refer to the parts list in this manual.
Should you need your game serviced, determine the serial number from the decal placed on the
front of this manual, or locate it on the back of the game. Then contact our Service Department at:
920.822.3951 or e-mail: [email protected]
NON-WARRANTY
Options and estimated charges will be provided to you for your approval.
Please remember that any items being sent to Bay Tek Games must include prior return
authorization from our Parts & Service Department.
This approval will include a Product Return Form which is required to be included with any incoming
shipments. Repaired parts will be shipped back using the same method in which they were received.
Repairs are warranted for 30 days from the date of return shipment.
37
To Purchase This Item, Visit BMI Gaming | www.bmigaming.com | (800) 746-2255 | +561.391.7200
CERTIFICATE OF COMPLIANCE
COMPLIANCE CERTIFICATION TESTING IN PROGRESS
38