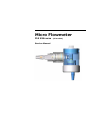
1
Micro Flowmeter
Pt# 816-xxxx
Service Manual
(all models)
Micro Flowmeter
© Copyright
No part of this manual may be copied for any reason without the written permission of BPR
Medical Ltd.
Manufactured By:
BPR Medical Ltd
22 Hamilton Way
Mansfield
NG18 5BU
United Kingdom
Tel: #44 (0)1623 628281
Fax: #44 (0)1623 628289
Table of Contents
1.0
DESCRIPTION OF SYMBOLS ................................................................... 4
2.0
PRODUCT DESCRIPTION ....................................................................... 4
3.0
APPROVALS ......................................................................................... 4
4.0
IN-HOUSE SERVICING .......................................................................... 4
5.0
GENERAL SAFETY WARNINGS ................................................................ 5
6.0
INSPECTION AND MAINTENANCE PERIODS.............................................. 6
7.0
SPECIFICATION ................................................................................... 6
8.0
CLEANING ........................................................................................... 7
9.0
PROCEDURES FOR PERIODIC INSPECTION .............................................. 7
10.0 PROCEDURES FOR CHECKING FLOW ACCURACY ...................................... 7
10.1
Flow Rate Test
7
10.2
Flowmeter Leak Through
7
11.0 PROCEDURES FOR SERVICING & REPAIR ................................................ 8
11.1
Flowmeter Disassembly
8
11.2
Probe Regulator
9
11.3
Servicing
10
11.4
Labelling
10
11.5
DISS Humidifier Fitting
10
12.0 SERVICE KITS .................................................................................... 12
12.1
Service Parts & Kits
Micro Flowmeter Service Manual
702-0044 v 3
12
Page 3 of 12
Micro Flowmeter
1.0
Description of Symbols
Attention, see Instructions for Use
Use no oil
Ascending diagonal line on the decal label
indicates increase in flow
2.0
Product Description
Micro flow describes oxygen therapy at flow rates below 100 cc/min. Primarily flows this low are used in the
weaning of neonates from their oxygen dependency.
The Micro Flowmeter provides 11 distinct flow rates, which enables the therapy to be moved from one step
to the next always knowing that the flow at each step is the same as the previous time the rate was
selected. This enables some level of control and in most cases it is the case that the absolute level is not
important but the ability to step up or down in distinct stages to suit the infants needs. This is not possible
with a variable ball-in-glaa type flowmeter.
Cutting edge techniques are used to manufacture the flow metering plates, which require orifice sizes
measured in microns. To prevent blockage of such small holes the device has two layers of filtration, a 40
micron filter at the input probe and a 5 micron immediately in front of the metering plate.
Change in output flow as a result of changes to the input pressure (either static or transient changes in line
pressure) a pre-regulator is built into the device, which provides a stable internal supply pressure
irrespective of the line pressure to which the device is connected. This ensures that wherever, or whenever,
the device is fitted the flow rate at any setting is always the same.
Finally, the device is of all-metal construction and will not break if dropped or knocked. This ensures that it
will continue providing the therapy required by the patient.
3.0
Approvals
Micro Flowmeter is a CE Marked device in accordance with the Medical Device Directive (93/42/EEC) and
meets the requirements of the following Harmonised Standards:
EN738-1............ Pressure Regulators and Pressure Regulators with Flowmetering Devices
4.0
In-House Servicing
It is strongly recommended that Micro flowmeters with a Service Due Date of Jan 04 or earlier should be
returned to BPR Medical for a chargeable, standard service prior to any attempts to service the device inhouse. Several important upgrades have been implemented on devices manufactured or serviced after
December 2002 that would not be included on devices built prior to this time. Upgrades are included in a
standard service at no extra charge.
Micro Flowmeter Service Manual
702-0044 v 3
Page 4 of 12
Micro Flowmeter
5.0
W1
W2
General Safety Warnings
Before using or servicing this equipment read
through
the
entire
instruction
manual.
Attempting to use this equipment without an
appreciation of its correct operation, its
limitations and the general safety warnings
associated with compressed oxygen may result
in patient or user injury.
Oxygen therapy may be a critical treatment. A
micro flowmeter should be used in strict
accordance
with
the
prescription
and
instructions of a qualified clinician. The
effectiveness of supplemental oxygen therapy
can only be determined by continuous
monitoring of blood oxygen levels. It is essential
that PaO2 or SpO2 monitoring is carried out
when supplemental oxygen is prescribed.
W3
When the micro flowmeter is turned off isolate
the
patient
from
the
equipment
by
disconnecting the delivery tube from either the
patient or the micro flowmeter.
W4
Only appropriately trained service personnel
working in controlled conditions must perform
disassembly, assembly and testing of this
equipment.
W5
Do not submerge in water or allow any fluid to
enter the equipment. If you have reason to
suspect that fluid or other ingress has occurred
remove the device from use and contact the
manufacturer.
W6
The performance of the device may be affected
if it is stored or transported in temperatures
outside of the range -20oC to +60oC.
W7
Check the cylinder contents before use and at
regular intervals during use, as low cylinder
pressure may result in poor or non-performance
of the equipment. Always change the oxygen
cylinder when the oxygen cylinder contents
gauge is showing red.
W8
The accuracy of the micro flowmeter may be
effected if the input pressure is other than that
stated in the specifications.
W9
Oxygen is not flammable, but the presence of
oxygen will drastically increase the rate and
severity of combustion. Hydrocarbons such as
oil or grease become highly combustible in the
presence of oxygen. Oxygen must never be
allowed to contact oil, grease or other
petroleum-based substances.
W12 Never use oxygen as a pressure medium to
purge obstructed pipelines or equipment, to
operate pneumatic tools, or to build up any
pressure in tanks.
W13 Never permit compressed medical gases to
enter a regulator suddenly. Always open the
cylinder valve slowly. Do not stand in front of a
regulator outlet when opening the cylinder
valve.
W14 Do not use or store oxygen equipment near
excessive heat (>50oC or 125oF) or an open
flame.
W15 Use only lubricants recommended by the
manufacturer
when
servicing
the
Micro
Flowmeter.
The use of lubricants other than
those recommended by the manufacturer may
result in fire or explosion.
W10 Never administer oxygen while smoking or when
near an open flame.
W11 Oxygen cylinders have fill
000 kPA (200 Bar). Never
from a cylinder without
pressure to a safe level
pressure regulator.
Micro Flowmeter Service Manual
702-0044 v 3
pressures up to 20
use medical oxygen
first reducing the
through a suitable
Page 5 of 12
Micro Flowmeter
6.0
Inspection and Maintenance Periods
Periodic Inspection (Every 6 Months)
Can be performed within the Ward environment. Includes visual inspection of device and basic check on flow
rates at each setting. Requires appropriate test equipment. Requires no replacement parts.
Full Service (Every 2 Years)
Strip down Service and functional check.
suitable workshop conditions.
7.0
Requires appropriate test equipment, replacement parts and
Specification
General
Operating, Storage and Transport
Temperature Range
-20oC to 60oC
Warranty
1 Year
Performance
Nominal Flow Rate
Range A:
0, 0.02, 0.03, 0.05, 0.08, 0.12,
0.20, 0.30, 0.50, 0.75,1.0, 3.0
Range E:
0, 0.01, 0.02, 0.03, 0.04, 0.05,
0.06, 0.07, 0.08, 0.09, 0.10, 1.0
Flow Accuracy
±10% of setting at 1 lpm and above, ±20% of
setting below 1 lpm
Nominal Input Pressure
400 kPa (58 psi)
Effect on accuracy as a result of:
i) varying inlet pressure
Less than 0.5% of reading for ±40 kPa (i.e. ±10%)
change in input pressure
ii ) varying outlet resistance
Less than 1% of reading up to 5kPa (50cmH2O)
back pressure
iii ) varying temperature
Less than 5% of reading in the range 0 – 40oC
Delivery Hose
6.0 mm inside diameter
Micro Flowmeter Service Manual
702-0044 v 3
Page 6 of 12
Micro Flowmeter
8.0
Cleaning
This device should be cleaned in accordance with hospital procedures to low level disinfection standard. To
clean, use a mild disinfectant detergent solution or alcohol based disinfectant on all external surfaces.
9.0
Procedures for Periodic Inspection
The following safety warnings apply, please read them carefully before you proceed: W1, W3, W5, W6, W7,
W8, W9, W10, W11, W12, W13, W15, W16, W17, W18, W19, W20, W21, W22 and W23
All Micro Flowmeters should be cleaned, inspected, and tested to ensure proper performance. The frequency
of this work is dependant on usage. As a guideline, it should be completed every 6 months if micro
flowmeter is used heavily. If only light use is made of the flowmeter then this period can be extended to 12
months. All flowmeters should be checked regularly at least every year.
•
Inspect the Micro Flowmeter for signs of general damage or disrepair.
•
Check that the input and output probes are secure and cannot be moved in relation to the main body.
•
Check that the decal label is in place and can be seen at each setting.
•
Starting at zero turn the flowmeter control knob anti-clockwise through each position and ensure that
the control knob rotates smoothly and there is a detent at each flow setting.
•
Connect the Micro Flowmeter to a 400 kPa oxygen supply and, in accordnace with the procedure given
below, check the actual gas flow at each setting.
•
Check the Service Due date
10.0 Procedures for Checking Flow Accuracy
The following safety warnings apply. Please read them carefully before you proceed: W1, W3, W5, W6, W7,
W8, W9, W10, W11, W12, W13, W15, W16, W17, W18, W19, W20, W21, W22 and W23
To verify the flow rates a mass flowmeter calibrated in standard litres per minute (ls/min) with an accuracy
and resolution better than 10% of reading down to 10 mls/min is required (suitable measuring equipment is
available - refer Spare Parts, Section 12).
10.1
Flow Rate Test
Connect the micro flowmeter to a 400 kPa oxygen source.
Check the flow rate at each flow setting is within tolerance (±10% of setting at 1 lpm and above, ±20% of
setting below 1 lpm).
Adjustment of individual holes is not possible, however, if all readings are high or low then limited
calibration is possible. Refer Section 10.2 for further details.
10.2
Flowmeter Leak Through
Connect the micro flowmeter to a 400 kPa oxygen source.
Set the micro flowmeter to zero setting.
Connect one end of a length of hose to the micro flowmeter output barb and rest the other in a glass of
water, not exceeding 5cm in depth. Ensure that there are no gas bubbles coming from the length of hose.
Micro Flowmeter Service Manual
702-0044 v 3
Page 7 of 12
Micro Flowmeter
11.0 Procedures for Servicing &
Repair
11.1
Flowmeter Disassembly
The following General Safety Warnings apply:
W1, W5, W6, W12, W13, W20 & W23
a)
Disconnect the Micro Flowmeter from the gas
supply.
b)
Remove Equipment Rating Label.
c)
Remove the M4 Countersunk Screw and pull the
Control Knob away from the Flowmeter Body
Note: take care not to lose the Detent Ball and
Detent Spring that will be loose when the Control
Knob is removed.
d)
Remove and discard the Screw Cover Label at
the bottom of the flowmeter to gain access to
the securing screws.
e)
Remove the 4 securing screws (refer fig 1 & 2)
using a 2.5 mm AF Allen Key and ease the
Flowmeter Output Body away from the Input
Body.
Note: The two longer screws also serve to secure
the Regulator Input Probe.
f)
Loosen the Grub Screw accessed via the hole
located between the longer securing screws
using a 1.5 mm AF Allen Key. Remove the Probe
Regulator Assembly from the Flowmeter Input
Body
g)
Slide the Carrier Plate Assembly off of the Drive
Shaft.
Fig 1
Note: Do not do disassemble the Carrier Plate
Assembly unless there is reason to believe that
the filter has become contaminated or one of the
flow orifices has been compromised.
h)
Remove the Drive Shaft by pressing it through
from the Control Knob side.
Fig 1
Fig 2
Micro Flowmeter Service Manual
702-0044 v 3
Page 8 of 12
Micro Flowmeter
11.2
Probe Regulator
The Probe Regulator is designed to reduce the
wall outlet pressure from a typical value of say
400 kPa to around 100 kPa. This provides a
stable pressure supply with which to drive the
very low flows used in micro flow irrespective of
the wall outlet pressure. It also smooths out
the affects of spurious line pressure changes
caused by other equipment.
The Probe Regulator requires no servicing and
will provide fault free service for the life of the
micro flowmeter. However, should failure occur
then the Probe Regulator is repalced as a
complete assembly.
Disassembly
a)
To remove the Probe Regulator Assembly first
remove the Screw Cover Label at the base of the
Micro Flowmeter.
b)
Using a 2.5mm A/F Allen Key withdraw the two
M3 x 35mm Screws shown in fig 2 & 3.
c)
Using a 1.5 mm A/F Allen Key remove the two
grub screws used to lock the Probe Regulator.
Fig 3
18
17
Adjustment
The output pressure of the Probe Regulator is
adjustable. However, it should be remembered
that any adjustment in output pressure will have
a proportional affect on the flow at every flow
setting.
d)
Using a 1.25 mm A/F Allen Key remove the four
lock screws, one from each of the four holes in
the end of the Probe Regulator (refer fig 5).
e)
Using the same Allen Key, adjust the output
pressure by turning the four remaining grub
screws either in or out in turn. Turning each
adjustment screw clockwise (in) will increase the
output pressure (i.e. flow) and counter clockwise
(out) will reduce the output pressure.
Fig 4 - Probe Regulator
The
amount
of
adjustment
required
is
determined empirically. Adjust, by 1/8 turn of
the Allen Key at a time, each of the four screws
and check the flow rate. Repeat until the desired
flow is required.
Note:- Always adjust the four grub screws by an
equal amount so that their ends remain at the
same height.
f)
Fig 5
Once the desired flow has been achieved replace
the four lock screws.
Note:- Apply a very small amount of Loctite 222
Thread Lock Compound on each of the lock
screws before refitting.
Note:- When refitting, screw the lock screws in
until they lightly touch the adjusting screws. Do
not overtighten as this will change the setting of
the Probe Regulator output.
Micro Flowmeter Service Manual
702-0044 v 3
Page 9 of 12
Adjustment
Screws x 4
Micro Flowmeter
11.3
14
Servicing
The following General Safety Warnings apply:
W1, W5, W6, W12, W13, W20 & W23
a)
Disassemble the
Section 11.1
flowmeter
as
described
in
b)
Using Isopropanol Alcohol (IPA) and a lint free
wipe, clean the inside of the flowmeter to
remove any residue.
c)
Look at the general condition of the Flow Plate
Carrier; unless there is reason to believe that the
filter or the metering plate has become
contaminated, the Carrier Plate Assembly should
not be disassembled.
d)
Remove the Output O-ring Seal from the PTFE
Bearing and replace with a new seal (refer fig 6)
e)
Remove the two Drive Spindle O-ring seals and
replace.
21
Fig 6
19
Notes:- Apply a small amount of Krytox Grease
to the Drive Spindle O-rings before re-assembly
f)
Assembly is the reverse of disassembly
Notes: Replacement Screw Cover Labels and
Rating Labels are available in the service kit
11.4
20
Fig 7
Labelling
Replacement Rating labels are provided as part
of the Service Kit (refer Section 12.1)
a)
Add the correct serial number and part number
to the replacement label to be applied.
b)
Add the SERVICE DUE date, which should be 24
months from the date of its last service.
c)
Apply the clear plastic sealing layer of the label
to protect the information just added.
d)
Apply the label to the Micro Flowmeter.
Fig 8
11.5
DISS Humidifier Fitting
Micro Flowmeters can be fitted with a DISS
connector that mates with bubble humidifier
packages that are commonly used. Refer fig 8 &
9.
a)
Remove the Output Barb Assembly using a 7 mm
A/F spanner.
b)
Place the Hydrophobic Filter, smooth side facing
out, in the Output Body as shown in fig 9.
22
Fit the DISS fitting assembly with a 10 mm A/F
spanner.
Fig 9
Hydrophobic filter
(included in DISS Kit)
Micro Flowmeter Service Manual
702-0044 v 3
Page 10 of 12
1
2
Micro Flowmeter
3
4
Ident
5
1
2
3
4
5
6
7
8
9
10
11
12
13
14
15
16
17
18
19
20
21
22
6
7
8
9
10
14
15
11
*
16
12
13
Micro Flowmeter Service Manual
Version 3
Page 11 of 12
Pt. No.
201
602
*
214
213
602
602
602
605
*
602
703
604
212
602
201
201
201
212
212
212
604
0025
0095
0001
0007
0084
0088
0089
0025
0085
0111
0034
0015
0087
0029
0037
0021
0041
0018
0016
0035
Description
Screw, M4 x 16
Control Knob
Decal Label
Detent Ball
Detent Spring
Input Body
Drive Spindle
Spindle Slider
Probe Regulator Assembly
Carrier Plate Assembly
Output Body
Screw Cover Label
Output Barb Assembly
Output O-ring Seal
Output Slider
Screw, M3 x 20
Screw, M3 x 35
Grub Screw, M3 x 6
O-ring, 5.5 x 1.5
O-ring, 5 x 2.5
O-ring, 23 x 1.0
DISS Assembly, inlcuding
hydrophobic filter
Part number range dependant
Qty
1
1
1
1
1
1
1
1
1
1
1
1
1
1
1
2
2
2
2
1
1
1
Micro Flowmeter
12.0 Service Kits
Parts are identified by Part Number throughout this manual and in most cases can be purchased individually. Small,
low cost items are generally provided in multiples or in kit form as given below.
12.1
Service Parts & Kits
Part No.
Description
Contents
610 0040
Micro Flowmeter Service Kit (5)
5 x Output O-ring Seal
5 x Screw Cover Label
5 x Equipment Rating Label
10 x Spindle O-rings
610 0043
Equipment Rating Labels, Pk 5
610 0044
Screw Cover Labels, Pk 5
610 0045
Output O-ring Seal, Pk 5
610 0046
Loctite 222 Threadlocker
610 0047
Krytox LC025 Oxygen Tolerant Grease
Suitable for 816 xxxx models only
Micro Flowmeter Service Manual
Version 3
Page 12 of 12