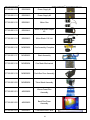
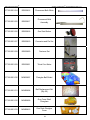
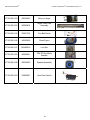
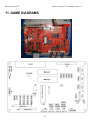
1
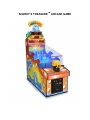
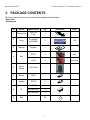
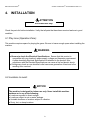
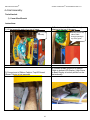
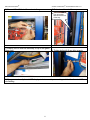
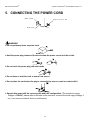
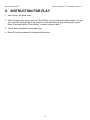
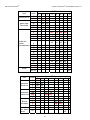
™ WARNING Be sure to read this Operation Manual before using your machine to ensure safe operation. June 2009 SHARKY’S TREASURE™ ARCADE GAME BOB’S SPACE RACERS® TM SHARKY’S TREASURE TABLE OF CONTENTS 1. SPECIFICATIONS 2. INTRODUCTION 2-1 Overview 2-2 Important Safety Information 2-3 Set Up 3. PACKAGE CONTENTS 4. INSTALLATION 4-1 Play zone (Operation Zone) 4-2 Locations to avoid 4-3 Game leveling 4-4 Hat Assembly 5. CONNECTING THE POWER CORD 6. INSTRUCTION FOR PLAY 7. OPTION SETTINGS 8. MAINTENANCE AND INSPECTION 8-1 Maintenance 8-2 Cleaning 9. TROUBLESHOOTING 9-1 Gun Detail and Ball Shoot Adjustment 9-2 Adding Balls 9-3 Error Codes Er1 – Er5 & Replacing the Shark Head Position Switch 9-4 General Troubleshooting 10. PARTS LIST 11. GAME DIAGRAMS 12. WARRANTY 3 ARCADE MANUAL BSR V1.0 BOB’S SPACE RACERS® TM SHARKY’S TREASURE ARCADE MANUAL BSR V1.0 1. SPECIFICATIONS (1) Rated power supply: 110VAC ±5%, 60 Hz. (Note: Please refer to the label on the game for the actual voltage). (2) Power consumption: 5Amp 120V (3) Dimensions: 28” W x 76” D x 87” H (4) Weight: 506 lbs 87” 28” 76” NOTE: Game parameters are subject to change without notice. 4 BOB’S SPACE RACERS® TM SHARKY’S TREASURE ARCADE MANUAL BSR V1.0 2. INTRODUCTION 2-1 Overview: Thank you for purchasing the new SHARKY’S TREASURE™ from Bob's Space Racers®. Built on a long tradition of value, the new SHARKY’S TREASURE TM retains all of the great game play you have come to expect of a game from BSR, and is specifically designed for today's Arcade environment. The new game uses technology specifically developed for this application. This owner’s Manual is intended to provide detailed descriptions together with all the necessary information covering the general operation of electronic assemblies, servicing control, spare parts, etc. pertaining to the game. This manual is intended for the owner, personnel and managers in charge of operation of the product. Operate the product after carefully reading and sufficiently understanding the instructions. If the product fails to function satisfactorily, non-technical personnel should under no circumstances touch the internal system. To Maintain Safety: To ensure the safe usage of the product, be sure to read the following before using the product. The following instructions are intended for the users, operators and the personnel in charge of the operation of the product. After carefully reading and sufficiently understanding the warning display and cautions, handle the product appropriately. Be sure to keep this operation manual nearby the product or elsewhere convenient for referring to it when necessary. Herein, explanations which require special attention are in sign of warning. Depending on the potentially hazardous degrees, the terms of NOTICE, WARNING, and CAUTION, etc. are used. Be sure to understand the content of the displays before reading the text. WARNING: (or) CAUTION: Disregarding this text could result in serious injury or damage to the machine. NOTE (or) NOTICE: An advisory text to give hints or help. NOTE: ONLY QUALIFIED TECHNICAL PERSONNEL SHOULD WORK ON THIS GAME. FAILING TO COMPLY CAN CAUSE SEVERE INJURY. 5 BOB’S SPACE RACERS® TM SHARKY’S TREASURE ARCADE MANUAL BSR V1.0 2-2 Important Safety Information: IMPORTANT SAFETY INFORMATION WARNING: Unplug the game from the AC wall receptacle when servicing this product. Failure to do so could result in serious injury to yourself or others. Use only a GROUNDED AC receptacle. Failure to do so could result in improper operation or damage to the game and could void your warranty. If you are unsure that your AC receptacle is properly grounded, have a qualified electrician perform this check for you. Always be sure power to the game is turned off when doing even routine maintenance. Otherwise, moving parts could activate unexpectedly causing injury. This product is heavy, necessitated by the design. When moving this game, be sure you have adequate help. Use a suitable dolly or hand truck where practical. Use back support when needed. 2-3 Set Up: SET UP 1. Be sure that the game is on a level surface. If the game is rocking on the floor adjust the legs to remove the rocking of the game. 2. Be sure to plug the game into the proper A.C. GROUNDED receptacle. Do not use long extension cords unless absolutely necessary and if so, be sure it is a heavy duty cord of at least 16 Ga. and no longer than 20 ft. Check the label on the back of the game to make sure the power requirements of the game match that of your location. 3. Turn the game on and check to be sure there are no unusual sounds and that everything appears to be working correctly. (See section 8.3, page 15 for Test Mode Procedure) 4. See additional instructions for the hat assembly. 6 BOB’S SPACE RACERS® TM SHARKY’S TREASURE ARCADE MANUAL BSR V1.0 3. PACKAGE CONTENTS Be sure to check that you have received all packages indicated below. Game Unit Accessories No Name Specification Qty 1 Power plug 10A/110V 1.8m 1 Fuse 6.3 A/250V Φ5-20MM 3 Manual English 1 X919 4 door X818 2 Coin box 2 3 4 Micro Switch CR-V 3mm 1 6 Silicon 600C 1 7 Audion TIP122 2 ULN2803 1 HD74HC374 1 HD74HC245 1 9 Note 110V Key 5 8 Illustration IC Ball 55 7 BOB’S SPACE RACERS® TM SHARKY’S TREASURE ARCADE MANUAL BSR V1.0 4. INSTALLATION ATTENTION ●For indoor use only! Check the parts list before installation. Verify that all parts that have been received and are in good condition. 4-1 Play zone (Operation Zone): This machine requires space for playing the game. Be sure to leave enough space when installing the machine. WARNING ● Be sure to check the Electrical Specifications. Ensure that this product is compatible with your location’s power supply, voltage and frequency requirement. A plate describing Electrical Specifications is attached to the product. Noncompliance with the Electrical Specifications can cause a fire and electric shock. ● Putting many loads on one electrical outlet can cause generation of heat and a fire resulting from overload. 4-2 Locations to avoid: NOTICE The machine is designed for indoor use only. Never install this machine outdoors or in any of the following: ● Locations exposed to direct sunlight ● Locations subject to rain or water leakage. ● Unstable locations or locations subject to vibration. ● Dusty, hot, or damp locations. 8 BOB’S SPACE RACERS® TM SHARKY’S TREASURE ARCADE MANUAL BSR V1.0 4-3 Game Leveling: Install this machine on a flat surface. Adjust levelers to lift the legs and level game. Make sure that the machine is level with the floor. If the machine is not level, the game may not play well. WARNING • • • • Disconnect game power before moving Make sure all wheels are intact. Replace any wheels that are damaged or broken before moving the game. When moving the game, DO NOT slide the game across the floor Ensure the game is level before connecting the power Do not Press, Bump or Scrape these areas when moving the game. 9 BOB’S SPACE RACERS® TM SHARKY’S TREASURE ARCADE MANUAL BSR V1.0 4-4 Hat Assembly: Tools Needed: 1) 8 mm Allen Wrench Instructions: 2) Route wire and ribbon cable through opening in the top of the game 1) Lift hat assembly and put on top of game Routing of wire and ribbon cable through opening in top of the game. Hat Assembly 3) Connect end of Ribbon Cable to Top LED board (Bonus Tickets) in hat assembly 10 4) Connect middle connector of Ribbon Cable to bottom LED Display (High Score to Beat) Display in bottom position on the hat assembly BOB’S SPACE RACERS® SHARKY’S TREASURE 5) Connect Wire Cable to Connector in the game 6) Tuck wire cable out of the way TM ARCADE MANUAL BSR V1.0 Tuck wire cable and connectors out of the way. 7) Install 4 bolts to hold hat assembly on top of the game finger tight 8) Tighten bolts with 8 mm allen wrench 9) Play game and verify that all LED displays in hat assembly are working and that the discrete LEDs are flashing 11 BOB’S SPACE RACERS® TM SHARKY’S TREASURE ARCADE MANUAL BSR V1.0 5. CONNECTING THE POWER CORD Power socket El ect r i cal wi r e box Power pl ug WARNING ● Do not put heavy items on power cord. ● Hold the power plug instead of the wire to draw the power cord out of the socket. ● Do not touch the power plug with wet hands. ● Do not draw or twist the cord or near a heat source. ● Do not place the cord where the player can easily trip over or come in contact with it. ● Operate this game with the correct power and fuse configuration. (The machine’s supply Voltage is 110VAC, please refer to the label on the machine, connect the actual supply voltage, if not, it can cause an electric shock or malfunction.) 12 BOB’S SPACE RACERS® TM SHARKY’S TREASURE ARCADE MANUAL BSR V1.0 6. INSTRUCTION FOR PLAY 1. Insert coin(s), the game starts. 2. When the game play starts, press the “Shoot Button” to shoot balls at the shark targets. Use the gun to aim the shooting balls at the sharks to knock them down as they randomly pop up and down. Press and hold the “Shoot Button” to shoot continuous balls. 3. Tickets will be awarded for each game play. 4. Bonus Tickets are awarded for beating the high score. 13 BOB’S SPACE RACERS® TM SHARKY’S TREASURE ARCADE MANUAL BSR V1.0 SW1 4 5 7 7. OPTION SETTINGS Sharky`s Treasure I/O Settings PCB Board:GAME_2009 BSR Design: 12/23/2008 item value coin per play 1 2 (coin/game) Bonus start value Bonus score 3 4 0 25 50 100 30 40 50 1 2 on on OFF ON on off 3 6 8 off off on on off on ON OFF off off on on on on OFF ON ON ON on off on on 60 70 80 90 100 110 120 130 140 150 160 170 180 14 off off on on on on on off on off on off on off on off on on off off on on off off on on off off off off off off on on on on off off off off off off on on off off off off off off off off BOB’S SPACE RACERS® TM SHARKY’S TREASURE item points per hit game time (seconds) ticket out score (score/piece) mode item minimum ticket out maximum tickets out Bonus increase each 3 sec. demo music value 1 2 25 35 45 55 1 2 3 4 5 1 off ON 2 3 0 1 2 3 0 100 250 500 0 1 2 5 have 6 7 8 ON ON off on on off off off on on on on OFF ON ON ON on off on on off off on on on on off on 6 8 10 12 15 18 20 22 25 30 no PUSH AUTO value SW2 4 5 ARCADE MANUAL BSR V1.0 off on off on on off on off on off on off on off off off on on off off on on off off off off on on on on off off off off on on off off off off off off off off ON off 1 2 ON ON off on on off off off 3 SW3 4 5 6 7 on on off on ON OFF off off on on off on ON OFF off off ON no off 15 8 BOB’S SPACE RACERS® TM SHARKY’S TREASURE ARCADE MANUAL BSR V1.0 Test Mode: Press the PCB TEST button for 2 seconds to enter test mode. Press the SERVICE button to cycle through the various modes The Mode number represents the number of times to press the Service button for that mode You must wait for the mode sound to play before entering the next mode For instance: pressing the service button 4 times fast will not take you to mode 4 4 Bank Switches SW1 SW2 SW3 SW4 *Note SW4 is N/A in this picture Off position On position Main PCB TEST Button SERVICE Button Each Bank Switch has 8 switch positions that can be set to On or Off 16 BOB’S SPACE RACERS® TM SHARKY’S TREASURE ARCADE MANUAL BSR V1.0 LED 3 LED 2 > Win Bonus Tickets LED 1 LED 6 LED 5 > High Score to Beat LED 4 Time to Play > LED 6 LED 5 LED 4 LED 1 LED 2 > Your Score LED 3 Bank Switch 1 Your Score LED 1 Bank Switch 4 Bank Switch 2 Your Score LED 2 Time To Play LED 4 Bank Switch 3 Your Score LED 3 17 Each number (1-8) represents the corresponding number of each switch within each Bank Switch * In this example, switches 7 and 8 are in the off position BOB’S SPACE RACERS® TM SHARKY’S TREASURE ARCADE MANUAL BSR V1.0 Mode Description 0 Press the "TEST" button for 2 seconds Mode 0: test all segments of the LED Displays All LED's will blink 3 times All LED’s will display the number 8 Section "0" sound will play Press the "SERVICE" button one time Mode 1: display the numbers in the LED Displays All LED's will blink 3 times 1 WIN Bonus Tickets will display 3.2.1. High Score will display 6.5.4. Time to Play will display 6.5.4. Your Score will display 3.2.1 Section "1" sound will play Press the "SERVICE" button one more time Mode 2: Bank Switch testing All LED's will blink 3 times 2 Win Bonus Tickets will display 2 2 2 High Score will display 2 2 2 Time to Play will display 2 2 in LED 6 and LED 5 LED 4 represents Bank Switch 4 settings Your Score represents Bank Switches 1, 2 and 3 settings Section "2" sound will play 3 Press the "SERVICE" button one more time Mode 3: Check Shoot Button, Coin Switch and Gun Switch All LED's will blink 3 times WIN Bonus Tickets will display 3 3 3 High Score will display 3 3 3 Time to Play will display 3 3 3 Your Score will display 3 0 5 (if 309 is displayed, remove the ball under the gun switch LED 1 will change when the following is tested Press the Shoot Button and the number 5 will change to 4 Test the Coin Switch and the number 5 will change to 1 Test the Gun Switch and the number 5 will change to 9 Section "3" sound will play 18 BOB’S SPACE RACERS® 4 TM SHARKY’S TREASURE ARCADE MANUAL BSR V1.0 Press the "SERVICE" button one more time Mode 4: Checks Ticket Dispenser, Shark Motors, Chasing Light Output and “Check Tickets” sound is heard All LED's will blink 3 times All displays are 4 4 4 Shark Motors sequentially raise up and down at about 2 second intervals Shark Eyes, then the LED lights in the treasure chest light up for 1 second about every 20 seconds 1 Ticket will be dispensed Section "4" sound will play Press the "SERVICE" button one more time Mode 5: Check Sounds All LED's will blink 3 times WIN Bonus Tickets will display 5 5 5 5 High Score will display 5 5 5 Time to Play will display 5 5 5 Your Score will display 5 0 0 Your Score LED 1 will cycle from 0 – 8 representing each different sound when the coin switch is pressed Section "5" sound will play Press the "SERVICE" button one more time to enter Mode 0 Exit Test Mode: Press and hold the "TEST” button for 2 seconds. Caution: When the game is powered on, make sure the gun is pointing inside the shield playing area. Reset High Score: Press the "SERVICE" button and while still holding the "SERVICE" button, press the "RESET" button at the same time. While both buttons are still pressed, release the "RESET" button and then release the "SERVICE" button. Then press the "RESET button again to reset the High Score. Error Codes: If all of the motors are operating properly then no error codes will be displayed. If any of the following codes appear, please troubleshoot the appropriate motor. Er1 Shark Motor 1 Failure or Motor Head Position Switch Er2 Shark Motor 2 Failure or Motor Head Position Switch Er3 Shark Motor 3 Failure or Motor Head Position Switch Er4 Shark Motor 4 Failure or Motor Head Position Switch Er5 Shark Motor 5 Failure or Motor Head Position Switch Er6 Driving Motor for Balls (screw auger) Ball Switch and Gun If Tickets run out, “Check Tickets” sound will be heard and Your Score will display a blinking HLP 19 BOB’S SPACE RACERS® TM SHARKY’S TREASURE ARCADE MANUAL BSR V1.0 8. MAINTENANCE AND INSPECTION 8-1 Maintenance: Due to the design of the machine, very little periodic maintenance is required. Start the game and verify the correct operation before putting the game into everyday operations. (See Test Mode on the previous page) Clean the surface of the game as needed. After about a month of game operation, check to be sure all parts are secure and in proper working order. 1. Remove power before servicing game. To avoid a short circuit, the power must be removed before touching the inside of the game. If you have to turn on the power, please refer to section 2-2. 2. Choose the appropriate replacement parts. Using the wrong parts could lead to malfunction or damage to the game and components. 3. Do not substitute or change equipment, without authorization. Doing so could lead to a short circuit and machine malfunction, or fire. 4. Do not put containers of water, cups or soda cans on the machine. In addition, chemicals or heavy items should not be allowed around the game. The spill could cause a short circuit. Falling items could injure people or destroy the machine. 8-2 Cleaning: CLEANING - Clean the outer surfaces of the game with a commercial spray type cleaner. DO NOT however, use glass cleaner or commercial sprays on the marquee graphic panel. Use a good quality spray type furniture polish to keep the game looking good. Vacuum the inside of the game occasionally to help keep the dust and ticket debris off of all the optical sensors. 20 BOB’S SPACE RACERS® TM SHARKY’S TREASURE ARCADE MANUAL BSR V1.0 9. TROUBLESHOOTING WARNING For your safety, and to reduce risk of damage to your game read the Important Safety Information in Chapter 2-2 before attempting any troubleshooting procedure. TROUBLESHOOTING PHILOSOPHY When troubleshooting any product, certain general guidelines should be followed. 1. Always check to be sure that your game is turned on. Be sure that all of the fuses in the game are functional and check to see that the AC voltage is in the proper operating range for your game. 2. Check to be sure that all of the game harnessing is plugged in properly and that all of the pins are firmly seated in the connectors. It is always possible that a harness can be damaged by rough shipping or moving. 3. Check game harnessing to be sure that none of the wires have become or are damaged. Using a handheld multi-meter, check continuity of the wires to make sure they are not broken. 4. Check for obvious damage to the P.C. Boards or electrical components. 5. If you have multiple games or multiple parts on a game, change or exchange the parts and see if the problem goes away or moves to another location. This way you can quickly eliminate certain parts as being the problem with the game. 6. When changing electronic or electrical components, ALWAYS turn off and unplug the game. 7. Check to see that all power supplies are delivering the specified voltages to the P.C. Boards and components as shown in the manual. 21 BOB’S SPACE RACERS® TM SHARKY’S TREASURE ARCADE MANUAL BSR V1.0 9-1 Gun Detail and Ball Shoot Adjustment: Tools: 3mm Allen Wrench 5/16 Wrench Phillips Screwdriver Remove 4 screws with Phillips Screwdriver Remove 4 screws Gun Spring Motor Motor Wheels 22 BOB’S SPACE RACERS® TM SHARKY’S TREASURE ARCADE MANUAL BSR V1.0 Shooting Adjustment Nut Decrease Ball Force Increase Ball Force Ball Shoot Adjustment: Loosen nut with 5/16 wrench Turn Adjustment Screw with 3mm Allen wrench: Turn screw clockwise to decrease the shooting force of the ball. Turn screw counter clockwise to increase the shooting force of the ball. Tighten nut **A worn wheel will cause little or no force of the ball Replace the wheel if visibly worn or damaged 9-2 Adding Balls: 23 Turn Adjustment Screw BOB’S SPACE RACERS® TM SHARKY’S TREASURE ARCADE MANUAL BSR V1.0 9-3 Error Codes Er1 – Er5 & Replacing the Shark Head Position Switch: The purpose for the error code is to flag a failure for the numbers 1-5 shark motor/s and or motor position sensor. For example, error Er5, is the upper most shark motor located in the right hand corner. (See Fig 1) Fig 1: Shark Head Motors There are several things that will cause this error: 1) 2) 3) 4) Motor is not turning. Position Micro Switch for Motor is Not Working or is not adjusted correctly. Switch wiring or terminations are open, intermittent, shorted, or not wired properly. Motor was manual turned counterclockwise and the switch lever was damage. Procedure: 1) If the motor is not turning, then the failure is either open/shorted wiring or connector, motor driver board, or the motor. 2) If the motor is turning, then it’s either the Micro Switch (See Fig. 2), an open or shorted terminal or wiring, or the Micro Switch lever is damaged or not adjusted correctly to sense the cam notch. If this is the case, the first thing to do is to check the resistance of the switch as you turn the motor clockwise (looking at it as if facing the game). 24 BOB’S SPACE RACERS® TM SHARKY’S TREASURE ARCADE MANUAL BSR V1.0 Notch Switch Lever and Roller Fig. 2: Typical Shark Position Micro Switch Sensor for Position 5 Caution: Do not turn the motor counterclockwise. It will damage the switch lever and roller. WE LEARNED THIS THE HARDWAY AND DON’T WANT YOU TO HAVE TO LEARN IT TOO Note: When the shark is in the fully up position, the switch roller should fall into the notch. 3) For example, if it’s shark position 5, the wires to the switch will be green and black. Locate the connector in back coming from the shark motor and switch assembly. Use an ohm meter while turning the shark position cam clockwise making sure the switch is detecting the notch position. 25 BOB’S SPACE RACERS® TM SHARKY’S TREASURE ARCADE MANUAL BSR V1.0 Fig. 3: For position 5 locate the green and black wires, with DVM on ohms position. Make sure switch opens and closes when it sees the notch. If you don’t see it open or close when you rotate the shark position cam, position notch on roller switch and manually, using your fingers actuate the switch and check to make sure it opens and closes. If it opens and closes with your fingers, but not with the roller notch, you may have to bend the roller / lever until it senses the notch. If Switch does open or close with your fingers then the switch is defective and needs to be replaced or you may have an open/short in your wiring/connection system. 4) If you have to replace the switch, then follow the procedure on the next page for Replacing the Shark Head Position Switch. 26 BOB’S SPACE RACERS® TM SHARKY’S TREASURE ARCADE MANUAL BSR V1.0 Replacing The Shark Head Position Switch 1. Remove Plexiglass shield. 2. Remove screws holding the decorative plexiglass wave in front of the shark’s heads. (Fig 4) 3. Remove plexiglass shark head motor/switch access cover. (Fig 5) Fig. 4: Remove Wave by removing two screws and nuts 4 screws for this cover Fig. 5: Remove Plexiglass Cover covering shark heads switch access cover 27 BOB’S SPACE RACERS® TM SHARKY’S TREASURE ARCADE MANUAL BSR V1.0 4. Remove two screws holding fluorescent light fixture to this plexiglass cover. There are two screws and nuts so you will need an assistant. (Fig 6) Nut/screw was located here and has been removed Fig. 6: Location of the nuts for one bracket. You will have to get to the screw from the top. There are two brackets that you have to remove the screws and nuts for regarding this. 5. You can now pick up the plexiglass and move it out of the way. (Fig 7) Fig. 7: Here we picked up the plexiglass and moved it out of the way. 28 BOB’S SPACE RACERS® TM SHARKY’S TREASURE ARCADE MANUAL BSR V1.0 6. Remove 4 screws holding shark head motors and mounts. (Fig 8) There are 4 screws holding this assembly Fig. 8: Remove 4 screws holding shark head assembly. 7. Remove 6 pipe clamp screws and nuts holding the shark head top assembly to the pipe. You will need a 7 mm open ended wrench and a small metric Allen wrench. (Fig 9) Remove screws and nuts from 6 clamps Fig. 9: Removal of pipe clamp screws and nuts 29 BOB’S SPACE RACERS® TM SHARKY’S TREASURE ARCADE MANUAL BSR V1.0 8. Remove entire assembly from the game so you can replace the switch. (Fig 10) Fig. 10: Removal of shark head motor and sensor assembly from game 9. Replace failed switch as seen in Fig. 2 or whichever switch has the failure. 10. Check each switch with an ohm meter as you rotate the respective motor clockwise. You should see the appropriate switch open and close as you rotate the respective motor. Make sure lever has the proper adjustment. DO NOT ROTATE the Motors counterclockwise. You may damage the levers and rollers. This is especially important after you have installed the assembly in the game. 11. Assembly is reverse order of these instructions. 30 BOB’S SPACE RACERS® TM SHARKY’S TREASURE ARCADE MANUAL BSR V1.0 9-4 General Troubleshooting: Symptom Possible Problem Solution POWER Shooting Balls with No Force Ball Driving will not work Shark will not move Shark will not score Sound Problems -No sound -Low Sound -Intermittent Sound POWER Wheel is worn Adjust shooting power adjustment Replace Wheel 24V Power not Connected Adjust 24V Electrical Voltage to 24V No 24V Power Supply Check 24V electrical power and circuit Driving Ball Motor is broken Replace Driving Ball Motor Driving Structure is blocked by broken ball Disconnect Power then overturn Driving Ball Auger by hand and remove broken ball No 110 Voltage Check 110V electricity power and circuit Motor is broken Replace motor Shark up and down motion Check up and down mechanism PC Board is defective Replace PC Board Power not on sensor Check wiring harness for 12 volts on sensor Output from sensor not working when shark head Should be about 12 volts when head is in up is pulled up position Sensor output not correct Signal not getting to mainboard Repair / Replace sensor Signal gets to main board but board doesn’t see it Repair / Replace harness Replace mainboard Low Volume Check Volume Control and adjust as necessary Faulty speaker harnessing Check connections and/or repair harnessing Faulty speaker Faulty sound board or sound board harnessing Check and/or replace speaker Check connections or Replace Sound Board Faulty Main P.C. Board Check and/or repair or replace Main P.C. Board Game does not take or add money correctly Coin switch out of adjustment Coin mech dirty or improperly adjusted Faulty Coin switch Faulty coin switch harness or connector Game improperly programmed Faulty Main P.C. Board or component Re-bend coin switch wire Clean and adjust mech as necessary Check and/or replace switch Check and/or repair harnessing Check programming options and adjust Repair and/or replace Main P.C. board Ticket Dispenser not working properly, or no tickets being dispensed No tickets in the game Tickets jammed in dispenser Ticket dispenser sensor blocked with debris Poor connection on the ticket dispenser Game improperly programmed Faulty ticket dispenser Faulty ticket dispenser harnessing Faulty Main P.C. Board Refill ticket dispenser Clear ticket jam Clean off sensor Check and/or replace connectors Check ticket programming options Replace dispenser Check and/or repair harnessing Replace or repair Main P.C. Board Game will not start. Game power off Electrical Power Switch Open Main fuse blown Power Supply problem or failure Faulty P.C. board or component Check on/off switch and power cord Close Electrical Power Switch Check and/or replace fuse as necessary Check Power Supply output and connections Repair and/or replace main P.C. board Game stops or is stopped with nothing displayed The power connector is disconnected. Possible faulty connection or short circuit. Reconnect the connector securely. Check all circuitry for faulty connections or short circuits. NOTE: CONTACT YOUR DISTRIBUTOR IF NONE OF THE CASES LISTED IN THIS MANUAL APPLIES TO THE PROBLEM, OR IF THE ACTION LISTED DOES NOT APPEAR TO RESOLVE THE PROBLEM. 31 BOB’S SPACE RACERS® TM SHARKY’S TREASURE ARCADE MANUAL BSR V1.0 10. PARTS LIST Reference Number Part Number Description ST100-001-000 MO800801 Painted Hat Only ST100-001-001 A0800801 Decal Set Complete ST100-001-002 EO800801 Hat Eyes LED ST100-001-003 EO800802 Hat Treasure LED ST100-001-004 EO800803 Hat LED Control PCB ST100-001-005 EO800804 Hat - 3 Digit Small LED PCB ST100-001-006 EO800805 Hat - 3 Digit Large LED PCB ST100-001-007 EO800806 Hat Ribbon Cable ST100-001-008 EO800807 Treasure Main PCB ST100-001-009 EO800808 Small PCB ST100-001-049 EO800826 Regulator Board 32 Photo BOB’S SPACE RACERS® TM SHARKY’S TREASURE ST100-001-010 EO800809 Power Supply #1 ST100-001-011 EO800810 Power Supply #2 ST100-001-012 EO800811 Motor Gun ST100-001-013 EO800812 Motor Gun Brush Repair Kit ST100-001-014 EO800813 Motor Shark 110 Volt ST100-001-016 MO800802 Gun Assembly Complete ST100-001-017 MO800803 Shark Assembly ST100-001-018 MO800804 Coin Mech Mechanical ST100-001-019 MO800805 Cash Box Door Assembly ST100-001-020 MO800806 Ticket Mech Assembly ST100-001-021 AO800802 Waves Foam/Plex Assembly ST100-001-022 AO800803 Back Plex/Foam Assembly ST100-001-023 EO800815 Fluorescent Bulb Blue 33 ARCADE MANUAL BSR V1.0 BOB’S SPACE RACERS® TM SHARKY’S TREASURE ST100-001-024 EO800816 Fluorescent Bulb White ST100-001-025 EO800817 Fluorescent Bulb Assembly ST100-001-026 EO800818 Gun Start Button ST100-001-027 EO800819 Connector and Pin Set ST100-001-028 EO800820 Fastener Set ST100-001-029 EO800821 Ticket Coin Meter ST100-001-030 MO800807 Plexiglas Ball Shield ST100-001-031 MO800808 Ball Replacement Set (Qty 50) ST100-001-032 MO800809 Gun Cover Shell Fiberglass ST100-001-033 MO800810 Gun Deck Plexiglas Cover 34 ARCADE MANUAL BSR V1.0 BOB’S SPACE RACERS® TM SHARKY’S TREASURE ST100-001-034 AO800804 Gun Set Decals ST100-001-035 MO800811 Gun Net ST100-001-051 M0800820 Gun Boot (Optional) ST100-001-036 MO800812 Gun Handle Grips Pair ST100-001-037 EO800822 Gun Wiring Harness ST100-001-038 MO800813 Gun Deck Lock Assembly ST100-001-039 MO800814 Gun Bushings Polyurethane Stops ST100-001-040 MO800815 Gun Spring ST100-001-041 MO800816 Gun Motor Wheel ST100-001-042 MO800817 Belt on Auger Motor 35 ARCADE MANUAL BSR V1.0 BOB’S SPACE RACERS® ST100-001-043 TM SHARKY’S TREASURE EO800823 Motor on Auger ST100-001-052 M0800818 Auger Feed Tube Assembly ST100-001-045 E0027335 Gun Ball Switch ST100-001-046 AO800805 Shark Figure ST100-001-047 MO800819 Lock Set ST100-001-055 M0800821 ZSA ST Gun Motor Bracket ST100-001-048 EO800825 Speaker Assembly ST100-001-050 E0800827 Head Cam Switch 36 ARCADE MANUAL BSR V1.0 BOB’S SPACE RACERS® TM SHARKY’S TREASURE 11. GAME DIAGRAMS 37 ARCADE MANUAL BSR V1.0 BOB’S SPACE RACERS® TM SHARKY’S TREASURE ARCADE MANUAL BSR V1.0 Main PCB PN: EO800807 Small PCB PN: EO800808 Hat LED Control PCB PN: EO800803 Regulator Board PN: EO800826 38 BOB’S SPACE RACERS® TM SHARKY’S TREASURE ARCADE MANUAL BSR V1.0 Bonus Tickets High Score Play Time Score Press Button to Shoot Balls Lock Ticket Dispenser Coin Slot Coin Lock Coin Box Lock Lock Back Door to Electronics Back Door Fan Electrical Wire Box 39 BOB’S SPACE RACERS® TM SHARKY’S TREASURE ARCADE MANUAL BSR V1.0 12. WARRANTY (a) BOB’S SPACE RACERS INC. 90 DAY COIN-OPERATED GAME WARRANTY 1. INCLUDED IN THIS WARANTY Bob’s Space Racers®, Inc. warrants to the original purchaser only that the equipment that is the subject of this sale conforms to its specifications, and is free from defects under normal service for a 90 day period from the original date of deliver. This warranty does not include any damages resulting from occurrences listed in paragraph 2 below. This warranty is not transferable under any circumstance. Any claims under this warranty must be received in writing by Bob’s Space Racers®, Inc. within 120 days from date of delivery. Within a reasonable time of such written notification Bob’s Space Racers®, Inc. will replace or repair any defective component of the equipment or part thereof which fails for reasons other than normal service, use, or wear. Bob’s Space Racers®, Inc. reserves the right to request dated proof of purchase by the end user (original purchaser) at any time. Light bulbs are specifically excluded from this warranty and shall be the sole responsibility of the purchaser. Bob’s Space Racers®, Inc., within its sole discretion, makes the final determination as to whether to repair or replace any component and whether any such repair or replacement shall be performed where the equipment is located or at it’s home facility in Volusia County, Florida, or another facility of its sole choice. Any and all freight charges for the purposes of repair or replacement shall be paid by the original purchaser. All defective parts shall be returned to Bob’s Space Racers®, Inc. if requested. Bob’s Space Racers®, Inc. does not warrant that the equipment will meet any original purchaser’s specific requirements or that the operation of the equipment will be uninterrupted. These remedies are the original purchaser’s exclusive remedies for breach of warranty. 2. EXCLUDED BY THIS WARRANTY Bob’s Space Racers®, Inc. does not warrant (a) any product, components or parts not manufactured by Bob’s Space Racers®, Inc.; (b) damages caused by use of the equipment for purposes other than those for which it was designed; (c) defects caused by failure to provide a suitable installation environment for the equipment; (d) damage caused by unauthorized attachments, modification, or service; (e) damage caused by normal wear and tear or improper power supply; (f) damage caused by accident or disaster such as fires, flood, lightning, and wind; or (g) any other abuse or misuse of the equipment. 3. EXCLUSIVE WARRANTY. THE FORGOING WARRANTY IS EXCLUSIVE AND IN LIEU OF ALL OTHER WARRANTIES OR REMEDIES, WHETHER WRITTEN, ORAL OR IMPLIED. THERE ARE NO WARRANTIES WHICH EXTEND BEYOND THE DESCRIPTION ON THE FACE HEREOF. ANY AND ALL IMPLIED WARRANTIES OF MERCHANTABILITY, FITNESS FOR A PARTICULAR PURPOSE, COURSE OF DEALING OR USAGE OF TRADE ARE HEREBY EXPRESSLY DISCLAIMED AND EXCLUDED. 4. REMEDIES LIMITED. UNDER NO CIRCUMSTANCES, EXCEPT TO THE EXTENT PROHIBITED BY APPLICABLE LAW, SHALL BOB’S SPACE RACERS®, INC. BE LIABLE FOR ANY LOSS OR DAMAGE, DIRECT OR INDIRECT, SPECIAL INCIDENTAL OR CONSEQUENTIAL ARISING OUT OF THE USE OR INABILITY TO USE THIS EQUIPMENT INCLUDING BUT NOT LIMITED TO ANY CLAIM FOR LOSS OR PROFITS, LOSS OF SAVINGS OR REVENUE, LOSS OF USE OF THE EQUIPMENT, OR ANY ASSOCIATED EQUIPMENT, FACILITIES OR SERVICE, DOWNTIME, THE CLAIMS OR COSTS OF THIRD PARTIES INCLUDING CUSTOMERS AND INJURY TO PROPERTY. Some states do not allow limitations on how long an implied warranty lasts or the exclusion or limitation of incidental or consequential damages, so the above limitations or exclusion may not apply to you. This warranty gives you specific legal rights, and you may also have other rights which vary from state to state. 5. NO OTHER WARRANTIES. Unless modified in writing and signed by both parties, this agreement is understood to be the complete and exclusive agreement between the parties, superseding all prior agreements, oral or written, and all other communications between the parties relating to the subject matter of this agreement. No employee or representative of Bob’s Space Racers®, Inc. or any other party is authorized to make any other warranty or to assume any other liability in connection with the sale of its equipment. 6. TIME LIMIT FOR CLAIMS. Any claim for breach of warranty or claims under this warranty must be received in writing by Bob’s Space Racers®, Inc. within 120 days following delivery of the equipment. 7. FUTURE CHANGES. Bob’s Space Racers®, Inc. reserves the right to reserve, change or modify the construction and design of its equipment or any component part or parts thereof without incurring the obligations to make such changes or modifications in present equipment. 8. ALLOCATION OF RISKS. This agreement allocates the risks of equipment failure between Bob’s Space Racers®, Inc. and the original purchaser. This allocation is recognized by both parties and is reflected in the price of the goods. THE PURCHASER ACKNOWLEDGES THAT HE HAS READ THIS AGREEMENT, UNDERSTANDS IT, AND IS BOUND BY ITS TERMS. 9. TO OBTAIN WARRANTY SERVICE. The original purchaser must, at his/her own expense, bring or ship the equipment to an authorized location for service. Additionally, the original purchaser must pay all freight, shipping or transportation charges for the return of the equipment from Bob’s Space Racers®, Inc. to the original purchaser. Telephone or write: Bob’s Space Racers®, Inc. 427 15th Street Daytona Beach, FL 32117 Telephone number: 386/677-0761 FAX: 386/677-0794 40 BOB’S SPACE RACERS® TM SHARKY’S TREASURE ARCADE MANUAL BSR V1.0 CALLING FOR SERVICE 1. When calling for service, please check the service manual first. Many times the answer to your problem has been addressed in this documentation. 2. Please make sure you have the serial number of the game ready when you call. 3. If this is a repeat call, please tell the service technician that you have made a previous call regarding this problem. This way we will be able to retrieve the history on your game allowing us to serve you better and save you time. 4. Please retain proof of purchase for your product. This might be requested for warranty repairs. 5. Please call from the game if possible since we might need you to check certain things on the game while we are on the telephone with you. IF YOU HAVE ANY QUESTIONS OR COMMENTS, PLEASE CALL OUR SERVICE DEPARTMENT AT (386) 677-0761 (MONDAY – FRIDAY, 8:30AM – 5:00PM EST, EXCLUDING HOLIDAYS) (or) EMAIL QUESTIONS TO: [email protected] (or) VISIT THE “CUSTOMER SUPPORT” SECTION ON OUR WEBSITE: WWW.BOBSSPACERACERS.COM 41