1
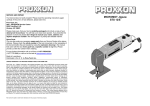
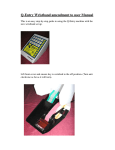
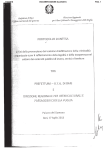
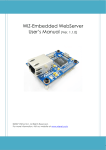
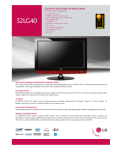
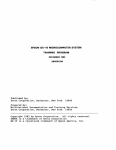
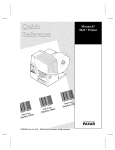
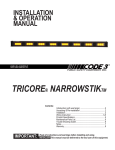
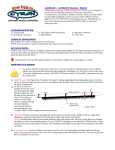
1305 E. St. Gertrude Place, Unit B Santa Ana, CA 92705
email: [email protected] web: www.europeanautosource.com
tel: 714.369.8524
fax: 714.908.1796
July 2008
INSTALLATION SUPPLEMENT FOR BMW v1.0
Subject:
e2 aurora angel Eyes for BMW
Models Supported:
1999-2003
non-sealed
2000-2006
1995-2001
1997-2000
e46 3-series (pre-facelift,
lamps)
e46 M3 Coupe/Convertible
e38 7 series
e39 5-series
Recommended Installation
Time:
45-60 minutes
Congratulations on purchasing aurora, the best in angel eyes for your BMW.
Note: Professional installation is highly recommended if you do not have prior experience with your
BMW’s electrical system.
Please consult a factory service manual for the exact location and disassembly instructions if you are
unsure of the procedures. Turn the ignition key to the “off” position. It is a good idea to disconnect both
battery cables and set aside to prevent any electrical shorts.
Items needed:
-
aurora 60LED Angel Eye kit
Phillips screwdriver
Crimping Pliers
Allen/Torx Wrench assortment (depending on model year)
Instructions:
In this DIY, we are going to install the aurora angel eye kit into a 2006 BMW M3 ZCP equipped with BiXenon headlamps.
First, the aurora angel eye kit comes in 4 major pieces:
- 4 highly polished Angel Eye rings with integrated LED circuitboards
- 2 Multi-stage Mounting Clips & Solderless connectors/T-Taps
- 1 Heavy Duty Wiring harness, comes with relay and remote feature
Copyright © 2008 eas, inc., Reproduction, distribution, modification, transmission, or publication of any copyrighted material is strictly prohibited
without the express written consent of eas. Violation will result in prosecution to the full extent available under law.
1
1305 E. St. Gertrude Place, Unit B Santa Ana, CA 92705
email: [email protected] web: www.europeanautosource.com
tel: 714.369.8524
fax: 714.908.1796
Instructions (continued):
This will cover two possibilities – having the halo rings on all the time when the vehicle is running, or the
option of wiring to the LCM (preferred) so you can turn on/off the Angel Eyes when desired.
1. In this DIY, we are going to install the aurora Angel Eye kit into a 2006 BMW M3 ZCP equipped with Bi‐Xenon headlamps. 2. Start by opening the hood and locating the (4) mounting screws that hold in the headlight. Removing the headlight will make the installation process much easier. Copyright © 2008 eas, inc., Reproduction, distribution, modification, transmission, or publication of any copyrighted material is strictly prohibited
without the express written consent of eas. Violation will result in prosecution to the full extent available under law.
2
1305 E. St. Gertrude Place, Unit B Santa Ana, CA 92705
email: [email protected] web: www.europeanautosource.com
tel: 714.369.8524
fax: 714.908.1796
Instructions (continued):
3. Remove the corner lens. This will either be a screw type (Phillips) or push in design. The screw type will simply unscrew off, the push in have a retaining clip that is pushed down to remove the lens. Remove lower headlight trim by unclipping the inner tab closest to the kidney grilles. Then release the outer clip of the lower trim by pressing on the outer tab using a pick tool. Once trim is detached, the headlight can be removed. Be careful to make sure the lower headlamp trim (painted portion) is not damaged when removing the lamp. 4. Remove the headlight lens. This is held in by lifting the retaining clips on the upper and lower portions of the lens. Set the lens aside and cover it to prevent dust from collecting on the inside. Insert the clipping mechanisms onto the aurora rings in an upward motion, “stepping” them into the mounting slots on the ring bridge. Take care when inserting the clips as the rings are fragile and can break under pressure. Repeat the steps for the remaining rings. Copyright © 2008 eas, inc., Reproduction, distribution, modification, transmission, or publication of any copyrighted material is strictly prohibited
without the express written consent of eas. Violation will result in prosecution to the full extent available under law.
3
1305 E. St. Gertrude Place, Unit B Santa
S
Ana, CA 92705
email: info@europe
eanautosource.com web: www
w.europeanauttosource.com
tel: 714.369.8524
fax: 714.908.1796
Ins
structions (con
ntinued)
):
5. C
Clip the Angell Eye rings onto the reflecttor housing. If equipped w
with auto‐leveel feature, maake sure theree is enough c
clearance for the projectorr to move up//down withou
ut coming in contact of the ring. 6. These images
T
show differe
ent angles of tthe rings instaalled. Copyrright © 2008 eas,, inc., Reproducttion, distribution, modification, tra
ansmission, or pu
ublication of any copyrighted mate
erial is strictly prohibited
without the express written
w
consent off eas. Violation will
w result in prose
ecution to the fulll extent available
e under law.
4
1305 E. St. Gertrude Place, Unit B Santa Ana, CA 92705
email: [email protected] web: www.europeanautosource.com
tel: 714.369.8524
fax: 714.908.1796
Instructions (continued):
7. The wiring can exit the rear rubber boot behind the headlamp. Poke a tiny hole in the rubber so the wiring when passed through is not chafed on any metal or plastic parts. 8. Here are completed images of the rings on the reflector housings. Aurora has a multi‐stage clipping mechanism in order to align the clips perfectly onto your housings with interference from auto‐leveling mechanisms. Take care in verifying the rings are perfectly aligned by inspecting at different angles Copyright © 2008 eas, inc., Reproduction, distribution, modification, transmission, or publication of any copyrighted material is strictly prohibited
without the express written consent of eas. Violation will result in prosecution to the full extent available under law.
5
1305 E. St. Gertrude Place, Unit B Santa Ana, CA 92705
email: [email protected] web: www.europeanautosource.com
tel: 714.369.8524
fax: 714.908.1796
Instructions (continued):
9. Repeat above steps for other headlamp. 10. Working with one headlight at a time, twist the (2) +12V leads together and crimp the included terminal onto the wire leads, making note of the correct terminal for the opposite leads on the wiring harness. Repeat on other headlamp. 11. Tuck your connections and excess wiring away from extreme heat or other moisture/elements. 12. Connect the power wires and test the Angel Eyes before routing the cables. Connect the larger gauge red to the +12V positive and the black to chassis ground. The small red/white wires going to a +12V source temporarily for testing. Copyright © 2008 eas, inc., Reproduction, distribution, modification, transmission, or publication of any copyrighted material is strictly prohibited
without the express written consent of eas. Violation will result in prosecution to the full extent available under law.
6
1305 E. St. Gertrude Place, Unit B Santa Ana, CA 92705
email: [email protected] web: www.europeanautosource.com
tel: 714.369.8524
fax: 714.908.1796
Instructions (continued):
13. Mount the Angel Eye harness relay to the inner side of the empty compartment underneath the hood as indicated in the diagrams. The plastic shroud on the +12V terminal can be removed temporarily to attach the positive power lead with the black terminal ring going to chassis ground. 14. Begin to route the wiring for the driver’s side Angel Eye rings and trigger lead by unclipping the wiring shroud so the harness can tuck inside for a clean, OEM look when finished. Pay careful attention to not allow wiring to chafe on the empty engine compartment metal, it should be insulated by the existing rubber insulator. 15. Route wiring to the driver’s side headlights and connect to the wiring leads on the power leads going to the aurora rings. Copyright © 2008 eas, inc., Reproduction, distribution, modification, transmission, or publication of any copyrighted material is strictly prohibited
without the express written consent of eas. Violation will result in prosecution to the full extent available under law.
7
1305 E. St. Gertrude Place, Unit B Santa Ana, CA 92705
email: [email protected] web: www.europeanautosource.com
tel: 714.369.8524
fax: 714.908.1796
Instructions (continued):
16. In order to enable the remote feature, the red/white wire closest to the relay will need to be connected to the interior lighting – this allows the fade‐in/out feature of the Angel Eyes when the doors are locked/unlocked. Start by removing the 7 phillips screws and 2 retaining clips holding on the glovebox and dropping it out of place. 17. Remove the oval grommet and poke a small hole for the trigger wire to pass through the interior opening. Route the wire through the opening and replace the grommet back into place. 18. Unplug the connector going into the footwell lighting and tap into the red wire of the connector with a scotchlock or solder into place. Reconnect the connector to the footwell lamp and reinstall the glovebox back into place. Copyright © 2008 eas, inc., Reproduction, distribution, modification, transmission, or publication of any copyrighted material is strictly prohibited
without the express written consent of eas. Violation will result in prosecution to the full extent available under law.
8
1305 E. St. Gertrude Place, Unit B Santa Ana, CA 92705
email: [email protected] web: www.europeanautosource.com
tel: 714.369.8524
fax: 714.908.1796
Powering options – Always on vs. Switched:
You have 2 options of powering on your new Angel Eyes. One option (easiest) would be to tap into the
power wire of the DME which would result into the Angel Eyes being placed into an “always on” state
meaning that the Angel Eyes will be on whenever the vehicle is running – even in daytime.
Another option would be to wire to the LCM parking light wire in the cabin area. While this is a bit more
effort to accomplish, you have the added option of turning on/off the Angel Eyes when desired.
Always on:
19. Remove the DME cover using a torx or allen bit (depending on model year) to expose the wiring. The red/white wire of the harness will be tapping into the red wire w/ white stripe – with yellow dots. Make sure the wire has the yellow dots before tapping. Switched:
20. Remove the trim underneath the steering wheel to gain access to the LCM wiring. Copyright © 2008 eas, inc., Reproduction, distribution, modification, transmission, or publication of any copyrighted material is strictly prohibited
without the express written consent of eas. Violation will result in prosecution to the full extent available under law.
9
1305 E. St. Gertrude Place, Unit B Santa Ana, CA 92705
email: [email protected] web: www.europeanautosource.com
tel: 714.369.8524
fax: 714.908.1796
Powering options – Switched (continued):
21. Remove the trim underneath the steering wheel to gain access to the LCM wiring. This is located in a thick bundle going towards the steering column. 22. Tap into the grey wire with purple stripe on the wiring bundle, this will allow the Angel Eyes to turn on with the parking lights. Replace interior panels and test to verify connections are secure. Final installation & testing:
To use the remote feature, simply open the door and the Angel
Eyes will “fade” on. Lock the BMW with the key and the Angel
Eyes will fade off, reappearing on when the doors are unlocked
with the interior lights.
Turning on the ignition will turn on the Angel Eyes with the
“Always on” option.
If you have wiring into the switched mode, you can turn on/off
the Angel Eyes with the parking light switch.
Copyright © 2008 eas, inc., Reproduction, distribution, modification, transmission, or publication of any copyrighted material is strictly prohibited
without the express written consent of eas. Violation will result in prosecution to the full extent available under law.
10