1
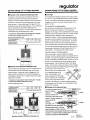
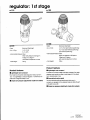
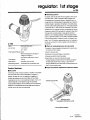
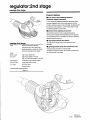
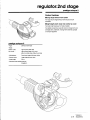
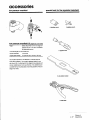
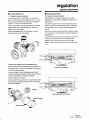
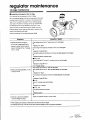
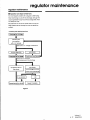
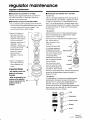
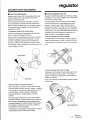
2000 engineering update
regulator service periods
recommended service periods for regulators
It has come to our attention that a number of technicians do not know or do not adhere
to the time frames recommended for having regulators serviced.
The use of a regulator falls into two basic categories:
recreational use:
a regulator used primarily by the sport diver who dives
mostly on the weekends, periodically during the week
and uses the regulator for extended periods only on trips.
commercial use:
a regulator used by an instructor, a commercial diver, a
regulator used in a dive school or for hire situation.
The following service periods are recommended by Apollo:
Service every 12 months after normal use for recreational diving or before use after
prolonged periods of storage.
Service every 6 months for commercial use or after using in contaminated waters.
note:
Service means carrying out the procedures laid down and recommended
by Apollo at technical workshops and seminars.
service info 1
2000 engineering update
regulator washing methods
routine washing after use
The following procedures should be recommended to your customers for washing their
equipment after use and also for washing rental equipment after use.
1.
After completing the check that the dust cap is dry before fitting to the
regulator (blow dry using cylinder air if necessary). Fit to regulator.
2.
Before carrying out the washing procedure make sure the dust cap is
fitted, that it is fitted the correct way up.
3.
DO NOT depress the purge button during the washing procedure.
4.
After EVERY dive the regulator should be soaked in fresh water
(preferably warm). Allow enough time for any salt deposits to soften.
5.
After the salt has softened it must be flushed away by rinsing under
running water (again warm water works better than cold). To be
effective direct the water into the ambient sensing chamber of the first
stage as well as washing externally. The second stage should be flushed
both internally and externally. Do not depress the purge button. If the
button is accidentally depressed during washing; the regulator must be
fitted to a cylinder, pressurized and purged until all moisture is blown
from the regulator.
6.
Shake the 1st and 2nd stages to help remove any rinse water from inside
(pressurizing the regulator and purging with air will be more efficient).
7.
Store your regulator in a dry area away from damp, fuels, paint and
thinners and remember cockroaches eat silicone mouthpieces, exhaust
valves, and diaphragms.
CARRYING OUT THE ABOVE PROCEDURES WILL PROVIDE PEAK PERFORMANCE FROM ONE
SERVICE PERIOD TO THE NEXT.
service info 2
2000 maintenance guide (for use with Service Manual Vol. 5)
a-101 1st stage
For a list of features and a description of the a-101 refer to page 3.
Factory intermediate pressure: 145 psi +/ - 7 psi
The following items should be highlighted in your manual page 37.
Items requiring mandatory annual replacement**:
key #
20
23
25
description
filter
o-ring (balance housing)
hp seat
Items requiring careful inspection for serviceability before refitting:
17
hp diaphragm
special notes:
All parts must pass a visual inspection for serviceability before refitting.
Adjusting screw (#11) and guide nut (#12) have a left hand thread.
Check to ensure that chamber spacer (#21) is fitted with the two support legs facing the
filter.
**Apollo includes the following items in the a-101 service kit (Pinnacle #163050 ): p. 37 key #’s 20,23, & 25.
service info 3
2000 maintenance guide (for use with Service Manual Vol. 5)
a-105 1st stage
For a list of features and a description of the a-105 refer to page 4.
Factory intermediate pressure: 145 psi +/ - 7 psi
The following items should be highlighted in your manual page 38.
Items requiring mandatory annual replacement**: Use Service Kit # 163051
key #
description
09
11
30
35
33
activated charcoal filter
moisturizing pad
filter
hp seat
o-ring (balance housing)
Items requiring careful inspection for serviceability before refitting:
13
27
o-ring (for moisturizer tube)
ensure the o-ring is glued to the tube.
hp diaphragm
special notes:
All parts must pass a visual inspection for serviceability before refitting.
Adjusting screw (#21) and guide nut (#22) have a left hand thread.
Check to ensure that chamber spacer (#31) is fitted with the two support legs facing the
filter.
**Apollo includes the following items in the a-105 service kit (Pinnacle#163051):p. 38 key #’s 9, 11, 30, 33,
& 35.
service info 4
2000 maintenance guide (for use with Service Manual Vol. 5)
a-107 1st stage
For a list of features and a description of the a-107 refer to page 4.
Factory intermediate pressure: 145 psi +/ - 7 psi
The following items should be highlighted in your manual page 39.
Items requiring mandatory annual replacement**:
key #
description
12
14
33
38
36
activated charcoal filter
moisturizing pad
filter
hp seat
o-ring (balance housing)
Items requiring careful inspection for serviceability before refitting:
30
hp diaphragm
special notes:
All parts must pass a visual inspection for serviceability before refitting.
Adjusting screw (#24) and guide nut (#25) have a left hand thread.
Check to ensure that chamber spacer (#34) is fitted with the two support legs facing the
filter.
**Apollo includes the following items in the a-107 service kit (Pinnacle#163052): p. 39 key #’s 12, 14, 33, 36,
& 38.
service info 5
2000 engineering update
a-102 hp module
problem
Some difficulty is being experienced by some technicians with disassembly of the HP
module in the a-102 regulator. Refer to the drawing on page 40 or 41 of the service
manual volume 5.
causes
Although the hp module is not over tightened during the assembly at manufacture, after
a period of use it is possible for the module to experience thread lock. Supply pressure
inside the module exerts a considerable force trying to push the module from the 1st
stage body. In some cases this causes the thread to lock up.
If salt water is allowed to enter the 1st stage through the filter this can find its way into the
hp module threads causing thread lock due to salt build up.
remedy
One remedy is very simple, ensure you use the correct size tool to remove the module, a
standard screw driver will not engage the slot in the module without causing damage to
the slot. A number of units have been returned to Apollo with this slot badly damaged.
If you are using the correct tool and the module is still too tight to move, the following
procedure can be used. After dissembling the 1st stage to the point where the module is
the next part to be removed and the module has thread lock, take a nylon drift 1/2”
diameter x 5” long, place the 1st stage on a solid surface and position the nylon drift on
top of the hp module. Then using a small engineers hammer firmly tap the module. This
has the effect of breaking the thread lock and the module can now be removed using
normal force.
CAUTION: DO NOT USE a metal drift, use only nylon or a hard wooden dowel, the module
is manufactured from brass which is quite soft so using a metal drift can damage the
housing.
service info 6
2000 maintenance guide (for use with Service Manual Vol. 5)
a-102 1st stage
For a list of features and a description of the a-102 refer to page 3.
Factory intermediate pressure: 145 psi +/ - 7 psi
The following items should be highlighted in your manual pages 40 & 41.
Items requiring mandatory annual replacement**:
key #
description
11
26
28
filter
o-ring (balance housing)
hp seat
Items requiring careful inspection for serviceability before refitting:
20
hp diaphragm
special notes:
All parts must pass a visual inspection for serviceability before refitting.
Adjusting screw (#14) and guide nut (#15) have a left hand thread.
**Apollo includes the following items in the a-102 service kit (Pinnacle#163050): pp. 40 & 41 key #’s 11, 26,
& 28.
service info 7
2000 maintenance guide (for use with Service Manual Vol. 5)
prestige “standard” 2nd stage
For a list of features and a description of the prestige 2nd stage refer to pages 2 & 5.
The following items should be highlighted in your manual page 42.
Items requiring mandatory annual replacement**:
key #
description
18
valve seat
Items requiring careful inspection for serviceability before refitting:
15
14
13
35
valve cone (check tip for damage)
demand lever (distortion)
diaphragm
exhaust valve
special notes:
All parts must pass a visual inspection for serviceability before refitting.
It is suggested to check the diaphragm cover lock and if the lock is the early type screw with plastic lug
ensure the thread is not stripped. It is suggested although not mandatory, that the screw assembly be
replaced with the new metal lock (#9).
The adjusting knob (#23) should be turned counter- clockwise (all the way out) until it stops and then
turned back clockwise 1 turn before commencing to adjust the orifice.
When dismantling shaft (#31) from nut (#28) the shaft has a left hand thread. This thread should be well
lubricated during reassemble to maintain free movement between service periods.
Check to ensure that a liberal quantity of silicone is applied to the threads of the adjusting shaft (#31)
during reassemble.
**Apollo includes the following items in the prestige standard 2nd stage serv ice kit (Pinnacle#163053):p. 42
key #’s 3, 4, 18, 20, & 27.
service info 8
2000 maintenance guide (for use with Service Manual Vol. 5)
prestige balanced / ex 2nd stage
The following items should be highlighted in your manual page 43.
Items requiring mandatory annual replacement**:
key #
description
21
2 x o-rings - valve seat carrier (on end of stem)
Items requiring careful inspection for serviceability before refitting:
20
17
18
14
13
37
LP seat (in end of stem)
valve cone (check tip for damage)
o-ring (valve cone)
demand lever (distortion)
diaphragm
exhaust valve
special notes:
All parts must pass a visual inspection for serviceability before refitting.
The adjustable orifice has changed on this unit compared to the earlier prestige 2nd stage. An in-line
adjusting tool is now required to complete the tuning operation.
The balance housing is threaded onto the adjusting shaft, this is difficult to remove although it will screw
together easily for replacement. Do not remove the balance cylinder unless it is damaged, this can be
safely acid cleaned while in position.
The adjusting knob (#23) should be turned counter- clockwise (all the way out) until it stops and then
turned back clockwise 1/2 to 1 turn before commencing to adjust the orifice.
When dismantling the adjusting shaft (#33) from adjusting nut (#30) the shaft has a left hand thread.
This thread should be well lubricated during reassemble to maintain free movement between service
periods.
The latest 2nd stage housing has two design changes:
1. The diaphragm cover lock is now an integrated part of the cover, it is not removable. To remove the
front cover depress the lock with a jewelers screw driver.
2. The exhaust cover is removable via a bayonet fitting, depress the lock and turn a quarter of a turn to
remove the cover. This cover is now interchangeable with the ecodiver exhaust covers.
**Apollo includes the following items in the prestige balanced 2nd stage service kit (Pinnacle#163056):p.
43 key #’s 3, 4,16, 21,& 28.
service info 9
2000 maintenance guide (for use with Service Manual Vol. 5)
ecodiver 2nd stage
The following items should be highlighted in your manual page 44.
Items requiring mandatory annual replacement**:
key #
description
22
2 x o-rings - valve seat carrier (on end of stem)
Items requiring careful inspection for serviceability before refitting:
21
23
24
13
12
25
LP seat (in end of stem)
valve cone (check tip for damage)
o-ring (valve cone)
demand lever (distortion)
diaphragm
exhaust valve
special notes:
All parts must pass a visual inspection for serviceability before refitting.
The adjustable orifice has changed on this unit compared to the earlier prestige 2nd stage. An in-line
adjusting tool is now required to complete the tuning operation.
Assembly and tuning procedures are located on the back of this page.
**Apollo includes the following items in the ecodiver balanced 2nd stage service kit (Pinnacle#163054):
p. 44 key #’s 3, 4, 15, 17, & 22.
service info 10