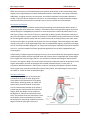
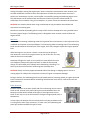
1
MLR: Engines eBook Table of Contents Unit 1: Engines Overview.......................................................................................................................... 2 Chapter 1: Engine Parts ........................................................................................................................ 2 Chapter 2: Engine Classifications ......................................................................................................... 4 Chapter 3: Mechanical Diagnostics .................................................................................................... 11 Unit 2: Engine Components, Inspection, And Repair ............................................................................. 16 Chapter 1: Engine Components ......................................................................................................... 16 Chapter 2: Inspection and Repair ....................................................................................................... 20 Unit 3: Engine Lubrication, Cooling, And Related Leaks ......................................................................... 31 Chapter 1: Lubrication and Oil Leaks.................................................................................................. 31 Chapter 2: Cooling and Coolant Leaks ............................................................................................... 40 Unit 4: Combustion And Ignition Systems .............................................................................................. 43 Chapter 1: Characteristics of Combustion ......................................................................................... 43 Chapter 2: Ignition Systems ............................................................................................................... 46 Unit 5: Computer Systems ...................................................................................................................... 51 Chapter 1: Computer Systems and OBDII .......................................................................................... 52 Unit 6: Air-Fuel Delivery Systems, Exhaust Systems, And Emission Controls......................................... 61 Chapter 1: Systems and Controls ....................................................................................................... 61 ©2013 Melior, Inc. MLR: Engines eBook ©2013 Melior, Inc. Unit 1: ENGINES OVERVIEW Chapter 1: Engine Parts The engine is the power plant of a vehicle. Automotive engines have gone through tremendous changes since the automobile was first introduced in the 1880s, but all combustion engines still have three requirements that must be met to do their job of providing power – air, fuel, and ignition. The mixture of air and fuel must be compressed inside the engine in order to make it highly combustible and get the most out of the energy contained in the fuel mixture. Since the mixture is ignited within the engine, automobile power plants are called internal combustion engines. Most can be further classified as reciprocating piston engines, since pistons move up and down within cylinders to provide power. This up-and-down motion is converted into turning motion by the crankshaft. Basic Engine Parts A small engine, such as one found in a lawn mower, usually contains only one cylinder and piston. Automotive engines use a number of cylinders to produce sufficient power to drive the wheels, but operate much like a small engine in many ways. Let’s look at one cylinder of an engine to see how the main parts work together. Engine Block The block is a heavy metal casting, usually cast iron or aluminum, which holds the lower parts of the engine together and in place. The block assembly consists of the block, crankshaft, main bearings and caps, connecting rods, pistons, and other components, and is referred to as the bottom end. The block may also house the camshaft, oil pump, and other parts. The block is machined with passages for oil circulation called oil galleries (not shown) and for coolant circulation called water jackets. Page 2 of 67 MLR: Engines eBook ©2013 Melior, Inc. Cylinders The cylinders are round holes or bores machined into the block for the pistons to travel up and down in. Pistons Combustion pressure acts upon the tops of the pistons in the cylinders, forcing them downward. Usually made of aluminum, the pistons transmit the downward force to the connecting rods. The top of the piston’s travel is called Top Dead Center (TDC) and the bottom of a piston’s travel is called Bottom Dead Center (BDC). Piston Rings Rings are installed in grooves around the pistons to form a seal between the piston and the cylinder wall. Two types of rings are used: compression rings, which prevent combustion pressure from entering the crankcase, and oil control rings, which prevent engine oil from entering the combustion chamber above the piston. Oil rings scrape excess oil from the cylinder walls for return to the crankcase. Connecting Rods A rod connects each piston to the crankshaft. The small, upper end of the rod commonly has a bushing pressed into it. A piston pin, or wrist pin, attaches the piston to the rod through this bushing, which allows the rod to pivot as needed. The larger, lower end of the rod is attached to the crankshaft through rod bearing inserts that are stationary relative to the rod and allow the crankshaft to turn within the rod on a film of oil. Page 3 of 67 MLR: Engines eBook ©2013 Melior, Inc. Crankshaft The crankshaft is a strong, alloyed iron or steel shaft that converts the up-and-down motion of the pistons into a turning motion that can be transmitted to the drive train. The crankshaft is supported by the block in several places along its length. The crankshaft rides in main bearings, which are inserts similar to the rod bearings at these supports. Where the crankshaft is connected to the rods and where it is supported by the block are called journals. The crank is finely machined and polished at these places. The crankshaft is also drilled with a network of oil passages to deliver oil under pressure to these places from the oil galleries. Counterweights are formed onto the crankshaft to help prevent vibration. These weights are added to offset the weight of the piston and connecting rod assemblies. At the front of the crankshaft, outside the engine front cover, a heavy wheel containing a rubber vibration damper is installed. Also called a harmonic balancer, it often incorporates the crank drive belt pulley, which powers belt-driven accessories. At the rear of the crankshaft, a large flywheel is mounted. The flywheel can serve several purposes: a ring gear is mounted to its circumference to provide a means to start the engine. It also connects the engine to the transmission. Finally, on vehicles with manual transmissions, the flywheel is made very heavy to help smooth out power pulses from the engine (this is accomplished by the torque converter on vehicles equipped with automatic transmissions). Cylinder Head Like the engine block, cylinder heads are usually cast from either iron or aluminum. Most V-type, opposed, and W-type engines have two cylinder heads. Inline engines have only one cylinder head. The head bolts to the top of the block, covering and enclosing the tops of the cylinders. The head forms small pockets over the tops of the pistons called combustion chambers. The spark plugs are threaded into holes in the head and protrude into the combustion chambers (gasoline engines). Intake ports and exhaust ports are cast into the head, and small holes called valve guides are machined into it to position the valves. The valves act as gates. When open, they let air and fuel into the cylinder and exhaust gas out. When closed, they seal the pressure of compression in the combustion chamber. The valves close against machined surfaces in the combustion chamber ports called valve seats. On overhead cam engines like the one pictured here, the head also houses the camshaft. The assembly, together with other valve train components and the intake and exhaust manifolds, is referred to as the top end. Between the head and the block, a head gasket seals the combustion chambers, and water and oil passages. Chapter 2: Engine Classifications Engines can be classified in many different ways, according to their design characteristics and operation. These differences can affect the methods of maintenance and repair. Some ways engines can be classified are: Operational design (four-stroke, two-stroke, rotary, etc.) Number of cylinders (four, five, six, eight, 12, etc.) Page 4 of 67 MLR: Engines eBook ©2013 Melior, Inc. Arrangement of cylinders (V-type, inline, etc.) Displacement (3.8 liter, 3800 cubic centimeters, 350 cubic inches, etc.) Number of valves and valve train type (overhead cam, pushrod, 24-valve, etc.) Fuel type (gasoline, diesel, propane, etc.) Cooling system (air or liquid) Operational Design The Four-Stroke Cycle (Otto Cycle) A stroke is one movement of the piston either down from Top Dead Center (TDC) to Bottom Dead Center (BDC), or up from BDC to TDC. The term “stroke” also refers to the physical distance between these two points. One stroke of the piston moves the crankshaft through one-half of a revolution. Almost all engines on the road today operate on a cycle of four piston strokes. The strokes are the intake stroke, compression stroke, power stroke, and the exhaust stroke. This cycle turns the crankshaft through two revolutions and then the process begins again. Let’s put our simple engine into motion to see what happens in a cylinder during this four-stroke cycle. We will begin with the intake stroke. Page 5 of 67 MLR: Engines eBook ©2013 Melior, Inc. While the vast majority of automobile engines are gasoline-powered four-stroke reciprocating piston engines, other engine designs have been developed and used in automobiles, some quite successfully. Additionally, changing economic, environmental, and political conditions have created a demand to modify or retire this proven workhorse with new or re-worked designs. As materials and technologies improve and evolve, some of these contenders may come into common use in automobiles. Two-Stroke Cycle Engines A two-stroke cycle engine is another reciprocating piston design. Every downstroke delivers power in this design, and it has no valve train. Instead, in a conventional two-stroke gasoline engine, the air-fuel and exhaust gas are managed by the piston as it covers and uncovers intake and exhaust ports in the side of the cylinder. It also has no oil sump or pressurized oil delivery system, because the crankcase is part of the fuel delivery system. Instead, the crankcase is lubricated by mixing a small amount of oil with the fuel. Being able to deliver power with every down stroke and not having a heavy valve train means the two-stroke engine can provide a lot of power for its size and weight. Two-stroke engines have been used for many years in small engine applications such as outboard boat engines, motorcycles, ultralight aircraft, chainsaws and lawn equipment, etc. Some two-stroke engine automobiles have been imported to the U.S., and many medium and heavy duty diesel applications are currently equipped with twostroke engines. Unfortunately, the light weight and simplicity come at a price. Conventional two-stroke gasoline engines produce higher exhaust emissions and yield lower fuel economy than a comparable four-stroke engine. This is largely due to the burning of the oil in the combustion chamber and leakage of unburned fuel inherent in the engine’s design. The causes of this will be clearer when we examine the operation of the engine. Nevertheless, the two-stroke engine has received renewed interest in recent years, as innovations and advancements in fuel injection, materials, and engine management systems develop. These engines have a pressurized lubrication system, fuel injectors, and superchargers that compress the intake air, similar to a two-stroke diesel engine. The Two-Stroke Cycle We’ll begin the explanation of the two-stroke cycle with the firing of the spark plug, which occurs before every downstroke. As the piston moves down, delivering power, the intake and exhaust ports are both covered. At the same time, the downward movement of the piston is pressurizing the crankcase with the next air-fuel charge, which was drawn into the crankcase through the air-fuel inlet and around the reed valve. This pressure forces the reed valve to close. As the piston continues downward, it uncovers the exhaust port. Remaining combustion pressure begins to blow the spent gas out the port. Page 6 of 67 MLR: Engines eBook ©2013 Melior, Inc. Further downward movement uncovers the intake port as well, and both ports are open for an instant, as the pressurized air-fuel charge from the crankcase enters the cylinder. The incoming air-fuel purges the remaining exhaust gas from the cylinder. As the piston travels upward again, it covers the intake and exhaust ports so compression can begin. At the same time, the piston’s movement creates a vacuum in the crankcase, opening the reed valve again and drawing in the next air-fuel charge. Diesel Engines The diesel engine is another reciprocating piston design. Diesel engines in passenger cars and light trucks operate on the four-stroke cycle, but they have important differences from the gasoline engines we have discussed. The most significant difference is the way in which diesel engines ignite the fuel. Rather than using a spark to start the combustion, a diesel engine uses the heat produced by compression of the air in the cylinder. Diesel engines must compress the air much more than a gasoline engine does – about twice as much – in order to produce enough heat to ignite the fuel. Compression ignition engines such as diesels must be designed heavier and stronger than spark ignition engines to withstand the compression and combustion produced in the cylinders. These engines have steel sleeves pressed into their cylinder bores. All diesel engines use fuel injectors to deliver the fuel to the combustion chambers at just the right time. If the fuel were delivered along with the air, as in a gasoline engine, the fuel would ignite prematurely. The fuel pressure at the injectors must be very high to overcome the pressure in the combustion chambers created during the compression stroke. Keep in mind that with the port fuel injection systems on gasoline engines, the fuel is injected outside the combustion chamber near the intake port and drawn into the cylinder on the intake stroke. Other significant differences between gasoline and diesel powered engines are the result of differences in the fuels they burn. Diesel fuel is thicker, heavier, and less volatile than gasoline. However, there is more energy contained in a gallon of diesel fuel than in a gallon of gasoline. While a gasoline engine can produce more power by weight than a diesel engine, the diesel engine runs much leaner and provides better fuel efficiency by about one-third. This has made diesel engines attractive to automobile manufacturers at times, but these engines have other drawbacks that have prevented them from taking over in passenger cars. High exhaust emissions of particulates (soot) and oxides of nitrogen (NOX) due to the high combustion temperatures are an obstacle. Difficulty in starting diesel engines in cold weather, sluggish acceleration, smell, and noise are other factors that have prevented diesels from being widely used in automobiles, but this may change again in the future. Rotary Engines The rotary engine is one of the few mass-produced automobile engines that is not a reciprocating piston design. Instead, combustion directly causes the rotation of rotors within a chamber. This design can Page 7 of 67 MLR: Engines eBook ©2013 Melior, Inc. produce a very powerful, smooth-running engine with fewer moving parts than a piston engine, and it can operate at higher RPM. Movement of the rotor produces a low pressure area at the intake, drawing in the air-fuel mixture. Further rotor movement compresses the mixture and it is ignited. The resulting power pulse pushes on the rotor. The rotor continues turning to expel the exhaust gas. Three power pulses are produced for every revolution of the rotor. Number and Arrangement of Cylinders Automobile engines can have three, four, five, six, eight, 10, or 12 cylinders. More cylinders mean more power strokes per revolution of the crankshaft, which provides more power and smoother running. The cylinders can be arranged in a number of ways. The three most common cylinder configurations are inline, V-type, and opposed. Engines with even numbers of cylinders have pairs of companion cylinders, in which the pistons move up and down together. When one of the pistons is on its power stroke, the other one will be on its intake stroke. Likewise, when one piston is on its exhaust stroke, its running mate will be on its compression stroke. Look for the companion cylinders in the animations here. Inline Engines Inline engines have all their cylinders in a straight row. This is a common arrangement for fourcylinder engines and inline six-cylinder engines are still produced. Many years ago, inline eightcylinder engines were produced, but there are several problems associated with an engine of that length. V-Type Engines V-type engines have two cylinder banks, a left bank and a right bank, at an angle to one another such that when viewed from the front or rear, the block forms the shape of a “V”. As with all matters of automotive service, left and right are referenced from the vantage point of someone sitting in the vehicle. V-6 and V-8 engines are common, while a few V-10 and V-12 engines are produced. The V-6 has several advantages over inline-6 engines. The V-type is more spaceand weight-efficient. Two connecting rods from opposing banks share one crank pin (rod journal). Page 8 of 67 MLR: Engines eBook ©2013 Melior, Inc. Opposed Engines Opposed engines have cylinders that face each other from opposite sides of the crankshaft. This arrangement is sometimes called a boxer or pancake engine, because the cylinders lay flat, giving the engine a low profile. This makes it suitable for rear- and mid-engine applications, and this type of engine has been used in Porsches, Volkswagens (air-cooled), and Subarus. Slant A slant arrangement has also been used. This arrangement is a variation on the inline design, and some manufacturers have used it to lower the hood line. It sets in the engine compartment at a slant, and may resemble “half” of a V-type engine. A few high-end automakers have produced engines with 16 cylinders in a “W” arrangement, but with a price of around one million dollars, you are unlikely to see one in a typical shop. The “W” arrangement is done to conserve space. Cylinders are assigned numbers by the manufacturer for reference. The numbering system varies by manufacturer. Sometimes the numbers are stamped into the intake manifold. The firing order is the sequence in which the spark plugs fire, and is usually different from the order of the cylinder numbers. The firing order may also be stamped on the intake manifold, but both sets of numbers are available in the service information for the vehicle. The firing order will vary among manufacturers or divisions. Displacement Commonly called “engine size,” the displacement of an engine is the volume of all the cylinders added together. In the U.S., engine displacement was expressed in cubic inches for many years. In modern vehicles, displacement is usually given in liters (L) or cubic centimeters (cc). The diameter of the cylinder is called the bore. If the bore and the length of the piston stroke are known, the volume of a cylinder can be calculated. The simplest formula for calculating the volume of a cylinder is: Bore2 x Stroke x 0.7854 = cylinder volume This result is multiplied by the number of cylinders to arrive at the displacement of the engine. The value of 0.7854 is pi/4. Using the formula to determine the displacement of a six-cylinder engine with a bore of 10cm and a stroke of 8cm, we find: 100 x 8 x 0.7854 x 6 = 3,769.92 Page 9 of 67 MLR: Engines eBook ©2013 Melior, Inc. This would be expressed as 3770cc, or approximately 3.8L. Number of Valves and Valve Train Type In an earlier section, we saw the operation of an engine with a single overhead cam. We noted that a dual overhead cam (DOHC) engine has a cam for the intake valves and one for the exhaust valves. A V-type DOHC engine has four camshafts – two for each bank. Dual overhead cams are frequently used on engines that have more than two valves per cylinder. Four-cylinder engines typically have eight, 12, or 16 valves. A six-cylinder may have 12, 18, 24, or 30 valves, and a V-8 may have 16, 24, 32, or some other number of valves. Pushrod Engines Pushrod engines (those with the cam in the block) are sometimes referred to as “overhead valve” engines to differentiate them from overhead cam engines, but all modern automobile engines use overhead valves. The term was originally used to distinguish the pushrod valve arrangement from engines that have the valves in the block, a design now found only in antique cars and some small engines. In pushrod engines, the cam acts on a valve lifter, which in turn acts on a pushrod to move the rocker arm and open the valve. Fuel Type By far the most common fuels for the internal-combustion engine are gasoline and diesel fuel; however, some fleet vehicles burn alternative fuels such as natural gas, propane, or liquefied petroleum gas (LPG). These engines are usually converted gasoline or diesel engines. Cooling System Type Engines are either air-cooled or liquid-cooled. Nearly all automobiles currently in production have liquidcooled engines. Air-cooled engines can be found in motorcycles, lawn mowers, and some automobiles. Cooling fins cast on the outside of engine parts, especially the cylinders and heads, increase surface area and help dissipate heat into the air flowing around them. Air-cooled engines run at higher temperatures than liquid-cooled engines under some conditions, and they can’t maintain as constant a temperature. This causes an exhaust emissions problem (especially oxides of nitrogen) that has limited their production in recent years. In liquid-cooled engines (often called “water-cooled”), a pump circulates coolant though cavities and passages called water jackets around the cylinders and combustion chambers. A thermostat keeps the engine at the optimum operating temperature by controlling the coolant flow between the engine and the radiator, where the heat is given off to the air passing through it. The coolant is normally a mixture of 50% water and 50% antifreeze. The antifreeze provides protection against freezing, boiling, and rust and corrosion, and provides lubrication and seal conditioning for the water pump. Cooling system operation and service is covered in the Today’s Class HVAC course. From this point on, this course will deal with gasoline powered, liquid-cooled four-stroke piston engines. Page 10 of 67 MLR: Engines eBook ©2013 Melior, Inc. Chapter 3: Mechanical Diagnostics Engine mechanical problems can have many causes. Component wear is both normal and inevitable. Anything with moving parts will wear with prolonged operation. This wear can occur sooner than expected if an engine is abused or is improperly maintained. Sealing gaskets can split or leak, internal engine parts such as piston rings, bearings, and valvetrain components can wear, and intake and exhaust valves can burn, just to note a few common examples. Typical Wear Areas This graphic illustrates some typical engine wear areas. Improper Service Improper service can cause engine mechanical problems and increased wear as well. For example, cleaning gasket surfaces with surface conditioning disks is NOT recommended by vehicle manufacturers. The use of such surface conditioning discs dislodges Aluminum Oxide (from the disk) and metal particles, which can lead to premature engine bearing failure. In some cases, this failure occurs in as little as 1,000 miles (2,200 km) after the repair has been made. Improper bolt torque when reassembling engine components can distort bearing or sealing surfaces when fasteners are overtorqued. Undertorqued fasteners can loosen and cause problems ranging from fluid leaks to major engine failure when an engine component comes apart while running. To effectively diagnose the wide range of possible engine mechanical problems requires more study than can be provided in this introductory course; however, some basic diagnostic information and testing methods will be provided to help you get started. Understanding some of the test methods included will also help in your understanding of how an engine works, why it works, and what happens when it doesn’t work properly. Page 11 of 67 MLR: Engines eBook ©2013 Melior, Inc. A logical, step-by-step approach should be developed and used in diagnosing all automotive systems. A systematic approach will save time and ensure that the proper repairs are made. Verifying the Customer’s Concern Effective communication between the customer, service writer, and technician is essential for efficient and satisfactory repairs. To begin with, you must know the correct or normal operation of the system and verify that the customer concern is a deviation from normal operation. You need to know what, where, when, and the magnitude of the complaint. This may necessitate a road test. Try to have the vehicle owner/driver ride along during the road test. The owner/driver can assist in identifying the source of any problems. Remember that you will not always be able to verify or even identify each and every customer concern. CAUTION: Always check engine oil and coolant levels prior to running the engine or road testing! Safety first when road testing – NEVER drive in an unsafe manner when attempting to identify a problem! Verify operation of the instrument panel engine warning indicators for correct operation and indicators that relate to customer concerns. Verify engine gauge operation: Engine gauges provide valuable information on the operating condition of the engine. Oil pressure, temperature, charging system, and fuel gauges are some of the most common types of gauges used on modern vehicles. The method of gauge operation varies widely between manufacturers. Oil pressure gauges: Most vehicles come equipped with an oil warning light. The problem with an oil warning light is that the light will not come on until the oil pressure has dropped to an extremely low point. An oil pressure gauge is an electrical gauge that has a needle that only tells the operator whether there is oil pressure. Oil pressure is critical to the operation of the engine. For that reason most technicians prefer to use a mechanical oil gauge to verify oil pressure. Temperature Gauge: An engine that is overheating will soon develop major problems. Overheating can be caused by low coolant, stuck thermostat, blown head gasket, inoperative coolant fan, or more severe engine problems such as cracked block or cylinder head. If the temperature gauge reads hot, verify that the coolant fans are operating and that the system is full of coolant. Depending on the model and year of the vehicle there are different methods of testing the temperature gauge. If the gauge is not reading on an older model vehicle (mid to late 70s), disconnect and ground the temperature sending unit wire at the sending unit. If the gauge reads HOT the electrical circuit is normal. If on a later model the temperature gauge does not read properly try grounding the temperature sending unit wire at the sending unit. This should make the unit read COLD. If with a cold vehicle the temperature starts out cold and slowly moves to hot as the engine warms up, this may indicate an engine problem such as a stuck thermostat, coolant leak, or other more serious problem. Page 12 of 67 MLR: Engines eBook ©2013 Melior, Inc. CAUTION: When a temperature gauges reads hot, allow the engine to cool before removing the radiator cap. Information Gathering In identifying and verifying the customer’s concern, you are actually gathering information from both the customer and from the vehicle itself. This process of gathering information is an essential step in forming a diagnostic strategy that in turn will identify the cause of the customer concern. Once you’ve gathered information form the customer and the vehicle, the next step is to research service information related to the owner/driver’s concern. Service manual information and technical service bulletins (TSBs) should be searched and read to familiarize yourself with the system. TSBs may also contain information on updated parts and service procedures related to your customer’s concern. Another part of information gathering, even when dealing with engine mechanical issues, is using a scan tool. Stored Diagnostic Trouble Codes can provide useful information, as can control module calibration or software identification numbers. Ideally, this step should be performed during the road test. It should be done before researching service information. Determine a Diagnostic Direction Based on the information that you’ve gathered, you now should be able to determine what diagnostic procedures should be performed to locate the concern. Here’s a real-world example of this process. A regular customer brings you a 1994 Buick Century with a 3100 V6 (VIN M) engine. The odometer in this vehicle shows 65,000 miles. This customer states that within the last month the vehicle has suddenly began consuming oil at a rate of a quart every 500 miles. Your shop has serviced this vehicle regularly, so you have the vehicle’s service history. As a part of the information gathering process, you find GM TSB # 87-60-03 while researching manufacturer’s technical service bulletins. This technical service bulletin identifies lower intake manifold gaskets as being a potential cause for your customer’s concern. The bulletin also describes how to verify the customer complaint and even gives part numbers for updated gaskets that should be used in making the repair. Keep in mind that your customer’s vehicle still needs to be properly diagnosed. The TSB in this example tells you how to perform the diagnosis to either confirm or rule out failed intake manifold gaskets as being the cause of the customer complaint. Preliminary Engine Inspection Even after determining a diagnostic path or direction, a preliminary inspection of the engine should be performed. This may reveal other areas that need service or that may be contributing to the customer complaint. Preliminary checks should include a visual inspection and confirmation. Your inspection should include listening for unusual sounds, looking for sources of fluid leaks, and checking for unusual odors. The vehicle service history can provide useful information as well. Evaluating Engine Noise Unusual noises can be indicators of engine damage or wear. Pinpointing and evaluating engine noise is a very difficult diagnostic job. It is important to attempt to locate the area where the noise appears to be Page 13 of 67 MLR: Engines eBook ©2013 Melior, Inc. coming from before tearing the engine apart. Noise is sometimes transmitted to other locations, and can often be difficult to isolate. Practice and experience will make this process easier over time. A technicians’ stethoscope, or probe, can be helpful in successfully locating and evaluating engine noise. The stethoscope can be moved around until the exact location of the noise is determined. If a stethoscope is not available, a long, thin screwdriver, or a piece of hose can sometimes be substituted. CAUTION: Use extreme caution when using a stethoscope or long screwdriver around electrical connections and moving parts. Note that is would be impossible given the scope of this course to attempt to list every possible sound from every type of engine. The following section is designed to show common causes of abnormal engine sounds. Rod Knock A worn, loose connecting rod bearing causes the big end of the rod to hammer on the rod journal of the crankshaft as the piston moves up and down. This hammering makes a knocking sound. The rod bearing knock sounds loudest at the lower part of the engine, and it may change at a particular engine speed or load. When the engine is cold, the oil is thicker. The knock may be quieter or even absent as a result. As the engine warms up, the oil thins out. This may make the knock more noticeable. Sometimes killing fuel or spark to one cylinder at a time while the knock is at its loudest will temporarily quiet the knock or make the knock sound change. This will enable you to identify which rod bearing is knocking. This test may not be conclusive when rod bearings are extremely worn. CAUTION: Always use factory-approved methods when interrupting or stopping spark or fuel on a running engine for safety and to minimize the chance of engine or component damage! During a road test, the rod bearing knock may be speed sensitive, becoming quieter as engine speed and load is increased or decreased. When rod bearing noise becomes more severe, it will tend to lose this speed sensitivity. Piston Pin Knock Excessive clearance at the other (small) end of the connecting rod can cause a knock as well. A knock at the piston (wrist) pin sounds somewhat like a rod bearing knock but will be located much higher in the engine than the rod knock. It also may or may not be sensitive to changes in engine speed, load, or temperature. In some cases, the location of the knock may be the only way to determine if it is coming from a rod or from a piston pin. In other cases, the rod bearing and piston pin produce two different types of noise. Page 14 of 67 MLR: Engines eBook ©2013 Melior, Inc. Note: Distinguishing between a wrist pin knock and a rod bearing knock is not critical at this point in the diagnosis. Repairing either component requires engine disassembly and further inspection. Piston Slap Piston slap is a knocking sound caused by a piston rocking in a worn cylinder bore and contacting the cylinder wall. Piston slap sounds much like a wrist pin knock. However, unlike a wrist pin knock, a piston slap generally quiets down as the engine warms up and the piston expands. Sometimes killing fuel or spark to one cylinder at a time will temporarily make the piston slap get louder or change its sound. Correction of the piston slap also requires engine disassembly and measurement. Main Bearing Knock A main bearing knock sounds more like a dull thud than a knock. A main bearing knock comes from lower in the engine. The knock is loudest when the engine is under a moderate to heavy load. The cause is usually worn crankshaft main journals and/or worn main bearings allowing the crankshaft itself to flex under load. This in turn makes the crankshaft move up and down inside the cylinder block. In addition to audible noise, loose connecting rod bearings or main bearings will usually cause low oil pressure. This low pressure will be more noticeable at slow engine speeds. This is because the oil pressure leaks off past the loose bearing. Slow engine speeds can compound this because the oil pump turns too slowly to overcome this leakage and maintain the proper pressure. At higher engine speeds, enough oil is pumped to overcome the leak and increase the oil pressure. A sharp knock or a dull thud sound and low oil pressure together indicate worn connecting rod or main bearings. Diagnosing oil pressure problems will be discussed in the next section. Timing Chain Rattle or Slap Some engines use timing chains. A rattle sound coming from the front of the engine is usually the result of a loose or stretched timing chain. The chain will sometimes slap the timing cover or chain guide when the throttle is snapped. Page 15 of 67 MLR: Engines eBook ©2013 Melior, Inc. Valvetrain Noise Excess clearance between valvetrain components sometimes produces a clicking or clattering sound that comes from high in the engine. This sound has a higher frequency than a bearing knock. With some engine designs, extremely loose timing chains can sometimes wear through the timing cover and cause an oil leak. If the timing cover contains coolant passages between the water pump and the block, (20R and 22R four cylinder Toyota engines, for example) a loose chain can wear through these passages as well. An internal coolant leak will cause coolant and engine oil to mix. Causes of excessive clearance can include worn valvetrain components, a worn camshaft lobe, a bent pushrod, or misadjustment of valve clearance (in the case of manually adjustable valves). Valvetrain wear occurs with age and mileage. Abnormal wear can be a sign of a lubrication system problem such as insufficient or dirty oil or clogged oil passages. Keep in mind that replacement of worn components without correcting the lubrication problem may result in a repeat failure and comeback. Non-Engine Related Sounds If the noise occurs only when changing gears or going into or out of gear, the engine itself may not be the problem. The engine mounts, transmission, torque converter flexplate or clutch should be checked for wear or breakage. Unit 2: ENGINE COMPONENTS, INSPECTION, AND REPAIR Chapter 1: Engine Components Cylinder Head Function and Construction As stated earlier in this course, the cylinder head’s main job is to contain the rapid increases in combustion chamber temperature and pressure that occur when the air/fuel mixture ignites. In addition, the overhead valve cylinder head provides the mounting point for the parts that actuate the valves, as well as for the intake and exhaust manifolds. Page 16 of 67 MLR: Engines eBook ©2013 Melior, Inc. Valves, Guides, & Seats Intake and exhaust valves open and close their respective ports. Small holes called valve guides are machined into the ports to position the valves. Valve guides are the bearings upon which the valves move. Some engine designs use separate, replaceable valve guides. These are most often press fitted into the cylinder head. Others use nothing more than a hole of the correct diameter machined into the head to guide the valve. The valves close against precision-machined areas or inserts in the combustion chamber ends of the ports called valve seats. These are shown here in cutaway view. As with the guides, some engines use press fitted replaceable valve seats while others have the seat machined directly into the cylinder head. Page 17 of 67 MLR: Engines eBook ©2013 Melior, Inc. Valvetrain Construction Single Overhead Camshaft Engine The valvetrain consists of the valves, camshaft, and other associated parts. Basic operation of the overhead camshaft valvetrain was discussed earlier in this course. Pushrod Engine Engines with the camshaft located in the block are called pushrod engines, because long pushrods are used to transmit the camshaft’s movement up to the rocker arms, which rock to open the valves. On these engines, the cam acts on a valve lifter, which in turn acts on a pushrod to move the rocker arm and open the valve. Different engine designs may use different valvetrain designs, some of which may not have all of the components previously listed. Each valve must open and close at exactly the right time relative to the position of each piston. This is accomplished through the camshaft and cam drive, which will be covered later in this course. Valve and Spring Retention Valve Springs are used to close each valve tightly against its seat as the closing side of the cam lobe passes the valve’s actuating mechanism. These valve springs are held in place by a spring retainer. Two valve keepers are used to “lock” the valve stem to the spring retainer as shown here. The O-ring and Valve Seal shown in the graphic are used to prevent engine oil from getting into the combustion chambers via the valve guide. The O-ring keeps oil that collects on top of the spring retainer from running down the valve stem. The seal shown on top of the valve guide serves a similar purpose. Page 18 of 67 MLR: Engines eBook ©2013 Melior, Inc. To remove the valve spring, or to remove the valve from the cylinder head with the cylinder head off of the engine, a tool called a valve spring compressor is used. There are as many different designs of valve spring compressors as there are valvetrain designs, but they generally fall into one of two categories: On-Car Valve Spring Compressor: This valve spring compressor can be used without removing the cylinder head. These are designed for replacing valve springs and/or valve seals with the cylinder head on the car. Compressed air is fed into the cylinder before the spring is removed to keep the valve from falling into the cylinder. Off-Car Valve Spring Compressor: This valve spring compressor requires removing the cylinder head. If a valve must be replaced for any reason, the cylinder head must first be removed from the engine block. Camshaft Drive Components The camshaft must open and close each valve at exactly the right time relative to piston position. This is accomplished via the cam drive. The camshaft is driven by the crankshaft via one of three methods: Chain drive, which uses a timing chain and sprockets. Chains used on overhead cam engines typically use a chain tensioner and guide rails as shown here. The tensioner can use an internal spring (mechanical) or engine oil pressure (hydraulic) to maintain chain tension. Most chains used in cam-in-block engine designs do not use guide rails or tensioners because the chain length is much shorter. Belt Drive, which uses a Timing Belt along with Pulleys and/or Sprockets. Belts are lighter and quieter than timing chains. They also do not require engine oil lubrication. As with overhead cam chain drives, tensioners can be mechanical or hydraulic. Guide pulleys are used rather than guide rails where needed. Gear Drive, which uses two or more Gears meshed directly. Very few modern gasoline engines use direct gear drive between the cam and crank, though some diesel truck and equipment engines still do. Systems Overview Engines are complex machines that rely on several systems for their operation. These systems include air-fuel delivery, ignition, cooling, lubrication, exhaust, emission controls, and the computer system. It is important to understand each system when diagnosing performance problems, as these systems work together to provide efficient operation. Each of these systems will be covered in-depth later in this course. Page 19 of 67 MLR: Engines eBook ©2013 Melior, Inc. Chapter 2: Inspection and Repair Cylinder Head Diagnosis and Repair On-Car Valve Seal Replacement Many technicians will replace valve seals on high-mileage engines in response to customer complaints of oil consumption and/or visible smoke out of the tailpipe. This is a short-term repair in many cases. Replacing the valve seals does not recondition the cylinder head, and may not solve the oil consumption problem long-term. Note: Manufacturer’s specific published service procedures detailing component and fastener removal or installation sequence and fastener torque should be followed to the letter. A generic overview of the valve seal replacement process is as follows. 1. 2. 3. 4. Disconnect the negative battery cable. Remove the engine accessories necessary for valve cover removal. Remove the valve cover(s). Remove the valve train components (e.g., rocker arms, camshafts) necessary to gain access to the valve springs. 5. Remove the spark plugs. 6. Insert an air hose adapter into the spark plug opening for the cylinder being serviced. 7. Connect the shop air hose to the adapter and pressurize the cylinder. 8. Use a valve spring compressor to compress the valve spring. 9. Note: There are as many different designs of valve spring compressors as there are valvetrain designs. Be sure to use the right compressor for the engine you’re working on to minimize the possibility of injury or damage. 10. Remove the valve locks, retainers, and spring (See image below). 11. Note: A magnet will be handy here to remove and capture the valve locks. Be careful not to drop them once they have been removed. 12. Remove the old valve stem seal. 13. Inspect the valve locks, valve lock grooves, and the valve stem and tip for signs of wear or damage. 14. Inspect the valve springs for squareness and signs of wear or damage. Measure their free height. To do this, stand all of the springs on a flat surface next to each other. They should stand the same height and should stand squarely. If there is any discrepancy in their height or if any of the springs do not stand squarely, replace all of the springs. Note: The tension of each valve spring can be tested using a special gauge. Extensive testing of valve springs is generally not cost effective. In most cases, it is cheaper to replace questionable valve springs than it is to test them, particularly in a high-mileage engine. 15. Inspect the top of the valve guide for signs of wear or damage. 16. Install a new valve seal. Note: Use caution to not nick, cut, chip, or otherwise damage the new valve seal during installation. Page 20 of 67 MLR: Engines eBook ©2013 Melior, Inc. 17. Reinstall the valve spring, retainer, and locks. Note: Once the valve spring, retainer and locks have been reinstalled, use a brass or plastic-faced nonmarring hammer to LIGHTLY tap the tip of the valve stem BEFORE releasing air pressure from the cylinder. Tap ONLY THE TIP of the valve stem, NOT the valve spring retainer. Tap lightly, but hard enough to move the valve off of its seat. You should hear a quick “pop” when the valve has moved caused by air pressure momentarily escaping the cylinder. This is done to make sure that the valve locks are properly installed and seated. Incorrectly secured or damaged valve locks will cause major engine damage when the affected valve falls into the cylinder and collides with the moving piston while the engine is running! 18. Repeat these steps for each valve assembly. 19. Reinstall the valve train components and valve cover(s). 20. Reinstall the spark plugs and wires. 21. Reinstall the engine accessories and connect the negative battery cable. 22. Connect the exhaust ventilation equipment. Note: Be sure to use approved exhaust ventilation equipment when operating a vehicle in an enclosed area. 23. Start the engine and check operation. 24. Shut off the engine. Disconnect the exhaust ventilation equipment. Note: Again, this is a generic overview of the valve seal replacement process. Manufacturer’s specific published service procedures should be followed for the vehicle that you’re working on. Cylinder Head Removal and Disassembly As with engine removal, there are so many different vehicle designs, engine and drivetrain configurations, and other variables that it would be impossible to come up with a valid, generic set of cylinder head removal instructions. Some vehicles may require that the engine assembly be removed from the vehicle before cylinder head removal because of space limitations. Notes: When removing or reinstalling a cylinder head, follow manufacturer’s specific published service procedures and instructions for the vehicle that you’re working on. Also follow standard safety guidelines and procedures when using engine cranes and stands, lifting equipment and safety stands. Manufacturer’s specific service procedures detailing component and fastener removal or installation sequence and fastener torque should be followed to the letter. Be sure to drain coolant and other necessary fluids as completely as possible prior to cylinder head removal to avoid spills. If the head is to be resurfaced or reconditioned, it should be partially disassembled once it has been removed from the engine. Bolt-on parts, like the intake and exhaust manifolds, thermostat housing, rocker shaft or camshaft, spark plugs, glow plugs, fuel injectors and the like should be removed at this time if they were not removed while pulling the head off. Page 21 of 67 MLR: Engines eBook Notes: ©2013 Melior, Inc. When removing or reinstalling these parts, follow manufacturer’s specific published service information and instructions for the vehicle that you’re working on. Manufacturer’s specific service procedures detailing component and fastener removal or installation sequence and fastener torque should be followed to the letter. Do not remove the valves and springs at this time. This will be done during the inspection process. If you break a bolt or strip threads on the cylinder head where bolt-on parts attach during disassembly, make note of this. Don’t try to extract a broken bolt or perform a thread repair on the cylinder head until after the head has been inspected thoroughly. There’s no sense in fixing a cylinder head that an inspection may show needs replacement instead of reconditioning. Once the cylinder head is off and the external bolt-on parts have been removed, the gasket sealing surfaces must be thoroughly cleaned. Be sure to clean all gasket surfaces, especially the head gasket surface and the manifold surfaces. Any gasket material left on the head surface will cause a leak when the engine is reassembled. The head gasket surface on the cylinder block deck should be cleaned as well. Note: Use a gasket scraper to remove debris and gasket residue from gasket mating surfaces as previously discussed. Cleaning gasket surfaces with surface conditioning disks is NOT recommended by vehicle manufacturers. Cylinder Head Inspection and Reinstallation Knowing the specific customer complaint (as discussed earlier) can help you find what you’re looking for when inspecting the cylinder head. For example, cooling system concerns, like overheating and loss of engine coolant, can in many cases be traced to a warped or cracked cylinder head. Oil consumption complaints can sometimes be traced to worn valves and guides. Misfire and power loss complaints are sometimes caused by burned valves that cannot keep the pressure of combustion confined to the inside of the cylinder. In addition, you may find that in some cases that replacing cracked, worn, or high-mileage cylinder heads with new or reconditioned heads makes the most economic sense for the vehicle owner. Warpage Check Check the head gasket surface for warpage using a precision straightedge and a set of thin feeler gauges. Check the head gasket surface lengthwise and crosswise in several places. Page 22 of 67 MLR: Engines eBook ©2013 Melior, Inc. As a general guideline, warpage lengthwise should not measure more than .003 in. (0.076 mm) for a three cylinder (V6) head, .004 in. (0.102 mm) for a four cylinder or V8 head, or .006 in. (0.152 mm) for a straight six head. When measuring side-to-side, the maximum allowable limit for warpage for any head is .002 in. (.05 mm) Note: Manufacturer’s specific specifications for warpage should be followed to the letter. The figures given here are general guidelines. If a cylinder head is warped, it should be straightened before any other machine work is done. This is typically a job that most shops will sublet out to an automotive machine shop. Some heads can be milled (shaved down) to make the gasket sealing surfaces flat and true again. Overhead cam cylinder heads are sometimes straightened by bolting the head down over shims to a straightening fixture. The head and fixture are then heated in an oven to 450 to 500 deg. F (230 to 260 deg. C) for three to six hours. The assembly is then cooled slowly to “de-stress” the metal. Disassembly and Visual Inspection for Cracks After checking for warpage, a close visual inspection should also be made for hairline cracks in the combustion chambers, ports, face, sides and top of the head. Be sure to examine the spark plug, glow plug and/or injector holes for damaged threads and cracks. Look closely around the head bolt holes for cracks and evidence of coolant leakage. Many cracks can be very difficult to see. Keep in mind that there may be cracks that aren’t visible even under close scrutiny. If a crack is found, don’t do anything else to the head until it is determined if the crack is repairable. In most cases, a cracked cylinder head will need to be replaced. If no cracks are found after a close visual inspection, the valves and springs can be disassembled. Make sure to mark and record the location of each valve as it is removed. The tips of the valve stems may have become mushroomed or enlarged from being pounded by the rocker arms. This can happen after an engine has been run for long periods of time with excessive valve clearance. Any valve that has a mushroomed stem should have the “mushrooming” filed off before the valve is removed. CAUTION: Don’t try to drive mushroomed valves out with a hammer and punch – this will damage the valve guide! After the valves are out, carefully clean the carbon from the ports and valve guides. A wire brush in an electric drill can be used on cast iron heads; aluminum heads should be cleaned by hand using a gasket scraper or carbon removal tool. Chemical carbon removers can help soften tough deposits CAUTION: Be careful not to gouge or scratch machined surfaces when cleaning aluminum heads. Page 23 of 67 MLR: Engines eBook ©2013 Melior, Inc. Inspect the valve springs for squareness and signs of wear or damage. Measure their free height. To do this, stand all of the springs on a flat surface next to each other. They should stand the same height and should stand squarely. If there is any discrepancy in their height or if any of the springs do not stand squarely, replace all of the springs. Note: The tension of each valve spring can be tested using a special gauge. Extensive testing of valve springs is generally not cost effective. In most cases, it is cheaper to replace questionable valve springs than it is to test them, particularly in a high-mileage engine. Next, the valve seats along with the area under the valves should be checked visually for damage or cracks. If any of the valve seats appear damaged, loose, or pitted, they should be replaced or repaired. This is another job that most shops will sublet out to an automotive machine shop. As noted previously, there still may be cracks that are not visible even under close inspection. It is therefore recommended that the cylinder head be pressure tested before any further inspection or machine work is performed. Pressure testing requires sealing up all the water openings in the head and applying regulated air pressure to the cooling jackets. Leaks are revealed by submerging the head in a tank of water or spraying it with soapy water. Bubbles indicate leakage. There are other ways to look for cracks. A magnetic particle crack detector can be used on cast iron heads, and a spray-on dye penetrant that glows under ultraviolet light can be used on aluminum heads. Crack detection is another job that most shops will sublet out to an automotive machine shop. Valve and Guide Inspection The contact area of each valve where it rests on the valve seat is called the face. The valve face and seat are what actually seal the intake and exhaust ports when the valves are closed. Both of these areas are precision machined. As well as providing a seal, this valve face / valve seat contact area also allows the heat of combustion to be transferred from the valve to the seat and water jacket while the valve is closed. The high temperatures found in the combustion chamber would rapidly burn away the face and seat of any valve that does not make solid contact when closed, especially in the case of an exhaust valve. The valvetrain is designed to rotate every valve slightly with each opening and closing event. This is done to help equalize valve seat and face wear. All valve faces and seats should be closely inspected. The contact areas should be true and shiny. The actual width of each face and seat can be measured and compared to manufacturer’s specifications. Pitted or obviously worn seats and faces should be reconditioned. Worn valves and seats can sometimes be resurfaced by cutting or grinding using special tools, but if they are severely worn replacement may be required. . Severely burnt valves will have a section of the face burned or melted away and should be replaced. Page 24 of 67 MLR: Engines eBook ©2013 Melior, Inc. Valve guides will always wear keyhole-style in a direction that is perpendicular or sideways to the length of the cylinder head. This wear occurs because the valvetrain loads the valve in this direction as the valve is opened and closed. Check for valve and guide wear by reinserting the valve into its corresponding guide. Hold the valve in its approximate open position a quarter inch (6.5 mm) off of the valve seat. With the valve in this position, wiggle the valve back and forth crosswise (at a 90 degree angle) to the head. If you can feel movement or play, the guide or valve stem is worn. A dial indicator can be used to measure the actual amount of play. Set up the dial indicator to contact the edge of the valve when it is in its normal open position so that it will indicate crosswise movement. As noted earlier, this should be a quarter inch (6.5 mm) off of the valve seat. With the valve in this position, wiggle the valve back and forth crosswise (at a 90 degree angle) to the head. Note any indication of movement on the dial. Valve guides can also be measured for roundness and diameter using a small-hole measuring gauge. If wear is detected, a micrometer can be used to measure the valve stems for wear and taper. Micrometer use is covered in the Today’s Class Brakes course. Replace all valves that have stems that are worn or tapered more than the vehicle manufacturer’s published specifications. If the valve stems are tapered and the guides are worn, new valves can often be purchased with oversized stems. The valve guides can then be reamed to the right diameter to fit the new stems. Some valve guides are replaceable. Integral or non-replaceable guides can be reamed out and then bushed back down to factory size using an insert. Cylinder Head Reinstallation As with cylinder head removal, there are so many different vehicle designs, engine and drivetrain configurations, and other variables that it would be impossible to come up with a valid, generic set of reinstallation instructions. Key points and reminders are noted here. When reinstalling a cylinder head, follow manufacturer’s specific published service procedures and instructions for the vehicle that you’re working on. Also follow standard safety guidelines and procedures when using engine cranes and stands, lifting equipment and safety stands. Page 25 of 67 MLR: Engines eBook ©2013 Melior, Inc. Manufacturer’s specific service procedures detailing component and fastener removal or installation sequence and fastener torque should be followed to the letter. Carefully inspect both the head and the block. Make sure that there is no head or block damage that will affect the sealing of the gasket. The cylinder head and block gasket surfaces should be clean and free of all old gasket materials and sealer. Head bolt holes in the block should be cleaned with a tap or thread chaser. After cleaning, use compressed air to blow out any loose debris. If head bolts are to be reused, they should be cleaned on a wire wheel. Torque-to-yield head bolts cannot be reused and must be replaced. Follow manufacturer’s specific published service procedures and recommendations for applying lubricant or sealant to head bolts. Don’t apply lubricant or sealant unless one or the other is specifically called for. Valvetrain Diagnosis and Repair Inspecting Overhead Camshaft Valvetrain Components Overhead camshaft valvetrain components are easily inspected as the cylinder head is being disassembled for service. In many cases, a close visual inspection will suffice. Cam lobe measurements can be taken if there’s a doubt about lobe wear, but visual comparison of multiple lobes should make it easy to note one or more that are worn. Notes: Manufacturer’s specific service procedures detailing component and fastener removal sequence, component inspection and fastener torque should be followed to the letter. Be sure to mark rocker arms and/or cam followers and keep them in order during disassembly and inspection. Do not mix them up when reassembling them. Match them to the same cam lobe that they were removed from. Failure to do this will cause rapid cam lobe, rocker arm and/or cam follower wear. The contact surfaces of the cam lobes and rocker arms and/or cam followers are some of the highest friction points in an engine. If a cam lobe is worn, replace the cam and ALL rocker arms and/or cam followers. Never run used rocker arms and/or cam followers on a new camshaft, or new rocker arms and/or cam followers on a used cam. Rapid wear will result. Page 26 of 67 MLR: Engines eBook ©2013 Melior, Inc. Inspecting Pushrod Valvetrain Components A visual inspection of the camshaft itself in a pushrod engine requires that the camshaft be removed. If a worn cam lobe is suspected, pushrod travel for each valve individually can be measured with a dial indicator while rotating the crankshaft. A visual comparison of how far each pushrod and rocker arm moves as the crankshaft is rotated may be enough to find a worn cam lobe. Rocker Arm Visually inspect all rocker arms for signs of scoring or excessive wear at their contact points. The example engine shown here uses a separate pivot which should also be inspected for excessive wear. Some rocker arms are shaft-mounted; the shafts need to be closely inspected as well. Excessively worn parts should be replaced. In some instances, the bearing that contacts the rocker shaft can be replaced. In other cases, the pad that contacts the valve stem can be replaced. The example engine shown here uses pressed-in studs to mount each rocker arm and pivot. The installed length of all pressed-in studs should be measured to be sure that they have not started to back out of the head. If any stud is significantly longer than the others, the head must be repaired by a qualified machinist. Attaching Hardware Some engines use screw-in studs. A popular performance modification to small-block Chevrolet V8 cylinder heads is to convert press-in studs to the screw-in type. Screw-in studs are less likely to pull out when used with high lift camshafts and stiffer valve springs. Other engines use bolts and pedestals to retain the rocker arms. Regardless of the attachment method, all attaching hardware and threads need to be inspected for wear and distortion. This includes threads in the head. If there’s any doubt as to the condition of the attaching hardware and pivots they should be replaced. Pushrod Carefully inspect both ends of each push rod. Make sure each end is smooth and rounded. Any roughness or distortion is reason for replacement. Roll each pushrod on a flat surface after removing them. Push rods that are bent do not roll smoothly. Replace all bent push rods. When reusing push rods, make sure that they are clean inside if they carry oil to the rocker arms (as with a small-block Chevrolet V8, for example). Lifter or Tappet You will typically find two types of lifters in most modern engines. Page 27 of 67 MLR: Engines eBook ©2013 Melior, Inc. Flat tappets are not truly flat. They have a slightly convex base that contacts the camshaft lobe. Flat tappet camshaft lobes are ground at an angle close to that of the convex tappet base. This is done to rotate the lifter in its bore with each valve opening/closing event, which promotes even contact area wear. Visually inspect the valve lifter base or roller for roughness and damage. If any damage is found on any lifter that contacts the camshaft, replace all of the lifters and the camshaft. Notes: Manufacturer’s specific service procedures detailing component and fastener removal sequence, component inspection and fastener torque should be followed to the letter. Be sure to mark lifters/tappets and keep them in order during disassembly and inspection. Do not mix them up when reassembling them. Match them to the same cam lobe that they were removed from if they are to be reused. Failure to do this will cause rapid cam lobe, rocker arm and/or cam follower wear. The contact surfaces of the lifters/tappets are some of the highest friction points in an engine. If a cam lobe is worn, replace the cam and ALL lifters. Never run used lifters on a new camshaft, or new lifters on a used cam. Rapid wear will result. Valvetrain Reinstallation The following things are important to keep in mind during valvetrain reinstallation. Mechanical and Hydraulic Lifters A small clearance has to be left between the valve and its actuating mechanism to allow for thermal expansion and wear. Valves must always close and contact their seats completely. A valve that does not close completely would rapidly burn away at the face and seat areas, especially in the case of the exhaust valve. Engines using mechanical lifters require periodic valve clearance (lash) adjustment. Mechanical (solid) lifters are of a fixed length. The hydraulic lifter was designed to ensure that the valvetrain always operates with zero clearance, leading to quieter operation and eliminating the need for periodic adjustment of valve clearance. These lifters are designed to automatically adjust their lengths to maintain zero valvetrain clearance. This length adjustment is accomplished using engine oil pressure along with simple valving inside the lifter itself. Valve Lash Adjustment As stated earlier, both hydraulic and mechanical valve train clearance must be set when the valve train is assembled. Mechanical valve train clearance must also be maintained by periodic measurement and adjustment. Hydraulic valve clearance will be automatically maintained making periodic maintenance unnecessary. Page 28 of 67 MLR: Engines eBook ©2013 Melior, Inc. Methods for adjusting valve lash (clearance) vary, depending on both engine design and the design of the valve lifter. There are so many different vehicle designs, engine and valvetrain configurations, and other variables that it would be impossible to come up with a valid, generic set of lash adjustment instructions. Note: Manufacturer’s specific service procedures detailing component and fastener removal sequence, lash adjustment and fastener torque should be followed to the letter. Camshaft Drive Component Inspection, Adjustment, Replacement The timing chain and sprockets should be replaced as a set if the chain is stretched or the sprockets are worn past manufacturer’s specifications. Some timing chain sprockets have nylon or plastic teeth to reduce noise. These can fatigue and break with heat and age. When these teeth break they wind up in the oil pan. Cleaning these pieces out should be a part of the timing chain replacement job as they can stop up the oil sump pickup screen. Gears in a gear drive arrangement should be replaced as a set as well. Mixing new gears with old, worn ones will result in increased noise and accelerated wear. Engines that use a toothed belt (sometimes there are more than one) to drive the camshaft generally have a recommended belt replacement interval. Consult manufacturer’s service information for this information. Timing belts also sometimes drive other engine components besides the camshaft(s). This varies with engine design – some designs use the timing belt(s) to drive the water pump, oil pump, or balance shafts. Belt breakage can occur if any one of these components seizes. Timing belts can also become oil or coolant-soaked if nearby gaskets or seals are leaking. Failure to fix the leak before replacing the belt will result in rapid deterioration and possible premature failure of the new belt. Any time a timing belt is being removed it is good practice to replace it regardless of age. An exception to this would be if the belt has recently been replaced, and is being removed to access another component. When and if in doubt, replace. Any vehicle that comes into the shop with a broken camshaft drive belt or chain should be checked for valvetrain or piston damage. Vehicles where the belt or chain didn’t break but got loose enough to get the crank and cam severely out of time should be checked as well. Some engines use what is called an interference design. This means that if the crank and cam get far enough out of time while they are turning that the pistons will hit any open valves. The result is valve, valvetrain, or piston damage. Other engines use what is called a freewheeling design. This means that the engine is designed with enough piston-to-valve clearance to keep these parts from colliding even if the crank and cam get out of time while they are turning. Page 29 of 67 MLR: Engines eBook ©2013 Melior, Inc. Timing chain or belt replacement on some vehicles may require special tools. Some belt pulleys, gears, or chain sprockets may be press-fitted onto the camshaft, crankshaft, or auxiliary shaft. Specific pullers and/or installers may be required to service these items. Note: Manufacturer’s specific service procedures detailing component and fastener removal sequence, component inspection, adjustment, or replacement, and fastener torque should be followed to the letter. Timing Belt Replacement Timing belts should be replaced at routine service intervals depending on the manufacture and engine design. Some timing belts may be need replacing at 60,000 miles. Timing belt replacement procedures vary between vehicles and manufacturers. In an interference-type engine, a broken timing belt can cause major damage to the valves and cylinder head. In a non-interference engine the piston will not come in contact with the valves even if the timing belt should break. When replacing a timing belt it is recommended to set the piston to top dead center (TDC) before removing the old timing belt. CAUTION: Timing must still be verified before trying to start the engine. Most engines have timing marks that will assist with aligning the cam and crankshaft gears. Perform Common Fastener and Thread Repair Removing broken bolts can be time-consuming and challenging. Any time a bolt breaks there are few options for removal. If the bolt is broken flat, drilling and using an easy-out may be the best option. Try drilling a hole in the center of the bolt. Install the easy-out and try turning out slowly. DO NOT BREAK the easy-out. An easy-out is made of very hard material and very difficult to drill. If after installing an easy-out you discover the easy-out alone will not remove the broken bolt, try heating the area around the bolt. Use caution not to overheat aluminum. If neither the easy-out nor heating the area around the bolt works it may be necessary to over-drill the broken bolt and tap to a larger size, if the area and situation permits. If this is not an acceptable repair option, using new thread inserts may be the only option left. Repairing External Threads Repairing external threads is normally much easier than repairing internal threads. In most cases, replacing bolts is the best option. However there are tools made that can be used to repair external threads. Hybrid Engine Service and Operation As an automotive technician, you should familiarize yourself with the safety and service issues that are inherent when dealing with hybrid vehicles. In a hybrid vehicle, DC power provided by a battery pack is run through an inverter. The inverter converts the DC voltage into regulated 3-phase AC voltage. As a safety precaution, hybrid vehicle high-voltage wiring is bright orange. When servicing or replacing a component that is in the high-voltage electrical system, the following steps are recommended. Remove the ignition key and place in a safe place (like your pocket). Disconnect the 12-volt battery before disabling the high-voltage batteries. Page 30 of 67 MLR: Engines eBook ©2013 Melior, Inc. Using insulated gloves, access the high-voltage battery pack. Remove the orange service plug and store it in a safe place. Wait 5 minutes before touching any high voltage wires. Using a volt meter, ensure that there are no charged high-voltage electrical circuits. Note: Some manufacturers recommend placing electrical tape over high-voltage (orange) electrical wires. Hybrid Engines Engines used in hybrid vehicles are different than engines used in non-hybrid vehicles. Most hybrid engines operate using an Otto cycle. The Otto cycle is only slightly different than the normally-used Atkinson cycle. The Otto cycle engine has a longer stroke than an Atkinson cycle engine. To avoid the high compression that is normally produced by having a longer stroke, the intake valve is held open longer, resulting in lower compression. Developing higher compression would require using higher octane fuel. However, holding the intake valve open longer reduces the compression stroke. The effect is a longer power stroke, which allows more energy to be achieved from the expanding gases. Hybrid Engine Service Hybrid engines are serviced in the same general way as any other engine. However, using the correct oil and following the recommended oil change intervals is critical. Most hybrid engine cooling systems require special attention when servicing. Mixing coolant can often cause premature failure of radiators and head gaskets. Always following manufacture remediation when determining coolant service intervals and types of replacement coolant. Unit 3: ENGINE LUBRICATION, COOLING, AND RELATED LEAKS Chapter 1: Lubrication and Oil Leaks All moving engine parts that have been discussed here must be lubricated, which makes the engine’s lubrication system a critical part of engine operation. Lubricating oil helps carry away heat and reduces friction and wear between moving parts. If a sufficient quantity of oil under pressure is not delivered to vital engine parts such as rod and main bearing journals, the engine would seize within the first few minutes of operation. The Lubrication System A supply of oil is maintained in the oil sump at the bottom of the oil pan. Submerged in this oil is a pickup tube, covered with a screen. The pickup tube leads to the oil pump, which is driven by the cam or crankshaft. The oil pump draws its supply of engine oil through the pickup tube. From the oil pump, pressurized oil is usually first delivered to the oil filter, and then to the main oil galleries for distribution to other engine parts. Page 31 of 67 MLR: Engines eBook ©2013 Melior, Inc. These main galleries feed the crankshaft bearings and then the connecting rod bearings via passages in the crankshaft. Other branches of the main oil galleries feed oil to the camshaft and valvetrain components. After the oil is pumped across the bearing surfaces of all moving parts, it sprays, oozes or drips away. At various points inside the engine, the oil then flows into drain holes that collect it and return it to the crankcase. The oil pump must provide pressure at all engine operating speeds. The faster the oil pump turns, the more oil is pumped, and so a pressure relief valve is used to divert excess pressure at high speeds. Also, a bypass valve near the oil filter opens in the event of a clogged filter to prevent oil starvation. Correct bearing clearance is critical to maintaining oil pressure. All engines lose a certain amount of oil pressure over time as normal wear increases bearing clearances. As these clearances become excessive, oil pressure bleeds off, reducing the flow of pressurized oil to other parts of the engine. This in turn can cause the valve train to become noisy and wear rapidly. Also, when bearing clearances are excessive, the protective film of engine oil that normally prevents actual metal-to-metal contact at the bearing surfaces can no longer be maintained. The engine will begin to knock. Diagnosing Excessive Oil Consumption Most vehicle manufacturers define “excessive oil consumption” as consuming or using a US quart or more of engine oil in 1,000 miles or less of vehicle operation. Lesser rates of oil consumption are considered normal operation in almost every case. Gaskets and seals are used in every engine to keep engine oil contained inside the engine’s lubrication system. Oil consumption almost always occurs as a result of oil leaking out of its normal location after a gasket or seal has failed. Even a relatively small internal or external oil leak can cause the loss of a quart of oil over 1,000 miles of vehicle operation. Keep in mind that gaskets and seals are designed and engineered to keep the engine oil confined to where it is supposed to be inside the engine. This includes keeping oil out of the combustion chambers and cooling system. Page 32 of 67 MLR: Engines eBook ©2013 Melior, Inc. Pinpointing External Leaks External leakage can be detected visually in most cases. Usually external oil leaks from engine gaskets or seals are the easiest to find. The quantity of the leakage can affect how easily the leak source can be visually detected. Oil leakage can be so slight that the source is not apparent. A leak could also be so massive that one entire section or even the whole engine is covered with oil. To diagnose large leaks, wash the engine off and run it in short cycles to prevent a flood of oil from covering a large area around the leak a second time. Small leaks can be diagnosed by washing the leak area off, letting it completely dry, and coating it with a tracing powder to pinpoint an oil seep. Aerosol foot powder (available in any drug store) can be used for this purpose. Spray the general area of the leak with the foot powder. The resulting white powder film will stick to the engine. Then, run the engine for a half-hour or so in the shop, or drive the vehicle fairly slowly in a parking lot or on a clean, dry road. Keep both vehicle speed and engine RPM slow, as higher engine and vehicle speeds will tend to blow the powder off of areas where it was sprayed. CAUTION: Always check engine oil and coolant levels prior to running the engine or road testing! Safety first when road testing – NEVER drive in an unsafe manner when attempting to identify a problem! Be sure to use approved exhaust ventilation equipment when operating a vehicle in an enclosed area. UV Leak Dye Another way to pinpoint small, difficult-to-trace oil leaks is by adding leak dye to the engine oil. A UV (ultraviolet) light can then be used to find the location of the leak. When viewed under the UV light, the dye glows a bright greenish/yellow that can't be mistaken for anything else. This may be the best way to pinpoint small leaks that occur only during special circumstances, such a driving vibrations, road shock, or flexing of components and lines. Page 33 of 67 MLR: Engines eBook ©2013 Melior, Inc. When you use the dye, follow the dye kit directions. Larger leaks will show up within a short time once the dye has been added to the engine oil and the engine has been run. For smaller, less obvious leaks, you may have to add the dye to the oil and have the customer return in a few days or even weeks. To see the leak, put on the UV glasses that come with the UV light. Next, turn on the UV light, shine it on the area you suspect to see leaking and look for a trail of dye from the bottom of the engine upwards. Once the trail is visible under the light, follow it up to the highest point to find the source of the leak. Pinpointing Internal Leaks Internal leakage can be very difficult to detect. In fact, internal leakage will often continue without being detected. Modern engines run at high internal engine temperatures and are also equipped with very efficient catalytic converters. These can mask internal oil leaks by causing any telltale smoke to be burned before it has a chance to make itself visible by coming out of the tailpipe. Oil can leak or be drawn into the induction system via several different paths. Some of the more common causes of internal leakage are included here. Intake Manifold Gaskets Oil can enter the intake manifold at any point where oil is close to a leaking intake manifold gasket. Most (but not all) V-type pushrod engines are designed so that the intake manifold covers the “valley” containing the camshaft, lifters and pushrods. Intake manifold gasket failure on these engines can allow manifold vacuum to suck oil past the leaky gasket into the intake ports where it is delivered with the air/fuel mixture to the cylinder. Some versions of the GM 60-degree V6 and Ford V6 and V8 engines are designed so that the intake manifold-to-cylinder head gasket is underneath the valve cover. This creates two potential paths for oil to enter the intake runners. A failed intake gasket can cause oil to be drawn from the valvetrain area under the valve cover, and from the area underneath the intake manifold itself. Page 34 of 67 MLR: Engines eBook ©2013 Melior, Inc. Propane Enrichment Pinpointing intake manifold gasket leaks can be difficult. A propane enrichment tool and exhaust gas analyzer can be used to locate them. To find the leak, remove the PCV valve from the valve cover. Leave the vacuum hose connected to it, and temporarily turn or orient the valve so that it draws in clean air rather than crankcase fumes. Next, connect the Exhaust Gas Analyzer as per the analyzer manufacturer’s instructions. Start the engine and allow it to idle. Once the engine is running, use the Propane Enrichment Tool to feed propane into the valve covers, one at a time, via the PCV grommet or oil cap. If there is a manifold gasket leak, the propane will be pulled into the cylinders by manifold vacuum. This in turn will cause the Carbon Monoxide and Hydrocarbon readings on the Exhaust Gas Analyzer to change. Some manifold gasket leaks will be large enough to cause the engine to smooth out or change speed once the propane is applied at idle. If the manifold gasket leak is very small, this test may not be conclusive. Valve Guides and Seals The vacuum created inside the cylinder by the intake stroke is applied directly to the intake valve stem. If the valve stems or valve guides are worn, or if the valve stem seals are defective, oil can be drawn into the intake runner at the cylinder intake port. Worn exhaust valves, guides, or seals can cause oil consumption as well. At a point between the exhaust stroke and the intake stroke, the exhaust valve will still be open though the piston has reached the top of its stroke. At this point, the “Venturi effect” of the exhaust gases moving out of the engine can cause a vacuum in the combustion chamber. This vacuum is momentary but can be strong enough to pull oil through a worn exhaust valve guide around the valve stem. Once siphoned past the exhaust valve, the oil will be burned by the hot exhaust gases in the exhaust ports and manifold. When the engine is shut down, oil drains from the top of the cylinder head back to the crankcase. During this time, oil can leak past worn out or split valve seals and worn valve guides onto the backs of closed valves or into any cylinder where a valve is open. Page 35 of 67 MLR: Engines eBook ©2013 Melior, Inc. Pinpointing valve guide and seal leaks can be difficult. One sign of potential valve guide or valve seal leakage would be heavy blue smoke coming from the tailpipe immediately after the vehicle is started. The volume of smoke will slowly taper off as the engine runs. The smoke volume tapers off for two reasons. As the engine warms, the valves and guides expand slightly. This reduces the amount of oil being pulled into the cylinders. Also, as the catalytic converter comes up to “light-off” temperature it begins to consume the oil smoke before it exits the tailpipe. Visible smoke on deceleration is another potential sign, but, again, this may not be seen with a modern engine. Worn valves, guides, and seals may cause oil residue in the form of carbon to build up on the backs of the valves. Intake valves run cooler and are more susceptible to this. Exhaust valves run hotter and may not have any or as much carbon buildup. This buildup can be seen in some cases using a borescope to view the back of the valve via the intake port. Borescopes are used for inspection work where the area to be inspected is inaccessible by other means. They are usually fitted with a magnifying device and a way to illuminate the area being inspected. Port fuel injectors can be removed on engines so equipped to get a glimpse of the back of the valve as well. Another method of inspecting the back of the valve with a borescope is to go in via the spark plug hole and rotate the engine carefully by hand until the intake valve is open. Valve and guide inspection and measurement, which requires cylinder head disassembly, is often the only way to determine valve and guide wear. Compression and cylinder leakage tests will not pinpoint worn valve guides or leaking valve seals. Many technicians will replace valve seals on high-mileage engines in response to customer complaints of oil consumption and/or visible smoke out of the tailpipe. This is a short-term repair in many cases. If the valve stems and guides are worn, excessive play between the two surfaces will wear new positive type valve seals out quickly. Cylinder Bores and Piston Rings As shown and discussed earlier in this section, oil can enter the combustion chamber by “blowing by” worn cylinder bores, worn pistons, or worn or broken piston rings. Page 36 of 67 MLR: Engines eBook ©2013 Melior, Inc. Compression and cylinder leakage tests will provide valuable clues to determine if worn cylinder bores, pistons, or rings are responsible for excessive oil consumption. High-Mileage Engines High-mileage engines that consume excessive amounts of oil often have multiple problems. In many cases, diagnosis of high-mileage, oil-burning engines will reveal that the entire engine assembly is worn. If any part of the engine is repaired in an attempt to reduce oil consumption, the repair could place additional strain on another part of the engine. Therefore, high-mileage engines are best completely reconditioned the first time. Partial reconditioning may actually increase oil consumption. Diagnosing Oil Pressure Problems Along with oil consumption problems, the next most common lubrication system problems relate to engine oil pressure, flow, and volume. The three most common oil pressure problems are as follows: Low oil pressure, which can be indicated by low oil pressure gauge readings (if the vehicle has an oil pressure gauge), or an oil pressure indicator light coming on while the engine is running. Abnormal engine noises (knocks, rattles, ticks or other mechanical noise) may also be noticeable. High oil pressure, which can be indicated by high or excessive oil pressure gauge readings (if the vehicle has an oil pressure gauge), or an obviously swollen oil filter housing. A malfunctioning oil pressure indicator light or gauge circuit, which can indicate that there is an oil pressure problem when the system is actually functioning normally. As simple as it sounds, checking the engine oil level and condition should be where diagnosis begins. The dipstick should read full when checked, and the oil should be clean and of the correct viscosity as specified by the engine manufacturer. Page 37 of 67 MLR: Engines eBook ©2013 Melior, Inc. Changing Oil and Testing Pressure As vehicle technology has evolved, engine oils have evolved from regular mineral engine oils to synthetic blend or full synthetic motor oils. Caution should be taken to use correct engine oil. Using the wrong type or grade motor oil can affect engine performance and shorten engine life. Newer engines use lower tension piston rings; because of this, using heaver engine oil than recommended by the manufacturer can cause premature engine damage. If there is any doubt whatsoever about the condition of the engine oil or oil filter, change it before going any further in your diagnosis. Even if further diagnosis reveals major mechanical problems, four or five quarts of the correct viscosity oil and a clean, correct oil filter are a very cheap way of eliminating potential variables during the diagnostic process. Be sure to observe the condition of the engine oil while it is being checked or drained during the oil change. Oil that appears “thin” or “watery” and that has a strong fuel odor is a sign of fuel entering the crankcase. A ruptured fuel pump diaphragm on a carbureted vehicle is a common cause for this. Any condition that can cause excessively rich fuel mixtures could potentially cause fuel contamination of the engine oil as well. The cause of the contamination needs to be diagnosed and repaired. Oil that appears “milky” is a sign of coolant entering the crankcase. If this is found, the cause of the coolant contamination needs to be diagnosed and repaired as well. Page 38 of 67 MLR: Engines eBook ©2013 Melior, Inc. If a low or abnormally high oil pressure condition is still indicated after the oil and filter have been changed, test the oil pressure with a test gauge as per the vehicle manufacturer’s published procedure, and compare the test readings with manufacturer’s published specifications. Measuring oil pressure with a test gauge after changing the oil and filter will quickly provide diagnostic direction. If the oil pressure test results are within manufacturer’s specifications using a test gauge but the vehicle’s oil pressure gauge or light reads abnormally, follow the vehicle manufacturer’s published procedure for testing the oil pressure light or gauge sending unit and circuit. Pressure Indications Abnormally high oil pressure as measured by a test gauge after changing to the correct oil and filter is generally caused by a stuck oil pressure relief valve. Note: Vehicle manufacturer’s published service information should be consulted for diagnosis and repair of a high oil pressure condition. Abnormally low oil pressure as measured by a test gauge after changing to the correct oil and filter indicates an engine mechanical problem. If the engine is knocking or mechanically noisy, engine damage has probably already occurred. When oil pressure and flow are restricted inside an engine, the resulting engine damage almost always happens before the gauge or warning light indicates a problem. In many cases, the circuit controlling the oil pressure warning lamp is designed not to turn the lamp on until the actual oil pressure is less than 45 PSI (27.6-34.5 kPa). Further diagnosis of low oil pressure and mechanical noise usually requires oil pan removal and a thorough inspection of the oil pump, oil pump pickup, and engine bearings. High-Mileage Engines High-mileage engines with low oil pressure and mechanical noise often have multiple problems. In many cases further diagnosis will reveal that the entire engine assembly is worn. Repair attempts made upon worn engines can sometimes compound problems. Installing a new oil pump in a worn engine may increase the oil pressure slightly for a short time, but it does nothing to reverse the wear that has already occurred. Therefore, high-mileage engines are best replaced or completely reconditioned the first time. Page 39 of 67 MLR: Engines eBook ©2013 Melior, Inc. Chapter 2: Cooling and Coolant Leaks A vehicle chassis is made up of several systems that all work in unison to provide a safe and comfortable ride. The chassis includes the frame (or unibody), brake system, steering and suspension systems, and wheel assemblies. Engine-Related HVAC Engine Cooling and the Heater System There is an abundant supply of waste heat produced in the engine. This waste heat is expelled into the exhaust system and absorbed into the engine parts and oil. The heat that is absorbed by the engine parts must be removed, or the engine would fail in minutes. This is the job of the engine cooling system. We can tap into this heat source to provide heat to the passenger compartment. On vehicles with an automatic transmission, the cooling system is also usually used to cool the transmission fluid. We will not be providing a full discourse on cooling system service here, but since the HVAC system is really all about heat, a brief discussion of the cooling system is a good place to start. The Cooling System An engine burns cleanest and with the least wear when at its normal operating temperature of around 200 degrees F (93° C). The cooling system is designed to allow fast warm up and then maintain this optimum temperature. This is accomplished with a thermostat that controls coolant circulation in the system. Coolant is pumped through the engine, where it absorbs the heat of combustion, to the radiator, where this heat is transferred to the atmosphere. The radiator is a heat exchanger. Hot coolant flows through tubes that are folded back and forth many times. The tubes have many fins attached to provide more surface area with which to dissipate heat. Air flowing around the tubes carries away the excess heat, then the coolant returns to the engine to continue the process. Let’s begin at the water pump and follow the coolant flow through a typical system. The pump sends the fluid to the engine block, where it flows through passages around the cylinders. The coolant then flows through the cylinder head and to the thermostat, where it is directed back to the pump (cold/closed) or to the radiator (hot/open). To heat the passenger compartment, another circuit is added to the cooling system. This circuit pumps hot coolant from the cylinder head through a heater core in the dash, and then back to the pump. In this way, heat can be obtained whether the thermostat is open or closed. The heater core is another heat exchanger, like a small radiator. A blower (fan) blows air through the heater core and into the passenger compartment. A heater control valve controls coolant flow through the heater core, according to the temperature selected by the operator. Page 40 of 67 MLR: Engines eBook ©2013 Melior, Inc. Coolant To cover all possible vehicle conditions, the coolant must have a low freezing point, a high boiling point, and the ability to hold a lot of heat. Water is an effective heat carrier, but its freezing and boiling points must be enhanced to make it a suitable coolant. A mixture of water and antifreeze (ethylene glycol) is used for this. Most manufacturers recommend a 50/50 mix, which yields protection against freezing to 35 degrees F (-37° C) and raises the boiling point to 223 degrees F (106° C). Antifreeze also contains an additive package to inhibit corrosion and lubricate the water pump. The coolant must not boil because when a fluid boils, it cannot absorb any more heat. Its temperature will remain the same, even though the temperature of the surrounding metal may continue to rise. Since coolant temperature can sometimes rise as high as 275 degrees F (135° C), more must be done to raise the coolant’s boiling point. The boiling point is further raised by pressurizing the system, typically to about 15 pounds per square inch (psi). This will raise the boiling point another 45 degrees F (25° C). The relationships between heat, pressure, and changes of state (liquid to gas and back) will be examined in detail in the Refrigeration Systems Overview. As the coolant in the system heats up, pressure is created. The pressure cap on the radiator serves as a pressure relief valve. If the pressure exceeds the cap’s rating, it will push the calibrated, spring-loaded valve off its seat, releasing coolant into the overflow reservoir tank. When the radiator cools down, the reduced volume of coolant creates a vacuum in the radiator, pulling open another valve that allows coolant from the reservoir tank to flow back into the radiator. CAUTION: If an engine runs very far outside its optimum temperature range, either too hot or too cold for very long, drivability and emissions problems can occur, in addition to severe engine or other system damage. If a vehicle’s temperature warning light should illuminate, or the gauge rises into the red or “hot” zone, turn the engine off at once! Note also that it is possible for an engine to overheat without illuminating the warning light. Excessive engine pinging, very hard or swollen hoses, boiling in the overflow reservoir or escaping coolant, or steaming from the system are indications of overheating. CAUTION: Never attempt to remove the radiator cap with a warm engine, with the engine at operating temperature, or higher! Severe burns can result! Ensure there is no pressure on the system before opening the radiator cap. See your instructor for tips on determining system pressure and temperature. Antifreeze is poisonous and especially toxic to animals. Page 41 of 67 MLR: Engines eBook ©2013 Melior, Inc. Inspecting and Testing the Engine Cooling System Inspecting and testing the engine cooling system. Inspect the cooling system by first checking coolant level and condition. Inspect and test the radiator, pressure cap, coolant recovery tank, and heater core and hoses. Inspect drive belts tensioners and pulleys. Check pulley and belt alignment. Worn Drive Belt Belt Tensioner New Drive Belt Engine Cooling System Thermostat Thermostat Top View Diagnosing Leaks in a Cooling System There are several methods used to diagnose leaks in a cooling system. Often the first test is a visual inspection. Start by looking for a busted radiator or heater hose. Next, look at the water pump for leakage. If a leak is visible, there is no need to use other methods. Page 42 of 67 MLR: Engines eBook ©2013 Melior, Inc. Pressure Testing Sometimes a small leak can be located using a pressure tester. A pressure tester allows the entire cooling system to be tested at one time. Radiator caps normally will have a pressure stamped on top. Pumping the system to the recommended pressure and allowing the vehicle to sit for 10-15 minutes will normally help pinpoint a coolant leak. For example, if the radiator cap is stamped 15 lbs. apply 15 lbs. of pressure. If after 10 minutes the pressure is holding at around 12 lbs., the system may not have a leak. If the pressure drops, there is a cooling system leak. If the leak cannot be pinpointed externally, this could be an indication of an internal coolant leak such as a head gasket or heater core leak. Testing with Coolant System Dye Some cooling system leaks are very difficult to pinpoint. In this event, using cooling system dye may be the best option. Always use the dye according to manufacturer directions and always ensure the dye you are using is compatible with the coolant of the vehicle. A UV dye will emit a bright green or orange color where it is escaping from the vehicle. Using a UV dye will requires allowing the vehicle to cool and pouring the dye into the cooling system. After test driving the vehicle, return to the shop, place on a lift, and recheck for coolant leaks. Bleeding Air from a Cooling System After repair a cooling system it may be necessary to bleed air from the system. There are several different procedures depending on the manufacturer. A vehicle with air trapped in the cooling system may overheat or the heater may not properly warm the passenger compartment in the winter. In some cases, air becomes trapped when a radiator hose or heater core is located higher in the vehicle that the radiator fill cap. In this event the vehicle will have a coolant bleed port located in the system higher than the radiator. When changing coolant or repairing a cooling system, always follow manufacturer instructions for removing air or the engine may overheat, causing severe damage. Unit 4: COMBUSTION AND IGNITION SYSTEMS Chapter 1: Characteristics of Combustion The combustion chamber is the area over the piston when it is at TDC. It is formed by the top of the piston, the bottom of the cylinder head, and the cylinder wall in between (if there is any cylinder wall exposed at TDC). Many things, such as the design and shape of the combustion chamber, compression ratio, fuel properties, engine temperature, and other factors can affect combustion in an engine. Page 43 of 67 MLR: Engines eBook ©2013 Melior, Inc. Compression Ratio In an earlier section, we said that the compression ratio is the volume of the cylinder, including the combustion chamber, with the piston at BDC compared to the volume at TDC. In the animation below, you can see that the volume of the cylinder at BDC is eight times as large as its volume at TDC, for a compression ratio of 8:1. If the total volume of the cylinder is 480cc with the piston at BDC, what will the volume be with the piston at TDC? Calculate your answer and then watch the animation to find out. A higher compression ratio can increase the power and fuel economy of an engine, but it also increases exhaust emissions and the temperature in the combustion chambers. Higher compression engines require a fuel with a higher octane rating (anti-knock rating). Abnormal Combustion Sometimes, conditions that cause abnormal combustion occur. The result is a loss of power, engine noise, and possibly engine damage. Abnormal combustion typically takes one of two general forms: preignition or spark knock. Pre-ignition Pre-ignition occurs when the air-fuel mixture self-ignites during the compression stroke before the spark plug fires. This condition has the effect of trying to force the piston back down the cylinder before it reaches TDC. Pre-ignition is the result of a hot spot in the combustion chamber that prematurely ignites the mixture. The early combustion creates abnormally high cylinder pressures and temperatures that the engine cannot withstand. Causes of pre-ignition include “hot” spark plugs (incorrect heat range), excessive accumulation of “glowing” carbon deposits in the combustion chamber, overheated exhaust valves, and cooling system malfunctions. Preignition is more prevalent during high speed and load conditions. Engine damage resulting from pre-ignition can include melted spark plug electrodes, melted/scuffed pistons, ring damage, and distorted valve heads. Spark Knock (Pinging) Spark knock, or “pinging,” is caused when the flame front initiated by the spark plug collides with an undesired flame front. The undesired flame front starts when part of the unburned air-fuel mixture is compressed to a pressure and temperature that exceeds the “self ignition” limit, causing it to spontaneously ignite. The fuel explodes too quickly, rather than burning smoothly. This condition is also referred to as “detonation.” Spark knock makes a “pinging” noise and occurs mostly under high load and low to medium speed conditions. Page 44 of 67 MLR: Engines eBook ©2013 Melior, Inc. Common causes of spark knock include low octane fuel, carbon deposits in the combustion chamber, high compression ratios, and high cylinder temperatures. Spark knock causes a rapid rise in pressure and temperature that can damage spark plug electrodes, pistons, rings, valves and valve seats. While spark knock is not as damaging as pre-ignition, the high combustion temperatures of prolonged knocking may lead to pre-ignition in severe cases. Spark Timing Spark timing must change to account for different operating conditions such as engine speed and load. The time required for combustion remains fairly constant, so this means that as engine speed is increased, the spark, which would normally occur just before the power stroke begins, must happen earlier in the compression stroke. Ignition timing is referenced in degrees, and earlier timing is said to be advanced, while later timing is said to be retarded. On many DI systems, the initial timing, or base timing is adjustable and must be set to a specification. The vehicle’s computer, or powertrain control module (PCM), or other mechanisms automatically handle the necessary changes in timing to match the operating conditions. The base timing specification is usually several degrees before TDC. Engines with EI systems have no base timing adjustment. Incorrect spark timing can cause abnormal combustion, and excessive timing advance can cause spark knock or pre-ignition. Most late model vehicles are equipped with a PCM controlled Knock Sensor (KS) system. Engine mounted knock sensors are used to detect vibrations caused by knock. When a knock is detected, the PCM retards spark timing to eliminate the knock. Torque and Horsepower Torque is turning or twisting force. The power developed in an engine’s cylinders is converted into a turning force by the crankshaft, which delivers this torque to the drive train where it is transmitted to the wheels. Torque is measured in pounds-feet (lb-ft), although it is often casually expressed as “footpounds,” which is actually a measure of work. In the metric system, torque is given in Newton-meters (Nm) or kilogram-meters (kg-m). Horsepower is the rate at which torque is produced. One horsepower was designated many years ago as the amount of work required to lift 550 pounds one foot in one second. The torque and horsepower an engine can deliver vary with engine speed. In the example of a typical performance graph shown below, note that maximum torque is developed at low to moderate RPM, while brake horsepower (the power available at the end of the crankshaft) continues to rise into the high RPM range. At higher RPM, the torque and horsepower curves begin to drop, due to difficulties in the engine’s breathing at the higher speeds. The line on the graph for friction horsepower represents the horsepower used to overcome the internal resistance in the engine. Page 45 of 67 MLR: Engines eBook ©2013 Melior, Inc. Chapter 2: Ignition Systems Ignition Systems Overview The ignition system must take the vehicle’s system voltage of about 12 volts and transform it to a high voltage of up to 60,000 volts to create sparks that jump the gap between the electrodes in each spark plug. It must do this hundreds of times a second and at precisely the right time for each cylinder under all operating conditions. We know that the ignition system provides the spark to ignite the air-fuel mixture, but how does it do it? First, let’s divide the ignition system into its two main sections, the primary and secondary circuits. The primary ignition circuit consists of the battery, the ignition switch, another switching device, and any other parts of the system that operate at or near vehicle system voltage (normally from about 12.6 volts to about 14.2 volts). In fact, all of the vehicle’s electrical system that operates at this voltage can be referred to as the “primary electrical system.” The secondary ignition circuit is the high-voltage section, and consists of the distributor cap and rotor (DI systems), spark plug wires, and spark plugs. Both the primary and secondary circuits must include a return path to ground. Ignition Coil Another very important component in the ignition system is the ignition coil. The coil (or coils) is part of both the primary and secondary circuits. The high voltage is produced here. The coil is a step-up transformer that produces high-voltage pulses. Aptly named, it contains two coils of wire that are insulated from each other: a primary winding and a secondary winding. The outer, primary winding contains hundreds of wraps of relatively large wire, while the inner, secondary winding contains thousands of wraps of much smaller wire. The wires are insulated from each other, so that current must flow through all of each coil. The start of the secondary winding is connected to one end of the primary winding. The primary winding receives vehicle system voltage (or near to it), and the secondary winding produces high-voltage pulses that exit the center high tension terminal of the coil on their way to the spark plugs. The high-voltage pulses are created through electromagnetic induction, and this is where the switching device comes into play. Page 46 of 67 MLR: Engines eBook ©2013 Melior, Inc. Current flowing through the primary winding creates a strong magnetic field around the coil. When the switching device interrupts the current flowing through the primary winding, the magnetic field collapses across the secondary winding. This induces a pulse of high voltage in the secondary. Since the secondary winding has many more turns of smaller wire than the primary winding, the moderate amount of current that was flowing through the primary induces the pulse of high voltage at a very low current in the secondary. Little current is needed; it is high voltage that’s required to create a spark capable of jumping the spark plug gap and igniting the air-fuel mixture. Contact Point Systems The switching device must turn on and off very rapidly, since it must interrupt the circuit to produce each spark. In years past, electromechanical contact points (breaker points) located in the distributor were used for this. The points opened to trigger the firing of the coil. It’s helpful in understanding later ignition systems to examine how these early systems work. As the distributor shaft rotates, cam lobes on it open the points to interrupt the circuit, and spring tension closes them to energize the primary winding again (called dwell time). A capacitor called a condenser is used to minimize arcing across the points. Contact point systems require periodic adjustment and replacement, and have performance shortcomings by today’s standards, but they work. These systems were used for over 60 years, but by 1975, most vehicles produced used electronic switching to fire the coil. Contact points can still be found in electromechanical relays and solenoids. Modern Systems Solid state, electronic triggering, and switching devices are now used an all automobiles produced, but the principles used are very similar to those used in contact point systems. These systems are much more accurate and provide better emissions, fuel economy, and performance than contact point systems could. They can produce higher voltages and are more reliable with little or no maintenance needed. Different manufacturers have used several different designs of electronic triggering and switching. These systems use some type of signal generator on the distributor or crankshaft, such as a timing disc (i.e., trigger wheel) and pickup coil in the distributor, or a Hall-effect pickup on the distributor or crankshaft. On these systems, movement of the timing disc generates a voltage signal in the pickup coil, which is sent to a transistor in the control module or PCM to control switching. Other engine sensor inputs may also be used. Page 47 of 67 MLR: Engines eBook ©2013 Melior, Inc. DI Systems In DI systems, the high-voltage pulses from the coil are sent to the rotor at the top of the distributor shaft. As the rotor turns, the pulses are sent to the proper spark plug wires through the distributor cap. Old distributor systems used weights on the distributor plate called a centrifugal advance to advance the timing for faster RPM, and a vacuum advance mechanism to advance the timing under lighter loads. These adjustments are made by the PCM on today’s cars. Below is an animation of a DI system with electronic triggering and switching. Page 48 of 67 MLR: Engines eBook ©2013 Melior, Inc. EI Systems EI systems go a step farther, eliminating the need for a distributor, cap, rotor, and sometimes spark plug wires. Like some later DI systems, these systems use input from a crankshaft sensor (CKP) and often a camshaft sensor (CMP) and other engine sensors for trigger timing. Ignition is controlled by an electronic control module (IC) and/or the PCM. In EI systems, multiple coils are used. Some systems use one coil per spark plug, while others use one coil per pair of spark plugs. Systems that use one coil for two spark plugs have pairs connected in series and both spark plugs fire at the same time. One cylinder will be ending its compression stroke, while the other will be ending its exhaust stroke, and this method is called a waste spark system, as the spark on the exhaust stroke does nothing. On this one-coil-per-plug system, the coils are mounted on the valve covers. Note the fuel rail located above the valve cover. Because of the wide variety of ignition systems on vehicles, it is imperative to consult the service information for the vehicle on which you are working before you attempt diagnosis and repairs. Note: Use care working with the secondary circuit with the engine running. While getting a shock from the high voltage is not normally injurious to healthy persons, it is not pleasant. Far more common are injuries caused by the involuntary reflex reaction to being shocked (banged head, lacerated hand, or worse). Engine Diagnostic Tests Engine diagnosis can be complex. No matter how good the tune-up, an engine with a burnt valve will still misfire. A vacuum leak can cause a rough idle and a timing belt that has jumped will always cause a loss of power. For that reason, any good tune-up begins with determining the engine condition. Several diagnostic tests can be performed to determine overall engine condition. The specific test you will perform depends on the type problem the vehicle is experiencing. For example: a vehicle with a DTC (diagnostic trouble code) P0300 is experiencing a random cylinder misfire. A vehicle with a DTC P0301 is experiencing a misfire on cylinder number one. For these two DTCs your diagnosis process may be different. Other common tests would be listening for a front engine noise or running compression tests using both static and running compression. Not all tests are required, however. Determining that a tune-up will most likely improve performance is a technician's responsibility. Page 49 of 67 MLR: Engines eBook ©2013 Melior, Inc. An engine diagnosis test usually starts with plugging a scan tool into the DLC connector, usually located under the dash on the driver's side. If a DTC is present, follow manufacturer diagnostic procedures to determine the cause of the problem. Always remember that a DTC only provides a starting point for diagnosis. A vehicle with a P0301 (misfire on cylinder one) does not mean that replacing the spark plug on cylinder one will repair the problem. In most cases, there is another problem that is causing the misfire. Cranking Compression Test In the case of a misfire that does not go away at higher RPMs, a compression test may be necessary. A compression test can reveal important information about internal engine condition. Remember, an engine with low compression cannot be tuned up properly until the problem causing the faulty compression reading is repaired. The step to perform a compression test is as follows: Warm the engine to normal operating temperature. Shut the engine off and disable the ignition system. Remove all spark plugs and label the ignition wire where necessary. Make sure there are no loose materials that can fall into the spark plug holes. Set the throttle plates to wide open position. Install the compression gauge into the cylinder you are testing. If testing all cylinders, most manufacturers recommend starting at cylinder number one. Crank the engine for approximately 5-6 seconds and record the highest reading. Be sure and crank each cylinder approximately the same amount of time. All cylinders should read approximately the same. As a rule of thumb they should all be within 10% of each other. For instance, for an engine with a cylinder that has its highest reading at 150 lbs., no other cylinder reading should be less than 135 lbs. If a cylinder's compression reading is lower than normal, try adding a few squirts of clean motor oil and retesting. If compression is now normal there is a good possibility that the engine has a worn or broken piston ring. If compression remained low, test for a burnt or bent valve. In any event, a basic tune-up will not repair the problem. Running Compression Test A running compression test or “dynamic” is run after a static compression test. The steps are as follows: Put all the spark plugs back into the engine except for the cylinder you are going to test. Disable the ignition and fuel injector for the cylinder. Remove the Schrader valve from the compression gauge. The test can be done with the Schrader valve in, but it will need to be released every 4-5 compression strokes. Start the engine and write down the reading with the engine idling. Snap the throttle quickly; the idea is not to increase engine speed but get a large amount of air into the cylinder. Running compression at idle should be about ½ cranking compression. Snap throttle compression should be around 80% of cranking compression. Page 50 of 67 MLR: Engines eBook ©2013 Melior, Inc. A running compression test checks the engine's ability to breathe. If the running compression is low, air did not make it into the engine. This can possibly mean a worn intake cam lobe. If the running compression is high (above 80%), air did not escape the engine (possibility a worn exhaust cam lobe). It is always a good idea to test more than one cylinder when performing a running compression test and compare the reading. If all cylinders fail, check the timing chain or belt for misalignment. Check for Vacuum Leaks A vacuum leak can cause several engine drivability concerns. A severe vacuum leak will cause the catalytic converter to run hotter than normal. A less severe vacuum leak can cause a rough, unstable idle. Most manufacturers now use a smoke machine to check for manifold vacuum leaks. It is not uncommon for a vehicle with a manifold vacuum leak to display a DTC P0171 or P0172. Oil Pressure Test A vehicle with low oil pressure may be worn to the point that a tune-up is a waste of time and money. Never depend on just the oil pressure gauge or light when diagnosing a vehicle with low oil pressure. Always use a mechanical gauge to verify a low oil pressure reading. However, if oil pressure is low and there is a lot of engine noise coming from engine valve train, an engine overhaul may be required to return the vehicle to normal operating condition. Cooling System Before a vehicle can run properly, the cooling system must be operating properly. A vehicle that is running too cool will more than likely develop drivability concerns. A cool-running engine will usually not run as efficiently as a properly warmed engine. If a vehicle is running too cool, check to see if the engine thermostat is stuck open. A vehicle that is running too hot can cause severe engine damage. A good tune-up should include testing the coolant for proper level. The electric cooling fans on the radiator should also be checked for proper operation. Other parts of the cooling system that should be checked include the radiator and heater hoses and water pump for leaks. Unit 5: COMPUTER SYSTEMS In modern vehicles, nearly all systems are electronically controlled. Ignition systems, emission controls, fuel delivery controls, and transmission controls are controlled by the PCM (powertrain control module). Some vehicles use several different control modules, but they all communicate on a network. Automotive networks have evolved over the years. Most modern vehicles have several communication networks that perform several different jobs. All vehicles produced since 1996 are required to comply with OBDII standards. Controller Area Network (CAN) bus is one of five (5) protocols used in OBDII-equipped vehicles. The primary on-board communication network between the microprocessors and electronic control modules (ECMs) now use CAN communication protocol. In a CAN system, redundant wiring is greatly reduced, because various input and outputs are shared between modules. There are several different CAN bus configurations. Always check service manuals to determine what particular system you are diagnosing. Page 51 of 67 MLR: Engines eBook ©2013 Melior, Inc. Chapter 1: Computer Systems and OBDII Computer Systems On late model vehicles, the Powertrain Control Module (PCM), or in some cases, the Vehicle Control Module (VCM) operates the entire engine management system. A PCM is a computer that controls the engine and transmission and stores Diagnostic Trouble Codes (DTC) for these systems. A VCM also controls and stores codes for other systems, such as the antilock brake system. "Computer" is a broad term. A computer is any device that can take input information and perform a set of instructions, then generate a specific output. For example, a computer may receive input from a keyboard (such as typing numbers), calculate a formula with those numbers, and then output a result on a screen. The computer also may activate a motor, turn on a switch, or perform just about any kind of engine management task. The computers in vehicles are no different. They receive input data from various devices, such as switches and sensors that provide information regarding conditions such as: Engine load Gear range Engine temperature Speed The computer also performs specific output functions, such as: Metering fuel Adjusting timing, etc. EGR operation Control transmission shifting Computers use voltage signals from the inputs and send signals to output devices. Two types of signals are involved: analog and digital. Incoming analog signals must be converted to digital format for the computer to use the data. Output digital signals may be modulated by frequency or pulse width. One of the bigger chips is the Microprocessor Unit (MPU), which may also be called the Central Processing Unit (CPU). Service on some of the newer models may involve reprogramming or changing the calibration in the PCM. It is necessary to refer to the vehicle service information for these procedures. Various computers in an electronic system communicate by means of a serial data stream. Serial data is a string of information transmitted in sequence, one item at a time, making up the data stream. In electrical terms, serial data consists of voltage signals changing between high and low, or ON and OFF. Page 52 of 67 MLR: Engines eBook ©2013 Melior, Inc. Each individual signal, either a "1" or a "0," is known as a "bit." A "1" is ON, and a "0" is OFF. A series of 8 bits makes up a "byte," also called a "word." The wire(s) that carry the serial data messages are called the data bus. Besides allowing control modules to communicate with each other, the data bus also allows the technician to tap into the data stream to run system diagnostics by connecting an electronic scan tool to the Data Link Connector (DLC). The DLC Connection The DLC Connector OBDII Since Onboard Diagnostics II (OBDII) was mandated in 1996 to reduce emissions (1997 for overseas imports), all vehicles sold in the U.S. have a standardized DLC connection located somewhere on the driver's side below the instrument panel. OBD-II compliant vehicles use the same standard for connections, trouble codes, and terminology. OBD-II guidelines require a vehicle system to have the ability to record a snapshot of operating conditions when a fault occurs, and the system must permit codes to be cleared with a scan tool. The speed at which bits are transmitted in the serial data stream is called the baud rate, a measure of how many bits are transmitted per second. Early Engine Control Modules had a baud rate of 160. Starting with the 1986 model year, ECMs with a baud rate of 8,192 were introduced, which is clearly a much higher serial data transmission speed. A common data stream for OBD II vehicles has a baud rate of 10.4K, or 10,400 bits per second, also known as “Class 2” data stream. The next serial networks to come into wide use on vehicles will be Controller Area Networks (CAN), which can transmit data at 1Mb, or 1,000,000 bits per second. The PCM controls many devices related to engine operation. In order to make operating decisions, the PCM depends on information from a network of sensors, switches, and other modules located throughout the vehicle. The data from these devices are considered inputs to the PCM. Page 53 of 67 MLR: Engines eBook ©2013 Melior, Inc. Note: Not all sensors are used in any one system. Some, such as the TP sensor, are used in all systems. But others, such as the cruise control switch or the accelerator pedal position sensor, are used only for certain applications. On-Board Diagnostics and OBDII Requirements All vehicles weighing less than 14,000 lbs. that are produced after 1996 are required to be equipped with an OBDII diagnostic system. The OBDII system is required to monitor every system that effects engine emission. The primary goal of OBDII is to ensure the vehicle operates as cleanly as possible for the entire life of the vehicle. A secondary concern was a lack of standardization within the automotive industry. Before OBDII, each manufacturer had used different scan tools, fault codes, and connectors. OBDII systems are required to use the same OBDII connector and Diagnostic Trouble Code (DTCs) for all emission-related codes. However, manufacturers still use some DTCs that are brand-specific. OBDII expanded the number and scope of systems being monitored and required more specific monitoring of emissions. OBDII systems will only set a DTC when pre-programed conditions are met. DTCs can be broken down into two categories: Type A and Type B. Note: A drive cycle is a test drive that duplicates a short freeway trip that closely simulates a daily drive to work. While the vehicle is being driven the PCM is running a series of tests to ensure the emission control system is operating properly. Type A DTC: Emission-related Will turn on the malfunction indicator light (MIL) after one drive cycle or when the condition (usually a misfire) is severe enough to damage the catalytic converter. Page 54 of 67 MLR: Engines eBook ©2013 Melior, Inc. Type A trouble codes will store freeze frame date after one drive cycle. Type B DTC: Emission-related Type B DTC will set a pending code after the first failed drive cycle. However, the MIL will not illuminate until the 2nd failed drive cycle. Some Type B pending DTC codes are cleared after one successful drive cycle. Type B DTC will illuminate the MIL after two driven cycles where the same failure occurred. Type B DTCs will not store freeze frame date until the 2nd drive cycle the failure occurred on most vehicles. When a failure occurs, that will set a DTC and an orange light will illuminate in the instrument cluster. The light will usually say "check engine" or "service engine soon." OBDII systems have a system of readiness monitors that run when certain driving conditions are met. When DTCs have been repaired or the system needs resetting, the system may not pass an emissions test because all monitored driving conditions have not been met. A system can be in a “Not Ready” state because of previous repairs or a dead or recently-replaced battery. A vehicle will remain "Not Ready" until all monitored driving conditions are met. Different manufactures have different procedures for setting readiness monitors. Most will require a drive cycle. Starting in 1996 through 2000, a vehicle can have no more than 3 readiness monitors not run and still pass an emissions test. For 2001 to 2008 no more than two readiness monitors can be left in a “Not Ready” status. On newer vehicles, all monitors must be operated. Most vehicles will display a P1000 DTC when tested if readiness monitors have not run. Continuous monitors are always operating any time their enabling condition is met. An example would be a misfire monitor. A misfire monitor would illuminate or flash an MIL if a misfire is severe enough to damage the catalytic converter. However, there is no need to operate a misfire monitor when the engine is not running. These are some of the major monitors run by the PCM in an OBDII-equipped vehicle. Depending on the manufacturer and vehicle there may be more major monitors. Always refer to the vehicle service manual for a list of monitors and their enabling condition. Catalyst Efficiency Comprehensive Component Monitor (CCM) EGR System Evaporative System (EVAP) Fuel System (adaptive fuel system trim) Heated Catalyst Heated Oxygen Sensor Misfire Detection Secondary Air Injection Page 55 of 67 MLR: Engines eBook ©2013 Melior, Inc. A vehicle scan tool is required to check the status of vehicle monitors. Some inexpensive scan tools do not have the capability to run a check of monitors. Diagnostic System Checks Most service manual sections have “systems checks” that verify proper operation of the system. These lead you on an organized approach to diagnostics. The “system checks” help narrow down the possible causes of a system fault. Once you have evaluated the situation, you should have enough information to perform a bulletin search. Other service information includes videos, newsletters and troubleshooting hints in the service manual. Using any stored DTCs, follow the designated DTC chart to make an effective diagnosis and repair. Select the symptom from the symptom tables and follow the diagnostic paths or suggestions to narrow down the possible causes and test for the root cause. You should develop a plan for diagnostics using wiring diagrams, theory of operation, and your experience. You may need to call technical assistance for more information. Repair and Verification After a cause has been isolated, make the repairs and validate proper operation. Verify that the symptom has been corrected. This may involve performing system checks or road‑testing the vehicle. Verify the correction under the conditions noted by the customer. Common Diagnostic Resources and Tools There are many resources available to the technician to help with diagnosis. The following is a list of some resources. Service Bulletins are currently available to technicians in several formats, including CDROM and paper. Manufacturer's Internet Communication SystemsWith a subscription to the manufacturer’s database, you can perform a search of published bulletins via the Internet on a PC or laptop computer. After a connection to the bulletin database is established, the technician types in keywords that relate to the vehicle owners concern. The system will display any bulletins that match the keywords. Service Manuals provide information such as diagrams, specifications, diagnostic charts, and procedures for each vehicle. It contains many system checks. It is an important tool, and knowing how to find service manual information is essential to diagnosis and service of engine performance conditions. The Onboard Diagnostic System Check is a critical step in diagnosis of engine performance conditions. Locate this system check in the drivability or engine controls section of the service manual. Service manuals may be available online and in paper format. Many diagnostic tools can be used in troubleshooting engine performance problems. Following is a list of common tools. Digital Volt-Ohmmeter (DVOM), or multimeter – is an essential automotive tool that functions as a voltmeter, ammeter, ohmmeter, and more. A high impedance unit is necessary for automotive use. Scan Tool – These will be discussed in the following section. Page 56 of 67 MLR: Engines eBook ©2013 Melior, Inc. Vacuum/Pressure Gauge – for measuring and testing engine manifold vacuum and other components. We will discuss this further in a later section. Compression Tester – for measuring cylinder compression. We will discuss this further in a later section. Cylinder Leakage Tester – for pinpointing sources of leakage in combustion chambers. Dynamometer – A large machine the vehicle is operated on that can load the engine to measure road performance characteristics. Oscilloscope – A scope provides a visual display of voltage over time on a monitor. The pattern displayed can be analyzed in various ways. Once used mainly for diagnosis of secondary ignition systems, it can be very useful in analyzing many other signals such as sensor outputs. Exhaust Gas Analyzer – Most measure the percentages of five different gasses in the exhaust stream: HC, CO, NOX, O2, and CO2. The makeup of the exhaust gas can be a useful tool in diagnosing the causes of excessive emissions as well as drivability issues. Engine Analyzer – Combines several of the above tools into one console Scan Tools A scan tool is a handheld device designed to help diagnose computer-controlled systems on vehicles. OBDII vehicles supply power to the tool through the pin connection; some older vehicles provide power through the cigarette lighter. Scan tools use an electronic storage device to store software programs, which must be updated periodically for new models and for changes to service information. The screen displays the instructions and menus, which are commanded through a keyboard or with buttons. Current scan tools can receive and display data, and can also send serial data messages to the PCM. This two-way communication is referred to as “bi-directional.” Data the scan tool receives include DTCs that have been set by a vehicle’s PCM, as well as live data from the serial stream with values for the many engine sensors and other system sensors, sometimes referred to as parameters. Scan tools can clear the trouble codes from the PCM’s active memory, and many will identify and provide information about the codes, or the codes can be looked up in the service information. Most scan tools can make a recording of a vehicle’s data stream over a period of time that can then be analyzed frame by frame to help in identifying intermittent or rapidly occurring problems. For more details on the scanner tool visit the web course MLR: Engines, at www.todaysclass.com. The Importance of Mechanical Systems Often, diagnosing a vehicle that has a DTC is not very difficult if you use the proper tools along with the service manual. Other times, what appears to be a problem with an input device or an output may really be a problem with a related circuit. The problem could also be in a mechanical system. Don’t forget that under all the electronics, there is still a basic engine. The engine management system assumes that all of the powertrain mechanical systems are functioning properly. Several items might cause conditions that could be blamed on the engine management system. Examples include: Low compression Page 57 of 67 MLR: Engines eBook ©2013 Melior, Inc. Vacuum leaks Exhaust system restrictions Problems with fuel delivery (including fuel pump, fuel filter, fuel lines or bad fuel) Worn ignition system components, bad wires, fouled spark plugs, etc. Incorrect basic ignition timing Cooling system malfunctions Transmission/transaxle faults Manifold Vacuum and Testing The intake stroke of the pistons creates a vacuum in the manifold. Vacuum is any pressure lower than atmospheric pressure. The strength of the vacuum created affects the distribution of air and fuel to the cylinders. Higher vacuum means better distribution. An engine’s ability to form and hold a vacuum is directly related to its ability to form and hold compression. When an engine loses the ability to create vacuum, performance suffers. The amount of vacuum formed in the manifold depends on several factors. First, the cylinders must be sealed. If a cylinder has low compression or high leakage, it may not produce sufficient vacuum to draw in the air-fuel mixture. Second, the manifold must be sealed, or vacuum will be lower than normal. Gaskets, vacuum hoses, vacuum operated systems, and accessories that operate on vacuum may leak, causing lower manifold vacuum. When the throttle plate is closed at idle, the vacuum in the manifold is greatest. When the throttle plate is open and the manifold is exposed to atmospheric pressure, vacuum is lower. Using a vacuum gauge to check manifold vacuum is a quick and easy way to test an engine. It is a good indicator of the engine’s ability to run efficiently. Typical engine vacuum will produce a steady reading of between 15 and 22 inches of mercury (inches Hg) with the engine at normal operating temperatures, idling, and in drive. Vacuum also changes with load, so if accessories are operated while monitoring vacuum, the readings will change. Vacuum readings will also vary between engines. One reason is differences in compression ratios. If an engine has higher compression, it will have 1 to 2 inches Hg higher vacuum. Altitude also affects vacuum. For every 1,000 feet above sea level, vacuum will be lower by 1 inch Hg. Some engines that use a high lift camshaft or have considerable valve overlap will produce a slightly lower, erratic needle reading on a vacuum gauge. Some areas that can be diagnosed using vacuum readings include: Engine components (i.e., valves, valve guides and springs, piston rings) Manifold leaks Valve timing Restricted exhaust system. In addition, low manifold vacuum can significantly affect the computer-controlled fuel system, in turn affecting performance. This is because the engine management system uses a manifold absolute pressure (MAP) sensor to influence spark timing and fuel control. Page 58 of 67 MLR: Engines eBook ©2013 Melior, Inc. In reference to vacuum and pressure, keep in mind that a vacuum still has a certain amount of pressure. It is simply lower than atmospheric pressure. Normal atmospheric pressure at sea level is 14.7 pounds per square inch (psi), but most standard pressure gauges, such as a tire gauge, assign atmospheric pressure a value of “0.” Some pressure specs are actually expressed in “psig,” indicating “pounds per square inch – gauge,” to distinguish them from absolute pressure. Higher air pressure will always flow into an area of lower pressure, if it is permitted. Readings Average, steady readings between 15-22 Hg (normal readings for a 60° V6 engine may be lower i.e, 12-16 inches Hg) Possible Causes Normal Low but steady, between 12 and 15 inches Hg. Leaking around piston rings, late ignition timing, or late valve timing. Needle fluctuates or drops between 1 and 2 inches Hg at idle. Burned or leaking valve or spark plug in one of the cylinders is not firing. Irregular needle drop between 1 and 2 inches Hg at idle. Sticking Valve, intermittent spark plug misfire, or rich or lean air/fuel mixture. Normal at idle speed, but excessive vibrations at higher rpm. Weak valve springs; valves sticking in guides. Page 59 of 67 MLR: Engines eBook ©2013 Melior, Inc. Excessive vibrations at idle speed, but steadies at higher. Worn valve guides. Excessive vibrations at all rpm. Leaky head gasket. Needle oscillates slowly, or drifts, between 3 and 9 inches HG lower than normal. Intake system leak. Normal at idle speed, but drops to near zero and rises to lower than normal. Restriction in exhaust system. Intermittents Conditions that are not always present are considered intermittent. These may be resolved by observing history DTCs, evaluating the symptoms, and reviewing conditions described by the customer. Simulating system conditions to duplicate the intermittent and using a systematic process is important. Follow the suggestions for intermittent diagnosis in the service manual. Most professional scan tools and DVOMs have excellent data capture capabilities that can help you detect intermittent conditions. When no trouble can be found and the vehicle seems to operate normally, it is most important to verify that the condition described by the owner is normal, compared to other vehicles. The condition may be intermittent, so verify the complaint under the conditions described by the customer before the vehicle is released. When the problem cannot be successfully located or isolated, a re-evaluation is necessary. The problem should be verified again by repeating one or more of the initial steps. Page 60 of 67 MLR: Engines eBook ©2013 Melior, Inc. Unit 6: AIR-FUEL DELIVERY SYSTEMS, EXHAUST SYSTEMS, AND EMISSION CONTROLS Chapter 1: Systems and Controls Air-fuel Delivery Systems Air is provided to engine cylinders through various methods of induction. Induction systems are matched, or tuned, to a particular application. The air filter surface area, throttle body bore diameter, and even the tubing from the air cleaner assembly to the throttle body control the air charge volume to the engine. Intake Manifold The intake manifold plays an important but different role in the air intake systems for Throttle Body Injection (TBI) and Multiport Fuel Injection systems. All new automobiles sold in the U.S. since 1990 use fuel injection systems. On engines equipped with TBI, the intake manifold must carry both air and atomized fuel to the cylinder head intake ports. Therefore, intake manifolds for TBI systems, like those for carbureted systems, are designed with compromises to meet both objectives. “Wet” manifolds, as they are known, must maintain proper velocity throughout the desired engine operating range to hold fuel in suspension while providing sufficient air capacity to obtain peak horsepower. In the TBI system shown here, the cylinder on the right is on its intake stroke. You can see the air-fuel mixture in both sides of the manifold and air-fuel entering the right cylinder around the open intake valve. The intake manifold for an MFI system does not carry fuel, and can be tuned for either maximum torque or horsepower. Since it carries only air, it is referred to as a “plenum.” Long air passages, called runners, that provide for increased low-end and mid-range torque, are possible without the concern of fuel condensing on the manifold walls. The fuel injector sprays a pulse of fuel and the air-fuel entering the right cylinder around the open intake valve. The plenum carries only air. Fuel is delivered either above the throttle plate (TBI), or in the intake port nearer the intake valves (MFI). The fuel injector(s) are controlled by the PCM. Many designs of fuel injectors are used, but all have the same primary function. When the injector nozzle opens and the pressurized fuel is injected, an atomized air-fuel mixture is provided to the engine. The fuel further atomizes as it enters the combustion chamber. Page 61 of 67 MLR: Engines eBook ©2013 Melior, Inc. Fuel Injector Fuel injectors are provided a continuous supply of pressurized fuel from the electric fuel pump. An injector is a solenoid that energizes when grounded by the PCM to deliver pressurized fuel into the intake manifold or intake port. The PCM controls fuel flow by pulse width modulation of the injector “ON” time. The duration of this “ON” time is called the pulse width. When fuel requirements increase, the injector “ON” time increases, producing a richer air-fuel mixture. When fuel requirements decrease, the injector “ON” time decreases, producing a leaner mixture. A fuel injector is an electromagnetic device. The precision mechanical components are controlled by means of the solenoid in the injector, and the solenoid is energized through an injector driver in the PCM. The injector is triggered based on ignition reference pulses. PCM Although engine RPM determines when an injector opens, the PCM determines how long to leave the injector open based on its readings of coolant temperature, engine load, throttle position and oxygen sensor (O2) voltage. Page 62 of 67 MLR: Engines eBook ©2013 Melior, Inc. The PCM driver circuit controls the “ON” time of the solenoid by providing a ground. When the injector driver opens the circuit to the solenoid (turns it off), return spring tension pushes the ball or pintle onto its seat and shuts off fuel flow. Because of the wide variety of air-fuel systems on vehicles, it is imperative to consult the service information for the vehicle on which you are working before you attempt diagnosis and repairs. CAUTION: Always follow all safety precautions and keep fuels away from sparks or flames. Exhaust System The exhaust system must collect the spent gas from each cylinder and route it to the rear of the vehicle for discharge to the air. The major components of the exhaust system include: Exhaust manifold(s) Exhaust pipes and seals Catalytic converter(s) Muffler(s) Tailpipe(s) Heat shields Hangers, clamps, and hardware Exhaust systems have a major affect on airflow through engines. Exhaust pipe diameters must be sufficient to allow the engine to expel exhaust gases at the proper rate, with minimum backpressure. If exhaust gases are not expelled effectively, the air-fuel charge to the cylinder will be diluted and engine performance will suffer. If the diameter is too large, the engine could run cooler, increasing emissions levels. Although exhaust system operation is simple, the design is often more complex. Exhaust manifolds must fit in cramped engine compartments without sharp bends that would restrict gas flow, while still leaving access for serviceability. Highpressure pulses produced when the exhaust valves open and close must also be muffled to reduce exhaust noise. Baffles in mufflers minimize exhaust noise, and catalytic converters contribute to noise reduction. A major component in the exhaust system is the catalytic converter, whose primary purpose is to control exhaust emissions. However, a deterioration of the materials inside the converter, possibly due to a prolonged misfire condition, can cause an exhaust restriction that may have a significant effect on engine performance. Page 63 of 67 MLR: Engines eBook ©2013 Melior, Inc. If an exhaust restriction occurs, the complaint might be “lack of power.” To determine if there is a restriction, check exhaust system backpressure using service manual procedures. CAUTION: Don’t forget that exhaust system components get very hot after the engine has been running. Catalytic converters get especially hot and have been known to start dry grass fires. Ensure proper ventilation to avoid asphyxiation when running an engine to check for exhaust leaks. Emission Controls When the Industrial Revolution began in the 19th century, the practices of industries and a growing population soon began to have a significant damaging effect on the environment. Pollution of the air and water became a serious problem, and eventually, regulations were enacted to curb the releasing of harmful pollutants into the environment. As the number of motor vehicles on the road steadily increased during the 20th century, it became evident that vehicle emissions were a significant part of the problem that would have to be addressed. California led the way by passing state laws to reduce vehicle emissions. Its dense population centers and climate conditions had caused a severe smog problem in the Los Angeles Basin. By the mid-1960s, the first emission control systems were being installed on all new cars sold in the U.S., and in 1967, the Clean Air Act was amended to include standards for automotive emissions. The Environmental Protection Agency (EPA) develops and enforces environmental regulations. Within a few years, fuel economy standards were introduced as well, in the Corporate Average Fuel Economy (CAFE) standards. With increasingly stringent emissions regulations that began in 1993, much has been done to reduce vehicle emissions, and emissions from an average vehicle today are less than 5% of a 1960 model. However, the increase in the number of vehicles on the road causes emissions to continue to be a concern. Emissions from the exhaust, crankcase, and fuel evaporation are controlled. Standards are set primarily with regard to three emissions: hydrocarbons (HC), carbon monoxide (CO) and various oxides of nitrogen (NOx). Hydrocarbons (HC) Hydrocarbons are simply unburned fuel. During combustion, hydrogen and carbon are converted in combination with oxygen, but not all of the molecules are converted. Some pass through the combustion chamber and come out of the engine as unburned fuel known as hydrocarbons. High levels of hydrocarbons are often related to problems in the ignition system. Some causes of high HC are misfire, improper timing, low compression, vacuum leaks, or incorrect air-fuel ratio. Carbon Monoxide (CO) Carbon monoxide is partially burned fuel, and the product of incomplete combustion. As previously stated, carbon is one of the elements that make up the fuel burned in the engine, together with oxygen. If the combustion were complete, carbon emissions would come out of the engine in the form of carbon dioxide, or CO 2, which is harmless to humans. Carbon monoxide, on the other hand, is a potentially lethal gas that is also odorless and colorless. High carbon monoxide emissions can be caused by an Page 64 of 67 MLR: Engines eBook ©2013 Melior, Inc. excessively rich fuel mixture, low idle speed, a restricted air filter, faulty PCV system, or a faulty fuel delivery system. Oxides of Nitrogen (NOx) Nitrogen makes up about 78% of the air going into an engine. Under extremely high temperatures, it combines with oxygen to form oxides of nitrogen (NOx). NOx, when exposed to sunlight and combined with unburned hydrocarbons, creates the visible air pollutant known as smog. Smog is a problem in many heavily populated areas of the world. Oxides of nitrogen can also combine with other molecules in the atmosphere to form compounds contained in “acid rain.” NOx is created when combustion chamber temperatures are too high (above approximately 2500°F). Common causes of excessive NOx include inoperative EGR, cooling system malfunction, lean air-fuel ratios, etc. Catalytic Converter The catalytic converter reduces all three exhaust emissions. Converters contain small amounts of rhodium, palladium and platinum. When heated, these elements act as catalysts and convert the exhaust gases -- the HC, CO and NOx -into the harmless substances of water (H2O), carbon dioxide (CO2) and nitrogen (N). Emission Subsystems EVAP System Hydrocarbons are released from fuel in vapor form. In the past, fuel tanks had vented caps, and HC was released into the atmosphere. Hydrocarbons escaped when the fuel tank was being filled, or even when the car was in operation. Hydrocarbon vapors are referred to as evaporative emissions. To reduce HC emissions, systems have since been developed to recover the vapors that evaporate from the fuel. An EVAP system is used to collect fuel vapor from the fuel tank. These vapors are then stored in a canister filled with activated carbon. The EVAP system allows the vapors to be drawn from the canister, into the engine and burned during certain operating conditions. This is called purging, since the vapors are purged from the canister. Page 65 of 67 MLR: Engines eBook ©2013 Melior, Inc. PCV A positive crankcase ventilation (PCV) system reduces crankcase emissions and protects the engine. During engine operation, some combustion gases leak past, or "blow by" the piston rings and into the crankcase. If the gases are not vented, moisture, sludge, and acids will build up, along with unwanted crankcase pressure. The accumulation of these harmful gases can shorten the life of the engine and cause oil leaks. These gases also contain the harmful emissions we have discussed, and are a source of air pollution. The PCV system removes blow-by gases from the crankcase and routes them back into the combustion chamber, where they can be burned, instead of venting them to the atmosphere. The PCV system was the first emission control device used on automobiles. In a PCV system, fresh air from the air cleaner is supplied to the crankcase where it mixes with the blow-by gases from the combustion process. The mixture of fresh air and blow‑by gases passes through the PCV valve and into the intake system to be burned in the engine. Most PCV systems use a mechanical valve to control flow rate, while others use an oil separator assembly. The PCV valve's spring tension is designed specifically for each unique engine application. The spring tension controls the flow rate of crankcase vapors into the engine, preventing pressure buildup. EGR Exhaust Gas Recirculation (EGR) systems have been used on vehicles for many years. The primary purpose of the EGR system is to control combustion chamber temperatures, thus reducing the amount of oxides of nitrogen (NO x) in the exhaust. Although EGR is necessary to control NO x emissions, it also affects volumetric efficiency. Volumetric efficiency is the ratio of the amount of air-fuel mixture that actually enters a cylinder to the amount that could enter under ideal conditions. An EGR valve provides a link between the air intake and exhaust systems. Air flowing into the engine through the throttle body enters the intake manifold. When the EGR valve is opened, some exhaust gas is directed into the intake as well. As the piston moves down the cylinder on the intake stroke, the combination of air-fuel and exhaust gas enters the combustion chamber. This combination has the same volume as a pure air-fuel charge, but there is less air and fuel to burn when the mixture is ignited, due to the presence of the exhaust gas. Temperature and pressure in the cylinder are reduced, resulting in reduced NO x. However, pressure in the cylinder is what pushes the piston down; therefore, engine performance can be affected by the decrease in cylinder pressure. Page 66 of 67 MLR: Engines eBook ©2013 Melior, Inc. An EGR valve is designed to operate under engine load, when NO x is most likely to be produced as the result of high combustion chamber temperatures. If the EGR valve opens during idle or low RPM, effects on engine performance may be noticeable. One benefit of the EGR system is that cooler combustion temperatures help the exhaust valves stay cooler. Some engines do not use an EGR valve. In such applications, low NO x levels are achieved through a combination of engine design and computer calibrations of fuel control and timing. With the appropriate valve overlap, cylinder temperatures are controlled, and emissions reduced. These are only some of the major subsystems of emission controls; some vehicles may have other systems. An exhaust gas analyzer can be used to measure the percentages of different gasses in the exhaust stream. Most machines measure the three main pollutants, along with the amount of oxygen (O2) and carbon dioxide (CO2) for reference. The makeup of the exhaust gas can also be a useful tool in diagnosing the causes of excessive emissions as well as drivability issues. CAUTION: It is against federal law for an automotive technician to remove or defeat emission control systems. It is also illegal to manipulate data or falsify records in order to issue a pass on a vehicle emissions inspection in states where they are required. Page 67 of 67