1
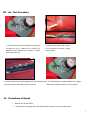
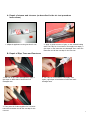
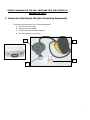
SERVICE MANUAL FOR THE AIR- PRESSURE TEST AND REPAIR OF
IMMERSION SUITS
I. Immersion Suit Repair Kit (Set of Servicing Equipment)
The aluminum kit contains a set of Servicing Equipment.
A. A face fixture (two parts),
B. A pressure gauge (0-6kPa).
C. A foot pump (with multi-valve adaptor).
D. Glue and applicator (two pieces).
A
C
D
B
1
II. Adjust the Air- Test Device on the Immersion Suit
Part 1 Face fixture
1. Lay the immersion suit on a work table
and check for damages.
2. Place part 1 face fixture inside immersion
suit hood area and zip up.
Attention: Stretch the hood fabric by
pulling it to the direction of arrows.
The hood should not have any folds.
Part 2 Face fixture
3. Place part 2 face fixture on part 2, by
4. Image of assembled face fixtures with
adjusting its holes carefully through the
hood. Attention: The zipper head
bolts and joints.
should pass through the hole.
5. Install the o-ring gasket and tighten up the butterfly nut so as to eliminate leakage around the face
seal.
2
6. Check the pressure gauge for any breaks
7. Insert the Pressure Gauge at the face
on the dial surface or to the pointer.
fixture, by pressing down -at the same
time- the joint at face fixture.
9. Install the Connector for the foot pump,
10. Adjust the multi-valve adaptor on the
by pressing down the proper joint, so as to
connector of face fixture.
insert the connector.
3
III. Air- Test Procedure
1. Provide air into the suit, through the foot pump, to
2. Sprinkle along seams and closures
a pressure of 0,7 to 1,4Kpa (0.1 to 0,2psi) [acc.
of the immersion suit with a soapy
MSC/Circ.1114.] Maintain the pressure to those
water solution.
limits for the air-test.
3. Check carefully if any bubbles appear from the Immersion Suit4. It is normal that the bubbles appear in the zipper
and mark properly the leaking areas of the suit.
slides and the zipper toother part in the clamp.
IV. Procedures of Repair
•
•
Remove the air-test device.
Clean the suit thoroughly with fresh water and dry it, trying to leave the marks visual.
4
A. Repair of steams and closures (as described in the air- test procedure
instructions)
1. Adapt the applicator on the glue tube for use.
2. Apply a gentle amount of glue on the marked leaking
areas. Let it dry for 8-10 minutes. Then apply once again, a
glue layer on the immersion suit damaged area. Leave the
immersion suit till the next day for the next use.
B. Repair of Rips, Tears and Punctures
1. With use of glue tube and applicator, apply a
2. Let it dry for 8-10 minutes. Then apply, once
glue layer on both sides of immersion suit
again, a glue layer on both sides of Immersion suit’s
damaged area.
damaged area.
3. Then press the 2 sides together for 2 minutes.
Leave the immersion suit till the next day for the
next use.
5