1
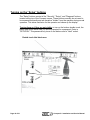
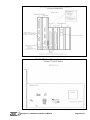
Coexpert 5.1
Installation and Service
Manual
Part Number: A0566980
Rev. C
Effective: 12/12/12
Please note that our address and phone information has changed.
Please reference this page for updated contact information.
These manuals are obsolete and are provided only for their technical information, data and capacities.
Portions of these manuals detailing procedures or precautions in the operation, inspection, maintenance
and repair of the products may be inadequate, inaccurate, and/or incomplete and shouldn’t be relied
upon. Please contact the ACS Group for more current information about these manuals and their
warnings and precautions.
Parts and Service Department
The ACS Customer Service Group will provide your company with genuine OEM quality parts manufactured to engineering
design specifications, which will maximize your equipment’s performance and efficiency. To assist in expediting your phone
or fax order, please have the model and serial number of your unit when you contact us. A customer replacement parts list
is included in this manual for your convenience. ACS welcomes inquiries on all your parts needs and is dedicated to
providing excellent customer service.
For immediate assistance, please contact:
•
North, Central and South America, 8am – 5pm CST +1 (800) 483-3919 for drying, conveying, heating and cooling
and automation. For size reduction: +1 (800) 229-2919.
North America, emergencies after 5pm CST (847) 439-5855
North America email: [email protected]
•
Mexico, Central & South America
Email: [email protected]
•
Europe, Middle East & Africa +48 22 390 9720
Email: [email protected]
•
India +91 21 35329112
Email: [email protected]
•
Asia/Australia +86 512 8717 1919
Email: [email protected]
Sales and Contracting Department
Our products are sold by a worldwide network of independent sales representatives. Contact our Sales Department for the
name of the sales representative nearest you.
Let us install your system. The Contract Department offers any or all of these services: project planning; system packages
including drawings; equipment, labor, and construction materials; and union or non-union installations.
For assistance with your sales or system contracting needs please Call:
North, Central and South America +1 (262) 641-8600 or +1 (847) 273-7700 Monday–Friday, 8am–5pm CST
Europe/Middle East/Africa +48 22 390 9720
India +91 21 35329112
Asia/Australia +86 512 8717 1919
Facilities:
ACS offers facilities around the world to service you no matter where you are located. For more information, please visit us at
www.acscorporate.com
United States:
ACS Schaumburg – Corporate Offices
1100 E. Woodfield Road
Suite 588
Schaumburg, IL 60173
Phone: + 1 847 273 7700
Fax: + 1 847 273 7804
ACS New Berlin – Manufacturing Facility
th
2900 S. 160 Street
New Berlin, WI 53151
Phone : +1 262 641 8600
Fax: + 1 262 641 8653
Asia/Australia:
ACS Suzhou
109 Xingpu Road SIP
Suzhou, China 215126
Phone: + 86 8717 1919
Fax: +86 512 8717 1916
Europe/Middle East/Africa:
ACS Warsaw
Ul. Działkowa 115
02-234 Warszawa
Phone: + 48 22 390 9720
Fax: +48 22 390 9724
India
ACS India
Gat No. 191/1, Sandbhor Complex
Mhalunge, Chakan, Tal Khed,
Dist. Pune 410501, India
Phone: +91 21 35329112
Fax: + 91 20 40147576
Coexpert 5.1 Menu Structure
Coexpert -----
Overall Page ---
Process Page ---
Trending Page --Inventory Page ---
Gauging Page ---
Security Page ---
Setup Page --Diagnose Page ---
Calculator Page --Alarm Log Page --Help Page --Minimize Button --Exit ---
Blender/OFC Image---
Start/Stop Blender/OFC
Change Blender Recipe
Size Button
Current Gear Choice
Ramp to Stop
Monitor Only
Control by RPM
Control by Weight
Go to RPM mode with Drool Speed Setpoints
Trim Width
Coexpert Recipe Book --Load and Quit
Cancel Load
Load a Recipe
Save the Recipe
Edit
Make back-up Floppy of all Recipes
Restore Recipes from Floppy
Graph of Recipe
Pause/Resume Data Capture
Show Grid Lines
Clear Inventory
Generate Report
Print
Save to Disk
Exit
Gauge #1
Gauge #2
Gauge #3
High Tolerance
Target Diameter
Low Tolerance
Administrator Password
Maintenance Password
Operator Password
Access Privileges
(See Setup Page Tree on Following Page)
Clear Com Counts
Restart High/Low Capture
Calibrate Layer RPM in Monitor Function
Entering in Service Passwords
Advanced Settings --Median Width
Calculation Points
Layer Deadband in %
Maximum Input Change in %
Maximum Input Change Before Alarm
Number of Maximum Inputs Before Alarm
Extruder Drive Offset Section
Maximum Input/Output Voltages
Voltage Deadband in %
Refresh Rate in Seconds
Advanced Control Settings --- Polling time in milliseconds
Response time in milliseconds
Volumetric layer control option
Force I/O Functions
Calculator Functions
Exiting the Calculator
Save Alarms to Disk
Print Log
Exit Alarm Log
Service Use
Minimizing the Coexpert Program
Exiting the Coexpert Program
Coexpert 5.1 Menu Structure Breakdown and Explanation
Overall View Page
Description
The overall view page is accessed by simply touching the "Overall View" button on
the top of the Coexpert screen. This page shows the status and value of all
extrusion process items. From this page the operator can monitor information
about the extrusion layer structure, rpm values, individual blender status, and other
recipe related information. For this reason the overall view page is the best page to
view during normal operation.
Explanation of Items Shown
Target Lbs/Hr or Kgs/Hr --the current set "target" rate that is calculated based on
the recipe that the operator has entered on the "Process Page". This value is only
shown when the line is in "Control by Weight" mode. Otherwise it will show "0".
Actual Lbs/Hr or Kgs/Hr --the current "actual" rate that the extruder is producing.
This value is shown in all modes of operation including "Monitor Only" mode.
Set RPM -- the current "target" RPM value for the extruder. This value is shown in
all modes of operation including "Monitor Only" mode.
Target % --the current set "target" layer percentage that is calculated based on the
recipe that the operator has entered on the "Process Page". This value is only
shown when the line is in "Control by Weight" mode. Otherwise it will show "0".
Actual % -- the current "actual" layer percentage that the extruder is producing.
This value is shown in all modes of operation including "Monitor Only" mode.
Target Total Lbs/Hr or Kgs/Hr --the current total "target" rate for all extruders
based on the recipe that the operator has entered on the "Process Page". This
value is only shown when the line is in "Control by Weight" mode. Otherwise, it will
show "0".
Actual Total Lbs/Hr or Kgs/Hr --the current total "actual" rate for all extruders. This
value is shown in all modes of operation including "Monitor Only" mode.
Target Hauloff Feet/Min or Meters/Min -- the current "target" speed of the hauloff
device such as capstan, nip, puller, or chill roll. This value is shown in all modes of
operation including "Monitor Only" mode, but is only available when the "Line
Speed Control" is selected under "Setup".
Actual Hauloff Feet/Min or Meters/Min -then current "actual" speed of the hauloff
device. This value is shown in all modes of operation including "Monitor Only"
mode, but is only available when the "Line Speed Control" is selected under
"Setup."
Coexpert 5.1 Installation and Service Manual
Page 3 of 31
Product in Spec Message -this is found in the lower-left comer of the screen and
shows that the current gauge measurement is within the specifications entered in
by the operator on the "Gauging" page. This is only available when a gauge has
been interfaced to the Coexpert system and configured under "Setup/Gauging
Interface Setup".
Gauge Control Active Message -this is found in the upper-left corner of the screen
and is only available if "Ramp Control" is selected under "Setup/Gauging Interface
Setup" (see "Gauging Interface Setup" page). This indicates that the gauging
control algorithm is currently active (see "Gauging Interface Setup" page)
Size Button -touching this area enlarges or shrinks the data in a particular box.
This is useful if the operator is having trouble viewing the small text.
Green Indicator on Blender/OFC Picture -this indicates that the blender or OFC is
"running" and currently does not have any alarms. If the unit is turned off or an
alarm occurs then the green indicator turns off
Double Touching the Blender/OFC Picture -this brings up another screen where
the operator can start/stop the blender/OFC from the Coexpert. The recipe for that
blender can also be changed. This feature can be disabled by deselecting it under
"Setup/Blender Network Setup/ID Setup/Edit Item".
Process Page
Description
The process page is accessed by touching the "Process" button located on the top
of the Coexpert screen. From this screen, the operator can modify the current
mode of operation (Stop, Monitor Only, Control by RPM, Control by Weight, Go to
RPM mode with DROOL speed setpoints). The operator also can modify all RPM,
Hauloff speed, and Recipe setpoints as well as access the "Coexpert Recipe
Book" where recipes have been previously stored.
Explanation of Items Shown
Current Gear Choice -the current selected gear for the hauloff. This is only
available once "Line Speed Control" under "Setup" has been selected and
multigear hauloff under "Setup/Extruder and Hauloff Setup" has been enabled. The
line must be stopped before the operator can change the gear choice selection.
"Ramp to Stop" button -this button is one of the operation mode selectors. Touch
this button to stop the extrusion line. When this button has been touched the
Coexpert will go into control mode (indicated by blue light on panel front) and then
will evenly ramp the line down to stop. In "Ramp to Stop" mode no values can be
entered in on the "Process Page", but the operator can access the "Recipe Book".
If the line was running prior to hitting this button then a warning message will
appear asking if the operator is sure that he wants to stop the line. This protects
against accidentally bumping the screen. The ramp that is used maintains product
specifications until the last minute. This minimizes variations for the product that
remains in the line. This function is not the same as the Remote "E-Stop" function,
which ramps the line down much quicker and does not maintain product
specifications.
Page 4 of 31
Coexpert 5.1 Installation and Service Manual
"Control by Weight" button -this button is one of the operation mode buttons.
Touching this button transfers the line to weight mode according to the values
entered by the operator in the "Control by Weight" section (upper right). Once this
button is touched, the "Control by Weight" section will be highlighted in blue. If the
line is running in either "Monitor Only" mode or "Control by RPM" mode then the
Coexpert checks to make sure a recipe has been entered and accepted prior to
transferring to "Control by Weight" mode. If no recipe has been entered, a "Check
Recipe" message will appear. Transferring the line in this fashion is not necessarily
a "bumpless" transfer. Only if the current recipe values are exactly what the line is
running will a "bumpless" transfer occur. In order to avoid such a problem, a
"LEARN RECIPE and TRANSFER to Control by Weight" button (located near top
of page) is available from "Monitor Only" or "Control by RPM". Touching this button
causes the Coexpert to take a "snapshot" of the current running recipe, write this
recipe to the "Control by Weight" section, and then automatically transfers the line
to "Control by Weight" mode. This is similar to the "cruise control" function in your
car. Running the line in "Control by Weight" prevents extruder output deviation that
is commonly caused by screen pack build-up, screw wear or build-up, heat setting
deviations, or changes in the density of the plastic.
Recipes can be saved to the "Coex Recipe Book" by touching the "Coex Recipe
Book" button, selecting "Save Recipe", and then picking the recipe number or
name that you wish to use. From the recipe book, the operator or process engineer
can also write new recipes, edit existing recipes, make back-up floppies of all
recipes, and restore recipes from floppies. This is a useful tool for the process
engineer.
From a demo program installed on the engineers’ desktop PC, they can write a
book of recipes, copy them to disk, and then distribute this disk to the Coexpert
systems in the plant. If the Coexpert has been integrated into the customers "TCP
LAN" Ethernet system then the engineer can remotely write and distribute these
recipes. An open slot is available inside the Coexpert for an Ethernet card, but it is
up to the customer to have one installed and configured. "Control by Weight" mode
is also very useful when developing new products. The operator can simply touch
the highlighted boxes, which will bring up a number pad that the operator can enter
in the recipe values. After all values have been entered, touch "Accept New
Recipe" and the line will ramp to that recipe. The "Running Recipe" boxes show
what the current set recipe values are.
To load a previously stored recipe, the operator touches the "Coex Recipe Book",
then "load a Recipe" button, picks the recipe number or name, then "Load and
Quit" button, and finally the" Accept New Recipe" button. The "Control by Weight"
mode is also very useful in "trimming" the line to reduce material cost. Usually lines
are operated slightly above the minimum specifications of a product. This is to
ensure quality product throughout the product run. With "Control by Weight" mode,
this is not necessary. The Coexpert adjusts for conditions that cause the extruder
output to fall and therefore ensures quality product using the minimum amount of
material throughout the run of the product.
Coexpert 5.1 Installation and Service Manual
Page 5 of 31
“Trim Width" entry box -this box can be touched to allow the operator to enter in
the current measured trim width of the product. This button is only available if trim
entry is configured under "Setup/Extruder and Hauloff Setup". The value can only
be entered once the process has become "Stable". The procedure should be done
exactly the same from operator to operator. Bring the line up to speed (using either
RPM mode or Control by Weight mode), let the process stabilize (indicated by
"Stable Process" message on "Overall View" page), enter the “Trim Width" on the
Coexpert program. You will be prompted for a password before the Coexpert will
allow the program to run. This is to prevent illegal installations. To obtain a
password, the customer must call AEC/HydReclaim on the day of installation and
ask for the "Pirate Protection Password". This password changes every day and
therefore can only be generated on the day of installation. It is possible for AEC/
HydReclaim to generate a password for a certain date if the installation is to be
done on the weekend. Once the password has been entered on the system you
will never see this display again. It is only necessary for the installation. After the
system has been authorized and the program boots go to "Setup/Configuration
Utilities" and select "Load a Configuration". Pick the name of the configuration that
was previously written down and the system will restart with the Coexpert
configured as before. All Coexpert configurations are forward and reverse
compatible, therefore if you are running version 1.0 you can easily upgrade to
version 5.1 or if you are running version 5.1 you can easily go back to version 1.0.
Because of this software, upgrades are very easy to accomplish, but some basic
knowledge of WIN95 shortcuts and functions are required. For information on
where to find the configuration files directly from WIN95 see "Hard Drive File
Structure".
Extruder and Hauloff Setup Button -this button accesses the "Extruder and Hauloff
Setup" page. SEE "Extruder and Hauloff Setup" page.
Enable History Log -this should only be enabled during extensive troubleshooting
of the system. Enabling this feature generates an on going log of all gravimetrical
data and system speeds. This feature will log up to 5Meg of information for
diagnosing. The file is not viewable directly from the Coexpert program, but can be
viewed from WIN95. This file is generated once a minute until the feature is turned
off. It should only be viewed once the logging has been turned off. Viewing the
data shows the polled throughput and polled extruder RPM for each extruder. The
data also shows volts to each drive and the current calculated Max WTP and
RPMs of each extruder. This is useful to verify if one of the blenders or OFC units
on the system is oscillating due to a load cell or A/D problem. It is also useful to
verify what speed changes the Coexpert has made to each drive over an extended
period of time. The time is also written to the log so you can correlate a speed or
throughput change to a time logged event or alarm that is also stored on the hard
drive. For information on where to find these files and more see "Hard Drive File
Structure".
Enable Alarm Log -this feature should be enabled during normal operation. This
will log all alarms and events (operator initiated) to a log that is either viewable
from within the Coexpert "Alarm Log" page or can viewed from within WIN95. If
viewing from WIN95 it is advisable to disable the alarm log prior to viewing. For
Page 6 of 31
Coexpert 5.1 Installation and Service Manual
information on where to find the alarm log file and more see "Hard Drive File
Structure".
Use Tahoma Font when Printing -this feature selects the "Tahoma Font" for all
printout functions including printing the verbose configuration report, the inventory
reports, and the alarm log report.
Trending Page
Description
This page is accessed by touching the "Trending" button that is located on the top
of the Coexpert screen. This page is used to observe the current extruder RPMs
and Hauloff speeds for the last 100 seconds. This is useful to show an operator
how the line is responding to the values that they have entered (very useful training
tool). Trending is also used by the service engineer when starting up the system. It
is useful in determining speed pot voltage stability while in "Monitor Only" mode
and for diagnosing a problem extruder. This page is not intended to be a "longterm" monitoring tool. The service engineer would instead use the "Max File"
function to monitor line variables over a length of time (see "Setup", enabling the
"Max File")
Explanation of Items Shown
% of Max RPM Axis -this is the vertical axis of the graph and is scaled in percent of
the maximum rpm of the extruder or the maximum hauloff speed of the hauloff.
Time in Seconds (T -axis) -this is the horizontal axis of the graph and is scaled in
seconds. The far right hand side of the graph is the current time and the far lefthand side is 100 seconds prior to the current time.
Max RPM key -this is located in the upper left-hand section of the page and shows
what the "% of Max RPM" axis coordinates to.
“Key” -this is located in the lower left hand section of the page and shows what
each color on the graph represents. A different color is given for each extruder and
the hauloff.
"Show Grid lines" -this is located in the middle of the bottom of the page and
enables the "grid" that overlays the graph. This is useful in quantifying the actual
deviation of a particular extruder or the hauloff.
"Vertical Spacing" key -this is located in the lower left section of the page. These
values correlate to the vertical spacing of the "grid". Each horizontal line on the grid
represents one unit of this value. Each vertical line on the grid represents one
second of data.
"Pause/Resume Data Capture" button -this button is located in the lower right of
the page. This is used to pause or resume the "scrolling" of the data that is shown.
In order to measure how much an extruder has changed, it is best to first pause
the data capture (doesn't affect anything except the graph) and then to enable the
"grid" to calculate the change in RPMs.
Coexpert 5.1 Installation and Service Manual
Page 7 of 31
Small dashes near left of graph -these dashes are shown in the case that two or
more extruders are overlapping each other. Without these indicators you would not
be able to see the some of the extruders if they were at the same position on the
graph.
Gauginq Paqe
Description
This page is accessed by touching the "Gauging" button that is located on the top
of the Coexpert screen and is only available when a gauge has been interfaced
under "Setup/Gauging Interface Setup". This page shows a graphical
representation of the up to three gauges. The current value of the gauge and
gauge setpoints are also shown. This is a "real-time" measuring system for
interfacing an analog output from a gauge into the Coexpert system.
Explanation of Items Shown
"Gauge #1", "Gauge #2", and "Gauge #3" buttons -these buttons are located on
the left side of the page. If only one gauge has been interfaced then you will not
see the other two buttons. The current selected gauge will have a yellow light on
its’ button. Touch the gauge that you wish to view and the corresponding gauge
data will be shown on the graph.
"High Tolerance" entry box -this box is located on the right side of the graph.
Touching this box brings up a number pad that allows the operator to enter in the
acceptable high tolerance of the product.
"Target" entry box -this box is located on the right side of the graph. Touching this
box brings up a number pad that allows the operator to enter in the nominal target
value of the product.
"Low Tolerance" entry box -this box is located on the right side of the graph.
Touching this box brings up a number pad that allows the operator to enter in the
acceptable low tolerance of the product.
Current Value -this is located on the upper right side of the graph and displays the
"real-time" value of the product.
"Out of Spec" Message -this red message tells the operator that the product is not
within the high and low tolerance values of the product.
"Unstable Gauge" Message -this red message tells the operator that the measured
voltage from the gauge is "jumping" around greater than the deadband volts
(configured under "Setup/Gauging Interface Setup").
Graph Data -the graph that is shown is "real-time". This data is not stored to disk
for long term trending and is only available for the operator to monitor.
Page 8 of 31
Coexpert 5.1 Installation and Service Manual
Setup Page
Description
This page is accessed by touching the "Setup" button that is located on the top of
the Coexpert screen and is only available when the “setup buttons" are turned on.
If this button is not visible, then double touch the blank area between the
"Gauging" and “Calculator" buttons. This brings up a password entry form. The
password is always “SETUPON" and cannot be modified. However, enabling the
setup buttons does not allow access to anything, it simply allows viewing of the
"Security", "Setup", and "Diagnose" buttons. These buttons can be turned back off
under "Setup". The setup page is used to configure the system for the customers’
exact application and therefore should only be accessed by a qualified service
engineer.
Explanation of Items Shown
"Virtual Keyboard Setup" button -this button accesses the virtual keyboard setup
page. After touching this button, the operator is given a message that instructs
them to plug in a "real" keyboard to the front of the Coexpert (a keyboard is
shipped with all units). The virtual keyboard setup page allows a customer to
customize the alpha keypad that "pops-up" whenever the operator is entering an
alpha type entry. To use the virtual keyboard setup routine, simply touch the blank
box in the upper right of the screen. Then using the real keyboard, type in the
character you wish to display, and then touch the position that you want that
character to reside on the virtual keyboard. When you’re done, touch "Done" or
"Return to Setup" to quit. The only way to reset the entire keypad back to factory
defaults is to set the entire system back to factory defaults under
"Setup/Configuration Utilities".
Number of Extruders -select the appropriate number of extruders for the line. The
Coexpert system allows up to 6 extruders with a hauloff to be configured. Versions
of Coexpert prior to 5.1 only allowed up to 6 devices (6 extruders or 5 extruders
with a hauloff).
Line Speed Control- select the type of hauloff you are using or select "none". The
current choices are "none", "puller", "nip", "Chill Roll", and "Wire and Cable".
Typically changing this only changes the graphic representation on the "Overall
View" page. However, if you are using the "Trim Entry" feature under "Setup/
Extruder and Hauloff Setup" then this will affect how trim is measured (See
"Process" page/”Trim Width" entry for more information).
Line Name -this allows up to 10 characters to be entered to represent the name of
the production line. This is useful when printing out inventory reports so that you
can distinguish what line the report came from. (Example: "Line 1")
Extruder Name -this allows up to 5 characters to be entered to represent the name
of a particular extruder. By default, the Coexpert uses "EXT -1", "EXT -2", etc. This
allows you to customize this name which is reflected on the “Process" page,
"Overall View" page, and the "Trending" page. This name will not affect the
"Diagnose" page or the "Setup" page.
Coexpert 5.1 Installation and Service Manual
Page 9 of 31
The entries and units of each entry can be selected to match the customers’
product specifications sheet for their line. This allows quick transition from the way
that they use to run the line to the way they will run the line-using Coexpert.
Thickness mode uses the operator entry of layer density and product laytlat to
calculate a target Ibs/hr of each extruder. If the operator incorrectly enters in the
layer density or the laytlat then the thickness will not be accurate. Remember that
the only control variables that any extrusion control system has are extruder
throughput (measured by a Gravimetrical blender or OFC) and hauloff speed
(measured by an encoder circuit).
"Inventory Report Setup" button -this button accesses the "Inventory Report Setup"
page. From this page the engineer can select from "automatic" report generation
and clearing as well as "automatic" printing of the report. If "automatic" generation
is selected then the interval can be configured. The start time of the first report can
be entered along with intervals such as "Every 8 hrs", "Every 12hrs", "Every 24hrs
in the AM", "Every 24hrs in the PM". If the customer wishes to generate reports
less frequently, they can select from "every 30 days", "every 180 days", or "every
365 days". The report will be generated with all devices shown, but the printout of
the report can be configured to only show what they want to see (such as extruder
1 info, extruder 2 info, blender info from extruder 1, etc.). If "automatic" report
generation is not selected, then the operator can manually clear and generate
reports from the "Inventory" page.
"Blender Network Setup" button -this button accesses the "Blender Network Setup"
page. From this page, the engineer can add or remove additional items to the
blender network such as OA/OS batch blenders that are above an OFC weigh
hopper. Due to high speed processing the Coexpert system is designed to only
interface to blenders or OFC units that are actually on the same process line. You
cannot communicate to a batch blender that is used elsewhere in the customer's
plant. The Coexpert reserves network "ID"s of 1-6. Additional items, such as batch
blenders, must be addressed 7-12. The Coexpert subtracts 6 from the ID to
determine which extruder the batch blender is feeding. You cannot add a batch
blender above an OL blender. In an example if you have an OL blender on
extruder 1 (1D 1) and an OFC hopper on extruder 2 (1D 2) then you are allowed to
place a batch blender above the OFC hopper of extruder 2 (ID would be 8, 8-6=2,
thus extruder 2). This numbering convention must be followed. The Coexpert will
allow you to add up to 6 additional items, but unless the extruder correlating to the
ID-6 is an OFC hopper the Coexpert will not include it in the Inventory Report. To
add, remove, or edit an item touch the "ID Setup" button. As a protection the
blender network setup will not let you add or remove an item with ID 1-6 (Coexpert
Reserved). However, this protection can be bypassed by entering in the "service
password" found on the "Diagnose" page (see "Diagnose" page for more info).
This should only be used if for some reason an ID of 1-6 has been accidentally
duplicated. From "Edit" you can customize the name of any "tagged" item on the
blender network. "Continuous Polling" should be turned on during normal
operation. This should only be turned off when you want to test a particular item for
communications. Once turned off, touch the item to test and push the "Push to
Page 10 of 31
Coexpert 5.1 Installation and Service Manual
Test" button. If a "Test String" response is shown in the Message window, then the
unit is communicating. A tag indicated by red means either that the unit is not
communicating or currently has an alarm. This page is only used during start-up.
These Maximum settings are setup differently depending on whether or not the
encoder circuit is being used and if "Multiple Gear Hauloff' is enabled. The "Use
Multiple Gear Control" should be enabled if you are using a capstan that has more
than one gear selection. Some lines have these capstans, but are never switched
and therefore should not be configured for "Use Multiple Gear Control". To
determine if the encoder circuit should be enabled and to examine the calibration
procedure for each type of hauloff see "Encoder Circuit Usage and Calibration". In
all cases, this setting for the Maximum RPM of the Hauloff and the gear ratio for
the hauloff (found under "Multiple Gear Setup") will automatically be adjusted by
the calibration procedure and should not be manually entered.
Hauloff Calibration Factor ---see "Encoder Circuit Usage and Calibration"
Number of Gears -this is found by touching the "Multigear Hauloff Setup" button
and is only available when the "Use Multiple Gear Control" has been enabled. Set
this to the number of gears available on your capstan. The system is designed to
handle up to 6 gears.
Maximum Extruder Rate -this number does not have to be manually entered. The
Coexpert will calculate this using the throughput information from the blender or
OFC once the "Stable Process" light has been lit for 30 seconds.
Use Trim Option -enable this if you wish to input trim below the blender or OFC.
Carefully see the section for this under "Process Page" before configuring. After
enabling this feature you will be able to select which layer contains trim.
Extruder and Hauloff Drool Speeds -the drool speed feature of the Coexpert allows
a preset speed for each device to be programmed. From the "Process" page, the
operator can touch the "Go to RPM Mode with Drool Speed Set points" and the
line will ramp to these preset speeds. A remote button can be wired into the
Coexpert to emulate the same function (see print for wiring detail). This allows the
operator to place the line in "Drool" without going to the Coexpert panel (from the
die or other remote location).
System Speed Limits -once the line is in "Control by Weight" mode and a recipe
has been entered successfully the Coexpert will monitor the speeds of each
extruder and hauloff. In order to maintain the extruder output, the Coexpert will
adjust for screen pack build-up and other physical properties of the line that cause
output to fall. If the speed exceeds or falls below the "System Speed Limits,” an
alarm will notify the operator of the condition. This alarm indicates that the
Coexpert cannot guarantee the quality of the product. In order to obtain the best
performance and quality for the product the system is usually limited to 98% max
and 5% min for this setting. Altering this setting can produce unwanted results
caused by the inconsistent output of the extruder at these extremely high or low
rates.
Coexpert 5.1 Installation and Service Manual
Page 11 of 31
The "Com" alarm indicates a communications network failure on one of the blender
or OFC units. This is usually caused by the unit either being powered off or
unplugged from the network. This alarm will occur in all modes of operation
including "Stop" mode.
Ratio the Haul-off Speed in RPM mode -this is used to tell the Coexpert whether or
not the "Master Control" (found on "Process" page) ratio will adjust the speed of
the hauloff. Some customers chose to ramp the extruders up together while
maintaining the speed of the hauloff. Usually this is done while the line is in "startup" and the hauloff is not actually pulling material. It is recommended in order to
keep the ramping benefits of the Coexpert that this value be enabled.
Use Multiple Gear Control- enable this if the hauloff device that you are using has
a multiple gear gearbox and you intend on using more than one of these gears.
Typically, this is only used in the "Wire and Cable" industry.
Bump Start Speeds and Time -this feature is useful if the extruder has an old drive
and has trouble going from a "dead" stop to a "drool" or low speed. The way
operators would avoid this using a speed pot was that they would turn the speed
pot to a higher setting for a second, wait for the drive to start turning, and then they
would turn it back down to where it should be. This feature does the same thing.
Whenever an extruder goes from stop to any speed, it first will receive a "Bump"
that is configurable. The "Bump" will last for a certain amount of time that is also
configurable. Only use this feature if you are aware you currently have a problem
with your drive.
Gauging Interface Setup Page
Description
This page is accessed by touching the "Gauging Interface Setup" button located on
the "Setup" page. It is used to integrate a gauging to the Coexpert system. Up to 3
gauges can be integrated for the Coexpert to measure, but the limit is dependent
on the number of "free" analog inputs. The Coexpert can also send analog signals
to a gauging system. This is also dependent on the number of "free" analog
outputs. This page shows the engineer what are free and how to configure them.
Explanation of Items Shown
Reference from Gauge to Coexpert Section
Current Input Use -this shows which analog inputs are already used by the
Coexpert system (for extruder and hauloff speed pots, hauloff encoder circuit). Any
input that is labeled "unused" can be selected as "Input From Gauge". Once this is
configured, the Coexpert will examine the signal and scale it using the other
parameters.
Page 12 of 31
Coexpert 5.1 Installation and Service Manual
Terminals -this shows where in the Coexpert panel the analog input should be
wired into. Carefully note the polarity.
Reference -this is only used with the "Ramp Control" algorithm. It determines
which extruder you want to be affected by the "Ramp Control" algorithm.
Adjust the set points on the "Gauging" page so that the product is in the "In Spec"
range. Next, slow the "Master Control" ratio to a realistic value that would be used
by the operator (slow the line down for a paper change). Using the "Gauging"
page, watch the gauge change. Don't adjust any speeds. After 2-6 minutes you will
see the gauge start to climb back to where it should be. Record this time and set
the "Ramp Control Steady Timer" to a value that is greater than this time. To
finalize this setting, enable the "Ramp Control" algorithm and run the line in
"Control by Weight" mode. Slow the line down by entering in a lower line speed
and examine both the "Gauging" page and the "Gauge Control Active" message on
the "Overall View" page. Run the test until the "Gauge Control Active" message
goes off for a few minutes (This ensures that the "Ramp Control" algorithm is
finished. By analyzing the results, you should be able to fine tune the algorithm and
reduce the amount of product that falls "Out of Spec".
Reference from Coexpert to Gauge Section
Current Output Use -this shows which analog outputs are already used by the
Coexpert (extruder and hauloff drive references). Any output that is "unused" can
be configured for "Output to a Gauge". Once this is configured, the Coexpert will
output a voltage that references the selected value and will scale it according to
the parameters specified.
Terminals -this shows where in the Coexpert panel the analog output should be
wired from. Carefully note the polarity.
Reference -this sets up which device to examine for the signal output Ext 1-6 or
Total are the available choices.
Units -this sets up which value of the device selected under "Reference" you wish
to measure for the signal output. The choices are "Lbs/Hr or KGs/Hr" or "W/L or W/
A". If the first choice is selected, then the output signal will output the throughput of
the device selected. If the second choice is selected, the output will either
reference the "Weight per Length" or the "Weight per Area" of the selected device
depending on which recipe format the system is using (see "Setup/Recipe Setup").
Output Volts Max/Min -set this up to correspond to the desired range of the system
with which you are sending the signal to.
Value Range Max/Min -these are the values that correlate to the Max/Min Output
volts specified above. This will scale the output. The Max Value should be set
higher than the maximum value you will expect to reference.
Coexpert 5.1 Installation and Service Manual
Page 13 of 31
Other Uses for the Gauging Interface -the gauging interface is simply an analog
communications interface. This interface could as well be used to drive a
volumetric feeder, a large remote display panel, an extruder amp monitoring tool,
and any other analog type system the customer can create. The uses are endless
and only limited to the ability of imagination.
Unstable Flag -this indicates that the "Polled" rate for a particular extruder is
varying on a 1 second interval (every poll) greater than the "Maximum Input
Change Before Alarm" (see "Advanced Settings" page). Once this flag is set, the
"Unstable Count" will begin to increment. Once this flag is reset, the "Unstable
Count" will count back down to "0".
Unstable Count -this counter keeps track of the number of "Unstable" conditions
that have occurred. Once this counter reaches the "Number of Maximum Input
Changes before Alarm" (see "Advanced Settings" page) then an alarm will notify
the operator of the problem.
W% Factor -this number is the "Weight per Percent of Drive Capacity" ratio. It is
calculated continuously once an extruder has become stable. The "Weight" is
retrieved from the "Polled" number from the blender or OFC, the "Percent of Drive
Capacity" is the "Speed%" field (0-100%). This ratio is used to determine where to
set the drive to obtain a desired output. It is very useful to record this number for
each extruder and the hauloff. Later comparison can indicate a possible
maintenance condition such as screen pack build-up, screw wear, etc.
Zero Flow rate -this indicates that the "Polled" rate for an extruder is "0" even
though the extruder drive is turning. This will only be set if the "Steady Flag" is
received from the blender or OFC first (refer to blender or OFC documentation for
details on why). When this occurs an alarm will notify the operator of the problem.
Set Daq -this is the D/A target value in "Bits" that is used to ramp the output to a
specific voltage. The range is (0-4095). This is used in comparison with the "Daq
Out" and the "Daq Step" to determine if the "Ramp Flag" should be set.
Daq Out -this is the current D/A output in "Bits". The range is (0-4095). If this
number is divided by 4095 and then multiplied by the "Maximum Output
Voltage" (see "Advanced Settings") you will calculate the "Output Volts" shown on
this page.
Daq Step -this is the current increment that is added to the "Daq Out" to slowly
ramp the extruder or hauloff to the "Set Daq". This number is recalculated anytime
the operator makes a process change.
Ramp Time -this is the amount of time that each device will take to ramp the "Daq
Out" to the "Set Daq". The largest of these ramp times is shown in "Max Ramp"
and this value is used to recalculate the "equal" ramping feature of the Coexpert
(see "Extruder and Hauloff Setup" page) .
Page 14 of 31
Coexpert 5.1 Installation and Service Manual
Polled -the current polled rate from the blender or OFC. This updates every
second.
Highest W/% -during a production run in "Control by Weight" mode, the highest
value ever observed for the "W% Factor".
Set Rate -the current target throughput rate and hauloff speed for each device.
This is calculated from the recipe that was entered in by the operator on the
"Process" page and is only available when the line is in "Control by Weight" mode.
Average Rate -the average observed throughput and hauloff speed for each device
throughout the entire product run.
"Clear Com Counts" button -this button restarts the "Com Counts" count. The
"Com Counts" are the max number of communications failures that have been
observed. Ten (10) failures must occur before a "Communications Failure" alarm is
given. The "Com Counts" are useful when you are diagnosing an intermittent
communications problem and you want to look for possible trouble areas.
"Restart High/Low Capture" -the "High/Low" capture refers to the "Highest W/%,
Average W/%, Lowest W/%, Highest RPM, Average RPM, and Lowest RPM". The
resetting of these values occurs automatically whenever the mode of operation
changes, but it is useful for trouble shooting to reset it manually and then check it
after a few hours of running.
Digital Out Data -this is the decimal equivalent to the binary digital outputs. All
Digital Outputs are from the ADI12-16(PC) card. Out 0 is unused, Out 1 is the
"Stable Process" light, Out 2 is the "Alarm" output, Out 3 is the "Coexpert Control"
signal that operates the switching relays in the back of the panel. Each of these
outputs would have a binary equivalent for the output number. In plain English, Out
0 output would be equal to "1" decimal, Out 1 output would be equal to "2" decimal,
Out 3 output would be equal to "4". Adding the decimal value for each output
energized gives you the "Digital Out Data" value. This seems useless to most
users, but to the developer it is very useful in determining what outputs should be
energized. The I/O cards process the digital output request in this format.
Stable Process Flag -indicates the "Stable Process" condition. Whenever this flag
is "1 ", then the "Stable Process" light on the front of the panel should be on. If
it is not, then there is either a hardware/wiring problem or the light is burned out.
Alarm On Flag -indicates the “Alarm" condition. Whenever this flag is “1", then the
“Alarm" light on the front of the panel should be on. If it is not, then there is either a
hardware/wiring problem or the light is burned out.
Stop Input Flag -this flag indicates that the remote stop input has been closed (see
print for wiring detail). This in turn will cause the line to stop quickly using the
"Emergency Decel Ramp Rate" (see "Extruder and Hauloff Setup" page).
Coexpert 5.1 Installation and Service Manual
Page 15 of 31
Drool Input Flag -this flag indicates that the remote drool input has been closed
(see print for wiring detail). This in turn will cause the line to switch to RMP mode
with the preset drool speeds (see "Extruder and Hauloff Setup" page).
10% UP Input Flag -this flag indicates that the remote 10% up input has been
closed. This in turn will bump up the "Master Control" ratio by 10% (see "Process
Page").
Help Page
Description
This page is accessed by touching the "Help" button on the top of the Coexpert
screen. From this page, the engineer can obtain the current configuration name
that is running and the installation path of the Coexpert program. At this time is
does not contain an active "Help" feature.
Exit button
Description
This button is accessed by touching the "Exit" button on the top of the Coexpert
screen. This will prompt the operator if he is sure he wants to exit the program and
then will shut down the program returning them to the standard WIN95 screen.
Minimize button
Description
This button is accessed by touching the minimize or "-" icon on the very top of the
Coexpert program. Before the program will allow you to minimize it you must enter
in the "5413" Service password (see "Entering in the Service Passwords").
Advanced Settings page
Description
This button is accessed by touching the" Advanced Settings" button on the
"Diagnose" page. You must enter in the "5413" Service password (see "Entering in
the Service Passwords") before this button is visible.
Explanation of Items Shown
Median Width -this is the width of the buffer that is used to buffer the "Polled" rate
measured at each blender or OFC (See "Diagnose" page/”Median Counts" for
more information). The default for this is 20. To increase response, decrease the
median width. To dampen out response, increase the median width. There is no
case where this has had to be adjusted.
Calculation Points -this is the width of the median filter that is used to average the
median width buffer (See "Diagnose" page/”Calc. Count" for more information).
The default for this is 30. To increase response, decrease the calculation points.
Page 16 of 31
Coexpert 5.1 Installation and Service Manual
To dampen out response, increase the calculation points. There is no case where
this has had to be adjusted.
Layer Deadband in % -this is the control deadband for each layer in relation to
throughput control. To increase response, decrease the layer deadband. To
dampen out response, increase the deadband. There is no case where this has
had to be adjusted.
Maximum Input Change in % -this is the allowed % change that the W% Factor is
allowed to change (see "Diagnose" page/”Unstable Flag" for more information).
The default for this is 2. To increase response, decrease this value (0 is lowest).
To dampen out response, increase this value. There is no case where this has had
to be adjusted.
Coexpert 5.1 Installation and Service Manual
Page 17 of 31
Turning on the “Setup” buttons
The "Setup" buttons consist of the "Security", "Setup", and "Diagnose" buttons
located on the top of the Coexpert screen. These buttons normally do not need to
be accessed frequently and are therefore "hidden" from the operator during normal
operation. This saves confusion for the operator and cleans up the display.
Turning them on if they are not visible -to turn on the buttons double touch, the
blank area shown below and you will be prompted for a password. Enter in
"SETUPON". This password only turns on the buttons and is "Hard" coded.
Double touch this blank area
Page 18 of 31
Coexpert 5.1 Installation and Service Manual
are and ask the customer if they approve or disapprove this error (this will be the
error when running the line). If they approve this then the customer provided
feedback signal is correct to use. Document this data and the customer's approval
before proceeding.
If all of these tests fail then you must use the encoder circuit from AEC/
HydReclaim in order to accurately control the line.
Hardware Calibration of the AEC/HydReclaim's Encoder Circuit -mount the
encoder on the hauloff motor or on the hauloff motor side of the gearbox. The RPM
at the mounting location cannot exceed 2300 RPM. If this is a problem, you can
either gear the encoder (using pulleys) to an RPM that is lower than 2300 RPM or
you can call AEC/HydReclaim and replace the current encoder (250
pulse/revolution) with a 100 pulse/revolution encoder (this allows up to 5750 RPM).
The max input frequency of the line speed box is 10khz. The encoder comes
supplied with a 15 foot cable between the encoder and line speed box. This is the
maximum length allowed. The distance between the line speed box and the
Coexpert Panel can be up to 300 foot without any problems. The line speed box
will also need a 120VAC supply (the box comes with a cable attached). Once the
encoder and panel are properly mounted and wired into the Coexpert Panel you
will need to plug in the line speed box to the 120VAC source at least 10 minutes
before you will be able to calibrate the hardware. Located in the line speed box is a
frequency to voltage converter. On the converter is a small rubber plug that can be
removed to access the calibration button.
First step: push and hold the calibration button for about 7 seconds.
Second step: turn the hauloff speed pot up to 10 volts (full speed).
Third step: press the calibration button once.
Fourth step: stop the hauloff and then press the calibration button once.
Fifth step: turn the hauloff speed pot up until the output voltage of the line speed
box (this can be measured in the Coexpert Panel on terminals 18a/b) measures
exactly 9.999 volts (as close to 10 without hitting 10). Press the calibration button
once.
Sixth step: turn the hauloff speed pot down until the output voltage of the line
speed box (this can also be measured in the Coexpert Panel on terminals 18a/b)
measures exactly .001 volts (as close to 0 without hitting 0). Press the calibration
button once.
Seventh step: press the calibration once to exit and save the calibration. You are
now ready to test the feedback voltage of the encoder circuit. Use the same test as
described for testing the "Customer's 0-10 volt feedback signal", but instead use
the voltage found on terminals 18a/b of the Coexpert instead of the customer's
feedback signal. If this does not test out then recalibrate the hardware of the
encoder circuit and repeat the test until it does.
Coexpert 5.1 Installation and Service Manual
Page 19 of 31
Integration Issues
Integration of the Speed Pot Signals -these signals are referred to as the "Speed
Pot" signals, but can actually be any 0-10 volt signal that represents the drive
speed of a particular device. This "speed" is actually not a representation of
"RPM", but instead is a reference to where the drive is currently set to in
accordance to "Drive Capacity". The 0-10 volt signal is an industrial standard. If it
is found that a customer has a signal that actually measures 0-10.9 volts then this
range is due to a faulty power supply within their drive. Usually, this voltage can be
"fine tuned" and the drive can they be relinearized so that the customer does not
lose any drive capacity (refer to the documentation of the particular drive, this is to
be done by the customer only!). If this problem is not corrected, the Coexpert will
not be able to properly control the line for voltages greater than 10 volts. If the line
is never run that high, then no adjustment is necessary. The speed pot signal is
sometimes a 0-10 volt signal coming from the customer's PLC that normally
controls the drive.
It is the customer's responsibility to understand how his existing controls function.
It is your responsibility as a service engineer to instruct the customer of what
signals you will need and work with them in integrating the solution. Integration’s
where other companies auxiliary equipment that follows either the extruder speed
or the hauloff speed must be carefully done. AEC/HydReclaim's Coexpert is not
designed to control such equipment and the integration is the customer's
responsibility. On analog systems (systems without a PLC) this integration is
usually just a matter of adding a few external relays to the switch which reference
the auxiliary equipment will follow. Remember that the Coexpert will make speed
changes and if this equipment is still following the old speed instead of the new
speed erroneous results can occur. Another thought when integrating to this
equipment is in the ramp rate (see "Extruder and Hauloff Setup" page). If the
Coexpert's ramp rate is too fast, then this could cause problems with
devices trying to follow the current speed.
In digital systems (systems with a PLC) the integration is not as simple. Usually the
reference speed that the auxiliary equipment is following is not switchable using
external relays (the reference is within the PLC). In this case either the customer or
the OEM of the PLC system must develop code to integrate the auxiliary
equipment. It is a very simple code and is usually just a matter of reading in the
Coexpert's analog outputs and reading in a contact from the Coexpert telling the
PLC when it should use our reference instead of theirs to control the auxiliary
equipment. The contact can be taken from a spare "Normally Open" contact off
one of the relays in the back of the Coexpert panel (there are 4 relays that are
enabled when the Coexpert is in control).
When integration becomes a problem that can not be resolved in one trip, then the
start-up can be completed for a "Monitor Only" application. See "Installation for a
"Monitor Only" Application".
Page 20 of 31
Coexpert 5.1 Installation and Service Manual
Wiring in the "Speed Pot" signals -only connect one cable at a time. This allows
you to test each signal as you go and will prevent any wiring mistakes. After you
connect each cable (see print for wiring detail), have the operator turn the speed
pot for that device up and monitor that the voltage on the "Input Volts" under the
"Diagnose" page follows properly and is wired into the correct input. Repeat this
until all of the inputs have been wired and tested.
Perform the "Encoder Circuit Usage and Calibration" section if the customer
wishes to monitor the Hauloff.
Once this is done, instruct the operator that he can go back to running the line in
production, while you complete the "Communications testing" before proceeding.
Step 1. Calibrating the "Max RPM" setting -while in "Monitor Only" mode, observe
the "Set RPM" value on the "Overall View" page and compare it to the "Polled
RPM" value on the "Diagnose" page. If they are not equal then enable the
"Calibrate Layer RPM while in Monitor mode" under the "Diagnose" page (see
"Diagnose" page for more detail). Wait about one minute and recheck the two
displayed values. If at this time the values are unchanged then you will need to
determine why. This is usually caused by the "Stable Process" light flashing on and
off. It must stay on for at least 30 seconds before this calibration can take place. If
it is flashing on and off, wait for it to turn off and then quickly go to the "Trending"
page. Usually this is caused by the speed pot voltage being unsteady. If at this
time you see a "bump" on the graph for a particular device, then you will have to
manually calibrate the "Max RPM" value. Be sure to turn the "Calibrate Layer RPM
while in Monitor mode" off at this point. If you must manually calibrate the "Max
RPM" value refer to the "Diagnose" page section of this manual for detailed
instructions. Once all the "Set RPM" values match the "Polled RPM" values for
earn extruder you will be ready for the next step.
Step 2. Calibrating the "Max WTP" setting -while in "Monitor Only" mode observe
the "ACTUAL LBS/HR" value on the "Overall View" page and compare it to the
"Polled" value on the "Diagnose" page. If they are not equal then determine why. If
the stable light is not on for at least 50 seconds then this value will not update and
you must adjust the "Voltage Dead band in %" (see "Advanced Settings" page for
instructions). Increase this value slowly and observe the "Stable Process" light. If
this is not being caused by the voltage from the speed pots then you will need to
use the "Diagnose" page to determine what is causing it (see "Diagnose" page for
information on all the given data). Once the "ACTUAL LBS/HR" values match the
"Polled" values for each extruder, then you have completed the installation of the
system. Be sure to setup the recipe format (see "Setup"/Recipe Setup" page for
details) and properly train the operators on the use of the Coexpert before leaving
the facility. Normally it is best to turn off the setup buttons (see "Setup") and save
the current configuration (also to floppy). Keep a copy of this configuration for the
records and give a copy to the engineer in charge at the facility. Load a version of
the "Coexpert" program on the customer's training computer, load in this
configuration, and then configure the system for "Simulation" (see "Setup").
Coexpert 5.1 Installation and Service Manual
Page 21 of 31
Service Notes
Page 22 of 31
Coexpert 5.1 Installation and Service Manual
Service Notes
Coexpert 5.1 Installation and Service Manual
Page 23 of 31
Communications Testing
Instructions
The interconnecting communications cables that connect the Coexpert to each
blender or OFC is to first be installed and wired according to print by the customer.
Using the "Setup/Blender Network Setup" page, you will be able to test
communications to each device. This is done automatically and it is not necessary
to push the "Push to Test" button. After you observe that the Coexpert is
communicating to each device (red is also an indication of a blender or OFC alarm,
be sure not to confuse this with a communications failure that will be indicated by a
"Communications Failure" message in the "Message Box" and a Coexpert
"Communications Alarm") you need to ensure that the device with ID 1 is above
extruder number 1 and so forth (see "Setup/Blender Network Setup" page of this
manual for details on configuring the "ID" of each unit).
If you are having a communications failure, it is more than likely an interconnect
cabling problem. Each Coexpert passes a quality control communications and
hardware test prior to the shipment of the unit. The QC stamp that indicates
that the unit passed this test is found under "My computer/C:/"coex_qcr.aec". If this
file is present, open it with "note pad" and you will see the date the unit was tested
and who by. This file is generated using the "Coexpert Panel Tester" software and
is an automated process. To this date, there has been no documented case of a
unit leaving the facility without the proper testing (even prior to the existence of the
"Coexpert Panel Tester" software). To verify that the problem is in the cabling you
should carry with you a "straight through" 50 foot DB9 serial cable. This cable can
quickly be plugged into the bottom of the Coexpert panel and the bottom of the
blender or OFC to test communications. If the customer has wired directly into the
Coexpert and blender panel they have usually avoided to notice that the internal
com cable that connects the Coexpert computer to the bottom of the Coexpert
panel is not a standard cable. It is manufactured so that they will be able to use a
standard cable when interconnecting the units. The following pages are given to
show the entire configuration and internal jumper settings of the Coexpert
computer. If all else has been verified thoroughly, then you will need to check
these settings by carefully opening the computer, removing all of the cards, and
checking the jumpers. This should only be done by a qualified service engineer
and could void your warrantee if done without the expressed written permission of
AEC/HydReclaim.
Page 24 of 31
Coexpert 5.1 Installation and Service Manual
Coexpert 5.1 Installation and Service Manual
Page 25 of 31
-Notes-
Page 26 of 31
Coexpert 5.1 Installation and Service Manual
Switching Relays & Encoder Pickup Module
Close up of relay group
This section of the interface backplate contains the switching relays to divert the
signal from the manual potentiometers on the extruder system over to the analog
outputs from the Coexpert system.
Coexpert 5.1 Installation and Service Manual
Page 27 of 31
Overview of Field Wiring Terminal Strip
View of Field Wiring Terminals
The Coexpert system is provided with a recessed terminal strip to ensure ease of
installation and trouble shooting.
All wire terminations in the panel are provided with ferrules to eliminate stray wire
strands that can cause noise pickup, and short circuits.
An excellent wire number system is provided.
Page 28 of 31
Coexpert 5.1 Installation and Service Manual
Wiring the existing speed pots into the Coexpert Panel
The Coexpert system replaces the function of your existing "speed pot", but in
order to keep the system capable of being ran from the original "speed pots" the
speed pots must be wired into the Coexpert Panel.
The first thing to verify is that the Coexpert system strictly works with 0-10V
signals. There is no problem if you are currently using a speed pot that is less than
0-10V, but if your drive is using 0-12V control circuits then you will need to lower
the voltage range to 0-10V before the Coexpert will perform correctly. If your drive
is using 4-20mA control circuits, then you will need to integrate a converter so that
the 0-10V signal from the Coexpert will work correctly.
The way that your existing drive works uses a speed pot with 3 connections. One
connection is for the excitation -, one for excitation +, and the other for the "signal".
You will need to run a shielded twisted pair cable from the speed pot to the
Coexpert Panel. Hook one of the wires from the twisted pair to the excitation -(do
not remove this wire from the drive). Remove the "signal" wire from the drive and
wire it to the other wire from the cable.
DO NOT GROUND THE SHIELD AT THE SPEED POT END!!! (it is only
grounded at the Coexpert Panel end).
The other end of the cable will wire into the "Speed Pot Inputs" section of the
Coexpert Panel.
Refer to the interconnect drawing for specific terminations
Wiring the reference signals from the Coexpert Panel to each Drive.
You will first need to run a twisted, shielded pair cable from the Coexpert panel to
each drive (one cable per drive). The Coexpert Panel end will be wired to the
"Drive Reference Outputs" section. The other end will be wired to the drive. You
will hook one wire from the cable to the excitation -(same as where the speed pot
is wired, see above) and the other to where the original "signal" wire was wired.
This will need to be done for each drive.
Refer to the interconnect drawing for specific terminations.
DO NOT GROUND THE SHIELD AT THE SPEED POT END!!! (it is only
grounded at the Coexpert Panel end)
Coexpert 5.1 Installation and Service Manual
Page 29 of 31
Entering in the Service Passwords
(Note: Remove this page for production floor use)
The service passwords consist allow a service engineer access to items
unavailable during normal operation. The list of specific passwords and access are
listed below.
"5413" Service Password -once this has been enabled, the engineer will gain
access to "Force I/O" functions ("Diagnose" page), access to the "Advanced
Settings" and "Advanced Control Settings" pages (from "Diagnose" page), can
view the alarm log's "hidden" event log to identify the keystrokes that the operator
has pressed, allows the "Minimizing" of the Coexpert program, and allows
modification (including removal) of "ID items" 1-6 (see "Blender Network Setup"
page).
"3145348" Service Password -once this has been enabled, the engineer will gain
access to "Force I/O" functions ("Diagnose" page), and access to the "Advanced
Settings" and "Advanced Control Settings" pages including the "Run Extruder in
Volumetric Always" setting under the" Advanced Control Settings".
How to Enter either password -on the "Diagnose" page, certain boxes are
actually "buttons". Using these buttons, an engineer can enter in the numbers 1-8
and there is also a "clear" button. Whenever entering in a password always hit
"clear” first to ensure you are starting with a new password. Also, be sure not to
leave a Service password enabled once you are done servicing the unit. To turn off
a service password simply hit "clear". The "buttons" are shown below.
Page 30 of 31
Coexpert 5.1 Installation and Service Manual
Parts Department
Call toll-free 8am-5pm CST [800] 423-3183
Parts shipped from the Schaumburg, IL facility available for Next Day Air shipment up to 4 pm EST.
The AEC/HydReclaim Parts Department is ready to provide the parts to keep your systems up and running. HydReclaim OEM
replacement parts ensure operation at design specifications. Please have the model and serial number of your equipment
when you call.
Service Department
Call toll-free 8am–5pm CST [800] 233-4819 or call [847] 273-7700
AEC/HydReclaim has a qualified service department ready to help. Service contracts are available for most AEC/HydReclaim
products.
Sales Department
Call 8am–5pm CST [847] 273-7700
AEC/HydReclaim products are sold by a worldwide network of independent sales representatives. Contact our Sales
Department for the name of the sales representative nearest you.
Contract Department
Call 8am–5pm CST [847] 273-7700
Let AEC/HydReclaim install your system. The Contract Department offers any or all of these services: project planning; system
packages including as-built drawings; equipment, labor, and construction materials; union or non-union installations; and field
supervision.
Coexpert 5.1 Installation and Service Manual
Page 31 of 31
1100 E. Woodfield Road, Suite 588
Schaumburg, IL 60713
http://www.aecinternet.com