1
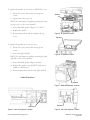
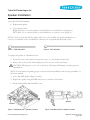
TM
TurboChef Technologies Inc.
Speaker Installation
Service kit CON-3003 includes:
•
Replacement speaker
•
Two connector wires
RWD-9654: Use to connect speaker to electrical harness on residential ovens (Figure 1).
HCT-4262: Use to connect speaker to electrical harness on conveyor ovens (Figure 2).
NOTE: i-Series oven models will not require either wire to be installed. For speaker installations on
conveyor or residential ovens, use whichever connector wire is required and discard the other.
Figure 1: RWD-9654 Wire
Figure 2: HCT-4262 Wire
To replace the speaker on a Residential oven:
1. Ensure the oven is removed from any power source (i.e., the breaker is turned off).
2. Remove the oven from the wall, making sure it does not rest on the front frame.
CAUTION: Allowing the oven to rest on the front of the frame will damage it and may prevent
reinstallation.
NOTE: For information regarding proper oven removal and reinstallation and accessing assemblies, see
the service manual.
3. Access the failed speaker (Figures 3 and 4).
4. Replace the speaker using the RWD-9654 wire to attach it to the harness.
5. Ensure functionality and reinstall the oven.
Speaker
Speaker
Figure 3: Residential Gen 1 Speaker Location
© 2010 TurboChef Technologies, Inc.
Figure 4: Residential Gen 2 Speaker Location
DOC-1250 / Rev B / April 2010
Page 1 of 2
˘ oven:
To replace the speaker on an i-Series or NGO/Sota
1. Ensure the oven is removed from any power
source.
Speaker
2. Open/remove the top cover.
NOTE: For information regarding opening/removing
the top cover, see the service manual.
3. Access the failed speaker (Figures 5, 6, and 7).
4. Replace the speaker.
5. Ensure functionality and close/replace the top
cover.
Figure 5: i5 Speaker Location
Speaker
To replace the speaker on a conveyor oven:
1. Ensure the oven is removed from any power
source.
2. Access the right end bell.
Figure 6: i3 Speaker Location
NOTE: For information regarding accessing the right
end bell, see the service manual.
3. Access the failed speaker (Figures 8 and 9).
4. Replace the speaker using the HCT-4262 wire to
attach it to the harness.
5. Ensure functionality and close the right end bell.
—End of Procedure—
Speaker
Figure 7: NGO/Sŏta Speaker Location
Speaker
Figure 8: HhC 3240 Speaker Location
© 2010 TurboChef Technologies, Inc.
Speaker
Figure 9: HhC 2020 Speaker Location
DOC-1250 / Rev B / April 2010
Page 2 of 2