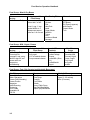
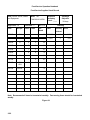
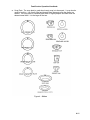
1
Naval Supply Systems Command Navy Food Service Operation Handbook First Edition: January 2010 THIS PAGE INTENTIONALLY LEFT BLANK Food Service Operation Handbook Although the words “he,” “him,” and “his” are used sparingly in this manual to enhance communication, they are not intended to be gender driven nor to affront or discriminate against anyone reading this manual. i Food Service Operation Handbook NAVY DEPARTMENT NAVAL SUPPLY SYSTEMS COMMAND 5450 CARLISLE PIKE PO BOX 2050 MECHANICSBURG, PA 17055-0791 This publication is issued for the information and guidance of all food service management personnel. This publication will be used in conjunction with the NAVSUP Publication 486, January 2010. NAVSUP issues its policies to general messes throughout this publication, which defines in detail the actions of general mess personnel in preparing meals, professional guidance on nutrition, automated financial management, managing inventory, maintaining accountability for stock and money, monitoring use and consumption, and preparing reports for headquarters. T. M. DAIL CDR,SC, USN Food Service Director Naval Supply Systems Command ii Food Service Operation Handbook CONTENTS FOOD SERVICE OPERATION HANDBOOK CHAPTER 1 NUTRITITION / MENU PLANNING / SPECIAL MEALS CHAPTER 2 MESS DECK MASTER at ARMS/FSA OPERATIONS CHAPTER 3 PRESENTATION SILVER CHAPTER 4 AFLOAT WARDROOM AND STATEROOM SERVICE CHAPTER 5 OFFICERS MESSES AFLOAT CHAPTER 6 CHEMICAL BIOLOGICAL RADIALOGICAL DEFENSE CHAPTER 7 SAFETY - 3M CHAPTER 8 FOOD SERVICE EQUIPMENT OPERATING AND CLEANING PROCEDURES CHAPTER 9 ASHORE FOOD SERVICE, FACILITY STRUCTURE AND HOUSEKEEPING CHAPTER 10 WASTE MANAGEMENT OPERATIONS CHAPTER 11 HEIMLICH MANEUVER INDEX iii Food Service Operation Handbook THIS PAGE INTENTIONALLY LEFT BLANK iv Food Service Operation Handbook CHAPTER 1 NUTRITION AND MENU PLANNING 1-0 Nutrition Guidelines Recommended Servings…………………………………………………………………1-1 2-0 Nutrients 3-0 Micronutrients 4-0 Menu Planning Process (Ashore) Cycle Menu ..............................................................................................................4-1 Menu Planning Procedures......................................................................................4-2 Menu Approval .........................................................................................................4-3 Menu Changes.........................................................................................................4-4 General Nutrition ......................................................................................................4-5 Menu Planning Nutrition Standards for Entrees .......................................................4-6 Menu Planning Nutrition Standards for Starches .....................................................4-7 Menu Planning Nutrition Standards for Vegetables .................................................4-8 Menu Planning Nutrition Standards for Desserts .....................................................4-9 Menu Planning Nutrition Standards for Salads/Salad Bars/Fruit Bars ...................4-10 Menu Planning Nutrition for Beverages..................................................................4-11 Healthy Ingredients ................................................................................................4-12 Marketing Menu Items............................................................................................4-13 Food Combinations/Scheduling Variety Innovation................................................4-14 Characteristics of an Aesthetically Pleasing Meal..................................................4-15 Speed Lines ...........................................................................................................4-16 Brunch ....................................................................................................................4-17 Night Meals ............................................................................................................4-18 Special Meals .........................................................................................................4-19 5-0 Food Handling and Nutrient Retention Food Handling ..........................................................................................................5-1 Food Preparation......................................................................................................5-2 As Purchased (AP) and Edible Portion (EP) ............................................................5-3 Temperature Monitoring ...........................................................................................5-4 6-0 Advanced Food 7-0 Traditional Foods 1-1 Food Service Operation Handbook 8-0 Special Meals 9-0 Food Presentation General Food Presentation ......................................................................................9-1 Self Service Serving Lines .......................................................................................9-2 1-2 Food Service Operation Handbook 1 – 0 NUTRITION GUIDELINES 2005 Nine Dietary Guidelines For Americans Nine Dietary Guidelines 1. Adequate Nutrients Within Calorie Needs 40 2. Weight Management 3. Physical Activity 4. Improving Eating Patterns 5. Fats 6. Carbohydrates 7. Sodium 8. Alcohol 9. Food Safety The number of servings from each level of the pyramid is dependent upon individual calorie requirements. Table 3.1 provides recommended servings for four different calorie levels. a. Grain Group (6 ounces Daily) Make Half Your Grains Whole The Pyramid emphasizes whole grain and cereal foods as the base of a nutritious diet. Wheat, corn, oats, and other grains have very little fat and are cholesterol free. These foods provide complex carbohydrates - an important source of energy. They also provide vitamins, minerals and fiber. 1-3 140 Food Service Operation Handbook When shortening, butter, oil, or eggs are prominent in a recipe, bread products can be quite high in fat. Some examples of higher fat breads include croissants, Danish pastries, sweet rolls, doughnuts, and oversized muffins. Higher fat grain/starch items can include fried potatoes/rice, potato/corn chips, and assorted snack crackers. b. Vegetable Group (2-1/2 Cups Daily) Vary Your Veggies Vegetables are naturally low in fat and contain no cholesterol. Vegetables are a good source of vitamins, especially A and C, fiber, folate, and minerals, such as iron and magnesium. Vegetables that are dark in color provide more nutrients. Starchy vegetables such as corn, peas and lima beans contain at least four times more calories than an equal quantity of a non-starch vegetable such as green beans or broccoli (1/2 cup corn = 80 calories, 1/2 cup broccoli = 20 calories). Starchy vegetables also tend to be less nutrient dense than other vegetables meaning they do not contain as many nutrients. Variety is the key… a diet containing an assortment of different vegetables is the best way to ensure adequate intake of important vitamins and minerals. c. Fruit Group (2 Cups Daily) Focus on Fruits Fruits are low in fat and are cholesterol free. Fruits and fruit juices provide important amounts of vitamins and minerals such as vitamins C, A and potassium. While either fruit or fruit juice will provide these important vitamins and minerals, whole fruits, especially fresh fruits with skins, provide fiber whereas fruit juice does not. Fruit juices should be consumed less often than fruit because they contain a higher caloric content than fruit. Only juices containing 100 percent fruit juice can count as a fruit serving. Fruit punches, “ades” and “drinks” generally contain only small percentages of actual fruit juice and large amounts of added sugar. d. Milk (2 to 3 Servings Daily) Get Your Calcium–Rich Foods Milk products provide protein, vitamins, and minerals. Milk, yogurt, and cheese are the best dietary source of calcium, and are necessary for the formation of strong bones and teeth. Dairy products made from whole milk contain fat and cholesterol. However, low fat and fat free options (i.e., 1% or fat free milk, low fat or fat free yogurt and reduced fat cheeses) are available and generally contain equal amounts of calcium. Lactose free products are also available which include calcium and calcium fortified foods and beverages. e. Meat & Beans Group (5-1/2 ounces Daily) Meat, poultry, and fish supply protein, B vitamins, iron, and zinc. Other foods in this group, such as dry beans, eggs, and nuts, are similar to meats in providing protein and most vitamins and minerals. The average healthy young adult requires approximately 5 to 7 ounces of cooked lean meat, poultry, or fish per day. For example, 6 ounces a day might come from: 1 egg (equals 1 oz of lean meat) for breakfast; 2 oz sliced turkey in a sandwich at lunch; and a 3 oz cooked hamburger for dinner. The following amounts equals one serving: 2 ½ to 3 ounces of lean beef, pork, lamb, veal, poultry, or fish; in addition ½ cup of cooked beans, one egg, 2 tablespoons of peanut butter, or 1/3 cup nuts count as 1 ounce of meat. Note: 1 oz of any protein source provides 7 grams of protein. The Meat Group is an excellent place to trim fat in the diet. Contrary to popular belief, red meat does not need to be avoided. Choosing 90% lean red meat with 10% fat is a good choice. In general, choose lean cuts of meat, and incorporate poultry and fish in addition to the red meats. To reduce fat from the meat group, choose lean meats; 1-4 Food Service Operation Handbook remove the skin from poultry; eat more fish, dry beans and peas. When cooking meats, broil, roast, bake, or simmer, instead of frying. Eggs are an excellent source of protein and can be included in a healthy diet. The egg yolk (yellow) is a concentrated source of cholesterol thus whole eggs should be consumed in moderation with the recommended maximum intake being 4 whole eggs per week. Egg whites contain no cholesterol/fat and can often be substituted for whole eggs in recipes. If a recipe calls for 1 whole egg, 2 egg whites can be substituted to yield an acceptable product. f. Fats, Oils, and Sweets Group (Use Sparingly) Fat, oils and sweets should be minimized. Know your limit on fats, sugars, and salt. Ensure most of your fat sources come from fish, nuts and vegetable oils. Limit solid fats like butter, margarine, shortening, and lard, as well as foods that contain these fats. Check the Nutrition Fact labels on products to ensure the products you purchase are low in saturated fats, trans-fats and sodium. Choose foods and beverages that are low in added sugars. Calories from added sugars contribute few, if any nutrients. ***A low fat style of eating allows room for use of some fats and high fat foods in moderation. Select foods and fat/oils that are high in unsaturated fat vice saturated fat and cholesterol. A high intake of saturated fat and cholesterol is associated with an increased risk of heart disease and certain types of cancer. Most of the added sugar in the American diet comes from soft drinks, candy, jams, jellies, syrups, and sugar. Consume these foods in moderation. TABLE 3.1 - SAMPLE DAILY FOOD PATTERNS AT FOUR CALORIE LEVELS Approximate calorie levels based on gender, age and activity: 1,600 calories = less active women and some older adults. 2,000 calories = moderately active women. 2,200 calories = most children, teenage girls, active women and less active men. (Women who are pregnant or breastfeeding may need 300-500 more calories per day.) 2,800 calories = teenage boys, active men and very active women. Bread Group Servings Fruit Group Servings Vegetable Group Servings Meat Group Servings Milk Group Servings Total fat (grams)** Total added sugars (tsp)** About 1,600 6 2 3 5 oz 2-3* 53 6 About 2,000 8 2 4 6 oz 2-3* 65 10 About 2,200 9 3 4 6 oz 2-3* 73 12 About 2,800 11 4 5 7 oz 2-3* 93 18 * Teenagers and young adults to age 24, and women who are pregnant or breastfeeding. ** Values for total fat and added sugars include fat and added sugars that are in food choices from the five major food groups as well as fat and added sugars from foods in the Fats, Oils, and Sweets group. What counts as a serving? Table 3.2 provides recommended food items and serving sizes for each level of the pyramid. 1-5 Food Service Operation Handbook TABLE 3.2 – THE PYRAMID GUIDE TO DAILY FOOD CHOICES Food Group - Bread, Cereal, Rice, Pasta What counts as Variety from a serving within a Food Group 6 oz of whole- 1 slide bread grain products ½ bun/English Daily muffin 1 small roll, biscuit Muffin 5-6 small crackers 3-4 large crackers ½ cup cooked Cereal, Rice, Pasta 1 oz ready-to-eat cereal 1-6 Whole Grain Enriched Added Fat/Sugar Brown rice Buckwheat Bulgur Corn Tortillas Graham Crackers Granola Oatmeal Popcorn Pumpernickel Bread Rye Bread Crackers Whole-wheat Bread, Crackers Rolls, Pasta Cereals Bagels Cornmeal Crackers English Muffins Farina Flour Tortillas French Bread Grits Rolls Italian Bread Macaroni Noodles Pancakes Waffles Pretzels Spaghetti Rice White Bread Rolls Ready-to-eat cereals Biscuits Cake (unfrosted) Cookies Cornbread Croissants Danish Doughnuts Muffins Pie Crust Tortilla Chips Food Service Operation Handbook Food Group - Fruit What counts as a serving 2-1/2 Cups Daily Variety from within a Food Group 1 medium apple, Banana Orange ½ Grapefruit 1 Melon wedge ¾ Cup 100% Fruit Juice ½ Cup Canned Fruit ¼ Cup Dried Fruit Citrus/Melon/Berry Other Fruits Other Fruits Blueberries Cantaloupes Citrus Juices Cranberries Grapefruits Honeydew melons Kiwi Fruit Lemons Oranges Raspberries Strawberries Tangerines Watermelons Ugli Fruit Apples Apricots Asian Pears Bananas Cherries Dates Figs Fruit Juices Guava Grapes Mangos Nectarines Papaya Passion Fruit Peaches Pears Pineapples Plaintains Plums Prickly Pears Prunes Raisins Rhubarb Star Fruit Food Group - Vegetables What counts as a serving 2 Cups Daily (include all types regularly, use dark green leafy vegetables and dry beans and peas several times per week Variety from within a Food Group ½ cup cooked vegetables ½ cup chopped raw vegetables 1 cup leafy raw vegetables (lettuce, spinach) ¾ cup vegetable juice Dark Green Leafy Deep Yellow Starchy Dry Beans/Peas (legumes) Other Vegetables Beet Greens Broccoli Chard Collard Greens Dandelion Greens Endive Escarole Kale Mustard Greens Romaine Lettuce Spinach Turnip Greens Watercress Carrots Pumpkin Sweet Potatoes Winter Squash Corn Green Peas Hominy Lima Beans Potatoes Rutabagas Taro Breadfruit Black Beans Black-Eyed Peas Chickpeas (Garbanzo) Kidney Beans Mung Beans Lentils Lima Beans Navy Beans Pinto Beans Split Peas Cauliflower Celery Chinese Cabbage Cucumbers Eggplant Green Beans Green Peppers Lettuce Mushrooms Okra Onions Radishes Snow Peas Summer Squash Tomatoes Turnips Vegetable Juice Zucchini 1-7 Food Service Operation Handbook Food Group - Meat & Dry Beans What counts as a serving 5-1/2 Ounces Daily Variety from within a Food Group Lean meat, poultry without skin, or fish Count 1 egg, ½ cup cooked beans or 2 tablespoons peanut butter as 1 oz of meat Meat/Poultry/Fish Alternatives Beef Chicken Fish Ham/Pork Lamb Organ Meats Shellfish Turkey Veal Luncheon Meats Sausage Eggs Dry Beans Dry Peas (Legumes) Nuts/Seeds Peanut Butter Tofu Food Group - Milk, Yogurt, Cheese What counts as a serving 2-3 Servings Daily (3 servings for teenagers, and young adults to age 24, and women who are pregnant or breastfeeding Variety from within a Food Group 1 cup milk 8 oz yogurt 1-1/2 oz natural cheese 2 oz processed cheese Lowfat Milk Products Buttermilk Lowfat Cottage Cheese Lowfat Milk (Skim, 1%) Lowfat/Nonfat Yogurt More Fat or Sugar Cheddar Cheese Chocolate Milk Flavored Yogurt Frozen Yogurt Fruit Yogurt Ice Cream Ice Milk Food Group - Fats, Oils, Sweets (and Alcoholic Beverages) Fats/Oils Bacon/Salt Pork Butter, Margarine Cream (Dairy/Nondairy) Cream Cheese Margarine Salad Dressing Shortening Sour Cream Vegetable Oil Fish Oil 1-8 Sweets Candy Corn Syrup Frosting Fruit Drinks Gelatin Honey/Table Syrup Jam/Jelly/Marmalade Maple Syrup/Molasses Alcoholic Beverages Beer (12 ounces) Liquor (1-1/2 ounces) Wine (5 ounces) Food Service Operation Handbook 2 - 0 NUTRIENTS Nutrients are required by the body in order to sustain life. During digestion, food is broken down into nutrients, which are absorbed into the bloodstream and carried to every cell of your body. Carbohydrates, proteins and fats are macronutrients, needed by the body in large amounts. Vitamins and minerals are micronutrients. 1. PROTEIN a. Function: Protein is necessary to build and repair body tissues. b. Sources: The primary sources of protein include meat, fish, poultry, eggs, dairy products, nuts and legumes. c. Caloric value: 4 calories per gram. d. Requirements: Protein should comprise 15% of an individual’s total caloric intake or approximately ½ gram protein per pound of body weight. 2. CARBOHYDRATE a. Function: Carbohydrates are the main source of fuel/energy for the body. b. Sources: The primary sources of carbohydrates include whole grains, cereals, fruits, vegetables and simple sugars. (1) Complex Carbohydrates: Complex carbohydrates are composed of chains of smaller carbohydrate molecules (simple sugars). Complex carbohydrates are digested more slowly and provide the body with energy for a longer period of time than simple carbohydrates. They also provide valuable sources of fiber and nutrients. Sources include grains, legumes, and starchy vegetables. (2) Simple Carbohydrates: Simple carbohydrates are sugars such as glucose, sucrose (table sugar) and fructose. They are absorbed into the bloodstream very rapidly and provide a quick source of energy. Simple sugars provide few, if any nutrients, other than calories. Sources include table sugar, honey, jams/jellies, candy and skinless fruit. c. Caloric value: 4 calories per gram. d. Requirements: Carbohydrates should comprise 55-60% of an individual’s total caloric intake. The majority of these carbohydrates should be complex carbohydrate. 3. FAT a. Function: Fat functions as a source of energy and as a vehicle to transport fatsoluble vitamins. b. Sources: (1) Saturated Fat. Excess saturated fats in the diet can lead to fatty deposits along the walls of vital arteries. These deposits can restrict/block the flow of blood leading to a heart attack or stroke. Saturated fats are generally solid at room temperature. Sources include foods of animal origin such as meat, cheese, whole milk, butter, some vegetable oils such as palm oil and coconut oil. (2) Polyunsaturated/Monounsaturated. Unsaturated fats may help reduce the risk of heart disease when substituted for saturated fats in the diet. These 1-9 Food Service Operation Handbook fats are generally liquid at room temperature and come from plant sources. Sources of polyunsaturated fats include: safflower oil, corn oil, sunflower and soybean oil. Sources of monounsaturated fats include: peanut oil, canola oil, and olive oil. (3) Cholesterol. Cholesterol is a fat-like substance produced by the body and also found in foods of animal origin. It does not contain any calories, however, excess dietary cholesterol may contribute to fatty deposits along the walls of vital arteries. Sources include: meats, egg yolks, whole milk, whole milk cheeses and butter. There are 2 types of cholesterol found in the body. They are LDL and HDL. Low-density lipoprotein, or LDL cholesterol, is known as “bad cholesterol.” Excess LDL builds up in your arteries and may lead to heart disease. The higher the level of LDL, the higher your risk of heart disease. Lowering elevated LDL cholesterol can reduce the risk of having a heart attack. A safe LDL cholesterol level is <130 mg/DL. High-density lipoprotein, or HDL cholesterol, has earned the nickname “good cholesterol.” That’s because it is believed to remove cholesterol from the blood. High levels of HDL in your blood may help to reduce your risk of coronary heart disease. A low level can increase your risk of heart disease. A safe level of HDL cholesterol is 40-59 mg/DL. (4) Trans Fat. Transfats are fats occur in low levels naturally in meat and dairy products. Most trans fats in our diet come from processed foods including cookies, cakes, pastries and pies. They are formed during a process of hydrogenation which adds hydrogen to a liquid fat making it solid. This process saturates the fat which increases shelf life, increases the smoke point and makes it easier to spread. Transfats raise blood cholesterol and are a major risk factor for heart disease. Buzz words to look for on nutrition fact labels for transfats are partially hydrogenated vegetable oil and palm kernel oil. (5) Essential Fatty Acids. There are two types of essential fatty acids and both are polyunsaturated fatty acids. They are linoleic acid (Omega 6) and alpha-linolenic acid (Omega 3). Omega 6 fatty acids are found in vegetable oils such as corn, safflower, soybean, cottonseed, and sunflower oils, mayonnaise, salad dressings and margarine. Omega 6 fatty acids tend to increase blood clotting and blood pressure. Omega 3 fatty acids are found in canola oil, walnuts, flaxseed, and soybean oil. The body converts Omega 3 fatty acids into two other Omega 3 fatty acids known as DHA and EPA. These other Omega 3 fatty acids can be found in fatty fish like salmon, mackerel, albacore tuna, sardines, herring. Omega 3 fatty acids reduce the risk of heart disease and should be consumed more regularly than Omega 6 fatty acids. Research shows more Omega 6 fatty acids are consumed in the American diet. c. Caloric value: 9 calories per gram. d. Requirements: Fat should comprise no more than 30% of an individual’s total caloric intake. Only 7-10% of caloric intake should come from saturated fat. Table 3.3 provides recommended Protein, Carbohydrate and Fat intakes for various calorie levels: 1-10 Food Service Operation Handbook TABLE 3.3 - RECOMMENDED PROTEIN, CARBOHYDRATE AND FAT INTAKES FOR VARIOUS CALORIE LEVELS CALORIES PER DAY GRAMS PROTEIN (15% total calories) GRAMS CARBOHYDRATE (55% total calories) GRAMS FAT (30% total calories) 1,200 45 165 40 1,500 56 206 50 1,800 68 248 60 2,000 75 275 67 2,200 83 303 73 2,500 94 344 83 2,800 105 385 93 3,000 113 413 100 3,500 131 481 117 4,000 150 550 133 4,500 169 619 150 Note: The Nutrition Fact Label references 2,000 calories as a standard calorie level for comparison of food products. 1-11 Food Service Operation Handbook TABLE 3.4 - TIPS FOR IDENTIFYING FOOD PORTIONS Meat, Poultry, Fish (cooked) 3 ounces 6 ounces 8 ounces = size of a computer mouse = amount in a sandwich = amount in a “quarter pounder” (cooked) = half chicken breast (3 inches across) = restaurant split chicken breasts (6 inches across) = common luncheon or cafeteria portion = common evening restaurant portion Cheese 1 ounce 1/2 cup = 1 slice on sandwich or hamburger = 1 inch cube or 1 wedge airplane serving = 1 scoop cottage cheese Salads 1 cup 2-4 cups = dinner salad = salad bar Vegetables 1/2 cup = cafeteria or restaurant portion = coleslaw or beans at a barbecue restaurant Potato 1 small (3 oz) 1 medium (6 oz) 1 large (8 oz) 1 huge (9 oz) = 80 calories = 160 calories = 200 calories = 250 calories = = = = 3 inches long = 1/2 cup 5 inches long 6 inches long 6+ inches long = meal-in-one potato Fruit 1 medium (3 inches across) fruit 1 large fruit (apple, banana, pear) = 60 calories = 120 calories Fats 1 teaspoon margarine/butter 1 tablespoon mayonnaise 2 tablespoons dressing = = = = = 45 calories = 1 pat 100 calories = typical amount on sandwiches 160 calories = typical amount on a dinner salad 1 small ladle (restaurant) 1/2 large ladle (restaurant) Ice Cream 1/2 cup (1 scoop) = 4 ounces Beverages 6 ounces 8 ounces 4 ounces 12 ounces 1 1/2 ounces = typical juice portion = common milk portion = small glass of wine = a can of beer or soft drink = 1 jigger per alcoholic drink ...Every Bite Counts... © 1993, The Balancing Act Nutrition and Weight Guide, C. Kostas, M.P.H., R.D., Dallas, Texas The author has granted permission for reproduction of this page for educational purposes only. 1-12 Food Service Operation Handbook 4. FIBER a. Function. Fiber functions as the body’s broom. Fiber is not an actual nutrient since it does not supply any vitamins, minerals or calories. It does, however, perform vital functions. b. Sources. There are two types of fiber: soluble and insoluble. (1) Soluble fibers are those that dissolve in water and include pectins and gums. Sources include: apples, bananas, dried beans, peas, and oatmeal. Soluble fiber may help lower blood cholesterol levels. (2) Insoluble fibers are those that do not dissolve in water and include cellulose and lignin. Sources include: wheat bran, whole-wheat flour and fibrous material in fresh fruits and vegetables. Insoluble fiber helps aid in digestion and may prevent constipation. c. Caloric value: Fiber has no caloric value. d. Requirements: 25 grams daily for women and 38 grams daily for men. 3-0 MICRONUTRIENTS 1. GENERAL. Vitamins and minerals perform a variety of specialized functions by the body. Compared with the macronutrients (protein, carbohydrate and fat), your body only requires vitamins and minerals in small amounts, hence the name micronutrients. Vitamins and minerals do not contain calories. Each nutrient has a specific and unique function to perform so it is important to consume a diet containing a variety of foods to ensure adequate intake of all nutrients. Vitamins are classified as either water-soluble or fat-soluble. Water soluble vitamins are Vitamins B and C. Fat soluble vitamins are Vitamins A, D, E and K. a. Water-soluble vitamins: (1) Dissolve in water and thus can not be stored by the body (2) Must be replenished on a daily basis (3) Are more fragile and may be washed out or destroyed in food preparation b. Fat-soluble vitamins: (1) Must be transported throughout the body via fat (2) Can be stored in body fat (3) Excess intake of fat-soluble vitamins can be dangerous because they are stored in the body 2. KEY VINTAMINS AND MINERALS. Key vitamins and minerals are discussed below: a. VITAMIN A (Anti-Oxidant) (1) Function: Vitamin A is a fat-soluble vitamin. Vitamin A is involved in the formation and maintenance of healthy skin, hair, and mucous membranes. Vitamin A helps us to see in dim light and is necessary for proper bone growth and tooth development. (2) Sources: Yellow, orange, dark green vegetables and fruits (e.g., carrots, broccoli, greens, and cantaloupe), liver, eggs, cheese, butter, and milk. b. VITAMIN C (Anti-Oxidant) 1-13 Food Service Operation Handbook (1) Function: Vitamin C is a water-soluble vitamin. Vitamin C is important in forming collagen (a protein that gives structure to bones, cartilage, muscle, and blood vessels). It also helps to maintain capillaries, bones, teeth and aids in the absorption of iron. (2) Sources: Citrus fruits, strawberries, melons, tomatoes, green peppers, dark green vegetables, and potatoes. c. FOLATE (1) Function: Folate is a water-soluble vitamin. Folate (Folacin, Folic Acid) helps the body form red blood cells and may help prevent the birth defect spina bifida. Folate is part of the B complex vitamins. (2) Sources: Fruits and vegetables, fortified breads, cereals and grains, and dry beans. d. B-COMPLEX VITAMINS (Thiamin (B-1), Riboflavin (B-2), Niacin (B-3)) (1) Function: The B-complex vitamins are water soluble. They include Thiamin (B-1), Riboflavin (B-2), Niacin (B-3). The main function of these vitamins is to help the body produce energy from carbohydrates. (2) Sources: (a) Thiamin (B-1): Enriched grains, liver (b) Riboflavin (B-2): Milk products, whole grains (c) Niacin (B-3): Meat, fish, poultry, peanut butter e. SODIUM f. (1) Function: Sodium is a mineral that maintains proper fluid balance in the body and helps muscles relax/contract properly. Sodium has also been linked to high blood pressure. People who are “salt-sensitive” may have an increase in blood pressure when consuming excess sodium. Approximately 30% of America’s population is salt-sensitive. (2) Sources: The main sources of sodium in the diet come from processed foods and table salt. Salt is a mixture of sodium and chloride. People often use the terms salt and sodium interchangeably. One teaspoon salt = 2400 mg sodium. CALCIUM (1) (2) 1-14 Function: Calcium is a mineral needed to build bones, teeth and maintain bone strength. 99% of body calcium is found in bones. Sources: Dairy foods such as milk, cheese and yogurt as well as dark green leafy vegetables. Food Service Operation Handbook 4-0 MENU REVIEW PROCESS (Ashore Only) 1. MENU REVIEW. All galleys are required to have their cycle menu reviewed by the NAVSUP dietitian annually. Some of the benefits of submitting your menu for review annually is to receive up-to-date nutritional educational material and new recipes. Commands can expect a hard copy of their review mailed to them within 45 days after menu receipt. (NOTE: NAVSUP dietitian will email receipt acknowledgement of the menu review.) The menu is evaluated in terms of compliance to the standards outlined in this chapter. Menus are given a numerical score, based on a 100-point scale. A score of 90 or better indicates an acceptable menu. Commands interested in having NAVSUP review their menu should contact the NAVSUP Nutrition Manager, listed in the Contact Directory, Page 4, P-476. Check with your TYCOM for any specific local requirements. 4- 1 CYCLE MENU 1. GENERAL. A cycle menu works best for general messes. Cycle menus save time and allow an easier and more thorough analysis than menus written weekly. Cycle menus provide more accurate forecasting for ration costs, requisition requirements, and daily food preparation. In deciding on the most desirable cycle length, the variety and frequency of resupply, the number of duty sections, and the CS watch schedule should be taken into consideration. An odd-numbered day cycle allows each watch section the opportunity to prepare the entire cycle menu. Every attempt will be made to offer a selective menu. Selective menus offer one or more options for each meal category. Ideally, each menu should offer two or more entrées, side dishes, vegetables and desserts. A variety of beverages and breads will also be available. 2. MENU PLANNING. Many factors effect the menu planner’s choice of foods for the menu: nutritional requirements, food costs, availability of supplies/equipment, skill level of galley personnel and manning levels. a. Monetary allowances determine the financial resources of the menu planner. A menu writer must stay within the Basic Daily Food Allowance. Careful planning will help eliminate rewriting of menus and making last-minute substitutions. b. Seasonal availability of foods is important to the menu planner. Menus should be adjusted to take advantage of seasonal changes in the supply of fresh produce. Canned or frozen fruits, juices, and vegetables supplement the fresh menu items and are comparable in nutritive value. c. Equipment and storage facilities also effect the choice of menu items. Avoid menus that require too much last minute preparation. Plan a balance between foods that can be prepared in advance without deteriorating in quality and those that must be prepared just before serving time. d. The amount of manpower and skill level of galley personnel must be considered when planning a menu. Balance labor intensive menu items with those that require minimal preparation. 1-15 Food Service Operation Handbook 4- 2 MENU PLANNING PROCEDURES 1. MENU DRAFT. The Leading Culinary Specialist will draft a menu using the following tools: Cargo (afloat), NAVSUPNOTE 7330, crew preference surveys, AFRS, and regional/NAVSUP approved recipes. The menu draft will include the food item and recipe number. Menus for salad and dessert bars are to be included and attached to the menu draft. a. Drafting the menu. Most meals are planned around the entrée dishes of meat, fish, or poultry. Other meal items are planned to complement the main dishes. Menus should be drafted as far in advance as practical. b. Meat block. A frequency chart for meat is known as a “meat block.” Its purpose is to optimally distribute beef, veal, pork, lamb, fish, poultry, and other meat substitutes. Careful attention should be given to balancing the variety of meats and meat substitutes to prevent the menu from becoming “heavy on beef” or “light on fish.” It is important to consider items not only because of their popularity but also cost. Meat is the largest single dollar investment in the menu. A planned pattern of meat and meat substitutes on the menu will stabilize use of costly and popular meat items and make it easier to accurately predict menu requirements. c. The Menu Draft will list each item in a meal with descriptive wording and the Armed Forces Recipe Service recipe numbers. Indicate a recipe number for all menu items requiring a recipe for preparation. Referencing the correct Armed Forces Recipe Service recipe number for each item eliminates guesswork. The following steps illustrate the correct sequence in drafting the major components of a meal: Step 1. Entree Step 2. Starches and vegetables Step 3. Salads Step 4. Breakfast fruits and cereals Step 5. Desserts Step 6. Breads and breakfast pastries Step 7. Soups and beverages d. Foods on the Cycle Menu or the posted menu at the head of the serving line must be listed in the following order: (Accompaniments to a menu item should be written alongside or directly underneath it) Breakfast 1-16 Lunch or Dinner Fruit Juices Soup-Crackers Cereals Main Entree Main Entree Gravy or Sauce (if required) Breakfast Pastry Starches Breads-Butter Vegetables Jam-Jelly Salad-Dressings Food Service Operation Handbook Breads-Butter Beverages Dessert Beverages 2. ANALYZING THE DRAFT MENU. The Food Service Officer will analyze the draft menu to ensure that meals are nutritionally balanced and reflect good management of food supplies, equipment, and personnel. The Food Service Officer will review and note changes on the menu draft and return it to the Leading Culinary Specialist. The menu draft will be used for preparing the daily Food Preparation Worksheet (NAVSUP Form 1090). 4- 3 MENU APPROVAL 1. SMOOTH MENU. The smooth menu will be submitted for command approval and signature when a new cycle menu is prepared. Menus will list nutrient information containing calories, carbohydrates, protein, and grams of fat. This information will allow the crew to reference the nutrition information and make more educated food selection choices. Menus posted on menu boards, bulletin boards, and other designated areas should include appealing, descriptive, and accurate wording. Recipe numbers will be omitted from posted menus. 4- 4 MENU CHANGES 1. MENU CHANGES. The Commanding Officer or the designated representative may allow the Food Service Officer to make necessary changes to an approved menu. This authorization occurs when the Commanding Officer signs the activity’s cycle menu that contain the following preprinted statement: “The Food Service Officer is authorized to make changes to this menu when, due to unusual or unforeseen circumstances, it may be necessary to provide substitutions for food items not in stock or to permit timely use of perishable foods.” Permanent changes to the approved cycle menu must be approved by the chain of command. 4-5 GENERAL NUTRITION 1. GENERAL NUTRITION. Healthy Navy standards. a. Menus will offer healthy options to include a Healthy Navy entrée, vegetable, starch and dessert. Healthy Navy standards are as follows: Entrée = 15 gm fat or less Side dish (starch and vegetable) = 5 gm fat or less Desserts = 5 gm fat or less b. Smaller portions should not be promoted as a standard weight control practice. Offer a balanced, low fat diet to patrons concerned about weight control. A diet consumed in smaller portions has an appearance of being severely restrictive and may contain more calories and fat than a well balanced diet consumed in average portion sizes. 1-17 Food Service Operation Handbook c. Vitamins and Minerals. Vitamins and minerals are required for all bodily functions. It is important to provide a variety of foods on your menu to ensure availability of all key nutrients. Several key vitamins and minerals are discussed below: 4-6 (1) Vitamin A: A good source of vitamin A will be on the menu every day. Dark green and deep yellow fruits and vegetables such as broccoli, sweet potatoes, green peppers, spinach, carrots, winter squash, tomatoes and cantaloupe are good sources of vitamin A. (2) Vitamin C: A good source of vitamin C will be served daily. Good sources include citrus fruit and/or juice, kiwi fruit, cantaloupe, cranberry juice, strawberries, tomato juice. (3) Folate: Good sources of folate will be offered daily. Sources include oranges/orange juice, kiwi, bananas, strawberries, spinach, broccoli, peas, green leafy vegetables, lentils, cereals, breads, rice and pasta. (4) Calcium: In addition to milk at every meal, other good sources of calcium such as yogurt, cottage cheese and cheese should be offered daily. (5) Sodium: When serving a high sodium entrée such as ham, corned beef, cured meats or entrées prepared with soy sauce, offer a lower sodium entrée such as fresh meat, seafood or poultry. MENU PLANNING/NUTRITION STANDARDS FOR ENTRÉES 1. ENTRÉES. Entrées for lunch and dinner meals. a. When serving two entrées per lunch/dinner meal: (1) A healthy option entrée (less than or equal to 15 grams fat) will be served at each meal. (2) In addition to red meat (beef, pork, veal, lamb), poultry and fish will be incorporated in the menu. (3) Lean cuts of beef and pork will be utilized. Refer to “The New Professional Chef” and “The Art and Science of Culinary Preparation” for additional information on lean cuts of meat. b. When serving one entrée per lunch/dinner meal: (1) A healthy option (less than or equal to 15 grams fat) should be served for either lunch or dinner. (2) In addition to red meat (beef, pork, veal, lamb), poultry and fish will be incorporated in the menu. (3) Lean cuts of beef and pork will be utilized. Refer to “The New Professional Chef” and “The Art and Science of Culinary Preparation” for additional information on lean cuts of meat. c. Only one fried entrée will be offered per day to reduce daily fat intake. It is preferable to serve entrees that are baked, roasted, broiled, poached, or grilled. If serving a fried entrée, the alternate entrée will be a healthy option. d. When a casserole entrée is served, offer an alternate entrée containing preportioned or sliced meat. 1-18 Food Service Operation Handbook e. When serving high fat cold cuts such as bologna, offer lean, cold sliced roast meats such as turkey or lean roast beef to provide a healthy option. f. Serve gravy/sauces on the side. g. At breakfast, a minimum of one egg entrée will be prepared without added fat. Reduced cholesterol eggs should be available. h. Reduced fat/fat free yogurt qualifies as a healthy entrée option for breakfast. 4-7 MENU PLANNING/NUTRITION STANDARDS FOR STARCHES 1. HEALTHY OPTION STARCH. Healthy option starch offered with each meal. a. A healthy option starch (less than or equal to 5 grams fat) will be offered each meal when serving 2 starches per meal. When serving one starch per meal, a healthy option starch will be provided at either lunch or dinner. Starch options should include potatoes, rice, or pasta. b. At breakfast, assorted breads, english muffins, bagels and low fat muffins will be offered as a Healthy Navy alternate to high fat breakfast pastries. c. At least one whole grain breakfast cereal will be offered daily. display whole grain RTE cereals on the breakfast serving line. Prominently d. Whole grain (whole-wheat) bread will be offered at each meal. 4-8 MENU PLANNING/NUTRITION STANDARDS FOR VEGETABLES 1. HEALTHY OPTION VEGETABLE. Healthy option vegetable offered with each meal. a. A healthy option vegetable (less than or equal to 5 grams fat) will be offered at each lunch and dinner meal when serving 2 vegetables per meal. When serving one vegetable per meal, a healthy option vegetable will be provided at either lunch or dinner. Small amounts of butter/margarine (1 cup per 100 portions) can be added to vegetables and still remain below 5 grams fat per serving. b. No more than one starchy vegetable (i.e., corn, peas, baked beans, pinto beans, black-eyed peas, lima beans) will be offered when serving two vegetables per meal. c. Relish trays will include a variety of fresh vegetables. If dip is to be served with the relish tray, offer a low fat/fat free variety. d. Ideally, two vegetables will be served at both lunch and dinner. e. Vegetables should complement the entrée being served. For example, green beans complement spaghetti but harvard beets do not. f. Vegetables will be prepared utilizing batch cooking techniques in order to preserve nutrients and provide flavorful and appetizing meals. g. Vegetables served with cheese sauce or cream sauce are generally high in fat. Recommend serving sauces on the side. h. Only one fried vegetable will be served per day. 1-19 Food Service Operation Handbook 4-9 MENU PLANNING/NUTRITION STANDARDS FOR DESSERTS 1. HEALTHY OPTION DESSERT. Healthy option dessert offered with each meal. a. A healthy option dessert (less than or equal to 5 grams fat) will be served with every lunch and dinner meal. Examples include fruit, low fat yogurt, sherbet, fruit ice, gelatin, angel food cake or appropriate healthy option dessert recipe. Offer fruit selections as a dessert choice for the lunch and dinner meals. b. Fresh fruit will be utilized to the greatest extent possible. If canned fruit is utilized, it should be packed in natural juice vice syrup packed. Seasonal fruits will be incorporated into the menu as much as possible. A minimum of two fruits will be offered every meal. c. The dessert menu should take into account personnel resources and skills, preferences, eye appeal, climate, and cooking facilities. Each week’s menu must be planned to provide an equitable distribution of favorite cakes, pies, fruit, ice cream, and cookies. The baker’s schedule should allow adequate time and oven space to make the desserts. If bread and breakfast pastries are baked in the galley, production schedules will be coordinated. 4 – 10 MENU PLANNING/NUTRITION STANDARDS FOR SALADS/SALAD BARS/FRUIT BARS 1. SALAD BAR. Salads and fruits offered with each meal. a. A salad bar or a pre-made fresh green salad will be served at lunch and dinner pending availability of ingredients. b. A minimum of two different fruits will be served at breakfast, lunch and dinner. c. A salad bar menu will be planned to complement the cycle menu. Avoid duplication of food flavors between the menus. Several factors to consider: (1) Seasonal availability. Fresh fruits and vegetables in season are a refreshing change from the processed varieties so often served while the ship is underway. Fresh fruit and vegetables should be served as often as their availability and the replenishment schedule allow. (2) Temperature and climate. Cool, colorful salads are most welcome in warm weather. Lighter meals for hot weather go well with hearty chilled salads, such as potato, macaroni and tuna salads. Crisp relishes and green leafy salads are an enjoyable contrast with the hot, heavier dishes of cold weather meals. d. Salad bar components: 1-20 (1) Every salad bar will include a raw vegetable salad, such as a tossed green salad. Take advantage of the wide variety of fresh greens such as romaine, escarole, endive, Chinese and red cabbage to add variety, color and texture to tossed green salad. (2) Assorted vegetables such as diced/sliced/shredded celery, radishes, carrots, onions, tomatoes, cucumbers, cauliflower, broccoli flowerets, and green pepper rings may be included. Use seasonal fresh vegetables to the maximum extent possible. Food Service Operation Handbook (3) Additional salad bar items may include: pickles, olives, bean sprouts, bacon bits, croutons, garbanzo beans (chick peas), red beets, diced hard boiled eggs, diced/cubed meat or cheese, and cottage cheese. (4) Specialty salads such as coleslaw, pasta salad, potato/macaroni salad, and marinated black bean salad should be added to the salad bar as often as possible. (5) Salad dressings. At least one reduced fat/fat free dressing will be offered at each meal. (6) Fruit. When possible, fresh fruits should be offered on the salad/fruit bar. If fresh fruit is not available, canned fruit provides a suitable alternative. A minimum of two types of fruit will be offered every meal. 4 - 11 MENU PLANNING/NUTRITION STANDARDS FOR BEVERAGES 1. BEVERAGES. Healthy beverage options offered at each meal. a. One percent low fat and/or skim milk will be offered at each meal. If chocolate milk is available, offer low fat chocolate milk. Deployed ships and overseas general messes are encouraged to use 1% low-fat milk when available. b. Pure 100% fruit juice is recommended vice fruit drinks containing large amounts of sugar and minimal fruit juice. c. Energy drinks should only be considered a part of menu planning for activities feeding Special Forces or unique war fighter groups that need additional electrolytes in their diet. BIB and powdered Gatorade and PowerAde products are available on the NSCM load list are the only products approved for use. 4 - 12 HEALTHY INGREDIENTS 1. HEALTHY OPTION INGREDIENTS. Healthy option ingredients offered with each meal. a. Substitute low fat/fat free ingredients wherever possible. For example, mayonnaise, sour cream, yogurt, and cheese products are available in low fat/reduced fat or fat free versions. b. Cholesterol free eggs can be substituted for regular table eggs. c. Use 90% lean, ground turkey or ground beef when possible. NOTE: If mixing ground turkey with beef, the internal cooking temperature must reach 165° F. or higher for 15 seconds. 4 - 13 MARKETING MENU ITEMS 1. GENERAL. a. Menus are posted daily in the general mess to describe and merchandise meals. Recipe numbers should not be posted on menu boards. Utilize descriptive terms that sound appetizing (i.e., Seasoned Mixed Vegetables vice Mixed Vegetables or Fluffy White Rice vice Rice). Menu items will be listed in the following order: Appetizer/Soup Entrées (gravy, sauce if required) Starches 1-21 Food Service Operation Handbook Cooked vegetables Salads Breads/spreads Desserts Beverages b. Healthy Option menu items will be identified. Galleys should utilize the marketing technique most effective for the individual galley. Posting on cycle menu, menu boards, beginning of serving lines, or in front of the items on the serving line and specialty bars (i.e., potato, salad, chili bar, etc.) A special symbol such as a star or a heart can be placed next to the item on the cycle menu/posted menu. Additionally, a sample plate displaying the healthy options using portion sizes as indicated by the Food Guide Pyramid may be placed at the beginning of the serving line. These techniques provide a quick reference for those patrons desiring to select the healthy options. c. Ensure serving line personnel are knowledgeable about the specific ingredients, portion size and nutritional value of the foods they are serving. d. Commands will be required to complete and properly display placards identifying the menu items with the nutritional data of each item being served on the serving line. 4 - 14 FOOD COMBINATIONS/SCHEDULING/VARIETY/INNOVATION 1. GENERAL. a. Preparation methods will be varied in the same meal, on the same day and throughout the menu cycle. For example, potatoes can be served mashed, baked, oven-fried or with a variety of seasonings. Rice can vary from white, brown or wild. b. The Armed Forces Recipe Service (AFRS) will be used to the greatest extent possible. The menu should incorporate an assortment of different recipes throughout the cycle including recipes from the latest AFRS updates. c. Variety breads such as cornbread, muffins, garlic bread, biscuits and similar items will be offered to complement the meal. d. A choice of two or more spreads will be offered at each meal (i.e., butter, margarine, jam, jelly, marmalade, honey, or peanut butter). e. A different type of soup will be served for the second meal when two soups are offered on the day’s menu. Soup ingredients should differ from other menu selections of the meal. Example: avoid serving entrées containing tomato sauce with tomato soup, baked beans with bean soup. The type of soup must be specified on the menu. Terms such as “soup of the day” will not be used. f. Sandwiches will be served as the alternate entrée. Menus that rely solely on sandwich meals may compromise crew satisfaction and nutrition. Sandwich preparation can be labor intensive. g. When less popular items are served an alternate item will be offered (i.e., if liver is served offer a popular item such as chicken). h. Avoid reliance on snack foods (i.e., potato chips) as an accompaniment for sandwiches. 1-22 Food Service Operation Handbook i. Theme meals will be included throughout the cycle. Theme/special meals are important as morale boosters and also allow Culinary Specialists to use their individual talents. With a few extra touches any meal can become fit for a special occasion. Special meals include holiday meals, cookouts, brunches and birthday meals. For example, the menu for St. Patrick’s Day could read “Irish Stew” rather than “Beef Stew.” Meals on these days can be highlighted with one or more special dishes to commemorate the occasion along with printed menus and decorations. SPECIAL OCCASION MEAL IDEAS January New Year’s Day Martin Luther King, Jr’s Birthday February Black History Month Valentine’s Day Presidents’ Day March St. Patrick’s Day Easter Sunday (or April) National Nutrition Month May Asian Pacific Heritage Month Mother’s Day Armed Forces Day Memorial Day June Father’s Day Flag Day July Independence Day September Labor Day 5-a-Day Month October Columbus Day Navy Birthday Halloween November Veteran’s Day Thanksgiving Marine Corps Birthday December Christmas 1-23 Food Service Operation Handbook 4 - 15 CHARACTERISTICS OF AN AESTHETICALLY PLEASING MEAL 1. MEAL CHARACTERISTICS. Making a meal pleasing to the patron. a. Color - Each meal should be colorful. The colors will complement, not contrast, one another. It is helpful to visualize the meal on a plate or to look at the meal on the steam table from the customer’s side of the serving line. A meal of baked fish, steamed rice and seasoned corn provides no color contrast and is unappealing for the customer. b. Shape - Each meal will consist of items that vary in shape. The combination of hamburgers, potato patties, and sliced beets is an example of poor shape variety. c. Texture - Food items that comprise a meal will vary in texture. A good rule to follow is to include a crisp, a firm and a soft food at every meal. Avoid a meal containing all saucy items or all soft items. d. Flavor - Avoid too many similar flavors in a meal as well as too many different flavors in one meal. For example, corn should not be scheduled with a meal containing cornbread or cornbread dressing or sweet potatoes with pumpkin pie. Alternately, a meal consisting of lasagna, sweet and sour pork, southwestern rice and southern style beans contains too many different flavors that do not complement one another. Flavors represented throughout the meal should be complementary. 4 - 16 SPEED LINES 1. GENERAL. Speed lines provide quick “grab and go” items for those patrons not having the time to proceed through the serving line. Attempts will be made to include healthy options on the speed line whenever possible. In addition to burgers and fries, healthy sandwiches such as grilled chicken sandwiches, lean meat sandwiches/wraps and ready-made salads (such as a Chef salad) can be offered. Seasoned oven fries provide an appetizing, lower fat alternative to french fries. Fresh fruit is an easy addition to any speed line and provides a healthy dessert option for those patrons desiring one. Properly managed speed lines can encourage healthful eating and be successful in any general mess having the space and personnel to run them. 4 - 17 BRUNCH 1. GENERAL. The Brunch meal answers the patron’s desire for a late breakfast and also provides the option of a more substantial mid-day meal. Generally, all breakfast options are available as well as a typical lunch entrée item such as a sandwich or casserole. Side dishes such as a starch and vegetable will accompany the lunch entrée. Healthy options will also be available for the brunch meal. The healthy option can be one of the breakfast entrées, however, it is preferable to offer a healthy sandwich or casserole as well. 4 - 18 NIGHT MEALS 1. GENERAL. The night meal is designed as an alternate meal for those who did not receive a lunch or dinner meal. Healthy option entrées and side dishes will be scheduled regularly throughout the night meal cycle. 1-24 Food Service Operation Handbook 4 - 19 SPECIAL MEALS 1. HOLIDAY MEALS. Food service facilities will be issued special menus and instructions via their TYCOMs for the Easter, Thanksgiving, and Christmas meals. These will be made available by Food Flash, naval message, NKO, and at each TYCOM level. In addition, each galley may serve its holiday meals on a day which is convenient for shipboard operations; the meal which was regularly scheduled can be postponed until the next cycle. 2. BIRTHDAY MEALS. Food service facilities are authorized to host monthly birthday meals utilizing NSCM line items on a day which is convenient for shipboard operations. 3. STEEL BEACH PICNICS. Food service facilities are authorized to host special events such as steel beach picnics utilizing NSCM line items. The meal which was regularly scheduled can be postponed until the next cycle. 4. THEME MEALS. Theme meals are incorporated into the NSCM and can be moved to accommodate shipboard operations. 5. CHANGE OF COMMANDS AND COMMAND SPONSORED RECEPTIONS. Menus can be created, and should be derived from the NSCM load list. The menu has to be fully funded by Official Representation Funds, personal funds or other sources. Use of the subsistence appropriation funds to defray the cost of food items is not authorized. 5 - 0 FOOD HANDLING AND NUTRIENT RETENTION 5 - 1 FOOD HANDLING 1. GENERAL. The way food is handled greatly effects nutrient retention. Growing conditions and degree of processing effect nutritional value. Storage conditions are controlled by food service personnel. These principles apply to minimize nutrient loss during storage: a. Store at recommended temperatures. b. Provide ample air circulation to maintain recommended storage temperatures. c. Provide cool, dry, ventilated conditions. d. Practice first-in, first-out (FIFO) use of food items. e. Long storage times result in greater nutrient loss. f. 5-2 Variable and excessive temperatures hasten nutrient loss. FOOD PREPARATION 1. GENERAL. Preparation methods affect nutrient content of food items. Refer to AFRS simmering and steaming instructions for vegetables. Avoid early preparation of all cooked foods. Hot foods continue to cook, losing nutrients, color, flavor and texture. Progressive/batch cooking techniques will be utilized. Prepare the minimum quantity required to maintain an even flow of freshly cooked products to serving lines. 1-25 Food Service Operation Handbook 5 - 3. "AS PURCHASED" (A.P) AND "EDIBLE PORTION" (E.P.) 1. GENERAL. The Issue column “As Purchased” (A.P.) on the Armed Forces Recipe Cards is utilized for the correct conversion of actual quantity needed to meet the yield size of 100 portions. The Weight column is equivalent to the “Edible Portion” (E.P.) of the item needed to yield 100 portions. Example: Carrots, fresh, shredded, Issue column is equivalent to 1-1/8 lb (A.P.) to yield the Weight column of 1 lb (E.P.) per 100 portions. 5 - 4. TEMPERATURE MONITORING 1. GENERAL. There are many types of thermometers used in food production to monitor storage temperatures as well as preparation temperatures. Location Type of Thermometer Milk Dispenser air measuring, spirit glass/dial Refrigerator air measuring, spirit glass/dial Freezer air measuring, spirit glass/dial Ovens air measuring, dial oven Grill surface measuring, grill stick type, candy or deep fry Manual ware washing stick type, pocket dial Food stick type, pocket dial 6-0 ADVANCED FOOD 1. ADVANCED FOODS. Advanced food is considered to be pre-prepared food which eliminates traditional “cook from scratch” preparation procedures. These foods are pre-cooked/cooked, prepared/pre-assembled and pre-breaded. Items that are fresh, chilled, seasoned, frozen, sliced, diced, and shredded are included in this category. Other items are ready-to-serve (RTS) or ready-to-eat (RTE) items which may require re-heating, cooking or served directly from the original container. 2. ADVANCED FOOD DESCRIPTIONS. Advanced Food: The following products are considered a. Pre-Cooked/Cooked. Preparation requires only re-heating vice complete cooking. These items can be served alone or as a component of another recipe. Examples are pre-cooked bacon, oven roast, chicken and corned beef. b. Prepared/Pre-Assembled. Items containing two or more ingredients that have been assembled to create a complete recipe. Preparation requires heat and serve or minimal preparation. Items may be purchased frozen, chilled, canned or other dry packaging such as plastic, foil or cardboard, and may include entrées, side dishes or pie fillings and desserts. Examples: Lasagna, Pizza, Salisbury Steak, Beef Stew, Macaroni and Cheese, Baked Beans, Refried Beans, Chili, Beef w/BBQ sauce, Ravioli, Lumpia, Egg Rolls, Assorted Hors d’ouvres, Au gratin Potatoes, frozen or shelf stable dough products, cookie dough, frozen whole eggs/egg whites and condensed or frozen soups, stuffing mixes, rice mixes and flavored potato mixes. 1-26 Food Service Operation Handbook c. Pre-Breaded. Items raw or pre-cooked, which have bread coating applied already. Preparation requires only heating and serving. These items are typically purchased in the frozen state. Examples of breaded products are shrimp, fish portions, veal/chicken/pork patties, onion rings and vegetables. d. Pre-Cut/Sliced/Diced/Chopped/Cubed/Shredded/Grated. Items which have been pre-cut, sliced, diced, chopped, cubed, shredded, or grated, and are purchased fresh, frozen or chilled. Examples are sliced/diced/chopped cheeses, pre-cut raw vegetables and meats such as fajita strips and diced meat (chicken, turkey, etc.). e. Ready-to-Serve (RTS)/Ready-to-Eat (RTE). Items that are fully prepared as purchased. They can be removed from the package and served as a standalone item without any further preparation other than portioning. Items may be purchased frozen, chilled, canned or in dry packaging such as plastic, foil or cardboard. Examples: Pre-made shelf stable or frozen cookies, brownies, cakes, pies, canned/dry puddings, canned meat spreads, croutons, ready-made pie crusts, ready-made icing, salsa, pizza, cocktail, tartar and cheese sauces. 7-0 TRADITIONAL FOODS 1. TRADITIONAL FOODS. These foods are NOT Advanced Foods. They are fresh or processed by canning, dehydration, compression, freezing, or other methods to save labor and to reduce waste, storage space and refrigeration requirements. Fleet operations and ships’ varying characteristics have historically dictated a need for foods that save storage space and do not require refrigeration. These foods can greatly extend the endurance of ships. Some types of Traditional Foods are as follows: a. Canned. These foods are practical to use because they can be safely stored in a wide temperature range, have a longer shelf-life than fresh or frozen foods, and are generally economical to use. Waste, such as skin, seeds and bones, has been removed. They are cooked and ready to heat or chill and serve. Canned foods available include fruits, vegetables, meats, poultry, fish and ice cream toppings, along with many others. b. Beverages. Available as Bag-in-a-Box (BIB), canned, concentrated, Ultra High Temperature (UHT), dehydrated or instant for many beverages (coffee, tea, soda, fruit juices, milk, flavored beverages). c. Dehydrated. The advantages of using dehydrated foods are the natural color, flavor, and texture of the food is preserved, less storage space is required since water is removed, and the food can be stored without refrigeration. Different methods of dehydration are used according to the individual characteristics and reactions of the food item. These are hot air, vacuum, spray, drum, and freezedrying. Examples are: dehydrated shrimp, cottage cheese, instant potatoes, garlic and chives, cream substitute, sour cream mix, green beans, dessert topping, ice milk and milk shake mixes, yogurt mix and American cheese, among many others. d. Fresh/Frozen. Foods commonly stocked are raw, unseasoned, unbreaded ground meats, fish, poultry, fruits, and vegetables. A variety of fresh items such as breads, rolls and pastries are available through local bakery contracts. e. Other. Other kinds of traditional foods are mixes for bakery items and pudding. Additional items are salad dressings, jams, jellies, gravy, icing mixes, condiments (including individual portion packets), dry and instant cereals and spices. 1-27 Food Service Operation Handbook 7-0 SPECIAL MEALS 1. SPECIAL MEALS. In-flight and boat meals that are prepared and eaten away from general messes pose special problems. Facilities for storage, refrigeration, and cooking aboard aircraft and service craft may be limited or lacking, and thereby limit menu selections. Special meals often must be held for several hours. Careful consideration must be given to selection food items that can withstand delays between preparation and serving without risk of food-borne illness or loss of quality. Factors that effect choice of food items: a. Highly perishable foods: Sandwich fillings made with salad dressing, chopped and ground protein foods, eggs, fish and shellfish, pastry with custard fillings, creamed soups and sauces, and leftover, cooked poultry are highly susceptible to bacterial contamination and should be avoided when making special meals. The Manual of Naval Preventative Medicine, NAVMED P-5010-1 gives guidelines for safe food handling procedures. Instead of meat spreads for sandwiches use sliced roast turkey, chicken, beef, pork, cheese, and peanut butter and jelly. If salad dressing is desired, use individual packages. Other items, such as catsup, mustard, lettuce, and tomato, should be packed separately so that the sandwiches will not become soggy. b. Foods known to cause discomfort for aircrews, such as highly spiced and rich, fatty foods should be avoided. For some individuals, beans, raw onions, cabbage, soy bean products, and carbonated beverages can cause intestinal gas at high altitudes. On the other hand, liquids and foods containing starch and sugar will help alleviate the effects of motion sickness, reduced oxygen and fatigue. c. The amount of water available may be limited and this should be taken into consideration when planning meals that include dehydrated or concentrated food items. d. When refrigeration is not available for meals: (1) Personnel responsible for meal preparation must strictly follow sanitary precautions. (2) Foods must be held at constant refrigeration while in the galley. (3) Food must be eaten within 4 hours of issue. (4) To ensure that customers are aware of the safe time limit the meals are to be consumed with, label the food with the following data: (a) Date and time of preparation; (b) Prepared by; and, (c) Keep under refrigeration or eat by _____(within 4 hours of issue). (5) Holding or reusing these meals for later consumption is hazardous and should be avoided. (6) Menu suggestions for special meals: To increase the variety of food items for special meals utilize all of your resources (i.e., made from scratch items, pre-prepared items, individually wrapped items and boxed meals). 1-28 Food Service Operation Handbook (a) The following food items are suggested for inclusion in breakfast meals: 1. Fruit 2. Juice 3. Cereal-Ready-To-Eat 4. Breads, pastries 5. Spreads (peanut butter, jam, margarine, cream cheese) 6. Snacks (dried fruit, nuts, granola type bars, cheese and crackers) 7. Beverages (cold or hot as applicable) (b) The following food items are suggested for inclusion in lunch and dinner meals: 1. Fruit 2. Juice 3. Entrée/Sandwich 4. Salad or relishes (raw vegetables, pickles) 5. Breads or roll 6. Accompaniments (cranberry sauce, applesauce) 7. Condiment packets (ketchup, mustard, mayonnaise, dressings) 8. Desserts (canned fruit or pudding, bakery items) 9. Snacks (dried fruit, nuts, granola type bars, chips, pretzels, cheese and crackers) 10. Spreads (peanut butter, jam, margarine, cream cheese) 11. Beverages (cold or hot as applicable) 1-29 Food Service Operation Handbook 8-0 FOOD PRESENTATION 8-1 GENERAL FOOD PRESENTATION Knowledge in menu planning, creative food preparation, plate 1. GENERAL. presentation and marketing skills are essential for establishing healthy dietary patterns within the Navy. Food must not only taste good, but it must also look and sound appealing. a. APPLICABLE EQUIPMENT (1) Use the right-size steam table pans to ensure an appetizing appearance of food. Use shallow steam table pans for serving soft vegetables (broccoli, cauliflower) and breaded or fried foods to prevent a soggy product. Food items should be covered, when appropriate, to prevent shriveling and drying. The use of clear dome lids allows patrons to easily view food items on the serving line. (2) The use of proper serving utensils will promote traffic flow, provide good sanitary practices, and keep neat order of service lines. Portion size appropriate for each food item is the Culinary Specialists’ responsibility and must be indicated on the Food Preparation Worksheet. The portion size that is indicated on the Armed Forces Recipe Service card is a guide, not a rule. Keep in mind that the nutrition information provided for each recipe is based on the serving size listed on the card. Periodically check excess tray waste, and if there is food waste, reduce portion sizes. The patron who desires more may request larger portions. For appropriate use of utensils, see NAVSUP-7, Guideline Card A-4, Table of Measuring Equivalents. b. SERVICE AREAS (1) General guidelines Coordinate menus with serving space available, as overcrowding detracts from visual appearance and slows service. Watch colors closely - tomatoes clash next to red beets. Careful arrangement of hot and cold foods is extremely important. If possible, personnel should be routed to avoid delay and unnecessary congestion in serving and dining areas. If the physical setup allows, salad bars should be situated to permit the patron to stop there first before approaching the hot food serving line. Eliminating the stop at the salad bar enroute to the table will enable the hot food to be eaten while still hot. If possible, separate the dessert bar from the serving line and place it in the center of the dining area. Using this setup, the patrons can pick up desserts after eating the main course. A reduction in the number of desserts consumed and a decrease in tray waste will usually be noticed. (2) 1-30 Hot Foods (a) A steam table should keep food hot without continuing the cooking process. (b) All short order type items, such as pancakes, french toast, and eggs should be served from the grill on a prepared-to-order basis. Timing is important. Food Service Operation Handbook (3) (c) Hot foods should be batch cooked and replenished as required. Do not mix batches. (d) Avoid having hot vegetables stand in liquid on the steam table. (e) Cold Foods Ensure items are properly chilled prior to service. (a) Cold items should be served in a refrigerated unit or in trays or pans on a bed of ice. If ice is used proper drainage is required. (4) Fresh fruits must be washed prior to serving. (5) Highly perishable desserts such as cream puddings and pies, custards, cream puffs and eclairs must be served chilled. (6) Cold drinks and juices should be dispensed by machine. (7) Butter patties should be served from a dispenser. If a dispenser is not available, the ready-to-serve patties may be placed on a tray and set over a container of ice on the serving line. (8) Miscellaneous (9) (a) Bread will maintain freshness if served from dispensers, otherwise, bread should be opened as needed. To give a fresh-baked quality to breakfast pastries such as coffeecakes and sweet rolls, heat them in an oven (250° F.) for 8 to 10 minutes before serving. (b) Individual boxes of ready-to-eat cold cereal should also be served from dispensers. If a dispenser is not available, the individual packages should be arranged on a tray on the serving line. (c) To ensure adequate food temperatures are maintained during meal service, serving areas should be set up in sufficient time for the serving equipment to reach appropriate temperatures. Foods requiring temperature control will be set on the serving line as close to meal service as possible. The quality of the food as well as temperatures are best maintained when the food is held in equipment used for cooking, a warming box, or appropriate cold storage areas. Self-Service Items (a) Protect food on display with sneeze guards or food shields, in direct line between the food and the mouth or nose of an average person. (b) Use long handled serving utensils to avoid patron contact with food, thus minimizing cross contamination. (c) In self-serving area careful attention should be give to arrangement of food items to eliminate reaching over one container of food to get to another. (d) Do not let patrons use soiled plates or silverware for refills. 1-31 Food Service Operation Handbook (10) MERCHANDIZING AND PLATE PRESENTATION c. Merchandise your food by presenting items on the serving line in an attractive manner and your patrons will want to eat it. Eye appeal is just as important as taste. A well-planned meal should contrast in color, shape, size and texture. Foods within a meal should have harmonious colors and pleasing color contrasts. A serving line of all red foods or all bland foods, such as Navy bean soup, roast veal, buttered noodles, summer squash and rice pudding is not eye appealing. d. A garnish is an ornament that is also used for flavor. Some garnishes are used merely as a decoration; others are planned to complement the flavor and texture of the dish as well as to add visual appeal. Generally, garnishes should be edible and should be an integral part of the food so that it will not be left on the plate. Clear guidelines or instructions for garnishing should be included on the Food Preparation Worksheet. Rules for garnishing are as follows: 8-2 (1) The entire service setting should be viewed as a whole. (2) Plan simple garnishes. Do not sacrifice timely preparation of the meal just for the sake of garnishing. (3) Vary the garnishes such as lemon twists or slices; it should not become monotonous. (4) Overcooked or improperly prepared food will not be helped by an attractive garnish. (5) Use garnishes sparingly. Beware of parsley overkill. (6) Ensure the serving line is neat and attractive. Use decoratively folded napkins or a draped tablecloth, a small centerpiece or garnish to add color and interest to the serving area. SELF-SERVE SERVING LINES 1. GENERAL. The use of self-service feeding style afloat will reduce Food Service workload in support of serving lines during meal times. Self-service feeding style allows sailors to serve themselves from the main serving line vice a food service attendant performing that function. Although sailors serve themselves from the main serving line and the hot/cold serving stations, food service attendants will restock these serving stations and maintain proper sanitation. This style of feeding is most efficient when additional hot and cold food serving stations are installed on the mess decks. Studies have demonstrated the advantages of the self-service feeding style include improved customer satisfaction, labor savings and a consistently faster throughput of patrons. Challenges associated with self-service feeding include required serving line design modifications, possible increase in food waste, and potentially degraded sanitation. 2. SERVING LINE CONFIGURATION. The serving line should consist of 6-10 hot food wells designed to minimize the waiting time in serving lines. The hot food wells will be capable of “buffet style” (self-service) or “cafeteria-style” service. This may require minor modifications to the serving line such as raising of the serving line or relocation of current sneeze shield. Proper serving utensils are necessary to comply with portion control standards. Galley personnel will only need to re-supply food items, monitor temperatures, and maintain cleanliness of the serving line. An 1-32 Food Service Operation Handbook emphasis should be made on crew awareness and training on proper sanitation and hygiene. Locating hand sanitizing solution dispenser units at the beginning of each self-service line for crew use is suggested to improve sanitation. 3. MENU PLANNING. Menu planning and food production is important to the overall success of the self-serve concept. Listening to food service personnel feedback and crewmember comments are essential and could save literally thousands of dollars. Menus should have a wide variety of items to select from and salad bars should be large enough to offer a large variety of fresh salads, vegetables, and fruits. Salad bars can be procured that are large enough to have a separate soup tureen station. 4. ADDITIONAL FOOD BARS. Installation of additional food serving bars on the mess decks will greatly increase the amount and variety of food offered. a. Speed line - featuring hamburgers, pizza, chicken wings, hot dogs, etc. b. Deli line - featuring sandwich making items for patron self-service. c. Traditional – featuring full meal, two entrée, starch, and vegetable selections. d. Potato bar - featuring baked potatoes with a variety of toppings. e. Suggested food items for an extended mess deck serving line for hot and cold items: (1) Buffalo wings (2) Pasta with sauce (meat or meatless) (3) Tacos (ground beef or turkey) (4) Fajitas (beef/chicken) (5) Burritos (6) Baked fish or chicken (7) Rice (8) Nacho machine with chips 5. FOOD CONSERVATION. Waste from food comprises roughly 75% of all waste that is produced on a ship. The self-serve concept could contribute to this waste stream if not controlled. One way of improving waste control would be monitoring the serving lines and scullery daily and reminders from the food service personnel to educate the crew. Any food left over that is taken off the serving line must be discarded at the end of the meal period. An additional means of controlling portions and waste is the arranging the serving line in the following order: vegetables, starches, and main entrées. 6. FOOD PRODUCTION. The galley captain/chief should be willing to give hands-on instruction and able to communicate exactly the expectations and goals of the Food Service Officer and Leading Culinary Specialist. They should manage by observing food production and take corrective actions as necessary. Proper planning, from meal predications to proper menu acceptability, is essential to a safe, efficient, and financially sound self-serve operation. Progressive cooking techniques along with utilization of prepared and advanced foods all need to be properly employed to ensure a successful operation. Low acceptability items should be deleted from the menu. 1-33 Food Service Operation Handbook 7. EXTENDED SERVING HOURS. Traditionally, serving lines are designed to feed the entire crew within two hours. Extending the meal periods will decrease customer waiting times. The Food Service Officer can create an alternating/rotating schedule of galley operations to afford the crew a nutritious meal anytime and create “off hours” for galley cleaning. 8. SANITATION GUIDELINES a. Clean plates and bowls will be provided each time the customer returns to the serving line. b. Non-commercially prepared salad dressings used in open containers must be discarded after each meal. c. Potentially hazardous food must not be held for more than 4 hours between 41° F. -135° F. Food that has been held between 41° F. -135° F. for more than 4 hours is potentially hazardous and will be discarded. d. Serving utensils for self-service must be stored in food with the handles extended above the rim. Utensils should be cleaned and sanitized every four hours during continued use. e. Desserts must be in individual dishes. f. Soft serve ice cream should be dispensed from a dispensing machine. Hard pack ice cream will be dispensed by a dedicated server only using a proper ice cream scoop and hot water to assist in dispensing. The hot water used must be changed on a frequent basis. g. Do not mix “old” food with “new” food when replenishing items on the serving line. Once a food item has been depleted, remove the pan, discard the food and replace with new. h. Provide a sneeze shield in a position to allow for self-service of food and prevent contamination from patrons. The sneeze shield shall be from 14 inches to 48 inches above food. It must be positioned in a direct line between food and the mouth/nose of the average patron. i. Self-Serve Serving Lines will be maintained in accordance with NAVMED (Rev. 8/99) P-5010, Chapter 1, Section III, article 3-5.13 under the section titled “Buffets.” Working closely with the local preventive medicine authority will ensure a safe-food operation 1-34 Food Service Operation Notebook CHAPTER 2 MESS DECK MASTER-AT-ARMS 1-0 INTRODUCTION Responsibilities ....................................................................................................... 1-1 Chain of Command ................................................................................................. 1-2 2-0 HOW TO BE AN EFFECTIVE MESS DECK MASTER-AT-ARMS General Guidelines (Afloat)..................................................................................... 2-1 General Guidelines (Ashore)................................................................................... 2-2 Supervisory and Management Tools ...................................................................... 2-3 Duties of Food Service Attendants.......................................................................... 2-4 Assignments of Food Service Attendants ............................................................... 2-5 Muster and Inspection............................................................................................. 2-6 Prior to Inspection ................................................................................................... 2-7 Inspection Procedures ............................................................................................ 2-8 Written Instructions ................................................................................................. 2-9 3-0 DINING AREA AND ASSOCIATED EQUIPMENT Safety Precautions .................................................................................................. 3-1 Pre-Service Set-Up ................................................................................................. 3-2 During the Meal....................................................................................................... 3-3 Cleaning Procedures............................................................................................... 3-4 Table Condiments ................................................................................................... 3-5 Dining Tables, Chairs, and Benches....................................................................... 3-6 Bulkheads ............................................................................................................... 3-7 Overheads............................................................................................................... 3-8 Decks ...................................................................................................................... 3-9 Carpeting................................................................................................................. 3-10 Stainless Steel Surfaces ......................................................................................... 3-11 Salad Bars............................................................................................................... 3-12 Refrigerated Milk Dispensers .................................................................................. 3-13 Non-Carbonated Beverage Dispensers .................................................................. 3-14 Carbonated Beverage Dispensers .......................................................................... 3-15 Coffee Urns ............................................................................................................. 3-16 Freeze-Dried Coffee Dispensers............................................................................. 3-17 Bulk Ice Making Machine ........................................................................................ 3-18 2-1 Food Service Operation Notebook Ice Dispensing Machines ........................................................................................ 3-19 Soft-Serve Ice Cream Machine ............................................................................... 3-20 Butter Dispensers.................................................................................................... 3-21 Tray, Bowl, Cup and Glass Lowerators................................................................... 3-22 Commercial Hot and Cold Beverages…………………………………… .................. 3-23 4 - 0 SERVING LINE AND ASSOCIATED EQUIPMENT Background ............................................................................................................. 4-1 Electric Hot Food Table........................................................................................... 4-2 General Operations................................................................................................. 4-3 Descaling ................................................................................................................ 4-4 Sneeze Shield and Tray Slide Rail.......................................................................... 4-5 Bread Dispenser ..................................................................................................... 4-6 Rotary Toaster ........................................................................................................ 4-7 Cereal Dispenser .................................................................................................... 4-8 5 - 0 SCULLERY OPERATIONS Background ............................................................................................................. 5-1 Safety Precautions for the Dishwashing Machine................................................... 5-2 Preparing Soiled Dinnerware and Silverware for Machine Washing....................... 5-3 Operating Instructions for Single-Tank Dishwashing Machines.............................. 5-4 Operating Instructions for Double-Tank Dishwashing Machines ............................ 5-5 Cleaning the Dishwashing Machine ........................................................................ 5-6 Descaling Dishwashing Machines........................................................................... 5-7 Destaining Dinnerware and Silverware ................................................................... 5-8 Care of Plastic Dinnerware (Non-Disposable) ........................................................ 5-9 Inventory of Dinnerware and Silverware ................................................................. 5-10 2-2 Food Service Operation Notebook 6-0 HAND DISHWASHING OF COOKING UTENSILS Background ............................................................................................................. 6-1 Preparation for Washing ......................................................................................... 6-2 Washing and Sanitizing........................................................................................... 6-3 Storage of Clean Utensils ....................................................................................... 6-4 7-0 FOOD WASTE AREAS Garbage Grinder Safety Precautions and Operating Procedures........................... 7-1 Cleaning the Garbage Grinder ................................................................................ 7-2 Cleaning Garbage/Trash Containers ...................................................................... 7-3 8-0 CLEANING GEAR/ESTABLISHING AND MAINTAINING REQUIREMENTS Proper Usage .......................................................................................................... 8-1 Cleaning and Sanitizing .......................................................................................... 8-2 Establishing and Maintaining Requirements ........................................................... 8-3 9-0 PLANNED MAINTENANCE SUBSYSTEM Responsibility .......................................................................................................... 9-1 Trouble Call Log...................................................................................................... 9-2 Inoperative Equipment Report ................................................................................ 9-3 10 - 0 TRAINING Responsibility .......................................................................................................... 10-1 Secretary of the Navy Requirements ...................................................................... 10-2 Formal Training ....................................................................................................... 10-3 Training Records..................................................................................................... 10-4 On-the-Job Training ................................................................................................ 10-5 Follow-Up Training .................................................................................................. 10-6 2-3 Food Service Operation Notebook Table I Recommended Quantity of Dishwashing Compound for Single-Tank Machines Table II Recommended Quantity of Dishwashing Compound for Double-Tank Machines Table III Dishwashing Machine Detergent Automatic Dispenser Table IV Rinse Additive Automatic Dispensers for the Dishwashing Machines Table V Instructions and Questionnaire for Incoming Food Service Attendants Table VI Check List for the Mess Deck Master-At-Arms Summary Review of Responsibilities 2-4 Food Service Operation Notebook 1-0 INTRODUCTION 1. GENERAL. Upon being assigned to the food service division, you have assumed an extremely important and a most demanding leadership responsibility as MDMAA (Mess Deck Master-atArms). One commanding officer recently summed it up this way: “The Mess Deck Master-at-Arms is the most demanding leadership responsibility a petty officer will ever face due to the fact that most food service attendants have just begun their enlistment, and are not only adapting to a new job, but to a new way of life. Many “eyes” will be watching you and, to a large degree, the health and well-being of the crew members will depend on how efficiently you perform your job.” Food service is one of the most important morale factors affecting our sailors. It can either be positive or negative. Regardless of how well the food is prepared, if the dining patrons are not provided with clean, dry dinnerware, the food is not properly served, the dining area is not clean and orderly, and good sanitation practices are not enforced, it will have a negative affect on the crew’s morale. Always strive to provide the excellent services that you would desire and expect if you were the dining patron. That’s the positive approach. This handbook is designed to provide you with step-by-step procedures for performing your duties, and for training and supervising food service attendants. If you are designated as Mess Deck Master-at-Arms, you will find this handbook a very helpful and easy-to-follow reference. Think of this handbook as a road map. By following the plotted charts and directions, you will arrive at your destination on schedule. There are no known shortcuts; don’t look for any at your activity either. You will find your assignment offers challenges, rewards, and personal satisfaction for doing your part to achieve excellence in food service. The reward, though often intangible, is significant - the health, well-being and respect of your shipmates. 1-1 RESPONSIBILITIES 1. MESS DECK MASTER-AT-ARMS. The Mess Deck Master-at-Arms serves as the command’s official host to the patrons of the food service facility. You are directly responsible to the food service officer or a designated representative who normally is the leading culinary specialist. Your duties and responsibilities are as follows: a. In charge of all spaces and equipment in the dining area, serving line, scullery and waste handling areas, except the equipment or areas under the cognizance of the leading culinary specialist. b. In coordination with the leading culinary specialist, assign food service attendants to the service of food, maintenance and cleanliness of the dining area and equipment, operation of the scullery, and handling and disposal of food waste. c. Muster food service attendants daily, and thoroughly inspect for personal neatness and cleanliness. d. Supervise the cleaning of the dining area, serving line, scullery, dinnerware and silverware. e. Ensure that all assigned equipment is operated in accordance with current instructions. f. Inventory (conduct bi-monthly inventory) and maintain adequate dinnerware and silverware to ensure that sufficient quantities will be available throughout the serving period. g. In conjunction with the medical department, administer a training program to food service attendants in sanitation, scullery operation, and food handling. h. Maintain order and discipline in assigned areas. Ashore, your duties will be slightly different, and will be covered more specifically in Section 2. 2-5 Food Service Operation Notebook 1–2 CHAIN OF COMMAND 1. GENERAL. The Mess Deck Master-at-Arms should ensure that the Leading MS, or a designated representative, is informed of any problems or changes in procedures. Communication with superiors promotes good working relationships and eliminates the possibility of misunderstanding. Remember, over-informing is better than under-informing. 2–0 HOW TO BE AN EFFECTIVE MESS DECK MASTER-AT-ARMS 2–1 GENERAL GUIDELINES (AFLOAT) 1. GENERAL. As Mess Deck Master-at-Arms, it is necessary that you demonstrate good leadership and supervisory qualities since many of the food service attendants have just recently enlisted in the Navy. Demonstrating such qualities will have a lasting effect on their military enlistment or career. Remember that the young sailors look to their supervisor for guidance and direction. As Mess Deck Master-at-Arms, you can excel as a supervisor and can earn respect and cooperation of superiors, peers, and food service attendants by: a. Knowing your job and performing it effectively. b. Leading and guiding food service attendants, not driving them. c. Being a fair, but also firm, leader. d. Being courteous, cooperative, and helpful to food service attendants and to the patrons of the food service facility. e. Setting a good example, e.g. having the right attitude and maintaining an outstanding military appearance. f. Listening attentively and sincerely to patrons’ and food service attendants’ complaints and suggestions. g. Striving constantly to make food service attendants aware of their responsibilities to the crew members. h. Respecting the right of all food service attendants to dignity and self-respect. Afloat activities are required to take an actual count of personnel who consume a meal during in port periods. As Mess Deck Master-at-Arms, you are responsible for ensuring that an accurate count is taken. One acceptable method is using a hand reciprocating counter (clicker). Upon securing the serving line, the number of personnel who consumed the meal should be submitted to the Watch Captain. 2 – 2 GENERAL GUIDELINES (ASHORE) 1. MDMAA DUTIES. As Mess Deck Master-at-Arms at an ashore food service facility, where civilian contract services are utilized, your responsibilities should be more defined but are just as important. The following guidelines will assist you in performing your duties: a. CONTRACT SPECIFICATIONS: 2-6 (1) The serving of food and cleaning of food service equipment and dining areas ashore is normally contracted to civilian companies. A contract is initiated covering the services to be provided by the contractor. (2) The food service officer or a designated representative will be appointed as the Contracting Officer’s Technical Representative (COTR). The COTR is responsible for all matters pertaining to administering the contract. However, you may be delegated by the Food Service Officer or COTR to conduct sanitation inspections. Food Service Operation Notebook (3) You should become thoroughly familiar with the contract and the services that the contractor is responsible for providing. Remember that the supervision of the contract employees is the responsibility of the contractor. b. HEAD COUNT PROCEDURES: (1) A signature head count procedure is used at most ashore enlisted dining facilities. Personnel receiving a meal should sign (in ink) a Meal Signature Record, NAVSUP Form 1291. (2) You are responsible for ensuring that only authorized personnel are permitted to eat in the food service facility. Personnel receiving rations in kind are authorized to eat at government expense. These personnel should exhibit a valid Meal Pass, NAVSUP Form 1105, and also their identification card, if in civilian attire. Facilities using Common Access Cards (CAC) should ensure the patrons identity matches the CAC and the card is properly swiped for ration credit. (3) Prior to the meal, you should ensure that the Meal Signature Record, NAVSUP Form 1291, is serialized and the headings filled out to preclude loss or misuse of signature sheets. (4) During the meal, you should direct personnel to the correct signature sheet, determined by branch of service or cash sales, and ensure that they insert first initial and surname, and Meal Pass number or command/unit for transient personnel. All entries should be legible. (5) Immediately upon securing the serving line, you should assemble the NAVSUP Forms 1291 in sequence by category, and draw an ink line horizontally below the last name on each form. Determine the total number of signatures for each category and enter the total on the Recapitulation of Meal Record, NAVSUP Form 1292. (a) Prepare NAVSUP Form 1292 in duplicate (original and one copy). (b) Use one NAVSUP Form 1292 to recap breakfast, lunch and dinner. (c) Mess Deck Master-at-Arms signs the first signature line on the NAVSUP Form 1292 and delivers the completed form to the food service office. 2 – 3 SUPERVISORY AND MANAGEMENT TOOLS 1. SUPERVISION OF FOOD SERVICE ATTENDANTS. To clarify the concept of supervisory responsibilities to food service attendants and host responsibilities to food service facility patrons, the following guidelines are furnished: a. Work in close coordination with the leading culinary specialist. b. Observe, know and enforce the objectives, policies, standards and procedures of the command and the food service division (treat “customers” courteously and respectfully). c. Study and analyze the jobs for which you are responsible (learn everything about the job or equipment and be able to apply your knowledge effectively). d. Use previous food service facility records to determine trends and anticipate workloads and changes; schedule food service attendants to meet work demands. e. Ensure in advance the availability of needed materials and equipment. f. Balance the workload among food service attendants in their work assignments. g. Give special attention to new food service attendants. Acquaint them with their jobs and their fellow workers (fully explain the policies, working conditions, and expected standards). h. Maintain discipline and good conduct, and ensure strict adherence to established standards. 2-7 Food Service Operation Notebook i. Keep your supervisor (Leading CS or designated representative) informed as to activities, progress, problems, etc. j. Keep food service attendants fully informed as to how they are doing, what they do well, and where improvement is needed. k. Plan and conduct meetings with food service attendants to share information and ideas in order to promote enthusiasm and teamwork, thus creating a positive atmosphere. l. Encourage good health habits and personal hygiene standards. Ensure proper grooming and strict conformance with uniform standards at all times. m. Pursue an aggressive training program. Training pays good dividends and will definitely earn you the respect of the food service attendants. n. Be conscious of wasted time, materials, equipment. Seek solutions to prevent waste. o. Review your area of responsibility periodically and make carefully planned recommendations for improvement. p. Accompany inspectors on sanitation inspections. In addition, food service attendants work unusually long hours and perform non-skilled work which is not a part of a Navy rating. Their performance, however, is critical to the effective operation of the food service division and an essential factor relating to the health and morale of the crew. These circumstances, combined with the fact that the food service attendant’s duties involve continuous cleaning of the same areas and equipment, make your job as a leader and supervisor unusually demanding. Unlike some assignments, there is never a lull in your duties; your performance and the performance of those you supervise must be at a peak at all times 2 – 4 DUTIES OF FOOD SERVICE ATTENDANTS 1. FOOD SERVICE ATTENDANTS. Food service attendants are junior enlisted members detailed to the food service facility for duty in any of the following capacities: a. Serving of food on the serving line. b. Cleaning and sanitation of food service spaces and equipment not used for food preparation. c. Operation of the scullery and the handling and disposal of food waste. d. Loading and unloading supplies for the food service facility. e. Night watch standing duties. f. Stateroom/Wardroom duties. 2. DUTIES. Food Service Attendants assigned to the general mess are responsible for performing the following duties: a. Maintain general cleanliness and sanitation of bulkheads, overheads, decks and associated equipment in all food service spaces. b. Maintain cleanliness and sanitation of the mess dining area salad bars, beverage bars, hot bars, condiment tables, self service bars, and galley steam tables. c. Handle and dispose of all trash, food waste, and plastic waste in all food service spaces. d. Maintain the cleanliness, sanitation, and descaling of the scullery, pots and pans machine and the cleanliness of all deep sink areas in food service spaces. e. Maintain the cleanliness and sanitation of countertops. 2-8 Food Service Operation Notebook f. Operate scullery and pots and pans equipment in order to sanitize all pans, dishware, silverware, and cooking utensils. g. Wash cooking and baking gear in the galley and baking areas. h. Assist in transferring hot and cold foods to all serving line and self service bars/tables. Assist in setting up the salad bar, hot bars, condiment tables, and galley steam tables. i. Fill and maintain non-carbonated beverage dispensers, milk machines, soda machines, hot drink dispensing machines, and juice dispensers; including the cutting of dispensing tubes. j. Set tables with napkin dispensers, salt and pepper shakers, sugar dispensers, and all condiments required for the meal served. k. Maintain cleanliness and sanitation of all portable dispensing units. Fill all dispensing units for the dining tables and beverage bar areas. l. Maintain cleanliness and sanitation of all mess gear cleaning equipment; mops, buckets, brooms. m. Place and remove tablecloths and table linens in food service dining areas. Set table settings in wardroom and CPO dining areas. n. Transfer and pick up dining linens from laundry. o. Transfer and store messdeck and private mess china, silverware and trays. p. Maintain cleanliness and sanitation of carpets and upholstery furniture. q. Maintain the cleanliness and sanitation of all dining facility ice dispensing machines. r. Prepare non-carbonated beverages and coffee for juice line dispensers. s. Assist in setting up individual servings of breads, condiments, desserts, etc. t. Assist the Master-at-Arms with the twice monthly inventory of the general mess dinnerware and silverware. u. Operate and maintain the cleanliness of garbage grinders. v. Maintain the cleanliness and sanitation of garbage and trash containers. w. Load and unload consumable supplies for the food service facility. x. Assist the Bulk Storeroom Custodian with stores rotation, store transfers to the galley and private messes, and general storeroom cleaning. y. Serve meals in flag and private messes. z. Maintain general stateroom cleaning for the ranks 05 and above. This may include rack makeup, laundry transfer and pick up, and head facility cleaning. Additional cleaning requirements may be required for an embarked Flag and Commanding Officer. aa. Other duties as assigned by the Leading CS. Refer to OPNAVINST 3120.32C, chapter 6 for MAA and FSA manning requirements. 2 – 5 ASSIGNMENTS OF FOOD SERVICE ATTENDANTS 1. FOOD SERVICE ATTENDANTS DUTIES. Up to this point, we have discussed responsibilities and supervision. Now, let’s start with the first assignment of the food service attendants and the correct procedures to be followed while assigned to the food service division. 2-9 Food Service Operation Notebook a. INDOCTRINATION. Personnel are detailed by the executive officer to perform food service duties (usually for a 90-day period). Figure 2-1 is a recommended check-in/out format. Table V contains proposed instructions and a questionnaire for reporting food service attendants, to be completed during an indoctrination period. Figure 2-2 is a proposed format to be used to indicate that indoctrination has been completed. Figures 2-1 and 2-2 should be used to establish minimum requirements. They can be tailored to the unique needs of your ship/station. Don’t be tempted to skip the indoctrination and leave the food service attendants to learn for themselves. A good indoctrination program is an essential management tool to ensure new personnel are properly indoctrinated to Navy standards. b. DUTY SECTIONS. Due to the long working hours while assigned to food service duty, it is recommended that the food service attendants be divided into two sections (port and starboard) to allow sufficient time off and still ensure full coverage for all meal periods. Figure 2-3 is a normal in-port routine for food service attendants. For example, the “port section” would report for work at 0530 hours (one hour prior to serving breakfast) and the “starboard section” would report for work at 0630 hours. At approximately 1400 hours (after all areas and equipment have been cleaned from the lunch meal) the port section would commence liberty and the starboard section would remain on duty until secured by the Mess Deck Master-at-Arms or galley lead cook after the evening meal and all cleaning has been properly completed. The port and starboard sections’ work schedule would be reversed each day. 2 – 6 MUSTER AND INSPECTION 1. PERSONAL HYGIENE. The importance of personal hygiene cannot be overemphasized in food service. Personnel should be physically clean and wear clean clothing. Paper food service hats or hair nets should be worn to prevent hair from falling on food or falling where food is to be served or eaten. Ball caps are not authorized for use in food service spaces. Fingernails will be cleaned and closely trimmed, free of polish or acrylic finishes. Upon completion of food service duties individuals may comply with grooming standards contained in Chapter 2 of Navy Uniform Regulations, NAVPERS 156651. Emphasize the need for clean hands and the necessity for washing hands frequently, especially after visiting the toilet facilities. Use of hand sanitizers are permitted; although, they should never be used as a substitute for regular hand washing. 2. INSPECTION. Food service attendants should be mustered and inspected prior to commencing work. At this time, any noted discrepancies should be corrected prior to handling food or eating utensils. The food service attendants should always present a neat, “squared away” appearance to the dining patrons. 2 – 7 PRIOR TO INSPECTION 1. APPEARANCE STANDARDS. You should set the example for good grooming standards. Your appearance should be interpreted as your standard. Inspect yourself prior to reporting to work to ensure that you present that “squared away” appearance. Remember that the food service attendants look to you for guidance and direction; you cannot expect a food service attendant to conform to Navy grooming standards if you do not adhere to those same standards. 2. UNIFORMS. Ensure that there are sufficient food service uniforms and disposable food service hats available to permit food service attendants to change daily. A laundry schedule for food service uniforms should be established by the Food Service Officer. This schedule should provide for trousers, aprons, etc., to be the first items washed that day. You should ensure that separate laundry bags are available for trousers and dungarees and food service attendants utilize them. It is often found that the reason for food service attendants not having clean uniforms is not the fault of the laundry, but that the food service attendants do not place them in the correct laundry bag, or they fail to turn in/pickup the laundry on schedule. Lastly, ensure that rubber aprons, arm length 2-10 Food Service Operation Notebook rubber gloves, rubber boots and ear protection (for scullery operation) are available for the food service attendants assigned to the scullery and the utensil washroom. 3. DAILY CHECKLIST. Figure 2-4 provides a useful daily check sheet to use when mustering and inspecting food service attendants. Maintain a file, after being initialed by the food service officer/leading culinary specialist, to provide you with reference on any recurring appearance or tardiness problems. 2 – 8 INSPECTION PROCEDURES 1. INSPECTION TECHNIQUES. The following are some suggested inspection techniques: a. Muster food service attendants at the designated time(s). (1) Follow military procedures; ensure that food service attendants line up in ranks; do not hesitate to give them commands, such as: ATTENTION, UNCOVER, PARADE REST, AT EASE, etc. This will not only make your job easier, but will gain you the respect of the food service attendants. b. Inspect each person to ensure that: (1) Clothing is clean and neat. (2) Food service hats are correctly worn to prevent hair from falling on the food. Do not permit personnel assigned to food service and food preparation areas to wear ball caps as they are not cleaned daily and are unsanitary. (3) Hair conforms to navy grooming standards. (4) When facial hair is authorized for medical reasons, it is kept clean, trimmed to no longer than ¾ inch in length and covered with an appropriate mask while performing food service functions. (5) Shoes are shined. (6) Hands are clean and free of open lesions, cuts, scabs, etc. If any cuts or lesions are noticed, instruct the person to report to medical. (7) Fingernails are clean and closely trimmed, free of polish or acrylic finishes. (8) Jewelry, as well as watches and bracelets, are prohibited from food service spaces. This does not apply to a plain ring, such as a wedding band. 2 – 9 WRITTEN INSTRUCTIONS The food service attendants have received written 1. INDOCTRINATION INSTRUCTIONS. instructions during the indoctrination period in the form of Table V, food service attendants’ reporting instructions. This should be supplemented with frequent oral and written instructions on personal hygiene and grooming standards. Signs instructing food service personnel to wash hands prior to returning to work shall be conspicuously posted at all entrances to food service and toilet areas. 2-11 Food Service Operation Notebook CHECK IN/OUT FORMAT FOR FOOD SERVICE ATTENDANTS ______________________ Date From: Executive Officer, ______________________________________________________ To: _____________________________________________________________________ Name Subj: Division FOOD SERVICE ATTENDANT DUTIES; ASSIGNMENT TO __________________ Encl: (1) Food Service Attendant Reporting Instructions (Table V, NAVSUP P-486, Appendix K ) Encl: (2) Food Service Attendant Questionnaire (Table V, NAVSUP P-486, Appendix K) 1. You are assigned to food service duties for this command to relieve ________________ on ___________________________. Check out and check in with the following personnel: CHECK OUT LCPO Division Officer Department Head Postal Clerk Medical representative (with slip showing that medical check has been made) _____________________________ _____________________________ _____________________________ _____________________________ _____________________________ CHECK IN Mess Deck Master-at-Arms Leading CS Food Service Officer Personnel Office _____________________________ _____________________________ _____________________________ _____________________________ 2. For planning purposes, you will be relieved on ___________________________________ . 3. Upon completion of the above, return this form to the Food Service Officer. Enclosures (1) and (2) will be completed during the indoctrination period. Executive Officer Figure 2-1 2-12 Food Service Operation Notebook FOOD SERVICE ATTENDANT INDOCTRINATION CERTIFICATION NAME ____________________________________ RATE _________ DATE____________ Purpose: This sheet is designed to ensure that prior to commencing duty as a food service attendant, an individual has received proper training in order to perform the duties with the necessary skills. Upon completion of training, an individual should be able to correctly answer the questions in enclosure (2) (Table V, NAVSUP P486, Appendix K). 1. I certify that this individual has passed a medical inspection and has been instructed in the following: a. The causes and dangers of food poisoning and contamination. b. Personal hygiene when handling food – both in serving of meals, and in disposal of waste and scraps, including a review of pertinent sections of General Sanitation Instructions. c. Oral hygiene. _____________________________ Senior Medical Representative / (PMT) 2. I certify that this person has been instructed in the following: a. All pertinent supply instructions covering general Supply Department procedures and duties of food service attendants. b. The proper care and cleaning of the dishwashing machine and other food service equipment. c. Proper serving techniques for all types of food. d. Proper disposal of waste and scraps. e. Duties and performance, both professional and military, expected while assigned to the food service division. f. Mustering time and location for quarters, General Quarters station, and other watch, quarter and station bill assignments. _____________________________ Leading Culinary Specialist 3. I certify that this person has received an assignment of duties, and has had all instructions and safety precautions explained. Assigned to liberty section ___________________. ______________________________________ Mess Deck Master-at-Arms 4. I have received and understand the above instructions, have read the recommended readings, and have successfully completed enclosure (2), Appendix K, NAVSUP P-486. ______________________________________ Reporting Food Service Attendant 5. Interview (by division officer). _________________________________________________________ Food Service Officer Figure 2-2 2-13 Food Service Operation Notebook NORMAL IN-PORT ROUTINE FOR FOOD SERVICE ATTENDANTS (All times to be adjusted to ship’s routine/policy) 0500 0530 0600* 0625 0630 0715 0730 1015 1045* 1125 1130 1230 1400** 1530 1600* 1640 1645 1730 1830 Awake oncoming section (port or starboard). Report to dining area for muster and inspection; commence preparation for breakfast. Breakfast for food service attendants. Awaken oncoming section (port or starboard). Duty section (port or starboard) at their assigned duty stations. Breakfast for the crew. Oncoming section (port or starboard) report to dining area for muster and inspection. Secure breakfast; commence clean up. All food service attendants will muster for quarters instruction and inspection. Commence preparation for the lunch meal. Lunch for food service attendants. All food service attendants at their assigned duty stations. Lunch for the crew. Secure lunch; commence cleanup. One section (port or starboard) secured from duty (provided all areas and equipment are clean). Commence preparation for the dinner meal. Dinner for food service attendants. Duty section (port or starboard) at their assigned duty stations. Dinner for the crew. Secure dinner; commence cleanup. Duty section (port or starboard) secured from duty (provided all areas and equipment are clean). NOTE * Ensure food service attendants eat at the prescribed times in order to be at their duty stations during the serving of the meal and to commence cleanup as soon as the meal secures. ** The Mess Deck Master-at-Arms will decide when to secure the food service attendants after notifying the Leading MS. AT-SEA ROUTINE At-Sea routine will be much the same with the possible exception of weekends. Figure 2-3 2-14 Food Service Operation Notebook DAILY MUSTER AND INSPECTION REPORT Rate Name Muster Trousers Shirt Y E S MDMAA ___________ N O S A T U N S A T S A T U N S A T Belt S A T U N S A T Shoes Haircut Shave S A T S A T U N S A T LEADING CS _____________ U N S A T S A T U N S A T Hands Comments S A T U N S A T FOOD SVC OFF ____________ Figure 2-4 2-15 Food Service Operation Notebook 3–0 DINING AREA AND ASSOCIATED EQUIPMENT 1. GENERAL. Sections 3 through 7 discuss the food service areas and associated equipment which usually come under the cognizance of the Mess Deck Master-at-Arms. 3 – 1 SAFETY PRECAUTIONS 1. EQUIPMENT SAFETY. You should be thoroughly familiar with the operation and safety precautions pertaining to the equipment in your area. Ensure that the following safety and operating precautions are observed: a. Operating instructions and safety precautions should be attached to each piece of equipment or posted adjacent to it. Food service attendants should read, understand and comply with posted operating instructions and safety precautions. b. Disconnect the electric power prior to cleaning equipment. c. Food or liquid spilled on the deck is cleaned up immediately to prevent falls. d. Exercise caution when handling hot pans, serving line inserts, etc., to prevent burns. Utilize hot pads or pan holders. e. Personnel should wear full arm length rubber gloves (not electric safety gloves) when cleaning with hot water or strong detergents. f. Loose fitting clothing will not be worn. g. It is recommended use of hair pieces be avoided to preclude entanglement and flammable hazards. 3 – 2 PRE-SERVICE SET-UP 1. PRIOR TO MEAL SET-UP. The following items should be accomplished prior to serving the meal: a. Clean all areas and equipment. b. Post/update the current menu at the entrance to the serving line. c. If tablecloths are to be used, they should be placed on the tables evenly. d. Set the tables with napkin dispensers, salt and pepper shakers, sugar dispensers, and other condiments which will be used for the meal. (1) Items should be arranged on the tables in a uniform manner. (2) Ensure all condiments/dispensers are clean and full. e. Place clean, dry dinnerware and silverware in the prospective positions for service. f. Fill the non-carbonated beverage dispenser with pre-chilled beverage for juice. g. Check the refrigerated milk dispensing machine to ensure that: (1) Milk containers are filled and dispensing tubes are cut properly. (2) Bowls or catch trays are in place to collect spillage. (3) A portable thermometer should be kept inside the milk dispenser to register the internal temperature. Ensure the thermometer is not lost during the changing of milk containers. 3 – 3 DURING THE MEAL 1. TIME MANAGEMENT. This is the timeframe in which all of your efforts and preparation should come together. If you have planned properly, and the food service attendants have been effectively 2-16 Food Service Operation Notebook trained, the next hour or so should go smoothly. On the other hand, it could be a time of complete confusion if you haven’t “gotten organized.” Assignments of food service attendants should have already been made and each person should know precisely what is to be done. You might want to review the topics discussed in Sections 1 and 2 which will be very beneficial to you during this time. During the meal period, both you and the food service attendants will be extremely busy. Your area of responsibility is indeed large and will require great organizational ability. Not only will you be required to maintain good order and discipline and be a good host, but you, as Mess Deck Masterat-Arms, are responsible for ensuring that: a. “Customers” are treated courteously at all times. Your function as “host” is extremely important. b. Only authorized personnel receive head-of-the-line and early meal privileges. c. An accurate head count is taken of all personnel consuming a meal. d. The flow of personnel through the serving line is regulated to suit the seating capacity of the dining area. e. Personnel are wearing the correct uniform or civilian attire and that all articles of clothing are worn correctly. Greasy, dirty uniforms or coveralls should not be permitted. (1) Personnel should be informed of any uniform/clothing discrepancies and corrective action should be taken prior to entering the serving line. (2) Any uniform/clothing discrepancy that is discovered after the patron has already been permitted to enter the serving line should be dealt with individually as the patron is leaving the dining area, not while the patron is eating. f. Food service attendants are at their assigned duty stations at least 5 minutes prior to serving time. g. Tables, chairs, and benches are cleaned during the meal. This not only ensures the dining patron a clean area to eat, but aids in cleanup after the meal. h. Any spillage on the deck or serving lines is cleaned up immediately. i. Milk and beverage dispensing machines are refilled as needed and any spillage is cleaned up immediately. j. The scullery operation is arranged to permit the dining patron to place the soiled dinnerware (tray) in the appropriate scullery opening to be scraped and sorted by the food service attendant. Never permit the trash/garbage container to be left outside the scullery to indicate that the patron should empty their tray. k. The dining area is secured for cleaning at the conclusion of the meal hour after all patrons have finished eating. 3 – 4 CLEANING PROCEDURES 1. PROPER CLEANING TECHNIQUES. Correct cleaning procedures cannot be overemphasized in food service. The use of strong detergents, salt water, scalding water or abrasive cleaners may damage or dull the surface of some areas or equipment. Throughout this handbook, reference will be made to the “two-pan” method for general cleaning of items such as tables, chairs, bulkheads and most equipment exteriors. a. The “two-pan” method is described below: (1) One pan containing 2 tablespoons of liquid detergent to each gallon of hot water. (2) The second pan contains hot, clear water or a sanitizing solution. 2-17 Food Service Operation Notebook Pan One of the “two-pan” method will ensure a thorough cleaning, particularly in cracks, crevices, and hard-to-get-at areas. Pan Two will ensure that dirt removed by Pan One and all traces of detergent are removed. You should ensure that the contents of the “two pans” are changed as the water becomes dirty. A separate clean towel will be utilized in each pan to prevent the possibility of cross-contamination. b. For hard-to-remove dirt and baked-on food deposits, the following solution is recommended: (1) Two tablespoons of liquid detergent and four tablespoons of Type I or Type II dishwashing machine detergent to each gallon of hot water. (2) You should read the label carefully on all cleaning products and ensure that they are not combined with any product containing bleach. An example of a “daily and weekly” work schedule for cleaning areas and equipment in the dining area is illustrated in Figure 3-1. This schedule, combined with the cleaning instructions in this section, will ensure proper cleaning at the prescribed time and will assist you in supervising and assigning jobs to food service attendants. 3 – 5 TABLE CONDIMENTS 1. TABLE CONDIMENTS. Napkin dispensers, salt and pepper shakers, and sugar dispensers should be cleaned and refilled after each meal and during the meals as necessary. Condiment bottles such as catsup, hot sauce, steak sauce, ect. Should b wiped after the meal and discarded when empty. The following procedure should be used for cleaning: a. Remove the tops (covers) and place them in a container of hot water. Tops (covers) may be placed in perforated dish rack and placed in the dishwashing machine. b. Thoroughly clean the exterior of the containers with a mild detergent and water solution using a clean soft cloth or disposable wiping cloth. Special attention should be given to the necks of the condiment bottles and the bottom and edges of the napkin dispensers. c. After the tops (covers) have been cleaned and air-dried, or dried with a clean disposable cloth, replace the tops and store the containers in a clean storage cabinet. Condiments that require refrigeration must be refrigerated until the next meal to prevent spoilage. 2. The following procedure should be accomplished weekly: a. Empty the salt and pepper shakers and the sugar dispensers into clean containers. b. Remove the napkins and the interior section (spring) from the napkin dispenser. c. Prewash the shakers, dispensers and covers in detergent and water using a nylon-bristled brush for hard-to-clean areas such as napkin holder edges and bottoms. d. Place the empty salt and pepper shakers, sugar dispensers, exterior of the napkin dispensers, and all tops (covers) into the dishwashing machine. e. Allow the shakers, dispensers, and tops to air-dry; refill and store them in a clean storage cabinet. 3 – 6 DINING TABLES, CHAIRS AND BENCHES 1. CLEANING THE DINING FACILITY. a. During the meal, tables and seating areas should be cleaned using a mild detergent, water solution, as soon as each patron has finished eating and left the table. b. Before breakfast and after each meal: 2-18 Food Service Operation Notebook c. Remove loose dirt, papers, food particles, etc., from table tops, chairs and benches. d. Using the “two-pan” method, thoroughly clean and rinse all surfaces. should be placed on the table edges and around metal rims. Particular emphasis e. Using the “two-pan” method, thoroughly clean and rinse the underside and legs of tables, chairs and benches. Special attention should be given to the table bottoms, the base of chair legs, table stanchions, and metal seams. 3–7 BULKHEADS 1. BULKHEAD CLEANING a. Daily, bulkheads adjacent to the serving line should be cleaned and rinsed using the “two-pan” method. b. Weekly, painted, Formica, tile and paneled surfaces should be cleaned and rinsed using the “two-pan” method. Special attention should be placed on seams, cracks, crevices, and hard-toget-at areas. Surfaces may be wiped with a clean, dry cloth after rinsing, to prevent spotting. c. As necessary, some areas, such as borders, door openings, around beverage islands, etc., may require more frequent cleaning. 3 – 8 OVERHEADS 1. WEEKLY CLEANING OVERHEADS. Weekly (for areas without false overheads): a. Pipes, ventilation ducts, wire ways, etc., should first be cleared of all loose materials and dust. This may be accomplished by: (1) Vacuuming; (2) Blowing down with low pressure air; b. Sweeping with a small bristle brush. c. Overheads should be cleaned first so that dust particles do not fall on previously cleaned areas. d. Cover or remove equipment and food, as necessary, to protect from falling dust particles. e. Clean all areas with a mild detergent and water solution. f. Clean and change filters in accordance with planned maintenance schedules. 2. WEEKLY CLEANING FALSE OVERHEADS. Weekly (for areas with false overheads): a. Acoustic tile and other porous surfaces should be vacuumed or brushed to remove loose dust and dirt. b. Accumulations of grease or dirt may be removed by careful wiping with a strong detergent and water solution. c. Light covers should be removed and cleaned. d. Ventilation supply/exhaust openings should be cleaned. 3 – 9 DECKS 1. FOOD SERVICE DECKS. Food service decks usually have coverings that will withstand heavyduty wear if good maintenance is practiced. Improper cleaning materials and methods such as strong, caustic base detergents, salt water, rough abrasives or scalding water will dull colors and cause surfaces to become porous. 2-19 Food Service Operation Notebook a. DECK CLEANING. Decks should not be swept during the serving or preparation of food as dust particles rise in the air and will fall on food and tables. (1) Decks in the dining area at afloat activities should be swept and cleaned before breakfast in addition to after each meal. Usually, the ship’s dining area is utilized by crew members in the evening as a crew’s lounge. Decks in other food service areas should be cleaned after each meal. Spillage on the decks should be cleaned up immediately to prevent falls. b. DECK TYPES. The following deck coverings are normally found in food service areas throughout the Navy: (1) Vinyl floor covering (linoleum) (2) Vinyl and vinyl asbestos tile (3) Ceramic tile (4) Quarry tile (normally found in the galley and scullery) (5) Terrazzo (6) Rubber terrazzo (7) Magnesite (8) Perma-deck (9) Terra cotta (10) Stratica (normally found in dining areas and passageways) c. DECK CLEANING METHODS. above listed deck coverings: The following method of cleaning is recommended for the (1) Prepare the cleaning solution: Two tablespoons of general purpose liquid detergent to each gallon of warm (not hot) and fresh (not salt) water. (2) Scrub: Use a scrubbing machine with circular brush or stiff bristle push brush. Apply solution and scrub well to loosen dirt. Special attention should be placed on hard-to-get-at areas such as under equipment, around deck drains, behind and under piping, etc. (3) Rinse: Use clean, fresh water and a clean mop. Mop up cleaning solution and dirt. (4) (a) Change the rinse water frequently as it becomes dirty. (b) Areas which have deck drains, such as the scullery, food waste area, utensil washroom, galley, etc., may be flushed with clean water to rinse. Caution should be exercised during underway periods not to waste fresh water. Dry: Remove remaining water with a clean mop until surface is barely damp and allow to air dry. d. DECK SEALING. Terrazzo, magnesite, and perma-deck surfaces should be resealed when the surface becomes dull, porous and difficult to clean. 3 – 10 CARPETING 1. GENERAL. Many of our dining facilities ashore have carpeting in the dining area. Some officer and Chief Petty Officer dining areas afloat also have carpeting. Carpeting requires daily care which will keep the carpeting looking clean and bright. The following pointers will assist you in prolonging the life of your expensive carpeting: a. Place a heavy-duty mat at all entrances for personnel to remove rough soil from their shoes. 2-20 Food Service Operation Notebook b. Cover heavily-traveled areas with runners made from the same fabric as the carpet or from rubber or plastic. c. Vacuum or sweep carpets after each meal. In areas where there is very heavy traffic, such as doorways, it may be necessary to vacuum several times a day. This will prolong the life of the carpet as abrasion from embedded sand or grit causes excessive wear. d. Clean up spills promptly. The longer spills remain on the carpet, the more likelihood of stains, and the spilled material will be tracked to other areas of the carpet. e. When stains do appear, try a dry cleaning solvent. If this doesn’t work, use a detergent solvent that dries to a powder and can be removed with a vacuum cleaner. f. If wax or chewing gum or similar material is stuck to the carpet, try placing a plastic bag filled with ice cubes on the material until it is frozen. Scrape it off with a plastic instrument not used for food preparation. When a thorough cleaning is necessary, rotary brush shampoo or dry foam methods should be satisfactory for normally soiled carpets. Steam cleaning is the best technique and is recommended for heavily soiled carpets. Follow the carpet manufacturer’s directions and recommendations and cleaning equipment operating instructions. In addition, be sure to read warning labels on cleaning solution containers; some of these can be hazardous. 3 – 11 STAINLESS STEEL SURFACES 1. GENERAL. Stainless steel is being extensively used in food service areas at afloat activities, not only for equipment, but also for bulkheads and overheads. Stainless steel is easy to maintain. If properly cared for, it presents a very impressive appearance and will shine like a mirror. The following cleaning procedures are recommended: a. Stainless steel surfaces should be cleaned daily to prevent the buildup of dirt and grease deposits which, if permitted to remain for a lengthy period, will harm the finish. Stainless steel requires exposure to air in order to remain bright and shiny. b. Use the “two-pan” method for cleaning and rinsing. Stainless steel has a polishing line or a “grain” like wood; clean in the direction of this “grain,” not against it. Ensure that strong cleaning agents or rough abrasives are not used as they will scratch the surface. c. Do not permit the cleaning solution or a sanitizing solution to remain on the stainless steel for long periods as it will cause discoloration. d. Stainless steel surfaces should be wiped dry with a soft, dry cloth after cleaning and rinsing. e. A silicone base polish is recommended for polishing stainless steel. Before ordering stainless steel cleaners, ensure that they meet the shipboard HAZMAT (Hazardous Material) requirements. Stainless steel polishes will be used in accordance with Material Safety Data Sheets (MSDS). Stainless steel polishes shall not be utilized on food contact surfaces. 3 – 12 SALAD BARS 1. NON-REFRIGERATED SALAD BAR AND REFRIGERATED SALAD BARS. a. Salad bars may be set up on a self-serve basis and must be equipped with a sneeze shield. To assure all salad bar items remain below 41° F., they must be pre-chilled in a refrigerator and placed in pans or trays which are located on a bed of ice or on an electrically refrigerated salad bar unit. Proper drainage is essential when ice is used. The top sections of a refrigerated salad bar is normally controlled by a separate valve or switch. In order to ensure all salad bar items remain below 41° F. these units should be turned on approximately one hour prior to placing the salads on it. 2-21 Food Service Operation Notebook b. Refrigerated salad bars should defrosted and thoroughly cleaned after each meal. Turn off the switch/valve of the top unit and allow it to defrost freely. Do not use any metal objects to remove the ice as it may puncture the coils and will scratch the surface. (1) Cleaning procedures after each meal: (a) Remove all inserts of salads and dressings and return them to the vegetable preparation room/galley supervisor. (b) Discard the ice or defrost the salad bar. (c) Using the “two-pan” method, clean and rinse the salad bar and allow it to air dry. 1. Special attention should be given to the drain to ensure that it is free of food particles and draining properly. 2. Clean the sneeze shield, the top and bottom of the refrigerated tier shelves, and the legs and metal frames. (d) Most refrigerated salad bars have a bottom section for the storage of salads and dressings. This should also be cleaned after each meal. Ensure that the drain and the gaskets around the doors are thoroughly cleaned. (e) If the exterior of the salad bar is made of stainless steel, follow the cleaning procedures for stainless steel surfaces. 3 - 13 REFRIGERATED MILK DISPENSERS 1. PROPER CARE OF MILK DISPENSERS. Take care to ensure milk dispensers are properly cleaned and sanitized. a. Before each meal: (1) Check the temperature utilizing the installed external gauge and the internal portable thermometer. Temperature range should be 32° – 41° F. (2) Fill the milk dispensers. Wipe the bottom of containers or cans before placing them in the dispenser. Do not reuse disposable cardboard milk containers. (3) Cut milk dispensing tubes with a clean, sanitized instrument at a point ¼ inch below the dispensing valve opening. Surgical scissors, stainless steel paring knives, or disposable plastic knives are recommended. Scissors and paring knives should be sanitized after each use. Plastic knives should be of the type which are individually wrapped and should be used only once and discarded. b. During the meal: (1) Replenish milk containers as necessary. (2) Keep bowls or catch trays clean; empty as necessary. (3) Wipe up spills immediately. c. After each meal: (1) Clean the exterior; follow the procedure for cleaning stainless steel surfaces. You should ensure that the base of the machine, around the legs, metal seams, and the edge under the dispenser opening and door are thoroughly cleaned. (2) Remove and disassemble the metal dispensing valve. Place all stainless steel parts in the dishwashing machine. d. Defrosting procedures: 2-22 Food Service Operation Notebook (1) Defrost when the ice reaches a thickness of 1/4 inch. Remove milk containers and place under refrigeration while defrosting. Turn off the electric power supply; open the door and allow the machine to defrost freely. Do not use metal objects to dislodge ice. (2) After defrosting, clean the interior of the machine using the “two-pan” method. Special attention should be given to the door gaskets. (3) After defrosting, cleaning, and wiping dry with a clean cloth, turn on the electric power supply. 3 – 14 NON-CARBONATED BEVERAGE DISPENSERS 1. GENERAL. Non-carbonated beverage dispensers are usually located in the dining area to dispense fruit juices, lemonade, iced tea and other popular beverages. These dispensers have a self-contained refrigeration unit and a recirculating pump to keep the beverages thoroughly mixed and promote uniform cooling. The beverages are dispensed from a clear plastic tank. 2. OPERATION. Operation of the equipment is as follows: a. Fill the dispensing tank well in advance of the meal to ensure a properly chilled beverage. Beverages should be prepared in advance and pre-chilled. b. Empty and clean the drip pans as necessary and wipe up any spillage immediately. c. Turn off the refrigeration unit and recirculating pump when the machine is not in use or the tank is empty. 3. DISPENSERThe dispenser should be disassembled and thoroughly cleaned after each meal/use. The following procedure should be followed: a. Turn off the electric power supply to the machine. b. Drain the beverage from the dispenser and check with the galley lead cook in regard to future use. Do not discard the beverage unless directed. c. Disassemble the dispenser in the following manner: (1) Remove the dispensing valves from the beverage tank. (2) Remove the cover, drip pan, re-circulating spray tubes and magnetized agitators. (3) Remove the beverage tank from the machine. (4) Clean the exterior of the exposed dispenser using the “two-pan” method. Areas that are often overlooked are the base of the dispenser (legs), and the dispensing valve openings. (5) Wash the removed items in warm detergent and water, rinse with clear water to remove all traces of detergent, place in a sanitizing solution and allow to air dry. Use dishwashing compound, hand, for detergent. DO NOT use any abrasive cleaners and DO NOT place in the dishwashing machine (remember the removable parts are of plastic material). (6) Reassemble the dispenser after it has air dried. 4. BASE CLEANING. The base of the dispenser should have an extensive cleaning weekly, or more often if necessary. The following procedure should be followed: a. Disconnect the electric power supply. b. Remove the stainless steel cover from the front of the dispenser. c. Remove the side panels and screens. 2-23 Food Service Operation Notebook d. Wash and rinse all removed items (be careful not to lose the metal screws). e. Vacuum the exposed area of the dispenser and wipe with a damp cloth. f. Reassemble the dispenser immediately. 3 – 15 CARBONATED BEVERAGE DISPENSERS 1. GENERAL. Many activities have carbonated beverage dispensers for dispensing soda. These beverages are highly acceptable to the patrons and are especially good for morale. The following procedure is recommended for cleaning: a. After each meal: (1) Remove the beverage dispensing nozzles, clean in hot water, and replace. (2) Remove the front stainless steel cover and clean; clean the exposed interior section and replace cover. (3) Pour hot water into the drain pan to flush all carbonated syrup from the drains. (4) Disconnect the electric power and CO² supply when the dispenser is not in use. b. Syrup containers: Containers should be checked and refilled prior to serving the meal. Wash, rinse and sanitize containers before refilling. Detachable hoses should be dipped in hot water prior to replacing to remove beverage syrup and clean O-ring seals. c. Weekly: (1) Disconnect the electric power. (2) Remove the top cover to the dispenser. Clean the cover with detergent and water, rinse, and air dry. (3) Vacuum or brush the compressor coils and the area around the compressor. (4) Reassemble the dispenser. 3 – 16 COFFEE URNS 1. COFFEE PREPARATION. Good coffee is an asset to all food service operations. The following guidelines will assist you: a. Prepare coffee in small quantities; use the exact amounts of coffee grounds and hot water prescribed by the leading culinary specialist. b. Coffee should be used within 30 minutes and held no longer than one hour at 185° F. After 1 hour coffee loses its good aroma and becomes bitter. c. Remove and dispose of used coffee grounds immediately after preparing coffee. d. If a cloth urn bag is used, it should be rinsed in clear hot water and placed in clean, cold water until the next use. (1) This prolongs the life of the urn bag and prevents absorption of foreign odors. (2) Disposable paper filters are highly recommended. 2. CLEANING COFFEE URN. One of the most important factors in preparing good coffee is a clean coffee urn. The following procedures should be followed: a. Daily (1) 2-24 Clean the urn immediately after the coffee has been used. Food Service Operation Notebook (2) Rinse with enough water to remove sediment and old coffee from the bottom of the urn liner, drain lines and faucet. (3) Add approximately 1 gallon of hot water to the urn liner and brush the sides carefully with a clean bristle brush. A long-handled bowl brush is recommended. The brush should be “labeled” and used only for this purpose. (4) Drain and flush with hot water until the water runs clear. It is now ready for the next batch of coffee. b. After the dinner meal (daily): (1) Follow the above procedure and then proceed with the following cleaning method. (2) Add an accurately measured solution of 1 ounce dishwashing machine compound completely dissolved in 1 gallon of hot water to the urn liner. Use only thoroughly mixed solution of dishwashing machine compound and hot water. Do not place solid cleaning agents in the urn liner as they may become entrapped in the drain line or faucet. (3) Thoroughly brush the coffee urn liner and using a small “pipette” brush clean the gauge glass. Clean the lid (cover) also as it is exposed to coffee vapors. (4) Rinse thoroughly to remove all traces of the cleaning solution. Flush the urn liner, gauge glass, and faucet with hot, clear water (180° F.) to ensure that these items are sanitized. (5) Place approximately 1 gallon of clean water in the urn liner when it is not in use and leave the lid (cover) ajar. This will prevent the bottom of the urn liner from becoming burned and will permit the steam to escape. (6) Remember to drain the water from the urn liner prior to preparing coffee. 3. DE-STAINING A COFFEE URN. The coffee urn should be de-stained at least weekly, and more frequently if the urn liner becomes badly stained. The following procedures should be followed: a. Be sure the urn water jacket is ¾ full and the urn is turned on. b. Fill the urn liner with hot water to the coffee line. Add the de-staining compound in accordance with the instructions on the container. c. Allow the solution to remain in the urn liner approximately 60 minutes. Drain off some of the solution through the drain line and faucet and pour back into the urn liner. Place a warning “DO NOT USE” sign on the coffee during the de-staining process. d. Drain and thoroughly rinse until all traces of the de-staining solution have been removed. e. Place approximately 1 gallon of clean water in the urn liner and leave the lid ajar until the next use. 3 – 17 FREEZE-DRIED COFFEE DISPENSERS 1. FREEZE-DRIED DISPENSERS. Many activities have freeze-dried coffee dispensers which provide a fresh cup of coffee each time the dispensing button is pushed. There is also a dispensing button for hot water which patrons may use to prepare hot tea or cocoa. You should be familiar with the following: a. The freeze-dried coffee is placed in a container which attaches to the funnel dispensing assembly. This should be firmly secured to prevent the entrance of moisture which will prevent the dispenser from operating properly. b. The funnel assembly should be cleaned in accordance with the manufacturer’s instructions, as deemed necessary by the leading culinary specialist, or if moisture enters the assembly. Empty 2-25 Food Service Operation Notebook the freeze-dried coffee, wash and rinse the funnel assembly, and dry the assembly parts under a heat lamp. DO NOT dry with a cloth. c. For instructions on adjusting the amount of freeze-dried coffee dispensed and other maintenance information, refer to the manufacturer’s operating and maintenance manual. 2. HOT TEA AND HOT CHOCOLATE DISPENSERS. Dispensers for iced tea and hot chocolate are basically operated in the same manner as the freeze-dried coffee dispenser. See the manufacturer’s operating and maintenance manual for specific cleaning and operating instructions. 3 – 18 BULK ICE MAKING MACHINE 1. GENERAL. This machine requires little maintenance by food service personnel, but should be closely monitored. Ice is easily contaminated; therefore, the following measures should be taken: a. Only authorized personnel should have access to the machine. From a sanitation view-point, the ice bin should be locked. b. The ice scoop should be stored dry outside the ice bin (handle up) or inside the bin at such a height as to preclude the possibility of being covered with ice. c. If the ice is to be served, it should be placed in clean glasses by the food service attendant. d. Serving tongs should be used for ice cubes and a small spoon for crushed ice. Patrons should not be permitted to serve themselves. 2. ICE MACHINE CLEANING. The following cleaning procedures should be followed: a. Daily: (1) Clean the exterior of the machine using the “two-pan” method. (2) Wipe the inside of the ice bin cover. b. Monthly: (1) Disconnect the electric power supply and remove the ice from the bin. (2) Thoroughly clean the interior of the bin with a mild detergent and water solution using a nylon bristle brush. (3) Flush with clean water until all traces of detergent have been removed. (4) Reconnect the electric power supply. 3. ICE MACHINE MAINTENANCE. The machinery and the internal workings of the ice machine are the responsibility of the engineering/public works department. Any problems relating to this equipment should be referred to the responsible personnel. 3 – 19 ICE DISPENSING MACHINES 1. GENERAL. These machines are highly appreciated by the dining patrons, particularly during the hot months of the year. The only cleaning involved by food service attendants is the exterior of the machine, which should be cleaned daily using the “two-pan” method. Any problems relating to the machinery and internal workings of the ice dispensing machine should be referred to the engineering/public works department. It is recommended that the machine not be used to furnish ice except during meals. If the machine becomes empty during service, it should be immediately disconnected to prevent damage to the dispensing assembly. 2-26 Food Service Operation Notebook 3 – 20 SOFT-SERVE ICE CREAM MACHINE 1. ICE CREAM MACHINE CLEANING. This machine is usually located in the dining area and the patrons serve themselves. You should be familiar with the cleaning and sanitizing procedures. a. Prior to using: (1) Dip each part in sanitizing solution prior to assembly. (2) Reassemble the machine and lubricate parts as per tech manual. (3) Place remainder of sanitizing solution in the hopper, move the switch to the “wash” position and run for one minute. Drain completely; the soft-serve ice cream machine is now ready for use. b. After each use: (1) Remove the hopper cover and mix feed assembly; move the switch to the “wash” position and draw off all remaining ice cream. (2) Rinse hopper and freezer with cold water, draw off, and move the switch to the “off” position. (3) Place 1 gallon of detergent and water (140° F.) solution into the hopper. Move the switch to the “wash” position and operate for 2 minutes. Draw off detergent and water solution. Use hand dishwashing compound for detergent. (4) Rinse the machine interior with clean water. (5) Remove all detachable parts: freezer door assembly and draw-off plunger, beater, blades and beater drive shaft, mix feed assembly and hopper cover assembly. (6) Wash all parts in detergent and water, rinse, place in sanitizing solution, remove and air dry. (a) Use hand dishwashing compound for detergent. (b) Store all sanitized parts in a clean area until the next use. 3 – 21 BUTTER DISPENSERS 1. GENERAL. There are two types of butter dispensers. One is electrically refrigerated and the other is refrigerated by filling the rear compartment with ice or a refrigerant packet which is stored in the freezer between uses. Both types should maintain the temperature below 41° F. This temperature will prevent the butter from melting, but will keep it soft enough for easy spreading. 2. DISPENSER PREPARATION. a. Prior to the meal: (1) Connect the electric power supply (if electric unit) or fill with ice or place refrigerant packet in place (if non-electric unit). (2) Fill the dispenser with trayed butter pats. b. During each use: (1) Replenish butter pats as needed. (2) Clean up spills immediately. c. After the meal: (1) Remove butter pats and place under refrigeration. 2-27 Food Service Operation Notebook (2) Electric unit: Disconnect power supply; wipe the exterior with a soft, damp cloth. DO NOT IMMERSE IN WATER. (3) Non-electric unit: Discard ice or remove refrigerant packet and place in freezer; wash dispenser in detergent and warm water solution, rinse, sanitize, and wipe exterior with dry cloth. Use hand dishwashing compound for detergent. 3 – 22 TRAY, BOWL, CUP AND GLASS LOWERATORS 1. GENERAL. These dispensers are self-leveling. The cabinets are made of stainless steel with a spring platform which pushes the trays and dinnerware to the surface as they are used. The spring tension may be adjusted according to the weight of the item being dispensed. 2. DAILY CLEANING: a. The stainless steel should be cleaned, rinsed and dried. Follow the procedures for cleaning stainless steel surfaces. b. Some tray and bowl dispensers are combined in one unit. (1) The bowl dispensers should be removed from the unit and the interior vacuumed and cleaned. (2) Clean the unit exterior following the procedures for cleaning stainless steel surfaces. 3 – 23 COMMERCIAL HOT AND COLD BEVERAGE DISPENSERS 1. GENERAL. Hot and cold beverage dispensers such as cappuccino dispensers and juice dispensers require internal and external cleaning on a daily basis. 2-28 1. Table condiments cleaned and refilled. 2. Salt/pepper/sugar/napkin dispensers put through dishwashing machine. 3. Table tops and chairs cleaned using the two-pan 4. Table bottoms, stanchions and chair bottoms and legs cleaned. 5. Decks swept, scrubbed and rinsed. 6. Decks stripped and waxed. 7. Overheads dusted and cleaned. 8. Bulkheads cleaned. 9. Bulkheads adjacent to the serving line cleaned. 10. Ladders leading to the dining area cleaned. 11. Doors leading to the dining area cleaned. 12. Ventilation supply/exhaust openings cleaned. 13. Refrigerated salad bar cleaned and defrosted. 14. Refrigerated milk dispenser cleaned. 15. Refrigerated milk dispenser defrosted. 16. Non-carbonated beverage dispenser disassembled and cleaned. AFTER EACH MEAL SUNDAY SATURDAY FRIDAY THURSDAY TUESDAY SPACE: DINING AREA MONDAY WORK SCHEDULE WEDNESDAY DAILY AND WEEKLY BEFORE BREAKFAST Food Service Operation Notebook X X X X X X X X X X X X X X X X X X X X X X X X X X X X X X X When ice reaches 1/4 inch thickness X X X X X X O X R 17. Carbonated beverage dispenser cleaned. X 18. Soft-serve ice cream machine cleaned and sanitized. Before and after each use 19. Coffee urn cleaned. X X X X X X X 20. Coffee urn destained. X 21. Butter dispenser cleaned. X 22. Bulk ice machine ice removed and bin thoroughly X Monthl cleaned and rinsed. y 23. All serving table tops, bottoms, and legs cleaned. X 24. All stainless steel surfaces cleaned and polished. X X X X X X X 25. All cleaning gear thoroughly cleaned and sanitized. X X X X X X X 26. Tray/bowl/cup/glass lowerators cleaned. X TO BE USED IN CONJUNCTION WITH CLEANING INSTRUCTIONS Figure 3-1 2-29 Food Service Operation Notebook SECTION 4: SERVING LINE AND ASSOCIATED EQUIPMENT 4–1 BACKGROUND 1. SERVING LINE PLANNING. The serving line is one of the keys to good service. Extensive planning is required to ensure that all food items are properly arranged and easily accessible to the patrons. Upon securing the serving line, preparation should commence for the serving of the next meal. The serving line opens and closes at least three times a day, 1,095 times a year. 2. SERVING LINE SETUP. Pre-service setup, supervising the serving line operation and cleaning the serving line in the galley are normally the responsibility of the culinary specialist; however, the Mess Deck Master-at-Arms may occasionally assume this responsibility. A sample daily and weekly work schedule is illustrated in Figure 4-1 to assist in cleaning the serving line and associated equipment. The following information will provide assistance with serving line operations. 4–2 ELECTRIC HOT FOOD TABLE 1. HOT FOOD TABLE OPERATION. a. If the food table is designed for “wet operation,” add water to cover the bottom of each unit. Some units are designed for “dry operation,” without water. b. Ensure that hot food placed on the electric hot food table is maintained at 135° F. or above. 2. HOT FOOD TABLE FOOD PLACEMENT. The following procedure should be followed when placing food items on the hot food table prior to opening the serving line: a. Arrange the food items as determined by the lead cook to expedite service. b. Do not overfill food inserts; use hot pads and exercise care when handling hot pans. c. Instruct and demonstrate correct serving techniques and procedures normally accomplished by the lead cook. d. Always check with the lead cook to ensure that all food items are in position and properly arranged; and that personnel are present to serve food items prior to opening the serving line. 4–3 GENERAL OPERATIONS. 1. GENERAL. During the period the serving line is open, particular attention should be directed towards: a. SERVING LINE CLEANING. (1) Cleaning food spills immediately. (2) Replenishing food items (do not wait until the food insert is empty). (3) Ensuring that personnel assigned to serving food items are courteous and follow serving instructions. b. CLOSING THE SERVING LINE. should be followed: (1) Check with the lead cook as to the disposition of food items. (2) Turn off the heat source. (3) 2-30 Upon closing of the serving line, the following procedure (a) Close the steam valve on steam table. (b) Turn the temperature control dials to the “off” position on the electric table. Open the drain valve(s). Food Service Operation Notebook c. HOT FOOD TABLE CLEANING. After the hot food table has cooled, the following procedure should be followed for cleaning: (1) Remove all loose food particles. Particular attention should be given to the drains. (2) Using the “two-pan” method, thoroughly clean the interior and exterior of the hot food table. DO NOT use abrasive materials or cleaners. 4–4 DESCALING NOTE: STRICT ADHERENCE TO SAFETY PRECAUTIONS MUST BE FOLLOWED WHEN DESCALING. 1. DESCALING A STEAM TABLE. Depending on the geographical location and the mineral content of the fresh water supply, the steam table may require scheduled descaling. This will remove rust, lime, and scale deposits and allow the unit to operate at maximum efficiency. It is recommended that descaling be accomplished after the evening meal. The following procedures should be followed for descaling: a. Fill the steam table with water to cover the coils and mineral deposits. b. Open the steam supply valve and bring the water to a boil. c. Turn off the steam supply valve and add the descaling compound as per the directions on the container. d. Allow the solution to remain in the steam table overnight. e. Brush the interior of the steam table with a nylon bristle brush. f. Drain and rinse with clear water to remove all loosened particles and descaling solution. A stronger detergent solution may be required to thoroughly clean the interior of the steam table on a daily basis. The following cleaning solution is recommended: four tablespoons of dishwashing machine detergent and two tablespoons of general purpose detergent to each gallon of hot water. 2. DESCALING ELECTRIC TABLES. If the electric hot food table is designed for “dry” operation, the bottom of each receptacle may take on a straw-colored appearance. The discoloration of the stainless steel surface is due to the intense heat from the unit. If the unit is designed for “wet” operation, descaling may be accomplished by following the basic procedures for the steam table. Some electric tables designed for “wet” operation have a drain line installed for each unit making cleaning and descaling procedures easier. Other tables do not have drains installed and the water/solutions should be removed with a ladle or by wiping dry. If this is the case, personnel should wear rubber gloves and exercise caution to prevent being burned or coming into contact with the descaling solution. The temperature control dials should be cleaned frequently. The following procedures should be followed: a. Pull outward to remove dial. b. Wash with mild detergent and water solution, rinse, and dry with a soft cloth. c. Replace dials immediately to avoid possible damage or loss. 4–5 SNEEZE SHIELD AND TRAY SLIDE RAIL 1. GENERAL. The sneeze shield and tray slide rail are an important part of the serving line and should be thoroughly cleaned after every meal. Cleaning should be accomplished using the “two- 2-31 Food Service Operation Notebook pan” method giving particular attention to cracks, crevices, and the underside of the tray slide rail. The following items should be observed during the cleaning procedure: a. Follow the procedure for cleaning stainless steel surfaces for areas adjacent to the serving line. b. Exercise care not to scratch the glass/plastic glass surfaces of the sneeze shield. c. DO NOT use abrasive materials or cleaners. 4–6 BREAD DISPENSER 1. GENERAL. Bread dispensers are of two types; the self-leveling dispenser, and the counter-top dispenser. a. SELF-LEVELING DISPENSER. The cabinet is made of stainless steel with a coil spring platform which raises the bread as it is used. The spring tension may be adjusted according to the weight of the item being dispensed. The self-leveling bread dispenser is usually recessed in the top of the serving line and should be cleaned after each use in the following manner: (1) Remove dispenser and disassemble. Remove platform and spring. (2) Wash, rinse, sanitize and reassemble. b. COUNTER-TOP DISPENSER. Bread is dispensed by lifting a lever which dispenses one slice at a time onto a tray. The dispenser should be cleaned after each use in the following manner: (1) Using a clean brush remove all bread crumbs. (2) Wipe the interior and exterior with a clean cloth using a mild detergent and water solution. (3) Wipe all areas using a clean cloth and clear water. (4) Wipe with a clean, dry soft cloth. Note: Check with the watch captain for instructions on the disposition of bread prior to cleaning the dispenser. 4–7 ROTARY TOASTER 1. GENERAL. Rotary toasters are usually located on the serving line. The following procedures should be followed when the toaster is utilized: a. Turn on electrical power approximately 15 minutes prior to using. b. Prepare toast as needed; ensure that it is hot and fresh for the patrons. c. Keep hands dry when preparing toast to avoid possible electric shock. d. Do not use metal objects to dislodge jammed toast. Turn off the machine and remove toast by hand. After each use: a. Disconnect the electric power supply and allow the toaster to cool. b. Remove the catch tray and wash/rinse in the utensil wash sink; catch tray may be placed in the dishwashing machine. c. Wipe down exposed surfaces with a damp cloth, and brush all crumbs out of the inside of the toaster and from around the base. d. Do not allow water or cleaning solution to come in contact with the conveyor chains as they will rust. 2-32 Food Service Operation Notebook e. Remove the bread baskets and clean thoroughly. dishwashing machine. To remove baskets: Bread baskets may be placed in the (1) Move each basket in turn to a position midway to the front of the machine. (2) Press the left conveyor chain to the left and the pins will slip out of the holes in the basket. (a) When replacing baskets, be sure holes on each side are properly aligned with the pins on the conveyors so the basket will not be slanted when it goes through the toaster. 4–8 CEREAL DISPENSER 1. GENERAL. The cereal dispenser is usually located at an area adjacent to the serving line. You should ensure that food service attendants: a. Fill the cereal dispenser prior to the meal if cereal is to be served. b. Replenish cereal as required, providing maximum variety. c. Check for damaged cereal boxes and deliver these damaged boxes to the lead cook for disposition. d. Rotate stock; oldest date of pack should be used first. The cereal dispenser should be cleaned daily. Remove the cereal boxes and wipe with a clean cloth using a mild detergent and water solution. 2-33 Food Service Operation Notebook 1. Rotary toaster; cleaned SUNDAY SATURDAY FRIDAY THURSDAY WEDNESDAY SPACE: SERVING LINE TUESDAY MONDAY WORK SCHEDULE AFTER EACH MEAL DAILY AND WEEKLY BEFORE BREAKFAST EXAMPLE After each use 2. Serving line; cleaned X 3. Steam table; descaled X Or as necessary 4. Sneeze shield; cleaned X 5. Bread dispenser; cleaned X 6. Plastic fruits, vegetables, and greens; cleaned 7. Cleaning gear; cleaned and sanitized X Or as necessary After each use 8. Cereal dispenser; cleaned X 9. Tray slide rail; cleaned X TO BE USED IN CONJUNCTION WITH CLEANING INSTRUCTIONS Figure 4-1 2-34 Food Service Operation Notebook SECTION 5: SCULLERY OPERATIONS 5–1 BACKGROUND 1. SCULLERY OPERATIONS. The scullery is one of the most important operations in food service. All dinnerware, silverware, and some food preparation equipment pass through this area for washing and sanitizing. It is essential that the scullery be scrupulously clean and the highest sanitation procedures be followed to prevent the growth of harmful bacteria which could cause serious illness. The sample “Daily/Weekly Work Schedule,” Figures 5-1 and 5-2, will assist you in ensuring that the scullery and associated spaces and equipment are thoroughly cleaned. You should be familiar with the operation and maintenance of scullery equipment and ensure that food service attendants follow the instructions and procedures outlined in this section. 2. SCULLERY ASSIGNMENTS. Sufficient food service attendants should be assigned to the scullery to permit dining patrons to place the soiled dinnerware and silverware in the designated scullery opening. Food service attendants should remove food particles, paper, etc., and sort the dinnerware and silverware. The garbage/trash container should never be positioned outside the scullery to indicate that the patrons are required to empty their own tray. 5–2 SAFETY PRECAUTIONS FOR THE DISHWASHING MACHINE 1. SAFETY INSTRUCTIONS. All food service attendants assigned to the scullery should be thoroughly familiar with the safety and operating instructions for the dishwashing machine. These instructions should be attached to the machine or posted to an area adjacent to it. The following precautions should be observed during operation of the dishwashing machine: a. Exercise caution. Personnel must keep their mind on the job. b. Ensure that protective covers are in place on all external moving parts of the machine. c. Ensure that the side doors of the machine are closed. d. Do not put hands into the machine while the steam is turned on or the machine is operating. e. If a dish rack becomes jammed on the conveyor chain, disconnect the electric power and steam supply prior to removing the rack. f. Personnel should wear arm length rubber gloves (not electrical gloves) and rubber aprons to prevent burns. g. Any machine malfunctions should be reported per established local procedures. Do not try to fix the problem yourself. h. Wear hearing protection when the dishwashing machine is operating. 2. DAILY INSPECTION. During your daily inspection of the scullery you should ensure that: a. The ventilation exhaust openings are operating properly. b. All lights are operating. c. The protective rubber covers for electric on/off switches are in place and are not damaged. 5–3 PREPARING SOILED DINNERWARE AND SILVERWARE FOR MACHINE WASHING 1. GENERAL. It is important that all items be prewashed prior to being placed in the dishwashing machine. This will ensure that all articles are clean and also prevent food particles/paper from entering the wash section and clogging the spray arms which would reduce the machine efficiency. The following procedures should be followed: a. Sort soiled dinnerware and silverware by type and size. 2-35 Food Service Operation Notebook b. Scrape off food particles with a plastic nylon bristle brush with handle or a rubber spatula. DO NOT HIT trays, dinnerware, etc. (especially plastic dinnerware) AGAINST THE SIDE OF TRASH CANS. This will break or damage the dinnerware. Replacement items are extremely costly. c. Prewash either by using a fine, warm water spray or placing the items in the utensil wash sink. (1) Hand dishwashing detergent should be used in the utensil wash sink. (2) The water in the wash sink should be changed as it becomes dirty and more detergent should be added. d. Silverware should be soaked in warm water (120°-125°) containing 3 ounces of hand dishwashing compound per gallon of water as soon as possible after it is collected. Scrub each piece with a nylon bristle brush, paying special attention to the spaces between the tines of the forks. e. Dish racks for machine washing should be loaded in the following manner: (1) Dishes and trays should be stacked vertically in the openings provided, ensuring that they do not overlap. (2) Cups, glasses, bowls should be placed bottom side up in a single layer. (3) Silverware should be placed eating end up in cylinders (a maximum of fifteen pieces in each cylinder). Use separate cylinders for knives, forks, and spoons. This will ensure that water reaches all surfaces when the racks are placed in the dishwashing machine. f. If time and space permit, it is recommended that articles be washed in the following order: Glassware, silverware, dishes, cups, bowls, and trays. 5–4 OPERATING INSTRUCTIONS FOR SINGLE-TANK DISHWASHING MACHINES 1. GENERAL. Some enlisted dining facilities, officer dining facilities, and chief petty officer dining facilities have single-tank dishwashing machines installed. The procedures listed below should be followed when operating the single-tank dishwashing machine: a. Close the drain valve. b. Open the hot water and steam valves to the rinse mixing valve and adjust the valve handle to the “hot” position. Some machines have a hot water booster heater installed. If this is the case, open the hot water and steam valves to the booster heater. c. Fill the tank with hot water to the top of the overflow pipe or the “full” mark on the water level indicator. d. Check the following: (1) Scrap screens are clean and in position. (2) Spray arms assembled, capped and properly adjusted so that water spray hits utensils directly. (3) Temperature of wash tank is in accordance with manufacturer’s instructions found on the data plate affixed to the machine by the manufacturer. (4) 2-36 When the rinse valve is open, the rinse water temperature is in accordance with manufacturer’s instructions found on the data plate affixed to the machine by the manufacturer. Some machines will not operate unless the rinse temperature is at a Food Service Operation Notebook specified temperature set by the manufacturer. The rinse temperature should not be less than 165° F. e. If the machine does not have an automatic detergent dispenser installed, add the prescribed amount of detergent to the wash tank. f. Push the start button and run the machine for 2 minutes (two cycles) to mix the detergent and water. g. Open the door and place the dish rack in the machine. Close the door and push the start button to start the wash cycle. (1) If the machine is manually operated, allow for at least 40 seconds wash and then move the control handle to the rinse position for 10 seconds. Release the handle, which should return to the closed position. (2) Most machines are automatically timed to allow for a 40-second wash, a 10-second rinse and then shut off. h. Open the door; remove dish rack, shake slightly to remove excess water and allow to air dry for at least 1 minute. i. Place clean, air dried dinnerware, bottom side up in clean storage cabinet or dispenser. j. Place a sanitized, empty cylinder over clean, air dried silverware, invert, and place in clean storage cabinet, avoid hand contact with eating surfaces. Machine temperatures should be checked frequently, using a pocket thermometer (0°-220° F.) to ensure accuracy of the external temperature gauges. If the machine temperature gauges do not agree with the thermometer within ±3 degrees, the gauge must be calibrated or replaced. 5–5 OPERATING INSTRUCTIONS FOR DOUBLE-TANK DISHWASHING MACHINES 1. GENERAL. Most enlisted dining facilities have double-tank dishwashing machines installed. The procedures listed below should be followed when operating the double-tank dishwashing machine: a. Close the drain valves to the wash and rinse sections of the machine. Open the hot water “fill” valves and fill the tanks to the “full” mark on the water level indicator. b. Inspect the inside of the machine to ensure that: (1) Scrap screens are in place. (2) Spray arms are capped, and adjusted so that the spray hits the utensils directly. (3) Splash curtains are in place and not hanging closer than five inches to the conveyor. c. Open the steam valve to the rinse tank until the temperature of the water is in accordance with manufacturer’s instructions found on the data plate affixed to the machine by the manufacturer. d. Open the steam and hot water valves to the final rinse mixing valve. Adjust the mixing valve handle to the “hot” position to maintain a temperature range in accordance with manufacturer’s instructions found on the data plate affixed to the machine by the manufacturer. On machines with hot water booster heaters installed, open the hot water and steam valves to the booster heater. e. On machines without automatic detergent dispensers, add the prescribed amount of detergent (Table II) to the wash tank. f. Push the “start” button to start the pumps and conveyor. Run the machine for 2 minutes to thoroughly mix the detergent and bring the temperature of the wash tank up to a temperature 2-37 Food Service Operation Notebook specified in the manufacturer’s instructions. This can be found on the data plate affixed to the machine by the manufacturer. g. Inspect the ends of the machine to ensure that the power sprays are operating properly. h. During the operation of the machine, keep a close watch on the temperature gauges and ensure that they are within temperature ranges specified in the manufacturer’s instructions found on the data plate affixed to the machine by the manufacturer. i. Place the dish rack on the conveyor carefully and allow the conveyor to push the rack through the machine. If the conveyor speed is properly set, the utensils will receive a 20-second wash and a 20-second rinse. j. As the dish rack approaches the end of the machine, it will pass a lever which will actuate the final rinse. Observe the final rinse temperature gauge for correct temperature. k. Allow dinnerware and silverware to air dry for at least 1 minute after passing through the machine. l. Place the clean, air dried dinnerware and trays bottom side up, in a clean storage cabinet or dispenser. m. Place an empty cylinder over clean, air dried silverware, invert, and place in a clean storage cabinet. n. For every 30 to 45 minutes of continuous machine operation, the wash section should be drained and the scrap trays cleaned. Machine temperatures should be checked frequently, using a pocket thermometer (0°-200° F.) to ensure accuracy of the temperature gauges. 2. TRIPLE TANK DISHWASHERS. Some shore activities have triple tank dishwashing machines installed. The procedures are basically the same with the following exceptions: 1. The dishwashing machine consists of pre-wash, wash, and rinse sections with a final rinse. 2. Refer to the manufacturer’s operating and instruction manual for the pre-set temperatures of the pre-wash, wash, and rinse sections. 5–6 CLEANING THE DISHWASHING MACHINE 1. DISHWASHER CLEANING. The dishwashing machine should be thoroughly cleaned after each meal or use. The procedures listed below should be followed: a. Turn the machine off. b. Secure the steam and hot water valves to the final rinse mixing valve, or the steam and hot water valves to the hot water booster heater. c. Add ¾ to 1½ cups of dishwashing machine detergent to the rinse tank, depending on the capacity of the rinse tank. d. Turn the machine on and allow it to operate for 5 minutes. e. Turn the machine off and secure the steam valve to the rinse tank. f. Open the drain valves to the wash and rinse tanks; open the doors and allow the machine to cool. g. Remove the door’s scrap screens, metal frames, wash and rinse spray arms (including the spray arm caps), pump intake strainer, drain strainer and splash curtains. Wash thoroughly in the utensil wash sink and rinse. 2-38 Food Service Operation Notebook h. Using hand dishwashing detergent and water with a nylon brush, thoroughly clean the inside and outside of the machine including all removable parts, i.e. splash curtains, spray arms caps, etc. Rinse with clean water to remove all loosened dirt and detergent. i. Reassemble the machine, close the drain valves to the wash and rinse tanks. j. Fill the tanks ½ full of water, open the steam valve to the rinse tank and allow the machine to reach normal operating temperatures in accordance with manufacturer’s instructions. k. Turn the machine on and operate for 5 minutes without detergent. l. Turn the machine off, close the steam valve to the rinse tank, and open the drain valves to the wash and rinse tanks. NOTE: Follow the same basic procedures for the single-tank dishwashing machine with the exception of steps 1 through 4. 5–7 DESCALING DISHWASHING MACHINES (NOTE: STRICT SAFETY PRECAUTIONS MUST BE FOLLOWED.) 1. GENERAL. The interior of the dishwashing machine and the manifold(s) should be inspected monthly for accumulation of calcium or lime deposits. If deposits are evident, the machine must be descaled. 2. DESCALING A DISHWASHER. Descaling the machine should be a part of the Planned Maintenance System (PMS) and is the responsibility of the food service division. The descaling operation must be closely supervised from “start to finish,” and personnel must wear face shields, chemical safety goggles, rubber gloves, and rubber aprons when handling acid. The following procedures will be followed: a. Drain wash/rinse tank(s), if applicable. b. Install overflow pipe(s), scrap tray(s), screen(s), spray manifold(s) (except final rinse), and curtains (inlet and discharge ends only). Place final rinse spray manifold on top of scrap tray in wash tank. c. Shut drain valve(s). d. Commence filling tank(s) to within 2 inches of top of overflow pipe(s) with clean hot water. e. Add 7 fluid ounces of orthophosphoric acid and 1 fluid ounce of rinse additive for each gallon of water per tank (see notes 1 and 2). f. Complete filling tank(s) and close door(s). g. Start the machine and operate for 1 hour maintaining normal operating temperatures. h. Stop machine, open drain valve(s) and completely drain acid solution from machine. (See note 3.) i. Inspect interior of machine. Parts should be free of calcium or lime deposits and metal should be shiny. j. Repeat steps 3 through 8 if necessary. k. Close drain valve(s) and fill tank(s) with clean hot water. machine compound per tank. l. Add two CUPS of dishwashing Close door(s), start machine and operate for 5 minutes at operating temperatures. m. Stop machine and completely drain tank(s). n. Refill and flush tank(s) with clear water to remove all traces of acid and detergent. 2-39 Food Service Operation Notebook 3. GENERAL NOTES. a. In the absence of orthophosphoric acid, only USDA approved chemicals for descaling of dishwashing machine should be used. Follow manufacturer’s instructions. b. If tank capacity in gallons is unknown, multiply length (inches) x width (inches) x depth to overflow (inches) and divide product by 231. c. Shore stations and ships in port shall dispose of acid drains in accordance with local regulations. 5–8 DESTAINING DINNERWARE AND SILVERWARE 1. DESTAINING DISHWARE. Dinnerware and silverware should be destained weekly or as necessary to remove unsightly stains. The following procedures should be followed: a. Place the prescribed amount of hot water in a large utensil wash sink or steam jacketed kettle. b. Dissolve destaining compound in hot water as per the instructions on the container. c. Place the dinnerware (glass or plastic) in the destaining solution and allow to remain for 30 minutes. A milder solution should be used for silverware. d. Rinse dinnerware and silverware thoroughly with clear water; place in the dishwashing machine for washing and sanitizing. 5–9 CARE OF PLASTIC DINNERWARE (NON-DISPOSABLE) 1. PLASTIC DINNERWARE. Many afloat and ashore food service activities use plastic dinnerware: trays, cups, tumblers, and bowls. These items are very durable and will last a long time if properly cared for. The following precautions will prolong the life of the plastic dinnerware: a. Inspect new items prior to placing them in service for cracks. Those with cracks or damages should be rejected. b. Ensure that food service attendants scrape food particles from dinnerware with a nylon bristled brush or rubber spatula. DO NOT HIT DINNERWARE ON TRASH CANS (this cannot be overemphasized). c. Do not use abrasive pads or cleaning compounds to clean dinnerware. These will scratch the hardened surface and make the dinnerware unsanitary. d. Ensure that the dishwashing machine final rinse temperatures are maintained in accordance with manufacturer’s instructions. Temperatures in excess of 195° F. will harm plastic dinnerware. Plastic dinnerware should be inspected during washing and those with cracks or chips set aside for disposition. The Mess Deck Master-at-Arms should inspect each piece prior to disposition to determine cause and course of action to be taken to prevent recurrence. 5 – 10 INVENTORY OF DINNERWARE AND SILVERWARE 1. DINNERWARE INVENTORY. An adequate supply of dinnerware will be maintained so all personnel will have dinnerware that is air-dried and at room temperature. The number of patrons served at the most attended meal combined with a base percentage of each item of dinnerware may be used as a guide to ensure this requirement is met. The following table provides an example of this process: ITEM Bowl, soup/salad 2-40 PERCENT 80 Food Service Operation Notebook Cup, coffee 60 Tumbler, glass 150 Silverware 100 Plate, 9 inch 100 Plate, 6 3/4 inch 200 Dish, 5 9/16 inch 80 Tray, carrying 100 EXAMPLE: 200 (persons served) multiplied by .80 (base percent) equals 160 soup bowls required. Dinnerware and silverware should be inventoried every two weeks to ensure that a sufficient supply is available for service. Dinnerware and silverware should be closely inspected at this time. Dinnerware with cracks or chips and silverware that is badly bent should be discarded. A local form or log book may be used to record the inventory. Figure 5-3 illustrates a proposed inventory record. 2-41 Food Service Operation Notebook SUNDAY SATURDAY FRIDAY THURSDAY WEDNESDAY SPACE: SCULLERY TUESDAY MONDAY WORK SCHEDULE 1. Decks swept, scrubbed and rinsed AFTER EACH MEAL DAILY AND WEEKLY BEFORE BREAKFAST EXAMPLE X 2. Overhead cleaned X 3. Bulkheads cleaned X 4. Table tops, bottoms and legs cleaned X 5. Deep sinks thoroughly cleaned X 6. Silverware metal chute cleaned X 7. Trash container thoroughly cleaned X 8. Ventilation supply/exhaust openings cleaned X 9. Dishwashing machine descaled X X X X X X X X X X Or as necessary 10. Dishwashing machine disassembled and thoroughly cleaned 11. Dinnerware and silverware inventoried X X 12. Dinnerware and silverware destained 13. Cleaning gear; cleaned and sanitized X X X X X Or as necessary X X X TO BE USED IN CONJUNCTION WITH CLEANING INSTRUCTIONS Figure 5-1 2-42 1. Overhead cleaned SUNDAY SATURDAY FRIDAY THURSDAY WEDNESDAY SPACE: UTENSIL WASH ROOM TUESDAY MONDAY WORK SCHEDULE AFTER EACH MEAL DAILY AND WEEKLY BEFORE BREAKFAST Food Service Operation Notebook X 2. Bulkheads cleaned X 3. Decks swept, scrubbed and rinsed X 4. Pot and pan storage racks cleaned X X X X 5. Sanitizing unit drained and flushed with clean water X X X X X X X 6. Trash/garbage containers (inside & out) and lids thoroughly cleaned X X X X X X X 7. Cleaning gear cleaned and sanitized X X X X X X X 8. Deep sinks thoroughly cleaned X TO BE USED IN CONJUNCTION WITH CLEANING INSTRUCTIONS Figure 5-2 2-43 Food Service Operation Notebook INVENTORY RECORD Date: _______________ (1) Item Tray, plastic (2) (3) (4) (5) (6) Previous Inventory Amount Received On Hand This Date Loss Gain 215 10 223 2 Bowl, soup 80 80 0 Dish, sauce 125 119 6 Cup, plastic 130 150 4 Tumbler, plastic 205 210 Knife, table 230 227 Fork, table 180 Spoon, dessert 210 203 7 Spoon, tea 120 120 0 0 Dispenser, napkin 30 30 0 0 Dispenser, sugar 30 29 1 Salt shaker 20 37 3 Pepper shaker 33 24 48 5 3 233 20 36 0 5 3 MDMAA ____________ Leading CS ____________ Food Service Officer ___________ Note: Column (2) plus column (3) should equal column (4). If (4) exceeds (2) plus (3) there is a gain (6). If (4) is less than (2) plus (3), there is a loss. Figure 5-3 2-44 Food Service Operation Notebook 6–0 HAND DISHWASHING OF COOKING UTENSILS 6–1 BACKGROUND 1. GENERAL. As Mess Deck Master-at-Arms, your area of responsibility is extensive, involving not only the dining area and scullery, but on some occasions, in the galley as well. One of these instances is the washing of cooking utensils. With the continuous inflationary cost of raw food products coupled with the Navy’s program to upgrade the quality of food service, it is very important that the cooking utensils in your food service facility be thoroughly cleaned. Greasy, improperly cleaned cooking utensils significantly effect an otherwise flavorful food item, not to mention the added possibility of contamination. By ensuring that food service attendants clean the cooking utensils properly, you are not only doing your job well but also contributing to the overall effectiveness of the food service division. Nothing is as irritating as reaching for a pan when the serving line is “backed up,” and finding a greasy, improperly cleaned/sanitized pan. Ensure that pans and utensils are cleaned right the first time, every time. 6–2 PREPARATION FOR WASHING 1. WASHING PREPARATION. Before washing the cooking utensils, scrape large food particles off, and sort according to size and type. You should have the necessary hand dishwashing supplies ready. They are: a. Dip and drain baskets. b. Hand dishwashing compound (clear or opaque). c. Nylon bristle brush. d. Arm-length rubber gloves. e. Water thermometer (if a booster heater unit is not available). f. Scrub pad. g. Clean storage facilities for cooking utensils. 6–3 WASHING AND SANITIZING 1. GENERAL. To determine the proper detergent solution, compute by following the below procedures: a. Fill the wash sink with water, using a measuring container. The water temperature should be maintained at not less than 110°. b. Mark the water level with a permanent etched mark in the sink for future use. c. Add the proper amount of detergent needed. The amount recommended is usually listed on the side of the container. 2. WASHING COKING UTENSILS. Below are steps for washing cooking utensils: a. Scrub the surfaces thoroughly utilizing the detergent solution in the wash sink and a nylon bristle brush. Pay particular attention to the edges and seams. b. Remove stubborn food particles with a scrub pad. c. Transfer each washed utensil to the next sink compartment for rinsing. Ensure that the wash water’s temperature is continually maintained at not less than 110°. Replace the water at the first appearance of grease or dinginess. 2-45 Food Service Operation Notebook 3. RINSING COOKING UTENSILS. When the cooking utensils are in the second sink compartment, rinse each utensil thoroughly to remove all traces of detergent. To ensure that this is done, you should: a. Keep the rinse water clean at all times. b. Replace the rinse water as needed. c. Transfer each rinsed cooking utensil to the third sink compartment. 4. SANITIZING COOKING UTENSILS. The third sink compartment is designed to sanitize cooking utensils. Ensure that: a. The water temperature is at least 171° F. b. The utensils are immersed in the water for at least 30 seconds. 5. OTHER SANITIZING METHODS. Many food service facilities do not have three-compartment deep sinks. To ensure that the cooking utensils are properly sanitized; use one of the following methods: a. Place them in the dishwashing machine, or b. Use a large pan, in lieu of the second sink compartment to remove all traces of detergent from each cooking utensil, and utilize the second sink compartment for sanitizing. The cooking utensils are placed on the clean end-shelf to air dry after sanitizing. DO NOT dry with a towel or dish cloth. As a safety measure, always ensure that arm-length rubber gloves are worn during the entire hand dish washing operation. 6–4 STORAGE OF CLEAN UTENSILS 1. COOKING UTENSIL STORAGE. Ensure that sanitized cooking utensils are promptly and properly stored. The storage area should be clean, free of dirt, grease, food particles, personal clothing, etc., otherwise, they will be contaminated and your time and efforts will be wasted. By adhering to the following rules, your overall hand dishwashing operation will be a success: a. DO NOT allow the cooking utensils to come in contact with your clothing while transporting them to the storage area. b. Avoid handling the cooking surfaces. c. Store them face down to prevent dust/dirt from accumulating. 2-46 Food Service Operation Notebook 7-0 FOOD WASTE AREAS 1. FOOD WASTE. Garbage collection and disposal methods differ among various types of ships, but a few sanitary requirements commonly govern these methods. Garbage should be disposed of promptly to prevent contamination of spaces, preclude buildup of offensive odors and eliminate a potential fire hazard. Garbage collection areas should be thoroughly cleaned each day. Trash and garbage should not be left in food service areas overnight as they attract insects and rodents. The Mess Deck Master-at-Arms should ensure that: a. Food service attendants are properly trained in the operation and cleaning of equipment used in collecting and disposing of garbage. b. All garbage grinders and disposal units are operated in compliance with established instructions. c. An adequate supply of garbage/trash containers is available. d. Garbage/trash containers are kept clean and covered. Recommend use of authorized trash can liners. 7–1 GARBAGE GRINDER SAFETY PRECAUTIONS AND OPERATING PROCEDURES 1. GENERAL. Consult the manufacturer’s operating instructions for the correct procedures to be followed when operating the garbage grinder. 2. SAFETY PRECAUTIONS. Follow safety procedures prior to operating garbage grinder. a. Always check to be certain the sealing plate is locked in the open position and the hinged top of the feed chute hopper is locked shut when the grinder is to be used. b. Turn on the flushing water by opening the valve to supply sufficient water to flush the ground food waste through the grinder. Do not turn on excessive water as the lower half of the grinder compartment will flood. Increase or decrease the amount of water, as required, during the grinding operation. c. The grinder motor must be operating at full speed before feeding food waste into it. d. Stand in front of the grinder when feeding food waste into the grinder. e. Pick out and discard all metal tableware, glass, dishes, wood, leather, bones and cloth from food waste prior to feeding into the garbage grinder. f. Corn husks and raw meat are not readily shredded and should be fed at a slow rate. Bones larger than ¼ inch in diameter for 400 pound/hour grinder or 1 inch for the 1600 pound/hour model should not be put into the grinder. g. Place the food waste into the feed chute at the cut-out end. Rake or push the food waste through the feed opening provided in front of the hinged safety door of the hopper. NEVER put your hand inside the hinged feed door while the grinder is operating. h. The capacity of grinders is either 400 or 1600 pounds per hour. Do not overload it. Feed food waste at a rate of 7 pounds per minute (about 1 gallon) for the 400 pound per hour model and 28 pounds per minute (4 gallons) for the 1600 pound per hour grinder. i. Do not turn off the motor until the grinder is completely clear of food waste. j. Before turning off the grinder, flush the feed chute with clean water. 2-47 Food Service Operation Notebook k. After turning off the grinder, disconnect the electric power supply, open the hinged top of the hopper and flush the top, sides, and the interior of the grinder with clean water, turning the rotor by hand so that the hammer and discs are cleaned. Due to rigid Navy environmental pollution control standards, always consult with the Food Service Officer to determine whether discharging garbage overboard is permitted. Never operate the garbage grinder when the ship is in port, in polluted water, or congested anchorage. 7–2 CLEANING THE GARBAGE GRINDER 1. GENERAL. Cleaning of the garbage grinder after each use: a. Turn off the machine by pushing the “Stop” button, secure power at the breaker, ensure the tank is empty. Never stop the grinder with food waste in it. b. Scrub the interior of the unit, using a nylon bristle brush with detergent and hot water solution. c. Flush the machine with hot clean water to remove all traces of detergent. 7–3 CLEANING GARBAGE/TRASH CONTAINERS 1. TRASH CONTAINER/LINER USE AND CLEANING. Garbage/trash containers should be emptied and thoroughly cleaned inside and out after each meal/use. The use of authorized trash can liners should not preclude the cleaning of garbage/trash containers on the prescribed frequency. 2. CLEANING TRASH CONTAINERS. To clean the containers, remove large pieces of trash or food waste, place 1 gallon of hot water and detergent solution in each can. Vigorously scrub the inside, outside, and the bottom of each container with a nylon bristle brush. a. If a live steam jet is available, invert garbage/trash container over it for 1 minute. b. Rinse containers with hot, fresh water. c. Scrub the lids/covers with a hot water and detergent solution and rinse. d. Invert garbage/trash containers and allow to air dry. e. Trash cans must stay covered when not in use. 8–0 CLEANING GEAR/ESTABLISHING AND MAINTAINING REQUIREMENTS 1. GENERAL. Throughout the preceding sections, emphasis has been placed on when and how to clean specific areas and equipment. This section discusses the use and care of the tools used and how to order consumables and maintain adequate supplies on hand. 8–1 PROPER USAGE 1. CLEANING TOOL USAGE. There are various kinds of tools used for cleaning, but it is essential to select the type that eliminates the possibility of damaging the surface to be cleaned. The following is a list of items and their use: a. A nylon bristle scrub brush can be used for most general cleaning. b. Metal sponges made of corrosion-resistant steel can be useful for hard-to-clean surfaces. However, this type sponge should never be used on surfaces that can be easily scratched (stainless steel, Formica, plastic, glass, etc.) and should be discarded when signs of wear are noticed. c. Steel wool is prohibited in all food service spaces. d. Metal polish is prohibited on surfaces that come into contact with food. 2-48 Food Service Operation Notebook e. Clean soft wiping cloths which are disposable and lint-free are ideal for wiping surfaces after they have been thoroughly cleaned. f. Hand dishwashing compound should be used for hand dishwashing of galley utensils and for cleaning surfaces that come in contact with food (dining tables, food preparation tables, serving line, beverage dispensing equipment, etc.). g. General purpose detergent should be used for removing dirt from bulkheads, decks, and overheads. General purpose detergent should NOT be used for hand dishwashing or on surfaces which come into contact with food. h. Scouring powder is not recommended for use. The powder contains abrasives which will scratch most surfaces and leaves a white, powdery film when not thoroughly rinsed. i. Scrubbing deck brushes have bristles made of Palmyra fiber. Use for loosening dirt deposits from deck surfaces. For sanitation purposes, sponges and scrub brushes used for cleaning dining tables or surfaces that come in contact with food should be used solely for that purpose and kept separate from similar cleaning gear. These items should be marked so as to eliminate their possible use in cleaning garbage/trash containers, toilet facilities, etc. 8–2 CLEANING AND SANITIZING 1. GENERAL CLEANING AND SANITIZING. Effective cleaning and sanitizing procedures cannot be overemphasized to food service attendants. Food service attendants should be fully aware of the hazards associated with careless procedures. An example of a careless procedure would be cleaning a dining table with a nylon scrub brush which had been “washed” (not sanitized) prior to use. Clean implies that the surface is free from dirt or impurities, while sanitize means to effectively treat clean surfaces by an approved process that destroys bacteria. 2. APPROVED SANITIZING METHODS. chemical sanitizing: The approved methods of sanitizing are hot water or a. Hot water sanitizing - all surfaces are completely immersed in or exposed to hot water of at least 171° F. for at least 30 seconds (this procedure is the preferred method for sanitizing food service utensils). b. Chemical sanitizing - the use of a chemical sanitizing agent which requires immersion in or exposure to solutions containing sufficient concentration of the agent to destroy bacteria. All contact surfaces must be wetted by the sanitizing solution. Immersion should be for at least one minute. 3. SANITATION OF CLEANING GEAR. Brushes, mops, and sponges should be properly cleaned and sanitized after each use to preclude transmission of germs. The following methods of sanitizing different cleaning gear are recommended: a. Scrub brushes - Brushes that are used for scrubbing dining tables or surfaces that come into contact with food should be cleaned after each use. (1) Wash in hot water and detergent solution. between bristles. Pay particular attention to food particles (2) Rinse in hot running water; dip in water to which a sanitizing agent has been added. (3) Shake and hang to dry; do not allow brushes to rest on bristles as this will cause the bristles to bend and mat. Brushes that will not be damaged by hot water may be placed in the dishwashing machine for sanitizing. b. Scrub brushes (brushes used for general cleaning): 2-49 Food Service Operation Notebook (1) Hand wash with hot water and detergent solution. (2) Rinse. (3) Hang to air dry. c. Cellulose sponges - clean at the end of each meal. (1) Wash in hot water and detergent solution. (2) Rinse in hot clear water. (3) Boil for at least 5 minutes (recommended) or chemically sanitize. (4) Wring out and air dry. deteriorated. Should be discarded when exceedingly soiled, stained, or d. Mops - clean after each use: (1) Wash in hot water and detergent solution. (2) Rinse in clean hot water to which a sanitizing agent has been added. (3) Wring out and hang to air dry. (4) Mops should be designated for food service use only and stored separately. e. Mop wringer and bucket – clean after each use: (1) Wash thoroughly with hot water and detergent solution. (2) Rinse and allow to drain. (3) Sanitize and store bucket upside down. 4. CLEANING GEAR STORAGE. Cleaning gear (mops, buckets, etc.) and cleaning supplies (detergents, disinfectants) should be stored in an area specifically designated for that purpose. These items will not be stored in: a. Food preparation or serving areas. b. Food storage cabinets or on food storage shelves. c. Cabinets or lockers with insecticide. 8–3 ESTABLISHING AND MAINTAINING REQUIREMENTS 1. GENERAL. Planning is the basis for supervising an efficient operation. It takes tremendous planning and forethought to maintain dinnerware and other related supplies in sufficient quantity to meet the requirements of your area of responsibility. Prior to estimating requirements, the desired endurance level (weeks or months of supply) should be established. Consult with the leading Culinary Specialist or Food Service Officer concerning endurance level and ordering procedures. Past usage data is necessary to establish requirements and endurance levels. 2. USAGE DATA/ENDURANCE LEVELS . To obtain usage data, a form (such as Figure 8-1) should be maintained for each individual item. Once reliable data is obtained, multiply the usage data (weeks or months) by the endurance level (weeks or months) to determine future requirements. (Usage X endurance level = future requirements). The use of a form (Figure 8-1) will provide information such as: a. On hand balance. b. Excessive usage (losses or breakage). c. Cost of previous supplies which can be used for supporting future budget information. 2-50 Food Service Operation Notebook 3. ORDERING SUPPLIES. Follow local supply procedures for ordering of supplies. Check with the leading Culinary Specialist to ascertain the division’s endurance levels prior to deployment. When ordering be sure to make allowance for: a. Lead time (in ordering and receiving). b. Ship’s schedule (duration of cruise, available supply support, etc.). 2-51 Food Service Operation Notebook Food Service Supplies Stock Record Item: Brush, Scrub, Utensil and Equipment NSN: 9Q 7920-00-061-0038 High Limit: 10 Low Limit: 5 U/I: EA Date Issues On Hand Recpts Total Stockage Objective Required Inventory Level: ____ 30 days Ordering Date Quantity Price Ordered 6/30/00 INV 10 7/02/00 6 3.55 7/01/00 INV BF 10 7/18/00 3 3.68 7/05/00 6 2 2 14 7/11/00 3 5 11 7/15/00 1 6 10 7/18/00 2 8 8 7/22/00 3 7/27/00 7/31/00 INV ADJ 8/01/00 INV BF 11 1 9 10 +1 10 9 9 Note: Recommend all items be inventoried monthly. Fast moving items should be inventoried weekly. Figure 8-1 2-52 Food Service Operation Notebook 9–0 PLANNED MAINTENANCE SUBSYSTEM 9–1 RESPONSIBILITY 1. GENERAL. “Public Works never fixes anything. The Engineering Department could care less about our equipment.” How many times have you heard these remarks when equipment breakdown occurs, but how much did these statements accomplish toward repairing the piece of equipment? Stop for a minute and think whose job is going to suffer the hardship of poorly maintained equipment. 2. EQUIPMENT MAINTENANCE. Equipment maintenance is the responsibility of the engineering or public works department. They are responsible for assigning qualified personnel to: a. Conduct systematic inspections of all food service equipment. b. Lubricate bearings, shafts, and other moving parts. c. Make adjustments/repairs before they develop into major defects. 3. MDMAA RESPONSIBILITY. As the Mess Deck Master-at-Arms, you are responsible for the equipment under your cognizance and should familiarize yourself with the required preventive maintenance and the frequency in which it should be performed. The procedure for performing planned maintenance subsystem varies from command to command and ship to shore; however, the end results should be the same. It is up to you to make sure that the equipment located in your spaces receives scheduled maintenance. In conjunction with the preventive maintenance subsystem, you should ensure that: a. Arrangement for assignment of specific maintenance personnel is made with the engineering or public works department. b. Only maintenance personnel are permitted to make repairs. c. Equipment is not operated in excess of speeds prescribed by the manufacturer. d. Personnel are thoroughly trained in the operation of assigned equipment. e. An inspection is conducted each morning of equipment for loose nuts, bolts, parts, connections, etc., before beginning operation. Culinary Specialists and Food Service Attendants that find loose nuts, bolts or parts should try to identify their proper location checking all equipment in the area for missing parts. Finding missing parts may be the difference between making a piece of equipment operational, operational in a degraded capacity or inoperative. f. Proper cleaning is performed on a scheduled basis. 4. NOTIFICATION. The leading culinary specialist/food service officer should be notified of any problems relating to the performance of preventive maintenance. 9–2 TROUBLE CALL LOG 1. TROUBLE CALLS. When equipment malfunction occurs, a trouble call or work request (OPNAV Form 4790-2K) is normally used for requesting repairs. A log (Figure 9-1) should be maintained to provide current information of all equipment repairs. This log, if properly maintained, should provide the following information: a. Recurring equipment malfunctions/problems. b. Failure of responsible personnel to expedite repairs. c. Necessary information for completing the Inoperative Equipment Report. 2-53 Food Service Operation Notebook 9–3 INOPERATIVE EQUIPMENT REPORT 1. GENERAL. The Inoperative Equipment Report (Figure 9-2) may be used to provide daily status of inoperative equipment to the Supply/Food Service Officer. Many afloat activities utilize the Inoperative Equipment Report for preparation of Supply Department Eight o’Clock Reports. The procedures listed in this section will initially appear to require additional time and effort, when time is already in short supply. The alternatives, however, are totally unacceptable. Preventive maintenance is an effective tool in keeping equipment operational. When properly performed, equipment “down time,” and cost of maintenance, and man-hours are reduced. After all, lubrication is cheaper than repair parts. 2-54 Food Service Operation Notebook TROUBLE CALL/WORK REQUEST LOG REPORTING TC/WR NO. DATE TIME EQUIP COMPLETED PROBLEM SIGN. DATE TIME SIGN . TC - TROUBLE CALL WR - WORK REQUEST Figure 9-1 2-55 Food Service Operation Notebook INOPERATIVE EQUIPMENT REPORT DATE DOWN DATE REPORTED EQUIPMENT REPAIR STATUS LEADING MS: ________________________________________________ FOOD SERVICE OFFICER: _____________________________________ MESS DECK MASTER-AT-ARMS: ________________________________ Figure 9-2 10-0 TRAINING 2-56 EST’D DATE OF REPAIR Food Service Operation Notebook 10 – 1 RESPONSIBILITY 1. GENERAL. The primary objective of the food service attendants’ training program should be to acquaint food service attendants with sanitation requirements and improve efficiency. Unlike other divisional training programs designed for advancement qualifications, the food service attendants’ training should be job-oriented. The need for an effective food service attendants’ training program is essential to the management of the dining area. Needless to say, training is the most important responsibility of a supervisor. Unfortunately, it is often either omitted or “gundecked.” Gundecked training does not fool anyone, because training is measured by effectiveness, not signatures on training attendance sheets. Food Service Management NAVSUP P-486 states, “The Mess Deck Master-at-Arms will, in conjunction with the medical department, administer a training program for food service attendants in sanitation scullery operation and food handling.” Your responsibility has been assigned; now we begin. 10 – 2 SECRETARY OF THE NAVY REQUIREMENTS 1. GENERAL. In addition to NAVSUP P-486, the Secretary of the Navy issued SECNAVINST 4061.1C which delineates the Navy’s food sanitation program. The instruction states that initial and subsequent semi-annual refresher training will be given to all food service workers employed for 30 days or longer. Personnel assigned to food service duties for less than 30 days shall receive 2 hours initial training and orientation by responsible supervisors. 2. TRAINING AND INSTRUCTORS. A minimum of 4 hours for initial training and 4 hours annual refresher training is required for all food service personnel. All training programs must be conducted by qualified food sanitation/safety instructors. Qualified food sanitation/safety instructors are: a. Independent duty Navy hospital corpsman (must re-qualify every three years); b. Preventive medicine technicians; c. Environmental health officers; d. Personnel who supervise or train food service personnel and are successful graduates of a supervisor/manager food safety training course approved by the Preventive Medicine Authority (must re-qualify every three years); e. Navy and Marine Corps food management teams, provided the instructors are certified as required by SECNAVINST 4061.1 Series. 3. INSTRUCTOR TRAINING. Navy and U.S. Environmental and Preventive Medicine Units should provide instructor training to supervisory personnel to qualify them to carry out local command food sanitation programs. Food sanitation training shall be an integral part of existing divisional training programs, both ashore and afloat. 10 – 3 FORMAL TRAINING 1. TRAINING SCHEDULE AND PUBLICATIONS. Now that you are aware of existing training requirements/directives, you should develop a 3-month training schedule. In 3 months all of your material will have been covered and the food service attendants should have been rotated. The following publications will help you greatly in the preparation of a 3-month training cycle and lesson plan development: a. Manual of Naval Preventive Medicine, NAVMED P-5010-1. b. Navy Customer Service Manual, NAVEDTRA 12972. c. Ship’s 3M Maintenance Material Management Manual, OPNAVINST 4790.4C. 2-57 Food Service Operation Notebook d. Navy Environmental and Natural Resources Program Manual OPNAVINST 5090.1B. e. Culinary Specialist Rate Training Manual. f. Military Requirements for PO 1 & C (current edition). g. Military Requirements for PO 3 & 2 (current edition). h. Navy Food Service, NAVSUP P-476 (published quarterly). i. NAVSUP published lesson www.navsup.navy.mil. plans are available j. Food Safety Training Program, BUMED INST 4061.2 on the NAVSUP Home Page at After each presentation, evaluate the effectiveness and make “pen and ink” changes to your lesson plan. This will assure you that in 3 months when the topic is presented again it will be even better. The training program should have a means for measuring effectiveness of the instructor and trainees. One means is by testing. A written achievement test is the type most use. A test could be administered monthly or at the end of each phase of instruction. 2. DEVELOPING A FORMAL TRAINING PROGRAM. training program for food service attendants are: The procedures for developing a formal a. Know the requirement (SECNAV, NAVSUP, Command Instructions, NAVMED 5010-1). b. Develop the plan. A three-month cycle is recommended. c. Prepare a lesson plan for each topic. Make pen and ink changes after each presentation. d. Test for effectiveness. If several trainees miss the same questions, review your method of presentation. 3. CLASSROOM PRESENTATION. If you apply the following rules in your classroom presentation, you will earn the respect of your trainees and you will be more effective: a. The instructor should provide the motivation essential to learning. b. Use audio-visual aids and/or OJT improve the learning process. Retention is better when visual aids or hands-on training are used rather than audio aids. c. Be sure of facts. It is well-known that to “relearn” is more difficult than to learn correctly in the beginning. d. Retention of newly gained knowledge and skills is dependent upon repetitive exercise; the instructor should provide ample time for trainees to practice newly acquired skills. e. The relationship that the instructor maintains with the trainee is extremely important. While giving more guidance and help to the slower learner, the instructor must plan interesting, session-related activities for fast learners to perform. Otherwise, the faster learners will probably become bored and lose interest. f. Formal presentations should not last over one hour. It is also better to schedule formal training presentations in the morning when both you and the trainees are most alert. 10 – 4 TRAINING RECORDS 1. RECORDING TRAINING. It is necessary that training be recorded. The procedure for recording training should be simple but thorough. Individual training folders, although not required, are recommended. Training documentation should be in accordance with Type Commander (TYCOM) or command instructions. If utilized, it is recommended that the individual training folder contain: 2-58 Food Service Operation Notebook a. Check In/Out format for Food Service Attendants (Figure 2-1). b. Food Sanitation Training Certificate, NAVMED 4061/1 (Figure 10-1). c. Report of Training Attendance (Figure 10-2). d. Health Card/Health Certification. These four items are considered sufficient for maintaining efficient training records and also to provide readily available personnel information concerning Food Service Attendants. All items can be retained in a binder for organizational purposes. 10 – 5 ON-THE-JOB TRAINING 1. GENERAL. This is an area where a small investment (time) will pay great dividends (efficiency) com-pounded quarterly (length of food service attendants’ tour of duty). One well-trained person can do the work of two or three poorly trained people. Well-trained personnel work better, faster, more efficiently, are better motivated and create fewer discipline problems than poorly trained personnel. 2. ON THE JOB TRAINING. Sections 3, 4, 5, 6, 7, and 8 provide excellent information for on-the-job training. On-the-job training is definitely a learning process which is job or work-oriented. All training, other than formal classroom type, can be defined as on-the-job training. It can either be group or one-on-one, depending on the job and the number of trainees to be taught; however, always keep the groups as small as possible. Never let opportunity for on-the-job training pass by. If you notice a person cleaning the mess decks table with only one bucket of water, stop them and show them the correct procedure (twopan method). There are two major reasons for this: first, it teaches the person the correct method, and second, it re-establishes your high standards. If you permit someone to continue with the wrong method, then both that individual and the other food service attendants will notice this oversight and interpret it to be either poor leadership or a decline in standards. 3. GOOD TRAINING PRACTICES. Practice the following points: a. Set realistic goals that the food service attendants can understand. b. Realize that learning takes time. Learning the daily details which later become routine requires many hours of hard work. c. Speed up the learning process by praising where warranted, for encouragement is oil to the wheels of the mind. Be careful to praise only when justified. This again establishes your standards. d. Build good morale. Inform food service attendants that they are a vital part of the food service organization. Help them realize that their job is important. e. Recognize different mental and physical capabilities. This information is necessary the right person in the right job. f. to place Finally, adopt the principle that each job is a stage in training for a more responsible assignment. 4. TRAINING IN SPECIFIC TASKS. In training a newly-assigned food service attendant, tell the person exactly what is expected and make sure they understand what they are being taught. If possible, give them a written job description and distribute basic guidelines. Use the following method in teaching how to do a specific task or to operate or clean a piece of equipment: a. Prepare the trainee (tell the person how to do the job). b. Demonstrate the correct technique (show the person how to do the job). 2-59 Food Service Operation Notebook c. Have the person perform under supervision while explaining to you what they are doing. Make training more realistic by preparing the food service attendants for the unusual or abnormal situations that may develop on the job. Make sure that they thoroughly understand and can apply what they are being taught. Extra time and effort spent in explaining and instructing during initial training will prove profitable. 10 – 6 FOLLOW-UP TRAINING 1. GENERAL. Follow-up training is conducted to improve on-the-job performance. It may be limited to additional instruction or assistance in a specific aspect of the job. Follow-up on daily performance is the true measure of effective training; closely observe on-the-job performance and offer constructive criticism when necessary. Repeat training in any specific area of the food service attendant’s performance that appears weak and continue to encourage and assist until the individual performs the job efficiently. 2-60 Food Service Operation Notebook ...1.1.1..1 ...1.1.1..2 ...1.1.1..3 ...1.1.1..4 ...1.1.1..5 Figure 10-1 2-61 Food Service Operation Notebook REPORT OF TRAINING ATTENDANCE Date: __________________ MEMORANDUM From: Mess Deck Master-at-Arms To: Food Service Officer Subj: Report of Training and Attendance Encl: (1) Lesson Plan for Session 1. Lesson: 2. Week of: 3. Date completed: 4. Personnel attending: __________________________________ __________________________________ __________________________________ __________________________________ ___________________________ ___________________________ ___________________________ ___________________________ ________________________________ Signature of MDMAA Figure 10-2 2-62 Food Service Operation Notebook TABLE I RECOMMENDED QUANTITY OF DISHWASHING COMPOUND FOR SINGLE-TANK MACHINES 1. The quantity of dishwashing compound used is dependent upon: a. The amount of wash water in the machine’s tank. b. The hardness of water being used. 2. Water hardness is the critical factor in determining the type and amount of dishwashing compound to use. Water produced by the ship’s distilling plants is always very soft. Water furnished from the pier is always harder and will vary greatly depending on location. The engineering/public works department should assist in determining water hardness. Water Hardness1 Soft:3 Medium hard: Hard: Water in wash tank (Gal.) Type of compound Amount (Oz.) Amount2 (Cup) 10 II4 3½ ½ 15 II 5½ 2/3 20 II 7 1 10 I5 5 2/3 15 I 7½ 1 20 I 10½ 11/3 10 I 7 1 15 I 10 11/3 20 I 14 1¾ 1 Shipboard produced water may be considered soft. quantities of detergent according to local water conditions. Ashore dining facilities should adjust 2 Add ½ the quantity shown after six racks have gone through the machine. The quantities in the table are initial charges. 3 Engineering/public works department should determine hardness of water. 4 Dishwashing compound, Type II for soft water. 5 Dishwashing compound, Type I for hard water. 2-63 Food Service Operation Notebook TABLE II RECOMMENDED QUANTITY OF DISHWASHING COMPOUND FOR DOUBLE-TANK MACHINES 1. The quantity of dishwashing compound used is dependent upon: a. The amount of wash water in the machine’s tank. b. The hardness of water being used. 2. Water hardness is the critical factor in determining the type and amount of dishwashing compound to use. Water produced by the ship’s distilling plants is always very soft. Water furnished from the pier is always harder and will vary greatly depending on location. The engineering/public works department should assist in determining water hardness. Water Hardness1 Soft:3 Medium hard: Hard: Water in wash tank (Gal.) Type of compound Amount (Oz.) Amount2 (Cup) 10 II4 3½ ½ 15 II 5½ 2/3 20 II 7 1 25 II 9 1¼ 10 I5 5 2/3 15 I 7½ 1 20 I 10½ 11/3 25 I 12 1½ 10 I 7 1 15 I 10 11/3 20 I 14 1¾ 25 I 16½ 2¼ 1 Shipboard produced water may be considered soft. quantities of detergent according to local water conditions. Ashore dining facilities should adjust 2 Add ½ the quantity shown after six racks have gone through the machine. The quantities in the table are initial charges. 3 Engineering/public works department should determine hardness of water. 4 Dishwashing compound, Type II for soft water. 5 Dishwashing compound, Type I for hard water. 2-64 Food Service Operation Notebook TABLE III DISHWASHING MACHINE DETERGENT AUTOMATIC DISPENSER 1. DISHWASHER INSTALLATION. Installation of a dishwashing detergent automatic dispenser is highly beneficial and strongly recommended. It is designed to automatically feed the dishwashing machine’s wash section whenever the dishwashing detergent concentration falls below the proper level. The use of an automatic dispenser significantly reduces the food service attendant’s work load and minimizes the wasteful use of dishwashing detergent. 2. DISPENSERS. Dishwashing detergent automatic dispensers are available in the supply system. 3. DISHWASHER DISPENSER PROCEDURES. Below are procedures to be followed when using a dishwashing detergent automatic dispenser, regardless of its make or type: a. Consult the manufacturer’s operating manual for specific instructions. b. Add dishwashing detergent as necessary. indicates when the detergent is running low. Many dispensers have an alarm feature which c. Check the reservoir outlet daily to ensure that it is not clogged. An effective procedure is to stir the detergent in the reservoir periodically to prevent caking and settling which could clog the outlet hole. d. Daily check the sensing electrodes, mounted in the wash tank, to ensure that they are not coated with mineral scale or other foreign matter. Clean the electrodes as necessary but at least once a week. A nylon web pad is ideal for this type of cleaning. Sensing electrodes are susceptible to corrosion from acid and should be protected from contact with the acid solution when descaling the dishwashing machine. e. Ensure that periodic maintenance and calibration is performed by trained and authorized personnel as part of the planned maintenance subsystem. 2-65 Food Service Operation Notebook TABLE IV RINSE ADDITIVE AUTOMATIC DISPENSERS FOR THE DISHWASHING MACHINES 1. GENERAL. Rinse additive automatic dispensers installed on dishwashing machines are useful attachments designed to produce gleaming and virtually spotless dinnerware and silverware. Injected in very small amounts into the dishwashing machine’s final rinse section, the rinse additive reduces the water’s surface tension to allow dinnerware and silverware to dry more quickly with very little streaking and spotting. However, so called “short cuts” from the recommended washing procedures such as dinnerware not prewashed, improper amount of dishwashing machine detergent added, excessively loaded silverware cylinders or tray racks, will make the rinse additive ineffective. 2. OPERATION. Operation and maintenance of the different types of rinse additive automatic dispensers varies, depending upon the design and the manufacturer. In any case, consult the technical manual that accompanies the equipment. Food service attendants assigned to the scullery should not tamper with this device except to add additive solution, to clean the exterior, or to adjust the valve regulating the rinse additive’s rate of flow. Both the rinse additive automatic dispenser and liquid additive are available. 2-66 Food Service Operation Notebook TABLE V INSTRUCTIONS AND QUESTIONNAIRE FOR INCOMING FOOD SERVICE ATTENDANTS 1. Food service attendants have been an important part of the Navy from the beginning and will continue to be so as long as there are ships. Most of the chief petty officers and senior enlisted personnel on board, as well as numerous captains and admirals in today’s Navy, served as food service attendants in the early days of their careers. Scuttlebutt has it that “messcooking (the previous term for food service attendant duty) is a nasty job and that you will suffer all types of hardship and injustice.” This is not true. There are times when the work is hard and the hours long, but this is the case in most jobs aboard a Navy ship. While serving in the food service division, your future leading petty officers will be your “customers.” There’s a saying that, “If a sailor does a good job as a food service attendant, then that sailor will perform in a similar manner when rated.” Many senior petty officers use this theory and closely watch the food service division for future “strikers.” 2. While assigned as a food service attendant, the responsibility for the handling and service of food, as well as the sanitation of the serving line, dining area and related spaces, will be delegated to you and your fellow food service attendants. Keep in mind that the health and well-being of your shipmates depend on how well you do your job. Your attitude, personal appearance and concern for your customers play an important role in providing excellent food service for the crew. 3. Rules and regulations are necessary in any organization. In order to make your temporary assignment more meaningful while assigned to the food service division, familiarize yourself with the following: a. Upon reporting to the Mess Deck Master-at-Arms, you will be assigned to the Supply Department. Work schedules, liberty/leave policy, personnel and similar inspections, and berthing while assigned as a food service attendant will all be discussed and explained to you by the Mess Deck Master-at-Arms. b. Upon completion of your indoctrination period, you will be assigned to a job in the food service area. Some of the jobs may seem harder than others; nonetheless, they play a very important role in the overall image of the food service division. Strive to do your best in whatever job you are assigned. Your supervisors will readily notice your commendable performance and it will not go unrewarded. Furthermore, your reputation as a high caliber performer will remain with you beyond your duty as a food service attendant. c. You will muster for work as instructed by the Mess Deck Master-at-Arms. When reporting to work, you will be inspected by the Mess Deck Master-at-Arms for cleanliness and personal hygiene. Always present a smart appearance; your hair must be clean and in accordance with Navy grooming standards, your fingernails must be clean and trimmed short, your uniform must be clean and “squared away,” and your shoes must be polished. Additionally, observe the wearing of hats and “no smoking” regulations at all times. d. It is expected that you will remain at your assigned station until all work is completed unless directed otherwise by the Mess Deck Master-at-Arms. Relief of one food service attendant by, or job-switching with, another food service attendant without authorization by the Mess Deck Master-at-Arms is not permitted. e. Whatever your job assignment, you will be expected to perform it as instructed by the Mess Deck Master-at-Arms. Shortcuts are not allowed; the end product will be less than acceptable and may possibly contribute to an injury or harm to an individual. Remember that the supervisors who instruct in these jobs are highly knowledgeable and proficient. Nonetheless, should you come up with an idea for improvement, bring it to your supervisor’s attention. 2-67 Food Service Operation Notebook f. Disagreements or misunderstandings while assigned to the food service division should be brought to the Mess Deck Master-at-Arms’ attention. Do not attempt to settle it yourself. Your supervisor is more experienced in handling such problems. g. Keeping aware of changes within the Supply Department is of the utmost importance as food service regulations and procedures are constantly being updated and improved. The Mess Deck Master-at-Arms will keep you informed of what’s going on concerning your job as a food service attendant. h. Your liberty will be regulated by the Mess Deck Master-at-Arms. When on authorized liberty, ensure that you return to your job on time and in a capable condition. In the event of a bona fide emergency, immediately notify your supervisor so that necessary arrangements may be initiated to assist you. 2-68 Food Service Operation Notebook INCOMING FOOD SERVICE ATTENDANT’S QUESTIONNAIRE This questionnaire is to be completed during your indoctrination period. Return it to the Mess Deck Master-at-Arms upon completion. 1. Who is your division officer while assigned as a food service attendant? ________________ 2. Who is your immediate supervisor?_____________________________________________ 3. What is the uniform for food service attendants assigned to the dining area? ____________ 4. What time do you muster in the morning? Where? _____________________ 5. What time do you start setting up for: Breakfast? ________ Lunch? ___________ Dinner? ___________ 6. What time period is the serving line open for the crew? Breakfast _________ Lunch ____________ Dinner ___________ 7. When should the dining tables and chairs be cleaned?______________________________ 8. Why is a clean-as-you-go program necessary? (Example: Wiping dining tables between sittings) 9. When should the napkin dispensers, salt and pepper shakers, sugar dispensers, and table condiment containers be cleaned? _____________________________________________ 10. How frequently should the napkin dispensers, salt and pepper shakers, and sugar dispensers be emptied and placed into the dishwashing machine? _______________________________ 11. At what temperature ranges should the dishwashing machine be maintained during operation? Wash section _____________ Rinse section ___________ Final rinse section __________ 12. How long should dinnerware/silverware be allowed to air dry after being removed from the dishwashing machine? ______________________________________________________ 13. When should the dishwashing machine be disassembled and thoroughly cleaned? _______ 14. When should the scullery be thoroughly cleaned? _________________________________ 15. When should trash containers and lids be thoroughly cleaned? _______________________ 16. The milk tubes should be cut at what length below the metal dispensing mechanism? ________________________________________________________________________ 17. Explain the correct procedure for cleaning dining tables, chairs, and bulkheads. _________________________________________________________________________ 18. Where is the laundry bag for food service attendants’ trousers located? ________________ 19. When should the clean trousers be returned from the laundry? _______________________ _________________________________________________________________________ 2-69 Food Service Operation Notebook TABLE VI CHECK LIST FOR MESS DECK MASTER-AT-ARMS Daily Weekly Every Other Week 1. Muster and inspect food service attendants. 1. Inventory fast moving consumable supplies. 2. Review “daily and weekly” work schedule. 2. Check with Leading CS for receipt of provisions. 2. Review food service attendants’ job rotation. 3. Check food service attendants berthing space (note laundry bag). 3. Check dishwashing machine for scale/mineral deposits. 3. Inventory all consumable supplies. 4. Check temperatures of the dishwashing machine during operation. 4. Clean ventilation exhaust filters. 4. Review Planned Maintenance Subsystem for assigned equipment. 5. Review on-the-job safety. 5. Check trouble call log/inoperative equipment report and make follow-up report. 6. Check equipment for operating defects and report to leading MS/FSO. 2-70 1. Inventory dinnerware and silverware. Monthly 1. Ensure safety and operating instructions are updated and posted. Food Service Operation Notebook SUMMARY REVIEW OF RESPONSIBILITIES 1. GENERAL. Have you noticed the number of times “effective” has been used throughout this appendix? According to the dictionary, effective is “producing a decided, decisive, or desired effect or the decisive accomplishment of a result or fulfillment of an intention.” Regardless of your intention, in order to be effective, the intention must be fulfilled. Effective is certainly a very positive word. All of the many items covered in this appendix are important things to know and follow. Refer to this appendix often and soon the correct procedures will come automatically. 2. SUPERVISORY TECHNIQUES. By following four very important supervisory techniques, your effectiveness as well as the effectiveness of the food service attendants will increase immediately. They are: a. Muster and inspect food service attendants each morning prior to beginning breakfast set-up. (Use military procedure and be forceful). b. Train food service attendants - both formally and on-the-job. c. Set your standard. Require food service attendants to come up to it. Don’t compromise. d. Show interest - berthing spaces, laundry, career planning, etc. In short - be positive and effective and remember that your assignment as Mess Deck Master-atArms is more than a job. It’s a responsibility to your shipmates. 2-71 Food Service Operation Notebook THIS PAGE INTENTIONALLY LEFT BLANK 2-72 Food Service Operation Handbook CHAPTER 3 PRESENTATION SILVER AND OTHER VALUABLE GIFTS 1 - 0 GENERAL Introduction ....................................................................................................................1-1 Acceptance of Gifts ........................................................................................................1-2 Requests for Presentation Silver....................................................................................1-3 Classification for Reassignment Purposes.....................................................................1-4 2 - 0 RECEIPT Appraisal ........................................................................................................................2-1 Report of Receipt ...........................................................................................................2-2 Photographs...................................................................................................................2-3 Reassigned Silver ..........................................................................................................2-4 3 - 0 CUSTODY AND STOWAGE General ..........................................................................................................................3-1 Custody ..........................................................................................................................3-2 Stowage .........................................................................................................................3-3 4 - 0 INVENTORY General ..........................................................................................................................4-1 Inventory Reports...........................................................................................................4-2 Care and Maintenance...................................................................................................4-3 Missing, Damaged or Destroyed Items ..........................................................................4-4 Recovery of Missing Items .............................................................................................4-5 5 - 0 TURN-IN General ..........................................................................................................................5-1 Strip Ship........................................................................................................................5-2 Temporary Vault Storage ...............................................................................................5-3 Repair.............................................................................................................................5-4 Turn-in Procedures ........................................................................................................5-5 3-1 Food Service Operation Handbook THIS PAGE INTENTIONALLY LEFT BLANK 3-2 Food Service Operation Handbook CHAPTER 3 PRESENTATION SILVER AND OTHER VALUABLE GIFTS 1 - 0 GENERAL 1 – 1 INTRODUCTION 1. GENERAL. Presentation silver and gold presents us with a vast number of time capsules, each representing a unique exchange and many with a fascinating tale to tell. The circumstances surrounding each presentation piece piques our curiosity and raises questions about specific people, places and events that beg to be answered. Presentation silver is considered to be “priceless,” and many of the skills used in creating it are a “lost art,” with irreplaceable artistic expression. Title 10 U.S. Code, Section 7221 authorizes the Secretary of the Navy to accept and care for gifts of silver and other valuable articles presented to United States ships by states, municipalities, organizations, individuals, or other sources, and is the basic authority to expend operational funds to care for such gifts. Presentation silver may consist of a single item (e.g., a bowl, a tray, a candelabra) or a group of items (e.g., punch bowl set, tea set, dinner service). Other valuable articles may consist of paintings, portraits, original historical documents, engraved clocks or chronometers, and other such items which the Commanding Officer considers to warrant continuing accountability. The historical value and intrinsic worth of such material, the continuing high level Navy and public interest it holds, and the numerous inquiries of donors concerning its status require the maintenance of detailed, current, and accurate records for all items of presentation silver and other valuable gifts. Presentation silver is the property of the U.S. Navy and cannot be authorized by assigned ship/activity Commanding Officer to be loaned or returned to anyone without prior NAVSUP and CNO approval. The Chief of Naval Operations is the delegated authority to act for the Secretary of the Navy with regard to returns of gifts of presentation silver services under Title 10 U.S. Code, Section 7545 and 7546. 1 – 2 ACCEPTANCE OF GIFTS 1. APPROVAL AUTHORITY. In accordance with SECNAVINST 4001.2H the following officials are delegated gift acceptance authority for gifts of silver made to vessels of the Navy under 10 U.S.C. 7221: a. Only the Secretary of the Navy can accept gifts of a value in excess of $60,000. b. Gifts of a value of $60,000 or less under Title 10, U.S. Code 7221: the Chief of Naval Operations, the Vice-Chief of Naval Operations, and the Director of Navy Staff. c. Gifts of a value at less than $12,000: the Commander, Naval Supply Systems Command. A letter to the appropriate level of authority must be submitted requesting approval to accept the gift (see sample on following page). Commander, Naval Supply Systems Command (COMNAVSUPSYSCOM) (ATTN: SUP 51) will be provided copies of all related correspondence. These gifts become the property of the U.S. Navy and must be maintained intact as originally presented and safeguarded against damage and loss. 3-3 Food Service Operation Handbook SAMPLE ACCEPTANCE LETTER 4001 DRAFTER/DOC DATE From: Commanding Officer, SHIP (XXX 1000) To: APPROPRIATE LEVEL Subj: GIFTS1 TO (SHIP) FROM (DONOR) Ref: (a) NAVSUP P-485, Afloat Supply Procedures 1. To accept a gift in accordance with reference (a), (DONOR) have/has made unsolicited offers of gifts for (SHIP). The following is a list of presentation silver and their appraised value. Gift 2. Cost, if Known items Appraised Value2 1. ITEM, DES. $xxx,xxx.xx $xxx,xxx.xx 2. ITEM, DES. $xxx,xxx.xx $xxx,xxx.xx 3. ITEM, DES. $xxx,xxx.xx $xxx,xxx.xx TOTAL $xxx,xxx.xx $xxx,xxx.xx In the interest of crew morale and development of closer ties between (SHIP) and (DONOR), recommend approval of acceptance of the gift(s) specified as gift(s) to the Navy. (COMMANDING OFFICER) Copy to: (TYCOM LEVEL) NAVSUP (IF NOT ADDRESSEE) ____________________ 1 Gifts other than presentation silver fall under the cognizance of the Curator of the Navy. 2 Appraised Value (Reproduction Cost) is defined as: “The total cost to reproduce an exact replica of the property, at current costs, using a similar or the same artist or craftsman, materials and design as the original property.” 3-4 Food Service Operation Handbook 1 – 3 REQUESTS FOR PRESENTATION SILVER 1. GENERAL. Previously assigned sets of presentation silver which have been turned-in to storage may be reassigned by the Naval Supply Systems Command (on a loan basis) to active Fleet ships that submit justified requests. When a ship has a particular need for a set of such silver, a request will be submitted in a letter from the Commanding Officer or the prospective Commanding Officer to the COMNAVSUPSYSCOM (ATTN: SUP 51), Food Service Division. The letter will state the purpose for which the silver is required and will indicate the size and quantity of the items desired (e.g., one set of silver service consisting of: 1 large tray, 1 large punch bowl, 1 ladle, and 12 punch cups). If the requested silver is unavailable, the requesting ship will be advised of any available items which most nearly correspond to the specific items requested or be placed on the waiting list until appropriate items are available. It is recommended that only 2 or 3 items, or a small coffee and tea service, be assigned to submarines or ships with limited storage and security. 1 – 4 CLASSIFICATION FOR REASSIGNMENT PURPOSES 1. GENERAL. Presentation silver received by a ship as a gift is classified as namesake silver. Namesake silver is assigned to a ship for as long as that ship remains in commission. Unless unusual circumstances exist, requests to turn-in namesake silver will not be honored. Presentation silver obtained from NAVSUP is transferred on a loan basis. Presentation silver on loan may be turned-in to the supporting FISC at any time provided prior approval is obtained from NAVSUP (SUP 51). On rare occasions, presentation silver on loan to a Fleet unit may become namesake silver when a new ship by the same name is commissioned. In such instances, the new ship will have first priority to any or all of such silver set as determined by NAVSUP. 2 - 0 RECEIPT 2 – 1 APPRAISAL 1. GENERAL. After receipt of new silver an appraisal must be promptly completed to determine the value of the silver. Assistance in obtaining the appraisal may be obtained through FISC contracting or pierside procurement. It is strongly recommended that silver be reappraised every 5 years. Appraisal costs are chargeable to the ship’s OPTAR. If appraisal services are performed aboard ship, the contractor must be accompanied by a crew member at all times. The contractor must provide an appraisal of the reproduction cost of the silver as opposed to the fair market value. Reproduction cost is defined as, “The total cost to reproduce an exact replica of the property, at current costs, using a similar or the same artist or craftsman, materials and design as the original property.” For each appraisal conducted, the contractor must provide an appraisal for each ship or activity to include the following information: a. Quantity of each unique item b. Description, dimensions and markings of each unique item c. Weight of each unique item d. Metallic content e. Manufacturer (if available) f. Name of ship (include hull #) silver set originally donated to (as determined by nscription) 3-5 Food Service Operation Handbook g. Appraised value of each unique item h. Appraised value of total number of each item (e.g., twelve punch cups), if available i. Narrative justification of appraised value assigned j. Appraised value of each complete silver set k. Date of appraisal l. Name of ship or station silver for which appraisal was performed The original of each completed appraisal and a legible copy of the invoice will be submitted within 15 days to: Naval Supply Systems Command Presentation Silver Manager P.O. Box 2050, Code SUP 51 5450 Carlisle Pike Mechanicsburg, PA 17055-0791 2-2 REPORT OF RECEIPT 1. GENERAL. Within 60 days of receipt of presentation silver a complete inventory of the donated items will be sent to: Commander, Naval Supply Systems Command, Code SUP 51, P.O. Box 2050, 5450 Carlisle Pike, Mechanicsburg, PA 17055-0791, or send email to the presentation silver manager listed on page two in the NAVSUP P-476. A cover letter will be submitted with the inventory report giving the date and place of presentation, the name, address and phone number of the donor, and the name and address of the silversmith, if known. For gifts other than presentation silver, the report will be sent to: Naval Historical Center Curator Branch Washington Navy Yard 901 M Street, Southeast Washington, DC 20374-5060 A retained copy of the initial inventory report will be used to post receipts of new gifts to the controlled equipage custody records. 3-6 Food Service Operation Handbook SAMPLE APPRAISAL FORMAT USS CARL VINSON (CVN 70) SANDWICH TRAY DESCRIPTION: A sterling silver SANDWICH TRAY of circular outline, the perfectly plain center engraved with armorials. INVENTORY NO: 19 INVENTORY TITLE: SANDWICH TRAY, circular 19” diameter QUANTITY: 3 units ORIGINAL OWNER: USS SAN FRANCISCO (Protected Cruiser No. 5) DONOR: City of San Francisco, CA METALLIC CONTENT: Sterling Silver MANUFACTURER: Wallace International DESIGN NO.: Not indicated INSCRIPTION: “SAN FRANCISCO” in Old English letters DIMENSIONS: Diameter: 19 inches Height: 1/2 inches WEIGHT: 33 troy ounces each CONDITION: Good VALUE FOR UNIT: $1,500.00 VALUE FOR SET: $4,500.00 2-3 PHOTOGRAPHS 1. GENERAL. Proper management of Presentation Silver dictates that a system must be in effect which enables the holder of Presentation Silver to adequately identify to the appropriate investigative body a complete description of the item(s) should it/they become lost or destroyed. Accordingly, a photograph of each unique item shall be taken using a ruler in the photograph to indicate actual size as shown below. For example: for a punch service consisting of a punch bowl, ladle, a tray and twelve cups, four separate photographs are required, one each of the punch bowl, the ladle, the tray and one group photograph of the punch cups. The photographs are to be 8" x 10" black and white (color photographs are unacceptable due to distortion of silver and tendency to “cover” true condition of silver). One copy of the entire set will be forwarded promptly, after receipt of the silver, to NAVSUP (SUP 51). Two prints of each photograph will be retained by the ship as an additional means of inventory control. These prints will accompany the gift if and when it is transferred. 3-7 Food Service Operation Handbook SAMPLE PHOTOGRAPH OF UNIQUE PIECE OF A SILVER SERVICE SET 2-4 REASSIGNED SILVER 1. REPORT OF RECEIPT. Within 30 days of receipt of presentation silver which formerly belonged to a ship that has been inactivated or otherwise disposed of, the recipient command will forward a receipted copy of the itemized DD Form 1149 (or DD Form 13481-A with an itemized inventory attached) by letter of transmittal to Commander, Naval Supply Systems Command, Code SUP 51, P.O. Box 2050, 5450 Carlisle Pike, Mechanicsburg, PA 17055-0791. A receipted copy of the DD Form 1149 will be used to post receipts of reassigned silver to custody records. If reassigned silver is received without documentation, contact NAVSUP (SUP 51) and prepare a dummy receipt invoice (DD Form 1149) as illustrated on the next page: 3-8 Food Service Operation Handbook SAMPLE DD FORM 1149 DUMMY RECEIPT INVOICE SHIPPING CONTAINER TALLY 1 2 3 4 5 6 7 8 9 10 11 12 13 14 15 16 17 18 19 20 21 22 23 24 25 26 27 28 29 30 31 32 33 34 35 36 37 38 39 40 41 42 43 44 45 46 47 48 49 50 Form Approved OMB No. 0704-0246 REQUISITION AND INVOICE / SHIPPING DOCUMENT Public reporting burden for this collection of inf ormation is estimated to average 15 minutes per response, including the t ime for review ing instructions, searching existing data sources, gathering and maintaining the data needed, and and review l ti ing the collection of information. Send comments regarding this burden estimate or any other aspect of this collection of information, including suggestions for reducing t his burden, to Washington Headquarters Services, Direct o Ifnformation Operations and Reports, 1215 Jefferson Davis Highw ay, Suite 1204, Arlington, VA 22202-4302, and to the Of fice of Management and Budget, Paperw ork Reduction Project (0704-0246), Washington, DC 20503 SHEET NO. OF 5. REQUISITION DATE6. REQUISITION NUMBER 1. FROM (Include ZIP Code) NO. SHEETS 1 (N00189) FISC Norfolk, VA (Code 301A) N00189-63300001 8. PRIORITY 9. AUTHORITY OR PURPOSE 2. TO: (Include ZIP Code) (R52704) 1 26 Nov 95 (YYMMDD) 7. DATE M ATERIAL REQUIRED COMNAVSUPSYSCOM ltr dtd 10 Nov 95 M. Jones USS JOUETT (CG-29) (YYMMDD) 11a.VOUCHER NUMBER & DATE 10. SIGNATURE LT M. Jones, MSC, USN 12. DATE SHIPPED(YYMMDD) 3. SHIP TO - M ARK FOR PRESENTATION SILVER CUSTODIAN 13. MODE OF SHIPMENT b. 14. BILL OF LADING NUMBER 15. AIR MOVEMENT DESIGNATOR OR PORT REFERENCE NO. 4. APPROPRIATIONS SYMBOL AND SUBHEAD ITEM NO. (a) OBJ. CL. BUR. CONT. NO. FEDERAL STOCK NUMBER, DESCRIPTION, AND CODING OF M ATERIEL AND / OR SERVICES (b) SUBALLOT AUTHORIZATION TRANS. ACCT' G ACTIVTY TYPE UNIT OF ISSUE (c) 1. Punch Bowl, 15” Diameter 1EA 2. Serving Tray, 24” Diameter 1EA 3. Punch Cups 12EA Date Recv’d: 28 Dec 95 by PROPERTY ACCT' G COUN- COST CODE TRY ACTIVITY QUANTITY REQUESTED SUPPLY ACTION (d) (e) TYPE CONTAINER (f) CONTAINER NOS. (g) AMOUNT UNIT PRICE TOTAL COST (h) (i) N. N. Withrow LTJG N. N. Withrow, SC, USS JOUETT (CG-29) 16. TRANSPORTATION VIA MATS OR MSTS CHARGEABLE TO 17. SPECIAL HANDLING 18. ISSUED BY 19. CONTAINERS DATE (YYMMDD) TOTAL TYPE TOTAL TOTAL DESCRIPTION CONCONRECEIVED WEIGHT CUBE R TAINERS TAINER EXCEPT AS E O NOTED C F R A E P S CHECKED BY QUANTITIES DATE(YYMMDD) I H C RECEIVED T I EXCEPT AS E U P NOTED I L A M P PACKED BY DATE (YYMMDD) E T N POSTED T I T O TOTAL N 51 52 53 54 55 56 57 58 59 60 61 62 63 64 65 66 67 68 69 70 71 72 73 74 75 76 77 78 79 80 81 82 83 84 85 86 87 . Previous editions are obsolete S/N 0102-LF-017 -7900 306/080 DD Form 1149, DEC 93 BY SHEET TOTAL BY GRAND TOTAL BY 20. RECEIVER' S VOUCHER NO. 88 89 90 91 92 93 94 95 96 97 98 99 100 (Navy Overprint 1994) a. If reassigned silver is received without a photograph, contact NAVSUP (SUP 51). An 8 x 10 inch black and white photograph of each unique piece received will be made for use as an additional means of inventory control. Photographs of reassigned silver are not normally required by NAVSUP unless there is no photograph on file. b. If reassigned silver is received without an appraisal, contact NAVSUP (SUP 51) to check for NAVSUP file copy. If an appraisal is required, contact FISC contracting or pierside procurement for assistance. Upon receipt of appraisal, forward a copy to NAVSUP (SUP 51) for file. 3 - 0 CUSTODY AND STOWAGE 3 – 1 ACCOUNTABILITY 1. GENERAL. Adequate protection and strict accountability of presentation silver is required to guard against damage or loss, which, if occurring, may cause public criticism of the ship's Commanding Officer and embarrassment to the Secretary of the Navy. The custody of presentation silver, therefore, will be entrusted to a responsible individual designated in writing by the Commanding Officer. The designated custodian will be responsible for adequate security, proper display, care, and preservation of all presentation silver items in his custody. When utilizing presentation silver for command functions where the designated custodian will not have immediate direct control of the items, sub-custody records will be utilized. 3-9 Food Service Operation Handbook 3 – 2 CUSTODY 1. RECORDS. The custodian of presentation silver is responsible for maintaining records, conducting physical inventories, and submitting required reports. Records to be maintained are as follows: a. Controlled Equipage Custody Records, will be maintained for presentation silver or other valuable gifts (a presentation may consist of one item or a number of items). If all items included in a presentation cannot be listed and properly identified in a single custody record, separate custody records will be prepared for individual items or groups of items. In addition to the requirements, each custody record will include: (1) A card number (to be consecutively assigned if more than one record is maintained); (2) Complete description, including the engraving and dimensions, of each item; (3) The name, address, and phone number of the donor; if known, (4) The name of the ship and hull number to which originally presented; (5) The quantity of each item; (6) The condition of each item; (7) The date of receipt; (8) Place of presentation; (9) The receipt document number, for reassigned silver; or the accession number for gifts other than silver. (The accession number is the numeric or alphanumeric identification number that is assigned by the Curator for the Navy upon receipt of the initial inventory report.); (10) For presentation silver, photographs of each unique piece; (11) Appraised value and date of appraisal. (a) Copy of inventories submitted to NAVSUP covering the most recent two year reporting periods. (b) Copy of Financial Liability Investigation of Property Loss (DD Form 200) if applicable, submitted/prepared during the most recent two year period. (c) Copy of correspondence submitted to or received from NAVSUP for the most recent two year period. (d) Copy of appraisal report. 2. REFERENCE DATA. The designated custodian is provided the following list for use in the performance of duties: a. Title 10, U.S. Code, Section 7221 - Acceptance and care of gifts to vessels. b. Title 10, U.S. Code, Section 7546 - Loan or gift of articles to ships' sponsors and donors. c. SECNAVINST 4001.2H Series - Acceptance of Gifts. d. OPNAVINST 4001.3 - Policy and Procedures for the Management of Presentation Silver 3-10 Food Service Operation Handbook e. NAVSUPINST 4441.20 Series - Fitting Out Guide for Prospective Supply Officers. f. JAG Manual, Para. 0217-0220 - Report of Investigation, Distribution. g. OPNAVINST 4440.4 Series - Declassification, Demilitarization and Stripping Procedures for Ships Programmed for Disposal. h. NAVSUP MANUAL P-485, VOLUME III (Supply Ashore), Para. 23189 - Strip Ship Material. i. OPNAVINST 5530.14E, Navy Physical Security And Law Enforcement Program 3. SECURITY. The following excerpt from SECNAVINST 4001.1 Series is provided for appropriate information and action: “In addition to the historical value and intrinsic worth of presentation silver, the continuing high level Navy and public interest in this material requires that these gifts be maintained intact as originally presented, and safeguarded against damage or loss.” Commands with a presentation silver inventory valued at $90,000 or more should carefully evaluate their security procedures and consider integrating presentation silver security procedures into the ships’ SORM. Consideration should be given to including display on Sounding and Security Watch/CDO rounds, installation of electronic sensors, and any other security devices deemed necessary. Security for stored presentation silver at all ashore locations to include FISC storage, must store presentation silver in a secure location. At a minimum, a General Services Administration (GSA)/government approved modular vault system or GSA/government approved armory or security vault door will be used. GSA/government approved high security padlocks may be used with security doors in place of vault doors only if location is within a secure space. Clearance should be limited to the NAVSUP Presentation Silver Manager, FISC Presentation Silver Manager, Security Manager and the Primary and Alternate Presentation Silver Custodians. Shore commands to include FISC storage should consider the installation of electronic security sensors (IDS, CAC Card entry, or DVR Systems). Reference OPNAVINST 5530.14E for additional guidance for the protection of precious metals. 3 – 3 STOWAGE 1. PREPARATION FOR STOWAGE. Prior to placing presentation silver in storage, all items will be carefully cleaned, wrapped in anti-tarnish tissue and protected with an outer layer of bubble wrap cushioning material. It is extremely important to wrap silver in anti-tarnish tissue paper before bubble wrap. The bubble wrap causes the silver to sweat and will ultimately damage the silver if placed directly against the silver piece. Soft flannel can be used as a substitute for the anti-tarnish tissue paper. Once the items are carefully wrapped they will be labeled to identify the item and placed in a sturdy container. Sufficient packing material will be utilized to prevent damage of items from the motion of the ship. 2. STORAGE ENVIRONMENT. Silver must be stored in clean, dry and low humidity environment. Recommend storage environment of 68-72°F and 35% humidity. Silica gels or dehumidifiers can be used to control humidity. 3. STORAGE CONTAINER. The recommended storage container for presentation silver service is manufactured under federal specification: Class 5 Cabinet-AA-F- 363B (GSAFSS) and is covered under Federal Supply Schedule 71 III E (FSC Group 71 Part III Section E Miscellaneous Furniture Insulated and Uninsulated Security Filing Cabinets, Safes, Vault Doors, and Map and Plan Files) Special Item (S.I.). National Stock Numbers are assigned to the basic container while special numbers are assigned to associated drawers or shelves. The dimensions of the safe currently available from Mosler are: Inside - 25 3/4" high, 19 1/4” wide, 19 3/8" deep; Outside - 29" high, 22 5/8" wide and 24 3-11 Food Service Operation Handbook 1/4" deep. The recommended container, if possible, will weigh in excess of 500 pounds, therefore, weight and movement compensation will be required on most combatants as well as other type ships. 4 - 0 INVENTORY 4 – 1 GENERAL 1. GENERAL. Physical inventories of presentation silver and other valuable gifts are required to ensure that all items received are actually on hand and in good condition. 4 – 2 INVENTORY REPORTS 1. PRESENTATION SILVER. Each Command having custody of presentation silver will submit an itemized inventory report of such material to the Commander, Naval Supply Systems Command, Code SUP 51, P.O. Box 2050, 5450 Carlisle Pike, Mechanicsburg, PA 17055-0791 or by email (Presentation Silver Manager email is located on page two of the NAVSUP P-476.) An annual report is required for all sets appraised at $90,000 or more; a biennial report, to be submitted in each odd numbered year, is required for all sets appraised below $90,000. The report is to be submitted by email no later than 20 March. An Excel Worksheet will be the accepted method for a silver inventory. The report will include the following information, in the following order: a. Name and hull number of original recipient (name of ship originally donated to) b. Serial Number or Inventory number (provided by NAVSUP) c. Asset number (ERP, Provided by NAVSUP) d. Command UIC e. Description of silver f. Quantity of a specific silver piece with identical characteristics (example - 24 punch cups) g. Inscription or placard on the silver describing a donation or specific historical event. h. Condition to be noted as follows: (1) Excellent (like new); (2) Good (almost new); (3) Fair (minor dents and scratches OR items for which an expert appraiser or silversmith recommends repairs not required in order to preserve historical value); or (4) Poor (broken, missing parts, repairs required). i. Detailed description of the silver when the silver is in fair or poor condition. j. Estimated or scheduled date of repair k. Manufacturer, if known l. Date of last appraisal, every five years is recommended m. Appraised value n. Ship and area assigned to (USS Underway (HULL), CO's Stateroom) o. Date of previous inventory 3-12 Food Service Operation Handbook p. Donor and donor date, if known q. Attach DD Form 200 when applicable 2. OTHER VALUABLE GIFTS. Inventories of gifts other than presentation silver are required to be taken upon relief of the custodian, upon change of command, and upon inactivation of the ship. Upon completion of the inventory, both the custodian being relieved and the relieving custodian (if applicable) will report to the Commanding Officer that the inventory has been completed, with an itemization of any missing or damaged items. For inventories incident to change of command or inactivation of the ship, an itemized inventory will be submitted to the Naval Historical Center, Curator Branch, Washington Navy Yard, 901 M Street, Southeast, Washington, DC 20374-5060. The inventory will be submitted by letter, identified by NAVHISTCEN report symbol 4001-1, as soon as practicable after completion of the inventory. The report will include the following: a. Description (including inscriptions) and quantity of each item; b. Name of the donor; c. Accession number assigned by the Curator for the Navy; d. Identification and explanation of any damaged items; e. Copy of a completed DD Form 200 for any item which, incident to inventory, is determined to be missing or destroyed. 4 – 3 CARE AND MAINTENANCE 1. GENERAL. Presentation silver is a part of America’s history and Navy tradition and requires correct handling to prevent damages. White cotton gloves should always be worn. Bare hands will leave fingerprints or other marks which may be hard to remove. Silver should be handled one piece at a time using both hands. When setting silver down, place the piece down gently and by itself. Ask for assistance with bulky or heavy pieces. 2. ROUTINE CARE. Maintenance of presentation silver can be an easy matter if a regular program is established. It is recommended that presentation silver be cleaned every three months. All surfaces should be lightly wiped down using a polishing mitt or polishsaturated soft cloth. A mild dishwashing liquid in hot water may be used to wash pieces by hands. Silver should be immediately and thoroughly dried with a soft cotton or linen cloth. 3-13 Food Service Operation Handbook NAVSUP REPORT 4001-1 15 March 2007 USS SOUTH WIND (FFG-001) PRESENTATION SILVER INVENTORY Certification: I hereby certify that the following inventory is accurate to the best of my knowledge. I further certify that any change(s) from the prior year inventory report is (are) properly documented and supported in accordance with NAVSUP P485, Afloat Supply Procedures. A B Jonah William Still A. B. JONAH, CDR, SC, USN WILLIAM STILL, LT, SC, USN Responsible Officer Assigned Custodian ------------------------------------------------------------------------------------------------------------------ITEM NO. QTY U/I # 01 01 EA ITEM COFFEE POT w/lid, handle. 11.5” high, 8.5” wide (spout tip to handle) sterling silver DEPT/DIV SUP/S5 a. USS SOUTH WIND (HULL)crest (front) b. One each (part of coffee set) c. Presented to the USS SOUTH WIND (FFG-001) by her sponsor Mrs. Jeremy Slatter on the occasion of her commissioning August 14, 1985. (back) d. Fair e. Broken handle and two dents on side f. April 10, 2007 g. Wallace International h. February 05, 2005 i. $460.00 j. Ship and area assigned to (USS UNDERWAY (HULL), CO'S Cabin k. Date of previous inventory l. Donor and Donor date, if known m. Attach DD Form 200 when applicable for missing or damaged beyond repair silver 3-14 Food Service Operation Handbook 3. POLISHING. Polishing requires special care and consideration. Presentation silver may be cleaned professionally or by using polishing kits available from Fleet Industrial Supply Center, Norfolk, Code 432, 757-443-1911 (DSN 646-1911) or Fleet Industrial Support Center, San Diego, Code 431, 619-556-0419 (DSN 526-0419 ). Instant or dip type commercial cleaners are not approved for cleaning presentation silver. Pieces with unique engravings or details require extra time and thought during polishing. Allow enough space to move freely and cover the workspace with plastic to protect the surface. The following procedures should be used to clean the silver: a. Using a container with hot water and a mild dishwashing liquid, gently clean all sides with a thin damp sponge. With the same sponge, rinse the piece with water from another container. b. Using a small quantity of polish on a clean sponge, put a thin coating of polish all over the silver and allow to dry briefly and then rinse off. c. With a circular motion, lightly rub a little polish over one area at a time. When one area has become bright, move to a new area. Never press hard or scrub while polishing. d. Wash off polish with a clean sponge being sure to clean out any carved or engraved areas. Cotton tipped applicators can help in these areas. These can be hard to polish and an attempt should not be made to remove all tarnish from these areas, especially in those places where oxidation is used as accent. e. Use a wet soft toothbrush or a “Tampico” brush to remove old polish that has dried in engravings and crevices by gently rubbing the surface to lift the polish out. f. When polishing is completed, rinse carefully to remove all traces of polish. thoroughly before returning to display cabinet or packing for storage. Dry 4. SPECIAL CONSIDERATIONS. a. Acid Etching. This is a process by which an engraving or detailed design is painted on a silver item with warm wax. After the wax hardened, the object is placed in acid that eats away a layer of silver around the wax. Due to the delicate nature of these designs, use a specially made polishing mitt and be sure keep fingers straight when lightly wiping the surface. Do not put any pressure on the engraving or design. b. Engraving/Flat Chasing. Engraving is one of the most common ways to decorate silver and is performed by using a sharp point to cut lines, detailed patterns and create three-dimensional patterns. Flat chasing is made by a tool pressing into the object making a design that leaves its pattern on the inside surface. Clean these areas by wiping gently, without pressure, using a specially treated polishing cloth or mitt. Be sure to thoroughly wash out all traces of polish from the fine lines or it will dry, detracting from the piece’s appearance. c. Oxidation. This term is used to describe dark areas which are recessed or sunken in a decorative pattern. Never try to polish out these places as they have been specially designed to create shade or accent parts of the design. Oxidation creates contrasts of color and texture which is important to the appearance. Polish only the upper surface and lightly wipe the recessed or sunken areas. Wait for the polish to dry before removing using a soft-bristled toothbrush to gently brush and lift away particles of polish. A cotton-tipped applicator is also useful. d. Repousse. This decoration appears to have been carved in the silver or stands away from the body of the object giving it a three-dimensional look. Clean with a polishing mitt or treated cloth to keep polish from settling in the details. The appearance and treatment are similar to those for oxidized silver. 3-15 Food Service Operation Handbook e. Weighted Silver. Lightweight silver objects particularly candlesticks and footed shallow dishes, often have filled or “weighted” bases. These pieces are filled with plaster, resin or cement to prevent them from falling over. They are usually marked on the under side of the base “cement filled,” “weighted,” or “weighted base” to warn the user that they have been filled and are not solid. These pieces should never be placed directly into water, which can cause the filling to either melt or shift and the object become unbalanced. f. Lacquered Surfaces. This is when a thin coating of chemical substance is put on the silver object to protect from tarnish and chemicals. However, these substances become yellowed and brittle over time leaving the exposed silver tarnished and hard to polish. When the lacquer has become chipped exposing the silver, it is best cleaned with a polishing mitt or treated cloth to prevent unsightly tarnish. g. Gilt/Gold Wash. Gilding is a coating of gold used to enrich the decoration with its gold appearance or to protect certain surfaces from acids and chemicals in food. It is easily recognized by its yellow color. Polish should not be used on these surfaces, as the coating will easily come off. Instead, use a mild soap and water and wipe gently to dry. Do not rub these areas. h. Candle Wax. Whenever candles have been used in table decorating, it is almost certain that the melted wax will drip where it is not wanted. Allow the wax to become cold and harden before trying to remove it from any surface. When the wax is hard, many times it can be gently chipped or picked away from the object. If some of it remains on the silver, place a cloth soaked in hot water on the area to melt it slightly and carefully rub or ease away the wax with a cotton tipped applicator. After the wax has been removed, polish the area again lightly to protect the surface. i. Wood Surfaces. Occasionally silver pieces have handles, carved finials or other parts made of wood. These should never be placed in water. Keep the wooden parts looking attractive by rubbing a light coating of an oil-based furniture polish into the wood. Do not allow silver polish to dry on wooden parts or in areas where they join the body, such as hinges. 5. SILVER CARE PRODUCTS. Both FISC Norfolk Code 100S and the FISC San Diego Code 112 stock a supply of anti-tarnish tissue paper, flannel cloth storage bags, and silver cleaning kits for your use. To obtain these products contact FISC NV (757-443-1911 or DSN 646-1911) or FISC-SD (619-556-0419 or DSN 526-0419 ) or contact your ship’s LSR. 4 – 4 MISSING, DAMAGED OR DESTROYED ITEMS 1. DAMAGED ITEMS. If a presentation item or other valuable gift is damaged, and repair is possible, it will be repaired even though the cost to do so may not be considered economical. The cost of such repairs are properly chargeable to the ship’s OPTAR. If an item is damaged to such an extent that it cannot possibly be repaired (i.e., destroyed) it will be surveyed. 2. MISSING OR DESTROYED ITEMS. Presentation silver items and other valuable gifts which have been lost, stolen or destroyed must be expended by means of survey. The survey action will be initiated as soon as the loss or irreparable damage is discovered. A detailed description of the circumstances relative to the loss or damage will be included in the DD Form 200 or in attachments thereto. If the survey pertains to a missing item and it is suspected that the missing item may have been stolen, the loss will be reported by letter to the Naval Criminal Investigative Service Headquarters (NCISH), Washington, DC 20388-5380 in accordance with SECNAVINST 5500.4 series. 3-16 Food Service Operation Handbook a. All surveys of presentation silver determined to be missing or destroyed must be approved by NAVSUP, not by the ship’s Commanding Officer. Missing or destroyed silver must be reported to NAVSUP (SUP 51) within 48 hours after discovery via email, naval message, or saltsgram (COMNAVSUPSYSCOM NFS) as required by SECNAVINST 5500.4. After the initial notification of the missing or destroyed item(s), a letter report will be promptly submitted to the Naval Supply Systems Command (ATTN: SUP 51) briefly outlining the known facts surrounding the loss or destruction. The letter will include, as a minimum: (1) A brief description and quantity of the item or items lost or destroyed, (2) The name of the designated custodian, (3) A telephone number, if available, (4) A statement regarding the feasibility of replacement. After the issuance of the report, the submission of a DD Form 200 is required in all cases where loss of presentation silver is involved. Ensure the current edition of DD 200 is used. When a missing or destroyed item of presentation silver is surveyed, the original and one copy of the completed DD Form 200 will be forwarded immediately in a letter of transmittal to the Commander, Naval Supply Systems Command, Code SUP 51, P.O. Box 2050, 5450 Carlisle Pike, Mechanicsburg, PA 17055-0791 for approval. Only NAVSUP (SUP 51) is authorized to approve the DD Form 200. When a missing presentation silver item which has been reported to the NCISH results in the issuance of a Report of Findings, forward a copy to NAVSUP (SUP 51) for file. Since loss of presentation silver is a potential embarrassment to the Secretary of the Navy, action will be taken to replace missing items with exact duplicates, chargeable to ship’s OPTAR. If the manufacturer of the missing item cannot be determined or contacted, NAVSUP (SUP 51) may be able to assist in locating silver replacement sources. A copy of all correspondence concerning replacement of missing presentation silver will be provided to NAVSUP (SUP 51). b. When a missing or destroyed item other than presentation silver is surveyed, a copy of the completed DD Form 200 will be forwarded immediately in a letter of transmittal to the Curator for the Navy. However, if the loss or damage is discovered during an inventory incident to change of command or inactivation of the ship, the copy of the completed DD Form 200 will be included with the inventory report. When a missing item which has been reported to the NCISH results in the issuance of a Report of Findings, the Curator for the Navy will be advised in order that a copy may be requested as required. 4-5 RECOVERY OF MISSING ITEMS 1. GENERAL. In the event that a presentation silver item or other valuable gift which was surveyed as missing is subsequently found, written notification of the recovery will be promptly sent to the Naval Criminal Investigative Service Headquarters (if notified of the loss) and either Naval Supply Systems Command (Food Service Division, SUP 51), if a presentation silver item, or to the Curator for the Navy, if other than a presentation silver item. The “receipt” of the recovered item will be posted to the custody record by reversing the previous survey entry. 3-17 Food Service Operation Handbook 5 - 0 TURN-IN 5 – 1 GENERAL 1. GENERAL. Except for the circumstances mentioned in this section, presentation silver will not be transferred, loaned or removed from the ship without prior approval and disposition instructions from NAVSUP. Except for the circumstances mentioned in this section, valuable gifts, other than presentation silver, may not be transferred without prior approval and disposition instructions from the Curator for the Navy. Presentation silver is the property of the U.S. Navy and cannot be authorized by the assigned ship or activity Commanding Officer to be loaned or returned to anyone without requesting in writing via NAVSUP to UNSECNAV for approval. Direct any loan or return inquiries to COMNAVSUPSYSCOM (SUP 51). Do not include presentations of the silver at decommissioning ceremonies unless the loan or return has been approved. Any movement of silver (transfer, temporary storage, etc.) must be reported to NAVSUP Code 51. 5 – 2 STRIP SHIP 1. GENERAL. When directed by competent authority to remove “strip ship material,” any presentation silver or other valuable gifts on board will be transferred subject to the restrictions indicated in the following paragraphs. 2. PRESENTATION SILVER. Presentation silver, together with 8” x 10” black and white photographs, appraisal, and copy of most recent inventory report submitted to NAVSUP, will be turned in for temporary vault storage at the nearest FISC or Supply Department of the Naval Shipyard for safekeeping. To ensure proper turn-in procedures are in place, it is recommended that the custodian of the silver contact the storage point and/or NAVSUP for specific disposition instructions. Broken or visibly damaged items will not be accepted for turn-in. Holders are expected to repair or survey broken/damaged items prior to turnin. All DD Form 200s for presentation silver require NAVSUP approval prior to turn-in. A legible copy of the transfer document (DD 1149 or DD 1348-1-A) will be provided to Commander, Naval Supply Systems Command, Code SUP 51, P.O. Box 2050, 5450 Carlisle Pike, Mechanicsburg, PA 17055-0791 within 30 days of transfer. A legible copy of the receipt document (DD 1149 or DD 1348-1-A) including the name (printed and signed), command code, phone number of the new holding custodian, and date received will be forwarded to NAVSUP (SUP 51). 3. OTHER VALUABLE GIFTS. Gifts other than presentation silver will be shipped directly to the Curator for the Navy, Naval Historical Center, Washington, DC 20374-0571. 5-3 TEMPORARY VAULT STORAGE 1. GENERAL. When scheduled for a period of extended maintenance such as regular overhaul, restricted availability, or post shakedown availability, and, in the opinion of the Commanding Officer, the level of industrial activity will create a significant security risk, presentation silver or other valuable gifts must be transferred for temporary vault storage to the nearest FISC, or Naval Shipyard. In all such instances, NAVSUP (SUP 51) or the Curator for the Navy, as appropriate, will be advised by letter when the presentation silver or other valuable gifts are transferred. As a minimum, the letter will include the date of transfer, transfer document number, activity to which transferred, and expected date of return. Upon return of the presentation silver or other valuable gifts, a letter report will be made to NAVSUP (SUP 51) or the Curator for the Navy, as appropriate. Inventory reports are still required by March 20. NAVSUP will accept letter and transfer document as your 3-18 Food Service Operation Handbook report if silver is still in storage during the reporting cycle. It is required that tamperevident serialized seals be used on the storage containers for silver to be temporarily stored at the FISC’s. Ensure silver is prepared for stowage. The silver remains under the custody of the transferring activity and FISC signs only for the containers, not its contents. Presentation silver in storage containers without serialized seals will not be accepted by the FISC. 5 – 4 REPAIR 1. GENERAL. It is the obligation of each ship with presentation silver to provide responsible care and upkeep of its service. The Pierside Procurement Specialist (PPS) should be contacted for assistance in obtaining repairs. Presentation Silver in need of repair will be released only to a commercial silversmith. The DD 1149 will be annotated with the name, address and phone number of the silversmith. Upon delivery of the presentation silver to the silversmith, the name of the recipient will be printed below his or her signature and the date of turnover will be indicated. First line in the description block will be: “Presentation silver, described as follows:” A copy of the itemized/receipt DD Form 1149 will be provided to the Commander, Naval Supply Systems Command, Code SUP 51, P.O. Box 2050, 5450 Carlisle Pike, Mechanicsburg, PA 17055-0791, promptly upon release of the silver to the silversmith. Upon return of the silver, a copy of the dealer’s invoice will be attached to the DD 1149 and forwarded to NAVSUP (SUP 51). In either the transmittal of the DD 1149 or the DD 1149 with copy of the dealer’s invoice, a forwarding letter is not required. 5 – 5 TURN-IN PROCEDURES 1. TURN-IN APPROVAL. Presentation Silver on loan to a Fleet unit may be permanently turned-in provided prior written approval has been obtained from NAVSUP (SUP 51). The request for turn-in shall include a statement indicating: a. All silver is in good condition (no damaged items), b. There is no Financial Liability Investigation of Property Loss (DD Form 200) outstanding, c. Two individual 8” x 10” black and white photographs are on file for each item assigned, d. The silver held has been appraised and a copy of the appraisal report is available, e. Location of supporting FISC. Turn-in of presentation silver or other valuable gifts will be accomplished by an itemized DD Form 1149 with photograph(s) attached and must cite specific NAVSUP authority. Multiple sets of silver will be packed separately and the outside of the container appropriately marked with set name. Shipment of presentation silver covered by this paragraph is not authorized; turn-in shall be made during a routine inport visit. For presentation silver, a copy of the itemized DD Form 1149 and copy of most recent itemized inventory report submitted to NAVSUP, will be forwarded by a letter of transmittal to the Commander, Naval Supply Systems Command, Code SUP 51, P.O. Box 2050, 5450 Carlisle Pike, Mechanicsburg, PA 17055-0791. DO NOT SEND SILVER TO NAVSUP. The locations for permanent storage turn-in are FISC Norfolk and FISC San Diego only. Additional FISC activities may be approved for temporary storage of silver as long as all security requirements are in place. 3-19 Food Service Operation Handbook Please contact the FISC prior to transporting silver to the below addresses. FISC NV Presentation Silver Manager STORES SPECIALIST LOGISTICS SUPPORT CENTER FISC NORFOLK 1968 GILBERT ST., STE 600 NORFOLK, VA 23511-3392 FISC SD Presentation Silver Manager 3985 CUMMINGS RD. BLDG 116-2D FLOOR SAN DIEGO, CA 92136 2. SHIPMENT. When authorized by proper authority, material will be properly cleaned, wrapped with in flannel bags or anti-tarnish tissue paper, then wrapped with bubble wrap and packaged prior to delivery of the material to the supporting FISC or Naval Shipyard for shipment. An itemized DD 1149 will accompany shipment. In the absence of a supporting activity to prepare the material for shipment, every effort must be made to protect the contents during shipment. The use of cardboard carton(s) as the external shipping container(s) is prohibited. All silver must be shipped in a protective container or wood crate to prevent damage during shipping “Constant Surveillance, Signature Service Required” will be used in the shipment of presentation silver. Prior to shipping, a declared value equaled to the appraised value, will be made for insurance purposes. All shipping cost, associated with the transfer out or transfer in of presentation silver loaned to organizations outside of the Navy, are the responsibility of the organization accepting the terms of the loan agreement. 3-20 Food Service Operation Handbook CHAPTER 4 AFLOAT WARDROOM AND STATEROOM SERVICE 1 - 0 AFLOAT WARDROOM FOOD SERVICE Introduction ....................................................................................................... 1-1 Background ....................................................................................................... 1-2 Responsibilities ................................................................................................. 1-3 Types of Wardroom Meal Service..................................................................... 1-4 Tableware Items................................................................................................ 1-5 Dining Table Center Items ................................................................................ 1-6 Setting the Dining Table.................................................................................... 1-7 Setting the Sideboard........................................................................................ 1-8 Setting for Buffet Service .................................................................................. 1-9 Meal Style Procedures ...................................................................................... 1-10 2 - 0 AFLOAT STATEROOM SERVICE Introduction ....................................................................................................... 2-1 Care of Quarters Afloat ..................................................................................... 2-2 Using Culinary Specialists and Rotational Pool Personnel ............................... 2-3 Stateroom Care................................................................................................. 2-4 Care of Private Property ................................................................................... 2-5 Job Scheduling ................................................................................................. 2-6 Additional Stateroom Cleaning.......................................................................... 2-7 Care of Deck Coverings .................................................................................... 2-8 Carpet Care....................................................................................................... 2-9 Control of Linen, Cleaning Equipment, and Supplies........................................ 2-10 Personal Laundry .............................................................................................. 2-11 Access to Staterooms ....................................................................................... 2-12 4-1 Food Service Operation Handbook THIS PAGE INTENTIONALLY LEFT BLANK 4-2 Food Service Operation Handbook CHAPTER 4 AFLOAT WARDROOM AND STATEROOM SERVICE 1 - 0 AFLOAT WARDROOM FOOD SERVICE 1-1 INTRODUCTION 1. AFLOAT WARDROOMS. This section is designed primarily for use in the operation of afloat wardrooms. Procedures for performing the basic wardroom food service functions are presented as guidelines for establishing a uniform training program. The text may also be used for self-study, on-the-job training, or a point of reference. However, it should be noted that wardrooms and groups of officers have different characteristics and habits, and wardroom operations will by necessity vary with the desires of the command, the extent of the facilities and the number of personnel assigned. Therefore, questions regarding procedures in certain situations should be referred to the wardroom supervisor. The information contained in this appendix has been gathered from various sources within and outside the Navy. 1-2 BACKGROUND 1. WARDROOM TYPES. There are different types of wardrooms, many types of Officer/Flag Officer messes. Large ships may have a flag officer’s mess, a commanding officer’s mess, senior and junior officer’s messes, and a warrant officer’s mess. Small ships may have only a single officer’s mess. Although the types of wardroom officer messes may vary, they all have one thing in common - the wardroom is each officer’s sea-going home; a home in which he/she should be proud to entertain family and friends. It is their club, reading room, and occasionally conference room. The attitude and spirit of the wardroom permeates the entire ship. The wardroom must be an institution in its own right, and one that unites officers and creates among them the desire for cooperation and growth. Whatever the event, it is a place where members must conduct themselves within the ordinary rules of propriety, common sense and good manners, and habitually observe the rules of etiquette and the customs and traditions of the Naval service. The wardroom should exhibit the maximum in habitability regarding meal preparation and general messes, berthing arrangements, appearance and decor, and noise level. The quality and variety of china, silverware, linen, and equipment in the ship’s allowance list are the minimum required and therefore must be maintained and augmented when necessary. The service of varied, well-prepared and attractively presented meals must likewise be expected and required. The achievement of high standards of facilities and food service depends upon the cooperation of all concerned mess members, food service personnel, and commanding officers. 1-3 RESPONSIBILITIES 1. GENERAL. The responsibilities for wardroom mess operations are a combination of regulation, custom, and tradition. NAVSUP Publication 486, App F, contains the basic regulations governing wardroom mess operation and procedures, and details of duties and responsibilities for those involved in the operation of a wardroom. 2. THE COMMAND. The commanding officer is responsible for the proper operation of officers messes. It cannot be expected that Culinary Specialists (CSs), other mess personnel, or young officers on their initial assignment will assume this responsibility. The commanding officer, directly, if he/she is president of the mess, or through the president if he/she has his/her own mess, must not hesitate to exert positive and direct personal control if the operation or condition of the mess so dictates. Group and division commanders, in the administration of the ships under their command, are responsible for ensuring that all of the officers messes within their command meet established standards. 4-3 Food Service Operation Handbook 3. PRESIDENT OF THE MESS. The senior line officer in succession to command, who is a member of the mess, normally is the president of the wardroom mess. In smaller types of ships, the commanding officer is president; in larger ships, the executive officer is usually president. Officers of an embarked staff are not eligible for presidency of the ship’s mess. The president presides over the mess and is responsible for ensuring compliance with mess regulations and with the customs and traditions of wardroom living. He/she sets the example of conduct and behavior expected of his/her messmates and looks after the welfare of mess members. 4. WARDROOM OFFICER/TREASURER. The Mess Wardroom Officer/Treasurer is appointed by the commanding officer for the wardroom mess. He/she may also be assigned the responsibilities and duties of mess caterer when considered appropriate. The mess treasurer shall keep accounts of and transact all receipts and expenditures of cash and provisions. Officers charged with the custody or disbursement of public funds and members of embarked staffs are not eligible for the office of mess treasurer. The mess treasurer shall render a statement of the mess account to the members as of the end of each month and be able to produce the books of the mess whenever called for by the commanding officer or the executive officer. 5. MEMBERS. The members of the wardroom mess are individually and collectively responsible for adherence to wardroom customs and traditions and their own habits of neatness. All officers regularly attached to the command normally are members of the appropriate mess. Officers attached for temporary duty in excess of 30 days should join the mess. Officers attached for less than 30 days need not join the mess but shall be accorded the comforts of the mess on a reimbursement basis. Civilian personnel embarked are not eligible for mess membership. However, if they are of a status equivalent to naval officers, they shall be accorded the comforts of the mess on a per diem basis. All wardroom mess members are solely responsible for the care, maintenance and orderliness of their personal effects. Sorting and storage of personal laundry is the responsibility of the individual officer. 6. SUPPLY OFFICER. Organizationally, the facilities, equipment, and personnel of officers’ country are under the administration of the supply officer. He/she, therefore, must maintain particularly close liaison with the officials and members of the mess. The supply officer is responsible for providing the consumable supplies, soft goods, and laundry and cleaning services available on the ship for the proper operation of the mess. Because of the supply officer’s organizational responsibilities in the wardroom, commanding officers may consider the advantages of assigning the collateral duty of mess caterer the Wardroom Officer to the supply officer. Appointment of the food service officer is especially advantageous for those ships whose officers subsist primarily from the general mess. It should be realized, however, that a Supply Corps Officer reporting for his/her first tour of duty in a ship with only one supply officer will have all he/she can do to master his/her own department. Therefore, assignment as mess caterer Wardroom Officer should be deferred for at least a year. 7. CULINARY SPECIALISTS. Wardroom Culinary Specialists are responsible for performing and supervising functions associated with the management and operation of officers’ messes and quarters afloat. Food preparation, service and the cleaning and maintenance of these and related spaces are the responsibility of this rating. Culinary Specialists are also assigned to supervise the work of rotational pool personnel who work in the food service and quarters areas. 8. ROTATIONAL POOL. Rotational pool personnel are assigned to assist Culinary Specialists in providing services. All personnel in pay grades E-1 and E-3 will be eligible for assignment to the rotational pool. Petty officers shall not be detailed to rotational pools except when personnel E-3 and below are not available. The duties normally assigned to rotational pool personnel include stateroom housekeeping, maintenance and cleaning of officers’ country, passageways and heads, food service maintenance, and cleaning and scullery duties. 4-4 Food Service Operation Handbook Rotational pool personnel may also be used to provide support service to include wardroom service and food preparation efforts when it is impractical to rely solely on CS personnel. 1-4 TYPES OF WARDROOM MEAL SERVICE 1. GENERAL. Normally family style is the most popular meal service provided in wardroom messes afloat. Specific wardroom design, number of food service personnel, and the desires of the mess president and the commanding officer, in many cases determine the type of service to be used. However, regardless of which style of service is used, it must be executed properly. The success of the best written menu and preparation efforts depend on how the food is served. There is a proper sequence to be observed in good food service. Good food service begins before the seating of wardroom members. It depends very much on advanced planning and proper preparation. 2. TWO BASIC MEAL STYLES. The two basic meal styles are “formal” and “informal,” with variations within each style. Different aspects of these styles will be discussed along with the peculiarities of each. a. Formal Service. Formal meal service includes the semi-formal style and the formal style of “French” service. This type of meal requires more advanced planning, detailed preparation, and elaborate tableware than any of the other styles. For these reasons, this style is usually conducted only in commanding and flag officers’ messes and is normally used for occasions involving the entertainment of special guests. The reference rules for this meal are covered more completely in the reference book entitled “Service Etiquette.” Interpretation and application of these rules or guidelines for any officers mess afloat will usually be done by the senior CS in association with the mess president and/or treasurer. b. Semi-Formal Service. This modification of the formal style service is used much more often. For example, it may be used daily in commanding and flag officers’ messes if there are no guests. The preparation and service of this meal are not as elaborate as the formal style and require less time, facilities and personnel. The individual place settings are similar to those used for the informal meal styles. Few center items are used other than salt and pepper shakers, sugar bowls, and creamers. The method of serving meal items is what distinguishes semi-formal from informal meal styles. In the semi-formal style, each food item is arranged on a separate serving dish in the pantry and then offered to each diner. Beginning with the meat or main course, each course is carried into the wardroom separately. The courses are presented to each diner in turn, starting with the head of the table, the senior guest, or the individual designated by a buck. Each diner selects desired items from the serving dishes and places them on his/her plate while the serving dish is held. Serving dishes are returned to the pantry after their contents have been offered to all the diners. 3. INFORMAL SERVICE. Several types of informal service are used in the typical wardroom messes. Each has its own advantages, but all are faster and more convenient to use than the formal styles. Those currently in use are called family, American, a la carte, cafeteria, and buffet styles. a. Family Style. For this style of service, food is arranged in serving dishes, along with the use of serving utensils. The dishes are then placed on the dining table and diners serve themselves, and then pass the dishes around the table until all diners have been served. The CS replenishes serving dishes as necessary and provides beverage service. Dessert items may be brought in and placed on the sideboard and served by the CS/rotational pool personnel when the main course items have been removed from the dining table. 4-5 Food Service Operation Handbook b. American Style. This type of service is used in most restaurants. The main course plate is not part of the initial place setting. Instead, individual plates are prepared in the pantry or galley and placed before the seated diners. This form of meal service is often provided in officers’ messes in medium-sized ships and is often combined with other, traditional forms of service. In American service, food is placed on plates in the galley and taken to the wardroom and served to each diner. c. A la Carte (Breakfast) Style. This type of service is usually provided at breakfast. As with the American style, the main plate is not part of the initial plate setting. Instead, the diner is given a menu or breakfast order form. After the diner has decided what food he or she wants and how it is to be prepared, the order is delivered to the pantry or galley and the food is prepared as requested. It is placed on a plate and served to the diner as the American style of service. d. Cafeteria Style. This is the type of service that is used aboard some larger ships (i.e., carriers, tenders, etc.). The diner does not normally serve himself/herself, rather, the diner selects the desired items and the food service attendant places them on his/her plate. For example, salads, desserts, and some side dishes may be apportioned in dishes; and the diner simply takes them from the serving line. The main course, vegetables, starches, and meat, are portioned onto a plate by the food server as the diner selects them. e. Buffet Style (Self-Serve). Although buffet service is listed under informal style service, it may also be used on formal occasions. The requirements for formal use, as for all formal service, may be obtained from the references listed under formal meal style. For both formal and informal use, this type of service can be used when either space or serving personnel is limited, and this is the preferred method of service to reduce workload. The food is attractively arranged on a sideboard or serving table and the diners serve themselves. It is customary to place silverware and other necessary dishes on the dining table so that the diners do not have to carry them. 4-6 Food Service Operation Handbook 1-5 TABLEWARE ITEMS 1. TABLEWARE. Tableware items used for arranging individual place settings are listed and discussed below. Some ship wardroom facilities may not have such infrequently used items such as pickle forks or egg cups, but these items are presented to familiarize food service personnel with them. a. Main Course Knife. The largest meal knife is always set for lunch and dinner meals. b. Breakfast Knife. This is always set for breakfast and brunch. It is similar in shape to the main course knife but is slightly smaller. c. Bread and Butter Knife. This is used only at lunch and dinner meals when bread is to be served. It is the same size as the breakfast knife, but has straight edges and a blunt tip. Figure 1 – Knives 4-7 Food Service Operation Handbook Figure 2 - Forks d. Main Course Fork. This is always set for lunch and dinner meals. It is largest of the eating forks. It is also used for serving meats, starches, and some vegetables. e. Dessert/Breakfast Fork. This is always set for breakfast or brunch. It is also set at dinner or lunch when dry desserts such as cake or pie are to be served. This fork is similar in shape to the main course fork but is slightly smaller. f. Salad Fork. This is used only at lunch or dinner when salad is to be served. It has four short tines, one of which is slightly wider than the other three and has a notch or indentation at the end. g. Oyster Fork. This is used only at lunch or dinner when oysters or shrimp cocktails are to be served. It is slightly smaller than the salad fork and has only three tines. One of the two outer tines is wider than the other and is notched at the end. 4-8 Food Service Operation Handbook Figure-3 – Spoons h. Teaspoon. The teaspoon is set for every meal. It is similar in size and shape to the common household teaspoon. i. Iced Tea Spoon. The iced tea spoon is set at lunch or dinner when iced tea or coffee is to be served. It has a smaller bowl and a longer handle than the teaspoon. j. Soup Spoon. The soup spoon is set at lunch and dinner when hearty soups or bouillon is to be served in the soup plate. It is slightly longer than the teaspoon with an almost round bowl. k. Dessert/Cereal Spoon. The dessert/cereal spoon is set at breakfast or brunch when cereal is to be served. It is also set at lunch or dinner when frozen, jelled or liquid dessert is to be served. The spoon is similar in shape to the teaspoon but is somewhat larger. l. Bouillon Spoon. The bouillon spoon is set for lunch and dinner when the bouillon cup is to be used. It has a round bowl and is smallest of the eating spoons. 4-9 Food Service Operation Handbook m. Main Course Plate. The main course plate is set when lunch or dinner is to be served in either semi-formal or family style. It is not set for American, a la carte, cafeteria, or buffet style meals. The dinner plate is the largest meal plate. n. Breakfast Plate. The breakfast plate is used for breakfast or brunch. Because these meals are normally served a la carte or buffet style, the breakfast plate is usually not set as a part of the cover. It is slightly smaller than the main course plate but is the same shape. The breakfast plate can be used as an under-liner for soup (if a soup plate is to be used in serving). o. Bread and Butter Plate. The bread and butter plate is set when bread, toast, and butter are to be served at lunch or dinner. It is the smallest flat plate. At breakfast it is used to deliver individual servings of toast and butter. If rolls or doughnuts are to be served at breakfast, bread and butter plates are stacked in the center of the table next to the cereal bowls. p. Dessert/Salad Plate. The dessert/salad plate is set with individual servings when salad is to be served at lunch or dinner. It is also used to serve pies, cakes, or other dry desserts after the main course has been completed. If shrimp cocktail is to be served in a sherbet cup, the cup is placed on this plate. The dessert/salad plate is smaller than the breakfast plate. q. Coffee Cup and Saucer. This coffee cup and saucer are set for every meal. Normally, the cup is placed upside down on the saucer. The diner turns it over when he/she is ready to be served. r. Demitasse Cup and Saucer. This cup and saucer are set when demitasse, a strong, rich coffee, is to be served at lunch or dinner. These items are shaped similar to the coffee cup and saucer, but are slightly smaller. The cup is placed upside down until the diner is ready to be served. s. Bouillon Cup. The bouillon cup is set at lunch and dinner when bouillon is to be served. Note, however, that bouillon may also be served in the soup plate at the discretion of the wardroom supervisor or the mess president. The cup is similar in size and shape to the coffee cup except that is has two handles. The coffee saucer is used with the bouillon cup. t. Sherbet Cup. The sherbet cup is a glass cup used to serve liquid desserts or shrimp cocktail at lunch or dinner. It is always served on a dessert plate. u. Egg Cup. The egg cup is a small china cup without handles used to serve hard cooked eggs at breakfast or brunch. It is used with a coffee cup saucer. v. Dessert/Cereal Bowl. The dessert/cereal bowl is used at lunch or dinner when jellied, frozen, or liquid desserts are to be served, and at breakfast or brunch when cereal is to be served. At breakfast, when hot or cold cereal is to be served, the dessert/cereal bowl is placed in stacks of four or five along with the dining table center items. At lunch or dinner, when jellied, frozen, or liquid desserts are to be served, the dessert/cereal bowl is placed before the diner after the main course plate has been removed. It may also be used with a tablespoon as a center item for serving horseradish, sour cream, applesauce, or similar condiments. It is smaller than the soup bowl. 4-10 Food Service Operation Handbook w. Soup Plate. The soup plate is used when hearty soup is to be served. It may also be used for bouillon. It is usually filled and brought from the pantry after the diners are seated. The soup plate is a shallow plate which is slightly deeper and wider than the dessert/cereal bowl. It is the larger of the two. Figure 4 – China 4-11 Food Service Operation Handbook x. Beverage Glass. The beverage glass is set for lunch or dinner when milk, iced tea or coffee, or other chilled beverages are to be served. It is a 10-ounce glass and is taller and narrower than the water glass. y. Water Glass. The water glass is set for lunch or dinner unless another chilled beverage is to be served. It is a 10-ounce glass and is used only for water. It is wider and shorter than the beverage glass. z. Juice Glass. The juice glass is normally used only at breakfast. It is not set but is used to serve juice when ordered by the diner. It is the smallest glass and contains 6 ounces. Figure 5 - Glasses 1-6 DINING TABLE CENTER ITEMS 1. GENERAL. Tableware items commonly placed in the center of the dining table are listed and discussed below. These items include standard items that are typically used at every meal and related items which may be included on the basis of menu requirements. 2. STANDARD CENTER ITEMS. The standard center items listed below are normally set for all meals. a. Sugar Bowl. The sugar bowl is a small, silver, oval-shaped container with a short pedestal stand and lid. It is always set with a sugar spoon. b. Salt and Pepper Shakers. The salt and pepper shakers may be all silver or they may be glass with silver tops. The salt should always be kept loose and dry, and both shakers should always be at least 3/4 full when placed on the dining table. c. Coffee Cream Pitcher. The coffee cream pitcher is similar in size and shape to the sugar bowl, but has a spout and no top. 4-12 Food Service Operation Handbook d. Centerpiece. Most ships consider some type of centerpiece as standard. The centerpiece usually consists of a silver fruit bowl containing either fresh or artificial fruit for breakfast or fresh or artificial flowers for lunch or dinner. e. The Buck. A buck is normally a small object, such as a statue, a model or a dummy weapon round, which is used aboard some ships to designate which diner is to be served first. The buck is not used at breakfast, at brunch, or when guests are to be served. Figure 6 - Standard Center Items 3. MEAL-RELATED CENTER ITEMS. The meal-related center items listed below and shown in Figure 7 are set at the indicated meals if the food items for which they are used are listed in the menu. a. Cereal Cream Pitcher. The cereal cream pitcher is shaped like a small beverage pitcher with a modified hour glass design. It has a handle on one side and a capacity of 16 ounces. It is set only for breakfast or brunch when cereal is to be served. b. Syrup Pitcher. The syrup pitcher is similar in size and shape to the coffee cream pitcher except that the pouring spout is partially enclosed by a metal lip. It is set only for breakfast or brunch when pancakes or waffles are to be served. It is placed on a coffee cup saucer. c. Silver Fruit Bowl. The silver fruit bowl is a large hollow bowl. It is used for serving fresh fruit for breakfast or brunch and is also set as a centerpiece containing artificial or real fruit for breakfast or artificial or real flowers for lunch or dinner. d. Bread Tray. The bread tray is a rectangular silver dish with rounded ends and perforated sides. It is used primarily for breads, but it may also be used for relishes such as carrot or celery sticks. When used for breads, an opened napkin is placed in the tray, the bread is neatly arranged on the napkin and folded over the bread to retain freshness and warmth. e. Cruet and Caster. The cruet and caster consists of two stopper glass bottles placed on a small tray. The bottles hold oil and vinegar salad dressings when salads are served at lunch or dinner. f. Butter Dish. The butter dish is a small, rectangular china dish with rounded corners. It may be used at all meals for serving butter patties. At breakfast or brunch, it may be used for serving jam or jelly packets. 4-13 Food Service Operation Handbook g. Pickle Fork. The pickle fork is used only at lunch or dinner when pickles or other relishes are served. It is placed on the relish (bread) tray. Figure 7 - Meal Related Center Items 1-7 SETTING THE DINING TABLE 1. GENERAL. Setting the dining table involves two basic tasks: setting individual place settings and setting the dining table center items. Linen placement should be completed before setting the dining table. This section lists the steps for selecting and placing individual place settings and dining table center items for specific menus and styles of meal service. Variations in the procedures may occur, depending on the way in which a specific general mess is equipped and on the desires of the mess president and/or the wardroom supervisor. For instance, if there is a lack of a certain type of needed tableware, the wardroom supervisor should be asked to decide what items should be used as substitutes. 2. SETTING INDIVIDUAL PLACE SETTINGS. Individual place settings, often called “covers” are set following the placement of linen. For sanitary reasons, it is important to remember to not handle tableware on “eating” surfaces. Handle silverware only by the handles, and handle plates, dishes and serving ware by the edges and/or handles. The sequence of steps involved in setting individual place settings is outlined below. a. Determine the Meal Style and Number of Diners. Information concerning the specific meal style and the expected number of diners is obtained from the wardroom supervisor. b. Plan the Place Setting. There are two basic place settings: one for breakfast or brunch 4-14 Food Service Operation Handbook c. Breakfast. Breakfast or brunch is normally served a la carte or buffet style. For a la carte style, each diner’s meal is served with whichever cover items are offered. For buffet style, the diner obtains his/her own items. If cereal is to be served, the dessert/cereal spoon is set to the outside of the teaspoon. d. Lunch/Dinner. The basic lunch/dinner setting applies to informal service. If soup or shrimp cocktail is being served, the breakfast plate is set as a serving plate. For cafeteria/buffet, a la carte, and American style meals, the main course plate is not set. Other changes in the basic settings are based on specific menu requirements. Check each item on the menu to determine if a specific item of individual tableware is required. As a general rule, only six pieces of silverware should be set for any one meal, but the oyster fork may be set as a seventh item. Normally, if more than six items are required, each additional piece must be set with its related meal item. For example, if six items are already planned and dessert is to be served, place the dessert fork or spoon in the proper place on the table when serving the dessert. e. Obtain Tableware. Based on the plan for each place setting, obtain enough tableware from the sideboard to arrange a place setting for each diner. If there are not enough seats for the expected number of diners, arrange extra individual tableware on the sideboard, unless a buffet is being served. Place the dessert fork or spoon in the proper place on the table when serving the dessert. For a buffet follow the procedures for placing silverware on the dining table or serving line as described in that section. 4-15 Food Service Operation Handbook Figure 8 - Basic Breakfast/Brunch Cover Figure 9 - Basic Lunch/Dinner Cover 1-8 SETTING THE SIDEBOARD 1. GENERAL. Most wardrooms are equipped with a waist-high cabinet known as the sideboard. Its storage spaces are used for storing wardroom linen and tableware, and the top forms a counter for the placement of beverage services and extra tableware in preparation for a meal. The sideboard may also be used for a buffet serving line on ships where the use of a separate buffet table is not practical. This latter use is discussed in “Setting the Buffet Serving Line.” The steps to be followed in preparing the sideboard for all other meals are outlined below. 2. SETTING UP THE HOT BEVERAGE SERVICE. The principal hot beverage used aboard ship is coffee. Hot tea or hot chocolate may also be used if desired by wardroom members. The hot beverage service should be set up following placement of the linen on the sideboard. The steps outlined below will guide beverage service set-up. 4-16 Food Service Operation Handbook a. Set Up Coffee. Take coffee pots (one each per 10-12 diners) from the sideboard to the pantry and obtain enough coffee for the meal. Place the pots on the sideboard coffee warmers. Select at least one coffee pitcher for each dining table and place on the linen next to the coffee warmers. Coffee servers should be filled just before serving and should not be placed on the warmers. b. Set Up Hot Tea or Chocolate. Place hot water in a coffee pot and set on the coffee warmer. Arrange tea serving pots next to the warmer. The number of tea pots will be determined by the wardroom supervisor or through experience. Tea bags and/or hot chocolate packets should be placed next to the serving pots. 3. SETTING UP EXTRA TABLEWARE a. Determine Extra Tableware Requirements. The required amount of extra tableware will normally be determined by the wardroom supervisor. Considerations that may influence the amount of extra tableware required include occasional breakage of china during meals and the possibility of unexpected diners. Additionally, if a second seating of diners is required due to limited wardroom seating capacity, sufficient tableware should be placed on the sideboard to permit quick resetting of the dining tables after the first seating has finished. b. Place the Extra Tableware. Obtain and neatly place all necessary items on the covered portion of the sideboard. Dishes and bowls may be stacked several high. Cups and glasses should not be stacked, especially during rough seas. Silverware should be arranged by type and napkins should be pre-folded and stacked near the silverware. 4. SETTING UP THE COLD BEVERAGE SERVICE a. Obtain Cold Beverage. Take serving pitchers from the sideboard to the pantry. Water will be made available even if another beverage is to be served. Water and other cold beverages are pre-chilled in the pantry and the glasses filled and placed on the table just before announcing the meal. b. Prepare Fruit Juices for Breakfast. If fruit juices are called for in the breakfast menu, a galley serving pan insert should be filled with enough ice to cover half the height of the glasses and then placed on the sideboard. The juice glasses are then filled to the bulge with juice and placed in the ice to cool. 1-9 SETTING FOR BUFFET SERVICE 1. GENERAL. Buffet service is like cafeteria-style service in that foods are placed in serving pans on a serving line or table. The main difference between the two styles is that buffet diners serve themselves, while cafeteria diners are served by food service personnel. In either case, the food is attractively arranged on a sideboard or on a separate serving table. The area to be selected for the serving line set-up will depend on the amount of space available in the wardroom. The wardroom supervisor or the mess caterer should be asked for their buffet-style preference before setting up the buffet serving line. Buffet service has the advantage of reducing service personnel with the disadvantage of possible food waste. Buffets make it possible to display food attractively and are useful in providing fast service. Buffets are also good for handling large numbers of people who wish to eat at different times. Sanitation is an important consideration in preparing and serving all meals. It becomes especially critical in the set-up and operation of buffet or cafeteria serving lines. Open serving pans and trays provide ideal sites for the growth and spread of disease-carrying organisms. Observing a few simple rules can greatly reduce the chance of infection. Hot foods should 4-17 Food Service Operation Handbook always be held for service at temperatures 140° F or higher and cold foods held for service at temperatures 41° F or lower. If these temperatures cannot be maintained, the food should be discarded within four hours of the beginning of preparation. Only limited amounts of food should be displayed on the serving line at any one time, permitting the balance of the food to be kept in the pantry for easier temperature control. Serving pans and trays may be refilled as necessary. Finally, a sneeze shield should be used whenever possible. The principle tasks involved in setting up the buffet serving line are presented below and the serving line set-up tasks should be done in the order listed and should be completed five minutes before serving time. 2. INITIAL PREPARATIONS a. Obtain Space for the Buffet Serving Line. This is often done by setting up a separate buffet table. Where space is limited, the counter space on the sideboard is used for the buffet serving line. If a buffet table is used, it should be located both to allow CSs convenient access to the pantry for filling the serving pans and to allow diners to easily use the serving line without being crowded by furniture or other diners. If the sideboard area is to be used, it should first be cleared of all non-essential items. b. Placement of Linen. This should be done in accordance with the guidelines in the section of “Linen.” c. Set Up the Chafing Dish Stands. The chafing dish stand is composed of a stand or framework and a pan, which is set on the stand. Enough stands should be set up so that there is at least one for each food item served. They should be placed in the serving area so that a diner can have ready access to them without leaning over the table. Sufficient space should be left at the beginning of the serving line for the placement of plates, silverware and napkins and at the end of the serving line for dessert items. After the chafing dish pans have been set in place, one inch of water is put into those pans that will be used for hot food. Sterno heating units are then placed below the center of the pans containing water. Ensure that there are no flammable items placed near these units as the set-up continues. Do not light the heating units at this time. d. Place the Sneeze Shield. If a sneeze shield is available, put it in place. Ensure that all food items to be served will be protected by this shield and that diners still have ready access to the foods. e. Place Necessary Eating Utensils on the Buffet Table. Determine what plates, bowls and other eating utensils will be needed to arrange these items neatly at the beginning of the serving line. f. Place dinner plates and other china next to the chafing dish stands, but not so close that diners could burn their hands picking them up. Do not stack china so high that it becomes unstable and thus presents a danger, especially in rough seas. g. Napkins and silverware are usually placed on dining tables. However, at times when there are more diners than seats, additional place settings will be kept on the sideboard and placed on the dining table as diners finish and depart. If there are not enough CSs to do the resetting, the napkins and silverware are to be placed on the buffet serving line next to the china and on the side away from the chafing dish stands. h. Arrange Decorations on Serving Table. Decorations will be designated by the wardroom supervisor. Decorations will usually consist of artificial or real flowers placed around the three sides of the serving area facing the diner. They should not be placed near the heating units or positioned so that diners could easily knock them off the table. It may be 4-18 Food Service Operation Handbook necessary to pin the decorations to the tablecloth so that they do not become a fire hazard or interfere with serving during rough sea conditions. i. Lunch or Dinner with Guests. A buck is not used if guests are present. If there is only one guest, he or she will be served first, the diner to the right of the guest is served next, and so on around the dining table. If there are two or more guests, the guest of the senior officer is served first, the person to the right of the guest is served next, and so on around the table. 3. DELIVERY OF FOOD TO THE DINING TABLE a. Foods are delivered to the dining table in various combinations of three basic methods: (1) Individual service; (2) Table service; and, (3) Self-service. The various meal styles typically employ combinations of these three methods. special characteristics of these methods are discussed below. The b. Individual Service. Individual service involves serving foods directly to each diner, either by delivering single portions on individual plates or by presenting platters or serving dishes with utensils to each diner to permit self-service. Individual service is always done from the diner’s left. Plates are normally placed on the table with your left hand while your right hand is held behind your back. In rough seas, you may grasp the back of the diner’s chair for stability. The proper way of offering platters or serving dishes is to stand to the left of the diner and lower the serving dish with the left hand until the diner can easily serve himself/herself. The left hand should not rest on the table unless required for stability during rough seas. The right hand is held behind the back or is used to offer serving utensils. c. Table service. Table service involves the careful placement of filled serving utensils directly on the dining table. Food items are then passed around the table for each diner to serve themselves. d. Self-Service. Self-service is normally limited to buffet and cafeteria style meals. Each diner takes their food from a serving line to the table. 1 - 10 MEAL STYLE PROCEDURES 1. FORMAL STYLE. As mentioned within the section on wardroom meal service, the requirements for serving this style are quite elaborate and are open to much variation between general messes. For these reasons, the serving of this style of meal is not described here. 2. SEMI-FORMAL STYLE. In this style of individual service, each item of food is brought to the dining table and offered to each diner. Serving dishes, other than the main course item, are placed on serving trays before they are brought into the dining areas. To prevent the serving dishes from sliding, a clean damp cloth should be placed on the tray. When all diners are seated, individual servings of the first course, soup and/or salad or shrimp cocktail are brought to the dining table and placed on the service plate in front of the diner. If both salad or shrimp cocktail and soup are to be served, the salad or shrimp cocktail is set on the table before the diners arrive and the soup is served after the diners have been seated. The order of delivery to the diners will be according to the rules specified previously. When the diners have finished the first course and the used china (including the service plate and 4-19 Food Service Operation Handbook silverware) has been removed, the main course items are served. Each food item will be in a separate serving dish and will be served in the following order: a. The entrée, or meat dish, is arranged on a meat platter and comes first. Serving utensils, usually a tablespoon and a main course fork, are carried in the right hand while the platter is carried in the left. The platter and serving utensils are offered on the left side of the first diner to be served. When the first diner has served himself/herself, he/she replaces the serving utensils on the platter, which is then offered to the next diner. There should be no need to touch the serving utensils again unless a diner leaves them in an awkward position for the next diner. b. The starch food item comes next. It is served in an appropriate serving dish carried on a serving tray. The tray is carried in the left hand and the serving utensils, a tablespoon and main course fork, are carried in the right hand. They are offered to the first diner in the same manner as the entrées. c. The vegetable comes next and is served in the same manner as the starchy food. d. The gravy or sauce is served last unless it is to be used only for the meat. If so, it is served immediately after the meat. The gravy boat is also placed upon a serving tray. The tray is carried in the left hand and the ladle in the right. Both are offered to the first diner to be served. The ladle should then be kept in the gravy boat as it is offered to other diners. This type of service is best accomplished when there are four servers at each table, so that each person can be responsible for serving only one item. Fewer personnel can do this type of service if there are not many diners to be served. When two or more persons are serving the food and a serving dish is close to being emptied, the server should quickly return to the pantry for a refill. While this is happening, serving should stop until the refilled dish has been presented to the next diner. To prevent long delays in service, a space of two or three diners should be maintained between servers. e. When all diners have been served the main course, bread and/or rolls and butter can be brought to the dining table and placed in the center. The amount will be determined by the wardroom supervisor. Refills of food items are seldom available during a semi-formal meal, but if a diner asks for seconds, the wardroom supervisor will decide if the request can be granted. f. If dessert is to be served, it will be served to diners in the same order as the other food items after all the main course tableware has been removed from the table. Each diner is offered the dessert and is not served unless he or she replies in the affirmative. 3. INFORMAL MEAL STYLES a. Family Style. As with the semi-formal style, food items are delivered to the dining table in appropriate serving dishes after the diners are seated. However, for family style service, the serving dishes are placed on the dining table and are not delivered or offered to each diner as is done in semi-formal service. The food items should be delivered to the dining table in the same order as for semi- formal; that is, the entrée should be placed first, starchy food second, the vegetable third, and the gravy or sauce last. The number of serving dishes placed at each table will be determined by the wardroom supervisor. Once all the serving dishes have been placed, they should be carefully watched so that they may be refilled when needed. When refills are obtained from the pantry or galley, the serving dish should be returned to the same place it was picked up. If soups or salads are 4-20 Food Service Operation Handbook to be served at a family style meal, they usually are individually portioned and may be set in place before the diners arrive. Desserts are served by presenting them to the individual, as is done for the semi-formal style of meal. Bread and/or rolls and butter will be placed on the table. The quantity will be determined by the wardroom supervisor. b. American Style. For this style of meal, foods are portioned on individual plates in the pantry or galley and then delivered to the diners. Food is served in the sequence previously described. Plates should be delivered to the dining table in the order in which they have been prepared so that the food presented to the diners is as warm as possible. Salads and/or soups are also served either by presenting them individually or by placing them on the table before diners arrive. Once the dinner plates have been placed, bread and rolls and butter will be put on the table in the same manner as for semi-formal style meals. The dessert service will also be the same as for the semi-formal style in which each diner is offered a serving. c. A la Carte (Breakfast) Style. A la carte means “in accordance with the menu.” This style of service is most often used at breakfast. Since diners enter the general mess at various times for breakfast, the order of service is simply “first-come, first-served.” As diners seat themselves, offer them menus and/or breakfast order forms. When it appears that a diner has made their selection, return and ask if they are ready to order. If so, take the order and make sure all ordered items and instructions for their preparation are clearly identified (e.g., whether or not eggs are to be prepared sunny-side up or easy over). The order form is coded to identify the diner (i.e. Seat 6 at Table A) and is then delivered to the pantry where it is placed in sequence on an order board. The wardroom supervisor will describe how the order forms are to be coded and where they are to be placed. While the main course is being prepared in the pantry, begin serving the other ordered items. The first item to be delivered, after coffee has been offered, will be fruit or fruit juice. Next, hot or cold cereals, if ordered, should be brought to the diner. Quite often, cold cereals are made available in the center of the dining table along with cereal bowls. In this case, a server must make sure that a filled cereal cream pitcher and sugar bowl are available. After this has been done, place butter and syrup next to the diners who have ordered pancakes or other such items. As the diner completes the cereal, check the pantry for the diner’s next course. The eggs, pancakes, or other cooked items should not be delivered until the diner has finished or nearly finished with the previous course of fruit or cereal. Toast, if ordered, should be taken to the diner immediately after the main hot course has been delivered. Cereal and fruit dishes should be removed if the diner has finished with them before the main course is delivered. d. Cafeteria Style. In this style of meal service, the CS stands behind the serving line and serves individual portions of each food item at the diner’s request. All food items are usually available on the serving line or are already in place on the dining table. Thus, this style of meal is quite efficient, requiring relatively few serving personnel. Once diners have been served from the serving line, the dining tables must be attended so that beverages may be served and tableware removed as diners finish. Place settings should be reset if there are to be more diners than space is available at one seating. In this case, as a diner finishes the meal, the place at the table should be cleared quickly and silverware, napkin, beverage glass, and other needed items replaced as quietly as possible so as not to disturb other diners. However, before removing tableware, it is best to check with the departing diner to make sure that he is through eating. The diner may merely be returning to the serving line for more food. If this is the case, remove only the empty used plates from this place setting and leave everything else as it is. 4-21 Food Service Operation Handbook For cafeteria style service, the serving line is usually kept open throughout the meal period, unless the wardroom supervisor decides differently. No matter how long the line is kept open, it is important that sanitary conditions be maintained by keeping foods at proper temperatures and cleaning up spills as they occur. e. Buffet Style (Self-Serve). This type of service, as with cafeteria style, requires relatively few personnel. Food is arranged on the serving line and the diners serve themselves. The primary tasks are to keep enough food in the serving dishes and to keep the serving area tidy. As hot food items are nearly depleted on the serving line, go to the pantry or galley and place more portions of this food on a plate, return to the serving line, and neatly place the food onto the correct serving pan or dish. Cold food items may be refilled in the same manner, or the entire serving pan or dish may be replaced by a filled one. Refilling should be done as smoothly as possible and with minimal disturbances to diners. To prevent the entire serving line from halting, try not to replace all items at the same time. In addition to the serving line, the dining tables also must be attended in the fashion described for cafeteria style meals. Thus, food items such as bread and butter should be refilled, beverages served, and place settings replaced as needed. Finally, desserts may be included on the buffet serving line or they may be served individually after diners have finished the main course. The wardroom supervisor will decide how dessert is to be served. 4. SERVING BEVERAGES. Presented below are four general guidelines and several specific procedures for serving beverages. a. The first guideline is that beverages are to be served from the diner’s right if at all possible. Otherwise, check with the wardroom supervisor about how to serve the beverages in a way which disturbs the least number of diners. b. The second guideline is that the server should never lift the diner’s glasses or cups from the dining table to refill them. Rather, the server should pour the beverage into them while they are on the table. If the cup or glass is not conveniently placed for service, carefully move it to a better location, or, if it cannot be reached, politely ask the diner to move it. c. The third guideline is that the order of service for beverages is the same as that for the serving of foods: At breakfast, order of service is not a problem, since diners enter at random and are served on the first-come, first-served basis. At lunch or dinner when no guests are present, the head of the table or the diner who has the buck in front of them will be served first. The diner to the right will be served next and so on around the table. If one guest is present, this guest will be served first, followed by the diner on the guest’s right, and so on around the table. If more than one guest is present, the guest of the senior officer is served first, followed by the diner to the right, and so on around the table. d. The fourth guideline is to not fill serving pitchers to the tip when they are to be used for filling glasses or cups at the dining table. A full pitcher is difficult to handle and feels quite heavy after a while. Therefore, pitchers should be filled to no more than one half to two thirds full. e. Finally, it is important to remember that each authorized mess may have certain rules for serving beverages. The wardroom supervisor should be asked about these rules. Specific guidelines for the various meal styles are presented below. 4-22 Food Service Operation Handbook 5. FORMAL MEAL STYLE a. Formal Style. This style of meal is quite elaborate and requires considerable guidance to be done correctly. Guidance should be obtained from the wardroom supervisor and from other references. b. Semi-Formal Style: (1) Cold Beverages. Usually, water is the only cold beverage served at semi-formal style meals. It is poured into the glasses before the diners are seated. Water and another cold beverage are rarely served together. However, if another cold beverage is served, water is always made available. If two cold beverages are to be served, both are usually poured before the diners are seated. Remember, beverages are served from the right. Glasses should be filled to about one-half inch from the top. Try not to fill higher than this, as a completely filled glass is difficult for a diner to handle without spilling. Refills of cold beverages (except milk) should be offered during the meal to diners when their glasses become less than one half full. Milk is refilled only upon request. When refilling a cold beverage, remember not to lift the glass off the table. Always pour while the glass is on the dining table. If ice cubes are available, they should be offered first to diners needing refills. (2) Hot Beverages. For semi-formal meals, the hot beverage most often served is coffee. It normally is not offered to diners until the dessert course has been served. At that time, coffee should be transferred from the Silex-type pot on the heater to the serving pots. The coffee should then be politely offered to each diner from the right in the previously described order. Cups should be refilled to about one-half inch from the top. If hot tea is requested and is available, hot water and a tea bag should be put in a tea serving pot and immediately delivered to the diner. Refills of coffee should be offered to diners when their cups become less than one half full. As mentioned previously, cups should be left on the table while being filled. Remember also that coffee will become cold if left in the serving pitcher too long. If this happens, empty the cold coffee in the pantry or galley and refill the serving pitcher with fresh coffee. c. Informal Meal Service (1) Family Style: (a) Cold Beverages. Use the procedures described under semi-formal style. The only exception is, if there is enough space, serving pitchers of water or other cold beverages may be placed on the dining table after the initial service so that diners can serve themselves. During the meal, the serving pitchers should be checked and refilled as needed. (b) Hot Beverages. Again, use the procedures listed under semi-formal style with these variations: 1. Offer coffee to the diners as soon as they have begun eating the main course; and, 2. After the initial serving, filled coffee serving pots may then be left on the dining table for the diners’ use. Care should be taken so that this coffee does not become too cold. If it does, the cold coffee should be emptied in the pantry and fresh coffee obtained. 4-23 Food Service Operation Handbook d. American Style - Use the same procedures given under Family Style meals. e. A la Carte (Breakfast) Style: (a) Cold Beverages. Water is poured before seating the diners. Upon taking a breakfast order, juice, if ordered, will be the first item delivered after coffee has been offered. Obtain juice in glasses from the pan on the sideboard. Wipe ice from the outside of the glass with a clean cloth and place the glass to the diner’s right, just above the end of their knife. If milk is ordered by the diner, it is usually obtained from the pantry. Milk is to be delivered to the diner when it is requested or just after the hot food item is served. So that there will be no question, it is best to ask the diner when they would like their milk served. If the diner requests refills of milk or juice, remove the soiled glass from the dining table and use fresh glasses for the refills. Always handle both soiled and fresh glasses as close to the bottom as possible. (b) Hot Beverages. If coffee is requested, it should be served immediately while the diner is deciding what to order. Refills of coffee should be offered when the diner’s cup becomes less than one half full. If hot tea is requested, the diner should be asked when they would like to have the tea served. At the requested time, the hot water and tea bag should be delivered to the diner. Hot chocolate may also be available at breakfast. If the diner orders this, determine when they would like it served. At the requested time, either fill the tea pot with hot water and deliver it with a hot chocolate packet to the diner or prepare the hot chocolate for the diner by taking the cup and saucer from the dining table to the sideboard, emptying the packet into the cup, and mixing the correct amount of water with it. Once prepared, the hot chocolate should be delivered to the diner. Coffee servers or other beverage pitchers are seldom left on the dining table during breakfast for service by the diner. Because of few diners likely to be seated at any one time, the beverage would soon become cold and stale. f. Cafeteria Style: (1) Cold Beverage. For cafeteria style, cold beverages may be placed on the table prior to diners entering the general mess. If not, the cold beverages should be offered to the diner as soon as they have passed through the serving line. Refills should then be offered when their glasses becomes less than one half full. Once the dining tables are full of seated diners, serving pitchers of cold beverages may be left for self-service. The pitchers should be checked often during the meal and refilled as needed. There may be several re-settings of the dining table during this style of meal so it is important to remain alert for diners who are in need of beverage service. (2) Hot Beverage. Once cold beverages have been offered and served, coffee should be offered. Refills should then be offered whenever the diner’s cup becomes less than one half full, or upon the diner’s request for more. Filled serving pitchers may be left on the dining table once several diners have been initially served coffee. g. Buffet Style. Use the same procedures given for the cafeteria style meal. 6. REMOVING TABLEWARE. The removal of tableware during a meal is another task which takes place in the presence of diners. After use, dishes and silverware are often slippery and may contain food scraps, making them hard to handle. These factors combine to make the removal of tableware a task which requires care and skill. Special care should be taken until one becomes more familiar with the tasks. Practice will aid in the development of confidence and of a smooth, polished performance which can be accomplished without hurrying the diner. A few basic rules have been developed for the removal of tableware during a meal. The rules are based on common sense and should be of considerable help in doing all the tasks 4-24 Food Service Operation Handbook involved. Remember, however, that variations may occur in a specific general mess. Thus, if there is any question about what to do, ask the wardroom supervisor. a. The first basic rule is to remove soiled tableware from the right side of the diner. b. The second basic rule applies when more than one item is to be removed from the table. Pick up the largest item first with your right hand and transfer it to your left hand behind the diner’s back. Then pick up the next largest item and stack it on top of the first item in your left hand. Do not stack items in front of the diner before you remove them from the table. This increases the chance of dropping tableware on the diner, the floor, or yourself. c. Third, dishes are picked up from the dining table with silverware on them. It is best to first move the silver to the right side of the dish and hold it with the thumb of the right hand as the dish is removed. This prevents the silverware from sliding off the dish and gives the CS better control. d. Finally, never try to carry more items than can be easily controlled and carried to the pantry or galley. With experience, one should be able to determine when enough tableware has been collected from the dining table. Nothing is more disturbing to the diner and the CS than the crashing sound of tableware hitting the deck. Further discussion of specific rules is presented under the various meal styles. 7. FORMAL MEAL STYLE a. Formal Style. As mentioned in other sections, the requirements for the serving of this style are quite elaborate and are open to much variation among general messes. For these reasons, nothing on the removal of tableware shall be presented here. Guidance will be obtained from the wardroom supervisor and from the references, “Service Etiquette” and the CS Rate Training Manual (NAVEDTRA 10267). b. Semi-Formal Style. The important factor to keep in mind for the removal of tableware during a semi-formal style meal is that no items are removed until all diners have completed a course. The tableware for that course then is removed in the same sequence that the diners were served. When no guests are present, the head of the table or the diner with the buck will have their course items removed first, the diner to his/her right next, and so on around the table. When no more than one guest is present, the guest should have his/her tableware removed first, followed by the diner to their right, and so on around the table. Thus, all tableware for a specific course will be removed before the next course is served. The specific items to be removed after each course will be determined by what is to be served next. Be careful not to remove items that are to be used in a later course. If this should occur, replace these items at the diner’s place setting as soon as possible. After the main course is completed all tableware should be removed from the individual place setting except for coffee cup and saucer, teaspoon, water glass, and any silverware needed for dessert. All center items should also be removed at this time, with the exception of the sugar bowl, creamer, and centerpiece. Individual place setting items should be removed first, followed by the center items. All this should be completed before serving dessert. Dessert dishes and silverware will then be removed when all diners are finished. All other items are to be left on the table until the diners leave. 4-25 Food Service Operation Handbook 2 - 0 AFLOAT STATEROOM SERVICE 2-1 INTRODUCTION 1. GENERAL. This section is designed primarily for use in the operation and care of officers’ quarters afloat. Procedures for performing the basic stateroom functions are presented as guidelines for establishing uniform stateroom maintenance training programs. The text may also be used for self-study, for on-the-job training, as a point of reference and for developing local lesson plans. To effectively use the information contained herein, especially in teaching newly assigned personnel, it is recommended that the following method be used: Step 1. Prepare the trainee (tell how to do the job). Step 2. Demonstrate the correct technique (show how to do the job). Step 3. is doing. Have the trainee perform under supervision while explaining what he/she 2-2 CARE OF QUARTERS AFLOAT 1. GENERAL. Staterooms are the berthing spaces for officers aboard ship. They are like small bedrooms ashore. It is here that officers sleep and keep their personal belongings. Quarters for the commanding officer and for the flag officer (if there is one aboard) include a stateroom and private head facilities for each of these officers. On some ships, the executive officer and department heads also have separate quarters and head facilities. Other officers are usually billeted two to a stateroom. They share head facilities with officers of other staterooms. Personnel assigned to the Admiral's and/or Captain's messes are responsible for cleaning those quarters while the Culinary Specialists and rotational pool personnel assigned to wardroom/stateroom areas are responsible for all other officers’ quarters. Regardless of quarters assignment, the cleaning procedures presented here are applicable for all officers’ berthing spaces. NOTE: NAVSUP evaluated the Reduced Stateroom concept of operations onboard the USS TARAWA (LHA-1) during the period November 99 - May 00. In the concept of operations, Junior Officers (Lieutenant Commanders and below) performed daily cleaning tasks within their staterooms. Officers in paygrades 05 and above, Commanding Officers and Executive Officers continued to receive stateroom cleaning services from the assigned Food Service Attendants or Culinary Specialists. Results indicated that approximately 7 hours per day were now available for additional S5 related duties. During the July 2000 Afloat Supply Department of the Future (ASDOF) conference attended by Supply representatives from the Fleets and the Type Commanders, the decision was made to allow Fleet-wide implementation of this concept at the discretion of the Commanding Officer. Although quarters/stateroom work is not physically hard, it does require a sense of orderliness, attention to detail and an understanding of the important role played by CS personnel in support of the ship. It is not enough just to see that the bunk is made, clothes are out of sight and trash cleaned away. Staterooms must be thoroughly cleaned to include furnishings, desks, all corners, ledgers and bulkheads. The same cleanliness is required for heads, showers, passageways and vestibules in officer’s quarters. 4-26 Food Service Operation Handbook 2-3 USING CULINARY SPECIALISTS AND ROTATIONAL POOL PERSONNEL 1. GENERAL. CS personnel are responsible for performing functions associated with the management and operation of officers’ messes and quarters afloat. However, a rotational pool of enlisted personnel in paygrades E-1 through E-3 is established to assist the CSs in providing maintenance, cleaning, and other services. This pool will be formed of personnel from various divisions (and squadrons if they are onboard). These personnel are normally assigned to such duties by the executive officer. Under the supervision of the Culinary Specialist, the rotational pool may perform housekeeping duties and basic maintenance service. Bedmaking service is provided ONLY to commanding officers, executive officers, unit commanders and officers in paygrades O-5 and above or their equivalents. Maintenance and cleaning of passageways, heads and showers are also the responsibility of the rotational pool. As a part of the stateroom service, the rotational pool may be required to pick up and deliver officers’ laundry. Sorting and stowage of personal laundry, however, is the responsibility of individual officers. (See Section 5, NAVSUP Pub 486, App F for responsibilities and duties of enlisted personnel assigned to wardrooms/staterooms afloat.) 2-4 STATEROOM CARE 1. CLEANING. Daily cleaning of staterooms is necessary, but the extent to which spaces are cleaned may vary with circumstances. Limited cleaning may be done each day with a major effort on field day, or the workload may be spread over the entire week. The advantages to spreading the workload over the entire week are: a. There can be a more equitable distribution of work. b. Cleaning schedules can conform to other schedules. For example, linens, bedsheets, pillowcases, and towels may be issued on the day the officers send their laundry to the ship’s cleaner/laundry. c. More attention can be given to all jobs when they are performed throughout the week, rather than crowded into one day. 2. WORK SCHEDULING. Work should be scheduled to make the most efficient use of available manpower and time. Good daily cleaning makes field day much easier. The following tasks should be considered as the minimum daily cleaning under ordinary circumstances: a. Dust furniture and sweep and mop deck. b. Clean mirror, washbasin, soap container and toothbrush holder. c. Empty wastebasket. 3. CARE OF CLEANING MATERIALS. The importance of the proper care of cleaning materials should be stressed to personnel assigned these duties. Cleaning materials should be correctly stowed after each use to prevent loss or damage. Mops should be washed, rinsed, and spread or hung to dry, not stood in a corner to sour. Obvious cleaning jobs, such as washing dirty paintwork resulting from plumbing or electrical repairs, should be performed as necessary and not put off until the day paintwork is scheduled to be washed. The major cleaning jobs normally weekly are: a. Paintwork checked carefully and scrubbed as needed. b. Brightwork polished. c. Knife edges of hatches and edges of ports cleaned. d. Soiled towels removed and clean ones issued. 4-27 Food Service Operation Handbook e. Decks scrubbed and waxed. 4. INSPECTIONS. Staterooms should be inspected frequently by the stateroom supervisor to ensure that these duties are being performed properly, and to request any maintenance or repair work that must be done by the engineering department. 2-5 CARE OF PRIVATE PROPERTY 1. GENERAL. One important rule to follow in cleaning staterooms is to avoid disturbing anything of a private nature that has been left laying about. From time to time, officers rush off leaving letters, papers, money, or other valuables in sight. These instances should be reported at once to the officer, the wardroom leading CS, or stateroom supervisor. Furthermore, papers, books or letters should not be examined if left lying around. These may concern official Navy matters or the officer’s personal affairs. In either case, they are to be treated as private property. If valuables or other items of a private nature must be moved when cleaning, be sure they are put back where they were found. 2. PERSONAL PAPERS AND MONEY. DO NOT TAKE PERSONAL PAPERS unless they are in the wastebasket. The officer may have official Navy papers or personal letters on his/her desk. You are trusted not to look at these papers or take them away when cleaning. DO NOT REMOVE MONEY or valuables which are left unsecured by the officer. They may have been called away in a hurry and may have forgotten to take their wallet, money, or watch. Notify the officer or the stateroom supervisor immediately. You are trusted not to take valuables. 2-6 JOB SCHEDULING 1. GENERAL. So that all weekly duties can be attended to, jobs can be spread out over the week, with some weekly jobs scheduled each day. For example, decks may be swabbed on Mondays, bed linens changed on Tuesdays, extra cleaning of heads and showers on Wednesdays, and so on. Major clean-up must also be scheduled regularly. If all jobs are carefully accomplished when scheduled, getting the spaces ready for field day (weekly inspection) should be just a matter of taking care of daily duties and touching up any weekly jobs that need last minute attention. A stateroom cleaning bill must be prepared. Major stateroom clean-up will be scheduled regularly. Some examples of major stateroom clean-up are monthly turning over of mattresses and vacuuming underneath (preferable during the week linen is changed), quarterly shampooing of carpets, and quarterly sending draperies, chair covers and bedspreads for dry cleaning. Figure Q-10 is an example of a stateroom cleaning bill: 4-28 Food Service Operation Handbook Figure 10 - Example of a Stateroom Cleaning Bill DATE:____________ From: Leading CS, Wardroom Mess To: All Stateroom CSs and Rotational Pool Personnel Subj: STATEROOM CLEANING BILL 1. In order to have a more uniform cleaning system, the following cleaning bill will be strictly adhered to by all personnel concerned. Any deviation of schedule will be referred to the stateroom supervisor or wardroom mess Leading CS. DAILY a. b. c. d. e. Clean wash basin, mirror, soap container and toothbrush holders. Make up beds for officers O-5 and above. Sweep and mop deck or vacuum carpet. Empty wastebaskets. Dust all furniture. WEEKLY a. Wash paintwork. b. Polish brightwork. c. Clean electric fans and wipe down light fixtures. d. Dust locker tops, shelves and overheads. e. Replace soiled hand and bath towels and replace with clean ones as scheduled. f. Deliver and pick up officers’ laundry as scheduled. g. Replace stripped linens with fresh clean ones. Leave linens on top of beds (O-4 and below only), as scheduled. h. Scrub and wax deck; or spot check carpet and remove stains as scheduled. i. Clean air conditioning filters and screens. j. General field day for certain staterooms as scheduled. Stand by for inspection. CLEAN AS SCHEDULED a. Monthly turn mattresses over and vacuum underneath (preferably during linen change). b. Quarterly send draperies, curtains, chair covers and bedspreads for dry cleaning. c. Quarterly shampoo carpets. SUBMITTED BY:________________________ APPROVED BY:__________________ Leading CS Division Officer Wardroom Mess Wardroom Mess 4-29 Food Service Operation Handbook 2-7 ADDITIONAL STATEROOM CLEANING 1. CLEANING WASHBOWLS AND MIRRORS. When cleaning washbowls and mirrors, apply cleaning material to a clean, damp cloth, and wipe mirror first, then the light with the cloth. Wash mirror and light first so that any falling dust and water can be wiped up when cleaning the bowl. a. Clean all metal, including faucets, valves, stoppers, and chain. b. Rinse the cloth in running water, add cleaning material, and clean all porcelain surfaces inside and out. Be sure to clean the underside of the rim above the overflow opening. Clean the overflow drain opening, using a thick fold of cloth or a wedge covered with the cloth. c. Rinse the cloth again and rinse porcelain and metal surfaces with fresh water. d. Dry and shine all surfaces with a clean dry cloth. e. Clean all exposed pipes below the basin. If the pipes are nickel, brass or copper, as scheduled. Also clean the bottoms of washbasins. polish 2. SWEEPING THE DECK. Decks must be swept carefully every day, which includes all corners. Place chairs on bunks while sweeping. Dampen the bristles of the broom slightly. This allows trash to be swept up more easily, and keeps dust from stirring up. Staterooms that are carpeted should be vacuumed. 3. SWABBING THE DECK. Check the cleaning schedule to see how often decks must be swabbed. When scheduled, swab them after they have been swept. Use a clean swab and hot soapy water. For best results, wring out the swab often. Dry the deck immediately with a clean swab. A wet deck is slippery and can cause accidents. 4. WASHING PAINTWORK. Weekly, or when scheduled, paintwork must be washed in staterooms. To do this, use hot soapy water and a clean rag. Use even motions up and down on the bulkhead. Rinse the suds off with clear water. Wring out the cloth often. Caution: Never use salt water soap on bulkheads, even for small spots. The soap destroys the paint’s shiny surface and makes the bulkhead more easily subject to soil. 5. CARE OF BUNKS. On the day when bed linens are scheduled to be changed, clean the bunk springs and turn the mattress. Reverse it from side to side, and also from end to end. This helps to prevent the mattress from getting lumps. Changing the areas where head, shoulders, and hips rest also helps to prolong mattress life. Do this once every month. 6. CHANGING TOWELS. Handling personal towels varies on different ships. On some ships, a supply of towels is issued to the officer when reporting aboard. The officer uses a clean one and puts the soiled one with clothes that are to go to the laundry. On other ships, the CSs or rotational pool personnel collect soiled towels, exchange them for clean ones, and put out clean ones on the days when towels are scheduled for changing. This may be done twice a week or more often. Follow the schedule of the ship. 7. CHANGING PILLOWCASES. To change a pillow case, grasp the soiled case by the corners of the closed end and shake the pillow out. Put the clean case flat on the bunk with its open end toward you. Place the pillow on the bunk just in front of the clean case. Open the case by grasping the corners near you and start sliding it onto the pillow. Lift them and shake the pillow into the case. 8. MAKING BUNKS. The characteristics of a properly made-up bunk are as follows: a. Square corners (all four corners); 4-30 Food Service Operation Handbook b. Bedspread 6-inches from head to mattress; c. Blanket 6-inches from foot of bed centered from both sides; d. Pillow centered at the head of bed and even with 6-inch folded top sheet; and, e. Bed sheet and bedspread tight and free from wrinkles. 9. CARE OF HEADS AND SHOWERS. Heads must be cleaned thoroughly every day. First flush the toilet. Next put cleaner or disinfectant into the bowl and let it stand while you clean the outside, adjoining pipes, seat hinges, and all around the base of the bowl. After cleaning the outside, use the special brush provided for cleaning the inside of the bowl. Be sure to scrub under the inside rim to prevent germs and odors from collecting there. The special brush has an extending tuff of bristles for doing this job quickly. Never use this brush on the outside of the stool or on the seat. Wipe the seat with disinfectant. Wash and dry the metal work. Wiping it with an oily cloth as soon as it is dry will prevent a green tarnish from forming on the metal. At least once a week, decks in heads and showers must be scrubbed and bulkheads cleaned. Soap dishes and shower heads must be cleaned, rubber mats scrubbed, shower curtains cleaned or changed if necessary and all brightwork polished in both areas. Figure 11 shows an example of a cleaning bill for stateroom heads and showers. 10. PASSAGEWAYS AND VESTIBULES. Passageways and vestibules are also important parts of the responsibilities of Culinary Specialists and rotational pool personnel, and must be incorporated in the daily and weekly schedules. Figure 12 is an example of a cleaning bill for passageways and vestibules. 4-31 Food Service Operation Handbook Figure 11 - Example of a Cleaning Bill for Stateroom Heads and Showers DATE:________ From: Leading CS, Wardroom Mess To: All Stateroom CSs and Rotational Pool Personnel Subj: CLEANING BILL FOR STATEROOM HEADS AND SHOWERS 1. In order to have a more uniform cleaning system, the following cleaning bill will be strictly adhered to by all personnel concerned. Any deviation of schedule will be referred to the stateroom supervisor or wardroom mess leading CS. DAILY a. Clean wash basins and wipe down mirrors. b. Refill soap and towel dispensers. c. Clean utility sink and storage area. d. Wipe down shower curtains. e. Scrub down shower stalls. f. Wipe down glass doors or stainless steel doors. g. Scrub rubber mats and air dry. h. Scrub, clean and disinfect/sanitize urinals and commodes (use rubber gloves). i. Wipe down partitions or dividers. j. Sweep and swab deck with hot soapy water and disinfectant. k. Replenish toilet paper. l. Empty trash can. m. Clean and neatly stow all cleaning gear in locker. WEEKLY a. Scrub down bulkhead. b. Clean overhead and light fixtures. c. Scrub down shower curtains; replace as required. d. Descale urinals and commodes. e. Wipe down and polish stainless steel and all other brightwork. f. Sweep, swab and scrub deck with hot soapy water and disinfectant. CLEAN AS SCHEDULED a. Replace burned out bulbs as required. b. Replace missing curtain hooks/rubber mats. c. Check for cold and hot water leaks. SUBMITTED BY:________________________ APPROVED BY:__________________ Leading CS Division Officer Wardroom Mess Wardroom Mess 4-32 Food Service Operation Handbook Figure 12 - Examples of a Passageways and Vestibules Cleaning Bill DATE:__________ From: Leading CS, Wardroom Mess To: All Stateroom CSs and Rotational Pool Personnel Subj: PASSAGEWAYS AND VESTIBULES CLEANING BILL 1. In order to have a more uniform cleaning system, the following cleaning will be strictly adhered to by all personnel concerned. Any deviation of schedule will be referred to the stateroom supervisor or a wardroom mess leading CS. DAILY a. b. c. d. e. f. Sweep down ladders; vacuum if necessary. Sweep, swab and buff passageways and vestibule decks. Wipe down ladder handrails with hot soapy water. Clean around deck coaming or hatch openings. Check angle iron ledges for gear adrift. Clean scuttlebutts. WEEKLY a. Spotcheck bulkheads and scrub down as required. b. Sweep, swab, wax and buff decks. c. Dust overhead, light fixtures and air vents. d. Clean baseboards and make sure all corners are completely cleaned. e. Scrub down ladders and dust guards with hot soapy water. f. Clean knife edges of hatches and ports. g. Polish brightwork as scheduled. CLEAN AS SCHEDULED a. Strip wax (once every two weeks or as scheduled). b. Check non-skid deck treads; replace when stripped or as required. c. Check for burned out bulbs and replace as required. d. Check for preservation and paint as required (Quarterly). SUBMITTED BY:________________________ APPROVED BY:__________________ Leading CS Division Officer Wardroom Mess Wardroom Mess 4-33 Food Service Operation Handbook 2-8 CARE OF DECK COVERINGS 1. GENERAL. Resilient coverings (vinyl, linoleum, etc.) are provided for the interior decks of many ships today. These coverings require special care. Rough and improper maintenance quickly destroys the appearance and durability of these decks. When cleaning deck coverings, scrub with a stiff-bristle tampico brush or circular brush, scrubbing machine, or swab, using a synthetic detergent cleaning solution. Avoid excess water, and use a limited quantity of detergent solution. To prolong the life of the material and prevent loss of deck adhesion, strong alkaline soap, abrasive cleaning compounds, or salt water should never be used. All water, cleaning compounds, and dirt should be removed and the deck rinsed with clear water, using a clean mop. The trick to efficient mopping is to use a rhythmic side-to-side stroke rather than a back-and-forth stroke. Do not try to over-reach. Stand erect and mop close to your feet, moving slightly backward (toward the buckets) as the mop nears your feet. Use fine steel wool, or a rag moistened with paint thinner, to remove stubborn grease and dirt. (See Figures Q-13 and Q-14 for more information on deck caring and cleaning recommendations.) After washing and drying, the covering may be buffed (without wax) to a velvet sheen with a buffing machine, or given a coat of wax (except certain linoleum) and allowed to dry without polishing. In applying waxes, (see Figure Q-15) the same tools are used for mopping decks but with one essential condition - the tools must be scrupulously clean. The wringer and the bucket must contain no traces of cleaning solution, and the mop must be perfectly clean and free of contaminants. It is desirable to have a separate mop on hand for applying wax only. It is important to remember that wax should always be applied THINLY AND EVENLY. Care taken in this respect will not only produce a better job, but will result in a longer lasting finish and make future deck finishing easier. The deck must be clean and dry and free of all stripping materials before waxing. 4-34 Food Service Operation Handbook Figure 13 - Deck Care Information TYPE DECK COMPOSITION FEATURE CERAMIC TILE CLAY AND WATER MIXTURE, GLAZED AND BAKED CLEANS EASILY BUT ALKALINE CLEANERS MAY RUIN GROUT BETWEEN TILES LINOLEUM FORMED OF BURLAP OR CANVAS, COATED WITH LINSEED OIL, POWDERED CORK, AND ROSIN EASY TO MAINTAIN BUT AVOID SOLVENTS AND EXCESS WATER RUBBER TILE RUBBER-NATURAL OR SYNTHETIC WITH INERT FILLERS AND COLOR PIGMENTS EASY TO MAINTAIN, OILS, GREASES AND SOLVENTS MAY CAUSE HARM TERRAZZO MARBLE OR GRANITE CHIPS MIXED WITH PORTLAND CEMENT AND GROUND SMOOTH VERY DURABLE, SHOULD BE MAINTAINED WITH SYNTHETIC CLEANERS VINYL TILE VINYL PLASTICS VERY EASY TO MAINTAIN; IMPERVIOUS TO ALMOST EVERYTHING STRATICA DECKING MINERAL FILLED ETHYLENE COPOLYMER WITH A DUPONT SURLYN SURFACE LOW MAINTENANCE, EASY TO CLEAN, NOSTRIPPING, NONWAXING, NON-BUFFING WITH A SIGNIFICANT REDUCTION IN WORKLOAD AFLOAT 4-35 Food Service Operation Handbook Figure 14 - Cleaning Recommendations TYPE DECK CLEANING SOLUTION NOTES CERAMIC TILE SYNTHETIC DETERGENT MILD ABRASIVE POWDER WET TILE WITH CLEAR WATER BEFORE OCCASIONALLY APPLYING CLEANER LINOLEUM SYNTHETIC DETERGENT PROMPT RINSING AND DRYING IMPORTANT RUBBER TILE SYNTHETIC DETERGENT RINSE AND DRY PROMPTLY TERRAZZO NEUTRAL SYNTHETIC DETERGENT WET WITH CLEAR WATER FIRST-RINSE AND DRY THOROUGHLY VINYL TILE SYNTHETIC DETERGENT WET FLOOR WITH WARM CLEAR WATER FIRST STRATICA DECKING RECOMMEND A NEUTRAL DETERGENT SUCH AS JOHNSON STRIDE 1000, BRITISH NOVA LIQUID 99, OR BUTCHERS SUNDANCE DO NOT USE ANY HARSH ABRASIVES ON STRATICA DECKING 4-36 Food Service Operation Handbook Figure 15 - Waxing Recommendations TYPE DECK TYPE FINISH NOTES CERAMIC TILE WATER EMULSION WAXES FLOOR MUST BE CURED AND NEUTRALIZED LINOLEUM EMULSIFIED RESINS, WATER EMULSION WAXES, SOLVENT LIQUID WAXES AVOID USE OF VARNISH OR LACQUER SEALING COMPOUNDS RUBBER TILE WATER EMULSION WAXES AVOID OILS AND SOLVENTS TERRAZZO EMULSIFIED RESINS AND WATER EMULSION WAXES SEAL TO PREVENT DUSTING AND STAINING VINYL ALL TYPES SOME SOLVENTS MAY ATTACK ADHESIVE 2. FLOOR WAXING. It is not always necessary to completely wax a deck when only small areas are worn. These areas can be cleaned and waxed separately, taking care to avoid waxing over perfectly good areas. This will prevent excess wax build-up, which will make tedious stripping projects unnecessary. In rewaxing decks that have not been stripped, on in spotwaxing decks, care must be taken to avoid mixing types of finishes. If a heavier coating is desired, allow the first coat to dry thoroughly and then apply a second thin coat. Steps in proper wax application are as follows: a. Rinse clean mop in clean water and wring thoroughly. b. Pour wax in bucket and saturate mop completely. c. Wring lower half of mop, leaving heel saturated. d. Swing mop in side-to-side motion, being careful to keep moist heat flat on deck and allowing fanning out strands to spread wax. e. If required, apply second coat after at least 1 hour of drying time. Two higher gloss and last longer than a single, heavy coat. f. thin coats give Buff with the buffing machine, if necessary, for appearance. To conserve wax and reduce maintenance, decks should be rebuffed several times before rewaxing. Decks may require only rewaxing in the traffic lanes once a week if dirty spots are promptly wiped up with a damp rag, and these areas are immediately redone. The most painstaking and careful maintenance of deck coverings may be wasted if the legs of furniture, especially movable pieces, are not properly equipped with rubber tips to prevent scratching and denting. If such tips are not provided, avoid dragging heavy objects across resilient deck covering. 2-9 CARPET CARE 1. GENERAL. The ability of carpets to perform the functions of many materials has long been recognized. Overall safety factors and low maintenance costs make carpeting a far more 4-37 Food Service Operation Handbook desirable and flexible environmental control material than any hard surface material which performs a single function. 2. PREVENTIVE MAINTENANCE. Maintenance time and costs can be greatly reduced and a good overall appearance of carpets can be maintained by eliminating soil and dirt before they are tracked into staterooms. Placing mats outside or inside entryways will eliminate most of the soil from shoes before it can be tracked onto the carpet. Critical high traffic areas, such as hallways and entrance doors, take the brunt of soiling. Frequent vacuuming and preventive maintenance in the high traffic areas will reduce the amount of time required to maintain these areas. 3. MAINTENANCE PROGRAM. Carpet maintenance requirements are directly related to the amount of traffic in the area. a. Daily. Clean with vacuum cleaner along all traffic patterns. It is extremely important to keep carpets as free as possible of loose, sandy, gritty soil. Remove spots and stains as they occur, if possible. b. Monthly. Shampoo using a good commercial-type steam cleaner, in accordance with manufacturer’s instructions. Proper shampooing procedures require the use of a neutral, synthetic detergent which is specially designed for cleaning carpets. 4. SPOTTING PROGRAM. A separate spot-cleaning program should be established, especially for areas where accidental spillage occurs at a higher rate. There are many excellent commercial spot-removal kits available for this type of use. Spills should be attended to as soon as possible and never left for more than a day. 5. DUST AND DIRT. Carpets are cleaned primarily to remove soil, in an effort to restore the original color, lengthen wear-life by the removal of gritty soil, and discourage mildew and other unsightly damages. A good carpet-care program will save time and money. 6. LOW MAINTENANCE. Carpeting requires only about half as much time to maintain as hardsurfaced decks. It is recommended that demonstrations be obtained from professional carpet cleaners before starting your carpet-care program. 2 - 10 CONTROL OF LINEN, CLEANING EQUIPMENT AND SUPPLIES 1. GENERAL. Aside from being expensive, supplies afloat are limited. A separate record should be kept for linens, cleaning equipment and consumable supplies. High and low limits for all items used should be established to assist in determining requirements. 2 - 11 PERSONAL LAUNDRY 1. GENERAL. Taking officers’ clothes to the laundry is another duty that varies from ship to ship. Individual ship schedules should be followed for taking care of personal laundry. When clean laundry is returned to the stateroom, the usual practice is to leave it out where the officer can check it to see that everything has been returned. In the captain’s or Admiral’s mess, it may be the responsibility of the attendant to check the clean laundry and put it away. 2 - 12 ACCESS TO STATEROOMS 1. GENERAL. Access to staterooms is a necessity in order to accomplish job requirements. This access should not be abused. To prevent conflict, Culinary Specialists and rotational pool personnel should be aware of their responsibilities and accountability while in these working spaces, and a check-in and check-out key control log should be maintained by the stateroom supervisor or wardroom leading CS. 4-38 Food Service Operation Handbook CHAPTER 5 OFFICERS' QUARTERS AND MESSES AFLOAT 1 – 0 AFLOAT MESSES ALIGNMENT OF FOOD SERVICE ACCOUNTING OPERATIONS Purpose..........................................................................................................................1-1 Scope .............................................................................................................................1-2 Mission ...........................................................................................................................1-3 Officers’ Messes Afloat ..................................................................................................1-4 Operation .......................................................................................................................1-5 2 - 0 ADMINISTRATIVE RESPONSIBILITY Administration and Technical Direction..........................................................................2-1 Navy Food Management Teams and Detachments.......................................................2-2 3 - 0 ADMINISTRATION OF OFFICERS’ MESSES AFLOAT Fleet and Unit Commanders ..........................................................................................3-1 Commanding Officers ....................................................................................................3-2 Mess President ..............................................................................................................3-3 Mess Treasurer or Wardroom Officer ............................................................................3-4 Duties and Responsibilities of the Mess Treasurer or Wardroom Officer ......................3-5 Meal Payment Methods .................................................................................................3-6 Guests............................................................................................................................3-7 4 - 0 ASSIGNMENT AND ADMINISTRATION OF ENLISTED PERSONNEL IN MESSES AFLOAT Culinary Specialist Personnel ........................................................................................4-1 Culinary Specialist Allowance ........................................................................................4-2 Culinary Specialist Assignments and Organization........................................................4-3 Wardroom Culinary Specialist Duties and Responsibilities............................................4-4 Food Service Attendant Personnel Utilization and Duties Wardroom............................4-5 CPO Culinary Specialist Duties and Responsibilities.....................................................4-6 Food Service Attendant Personnel Utilization and Duties CPO.....................................4-7 Alcoholic Beverages.......................................................................................................4-8 Name Tags for Enlisted Personnel ................................................................................4-9 Mess Personnel Training Program...............................................................................4-10 5-1 Food Service Operation Handbook Publications .................................................................................................................4-11 5 - 0 OFFICER’S QUARTERS AND MESSES AFLOAT PART A: INTRODUCTION Custom, Tradition, and Ceremony .................................................................................5-1 Wardroom Standards .....................................................................................................5-2 Habitability......................................................................................................................5-3 Quality of Facilities, Service, and Meals ........................................................................5-4 Use of Wardroom and Staterooms.................................................................................5-5 Association with Mess Personnel...................................................................................5-6 PART B: FACILITIES AND SERVICE Facilities .........................................................................................................................5-7 Equipment ......................................................................................................................5-8 Service ...........................................................................................................................5-9 Personal Service ..........................................................................................................5-10 5-2 Food Service Operation Handbook 1 – 0 AFLOAT MESSES 1 - 1 PURPOSE ALIGNMENT OF FOOD SERVICE ACCOUNTING OPERATIONS 1. GENERAL. All afloat mess accounting operations, to include Chief Petty Officer, Wardroom, Commanding Officer and Flag Messes have been aligned within existing general mess operations. Discontinuing mess accounting and singling-up food service accounting, for all messes other than the general mess will enable the supply department to reduce workload afloat and support the optimal manning initiative for the way ahead to food service distance support. Commanders and commanding officers in the fleet will ensure that officers' quarters and messes afloat operate within the principles, concepts and guidelines of this publication. All officer messes will subsist from the general mess. All messes will use the standard general mess menu. If deviation from the menu is required, all additional food items will be purchased separately in the form of bulk sale in accordance with P-486, paragraph 6300. The use of subsistence appropriation funds (SIK account) to defray the cost of these additional food items is strictly prohibited. a. Officer's mess bills will be collected monthly. Follow procedures for cash and credit sales of meals from the general mess as stated in paragraph 2201 and 2400. b. The general mess will claim the chief petty officer rations. c. The officer's and chief petty officer's mess will remain a separate dining facility and will continue to promote well being, traditional values and atmosphere. They will not be open to unauthorized personnel or pay-grades. d. Officer and chief petty officer messes are authorized to purchase "geedunk" and other specialty items using their non appropriated association funds. If the officer and chief petty officer messes wish to serve special meals in lieu of that days Navy Standard Core Menu as promulgated by their respective TYCOM they may do so pending proper coordination with the FSO. All items not adhering to that days NSCM must be purchased from the General Mess as a bulk sale and paid for accordingly. All food items used for a special meal different from the authorized NSCM must be purchased as a bulk sale. 1 - 2 SCOPE 1. GENERAL. This publication applies to all officers’ messes afloat. Recommendations for improvement to, or deviations from the manual may be requested in writing via the chain of command to the Commander, Naval Supply Systems Command (SUP 05). 1 – 3 MISSION 1. GENERAL. Officers' messes afloat are established for the purpose of promoting and maintaining the well being, morale, and efficiency of officers by providing dining, lodging, social, and recreational facilities aboard ship. 1 – 4 OFFICERS' MESSES AFLOAT 1. GENERAL. Officers' messes are generally categorized by their members and are defined as follows in subparagraphs 2-5. 5-3 Food Service Operation Handbook 2. FLAG MESS. When flag officers are regularly attached to ships they should establish their own mess and operate it with personnel assigned to their staff. Normally, the aide and staff division heads will be invited to be members of the flag mess. However, the admiral may invite such staff officers as they desire to join the flag mess. Staff officers not invited will become members of the ship's wardroom mess. 3. UNIT COMMANDER'S MESS. When a unit commander is regularly attached to a ship they may establish their own mess and operate it with personnel assigned to their staff. Normally, the commander's staff will be invited to be members of the mess. However the commander may invite such staff members as they desire. Staff officers not invited will become members of the ship's wardroom mess. If those ships that do not have separate unit commander and wardroom mess food preparation and storage facilities, the unit commander should join the wardroom mess and dine separately, if desired, rather than establishing a separate mess. 4. COMMANDING OFFICER'S MESS. The commanding officer of a ship may form his/her own mess. As a matter of custom, the commanding officer of a large ship will have his/her own cabin mess, while on small ships such as destroyers, the commanding officer generally eats in the wardroom mess. This is necessary, since on small ships the number of personnel assigned is insufficient to support two officer messes. The ship's manpower authorization and strength will normally indicate whether or not the commanding officer is expected to have his/her own mess. 5. WARDROOM MESS. Officers aboard a ship other than those subsisting in a flag mess, unit commander's mess, or commanding officer's mess must join the wardroom mess. This mess is normally the largest officers' mess on a ship. 1 – 5 OPERATION 1. LOCATION AND DESIGNATION. Officers' messes afloat will be physically located aboard ships and will be operated as integral parts of the Navy. Messes afloat will be designated as flag messes, unit commander's messes, commanding officer's messes, and wardroom messes. 2. STATUS. Messes afloat are instrumentalities of the United States Government. Consequently, they are established, organized, operated, and controlled by official regulations issued by the Department of the Navy. Furthermore, they will not be operated for financial profit of any individual, group, or organization. 3. MESSES ASHORE. Officers' and chief petty officers' messes afloat are not authorized to be physically located and operated ashore. Such messes, if operated ashore, will be established and operated under the provisions of the BUPERSINST 1710.11C, 2325. 4. EXCLUSIONS. This manual does not apply to commissioned officers' messes ashore, chief petty officers' messes ashore, troop messes on transport ships in service with the Military Sealift Command, cabin passenger messes on commissioned ships of the transport type, and general messes. 5-4 Food Service Operation Handbook 2 - 0 ADMINISTRATIVE RESPONSIBILITY 2 – 1 ADMINISTRATION AND TECHNICAL DIRECTION 1. GENERAL. The Chief of Naval Operations has assigned the responsibility for providing administrative and technical direction for the operation of authorized messes afloat to the Commander, Naval Supply Systems Command. Under the authority delegated by the Commander, Naval Supply Systems Command, the Deputy Commander for Support Services (SUP 05) is responsible for administering the Navy Food Service Program. Within the NAVSUP directorate for Support Services responsibility for the food service program is assigned to the Food Services Division (SUP 51). SUP 51 issues directives and letters of guidance, requires financial reports, audits and inspections, and provides technical assistance and training for managers and operating personnel. 2 – 2 NAVY FOOD MANAGEMENT TEAMS AND DETACHMENTS 1. GENERAL. Officers' messes afloat may obtain technical assistance the Navy Food Management Teams and detachments. These teams and detachments are field activities of NAVSUP Code 51. Procedures for requesting food management team assistance are described in NAVSUP P-486, Appendix H. 3 – 0 ADMINISTRATION OF OFFICERS' MESSES AFLOAT 3 – 1 FLEET AND UNIT COMMANDERS 1. GENERAL. Fleet commanders and unit commanders in the administration of ships under their command are responsible for ensuring that officers' quarters and messes under their cognizance are operated and maintained within the standards prescribed in this publication. 3 – 2 COMMANDING OFFICERS 1. GENERAL. Commanding officers are responsible for the proper operation and administration of the quarters and messes afloat in the command. As such, commanding officers will exert positive control of the messes through their capacity as mess president, or through the president of the mess if the commanding officer messes separately. 3 – 3 MESS PRESIDENT 1. GENERAL. In all officers' messes afloat the senior line officer member of the mess, in command or in succession to command, will be the mess president. This officer will preside over the mess and ensure the preservation of order. In the absence of the mess president the senior line officer present in the mess will act as president. The mess president exercises a command function and is responsible for mess administration. The mess president presides over and maintains order, ensures compliance with this publication and other mess regulations, and upholds the customs and traditions of officer messing. The president of the mess will set the example for conduct and behavior expected of mess members, and will look after the welfare of mess members. The mess president will no longer approve the menu. Wardroom messes currently subsist from the General Mess using the authorized Core Menu. All shipboard messes will serve the authorized Navy Standard Core Menu as promulgated by their respective TYCOM. 5-5 Food Service Operation Handbook 3 – 4 MESS TREASURER OR WARDROOM OFFICER 1. GENERAL. A mess treasurer or wardroom officer will be appointed for each officer’s mess except in those instances when a wardroom mess officer is authorized and assigned for the wardroom mess per the ships manpower authorization. A mess treasurer or wardroom officer will be appointed by the commanding officer for the wardroom mess (see Appendix B for template) and the commanding officer's mess using personnel assigned to the ship. Flag officers and unit commanders will appoint a mess treasurer or wardroom officer from personnel assigned to their immediate staffs. Frequent changes in personnel assigned mess treasurer or wardroom officer duties should be avoided. 2. ELIGIBILITY. Commissioned officers, warrant officers, and enlisted personnel in paygrades E-6 and above are eligible to serve as mess treasurer or wardroom officers for officers' messes afloat. Individuals charged with the custody and disbursement of public funds are ineligible for service as mess treasurer or wardroom officer. However, the mess treasurer or wardroom officer may be assigned the duties and perform the functions of mess caterer, and this practice is encouraged when possible on large ships, i.e., carriers. This assignment would be a primary duty vice the collateral duty of a mess caterer or a mess treasurer or wardroom officer. Members of an embarked staff are ineligible for duties as treasurer for the wardroom and commanding officer's mess. The assignment of mess treasurer or wardroom officer duties to enlisted members to officers' messes with multiple members is discouraged. 3. FLAG, UNIT COMMANDER, AND COMMANDING OFFICER'S MESSES. The assignment of mess treasurer or wardroom officer duties to enlisted personnel for messes serving one officer, such as a flag mess, unit commander's mess, or commanding officer's mess is encouraged when possible. 3 – 5 DUTIES AND RESPONSIBILITIES OF THE MESS TREASURER OR WARDROOM OFFICER 1. GENERAL. The mess treasurer or wardroom officer is responsible for keeping an account of meals sold on a credit basis utilizing the NAVSUP FORM 1046. The treasurer will also keep accounts of and transact all receipts and expenditures of cash and provisions. Officers charged with the custody or disbursement of public funds and members of embarked staffs are not eligible for the office of treasurer. Specifically, the mess treasurer or wardroom officer will: a. Exercise overall supervision of the operation of the mess, including collection of mess bills, and comprehensive advance planning. b. Assume responsibility for the receipt, safekeeping, deposit, disbursement, and accountability of funds. c. Ensure that all bills are paid before leaving port. Should circumstances preclude payment, the mess treasurer or wardroom officer will notify the commanding officer of the number and amount of unpaid bills on the day the ship leaves port. d. Compute the monthly mess bills. e. Collect basic charges and surcharges as applicable for all meals purchased/made available from the general mess no later than 15 days following the end of the month in which the meals were purchased. f. 5-6 Reimburse the food service officer for officer meals made available/purchased from the general mess no later than 15 days following the end of the month in which the meals were sold. Food Service Operation Handbook g. Reimburse the food service officer for provisions purchased from the general mess no later than 15 days following the end of the month in which the provisions were sold. h. Maintains accounts and transacts all receipts and expenditures of cash and provisions. Shall render a statement of the mess account to mess members at the completion of each month and be able to produce the books of the mess when requested by the Commanding Officer or Executive Officer. i. Use a “modified” NAVSUP Form 1367 (Monthly Financial Operating Statement for Messes Afloat) to track all daily transactions in the wardroom. j. Will maintain the following records as supporting documents to assist in tracking all daily transactions: (1) Records of Collection (2) Records of Expenditures (3) Records of Receivables (Assets) (4) Records of Liabilities (Payables) (5) NAVSUP FORM 1046 (Sale of Enlisted Dining Facility meals) 3 – 6 MEAL PAYMENT METHODS 1. MESSES SUBSISTING FROM THE GENERAL MESS. Meals will be sold at the rate prescribed by the Department of Defense and published on the Office of the Under Secretary of the Navy Homepage, www.dtic.mil/comptroller, Food Service Charges at Appropriated Fund Dining Facilities, Tab G and in the annual NAVSUP Sale of Meal Rates and Ration Credit Conversion Factors Naval Message. Mess treasurer or wardroom officers should contact the food service officer to obtain current prices. 2. PER DIEM. Messes which subsist from the general mess are required to collect a surcharge for meals from those individuals subsisting from the mess on a temporary basis and who are drawing per diem. Surcharge rates can be found on the Office of the Under Secretary of the Navy Homepage, www.dtic.mil/comptroller, Food Service Charges at Appropriated Fund Dining Facilities, Tab G and also in the annual NAVSUP Sale of Meal Rates and Ration Credit Conversion Factors Naval Message. 3. COLLECTION FOR MEALS SOLD ON A CREDIT BASIS. The mess treasurer or wardroom officer is responsible for maintaining the NAVSUP Form 1046 and collecting money for the credit sale of meals. 4. PAYMENT METHODS. For those activities on Navy Cash, collections will be made through the Navy Cash Program. Activities not on Navy Cash will be required to pay his/her mess bill at the end of each month via check or cash. 3 – 7 GUESTS 1. POLICY. Every officers' mess must have a policy which distinguishes guests of individual members from guests of the mess. 2. MEMBER’S GUEST. The cost of a meal for a member’s guest will be billed to the member at the end of each month. The consumption of a meal of a guest of a member will be recorded on the NAVSUP Form 1046. Special attention needs to be adhered to in order to ensure that the applicable meal rates and surcharges are applied to guests IAW the Sale of Meal Rates message and/or quarterly NAVSUP 5-7 Food Service Operation Handbook Notice 7330. Guests are not exempt from paying the applicable surcharge rates unless the Sale of Meal Rates message indicates otherwise. 4 – 0 ASSIGNMENT AND ADMINISTRATION OF ENLISTED PERSONNEL IN MESSES AFLOAT 4 – 1 CULINARY SPECIALIST PERSONNEL 1. GENERAL. Personnel of the Culinary Specialist rating and other enlisted personnel are assigned to officers' country to provide food service, to care for designated spaces, and to man assigned battle stations. In providing for the health and well being of the officers attached, and releasing officers' time for assigned duties, food service personnel are performing a vital service to the ship and to the Navy. The work of the food service personnel is a key factor in the morale of any wardroom. For this reason, it is essential that the work assignments be accomplished in an efficient and timely manner, that service be prompt and cheerful, that the compartments and rooms be clean at all times, and that training be provided to ensure that custom and etiquette are observed. It is equally essential that the officers recognize the importance of food service personnel by complimenting them for work well done. The proper performance of food service personnel is the collective responsibility of all members of the wardroom. 4 – 2 CULINARY SPECIALIST ALLOWANCE 1. GENERAL. The Culinary Specialist allowance is established by the manpower authorization for each ship or command. The number of Culinary Specialists assigned to a ship will vary considerably because of the size and design of the ship, the number of officers assigned, and the number of messes operated, i.e., commanding officer's mess, wardroom mess, chief petty officers' mess, etc. The manpower authorizations for ships do not, in every instance, specify the number of Culinary Specialists allocated to each mess. In those cases, the OPNAVINST 3120.32C, which provides the percentages allowed, should be used in the assignment of Culinary Specialists to more than one mess based on the size and numbers of members in each mess. An inequitable distribution to serve the interests of a small mess operation and to the detriment of a larger mess operation will be prohibited. 2. FLAG OFFICERS' MESSES. Embarked flag officer units are normally manned with Culinary Specialists but not with food service attendants. Additional augmentations and/or the use of shipboard Culinary Specialists are not authorized in the flag mess areas. On occasions depending on the circumstances, Food Service Attendants may be provided from the shipboard rotational pool but is not normally authorized and are highly discouraged. Flag mess staff must ensure they bring their appropriate manpower support of Culinary Specialists when embarked aboard naval vessels. 3. COMMANDING OFFICERS' MESSES. Commanding officers' messes and other small messes supporting a single officer will not be assigned more than two Culinary Specialists on a permanent basis. Commanding officers may temporarily augment the Culinary Specialists assigned to their mess when entertaining guests to provide adequate service using Culinary Specialists from other messes on the ship. 4 – 3 CULINARY SPECIALISTS' ASSIGNMENTS AND ORGANIZATION 1. GENERAL. In most ships, personnel allowance do not provide Culinary Specialists to separately fill all assignments contained in this manual, however, Culinary Specialists along with food service attendants can be organized to perform all required functions. Individuals of the Culinary Specialist rating should be assigned to officers' messes and 5-8 Food Service Operation Handbook stateroom spaces in supervisory capacities for sufficient periods of time to provide for continuity in the performance of assigned duties and teamwork in coordinating total officer support efforts. In this same regard, those duties which are less desirable and which require only minimum technical and professional competence should be rotated among assigned Culinary Specialist personnel to the maximum extent possible. This will ensure that all personnel assigned are provided an equal opportunity for professional growth and eventual advancement. 2. LEADING MESS PETTY OFFICER. The senior enlisted person assigned is the leading food service petty officer responsible to the mess caterer for the supervision of food service personnel and the day-to-day details of mess management. He/she supervises and trains assigned personnel, directs the procurement, preparation, and service of food, and works out the details of menus and seating plans for the approval of the mess caterer and the president. During meals he/she stations himself/herself in the wardroom to oversee the service and ensure that it is properly performed. A good leading food service petty officer will quickly determine the preferences of the members of the mess and adjusts meal planning accordingly. He/she will have a thorough knowledge of food and of menu planning, and will demonstrate great pride in his/her work. 4 – 4 WARDROOM CULINARY SPECIALIST DUTIES AND RESPONSIBILITIES 1. GENERAL. Culinary Specialists are responsible for performing the functions associated with the management and operations of messes and quarters afloat. The functional elements described below and associated tasks and duties contained within each functional area will normally be considered the responsibility of the Culinary Specialists. In cases where it is impractical to rely solely on Culinary Specialists, the rotational pool may be used to assist and support the Culinary Specialist personnel. 2. WARDROOM. Culinary Specialist personnel are responsible for the following: a. supervising wardroom mess personnel; b. determining the number of officers who will be aboard for meals; c. determining the number of guests expected and being alert for unexpected guests; d. ensuring that the proper number of tables and covers are provided to serve guests and officers; e. supervising the seating arrangement for meals; f. seeing that the "buck" is in its proper place before each meal (as applicable); g. supervising the serving of all meals and ensuring that: h. meals are properly served and on time; i. wardroom personnel uniforms are clean, unwrinkled, buttoned properly, and that the rules and requirements of personal hygiene are observed; j. wardroom personnel are attentive, alert, and do not lean on the sideboard or against the bulkheads during meal hours; k. changing soiled linens and napkins; l. avoiding waste of food and mess supplies of any kind; m. assuring that the wardroom and equipment are kept clean and neat at all times; and n. assuring table and chair covers are cleaned quarterly; drapes semiannually or as prescribed by the mess president or mess caterer. 5-9 Food Service Operation Handbook 3. GALLEY. Culinary Specialists are responsible for the following: a. preparing food for the wardroom mess; b. keeping the galley clean and neat; c. keeping all cooking utensils, ranges, stowage places, and other equipment clean and free from grease; d. disposing of garbage from the galley; and e. drawing stores for use in preparing food in the galley. 4. PANTRY. Culinary Specialists are responsible for the following: a. keeping the pantry and equipment clean and neat; b. ensuring leftover food is stored properly in a sanitary manner; c. polishing silverware and serving dishes; d. taking inventory of all silver; e. drawing and stowing stores; f. assisting in preparing food for the wardroom mess; g. keeping the wardroom mess storeroom clean; h. disposing of all garbage from the pantry; using proper plastic disposal procedures; i. handling all linens used in the pantry; and j. ensuring all dishes are washed. 5. STATEROOM AND LIVING SPACES. following: Culinary Specialists are responsible for the a. supervising personnel assigned to provide basic officer stateroom and living space maintenance and ensure the availability of cleaning gear. Cleaning gear lockers must be well equipped with adequate cleaning equipment and supplies in order to allow officers O-4 and below to maintain their living quarters b. ensuring that all tasks and duties are performed in a timely and efficient manner. 6. DUTY WATCH. Culinary Specialists are responsible for the following: a. keeping the wardroom and associated spaces in good order; b. setting out food for officers having the late watch; c. keeping fresh coffee, cream, and sugar available; and d. keeping the dishes washed and the pantry clean. 4 – 5 FOOD SERVICE ATTENDANT PERSONNEL UTILIZATION AND DUTIES (WR) 1. GENERAL. A rotational pool of enlisted personnel in pay grades E-1 through E-3 will be established to provide basic stateroom and associated space maintenance services in officers' quarters aboard ship. All personnel in pay grades E-1 through E-3 will be eligible for assignment to the rotational pool without exception, and normally will remain in the pool for a period not longer than 90 days. Petty officers will not be detailed to rotational pools except when E-3 and below personnel are not available. Refer to OPNAVINST 3120.32C, chapter 6 for FSA manning requirements. 2. STATEROOM AND LIVING SPACES. responsible for the following: 5-10 Food service attendant personnel will be Food Service Operation Handbook a. daily bed making services and weekly bed linen changing (only for commanding officers, executive officers, unit commanders and officers in paygrades O-5 and above or their equivalent); b. keeping all staterooms and associated living spaces clean by sweeping and dusting; shining sinks, mirrors and brightwork; scrubbing urinals, commodes and showers; emptying wastebaskets daily; vacuuming rugs; and waxing tiles; c. maintenance and cleaning of passageways and heads in officer's quarters; and d. ensuring that officers' beds have clean linen and that soiled hand and bath towels are changed twice weekly. 3. FOOD SERVICE RELATED SPACES, FOOD SERVICE AND FOOD PREPARATION. As delineated in para. 4-4, cleaning and maintenance of food service and related spaces including food service areas, food preparation areas and sculleries will normally be considered the responsibility of Culinary Specialist personnel. However, food service attendant personnel may be used to assist where it is impractical to rely solely on Culinary Specialists. Similarly, while food service is a Culinary Specialist responsibility, the rotational pool may also be used to support this function, including wardroom service and food preparation efforts. 4 – 6 CPO CULINARY SPECIALIST DUTIES AND RESPONSIBILITIES 1. GENERAL. Culinary Specialists are responsible for performing the functions associated with the management and operations of messes and quarters afloat. The functional elements described below and associated tasks/duties contained within each functional area will normally be considered the responsibility of the Culinary Specialists. In cases where it is impractical to rely solely on Culinary Specialists, the rotational pool may be used to assist and support the Culinary Specialist personnel. 2. CPO MESS. Culinary Specialist personnel are responsible for the following: a. supervising CPO mess personnel; b. determining the number of CPO's who will be aboard for meals; c. determining the number of guests expected and to be alert for unexpected guests while ensuring that CPO mess guests pay for their meal at the time services are rendered d. ensuring that the proper number of tables and covers are provided to serve guests and CPO's; e. supervising the serving of all meals and ensuring that:; f. meals are properly served and on time; g. CPO mess personnel uniforms are clean, unwrinkled, buttoned properly, and that the rules and requirements of personal hygiene are observed; h. CPO mess personnel are attentive, alert, and do not lean on the sideboard or against the bulkheads during meal hours; i. avoiding waste of food and mess supplies of any kind, and j. assuring that the CPO mess and equipment are kept clean and neat at all times. 3. GALLEY. Culinary Specialists are responsible for the following: a. preparing food for the CPO mess; b. keeping the galley clean and neat; 5-11 Food Service Operation Handbook c. keeping all cooking utensils, ranges, stowage places, and other equipment clean and free from grease; d. disposing of garbage from the galley; and e. drawing stores for use in preparing food in the galley. 4. LIVING SPACES. Culinary Specialists are responsible for the following: a. supervising personnel assigned to provide basic living space maintenance; and b. ensuring that all tasks and duties are performed in a timely and efficient manner. 5. DUTY WATCH. Culinary Specialists are responsible for the following: a. keeping the CPO mess and associated spaces in good order; b. setting out food for CPO's having the late watch; c. keeping fresh coffee, cream, and sugar available; and d. assisting FSA’s by keeping the dishes washed and the galley clean. 4 – 7 FOOD SERVICE ATTENDANT PERSONNEL UTILIZATION AND DUTIES (CPO) 1. GENERAL. A rotational pool of enlisted personnel in pay grades E-1 through E-3 will be established to provide basic living space maintenance service in CPO quarters aboard ship. All personnel in pay grades E-1 through E-3 will be eligible for assignment to the rotational pool without exception, and normally will remain in the pool for a period not longer than 90 days. Petty officers will not be detailed to rotational pools. 2. LIVING SPACES. Rotational pool personnel will be responsible for the following: a. pick up and delivery of bed linen. b. keeping all living and associated spaces clean by sweeping and dusting; shining sinks, mirrors and bright work; scrubbing urinals, commodes and showers; emptying wastebaskets daily; vacuuming rugs; and waxing tiles. c. maintenance and cleaning of passageways and heads in CPO quarters. d. operating scullery machine, ware washing, dish washing, washing of pots and pans. e. assist as servers on serving lines and/or during specific designated meal events as prescribed by the mess president or mess caterer. 4 – 8 ALCOHOLIC BEVERAGES 1. GENERAL. Sherry, wine, and beer may be served to American or foreign visitors in wardroom and flag messes on naval vessels in support of diplomatic and community relations goals. The authority, accountability and control of these alcoholic beverages are prescribed by the Office of the Chief of Naval Operations and contained in OPNAVINST 1700.16. These beverages shall be purchased using funds of the hosting mess. Under no circumstances shall general mess funds be used for the purpose of purchasing alcoholic beverages. 4 – 9 NAME TAGS FOR ENLISTED PERSONNEL 1. GENERAL. The publication, U.S. Navy Uniform Regulations (NAVPERS 15665I) Chapter 6, section 4, contains general regulations prescribing uniform apparel to be worn by Culinary Specialists and other food service enlisted personnel, including the wearing of name tags indicating name, rate, and command to which assigned. The wearing of 5-12 Food Service Operation Handbook nametags will assist officers and guests in correctly addressing the Culinary Specialist and other food service enlisted personnel during meals and at other times. 4 – 10 MESS PERSONNEL TRAINING PROGRAM 1. General. An effective training program for mess personnel is vital to establishing and maintaining proper mess standards. A division officer's notebook, with proper up-to-date records, written delegation of duties and responsibilities, and outlined training lessons with definite objectives, is as important for the Culinary Specialist as for any other division in the ship. It is a training program in which the commanding officer, executive officer, medical officer, supply officer, chaplain, caterer, and other officers, including the junior ensign, have an intimate and personal interest. All Culinary Specialists must be rotated into the positions of galley and pantry personnel, under the close supervision of the leading mess petty officer, to ensure their qualification in cooking. This is necessary both for their own personal growth and to broaden the base skills upon which to establish duty sections. 4 – 11 PUBLICATIONS 1. GENERAL. A complete and current file of directives and guides for the use of the mess caterer and assigned personnel is essential to the proper operation of officers' messes. The presence and use of the necessary publications will assist in ensuring that the required standards of food preparation, wardroom service, and stateroom service are met. Further, a complete set of applicable directives must be available for the use of personnel preparing for advancement in the rate. 5 – 0 OFFICERS' QUARTERS AND MESSES AFLOAT PART A: INTRODUCTION 5 – 1 CUSTOM, TRADITION, AND CEREMONY 1. INFLUENCE ON MILITARY SERVICE. Custom, tradition, and ceremony exert a profound influence on human behavior throughout life. This influence is particularly marked in the military service with customs, traditions, and ceremonies. Such stimuli, when understood and properly directed, can be of incalculable value to "esprit de corps". It is on discipline that the strength of the Naval Service rests, and ceremony to a marked degree enhances discipline. Proper dignified ceremony is more often in keeping with good custom than the lack of it. Every opportunity should be used to develop pride and discipline by the example of ceremony. 2. WARDROOM LIVING. The customs and traditions of wardroom living are dictated by propriety, good manners, and common sense. Since wardroom members are officers and gentlemen/ladies, the standards of social conduct, deportment, and dress expected of officers and gentlemen/ladies must be required in the wardrooms of the fleet, and expected of their members both afloat and ashore. 5 – 2 WARDROOM STANDARDS 1. GENERAL. To instill in their officers a respect for and habitual practice of these naval customs and traditions, commanding officers must require the highest standards of service, habitability, and cleanliness in their wardroom, and of neatness, decorum, and orderly manner of living by the members. While the degree of formality must, as a practical matter, differ between an aircraft carrier and a destroyer escort because of differences in physical facilities and number of personnel assigned, no ship in the fleet is 5-13 Food Service Operation Handbook so lacking in facilities or personnel that the minimum standards prescribed herein cannot be met. 5 – 3 HABITABILITY 1. GENERAL. Wardroom country is each officer's seagoing home. It should exhibit the maximum in habitability regarding meal preparation and dining facilities, berthing arrangements, appearance and decor, lighting, ventilation, and noise level. The structure and installed equipment provided in construction is but a base upon which attractive and comfortable facilities must be built. The guidance of the commanding officer and the interest and efforts of all officers are required. 5 – 4 QUALITY OF FACILITIES, SERVICE, AND MEALS 1. GENERAL. The quality and variety of china, silverware, linens, and equipment in the ship's allowance list are the minimum required and therefore must be maintained, augmented as necessary, and used when appropriate. Alert, attentive, well-trained, and well-groomed food preparation personnel must be expected and required. The service of varied, well-prepared, and attractively presented meals must likewise be expected and required. The achievement of high standards of facilities and food service depends on the cooperation of all mess members, which in turn must be elicited by the commanding officer. 5 – 5 USE OF WARDROOM AND STATEROOMS 1. GENERAL. Wardroom and staterooms are officers' country, the seagoing home for officers aboard ships, and should not be entered by others except when on official business or when invited. When an officer has anyone in officers' country for business or social purposes, he/she must keep in mind that he/she is using the home of other officers as well. For these reasons, official business should be conducted in other parts of the ship to the maximum extent possible. Wardroom pantries, washrooms, and storerooms are out of bounds to personnel other than mess members and mess personnel, except for official business related to those spaces. 5 – 6 ASSOCIATION WITH MESS PERSONNEL 1. GENERAL. The mess personnel duties and their continuous presence in officers' country produce an especially close relationship between the enlisted personnel and mess officers. Successful wardroom operation depends upon the mutual trust and respect of this relationship which results from high levels of personal honesty and integrity. Officers who do not display the qualities necessary for this special group should not be allowed to remain in the mess. Each officer must, by his/her attitude and comments, show the mess personnel his/her recognition and appreciation of their importance to the mess, the ship, and the Navy. Mess personnel are to be addressed courteously by name. Each officer must ensure that others enjoying the privileges of his/her mess observe these requirements. PART B: FACILITIES AND SERVICE 5 – 7 FACILITIES 1. GENERAL. The ship structure and installed equipment in officers' country is the basis upon which a proper facility can be built. Within the limitations of funding, the judicious expenditures of supplies and equipage and overhaul monies on allowed items must be exercised to obtain maximum levels of habitability. Improvisations with tender assistance can correct many of the design deficiencies in our ships. Finally, the members of the 5-14 Food Service Operation Handbook mess must not be reluctant to expend their own efforts in the physical improvement of their wardroom, since it is, after all, their home. 2. CAMARADERIE AND ESPRIT IN WARDROOMS. To foster camaraderie and esprit in wardrooms and to improve the opportunity for informal discussion and association between junior and more senior officers, commanding officers should modify facilities as feasible to provide for maximum seating at one service. 3. VENTILATION AND SOUND REPRODUCTION. Efforts should be made to ensure adequate ventilation and sound reduction is maintained through insulation, paneling, etc. 4. IMPROVEMENTS IN DECOR. Improvements in decor through the use of indirect lighting, carpeting, draperies, pictures, and furniture coverings should be pursued in a planned manner. Professional advice in matters of arrangement and decor,usually available without charge from quality establishments, should be obtained whenever possible. 5. RECREATIONAL ITEMS. Recreational items including radio, stereo, television, and games should be provided. 6. ADEQUATE AND HABITABLE DINING AREA. An adequate and habitable dining area for assigned Culinary Specialists and other enlisted mess personnel should be provided when practicable, or in its absence mess personnel should be provided the option of dining in the general mess. 5 - 8 EQUIPMENT 1. GENERAL. An officers' mess afloat cannot operate in keeping with the standards prescribed herein without adequate types and quantities of equipment and supplies. The allowances of equipment and furnishings tabulated in the COSAL are minimum required quantities; the quantities on hand are dictated by the usage necessary to meet the prescribed standards of service. The full use of allowed equipment and supplies eliminates the need for practices not in keeping with the standards of wardroom living such as placing condiment bottles, milk boxes, and paper on wardroom tables. Basic necessities for wardroom living are available through the Navy supply system, but wardrooms are encouraged to add additional refinements to increase habitability. Standard or non-standard allowance items which are not in stock must be ordered from the supply system. Non-allowance items urgently required may be purchased commercially. 2. MAINTENANCE OF FOOD SERVICE EQUIPMENT a. General. Personnel other than maintenance personnel will not be permitted to make repairs. If it becomes necessary to employ the services of a commercial establishment, the cost of such services, plus any parts supplies, will be paid by a Voucher for Disbursement and/or Collection (NAVCOMPT Form 2277) charging the appropriation, Operation and Maintenance Navy. b. Inspection. In addition to a thorough inspection for cleanliness, all food service machinery and equipment will be carefully examined by the personnel who operate the machinery for loose nuts, bolts, parts, connections, and the like, before beginning operations. This inspection each morning is especially important afloat where machinery is subject to a high degree of continuous vibration. Also afloat, a thorough inspection of machinery will always be made after firing the guns and upon completion of any structural tests to which the ship may be subjected. c. Lubrication. Maintenance personnel should assume independent responsibility for proper lubrication of food service machinery and equipment. 5-15 Food Service Operation Handbook d. Speed of Machinery. Under no circumstances will food service machinery be operated at a speed in excess of that prescribed by the manufacturer. 5 – 9 SERVICE 1. GENERAL a. Assigned Personnel. Service is provided by the assigned personnel. Except in the smallest ships, the number of personnel authorized is designed to supply the full range of services defined by the skill required of the Culinary Specialist group rating. b. Shortages of Personnel. Shortages of food service personnel may occur from time to time to the extent of requiring a reduction in normal services. Commanding officers must ensure an equitable distribution of services among all officers aboard. Reduced services must be progressively restored as the number of food service personnel approaches the allowance level. In a like manner, a shortage of food service personnel will require streamlining of service. This must be done by simplifying meals, not by neglecting proper service. c. Maintenance of Standards for Serving Meals. Heavy demands are placed upon the time and energy of officers in today's Navy. Shortages of Culinary Specialist personnel must not be justification for reduction in standards such that properly served meals are not available in the mess at normal meal hours, regardless of the number of officers aboard. 2. WARDROOM SERVICE. To maintain proper standards in wardrooms, service must be organized to: a. Provide individual table service at the breakfast meal and on those special occasions deemed appropriate by the president of the mess and the commanding officer. Individual service may also be necessary because of physical constraints of space or for other reasons, and in this regard, type commander and fleet commander guidance should be followed. At all other meals, family or buffet style food service will be used in officers' messes afloat. b. Provide duty watch service to tend the wardroom and provide food for the late watch. c. Keep the wardroom clean and neat at all times. d. Provide meal service in an efficient, timely, and courteous manner. 3. STATEROOM SERVICE. Minimum standards of stateroom service must be organized to: a. Deliver and return laundry and dry cleaning from the ship's laundry as scheduled and requested. b. Make up beds daily for commanding officers, executive officers, unit commanders, and officers in paygrades O-5 and above or their equivalents. Change bed linens weekly. c. Maintain staterooms and associated spaces in a high standard of cleanliness. 4. PANTRY LINEN SERVICE. Linen service will provide: a. Clean pantry towels daily. b. Clean mess jackets, in good repair and in proper sizes, as required or prescribed by the mess president or mess caterer. 5-16 Food Service Operation Handbook 5 – 10 PERSONAL SERVICE 1. GENERAL. The following services are considered of a personal nature and therefore are the sole responsibility of individual officers: a. Bed making and bed linen changing except as noted in para. 5-9, 3b. b. Care, maintenance and orderliness of personal effects which include military uniforms, uniform accessories, and shoes. c. Sorting and stowage of personal laundry. 5-17 Food Service Operation Handbook THIS PAGE INTENTIONALLY LEFT BLANK 5-18 Food Service Operation Handbook CHAPTER 6 CHEMICAL, BIOLOGICAL AND RADIOLOGICAL DEFENSE 1 - 0 CBR Defense General ............................................................................................................................... 1-1 Chemical Defense............................................................................................................... 1-2 Biological Defense .............................................................................................................. 1-3 Decontamination of Equipment and Spaces....................................................................... 1-4 Prevention of Recontamination........................................................................................... 1-5 Decontamination of Food Items .......................................................................................... 1-6 Radiological Defense .......................................................................................................... 1-7 Radiological Contamination ................................................................................................ 1-8 Decontamination ................................................................................................................. 1-9 Food Preservation............................................................................................................... 1-10 Additional References......................................................................................................... 1-11 6-1 Food Service Operation Handbook THIS PAGE INTENTIONALLY LEFT BLANK 6-2 Food Service Operation Handbook 1 – 0 CHEMICAL, BIOLOGICAL AND RADIOLOGICAL DEFENSE 1-1 GENERAL SECNAVINST 3300.2b titled the DEPARTMENT OF THE NAVY (DON) ANTI-TERRORISM (AT) PROGRAM is the implementation directive for DoD Directive 2000.12 which sets forth the DoD Antiterrorism Program. Food safety and Bio Terrorism is a major concern today in all areas of food service. Food and water security measures include those actions taken to detect, prevent, and mitigate the effects from intentional acts designed to disrupt or contaminate food and water sources. Recent terrorist activities have made bio-terrorism a real concern in the area of food safety. It is imperative that Culinary Specialist are made aware of this danger and are prepared to meet this threat, especially when dealing with overseas vendors and husbanding agents. It is extremely important that steps are taken to ensure that subsistence is being procured from approved sources and that a thorough inspection of all food items has been completed prior to stowage onboard. These steps are necessary in ensuring that the consumption of contaminated food is avoided at all cost eliminating the chance of illness, injury or death. The nature of the chemical, biological, and radiological contamination problems, outlining basic defense measures, and procedures to be followed when decontaminating eating, drinking and galley utensils, galley equipment, and food preparation spaces are discussed in the following paragraphs. 1-2 CHEMICAL DEFENSE 1. GENERAL. Chemically contaminated food is difficult to decontaminate. Due to limits in the ability to detect contamination that is bound to other materials, the use of such food will always pose a major risk. Methods are given for decontaminating eating, drinking, galley utensils, dinnerware dining spaces, food items, and water. 2. COMBINATION. Descriptions of chemical agents, methods of detection and identification of the various agents, material, equipment, and clothing to be used by decontamination personnel, and methods of decontamination to be employed in the recovery of various areas, spaces, materials, and objects are published in NAVMED P-5059 “NATO Handbook on the Medical Aspects of NBC Defense Operations,” NSTM Chapter 470, “Shipboard BW/CW Defense and Counter Measures,” and NAVMED P-5041, “Treatment of Chemical Agents Casualties and Conventional Military Chemical Injuries.” Descriptions of Biological Warfare Agents are published in NAVMED P-5042 “Treatment of Biological Warfare Agent Casualties.” 3. DECONTAMINATION OF FOOD SERVICE SPACES AND EQUIPMENT. The degree of contamination of food, food service spaces and equipment will depend on the chemical agents used and the factors involved such as the method of delivery, the weather, and various degrees of contamination (vapor contamination, light liquid contamination and heavy liquid contamination). 4. VAPOR CONTAMINATION. After surrounding areas have been decontaminated, the enlisted messing facility should be aerated thoroughly and the entire food service space washed down, inside and out, with clean water. All equipment and utensils used in the preparation and service of food should be washed carefully, using normal procedures. Spaces, utensils, and equipment then should be tested with the chemical agent detector kit and, if necessary, any of the prescribed procedures should be repeated. 5. LIGHT LIQUID CONTAMINATION. The food service spaces, inside and out, should be washed with hot water and an alkaline detergent, such as standard dishwashing compound. The application of the solution at high pressure will increase effectiveness. During and after cleaning, the spaces should be aerated. If slight contamination remains, the food service spaces should be heated to as high a temperature as possible for about 1 to 2 hours. The spaces then should be opened and ventilated for 15 minutes. This procedure should be repeated as necessary, 6-3 Food Service Operation Handbook testing at intervals with the M8 Chemical Agent Detector Paper, M9 Chemical Agent Detector Paper (tape) or detector kits such as the M256 Chemical Agent Detector Kit. Porous objects, such as wooden benches, will absorb liquid contamination to the extent that it probably will be necessary to destroy them. Decontamination of utensils and equipment is discussed below. 6. HEAVY LIQUID CONTAMINATION. Heavy liquid contamination is unlikely, except from a direct hit. However, where the necessity of the local situation requires that the food service officer attempt recovery, the following procedures are recommended: a. Spaces. As no amount of washing or scrubbing of a porous surface that is heavily contaminated by a liquid chemical agent, particularly mustard, is likely to do much good, heavily contaminated areas should be roped off or abandoned as unsalvageable. Residual contamination on nonporous surfaces or other light contamination should be removed as described for “light liquid contamination.” b. Utensils. Metal, glass, or china utensils or any equipment not damaged by water should be immersed for 30 minutes in actively boiling water. Add 1 cup of alkaline detergent to each 5 gallons of water. This process should be followed by normal dishwashing procedures. c. Large Equipment. Large equipment unsuited for immersion in boiling water should be scrubbed vigorously with DS2 (general-purpose decontamination that is effective for all toxic chemical agents) solution of hot water and an alkaline detergent, rinsed, disassembled, and scrubbed again with particular attention to parts not reached by the first washing. The equipment should be rinsed, dried, oiled, greased, and reassembled. Any wooden items should be removed and destroyed. d. Electrical Equipment. Unless the electrical unit is enclosed in a watertight seal, water must not be used in the decontamination processes. Electrical equipment should be decontaminated with DS2 or other solutions and methods as directed by the damage control assistant or disaster control officer. e. Decontamination of Water. In war, all water from undetermined sources is considered contaminated. There are no field methods for individuals or small units to decontaminate water sources. Disinfection does not remove chemical agents. Certain types of standard water purification equipment, held by engineer/quartermaster units, are capable of removing chemical contaminants from water; however, some modification of procedures may be required. Water that has been obtained from approved sources, stored in impermeable containers and has retained its residual disinfectant can be considered safe for drinking provided that external decontamination of the container has been performed. Any water source suspected of contamination should not be used unless the absence of contamination has been confirmed using a chemical testing kit. The following table (Table 1) gives some guidance on the effects of liquid chemical agents on water. 6-4 Food Service Operation Handbook TABLE 1 Effects of Liquid Chemical Agents on Water Effect of Agents on Water Chemical Taste Smell Color Toxicity Mustard Acid Bad Yellow Yes N-Mustard Acid Bad Yellow Yes Arsenicals Acid Bad Yellow/Turbid Yes Nerve Acid None None Yes Cyanogens Bitter None None Yes, but rapidly fades f. Decontamination of Food. The effect of chemical agents on food depends on both the nature of the agent and the nature of the food. These physical and chemical properties determine the degree of penetration of the food by the agent as well as whether any chemical reaction will take place. This in turn determines whether decontamination is possible. There is likely to be a requirement for military units to go completely over to using prepackaged foods in air tight containers. Physical and chemical absorption of agents into food can take place. In either event, the taste, smell, and appearance of the food may be affected. In addition, food may become highly toxic without any change in outward appearance. Field concentrations of phosgene and HCN would be unlikely to cause any serious contamination. Unlike the case with water, both liquids and vapors can cause spoiling of food. The following table (Table O-2) gives some effects of agents on foods. 6-5 Food Service Operation Handbook TABLE 2 - Effects of Chemical Agents on Water 1-3 Agents Food Type Action Liquid Nerve All Condemn Vapor Nerve Low fat/High moisture Dry food should be exposed to air for 48 hrs., others to be washed with NaHCO3, peeled if possible, and cooked by boiling. Vapor Nerve Low fat/Low moisture Dry food should be exposed to air for 48 hrs., others to be washed with NaHCO3, peeled if possible, and cooked by boiling. Vapor Nerve High fat content Condemn Liquid Blister All Condemn Vapor Blister Low fat/High moisture Dry food should be exposed to air for 48 hrs., others to be washed with NaHCO3, peeled if possible, and cooked by boiling. Vapor Blister Low fat/Low moisture Dry food should be exposed to air for 48 hrs., others to be washed with NaHCO3, peeled if possible, and cooked by boiling. Vapor Blister High fat content Condemn Choking All Agents decompose in water, wash food and expose to air for 24 hrs. Food may be unpalatable and require disposal. Cyanogens All Unlikely to have any effect. BIOLOGICAL DEFENSE 1. GENERAL. Current and emerging technology indicates that the most effective route for Biological Warfare Agents to gain entry into the body is the respiratory tract using aerosols 1-5 microns in diameter. Biological warfare employing the oral route of entry through ingestion of deliberately contaminated food may be limited to small terrorist attack scenarios. The deliberate use of heat stable toxins, however, such as staphylococcal enterotoxin, which is frequently the cause of reported peacetime outbreaks of foodborne illness, would make identification of a biological warfare attack very difficult. Development of detectors, the use of individual protective equipment and prophylaxis will be the best protection against biological warfare attack. The general sanitation procedures discussed in this section are very important from a food sanitationviewpoint, but will have little impact in reducing the effect of a biological warfare attack employing aerosols. The instructions of the military commander should enable the supply officer to operate an enlisted messing facility under conditions following a biological attack. The following instructions prescribe the protection that should employed in the decontamination of eating, drinking, and galley utensils, food preparation equipment, dining spaces, food items and water in an area contaminated by biological agents. In contrast with nuclear and chemical contamination, it 6-6 Food Service Operation Handbook probably will be impossible to locate or identify in a reasonable time specific items or areas that are contaminated with biological agents. Similarly, it will not be possible to measure the completeness or efficiency of the biological decontamination unless tedious laboratory procedures are used; therefore, all surfaces that would be health hazards if contaminated will be regarded as contaminated and treated accordingly. 2. PRECAUTIONS IN BIOLOGICAL DEFENSE. Decontamination teams should wear individual protective equipment including the MCU–2/P protective mask. Precautions should be taken to prevent any personnel from entering uncontaminated spaces. 3. CONTAMINATION BY BIOLOGICAL AGENTS. When treating the problem of biological contamination, it is assumed that there could be contamination of personnel, of all exposed surfaces, and of surrounding air. These instructions are intended for use in the event of suspected or known contamination. The task is to decontaminate and prevent recontamination. The major risk from transmission of infectious disease is from droplet nuclei, tiny particles that do not settle readily. Because of their size, they can bypass the barriers in the upper airway and settle in the alveoli of the lungs. Large particles will settle rapidly; while they are less likely to be inhaled, they can contaminate surface and foodstuffs. Contamination on food and surfaces may be ingested with the food or carried from the surfaces to the mouth by hand-to-mouth contact. Because of the current difficulty in rapidly detecting biological agents, knowledge of contamination may (although, not necessarily) be based on the occurrence of widespread or unusual sickness. This sickness could be caused by contamination that had occurred several days or weeks before. 1-4 DECONTAMINATION OF EQUIPMENT AND SPACES 1. INITIAL PROCEDURES. After contamination has occurred, decontamination measures should be carried out (as described below) so that recontamination will not occur. Decontamination procedures and chemicals. Steam application to surfaces, when available, is effective and may be used ashore and afloat. Afloat, Naval Ships’ Technical Manual (NSTM), Chapter 470, outlines a steaming procedure for decontaminating spaces. Calcium hypochlorite (65-70%) used as a one percent or 9 percent solutions in water with 0.5 percent detergent (Decontaminating Compound, NSN 9G 6850-00-664-2008) is readily available and is recommended. If the above detergent is not available, Liquid Detergent #50, NSN 7930-00-2829699, or equivalent may be substituted. Disinfectants such as iodophor solutions (germicidal or detergent) or other disinfectants registered with the Environmental Protection Agency (EPA) may be used if chlorine is not available. The medical department should be contacted for advice and recommendations as necessary when using these solutions. If calcium hypochlorite is not available, the deposits can be removed (physical decontamination) by the use of detergent solutions alone. In addition to the CBR decontamination compound a variety of detergents or cleaning compounds are available including liquid chlorine bleach and other laundry and dishwashing compounds, solvent-emulsion and water emulsion cleaners. 2. DECONTAMINATION OF VARIOUS TYPES OF EQUIPMENT a. Large Equipment. Large equipment (those items too large to be immersed in sinks or run through dishwashing machines) should be washed, rinsed, and decontaminated in the same manner as prescribed for interior surfaces of food service spaces. The methods most suited to decontaminating large equipment are those involving the use of hypochlorite and detergent solutions. Hypochlorites are corrosive to all metals that will rust and should not be allowed to come into contact with motors and other electrical equipment from which such hypochlorites could not be thoroughly wiped off. As much equipment as possible should be covered with clean cloths after decontamination to prevent recontamination. Hypochlorites identified as 6-7 Food Service Operation Handbook calcium hypochlorite (high-test hypochlorites), which contain 65-70 percent available chlorine can be used. This is the most concentrated form of hypochlorite or active chlorine available. Its normal use is for disinfecting potable water, potable water tanks, potable water hoses, etc. (NAVMED P-5010-6). This solution can be used, after suitable dilution, for decontamination or the calcium hypochlorite can be dissolved in 1 gallon of water, which gives a solution of 5,000 ppm (0.5 percent) available chlorine. b. Small Items of Equipment. Small items of equipment that will not suffer damage by immersion should be washed, rinsed, and sanitized in the manner described here for eating and drinking utensils. c. Dining and Small Galley Utensils and Other Small Items. Dinnerware, small galley utensils, and all other small items should be decontaminated. Items not absolutely essential to the operation or the mess can be removed more easily than decontaminated. 3. ADDITIONAL PROCEDURES. In addition to the initial procedures, decontamination should continue for as long as it is determined by competent authorities that danger exists. Interior surfaces, except overhead and bulkhead surfaces out of reach, should be decontaminated daily as long as the danger exists. Also, as long as the danger exists, large equipment should be decontaminated before and after each meal, and small equipment and utensils should be decontaminated after each use. After decontamination, the small equipment and utensils should be covered with a clean cloth. Direct exposure to bright sunlight for an hour or more is an effective decontaminant for smooth, nonabsorbent surfaces. Most exterior surfaces of building and ships where rapid decontamination is not required will be decontaminated satisfactorily by environmental conditions, sunlight, and time. Dirty, dusty, or porous surfaces tend to protect biological organisms from direct rays of the sun. 4. MACHINE WASHING GALLEY UTENSILS. The machine dishwashing instructions given in this manual shall be scrupulously observed with qualified supervisory personnel stationed in the scullery. a. Additional Washing Precautions. The interior walls of the scullery, all working surfaces (tables, dish carts, and sinks), the interior and exterior of dishwashing machines, and all other equipment used in the washing and sanitizing of eating and drinking utensils should be thoroughly washed, rinsed and decontaminated (sanitized). After all surfaces and equipment have been decontaminated, eating and drinking utensils should be brought to the scullery for decontamination. Decontamination of such utensils must be accomplished by following the instructions for washing and sanitizing eating and drinking utensils contained in this manual and the “Manual of Naval Preventive Medicine” b. (NAVMED P-5010-1). c. Decontaminated eating and drinking utensils should not be handled by any person who has previously handled contaminated utensils and should not be placed in contact with any surface that has been exposed to contamination. Baskets or containers should hold silverware in a vertical position, handle down, during the washing and sanitizing procedure. Additionally, containers should be available into which the silverware may be inverted without being handled by workers. If such containers are not available, silverware should be laid flat in racks not to exceed one layer of utensils. Particular care should be exercised in removing utensils from racks after decontamination to prevent recontamination. d. Sanitizing. If properly operating dishwashing machines, with the wash, rinse and sanitizing rinse at the recommended temperatures are not available, it will be necessary to manually wash and/or manually sanitize the dishware in a deep sink, steam jacketed kettle or other 6-8 Food Service Operation Handbook container. The sanitizing rinse may be hot water (170° F. for 30 seconds) or an approved chemical sanitizing agent. e. After Sanitizing. After sanitizing, cover the wash racks containing utensils with a cloth that has been sanitized by boiling or soaking in an approved sanitizing solution. 5. HAND WASHING GALLEY UTENSILS. Eating and drinking utensils may be washed and anitized to effect decontamination by manual methods as described in “Manual of Naval Preventive Medicine” (NAVMED P-5010-1). The washing precautions noted in the instructions in this manual for machine dishwashing are equally applicable to manual dishwashing. 1-5 PREVENTION OF RECONTAMINATION 1. GENERAL. Recontamination may be caused by secondary aerosols or clouds formed from particles (bacteria or other organisms) which having been deposited on a surface, are stirred up into the air again by scuffing, shaking, or other mechanical action. Although the degree of danger that these secondary aerosols represent has not been definitely established, protective measures to suppress them should be taken. Secondary aerosols may be suppressed by wetting surfaces with oil or water. If oil is used as a suppressant, it must not generate harmful vapors (cooking oil is suggested) and it must not be applied to walking surfaces, which may create slippery conditions. A suppressant should be used and traffic should be restricted in food preparation areas. It is important to ensure that before entering food service spaces, culinary specialists and all personnel eating in the dining area are as free as possible from contamination. The medical and public works officers and the damage control assistant may be consulted on the decontamination of personnel. Personnel should be indoctrinated in at least the objectives of biological defense. It has been found that removing clothing will shake off organisms covering on the surfaces, thereby, setting up secondary aerosols. Therefore, in cold weather, personnel in dining lines should remove outer garments and leave them outside food service spaces prior to entering. Unauthorized personnel should not be permitted in the food service spaces. 1-6 DECONTAMINATION OF FOOD ITEMS 1. GENERAL. The advice of the medical officer should be sought before any attempt is made to decontaminate food suspected of biological contamination. 2. DRY ITEMS. Food stored in containers that are resistant to the passage of biological agents (sealed containers of metal, plastic, glass or porcelain) requires only the proper exterior decontamination be performed. Paper labels and paper covers should be removed from the container (identify contents of container using a grease pencil if necessary) and one of the following methods of decontamination should be used: a. Immerse the container for one minute in a solution of warm water containing not less than 200 ppm available chlorine. Check the concentration periodically to ensure the chlorine residual is maintained above 50 ppm. A potable water rinse is not necessary. Clean containers may also be immersed in hot water, at least 170° F. for 30 seconds. b. If the impermeable containers are soiled and require detergent cleaning, they should be processed by dishwashing and sanitizing procedures either by machine or manually. c. Impermeable containers may be sanitized using any of the standard chemical methods (such as bleach slurry, sodium carbonate, or DS2) followed by rinsing in potable water). d. Food packages that will not stand immersion should be wiped off with a solution of water containing 200 ppm available chlorine. The food is to be thoroughly cooked before it is served. 6-9 Food Service Operation Handbook e. Food packed in sacks or other permeable containers, (e.g., fruit vegetables, nuts, etc.) can be decontaminated by immersion for at least 15 minutes in a 100 ppm free available chlorine solution or 30 minutes in a 50 ppm free available chlorine solution and by thoroughly rinsing with potable water before cooking or serving. Head items, such as lettuce, cabbage, celery, etc., must be broken apart before immersion. 3. FRESH OR CHILL ITEMS a. Foods That Can Be Peeled or Pared. Foods that can be peeled or pared may be decontaminated by using the procedure described for food packed in sacks above. b. All Other Fresh or Chill Items. The use of heat is the most practicable means of decontaminating contaminated foods. Thorough cooking will reduce contamination to a safe level so food can be consumed. Specific methods to be followed in this form of decontamination are outlined under “Additional Precautions” later in this chapter. 4. FROZEN ITEMS a. Impermeable Containers. Food items stowed in freezer space in impermeable containers (canned frozen strawberries, for example) may be decontaminated as outlined in “Dry Items” in this chapter. b. Permeable Containers. Food items stowed in freezer space in permeable containers (frozen fruits or vegetables for example) may be decontaminated by thorough cooking before use. c. Not Contained in Outer Packaging. Food items stowed in freezer space but not contained in outer packaging (meat, for example) should be completely thawed and thoroughly cooked before eating. 5. ADDITIONAL PRECAUTIONS a. General. Hands must be free of contamination during the opening operations to ensure that the contents do not become contaminated. b. Opened Cans of Food. Opened cans of fruit, jam, jelly, or similar foods will be destroyed, but opened cans of vegetables may be decontaminated by boiling the vegetables for a minimum of 15 minutes in a steam-jacketed kettle. 6. DECONTAMINATION BY HEAT a. Heat is the most practicable method of decontaminating foods. In no case will decontaminated food be consumed until it is pronounced safe by a designated medical officer. It is recommended that, insofar as possible, only foods contained in impermeable packages (cans, bottles, jars) be decontaminated and used for meal preparation. b. Cooking. Food items that are not packaged or those, which are packaged in permeable containers, may be cooked by either of the following methods: (1) (2) In a pressure-type cooker at 15 pounds pressure at 250° F. (121° C.) for 15 minutes. (3) Boiling for a minimum of 15 minutes. c. Baking. Certain contaminated items may be decontaminated by baking. Only those items in the Armed Forces Recipe Service that specify an oven temperature of 400° F. (204° C.) and above for a cooking period of 40 minutes or longer, will be used to prepare baked items using contaminated ingredients. d. Meats. All meats, except those contained in decontaminated impermeable containers (canned meat items), must be cooked to the well-done stage (at 325° F.) (167° C.) for about 2 6-10 Food Service Operation Handbook hours. Guidance cards in the Armed Forces Recipe Service also include information on internal temperature indicating the well-done stage. 7. WATER CONTAMINATION a. GENERAL. The detection of water contamination and the completion of associated laboratory analysis are responsibilities of the medical department. Biological decontamination of water is not difficult when regular water treatment facilities exist. However, more chlorine than normal will be needed to process the water. If no water-treatment facilities are available, water contaminated by bacteria can be decontaminated by any of the following methods: (1) Boiling for 5 minutes. (2) Distilling, if equipment is available. (3) Using iodine tablets according to the direction found on the label. A medical officer will approve the method and the completeness of the decontamination process before any water is used for drinking purposes. Water that has been decontaminated must be protected against recontamination. 1-7 RADIOLOGICAL DEFENSE 1. GENERAL. Radiological (nuclear) defense includes all measures taken to reduce personnel injury and material damage from radioactivity. Commanding Officers usually assign responsibilities for guidance in radiological defense to the engineering officer/damage control assistant (at sea) and to the disaster control officer (ashore). Food service personnel shall be assigned duties within the overall damage control plan. The specialized nature of the food service operation will require the following: a. Preliminary organization, distribution, and training of personnel to deal with blast damage and subsequent radioactive contamination. b. Emergency operation, decontamination, and recovery measures to cope with the situation. Survival may depend on how all individuals and teams are trained in each area of responsibility. Advance preparation will contribute to rapid recovery of functions essential to the mission. All Culinary Specialists will be made thoroughly familiar with plans and procedures to be followed. Personnel training should be accomplished with the advice and assistance of disaster control and medical officers. During an emergency, a realistic evaluation of the disaster situation will be made and initial steps toward recovery taken. There will be advance planning to meet this situation. Protective clothing, monitoring equipment, and decontamination gear will be needed. 1-8 RADIOLOGICAL CONTAMINATION 1. GENERAL. Radioactivity may be inducted in exposed materials close to a nuclear burst or may result from bomb fission residues. Most common will be dust, although such items as soap, table salt, copper or brass may become radioactive as a result of the action of neutrons. A person carrying radioactive particles can easily contaminate an otherwise safe object in an area. If this person handles food, the food likewise can become contaminated. Radioactivity cannot be destroyed by cooking or sterilization, or neutralized by chemical treatment. Radioactive materials can only be removed by physical means. It must be reduced to a limit of radioactivity set by command authority by removing the contamination physically or allowing it to “decay.” The extent radioactivity is existing in any food space will be determined by survey with RADIAC (Radiation Detection, Indicator, and Computation) monitoring equipment. If 6-11 Food Service Operation Handbook the survey so indicates, it may be necessary to reestablish the general mess in an area designated safe by the Commanding Officer. 1-9 DECONTAMINATION 1. GENERAL. Natural decay of radioactive substances commences immediately following the nuclear blast. If the situation permits, hazards to decontamination personnel can be reduced by delaying decontamination operations until natural decay has reduced radioactivity to a safer level. The process of decontamination consists mostly of cleaning or removing the surface to the depth of the contaminated layer. It will often be impossible to decontaminate meat, fish, etc., due to absorption of radioactive salts found in the fallout. This process neither neutralizes nor destroys the contamination, but transfers it to another area where It presents less hazard. The severity of contamination and its nature should be considered. Because galley and dining spaces are usually protected, it is likely that contamination will result from the deposit of finely divided solids or water droplets carried by the blast or otherwise airborne. Some radioactive particles may lodge in porous surface materials. Distribution and, therefore, levels of radioactivity will not be uniform. There are various methods of removing contamination. They differ in effectiveness in removing the contaminant, in applicability to various surfaces, and in rate of operation. They fall into two general classes, gross or rough decontamination and detailed contamination. Gross decontamination consists of rapid washing down with large quantities of water from a fire hose or nozzle system. Personnel aboard ship and in the field will be concerned with gross decontamination. Detailed decontamination procedures are costly in time, manpower, and material, and would be done only under direction of qualified personnel at shipyards. 2. WATER DECONTAMINATION. Efforts to decontaminate with heavily contaminated water will obviously be ineffective. Water used for decontamination must be allowed to drain freely from contaminated areas. Aboard ship the evaporators are an effective means of obtaining potable water. If a ship is in port the ship may be required to furnish safe potable water to the station. Seawater in the neighborhood of an aerial burst to windward will be contaminated at the surface. A subsurface burst will heavily contaminate seawater in the vicinity. See NSTM, Chapter 070; Radiological Recovery of ships after Nuclear Weapons Explosions or NAVEDTRA 10670C, Rate Training Manual for Hospital Corpsman 1 & C, for additional information on decontamination procedures. 3. DECONTAMINATION BY CLEANING AGENTS. When materials specifically designed for the removal of radioactive contaminants are available, they will be used as instructed. When specifically designated materials are not available, the following formulas are suggested for general cleaning of galley surfaces. a. Formula 1: (1) Detergent, general purpose, liquid water soluble, type 1, 1/2. Sodium phosphate tribasic, technical phosphate, type 2, 1/2 pound. (2) Water, hot (12 gallons), 100 pounds. (3) Directions: The sodium phosphate will be completely dissolved by being stirred into hot water. The syrup liquid detergent will be added and stirred until thoroughly dispersed. b. Formula 2: (1) Dishwashing compound, machine granular, free-flowing. 6-12 Food Service Operation Handbook (2) Directions: The compound will be dissolved in hot water to make a 0.5 percent approximate) solution and will be used hot. c. Formula 3: (1) Citric acid, monohydrate, granular form. (2) Directions: Citric acid will be dissolved by being stirred into hot water to make a three percent (approximate) solution (3 pounds in 12 gallons of water). In use, utensils will be immersed and metal surfaces will be sprayed. (3) Except for citric acid, the foregoing materials are commonly used and are readily available. The suggested formulations are not intended to supplant agents specified in existing decontamination instructions. They constitute the bare minimum as substitutes and will serve to meet immediate emergency requirements. All chemical cleaning agents function most efficiently when hot. The choice of method and cleaning agent to be used all depend on the nature of the surface to be decontaminated, kind and degree of contamination, time, manpower, and materials to do the work. 4. DECONTAMINATING GALLEY, EQUIPMENT, AND DINING SPACES. Conduct a radiological assay to determine the presence or absence of contamination with the food service spaces using radiological detection equipment. Only readily accessible surfaces (bulkheads and decks), and all food contact surfaces must be decontaminated unless a significant penetration dose hazard exists in the spaces due to contamination in inaccessible locations. Use conventional cleaning methods employing two man teams to decontaminate the majority of interior spaces that have become contaminated. These methods include scrubbing, wiping and some paint removal, as necessary, working from top to bottom in line direction of any liquid flow. Care should be taken to avoid electrical equipment, especially controls that are not water-proofed. Bare metal surfaces should be given an initial scrubbing with alkaline detergents to remove grease films. Citric acid solution should then be applied and allowed to remain for a minimum period of 10 minutes. The surfaces should then be rinsed with clean fresh water, allowed to dry, and then monitored. In the absence of citric acid, vinegar may be used, but it is less effective. 5. DECONTAMINATING UTENSILS AND DINNERWARE. The treatment for metal utensils should be carried out in essentially the same manner as for other metal surfaces, namely, a detergent wash followed by acid treatment. When feasible, the utensils should be immersed in the solution. Tray, cutlery, and metal tableware should be given the same treatment as utensils. Dishes and glass items present no particular cleaning problem if the glazed surfaces are without scratches and foreign deposits such as stains or hard-water scale. Plasticware may present some difficulty because of the relatively porous character of the surfaces, scratches, and the presence of foreign deposits. Both glass and plasticware will be machine washed, rinsed, dried, and each item monitored. Those that do not pass will be inspected for cracks and surface defects. Cracked and badly scratched items should be disposed of immediately. The other items still showing contamination should be given repeated washings until safe, or should be segregated to await natural decay or disposal. 6. DECONTAMINATING FOOD. All foodstuff should be carefully monitored in areas of low background radiation so that greater accuracy can be achieved. Foods in metal or glass packages will be safe. Contamination will be on the exterior surfaces and can be removed by washing. Food items in sealed dust-proof packages will probably be safe if the wrapper is not broken. Care must be taken with the disposal of the containers and wrappers. Some vegetables can also be decontaminated if carefully washed, dried, monitored, and peeled. Nonperishable items that cannot be easily decontaminated, such as flour, sugar, or salt, should be set aside allowing natural radioactive decay to reduce the radioactivity to less hazardous levels. Canned 6-13 Food Service Operation Handbook food should not be disposed of or segregated on the basis of high readings obtained from unopened containers. Cans, particularly those enameled, may incur a high level of induced activity (from zinc in the enamel, and not so much from the iron in the can). Glass, because of its high salt content, may turn in color. Container radioactivity is not transferred to the contents and highly radioactive containers can contain food that is safe to eat. When surface contamination cannot be physically removed, the food will be condemned. All food will be inspected and approved by the medical officer. 7. PRECAUTIONS IN DECONTAMINATION. Personnel engaged in decontamination must wear individual protective equipment only if chemical weapons have also been used. In the absence of chemical weapons, team members should wear water-resistant or water-repellant clothing and rubber foot wear. In order to prevent heat stress casualties from occurring, particularly at high ambient air temperatures and relative humidity, WGBT heat stress monitors should program work/rest cycles. Precautions will be taken to prevent any contaminated personnel or material from entering uncontaminated food storage or food service spaces. All personnel and material must be monitored and cleared before entering spaces not requiring decontamination. Cleaning gear, items of protective clothing, etc. used in decontamination procedures should be segregated and disposed of as contaminated, according to their level of contamination. If contaminated items are brought accidentally into food spaces, the contaminated items should be removed and, pending decontamination of the effected areas, these areas should be isolated. Personnel who may have walked through such areas or who may have otherwise come in contact with radioactive particles, shall be sent to a decontamination station. 1 - 10 FOOD PRESERVATION 1. GENERAL. Most foods will spoil unless special procedures are used to retard decomposition. The principle methods used to preserve foods employ high temperatures to pasteurize the foods, low temperatures to retard growth and enzymatic action, use of preservative that alters water activity levels or alters pH, and gamma or X-ray radiation that sterilizes certain foods. 2. PRESERVATIVES. Certain agents are used as preservatives to inhibit microbial growth in food. They include salt, sugar, and sodium nitrate, and are used for curing and pickling meat and vegetables. Other agents such as salicyclic acid and sodium benzoate are also used as preservatives. Ordinarily, salting is combined with curing and smoking to preserve some meats. Smoking improves flavor and, to a limited extent, helps inhibit microorganisms. 3. FREEZING. Freezing at 0° F. and below is an effective method of preserving certain foods. The length of time foods may be stored frozen depends on some extent on the foods being frozen and on the temperature. The colder and more constant the temperature, the better. Maintaining foods at -30° F. or below is desirable. 4. CHILLING. Chilling food between 30° F. and 40° F. will prevent most pathogens and retard many spoilage microbes, but will not prevent spoilage. 5. COOKING. Ordinary cooking may render foods digestible and palatable, but cooking does not preserve them. In fact, it may expedite spoilage of protein foods (meat, milk and its products, eggs), permitting active growth of both harmful organisms and those responsible for spoilage at certain temperatures. Bacteria carry out the protein breakdown that brings on foul-smelling, rotting processes in these foods. Temperatures used for boiling (212° F.) (100° C.) on top of a range or in a steam-jacketed kettle are not sufficiently constant to ensure a complete destruction of spoilage organisms in most foods. A product is safe only if cooked long enough to destroy the spore-forming microorganisms and many kinds of heat-enduring bacteria. This destruction is not accomplished by ordinary 6-14 Food Service Operation Handbook baking at the oven temperatures used to bake most products. During the baking process, heat does not penetrate into the item being cooked. Frying, like baking, is not effective in destroying heat-resistant microorganisms because heat does not penetrate the interior of some foods before over browning occurs on the exterior. 6. PASTEURIZATION. Foods can be preserved at least for short periods of time by the pasteurization process. Pasteurization is a process of heating a substance, usually a liquid, to a sufficient temperature to destroy disease producing microorganisms without changing the composition, flavor, or nutritive value of the liquid. Some spoilage microbes are destroyed in the process. Milk is a good example of how pasteurization, in combination with refrigeration or preservatives, can extend the storage times of many foods. 1 - 11 ADDITIONAL REFERENCES 1. GENERAL. Additional information on Food Service Operations in Chemical, Biological and Radiological Defense can be found in the Army (Field Manual) FM 10-23, Part Five, Nuclear, Biological, and Chemical Operations, Chapter 13, Protection From Contamination and FM 4-02.7 Health Service Support in A Nuclear, Biological, and Chemical Environment, Chapter 5, Food Protection, and Food Decontamination. Information on food and water vulnerability assessments maybe found in US Army CHPPM Technical Guide TG188. A commander may establish a multidiscipline Food Security Action Team via his Anti-Terrorism Officer (ATO) for conducting systematic review and assessment of installation food systems using principles of Operational Risk Management (ORM). 6-15 Food Service Operation Handbook THIS PAGE INTENTIONALLY LEFT BLANK 6-16 Food Service Operation Handbook CHAPTER 7 SAFETY AND 3M/PMS STANDARDS 1 - 0 SAFETY AND 3M/PMS STANDARDS General ............................................................................................................................ 1-1 Safe Working Conditions ................................................................................................. 1-2 Receiving And Stowage Operations ................................................................................ 1-3 Safe Food Preparation Operations .................................................................................. 1-4 Equipment Used For Food Preparation ........................................................................... 1-5 2 - 0 PLANNED MAINTENANCE SYSTEM (PMS) General ............................................................................................................................ 2-1 7-1 Food Service Operation Handbook THIS PAGE INTENTIONALLY LEFT BLANK 7-2 Food Service Operation Handbook 1 – 0 SAFETY AND 3M/PMS STANDARDS 1-1 GENERAL A well organized safety program will reduce accidents which result in time lost from the job, additional administrative burdens and undue hardships on all concerned. A safety conscious operation with well-trained personnel will result in reduced dish breakage, a more pleasant atmosphere, more efficient work habits, and better food service. In the final analysis, safety is good management. 1-2 SAFE WORKING CONDITIONS 1. GENERAL. It is necessary to have safe conditions before operations themselves can be made safe. The following are conditions that should underline safety. 2. AMPLE WORKING SPACE. All working spaces should have adequate clearance between equipment. Overhead clearance should be adequate enough so as to preclude injury. All food preparation counters should have adequate width and height so as to make the preparation area comfortable to work in. 3. SUITABLE STOWAGE FACILITIES. Food stowage areas should have adequate stowage facilities for all food items and food preparation equipment, with special emphasis on stowage of machine attachments and cutting devices. 4. ADEQUATE LIGHTING. All food service spaces should have adequate lighting as well as proper light intensity for jobs to be performed. For a good working environment it is necessary to have a well lighted space. Adequate guards on low hanging fixtures are required so as to avoid personal contact with exposed bulbs. 5. GOOD INSULATION. Steam and water lines located near food preparation spaces are required to have adequate insulation on all exposed pipes and valves. 6. GOOD HOUSEKEEPING. A properly cleaned and stowed operation will have a lasting impression on all parties involved. Safety is a primary concern for all; floor clutter and improper stowage can and will cause accidents to happen. 7. PROPER ENCLOSURES AND GUARDS FOR MACHINES. Machinery does not cause physical harm to personnel; people cause physical harm to each other. To avoid personal injury of personnel, knife guards and safety devices are required to be installed on all equipment that requires them. You are further required to have all safety and operating instructions posted adjacent to all equipment and visible to all operators. 8. PROPER CARE OF FLOORS. The floors in all areas require special attention; they must be kept clean and dry to avoid personal mishaps. Terazzo and tile floors may become especially slippery when weather is humid, and will require additional attention to maintain a dry and safe condition. 9. CHAIRS AND TABLES. Chairs and tables can be some of the most abused pieces of furniture in a food service operation. All chairs and tables requiring repair must be accomplished so as to preclude injury to personnel. Any damaged furniture must be removed until it is repaired. 10. FIRE SAFETY. Fire can be the single most damaging casualty afloat as well as ashore. It is up to you to ensure that your operation is fire safe, and that all personnel follow fire safety procedures. All fire extinguishers should be checked for leakage as well as charging on a monthly basis, and personnel must know the location of all equipment as well as who to notify in case of emergency. All exits must be clearly designated as fire exits, unlocked and free of debris. The use of supplementary locks or chains on fire exits is prohibited. 11. SAFE CLOTHING. The clothing that you wear during your working hours must be presentable and well taken care of. Jewelry, watches, and bracelets are prohibited from food service spaces. This does not apply to a plain ring, such as a wedding band. Safety shoes are required in all food 7-3 Food Service Operation Handbook service spaces and loose sleeved shirts, ties or aprons should not be worn when using grinders, mixers or saws. 12. COMPLIANCE WITH ORDINANCES, REGULATIONS, AND CODES. All equipment installed in Navy galleys will be in accordance with National Restaurant Association guidelines. Electrical equipment must be in accordance with the National Electrical Codes guidelines. All circuit breakers must be legibly marked as to what that particular circuit services. Integral electrical wiring on all equipment is mounted and secured properly. There is no evidence of electrical shock hazards in any food service space. 1-3 RECEIVING AND STOWAGE OPERATIONS In general, stowage compartments should be located away from sources of contamination, maintained in good repair and kept clean. When receiving food items the following procedures apply: 1. When opening boxes, cartons, crates etc., remove nails and beware of broken glass. 2. Locate the heavier and bulkier materials on the lower shelves. Avoid storage on top of food lockers or other high storage units. 3. Food containers should be covered except when in actual use or service. 4. Food containers will become contaminated by wire splinters and dirt if not opened properly. 5. Know where your firefighting equipment is located. Items will not be stored where they would be in the way when equipment is needed for emergency use. Flammable cleaning materials or other materials will be placed in specified lockers or in approved safety cans. 6. Maintain good housekeeping so as to reduce the hazards of fire and other accident hazards. Place stores so that they do not protrude into the aisles from bins or shelves. 7. Be sure that light bulbs are guarded and that materials are stored no closer than 18 inches to any bulb. 8. To avoid toppling of cases and injury to personnel; do not stack cases too high. 9. Use shelving of sturdy construction. In storerooms afloat, merchandise should be secured behind battens or lashed down. 10. Storerooms will be properly ventilated and smoking prohibited. 11. When lifting, keep back straight, bend knees and let leg muscles do the work. If load is too heavy for one person to manage, ask for assistance. 12. Use adequate and safe ladders; avoid overreaching to get objects. 13. Store pesticides, cleaning agents and chemicals in original containers away from food service areas. 14. Carbon dioxide (CO2) bottles (tanks) should be stored and secured where they cannot be knocked over. All gauges on tanks should be in good working condition. 1-4 SAFE FOOD PREPARATION OPERATIONS 1. To avoid burns you must use hot pads properly. Slip hands through the elastic straps on the back of pads to protect the underside of wrists and enable firm gripping of hot pans. Launder pads frequently. 2. Cook in minimum amounts of water to avoid boiling over and spilling when pouring off hot liquids. 3. Remove steam-jacketed kettle covers carefully so that steam may escape without scalding hands or face. 7-4 Food Service Operation Handbook 4. Keep range tops and ventilation hoods free of grease. 5. Handles of cooking utensils should be turned away from the edge of the range to prevent being pushed off. 6. Ask for help to lift heavy containers; know where to place the container in a clear work area. 7. To avoid splashing when drawing hot water or coffee from an urn, turn the spigot slowly and check all valves and spigots for proper closed position before filling urn. 8. Keep oven doors closed when not in use. 9. Do not clean the oven or range until it has cooled. 10. Clean up spills immediately and store all kitchen utensils off the floor and on shelves or in proper spaces provided. 11. ALL EQUIPMENT MUST BE SECURED WHEN GALLEY WATCH PERSONNEL ARE NOT IN FOOD SERVICE SPACES. 1-5 EQUIPMENT USED FOR FOOD PREPARATION 1. GENERAL. Only trained and qualified personnel are authorized to use food service equipment. Be sure all safety devices, to include interlock switches, shielded toggle switches, temperature/pressure gauges, steam relief valves and machinery guards are in place, are in proper operating condition, and that all parts are installed as directed by the manufacturer. All electrical equipment must be secured before cleaning or adjusting. The following guidelines apply for specific types of equipment. 2. CUTTERS AND CHOPPERS. Guards are required for cutters and choppers as specified by the manufacturer, including blade guard and interlock switches that render the machine inoperable when the guard is not properly positioned. 3. SLICERS. Slicers are required to be located away from the traffic areas, secured, mounted, guarded, and grounded electrically. a. Keep knife guards in place at all times unless the slicer is unplugged and disabled for cleaning. b. Use the pusher (not your hand) to guide the product being sliced toward the blade. c. Always disconnect power cord prior to cleaning and reconnect only when ready to use. d. Never touch the blade with your hands. Clean the blade with a clean, detergent soaked cloth, wiping from the inside to the outside. e. Always secure the machine when not in use. f. Always replace knife guards after cleaning machine. 4. GRINDERS. A guard or feeding device must be installed on every grinder and kept in place while the machine is in use. Do not put fingers or hands against the feed screw or other grinding mechanisms. On other models a multi-hole plate is secured over the opening. Plastic or metal stompers especially designated to prevent contact with the feed screw must be provided. Always feed the grinder with the stomper, not by hand. 5. MIXERS. Food service mixers come in various sizes depending on the specific gallon capacity that the mixer is capable of holding. You should never fill the mixer more than 2/3 full due to the uneven weight distribution. DO NOT START MACHINE WITH THE CLUTCH ENGAGED - IT CAN DAMAGE THE MACHINE OR DO PERSONAL HARM TO FOOD SERVICE PERSONNEL. 6. STEAM-JACKETED KETTLES AND STEAMERS. There are two different types of steam jacketed kettles in use afloat as well as ashore. It is important to know which type your command has installed. The following are basic principles to follow for each type kettle: 7-5 Food Service Operation Handbook a. Steam-Jacketed Kettle (Steam Supplied). Steam is supplied to food service spaces for various operations including the use of steam jacketed kettles. The food service division is required to ensure that the operating procedures are closely monitored, or the steam kettle can become a potential lethal instrument. To ensure the kettle is maintained properly follow the required PMS cards and operating instructions. b. Steam-Jacketed Kettle (Electric). Steam is internally supplied through a sealed “vacuum” system. It is the responsibility of the galley watch captain to ensure that the level of water does not go below the “MIN” level on the sight glass. To recharge the system with new water it must be distilled. You can obtain this water from either the ship’s distilling plant or from shore sources of supply. If tap water is used it can cause buildup of mineral deposits on the heating coils and decrease the effectiveness of the kettle. c. Hydrostatic Testing of Steam-Jacketed Kettles. Hydrostatic testing of steam-jacketed kettles is required as per OPNAVINST 11000.16A (ASHORE), and NAVSEA Tech Manual Chapter 651 Commissary Equipment (AFLOAT) is required to be scheduled on the ship’s preventive maintenance schedules. The testing is required on an annual basis. 7. CUTLERY. Knives are the most important tool in your food service operation. A dull knife can cause more harm than a sharp knife, so ensure that your knives are always kept sharp and clean. Cutting boards made of plastic, polyethylene, or hard maple or equivalent close-grained wood are required for use (see P5010-1, Section 4 for additional guidance regarding the use of wood cutting boards and utensils in the general mess). Each CS is required to clean his/her own knives; do not delegate them to the mess attendant. KNIVES ARE NOT CAN OPENERS and should not be used as such. 8. DEEP FAT FRYERS. The deep fat fryer has the potential to be an extremely dangerous piece of equipment. If the deep fat fryer is not maintained properly or safety rules adhered to the possibility exists that you may be severely burned. The following basic safety rules should be followed: a. The heating coils must ALWAYS be completely immersed in shortening. If they are not then the possibility exists that the shortening may ignite. b. The deep fat fryer is required to be manned at all times while the deep fat fryer is in operation. c. The deep fat fryer will not be operated without deep fat fryer thermometers inserted in each separate fry kettle or attached to the individual fryer baskets. Use of individual thermometers is not only a good safety practice, but allows you to quickly check the accuracy of the units’ thermostats and make adjustments in your frying temperature as needed. d. When filling the deep fat fryer with new shortening ensure that the coils are packed with new shortening and that the level is at least 1 inch above the top of the coils. e. The maximum temperature that you may melt the solid shortening is 200° F. f. Melted shortening ignites at 475° F. g. Ensure that the deep fat fryer is calibrated and that all safety devices are in full operation. 9. CHINA AND GLASSWARE. China and glassware is essential to your food service operation. To ensure that you get the most out of your eating utensils follow these simple rules: a. Chipped or cracked dinnerware/glassware is required to be discarded when discovered. b. Use care when handling glasses and dishes. Do not stack them so that there is danger of toppling. Whether afloat or ashore, remember, STOW FOR SEA. c. When stowing glasses and cups, place them upside down in the stowage racks. d. If you know of, or suspect that there is broken glass or dishware in soapy water, broken pieces carefully. 7-6 remove the Food Service Operation Handbook 2 - 0 PLANNED MAINTENANCE SYSTEM (PMS) 2 – 1 GENERAL 1. GENERAL. PMS maintenance actions are the minimum actions required to maintain machinery and equipment in a fully operable condition, and within specifications. Preventive maintenance is set up for all equipment that might seriously damage the equipment or effect the safety of the operator if it should break down. A good maintenance program should have the list of equipment that requires periodic inspection, adjustment, cleaning, and lubrication. A well maintained galley plays an important role in having an effective food service operation that contributes to saving labor and high morale. 2. PLANNED MAINTENANCE SYSTEM (PMS) a. Ensures that preventive maintenance is completed when required. b. Provides a simple and standard means for planning, scheduling, controlling and performing preventive maintenance. c. Uses schedules and documents, some of which are the following: (1) Daily PMS schedule; (2) Weekly PMS schedule; and (3) Quarterly PMS schedule. 3. LIST OF EFFECTIVE PAGES (LOEP). The list of effective pages (LOEP) provides a listing of the maintenance index pages (MIPs) assigned to each department, divided by work center. 4. MAINTENANCE INDEX PAGE (MIP). The Maintenance Index Page (MIP) lists all maintenance requirements for each particular piece of equipment (see Fig. P-1). 5. MAINTENANCE REQUIREMENT CARD (MRC). The Maintenance Requirement Card (MRC) provides detailed procedures for performing maintenance requirements and tell who, what, when, how, and with what resources a specific requirement is to be accomplished. It also states safety precautions which reduce the chance of costly or dangerous preventive maintenance errors. The MRC contains the following (see Fig. P-2). a. Ship system, system subsystem, and equipment. b. MRC codes: c. MIP series code d. Periodicity code e. Brief definition of the PMS action to be done. f. Rates. Recommended skill level of the maintenance person identified by rate or NEC. Qualified maintenance personnel other than specified may be assigned. g. Manhours required to accomplish the maintenance action. h. Safety precautions. Awareness to possible hazards to personnel or equipment while performing maintenance. i. Tools, parts, materials and test equipment. Note: Necessary to accomplish the maintenance action. j. Procedure. Sequence of detailed steps to be followed in performing the maintenance action. k. Location. l. Denotes the physical location of the equipment. 7-7 Food Service Operation Handbook m. EGL is placed in lieu of the physical location to alert maintenance personnel that more than one piece of equipment exists. n. Date, Month, and year the MRC was prepared. o. SYSCOM MRC control number located vertically along the lower right side of the MRC. 6. EQUIPMENT GUIDE LIST (EGL). A 5” x 8” card is used when several identical pieces of equipment are listed under the same MRC card. The EGL contains the following: a. Controlling MRC code. b. Name of equipment and serial number (if applicable). c. Location of each piece of equipment. 7. CYCLE PMS SCHEDULE. The Cycle PMS Schedule displays the planned maintenance requirements to be performed during the period between major overhauls of the ship. The Cycle PMS schedule contains the following: a. Ship’s name and hull number. b. Work center. c. Department head signature and date approved. d. MIP/components - listing of the MIP codes and their related system, subsystems, or equipment for which PMS requirements are to be scheduled in the cycle schedule. e. The annual, semi-annual, multiple-month (18 month and greater) maintenance requirements, and any related maintenance checks (except daily and weekly) to be completed during the cycle indicated. f. Every two weeks, monthly, every two months, and quarterly maintenance requirements, any related maintenance checks and situation requirements to be completed during each quarter. 8. QUARTERLY PMS SCHEDULE. The Quarterly PMS Schedule displays the work centers’ PMS requirements to be performed during a specific three-month period. The quarterly PMS schedule contains the following: a. Work center b. Year c. Quarter after overhaul d. Department head signature e. Date prepared f. Months covered 9. WEEKLY PMS SCHEDULE. The Weekly PMS Schedule displays the planned maintenance schedule for accomplishment in a given work center during a specific week. The weekly PMS schedule contains the following: a. Work center code b. Date of current week c. Division officer approval signature d. MIP code minus the date code e. List of applicable components f. 7-8 Maintenance personnel assigned Food Service Operation Handbook g. Periodicity h. Outstanding major repairs, etc. 10. PERIODICITY CODE. The periodicity code denotes the number of maintenance requirements needed for a certain piece of equipment. The following are examples of periodicity codes: a. D - daily b. 2D - every second day c. W - weekly d. 2W - every second week e. M - monthly f. Q - quarterly g. S - semi-annually h. A - annually i. R - situation requirement j. 18M - every 18 months k. 48M - every 48 months, and, l. LU - lay up. NOTE: The numbers indicate sequence. For example, if a piece of equipment has four monthly checks, they are identified as M-1, M-2, M-3 and M-4. Periodicity may indicate a combination of calendar and situation requirements. (For instance, M-1R means that the check is to be done monthly or when some specified situation occurs). 11. PMS PROCEDURES a. Daily the designated maintenance person checks the weekly PMS schedule. b. Maintenance person selects the proper MRC from the holder in his/her work center. The SYSCOM MIP CONTROL number plus the periodicity code gives the maintenance person the MRC code, which is found in the upper right hand corner of the MRC. (The MRC’s are filed in numerical order by MRC code i.e, A-609 M-1, A609 M-2, 6512 M-1, 6513 W-1, etc.). c. Verify the correctness of the MRC using the MIP, LOEP, and change page. d. Perform all maintenance of equipment listed on the EGL (when EGL is attached to the MRC). e. Accomplish the job using proper tools, parts, materials, test equipment and procedures on the MRC. f. Follow safety precautions. g. Maintenance person reports to his/her work center supervisor if a problem exists or when work is complete. h. Maintenance person returns the MRC to the card holder. 12. PMS AUDIT/SPOT CHECK. Individual maintenance requirements will be audited periodically in order to determine the effectiveness of PMS accomplishment. The food service division officer, or other designated person, should perform a PMS audit on at least one maintenance requirement (MR) per week. The following steps should be taken: a. Select at random from the weekly or quarterly schedule a maintenance requirement that has been crossed off as being completed. 7-9 Food Service Operation Handbook b. From the work center supervisor, weekly schedule or accomplishment log, identify the individual who performed the maintenance requirement. c. Have the maintenance person pull the MRC (auditor should read the MRC and become familiar with the steps performed). Proceed with the individual to the equipment selected to be checked. d. Question the maintenance person. The questioning should be of a general nature and related to the maintenance requirement. Memorizing the card is not required, but if the maintenance was done, the person should be familiar with the MRC. Inquiries should be made to determine whether: (1) The person actually did the work. (If not, a scheduling or supervisory problem exists). If someone else did the work, then the individual who actually did the maintenance should be questioned. (2) All basic parts of the maintenance requirement were done (i.e., if parts of the MR required operation of the equipment, is it in fact operable? If there was a requirement to grease the chain drive, was it greased? If there is a requirement to calibrate the oven, how was it done, etc.?). (3) Were basic safety precautions observed? (4) The proper tools/materials were used (e.g., where did the maintenance person obtain the grease or solvent; was test equipment properly calibrated, etc.?). (5) If disassembly is part of the procedure, inspect the equipment for evidence of disassembly (e.g., access plate, hold down bolts, mechanical guards, etc.). (6) If an equipment guide list (EGL) was used, determine if the maintenance requirement was performed on all equipment listed. (7) The work center supervisor should question the technical accuracy of the MRC. (If it is incorrect or not clear in any way, has a technical (category B) feedback report (FBR) been submitted?). 13. COORDINATING PERSONNEL a. The work center supervisor initially organizes personnel by filling out the weekly PMS schedule, based on the cycle and quarterly schedules. b. Maintenance personnel from other areas such as the Electrical Division, Air Conditioning and Refrigeration, Steam and Heat, or Damage Control are to perform the PMS. 7-10 (1) The senior CS is responsible for communicating with senior personnel from maintenance divisions to ensure that maintenance has been performed properly and on schedule. (2) The senior CS reviews the MRC to ensure work was done properly and on schedule. Food Service Operation Handbook Figure 1 - Maintenance Index Page SHIP SYSTEM, SYSTEM, SUBSYSTEM, OR EQUIPMENT Dishwashing Machine 6512 T E S T O T H E R SYSCO MRC CONTROL NO. 65 Z75J N 58 A7TT N 65 Z75K N 65 Z75L N MAINTENANCE INDEX PAGE (MIP) OPNAV 4790/84 (REV. 2-82) MAINTENANCE REQUIREMENT DESCRIPTION A scheduling aid: “U” MRC (Unscheduled Maintenance Requirement) is provided to assist in restoring system/equipment to an operational condition. Its use may be directed by a scheduled MRC, scheduling air, or system/equipment failures. ** For scheduling purposes only; no MRC is provided. 1. Inspect dishwashing machine. 2. Verify accuracy of dishwashing machine thermometer(s). NOTE: Accomplish monthly and when thermometers are suspected of being out of calibration. 3. Inspect in-line strainer. 4. Descale machine. INACTIVE EQUIPMENT MAINTENANCE The following requirements will be scheduled when equipment is inactivated for periods of prolonged idleness. Lay-Up Maintenance 1. Inspect dishwashing machine. NOTE: Use MRC M-1. 1. Install approved fire retardant cover over dishwashing machine. NOTE: Accomplished as required to protect equipment. Periodic Maintenance None Start-Up Maintenance 1. Remove protective cover from dishwashing machine. NOTE: Accomplish if required. Operational Test (None) ...1.1.1 Page 1 OF 1 DATE MAY 2009 REFERENCE PUBLICATIONS PERIODICITY RATER CODE MAN HOURS RELATED MAINTENANCE M-1 EN/MM2 0.2 None M-9R EN/MM2 2.0 None Q-1 EN/MM3 1.0 None U-1 None LU-1 ** SU-1 ** SYSCOM MIP CONTROL NUMBER 6512/003-58 7-11 Food Service Operation Handbook Figure 2 - Maintenance Requirement Card SHIP SYSTEM SUBSYSTEM MRC CODE 6512 SYSTEM EQUIPMENT Dishwashing 6512DV Machine RATES EN/MM2 M-9R M/H 2.0 TOTAL M/H 2.0 ELAPSED TIME 2.0 MAINTENANCE REQUIREMENT DESCRIPTION 1. Verify accuracy of dishwashing machine thermometer(s). SAFETY PRECAUTIONS 1. Forces afloat comply with Navy Safety Precautions for Forces Afloat, OPNAVINST 5100 series. 2. Ensure all tag-out procedures are in accordance with current shipboard instructions. TOOLS, PARTS, MATERIALS, TEST EQUIPMENT MATERIALS MISCELLANEOUS 1. (1144) Tag, safety 1. [1682] Calibrator, temperature indicator, Model 3604/3605 TOOLS 2. [3631] Calibrator, temperature 1. [1396] Wrench, torque, indicator, Model 3603-1-1 preset, 2 interchangeable heads, Part No. T8438 2. [1789] Wrench, adjustable, 10” heavy duty, 1.135” jaw open PROCEDURE Page 1 of 2 NOTE: Numbers in brackets can be referenced to Standard PMS Materials Identification Guide (SPMIG) for stock number identification. NOTE 1: Accomplish monthly and when thermometers are suspected of being out of calibration. NOTE 2: Calibration by an authorized calibration activity shall be accomplished when Measure Automated System for Uniform Recall and Reporting (MEASURE) indicates calibration is due. NOTE 3: Accuracy of installed thermometers should be within 3 F. of “standard” used. If thermometer is found to differ by more than 3 F., have results verified by authorized calibration activity. 58 Preliminary a. De-energize circuit and tag “Out of Service.” DATE MAY 2009 N LOCATION A7T T WARNING: Ensure all tag-out procedures are in accordance with current shipboard instructions. MAINTENANCE REQUIREMENT CARD (MRC) OPNAV 4790/82 (REV. 2-82) 7-12 Food Service Operation Handbook CHAPTER 8 FOOD SERVICE EQUIPMENT OPERATING/SAFETY PROCEDURES 1 - 0 NAVAL SHIPBOARD FOOD SERVICE EQUIPMENT CATALOG General .................................................................................................................... 1-1 2 - 0 EQUIPMENT Icemaking Machines and Ice Flakers ...................................................................... 2-1 Meat Slicer ............................................................................................................... 2-2 Microwave Oven ...................................................................................................... 2-3 Milk Dispensers........................................................................................................ 2-4 Noncarbonated Beverage Dispensers ..................................................................... 2-5 Powdered Mix Blender ............................................................................................. 2-6 Proof Box ................................................................................................................. 2-7 Reach-In Refrigerators............................................................................................. 2-8 Salad Bar ................................................................................................................. 2-9 Soft Ice Cream/Milkshake Machine........................................................................ 2-10 Vegetable Cutter .................................................................................................... 2-11 Vegetable Peeler.................................................................................................... 2-12 Utensil Washing Machines..................................................................................... 2-13 Multiple Blade Bread Slicer .................................................................................... 2-14 Dishwashing Machine (Conveyor) ......................................................................... 2-15 Dishwashing Machine ............................................................................................ 2-16 Food Mixing Machine, 20 Quart ............................................................................. 2-17 Walk In Reefer ....................................................................................................... 2-18 Steam Jacketed Kettles ......................................................................................... 2-19 Hot Dog Grill........................................................................................................... 2-20 Deep Fat Fryer (Non-Computer) ............................................................................ 2-21 Cookie Cutter/Dropper ........................................................................................... 2-22 Dough Mixer – Horizontal....................................................................................... 2-23 Model 550 Frispo-Matic.......................................................................................... 2-24 Pie Rimmer/Crimper............................................................................................... 2-25 Rotary Bread Toaster............................................................................................. 2-26 Food Mixer (140 Quart).......................................................................................... 2-27 Bun Slicer (Hotline) Operating and Safety Precautions ......................................... 2-28 Carbonated Beverage Dispenser........................................................................... 2-29 8-1 Food Service Operation Handbook Coffee Urns ............................................................................................................ 2-30 Convection Oven.................................................................................................... 2-31 Conveyor Broiler .................................................................................................... 2-32 Deep Fat Fryer (Computer Type)........................................................................... 2-33 Dough Divider/Rounder.......................................................................................... 2-34 Dough Sheeter/Molder ........................................................................................... 2-35 Doughnut Accumulating Conveyor......................................................................... 2-36 Doughnut Glazer .................................................................................................... 2-37 Food Waste Disposal System: Somat Navy Model 3............................................ 2-38 Griddle.................................................................................................................... 2-39 High Compression Steam Cooker (Market Forge)................................................. 2-40 Hot Chocolate Dispenser ....................................................................................... 2-41 Ice Tea Dispenser .................................................................................................. 2-42 Combi-Oven ........................................................................................................... 2-43 Clam Shell Griddle ................................................................................................. 2-44 Skittle ..................................................................................................................... 2-45 Accu-Temp Griddle ................................................................................................ 2-46 Electric Steam Table .............................................................................................. 2-47 Regular Steam Table ............................................................................................. 2-48 8-2 Food Service Operation Handbook CHAPTER 8 FOOD SERVICE EQUIPMENT OPERATING/SAFETY PROCEDURES 1 - 0 NAVAL SHIPBOARD FOOD SERVICE EQUIPMENT CATALOG 1-1 GENERAL. The following information is taken from the Naval Shipboard Food Service Equipment Catalog which is available on-line on the Naval Surface Warfare Center Carderock Division’s (NSWCCD) homepage and it should be noted that this is the only catalog that identifies food service equipment approved for shipboard use. The catalog can be accessed on-line at: https://90machinery.navsses.navy.mil/habitability/fsc/home.asp 1. The catalog has been prepared to assist planning yards, Naval Shipyards, Supply Officers, Food Service Officers, Supervisors of Shipbuilding (SUPSHIP), Fleet Industrial Supply Centers (FISC) and any other personnel who are required to order food service equipment authorized for Naval ships and to provide information relative to dimensions, weight and utility requirements. Equipment and their manufacturers have been selected because of their known conformance to shipboard food service equipment standards. 2. The catalog identifies Food Service equipment approved for use aboard U.S. Navy ships. Food service equipment listed in the General Services Administration (GSA) catalog is not authorized for shipboard use. Some equipment, with the exception of utensils and small consumable appliances, contained in the Forces Afloat Shopping Guide (FASG) may be duplicates of those contained in this catalog, however, this catalog shall be the only authority for all shipboard equipment. 3. Each page provides information relative to procurement, specific features, sizes, electrical or steam requirements and any other additional information needed to properly install the equipment in accordance with all applicable shipboard specifications. If no entry appears in an equipment field, no information was available and none is expected to be available. If “Pending” appears, no information was available at the time of publication, but will be available at a later date. A “Surface Ship Hatchable” entry in the remarks area means equipment will fit through a 26 inch by 66 inch oval hatch (Gen Spec 624c doors). A “Submarine Hatchable” entry means equipment will fit through a 25 inch diameter hatch. A “Modular” entry means that the equipment was designed to be disassembled to allow entry into a submarine and/or surface ship hatch and re- assembled at place of installation. Any equipment that is not an exact direct replacement and/or requires movement to a different physical location could be subject to the "SHIPMAIN" Ship Change Document (SCD) process. The SHIPMAIN process requirement must be coordinated with Naval Surface Warfare Center, Carderock Division (NSWCCD-974). 4. If you wish to procure food service equipment that is not shown in this catalog, a request must be submitted to NSWCCD Philadelphia for assessment of shipboard applicability. Letter or facsimile shall be forwarded containing the following information: a. Requestor’s name, phone number and facsimile (fax) number. b. Requestor’s activity or ship. 8-3 Food Service Operation Handbook c. Type of Food Service equipment, manufacturer, model number, and manufacturer’s point of contact and estimated cost of item. d. Valid technical and configuration justification for procurement. (Note: Please plan ahead; imminent deployment, circumspect declarations of medical exceptions, end of fiscal year dollars or other time related reasons are not generally considered valid reasons for consideration). e. Technical characteristics: dimensions, service or utility requirements, (electrical, water, steam, air, etc.) materials used in fabrication, hardware integral design and primary function of equipment. f. Area where equipment is to be used to include compartment name and number. g. Maximum dimensions of location where equipment is to be installed to ensure adequate fit and accessibility for maintenance/service. 5. If source of equipment/item is a discount/retail store, recommend soliciting technical information from this source or obtaining name references of part number used by source. In addition, the following general notes have been compiled to provide guidance to repair activities during installation of all food service equipment included in this catalog. 6. There shall be no crevices or inaccessible voids which might harbor vermin, cooking waste or other extraneous matter. Access shall be provided to all areas requiring cleaning, painting or treating with insecticide. 7. A clearance of 8 inches shall be provided under each piece of equipment to include deck mounted equipment except equipment with bedplate bases. 8. The following deck mounted equipment shall be leg mounted for air circulation and cleaning access: ovens, deep fat fryers, ranges, under counter and/or upright refrigerators and freezers, cold food counters, ice machines, and soft serve ice cream makers. Equipment abutting other pieces of equipment, dressers or bulkheads shall be installed in a manner to avoid grease or soil-catching crevices. Where the back or side of heat producing equipment adjoins a bulkhead, an air space of not less that five inches shall be provided. 9. Dresser mounted equipment shall not be welded to the dresser. Equipment shall be installed on four to six inch high round stock corrosion resistant (CRES) leg supports of suitable size in diameter for supporting the specified equipment and secured by bolting to the dresser. Dressers shall be adequately reinforced to support dresser mounted equipment and to prevent excessive vibration when equipment is operated. 10. NFPA-96 should be used to reference issues concerning ventilation control and fire protection for general mess operations. 11. Thermostats for equipment like fryers, ovens and grills should be calibrated per OPNAVINST 4790.4c. 12. All food service equipment will be COSAL supported. 8-4 Food Service Operation Handbook 13. Questions and comments concerning the catalog may be forwarded to: COMMANDER, CARDEROCK DIVISION NAVAL SURFACE WARFARE CENTER CARDEROCK DIVISION, SHIPS SYSTEMS ENGINEERING STATION CODE 974, PHILADELPHIA NAVAL BUSINESS CENTER 5001 SOUTH BROAD STREET, PHILADELPHIA PA 19112-1403 FAX: DSN 443-1094, Commercial 215-897-1094 8-5 Food Service Operation Handbook 2 - 0 EQUIPMENT 2-1 ICEMAKING MACHINES AND ICE FLAKERS OPERATING/SAFETY PRECAUTIONS 1. GENERAL. Check the machine periodically to see that temperatures are being maintained and enough ice is being produced. The machinery and inner workings of icemakers are the responsibility of the engineering department. Food service personnel should not enter the equipment, only engineering and public works personnel. Ensure that planned maintenance on icemaking equipment is carried out in accordance with the established schedules. Weekly disconnect the electric power and remove ice in the collection bin. Scrub out the bin area with a brush and mild detergent solution. Flush with clean water until all traces of the detergent are gone. Reconnect electric power. FLAKE ICE MAKER/DISPENSER 1. Make sure all air vents are open and unobstructed at all times. 2. Unless turned off for maintenance or cleaning, leave machine turned on at all times. 3. All housing parts and particularly doors and covers on the ice bin must be securely closed and attached at all times. Directions for Cleaning Automatic Ice Flakers Without Disassembly Step Procedure 1. Shut off water. Pour 1 quart cleaning solution slowly into water reservoir. 2. Place a container below ice chute in Ice will be formed from cleaning solution. bin and start ice machine. Discard ice. Shut off machine. 3. Flush icemaking system. Add 1 quart clean water to reservoir. Catch ice in container. Discard. 4. Wash down storage bin with mild detergent solution. Rinse. Inside should be scrubbed with plastic brush. Areas in and around motor, insulation panels, and condenser coils should be vacuumed or blown free of lint and dust. Periodic weekly checks for cockroach infestation should be made. Directions for Cleaning Water Reservoir At least once every 30 days, clean out the water reservoir Step Procedure 1. Shut off power. Use manual switch. 2. Turn off water supply. Shut water inlet valve. 3. Remove entire water reservoir from Take out water inlet. Pull out reservoir from top fittings of machine. water inlet. 4. Clean and descale. Wash out reservoir with warm detergent water. Rinse. Use a scale removing solution if necessary to clean inside of possible sediment. 5. Replace reservoir and reconnect power Refill reservoir and adjust water level in and water supply. accordance with manufacturer’s instructions. 8-6 Food Service Operation Handbook 2-2 MEAT SLICER OPERATING AND SAFETY PRECAUTIONS 1. Meat slicer should be securely bolted to the dresser top and electrically grounded. 2. Keep knife guard in place at all times except when slicer is disassembled for cleaning and only when the power has been secured. All Navy slicers are required to be hardwired with a bulkhead mounted switch, make sure the switch is off before attempting any cleaning or adjustment. 3. Use a pusher, not your hand, to guide product being sliced. 4. Never touch the blade with your hands. Clean the blade with a clean, detergent soaked cloth wrapped around a pad or block. 5. Always replace knife guard as quickly as possible after cleaning. Do not leave an unguarded blade unattended at any time. 6. After each use or at least daily, wash all food contact parts with detergent and warm water. Rinse thoroughly, air dry and then reassemble. 8-7 Food Service Operation Handbook 2-3 MICROWAVE OVEN OPERATING AND SAFETY PRECAUTIONS 1. Keep inside of oven door and heating surface on the cabinet scrupulously clean at all times. Do not use tools or abrasives on door closing surfaces at any time. 2. Do not allow oven door to be closed on any object including rags, towels, etc. 3. Do not attempt to defeat oven door safety interlocks. 4. Do not operate oven with an empty cavity and keep all metal utensils out of the oven cavity at all times. 5. Do not obstruct cooling vents in the oven housing. 6. Keep the oven door closed when the oven is not in use. Cleaning: 1. Wipe up spills immediately. 2. Do not allow food particles or grease to collect on plastic stirrer and light cover, inner door and oven cavity front surface. 3. Do not use scouring pads, abrasive powders or other abrasive materials on any oven surfaces. Daily: 1. Turn power to “OFF.” 2. Wipe the plastic stirrer cover with a cloth or sponge dampened in mild detergent solution. 3. Wipe all surfaces in the oven cavity with the dampened cloth or sponge and then dry with a clean cloth. 4. Wipe the inner door surface and oven cavity front with mild detergent solution and dry. Weekly: Remove the air intake filter and wash in hot water to remove grease and dust. 8-8 Food Service Operation Handbook 2-4 MILK DISPENSERS OPERATING AND SAFETY PRECAUTIONS 1. Check temperature range which should be from 32° to 41° F. 2. Cut milk dispenser tube with a clean sanitized instrument to a point not more than 1/4 inch below the termination of the dispensing mechanism. 3. Fill milk dispensers and replenish as necessary during the meal. 4. Wipe up spills immediately. 5. Keep catch bowls or trays clean; empty them as necessary. 6. Always wipe off the bottom of the containers or cans before placing them in the dispenser. 7. Do not reuse disposable cardboard milk containers; dispose of them when empty. Daily: 1. Clean exterior with a mild detergent solution. Rinse well with clear water to remove film. Use of abrasives is to be avoided. 2. Remove, disassemble, and wash the lift valves after each meal. Defrosting milk dispensers: When ice deposits have accumulated to a thickness of about 1/4 of an inch, defrost the dispenser by securing the electric power and leaving the door wide open. When the ice has melted, wash the interior with warm solution of water and detergent, rinse, dry, and reconnect the electric power. DO NOT use metal objects to scrape ice from cabinet walls. 8-9 Food Service Operation Handbook 2-5 NONCARBONATED BEVERAGE DISPENSERS OPERATING AND SAFETY PRECAUTIONS 1. GENERAL. Noncarbonated beverage dispensers are often located on the serving line to dispense fruit juices, lemonade, and other popular beverages. The majority of these machines have a self-contained refrigeration unit and a recirculating pump to keep the solids associated with pulpy juices in suspension and promote uniform cooling. The beverages are dispensed from a clear plastic tank. a. Fill the dispensing tank well in advance of each meal to ensure a properly chilled beverage. Frequent resupply during the meal will minimize the temperature rise caused by adding an unchilled beverage to the tank. b. Turn off refrigeration unit when not in use and as soon as the tank is empty. c. Empty and clean the drip pans as required. Daily or after each use: 1. Turn off power to refrigeration unit. 2. Drain, fill with warm detergent water, scrub the tank and flush through the dispensing valve. Rinse away traces of detergent. 3. Check the impeller assembly for cleanliness and wash away any syrup build-up which could clog the pumping mechanism. 8-10 Food Service Operation Handbook 2-6 POWDERED MIX BLENDER OPERATING AND SAFETY INSTRUCTIONS 1. Assemble cleaned and sanitized parts into the machine and lubricate with food grade lubricant in accordance with manufacturer’s instructions. 2. Assemble powder funnel and “O” ring and install in the funnel opening in the machine top housing. 3. With both switches in the “OFF” position, position water fill switch for milkshake operation and water will automatically fill to proper level. 4. Position “AUTO” switch to “AUTO” position which will start blending action and the refrigeration system. 5. Add milkshake powder through the funnel. Check powder in the funnel periodically and make sure powder is feeding down the funnel into the mix chamber. CAUTION: Do not put tools or fingers through funnel opening to the mix chamber. 6. The four gallon batch takes about six minutes to blend and chill to 40° F. When batch is done, turn off both switches and draw off mix and store in refrigerator. Cleaning: 1. After each day’s use, disassemble, clean, and sanitize all parts of the machine which have come into contact with dry powder or powder and water mixture. a. Dispensing door. b. Valve core. c. Beater. d. Beater drive shaft. e. Powder funnel. f. Powder funnel vent tube. g. All “O” rings. 2. Clean inside of mixing barrel and rear shaft bearing. 3. Before each use, sanitize assembled machine and drain. 8-11 Food Service Operation Handbook 2-7 PROOF BOX OPERATING AND SAFETY PRECAUTIONS 1. Make sure water is turned on to the proof box automatic feed, or in manual fill machine, and that the water reservoir is filled. 2. Turn on switches for heat, humidity control and circulating fan. 3. Proper temperature is 95° F. and proper humidity is 95 percent. 4. Allow proof box to reach proper proofing temperature. Normally, 30 to 45 minutes are required for stable conditions. 5. Proof products in accordance with the appropriate Armed Forces Recipe Service, NAVSUP P-7. Directions for Cleaning a Proof Box Step Procedure 1. Clean interior after removing racks. Clean bottom, walls, top and inside of door. Scrape sides, corners, and guide rails with putty knife. Scrub the bottom with long-handled gong brush and hot machine detergent solution. Rinse, dry. Wipe guide rails and ledges thoroughly. Remove and clean water pan, rinse, wipe dry. 2. Scrub exterior. Scrub top, outside of door, and sides with hot machine detergent solution; rinse and dry. 3. Clean around proof box. Scrub back of box and wall. Scrub floor good behind and under machine if space permits; if not, flush with hot water. 4. Air dry. Leave open to air. 8-12 Food Service Operation Handbook 2-8 REACH-IN REFRIGERATORS OPERATING AND SAFETY PRECAUTIONS 1. Maintain refrigerator temperature at 32° F. - 41° F. 2. Store only food items in refrigerator. 3. To avoid taste transfer, do not store eggs and butter with fruits and vegetables. 4. Frost or glaze should not be allowed to accumulate more than 1/4 inch on surfaces or coils as compressor overload will result. Daily: Clean up spills and exterior surfaces with detergent and warm water. Wipe dry. Bi-weekly Cleaning: 1. Transfer all stored foods to protected temporary storage. 2. Remove shelving and loose equipment to wash sink filled with detergent solution. Scrub with plastic bristle brush. Rinse. Sanitize with spray. Leave door open to dry. 3. Scrub interior of box with hot detergent solution, using plastic brush. Clean corners, doors, gaskets, openings, hinges, and latches. Rinse. Sanitize. Periodically: Clean and vacuum the following: compressor, condenser coils, motor and related areas. 8-13 Food Service Operation Handbook 2-9 SALAD BAR OPERATING AND SAFETY PRECAUTIONS 1. Salad bars may be refrigerated or non-refrigerated. Non-refrigerated salad bars will be filled with enough ice to properly cool the salad pans to ensure all salad bar items remain below 41° F. Also ensure that the salad dressings are refrigerated. After each meal the ice should be discarded and the salad bar cleaned. 2. Refrigerated salad bars in use must be maintained at a temperature in order to keep the salad bar items below 41° F. The electric power should be disconnected prior to cleaning. Clean and defrost after each use. Particular attention should be paid to the drain when cleaning the salad bar. 3. Dispose leftover food from the salad bar as directed by the Watch Captain and/or Food Preparation Worksheet or refer to NAVMED P-5010 3-5.11. 4. Metal objects should not be used to scrape ice from the coils; metal scrapers may damage or puncture the coils. After each use: 1. Run insert pans and trays through dishwashing machine. 2. Wash and scrub table surfaces with detergent and plastic brush. Rinse and allow to air dry. 8-14 Food Service Operation Handbook 2 - 10 SOFT ICE CREAM/MILKSHAKE MACHINE OPERATING AND SAFETY PRECAUTIONS 1. Assemble the machine in accordance with manufacturer’s detailed instructions. Pay close attention to lubrication instructions. 2. Sanitize the freezer with approved sanitizing solution. Operate machine in wash cycle for two minutes, then drain off all sanitizing solution. 3. Precharge the freezing cylinder with the amount of fresh mix recommended by the manufacturer. With a container under the draw-off spout, open spout and hold open until pure mix starts to flow. 4. Set temperature control knob for product to be dispensed. Set machine to automatic and allow freezer to operate and cycle off. 5. Assemble mix feed and install in machine reservoir. Fill reservoir to fill line with mix. Directions for Cleaning Soft Ice Cream Machines: Before use sanitize all utensils that come in contact with mix. Thoroughly clean and sanitize ice cream freezer and all component parts daily. To Clean: 1. Empty freezer and flush with cold water until water runs clear. 2. Rinse again with warm water (120° F.). 3. Pour a 140° F. solution of water and detergent into freezer and brush hopper as detergent runs through freezer. 4. Remove all parts that come in contact with the ice cream mix: lid, hopper valve, dasher, freezer door, all gaskets, seals, and O-rings. Place all parts in detergent solution and brush all surfaces. Brush inside of freezing cylinder; pay particular attention to the back wall and shaft connection. Rinse all parts thoroughly and allow to air-dry. To Sanitize: Prepare sanitizing solution (calcium hypochlorite) in accordance with package directions. Wear disposable gloves when assembling machine. Dip each part in solution as machine is assembled. Pour remaining solution into hopper and brush solution over entire inside and lid. Rotate dasher as solution runs through mixer. Drain completely, and the freezer is ready for the next batch of soft serve ice cream. 8-15 Food Service Operation Handbook 2 - 11 VEGETABLE CUTTER OPERATING AND SAFETY PRECAUTIONS 1. Never attempt to operate the machine with the blade guard raised. 2. Do not use hands or any other thing to attempt to push vegetable under the blade guard. If machine becomes clogged, shut off at the circuit breaker box (Required to be hardwired). 3. Observe product in the bowl carefully and unload when chopped satisfactorily. 4. When high speed gear-attachment and slicing-attachments are being used on the power take off hub, use extreme caution since there are no safety switches on the accessories. Always shut off the machine when opening or making adjustments. 5. See operator’s manual for complete instructions. Directions for Cleaning Vegetable Cutter: Step Procedure Daily: Preflush. Scrub bowl and parts with long handled brush and 125° F. detergent water. Air-dry. Sanitize. Be sure to reach all food contact surfaces. Weekly: 1. Shut off motor and disassemble for weekly cleaning. Lift out feeder pan. Remove the following: adjusting ring, perforated chopping plate, knife, food screw, and chopping cylinder. 2. Clean. Run parts through dishwasher or wash in detergent water in pot and pan sink with brush. Scrub vigorously until food particles are loosened. 3. Rinse. Sanitize and air-dry. If not machine cleaned, adequately rinse to eliminate solution and sanitize in 180° F. water. 8-16 Food Service Operation Handbook 2 - 12 VEGETABLE PEELER OPERATING AND SAFETY PRECAUTIONS 1. Put in proper load of vegetables in accordance with name plate rating. 2. Turn on water. 3. Start machine and run until skin is removed. 4. Open discharge door and allow load to empty into sink or container of clean water. 5. Do not overpeel or product will be lost. 6. Keep hands and all other articles out of peeler chamber while machine is running. Directions for Cleaning Vegetable Peeler: Step Procedure 1. Disassemble removable parts. Remove lid and disk. 2. Wash interior. Flush with hot water and scrub thoroughly; walls, shoulders, inside and outside of door. Leave door open to air dry. 3. Clean peel trap. Remove (raise) lid, strainer, and stopper. Flush interior with hot water; scrub with stiff fiber brush while flushing. Leave open to air dry. 4. Clean parts. Under hot running water, scrub lid, disk, strainer, and stopper. Leave abrasive parts out to dry. 5. Clean exterior. Wipe or scrub with brush and hot detergent solution. Safety Notes: 1. Do not stop machine while product is being peeled. Allow it to empty before opening. 2. Never operate the peeler unless water has been properly applied. 8-17 Food Service Operation Handbook 2 - 13 UTENSIL WASHING MACHINES OPERATING AND SAFETY PRECAUTIONS 1. Properly install all internal removable components. 2. Clean drain valve, add sudsless detergent as required and lower all doors. 3. Open all supply valves and turn “heat” switch on. 4. Turn selector switch to “Manual.” Tanks will be filled to proper level in approximately 2-1/2 minutes. When wash water is heated to desired temperature, machine will be ready for operation. 5. Open side doors and place rack of utensils in machine. Do not overpack racks. 6. Lower side doors, then turn selector switch to “auto.” The machine will automatically wash, rinse, and shut off. 7. For continuous operation, repeat steps 5 and 6. 8. If manual operation is desired, turn switch to “manual” and select “wash” or “rinse” as desired. Machine will perform selected function after doors are lowered. General Instructions: 1. Remove scraps from all utensils before placing them in racks. 2. Maintain rinse temperature. 3. Drain machine when finished. 4. After use, clean and replace all internal removable components. 5. Pump can be reached for cleaning by removing inspection plate only when necessary. NOTE: Ware washing machines will be provided with an easily accessible and readable data plate affixed to the machine by the manufacturer. The plate will indicate the machine’s design and operating specifications to include required temperatures for washing, rinsing, and sanitizing. 8-18 Food Service Operation Handbook 2 - 14 MULTIPLE BLADE BREAD SLICER OPERATING AND SAFETY PRECAUTIONS 1. Carefully remove the slicer from the shipping box. Install machine in accordance with installation instructions. 2. Ensure machine connection to power source and switch master switch to “ON” position. 3. Use the handle located on the front of the machine to raise the knife frame up until it remains in fixed position and bread rack pivots forward to open position. 4. Place bread to be sliced in receiving trough and raise operating handle on right side of machine to automatically operate motor switch and start the knife frame on its downward slicing motion. NOTE: Switch will shut off automatically when knife frame reaches its bottom position. 5. To remove sliced bread from machine, place right and left hands against the respective ends of the sliced loaf and lift loaf out of rack. Place it on bagging attachment for bagging. 6. When cutting rye bread with hard crust, place bottom of loaf against front side of rack. 7. When slicing large round loaves or long loaves lengthwise, use the procedure as follows: a. Raise the frame. b. Start the knives by lifting the switch button located on top of the frame at right. c. Feed bread (lengthwise) upward through knives until uncut portion of bread can rest on receiving trough. d. Rest lower end of bread on receiving trough and raise the operating handle to complete slicing. CAUTION: Do not allow fingers or hands to come in contact with knives when operating machine. 8. When slicing very hot bread, or bread of a very sponge-like, soft texture, with a well baked crust, slightly retard downward motion of knife frame until knives have entered the hard crust. 9. Follow procedures as outlined in operator’s manual for removal and replacement of knife frames and for removal and replacement of knives in frames. 10. Pay particular attention to manufacturer’s lubrication instructions. Cleaning: Daily or after each use: 1. Disconnect machine from power source. 2. Machine parts coming in contact with bread products such as upper and lower knife frame assemblies, bagging trough, and holding rack should be removed and washed thoroughly in mild detergent and warm water solution. Rinse and dry. Reassemble parts in accordance with operator’s manual. 3. Wipe down machine exterior with mild detergent and warm water solution. Rinse. CAUTION: Do not, at any time, spray or allow water to enter motor housing or crank mechanism. 8-19 Food Service Operation Handbook 2 - 15 DISHWASHING MACHINE (CONVEYOR) OPERATING AND SAFETY PRECAUTIONS Take caution not to damage component accessories which usually are appended on the side of the dishwashing machine. Installation of the machine and component accessories shall be in accordance with the manufacturer’s instructions. Operating: 1. Close all tank drains. 2. Open water supply service valves, turn main electrical disconnect on. 3. Check to see that conveyor is cleared of objects that may cause “jam-up” in machine. 4. Check to see that all internal removable parts are properly installed. 5. Turn on detergent dispenser. 6. Fill tanks to desired level (either manually by opening fill valves or by turning automatic tank fill switch to “on” position when machine is so equipped). Tanks will fill in approximately 4-1/2 minutes. 7. Turn heat switch on (or open all steam valves to tanks and booster). Allow time for water in tanks to reach desired temperatures. Machine is now ready for operation. 8. Start conveyor and pumps by depressing the proper push-buttons, then load dishes in correct manner for best cleaning. General: 1. Remove scraps from all dishware and utensils before placing on conveyor. 2. Maintain approximately 110° F. - 120° F. pre-wash, 150° F. - 160° F. wash, 160°F. - 180°F. rinse, 180° F. - 194° F. final rinse temperatures. 3. Always turn off tank heat before draining tanks. 4. Clean and replace all internal removable parts daily. Make sure spray pipes are free of foreign matter. 5. Shut off water, electric, steam, and gas supply when machine is not to be used for extended period. NOTE: Above listed temperatures are approximate. Ware washing machines will be provided with an easily accessible and readable data plate affixed to the machine by the manufacturer that indicates the machine’s design and operating specifications including required temperatures for washing, rinsing, and sanitizing. 8-20 Food Service Operation Handbook Cleaning: For best results, the dishwasher should be cleaned after each use. The simple steps outlined below will ensure clean, sanitized dishware. 1. Before cleaning, shut off the steam, water, and electrical supplies. 2. Open drains and wait until tanks are empty. 3. Remove wash manifolds, rinse manifolds, scrap screens, and suction strainers. 4. Clean dishwasher tank(s) preferably by using a hose. Be careful not to bend or twist any ball or float arms. Wipe down inside of hood. 5. Clean and replace suction strainers. 6. Clean and replace scrap screens. 7. Clean all spray pipes using the brush provided with the machine. The end caps must first be removed. 8. Replace caps and install manifolds in their proper positions. 9. Wipe down outside of hood. 10. It is necessary, periodically, to remove lime deposits which may build up on the machine over a period of time. An approved de-limer should be used for this purpose. 8-21 Food Service Operation Handbook 2 - 16 DISHWASHING MACHINE OPERATING AND SAFETY PRECAUTIONS 1. Install machine in accordance with manufacturer’s instructions. 2. Filling Tank: Open all water valves and fill tanks to level of overflow with hot water. electrical disconnect on. Turn main 3. Place an approved detergent in the wash tank. 4. Ensure that conveyor is cleared of objects that may cause “jam-up” in machine. 5. Heat water in rinse tank by opening steam valve. Temperature of water in wash tank will rise after machine is in operation. The rinse tank-fitted thermostat prevents operation of machine unless minimum temperature of 180° F. is reached. NOTE: Do not change this setting if temperature in rinse tank falls below 175° F.; thermostat will stop motor and pump operation. 6. In event rinse tank thermostat stops motor and pump due to low temperature, add additional steam to bring temperature of rinse tank up over 180° F. To resume operation, press start button. 7. Final rinse and sterilization spray: Set lever on steam and water-mixing valve to regulate mixture of steam and water desired. The final rinse spray should be adjusted to temperature of about 190° F. Operating: 1. Press starting button to start pump. 2. Place dishes loosely in baskets. Turn cups upside down, place bowls or deep dishes on end but tilt enough to allow for drainage of water. 3. Place basket between the conveyor chain lugs. NOTE: Above listed temperatures are approximate. Ware washing machines will be provided with an easily accessible and readable data plate affixed to the machine by the manufacturer that indicates the machine’s design and operating specifications including required temperatures for washing, rinsing, and sanitizing. Daily Cleaning: The scrap trays of the machine are to be cleaned of garbage as follows: a. Before cleaning, shut off steam, water, and electrical supplies. b. Remove the lower manifold assembly. c. Lift out scrap trays, and at the same time, remove pump suction strainer. d. After cleaning and washing, replace suction strainer and scrap trays in machine. e. Manifolds may be cleaned by inserting brass cleaning brushes directly into the tube, pushing ball inwards. When machine starts, the ball will return to end of pipe. f. Install manifold assembly in proper position. g. Wipe down outside of hood. 8-22 Food Service Operation Handbook 2 - 17 FOOD MIXING MACHINE, 20 QUART OPERATING AND SAFETY PRECAUTIONS 1. Set the shifter handle at the desired speed and turn on the switch to start the motor. 2. To change speeds, first turn off the motor, then move the shifter handle to the desired speed. 3. Use number 3 speed for fast, light work, such as whipping cream, beating eggs, and mixing thin batters. 4. Number 1 or slow speed is for heavy mixtures, such as breakfast rolls, etc. Also use this speed for the food chopper attachment. 5. In many operations, it is desirable to start on number 1 then change to a higher speed as the work progresses. 6. To lower the bowl, pull the lift handle forward. NOTE: It is necessary to lower the bowl to change agitators; this position also makes the bowl more accessible for filling. 7. When raising the bowl, move the lift handle a little beyond the vertical center until it is felt to touch the stop. 8. To mash potatoes or to cream butter, start with the bowl down and raise it slowly into working position, while the agitator is rotating. 9. When attaching an agitator (bowl in the “DOWN” position) slip the agitator up on the shaft and turn it until the driving pin in the shaft reaches the L-shaped slot in the agitator shank. 10. The style “B” beater is commonly used for thin batters, cakes, and mashing potatoes. 11. The style “D” whip is best for whipping cream and beating eggs. The “E” dough arm is for heavy bread doughs, and the “P” pastry knife for cutting shortening into flour for pastry. The “S” beater is used for sweet dough and the “C” wing whip for heavy whipping. 12. The attachment socket is for the size 12 attachments. Before putting an attachment into the socket, stop the motor, then insert with a slight twist toward the left so that the stop stud in the attachment is tight against the side of the hole that receives it. When in place, tighten the thumb screw and put a drop of oil in the oiler. 13. The attachment drive has three speeds, governed by the shifter handle of the mixer. For most attachments, set the handle at number 1. Set the speed at number 3 for the tool grinder. CAUTION: The chopper attachment must never run faster than speed 1 when cutting meat; when cutting vegetables it may run at the number 2 speed. Use the motor switch to start and stop the motor before changing the speed of an attachment. Cleaning: Daily or after each use: 1. Disconnect power to machine prior to cleaning. 2. Remove attachment, bowl, or accessory and preflush as required. 3. Scrub bowls, attachments, and accessories with long-handled brush and 125° F. detergent water solution. Rinse thoroughly. Air dry. Sanitize. Be sure to reach all food-contact surfaces. 4. Wipe down main body of machine with mild detergent and warm water solution. Rinse. CAUTION: Do not spray machine. 8-23 Food Service Operation Handbook 2 - 18 WALK IN REEFER OPERATING AND SAFETY PRECAUTIONS General: 1. To gain maximum use and performance, this refrigerator must be installed and operated properly. Assembly/installation must be in strict accordance with manufacturer’s instructions. 2. Operators of the unit must be thoroughly familiar with the various features of the unit. 3. The door latch is equipped with provisions for padlocking and inside door release mechanism which enables door to be opened from inside even when latch is padlocked. NOTE: An inside door release instruction label is attached to door interior. DO NOT REMOVE THIS LABEL FOR ANY REASON. 4. The strike part of the latch is adjustable to compensate for gasket wear. As the need arises, simply loosen two adjusting screws of the strike and move the sliding tongue forward or backward as required. Then tighten the screws. 5. The alarm control should be set to operate the warning lamp at 61° F. 6. The hold-back hook holds the door in the open position. To release door, simply press lever of the hold-back hook. 7. The condensing unit, with compressor and motor, is lubrication-sealed and is equipped with a relay, overload protector. 8. The evaporator is of the forced circulation type in which the accompanying fan cycles warmer air over coils of evaporator and re-circulates the air. CAUTION: Do not load refrigerator too close to the blower coil as this will block the air cycle. 9. The refrigerator cabinet is equipped with an automatic defrosting system, which eliminates the need for manual defrosting. Operating: 1. Before starting unit, open liquid valve, suction valve and discharge valve and make connection to the junction box. 2. The pressure control is factory set to maintain a cabinet temperature of 35° F. If adjustment is necessary, be sure the temperature does not go below 32° F., as the evaporator coil will be iced up. 3. If a compressor operates for too long or too often, it is generally due to the refrigerant being low, even though the temperature is cold enough. In the event either condition is present, refer to operator’s manual. Cleaning: 1. To clean the interior of the refrigerator, use a solution of baking soda or borax and hot water. These compounds act as deodorants and will not scratch or mar the finish. 2. To prepare a soda solution, mix one-half teaspoon of ordinary baking soda to each quart of water. 3. Clean the exterior of the cabinet with clear water or a weak solution of baking soda and warm water. 4. Once a week, wash door gasket rubber with mild soap and water followed by a fresh rinse. NOTE: Grease accumulation on door gaskets will shorten the life of the gaskets. 8-24 Food Service Operation Handbook 2 - 19 STEAM JACKETED KETTLES OPERATING AND SAFETY PRECAUTIONS 1. Installation of steam kettle is to be in accordance with installation instructions. 2. Do not tamper with or obstruct safety valve. 3. Leave cover and drain open when not in use. 4. Do not turn on steam unless water or food is in kettle. 5. Do not put water in hot dry kettle. 6. When heating a cold kettle, turn the steam on gradually, thus allowing the kettle to become warm before full pressure is applied. After kettle becomes warm, and before applying full pressure, open the safety valve momentarily to release any air trapped within the jacket. Cleaning: 1. Do not use steel wool or any abrasive for cleaning. 2. Wash kettle before and after each use with hot soapy water and rinse thoroughly with clean water. Dry thoroughly. 3. Clean strainer before and after each use with hot soapy water. Rinse thoroughly. 4. The stainless steel surface of the unit may be polished periodically with an approved stainless steel cleaner. 5. Clean strainer, draw off valve and draw off tube thoroughly after each use. To clean draw off valve and tube, remove the front end of the valve and brush. Scrub with hot water. 8-25 Food Service Operation Handbook 2 - 20 HOT DOG GRILL OPERATING AND SAFETY PRECAUTIONS General: 1. Install machine in accordance with installation instructions. 2. The fast heating rollers of the machine are capable of turning a large quantity of franks over at a slow, even speed which causes the fat to self-baste the franks while sealing in natural juices and flavors. Cooking the frank is quick, uniform, and requires no constant attention. 3. The machine is equipped with eight rollers with separate heating controls for each set of 4, which can be lowered or raised, thereby providing flexibility in capacity depending on the demand. Operating: 1. Turn on main disconnect switch to machine. 2. Turn both heat controls on high temperature and allow rollers to heat up for 10 minutes before turning on motor switch. 3. Temperature Controls. Front Control, left hand side, controls first four rollers nearest operator. Rear Control, right hand side, controls last four rollers farthest away from the operator. Each control has four heat settings -- HIGH, MEDIUM, LOW, and OFF -- each independent of the other. NOTE: On medium heat it is normal for alternate rollers to be cold. 4. Adjust temperature settings in accordance with manufacturer’s instructions. 5. Never change franks that have been on high heat to lower heat as they will shrivel. 6. Franks should always be kept under refrigeration until they are ready to be used. Keep at about 40° F. but be careful not to store in a freezer as this will cause the franks to dehydrate and toughen the skin. 7. If drip pan collects an unusual amount of drippings, a large amount of fat in frank is indicated. This generally means a poor quality frankfurter. If rollers show consistent black deposits, a high sugar content is indicated and possibly a large cereal content. Both indications reveal a poor quality frankfurter. Cleaning: Daily or after each use: 1. Turn both switches on high heat and allow rollers to get very hot. Turn on motor. 2. Clean rollers with a clean wet cloth. Cold water or plain carbonated water lifts grease. 3. Always start at end of rollers and wipe toward center of rollers. This prevents extra from entering bearings. 8-26 grease Food Service Operation Handbook 2 - 21 DEEP FAT FRYER (NON-COMPUTER) OPERATING AND SAFETY PRECAUTIONS General: 1. Assembly and installation is to be in accordance with manufacturer’s instructions. 2. Check for accuracy of the thermostat. A reading of more than five degrees difference from the setting of the thermostat knob requires recalibration of the thermostat. NOTE: Do not remove manufacturer’s decals from unit. 3. Do not leave fryer unattended while it is in operation. 4. Do not operate deep fat fryer without thermometers inserted into each fry kettle or attached to individual fryer baskets. 5. Handle food only with the implements provided for the purpose. 6. Foods which have been in water should be well drained before immersion in the shortening. Keep all other water sources away from the operating fryer. 7. Wipe up fryer spills immediately. Operating: CAUTION: DO NOT TURN ON THE POWER TO THE ELEMENTS WITHOUT FIRST FILLING THE FRY KETTLE. Filling the Fry Kettle: 1. Check to make sure that the thermostat sensing bulb inside the kettle is firmly held in the bracket attached to the back of the tank inside. Tighten the screws in clamp holding the bulb if necessary. 2. Always check to make sure that the drain valve is completely closed before filling the fry kettle. 3. If the fryer is new, it is advisable to fill the kettle with water and clean thoroughly as explained in the cleaning instructions in order to remove rust inhibitors and any foreign matter. 4. Using approved liquid shortening; fill the kettle an inch above the top of the elements before turning fryer on. If the heating element surfaces are not covered when the fryer is turned on, the element will become red hot and has the potential to cause damage to the fryer and personnel. 5. As a further precaution to prevent burning or scorching the shortening, keep the thermostat knob set at 200° F. until all shortening between and above the element has melted. Additional shortening can then be added until the desired frying depth has been reached. 6. After filling fry kettle, always check thermostat calibration. See “Thermostat Calibration and Recalibration Instructions” in the operator’s manual. Frying: 1. After filling the fry kettle, select the proper temperature for the product to be fried. Set the thermostat to this temperature. NOTE: DO NOT ATTEMPT TO FRY ANYTHING UNTIL THE PROPER TEMPERATURE HAS BEEN REACHED. The indicator light will shut off when the set temperature is obtained. 2. Fill each basket with food, and lower them into the fry pot. Sample frying times are given in the operator’s manual. These are average times and, with a little practice, proper load and time will be established. Cleaning the Fry Kettle: 8-27 Food Service Operation Handbook Do the following DAILY: 1. Turn off electrical power. 2. Screw drain nipple into drain valve. Place a suitable container under the drain nipple and drain the fry kettle completely. 3. Flush out any sediment remaining in the kettle with a little hot shortening. 4. Wipe off the elements and the inside of the fry kettle with a clean cloth. 5. Close drain valve and strain the shortening back into the fry kettle through several thicknesses of cheesecloth or filter it back using a filter machine. NOTE: ADD AT LEAST 7-1/2 POUNDS OF NEW SHORTENING TO KETTLE DAILY. IF EQUIVALENT WEIGHT HAS NOT BEEN ABSORBED BY FRIED FOODS, REMOVE SUFFICIENT AMOUNT OF OLD SHORTENING TO ALLOW ADDITION OF NEW SHORTENING. 6. Unscrew the drain nipple and the fryer is ready to operate when needed. Do the following WEEKLY: 1. Follow steps 1, 2, and 3 above. 2. Close drain valve and fill kettle with a solution of warm water and an approved strong detergent. 3. Turn on electric supply to the fryer and bring the water to a gentle boil. 4. Turn off electrical power. 5. Let the solution stand until the gum deposits are softened and the carbon spots and burned grease spots can be rubbed off. 6. Scrub the kettle walls, then drain out the kettle and rinse it with clean water. 7. Turn on electrical power. 8. Refill the kettle with clean water and boil again. 9. Turn off electrical power. 10. Drain and rinse well. 11. Wipe dry with a clean cloth. 12. Close drain valve and strain the shortening back into the fry kettle through several thicknesses of cheesecloth or filter it back using a filter machine. NOTE: ADD AT LEAST 7-1/2 POUNDS OF NEW SHORTENING TO KETTLE DAILY. IF EQUIVALENT WEIGHT HAS NOT BEEN ABSORBED BY FRIED FOODS, REMOVE SUFFICIENT AMOUNT OF OLD SHORTENING TO ALLOW ADDITION OF NEW SHORTENING. 13. Unscrew the drain nipple and the fryer is ready to operate when needed. Cleaning the Exterior Surfaces: 14. Wipe off spilled or splashed shortening while still warm with a soft clean cloth. 8-28 Food Service Operation Handbook 2 - 22 COOKIE CUTTER/DROPPER OPERATING AND SAFETY PRECAUTIONS General: 1. Uncrate machine with care and install in accordance with installation instructions. 2. Operators of the machine must be thoroughly familiar with machine parts. Operating: The depositor is started and stopped by an electrical toggle switch or push button. The fingers that carry the cut-off wire can be inched forward by quickly mapping the toggle “ON” or “OFF.” If the depositor has a magnetic starter with push buttons, hold in on the “Stop” and “Start” buttons and quickly operate the “Stop” button in and out. CAUTION: operation. Keep hands clear of feed rolls and finger drive mechanism when depositor is in Before placing depositor into production, it is beneficial to operate the depositor as though it is in production by completing the following: 1. Be sure machine is in the “OFF” position. 2. Inch the finger bar forward as explained in the first paragraph until the leading ends of are close to the die pads. fingers 3. Tilt the hopper and attach the die to be used. DO NOT start depositor with hopper tilted as this will damage the depositor. Lower the hopper easily down into operating position, loosen the finger wing screws and slide the fingers on shaft until fingers are between the pads of the die, lock wing screws. See operator’s manual for setting cut-off wire. Use the outer most holes in fingers for 3” and larger dies, each successive hole in finger is for dies with holes having smaller than 3” in 1” increments. 4. Start the depositor by placing the toggle switch in the “ON” position or by pushing the “Start” button. 5. The pans are carried on a pair of belts. The spacing between the row of deposits can be varied as follows: (a) stop the depositor, (b) pull out on conveyor, adjusting knob, (c) slide sliding lock nut “UP” (to increase spacing) or “DOWN” (to decrease spacing), and release adjusting knob so it can engage detents in the square rod. The gauge on square rod is approximate spacing per stroke in inches. DO NOT try to change spacing while depositor is running. 6. Feed adjustment (amount of deposit) can be made when the depositor is operating or not. A lock screw is provided so setting is not lost while operating. The indicator plate does not indicate weight but is used for reference only. 7. The speed of the depositor, strokes per minute and the conveyor speed can be changed in uniform by the machine speed adjusting hand wheel. The adjustment must be made while the depositor is running. 8. Improper adjustment of the cut-off wire may cause some pieces to be deposited upside down, or in irregular rows. See operator’s manual for correcting improper depositing. 9. Lubrication of this machine is of vital importance, and should be accomplished in strict accordance with manufacturer’s instructions. 10. Refer to operator’s manual for mixing instructions for machine-made cookies. 8-29 Food Service Operation Handbook Cleaning: 1. Before initial operation, and after each day’s use, the feed rolls must be thoroughly washed and sanitized. Do not delay in cleaning after operation as the material sets which makes taking it apart more difficult. 2. Move the finger shaft assembly so that the finger shaft is away from the hopper section, i. e., toward charge end of the depositor. 3. Remove the hopper by removing the two wing nuts, one on each bearing cap. Replace nuts, finger tightened. 4. Hinge the gear cover open at the far side of the hopper by tilting top of cover away from hopper. Tilt feed rolls toward left and by lifting at finger bar side. Loosen the two die screw knobs and remove die, then hinge feed rolls back to operating position being careful not to allow it to drop. 5. Remove the two wing nuts, one in each bearing cap at the end of feed rolls. Pull stud pin out of link stud, remove pin washer and slide end of drive link off of lever. Holding it so it does not fall, lower it gently. Lift bearing caps off, then lift each feed roll out. 6. DO NOT submerge drive clutch at end of drive feed roll in water or direct live steam against it. This precaution is necessary to protect the precision parts from corrosion. Clean all exposed surfaces. NOTE: When re-assembling feed rolls in machine, place drive feed roll in its bearings. The drive roll is the one with the clutch mounted on the outer shaft. 7. Place the motor (driven) feed roll on top of the driver roll, with gear teeth in mesh, roll the driven feed roll into its bearings. Replace bearing caps, hopper and the two wing nuts. 8. Replace the drive link on the link stud, place pin washer on stud and slip stud pin into and through hole in link stud. 8-30 Food Service Operation Handbook 2-23 DOUGH MIXER - HORIZONTAL OPERATING AND SAFETY PRECAUTIONS. Uncrate mixer machine carefully to prevent damage. Install in accordance with manufacturer’s instructions. Operating: 1. FUNCTION OF POWER DUMP: The function of the power dump is to place the bowl in the three working positions: loading position for flour and other ingredients; mixing position, where bowl is up to stop point and closed by the canopy; and dumping position, for removal of dough. Press the “DOWN” button until bowl is open far enough for loading and press “STOP” button. Press “UP” button until bowl stops (partially open), then hold in “UP” button to complete closing. 2. LOADING: To load flour and other ingredients, open the hinged part of the canopy and run the bowl toward the dump position far enough to allow the flour and ingredients to be put into the bowl. Run the bowl up to stop point (mixing position), close the hinged part of the canopy and start the mixer. 3. STARTING: The agitator is driven by a two-speed motor through a starter that has over-load and low-voltage protection. Starter is set into front of frame. Push button control for agitator motor consists of “BLOW,” “FAST,” and “STOP” when bowl is tilted, safety switch cuts off current. With bowl anywhere from slightly open to dump position, agitator will run only as long as “SLOW” button is held in. NOTE: If machine is equipped with “JOG” button, hold both “SLOW” and “JOG” buttons in to run agitator with bowl open. 4. RESTARTING: Relay in starter box will cut off when the current in the event line voltage drops below safe limit, or if motor over-load occurs. To restart motor, wait approximately two minutes and press “SLOW” button. 5. TIMERS: If mixer is equipped with one or two timers, set low speed timer for desired low speed mixing, set high speed timer for total mixing time and press “SLOW” button. 6. Lubrication of mixer is to be in accordance with manufacturer’s instructions. Cleaning: 1. After finishing the last mix, the bowl, agitator, dough seals and canopy must be cleaned. Residue will harden if allowed to stand over a half-hour period. 2. To clean bowl, use the following procedure: a. Run bowl to loading position, put approximately 10 gallons of hot water into bowl, run bowl up to mix position and start mixer. b. Allow mixer to run for several minutes and push “STOP” button. c. Run bowl half way down to dump position and clean surfaces with hot water and a stiff brush then empty water and residue. 3. Clean dough seals in the following manner: a. Remove the two wing nuts and slide the pressure ring off at the studs. b. Grasp lugs of seal ring and pull ring out of bowl head. c. Flip seal garter out of seal groove by placing the index finger under garter at notch in bowl seal. CAUTION: Use finger to remove garter; do not use tools to remove garter. d. After disassembling the seal, wash all parts and allow them to dry. e. To replace bowl seals, place garter around seal ring and push ring into bowl. Place pressure ring over studs and finger tighten wing nuts. 8-31 Food Service Operation Handbook 2 - 24 MODEL 550 FRISPO-MATIC OPERATING AND SAFETY PRECAUTIONS General: 1. Installation of this machine must be in strict accordance with the manufacturer’s instructions. 2. Operation of this machine is divided into four functions: a. The charging procedure which must be performed each operational day and also when machine has been idle for a long period of time. b. The AUTO operation mode, where machine dispenses all of potato pieces and then charges itself for next cycle. c. The SINGLE operation mode where machine dispenses one portion of potato pieces. When all of potato mix is used, machine will then recharge itself for next cycle. d. The operational checkout which contains procedures for checking and adjusting the machine. Operating: 1. Connect main disconnect and plate machine POWER switch to ON. Indicator in center of switch should illuminate, indicating that power is connected to unit. Ready button light should be visible within eight seconds and unit is now ready for charging. 2. If red REFILL indicator is also illuminated at this time, adding french fry potato product mix to storage hopper will cause REFILL indicator to go out. NOTE: Only refill hopper when REFILL indicator is illuminated. 3. After charging cylinder in prescribed manner, reassemble piston-diaphragm, cylinder slicer and cutter subassembly. 4. Now complete charging sequence by waiting for ready light to illuminate, then depressing READY button. This initiates a sequence which adds additional product and water into charging cylinder. When READY button illuminates again, unit is ready to operate and will dispense product upon request. 5. With PORTION CONTROL switch set at SINGLE, potato pieces will be dispensed only when READY button is depressed. Single portions, double portions, triple portions, etc., to a maximum of five portions, may be obtained in this manner. 6. With PORTION CONTROL switch set at AUTO, operator can actuate READY button causing unit to dispense one-half the rehydrated product. Unit will then automatically recharge its cylinder. 7. To receive ten portions, actuate illuminated READY button in normal manner and catch first dispensed portions in a fry basket. Move charged basket from drop area and place an additional empty basket for second five portions. Operator can now make a second five-portion request by pushing READY button even though button is not illuminated. This second request is stored in machine memory. After automatic recharge takes place, the second five portions will begin. 8. Move transfer tray slowly to distribute dispensed potato pieces evenly. 9. Place potato pieces into submerged fry basket. 10. After potato pieces are immersed in oil, shake basket with up and down motion. NOTE: Fry potato pieces in approximately 350° F. oil. 8-32 Food Service Operation Handbook 11. After 1-1/2 minutes, or when fry kettle timer sounds, remove basket from fryer, shake basket briskly and place fries under a red heat lamp. 12. Check fries for sticking and breaking. 13. If fried product sticks or breaks excessively, perform Operation Checkout and/or refer product Troubleshooting guide in operator’s manual. to Cleaning: NOTE: Failure to clean this machine could cause food poisoning or machine damage. Daily or after each use: 1. Move power switch to “ON” position and place transfer tray under the deflector plate. 2. If red REFILL light is on, refill product hopper. 3. When ready light is on, place PORTION CONTROL switch at AUTO and depress READY push button. 4. When potato pieces falling, place POWER switch to OFF. 5. Remove front cover, lift cutter sleeve and cutterback. 6. Rotate slicer counterclockwise and remove slicer. 7. Lift and remove deflector plate. 8. Remove cylinder and slide piston from piston shaft. 9. Remove remainder of rehydrated potato product. Remove diaphragm from piston. 10. Wipe all surfaces of the machine with a clean damp cloth. Wipe dry. CAUTION: Do not use abrasives on rubber, plastic or stainless steel surfaces. Do not use solvents on plastic parts, or place parts in automatic dishwasher. Hard to remove dry product may be softened by soaking parts for a short time in warm water. 11. Wash all removed parts in warm, soapy water. Rinse parts in clear, clean water. Submerge parts in sanitizing solution and allow parts to air dry. 12. Check piston shaft and area around nozzle discharge and dry-product discharge for dirt and product buildup. Wipe clean as required. NOTE: Do not reassemble until machine has been charged. 13. Install diaphragm on piston and install piston on shaft. 14. Install cylinder and deflector plate. 15. Install slicer and rotate slicer clockwise. 16. Lift cutter sleeve, install cutterback and front cover. 17. See manufacturer’s instructions and procedure for periodic major cleaning. 18. Lubrication and de-liming is to be in accordance with manufacturer’s instructions. 8-33 Food Service Operation Handbook 2-25 PIE RIMMER/CRIMPER OPERATING AND SAFETY PRECAUTIONS Operating: 1. Turn on electrical power to the machine. 2. Place a pie plate with a rolled untrimmed bottom crust in the bottom die and raise by pressing the counter-balanced foot pedal. 3. The rotating head of the machine engages automatically and produces a crimped, single crust pie shell. 4. For two-crust pies, use the optional trimming head and die. Place a filled, untrimmed, two-crust pie in the bottom die. 5. Raise pie with the counter-balanced foot pedal and the pie crust will be trimmed and crisp/sealed. 6. Trimmed dough will drop into catch pan for reuse. 7. Normal machine capacity is six to ten pies per minute. Safety Precautions: 1. Turn off the power at main disconnect for cleaning, for removing and changing dies or rimmer/crimper heads, and when machine is not in use. 2. Keep hands and tools out of the area between the die and the head when machine is in operation. Cleaning: Daily or After Each Use: 1. Turn off power to the machine at main disconnect. 2. Vacuum or blow off loose flour, dust, etc. Removable parts such as the lower die, rimmer/crimper head, and catch pans should be washed in a solution of warm water and an approved detergent. Rinse thoroughly under hot water. Dry thoroughly. 3. Wipe down surfaces of machine frame and permanently attached parts with a clean damp cloth. Dry thoroughly. CAUTION: Do not hose down or spray machine. 8-34 Food Service Operation Handbook 2 - 26 ROTARY BREAD TOASTER OPERATING AND SAFETY PRECAUTIONS Operating: 1. Turn on the electrical power approximately fifteen minutes prior to use. 2. After warm-up, set the conveyor speed to produce desired browness of toast. 3. Turn knob on right side of the toaster only if jamming occurs in the unit. 4. Place slices of bread on each conveyor rack as the conveyor turns. 5. Remove finished toast from the drop tray. Safety Precautions: 1. Secure the electrical power when the toaster is not in use. 2. Do not introduce any foreign objects into, or allow parts of the body to come into contact with, the toaster when in operation. Cleaning: Daily or After Each Use: 1. Secure the power to the unit. 2. Turn the knob on the right side of the toaster to ensure all the toast is out of the unit. 3. Remove the catch tray and chute, wash in a solution of hot water and an approved mild detergent, sanitize in 180° F. minimum water. Allow all removable parts to air dry. 4. Brush all crumbs out of the toaster and from around the base. 5. Clean the exterior of the toaster with a clean wet cloth and wipe dry. 8-35 Food Service Operation Handbook 2 - 27 FOOD MIXER (140 QUART) OPERATING AND SAFETY PRECAUTIONS Operating: 1. Properly attach the mixing bowl prior to starting the machine. 2. When shifting gears, always disengage the clutch lever and move the shift lever to the desired position. Re-engage the clutch to activate the spindle. 3. The bowl is raised and lowered by a power lift controlled by a lever on the control panel. Place the whip or beater in the bowl before raising the bowl. With the power off, attach the beater to the spindle. Always use the recommended beater for the product to be mixed. a. Batter beater for mixing cake batter, etc. b. Wing whip for icings, mayonnaise, etc. c. Balloon whip for thin mixtures. d. Dough hooks for bread and roll dough. e. Sweet dough beater for sweet yeast doughs. f. Pastry knife for cutting shortening into flour. Safety Precautions: 1. Keep hands and utensils out of the mixing bowl when the beater is running. 2. Never attempt to attach or detach beaters when the spindle shaft is turning. 3. Do not wear loose clothing or jewelry when working with rotating parts. 4. Determine that bowl lugs are firmly seated on the pins before raising or lowering the bowl. 5. Do not allow anything to be placed under the bowl when it is in the raised position. 6. At any sign of unusual noise or operating condition, secure the power immediately. Cleaning: 1. Secure the electrical power. 2. Detachable parts such as beaters should be thoroughly washed in a solution of hot water and approved mild detergent. Sanitize in the sanitizing sink and air dry. Bowls should also be thoroughly washed in a solution of hot water and approved mild detergent. If the sanitizing sink is large enough, sanitize the bowls and air dry. Chemical sanitizing may also be used. 3. Wipe down exterior parts of the mixer with a solution of hot water and approved mild detergent, rinse and wipe dry. CAUTION: Do not allow water to enter machine electrical compartments or gear case. 8-36 Food Service Operation Handbook 2 - 28 BUN SLICER (HOTLINE) OPERATING AND SAFETY PRECAUTIONS WARNING: Do not operate this machine without guards. Operators should be thoroughly familiar with the safety guards and safety features of the machine. 1. The machine is adjustable for width and height and can be adjusted to cut all the way through the bun, or part way. Maximum product size is 4-1/2” wide x 2-3/4” thick. CAUTION: Adjustments should be made with switch in the “OFF” position (switch is located on the base of the machine). 2. To adjust for thickness of bun, turn knob located on top of guard. This will increase or decrease the height of the chute. 3. To adjust for the thickness of cut, first loosen knob located on machine base under chute, then turn the thumb screw (which penetrates flange of base and underside of chute) to obtain desired thickness, and reset knob. 4. To adjust for depth of the cut and the width of the bun, loosen the two thumb screws located on the underside of the chute and slide the right guide assembly to the desired width. Tighten right guide thumb screws. Depth of cut has now been set. Left guide adjustment also aids in adjusting chute for width of bun after depth of cut has been determined. To make this adjustment, loosen the two left guide thumb screws and slide left guide toward the right guide, (to narrow chute) or away from the right guide (to widen chute), tighten left guide thumb screw. NOTE: Operator will note that chute-width and depth-of-cut adjustments are interrelated. 5. Adjustments should be made liberally to allow for size irregularities of buns. 6. The motor is equipped with manual reset thermal overload protection. In the event that the motor becomes overheated and stops, proceed as follows: a. Turn switch to “OFF” position. b. Allow motor to cool for approximately five (5) minutes. c. Reset by pressing red button on bottom side of motor. Cleaning: Daily or as required. 1. Machine may be disassembled as required for cleaning. CAUTION: Disconnect machine prior to cleaning. 2. Dip-wash disassembled machine parts in warm water and a mild detergent solution. Do not use abrasive cleaners. Rinse and dry thoroughly with soft cloth. NOTE: Do not submerse base (motor housing) in water. 3. Wash outside surfaces of base (motor housing) with mild detergent - warm water solution. Rinse with clean water and dry. CAUTION: Do not allow water to enter base. 4. Reassemble machine. 5. Before each day’s use, wash with warm water and mild detergent solution, rinse thoroughly, and dry all machine parts coming into contact with bread product. 8-37 Food Service Operation Handbook 2 - 29 CARBONATED BEVERAGE DISPENSER OPERATING AND SAFETY PRECAUTIONS 1. The refrigeration system cools the dispensed drinks by means of an ice bank or block which is built up over an initial period of 5 to 7 hours after connection to electrical outlet. Periods of inactivity for the dispenser are needed to replenish the ice banks. Therefore, except as required for repairs, do not turn dispensers off between uses. 2. On dispensers serving one non-carbonated drink, the extreme left hand valve is for noncarbonated. The small lever on the side of the valve is for plain cold water. 3. Due to evaporation of water in the water bath inside the dispenser, it will be necessary to periodically add water. Low water level results in noisy operation and reduced cooling capacity. Refer to operating manual. 4. Make sure water lines to dispenser and carbonator are open at all times. Refer to operating manual for restarting procedure after extended shut down. CAUTION: Do not remove exterior housing or put hands into operating compartment with electrical power connected. Cleaning: 1. To remove dispensing valves for cleaning or repair, remove plastic cover from valve, remove vertical latch pin from top center of valve body, and pull valve body away from the valve plate. Quick disconnect fittings automatically close and prevent liquid discharge. All other valves will remain operational. 2. When replacing valves, moisten the “O” ring on the inlet fittings with water. 3. Lines leading from the syrup tanks to dispenser can be cleaned in place by putting a little water in each tank. CAUTION: Before opening syrup tanks, disconnect all lines and bleed pressure off slowly. 8-38 Food Service Operation Handbook 2 - 30 COFFEE URNS OPERATING AND SAFETY PRECAUTIONS 1. Make coffee as needed according to the Armed Forces Recipe Service P-7. 2. Hold coffee at 185° F. for no longer than one hour. loses its good aroma and becomes bitter. Coffee held longer than one hour 3. Remove coffee grounds immediately after water passes through coffee grounds. 4. Discard filter and coffee grounds after use. Daily - Between brews: Clean coffee making equipment is required before your patrons can enjoy a good brew. Deposits will form on all surfaces of the equipment and will contaminate successive brews unless the urn is cleaned frequently. 1. Clean the urn immediately after a batch of coffee has been used up or disposed of. 2. Rinse with enough water to remove the sediment and old coffee from bottom of urn, drain lines and faucet. 3. With a gallon or more of hot water in the urn, brush the sides carefully with a bristle brush. Drain and flush out with some more hot water until the water runs clean. It is now ready for the next pot of coffee. Daily - At the end of the day or when securing the urn: 1. Carry out the procedure above except it must be brushed and cleaned more thoroughly. Use an accurately measured solution of 1 ounce of dishwashing compound, Type 1 completely dissolved in 1 gallon of hot water. Detergents are also good for cleaning but require a more extensive rinse to remove all traces of the detergent. Baking soda is good for “sweetening” the urn but it is a relatively poor cleaning agent. 2. Clean the gauge glass with a narrow brush. Check to see that the vents at the top of the gauge glasses are not fouled. A clogged vent will cause inaccurate readings of the coffee level. 3. Rinse thoroughly to remove all traces of the cleaning agent. Flush out the entire urn, including the faucet, with 180° F. water for sterilization. Leave about 1 gallon of water in the urn when it’s secured. 4. The lid of the urn must be cleaned also since it is exposed to the coffee vapors which will eventually cause a buildup on the lid. Leave the lid ajar when the urn is secured. 5. Remember to drain the old water out of the urn prior to making up a new batch of coffee. SAFETY NOTE: Never place any solid cleaning compounds directly into a coffee urn. Some of the solid material may become entrapped in the drain lines or faucet. This material would cause serious illness. 8-39 Food Service Operation Handbook Destaining Procedures: 1. Persistent stains may be removed by the periodic use of a destaining compound. 2. Be sure the jacket is at least 3/4 full of water, then turn on the heat. 3. Fill the liner with hot water to the coffee line. Add the destaining compound in accordance with the instructions which come on the package. 4. Allow the solution to remain in the liner approximately 60 minutes at about 180° F. Pass some of the solution down into the drain line and faucet. 5. Drain and thoroughly rinse until all traces of the compound have been removed. 6. Leave about a gallon of water in the urn. SAFETY NOTE: Hang a warning tag on the faucet while the urn is soaking with cleaning solutions. NOTE: To destain vacuum-type coffee makers, use a solution of one teaspoon of destaining compound per quart of warm water. Fill lower bowl to within two inches from top. Assemble unit, apply heat, and allow it to go through a regular cycle. Let stand five minutes (longer if badly stained), drain, and dry. 8-40 Food Service Operation Handbook 2 - 31 CONVECTION OVEN OPERATING AND SAFETY PRECAUTIONS 1. Put in proper number of shelves to give shelf spacing for the product to be cooked. 2. Set speed switch; high for solid products like meats, low for cakes and other fragile items. 3. Close doors, turn on main power switch and set thermostat for proper cooking temperature. NOTE: Fan and heating elements will not operate unless doors are closed. approximately ten minutes to preheat. Oven takes 4. When the doors are open, ovens lose temperature very rapidly. Load and unload as quickly as possible. Use interior lights and glass doors to observe cooking progress. 5. Use damper control wisely. Wide open dampers waste heat, cause heating elements to run continuously and produce lower cooked yields for meat products. For cakes, open damper enough to exhaust moisture so that cakes will rise properly. Convection Ovens With Stainless Steel Liners Step Procedure 1. Clean oven liners, shelves and shelf supports. Clean daily when oven is cold with mild detergent or soap and water. For burnt on foods and grease which resist simple soap and water cleaning, an abrasive cleaner, sized into a paste, may be employed. Apply with stainless steel wool, always rubbing with the “grain.” Rinse with clear water and dry. 2. Remove shelves and shelf supports. To clean liners and to occasionally clean blower wheel. Remove all shelves by pulling forward, lifting up and out. Remove both right and left shelf supports by lifting out. When cleaning blower, remove blower baffle by lifting up and pulling out. Wire brush the wheel and wipe it up with a moist cloth. Remove all loose particles. 3. Replace the hardware. Reverse the disassembly procedure. 4. Clean oven exterior. Wash all exterior surfaces daily with warm water and mild soap or detergent. 8-41 Food Service Operation Handbook 2 - 32 CONVEYOR BROILER OPERATING AND SAFETY PRECAUTIONS 1. Turn master control switch, conveyor switch and all heating element switches to “ON.” 2. Allow broiler to preheat 15 to 20 minutes. 3. Use only thawed meat (38°- 40° F. internal temperature) on the broiler. 4. Follow manufacturer’s instructions for guide settings on the conveyor speed control. Run a test hamburger patty. If a hamburger is completely done throughout but is burned on the surface, speed up the conveyor. If hamburger is rare throughout, slow down the conveyor. Optimum speed produces a hamburger which is slightly pink at the center with a center temperature of 160° F. The hamburger will finish cooking while being assembled into the bun and wrapped. CAUTION: Do not use utensils around the broiler which may be caught in the conveyor belt or serious damage will result. 5. Keep grease drip pan emptied. Cleaning: 1. Clean gross soil from conveyor belt periodically during use. Use a metal sponge (NOT STEEL WOOL). 2. After cooking is completed, turn conveyor control to lowest setting at which the belt still moves. With full heat on, allow to run for ten minutes. Use metal sponge to clean belt as above. 3. Turn machine off and secure power at the breaker panel. 4. When the broiler has cooled, unhook the conveyor at the open links provided and soak in a strong detergent solution to aid in cleaning. 5. Outer top housing, inner heat shield and hanging baffles lift off for soaking and cleaning. Note position for reassembly. 6. Conveyor support rods slide out for cleaning. Note correct positions for reassembly. 7. Loosen screws and remove side housing on the control box side to expose heater connection plugs. Unplug heater assemblies and remove. Heater frames may be cleaned but do not submerge in water as electrical connections are inside the end frames. 8. Slide out drip chutes and pan for cleaning. 9. Reassemble in order of disassembly. 8-42 Food Service Operation Handbook 2 - 33 DEEP FAT FRYER (COMPUTER TYPE) OPERATING AND SAFETY PRECAUTIONS 1. Follow operating instructions on the decal on the front of the fryer and in the manual furnished by the manufacturer. 2. Set the thermostat knob on the left hand front panel to the required temperature. 3. Set the doneness control on the right hand front panel to get the proper coils for the food being fried. This knob controls the computer. 4. Filter shortening daily after using the fryer. Add at least 7-1/2 pounds of new shortening to the kettle daily. If equivalent weight has not been absorbed by fried foods, remove a sufficient amount of old shortening to assure new shortening has raised the shortening level up to the normal operating level. 5. If the fryer is not used for 30 minutes, it will shut off automatically and must be restarted. The time to heat the shortening to operating temperature at start-up is approximately 6 minutes. 6. When the fryer is not in use, power should be shut off and the cover should be placed on the fryer. Safety Precautions: 1. Fryer shuts off automatically if shortening temperature reaches 430° F. - 460° F. for any reason. However, periodically check the temperature while the fryer is in operation. Never leave a fryer unattended while it is turned on. 2. Handle food only with the implements provided for that purpose. 3. Avoid spattering hot shortening. Foods which have been in water should be well drained before immersion in the shortening. Keep all other water sources away from the operating fryer. 4. Wipe up spilled shortening immediately. At all times keep the shortening level above the top of the heating coils and thermostat bulb. Directions For Cleaning Deep Fat Fryers: Step Procedure 1. Turn off heating element. Allow shortening to cool to 150° F. 2. Drain and filter shortening (after each use). Open the drain valve and catch the drained shortening in container. Drain entire kettle contents and filter into a container. Place a clean shortening container into well or wash and replace original one. 3. Remove baskets. Scrape off oxidized shortening with a knife. Remove all loose food particles from the heating units with a spatula or with a wire brush. Flush down sides of kettle with a scoop of the hot shortening. Soak basket and cover in deep sink in hot detergent water. 4. Remove strained sediment container cup as often as necessary for cleaning. Clean off the sediment and place back in the kettle. Stir hot shortening and whirl cleaning sediment to center to permit settling in the sediment container. Drain shortening and wipe off excess. 8-43 Food Service Operation Handbook 5. Close drain. Fill the tank with water and add water up to shortening level. Add 2 ounces of dish compound. 6. Turn on heating element. Set heat control at 250° F. and boil 10-20 minutes, depending on need. 7. Turn off heat. Open drain. Draw off cleaning solution. 8. Scrub interior. Using long-handled brush, scrub interior. Flush out with water. Clean basket with nylon brush and place back in kettle. 9. Rinse and sanitize. Fill kettle with water. Add 1/2 cup vinegar to neutralize remaining detergent. Turn on power and boil for 5 minutes. TURN OFF HEAT. Drain. Rinse with clear water. 10. Air dry parts. Expose baskets and strainer to air and dry. 11. Clean exterior. While kettle is cool, wipe off exterior with a grease solvent, or a detergent solution. Then rinse. Weekly Cleaning: Destain Deep-Fat Fryer: 1. Fill the kettle to shortening level with water. Heat to at least 175° F., or allow it to boil for 5 to 10 minutes. Turn off heat. 2. Add 2 tablespoons of destaining compound per gallon of water. Let stand up to 1 hour. Agitate solution and loosen particles remaining on the sides of kettle. 3. Place screens and strainers in 175° F. water containing 2 tablespoons of destaining compound per gallon. Make sure water covers. Allow to stand overnight. Rinse thoroughly and air dry. 4. Drain kettle and rinse thoroughly before replacing cleaned screen and strainer. Self-Cleaning Units: 1. Lift calrod heating units and drain thoroughly. 2. Turn on fryer; set thermostat at 400° F. for 2 minutes to allow heating units to burn clean. 3. Turn off fryer and brush carbon from heating units with a soft wire brush. 8-44 Food Service Operation Handbook 2 - 34 DOUGH DIVIDER/ROUNDER OPERATING AND SAFETY PRECAUTIONS 1. Do not allow any part of the body to come in contact with working parts when the machine is in operation. Keep hands free from under the divider heads. 2. Scale dough to proper weight, place in dough pan and pull down handle to divide and round. 3. Weight of the finished dough pieces is controlled by the scaled weight of the bulk dough. 4. Shut machine off while removing dough pieces. Directions for Cleaning Dough Divider: Step Procedure 1. Shut off power. Disconnect switch when knife and ram are in the extreme backward position, or turn divider by hand or move knives to the rear. 2. Prepare divider for cleaning. DAILY Thoroughly clean these parts: Sifter Scaling plunger Measuring chamber Ram Knife Hopper Conveyor belt Remove parts in this order: Remove pan. Remove pins and pull lever forward. Depress trip to release knives. Remove dropped knives with care. Release ram with care. Remove all plungers. WEEKLY Remove frame, trip, bed plate, knife frame and clean thoroughly. 8-45 Food Service Operation Handbook Directions for Cleaning Dough Divider (cont): Step 3. Clean parts. Procedure DAILY Base and frame: Clean with hot machine dishwashing detergent solution; rinse and dry. Pistons: Soak in bucket containing a solution of soda and water. When dough has loosened, remove and rinse under hot running water then dry. Dip each piston in divider oil and wipe off excess before replacing cylinders that have been wiped or scraped free of all dough. WEEKLY Soak pressure stems, all screws and all removable parts in a solution of hot machine dishwashing detergent. Scrub, Rinse and air-dry. 4. Brush and clean frame. DAILY Vacuum or blow out all flour from divider, conveyor belts, drives, and switchboxes. Clean the face of yoke and floor dividers, scraping if necessary. Clean frame with mild detergent solution. Rinse, dry. WEEKLY Clean flour sifter hoppers. Wipe off all the exposed parts of divider and oil unpainted surfaces with divider oil. 5. Replace parts. 6. Test for operation. 8-46 Reposition all parts and return pressure stems and screws. Replace washed pan under divider head to protect the conveyor belt. Food Service Operation Handbook 2 - 35 DOUGH SHEETER/MOLDER OPERATING AND SAFETY PRECAUTIONS 1. Refer to manufacturer’s manual for adjustments and special instructions. 2. Adjust drag boards for size of piece to be molded. 3. Scale pieces to use correct weight from Duchess Divider. NOTE: It may be necessary to use more than divided piece from the duchess machine to round to desired finished weight. 4. Turn machine on and place dough pieces on the belt between the drag boards. 5. For sheeting only, use roller part of the machine. Directions for Cleaning Molder: Step Procedure 1. Shut off power. Clean once daily; cleaning should proceed only when the machine is turned off for maximum safety. 2. Blow out dough particles and flour. Use air hose to clean hard to reach areas. 3. Clean. Use wet cloth to soften hardened dough on rollers, scrapers, deflectors. DO NOT USE TOOLS OR COARSE ABRASIVES. 4. Check conveyor belts. Clean daily after each shutdown, and during operation if dough particles stick. 5. Paint rollers with divider oil. Apply oil to soften any remaining dough after shutdown. DO NOT USE RAGS to wipe up oil during operation. Use a brush to apply oil every hour during run. 8-47 Food Service Operation Handbook 2 - 36 DOUGHNUT ACCUMULATING CONVEYOR OPERATING AND SAFETY PRECAUTIONS 1. Prior to assembly, the parts should be washed thoroughly with hot water and a mild detergent solution. Rinse and dry. Assemble in accordance with manufacturer’s instructions. 2. The conveyor is operated by a simple on-off switch located on the control center gear box. 3. When the machine is in use, if the product is too large to pass under the sweep end, remove the locating pin and elevate the sweep end. CAUTION: Do not operate machine without plexiglass cover in place. 4. Conveyor speed is pre-set by the manufacturer. If it is necessary, however, the conveyor speed may be changed by changing gears in the control center gear box. 5. Pay particular attention to manufacturer’s lubrication instructions. Cleaning: Daily or after each use: 1. Disconnect machine from power source. 2. Remove drip pans and exit chute for cleaning. Conveyor and sweep assembly may be cleaned in place or removed as required. Wash all parts with mild detergent and warm water solution. Rinse and dry. 3. Wipe down the rest of the machine with mild detergent and warm water solution. Rinse. CAUTION: Do not at any time spray the control center gear box with water or allow water to enter. 4. Reassemble machine parts. 5. Before each day’s use, wash with warm water and mild detergent solution, rinse thoroughly, and dry all machine parts coming into contact with food products. 8-48 Food Service Operation Handbook 2 - 37 DOUGHNUT GLAZER OPERATING AND SAFETY PRECAUTIONS 1. Prior to assembly, the parts should be washed thoroughly with hot water and a mild detergent solution. Rinse and dry. Assemble in accordance with manufacturer’s instructions. 2. The glazer operates with two separate control systems; one for the conveyor and one for the glass pump. Each is independently adjustable for speed. The conveyor speed is pre-set by the manufacturer. If it is necessary, however, the conveyor speed may be changed by changing gear sets in the control center gear box. The adjustable drive system of the glass pump is used to control the flow of glaze to the glaze distribution trough. The speed is changed by turning the crank on the motor housing. CAUTION: Do not operate the glaze pump without fluid in the pump or serious damage to the neoprene impeller will result. 3. Operating the machine with the flood plate installed will give product an all-over glaze. Removal of the flood plate will finish the product with glaze on one side only. 4. Pour the glaze into the glaze kettle until about two-thirds full. Turn the glaze pump motor on and adjust the speed of the pump to keep the distribution trough full without overflowing. 5. Turn the conveyor drive switch on. 6. Pay particular attention to manufacturer’s lubrication instructions. Cleaning: Daily or after each use: 1. Remove the glaze distribution trough from the end of the glaze tube. 2. Place a suitable container under the opening in the glaze tube and then pump the glaze out. 3. Replace the glaze distribution trough on the glaze tube. Pour about 2 gallons of hot water in the glaze kettle. 4. Switch the glaze pump and conveyor on, and using a soft brush, brush the glaze from the conveyor and side panels. 5. Remove the glaze distribution trough from the glaze tube and pump the water out of the glaze tank into a suitable container. 6. Start the conveyor and stop with the conveyor coupling pin in an “UP” position. 7. The entire conveyor assembly can now be removed and washed with hot water. The drip pan, which is under the conveyor assembly, should be removed and washed separately. 8. Before each day’s use, wash with warm water and mild detergent solution, rinse thoroughly, and dry all machine parts coming into contact with glaze and food product. Weekly: 1. To clean the pump and tank, use the special large wrench provided to release the three nuts that tie the tank to the pump and the pump to the glaze tube. 2. Release the clamp and remove pump body. Disassemble pump. 3. Examine the pump impeller and “O” rings for wear and damage. 4. Wash parts in hot water, dry, and lubricate with white mineral oil. 5. Reassemble by reversing the above procedure. 8-49 Food Service Operation Handbook 2 - 38 FOOD WASTE DISPOSAL SYSTEM: SOMAT NAVY MODEL 3 OPERATING AND SAFETY PRECAUTIONS General: The operator should become thoroughly familiar with the equipment and the operating instructions prior to starting the machine since visual observation of abnormal operation and rapid reaction to shut the machine down when conditions require it is essential to safe and sanitary operation. Start-Up Procedure: 1. Serious damage to the cutting mechanism or the drive system can result from attempts to pulp metals or other non-pulpable objects. Before starting the system, remove the feed chute and inspect inside of pulper tank for non-pulpable items. NOTE: Non-pulpable items must be removed prior to start-up of the system. 2. The feed chute contacts an electrical interlock switch; therefore the chute must be correctly positioned before the system can be started. 3. When the unit is started, the water level in the pulper should stabilize approximately two-thirds of the way up the inside of the pulper tank with a large vortex in the center of the pulper. Water level may be observed by momentarily depressing the feed chute flexible curtain. Do not attempt to feed food waste into the machine until normal water level is established. Start-Up Procedure Operation 1. Remove feed chute. Result Inspect interior of pulper for non-pulpable items. 2. Fully close drain valve by turning Closes bypass port to ship’s drain system. handle 90° from open position. 3. Fully open water shut–off valve (gate) Water admitted to inlet side of electrically by turning hand wheel fully counter- operated water inlet valve. clockwise. 4. Turn system disconnect handle on Power available to pulper motor starter and electrical control panel to “ON” position. water inlet valve (red light on). 5. Move drain switch control arm to Equalize use of all cutting edges. opposite rotation position from last previous run. 6. Replace feed chute. Green indicator “Run” light comes on. 7. Move detent over “STOP” button to “START” button in ready position. out-of-way position. 8. Depress “START” button. Water inlet valve opens. starts. 9. Wait one minute. Water level stabilize in pulper tank and water dam. 10. Check water level. Indicates proper water level. 8-50 Pulper motor Food Service Operation Handbook 11. Begin feeding food waste into the feed Food waste ground and discharged. chute. Shut-Down Procedures: 1. The shut-down procedures described herein assume that the Food Waste Disposal System is used continuously in a single run daily for disposal of all accumulated food waste. However, shipboard conditions may make it desirable to operate for more than one period during a day. In such cases, it is recommended that the interrupted runs in a single day be considered as temporary shut-down in which case it is necessary to accomplish the following: Temporary Shut-Down Procedure: 1. This procedure should be used if the equipment will be operated for particular time periods. For instance, a breakfast period, a lunch period, and a dinner period. In between each period the following shut-down procedure should be used. Temporary Shut-Down Procedure Operation Result 1. Allow the pulper to run for 5 minutes Clears the machine, dam and associated after last pieces of waste are fed to the piping of any accumulations of waste. machine. 2. Depress “STOP” button and move Closes the water inlet valve and stops the detent over “STOP” button pulper motor. WARNING: DO NOT UNDER ANY CIRCUMSTANCES ATTEMPT TO CLEAN THE MACHINE OR PLACE YOUR HANDS INSIDE THE PULPER TANK DURING THIS TEMPORARY SHUT-DOWN CYCLE. 1. Use an approved, clear liquid detergent to wash the interior/exterior surfaces of the machine. Detergent should be mixed with hot fresh water in accordance with instructions for its use. Shut-Down Procedure (End-of-Day) Operation Result 1. Allow the Pulper to run for 5 minutes Clears the machine, dam and associated after last pieces of waste are fed into piping of any accumulations of water. the machine. 2. Fully open drain valve by turning Opens bypass port to ship’s drain system, handle 90° from the closed position. drain pulper. 3. Depress “STOP” button and move Closes the water inlet valve and stops the detent over “STOP” button. pulper motor. 4. Fully close water supply shut-off valve. None. 5. Turn system disconnect switch to Green indicator “Run” light goes off and all “OFF” position. power is removed from system. 6. Remove feed chute. Exposes interior of pulper for inspection and cleanout. 8-51 Food Service Operation Handbook WARNING: FOOD WASTES HAVE A HIGH BACTERIA CONTENT. BROKEN GLASS OR OTHER SHARP REFUSE MAY BE PRESENT INSIDE THE PULPER TANK AND JUNK BOX AND CUTTING MEMBERS HAVE SHARP EDGES. EXERCISE EXTREME CAUTION WHEN REACHING INTO THESE AREAS. WEAR RUBBER GLOVES WHILE PERFORMING THE FOLLOWING STEPS. DO NOT DRINK, EAT OR SMOKE. 7. Remove accumulated debris from the Clear interior of extraneous material. pulper tank. 8. Fully close drain valve by turning Closes bypass port to ship’s drain system. handle 90° from open position. 9. Dump bucket full (2 gal) of hot fresh Washes lower part water/detergent solution into pulper tank/impeller assembly. tank. of the pulper 10. Wash down the feed chute, the interior Ensures that all interior faces are cleaned. of the and pulper tank, the gasket area with a bristle brush and hot detergent solution. 11. Turn system disconnect handle on Red indicator “Power On” light comes on. electrical control panel to “ON” position. 12. Replace feed chute. Red indicator “Power On” light goes out and green indicator “Run” light comes on. 13. Move detent over “STOP” button to “START” button in ready position, will out-of-way position. permit system’s operation without water input. 14. Depress “START” button and run Pulper drive motor starts. Water inlet valve pulper for 2 minutes. opens but no water enters. Part of wash water is “pumped” out through dam assembly. 15. Depress “STOP” button move detent Pulper drive motor stops; water inlet valve over “STOP” button. closes. 16. Fully open drain valve by turning Open bypass port to ship’s drain system, handle 90° from closed position. drains pulper. 17. Fully close drain valve by turning Closes bypass port to ship’s drain system. handle 90° from open position. 18. Remove feed chute. Provides access to pulper interior. light comes on. Red 19. Fill pulper tank with approximately 5 Rinses feed chute, pulper tank and dam gallons of hot fresh water, rinse assembly. feedchute and allow to set for 2 minutes. 20. Replace feed chute. 8-52 Red indicator “Power On” light goes out Food Service Operation Handbook and green indicator “Run” light comes on. 21. Move detent over “STOP” button to Will permit system’s operation without out-of-way position. water input. 22. Depress “START” button and run Pulper drive motor starts. Water inlet valve pulper for 2 minutes. opens but no water enters. Part of rinse water is “pumped” out through dam assembly. 23. Depress “STOP” button; move detent Closes the water inlet valve and stops the over “STOP” button. pulper motor. 24. Fully open drain valve by turning Opens bypass port to ship’s drain systems, handle 90° from closed position. drains pulper. 25. Scrub all exterior surfaces faces with Ensures that all exterior surfaces are bristle brush and hot detergent cleaned. solution. 26. Rinse all exterior surfaces faces with Remove wash water and water. Dislodge hot fresh water. waste particles. 27. Turn system disconnect switch to Shut-down completed. “OFF” position. Preparation for an Extended Period of Inactivity: 1. The Navy Model 3 Pulper assembly disposes of food waste which contain solids or semi-solids which may dry into rigid solids. The procedure described in the shut-down procedure (end-ofday) must be extended to include a more thorough cleansing of the internal passages if the unit is to remain idle for periods beyond 7 days. 2. Either of the chemical disinfecting agents listed herein are recommended for use in sanitizing the Food Waste Disposal System: a. Disinfectant, Food Service, (Chlorine-Iodine type), NSN 6840-00-810-6396. directions for use are given on the package. Complete WARNING: HAZARDOUS REACTIONS TO THE CHEMICAL OCCUR UPON EXPOSURE TO ACETONE, M-E-KETONE, AMMONIA, ANILINE (ALKALINE), PYRIDINE AND FLAME OR SPARK. b. Sodium Hypochlorite Solution, NSN 6810-598-7316 (one gallon bottle) dosage levels are. GALLONS OF WATER recommended AMOUNT TO ADD 25 7 OZ 10 3 OZ 5 2 OZ NOTE: Rinsing is not required after completing the following steps. SHUT-DOWN PROCEDURE FOR EXTENDED PERIOD Operation Result 1. Fully close drain valve by turning Close bypass port to ship’s drain system. handle 90° from open position. 8-53 Food Service Operation Handbook 2. Remove feed chute. Provides access to pulper for scrubbing. 3. Dump 5 gallons of hot fresh Washes lower part of water/sanitizing solution into pulper shell/impeller assembly. tank. the pulper WARNING: FOOD WASTES HAVE A HIGH BACTERIA CONTENT. WEAR RUBBER GLOVES WHILE PERFORMING THE FOLLOWING STEPS. DO NOT DRINK, EAT OR SMOKE. 4. Scrub feed chute and exposed posed Ensures that all interior surfaces are gasket area with a bristle brush and hot cleaned. sanitizing solution. 5. Leave sanitizing solution in pulper tank Ensures that all crevices are soaked to for 10 minutes. sanitize interior. 6. Turn system disconnect handle on Red indicator “Power On” light comes on. electrical control. 7. Replace feed chute. Red indicator “Power On” light goes out and green indicator “Run” light comes on. 8. Remove detent over “STOP.” “START” button in ready position, will permit systems operation without water input 9. Depress “START” button and run Pulper drive motor starts. Water inlet valve pulper for 2 minutes. opens but no water enters. Part of sanitizing water is “pumped” out through dam assembly. 10. Depress “STOP” button move detent Pulper drive motor stops, water inlet valve over “STOP” button. closes. 11. Fully open drain valve by turning Opens bypass port to ship’s drain system, handle 90° from closed position. drains pulper. 12. Turn system disconnect switch to Shut-down completed. “OFF” position. 8-54 Food Service Operation Handbook 2 - 39 GRIDDLE OPERATING AND SAFETY PRECAUTIONS 1. The griddle has separate thermostatic controls for each 9 to 12 inches of width. Turn on only the amount of griddle surface required for the operation. Set thermostats to required temperature and allow to preheat approximately twenty minutes. 2. Turn all thermostats to “OFF” when not in use. Allowing a griddle to heat unused for long period of time wastes energy and results in premature burn-out of heating elements. 3. Periodically check the calibration of the thermostats by using an accurate surface thermometer or pyrometer. Have thermostats calibrated as necessary. Directions for Cleaning Griddles: Step 1. Shut off power. Procedure Use manual switch. 2. Turn off heat. Remove carbonized NEVER clean surface plate while hot. grease (after each use). Allow plate to cool. NEVER POUR WATER ON HOT PLATE. Scrape surface with spatula or pancake turner. Wipe clean with dry paper towels. Use pumice stone block to clean hard to remove burned areas on plate after each use. 3. Clean grease and/or drain troughs. Pour hot detergent solution into small drain and brush. Rinse with hot water. 4. Empty grease receptacles. Remove grease from scrapings and supporting name with hot detergent solution; rinse and dry. 5. Scrub guards, front, and sides of Using hot detergent solution, wash off griddle. grease, splatter, and film. Rinse and dry. 8-55 Food Service Operation Handbook 2 - 40 HIGH COMPRESSION STEAM COOKER (MARKET FORGE) OPERATING AND SAFETY PRECAUTIONS 1. Make sure drain plug is in place. Pour 6 quarts of water into cooking chamber. water level and keep replenished during operation. Note 2. Turn main power switch on, turn timer to maximum setting and let cooker preheat approximately twenty minutes. When water starts to boil, cooker is ready for operation. Turn timer “OFF.” 3. Put in pans of food, close and latch door and set timer at cooking time. Cooking pressure is 9 to 10 pounds. 4. When cooking cycle is complete, steam will be automatically exhausted and buzzer will sound. Turn timer to “OFF” to silence buzzer. 5. Unlatch door and wait a few seconds for vapor to clear, then open door and remove food. CAUTION: NEVER attempt to open door when cooker is pressurized. 6. With cooker pressurized and before starting to cook, manually operate pressure relief valve briefly. Directions for Cleaning High-Speed Steam Cookers (Routine Daily Cleaning): Step 1. Turn off main power switch. chamber cool. Disassemble. Procedure Let Remove anti-spill pan. Drain chamber and replace drain plug. 2. Wash interior chamber walls, door, Use a mild detergent solution. Scrub spray nozzle. interior with plastic brush to remove stubborn food particles. 3. Soak cooking chamber, shelves, and Add about 2 quarts of detergent solution anti-spill pan. Rinse. and let remain for short time. Drain. Rinse with clean hot water. 4. Clean exterior. Scrub with brush and hot detergent solution, legs, side, top, back, outside and inside of doors, space between door and handle, and gasket. Rinse with hot water; dry. Polish stainless-steel exterior with non-abrasive cleaner. DO NOT USE STEEL WOOL. 5. Replace parts. Fill chamber with 6 quarts of water; close chamber door. Operate for a 5-minute cooking cycle. Cleaning After Use (or as needed): Thoroughly clean cookers in which meat and starchy foods are cooked frequently. Remove pan racks, door, and anti-spill pan. Wash with a solution of hot detergent water. Rinse with clean hot water. Replace parts. 8-56 Food Service Operation Handbook 2 - 41 HOT CHOCOLATE DISPENSER OPERATING AND SAFETY PRECAUTIONS CAUTION: For initial operation and whenever dispenser experiences loss of water supply, press and hold “HOT WATER” button until water flows from the dispensing spout before turning on the power switch. This will fill the water tank and prevent premature heater burnout. 1. Turn power switch on. Red light will glow. Tank should preheat in 15 minutes. 2. Set beverage quantity selector switch: small is for 6 oz. cup, large for 8 oz. cup. 3. Lift off cabinet hood, remove hopper cover and loosely fill hopper with chocolate mix. Replace cover and housing hood. 4. Press and release “CUP” button. Dispenser fills and shuts off automatically. For hot water only, press and hold hot water button until cup is almost full. 5. For drink strength and quantity adjustments, refer to the service manual. Cleaning: 1. The product handling system is basically self-cleaning, since each time the product is dispensed, hot water flushes the water system. 2. Weekly, a complete cleaning should be accomplished. Since a number of interrelated parts must be removed and replaced properly, refer to the operating manual for complete instructions. WARNING: Do not use hot water for cleaning plastic parts; use warm soapy water. Rinse all parts thoroughly and dry. Do not use abrasives and do not run through dishwashing machine. 8-57 Food Service Operation Handbook 2 - 42 ICE TEA DISPENSER OPERATING AND SAFETY PRECAUTIONS CAUTION: If dispenser will be without power supply for more than 45 minutes, remove the tea jar to avoid clogging. Duct heater must be operative to keep tea powder dry and free flowing. 1. Lift off machine front cover, lift jar and dispensing head out of the unit. Unscrew jar and fill with powdered iced tea. NOTE: Jar must be clear and completely dry for proper dispensing. Reinstall jar and dispensing head assembly and replace front cover. 2. To adjust drink strength, remove jar and dispensing head as above, tap lightly on dispensing head with hand to remove tea from dispensing wheel, invert the jar and turn strength adjuster on the dispensing head toward higher number to increase strength or to lower number to decrease strength of drinks. Turn the adjustor until it snaps into the next notch. Refer to manual for exploded view of parts of dispensing head. Reinstall dispensing assembly and cabinet front before operation. 3. If dispenser malfunctions, refer to troubleshooting chart in the operating manual. Cleaning: Remove cup rest and drip tray and empty drip tray. Remove front panel from unit. Lift jar and dispensing head up and out of unit. Remove mixing bowl by lifting front edge up and out. Wash cup rest, drip tray, mixing bowl, and all outside surfaces of unit with mild detergent/warm water solution. Rinse with clean water and dry with soft lint-free cloth. Do not use abrasive cleaners. To clean dispensing head, remove jar ring and disassemble dispensing head as shown in operator’s manual. Wash disassembled parts in water, then dry thoroughly with clean lint-free cloths. Reassemble dispensing head and attach to jar with jar ring. MAKE SURE PRODUCT TUBE SEALS OFF DISPENSING HEAD PRODUCT CHUTE. Position mixing bowl in unit. Invert and position jar on jar support so rotor shaft of dispensing head seats on motor drive. 8-58 Food Service Operation Handbook 2 - 43 COMBI-OVEN The Combi-Oven/Steamer can cook using (1) Steam, (2) Hot Air, or (3) Steam and Hot Air Combined. These modes of operation can be used separately, combined, or in sequence. Check manual for detailed instructions. Four Function Selector Switch: Steam Mode: Steam, Stew, Blanch, Poach, Reheat, and Thaw. Hot Air Mode: Roast, Broil, or Bake. Combi Mode: Defrost, Roast, Bake, Rethermalize, or Reheat. Cool Down Mode: Allows unit to cool down rapidly with door open or shut. OPERATING AND SAFETY PRECAUTIONS 1. Turn power on, indicator light will come on. 2. Set mode: Steam, Hot Air, or Combi (Steam & Hot Air). 3. Set time for desired cooking time. When timer time expires, the unit shuts off and the buzzer rings. Move the selector to Stay On to stop the buzzer ringing. 4. For Hot Air and Combi modes, set the temperature. The heat indicator light illuminates and stays lit until temperature is reached. 5. For the Steam mode the adjustment knob controls the rate of steam production. Turn clockwise to increase the steam. 6. Use the Cool Down mode in preparation for cleaning. In the Cool Down mode, neither the temperature dial nor the timer will be operational. The blower will function with the door open or closed. Cleaning the Exterior: 1. When the unit has cooled down, wipe the exterior with a soft cloth saturated with light oil. 2. Wipe dry with a clean soft cloth. NOTE: Do not spray exterior with water. Cleaning the Interior (daily when used): 1. Cool oven to 140 degrees Fahrenheit. If oven is cold, turn on Steam mode for 3 to 4 minutes to warm the oven interior surfaces. 2. Spray the interior of the oven with recommended cleaning detergent. NOTE: Never spray water into the unit when the temperature is above 212 degrees Fahrenheit. 3. Let cleaner work for 15 to 20 minutes. 4. Set oven on Steam mode and adjust timer for 20 minutes. 5. Use the exterior hose to rinse the oven interior with water. 6. Set oven on Steam mode and set timer for 5 minutes to remove all detergent residues. NOTE: Never scrape or scour the oven interior. 8-59 Food Service Operation Handbook 2 - 44 CLAM SHELL GRIDDLE OPERATING AND SAFETY PRECAUTIONS 1. Manually adjust Top-Platens to thickness of product being cooked. 2. Slowly pre-heat griddle to 400 degrees Fahrenheit to prevent warping. 3. Season griddle surface with oil or fat to prevent sticking. Cleaning: 1. After each use, clean the griddle with a spatula or griddle scraper. 2. Periodically check the grease container; empty when necessary. 3. Once daily, thoroughly clean the griddle, backsplash, sides, front, grease container, and platens. 4. Clean steel surface with a damp cloth and polish with a soft dry cloth. 5. Re-season griddle and platens with a light coat of oil or grease. 6. Wipe platen surfaces with a soft cloth moistened with water after each use. NOTE: Do not use chemicals or abrasive materials on the Teflon coated surfaces. 8-60 Food Service Operation Handbook 2 - 45 SKITTLE OPERATING AND SAFETY PRECAUTIONS Operating: 1. Press rocker switch to the ON position. 2. Set thermostat to the desired temperature. 3. Close lid until HEATER POWER ON light goes out. 4. Start cooking. 5. To shut down the unit, turn thermostat and rocker switch to OFF position. Cleaning (Disconnect Power Before Cleaning): Exterior: After each use, clean the stainless steel with a good commercial stainless steel cleaner or polish. Interior: 1. Use mild detergent, plastic scouring pads, and soft cloths. 2. Rinse off cleaning agent with water; wipe dry with soft cloth. NOTE: Never use cleaners containing chlorides or abrasive compounds. Draw-Off Valve: 1. Make sure stem is in the open position. 2. Unscrew the hex bonnet nut. 3. Carefully remove the nut and stem assembly. 4. Clean valve body and tube using draw-off brush provided with Legion Care Kit. 5. Re-assemble; tighten bonnet nut by hand only. Maintenance: See manual for specific maintenance of unit, such as actuator tension adjustment and re-packing actuator with grease. 8-61 Food Service Operation Handbook 2 - 46 ACCU-TEMP GRIDDLE OPERATION SEASONING It is recommended that you clean your ACCU-STEAM™ griddle thoroughly before turning your unit on. To clean the griddle surface, just simply wash the cooking surface down with a solution of mild soap and water, and then rinse thoroughly with clean water. Once the cooking surface has been cleaned, set the thermostat to 200°F (93°C), turn the griddle power switch to the “On” position and allow the griddle cooking surface to heat for 10 minutes. Using a high temperature oil, such as Pan and Grill Shortening™, Whirl™ or equivalent, pour enough to cover the entire griddle surface. Do not use standard vegetable oil to season the griddle cooking surface. It may cause food to stick and result in improperly cooked food. Work this seasoning oil into the griddle surface with a regular heavy-duty scrub pad for about 5 minutes, making sure that you scrub the seasoning oil over the entire griddle-cooking surface. After the entire griddle surface has been scrubbed with seasoning oil for 5 minutes, simply wipe or squeegee off excess oil from griddle surface. Your griddle is now ready to use! If you use chemicals to clean your griddle periodically or on a schedule, you may need to repeat this process after the use of chemicals. PREHEATING Turn On switch to the “On” position and set the thermostat to the desired temperature. The griddle will increase its surface temperature at an average rate of 15° F (8°C) per minute. It takes approximately 22 minutes to raise the griddle from room temperature to its maximum temperature of 400° F (204°C). The griddle will be preheated when the “Heat” light starts to cycle on and off. Please use caution as temperatures on and around the griddle cooking surface could cause severe burns. COOKING Begin cooking only after the griddle has been preheated to the desired temperature. Please note these facts: • You can cook all the way to the edges of the griddle surface because the temperature does not very across the entire cooking surface. • You can turn the product to the same spot because the griddle has near instant heat recovery. • It will always cook the same, regardless of product load or surface coverage. Accurate Cooking Temperatures Because of the inaccurate surface temperatures and long recovery times common with other griddles. It is doubtful you were cooking at the set temperature or the temperature you wanted. Adjust the temperature on your ACCU-STEAM™ griddle and it AT2T-2742-1 Rev. E ACCU-STEAM ELECTRIC GRIDDLE OWNERS MANUAL Page 13 / 41 OPERATION (cont.) won’t change or vary by the location on the griddle surface. There are no hot or cold zones. Heat Lamp It is normal for the heat light to cycle on and off. This light indicates when the heaters are energized. You will soon notice how little they are energized to maintain perfect surface temperatures on your griddle. 8-62 Food Service Operation Handbook Grease Pan Use caution when emptying the grease pan. The contents in this pan could cause severe burns. The pan should be checked periodically and emptied as necessary to prevent an overflow or dangerous condition. The grease can contents could cause severe burns. Slowly remove the grease can from the griddle to avoid spilling the contents. CAUTION DAILY CLEANING Cleaning during the work shift can be performed with a sharp scraper. When heavy cleaning at the end of a shift or periodically as needed, the following is recommended: • • • • Turn the griddle off and allow it to cool to between 220°F and 240°F (104°F and 116°C). Use water, ice and/or griddle cleaner as needed. For example, the 3M Scotch-Brite™ Quick Clean Griddle System provides the Scotch-Brite™ polishing pads, quick clean liquid, pad holder and squeegee. Clean-up is very easy using these tools with the quick clean liquid, water, ice or combinations of these liquids. If a griddle with grease on the cooking surface is cleaned at a high temperature using water or ice, the grease may splatter and cause skin burns. Be very cautious! Do not use a griddle stone or brick to clean the griddle. Do not use a water-jet to clean the griddle. Never leave a chlorine sanitizer in contact with the stainless steel longer than 10 minutes. Longer contact can cause corrosion. 8-63 Food Service Operation Handbook 2 - 47 Electric Steam Table 8-64 Food Service Operation Handbook 8-65 Food Service Operation Handbook 2 - 48 Regular Steam Table Thermostatic Controls The temperature of the Cospolich Hot Well is controlled using a thermostat. The heating element will cycle on and off periodically based on the users desired temperature setting. The temperature is set by turning the black temperature control knob. From the off position, turning the knob clockwise will switch the unit “on”. The knob contains graduated numbers. The operating temperature increases as the numbers on the dial increase. When not in use, the knob should be turned to the “off” position. This position has a detent to ensure that the switch is indeed off. You should be able to both hear and feel a “click” when the unit is turned off. The controls contain a red indicator light to visually notify you when the unit is on. Operating Instructions A. Adding Water The Hot Well units are designed to operate with water in the well. The unit will run without water, or “dry”. However, the heating is much more even and effective and the unit is more efficient with water placed in the well. The water level should be no less than 1” deep and no higher than the bottom of the food pan. The water level evaporates at a rapid pace – especially at higher temperatures. The water level should be checked periodically to ensure optimum performance. B. Pre-Heating Using the well with water requires more time from ambient temperature until the food pan begins to get warming effects. The heater must warm the volume of water which should take no more than 20 minutes. Once the water is heated, the thermostatic controls will allow the unit to run less due to the heat held by the water. *Note: The water warms faster if covered. A food pan makes a great cover. C. Operation Operating the Hot Well is as simple as turning a knob. Below is a list of steps, from start to finish, in operating the Cospolich Hot Well: 1. Check drain valve(s). It should be closed if using one (1) well and open if using more than one well. 2. Add water to the dry well. 3. Close valve(s). 4. Drop in food pan with or without (if pre-heating) food. 5. Turn knob “on”. A higher number indicates a higher temperature. The indicator light should glow red to indicate that the unit is on. Unit will cycle on and off periodically prior to reaching maximum temperature. When cycled off, the light will be off. 6. If pre-heating, upon reaching adequate well temperature, add pan with food. 7. Adjust thermostat setting to achieve desired food temperature. 8 Stir food products periodically to prevent sticking. 9 Periodically check water level in well. *Note: When changing food pans or adding water, use extreme caution. The surrounding metal surfaces are hot. 10. When finished, turn control knob to “off” position. 11. To drain water from well, open valve(s). Maintenance & Cleaning The Cospolich Hot Well unit is nearly maintenance free. There are, however, a couple of things that, if done routinely, can extend the life and performance of the unit. 8-66 Food Service Operation Handbook Cleaning is by far the most important thing that you can do to ensure reliable service from the Hot Well. The stainless steel surfaces should be cleaned after every use. The controls should be free of moisture, dust, and debris. A warm solution of soapy water should be a sufficient cleaning solution for routine spills. However, a mixture of warm water and bleach can both clean and disinfect stubborn or heavy spills or stains. The drain should be checked before or after every use to ensure that there are no obstructions preventing the flow of water. In addition, the seal of the Hot Well to the mounting surface should be checked monthly. A faulty seal could result in liquid infiltration under the well and below the well mounting surface. 8-67 Food Service Operation Handbook THIS PAGE INTENTIONALLY LEFT BLANK 8-68 Food Service Operation Handbook CHAPTER 9 ASHORE FOOD SERVICE, FACILITY STRUCTURE & HOUSEKEEPING 1–0 General Facility Structure and Housekeeping............................................................. 1-0 9-1 Food Service Operation Handbook THIS PAGE INTENTIONALLY LEFT BLANK 9-2 Food Service Operation Handbook CHAPTER 9 ASHORE FOOD SERVICE, FACILITY STRUCTURE AND HOUSEKEEPING 1-0 GENERAL FACILITY STRUCTURE AND HOUSEKEEPING The following information may be used as a guide for all ashore food service activities, including MWR facilities, serving Rations-In-Kind patrons. 1. Eating involves all the senses: taste, touch, smell, sight and hearing. Proper food preparation and plate presentation is essential for a pleasurable dining experience. It is equally important to serve food in an attractive environment that is conducive to dining. 2. Serving areas should be well-lighted, well-maintained and free from dirt, dust and food residue. The area should be organized and adequately stocked with food and supplies. A menu will be posted daily, include all food items offered for the meals served that day, and will be displayed at the front of the serving line. The use of plastic, paper or styrofoam tableware should be limited to take-out orders only. 3. The dining area will be kept neat, clean and free from litter. Flooring, ceilings and walls will be kept in good repair (no marks, chips or discoloration), and free from dirt, dust and food residues. Table top and chair coverings will be well maintained and clean. The color scheme in the dining area should contain subtle complementing colors. The quality, intensity and distribution of lighting have an effect on the appearance of food and the overall comfort of the customers. Warm lighting provides the best atmosphere in a dining area. To enhance the dining atmosphere, reduce the noise from the kitchen and dish washing areas. Navy Food Service sanitation standards are established by BUMED and are published in the manual of Naval Preventive Medicine (NAVMED P-5010-1). Ashore general messes refer to Unified Facilities Criteria (UFC) 4-722-01, 27 JAN 03, Dining Facilities. This publication can be downloaded from the following website: http://65.204.17.188//report/doc_ufc.htmland http:/criteria.navfac.navy.mil. 9-3 Food Service Operation Handbook THIS PAGE INTENTIONALLY LEFT BLANK 9-4 Food Service Operation Handbook CHAPTER 10 WASTE MANAGEMENT OPERATIONS 1–0 Regulations .................................................................................................................1-0 2–0 Policy...........................................................................................................................2-0 3–0 Solid Waste Processing Equipment ............................................................................3-0 4–0 Handling and Storage Guidance .................................................................................4-0 5–0 Training .......................................................................................................................5-0 10-1 Food Service Operation Handbook THIS PAGE INTENTIONALLY LEFT BLANK 10-2 Food Service Operation Handbook CHAPTER 10 WASTE MANAGEMENT OPERATIONS 1- 0 REGULATIONS 1. PLASTICS. Surface ships equipped with Plastic Waste Processors (PWP) are prohibited from discharging plastics into the sea. Currently, those ships without plastic processing capability or have non-operating Plastic Waste Processors must retain all plastic waste onboard or retrograde/transfer it to other ships. Discharge of plastics is prohibited for all ships. Exceptions to these retention requirements are allowed only when necessary for the purpose of securing the safety of the ship or the health of ship’s force. 2. BIODEGRADABLE TRASH AND FOOD WASTE. Biodegradable trash (paper and cardboard) and food waste may be discharged beyond three nautical miles from any shoreline as long as it is pulped using the approved Naval Sea Systems Command (NAVSEA) developed pulpers. 3. METAL AND GLASS. Metal and glass that has been shredded and bagged so as to ensure negative buoyancy may be discharged once the ship is beyond 12 nautical miles from any shoreline. 4. DEFINITIONS. Food Waste: Spoiled or unspoiled food substances, such as fruits, vegetables, dairy products, meat products, food scraps, and food particles. a. Pulped Waste: Pulped or ground waste capable of passing through a screen with openings no greater than 12 millimeters (0.47 inch). b. Plastic Waste: Styrofoam, nylon, vinyl, polypropylene and similar synthetic materials produced by polymerization and any material that contains plastic (e.g., punctured spray cans which contain plastic tubes). 2- 0 POLICY 1. GENERAL. An internal instruction is required that outlines policy, procedures and responsibilities for plastic waste storage and disposal. A sample shipboard solid waste management instruction may be acquired via NSWCCD-TR-63-97/25. All waste management policy information can be found at http:navyseic.dt.navy.mil/solid/solid.htm. 2. PLASTICS a. All waste plastic shall be separated from other types of waste and placed into “plastic waste only” receptacles for the collection and processing in the Plastic Waste Processor. Plastic waste, whether processed or unprocessed, shall be held onboard for disposal ashore. b. In the event that the Plastic Waste Processors are inoperative, the ship shall retain plastic waste onboard by utilizing odor barrier bags for storage of waste in accordance with the instructions provided in NAVSUP/NAVSEA PUB 726, Afloat Solid Waste Management Guide and OPNAVINST 5090.1B Change 2, Guide to Environmental Compliance Afloat. c. If retention of plastic waste endangers the health or safety of crew members, creates unacceptable nuisance conditions or compromises combat readiness, overboard discharge is authorized, provided it is properly packaged (in a manner that will not separate in the ocean) and weighted for negative buoyancy and dumped beyond 50 miles from any shoreline. Discharges shall be recorded in the ship’s deck log. Log entry shall include: (1) Date, time and location of discharge; (2) Approximate weight and cubic volume of the discharge; and, (3) Nature of the material discharged. 10-3 Food Service Operation Handbook Upon completion of deployment, Navy ships shall report by routine message to OPNAV (N45) and the chain of command regarding discharges other than food waste into the in-effect special area. Special areas now in-effect are the Baltic Sea, the North Sea and the Antarctic Area. Other special areas that have been designated but are not yet in-effect are: the Persian Gulf, Red Sea, Black Sea, Mediterranean Sea, Caribbean Sea and the Gulf of Mexico. 2. NON-PLASTIC a. Non-plastic solid waste shall be discharged at sea only where permitted by law as defined above. b. Recyclable materials will be collected and recycled when practical without negatively impacting shipboard habitability and readiness. No materials containing food residues will be retained onboard longer than necessary to process or properly dispose. 3- 0 SOLID WASTE PROCESSING EQUIPMENT 1. GENERAL. In most cases, the Auxiliary Engineering Department maintains the solid waste processing equipment. Guidelines on equipment operation may be obtained by contacting the Naval Sea Systems Command (NAVSEA) 03L. 2. PROCESSORS. Plastic Waste Processors (PWP) will melt and compress plastic into a disc at a 30 to 1 ratio. The PWP includes a shredder, melt unit, and cooling unit. The output discs, weighing approximately 10 pounds, are stored onboard until they can be off-loaded onto a Combat Logistics Force (CLF) ship during an underway replenishment or return to shore. 3. PULPERS. Pulpers will process paper, food waste, and cardboard into a non-floating slurry that is authorized for overboard discharge. Pulped materials will allow waste to be discharged near land (greater than 3 nautical miles) and during flight operations. Available are a large pulper capable of pulping 500 pounds per hour and a small pulper capable of processing 100 pounds per hour. Small pulpers will be installed on ships with a minimal waste stream and ships where a large pulper is not easily accommodated. 4. SHREDDERS. The glass and metal shredder will compact at a three-to-one ratio. The shredder is identical to the plastics shredder, except it has combs in the shredding chamber. All shredded waste will be placed in a burlap bag for authorized discharge. Bags must be weighted for negative buoyancy. 4- 0 HANDLING AND STORAGE GUIDANCE 1. GENERAL. Procedures shall be developed for collecting and separating the waste. Waste receptacles shall be placed at designated locations and labeled “Plastics Only,” “Biodegradable or Pulpables,” and “Metal and Glass.” All food-contaminated plastic, glass, and metal cans should be washed prior to processing to avoid possible safety and health problems during storage. Clean plastic discs will enhance recycling. 5- 0 TRAINING 1. GENERAL. Food service personnel will be provided training on operation, source separation, waste disposal and waste discharge restrictions. Regular meetings should be held to ensure ship’s policies are effective and comply with the law. Training aids are available by contacting your local Food Service Management Team. Additional guidance and samples of shipboard waste management plans may be acquired by contacting NAVSUP at (717) 605-5623 (DSN 430-5623) or NAVSEA at (703) 602-0351. 10-4 Food Service Operation Handbook CHAPTER 11 HEIMLICH MANEUVER 11-1 Food Service Operation Handbook THIS PAGE INTENTIONALLY LEFT BLANK 11-2 NAVSUP P-486 - Food Service Management Index to Food Service Operation Handbook A Afloat Wardroom And Stateroom Service Acceptance of Gifts Accu - Temp Griddle Advanced Foods Afloat Wardroom and Stateroom Service Alcoholic Beverages Wardroom Appraisal Ashore Food Service, Facility Structure And Housekeeping Chapter 4 Chapter 3 Chapter 8 Chapter 1 Chapter 4 Chapter 5 Chapter 3 Chapter 9 B Biological Defense Bread Dispenser Bulk Ice Making Machine Bulkheads Bun Slicer (Hotline) Operating And Safety Precautions Butter Dispensers Chapter 6 Chapter 2 Chapter 2 Chapter 2 Chapter 8 Chapter 2 C Carbonated Beverage Dispensers Care of Deck Coverings Care Of Plastic Dinnerware (Non-Disposable) Care of Private Property Care of Quarters Afloat Carpeting Cereal Dispenser Chemical Defense Chemical, Biological, And Radiological Defense Chief Petty Officer Messing On Ships Clam Shell Griddle Cleaning And Sanitizing Cleaning Gear Cleaning Garbage/Trash Containers Cleaning Gear - Establishing And Maintaining Requirements Cleaning Gear - Proper Usage Coffee Urns I-1 Chapter 8 Chapter 4 Chapter 2 Chapter 4 Chapter 4 Chapter 2 Chapter 2 Chapter 6 Chapter 6 Chapter 5 Chapter 8 Chapter 2 Chapter 2 Chapter 2 Chapter 2 Chapter 8 NAVSUP P-486 - Food Service Management Combi Oven Commanding Officer Administrative Responsibility Commanding Officers’ Mess Convection Oven Conveyor Broiler Cookie Cutter/Dropper Culinary Specialist Personnel Culinary Specialist Personnel Utilization Culinary Specialist Responsibilities And Duties Custody and Stowage Custom And Tradition Of Officers’ Messes Chapter 8 Chapter 5 Chapter 5 Chapter 8 Chapter 8 Chapter 8 Chapter 5 Chapter 5 Chapter 5 Chapter 3 Chapter 5 D Damaged Silver Decks Decontamination of Equipment and Spaces Decontamination of Food Items Deep Fat Fryer (Computer Type) Deep Fat Fryer (Non-Computer) Descaling De-staining Dinnerware And Silverware Dining Area And Associated Equipment Cleaning Procedures Dining Area And Associated Equipment During The Meal Dining Area And Associated Equipment Safety Precautions Dining Table Center Items Dining Tables, Chairs, And Benches Dishwashing Machine Dishwashing Machine Cleaning Dishwashing Machine Conveyor Dishwashing Machine Descaling Dough Divider/Rounder Dough Mixer – Horizontal Dough Sheeter/Molder Doughnut Accumulating Conveyor Doughnut Glazer Duties Of A Wardroom Officer Chapter 3 Chapter 2 Chapter 6 Chapter 6 Chapter 8 Chapter 8 Chapter 2 Chapter 2 Chapter 2 Chapter 2 Chapter 2 Chapter 4 Chapter 2 Chapter 8 Chapter 2 Chapter 8 Chapter 2 Chapter 8 Chapter 8 Chapter 8 Chapter 8 Chapter 8 Chapter 5 E Electric Hot Food Table Electric Steam Table Enlisted Personnel Assignment And Utilization Equipment Chapter 2 Chapter 8 Chapter 5 Chapter 8 I-2 NAVSUP P-486 - Food Service Management F Facilities Facilities And Service Flag Mess Food Handling and Nutrient Retention Food Management Teams And Detachments Food Microbiology Food Mixer (140 Quart) Food Mixing Machine, 20 Quart Food Presentation Food Preservation Food Service In Chemical, Biological, And Radiological Defense Food Waste Disposal System: SOMAT Navy Model 3 Freeze-Dried Coffee Dispensers Chapter 5 Chapter 5 Chapter 5 Chapter 1 Chapter 5 Chapter 6 Chapter 8 Chapter 8 Chapter 1 Chapter 6 Chapter 6 Chapter 8 Chapter 2 G Garbage Grinder Cleaning Garbage Grinder Safety Precautions And Operating Procedures General Facility Structure and Housekeeping Griddle Guests Chapter 2 Chapter 2 Chapter 9 Chapter 8 Chapter 5 H Habitability Habitability Items Hand Dishwashing Of Cooking Utensils, Preparation For Washing Hand Dishwashing Of Cooking Utensils, Storage Of Clean Utensils Hand Dishwashing Of Cooking Utensils, Washing And Sanitizing Heimlich Maneuver High Compression Steam Cooker (Market Forge) Hot Chocolate Dispenser Hot Dog Grill Chapter 5 Chapter 5 Chapter 2 Chapter 2 Chapter 2 Chapter 11 Chapter 8 Chapter 8 Chapter 8 I Ice Dispensing Machines Ice Tea Dispenser Chapter 2 Chapter 8 I-3 NAVSUP P-486 - Food Service Management Ice making Machines And Ice Flakers Inoperative Equipment Report Inventory Dinnerware And Silverware Inventory of Silver Chapter 8 Chapter 2 Chapter 2 Chapter 3 J Job Scheduling Chapter 4 L Location And Designation Of Messes Chapter 5 M Micronutrients Meal Style Procedures Meals Sold For Cash Meat Slicer Menu Planning and Food Preparation Mess Deck Master-At-Arms Assignments Of Food Service Attendants Mess Deck Master-At-Arms Chain Of Command Mess Deck Master-At-Arms Duties Afloat Mess Deck Master-At-Arms Duties Ashore Mess Deck Master-At-Arms Duties Of Food Service Attendants Mess Deck Master-At-Arms General Guidelines (Afloat) Mess Deck Master-At-Arms General Guidelines (Ashore) Mess Deck Master-At-Arms Inspection Procedures Mess Deck Master-At-Arms Muster And Inspection Mess Deck Master-At-Arms Prior To Inspection Mess Deck Master-At-Arms Responsibilities Mess Deck Master-At-Arms Supervisory and Management Tools Mess Deck Master-At-Arms Written Instructions Mess Operation Mess Publications Mess Service Mess Treasurer For Officers’ Messes Microwave Oven Milk Dispensers Mission Of Messes Afloat Model 550 Frispo-Matic Multiple Blade Bread Slicer I-4 Chapter 1 Chapter 4 Chapter 5 Chapter 8 Chapter 1 Chapter 2 Chapter 2 Chapter 2 Chapter 2 Chapter 2 Chapter 2 Chapter 2 Chapter 2 Chapter 2 Chapter 2 Chapter 2 Chapter 2 Chapter 2 Chapter 5 Chapter 5 Chapter 5 Chapter 5 Chapter 8 Chapter 8 Chapter 5 Chapter 8 Chapter 8 NAVSUP P-486 - Food Service Management N Naval Shipboard Food Service Equipment Catalog Non-Carbonated Beverage Dispensers Nutrients Nutrients – Macronutrients Nutrients – Micronutrients Chapter 8 Chapter 8 Chapter 1 Chapter 1 Chapter 1 O Officer Mess Bills Officers Association With Enlisted Personnel Officers’ Mess Treasurer Duties Operating Instructions For Double-Tank Dishwashing Machines Operating Instructions For Single-Tank Dishwashing Machines Overheads Chapter 5 Chapter 5 Chapter 5 Chapter 2 Chapter 2 Chapter 2 P Pantry Linen Service Personal Laundry Pie Rimmer/Crimper Planned Maintenance Subsystem, Responsibility PMS Standards Powdered Mix Blender Preparing Soiled Dinnerware And Silverware For Machine Washing Presentation Silver Pre-Service Set-Up Prevention of Recontamination Proof Box Chapter 5 Chapter 4 Chapter 8 Chapter 2 Chapter 7 Chapter 8 Chapter 2 Chapter 3 Chapter 2 Chapter 6 Chapter 8 R Radiological Contamination Radiological Defense Reach-In Refrigerators Receipt of Presentation Silver Refrigerated Milk Dispensers Regular Steam Table Responsibilities Of Mess Caterer Responsibilities Of Officers’ Mess Treasurer Rotary Bread Toaster Rotational Pool Personnel Utilization Chapter 6 Chapter 6 Chapter 8 Chapter 3 Chapter 2 Chapter 8 Chapter 5 Chapter 5 Chapter 8 Chapter 5 I-5 NAVSUP P-486 - Food Service Management S Safe Food Preparation Operations Safe Work Conditions Safety And 3M/PMS Standards Safety Precautions For The Dishwashing Machine Salad Bar Scullery Operations Background Self Serving Lines Service Serving Line And Associated Equipment - General Operations Setting the Buffet Service Setting the Dining Table Setting the Sideboard Skittle Sneeze Shield And Tray Slide Rail Soft Ice Cream/Milkshake Machine Soft-Serve Ice Cream Machine Solid Waste Processing Equipment Special Meals Stainless Steel Surfaces Stateroom Care Stateroom Service Status As Government Instrumentalities Steam Jacketed Kettles Subsisting From General Mess Chapter 7 Chapter 7 Chapter 7 Chapter 2 Chapter 8 Chapter 2 Chapter 1 Chapter 5 Chapter 2 Chapter 4 Chapter 4 Chapter 4 Chapter 8 Chapter 2 Chapter 8 Chapter 2 Chapter 10 Chapter 1 Chapter 2 Chapter 4 Chapter 5 Chapter 5 Chapter 8 Chapter 5 T Table Condiments Tableware Items Temporary Vault Storage Traditional Foods Traditional Foods Training Follow-Up Training Formal Training Records Training Responsibility Training Secretary of The Navy Requirements Training, On-The-Job Tray, Bowl, Cup and Glass Lowerators Trouble Call Log Turn In of Presentation Silver Types of Wardroom Meal Service Chapter 2 Chapter 4 Chapter 3 Chapter 1 Chapter 1 Chapter 2 Chapter 2 Chapter 2 Chapter 2 Chapter 2 Chapter 2 Chapter 2 Chapter 2 Chapter 3 Chapter 4 I-6 NAVSUP P-486 - Food Service Management U Unit Commanders’ Mess Using Culinary Specialist and Rotational Pool Personnel Utensil Washing Machines Utilization Of Enlisted Personnel Chapter 5 Chapter 4 Chapter 8 Chapter 5 V Vegetable Cutter Vegetable Peeler Chapter 8 Chapter 8 W Walk In Reefer Wardroom and Stateroom Food Service Wardroom Mess Wardroom Service Wardroom Standards Waste Management Waste Management Operations Handling And Storage Guidance Waste Management Operations Training I-7 Chapter 8 Chapter 4 Chapter 5 Chapter 5 Chapter 5 Chapter 10 Chapter 10 Chapter 10