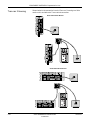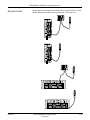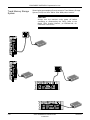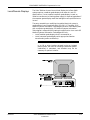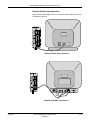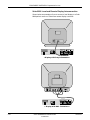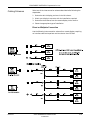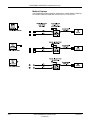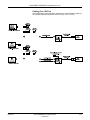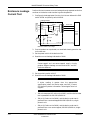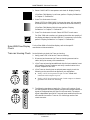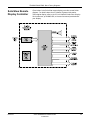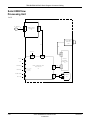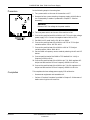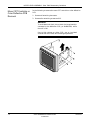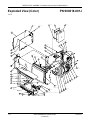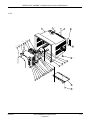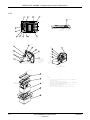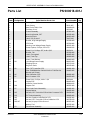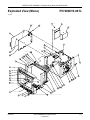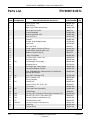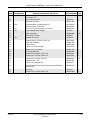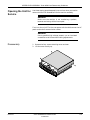
1
Solar® 7000/8000/SolarView
Patient Monitor
Field Service Manual
414993-001
Revision J
127(Due to continuing product innovation, specifications in this manual are subject to change without
notice.
Listed below are GE Medical Systems Information Technologies trademarks. All other trademarks contained
herein are the property of their respective owners.
900 SC, ACCUSKETCH, AccuVision, APEX, AQUA-KNOT, ARCHIVIST, Autoseq, BABY MAC, C Qwik
Connect, CardioServ, CardioSmart, CardioSys, CardioWindow, CASE, CD TELEMETRY, CENTRA, CHART
GUARD, CINE 35, CORO, COROLAN, COROMETRICS, Corometrics Sensor Tip, CRG PLUS, DASH,
Digistore, Digital DATAQ, E for M, EAGLE, Event-Link, FMS 101B, FMS 111, HELLIGE, IMAGE STORE,
INTELLIMOTION, IQA, LASER SXP, MAC, MAC-LAB, MACTRODE, MANAGED USE, MARQUETTE,
MARQUETTE MAC, MARQUETTE MEDICAL SYSTEMS, MARQUETTE UNITY NETWORK, MARS,
MAX, MEDITEL, MEI, MEI in the circle logo, MEMOPORT, MEMOPORT C, MINISTORE, MINNOWS,
Monarch 8000, MULTI-LINK, MULTISCRIPTOR, MUSE, MUSE CV, Neo-Trak, NEUROSCRIPT,
OnlineABG, OXYMONITOR, Pres-R-Cuff, PRESSURE-SCRIBE, QMI, QS, Quantitative Medicine,
Quantitative Sentinel, RAC RAMS, RSVP, SAM, SEER, SILVERTRACE, SOLAR, SOLARVIEW, Spectra
400, Spectra-Overview, Spectra-Tel, ST GUARD, TRAM, TRAM-NET, TRAM-RAC, TRAMSCOPE, TRIM
KNOB, Trimline, UNION STATION, UNITY logo, UNITY NETWORK, Vari-X, Vari-X Cardiomatic,
VariCath, VARIDEX, VAS, and Vision Care Filter are trademarks of GE Medical Systems Information
Technologies registered in the United States Patent and Trademark Office.
12SL, 15SL, Access, AccuSpeak, ADVANTAGE, BAM, BODYTRODE, Cardiomatic, CardioSpeak, CD
TELEMETRY®-LAN, CENTRALSCOPE, Corolation, EDIC, EK-Pro, Event-Link Cirrus, Event-Link
Cumulus, Event-Link Nimbus, HI-RES, ICMMS, IMAGE VAULT, IMPACT.wf, INTER-LEAD, IQA,
LIFEWATCH, Managed Use, MARQUETTE PRISM, MARQUETTE® RESPONDER, MENTOR,
MicroSmart, MMS, MRT, MUSE CardioWindow, NST PRO, NAUTILUS, O2SENSOR, Octanet, OMRS, PHiRes, Premium, Prism, QUIK CONNECT V, QUICK CONNECT, QT Guard, SMART-PAC, SMARTLOOK,
Spiral Lok, Sweetheart, UNITY, Universal, Waterfall, and Walkmom are trademarks of GE Medical Systems
Information Technologies.
© GE Medical Systems Information Technologies, 2001. All rights reserved.
T-2
Solar 7000/8000/SolarView
414993-001
Revision J
23 May 2001
CONTENTS
1
INTRODUCTION . . . . . . . . . . . . . . . . . . . . . . . . . . . . . . . . . . . . . . . . . . . . 1-1
Manual Information . . . . . . . . . . . . . . . . . . . . . . . . . . . . . . . . . . . . . . . . . . 1-3
Revision History . . . . . . . . . . . . . . . . . . . . . . . . . . . . . . . . . . . . . . . . . 1-3
Manual Purpose . . . . . . . . . . . . . . . . . . . . . . . . . . . . . . . . . . . . . . . . . 1-4
Intended Audience . . . . . . . . . . . . . . . . . . . . . . . . . . . . . . . . . . . . . . . 1-4
Safety Information . . . . . . . . . . . . . . . . . . . . . . . . . . . . . . . . . . . . . . . . . . . 1-5
Responsibility of the Manufacturer . . . . . . . . . . . . . . . . . . . . . . . . . . . 1-5
Intended Use . . . . . . . . . . . . . . . . . . . . . . . . . . . . . . . . . . . . . . . . . . . 1-5
Equipment Symbols . . . . . . . . . . . . . . . . . . . . . . . . . . . . . . . . . . . . . . 1-6
Warnings, Cautions, and Notes . . . . . . . . . . . . . . . . . . . . . . . . . . . . . 1-7
Service Information . . . . . . . . . . . . . . . . . . . . . . . . . . . . . . . . . . . . . . . . . . 1-8
Service Requirements . . . . . . . . . . . . . . . . . . . . . . . . . . . . . . . . . . . . 1-8
Warranty . . . . . . . . . . . . . . . . . . . . . . . . . . . . . . . . . . . . . . . . . . . . . . . 1-8
Equipment Identification . . . . . . . . . . . . . . . . . . . . . . . . . . . . . . . . . . . 1-8
2
EQUIPMENT OVERVIEW . . . . . . . . . . . . . . . . . . . . . . . . . . . . . . . . . . . . . 2-1
System Components . . . . . . . . . . . . . . . . . . . . . . . . . . . . . . . . . . . . . . . . 2-3
What is a Solar 7000/8000 Patient Monitoring System? . . . . . . . . . . 2-3
What is the Unity Network? . . . . . . . . . . . . . . . . . . . . . . . . . . . . . . . . 2-4
What is a Solar 7000 Patient Monitor? . . . . . . . . . . . . . . . . . . . . . . . . 2-5
What is a Solar 8000 Patient Monitor? . . . . . . . . . . . . . . . . . . . . . . . . 2-5
What is a SolarView Remote Display Controller? . . . . . . . . . . . . . . . 2-6
What is a Tram-rac Housing? . . . . . . . . . . . . . . . . . . . . . . . . . . . . . . . 2-7
What is a DDW? . . . . . . . . . . . . . . . . . . . . . . . . . . . . . . . . . . . . . . . . . 2-7
What is a PRN 50 Digital Writer? . . . . . . . . . . . . . . . . . . . . . . . . . . . . 2-8
What is a Remote Control? . . . . . . . . . . . . . . . . . . . . . . . . . . . . . . . . 2-9
What is a Remote Display? . . . . . . . . . . . . . . . . . . . . . . . . . . . . . . . . 2-9
What is a Tram-net Hub Assembly? . . . . . . . . . . . . . . . . . . . . . . . . . 2-10
What is a Tram-net Interface? . . . . . . . . . . . . . . . . . . . . . . . . . . . . . 2-11
What is an Octanet Connectivity Device? . . . . . . . . . . . . . . . . . . . . 2-11
What is a TMSS? . . . . . . . . . . . . . . . . . . . . . . . . . . . . . . . . . . . . . . . 2-12
Technical Specifications . . . . . . . . . . . . . . . . . . . . . . . . . . . . . . . . . . . . . 2-13
Revision H
Solar 7000/8000/View Patient Monitor
414993-001
i
CONTENTS
Preparation for Use . . . . . . . . . . . . . . . . . . . . . . . . . . . . . . . . . . . . . . . . . 2-18
Power Connection . . . . . . . . . . . . . . . . . . . . . . . . . . . . . . . . . . . . . . 2-18
Tram-rac Housing Connection . . . . . . . . . . . . . . . . . . . . . . . . . . . . . 2-19
Unity Network Connection . . . . . . . . . . . . . . . . . . . . . . . . . . . . . . . . 2-19
Interconnection . . . . . . . . . . . . . . . . . . . . . . . . . . . . . . . . . . . . . . . . . 2-20
Tram-rac 4A Housing . . . . . . . . . . . . . . . . . . . . . . . . . . . . . . . . . 2-21
Tram-rac 2 Housing . . . . . . . . . . . . . . . . . . . . . . . . . . . . . . . . . . 2-22
Dual Tram-rac Housings . . . . . . . . . . . . . . . . . . . . . . . . . . . . . . 2-23
Tram-net Interface Adapter . . . . . . . . . . . . . . . . . . . . . . . . . . . . 2-25
Octanet Connectivity Device . . . . . . . . . . . . . . . . . . . . . . . . . . . 2-26
DDW . . . . . . . . . . . . . . . . . . . . . . . . . . . . . . . . . . . . . . . . . . . . . 2-27
PRN 50 . . . . . . . . . . . . . . . . . . . . . . . . . . . . . . . . . . . . . . . . . . . 2-27
Remote Control . . . . . . . . . . . . . . . . . . . . . . . . . . . . . . . . . . . . . 2-29
Trend Memory Storage System . . . . . . . . . . . . . . . . . . . . . . . . . 2-30
Local/Remote Displays . . . . . . . . . . . . . . . . . . . . . . . . . . . . . . . 2-31
Cabling Schemes . . . . . . . . . . . . . . . . . . . . . . . . . . . . . . . . . . . . 2-35
Power Up . . . . . . . . . . . . . . . . . . . . . . . . . . . . . . . . . . . . . . . . . . . . . . . . 2-38
For all Solar Monitors . . . . . . . . . . . . . . . . . . . . . . . . . . . . . . . . . . . . 2-38
For Monochrome Solar 8000 . . . . . . . . . . . . . . . . . . . . . . . . . . . . . . 2-38
Configuration . . . . . . . . . . . . . . . . . . . . . . . . . . . . . . . . . . . . . . . . . . 2-38
More About Tram-net Communication . . . . . . . . . . . . . . . . . . . . . . . . . . 2-39
Internal Hub . . . . . . . . . . . . . . . . . . . . . . . . . . . . . . . . . . . . . . . . . . . 2-39
Tram-net Hub Assembly . . . . . . . . . . . . . . . . . . . . . . . . . . . . . . . . . . 2-40
More About Ethernet Communication . . . . . . . . . . . . . . . . . . . . . . . . . . . 2-41
Twisted Pair . . . . . . . . . . . . . . . . . . . . . . . . . . . . . . . . . . . . . . . . . . . 2-41
Concentrator . . . . . . . . . . . . . . . . . . . . . . . . . . . . . . . . . . . . . . . . . . . 2-42
Thin-net /Thick-net . . . . . . . . . . . . . . . . . . . . . . . . . . . . . . . . . . . . . . 2-42
Node . . . . . . . . . . . . . . . . . . . . . . . . . . . . . . . . . . . . . . . . . . . . . . . . . 2-42
Segment and Branch . . . . . . . . . . . . . . . . . . . . . . . . . . . . . . . . . . . . 2-42
Repeater . . . . . . . . . . . . . . . . . . . . . . . . . . . . . . . . . . . . . . . . . . . . . . 2-43
Bridge . . . . . . . . . . . . . . . . . . . . . . . . . . . . . . . . . . . . . . . . . . . . . . . . 2-43
3
MAINTENANCE . . . . . . . . . . . . . . . . . . . . . . . . . . . . . . . . . . . . . . . . . . . . . 3-1
Maintenance Schedule . . . . . . . . . . . . . . . . . . . . . . . . . . . . . . . . . . . . . . . 3-3
Manufacturer Recommendations . . . . . . . . . . . . . . . . . . . . . . . . . . . . 3-3
Manufacturer Responsibility . . . . . . . . . . . . . . . . . . . . . . . . . . . . . . . . 3-3
Visual Inspection . . . . . . . . . . . . . . . . . . . . . . . . . . . . . . . . . . . . . . . . . . . . 3-4
Cleaning . . . . . . . . . . . . . . . . . . . . . . . . . . . . . . . . . . . . . . . . . . . . . . . . . . 3-5
Cleaning Precautions . . . . . . . . . . . . . . . . . . . . . . . . . . . . . . . . . . . . . 3-5
Exterior Cleaning . . . . . . . . . . . . . . . . . . . . . . . . . . . . . . . . . . . . . . . . 3-6
Cleaning the Display . . . . . . . . . . . . . . . . . . . . . . . . . . . . . . . . . . 3-6
Cleaning the Touch Screen Display . . . . . . . . . . . . . . . . . . . . . . 3-6
Cleaning Inside the Solar 7000 Color Monitor . . . . . . . . . . . . . . . . . . 3-7
ii
Solar 7000/8000/View Patient Monitor
414993-001
Revision H
CONTENTS
Electrical Safety Tests . . . . . . . . . . . . . . . . . . . . . . . . . . . . . . . . . . . . . . . 3-8
General . . . . . . . . . . . . . . . . . . . . . . . . . . . . . . . . . . . . . . . . . . . . . . . . 3-8
Recommendations . . . . . . . . . . . . . . . . . . . . . . . . . . . . . . . . . . . . . . . 3-8
Test Conditions . . . . . . . . . . . . . . . . . . . . . . . . . . . . . . . . . . . . . . 3-8
Test Equipment . . . . . . . . . . . . . . . . . . . . . . . . . . . . . . . . . . . . . . 3-8
Power Outlet Test . . . . . . . . . . . . . . . . . . . . . . . . . . . . . . . . . . . . . . . . 3-9
Ground (Earth) Integrity . . . . . . . . . . . . . . . . . . . . . . . . . . . . . . . . . . . 3-9
Ground Continuity Test . . . . . . . . . . . . . . . . . . . . . . . . . . . . . . . . 3-9
Impedance of Protective Earth Connection . . . . . . . . . . . . . . . . 3-10
Ground (Earth) Wire Leakage Current Tests . . . . . . . . . . . . . . . . . . 3-10
Enclosure Leakage Current Test . . . . . . . . . . . . . . . . . . . . . . . . . . . 3-12
Patient (Source) Leakage Current Test . . . . . . . . . . . . . . . . . . . . . . 3-13
Patient (Sink) Leakage Current Test
(Mains Voltage on the Applied Part) . . . . . . . . . . . . . . . . . . . . . . . 3-14
Test Completion . . . . . . . . . . . . . . . . . . . . . . . . . . . . . . . . . . . . . . . . 3-15
Checkout Procedure . . . . . . . . . . . . . . . . . . . . . . . . . . . . . . . . . . . . . . . . 3-16
General . . . . . . . . . . . . . . . . . . . . . . . . . . . . . . . . . . . . . . . . . . . . . . . 3-16
Required Tools/Special Equipment . . . . . . . . . . . . . . . . . . . . . . 3-16
Procedure . . . . . . . . . . . . . . . . . . . . . . . . . . . . . . . . . . . . . . . . . . . . . 3-16
General Monitor Check . . . . . . . . . . . . . . . . . . . . . . . . . . . . . . . 3-16
Solar 7000 Display Check . . . . . . . . . . . . . . . . . . . . . . . . . . . . . 3-17
Solar 8000/View Display Check . . . . . . . . . . . . . . . . . . . . . . . . . 3-18
Tram-rac Housing Check . . . . . . . . . . . . . . . . . . . . . . . . . . . . . . 3-18
Tram-net Communication Check . . . . . . . . . . . . . . . . . . . . . . . . 3-20
LAN Network Check . . . . . . . . . . . . . . . . . . . . . . . . . . . . . . . . . 3-20
Remote Control Check . . . . . . . . . . . . . . . . . . . . . . . . . . . . . . . 3-20
Video/Alarm Check . . . . . . . . . . . . . . . . . . . . . . . . . . . . . . . . . . 3-20
Tram-net Interface Check . . . . . . . . . . . . . . . . . . . . . . . . . . . . . 3-20
Octanet Check . . . . . . . . . . . . . . . . . . . . . . . . . . . . . . . . . . . . . . 3-20
Completion . . . . . . . . . . . . . . . . . . . . . . . . . . . . . . . . . . . . . . . . . . . . 3-21
PM Form . . . . . . . . . . . . . . . . . . . . . . . . . . . . . . . . . . . . . . . . . . . . . . 3-21
Repair Log . . . . . . . . . . . . . . . . . . . . . . . . . . . . . . . . . . . . . . . . . . . . . . . 3-23
4
TROUBLESHOOTING . . . . . . . . . . . . . . . . . . . . . . . . . . . . . . . . . . . . . . . . 4-1
Introduction . . . . . . . . . . . . . . . . . . . . . . . . . . . . . . . . . . . . . . . . . . . . . . . . 4-3
Troubleshooting Outline . . . . . . . . . . . . . . . . . . . . . . . . . . . . . . . . . . . 4-3
Terms Used . . . . . . . . . . . . . . . . . . . . . . . . . . . . . . . . . . . . . . . . . . . . 4-4
Abort . . . . . . . . . . . . . . . . . . . . . . . . . . . . . . . . . . . . . . . . . . . . . . 4-4
Boot Loader . . . . . . . . . . . . . . . . . . . . . . . . . . . . . . . . . . . . . . . . . 4-4
Cold Start . . . . . . . . . . . . . . . . . . . . . . . . . . . . . . . . . . . . . . . . . . . 4-4
Configured Memory . . . . . . . . . . . . . . . . . . . . . . . . . . . . . . . . . . . 4-5
Continue . . . . . . . . . . . . . . . . . . . . . . . . . . . . . . . . . . . . . . . . . . . 4-5
Display On/Off . . . . . . . . . . . . . . . . . . . . . . . . . . . . . . . . . . . . . . . 4-5
Protected Memory . . . . . . . . . . . . . . . . . . . . . . . . . . . . . . . . . . . . 4-5
Power Cycle . . . . . . . . . . . . . . . . . . . . . . . . . . . . . . . . . . . . . . . . . 4-5
Service Mode/Menu . . . . . . . . . . . . . . . . . . . . . . . . . . . . . . . . . . . 4-5
Warm Start . . . . . . . . . . . . . . . . . . . . . . . . . . . . . . . . . . . . . . . . . . 4-5
Revision H
Solar 7000/8000/View Patient Monitor
414993-001
iii
CONTENTS
Block Theory Diagrams . . . . . . . . . . . . . . . . . . . . . . . . . . . . . . . . . . . . . . 4-6
Solar 7000 Color Monitor . . . . . . . . . . . . . . . . . . . . . . . . . . . . . . . . . . 4-6
Solar 7000 Monochrome Monitor . . . . . . . . . . . . . . . . . . . . . . . . . . . . 4-7
Solar 8000 Processing Unit . . . . . . . . . . . . . . . . . . . . . . . . . . . . . . . . 4-8
SolarView Remote Display Controller . . . . . . . . . . . . . . . . . . . . . . . . 4-9
Block Theory of Operation . . . . . . . . . . . . . . . . . . . . . . . . . . . . . . . . . . . 4-10
Overview . . . . . . . . . . . . . . . . . . . . . . . . . . . . . . . . . . . . . . . . . . . . . 4-10
Main Processor PCB . . . . . . . . . . . . . . . . . . . . . . . . . . . . . . . . . . . . 4-10
Display Processing Circuitry . . . . . . . . . . . . . . . . . . . . . . . . . . . 4-10
Remote/Local Display Circuitry . . . . . . . . . . . . . . . . . . . . . . . . . 4-10
Remote Alarm Circuitry . . . . . . . . . . . . . . . . . . . . . . . . . . . . . . . 4-10
Communication Circuitry . . . . . . . . . . . . . . . . . . . . . . . . . . . . . . 4-11
Low-Voltage Power Supply . . . . . . . . . . . . . . . . . . . . . . . . . . . . . . . 4-11
Keycap PCB . . . . . . . . . . . . . . . . . . . . . . . . . . . . . . . . . . . . . . . . . . . 4-11
Additional Solar 7000 Circuit Boards . . . . . . . . . . . . . . . . . . . . . . . . 4-11
Mono CRT Controller PCB . . . . . . . . . . . . . . . . . . . . . . . . . . . . 4-11
Color CRT Controller PCB . . . . . . . . . . . . . . . . . . . . . . . . . . . . . 4-11
Deflection PCB (Color Only) . . . . . . . . . . . . . . . . . . . . . . . . . . . 4-11
Block Diagram of Internal Cabling . . . . . . . . . . . . . . . . . . . . . . . . . . . . . 4-12
Solar 7000 Color Monitor . . . . . . . . . . . . . . . . . . . . . . . . . . . . . . . . . 4-12
Solar 7000 Monochrome Monitor . . . . . . . . . . . . . . . . . . . . . . . . . . . 4-16
Solar 8000/View Processing Unit . . . . . . . . . . . . . . . . . . . . . . . . . . . 4-20
Communication Connectors . . . . . . . . . . . . . . . . . . . . . . . . . . . . . . . . . . 4-22
Async COMM Signals . . . . . . . . . . . . . . . . . . . . . . . . . . . . . . . . . . . 4-22
RMT ALM Signals . . . . . . . . . . . . . . . . . . . . . . . . . . . . . . . . . . . . . . 4-23
Ethernet Signals . . . . . . . . . . . . . . . . . . . . . . . . . . . . . . . . . . . . . . . . 4-23
Tram-net Signals . . . . . . . . . . . . . . . . . . . . . . . . . . . . . . . . . . . . . . . 4-24
RS-232 Signals . . . . . . . . . . . . . . . . . . . . . . . . . . . . . . . . . . . . . . . . 4-25
RMT VID or VID Signals . . . . . . . . . . . . . . . . . . . . . . . . . . . . . . . . . . 4-25
Service Menus . . . . . . . . . . . . . . . . . . . . . . . . . . . . . . . . . . . . . . . . . . . . 4-26
Boot Loader Service Menu . . . . . . . . . . . . . . . . . . . . . . . . . . . . . . . . 4-26
Change Ethernet Address . . . . . . . . . . . . . . . . . . . . . . . . . . . . . 4-26
Change IP address . . . . . . . . . . . . . . . . . . . . . . . . . . . . . . . . . . 4-27
Set Clock . . . . . . . . . . . . . . . . . . . . . . . . . . . . . . . . . . . . . . . . . . 4-27
Clear Configured Memory . . . . . . . . . . . . . . . . . . . . . . . . . . . . . 4-27
Country Selection . . . . . . . . . . . . . . . . . . . . . . . . . . . . . . . . . . . 4-27
Serial Download Main . . . . . . . . . . . . . . . . . . . . . . . . . . . . . . . . 4-27
Serial Download Boot . . . . . . . . . . . . . . . . . . . . . . . . . . . . . . . . 4-27
Serial Download Old Boot . . . . . . . . . . . . . . . . . . . . . . . . . . . . . 4-27
Service Mode Menu . . . . . . . . . . . . . . . . . . . . . . . . . . . . . . . . . . . . . 4-28
Download Code . . . . . . . . . . . . . . . . . . . . . . . . . . . . . . . . . . . . . 4-28
Review Errors . . . . . . . . . . . . . . . . . . . . . . . . . . . . . . . . . . . . . . 4-28
Calibrate . . . . . . . . . . . . . . . . . . . . . . . . . . . . . . . . . . . . . . . . . . 4-28
Hardware Test . . . . . . . . . . . . . . . . . . . . . . . . . . . . . . . . . . . . . . 4-29
Patient-Monitor Type . . . . . . . . . . . . . . . . . . . . . . . . . . . . . . . . . 4-30
Menu Setup . . . . . . . . . . . . . . . . . . . . . . . . . . . . . . . . . . . . . . . . 4-30
Monitor Settings . . . . . . . . . . . . . . . . . . . . . . . . . . . . . . . . . . . . . 4-31
Copy Unit Defaults . . . . . . . . . . . . . . . . . . . . . . . . . . . . . . . . . . . 4-32
Degauss (Solar 7000 Only) . . . . . . . . . . . . . . . . . . . . . . . . . . . . 4-32
Time and Date . . . . . . . . . . . . . . . . . . . . . . . . . . . . . . . . . . . . . . 4-32
iv
Solar 7000/8000/View Patient Monitor
414993-001
Revision H
CONTENTS
General Fault Isolation . . . . . . . . . . . . . . . . . . . . . . . . . . . . . . . . . . . . . . 4-33
First Things to Ask . . . . . . . . . . . . . . . . . . . . . . . . . . . . . . . . . . . . . . 4-33
Visual Inspection . . . . . . . . . . . . . . . . . . . . . . . . . . . . . . . . . . . . . . . 4-33
AC Line Voltage Test . . . . . . . . . . . . . . . . . . . . . . . . . . . . . . . . . . . . . . . 4-35
120 VAC, 50/60 Hz . . . . . . . . . . . . . . . . . . . . . . . . . . . . . . . . . . . . . . 4-35
240 VAC, 50/60 Hz . . . . . . . . . . . . . . . . . . . . . . . . . . . . . . . . . . . . . . 4-35
Troubleshooting Procedure . . . . . . . . . . . . . . . . . . . . . . . . . . . . . . . . . . 4-36
LED Troubleshooting . . . . . . . . . . . . . . . . . . . . . . . . . . . . . . . . . . . . 4-45
Troubleshooting Software Updates . . . . . . . . . . . . . . . . . . . . . . . . . . . . 4-46
Problems and Solutions . . . . . . . . . . . . . . . . . . . . . . . . . . . . . . . . . . 4-46
5
CALIBRATION . . . . . . . . . . . . . . . . . . . . . . . . . . . . . . . . . . . . . . . . . . . . . 5-1
Solar 7000 Color Monitor . . . . . . . . . . . . . . . . . . . . . . . . . . . . . . . . . . . . . 5-3
Color Display Calibration . . . . . . . . . . . . . . . . . . . . . . . . . . . . . . . . . . 5-3
Preparation . . . . . . . . . . . . . . . . . . . . . . . . . . . . . . . . . . . . . . . . . 5-4
Horizontal Frequency Adjust . . . . . . . . . . . . . . . . . . . . . . . . . . . . 5-4
Color Focus Adjust . . . . . . . . . . . . . . . . . . . . . . . . . . . . . . . . . . . 5-5
Color Cross Hatch Adjust . . . . . . . . . . . . . . . . . . . . . . . . . . . . . . 5-5
Color Intensity Adjust . . . . . . . . . . . . . . . . . . . . . . . . . . . . . . . . . . 5-6
Color Adjust . . . . . . . . . . . . . . . . . . . . . . . . . . . . . . . . . . . . . . . . . 5-6
Completion . . . . . . . . . . . . . . . . . . . . . . . . . . . . . . . . . . . . . . . . . . 5-6
CRT Controller PCB Calibration . . . . . . . . . . . . . . . . . . . . . . . . . . . . . 5-7
Gain Adjust . . . . . . . . . . . . . . . . . . . . . . . . . . . . . . . . . . . . . . . . . 5-8
Completion . . . . . . . . . . . . . . . . . . . . . . . . . . . . . . . . . . . . . . . . . . 5-9
Solar 7000 Color Power Supply . . . . . . . . . . . . . . . . . . . . . . . . . . . . . . . 5-10
Preparation . . . . . . . . . . . . . . . . . . . . . . . . . . . . . . . . . . . . . . . . 5-10
Procedure . . . . . . . . . . . . . . . . . . . . . . . . . . . . . . . . . . . . . . . . . 5-11
Completion . . . . . . . . . . . . . . . . . . . . . . . . . . . . . . . . . . . . . . . . . 5-11
Solar 7000 Monochrome Monitor . . . . . . . . . . . . . . . . . . . . . . . . . . . . . . 5-12
Monochrome Display Calibration . . . . . . . . . . . . . . . . . . . . . . . . . . . 5-12
Special Tools/Equipment . . . . . . . . . . . . . . . . . . . . . . . . . . . . . . 5-12
Preparation . . . . . . . . . . . . . . . . . . . . . . . . . . . . . . . . . . . . . . . . 5-13
Horizontal Frequency Adjust . . . . . . . . . . . . . . . . . . . . . . . . . . . 5-13
Focus Adjust . . . . . . . . . . . . . . . . . . . . . . . . . . . . . . . . . . . . . . . 5-13
Cross Hatch Adjust . . . . . . . . . . . . . . . . . . . . . . . . . . . . . . . . . . 5-14
Intensity Adjust . . . . . . . . . . . . . . . . . . . . . . . . . . . . . . . . . . . . . 5-14
Completion . . . . . . . . . . . . . . . . . . . . . . . . . . . . . . . . . . . . . . . . . 5-14
Solar 7000 Monochrome Power Supply . . . . . . . . . . . . . . . . . . . . . . . . . 5-15
Special Tools/Equipment . . . . . . . . . . . . . . . . . . . . . . . . . . . . . . 5-15
Preparation . . . . . . . . . . . . . . . . . . . . . . . . . . . . . . . . . . . . . . . . 5-15
Procedure . . . . . . . . . . . . . . . . . . . . . . . . . . . . . . . . . . . . . . . . . 5-16
Completion . . . . . . . . . . . . . . . . . . . . . . . . . . . . . . . . . . . . . . . . . 5-16
Solar 8000/View Power Supply . . . . . . . . . . . . . . . . . . . . . . . . . . . . . . . 5-17
Special Tools/Equipment . . . . . . . . . . . . . . . . . . . . . . . . . . . . . . . . . 5-17
Procedure . . . . . . . . . . . . . . . . . . . . . . . . . . . . . . . . . . . . . . . . . . . . . 5-18
Completion . . . . . . . . . . . . . . . . . . . . . . . . . . . . . . . . . . . . . . . . . . . . 5-18
Revision H
Solar 7000/8000/View Patient Monitor
414993-001
v
CONTENTS
6
CONFIGURATION . . . . . . . . . . . . . . . . . . . . . . . . . . . . . . . . . . . . . . . . . . . 6-1
Configuring a Monitor . . . . . . . . . . . . . . . . . . . . . . . . . . . . . . . . . . . . . . . . 6-3
General . . . . . . . . . . . . . . . . . . . . . . . . . . . . . . . . . . . . . . . . . . . . . . . . 6-3
Gather Information . . . . . . . . . . . . . . . . . . . . . . . . . . . . . . . . . . . . 6-3
Select Procedures . . . . . . . . . . . . . . . . . . . . . . . . . . . . . . . . . . . . 6-3
Programming Admit Menu . . . . . . . . . . . . . . . . . . . . . . . . . . . . . . . . . 6-4
Programming Patient-Monitor Type . . . . . . . . . . . . . . . . . . . . . . . . . . 6-5
Programming Care Unit Name . . . . . . . . . . . . . . . . . . . . . . . . . . . . . . 6-6
Programming Bed Number . . . . . . . . . . . . . . . . . . . . . . . . . . . . . . . . . 6-6
Selecting Monochrome for Solar 8000/View . . . . . . . . . . . . . . . . . . . 6-7
Programming Display Brightness . . . . . . . . . . . . . . . . . . . . . . . . . . . . 6-7
For Solar 8000/View Monitors . . . . . . . . . . . . . . . . . . . . . . . . . . . 6-7
For All Monitors . . . . . . . . . . . . . . . . . . . . . . . . . . . . . . . . . . . . . . 6-7
Programming Line Frequency . . . . . . . . . . . . . . . . . . . . . . . . . . . . . . 6-8
Programming Analog Out Levels for the Solar ECG Module . . . . . . . 6-8
Programming Graph Locations . . . . . . . . . . . . . . . . . . . . . . . . . . . . . 6-9
Communication Confirmation . . . . . . . . . . . . . . . . . . . . . . . . . . . 6-9
Problems? . . . . . . . . . . . . . . . . . . . . . . . . . . . . . . . . . . . . . . . . . . 6-9
Completion . . . . . . . . . . . . . . . . . . . . . . . . . . . . . . . . . . . . . . . . . . . . . 6-9
Updating Software . . . . . . . . . . . . . . . . . . . . . . . . . . . . . . . . . . . . . . . . . 6-10
General . . . . . . . . . . . . . . . . . . . . . . . . . . . . . . . . . . . . . . . . . . . . . . . 6-10
Advanced User Procedures . . . . . . . . . . . . . . . . . . . . . . . . . . . . . . . . . . 6-11
Procedures . . . . . . . . . . . . . . . . . . . . . . . . . . . . . . . . . . . . . . . . . . . . 6-11
Programming Time and Date . . . . . . . . . . . . . . . . . . . . . . . . . . . . . . 6-12
From BOOT LOADER . . . . . . . . . . . . . . . . . . . . . . . . . . . . . . . . 6-12
From SERVICE MODE Menu . . . . . . . . . . . . . . . . . . . . . . . . . . 6-12
Changing Software Feature Level . . . . . . . . . . . . . . . . . . . . . . . . . . 6-13
Dial a Lower Level . . . . . . . . . . . . . . . . . . . . . . . . . . . . . . . . . . . 6-13
Exchange the EEPROM . . . . . . . . . . . . . . . . . . . . . . . . . . . . . . 6-13
Changing Remote Control Function . . . . . . . . . . . . . . . . . . . . . . . . . 6-13
Transferring Monitor Defaults . . . . . . . . . . . . . . . . . . . . . . . . . . . . . . 6-14
Storing Monitor Defaults for Transfer . . . . . . . . . . . . . . . . . . . . . 6-14
Copying Stored Monitor Defaults . . . . . . . . . . . . . . . . . . . . . . . . 6-15
Troubleshooting Monitor Defaults Transfer . . . . . . . . . . . . . . . . 6-16
Programming Ethernet Address . . . . . . . . . . . . . . . . . . . . . . . . . . . . 6-17
Find Label . . . . . . . . . . . . . . . . . . . . . . . . . . . . . . . . . . . . . . . . . 6-17
From BOOT LOADER . . . . . . . . . . . . . . . . . . . . . . . . . . . . . . . . 6-17
Programming Internet Address . . . . . . . . . . . . . . . . . . . . . . . . . . . . 6-18
Ethernet Address . . . . . . . . . . . . . . . . . . . . . . . . . . . . . . . . . . . . 6-18
Internet Address . . . . . . . . . . . . . . . . . . . . . . . . . . . . . . . . . . . . 6-18
Calculate Internet Address . . . . . . . . . . . . . . . . . . . . . . . . . . . . 6-19
From BOOT LOADER . . . . . . . . . . . . . . . . . . . . . . . . . . . . . . . . 6-19
From SERVICE MODE menu . . . . . . . . . . . . . . . . . . . . . . . . . . 6-19
Power Cycle . . . . . . . . . . . . . . . . . . . . . . . . . . . . . . . . . . . . . . . . 6-19
Reviewing Error Logs . . . . . . . . . . . . . . . . . . . . . . . . . . . . . . . . . . . . 6-20
Accessing Error Logs . . . . . . . . . . . . . . . . . . . . . . . . . . . . . . . . . 6-20
What Does an Error Log Contain? . . . . . . . . . . . . . . . . . . . . . . . 6-21
What Error Data is Useful? . . . . . . . . . . . . . . . . . . . . . . . . . . . . 6-22
What Do Error Codes Mean? . . . . . . . . . . . . . . . . . . . . . . . . . . 6-23
What Does Severity Imply? . . . . . . . . . . . . . . . . . . . . . . . . . . . . 6-24
vi
Solar 7000/8000/View Patient Monitor
414993-001
Revision H
CONTENTS
Transferring Error Logs . . . . . . . . . . . . . . . . . . . . . . . . . . . . . . . . . . 6-25
General . . . . . . . . . . . . . . . . . . . . . . . . . . . . . . . . . . . . . . . . . . . 6-25
Access the COPY LOGS Menu . . . . . . . . . . . . . . . . . . . . . . . . . 6-25
Select the Care Unit . . . . . . . . . . . . . . . . . . . . . . . . . . . . . . . . . . 6-26
Select the Monitoring Device . . . . . . . . . . . . . . . . . . . . . . . . . . . 6-26
Select the Error Log Date . . . . . . . . . . . . . . . . . . . . . . . . . . . . . 6-26
Copy Error Logs . . . . . . . . . . . . . . . . . . . . . . . . . . . . . . . . . . . . . 6-27
Eject Floppy . . . . . . . . . . . . . . . . . . . . . . . . . . . . . . . . . . . . . . . . 6-27
Reviewing Event Logs . . . . . . . . . . . . . . . . . . . . . . . . . . . . . . . . . . . 6-28
Accessing Event Logs . . . . . . . . . . . . . . . . . . . . . . . . . . . . . . . . 6-28
What Does an Event Log Contain? . . . . . . . . . . . . . . . . . . . . . . 6-29
7
UPPER LEVEL ASSEMBLY . . . . . . . . . . . . . . . . . . . . . . . . . . . . . . . . . . . 7-1
Solar 7000 Disassembly Guidelines . . . . . . . . . . . . . . . . . . . . . . . . . . . . . 7-3
General . . . . . . . . . . . . . . . . . . . . . . . . . . . . . . . . . . . . . . . . . . . . . . . . 7-3
PCB Assemblies . . . . . . . . . . . . . . . . . . . . . . . . . . . . . . . . . . . . . 7-3
Hardware . . . . . . . . . . . . . . . . . . . . . . . . . . . . . . . . . . . . . . . . . . . 7-3
Opening the Unit for Service . . . . . . . . . . . . . . . . . . . . . . . . . . . . . . . 7-4
Disassembly . . . . . . . . . . . . . . . . . . . . . . . . . . . . . . . . . . . . . . . . 7-4
Main Processor PCB Removal . . . . . . . . . . . . . . . . . . . . . . . . . . 7-5
Mono CRT Controller or Color Deflection PCB Removal . . . . . . . 7-6
Power Supply Removal . . . . . . . . . . . . . . . . . . . . . . . . . . . . . . . . 7-7
Color CRT Controller PCB Removal . . . . . . . . . . . . . . . . . . . . . . 7-8
Ordering Parts for Solar 7000 . . . . . . . . . . . . . . . . . . . . . . . . . . . . . . . . . . 7-9
Commonly Replaced Assemblies . . . . . . . . . . . . . . . . . . . . . . . . . . . . 7-9
Fuse Part Numbers . . . . . . . . . . . . . . . . . . . . . . . . . . . . . . . . . . . . . 7-10
Solar 7000 Labels . . . . . . . . . . . . . . . . . . . . . . . . . . . . . . . . . . . . . . 7-11
Exploded View (Color) . . . . . . . . . . . . . . . . . . . . . . . . . PN 900618-001J 7-12
Parts List . . . . . . . . . . . . . . . . . . . . . . . . . . . . . . . . . . . PN 900618-001J 7-15
Exploded View (Mono). . . . . . . . . . . . . . . . . . . . . . . . . PN 900619-001L 7-17
Parts List . . . . . . . . . . . . . . . . . . . . . . . . . . . . . . . . . . . PN 900619-001L 7-20
Solar 8000/View Disassembly Guidelines . . . . . . . . . . . . . . . . . . . . . . . 7-22
General . . . . . . . . . . . . . . . . . . . . . . . . . . . . . . . . . . . . . . . . . . . . . . . 7-22
PCB Assemblies . . . . . . . . . . . . . . . . . . . . . . . . . . . . . . . . . . . . 7-22
Hardware . . . . . . . . . . . . . . . . . . . . . . . . . . . . . . . . . . . . . . . . . . 7-22
Opening the Unit for Service . . . . . . . . . . . . . . . . . . . . . . . . . . . . . . 7-23
Disassembly . . . . . . . . . . . . . . . . . . . . . . . . . . . . . . . . . . . . . . . 7-23
Main Processor PCB Removal . . . . . . . . . . . . . . . . . . . . . . . . . 7-24
Power Supply Removal . . . . . . . . . . . . . . . . . . . . . . . . . . . . . . . 7-25
Ordering Parts for Solar 8000/View . . . . . . . . . . . . . . . . . . . . . . . . . . . . 7-27
Commonly Replaced Assemblies . . . . . . . . . . . . . . . . . . . . . . . . . . . 7-27
Fuse Part Numbers . . . . . . . . . . . . . . . . . . . . . . . . . . . . . . . . . . . . . 7-28
Solar 8000/View Labels . . . . . . . . . . . . . . . . . . . . . . . . . . . . . . . . . . 7-28
Exploded View . . . . . . . . . . . . . . . . . . . . . . . . . . . . . .PN 900691-001P 7-29
Parts List . . . . . . . . . . . . . . . . . . . . . . . . . . . . . . . . . . .PN 900691-001P 7-30
Revision H
Solar 7000/8000/View Patient Monitor
414993-001
vii
CONTENTS
For your notes
viii
Solar 7000/8000/View Patient Monitor
414993-001
Revision H
1
Revision J
INTRODUCTION
Solar 7000/8000/View Patient Monitor
414993-001
1-1
INTRODUCTION:
For your notes
1-2
Solar 7000/8000/View Patient Monitor
414993-001
Revision J
INTRODUCTION: Manual Information
Manual Information
Revision History
Each page of this manual has a revision letter, located at the bottom of
the page, that identifies its update level. This may be important if you
have different updates to a manual and don’t know which is the most
current.
For the initial release, all pages have the revision letter A. For the first
update of the manual, any changed pages receive the revision letter B.
For the second update, any changed pages receive the revision letter C.
The latest letter of the alphabet added corresponds to the most current
revision. Notice, however, that some pages may skip revision letters, for
example, jump from revision A to revision C because they did not change
in revision B.
Revision History
Revision
Date
Comment
A
28 March 1995
Initial release of this manual.
B
3 October 1995
Added references to Solar 8000 processing unit
C
1 March 1996
Minor corrections
D
15 May 1996
Added references to SolarView remote display controller
E
23 September 1996
Added references to Corometrics TMSS and updated upper assembly
F
17 June 1998
Added information for revised Service Mode Menu and updated upper
assembly
G
1 September 1999
Removed “Updating Software” from the manual and added UL
information.
H
13 January 2000
Added PRN-50 component to Chapter 2, “Equipment Overview”,
removed references to Corometrics, and updated Chapter 6,
“Configuration” to reflect Reviewing Event Logs.
J
23 May 2001
Added Monitor Default Transfer to Chapter 6, "Configuration."
Revision J
Solar 7000/8000/View Patient Monitor
414993-001
1-3
INTRODUCTION: Manual Information
Manual Purpose
This manual supplies technical information for service representatives
and technical personnel so they can maintain the equipment to the
assembly level. Use it as a guide for maintenance and electrical repairs
considered field repairable. Where necessary the manual identifies
additional sources of relevant information and technical assistance.
See the operator’s manual for the instructions necessary to operate the
equipment safely in accordance with its function and intended use.
For parts lists and schematic diagrams of the PCB assemblies, order the
Solar 7000/8000/View Monitor Data Manual, PN 414993-007.
Intended Audience
1-4
This manual is intended for service representatives and technical
personnel who maintain, troubleshoot, or repair this equipment.
Solar 7000/8000/View Patient Monitor
414993-001
Revision J
INTRODUCTION: Safety Information
Safety Information
Responsibility of the
Manufacturer
Intended Use
GE Medical Systems Information Technologies is responsible for the
effects of safety, reliability, and performance only if:
•
Assembly operations, extensions, readjustments, modifications, or
repairs are carried out by persons authorized by GE Medical Systems
Information Technologies.
•
The electrical installation of the relevant room complies with the
requirements of the appropriate regulations.
•
The equipment is used in accordance with the instructions for use.
Follow the directives stated below when using this device.
•
This device is intended for use under the direct supervision of a
licensed health care practitioner.
•
This device is not intended for home use.
•
Federal law restricts this device to be sold by or on the order of a
physician.
•
Contact GE Medical Systems Information Technologies for
information before connecting any devices to the equipment that are
not recommended in this manual.
•
Parts and accessories used must meet the requirements of the
applicable IEC 601 series safety standards, and/or the system
configuration must meet the requirements of the IEC 60601-1-1
medical electrical systems standard.
•
Periodically, and whenever the integrity of the device is in doubt, test
all functions.
•
The use of ACCESSORY equipment not complying with the
equivalent safety requirements of this equipment may lead to a
reduced level of safety of the resulting system. Consideration
relating to the choice shall include:
•
Revision J
◆
use of the accessory in the PATIENT VICINITY; and
◆
evidence that the safety certification of the ACCESSORY has
been performed in accordance to the appropriate IEC 60601-1
and/or IEC 60601-1-1 harmonized national standard.
If the installation of the equipment, in the USA, will use 240V rather
than 120V, the source must be a center-tapped, 240V, single-phase
circuit.
Solar 7000/8000/View Patient Monitor
414993-001
1-5
INTRODUCTION: Safety Information
Equipment Symbols
The following symbols appear on the equipment.
NOTE: Some symbols may not appear on all equipment.
ATTENTION: Consult accompanying documents before using the
equipment.
In Europe, this symbol means dangerous or high voltage. In the
United States, this symbol represents the caution notice below:
To reduce the risk of electric shock, do NOT remove cover (or back).
Refer servicing to qualified personnel.
Defibrillator-proof type CF equipment; type CF equipment is
specifically designed for applications where a conductive connection
directly to the heart is established. The paddles indicate the
equipment is defibrillator proof.
Defibrillator-proof type BF equipment; type BF equipment is suitable
for intentional external and internal application to the patient,
excluding direct cardiac application. Type BF equipment is type B
equipment with an F-type isolated (floating) part. The paddles
indicate the equipment is defibrillator proof.
Type B equipment; type B equipment is suitable for intentional
external and internal application to the patient, excluding direct
cardiac application.
Equipotential
Alternating current (AC)
Power; I = ON; O= OFF
Fuse
1-6
Solar 7000/8000/View Patient Monitor
414993-001
Revision J
INTRODUCTION: Safety Information
PRESS
Where used, indicates to press to open.
Classified by Underwriters Laboratories Inc. with respect to electric
shock, fire, mechanical and other specified hazards, only in
accordance with UL 2601-1, CAN/CSA C22.2 No. 601.1, IEC 60601-1,
and, if required, IEC 60601-2-27, IEC 60601-2-30, IEC 60601-2-34,
IEC 60601-1-1.
Warnings, Cautions,
and Notes
The terms danger, warning, and caution are used throughout this
manual to point out hazards and to designate a degree or level or
seriousness. Familiarize yourself with their definitions and significance.
Hazard is defined as a source of potential injury to a person.
DANGER indicates an imminent hazard which, if not avoided, will
result in death or serious injury.
WARNING indicates a potential hazard or unsafe practice which, if not
avoided, could result in death or serious injury.
CAUTION indicates a potential hazard or unsafe practice which, if not
avoided, could result in minor personal injury or product/property
damage.
NOTE provides application tips or other useful information to assure
that you get the most from your equipment.
Revision J
Solar 7000/8000/View Patient Monitor
414993-001
1-7
INTRODUCTION: Service Information
Service Information
Service
Requirements
Follow the service requirements listed below.
•
Refer equipment servicing to GE Medical Systems Information
Technologies’ authorized service personnel only.
•
Any unauthorized attempt to repair equipment under warranty voids
that warranty.
•
It is the user’s responsibility to report the need for service to GE
Medical Systems Information Technologies or to one of their
authorized agents.
•
Failure on the part of the responsible individual, hospital, or
institution using this equipment to implement a satisfactory
maintenance schedule may cause undue equipment failure and
possible health hazards.
•
Regular maintenance, irrespective of usage, is essential to ensure
that the equipment will always be functional when required.
Warranty
Standard:
Equipment
Identification
One year. Other options are available. Contact your
sales representative for more information.
Every GE Medical Systems Information Technologies device has a unique
serial number for identification. A sample of the information found on a
serial number label is shown below.
D 0 XX 0005 G XX
Month
Manufactured
A = January
B = February
C = March
D = April
E = May
F = June
G = July
H = August
J = September
K = October
L = November
M = December
1-8
Year
Manufactured
0 = 2000
1 = 2001
2 = 2002
(and so on)
Product Code
Two-character
product
descriptor
Product
Sequence
Number
Manufacturing
number (of total
units
manufactured.)
Division
F = Cardiology
G = Monitoring
N=Freiburg
Hellige
Solar 7000/8000/View Patient Monitor
414993-001
Device Characteristics
One or two letters that
further describe the unit,
for example:
P = prototype not
conforming to marketing
specification
R = refurbished equipment
S = special product
documented under Specials
part numbers
U = upgraded unit
Revision J
2
Revision J
EQUIPMENT OVERVIEW
Solar 7000/8000/View Patient Monitor
414993-001
2-1
EQUIPMENT OVERVIEW:
For your notes
2-2
Solar 7000/8000/View Patient Monitor
414993-001
Revision J
EQUIPMENT OVERVIEW: System Components
System Components
What is a Solar 7000/
8000 Patient
Monitoring System?
The Solar 7000/8000 patient monitoring system is designed to monitor
electrocardiographic, hemodynamic, respiratory, and pulmonary
parameters in the intensive care, coronary care, and operating room
environments of a hospital.
The Solar 7000/8000 patient monitoring system operates with the Unity
Network or as a system itself. At the patient’s bed, the Solar 7000/8000
patient monitoring system permits connection of many peripheral
devices from the Solar 7000/8000 monitor.
All Solar 7000/8000 Patient Monitoring Systems include a patient
monitor, at least one patient parameter monitoring module, and one or
more of the following items:
•
Tram-rac housing (Tram remote acquisition case),
•
DDW (direct digital writer),
•
remote control,
•
remote display,
•
SolarView remote display, or
•
TMSS (Trend Memory Storage System)
Shown below is an example of a Solar 7000 patient monitoring system.
Revision J
Solar 7000/8000/View Patient Monitor
414993-001
2-3
EQUIPMENT OVERVIEW: System Components
What is the Unity
Network?
The Unity Network is a comprehensive communication network which
unifies GE Medical Systems Information Technologies patient
monitoring and data management equipment into an integrated
hospital-wide system. It creates an extended communication system for
efficient information sharing among operating rooms intensive care
units, the emergency room, and other care and diagnostic areas.
Information entered anywhere on the network, via any input device, is
available anywhere else on the network. This is accomplished through
the Ethernet communication hardware in the patient monitor.
An example of part of a Unity Network is shown below.
2-4
Solar 7000/8000/View Patient Monitor
414993-001
Revision J
EQUIPMENT OVERVIEW: System Components
What is a Solar 7000
Patient Monitor?
The Solar 7000 patient monitor is the center of the Solar 7000 Patient
Monitoring System. It is an intelligent terminal, containing the display,
all of the user controls, and processors to communicate with patient
monitor peripherals and analyze patient data. It is capable of displaying
up to eight different waveforms at one time. System software may be
updated by a laptop computer at the monitor or through the Unity
Network using a central station..
What is a Solar 8000
Patient Monitor?
The Solar 8000 patient monitor consists of a Solar 8000 processing unit
with a compatible display purchased from GE Medical Systems
Information Technologies or another vendor. (For details about the GE
Medical Systems Information Technologies display, refer to the 15-Inch
Medical-Grade Color Display Service Manual, pn 414993-056.)
The processing unit is the center of the Solar 8000 Patient Monitoring
system. It provides the user controls, processors to communicate with
various patient monitoring modules contained in a Tram-rac housing,
and analyzes patient data. It is capable of displaying up to eight different
waveforms at one time on a compatible display. System software may be
updated using a laptop computer connected to the Solar 8000 processing
unit or from a central station on the Unity Network. Shown below is a
generic display and a Solar 8000 processing unit.
Revision J
Solar 7000/8000/View Patient Monitor
414993-001
2-5
EQUIPMENT OVERVIEW: System Components
What is a SolarView
Remote Display
Controller?
2-6
A SolarView remote display controller resembles a Solar 8000 processing
unit, but it is not connected to a Tram-rac housing with patient
monitoring modules. It consists of a SolarView remote display controller
with a compatible display purchased from GE Medical Systems
Information Technologies or another vendor. (For details about the GE
Medical Systems Information Technologies display, refer to the 15-Inch
Medical-Grade Color Display Service Manual, pn 414993-056.) The
controller is connected to the Unity network and may be configured to
display any patient waveforms broadcasted on the network for better
visibility as either a remote, full-view display or as an in-room, telemetry
display. System software may be updated using a laptop computer
connected to the SolarView remote display controller or from a central
station on the Unity Network. Shown below is a generic display and a
SolarView remote display controller.
Solar 7000/8000/View Patient Monitor
414993-001
Revision J
EQUIPMENT OVERVIEW: System Components
What is a Tram-rac
Housing?
The Tram-rac housing (remote acquisition case) acquires patient data for
the patient monitor. The Tram-rac Housing Service Manual, pn404183096, has more information. There are two Tram-rac housings available
for the monitor:
•
Tram-rac 2 housing, which holds a single Tram module, and
•
Tram-rac 4A housing, which holds a Tram module and two additional
Series 7000 input modules.
Shown below is a Tram-rac 4A housing with a Tram module, Series 7000
BP/dual temperature module, and single Series 7000 BP module
inserted.
What is a DDW?
Revision J
A Direct Digital Writer (DDW) allows patient data to be printed on a
paper strip. Any parameter or trace that can be monitored at the patient
monitor can also be printed on the DDW. Graphs are initiated
automatically when an alarm has been violated, or they can be initiated
manually at the patient monitor.
Solar 7000/8000/View Patient Monitor
414993-001
2-7
EQUIPMENT OVERVIEW: System Components
What is a PRN 50
Digital Writer?
2-8
A PRN 50 Digital Writer thermally records patient data on a paper strip.
Any parameter or trace that can be monitored on a patient monitor can
be graphed by the writer. Graphs are initiated automatically when an
alarm has been activated, or they can be initiated manually from a
monitor.
Solar 7000/8000/View Patient Monitor
414993-001
Revision J
EQUIPMENT OVERVIEW: System Components
What is a Remote
Control?
The remote control duplicates all patient monitor controls on a portable
component with a Trim Knob control. It allows the user to operate the
patient monitor from across a room. The twelve hard keys are configured
for adult, neonatal, or operating room applications. For more details
about the remote control, refer to the Modular Patient Monitor
Accessories Service Manual, pn 404183-150.
What is a Remote
Display?
A color or monochrome secondary display may be attached directly to the
Solar 7000 patient monitor to display up to eight patient monitor
waveforms for better visibility. It is connected to the video out (RMT VID)
connector at the back of the monitor. For details about the remote
display, refer to the Patient Monitor Accessories Service Manual,
pn 404183-150.
NOTE: An adapter,
pn 405947-002, is
required for cable,
pn 405360-00X, to the
remote display.
Revision J
Solar 7000/8000/View Patient Monitor
414993-001
2-9
EQUIPMENT OVERVIEW: System Components
What is a Tram-net
Hub Assembly?
If a patient monitor is connected to more than one peripheral device, the
Tram-net hub assembly is used. It connects the communication
processing capabilities inside the patient monitor to other equipment,
much like what a multiple outlet power strip does for ac power.
Peripherals can be connected to the Tram-net hub assembly via serial
cabling. The Tram-net hub assembly extends the patient monitor with a
cable of up to 1.3 meters (4 feet) long.
Note that a 25-pin D-type connector at the rear of the patient monitor is
marked TRAM-NET or ASYNC COMM. This connector handles both
Tram-net and async signals. One end of the Tram-net hub assembly
connects to this connector. At the other end of the Tram-net hub
assembly, the signals are separated into async and four Tram-net
connectors. The 25-pin red color coded connector handles async for
communication only with an async-only. The four 9-pin blue color coded
connectors are for extending the Tram-net network (blue label). More
details about Tram-net communication will be covered later in this
chapter.
Shown below is a Tram-net hub assembly. For details about the Tram-net
hub assembly, refer to the Modular Patient Monitor Accessories Service
Manual, pn 404183-150.
2-10
Solar 7000/8000/View Patient Monitor
414993-001
Revision J
EQUIPMENT OVERVIEW: System Components
What is a Tram-net
Interface?
The Tram-net interface adapter connects a specific device to the Solar
7000/8000 patient monitoring system using Tram-net communication.
Each adapter is preprogrammed at the factory to interface with a specific
device manufactured by a company other than GE Medical Systems
Information Technologies. In most cases, the Tram-net interface adapter
requires a Tram-net hub to connect with the Tram-net communication
network. For more details about the Tram-net interface adapter, refer to
the Modular Patient Monitor Accessories Service Manual, pn 404183-150.
What is an Octanet
Connectivity Device?
The Octanet Connectivity Device acquires digital data from eight
individually isolated serial ports. The data is collected from up to eight of
devices not manufactured by GE Medical Systems Information
Technologies. The Octanet Connectivity Device processes the patient
data from the peripheral devices and transmits the formatted data to the
Solar patient monitor. For more details about the Octanet Connectivity
Device, refer to the Octanet Connectivity Device Service Manual, pn
418264-003.
Revision J
Solar 7000/8000/View Patient Monitor
414993-001
2-11
EQUIPMENT OVERVIEW: System Components
What is a TMSS?
2-12
The Trend Memory Storage System (TMSS) is an optional device that
stores up to 24 hours of trend data for the CRG Plus display—six hours
at a time. This feature is available with V3 software or later. The stored
CRG data is used in the overall analysis of a patient. Analyzing trend
waveforms permits the ability to view both subtle and dramatic changes
in the patient’s vital signs. It also enables the clinician to correlate
changes of one parameter with respect to another. For more details about
the TMSS, refer to the Model 7024 Product Manual, pn 13703AA-000.
Solar 7000/8000/View Patient Monitor
414993-001
Revision J
EQUIPMENT OVERVIEW: Technical Specifications
Technical Specifications
Display Specifications
Item
Description
Size
Solar 7000 Monitor: 12-inch (measured diagonally)
Solar 8000 Processing Unit: Display is ordered separately and may vary.
SolarView Remote Display Controller: Display is ordered separately and
may vary.
Type
Solar 7000 Monitor: High-definition Raster scan for waveforms and
alphanumerics
Resolution
Solar 7000 Color Monitor: 1024 pixels wide by 512 pixels high
Solar 7000 Monochrome Monitor: 1024 pixels wide by 512 pixels high
Traces
Solar 7000 Monitor: Number of traces: 1 to 8
Solar 7000 Monitor: Number of seconds/trace: 6.5 at 25 mm/sec
Phosphor
Solar 7000 Color Monitor: P22
Solar 7000 Monochrome: Monitor: P218
Sweep Speed
Solar 7000 Monitor: 25 mm/sec (meets all ANSI/AAMI specifications)
Frequency Response
Limited by input response of data acquisition device
Linearity
Solar 7000 Monitor:1% of picture height
Waveform Display
Options
■
Full
■
Individual
■
CRG Plus
Information Window
Display all non-real time information without obstructing the display of
real-time information
Display Organization
Prioritized by parameter
Processing Specifications
Item
Description
Main Processor
Motorola MC68EN360, 32-Bit, 25 MHz
Graphics Processor
Texas Instrument TMS34010, 16-Bit, 46.7 MHz
Tram-net
Communication
Processor
Intel 82596CA, 32-Bit, 25 MHz
LAN (Ethernet)
Communication
Processor
Integrated into the Motorola MC68EN360 processor
Revision J
Solar 7000/8000/View Patient Monitor
414993-001
2-13
EQUIPMENT OVERVIEW: Technical Specifications
Alarm Specifications
Item
Classification
Description
Patient status alarms have 4 levels:
■
Crisis
■
Warning
■
Advisory
■
Message
System alarms have 2 levels:
■
Warning
■
Advisory
Alarms Notification
Audible and visual, dependent on level
Display of Alarm
Information
All limits are viewable and graphable
Silencing
Only current alarm for 1 minute
Alarm pause:
Continuous Display of
Limits
■
5 minutes in adult ICU mode
■
3 minutes in neonatal mode
■
5 minutes, 15 minutes, or permanent alarm pause in OR mode
All parameters, one set of limits
Control Specifications
Item
Trim Knob Control
Five Hard Keys
2-14
Description
Single control operation of all display functions
■
Display On/Off
■
Silence Alarm
■
Graph Go/Stop
■
NBP Go/Stop
■
Zero All
Solar 7000/8000/View Patient Monitor
414993-001
Revision J
EQUIPMENT OVERVIEW: Technical Specifications
Environmental Specifications
Item
Power Requirements
Description
Solar 7000 Color Monitor:
■ 110 ± 11 VAC, 50/60-Hz, single phase
■ 120 ± 12 VAC, 50/60-Hz, single phase
■ 220-230 ± 22 VAC, 50/60-Hz, single phase
■ 240 ± 24 VAC, 50/60-Hz, single phase
Solar 7000 Monochrome: Monitor and Solar 8000 Processing Unit
■ 110 ± 20 VAC, 50/60-Hz, single phase
■ 220-230 ± 40 VAC, 50/60-Hz, single phase
Power Consumption
Solar 7000 Color Monitor: 200 W (180 W for a Tram-rac housing with power
supply connected)
Solar 7000 Monochrome Monitor: 120 W (100 W for a Tram-rac housing with
power supply connected)
Solar 8000 Processing Unit: 100W (maximum)
SolarView Remote Display Controller: 25W (maximum)
Low Voltage Shutdown
Solar 7000 Color Monitor: 88 VAC/106 VAC/196 VAC/214 VAC
Solar 7000 Monochrome Monitor: 85 VAC/170 VAC
Solar 8000 Processing Unit: 90 VAC/190 VAC
SolarView Remote Display Controller: 90 VAC/190 VAC
Cooling
Solar 7000 Color Monitor: Forced convection
Solar 7000 Monochrome Monitor and Solar 8000 Processing Unit: Natural
convection
Heat Dissipation
Solar 7000 Color Monitor: 680 Btu/hr (200 W)
Solar 7000 Monochrome Monitor: 409 Btu/hr (120 W)
Solar 8000 Processing Unit: 100 Btu/hr (30W)
SolarView Remote Display Controller: 50 Btu/hr (15W)
Operating Conditions
■
Ambient
Temperature
Solar 7000 Monitor: 10°C to 35°C (50°F to 95°F)
Solar 8000 Processing Unit: 10°C to 40°C (50°F to 104°F)
SolarView Remote Display Controller: 10°C to 40°C (50°F to 104°F)
■
Relative Humidity
Solar 7000 Monitor: 15% to 95% (noncondensing)
Solar 8000 Processing Unit: 15% to 95% (noncondensing)
SolarView Remote Display Controller: 15% to 95% (noncondensing)
Storage Conditions
■
Temperature
Solar 7000 Monitor: –10°C to 50°C (14°F to 122°F)
Solar 8000 Processing Unit: –40°C to 70°C (–40F° to °158F)
SolarView Remote Display Controller: –40°C to 70°C (–40F° to °158F)
■
Relative Humidity
Solar 7000 Monitor: 0% to 95% (noncondensing)
Solar 8000 Processing Unit: 15% to 95% (noncondensing)
SolarView Remote Display Controller: 15% to 95% (noncondensing)
Revision J
Solar 7000/8000/View Patient Monitor
414993-001
2-15
EQUIPMENT OVERVIEW: Technical Specifications
Physical Specifications
Item
Height
Description
Solar 7000 Monitor: 31.1 cm (12.3 in)
Solar 8000 Processing Unit: 8.1 (3.2 in)
SolarView Remote Display Controller: 8.1 (3.2 in)
Width
Solar 7000 Monitor: 33.4 cm (13.5 in)
Solar 8000 Processing Unit: 33.6 cm (13.3 in)
SolarView Remote Display Controller: 33.6 cm (13.3 in)
Depth
Solar 7000 Color Monitor: 55.2 cm (21.7 in)
Solar 7000 Monochrome Monitor: 39.9 cm (15.7)
Solar 8000 Processing Unit: 34.9 cm (13.8 in)
SolarView Remote Display Controller: 34.9 cm (13.8 in)
Weight
Solar 7000 Color Monitor: 22 kg (48 lb)
Solar 7000 Monochrome Monitor: 13.3 kg (29.4 lb)
Solar 8000 Processing Unit: 5.4 kg (12.0 lb)
SolarView Remote Display Controller: 5.4 kg (12.0 lb)
Minimum Enclosure
Height: 10.7 cm (4.2 in)
Requirements
Width: 38.9 cm (15.3 in)
(Interior)
Depth: 51.8 cm (20.4 in)
Certification
Item
Safety Standards
Description
Solar 7000 Monitor:
■
UL544 Listed
■
UL Listed for CSA C22.2 No. 125
■
IEC 60601-1 Certified
■
CE Marking for the 93/42/EEC Medical Device Directive (Refer to operator’s
manual for CE Marking specifics.)
Solar 8000 Processing Unit and SolarView Remote Display Controller:
2-16
■
UL 2601-1 Classified
■
UL Classified for CAN/CSA C22.2 No. 601.1
■
IEC 60601-1 Certified
■
CE Marking for the 93/42/EEC Medical Device Directive (Refer to operator’s
manual for CE Marking specifics.)
Solar 7000/8000/View Patient Monitor
414993-001
Revision J
EQUIPMENT OVERVIEW: Technical Specifications
Classification
Item
Description
Type of protection
against electrical shock
Class I Equipment
Degree of protection
against electrical shock
Type B Applies Part
Degree of protection
against harmful ingress
of water
Ordinary Equipment (enclosed equipment without protection against ingress of
water)
Degree of safety of
application in the
presence of a flammable
anesthetic mixture with
air or with oxygen or
nitrous oxide
Equipment not suitable for use in the presence of a flammable anesthetic
mixture with air or with oxygen or nitrous oxide.
Method(s) of
sterilization or
disinfection
recommended by the
manufacturer
Not Applicable
Mode of operation
Continuous operation
Revision J
Solar 7000/8000/View Patient Monitor
414993-001
2-17
EQUIPMENT OVERVIEW: Preparation for Use
Preparation for Use
Power Connection
For the Solar 7000 monitor, connect the power cord to the power supply
inlet and anchor the cord with the restraining clip and screw.
For the Solar 8000 processing unit or SolarView remote display
controller, connect the power cord to the power supply inlet and anchor
the cord with the restraining clip and screw.
2-18
Solar 7000/8000/View Patient Monitor
414993-001
Revision J
EQUIPMENT OVERVIEW: Preparation for Use
Tram-rac Housing
Connection
If a Tram-rac power supply is used, connect the power cord as shown
below.
Unity Network
Connection
For the Solar 7000/8000 monitor or SolarView remote display controller,
connect the Unity network to the Ethernet connector with kit, pn
414292-001, as shown below.
1. Remove four jackscrews from
connectors shown.
2. Install two screws from kit to
secure ETHERNET
connector to chassis.
3. Install two screws to connect
transceiver bracket to
transceiver.
4. Use two jackscrews removed
earlier to mount transceiver
and bracket to ETHERNET
connector.
Revision J
Solar 7000/8000/View Patient Monitor
414993-001
2-19
EQUIPMENT OVERVIEW: Preparation for Use
Interconnection
The Solar 7000/8000 patient monitor or SolarView remote display
controller has six communication connectors to accomodate your
monitoring system.
•
ASYNC COMM connects to a DDW or remote control, or to download
new software. SolarView remote display controller does not use this
function.
•
TRAM-NET combines Tram async and the Tram-net network for
communication with many bedside peripherals, i.e. Tram-net hub,
Tram-rac housing, or remote control. SolarView remote display
controller does not use this function.
•
ETHERNET is the Unity Network connection that provides faster
hospital wide communication.
•
Remote alarm (RMT ALM) provides relay contact closure for “Level
I” alarms to an alarm annunciator.
•
For the Solar 7000 monitor, remote display (RMT VID) connects to a
secondary remote display. For the Solar 8000 processing unit or
SolarView remote display controller, video (VID) connects to the local
display.
•
RS-232 is for future use.
WARNING
Connect devices solely manufactured by GE Medical
Systems Information Technologies directly to the Unity
Network. Contact MMS—Technical Support before
connecting equipment from other manufacturers.
2-20
Solar 7000/8000/View Patient Monitor
414993-001
Revision J
EQUIPMENT OVERVIEW: Preparation for Use
Tram-rac 4A Housing
Shown below is the connection from the Tram-rac 4A housing to a Solar
monitor with and without a Tram-net hub connection.
Solar 7000 Patient Monitor
Solar 8000 Patient Monitor
Revision J
Solar 7000/8000/View Patient Monitor
414993-001
2-21
EQUIPMENT OVERVIEW: Preparation for Use
Tram-rac 2 Housing
Shown below is the connection from the Tram-rac 2 housing to a Solar
monitor with and without a Tram-net hub connection.
Solar 7000 Patient Monitor
Solar 8000 Patient Monitor
2-22
Solar 7000/8000/View Patient Monitor
414993-001
Revision J
EQUIPMENT OVERVIEW: Preparation for Use
Dual Tram-rac Housings
The Solar patient monitor may support two Tram-rac housings.
The right most Tram-net connector may be connected to the following:
•
a monitor or
•
a Tram-net hub,
The center Tram-net connector may be connected to the following:
•
a remote control or
•
to another Tram-rac 4A housing with a power supply.
NOTE: The Tram-rac housing furthest from the monitor must have a
power supply.
Shown below are examples of how to connect dual Tram-rac housings to a
Solar 7000 patient monitor.
Revision J
Solar 7000/8000/View Patient Monitor
414993-001
2-23
EQUIPMENT OVERVIEW: Preparation for Use
Shown below are examples of how to connect dual Tram-rac housings to a
Solar 8000 patient monitor.
2-24
Solar 7000/8000/View Patient Monitor
414993-001
Revision J
EQUIPMENT OVERVIEW: Preparation for Use
Tram-net Interface
Adapter
Revision J
Shown below are examples of how to connect a Tram-net interface
adapter to a Solar 7000 or Solar 8000 patient monitor.
Solar 7000/8000/View Patient Monitor
414993-001
2-25
EQUIPMENT OVERVIEW: Preparation for Use
Shown below is the connection from the Octanet to a Solar monitor with
a Tram-net hub connection.
Octanet Connectivity
Device
Solar 7000 Patient Monitor
Solar 8000 Patient Monitor
PATIENT ROOM TRAM-NET
Tram-rac
Housing
Tram-net
Hub
Solar 8000
Patient Monitor
Octanet
Connectivity
Device
Adapter
Peripheral
Bedside
Devices
Ethernet
Communication
Serial
Communication
RS232
For more details about the Octanet Connectivity Device, refer to the
Octanet Connectivity Device Service Manual, pn 418264-003
2-26
Solar 7000/8000/View Patient Monitor
414993-001
Revision J
EQUIPMENT OVERVIEW: Preparation for Use
DDW
The DDW connects between the ASYNC COMM ports of the DDW and
the Solar 7000 or 8000 patient monitor. Due to continuing product
innovation, your DDW may be different from that illustrated below.
PRN 50
The PRN 50 Digital Writer connects between the ASYNC COMM ports of
the PRN 50 Digital Writer and the Solar 7000 or 8000 monitor. Shown
below is the connection of the PRN 50 Digital Writer to Solar 7000 or
8000 monitor.
Solar 7000 Patient Monitor
Solar 8000 Patient Monitor
Revision J
Solar 7000/8000/View Patient Monitor
414993-001
2-27
EQUIPMENT OVERVIEW: Preparation for Use
The PRN 50 Digital Writer connects between AutoPort on the PRN 50
Digital Writer and the TRAM-NET ports of the Solar 7000 or 8000
monitor when using the Octanet. Shown below is the connection of the
PRN 50 Digital Writer to Solar 7000 or 8000 monitor with a Tram-net
hub and Octanet connection.
Solar 7000 Patient Monitor
Solar 8000 Patient Monitor
2-28
Solar 7000/8000/View Patient Monitor
414993-001
Revision J
EQUIPMENT OVERVIEW: Preparation for Use
Remote Control
Revision J
Shown below are examples of how to connect a remote control to a Solar
7000 or 8000 patient monitor with and without a Tram-net hub.
Solar 7000/8000/View Patient Monitor
414993-001
2-29
EQUIPMENT OVERVIEW: Preparation for Use
Trend Memory Storage
System
Shown below are examples of how to connect a Trend Memory Storage
System (TMSS) to a Solar 7000 or Solar 8000 patient monitor.
CAUTION
Always turn the monitor’s main power off before
connecting or disconnecting the TMSS. Refer to the
Model 7024 Product Manual, pn 13703AA-000, for
installation instructions.
2-30
Solar 7000/8000/View Patient Monitor
414993-001
Revision J
EQUIPMENT OVERVIEW: Preparation for Use
Local/Remote Displays
The Solar 7000 has its own internal local display, but a Solar 8000
system requires a medical-grade display that meets UL and IEC
specifications. If a non-medical computer-grade display is used, an
isolation transformer (or floating power supply) is required regardless if
the computer-grade display meets the leakage current specifications on
its own.
The party assembling or modifying the medical electrical system is
responsible to insure compliance with IEC 601-1-1. Therefore, if GE
Medical Systems Information Technologies installs a Solar 8000 system
with a computer-grade display, GE Medical Systems Information
Technologies is responsible for meeting the specification. As a result GE
Medical Systems Information Technologies will only:
• Install medical-grade displays that it recommends, or
• Install computer-grade displays with appropriate isolation
transformers (power conditioners).
NOTE
In an OR or other locations already having an isolated
power system, the use of an isolating transformer (power
conditioner) is redundant, and therefore may not be
necessary for patient isolation.
Revision J
Solar 7000/8000/View Patient Monitor
414993-001
2-31
EQUIPMENT OVERVIEW: Preparation for Use
FPD (Flat Panel Display) Interconnection
To connect a FPD, a medical-grade power supply is required. Connect the
FPD to the VID 15-pin connector on the Solar 8000 processing unit.
Connect the power supply to the power jack of the FPD as shown below.
Connect both power cords from both units to the AC outlet.
2-32
Solar 7000/8000/View Patient Monitor
414993-001
Revision J
EQUIPMENT OVERVIEW: Preparation for Use
Remote Display Interconnection
Shown below are examples of how to connect a remote display to a Solar
7000 patient monitor.
• Display with D style Connector •
• Display with BNC Connectors •
Revision J
Solar 7000/8000/View Patient Monitor
414993-001
2-33
EQUIPMENT OVERVIEW: Preparation for Use
Solar 8000 Local and Remote Display Interconnection
Shown below are examples of how to connect a local display to a Solar
8000 patient monitor or SolarView remote display controller.
• Display with D style Connector •
• Display with BNC Connectors •
2-34
Solar 7000/8000/View Patient Monitor
414993-001
Revision J
EQUIPMENT OVERVIEW: Preparation for Use
Cabling Schemes
Select one of the interconnection schemes described after following the
steps below.
1. Determine which display you have in the left column.
2. Match your display’s connector with the installation required.
3. Determine the distance from the remote display to the monitor.
4. Select the appropriate type of installation.
Direct or Wallplate Connection
Use the following interconnection scheme for a remote display requiring
an interface cable to the patient monitor shorter than 155 feet.
Revision J
Solar 7000/8000/View Patient Monitor
414993-001
2-35
EQUIPMENT OVERVIEW: Preparation for Use
Multiple Displays
Use the following interconnection scheme for a remote display requiring
an interface cable to the patient monitor shorter than155 feet.
2-36
Solar 7000/8000/View Patient Monitor
414993-001
Revision J
EQUIPMENT OVERVIEW: Preparation for Use
Cabling Over 155 Feet
Use the following interconnection scheme for a remote display requiring
an interface cable to the patient monitor longer than 155 feet.
Revision J
Solar 7000/8000/View Patient Monitor
414993-001
2-37
EQUIPMENT OVERVIEW: Power Up
Power Up
For all Solar
Monitors
After all connections are made, use the following power up sequence.
1. Turn the rear switch of the Solar 7000 monitor or Solar 8000
processing unit or SolarView remote display controller to ON (1). The
power LED on front of the unit should be illuminated.
2. If the display does not illuminate, press the DISPLAY ON/OFF
button ON.
NOTE: The DISPLAY ON/OFF button is not a power switch, but it is
used as a screen saver switch.
3. The following sequence of events should follow.
For Monochrome
Solar 8000
◆
The display will blank while it is booting up.
◆
The MAIN menu should appear on the display.
◆
If the display remains completely blank or resets
intermittently, there is a serious hardware failure. Refer to
“Troubleshooting Procedure” in Chapter 4: “Troubleshooting.”
After any cold start, the display will default to color video. For a
monochrome display, access the video option by executing the following
menu sequence starting from the MAIN menu:
MONITOR SETUP
SERVICE MODE
Password
Enter day and month from monitor screen with leading zeros.
(July 4 = 0407)
HARDWARE TEST
REMOTE VIDEO
Select MONOCHROME for a monochrome display.
CAUTION
If the Solar 8000 processing unit or SolarView remote
display controller is cold started, the video selection
defaults to color. Red and blue hues will not be
distinguishable on a monochrome display. Reselect
monochrome in the SERVICE MODE menu.
Configuration
2-38
The monitor will need to be configured at this time. Refer to “Configuring
a Monitor” in Chapter 6: “Configuration.”
Solar 7000/8000/View Patient Monitor
414993-001
Revision J
EQUIPMENT OVERVIEW: More About Tram-net Communication
More About Tram-net Communication
The Solar patient monitor uses two distinct local area networks:
•
Tram-net communication, and
•
Ethernet communication.
To avoid confusion, consider Tram-net as a small area network (SAN)
contained in one room or at the patient bedside. Consider Ethernet as the
local area network (LAN) for room to room communication or
communication between patient monitors, central stations, and other GE
Medical Systems Information Technologies equipment throughout the
hospital.
This local area network links all patient monitors, central stations, and
other GE Medical Systems Information Technologies equipment
throughout the hospital.
The 25-pin connector makes a Tram-net small area network available for
the peripheral devices. The Tram-net controller resides on the same bus
as the main processor which provides efficient data transfer by sharing
main memory.
Internal Hub
Tram-net is a small network that offers ample flexibility, a high rate of
communication, and relatively inexpensive cabling. Data is transmitted
at the rate of 921.6K bits per second. It uses a star topology, sometimes
referred to as a rooted tree topology. This means that the wiring of the
network can be pictured as a star or a series of stars. The center of each
star is called a hub, and the points of the star are called nodes. There are
cables between the nodes and the hubs, but no cables exist between
nodes.
NOTE: Do not confuse the internal hub or node with the Tram-net hub
assembly discussed earlier as a system component. The hub
described in these paragraphs refers to the electronic
distribution point of data.
Revision J
Solar 7000/8000/View Patient Monitor
414993-001
2-39
EQUIPMENT OVERVIEW: More About Tram-net Communication
Data is acquired at a node, and is transmitted through a hub to all the
other nodes. Each node has an address so data will be received by the
node with the correct destination address. It is impossible for a node to
communicate with another node without the data going through a hub
somewhere along its journey. The hub controls all of the data ‘traffic’ in
the system.
In a Tram-net system, the head hub is contained in the patient monitor,
but there will be intermediate hubs in the Tram-rac housing and Tram
module as well.
Tram-net Hub
Assembly
If more than one peripheral is connected to Tram-net, a Tram-net hub
assembly is required. The Tram-net hub assembly simply adds
connectors as more nodes to the patient monitor’s internal hub. The
nodes of the star in the Tram-net system can be patient monitor
peripherals like the remote control, or Tram-rac housing.
The Tram-net hub assembly extends the communication data and power
between the monitor and its peripherals. If the peripheral draws more
than 3.0 amperes of current, the maximum cable length will be 6.0
meters (20 feet). If the current draw of the peripheral is less, the cable
can be longer. The maximum serial cable length may be up to 61 meters
(200 feet) on peripherals with no power consumption.
2-40
Solar 7000/8000/View Patient Monitor
414993-001
Revision J
EQUIPMENT OVERVIEW: More About Ethernet Communication
More About Ethernet Communication
Ethernet is a local area network used as the main link of the Unity
network, a comprehensive information communication system. The
Unity network offers the high rate of communication of 10 megabits per
second. The 15-pin Ethernet connector connects to an Ethernet
transceiver directly or via a transceiver cable. This local area network
links all patient monitors, central stations, and other GE Medical
Systems Information Technologies equipment throughout the hospital.
Depending upon the construction of the hospital, thick-net, thin-net, or
twisted pair cabling is used.
Twisted Pair
Revision J
Twisted pair is the most popular cabling because it is easy to install and
flexible to work with. It uses the star topology with a concentrator as the
hub of the segment. Each of the network devices is connected directly to
the concentrator so longer lengths of cable are required. A maximum of
100 meters or 328 feet is the longest length of twisted pair cable used.
The number of devices is limited to the amount of connectors at the
concentrator. More details regarding twisted pair cable is described later
in this chapter.
Solar 7000/8000/View Patient Monitor
414993-001
2-41
EQUIPMENT OVERVIEW: More About Ethernet Communication
Concentrator
The concentrator is simply a transceiver that passes all network data
between any two branches in the LAN. Note that the concentrator passes
all network data between the two branches, regardless of whether or not
one node is sending data to another node on the same branch.
Thin-net /Thick-net
Thick-net and thin-net is not the most recommended type of network, but
are used in special situations. Both thick-net and thin-net use a bus
topology and connect any number of devices. Each device is tapped into a
straight data bus or trunk. A thick-net or thin-net cable is used for the
main trunk to provide fast data transmission, but is difficult to install
and harder to work with.
Node
Each network device or node is assigned an address number and requires
a transceiver to interface between the network device and the network.
For thick-net and thin-net cabling a transceiver and a serial drop cable
connects to the main trunk. The serial drop cable is sometimes referred
to as an AUI (attachment unit interface) transceiver cable. For twisted
pair cabling, the transceiver to connected directly to the network device.
Segment and Branch
Some Ethernet systems are comprised of smaller, stand-alone Ethernet
systems (called branches or segments) that are connected by bridges,
concentrators, or repeaters. Many nodes on the Ethernet network may be
serviced by one segment or branch. Each segment may support many
patient monitors, central stations, and auxiliary devices.
For example, one segment may connect all the patient monitors and
central stations in the ICU (Intensive Care Unit) and another may
connect the monitoring system in the CCU (Critical Care Unit). Each
segment could be a fully-functioning stand-alone system if they were not
connected to each other. However, with a bridge or repeater to connect
the ICU (one segment) with the CCU (the other segment), information
can pass between any of the nodes (patient monitors and central
stations) on either branch similar to a patient transfer from one unit to
another.
2-42
Solar 7000/8000/View Patient Monitor
414993-001
Revision J
EQUIPMENT OVERVIEW: More About Ethernet Communication
Repeater
A repeater is used to extend the length of cabling when the distance
required exceeds the length of the cable specifications. It is simply a
transceiver that passes all network data between any two segments.
Note that the repeater passes all network data between the two
segments, regardless of whether or not the one node is sending data to
another node on the same segment.
Bridge
A bridge is more selective than a repeater with the data that it passes
between segments. It also acts as a transceiver between two segments,
but it only passes signals if a node on one of the segments is attempting
to communicate with a node on the other segment. Since the majority of
communication on the network occurs within a single segment, the
bridge does not pass all of the data from one segment to the other. This
lowers the amount of data traffic passing between segments, and makes
the network more efficient than a system that is connected with
repeaters. Shown below is an example of two segments of thin-net
cabling connected by a bridge.
Revision J
Solar 7000/8000/View Patient Monitor
414993-001
2-43
EQUIPMENT OVERVIEW: More About Ethernet Communication
For your notes
2-44
Solar 7000/8000/View Patient Monitor
414993-001
Revision J
3
Revision J
MAINTENANCE
Solar 7000/8000/View Patient Monitor
414993-001
3-1
MAINTENANCE:
For your notes
3-2
Solar 7000/8000/View Patient Monitor
414993-001
Revision J
MAINTENANCE: Maintenance Schedule
Maintenance Schedule
Manufacturer
Recommendations
Manufacturer
Responsibility
To make sure the Solar monitor remains in proper operational and
functional order, a good maintenance schedule must be adhered to. The
manufacturer recommends the following:
•
Visual Inspection: This should be performed by service personnel
upon receipt of the equipment, every 12 months thereafter, and prior
to servicing the unit.
•
Cleaning: This should be performed by service personnel upon
receipt of the equipment, every 12 months thereafter, and each time
the unit is serviced.
•
Electrical Safety Tests: These should be performed by service
personnel upon receipt of the equipment, every 12 months thereafter,
and each time the unit is serviced.
•
Checkout Procedure: This should be performed by qualified
service personnel upon receipt of the equipment, every 12 months
thereafter, and each time the unit is serviced.
WARNING
Failure on the part of all responsible individuals,
hospitals or institutions, employing the use of this device,
to implement the recommended maintenance schedule
may cause equipment failure and possible health
hazards. The manufacturer does not, in any manner,
assume the responsibility for performing the
recommended maintenance schedule, unless an
Equipment Maintenance Agreement exists. The sole
responsibility rests with the individuals, hospitals, or
institutions utilizing the device.
Revision J
Solar 7000/8000/View Patient Monitor
414993-001
3-3
MAINTENANCE: Visual Inspection
Visual Inspection
The Solar monitor and it’s components should be carefully inspected
prior to installation, once every 12 months thereafter and each time the
equipment is serviced.
3-4
•
Carefully inspect the equipment for physical damage to the case, the
display screen, the controls and the keyboard. Do not use the monitor
if damage is determined. Refer damaged equipment to qualified
service personnel.
•
Inspect all external connections for loose connectors or frayed cables.
Have any damaged connectors or cables replaced by qualified service
personnel.
•
Inspect the CRT face for marks, scratches, or other damage. Physical
damage to the crt face may pose an implosion hazard. Have the crt
replaced by qualified service personnel if necessary.
Solar 7000/8000/View Patient Monitor
414993-001
Revision J
MAINTENANCE: Cleaning
Cleaning
Cleaning
Precautions
Use one of the following approved solutions:
•
Cidex solution, or
•
Sodium hypochlorite bleach (diluted), or
•
Mild soap (diluted)
•
Lint-free cloth
•
Dust Remover (compressed air)
To avoid damage to the equipment surfaces, never use the following
cleaning agents:
Revision J
•
organic solvents,
•
ammonia based solutions,
•
acetone solution,
•
alcohol based cleaning agents,
•
Betadine solution,
•
a wax containing a cleaning substance, or
•
abrasive cleaning agents.
Solar 7000/8000/View Patient Monitor
414993-001
3-5
MAINTENANCE: Cleaning
Exterior Cleaning
Cleaning the Display
Clean the exterior surfaces with a clean, lint-free cloth and one of the
cleaning solutions listed in the table above.
•
Wring the excess solution from the cloth. Do not drip any liquid into
open vents, switches, plugs, or connectors.
•
Dry the surfaces with a clean cloth or paper towel.
To clean the display, follow the recommendations of the display’s
manufacturer. In general you will need to use a soft, clean, lint-free cloth
dampened with a glass cleaner.
CAUTION
To avoid getting liquid into connector openings, do not
spray glass cleaning or general cleaning solutions
directly onto the product’s surface.
Cleaning the Touch
Screen Display
1. Turn OFF the mains power switch on the monitor and disconnect it
from the power source.
2. Clean the screen with an AMMONIA FREE glass cleaner and lint
free cloth.
CAUTION
Do not spray any glass cleaning solution or any general
cleaning solutions directly onto the monitor’s display
surface. Always dampen the towel and then clean the
screen.
3-6
Solar 7000/8000/View Patient Monitor
414993-001
Revision J
MAINTENANCE: Cleaning
Cleaning Inside the
Solar 7000 Color
Monitor
The Solar 7000 color monitor uses a forced-air cooling system that draws
appreciable quantities of air through the unit. As a result there can be a
buildup of lint and other debris inside the unit. Accumulations of lint and
debris can lead to thermal failures or short-circuit failures if not removed
regularly.
It is recommended that the inside of all Solar monitors should be cleaned
every 12 months.
To clean the inside of the monitor, follow this procedure:
1. Power down the monitor. Disconnect the monitor from the power
source and the network.
2. Remove the screws attaching the housing to the chassis at the rear of
the unit.
3. Pull the chassis out of the housing.
4. Using a source of clean, dry compressed air blow all lint and debris
from between the circuit boards and the other assemblies.
CAUTION
Do not use a vacuum device unless suitable static-control
procedures are followed. Many vacuum systems generate
appreciable static electricity which could damage
semiconductor circuits in the monitor.
5. Make sure all circuit boards are seated firmly. Make sure all cables
are connected.
6. Install the chassis back into the housing and attach with screws.
7. Perform leakage tests.
8. Connect the monitor to the network and to the power source.
9. Apply power to the monitor and verify operation.
Revision J
Solar 7000/8000/View Patient Monitor
414993-001
3-7
MAINTENANCE: Electrical Safety Tests
Electrical Safety Tests
General
Electrical safety tests provide a method of determining if potential
electrical health hazards to the patient or operator of the device exist.
Recommendations
GE Medical Systems Information Technologies recommends that you
perform all safety tests presented in this chapter.
•
upon receipt of the device (monitor and its associated equipment),
•
every twelve months thereafter,
•
each time the main enclosure is disassembled or a circuit board is
removed, tested, repaired, or replaced, and
•
record the date and results on the “Maintenance/Repair Log”
included at the end of this chapter.
These instructions are intended for every component in the system. If the
Tram-rac housing does not have its own power supply, it should remain
connected to the monitor throughout the safety tests.
WARNING
Failure to implement a satisfactory maintenance
schedule may cause undue equipment failure and
possible health hazards. Unless you have an Equipment
Maintenance Contract, GE Medical Systems Information
Technologies does not in any manner assume the
responsibility for performing the recommended
maintenance procedures. The sole responsibility rests
with the individual or institution using the equipment.
GE Medical Systems Information Technologies service
personnel may, at their discretion, follow the procedures
provided in this manual as a guide during visits to the
equipment site.
Test Conditions
Electrical safety tests may be performed under normal ambient
conditions of temperature, humidity, and pressure.
Test Equipment
The recommended test equipment required to perform electrical safety
tests is listed below.
Item
3-8
Specification
Leakage Current Tester
Equivalent to the circuits shown
Digital Multimeter (DMM)
AC volts, ohms
Ground Bond Tester
0 – 1 ohm
ECG Test Body
All leads together
Solar 7000/8000/View Patient Monitor
414993-001
Revision J
MAINTENANCE: Electrical Safety Tests
Power Outlet Test
Before starting the tests, the power outlet from which the monitoring
device will get electrical power must be checked. This test checks the
condition of the power outlet to ensure correct results from leakage tests.
For international power outlets, refer to the internal standards agencies
of that particular country. Use a digital multimeter to ensure the power
outlet is wired properly.
If other than normal polarity and ground is indicated, corrective action
must be taken before proceeding. The results of the following tests will be
meaningless unless a properly wired power outlet is used.
Ground (Earth)
Integrity
Listed below are two methods for checking the ground (earth) integrity,
“Ground Continuity Test” and “Impedance of Protective Earth
Connection.” These tests determine whether the device's exposed metal
and power inlet's earth (ground) connection has a power ground fault
condition.
Ground
Pin
Perform the test method below that is required by your Country/Local
governing safety organization.
Ground Continuity Test
Completion of this test is checked by the following steps:
1. Disconnect the device under test from the power outlet.
2. Connect the negative (-) lead of the DMM to the protective earth
terminal (ground pin in power inlet connector) or the protective earth
pin in the Mains plug (ground pin in power cord). Refer to the US
120Vac power cord figure above.
3. Set the DMM to the milliohm (mΩ) range.
4. Connect the positive (+) lead of the DMM to all exposed metal
surfaces on the device under test. If the metal surfaces are anodized
or painted, scrape off a small area in a inconspicuous place for the
probe to make contact with the metal.
5. Resistance must read:
Revision J
•
0.1 ohm or less without power cord
•
0.2 ohms or less with power cord
Solar 7000/8000/View Patient Monitor
414993-001
3-9
MAINTENANCE: Electrical Safety Tests
Impedance of Protective
Earth Connection
This test unlike a ground continuity test will also stress the ground
system by using special ground bond testers.
This test normally is only required as a manufacturing production test to
receive safety agency compliance (i.e. IEC601-1).
Some country agency’s do require this test after field equipment repairs
(i.e. Germany’s DIN VDE 0751 standards).
Consult your country/local safety agency if in question.
Compliance is checked by the following steps:
1. A current not less than 10A and not exceeding 25A from a current
source with a frequency of 50 or 60 Hz with a no-load voltage not
exceeding 6 V is passed for at least 5 s through the protective earth
terminal or the protective earth pin in the mains plug and each
accessible metal part which could become live in case of failure in
basic insulation.
2. The voltage drop between the parts described is measured and the
impedance determined from the current and voltage drop. It shall not
exceed the values indicated.
For equipment without a power supply cord the impedance between the
protective earth terminal and any accessible metal part which is
protectively earthed shall not exceed 0.1 ohms
For equipment with a power supply cord the impedance between the
protective earth pin in the mains plug and any accessible metal part
which is protectively earthed shall not exceed 0.2 ohms.
When taking this measurement, move the unit’s power cord around.
There should be no fluctuations in resistance.
Perform this test to measure current leakage through the ground (earth)
wire of the equipment during normal operation.
1. Configure the leakage tester like the circuit shown below.
Leakage Tester
Power Cord
Ground (Earth) Wire
Leakage Current
Tests
HIGH
NORM
Power Cord
LOW
GND
GND
RVS
Device
Under
Test
0.15µF
DMM
1K
10
DMM set to measure AC voltage
2. Connect the power cord of the device under test to the power
receptacle on the leakage tester.
3-10
Solar 7000/8000/View Patient Monitor
414993-001
Revision J
MAINTENANCE: Electrical Safety Tests
NOTE
The device under test is to be tested at its normal
operating voltage.
3. Set the power switch of the device under test to ON.
4. Read the current leakage indicated on DMM.
5. Set the polarity switch on the leakage tester to RVS (reverse).
6. Read the current leakage indicated on DMM.
NOTE
If either reading is greater than the appropriate
specification below, the device under test fails. Contact
GE Medical Systems Information Technologies Technical
Support.
•
300 microamperes (0.3 volts on the DMM), and the device under
test is powered from 100-120 V/50-60 Hz
•
300 µA (0.3 volts on the DMM), and the device under test is
powered from a centered-tapped 200-240 V/50-60 Hz, single
phase circuit
•
500 µA (0.5 volts on the DMM), and the device under test is
powered from a non-center-tapped, 200-240 V/50-60 Hz, singlephase circuit
NOTE
Center-tapped and non-center-tapped supply circuits
produce different leakage currents and the UL and IEC
limits are different.
7. Set the power switch of the device under test to OFF.
NOTES
The DMM plus leakage tester network shown is the
circuitry defined by the UL 544 standard for measuring
leakage current.
The measuring devices, defined by various standard
organizations (IEC, UL, etc.), produce almost identical
test measurement results.
Revision J
Solar 7000/8000/View Patient Monitor
414993-001
3-11
MAINTENANCE: Electrical Safety Tests
Enclosure Leakage
Current Test
Perform this test to measure current leakage through exposed conductive
surfaces on the device under test during normal operation.
1. Configure the leakage tester like the circuit shown below with GND
switch OPEN and polarity switch NORM.
Power Cord
Leakage Tester
HIGH
NORM
Power Cord
LOW
GND
RVS
Open
Closed
GND
Device
Under
Test
0.15µF
DMM
1K
10
Probe to exposed conductive chassis
DMM set to measure AC voltage
2. Connect probe to an unpainted, non-anodized chassis ground on the
unit under test.
3. Set the power switch of the device to ON.
4. Read the current leakage indicated on DMM.
NOTE
Center-tapped and non-center-tapped supply circuits
produce different leakage currents and the UL and IEC
limits are different.
5. Set the polarity switch to RVS.
6. Read the current leakage indicated on DMM.
NOTE
If either reading is greater than the appropriate
specification below, the device under test fails. Contact
GE Medical Systems Information Technologies Technical
Support.
3-12
•
300 microamperes (0.3 volts on the DMM), and the device under
test is powered from 100-120 V/50-60 Hz
•
300 µA (0.3 volts on the DMM), and the device under test is
powered from a centered-tapped 200-240 V/50-60 Hz, single
phase circuit
•
500 µA (0.5 volts on the DMM), and the device under test is
powered from a non-center-tapped, 200-240 V/50-60 Hz, singlephase circuit
Solar 7000/8000/View Patient Monitor
414993-001
Revision J
MAINTENANCE: Electrical Safety Tests
7. Set the GND switch on the leakage tester to CLOSED.
8. Read the current leakage indicated on DMM.
9. Set the polarity switch to RVS.
10. Read the current leakage indicated on DMM.
NOTE
If the reading is greater than the specification below, and
the device under test is powered from 100-240 V/50-60
Hz, the device under test fails. Contact GE Medical
Systems Information Technologies Technical Support.
•
100 microamperes (0.1 volts on the DMM), and the device under
test is powered from 100-240 V/50-60 Hz
11. Set the power switch of the device under test to OFF.
Patient (Source)
Leakage Current Test
This procedure only applies to Class I (grounded/earthed) equipment,
and measures the leakage current from the ECG/RESP connector of the
device to ground.
1. Configure the leakage tester like the circuit shown below with GND
switch OPEN and polarity switch NORM.
Power Cord
Leakage Tester
HIGH
NORM
Power Cord
LOW
GND
RVS
Closed
Device
Under
Test
GND
ECG Test Body
0.15µF
DMM
1K
10
DMM set to measure AC voltage
2. Connect an ECG test body to the ECG/RESP connector of the device
under test.
3. Set the power switch of the device to ON.
4. Read the leakage current indicated on the DMM.
5. Change the leakage tester polarity switch to the RVS position.
6. Read the leakage current indicated on the DMM.
Revision J
Solar 7000/8000/View Patient Monitor
414993-001
3-13
MAINTENANCE: Electrical Safety Tests
NOTE
If either reading is greater than 50 µA (0.05 volts on the
DMM), the device fails this test. Contact GE Medical
Systems Information Technologies Technical Support.
7. Change the GND switch to the Closed position.
8. Read the leakage current indicated on the DMM.
9. Change the leakage current switch to the RVS position.
10. Read the leakage current indicated on the DMM.
NOTE
If either reading is greater than 10 µA (0.01 volts on the
DMM), the device fails this test. Contact GE Medical
Systems Information Technologies Technical Support.
11. Set the power switch of the device to OFF.
NOTE
The AAMI and IEC single fault condition (ground open)
is 50 µA, whereas the normal condition (ground closed) is
less.
Patient (Sink)
Leakage Current Test
This procedure only applies to Class I (grounded/earthed) equipment,
and measures the leakage current from a mains voltage source into the
ECG/RESP connector.
(Mains Voltage on the
Applied Part)
1. Configure the leakage tester like the circuit shown below with GND
switch CLOSED and polarity switch NORM.
Power Cord
Leakage Tester
HIGH
NORM
Power Cord
LOW
GND
RVS
120K
Closed
GND
0.15µF
DMM
ECG Test Body
or ECG Cable
Device
Under
Test
1K
10
(Keep cable length as
short as possible.)
DMM set to measure AC voltage
3-14
Solar 7000/8000/View Patient Monitor
414993-001
Revision J
MAINTENANCE: Electrical Safety Tests
WARNING
Shock hazard. The following step causes high voltage at
the test body. Do not touch the test body.
2. Set power switch on the device to ON.
3. Read leakage current indicated on DMM.
4. Change the leakage tester polarity switch to the RVS position.
5. Read the leakage current indicated on the DMM.
NOTE
If either reading is greater than the appropriate
specification below, the device under test fails. Contact
GE Medical Systems Information Technologies Technical
Support.
•
10 µA (0.01 volts on the DMM) at 120 VAC using the test body.
•
20 µA (0.02 volts on the DMM) at 240 VAC using the test body.
•
50 µA (0.05 volts on the DMM) at 120-240 VAC using the ECG
cable.
NOTE
The 10 and 20 µA limits are based on internal design
standards. The 50 µA limit is common to all standards.
AAMI ES-1 standard requires using the patient cable.
6. Set the power switch on the device to OFF.
Test Completion
1. Disconnect the leakage tester from the power outlet.
2. Disconnect all test equipment from the device.
3. Disconnect the device power cord from the leakage tester.
Revision J
Solar 7000/8000/View Patient Monitor
414993-001
3-15
MAINTENANCE: Checkout Procedure
Checkout Procedure
General
This procedure tests the functions of the monitor, Tram-rac housing and
associated communication networks. Use the Service PM Form provided
at the end of this chapter with this procedure. For the Tram module and
input modules checkout procedures, refer to their appropriate service
manuals.
Required Tools/Special
Equipment
See the chart below for the equipment necessary to perform this checkout
procedure. Equivalent equipment may be substituted.
Required Tools/Special Equipment
Item
Procedure
Manufacturer and
Part Number/Model
Tram 100-850 module
MMS any
BP module
MMS any
Multifunctional Micro-simulator
MARQ-1
Oscilloscope
Tektronix 2215
Complete the following steps in the order presented. Failure to attain
any of the listed results indicates a malfunction.
1. Confirm that all components of the monitoring system are correctly
connected as described in Chapter 1: “Preparation for Use” of this
manual.
2. Place the Tram module into the top two slots of the Tram-rac
housing. Verify that the power indicator illuminates.
3. Configure the monitor display with as many waveforms as possible.
Refer to the appropriate monitor operator's manual, if necessary.
4. The waveforms should look clean (no noise).
General Monitor Check
Do the following to check the monitor.
1. For Solar 7000 color monitors only, inspect the cooling fan.
2. Verify the internal speaker is working by forcing an alarm.
3. Check all functions of the Trim Knob control by turning and pushing.
Verify a response at the monitor display.
3-16
Solar 7000/8000/View Patient Monitor
414993-001
Revision J
MAINTENANCE: Checkout Procedure
4. Check all functions of the four control keys as follows.
If NBP is available, the NBP key will start the non-invasive blood
pressure pump. The pump may be stopped by selecting the key again
if no hose is connected. If NBP is not available, a message will be
displayed to state that no NBP is available.
ZERO ALL key will give a message that a BP parameter is needed.
SILENCE ALARM can be checked by disconnecting the patient cable
from the Tram module. Select the key again to silence the alarm.
GRAPH GO/STOP will start the graph or display a NO GRAPH
message.
Solar 7000 Display Check
1. For color Solar 7000 display only, degauss the monitor by executing
the following menu selections from the MAIN MENU.
MONITOR SETUP
SERVICE MODE
Password
Enter day and month from monitor screen with leading zeros.
(July 4 = 0407)
DEGAUSS
Degauss the color display periodically and whenever the red color
becomes impure (not true red). Note that the display is automatically
degaussed every time the unit is turned ON. Once the display is
manually degaussed, it cannot be degaussed again for at least 10
minutes.
2. Display FOCUS TEST PATTERN on the display by executing the
following menu selections from the MAIN MENU.
MONITOR SETUP
SERVICE MODE
Password
Enter day and month from monitor screen with leading zeros.
(July 4 = 0407)
HARDWARE TESTS
VIDEO TEST
YES
FOCUS TEST PATTERN
If the Solar 7000 display does not have clarity of line definition,
perform “Display Calibration” in Chapter 5: “Calibration.”
Press Trim Knob control to exit.
Revision J
Solar 7000/8000/View Patient Monitor
414993-001
3-17
MAINTENANCE: Checkout Procedure
3. Select CROSS HATCH test pattern and check for display linearity.
If the Solar 7000 display is not linear, perform “Display Calibration”
in Chapter 5: “Calibration.”
4. Press Trim Knob control to exit.
Select VERTICAL GRAY BARS in the service menu. All gray scales
should be visible. The brightest bar should be white and not blurry.
If the Solar 7000 display fails this step, perform “Display
Calibration” in Chapter 5: “Calibration.”
5. Press Trim Knob control to exit. Select RESTART to exit menu.
For Solar 7000 color monitors only, observe the white color quality of
the display windows in the MAIN MENU. To remove any hue of color,
perform “Display Calibration” in Chapter 5: “Calibration.”
Solar 8000/View Display
Check
For the Solar 8000 or SolarView display, refer to the specific
manufacturer’s documentation.
Tram-rac Housing Check
Do the following to check the Tram-rac housing.
1. Verify power LED is ON at the Tram-rac housing.
2. Disconnect and reconnect the Tram-rac housing communication
cable. Verify the recovery of the waveforms.
3. If the Tram-rac housing has additional slots for input modules, insert
a BP module. Connect simulator and verify communication to the
monitor. Repeat for each slot.
4. If the Tram-rac housing has an optional power supply, check the
following on the connector that applies to your equipment.
◆
Verify +16.5V is not present at pin 5 of the TRAM-NET
connector with respect to pin 9.
◆
Verify +16.5V is not present at pin 5 with respect to chassis
ground of the Tram-rac housing.
5. The following step does not apply for a Tram-rac 2 housing. Check
the analog output connector (yellow) using an oscilloscope. Observe a
signal at the appropriate pins found in the next table. The output
signal is dependent upon which Tram and input module functions are
activated at the monitor. Tram-rac 3 & 4 housings use the front
round connector.
3-18
Solar 7000/8000/View Patient Monitor
414993-001
Revision J
MAINTENANCE: Checkout Procedure
Analog Output Signals
Pins for
Tram-rac 4A
D-Type
Connector
Pins for
Round
Connector
Pin 1
Pin 8
Signal GND for Tram Waveforms
–
Pin 2
Pin 2
Trace I (ECG II2)
Tram1
Pin3
Pin 6
Tram BP3 or SPO2 Value
Tram1
Pin 4
–
Reserved for Future Use
–
Pin 5
Pin 4
Tram ART 1 or BP1
Tram
Pin 6
Pin 9
Slot 3 Series 7000 Waveform A (Left Side or Module)
Parameter 6
Pin 7
Pin 11
Slot 4 Series 7000 Waveform A (Left Side or Module)
Parameter 8
Pin 8
Pin 8
Signal GND for Series 7000 Waveforms
–
Pin 9
Pin 1
Tram ECG II
Tram1
Pin 10
Pin 3
Tram ECG V
Tram1
Pin 11
Pin 7
Tram BP4 or RESP
Tram1
Pin 12
–
Reserved for Future Use
–
Pin 13
Pin 5
Tram BP2 or SPO2 Waveform
Tram
Pin 14
Pin 10
Slot 3 Series 7000 Waveform B (Right Side or Module)
Parameter 5
Pin 15
–
Slot 4 Series 7000 Waveform B (Right Side or Module)
Parameter 7
Revision J
Bezel Number
for BP Output
Signal Source
1
NOTE:
The top displayed trace on the monitor is present unless AVR,
AVL, or AVF leads are used, then lead II is output.
NOTE:
2
The top displayed trace on the monitor is present unless AVR,
AVL, or AVF leads are used, then lead II is output.
Solar 7000/8000/View Patient Monitor
414993-001
3-19
MAINTENANCE: Checkout Procedure
Tram-net Communication
Check
Do the following to check the Tram-net communication network.
1. If a Tram-net hub is used, plug the Tram-rac housing cables into each
of the four Tram-net connectors (blue). Verify that the waveforms
recover on the monitor display each time the cable is reconnected.
2. If a Tram-rac 2 housing with an ASYNC COMM connector (red) at
the rear of the unit is used, the functional test of Tram-net must be
performed using another Tram-net peripheral device (i.e. remote
control).
LAN Network Check
Do the following to check the monitoring network, if used.
1. Disconnect the patient cable from the Tram module and verify
alarms at the central station.
2. Select GRAPH GO/STOP and verify graphing at the Centralscope
central station.
Remote Control Check
Do the following to check the remote control.
1. Plug the remote control into a Tram-net connector (blue). Check all
functions of the Trim Knob control and 12 hard keys. Verify a
response at the monitor display.
2. Plug the remote control into the auxiliary async connector (red) at
the rear of the monitor. Check all functions of the Trim Knob control
and 12 hard keys. Verify a response at the monitor display.
Video/Alarm Check
If the monitor has a remote video/remote alarm, do the following to check
it.
1. If a remote display is used, check the connection from the monitor.
The remote display should show all real time waveforms exactly the
same as the display on the monitor.
2. Remote alarm indicators are site dependent. Verify proper operation
by disconnecting the patient cable from the Tram module. The
remote alarm should activate when an alarm is heard from the
monitor.
Tram-net Interface Check
If the monitor uses a Tram-net interface assembly connected to a device,
do the following to check it.
1. Connect the Tram-net interface assembly and device. Use the
appropriate Tram-net interface assembly manual and device manual
for interconnection directions.
2. Observe correct type of device identified at the monitor.
3. Simulate and observe waveform on monitor.
Octanet Check
3-20
For the Octanet checkout procedure see “Octanet Connectivity Device
Service Manual” pn 418264-003
Solar 7000/8000/View Patient Monitor
414993-001
Revision J
MAINTENANCE: Checkout Procedure
Completion
PM Form
This completes the checkout procedure.
•
Disconnect all test equipment.
•
Return the monitor and Tram-rac housing to service.
Due to continuing product innovation and because specifications in this
manual are subject to change without notice, a PM form is no longer
printed with this manual. For the latest PM form regarding this product,
contact GE Clinical Services (refer to “How to Reach Us” at the front of
this manual).
If repairs/adjustments were made or any parts replaced, describe this in
the area provided on the PM form.
Also include comments regarding any unusual environmental conditions
that may affect the operation or reliability of the equipment in the area
provided on the PM form.
On the following pages a repair log is included for your convenience to
record the repair history of this product.
Revision J
Solar 7000/8000/View Patient Monitor
414993-001
3-21
MAINTENANCE: Checkout Procedure
For your notes
3-22
Solar 7000/8000/View Patient Monitor
414993-001
Revision J
MAINTENANCE: Repair Log
Repair Log
Unit Serial Number:
Institution Name:
Date
Revision J
Maintenance/Repair
Solar 7000/8000/View Patient Monitor
414993-001
Technician
3-23
MAINTENANCE: Repair Log
Unit Serial Number:
Institution Name:
Date
3-24
Maintenance/Repair
Solar 7000/8000/View Patient Monitor
414993-001
Technician
Revision J
4
Revision J
TROUBLESHOOTING
Solar 7000/8000/View Patient Monitor
414993-001
4-1
For your notes
4-2
Solar 7000/8000/View Patient Monitor
414993-001
Revision J
TROUBLESHOOTING: Introduction
Introduction
Troubleshooting
Outline
The troubleshooting information presented in this chapter should help
you narrow service problems to one of the replaceable assemblies.
It is recommended to familiarize yourself with the following material in
this chapter before attempting to service the monitor.
1. Read the “Terms Used” to familiarize yourself with the terms used in
this chapter.
2. Read the “Block Theory of Operation.”
3. Study the “Block Diagram of Internal Cabling.”
4. Note the uses of the “Communication Connectors.”
5. Familiarize yourself with the “Service Menus.”
6. Read the “General Fault Isolation” suggestions.
7. Use the “Troubleshooting Procedure” to locate the faulty circuit board
or assembly.
8. Read “Troubleshooting Software Updates” if you are planning to
execute an update.
9. Before taking any invasive action, refer to “Disassembly Guidelines”
in Chapter 7: “Monitor Assembly.”
NOTE
If you replace the main processor PCB, remove the serial
EEPROM U9 and insert it into the replacement main
processor PCB. The serial EEPROM must stay with the
unit.
Revision J
Solar 7000/8000/View Patient Monitor
414993-001
4-3
TROUBLESHOOTING: Introduction
Terms Used
The terms listed below are used in this chapter. Understanding the
function of each term will help you understand the internal workings of
the monitor.
Abort
This is a menu selection that may appear on the monitor during software
downloads from the monitor SERVICE MODE menu. ABORT causes the
download to stop by pushing the Trim Knob control.
Boot Loader
The BOOT LOADER is used to download software as a means to receive
system status messages. Entering the BOOT LOADER does not erase
any memory, but downloading new software will erase protected memory.
To activate the BOOT LOADER, perform the following.
Cold Start
•
Hold down the NBP GO/STOP and ZERO ALL keys on the front
panel. (For the SolarView remote display controller, hold down the
two blank keys.)
•
Press and release the Trim Knob control.
•
Keep holding the NBP GO/STOP and ZERO ALL keys (or two blank
keys for the SolarView remote display controller) until the BOOT
LOADER menu appears on the display.
A COLD START is used only in extreme circumstances, because it erases
the protected memory and automatically discharges the patient.
•
Hold down the NBP GO/STOP and ZERO ALL keys on the front
panel. (For the SolarView remote display controller, hold down the
two blank keys.)
•
Press the Trim Knob control.
•
Simultaneously release the Trim Knob control, NBP GO/STOP and
ZERO ALL keys.
•
Quickly hold down the DISPLAY ON/OFF key until the MAIN menu
appears on the display.
You can verify if a coldstart was initiated in the Run Time Error Log
information window, Error Code:
At the monitor, execute the following menu sequence, starting from the
MAIN menu:
MONITOR SETUP
SERVICE MODE
Password
Enter day and month from monitor screen with leading zeros.
(July 4 = 0407)
REVIEW ERRORS
Select the VIEW SCOPE ERRORS option to open the Run Time Error
Log information window.
4-4
Solar 7000/8000/View Patient Monitor
414993-001
Revision J
TROUBLESHOOTING: Introduction
Configured Memory
Configured memory contains the Ethernet address, internet address, bed
name, care unit name, and standard unit defaults for each monitor.
Continue
CONTINUE is a menu selection on the monitor that appears after a
successful software download. It allows the user to continue downloading
other files without resetting the monitor.
Display On/Off
This front panel switch on the monitor only turns the display ON and
OFF. It has no effect on the software update, but it is used as a screen
saver.
Protected Memory
Protected memory contains a patient’s history and any individualized
changes to the unit defaults.
Power Cycle
To POWER CYCLE or reboot the monitor, turn the power OFF at the
rear of the unit, not at the front switch. A POWER CYCLE initializes the
new software and updates the software revision window.
Service Mode/Menu
There are two service menus available. The service menu found in the
BOOT LOADER is used when downloading the boot code and main
processor code. The SERVICE MODE menu is imbedded in the monitor
MAIN menu and is used for various functions like calibration, video
tests, and downloading monitor interface software.
Warm Start
WARM START is a menu selection on the monitor that appears after a
successful software download. A WARM START will activate the
software previously downloaded. The following also activates a warm
start.
Revision J
•
Hold down the NBP GO/STOP and ZERO ALL keys on the front
panel. (For the SolarView remote display controller, hold down the
two blank keys.)
•
Press and quickly release the Trim Knob control, NBP GO/STOP and
ZERO ALL keys.
Solar 7000/8000/View Patient Monitor
414993-001
4-5
TROUBLESHOOTING: Block Theory Diagrams
Block Theory Diagrams
The following theory of operation gives you a very broad overview of the
various functional circuit boards in the monitor. For more comprehensive
theory of operation, refer to the Solar 7000/8000/View Data Manual, pn
414993-007.
Solar 7000 Color
Monitor
4-6
Given below is the color Solar 7000 monitor overall block diagram.
Solar 7000/8000/View Patient Monitor
414993-001
Revision J
TROUBLESHOOTING: Block Theory Diagrams
Solar 7000
Monochrome
Monitor
Revision J
Given below is the monochrome Solar 7000 monitor overall block
diagram.
Solar 7000/8000/View Patient Monitor
414993-001
4-7
TROUBLESHOOTING: Block Theory Diagrams
Solar 8000
Processing Unit
4-8
Given below is the Solar 8000 processing unit overall block diagram. For
details about the GE Medical Systems Information Technologies display,
refer to the 15-Inch Medical-Grade Color Display Service Manual, pn
414993-056, or the service manual provided with your display.
Solar 7000/8000/View Patient Monitor
414993-001
Revision J
TROUBLESHOOTING: Block Theory Diagrams
SolarView Remote
Display Controller
Revision J
Given below is the SolarView remote display controller overall block
diagram. For details about the GE Medical Systems Information
Technologies display, refer to the 15-Inch Medical-Grade Color Display
Service Manual, pn 414993-056, or the service manual provided with
your display.
Solar 7000/8000/View Patient Monitor
414993-001
4-9
TROUBLESHOOTING: Block Theory of Operation
Block Theory of Operation
Overview
The monitor is capable of displaying up to six or eight different
waveforms at one time on a color or monochrome high-definition, rasterscan screen. Pop-up window guide user interactions on screen without
obstructing the display of real-time patient data. Software upgrades are
downloaded using a laptop computer or from the central station using
the Unity Network.
Main Processor PCB
The main processor PCB performs all the major processing of the Solar
7000/8000/View monitor and controls many other complex functions of
the monitor. It controls the display processing, remote display, remote
alarm, and all communication functions. More details are listed below.
Display Processing
Circuitry
The main section of this PCB is the display processing section that is
controlled by a 25-MHz microprocessor. It accepts processed or
unprocessed patient data from one of the communication networks and
processes it to be displayed on the monitor. The main microprocessor
receives control signals directly from the keycap PCB or remotely from
the various communication connectors. Two sets of analog video signals
are generated: one drives the CRT and the other drives the remote
display.
Remote/Local Display
Circuitry
The main processor PCB also provides circuitry to buffer the real-time
waveforms from the Solar 7000 monitor to a remote color or monochrome
display. Likewise, the Solar 8000 processing unit and SolarView remote
display controller provide the same circuitry to a compatible local
display. RGB video signals and horizontal and vertical sync signals are
available from the video display connector.
Remote Alarm Circuitry
The remote audio signals are generated for the remote audio/alarm
(RMT ALM) connector. The remote audio signal has an amplitude of
approximately 1 V p-p and a frequency response of 160 to 16 kHz.
Two sets of relay signals are also provided to drive the remote alarm
interface circuitry. Two sets of relay signals are provided in order to
implement a fail-safe scheme in which one relay signal set indicate alarm
condition, and the other indicates that the monitor is active. Both relay
control signals are actuated in the normal MONITOR ACTIVE/NO
ALARM state. This insures that a failure in the relay circuitry will cause
an alarm condition to occur. Assertion of the RESET* signal or removal
of power to the monitor forces the alarm control signals to the inactive
state.
An associated, separately powered remote alarm indicator unit is
required to complete the implementation of the fail-safe alarm scheme.
This unit must have MONITORING SYSTEM ENABLED/DISABLE
control which is used to confirm that the monitor has been turned OFF. If
this switch is in the ENABLED position and the monitor’s active relay
becomes deactuated, an alarm condition occurs. Indicators can be
provided on the remote alarm unit to identify the specific type of alarm
condition currently occurring.
4-10
Solar 7000/8000/View Patient Monitor
414993-001
Revision J
TROUBLESHOOTING: Block Theory of Operation
Communication Circuitry
The Ethernet communication section of the main processor PCB provides
an Ethernet communication interface for the monitor. The data is sent
and received at a rate of 10M bits per second over the Ethernet-based
Unity Network.
The communication circuitry also provides for Tram-net
communications. (Tram-net signals are not provided for the SolarView
remote display controller.) The Tram-net controller packages the data for
serial transmission to/from the monitor peripherals and relieves the
main microprocessor from performing the serial transmission conversion.
The data transferred may be patient data from the Tram-rac housing or
user input signals from a remote control. An FPGA functions as a header
hub in the Tram-net local-area network returning the sent data to all
nodes.
Asynchronous signals are sent to/from the four UART devices on the
main processor PCB. Async data is processed for serial transmission to
the auxiliary async (RS232/RS422) ports. The RS422 async port is used
for the peripheral devices like the DDW, remote control, and for software
updates. The RS232 port is reserved for future use.
Low-Voltage Power
Supply
The low-voltage power supply converts the AC voltage from the
transformer windings to provide all low voltage power requirements for
the monitor as filtered +16.75V and +5V.
For the Solar 7000 monitors, +24V DC is also provided. Only when a
control line from the main processor PCB is activated to the color Solar
7000 low-voltage power supply, the power supply will connect 100V to the
degaussing coil for the CRT.
Keycap PCB
The keycap PCB interfaces with the user and the main processor PCB. It
receives user input from the five hard keys and the Trim Knob control.
Additional Solar 7000
Circuit Boards
The following circuit boards are used in the Solar 7000 monitor only.
Mono CRT Controller
PCB
The monochrome CRT controller PCB controls electron beam deflections
in both axes and contains all the necessary drive circuitry for the display.
It contains circuitry for horizontal deflection, vertical deflection, video
drive, and dynamic focus. A protection circuit is provided to shut off the
electron beam should one of the deflection signals be lost.
Color CRT Controller PCB
The CRT controller PCB receives video and sync data from the main
processor pcb assembly. The video signals are amplified and DC level
restored. This pcb drives the three cathodes that control the intensity of
the color CRT.
Deflection PCB (Color
Only)
The deflection PCB provides the deflection signals to the yoke for
synchronous scanning of the CRT. The synchronizing signals are received
from the main processor PCB. This circuit board also develops auxiliary
voltages for other assemblies in the monitor.
Revision J
Solar 7000/8000/View Patient Monitor
414993-001
4-11
TROUBLESHOOTING: Block Diagram of Internal Cabling
Block Diagram of Internal Cabling
Solar 7000 Color
Monitor
A9P3
W4P1
1 of 4
A9W3
XFMR
406488-00X
A3
414604-00X
A9
S1J1
A3P2
Part of
406488-00X
A9W2
S1J2
A3P3
A3P7
A8J1
A8J3
A9P2
S1J3
A3P4
S1J4
A3P5
Part of
406488-00X
LOW-VOLTAGE
POWER SUPPLY
800974-00X
A8
A8J2
A9P6
S1J6
W1P2
W9
W9P1
S1J7
AC SOURCE
P2
A9P4
A8J4
S1J5
A3P6
AC INLET
FUSE HLDR
406445-00X
S1
Part of
414527-00X
FAN
A5
406489-00X
W1
W1P1
A9W1
414528-00X
W3
RMT ALM
4-12
A9P5
A1J1
W3P1
A1J6
Part of
800058-00X
A1J7
A4P2
MAIN PROCESSOR PCB
800678-00X
A1
A1J8
W2P1
J4-B
ASYNC COMM
J3-B
TRAM-NET
J3-T
ETHERNET
P1
A1J2
J5-B
RMT VID
J4-T
RS232
J5-T
SERVICE
Solar 7000/8000/View Patient Monitor
414993-001
414526-00X
W2
W2E1
W2E2
SPEAKER
1663-300
S1
Revision J
TROUBLESHOOTING: Block Diagram of Internal Cabling
2 of 4
405305-00X
W4
405739-00X
W8
Part of
405834-00X
W8P3
W3P2
A2J1
CRT CONTROLLER PCB
404641-00X
A2
W4
A11P5
A12P3
Part of
408099-00X
E
OD 4
2P
A1
A11P2
A2J2
A11P4
A12P2
AN
W5P1
A2J3
Part of
406896-00X
Part of
405739-00X
W8
HIGH-VOLTAGE
POWER SUPPLY
406896-00X
A12
Part of
406896-00X
W8P2
402302-001
W7
A4J8
A7P1
405785-00X
W5
DEGAUSS COIL
W8
CRT
A10
COL
NECK
YOKE
CABLE ASSY
405834-00X
A10
DAG
Part of
408099-00X
A11P1
A6J5
A12P1
OR
DEFLECTION PCB
404642-00X
A6
A6J1
W5P2
CRT SOCKET
ASSY
408099-00X
A11
A6J6
A11P3
A9P1
A6J7
Part of
405739-00X
W8
W8P1
A10P2
A6J4
A5P1
A6J8
A10P1
A6J3
W7E1
Part of
58111-00X
TRAM
CONTROL
ASSY
406273-00X
A7
KEYCAP PCB
800058-00X
A4
A4P1
PART of
800058-00X
402302-001
W6
W6E1
Revision J
Solar 7000/8000/View Patient Monitor
414993-001
4-13
TROUBLESHOOTING: Block Diagram of Internal Cabling
3 of 4
A2J1
1
2
3
4
5
6
7
8
9
10
11
12
13
14
15
16
17
18
19
20
A1J6
SHIELD
+5V_RTN
GREEN/MONO_VIDEO
GREEN_VIDEO_RTN
RED_VIDEO
RED_VIDEO_RTN
BLUE_VIDEO
BLUE_VIDEO_RTN
COLOR/MONOCHROME*
HORIZONTAL_SYNC*
VERTICAL_SYNC*
N/C
N/C
N/C
N/C
N/C
N/C
N/C
N/C
N/C
W3P2
1
2
3
4
5
6
7
8
9
10
11
12
13
14
15
16
17
18
19
20
W3P1
W3
A1J1
A8J2
1
+16.75V
6
2
+16.75V
5
3
+5V_RTN
12
4
+16.75V_RTN
8
5
+16.75V_RTN
7
6
+5V
2
7
+5V
1
8
+5V_RTN
4
9
+5V_RTN
3
10
ADVANCED_POWER_DWN
10
11
POWER_LINE_FREQ
9
12
DEGAUSS*
11
13
A9P5
A6J7
1
2
3
4
5
6
A8J3
+24V
+24V
+24V_RTN
+24V_RTN
+16.75V
+16.75V_RTN
1
2
3
4
5
6
A9W2
A9P1
FOCUS
A9P6
A9W1
20KV
A12P4
A6J5
1
2
3
4
N/C
–200V
A12P1
G2
1
2
3
A9W3
A9P3
1
2
3
4
5
6
7
8
9
1
2
3
W4
A6J3
1
2
A10P1
V_YOKE_HI
V_YOKE_LOW
H_YOKE_HI
N/C
H_YOKE_LOW
W4
A6J4
1
2
3
A10P2
J4
J2
1
2
A6J1
N/C
+VIDEO
VIDEO_RTN
+16.75V
+16.75V_RTN
–6.3V
HORIZONTAL_SYNC*
VERTICAL_SYNC*
DIGITAL_GND
W5
1
2
3
4
5
6
7
8
9
W5P2
W2P1
W2E1
AUDIO
AUDIO_RTN
W2E2
W2
DEGUASS
A2J2
RED CATHODE
N/C
GREEN CATHODE
N/C
J7
A4P1
W5P1
DEG_100VAC1
N/C
DEG_100VAC2
W4P1
1
2
3
4
5
6
7
8
9
10
11
12
13
14
15
16
A9P4
NECK
A12P3
A12
A10
DEG_100VAC1
N/C
DEG_100VAC2
+5V
N/C
+5V_RTN
N/C
+5V_RETURN
TRIM_KNOB_0
+5V_RTN
TRIM_KNOB_1
DISPLAY_ON/OFF*
+5V_RTN
TRIM_KNOB_PUSH_SW*
GRAPH_GO/STOP*
SILENCE ALARM*
ZERO_ALL*
NBP_GO/STOP
DISPLAY_LED_ON*
A4P2
A1J8
+24F
AGND
YOKE
A8J4
1
2
3
1
2
3
4
5
6
7
8
9
10
11
12
13
14
15
16
A2J3
A9P2
A12P2
ANODE
A1J7
BLUE CATHODE
1
2
3
4
5
A11P2
A6J6
J1
J5
J6
G1
FILAMENT
FILAMENT RTN
ARCGND
N/C
1
2
3
4
5
A11P3
J3
G2
1
A11P5
HV
A11P1
4-14
FOCUS
1
A11P4
Solar 7000/8000/View Patient Monitor
414993-001
Revision J
TROUBLESHOOTING: Block Diagram of Internal Cabling
4 of 4
A4J8
1
2
3
4
5
6
+5V_RTN
+5V_RTN
SWITCH
OUTPUT_B
OUTPUT_A
+5V
A7
XFMR
1
2
3
4
5
6
6
7
10
11
8
9
15
A7P1
N/C
A5
1
2
A8J1
16.75 AC1
16.75 AC2
24 AC1
24 AC2
5 AC1
5 AC2
SHIELD
A6J8
+24(FAN)
FANRTN
12
13
A5P1
1
S1J7
LINE
W9P1
W9
100VAC1
100VAC2
NEUTRAL BRN
S1J2
A3P2
AC-SOURCE
W9P2
1
2
3
4
5
6
7
8
9
10
2
100V(HOT) BLK
S1J4
A3P4
S1J5
S1J6
EARTH GND
W1P2
PWR SPLY
ENCL
W1
3
120V(HOT) WHT
A3P5
4
220V(HOT) ORN
S1J6
A3P6
CRT
CHASSIS
5
240V(HOT) RED
S1J3
CHASSIS GND
A3P3
A10
W8
A1J3B
1
2
3
4
5
6
7
8
9
10
11
12
13
14
15
A1J4B
RELAY0_NC
N/C
REMOTE_AUDIO
N/C
N/C
RELAY0_NO
RELAY_COMMON
REMOTE_AUDIO
N/C
N/C
RELAY1_NO
N/C
REMOTE_AUDIO_RTN
N/C
N/C
A3J19
A1J3T
1
2
3
4
5
6
7
8
9
PORT1_422_RX+
N/C
PORT1_422_RX–
TN_+16.75V
PORT1_422_TX–
TN_+16.75V
N/C
TN_+16.75V_RTN
PORT1_422_TX+
A3J11
W8P1
A1J5B
A1J2
1
2
3
4
5
6
7
8
9
10
P1
DS*
BUS_ERROR*
+5V_RTN
BKPT*/DSCLK
+5V_RTN
FREEZE
RESET*
IFETCH/DS1
+5V
IPIPEO/DSO
1
2
3
4
5
6
7
8
9
10
11
12
13
14
15
REM_RED_VIDEO
REM_GREEN_VIDEO
REM_BLUE_VIDEO
N/C
N/C
REM_RED_VIDEO_RTN
REM_GREEN_VIDEO_RTN
REM_BLUE_VIDEO_RTN
N/C
REM_SYNC_RTN
+5V_RTN
REM_MONOCHROME*
REM_HORIZONTAL_SYNC*
REM_VERTICAL_SYNC*
N/C
1
2
3
4
5
6
7
8
9
10
11
12
13
14
15
16
17
18
19
20
21
22
23
24
25
TN_+16.75V_RTN
PORT0_422_TX+
PORT0_422_RX+
TN_DOWN_0+
TN_DOWN_0–
TN_UP_0+
TN_+16.75V_RTN
TN_+16.75V
TN_DOWN_1+
TN_DOWN_1–
TN_UP_1+
TN_UP_1–
TN_+16.75V
TN_DOWN_2+
TN_DOWN_2–
TN_UP_2+
TN_UP_2–
TN_+16.75V_RTN
TN_DOWN_3+
TN_UP_0–
TN_DOWN_3–
TN_UP_3+
TN_UP_3–
PORT0_422_RX–
PORT0_422_TX–
A1J4T
1
2
3
4
5
6
7
8
9
10
11
12
13
14
15
CHASSIS
LAN_COLLISION+
LAN_TRANSMIT+
CHASSIS
LAN_RECEIVE+
LAN_+V_RTN
CHASSIS
CHASSIS
LAN_COLLISION–
AN_TRANSMIT–
CHASSIS
LAN_RECEIVE–
LAN_+V
CHASSIS
CHASSIS
A1J5T
1
2
3
4
5
6
7
8
9
Revision J
N/C
PORT_2_232_TX
PORT_2_232_RX
N/C
PORT_2_232_RTN
PORT_3_232_TX
PORT_3_232_RX
N/C
PORT_3_232_RTN
Solar 7000/8000/View Patient Monitor
414993-001
4-15
TROUBLESHOOTING: Block Diagram of Internal Cabling
Solar 7000
Monochrome
Monitor
1 of 4
Part of
414605-00X
A9
A8J3
A9P1
LOW-VOLTAGE
POWER SUPPLY
408102-00X
A8
P2
W1P1
S1J2
AC SOURCE
W1
414528-00X
W3
ASYNC COMM
RMT ALM
4-16
A9P2
A1J1
W3P1
A1J6
MAIN PROCESSOR PCB
800678-00X
A1
A1J7
A4P2
J5-B
P1
A1J2
A1J8
W2P1
TRAM-NET
J4-B J4-T
ETHERNET
J3-T
RMT VID
J3-B
RS232
J5-T
SERVICE
414526-00X
W2
Solar 7000/8000/View Patient Monitor
414993-001
W2E1
SPEAKER
1663-300
W2E2
SP1
Revision J
TROUBLESHOOTING: Block Diagram of Internal Cabling
2 of 4
Part of
407718-001
A7P1
A6J16
A7P2
A6J17
W8P1
CRT CONTROLLER PCB
401550-00X
A6
YOKE
CABLE ASSY
88491-00X
A7
TER
80681-00X
W6
A3
CRT
RAS
A6J19
W6P2
NECK
A6J5
A2P1
W6P1
A6J1
W3P2
DAG
W8
A9P3
A6J7
Part of
88491-00X
E
OD
P2
A2
AN
HIGH-VOLTAGE
POWER SUPPLY
6116-00X
A2
Part of
6116-00X
A4J8
A5P1
402302-001
W5
W5E1
Part of
406273-00X
TRIM KNOB
CONTROL
406273-00X
ASSY
A5
KEYCAP
PCB
800058-00X
A4
A4P1
Part of
800058-00X
402302-001
W4
W4E1
Revision J
Solar 7000/8000/View Patient Monitor
414993-001
4-17
TROUBLESHOOTING: Block Diagram of Internal Cabling
3 of 4
A6J1
1
2
3
4
5
6
7
8
9
10
11
12
13
14
15
16
17
18
19
20
W3P2
A1J6
N/C
+5V_RTN
GREEN/MONO_VIDEO
GREEN_VIDEO_RTN
N/C
N/C
N/C
N/C
COLOR/MONOCHROME*
HORIZONTAL_SYNC*
VERTICAL_SYNC*
N/C
N/C
N/C
N/C
N/C
N/C
N/C
N/C
N/C
1
2
3
4
5
6
7
8
9
10
11
12
13
14
15
16
17
18
19
20
W3P1
W3
A8J3
N/C
ANALOG_GND
16 +5V
13
DIGITAL_GND
14
15
N/C
+16.75V
V_YOKE_HI
V_YOKE_LOW
H_YOKE_HI
N/C
H_YOKE_LOW
A7
5
7
8
9
10
1
2
4
3
12
11
A5P1
A5
+5V_RTN
+5V_RTN
SWITCH
OUTPUT_B
OUTPUT_A
+5V
1
2
3
4
5
6
1
2
3
4
5
6
7
8
9
10
11
12
13
14
15
16
6
A1J1
N/C
+5V
1
+5V
2
+5V_RTN
3
+5V_RTN
4
+16.75V
5
+16.75V
6
+16.75V_RTN
7
+16.75V_RTN
8
POWER_LINE_FREQ
9
ADVANCED_POWER_DWN
10
DEGAUSS*
11
+5V_RTN
12
A9P2
NECK
4
6
7
5
1
2
A6J19
ANALOG_GND
G2
FOCUS
ARCGND
N/C
G1
CATHODE
N/C
A7P1
A4J8
1
2
3
4
5
6
A6J17
1
2
W7P2
A6J16
1
2
3
A1J7
1
2
3
4
5
6
A9P3
A9P1
YOKE
A6J7
3
W6P1
FILAMENT
W6
A2
1
2
3
4
5
6
7
8
9
+5V
N/C
+5V_RTN
N/C
+5V_RTN
TRIM_KNOB_0
+5V_RTN
TRIM_KNOB_1
DISPLAY_ON/OFF*
+5V_RTN
TRIM_KNOB_PUSH_SW*
GRAPH_GO/STOP*
SILENCE_ALARM*
ZERO_ALL*
NBP_GO/STOP
DISPLAY_LED_ON*
A4P2
A1J8
1
2
W2P1
S1J2
W1P1
1
2
3
4
5
6
7
8
9
10
11
12
13
14
15
16
A4P1
W2E1
AUDIO
AUDIO_RTN
W2E2
W2
LINE
W1
AC-SOURCE
P2
W6P2
A6J5
+16.75
ANALOG_GND
1KV
–100V
1
2
3
4
A2P1
ANODE
A2P2
4-18
Solar 7000/8000/View Patient Monitor
414993-001
Revision J
TROUBLESHOOTING: Block Diagram of Internal Cabling
4 of 4
A1J3B
1
2
3
4
5
6
7
8
9
10
11
12
13
14
15
A1J4B
RELAY0_NC
N/C
REMOTE_AUDIO
N/C
N/C
RELAY0_NO
RELAY_COMMON
REMOTE_AUDIO
N/C
N/C
RELAY1_NO
N/C
REMOTE_AUDIO_RTN
N/C
N/C
A3J19
A1J3T
1
2
3
4
5
6
7
8
9
PORT1_422_RX+
N/C
PORT1_422_RX–
TN_+16.75V
PORT1_422_TX–
TN_+16.75V
N/C
TN_+16.75V_RTN
PORT1_422_TX+
A3J11
A1J2
DS*
1
BUS_ERROR*
2
+5V RTN
3
BKPT*/DSCLK
4
+5V RTN
5
FREEZE
6
RESET*
7
IFETCH/DSI
8
+5V
9
IPIPEO/DSO
10
1
2
3
4
5
6
7
8
9
10
11
12
13
14
15
16
17
18
19
20
21
22
23
24
25
A1J5B
TN_+16.75V_RTN
PORT0_422_TX+
PORT0_422_RX+
TN_DOWN_0+
TN_DOWN_0–
TN_UP_0+
TN_+16.75V_RTN
TN_+16.75V
TN_DOWN_1+
TN_DOWN_1–
TN_UP_1+
TN_UP_1–
TN_+16.75V
TN_DOWN_2+
TN_DOWN_2–
TN_UP_2+
TN_UP_2–
TN_+16.75V_RTN
TN_DOWN_3+
TN_UP_0–
TN_DOWN_3–
TN_UP_3+
TN_UP_3–
PORT0_422_RX–
PORT0_422_TX–
1
2
3
4
5
6
7
8
9
10
11
12
13
14
15
REM_RED_VIDEO
REM_GREEN_VIDEO
REM_BLUE_VIDEO
N/C
N/C
REM_RED_VIDEO_RTN
REM_GREEN_VIDEO_RTN
REM_BLUE_VIDEO_RTN
N/C
REM_SYNC_RTN
+5V_RTN
REM_MONOCHROME*
REM_HORIZONTAL_SYNC*
REM_VERTICAL_SYNC*
N/C
A1J5T
1
2
3
4
5
6
7
8
9
N/C
PORT_2_232_TX
PORT_2_232_RX
N/C
PORT_2_232_RTN
PORT_3_232_TX
PORT_3_232_RX
N/C
PORT_3_232_RTN
A1J4T
1
2
3
4
5
6
7
8
9
10
11
12
13
14
15
CHASSIS
LAN_COLLISION+
LAN_TRANSMIT+
CHASSIS
LAN_RECEIVE+
LAN_+V_RTN
CHASSIS
CHASSIS
LAN_COLLISION–
AN_TRANSMIT–
CHASSIS
LAN_RECEIVE–
LAN_+V
CHASSIS
CHASSIS
P1
Revision J
Solar 7000/8000/View Patient Monitor
414993-001
4-19
TROUBLESHOOTING: Block Diagram of Internal Cabling
Solar 8000/View
Processing Unit
P2
W5
POWER SUPPLY
415838-001
A2
A2J2
W1P2
AC SOURCE
W5P1
AC INLET
1 of 2
TRIM KNOB
CONTROL
SW1
W1
W4
ASYNC COMM
RMT ALM
4-20
W4P1
A3P1
P1
A1J2
W1P1
A1J1
(TRAM-NET SIGNALS
NOT AVAILABLE
FOR SOLARVIEW)
Solar 7000/8000/View Patient Monitor
414993-001
W3
W2
W3P2
A3J2
MAIN PROCESSOR PCB
800678-00X
A1
A1J7
W3P1
J5-B
KEYCAP
ASSEMBLY
414925-00X
A3
A1J8
W2P1
TRAM-NET
J4-B J4-T
ETHERNET
J3-T
VID
J3-B
RS232
J5-T
SERVICE
W2E1
W2E2
SPEAKER
SP1
Revision J
TROUBLESHOOTING: Block Diagram of Internal Cabling
2 of 2
A1J3B
A1J4B
RELAY0_NC
N/C
REMOTE_AUDIO
N/C
N/C
RELAY0_NO
RELAY_COMMON
REMOTE_AUDIO
N/C
N/C
RELAY1_NO
N/C
REMOTE_AUDIO_RTN
N/C
N/C
1
2
3
4
5
6
7
8
9
10
11
12
13
14
15
1
2
3
4
5
6
7
8
9
10
11
12
13
14
15
16
17
18
19
20
21
22
23
24
25
A3J19
A1J3T
PORT1_422_RX+
N/C
PORT1_422_RX–
TN_+16.75V
PORT1_422_TX–
TN_+16.75V
N/C
TN_+16.75V_RTN
PORT1_422_TX+
1
2
3
4
5
6
7
8
9
1
2
3
4
5
6
7
8
9
10
11
12
13
14
15
A1J2
DS*
1
BUS_ERROR*
2
+5V_RTN
3
BKPT*/DSCLK
4
+5V_RTN
5
FREEZE
6
RESET*
7
IFETCH/DS1
8
+5V
9
IPIPEO/DSO
10
P1
5
7
8
9
10
1
2
4
3
12
11
6
W1P2
1
2
3
4
5
6
7
8
9
10
11
12
13
14
15
TN_DOWN_2+
TN_DOWN_2–
TN_UP_2+
TN_UP_2–
TN_+16.75V_RTN
TN_DOWN_3+
TN_UP_0–
TN_DOWN_3–
REM_RED_VIDEO
REM_GREEN_VIDEO
REM_BLUE_VIDEO
N/C
N/C
REM_RED_VIDEO_RTN
REM_GREEN_VIDEO_RTN
REM_BLUE_VIDEO_RTN
N/C
REM_SYNC_RTN
+5V_RTN
REM_MONOCHROME*
REM_HORIZONTAL_SYNC*
REM_VERTICAL_SYNC*
N/C
A1J5T
1
2
3
4
5
6
7
8
9
TN_UP_3+
TN_UP_3–
PORT0_422_RX–
PORT0_422_TX–
N/C
PORT_2_232_TX
PORT_2_232_RX
N/C
PORT_2_232_RTN
PORT_3_232_TX
PORT_3_232_RX
N/C
PORT_3_232_RTN
A1J4T (NOT AVAILABLE
FOR SOLARVIEW)
A3J11
A2J2
A1J5B
TN_+16.75V_RTN
PORT0_422_TX+
PORT0_422_RX+
TN_DOWN_0+
TN_DOWN_0–
TN_UP_0+
TN_+16.75V_RTN
TN_+16.75V
TN_DOWN_1+
TN_DOWN_1–
TN_UP_1+
TN_UP_1–
TN_+16.75V
A1J1
N/C
+5V
1
+5V
2
+5V_RTN
3
+5V_RTN
4
+16.75V
5
+16.75V
6
+16.75V_RTN
7
+16.75V_RTN
8
POWER_LINE_FREQ
9
ADVANCED_POWER_DWN
10
DEGAUSS*
11
+5V_RTN
12
W1
W1P1
CHASSIS
LAN_COLLISION+
LAN_TRANSMIT+
CHASSIS
LAN_RECEIVE+
LAN_+V_RTN
CHASSIS
CHASSIS
LAN_COLLISION–
AN_TRANSMIT–
CHASSIS
LAN_RECEIVE–
LAN_+V
CHASSIS
CHASSIS
A1J7
1
2
3
4
5
6
7
8
9
10
11
12
13
14
15
16
W2P2
A3J2
+5V
N/C
+5V_RTN
N/C
+5V_RTN
TRIMKNOB0
+5V_RTN
TRIMKNOB1
DISPLAY_ON/OFF*
+5V_RTN
TRIMKNOB_SW*
GRAPH_GO/STOP*
SILENCE_ALARM*
ZERO_ALL*
NBP_GO/STOP
NC
W3
1
2
3
4
5
6
7
8
9
10
11
12
13
14
15
16
A3J1
1
2
3
4
5
6
A3P1
A1J8
1
2
Solar 7000/8000/View Patient Monitor
414993-001
W2E1
AUDIO
W2E2
AUDIO_RTN
AC INLET
W3P2
1
2
3
4
5
6
W4
W2P1
W5P1
Revision J
SW1
+5V_RTN
+5V_RTN
TRIMKNOB_SW*
TRIMKNOB1
TRIMKNOB0
+5V
W2
LINE
W5
AC-SOURCE
P2
4-21
TROUBLESHOOTING: Communication Connectors
Communication Connectors
Pin-by-pin descriptions and the signal names for each connector on the
rear panel of the monitor are described in this section.
NOTE: Mbps represents mega-bits per second and kbps means kilo-bits
per second.
Async COMM
Signals
One full duplex RS-422 port is provided for asynchronous communication
to the DDW or remote control.
Asynchronous Communication Connector (J3-T)
Pin
Name
1
PORT_422_RX+
2
NC
3
Input/
Output
Range
Type
Maximum
Frequency
I
0 to +5V
RS-422
115.2 kbps
PORT_422_RX–
I
0 to +5V
RS-422
115.2 kbps
4
TN_+16.75V
O
+16.75V
PWR
DC
5
PORT_422_TX–
O
0 to +5V
RS-422
115.2 kbps
6
TN_+16.75V
O
+16.75V
PWR
DC
7
NC
8
TN_+16.75V_RETURN
O
0V
PWR RTN
DC
9
PORT_422_TX+
O
0 to +5V
RS-422
115.2 kbps
4-22
Solar 7000/8000/View Patient Monitor
414993-001
Rear View of
Monitor
Revision J
TROUBLESHOOTING: Communication Connectors
RMT ALM Signals
Two different RELAY signals indicate when the monitor is active and
when the alarm is active. The AUDIO signals are used to drive a remote
speaker.
Remote Alarm Connector (J3-B)
Pin
Name
1
RELAY0_NC
2
NC
3
REMOTE_AUDIO
4
NC
5
NC
6
7
Input/
Output
Range
Type
Maximum
Frequency
I/O
0 to 32V
SWITCH
DC
O
5V P-P
AUDIO
16 KHZ
RELAY0_NO
I/O
0 to 32V
SWITCH
DC
RELAY_COMMON
I
0V
GND
DC
8
REMOTE_AUDIO
O
5V P-P
AUDIO
16 KHZ
9
NC
10
NC
11
RELAY1_NO
I/O
0 to 32V
SWITCH
DC
12
NC
13
REMOTE_AUDIO_
RETURN
I
0V
14
NC
15
NC
Ethernet Signals
DC
Rear View of
Monitor
The Ethernet connector transmits, receives, and detect errors by IEEE
802.3 standards.
Ethernet Communication Connector (J4-T)
Pin
Name
Input/
Output
Range
Type
Maximum
Frequency
1
CHASSIS
I
0V
PWR RTN
DC
2
LAN_COLLISION+
I
1.4V P-P
ECL
10 Mbps
3
LAN_TRANSMIT+
O
1.4V P-P
ECL
10 Mbps
4
CHASSIS
I
0V
PWR RTN
DC
5
LAN_RECEIVE+
O
1.4V P-P
ECL
10 Mbps
6
LAN_+V_RETURN
I
0V
PWR RTN
DC
7
CHASSIS
I
0V
PWR RTN
DC
8
CHASSIS
I
0V
PWR RTN
DC
9
LAN_COLLISION–
I
1.4V P-P
ECL
10 Mbps
10
LAN_TRANSMIT–
O
1.4V P-P
ECL
10 Mbps
11
CHASSIS
I
0V
PWR RTN
DC
12
LAN_RECEIVE–
I
1.4V P-P
ECL
10 Mbps
13
LAN_+V
O
+12V
PWR
DC
14
CHASSIS
I
0V
PWR RTN
DC
15
CHASSIS
I
0V
PWR RTN
DC
Revision J
Solar 7000/8000/View Patient Monitor
414993-001
Rear View of
Monitor
4-23
TROUBLESHOOTING: Communication Connectors
Tram-net Signals
To communicate on the Tram-net network, the monitor has four external
channels of RS-485 transmit and receive differential pairs. They provide
four upward path receivers from lower-level devices (i.e. Tram and Tramrac housing) to communicate with a higher-level hub and four downward
path transmitters to transmit information from a higher-level down to
the lower-level devices.
One full duplex RS-422 port is also provided for asynchronous
communication. (Tram-net signals are not provided for the SolarView
remote display controller.)
Tram-net Communication Connector (J4-B)
Pin
Name
Input/
Output
Range
Type
Maximum
Frequency
1
TN_+16.75V_RETURN
O
0V
PWR RTN
DC
2
PORT0_422_TX+
O
0 TO +5V
RS-422
115.2 kbps
3
PORT0_422_RX+
I
0 TO +5V
RS-422
115.2 kbps
4
TN_DOWN_0+
O
0 TO +5V
RS-485
921.6 kbps
5
TN_DOWN_0–
O
0 TO +5V
RS-485
921.6 kbps
6
TN_UP_0+
I
0 TO +5V
RS-485
921.6 kbps
7
TN_+16.75V_RETURN
O
0V
PWR RTN
DC
8
TN_+16.75V
O
+16.75
PWR
DC
9
TN_DOWN_1+
O
0 TO +5V
RS-485
921.6 kbps
10
TN_DOWN_1–
O
0 TO +5V
RS-485
921.6 kbps
11
TN_UP_1+
I
0 TO +5V
RS-485
921.6 kbps
12
TN_UP_1–
I
0 TO +5V
RS-485
921.6 kbps
13
TN_+16.75V
O
+16.75
PWR
DC
14
TN_DOWN_2+
O
0 TO +5V
RS-485
921.6 kbps
15
TN_DOWN_2–
O
0 TO +5V
RS-485
921.6 kbps
16
TN_UP_2+
I
0 TO +5V
RS-485
921.6 kbps
17
TN_UP_2–
I
0 TO +5V
RS-485
921.6 kbps
18
TN_+16.75V_RETURN
O
0V
PWR RTN
DC
19
TN_DOWN_3+
O
0 TO +5V
RS-485
921.6 kbps
20
TN_UP_0–
I
0 TO +5V
RS-485
921.6 kbps
21
TN_DOWN_3–
O
0 TO +5V
RS-485
921.6 kbps
22
TN_UP_3+
I
0 TO +5V
RS-485
921.6 kbps
23
TN_UP_3–
I
0 TO +5V
RS-485
921.6 kbps
24
PORT0_422_RX–
I
0 TO +5V
RS-422
115.2 kbps
25
PORT0_422_TX–
O
0 TO +5V
RS-422
115.2 kbps
4-24
Solar 7000/8000/View Patient Monitor
414993-001
Rear View of
Monitor
Revision J
TROUBLESHOOTING: Communication Connectors
RS-232 Signals
The connector is for future use.
RS-232 Service Connector (J5-T)
Pin
Name
Input/
Output
Range
Type
Maximum
Frequency
1
NC
2
PORT_2_232_TX
O
0 to +5V
RS-232
115.2 kbps
3
PORT_2_232_RX
I
0 to +5V
RS-232
115.2 kbps
4
NC
5
PORT_2_232_
RETURN
O
0V
PWR RTN
DC
6
PORT_3_232_TX
O
0 to +5V
RS-232
115.2 kbps
7
PORT_3_232_RX
I
0 to +5V
RS-232
115.2 kbps
8
NC
9
PORT_3_232_
RETURN
O
0V
PWR RTN
DC
RMT VID or VID
Signals
Rear View of
Monitor
Color video signals and their respective return paths with vertical and
horizontal synchronizing signals are provided from the video output
connector. Pin 12 is driven low if the remote display is monochrome and
left open to indicate a color display.
Video Output Connector (J5-B)
Pin
Name
Input/
Output
Range
Type
Maximum
Frequency
1
REM_RED_VIDEO
O
0.7V P-P
ANLG
46.8 MHZ
2
REM_GREEN_VIDEO
O
0.7V P-P
ANLG
46.8 MHZ
3
REM_BLUE_VIDEO
O
0.7V P-P
ANLG
46.8 MHZ
4
NC
5
NC
6
REM_RED_RETURN
I
0V
GND
DC
7
REM_GREEN_
I
0V
GND
DC
RETURN
8
REM_BLUE_RETURN
9
NC
14
13
I
0V
GND
DC
12
11
10
REM_SYNC_RETURN
I
0V
GND
DC
11
+5V_RETURN
O
0V
GND
DC
12
REM_
MONOCHROME*
I
0 to 5V
TTL
DC
13
REM.HORIZONTAL_
SYNC*
O
0 TO 5V
TTL
34.4 KHZ
14
REM.VERTICAL_
SYNC*
O
0 TO 5V
TTL
60 HZ
15
NC
Revision J
15
Solar 7000/8000/View Patient Monitor
414993-001
10
5
9
8
7
6
4
3
2
1
Rear View of
Monitor
4-25
TROUBLESHOOTING: Service Menus
Service Menus
The BOOT LOADER service menu and SERVICE MODE menu are
generally used by qualified field engineers and factory service personnel
to troubleshoot, repair, or download new software to the patient monitor.
WARNING
The BOOT LOADER service menu or SERVICE MODE
menu is intended for qualified personnel only. It is
possible to lose patient data, damage the operating
software for this monitor, and even affect the Unity
Network. Do not ‘experiment’ with any commands found
in the service menus.
Boot Loader Service
Menu
Change Ethernet Address
Use the BOOT LOADER service menu when downloading new software
to the monitor or when the monitor exhibits a serious failure. To activate
the BOOT LOADER program, do the following:
•
Hold down the NBP GO/STOP and ZERO ALL keys on the front
panel. (For the SolarView remote display controller, hold down the
two blank keys.)
•
Press and release the Trim Knob control.
•
Keep holding the NBP GO/STOP and ZERO ALL keys (or two blank
keys for the SolarView remote display controller) until the BOOT
LOADER menu appears on the display.
Only change the Ethernet address if the factory installed address has
been corrupted. Refer to “Programming Ethernet Address” in Chapter 6:
“Configuration.”
WARNING
Duplication of an Ethernet address on a network will
cause lost data. If you change the factory assigned
Ethernet address, you must record all other Ethernet
addresses used on your network to avoid duplication.
4-26
Solar 7000/8000/View Patient Monitor
414993-001
Revision J
TROUBLESHOOTING: Service Menus
Change IP address
This menu selection allows changes to the internet (IP) address.
WARNING
Duplication of an internet (IP) address on a network will
cause lost data. If you change the factory assigned
internet address, you must record all other internet
addresses used on your network to avoid duplication.
If the internet address becomes corrupted, refer to “Programming
Internet Address” in Chapter 6: “Configuration.”
Set Clock
This menu selection allows changes to the time and date and may affect
the time and date for the entire monitoring network.
WARNING
This menu should rarely be used because patient
histories will be lost.
This procedure is described in “Programming Time and Date ” in Chapter
6: “Configuration.”
Clear Configured Memory
If you respond with YES in this option, you will erase all patient
histories and programmed defaults in the protected memory and return
to factory installed defaults.
Country Selection
This option is used when downloading software in a foreign language.
Serial Download Main
This option is used when downloading software from a laptop PC.
Serial Download Boot
This option is used when downloading software from a laptop PC.
Serial Download Old Boot
This option is used when downloading boot code previous to version 4.
Revision J
Solar 7000/8000/View Patient Monitor
414993-001
4-27
TROUBLESHOOTING: Service Menus
Service Mode Menu
To access the SERVICE MODE menu, execute the following menu
sequence, starting from the MAIN menu:
MONITOR SETUP
SERVICE MODE
Password
Enter day and month from monitor screen with leading zeros.
(July 4 = 0407)
The following menu selections are available.
NOTE: The degauss menu selection it not available for the Solar 8000
or SolarView monitor.
Download Code
This menu selection is used to download new software code in the ECG/
RESP Module, SPO2 Module, SAM Module, CO2 Module, TIA, Octanet,
Tram-rac housing, or remote control. Refer to Chapter 6: “Configuration”
for the appropriate version software update procedure for your system.
Review Errors
This menu selection is for advanced troubleshooting by GE Medical
Systems Information Technologies engineers. Error log data can be
transferred over the network to a central station and then loaded onto a
diskette for review. When troubleshooting a persistent and evasive
problem, the error logs can be compiled over a long time and sent to GE
Medical Systems Information Technologies engineers for analysis. This
procedure is described in “Reviewing Error Logs” in Chapter 6:
“Configuration.”
Calibrate
These menu selections are used to calibrate various inputs from the
Tram module or other discrete modules. Refer to “Calibration” of the
appropriate manual for the specific module you are using. Menu options
are:
Calibrate NBP
CO2 Service
Calibrate SAM
Calibrate RAMS
TC Module Service
4-28
Solar 7000/8000/View Patient Monitor
414993-001
Revision J
TROUBLESHOOTING: Service Menus
Hardware Test
This menu selection allows the user to access the hardware tests for the
monitor.
Memory Monitor
This menu selection has no use in the field. It is used only by GE Medical
Systems Information Technologies engineers to view the contents of
memory locations.
Hardware Status
This menu selection gives the serial number of the patient monitor and
Tram-rac housing. The ‘one of a kind’ patient monitor LAN address is
listed here. The current revision of the system software, the main
processor, and EPLD are also listed.
Video Test
Once you enter the video test menu, the patient monitor will cold start to
exit and patient data is lost.
WARNING
Do not enter this menu selection unless loss of patient
data is not an issue.
This menu selection gives a list of video tests that can be used to
calibrate the display. Refer to the color or monochrome “Monitor
Calibration” in Chapter 5: “Calibration.”
Remote Video (Solar 8000/View Only)
This menu selection indicates to the Solar 8000 processing unit or
SolarView remote display controller if a color or monochrome display is
connected. If the processing unit is cold started, this selection defaults to
color video.
Remote Video Amplitude
This menu selection adjusts the brightness of the display by increasing
the voltage amplitude driving the display. In most cases, the STANDARD
option of 0.7 voltages works best. If the unit is cold started, this selection
defaults to STANDARD amplitude.
Revision J
Solar 7000/8000/View Patient Monitor
414993-001
4-29
TROUBLESHOOTING: Service Menus
Patient-Monitor Type
This menu selection allows the user to select the type of monitor desired,
i.e adult, neonatal or operating room.
WARNING
Do not change the patient-monitor type, it will default
the admit function to STANDARD configuration.
Different alarms and parameters are activated for each
selection.
All combinations are explained in “Programming Patient-Monitor Type”
in Chapter 6: “Configuration.”
Menu Setup
This menu selection allows the user to access the following sub-menus:
Admit Menu: Standard
This menu selection allows the user to determine the function of the
patient monitor. The four variables include stationary or ambulatory
(telemetry) patient monitoring with a monitor that always stays in one
room or a monitor that moves from room to room. All combinations are
explained in “Programming Admit Menu” in Chapter 6: “Configuration.”
Software Level
This menu selection displays which software feature level this monitor is
using.
Monitor Defaults Passwd
This menu selection is used to turn a password requirement ON or OFF
for entry into the “Patient-Monitor Type” menu section described above.
If selected, the password will be the same as the Service Mode Menu
password.
Remote Menus (Solar 7000 Only)
This menu selection displays or hides the MAIN menu portion of the
screen on a remote display when a remote display is connected to your
monitor. By selecting and pressing the Trim Knob control, the MAIN
menu on the remote display will turn ON or OFF.
4-30
Solar 7000/8000/View Patient Monitor
414993-001
Revision J
TROUBLESHOOTING: Service Menus
Monitor Settings
This menu selection allows the user to access the following sub-menus:
Set Unit Name
This menu selection allows changes to the care unit name. This
procedure is described in “Programming Care Unit Name” in Chapter 6:
“Configuration.” After initial setup, this name should not be changed or
communication to the central station will be corrupted. Note that the
care unit name must be registered exactly the same in the central station
and the patient monitor.
Set Bed Name
This menu selection allows changes to the bed number. This procedure is
described in “Programming Bed Number” in Chapter 6: “Configuration.”
After initial setup, this number should not be changed or communication
to the central station will be corrupted. Note that the bed number must
be registered exactly the same in the central station and the patient
monitor.
Set Internet Address
This menu selection allows changes to the internet (IP) address.
WARNING
Duplication of an internet (IP) address on a network will
cause lost data. If you change the factory assigned
internet address, you must first record all other internet
addresses used on your network to avoid duplication.
If the internet address becomes corrupted, refer to “Programming
Internet Address” in Chapter 6: “Configuration.”
Store Defaults For Network Transfer
Monitor Defaults can be transferred from one monitor to another
monitor. This menu option is used to store the Monitor Defaults you wish
to transfer. Refer to “Transfer Monitor Defaults” in Chapter 6:
“Configuration” for complete details.
Revision J
Solar 7000/8000/View Patient Monitor
414993-001
4-31
TROUBLESHOOTING: Service Menus
Copy Unit Defaults
This menu option is used to copy Monitor Defaults from one monitor to
another monitor. Refer to “Transfer Monitor Defaults” in Chapter 6:
“Configuration” for complete details.
Degauss
(Solar 7000 Only)
This menu selection is used to degauss the Solar 7000 display. Select
YES to degauss the color display periodically or whenever the red color
becomes impure (not true red). Note that the display is automatically
degaussed every time the unit is turned ON at the back switch. Once the
display is manually degaussed, it cannot be degaussed again for at least
10 minutes.
Time and Date
This menu selection allows changes to the time and date and may affect
the time and date for the entire monitoring network.
WARNING
This menu should rarely be used because patient
histories will be lost.
This procedure is described in “Programming Time and Date ” in Chapter
6: “Configuration.”
4-32
Solar 7000/8000/View Patient Monitor
414993-001
Revision J
TROUBLESHOOTING: General Fault Isolation
General Fault Isolation
First Things to Ask
If the unit is not working properly, save yourself some time
troubleshooting by asking yourself these basic questions.
•
Is the power cord connected?
•
Is the unit turned ON at the rear of the monitor?
•
On the Solar 7000, is the display LED illuminated? (If not, press the
DISPLAY ON/OFF button to turn the display ON.)
•
On a Solar 8000/View, is the display LED or screen illuminated? (If
not, press the power ON/OFF button to turn the display ON.)
•
Are all the communication cables firmly connected?
•
Were there any changes in the use, location, or environment of the
equipment that could cause the failure?
•
Has the unit been modified in any way, either in software or
hardware?
Is operator error the cause of the problem? Try to repeat the user’s
scenario exactly and compare that to the proper operation of the
equipment. Check the operator’s manual as necessary.
Visual Inspection
A thorough visual inspection of the equipment can save time. Small
things—disconnected cables, foreign debris on circuit boards, missing
hardware, loose components—can frequently cause symptoms and
equipment failures that may appear to be unrelated and difficult to
track.
The following steps might seem trivial but it is highly recommended that
they be performed to remove these “simple” failures as causes of
problems.
•
Set the ON/OFF switch to the OFF position and disconnect the
monitor from its power source.
•
Read the “Disassembly Guidelines” in Chapter 7: “Upper Level
Assembly,” before you perform an internal visual inspection of the
components.
WARNING
High voltages exist in this unit. Use insulated tools.
Remove jewelry. Use only one hand when possible.
•
Revision J
Check all fuses. See “Fuse Part Numbers” in Chapter 7: Upper Level
Assembly.
Solar 7000/8000/View Patient Monitor
414993-001
4-33
TROUBLESHOOTING: General Fault Isolation
Take the time to make all the recommended visual checks (refer to the
visual inspection chart below) before starting any detailed
troubleshooting procedures.
Visual Inspection Chart
Area
I/O Connectors and
Interface Cables
Look for the following problems:
■
Fraying or other damage
■
Bent prongs or pins
■
Cracked housing
■
Loose screws in plugs
■
Excessive cable tension or wear
■
Secure mounting hardware
■
Excessive tension or wear
■
Loose connection
■
Strain reliefs out of place
■
Moisture, dust, or debris (top and bottom)
■
Loose or missing components
■
Burn damage or smell of over-heated components
■
Socketed components not firmly seated
■
PCB not seated properly in edge connectors
■
Whenever you swap a main processor PCB, remember to exchange the
serial EEPROM U9.
■
Solder problems: cracks, splashes on board, incomplete feedthrough, prior
modifications or repairs
■
Loose wires or ground strap connections
■
Faulty wiring
■
Wires pinched or in vulnerable position
Mounting Hardware
■
Loose or missing screws or other hardware, especially fasteners used as
connections to ground planes on PCBs
Power Source
■
Faulty wiring, especially AC outlet
■
Circuit not dedicated to system
Internal Harnesses and
Cables
Circuit Boards
Ground Wires/Wiring
(Power source problems can cause static discharge, resetting problems, and
noise.)
WARNING
Solder multilayer and surface mount PCB assemblies at
your own risk! Improper repair methods can damage the
PCB assemblies even further. Only qualified service
personnel with the proper laboratory equipment should
attempt to repair PCB assemblies.
4-34
Solar 7000/8000/View Patient Monitor
414993-001
Revision J
TROUBLESHOOTING: AC Line Voltage Test
AC Line Voltage Test
This test verifies that the domestic wall outlet supplying power to the
equipment is properly wired. For international wiring tests, refer to the
internal standards agencies of that particular country.
120 VAC, 50/60 Hz
Use a digital voltmeter to check the voltages of the 120-volt AC wall
outlet (dedicated circuit recommended). If the measurements are
significantly out of range, have a qualified electrician repair the outlet.
The voltage measurements should be as follows:
1. 120 VAC (± 10 VAC) between the line contact and neutral and
between the line contact and ground.
2. Less than 3 VAC between neutral and ground.
❶
❷
240 VAC, 50/60 Hz
❶
Use a digital voltmeter, set to measure at least 300 VAC, to check the
voltages of the NEMA 6-20R, AC wall outlet (dedicated circuit
recommended). If the measurements are significantly out of range, have
a qualified electrician repair the outlet. The voltage measurements
should be as follows:
1. 120 VAC (± 10 VAC) between either “hot” contact and ground.
2. 210 to 230 VAC between the two “hot” contacts.
❶
❷
Revision J
Solar 7000/8000/View Patient Monitor
414993-001
❶
4-35
TROUBLESHOOTING: Troubleshooting Procedure
Troubleshooting Procedure
To use this troubleshooting procedure, read through the steps in the
table until you find a similar problem to the one you are having. Many
network problems at the central station are traced back to the patient
monitor or Tram-rac housing. Therefore, many of the troubleshooting
suggestions include swapping pcb assemblies in the patient monitor or
Tram-rac housing. The “LED Troubleshooting Chart” presented after this
procedure explains how the various LEDs on the pcb assemblies should
normally perform.
Do not perform any invasive procedures listed in this procedure unless
you are a trained field or bio-medical engineer. To aid in disassembly of
the unit, refer to “Disassembly Guidelines” in Chapter 7: “Monitor
Assembly.”
WARNING
This procedure is intended for use by service personnel
with advanced troubleshooting skills. The consequences
of the following steps may cause loss of patient data and
disruption of the entire Unity Network.
CAUTION
Whenever you swap a main processor PCB, remember to
exchange the serial EEPROM U9.
4-36
Solar 7000/8000/View Patient Monitor
414993-001
Revision J
TROUBLESHOOTING: Troubleshooting Procedure
Troubleshooting Chart
Is the MAIN menu
displayed on the
monitor?
The display is completely blank or resetting intermittently. There is a serious
hardware failure so try one of the following solutions.
1. Verify the rear power switch is turned ON.
2. Verify the monitor DISPLAY ON/OFF switch is turned ON. (Solar 7000 only.)
3. When power is initially applied to the monitor, the DISPLAY ON/OFF
indicator is not illuminated.
■
Remove all external connections (except power cord) to check for overload
caused by malfunctioning peripheral device.
■
There are loose connections to the power supply in the Solar 7000 monitor,
Solar 8000 processing unit, or SolarView remote display controller.
■
Swap bad power supply with a known good one.
■
Swap main processor PCB with a known good one.
4. When power is initially applied to the monitor, the DISPLAY ON/OFF
indicator flashes quickly (more than two times per second).
■ Remove all external connections (except power cord) to check for overload
caused by malfunctioning peripheral device.
■ The power supply is underloaded.
▲
Check for a loose power supply connection.
▲
Check for a failed PCB.
5. When power is initially applied to the monitor, the BOOT CODE indicates
that the serial EEPROM is damaged or missing.
■
Ensure serial EEPROM U9 is in place on the main processor PCB.
■
Swap main processor PCB with a known good one.
6. When power is initially applied to the monitor, the BOOT CODE indicators
that the BOOT FLASH or MAIN FLASH has failed.
■ Try downloading new software.
■ Swap main processor PCB with a known good one.
7. When power is initially applied to the monitor the DISPLAY ON/OFF
indicator is not illuminated continuously.
■ Check for a loose connection to the Solar 8000/View display or Solar 7000
low-voltage supply.
■ Check for a loose connection to the keycap PCB.
■ Swap main processor PCB with a known good one.
8. When power is initially applied, the DISPLAY ON/OFF indicator is
illuminated continuously, but the display is blank.
■ Check for a loose connection to the CRT.
■ For the Solar 7000 monitor, check for a loose connection to the CRT
controller or deflection PCB.
■ For the Solar 7000 monitor, swap high-voltage power supply with a known
good one.
■ For the Solar 7000 monitor, swap deflection PCB with a known good one.
■ Swap main processor PCB with a known good one.
Revision J
Solar 7000/8000/View Patient Monitor
414993-001
4-37
TROUBLESHOOTING: Troubleshooting Procedure
Troubleshooting Chart
Is the quality of the
monitor display
good?
Swap the Solar 8000/View display with a known good one or try one of the
following solutions for the Solar 7000 monitor.
1. The display is ‘rolling’ or ‘tearing.’
■
■
Check for vertical and horizontal sync signals at J6 on the main processor
PCB.
▲
Verify horizontal sync of 35kHz at pin 10 of J6.
▲
Verify vertical sync of 60 Hz at pin 11 of J6
▲
If sync signals are not present, swap main processor PCB with a known
good one.
The display circuitry is not adjusted properly. Perform the “Display
Calibration” in Chapter 5: “Calibration.”
▲
Move jumper W1 to DISABLE position on the deflection PCB. This will
indicate which deflection is lost (vertical or horizontal).
▲
Swap deflection PCB with a known good one.
2. The display image is too small, too large, or not stable.
■
Check for a poor connection between the CRT and the high-voltage supply.
■
The deflection is not adjusted properly. Perform the “Display Calibration” in
Chapter 5: “Calibration.”
▲
Swap deflection PCB with a known good one.
▲
Swap high-voltage power supply with a known good one.
3. The display background is highlighted in some areas or the display colors are
abnormal.
4-38
■
Check for loose connections between the CRT, high-voltage supply, deflection
and CRT controller PCBs.
■
The intensity, focus, or color is not adjusted properly.
▲
First, perform the “Display Calibration” in Chapter 5: “Calibration.”
▲
Perform the “CRT Controller PCB Calibration” in Chapter 5:
“Calibration.” Next, repeat the “Display Calibration” to verify
adjustments.
■
Swap CRT controller PCB with a known good one.
■
Swap high-voltage power supply with a known good one.
■
Swap CRT with a known good one.
Solar 7000/8000/View Patient Monitor
414993-001
Revision J
TROUBLESHOOTING: Troubleshooting Procedure
Troubleshooting Chart
Is patient data
displayed at the
monitor?
This problem has many sources, so try one or more of the following solutions.
1. Verify correct patient or simulator leadwire connections to Tram module in
Tram-rac housing.
2. Verify Tram module is completely inserted and ON.
3. Verify Tram-rac housing is turned ON.
4. When the SOFTWARE REVISION menu is selected, the RAC COMM, RAC
DAS, or Tram module software file numbers are missing.
■
If INCOMPATIBLE SOFTWARE REV message is displayed, refer to
“Software Updating” in Chapter 6: “Configuration.”
■
Check for a loose or faulty cable from the patient monitor to the Tram-rac
housing.
■
Power cycle Tram-rac housing.
■
View error logs for TRAM module and patient monitor. Refer to “Reviewing
Errors Logs” in Chapter 6: “Configuration.”
■
Swap Tram module with a known good one.
■
Swap Tram-rac housing with a known good one.
■
Verify Tram-net/Ethernet operation of the main processor PCB with the
“LED Troubleshooting Chart.”
▲
▲
If red LED (DS2) is ON steady, try the following.
◆
Another device using Tram-net is faulty.
◆
Reduce devices using Tram-net because the network is overloaded.
◆
Swap main processor PCB with a known good one.
If yellow and green LEDs (DS5 and DS4) do not agree with “LED
Troubleshooting Chart”, try the following.
◆
■
Verify operation of rac processor PCB with the “LED Troubleshooting Chart.”
▲
If red LED (DS1) does not flash opposite LED DS2, do the following.
◆
▲
▲
Swap rac processor PCB with a known good one.
If red LED (DS2) does not flash opposite LED DS1, do the following.
◆
Revision J
Swap main processor PCB with a known good one.
Swap data acquisition PCB with a known good one.
If LEDs red, yellow, and green do not agree with the “LED Troubleshooting
Chart,” do the following.
◆
Swap Tram-rac processor PCB with a known good one.
◆
Swap data acquisition PCB with a known good one.
Solar 7000/8000/View Patient Monitor
414993-001
4-39
TROUBLESHOOTING: Troubleshooting Procedure
Troubleshooting Chart
Are patient alarms
sounding when
activated?
Try one of the following solutions.
1. If a patient’s waveform and the DISCHARGED message are both displayed,
consult the operator’s manual for correct patient admitting instructions.
This problem usually implies an operator error. The alarm function remains
disabled until the patient is correctly admitted into the system.
2. Ensure the alarms are enabled. Consult the operator’s manual for correct
alarm settings.
3. To test if the speaker is functioning, use the LEARN THE MONITOR menu
option.
4. Perform recommended maintenance procedure.
4-40
Solar 7000/8000/View Patient Monitor
414993-001
Revision J
TROUBLESHOOTING: Troubleshooting Procedure
Troubleshooting Chart
Is patient data from
monitor displayed
at the central
station?
Often simple programming errors restrict the communication link between the
monitor and the central station. First decide if all, multiple, or one patient
monitor in not communicating with the central station.
1. If the central station displays a NO COMM message for all patients, do the
following.
■
Power cycle the central station.
■
Verify the central station is programed to display the patient data. Use
SELECT BEDS FOR DISPLAY AT THIS CENTRAL option.
■
Verify the care unit name is correctly programmed in the central station.
Refer to Centralscope Central Station Service Manual for instructions.
■
Use the SERVICE MONITOR menu of the central station to check if the
patient monitors communicating with the network. The LIST NETWORK
option will show all monitors actively communicating. If no patient monitors
are listed but the central station is listed, do the following.
▲
Check for a loose connection between the central station and the
transceiver.
▲
Check for a faulty transceiver.
▲
Check for an open transceiver cable connection.
▲
Check for loose or faulty Ethernet cabling.
▲
Swap the LAN controller or main processor PCB in the central station
with a known good one.
2. If the central station displays a NO COMM message for multiple patients, do
the following.
Revision J
■
Power cycle the central station.
■
Use the SERVICE MONITOR menu of the central station to check if the
patient monitor is communicating with the network. The LIST NETWORK
option will show all monitors that are actively communicating. Refer to the
Centralscope Central Station Service Manual for details.
■
If all patient monitors are listed correctly, check the configuration of the
patient monitors that are not communicating. Refer to “Configuring the
Monitor” in Chapter 6: “Configuration.”
■
If some patient monitors are not in the network list, check the overall
topology of the network to locate the segment not communicating.
▲
Check for loose connections.
▲
Check transceivers and interface cables to the Ethernet cables.
Solar 7000/8000/View Patient Monitor
414993-001
4-41
TROUBLESHOOTING: Troubleshooting Procedure
Troubleshooting Chart
3. If the central station displays a NO COMM message for one patient, do the
following.
■
Power cycle the Solar 7000 patient monitor or Solar 8000 processing unit.
■
Power cycle the central station.
■
Check for a loose connection between the patient monitor and the Ethernet
cable.
■
View error logs for TRAM and the monitor. Refer to “Reviewing Errors Logs”
in Chapter 6: “Configuration.”
■
An incorrect LAN address was programmed into the monitor. Refer to
“Configuring the Monitor” in Chapter 6: “Configuration.”
■
Verify no duplication of internet (IP) addresses on the network.
■
Verify operation of the main processor PCB with the “LED Troubleshooting
Chart.”
▲
▲
▲
4-42
If red LED (DS3) and green (DS5) flash at the same time, check for an
open circuit.
◆
Check for loose or faulty Ethernet cabling.
◆
Ensure a terminator exists at both ends of the Ethernet cable and only
two are used.
◆
Swap main processor PCB with a known good one.
If green LED (D5) flashes without yellow LED (DS4), try one of the
following.
◆
Check for a faulty transceiver.
◆
Check for an open transceiver cable connection.
◆
Replace main processor PCB with a known good one.
If yellow LED (DS4) never flashes, try one of the following.
◆
Check for short-circuited Ethernet main bus.
◆
Check for a faulty transceiver.
◆
Check for an open transceiver cable connection
Solar 7000/8000/View Patient Monitor
414993-001
Revision J
TROUBLESHOOTING: Troubleshooting Procedure
Troubleshooting Chart
Are patient alarms
sounding at the
desired central
station?
This problem usually implies an operator error. The alarm function remains
disabled until the patient is correctly admitted into the system.
1. If DISCHARGED message is displayed, consult the operator’s manual for
correct patient admitting instructions.
2. If the monitor was moved from one care unit to another, reprogram the alarm
destinations.
■
Watch for misspelling or inclusion of a space character in the name.
■
Make sure that the care unit name programmed into the monitor and central
station match exactly.
Typically, the care unit name for a monitor is not shown on the central
station display of a patient’s data. Only the bed number is shown. If the care
unit name for a monitor does not match the central station care unit name,
then the monitor identification changes. The monitor identifier shows the
care unit name followed by a vertical slash (|) and then the bed number. The
solution is to modify the monitor care unit name to match the central
station’s care unit name.
3. To test if the speaker is functioning, force an alarm from another monitor.
Are waveforms
displayed complete
at the central
station?
If the waveforms are broken up at the central station display, do the following.
1. Ensure all SQE (signal quality enable) switches are turned OFF for all
transceivers.
2. Use LANSTATS function in the SERVICE MONITOR of the central station
to get the LAN statistics. Refer to Troubleshooting in the Centralscope
Central Station Service Manual for more information.
3. Check for large amounts of data errors at each central station in the system.
■ If only one central station has a large number of detected errors, this
implies a problem with that specific central station. Try replacing the
LAN controller PCB in the central station.
■ If large error values are found in all central stations in the system, this
implies a problem with the Unity Network. Try troubleshooting the
network for loose connections and faulty transceivers.
Revision J
Solar 7000/8000/View Patient Monitor
414993-001
4-43
TROUBLESHOOTING: Troubleshooting Procedure
Troubleshooting Chart
Are graphs and
alarms printed at
the desired
location?
Try one of the following solutions.
1. Verify paper in central station writer is correct side up.
2. If the monitor was moved from one care unit to another, reprogram the graph
destinations.
■
Watch for misspelling or inclusion of a space character in the name.
■
Make sure that the care unit name programmed into the monitor and central
station match exactly.
Typically, the care unit name for a monitor is not shown on the central
station display of a patient’s data. Only the bed number is shown. If the care
unit name for a monitor does not match the central station care unit name,
then the monitor identification changes. The monitor identifier shows the
care unit name followed by a vertical slash (|) and then the bed number. The
solution is to modify the monitor care unit name to match the central
station’s care unit name.
3. If a stand-alone DDW is being used, you should set the graphs to BEDSIDE
for both graphing locations.
Does the remote
control activate the
display?
At times, the remote control will ‘lock up.’ This is caused by an interruption of
power to the remote control. Try one of the following solutions.
1. Check for a loose connection from the monitor to the remote control.
2. Try a different Tram-net hub port.
3. Disconnect and securely reconnect the remote control from the monitor to
reset the remote control.
4. Replace remote control with a known good one.
5. Swap main processor PCB in patient monitor with a known good one.
Is the quality of the
Solar 7000 remote
display good?
The monitor display is fine, but the remote display is distorted. Try one of the
following solutions.
1. Check for a loose connection from the monitor to the remote display.
2. If the remote display was first used with a Tramscope monitor and then
connected to a Solar 7000 monitor, a cable adapter, pn 405947-002, is
required between the monitor and the remote display.
3. Swap cable adapter or cable between monitor and remote display with a
known good one.
4. Ensure RGB and SYNC inputs are 75Ω terminated (LOW). (Tramscope
monitors support unterminated (HIGH) impedance mode.
End
4-44
This is the extent of troubleshooting steps developed at this time.
Solar 7000/8000/View Patient Monitor
414993-001
Revision J
TROUBLESHOOTING: Troubleshooting Procedure
LED Troubleshooting
The LED Troubleshooting Chart presented below explains how the
various LEDs should normally perform. This may help you determine the
source of a malfunction in conjunction with the steps previously
discussed in the Troubleshooting Procedure.
LED Troubleshooting Chart
LED/Color
Signal Name
Function
Normal Condition
Tram-net LEDs on Main Processor PCB, PN 800678-00X
DS1/Yellow
Network Activity
“I hear all talking on Tram-net”
ON steady or flickers
DS2/Red
Jabber Detect
“I detect excessive talking on
OFF if all hub ports OK
Tram-net”
Ethernet LEDs on Main Processor PCB, PN800678-00X
DS3/Red
Collision Detect
“I hear data collisions on Ethernet”
OFF or
Flickers ON infrequently
DS4/Yellow
Network Activity
“I hear all talking on Ethernet”
ON steady or flickers*
DS5/Green
Transmit Enable
“I am talking on Ethernet”
Flickers ON with yellow
LED*
Processor LEDs on Main Processor PCB, PN800678-00X
DS6/Orange
Power
+5V is OK to PCB
ON steady
DS7/Green
“I am OK LED”
“Main processor PCB is OK”
V1 or V2: Don’t care
steady state, but flashes
when executing boot code
V3 or later: Flashes at
1Hz
Tram-net LEDs on Tram-rac Processor PCB, PN 402518-003, in the Tram-rac Housing
DS1/Green
Power
“+5V is OK to PCB”
ON steady
DS2/Red
Network Activity
“I hear all talking on Tram-net”
ON mostly steady with
Tram-rac connected or
Flickers LOW with no
Tram-rac connected
DS3/Green
Transmit Enable
“I am talking on Tram-net”
Flickers ON with red LED1
ON steady while graphing
DS4/Yellow
Error Detect
“I detect an error on this PCB”
OFF
DS6/Red2
Rac COMM
“Tram-rac4 processor PCB is OK”
Flashes opposite DS5
(twice per second)
DS5/Red2
Rac DAS
“Data acquisition PCB is OK”
Flashes opposite DS6
(twice per second)
Revision J
1Because
NOTE:
“I hear when I am talking,” the “talking” LED flashes
with the “hearing” LED, but the “hearing” LED will also flash
alone when it “hears someone else talking.”
NOTE:
2
For pn 800518-001/002, reference designators for DS5 and DS6
were swapped.
Solar 7000/8000/View Patient Monitor
414993-001
4-45
TROUBLESHOOTING: Troubleshooting Software Updates
Troubleshooting Software Updates
Problems and
Solutions
The following is a list of problems commonly encountered during a
software update with their solutions.
Central station contains the software, but the monitor
cannot find it.
The central station has loaded the monitor software onto its hard drive,
but the monitor does not see the central station on the network. There
are two ways to get the central station to broadcast across the network.
•
If patient monitoring may be interrupted, press the CTRL, ALT, and
DELETE keys simultaneously to reboot the central station.
•
If the central station is monitoring patients, do the following:
1. At the central station, execute the following menu sequence, starting
from the MAIN menu:
CENTRAL SETUP
SERVICE
Enter Password (MEI CS 123)
SERVICE MONITOR
NOTE: The commands presented in italics are case sensitive.
2. Type ps eaglefs and press the ENTER key. Enabling the EAGLEFS
program that teaches your central station how to broadcast the
software on the network. The central station will respond in one of
two ways:
◆
If the central station is not running EAGLEFS, it will respond
with: INVALID PROCESS ID OR NAME. Type run eaglefs HDØ
and press the ENTER key.
◆
If the central station lists EAGLEFS as a running process, go
to the next step.
3. Press the MAIN MENU key on the front panel to exit the SERVICE
MONITOR and go back to the monitor to download the software.
4-46
Solar 7000/8000/View Patient Monitor
414993-001
Revision J
TROUBLESHOOTING: Troubleshooting Software Updates
Monitor appears ‘locked up’ during a network download:
CAUTION
Do not POWER CYCLE or reboot the monitor if
downloading of boot code is proceeding normally. The
monitor will be rendered useless.
If the packet or byte numbers stop advancing for at least two minutes, do
the following:
•
Check that all cables are properly connected.
•
At the monitor:
•
◆
Hold down the NBP GO/STOP and ZERO ALL keys on the
front panel. (For the SolarView remote display controller, hold
down the two blank keys.)
◆
Press and release the Trim Knob control.
◆
Keep holding the NBP GO/STOP and ZERO ALL keys (or two
blank keys for the SolarView remote display controller) until
the BOOT LOADER menu appears on the display.
Repeat the software update procedure for the aborted file from the
beginning.
IF A:/> prompt does not appear at the PC:
Select the correct disk drive on the PC to get the A:/> prompt. Many
laptop PCs have a switch that allows a single disk drive to emulate two
disk drives. Set the drive switch to A and then press the CTRL, ALT, and
DELETE keys simultaneously to reboot the PC.
Monitor appears ‘locked up’ during a PC download:
CAUTION
Do not POWER CYCLE or reboot the monitor if
downloading of boot code is proceeding normally. The
monitor will be rendered useless.
If the packet or byte numbers stop advancing for at least two minutes, do
the following:
Revision J
•
Check that all cables are properly connected.
•
Press the ESC key on the PC and the update will continue.
•
Select ABORT on the monitor or POWER CYCLE the monitor.
•
Repeat the software update procedure for the aborted file from the
beginning.
Solar 7000/8000/View Patient Monitor
414993-001
4-47
TROUBLESHOOTING: Troubleshooting Software Updates
Software revision window does not list part numbers:
If the part numbers are not listed for the monitor interfaces in the
software revision window, the software update has not been activated.
POWER CYCLE the monitor and view the software revisions window
again. If the part numbers are still missing, repeat the update procedure
for each missing file.
Waveforms do not appear at the central station:
If communication is corrupted, do the following:
•
Check all cables for a good connection.
•
Ensure that the central station software is correct.
•
Ensure Ethernet addresses have been programed correctly. Refer to
the appropriate service manual.
•
Ensure the Ethernet address has been programmed correctly using
the following steps.
◆
Hold down the NBP GO/STOP and ZERO ALL keys on the
front panel. (For the SolarView remote display controller, hold
down the two blank keys.)
◆
Press and release the Trim Knob control.
◆
Keep holding the NBP GO/STOP and ZERO ALL keys (or two
blank keys for the SolarView remote display controller) until
the BOOT LOADER menu appears on the display.
◆
When the BOOT LOADER asks for the Ethernet address,
enter it from the label by the rear connectors of the monitor.
Software feature level is UNKNOWN in the SOFTWARE
REVISION window:
If the monitor software feature level is listed as UNKNOWN, the
EEPROM U9 of main processor PCB was not installed properly or was
not transferred to the new PCB if the circuit board was replaced. Refer to
“Disassembly Guidelines” in Chapter 7: “Monitor Assembly” in this
manual.
4-48
Solar 7000/8000/View Patient Monitor
414993-001
Revision J
5
Revision J
CALIBRATION
Solar 7000/8000/View Patient Monitor
414993-001
5-1
CALIBRATION:
For your notes
5-2
Solar 7000/8000/View Patient Monitor
414993-001
Revision J
CALIBRATION: Solar 7000 Color Monitor
Solar 7000 Color Monitor
Color Display
Calibration
The color CRT display of the Solar 7000 monitor is accurately adjusted at
the factory prior to shipment. If the CRT, CRT controller PCB, or
deflection PCB is replaced, it will be necessary to calibrate the display.
The following steps describe a simple method to calibrate the color
display using special displays generated by the monitor in the SERVICE
MODE menu.
To perform this procedure, you will need the special tools and items listed
below. Equivalent equipment may be substituted.
Required Tools/Special Equipment
Manufacturer and
Part Number/Model
Item
Very small Blade Screwdriver
–
Small Hex Coil Tuning Tool
–
Multimeter (DMM)
Fluke 8060A
WARNING
To avoid electrical shock, do not touch the large heatsink
connected to the deflection PCB, pn 404642-002, while
the unit is ON.
Due to high voltage on the deflection PCB, use an
insulated screw driver at all times while making
adjustments.
WARNING
Make sure the monitor is not monitoring a patient.
Patient monitoring will be interrupted.
Revision J
Solar 7000/8000/View Patient Monitor
414993-001
5-3
CALIBRATION: Solar 7000 Color Monitor
Preparation
Remove monitor housing by following the steps given below.
1. Turn the power switch at the rear of the monitor to OFF.
2. To aid in disassembly, refer to “Disassembly Guidelines” in Chapter
7: “Monitor Assembly.” (Remove two screws at the back of the unit.
Lay the unit on its front display. Do not apply too much pressure on
the Trim Knob control. Remove three screws from bottom of unit.
Pull the housing directly up. Set the unit upright again.)
3. Apply power at the rear power switch and let the unit warm up for at
least 30 minutes.
4. Color units will automatically degauss the display when turned ON.
If the red color is impure (not true red), the screen may need to be
degaussed again. (Use Service Mode.) Note that once the display is
manually degaussed, it cannot be degaussed again for at least 10
minutes.
An external degaussing coil may have to be used if the impure red
persists after performing following procedure.
Horizontal Frequency
Adjust
Do the following steps in the order given for the color display.
1. Set DMM to frequency counter mode by selecting the AC and HZ
button.
2. Disconnect the video cable ribbon cable from connector on the main
processor PCB, pn 800678-00X.
3. Locate variable resistor R61 on the solder side of the deflection PCB.
4. Connect positive lead of DMM to TP18 or TP19 on solder side of the
deflection PCB. Connect negative lead to chassis GND.
5. Verify 34.53 kHz ±20 Hz for the horizontal frequency. Adjust variable
resistor R61 to achieve this measurement. The unit must be at
operating temperature for this adjustment.
6. Reconnect video connector ribbon cable assembly to connector on the
main processor PCB.
5-4
Solar 7000/8000/View Patient Monitor
414993-001
Revision J
CALIBRATION: Solar 7000 Color Monitor
Display FOCUS TEST PATTERN on the display by executing the
following menu selections from the MAIN MENU.
Color Focus Adjust
CUSTOMIZE MONITOR or MONITOR SETUP
SERVICE MODE
Password
Enter day and month from monitor screen with leading zeros.
(July 4 = 0407)
HARDWARE TESTS (if menu option is available)
VIDEO TEST
YES
FOCUS TEST PATTERN
1. Locate the variable resistor labelled FOCUS or COARSE FOCUS on
the top of the high-voltage power supply. Depending on power supply
used, refer to figure at left for location
2. Adjust variable resistor to achieve the best overall clarity of line
definition.
3. Push the Trim Knob to exit.
Color Cross Hatch Adjust
0.25"
PICTURE
BEZEL
0.25"
0.25"
RASTER
0.25"
Select CROSS HATCH test pattern and check for display linearity. All
the following adjustments are made on the deflection PCB, pn 404642002. This PCB is on the right as you face the CRT.
1. Adjust HORIZONTAL LINEARITY with variable inductor L3 to
make each box symmetrical horizontally.
2. Adjust HORIZONTAL PHASE with variable resistor R64 to center
the cross hatch from right to left.
3. Adjust HORIZONTAL SIZE with variable resistor R2 to 0.25 ±0.1
inch from center of the outer cross hatch line to the bezel edge on
each side.
4. Adjust PIN CUSHION with variable resistor R63 to reduce
horizontal bowing at each side at the center of the picture.
5. Horizontal linearity, phase, size, and pin cushion may need to be
readjusted because of their affect on each other.
6. Adjust VERTICAL LINEARITY with variable resistor R23 to make
each box in the cross hatch as square as possible.
7. Adjust HEIGHT with variable resistor R32 to 0.25 ±0.1 inch from
center of the outer cross hatch line to the bezel edge on the top and
bottom.
8. Adjust VERTICAL CENTERING with variable resistor R38 to center
the cross hatch vertically.
9. Vertical linearity, height, and vertical centering may need to be
readjusted because of their affect on each other.
10. Push the Trim Knob to exit.
11. Vertical linearity, height, and vertical centering may need to be
readjusted because of their affect on each other.
12. Push the Trim Knob to exit.
Revision J
Solar 7000/8000/View Patient Monitor
414993-001
5-5
CALIBRATION: Solar 7000 Color Monitor
Color Intensity Adjust
Select the VERTICAL GRAY BARS on the monitor display and push the
Trim Knob.
1. Locate the variable resistor labelled G2 or SCREEN on the top of the
high-voltage power supply PCB. Depending on power supply used,
refer to figure at left for location.
2. Adjust G2 or SCREEN until all gray scales are visible.
3. Push the Trim Knob to exit. Select RESTART SYSTEM to return to
the MAIN MENU.
Color Adjust
With the MAIN MENU displayed, do the following to adjust the color.
1. Locate the CRT controller PCB, pn 404641-00X at the back of the
assembly as you face the CRT. Locate R33, R51, and R52 variable
resistors near the top of the PCB labelled BLUE, GREEN, and RED
CUTOFF, respectively.
2. Adjust BLUE CUTOFF R33 until retrace lines appear and then just
disappear.
3. Adjust GREEN CUTOFF R51 until retrace lines appear and then
just disappear.
4. Adjust RED CUTOFF R52 until retrace lines appear and then just
disappear.
5. While observing the white display windows of the MAIN MENU,
readjust the BLUE, GREEN, and RED CUTOFF to remove any hue
of color in the white display areas.
Completion
1. Select RESTART SYSTEM to return to the MAIN MENU.
2. Assemble unit and return to service.
5-6
Solar 7000/8000/View Patient Monitor
414993-001
Revision J
CALIBRATION: Solar 7000 Color Monitor
CRT Controller PCB
Calibration
This procedure should be performed whenever a CRT controller PCB has
been repaired in a Solar 7000 color monitor. When this procedure is
completed, perform “Display Calibration” found earlier in this chapter.
The following steps describe a simple method to calibrate the CRT
controller PCB using a special display generated by the monitor circuits.
To perform this procedure, you will need the special tools and items listed
below. Equivalent equipment may be substituted.
Required Tools/Special Equipment
Manufacturer and
Part Number/Model
Item
Very small Blade Screwdriver
–
Oscilloscope (100 MHz BW or greater)
Tektronix 2215
Multimeter (DMM)
Fluke 8060A
WARNING
Beware of AC line voltage at the power module. When
rear power switch is OFF, AC line voltage is still present.
Use an insulated screw driver at all times when making
adjustments.
WARNING
Make sure the monitor is not monitoring a patient,
because monitoring will be interrupted.
Revision J
Solar 7000/8000/View Patient Monitor
414993-001
5-7
CALIBRATION: Solar 7000 Color Monitor
Remove monitor housing by following the steps given below.
1. Turn the power switch at the rear of the monitor to OFF.
2. Remove two screws at the back of the unit. Lay the unit on its front
display. Do not apply too much pressure on the Trim Knob. Remove
three screws from bottom of unit. Pull the housing directly up. Set
the unit upright again.
3. Display VERTICAL GRAY BARS on the display by executing the
following menu selections from the MAIN MENU.
CUSTOMIZE MONITOR or MONITOR SETUP
SERVICE MODE
YES or Password
Enter day and month from monitor screen with leading zeros.
(July 4 = 0407)
HARDWARE TESTS (if menu option is available)
VIDEO TEST
YES
VERTICAL GRAY BARS
4. Locate TP2, TP4, and TP6 on the CRT controller PCB. See figure on
next page. It may be necessary to remove the two mounting screws to
gain access to the tests points.
NOTE: If the two mounting screws are removed from the CRT
controller PCB, jumper the ground of the PCB to chassis
ground. All color calibration will be erroneous without proper
grounding of this PCB.
Gain Adjust
Do the following, to set the color gain.
1. Connect the negative lead to the oscilloscope to chassis ground.
2. Connect the positive lead of the oscilloscope to TP2. Observe a
stairstep waveform.
Adjust RED CLAMP variable resistor R7 until the most positive
portion of the signal is at +47 volts.
Adjust CONTRAST variable resistor R42 until the most negative
portion of the signal is at +7 volts.
Adjust RED PEAKING variable capacitor C1 for peaking (overshoot)
of 10%. Verify that the steps are linear and that the signal is not
compressed.
5-8
Solar 7000/8000/View Patient Monitor
414993-001
Revision J
CALIBRATION: Solar 7000 Color Monitor
3. Connect the positive lead of the oscilloscope to TP4. Observe a
stairstep waveform.
Adjust GREEN CLAMP variable resistor R15 until the most positive
portion of the signal is at +47 volts.
Adjust GREEN GAIN variable resistor R41 until the most negative
portion of the signal is at +7 volts.
Adjust GREEN PEAKING variable capacitor C6 for peaking
(overshoot) of 10%. Verify that the steps are linear and that the
signal is not compressed.
4. Connect the positive lead of the oscilloscope to TP6. Observe a
stairstep waveform.
Adjust BLUE CLAMP variable resistor R32 until the most positive
portion of the signal is at +47 volts.
Adjust BLUE GAIN variable resistor R40 until the most negative
portion of the signal is at +7 volts
5. Adjust BLUE PEAKING variable capacitor C11 for peaking
(overshoot) of 10%. Verify that the steps are linear and that the
signal is not compressed.
Completion
This completes the color gain adjustment.
1. Press Trim Knob on the monitor to exit. Select RESTART to exit
menu.
2. Remove test equipment.
3. Perform the intensity and color adjust in the “Display Calibration”
procedure found earlier in this chapter before returning to service.
Revision J
Solar 7000/8000/View Patient Monitor
414993-001
5-9
CALIBRATION: Solar 7000 Color Power Supply
Solar 7000 Color Power Supply
This procedure describes how to check and adjust the low-voltage power
supply PCB, pn 800974-00X, used in the Solar 7000 color monitor.
To perform this procedure, you will need the special tools and items listed
below. Equivalent equipment may be substituted.
Required Tools/Special Equipment
Manufacturer and
Part Number/Model
Item
Very small Blade Screwdriver
–
Multimeter (DMM)
Fluke 8060A
WARNING
Beware of AC line voltage at the power module. When
rear power switch is OFF, AC line voltage is still present.
Use an insulated screw driver at all times when making
adjustments.
WARNING
Make sure the monitor is not monitoring a patient,
because monitoring will be interrupted.
Preparation
Remove monitor rear power supply panel by following the steps given
below.
1. Turn power switch at the rear of the monitor to OFF.
2. Remove six screws attaching the rear panel to the power supply at
the rear of the unit. Beware of AC line voltage at the power module.
3. Carefully pull the heatsink/PCB out to make the component side of
the PCB accessible. Make sure the four cable connectors remain
intact.
5-10
Solar 7000/8000/View Patient Monitor
414993-001
Revision J
CALIBRATION: Solar 7000 Color Power Supply
Procedure
Do the following steps in the order given.
1. Turn power switch at the rear of the monitor to OFF.
2. Remove the four screws attaching the power supply shield. Refer to
the “Disassembly Procedure” presented in Chapter 7: “Monitor
Assembly.”
WARNING
Beware of AC line voltage at the power module.
3. Turn the power switch at the rear of the monitor to ON.
4. Connect the positive lead of the DMM to +5V TP1 on the low-voltage
power supply PCB. Connect the negative lead to GND at TP6.
5. Set DMM to DC mode. Verify +5V ±0.1V on DMM.
6. Connect the positive lead of the DMM to +16.75V at TP2. Adjust
variable resistor R32 to +16.75V ±0.1V.
7. Connect the positive lead of the DMM to +24V at TP3. Adjust
variable resistor R40 to +24V ±0.1V.
8. Set the DMM to frequency counter mode by selecting the AC and HZ
button.
9. Connect positive lead of the DMM to TP5 labelled CLK. Verify a
frequency of 60 Hz ±2 Hz.
10. Connect the positive lead of the DMM to pin 7 of +24V regulator U5.
Adjust variable resistor R51 to a frequency of 82.8 kHz ±1 kHz.
11. Connect the positive lead of the DMM to pin 7 of +5V regulator U4.
Adjust variable resistor R52 to a frequency of 86.6 kHz ±1 kHz.
Completion
Revision J
This completes the low-voltage power supply PCB calibration.
•
Remove test equipment and assemble unit.
•
Perform “Checkout Procedure” provided in Chapter 3: “Maintenance”
before returning the unit to service.
Solar 7000/8000/View Patient Monitor
414993-001
5-11
CALIBRATION: Solar 7000 Monochrome Monitor
Solar 7000 Monochrome Monitor
Monochrome Display
Calibration
The monochrome CRT display in the Solar 7000 monitor is accurately
adjusted at the factory prior to shipment. If the CRT is replaced, it will
be necessary to readjust the display. The following steps describe a
simple method to calibrate the monochrome display using special
displays generated by the monitor circuits in the service mode.
To aid in disassembly, refer to “Disassembly Guidelines” in Chapter 7:
“Monitor Assembly.”
Special Tools/Equipment
To perform this procedure, you will need the special tools and items listed
below. Equivalent equipment may be substituted.
Required Tools/Special Equipment
Manufacturer and
Part Number/Model
Item
Very small Blade Screwdriver
–
Small Hex Coil Tuning Tool
–
Multimeter (DMM)
Fluke 8060A
WARNING
Due to possible high voltage, use an insulated screw
driver at all times while making adjustments.
WARNING
Make sure the monitor is not monitoring a patient.
Patient monitoring will be interrupted.
5-12
Solar 7000/8000/View Patient Monitor
414993-001
Revision J
CALIBRATION: Solar 7000 Monochrome Monitor
Preparation
Remove monitor housing by following the steps given below.
1. Turn the power switch at the rear of the monitor to OFF.
2. To aid in disassembly, refer to “Disassembly Guidelines” in Chapter
7: “Monitor Assembly.” (Remove two screws at the back of the unit.
Lay the unit on its front display. Do not apply too much pressure on
the Trim Knob control. Remove three screws from bottom of unit.
Pull the housing directly up. Set the unit upright again.)
3. Apply power at the rear power switch and let the unit warm up for at
least 30 minutes.
Horizontal Frequency
Adjust
Do the following steps in the order given for the monochrome display.
1. Set DMM to frequency counter mode by selecting the AC and HZ
button.
2. Disconnect the video cable ribbon cable from connector J6 on the
CRT controller PCB, pn 401550-00X.
3. Locate variable resistor R103 on the solder side of the CRT controller
PCB.
4. Connect positive lead of DMM to TP10 or TP10 on solder side of the
CRT controller PCB.
5. Connect negative lead to chassis GND.
6. Verify 34.53 kHz ±20 Hz for the horizontal frequency. Adjust variable
resistor R103 to achieve this measurement. The unit must be at
operating temperature for this adjustment.
7. Reconnect video connector ribbon cable assembly to connector J6 on
the CRT controller PCB.
Focus Adjust
Display FOCUS TEST PATTERN on the display by executing the
following menu selections from the MAIN MENU.
CUSTOMIZE MONITOR or MONITOR SETUP
SERVICE MODE
YES or Password
Enter day and month from monitor screen with leading zeros.
(July 4 = 0407)
HARDWARE TESTS (if menu option is available)
VIDEO TEST
YES
FOCUS TEST PATTERN
1. Locate the FOCUS variable resistor R3 on the top of the CRT
controller PCB.
2. Adjust variable resistor to achieve the best overall clarity of line
definition
3. Push the Trim Knob to exit
Revision J
Solar 7000/8000/View Patient Monitor
414993-001
5-13
CALIBRATION: Solar 7000 Monochrome Monitor
Select CROSS HATCH test pattern and check for display linearity. All
the following adjustments are made on the solder side of CRT controller
PCB.
Cross Hatch Adjust
0.25"
PICTURE
BEZEL
0.25"
0.25"
RASTER
0.25"
1. Adjust HORIZONTAL LINEARITY with variable inductor L3 to
make each box symmetrical horizontally.
2. Adjust HORIZONTAL PHASE with variable resistor R63 to center
the cross hatch from right to left.
3. Adjust HORIZONTAL SIZE with variable resistor R95 to 0.25 ±0.1
inch from center of the outer cross hatch line to the bezel edge on
each side.
4. Horizontal linearity, phase, size, and pin cushion may need to be
readjusted because of their affect on each other.
5. Adjust VERTICAL LINEARITY with variable resistor R92 to make
each box in the cross hatch as square as possible.
6. Adjust HEIGHT with variable resistor R75 to 0.25 ±0.1 inch from
center of the outer cross hatch line to the bezel edge on the top and
bottom.
7. Adjust VERTICAL CENTERING with variable resistor R47 to center
the cross hatch vertically.
8. Vertical linearity, height, and vertical centering may need to be
readjusted because of their affect on each other.
9. Push the Trim Knob to exit.
Intensity Adjust
Select the VERTICAL GRAY BARS on the monitor display and push the
Trim Knob.
1. Adjust display INTENSITY with variable resistor R1on the CRT
control PCB. Adjust R1 until the retrace lines just disappear.
2. Adjust CONTRAST variable resistor R32 to make all gray scales are
visible. The brightest bar should not be blurry.
3. Push the Trim Knob to exit.
Completion
Select RESTART SYSTEM to return to the MAIN MENU.
Assemble unit and return to service.
5-14
Solar 7000/8000/View Patient Monitor
414993-001
Revision J
CALIBRATION: Solar 7000 Monochrome Power Supply
Solar 7000 Monochrome Power Supply
This procedure describes how to check and adjust the low-voltage power
supply PCB, pn 408102-00X, used in the Solar 7000 monochrome
monitor. To aid in disassembly, refer to “Disassembly Guidelines” in
Chapter 7: “Monitor Assembly.”
Special Tools/Equipment
To perform this procedure, you will need the special tools and items listed
below. Equivalent equipment may be substituted.
Required Tools/Special Equipment
Manufacturer and
Part Number/Model
Item
Very small Blade Screwdriver
–
Multimeter (DMM)
Fluke 8060A
WARNING
Beware of AC line voltage at the power module. When
rear power switch is OFF, AC line voltage is still present.
Use an insulated screw driver at all times when making
adjustments.
WARNING
Make sure the monitor is not monitoring a patient,
because monitoring will be interrupted.
Preparation
Remove monitor rear power supply panel by following the steps given
below.
1. Turn power switch at the rear of the monitor to OFF.
2. Remove six screws attaching the rear panel to the power supply at
the rear of the unit. Beware of AC line voltage at the power module.
3. Carefully pull the heatsink/PCB out to make the component side of
the PCB accessible. Make sure the four cable connectors remain
intact.
Revision J
Solar 7000/8000/View Patient Monitor
414993-001
5-15
CALIBRATION: Solar 7000 Monochrome Power Supply
Procedure
Do the following steps in the order given.
1. Turn the power switch at the rear of the monitor to OFF.
2. Remove the four screws attaching the power supply shield. To aid in
disassembly, refer to “Disassembly Guidelines” in Chapter 7:
“Monitor Assembly.”
3. Beware of AC line voltage at the power module.
4. Turn the power switch at the rear of the monitor to ON.
5. Connect the positive lead of the DMM to +5V to pin 7 or 8 of the
exposed connector on the left of the power supply.
6. Connect the negative lead to GND at pin 3 or 4.
7. Set DMM to DC mode. Adjust variable resistor R32 to +5V ±0.1V on
DMM.
8. Connect the positive lead of the DMM to +16.75V at pin 1 or 2 of the
exposed connector on the left of the power supply.
9. Adjust variable resistor R39 to +16.75V ±0.17V.
Completion
5-16
This completes the low-voltage power supply PCB calibration.
•
Remove test equipment and assemble unit.
•
Perform “Checkout Procedure” provided in Chapter 3: “Maintenance”
before returning the unit to service.
Solar 7000/8000/View Patient Monitor
414993-001
Revision J
CALIBRATION: Solar 8000/View Power Supply
Solar 8000/View Power Supply
This procedure describes how to verify and adjust the power supply PCB,
pn 800948-001, used in the Solar 8000 processing unit or SolarView
remote display controller.
Special Tools/
Equipment
To perform this procedure, you will need the special tools and items listed
below. Equivalent equipment may be substituted.
Required Tools/Special Equipment
Manufacturer and
Part Number/Model
Item
Very small Blade Screwdriver
–
Frequency Counter
Any
Multimeter (DMM)
Fluke 8060A
CAUTION
Ensure the monitor is not monitoring a patient, because
monitoring will be interrupted.
CAUTION
Fluorinated and chlororinated cleaning agents may
seriously damage the aluminum electrolytic capacitors in
this assembly.
CAUTION
Keep circuit board mounted to metal sub-chassis at all
times to avoid stressing solder joints and surface mount
components.
Revision J
Solar 7000/8000/View Patient Monitor
414993-001
5-17
CALIBRATION: Solar 8000/View Power Supply
Procedure
Do the following steps in the order given.
1. Remove the detachable power cord plug from the power module inlet
connector on the rear of the Solar 8000/View.
2. Remove the four screws attaching the cover. To aid in disassembly,
refer to “Disassembly Guidelines” in Chapter 7: “Upper Level
Assembly.”
3. Position the unit to facilitate making the internal adjustments
WARNING
Handle the unit only when the power cord is unplugged.
Beware of AC line voltage at the power module, even
when the rear power switch is OFF. Capacitors C1-C4
may remain fully charged up to 30 seconds. Use an
insulated screw driver at all times when making
adjustments.
4. Attach the power cord, energize the unit, and carefully proceed with
the adjustments.
5. Verify or adjust the +5V power supply output as follows.
◆
Connect the positive lead of the DMM to the cathode of diode
CR32.
◆
Connect the negative lead to the anode of diode CR32.
◆
Set DMM to DC mode. If necessary, adjust variable resistor
R76 to +5V ±0.1V on the DMM.
6. Verify or adjust the +16.75 power supply output as follows.
◆
Connect the positive lead of the DMM to the cathode of diode
CR33.
◆
Connect the negative lead to the anode of diode CR33.
◆
Set DMM to DC mode. If necessary, adjust variable resistor
R51 to +16.75V ±0.02V on the DMM.
7. Frequency adjust is set at the factory for variable resistor R24. If the
pulse width modulator U2 or associated parts are replaced, the
frequency adjust will require calibration. Do the following.
Completion
5-18
◆
Connect the positive lead of the frequency counter to pin 1 of
diode CR28.
◆
Connect the negative lead of the frequency counter to pin 9 of
the transformer T2.
◆
If necessary, adjust variable resistor R24 to 112 kHz
±0.25 kHz on the frequency counter.
This completes the power supply PCB calibration.
•
Remove test equipment and assemble unit.
•
Perform “Checkout Procedure” provided in Chapter 3: “Maintenance”
before returning the unit to service.
Solar 7000/8000/View Patient Monitor
414993-001
Revision J
6
Revision J
CONFIGURATION
Solar 7000/8000/View Patient Monitor
414993-001
6-1
For your notes
6-2
Solar 7000/8000/View Patient Monitor
414993-001
Revision J
CONFIGURATION: Configuring a Monitor
Configuring a Monitor
The following procedure explains how to configure a monitor on the
Unity Network. The monitor communicates with central stations, and
other related equipment over the Unity Network. This network is
essentially an Ethernet implementation.
General
Gather Information
Select Procedures
This procedure is useful if:
•
you are experiencing communication problems on the Unity
Network, or
•
you are adding a new monitor to the Unity Network.
To configure a new monitor, you must gather the following information
first.
•
Ensure the new monitor’s software revision is the compatible with
the other monitors connected to the Unity Network.
•
Write down the care unit name from the upper left hand corner of the
central station exactly.
•
Write down the bed name for the new monitor.
•
You must know if the monitor will be used for either stationary or
ambulatory (telemetry) monitoring or both.
•
You must know if the monitor will be moved from one Ethernet
connection to another.
Choose and perform the procedures listed below in the order presented.
Each procedure is described on the next pages.
•
Programming Care Unit Name.
•
Programming Bed Number
•
Programming Patient-Monitor Type
•
Programming Admit Menu
•
Selecting Monochrome for Solar 8000/View (optional)
•
Programming Display Brightness (optional)
•
Programming Line Frequency (optional)
•
Programming Analog Output Levels for the Solar ECG Module
(optional)
•
Programming Graph locations
•
Programming Defaults
After completing all necessary procedures, perform the “Checkout
Procedure” found in Chapter 3: “Maintenance.”
Revision J
Solar 7000/8000/View Patient Monitor
414993-001
6-3
CONFIGURATION: Configuring a Monitor
Programming Admit
Menu
The ADMIT MENU selection allows the user to determine the function of
the monitor. This menu item is part of the SERVICE MODE to keep a
casual user from changing the function of the monitor.
Before programming the ADMIT MENU, the user must know if the
monitor will be used for standard adult, neonatal, or operating room
monitoring, and if the monitor will be moved from room to room. All
combinations are explained below.
•
STANDARD configures the monitor to stay in one room for
stationary monitoring only. Monitors not connected to the Unity
Network (Ethernet connection) must use STANDARD configuration
only.
•
ROVER configures the monitor to move from room to room for
stationary monitoring only.
•
COMBO configures the monitor to stay in one room for both
stationary and ambulatory (telemetry) monitoring. This monitor
displays all Tram module data combined with ECG data for
ambulatory patients.
•
ROVER COMBO configures the monitor to move from room to room
for both stationary and ambulatory (telemetry) monitoring.
Do the following procedure to change the ADMIT MENU.
1. To access ADMIT MENU option, execute the following menu
sequence starting from the MAIN menu:
MONITOR SETUP
SERVICE MODE
Password
Enter day and month from monitor screen with leading zeros.
(July 4 = 0407)
MENU SETUP
ADMIT MENU
↑
↓
2. Rotate Trim Knob control to select the function of the monitor.
3. Press Trim Knob control to exit.
6-4
Solar 7000/8000/View Patient Monitor
414993-001
Revision J
CONFIGURATION: Configuring a Monitor
Programming
Patient-Monitor Type
The PATIENT-MONITOR TYPE selection allows the user to select the
type of monitor desired, i.e adult, neonatal or operating room. Different
alarms and parameters are activated for each selection. This menu item
is part of the SERVICE MODE to keep a casual user from changing the
type of the monitor.
CAUTION
Each time the patient-monitor type is changed, the
ADMIT MENU function will default to STANDARD
configuration. Be aware that some alarms and
parameters may be changed.
Do the following procedure to change the PATIENT-MONITOR TYPE.
Refer to the operator’s manual for a full description of alarm, limit, and
parameter changes for each monitor type.
1. To access PATIENT-MONITOR TYPE option, execute the following
menu sequence starting from the MAIN menu:
MONITOR SETUP
SERVICE MODE
Password
Enter day and month from monitor screen with leading zeros.
(July 4 = 0407)
PATIENT-MONITOR TYPE
↑
↓
2. Rotate Trim Knob control to select the type of environment the
monitor will be used in.
3. Press Trim Knob control to exit. Your selection will be displayed at
the top of the screen after the time.
Revision J
Solar 7000/8000/View Patient Monitor
414993-001
6-5
CONFIGURATION: Configuring a Monitor
Programming Care
Unit Name
Up to seven characters are used to identify the care unit. These
characters are displayed at the top right of the screen immediately
preceding the bed number. Do the following procedure to enter a care
unit name.
1. To access SET UNIT NAME option, execute the following menu
sequence starting from the MAIN menu:
MONITOR SETUP
SERVICE MODE
Password
Enter day and month from monitor screen with leading zeros.
(July 4 = 0407)
MONITOR SETTINGS
UNIT NAME
↑
↓
2. Note that the first character in the care unit name is highlighted.
Rotate the Trim Knob control to change this character.
3. When satisfied with the character chosen, press the Trim Knob
control. This causes the highlight to move to the next character.
4. Follow this procedure for all characters. Up to seven characters may
be entered.
5. Turn the Trim Knob control to highlight SET UNIT NAME and press
the Trim Knob control to exit.
Programming Bed
Number
The bed number identifies a particular patient bed. Up to five characters
are used to identify bed number. This number will be displayed at the top
right of the screen.
1. To access SET BED NUMBER option, execute the following menu
sequence starting from the MAIN menu:
MONITOR SETUP
SERVICE MODE
Password
Enter day and month from monitor screen with leading zeros.
(July 4 = 0407)
MONITOR SETTINGS
SET BED NUMBER
↑
↓
2. Using Trim Knob control, follow same procedure as listed above to
change the bed number.
6-6
Solar 7000/8000/View Patient Monitor
414993-001
Revision J
CONFIGURATION: Configuring a Monitor
Selecting
Monochrome for
Solar 8000/View
After any cold start, the display will default to color video. For a
monochrome display, access the video option by executing the following
menu sequence starting from the MAIN menu:
MONITOR SETUP
SERVICE MODE
Password
Enter day and month from monitor screen with leading zeros.
(July 4 = 0407)
HARDWARE TEST
REMOTE VIDEO
Select MONOCHROME for a monochrome display.
CAUTION
When Solar 8000 processing unit or SolarView remote
display controller is cold started, the video selection
defaults to color. Red and blue hues will not be
distinguishable on a monochrome display. Reselect
monochrome in the SERVICE MODE menu.
Programming
Display Brightness
In most cases the brightness will require no additional configuration
because the default video amplitude level is STANDARD (0.7 volts) for
the Solar 8000/View display and set in the factory for the Solar 7000
display.
For Solar 8000/View
Monitors
If the connected display requires more than 0.7 volts amplitude, the
processing unit will need to be programmed. Refer to the owner’s manual
of the display connected to the Solar 8000 processing unit or SolarView
remote display controller for the signal amplitude specification.
The video amplitude adjustment will also affect the contrast and
brightness of the display. First, adjust the contrast and brightness to
medium range according to the owner’s manual supplied with the
display. Next, adjust the video amplitude as described below.
For All Monitors
Adjust the video amplitude if the brightness of the screen appears dull or
requires more than standard 0.7 volts. Access the REMOTE VIDEO
AMPLITUDE option by executing the following menu sequence starting
from the MAIN menu:
MONITOR SETUP
SERVICE MODE
Password
Enter day and month from monitor screen with leading zeros.
(July 4 = 0407)
HARDWARE TEST
REMOTE VIDEO AMPLITUDE
Select the desired amplitude for your display. “+100%” represents
1.4 volts (across 75¾) video amplitude delivered to the display.
Revision J
Solar 7000/8000/View Patient Monitor
414993-001
6-7
CONFIGURATION: Configuring a Monitor
Programming Line
Frequency
Use the BOOT LOADER service menu to configure or change the
monitor line frequency to 50 or 60 Hertz. The default is 60 Hz.
1. To activate the BOOT LOADER program, do the following:
◆
Hold down the NBP GO/STOP and ZERO ALL keys on the
front panel. (For the Solar View remote display controller,
hold down the two blank keys.)
◆
Press and release the Trim Knob control.
◆
Keep holding the NBP GO/STOP and ZERO ALL keys (or two
blank keys for the SolarView remote display controller) until
the BOOT LOADER menu appears on the display.
2. Select SERVICE MENU.
3. Under the SET CONFIGURATION menu option, select 50 Hz or 60
Hz line frequency.
Programming
Analog Out Levels
for the Solar ECG
Module
The Solar monitor controls the analog out signal (MARKER OUT) used
to trigger a defibrillator the Solar ECG module. Refer to the defibrillator
manufacturer’s manual for the required pulse amplitude and duration.
Use the BOOT LOADER service menu to configure or change the
MARKER OUT signal of the DEFIB SYNC connector on a Solar ECG
module.
1. To activate the BOOT LOADER program, doing the following:
◆
Hold down the NBP GO/STOP and ZERO ALL keys on the
front panel. (For the Solar View remote display controller,
hold down the two blank keys.)
◆
Press and release the Trim Knob control.
◆
Keep holding the NBP GO/STOP and ZERO ALL keys (or two
blank keys for the SolarView remote display controller) until
the BOOT LOADER menu appears on the display.
2. Select SERVICE MENU.
3. Under the SET CONFIGURATION menu option, select the desired
levels.
6-8
◆
Select 5V or 12V amplitude.
◆
Select 10 ms or 100 ms for pulse duration.
Solar 7000/8000/View Patient Monitor
414993-001
Revision J
CONFIGURATION: Configuring a Monitor
Programming Graph
Locations
1. Execute the following menu sequence, starting from the MAIN
menu:
MONITOR SETUP
GRAPH SETUP
GRAPH LOCATION
MANUAL GRAPH LOCATION
2. Choose the manual graph location from the list and press the Trim
Knob control.
3. Select ALARM GRAPH LOCATION with the Trim Knob control.
4. Choose the alarm graph location from the list and press the Trim
Knob control.
5. Select PRINT WINDOW LOCATION with the Trim Knob control.
6. Choose the print window location from the list and press the Trim
Knob control.
7. Select 12 LEAD PRINT LOCATION with the Trim Knob control.
8. Choose the 12 lead print location from the list and press the Trim
Knob control.
Communication
Confirmation
Do the following to confirm communication across the network.
1. Admit and generate a waveform at the monitor with a simulator.
2. Press GRAPH GO/STOP button on the monitor
3. Observe graph output at chosen locations.
Problems?
If the DDW does not graph, do the following:
•
Ensure the DDW is turned ON.
•
Check all cables for a good connection.
•
Check programmed alarms and manual graph locations at the
monitor.
If you do not have a waveform at the central station, do the following:
Completion
Revision J
•
Ensure the central station software is a compatible.
•
Check all cables for a good connection.
•
Check the programmed alarms and manual graph locations at the
monitor.
•
Ensure the care unit name is the same in the monitor and in the
central station.
•
Ensure the central station serial number and LAN address are
programmed correctly.
The monitor is now ready for normal operation. At this time, perform the
“Checkout Procedure” found in Chapter 3: “Maintenance.”
Solar 7000/8000/View Patient Monitor
414993-001
6-9
CONFIGURATION: Updating Software
Updating Software
General
Software downloading procedures are provided with each software
upgrade kit. Contact your GE Medical Systems Information Technologies
Service Representative for information on the latest software required
for your equipment. To aid GE Medical Systems Information
Technologies in determining your software needs, please complete the
following:
•
Notate all internal software revisions of the monitors. All Solar
monitors should be using the same software revisions on the Unity
Network. Write down or print out all software code part numbers for
each monitor in the system. To accomplish this, execute the following
menu sequence starting from the MAIN menu:
MONITOR SETUP
SOFTWARE REVISION
PRINT (if menu option is available)
•
•
6-10
Determine if any Solar compatible modules require updating. Each of
the following modules requires its own diskette of software, but it is
downloaded in the same manner as any other monitor interface
software similar to the RAC DAS or RAC COMM software.
◆
SAM module with V3 software or later
◆
Solar ECG module V1 software or later
◆
Solar SpO2 module V1 software or later
◆
CO2 module V1 software or later
GE Medical Systems Information Technologies software is backwards
compatible, but not all features are available. To find out if new
software is available, call GE Medical Systems Information
Technologies Tech Support.
Solar 7000/8000/View Patient Monitor
414993-001
Revision J
CONFIGURATION: Advanced User Procedures
Advanced User Procedures
The procedures discussed in the remainder of this chapter are presented
for advanced users only. In most cases these procedures will not be
necessary and only experienced technicians should attempt these
procedures.
Procedures
The following procedures are discussed later in this chapter.
•
Programming Time and Date
•
Changing Software Feature Level
•
Changing Remote Control Function
•
Transferring Monitor Defaults
•
Programming Ethernet Address
•
Programming Internet Address
•
Reviewing Error Logs
•
Transferring Error Logs
•
Reviewing Event Logs
After completing any of the procedures, it is recommended to perform the
“Checkout Procedure” found in Chapter 3: “Maintenance.”
Revision J
Solar 7000/8000/View Patient Monitor
414993-001
6-11
CONFIGURATION: Advanced User Procedures
Programming Time
and Date
Change the time when the system is switched to or from daylight savings
time or when absolutely necessary.
NOTE: When a monitor is first connected to the Unity Network, the
time and date is automatically updated from the network time.
WARNING
Changing the time or date settings may result in the loss
of patient data history. If one monitor’s time or date is
changed, all monitors on the network will ‘listen’ and
follow suit within 3-5 seconds. Changing the time base of
one monitor may cause some loss of patient data history
for all the monitors on the network.
There are two ways to change the time and date; the SERVICE MODE
menu method is preferred.
The following procedure explains how to use the TIME AND DATE
option in the monitor SERVICE MODE menu or the SET CLOCK option
in the BOOT LOADER service menu.
From BOOT LOADER
1. To activate BOOT LOADER program, doing the following:
◆ Hold down the NBP GO/STOP and ZERO ALL keys on the
front panel. (For the Solar View remote display controller,
hold down the two blank keys.)
◆ Press and release the Trim Knob control.
◆ Keep holding the NBP GO/STOP and ZERO ALL keys (or two
blank keys for the SolarView remote display controller) until
the BOOT LOADER menu appears on the display.
2. Dial the Trim Knob control to access the SET CLOCK option from the
SERVICE MENU. Press the Trim Knob control to change and select
the correct time and date.
From SERVICE MODE
Menu
1. To access the TIME AND DATE menu, execute the following menu
sequence, starting from the MAIN menu:
CUSTOMIZE MONITOR or MONITOR SETUP
SERVICE MODE
Password
Enter day and month from monitor screen with leading zeros.
(July 4 = 0407)
TIME AND DATE
Set Time
2. The time is displayed as a 24-hour military clock. A popup menu is
displayed and the hour is highlighted. To set the time, select SET
DATE option and use the Trim Knob control.
Set Date
3. To set the date, select SET DATE option from the time and date
menu. A popup menu is displayed. Use the Trim knob control to
select the date.
6-12
Solar 7000/8000/View Patient Monitor
414993-001
Revision J
CONFIGURATION: Advanced User Procedures
Changing Software
Feature Level
The highest software feature level (i.e. 7015, 7020, 7025, 7030) of a
monitor is programmed into the serial EEPROM of the main processor
PCB. There are two ways of changing the software feature level. One way
is to dial a lower level and the other is to exchange the serial EEPROM
on the main processor PCB. The EEPROM should only be changed by
authorized personnel.
NOTE: The user may only change the feature level to a lower level than
the level installed at the factory.
Dial a Lower Level
There are times when a monitor may need to function at a lower feature
level than it was originally programmed at.
1. To access FEATURE LEVEL option, execute the following menu
sequence starting from the MAIN menu:
MONITOR SETUP
SERVICE MODE
Password
Enter day and month from monitor screen with leading zeros.
(July 4 = 0407)
MENU SETUP
SOFTWARE LEVEL
2. Rotate Trim Knob control to select the type of environment the
monitor will be used in.
3. Press the Trim Knob control to exit. Your selection will be displayed
at the top of the screen after the time.
Exchange the EEPROM
To change the highest software feature level available in a monitor, you
must purchase the serial EEPROM U9 which contains the software
feature level you want.
Do the following to change the serial EEPROM in the monitor.
1. Contact your Monitoring Sales Representative for the current part
number and order the part.
2. Refer to the “Disassembly Guidelines” in Chapter 7:“Monitor
Assembly” of this manual.
Changing Remote
Control Function
There are three types of remote control available. In order to change the
function of a standard remote control to a neonatal or general operating
room (OR) remote control, a specific update kit and instructions are
required. Both kits listed below include the instructions, pn 404183-210.
Remote Control Update Kits
Item
Revision J
Part Number
Operating Room Remote Control Update Kit
412977-002
Neonatal Remote Control Update Kit
412977-003
Solar 7000/8000/View Patient Monitor
414993-001
6-13
CONFIGURATION: Advanced User Procedures
Transferring Monitor
Defaults
The Monitor Defaults set on one monitor may be transferred to another
monitor, provided that the second monitor shares the following:
•
the same software revision (version),
•
the same patient-monitor type (i.e. ADULT, NEO, or OR),
•
the same software package (i.e. 7020, 7025, etc.), and
•
the same country code (i.e. DEFAULT, FRANCE, or GERMANY).
The following defaults are transferred when using this feature:
Storing Monitor Defaults
for Transfer
•
all monitor defaults
•
custom default names
•
12 SL location
•
12 SL site
In order to transfer Monitor Defaults, they must first be set then stored
on the monitor that will be used as the server.
1. At the server monitor, setup the monitor defaults you wish to store.
(Refer to Monitor Setup in the Solar 7000/8000 Operator’s Manual.)
2. Once your defaults are set, execute the following menu sequence to
store your monitor defaults. Starting from the MAIN menu select:
MONITOR SETUP
SERVICE MODE
Password
Enter day and month from monitor screen with leading zeros.
(July 4 = 0407)
3. From the Service menu select MONITOR SETTINGS.
4. Select STORE DEFAULTS FOR NETWORK TRANSFER then
answer YES to the confirmation popup menu.
6-14
Solar 7000/8000/View Patient Monitor
414993-001
Revision J
CONFIGURATION: Advanced User Procedures
Copying Stored Monitor
Defaults
WARNING
Copying Monitor Defaults from another monitor will
erase all of the Monitor Defaults on the current monitor.
To copy Monitor Defaults from the server monitor, the client monitor
must first be in the DISCHARGED state. If the client monitor is set to
the OR patient-monitor type, it must NOT be in Combo or Rover Combo
admit mode.
NOTE
Make sure that the client monitor shares the same
configuration as the server monitor.
1. At the client monitor, execute the following menu sequence, starting
from the MAIN menu select:
MONITOR SETUP
SERVICE MODE
Password
Enter day and month from monitor screen with leading zeros.
(July 4 = 0407)
2. From the Service menu select COPY UNIT DEFAULTS.
3. Select the SELECT UNIT TO COPY MONITOR DEFAULTS FROM
option to scroll through a list of units currently on the UNITY
network. Choose the unit that has the desired server monitor.
4. Select the SELECT BED TO COPY MONITOR DEFAULTS FROM
option to scroll through a list of beds within the selected unit. When
the desired bed is found, select it, and answer YES to the
confirmation popup menu.
NOTE
After transferring Monitor Defaults, the first Defaults set
is automatically activated. If another set of Defaults is
desired, the user must manually select it from the
RECALL DEFAULTS menu.
After copying Monitor Defaults from another bed, verify that the defaults
were transferred and arrhythmia levels are as desired.
Revision J
Solar 7000/8000/View Patient Monitor
414993-001
6-15
CONFIGURATION: Advanced User Procedures
Troubleshooting Monitor
Defaults Transfer
Below is a list of error messages which may be displayed when
performing a Monitor Default Transfer.
Storing Monitor Defaults
Message
ERROR - UNIT DEFAULTS
HAVE NOT BEEN SAVED
Description
Monitor Defaults were not saved
due to a memory error in the
monitor.
Copying Stored Monitor Defaults
Message
6-16
Description
ERROR COPYING UNIT
DEFAULTS - NETWORK
ERROR
Either an error has occurred while
the Defaults were being
transferred, or Defaults have not
been saved on the server monitor.
ERROR COPYING UNIT
DEFAULTS - UNIT TYPE
MISMATCH
The server and client monitors are
set to different unit types (i.e.
ADULT, NEO, or OR)
ERROR COPYING UNIT
DEFAULTS - SOFTWARE
VERSION MISMATCH
The server and client monitors
have either different revisions of
software, or different software
versions (i.e. Solar 7/8000 vs.
Solar 8000M)
ERROR COPYING UNIT
DEFAULTS - DATA
CORRUPTION ERROR
The Monitor Defaults transferred
in have become corrupted,
possibly due to a memory error.
ERROR COPYING UNIT
DEFAULTS - SOFTWARE
FEATURE MISMATCH
The server and client monitors are
set to different software levels (i.e.
7020, 7025, etc.).
ERROR COPYING UNIT
DEFAULTS - COUNTRY CODE
MISMATCH
The server and client monitors are
set to different country codes (i.e.
DEFAULT, FRANCE, or
GERMANY).
Solar 7000/8000/View Patient Monitor
414993-001
Revision J
CONFIGURATION: Advanced User Procedures
Programming
Ethernet Address
The Ethernet address is an identification number assigned to each device
on the Unity Network. The address is assigned at Use the BOOT
LOADER service menu to input the Ethernet address only if it has been
corrupted.
WARNING
Duplication of an Ethernet address on a network will
cause lost data. If you change the factory assigned
Ethernet address, you must first record all other
Ethernet addresses used on your network to avoid
duplication.
Find Label
Locate the Ethernet address from the label on the back of the unit next to
the communication connectors.
From BOOT LOADER
To activate the BOOT LOADER program, do the following:
Revision J
•
Hold down the NBP GO/STOP and ZERO ALL keys on the front
panel. (For the SolarView remote display controller, hold down the
two blank keys.)
•
Press and release the Trim Knob control.
•
Keep holding the NBP GO/STOP and ZERO ALL keys (or two blank
keys for the SolarView remote display controller) until the BOOT
LOADER menu appears on the display.
•
Select CHANGE ETHERNET ADDRESS in the SERVICE MENU.
•
Use the Trim Knob control to enter the last six digits of the Ethernet
address.
Solar 7000/8000/View Patient Monitor
414993-001
6-17
CONFIGURATION: Advanced User Procedures
Programming
Internet Address
The internet (IP) address is generated to make the monitor compatible
with non-GE Medical Systems Information Technologies equipment
connected to the Tram Critical Care Monitoring Network. It may be
manually derived from the monitor Ethernet address in this procedure if
the factory-assigned internet address is corrupted. You may use the
BOOT LOADER service menu or the monitor SERVICE MODE menu.
WARNING
Duplication of an internet (IP) address on a network will
cause lost data. If you change the factory assigned
internet address, you must first record all other internet
addresses used on your network to avoid duplication.
Ethernet Address
An Ethernet address is six bytes long. It is typically written in
hexadecimal notation with a colon between each byte like this:
00:00:A1:26:13:FD. The first three bytes indicate the manufacturer of the
Ethernet hardware. In this case, 00:00:A1 represents GE Medical
Systems Information Technologies. The last three bytes represent an
unique number, like a serial number, that identifies it. This is the actual
node address.
Internet Address
The internet (IP) address is four bytes long. It is typically written in
decimal notation with a period between each byte like this:
126.38.19.253. The internet address that GE Medical Systems
Information Technologies uses is a class A address. In a class A address,
the first byte represents the network ID to the Internet Protocol (IP)
software and the last three bytes represent the specific node ID. At GE
Medical Systems Information Technologies, we use the network ID of
126. The node ID is a direct conversion of the last three bytes of the
Ethernet address and its unique ID number.
To generate an internet address from an Ethernet address, GE Medical
Systems Information Technologies simply converts the last three bytes of
the Ethernet address from hex to decimal. This combines the unique
identifier along with the network ID to produce the entire internet
address.
6-18
Solar 7000/8000/View Patient Monitor
414993-001
Revision J
CONFIGURATION: Advanced User Procedures
Calculate Internet
Address
Do the following to calculate the factory-assigned internet (IP) address.
1. Write down the last six digits of the 12-digit monitor Ethernet
address from the label near the rear connectors of the unit. An
example is given below.
00 : 00 : 7E : 26 : 13 : FD
2. Consider the six digits as three separate hexadecimal pairs. Convert
each hexadecimal pair separately to a decimal number. All internet
addresses must be in decimal.
3. The first number of the internet address should be 161 (A1 in hex).
Convert each hex pair separately. As each pair of hex digits is
converted to a decimal value, a three digit location is necessary.
126 . 38 . 19 . 253
From BOOT LOADER
To activate the BOOT LOADER program, do the following:
◆
Hold down the NBP GO/STOP and ZERO ALL keys on the
front panel. (For the SolarView remote display controller, hold
down the two blank keys.)
◆
Press and release the Trim Knob control.
◆
Keep holding the NBP GO/STOP and ZERO ALL keys (or two
blank keys for the SolarView remote display controller) until
the BOOT LOADER menu appears on the display.
◆
Select CHANGE INTERNET ADDRESS in the SERVICE
MENU.
◆
Use the Trim Knob control to enter internet (IP) address.
From SERVICE MODE
menu
Execute the following menu options starting from the MAIN menu:
Power Cycle
Power cycle the monitor by turning the rear power switch OFF and then
ON. This configures the monitor with the new programmed data.
Revision J
MONITOR SETUP
SERVICE MODE
Password
Enter day and month from monitor screen with leading zeros.
(July 4 = 0407)
MONITOR SETTINGS
SET INTERNET ADDRESS
Enter the internet address using the Trim Knob control.
Solar 7000/8000/View Patient Monitor
414993-001
6-19
CONFIGURATION: Advanced User Procedures
Reviewing Error
Logs
This procedure describes how to review the error logs of a monitor or
Tram module. The error logs may also be transferred over the network to
a central station and copied onto diskette for further review or sent to GE
Medical Systems Information Technologies personnel for review. The
transferring procedure “Copying Error Log Files” is described later in
this chapter.
WARNING
This procedure is intended for use by service personnel
with advanced troubleshooting skills.
Accessing Error Logs
Some of the information recorded in the error logs is useful for field
troubleshooting. The details included here will serve as an introduction
to the error logs and provide basic information about what you can learn
from them.
At the monitor, execute the following menu sequence, starting from the
MAIN menu:
MONITOR SETUP
SERVICE MODE
Password
Enter day and month from monitor screen with leading zeros.
(July 4 = 0407)
REVIEW ERRORS
The menu provides four choices, two for viewing error logs and two for
clearing the error logs.
Select the VIEW SCOPE ERRORS option to view one error in the log of
errors.
The error log in a monitor holds 50 errors that can be accessed with the
NEXT or PREVIOUS command. The errors are displayed one error at a
time in the upper right corner of the screen. Watch the error number
category to keep track of which error you are viewing. If one error code
seems significant, select PRINT. The error code will print out at the
central station determined by the monitor’s graph destination menu.
The VIEW TRAM ERRORS provides a listing of errors from the Tram
module. It appears very similar to the monitor’s listing.
The VIEW INTERFACE ERRORS provides a listing of errors from the
Tram-net Interface adapter and Octanet Connectivity Device. It appears
very similar to the monitor’s listing.
To clear all the errors in the error log, select CLEAR SCOPE ERRORS,
CLEAR TRAM ERRORS, or CLEAR INTERFACE ERRORS menu
option. Be aware that once the clear menu option is executed, all selected
errors in memory are erased.
6-20
Solar 7000/8000/View Patient Monitor
414993-001
Revision J
CONFIGURATION: Advanced User Procedures
What Does an Error Log
Contain?
The error log holds 50 events and as each error occurs, the error
information is stored in the log. Subsequent errors are stored
sequentially as they occur. After the first 50 errors are recorded, the next
error detected overwrites the oldest error in the log. If errors occur
infrequently, the error log could span a period of weeks. If a problem with
the network repeats frequently, the error log might consist only of errors
from the last few hours.
A sample monitor error log display appears as follows:
Revision J
Solar 7000/8000/View Patient Monitor
414993-001
6-21
CONFIGURATION: Advanced User Procedures
What Error Data is
Useful?
When troubleshooting a monitor, the parameters displayed below will be
of interest.
Definition of Parameters
Name
Description
Process Name
is the name of the software task that was
operating when the event/problem occurred.
Error Code
is a code for the type of event/problem that
occurred.
Severity
indicates the impact of the event/problem on the
system.
Date
is the date the event/problem occurred.
Time
is the time the event/problem occurred.
Error Number
is a sequential number that is used to identify
each event/problem.
For some categories of Tram-net network errors, two additional lines are
added to the error log entry.
Definition of Parameters
Name
6-22
Description
Network Error
identifies that a network error occurred.
Channel Number
identifies the network channel exhibiting the
error.
Solar 7000/8000/View Patient Monitor
414993-001
Revision J
CONFIGURATION: Advanced User Procedures
What Do Error Codes
Mean?
The error log contains more than just operating system errors. Many
events that have an impact upon the system are also entered into the log.
The 700-series of error codes are really system initiated events. Listed
below are some of the event/error codes you might find useful.
Definition of Parameters
Error Code
400-4FF
Description
Network errors were detected.
703
Diagnostic tests were completed.
70B
Internet address was changed. The network address
for the monitor was changed. This should only be done
by qualified service personnel.
70C
Video test was completed. This test should only be
performed by qualified service personnel.
70D
Rear power switch was turned off.
70E
Time was changed from this monitor. This helps
determine how the system-wide time may have been
altered.
70F
Date was changed from this monitor. This helps
determine how the system-wide date was altered.
710
Incompatible software was detected. If the main
processor software finds that the software operating
on the communication software incompatible, it turns
off the communication (network) controller and enters
this data into the error log. When the monitor won’t
“talk” to the network, looking for this entry in the
error log is one part of the troubleshooting process.
714
Incompatible TRAM module software was detected. If
the main processor software finds the software
revision in the TRAM is incompatible, it turns off
communication with the TRAM and enters an error
log. Refer to the software compatibility listing in the
SOFTWARE REVISION window.
NOTE
The monitor may be referred to as a display or scope in
the error code descriptions.
Revision J
Solar 7000/8000/View Patient Monitor
414993-001
6-23
CONFIGURATION: Advanced User Procedures
What Does Severity
Imply?
Severity is a measure of how the event/error affected the system. There
are three levels of severity.
Definition of Parameters
Levels
6-24
Description
Continue
the event/error was logged, the task may have or
may not have been finished, but the system was
able to go on. Most log entries will have a
severity of CONTINUE.
Fatal
the event/error was such that the task is not able
to go on. Recovery was not possible. This always
is followed by a WARM START.
Forced Restart
the system was restarted by a known condition
(internet address change, video test, etc).
Solar 7000/8000/View Patient Monitor
414993-001
Revision J
CONFIGURATION: Advanced User Procedures
Transferring Error
Logs
General
The following procedure describes how to copy the patient monitor and
parameter module error logs and then transfer them to a diskette at the
Centralscope central station. To transfer error files from a Clinical
Information Center (CIC), refer to the Prism Information Field Service
Manual, pn 419897-002.
The Centralscope or CIC central station can perform their normal
patient data display tasks and act as remote terminals. The remote
terminal function is very useful for retrieving, viewing, and saving error
logs from any GE Medical Systems Information Technologies patient
monitoring equipment communicating on the Unity Network. Through a
series of menus a device, such as a monitor, another central station, or
parameter module, can be selected in any Care Unit. Then a device error
log for a particular day may be chosen.
Once the desired error log is selected it can be copied over the network to
a floppy diskette in the central station’s floppy diskette drive. Since the
error logs are text files they can be read into other computers and read
using most text editors or word processing applications.
To transfer error files from a Centralscope central station, use the
following procedure.
CAUTION
This procedure is intended for use by service personnel
with advanced troubleshooting skills. Do not
“experiment” with these commands! The consequences of
misuse include loss of patient data, corruption of the
central station operating software, or disruption of the
entire Unity Network.
Access the COPY LOGS
Menu
1. Select the following menu options beginning with the Centralscope
central station MAIN MENU:
CENTRAL SETUP
SERVICE
Enter password: MEI CS 123
COPY LOGS
2. The COPY LOGS menu is displayed.
Revision J
Solar 7000/8000/View Patient Monitor
414993-001
6-25
CONFIGURATION: Advanced User Procedures
Select the Care Unit
To specify the Care Unit, select the UNIT: button.
Rotate the trim Knob control to change the displayed Care Unit name.
When the desired Care Unit name is displayed press the Trim Knob
control.
Select the Monitoring
Device
To specify a monitoring device, select the DEVICE: button.
Select the Error Log Date
The final selection is to pick the date of the error logs to be copied to the
floppy diskette.
Rotate the Trim Knob control to change the displayed device name. Note
that only monitoring devices within the previously selected Care Unit
are shown. When the desired monitoring device name is displayed press
the Trim Knob control.
1. Rotate the Trim Knob control to change the error log date. Note that
one of the selections is ALL, which will retrieve all stored error logs
from the specified device. When the desired date is displayed press
the Trim Knob control.
2. Once the Care Unit, device, and date have been specified the final
step is to begin copying the error logs to the floppy diskette.
3. Insert a PC-formatted, high-density floppy diskette into the floppy
diskette drive of the central station.
6-26
Solar 7000/8000/View Patient Monitor
414993-001
Revision J
CONFIGURATION: Advanced User Procedures
Copy Error Logs
Once the START COPY button is selected a new display is shown that
confirms the file source device. The other options are to eject the floppy
diskette or to start the copying process.
Rotate the Trim Knob control to select the desired function. Then press
the Trim Knob control to start.
Once the copy function begins the START COPY button changes to show
the function: “copying.”
Eject Floppy
When selected this option just causes a floppy diskette to be ejected from
the central station’s disk drive.
NOTE
If the floppy diskette does not eject, a thin tool such as a
straightened paper clip can be inserted in the small
round hole under the disk slot. By pressing on the
mechanical release bar inside the drive the floppy
diskette can be forcibly ejected.
Revision J
Solar 7000/8000/View Patient Monitor
414993-001
6-27
CONFIGURATION: Advanced User Procedures
Reviewing Event
Logs
This procedure describes how to review the event logs of a monitor.
WARNING
This procedure is intended for use by service personnel
with advanced troubleshooting skills.
Accessing Event Logs
Some of the information recorded in the event logs is useful for field
troubleshooting. The details included here will serve as an introduction
to the event logs and provide basic information about what you can learn
from them.
At the monitor, execute the following menu sequence, starting from the
MAIN menu:
MONITOR SETUP
SERVICE MODE
Password
Enter day and month from monitor screen with leading zeros.
(July 4 = 0407)
REVIEW ERRORS
Select the VIEW SCOPE EVENTS option to scroll through the log of
events.
The event log in a monitor holds 500 events that can be accessed by
turning the Trim Knob control. You may select PRINT to print out an
event.
To clear all the events in the error log, select CLEAR SCOPE EVENTS
menu option. Be aware that once the clear menu option is executed, all
selected events in memory are erased.
6-28
Solar 7000/8000/View Patient Monitor
414993-001
Revision J
CONFIGURATION: Advanced User Procedures
What Does an Event Log
Contain?
As an event occurs, the event information is stored in the event log.
Subsequent events are stored sequentially as they occur. When the event
log is full, the next event detected overwrites the oldest event in the log.
A sample monitor event log display appears as follows:
For each event the index, date, and time are shown. These are followed
by the event code, event-specific data and a textual description of the
event code.
Revision J
Solar 7000/8000/View Patient Monitor
414993-001
6-29
CONFIGURATION: Advanced User Procedures
For your notes
6-30
Solar 7000/8000/View Patient Monitor
414993-001
Revision J
7
Revision J
UPPER LEVEL ASSEMBLY
Solar 7000/8000/View Patient Monitor
414993-001
7-1
UPPER LEVEL ASSEMBLY:
For your notes
7-2
Solar 7000/8000/View Patient Monitor
414993-001
Revision J
UPPER LEVEL ASSEMBLY: Solar 7000 Disassembly Guidelines
Solar 7000 Disassembly Guidelines
General
Two versions of the Solar 7000 monitor are available: color or
monochrome. Follow the guidelines described when disassembling your
version monitor. You will require a standard set of hand tools.
PCB Assemblies
Observe the following guidelines when working on all PCB assemblies:
Hardware
Revision J
•
Take precautions against electrostatic discharge damage.
•
Handle all PCB assemblies by their edges.
•
Generally, use 60/40 low melting point solder. Use high melting point
silver solder when working on the surface mounted components.
•
Use a heatsink when soldering any phototransistors, photodiodes, or
optical isolators.
•
Repair breaks in PCB tracks by bridging with wire from pad to pad.
Do not lay solder across the breaks. (The heat from the soldering iron
may cause the track to detach from the PCB.)
•
After soldering, clean excess flux from the PCB assembly.
•
If you replace the main processor, remove the serial EEPROM U9
and insert it into the replacement main processor PCB. The serial
EEPROM must stay with the unit.
•
Before disassembly, note the positions of any wires or looms (cables),
marking them if necessary to ensure that they are replaced correctly.
•
Gray ribbon cables have retainer clips holding them in the connector.
•
Save and set aside all hardware for re-assembly.
Solar 7000/8000/View Patient Monitor
414993-001
7-3
UPPER LEVEL ASSEMBLY: Solar 7000 Disassembly Guidelines
Opening the Unit for
Service
Use these step-by-step disassembly instructions when you need to
remove various PCB assemblies from the monitor assembly.
WARNING
Make sure the monitor is not monitoring a patient,
because monitoring will be interrupted.
First, turn the unit OFF at the rear power switch and disconnect the AC
power cord and all communication cables.
WARNING
Due to possible high voltage present, use an insulated
screwdriver at all times when making adjustments.
Disassembly
1. Lay the unit on its front display on either foam or other soft material.
Do not apply excessive pressure on the Trim Knob control.
2. Remove the five screws at the rear as shown.
3. Lift the bezel directly up.
7-4
Solar 7000/8000/View Patient Monitor
414993-001
Revision J
UPPER LEVEL ASSEMBLY: Solar 7000 Disassembly Guidelines
Main Processor PCB
Removal
1. Remove two screws at the rear of the monitor to release the shield
over the main processor PCB.
WARNING
When you reassembly the unit, do not replace the shield
backwards! You will short out the battery, damage boot
code, and render the unit useless.
2. Disconnect all harnesses from the main processor PCB.
3. Remove five screws attaching the main processor PCB.
4. Remove the serial EEPROM U9 and insert it into the replacement
main processor PCB. The serial EEPROM must stay with the unit.
Revision J
Solar 7000/8000/View Patient Monitor
414993-001
7-5
UPPER LEVEL ASSEMBLY: Solar 7000 Disassembly Guidelines
Mono CRT Controller or
Color Deflection PCB
Removal
Do the following to remove the mono CRT controller or color deflection
PCB.
1. Remove all attaching harnesses.
2. Remove four attaching screws and lift.
WARNING
To avoid electrical shock, do not touch the large heatsink
connected to the deflection PCB, pn 404642-00X, while
the unit is ON.
Due to high voltage on either PCB, use an insulated
screw driver at all times while making adjustments.
7-6
Solar 7000/8000/View Patient Monitor
414993-001
Revision J
UPPER LEVEL ASSEMBLY: Solar 7000 Disassembly Guidelines
Power Supply Removal
Do the following to access the power supply.
WARNING
Beware of ac line voltage at the power module. When rear
power switch is OFF, ac line voltage is still present. Use
an insulated screw driver at all times when making
adjustments.
For the monochrome monitor, remove the bezel first and then the four
screws attaching the power supply cover.
For color monitors, the bezel does not have to be removed to access the
power supply. Remove the four recessed screws to remove the power
supply cover.s
Revision J
Solar 7000/8000/View Patient Monitor
414993-001
7-7
UPPER LEVEL ASSEMBLY: Solar 7000 Disassembly Guidelines
Color CRT Controller PCB
Removal
For color monitors only, do the following.
WARNING
To avoid electrical shock on color units, do not touch the
large heatsink connected to the nearby deflection PCB,
pn 404642-00X, while the unit is ON.
Due to high voltage on either PCB, use an insulated
screw driver at all times while making adjustments.
1. Remove attaching harness.
2. Remove two screws and lift the color CRT controller PCB.
7-8
Solar 7000/8000/View Patient Monitor
414993-001
Revision J
UPPER LEVEL ASSEMBLY: Ordering Parts for Solar 7000
Ordering Parts for Solar 7000
The parts lists and assembly drawings in this chapter supply enough
detail for you to order parts for the assemblies considered field
serviceable. If you require additional information, schematics, or
troubleshooting assistance, contact Tech Support.
To order parts, contact Service Parts at the address or telephone number
listed on the “How to Reach Us...,” page found in Chapter 1:
“Introduction” of this manual.
Commonly Replaced
Assemblies
The tables below list the most commonly replaced assemblies ordered in
the service spare circuit board kits. See the operator’s manual for a
complete list of accessories and expendable supplies.
NOTE
If you replace the main processor, remove the serial
EEPROM U9 and insert it into the replacement main
processor PCB. The serial EEPROM must stay with the
unit.
Color Monitor Spare Kit, PN 415194-001
Item
Part Number
Main Processor PCB
800678-002
Color CRT Controller PCB
404641-009
Color Deflection PCB
404642-005
Color Power Supply
800974-001
High-Voltage Power Supply (Color)
406896-002
Monochrome Monitor Spare Kit, PN 415193-001
Item
Main Processor PCB
800678-002
Mono CRT Controller PCB
401550-006
Monochrome Power Supply
408102-001
High-Voltage Power Supply (Monochrome)
Revision J
Part Number
Solar 7000/8000/View Patient Monitor
414993-001
6116-007
7-9
UPPER LEVEL ASSEMBLY: Ordering Parts for Solar 7000
Fuse Part Numbers
The monochrome monitor does not have replaceable fuses.
For the color monitor, read the fuse rating at the rear of monitor to select
correct fuse replacement. Use a single blade screwdriver to pop out of the
panel above the AC main outlet to access the fuses.
WARNING
To avoid electric shock, always turn OFF unit and remove
power cord from AC main outlet before replacing fuses.
Color Monitor Fuses
Description
7-10
Part Number
Fuse, 2.0A Slow Blow
1908-504
Fuse, 4.0A Slow Blow
1908-506
Solar 7000/8000/View Patient Monitor
414993-001
Revision J
UPPER LEVEL ASSEMBLY: Ordering Parts for Solar 7000
Solar 7000 Labels
The list of labels given below are determined by destination and are not
included in the part lists included in this chapter. To reference item
numbers, refer to the exploded views provided later in this chapter. Your
model will not use all the labels listed.
Monitor Labels
Mono
Item
Color
Item
Description
Part Number
60
–
Domestic Monochrome Fuse Ratings Label
414938-001
60
–
International Monochrome Fuse Ratings Label
414938-002
61
76
Risk of Explosion
415043-001
62
77
Serial Number Label
404525-001
63
79
English Keycap Label Set
414909-001
63
79
German Keycap Label Set
414909-002
63
79
French Keycap Label Set
414909-003
63
79
Swedish Keycap Label Set
414909-004
63
79
Spanish Keycap Label Set
414909-005
63
79
Italian Keycap Label Set
414909-006
63
79
Dutch Keycap Label Set
414909-007
64
80
German NBP Value ID
408793-001
65
74
GE Label
414908-001
65
74
GE Company Label
414908-002
66
78
Solar 7000 Front Label
414907-001
66
78
Solar 7000N Front Label
414907-002
71
59
Rear Communication Label
414494-001
–
72
Domestic Color UL Fuse Ratings Label
414495-001
–
72
International Color Ruse Ratings Label
414495-002
69
82
CE Mark Label
408230-008
Revision J
Solar 7000/8000/View Patient Monitor
414993-001
7-11
UPPER LEVEL ASSEMBLY: Exploded View (Color) PN 900618-001J
Exploded View (Color)
PN 900618-001J
1 of 3
39 4 PL
56 2 PL
44 A12
9
56 2 PL
10
2 PL
4 PL
56
A3 37
2 PL 48
56 2 PL
A2 21
47 SP1
48 3 PL
56 2 PL
24 A1
56 4 PL
36
4 PL
42
4 PL
32 A11
51
76
42 4 PL
50 REF
SEE NOTE 1
6 2 PL
78
3
26
66
23
A4
55 2 PL
5
30
56
58 2 PL
54
41 REF
43 A10
SEE
DETAIL A
79
SEE
DETAIL B
55 2 PL
35 2 PL
W6, W7
29 A7
TORQUE NUT TO 10.0 IN-LBS
74
2
7-12
2 PL
A6
25 2 PL
40 A5
56 2 PL
14
63
Solar 7000/8000/View Patient Monitor
414993-001
Revision J
UPPER LEVEL ASSEMBLY: Exploded View (Color) PN 900618-001J
2 of 3
57 2 PL
1
A8 18
4 PL 49
6
4 PL
71
72
67
2 PL 65
56
82
A3 37
60 4 PL
69
75
2 PL
49
2 PL
46 SEE
DETAIL C
70
53
52
42
39
68
45
59
REF
8
38
56 4 PL
REF
7
12 3 PL
Revision J
Solar 7000/8000/View Patient Monitor
414993-001
7-13
UPPER LEVEL ASSEMBLY: Exploded View (Color) PN 900618-001J
3 of 3
57 REF
24 REF
71 REF
46 REF
50 SEE NOTE 1
RMT ALM
ASYNC COMM
!
TRAM-NET
ETHERNET
RMT VID
RS232
72
DETAIL B
BOTTOM VIEW of BEZEL (ITEM 3)
82
REAR VIEW
ASSEMBLY
70 REF
59 REF
42 REF
52 53 REF
60 REF
62 4 PLACES
61
28 W4
46 REF
BRN
REF 37
51 REF
44 REF
41 W8
27
WHT 37
REF
43 REF
ORG 37
REF
62
32 REF
DETAIL A
INSERT TIE
WRAP THROUGH
BRAIDED WIRE
AT LOCATION
SHOWN.
BLK 37
REF
RED 37
REF
GRN/YEL 68
REF
REAR VIEW OF CRT (ITEM 43)
DETAIL C
POWER MODULE (ITEM 46)
SEE NOTE 4
15
16
NOTES:
1. LABEL (ITEM 50) TO BE MARKED: "SOLAR 7000 C", SERIAL NUMBER AND
APPROPRIATE BARCODE.
COLOR
MONITOR
20
2. LABEL (ITEM 77) TO BE MARKED AS FOLLOWS:
"DIE IN DIESEM GERAT ENTSTEHENDE RONTGENSTRAHLUNG IST AUSREICHEND
ABGESCHIRMT BESCHLEUNIGUNGSSPANNUNG < 20K"
4. LOOSE ITEMS MAY BE SHIPPED WITH THE UNIT IF SPACE PERMITS OR
PACKAGED AND SHIPPED SEPARATELY.
17
5 . APPLY LABEL (ITEM 80) TO BEZEL NEXT TO NBP VALUE ID BLOCK.
19
7-14
Solar 7000/8000/View Patient Monitor
414993-001
Revision J
UPPER LEVEL ASSEMBLY: Parts List PN 900618-001J
Parts List
Item
PN 900618-001J
Reference
Designation
Color Monitor Parts List
Part Number
Qty
1
Housing Solar 7000
400616-003
1
2
Knob, Rotary
58111-007
1
3
Bezel, Solar 7000, Color
414918-001
1
4
Tie Warp, 8-Inch
4535-002
1
5
Chassis Assembly
413600-002
1
6
Mounting Bracket, CRT
405382-002
2
7
Mounting Plate
400613-005
1
8
Label, Icon, Ground
70437-005
1
9
Bracket, High Voltage Supply
413589-002
1
10
PCB Cover
413594-001
1
11
Housing, Low-Voltage Power Supply
405101-001
1
12
Screw, Captive, Phillips, 6-32 x 1/2
414106-001
3
13
Screw, FLH, Phillips, SST, 4-40 x 5/16
4505-410
3
14
Bracket, Fan
413599-001
1
15
Insert, Corrugated
406662-001
1
16
Insert, Foam Top
406664-001
1
17
Insert, Foam Bottom
406664-002
1
Low-Voltage Power Supply
800974-001
1
19
Shipping Carton
415117-001
1
20
Bag, Anti-Static
405183-001
1
Color CRT Controller PCB
404641-009
1
Solar 7000/8000/View Patient Monitor Field Service
Manual (not Shown)
414993-001
1
18
21
A8
A2
22
23
A6
Color Deflection PCB
404642-005
1
24
A1
Main Processor PCB
800678-002
1
Screw, PNH, Phillips, 4-40 x 1-1/4
4502-440
2
A4
Keycap PCB
800058-003
1
Insulator, Power Module
406904-001
1
25
26
27
28
W4
Degauss Coil
405305-001
1
29
A7
Trim Knob Control Assembly
414642-001
1
Keycap Gasket
404392-001
1
30
31
W3
Harness, CRT Controller PCB-to-Main Processor PCB
414548-001
1
32
A11
CRT Socket Assembly
408099-001
1
33
W2
Harness, Speaker-to-Deflection PCB
414526-001
1
34
W5
Harness, CRT Controller PCB-to-Deflection PCB
405785-002
1
35
W6, W7
Harness, Keycap PCB-to-Ground
402302-001
2
Washer, Flat
403335-001
4
Transformer Assembly
406488-001
1
36
37
Revision J
A3
Solar 7000/8000/View Patient Monitor
414993-001
7-15
UPPER LEVEL ASSEMBLY: Parts List PN 900618-001J
Item
Reference
Designation
38
A9
39
Color Monitor Parts List
Part Number
Qty
Cable Assembly, Low-Voltage Power Supply-to-Main
Processor PCB
414604-001
1
Nut, Keps, Hex, 6-32
4521-706
5
40
A5
Fan Assembly
414527-001
1
41
W8
Cable Assembly, Color CRT
405739-001
1
Screw, PNH, Phillips, 10-32 x 3/8
45018-906
9
43
A10
Yoke Cable Assembly and Color CRT
405834-003
1
44
A12
High-Voltage Power Supply
406896-002
1
Washer, Lock, External No. 6
4520-306
1
42
45
46
S1
Power Line Conditioner
406445-001
1
47
SP1
Speaker, 3-Inch, 8 Ω
1663-300
1
48
Screws, BDGH, Phillips, 6-32 x 1/4
45074-608
5
49
Screws, FLH, Phillips, SST, 4-40 x 1/4, Black
4776-404
8
50
Label, Blank
404525-006
2
51
Label, Icon, High-Voltage
70437-001
1
52
Washer, Lock, Serrated
400041-001
1
53
Plug, Equipotential
400040-001
1
54
Keycap Kit
414841-001
1
55
Screws, PNH, Phillips, 4-40 x 1/4
45000-404
4
56
Screws, PNH, Phillips, 6-32 1/4
45000-604
23
57
Screws, PNH, Phillips, 8-32 x 1/2
4502-812
2
58
Screws, BDGH, Phillips, 4-40 x 1/4
45074-408
2
59
Cable Clamp
4528-106
1
60
Foot, W/Threadlock
418987-001
4
61
Spring, Extender
4552-002
1
62
Tie Warp
4535-001
5
63
Spring Clip, D-Type
4556-001
1
64
Tie Wrap, Kurly-Lok
406447-001
2
65
Cable Clip
405558-004
2
66
PCB Guide
401867-002
2
67
Rear Panel, Power Supply
406093-001
1
Cable Assembly, Power Module-to-Safety Ground
406489-001
1
69
Fuse Holder
406448-001
1
70
Label, Icon Equipotential
70437-002
1
81
Modular Patient Monitor Accessories Service Manual
(Not Shown)
404183-150
1
83
Screw, PNH, Phillips, 8-32 x 3/8
405318-008
4
68
7-16
W1
Solar 7000/8000/View Patient Monitor
414993-001
Revision J
UPPER LEVEL ASSEMBLY: Exploded View (Mono) PN 900619-001L
Exploded View (Mono)
PN 900619-001L
1 of 3
39 2 PL
56 2 PL
9
56 2 PL
44
A2
10
36 3 PL
56 2 PL
47 SP1
REF
41
56 2 PL
SEE DETAIL B 41
W8
4 PL
57
8 PL
14
4 PL
11
4 PL 4
48 3 PL
24 A1
2 PL 6
4 PL 56
54
4 PL
3
61
66
62
26
SEE NOTE 3
50
23
A4
28
37
55
A6
2 PL
5
13
8
SEE NOTE 1
2 PL
32
45
W6
21 40
34
25
63
35
SEE DETAIL A
55
65
43
A3
W4, W5
2 PL
29 A5, TORQUE NUT TO 10.0 IN-LBS
46
2
Revision J
Solar 7000/8000/View Patient Monitor
414993-001
7-17
UPPER LEVEL ASSEMBLY: Exploded View (Mono) PN 900619-001L
2 of 3
1
27
2 PL
59
60
53
52
42
30
69
49 4 PL
18
38
A8
REF
7
12 3 PL
7-18
Solar 7000/8000/View Patient Monitor
414993-001
Revision J
UPPER LEVEL ASSEMBLY: Exploded View (Mono) PN 900619-001L
3 of 3
27 REF
50 SEE NOTE 1
58 REF
52 53
59 REF
RMT ALM
ASYNC COMM
!
DETAIL A
BOTTOM VIEW OF BEZEL (ITEM 3)
24 REF
TRAM-NET
ETHERNET
RMT VID
RS232
REAR VIEW
ASSEMBLY
60
63
41 REF
51 REF
49 REF
42 REF
SEE NOTE 3
25 REF
INSERT TIE
WRAP THROUGH
BRAIDED WIRE AT
LOCATION SHOWN.
30 REF
10
15
16
MONOCHROME
MONITOR
20
DETAIL B
REAR VIEW OF CRT (ITEM 43)
17
NOTES:
1. LABEL (ITEM 50) TO BE MARKED: "SOLAR 7000", SERIAL NUMBER AND
APPROPRIATE BARCODE.
3. LOOSE ITEMS MAY BE SHIPPED WITH THE UNIT IF SPACE PERMITS OR
PACKAGED AND SHIPPED SEPARATELY.
19
Revision J
Solar 7000/8000/View Patient Monitor
414993-001
7-19
UPPER LEVEL ASSEMBLY: Parts List PN 900619-001L
Parts List
Item
PN 900619-001L
Reference
Designation
Monochrome Monitor Parts List
Part Number
Qty
1
Housing Solar 7000
400616-003
1
2
Knob, Rotary
58111-007
1
3
Bezel, Solar 7000, Monochrome
414919-001
1
4
Nut, Keps, Hex, 10-32
4644-710
4
5
Chassis Assembly
413600-002
1
6
Mounting Bracket, CRT
413602-001
2
7
Mounting Plate
400613-005
1
8
Keycaps
414841-001
1
9
Bracket, High-Voltage Supply
413598-002
1
10
PCB Cover
413594-001
1
11
Nut, Hex 10-32
4644-110
4
12
Screw, Captive, Phillips, 6-32 x 1/2
414106-001
3
13
Screw, BDGH, Phillips, 4-40 x 1/4
45074-408
2
14
Washer, Flat, SST, No. 10
4520-010
8
15
Insert, Corrugated
405045-001
1
16
End Cap Insert, Foam, Left
404854-002
1
17
Bag, Anti-Static
405183-001
1
Low-Voltage Power Supply
408102-002
1
19
Shipping Carton
415118-001
1
20
End Cap Insert, Foam, Right
404854-001
1
21
Permanent Magnet, Ceramic
405593-001
1
22
Solar 7000/8000/View Patient Monitor Field Service
Manual (Not Shown)
414993-001
1
18
A8
23
A6
Mono CRT Controller PCB
401550-006
1
24
A1
Main Processor PCB
800678-002
1
Spring Extender
4552-002
1
A4
Keycap PCB
800058-003
1
27
Screw, Phillips, SST, 8-32 x 1/2
45000-812
2
28
PCB Guide
401867-002
1
Trim Knob Control Assembly
414642-001
1
Cable Clamp
4528-106
1
25
26
29
A5
30
31
W3
Harness, CRT Controller PCB-to-Main Processor PCB
415548-001
1
32
A11
Harness, CRT-to-CRT Controller PCB
80681-005
1
33
W2
Harness, Speaker-to-Deflection PCB
414526-001
1
34
A7
Cable Assembly, Yoke
88491-008
1
35
W4, W5
Harness, Keycap PCB-to-Ground
402302-001
2
36
Cable Clip
405558-004
3
37
Keycap Gasket
404392-001
1
7-20
Solar 7000/8000/View Patient Monitor
414993-001
Revision J
UPPER LEVEL ASSEMBLY: Parts List PN 900619-001L
Item
Reference
Designation
38
A9
Part Number
Qty
Cable Assembly, Low-Voltage Power Supply-to-Main
Processor PCB
414605-001
1
39
Nut, Keps, Hex, 6-32
4521-706
5
40
Adhesive, Hot Melt
406201-002
1
W8
Cable Assembly, Monochrome CRT
405739-001
1
Screw, Phillips, 10-32 x 3/8
45018-906
1
43
A3
12-Inch CRT, Monochrome, Flat Profile
416821-001
1
44
A2
High-Voltage Power Supply
6116-007
1
Tape, Hardware
403949-001
AR
Spring Clip, D-Type
4556-001
1
Speaker, 3-Inch, 8 Ω
1663-330
1
48
Screws, BDGH, Phillips, 6-32 x 1/4
45074-608
3
49
Foot, W/Threadlock
418987-001
4
50
Label, Blank
404525-006
2
51
Label, Icon, High-Voltage
70437-001
1
52
Washer, Lock, Serrated
400041-001
1
53
Plug, Equipotential
400040-001
1
54
Screw, PNH, Phillips, 6-32 x 3/8
45000-606
4
55
Screw, PNH, Phillips, 4-40 x 1/4
45000-404
4
56
Screw, PNH, Phillips, 6-32 1/4
45000-604
12
57
Standoff, Hex, 1-1/2
415145-001
4
58
Label, Icon Equipotential
70437-002
1
68
Modular Patient Monitor Accessories Service Manual
(Not Shown)
404183-150
1
70
Tie Wrap
4535-001
1
71
Screw, PNH, Phillips, 8-32 x 3/8
405318-008
4
41
42
45
46
47
Revision J
SP1
Monochrome Monitor Parts List
Solar 7000/8000/View Patient Monitor
414993-001
7-21
UPPER LEVEL ASSEMBLY: Solar 8000/View Disassembly Guidelines
Solar 8000/View Disassembly Guidelines
General
Follow the guidelines described when disassembling Solar 8000
processing unit or SolarView remote display controller. You will require a
standard set of hand tools.
PCB Assemblies
Observe the following guidelines when working on all PCB assemblies:
Hardware
7-22
•
Take against electrostatic discharge damage.
•
Handle all PCB assemblies by their edges.
•
Generally, use 60/40 low melting point solder. Use high melting point
silver solder when working on the surface mounted components.
•
Use a heatsink when soldering any photo-transistors, photodiodes, or
optical isolators.
•
Repair breaks in PCB tracks by bridging with wire from pad to pad.
Do not lay solder across the breaks. (The heat from the soldering iron
may cause the track to detach from the PCB.)
•
After soldering, clean excess flux from the PCB assembly.
•
If you replace the main processor, remove the serial EEPROM U9
and insert it into the replacement main processor PCB. The serial
EEPROM must stay with the unit.
•
Before disassembly, note the positions of any wires or looms (cables),
marking them if necessary to ensure that they are replaced correctly.
•
Gray ribbon cables have retainer clips holding them in the connector.
•
Save and set aside all hardware for re-assembly.
Solar 7000/8000/View Patient Monitor
414993-001
Revision J
UPPER LEVEL ASSEMBLY: Solar 8000/View Disassembly Guidelines
Opening the Unit for
Service
Use these step-by-step disassembly instructions when you need to
remove various PCB assemblies from the monitor assembly.
WARNING
Make sure the monitor is not monitoring a patient,
because monitoring will be interrupted.
First, turn the unit OFF at the rear power switch and disconnect the AC
power cord and all communication cables.
WARNING
Due to possible high voltage present, use an insulated
screwdriver at all times when making adjustments.
Disassembly
1. Remove the four screws attaching cover as shown.
2. Lift the cover directly up.
Revision J
Solar 7000/8000/View Patient Monitor
414993-001
7-23
UPPER LEVEL ASSEMBLY: Solar 8000/View Disassembly Guidelines
Main Processor PCB
Removal
1. Squeeze and pull the harness clip from the chassis as shown below.
2. Disconnect J7 harness from the main processor PCB and remove five
screws attaching the PCB.
3. After removing the PCB, disconnect harness J1 and J8.
4. Remove the serial EEPROM U9 and insert it into the replacement
main processor PCB. The serial EEPROM must stay with the unit.
7-24
Solar 7000/8000/View Patient Monitor
414993-001
Revision J
UPPER LEVEL ASSEMBLY: Solar 8000/View Disassembly Guidelines
Power Supply Removal
Do the following to remove the power supply.
WARNING
Beware of AC line voltage at the power module. When
rear power switch is OFF, AC line voltage is still present.
Capacitors C1-C4 may remain fully charged up to 30
seconds. Use an insulated screw driver at all times when
making adjustments.
1. Verify power cord is disconnected.
2. Remove one end of the harness from the power supply assembly to
the main processor PCB.
CAUTION
Keep circuit board mounted to metal sub-chassis at all
times to avoid stressing solder joints and surface mount
components.
3. Remove four recessed screws attaching the power supply assembly.
Revision J
Solar 7000/8000/View Patient Monitor
414993-001
7-25
UPPER LEVEL ASSEMBLY: Solar 8000/View Disassembly Guidelines
4. For easier removal, first tip the power supply towards the front of the
unit up at a 45° angle.
5. Pull power supply out towards front of unit as shown below.
CAUTION
Fluorinated and chlorinated cleaning agents may
seriously damage the aluminum electrolytic capacitors in
this assembly.
7-26
Solar 7000/8000/View Patient Monitor
414993-001
Revision J
UPPER LEVEL ASSEMBLY: Ordering Parts for Solar 8000/View
Ordering Parts for Solar 8000/View
The parts lists and assembly drawings in this chapter supply enough
detail for you to order parts for the assemblies considered field
serviceable. If you require additional information or PCB schematics and
parts lists, order the Solar 7000/8000/View Data Manual, pn 414993007. For troubleshooting assistance, contact Tech Support.
To order parts, contact Service Parts at the address or telephone number
listed on the “How to Reach Us...,” page found in Chapter 1:
“Introduction” of this manual.
Commonly Replaced
Assemblies
The table below lists the most commonly replaced assemblies in the Solar
8000/View monitor. See the operator’s manual for a complete list of
accessories and expendable supplies.
NOTE
If you replace the main processor, remove the serial
EEPROM U9 and insert it into the replacement main
processor PCB. The serial EEPROM must stay with the
unit.
PCB Assemblies
Item
Part Number
Main Processor PCB
800678-002
Power Supply Assembly (Contains PCB
pn 800948-001)
415838-001
Subassemblies
Item
Revision J
Part Number
Trim Knob Control Assembly
414642-001
Speaker
413246-001
Keycap Assembly
414925-002
Solar 7000/8000/View Patient Monitor
414993-001
7-27
UPPER LEVEL ASSEMBLY: Ordering Parts for Solar 8000/View
Fuse Part Numbers
The fuses used in the Solar 8000 processing unit or SolarView remote
display controller are listed below. Read fuse rating on rear of the unit to
select correct fuse replacement. Refer to disassembly procedure
presented earlier in this chapter to remove cover. The fuses are easily
accessible on the power supply assembly, pn 415838-001.
WARNING
To avoid electric shock, always turn OFF unit and remove
power cord from outlet before replacing fuses.
Fuses
Description
Fuse, 4.0A Slow Blow
Solar 8000/View
Labels
Part Number
Qty
1908-506
2
The list of labels given below are determined by destination and are not
included in the part lists included in this chapter. To reference item
numbers, refer to the exploded views provided later in this chapter. Your
model will not use all the labels listed.
Solar 8000/View Processing Unit Labels
Item
7-28
Description
Part Number
15
Rear Communication Label
415854-001
16
Solar 8000 Front Label
415487-001
16
Solar 8000N Front Label
415487-002
16
SolarView Front Label
415487-003
17
English Keycap Label Set
415690-001
17
German Keycap Label Set
415690-002
17
French Keycap Label Set
415690-003
17
Swedish Keycap Label Set
415690-004
17
Spanish Keycap Label Set
415690-005
17
Italian Keycap Label Set
415690-006
17
Dutch Keycap Label Set
415690-007
17
SolarView Keycap Label Set
417051-001
18
GE Label
415852-001
18
GE Company Label
415852-002
19
Fuse Ratings Label
415853-001
32
Label, Prescription Device
415043-002
34
Power Cord
80274-006
Solar 7000/8000/View Patient Monitor
414993-001
Revision J
UPPER LEVEL ASSEMBLY: Exploded View PN 900691-001P
Exploded View
Revision J
PN 900691-001P
Solar 7000/8000/View Patient Monitor
414993-001
7-29
UPPER LEVEL ASSEMBLY: Parts List PN 900691-001P
Parts List
Item
PN 900691-001P
Reference
Designation
Solar 8000 Parts List
Part Number
Qty
1
Mounting Plate
400613-005
1
2
Foot, Rubber
418987-001
4
3
Label, Serial
404525-006
1
4
Cable Clamp
4528-106
1
5
Trim Knob
406080-001
1
6
Ferrite Bead, Split
417198-001
2
7
Speaker Assembly
421378-001
1
SW1, W4
Switch Assembly, Rotate
414642-001
1
Bezel, Solar 8000
414924-001
1
A3, W3
Keycap Assembly
414925-002
1
11
Chassis, Solar 8000
415765-001
1
12
Cover, Solar 8000
415766-001
1
8
9
10
13
A2
Power Supply, Solar 8000
415838-001
1
14
A1
Main Processor PCB
800678-002
1
20
Screw, Sems, Phillips 4-40 x 1/4
45074-408
2
21
Screw, Sems, Phillips 6-32 x 1/4
45000-604
12
22
Screw, Sems, Phillips, 8-32 x 1/4
45000-804
4
23
Screw, FLH, 4-40 x 1/4, Gray
4776-833
4
24
Screw, BDGH, 6-32 x 1/4
45074-608
7
25
Bushing, Split, Heyco
4579-251
2
Spring Clip
4556-001
1
Harness, Power Supply
415735-001
1
29
Shipping Box (Not Shown)
422774-001
1
30
Box Insert (Not Shown)
2001621-001
2
31
Service Manual, Solar 7000/8000/View (Not Shown)
414993-001
1
33
Label, UL-2601
416338-002
1
35
Gasket, EMC
415484-001
2
36
Clip, Ferrite Bead
417061-001
2
37
Screw, BDGH, Nylon, 6-32 x 3/16
417734-001
4
38
Screw, PNH, Phillips, 8-32 x 3/8
405318-008
4
39
Spacer
409628-001
2
40
Washer
4538-476
2
41
Tape, Kapton, 1/2 inch wide
4835-001
.4
42
Screw, PH 6-32 x .375
405318-004
2
43
Bag, Antistatic (Not Shown)
99014-001
1
26
27
7-30
W1
Solar 7000/8000/View Patient Monitor
414993-001
Revision J