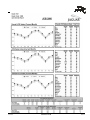
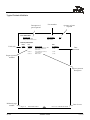
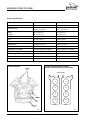
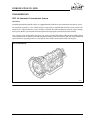
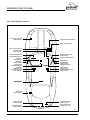
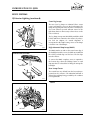
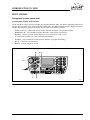
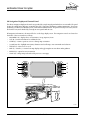
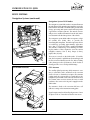
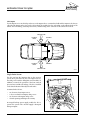
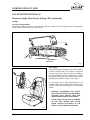
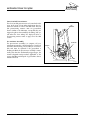
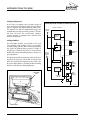
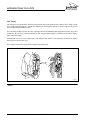
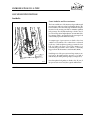
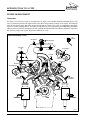
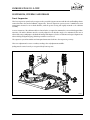
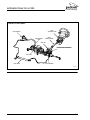
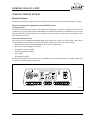
1
J A G U A R
S E R V I C E
T R A I N I N G
SERVICE TRAINING COURSE INTR
INTRODUCTION TO JAGUAR
ISSUE ONE
DATE OF ISSUE: 10/01/2002
This publication is intended for instructional purposes only. Always refer to the appropriate
Jaguar Service publication for specific details and procedures.
All rights reserved. All material contained herein is based on the latest information available at the time of
publication. The right is reserved to make changes at any time without notice.
Publication TINTR/02
DATE OF ISSUE: 10/01/2002
© 2002 Jaguar Cars
PRINTED IN USA
INTRODUCTION TO JAGUAR
Service Training
ACRONYMS AND ABBREVIATIONS
The following abbreviations and acronyms are used throughout the Jaguar Service Training Student Guides:
A/C
A/CCM
APP SENSOR
APP1
APP2
AUTO
AWD
B+
BANK 1
BANK 2
CAN
CKP SENSOR
CM
CMP SENSOR / 1
CMP SENSOR / 2
CV
D2B
DATC
DLC
DSC
EATC
ECM
ECT SENSOR
EFT SENSOR
EGR
EGT SENSOR
EOT SENSOR
EVAP CANISTER CLOSE VALVE
EVAP CANISTER PURGE VALVE
FTP SENSOR
GECM
GPS
HID
HO2 SENSOR 1 / 1
HO2 SENSOR 1 / 2
HO2 SENSOR 2 / 1
HO2 SENSOR 2 / 2
IAT SENSOR
IC
ICE
IMT VALVE / 1
IMT VALVE / 2
IP SENSOR
KS / 1
KS / 2
LH
LHD
MAF SENSOR
MAN
MAP SENSOR
N/A
NAS
NTC
ii
Air Conditioning
Air Conditioning Control Module
Accelerator Pedal Position Sensor
Accelerator Pedal Position Sensor Element 1
Accelerator Pedal Position Sensor Element 2
Automatic Transmission
All-Wheel Drive
Battery Voltage
RH Cylinder Bank (Cylinders 1, 3, 5, 7)
LH Cylinder Bank (Cylinders 2, 4, 6, 8)
Controller Area Network
Crankshaft Position Sensor
Control Module
Camshaft Position Sensor / RH Bank
Camshaft Position Sensor / LH Bank
Constant Velocity
D2B Network
Dual Automatic Temperature Control
Data Link Connector
Dynamic Stability Control
Electronic Automatic Temperature Control
Engine Control Module
Engine Coolant Temperature Sensor
Engine Fuel Temperature Sensor
Exhaust Gas Recirculation
Exhaust Gas Temperature Sensor
Engine Oil Temperature Sensor
Evaporative Emission Canister Close Valve
Evaporative Emission Canister Purge Valve
Fuel Tank Pressure Sensor
General Electronic Control Module
Global Positioning System
High Intensity Discharge
Heated Oxygen Sensor – RH Bank / Upstream
Heated Oxygen Sensor – RH Bank / Downstream
Heated Oxygen Sensor – LH Bank / Upstream
Heated Oxygen Sensor – LH Bank / Downstream
Intake Air Temperature Sensor
Instrument Cluster
In-Car Entertainment System
Intake Manifold Tuning Valve / Top
Intake Manifold Tuning Valve / Bottom
Injection Pressure Sensor
Knock Sensor / RH Bank
Knock Sensor / LH Bank
Left Hand
Left Hand Drive
Mass Air Flow Sensor
Manual Transmission
Manifold Absolute Pressure Sensor
Normally Aspirated
North American Specification
Negative Temperature Coefficient
Student Guide
Date of Issue: 10/01/2002
INTRODUCTION TO JAGUAR
NVH
OAT
PATS
PCM
PTEC
PWM
RECM
RH
RHD
ROW
SCP
TCM
TP SENSOR
TP1
TP2
TURN
TV
V6
V8
VICS
VVT VALVE / 1
VVT VALVE / 2
WDS
+ve
–ve
Date of Issue: 10/01/2002
Service Training
Noise, Vibration and Harshness
Organic Acid Technology
Passive Anti-Theft System
Powertrain Control Module
Powertrain Electronic Control
Pulse Width Modulated
Rear Electronic Control Module
Right Hand
Right Hand Drive
Rest of World
Standard Corporate Protocol Network
Transmission Control Module
Throttle Position Sensor
Throttle Position Sensor Element 1
Throttle Position Sensor Element 2
Turn Signal
Television
V6 Engine
V8 Engine
Vehicle Information Control System
Variable Valve Timing Valve / Bank 1
Variable Valve Timing Valve / Bank 2
Worldwide Diagnostic System
Positive
Negative
Student Guide
iii
INTRODUCTION TO JAGUAR
iv
Service Training
Student Guide
Date of Issue: 10/01/2002
J A G U A R
S E R V I C E
T R A I N I N G
INTRODUCTION TO JAGUAR
GENERAL INFORMATION
1
INTRODUCTION TO XJ/XK
2
INTRODUCTION TO S-TYPE
3
INTRODUCTION TO X-TYPE
Service Training Course TINTR
Date of Issue: 10/01/2002
The illustrations, technical information, data and descriptive text in this publication, to the
best of our knowledge, were correct at the time of going to print. The right to change
specifications, equipment, procedures and maintenance instructions at any time without
notice is reserved as part of our policy of continuous development and improvement
No liability can be accepted for any inaccuracies or omissions in this publication, although
every possible care has been taken to make it as complete and accurate as possible.
Jaguar Cars North America Service Training Department
GI.2
Student Guide
10/01/2002
A welcome message to the new Jaguar technician
Introduction to Jaguar is intended not only to provide you with the information you need on an ongoing basis,
but also with a historical and cultural perspective of the Jaguar Marque. You might have already noticed a
difference between the Jaguar training center and other automotive training centers. The Jaguar training
environment is sophisticated yet comfortable so that you will enjoy your stay while you gain important job
related skills and knowledge. Jaguar trainers are highly experienced and prepare their classrooms and lesson
plans carefully for each class that they teach. You will find that the course presentations and student materials
are designed to respect you as a professional, and to adjust to your individual training needs.
I hope the training that you are about to experience begins to express how Jaguar customers and their vehicles
need to be treated in your dealership. Of course fixing cars right the first time is important and expected, but
Jaguar also offers distinction in the marketplace. The Jaguar difference is that of individual attention to detail,
and of treating customers and fellow employees with the utmost respect.
Over the next few days, I ask that you look, listen, learn and participate. If you are not already a Jaguar
enthusiast, you soon will be. Welcome to Jaguar.
Regards;
Mike McDonald
Technical and Aftersales Training Manager
Jaguar NA
10/01/2002
Student Guide
GI.3
MILESTONES IN THE HISTORY OF JAGUAR
•
1922 – William Lyons and William
Walmsley partner to found the
William Lyons
Swallow Sidecar Company
•
1928 – Swallow sedan
introduced
•
1935 – SS100 sports car
introduced
•
1935 – Jaguar name chosen for SS
cars
Swallow Sidecar
Swallow Sedan
SS100
•
1940-45 – XK engine designed
•
1945 – Company changed name to
Jaguar Cars Ltd.
XK120
•
1948 – XK120 introduced
•
1950 - Mark VII sedan introduced
•
1951-1957 - Jaguar wins Le Mans
five times
•
1954 - Jaguar Cars of North America
opened
GI.4
Mk I Sedan
Student Guide
10/01/2002
•
1955 – Mk I Sedan introduced
•
1955 – XK140 introduced
•
1957 - XK150 introduced
•
1960 – Mk II Sedan introduced
•
1961 – E-type introduced
XK 150
E-Type
S-Type
•
1961 – Mark X sedan introduced
•
1964 – 3.8 S-Type introduced
•
1966 – Jaguar merged with British
Motors Corporation and later with
British Leyland Motor Company
•
1967 – 420 sedan introduced
•
1969 – Series I XJ6 sedan
introduced
•
1971 – 5.3-liter V12 introduced
•
1971 – Series III V12 E-type
introduced
10/01/2002
Series I XJ6
Series III V12 E-Type
Student Guide
GI.5
•
1972 – Sir William Lyons retired
•
1972 – XJ12 introduced
•
1974 – Series II XJ6 sedan introduced
•
1976 – XJS introduced with 5.3-liter
V12 engine
•
1977 – Bob Tullius wins first of two
consecutive SCCA Trans Am
championships in an XJS
•
1979 – Series III XJ6 sedans
introduced
•
1983 – Jaguar becomes independent
company as Jaguar Cars Ltd.
•
1985 – Sir William Lyons died
•
1987 – XJ40 (1988 MY) introduced in
North America
•
1988 – Jaguar won Le Mans for a
sixth time
•
1988 – Jaguar-built XJS convertible
(1989 MY) introduced
GI.6
XJS
SCCA Champions
Series III XJ6
XJ40
Le Mans 1988
XJS Convertible
Student Guide
10/01/2002
XJ6
•
1989 – Ford buys Jaguar
•
1994 – New range of restyled sedans
(1995 MY) introduced including the
XJR supercharged sedan
XK8
•
1996 – AJ-V8 engine introduced
•
1996 – XK8 (1997 MY) coupe and
convertible introduced
•
1997 – XJ8 (1998 MY) introduced
•
1999 – S-Type (2000 MY)
introduced
•
2001 – X-Type (2002 MY) introduced
•
2002 – Aston Martin/Jaguar/Land
Rover join to form AMJLR
XJ8
S-Type
X-Type
10/01/2002
Student Guide
GI.7
Jaguar Service Training
The Jaguar Service Training program is designed above all else to increase customer satisfaction by helping
the technician to develop the specialized skills and knowledge required to keep Jaguar vehicles operating
at peak performance levels.
Professional training is available at five strategically located training centers in North America. Each
Jaguar training center provides an ideal learning environment and is equipped to Jaguar dealer standards
of appearance, tools, and equipment.
Training Center Locations
California
Canada
Georgia
Illinois
New Jersey
6 Morgan, Suite 150, Irvine, CA 92718
8 Indell Lane, Bramalea, Ontario L6T 4H3
6160 Peachtree Dunwoody Road, Atlanta, GA 30328
1435 Plum Grove Road, Suite A, Shaumburg, IL 60173
555 MacArthur Blvd., Mahwah, NJ. 07430
Jaguar Training Courses
Jaguar Service Training Courses are designed to offer the optimum mix of hands-on with live vehicles and
actual components, and the related practical knowledge required to develop a thorough understanding of
the vehicle systems. Each course is finely tuned and concisely presented to provide information and
develop new skills that technicians can put to work when they return to their dealerships. For a complete
listing of current courses and descriptions, refer to Administration Bulletins (section 2 - Training) or visit
the Jaguar Business Network (https://www.jbnonline.com), Training and Recognition site.
Registering for Training
Jaguar Service Training Schedules are published periodically via Administration Bulletins. Schedules are
also available online at the Jaguar Business Network. The schedule shows the class schedules for all five
Jaguar Training Centers. There are no geographical restrictions for participating in the training program;
dealers anywhere in North America may register their staff at any training center depending on
availability. Training seats are allocated to dealerships based on service volume and training gap for initial
enrollment. After the initial enrollment period, there are no restrictions and requests are filled on a first
come, first served basis.
To register for training, submit the Request for Enrollment, which is included with the published training
schedule, to the Training Administrator at Jaguar Cars, Mahwah, NJ via U.S. Mail or fax to (201) 818-9074.
State the name and social security number of the enrollee, and the dates, locations, and class titles
requested. Jaguar will respond acknowledging receipt of enrollment information. The dealer will be
notified that the enrollment is confirmed or that the class is full. If the class is full, the dealer will be
offered the choice of alternate dates, alternate locations, or the opportunity to be placed on a waiting list for
the originally requested. Jaguar will soon make enrollment and immediate confirmation available online
through the Jaguar Business Network.
GI.8
Student Guide
10/01/2002
Multimedia Training
Jaguar supplies each dealership with a series of multimedia training courses on compact discs for use on
the Multimedia Training Computer. Available courses include:
•
•
•
•
•
•
XK8 Introduction
XJ8 Introduction
S-Type Introduction (2000 MY)
S-Type Systems (2000 MY)
S-Type Introduction (2003 MY)
•
•
•
Advanced Electrical Circuits and
Diagnostics
Advanced Electrical Components
PDU Training
Beginner Electrical
The average time required to complete each course ranges from 1 to 3 hours, depending on the length of
the course and student proficiency. Completion of all multimedia courses is a prerequisite for all three
levels of recognition in the Service Masters Recognition Program. To receive credit for completing each
course, students must complete the course and print the completion certificate. Be sure that the student’s
name and identification number (SSN or SIN) are printed on the certificate. Then fax or mail the certificate
for the attention of:
Training Administrator
Jaguar Cars of North America
555 MacArthur Blvd.
Mahwah, NJ. 07430
Fax: (201) 818-9074
Training Reports
Jaguar dealerships receive a monthly report called the Training Planner. The report is a record of all service
and parts personnel training completion and required courses. This report may also be available online at
the Jaguar Business Network.
Jaguar Technician Qualifications and Training Requirements
To aid in the training and development of technicians, Jaguar has introduced a new Jaguar technician
qualification system. This system outlines developmental paths to take the technician from Jaguar
Entry Level to Jaguar Expert. In the first phase of the plan, technicians are provided with a knowledge
“base”. In subsequent years, technicians attend a specific collection of courses to provide them with all
the training required to become a Qualified Jaguar Technician in one the four qualification groups. A
Jaguar Expert is a technician who has completed all four qualification groups.
Note: Technician Qualifications stand apart from the Jaguar Masters Recognition Program. For a
detailed explanation of the Qualification System, see Administration Bulletin 2-101.
10/01/2002
Student Guide
GI.9
Jaguar Technician
(Year one training)
Entry Level
Technician
Jaguar Technician and Qualification Paths
*E = Equivalencies (see bottom of chart)
Automotive Technology Certificate or Diploma
(Or ASE A4 + A5 +A6 + A7 + A8 Certificates)
Jaguar Technician
Instructor-led Courses
Self Study Courses
Introduction to Jaguar
*E1
New Product Introduction
World Diagnostic System
SSYS: S-TYPE Systems
Jaguar Electrical Systems
6BEG, 6AEC, 6ADC Electrical Systems
Jaguar Supplemental Restraint Systems
Tire 1, Tire 2
Jaguar Expert
Technician
Jaguar Qualified Technician
(Years two, three, four and five training)
Electrical and Climate Control
GI.10
Engine Repair
Advanced Jaguar Electrical Systems *E2
ASE: A1+ A3 Certification
Multiplex Systems Advanced Diagnostics
V6/V8 Engine Repair
Climate Control
Current New Product
*E3
*E6
Current New Product
Power Unit Management
Chassis and Brakes
Engine Management Self Study
*E4
Suspension and Handling
V6/V8 Engine Management
*E5
Brakes and Traction Control
Jaguar Automatic Transmissions
Body Systems Advanced Diagnostics
EMS Advanced Diagnostics
Vehicle Vibration Analyzer
Jaguar Expert
Achieve and maintain all four Specialist paths and New Product Training
*Jaguar Course Equivalencies
E1 = 2+ years of Jaguar dealership technician or Service Advisor experience
E2 = Previous Jaguar instructor led courses 681 plus NPX2
E3 = Previous Jaguar instructor led courses 701, NP00 and NPX2 (or 702 and NPX2)
E4 = Previous Jaguar instructor led course 801
E5 = Previous Jaguar instructor led courses 880 plus NP00
E6 = Previous Jaguar instructor led courses 180 plus NP00
Student Guide
10/01/2002
Technical Hotline
The Jaguar Technical Service Hotline is an important part of the Jaguar commitment to quality. The Hotline provides,
at no charge, a direct communications link between the dealership technician and the manufacturer. Its purpose is to
give the technician additional assistance to help quickly resolve customer and dealer technical product concerns. It
also gives Jaguar "real life" information about service problems that may be occurring within dealerships. Normal
hours of operation are from 8am to 7pm Mon.-Fri. EST.
The Technical Service Hotline is for Jaguar technicians employed by authorized Jaguar dealers only. If customers or
independent repair shop personnel wish to contact Jaguar, they should call the Jaguar Cars Customer Assistance
Center at 1-800-4-JAGUAR (1-800-452-4827) and select option three on their touch-tone telephones.
• The Technical Hotline Precall Work Sheet (S,88) is necessary for repairs that require direct Jaguar assistance.
• Before calling the Hotline to request assistance, the following MUST be performed:
– Complete the worksheet dealer information and items 1,2 and 3.
– All applicable Technical Service Manual / JTIS, Service Bulletin, and PDU/WDS diagnostics must be
performed.
– All other applicable service procedures must be performed.
• When you contact the Hotline for assistance, the following must be at hand:
– The work sheet with dealer information and items 1,2 and 3 completed and documented.
– All Service Bulletins, Electrical Guides and other publications relevant to the concern.
Technical Hotline Telephone Menu Options
After dialing 1-888-JAG-DLRS (1-888-524-3577) and selecting option two, then select the desired Hotline menu option
using the telephone keypad.
Press 1 to close a case
Press 4 for technical support
Press 2 for Multimedia Computer support
Press 5 for a prerecorded technical message Press 3
for Spanish speaking technical support
Press 8 to repeat all options
NOTE: The Technical Hotline Menu options and selections may be periodically updated without notice. Each time
you call; listen carefully to the recorded menu before making a selection.
• Record the Jaguar Cars Technical Representative’s recommendations, name, and the CATS case number, if one
is assigned.
– Technical Service Hotline CATS Case Numbers are only given out to dealers who require technical assistance
to resolve a concern.
– A CATS Case Number DOES NOT automatically justify additional warranty paid diagnostic time. It is the
dealer’s responsibility to properly document all diagnostic and repair procedures on the hard copy of the
repair order in accordance with the Jaguar Warranty Policies and Procedures Manual.
• The assigned technician is responsible for follow-up with the Technical Hotline to advise them of case progress.
– When the problem is rectified, the technician should close the case by calling the Hotline selecting option 1
from the Technical Service Hotline main menu.
• To provide the most effective assistance it may be necessary for the Hotline Technical Representative to work
with the technician at the vehicle. In such cases a cordless telephone is an asset.
Technician feedback and input is vital to the Hotline. Please take the time to submit an Electronic Product Quality
Report (S,94) on all Hotline case
10/01/2002
Student Guide
GI.11
TECHNICAL HOTLINE PRECALL
WORK SHEET
Date of Issue: 3/2000
S,88 page 2 of 2
Dealer ___________________________________________
Dlr. No. ____________________ Date ________________
Person making call _____________________________________________ Tel. No.
VIN
S,88
______________________________
Mileage _________________________________
1. Read and follow the instructions on page two of this form BEFORE calling the Jaguar Technical Service Hotline.
2 Fill in the following information.
PROBLEM DESCRIPTION (include all DTCs and any other relevant information): _______________________________
_______________________________________________________________________________________________________
_______________________________________________________________________________________________________
_______________________________________________________________________________________________________
_______________________________________________________________________________________________________
PREVIOUS REPAIRS, CASES AND / OR DIAGNOSIS: ________________________________________________________
_______________________________________________________________________________________________________
_______________________________________________________________________________________________________
_______________________________________________________________________________________________________
_______________________________________________________________________________________________________
3. Call the Hotline and discuss the problem with the Hotline Representative.
Telephone: 1-888-JAG-DLRS (1-888-524- 3577)
FAX: (201) 818-8478
Refer to page 1 for MENU OPTIONS.
4. Record the Hotline recommendations.
HOTLINE RECOMMENDATIONS: _________________________________________________________________________
_______________________________________________________________________________________________________
_______________________________________________________________________________________________________
_______________________________________________________________________________________________________
_______________________________________________________________________________________________________
_______________________________________________________________________________________________________
_______________________________________________________________________________________________________
_______________________________________________________________________________________________________
_______________________________________________________________________________________________________
_______________________________________________________________________________________________________
_______________________________________________________________________________________________________
Jaguar Tech. Rep. ________________________________________ CATS Case No.
NOTE: A Technical Service Hotline CATS Case Number is only assigned to vehicles when the dealer requires special technical
assistance to resolve a concern. The assignment or a CATS Case Number DOES NOT automatically justify additional
warranty paid diagnostic time. It is the dealer’s responsibility to properly document all diagnostic and repair procedures on the
hard copy of the repair order in accordance with the Jaguar Warranty Policies and Procedures Manual.
GI.12
Student Guide
10/01/2002
Field Service Engineer
Jaguar provides on-site technical assistance through Field Service Engineers. Each FSE is “home
based” and serves two market areas. FSE’s are responsible for preventing reacquired vehicles by
providing technical assistance in cases where in-dealer resources have been exhausted and the
Technical Hotline has been unable to assist in resolving the vehicle fault. In addition to the
Technical Hotline, FSE’s also have access and support of Product Investigation and Engineering.
FSE’s also make routine visits to all the dealers within their markets. During these visits, they will
analyze operational procedures utilized by service departments and offer recommendations, which
will improve “fix right first time” scores. When FSE assistance is required, the dealer’s Aftersales
Market Manager (AMM), Service Manager, or Technical Hotline can initiate the visit.
10/01/2002
Student Guide
GI.13
Jaguar Masters Recognition Program
Jaguar recognizes the accomplishments of service technicians through the Technicians Association of
the Jaguar Masters Recognition Program. Technicians have the opportunity to achieve recognition at
three levels in the Technicians Association:
•
•
•
Certified
Associate
Master
Top scoring Master Technicians are invited to compete in a hands on technical competition that
determines Guild Status. In addition to being named Guild Member, the top-scoring technician in the
competition is named the Brian Fuerstenau Winner. This technician is honored at a special award
presentation at his or her dealership.
The requirements for each level are based on Jaguar dealership technical experience, ASE certifications,
training, and passing the TechExam, an open book technical exam for technicians. The minimum
requirements for each of the three levels are detailed in the Jaguar Masters Recognition Program binder
or online. To see the requirements online, visit the Training and Recognition Section of Jaguar Business
Network online.
GI.14
Student Guide
10/01/2002
Jaguar Customer Satisfaction Index (JCSI)
In the highly competitive luxury car market, Jaguar continuously seeks to maintain and improve
customer satisfaction. Customer feedback is vital for identifying the strengths and weaknesses of
dealership and manufacturer performance. Jaguar acquires service department performance
through surveys.
What does JCSI measure?
• Customer satisfaction
• Effectiveness of retail process
• Dealer diagnostics that improve customer handling
• Indications of how well we are building and sustaining our evolving relationships with
customers
Jaguar Owners
Jaguar cars appeal to a distinctive group of people; independent, highly successful individuals who
have achieved a substantial measure of professional and personal accomplishment. They
appreciate the refined elegance and performance of the product and expect competent professional
service and courteous personal treatment. Jaguar owners expect perfection in their cars and in
service from their Jaguar dealer.
JAGUAR DEMOGRAPHICS U.S. MARKET
XJ
Target
Media
Actual
Age
S-TYPE
X-TYPE
Select
Edition
Adults 45-54
Adults 45-54
Adults 35-54
Adults 30-39
Adults 35-54
Income
200+ HHI
200+ HHI
100+ HHI
75+ HHI
150+ HHI
Gender
50/50
Male/Female
65/35
Male/Female
50/50
Male/Female
40/60
Male/Female
60/40
Male/Female
Age
Adults 35-54
Adults 35-54
Adults 35-54
Adults 30-49
Adults 35-54
Income
100+ HHI
100+ HHI
75+ HHI
75+ HHI
100+ HHI
Gender
50/50
Male/Female
65/35
Male/Female
50/50
Male/Female
40/60
Male/Female
60/40
Male/Female
Age
Adults 53
Adults 52
Adults 53
Adults 52
Adults 53
Income
215 HHI
289 HHI
50% 100+ HHI
128 HHI
138 HHI
Gender
61/39
Male/Female
68/32
Male/Female
51/49
Male/Female
57/43
Male/Female
65/35
Male/Female
Based on XJ8
10/01/2002
XK
Sourced: NOP
Automotive
Phone Surveys
Student Guide
GI.15
JCSI Survey Process Overview
A customer has a dealership experience (new car/pre-owned purchasers/lessees, and warranty). A
telephone call (proactive customer contact (PCC)) is made to the customer within seven days to
assess overall satisfaction. The customer's satisfaction or dissatisfaction is posted on the
Performance Metrics Website allowing dealership personnel to "recover" a customer from a
negative experience.
Paper Reports
The JCSI report summarizes the JCSI overall index, sales index, service index, and PCC/Mail
survey sample dispositions.
•
•
•
Produced monthly, summarizing current month, previous 11 months and 12-month averages
for the sales and service mail survey.
Provides trends, graphs, and tables to make it easy to track dealership performance.
Displays dealership’s national rank based on a 12-month rolling average. (Note: dealership
must have a minimum of 30 returns for the 12-month period to be ranked; “N/A” will appear
instead of a value if this is not the case.)
Displayed are the dealer, district, and national scores for overall JCSI index, sales index, and service
index.
Electronic Reports
Survey information is updated daily and is available on the web through Jaguar Business Network
(JBN) online.
Site Access
•
•
Log on to the secure Jaguar Business Network (JBN) online system using your unique user ID
and password (https://jbnonline.com)
Double-click on the “Jaguar Performance Metrics” link
Web Information
•
JBN features real-time data. Reports are updated throughout the day as contacts are completed
and mail surveys returned are processed
• User-friendly system
• Menu-driven, drill-down capacity
Ability to view individual customer responses (No other dealership will be able to access or acquire
your reports. The information is protected by log-in and password procedures).
GI.16
Student Guide
10/01/2002
10/01/2002
Student Guide
GI.17
GI.18
Student Guide
10/01/2002
Electrical Guides
Electrical schematics and associated information are contained in Electrical Guides. Electrical Guides are
available in print and electronic (JTIS) versions. Electrical Guides are specific to individual models and, in
most cases, individual model years.
Electrical Guide Format
All current Jaguar Electrical Guides are made up of two major sections. The first section, at the front of the
guide, provides general information for and about the use of the guide, and information and illustrations
to aid in the understanding of the vehicle electrical/electronic systems, as well as location and
identification of components. It is STRONGLY recommended that technicians read thoroughly through
this section of the guide to develop familiarity with the layout and use of the guide.
The second section includes figures (wiring diagrams), which are the basis of each Electrical Guide. Each
Figure is identified by a Figure Number (i.e. Fig. 01.1) and Title, and is accompanied by a page of data
containing information specific to that Figure.
Major Electrical Guide Headings
Introduction
Description
Description of Electrical Guide format, interpretation of commonly
used acronyms, description of vehicle electrical/electronic system and
VIN range
Table of Contents
Listing of each electrical diagram and associated Figure number
Component Index
Listing of all major components and in which Figures they appear
User Instructions
Detailed explanation of Electrical Guide usage
Symbols and Codes
Interpretation of symbols, wiring color codes, wiring harness codes
and harness component numbers
Connectors
Illustrations of commonly utilized connector styles
Main Power Distribution
Illustration of battery harness routing through vehicle
Ground Point Locations
Illustration of ground point locations
Harness Layout
Illustration of harness routing through vehicle
Control Module Location
Illustration of module locations
Control Module Pin Identification
Illustration of control module connectors and related pin information
Relay and Fuse Box Location
Illustration of relay and fuse box locations
Figures
Electrical diagrams with associated data pages
Appendix
Message matrix (listing of multiplex messages used on the associated
networks)
10/01/2002
Student Guide
GI.19
Typical Electrical Guide Usage
In most circumstances, the technician will begin usage of an Electrical Guide by referring to the Table of Contents for
the appropriate Figure Number of the desired schematic. Turning to the appropriate Figure, the tri-fold page for
schematic should be unfolded to the right side and the tri-fold data page should be unfolded to the left side. This will
display both the schematic and data pages simultaneously. As needed, the technician can refer back to the first
section of the Electrical Guide for additional information (i.e. location illustrations, control module pin information,
etc.).
Note: Electrical Guides are not market-specific. The user must pay close attention when selecting a Figure to insure
that the proper schematic is referenced.
GI.20
Student Guide
10/01/2002
Technical Guides, Focus Series and Guides CD
Technical Guides
Two types of Technical Guides are produced; Technical Introductions and Model Year Updates.
Technical Introductions provide a comprehensive technical overview of new models or powertrains
while Model Year Updates cover changes in existing models that have undergone significant changes.
Focus Series
The Focus Series provides technical information on specific systems. Each book covers an individual
system and will include a technical overview, detailed systems operation, and diagnostic information.
Technical Guides and Focus Series CD
Released in 2000, the Technical Guides and Focus Series CD contains a compilation of all guides
released from 1987 – 1999. Adobe Acrobat Reader is required to view the guides and is included on the
CD.
10/01/2002
Student Guide
GI.21
Technical Guides and Focus Series CD Contents
FOCUS SERIES
PUB. NO.
S 58
S 64
S 70
S 73
S 91
DESCRIPTION
XJ-S Engine Performance (1981-88 MY w/ Lucas Ignition)
1989-91 MY XJS Coupe & Convertible Body Enhancement
Electrical System Batteries and Charging Second Edition
Sedan Power Hydraulic System
1993-94 AJ6 4.0L Engine Management System OBD I Diagnostic Guide
TECHNICAL GUIDES
PUB. NO.
JTP 425/1
DESCRIPTION
Air Conditioning System HFC Refrigerant Retrofit
XJ6/VDP/XJ12 SEDAN RANGE 1988-94 MY
PUB. NO.
S 63
S 66
S 69
S 78
S 81
DESCRIPTION
1988 MY Sedan Range Introduction
1989 MY XJ6 3.6 Model Year Update
1990 MY Sedan Range Model Year Update
1991 MY Sedan Range Model Year Update
1993 MY XJ6 Sedan Range Model Year Update
1994 MY XJ12 Sedan Technical Introduction
XJ6/VDP/XJR/XJ12 SEDAN RANGE 1995-97 MY
PUB. NO.
JJM 101512/50
JJM 181512/55
JJM 181512/57
JJM 181599/60
DESCRIPTION
1995 MY Technical Guide XJ6 & XJ12 Range Introduction
1995 MY Technical Guide XJ6 & XJ12 Range Supplement 1
1996 MY Technical Guide XJ6 & XJ12 Range (Long Wheel Base Sedan)
1996 MY Technical Guide XJ Sedan & XJS Ranges 1996 MY Update
XJS RANGE
PUB. NO.
--S 60
S 60/SUPP
S 61
S 67
JJM 101506/01
S 71
S 79
S 80
S 83
S 92
JJM 101506/52
JJM 181599/60
DESCRIPTION
1986-88 MY Hess & Eisenhardt Convertible Repair Operation Manual
1988 MY XJS Model Year Update
1989 MY XJS Model Year Update
1989 MY XJS Model Year Update Supplement (Marelli Ignition)
XJ-S Convertible Technical Introduction
1990 MY XJS Model Year Update
1990 XJS Convertible Technical Guide
1992 MY XJS Technical Introduction
1993 MY XJS Model Year Update
XJR-S Product Support
1994 MY XJS Modle Year Update
1995 MY XJS Model Year Update
1995 MY XJS Update from VIN 198335
1996 Technical Guide Sedan & XJS 1996 MY Update
XJ8/VDP/XJR
PUB. NO.
DESCRIPTION
JJM 181512/80
JJM 181518/90
1998 MY Technical Guide V8 XJ Series Sedan 1998 MY Introduction
1999 MY Technical Guide XJ and XK Series 1999 MY Update
XK8
PUB. NO.
JJM 181514/70
JJM 181515/70
JJM 181518/90
GI.22
DESCRIPTION
1997 MY Technical Guide XK8 Sports Coupe and Convertible Introduction
1997 MY Technical Guide AJ-V8 Engine and 5HP24 Transmission Introduction
1999 MY Technical Guide XJ and XK Series 1999 MY Update
Student Guide
10/01/2002
Diagnostic Trouble Code Summaries
DTC Summaries are a compilation of diagnostic trouble codes for all major vehicle systems that support onboard
diagnostics. DTC Summaries include detailed information for each code
Diagnostic Trouble Code Contents
Table Heading
Description
DTC
Code number
Fault Description
Subsystem or component associated with the DTC
Monitoring Conditions
Operating conditions under which a system self-test will be performed on
described system or subcomponent
OBD II (selected systems)
Indicates if DTC is an OBD II DTC
Tool (selected systems)
Indicates if the DTC can be accessed via a generic scan tool or will require
WDS/PDU/GDS
CK Engine
Indicates the drive trip(s) required to activate the CHECK ENGINE MIL
Other
Lists driver warnings associated with DTC (if any)
Default Action
Lists default actions initiated by system control module in response to the DTC
Possible Causes
Lists possible faults that could cause the DTC
Note: a detailed interpretation of table headings is included in the introduction pages of each DTC Summary
section.
Typical DTC Table
DEFAULT ACTION
POSSIBLE CAUSES
P0010 VVT Circuit malfunction –
A bank
DTC
FAULT DESCRIPTION
Drive vehicle; accelerate rapidly to cruise,
decelerate to stop, repeat several times
MONITORING CONDITIONS
Y
2
N
When CK ENG MIL is activated
(DTC flagged; second trip), ECM:
Sets VVT drive PWM duty cycle to 0
(intake camshaft fully retarded)
VVT solenoid valve to ECM PWM drive
circuit fault
VVT solenoid valve to ECM ground circuit
fault
VVT solenoid failure
P0020 VVT Circuit malfunction –
B bank
Drive vehicle; accelerate rapidly to
cruise, decelerate to stop, repeat several
times
Y
2
N
When CK ENG MIL is activated
(DTC flagged; second trip), ECM:
– Sets VVT drive PWM duty cycle to
0 (intake camshaft fully retarded)
VVT solenoid valve to ECM PWM drive
circuit fault
VVT solenoid valve to ECM ground circuit
fault
VVT solenoid failure
P0101 MAFS range / performance
Engine at normal operating temperature;
drive at steady speed on level surface 43
– 59 mph (70 – 95 km/h); 1500 – 2500
rpm; > 10 seconds
Fuel level > 10%;
surface elevation < 8,000 ft (2,438 m)
Y
2
2
[A, M]
When CK ENG MIL is activated
(DTC flagged; second trip), ECM:
– Substitutes throttle angle for
engine load measurement
– Limits engine speed to
3000 rpm
– Inhibits canister purge
Blocked air cleaner
Air intake leak
Engine breather leak
Throttle control malfunction
MAFS to ECM sensing circuit high
resistance
MAFS to ECM sensing circuit
intermittent short circuit to ground
MAFS supply circuit high resistance
MAFS failure
P0102 MAFS sense circuit low voltage
Ignition ON > 5 seconds
Y
2
1
[A, M]
When AMBER MIL is activated
(DTC logged; first trip), ECM:
– Substitutes throttle angle for
engine load measurement
– Limits engine speed to
3000 rpm
– Inhibits canister purge
Blocked air filter
MAFS to ECM sensing circuit high
resistance or open circuit
MAFS to ECM sensing circuit
intermittent short circuit to ground
MAFS supply circuit open circuit or short
circuit to ground
MAFS failure
The following code prefixes are used:
P – Powertrain
B – Body
OBD II CK ENG
OTHER
C – Chassis
U - Network
Beginning in 1995 and ending in 2002, Jaguar has provided DTC Summaries in print. From 2001 onwards, DTC
Summaries are available on CD and can be viewed using Adobe Acrobat Reader. The CD version contains all
DTC Summaries since 1995.
10/01/2002
Student Guide
GI.23
JAGUAR TECHNICAL INFORMATION SYSTEM
Jaguar Technical Information System is a computer program that provides Jaguar technicians with
service manuals on compact disc. JTIS is utilized on the Jaguar Multimedia computer in each service
department. JTIS allows Technicians to view service information for a specific vehicle and model year.
This includes information such as:
• General Procedures
• Specifications
• Description and Operation
• Removal and Installation
• Diagnostic and Testing
JTIS contains service information for sedans beginning with the 1995 MY XJ6 and for coupes beginning
with the 1997 MY XK8. Compared to service manuals in print, JTIS can be updated more quickly,
updated at lesser expense, and shipped more easily. All service manuals are contained on a single JTIS
CD. With each update, a replacement CD is issued. Each CD is labeled with the date of release and the
edition number (revision number).
Navigator Display
GI.24
Student Guide
10/01/2002
JTIS Screen Elements
Menu Bar:
The menu bar is beneath the title bar and contains the menus. “Click” on a menu to open it.
Tool Bar:
The tool bar is beneath the menu bar and contains the Exit, New, Service, Electrical Diagrams, DTC
Summaries, and Help buttons. The New button displays a listing of changes in the current JTIS
edition over the previous edition.
Navigation Bar:
The navigation bar is beneath the display area and contains the navigation buttons. A brief
description of the button function is shown when you move the Mouse Cursor over a button and
wait for a moment.
Status Bar:
The status bar is at the bottom of the screen. The left part of the status bar shows a short description
for a menu command or a button when you move the Mouse Cursor over it. The right part of the
status bar shows the current model, model year and the current document, date and time.
Vehicle Selection
The model year and the vehicle must be specified before service information can be accessed.
To select a service information manual using year and vehicle:
1. Click on the “Service” button in the
tool bar. The “Select Service
Manuals Year and Vehicle” dialog
box appears:
2. Click on a model year.
3. Click on a vehicle.
4. Click on the “OK” Button
10/01/2002
Student Guide
GI.25
JTIS provides three primary ways of locating service information; JTIS Navigator, JTIS Graphical
Navigator and Search (Global, Local, SRO and Torque search)
The JTIS Navigator is the structured table of contents for available service information.
The JTIS Navigator displays automatically in the left part of the display area when a new service
information manual is opened. The display level is the group level. You can switch between Full Screen
and Display Navigator.
There are symbols for every navigator entry to show the structure:
Plus Symbol
This entry contains subentries. The subentries are not displayed yet.
Click on the plus symbol to expand the subentries.
Minus Symbol
This entry contains subentries. The subentries are displayed now. Click
on the minus symbol to collapse the subentries.
Point Symbol
This entry is a document. Click on the document to open it.
Arrow Symbols
This is your current position in the structure. Click on an entry text (not
the symbol) to change the position.
Navigator Main Display
GI.26
Student Guide
10/01/2002
The JTIS Graphical Navigator is a pictorial display of available service information.
The Graphical Navigator is automatically displayed after a vehicle has been selected. An image
representing the selected model is shown in the center of the screen and is surrounded by images
representing the main target groups.
Graphical Navigator Main Display
10/01/2002
Student Guide
GI.27
When “clicking” on a main group image, the following screen will show an image representing the main
group surrounded by images representing each section.
Navigator Main Display Chassis group displayed
GI.28
Student Guide
10/01/2002
The Search menu provides four ways of location service information
Selecting Search from the Menu Bar provides the four following
options:
•
•
•
•
Local Search – searches current document for matches
Global Search – searches all documents for matches
SRO Search – searches for matching Service Repair Operation
number
Torque Search – searches for torque specifications for described
component
After selecting one of the four options, enter the
description of the information desired, then
select OK
Spring
A dialog box containing all
search matches is displayed.
Click on the desired document
and select OK to display
desired information.
10/01/2002
Student Guide
GI.29
Display Area:
The display area is between the Tool Bar and the Navigation Bar. The display area covers most of the
screen and is split into a left part and a right part.
• Left Side:
Contains the JTIS Navigator or a graphic that corresponds to the currently
displayed service information.
Contains the service information text.
• Right Part
Graphic Display
Electrical Guides
Electrical diagrams can be accessed through the “Electrical Guides” button on the tool bar. After
selecting a model year and vehicle, JTIS will launch Adobe Acrobat. This is a separate program from JTIS
and provides the ability to view diagrams. The Electrical Guides contained in JTIS are an electronic
version of those provided in print by Jaguar Cars.
GI.30
Student Guide
10/01/2002
Diagnostic Trouble Code Summaries
DTC Summaries can be accessed through the “DTC” button on the tool bar. After selecting a model year
and vehicle, JTIS will launch Adobe Acrobat. This is a separate program from JTIS and provides the
ability to view DTC Summaries. The summaries contained in JTIS are an electronic version of those
provided in print by Jaguar Cars.
Printing Documents
After the desired service information has been displayed, it can be printed. Printing can be accessed
through the File option on the menu bar or the “Printer” button located on the navigation bar. Up to four
print options will be presented before printing will be executed.
•
Print All
The entire document, including graphics, will be printed.
•
Print Pages
This option will allow the user to select which pages of the document to print (this
is particularly useful when working with large documents).
•
Print Selection
Only the portion of the document that has been highlighted by the user will be
printed (highlighting of text is achieved by “click-and-holding” the left mouse
button, then dragging the mouse cursor across the desired text).
•
Shrink To Fit
When using DTC Summaries or Electrical Guides, this option will allow the user to
fit a large image, such as an electrical diagram, onto a single page.
Help
Selecting the “Help” button on the tool bar will display a table of contents for the available
online help.
Refer to “Help” for further information concerning the use of JTIS.
10/01/2002
Student Guide
GI.31
Service Bulletins
Service bulletins are published and distributed to update the Jaguar dealer organization with the latest
service information. A quantity of bulletins, specified by the dealer, is mailed directly to the dealer
service manager. Jaguar suggests that every technician be given copies of service bulletins.
Service bulletins are categorized as Administration Bulletins and Technical Bulletins. Technical
bulletins contain the latest service information, updates to specifications and repair procedures, special
repair procedures and other information that is directly related to the technical job of diagnosing and
repairing vehicles. Administration Bulletins cover non-technical service matters such as changes and
updates to service programs, tool and literature information, training information and general
workshop administrative issues.
Service bulletins are organized in their respective binders by subject matter. Bulletins within each
subject group are sequentially numbered so that they can be easily files and any missing bulletins will
be easily identified.
Technical Bulletins
Technical bulletins are organized into three separate binders for ease of access; XK8/XJ8 binder, S-Type
binder, and X-Type binder. The numbering system for all three binders is the same.
Technical Bulletin Numbering System
Group
Subject
100
General Information, ID Codes, Jacking & Lifting, NVH
204
Suspension System
205
Driveline System
206
Brake System
211
Steering System
303
Engine System
307
Transmission
309
Exhaust Components
310
Fuel System
412
Climate Control
413
Information, Gauge, and Warning Group
414
Electrical Power Supply System
415
In-Vehicle Entertainment System
417
Lighting System
418
Electrical Distribution & Electronic Control System
419
Electronic Feature Group
501
Body System
600
Maintenance
910
Squeaks and Rattles
920
PDU & WDS
Note: S-Type and X-Type bulletin group numbers are preceded by an “S” or “X”, respectfully.
GI.32
Student Guide
10/01/2002
Typical Technical Bulletin
V8 XJ Series/XK8
Title
Bars are placed
on amended
bulletins beside
revised
information
(revised text
appears in bold)
DATE 04/98
206-07
Amended 04/00
TECHNICAL BULLETIN
SERVICE
Detailed
explanation of
fault/concern
Group and issue number
206-07 = 7th bulletin issued for
group 206 (Brake Systems)
Original date of issue and
date of amendment (if
applicable)
Model group
Applicable
model(s)
MODEL
Brake Pedal Switch –
Parts Inventory Simplified
1997 MY-ON XK8 Range
1998 MY-ON V8 XJ Series
VIN
001001-ON
812256-ON
Remove and destroy Bulletin 206-07, amended 11/98.
Replace with this Bulletin.
Revisions are marked with a bar and in bold text.
Issue:
Brake pedal switch assemblies were changed in production (Illustration 1) from the following
VINs:
XK8
VIN A03098
V8 XJ Series VIN F05566
These switch assemblies are the only ones now available and can be installed on earlier vehicles.
Action:
The current brake pedal switch assembly (date code 44/99) , as listed on the next page, must be
installed if replacement of the switch is necessary.
Detailed
explanation of
repair
procedure
Note: When the cruise control is in operation, a malfunctioning brake switch
can cause FAILSAFE to display in the message center and cause a DTC
P1571 to be stored in the ECM.
BRAKE PEDAL SWITCHES
Applicable VIN
range(s)
Amended
bulletins include
instructions to
destroy original
and replace with
amended
version
Notes, Cautions &
Warnings are
emphasized with a
border
Illustrations
V8 XJ SERIES
XK8
ILLUSTRATION 1
Date of issue
Date of issue 04/98 Amended 04/00
10/01/2002
Bulletin Number 206-07 Page 1 of 2
Student Guide
Bulletin & page
number
GI.33
Typical Technical Bulletin
Description of
parts required
Part numbers
Quantity of parts
required
Parts Information:
DESCRIPTION
Brake pedal switch XK8
Brake pedal switch V8 XJ Series
PART NUMBER
LJB 6420BB
LNB 6420BB
QTY
1
1
Warranty Information:
Fault code
FAULT
CODE
QN FB 28
R.O.
NUMBER
86.65.51
86.65.51
86.99.97
86.99.99
DESCRIPTION
Replace brake light switch - XK8
Replace brake light switch V8 XJ Series
Connect PDU for download
capture/printout
PDU test time
TIME
ALLOWANCE
0.10 hrs.
0.10 hrs.
Time
allowances
0.15 hrs
0.30 hrs.
Repair operation
numbers
Repair operation
description
Bulletin & page
number
GI.34
Date of issue
Page 2 of 2
Bulletin Number 206-07
Date of issue 04/98 Amended 04/00
Student Guide
10/01/2002
Administration Bulletins
Administration bulletins are organized into a single binder.
Administration Bulletin Numbering System
Group
Subject
1
Tools and Equipment (i.e. WDS)
2
Training (i.e. schedules)
3
Warranty
4
Maintenance and PDI Schedules
5
Repair Operation Times
6
Workshop Administration (i.e. JTIS)
7
Recalls and Campaigns
10/01/2002
Student Guide
GI.35
Typical Administration Bulletin
Applicability
Original date of issue
and date of amendment
(if applicable)
All
Title
Detailed
explanation of
fault/concern
Detailed
explanation of
action procedure
SERVICE
DATE
Group and issue number
6-99 = 99th bulletin issued for
group 6 (Workshop
Administration)
6-99
05/02
ADMINISTRATION BULLETIN
Jaguar Technical Information System
(JTIS) – Issue 16 –
Workshop Manual – CD-ROM
MODEL
All
Applicable
models
VIN
ISSUE:
Workshop manual information for 2002 X-TYPE, 2000-2002 MY S-TYPE, 1995-2002
MY Sedan Range, and 1997-2002 MY XK8 has been released on CD-ROM Part No.
JJM 10 30 99/203.
The new 2003 MY S-TYPE is covered, but listed under 2002 MY.
This CD-ROM can be used on the Jaguar multimedia PC or any suitable Windowsbased PC with a minimum 133 MHz processor, 2.0 Gb hard drive, 8x CD-ROM
drive, and 24 Mb RAM.
ACTION:
Ensure that the software is stored inside the PC storage cabinet with all other
Jaguar multimedia PC CD-ROMs.
Refer to the inside cover of the CD-ROM jewel case for installation instructions.
Once this CD-ROM has been installed, the system will not accept the
JTIS Issue 15 CD-ROM.
Note: You must install JTIS 16 to have access to all new
information. Click on the NEW button to review the added
information.
Applicable VIN
ranges
Notes, Cautions &
Warnings are
emphasized with a
border
INSTALLATIONTIPS
•
You do not have to install Acrobat Reader 3.0, if you already have a later
version (4.0 or 5.0). Clicking OK only closes the message window - it does not
install Acrobat.
•
The first time you install JTIS on a PC, you may have to install Data Access
Objects 3.5. Clicking OK only closes the message window - it does not install
the component. If necessary, install DAO 3.5 by navigating to
dao35\DISK1\S
etup.exe on the JTIS CD-ROM.
dao35\DISK1\Setup.exe
Date of issue
Date of issue 05/02
GI.36
Bulletin Number 6-99 Page 1 of 1
Student Guide
Bulletin & page
number
10/01/2002
Service Actions, Campaigns &
Recalls
Campaign
A campaign is a category or warranty transaction. It is used as in general communications around "Types of
Warranty Transactions". There two types of campaign 1) Service Action 2) Recall.
Service Action
A service action is a repair to a specific product concern. There is no customer notification. A Service Action is
performed based on either a customer complaint (the problem MAY occur) or the first service opportunity (the
problem WILL occur sooner or later). In time all service actions will be closed. Service Actions are claimable
only while the vehicle is within the terms of the New Car Warranty.
Recall
A recall is also a repair to specific product concerns. However, vehicle owners/drivers are notified. There will
also be reporting of completion rates to Federal agencies, State Agencies or both. Short of a 100% completion
rate, Recalls are never closed. Recalls are claimable regardless of the New Car Warranty status.
10/01/2002
Student Guide
GI.37
Forms
Several forms exist to assist Jaguar service technicians. These forms insure complete reporting and
proper procedure for various service operations. Below is a listing of forms more commonly used by
technicians.
Form Number
W,18
W,27
W,28
W,29
S,18
S,18,4
S,1897,SED
S,18,XJS
S,1898
S,1899
S,18,00
S,18,02
S,88
S,93
S,94
S,95
S,97
Description
Battery Test Report
In Car Entertainment Warranty Parts Return Form
Automatic Transmission Evaluation Report
PAS Rack and Pinion Evaluation Form
Vehicle Maintenance Checklist: XJ6 and Vanden Plas 1988-1989 MY
Vehicle Maintenance Checklist: Sedan Range 1990-1994 MY
Vehicle Maintenance Checklist: Sedan Range 1995-1997 MY
Vehicle Maintenance Checklist: XJS (through 1994 MY)
Vehicle Maintenance Checklist: All 1998 Models
Vehicle Maintenance Checklist: All 1999 Models
Vehicle Maintenance Checklist: All 2000/2001 Models
Vehicle Maintenance Checklist: All 2002 Models
Technical Hotline Precall Worksheet
OBD II Report (Note: Replaced by Electronic OBD II Report online at the EPQR
website)
Product Quality Report (Note: Replaced by Electronic OBD II Report online at
the EPQR website)
Vibration Report: All Jaguar Vehicles 1988 MY on
Alignment Report: 1995 MY on
Note: Selected repair operations require proper form submission for warranty reimbursement
GI.38
Student Guide
10/01/2002
Jaguar Business Network (JBN)
Online
The JBN-online website is a one-stop shop for all kinds of dealer-related information. This dealer-only website,
provides both sales and service dealer personnel a wide variety of research and information choices.
The JBN online home offers the user all the different areas the dealer can select to obtain information.
Even though all selections on the main page are of great advantage to the user, there are some selections, which
are very useful to the service department user. The following sections will provide you with an overview of
these service-related areas
Service Support
This section, offers the user access to:
•
•
•
•
•
Service & Parts bulletins
Service Actions & Recalls
PI Department Technical E-mail
Jaguar Service Support partners
Global Vehicle Specifications
This site provides on-line versions of service bulletins covering North American Specification (NAS) or USA
specification Jaguar vehicles.
Training & Recognition Program
This section, offers the user access to:
•
•
•
•
•
Introduction to Jaguar
Sales Training
Parts & Service Training
Customer Care
And several other important areas
The Parts and service page offers several selections which are commonly utilized by service department
personnel.
For example, all self-study training programs require the technician to complete the course by taking an online
test. The user automatically receives credit for the course upon successful completion.
The technical training home page offers all service personnel a complete list of all available service-training
courses. Each course includes a brief description of the prerequisites, number of days and required materials.
10/01/2002
Student Guide
GI.39
Technical Training Schedule
The schedules are shown in 3-month periods and are easy to interpret with such features as specific colors for
each training center.
Parts & Service Marketing
This section, offers the user access to:
•
•
•
•
•
GI.40
Vehicle accessories
Jaguar Tire Program
Service Loaner Program
Roadside assistance program
And several other important programs
Student Guide
10/01/2002
Electronic Product Quality Reports (EPQR)
The EPQR system is a quick and easy way for
the dealers to report vehicle quality concerns
directly to Jaguar Cars North America Product
Investigation (PI) department and Jaguar Cars
Limited (JCL) engineering groups. All Jaguar
dealers have access to a web site (Fig. 1) where
the EPQRs and OBD-II reports (S93) can be
electronically submitted.
Fig. 1 Jaguar Cars EPQR home page
The Submit EPQR page (Fig.2), allows the technician
to enter the details of the concern into the relevant
fields. Clicking on the Submit button at the bottom of
the page will send the EPQR on its way.
The report is electronically delivered to the
appropriate product investigation analyst at JNA.
The analyst reviews the report and if necessary,
modifies it for transmittal to the appropriate
component-engineering group or engineer at JCL.
Fig. 2 EPQR submit Form
10/01/2002
Once Jaguar Cars UK investigates the concern, the
findings and appropriate actions are sent to back to
JNA for final review and if necessary modification of
any instructions before forwarding the information
to the dealer.
Student Guide
GI.41
Electronic Product Quality Reports (EPQR)
The user can keep track of the status of the
investigation by going to the outstanding EPQRs
page (Fig.3), and checking on the EPQR
submitted.
Not only can the user view the status of the
report but can also edit the report by clicking on
the relevant reference number in the left hand
column of the table.
Fig. 3 Outstanding EPQRs page
Another feature that the EPQR site offers is the
Frequently Asked Questions (FAQs) search form
(Fig. 4). This feature offers the technician a
quick way of checking for similar concerns
already investigated or product investigation
reports on the issue. Once the appropriate fields
are filled out on the search form (Fig.5), the
results of the search are on shown in full detail
(Fig. 6)
Fig. 4 FAQ search Form
Fig. 5 Search options
GI.42
Fig. 6 FAQ search results
Student Guide
10/01/2002
Electronic Product Quality Reports (EPQR)
In addition to the FAQ, the user can also perform
a more detailed search using the search EPQR
form (see Fig. 7).
The search EPQR page allows the user to search
using the various criteria in any combination
required. One can therefore view both recent and
historical EPQRs and also search for EPQRs
relating to specific areas.
Fig.7 EPQR Search screen
Fig. 8 EPQR search results page
10/01/2002
Once the appropriate fields are filled out, the
results are shown on a different page (Fig. 8).
Clicking on the EPQR number takes the user to a
new page with all the details of the investigation
(Fig. 9)
Fig. 9 EPQR search results detailed file
Student Guide
GI.43
Electronic Product Quality Reports (EPQR)
In addition to the submitting EPQRs,
dealers can also attach the OBD-II concern
report (Form S-93). This form is used by
technicians to report OBD-II powertrain
malfunction indicator light (MIL)
occurrences on OBD-II equipped vehicles.
Using the WDS - S93 menu tab, the user can
save all the pertinent data into a report,
which is uploaded using the Submit S93
screen (Fig. 10) on the EPQR menu screen
followed by choosing the appropriate file
adding it to the file field (Fig. 11) and
submitting.
Fig. 10
Both the EPQR and S93 forms are very
important to Jaguar Cars North America
and Jaguar Cars Limited. Not only do they
inform the appropriate engineering groups
of any important vehicle concerns, but also
the US environmental protection agency
(EPA) requires all vehicle manufacturers to
submit any emissions related concerns after
a certain number of occurrences.
For more information on accessing the
EPQR website or any additional
information, refer to Administrative Bulletin
6-93 (Electronic Submission of Product
Quality Reports and S-93 Data), date of
issue 07/01.
GI.44
Fig. 11
Student Guide
10/01/2002
Special Tools
Special tools are designed for service operations that cannot be performed proficiently, properly, or
safely using general hand tools or shop equipment. Special tools are numbered using a global
numbering system. This system utilizes a six-digit numbering system; the first three digits are the
service group, the last three digits are the tool number within the group (i.e. 303-536 is the number for
AJV8 engine lifting plates).
Special Tools Numbering System
Group
Subject
100
Miscellaneous
204
Suspension
205
Driveline
206
Brakes
211
Steering
303
Engine
307
Transmission
310
Fuel System
412
Climate Control
418
Electrical
501
Body
Storage and organization of most tools are facilitated through the Jaguar Tools Storage System. This
system consists of mobile storage cabinets for XK8/XJ8, S-Type, and X-Type special tools.
Special tools are automatically sent to each dealership whenever new tools are introduced. Special
tools can also be purchased directly from the SPX Corporation (1-800-533-5338). Special tool catalogues
are automatically shipped to Jaguar dealerships whenever they are revised. Tools not utilizing the
global numbering system are identified by a Jaguar part number and are available through the Jaguar
Parts Department.
10/01/2002
Student Guide
GI.45
Worldwide Diagnostic System (WDS)
Introduced in 2000, WDS is Jaguar’s primary diagnostic system.
Operating on a Windows 98 platform, WDS utilizes a Pentium II
microprocessor, 6.4-gigabyte hard drive, and a 12” color, touchsensitive screen. Most vehicle systems interfacing are achieved
through the Data Link Connector (DLC).
WDS
1
WDS capabilities include:
• Guided diagnostics
• Monitor/record system signals (Datalogger)
• Extract/clear fault codes
• CM reflashing
• Connector information (Connector Viewer)
• CM programming
• Vehicle Vibration Analyzer (VVA)
• Digital Multimeter
• Four-trace oscilloscope
• On Demand Self Test (ODST)
• Output State Control (OSC)
• Vehicle setup
• CM interrogation
• Data Recorder access
WDS software is updated regularly to provide coverage of all current Jaguar models. All applications are
contained on a single CD that is updated every 30-60 days.
WDS Vehicle Coverage
MY
Model
1995-1997
Sedan Range
1996-1997
XJS
1997-on
XK8
1998-on
XJ8
2000-on
S-Type
2002-on
X-Type
Note: refer to the latest Administration Bulletin for current WDS vehicle coverage.
Jaguar offers a two-day, instructor-led WDS course.
GI.46
Student Guide
10/01/2002
Portable Diagnostic Unit (PDU)
PDU is a computer-based, software-driven diagnostic
tool. PDU communicates with vehicle systems via a
serial communications diagnostic connector or CM
interface adapter. The systems supported through
serial communications include engine management,
transmission, security, instrumentation, braking,
climate control and air bag supplementary restraints.
Systems not supported through serial
communications are supported through directed
diagnostics using PDU as a multimeter.
PORTABLE DIAGNOSTIC UNIT
PDU’s capabilities include:
• Monitor/record system signals (Datalogger)
• Extract/clear fault codes
• Enable/disable programmable features
• ECM reflashing
• Vehicle setup
• Connector information (Vehicle Data Viewer)
• Guided diagnostics
• Digital multimeter (DMM)
• Vehicle Vibration Analyzer (VVA)
INTR / 2.99
Since the introduction of PDU in 1993, PDU’s application software has been continuously updated to improve
its performance and provide the capability to interface with newer vehicles and their subsystems. The
Worldwide Diagnostic System (WDS) was introduced in 2000 to replace PDU and, as a result, the final two
revisions of PDU software were released in 2001.
PDU Vehicle Coverage and Software Applications
MY
Model
Software
1990-1996
XJS
JTP 626/7
1990-1994
Sedan Range JTP 626/7
1995-2001
XJ Series
JTP 627/10
1997-2001
XK8
JTP 627/10
2000-2001
S-Type
JTP 627/10
PDU’s expanded capabilities, small size and portability have proven a valuable resource in the hands of
trained technicians. As with all diagnostic aids, an understanding and knowledge of the vehicle system being
tested is required to maximize PDU’s effectiveness.
While Jaguar no longer provides instructor-led factory training courses for PDU, a multimedia training CD
designed to familiarize the new user with PDU usage is part of the in-dealer multimedia training library.
10/01/2002
Student Guide
GI.47
GDS 500E
Introduced in 1997, GDS 500E is Jaguar’s first generic scan tool. While GDS
500E was specifically designed for use on Jaguar vehicles, it will also work
on most other foreign and domestic OBDII-compliant vehicles. The tool is
not mandatory and is not designed to replace PDU/WDS. GDS 500E has
limited functionality, when compared to PDU/WDS, but is smaller, faster
and easier to use. The unit is equipped with a PROM that contains all
operating and application software and therefore, does not require software
application download before interfacing with vehicles. The PROM is
serviceable, allowing for GDS 500E upgrading. The final upgrade PROM
was made available in 2001. No further development of the GDS 500E will
be made due to the release of its successor, the GDS 510.
GDS 500E
GDS 500E is for use on 1995– 2001 MY Jaguar vehicles and includes the
following capabilities on most vehicles:
OBDII Operations Menu
• Monitor powertrain data
• Monitor freeze frame data
• Request emissions trouble codes
• Clear emissions trouble codes
• Request oxygen sensor test results
• On-board monitoring system test results
• Control on-board system
JAGCOM Operations Menu
(engine/transmission/ABS)
• Parameter monitor
• Stored codes
• Clear stored codes
• Diagnostic control
Note: While the final PROM upgrade was released in 2001, GDS 500E still retains limited functionality on later
vehicles.
GI.48
Student Guide
10/01/2002
SEDAN MODELS
1995-1997
XJ6, Vanden Plas, XJR and XJ12 (1995/1996 only)
(X300-SWB, X330-LWB)
4.0 liter, 245 hp in-line 6 cyl eng. (except XJR and XJ12)
4.0 liter, 322 hp Supercharged in-line 6 cyl eng. (XJR only)
6.0 liter, 312 hp V-12 eng. (XJ12 only)
ZF 4HP24 4-spd automatic trans (XJ6, Vanden Plas)
GM 4L80E 4-spd automatic trans (XJ12 and XJR)
1998-2003
XJ8, Vanden Plas, and XJR
(X308-SWB, X338-LWB)
Normally aspirated 4.0 liter, 290 hp V8 eng. (XJ8)
Supercharged 4.0 liter, 370 hp V8 eng. (XJR)
ZF 5HP24 5-spd automatic trans (XJ8)
MB W5A580 5-spd automatic trans (XJR)
10/01/2002
Student Guide
GI.49
SEDAN MODELS
2000-2002
S-Type
(X200)
Normally aspirated 4.0 liter, 281 hp V8 eng.
Normally aspirated 3.0 liter, 240 hp V6 eng.
Ford 5R55N 5-spd automatic trans
2003
S-Type, Type R
(X202)
Normally aspirated 4.2 liter, 300 hp V8 eng.
Supercharged 4.2 liter, 400 hp V8 eng. (Type R only)
Normally aspirated 3.0 liter, 240 hp V6 eng.
ZF 6HP26 6-spd automatic trans (V6 or V8)
Getrag 221 5-spd manual trans (V6 only)
2002-2003
X-Type
(X400)
Normally aspirated 3.0 liter, 231 hp V6 eng.
Normally aspirated 2.5 liter, 194 hp V6 eng.
Ford MTX75 5-spd manual transaxle (AWD)
JATCO 5-spd automatic transaxle (AWD)
GI.50
Student Guide
10/01/2002
COUPE AND CONVERTIBLE MODELS
1995-1996
XJS and XJS Convertible
4.0 liter, 245 hp in-line 6 cyl eng. OR
6.0 liter, 312 hp V-12 eng. (1995 only)
ZF 4HP24 4-spd automatic trans (except 6.0 liter)
GM 4L80E 4-spd automatic trans (6.0 liter only)
1997- 2002
XK8, XK8 Convertible, and
XKR (supercharged – 2000MY on)
(X100)
Normally aspirated 4.0 liter, 290 hp V8 eng. (XK8)
Supercharged 4.0 liter, 370 hp V8 eng. (XKR)
ZF 5HP24 5-spd automatic trans (XK8)
MB W5A580 5-spd automatic trans (XKR)
10/01/2002
Student Guide
GI.51
VIN DECODER
2003 MODEL YEAR (MY) Shown
POSITION
1-3
4
DEFINITION
World Manufacturer ID
Market/Airbags
5
Transmission/Steering
6-7
Vehicle Line/Body Type
8
Emission Control System
9
10
11
Check Digit
Model Year
Model Line & Assembly Plant
GI.52
Student Guide
CHARACTERS
SAJ
F,G= Canada
T,P = Mexico
D,E= USA
A = Automatic LHS
B = Manual LHS
01 = S-TYPE 4 Door Sedan
03 = S-TYPE SPORT 4 DR SEDAN
12 = XJ Sport
14 = XJ8
15 = XJR
24 = VDP
25 = Super V8
41 = XK8/XKR Coupe
42 = XK8/XKR Convertible
51 = X-TYPE 4 door sedan
52 = X-TYPE entry level 4 dr sedan
53 = X-TYPE Sport 4 dr sedan
B = XKR,XJR/Super V8
B = Mexico 3.0 S-TYPE
C = XJ8, XJ Sport, VDP, XK8,
C = X-TYPE 3.0
C = Mexico 4.2 S-TYPE
D = X-TYPE 2.5
D = Mexico S-TYPE R
E = Mexico X-TYPE 2.5
F = Mexico X-type 3.0
G = Mexico V8 normally aspirated
K = Mexico V8 S/C
T = US/CANADA S-TYPE 3.0
U = US/CANADA S-TYPE 4.2
V = US/CANADA S-TYPE R
?
3 = 2003 Model Year
F = 3.0L S-TYPE V6; Castle Bromwich
H= 4.2L S-TYPE V8;Castle Bromwich
L = 4.0L Sedan; Browns Lane
M = 4.0L S/C; Browns Lane
1 = 4.2L S-TYPE R; Castle Bromwich
2 = 4.2L XK8; Browns Lane
3 = 4.2 XKR S/C; Browns Lane
W = 3.0L X-TYPE Halewood
X = 2.5L X-TYPE Halewood
10/01/2002
POSITION
12
DEFINITION
Model
13-17
Sequential
10/01/2002
Student Guide
CHARACTERS
A = XK8
F = XJ Sedan, Super V8
L, M, N =S-TYPE
C, D = X-TYPE
00001
GI.53
J A G U A R
S E R V I C E
T R A I N I N G
INTRODUCTION TO JAGUAR
1
INTRODUCTION TO XJ/XK
1.1
Overview
1.2
Engine
1.3
Engine Management
1.4
Transmissions
1.5
Suspension, Steering and Brakes
1.6
Climate Control
1.7
Electrical Distribution System
1.8
Body Systems
1.9
Occupant Protection
1.10 Task Sheets
Service Training Course TINTR
Date of Issue: 10/01/2002
INTRODUCTION TO XJ/XK
Service Training
OVERVIEW
XJ General Information
INTR.01
Introduced in 1998 MY, the XJ V8 Series Sedan was available in four model variants; XJ8, XJ8L (long wheel base), XJR
(supercharged) and Vanden Plas (long wheel base). A fifth variant, Super V8 (supercharged Vanden Plas) was added in
1999 MY. The XJ8 is a major update to the XJ6 Series Sedan it replaces. Although little externally changed, extensive
changes are incorporated into the body structure to accommodate new power trains. Most systems were overhauled,
with emphasis being placed on commonality with components and operation of the related systems in the XK8.
New engines providing improved performance, economy and refinement are combined with new transmissions
providing improved shift quality and flexibility. These are complemented by the introduction of a new driveshaft
and final drive unit. Handling and ride refinement are enhanced by upgraded braking and stability/traction control
systems, variable ratio steering and extensive changes to the suspension, including an all-new front suspension.
New electrical and multiplex communication systems are introduced to reduce the weight and complexity of vehicle harnesses.
Cabin interior remains the Classic or Sport theme, depending on model, while incorporating an all new fascia and
revised model differentiation. A new center console and cubby box lid, restyled one-piece door casings, a restyled
steering wheel center pad and a revised shift lever surround, further promotes interior freshening. Driver benefits
include a new radio cassette with integrated phone controls and additional fore/aft seat travel.
Exterior freshening includes styling changes to the lamps, bumpers and headlamp powerwash jets, and the introduction of new wheel designs.
NOTES
1.1.2
Student Guide
Date of Issue: 10/01/2002
INTRODUCTION TO XJ/XK
Service Training
XK General Information
INTR.02
Introduced in 1997 MY, the XK8 luxury sports car is available in both coupe and convertible forms. It was the launch
vehicle for the AJ-V8 engine and the ZF 5-speed transmission. The supercharged XKR variant was added to the model lineup in 2000 MY.
Interiors are trimmed in Sports or Classic style. Sports style follows the dark wood veneer and charcoal theme of the
Sedan Sports models. The Classic style retains Jaguar’s traditional burr walnut veneer and color coordinated trim.
Some features available (dependent on variant and MY):
• Speed sensitive, variable ratio, power steering system
• Adaptive damping
• Power latching convertible top
• Steering wheel mounted ICE and cruise control switches
• Telescopic headlamp power wash
• Four button remote transmitter
• Navigation
• Cellular phone
• Rain sensing windshield wipers
• Reverse parking aid
NOTES
Date of Issue: 10/01/2002
Student Guide
1.1.3
INTRODUCTION TO XJ/XK
Service Training
OVERVIEW
XJ Vehicle Weights
Model
Kerb Weight (approximate)
Gross Vehicle Weight (approximate)
Front Axle
Rear Axle
Total
Front Axle
Rear Axle
Total
XJ8
923 kg
(2035 lb.)
866 kg
(1910 lb.)
1789 kg
(3945 lb.)
1016 kg
(2240 lb.)
1202 kg
(2650 lb.)
2218 kg
(4890 lb.)
XJ8 L
924 kg
(2038 lb.)
885 kg
(1952 lb.)
1810 kg
(3990 lb.)
1018 kg
(2245 lb.)
1222 kg
(2695 lb.)
2240 kg
(4940 lb.)
XJR
960 kg
(2117 lb.)
888 kg
(1958 lb.)
1848 kg
(4075 lb.)
1055 kg
(2325 lb.)
1215 kg
(2680 lb.)
2270 kg
(5005 lb.)
VOIDS
941 kg
(2075 lb.)
873 kg
(1925 lb.)
1814 kg
(4000 lb.)
1036 kg
(2285 lb.)
1209 kg
(2665 lb.)
2245 kg
(4950 lb.)
Super V8
NOTE: The above weights are for vehicles without a towbar. The addition of a towbar increases the total
weight by 25 kg (55 lb.), with the front axle load decreasing by approximately 8.5 kg (19 lb.) and the rear
axle load increasing by approximately 33.5 kg (74 lb.).
The gross vehicle weight can be increased by a maximum of 100 kg provided the tire pressures are at
Normal pressure and vehicle speed does not exceed 100 km/h (62.5 mph).
XJ Dimensions
DIMENSIONS: XJ (2002 MY SHOWN)
287 cm (113 in.) SWB; 299.4 cm (117.9 in.) LWB
502.4 cm (197.8 in.) SWB; 518.8 cm (202.7 in.) LWB
133.8 cm (52.7 in.)
SWB
135.1 cm (53.2 in.)
LWB
149.8 cm (59 in.)
150.1 cm (59.1 in.)
207.5 cm (81.7 in.)
1.1.4
INTR.03
Student Guide
Date of Issue: 10/01/2002
INTRODUCTION TO XJ/XK
Service Training
XK Vehicle Weights
Model
Kerb Weight (approximate)
Gross Vehicle Weight (approximate)
Front Axle
Rear Axle
Total
Front Axle
Rear Axle
Total
XK8 Coupe
842 kg
(1852 lb.)
773 kg
(1700 lb.)
1615 kg
(3553 lb.)
953 kg
(2100 lb.)
1057 kg
(2330 lb.)
2010 kg
(4431 lb.)
XK8
Convertible
877 kg
(1929 lb.)
828 kg
(1821 lb.)
1705 kg
(3751 lb.)
983 kg
(2167 lb.)
1117 kg
(2463 lb.)
2100 kg
(4630 lb.)
XKR Coupe
1717 kg
(3785 lb.)
XKR
Convertible
1824 kg
(4021 lb.)
NOTE: The maximum permitted trunk capacity (with driver and passenger) is 48 kg (106 lb.).
XK Dimensions
DIMENSIONS: XK (2002 MY SHOWN)
258.8 cm (101.9 in.)
475.9 cm (187.4 in.)
128.2 cm (50.5 in.)
XK8 Coupe
127.7 cm (50.3 in.)
XKR Coupe
129.5 cm (51 in.)
XK8 Convertible
128.7 cm (50.7 in.)
XKR Convertible
150.3 cm (59.2 in.)
149.8 cm (59 in.)
201.4 cm (79.3 in.)
INTR.04
NOTES
Date of Issue: 10/01/2002
Student Guide
1.1.5
INTRODUCTION TO XJ/XK
Service Training
OVERVIEW
Vehicle Identification Numbers (VIN)
XJ Identification Plates and Labels
IDENTIFICATION PLATE AND LABEL LOCATION: XJ
VIN (vehicle identification number) and other information is displayed on a label located on the rear edge of
the LH front door. For certain markets, the VIN appears
on a bar code label referred to as the Certification Label
and additionally carries the month and year of manufacture, vehicle weight data and paint codes. The VIN is
also displayed on a plate that is visible through the
windshield. It is essential that the VIN is quoted when
ordering parts, and in all associated correspondence.
XK Identification Plates and Labels
The Vehicle Identification Number (VIN) is stamped on
the right-hand side longitudinal member of the spare
wheel compartment.
MFD BY JAGUAR CARS LTD
COVENTRY ENGLAND
MFD DATE
GVWR
GAWR F
R
JAGUAR CARS LTD
TYPE PASSENGER CAR
PAINT
TRIM
NORTH AMERICA
R/AR
VEH IDENT NO.
THIS VEHICLE CONFORMS TO ALL APPLICABLE FEDERAL MOTOR
VEHICLE SAFETY BUMPER AND THEFT PREVENTION STANDARDS
IN EFFECT ON THE DATE OF MANUFACTURE SHOWN BELOW
VEH IDENT NO.
GVWR
/PNBV
MFD DATE
GAWR
/PNBE F/AV
A clear patch in the darkened area at the bottom left of
the windshield allows visible access to a VIN plate
which is bonded to the windshield reinforcing lower
panel.
TYPE
The VIN identification label is fixed to the B-post on the
left-hand side of the vehicle, above the door striker
plate. For Canada markets the VIN label is similar to
that for the USA market and in the same location.
PC/VT
PAINT
969
TRIM
CANADA
INTR.06
For the USA markets, an emissions bar code label is
adhered to the drivers door shut face. The E approval
label is fixed to the top surface of the LH turret panel.
IDENTIFICATION PLATE AND LABEL LOCATION: XK
NOTES
ALL MARKETS EXCEPT USA,
CANADA AND SAUDI ARABIA
USA MARKETS
INTR.05
1.1.6
Student Guide
Date of Issue: 10/01/2002
INTRODUCTION TO XJ/XK
Service Training
VIN DESCRIPTION
SAJ A A 01 R ? X F L 00001
WORLD
MANUFACTURER
INDENTIFIER
TRANSMISSION
AND STEERING
CODE
MARKET,
AIRBAG SPECIFICATION
EMISSION
CONTROL
SYSTEM
BODY CODE
MODEL
YEAR I.D.
CHECK
DIGIT
PRODUCTION SEQUENCE NUMBER
ASSEMBLY PLANT,
MODEL LINE
INTR.07
Production Sequence Numbers
XJ Models XJ8, XJ8 L, XJR, VDP, Super V8
XK Models XK8 Coupe, XK8 Convertible, XKR Coupe, XKR Convertible
Model Year
Production Sequence Numbers
XJ Models
XK Models
1997
(Model year I.D. “V”)
——
001001 – 018107
1998
(Model year I.D. “W”)
812256 – 853935
018108 – 031302
1999
(Model year I.D. “X”)
853936 – 878717
031303 – 042775
2000
(Model year I.D. “Y”)
F00001 – F20644
A00001 – A11050
2001
(Model year I.D. “1”)
F20645 – F40031
A11051 – A22928
2002
(Model year I.D. “2”)
F40032 –
A22929 –
NOTES
Date of Issue: 10/01/2002
Student Guide
1.1.7
INTRODUCTION TO XJ/XK
Service Training
OVERVIEW
Vehicle Jacking and Towing
CAUTION: Do not use the aluminum suspension cross beam for jacking the front of the car.
Use only the car jacking points or the steel cross member below the radiator package.
Rear jacking points are the normal car jacking points or the rear of the rear suspension subframe.
Road and ship transportation lashdown for the rear of the vehicle is via the rear suspension reinforcement forward of the
rear wheels. Slave towing/lashing eyes are provided for road or ship lashdown of the front of the vehicle.
CAUTION: The slave towing/lashing eyes must be removed before the vehicle is driven on the
public highway.
VEHICLE RECOVERY
VEHICLE JACK AND JACKING POINTS
INTR.08
INTR.09
NOTES
1.1.8
Student Guide
Date of Issue: 10/01/2002
INTRODUCTION TO XJ/XK
Service Training
For vehicle recovery, a single front towing eye, stowed
in the trunk, screws into either the left or right-hand
side of the lower cross member. The rear towing eye is a
welded double loop on the right-hand side corner of
the luggage floor.
FRONT TOWING EYE (XK SHOWN)
INTR.10
NOTES
Date of Issue: 10/01/2002
Student Guide
1.1.9
INTRODUCTION TO XJ/XK
1.1.10
Service Training
Student Guide
Date of Issue: 10/01/2002
J A G U A R
S E R V I C E
T R A I N I N G
INTRODUCTION TO JAGUAR
1
INTRODUCTION TO XJ/XK
1.1
Overview
1.2
Engine
1.3
Engine Management
1.4
Transmissions
1.5
Suspension, Steering and Brakes
1.6
Climate Control
1.7
Electrical Distribution System
1.8
Body Systems
1.9
Occupant Protection
1.10 Task Sheets
Service Training Course TINTR
Date of Issue: 10/01/2002
INTRODUCTION TO XJ/XK
Service Training
ENGINE
4.0 LITER AJ-V8 ENGINE
INTR.11
The AJ-V8 4.0 liter engine is the first V8 to be offered by Jaguar. Designed to give excellent performance, refinement,
economy, and low vibration levels it also conforms to the strictest emission legislation. The AJ-V8 is available in both
normally aspirated and supercharged versions. The engine is shorter by 12 inches (300 mm) then the AJ16 4.0 liter
engine it replaced. Compression ratio is 10.75:1 (N/A) and 9.0:1 (SC), with four valves per cylinder. The cylinder
head heads, block, and bedplate are cast aluminum. Normally aspirated variants are equipped with variable valve
timing to give improved low and high-speed engine performance and excellent idle quality. Airflow into the normally aspirated engine is through a one-piece composite intake manifold via an electronic throttle assembly. The intake
manifold is replaced with dual charge air coolers on the supercharged variant. The engine has a low volume, high
velocity, cooling system which achieves a very fast warm-up with reduced and even metal temperatures in the combustion chamber and increased bore temperatures.
The generator, A/C compressor, and PAS are mounted to the block on rigid cradle supports. Accessory drive is from
a single, 7-ribbed vee belt. Hydraulic engine mounts minimize noise and vibration.
NOTES
1.2.2
Student Guide
Date of Issue: 10/01/2002
INTRODUCTION TO XJ/XK
Service Training
Engine Specifications
4.0 Liter N/A
4.0 Liter SC
Configuration
90˚ V8
90˚ V8
Cylinder Head
Dual overhead camshafts,
4 valves per cylinder
Dual overhead camshafts,
4 valves per cylinder
Valve Clearances (Cold):
Intake
Exhaust
0.18 to 0.22 mm
0.23 to 0.27 mm
0.18 to 0.22 mm
0.23 to 0.27 mm
Firing Order
1A, 1B, 4A, 2A, 2B, 3A, 3B, 4B
1A, 1B, 4A, 2A, 2B, 3A, 3B, 4B
Bore
86 mm (3.386 in)
86 mm (3.386 in)
Stroke
86 mm (3.386 in)
86 mm (3.386 in)
in3)
3.996 liters (244 in3)
Displacement
3.996 liters (244
Compression Ratio
10.75 : 1
9.00 : 1
Maximum Power (DIN)
216 kW (290 BHP) at 6100 rpm
276 kW (370 BHP) at 6150 rpm
Maximum Torque (DIN)
393 Nm (290 lb ft) at 4250 rpm
525 Nm (387 lb ft) at 3600 rpm
Maximum Speed (limited)
6950 rpm
6200 rpm
Coolant Volume (complete system)
10 liters (2.65 gal)
12 liters (3.17 gal)
Weight (approximate, with accessories)
200 kg (441 lb)
227 kg (500 lb)
ENGINE STRUCTURE
CYLINDER NUMBERING (REFER TO ENGINE
SPECIFICATION CHART ABOVE FOR FIRING ORDER)
CYLINDER
HEAD
FRONT OF ENGINE
1
1
2
2
3
3
4
4
BANK 2
BANK 1
CYLINDER
BLOCK
BED
PLATE
STRUCTURAL
SUMP
Date of Issue: 10/01/2002
INTR.12
INTR.13
Student Guide
1.2.3
INTRODUCTION TO XJ/XK
Service Training
ENGINE
ENGINE DATA LOCATIONS
SERIAL NUMBER
(UP TO 2001 MY)
• MAIN BEARING CRANKSHAFT DIAMETERS
• CONNECTING ROD BEARING
CRANKSHAFT DIAMETERS
• CYLINDER BORE DIAMETERS
• MAIN BEARING BORE DIAMETERS
• SERIAL NUMBER (FROM 2001 MY ON)
EMISSIONS CODE
INTR.14
NOTES
1.2.4
Student Guide
Date of Issue: 10/01/2002
J A G U A R
S E R V I C E
T R A I N I N G
INTRODUCTION TO JAGUAR
1
INTRODUCTION TO XJ/XK
1.1
Overview
1.2
Engine
1.3
Engine Management
1.4
Transmissions
1.5
Suspension, Steering and Brakes
1.6
Climate Control
1.7
Electrical Distribution System
1.8
Body Systems
1.9
Occupant Protection
1.10 Task Sheets
Service Training Course TINTR
Date of Issue: 10/01/2002
INTRODUCTION TO XJ/XK
Service Training
ENGINE MANAGEMENT
AJ26 / AJ27 EMS Overview
The AJ26 engine management system was designed for the introduction of the V8 engine to the Jaguar range of vehicles starting with the 1997 model year XK8. A supercharged version was added for 1998 model year.
The AJ27 engine management system is a further development of the AJ26 system designed to meet more stringent
emission control standards and enhance engine performance. The naturally aspirated AJ27 system was introduced
for the 1999 model year; the supercharged AJ27 system was introduced for the 2000 model year.
System application is as follows:
Engine Management System
Model Year
Models
AJ26
1997
1998
1999
XK N/A
XK & XJ N/A
XJR (SC)
AJ27
1999
2000
2001
2002
XK & XJ N/A
XK & XJ N/A and SC
XK & XJ N/A and SC
XK & XJ N/A and SC
Both systems are built around a two-microprocessor based Engine Control Module (ECM). The ECM is linked to and
communicates with other powertrain control modules and other vehicle systems via the Controller Area Network (CAN).
The ECM governs all engine operating functions including:
• Air induction via an electronically controlled throttle
• Fuel delivery
• Sequential fuel injection
• Ignition via on-plug ignition coils
• Idle speed control
• Exhaust emission control
• Evaporative emission control
• Intake valve timing
• Exhaust gas recirculation (certain variants only)
• Cooling system radiator fan control
• Air conditioning compressor control
• Cruise control
• Engine speed limiting
• Engine torque reduction to aid transmission shift quality and enhance traction / stability control
• EMS and OBD II diagnostics
• Default operating modes including engine speed and throttle limits
NOTES
1.3.2
Student Guide
Date of Issue: 10/01/2002
INTRODUCTION TO XJ/XK
Service Training
System Variant Summary (North American specification vehicles):
FUNCTION
AJ26 N/A
AJ26 SC
Electronically controlled throttle
• Electronically controlled throttle with mechanical guard
• Full authority electronically controlled throttle
X
X
Variable valve timing
• Two position variable intake valve timing
• Linear variable intake valve timing
X
AJ27 N/A
AJ27 SC
X
X
X
Exhaust gas recirculation
X*
X
Oxygen sensors
• Upstream HO2S; downstream O2S
• Upstream Universal HO2S; downstream HO2S
X
X
Ignition coils
• A Bank / B Bank ignition coil modules
• Individual integral ignition coil modules
X
X
X
X
X
X
X
Security engine management immobilization
X **
X
X
X
On-board refueling vapor recovery
X ***
X
X ***
X
Air assisted fuel injection
X
DTC memory
• DTCs and system adaptions stored in volatile memory
• DTCs and system adaptions stored in non-volatile memory
X
X
X
X
* Early production only. EGR deleted on normally aspirated engine as a running change during 1997.
** Key transponder security input and diagnostic introduced for 1998 model year.
*** On-board refueling vapor recovery (ORVR) introduced for 1998 model year XJ8, 1999 model year XK8.
NOTES
Date of Issue: 10/01/2002
Student Guide
1.3.3
INTRODUCTION TO XJ/XK
Service Training
ENGINE MANAGEMENT
Control Summaries
The AJ26 and AJ27 engine management systems are comprehensive engine control systems that allow complete
electronic control over all engine functions. The following pages provide control summaries for the four system
variants. Specific pin-out data can be found in the applicable Electrical Guide.
System Logic: AJ26 N/A
AJ26 N/A ENGINE MANAGEMENT SENSORS AND COMPONENTS
IATS
MECHANICAL GUARD
SENSOR
PEDAL POSITION
SENSOR
MAFS
TPS
THROTTLE
MOTOR
M
IGNITION
MODULE
1
CYLINDERS
1A, 2B, 3B, 4A
IGNITION
MODULE
2
CYLINDERS
1B, 2A, 3A, 4B
EGR
CMPS
FI
FI
IGNITION
IGNITION
VVT
VVT
ECTS
KS
HO2S
HO2S
A BANK
B BANK
O2S
O2S
CKPS
INTR.15
1.3.4
Student Guide
Date of Issue: 10/01/2002
INTRODUCTION TO XJ/XK
Service Training
System Logic: AJ26 SC
AJ26 SC ENGINE MANAGEMENT SENSORS AND COMPONENTS
IATS
MECHANICAL GUARD
SENSOR
PEDAL POSITION
SENSOR
MAFS
TPS
THROTTLE
MOTOR
M
EGR
FI
IGNITION
MODULE
1
CYLINDERS
1A, 2B, 3B, 4A
IGNITION
MODULE
2
CYLINDERS
1B, 2A, 3A, 4B
FI
IATS 2
ECTS
CMPS
IGNITION
IGNITION
KS
HO2S
HO2S
A BANK
B BANK
O2S
O2S
CKPS
INTR.16
Date of Issue: 10/01/2002
Student Guide
1.3.5
INTRODUCTION TO XJ/XK
Service Training
ENGINE MANAGEMENT
Control Summaries (continued)
System Logic: AJ27 N/A
AJ27 N/A ENGINE MANAGEMENT SENSORS AND COMPONENTS
IATS
MAFS
PPS
AACV
TPS
THROTTLE
MOTOR
M
FI
FI
CMPS
CMPS
IGNITION
MODULE
IGNITION
MODULE
ECTS
VVT
VVT
KS
HO2S
HO2S
HO2S
EOTS
HO2S
A BANK
B BANK
CKPS
INTR.17
1.3.6
Student Guide
Date of Issue: 10/01/2002
INTRODUCTION TO XJ/XK
Service Training
System Logic: AJ27 SC
AJ27 SC ENGINE MANAGEMENT SENSORS AND COMPONENTS
IATS
MAFS
PPS
TPS
THROTTLE
MOTOR
MAPS
EGR
FI
FI
IATS 2
IGNITION
MODULE
CMPS
ECTS
CMPS
IGNITION
MODULE
KS
HO2S
HO2S
A BANK
B BANK
HO2S
HO2S
CKPS
Date of Issue: 10/01/2002
Student Guide
INTR.18
1.3.7
INTRODUCTION TO XJ/XK
1.3.8
Service Training
Student Guide
Date of Issue: 10/01/2002
J A G U A R
S E R V I C E
T R A I N I N G
INTRODUCTION TO JAGUAR
1
INTRODUCTION TO XJ/XK
1.1
Overview
1.2
Engine
1.3
Engine Management
1.4
Transmissions
1.5
Suspension, Steering and Brakes
1.6
Climate Control
1.7
Electrical Distribution System
1.8
Body Systems
1.9
Occupant Protection
1.10 Task Sheets
Service Training Course TINTR
Date of Issue: 10/01/2002
INTRODUCTION TO XJ/XK
Service Training
TRANSMISSIONS
5HP 24 Automatic Transmission System
Overview
Normally aspirated V8 XJ and XK vehicles are equipped with the 5HP 24 five-speed automatic transmission system.
The transmission and most of the vehicle interface components are mechanically identical for both vehicles. The
transmission is TCM (transmission control module) controlled. The TCM communicates with the engine management system, ABS/TC system and the instrument pack via the high speed Controller Area Network (CAN).
Gear selection occurs via the Jaguar style J-gate gear selector assembly that features fully automatic shifting (Drive)
on the right hand side and driver controlled semi-manual shifting on the left hand side (4th, 3rd, 2nd). Normal and
Sport transmission operating modes are selected by the driver via the mode switch located near the J-gate.
5HP 24 TRANSMISSION
INTR.19
NOTES
1.4.2
Student Guide
Date of Issue: 10/01/2002
INTRODUCTION TO XJ/XK
Service Training
Specifications
Transmission weight:
95 kg (210 lb.) with torque converter and fluid.
Mechanical features:
Transmission case in three sections – torque converter housing, main case
and rear extension housing.
Torque converter with single plate controlled slip lock-up clutch
Planetary gear train (no brake bands)
Gear ratios
1st
3.57 : 1
2nd
2.20 : 1
3rd
1.51 : 1
4th
1.00 : 1
5th
0.80 : 1
Rev
4.10 : 1
Transmission fluid:
Capacity – 10 liters (10.6 quarts)
Fill / change – “Filled for life” (Refer to Maintenance Schedule and JTIS.)
Type – Esso LT
Jaguar Part Number
JLM 20237 (1 liter)
Transmission fluid cooler:
External liquid-to-liquid cooler integral with the left hand side radiator tank.
Stall Test:
There is no stall test specification for the 5HP 24 transmission.
NOTES
Date of Issue: 10/01/2002
Student Guide
1.4.3
INTRODUCTION TO XJ/XK
Service Training
TRANSMISSIONS
5HP 24 Automatic Transmission System (continued)
Transmission Control
The 5HP 24 automatic transmission system is fully controlled by the transmission control module (TCM) located in
the engine compartment “cool box” along with the engine control module (ECM).
A high speed controller area network (CAN) allows communication between the TCM, ECM, ABS/TC CM, and the
instrument pack.
TRANSMISSION CONTROL MODULE: 5HP 24
INTR.20
TCM volatile memory
Adaptive values and DTCs are stored in TCM volatile memory. If the vehicle battery is disconnected, all TCM stored
adaptive values DTCs will be lost. The TCM will relearn the adaptive values during the next driving cycle.
NOTES
1.4.4
Student Guide
Date of Issue: 10/01/2002
INTRODUCTION TO XJ/XK
Service Training
5HP 24 TCM control incorporates the following control features:
• Normal / Sport operational modes
• Shift scheduling / shift feel strategy
• Closed loop shift control
• Controlled overlap shifting
• Adaptive pressure control to account for component aging and operating conditions
• Specific driving conditions shift strategies
– Traction control active
– Engine / transmission over-temperature (hot mode)
– Gradient
– Cruise control
– Hot mode
– Manual shift (M 2, 3, 4)
• Torque converter clutch on, off and controlled slip
• Shift energy management (engine torque modulation during shift)
• Engine torque reduction during “transmission failure”, Reverse
• On board diagnostics (OBD II and non OBD II)
• Component failure default modes (mechanical and electronic “limp home”)
NOTES
Date of Issue: 10/01/2002
Student Guide
1.4.5
INTRODUCTION TO XJ/XK
Service Training
TRANSMISSIONS
W5A 580 Automatic Transmission System
Overview
Supercharged V8 XJ and XK vehicles are equipped with the W5A 580 five-speed automatic transmission system.
The transmission and most of the vehicle interface components are mechanically identical for both vehicles. The
transmission is TCM (transmission control module) controlled. The TCM communicates with the engine management system, ABS/TC system and the instrument pack via the high speed Controller Area Network (CAN).
Gear selection occurs via the Jaguar style J-gate gear selector assembly that features fully automatic shifting (Drive)
on the right hand side and driver controlled semi-manual shifting on the left hand side (4th, 3rd, 2nd). Normal and
Sport transmission operating modes are selected by the driver via the mode switch located near the J-gate.
W5A 580 TRANSMISSION
COOLER PORT
BREATHER
SELECTOR LEVER
INTR.21
NOTES
1.4.6
Student Guide
Date of Issue: 10/01/2002
INTRODUCTION TO XJ/XK
Service Training
Specifications
Transmission weight:
81 kg (179 lb.) with torque converter
Mechanical features:
Transmission case in two sections – torque converter housing and main case
Torque converter with two-plate controlled slip lock-up clutch
Planetary gear train (no brake bands)
Gear ratios:
1st
2nd
3rd
4th
5th
Rev (Norm.) Rev (Sport)
3.59 : 1
2.19 : 1
1.41 : 1
1.00 : 1
0.83 : 1
1.93 : 1
3.16 : 1
Transmission fluid:
Capacity – 9.4 liters (10 quarts)
Fill / change – “Filled for life” (Refer to Maintenance Schedule and JTIS.)
Type – Shell LA
Jaguar Part Number
JLM 20292 (1 liter)
Transmission fluid cooler:
External liquid-to-liquid cooler integral with the left hand side radiator tank.
Towing:
Maximum 50 km (30 mi.) at less than 50 km/h (30 mph)
Stall Test:
Due to throttle limitation at low vehicle speed, a stall test cannot be performed on the
W5A 580 system.
NOTES
Date of Issue: 10/01/2002
Student Guide
1.4.7
INTRODUCTION TO XJ/XK
Service Training
TRANSMISSIONS
W5A 580 Automatic Transmission System (continued)
Transmission Control
The W5A 580 automatic transmission system is fully controlled by the transmission control module (TCM) located in
the engine compartment “cool box” along with the engine control module (ECM).
A high speed controller area network (CAN) allows communication between the TCM, ECM, ABS/TC CM, and the
instrument pack.
TRANSMISSION CONTROL MODULE: W5A 580
INTR.22
TCM non-volatile memory
TCM adaptive values and DTCs are stored in non-volatile memory (EEPROM). If the vehicle battery is disconnected,
all adaptive values and stored DTCs will be retained.
NOTES
1.4.8
Student Guide
Date of Issue: 10/01/2002
INTRODUCTION TO XJ/XK
Service Training
W5A 580 TCM control incorporates the following control features:
• Normal / Sport operational modes (strategies)
• Shift scheduling / shift feel
• Adaptive pressure control
• Component wear and aging adaptions – shift time, fluid filling time and pressure, TCC control
• Specific driving conditions shift strategies
– Traction control active
– Engine / transmission over-temperature (hot mode)
– Gradient
– Cruise control
– Manual shift (M 2, 3, 4)
• Torque converter clutch on, off and controlled slip
• Two Reverse gear ratios
• Shift energy management (engine torque modulation during shift)
• Engine torque reduction during “transmission failure”, Reverse
• On board diagnostics (OBD II and non OBD II)
• Component failure default modes (mechanical and electronic “limp home”)
NOTES
Date of Issue: 10/01/2002
Student Guide
1.4.9
INTRODUCTION TO XJ/XK
Service Training
TRANSMISSIONS
Driveshaft
XJ vehicles utilize a two-piece steel driveshaft. Both ends of the driveshaft are fitted with flexible couplings and the
two driveshaft sections are connected via a universal joint. The center of the driveshaft is supported in a bearing
attached to a bracket installed across the driveshaft tunnel. Driveshaft weight is between 9.9 kg (21.8 lb.) and
10.5 kg (23.1 lb.), depending on model variant.
XK vehicles are equipped with a tubular one-piece aluminum driveshaft. Connection to the transmission output
shaft is through a flexible coupling, while a universal joint connects the driveshaft to the final drive. The weight of
the driveshaft is 6.93 kg (15.28 lb.).
DRIVESHAFT (XJ SHOWN)
INTR.23
NOTES
1.4.10
Student Guide
Date of Issue: 10/01/2002
INTRODUCTION TO XJ/XK
Service Training
Final Drive Unit
The type 14 HU final drive assembly is a hypoid unit with the pinion arranged on the cross-car centerline. The driveshaft coupling utilizes a cassette-type pinion oil seal, which is an integral part of the pinion flange. This type of seal
cannot be separated from the pinion flange and therefore may only be renewed as a complete seal/flange assembly.
The axle shafts are driven by the output flanges which rotate on sealed bearings, these assemblies being retained in
the final drive unit by circlips.
FINAL DRIVE UNIT
INTR.24
NOTES
Date of Issue: 10/01/2002
Student Guide
1.4.11
INTRODUCTION TO XJ/XK
1.4.12
Service Training
Student Guide
Date of Issue: 10/01/2002
J A G U A R
S E R V I C E
T R A I N I N G
INTRODUCTION TO JAGUAR
1
INTRODUCTION TO XJ/XK
1.1
Overview
1.2
Engine
1.3
Engine Management
1.4
Transmissions
1.5
Suspension, Steering and Brakes
1.6
Climate Control
1.7
Electrical Distribution System
1.8
Body Systems
1.9
Occupant Protection
1.10 Task Sheets
Service Training Course TINTR
Date of Issue: 10/01/2002
INTRODUCTION TO XJ/XK
1.5.2
Service Training
Student Guide
Date of Issue: 10/01/2002
INTRODUCTION TO XJ/XK
Service Training
SUSPENSION, STEERING AND BRAKES
Suspension System
XJ Front Suspension
The XJ V8 Series Sedan front suspension maintains the Jaguar pattern of unequal-length ‘A’ arms mounted to a subframe. The ‘A’ arm inner fulcrum angles reduce dive during braking. Refinements to the suspension components
improve NVH (noise, vibration, and harshness) refinement without compromising ride quality, suspension
response, or handling. Caster, camber, and toe are adjustable.
VIEWS OF RIGHT FRONT SUSPENSION SYSTEM: XJ
UPPER ‘A’ ARM
FRONT OF
VEHICLE
FRONT OF
VEHICLE
VERTICAL
LINK
ANTI-ROLL BAR
LINK
SPRING PAN
CASTER
ADJUSTING BOLT
CAMBER
ADJUSTING BOLT
SHOCK ABSORBER
MOUNT
INTR.25
NOTES
Date of Issue: 10/01/2002
Student Guide
1.5.3
INTRODUCTION TO XJ/XK
Service Training
SUSPENSION, STEERING AND BRAKES
Suspension System (continued)
XK Front Suspension
Front Crossbeam
The XK8 has a lightweight, cast aluminum, front suspension crossbeam. It is bolted at four points to the body longitudinal members through bonded rubber to metal bushings.
CAUTION: Do not use the aluminum crossbeam as a jacking point. Damage can occur to either
the crossbeam, brake pipes or the steering rack.
The steel lower crossbeam beneath the radiator package or the normal car jacking points must
be used for front end jacking.
The crossbeam carries the engine mounting points, upper and lower wishbone mounting points, the steel wishbone
tie bar, stabilizer bar and the power steering rack.
FRONT CROSSBEAM: XK
LOWER WISHBONE
MOUNTINGS
UPPER WISHBONE
MOUNTING
FRONT
BODY MOUNTING
ENGINE MOUNTING
POWER STEERING
RACK MOUNTING
REAR
BODY MOUNTING
INTR.26
NOTES
1.5.4
Student Guide
Date of Issue: 10/01/2002
INTRODUCTION TO XJ/XK
Service Training
FRONT SUSPENSIONS COMPONENTS: XK
FRONT SPRING
AND DAMPER ASSEMBLY
UPPER WISHBONE
VERTICAL LINK
LOWER
WISHBONE
INTR.27
Front Dampers
The top of each front independent suspension co-axial
spring and damper assembly is fitted to the car body.
The spring is compressed between the top mounting
flange and spring pan on the damper body. Damper
attachment at the lower end is between two plates
located on the rear lower wishbone.
FRONT DAMPER: XK
NOTES
INTR.28
Date of Issue: 10/01/2002
Student Guide
1.5.5
INTRODUCTION TO XJ/XK
Service Training
SUSPENSION, STEERING AND BRAKES
Suspension System (continued)
Front Wheel Bearings
VERTICAL LINK
The front wheel bearings are sealed units requiring no
service or adjustment. The bearing is pressed into the
vertical link. The wheel hub is pressed into the bearing
and retained by a special hub nut that acts as the wheel
speed sensor rotor. The hub nut is locked with a twopin spring-loaded device. A Jaguar Service Tool is
required to remove the bearing hub.
WHEEL BEARING
HUB NUT
NOTES
INTR.29
HUB NUT
LOCKING PIN
HUB NUT
INTR.30
1.5.6
Student Guide
Date of Issue: 10/01/2002
INTRODUCTION TO XJ/XK
Service Training
Rear Suspension
The independent rear suspension incorporates co-axial spring and shock absorber units, a subframe, wishbone tie,
pendulum assembly, mounting bracket, differential strut, cast wishbones and hub carriers. The suspension assembly is positively located by the subframe, mounting bracket and monostrut. The outer extremity of each wishbone is
secured to its respective hub carrier assembly by a fulcrum bolt. Each fulcrum bolt head incorporates an eccentric
circular flange, which locates in a groove in the front face of the wishbone arm. Rotation of the fulcrum bolt results
in horizontal movement of the bolt shank in an elongated hole in the rear of the wishbone arm. This action achieves
corresponding movement of the hub carrier, facilitating adjustment of road wheel toe. A rear stabilizer bar is
installed on supercharged models.
REAR SUSPENSION
MONOSTRUT
INTR.31
NOTES
Date of Issue: 10/01/2002
Student Guide
1.5.7
INTRODUCTION TO XJ/XK
Service Training
SUSPENSION, STEERING AND BRAKES
Suspension System (continued)
Adaptive Damping System
The optional adaptive damping system is automatic requiring no input from the driver. The system selects the best
damper characteristics to suit the driving conditions and improve the ride and the vehicle handling qualities.
System Components
An ADCM is located in the spare wheel well adjacent to
the battery box.
ADAPTIVE DAMPING CONTROL MODULE
Three accelerometers, (movement sensors) are used to
provide ride signals to the ADCM. There are two vertical movement sensors – one located on the bulkhead
below the air conditioning unit casing and the other
located in the trunk below the fuel tank. The rear vertical sensor in the convertible is located below the fuel
tank, behind the tank retaining plate. A single horizontal movement sensor is mounted within the forward
bulkhead extension compartment which contains the
ECM and TCM.
INTR.35
Four adaptive dampers are fitted in place of the normal
dampers and are easily identifiable by the cable exiting
the top of the damper.
ACCELEROMETER (MOVEMENT SENSOR)
NOTES
INTR.33
FRONT ADAPTIVE DAMPER
INTR.34
1.5.8
Student Guide
Date of Issue: 10/01/2002
INTRODUCTION TO XJ/XK
Service Training
ADAPTIVE DAMPING COMPONENTS LOCATIONS (XK SHOWN)
HORIZONTAL
MOVEMENT SENSORS
FRONT
ADAPTIVE DAMPERS
VERTICAL
MOVEMENT SENSORS
REAR
ADAPTIVE DAMPERS
ADAPTIVE DAMPING
CONTROL MODULE
INTR.32
System Operation
Two damper settings are available, soft and firm, and all four dampers operate simultaneously. While the vehicle is
standing still the dampers will be in the firm setting. They will switch to the soft setting when the vehicle speed
exceeds 8 km/h (5 mph). When the vehicle encounters a bump in the road, the bump will be detected by the accelerometers and the ADCM will then switch the dampers to the firm setting to damp out the resulting body motion.
When cornering is sensed by the lateral accelerometer, the ADCM will switch the dampers to firm to reduce the roll
rate and improve wheel control. When the brake switch is activated the ADCM receives a signal and the dampers
will be switched to firm to reduce the pitch rate and improve wheel control.
After the event has passed the dampers will revert to the soft setting. If a system failure occurs a text warning, ‘Suspension Fault’, will be shown on the dashboard message center and the amber warning light will illuminate. The
vehicle is still safe to drive. The system always fails to the firm setting.
For fault diagnosis, interrogation of the ADCM can be made using WDS.
NOTES
Date of Issue: 10/01/2002
Student Guide
1.5.9
INTRODUCTION TO XJ/XK
Service Training
SUSPENSION, STEERING AND BRAKES
Power Assisted Steering (PAS) System
Steering Rack
STEERING RACK (XK SHOWN)
INTR.36
PAS RESERVOIR (XK SHOWN)
The steering rack is a ZF Servotronic speed sensitive,
variable ratio, rack and pinion, power assisted unit and
is standard on all models. Service is limited to the transfer pipes, bellows, outer ball joint assemblies,
transducer, centralizing cap and their clips and fittings.
The track rod assembly, including the inner ball joint, is
not a serviceable item. Centralization of the rack is
made by a locating pin and the unit cover. The rack is
mounted across the rear of the front suspension aluminum crossbeam by wrap-around ‘U’-brackets and
bushings. The handed and orientated bushings and
“U”-brackets are replaceable without removal of the
rack. Incorporated in the rack is an integrated power
cylinder, a rotary hydraulic valve and positive center
feel torsion bar. The rotary control valve distributes and
controls the degree of hydraulic pressure needed to
support any given driving situation. This arrangement
gives the driver a power assist which is speed sensitive
allowing ease of parking combined with high speed feel.
PAS Pump
The power assist pump is a new Hobourn Automotive
Series 500, belt driven by the engine and contains no
serviceable parts.
PAS Reservoir
INTR.37
The 0.4 litre (0.42 US quart) fluid capacity oil reservoir
is rubber mounted in the engine compartment to the
rear of the left-hand headlamp. It has a screw cap with
integral dipstick and incorporates a 10 micron paper filter. The filter is not a serviceable item. If any major PAS
component is replaced then the reservoir and fluid
must also be changed.
PAS Control Module
The PASCM, mounted in the LH lower ‘A’ post (XJ) or in the right-hand side fascia (XK), receives a speed signal from the
instrument cluster and sends a variable current signal to the PAS rotary valve to provide speed feel control to the driver.
NOTES
1.5.10
Student Guide
Date of Issue: 10/01/2002
INTRODUCTION TO XJ/XK
Service Training
Anti-Lock Braking (ABS) Systems
ABS controls the hydraulic pressure to the front and rear wheel brake calipers to help prevent the wheels from
locking and skidding during braking.
Stability Control (ASC)
ASC is a feature of XK ABS that reduces engine torque to prevent acceleration wheel slippage throughout the total
vehicle speed range.
Traction Control (TC)
TC is added to anti-lock braking systems to control wheel spin when starting off and at lower speed acceleration. TC
reduces engine torque and applies braking to the slipping drive wheel(s). During TC operation, the ABS / TC control
module also cancels cruise control and inhibits transmission downshifting. Upshifts are also inhibited below a specified speed.
Dynamic Stability Control (DSC)
DSC is an enhanced anti-lock brake system which is designed to improve dynamic stability when braking. The system uses the existing sensors and braking hardware but the brake control modulator software is modified to provide
a more detailed analysis of the input sensor data. This allows the system to recognize any differences in speed
between the four wheels due to slip angle and load changes, caused by critical situations on bends, varying road surfaces or abrupt steering movements. Under these conditions, the system reduces or increases braking on individual
wheels to provide compensating yaw movements which stabilize the course of the vehicle. Note that the Dynamic
Stability Control system is only active when the brakes are applied (unlike traction control).
The modified brake control modulator is physically unchanged from the previous unit except that the valve block is
keyed to the ABS/TC control module to ensure that only Dynamic Stability Control components are assembled
together.
XK ABS Summary
Model Year
ABS System
Power Assist
System
MIL
On-Board Diagnostics
DTCs
Diagnostic Connector
1997 – 1999
Teves Mk 20-I:
ASC standard,
TC optional
Vacuum,
Dual Diaphragm
Yes
Yes, C Codes
(WDS)
DLC – driver side ‘A’ post
below fuse box
2000 – 2002
Teves Mk 20-I:
ASC/TC standard,
DSC optional
Vacuum,
Dual Diaphragm
Yes
Yes, C Codes
(WDS)
DLC – driver side ‘A’ post
below fuse box
NOTES
Date of Issue: 10/01/2002
Student Guide
1.5.11
INTRODUCTION TO XJ/XK
Service Training
SUSPENSION, STEERING AND BRAKES
Anti-Lock Braking (ABS) Systems (continued)
MK 20-I SYSTEM LOGIC
BRAKE FLUID LEVEL
MASTER CYLINDER
RH
FRONT
RH
REAR
LH
FRONT
LH
REAR
MODULATOR / PUMP
ASSEMBLY
PUMP MOTOR
CONTROL
SOLENOID VALVE
CONTROL
DIAGNOSTICS
DLC
VEHICLE SPEED
ABS MIL
ASC / TC SWITCH
ASC / TC INDICATOR
INSTRUMENT PACK
VEHICLE
SPEED
BRAKES APPLIED
(TC ONLY)
ASC OR TC ACTIVE
BRAKE SWITCH
TCM
LH IGNITION
RELAY
IGNITION SWITCHED
B+ VOLTAGE
CRUISE CONTROL INHIBIT
(TC ONLY)
ECM
BATTERY
B+ VOLTAGE
ASC OR TC ACTIVE
B+ VOLTAGE
ABS / TC
CONTROL MODULE
LH FRONT
LH REAR
WHEEL SPEED
WHEEL SPEED
WHEEL SPEED
WHEEL SPEED
RH FRONT
RH REAR
INTR.38
1.5.12
Student Guide
Date of Issue: 10/01/2002
J A G U A R
S E R V I C E
T R A I N I N G
INTRODUCTION TO JAGUAR
1
INTRODUCTION TO XJ/XK
1.1
Overview
1.2
Engine
1.3
Engine Management
1.4
Transmissions
1.5
Suspension, Steering and Brakes
1.6
Climate Control
1.7
Electrical Distribution System
1.8
Body Systems
1.9
Occupant Protection
1.10 Task Sheets
Service Training Course TINTR
Date of Issue: 10/01/2002
INTRODUCTION TO XJ/XK
Service Training
CLIMATE CONTROL
Overview
The Jaguar Denso Climate Control System, introduced in the 1995 Model Year XJ, is standard equipment on XJ and
XK models. The system is controlled through a microprocessor-based electronic control module and a microprocessor-based control panel. The system produces the driver selected comfort level by controlling air flow volume and
distribution using cooling from the air conditioning system and heat from the engine cooling system. To control cabin temperature, the system uses a heater valve to regulate the heater matrix temperature. The Denso system differs
from previous Jaguar systems that controlled cabin temperature with flaps in the air conditioning heater unit to
blend cooled air with the heated air from an unregulated heater matrix. The windshield, rear window, and mirror
heater circuits are integral with the Denso climate control system.
AIR DISTRIBUTION (XJ SHOWN)
INTR.39
NOTES
1.6.2
Student Guide
Date of Issue: 10/01/2002
INTRODUCTION TO XJ/XK
Service Training
Climate Control Panel
The control panel is the interface between the driver and the air conditioning control module (A/CCM). It has a 4-bit
microprocessor that processes information and converts the selected switch positions and settings into digital data
that is communicated to the A/CCM over a serial data link.
Climate Control System ON / OFF
CLIMATE CONTROL PANEL ON / OFF FUNCTIONS
SYSTEM ON AND
AUTOMATIC / MANUAL OPERATION
SYSTEM ON AND
AIR CONDITIONING ON / OFF
SYSTEM ON: DEFROST ONLY
AND DEFROST SELECT
SYSTEM ON / OFF AND
MANUAL FAN SPEED
INTR.40
The climate control panel is switched ON by pressing one of the following panel controls:
AUTO
AUTO switches the system ON in the automatic mode; AUTO appears on the panel display.
Temperature, blower speed and air distribution are automatically controlled. If heat is
required, the blowers will not operate until the engine temperature has risen above 30 °C (87
°F), unless defrost is selected. The blowers operate any time cooling is required. Except in
recirculation mode, blower speed is linked to vehicle speed to adjust for the ram air effect at
higher vehicle speeds.
A/C
A/C switches the system ON in air conditioning mode only. The system uses the air condition settings in effect the last time air conditioning was used.
DEF
DEF switches the system ON in the defrost mode only. Air is directed to the windshield only. The
blowers operate at maximum speed. Temperature is automatically controlled by the A/CCM.
Push OFF
Push OFF switches the system ON in the AUTO mode. AUTO appears on the panel display.
The climate control system is switched OFF as follows:
Push OFF
Push OFF is the only method for switching the system OFF. When push OFF is pressed, the
system is switched off and the fresh air or recirculation blower flaps are set to recirculation,
shutting off outside air intake.
NOTES
Date of Issue: 10/01/2002
Student Guide
1.6.3
INTRODUCTION TO XJ/XK
Service Training
CLIMATE CONTROL
Climate Control Panel (continued)
Climate Control Panel Switch Functions
CLIMATE CONTROL PANEL ON / OFF FUNCTIONS
DISPLAY OUTSIDE
AIR TEMPERATURE
˚C / ˚F SELECT
LED DISPLAY
MANUAL RECIRCULATION
SYSTEM ON / OFF AND
MANUAL FAN SPEED
SYSTEM ON AND
A/C ON / OFF
SYSTEM ON AND AUTOMATIC /
MANUAL OPERATION
SYSTEM ON: DEFROST ONLY
AND DEFROST SELECT
WINDSHIELD AND
FOOT LEVEL
WINDSHIELD HEATER
(OPTIONAL)
FOOT LEVEL
HEATED REAR WINDOW
BI-LEVEL
INTERIOR TEMPERATURE
INCREASE (1˚ STEPS)
FACE LEVEL
INTERIOR TEMPERATURE
DECREASE (1˚ STEPS)
MANUAL AIR DISTRIBUTION
INTR.41
Push OFF
This switch is a combination switch for manual blower speed control and system ON / OFF.
Pushing the rotary switch provides system ON or OFF. Turning the switch provides manual
blower control and overrides the AUTO control blower speed functions.
Recirculation
Pressing this switch closes off the outside air intake and recirculates cabin air. The LED indicates the status.
Momentary press (one beep) – five minute operation
Long duration press (two beeps) – continuous operation
A/C
This switch signals the A/CCM to request air conditioning compressor operation from the
engine control module. The LED indicates when compressor operation is requested.
AUTO
When AUTO is selected (LED on), control of air distribution, blower speed, and interior temperature is fully automatic. Manual overrides, such as pressing one of the air distribution
buttons, turning the blower speed control, or selecting A/C, will disengage the automatic
function. The AUTO LED will go out to indicate that a manual override has been selected.
When AUTO is pressed again, manual overrides are canceled and full automatic system control is restored.
NOTES
1.6.4
Student Guide
Date of Issue: 10/01/2002
INTRODUCTION TO XJ/XK
DEF
Service Training
This switch selects defrost. Maximum blower speed occurs and all air is directed to the windshield. Blower speed can be reduced by turning the blower speed control rotary switch.
Temperature is controlled by the A/CCM; however, the temperature can be adjusted by
using the temperature select UP / DOWN switches. The optional heated windshield will also
be switched on for six minutes. If DEF is switched off or the system is switched off before the
six minutes has elapsed, the heated windshield will remain on for the six minute timed period. The LED indicates the status.
Heated windshield This switch selects the optional windshield electric heater. The heater will operate for six
minutes, then time-out. The LED indicates the status. The windshield heater operates only
when the engine is running.
Heated backlight
This switch selects the backlight and door mirror heaters. The backlight will operate for 20
minutes and the door mirror heaters will operate for 11 minutes, then time-out. The LED
indicates the status. The heated backlight and mirror heaters operate only when the engine is
running.
Interior temperature The temperature select buttons increase or decrease the desired interior temperature in 1°
increments, °C or °F, as selected.
Manual air
Four air distribution manual override buttons are used to override the automatic function
and distribution override distribute air as the driver selects: FACE, FACE AND FEET (bi-level),
FEET ONLY and WINDSHIELD AND FEET. The LED indicates the status.
NOTES
Date of Issue: 10/01/2002
Student Guide
1.6.5
INTRODUCTION TO XJ/XK
Service Training
CLIMATE CONTROL
Refrigeration System
REFRIGERATION SYSTEM: XJ
HIGH SIDE
CHARGE PORT
RECEIVER / DRIER
CONDENSER
LOW SIDE
CHARGE PORT
FOUR-LEVEL
PRESSURE SWITCH
CONNECTIONS
TO A/C UNIT
COMPRESSOR
MUFFLER
INTR.42
NOTES
1.6.6
Student Guide
Date of Issue: 10/01/2002
INTRODUCTION TO XJ/XK
Service Training
REFRIGERATION SYSTEM: XK
HIGH SIDE
CHARGE PORT
RECEIVER / DRIER
CONDENSER
LOW SIDE
CHARGE PORT
FOUR-LEVEL
PRESSURE SWITCH
CONNECTIONS
TO EVAPORATOR
COMPRESSOR
MUFFLER
INTR.43
NOTES
Date of Issue: 10/01/2002
Student Guide
1.6.7
INTRODUCTION TO XJ/XK
Service Training
CLIMATE CONTROL
System Diagnostics
The A/CCM continuously monitors the climate control system for faults. If a fault is detected the A/CCM flags a DTC
corresponding to the fault. All DTCs can be retrieved using WDS. In addition, some fault codes can be displayed on
the control panel screen. The WDS DTCs consist of 5 characters; the codes displayed on the control panel are 2-digit numbers. WDS and panel display fault code information is supplied with the description of the applicable
components in the DTC Summary.
System Self-Test
Some system generated fault codes can be displayed on the control panel screen. When a fault is flagged, an audible
“beep” will sound and the message “Er” will be displayed for five seconds, after the ignition is switched to position II.
To display stored “panel fault codes”, follow this procedure:
• Switch off the ignition
Press and hold the AUTO and FRESH / RECIRC buttons simultaneously while switching the ignition to position II.
All of the panel LEDs and all LCD segments will flash ON and OFF. Any function LED indicator or LCD segment
that does not flash suggests a fault condition within that area of the panel, or with the LED or LCD.
• Press AUTO
The control panel display will flash and scroll through the list of flagged fault codes. A maximum of five codes
will be stored and displayed. If 0 is displayed, no fault codes are flagged.
• Press FACE to manually scroll through the fault codes
When a fault code is displayed, an accompanying beep will indicate if the fault is present. If the code is not
accompanied by a beep, the fault occurred previously.
NOTE: Faults that are present can not be cleared until the cause of the fault is repaired.
To clear fault codes, press HRW and FACE simultaneously. Wait 30 seconds for the A/CCM to retest the system
and reflag any current faults.
• Press PUSH OFF to return the system to normal operation (default panel settings)
Panel Communication Check
The data link, power, and lighting circuits between the A/CCM and the control panel can be checked by simultaneously holding AUTO and FAN while the ignition is switched to position II. Panel control LEDs will illuminate to
indicate that each circuit is OK, as follows:
Circuit
LED
Ignition switched power supply (pos. II) circuit
Defrost button LED
Ignition switched power supply (pos. I, Aux.) circuit
Face button LED
Clock circuit
Bi-level button LED
Start circuit
Foot button LED
Data circuits
Defrost / foot button LED
Panel lighting
Recirc. button LED (Headlights ON!)
1.6.8
Student Guide
Date of Issue: 10/01/2002
INTRODUCTION TO XJ/XK
Service Training
Actuator Check
The control panel, system actuators and certain components can be checked by simultaneously holding AUTO and
FRESH / RECIRC while the vehicle is being started.
Control Panel
All of the panel control LEDs and LCD segments will flash on and off to indicate that each panel circuit is OK. If an
LED does not flash, a fault condition in that area of the panel is indicated, or the LED has failed. If an LCD segment
does not flash, a fault condition in that area of the panel is indicated, or the LCD segment has failed.
Actuators and Components
Check the actuators by selecting AUTO, then FRESH / RECIRC. Select FACE to cycle through the actuator mode conditions
20 – 27 as shown in the following table. After the check is complete, select PUSH OFF to restore normal system operation.
Actuator Check Chart
*
Code
Blower
level
Face
Outlet:
Foot
Defrost
Cool Air
bypass
Fresh /
recirc
Compressor
Heater
valve
Heater
pump
20
0
open
closed
closed
closed
fresh
OFF
closed
OFF
21
1
open
closed
closed
closed
fresh
OFF
closed
ON
22
10
open
closed
closed
open
1/2 open
A/C ON
closed
ON
23
17
bleed
1/2 open
closed
1/2 open
1/2 open
A/C ON
6 sec. pulse*
ON
24
17
bleed
1/2 open
closed
closed
recirc
A/C ON
6 sec. pulse*
ON
25
23
closed
open
bleed
closed
recirc
A/C ON
open
ON
26
23
closed
1/2 open
1/2 open
closed
recirc
A/C ON
open
ON
27
31
closed
closed
open
closed
open
A/C ON
open
ON
The heater valve operates on a 6 second pulse (3 seconds ON, 3 seconds OFF)
NOTES
Date of Issue: 10/01/2002
Student Guide
1.6.9
INTRODUCTION TO XJ/XK
1.6.10
Service Training
Student Guide
Date of Issue: 10/01/2002
J A G U A R
S E R V I C E
T R A I N I N G
INTRODUCTION TO JAGUAR
1
INTRODUCTION TO XJ/XK
1.1
Overview
1.2
Engine
1.3
Engine Management
1.4
Transmissions
1.5
Suspension, Steering and Brakes
1.6
Climate Control
1.7
Electrical Distribution System
1.8
Body Systems
1.9
Occupant Protection
1.10 Task Sheets
Service Training Course TINTR
Date of Issue: 10/01/2002
INTRODUCTION TO XJ/XK
Service Training
ELECTRICAL DISTRIBUTION SYSTEM
Electrical System Architecture
The XJ / XK vehicle electrical system is a ground side switched system. The ignition switch switches ground circuits
on / off to complete system circuits and apply power. Circuits that require ignition switch position control are supplied with “ignition switched grounds”. Both power grounds (high current consumers) and logic grounds (electronic
switching circuits) are used throughout the system.
Power Distribution
Distribution cables supply battery power through a high power protection module to the starter motor and to five fuse
boxes. Harnesses distribute battery, auxiliary and ignition power from the fuse boxes to all the user components.
Battery
BATTERY
The DIN88, 92 ampere hour battery is installed on the
right side of the trunk floor below the trim.
CAUTION: Sulfuric acid is highly corrosive. Batteries produce explosive gasses.
Keep flames and sparks away. Always
wear protective clothing, face, and eye
protection to prevent injury while working around batteries.
INTR.44
CAUTION: Open both doors, or lower the
glass of both doors, before disconnecting
the battery. Disconnecting the battery
disables the automatic glass drop/raise
function. Opening a door when the automatic glass drop/raise function is disabled and the door glass are closed could
damage the door seals.
NOTES
1.7.2
Student Guide
Date of Issue: 10/01/2002
INTRODUCTION TO XJ/XK
Service Training
High Power Protection Module: 1997 – 2000 MY
HIGH POWER PROTECTION MODULE: 1997 – 2000 MY
The high power protection module contains three 250
amperes fuses. Two fuses connected in parallel provide
500 amperes protection for the starter supply. The third
fuse provides 250 amperes protection for the fuse box
supplies.
High Power Protection Module: 2001 – 2002 MY
A new high-power protection module has been fitted
which incorporates two individual power cable covers.
The connectors on the power cables have been modified to accommodate the new protection module.
INTR.45
NOTES
HIGH POWER PROTECTION MODULE: 2001 – 2002 MY
INTR.46
Date of Issue: 10/01/2002
Student Guide
1.7.3
INTRODUCTION TO XJ/XK
Service Training
ELECTRICAL DISTRIBUTION SYSTEM
Power Distribution (continued)
XJ Fuse Boxes
Five fuse boxes contain the protection fuses for all the electrical circuits. The engine compartment fuse box and the
engine management fuse box are located on the left side of the engine compartment. The heelboard fuse boxes are
located behind the left and right heelboards. The trunk fuse box is installed in the electrical carrier in the trunk.
CAUTION: Always replace blown fuses with the same rated fuse.
NOTES
1.7.4
Student Guide
Date of Issue: 10/01/2002
INTRODUCTION TO XJ/XK
Service Training
FUSE BOX AND RELAY LOCATIONS: XJ
ENGINE COMPARTMENT
FRONT RELAYS
ENGINE COMPARTMENT
RELAYS AND FUSE BOX
ENGINE MANAGEMENT
RELAYS AND FUSE BOX
CONTROL MODULE
ENCLOSURE RELAYS
FRONT BULKHEAD RELAYS
LH FRONT SEAT RELAYS
RH FRONT SEAT RELAYS
LH HEELBOARD
RELAYS AND FUSE BOX
RH HEELBOARD
RELAYS AND FUSE BOX
TRUNK RELAYS AND FUSE BOX
INTR.48
Date of Issue: 10/01/2002
Student Guide
1.7.5
INTRODUCTION TO XJ/XK
Service Training
ELECTRICAL DISTRIBUTION SYSTEM
Power Distribution (continued)
XK Fuse Boxes
Five fuse boxes contain the protection fuses for all the electrical circuits. The engine compartment fuse box is located on the left side of the engine compartment; the control module enclosure fuse box is located in the right hand
control module enclosure. The driver and passenger fuse boxes are located on the left and right fascia, respectively.
The trunk fuse box is installed in the electrical carrier in the trunk; spare fuses and a fuse extractor tool are installed
on the underside of the lid.
CAUTION: Always replace blown fuses with the same rated fuse.
NOTES
1.7.6
Student Guide
Date of Issue: 10/01/2002
INTRODUCTION TO XJ/XK
Service Training
FUSE BOX AND RELAY LOCATIONS: XK
ENGINE COMPARTMENT
RELAYS AND FUSE BOX
CONTROL MODULE ENCLOSURE
RELAYS AND FUSE BOX
LH ENCLOSURE RELAYS
RH ENCLOSURE RELAYS
LH FASCIA RELAYS
RH FASCIA RELAYS
DRIVESHAFT TUNNEL RELAYS
TRUNK RELAYS AND FUSE BOX
INTR.47
Date of Issue: 10/01/2002
Student Guide
1.7.7
INTRODUCTION TO XJ/XK
Service Training
ELECTRICAL DISTRIBUTION SYSTEM
Control Modules
XJ Control Module Locations
CONTROL MODULE LOCATIONS: XJ
RADIATOR FAN CONTROL
RELAY MODULE
ABS / TRACTION CONTROL
CONTROL MODULE
BODY PROCESSOR MODULE
AIRBAG / SRS
SINGLE POINT SENSOR
DIMMER MODULE
ENGINE CONTROL MODULE
KEY TRANSPONDER
MODULE
TRANSMISSION CONTROL MODULE
ADAPTIVE DAMPING
CONTROL MODULE
INSTRUMENT PACK
AIR CONDITIONING
CONTROL MODULE
SLIDING ROOF
CONTROL MODULE
GARAGE DOOR OPENER
DRIVER DOOR
CONTROL MODULE
PASSENGER DOOR
CONTROL MODULE
DRIVER SEAT
CONTROL MODULE
PASSENGER SEAT
CONTROL MODULE
GEAR SELECTOR
ILLUMINATION MODULE
PASSENGER REAR DOOR
CONTROL MODULE
DRIVER REAR DOOR
CONTROL MODULE
NAVIGATION
CONTROL MODULE
SECURITY AND LOCKING
CONTROL MODULE
CELLULAR PHONE
CONTROL MODULE
REVERSE PARKING AID
CONTROL MODULE
INTR.50
1.7.8
Student Guide
Date of Issue: 10/01/2002
INTRODUCTION TO XJ/XK
Service Training
XK Control Module Locations
CONTROL MODULE LOCATIONS: XK
ABS / TRACTION CONTROL
CONTROL MODULE
TRANSMISSION CONTROL MODULE
ENGINE CONTROL MODULE
BODY PROCESSOR MODULE
AIR CONDITIONING
CONTROL MODULE
POWER ASSISTED STEERING
CONTROL MODULE
MAJOR INSTRUMENT PACK
KEY TRANSPONDER MODULE
OCCUPANCY SENSING MODULE
RESTRAINTS
CONTROL MODULE
DRIVER DOOR
CONTROL MODULE
DIMMER MODULE
PASSENGER DOOR
CONTROL MODULE
GEAR SELECTOR
ILLUMINATION MODULE
RAIN SENSING MODULE
PASSENGER SEAT
CONTROL MODULE
PASSENGER HEAD RESTRAINT
CONTROL MODULE
DRIVER SEAT
CONTROL MODULE
DRIVER HEAD RESTRAINT
CONTROL MODULE
CELLULAR PHONE
CONTROL MODULE
NAVIGATION
CONTROL MODULE
SECURITY AND LOCKING
CONTROL MODULE
ADAPTIVE DAMPING
CONTROL MODULE
LAMP CONTROL MODULE
(DELETED 2001 MY ON)
REVERSE PARKING AID
CONTROL MODULE
INTR.49
Date of Issue: 10/01/2002
Student Guide
1.7.9
INTRODUCTION TO XJ/XK
Service Training
ELECTRICAL DISTRIBUTION SYSTEM
Control Modules (continued)
Vehicle Configuration and Test System (VCATS)
VCATS data has to be supplied to Jaguar for some control module market specific configurations. The data is added
to the Control Module at the factory. VCATS matches hardware part numbers with the correct software; therefore
care must be taken when exchanging control units from another vehicle for diagnosis.
TYPICAL VCATS LABEL
ABBREVIATIONS:
PSM
Passenger Seat Control Module
DSM
Driver Seat Control Module
PDM
Passenger Door Control Module
DDM
Driver Door Control Module
SLM
Security and Locking Control module
IPK
Major Instrument Pack
BPM
Body Processor Module
ECM
Engine Control Module
INTR.53
Should a similar, but not identical, CM from one vehicle be installed in a second vehicle, this may result in various
malfunctions in the second vehicle. Since the CM may then ‘learn’ information from the second vehicle, incorrect
data would then be transferred back to the first vehicle when the CM is transferred back to its original location. This
is particularly applicable in the case of the Engine Control Module (ECM).
With the increasing number of control units on a given vehicle, it is becoming less cost effective to have replacements pre-programmed at the factory, also the space required to store all market configurations becomes
prohibitive. WDS is the main tool for programming and with the latest CD updates it will include the latest software
for the vehicle control modules (the CD release notes should be read to see the scope of programming and what
vehicles it affects).
NOTES
1.7.10
Student Guide
Date of Issue: 10/01/2002
INTRODUCTION TO XJ/XK
Service Training
Networks
Three data networks are employed: a high speed Controller Area Network (CAN) for the engine, drive train and
related systems, a Standard Corporate Protocol network (SCP) for the body systems, and an Audio Control Protocol
network (ACP) for certain In-Car Entertainment and Telephone functions. Any vehicle subsystem with the CAN or
SCP included uses data derived from the network, or transmits data via the network to achieve control. In addition
to the two networks, the vehicle uses a Serial Data Link (ISO 9141) for diagnostics and for the programming of certain control modules.
XJ COMMUNICATION NETWORKS
ABS
CONTROL MODULE
ENGINE
CONTROL MODULE
BODY
PROCESSOR
MODULE
SECURITY AND
LOCKING
CONTROL MODULE
DRIVER SEAT
CONTROL MODULE
PASSENGER SEAT
CONTROL MODULE
DRIVER DOOR
CONTROL MODULE
PASSENGER DOOR
CONTROL MODULE
DRIVER
REAR DOOR
CONTROL MODULE
PASSENGER
REAR DOOR
CONTROL MODULE
KEY
TRANSPONDER
MODULE
TRANSMISSION
CONTROL MODULE
AIRBAG / SRS
SINGLE POINT
SENSOR
GEAR SELECTOR
MODULE
A/C
CONTROL MODULE
INSTRUMENT PACK
CAN
SCP
SERIAL
DATA LINK
DATA LINK CONNECTOR
CAN NETWORK
SCP NETWORK
SERIAL DATA LINK
ECM PROGRAMMING
INTR.51
Date of Issue: 10/01/2002
Student Guide
1.7.11
INTRODUCTION TO XJ/XK
Service Training
ELECTRICAL DISTRIBUTION SYSTEM
Networks (continued)
XK COMMUNICATION NETWORKS
ABS
CONTROL MODULE
BODY
PROCESSOR
MODULE
SECURITY AND
LOCKING
CONTROL MODULE
DRIVER
HEAD RESTRAINT
CONTROL MODULE
(2001 MY ON)
PASSENGER
HEAD RESTRAINT
CONTROL MODULE
(2001 MY ON)
DRIVER SEAT
CONTROL MODULE
PASSENGER SEAT
CONTROL MODULE
DRIVER DOOR
CONTROL MODULE
PASSENGER DOOR
CONTROL MODULE
ENGINE
CONTROL MODULE
TRANSMISSION
CONTROL MODULE
ADAPTIVE
DAMPING
CONTROL MODULE
GEAR SELECTOR
MODULE
A/C
CONTROL MODULE
INSTRUMENT PACK
CAN
SCP
SERIAL
DATA LINK
HARD WIRE
AIRBAG / SRS
CONTROL MODULE
DATA LINK CONNECTOR
CAN NETWORK
SCP NETWORK
SERIAL DATA LINK
ECM PROGRAMMING
INTR.52
1.7.12
Student Guide
Date of Issue: 10/01/2002
J A G U A R
S E R V I C E
T R A I N I N G
INTRODUCTION TO JAGUAR
1
INTRODUCTION TO XJ/XK
1.1
Overview
1.2
Engine
1.3
Engine Management
1.4
Transmissions
1.5
Suspension, Steering and Brakes
1.6
Climate Control
1.7
Electrical Distribution System
1.8
Body Systems
1.9
Occupant Protection
1.10 Task Sheets
Service Training Course TINTR
Date of Issue: 10/01/2002
INTRODUCTION TO XJ/XK
Service Training
BODY SYSTEMS
Exterior Lighting
Operation
SIDE LAMS / HEADLAMPS SWITCH
The controls for the side lamps, headlamps and turn
signal lamps are on the left stalk of the column switch
assembly. The side lamps operate with the ignition on
or off. The headlamps operate only while the key is on;
if the ignition is switched off with the headlamps selected on, the headlamps go off but the side lamps remain
on. For the auto headlamp function, introduced as
standard to XJ/XK in 1998 MY, a light sensor in the interior rear view mirror monitors ambient light and signals
the BPM to switch the low beam headlamps on and off
as appropriate for the prevailing light conditions. The
automatic function is selected by setting the side lamps/
headlamps switch to AUTO. An adjuster on the sensor
allows the switching point to be adjusted to different
light levels. A delay in the BPM prevents “hunting”
between the on and off states.
INTR.54
NOTES
AUTO HEADLAMP LIGHT SENSOR
INTR.55
1.8.2
Student Guide
Date of Issue: 10/01/2002
INTRODUCTION TO XJ/XK
Service Training
The front and rear fog lamp switches are non-latching
push switches installed on the fascia, left of the instrument cluster (XJ), or on the center console switchpack
(XK). The front fog lamps only operate when the side
lamps or headlamps are selected on; they go off when
the headlamps are set to high beam.
FOG LAMP SWITCHES: XJ
The rear fog lamps operate only when the headlamps or
side lamps and front fog lamps are selected on.
INTR.56
FOG LAMP SWITCHES: XK
INTR.57
NOTES
Date of Issue: 10/01/2002
Student Guide
1.8.3
INTRODUCTION TO XJ/XK
Service Training
BODY SYSTEMS
XJ Exterior Lighting
Headlamps
HEADLAMPS
Plain lenses are introduced on all four headlamps, and
the facets that help to shape the light beams are now
incorporated in the reflectors. The side lamp bulbs are
moved from the outboard (low beam) lamps to the
inboard (high beam) lamps. This maximizes the reflector surface available for control of the low beams,
which is more critical than that of the high beams.
The headlamp and side lamp bulb are installed in bulb
holders which are a push fit in the reflectors. The headlamps incorporate H7 bulbs. Light output from the new
headlamps is 10% greater than from the previous
design.
INTR.58
HEADLAMP AND SIDE LAMP BULB REMOVAL
INTR.59
NOTES
1.8.4
Student Guide
Date of Issue: 10/01/2002
INTRODUCTION TO XJ/XK
Service Training
FRONT TURN SIGNAL LAMP BULB REMOVAL
SIDE MARKER LAMP / REFLECTOR BULB REMOVAL
INTR.60
INTR.61
NOTES
Date of Issue: 10/01/2002
Student Guide
1.8.5
INTRODUCTION TO XJ/XK
Service Training
BODY SYSTEMS
XJ Exterior Lighting (continued)
Front Fog Lamps
FRONT FOG LAMP
The two front fog lamps are identical. Three screws
secure each lamp in a recess in the front bumper. The
lamps incorporate plain lenses and free form reflectors
(free form reflectors provide sufficient control of the
light beam that it is unnecessary to have facets on the
lens or reflector).
The fog lamps incorporate HB4 bulbs installed in bulb
holders which are retained in the reflector by a bayonet lock. An adjuster for vertical alignment is
incorporated in the lamp housing. Access to the lamps
is from the rear of the bumper.
INTR.62
High-Mounted Stop Lamp (HMSL)
The HMSL attaches to studs on the center lower edge of
the backlight. Inside the cover, five bulbs are installed in
the reflector, which clips onto the base. The lens clips
into the reflector.
HIGH-MOUNTED STOP LAMP
To remove the HMSL complete, access is required to
the bottom edge, where the latching feature on each
clip must first be released before lifting the unit up the
back light.
Rear Lamp Cluster
The vertical faces are deleted from the lens and incorporated into the reflector. The individual tail bulb is
deleted, the tail lamp being provided by the combination stop/tail bulb.
INTR.63
NOTES
REAR LAMP CLUSTER
INTR.64
1.8.6
Student Guide
Date of Issue: 10/01/2002
INTRODUCTION TO XJ/XK
Service Training
XK Exterior Lighting
Headlamps
The headlamps incorporate the high and low beam headlamps, the front turn indicator lamps and the side lamps.
Each headlamp is secured to the body by two screws and a nut. A rubber gasket around the periphery of the lens
seals the headlamp with the body. Clips secure the lens to the lamp housing and a rubber gasket seals the interface.
The housing contains four separate bulbs:
• H1 55W low beam headlamp bulb, retained by a spring clip
• HB3 65W high beam headlamp, retained by a spring clip
• W 5W side lamp bulb, in a bulb holder
• PY 21W front turn indicator lamp bulb, in a bulb holder
Circuits integrated into the housing link all the bulbs and bulb holders to a single connector on the rear of the housing. All bulbs, except high beam, are long life bulbs.
HEADLAMPS
SIDE LAMP
HIGH BEAM
LOW BEAM
TURN SIGNAL
HORIZONTAL
ADJUSTMENT
ACCESS PANEL
LEVELING MOTOR
(WHERE FITTED)
Headlamp Adjustment
Adjusters for horizontal and vertical alignment are on
the rear of the housing. To enable roadside alignment
checks, headlamps contain an adjustment scale, visible
through a clear plastic panel on the inboard side of
the housing.
ACCESS CAP
VERTICAL
ADJUSTMENT
INTR.65
HEADLAMP ADJUSTMENT SCALE
Removal of the clear plastic panel provides access for
replacement of all bulbs except for the low beam headlamp bulb. The cap on the rear of the housing, accessed
through the panel in the wheel arch liner, provides the
access for the low beam headlamp bulb.
INTR.66
Date of Issue: 10/01/2002
Student Guide
1.8.7
INTRODUCTION TO XJ/XK
Service Training
BODY SYSTEMS
XK Exterior Lighting (continued)
Front Fog Lamps
FRONT FOG LAMP (1997 – 200 MY)
The front fog lamps are installed in recesses in the front
bumper. Three screws secure each fog lamp. Due to the
orientation of the securing holes, the lamps are not
interchangeable.
Each lamp has an adjuster for vertical alignment (only)
and an H1 55W bulb installed in a bulb holder. Access
for adjustment and bulb replacement is through the
panel in the wheel arch liner.
High-Mounted Stop Lamp (HMSL)
INTR.66
FRONT FOG LAMP (2001 – 2002 MY)
The HMSL is installed on the backlight (coupes) or trunk
lid (convertible) for some markets and consists of a
lamp unit and a cover. Clips secure the cover to the
lamp unit. On coupes, clips secure the lamp unit to the
backlight. On convertibles, three nuts secure the lamp
unit to the trunk lid.
Each lamp unit contains 16 non-replaceable LED wired
to a single connector. The lamp unit must be replaced
after failure of 1 LED maximum.
NOTES
INTR.67
1.8.8
Student Guide
Date of Issue: 10/01/2002
INTRODUCTION TO XJ/XK
Service Training
Rear Lamp Clusters
The rear lamp clusters incorporate the reverse lamps, rear fog lamps, tail lamps and stop lamps. The upper part of
the lens is clear and the lower part is red. The area of the lens over the tail lamp incorporates a reflector.
The removable bulb carrier contains all bulbs. Two releasing clips retain the carrier for 1997 – 2000 MY; 2001 –
2002 MY carriers are retained by a single wing nut.
REAR LAMP CLUSTER (1997 – 2000 MY)
BACK-UP LAMP
TURN INDICATOR
LAMP
STOP LAMP
FOG LAMP
TAIL LAMP
RELEASING
CLIPS
INTR.69
NOTES
REAR LAMP CLUSTER (2001 – 2002 MY)
INTR.70
Date of Issue: 10/01/2002
Student Guide
1.8.9
INTRODUCTION TO XJ/XK
Service Training
BODY SYSTEMS
Convertible Top: XK only
Introduction
CONVERTIBLE TOP OPERATING PUMP
The convertible top is fully lined and padded and fitted
to an aluminum frame which has steel linkages.
Hydraulic power is used to open, close and latch the
top, operated by a single hold-down switch (ROOF) on
the center console. This switch also operates the rear
quarter lights. The top closes to a low stack height in the
body opening of the rear quarter. A green tinted, heated, glass backlight is fitted as part of the top. A new
feature is over-center linkage pivoting on the rear wheel
arch to hold the top forwards during the latching and
unlatching operations.
CAUTION: It is imperative that the procedure for manual latching/unlatching of
the convertible top is read before any
moves are made to unlatch the top, (see
Manual Latching).
MANUAL OPERATION
LATCHING KEY
MANUAL OPERATION
TAP
INTR.71
Operating Pump and Hoses
The convertible top operating pump is located in the
right-hand side of the trunk mounted on a steel pressing, which also houses the CD player and power
amplifier units (where fitted). This operates at a pressure of 140 bar (2030 psi) maximum and is equipped
with valves and cylinders to operate the two actuators
and the latch mechanism. The high pressure hoses are
routed through the rear bulkhead to each of the actuators. The latch hoses pass across the rear seat pan and
the right heelboard and up the ‘A’-post into the latch
plate assembly.
CONVERTIBLE TOP OPERATING CYLINDER
NOTES
INTR.72
1.8.10
Student Guide
Date of Issue: 10/01/2002
INTRODUCTION TO XJ/XK
Service Training
Automatic Latching
WARNING: Ensure that the convertible top cover is removed and that all personnel and equipment are clear before the convertible top is raised or lowered.
The latching system is supplied as a complete unit and has no serviceable components. Latching of the top is by a
hydraulically operated center pull and latch mechanism and two outboard latches. The latch mechanism automatically pulls the top onto the body header and latches it into position. When the top is not latched, an unlatched
warning appears on the message center display.
Operation of the convertible top is inhibited, or, if the top is moving it will retract to the lowered position, if the
vehicle exceeds 16 km/h (10 mph). The ROOF NOT LATCHED warning will be displayed on the message center until
the next actuation.
AUTOMATIC LATCHING MECHANISM
INTR.73
The convertible top operating ROOF switch must be
held to be activated. Short presses of the switch operate the rear quarter lights without operating the top.
The operating switch will only activate the top if the
ignition switch is in either position I or II.
CONVERTIBLE TOP OPERATING ROOF SWITCH
As soon as the top starts to move an audible warning
will sound. Raising and lowering of the convertible top
is controlled on the SCP network.
INTR.74
Date of Issue: 10/01/2002
Student Guide
1.8.11
INTRODUCTION TO XJ/XK
Service Training
BODY SYSTEMS
Convertible Top: XK only (continued)
Manual Latching
In the event that the top cannot be powered to the raised or lowered position, provision is made for manual operation.
NOTE: The convertible top frame uses an over-center link to lock the frame in its forward position. It is
essential to carry out the following procedure to manually lower the vehicle convertible top. Because of the
possibility of damaging the frame, manual lowering of the convertible top is only recommended as a Dealer
function and not an Owner/Driver function. Manual lowering has been deleted from the Driver Handbook.
1. Lower the rear quarter lights by pressing the
ROOF switch once.
UNLOCKING OVER-CENTER LINK
2. Gain access to the pump located in the trunk, (the
right hand side trunk trim carpet must be removed
for access to the pump) and turn the manual override tap on the pump body counterclockwise to
place the pump into MANUAL mode.
3. The windscreen header trim has a small round
plug, adjacent to the header console, which has
to be removed to gain access to the latching
mechanism. Insert either the key which is
retained in clips on the pump mounting base, or
an 8mm Allen key, and unlatch the hood by
turning the key clockwise.
INTR.75
CAUTION: Do not attempt to lower the
convertible top further at this stage.
CONVERTIBLE TOP MANUAL LATCHING
4. Prior to lowering the hood, reach behind the
headlining rear quarter curtains and locate both
of the convertible top cylinder rams and the
linkage to which they are fixed.
5. Pull, in turn, both the left and right hand cylinders and linkage down as far as possible. A significant force may be required.
6. Manually lower the top to its stowed position. (If
the hood resists movement repeat step 5).
INTR.76
CAUTION: Failure to carry out steps 4
and 5 will result in severe damage to the
convertible top frame and/or linkages.
NOTES
1.8.12
Student Guide
Date of Issue: 10/01/2002
INTRODUCTION TO XJ/XK
Service Training
Door Glass Movement
The door glass is operated by the DDCM and the PDM
from the switchpacks located in the driver and passenger door arm rests. The switchpacks are illuminated
when the sidelights are on.
• Each door glass automatically drops 15 mm (0.65
in) when the door is opened and closes when the
door is closed.
• The glass of both front doors will drop when the
convertible top is raised and close when the top is
full raised and latched in position.
• Each door glass has a one-touch down facility.
•
DOOR GLASS AND WINDOW MECHANISM
INBOARD/OUTBOARD
ADJUSTERS
If the key barrel lock switch is held active for more
than 1.5 seconds then the door glass and the convertible rear quarter light glass will be driven
closed unless the key is released.
The glass in both doors operate with the ignition switch
in either position I or II and for 30 seconds after ignition is switched off or until a door is opened.
Resetting Door Glass Position
If the power supply to the DDCM or PDM is disconnected (battery disconnected, module unplugged or fuse
removed) or a PDU or scan tool is connected to the ISO
connector and diagnostic checks are made, then the
modules must relearn the glass characteristics.
REGULATOR UPSTOP
ADJUSTER
REGULATOR SLAVE ARM
ADJUSTER
INTR.77
The last known glass position is regarded as top of travel by one touch operation until relearning has taken place.
One touch down, manual up and down control and the automatic lowering of the glass for door opening are unaffected. For the control module to learn the glass characteristics the door must be closed (door ajar switch inactive
and the ignition switch in position I or II) then drive the glass fully down and hold it stalled at the bottom of its travel
for a minimum of one second. Drive the glass fully up and hold stalled for a minimum of one second. The relearning
procedure must also be accomplished before automatic glass closing is allowed.
CAUTION: With the transit relay fitted, do not operate more than one door glass at a time.
NOTES
Date of Issue: 10/01/2002
Student Guide
1.8.13
INTRODUCTION TO XJ/XK
Service Training
BODY SYSTEMS
Security Systems
The following security features are available:
• Panic alarm (dealer option)
• Passive arming (dealer option)
• Audible warnings
• Security LED in gear selector surround
• Drive away door locking
• Key and remote transmitter locking/unlocking
• Remote headlamp convenience
• Remote trunk open
SECURITY AND LOCKING CONTROL MODULE
The security and locking systems involve the SLCM,
BPM, DDCM and PDCM all connected via the SCP
network.
The SLCM is located in the electrical carrier below the
fusebox, in the trunk. The BPM is mounted off the passenger airbag bracket, behind and above the glove box.
DDCM and PDCM are located in the doors.
INTR.78
Anti-Theft System
Full Alarm
Once armed any of the following circumstances will create a full alarm state and the sounder will operate (if fitted):
•
•
•
•
•
•
Opening a door (after seven seconds)
Opening the trunk with the key (after seven seconds)
If the ignition key is turned to position I
Pressing the key-ring transmitter headlamp button three times - Panic Alarm
Opening the hood
Glass breakage (if sensor is fitted).
Error Tone
The sounder gives a short, high-pitched warble if an attempt is made to secure the vehicle and one of the following
conditions is present:
• The trunk is not closed when an attempt is made to arm the security system
• The key is in the ignition switch when a transmitter button is pressed
• If there is a failure within the alarm system the error tone will sound when the vehicle is disarmed
• If any door or the hood is open when an attempt to arm the security system is made.
1.8.14
Student Guide
Date of Issue: 10/01/2002
INTRODUCTION TO XJ/XK
Service Training
Key-ring Transmitter
KEY-RING TRANSMITTER
A four-button, rolling code, key-ring transmitter gives
remote control of the system. Two key-ring transmitters are supplied with each vehicle.
Button functions are as follows (numbers correspond to
those in the illustration at right):
1
2
3
4
1. Locks and arms the vehicle.
One press will lock both doors and the trunk and
will set the alarm system. One signal will be heard
and the direction indicators will flash once. The
LED in the gear selector surround will continually
flash whilst the vehicle is armed.
INTR.79
2. Unlocks and disarms the vehicle.
If the car is in a locked state, at the first press of the button the driver’s door only unlocks and the interior lights
fade on. A second press unlocks the passenger door.
3. Switches on the headlamps and starts the panic alarm.
One press switches on the dipped headlamps which remain on for 25 seconds or until the button is pressed a
second time or until the key is inserted in the ignition switch. Three presses within three seconds starts the panic alarm. The alarm will sound for a full period and can only be stopped by inserting the key into the ignition and
turning to positions I or II. The transmitter cannot be used to cancel the panic alarm.
4. Releases the trunk lock.
One press releases the trunk lock, without disarming the system.
The key-ring transmitter will only work if the vehicle’s doors, hood and trunk are closed and the key is not in the
ignition. Dealers are required to obtain proof of ownership before issuing a replacement transmitter. Batteries for
the transmitter are CR 2016.
Key-ring Transmitter Programming (Manual Procedure)
• Insert Ignition Key
• Hold Headlamp Stalk Switch active (headlamps ON)
• Turn Ignition Key to position 1 (Auxiliary)
• Flash Headlamp Switch: 3 times for 1997 MY vehicles or 4 times for 1998 MY vehicles
• Confirmation chirp will sound and LED will flash once to indicate “Learn Mode” has been entered
• Activate each Remote Transmitter by pressing any button on the transmitter once – a chirp will sound for each
Remote Transmitter signal received (LED will flash); allow 15 seconds maximum between each press
• Switch ignition off – confirmation chirp will sound to indicate “Learn Mode” has been exited (system will automatically “time out” after 15 seconds)
Date of Issue: 10/01/2002
Student Guide
1.8.15
INTRODUCTION TO XJ/XK
Service Training
BODY SYSTEMS
Security Systems (continued)
Key Transponder Module (KTM)
KEY TRANSPONDER MODULE (XJ SHOWN)
Engine immobilization is introduced. The engine immobilizer ensures the engine can only be started using a
valid ignition key. A key transponder control module,
installed in the fascia next to the control column, is
linked to the BPM, the ECM and a reader/exciter coil
around the ignition switch. The KTM is programmed to
recognize a uniquely coded transponder in the head of
each key supplied with the vehicle. When a key is
installed in the ignition switch and turned to position I
(auxiliary), the KTM uses the reader/exciter coil to read
the transponder code. When the key is turned to position II (ignition), the KTM exchanges signals with the BPM
and ECM and, if the key is valid, fueling, ignition and
cranking functions are enabled to allow the engine to
start when the key is turned to position III (crank). If the
key is invalid, the fueling, ignition and cranking functions
are inhibited and the engine cannot be started.
Replacement keys are programmed using WDS.
INTR.80
NOTES
1.8.16
Student Guide
Date of Issue: 10/01/2002
INTRODUCTION TO XJ/XK
Service Training
Ignition Key Transponder Programming Using WDS
If the KTM is replaced, all keys must be programmed at the same time. No more than 5 keys can be programmed to
any one vehicle. If only the ECM is replaced, key transponder programming is not necessary.
1. Ensure all of the vehicle’s keys are available for this procedure. No more than 5 keys can be programmed
to one vehicle.
2. Load the latest software for the vehicle into WDS.
3. Access Vehicle Setup.
4. Select Security System Setup.
5. Select Program New Transponders.
6. Ensure that only the key being programmed is in the ignition. (Remove key from a ring with other keys. If
other Jaguar keys are near the reader exciter, they may also be detected, which will cause the KTM to
interpret this condition as an invalid signal).
NOTES
Date of Issue: 10/01/2002
Student Guide
1.8.17
INTRODUCTION TO XJ/XK
Service Training
BODY SYSTEMS
In-car Entertainment (ICE)
XJ/XK vehicles are equipped with either a base or premium entertainment system. The premium system uses
the same audio unit and antenna as the base system,
but includes a power amplifier and different speakers.
Both systems have switches on the steering wheel for
remote operation. Telephone controls are incorporated in the audio unit of all vehicles, although the
telephone system itself is an accessory. In 2000 MY, the
XJ was fitted with a dual function audio unit which
incorporates the navigation system controls and a
shared radio/navigation LCD display. The XK audio unit
was also revised, but remains visually the same due to a
separate navigation display/control panel.
STEERING WHEEL ICE SWITCHES
+
-
INTR.83
AUDIO UNIT (XJ 1998 – 1999 MY)
TAPE EJECT
BUTTON
DISPLAY
PRESET BUTTONS
1–9
AM/FM BUTTON
INTR.81
AUDIO UNIT (XK 1998 MY)
PRESET BUTTONS
1–9
TAPE EJECT
BUTTON
DISPLAY
AM/FM BUTTON
INTR.82
1.8.18
Student Guide
Date of Issue: 10/01/2002
INTRODUCTION TO XJ/XK
Service Training
Selecting Radio Features
To access the selectable features, simultaneously press the AM/FM button and the tape eject button. The radio will
display SET UP MODE. The following set up modes can then be selected and changed in any order, as long as no
more than 15 seconds elapses between presets. After 15 seconds the display will clear. If additional mode changes
are needed, re-enter the set up mode. To select a feature, press the applicable preset button.
Preset 1
Press preset 1 to select the market mode to suit the users country and Radio Data System (RDS) ON/OFF.
(RDS is being introduced by some radio stations.)
Preset 2
Toggles the tape head cleaning service reminder off and on. (Should be ON)
Preset 3
Toggles the clean aerial service reminder off and on. (Should be ON)
Preset 4
Toggles the cellular telephone function off and on. If a Jaguar telephone is installed, turn the telephone
function on by pressing the reset 4 button until TEL ON shows on the display. (Should be ON)
NOTE: If a hands-free cellular telephone is installed, the mute function must be switched ON.
Preset 5
TAPE EJE ON/OFF – sets the cassette tape to automatically eject when the ignition key is turned off.
Preset 6
Not used.
Preset 7
DIVERSITY ON/OFF – Used when a Diversity Antenna System is connected to the radio. (Should be OFF
because the system is not used by Jaguar.)
Preset 8
AF ON/OFF – (Alternate Frequency) Used when reception problems occur with RDS stations. Toggling
AF ON/OFF will eliminate program drop-out on RDS channels.
Preset 9
Not used.
NOTES
Date of Issue: 10/01/2002
Student Guide
1.8.19
INTRODUCTION TO XJ/XK
Service Training
BODY SYSTEMS
Navigation System
XJ and XK vehicles may be fitted with optional fully integrated navigation systems which provide various types of
route guidance information to aid the driver, using visual displays and voice commands. The navigation system uses
signals from the global positioning satellite (GPS) system together with ground map data, vehicle road speed and
yaw rate to calculate the position of the vehicle to an accuracy of several metres. After entering the desired destination and route information, the driver is guided by both visual and/or voice instructions and if, for example, a wrong
turn is made, the navigation system recalculates the route.
The XJ navigation display and controls are integrated into the audio unit while the XK has a separate integral display
and controls panel located in the central fascia. The remaining equipment is common to both types of vehicle and
consists of the navigation control module, the GPS antenna and the vehicle speed module. Map and associated data
for a particular country or region are stored on the new technology digital versatile disc (DVD) which is loaded into
the navigation system DVD reader.
System Features
A description of the navigation system facilities and operating instructions is given in the Navigation Handbooks
provided with the vehicle. A brief overview of these facilities is provided here.
Destination and Route
Various types of destination information may be input by the driver using screen menus and panel controls to make
selections and input text characters. Addresses may be entered or selections made from the DVD database listing
‘points of interest’ such as hotels, bus stations, amusement parks and other places. Other types of destination which
may be requested include road intersections, map cursor locations, recent destinations or local points of interest,
that is, locations within a specified radius. As well as this DVD stored data, the user may create ‘memory points’
which are map locations for subsequent selection as route destinations or way points.
The user can also specify route modifications to a particular destination by defining way points to split a route into
sections. After a destination has been selected, roads to be avoided or utilized (e.g. all major highways) may also be
specified. Further route parameters include shortest distance or time and re-route calculations.
NOTES
1.8.20
Student Guide
Date of Issue: 10/01/2002
INTRODUCTION TO XJ/XK
Service Training
Route Guidance
On XJ vehicles, only the arrow view type guidance display is available, though it may also be shown together with
radio/audio information.
On XK vehicles, three types of screen guidance are available: map, arrow view or hybrid.
• The map view shows the relevant map area with the route highlighted and the arrowed vehicle: the map
scrolls automatically to keep the vehicle on screen.
• The arrow view shows a diagrammatic display: as the vehicle approaches the next manoeuvre point, a detailed
view of the junction is displayed with a direction arrow and distance information.
• With hybrid selected, the map and highlighted route are shown until a manoeuvre point is reached when the
arrow view appears.
Voice Guidance
A main feature of the navigation system is the synthesized voice guidance which enables the driver to receive verbal
instructions about the next manoeuvre (e.g. ‘turn left’). A button on the control panel allows the user to ask the system to repeat the last instruction. The voice guidance instructions are broadcast via the audio system and may be
adjusted using the MODE buttons and volume controls on the audio unit. The settings available allow the relative
balance of volume between voice guidance and audio system to be varied.
Clock
A digital clock is displayed in the lower left-hand corner of the screen and is in 12-hour format. The correct time is
maintained automatically from the GPS satellite signals and no adjustment is provided. Time zone and summer time
settings are selectable via a screen menu and must be adjusted according to vehicle location and time of year.
NOTES
Date of Issue: 10/01/2002
Student Guide
1.8.21
INTRODUCTION TO XJ/XK
Service Training
BODY SYSTEMS
Navigation System (continued)
XJ Navigation Display and Controls
The XJ navigation controls and screen display are integrated with the audio unit which is physically similar to the
previous unit. The LCD screen shows navigation and/or radio and audio information and is displayed in monochrome only. Navigation system controls are to the left of the screen and are as follows:
• Volume control (A) – adjust audio system volume and audio/navigation voice guidance balance
• MODE button (B) – select navigation volume adjust (also audio system sound effects)
• CLEAR (C) – return to previous menu, character or text: clear screen at end of route
• Four cruciform scroll keys (D) – cursor up/down and left/right
• ENTER (E) – enter command for selected menu, character or prompt acknowledge
• RPT (F) – repeat last voice instruction
• NAV (G) – activate navigation system
XJ NAVIGATION CONTROLS
B
C E
A
D
F
G
INTR.85
NOTES
1.8.22
Student Guide
Date of Issue: 10/01/2002
INTRODUCTION TO XJ/XK
Service Training
XK Navigation Display and Controls Panel
The drivers navigation display and controls are provided by a single integral panel which is non-serviceable. The panel
fits into the central fascia otherwise occupied by the clock, oil pressure and battery condition instruments: oil pressure
and battery condition are indicated by icons on the main instrument cluster. The panel is fixed by four screws, accessible from the front, and is finished by a new clip in veneer panel with cut-outs.
All navigation information is shown in full color on the large display screen. The navigation controls are located on
both sides of the screen and are as follows:
• Main MENU (A) – display choice of Destination, Set-up, Options, Route
• LIST (B) – list turn information for calculated route
• CLEAR (C) – return to previous screen or change map orientation
• Joystick/enter (D) – highlight menu items, characters and scrolls map: enter commands and selections
• ON/OFF (E) – turn screen on or off
• MAP (F) – switch to, or return from map display and toggle map/arrow view when under guidance
• REPEAT (G) – repeat last voice instruction
• SCALE (H) – change map scale and scrolls previous or next page
XK NAVIGATION DISPLAY AND CONTROLS PANEL
A
E
B
F
C
G
D
H
INTR.86
Date of Issue: 10/01/2002
Student Guide
1.8.23
INTRODUCTION TO XJ/XK
Service Training
BODY SYSTEMS
Navigation System (continued)
Navigation System DVD Reader
NAVIGATION SYSTEM DVD READER
The navigation system DVD reader is mounted between
the CD changer and optional power amplifier on a modified bracket in the trunk. The DVD reader provides data
storage, processing and system control and incorporates
a gyrometer to measure yaw rate. The unit also receives
and processes satellite information from the GPS antenna to determine the absolute position of the vehicle.
The navigation system DVD reader incorporates a digital versatile disc (DVD) drive to provide the
interchangeable map data. The DVD represents the latest technology, providing approximately eight times
more data on a single disc than a standard CD-ROM.
This amount of data storage is an advantage in reducing the number of discs required to cover the current
navigable countries: USA (1 disc), Europe (5 discs),
Japan (1 disc, XJ only).
INTR.87
GPS ANTENNA LOCATIONS
There are no controls on the DVD reader. To load the
unit, the front panel is pulled down (bottom hinge) and
the disc is inserted directly into the slot. Before loading
a disc, always press the eject button to check if a disc is
already present so as to avoid possible damage.
GPS Antenna
The satellite global positioning (GPS) antenna is common to all models and is mounted on the rear trim
shelf, as shown, to obtain best reception. The antenna
output signals are connected by a co-axial cable to the
navigation system DVD reader. Since the antenna module contains active receiver circuits, the inner co-axial
conductor also carries a 5V dc power supply from the
DVD reader.
The antenna is fixed to the rear trim shelf via a self
adhesive coating on the antenna mounting plate.
Signal reception may be affected by the presence of metal objects or foil on or near the rear shelf or rear screen.
NOTES
INTR.88
1.8.24
Student Guide
Date of Issue: 10/01/2002
INTRODUCTION TO XJ/XK
Service Training
Vehicle Speed Interface Module
VEHICLE SPEED INTERFACE MODULE: XJ
One type of data required by the navigation system is the
current vehicle road speed. The ABS/traction control
module calculates the vehicle speed from wheel speed
sensor inputs and broadcasts the speed over the CAN
data bus. To access this data, the new navigation system
vehicle speed interface module is connected to the CAN
bus and sends a signal with a frequency proportional to
vehicle speed to navigation system DVD reader.
The navigation vehicle speed interface module is an
integral electronic unit common to both XJ and XK vehicles. On XJ vehicles, the module is fitted with a bracket
which is fixed to two threaded studs on the underside
of the coolbox mounting plate. The bracket has fixing
slots, enabling the module to be removed or fitted without fully unscrewing the securing nuts. On XK vehicles,
the module is fixed by Velcro to the underside of the
engine bay coolbox cover.
INTR.90
VEHICLE SPEED INTERFACE MODULE: XK
NOTES
INTR.89
Date of Issue: 10/01/2002
Student Guide
1.8.25
INTRODUCTION TO XJ/XK
1.8.26
Service Training
Student Guide
Date of Issue: 10/01/2002
J A G U A R
S E R V I C E
T R A I N I N G
INTRODUCTION TO JAGUAR
1
INTRODUCTION TO XJ/XK
1.1
Overview
1.2
Engine
1.3
Engine Management
1.4
Transmissions
1.5
Suspension, Steering and Brakes
1.6
Climate Control
1.7
Electrical Distribution System
1.8
Body Systems
1.9
Occupant Protection
1.10 Task Sheets
Service Training Course TINTR
Date of Issue: 10/01/2002
INTRODUCTION TO XJ/XK
Service Training
OCCUPANT PROTECTION: XJ
XJ vehicles comply with the occupant protection and safety standards of all countries. Body torsional rigidity and
side impact resistance is improved through the revision of some body components and the use of high strength steel
in a number of body panels.
Three-point active seat belts with pyrotechnic pretensioning retractors are fitted to the driver and front passenger
positions. Pyrotechnic front airbags for the driver and passenger deploy to additionally protect the occupants during frontal impacts. Argon gas inflated side airbags located in the outboard frames of the driver and front passenger
seats deploy to protect the occupants in the event of a severe side impact. A single-point sensing module (SPS) controls the operation of the front airbags and the front seat belt pretensioners. Side airbag deployment is controlled by
the SPS using input signals from separate side impact sensors.
Active three-point seat belts are provided for the rear seat passengers.
WARNING: READ AND OBSERVE ALL SAFETY PRECAUTIONS IN JTIS (JAGUAR TECHNICAL
INFORMATION SYSTEM) AND SERVICE BULLETINS BEFORE ATTEMPTING TO SERVICE THE
FRONT OR SIDE AIRBAGS, THE STEERING WHEEL, THE AREA AROUND THE PASSENGER
AIRBAG, THE FRONT SEAT BELT PRETENSIONING RETRACTORS, THE FRONT SEATS, OR ANY
AIRBAG / SRS COMPONENTS.
OBSERVE ALL SAFETY PRECAUTIONS WHEN HANDLING OR TRANSPORTING AIRBAG
MODULES.
DO NOT ATTEMPT TO MEASURE CIRCUIT RESISTANCE THROUGH THE AIRBAG MODULES OR
THE SEAT BELT PRETENSIONING RETRACTOR UNITS. DOING SO MAY TRIGGER DEPLOYMENT
AND RESULT IN PERSONAL INJURY.
DO NOT ATTEMPT TO REPLACE THE AIRBAG / SRS BATTERY POWER FUSE UNLESS THE
SYSTEM IS DISARMED.
TO DISARM THE SRS SYSTEM, DISCONNECT THE NEGATIVE BATTERY CABLE AND WAIT A
MINIMUM OF ONE MINUTE FOR THE RESERVE POWER CHARGE TO DISSIPATE.
NOTES
1.9.2
Student Guide
Date of Issue: 10/01/2002
INTRODUCTION TO XJ/XK
Service Training
Electronic Single-Point Sensor Airbag / SRS
System Description
The SPS (electronic single-point sensor) Airbag / SRS system is a microprocessor controlled system that controls the
deployment of the driver and passenger front and side airbags, and the front seat belt pretensioning retractors. The
system connects to: the data link connector (DLC) for WDS diagnosis, the instrument pack for the AIRBAG / SRS MIL,
and the body processor module (BPM) for an audible backup warning in case of MIL failure. The SPS Airbag / SRS
system is not part of the vehicle multiplex circuitry.
A 5 A, fused, ignition switched B+ circuit provides system power.
SPS AIRBAG / SRS COMPONENT LOCATIONS
SIDE
IMPACT SENSOR
SEAT BELT
PRETENSIONER
SIDE
AIRBAG
DRIVER
AIRBAG
SIDE
IMPACT SENSOR
SEAT BELT
PRETENSIONER
SIDE
AIRBAG
PASSENGER
AIRBAG
AIRBAG / SRS
SPS MODULE
INTR.91
NOTES
Date of Issue: 10/01/2002
Student Guide
1.9.3
INTRODUCTION TO XJ/XK
Service Training
OCCUPANT PROTECTION: XJ
Electronic Single-Point Sensor Airbag / SRS (continued)
System Description
Frontal impact
If the impact sensor in the SPS module detects a frontal impact above a certain threshold and the impact is also
detected by the safing sensor in the SPS module, the module fires both front seat belt pretensioners and both front
airbags. The side airbags are not fired during frontal impacts.
FRONT IMPACT ZONE
SEAT BELT
PRETENSIONER
AIRBAG
FRONT IMPACT ZONE
SEAT BELT
PRETENSIONER
AIRBAG
INTR.92
NOTES
1.9.4
Student Guide
Date of Issue: 10/01/2002
INTRODUCTION TO XJ/XK
Service Training
Side impact
If a side impact sensor in the B/C post detects a side impact above a certain threshold and the impact is also detected by the side impact safing sensor in the SPS module, the module fires the side airbag on the impacted side of the
vehicle. The front airbags, seat belt pretensioners, and the airbag on the other side of the vehicle are not fired.
SIDE IMPACT ZONE
SIDE IMPACT ZONE
SIDE IMPACT
SENSOR
SIDE AIRBAG
SIDE IMPACT
SENSOR
SIDE AIRBAG
SIDE IMPACT ZONE
INTR.93
Single Point Sensor
SINGLE-POINT SENSOR (SPS) MODULE LOCATION
The SPS performs the functions that, in the previous
system, were performed by the front impact sensors,
the safing sensor and the airbag/SRS control module. In
addition, it controls the operation of the front seat belt
pre-tensioners and the side airbags. The SPS is installed
on the driveshaft tunnel directly below the radio.
Contained in the SPS are:
• an electronic front impact sensor
• a sleeve-on-shaft front impact safing sensor
• an electronic side impact safing sensor
• related operating and diagnostic circuitry
An integral back-up power supply enables the SPS to
operate the system if the external supply is disrupted
during an impact.
INTR.94
Date of Issue: 10/01/2002
Student Guide
1.9.5
INTRODUCTION TO XJ/XK
Service Training
OCCUPANT PROTECTION: XJ
Electronic Single-Point Sensor Airbag / SRS (continued)
Airbags
Passenger Airbag Module
The passenger airbag module uses a tethered deployment door similar to XK. The deployment door retaining clips
must be replaced every time the door is removed.
PASSENGER AIRBAG MODULE
CLIPS
CLIPS
AIRBAG MODULE
INTR.95
Side Airbags
A side airbag module is attached to the outboard side of
each front seat back frame. The module is contained in
a cavity formed in the outboard seat bolster padding. A
slit in the padding directs the expanding bag to deploy
through the existing side bolster stitched seam. The airbag fully deploys within 11 milliseconds of impact.
SIDE AIRBAG MODULE (PASSENGER SIDE SHOWN)
If a side impact causes airbag deployment, the seat
should be replaced because the impact would be severe
enough to cause structural damage to the seat and the
vehicle.
WARNING: AFTERMARKET SEAT COVERS
MUST NOT BE INSTALLED ON SIDE AIRBAG
EQUIPPED SEATS BECAUSE THEY MAY
INTERFERE WITH AIRBAG DEPLOYMENT.
LOOSE ITEMS SHOULD NOT BE CARRIED
IN THE SEATS WHERE THEY COULD
INJURE VEHICLE OCCUPANTS IN THE
EVENT OF SIDE AIRBAG DEPLOYMENT.
INTR.96
1.9.6
Student Guide
Date of Issue: 10/01/2002
INTRODUCTION TO XJ/XK
Service Training
Front Seat Belt Pretensioners
The front seat belt pretensioners are located in the B/C
posts. In the event of front airbag deployment, the pretensioners activate to remove seat belt slack. The seat
belt pretensioning retractor units are pyrotechnic
devices similar to the XK8 units, except that they are
triggered together electronically by the Airbag / SRS system when the front airbags are deployed. Refer to
Pretensioning retractor units on page 10 of the XK8
section.
Pre-tensioner Assembly
The pre-tensioner assembly is a compact, self contained unit mounted to a body bracket by a single bolt
and anti-rotational fixing. The assembly is not serviceable and must be replaced if the pyrotechnic is
discharged. While the pre-tensioner assembly is intrinsically safer than the mechanically triggered type, the
normal safeguards and procedures applicable to the
storage, handling and disposal of pyrotechnic devices
must be followed.
FRONT SEAT BELT PRETENSIONER
GAS
GENERATOR
RETRACTOR
SEAT BELT
INTR.97
NOTES
Date of Issue: 10/01/2002
Student Guide
1.9.7
INTRODUCTION TO XJ/XK
Service Training
OCCUPANT PROTECTION: XK
Jaguar XK vehicles comply with the occupant protection and safety standards of all countries. From 1997 – 2002
MY, the XK has had three occupant protection variants.
WARNING: READ THE INSTRUCTIONS IN THE SERVICE MANUAL AND OBSERVE ALL SAFETY
PRECAUTIONS BEFORE ATTEMPTING TO SERVICE THE STEERING WHEEL, THE AREA AROUND
THE PASSENGER AIRBAG, OR ANY AIRBAG / SRS COMPONENTS. OBSERVE ALL SAFETY
PRECAUTIONS WHEN HANDLING OR TRANSPORTING AIRBAG MODULES.
DO NOT ATTEMPT TO MEASURE CIRCUIT RESISTANCE THROUGH THE AIRBAG MODULES.
DOING SO MAY TRIGGER AIRBAG DEPLOYMENT AND RESULT IN PERSONAL INJURY.
DO NOT ATTEMPT TO REPLACE THE AIRBAG / SRS 10 A BATTERY POWER FUSE UNLESS THE
SYSTEM IS DISARMED (1997 – 2000 MY).
TO DISARM THE SRS SYSTEM, DISCONNECT THE NEGATIVE BATTERY CABLE AND WAIT A
MINIMUM OF TWO MINUTES FOR THE RESERVE POWER CHARGE TO DISSIPATE.
1997 – 1999 MY
Active three-point seat belts are fitted for the driver and passenger positions. An electromechanical airbag is mounted in the steering wheel for the driver and in the fascia for the front passenger. In addition, the front seat belt
retractors include pyrotechnic seat belt pretensioners. Rear seat passenger positions are equipped with conventional three-point seat belts.
NOTES
1.9.8
Student Guide
Date of Issue: 10/01/2002
INTRODUCTION TO XJ/XK
Service Training
Airbag Deployment
In the event of an impact severe enough to trigger at
least one impact sensor plus the safing sensor, both airbags are triggered and deploy within 32 milliseconds.
The impact force will also independently trigger the
mechanically sensed pretensioning retractors of buckled front seat belts. The pretensioning retractors
position the belts to optimum tension and lock their
retractor mechanisms.
AIRBAG DEPLOYMENT –
SAFING SENSOR AND LEFT IMP[ACT SENSOR ACTIVATED
DIAGNOSTIC MODULE
BATTERY
VOLTAGE
10 A
FUSE BLOW
SWITCH
Airbag Modules
Non-serviceable modules are provided for the front
seat occupants. Each module consists of an inflator
assembly, airbag, and trim. When electrically ignited by
the system, the inflation charge generates a volume of
nitrogen gas to inflate the bag. The force of the inflation
displaces the trim and the airbag deploys in the passenger compartment.
DRIVER
AIRBAG
SAFING
SENSOR
IGNITION
SWITCHED
VOLTAGE
PASSENGER
AIRBAG
5A
The driver side module is located in the center of the steering wheel; the passenger side module is located in the
fascia. The passenger side deployment door snaps onto
the fascia. Straps attach to the airbag module mounting
bracket to control the door during deployment.
DEPLOY POWER
ENERGY RESERVE
LEFT
IMPACT
SENSOR
DWELL
ENHANCER
PASSENGER AIRBAG MODULE
DEPLOYMENT
DOOR
ALTERNATE
GROUND
RIGHT
IMPACT
SENSOR
INTR.98
STRAPS
AIRBAG MODULE
Date of Issue: 10/01/2002
INTR.99
Student Guide
1.9.9
INTRODUCTION TO XJ/XK
Service Training
OCCUPANT PROTECTION: XK
1997 – 1999 MY (continued)
Pretensioning retractor units
FRONT SEAT BELT PRETENSIONING RETRACTOR
The front seat belt pretensioners are pyrotechnic devices that remove seat belt slack and lock the retractors in
the event of a severe frontal impact. Tear-loop–type
seat belts are not used on XK8 vehicles.
ARMING
BUTTON
GAS
GENERATOR
Each self-contained pretensioning retractor unit consists of a mechanical impact sensor and triggering
control, a gas generator, and a piston / cable assembly
that connects to the seat belt retractor mechanism. If a
frontal impact of sufficient force occurs within 30° of
the vehicle center line and the seat belt is in use, the
pretensioner activates. The impact sensor ignites a solid nitrocellulose propellant in the gas generator, driving
the piston / cable assembly connected to the retractor
mechanism. The cable turns the retractor to remove
excess seat belt slack at the moment of airbag / SRS
deployment. After activation, the seat belt is locked. It
will not retract and cannot be pulled from the retractor
reel. The retractor unit / seat belt assembly must be
replaced following activation.
ARMING PIN
(DISARMED CONDITION)
SAFETY
LEVER
INTR.100
Pretensioning retractor arming
The pretensioning retractor unit is armed at installation by screwing in the red arming pin to fully depress the red
arming button. Once installed, a safety lever prevents the impact sensor from activating the pretensioner with the
seat belt fully retracted. When the seat belt is pulled from the retractor reel (seat belt in use by an occupant or securing a child seat), the safety lever moves and the unit is ready to activate if an impact occurs.
WARNING: IF A PRETENSIONING UNIT IS RUPTURED AND PROPELLANT INGESTION OR
INHALATION OCCURS, APPLY FIRST AID AND SEEK MEDICAL ADVICE.
DO NOT ATTEMPT TO DISMANTLE THE NON-SERVICEABLE RETRACTOR UNIT.
WHEN HANDLING THE RETRACTOR UNIT, THE PISTON MUST ALWAYS BE POINTED DOWN
AND AWAY FROM ANYONE. KEEP FINGERS AWAY FROM THE RETRACTOR REEL MECHANISM.
IF A PRETENSIONING RETRACTOR UNIT IS DROPPED FROM A HEIGHT GREATER THAN 0.3 M
(12 IN.), IT MUST NOT BE FITTED TO A VEHICLE.
NOTES
1.9.10
Student Guide
Date of Issue: 10/01/2002
INTRODUCTION TO XJ/XK
Service Training
2000 MY
Electrical Seat belt Pretensioners
While the electro/mechanical airbag system remained unchanged from the 1997 – 1999 MY XK, the previously fitted mechanical/pyrotechnic front seat belt pretensioners are replaced with electrical/mechanical pretensioners. The
pretensioners are fire by electrical signals from an impact sensing/control module mounted on the transmission tunnel and the system operates completely independently of the airbag system.
Pre-tensioner Assembly
The pre-tensioner assembly is a compact, self contained unit mounted to a body bracket by a single bolt
and anti-rotational fixing. The assembly is not serviceable and must be replaced if the pyrotechnic is
discharged. While the pre-tensioner assembly is intrinsically safer than the mechanically triggered type, the
normal safeguards and procedures applicable to the
storage, handling and disposal of pyrotechnic devices
must be followed.
ELECTRICALLY FIRED PRE-TENSIONER
NOTES
INTR.101
Date of Issue: 10/01/2002
Student Guide
1.9.11
INTRODUCTION TO XJ/XK
Service Training
OCCUPANT PROTECTION: XK
2001 – 2002 MY
Advanced Restraints System
New technologies have permitted the development of an ‘Advanced Restraints System’ that provides an improved
overall level of frontal crash protection for the front seat occupants. The system analyzes the occupancy scenario
and crash severity before activating the appropriate safety devices to help better protect a range of occupants in a
variety of frontal crash situations.
Benefits of the new system include:
• Optimization of the deployment restraint devices.
• The reduction in potential for airbag induced injuries.
• The significant reduction in passenger airbag deployments (particularly when passenger seats are unoccupied)
and a general reduction in all airbag deployments.
BASIC OCCUPANCY SCENARIOS (PASSENGER SIDE)
EMPTY SEAT – NO DEPLOYMENT
OUT OF POSITION – NO DEPLOYMENT
IN POSITION – AIRBAG DEPLOYS
EXTREMITIES – NO EFFECT ON DEPLOYMENT DECISION
INTR.102
NOTES
1.9.12
Student Guide
Date of Issue: 10/01/2002
INTRODUCTION TO XJ/XK
Service Training
In order to support the advanced restraint system requirements, a new restraint control architecture has been introduced comprising the following systems or components;
• Passenger occupancy sensing system.
• All-electronic crash sensing including frontal crash severity sensing and advanced restraints management.
• Driver airbag with twin stage inflator.
• Passenger airbag with twin stage inflator.
• Child seat lower ISO fix anchors for rear seats.
• Safety belt system including front belt use detection, load limiting and electrical comfort system.
• Front seats including driver seat track position sensor and passenger seat weight-sensing system.
• Lower steering column.
• Front seat mounted, side airbags.
RESTRAINT CONTROL ARCHITECTURE
CRASH SENSING
OCCUPANCY SENSING
FRONT CRASH SENSOR
OCCUPANCY SENSOR
(ROOF CONSOLE)
SIDE CRASH SENSOR (LH)
SIDE CRASH SENSOR (RH)
OCCUPANCY SENSOR
(A-POST)
PASSENGER SEAT
WEIGHT-SENSING SYSTEM
SEAT TRACK
POSITION SENSOR
SAFETY BELT
BUCKLE SENSOR (LH)
SAFETY BELT
BUCKLE SENSOR (RH)
OCCUPANCY SENSOR
(B-POST)
CONTROL AND PROCESSING
RESTRAINTS CONTROL MODULE
DIAGNOSTIC
CONNECTOR
OCCUPANCY
SENSING MODULE
BODY PROCESSOR
MODULE
DRIVER AIR BAG
PASSENGER AIR BAG
SIDE AIR BAG
SIDE AIR BAG
DRIVER
PRE-TENSIONER
PASSENGER
PRE-TENSIONER
AUDIBLE WARNING
SPEAKER
SRS INDICATOR
LAMP
PASSENGER AIR BAG
DE-ACTIVATION LAMP
WARNINGS
PROTECTION
INTR.103
Date of Issue: 10/01/2002
Student Guide
1.9.13
INTRODUCTION TO XJ/XK
Service Training
OCCUPANT PROTECTION: XK
2001 – 2002 MY (continued)
Airbag Modules
Driver Airbag Module
The driver airbag module is controlled by the restraints
control module (RCM), which chooses between first or
second stage deployment depending on occupant position and crash severity.
DRIVER AIRBAG MODULE
NOTE: Variation in passenger airbag deployment is determined by the timing of the first
and second stage ignition signals. This
facilitates adaptation of the stiffness and
timing of the airbag to optimize occupant
protection.
INTR.104
The module comprises:
• A twin stage inflator as opposed to the single stage
inflator.
• Separate chambers for the two inflation stages,
each independently activated by the RCM.
• Two airbag squib connectors, that have foolproof
mechanical keying and are color coded to the
respective plug on the inflator.
• A non-azide propellant that reduces particulates
and effluents.
The airbag deploys radially, to reduce the risk of airbag induced injury to a driver that is positioned close to the
steering wheel.
NOTES
1.9.14
Student Guide
Date of Issue: 10/01/2002
INTRODUCTION TO XJ/XK
Service Training
Side Airbag Module
The side airbag module is a new feature for XK vehicles,
designed to provide protection for the thorax (the part of
the trunk between the neck and abdomen) and head.
SIDE AIRBAG MODULE
The module:
• is mounted in the outboard bolster of each front seat;
• is standard fit and specification in all markets;
• does not require routine maintenance;
• has no serviceable parts;
• uses compressed argon to inflate the bag.
NOTE: As with all occupant safety
components, the SRS indicator lamp will
illuminate if a DTC has been stored. Diagnosis
must be undertaken using WDS.
In an airbag deployment situation, the airbag deploys
through the stitch seam in the side bolster. To ensure
the airbag always emerges at the same point, a chute is
attached to the inside of the trim cover and wrapped
around the airbag module.
WARNING: IN A SERVICE SITUATION,
THE MODULE MUST BE CORRECTLY
LOCATED IN THE CHUTE. FAILURE TO
FOLLOW THE SERVICE PROCEDURE
COULD RESULT IN INCORRECT AIRBAG
DEPLOYMENT; REFER TO JTIS.
INTR.105
NOTE: In the event of a side impact that is sufficient to deploy the bag, it will be necessary to replace the
complete seat.
NOTES
Date of Issue: 10/01/2002
Student Guide
1.9.15
INTRODUCTION TO XJ/XK
Service Training
OCCUPANT PROTECTION: XK
2001 – 2002 MY (continued)
Airbag Modules
Passenger Airbag Module
The passenger airbag module is controlled by the restraints control module (RCM), which chooses between first or
second stage deployment, depending on occupant status and crash severity.
NOTE: Variation in passenger airbag deployment is determined by the timing of the first and second stage
ignition signals. This facilitates adaptation of the stiffness and timing of the airbag to optimize occupant
protection.
The module comprises:
• A twin stage inflator as opposed to the single stage inflator.
• Two airbag squib connectors to accommodate the twin stage inflation.
The inflator is a development of the heated gas inflator technology developed for the S-TYPE sports saloon, which
replaces the conventional pyrotechnic device, previously used for the XK Range of vehicles.
The heated gas inflator:
• Comprises a high-pressure mix of clean air and hydrogen gas, triggered by two separate ignition squibs.
• Produces a controlled generation of clean gas to rapidly fill the airbag.
• Is classified as a stored flammable gas (not as an explosive) and as such, has less restrictive storage and transportation requirements.
• Produces a very clean burn and almost no particulates.
• Is almost free of any toxins, making disposal or recycling much easier.
NOTE: Disposal of twin stage airbags is different from single stage airbags; refer to JTIS.
PASSENGER AIRBAG SYSTEM CONNECTORS
AIRBAG
CONNECTOR
AIRBAG
CONNECTOR
AIRBAG DE-ACTIVATION
INDICATOR LAMP
CONNECTOR
1.9.16
INTR.106
Student Guide
Date of Issue: 10/01/2002
J A G U A R
S E R V I C E
T R A I N I N G
INTRODUCTION TO JAGUAR
1
INTRODUCTION TO XJ/XK
2
INTRODUCTION TO S-TYPE
2.1
Overview
2.2
Engine
2.3
PTEC Engine Management
2.4
Transmission
2.5
Suspension, Steering and Brakes
2.6
DATC Climate Control
2.7
Electrical Distribution System
2.8
Body Systems
2.9
Occupant Protection
2.10 Task Sheets
Service Training Course TINTR
Date of Issue: 10/01/2002
INTRODUCTION TO S-TYPE
Service Training
OVERVIEW
General Information
INTR.1.7
The Jaguar S-TYPE is a luxury sports sedan with a distinctive style, refined power, agile handling, supple ride and luxurious comfort.
Powertrains are a V8 (AJ28) engine, derived from the engines currently used in XJ/XK vehicles, and a V6 (AJ-V6)
engine. Both engines are coupled to a new five-speed automatic transmission. The new V6 and updated V8 engines
and the transmission unit are described in the ‘Jaguar S-TYPE Powertrain Introduction’ Technical Guide.
As with current vehicles, variable rate steering control is fitted and all vehicles have ABS brakes with traction control as
standard. A new, optional feature with the Jaguar S-TYPE is Dynamic Stability Control (DSC), yaw control, which assists
the driver in maintaining directional control of the vehicle. Unlike current vehicles, the hood is hinged at its rear with a
safety catch provided at the front of the hood. A tilt and slide sliding roof with sunshade is an optional feature.
Both front seats have electrically operated 8-way adjustments as standard and memory equipment is available as an
option. To allow a greater load to be carried in the luggage compartment, the rear seats can be folded forwards and
are split in a 60/40 configuration.
Automatic climate control, with dual temperature control for the driver and front passenger, is a standard feature on
all vehicles. Another new item is reverse park control, a system giving the driver audible warning of obstructions
which could damage the vehicle during reversing.
A standard fit radio/cassette unit provides in-car entertainment with a CD autochanger also being offered. Other
options include a phone, navigation system, vehicle emergency monitoring system and certain voice activated systems. Optional cruise control and audio switches are fitted to the steering wheel. All vehicles have a trip computer
system and a message center.
Security features are immobilizer and alarm. A 4-button key-ring transmitter has a radio frequency operation with
an encrypted rolling code to help prevent theft of the vehicle.
Standard Corporate Protocol (SCP) is the only network for all the vehicle electronic controls, CAN is not used.
2.1.2
Student Guide
Date of Issue: 10/01/2002
INTRODUCTION TO S-TYPE
Service Training
Vehicle Weights
Kerb Weight (approximate)
Gross Vehicle Weight (approximate)
Front Axle
Rear Axle
Total
Front Axle
Rear Axle
Total
Vehicles with
3.0L V6 engine
850 kg
(1874 lb.)
785 kg
(1730 lb.)
1635 kg
(3604 lb.)
998 kg
(2200 lb.)
1177 kg
(2595 lb.)
2175 kg
(4795 lb.)
Vehicles with
4.0L V8 engine
915 kg
(2017 lb.)
810 kg
(1786 lb.)
1725 kg
(3803 lb.)
1018 kg
(2244 lb.)
1177 kg
(2595 lb.)
2195 kg
(4839 lb.)
Dimensions
EXTERNAL DIMENSIONS
290.9 cm (114.5 in.)
486.1 cm (191.4 in.)
140.1 cm (55.2 in.)
Comfort Suspension
141.1 cm (55.5 in.)
Sport Suspension
154.4 cm (60.8 in.)
153.7 cm (60.6 in.)
181.9 cm (71.6 in.)
INTR.108
NOTES
Date of Issue: 10/01/2002
Student Guide
2.1.3
INTRODUCTION TO S-TYPE
Service Training
OVERVIEW
Vehicle Identification Numbers (VIN)
Identification Plates and Labels
The Vehicle Identification Number (VIN) is displayed, from outside the vehicle, on a plate visible in the lower left
edge of the windshield. There is also a certification label attached to the LH front door hinge pillar which gives
details of vehicle weights, paint code, trim, date of manufacture and VIN.
IDENTIFICATION PLATE AND LABEL LOCATION
SAJDA
1M9XG000484
AIRBAG
MFD BY JAGUAR CARS LTD
COVENTRY ENGLAND
MFD DATE
GVWR
GAWR F
R
JAGUAR CARS LTD
TYPE PASSENGER CAR
PAINT
TRIM
NORTH AMERICA
R/AR
VEH IDENT NO.
THIS VEHICLE CONFORMS TO ALL APPLICABLE FEDERAL MOTOR
VEHICLE SAFETY BUMPER AND THEFT PREVENTION STANDARDS
IN EFFECT ON THE DATE OF MANUFACTURE SHOWN BELOW
VEH IDENT NO.
GVWR
/PNBV
MFD DATE
GAWR
/PNBE F/AV
TYPE
PC/VT
PAINT
969
TRIM
CANADA
INTR.109
NOTES
2.1.4
Student Guide
Date of Issue: 10/01/2002
INTRODUCTION TO S-TYPE
Service Training
VIN DESCRIPTION
SAJ A A 01 R ? X F L 00001
WORLD
MANUFACTURER
INDENTIFIER
TRANSMISSION
AND STEERING
CODE
MARKET,
AIRBAG SPECIFICATION
BODY CODE
EMISSION
CONTROL
SYSTEM
MODEL
YEAR I.D.
CHECK
DIGIT
PRODUCTION SEQUENCE NUMBER
ASSEMBLY PLANT,
MODEL LINE
INTR.110
Production Sequence Numbers
S-TYPE Models 3.0-liter V6, 4.0-liter V8
Model Year
Production Sequence Numbers
2000
(Model year I.D. “Y”)
L00001 – L77677
2001
(Model year I.D. “1”)
L77678 – L86901
2002 Update
(Model year I.D. “1”)
L86902 – M21729
2002
(Model year I.D. “2”)
M21730 – M44997
NOTES
Date of Issue: 10/01/2002
Student Guide
2.1.5
INTRODUCTION TO S-TYPE
2.1.6
Service Training
Student Guide
Date of Issue: 10/01/2002
J A G U A R
S E R V I C E
T R A I N I N G
INTRODUCTION TO JAGUAR
1
INTRODUCTION TO XJ/XK
2
INTRODUCTION TO S-TYPE
2.1
Overview
2.2
Engine
2.3
PTEC Engine Management
2.4
Transmission
2.5
Suspension, Steering and Brakes
2.6
DATC Climate Control
2.7
Electrical Distribution System
2.8
Body Systems
2.9
Occupant Protection
2.10 Task Sheets
Service Training Course TINTR
Date of Issue: 10/01/2002
INTRODUCTION TO S-TYPE
Service Training
ENGINE
AJ-V6 ENGINE
INTR.111
The S-TYPE sports sedan has an in-line powertrain and rear wheel drive configuration and is available with either a
3-liter V6 or a 4-liter V8 engine, both normally aspirated. The V6 engine, designated AJ-V6 is new to the Jaguar range
and provides expected Jaguar levels of performance with smooth power delivery, economy and excellent torque
characteristics across the engine speed/load range. The engine is of a lightweight but rigid design with particular
attention paid to minimizing noise and vibration. A major innovation is the use of a variable geometry air intake
manifold, which is controlled, via valves, by the engine management system and produces optimized volumetric
efficiency at all engine speeds. Two stage variable valve timing is also fitted and both systems are optimized together
to achieve the wide torque delivery at all engine speeds.
The V8 engine, designated AJ28, is a development of the now established engine fitted to XJ and XK vehicles and
incorporates the latest modifications fitted to the AJ27 variant, in particular the continuously variable valve timing
system and air assisted fuel injection.
Both the V6 and V8 engines are fitted with a new, common, electronic throttle which does not require a mechanical
cable. Another new feature, also common to both engines, is the use of a returnless fuel system to reduce the formation of fuel vapor (evaporative emissions).
2.2.2
Student Guide
Date of Issue: 10/01/2002
INTRODUCTION TO S-TYPE
Service Training
Engine Specifications
3.0 Liter V6
4.0 Liter V8
Configuration
60˚ V6
90˚ V8
Cylinder Head
Dual overhead camshafts,
4 valves per cylinder
Dual overhead camshafts,
4 valves per cylinder
Valve Clearances (Cold):
Intake
Exhaust
0.175 to 0.225 mm
0.325 to 0.375 mm
0.18 to 0.22 mm
0.23 to 0.27 mm
Firing Order
1,4,2,5,3,6
1A, 1B, 4A, 2A, 2B, 3A, 3B, 4B
Bore
89 mm (3.504 in)
86 mm (3.386 in)
Stroke
79.5 mm (3.13 in)
86 mm (3.386 in)
Displacement
2.967 liters (181 in3)
3.996 liters (244 in3)
Compression Ratio
10.5 : 1
10.75 : 1
Maximum Power (DIN)
179 kW (240 BHP) at 6800 rpm
209 kW (281 BHP) at 6100 rpm
Maximum Torque (DIN)
300 Nm (221 lb ft) at 4500 rpm
390 Nm (287 lb ft) at 4300 rpm
Coolant Volume (complete system)
10.4 liters (11 qts.)
10 liters (10.6 qts.)
V6 Engine Structure
ENGINE STRUCTURE
Basic engine construction is similar to the V8 in that a
structural bedplate is used which bolts to the cylinder
block to provide a very strong housing for the crankshaft, minimizing vibration. Both units are of cast
aluminum alloy and are accurately aligned together by
the use of eight hollow dowels.
The cylinder block is fitted with dry cast iron liners.
The oil sump is an aluminum alloy casting which combines a sump body and oil pan in a single structural
component. The sump mounts to the bedplate via an
aluminum gasket incorporating a silicone rubber seal.
NOTES
INTR.112
Date of Issue: 10/01/2002
Student Guide
2.2.3
INTRODUCTION TO S-TYPE
Service Training
ENGINE
Engine Identification Data
An engine identification code tag is located on the bank 2 side of the front cover assembly. Main bearing selection
codes are located at the rear of the cylinder block and on the rear face of the crankshaft flange. The two codes are
compared using reference data provided in the JTIS service information to identify the correct bearing.
ENGINE DATA LOCATIONS
ENGINE IDENTIFICATION CODE
MAIN BEARING SELECTION CODES
INTR.113
NOTES
2.2.4
Student Guide
Date of Issue: 10/01/2002
J A G U A R
S E R V I C E
T R A I N I N G
INTRODUCTION TO JAGUAR
1
INTRODUCTION TO XJ/XK
2
INTRODUCTION TO S-TYPE
2.1
Overview
2.2
Engine
2.3
PTEC Engine Management
2.4
Transmission
2.5
Suspension, Steering and Brakes
2.6
DATC Climate Control
2.7
Electrical Distribution System
2.8
Body Systems
2.9
Occupant Protection
2.10 Task Sheets
Service Training Course TINTR
Date of Issue: 10/01/2002
INTRODUCTION TO S-TYPE
Service Training
PTEC SYSTEM
Overview
The PTEC (Powertrain Electronic Control) system is a comprehensive combined engine and transmission control system. The system is used on both the 3 liter AJ-V6 and the 4 liter AJ28 V8 engines installed in the Jaguar S-TYPE. There
are detailed sensor and control differences between V6 and V8, however the majority of the system is identical in its
functions. PTEC complies with OBD II and is capable of achieving future LEV (Low Emission Vehicle) emission
standards.
PTEC has several features that are unique from other
Jaguar engine management systems:
AJ-V6 ENGINE
Single control module
A single Powertrain Control Module (PCM) performs
both engine and transmission control functions. This
Student Guide covers only the engine management
portion of the PTEC system.
SCP Network
PTEC communicates only on the vehicle SCP (Standard
Corporate Protocol) multiplex network.
Returnless fuel system
The fuel delivery system is a supply only system with no
provision for returning unused fuel from the fuel rail to the
fuel tank.
Full authority throttle
PTEC employs a full authority electronic throttle assembly with no cable connection between the accelerator
pedal and the throttle. The throttle assembly incorporates a separate control module with diagnostic
capabilities.
Variable intake system (V6)
V6 engines are equipped with a variable length air
intake manifold that optimizes engine torque across the
entire speed/load range.
Fail safe cooling (V6)
INTR.114
V6 engines have a PCM “fail safe cooling” strategy that
allows for limited engine operation with low or no
coolant.
NOTES
2.3.2
Student Guide
Date of Issue: 10/01/2002
INTRODUCTION TO S-TYPE
Service Training
Control Summary
The engine management systems for the 3.0 liter AJ-V6 engine and the 4.0 liter AJ28 V8 engine vehicles are virtually
identical in function with differences in the control module parameters and the location of some components.
The major differences between the two systems are as follows:
AJ-V6
AJ28 V8
Two position VVT (variable valve timing)
Variable air intake system
EGR (exhaust gas recirculation) – 2000 MY only
Continuously variable VVT (variable valve timing)
AAI (air assisted injection)
The PTEC powertrain control module (PCM) directly governs the following functions:
• Air assisted fuel injection (V8 only)
• Air conditioning compressor
• Automatic transmission
• Cooling system radiator fan
• Cruise control
• Default operating modes
• Engine power limiting
• Engine speed limiting
• Engine torque reduction control
• Evaporative emission control
• Exhaust emission control
• Exhaust gas recirculation (V6 only)
• Fail safe engine cooling
• Fuel delivery and injection (fuel pump via RECM)
• Fuel system leak check
• Full authority electronic throttle (via Throttle Actuator Control Module)
• Idle speed
• Ignition
• OBD II diagnostics
• Variable intake manifold tuning (V6 only)
• Variable intake valve timing
• Vehicle speed limiting
NOTES
Date of Issue: 10/01/2002
Student Guide
2.3.3
INTRODUCTION TO S-TYPE
Service Training
PTEC SYSTEM
Control Summary (continued)
System Logic – V6
V6 ENGINE MANAGEMENT
TACM
DPFE
EGR
VALVE
TP SENSOR
IMT VALVES
IAT SENSOR
MAF SENSOR
CMP SENSOR 2
VVT VALVE 2
IP SENSOR
EFT SENSOR
FI
CMP SENSOR 1
FI
ON-PLUG
COIL
ON-PLUG
COIL
CHT SENSOR
VVT VALVE 1
KS 2
HO2 SENSOR 1/1
KS 1
HO2 SENSOR 2/1
EOT
SENSOR
BANK 1
CKP
SENSOR
BANK 2
HO2 SENSOR 1/2
HO2 SENSOR 2/2
INTR.115
2.3.4
Student Guide
Date of Issue: 10/01/2002
INTRODUCTION TO S-TYPE
Service Training
System Logic – V8
V8 ENGINE MANAGEMENT
MAF SENSOR
TP SENSOR
IAT SENSOR
AAI
VALVE
EFT SENSOR
TACM
IP SENSOR
CMP SENSOR 1
ON-PLUG
COIL
FI
FI
CMP SENSOR 2
ON-PLUG
COIL
ECT
SENSOR
VVT
VALVE
VVT
VALVE 2
KS
HO2 SENSOR 1/1
HO2 SENSOR 2/1
BANK 1
BANK 2
CKP
SENSOR HO2 SENSOR 2/2
HO2 SENSOR 1/2
EOT SENSOR
INTR.116
Date of Issue: 10/01/2002
Student Guide
2.3.5
INTRODUCTION TO S-TYPE
Service Training
PTEC SYSTEM
Electronic Returnless Fuel System
The electronic returnless fuel system used with the PTEC engine management system provides pressurized fuel at the fuel
injectors and does not require a return line with its associated hardware. Additional benefits of the system include:
• Precise fuel pressure control
• Reduced fuel temperature and fuel tank vapor caused by constant fuel recirculation
• Reduced electrical system load
• Fuel pressure boost to prevent fuel vapor lock
• Reduce hot start cranking time
Fuel delivery volume and pressure from the single in-tank fuel pump are controlled by the PCM in a closed loop. The
actual fuel pump “drive” is supplied and controlled by the Rear Electronic Control Module (RECM), which receives
fuel pump control input from the PCM. The PCM / RECM fuel pump control circuit is hard wired.
The system delivers the correct amount of fuel to the engine under all conditions and at a constant pressure differential
with respect to manifold absolute pressure, without the need for a return line to the tank or a fuel rail pressure regulator.
FUEL PUMP CONTROL
IGNITION
SWITCHED POWER
MAF
IAT
CHT / ECT
CKP
PWM
FUEL FLOW DEMAND
IP
EFT
DATA
FUEL PUMP
DIAGNOSTICS (SCP)
PWM
POWERTRAIN
CONTROL MODULE
FUEL PUMP
DRIVE
FUEL PUMP
BATTERY POWER
B+ IGNITION SWITCHED
POWER
FUEL PUMP
DRIVE POWER
INERTIA SWITCH
REAR ELECTRONIC
CONTROL MODULE
FUEL PUMP
RELAY
INTR.117
NOTES
2.3.6
Student Guide
Date of Issue: 10/01/2002
INTRODUCTION TO S-TYPE
Service Training
Inertia switch
INERTIA SWITCH
The inertia switch is located behind the trim on the left
side of the vehicle, forward of the front door post and
below the fascia. A finger access hole in the trim allows
the switch to be reset.
If the inertia switch is tripped, it interrupts the ignition
switched B+ voltage supply circuit to the fuel pump relay
coil. The direct B+ voltage fuel pump supply to the RECM
is interrupted and the pump immediately stops.
NOTES
INTR.118
Date of Issue: 10/01/2002
Student Guide
2.3.7
INTRODUCTION TO S-TYPE
Service Training
PTEC SYSTEM
Electronic Returnless Fuel System (continued)
Fuel flow
•
•
The variable speed fuel pump is contained in a fuel reservoir in the RH compartment.
Fuel is pumped from the reservoir through an external crossover pipe to the LH compartment where it flows
via a ‘T’ junction to the parallel pressure relief valve and then out to the engine fuel rail.
• The reservoir fuel level is maintained by the continual flow of fuel supplied by jet pumps in the LH and RH
compartments.
Fuel from the LH compartment is pumped through an external crossover pipe to the reservoir. The RH compartment jet pump is located in the base of the reservoir.
Parallel pressure relief valve
The parallel pressure relief valve assembly contains two spring-loaded valves, which operate in opposite directions:
• The supply valve opens to allow fuel flow at approximately 0.014 Bar (0.2 psi) during normal operation.
• The fuel rail pressure relief valve opens at approximately 4.14 – 4.48 Bar (60 – 65 psi) to relieve excessive fuel
rail pressure.
The main functions of the parallel pressure relief valve assembly are:
• To ensure fast engine starting by “checking” fuel in the supply lines and rail.
• To limit rail pressure due to temporary vapor increase during hot soak conditions (temperature and
thus pressure drop after approximately 20 minutes.)
• To limit rail pressure caused by sudden load changes such as a full to closed throttle transition.
• To prevent siphoning from the tank in the even of the fuel line being severed with the pump inactive.
NOTES
2.3.8
Student Guide
Date of Issue: 10/01/2002
INTRODUCTION TO S-TYPE
Service Training
FUEL FLOW
EFT SENSOR
IP SENSOR
FUEL FILTER
FUEL INJECTORS
LH FUEL LEVEL
SENSOR
ELECTRICAL
CONNECTOR
FUEL RAIL
FUEL INJECTORS
RH FUEL LEVEL SENSOR
AND FUEL PUMP
ELECTRICAL CONNECTOR
MANIFOLD
VACUUM
FUEL LEVEL
SENSORS
LH COMPARTMENT
RH COMPARTMENT
FUEL PUMP
PARALLEL PRESSURE
RELIEF VALVE
FUEL RESERVOIR
JET PUMP
JET PUMP
FUEL RAIL PRESSURE RELIEF VALVE
opens at 60 – 65 psi to allow
fuel flow to the fuel tank
SUPPLY VALVE
opens at 0.2 psi to allow
fuel flow to the fuel rail
PARALLEL PRESSURE
RELIEF VALVE
INTR.119
Date of Issue: 10/01/2002
Student Guide
2.3.9
INTRODUCTION TO S-TYPE
2.3.10
Service Training
Student Guide
Date of Issue: 10/01/2002
J A G U A R
S E R V I C E
T R A I N I N G
INTRODUCTION TO JAGUAR
1
INTRODUCTION TO XJ/XK
2
INTRODUCTION TO S-TYPE
2.1
Overview
2.2
Engine
2.3
PTEC Engine Management
2.4
Transmission
2.5
Suspension, Steering and Brakes
2.6
DATC Climate Control
2.7
Electrical Distribution System
2.8
Body Systems
2.9
Occupant Protection
2.10 Task Sheets
Service Training Course TINTR
Date of Issue: 10/01/2002
INTRODUCTION TO S-TYPE
Service Training
TRANSMISSION
5R55N Automatic Transmission
V6 and V8 Jaguar S-TYPE vehicles are equipped with the 5R55N 5-speed automatic transmission system. The transmission design for both vehicles is identical with slight mechanical differences to account for engine power and
configuration, as well as the installation in the vehicle. The V6 requires a transmission with a longer rear extension
housing and output shaft assembly to accommodate the shorter engine. Each variant uses a unique torque converter matched to the engine torque requirement. The V8 uses an adapter plate to mate the torque converter to a large
diameter drive plate.
5R55N TRANSMISSION
INTR.120
The transmission is electronically controlled by the Powertrain Control Module (PCM), which integrates Engine Management System control. The combined system is known as PTEC – Powertrain Electronic Control. The single control
module for both engine and transmission eliminates the need for a high speed Controller Area Network (CAN).
Normal P,R,N,D drive functions plus manual selection of 4th, 3rd and 2nd gears are provided by a Jaguar style 'J' gate
(not the same as XJ and XK Series). Sports or Normal mode is selected by the switch located at the 'J' gate.
NOTES
2.4.2
Student Guide
Date of Issue: 10/01/2002
INTRODUCTION TO S-TYPE
Service Training
Specifications
5 R 55 N
5
R
55
N
=
=
=
=
Five forward gears
Rear wheel drive
Torque capability code number
Type code
Transmission weight with fluid:90 kg (198 lb.)
Mechanical features:
Five forward gears
Three compound planetary gear sets
Three brake bands
Four multi-plate clutches
Three one-way clutches
Transmission fluid:
Capacity – 9 liters (9.5 quarts)
Fill / change – filled for life
Type – Mercon V Semi-Synthetic
Jaguar Part Number
JLM 21044 (1 liter)
Transmission fluid cooler:
External, separate air-to-liquid cooler located below the air conditioning
condenser.
Towing:
35 mph for 50 miles
Power is transmitted from the torque converter to the planetary gear sets through the input shaft. Brake bands and
clutches are used to hold and drive certain combinations of gear sets to produce five forward gears and one reverse
gear, which is transmitted to the output shaft and differential.
Gear ratios
1st gear
3.25 : 1
2nd gear
2.44 : 1
3rd gear
1.55 : 1
4th gear
1.00 : 1
5th gear
0.75 : 1
Reverse
3.07 : 1
NOTES
Date of Issue: 10/01/2002
Student Guide
2.4.3
INTRODUCTION TO S-TYPE
Service Training
TRANSMISSION
Driveline
Driveshaft
The S-TYPE has a two-piece welded steel tube driveshaft with a splined center slip joint and locking collar, the whole
being aligned with the body centerline. The driveshaft has rubber flex couplings and a rubber, body-mounted, center bearing. For safety, the front tube is collapsible. Serviceable parts are the center bearing, flex coupling, rubber
boot, alignment bearing and fasteners. Lubrication of the driveshaft components is unnecessary. The universal joint
is equipped with nylon thrust washers, located at the base of the bearing cup.
Balancing of the driveshaft is achieved using a PDU with the new vibration analyzer. This gives details of where the
shaft is out of balance and by how much and where to place the balance nuts.
Final Drive (differential)
The final drive, differential, has a steel case and rear cover, no drain plug and has a sealed for life lubricant. The
hypoid gearset is mounted in taper roller bearings. It has a two point differential assembly retained by bearing
straps. The central pinion is on the body centerline. Pinion and output oil seals, the companion flange and nut and
the needle roller output bearing are the only serviceable items.
Final drive ratios are:
3.31:1 (V6 and V8 auto)
2.87:1 (V6 manual)
Half-shafts
Half-shafts are unequal lengths and are therefore handed, left and right. Constant velocity joints are fitted to both
ends, the outer is fixed and the inner is sliding. They are sealed for life and retained in the differential side gear with
a spring clip.
NOTES
2.4.4
Student Guide
Date of Issue: 10/01/2002
INTRODUCTION TO S-TYPE
Service Training
DRIVELINE ARRANGEMENT
INTR.121
Date of Issue: 10/01/2002
Student Guide
2.4.5
INTRODUCTION TO S-TYPE
2.4.6
Service Training
Student Guide
Date of Issue: 10/01/2002
J A G U A R
S E R V I C E
T R A I N I N G
INTRODUCTION TO JAGUAR
1
INTRODUCTION TO XJ/XK
2
INTRODUCTION TO S-TYPE
2.1
Overview
2.2
Engine
2.3
PTEC Engine Management
2.4
Transmission
2.5
Suspension, Steering and Brakes
2.6
DATC Climate Control
2.7
Electrical Distribution System
2.8
Body Systems
2.9
Occupant Protection
2.10 Task Sheets
Service Training Course TINTR
Date of Issue: 10/01/2002
INTRODUCTION TO S-TYPE
Service Training
SUSPENSION, STEERING AND BRAKES
Front Suspension
The independent front wheel suspension is a double wishbone axle arrangement with aluminum control arms. The
two arms are of different lengths, which minimizes the changes in track and camber. Inclination of the upper control arm axis provides anti-dive front suspension action. There are two front cross members, known as Number 1
and Number 2.
Number 1, the forward cross member, is a steel fabrication, non-isolated, which locates the lower control arm front
mounting, the anti-roll bar and the cooling module.
The rear cross member, Number 2, is an aluminum casting, non-isolated and it locates the lower control arm rear
mounting, the power steering rack and the engine hydro-mounts.
WARNING: NO ATTEMPT MUST BE MADE TO WELD OR REPAIR THE ALUMINUM CROSSMEMBER.
IF IT IS DAMAGED, A NEW ONE MUST BE INSTALLED.
FRONT SUSPENSION
NUMBER 2
CROSSMEMBER
NUMBER 1
CROSSMEMBER
INTR.122
Suspension Alignment
A special tool has been designed to enable correct alignment of the suspension to the body.
Connected to a personal computer, a transducer with a wire measuring device is fitted to a plate attached to the Number
2 cross member. Alignment pins are fitted to the body front and rear to the left-hand side chassis rail and to the rear suspension beam. Measurements are taken from one point on the Number 2 beam. Then the transducer is transferred to the
other point on the beam and a second set of measurements taken. The PC then calculates if there is any misalignment and
by how much, and displays the information on the screen. The beam(s) are then adjusted to bring the alignment back
within limits and a further series of measurements are taken. This process is repeated until the alignment is correct and
the beams are then tightened. A printout of the measurements is to be attached to the job card as a permanent record of
alignment. Note that camber, caster and toe may be required if any of the beams have been adjusted.
2.5.2
Student Guide
Date of Issue: 10/01/2002
INTRODUCTION TO S-TYPE
Service Training
Lower Control Arm
The lower control arm is an aluminum forging and has locations for the damper and the anti-roll bar drop link. It is
mounted with one hydro-bush, the front lower bush, and one rubber bush, both serviceable. This is the first time
that a hydraulic bush has been fitted to a Jaguar wishbone. The hydro-bush is tuned for refinement and helps to
reduce brake vibration.
Service adjustments for caster and camber can be made to the lower control arm geometry with the addition of cam
bolts (not supplied with the vehicle).
LOWER CONTROL ARM
LOWER
CONTROL ARM
ANTI-ROLL BAR
ANTI-ROLL BAR
DROP LINK
INTR.123
Vertical Front Knuckle
VERTICAL FRONT KNUCKLE
The vertical front knuckle is an aluminum casting with
integral steering arm, installed between the upper and
lower control arms. The lower ball joint is serviceable
and is a press fit. The knuckle locates the upper balljoint, riveted disk shield and brake caliper and wheel
bearing/hub. The wheel bearing is a new type and contains the integral ABS rotor and sensor. The bearing is
not serviceable and must be replaced as a complete
unit. A service kit is available for the ABS sensor.
VERTICAL
FRONT KNUCKLE
DISC SHIELD
WHEEL BEARING / HUB
NOTES
INTR.124
Date of Issue: 10/01/2002
Student Guide
2.5.3
INTRODUCTION TO S-TYPE
Service Training
SUSPENSION, STEERING AND BRAKES
Rear Suspension
The rear suspension is a double wishbone arrangement with aluminum control arms. The rear crossbeam is steel
fabricated and isolated to the body with four bushes. The crossbeam locates the upper and lower control arms and
the anti-roll bar.
Control arms are aluminum castings and heavily inclined in plan view. The lower control arm locates the damper
and anti-roll bar drop link. The damper fixing is tapped into the aluminum casting. The upper control arm has one
cross axis bush and one rubber bush. It contains an integral balljoint.
REAR SUSPENSION
INTR.125
Rear Knuckle
REAR KNUCKLE
The rear knuckle is an aluminum casting and has a press
fit cartridge bearing.
REAR KNUCKLE
DISC SHIELD
The independent rear suspension upper and lower
front bushes are conventional rubber bonded bushes.
The upper and lower rear bushes contain no rubber
and are essentially pressed in ‘rose’ bearings for superior suspension geometry control. These are common
components between all vehicle variants and are a similar concept to the A-frame bush on current sports and
saloon vehicles. The bushes are not bonded in place but
require a special lubricant when assembling. Care must
be taken to ensure that the replacement bushes are
pushed fully home, the angular orientation of the bushes is important and it is essential to mark the position of
the subframe before removing from the vehicle or else
driveline alignment will be lost.
WHEEL BEARING / HUB
INTR.126
2.5.4
Student Guide
Date of Issue: 10/01/2002
INTRODUCTION TO S-TYPE
Service Training
Power Assisted Steering
The Jaguar S-TYPE has a variable assist rack and pinion steering gear and variable rack ratio. The variable steering
rack ratio reduces the number of turns from lock to lock (2.8) to enhance parking maneuverability whilst maintaining the on-center steering precision required at high speed. Full power assistance is provided for parking. Steering
assistance decreases smoothly at a calibrated rate to raise driver steering efforts as vehicle speed increases.
POWER ASSISTED STEERING RACK
INTR.127
NOTES
Date of Issue: 10/01/2002
Student Guide
2.5.5
INTRODUCTION TO S-TYPE
Service Training
SUSPENSION, STEERING AND BRAKES
Brakes
Brake Control Module
ABS/TC CONTROL MODULE
Brakes are controlled with a Teves Mk 20E brake
modulator.
The anti-lock braking / traction control control module
(ABS/TCCM) contains the integral software for ABS and
traction control, similar to current XJ and XK vehicles. It
is supplied as a 10-valve, 4-channel module and calibration is the same to all powertrains. It is connected to the
SCP bus for traction control, warnings and vehicle speed.
INTR.128
Dynamic Stability Control
Dynamic stability control (DSC) is a new Jaguar safety feature, which uses ABS and traction control to control yaw movements of the vehicle. Yaw is the rotary motion of the vehicle on its vertical axis, a force that would cause oversteer or
sideslip. The dynamic stability control module (DSCM) contains the same software as described but with the addition of
IVD software. The modulator is supplied as a 12 valve, 4-channel module calibrated for base suspension only. The connectors differ between the two; the 10 valve unit has a 25-way with sliding cam, as current vehicles and the 12-valve unit
has a 47-way connector with lever cam. DSC calculates the real vehicle motion (forward and gearing) and compares it to
the direction initially chosen by the driver. A steering rate sensor is located on the steering column and is used to calculate
steering angle. A yaw rate sensor and lateral accelerometer are located on a bracket behind the hand brake lever and are
used to calculate the vehicle under or over steer and any side slip.
As soon as DSC recognizes that the driver is not reacting sufficiently to compensate a deviation, DSC intervenes by
applying brake force to each of the four wheels individually to control yaw.
NOTES
2.5.6
Student Guide
Date of Issue: 10/01/2002
INTRODUCTION TO S-TYPE
Service Training
Brake Booster
BRAKE BOOSTER
The brake booster is a Lucas unit mounted on the
engine bay bulkhead with a 25.4mm (1 in.) diameter
master cylinder and integral brake fluid reservoir.
NOTE: The reservoir is also a combined brake/
clutch reservoir for manual transmission
vehicles.
Twin vacuum boosters of 8-inch and 9-inch sizes are fitted.
The DSC booster is different having integral pressure
transducers and solenoids with air control valves for the
booster. The transducers are located on the brake master cylinder and are used for pressure feedback, brake
application and fail safe operation. The booster is used
to supply brake pressure without driver input.
ABS operation is no different to current Jaguar vehicles.
INTR.129
NOTES
Date of Issue: 10/01/2002
Student Guide
2.5.7
INTRODUCTION TO S-TYPE
2.5.8
Service Training
Student Guide
Date of Issue: 10/01/2002
J A G U A R
S E R V I C E
T R A I N I N G
INTRODUCTION TO JAGUAR
1
INTRODUCTION TO XJ/XK
2
INTRODUCTION TO S-TYPE
2.1
Overview
2.2
Engine
2.3
PTEC Engine Management
2.4
Transmission
2.5
Suspension, Steering and Brakes
2.6
DATC Climate Control
2.7
Electrical Distribution System
2.8
Body Systems
2.9
Occupant Protection
2.10 Task Sheets
Service Training Course TINTR
Date of Issue: 10/01/2002
INTRODUCTION TO S-TYPE
Service Training
DATC CLIMATE CONTROL
The Dual Automatic Temperature Control (DATC) climate control system is a compact system that provides a complete selection of driver controlled functions and additional automatic functions. The DATC climate control system
was designed by Visteon for the Jaguar S-TYPE; most of the DATC functions and controls are similar to the existing
Jaguar systems.
Control Summary
The A/CCM automatically maintains the selected driver and passenger interior temperatures and regulates the volume
of airflow between the various system outlets. Separate driver and passenger discharge temperatures are made possible by the heater system that incorporates a partitioned dual zone heater core and dual coolant flow control valve.
Air Intake
Depending on the interior temperature when the system is activated, the A/CCM automatically selects between fresh
intake air and recirculated cabin air; however, the driver has the option for manually selecting RECIRCULATION /
FRESH. If the manual recirculation button is pressed for a short period (one chime), “timed recirculation” is enabled.
Timed recirculation varies with air conditioning compressor status and ambient temperature. If the compressor is
off (A/C LED OFF), recirculation will be enabled for 1 to 6 minutes by the A/CCM. If the compressor is on (A/C LED
ON), recirculation will be enabled for 1 to 12 minutes by the A/CCM. If the manual recirculation button is pressed
for a long period (two chimes), “latched recirculation” is enabled.
All manual recirculation settings are canceled at the next ignition switch cycle.
Discharge Air Temperature
The A/CCM attempts to provide both the driver and the passenger with their selected air temperature. If both of the
selected temperatures cannot be achieved, the system is biased in favor of the driver. The rear seat passengers
receive the air temperature selected for the person seated directly in front. Fan speed and air distribution are centrally controlled. Pressing and holding the AUTO button for two seconds equalizes the driver and passenger
temperature selections.
A feature unique to V8 vehicles allows interior heating to be continued after the engine has been switched off. With
the ignition switch in position II, the climate control system will continue to provide interior heating until the engine
cools to a predetermined level (maximum 20 minutes).
Diagnostics
All diagnostics are carried out using WDS. No separate “panel diagnostics” are provided.
Voice Control
An optional Voice Activation Control system allows the driver to adjust temperature control without touching the
DATC controls.
NOTES
2.6.2
Student Guide
Date of Issue: 10/01/2002
INTRODUCTION TO S-TYPE
Service Training
Air Conditioning Control Module
The DATC A/CCM is a single module packaged in the center of the fascia. The control module is microprocessorbased, consisting of a bezel assembly (including all buttons and switches), a main control board and a housing for
the assembly. Battery direct and ignition switched B+ power is supplied from the primary junction box.
A/CCM CONTROL PANEL
AIR CONDITIONING CONTROL MODULE
°F / °C SELECT
DEFROST MODE
DISPLAY EXTERIOR
TEMPERATURE
MANUAL FAN SPEED
MANUAL A/C
RECIRCIRCULATE
DRIVER (LHD), PASSENGER (RHD)
TEMPERATURE
PASSENGER (LHD), DRIVER (RHD)
TEMPERATURE
AUTO MODE
MANUAL AIR DISTRIBUTION
OFF
FACE
LEVEL
FACE AND
FOOT
FOOT LEVELS LEVEL
HEATED BACKLIGHT AND
MIRROR HEATERS
HEATED WINDSHIELD
OR HEATED WIPER PARK
DEMIST AND
FOOT LEVELS
INTR.130
NOTES
Date of Issue: 10/01/2002
Student Guide
2.6.3
INTRODUCTION TO S-TYPE
Service Training
DATC CLIMATE CONTROL
Refrigeration System
Jaguar S-TYPE has a conventional R134a air conditioning refrigeration system. The installation of a variable displacement scroll type compressor and the use of an air conditioning pressure sensor are components new to Jaguar. The
system does not require the installation of mufflers.
REFRIGERATION SYSTEM
RECEIVER / DRIER
HIGH SIDE
TAKE-OFF
SCROLL TYPE
COMPRESSOR
THERMAL
EXPANSION VALVE
CONDENSER
LOW SIDE
TAKE-OFF
EVAPORATOR
A/C PRESSURE
SENSOR
INTR.131
HEATER, EVAPORATOR AND BLOWER UNIT
INTR.132
2.6.4
Student Guide
Date of Issue: 10/01/2002
INTRODUCTION TO S-TYPE
Service Training
System Details
Dual Coolant Control Valve
The dual coolant control valve, located behind the right
hand headlamp, contains two solenoid operated valves
that are actuated by the A/CCM to achieve the driver
and passenger selected temperatures. The A/CCM,
using pulse width modulated (PWM) low (ground) side
drives, positions the valves to control engine coolant
flow through the partitioned dual zone (driver / passenger) heater core. Battery voltage (12 v minimum) is
required to close the valves so that if electrical circuit
failure occurs, the valves will remain open and allow
full coolant flow to the heater core.
DUAL COOLANT CONTROL VALVE
INTR.133
ENGINE COOLING SYSTEM (V8 SHOWN)
DUAL COOLANT
CONTROL VALVE
INTERNAL
BYPASS
THROTTLE
ADAPTOR
HEATER
CORE
AUXILIARY
COOLANT PUMP
COOLANT
PUMP
BLEED
VALVE
RESERVOIR
BOTTLE
ENGINE
OIL COOLER
INTR.134
NOTES
Date of Issue: 10/01/2002
Student Guide
2.6.5
INTRODUCTION TO S-TYPE
Service Training
DATC CLIMATE CONTROL
System Details (continued)
Climate Control Intake Air
AIR INTAKE (RHD SHOWN)
Exterior air enters the system via the grille located at the
base of the windshield on the passengers side of the
vehicle. The grille can be removed by releasing the integral fasteners.
A serviceable air filter is located in the duct connecting
the air intake to the blower housing. On NAS vehicles,
the filter should be changed at the 10,000 mile service
interval.
NOTES
INTR.135
INTAKE AIR FILTER
INTR.136
2.6.6
Student Guide
Date of Issue: 10/01/2002
J A G U A R
S E R V I C E
T R A I N I N G
INTRODUCTION TO JAGUAR
1
INTRODUCTION TO XJ/XK
2
INTRODUCTION TO S-TYPE
2.1
Overview
2.2
Engine
2.3
PTEC Engine Management
2.4
Transmission
2.5
Suspension, Steering and Brakes
2.6
DATC Climate Control
2.7
Electrical Distribution System
2.8
Body Systems
2.9
Occupant Protection
2.10 Task Sheets
Service Training Course TINTR
Date of Issue: 10/01/2002
INTRODUCTION TO S-TYPE
Service Training
ELECTRICAL DISTRIBUTION SYSTEM
Electrical System Architecture
The Jaguar S-TYPE electrical system is a supply-side switched system. The ignition switch directly carries much of the
ignition switched power supply load. Power supply is provided via three methods: direct battery power supply, ignition switched power supply, and switched system power supply.
The switched system power supply is controlled via the GECM and the RECM from SCP messages. After ignition ON,
four relays are activated by either the GECM or the RECM for as long as SCP messages remain on the SCP network.
The relays will remain activated after ignition OFF, until all SCP messages are removed.
Engine management and transmission control are combined into a single Powertrain Control Module eliminating the
need for a controller area network. The Jaguar S-TYPE employs an SCP network for all powertrain, chassis and body
systems interface / control. An ACP network is employed for audio and communications systems interface / control.
Circuit ground connections are made at body studs located throughout the vehicle. There are no separate power
and logic grounding systems.
The electrical harness incorporates hard-wired front and rear power distribution boxes and a serviceable primary
junction box. All fuses and relays (except the trailer towing accessory kit) are located in the two power distribution
boxes and the primary junction box.
NOTES
2.7.2
Student Guide
Date of Issue: 10/01/2002
INTRODUCTION TO S-TYPE
Service Training
Power Distribution
CLEAN POWER FUSE
Distribution cables supply battery power through to the
starter motor and to three power distribution/fuse boxes. Harnesses distribute battery, auxiliary and ignition
power from the fuse boxes to all the user components.
The front power distribution/fuse box clean power is
fed via a clean power 175 ampere fuse (megafuse)
which is located next to the rear power distribution
box/fusebox.
REAR POWER DISTRIBUTION
FUSE BOX
The secondary junction box is located on the bulkhead in
the LH side of the cabin near the ‘A’ post. It acts as a splice
header to avoid having numerous splices in the harness.
CLEAN POWER
FUSE
Battery
INTR.137
The low maintenance DIN 88, 90 ampere hour battery
is installed on the RH side of the luggage compartment
floor below the trim.
SECONDARY JUNCTION BOX
CAUTION: Sulfuric acid is highly corrosive. Batteries produce explosive gases.
Keep flames and sparks away. Always
wear protective clothing and face and
eye protection to prevent injury while
working around batteries.
NOTES
INTR.138
BATTERY
INTR.139
Date of Issue: 10/01/2002
Student Guide
2.7.3
INTRODUCTION TO S-TYPE
Service Training
ELECTRICAL DISTRIBUTION SYSTEM
Fuses
Fuse failure is identified by an inoperative circuit. Two
types of fuses are fitted in the fuse boxes, a mini-type
and a cartridge-type.
FUSES
MINI-FUSES
CARTRIDGE FUSE
A special tool for removing and replacing the mini-fuse is
provided in the passenger compartment fuse box,
together with spare fuses. If a spare fuse is used, replace it
with a Jaguar approved fuse of the same ampere rating.
Checking and Renewing a Blown Fuse
Make sure the new fuse is the correct rating (amperage). Fuses are color coded according to the amperage
and the rating is also marked on each fuse.
WARNING: DO NOT FIT A FUSE OF A
DIFFERENT AMPERAGE FROM THAT
REMOVED. THE ELECTRICAL CIRCUITS
MAY BECOME OVERLOADED WITH THE
SUBSEQUENT POSSIBILITY OF A FIRE.
NO ATTEMPT SHOULD BE MADE TO
REPAIR A FUSE THAT HAS BLOWN. THIS
MAY CAUSE A FIRE HAZARD OR SERIOUS
DAMAGE ELSEWHERE IN THE ELECTRICAL
CIRCUIT.
INTR.140
NOTES
2.7.4
Student Guide
Date of Issue: 10/01/2002
INTRODUCTION TO S-TYPE
Service Training
FUSE BOX LOCATIONS
FRONT POWER DISTRIBUTION FUSE BOX
REAR POWER DISTRIBUTION FUSE BOX
PRIMARY JUNCTION FUSE BOX
INTR.141
NOTES
Date of Issue: 10/01/2002
Student Guide
2.7.5
INTRODUCTION TO S-TYPE
Service Training
ELECTRICAL DISTRIBUTION SYSTEM
Control Modules
The vehicle control module functions are described briefly below.
Anti Lock Brake/Traction Control and Dynamic Stability Control Control Modules (ABS/TCCM or DSCCM)
The anti-lock brake control module is connected to the SCP communication network. The module comes in two
forms. The first type is the standard equipped anti-lock brake system (ABS) with traction control (TC). It controls the
brake pressure to the four wheels to keep the vehicle under control while braking.
The second type of ABS is optional and is called dynamic stability control (DSC). This control module adds yaw sensors to the package to help in sensing a loss of vehicle control.
Audio Unit
The audio unit is connected to the SCP communication network and also to the audio control protocol (ACP) communication network. The audio control unit communicates with the compact disc and the cellular phone
transceiver.
Driver Door Control Module (DDCM)
DDCM is connected to the SCP communication network. The module controls many functions including power
windows, driver mirror, power locks, and keyless remote entry.
Driver Seat Control Module (DSCM)
The DSCM is connected to the SCP communication network. The DSCM is located under the driver seat and controls the seat positions. The module also communicates with DDCM to control the driver seat memory functions.
Air Conditioning Control Module (A/CCM)
The A/CCM is connected to the SCP communication network. The A/CCM controls automatic climate functions that
maintain the vehicle at a constant temperature setting.
Instrument Cluster
The instrument cluster is connected to the SCP communication network. The instrument cluster displays information received on the SCP including speedometer, odometer, fuel, and message center warnings. The instrument
cluster also controls the passive anti-theft system (PATS).
General Electronic Control Module (GECM)
The GECM is connected to the SCP communication network. This module is located behind the LH ‘A’ post trim
panel below the fascia. The GECM controls many of the body systems, being directly linked to the interior lighting,
wiper and security systems. It is a support module for other systems including exterior lighting, locking, remote
entry, mirrors (passenger), seat/mirror/steering column memory recall and windows.
Rear Electronic Control Module (RECM)
The RECM is connected to the SCP communication network. This module is located in the passenger side luggage
compartment behind the trim panel. The RECM controls the locking/unlocking of the front passenger and rear passenger doors and provides power control of the fuel pump.
NOTES
2.7.6
Student Guide
Date of Issue: 10/01/2002
INTRODUCTION TO S-TYPE
Service Training
Powertrain Control Module (PCM)
The PCM is connected to the SCP communication network. For the location of this module see the S-TYPE Powertrain Technical Guide. The PCM controls the engine performance, electronic ignition, emission controls, speed
control, transmission and on board diagnostics.
Restraints Control Module (RCM)
The RCM is connected to the ISO 9141 communication network. The RCM controls the deployment of the air bags
based on sensor inputs.
Vehicle Emergency Control Module (VECM)
The VECM is connected to the SCP communication network. The module allows a user to request emergency assistance (police, ambulance, fire, wrecker) or directions to a desired location at the touch of a button. Also, if any of the
vehicle’s airbags are deployed while the VEMS system is powered ON, the system automatically issues a call for
emergency assistance.
Voice Activation Control Module (VACM)
The VACM is connected to the SCP communication network. This module is located in the driver side luggage compartment behind the trim panel. The VACM controls and processes all the voice commands given by the driver. It
delivers this information to the audio unit, GSM or AMPS cellular phones and the A/CCM which then carry out these
commands.
Control Module Configuration
Most S-TYPE control modules require configuration when replaced. Configuration sets up the control module to correctly
function in the vehicle in which it is installed. If configuration is not carried out, one or more difficulties will occur:
• The engine will not start
• Incorrect operation may occur
• Certain features may not function
Configuration is performed using WDS and is carried out by performing the following steps:
• Select the “Vehicle Configuration” main tab
• Highlight “Configure New Modules”
• Select the appropriate module and follow on-screen prompts
NOTES
Date of Issue: 10/01/2002
Student Guide
2.7.7
INTRODUCTION TO S-TYPE
Service Training
ELECTRICAL DISTRIBUTION SYSTEM
Control Modules (continued)
CONTROL MODULE LOCATIONS
ABS / TRACTION CONTROL
OR DYNAMIC STABILITY CONTROL
CONTROL MODULE
THROTTLE ACTUATOR
CONTROL MODULE (V8)
THROTTLE ACTUATOR
CONTROL MODULE (V6)
STEERING COLUMN
LOCK MODULE
GENERAL ELECTRONIC
CONTROL MODULE
POWERTRAIN
CONTROL MODULE
INSTRUMENT PACK
AIR CONDITIONING
CONTROL MODULE
RESTRAINTS
CONTROL MODULE
(BELOW RADIO)
DRIVER DOOR
CONTROL MODULE
SLIDING ROOF
CONTROL MODULE
DRIVER SEAT
CONTROL MODULE
PASSENGER SEAT HEATER
CONTROL MODULE
DRIVER SEAT
HEATER CONTROL MODULE
CELLULAR PHONE
CONTROL MODULE
REAR ELECTRONIC
CONTROL MODULE
VOICE ACTIVATION
CONTROL MODULE
VEHICLE EMERGENCY
CONTROL MODULE
ADAPTIVE DAMPING
CONTROL MODULE
NAVIGATION
CONTROL MODULE
PARKING AID
CONTROL MODULE
INTR.142
2.7.8
Student Guide
Date of Issue: 10/01/2002
INTRODUCTION TO S-TYPE
Service Training
Networks
The S-TYPE has three module communications networks. The first is the Standard Corporate Protocol (SCP) Network (J1850 SAE Standard), which is a twisted pair of cables: data bus plus and data bus minus. The second is the
Serial Data Link (ISO 9141), which is a single wire network. The third is the Audio Control Protocol (ACP) Network,
which, like the SCP, uses a twisted pair of wires. ACP is used only for the audio system. Both the SCP Network and
the Serial Data Link can be connected to WDS by the data link connector (DLC), located under the instrument panel
between the steering column and the audio unit.
MULTIPLEX NETWORKS
SCP
PCM
INST
PATS
ABS/TCCM
OR DSCCM
GECM
ADCM
RECM
TACM
VEMCM
A/CCM
NCM
DDCM
RADIO
MC
CD
ACP
DSCM
VACM
RCM
CPCM
PACM
SERIAL DATA LINK
PCM PROGRAMMING LINK
SERIAL DATA LINK
SCP NETWORK
PCM PROGRAMMING
LINK
ACP NETWORK
DATA LINK CONNECTOR
INTR.143
Date of Issue: 10/01/2002
Student Guide
2.7.9
INTRODUCTION TO S-TYPE
2.7.10
Service Training
Student Guide
Date of Issue: 10/01/2002
J A G U A R
S E R V I C E
T R A I N I N G
INTRODUCTION TO JAGUAR
1
INTRODUCTION TO XJ/XK
2
INTRODUCTION TO S-TYPE
2.1
Overview
2.2
Engine
2.3
PTEC Engine Management
2.4
Transmission
2.5
Suspension, Steering and Brakes
2.6
DATC Climate Control
2.7
Electrical Distribution System
2.8
Body Systems
2.9
Occupant Protection
2.10 Task Sheets
Service Training Course TINTR
Date of Issue: 10/01/2002
INTRODUCTION TO S-TYPE
2.8.2
Service Training
Student Guide
Date of Issue: 10/01/2002
INTRODUCTION TO S-TYPE
Service Training
BODY SYSTEMS
Exterior Lighting
Exterior Lighting Switch
EXTERIOR LIGHTING SWITCH
Autolamps Delayed Exit (A)
This feature leaves the headlamps turned on after the
ignition has been switch off, allowing the driver and
passengers increased visibility on leaving the vehicle.
The switch has seven positions and varies the time from
three seconds up to three minutes. After adjustment,
the newly set delay time will be displayed on the message center.
OFF (C)
SIDELAMPS (D)
AUTO (B)
HEADLAMPS (E)
TIMER (A)
Auto (B)
A light sensor on top of the instrument panel, monitors
exterior light levels and automatically switches the
sidelamps and dipped headlamps on or off. When light
fades to the non-adjustable preset level, the sidelamps
and headlamps switch on automatically. As light
increases to the preset level, the sidelights and headlamps switch off automatically.
REAR FOG
LAMPS – PULL (F)
FRONT FOG
LAMPS – PULL (G)
INTR.144
Rear Fog Lamps (F)
Turn the switch to headlamps on, pull the switch and then turn to position (F). Turning on the rear fog lamps will
also turn on the front headlamps.
Front Fog Lamps (G)
Pull the switch in positions (A), (B), (D) or (E) to switch on the front fog lamps. Push to turn off. If the rotary switch is
turned to off (C) the switch will be retracted to its normal position and the fog lamps will be turned off.
Daytime Running Lamps
In certain countries it is a legal requirement for the lamps to be on during the hours of daylight. With the rotary
switch in the off position (C), dipped headlamps, sidelights and tail and number plate lamps will switch on automatically when the ignition is turned to position II, the vehicle is out of park (automatic transmission only) and the
parking brake is released.
Battery Saver
If the dipped or main beam headlamps are switched on and the ignition is turned to OFF or the key is removed, the
lamps will automatically turn OFF after 10 minutes. The sidelights will remain ON.
Bulb Failure Monitoring
The tail and brake lamp bulbs are monitored for failure and a corresponding message is shown in the message center, e.g. ‘LEFT TAIL LAMP FAILED’. There are two tail lamp bulbs in each tail lamp. The message that a tail lamp has
failed indicates that both bulbs in that cluster have failed. The message will be shown, even after a bulb is replaced,
until the next time the bulb is switched on.
NOTES
Date of Issue: 10/01/2002
Student Guide
2.8.3
INTRODUCTION TO S-TYPE
Service Training
BODY SYSTEMS
Exterior Lighting (continued)
Headlamp Assembly
The bulbs are halogen type and will be damaged if touched by hand or contaminated with oil or grease. It is important to use clean gloves or cloth when handling a bulb which is to be used again. A contaminated bulb may be
cleaned with methylated spirit before refitting.
HEADLAMPS – DIPPED BEAM
INTR.145
The headlamp assembly contains the following bulbs:
• Dipped Beam (outer) headlamp – type H7
• Main Beam (inner) headlamp – type HB3
• Front Turn Signal lamp – type PY21W
• Front Parking (side) lamp – type W5W
HEADLAMPS – MAIN BEAM
To remove any of the above bulbs, the top cover has to
be removed first.
NOTES
INTR.146
FRONT TURN SIGNAL AND PARKING LAMPS
FRONT PARKING LAMP
FRONT TURN SIGNAL LAMP
INTR.147
2.8.4
Student Guide
Date of Issue: 10/01/2002
INTRODUCTION TO S-TYPE
Service Training
Front Fog Lamp
FRONT FOG LAMP
Remove bumper splitter vane and blackout panel.
Unscrew fixing; remove lamp from front. Twist/remove
bulb carrier. Remove the bulb and fit a new one of the
correct type (H3).
Side Repeater Indicator
Remove the lamp unit from the front wing panel by
pressing the unit forwards or rearwards to compress the
spring clip and remove the complete unit. Twist the bulb
anti-clockwise and remove. Fit a new bulb of the correct type (WSW). Press the unit into the recess until it
clicks into place.
Rear Lamp Assembly
INTR.148
SIDE REPEATER INDICATOR
The rear lamp assembly has the following bulbs:
• Reverse lamp, type P21W
• Stop/tail lamp, type P21/4W
• Fog lamp, type P21W
• Tail lamp, type R5W
• Turn signal, type PY21W
Open the luggage compartment, loose the side carpet
and unclip the rear lamp bulb carrier.
INTR.149
Remove the faulty bulb and fit a new one of the correct
type, as illustrated on the bulb holder. Fitment of the
correct type is essential.
REAR LAMP ASSEMBLY
NOTES
REVERSE
LAMP
TURN SIGNAL
STOP / TAIL
LAMP
FOG LAMP
TAIL LAMP
Date of Issue: 10/01/2002
Student Guide
INTR.150
2.8.5
INTRODUCTION TO S-TYPE
Service Training
BODY SYSTEMS
Interior Rear View Mirror
There are five derivatives of interior rear view mirror:
• Base, non-electric
• Electrochromic
• Electrochromic with rain sensing
• Electrochromic with compass
• Electrochromic with rain sensing and compass
ELECTROCHROMIC MIRROR
Electrochromic Interior Rear View Mirror
(where fitted)
INTR.151
ELECTROCHROMIC MIRROR WITH COMPASS
Push the switch in and the rear view mirror darkens
automatically to prevent glare from the following vehicle’s headlamps. The mirror clears when the light levels
return to normal. The mirror also clears when reverse
gear is selected. Where fitted, an LED is lit when mirror
dimming is active. Push the switch again and the glarereducing effect of the mirror is switched off so that a
clear reflection is given.
Electrochromic Interior Rear View Mirror
with Rain Sensing (where fitted)
The moisture sensor for the wipers is fitted to the windshield and covered by the mirror pod.
NOTE: The auto headlamp sensor is fitted to
the fascia for the S-TYPE, not to the mirror as
on XJ.
INTR.152
Ensure that the windshield in front of the mirror pod
and the autoheadlamp sensor is kept clean since any
dirt may affect the operation of these sensors.
NOTES
2.8.6
Student Guide
Date of Issue: 10/01/2002
INTRODUCTION TO S-TYPE
Service Training
Electrochromic Interior Rear View Mirror
with Compass
COMPASS CALIBRATING AND ZONE SETTING
The compass direction is given in a digital display (eight
compass points) in the corner of the mirror. The brightness of the compass display dims as the ambient light
level falls. The compass must be calibrated by the Dealer
at PDI to compensate for the difference between magnetic north and the true north in the part of the world
where the car is driven. For best results, the calibration
procedure should take place in an open area free from
overhead power lines or large metal structures.
On the underside of the mirror pod there are two small
holes. Insert a small screwdriver or other pointed tool into
the RH hole. Press the button in the hole until the word
‘ZONE’ appears in the display. Continue to press to select
a number corresponding to the zone shown in the diagram for the area in the world where the vehicle is driven.
CALIBRATING
BUTTON
ZONE
BUTTON
CALIBRATING
BUTTON
ZONE
BUTTON
RAIN SENSING MIRROR
Press the button in the LH hole until the ‘CAL’ indicator
appears in the display. Slowly drive the vehicle in a circle
until the ‘CAL’ indicator disappears. This should happen
after two or three revolutions. The compass is now
adjusted to compensate for the vehicle’s magnetic field.
INTR.153
NAS COMPASS ZONES
NOTE: Using the vehicle in the vicinity of CB
radios or an airport may cause the display to
extinguish for a few seconds.
NOTES
INTR.154
Date of Issue: 10/01/2002
Student Guide
2.8.7
INTRODUCTION TO S-TYPE
Service Training
BODY SYSTEMS
Security and Locking Systems
The following security and locking features are available but vary by market or options:
• Key barrel on driver’s side only
• Encrypted engine immobilization by ignition key
transponder (PATS)
• Radio frequency remote fob
• Central locking by key and remote fob
• Drive away door locking
• Mechanical child locks on rear doors
• Perimeter alarm of doors, bonnet, trunk
• Inclination (tilt) sensing (Dealer fit accessory)
• Panic alarm, fob operated
• Trunk lock isolate
System Description
The following convenience features are included either
as standard or optional features:
• Remote fob operated driver’s seat, door mirrors and
steering column memory recall (two memories)
• Remote fob operated trunk lid release
• Key operated global close (sliding roof and all windows)
• Key and fob remote-operated global open (sliding
roof and all windows)
• Trunk lid and fuel flap interior release buttons
• Trunk release button in trunk plinth
• Emergency key lock barrel under trunk plinth
Two transmitters are supplied with the vehicle, but up
to four can be used provided they are all programmed
to the vehicle by the Dealer.
KEY-RING TRANSMITTER
LOCK / DOUBLELOCK / ARM
The security system is controlled by a driver door control
module (DDCM). When activated unauthorized entry
into the vehicle is detected by the courtesy lamp switches. When the alarm is triggered, the system flashes the
turn signal lamps and sounds the alarm system horns.
Key-ring Transmitters
The security system is controlled remotely by a radio
frequency, battery-operated transmitter. The transmitter is activated by pointing it towards the vehicle and
pressing one of the operating buttons.
Key-ring transmitters will not operate if a key is in the
ignition switch.
Keys
Two black-headed keys (and one green-headed key in
the North American market) are supplied with the vehicle. The key number is recorded on a plastic tag which
is attached to each key.
Each black-headed key will operate the ignition switch
and lock the doors, luggage compartment and the glove
box. The green-headed key is a valet key which will not
unlock a locked glove box or locked trunk lid. The interior and exterior trunk switches will not unlock the
trunk lid when the valet switch has been set.
An electronic device is fitted in the head of each key
which is programmed to the vehicle electronics. When
the key is placed in the ignition switch the vehicle electronics recognize the correct key and allow engine start.
The engine cannot be started with a key not programmed to the vehicle electronic systems.
UNLOCK / DISARM
Up to eight keys can be used provided the Dealer programs them all to the vehicle.
PANIC ALARM
TRUNK LID RELEASE
NOTES
INTR.155
2.8.8
Student Guide
Date of Issue: 10/01/2002
INTRODUCTION TO S-TYPE
Service Training
ANTI-THEFT SYSTEM COMPONENTS
KEY RING
TRANSMITTER
TRUNK SWITCH
TRUNK COMPARTMENT
ACTUATOR
RECM
DRIVER DOOR LOCK
ACTUATOR
INSTRUMENT PACK
DRIVER DOOR
CONTROL MODULE
DATA LINK
CONNECTOR
HORNS
Date of Issue: 10/01/2002
SECURITY INDICATOR
HOOD SWITCH
Student Guide
PATS
TRANSCEIVER
GECM
INTR.156
2.8.9
INTRODUCTION TO S-TYPE
Service Training
BODY SYSTEMS
Security and Locking Systems (continued)
Passive Anti-Theft System (PATS)
The Passive Anti-Theft System (PATS) function is split between the instrument pack and the PCM. In order for the engine to
crank and start, the instrument pack must have read a valid ignition key code, and the correct information flow must have
occurred between the instrument pack and the PCM. Correct PATS operation can be determined by observing the security
LED indicator “flash code”. The security indicator, situated on top of the fascia, will also flash fault code information.
PASSIVE ANTI-THEFT SYSTEM
PATS
TRANSCEIVER
INSTRUMENT PACK
PATS MODULE
DETERMINE KEY STATUS
SCP NETWORK
KEY STATUS
POWERTRAIN
CONTROL MODULE
KEY STATUS
NO
OK
KEY
CODE
CHALLENGE
CODE
CHALLENGE CODE
TRANSMIT
CHALLENGE
TRANSMIT
RESPONSE
RESPONSE CODE
RESPONSE
PCM I.D.
NO
OK
PATS
PROVE OUT
SYSTEM STATUS MESSAGE
SECURITY
INDICATOR
DISABLE
FUEL PUMP
AND
FUEL INJECTION
ENABLE
FUEL PUMP
AND
FUEL INJECTION
OK TO START
FUEL PUMP
ACTIVATE
STARTER RELAY
ACTIVATE
INTR.157
PATS Operation
When the driver inserts the ignition key into the ignition switch key barrel, the Key-In switch closes and applies B+
voltage to the instrument pack. This signal causes the instrument pack to read the PATS key transponder code stored
in the ignition key and compare it with those stored in memory.
The result of this comparison is transmitted to the PCM via the SCP network. If the key code is OK, the PCM will
send a challenge code to the instrument pack. If the correct response to the challenge code is received within one
second, the PCM will enable fuel pump operation and fuel injection. Simultaneous with the PCM challenge, if the
key code is OK, the instrument pack will complete the starter relay coil circuit to ground when the ignition switch is
moved to position III (START).
The PCM will not enable fuel pump operation or fuel injection if any of the following conditions exist:
• The ignition key code is not recognized (theft signal).
• A response to a challenge code has not been received within one second.
• An incorrect response to a challenge code has been received.
NOTES
2.8.10
Student Guide
Date of Issue: 10/01/2002
INTRODUCTION TO S-TYPE
Service Training
PATS Diagnostics
Correct PATS operation can be confirmed by observing the security indicator as the ignition key is inserted. The LED
should illuminate for 3 seconds when the key is inserted and moved to position II (RUN), then switched OFF. This
action will validate all PATS functions:
• The key transponder code matches the key code stored in memory.
• The challenge / response sequence between the instrument pack and the PCM has been successful.
• The fuel pump and fuel injection have been enabled.
Normal PATS communications are completed within 1.4 seconds after key-in or the ignition switch transition from 0
to II or III. If PCM communication problems exist, the time duration can be as long as 2 – 3 seconds and still provide
a functional prove out.
If PATS faults are detected during the maximum 3 second period and a valid ignition key has been used, the security
indicator will exit its prove out mode and start to flash. When the ignition key is moved to 0 (OFF), the flashing will
terminate and control of the security indicator will shift to the vehicle security system.
PATS Faults
If a PATS fault is detected, the security indicator LED will flash for 60 seconds at 4 Hz with a 50% duty cycle. At the
end of this period, the LED will flash a two digit flash code, repeated 10 times. As a general rule, flash codes numbered 15 or less will prevent engine cranking while codes numbered 16 and above result in the engine cranking but
not starting (fuel pump and fuel injection disabled).
PATS Diagnostics Summary
Mode of Operation / Fault
Prove-out
Perimeter theft control
Anti-scan – Incode
Transceiver not connected / open circuit
(no diagnostic byte received)
Corrupted diagnostic byte received from transceiver
Ignition key transponder signal not received
Ignition key transponder signal invalid
Ignition key code incorrect
SCP Network fault:
PCM verify does not match key status
SCP Network fault:
security system status message missing
Less than 2 keys programmed
PCM ID not in instrument pack non-volatile memory
PCM ID does not match instrument pack
Transponder programming failure
Date of Issue: 10/01/2002
DTC
Flash Code
n/a
3 seconds – on
n/a
Security access
Ignition Switch
position
0 (OFF) to
II (RUN) / III (START)
0 (OFF)
II (RUN) / III (START)
n/a
n/a
Steady flashing
None
Key read
II (RUN) / III (START)
B1681
11
Key read
Key read
Key read
Key read /
diagnostic test
PCM/SCP
communications
PCM/SCP
communications
Before & after /
dealer
Before & after /
dealer
Challenge /
response
Key prog.
II (RUN) / III (START)
II (RUN) / III (START)
II (RUN) / III (START)
B2103
B1600
B1602
12
13
14
II (RUN) / III (START)
B1601
15
II (RUN) / III (START)
U1147
16
II (RUN) / III (START)
U1262
16
II (RUN) / III (START)
B1213
21
II (RUN) / III (START)
B2141
22
II (RUN) / III (START)
B2139
23
II (RUN) / III (START)
B2431
13
When logged
n/a
Student Guide
2.8.11
INTRODUCTION TO S-TYPE
Service Training
BODY SYSTEMS
In-Car Entertainment (ICE)
The Jaguar sound system is available in two versions: the Base System and the Premium System. The audio unit with
integral amplifier is located in the center stack. The audio system has a phone interface to access stored numbers. The
antenna module is located on the vertical panel under the rear parcel shelf (accessed from the LHS of the trunk), FM
and AM antenna elements are in the rear screen. Four twin cone 5in. x 7in. door speakers are a modular cassette type
for ease of assembly/disassembly. The assembly consists of a driver’s door module (driver’s door only), speaker, and
wiring and is mounted to the inner door molding. A special seal is kept under tension to avoid water ingress.
The system is operated by the controls on the fascia panel and the controls on the LH side of the multi-function
steering wheel (where fitted).
The radio has an alpha-numeric display which shows information such as station frequency, program service name,
tape & track, CD and track, phone mode and audio mute. Steering wheel switch commands however, (when the
steering wheel switches are pressed) are shown on the Instrument Pack message center.
The radio incorporates communication links with Jaguar unique features: CD Autochanger, Cellular Phone, Voice
Activation and Navigation system. Text messages relating to these features appear on the display.
AUDIO SYSTEM CONTROL PANEL
ON/OFF;
ROTARY CONTROL
TAPE
SELECT
TAPE SLOT
DIGITAL SIGNAL PROCESSING (DSP) BUTTON
(PREMIUM ICE ONLY)
TAPE
EJECT
CD
SELECT
AM/FM SELECT;
AUTO STORE
DOLBY B
(STANDARD ICE ONLY)
MENU
FUNCTION
BASE, TREBLE,
BALANCE, FADE
SEEK / TUNE
PHONE/MUTE
COMPRESS
SHUFFLE
(NON-RDS MARKETS)
DISPLAY
PROGRAM
TYPE
PRESET BUTTONS
(1 – 6)
TRAFFIC ANNOUNCEMENT
(RDS MARKETS ONLY)
INTR.158
NOTES
2.8.12
Student Guide
Date of Issue: 10/01/2002
INTRODUCTION TO S-TYPE
Service Training
Menu
Press the menu button repeatedly to cycle through the first level menu functions; press the seek button to enable/
adjust the selected item. The extended menu features can be accessed by depressing and holding the menu button
for two seconds. Use the seek button to enable/adjust the selected item. Some functions in the menu structure
require the use of the volume control.
First Level Menu
Button Press
1
2
3
4
Radio
MAN – manual tune
AVC – automatic volume control
*NEWS ON / OFF
Tape
DOLBY ON / OFF
AVC
*NEWS ON / OFF
CD
SHUF – shuffle
COMP – compress
AVC
*NEWS ON / OFF
* The NEWS enable/disable function is only available in MENU when the radio is in FM mode.
Second Level (Extended Menu)
Button Press
Function
1
ADJUST CLOCK (hours) – adjust
2
ADJUST CLOCK (minutes) – adjust
3
12 / 24 HR CLOCK – adjust
4
RDS TIME ON / OFF
5
VOICETRAIN A (when fitted)
6
VOICETRAIN B (when fitted)
7
Vehicle Identification Number (VIN)
Security Code
The unit is protected by an anti-theft security code. Any power interruption will cause the display to indicate
‘CODE’. At this point the unit will not operate until the correct security code has been entered. The four digit security code is listed on the two security cards supplied with the vehicle. After three unsuccessful attempts, the unit will
not accept further entries until a delay of 30 minutes has elapsed. Up to seven further attempts may be made, with a
delay of 30 minutes between each, after which the display will show ‘LOCKED’.
If the security code is lost or the display shows ‘locked’ the owner will need to return the vehicle to the Dealer. The
Dealer must ask for proof of ownership and the serial number of the unit before supplying a security code given by
contacting Jaguar Cars Ltd. To display the serial number, press and hold preset buttons two and six simultaneously.
The remaining controls are similar to those in previous Jaguar audio systems. For specific operation of all the controls refer to the owner’s Audio Systems Handbook.
NOTES
Date of Issue: 10/01/2002
Student Guide
2.8.13
INTRODUCTION TO S-TYPE
Service Training
BODY SYSTEMS
Navigation System
NAVIGATION HEAD UNIT
LCD DISPLAY
FUNCTION BUTTONS
(F1 – F4)
MAP
BUTTON
CURSOR
CONTROL
ENTER
BUTTON
ZOOM
CONTROL
OFF
BUTTON
INFORMATION/
ASSIST BUTTON
INTR.159
NAVIGATION CONTROL MODULE / CD LOADER
QUARTER-TURN
FASTENER
The LCD provides full information for operating the system by means of menus, text prompts and map
displays. Screen selections are made by the controls on
the front panel.
System Operation
The system uses signals from the Global Positioning System (GPS) satellites, which enables the Navigation
control module to calculate, with the aid of CD ROM
map data, ABS sensors’ signals and Gyro sensor’s signals, the exact position of the vehicle to within meters.
After entering the desired destination, the driver is
guided along by both voice and visual instructions. If
the driver strays off the route, the system calculates a
new route showing the easiest way back to the original
destination.
CD LOAD
COVER
INTR.161
CAPTION
MAP HEADING
GPS SYMBOL
SYMBOL
SCALE
The Jaguar Navigation system assists the driver by providing a route to a selected destination. The navigation
head unit, comprising a 5 inch (130 mm) full color
screen and the control switch assembly is designed as
an integral unit of the center stack. The navigation control module/CD map loader is mounted in the rear LH
side of the trunk and covered by a dedicated styled trim
panel. The GPS antenna is located above the rear parcel shelf but hidden underneath the interior trim.Digital
map information is held on a compact disk (CD) which
is loaded into the navigation control module.
MAP POSITION
MARKER
Voice Guidance
A chime and an audible instruction will be heard just
before the vehicle reaches the next junction along the
route where a turn has to be made.
Screen Guidance
The screen shows the map display with the current
vehicle position and route highlighted. Just before each
turn, the screen automatically shows the next junction
diagram (with turn information) overlaid on the map
display. After the junction, the screen returns to full
map display.
DESTINATION
INFORMATION
2.8.14
FUNCTION BUTTONS
(F1 – F4)
INTR.160
Student Guide
Date of Issue: 10/01/2002
INTRODUCTION TO S-TYPE
Service Training
Jaguar Assist (NAS only)
Assist is an integrated vehicle emergency message system VEMS) that uses the Jaguar security response center for
emergency roadside assistance via the Jaguar in-car telephone installation. The global positioning system (GPS) is
used to identify the position, direction of travel and speed of the vehicle. Access to the Assist feature is through the
use of the Navigation system. The emergency assistance feature allows rapid access to the emergency services
(police, fire or ambulance) and roadside assistance. Once assistance has been requested and the vehicle location
confirmed, the appropriate services are contacted for assistance to be dispatched. In the unfortunate event of an airbag deployment, the system will automatically place an emergency call.
Access to the system is gained by pressing the information button on the Navigation front panel screen (the ignition
must be in position I or II). While in use, a sequence of messages is displayed on the LCD.
NOTE: If an Assist call is initiated and the operator cannot establish voice communication, police
assistance will be dispatched to the vehicle.
The system can be used wherever a cellular phone service is available. The Jaguar phone must be connected to the
vehicle, working correctly and registered with a cellular network. A roaming airtime agreement is required so that
the system can be used in all areas.
Diagnostic Light
A diagnostic light is integrated into the information (ASSIST) button. The diagnostic light flashes throughout an activation but stays on continuously when a failure is detected. A message is given on the display: ‘ASSIST FAILURE’.
There are four potential failure modes:
•
•
•
•
No VEMS menu is displayed when the information ASSIST button is pressed
No activation is performed when the enter button is pressed to make a selection
VEMS is unable to compute the location of the vehicle’s current position
The Navigation system is unable to display any VEMS messages or would display the wrong VEMS messages.
NOTES
Date of Issue: 10/01/2002
Student Guide
2.8.15
INTRODUCTION TO S-TYPE
Service Training
BODY SYSTEMS
Voice Activation
Voice Activation, currently available in a limited number
of markets, provides a convenient way of controlling the
following vehicle systems (where fitted):
• Sound System (radio, cassette tape player and CD player)
• In-car Telephone
• Climate Control System
VOICE ACTIVATION SYSTEM
MICROPHONE
MESSAGE CENTER
DISPLAY
The system is controlled by the Voice button on the lefthand side of the steering wheel. Voice commands are
picked up by a directional microphone mounted on the
headlining between the overhead console and the sunvisor. The microphone is also used for the in-car telephone.
When giving a command, audible feedback will be heard
through the sound system speakers and messages will be
shown on the message center display. Audible feedback
can be turned off if required. The system is capable of storing unique nametags for 20 radio stations and 40 phone
numbers. Verbal playback of nametag directories is provided by issuing the proper voice command (RADIO
DIRECTORY or PHONE DIRECTORY).
SPEAKER / VOICE
BUTTON
SOUND
SYSTEM
INTR.162
Personal directories of nametags for phone dialing and
radio station presets can be created and spoken command help is provided.
Language and Accent
Commands are given in English in a natural speaking voice, without having to pause between words. Most North
American accents (for vehicles equipped with a US Voice Module) are understood without difficulty but the system
also provides for voice training, if required.
Voice Commands
Voice commands are generally in the form of:
• System, e.g. RADIO
• Function, e.g. TUNE
• Action Required, e.g. 99.7 (to select the frequency)
NOTES: Voice commands cannot be given while a phone call is in progress.
While a voice command is being processed, the command can be canceled by pressing the Voice button again.
Audible feedback can be interrupted by pressing the Voice button during the verbal playback. In this case
the command is not canceled.
Command Help
There are commands available which give spoken/visual help for the voice commands. This provides a useful
reminder of the commands available while driving. The commands are: VOICE HELP; RADIO HELP; TAPE HELP; CD
HELP; PHONE HELP; and CLIMATE CONTROL HELP.
2.8.16
Student Guide
Date of Issue: 10/01/2002
INTRODUCTION TO S-TYPE
Service Training
System Operation
Initialization
When the ignition switch is turned to position II, the initialization of the system is carried out, which takes a few seconds. When complete, the system is ready to accept voice commands. If the voice button is pressed before
initialization is complete, the message center display will show ‘VOICE NOT READY’.
Audible Feedback, Confirmation & Prompts
For most voice commands, audible feedback of the command, as understood by the system, is available. Audible
feedback may be turned on or off by giving the Voice Feedback command.
For the phone dial commands, confirmation of the number, before it is dialed, may be turned on or off by giving the
phone feedback command. During some commands for voice training, the user is prompted by the system to give
the next item of information.
For specific operation of all the controls, refer to the Owner’s Voice Activation Handbook.
Voice Training
The Voice Activation System is able to interpret most English speakers without difficulty. If, however, it is found that
commands are sometimes not being recognized, the voice training procedure can be carried out.
Voice Memories
The system has two memories (A and B) for storing the trained voices. The Voice Memory Directory command provides an indication of the availability of the two voice memories (Full or Available).
Giving Commands after Training
After Voice training the system will automatically recognize a speaker whose voice is held in voice memory. The system can still be used by other speakers with no loss of response.
Error Messages
In addition to the voice command prompts given by the system, the following error messages may be encountered.
The messages are shown on the message center with voice confirmation (error tone or voice playback).
Message
Explanation
NO SPEECH DETECTED
The system did not detect any speech when the voice button was pressed
NAMETAG TOO LONG
A nametag must not take longer than three seconds to say
NAMETAG NOT UNIQUE
The nametag (or similar sounding name) has already been used
COMMAND NOT RECOGNIZED
The command was not recognized from the list of voice commands
HANDBRAKE MUST BE ENGAGED
The handbrake must be applied for voice training
RADIO MUST BE IN TUNER MODE
The sound system must be in radio mode before giving the Radio Store command
VOICE NOT READY
The voice button was pressed while the voice system was still initializing
TOO MANY DIGITS
The phone number is a Phone Enter command was too long
Date of Issue: 10/01/2002
Student Guide
2.8.17
INTRODUCTION TO S-TYPE
2.8.18
Service Training
Student Guide
Date of Issue: 10/01/2002
J A G U A R
S E R V I C E
T R A I N I N G
INTRODUCTION TO JAGUAR
1
INTRODUCTION TO XJ/XK
2
INTRODUCTION TO S-TYPE
2.1
Overview
2.2
Engine
2.3
PTEC Engine Management
2.4
Transmission
2.5
Suspension, Steering and Brakes
2.6
DATC Climate Control
2.7
Electrical Distribution System
2.8
Body Systems
2.9
Occupant Protection
2.10 Task Sheets
Service Training Course TINTR
Date of Issue: 10/01/2002
INTRODUCTION TO S-TYPE
Service Training
OCCUPANT PROTECTION
Supplementary Restraints System (SRS)
The Supplementary Restraints System (SRS) provides
impact sensing, control of deployment and fault diagnosis of the control module, airbags, pre-tensioners and
associated circuits. Most of these functions are carried
out by the Restraints Control Module (RCM).
RESTRAINTS CONTROL MODULE
A front impact triggers the driver and passenger airbags
and both pre-tensioners provided the impact is above
the set threshold as detected by the two longitudinal
sensors in the RCM.
When a side impact occurs, the lateral safing sensor in
the RCM must also agree with an impact detection signal received from either the LH or RH Side Impact
Sensor in order to deploy the corresponding airbag.
INTR.164
NOTE: An impact at an oblique angle may
cause both frontal and side airbags to deploy,
depending on how much lateral acceleration
is sensed.
The RCM is bolted to the top of the driveshaft tunnel below the center stack. Due to the importance of the module
being securely fixed to the vehicle body, the ground connection is made via a fixing bolt and is monitored by the
diagnostic system. A bad connection causes a fault code to be generated.
NOTE: The torque settings are safety critical and the figures given in the JTIS Service instructions must be
adhered to.
NOTES
2.9.2
Student Guide
Date of Issue: 10/01/2002
INTRODUCTION TO S-TYPE
Service Training
SUPPLEMENTARY RESTRAINTS SYSTEM
INSTRUMENT CLUSTER
BACK-UP WARNING
SOUNDER
AIRBAG
WARNING LAMP
VEHICLE EMERGENCY
MESSAGE SYSTEM
POWERTRAIN
CONTROL MODULE
DATA LINK
CONNECTOR
DRIVER
AIRBAG
PASSENGER
AIRBAG
RESTRAINTS
CONTROL MODULE
LH SIDE IMPACT
SENSOR
RH SIDE IMPACT
SENSOR
DRIVER
SIDE AIRBAG
PASSENGER
SIDE AIRBAG
FRONT SEAT BELT
PRE-TENSIONER
FRONT SEAT BELT
PRE-TENSIONER
INTR.163
NOTES
Date of Issue: 10/01/2002
Student Guide
2.9.3
INTRODUCTION TO S-TYPE
Service Training
OCCUPANT PROTECTION
Airbags
Driver Airbag
The driver airbag module is fitted in the center of the steering wheel and is of conventional design. A reduced charge
propellant (‘de-powered’) is used to minimize impact effects where the driver is seated close to the wheel.
The module is secured by two side screws on the left and right underside of the steering wheel.
Passenger Airbag
PASSENGER AIRBAG
WARNING: DO NOT PLACE OBJECTS ON
THE PASSENGER AIRBAG DEPLOYMENT
PANEL. INJURY COULD OCCUR IF THE
AIRBAG CONTACTS AN OBJECT DURING
INFLATION.
INTR.165
The passenger airbag uses a heated gas inflator (HGI)
system instead of a solid propellant. This system is
inherently 'clean’ since the inflation gas is a lean hydrogen/air mixture and the by-products are water vapor
and air. Although the gas is not classified as an explosive, the possible effects of accidental deployment
when handling or working close to the unit are similar
to those of other types of airbag. It is recommended
that current safety procedures are also followed when
handling the HGI modules.
The HGI airbag module has fewer components than previous types, consisting of:
• 140 liter bag
• Aluminum pressure vessel containing a mixture of 12% hydrogen/88% air at a pressure of 180 bar.
• Pressure vessel end plug with burst disc.
• Pyrotechnic igniter assembly fitted to pressure vessel end plug
The igniter is electrically triggered from the Restraints Control Module (RCM). When triggered, the igniter fires a high
speed ‘dart’ along the length of the pressurized cylinder, producing a heated trail (due to friction) which causes rapid and even combustion of the gas throughout the cylinder. The igniter also ruptures the burst disc in the end plug,
allowing the expanding gases from the pressure vessel to inflate the airbag. The airbag is a top mounted assembly
and deploys in an upwards direction, climbing the windshield before folding downwards. After deployment, the bag
deflates through two vents.
The airbag deployment door is an integral part of the top fascia molding. The airbag module is bolted to the underside of the fascia via a steel deployment chute and is also bolted to two brackets on the tubular cross car beam
which supports the fascia assembly.
NOTE: The module is not handed. To access the airbag module, the complete fascia assembly must be
removed.
2.9.4
Student Guide
Date of Issue: 10/01/2002
INTRODUCTION TO S-TYPE
Service Training
Side Airbag
Side airbags are incorporated into the driver and front passenger seat squabs and are similar to those fitted to the XJ
Series, using compressed argon to provide the inflation gas. The bag has a capacity of 19 liters and provides protection to both the head and chest regions.
The side airbag module is fixed to the outer seat frame and is located within a fabric deployment pocket. The pocket
is stitched to the seat cover seam and when the module is triggered, this length of seam bursts to provide the deployment exit for the airbag.
If a damaged seat cover is to be replaced, the side airbag module must be removed and re-located in the deployment pocket of the new seat cover.
The complete seat must be replaced if the airbag has been deployed.
SIDE AIRBAG
INTR.166
NOTES
Date of Issue: 10/01/2002
Student Guide
2.9.5
INTRODUCTION TO S-TYPE
Service Training
OCCUPANT PROTECTION
Seatbelts
Front Seatbelts and Pre-tensioners
FRONT SEAT BELT PRE-TENSIONER
The front seatbelts are of the inertia reel type with integral
pre-tensioners and torsion bar load limiters fitted to the
reel assemblies. The lower anchorage and buckle strap are
mounted on the moving seat slides to maintain optimum
belt geometry. The shoulder anchorage is fixed to the ‘B’
post via a four position height adjuster. An automatic locking retractor (ALR) is incorporated in the passenger belt
reel assembly to provide child seat security.
A compact type of pre-tensioner is fitted to the front
seatbelt reel assemblies. The reduced size is achieved
by the use of rack and pinion gearing to retract the seatbelt reel when the unit is fired. The initiator is a
conventional pyrotechnic device which is electrically
triggered from the Restraints Control Module (RCM).
Fault diagnosis of the pre-tensioner firing circuits is carried out by the RCM and the presence of a fault is
indicated by the airbag warning lamp (see Diagnostics).
INTR.167
Note that plastic belt guides are fitted to the ‘B’ post; if
the pre-tensioners are fired, these guides will fracture.
NOTES
2.9.6
Student Guide
Date of Issue: 10/01/2002
J A G U A R
S E R V I C E
T R A I N I N G
INTRODUCTION TO JAGUAR
GENERAL INFORMATION
1
INTRODUCTION TO XJ/XK
2
INTRODUCTION TO S-TYPE
3
INTRODUCTION TO X-TYPE
3.1
Overview
3.2
Engine
3.3
Engine Management
3.4
Transmissions and Driveline
3.5
Suspension, Steering and Brakes
3.6
Climate Control
3.7
Electrical Distribution System
3.8
Body Systems
3.9
Occupant Protection
3.10 Task Sheets
Service Training Course TINTR
Date of Issue: 10/01/2002
INTRODUCTION TO X-TYPE
Service Training
OVERVIEW
General Information
INTR.168
The Jaguar X-TYPE is an all-wheel drive (AWD), elegant small luxury sedan, which combines the contemporary
expression of traditional Jaguar product attributes with excellent driving dynamics, package and functionality.
The powertrain comprises a 2.5 liter or 3.0 liter transversely mounted V6 engine, derived from the engine currently
used in S-TYPE, coupled with a five-speed automatic transmission or a five-speed manual transmission.
Like previous Jaguar models, X-TYPE utilizes CAN, SCP and ISO9141 communication networks. In addition, it uses
an optical network (D2B) for very high speed transfer of audio data to support features such as navigation, voice activation and television.
NOTES
3.1.2
Student Guide
Date of Issue: 10/01/2002
INTRODUCTION TO X-TYPE
Service Training
Standard features for the 2.5 liter V6 model include:
• Front seat-mounted side airbags
• Side curtain airbags
• Driver seat-track position sensing
• Passenger seat weight sensing
• All-wheel drive
• Leather seats
• Leather gear shift knob (manual)
• Wood gear shift knob (automatic)
•
•
•
Rear electric windows
Power driver/passenger seats
Steering wheel controls
•
•
•
•
Wood door trim (front/rear)
Automatic air conditioning with pollution filter
Front center sliding armrest
Chrome exterior trim
The Sports model comprises a similar range of features,
however, 17” sports wheels and a sports suspension are
fitted as standard.
Optional features, which vary depending on market
and vehicle specification, include:
• Dynamic stability control, which assists the driver
in maintaining directional control of the vehicle
• Xenon, high-intensity discharge lamps (for improved
driver visibility) supplied complete with automatic
headlamp leveling and headlamp power wash
• Autolamp which, when selected, automatically
activates the headlamps should the ambient light
fall below a predetermined level
• A message center (integral to the instrument cluster) that displays warnings and information for use
by both the driver and the technician
• Telematics display which provides a user interface
to support navigation, television, climate control,
cellular phone and entertainment systems
• Parking aid, a system which gives the driver audible warning of obstructions that could damage the
vehicle during reversing
• Manual or automatic climate control
• Single CD player or CD changer
• Mini-disc player
• Power lumbar support
• Voice activation system
• Vehicle emergency monitoring system
• Power foldback mirrors
• Sliding roof
• Premium entertainment system
As with current vehicles, the X-TYPE is fitted with variable ratio power steering and ABS brakes as standard.
Security features include immobilizer and alarm; intrusion sensors and the inclination sensor are available as
options. The key fob transmitter has radio frequency
operation with an encrypted rolling code to help prevent theft of the vehicle.
NOTES
Date of Issue: 10/01/2002
Student Guide
3.1.3
INTRODUCTION TO X-TYPE
Service Training
OVERVIEW
Dimensions
271 cm (107 in.)
467.2 cm (184 in.)
139.2 cm (55 in.)
Design Weight
142.2 cm (56 in.)
Curb Weight
153.7 cm (60.5 in.)
152.2 cm (60 in.)
178.9 cm (70 in.)
INTR.169
Design weight condition refers to a vehicle at curb weight including 33% optional equipment, plus occupant load
dependent upon the number of seats in vehicle. Curb weight condition refers to the complete vehicle with all fluids
filled to capacity and without occupants, optional equipment or luggage. Minimum ground clearance (fuel tank
undertray to ground) when measured at gross vehicle weight (GVW) is 112.90 mm (4.4 in).
NOTES
3.1.4
Student Guide
Date of Issue: 10/01/2002
INTRODUCTION TO X-TYPE
Service Training
Identification Plates and Labels
IDENTIFICATION PLATE AND LABEL LOCATION
QUICK REFERENCE VIN PLATE
SAJDA 1M9XG000484
AIRBAG
CERTIFICATION LABEL
OFFICIAL VIN PLATE
INTR.170
Production Sequence Numbers
X-TYPE Models 2.5-liter V6, 3.0-liter V6
Model Year
Production Sequence Numbers
2002
(Model year I.D. “2”)
C00001 –
NOTES
Date of Issue: 10/01/2002
Student Guide
3.1.5
INTRODUCTION TO X-TYPE
Service Training
OVERVIEW
Vehicle Jacking and Lifting
There are four jacking points, two on each side of the vehicle on the underside of the floor. Two indented triangular
jack location points are provided on each sill cover.
CAUTION:
• Jacking and lifting points are critical.
• Vehicle support stands should only be used in conjunction with cushioned pads.
Refer to JTIS for detailed information.
VEHICLE JACKING POINTS
SUBFRAME JACKING POINTS
INTR.171
Vehicle Recovery and Towing
It is preferred and recommended that vehicle recovery is performed using a flatbed transporter. Otherwise, the following guidelines should be observed.
Vehicles with all four wheels on the ground
Provided there is no damage to the transmission, the vehicle can be towed with all four wheels on the ground for a
maximum distance of 50 km (30 miles) at a speed not exceeding 50 km/h (30 mph).
Vehicles with only the rear wheels on the ground
To prevent damage to the automatic transmission while towing the vehicle with only the rear wheels on the ground,
the towing distance must be restricted to 0.8 km (0.5 miles). The towing speed must no exceed 50 km/h (30 mph).
3.1.6
Student Guide
Date of Issue: 10/01/2002
J A G U A R
S E R V I C E
T R A I N I N G
INTRODUCTION TO JAGUAR
GENERAL INFORMATION
1
INTRODUCTION TO XJ/XK
2
INTRODUCTION TO S-TYPE
3
INTRODUCTION TO X-TYPE
3.1
Overview
3.2
Engine
3.3
Engine Management
3.4
Transmissions and Driveline
3.5
Suspension, Steering and Brakes
3.6
Climate Control
3.7
Electrical Distribution System
3.8
Body Systems
3.9
Occupant Protection
3.10 Task Sheets
Service Training Course TINTR
Date of Issue: 10/01/2002
INTRODUCTION TO X-TYPE
Service Training
ENGINE
Introduction
The X-TYPE is the first Jaguar vehicle range to be fitted with a transverse engine. This modification has resulted in the
2.5 liter and 3.0 liter AJ V6 engines, which are both variants of the 3.0 liter S-TYPE engine redesigned to accommodate the new powertrain configurations.
The base engine is manufactured and assembled at the same engine plant in Cleveland, Ohio, using the same facilities as the current S-TYPE engine.
Base engine features – variation from 3.0 liter S-TYPE:
• Continually variable valve timing.
• New cylinder heads and gaskets.
• Cast iron camshafts with steel tappets.
• Redesigned three-stage variable geometry intake system (identical concept and operating parameters to the
3.0L S-TYPE).
• Redesigned exhaust manifolds – fabricated on the front bank and cast on the rear.
•
•
•
•
•
•
•
•
•
Rear end auxiliary driven water pump on the front (left) bank – exhaust camshaft.
Redesigned front end auxiliary drive layout.
Redesigned front cover including engine mounting location.
Redesigned engine mounts to suit transverse installation.
Redesigned oil pan to suit engine installation.
Denso engine management.
5w/30 GF3 engine lubricant.
Redesigned breather system due to water flow pipe to rear, oil separator in cam cover instead of Vee.
Full coolant flow oil cooler.
NOTES
3.2.2
Student Guide
Date of Issue: 10/01/2002
INTRODUCTION TO X-TYPE
Service Training
JAGUAR X-TYPE AJ V6 ENGINE
INTR.172
Date of Issue: 10/01/2002
Student Guide
3.2.3
INTRODUCTION TO X-TYPE
Service Training
V6 ENGINES
Location of Identification Codes
The engine identification code is on a label behind the drive belt, stuck to the front cover. The serial number and
emission code are stamped on the left-hand side of the engine at the assembly plant. Main bearing selection codes
are inked on the crankshaft and stamped on the back of the engine block.
3.0 Liter Engine
Engine code
Emissions
Market
Transmission
1G-730-AA
1G-731-AA
LEV
LEV
All
All
Auto
Manual
Engine code
Emissions
Market
Transmission
1G-430-AA
1G-431-AA
LEV
LEV
All
All
Auto
Manual
2.5 Liter Engine
Engine Identification using the VIN
The eleventh digit of the VIN indicates which engine is fitted on the vehicle. An “X” indicates that the vehicle is fitted
with a 2.5-liter engine; a “W” indicates that the vehicle is fitted with a 3.0-liter engine. For example:
SAJEB53D52XC000236 = 2.5 liter engine; SAJEA51CX2WC000235 = 3.0 liter engine.
ENGINE IDENTIFICATION CODES
ENGINE IDENTIFICATION CODE
MAIN BEARING SELECTION CODES
SERIAL NUMBER AND EMISSION CODE
INTR.173
NOTES
3.2.4
Student Guide
Date of Issue: 10/01/2002
INTRODUCTION TO X-TYPE
Service Training
Engine Specifications
Cylinder configuration
Bore
Stroke
Swept volume
BHP
Torque (Nm)
Firing order
Engine oil
Oil capacity (w/filter)
Coolant capacity
Spark plugs
Plug gap
Valve clearance (cold)
X-TYPE 3.0L
X-TYPE 2.5L
60˚ V6
89.0 mm
79.5 mm
2967 cc
231 @ 6800 rpm (172 kw)
284 @ 3000 rpm
1-2-3-4-5-6
5w-30GF3
6.4 liters
8.25 liters
AWSF22F
1.3 – 1.45 mm
Inlet 0.175 – 0.225 mm
Exhaust 0.325 – 0.375 mm
60˚ V6
81.6 mm
79.5 mm
2495 cc
194 @ 6800 rpm (145 kw)
244 @ 3000 rpm
1-2-3-4-5-6
5w-30 GF3
6.4 liters
8.25 liters
AWSF22F
1.3 – 1.45 mm
Inlet 0.175 – 0.225 mm
Exhaust 0.325 – 0.375 mm
Engine Cylinder Numbering
NOTES
CYLINDER NUMBERING
FRONT OF ENGINE
2
1
4
3
6
5
INTR.174
Date of Issue: 10/01/2002
Student Guide
3.2.5
INTRODUCTION TO X-TYPE
3.2.6
Service Training
Student Guide
Date of Issue: 10/01/2002
J A G U A R
S E R V I C E
T R A I N I N G
INTRODUCTION TO JAGUAR
GENERAL INFORMATION
1
INTRODUCTION TO XJ/XK
2
INTRODUCTION TO S-TYPE
3
INTRODUCTION TO X-TYPE
3.1
Overview
3.2
Engine
3.3
Engine Management
3.4
Transmissions and Driveline
3.5
Suspension, Steering and Brakes
3.6
Climate Control
3.7
Electrical Distribution System
3.8
Body Systems
3.9
Occupant Protection
3.10 Task Sheets
Service Training Course TINTR
Date of Issue: 10/01/2002
INTRODUCTION TO X-TYPE
3.3.2
Service Training
Student Guide
Date of Issue: 10/01/2002
INTRODUCTION TO X-TYPE
Service Training
ENGINE MANAGEMENT
Overview
The engine control system consists of sensing devices, an engine control module (ECM) and actuating devices. The
sensors continuously measure the requirements of the driver and operating conditions of the engine. The ECM evaluates this information using data tables (maps) and calculations, and uses the results to command an appropriate
response from the actuating devices. The total system provides the necessary accuracy and adaptability to minimize
exhaust emissions and fuel consumption, provide optimum driveability under all conditions, minimize evaporative
fuel emissions, and provide system diagnostics if malfunctions occur.
ENGINE MANAGEMENT SYSTEM
APP
SENSOR
MAP SENSOR
THROTTLE MOTOR
IMT VALVE 1
VVT SOLENOID
IAT / MAF SENSOR
TP SENSOR
IP SENSOR
EFT
SENS.
CMP
SENSOR
FI
ON-PLUG COIL
FI
ON-PLUG COIL
IMT VALVE 2
VVT SOLENOID
KS
CMP
SENSOR
ECT
SENSOR
UPSTREAM
HO2 SENSOR
UPSTREAM
HO2 SENSOR
EOT
SENSOR
OIL PRESSURE
SWITCH
CKP
SENSOR
DOWNSTREAM
HO2 SENSOR
DOWNSTREAM
HO2 SENSOR
INTR.175
Date of Issue: 10/01/2002
Student Guide
3.3.3
INTRODUCTION TO X-TYPE
Service Training
ENGINE MANAGEMENT
Engine Control Module
ECM Data Recorder
The flight data recorder captures vehicle data in the event of an incident in the field. This data may be used for problem diagnosis and displayed using WDS.
The ECM will utilize an area of its RAM to provide a 10 second rolling buffer for a number of parameters defined by
Jaguar. The data in the rolling RAM buffer will be refreshed every 256 milliseconds by the ECM and will be transferred to an area of EEPROM once a trigger condition has been met.
The data storage area in EEPROM is divided into two areas (Area A and Area B) and the data transferred into these
areas from RAM will depend on the trigger condition that has been detected. The data in these areas will represent
events over a calibrated time prior to the trigger event followed by the remaining portion of the 10-second buffer
after the trigger event.
Area A will only store data associated with the Area A trigger condition and likewise Area B will only store data associated with the Area B trigger conditions. The Data stored in area A will be overwritten with new data every time a
trigger condition occurs.
The data stored in area B will be overwritten depending on the priority of the triggered data. The trigger priorities are
as follows:
Highest priority
A fuel pump cut off by the inertia switch being tripped will trigger data rated as the highest priority. This data will
overwrite all other data and can only be cleared using WDS.
Medium priority
A throttle default will trigger data rated at a medium priority. This data will overwrite any lower priority data. It will
not overwrite medium or highest priority data.
Lowest priority
An engine that fails to start or an engine that starts and stumbles will trigger data rated as the lowest priority. It will
not overwrite high or medium priority data.
Whenever data is captured in EEPROM memory, the odometer reading and stored DTCs are also written to the
EEPROM. DTC P1582 (Flight Recorder Information Available) will be logged whenever data is stored in either Area A
or Area B.
To access the recorded information you can choose to read DTCs from the vehicle, and select the DTC (P1582) that
indicates that ECM recorded data is available. The user may choose to investigate the DTC by pressing the DTC pinpoint button. This causes the application sub-tab to appear within DTC Monitor. This is consistent with existing
methods of DTC investigation. The existing functionality of DTC Monitor will allow user help and the required DTC
clearing operations to be performed as with any other DTC.
Or, the user can select Vehicle Configuration, then Special Applications, then select the ECM Data Recorder application from the Special Applications menu.
NOTES
3.3.4
Student Guide
Date of Issue: 10/01/2002
INTRODUCTION TO X-TYPE
Service Training
Trigger Conditions for Data Storage
Storage
Area
Trigger
Mode
Engine speed held above a calibrated threshold for more than
a calibrated period of time, and then dropping below a
calibrated threshold.
A
1
Engine fails to start
Engine speed remaining below a calibrated threshold for
longer than a calibrated period of time while the engine is
being cranked.
B
2
Engine starts and stumbles
Engine speed exceeding a calibrated threshold and then
dropping below a calibrated threshold without meeting the
conditions for “engine stall”.
B
2
Throttle default
Entry into throttle default mode
B
4
Fuel pump cut off by inertia switch
Inertia switch going open circuit
B
5
Condition
Trigger
Engine Stalls
ECM Data Recorder Parameters
• Throttle position
• Driver demand
• Engine speed
• Vehicle speed
• Fuel pulse width
• Ignition
• MAF volts
• Coolant temperature
• Air temperature
• PATS status
•
•
•
•
•
•
•
•
•
•
CAN traction status
Gear position selected
Gear position actual
Brake switch status
Cruise control mode
Fuel intervention
Throttle failure flag
Ignition angle
Fuel pressure
Battery voltage
Start Time Monitor
The start time monitor is another feature within the data recorder function. This will display the length of time taken
to start the vehicle in milliseconds for each of the last 50 engine starts. The ECM considers the engine to have started when the engine speed exceeds 700 rpm.
The display will also indicate the engine temperature for each of the 50 starts as either low, medium or high. The following parameters are used:
• Low: < 15 degrees centigrade (25 starts)
• Medium: 15 – 70 degrees centigrade (10 starts)
• High: > 70 degrees centigrade (15 starts)
WDS will also display the total number of times the engine has been started and the average length of time taken.
This data will be reset if the vehicle battery is disconnected.
Date of Issue: 10/01/2002
Student Guide
3.3.5
INTRODUCTION TO X-TYPE
3.3.6
Service Training
Student Guide
Date of Issue: 10/01/2002
J A G U A R
S E R V I C E
T R A I N I N G
INTRODUCTION TO JAGUAR
GENERAL INFORMATION
1
INTRODUCTION TO XJ/XK
2
INTRODUCTION TO S-TYPE
3
INTRODUCTION TO X-TYPE
3.1
Overview
3.2
Engine
3.3
Engine Management
3.4
Transmissions and Driveline
3.5
Suspension, Steering and Brakes
3.6
Climate Control
3.7
Electrical Distribution System
3.8
Body Systems
3.9
Occupant Protection
3.10 Task Sheets
Service Training Course TINTR
Date of Issue: 10/01/2002
INTRODUCTION TO X-TYPE
Service Training
TRANSMISSIONS AND DRIVELINE
Automatic Transmission
The JF506E automatic transmission has been developed for use by Jaguar. Made in Japan by JATCO, the transmission employs a transmission control module (TCM), three rotational speed sensors, and nine gear change / pressure
solenoids to achieve refined gear change control with excellent response to changing driving conditions.
JF506E can be interpreted as follows:
• J
Japan Automatic Transmission Company
• F
Front wheel drive
• 5
5 forward gears
• 06 Version number
• E
Electronic control
The transmission ID is stamped on the transmission; for example:
PL 000 = 3.0 liter or PL 001 = 2.5 liter.
This description is followed by the production year and month and a 5 digit serial number; for example:
08 XXXXX.
Specifications
Transmission fluid
Transmission capacity
Fluid cooler
Torque capacity
Torque converter
Stall speeds
Weight
Ratios:
First
Second
Third
Fourth
Fifth
Reverse
Final drive
Recovery
Fill for life with Idemitsu. Not compatible with other transmission oils.
8.8 liters
Air cooler with thermostat
295 Nm
With single plate lock-up clutch and torsional damper
2.5 liter – 2610 rpm; 3.0 liter – 2610 rpm
101 kg
3.80:1
2.13:1
1.36:1
0.93:1
0.68:1
2.97:1
3.8:1
0.5 miles @ 30 mph
NOTES
3.4.2
Student Guide
Date of Issue: 10/01/2002
INTRODUCTION TO X-TYPE
Service Training
JF506E AUTOMATIC TRANSMISSION
TRANSMISSION ID
INTR.176
NOTES
Date of Issue: 10/01/2002
Student Guide
3.4.3
INTRODUCTION TO X-TYPE
Service Training
TRANSMISSIONS AND DRIVELINE
Manual Transmission
The MTX 75 manual transmission is a “two-shaft transmission”. MTX 75 can be interpreted as follows:
• M Manual
• T
Transmission
• X
Transaxle (front wheel drive)
• 75 The distance between input and output shafts in millimeters
The aluminum housing of the manual transmission consists of two closed sections. The purpose of the reinforcing
ribs on the transmission housing is to reduce noise and vibration and to contribute to powertrain bending stiffness.
With the “two-shaft transmission,” all the gear wheels are in permanent mesh. In each gear, the required ratio is
achieved by means of a pair of gear wheels.
When Reverse is selected, an idler gear changes the direction of rotation of the output.
The input and output shafts run in taper roller bearings.
To further improve stability and gear shifting, a maintenance-free cable operating mechanism is used.
All the gear wheels, including reverse gear, are helical cut, synchronized, and run on needle roller bearings.
First, second, and third gear have double synchronization. The advantages of double synchronization are that the
transmission runs quietly, gearshifts are smooth, and the assembly is compact and light in weight.
Differential (Front)
The main components of the differential are:
• Final drive wheel
• Drive sleeve
• Differential housing with two taper roller bearings
• Two differential side gears
• Two differential pinions and cross shaft
The transmission and differential are installed in a two-part aluminum housing that is flange-mounted to the engine.
The driveshafts have serrated teeth and are secured with a snap ring.
The torque is transmitted from the final drive gear via the cone shaped drive sleeve into the transfer box. The transfer box then splits the torque between the front and rear wheels. An intermediate driveshaft couples the transfer
case to the differential housing (via planetary set sun gear), transmitting the front wheel drive torque. Torque is then
transmitted from the differential housing via the crosspin to the differential pinions, which in turn drive the differential side gears; these in turn drive the driveshafts.
3.4.4
Student Guide
Date of Issue: 10/01/2002
INTRODUCTION TO X-TYPE
Service Training
MTX 75 MANUAL TRANSMISSION
SELECTOR
MECHANISM
INPUT
SHAFT
TRANSAXLE HOUSING –
CLUTCH SIDE
TRANSAXLE
HOUSING
REVERSE GEAR
IDLER
DIFFERENTIAL
OUTPUT
SHAFT
INTR.177
NOTES
Date of Issue: 10/01/2002
Student Guide
3.4.5
INTRODUCTION TO X-TYPE
Service Training
TRANSMISSIONS AND DRIVELINE
Manual Transmission (continued)
Transmission ID
The transmission can be identified from the information on the type data sticker. This label is located on the transmission housing. For example, a label that has the information 1G A 1 9M02 000436 can be interpreted as follows:
• 1G
Plant
• A
Shift
• 1
Line
• 9M02
Build date: 02.12.99
• 000436 Serial number
Specifications
Torque capacity
Weight
Transmission fluid
Transmission capacity
Brake fluid
Ratio:
First
Second
Third
Fourth
Fifth
Rev.
Final drive
Recovery
300 Nm
48.6 kg
ESD-M2C186-A
1.75 liters
DOT 4 ESD-M6C57-7
3.42
2.14
1.45
1.03
0.77
3.47
3.8
30 miles @ 30 mph (flat bed)
NOTES
3.4.6
Student Guide
Date of Issue: 10/01/2002
INTRODUCTION TO X-TYPE
Service Training
Shift Mechanism
The external shift mechanism consists of the gear lever housing with the gear lever; the internal shaft mechanism
housing, which accommodates the shift shaft with the internal shift mechanism; and two cables.
At the transmission end, the cables are secured to a bracket on the transmission housing by means of abutment
sleeves; they are attached to the shift shaft by means of an end fitting with a ball socket. The internal shaft mechanism is operated through the shift shaft.
SHIFT MECHANISM
GEAR SHIFT
LEVER
REVERSE GEAR
RING
BODY SEAL
DAMPING
WEIGHT
SELECTOR
CABLE
EXTERNAL
SHIFT MECHANISM
SHIFT CABLE
SHIFT ACTUATING
LEVER
INTR.178
NOTES
Date of Issue: 10/01/2002
Student Guide
3.4.7
INTRODUCTION TO X-TYPE
Service Training
TRANSMISSIONS AND DRIVELINE
Manual Transmission (continued)
Clutch
•
•
•
•
•
•
The clutch is a hydraulically-operated, self-adjusting system which improves operation and driver comfort by
enabling a constant pedal pressure to be applied as the friction faces of the clutch plate wear.
The system employs a concentric slave cylinder, located on the transaxle’s input shaft behind the pressure
plate. The concentric slave cylinder eliminates the need for a release lever mechanism and improves operating
efficiency.
The clutch pedal, which is mounted on a combined assembly with the brake pedal, employs an assister spring
to reduce pedal load.
The clutch master cylinder is directly actuated by the clutch pedal, and shares a common fluid reservoir with
the brake system.
Operation of the clutch pedal when the vehicle is in speed (cruise) control mode activates a switch which supplies a signal to the ECM to deactivate speed control.
To enable engine starting the clutch pedal must be fully depressed. This activates a switch which sends a signal
to the ECM to provide one of the requirements for activating the starter relay.
CLUTCH SYSTEM
COMBINED CLUTCH / BRAKE
FLUID RESERVOIR
SPEED CONTROL
DEACTIVATION SWITCH
MASTER
CYLINDER
FREQUENCY
MODULATOR
BLEED POINT
STARTER RELAY
ACTIVATION SWITCH
CLUTCH PEDAL
CONCENTRIC
SLAVE CYLINDER
INTR.179
3.4.8
Student Guide
Date of Issue: 10/01/2002
INTRODUCTION TO X-TYPE
Service Training
Driveline
All Wheel Drive (AWD) System
A new feature and a first for Jaguar is the Visteon all wheel drive (AWD) system. The AWD system provides superior
traction and handling characteristics that will appeal to a younger driver.
AWD uses an epicyclic center differential with a viscous coupling. A drive split of 40% / 60% is provided, with 40%
split to the front road wheels and 60% to the rear wheels.
AWD Unit
• The AWD unit is a two-piece aluminum unit weighing 25.9 kg.
• Oil quantity is 0.550 – 0.600 liters of synthetic hypoid gear oil to SAE 75W-140 specifications; unit is filled for life.
• An overall ratio of 2.526:1 is achieved through two separate gearing principles:
– Helical gear at 1.65:1
– Hypoid bevel gear at 1.53:1
TRANSFER CASE
TRANSAXLE
(MANUAL SHOWN)
TRANSFER
CASE
TRANSAXLE
DIFFERENTIAL
DIFFERENTIAL CAGE
LINK SHAFT TO
RH FRONT AXLE SHAFT
DIFFERENTIAL OUTER CASE
(OUTPUT)
INTR.180
NOTES
Date of Issue: 10/01/2002
Student Guide
3.4.9
INTRODUCTION TO X-TYPE
Service Training
CHASSIS SYSTEMS
Driveline (continued)
REAR FINAL DRIVE UNIT
Rear Final Drive
•
•
•
•
•
The assembly consists of an iron main casing with
an aluminum rear cover which is sealed using RTV.
• The final drive unit weighs 26.9 kg.
• For NVH control, the final drive assembly has a 3–
point isolated mounting system:
– Two mountings at the front of the final drive unit.
– One mounting at the rear of the assembly.
• Double isolation is provided, when combined with
the rear subframe mounting bushes.
• Plug-in driveshafts are retained by C clips in the
side gears.
• The unit is filled for life, with an oil capacity of 1.2
liters.
• The oil used is a synthetic hypoid gear oil to an SAE
INTR.182
75W-140 specification.
This is the same thermally stable oil as used by the AWD unit.
The rear final drive has the ratio 2.53:1.
A compact size is achieved because only 60% of the drive is transmitted.
The diff pinion seal replacement will be the subject of a follow-up curriculum program.
Driveshafts
Rear Halfshafts
Rear halfshafts are GKN-manufactured from a solid bar, with twin plunging CV joints. Rear driveshafts are unequal
in length and have an ABS sensor ring mounted on the outboard joint. The driveshaft is retained in the final drive
unit by a spring clip.
REAR HALF SHAFTS
INTR.183
3.4.10
Student Guide
Date of Issue: 10/01/2002
INTRODUCTION TO X-TYPE
Service Training
Driveshaft (Propshaft)
The GKN-manufactured driveshaft is the longest driveshaft used by Jaguar in the shortest body produced by the
company to date. It consists of a two-piece steel construction using a Mag-arc welding process. The driveshaft incorporates CV joints at both ends, providing plunge capability and a Hooke’s joint at the center. The center bearing is
rubber isolated to the body for enhanced NVH.
One design exists for both automatic (2091.7mm installed length) and manual (2097mm installed length) transmissions.
Driveshaft Alignment A service tool for the alignment of the driveshaft (propshaft) has been developed. This tool
will position the driveshaft by taking a number of measurements from points underneath the body.
Front Halfshafts
The front halfshaft is GKN-manufactured from solid Boron steel bar, with twin CV joints. The outer CV is fixed, while
the inner CV is of the plunging variety. The left-hand shaft is retained in the front differential by a spring clip. The
right-hand shaft is also retained by a spring clip, but is attached to a link shaft.
Special rubber gaiters on the inboard joints are fitted to withstand the heat from the exhaust system.
FRONT HALFSHAFTS
INTR.181
Three service tools are issued:
• An inner joint handle and fork tool
• A 200 mm limited extraction distance tool
• A link shaft removal adaptor
NOTES
Date of Issue: 10/01/2002
Student Guide
3.4.11
INTRODUCTION TO X-TYPE
3.4.12
Service Training
Student Guide
Date of Issue: 10/01/2002
J A G U A R
S E R V I C E
T R A I N I N G
INTRODUCTION TO JAGUAR
GENERAL INFORMATION
1
INTRODUCTION TO XJ/XK
2
INTRODUCTION TO S-TYPE
3
INTRODUCTION TO X-TYPE
3.1
Overview
3.2
Engine
3.3
Engine Management
3.4
Transmissions and Driveline
3.5
Suspension, Steering and Brakes
3.6
Climate Control
3.7
Electrical Distribution System
3.8
Body Systems
3.9
Occupant Protection
3.10 Task Sheets
Service Training Course TINTR
Date of Issue: 10/01/2002
INTRODUCTION TO X-TYPE
Service Training
SUSPENSION, STEERING AND BRAKES
Front Suspension
The front suspension system has been engineered to provide the Jaguar customer with the ride and handling characteristics that haves become the hallmark of Jaguar Cars. The new suspension system consists of a MacPherson strut
arrangement mounted on an isolated subframe, with the power steering rack rigidly mounted to the subframe
assembly.
Correct orientation of the subframe rubber isolation bushes is required to maintain the correct NVH-designed characteristics. The whole subframe must be correctly aligned for the driveline angle to be maintained. This state is
achieved by using a multipurpose hydraulic lift with special adaptors. Checks on subframe and engine alignment are
achieved using an alignment gauge, which is provided as a service tool.
The suspension system has antidive and antisquat characteristics built in to the suspension geometry.
There is no adjustment for castor or camber; tracking is the only adjustment available.
Jacking must be carried out only on recognized body location points.
FRONT SUSPENSION ASSEMBLY
INTR.184
NOTES
3.5.2
Student Guide
Date of Issue: 10/01/2002
INTRODUCTION TO X-TYPE
Service Training
Rear Suspension
The rear suspension system consists of a multilink coil spring system with a subframe that provides double isolation
for the driveline. The Bilstein damper units are inclined to the body in white (BIW) and consist of a single tube with a
46 mm piston element.
There is no adjustment for castor or camber; tracking is the only adjustment available. The suspension system has
antidive and antisquat characteristics built in to the suspension geometry.
Correct orientation of the subframe bushes is required, and the whole subframe must be aligned for the correct driveline angle to be maintained.
Jacking must be carried out only on recognized body location points, not on the suspension assembly (refer to JTIS).
REAR SUSPENSION ASSEMBLY
INTR.185
NOTES
Date of Issue: 10/01/2002
Student Guide
3.5.3
INTRODUCTION TO X-TYPE
Service Training
SUSPENSION, STEERING AND BRAKES
Power Steering System
The Servotronic power steering system operates using a conventional hydraulically-operated rack and pinion
equipped with a rotary valve and added electronics to control the system’s hydraulics. This system provides the driver with steering assistance proportional to the vehicle’s speed:
• full hydraulic power assistance is provided at low vehicle speeds, for example when parking the vehicle
• hydraulic steering assistance is gradually reduced as the vehicle speed increases, allowing the driver a precise
feel of road contact
Road speed as measured by the electronic speedometer is fed to a microprocessor in the instrument cluster. The
microprocessor analyzes the signal and transforms it into a current pulse which is fed to the electro-hydraulic transducer. On the basis of this pulse the transducer, which is directly attached to the rotary valve housing, controls the
hydraulic reaction of the rotary valve, which determines the amount of torque the driver has to apply to the steering
wheel at various vehicle speeds.
A further advantage of the Servotronic system is the fact that the oil pressure and flow are never reduced and can therefore be utilized immediately in emergencies where sudden and unexpected steering corrections become necessary.
Depending on vehicle specification, the steering is electronically programmed at vehicle production to compliment
the characteristics of either the 16 or 17 inch wheels. This provides a tuned balance of the vehicle’s steering to befit
the size of the wheels.
The power steering pump is mounted to the engine and is driven by the accessory belt. The pump provides a constant flow rate of 8 liters per minute and has a maximum pressure of 110 bars. The fluid reservoir incorporates a 10
micron internal filter to ensure cleanliness of the system.
Steering Rack
The steering rack is a compact unit, mounted rigidly to the subframe, which from lock-to-lock requires 2.6 steeringwheel turns. The rotary motion of the steering wheel is transformed by the pinion into an axial motion of the rack.
The tie rods, which are attached at each end of the rack, transmit the motion to the wheel knuckles.
The steering rack is a variable ratio design, providing ease of parking maneuverability while maintaining the on-center steering precision required at high vehicle speeds.
A heatshield is installed to protect the steering rack and other components in the bulkhead area from exhaust
temperatures.
NOTES
3.5.4
Student Guide
Date of Issue: 10/01/2002
INTRODUCTION TO X-TYPE
Service Training
STEERING SYSTEM ASSEMBLY
UPPER
STEERING COLUMN
FLUID RESERVOIR
POWER STEERING
PUMP
LOWER
STEERING COLUMN
BODY SEAL
ROTARY VALVE HOUSING AND
ELECTRO-HYDRAULIC TRANSDUCER
HEAT SHIELD
FLUID COOLER
RACK AND PINION
INTR.186
NOTES
Date of Issue: 10/01/2002
Student Guide
3.5.5
INTRODUCTION TO X-TYPE
Service Training
SUSPENSION, STEERING AND BRAKES
Anti-lock Braking System (ABS)
The anti-lock braking system (ABS) is a four channel system having independent inputs from all four wheels. ABS is
controlled by the ABS control module (ABSCM) which monitors signals from the wheel speed sensors to calculate
the brake slip and the acceleration and deceleration of individual wheels. When the brake pedal is depressed, and
the ABSCM detects incipient wheel lock-up from the incoming signals, it triggers the recirculation pump inside the
hydraulic modulator and the solenoid valves for the wheel(s) concerned. Brake pressure is then modulated to
increase/decrease or remain constant at the wheel(s) concerned until wheel lock-up is eliminated.
The ABS provides self-diagnosis and any malfunction within the system will be indicated to the driver by the antilock warning light illuminating. Should a fault develop within the ABS, the brake system will operate conventionally
and with the same standard of performance as a vehicle not equipped with ABS.
3.5.6
Student Guide
Date of Issue: 10/01/2002
INTRODUCTION TO X-TYPE
Service Training
Bosch Dynamic Stability Control (DSC)
Dynamic stability control (DSC) maximizes vehicle stability under all conditions. The DSC system compares actual
vehicle course to that intended by the driver. If the intended course differs from the actual course because of oversteer or understeer conditions, the DSC system will brake individual wheels and reduce engine torque to bring the
vehicle back to the driver’s intended direction.
By using a combined yaw rate sensor and lateral accelerometer, the vehicle’s rotational motion around its vertical
axis and centrifugal forces generated while cornering are calculated to determine the vehicle’s actual behavior.
Using additional sensors for detecting steering wheel position and road wheel speed enables the system to recognize the driver’s original intentions.
If the vehicle begins to stray off the desired path, the DSC system interacts and provides exactly the right amount of
metered brake pressure at the correct brake caliper. Torque reduction can also be requested to assist in correcting
the vehicle’s attitude.
Oversteer
Oversteer indicates that the slip angle is greater at the rear than the front; the vehicle takes a smaller cornering radius than that prescribed by the driver. This condition is produced when the rear of the vehicle breaks away and
pushes out towards the outside curve. Under these circumstances, the DSC system will apply braking to the front
road wheel on the outside of the curve.
Understeer
Understeer indicates that the slip angle is greater at the front than at the rear; the vehicle takes a larger cornering
radius than that prescribed by the driver. In this situation, the front of the vehicle pushes out towards the outside of
the curve. The resulting action is that the DSC system will apply brake pressure to the rear brake caliper on the
inside of the curve.
Traction Control System (TCS)
The traction control system (TCS) is combined with the DSC system. The TC system optimizes road wheel traction
and vehicle stability by controlling road wheel spin. It controls the spin by using either brake actuation or engine
torque reduction; where possible, both may be utilized.
Individual wheel speed signals are compared against each other and against the vehicle reference speed. The TC system will then, either by using brakes or engine intervention, reduce the slip of all affected road wheels to that of the
lowest wheel speed.
In order to ensure that the brakes do not overheat, traction control braking is limited to low speeds. If the TCS system dictates that the temperature threshold has been reached, engine torque reduction is implemented and braking
is ceased.
It is important to remember that the TCS enhances vehicle stability under acceleration conditions only.
NOTES
Date of Issue: 10/01/2002
Student Guide
3.5.7
INTRODUCTION TO X-TYPE
3.5.8
Service Training
Student Guide
Date of Issue: 10/01/2002
J A G U A R
S E R V I C E
T R A I N I N G
INTRODUCTION TO JAGUAR
GENERAL INFORMATION
1
INTRODUCTION TO XJ/XK
2
INTRODUCTION TO S-TYPE
3
INTRODUCTION TO X-TYPE
3.1
Overview
3.2
Engine
3.3
Engine Management
3.4
Transmissions and Driveline
3.5
Suspension, Steering and Brakes
3.6
Climate Control
3.7
Electrical Distribution System
3.8
Body Systems
3.9
Occupant Protection
3.10 Task Sheets
Service Training Course TINTR
Date of Issue: 10/01/2002
INTRODUCTION TO X-TYPE
Service Training
CLIMATE CONTROL SYSTEM
Electrical System
The majority of components is made by Visteon. The climate control electrical system is an air-blend single-zone system.
Electronic Automatic Temperature Control (EATC) System
System Operation
The EATC system maintains the interior of the vehicle at the temperature selected by occupant. The heat input, air
conditioning, fan speed, and air intake and distribution are adjusted automatically to maintain the desired set temperature. Automatic control (AUTO) may be overridden at any time by the use of the various control buttons, such
as the blower speed control.
EATC Control Interface Panel
This interface panel is equipped with a digital display and in many cases operates on a logic similar to that of previous Jaguar climate control systems. The information shown on the panel consists of the following items:
• External temperature (permanently displayed, when system is operational)
• Blower motor speed chaplets and axis line
• Recirculation operation symbol
• Selected temperature demand
• Auto symbol
• Air distribution symbol
The EATC panel can have up to a total of fourteen push buttons. The system On/Off button is combined with a rotary control for manual blower speed operation.
EATC CONTROL INTERFACE PANEL
INTR.187
NOTES
3.6.2
Student Guide
Date of Issue: 10/01/2002
INTRODUCTION TO X-TYPE
Service Training
NAVIGATION CONTROL INTERFACE PANEL
INTR.188
Navigation Control Panel
This panel contains a 7 inch (178 mm) touch-sensitive screen-display control system, with eleven climate control
buttons, while the remaining features are selected via the navigation touch-screen display.
All the operating features for the EATC mid-line system apply to the navigation system. The main distinguishing element that differentiates the two systems is the location of the CM. On the EATC mid-line and manual low-line
systems, the CM is located in the control panel assembly. However, the navigation system utilizes a remote CM
because Denso, not Visteon, produces the navigation display unit.
Navigation Keys
Three levels of soft key functionality exist.
• A grayed out soft key indicates that the function is inhibited.
• A soft key with a red ring circling the circumference indicates that the feature is active.
• A soft key, not grayed out, with no red ring, indicates that the soft key is available but not active.
Keys Available
Climate Control Hard Keys
• Climate menu
• Blower speed control
• A/C ON / OFF
• Temperature demand
• Heated rear window (R)
• Heated windshield (F) (optional fitment)
• Defrost
• Recirculation
• Auto mode
Date of Issue: 10/01/2002
Climate Control Soft Keys
• Manual fan speed indicator chaplets
• Manual air distribution selection
• System ON/OFF
• External temperature scales ˚C and ˚F
• RAM air mode
• Mute feature
Student Guide
3.6.3
J A G U A R
S E R V I C E
T R A I N I N G
INTRODUCTION TO JAGUAR
GENERAL INFORMATION
1
INTRODUCTION TO XJ/XK
2
INTRODUCTION TO S-TYPE
3
INTRODUCTION TO X-TYPE
3.1
Overview
3.2
Engine
3.3
Engine Management
3.4
Transmissions and Driveline
3.5
Suspension, Steering and Brakes
3.6
Climate Control
3.7
Electrical Distribution System
3.8
Body Systems
3.9
Occupant Protection
3.10 Task Sheets
Service Training Course TINTR
Date of Issue: 10/01/2002
INTRODUCTION TO X-TYPE
3.7.2
Service Training
Student Guide
Date of Issue: 10/01/2002
INTRODUCTION TO X-TYPE
Service Training
ELECTRICAL DISTRIBUTION SYSTEM
Electrical System Architecture
Power Supplies
The Jaguar X-TYPE electrical system is a supply-side switched system. The ignition switch directly carries much of the
ignition switched power supply load. Power supply is provided via three methods: direct battery power supply, ignition switched power supply, and “Battery Saver” power supply. The “Battery Saver” power supply circuit is
controlled via GECM (General Electronic Control Module) internal timer circuits.
Fuse Boxes
The electrical harness incorporates a hard-wired Power Distribution Fuse Box in the engine compartment and a serviceable Central Junction Fuse Box in the front left-hand foot well. All fuses and relays (except the trailer towing
accessory kit) are located in the two fuse boxes.
Battery and Transit Relay
BATTERY BOX AND MOUNTING BRACKETS
The X-TYPE battery is located in the front left-hand corner of the engine bay and is unique to the individual
model. The battery is rated 80 Ah.
The transit relay is fitted for all models and markets. Its
operation is the same as that in current models. While
the transit relay is fitted, the battery box lid should be
stored in the trunk.
The battery is housed in a box and covered with a lid to
provide protection from excessive temperatures.
VENT PIPE
The battery uses silver calcium technology, which features a specially formulated silver calcium alloy
designed to operate at higher temperatures to reduce
battery gassing and corrosion.
NOTE: The battery has no special
requirements; however, disconnecting the
battery will inevitably affect the vehicle’s
electrical systems. Refer to Effect of Battery
Disconnection on the following pages.
INTR.191
SERVICE NOTE: Make sure the battery vent tube is not kinked or crushed.
NOTES
Date of Issue: 10/01/2002
Student Guide
3.7.3
INTRODUCTION TO X-TYPE
Service Training
ELECTRICAL DISTRIBUTION SYSTEM
Control Module Locations
CONTROL MODULE LOCATIONS
COOLING FAN MODULE
ABS / DSC CONTROL MODULE
BRAKE VACUUM CONTROL MODULE
AIR CONDITIONING CONTROL MODULE
(TOUCH-SCREEN)
CENTER CONSOLE:
AIR CONDITIONING CONTROL MODULE
(NON TOUCH-SCREEN);
NAV DISPLAY UNIT; AUDIO UNIT
ENGINE CONTROL MODULE
RAIN SENSING CONTROL MODULE
GENERAL ELECTRONICS MODULE
TRANSMISSION CONTROL MODULE
HID MODULE
YAW / LATERAL SENSOR
INSTRUMENT CLUSTER
J GATE MODULE
ADAPTIVE RESTRAINT CONTROL MODULE
FUEL PUMP CONTROL MODULE
RADIO ANTENNA MODULE
TELEPHONE PSE
VOICE ACTIVATION CONTROL MODULE
NAVIGATION CONTROL MODULE
CD DISC JOCKEY
REVERSE AID CONTROL MODULE
INTR.192
3.7.4
Student Guide
Date of Issue: 10/01/2002
INTRODUCTION TO X-TYPE
Service Training
Control Module Configuration
Overview
On current vehicles, replacement control modules are programmed at the Unipart distribution centers at Baginton
and Mahwah. As the number of vehicle variants increases, the number of different combinations of parameters
required to configure a control module is becoming too large to allow all the options to be dealt with as a complete
dataset. The system also introduces undesirable delays in repairing a vehicle. With X-TYPE vehicles, WDS software will
allow replacement modules to be programmed at the dealership from the vehicle VID block.
Configuration Procedure using WDS
The operator should select the Vehicle Configuration application tab followed by Programme New Module.
• The screen will display a list of configurable modules.
• When the operator selects the appropriate module, the WDS will determine the configuration requirements
and read the appropriate data from the vehicle VID block.
• The WDS will then configure the module accordingly.
• The WDS will then display the Dealer Option screen and the operator should complete the configuration by
selecting the appropriate dealer fit and customer options.
Configuration of the ECM
The exception to the above procedure is when the VID block itself needs to be reprogrammed. This situation would
arise if a new ECM was fitted. The procedure would be as follows:
• The operator should select the Vehicle Configuration application tab followed by Programme New Module and ECM.
• The WDS will check the VIN stored in the Instrument Cluster and compare this with the VIN entered by the
operator at the start of the session. If these are different, the operator will be given a VIN mismatch warning
and will be asked if the manually entered data should be used.
• If the operator selects No, a keyboard will be displayed and the VIN can be re-entered manually.
• If the operator selects Yes, the calibration files and VCATS data stored by WDS relating to that VIN will be displayed for the operator to check and confirm.
• The calibration procedure will then take place after which the operator will be told to cycle the ignition.
• The appropriate Dealer Option screens will be presented for the operator to select the appropriate dealer fit
and customer options.
• Finally, the VID block programming will be carried out where the configuration details from the other modules
and the vehicle VIN are stored in the VID block. At this stage, the PATS code alignment to the Instrument Cluster will be carried out without any input required from the operator.
Programming Existing Modules
The Vehicle Configuration application tab gives the operator the option of configuring an existing module as well as
a new module. This procedure will only be provided for modules that require flash programming or software
updates. If this option is selected, only a list of re-programmable modules will be displayed.
NOTES
Date of Issue: 10/01/2002
Student Guide
3.7.5
INTRODUCTION TO X-TYPE
Service Training
ELECTRICAL DISTRIBUTION SYSTEM
Multiplexing
The X-TYPE is the most complex Jaguar vehicle to date in terms of both the number of harness variants and the possible combinations necessary to achieve give vehicle specifications. The most significant deviation from the
distribution system used for other Jaguar models is the introduction of optical fiber cables to accommodate the
transfer of very high-speed, real-time audio data.
The optical fibers provide an optical network that interfaces to the SCP network via the audio unit. Refer to D2B Network for detailed information.
NOTE: The optical network currently uses a transfer protocol known as D2B. Although this protocol may
change in the future, the optical network will be referred to as “D2B” throughout this and other Jaguar
technical publications.
SCP, CAN and Serial Data Link (ISO 9141) Networks
The Standard Corporate Protocol (SCP), Controller Area Network (CAN) and Serial Data Link (ISO 9141) networks
are configured in a similar way to current Jaguar models to accommodate different data types and flow rates as
required for various vehicle features. Refer to the following table.
Network
Communication Between
Speed
CAN
Engine, Transmission, Braking System
500 K baud
SCP
Lower speed body systems
41.6 K baud
Serial Data Link
(ISO 9141)
Data Link Connector and ECM;
Control modules with self-diagnostic capability not connected to CAN or SCP
10.4 K baud
D2B
In-Car Entertainment
5.6 M baud
NOTES
3.7.6
Student Guide
Date of Issue: 10/01/2002
INTRODUCTION TO X-TYPE
Service Training
X-TYPE NETWORKS
ABS, ABS/TC, DSC
CONTROL MODULE
ENGINE
CONTROL MODULE
VOICE ACTIVATION
CONTROL MODULE
TRANSMISSION
CONTROL MODULE
CELLULAR PHONE
CONTROL MODULE
AIR CONDITIONING
CONTROL MODULE
AIR CONDITIONING
CONTROL MODULE
DSC
YAW RATE SENSOR
AUDIO UNIT
NETWORK GATEWAY
HEADLAMP LEVELING
CONTROL MODULE
RESTRAINTS
CONTROL MODULE
D2B
J GATE
PARKING AID
CONTROL MODULE
DSC
STEERING ANGLE SENSOR
NAVIGATION
CONTROL MODULE
ROOF
CONSOLE
INSTRUMENT
CLUSTER
NETWORK GATEWAY
CAN
GENERAL ELECTRONIC
CONTROL MODULE
SCP
SERIAL DATA LINK
CAN NETWORK
DATA LINK CONNECTOR
SCP NETWORK
D2B NETWORK
SERIAL DATA LINK
INTR.193
Date of Issue: 10/01/2002
Student Guide
3.7.7
INTRODUCTION TO X-TYPE
Service Training
ELECTRICAL DISTRIBUTION SYSTEM
Multiplexing (continued)
D2B Network
Network Components
Optical fiber The fiber comprises a 1mm (0.039 in.) polymer core with a 3.5mm (0.137 in.) diameter outer protective jacket. The fiber facilitates the transport of data, in the form of pulses of light which are too fast to be seen by the
eye, at a data bit rate of approximately 5.5M bits per second.
Wake-up wire The wake-up wire comprises copper wire configured in a star-like arrangement that connects to a
single pin on each of the modules.
•
•
•
•
The audio unit sends a wake-up command (an electrical pulse) via the copper wire to initialize the slave module(s).
The wake-up pulse is sent when the ignition key is turned to position “I”.
The pulse triggers slave modules to look at the preceding module for a “light signal” (originated by the audio
unit) and to participate with the audio unit in network initialization.
At the end of this initialization procedure, the modules are ready for full network operation.
NOTE: Any malfunction during the initialization stage will cause a DTC to be stored by the audio unit. The
D2B Network will then shut down for the remainder of that key cycle.
Master module The master module is the audio unit; it manages the D2B network and provides the gateway to the
SCP network.
Slave module(s) A slave module is any other system module that is connected to the D2B network and includes:
• Navigation control module
• Cellular phone control module
• CD autochanger
• Voice activation control module
Handling
Special care should be taken to avoid damage or contamination when handling or working on the vicinity of fiber
optical cables and connectors.
NOTE: Damage or contamination includes scratches to the cable ends and pollution caused by dust, dirt or oil.
CAUTION: When handling optical fibers, cleanliness is of paramount importance. The fiber
ends should not be touched even with clean bare hands, as the natural oils deposited from the
skin may penetrate the fiber or may cause dirt to adhere to the fiber end.
System malfunctions and unnecessary warranty claims can be minimized by following these guidelines:
• After disconnection of any cables, carefully install an appropriate dust cap to protect the mating face of the
connectors from damage or contamination.
• Avoid introducing tight bends (less than 25mm radius) or kinks into the optical fiber during service or repair.
Tight bends or kinks could:
– Impair system operation
– Cause immediate system failure
– Cause future system failure
• Avoid excessive force, strain or stress on the fibers and connectors, especially permanent stress after reinstallation.
3.7.8
Student Guide
Date of Issue: 10/01/2002
INTRODUCTION TO X-TYPE
Service Training
X-TYPE D2B NETWORK
B+
SET
KEY BARREL SWITCH
SLIDING ROOF
I
GLOBAL
CLOSE
GLOBAL
CLOSE
O
RELAY
B+
B+
II
LH FRONT DOOR
LATCH ASSEMBLY
MOTOR
CONTROL
POSITION
SENSORS
GENERAL ELECTRONIC
CONTROL MODULE
LH FRONT WINDOW MOTOR ASSEMBLY
B+
II
REAR
WINDOWS
ISOLATE
CONTROL
REAR WINDOW
ISOLATE
O
RELAY
B+
B+
II
LH FRONT
WINDOW
MOTOR
CONTROL
POSITION
SENSORS
RH FRONT
WINDOW
LH REAR
WINDOW
RH FRONT WINDOW MOTOR ASSEMBLY
RH REAR
WINDOW
RELAY
B+
DRIVER DOOR SWITCH PACK
B+
II
MOTOR
CONTROL
POSITION
SENSORS
PASSENGER DOOR
SWITCH PACK
LH REAR WINDOW MOTOR ASSEMBLY
RELAY
B+
LH REAR DOOR
SWITCH PACK
B+
II
MOTOR
CONTROL
POSITION
SENSORS
RH REAR WINDOW MOTOR ASSEMBLY
RH REAR DOOR
SWITCH PACK
INTR.194
Date of Issue: 10/01/2002
Student Guide
3.7.9
INTRODUCTION TO X-TYPE
3.7.10
Service Training
Student Guide
Date of Issue: 10/01/2002
J A G U A R
S E R V I C E
T R A I N I N G
INTRODUCTION TO JAGUAR
GENERAL INFORMATION
1
INTRODUCTION TO XJ/XK
2
INTRODUCTION TO S-TYPE
3
INTRODUCTION TO X-TYPE
3.1
Overview
3.2
Engine
3.3
Engine Management
3.4
Transmissions and Driveline
3.5
Suspension, Steering and Brakes
3.6
Climate Control
3.7
Electrical Distribution System
3.8
Body Systems
3.9
Occupant Protection
3.10 Task Sheets
Service Training Course TINTR
Date of Issue: 10/01/2002
INTRODUCTION TO X-TYPE
Service Training
BODY SYSTEMS
Exterior Lighting
Depending on market and vehicle specification, X-TYPE has only two major deviations from a standard exterior lighting arrangement: autolamp and high-intensity discharge headlamps (complete with automatic headlamp leveling).
Exterior lighting is activated by the main lighting switch and, where appropriate, the left-hand column stalk switch
(high beam).
NOTE: Due to the ‘warm-up time’ experienced with xenon lamps, the low beam lamp is not used for the
headlamp flash feature; the high beam is used instead.
Switching is via allocated fuses and relays, with the exception of the turn signal lamps/hazard warning lamps, which
are controlled by the general electronic control module (GECM).
Main Lighting Switch
The main lighting switch assembly comprises:
• Rotary switch
• Dimmer switch
• Trip computer switchpack
The rotary switch is used to activate the following:
• Side lamps
• Headlamps
• Autolamp
• Front fog lamps
– The lamps are activated when the rotary switch
is ‘pulled’ to its first position, provided the side
lamp or headlamp position is also selected.
NOTE: The front fog lamps will not operate if
main beam is selected.
• Rear fog lamps
– The lamps are activated when the rotary switch
is ‘pulled’ to its second position, provided the
rotary switch is not at the OFF position.
NOTE: The front fog lamps will automatically
operate when the rear fog lamps are selected,
provided the main beam is not selected.
MAIN LIGHTING SWITCH
INTR.195
NOTES
3.8.2
Student Guide
Date of Issue: 10/01/2002
INTRODUCTION TO X-TYPE
Service Training
Halogen Headlamps
NOTE: After approximately 5 minutes a noticeable fall in lamp output may be observed. The effect is due
to a voltage boost feature that has been introduced.
Autolamp (where applicable)
AUTOLAMP SENSOR
A sensor monitors ambient lamp levels and provides
feedback that will permit the automatic control of the
side lamps and low beam headlamps where appropriate, providing:
• The ignition key is at position II
• The AUTO option on the main lighting switch is
selected
NOTE:The sensor is integral to the interior
rear view mirror (but is only available when
the electrochromic mirror is fitted), therefore
obstruction of the sensor, including failure to
keep the windshield clean, will affect the
operation of the lamps.
INTR.196
The sensor is calibrated to monitor ambient light levels:
• Detection of darkness for 2 seconds continuously, will cause the low beam and side lamps to be activated
• Detection of daylight for 15 seconds continuously, will cause the exterior lighting to be extinguished
NOTES
Date of Issue: 10/01/2002
Student Guide
3.8.3
INTRODUCTION TO X-TYPE
Service Training
BODY SYSTEMS
Exterior Lighting
High Intensity Discharge (HID) Headlamps
The High Intensity Discharge Headlamp System provides illumination approximately twice as bright as a standard
H1 halogen bulb. Because of this level of brightness, an automatic headlamp leveling system has to be incorporated
to prevent dazzling oncoming drivers.
HID headlamps are used only for dip beams. Main beams remain halogen bulbs.
The headlamp burners consist of a tube filled with xenon gas with an electrode at either end. When the lamps are
switched on, an electric charge is applied across the electrodes. After a brief high current phase, the lamp output is
regulated to 35 W.
The lamp wear is so minimal that the xenon burner is designed to last the life of the vehicle.
NOTE: The system is not a dealer fit option.
WARNING: CARE SHOULD BE TAKEN WHEN WORKING ON THE SYSTEM. XENON LAMPS CAN
GENERATE ELECTRICAL VOLTAGES OF UP TO 35 kV; SUITABLE SAFETY PRECAUTIONS MUST
BE OBSERVED.
WARNING: DISCONNECT LIGHTING UNITS FROM THE VEHICLE HARNESS BEFORE
PERFORMING ANY WORK ON THE HID SYSTEM.
The high-intensity discharge headlamp assembly comprises:
•
•
•
•
•
•
•
Low beam lamp (xenon)
High beam lamp (halogen)
Side lamp
Turn signal lamp
Xenon lamp control module
Igniter
Headlamp leveling motor
Vehicles fitted with the high-intensity discharge lighting system use xenon lamps for the low beam instead of standard halogen lamps.
• The functionality of the low beam remains unchanged
• The high beam, turn signal and side lamps are all conventional lamps
NOTE: Due to national legislation, vehicles equipped with xenon lamps require the installation of
Automatic Headlamp Leveling and Headlamp Cleaning System.
NOTES
3.8.4
Student Guide
Date of Issue: 10/01/2002
INTRODUCTION TO X-TYPE
Service Training
HIGH-INTENSITY DISCHARGE HEADLAMP ASSEMBLY
HIGH BEAM LAMP
SIDE LAMP
TURN SIGNAL
LAMP
AUTOMATIC HEADLAMP
LEVELING MOTOR
LAMP CONTROL MODULE
LOW BEAM LAMP
CLAMPING RING
IGNITER
INTR.197
Xenon Lamp
XENON LAMP
The 35 watt xenon lamp produces a beam with a intensity that is approximately three times that produced by
a conventional lamp of the same wattage.
The chamber contains xenon gas and a mixture of metal halide salts. High voltage (typically 20kV) ignition is
provided by the xenon lamp control module and an arc
forms in the chamber as the gap between the two electrodes is bridged. After ignition there is a warm-up
period of approximately three seconds during which
the metal-halide salts evaporate. This brief excess-current phase is followed by stabilization of the arc and the
regulation of the lamp output at 35W by the control
module.
ELECTRODES
GAS-FILLED
CHAMBER
NOTE: Unlike conventional lamps, xenon
lamps do not deteriorate and so should last
the lifetime of the vehicle.
INTR.198
Date of Issue: 10/01/2002
Student Guide
3.8.5
INTRODUCTION TO X-TYPE
Service Training
BODY SYSTEMS
Exterior Lighting
High Intensity Discharge (HID) Headlamps
Automatic Headlamp Leveling
The system comprises:
• Front-axle level sensor assembly
• Rear-axle level sensor assembly
• Headlamp leveling module
• Left-hand headlamp leveling motor
• Right-hand headlamp leveling motor
AUTOMATIC HEADLAMP LEVELING SYSTEM
ENGINE
CONTROL MODULE
LH HEADLAMP
LEVELING MOTOR
CAN
REAR AXLE
LEVEL SENSOR
HEADLAMP LEVELING
MODULE
FRONT AXLE
LEVEL SENSOR
RH HEADLAMP
LEVELING MOTOR
DATA LINK
CONNECTOR
SERIAL
DATA LINK
INTR.199
Automatic headlamp leveling is operational when the main lighting switch is set to the headlamp, rear fog lamp or
autolamp position and the ignition key is at position II.
The headlamp leveling module is located at the left-hand side of the instrument panel and is accessible after removing the side and lower panels.
The axle level sensors are inductive devices that respond to the vertical position of the vehicle and supply feedback
signals to the module. The module processes the data and supplies appropriate signals to the headlamp leveling
motors causing the position of the headlamps to be adjusted accordingly.
NOTE: After disconnecting any element of the automatic headlamp leveling system, recalibration will be
necessary using WDS.
NOTES
3.8.6
Student Guide
Date of Issue: 10/01/2002
INTRODUCTION TO X-TYPE
Service Training
Anti-Theft System
Anti-theft options depend on market specification and
include a perimeter alarm system and a passive antitheft system (PATS). The X-TYPE incorporates the following, either as standard or dealer installed options:
• Key barrel on driver’s side only
• Encrypted instrument cluster/engine control module immobilization system, controlled by the ignition key transceiver/transponder
• Radio frequency remote transmitter integrated into
main key
– Four control buttons (lock, unlock, luggage
compartment lid release, headlamp convenience/panic)
• Central locking by key, remote transmitter and
interior handle
• Auto-locking
– Drive-away locking
– Auto-relock
• Perimeter alarm of doors, hood and luggage compartment lid
• Panic alarm – remote transmitter operated
• Integrated security system indicator lamp (dual
function – indicates vehicle alarm system armed
and PATS fault codes)
• Two-stage unlocking
• Separate security horn or battery backed security
sounder (market dependent)
Definition of terms:
• Auto-locking (drive-away locking) – the doors will
lock automatically when the vehicle is driven
away, at a speed in excess of 7 km/h (4 mph)
• Auto-relock – the vehicle is centrally locked and
armed following a remote control unlock if no
door was opened or if the ignition key remained at
position ‘0’ for 45 seconds
• Two-stage unlocking – a security feature where only
the driver’s door unlocks under normal operation of
key or transponder remote (passenger door can be
unlocked with a second unlock operation)
Date of Issue: 10/01/2002
The perimeter alarm system consists of several core
components:
• General electronic control module (GECM)
• Vehicle horn
• Hood ajar switches
• Door ajar switches
• Luggage compartment lid ajar switch
• Security system indicator lamp
Market dependent components include:
• Security horn or battery backed sounder
The security system is armed by locking the vehicle
using the driver’s door lock or by pressing the lock button on the key fob transmitter.
Once armed (25 seconds after locking), any of the following will trigger an alarm:
• Opening a door/hood/luggage compartment lid
• Using an invalid PATS ignition key
When an alarm is in progress, the turn signals flash and
the vehicle horn sounds. Where fitted, the security horn
or battery backed sounder sound in conjunction with
the vehicle horn.
The security system can be disarmed by unlocking the
driver’s door lock, pressing the unlock button on the
key fob transmitter, or turning a valid key in the
ignition.
NOTES
Student Guide
3.8.7
INTRODUCTION TO X-TYPE
Service Training
BODY SYSTEMS
Power Windows
The power window motor electronics each monitor an integral hall effect sensor feedback signal to determine when
the normal travel of the motor is limited.
When the vehicle power supply is disconnected, the antitrap and one-touch up features will no longer function
when the power supply is restored.
The initialization procedure must be carried out to restore operation.
Power Window Initialization
•
•
•
•
Lift and hold the window switch in the up direction until the window seats completely. Continue to hold the
switch for a further 2 seconds.
Release the switch and then lift and hold it again for a further 2 seconds. This procedure ensures that the window is fully seated into the seal.
Press the window switch to lower the window to its fully open position.
Verify the operation of the antitrap and one-touch up operation.
NOTE: This procedure can be carried out either from the individual window switches or from the driver’s
switchpack.
Thermal Overload
The window motors are protected from overheating by a thermal overload feature. If the windows are operated
continuously, the thermal overload feature will operate and the window will no longer respond to the operation of
the switch. The number of opening / closing cycles required to implement this feature varies depending on temperature, but it should never be less than 7. One touch up and down operation should be possible within 10 seconds
with full operation resuming after a brief rest period.
Ice Mode
The windows have an ice mode feature to facilitate the closing of the windows in the event of the glass run channels
being obstructed by ice. This feature is activated by the vehicle occupant as follows:
• Raise the window until the obstruction is reached. The antitrap feature will operate, lowering the window to a
minimum of 50 mm below the point at which reversing was initiated (or at least 200 mm from the close position).
• Raise the window back up to the obstruction. Again the antitrap feature will operate.
• Within 10 seconds, raise the window a third time to the obstruction. This time the antitrap feature will not
operate. Release the switch.
• Lift the switch again within 0.5 seconds. The window motor will now operate at its full force (250 N maximum)
for approximately 12 mm of upward travel. This can be repeated several times provided that each time the
switch is activated within 0.5 seconds.
• Should the 250 N force be insufficient to clear the obstruction, this insufficient force will be interpreted as system failure and the one-touch up function will be disabled. To relearn the function, the window initialization
procedure will have to be performed.
3.8.8
Student Guide
Date of Issue: 10/01/2002
INTRODUCTION TO X-TYPE
Service Training
Sunroof Operation
The sunroof motor module also monitors an integral hall effect sensor feedback signal to determine when the normal travel of the motor is limited.
The sunroof is not affected by battery disconnection and will not need to be initialized. However, if power is disconnected while the sunroof is actually being operated, then memory will be lost and the following initialization
procedure will have to be carried out. This procedure will also have to be carried out if the sunroof motor is
changed.
Sunroof Initialization
•
•
•
•
Press the switch in the tilt position until the roof moves to the fully tilt position and stops.
Release the switch.
Within 5 seconds, press and hold the switch in the tilt position again. The roof will travel automatically to the
fully open position, back to the fully closed position and stop.
Verify the operation of the antitrap and one-touch features.
NOTE: If the antitrap or one-touch features stop working correctly for any reason, the roof can be
reinitialized without disconnecting the battery.
To reinitialize without disconnecting the battery, run the roof panel into the tilt position and continue to press and
hold the switch for 20 seconds. The roof panel will move up and down signaling memory erasure of the previous
initialization.
The roof panel can then be reinitialized as described above.
NOTES
Date of Issue: 10/01/2002
Student Guide
3.8.9
INTRODUCTION TO X-TYPE
Service Training
BODY SYSTEMS
In-Car Entertainment (ICE)
The entertainment systems comprise:
• Audio system:
– Audio unit
– CD changer
– Steering wheel telematics controls
• Antenna
• Speakers
Specific components will vary according to vehicle and market specifications.
NOTE: The entertainment system may also be operated by spoken commands if the optional Voice
Activated Control System is installed.
Audio Unit
AUDIO UNIT: TELEMATICS VERSION
Depending on vehicle specification, the audio unit is
integrated with the telematics display module (telematics version) or integrated with the phone keypad and
small LCD (non-telematics version).
The audio unit:
• Manages the D2B network and provides the gateway to the SCP network
• Stores diagnostic trouble codes for itself and the
CD changer (where installed).
NOTE: The installation of new components
within the audio system will necessitate the
reconfiguration of the system using WDS.
INTR.200
Telematics Version
The telematics version of the audio unit is integrated
with the telematics display module and comprises:
• Radio cassette
• Integral amplifier (4x 35W output)
TELEMATICS DISPLAY SCREEN: CASSETTE TAPE
NOTE: The telematics display module is used
in conjunction with the audio unit to control
entertainment system functions but also
provides the ability for the user to control such
features as climate control.
INTR.201
3.8.10
Student Guide
Date of Issue: 10/01/2002
INTRODUCTION TO X-TYPE
Service Training
Non-Telematics Version
• The non-telematics audio unit comprises:
• Radio cassette
• Liquid crystal display (LCD) including clock
• Integrated phone keypad
• Integral amplifier (4 x 35W output)
AUDIO UNIT: NON-TELEMATICS VERSION
NOTE: The non-telematics version of the
audio unit is complimented by the climate
control panel/module.
CD Changer
The CD changer (where installed) is:
• Located in the left side of the luggage compartment
• Operated from either version of the audio unit
INTR.202
TELEMATICS DISPLAY SCREEN: CD CHANGER
Steering Wheel Telematics Control
To ensure minimum disruption to concentration when
driving, limited control of audio, telephone and voice
activation systems is possible using the steering wheel
telematics controls.
The controls provide the following functionality:
• Answer phone call, mute, or select voice activation
• Increase or decrease volume
• Selection of radio FM, AM, tape cassette, CD and
phone ready mode
• Cycle through preset radio stations, the next CD
track or tape AMS (automatic music search)
INTR.203
Antenna
Speakers
The following antennas (where applicable) are integrated into the rear window glass:
• FM element
• AM element
The base audio sound system comprises:
• Four full range door speakers
Date of Issue: 10/01/2002
The premium audio sound system comprises:
• Four lightweight mid-bass door speakers
• Four door-mounted tweeters
• Sub-woofer enclosure
Student Guide
3.8.11
INTRODUCTION TO X-TYPE
Service Training
BODY SYSTEMS
Navigation System
The navigation system comprises:
• Navigation control module complete with DVD reader
• Navigation data DVD
• Navigation system display module (audio unit – telematics version)
• Navigation system antenna
NOTE: The navigation system uses the Telematics Display Module (the display component of the
telematics version of the Audio Unit) as the navigation system display module; refer to the appropriate
section for more information.
The vehicle location/direction is determined using the following:
• Global positioning system (GPS)
• Vehicle speed
• Gyroscope to detect directional changes
• Navigation software integral to the Navigation Control Module
NAVIGATION SYSTEM COMPONENT LOCATION
AUDIO UNIT
(TELEMATICS VERSION)
NAVIGATION CONTROL MODULE
NAVIGATION SYSTEM ANTENNA
INTR.204
NOTES
3.8.12
Student Guide
Date of Issue: 10/01/2002
INTRODUCTION TO X-TYPE
Service Training
Navigation Control Module
The navigation control module (NCM) comprises:
• Navigation software which controls:
– generation of map display
– routing functions
• Graphics display driver
• D2B output of audio data for voice guidance and television
• SCP link for communications between other modules
• Subsystem control software to generate control screens for other modules and support communications
• GPS decoder which amplifies and decodes the GPS signal received from the antenna
• Gyroscope to monitor vehicle direction
• DVD drive which reads the map database stored on disk
• Diagnostic software
Navigation System Display Module
The display module is a multifunction touch screen console which comprises on-screen simulated buttons (soft buttons) and perimeter buttons (hard buttons). Unlike other Jaguar models, the display module is not dedicated to
navigation, it is also:
• The principal interface for several subsystems – climate control, phone, voice activation
• An integral component of the audio unit
Navigation System Antenna
The navigation system antenna is a satellite GPS type. It is common to all models and is mounted on the parcel shelf
to optimize reception. The coaxial cable links the antenna module to the NCM and:
• Provides 5V dc power from the NCM to active receiver circuits of the antenna via the inner coaxial conductor
• Transfers incoming signals from the antenna to the NCM
NOTE: Signal reception may be affected by the presence of metal objects or foil on or near the parcel shelf
or rear screen.
NOTES
Date of Issue: 10/01/2002
Student Guide
3.8.13
INTRODUCTION TO X-TYPE
Service Training
BODY SYSTEMS
Voice Activated Control System
Where installed, the voice activated control system for X-TYPE is an expansion of the S-TYPE system and offers the
user the option to voice-activate certain features for the following:
• Entertainment system
• Cellular phone system
• Climate control system
• Navigation system
NOTE: The voice activated control system can only be installed during manufacture. It is not available as
an accessory.
The system components comprise:
• Voice activation control module (VACM) located in left side of the luggage compartment
• Microphone, shared with the phone and integrated into the roof console
• Push-to-talk button, mounted on the steering wheel, shared with the phone and wired through the audio unit
VOICE ACTIVATED CONTROL SYSTEM COMPONENT LOCATIONS
MICROPHONE
VOICE ACTIVATION CONTROL MODULE
PUSH-TO-TALK BUTTON
INTR.205
NOTE: Where applicable, it is possible to initiate a training mode which enables the voice activated
control system to fine-tune the voice recognition capability.
The VACM is not serviceable but will need to be reconfigured using WDS if changes are made to the systems it controls; for example after the installation of a CD changer.
NOTE: The VACM is part of the optical network.
3.8.14
Student Guide
Date of Issue: 10/01/2002
J A G U A R
S E R V I C E
T R A I N I N G
INTRODUCTION TO JAGUAR
GENERAL INFORMATION
1
INTRODUCTION TO XJ/XK
2
INTRODUCTION TO S-TYPE
3
INTRODUCTION TO X-TYPE
3.1
Overview
3.2
Engine
3.3
Engine Management
3.4
Transmissions and Driveline
3.5
Suspension, Steering and Brakes
3.6
Climate Control
3.7
Electrical Distribution System
3.8
Body Systems
3.9
Occupant Protection
3.10 Task Sheets
Service Training Course TINTR
Date of Issue: 10/01/2002
INTRODUCTION TO X-TYPE
Service Training
OCCUPANT PROTECTION
Advanced Restraints System
New technologies have permitted the development of an ‘Advanced Restraint System’ that provides an improved
overall level of crash protection for vehicle occupants. The system analyzes the occupancy scenario and crash severity before activating the appropriate safety devices to help better protect a range of occupants in a variety of crash
situations. Benefits of the new system include:
• Optimization of the deployment restraint devices and reduction in potential for airbag induced injuries
• The significant reduction in passenger airbag deployments (particularly when passenger seats are unoccupied)
and a general reduction in all airbag deployments
In order to support the advanced restraint system requirements, a restraint control architecture has been introduced comprising the following systems or components:
• All-electric crash sensing with frontal crash severity sensing and advanced restraints management
• Driver airbag with twin stage inflator
• Passenger airbag with twin stage inflator
• Child seat lower ISOfix anchors for rear seats
• Safety belt system including: front belt use detection, load limiting retractors and buckle pre-tensioner
• Front seats including: driver seat track position sensor and passenger seat weight-sensing system
• Lower steering column
• Front seat-mounted side airbags
• Side curtain airbag
NOTES
3.9.2
Student Guide
Date of Issue: 10/01/2002
INTRODUCTION TO X-TYPE
Service Training
ADVANCED RESTRAINTS SYSTEM DIAGRAM
CRASH SENSING
FRONT CRASH SENSOR
SEAT TRACK
POSITION SENSOR
FRONT
SIDE CRASH SENSOR (LH)
FRONTŁ
SIDE CRASH SENSOR (RH)
SAFETY BELT
BUCKLE SENSOR (LH)
SAFETY BELT
BUCKLE SENSOR (RH)
REAR
SIDE CRASH SENSOR (LH)
REARŁ
SIDE CRASH SENSOR (RH)
PASSENGER SEAT
WEIGHT-SENSING SYSTEM
CONTROL AND PROCESSING
RESTRAINTS CONTROL MODULE
DIAGNOSTIC
CONNECTOR
GENERAL ELECTRONIC
CONTROL MODULE
DRIVER AIRBAG
PASSENGER AIRBAG
SEAT-MOUNTED
SIDE AIRBAG
SEAT-MOUNTED
SIDE AIRBAG
DRIVER
PRE-TENSIONER
PASSENGER
PRE-TENSIONER
SIDE CURTAIN
AIRBAG (LH)
SIDE CURTAIN
AIRBAG (LH)
AUDIBLE WARNING
SPEAKER
SRS INDICATOR
LAMP
PASSENGER AIRBAG
DE-ACTIVATION LAMP
WARNINGS
PROTECTION
INTR.206
Date of Issue: 10/01/2002
Student Guide
3.9.3
INTRODUCTION TO X-TYPE
Service Training
OCCUPANT PROTECTION
Airbag Modules
Driver Airbag Module
The driver airbag module is controlled by the restraints control module (RCM), which chooses between first or second stage deployment, depending on driver seat buckle usage, seat track position and crash severity.
NOTE: Variation in passenger airbag deployment is determined by the timing of the first and second stage
ignition signals. This facilitates adaptation of stiffness and timing or the airbag to optimize occupant protection.
The module comprises:
• A twin stage inflator as opposed to a single stage
inflator
• Separate chambers for the two inflation stages,
each independently activated by the RCM
• Two air bag connectors, that have foolproof
mechanical keying and are color coded to the
respective plug on the inflator
• A non-azide propellant that reduces particulates
and effluents
DRIVER AIRBAG MODULE
The airbag deploys radially, to reduce the risk of airbag
induced injury to a driver that is positioned close to the
steering wheel.
NOTE: Disposal of twin stage airbags is different
than with single stage airbags; refer to JTIS.
INTR.207
NOTES
3.9.4
Student Guide
Date of Issue: 10/01/2002
INTRODUCTION TO X-TYPE
Service Training
Passenger Airbag Module
PASSENGER AIRBAG MODULE
The module comprises:
• A twin stage inflator as opposed to the single stage
inflator
• Two airbag connectors to accommodate the twin
stage inflation
The heated gas inflator:
• Comprises a high-pressure mix of clean air and
hydrogen gas, triggered by two separate igniters
• Produces a controlled generation of clean gas to
rapidly fill the airbag
• Is classified as a stored flammable gas (not as an
explosive) and as such, has less restrictive storage
and transportation requirements
• Produces a very clean burn and almost no particulates
• Is almost free of any toxins, making disposal or
recycling much easier
NOTE: Disposal of twin stage airbags is different
than with single stage airbags; refer to JTIS.
The passenger air bag module is controlled by the
restraints control module (RCM), which chooses
between first or second stage deployment, depending
on occupant status and crash severity.
INTR.208
NOTE: Variation in passenger airbag deployment is determined by the timing of the first and second stage
ignition signals. This facilitates adaptation of the stiffness and timing of the airbag to optimize occupant
protection.
NOTE: This passenger airbag module can be removed through the glovebox aperture; refer to JTIS.
NOTES
Date of Issue: 10/01/2002
Student Guide
3.9.5
INTRODUCTION TO X-TYPE
Service Training
OCCUPANT PROTECTION
Airbag Modules (continued)
Seat-Mounted Side Airbag Module
SEAT-MOUNTED SIDE AIRBAG MODULE
The seat-mounted side airbag is designed to provide
protection for the thorax (the part of the torso between
the neck and the abdomen). The module:
• Is mounted in the outboard bolster of each front seat
• Is standard fit and specification in all markets
• Does not require maintenance
• Has no serviceable parts
• Uses compressed argon to inflate the bag
INTR.209
NOTE: As with all occupant safety
components, the SRS indicator lamp will
illuminate if a DTC has been stored. Diagnosis
must be undertaken using WDS.
In an airbag deployment situation, the airbag deploys through the stitched seam in the side bolster. A chute has
been designed into the inside of the trim cover to ensure the airbag always emerges at the same point.
WARNING:IN A SERVICE SITUATION, THE MODULE MUST BE CORRECTLY LOCATED IN THE
CHUTE. FAILURE TO FOLLOW THE SERVICE PROCEDURE COULD RESULT IN INCORRECT AIR
BAG DEPLOYMENT; REFER TO JTIS.
NOTE: In the event of a side impact that is sufficient to deploy the bag, it will be necessary to replace the
complete seat.
NOTES
3.9.6
Student Guide
Date of Issue: 10/01/2002
INTRODUCTION TO X-TYPE
Service Training
Side Curtain Airbag
SIDE CURTAIN AIRBAG
The side curtain airbag has been designed uniquely for
X-TYPE and comprises:
• Attachment brackets (p-clips)
• Fill tube
• Airbag
• Housing
• Inflator
• Front/rear tethers
The side curtain airbag:
• Is standard fit and specification in all markets
• Is located under the headliner and stabilized at the
‘A’ post and ‘C’ post by tethers
• Does not require routine maintenance
• Has no serviceable parts
• Uses compressed argon to inflate the airbag
• Deploys to coincide with seat-mounted side airbag
deployment
NOTE: If the passenger airbag is deactivated,
the corresponding seat-mounted side airbag is
also deactivated, however the side curtain
airbag will still deploy to afford protection to
any corresponding rear occupant.
• After deployment, the side curtain airbag extends
down to approximately shoulder height providing
head protection for both the front and rear occupants
HOUSING
FILL TUBE
INFLATOR HOUSING
ASSEMBLY
REAR TETHER
FRONT TETHER
INFLATOR
INTR.210
The inflator:
• Generates the gas needed to fill the airbag
• Consists of a high strength steel casing filled with a solid propellant charge, an electrically activated igniter and
a cold gas bottle containing pressurized gas
When appropriate, the restraints control module (RCM) sends a signal to the igniter causing the following sequence of events:
• The propellant is ignited
• The burning propellant opens the membrane of the cold gas bottle and heats the pressurized gas
• The expanding gas is directed into the fill tube by the inflator housing assembly
• The gas emerges through holes in the fill tube and enters the front and rear side curtain airbag chambers
Steering Column
The steering column is an integral part of the occupant safety system.
Date of Issue: 10/01/2002
Student Guide
3.9.7
INTRODUCTION TO X-TYPE
3.9.8
Service Training
Student Guide
Date of Issue: 10/01/2002