1
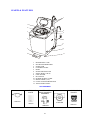
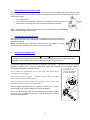
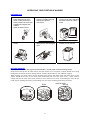
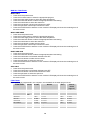
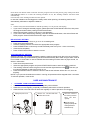
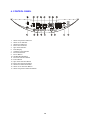
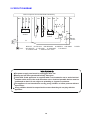
ZEROWATT
MODEL: XQB55-526
Service Manual
CONTENTS
1.PARTS & FEATURES
2.IMPORTANT SAFETY INSTRUCTIONS
3 .INSTALLATION INSTRUCTIONS
4.CONTROL PROGRAM
5.CIRCUIT DIAGRAM
6. HOW TO DISASSEMBLE THE UNIT
7. TROUBLESHOOTING
8.EXPLOSION VIEWS & PARTS LISTS
1
1.PARTS & FEATURES
7
1
2
8
3
9
4
10
11
12
5
6
13
1.
2.
3.
4.
5.
6.
7.
8.
9.
10.
11.
12.
13.
DETERGENT CASE
SOFTENER DISPENSER
INNER TUB
CONTROL PANEL
BASE
NOISE PROOF PLATE
INLET HOSE (2 PCS)
LINT FILTER
PULSATOR
POWER SUPPLY CORD
DRAIN HOSE (1 PC)
LEVEL ADJUSTABLE KNOB
ADJUSTABLE FOOT
ACCESSORIES
INLET HOSE
NOISE PROOF
PLATE
WATER INLET
QUICK CONNECT
ASSEMBLY
2 PIECES
CASTER
CONNECTOR FOR
FAUCET
4 PIECES
1 PIECE
1 PIECES
2
1 PIECES
2.IMPORTANT SAFETY INSTRUCTIONS
aWARNINGa
•
•
•
•
•
•
•
•
•
•
•
•
•
•
To reduce the risk of fire, electrical shock, or injury
when using your portable washer, follow these basic
precautions:
Read all instructions before using the portable washer.
Do not wash articles that have been previously cleaned in, washed in, soaked in, or spotted with
gasoline, dry-cleaning solvents, or other flammable or explosive substances, as they give off vapors
that could ignite or explode.
Do not add gasoline, dry-cleaning solvents, or other flammable or explosive substances to the wash
water. These substances give off vapours that could ignite or explode.
Under certain conditions, hydrogen gas may be produced in a hot-water system that has not been used
for 2 weeks or more. HYDROGEN GAS IS EXPLOSIVE. If the hot-water system has not been used
for such a period, before using a washing machine, turn on all hot-water faucets and let water flow
from each for several minutes. This will release any accumulated hydrogen gas. As the gas is
flammable, do not smoke or use an open flame during this time.
DANGER or WARNING: Risk of child entrapment.
Child entrapment and suffocation are not problems of the past. Junked or abandoned appliances
are still dangerous . . . even if they will “just sit in the garage a few days.”
Before you throw away your old portable washer: Take off the lid.
Never allow children to operate, play with, or crawl inside the portable washer. Close supervision of
children is necessary when the washer is used near children.
Do not reach into the washer if the agitator or inner tub is moving.
Do not tamper with controls.
Do not repair or replace any part of the washer or attempt any servicing unless specifically
recommended in the user-maintenance instructions or in published user-repair instructions.
Never clean portable washer parts with flammable fluids. The fumes can create a fire hazard or
explosion.
Do not place the washer in steamy rooms or where the washer is directly exposed to rain. Moisture may
destroy the electrical insulation causing an electrical shock hazard.
Do not store, use gasoline, or any other flammable vapors and liquids in the vicinity of this or any other
portable washer. The fumes can create a fire hazard or explosion.
If the power cord is damaged, it must be replaced by the manufacturer or its service agent or a similar
qualified person in order to avoid a hazard.
-Save these instructions-
3
3.INSTALLATION INSTRUCTIONS
¾
•
•
939mm
BEFORE USING YOUR PORTABLE WASHER
SCREWDRIVER
Remove the exterior and interior packing.
You will need the following tools:
• Wrench
• Pliers
• Screwdriver
• Check to be sure you have all of the following parts:
PLIERS
WRENCH
2 Inlet Hoses
• 1 Water Inlet Quick Connect Assembly
• 1 Connector For Faucet
• 1 Noise Proof Plate With Screws
• 4 Casters
•
Remove shipping brace. Note - It should be saved and used (to prevent damage to washer
components) whenever washer is moved or transported to a new location.
• Clean the interior surface with lukewarm water using a soft cloth.
• Allow 2 inches of space between the back and sides of the appliance.
• Put your laundry into the washer evenly. Uneven laundry may cause noise or vibration.
• Don’t use excessively hot water (50°C or more). Plastic parts may be deformed or damaged.
Also, clothing may be deformed or bleached.
• Before washing, check all pockets. If nails or pins remain in pockets, they may damage the
washer or clothes.
• Never splash water on the control panel.
• Plug the washer into an exclusive properly installed-grounded wall outlet. Do not under any
circumstances cut or remove the third (ground) prong from the power cord. Any questions
concerning power and/or grounding should be directed toward a certified electrician or an
authorized Avanti Products service center.
¾
SELECTING A LOCATION
Before you install the portable washer, select a location with the following
characteristics:
• A hard level surface (if the surface is uneven, see Adjusting The Adjustable
Foot).
• Away from direct sunlight. Direct sunlight may affect the acrylic coating,
plastic and electrical components.
• Adequate ventilation.
• Away from sources of heat such as coal or gas. Make sure that the washing
m
4m
machine does not stand on its power cord. Ventilation openings must not be
538mm
54
obstructed by carpeting when the portable washer is installed on a carpeted
floor.
¾
ADJUSTING THE ADJUSTABLE FOOT
If the floor is uneven adjust the adjustable foot (do not insert pieces of wood, or
CORRECT
IN CO RRECT
INCO RR ECT
any other objects under the feet).
Loosen the adjustable foot by turning the level adjustable knob with your hand
until it is at the desired height.
Tighten the adjustable foot by turning the level adjustable knob in the reverse
TIGHTEN
LOOSEN
direction.
Place the washer on a sturdy flat surface.
LEVEL
ADJUSTABLE KNOB
If the washer is placed on an uneven or weak surface, noise or vibration occurs
(Allowable is 1°).
For portable applications, the washing machine comes equipped with four
ADJUSTABLE FOOT
north/south casters that can easily be installed to assist in the movement of the
machine to and from the sink. Lay the unit on its back. Install the casters into
Fixed foot
Adjustable foot
the bottom of the base as indicated.
Caster
Caster
Caster
Fixed foot
4
Caster
Fixed foot
Return the machine to the upright position. When the machine is positioned for operation set the height of
the adjustment foot slightly higher than the front caster to prevent movement of the machine during wash
and spin operation.
NOTE: Not all movement will be totally eliminated, this is normal.
¾
INSTALLING THE NOISE PROOF PLATE
Take the noise proof
plate out of the
package .
The opening of the
noise proof plate is
at the bottom of
the machine.
Insert the noise proof
plate into the washing
machine base.
Lay down the machine
and secure the noise proof
plate by fastening the two
set screws.
¾
CONNECTING THE WATER SUPPLY HOSE
The water supply hose must be connected to the washing machine at one end and to the water faucet
at the other. Do not stretch the water supply hose. If the hose is too short and you do not wish to
move the water faucet, replace the hose with a longer, high-pressure hose.
Select appropriate faucet as shown in the figures below. If none of these faucets are available, use the
faucet adapter provided.
The end of faucet spout should be longer than 10mm (0.4”), or the connector cannot be fixed properly.
Water leakage could develop.
If you have both cold and hot water supplied, connect the inlet hoses by matching cold to cold and
hot to hot.
5
¾
DISCONNECTING THE INLET HOSE
Dismantling the hose directly may cause water to splash due to the possible high water pressure in the
hose, even after the faucet has been turned off. Please take off the hose as per following steps, even if
the faucet is closed:
•
•
•
Turn off the faucet.
Turn on the power and let the machine run for about 5 seconds then turn it off.
Remove the connecting nuts from the faucet and washing machine.
Note: If the washing machine is frequently used, it is not necessary to dismantle the inlet hose to
avoid possible damage to the screws.
¾
0.7-1.2m
¾
POSITIONING THE DRAIN HOSE
Connect the drain hose to the water outlet of the washing machine then fasten it
with a pinchcork. Since only up drainage is available, drain hose can be hung in
the basin or bathtub.
NOTE: The highest point of the drain hose must be in the height of 0.7-1.2m
above floor level, otherwise, the washer cannot work normally.
ELECTRICAL CONNECTION
aWarninga
Improper use of the grounded plug can result in the risk of electrical shock. If the power cord is
damaged, have it replaced by an authorized Avanti Products service center.
This portable washer should be properly grounded for your safety. The power cord of this portable
washer is equipped with a three-prong plug which mates with standard three prong wall outlets to
minimize the possibility of electrical shock.
Do not under any circumstances cut or remove the third ground prong
from the power cord supplied.
STANDARD 120
VOLTS, 60 HERTZ,
3-WIRE SOCKET
L1
This portable washer requires a standard 110-120 Volts~A.C./60Hz
electrical outlet with three-prong ground.
The cord should be secured behind the portable washer and not left
exposed or dangling to prevent accidental injury.
N EU TR AL
SID E
GROUND
0
V.A.C.
120±12
V.A.C.
115±12
V.A.C.
Never unplug the portable washer by pulling the power cord. Always
grip the plug firmly and pull straight out from the receptacle.
Do not use an extension cord with this appliance. If the power cord is
too short, have a qualified electrician or service technician install an
outlet near the appliance.
6
R O UN D
G RO U N DIN G
PR O N G
OPERATING YOUR PORTABLE WASHER
PREPARATION
4. Insert the end of drain hose
into the hook shelf, and hang
the drain hose over a drain
outlet.
5. Put the wash load into the tub 6. Add the suitable quantity
detergent into the detergent
evenly.
case.
7. Close the lid. Otherwise the
washer will not operate.
0.7m~1.2m
1. Connect the water inlet hose 3. Insert the plug into the
socket. For safety the plug
to the water faucet. Don’t
should have ground
switch on the power if the
connection.
water pressure is lower than
0.05MPa and higher than
0.5MPa.
2. Open the water faucet.
)
BEFORE WASHING
Prepare the wash load. Mix large and small articles in a load to get the best washing results.
Drop articles loosely into the inner tub. Do not pack articles in or wrap them. Articles should move freely
through the wash water for best cleaning results. Articles should rollover, sink and then reappear.
When washing very large articles, do not fill inner tub as full as with other loads. The water level in your
washer should fit the size of your wash load. Small load will use lower water levels. There must be
enough water in the inner tub to allow articles to move and turn over freely. Overloading the inner tub can
result in poor washing and rinsing. Overloading may also cause wrinkling and tearing of articles.
Right
7
WATER WATER
LEVEL LEVEL
Wrong
OPERATION INSTRUCTIONS
PRESS DOWN POWER BUTTON.
PRESS DOWN WATER LEVEL BUTTON.
Choose appropriate water level according to wash load quantity.
WATER TEMPERATURE CHOICE.
Press down the water temperature selection button, you can choose to inlet cold water or hot water. When
the cold-water indicator and the hot-water indicator turn on simultaneously, which means you chose the
warm water.
NOTE: The washer will provide a cold rinse in all TEMPERATURE settings.
IMPORTANT: A single cold hose system does not allow the washing machine to automatically (select)
regulate incoming water temperatures to match those listed on the control panel such as WARM or HOT.
PRESS DOWN WASH TIME SELECTION BUTTON.
Press down wash time selection button to select the wash time. You can also press the button to select soak.
NOTE: When all indicators are OFF, the wash cycle is finished.
PRESS DOWN RINSE TIMES SELECT BUTTON.
Press this button to select the times of rinse. When SPRAY RINSE is selected, the washing machine
will spray water to rinse firstly during rinse course.
NOTE: When all indicators are OFF, the rinse cycle is finished.
PRESS DOWN SPIN TIME SELECT BUTTON.
Press this button to select the time of spin.
NOTE: When all indicators are OFF, the spin cycle is finished.
IMPORTANT NOTE: You can select different WASH, RINSE and SPIN combinations according to
your needs.
PRESS DOWN PRESET BUTTON.
Press this button for delay start setting and children-proof setting.
PRESS DOWN FUNCTIONS SELECTION BUTTON.
Choose the desired function and then the corresponding indicator blink.
PRESS DOWN START/HOLD BUTTON ONCE AND THE MACHINE WILL BEGIN OPERATION.
Please press this button to stop the normal operation, if it continues to work, press it again.
Water level can be reset during the normal operation. If the higher water level is selected, the machine will
operate after refilling the water level selected.
AUTOMATIC WASH PROGRAMS
NORMAL – For normal laundry
• Press down the power button.
• The NORMAL indicator will be ON. (NORMAL is the default program)
• Press the water supply button to select the water temperature.
• Press the water level button to select the appropriate water level setting. (The default water level is
HIGH)
• Press the START/HOLD to start the course. And the LED display will show the remaining time of
the entire course.
8
SOAK – For dirty laundry
• Press down the power button.
• Press the functions button to select the SOAK function until the SOAK indicator is ON.
• Press the water supply button to select the water temperature.
• Press the water level button to select the appropriate water level setting.
• Press the START/HOLD to start the course. And the LED display will show the remaining time of
the entire course.
SPEEDY – For light dirty laundry
• Press down the power button.
• Press the functions button to select the SPEEDY function until the SPEEDY indicator is ON.
• Press the water supply button to select the water temperature.
• Press the water level button to select the appropriate water level setting. Press the START/HOLD
to start the course. And the LED display will show the remaining time of the entire course.
JEANS – For massive laundry
• Press down the power button.
• Press the functions button to select the JEANS function until the JEANS indicator is ON.
• Press the water supply button to select the water temperature.
• Press the water level button to select the appropriate water level setting.
• Press the START/HOLD to start the course. And the LED display will show the remaining time of
the entire course.
GENTLE – For elaborate laundry
• Press down the power button.
• Press the functions button to select the GENTLE function until the GENTLE indicator is ON.
• Press the water supply button to select the water temperature.
• Press the water level button to select the appropriate water level setting.
• Press the START/HOLD to start the course. And the LED display will show the remaining time of
the entire course.
BLANKET – For big laundry
• Press down the power button.
• Press the functions button to select the BLANKET function until the BLANKET indicator is ON.
• Press the water supply button to select the water temperature.
• Press the water level button to select the appropriate water level setting.
• Press the START/HOLD to start the course. And the LED display will show the remaining time of
the entire course.
DELICATES – For small laundry
• Press down the power button.
• Press the functions button to select the DELICATES function until the DELICATES indicator is ON.
• Press the water supply button to select the water temperature.
• Press the water level button to select the appropriate water level setting. (The default water level is
LOW-LEV2)
• Press the START/HOLD to start the course. And the LED display will show the remaining time of
the entire course.
EXTRA RINSE – For children laundry
• Press down the power button.
• Press the functions button to select the EXTRA RINSE function until the EXTRA RINSE indicator is
ON.
• Press the water supply button to select the water temperature.
• Press the water level button to select the appropriate water level setting.
• Press the START/HOLD to start the course. And the LED display will show the remaining time of
the entire course.
9
MANUAL FUNCTIONS
WASH ONLY
• Press down the power button.
• Press the functions button to select the appropriate program.
• Press the water supply button to select the water temperature.
• Press the water level button to select the appropriate water level setting.
• Press the wash button to select the wash time.
• Press the rinse button until all rinse indicators are OFF.
• Press the spin button until all spin indicators are OFF.
• Press the START/HOLD to start the course. And the LED display will show the remaining time of
the entire course.
WASH AND RINSE
• Press down the power button.
• Press the functions button to select the appropriate program.
• Press the water supply button to select the water temperature.
• Press the water level button to select the appropriate water level setting.
• Press the wash button to select the wash time.
• Press the rinse button to select the rinse times.
• Press the spin button until all spin indicators are OFF.
• Press the START/HOLD to start the course. And the LED display will show the remaining time of
the entire course.
RINSE AND SPIN
• Press down the power button.
• Press the water level button to select the appropriate water level setting.
• Press the wash button until all wash indicators are OFF.
• Press the rinse button to select the rinse times.
• Press the spin button to select the spin time.
• Press the START/HOLD to start the course. And the LED display will show the remaining time of
the entire course.
SPIN ONLY
• Press down the power button.
• Press the wash button until all wash indicators are OFF.
• Press the rinse button until all rinse indicators are OFF.
• Press the spin button to select the spin time.
• Press the START/HOLD to start the course. And the LED display will show the remaining time of
the entire course.
FUNCTIONS
Each wash set is programmed in the computer; see the details in the wash program chart.
FUNCTION
NORMAL
SOAK
SPEEDY
JEANS
GENTLE
BLANKET
DELICATES
EXTRA RINSE
SOAK
20
Min.
WASH
RINSE
12 Min.
12 Min.
2 Cycles
2 Cycles
5 Min.
5 Min.
TOTAL
TIME
(Approx.)
46 Min.
66 Min.
6 Min.
12 Min.
12 Min.
12 Min.
6 Min.
12 Min.
1 Cycle
2 Cycles
2 Cycles
2 Cycles
2 Cycles
3 Cycles
3 Min.
5 Min.
3 Min.
5 Min.
3 Min.
5 Min.
27 Min.
46 Min.
44 Min.
46 Min.
38 Min.
57 Min.
10
SPIN
Press down each button within 5 minutes since the program will reset the process group. Then press down
STRAT/HOLD button to re-start the washing machine. If not, the washing machine will shut down
automatically.
Close the lid, or the washing machine will not operate.
In case the unbalance of load triggers the safety switch when spinning, the washing machine will
automatically refill water to adjust the balance.
Note:
• Clothes easily discolored should be washed separately so as to prevent inter-dyeing.
• If you want to change a selected program, please press the START/HOLD button first, then press
the Program button before pushing START/HOLD button.
• When Rinse & Drain program is ON, do not use detergent.
• If you want to drain water during washing, press the START/HOLD button, then select Rinse and
Drain program. Press START/HOLD button again to restart.
DELAY START SETTING
Select this course when you have to go out or do something else.
• Press down the power button.
• Load the washing machine and select the appropriate wash program.
• Press PRESET button continuously to select the delay start time. (From 1 hour to 24 hours)
• Close the lid completely.
• Press START/HOLD button to start the course.
CHILDREN-PROOF SETTING
Select the function, the program will hold the washing machine and give out alert voice once the lid is
opened when washing. And the washing machine will automatically drain water and give alarm if the lid
is not closed in 10 seconds. In case a child falls into the washing machine when he plays around, he
will be in safe status.
• Press down the power button.
• Select the appropriate program and press START/HOLD button to start the washing machine.
• The washing machine buzzer will give out music and the digital indicator show
. This time you
must decide whether to select the function or not.
• Press the PRESET button to select the function and the dot indicator will be ON. If no, don’t do
anything.
NOTE: If you open the lid while the machine in running, all operations will be stopped within 7 seconds.
To resume operation, close the lid.
CARE AND MAINTENANCE
¾
•
•
•
CLEANING YOUR PORTABLE WASHER
Clean the surface of your portable washer regularly with soft fabric.
Clean the inner tub regularly, especially immediately after starch or bleach operation.
Clean the filter in the inlet valve or inlet hose regularly in order to prevent it from clogging.
Unplug the power cord.
Remove the inlet hose and clean
the filter with a brush.
Clean the surface of
the washing machine
with a soft cloth
regularly.
Clean the inner tub
regularly, especially after
washing starched or
bleached laundry.
11
•
Clean the lint filter.
Pull upward to remove the
lint filter.
•
Clean and rinse it thoroughly.
Vacation time
12
4. CONTROL PANEL
1.
2.
3.
4.
5.
6.
7.
8.
9.
10.
11.
12.
13.
14.
15.
16.
17.
Water Temperature Indicator
Water Level Indicator
Wash Time Indicator
Rinse Time Indicator
Spin Time Indicator
LED Display
Children-proof Indicator
Function Indicator
Power Button
START/HOLD Button
Function Selection Button
Preset Button
Spin Time Selection Button
Rinse Time Selection Button
Wash Time Selection Button
Water Level Selection Button
Water Temperature Selection Button
13
5.CIRCUIT DIAGRAM
Y
GR
WH
G
WH
B
R
C
HOT
COLD
B R R
L
R
B
Water level
sensor
Y
Safety
switch
Y
M
Motor
BR
B
BL
R
Y
BL
Pump
BR/WH
B/WH
BR
BL/WH
Microcomputer Controlled board assembly
Y
BL
Ms
Drain
motor
Y
Plug
Y/G
B-BLUE BL-BLACK BR-BROWN G-GREEN GR-GRAY
WH-WHITE Y-YELLOW
O-ORANGE
P-PURPLE
C-CAPACITOR
L-INDUCTIVE COIL
R-RED
The power supply cord must be unplugged after use.
Please use low foam powdered laundry detergent.
"CAUTION: if this appliance is supplied with a cord extension set or and electrical
portable outlet device, the cord extension set or electrical portable device must be
positioned so that it is not subject to splashing or ingress or moisture.
The appliance is not intended for use by young children or infirm persons without
supervision;
Young children should be supervised to ensure that they do not play with the
appliance.
14