1
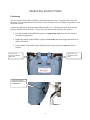
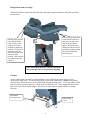
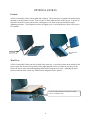
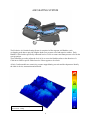
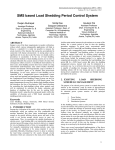
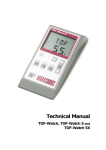
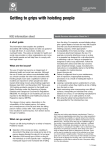
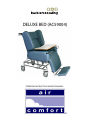
DELUXE BED (AC59004)
OPERATING INSTRUCTIONS & SERVICE MANUAL
INDEX
• Specifications
1
• Important Safety Precautions
2
• Operating Instructions
3, 4
• Optional Extras (Meal Tray & Footrest)
5
• Air System
6
• Service & Maintenance
7
• Warranty / Service Contract
8
SPECIFICATIONS
MAXIMUM USER WEIGHT:
180kg
DIMENSIONS:
Back Width: 710mm (Outside), 460mm (Inside)
Seat Width: 690mm (Outside), 510mm (Inside)
Sitting Length: 1040mm
Back Height: 710mm
GROSS WEIGHT OF BED:
45kg
CONSTRUCTION:
Mild steel framework, patented Air Comfort Seating
System, Foam & Poly Urethane & Vinyl cover.
FINISH:
Chrome plated
GAS STRUTS:
2 x 100 / 300n, 1 x 150 / 200n
CASTORS:
∅150mm grey rubber swivel castors
(3 Full lock, 1 Directional)
OPTIONS:
Meal Tray (AO59011)
Foot Rest (AO59001)
IV Pole (IVPOLE)
1
IMPORTANT SAFETY PRECAUTIONS
•
•
•
•
•
•
•
•
•
This product has been designed and manufactured with safety and function for both the user and
the operator as the utmost importance. The recommended max load capacity for this product is
180kg.
Operators must read and follow the manual to ensure all safety precautions are not compromised.
For safety when lowering the product to its lowest position, the operator should ensure any
obstructions are removed from behind.
For safety when side transferring a patient on / off the product, the operator must ensure that the
castors have been locked
Never have any loose objects in the vicinity of the product when using any of the functions, as
these may obstruct, hinder or damage the moving components of the product. Always check the
surrounding area and under the bed for objects that may be crushed with any movement of the
product.
Do not use as a CPR Bed.
When not in use, leave the product in the upright position.
Follow the maintenance instructions.
Follow the cleaning instructions.
SET UP INSTRUCTIONS
The product is delivered fully assembled and ready for use however inspect the product before use.
2
OPERATING INSTRUCTIONS
Positioning
The Air Comfort Deluxe Bed (AC59004) is fitted with three gas struts. Using the brake levers, this
allows the carer to manipulate the back recline, seat tilt and leg rest into any number of positions to suit
the patient’s needs.
Positions are adjusted by squeezing and holding the brake lever. Maneuver the angle to the desired
position, and then release the brake. The gas strut will automatically lock back into position.
•
Left brake handle (Labeled BACK) operates the angle of the back from vertical (seated) to
horizontal (Laying down).
•
Right brake handle (Labeled SEAT) operates the tilt of the seat from roughly horizontal to 45
degrees tilted back.
•
Legrest handle (Underneath legrest, right hand side facing) operates the legrest to desired
position.
Left brake lever
operates the BACK
RECLINE.
Right brake lever
operates the SEAT
TILT.
Legrest lever operates
LEGREST RAISE AND
WITHDRAWAL.
3
Drop down arms or wings.
The Deluxe Beds are fitted with drop down arms and wings for patient transfers, and other specialised
patient needs.
Pull the spring-loaded pin
at the bottom of the arm,
and move the arm to the
drop down position to
adjust. When the arm is
lifted back into the raised
position the spring-loaded
pin will automatically
lock into place.
Pull the spring-loaded
pin at the top of the
wing, and move the
wing to one of four
locations to adjust the
position. The pin will
spring back into the
hole, locking the wing
into the desired
position. Fully opened
is positioned for side
transfers.
Note: Gently push the arm / wing in towards the
seat to take pressure off the pin when adjusting.
Castors
All Air comfort Beds and chairs are fitted with three swivel full locking castors and one swivel
directional locking castor. The directional locking castor can be identified by a black locking pedal,
while the three Full lock castors can be identified by the grey locking pedal. To lock the castors simply
push the pedal to the down position. Lift the pedal to release the lock. When engaged the directional
lock castor will lock the wheel straight. This can assist when manoeuvring the chair in a straight
direction.
Directional
Locking Castor.
Full Locking
Castor.
4
OPTIONAL EXTRAS
Footrest
All Air Comfort Day Chairs can be fitted with a footrest. The footrest has a trombone action that can be
adjusted to suit the patient’s needs. There are two Tri Nuts under the front of the leg rest. Turn the Tri
Nuts anti-clockwise to loosen the footrest, and then move the footrest into position before again
tightening into place. The footplates can also be flipped up to a vertical position to allow easier access
for a patient.
Flip Open Foot
Plates
Tri Nuts
Meal Tray
All Air Comfort Day Chairs can also be fitted with a meal tray. Loosen the tri-nuts on the outside of the
arms to move the meal tray into position, before tightening the tri-nuts to ensure the tray doesn’t slip.
Ensure the bed is in the seated and upright position before using the meal trays. Adjusting the tilt or
backrest function while a meal tray is fitted can be dangerous for the patient.
Loosen or tighten both the 5 Star Wheels to adjust /
remove / fit the Meal Tray.
5
AIR SEATING SYSTEM
Head Rest
Leg Rest
Lumber
Seat
The Exclusive Air Comfort Seating System is comprised of four separate Air Bladders, each
overlapping each other to provide complete head to toe pressure relief and superior comfort. Each
Bladder is filled with a specifically calibrated low level of air to ensure maximum pressure relief for the
average patient.
There should be no need to adjust the level of air or access the bladders unless at the direction of a
Clinician to fulfill a specific clinical need or if there appears to be a fault.
All Air Comfort models are extensively pressure mapped during research and development to identify
the ideal air levels, construction and materials.
Deluxe Bed Seat – Pressure Map – 30 Mins
Measurement - mmHg
6
SERVICE & MAINTENANCE
Maintenance and Cleaning
1. Cleaning Instructions
•
Material: Please follow fabric-cleaning instructions located on the back of the headrest.
•
Frame: All exposed metal framing should be cleaned regularly, at least every three
months, depending on usage. This should be done with a damp cloth before being wiped
dry.
•
Gas Springs: Gas springs will attract grim so it is important to maintain them to ensure
maximum efficiency and increase the working life of the spring. Wipe them over with a
damp cloth, and then wipe them dry. The push rod should also be oiled to keep the seal
in good condition.
Common Service Concerns
1. Gas Springs don’t work. It is best not to attempt to adjust the gas springs or brake cables. If
you feel the unit is not operating correctly, first contact the distributor to make them aware of
your concern. Brake cables and gas springs can be replaced if they have been damaged, or if
there is a manufacturing fault.
2. There isn’t enough air in the seat. If you are unfamiliar with the Air system, it may appear
that there is not enough air in the air bags. The air bladders are designed to work together as a
unit. When the patient is in the seat they will displace the small amount of air throughout the
bladders to create a thin layer of air cushioning. Do not add air to the bladders before first
consulting the store or the manufacturer. If you believe one of the air bladders has deflated, unvelcro the cover on the side of the seat to access and carefully remove the problem bladder.
Examine the bag and the valve for obvious punctures or any sign of damage, particularly along
the welds. To test for a leak, inflate the bag (making sure the valve is then properly secured) and
leave it aside for several hours or overnight to see if it deflates of its own accord. If the bladder
shows signs of leaking air, a new bladder can be sourced through the distributor from whom the
unit was purchased. Should you wish to repair the air bladder onsite, puncture kits available.
Follow the instructions on the puncture kits for repairing the leak.
3. The seat area has collapsed. Do not be alarmed when the seat settles into its natural shape.
The seat should look concaved after some time as the foam settles. This does not necessarily
indicate that the air bladders are faulty. Sit in the unit and you will find that the cushioning is
unchanged, or in fact improved. The concave shape has the added benefit of helping to prevent
the patient from slipping forward without being uncomfortable. If you still feel the air bladder
has a leak, follow the steps outlined in point 2 above.
7
WARRANTY / SERVICE CONTRACT
Warranty
Frame
Foam
Gas struts
Air Bags
Castors
Fabric
Workmanship
10 Years
5 Years
1 Year
2 Years
2 Years
Manufacturers
2 Years
* Conditions Apply. See Warranty for further details
Service contract
A Hills Healthcare Technical Representative should service the product annually. Please
contact your place of purchase for warranty claims or service contract enquires.
We appreciate any feedback regarding Air Comfort products or service.
Supplied by:
BACKCARE & SEATING
ADDRESS: 4 Guilfoyle Avenue, Coburg North VIC 3058 Australia
PHONE: 03 9353 0517
[email protected]
www.backcare.com.au