1
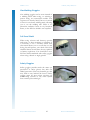
TRADE OF HEAVY VEHICLE MECHANIC PHASE 2 Module 1 Induction/Customer Care/Bench Fitting/Welding UNIT: 1 Induction, Safety, Hand Tools Module 1 – Unit 1 Induction, Safety, Hand Tools Table of Contents 1.0 Learning Outcome................................................................................................. 1 2.0 Heavy Vehicle Mechanics off-The Job Phases.................................................. 1 Introduction .............................................................................................................. 1 3.0 Fire Drill and Behaviour Guidelines ................................................................... 2 3.1 3.2 3.3 3.4 3.5 3.6 3.7 4.0 4.1 5.0 5.1 5.2 6.0 Introduction: ................................................................................................ 2 Identifying Hazards .................................................................................... 2 Using a Fire Extinguisher .......................................................................... 6 Fighting a Fire ............................................................................................. 8 Fire Classifications ...................................................................................... 9 Fire Extinguisher Types ...........................................................................10 Fire Extinguisher Suitability ....................................................................10 Use of Fixed Equipment ............................................................................. 11 Using a Hoist .............................................................................................11 Other Non Fixed Equipment ..................................................................... 13 Using an Engine Hoist .............................................................................13 Using a Floor Jack.....................................................................................16 Personal Protection/Protective Clothing ................................................. 19 7.0 Hand Tools: .......................................................................................................... 25 Hand & Power Tools .............................................................................................25 Heavy Vehicle Mechanic Phase 2 Revision 2.0 December 2013 Module 1– Unit 1 Induction, Safety, Hand Tools 1.0 Learning Outcome By the end of this unit each apprentice will be able to:: State the attendance, safety and fire drill procedures that apply to the training establishment Select correct tool, type/sizes for different applications Operate garage jacks and vehicle hoists Select fire extinguishers appropriate to diesel, petrol and electrical fires State safety rules as outlined in the safety rules booklet Identify the main hazards associated with working on heavy commercial vehicles 2.0 Heavy Vehicle Mechanics Off-The Job Phases Introduction Purpose; The purpose of Phases 2, 4 and 6 of apprenticeship training and education programmes is to provide all apprentices with the opportunity to learn, practice and develop the skills of their craft, to familiarise them with the terminology, tools, materials, equipment and working practices which will form the foundation for their further development and progression. Content; During each phase the apprentice will undergo a series of integrated learning experiences to develop the skills, knowledge and competence prescribed for each Phase. The content is structured to develop the apprentice in the range of skills which they will be required to perform to agreed industry standards. Assessment; Throughout each Phase, the apprentice will undertake a number of assessments. Theory, Practical, Drawing, Course Work, which are an essential part of the certification and award of a Level 6 Advanced Certificate from FETAC. Heavy Vehicle Mechanic Phase 2 1 Revision 2.0 December 2013 Module 1– Unit 1 Induction, Safety, Hand Tools 3.0 Fire Drill and Behaviour Guidelines 3.1 Introduction: Describe the health, safety, responsibilities of all personnel, fire drill procedures and course participant personal behaviour guidelines that apply to the Training Centre/premises. Because of the unique nature of each Training centre this element of the course will be delivered in accordance with the local conditions and rules governing health and safety, local safety statement and identification of hazards. The fire alarm sound will be demonstrated as part of the fire drill in the particular centre where the course is located. Emergency exit route, designated safe areas, location and function of Safety Statements, are all specific to the location and will be covered in the induction programme for the centre where the course is located. Describe the vehicle parking arrangements of the Training Centre Workshop that comply with emergency fire evacuation procedures. The vehicle parking arrangements and positioning of assembly areas for use in fire evacuation procedures are unique to each training centre and will be described as part of the fire drill and evacuation procedures for the centre. Identification of hazards, their removal and reduction are all part of an on going process in each training location. Copies of hazard statements are located in the training areas and will be brought to the attention of the apprentices during the induction programme. 3.2 Identifying Hazards Part 1. Preparation and Safety Objective Follow workplace procedures for hazard identification and avoidance. Safety check Make sure that you understand and observe all legislative and personal safety procedures when carrying out the following tasks. If you are unsure of what these are, ask your instructor. Heavy Vehicle Mechanic Phase 2 2 Revision 2.0 December 2013 Module 1– Unit 1 Induction, Safety, Hand Tools Points to note A workshop is a hazardous environment. To make people more aware of specific workshop hazards, legislative bodies, such as the International Safety Organization (ISO), have developed a series of safety signs. These signs are designed to give adequate warning of an unsafe situation. Each sign has four components: Signal word Background color Text Pictorial message There are 3 signal words: Danger /Warning /Caution. Danger: This indicates an immediately hazardous situation, which, if not avoided, will result in death or serious injury. "Danger" is usually indicated by white text with a red background. Warning: This indicates a potentially hazardous situation, which, if not avoided, could result in death or serious injury. The sign is usually in black text with an orange background. Caution: This indicates a potentially hazardous situation, which, if not avoided, may result in minor or moderate injury. It may also be used to alert against unsafe practices. This is usually in black text with a yellow background. The sign will sometimes include an explanatory text that is intended to provide additional safety information. Heavy Vehicle Mechanic Phase 2 3 Revision 2.0 December 2013 Module 1– Unit 1 Induction, Safety, Hand Tools Some signs are designed to convey a personal safety message. These signs suggest the use of safety glasses or hearing protection when in the area. In symbol signs, a pictorial message appears alone or is combined with an explanatory text. This allows the safety message to be conveyed to people who are illiterate or who do not understand the local language. Workshop safety equipment includes items such as: o Hand Rails o Machinery Guards o Painted Lines o Soundproof Rooms o Gas Extraction Hoses o Doors and Gates o Adequate Ventilation Large, fixed machinery such as lathes and milling machines present a hazard to the operator and others working in the area. To prevent accidents, a machinery guard or a yellow painted line on the floor usually borders this equipment. Machinery guards and yellow lines will prevent people from accidentally walking into the operating equipment or indicate that a safe distance should be kept from the equipment. Soundproof rooms are usually used when a lot of noise is made by operating equipment. An example is the use of a chassis dynamometer. A vehicle operating on a dynamometer produces a lot of noise from its tires exhaust and engine. To protect other workshop users from the noise, the dynamometer is usually placed in a soundproof room, keeping workshop noise to a minimum. Heavy Vehicle Mechanic Phase 2 4 Revision 2.0 December 2013 Module 1– Unit 1 Induction, Safety, Hand Tools Exhaust gases in workshops are a serious health hazard. Whenever a vehicle's engine is running, toxic gases are produced from its exhaust. To prevent an excess of gas build-up, a well-ventilated work area is needed as well as some method of extracting the toxic gases. The best way to get rid of these gases is with a suction hose that fits over the vehicle's exhaust pipe. The hose is attached to an extraction pump that vents the gas to the outside. Doors and gates are used for the same reason as machinery guards and painted lines. A doorway is a physical barrier that can be locked and sealed to separate a hazardous environment from the rest of the workshop, or a general work area from an office or specialist work area. In the day-to-day operation of a workshop, there is often a reason to temporarily separate one work bay from others. If a welding machine or an oxyacetylene cutting torch is in use, it may be necessary to place a temporary screen or barrier around the work area to protect other workshop users from "welding flash" or injury. Part 2: Step-By-Step Instruction 1. Workshop layout - Familiarize yourself with your workshop. There are special work areas that are defined by painted lines. These show the hazardous zone around certain machines and areas. If you are not working specifically on the machines, you should stay outside the marked area. 2. Observe warning signs - Study the various warning signs around your workshop. Understand the meaning of the Signal Word, the colors, the text and the symbols or pictures on each sign. Ask your instructor if you do not fully understand any part of the sign. 3. Identify exits - Find out where every door, window and gate is, and whether they are usually open or locked. Plan your escape route, should you need to exit in a hurry. 4. Check air quality - Check for air quality. There should be good ventilation and very little chemical fumes or smell. Locate the extractor fans or ventilation outlets and make sure they aren’t obstructed in any way. Locate and observe the use of the exhaust extraction hose, pump and outlet that’s used on the vehicle’s exhaust pipes. Heavy Vehicle Mechanic Phase 2 5 Revision 2.0 December 2013 Module 1– Unit 1 Induction, Safety, Hand Tools 5. Identify fire fighting equipment - Check the location and types of fire extinguishers in your workshop. Be sure you know when to use each type, and how. 6. Identify flammable hazards - Find out where flammable materials are kept, and make sure they’re stored properly. 7. Identify hazards – Compressed air - Check the hoses and fittings on the air compressor for any damage or excessive wear. You have to be particularly careful when troubleshooting air guns. Never pull the trigger while inspecting it—severe eye damage can result. 8. Identify hazards – Corrosives - Find out which liquids will burn or corrode parts, metals or skin. Identify caustic chemicals and acids associated with activities in your workshop. 9. Personal protection - Be aware that YOU could be a hazard in the workshop, if you don’t wear mandatory protective gear when working on hazardous machines. 10. Equipment hazards - Ask your instructor for information on any special hazards in your particular workshop, and any special avoidance procedures, which may apply to you and your working environment. 3.3 Using a Fire Extinguisher Part 1. Preparation and Safety Objective Locate workplace fire extinguishers and identify applications and operating procedures. Safety check Do not attempt to fight a fire unless you have a fire extinguisher large enough to extinguish the fire. Many small extinguishers empty in 8 to 10 seconds. Never try to extinguish a fire that is spreading rapidly. Do not try to put out a fire unless you know what type of fire is burning. Using the wrong fire extinguisher will make the fire worse. Test the fire extinguisher before you attempt to extinguish a fire. Do not inhale any fumes from a fire. Fire gives off toxic gases. Heavy Vehicle Mechanic Phase 2 6 Revision 2.0 December 2013 Module 1– Unit 1 Induction, Safety, Hand Tools Do not use water on grease fires, electrical fires or fires where electrical wiring is present. If you cannot fight the fire, leave the area and call the fire department. See your local fire department for a demonstration of the appropriate procedure in your jurisdiction. Make sure that you understand and observe all legislative and personal safety procedures when carrying out the following tasks. If you are unsure of what these are, ask your instructor. Points to note Each workshop will have a firefighting procedure. There should be a workshop fire warden and fire officers. Understand clearly the firefighting policy for your workshop. Fire extinguishers will be located in easily accessible places. Do not block access to fire extinguishers with workshop equipment and clutter. Fire extinguishers either smother or quench a fire. A fire extinguisher that smothers a fire does not remove heat. Keep a watch over the fire. Even though the fire may seem to be out, it may restart. Workshops will have various firefighting tools: fire hoses, fire buckets, fire blankets and fire extinguishers. Each has a specific application and method of use. Familiarize yourself with each of these tools. Heavy Vehicle Mechanic Phase 2 7 Revision 2.0 December 2013 Module 1– Unit 1 Induction, Safety, Hand Tools Fire blankets are manufactured from fire retardant material and have multiple uses. They can be used to smother a fire in a cleaning station or wrap around clothing that has caught on fire. They may be used to shield people from fire when evacuating a building or be used as a stretcher to carry injured or unconscious people. Never use water on a fuel-based fire. The fuel will float on the water and spread further. The only exception to this is in the case of a fire fuelled by methanol. Methanol is heavier than water and burns with an invisible flame. Use a water extinguisher on a methanol fire. Fire buckets contain sand that can be thrown over a fire to smother it. Do not be too quick to empty all the sand in one throw. You may not completely cover the fire the first time. 3.4 Fighting a Fire Three elements must be present at the same time for a fire to occur: fuel, oxygen and heat. These three elements are demonstrated by the fire triangle. The secret of fire fighting involves the removal of one of these elements, usually the oxygen or the heat. Know how to operate the extinguisher. Read the instructions when you purchase the extinguisher. You will not have time to read them once a fire has started. Never turn your back on a fire or allow a fire to get between you and a means of escape. If you are fighting a fire outside, always have the wind at your back. If possible, get an assistant to guide you and inform you of the fire's progress. If a fire occurs in your work area, remember the PASSWORD: Pull, Aim, Squeeze, Sweep Heavy Vehicle Mechanic Phase 2 8 Revision 2.0 December 2013 Module 1– Unit 1 Induction, Safety, Hand Tools PULL out the pin that locks the handle at the top of the extinguisher to prevent accidental use. Carry the fire extinguisher in one hand, and use your other hand to AIM the nozzle at the base, or seat, of the fire. Some fire extinguishers need to be turned upside down to operate. Check which way to hold the extinguisher you've chosen. Stand about 2.8 m (8 ft) away from the fire and SQUEEZE the handle to discharge the fire extinguisher. Remember that if you release the handle on the extinguisher, it will stop discharging. SWEEP the nozzle from side to side at the base of the fire. Watch the fire. Although it may appear to have gone out, it may re-ignite. If the fire is indoors, you should be standing between the fire and the nearest safe exit. If the fire is outdoors, you should be standing facing the fire with the wind on your back, so that the smoke and heat are being blown away from you. Again, make sure that you have a means of escape, should the fire get out of control. When you are quite sure that the fire is out, report it to your instructor. Also report what actions you took to put out the fire. Once the circumstances of the fire have been investigated, and your instructor or the fire brigade has given you the all clear, clean up the debris and submit the used fire extinguishers for inspection and refilling. 3.5 Fire Classifications There are 5 classes of fire. "A" class fires involve wood, paper, cloth, rubber and trash. "B" class fires involve flammable liquids, such as oil, paint, gasoline, grease, and tar. "C" class fires involve flammable gases, such as LPG, Natural Gas, Acetylene, etc. "D" class fire is fuelled by combustible metals - magnesium, potassium turnings and metal shavings. They are not as common as A, B, or C class fires. "E" class fires need electricity to feed the fire. This class includes wiring, damaged appliances, circuit breakers and fuse boxes. Once the electrical supply has been disconnected, the fire changes to the class of fuel it is burning. Heavy Vehicle Mechanic Phase 2 9 Revision 2.0 December 2013 Module 1– Unit 1 Induction, Safety, Hand Tools 3.6 Fire Extinguisher Types There are four types of fire extinguisher. Each type can be used for one or more classes of fire. Water extinguishers contain water pressurized by an inert gas or compressed air. The water quenches the heat from the fire to below its vaporization point. They should only be used on class "A" fires. Carbon dioxide fire extinguishers are most effective when used against "B", "C" and "E" class fires. The gas is heavier than air and provides an inert blanket that smothers the fire. A carbon dioxide fire extinguisher will spray small ice particles with the gas. This is normal. Dry Powder fire extinguishers contain a fine powder, usually sodium bicarbonate, held under pressure by an inert gas. The extinguisher smothers the fire with a fine powder. These extinguishers are good to fight any fuel or liquid fire. Foam fire extinguishers contain a chemical that forms soft foam that floats over the target area and smothers the fire. These are effective fighting liquid, gaseous, paper or wood fires. 3.7 Fire Extinguisher Suitability You will often see more than one symbol on a fire extinguisher. This identifies the extinguisher as suitable for more than one class of fire. Class "A", "B" and "C" fire extinguishers have a numerical rating. These are used to determine the extinguisher's potential to fight a fire. This rating is expressed as a number from 1 to 40 for Class A fires and from 1 to 640 for Class B and C fires. It will appear on the extinguisher, e.g. 1A or 20B or 4A: 20B:C. A larger number means a larger fire extinguisher. Heavy Vehicle Mechanic Phase 2 10 Revision 2.0 December 2013 Module 1– Unit 1 Induction, Safety, Hand Tools 4.0 Use of Fixed Equipment The major items of fixed equipment in the garage are the hoists. The following notes indicate the safety procedures to be observed in operating these items of equipment. 4.1 Using a Hoist Part 1. Preparation and Safety Objective Lift a vehicle using a hoist. Safety check Make sure that you understand and observe all legislative and personal safety procedures when carrying out the following tasks. If you are unsure of what these are, ask your instructor. Points to note Before lifting any vehicle, make sure the frame is structurally sound. If you see rust or signs of major repair, lifting the vehicle with a hoist may cause damage to the vehicle or may be dangerous to you. The lifting capacity of the hoist you are using must be rated for a vehicle weight greater than that of the vehicle you are intending to lift. Check the hoist rating and compare it with the weight given in the vehicle service manual. Make sure you know exactly how to operate the hoist. Take particular care that you know exactly where the "stop" control is so that you can use it quickly in an emergency. Refer to the operations manual for the correct procedure. Be sure the hoist is fully lowered before positioning the vehicle over it. Check the amount of clearance under the vehicle. Driving a low-slung vehicle over the lifting mechanism may result in damage to the underside of the vehicle. The lifting points on a vehicle are typically located under the jacking points. Check the vehicle service manual if you are not sure where the lift points are. The lifting arms must be positioned under the center of the lift points, so that the weight of the vehicle is distributed evenly. Heavy Vehicle Mechanic Phase 2 11 Revision 2.0 December 2013 Module 1– Unit 1 Induction, Safety, Hand Tools Make sure that there will be adequate headroom above the vehicle after it has been raised. Taller vehicles, especially those fitted with roof racks, may need more headroom than you think. The hoist should be raised so you can comfortably work under it. Lock the lift in place before moving underneath or working on the vehicle. Part 2: Step-by-step instruction 1. Read instructions - Read the safety instructions that are provided with the hoist. They should be displayed near the lift operating controls. Check the hydraulic system for leaks. Make sure there are no oil spills around or under the hoist. 2. Prepare the hoist - The hoist should be completely down before you attempt to drive the vehicle onto it. You should also check the arms and pads for any signs of damage. Check under the vehicle to make sure there are no parts which will interfere with the hoist operation and that the vehicle is structurally sound and not badly corroded. Check the vehicle’s service manual or your workshop service manual and locate the correct contact points for the lifting pads. 3. Position the vehicle - Carefully drive the vehicle onto the hoist and position it centrally. Leave the vehicle in neutral with the emergency brake off. You may need to move the car forward or backward to allow the arms to swing under the car. Position the lifting pads under the vehicle lifting points. Make sure the lifting pads are adjusted to the same height for both sides of the vehicle. 4. Raise the hoist to the vehicle - Move to the operating controls and raise the hoist just far enough to come into contact with the vehicle. Make sure that the lifting pads are positioned centrally under the contact points. 5. Raise the vehicle slightly - Make sure nobody is near the vehicle, and then raise it just far enough for the wheels to be off the floor. Check the position of the lifting pads to make sure they have not moved, and shake the vehicle gently to confirm that it is stable on the hoist. Heavy Vehicle Mechanic Phase 2 12 Revision 2.0 December 2013 Module 1– Unit 1 Induction, Safety, Hand Tools 6. Raise the vehicle completely - Once you are sure the vehicle is safely positioned on the hoist, lift it to the working height. 7. Engage safety device - With the vehicle at the correct height you should now lock the hoist in place and engage whatever safety device is used with it. 8. Lower the vehicle - Before the hoist is lowered, remove all tools and equipment from the hoist area, and wipe up any spilled fluids. Remove the safety device or unlock the lift before lowering it. Make sure nobody is near the vehicle on the hoist before lowering it. Once the vehicle is on the ground you can remove the lifting arms and drive it away from the hoist. 5.0 Other Non Fixed Equipment 5.1 Using an Engine Hoist Part 1. Preparation and Safety Objective Use an engine hoist and choose the correct attachments to lift an engine. Safety check The weight rating of the crane or hoist must be greater than the weight of the object to be lifted. Never leave an unsupported engine hanging on a shop crane. Secure the engine on an engine stand, or on the ground, before starting to work on it. If using engine stands, make sure they are designed to support the weight of the object you are lifting. Make sure that you understand and observe all legislative and personal safety procedures when carrying out the following tasks. If you are unsure of what these are, ask your instructor. Heavy Vehicle Mechanic Phase 2 13 Revision 2.0 December 2013 Module 1– Unit 1 Induction, Safety, Hand Tools Points to note Mobile floor cranes are capable of lifting very heavy objects, which make them suitable for lifting engines. The lifting arm is moved by a hydraulic cylinder and is adjustable for length. If the arm is lengthened, the lifting capacity of the arm is reduced. The weight limit is usually marked on the arm so that the arm or the hydraulic mechanism is not damaged by attempting to lift too heavy a load. Make sure the lifting attachment at the end of the lifting arm is strong enough to lift the engine and is not damaged or cracked. When attaching the lifting chain, or sling, to an engine make sure it is firmly attached and that the hoist is configured to lift that weight. Make sure that the fasteners attaching the lifting chain, or sling, have a tensile strength that is in excess of the weight of the engine. Leave enough length in the sling so that when the engine is hanging, the angle at the top of the sling is close to 45 degrees and not exceeding 90 degrees. If removing an engine from an engine bay, once it is lifted free and away from the vehicle, lower the engine so that it is close to the ground. If the engine is lifted high in the air, the hoist will be unstable. When moving a suspended engine, move the hoist slowly. Do not change direction quickly because the engine will swing and may cause the whole apparatus to tumble. Heavy Vehicle Mechanic Phase 2 14 Revision 2.0 December 2013 Module 1– Unit 1 Induction, Safety, Hand Tools Part 2: Step-By-Step Instruction 1. Position the hoist - Make sure the weight rating of the lifting crane is greater than the weight of the object you’re lifting. In this case, you’ll be lifting and moving an engine. Lower the lifting arm and position the lifting end and chain over the centre of the engine. 2. Inspect the lifting attachments - Inspect the chain, steel cable or sling and bolts to make sure they are in sound condition. They must be strong enough to support the weight of the engine. The sling should be long enough so when you lift the engine the angle at the top of the sling is about forty-five degrees. 3. Locate the lifting points - Look carefully around the engine to determine if it has lifting “eyes” or other anchor points 4. Attach the hoist sling - If the engine has lifting eyes, attach the sling with “D” shackles or chain hooks. If you need to screw in bolts and spacer washers to lift the engine, make sure you use the correct bolt and spacer size for the chain or cable. Screw the bolts until the sling is held tight against the engine. 5. Attach the hoist hook - Attach the hook of the hoist under the centre of the sling and raise the hoist just enough to lift the engine an inch or two. Double-check the sling and attachment points for safety. The centre of gravity of the engine should be directly under the hook of the hoist, and there should be no twists or kinks in the chain or sling. 6. Raise the engine - Raise the hoist high enough so that the engine is clear of the ground and any obstacles. Slowly and gently move the hoist and engine to its new position. 7. Lower the engine - Lower the engine until it touches the ground. Making sure it is positioned correctly. You may need to place spacers under the engine to stabilize it. Once you are sure the engine is stable lower the hoist, remove the sling and any securing fasteners, then, and return the equipment to its storage area. Heavy Vehicle Mechanic Phase 2 15 Revision 2.0 December 2013 Module 1– Unit 1 Induction, Safety, Hand Tools 5.2 Using a Floor Jack Part 1. Preparation and safety Objective Lift and secure a vehicle with a floor jack and jack stands. Safety check Make sure the jack and stands you are using are suitable for the job. Never lift a vehicle that is heavier than the jack's rated capacity. Always use matched pairs of jack stands. Never support a vehicle on anything other than jack stands. Do not use wood or steel blocks to support the vehicle. They may slide or split under the weight of the vehicle. Do not use bricks to support the vehicle. They will shatter under the weight of the vehicle. Make sure that you understand and observe all legislative and personal safety procedures when carrying out the following tasks. If you are unsure of what these are, ask your instructor. Points to note There are three types of workshop jacks: hydraulic, pneumatic and mechanical. Hydraulic and pneumatic jacks are the most common. They can be mounted on slides or on a wheeled trolley. Heavy Vehicle Mechanic Phase 2 16 Revision 2.0 December 2013 Module 1– Unit 1 Induction, Safety, Hand Tools The size of jack you use will be determined by the weight of the vehicle you want to lift. Most workshops will have a jack that has a lifting capacity ranging from 5 up as high as 60 tons/tonnes. If the vehicle is heavier than that, or if the vehicle is loaded, you will need to use a jack with a larger lifting capacity. Always check the vehicle service manual or owner's manual to determine the best position to support a vehicle. Some vehicles require special attachments to be fitted before they can be lifted. Do not jack or support a vehicle under any independent suspension components. They are not strong enough to support the weight of the vehicle. Make sure the vehicle is positioned on a firm level surface. Make sure the jack stands are in good condition before you use them to support the vehicle. If they are cracked or bent, they will not support the vehicle safely. Part 2: Step-By-Step Instruction 1. Position the vehicle - Position the vehicle on a flat, solid surface. Put the vehicle into first gear or park and set the emergency brake. Then place blocks in front of and behind the wheels that aren’t going to be raised off the ground. 2. Inspect the floor jack - Before you try to use the jack, check for leaks in the hydraulic system. Check the pad, or saddle, and the wheels of the jack. They should rotate freely and show no signs of damage. Check the manufacturers’ label on the jack. The specifications will tell you the maximum load weight it will bear, so it must suit the vehicle you want to raise. 3. Check the vehicle handbook - Refer to the owner’s manual to find out where you can safely place the jack. This is usually a major point on the chassis, a cross member or axle unit. 4. Select the jack safety stands - Before operating the jack, select two safety stands of the same type, suitable for the weight of the vehicle. Check the stands for any cracks, and if necessary lubricate the threaded adjusting post with a few drops of engine oil. Place one stand on each side of the vehicle at the same point. Adjust them so that they are both the same height, and high enough to slip under the vehicle once you’ve raised it. Heavy Vehicle Mechanic Phase 2 17 Revision 2.0 December 2013 Module 1– Unit 1 Induction, Safety, Hand Tools 5. Position the jack - Roll the jack under the vehicle, and make sure the pad, or saddle, is positioned correctly under the frame or cross member. Turn the valve on the top of the jack handle clockwise, and begin pumping the handle up and down until the jack pad touches and begins to lift the vehicle. 6. Check position of jack - Once the wheels lift off the floor, stop and check the placement of the jack pad under the vehicle to make sure there’s no danger of slipping. Double check the position of the wheel blocks to make sure they haven’t moved. If the vehicle is stable, continue lifting it until it’s at the height where you can safely work under it. 7. Position the safety stands - Slide the two jack safety stands underneath the vehicle. Make sure they’re positioned at a point that can support the weight. Both stands should be adjusted to the same height and placed as far apart as practical. 8. Lower the vehicle onto the stands - Turn the valve on the jack handle counter-clockwise and gently lower the vehicle onto the stands. When the vehicle has settled onto the stands, lower the jack completely and remove it from under the vehicle. Repeat this process to lift the other end of the vehicle. Be aware that the vehicle is now supported on jack stands and will not be as stable as it would if the wheels were on the ground. When you’ve finished working under the vehicle, make sure you’ve removed all tools and equipment before you attempt to lower it. 9. Raise the vehicle off the stands - Use the jack to raise the vehicle off the safety stands. Slide out the safety stands from under the vehicle. 10. Lower the vehicle - Turn the valve on the jack handle counterclockwise very gently to lower the vehicle to the ground. Do not allow the vehicle to drop quickly or you may cause serious damage. Return the floor jack, the safety stands and the wheel wedges to their storage area before you continue working on the vehicle. Heavy Vehicle Mechanic Phase 2 18 Revision 2.0 December 2013 Module 1– Unit 1 Induction, Safety, Hand Tools 6.0 Personal Protection/Protective Clothing Personal safety recommendations applicable to the automotive workshop equipment will be demonstrated as they arise as during the delivery of each unit and module of the course. However the following notes and guidelines cover most of the standard issue protective personal equipment necessary for safe working. Outerwear Always wear appropriate work clothing. Whether this is a one piece coverall/overall, or a separate shirt and pants, the clothes you work in should be comfortable enough to allow you to move without being loose enough to catch on machinery. The material must be flame retardant and strong enough that it is not easily torn. A flap must cover buttons or press-studs. If you wear a long sleeve shirt, the cuffs must be close fitting, without being tight. Pants should be cuff-less so that hot debris doesn’t become trapped. Care of Clothing Always wash your work clothes separately from your day-to-day clothes. Start a new working day with clean clothes and change out of contaminated clothing as soon as possible. It is a good idea to keep a spare set of work clothes in the workshop in case some toxic or corrosive fluid is spilt on the ones you are wearing. Heavy Vehicle Mechanic Phase 2 19 Revision 2.0 December 2013 Module 1– Unit 1 Induction, Safety, Hand Tools Footwear Always wear safety shoes that comply with the relevant standards for your area. The soles must be acid and slip resistant, the uppers made from a puncture proof material such as leather and the toes protected by a steel cap. Headgear It is also good practice to wear a cap to hold longer hair in place and to keep it clean when working under a vehicle. Hand Protection Wherever possible wear gloves to protect your hands. There are many types of gloves available and their applications vary greatly. Heavy-duty impervious gloves should always be worn when using solvents and cleaners. They should also be worn when working on a battery. They should extend up to the middle of your forearm to reduce the risk of liquid spilling into them when your hands are Chemical gloves immersed. Some chemical gloves are also slightly heat resistant. They are suitable for use when removing radiator caps and mixing coolant. Heavy Vehicle Mechanic Phase 2 20 Revision 2.0 December 2013 Module 1– Unit 1 Induction, Safety, Hand Tools Leather Gloves These will protect your hands from burns when welding and heating or handling hot components. You should also use them when removing steel from a storage rack and when handling sharp objects. Rubber Gloves Light duty rubber and plastic gloves should be used to protect your hands from exposure to greases and oils. General-Purpose Cloth Gloves Wear these in cold temperatures, particularly during winter so that cold tools do not stick to your skin. Barrier Cream This prevents chemical being absorbed into your skin and should be applied to your hands before you commence work. Even the slightest exposure to some chemicals can lead to dermatitis, a painful skin irritation. Heavy Vehicle Mechanic Phase 2 21 Revision 2.0 December 2013 Module 1– Unit 1 Induction, Safety, Hand Tools Cleaning Your Hands When cleaning your hands use only specialised hand cleaners, which protect your skin, not solvents such as gasoline or kerosene as they remove the natural oils. Eye Protection Safety Glasses The most common is a pair of safety glasses. It is good practice to wear these whenever you are in a workshop. They are designed to protect your eyes from direct impact or debris damage. The only time they should be removed is when you are using other eye protection equipment. Prescription safety glasses are also available. Welding Mask Wear a welding mask when using, or assisting a person using, an electric welder. The light from a welding arc is very bright and contains high levels of ultraviolet radiation. For this reason the viewing aperture has heavily tinted glass, to reduce the intensity of the light from the welding tip, so you can see what you are doing and the remainder of the mask is made from a durable material that blocks any other light from reaching your face. Heavy Vehicle Mechanic Phase 2 22 Revision 2.0 December 2013 Module 1– Unit 1 Induction, Safety, Hand Tools Gas Welding Goggles Gas welding goggles can be worn instead of a welding mask when using, or assisting a person using, an oxyacetylene welder. The eyepieces are heavily tinted, but not as much as those in an electric welding mask, allowing you to see the welding task. There is no ultraviolet radiation from an oxy/acetylene flame, so the full-face shield is not required. Full Face Shield When using solvents and cleaners, epoxies and resins, or when working on a battery, it is necessary to use a full-face shield. The clear mask allows you to see all that you are doing, but will protect your whole face from chemical burns should there be any splashes or battery explosions. You should also use a full-face shield combined with safety goggles when using a bench or angle grinder. Safety Goggles Safety goggles provide much the same eye protection as safety glasses but with the added protection from any harmful gas that may find its way behind the lenses. Safety goggles must be worn when servicing air conditioning systems or any other system that contains pressurized gas Heavy Vehicle Mechanic Phase 2 23 Revision 2.0 December 2013 Module 1– Unit 1 Induction, Safety, Hand Tools Ear Protection Ear Protection should be worn once sound levels exceed 85 dB, when working around operating machinery for any period of time or when the equipment you or others nearby are using produces loud noise. If you have to shout at a person two feet away from you in order to be heard, then the sound level is about 85 decibels. Ear protection comes in two forms, one type covers the entire outer ear and the other is fitted into the ear canal. Both types perform the same task and it is a matter of personal preference as to which is the most suitable for you. Breathing Devices When working in an environment where dust is present or where the task you are performing will produce dust you should always wear some form of breathing device. There are two types, disposable dust mask & respirator. Disposable Dust Mask A disposable dust mask is made from paper with a wire reinforced edge that is held to your face with an elastic strip. It covers your mouth and nose, and is disposed of at the completion of the task. Respirator The respirator has removable cartridges that can be changed according to the type of contaminant they are to filter. The cartridges should be replaced periodically to ensure their effectiveness. Heavy Vehicle Mechanic Phase 2 24 Revision 2.0 December 2013 Module 1– Unit 1 Induction, Safety, Hand Tools 7.0 Hand Tools: Hand & Power Tools Basic tool preparation – Hardening & tempering -Certain kinds of steel can be hardened by heating, then cooling it rapidly. Carbon-alloy -When carbon and other materials are alloyed with iron it forms steel. Power tools Air tools -Air tools use compressed air to do a number of tasks. They can include the air impact wrench, air ratchet, air chisel, air drill & air duster. Power grinder -Power grinders come in different sizes and speed ranges. The size of a power grinder is the diameter of the largest wheel or disc it takes. Drills & drill bits -Drills can be portable or bench mounted. Common workshop tools Wrenches -A torque wrench tightens bolts and nuts. A pipe wrench grips pipes and tubes. Other specialized wrenches include the wheel brace & oil filter removing tool. Chisels -The most common type of chisel is a flat chisel. Hammers -The most common hammer in an automotive workshop is the ball pein or engineer’s hammer. The soft-face & dead blow hammers are also used. Saws -For just one hacksaw frame, there’s a range of hacksaw blades to cope with different materials and situations. Screw-drivers -The correct screw-driver to use depends on the type of slot or recess in the head of the screw or bolt, and how accessible it is. Heavy Vehicle Mechanic Phase 2 25 Revision 2.0 December 2013 Module 1– Unit 1 Induction, Safety, Hand Tools Spanners -There are many types of spanners. The most common are the ring spanner, open end spanner & the combination spanner. Sockets & accessories -Socket spanners are a good choice where the top of the fastener is reasonably accessible. The socket fits onto it snugly and grips it on all 6 corners. Files -There are many different types of files. What makes one file different from another is not just its shape but how much material it’s designed to remove with each stroke. Pliers -Most pliers are limited by their size in what they can grip. It is important to select the right type and size of pliers for the job. Vices & clamps -The bench vice is a plain vice that will hold anything that needs sawing, filing, or chiseling. The G-clamp holds parts together while they’re being worked on. Automotive tools Gauges -A gauge measures the difference between any two points and can be divided according to how accurately they do it. Marking tools -Marking tools include a scriber, dividers, marking-dye & engineers blue. Pipe flaring & cutting -Pipe flaring tools can create single or double flares. A pipe cutter creates a neater cut than sawing pipes and metal tubing. Fasteners -There are many different fasteners used in automotive applications, including screws, bolts, studs & nuts. Washers & chemical compounds can be used to help secure these fasteners. Pullers -The most common pullers have 2 or 3 legs which grip the part to be removed. A pulling action then extracts the part. Taps & dies -Threads are cut on screws, bolts, nuts, studs and inside holes to allow components to be attached and assembled. Taps cut threads inside holes or nuts. Additional tools Punches - A punch makes an accurate blow at exactly one point. Riveting tools -There are many applications for rivets & a variety of tools for doing the riveting. Heavy Vehicle Mechanic Phase 2 26 Revision 2.0 December 2013 27-33 Upper Baggot Street Dublin 4