1
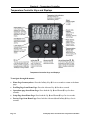
Model TEC1 Thermoelectric Temperature Chamber Operation and Service Manual TestEquity LLC 6100 Condor Drive Moorpark, CA 93021 Support: 877-512-3457 Toll Free 805-480-0636 Corporate: 800-732-3457 805-498-9933 http://www.testequity.com Copyright © 2010 TestEquity LLC Rev. 1.2 – 11/01/2010 Table of Contents Chapter 1 – Safety Instructions ................................................................................................ 1-1 Introduction ____________________________________________________________________________ 1-1 Installation Safety Notices _________________________________________________________________ 1-1 Operation Safety Notices __________________________________________________________________ 1-1 Chapter 2 – Installation ............................................................................................................. 2-1 Unpacking ______________________________________________________________________________ 2-1 Preparation For Use _____________________________________________________________________ 2-1 Installation Location _____________________________________________________________________ 2-1 Condensate Drain _______________________________________________________________________ 2-2 Input Voltage Configuration _______________________________________________________________ 2-2 Chapter 3 – Operation ............................................................................................................... 3-1 Introduction ____________________________________________________________________________ 3-1 Summary of Chamber Operation___________________________________________________________ 3-1 Front Panel Switches _____________________________________________________________________ 3-1 POWER Switch................................................................................................................................................ 3-1 TEMP Switch ................................................................................................................................................... 3-1 Convenience Outlet ______________________________________________________________________ 3-1 Loading the Chamber ____________________________________________________________________ 3-2 Performance Considerations ............................................................................................................................ 3-3 Internal Test Fixtures ....................................................................................................................................... 3-3 Chapter 4 – Temperature Controller ....................................................................................... 4-1 Introduction ____________________________________________________________________________ 4-1 Temperature Controller Keys and Displays __________________________________________________ 4-2 Home Page _____________________________________________________________________________ 4-3 Home Page Parameters .................................................................................................................................... 4-3 Temperature Set Point Control......................................................................................................................... 4-3 Profile Programming _____________________________________________________________________ 4-4 Operations Page _________________________________________________________________________ 4-5 Setup Page _____________________________________________________________________________ 4-5 Factory Page ____________________________________________________________________________ 4-5 Computer Interface ______________________________________________________________________ 4-6 RS-232C ........................................................................................................................................................... 4-6 GPIB (optional) ................................................................................................................................................ 4-6 Ethernet (optional) ........................................................................................................................................... 4-6 GPIB and Ethernet Programming .................................................................................................................... 4-7 Chapter 5 – Frequently Asked Questions ................................................................................ 5-1 Chapter 6 – Specifications ......................................................................................................... 6-1 Model TEC1 Chamber Specifications _______________________________________________________ 6-1 Table of Contents Chapter 7 – Maintenance .......................................................................................................... 7-1 Preventive Maintenance Schedule __________________________________________________________ 7-1 Daily or As Needed .......................................................................................................................................... 7-1 Every 6 Months ................................................................................................................................................ 7-1 Every 12 Months .............................................................................................................................................. 7-1 How to clean the chamber interior and exterior ............................................................................................... 7-1 How to verify the chamber performance .......................................................................................................... 7-2 How to verify the calibration ........................................................................................................................... 7-3 Theory of Operation _____________________________________________________________________ 7-4 Thermoelectric Cooling and Heating ............................................................................................................... 7-4 Temperature Control ........................................................................................................................................ 7-4 Troubleshooting _________________________________________________________________________ 7-5 Recommended Spare Parts ________________________________________________________________ 7-6 Major Electrical Parts ____________________________________________________________________ 7-6 General Replaceable Parts ________________________________________________________________ 7-6 EZ-Zone Temperature Controller Setup Parameters __________________________________________ 7-7 EZ-Zone Setup Menu Parameters .................................................................................................................... 7-8 EZ-Zone Custom Menu Parameters ............................................................................................................... 7-10 EZ-Zone Operations Page Parameters ........................................................................................................... 7-10 Chapter 8 – Warranty ............................................................................................................... 8-1 Chapter 9 – Drawings ................................................................................................................ 9-1 Chapter 1 – Safety Chapter 1 – Safety Instructions Introduction Follow all CAUTION notices to prevent damage to the chamber or your test sample. Failure to follow all CAUTION notices may void your warranty. CAUTION may also indicate a potentially hazardous situation which, if not avoided, may result in minor or moderate personal injury. WARNING indicates a potentially hazardous situation which, if not avoided, could result in death or serious injury. The safety alert symbol ! precedes a general CAUTION or WARNING statement. The electrical hazard symbol 2 precedes an electric shock hazard CAUTION or WARNING statement. Installation Safety Notices 2 WARNING: The power cord is equipped with a grounded/polarized plug. To prevent a shock hazard, DO NOT defeat the ground or polarization feature. This device MUST be plugged into a properly grounded and polarized outlet. ! CAUTION: This chamber is designed for operation in a conditioned laboratory environment. Operation above 27°C (80°F) will have a significant impact on low-temperature operation. ! CAUTION: For optimum performance, there should be a minimum of 4-inch clearance between the fans on the back of the chamber and a wall. Operation of the chamber directly against a wall will result in 25% less cooling capacity. Operation Safety Notices ! CAUTION: The “EZ-Zone PM User’s Manual” is a general manual and is written by the manufacturer, Watlow, for a wide variety of applications and configurations. Not all features or functions are applicable. Only the capabilities of a model PM6R1CC-2AAAAAA, as described on page 112 of the “EZ-Zone PM User’s Manual” are applicable. ! CAUTION: The EZ-Zone Temperature Controller has been properly configured by TestEquity to match the chamber’s system requirements and to perform optimally over a wide range of operating conditions. Improper modifications to these setup values can result in erratic performance and unreliable operation. Do not attempt to modify the setup values, unless you thoroughly understand what you are doing. If there is any doubt, please call TestEquity before proceeding. TestEquity TEC1 Thermoelectric Temperature Chamber Page 1-1 Chapter 1 – Safety ! CAUTION: NEVER select “Factory Default” in the Diagnostic Menu. “Factory Defaults” are NOT the TestEquity configuration parameters for this chamber. If you select “Factory Defaults”, you must reconfigure all System and Operation Parameters as documented in the TestEquity manual, NOT the “EZ-Zone PM User’s Manual”. ! CAUTION: The EZ-Zone Temperature Controller “Alarm” function is NOT used in the chamber and is NOT connected. ! WARNING: Do NOT put items in the chamber that can emit corrosive vapors or substances. ! WARNING: This chamber is NOT a curing oven. There are NO provisions for venting fumes. ! WARNING: The chamber door must remain closed while the chamber is operating. If you need to open the door while the chamber is operating, wear safety goggles to prevent the high velocity airflow from blowing particles or objects into your eyes. ! CAUTION: If your test sample is energized, it may be capable of raising the workspace temperature beyond safe limits. This could occur if your test sample exceeds the live load rating of the chamber or if the chamber’s cooling system fails. You are responsible for providing thermal protection devices to your test sample. ! CAUTION: To prevent damage to your test sample and the thermoelectric devices, do not exceed the live load rating of the chamber. Live Load Rating Temp +37°C 90 W Watts Page 1-2 +23°C 50 W +15°C 35 W +10°C 20 W TestEquity TEC1 Thermoelectric Temperature Chamber Chapter 2 – Installation Chapter 2 – Installation Unpacking Inspect the shipping container for any signs of visible damage. Notify the carrier and TestEquity immediately if there are signs of shipping damage. 1. 2. 3. 4. Cut the bands that hold the packaging together. Remove the top cover and top foam inserts. Remove the outer box. Carefully lift the chamber out of the box. This should be done by two people, since the unit weighs 52 pounds. 5. Do NOT handle the chamber by the thermoelectric modules which protrude from the rear. Preparation For Use 2 WARNING: The power cord is equipped with a grounded/polarized plug. To prevent a shock hazard, DO NOT defeat the ground or polarization feature. This device MUST be plugged into a properly grounded and polarized outlet. 1. 2. 3. 4. Inspect the chamber for signs of shipping damage. Read this entire manual. Select a suitable location to place the chamber for use. Plug the power cord to a 115 VAC, 60 Hz power source (or 230 V, 50 Hz if configured for export use. See “Input Voltage Configuration” on the next page). 5. Perform following the procedure “How to verify the chamber performance” in the Maintenance chapter of this manual to make sure that no damage has occurred in shipment. Installation Location ! CAUTION: This chamber is designed for operation in a conditioned laboratory environment. Operation above 27°C (80°F) ambient room temperature will have a significant impact on the ability to reach low temperature and is NOT recommended. ! CAUTION: For optimum performance, there should be a minimum of 4-inch clearance between the fans on the back of the chamber and a wall. Operation of the chamber directly against a wall will completely block airflow to the fans, resulting in 25% less cooling capacity. TestEquity TEC1 Thermoelectric Temperature Chamber Page 2-1 Chapter 2 – Installation Condensate Drain Any time the ambient air is subjected to temperatures below the dew point, moisture will condense out of the air. Example 1: If the room temperature is 23°C (74°F) and the humidity is ≥45%RH, moisture will condense if the chamber is held at 10°C (51°F). Example 2: If the room temperature is 23°C (74°F) and the room humidity is ≥59%RH, moisture will condense if the chamber is held at 15°C (58°F). The condensate drain connection is located on the rear of the chamber. The chamber drain water is not under pressure and is fed by gravity. Therefore, it must empty into a container. The drain fitting accommodates a 3/8-inch ID hose. Under most controlled laboratory or office conditions, there will be no condensation and the Condensate Drain can be ignored. Input Voltage Configuration (Does not apply to model TEC1-001, which is only rated for 115V input) This chamber can be configured for 115V (88 to 132VAC) or 230 V (176 to 264VAC), 50/60 Hz input. The chamber ships pre-configured for the correct input voltage based on the county it ships to. To change the input voltage, use the following procedure: 1. Make sure the chamber is NOT plugged into the power source. 2. Remove the 6 screws on the perimeter of the right side panel. 3. Locate the red voltage selection switch on the DC power supply on the side which normally faces up. 4. Select either 115 V or 230 V as applicable. 5. Reattach the right side panel, ensuring that no wires are pinched. 6. Plug the chamber into the power source. 7. Turn the POWER switch ON. 8. On the Temperature Controller, enter the Setup Menu\Global Menu. Change the AC Line Frequency (AC.FL prompt) to either 50 or 60 (Hz) as appropriate. See EZ-Zone Temperature Controller Setup Parameters in Chapter 7 for instructions on how to navigate to this menu. Page 2-2 TestEquity TEC1 Thermoelectric Temperature Chamber Chapter 3 – Operation Chapter 3 – Operation Introduction The Front Panel Switches control power to the Temperature Controller and all chamber functions. The Temperature Controller controls the temperature of the chamber. The chamber automatically heats or cools as required based on the deviation from temperature set point and according to the PID tuning values. Summary of Chamber Operation 1. 2. 3. 4. 5. Turn the POWER Switch ON. Enter the desired temperature set point on the Temperature Controller. Load your test sample in the chamber and close the door. Turn the TEMP Switch ON. When you are completed with your test, turn the TEMP Switch OFF to ensure the longest possible life for the fans, while reducing power consumption and audible noise. You may also turn the POWER Switch OFF. Front Panel Switches POWER Switch The POWER Switch controls power to the entire chamber. TEMP Switch The TEMP Switch enables all chamber functions. When the POWER Switch is ON and the TEMP Switch is OFF, only the Temperature Controller is operational. When both the POWER and TEMP Switches are ON, the chamber fans will turn on and the temperature conditioning system will function to maintain the temperature set point. Convenience Outlet (Applies to model TEC1-001 only) The rear panel has a convenience outlet. It is provided for the AC power adapter for the GPIB or Ethernet interface converter only. The power is unswitched and is the same voltage as the outlet that the chamber is plugged into. Thus, the TEC1-001 is rated for 115 V input only. TestEquity TEC1 Thermoelectric Temperature Chamber Page 3-1 Chapter 3 – Operation Loading the Chamber ! WARNING: Do NOT put items in the chamber that can emit corrosive vapors or substances. ! WARNING: This chamber is NOT a curing oven. There are NO provisions for venting fumes. ! WARNING: The chamber door must remain closed while the chamber is operating. If you need to open the door while the chamber is operating, wear safety goggles to prevent the high velocity airflow from blowing particles or objects into your eyes. ! CAUTION: If your test sample is energized, it may be capable of raising the workspace temperature beyond safe limits. This could occur if your test sample exceeds the live load rating of the chamber or if the chamber’s cooling system fails. ! CAUTION: To prevent damage to your test sample and the chamber’s thermoelectric devices, do not exceed the live load rating of the chamber. Live Load Rating Temp +37°C 90 W Watts Page 3-2 +23°C 50 W +15°C 35 W +10°C 20 W TestEquity TEC1 Thermoelectric Temperature Chamber Chapter 3 – Operation Performance Considerations The performance of all chambers is significantly affected by the characteristics of your test sample. Factors include size, weight, material, shape, and power dissipation if energized. The test sample should be placed in the chamber in a manner that allows for air circulation. Multiple test samples should be distributed throughout the chamber to ensure even airflow and minimize temperature gradients. Verify that the temperature gradients are within acceptable limits, by measuring the chamber temperature at strategic points using a multipoint thermocouple meter or data logger. You may find that the temperature is different from what the temperature controller indicates at a particular temperature. The correct way to adjust what the temperature controller “displays” compared to what is measured at some point other than the controller’s sensor is with the “Calibration Offset” parameter. See page 56 of the “EZ-Zone PM User’s Manual” for details. Internal Test Fixtures Some applications require internal fixtures to support test samples and provide a convenient method of connecting wires and sensors. Fixtures must be designed to minimize their impact on chamber functionality and performance. Fixtures should be designed for easy removal to permit maintenance and cleaning of the chamber. Fixtures should be constructed of stainless steel. This also applies to all screws and fasteners. All welds should be passivated. To prevent rust and corrosion, never use iron or mild steel even if it is painted or plated. Aluminum may be used. However, since the specific heat of aluminum is double that of steel, it represents a greater load and will have more impact on the chamber performance. Make sure that all connectors, wiring, pc boards, and auxiliary components can withstand the temperature extremes that they will be subjected to. In some cases, these components may not be able to last after repeated tests and should be considered expendable. TestEquity TEC1 Thermoelectric Temperature Chamber Page 3-3 Chapter 4 – Temperature Controller Chapter 4 – Temperature Controller Introduction The EZ-Zone Temperature Controller can function as either a single set point controller (static mode) or as a programmable profile controller. The user-interface is organized into five “pages” of menus. See the next page for a description of the controller keys and displays, and how to navigate the menus. ! CAUTION: The EZ-Zone Temperature Controller has been properly configured by TestEquity to match the chamber’s system requirements and to perform optimally over a wide range of operating conditions. Improper modifications to these setup values can result in erratic performance and unreliable operation. Do not attempt to modify the setup values, unless you thoroughly understand what you are doing. If there is any doubt, please call TestEquity before proceeding. ! CAUTION: NEVER select “Factory Default” in the Diagnostic Menu. “Factory Defaults” are NOT the TestEquity configuration parameters for this chamber. If you select “Factory Defaults”, you must reconfigure all System and Operation Parameters as documented in the TestEquity manual, NOT the “EZ-Zone PM User’s Manual”. ! CAUTION: The EZ-Zone Temperature Controller “Alarm” function is NOT used in the chamber and is NOT connected. TestEquity TEC1 Thermoelectric Temperature Chamber Page 4-1 Chapter 4 – Temperature Controller Temperature Controller Keys and Displays Temperature Controller Keys and Displays To navigate through the menus: • Home Page from anywhere: Press the Infinity Key ˆ for two seconds to return to the home page. • Profiling Page from Home Page: Press the Advance Key ‰ for three seconds. • Operations page from Home Page: Press both the Up ¿ and Down ¯ keys for three seconds. • Setup Page from Home Page: Press both the Up ¿ and Down ¯ keys for six seconds. • Factory Page from Home Page: Press both the Advance ‰ and Infinity ˆ keys for six seconds. Page 4-2 TestEquity TEC1 Thermoelectric Temperature Chamber Chapter 4 – Temperature Controller Home Page Use the Advance Key ‰ to step through the Home Page parameters. The parameter prompt will appear in the lower display, and the parameter value will appear in the upper display. You can use the Up ¿ and Down ¯ keys to change the value of read-write parameters, just as you would in any other menu. The chamber temperature (read-only) is in the upper display and the temperature Set Point (readwrite) is in the lower display. If a profile is running, the chamber temperature is in the upper display and the Target Set Point (read-only) is in the lower display. Home Page Parameters The Home Page is a customized list of as many as 20 parameters that can be configured and changed in the Custom Menu [CUSt] (Factory Page). The home page has been configured by TestEquity to display only the following parameters: Prompt Value Description [AcPu] * Active Process Value Actual chamber temperature (upper display) [AcSP] * Active Set Point Temperature Set Point (lower display) [hPr1] Heat Power The percentage of heat throttle. [CPr1] Cool Power The percentage of heat throttle. [AUt1] Autotune Autotune (yes or no). While Autotune is active, the Home Page will display [Attn] [tUn1]. When the Autotune is complete, the message will clear automatically. [idS1] Idle Set Point Set a temperature Set Point that can be triggered by an event state, such as pressing the EZ Key (if configured in the Function Key Menu\Digital Input Function parameter). [PSt1] Profile Start Select a profile or step number that will be affected by Profile Action. [PAC1] Profile Action Request Select the action to apply to the profile (1 to 4) or step selected in Profile Start. *Note: [AcPu] and [AcSP] only show up in the Custom Menu configuration Page. They are the parameters that normally show when the chamber is powered ON. Temperature Set Point Control You can change the temperature set point by using the Up ¿ and Down ¯ when a profile is not running and you are in the Home Page. The new set point is entered within three seconds after a new value is set. TestEquity TEC1 Thermoelectric Temperature Chamber Page 4-3 Chapter 4 – Temperature Controller Profile Programming The EZ-Zone Temperature Controller can be programmed to store up to 40 total steps into as many as 4 profiles. You do not need a computer to enter a profile – it can be easily done through the controller’s front panel keys. A Profile is a set of instructions programmed as a sequence of steps. The controller handles the profile steps automatically, in sequence. Refer to Chapter 7 of the “EZ-Zone PM User’s Manual” for detailed instructions on using the Profile function. To enter the Profiling Page from Home Page: Press the Advance Key ‰ for three seconds until [ProF] appears in the lower display. NOTES: TestEquity recommends having the End step type to be Hold or User. TestEquity does NOT recommend using an end step type of Off. This does not turn off the chamber fans and the temperature will be uncontrolled. Input events and output events are not included in the controller supplied with the TEC1 chamber. Ignore any mention of them in the “EZ-Zone PM User’s Manual”. Only the capabilities of a model PM6R1CC-2AAAAAA, as described on page 112 of the “EZ-Zone PM User’s Manual” are applicable. Page 4-4 TestEquity TEC1 Thermoelectric Temperature Chamber Chapter 4 – Temperature Controller Operations Page The Operations Page provides access to menus for control tuning (PID) and controller alarms. Operations page access from Home Page: Press both the Up ¿ and Down ¯ keys for three seconds. [``Ai] will appear in the upper display and [oPEr] will appear in the lower display. ! CAUTION: The EZ-Zone Temperature Controller “Alarm” function is NOT used in the chamber and is NOT connected. ! CAUTION: The EZ-Zone Temperature Controller PID values have been properly configured by TestEquity to match the chamber’s system requirements and to perform optimally over a wide range of operating conditions. Improper modifications to these values can result in erratic performance and unreliable operation. Do not attempt to modify the PID values, unless you thoroughly understand what you are doing. If there is any doubt, please call TestEquity before proceeding. The correct values are documented in the “EZ-Zone Temperature Controller Setup Parameters” section of this manual. Setup Page The Setup Page provides access to menus for configuring the controller hardware. Setup Page access from Home Page: Press both the Up ¿ and Down ¯ keys for six seconds. [``Ai] will appear in the upper display and [`Set] will appear in the lower display. ! CAUTION: The EZ-Zone Temperature Controller setup values have been properly configured by TestEquity to match the chamber’s system requirements and to perform optimally over a wide range of operating conditions. Improper modifications to these values can result in erratic performance and unreliable operation. Do not attempt to modify the setup values, unless you thoroughly understand what you are doing. If there is any doubt, please call TestEquity before proceeding. The correct values are documented in the “EZ-Zone Temperature Controller Setup Parameters” section of this manual. Factory Page The Factory Page provides access to menus for controller diagnostics and calibration. Factory Page access from Home Page: Press both the Advance ‰ and Infinity ˆ keys for six seconds. ! CAUTION: NEVER select “Factory Default” in the Diagnostic Menu. “Factory Defaults” are NOT the TestEquity configuration parameters for this chamber. If you select “Factory Defaults”, you must reconfigure all System and Operation Parameters as documented in the TestEquity manual, NOT the “EZ-Zone PM User’s Manual”. TestEquity TEC1 Thermoelectric Temperature Chamber Page 4-5 Chapter 4 – Temperature Controller Computer Interface ! CAUTION: Every setting in the EZ-Zone Controller can be accessed via the computer interface. Improper modifications to configuration settings can result in erratic performance and unreliable operation. The correct values are documented in the “EZ-Zone Temperature Controller Setup Parameters” section of this manual. RS-232C The EZ-Zone Temperature Controller has an RS-232C interface. A DB-9 connector is located on the rear panel. It is wired to accommodate a null-modem cable. To communicate with the controller from a PC, you need to run software that uses 32-bit Modbus RTU protocol. Each controller function has a “register” number which can be read or written to (when applicable). These registers are listed Chapters 6 through 9 of the “EZ-Zone PM Controller Communications Manual”. RS-232C Modbus programming resources can be downloaded from http://www.testequity.com/ez . GPIB (optional) The optional GPIB interface, model TE-1052, consists of an external converter box (ICS Model 4899A) that connects to the chamber’s RS-232C interface. Ethernet (optional) The optional Ethernet interface, model TE-1055, consists of an external converter box (ICS Model 8099) that connects to the chamber’s RS-232C interface. Page 4-6 TestEquity TEC1 Thermoelectric Temperature Chamber Chapter 4 – Temperature Controller GPIB and Ethernet Programming Floating Point Variables EZ-Zone PM Series controllers use two consecutive register to control a value or to read back a process variable. The two registers hold an IEEE-754 32-bit floating point word. The registers are read and written to in the low word-upper word order. Floating Point Write The WF command writes the num value in floating point format to two consecutive registers starting with the low word register. To enter a temperature setpoint: WF 2160, 50 'writes 50.0°C to registers 2160 and 2161 WF 2160, 15.5 'writes 15.5°C to registers 2160 and 2161 Floating Point Read The RF? query reads a 32-bit floating point value from two sequential register in low word-upper word order. The RF? does not require the number of register to read since it is fixed at two registers. To read the actual chamber temperature: RF? 360 'reads registers 360 and 361 The [?] is an optional symbol for smart programs like ICS’s GPIBKybd program. These programs can recognize the command as a query and automatically read the response. Setting Modbus Device Timeouts The time that the 4899A/8099 waits to receive a response from the Modbus device is programmable by the D command. This is an internal 4899A/8099 timeout and not the same as the GPIB bus timeout. If the 4899A/8099 does not receive a response within the timeout period, it assumes that the Modbus device is not responding and sets the timeout error. Timeout errors can be determined by reading the 4899A/8099’s Modbus Error Register with the E? query. If the error code is 101 (Modbus timeout) then the timeout period should be lengthened. The command to change the timeout period is: D 300 *SAV 0 ‘sets timeout period to 300 ms ‘saves current values and configuration (do this if you want to keep the new value) The default time period of 100 milliseconds has proved to be satisfactory for most applications. The recommendation is that your program should have a built-in recovery routine to handle the possibility of a timeout error. More details on GPIB and Ethernet Interface See the ICS Electronics Manual for more details on the GPIB or Ethernet interfaces. TestEquity TEC1 Thermoelectric Temperature Chamber Page 4-7 Chapter 5 – Frequently Asked Questions Chapter 5 – Frequently Asked Questions Why does my chamber heat or cool slower than the published specifications? Performance is significantly affected by the characteristics of your test sample. Factors include size, weight, material, shape, and power dissipation if energized. The test sample should be placed in the chamber in a manner that allows for air circulation. Multiple test samples should be distributed throughout the chamber to ensure even airflow and minimize temperature gradients. If necessary, an additional shelf should be used to evenly distribute the load. You can determine if the chamber is operating properly by following the procedure in “How to verify the chamber performance”. How can I modify the chamber to cool faster or colder? Unfortunately, there is nothing you can do to improve upon the designed-in performance. Modifying the chamber will permanently damage the chamber and void the warranty. Why is there water coming out of the tube in the back of the chamber? Under what conditions do I need to be concerned about condensation? Any time the ambient air is subjected to temperatures below the dew point, moisture will condense out of the air. For example, if the room temperature is 23°C (74°F) and the room humidity is ≥45%RH, moisture will condense if the chamber is held at 10°C (51°F). If the room temperature is 23°C (74°F) and the room humidity is ≥59%RH, moisture will condense if the chamber is held at 15°C (58°F). The condensate drain is provided to remove condensate from the chamber. Under most controlled laboratory or office conditions, there will be no condensation. My test specification requires convection heat only. Can I turn the circulator motors off? NO! This will damage the thermoelectric devices and void the warranty. You need a “gravity convection oven” for that kind of test. TestEquity TEC1 Thermoelectric Temperature Chamber Page 5-1 Chapter 6 – Specifications Chapter 6 – Specifications Model TEC1 Chamber Specifications Temperature Range +10°C to +60°C Control Tolerance ±0.1°C (Measured at the control sensor after stabilization) Uniformity ±1.0°C (Variations throughout the chamber after stabilization, at least 2-inches from any inside surface) System Accuracy ±2.0°C (Indication on temperature controller compared to measurement in the center of the chamber, in the range of +15°C to +55°C, after 30 minute stabilization at set point) Cool Down Time Start Temp to +55°C +23°C +55°C --------- +37°C 7 min ----- +23°C 16 min ----- +15°C 26 min 7 min Heat Up Time Start Temp to +23°C +15°C +23°C ----2.0 min +37°C 3.5 min 5 min +55°C 10 min 11 min +60°C Ultimate Ultimate +10°C Ultimate Ultimate *Note: Heat and cool transition times are measured in an empty chamber after a 30 minute soak at the start temperature, as indicated on the temperature controller. Transition times do not include the effect of proportional band when approaching the temperature set point. Live Load Rating Power Requirements Input Voltage Current Draw +37°C +23°C +15°C +10°C 90 Watts 50 Watts 35 Watts 20 Watts 88 to 132VAC / 176 to 264VAC, 50/60 Hz (internal switch for voltage range) NOTE: Model TEC1-001 is rated for 115 V nominal input only. 6A at 115 VAC, 3.5A at 230 VAC Workspace Dimensions 16" W x 8" H x 13" D (0.96 cubic feet) Outside Dimensions 24.7" W x 12" H x 20.4" D (nominal) Min. Installed Clearance 4" from the rear Cable Notch 1" x 3" Cable Notch on left and right side (two total). Weight 52 pounds Sound Level Less than 50 dBA (A-weighted, measured 36" from the front surface in a free-standing environment) NOTE: Performance is typical and based on operation at 23°C (73°F) ambient and nominal input voltage. This product is designed for use in a normal conditioned laboratory. Operation at higher ambient temperatures will result in decreased cooling performance. Operation above 27°C (80°F) will have a significant impact on low-temperature operation. TestEquity TEC1 Thermoelectric Temperature Chamber Page 6-1 Chapter 7 – Maintenance Chapter 7 – Maintenance Preventive Maintenance Schedule Daily or As Needed • • Clean chamber interior and exterior. Listen for abnormal noise or vibration. Every 6 Months • Verify the chamber performance. Every 12 Months • Verify the calibration. How to clean the chamber interior and exterior • Wipe or vacuum out all debris. • Clean surfaces with a damp cloth, mild detergent, or stainless-steel cleaner. Avoid cleaners that are abrasive or leave a residue. NEVER use steel wool. • Clean the exterior painted surfaces with a damp cloth or mild detergent. If you are using a detergent, test a small inconspicuous area to make sure it does not damage the finish. TestEquity TEC1 Thermoelectric Temperature Chamber Page 7-1 Chapter 7 – Maintenance How to verify the chamber performance These tests verify the performance of the heating, cooling, electrical controls, temperature controller, and air circulation systems. The chamber should meet all published performance specifications if all of these tests are successfully passed. These tests assume that the Temperature Controller’s setup and tuning values have not been changed from the values as shipped from TestEquity. If the chamber fails any of these tests, it should be removed from service to prevent further damage until the cause of the problem is determined and resolved. Use the Up and Down arrow keys to enter the specified temperature in the lower display. Read the actual chamber temperature on the upper display. 1. 2. 3. 4. 5. The chamber interior should be empty and at ambient temperature, approximately 23°C. Plug the chamber into an AC outlet which matches the input power configuration. Turn the POWER Switch ON and the TEMP Switch OFF. Set the Temperature Controller Set Point to 55.0°C and turn the TEMP Switch ON. The Temperature Controller’s 1 light should be ON continuously and the Controller’s 2 light should be OFF. The chamber should begin to heat up within approximately 20 seconds. 6. The Temperature Controller should begin controlling (1 light cycles ON/OFF) at approximately 47°C within approximately 6 minutes. 7. The chamber temperature should slowly increase and stabilize to 55.0°C. It should NOT overshoot beyond 56.5°C. 8. Let the chamber stay at this condition for 30 minutes. 9. After stabilization, the display should vary no more than ±0.1°C, or a total of 0.2°C. 10. Set the Temperature Controller Set Point to 10.0°C. 11. The Temperature Controller’s 2 light should be ON continuously and the Controller’s 1 light should be OFF. After about 30 seconds, the chamber should begin to cool down. 12. The chamber should cool down from 55.0°C to 15.0°C within approximately 26 minutes. 13. The chamber should continue to cool down to 10.0°C and begin controlling (2 light cycles ON/OFF) 14. After stabilization, the display should vary no more than ±0.1°C, or a total of 0.2°C. 15. Set the Temperature Controller Set Point to +23°C. The chamber should begin to heat up. 16. The Temperature Controller’s 1 light should be ON continuously and the Controller’s 2 light should be OFF. 17. This concludes the chamber performance verification tests. Page 7-2 TestEquity TEC1 Thermoelectric Temperature Chamber Chapter 7 – Maintenance How to verify the calibration ! CAUTION: TestEquity does not recommend performing the controller calibration procedures unless you have verified that the controller is actually out of calibration. TestEquity recommends verifying the calibration before attempting to actually perform a calibration. The microprocessor-based instrumentation used in TestEquity chambers seldom goes out of calibration. If you try to calibrate the instrumentation before determining that calibration is necessary, you may make it worse if done incorrectly. Variations in temperature throughout the chamber interior are NOT a measurement of controller accuracy. These variations, called “gradients”, are a function of the physical design of the chamber and its airflow, the characteristics of the test sample, and how it is oriented in the chamber. You cannot “calibrate” to improve gradients. The correct way to adjust what the temperature controller “displays” compared to what is measured at some point other than the controller’s sensor, is with the “Calibration Offset” parameter. See page 28 and 29 of the “EZZone PM User’s Manual” for details. Total chamber accuracy, including the effects of controller accuracy, sensor accuracy, and gradients is ±2.0°C. This is the indication on temperature controller compared to measurement in the center of the chamber, in the range of +15°C to +55°C, after 30 minute stabilization at set point. Actual measurements may typically be the following: Controller 55.0°C 37.0°C 23.0°C 15.0°C Standard 53.5°C 36.0°C 23.1°C 15.5°C Error -1.5°C -1.0°C +0.1°C +0.5°C These would be considered as being within the specification limit of ±2.0°C. TestEquity typically enters a Calibration Offset value of -0.5°C to -1.5°C in order to achieve the results above. If calibration of the temperature controller is necessary, refer to page 56 of the “EZ-Zone PM User’s Manual” and follow the instructions for RTD Input. TestEquity TEC1 Thermoelectric Temperature Chamber Page 7-3 Chapter 7 – Maintenance Theory of Operation Thermoelectric Cooling and Heating Air-to-air exchangers utilize the Peltier effect, whereby the heat is transferred via the flow of current through thermoelectric modules. One part absorbs the heat and, as a consequence, reduces the temperature (cold side) and the other part dissipates the heat to ambient (hot side). Fans are used to move air over heat sinks attached to both the hot and cold sides of the thermoelectric modules. If the polarity is reversed, the hot and cold sides are also reversed. There are no moving mechanical parts (except fans) so thermoelectric air-to-air exchangers are extremely reliable with an almost unlimited life span and require no maintenance (except possible fan replacement). A thermoelectric air-to-air exchanger does not contain any polluting substances such as CFC or other gases, has a more compact and simple structure than a conventional refrigeration system. Temperature Control Refer to the electrical schematic to identify the items referenced below. Three thermoelectric modules (TE1, 2, 3) provide cooling and heating. The air is circulated by a fan which is mounted to each thermoelectric module. A DC power supply (PS1) provides 12 VDC to power the fans and thermoelectric modules. A temperature controller (TCR1) measures the air temperature using at RTD temperature sensor (RTD) and cycles an array of solid state relays on/off as required to modulate DC power to the thermoelectric modules. The solid state relays are arranged in an H-bridge configuration to provide switching with polarity reversal for cooling and heating. When cooling is required, TCR1 output 2 (cool) turns on. This energizes SSR1 and SSR2. This applies power to TE1, 2, 3 with (+) on the red wires and (–) on the black wires. When heating is required, TCR1 output 1 (heat) turns on. This energizes SSR3 and SSR3. This applies power to TE1, 2, 3 with (–) on the red wires and (+) on the black wires. Page 7-4 TestEquity TEC1 Thermoelectric Temperature Chamber Chapter 7 – Maintenance Troubleshooting SYMPTOM Chamber does not function. CONDITION If POWER switch is ON and TEMP switch is ON. Controller is lit up. Fans are not running and doesn’t heat or cool. Does not heat up at all. If controller light 1 is ON, fans are running. Heats up too slow. If controller light 1 is ON, fans are running. a) b) c) d) a) b) a) b) Does not cool at all. If temperature controller light 2 is ON, fans are running. c) a) b) Cools too slowly or does not cool down to 10°C. If temperature controller light 2 is ON, fans are running. Temperature has excessive overshoot or undershoot. If tuning PID control parameters in temperature controller were changed. If tuning PID control parameters in temperature controller are as shipped from TestEquity. TestEquity TEC1 Thermoelectric Temperature Chamber POSSIBLE CAUSES DC power supply is configured for 230 V but chamber plugged into 115 V. Defective DC power supply. Shorted Thermoelectric Module Shorted fan. Defective output 1 on Temperature Controller. Defective SSR3 or SSR4. One Thermoelectric Modules is open. One of the fans is not running (defective). Chamber interior is overloaded. Defective output 2 on Temperature Controller. Defective SSR1 or SSR2. a) Chamber interior is overloaded. b) Test sample is energized, giving off excessive heat. c) Chamber is pushed up against a wall. d) Room temperature is over 27°C. a) Re-enter values as shipped from TestEquity. a) Control parameters may need to be changed for your unique test conditions. b) Try to Autotune at the temperature where you are observing the overshoot or undershoot. Page 7-5 Chapter 7 – Maintenance Recommended Spare Parts Replacement parts are available from TestEquity. Parts are generally in-stock and ready for immediate shipment. Next-day delivery is always available. If you cannot risk being out of service for even one day, then you should purchase critical spare parts in advance. The following is a list of the kinds of parts that you may want to purchase in advance. Critical Spare Parts DC Power Supply Solid State Relay Switch Temperature Controller Thermoelectric Module Temperature Sensor, RTD Part # 222305 222300 200032 222304 222307 222306 Major Electrical Parts Description AC Input Connector AC Outlet, NEMA 1-15R (TEC1-001 only) DC Power Supply, 12 VDC, 24A Fan (for electrical enclosure) Power Cord (for USA) Solid State Relay, 30A DC Switch, SPST, Rocker Temperature Controller Temperature Sensor, RTD Thermoelectric Module (with fans) Mfr Tyco Corcom Qualtek Mfr Part No. 6ESRM-3 738W-CX2/01 Ref # --- Part # Qty UOM 222301 1 ea 222303 1 ea Mean Well ebm-Papst Qualtek Crouzet Carlingswitch Watlow CUSTOM CUSTOM S-320-12 3412N 562-312003-01 84 134 870 LRA211-RA-B/125N PM6R1CC-2AAAAABR 222306 222307 PS1 FM1 -SSR1, 2, 3, 4 SW1, 2 TCR1 RTD TE1, 2, 3 222305 222302 222309 222300 200023 222304 222306 222307 Mfr Part No. CUSTOM P2-51 MC-JM50 MC-JM49 382355 Ref # ------ Part # Qty UOM 382352 2 ea 382354 1 ea 382350 1 ea 382351 1 ea 382355 1 ea 1 1 1 4 2 1 1 3 ea ea ea ea ea ea ea ea General Replaceable Parts Description Cable Slot Gasket Door Handle Magnetic Catch Magnetic Catch Striker Static Dissipative Sheet (TEC1-001 only) Page 7-6 Mfr CUSTOM Southco Sugatsune Sugatsune CUSTOM TestEquity TEC1 Thermoelectric Temperature Chamber Chapter 7 – Maintenance EZ-Zone Temperature Controller Setup Parameters ! CAUTION: The “EZ-Zone PM User’s Manual” is a general manual and is written by the manufacturer, Watlow, for a wide variety of applications and configurations. Not all features or functions are applicable. Only the capabilities of a model PM6R1CC-2AAAAAA, as described on page 112 of the “EZ-Zone PM User’s Manual” are applicable. The “Retransmit” function is available as an option. ! CAUTION: The EZ-Zone Temperature Controller has been properly configured by TestEquity to match the chamber’s system requirements and to perform optimally over a wide range of operating conditions. Improper modifications to these setup values can result in erratic performance and unreliable operation. Do not attempt to modify the setup values, unless you thoroughly understand what you are doing. If there is any doubt, please call TestEquity before proceeding. ! CAUTION: The EZ-Zone Temperature Controller “Alarm” function is NOT used in the chamber and is NOT connected. ! CAUTION: NEVER select “Factory Default” in the Diagnostic Menu. “Factory Defaults” are NOT the TestEquity configuration parameters for this chamber. If you select “Factory Defaults”, you must reconfigure all System and Operation Parameters as documented in the TestEquity manual, NOT the “EZ-Zone PM User’s Manual”. TestEquity has configured the Temperature Controller with the parameters as documented on the following pages. These parameters have been saved in User Save Set 1 and User Save Set 2 which is accessible from the Diagnostics Menu. TestEquity TEC1 Thermoelectric Temperature Chamber Page 7-7 Chapter 7 – Maintenance EZ-Zone Setup Menu Parameters Setup Page access from Home Page: Press both the Up ¿ and Down ¯ keys for six seconds. [``Ai] will appear in the upper display and [`Set] will appear in the lower display. Setup Menu\Analog Input Menu\Input1 Parameter Sensor Type RTD Leads Filter Time Error Latching Decimal Prompt SEn rt.L FiL i.ER dEC Value r0.1H (RTD 100 Ω) 3 0.5 oFF 0.0 Prompt h.Ag C.Ag C.Cr t.tUn t.AGr P.dL UFa FAiL MAn L.dE rP L.SP h.SP SP.Lo SP.hi Value Pid Pid off no Crit 0.2 oFF oFF 0.0 no oFF 9.0 °C 61.0 °C -100.0 % 100.0 % Prompt Fn Fi o.Ct o.tb o.Lo o.hi Value hEAt 1 Ftb 0.1 0.0 % 100.0 % Prompt Fn Fi o.Ct o.tb o.Lo o.hi Value CooL 1 Ftb 0.1 0.0 100.0 Setup Menu\Loop Menu Parameter Heat Algorithm Cool Algorithm Cool Output Curve Tru-Tune Enable Autotune Aggressiveness Peltier Delay User Failure Action Input Error Failure Manual Power Open Loop Detect Enable Ramp Action Low Set Point High Set Point Set Point Low Open Loop Set Point High Open Loop Setup Menu\Output Menu\Output 1 Parameter Function Function Instance Control Time Base Low Power Scale High Power Scale Setup Menu\Output Menu\Output 2 Parameter Function Function Instance Control Time Base Low Power Scale High Power Scale Page 7-8 TestEquity TEC1 Thermoelectric Temperature Chamber Chapter 7 – Maintenance Setup Menu\Alarm Menu (1 to 4) Parameter Type Source Hysteresis Logic Sides Latching Blocking Silencing Display Delay Prompt A.ty Sr.A A.hy A.Lg A.Sd A.LA A.bL A.Si A.dSP A.dl Value oFF Ai 1.0 AL.C both nLAT oFF oFF on 0 Prompt LEv Fn Fi Value high nonE 0 Prompt C_F AC.FL r.tYP P.tyP gSE gSd1 Value C 60 ti StPt on 2.0 °C Setup Menu\Function Key Menu Parameter Level Digital Input Function Instance Setup Menu\Global Menu Parameter Display Units AC Line Frequency Ramping Type Profile Type Guaranteed Soak Enable Guaranteed Soak Deviation Setup Menu\Communications Menu\Communications 1 Parameter Address Standard Bus Temperature Units Prompt Ad.s C_F Value 1 C Setup Menu \Communications Menu\Communications 2 Parameter Address Modbus Baud Rate Modbus Parity Modbus Temperature Units Modbus Word Order Prompt Ad.M bAUd PAr C_F M.hl Value 1 9600 none C Low-High TestEquity TEC1 Thermoelectric Temperature Chamber Page 7-9 Chapter 7 – Maintenance EZ-Zone Custom Menu Parameters Factory Page access from Home Page: Press both the Advance ‰ and Infinity ˆ keys for six seconds. Factory Page\Custom Menu Parameter Custom 1 Custom 2 Custom 3 Custom 4 Custom 5 Custom 6 Custom 7 Custom 8 Custom 9 to 20 Prompt AC.Pu AC.SP h.Pr C.Pr AUt idle P.Str P.ACr nonE Value Active Process Value Active Set Point Heat Power Cool Power Autotune Idle Set Point Profile Start Profile Action Request none EZ-Zone Operations Page Parameters Operations page access from Home Page: Press both the Up ¿ and Down ¯ keys for three seconds. [``Ai] will appear in the upper display and [oPEr] will appear in the lower display. Operations Page\Analog Input 1 Parameter Process Value Error Status Calibration Offset Prompt Ain I.Er i.CA Value current temperature current status 0.0 °C (offset as required to meet accuracy spec) Prompt C.M A.tSP AUt C.SP id.S h.Pb C.Pb ti td db o.SP Value Auto 90.0 % no 23.0 °C 23.0 °C 7.0 4.0 180 30 0.0 0.0 Operations Page\Loop Menu Parameter Control Mode Autotune Set Point Autotune Request Closed Loop Set Point Idle Set Point Heat Proportional Band Cool Proportional Band Time Integral Time Derivative Dead Band Open Loop Set Point Page 7-10 TestEquity TEC1 Thermoelectric Temperature Chamber Chapter 8 – Warranty Chapter 8 – Warranty TestEquity LLC Limited Warranty for Model TEC1 TestEquity LLC (TestEquity) warrants the Model TEC1 to be free from defects in materials and workmanship under normal use and proper maintenance. TestEquity will repair or replace any defective part for a period of THREE YEARS from the date of invoice. TestEquity reserves the right to require any defective part be returned, freight prepaid, to TestEquity’s factory or to inspect any defective part at the Purchaser’s site. TestEquity shall have sole discretion to determine whether any part is defective and whether any defective part will be repaired or replaced. This limited warranty shall extend to any standard chamber accessory and component part which is normally sold by TestEquity. Non-standard accessories and component parts specified by the Purchaser shall be warranted only to the extent of the original manufacturer’s warranty, if any exists. If the repair or replacement is performed in the FIRST YEAR from the date of invoice, TestEquity will also pay for the labor associated with the repair, subject to TestEquity’s prior approval. The chamber must be sent back to TestEquity for repair, freight prepaid. On-site labor warranty does not apply to Model TEC1. During the SECOND and THIRD YEAR of the warranty period, Purchaser will be responsible for the installation and cost of installation of replacement or repaired parts. Purchaser shall notify TestEquity in writing of any alleged defect within 10 days after its discovery within the warranty period. This limited warranty does not cover: (1) Defects or damages arising as the result of shipment by common carriers or private transportation, unless TestEquity undertakes shipment and transportation of the Equipment to Purchaser’s site or contractually assumes the risk of damage to the Equipment in shipment; (2) Defects or damages arising out of, or as the result, of mishandling, modification, or improper start up, installation or maintenance of the Equipment (including start up, installation or maintenance not in accordance with TestEquity’s written procedures); (3) Defects or damages resulting from, or arising out of, abuse, misuse, neglect, intentional damage, accident, fire, flood, earthquake, or any other act of God. This warranty as to Equipment is LIMITED to repair or replacement of parts or Equipment in the determination of TestEquity LLC THE FORGOING LIMITED WARRANTY IS IN LIEU OF ALL OTHER WARRANTIES INCLUDING THE IMPLIED WARRANTIES OF FITNESS FOR A PARTICULAR PURPOSE AND MERCHANTABILITY. TestEquity LLC DISCLAIMS ANY LIABILITY FOR ANY DAMAGES RESULTING FROM DELAY OR LOSS OF USE IN SERVICE OR REPAIR, OR FOR INCIDENTAL OR CONSEQUENTIAL DAMAGES ARISING OUT OF OR IN CONNECTION WITH THE USE OR PERFORMANCE OF THE EQUIPMENT, EXCEPT AS STATED IN THIS PARAGRAPH. This limited warranty cannot be modified in any way except in writing by both TestEquity and Purchaser. Invalidation of any one or more of the provisions of this limited warranty shall in no way affect any of the other provisions hereof, which remain in full force and effect. This limited warranty shall be extended only to the first Purchaser of this Equipment and is not transferable. TestEquity TEC1 Thermoelectric Temperature Chamber Page 8-1 Chapter 10 – Drawings Chapter 9 – Drawing TestEquity TEC1 Thermoelectric Temperature Chamber Page 9-1