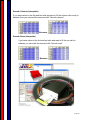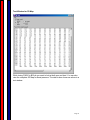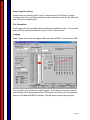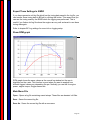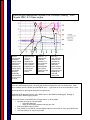
1
Tune It!
It’s my car, and I want to Tune It NOW!
Performance Tuning for the Modern OBDII
Compliant Vehicle
By North Coast Turbo Systems LLC
Page 1
Contents
Introduction:................................................................................... 3
Tuning Methods:............................................................................ 5
Signal Modifiers:…...................................................................................... 8
Signal Clamps:.............................................................................................. 8
Signal Delay:…............................................................................................... 9
Tools For Tuning:........................................................................ 14
Scan Tools: .................................................................................................. .15
Wide Band AFR Display Unit:............................................................. 15
Data Logging: .............................................................................................. 16
The Chassis Dyno: ................................................................................... 16
ECU Operating Modes:.............................................................. 17
Closed Loop Mode: ................................................................................. 18
Open Loop Mode:...................................................................................... 18
Fuel Cut:.......................................................................................................... 19
Tuning (Not Yet!):......................................................................... 19
Perform Your Maintenance:............................................................. 19
Ready for Tuning (Almost!), Learning the iEMS3:............. 21
Gear Selection:......................................................................................... 72
Altitude Changes:................................................................................... 72
Temperature Changes:........................................................................ 73
Ignition Retard Map:............................................................................. 73
E85 Ethanol Conversion:................................................................... 74
Detonation and Pre Ignition................................................................. 80
To Spray or not to Spray!...................................................................... 92
iEMS3 Datalog Examples Explained.............................................. 96
Wiring examples and Technical Information.......................... 101
Page 2
INTRODUCTION:
Welcome to the world of aftermarket performance tuning. If you are reading this
document, then obviously you have an interest in tuning your own vehicle. Once
you have grasped some basic methods, techniques and terminology, you will be
able to successfully tune your modified vehicle. Proper tuning will help you to
achieve optimum performance and eliminate poor drivability.
We will focus on the techniques available to tune your vehicle and the use of the
IEMS3 “In Series” engine management system.
The IEMS3 is vastly different from more common “piggyback” units, and we will
explore what those differences are as well.
Please read through this entire document and any literature supplied with your unit.
Additional reading regarding the basics of fuel injection and in particular the
functioning of a modern OBDII compliant vehicle ECU would also be helpful. Your
vehicles service manual should provide a discussion of the function of various
systems, individual components, and sensors.
It is also a good idea to read the troubleshooting/testing sections related to
malfunction codes for the particular area of interest associated with your vehicle.
With the right components, tools, and knowledge, you can make your vehicle more
enjoyable or if you disregard caution and simply charge ahead, you can cause
damage if the tuning is not done correctly.
HOW THINGS WORK:
What is this CANbus thing I hear about?
The modern OBDII compliant (meaning it meets and maintains compliance to the
Federal Emissions Standards) vehicle uses a very complicated and intelligent series
of computers. Today, most vehicles have numerous modules (or nodes) connected
together over what is known as a Controller Area Network bus (CANbus) system.
The modules have their own “address” (like your computer’s IP address on the
internet), and if one is missing, the system will call foul and may take a time out.
This is similar to the central nervous system you and me were born with. In nearly
all cases, if you disconnect a module from the system, you will get a Malfunction
Indicator Light (MIL) or some call it a Check Engine Light (CEL). Depending on the
device disconnected, you may simply get a hidden trouble code as commonly occurs
when changing audio equipment, or a particular system, such as Heating and
Cooling, may cease to function all together. Worst case, the vehicle simply will not
start or run.
Page 3
When tuning these vehicles, one must keep this in mind at all times. Like it or not,
we have to work with what is installed unless you want to strip down the vehicle and
install old style, manually controlled and actuated equipment. This would be quite
an expensive and time consuming task. Not to mention, your vehicle will likely no
longer be legal to license and operate.
This is why you cannot simply take a full Stand Alone Engine Management system
and install it in a modern vehicle, thereby pitching the original ECU (engine control
unit). If we could simply replace the vehicle ECU, life would be easy, but we can’t,
so let’s move on.
There are many different products by numerous manufacturers on the market. They
will generally fall within a few categories regardless of who made it. So let’s take a
look at what they are, and what they can do.
The “Chip”
A chip is simply a small electronic module that plugs into the vehicle ECU plug or
harness. They generally work by modifying certain signals to a new fixed value. In
a lot of cases, this is nothing more than changing the Intake Air Temperature (IAT)
sensor value to make the ECU think the air is colder than it really is, thus adding
more fuel. Chips are a simplified version of the Piggyback unit discussed below. It
has fixed settings and generally can not be adjusted by the end user.
The “Piggyback” unit
The “tunable” type of unit, are those commonly known as a “piggyback” unit. These
are a secondary computer that rides on the back of certain engine sensors. They
will intercept a signal, modify it, and send it to the ECU with the intent of making the
ECU think the engine is operating under a condition different than it really is.
The primary basis for fuel control on these units is to offset the MAP (Manifold Air
Pressure) or MAF (Manifold Air Flow) sensor signals so the vehicle ECU will see a
lighter load on the engine and scale back the fuel injector pulse width, thus allowing
larger than stock fuel injectors to be used. This is also known as MAP/MAF sensor
voltage skewing, or indirect fuel management.
While this may have worked on older non OBD or OBDI compliant vehicles, today’s
OBDII compliant vehicles are far too smart for this old trick. The ECU adaptives will
quickly see any signal modification that is constant or repeatable, interpret this as
degradation of the component (in most cases), and will apply changes to its own
internal ECU calibrations to get things back in line with the original parameters for
operation of the vehicle.
Page 4
In other words, the ECU “learns” around your changes and will apply adaptive
correction, negating all your efforts. You ECU is what it is, why fight it, let’s
understand it and learn how to work with it. For modern OBDII compliant vehicles,
MAP/MAF voltage skewing piggyback units are bad news, let’s move on.
Handheld tuners
There are many handheld tuners on the market. They function by rewriting part of
the information stored in the vehicle ECU. Generally, the parameters in the stock
ECU are modified, rarely is the actual computer software code changed. Most
handheld tuners come with several “canned” tunes, low octane fuel, high octane
fuel, cold air intake and cat back exhaust, etc. These cover the more common
simple vehicle modifications. If this is all that you have, and all you ever intend to do,
then one can surely be found to meet your needs.
Handhelds will also give you numerous individual configuration options as well,
speed limiter, rev limiter, transmission settings, tire size, rear end gearing, shift
points, idle speed, etc. All good things to have, and well worth the cost of the unit
alone, plus nearly all have scan tool capability as well as the ability to read and clear
the MIL/CEL codes that may pop up form time to time. Some will give a narrow
range of option to adjust fuel and/or timing, generally 10% or less.
All good things, helpful for minor tweaking, but they can’t handle more serious power
adders. For serious power adders, a more intrusive step is needed.
The Custom Tune
Here is where things get serious in short order. On older vehicles, (GM and Ford
primarily) the actual ECU software in some cases has been “leaked” to the
aftermarket or hacked, and either tuners or PC software is available where one can
rewrite exactly how an ECU functions. An experienced tuner can make a heavily
modified vehicle perform as if it was a factory power option.
Around 2004, the Federal Government really started to crack down on vehicle
manufacturers regarding emissions compliance, and they have instituted some
highly advanced encryption methods in their software to prevent the ECU from being
modified. False warranty claims have also become a concern of the manufacturer,
so expanding the encryption techniques and capabilities of the control systems to
detect and report tampering is the rule, not the exception today.
Custom tunes are created using licensed software that is not available to the end
user of the vehicle (most cases). Since the software opens up nearly all of the ECU
parameters and tables, there is generally a very steep learning curve, in particular
on new models coming to market.
Since the original vehicle manufacturer’s software that operates the actual ECU is
proprietary, there is vigorous enforcement and prosecution of copyright
Page 5
infringements. Since the actual software programming is not being modified, the
tuner is left to figure out how to manipulate the parameters and tables that can be
accessed to achieve a particular goal.
It is not a simple matter of just changing a single parameter (spark for example), but
it has to be approached from a three dimensional aspect and all of the cause and
effects must be considered and changes made in those areas as well. The
manufacturers spent considerable time and money to develop the operating
envelope for the vehicle, and it is not a simple task to modify those parameters and
still keep all other aspects of operation in check.
It is not uncommon for certain adaptives and functions to simply be “turned” off or
desensitized to make the process simpler, however this practice can lead to
unexpected results not to mention the vehicle will likely no longer pass emissions
inspections as the ECU may not show up in a “Ready” state for testing. Modern
ECU’s have very advanced adaptive capabilities and provisions to protect your
investment from damage, it makes more sense to work with these capabilities rather
than fight them.
The custom tune is loaded into the ECU via a handheld or laptop. It is important to
obtain a back up file in case the original is lost, corrupted, or overwritten by a dealer
ECU reflash.
The end user generally has no idea what was changed, and no ability to modify or
tweak it without a trip back to a shop with the software and capabilities the original
file was created from. A custom tune can range anywhere from about $300 for what
is known as an e-mail “semi canned” tune, to as much as several thousand dollars
for a full on, in person tune with dyno and road testing times involved.
These tunes generally work well for Naturally Aspirated engines; however, Forced
Induction is another challenge all together as the original ECU programming does
not have the needed parameters and tables built into it. Therefore a lot of
manipulation has to take place to develop a new operating envelope and adapt what
can be changed in the ECU to this. Sometimes it works out okay; many times it
does not, as the ECU is being asked to do something it was never designed to
perform. Almost always, there are residual drivability issues that remain as a result
of modifying the parameters outside the norm for the particular ECU.
If you are going to have a custom tune created for your vehicle, here are some of the
things to keep in mind before you spend your hard earned money. First, you are
putting your trust in someone to perform brain surgery on your $40,000 vehicle.
Seek out and talk to multiple people who have used the person/shop for tuning on
your type of vehicle. Many times you can find people on various internet forums that
have used a person/shop before. If you can, find someone close by with a similar
vehicle that has a tune from the person/shop of interest and get a test drive to see
just how well it performs.
Page 6
Do they lock their tunes? Will they provide a back up file copy? Will they work with
you to resolve any drivability issues after the initial session? Are they willing to tell
you exactly what they are doing to the ECU, such as turning off functions, adaptives,
areas they are modifying, etc? You are paying for it; you have the right to know
what is going on and what you are paying for.
Many times, we see a Wide Open Throttle (WOT) tune session on a dyno and that is
it. What about day to day street drivability? If you have things like high or low idle,
surging on start up or at idle, poor gas mileage, jumpy throttle, sloppy shifting,
degrading performance with either colder or warmer weather than when it was
tuned, are all signs that very little thought was put into the drivability portion of the
tune.
If end user tuning ability is your desire, we need to move on.
The Stand Alone Engine Management system
We have made mention of the Stand Alone in the introduction, but we will mention it
again as they are commonly looked at as a possible solution to the tuning dilemma.
As was mentioned, it is important to understand the vehicle ECU is just one of the
many modules in a modern vehicle. Removing the ECU will have the effect of
shutting down the entire vehicle control system.
A Stand Alone works very well on older vehicles without an ECU. To use one in a
modern vehicle, you would need to strip out nearly every system in the vehicle and
install direct control components as were used in older vehicles such as audio,
power windows and locks, gauges, heat and AC controls, etc. But many other
things would be lost, first and foremost is the vehicles emissions compliance, so
depending on where you live, you might not be able to register and license ft for on
road use.
Vehicle speed sensors, security systems, stability and torque management controls,
automatic functions such as headlights, wipers, etc, would also cease to function as
the controller that provides input to the relays that turn these items on/off would no
longer be present.
So, a full Stand Alone Engine Management System is simply not an option for the
modern OBDII compliant vehicle.
Programmable Calibrators
There are individual devices available that are known as a programmable calibrator.
It is a device that is installed “inline” in the vehicle wire harness between certain
engine sensors and the stock ECU. The programmable calibrator modifies these
signals from the sensors and then passes the modified signal on to the ECU.
Page 7
Generally these trick the ECU into doing things a little differently than it normally
would thus providing some control to retune a modified engine. Generally, the
programmable calibrator can modify a signal, clamp a signal, or delay a signal.
If this sounds a little familiar, you are correct, a “piggyback” unit usually has
numerous types of programmable calibrators combined in a single package. For
clarity we will discus the various types from an individual basis as they can be very
useful when used for specific purposes.
Signal Modifiers:
Signal Modifiers function by taking a sensor signal and changing it in some fashion.
Nearly all voltage based signals in a vehicle operate on a 0 – 5 volt range. For
example, the signal from the MAP sensor varies depending on the pressure in the
manifold, with a corresponding voltage change the ECU will recognize and provide
the appropriate amount of fuel by changing the fuel injector pulse width.
If a signal modifier is used to offset the actual voltage from the MAP sensor, then the
ECU would see a different load on the engine, and make changes to the injector
pulse width to provide what it thinks is the correct amount of fuel. This is MAP
sensor voltage skewing that is at the heart of nearly every “piggyback” unit on the
market today.
While these do not work well in regards to a MAP or MAF sensor, they can be of use
for other less critical sensors which do not have the cross checking that takes place
with MAP/MAF signals via ECU Adaptives.
An important point to remember is that if you are in Closed Loop mode, simply trying
to add fuel will always result in the ECU modifying its internal parameters to remain
at a 14.7 AFR. It will always win; give up that fight (or at least the approach). Signal
modifiers are either voltage or frequency based; however the vast majority are
voltage based, but both work the same.
Signal Clamps:
Signal clamps can be either voltage or frequency based as well. They limit a signal
to a preset level so it does not go any higher, or in some cases drop below a certain
level.
You may see signal clamps used to clamp signals like engine coolant sensor
signals, and vehicle speed sensor signals. Engine coolant sensors are usually
voltage based where devices like vehicle speed sensors are frequency based.
Once the clamping level is reached the signal clamp will not allow the signal to
change beyond the preset limit. This is a very useful device, well proven, and
invisible to the ECU so it can not learn around it as the sensor continues to behave
as it originally performed up to its limit, generally the normal top of its voltage range.
Page 8
These are very popular for use in clamping (limiting) MAP or MAF sensor output so
a stock sensor is not over ranged causing a MIL/CEL code.
Signal Delay:
By intercepting a signal and delaying when it gets to the ECU, then time
critical signals can be altered. The most typical use for this technique is to control
ignition timing.
Modern vehicles use a magnetic sensor that sits near a ring that is attached to the
crankshaft . This ring will have teeth (or notches) on it. When one passes by the
sensor, it creates a pulse into the sensor lead. These rings may have a tooth or two
missing at one point or may not have any teeth until a certain point. It is this
difference in the teeth and the signal it generates that tells the ECU what position the
crankshaft is at. The ECU must have this information to decide when to fire the
spark plugs and the fuel injectors.
If the pulsed signal is intercepted and delayed before it is allowed to
continue to the ECU, the timing of when the spark plugs are fired is changed. If it is
delayed a little, then we can retard the ignition timing. If we delay it a lot, such as
350 degrees, we can end up make the spark plugs fire 10 degrees sooner, making it
advance the ignition timing (not all engines can advance timing with this method).
Depending on the desired outcome, and what sensors are involved, the modules
described above can be very useful for specific tasks. On an OBDII compliant
vehicle, the worst thing to do is use a signal modifier to offset the MAP/MAF voltage
to try and accommodate larger injectors. Your vehicles ECU police will figure it out,
and take appropriate actions to neutralize the threat!
The iEMS3 “Integrated Engine Management System 3”
Features & Benefits:
• Manifold pressure and RPM referenced fuel calibration.
• Manifold pressure and RPM referenced ignition timing calibration.
• Internal 2.5 bar pressure sensor.
• Analog input from external 0-5V sensors (allows utilization of stock sensors for
reference input).
• Analog output voltage limit function (useful on forced induction using stock MAP
sensor).
• Allows for the use of significantly larger fuel injectors while retaining proper air / fuel
ratios.
• Individual cylinder fuel trim.
• Internal injector drivers operate high resistance fuel injectors, while using external
resistors will allow the IEMS3 to run low resistance injectors.
• Smart Card programmable. No need to link to IEMS3 to make program changes.
Page 9
• Allows for stock-like drivability on heavily modified engines.
• Programmable RPM limit.
• Utilizes factory ECU adaptive capability to properly adjust for various operating
conditions, such as altitude, engine coolant temperatures, intake air temperatures,
etc.,
• Programmable output signal(s) (12V- negative) can be used to activate a switched
component or PWM (pulse width modulation) controlled component.
• Plugs into factory injector wiring harness for easy installation.
• Does not alter other stock ECU functions, allowing for full OBD2 functionality.
• Full data logging system with graphical screen.
• 3D mapping view of IEMS3 fuel and ignition programs.
• Active fuel and ignition cells are highlighted in the IEMS3 software while linked to
the system in the logging mode.
The IEMS3 system allows precise tuning of the air to fuel ratio and ignition timing
over the entire operating range of the engine. Simply inserting a pre-programmed
Smart Card immediately changes the program settings for the current driving
situation or octane of fuel as desired.
The unit contains its own fuel injector drivers and is wired in between the factory
ECU and engine. It is especially useful for recalibration of both forced induction
engines and those with extensive modifications, allowing the tuner to quickly get the
engine running correctly. The IEMS3 is similar to a stand-alone engine
management system, but also has similarities to a piggyback system. We consider it
as working “in series” with the factory ECU.
In a true stand-alone system, you must program for every operating condition the
engine will experience, such as load, throttle position, RPM, engine temperature, air
temperature, etc. These systems can be quite complex to tune. Most ECU’s also
control radiator fan operation, A/C operation, emissions operation and diagnostic
functions. Stand-alones are generally not compatible with OBD2 emissions testing in
that they replace the factory ECU and will not link up with state run emissions
equipment. These systems are best suited for racetrack use where engine tuners
can fine-tune the program to the environment of the moment for optimal
performance.
In a typical piggyback system, control over the engine is done by manipulating inputs
to the stock ECU. Manifold air pressure and oxygen sensor voltages can be altered
in order to make the ECU change its load calibration, thus altering fuel and ignition
advance curves. Reducing MAP sensor voltage has the effect of reducing injector
pulse width by making the ECU “think” the engine is under greater vacuum than
actual. At the same time, ignition timing is advanced due to the ECU believing the
engine is under a lower load. Conversely, increasing voltage has the opposite effect,
increasing fuel and reducing timing advance. When tuning with systems of this type,
you can find yourself in situations where you can have proper part throttle tuning, or
Page 10
proper full throttle tuning, but rarely both if the engine is heavily modified or has
forced induction.
The IEMS3 offers the best of both worlds. Stand alone system control, but with the
simplicity of a piggyback system. The IEMS3 controls fuel and timing, leaving the
stock ECU to handle all other functions, such as idle speed, A/C control, emissions
operation, etc.
System Description:
The IEMS3 uses the factory ECU injector pulse output as a timing reference, which
can be scaled within a range of 0% to 199%. This is beneficial in that if you’re using
larger injectors, you can use a calculated percentage of the stock ECU pulse to
make the larger injectors flow the same as the stock ones. This allows the engine to
start up and immediately operate with the proper air/fuel
ratio in closed loop operation. For use under a heavier load (full throttle / boost), you
can create a fuel curve that begins adding milliseconds of injector pulse width as the
load / boost increases.
The fuel curve can be further trimmed based on the engine RPM, since the engine
efficiency / fuel demand can change with RPM. Negative values can also be placed
in load and RPM tables, allowing you to shut off injectors under deceleration and
trim down fuel when it is otherwise too rich (both very beneficial for naturally
aspirated engines)
Ignition timing can be controlled for retard and/or advance depending on the vehicle
make and model. See additional discussion as to when ignition can be advanced.
The curve can be configured based on engine load and RPM. The factory ECU
continues to drive the coils, though the input and resulting delivered spark advance
is controlled by the IEMS3. In places where the factory programmed timing curve
was too advanced for an engine, such as under boost, it can be retarded, while
leaving normal timing in vacuum conditions. In some cases, you can also add timing
advance in areas where the factory programmed timing advance was insufficient,
such as for naturally aspirated engines.
The IEMS3 has programmable 12V negative outputs. The output can be used to
operate a relay, turn on a shift light, operate a PWM injector circuit, etc. The output
is signal (manifold pressure or voltage) and engine RPM referenced. For example,
you can create a program which will turn on a Nitrous relay, increase the injector
pulse and decrease the ignition advance all at the same time.
For use on engines that pressurize the stock intake manifold, the IEMS3 has a
programmable analog output signal limiting function. This allows the MAP sensor
signal to be processed by the IEMS3 before going to the original equipment ECU.
The tuner can adjust the maximum allowable voltage that will go out to the stock
Page 11
ECU in an RPM referenced table, keeping check engine lights from occurring due to
the ECU seeing a MAP sensor voltage higher than normal when under boost.
The different fuel and timing programs are written using the IEMS3 software.
Program files can be modified, saved, e-mailed and written to Smart Cards with
serial and USB plug reader / writers. The IEMS3 has an internal Smart Card reader
and writer. To change the program, simply slide the card into the slot and wait for the
green ready light to blink (typically 1-2 seconds). Using Smart Cards allows you to
quickly change the program without having to link up to the IEMS3. You can have an
unlimited number of Smart Card programs (they are rewrite-able) and they are
compact enough to put in your wallet.
When tuning, there are numerous factors that work together to produce proper
engine operation and maximum power. This section is not meant to replace the
many books on engine tuning and the years of experience most professionals have.
Rather, it is simply an introductory guide for using the iEMS3.
The IEMS3 system and software does not have built in safeguard settings. It is
possible to fine tune a vehicles operational envelope as well as create settings that
would be detrimental to engine operation. Always double check and verify your
changes. It is strongly suggested that you save your files with a logical name for
easy recognition. For example it is much more desirable to name the tunes “91
octane”, 93 octane”, and “Race fuel”, rather than “Tune 1, 2, 3”. You can clearly tell
which file you are loading.
Special tools will be required for fine-tuning, such as a scan tool and A/F ratio
logging system. These items are readily available through various suppliers (most
dyno’s have A/F ratio monitoring equipment). See the section discussing Tuning
Tools.
Ignition timing and fuel delivery work together. A change in one has an impact on the
other. For example, an area at full throttle where the A/F ratio may be too rich may
indicate too little spark advance rather than too much fuel pulse (lighting the fuel
later does not allow as much of it to burn in the combustion chamber, hence there is
more unburned fuel in the exhaust). In an area like this, you may either reduce fuel
injector pulse or increase spark advance.
Increasing the spark advance will generally increase the power as more fuel is
burned and its energy is released in the combustion chamber. The fuel octane and
cylinder pressure are usually the determining factors of how far you can increase the
spark advance before pre-ignition / detonation occurs.
Higher-octane fuel is harder to ignite, so it can generally take more spark advance.
Other factors, such as piston construction should also be taken into consideration.
When tuning on a forced induction engine, transitions from vacuum to boost play an
important role in vehicle drivability. In the case of a positive displacement
Page 12
Supercharger, boost can come on very fast and at a low RPM. The factory ECU was
not originally programmed for such engine load changes so quickly. This means that
we must go deeper into the engine vacuum table when making our spark advance
and fuel calibrations, in order to stay in front of the factory ECU curves.
True millisecond fuel values for each load and RPM, versus the use of “VE
Tables”.
Engine management systems with VE tables, have fuel values entered as a percent
(%) instead of milliseconds (ms). A VE Table percent value (%) basically follows the
torque curve and is less dependant on MAP sensor load. If we divide the iEMS3 fuel
ms value with MAP-load value, you get a VE (%) value.
For simplicity in use by the end user, it was deemed that using a factual value (ms of
fuel pulse) would be easier to grasp than dealing with an imaginary number (%
value). The difference is that it is easier to understand exactly how much fuel is
being delivered when expressed in ms rather than a % value of available injector
fuel.
There is no difference in performance as the outcome is the same. If we have
sufficient requests, we may issue a version of the software that expresses the fuel
table in VE % values.
Fuel basics
There are different optimal AFR settings for different applications and loads. During
light load cruise, most engines prefer a 14.7:1 air / fuel ratio. Under heavy load, a
naturally aspirated engine may perform best at 12.9:1, while a forced induction
application can range from 11.5:1 to 12.5:1 depending on the air charge temperature
(sometimes fuel is used to cool the air).
In relation to ambient temperature, normally, the IEMS3 itself does not need to use
temperature input. It uses the offsets of the stock ECU to compensate for
temperature. The stock ECU has been properly programmed at the factory to
decrease its injector pulse output (which the IEMS3 references) as air temperature
increases / density decreases.
However, for forced induction, you may need to apply a temperature offset to reduce
the load on closed loop adaptives, and when in open loop, to automatically add or
reduce the injector pulse width to eliminate the need to create multiple maps for
varying conditions. The Generation 3 unit has this compensation ability included in
the available options for fuel. For example, a tune for 40 degrees F may need 5%
more enrichment than the tune for 100 degrees F
.
Page 13
There is a finite amount of time available to inject fuel into a cylinder while the intake
valve is open. Generally, you have 20ms of injector pulse time available at 6,000
RPM. At 3000 RPM, you would have twice the amount of time available (40 ms
available at 3,000 RPM).
Injectors also have duty cycle limitations, which refers to how long an injector is
pulsed relative to the amount of time available. If you pulsed an injector 20ms at an
engine RPM of 6,000, you would be at 100% duty cycle. If you pulsed the same
injector 20ms at 3,000 engine RPM, you would be at 50% duty cycle. To inject more
fuel than the time available, you will require larger injectors as their spray can
produce greater volume in the same amount of time. Normally, factory ECU
programming limits duty cycle to 80% at maximum RPM. Beyond 80% decreases
injector life span, and the closer to 100% the duty cycle approaches, increases the
risk of the injector sticking open. 100% duty cycle should only be used with extreme
consideration, and never for primarily street driven vehicle.
Timing basics
When setting up the spark advance curves, there are many factors that are involved.
When performing timing changes, the compression ratio, fuel octane, camshaft
profile, cylinder head design, etc. must all be considered. Generally, there is
considerable power to be gained by optimizing the spark advance. On the flip side,
you can get spark knock if you ignite the fuel too early, which can cause damage to
the engine. The iEMS3 can only advance the ignition in certain applications.
Review the discussion regarding timing setup for timing limitations. If the engine has
forced induction or Nitrous Oxide, you will want to start by reducing the timing
advance under boost / NOS use.
TOOLS for TUNING:
Tuning cannot be done without the necessary measurement tools. You will need
some basic tools to tune your engine. For tuning in CLOSED LOOP mode, you will
need a scan tool that will allow you to interface with the stock Engine Control Unit
(ECU). A scan tool provides information regarding when the ECU is in OPEN LOOP
or CLOSED LOOP mode and what the FUEL TRIMS are.
For tuning in OPEN LOOP mode, you will need a wideband sensor and controller.
The wideband unit will provide you with the critical air/fuel ratio information.
Scan tools simply report out the status of what is going on in the ECU, speed of
refresh rate is the primary factor when shopping for a scan tool, but you should
always limit the parameters monitored to the Closed/Open loop state, and short
term/long term trims. This will ensure the fastest refresh rate for the data.
A wideband controller/sensor package is a more expensive item. Your AFR is one
of the most critical parameters to monitor, so skimping on quality here can have a
Page 14
big effect later on. I don’t like to get into brand discussions, but I will say that if you
are considering the Innovative line, I like the LM-1 handheld, I do NOT like the LC-1
remote gauge unit. The LC-1 has been very troublesome in its use for us. If you
want a gauge mount based readout, look into a PLX or other top brand unit.
Scan Tools:
This is the main page from
the BR-3 OBDII scan tool.
There are numerous
scan tools on the
market, some below
$100.00, to
professional units
costing thousands of
dollars. If you have
an aftermarket
handheld tuner such
as SuperChips or
Diablo, then you
already have the
ability to interpret the
OBDII data and see
what is taking place in real time regarding the fuel trims. The MSD Dashawk is a
small readout unit, where as the Auto Enginuity unit uses software and a Laptop
computer.
The scan tool connects to the OBD diagnostic port on your vehicle. It is normally
located under the dash on the driver’s side.
Wide Band Sensor Display Unit:
The Innovate Motor Sports LM-1 Wide Band Unit with data logging.
Page 15
The wideband sensor is an advanced oxygen sensor that reads the oxygen
content of the exhaust and reports the information to you with a digital display
showing the air/fuel ratio of the mixture entering the engine.
If possible, install the sensor in the exhaust so it can sample the exhaust gas
BEFORE the catalytic converter. This provides the most accurate reading of what
the air/fuel ratio reading really is. The catalytic converter will alter the oxygen content
of the exhaust and throw the reading off a slight amount.
If installing an O2 sensor, install it from the 9 o’clock to the 3 o’clock range. Never at
the 6 o’clock position as condensation in the exhaust will damage the sensor.
Data Logging:
Data logging is a feature that you will want to look into when considering a wideband
AFR unit. If you feed the wideband controller’s aux 0-5volt output in to the IEMS3,
you can easily datalog the AFR along with the other monitored engine parameters.
The purpose of data logging is to capture information that will assist you in
identifying specific areas in your fuel/timing maps that need adjustment for better
performance. A printout from a chassis dyno is a three-channel data logger. It simply
logs horsepower/torque, RPM and Air/Fuel Ratio (AFR). The manufacturer of your
AFR unit will have additional information related to this topic.
The Chassis Dyno:
Your vehicle should be road tuned before you even think about dyno tuning it. This
does not mean that you have to be a terror on the road either. You are looking to
get the tuning down in the vehicles everyday performance envelope. 0-80 mph will
cover nearly the entire area where most people have drivability issues.
Most chassis dynos are inertia based, units like DynoJet, are generally only useful
for tuning at full throttle. You MUST, completely road tune your closed loop map
before you dyno tune full throttle on an inertia dyno.
If your shop uses a loading type dyno, then the dyno can very closely simulate real
world road conditions and easily verify and tweak the closed loop tuning. This is
because the dyno applies variable levels of resistance that can be held constant, to
the turning of the rollers, and is not relying solely on the weight of the rollers for the
applied load. Generally an Eddy Current load brake is used to apply the load.
These are the types that the manufacturers use when developing the ECU
programming, and the type used for emissions testing in many places.
Page 16
Inertia style dynos will report a higher HP and Torque than a loading style dyno.
Real world performance is what you are after, not maximum numbers on a dyno
sheet. Make sure you are comparing apples to apples when looking at someone
else’s numbers as well.
We have found that the ECU’s Closed Loop fuel map and its adaptive changes will
have a slight affect on Open Loop (WOT), and how the ECU applies its internal fuel
trims to the Open Loop fuel mixture. If you tune Open Loop (WOT) first and then go
back and play with the Closed Loop, you will find that your Open Loop (WOT) AFR
will change, and you may have wasted a dyno tuning session.
Another thing to watch out for is that your vehicle will perform one way on the dyno
and then perform differently on the road. You can set the AFR that gives you max
power on the dyno and then go out on the road and find that the AFR at
wide open throttle is leaner. Tune the AFR on the dyno a little richer so that it will be
in line with the desired on the street.
Dyno tuning should be used for verification and for the upper speed/rpm ranges that
are unsafe for public highways.
ECU OPERATING MODES:
There are two primary operating modes that the stock ECU operates in, Open and
Closed Loop. There is a third mode for deceleration where fuel will be cut for fuel
economy and emissions. These three modes are what control the fuel mixture of the
engine. The difference between two of the modes is whether or not the ECU is
getting feedback from the oxygen sensors to make fine adjustments to the fuel
mixture.
When the ECU is using feedback from the oxygen sensors to adjust the fuel mixture
it is said to be operating in Closed Loop mode. When it is not using feedback from
the oxygen sensors it is said to be in Open Loop or a Wide Open Throttle (WOT)
mode. When the vehicle enters into an extended deep vacuum deceleration state, it
is in the deceleration mode, and the ECU will cut nearly all fuel from the fuel mixture.
This provides maximum fuel economy, the least emissions, and increases engine
braking. This is normal function, and one we do not need to be concerned with
With a wideband connected, don’t be surprised to see your AFR go to 19, 20 or
more during decelerating. It is normal and not cause for alarm as it will return to
normal AFR’s after a period of time, or as soon as the pedal is moved even the
slightest amount.
Page 17
Closed Loop Mode:
The stock ECU uses fuel lookup tables to determine how much fuel to inject into the
engine. It uses sensor inputs from; RPM, throttle position, MAP or MAF sensor
values, intake air temperature, engine coolant temperature, even fuel pump voltage
to determine just how much fuel by weight to inject into the engine. This initial
amount of fuel is then fine-tuned based on the reading from the oxygen sensor. The
adjustment it makes to the standard lookup tables is called fuel trim. Whenever the
ECU is making these fine adjustments to the fuel mixture using feedback from the
oxygen sensor, the ECU is operating in the Closed Loop mode.
When operating in the Closed Loop mode you do not have control
over the fuel mixture. If you try to change the MAP/MAF sensor signal value to
make it run richer or leaner, the ECU will just trim the fuel to keep the
mixture near the preset 14.7:1 air fuel ratio by weight. It is very important that this
is clearly understood.
For the most part you cannot change the mixture while the ECU is operating in
CLOSED LOOP mode. If you try the ECU will resist keeping the mixture where it
thinks it is supposed to be. There is a limit to how much control authority the ECU
has to adjust the mixture. If the maximum fuel trim limit is exceeded and the ECU
looses control of the mixture in CLOSED LOOP mode it will set a check engine light.
You must work with the ECU when tuning CLOSED LOOP and not against it. The
ECU will win every time.
What you can control in CLOSED LOOP is the amount of trimming the ECU has to
perform, and the O2 sensor signal to the ECU. You will enjoy the best drivability
when the fuel trims are minimized throughout the CLOSED LOOP region.
Open Loop Mode:
When the ECU is not using feedback from the oxygen sensor to adjust the
mixture it is operating in OPEN LOOP mode. When you first start the engine, it
will start up in OPEN LOOP mode because the oxygen sensors have not heated
enough to start the chemical reaction needed to provide a usable signal. Under
some conditions during deceleration with the throttle closed it will switch to
OPEN LOOP, and finally, when the throttle is advanced to some preset point,
usually around 80% or higher, or held at a high throttle position for a given time,
the ECU will switch to OPEN LOOP mode and apply enrichment of the fuel
mixture.
The important thing to know is that when the ECU is operating in OPEN LOOP
mode it has no idea at all what the mixture is. It can be richer than it needs to be
killing power and damaging the engine and catalytic converters, or way too lean
causing serious engine damage in a short period of time. It is OPEN LOOP
tuning where you can unlock hidden power or destroy your engine very quickly.
Page 18
Fuel Cut:
A third ECU mode is called Fuel Cut. The ECU will cut fuel to the engine in
three conditions. The ECU will cut fuel to the engine when you attempt to
exceed the maximum safe engine RPM to protect the engine. It will cut the fuel
to the engine if you attempt to exceed the maximum safe tire speed rating
programmed into the ECU (with electronic throttle control, the ECU will likely reduce
power through manipulation of the throttle blade opening rather than fuel cut in this
situation).
It will also cut fuel to the engine if you are
decelerating with the throttle closed, generally above 1500 RPM.
When tuning you are most concerned with deceleration FUEL CUT. You want to
make sure that the ECU makes a smooth transition from FUEL CUT deceleration
back to CLOSED LOOP, or to a CLOSED LOOP idle if the vehicle is stopped.
If you have your closed loop tuning nailed and have limited the amount of fuel
trimming taking place, then deceleration transition will be smooth.
It is important to realize that this is a normal function, and not something to be
concerned about. I have had customers call in a panic because they were
monitoring their AFR (smart thing to do), and were seeing the AFR go to 20 upon
deceleration. Remember this is normal, and the engine is not under any load, it only
needs enough fuel to keep it running.
But, one thing he did do, and it is never a good thing, he kept repeating it 15 or 20
times and it was always the same. While in this situation, there was no impact by
this, if you see something out of the ordinary, it is not a good idea to keep repeating
it hoping it will go away. The issue most likely will remain, but your engine may
decide to go away! Call and discuss the issue with a knowledgeable individual and
get it dismissed or resolved. If you kick your toe on a chair, it hurts, you don’t need to
do it 10 more times to verify that “Yes” it did hurt.
TUNING (Not Yet!):
The very best way to start your tuning is to learn how your vehicle operates while
STOCK. Before you start making substantial modifications and installing larger
injectors, fuel pumps, and engine tuning, take some time to learn
how your vehicle operates.
Hook up the scan tool and wideband unit, drive the vehicle normally and monitor
the fuel trims, air/fuel ratios, and most importantly how the ECU switches from
OPEN LOOP to CLOSED LOOP operation.
Page 19
A few of the troublesome areas are how it transitions from OPEN LOOP cold and
hot starts to CLOSED LOOP idle, and how it transitions from OPEN LOOP
deceleration and stopping to CLOSED LOOP idle.
Generally you want it to function just like the stock operation in these areas. By
observing these things before you start modifying your car, you will learn valuable
information and greatly speed up your tuning time. However,
most people install everything first, and then try to figure out how to tune it, or hope it
will not need tuning. A reality check is needed in that case.
Maintenance FIRST!
Before you even start on your vehicle, you should perform some routine
maintenance checks;
•
Verify that the throttle body plate is opening all the way when the
accelerator pedal is put to the floor (if electronic throttle control, this is not
possible, but you can pull the inlet tube and check for free range of travel
(MOTOR OFF!). If it is not functioning properly, the engine will not make full
power, and it will delay the ECU switching into OPEN LOOP mode.
•
Inspect your exhaust. It must not in the area ahead of the
catalytic converter. If it leaks here, it can cause faulty readings by
the oxygen sensor and your wide band unit and can really confuse your tuning
efforts. If you have erratic fuel trims this is one thing that is a likely culprit.
•
Make sure ALL of your vacuum lines are in good condition with NO leaks. You
would be surprised how many vehicles are sold cheap because they have a
“serious” problem that turns out to be an old cracked vacuum line. If over 5 years
old, I would be installing new lines as they do age.
•
What is the overall health of the engine? If there is oil coming out of the
engine breather, smoke out the exhaust, or general state of disrepair, the engine
might be on its last leg. If you are a tuner reading this, you do not want to be the
one operating or tuning it when it comes apart. It will always be your fault.
•
Check the engine oil. If it is low or looks really bad, think twice about
tuning the vehicle. Poor maintenance is a sure sign of lurking issues.
•
Verify the air inlet is secure and leak free. If the vehicle has a MAF sensor, and
air is allowed to enter the engine that does not go through and get read by the
MAF sensor, you will have a very long and frustrating tuning session.
•
Verify O2 sensor function with a scan tool. Check the waveform and make sure
it nice and healthy. An old or defective O2 sensor will result in poor CLOSED
Page 20
LOOP operation that maybe very erratic. If in doubt, replace the sensors, they
are a cheap investment for success.
•
Check the air filter and the MAF sensor if the vehicle has one. If the filter is filthy,
replace or clean it. You want to check the MAF sensor for oil contamination and
most have a screen over them, look for the obvious debris obstruction to air flow.
If it is dirty or flow is obstructed, it will throw your tune off and cause erratic
operation. The MAF sensor can be cleaned with non-residue electronic parts
cleaner (NOT carb or brake cleaner, go to Radio Shack, not the auto parts store!
When using a filter that is recharged such as a K&N or AIRAID, be sure to use a
minimum of oil to avoid contamination of the MAF sensor element. You want your
vehicle to be in the best condition possible prior to performing major
modifications. This helps to ensure that any potential problems are identified up
front (and corrected), and clears the way to see the maximum gains from your
efforts.
Ready for Tuning (almost!) Learning the iEMS3:
If you haven’t already, and before you go any further stop and locate the technical
repair manual for the vehicle (not the owners manual) And the manual that came
with your tuning device installed on your vehicle. Read it completely so you have a
clear understanding of its operation. Now, read it a second time to pick up the items
you just skimmed through.
Taking a little time here could save you a lot of heartache down the road from a very
costly mistake.
Installing the iEMS3 Software
Put the CD in your computer and start the installation by double clicking the file
setup.exe. Then just follow the instructions. If you have downloaded the file from
www.iems3.com then you must first unzip the downloaded file using winzip. This
program is available at www.winzip.com
Upgrading the iEMS3 Software
Upgrades are made available at www.iems3.com download and follow the
instructions.
Lets get started tuning the vehicle. The first thing to do is the initial setup of the
tuning software. Open the iEMS3 Tuning software in your Windows PC and follow
the prompts for installation:
Page 21
iEMS3 box settings – Standard Tab
Model preset
Dataset is a basic setup of the iEMS3 software in order to determine which
functions, controls, menus and tables are to be available. This is to simplify for the
user and not show more controls than necessary.
Dataset ID
This is an identification number (103-109) which specifies which type of TuneCard is
used. This is also co-ordinated with the IEMS3 box firmware version. It's not possible
to use a different Dataset ID in the IEMS3 box and on the TuneCard.
Swap degrees and percent in ignition table
This gives you the option of switching the load and rpm-table units (degrees and %).
This is up to the individual tuners taste that determines what is best to use. It only
has relevance if you intend to tune the ignition.
Page 22
Fuel RPM Table Precision
This gives you the option of increasing the number of fuel rpm cells to tune (every
250rpm). In this case it will not be possible to use the Analog2 output.
RPM indicator (LED2)
Use this to select the rpm at which the red LED on the front panel will light up.
Advanced Tab
Enable By Pass mode
Used to let all input signals pass through the IEMS3 box without being altered. This
will be the same as using the mechanical bypass plug.
This only works in the following case:
•
Boost control must be connected to PWM In/Out pins 11-12 and be run in
Mode5
•
The use of Dataset ID 106 or higher
Page 23
What actually happens is that all tables are zeroed, the PID regulation is deactivated
and the program runs in mode1. This means that all signals will pass through the
IEMS3 box without being altered.
iEMS3 digital I/O mode
This is where the main mode of operation is determined and which connector pins
are used for the various features and functions. In the Ignition load, Fuel load and
PWM load tabs, you will specify which analog input is to be used to measure load or
to base the tuning on. If the engine has a MAP sensor, you will specify which pin this
is connected to; other engines may want to base the tuning on the throttle position
sensor.
Digital inputs and outputs
The IS4G3 has 6 digital in/output-pairs (12 pins)(IS8G3 has double), where every
input has its associated output. These are called: Fuel A-Fuel E(5 fuel channels),
Ignition A-Ignition B (2 Ignition channels) and PWM (1 boost channel). One of the
signal-pairs can be used for different functions and cannot be used simultaneously.
This is Fuel E, Ignition B and PWM.
The reason for organising the in/outputs in pairs is that when connecting a bypassplug (instead of the IEMS3 box) then all channels will be inter connected and the
signals are unaffected (the engine behaves stock). When the IEMS3 box is
connected, the box will modify the signals according to the Tuning parameters and
send them to the paired output.
iEMS3 digital I/O modes
The IEMS3 box can thus be run in different modes where the pins have different
functions:
•
Mode1
o 4 Fuel in/out, FuelA-FuelD, pins 15-22
o 2 Ignition in/out, IgnitionA-IgnitionB, pins 11-14
o Boost control out, PWM_OUT, pin 5
•
Mode2, no longer activated
•
Mode3
o 5 Fuel in/out, FuelA-FuelE, pins 15-22 & 11-12
o 1 Ignition in/out, IgnitionA, pins 13-14
o Boost control out, PWM_OUT, pin 5
•
Mode4, no longer activated
Page 24
•
Mode5
o 4 Fuel in/out, FuelA-FuelD, pins 15-22
o 1 Ignition in/out, IgnitionA, pins 13-14
o Boost control in/out, PWM_OUT/IN, pins 11-12
Digital out
The IS4G3 has one pure digital output (IS8G3 has two), PWM_OUT which in
mode1&3 is used to control the boost, but in mode5 can be used for other purposes.
Analog inputs and outputs
The iEMS3 has two analog in/output pairs where every input has its associated
output. These are called: Analog1 and Analog2. The basic idea with this is to limit
the analog sensor signal (rpm dependant)l to a value which represents the stock
manifold pressure or Mass airflow. In the iEMS3 software, you will select which
analog sensor signal to base the tuning on. This selection is done at pages: Ignition
load, Fuel load and PWM load.
Analog input
The iEMS3 has one more analog input which is a pure input, thus the total is 3
analog inputs (4 cyl has 3, 8 cyl has 6).
Ignition Mode master
Setting used to specify if the ignition can only be retarded or both retarded and
advanced
Ignition Mode slave
Setting used to specify if the ignition can only be retarded or both retarded and
advanced. The slave setting is only relevant with the IS8G3. This IEMS3 box has
two PCB cards where one is the master and the other the slave.
Fuel enrichment strategy
Setting to specify how the acceleration fuel enrichment pulse is to be applied; Add
acc pulse to all fuel pulses or only to one fuel pulse per engine cycle. If choosing
“add to all fuel pulses”, sometimes this will result in too much fuel as the ECU
sometimes generates more than one fuel pulse per engine cycle, typically during
acceleration.
Page 25
Base Acceleration Enrichment on
Selects the analog input to base the IEMS3 box generated acceleration fuel
enrichment on (in the case such is used).
Acceleration Enrichment performed by
Selects if the acc fuel pulse is to be generated by quickly increaseing the MAP
sensor signal (and thus stimulating the ECU to generate the acc pulses) or by letting
the IEMS3 box generate the acc pulses.
Enrichment
When MAF simulation is active you have to control acceleration fuel enrichment.
This is done by setting which sensor the enrichment is based on. In this case it
would be Analog3, which is the accelerator pedal (or TPS sensor).
Enable MAFSIM
This activates the Mass airflow simulation. When the engine has a stock Mass
airflow sensor this can be removed and the signal to the ECU is generated by the
IEMS3 box with the help of an internal MAP sensor.
This deactivates all other previous tuning for Analog1/2 output.
MAF SIM analog out
Selects which analog output is to generate the simulated Mass airflow signal. This
signal must then be connected to the ECU.
MAF SIM MAP signal
Selects which analog input is used to measure the MAP signal. The internal MAP
sensor is always connected to Analog3.
MAF SIM limit
Indicates if the simulated MAF-signal should be limited. If this would be the case the
MAF-SIM limit table is used. This also makes the Analog2-table inactive.
Page 26
RPM Calculation
The IEMS3 box always uses Ignition A to calculate the rpm. The signal can be from
various sources though as long as we know how many pulses per rev is being
generated. Both Ignition A and Ignition B can be connected to the cam and crank
signals or the ECU driver signals to the ignition module. It's important that the
signals are of 0V to 5-20V type. Some signals are too weak and must use an
amplifier to achieve this voltage level.
To get the correct rpm calculation you must specify how many pulses per engine
cycle (not engine revs) are present at Ignition A. If a slave is connected (IS8G3) then
the correct value must be entered in the right control as well.
Analog input settings
Specifies if any analog input channel that is being measured should be synchronised
with the engine cycle. Sometimes it's an advantage to synchronise the MAP sensor
if it is somewhat unstable. This could be an issue regarding ignition adjustment.
Used If the MAP sensor output is spiky during high rpms, (High performance
engines). The system should measure the MAP only one time per revolution, and
always at the same point relative to the crank. The draw back of this is a slower
measurement and response since the MAP (and fuel calc) is made only 1
time/revolution.
Boost options
Here you can select which analog input channel measures the boost. Normally this
is the same as the MAP sensor (if installed). "Boost limit" is a safety feature where
you can set a voltage level (corresponding to a certain boost level) above which the
IEMS3 box tries to reduce the boost to the base level and at the same time releases
all sensor limiting to allow the ECU to perform its own safety features.
View cardbyte
Can be used as an advanced debugger tool where you can view all tuning on the
TuneCard. We do recommend that you rather use the Setting viewer for this
purpose.
Ignition
3D ignition map size
Choose map size (number of cells in the ignition map)
• 18 rpm x 11 load
• 15 rpm x 13 load
• 11 rpm x 18 load
Page 27
Base ignition load on:
Determines which analog input should be used to calculate ignition. “Analog X in
minus Analog Y in” is used to base the calculation on the difference between two
signals. A common example is to use Analog 1_in – Analog 1_out, if this is the MAP
signal, and limit the output to the ECU. If the signals aren’t limited the output signal
is the same as the input signal, the difference is then 0V. If you at a specific moment
limit the signal from 4.5V to 3.5V the difference is 1V, you can then retard the
ignition even more because the ECU can’t see the real signal.
Table control
You are free to select RPM and load points for the fuel map. Select which cells to
modify and press desired button.
Increase
Increases selected cell. All the cells below automatically changes as well.
Decrease
Decreases selected cell. All the cells below automatically changes as well.
Insert row
Inserts a new row to make more tuning points in a specific area. This removes the
last cell.
Convert map to new axis
If you’ve already done a tuning map it’s still possible to convert the map to a different
number of cells or area of measurement. See page Fuel settings for more
information.
Fuel
Base fuel load on:
Determines which analog input is used to calculate the fuel enrichment. “Analog X in
minus Analog Y in” is used to base the calculation on the difference between two
signals. A common example is to use Analog 1_in – Analog 1_out, if this is the MAP
signal, and limit the output to the ECU. If the signals aren’t limited the output signal
is the same as the input signal, the difference is then 0V. If you decide to limit the
signal from 4.5V to 3.5V the difference is 1V, you can then provide fuel enrichment
proportional to the difference. The ECU doesn’t see the pressure difference and
because of this can’t compensate the fuel.
Page 28
3D fuel options
3D map size
This is where you set how large the main fuel map should be.
Table control
You are free to select RPM and load points for the fuel map. Select which cells to
modify and press desired button.
Increase
Increases selected cell. All the cells below automatically changes as well.
Decrease
Decreases selected cell. All the cells below automatically changes as well.
Insert row
Inserts a new row to make more tuning points in a specific area. This removes the
last cell.
Convert map to new axis
If you’ve already created a tuning map it’s still possible to convert the map to a
different number of cells or area of measurement.
1) Start off by saving current map by clicking “Save current map”. The current
map is then saved in a new window
2) You can now change all the settings. (Change size, which rpm and load
should be on the different axis, change MAP sensor etc)
3) Click “Convert saved map” and BCLab automatically converts the map and
adjusts all the fuel cells.
Carefully check that the map was converted the way you intended. If you convert a
map from 0-8000 rpm and decrease it to 0-5000 rpm the values are converted
correctly. If you convert a map from 0-5000 rpm and increase it to 0-8000 rpm the
iEMS3 converts the area 5000-8000 rpm with the same values that you had at 5000
rpm. This is the best guess the program is able to do.
Page 29
Fuel Options
Boost Fuel Enrichment Method
Extended stock pulse
Enriches the fuel by extending the stock fuel pulse. This is the most common
method.
Synchronized extra injector
When you use extra injectors to supply the fuel enrichment.
100 Hz PWM
Used when you don't want to synchronise the fuel enrichment with the rpm, but only
"spray" fuel enrichment. This is not a method we normally recommend, it's normally
better to use the “synchronised extra injector method”.
Page 30
Base Fuel Calculation
There is the ability to compensate if you have installed larger injectors than stock.
You can both compensate for different size and different opening times (percent and
offset). You can even make the adjustment individually for each injector. Click "Trim
individual" if you need to adjust individual cylinders fuel supply.
Injector size
Specifies stock injector size in relation to the new injector size. If you have doubled
the size of the new injector the % value is 50%. This means that the iEMS3 will
shorten all the stock pulses to half, to compensate for the double size injectors.
Injector offset
The offset value is a measure of how fast the new injector will open and close in
relation to the stock one. This is most noticeable at low load (idle) when the injectors
have a short pulse. If you know the exact specs of the stock and new injectors it's
possible to calculate the offset but this is seldom the case. You are left to test this at
idle to find the correct value. You can start by selecting 0 ms. It also compensates
for the fact that if you half the injector pulses, the idle pulses may be below the time
where the injector shoots fuel at all (typically 1 ms).
How to tune the Injector size and offset
First you specify the injector size relation. This will then make sure you have the”big
picture” correct. This will make the engine run correctly on high load and at long fuel
pulses. When you have the right fuel for full load, quite often the pulses on idle will
be overcompensated so you have to add some offset fuel. Normally an injector
starts to give fuel for pulses over 1 ms, so at 2 ms fuel pulses, the engine actually
only get 1 ms fuel. If the stock idle pulses are 2 ms and you halve it with the injector
size compensation, the engine will not get any fuel with only 1 ms pulses. By adding
some offset (0.5ms in this case with double size injectors) you will be back on same
idle fuel as before. These 0.5 ms will not affect the full load so much. Theoretically
about 0.5/20=2.5%
Acceleration Fuel Enrichment
The IEMS3 box can also add acceleration fuel when performing a quick
acceleration. This function is based on an analog input, usually the throttle position.
The IEMS3 box measures the throttle position 20 times per second and can then
compare the current position with the last one and thus detect a rapid throttle
movement. Which sensor to use and which strategy to use is selected in Boxsettings, Enrichment.
Page 31
The acceleration fuel enrichment is controlled by three parameters, Gain, Threshold
and Sustain. The actual result will be extended fuel pulse in ms or a voltage increase
for the Mass airflow simulation, depending on the chosen strategy.
Gain determines the fuel pulse at a certain throttle movement according to : Acc
pulse=Gain* [current TPS – last TPS]. This means that a larger Gain will result in a
longer acc pulse.
Threshold determines the minimum throttle change required to generate an acc
pulse. If you select this value as 255 there will never be any acc pulses.
Sustain determines for how long the acc pulse will remain. If the IEMS3 box
detected an acceleration situation and calculated the first acc pulse to be 1 ms, then
the next acc pulse will be 1 ms multiplied by the sustain value. So if Sustain is 50%
the next acc pulse will be 0.5 ms, then 0.25 ms and so on. The Sustain value 255
equals 100% and 0 equals 0%. The value 0 means that only one acc pulse per
event is generated.
Rev Limit
Fuel cut - Select an rpm when all fuel is cut off.
CAUTION: We do not suggest using fuel cut in boosted applications as in
certain instances it could result in a severe lean condition in the engine.
RPM to allow open injectors & Boost level to open injectors
It's possible to force the injectors fully open when reaching a certain boost and at the
same time be above a certain rpm. This is used to supply the maximum possible
fuel.
Page 32
PID Boost control
Advanced boost control will use feedback information to regulate the boost pressure.
This is done with an advanced PID-regulation algorithm that controls the boost valve
output signal depending on the boost pressure feedback signal.
The IEMS3 box measures the current boost feedback signal and compares this with
the desired (tuned) boost level. If they are not the same there is an error present. If
you open the throttle and the desired boost level rises then the regulating algorithm
controls in which way that boost level is reached. If the boost level is too low, the
signal to the boost valve will increase a bit and vice versa at too high of a boost
pressure (called Gain or P-factor). If there has been an error for a longer time the
boost valve output will increase a bit faster (Integration or I-factor). If the boost level
changes rapidly the signal must be dampened in order to limit over boost and boost
spiking for the boost not to pass the desired level. (Derivation or D-factor).
PWM output=Error*P + Long time error*I + Rate of change*D
The use of this function calls for knowledge in regulation theory and is not further
addressed in this manual. More information and a manual are available from NCTS
LLC.
See page PWM RPM for more info on how to enter values in the PWM_RPM table
when using PID-regulation.
Page 33
iEMS3 Log settings
Signal Name and Selection of Log Sensor
Normally the iEMS3 software will log 20 different signals. These signals have
different names which you can see in the left column. In the second column you can
chose your own names for the same signals. If you know the type of sensor the
signals are you can specify this and the graphs will present the correct actual values.
Also refer to Sensor specification for more info on this subject
Other Settings
Autosave
Selected if you wish the program to automatically save the log file after a log run.
The name will be generated with date, time and the name selected in the lower
textbox.
Page 34
Default settings in log file
This gives you the ability to choose the default log settings when starting the BCLab
software. It is controlled by the file Default_Logg_Settings.cbl which is located in the
same folder as the BCLab program was installed in. This file is opened every time
the BCLab is started. You can open this file as any other log file. Make the desired
changes and save again.
Import default log sensors
If you open an old log file that doesn’t have all the new log sensor definitions, you
can set all the missing sensor definitions to the open log file.
iEMS3 Sensor viewer
In this section you can view, set and save all the sensor settings. Both log sensors
and tuning sensors.
There are three types of sensors; Linear (2) and table entered.
Linear – Saved as a straight line that translates the voltage to a certain value.
Page 35
Linear 2 –complement – Saved as a straight line but adapted to also be able to
send negative numbers from the box to the computer. Typically used for ignition.
Table sensors – Saved in a 33 row table with 0.16V between the rows. You can
change the data for every voltage which makes it possible to have nonlinear sensors
such as temperature sensors etc.
If you know the voltage at various actual sensor values, this can be used in the
program to display the actual sensor values (pressure, speed, gear etc) instead of
the voltage.
Open sensor definition - You can open an already saved tuning or log sensor.
Save as new sensor - If you have redefined or created a new sensor this is where
you save it.
NOTE! If you save the new sensor with a name from the list, then the old
sensor definition will be changed.
Choose what kind of sensor you’ve created and fill in the right box.
Finally, you choose whether the sensor is a tuning sensor, log sensor or both.
The sensors used for tuning are saved in the “.ini” file and should be in the catalogue
where you installed the program.
The log sensors are saved in each log file (xxx.cbl) and you choose where you want
them on your hard drive. The sensors that are always there when you start the
program are saved in a “default_log_settings.cbl” file and should be in the catalogue
where you installed the program.
Sensor tester - A calculator for testing sensors by giving it a voltage or a desired
data and calculate the other unit.
Linear control - To create or modify a linear or a linear 2-complement sensor you
set two values along the line.
Table control - If you’re using a table sensor this function helps you to freely modify
all the values in the table. You’re also able to modify the table by entering the values
directly in the table.
Used Analog Sensors
You can connect many different sensors and transmitters to the IEMS3 box. Usually
these are the cars original sensors. The sensor definitions translate the voltage to
Page 36
the accurate unit that the sensors are supposed to measure e.g. temperature or
pressure.
Used Analog Sensors for tuning - Choose what kind of sensor you connect to
each of the analog inputs.
Chipdrive Status / USB Status / BC-box as TuneCard Reader Status
There are three ways to communicate with your box or TuneCards. In the upper left
corner you will see the chosen communication mode. You may switch between
these in the menu Edit-Toggle Interface or by pressing Ctrl+T.
• RS-232 serial communication between PC and BC-box
•
Chipdrive connected to the PC that read/writes TuneCards
•
Use of the BC-box as a TuneCard reader when BC-box is connected via RS232
Direct communication with the box
Handles the USB communication with the iEMS3.
Write - Saves the BCLab current tuning to the iEMS3
Verify - Verifies that the BC-box tuning is the same as the BCLab tuning
Read - Reads the BC-box tuning and displays them in BCLab
Info - Reads some general information from the iEMS3
Page 37
Chipdrive reader
Handles TuneCard readers if connected to the PC. Currently supported readers are
Chipdrive or Todos.
Find Reader - The program tests the connection with the Chipdrive reader
Write Card - Saves the BCLab current tuning to the TuneCard
Read Card - Reads the TuneCard tuning and displays them in BCLab
iEMS3 as TuneCard writer
Used when you want your PC-connected BC-box to read a
TuneCard. This makes it possible to write TuneCards without
the Chipdrive.
Check - The program tests that the BC-box works as a
TuneCard reader
Write - Saves the BCLab current tuning to the TuneCard
inserted in the BC-box
NOTE! When you put a TuneCard in the box it reads the
current tuning on the TuneCard which might change the
engine settings.
File Description
This area in the lower left corner can be used to write text to describe the new
settings. The text is saved at the same time as you save the settings to the hard
drive. They are not saved to the TuneCard or when you write to the box.
Page 38
Table Control for all pages
All BCLab pages that have tuning tables also have a "Table Control" box or “3D
Table Control”. This is used to easily adjust the tuning values in the table. You can
also use this to edit several tuning values at the same time by marking the desired
values. (to mark all table values click on "Deg" or "%" in the upper right corner).
•
•
•
•
•
•
•
•
•
•
•
•
•
”+” increase the selected values 1 step
”-” decrease the selected values 1 step
increase slope of the selected values to the right
decrease slope of the selected values to the right
decrease slope of the selected values to the left
increase slope of the selected values to the left
decrease slope of the selected values in the bottom
increase slope of the selected values in the bottom
decrease slope of the selected values in the top
increase slope of the selected values in the top
"Scale%" Scales the marked values with the selected % value
"Set to" Sets the marked values to the selected value.
”min", "max" Informs the user of the possible values in this table
You can also mark a cell and enter the value directly into the box without using the
commands above.
Smooth data (interpolate)
There are two functions that evens out the values between cells, e.g. to get rid of the
“highs and lows”. You can smooth the cells both vertically and horizontally.
Page 39
Smooth Columns (interpolate)
If you have values in the first and last cells and want to fill the column cells evenly in
between then you can mark the area and click “Smooth columns”
Becomes
Smooth Rows (interpolate)
If you have values in the first and last cells and want to fill the row cells in
between you can mark the area and click “Smooth rows”
Becomes
Page 40
Ignition
RPM and Load Resolution (number of cells)
You can adjust how many cells and what values the different axles should be. These
settings are done in – Settings – Ignition maps
The value shown in the left column depends on what kind of sensor you choose in
“Used Analog Sensor”.
Ignition Adjustment
Negative values equals retarded ignition (delayed ignition).
Positive values equals advanced ignition. The iEMS3 can only advance ignition
under certain circumstances.
Currently, iEMS3 can advance the ignition in the following cases:
•
Dodge Viper, all three generations. This is due to the crank and cam signals are
of the digital type (non inductive) and have a special pattern. Inductive sensors
will need a special amplifier.
Page 41
•
All engines with distributor and an external ignition amplifier where the ignition
pulses are symmetrical with the rpm (2 times/revolution in a 4 cylinder engine)
•
Inductive sensors will need a special amplifier.
Currently iEMS3 can retard the ignition in the following cases:
•
When the ECU ignition signal is low voltage (0-12V or 0-5V and does not drive
the ignition coil directly). The BC-box can retard two ignition channels
simultaneously (4 channels with the BC1000).
•
When the crank and cam signals are of the digital type, max 0-15V (non
inductive), with a dutycycle between 40-60% and max 2.5kHz at max rpm
(equals 24 teeth at 6000rpm). Shortest pulse length is 100us. Inductive sensors
will need a special amplifier.
The ignition functions are continuously expanded, call for the latest info.
View 3D Map
Opens a window to view a 3D graph of ignition timing.
Page 42
Fuel - For a better understanding of the tuning principles see the chapter on Fuel
enrichment
You set how long the base fuel pulse is extended or shortened (in milliseconds)
depending on the input signal and the rpm.
RPM and Load Resolution (Number of Cells)
You can adjust how many cells and what values the different axis should be. These
settings are done in – Settings – Fuel maps
Page 43
View 3D Map
Opens a window to view a 3D graph of fuel settings.
Page 44
IAT compensation
Fuel Temperature Correction
In some cases there’s a need to adjust fuel depending on the intake air temperature.
With this function you set how much longer /shorter the fuel pulse should be when
the engine temperature is low (low temperature limit) or high (High temperature
limit). The iEMS3 needs to be connected to an IAT sensor.
Fuel Injection, Start Up Fuel
In some cases you have a need to give lots of extra fuel during start-up when it’s
cold outside, mostly if your engine runs on ethanol, E85. With this function you can
set how long the fuel pulse should be while cranking and the engine is cold (low
temperature limit). This fuel pulse gets shorter and shorter depending on how warm
the engine is at start-up. If the engine has reached “High temperature limit” there will
be no start-up fuel.
The iEMS3 needs to be connected to a water coolant temperature sensor.
Page 45
PWM / Digital out
For a better understanding of the principles of tuning refer to the chapter on Boost
control.
PWM signals
PWM is short for Pulse Width Modulation. This method can be considered
equivalent to an analog output voltage and is used for controlling devices (valves,
motors etc.) that require somewhat higher power. In real life the signal is actually a
switched on/off type 12V signal. The switching occurs very quickly and is thus
"smoothed out". If the signal is on and off the same amount of time then the result
will be equivalent of a 6V output. The PWM output is specified in % where the equal
on - equal off means 50%.
The iEMS3 output will ground the output when active. This means that the controlled
device must be 12V positive supplied by other means. A value of 100% means that
the device is grounded all the time (active all the time) and 0% means no grounding
(non active). The iEMS3 PWM output has a frequency of 38.6 Hz.
In the examples below, the pulse is set for 10% in the first graph and 75% in the
second graph. The green bars indicate the relative amount of time that the output is
grounded (turned on).
PWM 10%
2 – 24 pin Molex connectors
12
12
8
Output
8
Output
4
4
0
0
1
2
3
Time (s)
4
0
1
2
3
Time (s)
4
The iEMS3 can use the PWM output to control:
•
•
•
•
•
Boost valve
VTEC (variable camshaft)
Nitrous
Water injection
Gearshift indication
Normally the PWM uses pin 11 for boost control.
Page 46
PWM1 Load
Base PWM Load On
Determines which analog input to base the calculation of PWM output. The table
values (0-100%) determines the PWM output duty cycle value in percentage as a
function of the selected analog input. The PWM output is also controlled by the
"PWM RPM" table. The "PWM Load" value is multiplied with the "PWM RPM" value
to form the final PWM output value.
Examples:
50% x 50% = 25%
50% x 150% = 75%
Boost pressure is normally controlled by throttle position so that the pressure is low
when you push gently on the accelerator. This makes it easier to create a fuelefficient setting.
Page 47
Run PWM as an On/Off Switch
By selecting this option the PWM output is forced active (0V, grounded) as soon as
the calculated PWM value is above 50%. The function of the output then resembles
an on/off switch. It can be used to turn on/off lamps, relays etc.
Example
Set the entire PWM Load table to 100% (no load influence)
Set the PWM RPM table at 0% up to 6500 rpm and at 100% above this rpm.
This results in PWM_Out is off up to 6500 rpm, and on above 6500rpm. If you
connect a lamp between 12V and PWM_Out you now have an rpm-indicator lamp.
PWM1 RPM
The value 0-100% determines the PWM signals duty cycle in percentage depending
on rpm.
If you choose to control a boost control valve, then every PWM-value corresponds to
a specific boost. The boost for the different values differs and needs testing to be
determined.
Page 48
The PWM signal is also controlled from “PWM Load”. See page Run PWM as on/off
switch.
PWM RPM with Boost Control
If you chose PID-regulation of boost, you will specify desired boost at every rpm.
Page 49
3D Map for PWM
Page 50
Text Window for 3D Map
While tuning PWM1 in BCLab you want to look at both rpm and load. You can also
view the complete 3D Map for boost pressure. The data is also shown as values in a
text window.
Page 51
PWM2
The iEMS3 IS8G3 also has a PWM2 in the slave connector pin no 5 which can be
separately tuned depending on load or rpm.
Page 52
Digital output 1&2
There is one digital output in the master and one in the slave which can be turned on
and off depending rpm and an optional analog input. The output is grounded when
it’s turned on. This means that you connect +12V separately from the battery or
ignition key to whatever you would like to control (relay, light etc).
RPM On
At what rpm the output should be turned on.
RPM Off
At what rpm the output should be turned off again.
Analog On At what analog signal the output should be turned on.
Analog Off At what analog signal the output should be turned of again.
The green area in the box next to each control shows when the output is turned on.
Page - Analog Out
For a better understanding of the tuning principles see the chapter on Signal limiting.
Page 53
Analog 1 out
The table values (0-5V) determine the maximum analog1 output signal voltage
depending on rpm. Below this maximum value the output is the same as the input
voltage.
Page 54
Analog 2 out
Analog 2 Out Settings
The analog 2 output can be run in 4 modes.
Mode1, Analog 2 limit
Sensor limiting in the same manner as Analog 1.
Mode 2, Function of Analog 2 input
Page 55
Analog 2 output is calculated as a function of Analog 2 input. The relevant output
values are specified in this table.
The values in the table can quickly be entered using the Gain and Offset function.
The values in the table will be automatically calculated as:
Table value=Offset+[Input]*Gain
Mode 3, Analog 2 limit trim
Same function as Mode 1, but with the addition of "limit trim". This function varies the
limited signal to the ECU in a special fashion. This is necessary in some engines as
the ECU will detect a fault condition if it tries to regulate the boost but nothing
happens (due to sensor limiting). In this mode the iEMS3 will detect the ECU trying
to regulate boost and adjust the limited signal enough to make the ECU think it is
actually regulating boost. This only works when connecting the boost pressure
feedback signal to the IGB_IN pin.
Page 56
Mode 4, Boost activated AN2 output
This can control Analog 2 out when you exceed a certain boost pressure (or any
other analog input signal).
There are two options:
•
Analog 2 out is set to a certain value.
This is often used to tweak the AFR signal by connecting a resistance
between Analog 2 out and the AFR signal.
•
Analog 2 should be the value 1, add or subtract a certain voltage to the
Analog 2 input.
This function is used when you want to offset the AFR signal with a
specific voltage at a specific boost pressure.
Page 57
Mass Airflow Simulation
When using mass airflow simulation the Analog1 table is used to specify the Mass
airflow simulation. For every individual engine you must specify/tune which output
signal to be generated based on rpm and manifold pressure. The iEMS3
automatically calculates the product of rpm*(A/D-conversion of MAP sensor)*32.
Depending on this product the iEMS3 reads the table and finds the correct voltage to
be used as Mass airflow simulation signal.
Example:
Rpm: 3500 (3.5krpm)
MAP: 2.44 volt at MAP sensor
Product: 3.5*2.45*1632=13994
Mass airflow sim signal: 3.43V (Closest table value is 12288)
Page 58
Mass Airflow Simulation Limit
In some cases you have to limit the simulated signal on a specific rpm and hide it from the
ECU, even though the calculated mass airflow is higher. This limit is set in the table below.
Main menu – File
Open - Opens a TuneCard tuning file which is previously saved on disk. The files
are denoted .cbc files.
Save - Saves the current BCLab settings to the presently open TuneCard file
Save As - Saves the current BCLab settings to a TuneCard file with a new name
Exit - Exits BCLab
Main menu – Edit
Undo - Undo the last pressed button, Redo - Redoes the latest "Undo"
Page 59
Main menu – Communication
For more details, see page General/Chipdrive status
Toggle between Card and Direct communication (Ctrl+R)
Toggles between communication with the BC-box and the TuneCard . Same as
clicking on page ”iEMS3” or ”TuneCard”.
Toggle between Card writers (Ctrl+T)
Toggles between different card readers. Supported readers are Chipdrive, Todos
and the use of the iEMS3 as a card reader.
Start Logging
Starts logging without opening the log window.
Page 60
Main menu – View
Log window
The BCLab software can log all signals connected to the iEMS3 in realtime with
20Hz sampling frequency. BCLab can also use these signals to calculate secondary
values such as:
•
•
•
•
•
Engine power
Engine torque
Speed
Acceleration
Duty Cycle of stock fuel pulse and BC-box fuel pulse (used to detect 100%
fuel situation)
BCLab shows all data in the logging graph. You may also save the data to disk for
later viewing. Some of the possible settings: Name all signals, many typical sensors
to choose from, metric or US units, gearing at all gears, etc.
Page 61
Select Log File to Open
Double click on a saved log file to open it. Same function in File/Open. If single
clicking on the file you will see a preview on the comments on this log file, date and
size. This will not open the file.
File Information
At all logging the time and date will automatically be added to the file. You may also
write your own comments about this log run in the "Free text note".
Logging
Starts, stops and erases the logging. Make sure your iEMS3 is connected via USB.
The log data is also shown in a real-time graph. A red marker shows the currently
active tuning cell in the load/rpm tables. This marker will enable you to quickly see
where in the table the iEMS3 is working. This will speed up the tuning process.
Page 62
Seconds to show while logging
Specifies how many seconds of logging data are to be shown on the screen. If you
have a slow computer you can decrease this value for proper function. Normally we
set this to 5-10 seconds.
Update interval
This specifies how often the live graph is updated while logging. If you have a slow
computer you may need to increase this value. Normally we set this value to 0.1-1
second.
Chart Scale Options
Sets the min and max displayed values on the Y-axis in the graph. If selected to
Auto the program will adjust this as necessary.
Select Signals to View
You will select the desired signals to view in the graph.
You can also choose if the signal is to be displayed on the 1st or 2nd Y-axis. This is
practical if displaying two signals which differ a lot in magnitude, which might
otherwise make them difficult to see in the graph. Normally we set the rpm to be
displayed on the 2nd Y-axis while all other signals are displayed on the 1st Y-axis.
This is because the rpm value is often much larger than the rest of the signals.
Chart Controls
Scroll left - Moves the graph to display earlier values (more to the left)
Scroll right - Moves the graph to display later values (more to the right)
Zoom in - Zooms in on the graph. Doubles the magnification
Zoom out - Zooms out on the graph. Haves the magnification
Zoom all - Zooms out on the graph so the whole graph is displayed
Redraw - Redraws the graph
Specific values in the graph
To see the value of a specific point in the graph you can click on it. To move the
cursor right or left you can use “Page up” or “Page down”.
Page 63
Export These Settings to iEMS3
If you have opened an old log file which has the tuning data saved in the log file, you
can transfer these tuning data to BCLab by clicking this button. This means that you
can see the tuning used by the iEMS3 when the logging was performed. This is
useful if you find an old log file where the engine ran very well and want to use these
tuning data again.
Refer to chapter BC Log settings for more info on logging setup.
Show RPM graph
RPM graph shows the same values as the normal log window but the rpm is
displayed on the x-axis. This function is good when you want to analyze how
different logged values vary depending on rpm. Normally you use this for engine
power, engine torque, Oxygen sensor etc.
Main Menu File
Open - Opens a log file containing saved setups. These files are denoted .cbl files.
Save - Saves the current log file
Save As - Saves the current log file with a new name
Page 64
Export log data
Saves the current log data shown in the log window, either as a picture or as a text
file which can be opened in Excel.
Log window exported as a picture
Page 65
Main menu – Settings
BCLab settings
COM Port
Use this to select the PC comport used to connect to the BC-box
Interface
Use this to select one of three ways to communicate with your BC-box and
TuneCards.
Also refer to page General/Chipdrive status
Do not connect your Windows PC to the iEMS3 until AFTER the
PC has finished booting. If it is connected while it is booting up, the
Windows “Plug-N-Play” may see the unit as a USB device and try to
install it as such. If you have this happen, disconnect
from the iEMS3 and reboot to clear the problem.
At this point, you should have set up all the functions, sensors, and options in the
software. If not, this needs to be performed before going any further. Depending on
the vehicle model you have, there may be base configuration file available. Check
the download page at www.iems3.com for the particular unit that you purchased.
Make sure you are running the latest software version available for your unit as well.
All iEMS3 “In Series” units started production with Dataset 109. The software should
be iEMS3 version 3.7.44 or later.
Page 66
Verify setup
Verify that the following areas in the various software tabs are setup for your vehicle.
If you missed any, go back and review the section relating to that area of the
software.
From the top bar menu, select “Settings” > “Box Settings”
Standard Box Settings Tab
General Dataset 109 or later
Ignition Tables
RPM Indicator
Advanced Settings Tab
BC Digital I/O mode
Ignition (Master and Slave if IS8G3)
Enrichment
MAF Simulation
RPM Calculation (Master and Slave if IS8G3)
Sequential fuel or not
Analog input synchronization
Boost Options
Fuel Tab
3D RPM and Map axis set
3 D Fuel options
Base fuel load on
Verify the Load and RPM columns have the desired span
Ignition Tab
3D RPM and Map Table set
Ignition setting
Base ignition load on
Verify the Load and RPM columns have the desired span
Fuel Options Tab
Boost fuel enrichment method
Base fuel calculations
Acceleration fuel enrichment
Rev limit
Force injector to open
PID Boost Control Tab
PWM1 PID Regulator
Page 67
From the top bar menu, select “PC Settings”
Box as Card Reader/Writer should be the default
Verify PC Operating system
Com port will show when connected to the unit
From the top bar menu, select “Log Settings” then select “Log Settings” again
Log Sensor Settings
Car Settings (if used)
From the top bar menu, select “Sensor Settings”
Used Analog Sensors for Tuning
Sensor Viewer (to create or change sensor definitions)
Ignition Tab
Main ignition - Verify proper map axis
Fuel Tab
Main fuel - Verify proper map axis
Temperature correction - Unless used, under Temperature Fuel Correction,
top three rows should be 0%, 0%, and 0 ms
PWM/Digital Out Tab
PWM1 Load – set or verify sensor used for “Base PWM1 Load On”
PWM1 RPM – Verify table axis
PWM2 – set or verify sensor used for “Base PWM2 Load On”
Digital Out 1 settings
Digital Out 2 settings
Analog Tab
Analog 1 Out - set or verify sensor used for “Analog 1 out settings”
Analog 2 Out - set or verify sensor used for “Analog 2 out settings”
Once you have verified the setup, you should save the file as “My Base File” or
similar on your PC so you will recognize it as the original start up file.
Fuel tuning in the iEMS3 is very straight forward. All corrections are based on the
length of the injector fuel pulse in milliseconds. A normal vehicle pulse width at idle
is generally around 1.5 to 2 milliseconds in length. Maximum fuel pulse length is
around 20 milliseconds. Beyond that, at high RPMS there is no longer any time to
inject fuel. So if you are running near 20 milliseconds of injector pulse width on the
top end, you are very close to running out of injector.
If you are running a 50% larger injector, the iEMS3 base value is going to cut the
factory ECU fuel pulse length in half. A correct value in the percent larger window
sets the basis for everything else across the fuel map. However, since the injector
pulse width is normally about 2 ms at idle, and you cut it in half, you are now at the
Page 68
point of the injector opening time being greater than the fuel pulse. This would mean
no fuel at idle. This is compensated by using the fuel offset. Since the max pulse
length is 20 ms, a value of .50 ms would equate to approximately 2.5 % of the
injectors capability. This has a negligible impact in the upper RPM range, but is
crucial for proper idle. The larger the injector ratio, the larger the offset will be. Most
settings will fall somewhere between .25 ms and .50 ms.
Turn the ignition to the “ON” position at this time (do not start). Verify iEMS3 front
panel lights light up, and the power indicating light is on. You will likely get some
type of code on the first key on, ignore at this point. You will need to click on the
“Write” button on the software to load the base file into the iEMS3.
Once this is accomplished, turn the key back off, and then back to the “ON” position
(do not start). Using your scan tool or other OBDII device, clear any codes in the
ECU. After the codes are cleared, turn the key back off and then back to the “ON”
position. Verify that you did not receive any additional ECU codes. If so, diagnose
prior to the inital start. Generally these are related to a connection problem in the
harness. Recheck the associated connections for loose or missed connections or
proper “IN” and “OUT” configurations.
NOTE: Some vehicles take a Barometric pressure reading from the MAP sensor in
the first few key on milliseconds. Your iEMS3 should be connected to the power
feed to the ECU directly. DO NOT CONNECT THE LOAD BOARD POWER LEAD
TO THE ECU POWER! It can place too much load on the ECU circuit, so wire the
Load Board power lead to a separate key on power source.
If you get a code for LOW MAP SENSOR VOLTAGE, this is indicative of the ECU
powering up prior to the iEMS3 and not seeing the expected MAP sensor voltage.
Usually this is not an every start occurrence and can vary in frequency if this is an
issue. Key off, back to key on, clear code, then normal start usually takes care of
the issue for the short term.
If this is an issue, a permanent fix can be accomplished by adding a timed relay
circuit triggered from the interior light with the time out set to a value of 10 minutes to
ensure power even if sitting in the vehicle for an extended period prior to start. This
will provide power up to the iEMS3 prior to the ECU start sequence. We have timer
boards available if needed.
Once all checks are completed, it is time for the initial start. Make sure you have a
scan tool connected so you can see the fuel trim activity. Start the engine and
Monitor the ECU operating mode. This will tell you what mode the ECU is operating
in and what the fuel trims are. Once warmed up completely it should report CLOSED
LOOP mode and you should see the fuel trims come alive.
If the vehicle fails to start, it is likely there is not enough injector offset in the base file
to allow the new larger injectors to be open a sufficient time at idle/start up. Increase
Page 69
the value in .10 larger increments. Normally with a new style 50% larger injector the
value will be between .25 and .50 milliseconds of offset.
As you make changes, get into the habit of “SAVE” and then “WRITE” so you keep
your PC and iEMS3 box in sync with each other.
Once started, you want to monitor the direction of the short and long-term fuel trims
at idle. If you are under compensating for the larger injector size, the ECU should
recognize that too much fuel is being injected and start pulling fuel out. This will be
reported by NEGATIVE TRIM values. Once they stabilize, see what the value is. If it
is negative you will need to increase either the percent larger value (large change
needed), or the injector offset value (very small change needed). If the trims are
positive, then you are overcompensating, and you will need to reduce the percent
value or offset value.
Your goal is to find the values that will drive both fuel trims into single digits. It is
doubtful you will ever get near zero. Keep in mind, that short term trims react fairly
quickly, and long term are very slow to react, so don’t over do it trying to force a
change rapidly. As long as it is idling smoothly and the trims are not maxed out
(generally about 25% to 32% + or -), let it run for a while to stabilize. Also, you need
to learn how to read between the lines as well.
The ECU will constantly ping the left and right upstream O2 sensors, and you will
see this when watching the trims. If your trim is bouncing around 5 for example, and
then it ramps up to 10 or 12 on one side or the other, you have to learn to ignore
that. It will quickly settle back down and then the other side will do the same, so it is
a back and forth, and up and down trim fluctuation. I normally select only bank 1
short and long term trims to view rather than both banks for initial adjustments.
Now that the engine is started and idling, you want to see where the fuel trims are at.
Again, let it run for a few minutes to stabilize. If you see a negative short term trim
value of –10% and a negative long term trim value of –15%, the combined value is 25%. The map is far too rich at idle. If this is the case, your injector percent value is
likely to be too small as we are not removing enough of the base fuel pulse. You will
want to up this value, say from the original 50% to a value of 55%. When you make
the change, you will see the short term trim quickly jump to a positive state. Again,
get into the habit of “SAVE” then “WRITE”.
Let it stabilize, and after a few minutes, you should see the long term trims start to
change to a less negative value as well as the short term value decreasing as well.
One offsets the other, so the goal is to slowly work the idle map to get the idle trims
to cancel each other out as much as possible. If you can get it to come in below +/10 this is good, if you get it between +/- 5 to +/- 10 this is great. Remember the ECU
will be pinging the O2 sensors so the short term trims will be swinging +/- all the
while. You just need to recognize and ignore this and look at the value it settles
back to.
Page 70
Once you have the idle trims down, now it is time to start driving the car around and
monitoring the vacuum range. You will find certain cells that you will need to tweak
a bit here and there. Proceed with caution as you work through the vacuum range.
Take small steps here and progressively move to higher load levels in the map.
Keep in mind that your original injectors would never have been run over 80% duty
cycle. So at full load and wide open throttle, the max pulse likely from the ECU
would be 16 ms. With a 50% larger value in the software, you would be seeing an 8
ms pulse (plus any base offset value) to the injector if no additional ms value was
added in the fuel map at wide open throttle. This alone would match factory
performance in the vacuum state, and the fuel trims based on O2 sensor closed loop
feedback is going to drive the fuel to a 14.7 AFR. Watching the trims will tell you
where you need to tweak the map in the vacuum range.
Eventually you are going to reach the boost area of the map. Once you cross the
threshold, you are going to start adding more injector pulse width. If your injectors
are not greatly oversized for the amount of boost you intend to run, the max amount
of injector pulse width addition you will run is likely around an additional 8 ms.
With a 50% larger injector, .50 ms = 2.5% fuel increase. For a 50% larger injector, 8
ms would equal a 40% increase in fuel. This will likely be quite rich on the top end,
but better rich than lean to start off. As you go into boost, now you are going to be
gauging your settings from your AFR readings to get the desired AFR, and not the
fuel trims.
If you take the 8 ms value and plug that into the load pressure (10 psi for example)
that equates to the injector sizing calculations and then interpolate that back down to
the cell in the vacuum range just prior to boost, this will give you a base fuel curve to
work from.
Work in small increments, and progressively move to higher pressures.
Take note that when the vehicle goes into boost, it will not immediately switch out of
Closed Loop mode to Open Loop mode. This is where we take control of the O2
sensors and inject a value that tells the ECU that it is lean so it will apply additional
fuel correction during the transition period. Generally a value of .49 volts works well
to start with. If your forced induction system has the ability control the amount of
boost generated (electronic boost control for example) in a light load situation (part
throttle), as soon as you enter into boost, you should see your AFR’s drop based on
the O2 sensor control. 12.2 – 12.4 is a safe value for low boost pressures in the 2 4 psi range.
At some point near full throttle your scan tool will report that the ECU has switched
Page 71
into OPEN LOOP mode. Once it has switched to OPEN LOOP, you must rely on the
wideband unit to tell you what the Air Fuel Ratio (AFR) is. A good safe value is in the
10.8 – 11.2 range when in Open Loop at full boost.
There will be a “grey” area up the middle diagonal area of the map where some cells
will be in CLOSED LOOP and other times it will be in OPEN LOOP. In that area you
may need to split the difference in what you need for between a CLOSED LOOP
setting and an OPEN LOOP setting.
Whenever working in the OPEN LOOP area of the fuel map, you will want to get cell
specific with the values. In most cases, when working in the CLOSED LOOP area of
the map, you will have like values in blocks of cells rather than individual cell
variations. Later if you find any drivability issues, you may then
need to get cell specific in CLOSED LOOP. You will likely be cell specific in the idle
vacuum area of the map. Once you feel you have a good base map dialed in, be
sure to save a copy of this map as a back up. You may need it later when you forget
and overwrite values by accident.
Gear Selection:
When performing full throttle power tuning, gear selection can make a difference.
What you may notice is that if you start with 1st and run through all
the gears that the lower gears may look a little lean on a wideband unit. There is
not much load on the engine in low gears and you can’t get a very good
reading on a wideband unit in the short time it will be in the lower gears.
You want things to settle down some so you can get decent data to work from.
Loading the drivetrain so it will not accelerate so fast will provide you better data. 3rd
gear on most autos, and 3rd and 4th gear on most manuals will give you the best
tuning result.
Altitude Changes:
Since the iEMS3 does not write to the ECU, nor does it turn off or modify ECU
functions and parameters, the original adaptives that provide correction for altitude
changes will still function as designed to vary the base injector fuel pulse to
accommodate for altitude changes. It is a good idea to monitor significant altitude
changes as you may need to tweak things a bit here or there if a particular area of
the fuel map is causing elevated fuel trim changes in Closed Loop. Over time, the
closed loop fuel changes will spill over into long term corrections for the Open Loop
fuel tables.
Page 72
Temperature Changes:
Temperature changes affect the tune much like altitude changes, but not as
drastically. When the ambient temperature is very hot outside, this
will result in a less dense air charge and may be seen as less boost or manifold
pressure. The opposite will take place when the ambient temperature drops.
Cooler more dense air can result in greater boost or manifold pressure.
As with altitude changes above, the vehicle ECU is still able to detect and
accommodate fuel trims for colder (need more fuel) and warmer (need less fuel)
conditions for the base injector pulse.
The iEMS3 does have a temperature based adaptive available that can be used to
help fine tune the ECU adaptive fuel trim swings if they are significantly positive or
negative. All it does is to minimize the amount of fuel trimming the ECU has to
perform.
It is best to start with a tune that is created with ambient conditions around 70 – 75
degrees. This will provide a good middle of the road center point for the ECU
adaptives to work from. If the tune was created during hotter or colder conditions,
you may want to spend some time tweaking things when you have 70 – 75 degree
temperatures outside temperatures. Keep in mind that on a 70 degree day, your
Intake Air Temperature is going to be hotter, so use the Intake temperatures as your
midpoint for corrections. To use this function, the vehicle Intake Air Temperature
sensor (IAT) needs to be tapped into the iEMS3 to provide the temperature
reference.
Ignition Retard Map:
It is important to understand how ignition timing works in the ECU. We must also
standardize the terminology used to describe knock or ping, and it will fall into the
following two categories.
Spark Knock- This is when the fuel/air charge in the combustion chamber is
ignited by the spark of the spark plug, but too soon for the conditions. It results
in an uneven flame front and you may hear it as a sound commonly called pinging.
The important thing to grasp is that the spark of the spark plug starts the process
therefore tuning can address this problem.
Detonation- This is a condition where the fuel/air charge in the combustion
chamber is ignited by something other than the spark of the spark plug. This can
be extreme heat, too much boost, carbon build up, low fuel quality, and so on. The
important thing to grasp is that the spark of the spark plug does not ignite it.
If you are having true detonation, you have a very serious condition and should
Page 73
expect a catastrophic engine failure in a short time if you allow it to go unchecked. It
is likely going to take more then tuning to address it and will most likely require
hardware changes like reducing boost, lowering compression and so on. This should
not be an issue for most people.
The ECU will always try to run the ignition timing as far advanced as possible. It will
keep advancing it until it sees some knock from the knock sensors and then pull the
timing back until it stops, then it will start advancing it again until it knocks
and so on. This process is going on constantly and it is dynamic meaning it is
always self-adjusting. The ECU will always try to keep the ignition timing at the
knock threshold above a certain RPM. This is a normal process.
One of the worst things one can do is to remove this level of engine protection by
turning off the knock sensors. A very noisy engine may need some desensitizing of
the sensors, but I would never suggest turning them off, in particular on a stock
internals engine running boost.
We have seen tuners do this in order to mask the inability to eliminate knock retard
timing corrections either because of mechanical issues or that it is a short cut to
completing a tune. You have a right to know if this level of protection is modified in
some way in your engine. If you are running a custom ECU tune, and you NEVER
see any knock retard (you are monitoring your vehicle aren’t you?), there is a good
chance they are either off or dumbed down. Check the knock sensor voltage with
your scan tool, if it just stares at you like it is in a coma; guess what, it is brain dead.
I hope you have forged internals.
E85 Ethanol Conversion with the iEMS3
Titania O2 Sensors
A Titania Sensor is a less common type of narrow-band lambda sensor that has a
ceramic element made of titanium dioxide (Titania). This type does not generate its
own voltage (as does the Zirconia sensor), but changes its electrical resistance in
response to the oxygen concentration. The resistance of the Titania is a function of
the oxygen partial pressure and the temperature.
Titania is an N-type semiconductor with a structure TiO2-x, therefore, the x defects
in the crystal lattice conduct the charge. For fuel-rich exhaust the resistance is low,
and for fuel-lean exhaust the resistance is high. The ECU feeds the sensor with a
small electrical current and measures the resulting voltage across the sensor, which
varies from near 0 volts to about 5 volts. Like the Zirconia sensor, this type is so
nonlinear that in practice it is used simply as a binary "rich or lean" indicator. Titania
sensors are more expensive than Zirconia sensors, but they also respond faster.
Page 74
In automotive applications the Titania sensor, unlike the Zirconia sensor, does not
require a reference sample of atmospheric air to operate properly. This makes the
sensor assembly easier to design against water contamination.
E85 Ethanol
E85 has an octane rating of 105 AKI, which is higher than typical commercial
gasoline mixtures (octane ratings of 85 to 98 AKI); however, it does not burn as
efficiently in traditional internal-combustion engines. E85 contains less energy per
volume as compared to gasoline. Although E85 contains only 72% of the energy on
a gallon-for-gallon basis compared to gasoline, experimenters have seen slightly
better fuel mileage than the 28% this difference in energy content implies. Recent
tests by the National Renewable Energy Lab on fleet vehicles owned by the state of
Ohio showed about a 25% reduction in mpg (see table below) comparing E85
operation to reformulated gasoline in the same flexible fuel vehicle. Results
compared against a gasoline-only vehicle were essentially the same, about a 25%
reduction in volumetric fuel economy with E85.
The main attractions of burning E85 are the common benefits of renewable energy
sources, such as increased economic benefits for rural populations, less reliance on
foreign energy that keeps more fuel dollars in the domestic economy, with further
research into increasing production efficiency, less carbon emissions per unit as
compared to conventional fossil fuels.
Modern cars (most cars built after 1988) have fuel-injection engines with oxygen
sensors that will attempt to adjust the air-fuel mixture, but the oxygen sensor only
changes the air to fuel ratio at idle, and at light cruising speeds (closed loop
operation). Since the computer can not add more fuel without the input from the
oxygen sensor at high loads (open loop operation), there will be significant power
losses in modern cars due to the inability of the ECU to correct the open loop fuel
tables to deliver the required amount of fuel per injector pulse.
Operating fuel-injected non-FFVs on more than 50% ethanol will generally cause the
Malfunction Indicator Lamp (MIL) to illuminate, indicating that the electronic control
unit (ECU) believes that it can no longer maintain closed-loop control of the internal
combustion process, not due to the presence of more oxygen in E85, but rather
the fact that E85 has less carbon per volume, thus requiring more fuel than the
injector size can deliver versus gasoline.
In other words, the issue is simply the stock injectors are not sized large
enough in a non FFV to allow full compensation by the ECU via the fuel trims
once the stock injectors are maxed out.
Under stoichiometric combustion conditions, ideal combustion occurs for burning
pure gasoline as well as for various mixes of gasoline and ethanol (at least until the
MIL illuminates in the non-FFV) such that there is no significant amount of
uncombined oxygen or unburned fuel being emitted in the exhaust.
Page 75
This means that no change in the exhaust manifold oxygen sensor is required for
either FFVs or non-FFVs when burning higher percentages of ethanol. This also
means that the catalytic converter on the non-FFV burning ethanol mixed with
gasoline is not being stressed by the presence of too much oxygen in the exhaust,
which would otherwise reduce catalytic converter operating life.
For non-FFVs burning E85 once the MIL illuminates, it is the undersized amount
of fuel injection than what is needed that causes the air fuel mixture to become
too lean; that is, there is not enough fuel being injected into the combustion process,
with the result that the oxygen content in the exhaust rises out of limits, and perfect
(i.e., stoichiometric) combustion is lost if the percentage of ethanol in the fuel tank
becomes too high. It is the loss of near-stoichiometric combustion that causes the
excessive loss of fuel economy in non-FFVs burning too high a percentage of
ethanol versus gasoline in their fuel mix.
E85 and Forced Induction
E85 gives particularly good results in turbocharged cars due to its high octane. It
allows the ECU to run more favorable ignition timing and leaner fuel mixtures than
are possible on normal premium gasoline. Users who have experimented with
converting OBDII (i.e., On-Board Diagnostic System 2, that is for 1996 model year
and later) turbocharged cars to run on E85 have had very good results.
Experiments indicate that most OBDII-specification turbocharged cars can run up to
approximately 39% E85 (33% ethanol) with no MILs or other problems. (In contrast,
most OBDII specification fuel-injected non-turbocharged cars and light trucks are
more forgiving and can usually operate well with in excess of 50% E85 (42%
ethanol) prior to having MILs occur.) Fuel system compatibility issues have not been
reported for any OBDII cars or light trucks running on high ethanol mixes of E85 and
gasoline for periods of time exceeding two years. (This is likely to be the outcome
justifiably expected of the normal conservative automotive engineer's predisposition
not to design a fuel system merely resistant to ethanol in E10, or 10% percentages,
but instead to select materials for the fuel system that are nearly impervious to
ethanol.)
Fuel economy does not drop as much as might be expected in turbocharged
engines based on the specific energy content of E85 compared to gasoline, in
contrast to the previously-reported reduction of 23.7% reduction in a 60:40 blend of
gasoline to E85 for one non-turbocharged, fuel-injected, non-FFV. The reason for
this non-intuitive difference is that the turbocharged engine seems especially wellsuited for operation on E85, for it in effect has a variable compression ratio
capability, which is exactly what is needed to accommodate varying ethanol and
gasoline ratios that occur in practice in an FFV.
At light load cruise, the turbocharged engine operates as a low compression engine.
Under high load and high manifold boost pressures, such as accelerating to pass or
merge onto a highway, it makes full use of the higher octane of E85. It appears that
due to the better ignition timing and better engine performance on a fuel of 100
Page 76
octane, the driver spends less time at high throttle openings, and can cruise in a
higher gear and at lower throttle openings than is possible on 100% premium
gasoline. In daily commute driving, mostly highway, 100% E85 in a turbocharged car
can hit fuel mileages of over 90% of the normal gasoline fuel economy. Tests
indicate approximately a 5% increase in engine performance is possible by switching
to E85 fuel in high performance cars.
No significant ignition timing changes are required for a gasoline engine running on
E85.
Air/Fuel mixture problems
Running a non-FFV with a high percentage of ethanol will cause the air fuel mixture
to be leaner than normal in open loop fuel injection engines, and cause closed
loop fuel injection systems to adjust for the increase in oxygen content of the fuel
mixture. A lean mixture, when leaner than stoichiometric, could cause heat related
engine damage because combustion chamber temperatures can increase with a
surplus of air during the combustion event. Some aftermarket E85 conversion kits for
modern fuel injected vehicles operate by altering the duty cycles of electronic
injectors to help offset air/fuel mixture issues.
Closed loop fuel injection systems eliminate much of the risk. This is also why the
check engine light will illuminate if you mix more than around 50% to 60% E85 by
volume with your gasoline in a non-FFV. If this happens, just add more 87 octane
regular grade gasoline as soon as possible to correct the problem. (Some premium
blends contain up to 10% ethanol; to correct the problem as quickly as possible,
always add regular grade gasoline, not premium grade gasoline.) These fuel/air
mixture related problems will not happen in a properly-converted vehicle.
After-market conversions
There are E85 conversion kits available that will permit the conversion of 4, 6, or 8
cylinder engines to operate from fuels ranging from pure gasoline to a mix of
gasoline and ethanol to pure ethanol, including E85. It operates by modifying the
fuel-injection pulses sent to the fuel injectors when in 'A', or ethanol mode instead of
'G', or gasoline mode. (In 'G' mode, no modification to the fuel-injection pulses is
performed.) This conversion kit modification serves to extend the control range over
which the ECU can adjust the air-fuel ratio to achieve an oxygen sensor reading
measured before the catalytic converter that falls within nominal stoichiometric ideal
combustion limits. The general belief is that this conversion kit operates in its 'A'
mode simply through lengthening the individual pulse-widths of fuel-injection pulses,
thereby increasing fuel flow per injection pulse by roughly 30%, whereas in 'G'
mode, it acts simply as a straight pass through for fuel-injection pulses.
Air fuel ratio comparison
E85 fuel requires a richer air fuel mixture than gasoline for best results. Successful
conversions generally require up to 60% more fuel flow than when the engine burns
Page 77
100% gasoline. (In contrast, methanol conversions require even more fuel flow
increase than ethanol conversions.) Flexible fuel vehicles additionally impose a
wider range of air fuel ratios that must be achieved than what is required for vehicles
that operate only on gasoline or ethanol. This is because a wider range of air fuel
ratios is required to use all the varying percentages of ethanol and gasoline
efficiently that may be present in the fuel tank at any given time.
The nominal (chemically correct) air fuel ratio is 14.64:1 by mass (not volume) for
burning 100% gasoline, but in practice the nominal air fuel ratio for most 100%
gasoline fuel injection systems ranges from about 14.6 to 14.7 for a typical nominal
value, depending on manufacturer, with the ratio of 14.7 being slightly preferred for
increasing fuel economy under light load conditions.
The following table shows the range of air fuel ratios typically used for burning
gasoline, E85, and pure ethanol (E100) under an assortment of assumed operating
conditions:
Fuel
AFR
Equivalence Ratio
Lambda
Gasoline stoichiometric
14.7
1
1
Gasoline max power rich
12.5
1.176
0.8503
Gasoline max power lean 13.23
1.111
0.900
E85 stoichiometric
9.765
1
1
E85 max power rich
6.975
1.40
0.7143
E85 max power lean
8.4687
1.153
0.8673
The term AFRst refers to the air fuel ratio under stoichiometric or ideal air fuel ratio
mixture conditions. Equivalence ratio is the ratio of actual fuel air ratio to
stoichiometric fuel air ratio; it provides an intuitive way to express richer mixtures.
Lambda (λ) is the ratio of actual air fuel ratio to stoichiometric air fuel ratio; it
provides an intuitive way to express leanness conditions (i.e., less fuel, less rich)
mixtures of fuel and air.
Page 78
At inlet air temperatures below 15 °C (59 °F), it i s likewise not possible to start the
typical internal combustion engine on pure ethanol (E100); for cold engine starts,
starting the engine on gasoline and then shifting to E100 can be done. Similarly, for
starting a vehicle on E85 summer blend in extremely cold weather, it is likewise
required to add additional gasoline during at least the starting of the engine, before
switching to burning the E85 summer blend. In practice, it is easier simply to add
more pure gasoline to the fuel tank when extremely cold weather is expected, prior
to the arrival of the cold weather, to avoid cold engine start difficulties.
Fortunately for those converting non-FFVs to operate on E85, the wide range of
inherent air fuel control required for burning pure gasoline is very nearly the same
range required for burning many blends of E85 with gasoline up to approximately
60% E85, at least for non-extreme engine loads and non-extreme weather
conditions. Hence, the common success seen in practice for burning many blends of
E85 with gasoline even in non-FFVs at blends in excess of 50% E85, especially
under light engine loads cruising under benign weather conditions.
Additionally, the ideal stoichiometric mixture typically burns too hot for any situation
other than light load cruise (closed loop operation). This is the target mixture that the
ECU attempts to achieve in closed-loop fueling to get the best possible emissions
and fuel mileage at light load cruise conditions. This mixture typically can give
approximately 95% of the engine's best power, provided the fuel has sufficient
octane to prevent damaging detonation (i.e., knock).
The "max power rich" condition is the richest air fuel mixture (more fuel than best
power) that gives both good drivability and power levels, within approximately 1% of
the absolute best power on that fuel.
The "max power lean" condition is the leanest air fuel mixture (less fuel than best
power) that gives good drivability, acceptable exhaust gas temperatures to prevent
engine damage, and power levels within approximately 1% of the absolute best
power on that fuel.
Lambda, typically used for referring to lean versus rich air fuel mixtures, is normally
measured by the lambda sensor] (also known as an oxygen sensor.)
iEMS3 and E85 Conversion
The modern OBDII vehicles closed loop fuel system is fully capable of correcting for
the additional fuel requirements up to the point where the ECU adaptive fuel trims
max out based on the stock injector size and duty cycle.
Keep in mind, the O2 sensor is measuring oxygen concentration, and it will adjust
the fuel trims to achieve the 1 to 1 Lambda ratio regardless of the fuel used. If you
are running a wideband sensor, and set the display scaling to Lambda in lieu of
gasoline AFR, you will see the Lambda value as 1 in closed loop operation. It is
easier to understand if you think of this in the Lambda value rather than specific fuel
AFR values.
Page 79
So the problem running E85 in non FFV’s is simply the maximum amount of fuel that
can be injected via the stock fuel injectors. Generally an FFV has 30% larger
injectors installed, and the ECU maps scaled accordingly from the factory. In a non
FFV in open loop mode without the o2 sensor feedback, a stock vehicle will see a
very lean condition as the ECU is not able to add additional injector pulse width to
the values in the open loop fuel tables as it can via the fuel trims in closed loop
operation.
The iEMS3 has the capabilities to scale the injector pulse widths to extend the
adaptive trim range in closed loop operation, and to extend the injector fuel pulse in
open loop, thereby allowing convenient and effective use of E85 rather for purely
environmental desires (a more green footprint) or to take advantage of the higher
octane ratings and cooling effects of burning E85. In addition, the iEMS3 has the
ability to be tied into an engine coolant sensor to allow application of a cold start fuel
delivery increase to assist in cold weather operation. As the engine warms, the
additional injector pulse width is lowered back to the normal programmed pulse
width during normal operation.
Detonation and Pre Ignition, causes and effects by Allen W. Cline
All high output engines are prone to destructive tendencies as a result of over boost,
misfueling, mis-tuning and inadequate cooling. The engine community pushes ever
nearer to the limits of power output. As they often learn cylinder chamber
combustion processes can quickly gravitate to engine failure. This article defines two
types of engine failures, detonation and pre-ignition that is as insidious in nature to
users as they are hard to recognize and detect. This discussion is intended only as a
primer about these combustion processes since whole books have been devoted to
the subject.
First, let us review normal combustion. It is the burning of a fuel and air mixture
charge in the combustion chamber. It should burn in a steady, even fashion across
the chamber, originating at the spark plug and progressing across the chamber in a
three dimensional fashion. Similar to a pebble in a glass smooth pond with the
ripples spreading out, the flame front should progress in an orderly fashion. The burn
moves all the way across the chamber and , quenches (cools) against the walls and
the piston crown. The burn should be complete with no remaining fuel-air mixture.
Note that the mixture does not "explode" but burns in an orderly fashion.
There is another factor that engineers look for to quantify combustion. It is called
"location of peak pressure (LPP)." It is measured by an in-cylinder pressure
transducer. Ideally, the LPP should occur at 14 degrees after top dead center.
Depending on the chamber design and the burn rate, if one would initiate the spark
at its optimum timing (20 degrees BTDC, for example) the burn would progress
through the chamber and reach LPP, or peak pressure at 14 degrees after top dead
center. LPP is a mechanical factor just as an engine is a mechanical device. The
piston can only go up and down so fast. If you peak the pressure too soon or too late
in the cycle, you won't have optimum work. Therefore, LPP is always 14 degrees
ATDC for any engine.
Page 80
I introduce LPP now to illustrate the idea that there is a characteristic pressure
buildup (compression and combustion) and decay (piston downward movement and
exhaust valve opening) during the combustion process that can be considered
"normal" if it is smooth, controlled and its peak occurs at 14 degrees ATDC.
Our enlarged definition of normal combustion now says that the charge/bum is
initiated with the spark plug, a nice even burn moves across the chamber,
combustion is completed and peak pressure occurs at 14 ATDC.
Confusion and a lot of questions exist as to detonation and pre-ignition.
Sometimes you hear mistaken terms like "pre-detonation". Detonation is one
phenomenon that is abnormal combustion. Pre-ignition is another phenomenon that
is abnormal combustion. The two, as we will talk about, are somewhat related but
are two distinctly different phenomenon and can induce distinctly different failure
modes.
Key Definitions
Detonation
Detonation is the spontaneous combustion of the end-gas (remaining fuel/air
mixture) in the chamber. It always occurs after normal combustion is initiated
by the spark plug. The initial combustion at the spark plug is followed by a
normal combustion burn. For some reason, likely heat and pressure, the end
gas in the chamber spontaneously combusts. The key point here is that
detonation occurs after you have initiated the normal combustion with the
spark plug.
Pre-ignition
Pre-ignition is defined as the ignition of the mixture prior to the spark plug
firing. Anytime something causes the mixture in the chamber to ignite prior to
the spark plug event it is classified as pre-ignition. The two are completely
different and abnormal phenomenon.
Detonation
Unburned end gas, under increasing pressure and heat (from the normal
progressive burning process and hot combustion chamber metals) spontaneously
combusts, ignited solely by the intense heat and pressure. The remaining fuel in the
end gas simply lacks sufficient octane rating to withstand this combination of heat
and pressure.
Detonation causes a very high, very sharp pressure spike in the combustion
chamber but it is of a very short duration. If you look at a pressure trace of the
combustion chamber process, you would see the normal burn as a normal pressure
rise, then all of a sudden you would see a very sharp spike when the detonation
occurred. That spike always occurs after the spark plug fires. The sharp spike in
pressure creates a force in the combustion chamber. It causes the structure of the
engine to ring, or resonate, much as if it were hit by a hammer. Resonance, which is
characteristic of combustion detonation, occurs at about 6400 Hertz. So the pinging
you hear is actually the structure of the engine reacting to the pressure spikes. This
Page 81
noise of detonation is commonly called spark knock. This noise changes only slightly
between iron and aluminum. This noise or vibration is what a knock sensor picks up.
The knock sensors are tuned to 6400 hertz and they will pick up that spark knock.
Incidentally, the knocking or pinging sound is not the result of "two flame fronts
meeting" as is often stated. Although this clash does generate a spike the noise you
sense comes from the vibration of the engine structure reacting to the pressure
spike.
One thing to understand is that detonation is not necessarily destructive. Many
engines run under light levels of detonation, even moderate levels. Some engines
can sustain very long periods of heavy detonation without incurring any damage. If
you've driven a car that has a lot of spark advance on the freeway, you'll hear it
pinging. It can run that way for thousands and thousands of miles. Detonation is not
necessarily destructive. It's not an optimum situation but it is not a guaranteed
instant failure. The higher the specific output (HP/in3) of the engine, the greater the
sensitivity to detonation. An engine that is making 0.5 HP/in3 or less can sustain
moderate levels of detonation without any damage; but an engine that is making 1.5
HP/in3, if it detonates, it will probably be damaged fairly quickly, here I mean within
minutes.
Detonation causes three types of failure:
1. Mechanical damage (broken ring lands)
2. Abrasion (pitting of the piston crown)
3. Overheating (scuffed piston skirts due to excess heat input or high coolant
temperatures)
The high impact nature of the spike can cause fractures; it can break the spark plug
electrodes, the porcelain around the plug, cause a clean fracture of the ring land and
can actually cause fracture of valves-intake or exhaust. The piston ring land, either
top or second depending on the piston design, is susceptible to fracture type
failures. If I were to look at a piston with a second broken ring land, my immediate
suspicion would be detonation.
Another thing detonation can cause is a sandblasted appearance to the top of the
piston. The piston near the perimeter will typically have that kind of look if detonation
occurs. It is a swiss-cheesy look on a microscopic basis. The detonation, the
mechanical pounding, actually mechanically erodes or fatigues material out of the
piston. You can typically expect to see that sanded look in the part of the chamber
most distant from the spark plug, because if you think about it, you would ignite the
flame front at the plug, it would travel across the chamber before it got to the farthest
reaches of the chamber where the end gas spontaneously combusted. That's where
you will see the effects of the detonation; you might see it at the hottest part of the
chamber in some engines, possibly by the exhaust valves. In that case the end gas
was heated to detonation by the residual heat in the valve.
Page 82
In a four valve engine with a pent roof chamber with a spark plug in the center, the
chamber is fairly uniform in distance around the spark plug. But one may still may
see detonation by the exhaust valves because that area is usually the hottest part of
the chamber. Where the end gas is going to be hottest is where the damage, if any,
will occur.
Because this pressure spike is very severe and of very short duration, it can actually
shock the boundary layer of gas that surrounds the piston. Combustion
temperatures exceed 1800 degrees. If you subjected an aluminum piston to that
temperature, it would just melt. The reason it doesn't melt is because of thermal
inertia and because there is a boundary layer of a few molecules thick next to the
piston top. This thin layer isolates the flame and causes it to be quenched as the
flame approaches this relatively cold material. That combination of actions normally
protects the piston and chamber from absorbing that much heat. However, under
extreme conditions the shock wave from the detonation spike can cause that
boundary layer to breakdown which then lets a lot of heat transfer into those
surfaces.
Engines that are detonating will tend to overheat, because the boundary layer of gas
gets interrupted against the cylinder head and heat gets transferred from the
combustion chamber into the cylinder head and into the coolant. So it starts to
overheat. The more it overheats, the hotter the engine, the hotter the end gas, the
more it wants to detonate, the more it wants to overheat. It's a snowball effect. That's
why an overheating engine wants to detonate and that's why engine detonation
tends to cause overheating.
Many times you will see a piston that is scuffed at the "four corners". If you look at
the bottom side of a piston you see the piston pin boss. If you look across each pin
boss it's solid aluminum with no flexibility. It expands directly into the cylinder wall.
However, the skirt of a piston is relatively flexible. If it gets hot, it can deflect. The
crown of the piston is actually slightly smaller in diameter on purpose so it doesn't
contact the cylinder walls. So if the piston soaks up a lot of heat, because of
detonation for instance, the piston expands and drives the piston structure into the
cylinder wall causing it to scuff in four places directly across each boss. It's another
dead give-a-way sign of detonation. Many times detonation damage is just limited to
this.
Some engines, such as liquid cooled 2-stroke engines found in snowmobiles,
watercraft and motorcycles, have a very common detonation failure mode. What
typically happens is that when detonation occurs the piston expands excessively,
scurfs in the bore along those four spots and wipes material into the ring grooves.
The rings seize so that they can't conform to the cylinder walls. Engine compression
is lost and the engine either stops running, or you start getting blow-by past the
rings. That torches out an area. Then the engine quits.
In the shop someone looks at the melted result and says, "pre-ignition damage". No,
it's detonation damage. Detonation caused the piston to scuff and this snowballed
into loss of compression and hot gas escaping by the rings that caused the melting.
Page 83
Once again, detonation is a source of confusion and it is very difficult, sometimes, to
pin down what happened, but in terms of damage caused by detonation, this is
another typical sign.
While some of these examples may seem rather tedious I mention them because a
"scuffed piston" is often blamed on other factors and detonation as the problem is
overlooked. A scuffed piston may be an indicator of a much more serious problem
which may manifest itself the next time with more serious results.
In the same vein, an engine running at full throttle may be happy due to a rich WOT
air/fuel ratio. Throttling back to part throttle the mixture may be leaner and
detonation may now occur. Bingo, the piston overheats and scuffs, the engine fails
but the postmortem doesn't consider detonation because the the failure didn't
happen at WOT.
I want to reinforce the fact that the detonation pressure spike is very brief and that it
occurs after the spark plug normally fires. In most cases that will be well after ATDC,
when the piston is moving down. You have high pressure in the chamber anyway
with the burn. The pressure is pushing the piston like it's supposed to, and
superimposed on that you get a brief spike that rings the engine.
Causes
Detonation is influenced by chamber design (shape, size, geometry, plug location),
compression ratio, engine timing, mixture temperature, cylinder pressure and fuel
octane rating. Too much spark advance ignites the burn too soon so that it increases
the pressure too greatly and the end gas spontaneously combusts. Backing off the
spark timing will stop the detonation. The octane rating of the fuel is really nothing
magic. Octane is the ability to resist detonation. It is determined empirically in a
special running test engine where you run the fuel, determine the compression ratio
that it detonates at and compare that to a standard fuel, That's the octane rating of
the fuel. A fuel can have a variety of additives or have higher octane quality. For
instance, alcohol as fuel has a much better octane rating just because it cools the
mixture significantly due to the extra amount of liquid being used. If the fuel you got
was of a lower octane rating than that demanded by the engine's compression ratio
and spark advance detonation could result and cause the types of failures previously
discussed.
Production engines are optimized for the type or grade of fuel that the marketplace
desires or offers. Engine designers use the term called MBT ( Minimum spark for
Best Torque) for efficiency and maximum power; it is desirable to operate at MBT at
all times. For example, let's pick a specific engine operating point, 4000 RPM, WOT,
98 kPa MAP. At that operating point with the engine on the dynamometer and using
non-knocking fuel, we adjust the spark advance. There is going to be a point where
the power is the greatest. Less spark than that, the power falls off, more spark
advance than that, you don't get any additional power.
Page 84
Now our engine was initially designed for premium fuel and was calibrated for 20
degrees of spark advance. Suppose we put regular fuel in the engine and it spark
knocks at 20 degrees? We back off the timing down to 10 degrees to get the
detonation to stop. It doesn't detonate any more, but with 10 degrees of spark retard,
the engine is not optimized anymore. The engine now suffers about a 5-6 percent
loss in torque output. That's an unacceptable situation. To optimize for regular fuel
engine designers will lower the compression ratio to allow an increase in the spark
advance to MBT. The result, typically, is only a 1-2 percent torque loss by lowering
the compression. This is a better trade-off. Engine test data determines how much
compression an engine can have and run at the optimum spark advance.
For emphasis, the design compression ratio is adjusted to maximize
efficiency/power on the available fuel. Many times in the aftermarket the opposite
occurs. A compression ratio is "picked" and the end user tries to find good enough
fuel and/or retards the spark to live with the situation...or suffers engine damage due
to detonation.
Another thing you can do is increase the burn rate of the combustion chamber. That
is why with modem engines you hear about fast burn chambers or quick burn
chambers. The goal is the faster you can make the chamber burn, the more tolerant
to detonation it is. It is a very simple phenomenon, the faster it burns, the quicker the
burn is completed, the less time the end gas has to detonate. If it can't sit there and
soak up heat and have the pressure act upon it, it can't detonate.
If, however, you have a chamber design that burns very slowly, like a mid-60s
engine, you need to advance the spark and fire at 38 degrees BTDC. Because the
optimum 14 degrees after top dead center (LPP) hasn't changed the chamber has
far more opportunity to detonate as it is being acted upon by heat and pressure. If
we have a fast burn chamber, with 15 degrees of spark advance, we've reduced our
window for detonation to occur considerably. It's a mechanical phenomenon. That's
one of the goals of having a fast burn chamber because it is resistant to detonation.
There are other advantages too, because the faster the chamber burns, the less
spark advance you need. The less time pistons have to act against the pressure
build up, the air pump becomes more efficient. Pumping losses are minimized. In
other words, as the piston moves towards top dead center compression of the
fuel/air mixture increases. If you light the fire at 38 degrees before top dead center,
the piston acts against that pressure for 38 degrees. If you light the spark 20
degrees before top dead center, it's only acting against it for 20. The engine
becomes more mechanically efficient.
There are a lot of reasons for fast burn chambers but one nice thing about them is
that they become more resistant to detonation. A real world example is the Northstar
engine from 1999 to 2000. The 1999 engine was a 10.3:1 compression ratio. It was
a premium fuel engine. For the 2000 model year, we revised the combustion
chamber, achieved faster bum. We designed it to operate on regular fuel and we
only had to lower the compression ratio .3 to only 10:1 to make it work. Normally, on
a given engine (if you didn't change the combustion chamber design) to go from
Page 85
premium to regular fuel, it will typically drop one point in compression ratio: With our
example, you would expect a Northstar engine at 10.3:1 compression ratio, dropped
down to 9.3:1 in order to work on regular. Because of the faster burn chamber, we
only had to drop to 10:1. The 10:1 compression ratio still has very high compression
with attendant high mechanical efficiency and yet we can operate it at optimum
spark advance on regular fuel. That is one example of spark advance in terms of
technology. A lot of that was achieved through computational fluid dynamics analysis
of the combustion chamber to improve the swirl and tumble and the mixture motion
in the chamber to enhance the bum rate.
Chamber Design
One of the characteristic chambers that people are familiar with is the Chrysler
Hemi. The engine had a chamber that was like a half of a baseball. Hemispherical in
nature and in nomenclature, too. The two valves were on either side of the chamber
with the spark plug at the very top. The charge burned downward across the
chamber. That approach worked fairly well in passenger car engines but racing
versions of the Hemi had problems. Because the chamber was so big and the bores
were so large, the chamber volume also was large; it was difficult to get the
compression ratio high. Racers put a dome on the piston to increase the
compression ratio. If you were to take that solution to the extreme and had a 13:1 or
14:1 compression ratio in the engine pistons had a very tall dome. The piston dome
almost mimicked the shape of the head's combustion chamber with the piston at top
dead center. One could call the remaining volume "the skin of the orange." When
ignited the charge burned very slowly, like the ripples in a pond,, covering the
distance to the block cylinder wall. Thus, those engines, as a result of the chamber
design, required a tremendous amount of spark advance, about 40-45 degrees. With
that much spark advance detonation was a serious possibility if not fed high octane
fuel. Hemis tended to be very sensitive to tuning. As often happened, one would
keep advancing the spark, get more power and all of a sudden the engine would
detonate, Because they were high output engines, turning at high RPM, things would
happen suddenly.
Hemi racing engines would typically knock the ring land off, get blow by, torch the
piston and fall apart. No one then understood why. We now know that the Hemi
design is at the worst end of the spectrum for a combustion chamber. A nice
compact chamber is best; that's why the four valve pent roof style chambers are so
popular. The flatter the chamber, the smaller the closed volume of the chamber, the
less dome you need in the piston. We can get inherently high compression ratios
with a flat top piston with a very nice bum pattern right in the combustion chamber,
with very short distances, with very good mixture motion - a very efficient chamber.
Look at a Northstar or most of the 4 valve type engines - all with flat top pistons, very
compact combustion chambers, very narrow valve angles and there is no need for a
dome that impedes the burn to raise the compression ratio to 10:1.
Page 86
Detonation Indicators
The best indication of detonation is the pinging sound that cars, particularly old
models, make at low speeds and under load. It is very difficult to hear the sound in
well insulated luxury interiors of today's cars. An unmuffled engine running straight
pipes or a propeller turning can easily mask the characteristic ping. The point is that
you honestly don't know that detonation is going on. In some cases, the engine may
smoke but not as a rule. Broken piston ring lands are the most typical result of
detonation but are usually not spotted. If the engine has detonated visual signs like
broken spark plug porcelains or broken ground electrodes are dead giveaways and
call for further examination or engine disassembly.
It is also very difficult to sense detonation while an engine is running in an remote
and insulated dyno test cell. One technique seems almost elementary but, believe it
or not, it is employed in some of the highest priced dyno cells in the world. We refer
to it as the "Tin Ear". You might think of it as a simple stethoscope applied to the
engine block. We run a ordinary rubber hose from the dyno operator area next to the
engine. To amplify the engine sounds we just stick the end of the hose through the
bottom of a Styrofoam cup and listen in! It is common for ride test engineers to use
this method on development cars particularly if there is a suspicion out on the road
borderline detonation is occurring. Try it on your engine; you will be amazed at how
well you can hear the different engine noises.
The other technique is a little more subtle but usable if attention is paid to EGT
(Exhaust Gas Temperature). Detonation will actually cause EGTs to drop. This
behavior has fooled a lot of people because they will watch the EGT and think that it
is in a low enough range to be safe, the only reason it is low is because the engine is
detonating.
The only way you know what is actually happening is to be very familiar with your
specific engine EGT readings as calibrations and probe locations vary. If, for
example, you normally run 1500 degrees at a given MAP setting and you suddenly
see 1125 after picking up a fresh load of fuel you should be alert to possible or
incipient detonation. Any drop from normal EGT should be reason for concern. Using
the "Tin Ear" during the early test stage and watching the EGT very carefully, other
than just plain listening with your ear without any augmentation, is the only way to
identify detonation. The good thing is, most engines will live with a fairly high level of
detonation for some period of time. It is not an instantaneous type failure.
Pre-Ignition
The definition of pre-ignition is the ignition of the fuel/air charge prior to the spark
plug firing. Pre-ignition caused by some other ignition source such as an overheated
spark plug tip, carbon deposits in the combustion chamber and, rarely, a burned
exhaust valve; all act as a glow plug to ignite the charge.
Page 87
Keep in mind the following sequence when analyzing pre-ignition. The charge enters
the combustion chamber as the piston reaches BDC for intake; the piston next
reverses direction and starts to compress the charge. Since the spark voltage
requirements to light the charge increase in proportion with the amount of charge
compression; almost anything can ignite the proper fuel/air mixture at BDC!! BDC or
before is the easiest time to light that mixture. It becomes progressively more difficult
as the pressure starts to build.
A glowing spot somewhere in the chamber is the most likely point for pre-ignition to
occur. It is very conceivable that if you have something glowing, like a spark plug tip
or a carbon ember, it could ignite the charge while the piston is very early in the
compression stoke. The result is understandable; for the entire compression stroke,
or a great portion of it, the engine is trying to compress a hot mass of expanded gas.
That obviously puts tremendous load on the engine and adds tremendous heat into
its parts. Substantial damage occurs very quickly. You can't hear it because there is
no rapid pressure rise. This all occurs well before the spark plug fires.
Remember, the spark plug ignites the mixture and a sharp pressure spike occurs
after that, when the detonation occurs. That's what you hear. With pre-ignition, the
ignition of the charge happens far ahead of the spark plug firing, in my example,
very, very far ahead of it when the compression stroke just starts. There is no very
rapid pressure spike like with detonation. Instead, it is a tremendous amount of
pressure which is present for a very long dwell time, i.e., the entire compression
stroke. That's what puts such large loads on the parts. There is no sharp pressure
spike to resonate the block and the head to cause any noise. So you never hear it,
the engine just blows up! That's why pre-ignition is so insidious. It is hardly
detectable before it occurs. When it occurs you only know about it after the fact. It
causes a catastrophic failure very quickly because the heat and pressures are so
intense.
An engine can live with detonation occurring for considerable periods of time,
relatively speaking. There are no engines that will live for any period of time when
pre-ignition occurs. When people see broken ring lands they mistakenly blame it on
pre-ignition and overlook the hammering from detonation that caused the problem. A
hole in the middle of the piston, particularly a melted hole in the middle of a piston, is
due to the extreme heat and pressure of pre-ignition.
Other signs of pre-ignition are melted spark plugs showing splattered, melted, fused
looking porcelain. Many times a "pre-ignited plug" will melt away the ground
electrode. What's left will look all spattered and fuzzy looking. The center electrode
will be melted and gone and its porcelain will be spattered and melted. This is a
typical sign of incipient pre-ignition.
The plug may be getting hot, melting and "getting ready" to act as a pre-ignition
source. The plug can actually melt without pre-ignition occurring. However, the
melted plug can cause pre-ignition the next time around.
Page 88
The typical pre-ignition indicator, of course, would be the hole in the piston. This
occurs because in trying to compress the already burned mixture the parts soak up a
tremendous amount of heat very quickly. The only ones that survive are the ones
that have a high thermal inertia, like the cylinder head or cylinder wall. The piston,
being aluminum, has a low thermal inertia (aluminum soaks up the heat very
rapidly). The crown of the piston is relatively thin, it gets very hot, it can't reject the
heat, it has tremendous pressure loads against it and the result is a hole in the
middle of the piston where it is weakest.
I want to emphasis that when most people think of pre-ignition they generally accept
the fact that the charge was ignited before the spark plug fires. However, I believe
they limit their thinking to 5-10 degrees before the spark plug fires. You have to
really accept that the most likely point for pre-ignition to occur is 180 degrees BTDC,
some 160 degrees before the spark plug would have fired because that's the point (if
there is a glowing ember in the chamber) when it's most likely to be ignited. We are
talking some 160-180 degrees of bum being compressed that would normally be
relatively cool. A piston will only take a few revolutions of that distress before it fails.
As for detonation, it can get hammered on for seconds, minutes, or hours depending
on the output of the engine and the load, before any damage occurs. Pre-ignition
damage is almost instantaneous.
When the piston crown temperature rises rapidly it never has time to get to the skirt
and expand and cause it to scuff. It just melts the center right out of the piston.
That's the biggest difference between detonation and pre-ignition when looking at
piston failures. Without a high pressure spike to resonate the chamber and block,
you would never hear pre-ignition. The only sign of pre-ignition is white smoke
pouring out the tailpipe and the engine quits running.
The engine will not run more than a few seconds with pre-ignition. The only way to
control pre-ignition is just keep any pre-ignition sources at bay. Spark plugs should
be carefully matched to the recommended heat range. Racers use cold spark plugs
and relatively rich mixtures. Spark plug heat range is also affected by coolant
temperatures. A marginal heat range plug can induce pre-ignition because of an
overheated head (high coolant temperature or inadequate flow). Also, a loose plug
can't reject sufficient heat through its seat. A marginal heat range plug running lean
(suddenly?) can cause pre-ignition.
Passenger car engine designers face a dilemma. Spark plugs must cold start at -40
degrees F. (which calls for hot plugs that resist fouling) yet be capable of extended
WOT operation (which calls for cold plugs and maximum heat transfer to the cylinder
head).
Here is how spark plug effectiveness or "pre-ignition" testing is done at WOT. Plug
tip/gap temperature is measured with a blocking diode and a small battery supplying
current through a milliamp meter to the spark plug terminal. The secondary voltage
cannot come backwards up the wire because the large blocking diode prevents it.
Page 89
As the spark plug tip heats up, it tends to ionize the gap and small levels of current
will flow from the battery as indicated by the milliamp gauge. The engine is run under
load and the gauges are closely watched. Through experience techni-cians learn
what to expect from the gauges. Typically, very light activity, just a few milliamps of
current, is observed across the spark plug gap. In instances where the spark plug
tip/gap gets hot enough to act as an ignition source the mil-liamp current flow
suddenly jumps off scale. When that hap-pens, instant power reduction is necessary
to avoid major en-gine damage.
Back in the 80s, running engines that made half a horsepower per cubic inch, we
could artificially and safely induce pre-ignition by using too hot of a plug and leaning
out the mixture. We could determine how close we were by watching the gauges
and had plenty of time (seconds) to power down, before any damage occurred.
With the Northstar making over 1 HP per cubic inch, at 6000 RPM, if the needles
move from nominal, you just failed the engine. It's that quick! When you disassemble
the engine, you'll find definite evidence of damage. It might be just melted spark
plugs. But pre-ignition happens that quick in high output engines. There is very little
time to react.
If cold starts and plug fouling are not a major worry run very cold spark plugs. A
typical case of very cold plug application is a NASCAR type engine. Because the
prime pre-ignition source is eliminated engine tuners can lean out the mixture
(some) for maximum fuel economy and add a lot of spark advance for power and
even risk some levels of detonation. Those plugs are terrible for cold starting and
emissions and they would foul up while you were idling around town but for running
at full throttle at 8000 RPM, they function fine. They eliminate a variable that could
induce pre-ignition.
Engine developers run very cold spark plugs to avoid the risk of getting into preignition during engine mapping of air/fuel and spark advance, Production engine
calibration requires that we have much hotter spark plugs for cold startability and
fouling resistance. To avoid pre-ignition we then compensate by making sure the
fuel/air calibration is rich enough to keep the spark plugs cool at high loads and at
high temperatures, so that they don't induce pre-ignition.
Consider the Northstar engine. If you do a full throttle 0-60 blast, the engine will
likely run up to 6000 RPM at a 11.5:1 or 12:1 air fuel ratio. But under sustained load,
at about 20 seconds, that air fuel ratio is richened up by the PCM to about 10:1. That
is done to keep the spark plugs cool, as well as the piston crowns cool. That
richness is necessary if you are running under continuous WOT load. A slight
penalty in horsepower and fuel economy is the result. To get the maximum
acceleration out of the engine, you can actually lean it out, but under full load, it has
to go back to rich. Higher specific output engines are much more sensitive to preignition damage because they are turning more RPM, they are generating a lot more
heat and they are burning more fuel. Plugs have a tendency to get hot at that high
specific output and reaction time to damage is minimal.
Page 90
A carburetor set up for a drag racer would never work on a NASCAR or stock car
engine because it would overheat and cause pre-ignition. But on the drag strip for 8
or 10 seconds, pre-ignition never has time to occur, so dragsters can get away with
it. Differences in tuning for those two different types of engine applications are
dramatic. That's why a drag race engine would make a poor choice for an aircraft
engine.
Muddy Water
There is a situation called detonation induced pre-ignition. I don't want to sound like
double speak here but it does happen. Imagine an engine under heavy load starting
to detonate. Detonation continues for a long period of time. The plug heats up
because the pressure spikes break down the protective boundary layer of gas
surrounding the electrodes. The plug temperature suddenly starts to elevate
unnaturally, to the point when it becomes a glow plug and induces pre-ignition.
When the engine fails, I categorize that result as "detonation induced pre-ignition."
There would not have been any danger of pre-ignition if the detonation had not
occurred. Damage attributed to both detonation and pre-ignition would be evident.
Typically, that is what we see in passenger car engines. The engines will typically
live for long periods of time under detonation. In fact, we actually run a lot of piston
tests where we run the engine at the torque peak, induce moderate levels of
detonation deliberately. Based on our resulting production design, the piston should
pass those tests without any problem; the pistons should be robust enough to
survive. If, however, under circumstances due to overheating or poor fuel, the spark
plug tip overheats and induces pre-ignition, it's obviously not going to survive. If we
see a failure, it probably is a detonation induced pre-ignition situation.
I would urge any experimenter to be cautious using automotive based engines in
other applications. In general, engines producing .5 HP/in3 (typical air-cooled aircraft
engines) can be forgiving (as leaning to peak EGT, etc.). But at 1.0 HP/in3 (very
typical of many high performance automotive conversions) the window for calibration
induced engine damage is much less forgiving. Start out rich, retarded and with cold
plugs and watch the EGTs!
This article by AWC, was originally published in the January-February 2000 (Volume 10 Number 1) edition of Contact!
magazine. This magazine is published bi-monthly by the Aeronautics Education Enterprises (AEE), an Arizona nonprofit
organization.
Top Ring End Gap is often a major player when it comes to piston problems. Most
top land damage on race pistons appears to lift the land into the combustion
chamber. The reason is that the top ring ends butt and lock the piston at TDC. Crank
rotation pulls the piston down the cylinder while leaving at least part of the ring and
top land at TDC. Actual running end gap will vary depending on the engine heat
load. Piston alloy, fuel mixture, spark advance, compression, cooling system
capacity, duty cycle, and Hp per c.i. all combine to determine an engine's heat load.
Most new generation pistons incorporate the top compression ring high on the
piston. The high ring location cools the piston top more effectively, reduces
Page 91
detonation, smog, and increases Hp. If detonation or other excess heat situations
develop, a top ring end gap set toward the tight side will quickly butt, with piston and
cylinder damage to follow immediately. High location rings require extra end gap
because they stop at a higher temperature portion of the cylinder at TDC and they
have less shielding from the heat of combustion. At TDC the ring is usually above
the cylinder water jacket. The current design KB Pistons do a better job of keeping
the rings cool.
If a ring end gap is measured on the high side, you improve detonation tolerance in
two ways. One, the engine will run longer under detonation before ring butt. Two,
some leak down appears to benefit oil control by clearing the rings from oil loading.
A small amount of chamber oil will cause detonation and significant Hp loss. The
correct top ring end gap with aftermarket pistons can be 50% to 100% more than
manufacturer's specs.
To Spray or not to Spray, that is the question!
A discussion on water/methanol injection, air to air, and water to air
intercoolers.
You have probably heard of “intercoolers”, the big radiator looking device normally
seen in the front of a turbocharged, or in some cases supercharged vehicle. But
what are they, what do they do, and why are they important? What are the
differences, and why does it matter?
In simple terms, the colder the air charge is prior to entering the engine, the less
chance for detonation, and a cooler dense air charge will hold more oxygen,
meaning more power potential.
Anytime air is compressed, it creates heat and a lot of it. If you have an air
compressor at home, you probably know not to touch that copper tube between the
compressor and the storage tank after it has pumped up the tank. Why? It will be
so hot; you can get second degree burns from it!
A turbocharger or supercharger can easily raise the air temperature in the intake
manifold by 100 – 200 degrees or more! This heat is the primary drawback of forced
induction, and the more heat we can get rid of, the better the vehicle will perform.
So how do we get rid of this heat energy? That is where ‘intercooling” comes into
play. But before we discuss it, are we using the right terminology? Well, not exactly,
but close.
The inter prefix in the device name originates from historic compressor designs. In
the past, aircraft engines were built with charge air coolers that were installed
between multiple stages of supercharging, thus the designation of inter, meaning
between the compressor stages.
Page 92
Modern automobile designs are technically designated aftercoolers because of
their placement at the end of the forced induction system, or after the last
compressor stage. This term is now considered archaic in modern automobile
terminology since most forced induction vehicles have single-stage superchargers or
turbochargers.
Charge Air Cooler or Aftercooler would be more appropriate for modern vehicles.
How do they work?
Passing a compressed and heated intake charge through an intercooler reduces its
temperature (due to heat rejection) and pressure (due to flow restriction of fins). If
properly designed, the net result is an increase in air density. This increases system
performance by recovering some losses of the inefficient compression process by
rejecting heat to the atmosphere. Additional cooling can be provided by externally
spraying a fine mist onto the intercooler surface, or even into the intake air itself, to
further reduce intake charge temperature through evaporative cooling.
Intercoolers that exchange their heat directly with the atmosphere are designed to
be mounted in areas of an automobile with maximum air flow. These types are
mainly mounted in front mounted systems (FMIC), and are considered to be of the
Air to Air design.
As well as allowing a greater volume of air to be admitted to an engine, intercoolers
have a key role in controlling the internal temperatures in a forced induction engine.
When fitted with a turbo (as with any form of supercharging), the engine's specific
power is increased, leading to higher combustion and exhaust temperatures. The
exhaust gases passing through the turbine section of the turbocharger are usually
around 450 °C (840 °F), but can be as high as 1000 °C (1830 °F) under extreme
conditions.
This heat passes through the turbocharger unit and contributes to the heating of the
air being compressed in the compressor section of the turbo. If left un-cooled this hot
air enters the engine, further increasing internal temperatures. This leads to a build
up of heat that will eventually stabilize, but this may be at temperatures in excess of
the engine's design limits- 'hot spots' at the piston crown or exhaust valve can cause
warping or cracking of these components.
This effect is especially found in modified or tuned engines running at very high
specific power outputs. An efficient intercooler removes heat from the air in the
induction system, preventing the cyclic heat build-up via the turbocharger, allowing
higher power outputs to be achieved without damage. The extra power obtained
from forced induction is due to the extra air available to burn more fuel in each
cylinder. This sometimes requires a lower compression ratio be used, to allow a
wider mapping of ignition timing advance before detonation occurs (for a given fuel's
octane rating). Although a lower compression ratio generally lowers combustion
efficiency and costs power.
Page 93
Air to Liquid Intercooling
Air-to-liquid intercoolers (Charge-Air-Coolers) are heat exchangers that transfer
intake charge heat to an intermediate fluid, usually water, which finally rejects heat
to the air. These systems use radiators in other locations, usually due to space
constraints, to reject unwanted heat, similar to an automotive radiator cooling
system. Air-to-liquid intercoolers are usually heavier than their air-to-air counterparts
due to additional components making up the system (water circulation pump,
radiator, fluid, and plumbing).
A big advantage of the air-to-liquid setup is the lower overall pipe and intercooler
length, which offers less restriction and less pressure drop across the cooler. This
helps provide a faster response, giving peak boost faster than most front-mount
intercooler setups. Some setups can use reservoirs that can have ice put into it for
intake temperatures lower than ambient air, providing an even greater advantage
(but of course, ice would need constant replacement, usually only used at a drag
strip).
Water has far greater properties to transfer heat than air, so the systems
components can be much smaller. It is easier to mount the small radiator where it
has less impact on the vehicles radiator, helping to prevent overheating of the
vehicle coolant system. Ford adopted the technology when they decided to use
forced induction (via Supercharger) on their Mustang Cobra and Ford Lightning truck
platforms. It uses a water/glycol mixture intercooler inside the intake manifold, just
under the supercharger, and has a long heat exchanger front mounted, all powered
by a Bosch pump made for Ford.
Water/Methanol Injection
In internal combustion engines, water injection, also known as anti-detonate
injection, is a method for cooling the combustion chambers of engines by adding
water to the cylinder or incoming fuel-air mixture, allowing for greater compression
ratios and largely eliminating the problem of engine knocking (detonation). This
effectively increases the octane rating of the fuel, meaning that performance gains
can be obtained when used in conjunction with a supercharger or turbocharger,
altered spark ignition timing, and other modifications.
Many water injection systems use a mixture of water and alcohol (approximately
50/50), with trace amounts of water-soluble oil. The water provides the primary
cooling effect due to its great density and high heat absorption properties. The
alcohol is combustible, and also serves as antifreeze for the water. The purpose of
the oil is to prevent corrosion of water injection and fuel system components.
Effects
In a piston engine, the initial injection of water cools the fuel-air mixture significantly,
which increases its density and hence the amount of oxygen that enters the cylinder.
An additional effect comes later during combustion when the water absorbs large
Page 94
amounts of heat as it vaporizes into steam, reducing peak temperature and resultant
NOx formation, and reducing the amount of heat energy absorbed into the cylinder
walls.
The alcohol in the mixture burns, but is also much more resistant to detonation than
gasoline. The net result is a higher octane charge that will support very high
compression ratios or significant forced induction pressures before onset of
detonation.
With the introduction of the intercooler the interest in water injection disappeared,
but today, water injection is also of interest because it can potentially decrease
nitrogen oxide (NOx) emissions in exhaust.
The most common use of water injection today is in modern vehicles with
aftermarket forced induction systems, such as turbochargers or superchargers. Such
engines are commonly tuned with a narrower margin of safety from detonation and
therefore benefit greatly from the additional cooling effects of vaporized
water/methanol.
We have found that the additional cooling benefits of the water/methanol injection
system to be invaluable in maintaining manageable combustion temperatures in the
cylinders, thereby preventing detonation and potential engine damage. This is why
all of our turbocharger systems incorporate water/methanol injection into the overall
design.
Page 95
iEMS2 Engine Management System Fuel Correction Datalog. 2006
Chrysler 300C, 5.7L Hemi engine.
System
senses rapid
parameter
change, takes
control of O2
sensors as
evidenced by
flatline drop in
O2 voltage
applying
preliminary
fuel correction
prior to onset
of boost.
At boost onset,
AFR has
already
reached 13.2
and is plunging
as the system
transitions over
to full injector
pulse width
control.
st
Prior to 1 to
second shift,
AFR has
reached 11.1
and continues
to plunge
following shift
point, boost
reaches 6.5 psi
after shift.
nd
Prior to 2
shift, AFR has
reached 10.5
and flatlines
following the
shift point,
boost reaches
7.5 psi at shift
and goes to 8.5
following the
shift with
steady AFR.
This is the very first boosted run following the installation of the iEMS2, and after less than 1.5 hours of
setup and initial mapping setup. All tuning was performed without the use of a chassis dyno. Initial
dyno readings were 411 RWHP and 500 RWTQ at 6.5 – 7 psi boost on an all stock internals 5.7 Hemi.
All tuning based on the original factory ECU programming.
Wideband AFR data was fed from a PLX R300 output to the iEMS3 for datalogging. Datalog is
captured via the iEMS3 logging window.
The current version of the iEMS unit is G3 (generation 3), which added:
• Complete 3D map for fuel and ignition.
o Selectable Map size.
o Ability to select span between load and rpm cells.
• One extra PWM-output in IS8G3
• One (IS4G3) or two (IS8G3) tuneable digital outputs to control Vanos, Vtec, gear indicator etc.
• Cold start function for easy tuning of E85.
Page 96
iEMS2 Engine Management System Fuel Correction Datalog. 2006
Chrysler 300C, 5.7L Hemi engine.
System
senses rapid
parameter
change,
takes control
of O2
sensors as
evidenced by
flat line drop
in O2 voltage
applying
preliminary
fuel
correction
prior to onset
of boost.
At boost onset,
AFR has
already
reached 12.7
and is plunging
as the system
transitions over
to full injector
pulse width
control. This
graph also
shows stock
MAP sensor
clamped at 0
inches of
vacuum.
st
Prior to 1 to
second shift,
AFR has
reached 11.1
and continues
to plunge
following shift
point; boost
reaches 6.5 psi
after shift.
nd
Prior to 2
shift, AFR has
reached 10.5
and flat lines
following the
shift point,
boost reaches
6.5 psi at shift.
AFR remains
steady through
rd
run up to 3
gear shift point
and remains
steady through
th
beginning of 4
gear run up.
Following 3 - 4
shift, boost is
increased to
7.5 psi and
AFR continues
to hold steady
at 10.5 during
th
4 gear run up.
Page 97
iEMS2 Engine Management System Part Throttle Boost Fuel Correction
Datalog. 2006 Chrysler 300C, 5.7L Hemi engine.
View above is an overall view of the subject time period, the view below is a zoom detail
view providing detail of the transition into part throttle (Closed Loop) low boost operation.
Note, the vehicle remained in closed loop at all times and did not transition to Open Loop
(WOT).
Page 98
At 104 seconds, tip in is started by slowly easing into the pedal. Just before 110 seconds,
vehicle disengages from 5th overdrive and drops into 4th gear and begins a slow steady
increase in rpm.
Just before 111 seconds, system senses the approach to boost threshold and takes control
of the O2 sensors and begins to increase fuel and the AFR. This can be seen by the ripple
of the AN2 out (O2) line going to a flat line.
The AFR line starts to trend downward as fuel is increased.
At 111 seconds, vehicle transitions into low boost, there has been minimal pedal movement
and the vehicle is experiencing a slow gradual increase in speed and rpm with a smooth
transition from vacuum to a boosted state.
Data from 110 seconds during the downshift, -7.71 inches of vacuum and AFR 14.67;
RPM [rpm] - 110.00s ; 2168.4
MPX [-in_PSI] - 110.00s ; -7.71
IAT [F] - 110.00s ; 113
AN2 Out [V] - 110.00s ; 3.95
WB AFR [C] - 110.00s ; 14.67
TP [V] - 110.00s ; 1.74
Data from 111 seconds following downshift, boost pressure is 2.06 psi and AFR is 13.1;
RPM [rpm] - 111.75s ; 3408.2
MPX [-in_PSI] - 111.75s ; 2.06
IAT [F] - 111.75s ; 110.75
AN2 Out [V] - 111.75s ; 4.28
WB AFR [C] - 111.75s ; 13.1
TP [V] - 111.75s ; 1.7
Data from 113 seconds, boost pressure is 2.8 psi and AFR is 12.27;
RPM [rpm] - 113.50s ; 4400.3
MPX [-in_PSI] - 113.50s ; 2.8
IAT [F] - 113.50s ; 115.5
AN2 Out [V] - 113.50s ; 4.24
WB AFR [C] - 113.50s ; 12.27
TP [V] - 113.50s ; 1.5
Data from 115 seconds, boost pressure is 2.21 psi and AFR is 12.08
RPM [rpm] - 115.30s ; 5328.1
MPX [-in_PSI] - 115.30s ; 2.21
IAT [F] - 115.30s ; 120.5
AN2 Out [V] - 115.30s ; 4.2
WB AFR [C] - 115.30s ; 12.08
TP [V] - 115.30s ; 1.33
Page 99
Data from 117 seconds, boost pressure is 3.53 psi and AFR is 12.55, this is following the up
shift, and release of the pedal immediately before rpm and boost falls off back to a vacuum
state. The AN2 (O2) sensor voltage immediately goes back to a ripple as the system
returns to normal operation.
RPM [rpm] - 117.00s ; 4046.8
MPX [-in_PSI] - 117.00s ; 3.53
IAT [F] - 117.00s ; 125.5
AN2 Out [V] - 117.00s ; 4.16
WB AFR [C] - 117.00s ; 12.55
TP [V] - 117.00s ; 1.29
Page 100
Typical electrical schematic for the iEMS3 IS8G3 “In Series” unit.
iEMS3 box
2 – 24 pin Molex connectors
B
Lead to wideband output
A
Male/Female 16 pin Molex
connector for injector leads
Injector load board
C
F
ECU
Tap
E
D
+12V
keyed
source
Factory fuse box,
location varies
-
Ground stud
Red lead is +12V jumper from one plug to the opposite plug
Black lead is input from factory injector harness to the iEMS3
Blue lead is new output from iEMS3 to injector
New injector plug
that connects to the
injector
Injector connector pins,
12V+ is opposite of the
connector retainer clip.
New injector plug
that connects to
factory harness
injector plug
Page 101
All splices must be soldered; Crimp style T-Taps and butt splices are NOT to be
used due to potential for wire damage and increased wire resistance.
Cut/Splice Connection
ECU
Tap
To iEMS3 “IN”
From sensor
(engine)
From iEMS3 “OUT”
To ECU
To iEMS3 “IN”
From sensor
(engine)
To ECU
Cut wire
Care must be taken with the Molex Mini-Fit connectors that connect the iEMS3 harness
to the iEMS3 unit. You want to minimize the amount of back and forth movement of the
pins in the connectors. After you have determined the final wiring configuration
(optional leads inserted in the connectors), you can use a thick gap filling CA (instant)
adhesive in the end of the connector where the wire exits to anchor the lead if desired.
Do not use the thin watery type of adhesive if you decide to do this.
It is important to power the iEMS3 unit directly from the lead that supplies 12 volt +
power to the vehicle ECU. This is to ensure the ECU and iEMS3 power up at the same
time, as some vehicles take a barometric pressure update within the first few
milliseconds on power up. If the iEMS3 is not online, you may receive a low MAP
sensor voltage code (clear the code and start the vehicle).
If this is an issue, we have an inexpensive timer circuit available that can be tapped into
the interior light circuit so that as soon as the door opens it triggers the timer which will
put power first to the iEMS3 and can be set to drop out after several minutes (1-60
minutes) giving plenty of time for the vehicle to be started and the normal power to be
supplied to the iEMS3.
In some vehicles, the ECU may be powered through an ASD (Auto Shut Down) relay
system. Some vehicles will produce an ASD relay trouble code if the ECU is sensitive
enough to detect additional draw on the ECU power circuit. Due to this, DO NOT
connect the injector load board power lead to the ECU power supply, Connect to a
separate key on power source.
Page 102
Mount the iEMS3 in a convenient location for access to change tunes. Flying lead
harness has 3 meter length leads, however keep the leads as short as practical. If
iEMS3 is located in the console for example, consider wrapping the non power leads
with shielding foil or foil covered convoluted split tubing in the passenger compartment.
DO NOT insert optional leads into the iEMS3 connectors unless the function will be
used.
We can create a custom modular harness for your application if you can supply the
required dimensions. This would include heavy duty plugs where the main harness
enters the engine compartment, splitting the harness into two sections. Please inquire
regarding cost and availability.
A includes, iEMS3 Box
8 – inj lead in (from male injector plug that plugs into existing injector connector)
8 – inj lead out (from iEMS3, plugs into the injector)
1 – +12v power in (power from 12v key on power circuit, T splice)
B includes, wideband input lead
1 – wideband controller optional output, in to iEMS3 (if used, optional)
C includes, PCM
1 – +12v power in (power from ECU 12v power circuit, T splice)
2 – -12v chassis ground in (Both chassis grounds should be taken to a substantial
chassis ground location) close to the iEMS3 unit as possible, or to the ECU
ground stud..
2 – Factory MAP sensor in/out (cut original lead)
2 – Crank sensor in/out (cut original lead)
2 – Factory O2 sensor return lead in/out (cut original lead)
2 – Cam sensor in/out (if used) (cut original lead)
1 – IAT sensor input (if used, optional, T-splice)
1 – TPS input (if used, optional, T splice)
2 – -12v signal ground in (connect both grounds to the ECU sensor ground).
1 – Shift light output (if used, optional)
1 – PWM Boost control out (if used, optional)
1 – PWM Water/meth out (if used, optional, must use power switch)
D includes, even cylinder bank
2, 4, 6, 8 injector leads (4 in, 4 out)
Page 103
E includes, odd cylinder bank
1, 3, 5, 7 injector leads (4 in, 4 out)
F includes, injector load board
+12v key on source to fuse box
Note: The injector load board has 10 injector leads (8 used), and 1 +12 volt power
source. The 8 injector leads are T-spliced into the 8 injector leads that feed into the
iEMS3 unit. 2 are unused.
24 22 20 18 16 14 12 10 08 06 04 02
23 21 19 17 15 13 11 09 07 05 03 01
LOOKING AT WIRE SIDE OF CONNECTOR
Pin configurations above is typical for the iEMS3 24 pin Molex Connectors that plug
into the unit.
Load Board:
The red wire on the load board is connected to a switched 12v source. There is no
ground lead. The fuel signal wires that leads from the ECU to the iEMS3 fuel inputs
needs the load board to simulate that there are injectors connected to it now when
we are driving the injectors with the iEMS3. There are 10 input wires on the load
board, only eight are used for a V8 engine. Each wire is an individual circuit, so it
does not matter which are used in any particular order.
Power Switch:
black - Chassis ground
red - 12volt power in
white - 12volt power out - The pump can be powered from another source. In that
case this wire would not be used.
white/black - Grounding output
thin black/yellow or black/green - in signal. It can be a PWM from the iEMS3. When
this is grounded the white/black output of the power switch is also grounded
M=Master
S=Slave
Page 104
Typical pin function assignment for Chrysler/Dodge/Jeep
PWM1 - M-5
PWM2 - S-5
An2 in - M-8
An2 out - M-7
An4 in - M-4 and S-4
M-11
M-12
M-13
M-14
S-14
An3 in M-6 and S-6
An1 in M-10
An1 out M-9
AN2 in S8
An1 in S-10
Digital 1 out
Digital 2 out
Boost control (open or closed loop mode)
Water/Methanol or other high amperage load using power switch
From O2 sensor
O2 sensor signal to ECU
IAT connects to master and slave when used for
tuning
camshaft out
camshaft in
crankshaft out
crankshaft in
crankshaft in
Internal MPX MAP sensor
Stock MAP sensor signal from sensor
Stock MAP signal to ECU
Throttle position - only for monitoring value
Analog sensor for monitoring any 0-5 v signal
Switched grounding output. Can be based on rpm and/or any analog
sensor.
Switched grounding output. Can be based on rpm and/or any analog
sensor.
If you need to connect to oxygen sensors on both banks:
An2in - S-8
from o2 sensor
An2out - S-7
o2 sensor signal to ECU
If Camshaft Signal is not used, then M11/M12 analog pair are available
for other use.
The iEMS3 uses PIC microprocessors that are programmed "close to hardware". All critical timing
issues are executed in assembler language. This is the best method for engine management systems
as the code is highly efficient, keeping the response time (interrupt to action) minimized.
Page 105
iEMS3 IS8G3 - TECHNICAL SPECIFICATIONS
GENERAL
WEIGHT
SIZE (LxWxH)
POWER INPUT
POWER CONSUMPTION
CPU
CABLE CONNECTOR
STATUS LED
OPERATING TEMPERATURE
TUNECARD
DATA LOGGER
DIGITAL OUTPUT RESOLUTION
310 g
111 x 82 x 35 mm
7 V to 17 V
12 V / 120 mA
Microchip PIC running @ 40 MHz
2 x 24-pin
Power, RPM indicator, TuneCard wr/rd active, TuneCard ok
-40°C to +85°C (-40°F to +185°F)
All settings can be stored on TuneCard for easy change of
settings
TuneCard memory size – 16kb
Aquire data to a PC, standard frequency 20 Hz – 50
parameters
0.8 micro seconds
FUEL
CHANNELS
CURRENT
FUEL CHANGE SPAN
8 input, 8 output
3A grounding
-25 to +25 ms (normally based on engine load and rpm)
3D map with fully adjustable axis
Ability to run extra injectors
Fuel cut RPM
Injector change calibration – run from half size to 4x larger
than stock injectors
IGNITION
CHANNELS
CURRENT
SIGNAL LEVEL
CURRENT
TIMING CHANGE SPAN
4 input, 4 output
3A grounding, 100mA to 5v
3D map with fully adjustable axis
12 V / 5 V
3A grounding, 100mA to 5v
-25 to +25° (normally based on engine load and rpm)
ANALOG MAP / MAF
CHANNELS
4 input, 2 output
Analog 1 out limit depending on RPM
Analog 2 out limit depending on RPM
Analog2 out, function of analog2 in
Analog2 out, boost activated analog output
PWM out/DIGITAL out
CHANNELS
4 output
PWM1 out based on analog sensor and RPM w. closed loop
boost control
PWM2 out based on analog sensor
Digital1 and Digital2 out, based on RPM and analog sensor
EXTERNAL SENSOR
POWER
VOLTAGE
CURRENT
5V
25 mA
Page 106
Performance Tuning for the Modern OBDII
Compliant Vehicle
By North Coast Turbo Systems LLC
North Coast Turbo Systems LLC
4075 East Kirk Road, #17
Port Clinton, OH 43452
419-573-2122
www.northcoastturbosystems.com
www.iems3.com
[email protected]
[email protected]
[email protected]
[email protected]
Page 107