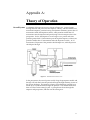
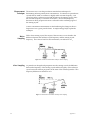
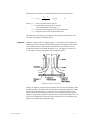
1
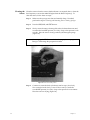
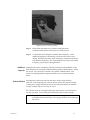
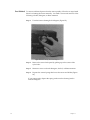
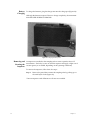
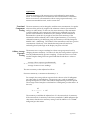
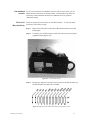
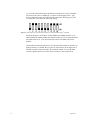
Model 8510
PIEZOBALANCE
Respirable Aerosol
Mass Monitor
Operation and Service
Manual
Model 8510
PIEZOBALANCE
Respirable Aerosol
Mass Monitor
Operation and Service
Manual
February 1993
P/N 1980037
Rev A
TSI Incorporated
P.O. Box 64394
500 Cardigan Road
St. Paul, MN 55164
USA
Sales 800-876-9874
Customer Service (612) 483-4711
Part number: 1980037 Rev A
Copyright©
TSI Incorporated/February 1993/All rights reserved.
Address
TSI Incorporated/500 Cardigan Road/P.O. Box 64394/St. Paul, MN 55164/USA
Telex No.
6879024
LIMITATION OF WARRANTY AND LIABILITY
Seller warrants that this product, under normal use and service as described in the operator's manual, shall be free from defects in
workmanship and material for a period of twelve (12) months from the date of shipment to the customer. This limited warranty is
subject to the following exclusions:
1.
2.
3.
4.
Batteries, hot wire or hot film sensors and certain other components when indicated in specifications are warranted for a period of 90
days from the date of shipment to the customer.
With respect to any repair services rendered, seller warrants that the parts repaired or replaced will be free from defects in
workmanship and material, under normal use, for a period of 90 days from the date of shipment to the customer.
Seller does not provide any warranty on finished goods manufactured by others. Only the original manufacturer's warranty applies.
Unless specifically authorized in a separate writing by seller, seller makes no warranty with respect to, and shall have no liability in
connection with, any goods which are incorporated into other products or equipment by the Buyer.
The foregoing is IN LIEU OF all other warranties and is subject to the conditions and LIMITATIONS stated herein. NO OTHER
EXPRESS OR IMPLIED WARRANTY OF FITNESS FOR PARTICULAR PURPOSE OR MERCHANTABILITY IS MADE.
THE EXCLUSIVE REMEDY OF THE USER OR PURCHASER, AND THE LIMIT OF THE LIABILITY OF SELLER FOR ANY
AND ALL LOSSES, INJURIES, OR DAMAGES IN CONNECTION WITH THIS PRODUCT (INCLUDING CLAIMS BASED ON
CONTRACT, NEGLIGENCE, STRICT LIABILITY, OTHER TORT, OR OTHERWISE) SHALL BE THE RETURN OF THE
PRODUCT TO THE FACTORY OR DESIGNATED LOCATION AND THE REFUND OF THE PURCHASE PRICE, OR, AT THE
OPTION OF SELLER, THE REPAIR OR REPLACEMENT OF THE PRODUCT. IN NO EVENT SHALL SELLER BE LIABLE
FOR ANY SPECIAL INCIDENTAL OR CONSEQUENTIAL DAMAGES. NO ACTION, REGARDLESS OF FORM, MAY BE
BROUGHT AGAINST THE SELLER MORE THAN ONE YEAR AFTER THE CAUSE OF ACTION HAS ACCRUED.
The purchaser and all users are deemed to have accepted the terms of this LIMITATION OF WARRANTY AND LIABILITY, which
contains the complete and exclusive limited warranty of seller. This LIMITATION OF WARRANTY AND LIABILITY may not be
amended or modified nor may any of its terms be waived except by a writing signed by an authorized representative of seller.
Service Policy
Knowing that inoperative or defective instruments are as detrimental to TSI as they are to our customers, our service policy is designed
to give prompt attention to any problems. If any malfunction is discovered, please contact your nearest sales office or representative,
or call TSI's Customer Service department at (612) 483-4711.
Contents
About this manual
1
Introduction
3
Chapters
I
II
III
IV
Set up
5
Unpacking
Parts Identification
Preparing the Piezobalance for Operation
Installing the Impactor
Filling the Sponge Preparation Bottles
Preparing the Sensor Cleaning Sponges
5
6
7
7
9
9
Description of Parts and Functions
13
Control Panel
Data Display
Operational Pushbuttons
Range Selector
Operation Monitor
Miscellaneous Features
13
13
14
14
14
14
Operation
17
Selecting the Measurement Time
Making a Measurement
Approximate guidelines for Sensor Cleaning
Special Applications
Low Concentration Measurements
High Concentration Measurements
17
18
21
21
21
22
Maintenance
25
Maintenance Schedule
Cleaning and Rewetting the Sensor-Cleaning Sponges
Cleaning the Sensor
Stubborn Deposits
Patient Method
Fast Method
Battery Charging
Removing and Greasing the Impactor
Cleaning the Precipitator's Needle Assembly
Vacuum Pump
Removing and Cleaning the Vacuum Pump
Checking for Air Leaks
Checking the Flow Rate
Adjusting the Flow Rate
25
25
28
29
29
30
32
32
34
35
35
40
41
42
i
Appendices
Illustrations
ii
V
Troubleshooting
43
A
B
C
D
Theory of Operation
Mass Sensitivity
Specifications
Assembly Drawing
45
51
55
57
PIEZOBALANCE and accessories
Front of PIEZOBALANCE
Back of PIEZOBALANCE
Impactor assembly
Removing the side panel
Installing the impactor
Installing the thumbscrew
Using the Sponge squeezer to remove excess water
Sponge tray with sponges
Removing the sponge compartment door
Installing the sponge tray
Parts and functions of the PIEZOBALANCE
Parts and functions of PIEZOBALANCE
Selecting the Measurement Time
Checking the battery voltage
Comparing the sensor frequency with the Basic Frequency
Checking the precipitator current level
Concentration of respirable aerosol displayed for 24-second sample
Opening the sponge compartment door
Removing the sponge tray
Rinse and Detergent sponges
Using the sponge squeezer to remove excess water
Sensor in the soak position
The sensor in the drying position
Sensor-cleaning dial turned 10 degrees
Clean the sensor with the swab
Cleaning the sensor with the fast method
Charging the Battery Pack
Removing the inlet panel
Removing the impactor and housing
Impactor and housing
Removing the precipitator needle assembly
Removing the panels
Removing the screws that connect the bracket to the PIEZOBALANCE
Removing the intake hose
Removing the pump rotor and vanes
Soaking the rotor and carbon vanes
Cleaning the inside of the pump housing
Exploded drawing of the pump
Leak-checking the PIEZOBALANCE
Using a bubble flow meter
Adjusting the flow rate
Schematic of the PIEZOBALANCE
Piezoelectric microbalance technique-before sampling
6
6
7
7
8
8
9
10
10
11
12
13
15
17
18
19
19
20
26
26
27
27
28
29
30
31
31
32
33
33
34
35
36
36
37
37
38
39
39
40
41
42
45
46
1
2
3
4
5
6
7
8
9
10
11
12
13
14
15
16
17
18
19
20
21
22
23
24
25
26
27
28
29
30
31
32
33
34
35
36
37
38
39
40
41
42
A-1
A-2
A-3
A-4
A-5
B-1
B-2
B-3
Piezoelectric microbalance technique-after sampling
Schematic of the impactor
Block diagram of electronic system
Location of DIP switches
Schematic of DIP switches with numbers corresponding to values
DIP switches set to On and Off at the factory for a setting of 0
.000278 (mg/m3)/Hz setting
46
47
50
53
53
54
iii
iv
About This Manual
The PIEZOBALANCE Operation and Service Manual tells you how to operate
and maintain the PIEZOBALANCE. Read it thoroughly before using the
instrument.
Chapter 1 explains how to set up the PIEZOBALANCE.
Chapter 2 describes the parts of the PIEZOBALANCE and how they work.
Chapter 3 explains how to operate the PIEZOBALANCE.
Chapter 4 covers the maintenance schedule and procedures required to
keep the PIEZOBALANCE operating properly.
Chapter 5 provides a troubleshooting table for quick reference.
Appendix A describes the theory of operation on which the instrument
is based. Appendix B explains the theory of mass sensitivity and how
to set the mass sensitivity of the PIEZOBALANCE. Appendix C lists the
instrument's important specifications.
References to operational buttons on the PIEZOBALANCE, along with the
instrument's data readout and function keys, are represented in this manual
by the typeface called Helvetica Narrow. Reference to section titles of the
manual are identified by italics.
Example 1. Press the PWR button (from Making a Measurement in Chapter 2).
Example 2. See Cleaning the Sensor under Maintenance (from Chapter 2).
To call your attention to an important note or comment, a black four-pointed
star is used.
1
2
About This Manual
Introduction
The Model 8510 PIEZOBALANCE Respirable Aerosol Mass Monitor is a
reliable, easy-to-use, portable instrument for measuring the mass
concentration of smoke, fumes, dust, and other airborne particles. It offers
numerous applications, including tuning ventilation systems and
performing a quick-check of problem areas for OSHA compliance.
The PIEZOBALANCE uses the piezoelectric technique, similar to a
microbalance, for determining aerosol mass concentrations. This technique
is based on the inherent stability of a quartz crystal. If the crystal
experiences mass accumulation, its natural frequency changes. This
frequency is measured by the instrument and related to the mass
concentration of the sampled air. The value for mass concentration is then
displayed in milligrams per cubic meter .
3
4
Introduction
Chapter 1
Set Up
The PIEZOBALANCE is easy to set up. First, verify that no components are
missing; refer to the following parts list and to the labelled photographs
(Figures 1, 2, and 3). Then carefully follow the instructions to prepare the
instrument for operation.
Unpacking The following items are included with the PIEZOBALANCE; if anything is missing
or damaged, notify TSI promptly.
Qty
Item
Part No.
1
1
Pin-vise
Offset Phillips-head
screwdriver
Vacuum grease
Sponge squeezer
Operation and
Service Manual
Small drop bottles
Plastic bottles
Screw cap
O-ring, EPDM 1-115
O-ring, EPDM 1-021
O-ring, EPDM 1-019
O-ring, EPDM 1-014
O-ring, EPDM 1-011
Sensor cleaning sponges
Cassette sponge holders
Battery Charger (115V) or
Battery Charger (230V)
Cleaning Solution
1502245
1
1
1
2
2
1
1
1
1
2
2
4
2
1
1
3012028
1502249
1502260
1980037
2002007
2002008
2002009
2501525
2501526
2501527
2501528
2501529
1502248
1502235
8501
8504
2915013
A registration card is located at the front of this manual. Please complete
it promptly and drop it in the mail. This allows TSI to inform you of any
product updates.
5
Figure 1. PIEZOBALANCE and accessories
Parts The following items are included with the PIEZOBALANCE; if anything is missing
Identification or damaged, notify TSI promptly.
Figure 2. Front of PIEZOBALANCE
1.
2.
3.
4.
5.
6.
7.
8.
6
Data Display
HZ Light
MG/M3 Light
X 5 Light
NEG Light
PWR Pushbutton
STRT Pushbutton
MEAS Pushbutton
9.
10.
11.
12.
13.
14.
15.
16.
Sensor CHK Pushbutton
MEAS TIME Button
BATTERY VOLTAGE Indicator
PRECIPITATOR CURRENT Indicator
Sensor-cleaning dial
Precipitator NEEDLE
Aerosol Inlet
Sponge Compartment Door
Chapter 1
Figure 3. Back of PIEZOBALANCE
17. Pull-Up Locks
18. Battery Charge Port
Preparing the The following paragraphs give step-by-step instructions for preparing the
Piezobalance for PIEZOBALANCE for operation. All steps must be completed to ensure proper
Operation operation of your instrument.
Installing the An impactor is used on the inlet of the PIEZOBALANCE to remove nonrespirable
Impactor particles from the air being sampled . You must install it before running the
instrument. To install the impactor, follow these five steps:
Step 1. Locate the impactor assembly (in the triangular compartment) in the
carrying case (Figure 4).
Figure 4. Impactor assembly
Set Up
7
Step 2. Remove the aerosol inlet sidepanel of the PIEZOBALANCE by pulling up
on the small nylon locks (Figure 5).
Figure 5. Removing the sidepanel
Step 3. To install the impactor, push the exit of the impactor into the inlet of
the PIEZOBALANCE located right of center (Figure 6). The impactor is
properly installed when the screw hole on the PIEZOBALANCE coincides
with the cutaway area of the impactor assembly.
Figure 6. Installing the impactor
8
Chapter 1
Step 4. With the impactor in place, install the mounting thumbscrew
(Figure 7).
Figure 7. Installing the thumbscrew
Step 5. Attach the sidepanel to the PIEZOBALANCE.
Filling the Sponge The carrying case also contains two small drop bottles. Fill one of these with
Preparation the cleaning solution supplied in the carrying case in a large squeeze bottle)
Bottles and fill the other with distilled water. These will be used for sponge cleaning
and preparation. Label the bottles!
Preparing the To make measurements, the PIEZOBALANCE collects particles on its sensor.
Sensor-Cleaning These particles must be cleaned from time to time (as indicated by the
Sponges instrument). To do so, the sensor cleaning sponges must be in the proper
condition. To ensure that they are ready for cleaning the sensor, follow these
eight steps:
Step 1. Locate the plastic sponge cassettes, sponges, and sponge squeezer in
the carrying case. Remove one cassette, two sponges, and the sponge
squeezer.
Step 2. Wash the sponges with lukewarm tap water.
Step 3. Squeeze out the excess water using the sponge squeezer (Figure 8).
Set Up
9
Figure 8. Using the Sponge squeezer to remove excess water
Step 4. Place the sponges in the plastic cassette tray. Be sure they are flat and
fill their compartment (see Figure 9).
Step 5. Place 40 drops of detergent (supplied in the carrying case) on the
detergent sponge (the sponge farthest from the tray handle, Figure 9).
Figure 9. Sponge tray with sponges
10
Chapter 1
Step 6. Place 5 to 8 drops of distilled water on the rinsing sponge (the sponge
closest to the tray handle).
Step 7. Locate the small sponge compartment door on the PIEZOBALANCE
(Figure 10) and remove it.
Figure 10. Removing the sponge compartment door
Step 8. Slide the tray into the PIEZOBALANCE with the exposed surface of the
sponges face downward (Figure 11). Slide in the tray until you hear a
click. The click means the tray is locked in place. Replace the sponge
compartment door. It may be necessary to hold the sensor-cleaning
dial in the 12 o'clock position as you replace the door.
Set Up
11
Figure 11. Installing the sponge tray
The preliminary steps needed before operation of the PIEZOBALANCE should
now be completed. Chapter 2, Description of Parts and Functions will help you
learn more about your instrument.
12
Chapter 1
Chapter 2
Description of
Parts and Functions
Control Panel The control panel of the PIEZOBALANCE is shown in Figure 12. Its functions are
described below.
Data Display The data display has four indicator lights; these define what is being displayed.
HZ Light (1, Figure 12) indicates that a sensor frequency measurement is being
displayed.
MG/M3 Light (2, Figure 12) indicates that a mass concentration, in milligrams per
cubic meter, is being displayed.
X 5 Light (3, Figure 12) indicates that the displayed concentration must be
multiplied by a factor of 5 to obtain the correct reading. The X 5 light becomes
active when you select the 24-second sampling time.
NEG Light (4, Figure 12) indicates that the displayed concentration is in error,
specifically, the change in frequency of the sensor was not steadily increasing.
The concentration is too low for the current sampling time and a longer
sampling time is required.
Figure 12. Parts and functions of the PIEZOBALANCE
13
Operational The functions of the four operational pushbuttons on the control panel (5,
Pushbuttons Figure 12) are explained below.
PWR Pushbutton (6, Figure 12) starts the vacuum pump in the PIEZOBALANCE
and powers up the entire unit.
STRT Pushbutton (7, Figure 12) starts a mass concentration measurement (if
MEAS button is already depressed) or a Basic Frequency check (if CHK button is
already depressed).
MEAS Pushbutton (8, Figure 12) activates the electrostatic precipitator. The
entire time the MEAS button is depressed, aerosol is being collected on the
sensor . The precipitator current needle should rise slowly and stop in the
middle of the Operation Monitor after depressing the MEAS button.
CHK Pushbutton (9, Figure 12) which is short for (sensor check), displays the
sensor's base frequency. The base frequency should be compared to the Basic
Frequency periodically to determine if the sensor needs to be cleaned.
Range Selector MEAS TIME Button (10, Figure 12) enables you to select either a 24-second or 120second measurement time.
Operation The Operation Monitor serves two purposes. According to the status of the
Monitor Operational Pushbuttons, the monitor displays either the battery's charge level
or the precipitator's current level, as described below.
BATTERY VOLTAGE (11, Figure 12) displays the charge level of the batteries.
When the PWR button is pressed, the needle should read well in the center of
the blue region.
PRECIPITATOR CURRENT (12, Figure 12) displays the current level of the
precipitator. Within a couple seconds of pressing the MEAS button, the needle
should read well in the center of the black region.
Other Features Sensor-cleaning dial (13, Figure 12) controls the placement of the detergent sponge
and rinse sponge for cleaning the sensor.
NEEDLE O-S (14, Figure 12) indicates the position of the precipitator needle. The
precipitator needle should be in the open (O) position for removal. It should be
in the shut (S) position for operation.
Aerosol Inlet (15, Figure 12) is where the aerosol to be measured is drawn into
the PIEZOBALANCE. The inlet contains an impactor to eliminate particles above
the impactor cut size. The instrument is shipped standard with a 3.5 micron
impactor.
Pull-Up Locks (16, Figure 13) make it easy to remove the side panel.
14
Chapter 2
Sponge Compartment Door (17, Figure 13) can be removed easily to give you
access to the sponge tray for cleaning or rewetting the sponges. The Basic
Frequency and mass sensitivity of the PIEZOBALANCE is posted on the inside of
this door.
Battery Charge Port (18, Figure 13) allows the battery charger to be plugged
into the PIEZOBALANCE.
Figure 13. Parts and functions of PIEZOBALANCE
Description of Parts and Functions
15
16
Chapter 2
Chapter 3
Operation
Selecting the Operation of the PIEZOBALANCE is simple. This section explains how to use the
Measurement PIEZOBALANCE step-by-step to make mass concentration measurements. A
Time standard measurement consists of (1) ensuring that the sensor's base frequency
is within 1000 Hz of the Basic Frequency (and cleaning the sensor if necessary),
and (2) taking the measurement.
To select the measurement sample time, press the MEAS TIME button on the front
panel to the desired position--out for 120-seconds and in for 24-seconds (Figure
14).
Figure 14. Selecting the Measurement Time
Use the 120-second time to measure particle concentrations from 0.01 to 3.0
milligrams per cubic meter. Use the 24-second time to measure particle
concentrations from 2 to 10 milligrams per cubic meter. The advantage of the
shorter time is that it reduces the frequency of sensor cleaning by reducing
mass build-up on the sensor.
If you are unsure of the concentration being measured, start with the 120second time and use this initial measurement to determine which time to use. If
the resultant measurement of mass concentration is greater than 3.0 and less
than 10.0 milligrams per cubic meter, use the 24-second time; if the
measurement is between 2 and 3 milligrams per cubic meter, select either time.
17
After several more measurements are made, you may want to change your
choice to coincide with the range you use most often. If most of your
measurements are above 3.0 milligrams per cubic meter, it will be easier to use
the 24-second time for sampling between 2.0 and 3.0 milligrams per cubic
meter.
If the concentration from the initial test exceeds 10.0 milligrams per cubic
meter or falls short of 0.01 milligrams per cubic meter, see either Low
Concentration Measurements or High Concentration Measurements under Special
Applications at the end of this chapter.
Making a To make a mass concentration measurement with the PIEZOBALANCE, follow
Measurement these eleven steps.
Step 1. Select the appropriate measurement time (see previous section).
Step 2. Press the PWR button.
Step 3. Check the battery voltage indicator. It should read in the center of the
blue region (Figure 14). If not, see Charging the battery in Chapter 4.
Figure 15. Checking the battery voltage
Step 4. Press the CHK button and then the STRT button.
Step 5. Compare the frequency displayed with the Basic Frequency.
The BASIC FREQ. is posted on the label on the inside of the sponge
compartment door (Figure 16). If the displayed frequency exceeds the Basic
Frequency by 1000 Hz or more, you must clean the sensor.
18
Chapter 3
Figure 16. Comparing the sensor frequency with the Basic Frequency.
Step 6. Press the MEAS button.
Step 7. After a few seconds, make sure the precipitator current needle has risen
and stabilized in the central black region of the meter (Figure 17).
If the sensor needle does not read in the correct zone of the meter, make sure
that the sensor-cleaning dial is firmly locked in the 12 o'clock position. If it
still does not read properly, see Chapter 5, Troubleshooting.
Figure 17. Checking the precipitator current level
Operation
19
Step 8. Press the STRT button.
The sensor frequency is displayed approximately 2 seconds after you press the
STRT button. To ensure accurate readings, this value should be within 1000 Hz
of the Basic Frequency.
The frequency change is displayed every 10 seconds for the 120-second time
and every 2 seconds for the 24-second time. The PIEZOBALANCE uses the
frequency change to calculate the mass concentration of respirable particles.
The aerosol concentration is displayed after 120 seconds for the 120-second
measuring time and after 24 seconds for the 24-second measuring time. This
reading remains on the screen until you shut off power or make a new
measurement.
If you use the 24-second time, you must multiply the displayed
concentration by 5, as indicated by the X 5 light on the display panel (Figure
18).
Figure 18. Concentration of respirable aerosol displayed for 24-second sample
Step 9.
After the concentration from the test is displayed and recorded, press
the CHK button or switch off the power.
This step is important because it stops the instrument from collecting particles
on the sensor. The PIEZOBALANCE continues to collect particles on the sensor as
long as the MEAS button is depressed and the PWR button is on. If you leave the
MEAS button on between tests, you must clean the sensor more often.
Step 10. To make another measurement, push the MEAS button and then the
STRT button.
When you are finished making measurements, push the PWR button to switch
off the instrument.
20
Chapter 3
Approximate The following table gives approximate guidelines for the number of
Guidelines for measurements which can be made, with various mass concentrations, before
Sensor Cleaning sensor cleaning is necessary. This is only an approximation. The sensor should
always be cleaned if the base frequency is 1000 hertz or more above the Basic
Frequency.
Concentration
.1 mg/m3
.2
.5
1
2*
5*
10*
Continuous
Measuring Time
5
5
5
2, 5*
5*
2*
1*
Measurements Before
Cleaning
10 min.
10 min.
10 min.
5 min.
2.5 min.
1 min.
30 sec.
* using 24-second measurement time
Special The following sections explain how the PIEZOBALANCE can be used for making
Applications very low or very high mass concentration measurements for special
applications.
Low- To accurately measure low concentrations (from 0.005 to 0.05 mg/m3), an
Concentration extended measuring time is necessary. You will need a stopwatch, pencil, and
Measurements paper. Carefully follow these nine steps:
Step 1. Clean the sensor.
Step 2. Select the 120-second time.
Step 3. Press the PWR button.
Step 4. Press the MEAS button.
Step 5. Simultaneously press the STRT button and start the stopwatch.
Step 6. After 2 seconds, record the frequency displayed; this is your f1 reading.
Step 7. Continue sampling for a period of 5 to 20 minutes. Disregard the
concentration that is displayed after 2 minutes. The sensor will
continue collecting respirable aerosol until you push the STRT button
again.
Operation
21
Step 8. When the desired sampling time has been reached, push the STRT
button . After 2 seconds, record the frequency that is displayed; this is
your f2 reading.
Step 9. To calculate the measured concentration, use the following equation:
C = 0.333
f2 - f1
mg/m3
(1)
t
Where: C
t
f1
f2
=
=
=
=
Aerosol concentration in mg/m3
Sample measurement time, in seconds
Frequency read at beginning of measurement, Hz
Frequency read at end of measurement, Hz
High- You can make high-concentration measurements (10 to 20 mg/m3) by
Concentration recording frequency changes manually and then performing a simple
Measurements calculation. Ignore displayed mass concentration readings when using this
procedure.
For high-concentration measurements, the sample aerosol must be sticky,
such as cigarette smoke, to adhere sufficiently to the sensor.
To make a measurement, follow these eight steps.
Step 1. Clean the sensor.
Step 2. Press PWR.
Step 3. Select the 24-second time.
Step 4. Press the MEAS button.
You must press the STRT button (Step 5) within 12 seconds of pressing the
MEAS button.
Step 5. Press the STRT button.
The aim is to record five or six frequencies in rapid succession.
Step 6. After the first frequency is displayed, record the frequencies displayed
every two seconds, except the first, which should be near the Basic
Frequency. Record a total of five or six frequencies.
Because the 24-second measurement time is being used, remember to
multiply each reading by 5.
Step 7. Check the data you have recorded. The frequencies should increase
steadily.
Example: 100 Hz, 206 Hz, 302 Hz, 396 Hz, 505 Hz, etc.
22
Chapter 3
Do not include more than 10 seconds of data (five readings) unless the
frequencies are increasing steadily.
Step 8. To calculate the respirable aerosol mass concentration, use the
following equation:
f
C = 0.333
mg/m3
(2)
t
Where: C = Respirable aerosol concentration in mg/m3
t = Sample measurement time, in seconds;
this is the number of readings x 2.
f = Highest frequency obtained steadily, Hz
From the data of the 10-second total sample given above, the concentration
would be calculated as:
505
C = 0.333
mg/m3 = 16.8 mg/m3
(2)
10
Operation
23
24
Chapter 3
Chapter 4
Maintenance
Maintenance If you follow the maintenance schedule given below, the PIEZOBALANCE and its
Schedule accessories will provide accurate and reliable measurements for years.
Daily:
1. Check the sensor-cleaning sponges to ensure that they are clean and suitably
damp so that the sensor can be cleaned effectively.
2. Recharge the batteries.
3. Check the impactor; clean and grease if necessary.
Weekly:
Clean both sensor sponges thoroughly.
Every 2 Weeks:
Clean the precipitator needle assembly.
Every Month:
Check the pump for leaks.
Every Six Months:
1. Clean the vacuum pump.
2. Check the rate of airflow.
Yearly:
Return the PIEZOBALANCE to TSI Incorporated for a complete cleaning, checkout,
and recalibration.
Cleaning and The sensor-cleaning sponges must be prepared before the sensor can be
Rewetting the cleaned. To prepare the sponges, follow these 10 steps:
Sensor-cleaning
Step 1. Open the sponge compartment door on the side of the instrument
Sponges
(Figure 19).
25
Figure 19. Opening the sponge compartment door
Step 2.
Pull the sponge tray straight out (Figure 20).
Figure 20. Removing the sponge tray
Step 2.
Moisten the sponges with tap water to prepare them for removal.
Never try to remove dry sponges or you will damage them.
Step 3.
26
Remove the rinsing sponge (the one closest to the tray handle)
(Figure 21).
Chapter 4
Figure 21. Rinse and Detergent sponges
Step 4.
Rinse the sponge with lukewarm water.
Step 5.
Squeeze out excess water from the sponge using the sponge squeezer
(Figure 22).
Figure 22. Using the sponge squeezer to remove excess water
Step 6.
Return the sponge to its tray.
Step 7.
Repeat steps 3 thru 6 with the detergent sponge (the sponge farthest
from the tray handle).
Step 8.
Place 40 drops of detergent on the detergent sponge.
Step 9.
Place 5 to 8 drops of clean water on the rinsing sponge.
Step 10. Slide the sponge tray back into the PIEZOBALANCE until you hear a
click. The click means the tray is locked in place. Replace the sponge
compartment door.
Maintenance
27
Cleaning the Clean the sensor when the sensor check indicates it is required, that is, when the
Sensor base frequency is more than 1000 Hz higher than the Basic Frequency). To
clean the sensor, follow these six steps:
Step 1.
Make sure the sponges are clean and suitably damp. If needed,
perform the steps in Cleaning and Rewetting Sensor cleaning Sponges.
Step 2.
Press the PWR, CHK, and STRT buttons.
Step 3.
Slowly rotate the sensor-cleaning dial in the clockwise direction until
it reaches the first WAIT position (4 o'clock). Stop at this position for 20
seconds. Here the sensor is being soaked by the detergent sponge
(Figure 23).
Caution: Never engage the MEAS button while a cleaning cycle is in progress.
Doing so will damage the precipitator needle!
Figure 23. Sensor in the soak position
Step 4.
28
Continue to rotate the knob (clockwise) until it stops (10 o'clock).
Now rotate the knob slowly counterclockwise until you reach the
second WAIT position (2 o'clock). Stop at this position for one minute.
Here the sensor is drying (Figure 24).
Chapter 4
Figure 24. The sensor in the drying position
Step 5.
With a firm and rapid twist, continue rotating the knob
counterclockwise until it locks at the 12 o'clock position.
Step 6.
Compare the sensor frequency with the Basic Frequency. If the
displayed frequency is decreasing, it is because the sensor is still
drying. When the frequency stops decreasing, compare the frequency
with the Basic Frequency. If it is still 1000 Hz or more above the Basic
Frequency, repeat steps 1 through 5 above.
Stubborn Sometimes the sensor's frequency cannot be reduced to within 1000 Hz of the
Deposits Basic Frequency by using the standard cleaning method outlined above. When
this occurs, two options are available: the "patient" method and the "fast"
method of cleaning stubborn deposits from the sensor are both described
below.
Patient Method Most deposits can be removed from the sensor with a single cleaning.
However, some sticky deposits, such as tobacco smoke, may require a longer
soaking time. Simply increase the time in the wait position (10 to 50 minutes
usually works) in step 3 of Cleaning the Sensor.
For extreme cases, an overnight soaking may be necessary. Leave the knob at
the step 3 position. Turn off the power and let the sensor soak overnight.
Caution: Do not, however, leave the PIEZOBALANCE in this position for an
extended period (several days). The sponges will dry out and damage
the sensor.
Maintenance
29
Fast Method To remove stubborn deposits from the sensor quickly, follow the six steps listed
below for cleaning the sensor manually. You need a cotton swab and one of the
following: alcohol, detergent, or dilute ammonia.
Step 1.
Turn the Sensor-cleaning dial 10 degrees (Figure 25).
Figure 25. Sensor-cleaning dial turned 10 degrees
Step 2.
Remove the aerosol inlet panel by pulling up on the center of the
nylon locks.
Step 3.
Moisten a cotton swab with detergent, alcohol, or dilute ammonia.
Step 4.
Depress the vertical spring that lowers the sensor and holder (Figure
26).
If you cannot easily depress the spring, make sure the cleaning knob is
turned 10 degrees.
30
Chapter 4
Figure 26. Positioning the sensor assembly for cleaning
Step 5.
Clean the sensor with the swab (Figure 27).
Figure 27. Cleaning the sensor with the fast method
Step 6.
Complete a normal cleaning cycle using the cleaning knob.
Repeat steps 3 through 6 as needed until the sensor frequency falls within 1000
Hz of the Basic Frequency.
Maintenance
31
Battery To charge the batteries, plug the charger unit into the charge port (Figure 28).
Charging
Although the batteries require 15 hours to charge completely, the instrument
MAY BE USED DURING CHARGING.
Figure 28. Charging the Battery Pack
Removing and An impactor is installed in the sampling inlet to remove particles above 3.5
Greasing the micrometers.* Each day, be sure to clean the impactor and apply a light coat of
Impactor vacuum grease (or as needed, depending on the operating conditions).
To remove the impactor, follow these five steps:
Step 1.
Remove the panel that contains the sampling inlet by pulling up on
the small nylon locks (Figure 29).
*Various impactors with different cut-off sizes are available.
32
Chapter 4
Figure 29. Removing the inlet panel
Step 2.
Remove the impactor and housing by unscrewing the thumbscrew
and pulling the assembly toward the right end of the cabinet
(Figure 30).
Figure 30. Removing the impactor and housing
Step 3.
Maintenance
Remove the impactor from its housing by unscrewing the headscrew
(Figure 31).
33
Figure 31. Impactor and housing
Step 4.
Clean the surface of the impactor with a soft paper towel moistened
with alcohol.
If you are using the instrument in very dusty conditions, such as in a
sawmill, clean the impactor housing as well. Blow clean compressed air
through it.
Step 5.
Apply a light coat of vacuum grease to the impactor's impaction
surface.
Cleaning the Clean the precipitator needle every two weeks or whenever the precipitator
Precipitator's current proves unstable. To clean the precipitator needle, you will need the
Needle following:
Assembly
- A small beaker
- Cleaning solution (supplied)
- Clean compressed air
Follow these seven steps:
Step 1.
Turn the tick mark on the precipitator needle assembly to the "O"
(open) position.
Step 2. Pull the needle assembly straight out until the entire needle assembly is
clear of the PIEZOBALANCE (Figure 32).
Caution: The large screwdriver slot in the center of the knob does not control
the locking or unlocking of the needle assembly. Do not turn this
screw.
34
Chapter 4
Figure 32. Removing the precipitator needle assembly
Step 3.
Place the needle assembly in a beaker, tip down.
Step 4.
Fill the beaker with cleaning solution up to the first O-ring level,
about 13 mm (1/2 in.).
Step 5.
For routine cleaning, soak the sensor for several minutes; for tougher
deposits, soak the precipitator needle overnight.
Step 6.
Rinse the assembly in hot tap water and blow it dry with clean
compressed air or allow it to air dry.
Step 7.
Carefully insert the assembly back into the PIEZOBALANCE by aligning
the key slot and pushing straight in. When the needle is in place, turn
the knob to the "S" (shut) position.
Vacuum Pump Clean the vacuum pump every six months; if it sounds loud and erratic, clean it
sooner. After you clean and reinstall the pump, check the system for air leaks.
Then check the flow rate and adjust it as needed. The following sections
explain in detail how to perform each of these steps.
Removing and To remove and clean the pump, you need the following equipment:
Cleaning the
- Offset Phillips-head screwdriver (provided)
Pump
- A small beaker
- A cotton swab
- A soft cloth
- A good grease solvent
Maintenance
35
Before you clean the pump, you must remove it from the instrument. Follow
the 11 steps below for both removing and cleaning the pump.
Step 1.
Remove the side and end panels of the PIEZOBALANCE that cover the
pump (Figure 33).
Figure 33. Removing the panels
Step 2.
Using the offset screwdriver, remove the two screws that connect the
pump bracket to the PIEZOBALANCE (Figure 34).
Figure 34. Removing the screws that connect the bracket to the PIEZOBALANCE
36
Chapter 4
Step 3.
Disconnect the pump's intake hose so that the pump and bracket
assembly can be removed from the instrument (Figure 35).
Figure 35. Removing the intake hose
Step 4.
Remove the three screws on the exhaust side of the pump that connect
the pump to the bracket.
Step 5.
Remove the O-ring and use the pin vise (provided) to pull the pump
rotor out of the housing (Figure 36). The four carbon vanes should fall
out of the rotor. If this method does not work, use the alternate
method that follows.
Figure 36. Removing the pump rotor and vanes
Maintenance
37
Alternate method:
Remove the screws that attach the motor to the pump. Gently push on the
center shaft of the pump until the rotor comes out the other end.
Step 6. Place the rotor and carbon vanes in a beaker of grease solvent (Figure
37).
Caution: Do not put the bearings in the grease solvent. This will inhibit the
operation of the pump.
Figure 37. Soaking the rotor and carbon vanes
38
Step 7.
After soaking the rotor and vanes, dry them thoroughly.
Step 8.
Wipe off the bearings with a soft, dry cloth.
Step 9.
Clean the inside of the housing with a cotton swab or soft cloth. Be
careful not to scratch the surface (Figure 38).
Chapter 4
Figure 38. Cleaning the inside of the pump housing
Step 10. After all the parts are dry, reassemble them in reverse order.
A clean O-ring works well to hold the vanes in the rotor while reassembling.
See Figure 39 for an exploded drawing of the pump.
Figure 39. Exploded drawing of the pump
Step 11. Check the PIEZOBALANCE for leaks. Then check the sample flow rate
and reset it if necessary. See the following sections on Checking for Air
Leaks and Checking The Flow Rate.
Maintenance
39
Checking for Check the system for air leaks before you check the pump's flow rate. To leakAir Leaks check the PIEZOBALANCE, follow these five steps:
Step 1.
Attach a 40-centimeter flexible hose to the vacuum pump's exhaust.
Step 2.
Place the other end of the house approximately 10 centimeters from
your ear (Figure 40).
Caution: For safety, do not place too close to you ear.
Step 3.
Press the PWR button; you should hear a soft, steady hum.
Step 4.
Place your finger over the aerosol intake port of the PIEZOBALANCE.
The sound should now drop to a lower frequency. If the pitch does
not change, the system has a leak (Figure 40).
Figure 40. Leak-checking the PIEZOBALANCE
If you are unsure about what you are hearing, simulate a leak. Turn the
sensor-cleaning dial to the 10 o'clock position and repeat steps 1 through 4.
40
Chapter 4
Step 5.
If you detect a leak, make sure that the :
Sensor knob is firmly in 12 o'clock position.
O-rings are in good condition:
- in the impactor
- between the sensor mounting block and the precipitator
housing
- in the precipitator needle assembly
- in the vacuum pump
Checking the After you clean the pump and leak-check the PIEZOBALANCE, check the flow
Flow Rate rate. Follow these two steps:
Step 1.
Connect an accurate airflow meter to the inlet of the impactor. Any
flow meter will work that has a pressure drop of 1 cm H2O or less at a
flow of 1 liter per minute.
If a flow meter is unavailable, use a bubble flow meter and stopwatch
(Figure 41).
Figure 41. Using a bubble flow meter
Maintenance
41
Step 2.
Measure the flow rate with the power on and the sensor-cleaning
knob in the 12 o'clock potition. The flow rate should be 1.00 +/- 0.05
liters per minute.
If the flow rate needs adjustment, follow the instructions given in the following
section under Adjusting the flow rate.
Adjusting the If the flow rate check indicates that the flow rate should be adjusted, perform
Flow Rate the following four steps:
Step 1.
Step 2.
Remove the sidepanel of the PIEZOBALANCE that contains the battery
charge port.
Locate the pump adjustment circuit on the right-hand side of the
(Figure 42).
PIEZOBALANCE
Step 3.
Adjust the flow rate by turning the coarse or fine adjustment
potentiometers on the pump adjustment circuit, as shown in the
Figure 41.
Caution: As you are making the adjustments, do not touch the capacitor (shown
in Figure 42) with a metal screwdriver. This will destroy the circuit.
To avoid this, wrap the metal shaft of your screwdriver with electrical
tape.
Figure 42. Adjusting the flow rate
Step 4.
42
Continue a sequence of adjustments and flow checks until the flow
rate is 1.00 +/- 0.05 liters per minute.
Chapter 4
Chapter 5
Troubleshooting
Symptom
Sensor frequency is too high
compared to Basic Frequency
(Hz=1000 + Basic Frequency).
Possible Causes
Sensor is not thoroughly cleaned.
Solution
Rinse sponges thoroughly and
rewet.
Make sure sponges protrude
sufficiently from the cassette, but
do not protrude too far.
Precipitator current is low or
unstable.
Sensor cleaner knob is not returned to
lock position.
Clean sensor as described by
Sensor Cleaning under
Maintenance.
Return sensor cleaner knob to 12
o'clock position with a firm, quick
twist.
The precipitator needle is dirty.
Digital readout does not display
a number or PIEZOBALANCE
fails to complete cycle.
Precipitator current is low or
unstable.
Logic circuitry has stopped.
Sensor cleaner knob is not returned to
lock position.
Clean precipitator needle
assembly.
Switch power off, then restart
Return sensor cleaner knob to 12
o'clock position with a firm, quick
twist.
The precipitator needle is dirty.
Battery voltage is too low or
unstable.
Full battery charge lasts less
than four hours.
Vacuum pump sounds loud and
erratic.
Battery is discharged.
Battery is dead.
Vacuum pump is dirty.
Clean precipitator needle
assembly.
Charge battery for 15 hours until
fully charged.
Replace batteries.
Clean the pump and check flow
rate as described in Maintenance.
43
Symptom
Consecutive mass
measurements fluctuate too
much.
Possible Causes
Aerosol concentration fluctuates.
Solution
Use a plenum chamber to dampen
aerosol humidity or temperature
fluctuations.
Sensor is dirty.
Clean sensor.
Relative humidity or temperature
fluctuates too rapidly.
Use a plenum chamber to dampen
aerosol humidity or temperature
fluctuations.
Precipitator needle assembly is dirty.
Clean precipitator needle
assembly, see Maintenance.
Impactor is dirty.
Clean the impactor, see
Maintenance.
Pump is dirty.
Clean the pump, see Maintenance.
Measurements do not agree
with filter measurements.
Sample time is too short.
Use longer sample times.
Filter and PIEZOBALANCE are not
measuring the same aerosol.
PIEZOBALANCE
sensitivity to the
specific aerosol is different from set
sensitivity.
PIEZOBALANCE
Negative light comes on during
or after measurement.
Deposited particles are evaporating.
Concentration is so low that it is
within noise level of the sensor.
Check calibration by making sure
and filter measure
same aerosol, then reset
sensitivity.
Check calibration by making sure
and filter measure
same aerosol, then reset
sensitivity.
PIEZOBALANCE
Ensure only dry particles are
being sampled.
Use longer sample time.
Sensor not cleaned well.
Clean and thoroughly dry the
sensor.
Moisture on sensor.
Allow time for the instrument to
equilibriate to ambient
temperature.
Find an area without decreasing
humidity. Allow sensor to dry.
44
Chapter 5
Appendix A:
Theory of Operation
Overall System A schematic of the PIEZOBALANCE is shown in Figure A-1. Aerosol enters
through the inlet and passes into the impactor. Ideally, with the standard 3.5micrometer impactor, particles having aerodynamic diameters greater than 3.5
micrometers strike the impaction surface, while particles smaller than 3.5
micrometers exit the impactor and pass through a short transport tube to the
precipitator. In fact, the impactor's cut-off range is not perfect and some
particles greater than 3.5 micrometers pass through the impactor, while some
particles smaller than 3.5 micrometers strike the impaction surface. At 3.5
micrometers, 50 percent of the particles should impact out, while 50 percent
should pass through.
Figure A-1. Schematic of the PIEZOBALANCE
In the precipitator, the aerosol passes axially along the precipitator needle and
through a nozzle that forces the particles through the high-intensity portion of
the corona discharge. The negative-polarity corona discharge, passing from
needle tip to crystal electrode, charges the particles. The electric field causes
them to collect on the sensing crystal. A pump draws the air through the
impactor and precipitator, and then out the sensing area.
45
Measurement The PIEZOBALANCE uses the piezoelectric microbalance technique for
Technique determining airborne particle mass concentrations. It contains two piezoelectric
crystals that are made to oscillate at a highly stable resonant frequency. One
crystal is used as a reference crystal and the other as the sensing crystal. Since
the resonant frequency is a function of the mass, the resonant frequency
decreases in direct proportion as mass is collected on the oscillating region of
the sensing crystal.
A mass concentration measurement is calculated using the change in the two
frequencies over a given period of time. A simple analogy helps explain the
technique.
Before With a clean sensing crystal, the output of the PIEZOBALANCE is related to the
Sampling difference between the reference crystal frequency and the sensing crystal
frequency. This value is fixed for each instrument; it is referred to as f1.
Figure A-2. Piezoelectric microbalance technique--before sampling
After Sampling As particles are charged and precipitate onto the sensing crystal, the difference
between the frequency of the sensing crystal and the frequency of the reference
crystal increases in direct proportion to the mass of the collected particles. This
frequency difference is referred to as f2.
Figure A-3. Piezoelectric microbalance technique--after sampling
46
Appendix A
The particle concentration is calculated easily by the following formula:
C = 0.333
f2 - f1
mg/m3
(1)
t
Where: C = Aerosol concentration in mg/m3
t = Sample measurement time, in seconds;
this is the number of readings x 2.
f1 = Frequency read at beginning of measurement, Hz
f2 = Frequency read at end of measurement, Hz
The operation of the impactor, precipitator, piezoelectric microbalance, and
circuitry is explained individually below.
Impactor Impactors operate under a simple principle: if a stream of particle-laden air is
directed at a surface, particles with sufficient inertia will impact on the surface
while smaller particles, and therefore insufficient inertia will follow the air
streamlines and not be collected (See Figure A-4). An impactor consists of a
nozzle, either round or rectangular, and an impaction plate.
Figure A-4. Schematic of the impactor
Ideally, an impactor would collect all particles above its cut-off diameter, while
smaller particles would follow the air streamlines around the impaction surface
and pass through the impactor. However, the cut-off in the impactor is not
perfect, and some particles greater than the cut-off diameter pass through the
impactor, while some particles smaller than the cut-off diameter impact out. At
a given cut-off diameter, 50 percent of the particles of the cut-off diameter size
impact out, while 50 percent pass through.
Theory of Operation
47
Precipitator The precipitator block of the PIEZOBALANCE is constructed of TeflonR, an
excellent electrical insulator that is inert to most chemicals found in ambient air
or mobile exhaust.
The size and shape of the precipitator chamber is designed to optimize the
collection efficiency of the sensor. Because the sensitivity of the piezoelectric
microbalance depends inversely on the area of the crystal electrode, the
diameter of chamber is as small as possible.The depth of the chamber (distance
from the precipitator's needle point to the sensor plane) is large enough to allow
time for particles to become charged and precipitate, yet small enough to
maintain a stable corona current with reasonable voltages. Experimental results
for collection efficiency agree well with detailed calibrations based on
electrostatic charging and precipitating theory. Since the precipitating chamber
is made of Teflon, its inner surface carries a high surface charge with the same
polarity as the particles, making deposition on the chamber walls negligible.
The high-voltage power supplied to the precipitator needle operates at constant
corona current, assuring constant particle collection efficiency. The
combination of flowing air and the electric field generated by the precipitator
needle carries the particles to the electrode surface of the piezoelectric crystal.
The high adhesive force between the particles and the surface causes the
particles to stick firmly to the surface.
Piezoelectric When a quartz crystal or other piezoelectric material is placed in an electric
Microbalance field, the crystal becomes mechanically stressed. Conversely, if a piezoelectric
material becomes mechanically stressed, electric charges of like polarity appear
on certain surfaces of the material. When a piezoelectric material is made part
of an electrical driving circuit, the piezoelectric material vibrates with a precise
natural frequency, depending on the orientation of the cut of the crystal with
respect to the axis of the raw crystal and on the thickness and density of the
crystal. For a given cut, the natural frequency of the crystal depends on the
mass of material that sticks to its surface. The addition of mass to the surface of
a given crystal causes the natural frequency to decrease in direct proportion to
this added mass. This is similar to the decrease in frequency of a vibrating
mechanical spring-mass system when more mass is added to the system.
The piezoelectric crystal sensor used in the PIEZOBALANCE is an AT-cut quartz
crystal. These crystals vibrate in the thickness-shear mode. In the fundamental
thickness-shear mode, the vibrational node is a plane passing through the
center of the crystal, between the flat surfaces of the plate-like crystal. No node
exists on the surface where particles are weighed. Only the portion of the
crystal between the electrodes vibrates. The sensor then detects only those
particles that stick to the electrode surface. Particles sticking to the surface of
the quartz outside the electrode area have a negligible effect on the vibrating
portion of the crystal and are not detected.
48
Appendix A
A given mass of particles sticking to the electrode of a given crystal causes a
downward shift in natural vibrational frequency. The simplified relationship
between added mass and natural frequency for AT-cut quartz crystals is:
Df = - (2.27 fo2/A) DM
Where: Df
f
A
DM
=
=
=
=
(2)
Change in natural frequency, Hz
Natural vibrational frequency of the crystal, MHz
Electrode area of crystal, cm2
Mass added to electrode area, micrograms
If the frequency shift, Df, is sufficiently small in comparison to the natural
frequency (typically Df is less than 0.02% of fo), then Df is a linear function of
the added mass DM, given by Equation 2. The crystal sensor used in the
PIEZOBALANCE has a nominal frequency of 5 MHz with 0.635-centimeterdiameter electrodes. The theoretical sensitivity of this sensor, S = Df/DM, is:
S = 180 Hz/microgram
(3)
Since a frequency shift of 1 hertz can easily be measured with the simple
frequency counter in the PIEZOBALANCE, a mass as low as approximately 0.005
microgram can be detected.
The sensor frequency is effectively reduced to a more convenient range, 1 to 3
kilohertz, by electrically mixing the sensor frequency against a reference crystal
having a resonant frequency that is 1 to 3 kilohertz higher than the sensor
frequency. The resulting mixed frequency is equal to the difference between
reference crystal and sensor crystal frequencies.
The mass concentration is then calculated as:
C = (f2 - f1) / StQ
Where:
C
t
f1
f2
Q
S
=
=
=
=
=
=
(4)
Aerosol concentration in mg/m3
Sample measurement time, in seconds
Mixed crystal frequency at time = 0, Hz
Mixed crystal frequency at time = t, Hz
Volumetric air sampling rate, m3/sec
Mass sensitivity of the crystal sensor, Hz/microgram
For the sensor described by Equation 3 with an aerosol flow rate of 1 liter per
minute,
C = 0.333 (f2 - f1) /t
Theory of Operation
(5)
49
Circuitry Figure A-5 shows the electronic block diagram for both the primary and
reference crystals, which are driven by separate electronic circuits. The
frequency signals from the two driving circuits enter a frequency mixer that
electrically subtracts the two frequency signals and generates a "beat"
frequency. The beat frequency is the output frequency signal of the
piezoelectric microbalance.
Figure A-5. Block diagram of electronic system.
50
Appendix A
Appendix B:
Adjusting Mass Sensitivity
Theory The mass sensitivity of the PIEZOBALANCE, which relates the frequency
measured to the concentration displayed, is determined in the factory by
calibrating the instrument through filter sampling. In factory calibration the
PIEZOBALANCE measures an aerosol concentration that is also collected by filters
and weighed.
The mass concentration is defined by equation 1:
1 Df
C = ----------S Q Dt
Where: C
Df
S
Q
Dt
=
=
=
=
=
(1)
Mass concentration in mg/m3
Change in frequency, Hz
Sensitivity, Hz/mg
Flow rate, m3/sec
Time of sample, sec
A more direct calculation combines part of Equation 1 into a single number, P,
as defined in Equation 2.
1
P = ----------Dt S Q
Where: P =
(2)
sensitivity (mg/m3)/(Hz) where the
frequency in hertz is taken for a 120-second sample.
PIEZOBALANCE
The concentration can then be described by Equation 3.
C = P (Df)
(3)
The values of the sensitivities, P and S described above, must be determined by
calibration. The mass sensitivity of the PIEZOBALANCE is very stable over a wide
range of aerosols and conditions. The mass sensitivity, S, of the PIEZOBALANCE
has been determined to be 180 hertz per microgram for general environments
such as industrial dusts, fumes, mists, smokes, and aerosols.
Using S = 180 Hz/μg, P is calculated as 0.00278 (mg/m3)/Hz. This is the
setting for PIEZOBALANCE sensitivity used at the factory.
51
Applications
The mass sensitivity of the PIEZOBALANCE can be adjusted to meet specific
needs. It can be adjusted to read the direct mass concentration of a substance
that is in an aerosol, to determine the 8-hour average exposure directly, or to
measure nonstandard aerosols, such as cotton dust.
Fractional The mass sensitivity can be changed to read the mass concentration of a specific
Component substance if the percent by weight of the substance is known (from chemical
Testing analysis or other means). In this case, the mass sensitivity of the instrument
would be reduced to the same percent of the factory-calibrated level as the
percent of the substance to be measured. For example, if an environment is
determined to contain 20% by weight of lead, the mass sensitivity of the
instrument could be reduced to 20% of the original sensitivity. For a factorycalibrated sensitivity of 0.00278 (mg/m3), the sensitivity would be changed to
0.00278 x 20% = .000556 mg. The readout of the instrument would now give the
concentration of lead only. Note that the decimal point will need to be
artificially placed (with tape) on the display one place to the left.
8-Hour Average The PIEZOBALANCE can give readings for 8-hour average exposure levels by
Exposure changing the mass sensitivity. In order to do this, the average 8-hour exposure
Testing must be predetermined by previous sampling. Use the PIEZOBALANCE to take
random samples during an 8-hour period and then divide the two values as
follows:
Average 8-hour exposure (predetermined)
X = ----------------------------------------------------------Average of PIEZOBALANCE readings
(4)
The mass sensitivity is then adjusted as follows:
New mass sensitivity = current mass Sensitivity x X
For example, the average 8-hour exposure level is known to be 0.5 milligrams
per cubic meter of respirable dust. The PIEZOBALANCE, with its standard 3.5
microgram impactor, is used to take random samples during an 8-hour period.
The average of these samples is calculated as 0.3 milligrams per cubic meter. In
this case,
0.5
X = ------------ = 1.67
0.3
The sensitivity would then be adjusted to 1.67 x the current level of sensitivity.
If the current level of sensitivity is the factory standard of .00278 milligrams per
cubic meter, then the new sensitivity setting would be .00278 x 1.67 = 0.00464
milligrams per cubic meter.
52
Appendix B
Non-standard If you want to measure nonstandard aerosols, such as cotton dust, you can
aerosols adjust the mass sensitivity of the instrument. To determine what the mass
sensitivity of the instrument should be for different aerosols, perform
calibration testing.
How to Set The mass sensitivity can be easily set with DIP switches. To reset the mass
Mass Sensitivity sensitivity, follow these 3 steps.
Step 1.
Remove the side panel on the side of the instrument that stores the
batterypack.
Step 2.
Locate the row of DIP switches on the back side of the control panel
(righthand side) (Figure B-1).
Figure B-1. Location of DIP switches
Step 3.
Referring to Figure B-2 for the values for each of the DIP switches, set
the DIP switches ON and OFF as needed.
Figure B-2. Schematic of DIP switches with numbers corresponding to values
Adjusting Mass Sensitivity
53
As you look at the DIP switches, the leftmost switch has the value of 0.00001;
the next has the value of 0.00002 etc., as shown in the diagram above. The
factory-calibrated setting of the DIP switches should be .00278 (mg/m3)/Hz.
To obtain this value make the following setting:
Figure B-3. DIP switches set to On and Off at the factory for a setting of 0.00278 (mg/m3)/Hz setting.
Study this diagram. Note that to obtain 0.00008, the 0.00008 switch is on; to
obtain 0.0007, the 0.0004, 0.0002, and 0.0001 switches are on; to obtain the 0.002,
the 0.002 switch is on. You can see that the buttons are additive and total
0.00278.
The maximum sensitivity that can be set using the DIP switches is 0.00399. If a
higher sensitivity is needed, the two pairs of vertical holes on the right side of
the DIP switches can be activated to give 0.004 and 0.008. To activate them,
connect together the first two holes or the second two holes (Figure B-2).
54
Appendix B
Appendix C:
Specifications
Mass concentration range
0.01 to 10 mg/m3
Particle size range
0.01 μm to 10 μm*
Sample flow range
Sensitivity
1.0 L/min
0.001 mg/m3
Accuracy
+/- 10% of reading or
+/-0.01 mg/m3
Display
4 digits
Concentration XX.XX mg/m3
Frequency
XXXX Hz
Temperature limits
41°F to 104°F
(5°C to 40°C)
Measuring time
Switch-selectable; 24 or 120 seconds
Dimensions (LWH)
170 mm)
12.3 in. x 5.2 in. x 6.7 in. (310 x 130 x
Weight
9.5 lb (4.5 kg)
Power
batteries
Built-in rechargeable Ni-Cd
Battery life
8-hour operation at 50% duty cycle
Recharge cycle
15 hours
* The upper size limit is determined by the 50% cut-off size of the
impactor.
55
56
Appendix C
Appendix D:
Assembly Drawing
57
58
Appendix D