1
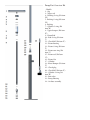
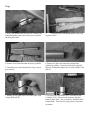
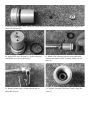
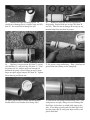
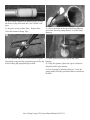
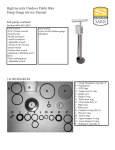
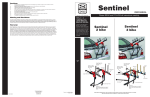
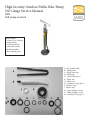
High Security Outdoor Public Bike Pump
NO Gauge Service Manual
8804
Full pump overhaul
Tools Needed:
- 4.5mm (3/16”) hex key
-16mm wrench
- Small Screwdriver
- Adjustable wrench
-Needle nose pliers
-Clean working space
A – Pin Spanner Tool
B – Pump grease
C – Piston wear ring
D – PTFE tape
E – Check balls (Qty. 2)
F – Wiper seal
G – Piston seal
H – Cylinder O-ring (Qty. 2)
I – Piston O-ring
J – Rod O-ring
K – Upper bumper O-ring
L – Lower bumper O-ring
M – Bushing O-ring (Qty. 2)
Pump Part Overview Kit
- Handle
2 - Cap
3 – Wiper seal
4 – Bushing O-ring (Kit item
‘M’ )
5 - Bushing O-ring (Kit item
‘M’ )
6 - Bushing
7 – Cylinder O-ring (Kit
item ‘H’)
8 – Upper bumper (Kit item
‘K’)
9 – Piston Rod
10 – Rod O-ring (Kit item
‘J’)
11 – Check ball (Kit item ‘E’)
12 – Piston housing
13 – Piston O-ring (Kit item
‘I’)
14 – Piston wear ring (Kit
item ‘C’)
15 – Piston seal (Kit Item
‘G’)
16 – Piston Nut
17 – Cylinder
18 –Lower Bumper (Kit item
‘L’)
19 – Check plug
20 – Check ball (Kit item ‘E’)
21 – Cylinder O-ring (kit
item ‘H’)
22 – Foot valve
23 – Pump Housing
24 – Air hose assembly
Steps:
1. With a pin spanner tool (Kit Item ‘A’), remove the
aluminum pump cap by unscrewing it in a counterclockwise direction.
3.
Clean off grease and contaminants using a rag
or parts washer.
4. Remove the Piston Rod from the Pump Cylinder.
6. Remove the foot valve from the bottom of the
cylinder by pulling. Clean the inside of the cylinder.
Replace the bottom bumper that is inside cylinder (Kit
item ‘L’).
5. Clean off grease and contaminants using a rag or
parts washer.
7. Remove o-ring from Foot Valve and replace with
O-ring (Kit Item ‘H’).
8. To replace the Check Ball, use a screwdriver and
a 4.5mm (3/16”) Allen wrench to remove the plug
from the Foot Valve. The screwdriver should fit in the
bottom holes. Turn the brass plug counter-clockwise
to remove.
9. When the brass plug is free, remove the Check Ball and clear the Foot Valve of any obstructions. Replace the
check ball (kit Item ‘E’).
10. Apply PTFE tape (Kit Item ‘D’) to the brass plug
and tighten in reverse order of step 7.
12. Remove piston using a 16mm wrench and an
adjustable wrench.
11. Remove the bottom piston nut using adjustable
wrench and 16mm wrench. Remove piston seal (Kit
item ‘G’).
13. Replace check ball (Kit Item ‘E’)and o-ring (Kit
Item ‘J’)
14.
Remove rod wiper seal using a pliers. Be
careful not to damage plastic. Replace wiper seal (Kit
Item ‘F’). Be careful not to damage the seal.
15.
Remove o-rings that are to be replaced on
the bushing. Replace with new o-rings (Kit Item ‘H’
and ‘M’). Take care not to damage the o-rings on any
material edges they may have to go over.
16.
Replace O-ring on piston (Kit Item ‘I’), piston
seal (Kit Item ‘G’), and wear ring (Kit Item ‘C’). Note
the piston seal sits, with the open end towards the
bottom of the pump. Place bushing on rod. Do not
forget to replace upper bumper (Kit Item ‘K’) Tighten
Piston housing and Piston nut.
17. Re-grease o-rings on Bushing. Place a thin layer of
grease below the bushing on the Pump Rod.
18. Grease top of Pump Cylinder (Bottom Bumper
should still be in the bottom of the Pump Tube).
19. Slide Piston and Pump Rod into Pump Tube. Start
with piston at an angle, taking care not to damage the
Rod Wiper Seal or force it to fold while entering the
tube. It may help to gently guide the Rod Wiper Seal
into the pump tube by using your finger nail or a soft
plastic hook tool.
20. Press Pump cylinder on to Bushing until it is snug
on the last o-ring and it feels like it has “clicked” into
place.
21. Re-grease o-ring on Foot Valve. Replace Foot
Valve into bottom of Pump Tube.
22. Grease the inside of the top of the Pump Housing
and return the entire pump contents in to the Pump
Housing.
23. Use a spanner tool or two small wrenches to press
24. Hand-tighten the pump cap onto the pump
the bushing snugly into the pump housing until the top housing.
of the bushing and pump housing are flush.
25. Using the spanner, tighten the cap in a clockwise
direction until it stops moving.
26. Test the pump by inflating a bike tire. Leave the
pump connected to the pressurized bike tire and listen
for leaks
Saris Cycling Group 5253 Verona Road Madison WI 53711