1
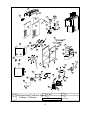
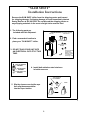
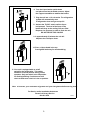
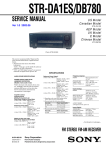
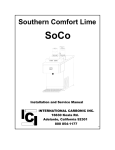
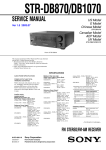
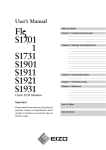
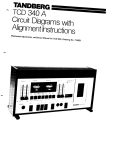
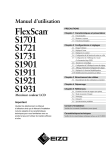
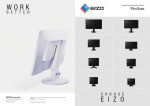
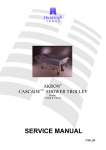
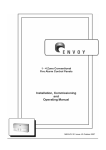
"SLIM SHOT"
06.0
Installation and Service Manual
CI
INTERNATIONAL CARBONIC INC.
16630 Koala Rd.
Adelanto, California 92301
800 854-1177
6/17/08
IMPORTANT: This
manual
is
a
guide
for
installing,
operating, servicing and maintaining this equipment. Refer
to
Table
of
Contents
information
to
answer
installation,
operating,
for
page
location
of
that
arise
questions
service
installation of this equipment.
and
detailed
during
maintenance,
or
TABLE OF CONTENTS
PAGE
PREFACE ..................................................................................................1
CHAPTER 1
GENERAL DESCRIPTION .........................................................................2
SYSTEM DESCRIPTION ...........................................................................2
DESIGN DATA ...........................................................................................2
THEORY OF OPERATION.........................................................................3
EXPLODED VIEW......................................................................................4
EXPLODED VIEW DESCRIPTION ............................................................5
ELECTRIC SCHEMATIC............................................................................6
CHAPTER II
UNPACKING AND INSPECTION...............................................................7
SELECTING LOCATION ............................................................................7
LOCATION RECOMMENDATIONS ...........................................................7
ELECTRICAL REQUIREMENTS................................................................7
UNIT INSTALLATION INSTRUCTIONS.....................................................8
UNIT INSTALLATION INSTRUCTIONS PAGE 2 .......................................9
CHAPTER III
OPERATORS INSTRUCTIONS ...............................................................10
DAILY PRE-OPERATION CHECK ...........................................................10
COOLING UNIT MAINTENANCE.............................................................10
CLEANING DISPENSING TUBE..............................................................10
CLEANING CONDENSER COIL ..............................................................11
FLUSHING LIQUOR COIL .......................................................................11
CLEANING AND SANITIZING..................................................................12
NOTES .....................................................................................................13
PREFACE
INTERNATIONAL CARBONIC INC. has enjoyed
over 56 years of manufacturing excellence in the
field of carbonation and in the beverage related
industry. We have been located in the Southern
California area since 1952 and have a long and
proud history with quality as our standard and
innovation as our goal. Originally started just
after World War II in Canfield Ohio as Carbonic
Dispensers we enjoyed patents on the first
Sodajet type carbonator.
This method of
carbonation instantaneously carbonated the
water to 100% saturation. We developed the
first patented dispensing valve to dispense bulk
beverage with carbonation equal to or in excess
of bottled beverages. A valve with three flavors
and soda was another first. We were the first to
incorporate the total post-mix package; i.e.,
carbonation, refrigeration & the ability to
dispense from one self contained unit. We have
pioneered many such firsts and will continue to
develop advance systems for the future, such as
electronic interrogatable portion controls to
electronic liquid level controls.
We hope you enjoy this product that has been
produced to give many years of trouble free
service. We thank you for your purchase and
hope we may serve you in the future.
1
SLIM SHOT
CHAPTER I
GENERAL DESCRIPTION
This chapter gives the description, theory of operation, and design data for the SLIM SHOT unit.
SYSTEM DESCRIPTION
The SLIM SHOT unit is a complete self-contained liquor dispenser that will dispense a shot of liquor that
is colder then ice. The unit consists of a cabinet, refrigeration system, modular pump/s, and LED lights
for merchandising. The cabinet is housed in attractive black vinyl coated steel with vibrant custom
decals. The front plate and switch housing are formed from attractive grained stainless steel. The SLIM
SHOT unit has been designed to fit in the smallest possible space while dispensing a maximum amount
of chilled liquor.
Essentially the SLIM SHOT unit is designed to plug and play. For proper function the SLIM SHOT unit
must have 115-volt electrical supply and proper space around the unit to allow the refrigeration to breath
during operation.
DESIGN DATA
Cabinet:
Height ........................................................................................................................ 23
Width............................................................................................................................. 8 ½
Depth .......................................................................................................................... 16
Depth w/Switch Housing............................................................................................. 18 ¾
Weights:
Shipping...................................................................................................................... 60 LBS.
Operational weight...................................................................................................... 54 LBS.
Refrigerant requirement (R-134a) ............................................................................1.94 ounces
Refrigerant requirement (R-134a) .............................................................................. 55 grams
Ambient operating temperature .................................................................................. 40 F to 100 F
Electrical Requirements:
The cooling unit requires a 115-VAC, single phase, 60-Hertz power circuit.
Circuit Ampacity............................................................................................................ 3.5 Amps
Compressor .................................................................................................................. 2.2 Amps
Liquor Pump ................................................................................................................. 0.98 Amps
Condenser Fan ............................................................................................................. 0.25 Amps
REFRIGERATION 1/9 H.P. capillary air-cooled.
2
THEORY OF OPERATION
The SLIM SHOT unit was designed to cool and dispense a chilled serving of
liquor using a minimum amount of counter space. After connecting the unit to an
electrical outlet and after placing the liquor bottles in the bottle reservoirs.
Depress the push button switch to dispense a small portion of liquor. In
approximately 45 minutes from the time the unit is electrically activated the unit
will dispense a chilled liquor shot between 5 to 10 degrees.
When the Push Button Switch is pushed the incoming liquor is routed to a
through the pump, and then through a cooling coil that is housed in an aluminum
cold plate. This aluminum cold plate also houses our refrigeration evaporator
turning the aluminum cold plate into an extension of the evaporator. This
evaporator assembly is thoroughly insulated. The temperature of the incoming
liquor is at ambient temperature as it enters the cooling coil. As the incoming
liquor passes through the cooling coil the heat is removed from the liquor and
chilled to a temperature acceptable for a quality cold shot, normally a
temperature of 5 to 10 degrees. The liquor is now directed to a dispensing tube
where the liquor is dispensed.
3
1
3
2
8
4
06.0
06.0
9
7
13
10
6
5
12
14
11
15
17
16
18
21
19
10
22
24
23
20
25
26
24
29
27
28
30
33
31
10
43
34
42
35
40
46
47
44
37
48
39
Unit:Slim
Shot
International Carbonic Inc.Item No.:SS-2
Adelanto, California
38
48
48
ICI
36
41
45
32
Spl Note:
2 Brand
4
Drn By:
JGS
Ck By:LL
Date:6/10/08
SLIM SHOT
SYM QTY PART NO. DESCRIPTION
1
1
S1892
Top Cover
SYM QTY PART NO. DESCRIPTION
25
1 S1834-CP-SS-2 Cold Plate, Slim Shot, 2 Brand
2
1
S1911
Digital Thermometer
26
1
Z0009
Cap Tube, 12' - .042
3
2
A0063
Screw, 8-32 x 3/8" Phil. T.H. M/S Black Oxide
27
1
S1910
Push Switch
4
1
S1922
Service Panel, Rear
28
1
S1921
Front Panel, S.S.
5
1
S1923
Service Panel, Left
29
1
S1912
LED Wire Harness
6
1
S1924
Service Panel, Right
30
4
S1598
Leg, Slim Shot
7
1
S0783
Switch, ON/OFF
31
4
A0013
Screw, #8 X 1" HWH. SMS.
8
2
12074
Bottle Support Assembly
32
1
S1838-SS
9
2
18018
Sleeve, Bottle Cap, (LARGE)
33
4
A0047
10
2
34
1
11
30
35
1
S1839
Hot Gas Bypass Discharge Valve
12
2
36
4
N0071
Sleeve, Compressor Mounting
13
2
37
4
N0046
Grommet, Compressor Mounting
14
2
38
1
S1908
Fan, Condenser
15
2
39
1
S1909
Condenser
16
1
S1920
Switch Housing
40
1
S1545
Drier, Refrigerant
17
2
S1904
Bracket, Pump Mounting
41
1
E0141-8-CS
Power Cord, 8 ft.
18
2
S1903
Grommet, Pump Mounting
42
7
S0046
Bushing, Universal
19
2
S1902
Elbow, Pump Inlet/Outlet 1/8P X 1/4H, Plastic
43
1
S1916
Control Box, Slim Shot
20
2
S1900
Pump, Oscillating Piston
44
1
E0664
Strain Relief
21
2
S1901
Plug/Wire/Diode
45
4
S1335
Spacer, Control Board
22
1
S1915
Frame
46
1
S1950-SS
23
34
S1325
Nut, Square Grommet, Nylon
47
1
S1917
Control Box Cover
24
1
S1846
Insulation Set
48
8
A0020
Screw, 8-32 X 3/8 T.H. S.S.
12008-CS Bottle Cap Assembly, Chill Shot
A0014
Screw, #10 X 1/2 P.H. T.H. S.S.
18013-CS Strainer, Reserve, Perforated S.S.
12004-1/4-R Bottle Reserve Replacement For Chill Shot
18020
Elbow, Reserve 1/4P X 1/4H, Plastic
S1836-SS Bottle Reserve Mounting Bracket
5
Hot Gas Bypass Discharge Valve Assembly
Screw, 5/16-18 x 1", H.H. Flange
AZA0370YXA Compressor, 1/9th h.p.
Control Board
6
SLIM SHOT
CHAPTER II
INSTALLATION
This chapter covers the unpacking and inspection, selecting a location, electrical requirements and installing
your SLIM SHOT unit.
UNPACKING AND INSPECTION
Upon receiving unit, immediately remove your SLIM SHOT unit from the shipping carton and inspect for
shipping damage.
Remove the SLIM SHOT unit from the shipping carton and inspect for shipping damage.
NOTE:
If shipping damage is found immediately contact Sentry BevCon at (800) 661-3003. Do not
discard the shipping carton or any shipping materials in the event a freight claim must be
filed.
SELECTING LOCATION
Ambient temperature for cooling unit should not exceed 100 degrees “F".
Operation of cooling unit in ambient above 100 degrees “F" can and will
contribute to early failure of condensing unit and poor quality of finished
product.
IMPORTANT:
LOCATION RECOMMENDATIONS FOR THE SLIM SHOT UNIT
1.
2.
Position unit as close as possible to proper electrical source, 120V 6OHz.
Position unit with a minimum of 2" space between bulkhead and cabinet for sufficient space for
ventilation. Allow enough space between ceiling and unit for bottle removal.
LOOSE - SHIPPED PARTS
Qty.
1
2
2
2
Item
No.
----12008-CS
18013-CS
*
Description
Installation instructions
Bottle Cap Assembly
Strainer
Sleeve to fit Bottle
*(Small #18014, Medium #18016, Med/Large #18017, Large #18018, Ext Large #18011)
ELECTRICAL REQUIREMENTS:
The SLIM SHOT unit must be wire in accordance with N.E.C. or local ordinance.
7
"SLIM SHOT"
Installation Instructions
Remove the SLIM SHOT chiller from the shipping carton and inspect
for shipping damage. If shipping damage is found immediately contact
Sentry BevCon at 800 661-3003. Do not discard the shipping carton or
any shipping materials in the event a freight claim must be filed.
1. The following parts are
included with this Shipment.
"SLIM SHOT"12074 Support Assembly
CHILLER
2. Find a convenient location to
place your "SLIM SHOT" chiller.
Bottle Reserve
18013-CS Strainers
06.0
12008-CS Bottle Cap
Assembly
3. DO NOT PLUG YOUR UNIT INTO
AN ELECTRICAL OUTLET AT THIS
TIME.
Sleeve to Fit Bottle
Small #18014
Medium - #18016
Med/Large - #18017
Large - #18018
Extra Large - #18011
18013-CS RESERVE
STRAINER
12074 SUPPORT
ASSEMBLY
4. Install both stainless steel strainers
in bottle reserves.
12005-CS BOTTLE
RESERVE
12008-CS BOTTLE
CAP ASSEMBLY
SLEEVE
5. Slip the sleeves over bottle caps
then slip these assemblies
into the liquor bottles.
8
6. Turn the Liquor bottles upside down
and place them into the bottle reserves. Adjust
the support assemblies to stablize the bottles.
7. Plug the unit into a 110 volt outlet. The refrigeration
system will automatically start.
If refrigeration does start go to step #11.
06.0
8. Activate the "PUSH" switch until the liquor
is dispensed. The level of the liquor in the
bottles will drop as the cooling coils are filled.
Dispense 6 to 8 ounces in order to flush the unit.
DO NOT REUSE THIS LIQUOR!
9. In approximately 45 minutes the unit will
dispense ice-cold liquor shots.
10. Place a Liquor bottle in the top
front-lighted bottle tray for merchandising.
06.0
11. Your unit is equipped with an on/off
switch for the refrigeration. This switch
should be in the on position during normal
operation. Only put switch in the off position
for flushing/cleaning. If unit does not chill
check to make sure switch is in the on position.
06.0
Note: to increase your customers enjoyment cool your shot glasses before serving shots.
For Service and/or Installation Assistance
Please Call Sentry BevCon
800 661-3003
9
5/22/08
SLIM SHOT
CHAPTER III
OPERATORS INSTRUCTIONS
This chapter covers operators’ responsibilities for daily pre-operation check, adjustments, cleaning, and
sanitizing.
DAILY PRE-OPERATION CHECK
1.
2.
3.
Make sure reservoir is full and ready to dispense.
Make sure electrical power is supplied to unit.
Make sure unit is clean.
COOLING UNIT MAINTENANCE
NOTE:
Air circulation through the unit is required to cool the condenser/compressor and is drawn in
through vents on the side of the unit, through the condenser and is exhausted out vents on the
rear of the unit. Restricting air circulation through the cooling unit will decrease its cooling
capacity.
To avoid needless and sometimes costly repairs, it is imperative to keep condenser fins clean. This may be
accomplished by using a condenser brush (a longhaired, soft bristle brush) and/or a vacuum to gently sweep
fins of condenser clean and vacuum dust and dirt away.
CLEAN DISPENSING TUBE
Use a damp towel and clean tube nightly.
PERIODIC INSPECTION AND CLEANING
Daily:
1.
2.
3.
4.
Clean bottles and reservoir area with warm water.
Clean the beverage dispensing area.
Clean dispensing tube and all exposed areas on front plate.
Wipe exterior of unit with moist towel.
Weekly:
1.
Check condenser coil for obstructions or dirt.
Monthly:
1.
2.
Clean condenser fins or filter to make sure the refrigeration unit has adequate airflow.
Check entire system for leaks or damaged components. Repair as necessary.
DO NOT USE ABRASIVE TYPE CLEANERS.
10
CLEANING CONDENSER COIL
IMPORTANT:
NOTE:
1.
2.
3.
4.
5.
Air circulation through the condenser coil required to cool the condenser coil/compressor,
is drawn in through grills on cooling unit, through condenser coil and exhausted out grills
on the other side of unit. Restricting air circulation through the cooling unit will decrease
its cooling capacity.
Cleaning condenser coil should be done during non-business hours.
Unplug refrigeration unit power cord from electrical socket.
Remove the screws securing the front and side service panels, remove panels in preparation for
service.
Vacuum or use a soft brush to clean fins of condenser coil.
Replace panels.
Plug refrigeration unit power cord in electrical socket.
FLUSHING LIQUOR COIL
It is recommended to flush the Liquor Coil periodically. To accomplish this task shut off the refrigeration
system at the on/off switch located on the rear service panel.
Flush all liquor out of liquor coil and into a container to be reused.
After condensing unit has been off for at least one hour fill liquor reservoir with hot water and flush through
coil. Flush coil until water comes out clear.
Refill reservoir with saved liquor and flush all water out of liquor coil.
When all water is flushed out of system turn on condensing unit. In approximately 1 hour cold shots can be
dispensed.
11
CLEANING AND SANITIZING
Your local Health Department rules and general area cleanliness should determine the frequency of which
the unit should be sanitized.
SANITIZING PROCEDURES
Your local health department rules and general area cleanliness should determine the frequency at which the
unit should be sanitized. Note: Your Liquor plumbing will not need cleaning as often as the Lime mix section
of your unit if at all.
EQUIPMENT REQUIRED:
1.
2.
3.
4.
Stainless Steel container, (product tank), or large volume container.
Cleaning Agent.
Sanitizing Solution.
Phenolphthalein.
NOTE: One recommended cleaning agent and sanitizing agent is manufactured by:
MT. HOOD CHEMICAL CORP.
4444 N.W. Yeon Avenue
Portland, Oregon 97210
Trade names are: STAR - CHLORINATED CLEANER
CROWN - 12.5% SODIUM HYPOCHLORITE BLEACH
Use STAR at 18 oz. per 1 gallon of water yields 2% Sodium Hydroxide Solution.
Use Crown at 2 ounce per 9 gallons of water (gives 200 PPM of available chlorine) at a minimum contact
time of 10 minutes.
1. Turn off the unit at the on/off switch on the rear service panel. Activate the push button switch and empty
out product from system by flushing with warm water.
2. Fill bottle reserve with a caustic-based (low sudsing, non-perfumed, and rinsed) detergent solution,
(STAR). The solution should be prepared in accordance with the manufacturers recommendations, but
should be at least 2 percent sodium hydroxide. Make sure the syrup lines are completely filled and allow
standing for at least 10 minutes.
4. Flush the detergent solution from the bottle reserve with clean water. Continue rinsing until testing with
phenolphthalein shows that the rinse water is free of residual detergent.
5. Fill the bottle reserve with a low PH (7.0) chloride solution containing maximum 200-PPM chlorine. Make
sure that lines are completely filled and allow standing for 30 minutes.
6. Refill bottle reserve with clean hot water.
7. Draw water until chloride solution is dispensed from unit and liquor reservoir is empty.
8. Fill reservoir with Liquor.
9. Push switch until Liquor is dispensed.
10. Wait 45 minutes and then taste the liquor to verify that there is no off taste.
12
NOTE SECTION
Frequently Called Numbers:
__________________________________
____________________________
__________________________________
____________________________
__________________________________
____________________________
__________________________________
____________________________
__________________________________
____________________________
__________________________________
____________________________
_____________________________________________________________
_____________________________________________________________
_____________________________________________________________
_____________________________________________________________
_____________________________________________________________
_____________________________________________________________
_____________________________________________________________
_____________________________________________________________
_____________________________________________________________
_____________________________________________________________
_____________________________________________________________
_____________________________________________________________
_____________________________________________________________
_____________________________________________________________
_____________________________________________________________
_____________________________________________________________
_____________________________________________________________
_____________________________________________________________
_____________________________________________________________
_____________________________________________________________
13