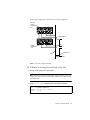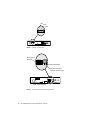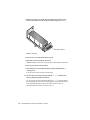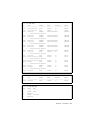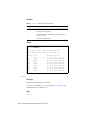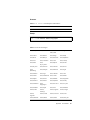
1
Sun StorEdge™ 6020 and 6120
Arrays System Manual
Sun Microsystems, Inc.
4150 Network Circle
Santa Clara, CA 95054 U.S.A.
650-960-1300
Part No. 817-0200-10
May 2003, Revision A
Submit comments about this document at: http://www.sun.com/hwdocs/feedback
Copyright 2003 Sun Microsystems, Inc., 4150 Network Circle, Santa Clara, California 95054, U.S.A. All rights reserved.
Sun Microsystems, Inc. has intellectual property rights relating to technology embodied in the product that is described in this document. In
particular, and without limitation, these intellectual property rights may include one or more of the U.S. patents listed at
http://www.sun.com/patents and one or more additional patents or pending patent applications in the U.S. and in other countries.
This document and the product to which it pertains are distributed under licenses restricting their use, copying, distribution, and
decompilation. No part of the product or of this document may be reproduced in any form by any means without prior written authorization of
Sun and its licensors, if any.
Third-party software, including font technology, is copyrighted and licensed from Sun suppliers.
Parts of the product may be derived from Berkeley BSD systems, licensed from the University of California. UNIX is a registered trademark in
the U.S. and in other countries, exclusively licensed through X/Open Company, Ltd.
Sun, Sun Microsystems, the Sun logo, AnswerBook2, docs.sun.com, Sun StorEdge, StorTools, JumpStart, and Solaris are trademarks or
registered trademarks of Sun Microsystems, Inc. in the U.S. and in other countries.
All SPARC trademarks are used under license and are trademarks or registered trademarks of SPARC International, Inc. in the U.S. and in other
countries. Products bearing SPARC trademarks are based upon an architecture developed by Sun Microsystems, Inc.
The OPEN LOOK and Sun™ Graphical User Interface was developed by Sun Microsystems, Inc. for its users and licensees. Sun acknowledges
the pioneering efforts of Xerox in researching and developing the concept of visual or graphical user interfaces for the computer industry. Sun
holds a non-exclusive license from Xerox to the Xerox Graphical User Interface, which license also covers Sun’s licensees who implement OPEN
LOOK GUIs and otherwise comply with Sun’s written license agreements.
U.S. Government Rights—Commercial use. Government users are subject to the Sun Microsystems, Inc. standard license agreement and
applicable provisions of the FAR and its supplements.
DOCUMENTATION IS PROVIDED "AS IS" AND ALL EXPRESS OR IMPLIED CONDITIONS, REPRESENTATIONS AND WARRANTIES,
INCLUDING ANY IMPLIED WARRANTY OF MERCHANTABILITY, FITNESS FOR A PARTICULAR PURPOSE OR NON-INFRINGEMENT,
ARE DISCLAIMED, EXCEPT TO THE EXTENT THAT SUCH DISCLAIMERS ARE HELD TO BE LEGALLY INVALID.
Copyright 2003 Sun Microsystems, Inc., 4150 Network Circle, Santa Clara, California 95054, Etats-Unis. Tous droits réservés.
Sun Microsystems, Inc. a les droits de propriété intellectuels relatants à la technologie incorporée dans le produit qui est décrit dans ce
document. En particulier, et sans la limitation, ces droits de propriété intellectuels peuvent inclure un ou plus des brevets américains énumérés à
http://www.sun.com/patents et un ou les brevets plus supplémentaires ou les applications de brevet en attente dans les Etats-Unis et dans les
autres pays.
Ce produit ou document est protégé par un copyright et distribué avec des licences qui en restreignent l’utilisation, la copie, la distribution, et la
décompilation. Aucune partie de ce produit ou document ne peut être reproduite sous aucune forme, par quelque moyen que ce soit, sans
l’autorisation préalable et écrite de Sun et de ses bailleurs de licence, s’il y ena.
Le logiciel détenu par des tiers, et qui comprend la technologie relative aux polices de caractères, est protégé par un copyright et licencié par des
fournisseurs de Sun.
Des parties de ce produit pourront être dérivées des systèmes Berkeley BSD licenciés par l’Université de Californie. UNIX est une marque
déposée aux Etats-Unis et dans d’autres pays et licenciée exclusivement par X/Open Company, Ltd.
Sun, Sun Microsystems, le logo Sun, AnswerBook2, docs.sun.com, Sun StorEdge, StorTools, JumpStart, et Solaris sont des marques de fabrique
ou des marques déposées de Sun Microsystems, Inc. aux Etats-Unis et dans d’autres pays.
Toutes les marques SPARC sont utilisées sous licence et sont des marques de fabrique ou des marques déposées de SPARC International, Inc.
aux Etats-Unis et dans d’autres pays. Les produits protant les marques SPARC sont basés sur une architecture développée par Sun
Microsystems, Inc.
L’interface d’utilisation graphique OPEN LOOK et Sun™ a été développée par Sun Microsystems, Inc. pour ses utilisateurs et licenciés. Sun
reconnaît les efforts de pionniers de Xerox pour la recherche et le développement du concept des interfaces d’utilisation visuelle ou graphique
pour l’industrie de l’informatique. Sun détient une license non exclusive de Xerox sur l’interface d’utilisation graphique Xerox, cette licence
couvrant également les licenciées de Sun qui mettent en place l’interface d ’utilisation graphique OPEN LOOK et qui en outre se conforment aux
licences écrites de Sun.
LA DOCUMENTATION EST FOURNIE "EN L’ÉTAT" ET TOUTES AUTRES CONDITIONS, DECLARATIONS ET GARANTIES EXPRESSES
OU TACITES SONT FORMELLEMENT EXCLUES, DANS LA MESURE AUTORISEE PAR LA LOI APPLICABLE, Y COMPRIS NOTAMMENT
TOUTE GARANTIE IMPLICITE RELATIVE A LA QUALITE MARCHANDE, A L’APTITUDE A UNE UTILISATION PARTICULIERE OU A
L’ABSENCE DE CONTREFAÇON.
Please
Recycle
Contents
Preface
xix
Before You Read This Book
xix
How This Book Is Organized
Typographic Conventions
Related Documentation
xxi
xxii
Using UNIX Commands
Shell Prompts
xx
xxiii
xxiii
Accessing Sun Documentation
xxiii
Contacting Sun Technical Support
Sun Welcomes Your Comments
1.
Array Overview
xxiv
1
Array Description
1
Array Storage Organization
Volumes
xxiv
2
3
Volume Slices
User Interfaces
4
6
Supported Configurations
7
Default Configuration Settings
7
Default System Parameters
8
Contents
iii
Default Boot Parameter Settings
9
Miscellaneous Configuration Parameters
Array Battery Information
10
10
Battery Health Check
10
Battery Hold-Time Test
11
Battery Management Daemon Configuration File
Battery Temperature Monitoring
Battery Warranty Check
Shelf-Life Check
12
12
13
Battery Replacement
13
Array Temperature Monitoring
14
Service Indicator Standard LEDs
2.
Reconfiguring the Array
Setting Global Parameters
14
17
17
▼
To Set the Cache Block Size
▼
To Enable Multipathing
▼
To Set the Cache Mode
▼
To Enable Mirrored Cache
▼
To Set the LUN Reconstruction Rate
▼
To Perform Volume Verification
▼
To Set the Cache Read-Ahead Threshold
▼
To Set the IP Address
18
20
21
21
22
23
24
25
Specifying Fibre Channel Topology
26
▼
To Determine the Topology Firmware Mode
▼
To Change the Topology Firmware Mode
Specifying the Network Time Protocol
▼
To Set Up the NTP Server
26
27
27
28
Configuring the Array for Remote System Logging
iv
11
Sun StorEdge 6020 and 6120 Arrays System Manual • May 2003
30
▼
To Transfer the Array Files to the Management Host
▼
To Edit the Array /etc/syslog.conf File
▼
To Edit the Array /etc/hosts File
▼
To Transfer Files Back to the Array
▼
To Edit the Management Host /etc/syslog.conf File
3.
34
To Transfer the Array Files to the Management Host
▼
To Edit the Array /etc/syslog.conf File
▼
To Edit the Array /etc/hosts File
▼
To Transfer Files Back to the Array
Volume Configuration Guidelines
▼
▼
40
41
45
45
46
48
48
To Create a Volume
Configuring Volumes
Volume Slicing
49
51
51
Volume Slicing Guidelines
52
▼
To Reconfigure a Volume by Adding Slices
▼
To Create a Volume Slice
▼
To Remove a Volume Slice
▼
To Label a Slice
52
61
62
62
Specifying LUN Mapping
▼
39
47
To Delete a Volume
Creating a Volume
37
42
Creating and Reconfiguring a Volume
Deleting a Volume
35
37
▼
Array Configuration Considerations
4.
32
33
Configuring the Array for SNMP Notification
Battery Configuration
30
66
To Display the LUN Map
66
Contents
v
▼
To Add an Entry to the LUN Map
▼
To Remove an Entry From the LUN Map
Specifying LUN Masking
66
67
67
▼
To Find the Default LUN Permissions and System-Assigned WWNs
▼
To Set a Specific LUN Permission
▼
To View All Registered WWNs
68
69
Setting LUN Permission with Host Multipathing
5.
6.
▼
To Change the Default LUN Permissions
▼
To Define a Host WWN Group
▼
To Set the Permissions of a LUN for All Members of a Group
▼
To Remove the Registered Status of a WWN
▼
To Remove a WWN From a Specific Group
▼
To Remove All WWNs From a Specific Group
Monitoring the Array
▼
To Determine Failover
▼
To Check the Drive Status
▼
To Check the Hot-Spare
▼
To Check Data Parity
80
▼
To Check the Battery
81
▼
To Display the FRU Information
▼
to Check the FRU Status
Servicing the Array
78
79
79
82
83
87
Troubleshooting the Array
87
Analyzing the Problem
87
98
Determining Channel Connection Failures
Servicing FRUs
99
Sun StorEdge 6020 and 6120 Arrays System Manual • May 2003
70
71
77
Determining FRU Failures
vi
69
98
73
74
74
72
68
Preparing for Service
99
Removing and Replacing Components
99
Upgrading Array Firmware and
System Files 121
Live Upgrades
121
Offline Upgrades
7.
129
Changing the Array Configuration
Converting a Single Array
135
▼
To Convert a Controller Unit into an Expansion Unit
136
▼
To Convert an Expansion Unit into a Controller Unit
137
Adding Expansion Units
▼
8.
135
138
To Add Expansion Units to an Array
Troubleshooting
143
Error Message Syntax
143
Message Types
144
FRU Identifiers
144
Error Message Listing
145
Warning Message Listing
152
Command-Line Error Messages
166
RAID Errors and Other Common Errors
Port Errors
Examples
172
175
177
Error Messages
177
Warning Messages
Notice
166
171
Interconnect Card and Other FRU Errors
Other Errors
138
177
179
Contents
vii
9.
CLI Commands
181
Displaying Commands
181
▼
To Display Commands
▼
To Display Command Syntax
▼
To Display Command Summary
FRU Identifiers
CLI Commands
187
188
boot
189
disable
190
disk
191
enable
191
192
help
198
hwwn
198
199
hwwn list
199
hwwn listgrp
200
hwwn add
hwwn rm
201
202
hwwn rmgrp
id
led
202
205
linkstat
logger
viii
184
187
abort
fru
182
182
Complete List of CLI Commands
ep
181
lpc
206
lun
208
205
206
Sun StorEdge 6020 and 6120 Arrays System Manual • May 2003
182
208
lun map list
210
lun map add
210
lun map rm
211
lun map rm all
212
lun perm list
213
lun perm
215
lun default
216
lun wwn list
216
lun wwn rm
217
lun wwn rm all
ntp
218
219
ntp stats
220
ntp poll
220
ntp interval
221
ntp server
ofdg
221
port
222
proc
224
225
refresh
reset
226
savecore
set
227
228
set timezone
shutdown
236
sim_diag
237
sun
237
sys
237
230
sys fc_topology
240
Contents
ix
241
tzset
ver
242
vol
242
246
volslice
volslice create
volslice list
volslice remove
Other Commands
arp
252
cat
252
cd
254
254
df
254
echo
254
head
255
255
255
mkdir
256
more
256
256
netstat
257
passwd
257
ping
257
pwd
rm
257
rmdir
x
252
253
du
mv
250
253
date
ls
248
253
cmp
cp
247
258
Sun StorEdge 6020 and 6120 Arrays System Manual • May 2003
route
258
sync
259
tail
259
touch
260
Contents
xi
xii
Sun StorEdge 6020 and 6120 Arrays System Manual • May 2003
Figures
FIGURE 1-1
Examples of Disks Used to Create Volumes in One Tray 3
FIGURE 1-2
Slice Creation in the Array
FIGURE 1-3
LED Pictorial 15
FIGURE 4-1
Array HA Configuration Example 53
FIGURE 4-2
Host Multipathing Configuration 70
FIGURE 6-1
Array Unit SIS LEDs 90
FIGURE 6-2
Disk Drive LEDs 91
FIGURE 6-3
Power and Cooling Unit LEDs 93
FIGURE 6-4
Interconnect Card LEDs
FIGURE 6-5
Controller Card SIS LEDs
FIGURE 6-6
Controller Card Communication Channel LEDs 96
FIGURE 6-7
Disk Drive Numbering
FIGURE 6-8
Removing a Disk Drive 101
FIGURE 6-9
Power and Cooling Unit
FIGURE 6-10
Removing the Power and Cooling Unit
FIGURE 6-11
Removing the UPS Battery 107
FIGURE 6-12
UPS Battery
FIGURE 6-13
Removing the Interconnect Card 110
FIGURE 6-14
Controller Card 112
FIGURE 6-15
Removing the Controller Card 113
5
94
96
101
104
105
108
xiii
xiv
FIGURE 6-16
Array—Back View 115
FIGURE 6-17
Removing the Mounting Screws 116
FIGURE 6-18
Removing the Chassis
FIGURE 7-1
Conversion From a 2x2 HA Configuration to a 2x4 HA Configuration
FIGURE 7-2
Base Configuration Before Conversion
FIGURE 7-3
Expansion Units Added to a Rack Configuration
FIGURE 7-4
Move the Array Controller Board 140
FIGURE 7-5
Connect the Interconnect Cables for the New Configuration 141
117
139
Sun StorEdge 6020 and 6120 Arrays System Manual • May 2003
140
138
Tables
TABLE 1-1
Examples of Volumes and Included Disks 4
TABLE 1-2
Default System Parameter Settings 8
TABLE 1-3
Default Boot Parameter Settings 9
TABLE 1-4
Default vol Parameter Settings
TABLE 1-5
Default port Parameter Settings
TABLE 2-1
fc_topology Mode Settings 27
TABLE 2-2
Message Categories 32
TABLE 2-3
Message Categories 39
TABLE 3-1
Array Volume and Drive Configurations Available per RAID Level
TABLE 5-1
Possible FRU States and Definitions 84
TABLE 6-1
Array Unit SIS LEDs 90
TABLE 6-2
Disk Drive LEDs 91
TABLE 6-3
Power and Cooling Unit LEDs 93
TABLE 6-4
Interconnect Card SIS LEDs
TABLE 6-5
Interconnect Card Channel Status LEDs 95
TABLE 6-6
Controller Card SIS LEDs
TABLE 6-7
FC-AL Channel-Status LEDs
TABLE 6-8
Ethernet Channel Status LEDs 98
TABLE 7-1
Message Types 144
TABLE 7-2
FRU Identifiers 144
10
10
46
95
97
97
xv
xvi
TABLE 7-3
Error Messages 145
TABLE 7-4
Warning Messages 152
TABLE 7-5
CLI Error Message Types
TABLE 7-6
Volume-Related (VN) Errors
TABLE 7-7
Port Errors
TABLE 7-8
Unit-Related Errors (Interconnect Card and Other FRUs) 172
TABLE 7-9
Embedded Operating System and Driver Errors 175
TABLE 7-10
FRU Identifiers 182
TABLE 7-11
CLI Commands Listed in Alphabetical Order for the Array 184
TABLE 7-12
abort Command Options and Parameters 188
TABLE 7-13
boot Command Options and Parameters 189
TABLE 7-14
disable Command Options and Parameters 190
TABLE 7-15
disk Command Options and Parameters 190
TABLE 7-16
enable Command Options and Parameters 191
TABLE 7-17
ep Command Options and Parameters 192
TABLE 7-18
fru Command Options and Parameters 193
TABLE 7-19
help Command Options and Parameters 198
TABLE 7-20
hwwn list Command Options and Parameters 199
TABLE 7-21
hwwn add Command Options and Parameters 200
TABLE 7-22
hwwn rm Command Options and Parameters 201
TABLE 7-23
hwwn rmgrp Command Options and Parameters 202
TABLE 7-24
id Command Options and Parameters 203
TABLE 7-25
led Command Options and Parameters 205
TABLE 7-26
logger Command Options and Parameters 206
TABLE 7-27
lpc Command Options and Parameters 207
TABLE 7-28
lun map list Command Options and Parameters 209
TABLE 7-29
lun map add Command Options and Parameters 210
TABLE 7-30
lun map rm Command Options and Parameters 211
TABLE 7-31
lun perm list Command Options and Parameters 212
TABLE 7-32
lun perm Command Options and Parameters 214
166
166
171
Sun StorEdge 6020 and 6120 Arrays System Manual • May 2003
TABLE 7-33
lun default Command Options and Parameters 215
TABLE 7-34
lun wwn rm Command Options and Parameters 216
TABLE 7-35
ntp poll Command Options and Parameters 220
TABLE 7-36
ntp interval Command Options and Parameters 220
TABLE 7-37
ntp server Command Options and Parameters 221
TABLE 7-38
ofdg Command Options and Parameters 222
TABLE 7-39
port Command Options and Parameters 223
TABLE 7-40
proc Command Options and Parameters 225
TABLE 7-41
refresh Command Options and Parameters 226
TABLE 7-42
reset Command Options and Parameters 227
TABLE 7-43
set Command Options and Parameters 229
TABLE 7-44
set timezone Command Options and Parameters 231
TABLE 7-45
Olson Time Zone Regions
TABLE 7-46
shutdown Command Options and Parameters 237
TABLE 7-47
sys Command Options and Parameters 238
TABLE 7-48
Fibre Channel Topology Options 240
TABLE 7-49
vol Command Options and Parameters 243
TABLE 7-50
volslice create Command Options and Parameters 248
TABLE 7-51
volslice list Command Options and Parameters 249
TABLE 7-52
volslice remove Command Options and Parameters 250
TABLE C-1
Illustrated Parts 261
231
Tables
xvii
xviii
Sun StorEdge 6020 and 6120 Arrays System Manual • May 2003
Preface
The Sun StorEdge 6020 and 6120 Arrays System Manual describes how to configure,
monitor, and service a Sun StorEdge™ 6120 array using the array’s telnet commandline interface (CLI). An array that is part of a Sun StorEdge 6320 system is called a
Sun StorEdge 6020 array. Both arrays are signified by the term array in this book.
The array is delivered with a default configuration of parameter settings. The Sun
StorEdge 6120 Array Installation Guide discusses the installation of the array with its
default settings. This document discusses reconfiguring parameter settings and
creating storage volumes for use in your particular environment following
installation.
This document is written for an experienced system administrator of the Solaris™
operating system (Solaris OS) and related disk storage systems. This document
provides information on commands that are specific to the array and is not intended
as a reference for general operating system commands.
Before You Read This Book
The service section of this document contains information for replacing field
replaceable units (FRU). Before attempting to service the hardware of the array, read
and become familiar with the contents of the Sun StorEdge 6120 Array Regulatory and
Safety Compliance Manual.
xix
How This Book Is Organized
Chapter 1 presents general information about the array and its features.
Chapter 2 discusses the reconfiguration of the array. Topics discussed include array
communication topology, error notification, network time protocol, and battery
configuration.
Chapter 3 describes procedures for creating a volume and for changing existing
volume configuration.
Chapter 4 discusses volume slicing, LUN mapping, and LUN masking.
Chapter 5 describes how to use the telnet CLI to monitor the array.
Chapter 6 describes basic array troubleshooting and replacement procedures for
serviceable parts.
Chapter 7 presents procedures for reconfiguring arrays and for adding and
removing disk trays.
Appendix A contains a list of errors that can be reported by the array and error
definitions.
Appendix B is a complete listing of telnet CLI commands for the array.
Appendix C contains part numbers and illustrations for all field-replaceable units
(FRUs) in the array.
Glossary is a list of words and phrases and their definitions.
xx
Sun StorEdge 6020 and 6120 Arrays System Manual • May 2003
Typographic Conventions
Typeface1
Meaning
Examples
AaBbCc123
The names of commands, files,
and directories; on-screen
computer output
Edit your.login file.
Use ls -a to list all files.
% You have mail.
AaBbCc123
What you type, when contrasted
with on-screen computer output
% su
Password:
AaBbCc123
Book titles, new words or terms,
words to be emphasized.
Replace command-line variables
with real names or values.
Read Chapter 6 in the User’s Guide.
These are called class options.
You must be superuser to do this.
To delete a file, type rm filename.
[] Brackets
Indicates optional arguments.
abort [-y] [u<1-8>]
| Pipe
Separates mutually exclusive
arguments.
enable uencidl[1|2]
1 The settings on your browser might differ from these settings.
Preface
xxi
Related Documentation
Application
Title
Part Number
man pages
sscs(1M)
not applicable
Release and product
information
Sun StorEdge SAN Foundation 4.2 Release Notes
817-1246
Sun StorEdge Traffic Manager Software Release
Notes
817-0385
Sun StorEdge 6120 Array Release Notes
817-0201
Sun StorEdge 6320 System Release Notes
816-7880
Sun StorEdge SAN Foundation Installation Guide
817-1244
Sun StorEdge SAN Foundation Configuration
Guide
817-1245
Sun StorEdge 6120 Array Installation Guide
817-0199
Sun StorEdge 6320 System Installation Guide
816-7878
Sun StorEdge 6020 and 6120 Arrays System
Manual
817-0200
Sun StorEdge 6320 System Reference and Service
Manual
816-7879
Storage Automated Diagnostic Environment 2.2
User’s Guide
817-0822
Storage Automated Diagnostic Environment 2.2
Device Edition Release Notes
817-0823
Sun StorEdge 6120 Array Start Here
817-0198
Sun StorEdge 6120 Array Regulatory and Safety
Compliance Manual
817-0961
Sun StorEdge 6120 Array Site Preparation Guide
817-0960
Sun StorEdge 6120 Array Troubleshooting Guide
817-0828
Sun StorEdge 6320 System Start Here
816-7875
Sun StorEdge 6320 System Regulatory and Safety
Compliance Manual
816-7876
Sun StorEdge 6320 System Site Preparation Guide
816-7877
Sun StorEdge 6320 System Troubleshooting Guide
816-7881
Installation
System administration
User and diagnostic
xxii Sun StorEdge 6020 and 6120 Arrays System Manual • May 2003
Using UNIX Commands
This document might not contain information on basic UNIX® commands and
procedures such as shutting down the system, booting the system, and configuring
devices.
See one or more of the following for this information:
■
Solaris Handbook for Sun Peripherals
■
AnswerBook2™ online documentation for the Solaris OS
■
Other software documentation that you received with your system
Shell Prompts
Shell
Prompt
C shell
machine-name%
C shell superuser
machine-name#
Bourne shell and Korn shell
$
Bourne shell and Korn shell superuser
#
Sun StorEdge 6120 array
:/:
Accessing Sun Documentation
You can view, print, or purchase a broad selection of Sun documentation, including
localized versions, at:
http://www.sun.com/documentation
Preface
xxiii
Contacting Sun Technical Support
If you have technical questions about this product that are not answered in this
document, go to:
http://www.sun.com/service/contacting
Sun Welcomes Your Comments
Sun is interested in improving its documentation and welcomes your comments and
suggestions. You can email your comments to Sun at:
[email protected]
Please include the part number (817-0200-10) of your document in the subject line of
your email.
xxiv
Sun StorEdge 6020 and 6120 Arrays System Manual • May 2003
CHAPTER
1
Array Overview
This chapter provides an introduction to the array. It includes an overview of the
array’s available hardware configurations, a description of the default configuration,
an explanation of the logical structure of the array’s storage, and other general
information about the array.
Topics in this chapter include:
■
■
■
■
■
■
■
■
“Array Description” on page 1
“Array Storage Organization” on page 2
“User Interfaces” on page 6
“Supported Configurations” on page 7
“Default Configuration Settings” on page 7
“Array Battery Information” on page 10
“Array Temperature Monitoring” on page 14
“Service Indicator Standard LEDs” on page 15
Array Description
The array is a high-performance, modular, scalable storage device. The array can
contain from 1 to 6 disk trays each of which can have from 7 to 14 disk drives. The
disk drives can have a capacity as high as 146 GBytes. A disk tray is either a master
unit or an expansion unit. A master unit includes a controller card.
The array includes 2-Gbit/sec Fibre Channel connectivity to hosts. Extensive
reliability, availability, and serviceability (RAS) features include redundant
components, notification of failed components, and the ability to replace
components while the unit is online.
The array is mounted in a rack and can be interconnected with other arrays of the
same type.
1
The data and administrative paths in the array are completely independent for
reliability, security, serviceability, and ease of use. The network-based administrative
path enables centralized configuration and monitoring of large numbers of array
configurations, providing storage to multiple application servers.
Each disk drive has a drive label, a small portion of which is reserved for the system
area. Approximately 200 Mbytes is reserved for the system area, which contains the
configuration data, boot firmware, and file system information. The system area
information is mirrored across all fourteen drives for redundancy so that data can be
recovered from the other functional drives.
The switched-loop architecture of the array provides the flexibility to configure
multiple units together for scalability and availability. Loops can be reconfigured
dynamically for diagnosis and recovery in case of loop-related failures.
Some additional characteristics of the array are:
■ RAID levels 0, 1, and 5 are supported
■ 1 Gbyte of data cache memory is provided
■ Administrative path is network-based (Ethernet) and serial-based (RS-232)
■ Two separate serial buses support control and sense operations
The array is delivered with a default configuration of system settings (see “Default
Configuration Settings” on page 7). These system settings determine how the array
operates. You might have to change some or all of these array system settings for use
in your storage environment.
The Sun StorEdge 6120 array is delivered with no volumes configured. For
information about the Sun StorEdge 6020 array and its delivered configuration, see
the Sun StorEdge 6320 Series Reference and Service Manual.
Array Storage Organization
A SAN or direct-attached host sees an array as raw storage that appears as a disk
drive on the network. This raw storage is called a logical unit, or LUN. The capacity
of this LUN can be the entire capacity of one tray of disks or it can be a smaller
portion of the array’s capacity. A LUN is seen only by the host or hosts that are
given permission to access that LUN. LUN masking is the term used for assigning
LUN permissions (read-only, read/write, or none) to a host. Hosts on the network
that are not given permission to access the LUN cannot access it. An array of any
configuration can provide a maximum of 64 LUNs (see “Supported Configurations”
on page 7).
Each LUN is mapped to a single slice of storage within the array. Each slice is part of
a volume that you create on the array.
2
Sun StorEdge 6020 and 6120 Arrays System Manual • May 2003
Volumes
In an array disk tray, which contains from 7 to 14 disk drives, you can configure
either one or two volumes. A volume can include from 1 to 14 drives, depending on
RAID level, which must be in adjacent positions in the disk tray. When you create a
volume, you specify the drives to be included, the RAID level, and whether a hot
spare is to be used.
Drives in an array are numbered sequentially from one to fourteen and from left to
right when viewed from the front of the array. You can assign adjacent drives to a
volume, for example: assign drives 1–9 to volume 1 and drives 10–14 to volume 2.
You cannot assign drives 1–5 and drive 8 to a single volume because they are not
adjacent.
Configure the RAID level when you configure the volume. The array supports RAID
level 0, RAID level 1, and RAID level 5.
You also configure the hot spare when you create the volume. Drive 14 is always the
hot spare if a hot spare is configured. The hot spare’s purpose is to act as a
temporary disk until the failed disk is replaced. You can configure the hot spare to
one or both volumes in a disk tray.
For example, the following command line creates a volume named v1 with data
drives 1 to 8 inclusive in unit 2, as a RAID 5 volume, and with a hot spare in unit 2
drive 14:
6120:/: vol add v1 data u2d1-8 raid 5 standby u2d14
In a high-availability (HA) array configuration with 6 array disk trays, you can
create as many as 12 volumes (two per tray) or as few as 6 volumes (1 per tray).
Sun StorEdge 6120 Array Tray (u1) With 14 drives
1
FIGURE 1-1
2
3
4
5
6
7
8
9
10
11
12
13
14
Examples of Disks Used to Create Volumes in One Tray
Chapter 1
Array Overview
3
TABLE 1-1
Example
No.
Examples of Volumes and Included Disks
VOLUME 1 Disks
Standby Disk
VOLUME 2 Disks
1
disks u1d1-5
disks u1d6-14
2
disk u1d1
disks u1d2-14
3
disks u1d1-6
disk u1d14
disks u1d7-13
4
disks u1d1-7
disk u1d14
disks u1d8-13
5
disks u1d1-14
6
disks u1d1-13
Standby Disk
disk u1d14
disk u1d14
Volume Slices
Any array configuration can have up to 64 slices created from its configured volumes
(see “Supported Configurations” on page 7). Each slice can be mapped to 1 specific
LUN number with LUN mapping, which means that there is also a maximum of 64
LUNs that any array configuration can make available to hosts.
All the volumes in an array can be sliced into a maximum of 64 slices. In the case of
a single array with 1 disk tray, you can create 1 or 2 volumes and up to a total of 64
slices. In the case of a HA configuration, with 6 disk trays, you can create up to 12
volumes and slice these volumes into 64 slices total. Note that a volume exists
wholly within one tray of disk drives and so any slice also exists wholly within one
tray of disks: You cannot include portions of more than one tray in any volume or
slice.
4
Sun StorEdge 6020 and 6120 Arrays System Manual • May 2003
Array with 1 controller and 1 disk tray
Controller
Disk Tray
u1
1–2 volumes
1–64 slices
64 slices maximum in the array
Array with 1 controller and 2 disk trays
Controller
Disk Trays
u1
1–2 volumes
1–64 slices
u2
1–2 volumes
1–64 slices
64 slices maximum in the array
Array with 2 controllers and 6 disk trays
Controllers
Disk Trays
u1
1–2 volumes
1–64 slices
u2
1–2 volumes
1–64 slices
u3
1–2 volumes
1–64 slices
u4
1–2 volumes
1–64 slices
u5
1–2 volumes
1–64 slices
u6
1–2 volumes
1–64 slices
64 slices maximum in the array
FIGURE 1-2
Slice Creation in the Array
LUN access can then be controlled to external hosts, giving the hosts access to the
LUNs and to the storage of their mapped slices. For a host to be allowed to access
any particular LUN, the world wide name, or WWN, of the host’s host bus adapter
(HBA) must be given permission to access the LUN with LUN masking. LUN
masking provides security by servicing host I/O only if the host’s WWN matches
the WWN in the LUN’s mask.
Chapter 1
Array Overview
5
For example, to provide storage capacity to a host on the Fibre Channel network:
1. Create a volume, v1, on array u2.
6120:/: vol add v1 data u2d1-8 raid 5 standby u2d14
2. Create slice s6 on volume v1.
6120:/: volslice create s6 -s 1024 -z 5GB v1
3. Map slice s6 to lun 3.
6120:/: lun map add lun 3 slice 6
4. Mask lun 3 to the host whose HBA has the WWN 20020da445678901.
6120:/: lun perm lun 3 rw wwn 20020da445678901
The host would now have read and write privileges to the storage in slice s6. See
“CLI Commands” on page 181 for detailed information about these commands.
User Interfaces
You can configure the array using three different interfaces:
■
■
■
Array telnet command line interface (CLI)
Sun StorEdge Configuration Service web browser user interface (UI)
Sun StorEdge Configuration Service CLI
The array’s CLI is part of the array itself. All the examples in this book demonstrate
the array’s CLI. The Sun StorEdge Configuration Service UI and CLI reside on an
external host. This host can be any host configured to communicate with the array
through a telnet session.
For information about the Sun StorEdge Configuration Service UI and CLI, see
“Related Documentation” on page xxii.
6
Sun StorEdge 6020 and 6120 Arrays System Manual • May 2003
Supported Configurations
The array supports attaching controller-less arrays to arrays that have controllers.
These controller-less trays are referred to as expansion units. The naming convention
used in the configuration is: controller x trays (controller by trays). A 2x2
configuration means there are two controllers and two trays. A 2x4 configuration
means two controllers and four trays.
The following array configurations are supported:
■
High-availability (HA) configurations
Dual-controller arrays with expansion capability to provide additional capacity:
■
■
■
■
Array with two controllers and two disk trays (2x2)
Array with two controllers and four disk trays (2x4)
Array, with two controllers and six disk trays (2x6)
Non-HA configurations
Single-controller arrays with expansion capability to provide additional capacity:
■
■
■
Array with a single controller and a single disk tray (1x1)
Array with a single controller and two disk trays (1x2)
Array with a single controller and three disk trays (1x3)
Default Configuration Settings
A new array is delivered with default settings for system, boot, volume, and port
management parameters. During installation the default configuration and some or
all of these settings might have been changed. To modify these settings, see
“Reconfiguring the Array” on page 17, “Creating and Reconfiguring a Volume” on
page 45, and “CLI Commands” on page 181.
Chapter 1
Array Overview
7
Default System Parameters
TABLE 1-2 shows the default system parameter settings.
TABLE 1-2
Default System Parameter Settings
System Parameter
Default Value
controller
2.5 (controller version)
blocksize
16k
cache
auto
mirror
auto
mp_support
mpxio
naca
off
rd_ahead
on
recon_rate
med
sys memsize
256 MBytes
cache memsize
1024 MBytes
fc_topology
auto
fc_speed
2Gb
See “Setting Global Parameters” on page 17 for detailed information about these
parameters.
8
Sun StorEdge 6020 and 6120 Arrays System Manual • May 2003
Default Boot Parameter Settings
TABLE 1-3 shows the default boot parameter settings.
Note – If you change the array’s network settings, make sure that your network’s
physical connectivity and settings match these new array settings.
TABLE 1-3
Default Boot Parameter Settings
Boot Parameter
Default Value
bootmode
auto
bootdelay
3
sn
XXXXXX
ip
0.0.0.0
netmask
255.255.255.0
gateway
0.0.0.0
tftphost
0.0.0.0
tftpfile
<NULL>
hostname
<NULL>
vendor
301
model
501-5710-01(50)
revision
300
logto
/syslog
loglevel
3
rarp
on
mac
X:X:X:X:X:X
See “set” on page 228 for information about these settings and how to modify them.
Chapter 1
Array Overview
9
Miscellaneous Configuration Parameters
TABLE 1-4 shows the default vol parameter settings.
TABLE 1-4
Default vol Parameter Settings
vol Parameter
Default Value
vol init
rate=16
vol verify
rate=1
See “vol” on page 242 for information about these settings and how to modify them.
TABLE 1-5 shows the default port parameter settings.
TABLE 1-5
Default port Parameter Settings
port Parameter
Default Value
port host
sun
See “port” on page 222 for information about this setting and how to modify it.
Array Battery Information
The array’s power and cooling units (PCU) include batteries with sufficient capacity
to allow an orderly shutdown in the event of an AC power failure. Each tray
contains two PCUs and two batteries. The array incorporates automatic testing to
help ensure that these batteries remain fully charged and in optimum condition.
This section discusses the battery system and the automatic tests in a general way.
For specific information about setting up the test schedule, see “Battery
Configuration” on page 42.
Battery Health Check
The array firmware performs battery health tests on a regular basis. To do this, the
array periodically reads each battery field-replaceable unit (FRU) status to
determine, among other things, the date of the last health test and whether the
warranty life of the battery has expired. This data is stored in the FRU identification
module located in each battery pack, which the system can query.
10
Sun StorEdge 6020 and 6120 Arrays System Manual • May 2003
Within an array, the system performs parallel battery refresh tests, when needed,
allowing one health test at a time per tray. See “Supported Configurations” on
page 7.
To ensure one fully charged battery is always available within each tray, battery
health checks on the second PCU within a tray are only started if:
■
■
■
The first battery health test is complete
The first battery has passed the health test
The first battery has been completely returned to a fully charged state
In a large configuration, such as an HA array with six disk trays, it is possible to
have as many as six battery health tests in process with one running on each tray.
During a battery health check, the system cache, if set to auto remains in writebehind mode if no other FRU failures are detected. This ensures continued optimal
performance during the battery health test procedures.
Battery Hold-Time Test
Periodically the array firmware schedules each battery pack for a hold-time test.
This test determines each battery’s ability to provide power to a fully populated
array in the case of a loss of AC power.
The system runs the array from the battery being tested for approximately six
minutes, which is the estimated worst case time it would take to flush dirty data in
cache to disk and perform a graceful shutdown of the system. If the battery is able to
sustain the system for the full six minutes, the battery FRU information is updated
indicating when the test was performed and that the test passed. Within a tray, the
same test is performed on the redundant battery after the first battery has been
completely charged to full capacity.
The array’s battery charging facility recharges discharged batteries in an average of
90 to 140 minutes, depending on the age and strength of the battery.
Battery Management Daemon Configuration File
The battery management daemon is responsible for checking and updating array
battery status on a weekly basis. The day of the week and the time at which the
battery hold-time test is launched are specified in a file located on the master tray in
each array group. This file is located in the tray’s /etc directory and is named
bat.conf. The default time for the battery daemon to run is 2:00 a.m. on Sunday.
See “Battery Configuration” on page 42 for information about changing these
settings.
Chapter 1
Array Overview
11
The battery refresh facility uses the /etc/bat.conf file to determine when to
launch the battery refresh daemon. The battery refresh daemon’s role is to determine
if any battery in the array is due for a battery refresh cycle. The daemon performs
this check on a case by case basis for each battery, using each battery’s FRUid
information.
Battery refresh cycles are required every 28 days. If any battery’s FRUid information
indicates that it has exceeded its 28 day refresh cycle, then a refresh cycle is started
(assuming the tray in question is in an optimal state).
After a health check test is run on one battery, it is run on the other battery in the
same tray even if the second battery isn’t due for a battery health test. This ensures
that both batteries in a tray have synchronized battery health test dates.
Battery Temperature Monitoring
The array’s PCU contains multiple temperature sensors. If the firmware detects any
given PCU temperature to be greater than or equal to 44 degrees Centigrade at the
beginning of a battery health test, that health test is not run on either battery.
Appropriate syslog messages are issued to indicate the detected overtemperature
condition and the skipped battery health test. All battery FRUs remain online.
When a battery overtemperature condition is detected, a battery error message is
sent to the syslog facility for each sensor in the PCU that detects the
overtemperature condition. A maximum of six notice-level messages might be sent
to the syslog facility for a given tray (three messages per PCU). In addition, one
warning-level message per PCU is also logged indicating this condition. These
messages are only recorded if an overtemperature condition is detected when the
battery management daemon is launched once a week. The array has other
temperature monitoring facilities that become active if an overtemperature condition
is detected at any time during operation of the array.
If an overtemperature condition is detected on a tray, then battery health checks are
skipped on that tray but proceed on other trays in the array.
Battery Warranty Check
Each battery in an array is warranted for two years from the date the battery is first
installed in a running system. When the battery warranty has expired, a message is
logged indicating that the warranty has expired. This message includes a
recommendation to replace the battery to ensure optimal performance of the system.
This is a one-time message that is repeated only if the array is rebooted.
12
Sun StorEdge 6020 and 6120 Arrays System Manual • May 2003
The warranty date on each battery in an array is checked each day at 1:00 a.m. In
addition, battery warranty dates are checked when a PCU is inserted into an array.
If a battery warranty has expired, the array takes no action other than to log the
message. The array’s cache mode is not changed, and the service LED on the PCU
housing the battery does not indicate a FRU failure. The array considers a battery
with an expired warranty date to be good as long as that battery continues to pass
the battery health checks.
Shelf-Life Check
The array also performs two battery shelf-life checks at the same time that it
performs the warranty checks. The purpose of the shelf-life checks is to detect the
installation of a battery that hasn’t been used for an extended period of time, which
leaves the batteries in an unknown state.
The first shelf-life check validates that the time between the date of manufacture and
the current system date is less than three years. This ensures that the battery is less
than three years old.
The second check detects batteries that have not been charged for eight months or
longer, which can adversely affect the long term health of a battery. Sun inventory
control keeps batteries in stock fully charged for immediate use. This second test
applies only to batteries that have an active Start Date field on the battery FRU.
A battery Start Date is registered the first time the battery is installed in an array.
Batteries from Sun have a cleared Start Date field. Therefore, this test detects and
fails only batteries that have been installed in an active array that has not been in
operation for more than eight months.
If either of the shelf-life checks fails, the array marks the battery as failed and system
facilities (such as system cache mode) react as they would with any FRU failure. If
this occurs, the array operator will be notified to replace the battery immediately.
Battery Replacement
Battery replacement procedures are straightforward and can be performed on a live
system. Because this procedure involves removing a power and cooling unit (PCU),
the system automatically reverts to write-through cache mode when either PCU is
removed (assuming the cache mode is set to the factory default value of auto). If
optimal system performance is necessary and the battery has not failed, but needs to
be replaced, schedule this procedure during a time when system latencies are less
critical.
Chapter 1
Array Overview
13
Note – Following battery FRU replacement, the tray remains in write-through mode
until the newly installed battery is fully charged.
Once a battery has been physically replaced in a given PCU and that PCU has been
reinstalled in the tray, no further action is required. The system updates the battery
FRU information as needed without operator intervention.
Array Temperature Monitoring
The array is capable of monitoring internal components for overtemperature
conditions. The system is designed to tolerate missing FRUs for an indefinite period
of time, although a missing FRU such as a missing PCU, may cause the system to go
to write-through mode.
When a FRU is removed from an array, the internal monitoring facilities will detect
and log a message indicating a FRU is missing. It will continue to write a single
message for each missing FRU every 10 minutes.
If the temperature in the array reaches 65 degrees Centigrade, a warning message
will be logged indicating this condition. If the internal array temperature reaches 75
degrees Centigrade, the system will consider this a critical overtemperature
condition. At this temperature, a log message will be generated and a graceful
shutdown procedure will be initiated.
In the case of disk drives, if an individual disk drive reaches a temperature within 10
degrees Centigrade of the drive manufacturer’s preset overtemperature threshold
specification, the system will begin generating log messages referencing the disk
drive experiencing the problem. When the individual disk drive has reached the
drive manufacturer’s critical temperature threshold, the system will log that event,
and proceed to spindown the overheated disk drive.
Service Indicator Standard LEDs
The array incorporates a number of light-emitting diode (LED) indicators that are
used to assist in determining the status of the array as well as in repairing it. The
LED colors have the following general meanings:
■
14
Green indicates whether the unit is running.
Sun StorEdge 6020 and 6120 Arrays System Manual • May 2003
■
Amber indicates that the unit requires service.
■
Blue means that it is safe to remove the unit and to replace it.
■
White is used to identify the location of the unit.
A white, or locator, LED is implemented on the array tray front and rear. No other
field-replaceable unit (FRU) within the array has a white LED. The white LED is
used to lead the service person to the correct array. LEDs on FRUs, within the array
whose white LED is lit, show the service person which FRU requires service and the
current status of the FRU.
Each LED color is accompanied by a small pictorial indicator that is positioned near
the LED.
Green - unit is running
Amber - service action required
Blue - safe to remove
White - locate
FIGURE 1-3
LED Pictorial
See “Servicing the Array” on page 87 for additional information about the LEDs.
That chapter also includes procedures that use the LEDs to service the array.
Note – The following issue is under investigation:
In cases where a disk drive is undergoing data reconstruction, the system will
erroneously illuminate the blue Ready-to-Replace LED on that drive. The blue LED
will no longer be lit after the reconstruction has completed however. As a general
rule, do not remove any disk drive from the system if there is a flashing green LED
indicating I/O to the disks is in progress, regardless of the state of the blue Readyto-Replace LED. Drives that are truly ready to be swapped will not have any I/O
activity as evidenced by the green LED.
Chapter 1
Array Overview
15
Note – The following issue is under investigation:
During the process of booting a 6120 controller, if either the Power-on Self Test or
Built-in Self Test firmware detects a fatal problem with the hardware, the system will
prevent the faulty controller from going online. If this should occur, the system does
not illuminate the amber LED on the controller (normally used to indicating the
hardware is faulty). System users should allow enough time for newly inserted
controllers to boot followed by inspection of the controller status through the Sun
Storage Configuration Service interface. Should a controller not come online, it may
be that the inserted controller is bad and should be replaced.
16
Sun StorEdge 6020 and 6120 Arrays System Manual • May 2003
CHAPTER
2
Reconfiguring the Array
This chapter discusses how to reconfigure the array. The array is delivered with a
default system configuration from the factory (see “Default Configuration Settings”
on page 7), which might have been modified upon installation. The instructions in
this chapter describe how to make changes to the system configuration subsequent
to installation.
See “Creating and Reconfiguring a Volume” on page 45 for information about
reconfiguring the storage structure of the array.
Topics in this chapter include:
■
■
■
■
■
■
“Setting Global Parameters” on page 17
“Specifying Fibre Channel Topology” on page 26
“Specifying the Network Time Protocol” on page 27
“Configuring the Array for Remote System Logging” on page 30
“Configuring the Array for SNMP Notification” on page 37
“Battery Configuration” on page 42
Setting Global Parameters
This section contains information about modifying array settings within an
administrative domain. An administrative domain can be either a single array (1 x 1)or
an HA configuration that shares common administration through a master
controller. Each of the configurations listed in “Supported Configurations” on page 7
comprises an administrative domain. Change these settings to configure your array
to suit your application and recovery needs.
Note – You must set the cache segment size before you create volumes. Thereafter,
you must remove volumes before you can change the cache segment block size.
17
The steps to set the global parameters are as follows:
■
■
■
■
■
■
■
■
▼
“To
“To
“To
“To
“To
“To
“To
“To
Set the Cache Block Size” on page 18
Enable Multipathing” on page 20
Set the Cache Mode” on page 21
Enable Mirrored Cache” on page 21
Set the LUN Reconstruction Rate” on page 22
Perform Volume Verification” on page 23
Set the Cache Read-Ahead Threshold” on page 24
Set the IP Address” on page 25
To Set the Cache Block Size
Caution – Changing the cache segment block size requires that you delete the
existing volume. Deleting a volume destroys the data. Back up all data before
beginning this procedure.
The data block size is the amount of data written to each drive when striping data
across drives. (The block size is also known as the stripe unit size.) The block size can
be changed only when no volumes are defined. The block size can be configured as
4 Kbytes, 8 Kbytes, 16 Kbytes, 32 Kbytes, or 64 Kbytes. The default block size is
64 Kbytes.
A cache segment is the amount of data being read into cache. A cache segment is
1/8 of a data block. Therefore, cache segments can be 2 Kbytes, 4 Kbytes, or
8 Kbytes. Because the default block size is 64 Kbytes, the default cache segment size
is 8 Kbytes.
Note – To optimize performance, host stripe size should be equal to a multiple of
the number of data drives times the cache block size:
host data stripe size = # of drives in volume * array block size
Note that in a RAID 5 volume, one drive is used for parity:
host data stripe size = ((# of drives in volume) -1) * array block size
You can also use a multiple of these calculated values.
Cache block size is universal throughout an administrative domain. Therefore, you
cannot change it after you have created a volume. The only way to change the cache
block size is to delete a volume, change the block size, and then create a new
volume.
18
Sun StorEdge 6020 and 6120 Arrays System Manual • May 2003
Note – Some operating system utilities, such as format, only support a 1 Tbyte size
limit, so you must ensure that all LUN sizes are less than 1 Tbyte. For example, in a
system with 146 Gbyte drives, the total available capacity of the fourteen 146 Gbyte
drives is approximately 2.0 Tbytes. Therefore, you must create two volumes, with
each having less than 1 Tbyte.
1. From the array, delete any existing volume as follows:
6120:/:<#> vol list
volume
capacity
raid
data
v0
143.2 GB
5
u1d1-9
6120:/:<#> vol unmount volume-name
standby
none
6120:/:<#> vol remove volume-name
2. Type sys list to display the current cache segment size in blocks.
Cache segment size is shown as blocksize.
6120:/:<#> sys list
controller
:
blocksize
:
cache
:
mirror
:
mp_support
:
naca
:
rd_ahead
:
recon_rate
:
sys memsize
:
cache memsize
:
fc_topology
:
fc_speed
:
2.5
16k
auto
auto
mpxio
off
on
med
128 MBytes
1024 MBytes
auto
2Gb
3. Specify and confirm the blocksize setting using the sys command.
a. Type sys blocksize n to change the blocksize, where n = 4K, 8K, 16K, 32K,
or 64K.
Chapter 2
Reconfiguring the Array
19
b. Type sys list to display the revised block size.
For example:
6120:/:<#> sys blocksize 64k
6120:/:<#> sys list
controller
: 2.5
blocksize
: 64k
cache
: auto
mirror
: auto
mp_support
: mpxio
naca
: off
rd_ahead
: on
recon_rate
: med
sys memsize
: 128 MBytes
cache memsize
: 1024 MBytes
fc_topology
: auto
fc_speed
: 2Gb
▼
To Enable Multipathing
This task applies only when two controller units are configured as an HA
configuration. For VERITAS Dynamic Multipathing (DMP) by VERITAS Volume
Manager and the Sun StorEdge Traffic Manager software to function properly, you
must enable multipathing support on the array for array HA configurations.
● On the array, enable multipathing support by typing the following:
■
For DMP:
6120:/:<#> sys mp_support rw
■
For Sun StorEdge Traffic Manager software:
6120:/:<#> sys mp_support mpxio
Note – If you are using Sun StorEdge Traffic Manager software for your
multipathing software, type sys mp_support mpxio to select the correct array
setting to support this software.
20
Sun StorEdge 6020 and 6120 Arrays System Manual • May 2003
▼
To Set the Cache Mode
Write caching improves performance for applications because the data is written to
fast memory as opposed to slower disk storage devices. The cache is protected with
redundant battery systems that ensure the data is written to disk in the event of an
AC power loss.
The cache mode options are:
■
■
■
■
Auto (default)
Write-behind
Write-through
Off
The default cache setting on the array is auto, which enables write-behind caching as
long as there are no FRU failures.
● Type sys cache cache-mode.
For example, if you are setting the cache mode to auto, you would type:
6120:/:<#> sys cache auto
Caution – Data loss can occur in the write-behind cache mode if the units are not
configured as a fully redundant HA configurations and an array system failure
occurs. Use the auto cache mode for the highest degree of data protection.
Tip – You can view the actual cache status in use on a per-volume basis by typing
vol mode.
6120:/:<#> vol mode
volume
mounted cache
v0
yes
writebehind
v1
yes
writebehind
v2
yes
writebehind
▼
mirror
on
on
on
To Enable Mirrored Cache
Mirrored cache can safeguard cached data when a controller fails in an HA
configuration. When enabled, cache data is copied to a cache mirror segment on the
alternate controller before the write is acknowledged to the host.
Chapter 2
Reconfiguring the Array
21
Note – Cache mirroring impacts performance because the data is written to two
separate controller caches.
● Type:
6120:/:<#> sys mirror auto
Note – The auto setting enables cache mirroring only when array health and
conditions are optimal.
▼
To Set the LUN Reconstruction Rate
You can configure the LUN reconstruction rate so application performance is not
impacted. The reconstruction rate options are high, medium, and low.
Note – You cannot change the reconstruction rate while disk drive reconstruction is
in progress.
1. Use the sys list command to check the current reconstruction rate
(recon_rate).
6120:/:<#> sys list
controller
:
blocksize
:
cache
:
mirror
:
mp_support
:
naca
:
rd_ahead
:
recon_rate
:
sys memsize
:
cache memsize
:
fc_topology
:
fc_speed
:
2.5
16k
auto
auto
mpxio
off
on
med
128 MBytes
1024 MBytes
auto
2Gb
2. Use the sys command to specify and confirm the reconstruction rate.
a. Type sys recon_rate and either high, med, or low to change the
reconstruction rate.
22
Sun StorEdge 6020 and 6120 Arrays System Manual • May 2003
b. Type sys list to display the revised rate.
For example:
6120:/:<#> sys recon_rate low
6120:/:<#> sys list
controller
: 2.5
blocksize
: 16k
cache
: auto
mirror
: auto
mp_support
: mpxio
naca
: off
rd_ahead
: on
recon_rate
: low
sys memsize
: 128 MBytes
cache memsize
: 1024 MBytes
fc_topology
: auto
fc_speed
: 2Gb
▼
To Perform Volume Verification
The vol verify command executes manual parity checks on existing volumes.
Parity checking applies only to RAID 1 and RAID 5 volumes. You check data parity
using the vol verify command before performing tape-backup overwrite cycles,
approximately once every 30 days.
Note – Verify that the system health is in optimal condition before you run the vol
verify command. For example, ensure that no LUNs are under reconstruction, that
the status of all disks is mounted (which can be checked using the vol stat
command), and that other similar conditions are resolved.
Note – The vol verify operation can take up to several hours to run, depending
on system activity and the verification rate selected. Executing this command can
affect system performance, depending on these factors.
● Use the vol verify command to set parity check rate (volume-name is the name of
the volume to verify).
6120:/:<#> vol verify volume-name [fix] rate n
Chapter 2
Reconfiguring the Array
23
Note – The volume name is a name internal to the array and is not seen by the host.
The [fix] option corrects parity errors on RAID 5 volumes and corrects mirrored
data errors on RAID 1 volumes. If fix is not specified, vol verify reports errors
but does not correct them. If the fix option is specified and an error is detected, the
vol verify command regenerates parity from the existing data on the volume.
The verification rate is n, where n equals any number from 1 to 8. The default rate is
1, which has the minimum performance impact on the data host.
Note – Within an HA configuration, the vol verify command can be run on only
one volume at a time.
▼
To Set the Cache Read-Ahead Threshold
Setting read caching can reduce disk I/O by reading data for future retrieval. This
refers to the number of sequential reads in a chunk of data. The two cache readahead threshold options are on and off. The default setting for the array is on.
1. Use the sys list command to check the current cache read-ahead threshold
(rd_ahead).
6120:/:<#> sys list
controller
:
blocksize
:
cache
:
mirror
:
mp_support
:
naca
:
rd_ahead
:
recon_rate
:
sys memsize
:
cache memsize
:
fc_topology
:
fc_speed
:
24
2.5
16k
auto
auto
mpxio
off
on
med
128 MBytes
1024 MBytes
auto
2Gb
Sun StorEdge 6020 and 6120 Arrays System Manual • May 2003
2. Use the sys rd_ahead command to set the default threshold to off and confirm
the setting using the sys list command.
For example:
6120:/:<#> sys rd_ahead off
6120:/:<#> sys list
controller
: 2.5
blocksize
: 16k
cache
: auto
mirror
: auto
mp_support
: mpxio
naca
: off
rd_ahead
: off
recon_rate
: med
sys memsize
: 128 MBytes
cache memsize
: 1024 MBytes
fc_topology
: auto
fc_speed
: 2Gb
▼
To Set the IP Address
You can set the IP address on an array with either of the following methods:
■
Edit the host files on a Reverse Address Resolution Protocol (RARP) server with
IP address information.
This option enables the IP address to be downloaded automatically, after the
array is first installed and powered on, and then receives a RARP request from
the host. If you move the array to another network, it receives its IP information
from the RARP server on that network. Thus, the host files of the new RARP
server must be updated to include the new array. To set the array IP address by
editing the host files, refer to the instructions in the installation section of the Sun
StorEdge 6120 Array Installation Guide.
■
Use the array set ip command.
This option can be used only if the array is online and already connected to an
Ethernet network, which would be possible only if the array IP address had been
assigned using the RARP server previously. Use this option if you are moving the
array to a network without a RARP server.
● Type set ip IP-address to assign the array IP network address:
6120:/:<#> set ip IP-address
Chapter 2
Reconfiguring the Array
25
Caution – If you are moving the array to a network with a RARP server and if the
array reboots, the array can pick up another IP address from the RARP server that
will override the IP address you assigned with the set ip command. To avoid this,
always assign the IP address by editing the host files on a RARP server.
Specifying Fibre Channel Topology
The array supports both point-to-point topology and loop topology. This means that
an array can connect directly to a switch, hub, or host, with full fabric connectivity.
For more information on the individual commands, see “CLI Commands” on
page 181. The section contains the following topics:
■
■
▼
“To Determine the Topology Firmware Mode” on page 26
“To Change the Topology Firmware Mode” on page 27
To Determine the Topology Firmware Mode
● Use the sys list command to determine the topology firmware mode setting of
the array.
6120:/:<#> sys list
controller
:
blocksize
:
cache
:
mirror
:
mp_support
:
naca
:
rd_ahead
:
recon_rate
:
sys memsize
:
cache memsize
:
fc_topology
:
fc_speed
:
2.5
16k
auto
auto
mpxio
off
on
med
128 MBytes
1024 MBytes
auto
2Gb
In this example, the array Fibre Channel topology mode is set to automatic sense
and set. This is the default setting. See TABLE 2-1 for an explanation of the various
mode settings. For a full explanation of the fc_topology command, see “CLI
Commands” on page 181.
26
Sun StorEdge 6020 and 6120 Arrays System Manual • May 2003
TABLE 2-1
▼
fc_topology Mode Settings
Parameter
Function
auto
Enables the controller firmware to automatically determine and set
the topology firmware mode.
loop
Sets the loop topology firmware mode.
fabric_p2p
Sets the point-to-point topology firmware mode.
To Change the Topology Firmware Mode
You should not need to perform this task except for troubleshooting purposes.
1. Set the topology firmware driver of the array as desired. For example, to set the
driver to point-to-point, type:
6120:/:<#> sys fc_topology fabric_p2p
2. Wait at least 10 seconds before querying the current negotiated topology.
3. Use the sys fc_topology command to verify the current negotiated topology.
6120:/:<#> sys fc_topology
Host port u1p1 Current Negotiated Topology=Fabric
Point to Point, Port ID=100300
Specifying the Network Time Protocol
The Network Time Protocol (NTP) support feature enables a network system of
arrays to automatically synchronize their internal system time with a designated
NTP master array.
To set the time zone, see “set timezone” on page 230. For more information about all
commands, see “CLI Commands” on page 181.
Chapter 2
Reconfiguring the Array
27
▼
To Set Up the NTP Server
1. Use the set timezone command to establish the time zone.
6120:/:<#> set timezone :America/Los_Angeles
2. Use the set command to confirm the time zone region setting.
6120:/:<#> set
bootmode auto
bootdelay 3
ip
<omitted..>
netmask
255.255.255.0
gateway
<omitted..>
tftphost <omitted..>
tftpfile <omitted..>
hostname 6120
timezone :America/Los_Angeles
logto
*
loglevel 3
rarp
on
mac
00:03:ba:27:d4:df
28
Sun StorEdge 6020 and 6120 Arrays System Manual • May 2003
3. Use the ntp server command to set the IP address of the server that is running
the NTP daemon.
6120:/:<#> ntp server nnn.nnn.nnn.nnn
4. Use the ntp interval command to set up the polling interval, in minutes, of an
NTP client to the NTP server.
6120:/:<#> ntp interval 5
In this example, the array polls the NTP server (updates the synchronization) every
5 minutes.
5. Use the ntp command to verify that the server and polling interval are set
correctly.
6120:/:<#> ntp
server
poll
interval
nnn.nnn.nnn.nnn
off
5
The example above shows the NTP server’s IP address, that polling is turned off,
and that the polling interval is set at 5 minutes.
6. Use the ntp poll command to turn on the NTP polling, if required.
6120:/:<#> ntp poll unicast
7. Use the ntp stats command to verify the NTP client (array) status.
6120:/:<#> ntp stats
lastpollTue Feb 19 21:07:32 GMT 2002
server nnn.nnn.nnn.nnn
offset + 0.00413176
status Successfully adjusted the time.
This example shows the time of the last poll, the NTP server’s IP address, the
adjustment made to the array’s internal clock, and the clock set success statement.
Chapter 2
Reconfiguring the Array
29
Configuring the Array for Remote
System Logging
Configuring the array consists of editing the /etc/syslog.conf and the
/etc/hosts files on the array. Editing these files enables system messages to be
logged and directed to a management host. Because you cannot edit files on the
array, you must use FTP to transfer them to a host, make the edits on the host, and
then transfer them back to the array.
This procedure consists of the following tasks:
■
■
■
■
■
▼
“To
“To
“To
“To
“To
Transfer the Array Files to the Management Host” on page 30
Edit the Array /etc/syslog.conf File” on page 32
Edit the Array /etc/hosts File” on page 33
Transfer Files Back to the Array” on page 34
Edit the Management Host /etc/syslog.conf File” on page 35
To Transfer the Array Files to the Management
Host
Note – For this procedure to work properly, you must have the root password set.
1. Start an ftp session from the management host to the array.
For example:
host#<15>ftp nnn.nnn.nnn.nnn
Connected to nnn.nnn.nnn.nnn.
220 chon-ji FTP server (SunOS 5.7) ready.
Name (nnn.nnn.nnn.nnn:root):
2. Log in to the array by typing root and your password at the prompts.
Name (nnn.nnn.nnn.nnn:root): root
331 Password required for root.
Password: password
230 User root logged in.
ftp>
30
Sun StorEdge 6020 and 6120 Arrays System Manual • May 2003
3. Move to your working directory on the management host.
For example:
ftp> lcd /tmp
Local directory now /tmp
ftp>
4. Move to the /etc directory on the array.
ftp> cd /etc
250 CWD command successful.
ftp>
5. Copy the syslog.conf file from the /etc directory on the array to your working
directory.
ftp> get syslog.conf
200 PORT command successful.
150 Binary data connection for syslog.conf (nnn.nnn.nnn.nnn,1031) (162 bytes).
226 Binary Transfer complete.
162 bytes received in 1 seconds (0 Kbytes/s)
ftp>
6. Copy the hosts file from the /etc directory on the array to your working
directory.
ftp> get hosts
200 PORT command successful.
150 Binary data connection for hosts (nnn.nnn.nnn.nnn,1034) (47 bytes).
226 Binary Transfer complete.
47 bytes received in 1 seconds (0 Kbytes/s)
ftp>
7. Exit the ftp session.
ftp>
quit
221 Goodbye.
mngt_host:/:
Chapter 2
Reconfiguring the Array
31
▼
To Edit the Array /etc/syslog.conf File
You must edit the /etc/syslog.conf file to include the category of messages that
you want to have logged with the IP address and host name of the management host
that will be logging these messages.
1. Determine the IP address and host name of the management host that will be
logging messages.
2. Determine which category of messages you would like to receive from the array.
Messages generated by the array are grouped into four categories in the order of
severity, as described in TABLE 2-2.
TABLE 2-2
Message Categories
Category
Description
Error
Indicates a critical system event that requires immediate user
intervention or attention. For example, inability to flush the writebehind cache.
Warning
Indicates a serious system event that requires eventual user
intervention. For example, a disk drive being disabled.
Notice
Indicates a system event that may lead to a more serious condition
in the future. For example, the occurrence of hard errors corrected
via parity replacement.
Information
Indicates a system event that has no consequence on the running
health of the system. For example, user login notifications.
Note – The message categories are cumulative. For example, if you specify that you
want to be notified about notice messages, you will also receive notification of
error and warning messages. If you specify that you want to be notified about
information messages, you will receive messages from all categories.
32
Sun StorEdge 6020 and 6120 Arrays System Manual • May 2003
3. On the management host, use a text editor to edit the syslog.conf file in the
working directory.
Use tab spaces to separate field entries when editing the /etc/syslog.conf file. If
you use spaces rather than tab spaces to separate field entries, the array will not
recognize your edits.
# syslog.conf
# facility.level action
# messages to local syslog file
*.notice /syslog
# messages to syslogd on another host Remote system logging
*.warn @remote-host
*.warn @nnn.nnn.nnn.nnn
# messages sent as SNMP traps
*.warn | snmp_trap nnn.nnn.nnn.nnn
Note – Use the IP address in the syslog.conf file. If you want to add a host name,
you must add a corresponding entry to the array’s /etc/hosts file as described in
the following section. The entry in the array’s /etc/hosts file is used only for
syslog control features on the array. Array utilities such as ping do not reference
the array’s /etc/hosts file. Therefore, IP addresses must be used with these
utilities.
▼
To Edit the Array /etc/hosts File
You must edit the /etc/hosts file to add the name and IP address of the
management host.
● On the management host, use a text editor to edit the /etc/hosts file in the
working directory.
Separate the IP address from the name with a tab space.
#hosts
#ip-address name
nnn.nnn.nnn.nnn host-name
IP address
Chapter 2
Reconfiguring the Array
33
▼
To Transfer Files Back to the Array
After editing the /etc/syslog.conf and /etc/hosts files, transfer the files from
the management host back to the array.
1. Start an ftp session from the management host to the array.
For example:
host#<15>ftp nnn.nnn.nnn.nnn
Connected to nnn.nnn.nnn.nnn.
220 chon-ji FTP server (SunOS 5.7) ready.
Name (nnn.nnn.nnn.nnn:root):
2. Log in to the array by typing root and your password at the prompts.
Name (nnn.nnn.nnn.nnn:root): root
331 Password required for root.
Password: password
230 User root logged in.
ftp>
3. Move to the /etc directory on the array.
ftp> cd /etc
250 CWD command successful.
ftp>
4. Copy the edited syslog.conf file from your working directory to the /etc
directory on the array.
ftp> put syslog.conf
200 PORT command successful.
150 Binary data connection for syslog.conf (nnn.nnn.nnn.nnn,1031) (162 bytes).
226 Binary Transfer complete.
162 bytes received in 1 seconds (0 Kbytes/s)
ftp>
34
Sun StorEdge 6020 and 6120 Arrays System Manual • May 2003
5. Copy the edited hosts file from your working directory to the /etc directory on
the array.
ftp> put hosts
200 PORT command successful.
150 Binary data connection for hosts (nnn.nnn.nnn.nnn,1034) (47 bytes).
226 Binary Transfer complete.
47 bytes received in 1 seconds (0 Kbytes/s)
ftp>
6. Exit the ftp session.
ftp>
quit
221 Goodbye.
host#
7. On the array, start message traffic to the host.
The syslogd will reexamine the syslog.conf file at the array.
6120:/:<#> set logto *
▼
To Edit the Management Host
/etc/syslog.conf File
You must edit the /etc/syslog.conf file on the management host (the host used
for monitoring and administering one or more arrays through the Ethernet
connection) to include a log file for capturing error messages.
Chapter 2
Reconfiguring the Array
35
● On the management host, add a line with the name of the host’s log file to the
host’s /etc/syslog.conf file, as shown in bold type in the following example:
Note – You must use a tab space between log-filename and /var/adm/messages.
#ident "@(#)syslog.conf1.496/10/11 SMI"/* SunOS 5.0 */
#
# Copyright (c) 1991-2001, by Sun Microsystems, Inc.
#
# syslog configuration file.
#
# This file is processed by m4 so be careful to quote (‘’) names
# that match m4 reserved words. Also, within ifdef’s, arguments
# containing commas must be quoted.
#
*.err;kern.notice;auth.notice/dev/console
*.err;kern.debug;daemon.notice;mail.crit/var/adm/messages
*.alert;kern.err;daemon.erroperator
*.alert
root
*.emerg
*
# if a non-loghost machine chooses to have authentication messages
# sent to the loghost machine, un-comment out the following line:
#auth.notice ifdef(‘LOGHOST’, /var/log/authlog, @loghost)
mail.debug
ifdef(‘LOGHOST’, /var/log/syslog, @loghost)
#
# non-loghost machines will use the following lines to cause "user"
# log messages to be logged locally.
#
ifdef(‘LOGHOST’, ,
user.err
/dev/console
user.err
/var/adm/messages
user.alert
‘root, operator’
user.emerg
*
)
local7.notice /var/adm/messages.6120
In this example, all arrays that use this host for logging will have their messages
dumped to /var/adm/messages.6120. The file name of the log file might be
different depending on the type of array management software you are using.
36
Sun StorEdge 6020 and 6120 Arrays System Manual • May 2003
Note – If you are using the Storage Automated Diagnostic Environment in the
Solaris OS to monitor the array, verify that you are using the correct
/var/adm/messages file name. Refer to the Storage Automated Diagnostic
Environment documentation for the name of this message file.
Configuring the Array for SNMP
Notification
The array can provide remote notification of array events to designated hosts using
Simple Network Management Protocol (SNMP) traps. To enable SNMP notification,
you must edit files on the array to configure system message logging. Because you
cannot edit files on the array, you must use the ftp command to send them to a host
to make the edits and then use the ftp command to return them to the array.
This procedure consists of the following tasks:
■
■
■
■
▼
“To
“To
“To
“To
Transfer the Array Files to the Management Host” on page 37
Edit the Array /etc/syslog.conf File” on page 39
Edit the Array /etc/hosts File” on page 40
Transfer Files Back to the Array” on page 41
To Transfer the Array Files to the Management
Host
Note – For this procedure to work properly, you must have the root password set.
1. Start an ftp session from the management host to the array.
For example:
host#<15>ftp nnn.nnn.nnn.nnn
Connected to nnn.nnn.nnn.nnn.
220 chon-ji FTP server (SunOS 5.7) ready.
Name (nnn.nnn.nnn.nnn:root):
Chapter 2
Reconfiguring the Array
37
2. Log in to the array by typing root and your password at the prompts.
Name (nnn.nnn.nnn.nnn:root): root
331 Password required for root.
Password: password
230 User root logged in.
ftp>
3. Move to your working directory on the management host.
For example:
ftp> lcd /tmp
Local directory now /tmp
ftp>
4. Move to the /etc directory on the array.
ftp> cd /etc
250 CWD command successful.
ftp>
5. Copy the syslog.conf file from the /etc directory on the array to your working
directory.
ftp> get syslog.conf
200 PORT command successful.
150 Binary data connection for syslog.conf (nnn.nnn.nnn.nnn,1031) (162 bytes).
226 Binary Transfer complete.
162 bytes received in 1 seconds (0 Kbytes/s)
ftp>
6. Copy the hosts file from the /etc directory on the array to your working
directory.
ftp> get hosts
200 PORT command successful.
150 Binary data connection for hosts (nnn.nnn.nnn.nnn,1034) (47 bytes).
226 Binary Transfer complete.
47 bytes received in 1 seconds (0 Kbytes/s)
ftp>
38
Sun StorEdge 6020 and 6120 Arrays System Manual • May 2003
7. Exit the ftp session.
ftp>
quit
221 Goodbye.
host#
▼
To Edit the Array /etc/syslog.conf File
You must edit the /etc/syslog.conf file to include the category of messages that
you want to have logged with the IP address of the management host that will be
receiving these messages.
1. Determine the IP address and host name of the management host that will be
logging messages.
2. Determine which category of messages you would like to receive from the array.
Messages generated by the array are grouped into four categories in the order of
severity, as described in TABLE 2-3.
TABLE 2-3
Message Categories
Category
Description
Error
Indicates a critical system event requiring immediate user
intervention or attention, such as the inability to flush the
write-behind cache.
Warning
Indicates a serious system event requiring eventual user
intervention. An example would be a disk drive being disabled.
Notice
Indicates a system event that may lead to a more serious condition
in the future. An example would be the occurrence of hard errors
corrected via parity replacement.
Information
Indicates a system event that has no consequence on the running
health of the system. An example would be user login notifications.
Note – The message categories are cumulative. For example, if you specify that you
want to be notified about notice messages, you will also receive notification of
error and warning messages. If you specify that you want to be notified about
information messages, you will receive messages from all categories.
Chapter 2
Reconfiguring the Array
39
Caution – Use tab spaces to separate field entries when editing the
/etc/syslog.conf file. If you use spaces rather than tab spaces to separate field
entries, the array will not recognize your edits.
3. On the management host, use a text editor to edit the syslog.conf file in the
working directory.
Separate entries with tab spaces. Edits are highlighted in the following example:
# syslog.conf
# facility.level action
# messages to local syslog file
*.notice /syslog
# messages to syslogd on another host
*.warn @remote-host
*.warn @nnn.nnn.nnn.nnn
# messages sent as SNMP traps
*.warn | snmp_trap nnn.nnn.nnn.nnn
SNMP notification
Note – You can use either the IP address or a host name in the syslog.conf file. If
you use a host name, a corresponding entry must be present on the array’s
/etc/hosts file, as described in the next section.
▼
To Edit the Array /etc/hosts File
You must edit the /etc/hosts file to add the name and IP address of the
management host.
● On the management host, use a text editor to edit the /etc/hosts file in the
working directory.
Separate the IP address from the name with a tab space.
#hosts
#ip-address name
nnn.nnn.nnn.nnn host-name
40
Sun StorEdge 6020 and 6120 Arrays System Manual • May 2003
IP address
▼
To Transfer Files Back to the Array
After editing the /etc/syslog.conf and /etc/hosts files, transfer the files from
the management host back to the array.
1. Start an ftp session from the management host to the array.
For example:
host#<15>ftp nnn.nnn.nnn.nnn
Connected to nnn.nnn.nnn.nnn.
220 chon-ji FTP server (SunOS 5.7) ready.
Name (nnn.nnn.nnn.nnn:root):
2. Log in to the array by typing root and your password at the prompts.
Name (nnn.nnn.nnn.nnn:root): root
331 Password required for root.
Password: password
230 User root logged in.
ftp>
3. Move to the /etc directory on the array.
ftp> cd /etc
250 CWD command successful.
ftp>
4. Copy the edited syslog.conf file from your working directory to the /etc
directory on the array.
ftp> put syslog.conf
200 PORT command successful.
150 Opening ASCII mode data connection for syslog.conf
226 Transfer complete.
local: syslog.conf remote: syslog.conf
155 bytes sent in 0.00049 seconds (307.66 Kbytes/s)
ftp>
Chapter 2
Reconfiguring the Array
41
5. Copy the edited hosts file from your working directory to the /etc directory on
the array.
ftp> put hosts
200 PORT command successful.
150 Opening ASCII mode data connection for hosts
226 Transfer complete.
local: hosts remote: hosts
47 bytes sent in 0.00024 seconds (307.66 Kbytes/s)
ftp>
6. Exit the ftp session.
ftp>
quit
221 Goodbye.
host#
7. On the array, start message traffic to the host.
The syslogd will reexamine the syslog.conf file at the array.
6120:/:<#> set logto *
Battery Configuration
The battery management daemon is responsible for checking and updating the
array’s battery status on a weekly basis. The daemon is launched on the day of the
week and at the time specified in a file located on the master tray in each array. This
file, /etc/bat.conf, consists of the following required three data fields:
DAY 0
HOUR 2
MINUTE 0
Permissible values for the three fields in the file are as follows:
■
42
DAY is entered as a number:
Sun StorEdge 6020 and 6120 Arrays System Manual • May 2003
0 = Sunday, 1 = Monday, 2 = Tuesday, 3 = Wednesday, 4 = Thursday, 5 = Friday,
6 = Saturday.
■
HOUR is entered as 0 to 23.
■
MINUTE is entered as 0 to 59.
The battery refresh daemon’s role is to determine if any battery in the array is due
for a battery refresh cycle. The daemon performs this check on all batteries, using
each battery’s FRU id information. Battery refresh cycles are required every 28 days.
If a given battery’s FRU information indicates that the battery has exceeded its 28
day refresh cycle, a refresh cycle is started (assuming the tray in question is in an
optimal state).
After the completion of a battery’s health check test, the other battery in the same
tray is also tested even if the second battery isn’t due for a battery health test. This
ensures that both batteries in a tray have synchronized battery health test dates.
To initialize changes made to the /etc/bat.conf file type:
6120:/:<#> refresh -i
If the bat.conf file doesn’t exist, contains an invalid setting, or is incomplete, an
error message is logged to the array’s syslog facility, and the system launches the
battery management daemon on Sundays at 2:00 a.m. The system error message
indicates the problem with the bat.conf syntax. To verify any change you make to
the bat.conf file, check the syslog files for messages.
Chapter 2
Reconfiguring the Array
43
44
Sun StorEdge 6020 and 6120 Arrays System Manual • May 2003
CHAPTER
3
Creating and Reconfiguring a
Volume
Use the instructions in this chapter to create a volume or to change the volume
configuration.
See also “Reconfiguring the Array” on page 17, which discusses reconfiguring the
array itself, not its included volumes.
Note – You must set the cache block size before you configure volumes. See “To Set
the Cache Block Size” on page 18.
The topics in this chapter include:
■
■
■
■
“Array Configuration Considerations” on page 45
“Volume Configuration Guidelines” on page 46
“To Delete a Volume” on page 48
“To Create a Volume” on page 49
Array Configuration Considerations
When you are configuring an array, consider these four questions:
1. Will drive 14 be used as a hot-spare?
2. How many volumes do you need per array, one or two? How many drives will be
in each volume? Choosing between one or two volumes per array requires
balancing considerations of capacity, performance, and availability.
A configuration of a single volume per array provides better performance than
two volumes because two volumes require additional administrative
management overhead. However, an availability trade-off is associated with
45
higher performance. For example, a one-volume array might have a RAID 5 stripe
of 13 drives. A failure of one of these drives results in a longer reconstruction time
than if one drive within one of two RAID 5 volumes were to fail. This also leaves
the 13-drive volume in a vulnerable state, because a subsequent failure during the
reconstruction of another drive within the same stripe results in a loss of data.
3. What RAID level is desired for each volume? See TABLE 3-1 for details.
TABLE 3-1
Array Volume and Drive Configurations Available per RAID Level
RAID Level
Volume and Drive Configurations
0
One or two volumes: 14 drives maximum or 13 plus a hot-spare; two
drives minimum
RAID 0 is advised only where performance is the sole qualifier or in
conjunction with an external form of data protection such as using a
host-based mirroring scheme across two arrays.
1+0
One or two volumes: 14 drives maximum or 13 plus a hot-spare; 2
drives minimum
5
• One volume: 14 drives maximum or 13 plus a hot-spare; 3 drives
minimum
• Two volumes—Any combination of drives on the two volumes as
long as at least 3 drives (exclusive of a hot-spare) are used in any
one volume using RAID 5
4. How many total slices are desired, and how are they to be mapped to LUNs and
to hosts? Consider that a failure within a volume affects all slices of that volume.
Volume Configuration Guidelines
An array consists of from seven to fourteen disk drives that can be configured into
one or two volumes. These volumes, after slicing and mapping, are presented to
network-attached hosts by the array as logical units, or LUNs, which appear to the
hosts as disk drives. The host does not see the underlying hardware structure of the
array.
The following rules govern volume creation and reconfiguration.
1. Volumes must consist of whole drives.
2. A drive cannot be partitioned into different volumes.
3. A tray can contain a maximum of two volumes.
46
Sun StorEdge 6020 and 6120 Arrays System Manual • May 2003
4. A volume must equate to one drive group. A drive group is the exact equivalent
of one RAID level. A RAID level is either striped (RAID 0 or RAID 5) or striped
and mirrored (RAID 1+0). Thus, a drive group using RAID 5 can consist of from
three to fourteen drives, and a RAID 1+0 drive group must consist of at least two
drives.
5. If drive 14 is used as a hot-spare, it must be specified when a given volume is
created. If you create two volumes, they can both use drive 14 as a shared hotspare if the hot-spare is designated when they are created. If you want to
designate a hot-spare for an existing volume, that volume must be deleted and
then recreated with a hot-spare (drive 14) designated.
Before creating or reconfiguring volumes in an array, be sure to read “Volume Slicing
Guidelines” on page 52 and “Array Configuration Considerations” on page 45. To
create a volume, see “Creating a Volume” on page 48.
Note – If you have an array with less than 14 drives installed, consider not creating
the second volume until the tray is fully populated. If you do create two volumes
with less than 14 drives installed, then you must backup and restore any data on the
array when you install additional disk drives.
Deleting a Volume
If you install more drives on an array that has fewer than 14 drives installed, then
you can create a volume from these drives without deleting an earlier volume as
long as you haven’t configured the maximum of two volumes already. If the tray is
fully populated and presently contains two volumes, then you must delete an
existing volume before you can create a new one.
Caution – Before you delete a volume and create a new volume, back up all data
associated with the volume being deleted. Data that resides in the volume to be
deleted is destroyed.
Once a volume has been configured, you cannot reconfigure it to change its size,
RAID level, or hot-spare configuration. If you install a new drive, any deleted
volume must be adjacent to the new drive.
Chapter 3
Creating and Reconfiguring a Volume
47
▼
To Delete a Volume
Caution – Deleting a volume destroys your data. Back up all data before beginning
this procedure.
1. Use the vol list command to display the configuration of the current volumes.
6120:/:<#> vol list
volume
v0
capacity
143.2 GB
raid
5
data
u1d1-9
standby
none
2. Unmount the volume.
6120:/:<#> vol unmount volume-name
3. Delete the volume.
6120:/:<#> vol remove volume-name
Creating a Volume
Once a volume has been configured, you cannot reconfigure it to change its size,
RAID level, or hot-spare configuration.
Some operating systems utilities only support a specific volume size limit, so you
must ensure that all volume sizes are within this limit.
Caution – Before you delete a volume and create a new volume, back up all data
associated with the volume being deleted. Data that resides in a volume is destroyed
when the volume is deleted.
Creating a new volume involves:
■
■
48
Creating the volume
Labeling the volume so that the operating system can recognize it.
Sun StorEdge 6020 and 6120 Arrays System Manual • May 2003
▼
To Create a Volume
Configuring a hot-spare drive in the volume is optional. If you are configuring a hot
spare in the volume, you can use only disk drive d14 as the hot spare. You can have
only one hot spare per disk tray, which can be shared by two volumes.
When configuring a volume, you must define the volume, RAID level, and hot spare
at the same time. See “Volumes” on page 3 for some valid volume configurations.
1. On the array, use the vol add command to create the volume as follows:
6120:/:<#> vol add volume-name data undn-n raid n standby und14
■
■
■
Define the drives (data undn-n) on which the volume will reside
Define the RAID level (raid n), where n = 0, 1, or 5.
Optional: Define the hot-spare drive (standby und14); d14 is the number of the
hot-spare disk drive
6120:/:<#> vol add volume-name data undn-n raid n standby und14
For example:
6120:/:<#> vol add v1 data u1d1-8 raid 5 standby u1d14
2. Check the status of the volumes.
The vol stat command shows the drive status. For example:
6120:/:<#> vol stat
v1: mounted
u1d01: mounted
u1d02: mounted
u1d03: mounted
u1d04: mounted
u1d05: mounted
u1d06: mounted
u1d07: mounted
u1d08: mounted
Standby: u1d14: mounted
Chapter 3
Creating and Reconfiguring a Volume
49
3. Use the vol init command to initialize the volume.
Depending on system activity at the time of initialization, it can take a considerable
amount of time to initialize a volume. Only one volume can be initialized at a time.
For approximate times for the vol init command to complete, see “vol” on
page 242.
6120:/:<#> vol init volume-name data
4. Use the vol mount command to mount the volume.
6120:/:<#> vol mount volume-name
5. Use the vol list command to confirm that you created the volume correctly.
For example:
6120:/:<#> vol list
volume
v1
50
capacity
125.2 GB
raid
5
data
u1d1-8
Sun StorEdge 6020 and 6120 Arrays System Manual • May 2003
standby
u1d14
CHAPTER
4
Configuring Volumes
This chapter discusses volume slicing, LUN mapping, and LUN masking.
The array firmware allows for multiple volume slices (more than one slice per
volume) which is similar to partitioning the hard drive of a desktop computer. This
feature allows greater flexibility to address storage in smaller increments, takes
advantage of larger capacity drives, and provides ease of scaling to suit individual
applications.
Topics in this chapter include:
■
■
■
“Volume Slicing” on page 51
“Specifying LUN Mapping” on page 66
“Specifying LUN Masking” on page 67
Volume Slicing
A volume can be partitioned into as many as sixty-four variable-sized slices, which
allows multiple LUNs per array configuration. For more information on the
individual commands, see “CLI Commands” on page 181.
This section contains the following topics:
■
“To Reconfigure a Volume by Adding Slices” on page 52
■
“To Create a Volume Slice” on page 61
■
“To Remove a Volume Slice” on page 62
51
Volume Slicing Guidelines
1. A maximum of 64 slices is allowed per array.
2. The minimum slice size is 10 Mbytes and must be rounded on a RAID stripe
boundary.
3. All slice sizes must be in multiples of the minimum slice size.
4. The maximum slice size is dependent on the volume size. All space in a volume
need not be used.
Note – If you have an array with less than fourteen drives installed, consider not
creating the second volume until the tray is fully populated. If you do create two
volumes with less than fourteen drives installed, then you must backup and restore
any data on the array when you install additional disk drives.
▼
To Reconfigure a Volume by Adding Slices
This procedure assumes the following:
52
■
An HA array with the default configuration (see “Default Configuration Settings”
on page 7).
■
Three new slices will be created on volume 0.
■
The application host has two HBAs connected, as shown in FIGURE 4-1.
Sun StorEdge 6020 and 6120 Arrays System Manual • May 2003
■
The array HA configuration is connected via a private loop configuration.
Alternate
master
controller
unit
Application host
HBA
HBA
Master
controller
unit
Ethernet port
LAN
Management host
FIGURE 4-1
Array HA Configuration Example
▼ To Remove an Existing Slice and Create a New Slice
1. Back up all data on slice 0 onto a safe location.
Note – With the three slices to be created in this example, you must ensure that the
available space on one of the newly created slices is sufficient onto which to restore
the backed-up data.
2. Use the volslice remove command to remove the slice from volume 0.
6120:/:<#> volslice remove s0
WARNING - The slice will be deleted.
Continue ? [N]: Y
Chapter 4
Configuring Volumes
53
3. Use the volslice create command to create the desired slices.
For example, to create a slice with a size of 5 Gbytes, a second slice with 15 Gbytes,
and a third slice with 10 Gbytes on volume 0, type the following:
Note – This example shows what happens if you type a slice name that already
exists—you are prompted to select another slice name.
6120:/:<#> volslice create s1 -z
Slice name already exists
6120:/:<#> volslice create s4 -z
4 out of Max. 64 slices created,
6120:/:<#> volslice create s5 -z
5 out of Max. 64 slices created,
6120:/:<#> volslice create s6 -z
6 out of Max. 64 slices created,
5GB v0
5GB v0
60 available.
15GB v0
59 available.
10GB v0
58 available.
New slice names can be “Take1,” “slice1,” “Bob1,” or anything you desire. A slice
name can be any 12 (maximum) alphanumeric characters except a blank space. The
default permission of a newly created slice is set at none—the system will not permit
any access by any host.
4. Use the volslice list command to verify the slice sizes.
6120:/:<#> volslice
Slice
Slice Num
s1
0
s2
1
s3
2
s4
4
s5
5
s6
6
-
54
list
Start Blk
0
104870400
0
104870400
0
104870400
0
104870400
120334782
135335223
Size Blks
104870400
190125327
104870400
190125327
104870400
190125327
104870400
120334782
135335223
190125327
Sun StorEdge 6020 and 6120 Arrays System Manual • May 2003
Capacity
5.014 GB
68.3 GB
5.014 GB
68.3 GB
5.014 GB
68.3 GB
5.014 GB
15.020 GB
10.018 GB
43.8 GB
Volume
v1
v1
v2
v2
v3
v3
v0
v0
v0
v0
5. Use the lun perm list command to verify the permissions are set to none.
6120:/:<#> lun perm list
Lun Slice WWN
Group Name
Group Perm
WWN Perm Effective Perm
----------------------------------------------------------------------------4
4
default
--none
none
5
5
default
--none
none
6
6
default
--none
none
1
1
default
--none
none
2
2
default
--none
none
3
3
default
--none
none
--------------------------------------------------------------------------
▼ To Obtain the Controller Card WWNs for each Array HA
Configuration
1. Use the port list command to display the WWN of each controller card of the
array HA configuration.
6120:/:<#> port list
port
u1p1
u2p1
targetid
5
6
addr_type
hard
hard
status
online
online
host
sun
sun
wwn
20020f230000a74d
20020f230000a8bf
2. Record the WWN of each array controller card.
3. Use the lun default command to assign read/write permission to all
LUNs/slices.
This allows the host to detect all slices.
6120:/:<#> lun default all_lun rw
Chapter 4
Configuring Volumes
55
4. Use the lun perm list command to verify all permissions are set at r/w.
6120:/:<#> lun perm list
Lun Slice WWN
Group Name
Group Perm
WWN Perm Effective Perm
----------------------------------------------------------------------------4
4
default
--rw
rw
5
5
default
--rw
rw
6
6
default
--rw
rw
1
1
default
--rw
rw
2
2
default
--rw
rw
3
3
default
--rw
rw
--------------------------------------------------------------------------
5. On the host, use the format command to display the paths to each LUN/slice.
host# format
1. c3t5d0 <SUN-T400-0201 cyl 4680 alt 2 hd 7 sec 128>
/ssm@0,0/pci@1c,600000/pci@1/SUNW,qlc@5/fp@0,0/ssd@w50020f230000a74d,0
2. c3t5d1 <SUN-T400-0201 cyl 11703 alt 2 hd 7 sec 128>
/ssm@0,0/pci@1c,600000/pci@1/SUNW,qlc@5/fp@0,0/ssd@w50020f230000a74d,1
3. c3t5d2 <SUN-T400-0201 cyl 4680 alt 2 hd 7 sec 128>
/ssm@0,0/pci@1c,600000/pci@1/SUNW,qlc@5/fp@0,0/ssd@w50020f230000a74d,2
4. c4t6d0 <SUN-T400-0201 cyl 4680 alt L2 hd 7 sec 128>
/ssm@0,0/pci@1d,700000/pci@1/SUNW,qlc@4/fp@0,0/ssd@w50020f230000a8bf,0
5. c4t6d1 <SUN-T400-0201 cyl 11703 alt 2 hd 7 sec 128>
/ssm@0,0/pci@1d,700000/pci@1/SUNW,qlc@4/fp@0,0/ssd@w50020f230000a8bf,1
6. c4t6d2 <SUN-T400-0201 cyl 4680 alt 2 hd 7 sec 128>
/ssm@0,0/pci@1d,700000/pci@1/SUNW,qlc@4/fp@0,0/ssd@w50020f230000a8bf,2
There are six paths—three LUNs/slices and two paths to each LUN/slice (through
the two HBAs).
6. Confirm the two controller card WWNs for the two array units with the WWNs
recorded from the output of Step 1 and 2.
These are listed in line 1 and 4 in the format command output:
56
■
50020f230000a74d
■
50020f230000a8bf
Sun StorEdge 6020 and 6120 Arrays System Manual • May 2003
▼ To Obtain the WWN for the First Host HBA Port
1. On the host, use the luxadm disp command with the logical path of the first
LUN/slice to obtain its physical path.
Lines “1.” through “3.” of the format command output show the logical device
names for the ...a74d controller card. Use the first one with “s2” to indicate the entire
LUN/slice (c3t5d0s2) and add it to complete the logical device name path
(/dev/rdsk/c3t5d0s2).
host# luxadm disp /dev/rdsk/c3t5d0s2
DEVICE PROPERTIES for disk: /dev/rdsk/c3t5d0s2
Status (Port B):O.K.
Vendor:SUN
Product ID:T400
WWN (Node):50020f230000a74d
WWN (Port B):50020f230000a8bf
Revision:0200
Serial Num:Unsupported
Unformatted capacity:136588.000 MBytes
Write Cache: Enabled
Read Cache: Enabled
Minimum prefetch:0x0
Maximum prefetch:0x0
Device Type:Disk device
Path(s):
/dev/rdsk/c3t5d0s2
/devices/ssm@0,0/pci@1c,600000/pci@1/SUNW,qlc@5/fp@0,0/ssd@w50020f230000a74d,0
The physical LUN/slice path in this example is:
/devices/ssm@0,0/pci@1c,600000/pci@1/SUNW,qlc@5/fp@0,0
/ssd@w50020f230000a74d,0.
2. Replace the /ssd@w50020f230000a74d,0 portion of the physical LUN/slice path
with :devctl to obtain the physical HBA controller path:
/devices/ssm@0,0/pci@1c,600000/pci@1/SUNW,qlc@5/fp@0,0:devctl
Chapter 4
Configuring Volumes
57
3. On the host, use the luxadm command with the -e dump_map option and the
physical HBA controller path to display the WWN for the first HBA port.
Note – The luxadm -e dump_map command can only be used with Fibre Channel
controller ports.
host# luxadm -e dump_map
/devices/ssm@0,0/pci@1c,600000/pci@1/SUNW,qlc@5/fp@0,0:devctl
Pos Port_ID Hard_Addr
Port WWN
Node WWN
Type
0
1044d5
1000d5
50020f230000091f
50020f200000091f 0x0(Disk device)
1
1046d1
1000d1
50020f230000064a
50020f200000064a 0x0(Disk device)
2
1047cd
1000cd
50020f2300004251
50020f2000004251 0x0(Disk device)
3
104800
0
210100e08b208900
200100e08b247212 0x1f(Unknown
Type,Host Bus Adapter)
In this example, the first host HBA port is identified as 210100e08b208900. Record
the WWN number for use in “To Set Up Access for the Desired Host HBA Ports” on
page 60.
▼ To Obtain the WWN for the Second Host HBA Port
1. On the host, use the luxadm disp command with the logical path of the second
LUN/slice to obtain its physical path.
Lines “4.” through “6.” of the format command output show the logical device
names for the ...a8bf controller card. Use the first one with “s2” to indicate the entire
LUN/slice (c4t6d0s2) and add it to complete the logical device name path
(/dev/rdsk/c4t6d0s2).
58
Sun StorEdge 6020 and 6120 Arrays System Manual • May 2003
host# luxadm disp /dev/rdsk/c4t6d0s2
DEVICE PROPERTIES for disk: /dev/rdsk/c4t6d0s2
Status(Port B):O.K.
Vendor:SUN
Product ID:T400
WWN(Node):50020f230000a74d
WWN(Port B):50020f230000a8bf
Revision:0200
Serial Num:Unsupported
Unformatted capacity:136588.000 MBytes
Write Cache: Enabled
Read Cache: Enabled
Minimum prefetch:0x0
Maximum prefetch:0x0
Device Type:Disk device
Path(s):
/dev/rdsk/c4t6d0s2
/devices/ssm@0,0/pci@1d,700000/pci@1/SUNW,qlc@4/fp@0,0/ssd@w50020f230000a8bf,0
The physical LUN/slice path in this example is:
/devices/ssm@0,0/pci@1d,700000/pci@1/SUNW,qlc@4/fp@0,0
/ssd@w50020f230000a8bf,0.
2. Replace the /ssd@w50020f230000a8bf,0 portion of the physical LUN/slice path
with :devctl to obtain the physical HBA controller path:
/devices/ssm@0,0/pci@1d,700000/pci@1/SUNW,qlc@4/fp@0,0:devctl
3. On the host, use the luxadm command with the -e dump_map option and the
physical HBA controller path to display the WWN for the second HBA port.
Note – The luxadm -e dump_map command can only be used with Fibre Channel
controller ports.
Chapter 4
Configuring Volumes
59
host# luxadm -e dump_map
/devices/ssm@0,0/pci@1d,700000/pci@1/SUNW,qlc@4/fp@0,0:devctl
Pos Port_ID Hard_Addr
Port WWN
Node WWN
Type
0
1044d5
1000d5
50020e230000091b
50020e200000091b 0x0(Disk device)
1
1046d1
1000d1
50020e230000064c
50020e200000064c 0x0(Disk device)
2
1047cd
1000cd
50020e2300004251
50020e2000004251 0x0(Disk device)
3
104800
0
210000e08b04aa9a
200100e08b247212 0x1f(Unknown
Type,Host Bus Adapter)
In this example, the second HBA port is identified as 210000e08b04aa9a. Record the
WWN number for use in “To Set Up Access for the Desired Host HBA Ports” on
page 60.
▼ To Set Up Access for the Desired Host HBA Ports
1. On the array, use the lun default command to remove the read/write
permission from all slices.
This allows setting a specific permission for an HBA port for LUN masking.
6120:/:<#> lun default all_lun none
Note – If you have existing slices and you want to retain their permissions, do not
run this command.
2. Use the lun perm command to:
■
Set the LUN 0 permission as desired (read/write in the example below).
■
Set up access to the desired application host HBA port WWN with the named
permission.
6120:/:<#> lun perm lun 0 rw wwn 210100e08b208900 (first HBA port
WWN)
60
Sun StorEdge 6020 and 6120 Arrays System Manual • May 2003
3. Verify the result with the lun perm list command.
6120:/:<#> lun perm list
Lun Slice WWN
Group Name
Group Perm
WWN Perm Effective Perm
----------------------------------------------------------------------------0
4
210100e08b208900
--rw
rw
0
5
default
--none
none
0
6
default
--none
none
1
1
default
--none
none
2
2
default
--none
none
3
3
default
--none
none
--------------------------------------------------------------------------
4. Repeat Steps 2 and 3 for each LUN.
When you are finished with all LUNs, restore the data onto the slices.
▼
To Create a Volume Slice
1. Use the volslice create command to create slice 1 with a size of 5 Gbytes on
volume 2.
Note – If you issue the volslice create command without any parameters, you
will be interactively prompted to specify the parameters.
6120:/:<#> volslice create s1 -z 5GB v2
1 out of Max. 64 slices created, 63 available.
Note – When you create a slice, the actual size of the slice is rounded to the nearest
stripe boundary.
2. Use the volslice list command to list the details of volume 2 to verify the
slice.
6120:/:<#> volslice
Slice
Slice Num
s1
0
-
list -v v2
Start blk
0
1024
4966680
Size blks
1023
4966680
87418240
volume
v2
v2
v2
Chapter 4
Configuring Volumes
61
▼
To Remove a Volume Slice
● Use the volslice remove command to either remove a specified slice or remove
all slices of a specified volume.
6120:/:<#> volslice remove s4
WARNING - The slice will be deleted.
Continue ? [N]: Y
6120:/:<#> volslice remove -v v1
WARNING - All slices in the given volume will be deleted.
Continue ? [N]: Y
▼
To Label a Slice
For the Solaris operating system to recognize a slice, it must be labeled with the
format command. Whenever you create a slice, label it using the following
procedure. For more information on the format command, see the format(1M)
man page.
To change the label of a slice:
1. On the array, type vol stat to verify that the volume is mounted.
62
Sun StorEdge 6020 and 6120 Arrays System Manual • May 2003
2. On the data host, type format at the root prompt.
Specify the disk number when prompted. In this example, the array is shown as disk
number 2. It can be identified by the SUN-T400-0200 label.
format
Searching for disks...done
AVAILABLE DISK SELECTIONS:
0. c0t2d0 <SUN-T400-0200 cyl 34901 alt 2 hd 128 sec 256> disk8
/pci@70,2000/pci@2/SUNW,qlc@4/fp@0,0/ssd@w50020f230000b230,0
1. c0t2d1 <SUN-T400-0200 cyl 34901 alt 2 hd 128 sec 256> disk9
/pci@70,2000/pci@2/SUNW,qlc@4/fp@0,0/ssd@w50020f230000b230,1
2. c0t4d0 <SUN-T400-0200 cyl 34901 alt 2 hd 128 sec 256> disk10
/pci@70,2000/pci@2/SUNW,qlc@4/fp@0,0/ssd@w50020f230000b37f,0
3. c0t4d1 <SUN-T400-0200 cyl 34901 alt 2 hd 128 sec 256> disk11
/pci@70,2000/pci@2/SUNW,qlc@4/fp@0,0/ssd@w50020f230000b37f,1
4. c0t6d0 <SUN-T400-0200 cyl 34901 alt 2 hd 128 sec 256> disk12
/pci@70,2000/pci@2/SUNW,qlc@4/fp@0,0/ssd@w50020f230000b28e,0
5. c0t6d1 <SUN-T400-0200 cyl 34901 alt 2 hd 128 sec 256> disk13
/pci@70,2000/pci@2/SUNW,qlc@4/fp@0,0/ssd@w50020f230000b28e,1
6. c0t8d0 <SUN-T400-0200 cyl 34901 alt 2 hd 128 sec 256> disk14
/pci@70,2000/pci@2/SUNW,qlc@4/fp@0,0/ssd@w50020f230000b719,0
7. c0t8d1 <SUN-T400-0200 cyl 34901 alt 2 hd 128 sec 256> disk15
/pci@70,2000/pci@2/SUNW,qlc@4/fp@0,0/ssd@w50020f230000b719,1
8. c1t1d0 <SUN-T400-0200 cyl 34901 alt 2 hd 128 sec 256> disk8
/pci@71,2000/pci@2/SUNW,qlc@4/fp@0,0/ssd@w50020f230000af55,0
9. c1t1d1 <SUN-T400-0200 cyl 34901 alt 2 hd 128 sec 256> disk9
/pci@71,2000/pci@2/SUNW,qlc@4/fp@0,0/ssd@w50020f230000af55,1
10. c1t3d0 <SUN-T400-0200 cyl 34901 alt 2 hd 128 sec 256> disk10
/pci@71,2000/pci@2/SUNW,qlc@4/fp@0,0/ssd@w50020f230000afdf,0
11. c1t3d1 <SUN-T400-0200 cyl 34901 alt 2 hd 128 sec 256> disk11
/pci@71,2000/pci@2/SUNW,qlc@4/fp@0,0/ssd@w50020f230000afdf,1
12. c1t5d0 <SUN-T400-0200 cyl 34901 alt 2 hd 128 sec 256> disk12
/pci@71,2000/pci@2/SUNW,qlc@4/fp@0,0/ssd@w50020f230000b723,0
13. c1t5d1 <SUN-T400-0200 cyl 34901 alt 2 hd 128 sec 256> disk13
/pci@71,2000/pci@2/SUNW,qlc@4/fp@0,0/ssd@w50020f230000b723,1
14. c3t2d0 <SUN18G cyl 7506 alt 2 hd 19 sec 248>
/sbus@7d,0/SUNW,fas@1,8800000/sd@2,0
15. c3t3d0 <SUN18G cyl 7506 alt 2 hd 19 sec 248>
/sbus@7d,0/SUNW,fas@1,8800000/sd@3,0
Specify disk (enter its number): 2
selecting c0t4d0
[disk formatted]
Chapter 4
Configuring Volumes
63
■
If the volume had been labeled previously using the format command, the next
display is the FORMAT MENU. If the FORMAT MENU is displayed, continue to the
next step.
■
If the volume had not been labeled previously using the format command, you
will be prompted with the question: Disk not labeled. Label it now? If
so, answer y at the prompt and press Return. The FORMAT MENU is displayed.
3. Type type to select a drive type.
FORMAT MENU:
disk
type
partition
current
format
repair
label
analyze
defect
backup
verify
save
inquiry
volname
!<cmd>
quit
format> type
64
-
select a disk
select (define) a disk type
select (define) a partition table
describe the current disk
format and analyze the disk
repair a defective sector
write label to the disk
surface analysis
defect list management
search for backup labels
read and display labels
save new disk/partition definitions
show vendor, product and revision
set 8-character volume name
execute <cmd>, then return0
Sun StorEdge 6020 and 6120 Arrays System Manual • May 2003
4. Type 0 to choose the Auto configure option.
Select the Auto configure option regardless of which drive types are displayed by
the type option. For further information on partitioning, see the Solaris
format(1M) man page.
AVAILABLE DRIVE TYPES:
0. Auto configure
1. Quantum ProDrive 80S
2. Quantum ProDrive 105S
3. CDC Wren IV 94171-344
4. SUN0104
5. SUN0207
6. SUN0327
7. SUN0340
8. SUN0424
9. SUN0535
10. SUN0669
11. SUN1.0G
12. SUN1.05
13. SUN1.3G
14. SUN2.1G
15. SUN2.9G
16. SUN-T400-0100
17. other
Specify disk type (enter its number)[16]: 0
c1t1d0: configured with capacity of 33.34GB
<SUN-T400-0200 cyl 34145 alt 2 hd 16 sec 128>
selecting c1t1d0
[disk formatted]
5. Type label and answer y when prompted to continue.
format> label
Ready to label disk, continue? y
Chapter 4
Configuring Volumes
65
Specifying LUN Mapping
This section describes LUN mapping. For more information on the individual
commands, see “CLI Commands” on page 181.
This section contains the following topics:
▼
■
“To Display the LUN Map” on page 66
■
“To Add an Entry to the LUN Map” on page 66
■
“To Remove an Entry From the LUN Map” on page 67
To Display the LUN Map
1. Use the lun map list command to display the LUN map.
6120:/:<#> lun map list
Lun No
Slice No
0
0
1
1
2
2
3
3
▼
To Add an Entry to the LUN Map
1. Use the lun map add command to map LUN 4 to slice 3.
6120:/:<#> lun map add lun 4 slice 3
2. Use the lun map list command to verify the result.
6120:/:<#> lun map list
Lun No
Slice No
0
0
1
1
2
2
3
4
4
3
66
Sun StorEdge 6020 and 6120 Arrays System Manual • May 2003
▼
To Remove an Entry From the LUN Map
1. Use the lun map rm command to remove LUN mapping from LUN 4 to slice 3.
6120:/:<#> lun map rm lun 4 slice 3
2. Use the lun map list command to verify the result.
6120:/:<#> lun map list
Lun No
Slice No
0
0
1
1
2
2
3
4
Specifying LUN Masking
LUN masking is a key component of building large storage systems. It eases storage
administration while allowing for a more secure environment.
Each host bus adapter (HBA) port is assigned a unique world wide name (WWN) by
the HBA manufacturer. A WWN is composed of 16 alphanumeric characters. After
the HBA is installed on a host, the host system software (for example, the luxadm
administration program in the Sun Enterprise Network Array in the Solaris OS) can
be used to identify the WWN for each HBA port.
The array controller firmware does not recognize (register) a WWN until the WWN is
recorded by the lun perm or hwwn add commands.
WWNs can be assigned to a specific LUN or LUNs. WWNs can also be grouped and
assigned to a specific LUN or LUNs. This is referred to as LUN masking. LUN
masking requires the verification of each host I/O by checking the host WWN
against the LUN permissions. This allows for configuration planning for increased
security.
For more information on the individual commands, see “CLI Commands” on
page 181.
This section contains the following topics:
■
“To Find the Default LUN Permissions and System-Assigned WWNs” on page 68
■
“To Set a Specific LUN Permission” on page 68
Chapter 4
Configuring Volumes
67
▼
■
“To View All Registered WWNs” on page 69
■
“To Change the Default LUN Permissions” on page 70
■
“To Define a Host WWN Group” on page 71
■
“To Set the Permissions of a LUN for All Members of a Group” on page 72
■
“To Remove the Registered Status of a WWN” on page 73
■
“To Remove a WWN From a Specific Group” on page 74
■
“To Remove All WWNs From a Specific Group” on page 74
To Find the Default LUN Permissions and
System-Assigned WWNs
● Use the lun perm list command to find the default LUN permissions.
For each LUN, the default access permissions are followed by any exceptions.
6120:/:<#> lun perm list
Lun Slice WWN
Group Name
Group Perm
WWN Perm Effective Perm
----------------------------------------------------------------------------0
0
default
--rw
rw
0
0
20020678ff345678 G1
none
ro
ro
1
1
default
--ro
ro
1
1
20020678ff345678 G1
ro
rw
rw
1
1
20020678ee345678 G1
ro
none
ro
1
1
20020678ee345678 G2
ro
none
ro
1
1
20020678ab345678 G2
ro
none
ro
--------------------------------------------------------------------------
▼
To Set a Specific LUN Permission
1. Use the lun perm command to set up LUN 2 with read/write access to WWN
20020da445678901.
6120:/:<#> lun perm lun 2 rw wwn 20020da445678901
Note – The lun perm command “registers” the specified WWN, if it is not already
registered.
68
Sun StorEdge 6020 and 6120 Arrays System Manual • May 2003
2. Use the lun perm list command to verify the result.
6120:/:<#> lun perm list wwn 20020da445678901
Lun Slice WWN
Group Name
Group Perm
WWN Perm Effective Perm
----------------------------------------------------------------------------0
0
default
--none
none
0
0
20020da445678901 --rw
rw
1
1
default
--none
none
1
1
20020da445678901 --rw
rw
2
2
default
--none
none
2
2
20020da445678901 --rw
rw
▼
To View All Registered WWNs
1. Use the lun wwn list command.
6120:/:<#> lun wwn list
List of all registered WWNs
-----------------------------------20020da445678901
20020da445678901
Setting LUN Permission with Host Multipathing
Note – If you are not using Sun StorEdge Traffic Manager, see the documentation
for your multipathing solution.
The arrays are redundant devices that automatically reconfigure whenever a failure
occurs on an array internal component. To allow for the automatic reconfiguration to
take effect, a host-based software solution (for example, Sun StorEdge Traffic
Manager Software or VERITAS Dynamic Multipathing (DMP)) and a redundant data
path are also required. This redundant path is referred to as host multipathing. See
FIGURE 4-2.
During normal operation, data I/O takes place on the host channel connected to the
controller that owns the LUNs. This path is a primary path. During fail-over
operation, the multipathing software directs all I/Os to the alternate channel’s
controller. This path is the fail-over path.
Chapter 4
Configuring Volumes
69
When a controller card in the master controller unit fails, the alternate master
controller unit becomes the master. When the failed controller is replaced, the new
controller immediately boots, goes online, and the original master controller unit
becomes the alternate master controller unit. The former alternate master controller
unit retains master controller unit status until the next array reboot.
Alternate
master
controller
unit
Application host
HBA
Master
controller
unit
HBA
FC-AL connections
(Host multipathing)
Ethernet port
Primary path
FIGURE 4-2
LAN
Management host
Host Multipathing Configuration
When a system is configured to incorporate both LUN masking and host
multipathing, you must ensure that all WWNs of all HBAs (or, if applicable, both
ports being used on a single HBA) are set with the same permissions to permit the
desired fail-over communications. The easiest way to do this is to group the WWNs
with a common group name and then set the permission for that group. See “To
Define a Host WWN Group” on page 71 and “To Set the Permissions of a LUN for
All Members of a Group” on page 72.
▼
To Change the Default LUN Permissions
1. Use the lun default command to establish the default permission to LUN 3 as
read only.
6120:/:<#> lun default lun 3 ro
70
Sun StorEdge 6020 and 6120 Arrays System Manual • May 2003
Note – The lun default command changes the permissions of only nonregistered
WWNs.
2. Use the lun perm list command to verify the result.
6120:/:<#> lun perm list lun 3
Lun Slice WWN
Group Name
Group Perm
WWN Perm Effective Perm
----------------------------------------------------------------------------3
3
default
--none
none
3
3
20020678ff345678 --ro
ro
▼
To Define a Host WWN Group
If all HBAs on a host will share the same access permissions, you can use this
procedure to define a host WWN group. The two methods are shown merely as an
example.
Note – If you issue the hwwn add command without any parameters, you will be
interactively prompted to specify the parameters.
1. Use the hwwn add command to add the WWN 20020678ef345678 to group node1
■
Interactively
6120:/:<#> hwwn add
Please enter Group Name: node1
Please enter WWN: 20020678ef345678
Add more WWN? [n]: N
■
Manually
6120:/:<#> hwwn add node1 wwn 20020321ff345678
Note – The hwwn add command registers the specified WWN, if it is not already
registered. The permission of the existing group also becomes the permission of the
added WWN.
Chapter 4
Configuring Volumes
71
2. Use the lun perm list command to verify the result.
6120:/:<#> lun perm list grp node1
Lun Slice WWN
Group Name
Group Perm
WWN Perm Effective Perm
----------------------------------------------------------------------------0
0
default
--rw
rw
0
0
20020678ff345678 node1
none
ro
ro
1
1
default
--ro
ro
1
1
20020678ff345678 node1
ro
rw
rw
1
1
20020678ff345678 node1
ro
none
rw
2
2
default
--rw
none
▼
To Set the Permissions of a LUN for All
Members of a Group
With a host WWN defined for a group, this procedure can be used to set permissions
using the host WWN group name.
1. Use the lun perm list command to display the current LUN permissions.
6120:/:<#> lun perm list
Lun Slice WWN
Group Name
Group Perm
WWN Perm Effective Perm
----------------------------------------------------------------------------0
0
default
--rw
rw
0
0
20020678ff345678 G1
none
ro
ro
1
1
default
--ro
ro
1
1
20020678ff345678 G1
ro
rw
rw
1
1
20020678ee345678 G1
ro
none
ro
1
1
20020678ee345678 node2
rw
none
rw
1
1
20020678ab345678 node2
rw
none
rw
--------------------------------------------------------------------------
2. Use the lun perm command to set read-only permissions on LUN 1 for group
node2.
6120:/:<#> lun perm lun 1 ro grp node2
72
Sun StorEdge 6020 and 6120 Arrays System Manual • May 2003
3. Use the lun perm list command to verify the result.
6120:/:<#> lun perm list
Lun Slice WWN
Group Name
Group Perm
WWN Perm Effective Perm
----------------------------------------------------------------------------0
0
default
--rw
rw
0
0
20020678ff345678 G1
none
ro
ro
1
1
default
--ro
ro
1
1
20020678ff345678 G1
ro
rw
rw
1
1
20020678ee345678 G1
ro
none
ro
1
1
20020678ee345678 node2
ro
none
ro
1
1
20020678ab345678 node2
ro
none
ro
--------------------------------------------------------------------------
▼
To Remove the Registered Status of a WWN
1. Use the lun wwn list command to display the registered WWNs.
6120:/:<#> lun wwn list
List of all registered WWNs
---------------------------------------2002067890123456
2002078901234567
2002089012345678
2002090123456789
2. Use the lun wwn rm command to remove the 2002067890123456 WWN.
6120:/:<#> lun wwn rm wwn 2002067890123456
2002067890123456 will get default access right.
Do you want to remove? (Y/N)[n]:Y
3. Use the lun wwn list command to verify the result.
6120:/:<#> lun wwn list
List of all registered WWNs
---------------------------------------2002078901234567
2002089012345678
2002090123456789
Chapter 4
Configuring Volumes
73
▼
To Remove a WWN From a Specific Group
1. Use the hwwn list command to display all the WWN(s) in a specified group.
6120:/:<#> hwwn list node1
WWN in this group node1
--------------------------20020678ef345678
20020321ff345678
--------------------------** Total 2 entries **
2. Use the hwwn rm command to remove both WWNs from the group “node1.”
6120:/:<#> hwwn rm node1 wwn 20020678ef345678
6120:/:<#> hwwn rm node1 wwn 20020321ff345678
Note – If you issue the hwwn rm command without any parameters, you will be
interactively prompted to specify the parameters.
▼
To Remove All WWNs From a Specific Group
1. Use the hwwn listgrp command to display all registered group names.
6120:/:<#> hwwn listgrp
Group Name
----------------------------node1
node2
node3
----------------------------** Total 3 entries **
74
Sun StorEdge 6020 and 6120 Arrays System Manual • May 2003
2. Use the hwwn list command to display all WWN(s) in a specified group.
6120:/:<#> hwwn list node1
WWN in this group node1
--------------------------20020678ef345678
20020321ff345678
--------------------------** Total 2 entries **
3. Use the hwwn rmgrp command to remove all WWN(s) from a specified group.
6120:/:<#> hwwn rmgrp node1
4. Use the hwwn list command to verify the results.
6120:/:<#> hwwn list node1
WWN in this group node1
----------------------------------------------------** Total 0 entries **
Chapter 4
Configuring Volumes
75
76
Sun StorEdge 6020 and 6120 Arrays System Manual • May 2003
CHAPTER
5
Monitoring the Array
This chapter describes how to use the CLI to monitor the array. You can check array
status by using a variety of CLI commands. This chapter discusses how to monitor
the following:
■
■
■
■
■
■
■
“To Determine Failover” on page 78
“To Check the Drive Status” on page 79
“To Check the Hot-Spare” on page 79
“To Check Data Parity” on page 80
“To Check the Battery” on page 81
“To Display the FRU Information” on page 82
“to Check the FRU Status” on page 83
77
▼
To Determine Failover
1. To determine which controller unit is the master or alternate master controller
unit, type sys stat.
The following example shows a 2x2 HA configuration in a normal state:
6120:/:<#> sys stat
Unit
----1
2
State
--------ONLINE
ONLINE
Role
-----Master
AlterM
Partner
------2
1
In a failover state, unit 2 assumes the role of master unit and unit 1 is disabled, as
shown in the following example:
6120:/:<#> sys stat
Unit
State
Role
----- --------- -----1
DISABLED
Slave
2
ONLINE
Master
Partner
-------
2. To display how paths are mapped from the host ports to the volume, type port
listmap.
6120:/:<#> port listmap
port
u1p1
u1p1
u2p1
u2p1
78
targetid
1
1
2
2
addr_type
hard
hard
hard
hard
lun
0
1
0
1
volume
v0
v1
v0
v1
Sun StorEdge 6020 and 6120 Arrays System Manual • May 2003
owner
u1
u2
u1
u2
access
primary
failover
failover
primary
▼
To Check the Drive Status
● Use the vol stat command to check drive status codes.
6120:/:<#> vol stat
v0: mounted
u1d01: mounted
u1d02: mounted
u1d03: mounted
u1d04: mounted
u1d05: mounted
u1d06: mounted
Standby: u1d14: mounted
v1: mounted
u2d01: mounted
u2d02: mounted
u2d03: mounted
u2d04: mounted
u2d05: mounted
u2d06: mounted
Standby: u2d14: mounted
▼
To Check the Hot-Spare
1. Use the vol list command to check the location of the hot spare (standby)
drive.
6120:/:<#> vol list
volume
v0
v1
capacity
125.2 GB
125.2 GB
raid
5
5
data
standby
u1d01-08
u1d14
u2d01-08
u2d14
Chapter 5
Monitoring the Array
79
2. Use the vol stat command to check the status of the hot spare drive.
6120:/:<#> vol stat
v0: mounted
u1d01: mounted
u1d02: mounted
u1d03: mounted
u1d04: mounted
u1d05: mounted
u1d06: mounted
Standby: u1d14: mounted
▼
To Check Data Parity
Note – Check data parity before performing tape-backup overwrite cycles,
approximately once every 30 days.
● Use the vol verify command to perform a parity check of the drives.
6120:/:<#> vol verify [fix] volume-name
where volume-name is the name of the volume to verify.
Note – The volume name is a name internal to the array and to the Sun StorEdge
Configuration Service. The name is not seen by the host.
The [fix] option corrects parity errors on RAID 5 volumes and corrects mirrored
data errors on RAID 1 volumes. If fix is not specified, then vol verify will report
errors, but not correct them. If the fix option is specified and an error is detected,
the vol verify command will regenerate parity from the existing data on the
RAID 5 volume.
Note – The vol command is not reentrant. Therefore, you cannot run other vol
commands on the array until the vol verify operation has completed.
See “To Perform Volume Verification” on page 23 for more information on checking
parity.
80
Sun StorEdge 6020 and 6120 Arrays System Manual • May 2003
▼
To Check the Battery
1. Use the id read command to display information about battery life. (Unit
number n = 1 or 2; power cooling unit number n = 1 or 2.)
6120:/:<#> id read unbn
Description: ASSY, T4 BATTERY, 14 SLOT
Short Name: T4-14_Bat
Serial Number: 001194
Part Number: 3704861
Dash Level: 01
Rev Level: 01
Vendor Name: 0x076
Manufacture Loc: TIJUANA,MEXICO
Timestamp: Thu Nov 07 22:49:45 GMT 2002
2. Use the refresh -s command to check the status of a battery refresh cycle.
The following example shows a normal battery status (no refresh cycle):
6120:/:<#> refresh -s
Current Date and Time: Wed Feb 12 09:45:20 GMT 2003
Next Scheduled Refresh: Sun Feb 16 02:00:29 GMT 2003
Battery
------u1b1
u1b2
u2b1
u2b2
u3b1
u3b2
u4b1
u4b2
State
------------------Normal
Normal
Normal
Normal
Normal
Normal
Normal
Normal
Warranty Expiration
---------------------------Sat Jan 01 00:00:00 GMT 2005
Sat Jan 01 00:00:00 GMT 2005
Sat Jan 01 00:00:00 GMT 2005
Sat Jan 01 00:00:00 GMT 2005
Sat Feb 05 12:18:44 GMT 2005
Sat Feb 05 12:18:44 GMT 2005
Sat Jan 01 00:00:00 GMT 2005
Sat Jan 01 00:00:00 GMT 2005
Chapter 5
Monitoring the Array
81
▼
To Display the FRU Information
● Use the fru list command to display FRU vendor information, serial number,
and firmware levels.
In the event of a FRU failure, fru list output is helpful in verifying correct FRU
replacement because it contains the serial numbers. The following example shows
fru list output for an array.
6120:/:<#> fru list
ID
TYPE
------ ----------------u1ctr
controller card
u3ctr
controller card
u1d01
disk drive
- - - - - - (items omitted
u1d14
disk drive
u2d01
disk drive
- - - - - - (items omitted
u2d14
disk drive
u3d01
disk drive
- - - - - - (items omitted
u3d14
disk drive
u4d01
disk drive
- - - - - - (items omitted
u4d14
disk drive
u1l1
loop card
- - - - - - (items omitted
u4l2
loop card
u1pcu1 power/cooling unit
- - - - - - (items omitted
u4pcu2 power/cooling unit
u1bat1 battery
- - - - - - (items omitted
u4bat2 battery
u1mpn
mid plane
- - - - - - (items omitted
u4mpn
mid plane
82
VENDOR
----------0x301
0x301
SEAGATE
in example)
SEAGATE
SEAGATE
in example)
SEAGATE
SEAGATE
in example)
SEAGATE
SEAGATE
in example)
SEAGATE
0x301
in example)
0x301
0x3AD
in example)
0x3AD
0x076
in example)
0xBEEF
0x301
in example)
0x301
MODEL
----------5405559
5405559
ST373307FSUN
REVISION
------------01
01
A207
SERIAL
-------000192
000662
3HZ0A9LG
ST373307FSUN A207
ST373405FSUN A538
3HZ0AL45
3EK1VYNN
ST373405FSUN A538
ST373307FSUN A207
3EK1VS59
3HZ0AK2V
ST373307FSUN A207
ST373405FSUN A538
3HZ0AGX2
3EK1VRZE
ST373405FSUN A538
5405384
02
3EK1VWC7
000981
5405384
3001562
02
16
000708
Q01331
3001562
3704861
16
01
Q00900
001194
3704861
5016338
01
01
000589
400540
5016338
01
400480
Sun StorEdge 6020 and 6120 Arrays System Manual • May 2003
▼
to Check the FRU Status
● Use the fru stat command to provide a status of each FRU.
Possible FRU states and definitions are listed in TABLE 5-1
6120:/:<#> fru stat
CTLR
STATUS
STATE
------ ------- ---------u1ctr
ready
enabled
u2ctr
missing
u3ctr
ready
enabled
u4ctr
missing
ROLE
---------master
PARTNER
------u3ctr
TEMP
---28
alt master
u1ctr
28
DISK
-----u1d01
- - - u1d14
u2d01
- - - u3d14
u4d01
- - - u4d14
STATUS
STATE
ROLE
------- ---------- ---------ready
enabled
data disk
- - (items omitted in example)
ready
enabled
standby
ready
enabled
data disk
- - (items omitted in example)
ready
enabled
standby
ready
enabled
data disk
- - (items omitted in example)
ready
enabled
standby
PORT1
--------ready
PORT2
--------ready
TEMP
---25
VOLUME
-----v0
ready
ready
ready
ready
24
30
v0
v1
ready
ready
ready
ready
24
29
v2
v3
ready
ready
30
v3
LOOP
-----u1l1
- - - u4l2
STATUS
STATE
MODE
------- ---------- ------ready
enabled
master
- - (items omitted in example)
ready
enabled
slave
CABLE1
---------
CABLE2
--------installed
TEMP
---31
installed
-
33
POWER
-----u1pcu1
- - - u4pcu2
STATUS
STATE
SOURCE OUTPUT
------- -------------- -----ready
enabled
line
normal
- - (items omitted in example)
ready
enabled
line
normal
BATTERY
------normal
TEMP
-----normal
FAN1
-----normal
FAN2
-----normal
normal
normal
normal
normal
Chapter 5
Monitoring the Array
83
TABLE 5-1
Possible FRU States and Definitions
FRU
Status
State
Controller Card
Status and State Conditions
absent
disabled
Controller not in tray
ready
disabled
Disabled or disabling
offline
disabled
Reset or resetting
booting
enabled
Booting
ready
enabled
Online
Disk Drive
84
Definition
Status and State Conditions
ready
enabled
Online
fault
enabled
Problem with the drive; check LED
missing
enabled
Drive is missing
Role
Disk Drive Assignment
data disk
Part of volume
unassigned
Not in volume
standby
Standby disk for volume. (Must be
drive number 14)
Port
Drive Port Condition1
ready
Corresponding drive port online
not ready
Drive port not ready. Expect ready
soon.
bypass
This drive port is being bypassed; use
another. (It is possible that the
interconnect card with corresponding
loop to drive is down.)
unknown
Drive port state is not known. (Occurs
only in HA configurations when
drive’s corresponding interconnect
card is down and interconnect card on
partnered unit is up.)
Sun StorEdge 6020 and 6120 Arrays System Manual • May 2003
TABLE 5-1
FRU
Possible FRU States and Definitions (Continued)
Status
State
Interconnect
(Loop) Card
Definition
Status and State Conditions
ready
enabled
Online
missing
Interconnect card not installed
offline
Interconnect card offline
fault
Interconnect card has fault condition
Power and
Cooling Unit
Status and State Conditions
ready
enabled
Online
ready
substituted
Battery refresh in progress
missing
Power and cooling unit not installed
fault
enabled
Problem in power and cooling unit.
For example: fan fault, output fault,
overtemperature.
fault
disabled
Power and cooling unit offline
Source
Power Source
line
Powered from power cord
battery
Powered from battery
--
Power and cooling unit not installed
Output
Power and Cooling Unit Condition
normal
Online
fault
Fault condition
--
Power and cooling unit not installed
Battery
Battery Condition
normal
Battery is healthy, PCU is operating
from AC line.
active
Battery is supplying power to the
PCU; AC line has probably failed.
charge
Battery is charging and not being
tested.
in test
Battery is undergoing health check.
failed
Battery failed testing and needs to be
replaced
missing
Battery is not installed.
Chapter 5
Monitoring the Array
85
TABLE 5-1
FRU
Possible FRU States and Definitions (Continued)
Status
State
Definition
off
The PCU is off.
fault
A PCU fault was detected.
disabled
The PCU has been disabled.
margin
None of the defined states applies.
PCU has been margined.
unknown
Should never be seen. Indicates an
internal software error.
--
Power and cooling unit not installed
Temp
Temperature Condition
normal
Normal operating temperature
fault
Power and cooling unit
overtemperature condition
--
Power and cooling unit not installed
1 Each drive has two ports, and each port corresponds to an interconnect card. If one interconnect card fails, then
all drives on that loop will bypass that particular port, and the interconnect card that is still online will start
controlling all drives using the other port.
86
Sun StorEdge 6020 and 6120 Arrays System Manual • May 2003
CHAPTER
6
Servicing the Array
This chapter explains how to perform basic troubleshooting for the Sun StorEdge
6120 array and how to service the array field-replaceable units (FRUs) in either a Sun
StorEdge 6020 or 6120 array. This chapter also includes upgrade procedures for array
files and is organized as follows:
■
“Troubleshooting the Array” on page 87
■
“Servicing FRUs” on page 99
■
“Upgrading Array Firmware and System Files” on page 121
Troubleshooting the Array
This section explains how to perform basic troubleshooting procedures on the Sun
StorEdge 6120 array. If you are unable to determine the problem using the tools
described in this section, contact your Sun Service representative to run detailed
diagnostics on the array.
This section is organized as follows:
■
“Analyzing the Problem” on page 87
■
“Determining FRU Failures” on page 98
■
“Determining Channel Connection Failures” on page 98
Analyzing the Problem
Begin the problem analysis by checking one or more of the following:
■
“Host-Generated Message” on page 88
87
■
“Telnet Session” on page 88
■
“LEDs” on page 88
Host-Generated Message
The data host sees the array as 1 to 64 logical volumes. A host-generated message
might indicate that the host cannot communicate with the array through the Fibre
Channel-Arbitrated Loop (FC-AL) channel or that too many channel errors are
occurring. To see details of problems internal to the array, use a diagnostics tool that
is installed on your management console, such as the Storage Automated Diagnostic
Environment. Refer to the documentation for the Storage Automated Diagnostic
Environment that is listed in the “Related Documentation” table in the Preface of
this book for more information about this software tool and how to use it.
In an array configuration where multipathing failover has been established, the
failure of a channel path or array controller causes the host to redirect I/O from the
failed channel to the second FC-AL connection.
Telnet Session
The Telnet session is a direct network link to the array unit by means of the CLI. You
can run individual commands to query and repair the unit from this interface. The
Telnet session requires access to the unit’s IP address. You can run the CLI from any
host that is part of the same network.
You can quickly determine the status of the array from the CLI. You can also
examine the syslog file of the array file system through the CLI. The syslog file
contains a record of events that have occurred in the unit.
For information about how to set up the array for message logging, see “Configuring
the Array for Remote System Logging” on page 30. For information about
interpreting the syslog file, see “Troubleshooting” on page 143. For information
about how to use the telnet CLI commands to monitor array activity, see “CLI
Commands” on page 181.
LEDs
The array incorporates a number of Service Indicator Standard (SIS) light-emitting
diodes (LEDs) that are used to assist in determining the status of the array as well as
in repairing it. The array unit and each array FRU have SIS LEDs, which have the
following general meanings:
88
■
Green indicates that the unit or FRU is operating properly.
■
Yellow or amber indicates that the unit or FRU requires service.
Sun StorEdge 6020 and 6120 Arrays System Manual • May 2003
■
Blue means that it is safe to remove the unit or FRU and to replace it.
■
White indicates the location of the array unit.
A white, or locator, LED is implemented on the front and back of the array. No other
FRU within the array has a white LED. The white LED is used to lead the service
person to the correct array. LEDs on FRUs within the array indicate to a service
person the FRU that requires service and the FRU’s current status. This section
contains information about the LEDs for the array and each array FRU. This section
includes illustrations of the LED locations, and tables of LED descriptions for all
types of LED indicators.
Array Unit LEDs
The array contains SIS LEDs that are visible from the front and back of the array unit
(FIGURE 6-1).
Chapter 6
Servicing the Array
89
Front view
White
Amber
Green
Back view
FIGURE 6-1
Array Unit SIS LEDs
TABLE 6-1 lists the possible conditions of the LEDs and describes each state.
TABLE 6-1
90
Array Unit SIS LEDs
White
Amber
Green
Function
Off
Off
Off
Array is not powered (no AC power).
Off
n/a
On
No locator action is active to this tray.
On
n/a
On
A locator action is underway for this tray.
Sun StorEdge 6020 and 6120 Arrays System Manual • May 2003
TABLE 6-1
Array Unit SIS LEDs
White
Amber
Green
Function
n/a
Off
On
Array is powered on to standby or to full power
and no service action is required.
n/a
On
On
A service action is required for an included FRU
and the array is powered on to standby or to full
power.
Fast blink1
Fast blink
On
Array is performing power-on test or tray LED
check.
1 Fast blink is measured as four blinks per second.
Disk Drive LEDs
Each disk drive has three SIS LEDs, viewable from the front of the array only, as
shown in the following figure.
Blue
Amber
Green
FIGURE 6-2
Disk Drive LEDs
TABLE 6-2 lists the possible conditions of the LEDs and describes each state.
TABLE 6-2
Disk Drive LEDs
Blue
Amber
Green
Function
Off
Off
Off
Drive not mated or not powered on.
On
Off
Off
OK to remove; not ready; software deconfigured;
drive mated, powered on.
Chapter 6
Servicing the Array
91
TABLE 6-2
Disk Drive LEDs (Continued)
Blue
Amber
Green
Function
Off
Off
Slow
blink1
Not ready; drive powered on; either spinning up
or down or waiting for the spin-up command.
Off
Off
On
Ready; drive spun-up.
Off
Off
Mainly on,
flashing off
at a visible
frequency
Ready with SCSI activity.
Off
On
On
Drive service action required; drive ready;
not OK to remove.
Off
On
Slow blink
Drive service action required; drive not ready;
not OK to remove.
On
On
Off
OK to remove; drive service action required; drive
not ready; software deconfigured.
On
Off
Slow blink
OK to remove; not ready; software deconfigured;
powered on; either spinning up or down or
waiting for the spin-up command.
Fast blink
Fast blink
n/a
Array power-on test, drive insertion test, or array
LED check.
1 Slow blink is measured as one second on and one second off. Fast blink is measured as four blinks per second.
Caution – During a data reconstruction on the disk drive, the blue SIS LED will
light indicating a “ready to replace” state for the drive. Do not remove the drive at
this time as this is a false LED signal.
92
Sun StorEdge 6020 and 6120 Arrays System Manual • May 2003
Power and Cooling Unit LEDs
Each power and cooling unit has three SIS LEDs, viewable from the back of the array
(FIGURE 6-3).
Blue
Amber
Green
Power switch
FIGURE 6-3
Power and Cooling Unit LEDs
TABLE 6-3 lists the possible conditions of the LEDs and describes each state.
TABLE 6-3
Power and Cooling Unit LEDs
Blue
Amber
Green
Function
Off
Off
Off
PCU not mated; no AC power, or normal state for
PCU in standby.
Off
Off
On
PCU ready; all voltages at rated value.
blink1
PCU ready, battery power available, and all DC
voltages within tolerance.
Off
Off
Fast
Off
On
On
PCU service action is required; PCU ready.
Off
On
Off
PCU service action is required; PCU not ready.
Chapter 6
Servicing the Array
93
TABLE 6-3
Power and Cooling Unit LEDs (Continued)
Blue
Amber
Green
Function
On
On
Off
OK to remove; PCU service action is required;
PCU not ready; PCU is software deconfigured.
On
Off
Off
OK to remove; PCU is software deconfigured; no
service action required.
Fast blink
Fast blink
Fast blink
Array power-on test, PCU insertion test, or array
LED test.
1 Fast blink is measured as four blinks per second.
Interconnect Card LEDs
Each interconnect card has three SIS LEDs and two channel-status LEDs viewable
from the back of the array (FIGURE 6-4).
Blue
Amber
Green
Channel-status LED
Channel-status LED
FIGURE 6-4
94
Interconnect Card LEDs
Sun StorEdge 6020 and 6120 Arrays System Manual • May 2003
TABLE 6-4 lists the possible conditions of the SIS LEDs and describes each state.
TABLE 6-4
Interconnect Card SIS LEDs
Blue
Amber
Green
Function
Off
Off
Off
Interconnect card not mated or no standby power.
Off
Off
On
Ready; standby power OK.
Off
On
On
Interconnect card service action required;
interconnect card ready.
Off
On
Off
Interconnect card service action required;
interconnect card not ready.
On
Off
Off
OK to remove; not ready; software deconfigured.
On
On
Off
OK to remove; interconnect card service action
required; interconnect card not ready; interconnect
card is software deconfigured.
Fast blink1
Fast blink
Fast blink
Array power-on test, interconnect card insertion
test, or array LED check.
1 Fast blink is measured as four blinks per second.
TABLE 6-5 lists the possible conditions and states for the interconnect card channel
status LEDs.
TABLE 6-5
Interconnect Card Channel Status LEDs
Amber
Green
Function
Off
On
Interconnect cable present; OK.
Off
Off
Interconnect cable missing or port has been shut
down.
On
Off
Interconnect cable present; no signal detected.
Controller Card LEDs
Each controller card has three SIS LEDs, an FC-AL channel-status LED, and an
Ethernet channel-status LED viewable from the back of the array (FIGURE 6-5 and
FIGURE 6-6).
Chapter 6
Servicing the Array
95
Blue
Amber
Green
FIGURE 6-5
Controller Card SIS LEDs
Ethernet channel
LED states
VAL 100 bps
ACT
10 bps
Ethernet transfer rate
Ethernet channel status
Valid (VAL) and Active (ACT)
FC-AL channel-status LED
FIGURE 6-6
96
Controller Card Communication Channel LEDs
Sun StorEdge 6020 and 6120 Arrays System Manual • May 2003
TABLE 6-6 lists the possible conditions of the controller card SIS LEDs and describes
each state.
TABLE 6-6
Controller Card SIS LEDs
Blue
Amber
Green
Function
Off
Off
Off
Controller not mated, not powered, or not booted.
Off
Off
On
Controller ready.
Off
On
On
Controller service action required; controller
ready.
Off
On
Off
Controller service action required; controller not
ready.
On
On
Off
OK to remove; controller service action required;
controller not ready; controller is software
deconfigured.
On
Off
Off
OK to remove; controller not ready; software
deconfigured.
Fast blink1
Fast blink
n/a
Array power-on test, controller insertion test, or
array LED check.
1 Fast blink is measured as four blinks per second.
TABLE 6-7 lists the possible conditions of the FC-AL channel-status LED and
describes each state.
TABLE 6-7
FC-AL Channel-Status LEDs
Green
Amber
Function
Off
Off
Port disabled.
Off
On
Port enabled; no signal detected or Laser Fault
On
Off
Port enabled; signal detected.
Blink
Off
Port enabled; signal detected; transferring
information.
Chapter 6
Servicing the Array
97
TABLE 6-8 lists the possible conditions of the Ethernet channel-status LEDs and
describes each state.
TABLE 6-8
Ethernet Channel Status LEDs
LED
Green
Function
VAL/ACT
Off
Link invalid.
On
Link valid.
Blink
Link valid and active.
On
100 Mbps communication speed
Off
10 Mbps communication speed
100 bps or 10 bps
Determining FRU Failures
FRU failures are reported by an alarm or message notification from the tool that is
used to monitor the array, such as the Storage Automated Diagnostic Environment
tool. The failed FRU displays a blinking amber LED. FRU failures can be found also
in the syslog output of the array activity.
Before replacing a FRU based on an LED indicator, verify its failure by using one of
the diagnostics tools such as the Storage Automated Diagnostic Environment or the
array CLI commands.
Determining Channel Connection Failures
Host-to-array channel failures occur when the connection between the array and the
host is either severed or intermittent. Errors in the host data channel are outside the
scope of the array. To determine failures in the data path, you must use host-based
application diagnostics such as the Storage Automated Diagnostic Environment.
Refer to the documentation of the selected diagnostic tool for information about
identifying data channel failures.
98
Sun StorEdge 6020 and 6120 Arrays System Manual • May 2003
Servicing FRUs
This section contains information about removing and replacing the FRUs in an
array.
This section contains the following information:
■
“Preparing for Service” on page 99
■
“Removing and Replacing Components” on page 99
Preparing for Service
1. Read the Sun StorEdge 6120 Array Regulatory and Safety Compliance Manual for basic
safety information before performing service procedures.
2. Follow these guidelines to help prevent damaging FRUs:
■
Wear a grounding wrist strap.
■
Before handling a FRU, discharge any static electric charge by touching a ground
surface.
■
Do not remove a FRU from its antistatic protective bag until it is ready for
installation.
■
When removing a FRU from the array, immediately place it in an antistatic bag
and packaging.
■
Handle a FRU only by its edges and avoid touching the circuitry.
■
Do not slide a FRU over any surface.
■
Remove all plastic, vinyl, and foam from the work area.
■
Limit body movement (which builds up static electricity) during FRU installation.
Removing and Replacing Components
This section contains instructions for servicing the following array FRUs:
■
■
■
■
■
■
“Disk Drives” on page 100
“Power and Cooling Units” on page 102
“UPS Battery” on page 106
“Interconnect Cards” on page 109
“Controller Card” on page 111
“Chassis” on page 114
Chapter 6
Servicing the Array
99
Disk Drives
Caution – Replace only one disk drive in an array at a time to ensure that no data
is lost. Ensure that the disk drive is fully reenabled before replacing another disk
drive in the same array.
The default configuration for the array is to automatically spin up and reenable a
replaced disk drive, and then automatically copy the data. Disk drive spinup takes
about 30 seconds, and reconstruction of the data on the disk drive can take one or
more hours, depending on system activity.
Replacement disk drives in either a Sun StorEdge 6020 or 6120 array must have
either equal or greater storage capacity than the drives used in the volume. Drive
capacities available include 36 Gbyte, 73 Gbyte, and 146 Gbyte.
Note – In some cases, if disk drives are removed and replaced on a powered-off or
incompletely booted array, the internal system-monitoring facilities might not
correctly detect the drive replacement. Therefore, replace disk drives only on
powered-on, fully booted arrays.
Note – Even if the LED indicates a drive failure, you should always verify the FRU
status using either the Storage Automated Diagnostic Environment or array CLI
before replacing the drive.
Note – Use this procedure if you are removing a diskless drive bracket and adding
a new drive in its place.
▼ To Remove and Replace a Disk Drive
1. Observe static electricity precautions.
2. Locate the disk drive that needs to be replaced.
Disk drives are numbered from 1 to 14, starting on the left side of the array
(FIGURE 6-7).
100
Sun StorEdge 6020 and 6120 Arrays System Manual • May 2003
Disk 1
Disk 14
FIGURE 6-7
Disk Drive Numbering
3. Push down on the latch release to open the drive latch handle (FIGURE 6-8).
Latch release
Latch handle
FIGURE 6-8
Removing a Disk Drive
Chapter 6
Servicing the Array
101
4. Use the latch handle to slowly pull out the disk drive about one inch.
Wait 30 seconds before pulling the drive out completely, giving the disk drive time
to spin down.
5. Remove the disk drive from the array.
After removing the failed drive or a diskless drive bracket, wait for approximately
one minute after the drive has been removed before inserting a new replacement
drive. This allows the system enough time to correctly determine that the failed
drive has been removed and internal drive states get updated correctly.
6. Push in the latch handle on the removed disk drive to protect it from damage.
7. Push the latch release to open the handle on the disk drive to be installed.
8. Insert the new disk drive gently on the middle of the rails and push it in until it
is seated with the midplane connector.
9. Push in on the drive handle to firmly secure the drive.
The handle will click into place when the drive is fully inserted.
10. Use the fru stat command to view the drive status and to ensure there are no
errors.
See “fru” on page 192 for more information about the fru stat command. You can
also use the Storage Automated Diagnostic Environment to verify the drive status.
Refer to the documentation for the Storage Automated Diagnostic Environment that
is listed in the “Related Documentation” table in the Preface of this book for more
information about this software tool and how to use it.
Power and Cooling Units
The power and cooling unit has two active power sources: standby and primary power.
Standby power, which is used to power the microcontroller on the interconnect card,
is activated when AC power is present. Primary power, which is used to power all
remaining circuits and disk drives, is activated when AC or battery power is present
and the power switch is on.
Each power and cooling unit has a power switch in the upper center of the unit.
Turning off the power on a power and cooling unit affects only that power and
cooling unit. Therefore, to power off all primary power to the unit, both power
switches on both power and cooling units must be turned off. After the switches are
turned off, system primary power does not actually turn off until the controller has
performed an orderly shutdown, including writing any data cache to disk. This
process can take up to two minutes.
102
Sun StorEdge 6020 and 6120 Arrays System Manual • May 2003
Separate power cords are used for the connector on each power and cooling unit to
provide redundant cabling. The power cords need to be connected to alternate AC
power sources on separate power grids for full redundancy.
Caution – Do not handle the power and cooling unit when the power cord is
connected. Line voltages are present within the power and cooling unit when the
power cord is connected, even if the power switch is in the Off position.
Caution – At the rear of the power and cooling unit is a recessed PC card connector.
Do not touch this connector or allow any metal object to touch it. The power and
cooling unit contains the UPS battery backup, which can be replaced as a separate
FRU.
Note – Even if the LED indicates a power and cooling unit failure, you should
always verify the FRU status by using either the Storage Automated Diagnostic
Environment or the array CLI.
Caution – To ensure correct airflow for system cooling, both power and cooling
units must be in the installed position for normal operation. A failed power and
cooling unit should be removed only when a replacement power and cooling unit is
available to be inserted.
Caution – Replace only one power and cooling unit at a time to prevent system
interruption.
▼ To Replace a Power and Cooling Unit
1. Power off the power and cooling unit by pressing the power switch (FIGURE 6-9).
Make sure that the blue SIS LED is lit.
Chapter 6
Servicing the Array
103
Power switch
Power cable clip
Retainer screw
Latch handle
Power cable clip
FIGURE 6-9
Power and Cooling Unit
2. Disconnect the power cable from the AC outlet and from the power and cooling
unit, in that order.
3. Remove the power cable from the cable clip on the power and cooling unit
(FIGURE 6-9).
4. Loosen the Phillips retainer screw to unlock the power and cooling unit latch
handle.
5. Pull up on the latch handle to release the power and cooling unit from its
connector (FIGURE 6-10).
Pull the power and cooling unit straight out of the array.
104
Sun StorEdge 6020 and 6120 Arrays System Manual • May 2003
FIGURE 6-10
Removing the Power and Cooling Unit
6. Insert the new power and cooling unit until the latch handle touches the chassis.
7. Push the latch handle down and secure the Phillips retainer screw to lock the
latch handle.
Caution – Make sure the power switch is in the Off position (-) before connecting
power cords.
8. Insert the power cord into the power and cooling unit connector.
9. Insert the power cable into the cable clip.
10. Connect the power cord to the AC outlet.
When the power and cooling unit receives AC power, the SIS LEDs will flash.
11. Press the power and cooling unit power switch to the On position.
12. Verify that the power and cooling unit SIS LED is green, indicating that it is
receiving power.
It can take several seconds for the green LED to light.
13. Check the power and cooling unit status by using the fru stat command or the
Storage Automated Diagnostic Environment.
Chapter 6
Servicing the Array
105
See “fru” on page 192 for more information about the fru stat command. Refer to
the documentation for the Storage Automated Diagnostic Environment that is listed
in the “Related Documentation” table in the Preface of this book for more
information about this software tool and how to use it.
UPS Battery
The UPS battery is located within the power and cooling unit. The battery provides
backup in case of a complete AC power failure, and it sustains power to the array
long enough to flush cache data to the drives.
During a power failure, if the battery is flushing cache data to the drives, battery
power becomes depleted. After AC power is available, the battery recharges. While
the battery is recharging, write-behind cache mode is disabled and write-through
cache mode is enabled until the battery is fully recharged. The battery recharge
could take up to several hours, depending on the length of the power outage and the
amount of cache data that was flushed to the drives.
The battery service life is two years. When the battery approaches the end of its life
span, warning messages are sent to the syslog file. The first message is sent 45 days
before the end of the life span, followed by a warning message every 5 days
thereafter. Replace the power and cooling unit that contains the battery as soon you
receive these warning messages.
You can view information about the battery, including the life span, using the CLI.
See “To Check the Battery” on page 81 for more information about this feature.
▼ To Remove and Replace the UPS Battery
1. Remove the power and cooling unit from the array.
Follow the instructions in “To Replace a Power and Cooling Unit” on page 103.
2. Turn the power and cooling unit over and place it on a flat surface so that the
bottom is facing up.
3. Remove the four Phillips screws that secure the UPS battery to the power and
cooling unit (FIGURE 6-11).
106
Sun StorEdge 6020 and 6120 Arrays System Manual • May 2003
FIGURE 6-11
Removing the UPS Battery
4. Lift the battery up and out at an angle to disconnect it.
Set the old battery aside for recycling.
Chapter 6
Servicing the Array
107
5. Slide the new battery in at a slight angle, matching the male connector on the
battery with the female connector on the power and cooling unit (FIGURE 6-12).
UPS battery connector
FIGURE 6-12
UPS Battery
6. Secure the four screws that hold the battery in place.
7. Replace the power and cooling unit in the array.
Tighten the Phillips retainer screw to secure the power and cooling unit latch handle.
8. Press the power switch to the On position.
9. Verify that the power and cooling unit SIS LED is green, indicating that it is
receiving power.
It can take several seconds for the green LED to light.
10. Check the power and cooling unit status using the fru stat command or the
Storage Automated Diagnostic Environment.
See “fru” on page 192 for more information about the fru stat command. Refer to
the documentation for the Storage Automated Diagnostic Environment that is listed
in the “Related Documentation” table in the Preface of this book for more
information about this software tool and how to use it.
108
Sun StorEdge 6020 and 6120 Arrays System Manual • May 2003
Interconnect Cards
The interconnect cards contain the interface circuitry and two connectors on each
card for interconnecting multiple Sun StorEdge 6020 or 6120 arrays. The interconnect
card also contains the environmental monitor for the array. If an interconnect card or
cable fails, the array continues to function using the remaining interconnect card and
cable.
The interconnect cards in an array are assigned a master and slave status, similar to
the controller card. If you unplug or remove the master interconnect card from the
unit and then put it back, the new status is reported as “slave.” The corresponding
interconnect card that was the slave then becomes the master. You can view the
status of the interconnect cards using the fru stat command on the array. There is
no performance impact to the array if the interconnect cards change status, and it is
not necessary to alter the state back to the original master-and-slave configuration.
Note – If the interconnect card LED indicates an interconnect card failure, you
should always verify the FRU status using either the Storage Automated Diagnostic
Environment or array CLI
Caution – Use the interconnect cables to cable only Sun StorEdge 6020 or 6120
arrays together using the interconnect card connectors. Do not use these cables for
any other FC-AL connection.
Caution – The interconnect card FRUs are extremely sensitive to static electricity.
Use proper grounding wrist straps and antistatic procedures when handling these
FRUs. See “Preparing for Service” on page 99 for a list of static electricity
precautions.
Caution – Replace one interconnect card at a time. Follow the procedure as
described to ensure that there is no interruption in system operation or loss of data.
Caution – To prevent interruption of system operation during interconnect card
replacement, make sure that you remove only the failed interconnect card. Leave the
second interconnect card intact in the array. Removing both interconnect cards at the
same time in a controller unit causes the array to shut down immediately.
Chapter 6
Servicing the Array
109
▼ To Replace an Interconnect Card
1. Ensure that the interconnect card to be replaced is showing failure status.
Use either the Storage Automated Diagnostic Environment or the array CLI to check
FRU status.
2. Observe static electricity precautions, as described in “Preparing for Service” on
page 99.
If you have a single controller unit configuration, proceed to Step 4.
3. Squeeze the connector clip to remove the interconnect cable from the failed
interconnect card and from the other array unit to which it connects.
Mark the connector with either 1 or 2.
4. Loosen the Phillips retaining screw to unlock the latch handle (FIGURE 6-13).
Retaining screw
FIGURE 6-13
Removing the Interconnect Card
Caution – The latch handle on the interconnect card is operated by a gear at the
base of the card. To avoid injury, keep your fingers away from this gear when
removing the card and opening or closing the latch handle.
5. Pull the latch handle out to release the interconnect card from its connector and
pull the card out of the chassis.
6. Insert the new interconnect card all the way in the chassis, making sure that the
card sits on the frame.
110
Sun StorEdge 6020 and 6120 Arrays System Manual • May 2003
7. Lock the new interconnect card in place by pushing in on the latch handle.
8. Tighten the retaining screw.
9. Reconnect the interconnect cable to the interconnect card and to the other array
unit.
10. Verify that the LEDs on the interconnect card show that it has initialized properly.
11. Check the interconnect card status using the fru stat command or using the
Storage Automated Diagnostic Environment.
See “fru” on page 192 for more information about the fru stat command. Refer to
the documentation for the Storage Automated Diagnostic Environment that is listed
in the “Related Documentation” table in the Preface of this book for more
information about this software tool and how to use it.
Controller Card
The controller card is redundant in a Sun StorEdge 6120 HA array configuration—
that is, when the array is connected to another array that contains a controller card.
In an HA array configuration, if there is a controller card failure in a master unit, the
controller fails over to the alternate master, which then assumes master controller
status. After the failed controller card is replaced in the master unit, that unit
assumes the role of alternate master. The new master unit (previously the alternate
master) retains all the necessary information, such as the unit IP address, to continue
functioning without system interruption. You can return the HA array configuration
back to its original, prefailover configuration of master and alternate master by
performing a reset command.
In a 1x1, 1x2, or 1x3 array configuration, system activity is interrupted until the
controller card is replaced and is back online. When a controller card is replaced, the
array automatically downloads the previous settings to the new controller card. The
array is fully functional after the new controller card is installed and the controller is
online.
A controller card can be replaced without system interruption only if the array is
part of an HA array configuration.
Note – If the controller card LED indicates a controller card failure, you should
always verify the FRU status by using either the Storage Automated Diagnostic
Environment or the array CLI command.
Chapter 6
Servicing the Array
111
▼ To Replace the Controller Card:
1. Observe static electricity precautions.
See “Preparing for Service” on page 99 for precautions.
2. Ensure that the controller card is showing failure status.
Use either the Storage Automated Diagnostic Environment or the array CLI to check
FRU status.
3. Remove the Ethernet cable from the Ethernet connector.
4. Remove the fiber-optic cable from the FC-AL connector.
5. Loosen the Phillips retaining screw to unlock the latch handles (FIGURE 6-14).
FC-AL connector
Retaining
screw
Ethernet connector
Latch handles
FIGURE 6-14
Controller Card
6. Pull the latch handles to release the controller card from the connector and remove
it from the array (FIGURE 6-15).
112
Sun StorEdge 6020 and 6120 Arrays System Manual • May 2003
FIGURE 6-15
Removing the Controller Card
7. Insert the new controller card all the way in the chassis.
8. Push in the latch handles to secure the controller card with the connector.
9. Tighten the retaining screw.
10. Insert the fiber-optic cable into the FC-AL connector.
11. Insert the Ethernet cable into the Ethernet connector.
12. Check the controller LEDs to determine when the controller is operational.
When the controller is operational, the SIS LED is green.
Caution – During a controller boot process, if the Power-On-Self-Test or Built-InSelf-Test firmware detects a fatal problem with the controller, the system prevents
the controller from going online. If this happens, the amber LED, which normally
indicates a controller failure, will not light. After installing a new controller board,
allow enough time for the controller to boot and follow with an inspection by using
the Storage Automated Diagnostic Environment to verify controller online status.
13. Check the controller card status using the fru stat command or using the
Storage Automated Diagnostic Environment.
Chapter 6
Servicing the Array
113
See “fru” on page 192 for more information about the fru stat command. Refer to
the documentation for the Storage Automated Diagnostic Environment that is listed
in the “Related Documentation” table in the Preface of this book for more
information about this software tool and how to use it.
Chassis
The array chassis rarely needs to be replaced. However, the chassis part number is
available in case you need to replace the midplane and chassis. (These must be
replaced together, because they are factory aligned.)
Any problems with the midplane are usually due to an electrical short or a bent or
broken pin connector. These problems first appear as a failure of another FRU
component, such as an interconnect failure or drive failure. If replacing the FRU that
appears to be failed does not correct the problem, then examine the midplane
connector that the FRU connects to for bent or broken pins. If nothing is obvious,
install another spare FRU to verify that it is not a failed FRU component causing the
problem. If you have eliminated all possibility of a FRU component failure and the
problem still remains, it is likely a midplane failure.
Caution – This procedure should be performed only by a trained, qualified service
provider. If you suspect a midplane failure or need to replace a damaged chassis,
contact your Sun service representative to perform this procedure.
Caution – Replacing an array chassis interrupts array operation.
Note – If the array is part of an HA array configuration, access to all volumes in the
HA array is unavailable during this midplane replacement procedure. Assess the
impact of unmounting volumes and stopping applications prior to starting this
procedure.
▼ To Replace a Chassis and Midplane
1. Perform full backups of data on affected arrays for all accessible volumes.
Caution – This procedure involves disassembling the array hardware and
reassembling it. Make sure you back up all data on the array before proceeding to
avoid data loss.
114
Sun StorEdge 6020 and 6120 Arrays System Manual • May 2003
2. From the data host, halt all channel activity going to all volumes in that array and
in arrays connected to it.
a. Notify all applications to stop accessing any affected volumes by unmounting
the volume(s) or stopping the application if necessary.
b. Verify that all drive activity has stopped.
The drive LEDs become solid green, indicating that the drives are idle.
3. If any volume manager software is running, such as Solaris Volume Manger
software or VERITAS Volume Manager, disable transactions to the volumes that
reside on the array midplane that you are replacing and to all other volumes in
that HA array configuration.
Consult the appropriate volume manager documentation for information about
disabling the data host’s access to the array volumes.
4. Remove power by typing:
:/:<1> shutdown
Shutdown the system, are you sure? [N]: y
Note – After removing power, the fans in the power and cooling unit will continue
to operate as long as the AC power cable is connected, even when power switches
are in the Off position.
5. Press the power switch on the power and cooling units to the Off (-) position
(FIGURE 6-16).
5016338 400020
00 20 FZ 05 1A 34
Power switch
Serial number and
MAC address label
FIGURE 6-16
Array—Back View
All arrays connected to the failed array power off automatically.
Chapter 6
Servicing the Array
115
6. Disconnect all external cables from the failed array.
Disconnect all power, interconnect, FC-AL, and Ethernet cables.
Note – If the array is part of an HA array configuration, note the placement of the
host FC-AL connections and loop cables. You will need this information in Step 11.
Caution – Use two people to lift and move the array. It can weight up to 90 lbs
(41 kg).
7. Remove the chassis from the cabinet.
a. Remove the four Phillips screws at the back of the chassis and the four at the
front that secure the array to the side rails in the cabinet (FIGURE 6-17).
FIGURE 6-17
Removing the Mounting Screws
b. Slide the chassis out of the cabinet (FIGURE 6-18).
116
Sun StorEdge 6020 and 6120 Arrays System Manual • May 2003
FIGURE 6-18
Removing the Chassis
8. Move the failed array to an area where both the front and back can be easily
accessed.
Caution – FRUs are extremely sensitive to static electricity. Use proper antistatic
wrist strap and procedures when handling any FRU. Observe all static electricity
precautions as described in “Preparing for Service” on page 99.
9. Remove all FRU components from the failed array and put them into the new
chassis, making sure they are placed in the same location.
Note – When removing disk drives, label each one with its slot position in the unit
so that you can replace the drives in the correct slots.
a. Unlock each FRU by loosening the Phillips retaining screw that secures the
latch handles, and pull out the handles to release the FRU from the midplane
connectors.
The disk drives do not have retaining screws.
b. Pull the FRU straight out.
Chapter 6
Servicing the Array
117
c. Lock the FRU back into place in the new chassis by pushing in and securing
the latch handle(s).
Be sure to tighten the retaining screw for each FRU.
Caution – Maintain disk positions or data could be lost.
10. Move the replacement chassis back into place.
If you are installing the chassis in a cabinet, align the new chassis with the side rails
and slide the chassis into the cabinet. Replace the four screws at the back of the
chassis and the four screws at the front to secure the chassis to the cabinet.
11. Connect all cables previously removed, but do not power on the array(s).
Note – If the array is part of an HA array configuration, make sure that the host
FC-AL cables are recabled to the same Sun StorEdge 6020 or 6120 array FC-AL
connections that they were removed from as you noted in Step 6. Also ensure that
loop cables are properly recabled.
12. Contact the appropriate Contract Administrator (CA) of the Contracts Verification
Group (CVG) to relay the system serial number and new chassis information.
13. On the rarp server, update the /etc/ethers file.
Replace the MAC address entry of the failed chassis with the MAC address of the
new chassis. For example:
8:0:20:6d:93:7e array-name
In this example:
■
■
8:0:20:6d:93:7e is the new MAC address
array-name is the name of the old array.
Note – If the failed unit was an alternate master, the unit’s MAC address might not
be in the /etc/ethers file. In this case, no file changes are required.
14. Verify that the /etc/hosts file contains the previous IP address and array name.
For example:
118
Sun StorEdge 6020 and 6120 Arrays System Manual • May 2003
nnn.nnn.nnn.nnn array-name
In this example, nnn.nnn.nnn.nnn is the IP address assigned previously.
15. Verify that the /etc/nsswitch.conf file on the rarp server references the local
system files.
To ensure that the Solaris software environment uses the changes made to the
/etc/ethers and /etc/hosts files, edit the host and ethers entries in the
/etc/nsswitch.conf file so that the files parameter appears before the
[NOTFOUND=return] statements. For example:
hosts:
ethers:
nis files [NOTFOUND=return]
nis files [NOTFOUND=return]
16. Ensure that the rarp daemon is running on the rarp server:
rarpserver# ps -eaf | grep rarpd
17. If the rarp daemon is not already running on the rarp server, start it by typing:
rarpserver# /usr/sbin/in.rarpd -a &
18. Verify that AC power is present on each power and cooling unit in the chassis.
The AC indicator light on each power and cooling unit is amber.
19. Press the power switch to the On position to restore power.
FIGURE 6-16 shows the power switch location. The AC indicator lights on the power
and cooling units are solid green.
After you power on, the array’s previous IP address is reassigned to the new MAC
address.
Allow time to complete the boot cycle. When all LEDs are green, proceed to the next
step.
20. Check the LEDs at the front and back of the unit to ensure that all components are
receiving power and are functional.
While the drives are spinning up, the LEDs blink. The array boot time takes up to
several minutes, after which all LEDs are solid green, indicating that the unit is
receiving power and there is no drive activity.
Chapter 6
Servicing the Array
119
Note – The batteries in the power and cooling units recharge after powering on the
unit. While the batteries are recharging, write-behind cache is disabled.
Caution – During a controller boot process, if the Power-On-Self-Test or Built-InSelf-Test firmware detects a fatal problem with the controller, the system prevents
the controller from going online. If this happens, the amber LED, which normally
indicates a controller failure, will not light. After installing a new controller board,
allow enough time for the controller to boot and follow with an inspection using the
Storage Automated Diagnostic Environment tool to verify controller online status.
21. Use the CLI to verify that all components are functioning properly.
To verify status using the CLI, open a Telnet session to the disk array and verify
volume and FRU status.
:/:<1> fru stat
:/:<2> vol stat
Note that when the midplane is replaced, the data host volume’s worldwide name
(WWN) changes. The WWN is derived from the midplane serial number. Because
the volume WWN is part of the volume’s device path on the data host, the device
path definition on the data host changes. Therefore, you must reconfigure the data
host to recognize the new WWNs.
22. Configure the data host to recognize the new WWNs by typing the following
command on the data host:
datahost# devfsadm
Note – Any applications specifically dependent on the volume’s device path also
need to be changed. Refer to each application’s documentation for instructions.
23. Execute a format (1M) command on the data host to verify that the Sun StorEdge
6120 arrays are seen.
The Sun StorEdge 6120 array volumes are now usable by the data host and can be
mounted or reenabled with the appropriate volume manager software.
120
Sun StorEdge 6020 and 6120 Arrays System Manual • May 2003
Upgrading Array Firmware and
System Files
This section explains how to upgrade the array firmware and system files located on
the Sun StorEdge 6120 array controller card, interconnect card, and disk drives.
There are two types of upgrades:
■
A live upgrade is performed while the array is operational and is processing I/O
data. Live firmware upgrades are used to upgrade the controller card firmware,
interconnect card firmware, and system files on Sun StorEdge 6120 HA array
configurations where there are two active controller cards in the array.
■
Offline upgrades are performed when the array is not processing I/O data; all
array activity must be halted during the upgrade. Offline upgrades are used for
single controller array configurations such as a 1x1, 1x2, or 1x3 array
configurations, and for all disk drive firmware upgrades in both single-array
controller unit configurations and HA array configurations.
This section is organized as follows:
■
“Live Upgrades” on page 121
■
“Offline Upgrades” on page 129
Live Upgrades
Use the procedures in this section to upgrade controller card firmware, interconnect
card firmware, and system files on Sun StorEdge 6120 HA array configurations only.
Note – To upgrade disk drive firmware on Sun StorEdge 6120 HA array
configurations, you must perform an offline upgrade. See “Offline Upgrades” on
page 129 for instructions
This section is organized as follows:
■
“Preparing for the Live Upgrade” on page 122
■
“Transferring Patches and Files to the Array” on page 124
■
“Upgrading the Controller Card Firmware” on page 124
■
“Upgrading the Interconnect Card Firmware” on page 127
■
“Completing and Verifying the Live Upgrade” on page 128
Chapter 6
Servicing the Array
121
Preparing for the Live Upgrade
1. Make sure there are two active controller cards in the configuration to perform the
live firmware upgrade: a master controller unit and an alternate master controller
unit.
2. Verify that the controller unit ownership is operating in the default mode, where
the bottom array is the master controller unit and the top array is the alternate
master controller unit.
:/:<36> sys stat
Unit
State
----- --------1
ONLINE
2
ONLINE
Role
-----Master
AlterM
Partner
------2
1
3. Make sure that the multipathing host software, such as the VERITAS DMP agent
in VERITAS Volume Manager or Sun StorEdge Traffic Manager, is configured
correctly and is running on the host system.
Refer to the multipathing software documentation that came with your multipathing
software for instructions.
4. Before you begin the firmware download, verify that the arrays and their
associated back-end loops are in an optimal state.
a. Use the proc list command to make sure there are no volume
reconstructions underway.
b. Type port listmap to display the current mappings between the host
interface ports and the array volumes, and to ensure that no ports are operating
in a failover state.
c. Type refresh -s to check the battery status and to ensure that no battery
refresh operations are underway.
d. Type the fru stat command to display the status of all array FRUs to ensure
that they all are functioning properly.
5. Disable any monitoring software, such as the Storage Automated Diagnostic
Environment, to avoid triggering false alerts during the upgrade.
6. Display current array system settings by using the sys list command, and
record the array setting information.
You will be modifying system settings during the upgrade procedure and will need
to return them to their previous state after the upgrade.
122
Sun StorEdge 6020 and 6120 Arrays System Manual • May 2003
7. View the sys list command from Step 6 and make sure the mp_support setting
is set to rw or mpxio to enable multipathing.
Caution – If multipathing is not enabled, the system is not configured for a failover
operation. Before continuing with a live firmware upgrade, make sure the
configuration is set up for multipathing support.
8. Make backup copies of the following array files if they have been modified for
your array configuration:
■
■
■
/etc/hosts
/etc/bat.conf
/etc/syslog.conf
You might need to restore these files to the array after completing the upgrade
procedure as these files are over-written during the upgrade, and any previous
modifications will be lost.
9. Use the set command to verify that the array bootmode is set to auto.
For example:
:/:<52>set
bootmode auto
bootdelay 3
ip
nnn.nnn.nnn.nnn
netmask
255.255.255.0
gateway
nnn.nnn.nnn.nnn
tftphost nnn.nnn.nnn.nnn
tftpfile null
hostname qatest
timezone
logto
*
loglevel 3
rarp
on
mac
00:03:ba:27:ca:64
10. Turn off local system logging on the array to avoid sending false alerts through
facilities that monitor the syslog. Type:
:/:<53>set logto 1
Chapter 6
Servicing the Array
123
Transferring Patches and Files to the Array
Note – You must have a root password to log in to the array and set it. If you do
not have a root password, you must establish one before proceeding for this
procedure to work correctly.
The latest controller and interconnect card firmware images and the array system
files are available on the SunSolve™ web site:
http://www.sunsolve.sun.com
1. Navigate to the Patch Portal and select one of the available patch utilities, such as
PatchPro.
2. Use the patch program to locate and download the Sun StorEdge 6120 array patch
image.
3. Refer to the patch README file for specific patch installation instructions.
The 6120.sh script is included with the patch image and provides an interactive
utility that transfers the necessary files and binaries from the patch directory on the
host to the array that is being upgraded.
After downloading the array patch and running the 6120.sh script, you must
install the firmware image on the individual components as described in the
following sections.
Upgrading the Controller Card Firmware
1. Start a Telnet session from the management host to the array if you are not already
in a Telnet session.
2. On the array, use the ep download command to install the new controller
firmware:
:/:<1> ep download xxxx.bin
where xxxx.bin is the name of the controller firmware file.
3. Disable cache mirroring and disable the master controller unit by typing:
:/:<2> sys mirror off; disable u1
Disabling the master controller unit ends the current Telnet session.
124
Sun StorEdge 6020 and 6120 Arrays System Manual • May 2003
4. Start a new Telnet session with the array.
5. Display the controller status and verify that the master controller unit has been
disabled by typing:
:/:<3>
Unit
----1
2
sys stat
State
--------OFFLINE
ONLINE
Role
Partner
------ ------Master
2
AlterM
1
6. Enable the u1 controller by typing:
:/:<4> enable u1
It can take a few minutes for the u1 controller to completely boot and become
available to the host system.
7. Verify that the master controller unit is enabled by typing:
:/:<5>
Unit
----1
2
sys stat
State
--------ONLINE
ONLINE
Role
-----AlterM
Master
Partner
------2
1
8. Using the host-based multipathing software, verify that the u1 controller is back
online and that a failback operation to the path associated with the u1 controller
has occurred.
You must determine that the path to the u1 controller has been completely restored
before continuing this procedure. For example, if you are using Sun StorEdge Traffic
Manager software on the Solaris 9 operating environment, you can use the iostat
-X command to determine the state of physical paths to a storage device. For specific
instructions, refer to the documentation that came with your multipathing tool.
Caution – Failure to confirm a proper failback of I/Os to the master controller unit
before continuing this procedure can result in a temporary loss of access to data on
the array.
9. Once data path failback to the u1 controller has completed, disable the u2
controller by typing:
Chapter 6
Servicing the Array
125
:/:<6> disable u2
The Telnet connection to the array terminates, and host path failover of all I/O paths
to the u1 controller begins.
10. Start a new Telnet session with the array.
11. Verify that the u2 controller has been disabled by typing:
:/:<1>
Unit
----1
2
sys stat
State
--------ONLINE
OFFLINE
Role
Partner
------ ------Master
2
AlterM
1
12. Enable the u2 controller by typing:
:/:<2> enable u2
13. Verify that a host-side failback operation has occurred:
a. Use the array port listmap command to confirm LUN ownership.
b. Use the host-based multipathing software to verify that I/O has failed back to
its primary paths.
14. Reenable cache mirroring on the array by typing:
:/:<3> sys mirror auto
15. Verify that the new controller firmware is loaded and running by typing:
:/:<4> ver
6120 Release 3.0.2 Fri Feb 21 16:04:37 PST 2003 (nnn.nnn.nnn.nnn)
Copyright (C) 1997-2003 Sun Microsystems, Inc.
All Rights Reserved.
The controller firmware is displayed in the ver output as Release 3.0.2.
126
Sun StorEdge 6020 and 6120 Arrays System Manual • May 2003
Upgrading the Interconnect Card Firmware
Note – The firmware for the interconnect card is also referred to as loop card
firmware. In the screen output, the term loop refers to the interconnect card.
This procedure explains how to upgrade interconnect (loop) card firmware on an
active Sun StorEdge 6120 HA array configuration.
1. Make sure you have completed the steps in “Preparing for the Live Upgrade” on
page 122.
2. Determine which interconnect cards in the array configuration require a firmware
upgrade by typing:
:/:<11>lpc version
LOOP A
Enclosure 1
6.19
Enclosure 2
6.23
Enclosure 3
6.23
Enclosure 4
6.23
LOOP B
6.23
6.23
6.19
6.23
In this example, only interconnect cards u1l1 and u3l2 require a firmware upgrade
from version 6.19 to version 6.23.
3. Use the lpc command to download the firmware to all Loop A interconnect cards
that require an update.
Using the example in the previous step, type:
:/:<12>lpc download u1l1 filename.bin
where filename.bin is the filename of the interconnect card firmware image.
4. Reboot each interconnect card on Loop A for which you downloaded the new
firmware image.
Using the example in the previous step, type:
:/:<13>lpc reboot u1l1
Chapter 6
Servicing the Array
127
5. Verify that the updated Loop A interconnect cards are running the correct new
firmware image.
For example:
:/:<15>lpc version
LOOP A
Enclosure 1
6.23
Enclosure 2
6.23
Enclosure 3
6.23
Enclosure 4
6.23
LOOP B
6.23
6.23
6.19
6.23
6. Verify that Loop A is up and functional before proceeding.
7. Follow Step 3 through Step 5 to install the firmware image to all Loop B
interconnect cards that require an upgrade.
Completing and Verifying the Live Upgrade
1. Reenable system logging to the previous settings by using the set logto *
command.
The command restores array logging to settings specified in the array’s
/etc/syslog.conf configuration file.
2. Restore all system settings that you changed during the upgrade procedure back
to the previous settings that you recorded in Step 6 of “Preparing for the Live
Upgrade” on page 122.
3. Copy back the system files that you backed up in Step 8 of “Preparing for the Live
Upgrade” on page 122.
Only do this if the system files that you started with had been previously modified
and customized for your array configuration. Otherwise, skip this step.
4. Verify that the array configuration is operating correctly by viewing the output of
the following array commands:
■
■
■
■
proc list
port listmap
fru stat
fru list
5. Reenable any remote monitoring tools, such as the Storage Automated Diagnostic
Environment, that you disabled before beginning the upgrade.
This completes the live upgrade procedure.
128
Sun StorEdge 6020 and 6120 Arrays System Manual • May 2003
Offline Upgrades
Use the procedures in this section to upgrade the controller card firmware,
interconnect card firmware, and system files on 1x1, 1x2, or 1x3 Sun StorEdge 6120
array configurations. This section also includes an offline firmware upgrade
procedure for disk drive firmware on all array configurations.
Note – Disk drive firmware upgrades can be performed only on Sun StorEdge 6120
arrays or HA array configurations that have been taken offline; that is, all data I/O
activity has been halted between the array and the host.
This section is organized as follows:
■
“Preparing for the Offline Upgrade” on page 129
■
“Transferring Patches and Files to the Array” on page 130
■
“Upgrading the Controller Card Firmware” on page 131
■
“Upgrading the Interconnect Card Firmware” on page 132
■
“Upgrading the Disk Drive Firmware” on page 133
■
“Completing and Verifying the Upgrade” on page 134
Preparing for the Offline Upgrade
1. Halt all I/O activity between the data host and the array(s).
2. Verify that the arrays and their associated back-end loops are in an optimal state
before beginning the firmware download as follows:
a. Use the proc list command to make sure no volume reconstructions are
underway.
b. Use the refresh -s command to check battery status and to make sure no
battery refresh operations are underway.
c. Use the fru stat command to display the status of all array FRUs and to
ensure they are all functioning properly.
3. Disable any monitoring software, such as the Storage Automated Diagnostic
Environment, to avoid triggering false alerts during the upgrade.
4. Display current array system settings by using the sys list command, and
record the array setting information.
You will be modifying system settings during the upgrade procedure and will need
to return them to their previous state after the upgrade.
Chapter 6
Servicing the Array
129
5. Make backup copies of the following array files if they have been modified for
your array configuration:
■
■
■
/etc/hosts
/etc/bat.conf
/etc/syslog.conf
You might need to restore these files to the array after completing the upgrade
procedure as these files are over-written during the upgrade, and any previous
modifications will be lost.
6. Use the set command to verify that the array bootmode is set to auto.
For example:
:/:<52>set
bootmode auto
bootdelay 3
ip
nnn.nnn.nnn.nnn
netmask
255.255.255.0
gateway
nnn.nnn.nnn.nnn
tftphost nnn.nnn.nnn.nnn
tftpfile null
hostname qatest
timezone
logto
*
loglevel 3
rarp
on
mac
00:03:ba:27:ca:64
7. Turn off local system logging on the array to avoid sending false alerts through
facilities that monitor the syslog by typing:
:/:<53>set logto 1
Transferring Patches and Files to the Array
Note – You must have a root password to log in to the array and set it. If you do
not have a root password, you must establish one before proceeding for this
procedure to work correctly.
The latest controller and interconnect card firmware images and the array system
files are available on the SunSolve™ web site:
130
Sun StorEdge 6020 and 6120 Arrays System Manual • May 2003
http://www.sunsolve.sun.com
1. Navigate to the Patch Portal and select one of the available patch utilities, such as
PatchPro.
2. Use the patch program to locate and download the Sun StorEdge 6120 array patch
image.
Note – The patch image does not include disk drive firmware patches. To download
the latest drive firmware patches, use the patch program on the SunSolve web site to
search for Sun StorEdge 6120 array disk drive firmware. The patch program
provides the latest array drive firmware levels and a README file with drive
firmware upgrade information. Download the drive firmware to a host connected to
the array, and then ftp the drive firmware files to the array system. See “Upgrading
the Disk Drive Firmware” on page 133 to install the drive firmware.
3. Refer to the patch README file for specific patch installation instructions.
The 6120.sh script is included with the patch image and provides an interactive
utility that transfers the necessary files and binaries from the patch directory on the
host to the array that is being upgraded.
After downloading the array patch and running the 6120.sh script, you must
install the firmware image on the individual components as described in the
following sections.
Upgrading the Controller Card Firmware
1. Start a Telnet session from the management host to the array if you are not already
in a Telnet session.
2. On the array, use the ep download command to install the new controller
firmware:
:/:<1> ep download xxxx.bin
where xxxx.bin is the file name of the controller firmware image.
Chapter 6
Servicing the Array
131
3. Reboot the array by typing:
:/:<2> reset -y
It can take a few minutes for the u1 controller to completely boot and become
available to the host system.
4. Verify that the new controller firmware is loaded and running by typing:
:/:<1>ver
6120 Release 3.0.2 Fri Feb 21 16:04:37 PST 2003 (nnn.nnn.nnn.nnn)
Copyright (C) 1997-2003 Sun Microsystems, Inc.
All Rights Reserved.
The controller firmware is displayed in the ver output as Release 3.0.2.
Upgrading the Interconnect Card Firmware
Note – The firmware for the interconnect card is also referred to as loop card
firmware. In the screen output, the term loop refers to the interconnect card.
1. Make sure you have completed the steps in “Preparing for the Offline Upgrade”
on page 129.
2. Determine which interconnect cards in the array configuration require a firmware
upgrade by typing:
:/:<15>lpc version
LOOP A
Enclosure 1
6.19
Enclosure 2
6.23
Enclosure 3
6.23
LOOP B
6.23
6.23
6.19
In this example, only interconnect cards u1l1 and u3l2 require a firmware upgrade
from version 6.19 to version 6.23.
132
Sun StorEdge 6020 and 6120 Arrays System Manual • May 2003
3. Use the lpc command to download the firmware to all Loop A interconnect cards
that require an update.
Using the example in the previous step, type:
:/:<12>lpc download u1l1 filename.bin
where filename.bin is the filename of the interconnect card firmware image.
4. Reboot each interconnect card on Loop A for which you downloaded the new
firmware image.
Using the example in the previous step, type:
:/:<13>lpc reboot u1l1
5. Follow Step 3 and Step 4 to install the firmware image to all Loop B interconnect
cards that require an upgrade.
6. Verify that the updated Loop A and Loop B interconnect cards are running the
correct new firmware image.
For example:
:/:<15>lpc version
LOOP A
Enclosure 1
6.23
Enclosure 2
6.23
Enclosure 3
6.23
LOOP B
6.23
6.23
6.23
Upgrading the Disk Drive Firmware
1. Make sure you have completed the steps in “Preparing for the Offline Upgrade”
on page 129.
2. Copy the disk drive firmware image to the array as explained in “Transferring
Patches and Files to the Array” on page 130.
Chapter 6
Servicing the Array
133
3. In a Telnet session with the array, install the firmware using the disk command:
:/:<1>disk download u1d1-14 filename
where:
■
u1 is the array unit
■
d1-14 are disk drives 1 through 14
■
filename is the file name of the disk drive firmware image
4. Use the disk version command to view the firmware level of each disk drive
in the array.
5. Verify that the drives are online and ready using the fru stat command.
Completing and Verifying the Upgrade
1. Restore system logging to the previous settings by using the set logto *
command.
The command restores array logging to the settings specified in the array’s
/etc/syslog.conf configuration file.
2. Restore all system settings that you changed during the upgrade procedure back
to the previous settings that you recorded in Step 4 of “Preparing for the Offline
Upgrade” on page 129.
3. Copy back all system files that you backed up in Step 5 of “Preparing for the
Offline Upgrade” on page 129.
Only do this if the system files that you started with had been previously modified
and customized for your array configuration. Otherwise, skip this step.
4. Verify that the array configuration is operating correctly by viewing the output of
the following array commands:
■
■
■
■
proc list
port listmap
fru stat
fru list
5. Reenable any remote monitoring tools, such as the Storage Automated Diagnostic
Environment, that you disabled before beginning the upgrade.
This completes the offline upgrade procedure.
134
Sun StorEdge 6020 and 6120 Arrays System Manual • May 2003
CHAPTER
7
Changing the Array Configuration
This chapter discusses various configuration changes to an array. The main sections
are:
■
“Converting a Single Array” on page 135
■
“Adding Expansion Units” on page 138
Converting a Single Array
These procedures assume the following:
■
All reconfigurations are performed while the system is offline from accepting I/O
from the host system (I/O has been quiesced).
■
System reconfigurations involve power cycling of storage arrays.
■
Data stored on the arrays will need to be evacuated before any reconfiguration
procedures start. During the reconfiguration process, all existing volumes (storage
pools) will be deleted and recreated.
Note – All telnet CLI connections are made to the CLI that resides in the
appropriate Sun StorEdge 6120 array.
135
▼
To Convert a Controller Unit into an Expansion
Unit
Caution – This procedure will result in unrecoverable data on the tray being
converted from a controller unit to an expansion unit. Before proceeding, be sure to
evacuate all data on the tray to some other media (for example, tape or another
storage system).
1. Connect to the telnet CLI of the array controller that is managing the array.
2. Obtain a list of volumes with the vol list command.
6120:/: vol list
3. Unmount the volumes with the vol unmount command.
6120:/: vol unmount name
4. Remove all volumes from the configuration using the vol remove command.
6120:/: vol remove name
5. Unconfigure the unit to be converted to an expansion tray by running the
following command:
6120:/: unconfig u<encid>
6. Power off the tray (or array system if this unit is part of a larger configuration).
7. Disconnect the host-side Fibre Channel connectors from the array controller.
8. Physically remove the controller card from the unit.
9. Install the controller card slot dummy panel.
The newly created expansion unit is ready to use.
136
Sun StorEdge 6020 and 6120 Arrays System Manual • May 2003
▼
To Convert an Expansion Unit into a Controller
Unit
Note – This procedure assumes the expansion unit to be converted has already been
removed from its array system and is now a standalone expansion unit that is ready
to be converted to a controller unit.
1. Verify that the expansion unit is powered off.
2. Verify that the network LAN to which the expansion unit is to be connected has a
RARP server with the expansion unit’s MAC address already configured.
Refer to the Sun StorEdge 6120 Array Installation Guide for specific instructions on
establishing the MAC address on the host.
3. Remove the array controller slot dummy panel.
4. Install a new array controller.
5. Connect the controller card to the host with the FC cable and to the LAN with the
Ethernet cable.
6. Power on the array.
7. Connect to the new array controller unit using the telnet CLI.
8. Clear all system labels by executing the following command on the new array
controller unit:
6120:/: boot -w
The new array controller unit reboots.
Note – Following execution of the boot -w command, the array password is reset to
the default password, which is blank.
Note – If the boot -w command seems to hang, wait for at least five minutes before
doing anything else. You can start another telnet CLI session and do a reset of the
system. Once the storage array comes back up, then repeat the boot -w command to
ensure that it executes completely.
Chapter 7
Changing the Array Configuration
137
Adding Expansion Units
This procedure describes adding expansion units to an array.
The procedure assumes the following:
▼
■
All reconfigurations are performed while the system is offline from accepting I/O
from the host system (I/O has been quiesced).
■
System reconfiguration involves power cycling of storage arrays.
■
Data stored on the arrays will need to be evacuated before any reconfiguration
procedure starts. During the reconfiguration process, all existing volumes (storage
pools) will be deleted and recreated.
To Add Expansion Units to an Array
Note – This procedure uses, as a working example, a 2x2 HA configuration and
demonstrates the addition of two expansion units, which results in a 2x4 HA
configuration.
2x2 HA Configuration
FIGURE 7-1
138
2x4 HA Configuration
Conversion From a 2x2 HA Configuration to a 2x4 HA Configuration
Sun StorEdge 6020 and 6120 Arrays System Manual • May 2003
1. Quiesce all I/O from hosts using the storage system.
2. As a precaution, back up all user data to an alternate media location.
This is not required, but is considered to be good practice.
3. Halt all monitoring applications to prevent erroneous alerts from being generated.
Note – The next two steps are only required if expanding an array that has two
array controllers. If adding trays to a single-controller configuration, proceed
directly to Step 6.
4. Disable the alternate master controller unit using the disable u2 command.
5. Run unconfig u2 specifying the alternate master controller unit that will be
relocated to a new tray added to the configuration.
6. Shutdown the 2x2 storage array using the shutdown command from the telnet CLI
interface.
7. After the 2x2 storage array has shut down, turn off power on all PCUs on the array
by pressing the power switches on the PCUs.
Proceed to the next step after the blue LED have been illuminated on the PCUs.
(FIGURE 7-2 depicts the base configuration being converted).
Alternate master controller unit
PCU switches (typical)
FIGURE 7-2
Base Configuration Before Conversion
8. Remove power cords from all PCUs in the original 2x2 storage array.
Verify all LEDs on the back of all trays are turned off before proceeding.
Chapter 7
Changing the Array Configuration
139
9. Add new expansion units to the top of the existing 2x2 storage array. (See
FIGURE 7-3.)
Add
FIGURE 7-3
Expansion Units Added to a Rack Configuration
10. Once the expansion units have been added, move the array controller board from
the former alternate master unit to the tray above it.
This results in an even number of expansion units above each array controller unit.
Move array controller board up
Former alternate master controller unit
FIGURE 7-4
140
Move the Array Controller Board
Sun StorEdge 6020 and 6120 Arrays System Manual • May 2003
11. Reconnect interconnect cables to include the new expansion unit trays.
Interconnect card cable connections to the new trays are connected as shown in
FIGURE 7-5.
FIGURE 7-5
Connect the Interconnect Cables for the New Configuration
12. Connect power cables to all the trays.
13. Connect Ethernet and host Fibre Channel cables to the new tray that received the
array controller board.
14. Power up the newly configured storage array.
Note – Wait while the system boots, which might take several minutes.
15. Verify that the fru list command can see the newly installed expansion units.
16. Verify overall system health with the fru stat command.
Be sure all drives in all trays are optimal.
17. Obtain a list of volumes with the vol list command.
6120:/: vol list
Chapter 7
Changing the Array Configuration
141
18. Perform a vol verify command on each existing volume in the configuration to
ensure volume integrity.
6120:/: vol verify name
142
Sun StorEdge 6020 and 6120 Arrays System Manual • May 2003
APPENDIX
A
Troubleshooting
This chapter contains a list of errors that can be reported by the array in the syslog
file, along with error definitions.
Topics in this chapter include:
■
■
■
■
■
“Error Message Syntax” on page 143
“Error Message Listing” on page 145
“Warning Message Listing” on page 152
“Command-Line Error Messages” on page 166
“Examples” on page 177
Error Message Syntax
Error message syntax consists of the following three components:
■
■
■
“Message Types” on page 144
“FRU Identifiers” on page 144
“Error Message Listing” on page 145
These components are described in the following subsections, which include a
listing of syslog error and warning messages.
143
Message Types
A syslog daemon exists in the hardware controller that records system messages
and provides remote monitoring. The four possible levels of messages are listed in
TABLE 7-1 in order of their severity.
TABLE 7-1
Message Types
Message Type
Definition
Error
Indicates a critical system event requiring immediate user
intervention or attention. For example, an overtemperature
condition exists or a detected FRU is being removed.
Warning
Indicates a possible event requiring eventual user intervention. For
example, a FRU has been disabled.
Notice
Indicates a system event that may be a side effect of other events or
may be a normal condition. For example, the power switch is
turned off.
Information
Indicates a system event that has no consequence on the running
health of the system. For example, notification of a of a proper
functioning FRU.
FRU Identifiers
The syntax of the error message uses a FRU identifier to refer to a particular FRU in an
array. This identifier contains a unit constant (u), the unit number (n), the FRU
constant (ctr for controller card, pcu for power and cooling unit, l for interconnect
card, d for disk drive), and the FRU number (n).
TABLE 7-2
144
FRU Identifiers
FRU
Identifier
Unit Number
Controller card
uencidctr
encid = unit number (1 to 2)
Power and cooling unit
uencidpcu[1|2]
encid = unit number (1 to 6)
n = pcu number (1, 2)
Interconnect card
uencidl[1|2]
encid = unit number (1 to 6)
n = interconnect card number (1, 2)
Disk drive
uenciddn
encid = unit number (1 to 6)
n = disk drive number (1 to 14)
Sun StorEdge 6020 and 6120 Arrays System Manual • May 2003
Error Message Listing
TABLE 7-3 lists possible error messages.
TABLE 7-3
Error Messages
Error Message
Description
Solution
System
E: No boot image on disk,
writing EPROM to boot image
area...
No master boot image on disk.
Writing to disk from EPROM
the boot image.
E: EPROM update failed...
Failed to write data to EPROM
from disk.
Retry EPROM update, or
inspect the controller.
E: Power On Self Test
failed...
This is a fatal error that means
the firmware probably could
not talk to the drives. This could
have been caused by the
interconnect cables, interconnect
cards, the controller,
disks/firmware, or a bad
centerplane.
Troubleshoot the unit. Check its
status.
E: Found then lost property
node in chain
Fail to find a property node
(contains property information)
in the property chain for
deletion.
Notify your Sun authorized
service provider.
E: Invalid operation for
property token
An invalid property token is
detected while executing a
property token. Two property
tokens are supported, the get
and set tokens.
Check the property token and
only use supported property
tokens.
E: Unable to create scheduled
task (0x<status>)
The system encounters an error
while creating a scheduled
internal task. The system is able
to continue with the I/O, but
some of the housekeeping tasks,
for example, periodic battery
health check, will not be
performed.
Contact your Sun service
provider.
Appendix A
Troubleshooting
145
TABLE 7-3
Error Messages (Continued)
Error Message
Description
Solution
E: Unable to start scheduled
task (0x<status>)
The system encounters an error
while starting a scheduled
internal task. The system is able
to continue with the i/o, but
some of the housekeeping tasks,
for example, periodic battery
health check, will not be
performed.
Contact your Sun service
provider.
E: Unable to create scheduler
semaphore errno 0x<status>
The system encounters an error
while creating an internal
scheduler semaphore. The
system is able to continue with
the i/o, but some of the
housekeeping tasks, for
example, periodic battery health
check, will not be performed.
Contact your Sun service
provider.
E: Unable to create scheduler
task (0x<status>)
The system encounters an error
while creating an internal
scheduler task. The system is
able to continue with the i/o,
but some of the housekeeping
tasks, for example, periodic
battery health check, will not be
performed.
Contact your Sun service
provider.
E: Unable to start scheduler
task (0x<status>)
The system encounters an error
while starting an internal
scheduler task. The system is
able to continue with the i/o,
but some of the housekeeping
tasks, for example, periodic
battery health check, will not be
performed.
Contact your Sun service
provider.
E: Out of memory while
scheduling a task
The system encounters an error
while allocating memory for a
scheduled internal task. The
system is able to continue with
the i/o, but some of the
housekeeping tasks, for
example, periodic battery health
check, will not be performed.
Contact your Sun service
provider.
E: Invalid property file
entry: <entry>
An invalid property entry is
detected while reading entries
from the properties file.
Check the properties entry to
ensure that it is formatted
correctly.
146
Sun StorEdge 6020 and 6120 Arrays System Manual • May 2003
TABLE 7-3
Error Messages (Continued)
Error Message
Description
Solution
E: Failed to copy old
properties file
Fail to rename the current
properties file to a backup
properties file.
Check the file system to ensure
it is not already full. If this is
not the case, notify your Sun
authorized service provider.
E: Can’t create properties
file during flush
Fail to create a new properties
file for writing the property
entries.
Check the file system to ensure
it is not already full. If this is
not the case, notify your Sun
authorized service provider.
E: Write failed during
property flush
Fail to write property entries to
the properties file.
Notify your Sun authorized
service provider.
E: u<n>ctr: Missing
A controller card is missing.
Reseat or replace the controller
card.
E: u<n>ctr: Missing (last
warning)
A controller card was not
replaced. This is the last
warning message; the system
will not print out any more
warning messages to indicate
this problem after this one.
Replace the controller.
E: u<n>ctr: Not present
The system detects the
controller is missing; the
controller has been removed.
Reseat or replace the controller
card.
E: u<n>ctr BIST: ISP2200 test
failed
ISP2200 POST test failed.
Contact your contract service
provider for further analysis.
E: u<n>ctr BIST: Data cache
memory test failed
Cache Memory POST test failed.
Contact your contract service
provider for further analysis.
E: u<n>ctr BIST: XOR
functions and datapaths test
failed
XOR Memory POST test failed.
Controller will be reset.
Controller board replacement
may be necessary. Take
appropriate action.
Controller Card
Appendix A
Troubleshooting
147
TABLE 7-3
Error Messages (Continued)
Error Message
Description
Solution
E: u<n>ctr XOR: Flags=<flags>
Cntr=<error count>
Synd=<syndrome> Addr=<addr>
An ECC soft/hard error is
detected and the error is a
multi-bit uncorrectable error.
<flags> - possible values are:
• A - Accumulator VRAM error
• B - Buffer (system cache
SDRAM) DIMM error
• S - Single-bit error
• M - Multi-bit error
• V - Accumulator drive out
error
• D - Buffer drive out error
• c - Control signal drive out
error
• a - Address line drive out
error
<error count> - ECC error count
after last report
<syndrome> - ECC error
syndrome
<addr> - Offending address
If problem persists, contact your
Sun authorized service
provider.
E: XOR: Acc mem VRAM address
line drive out error!
An ECC uncorrectable error
occurred on the address output
line of XOR FPGA. This
indicates a stuck-a-0/stuck-a-1,
or shorted address line.
Contact your Sun service
provider.
E: XOR: Acc mem VRAM control
line drive out error!
An ECC uncorrectable error
occurred on the control output
line of XOR FPGA. This
indicates a stuck-a-0/stuck-a-1,
or shorted control line.
Contact your Sun service
provider.
E: XOR: Buf mem SDRAM address
line drive out error!
An ECC uncorrectable error
occurred on the address output
line of XOR FPGA. This
indicates a stuck-a-0/stuck-a-1,
or shorted address line.
Contact your Sun service
provider.
E: XOR: Buf mem SDRAM control
line drive out error!
An ECC uncorrectable error
occurred on the control output
line of XOR FPGA. This
indicates a stuck-a-0/stuck-a-1,
or shorted control line.
Contact your Sun service
provider.
148
Sun StorEdge 6020 and 6120 Arrays System Manual • May 2003
TABLE 7-3
Error Messages (Continued)
Error Message
Description
Solution
Results of diagnostic tests,
should be preceded by more
detailed error messages.
E: u<n>ctr Diag Fail: Test
System Memory failed
or
E: u<n>ctr Diag Fail: Test
ISP2200 failed
or
E: u<n>ctr Diag Fail: Test
data cach memory failed
or
E: u<n>ctr Diag Fail: XOR
Memory Test failed. System
Resetting...
Interconnect Card and Cable
E: u<n>l<m>: Missing
An interconnect card is missing.
Replace the interconnect card.
E: u<n>l<m>: Missing (last
warning)
A interconnect card was not
replaced. This is the last
warning message; the system
will not print out any more
warning messages to indicate
this problem after this one.
Replace the interconnect card
and power on the system.
E: u<n>l<m>: Not present
System detects the interconnect
card is missing.
Reseat or replace the
interconnect card.
E: u<n>l<m>: UP cable not
present
or
E: u<n>l<m>: DOWN cable not
present
System detects missing
interconnect cable for
interconnect card.
Check cables.
E: u<n>d<m>: Missing
A disk drive is missing.
Replace the missing disk drive.
E: u<n>d<m>: Missing for more
than <l> minutes
A disk drive is missing for more
than <l> minutes.
Replace the disk drive and
power on the system.
E: Multi-disk failure, access
disallowed
System detects multiple disk
failure in the LUN, and
automatically unmounts this
volume.
Check the syslog for any other
related messages. Replace the
failed disks.
E: u<n>d<m>: Not present
System detects a drive was
removed.
Reseat or replace the disk drive.
Disk Drive
Appendix A
Troubleshooting
149
TABLE 7-3
Error Messages (Continued)
Error Message
Description
Solution
No disks are found on the
master unit while system
booting.
Check the disks and/or run
diagnostics. Fix the problem
and try rebooting the system.
E: u<n>pcu<m>: Missing
A PCU is missing.
Replace the PCU.
E: u<n>pcu<m>: Missing (last
warning)
A PCU was not replaced. This is
the last warning message; the
system will not print out any
more warning messages to
indicate this problem after this
one.
Replace the PCU; power on the
system.
E: u<n>pcu<m> Not present
System detects the PCU is
missing.
Reseat or replace the PCU.
E: u<n>pcu<m>: Over
temperature
System detects that a PCU has
reached an overtemperature
state.
Check room temperature and
possible airflow obstruction. If
the problem persists, replace the
PCU.
E: u<n>pcu<m>: Battery not
present
System detects that the battery
for the PCU is missing.
Inspect and/or install a battery.
E: u<n>ctr: Multiple Fan
Faults
The controller has detected a
fault on fans in both PCUs.
Determine which fans in which
PCU failed; replace the PCU.
E: u<n>ctr: Multiple Fan
Faults (last warning)
The controller has detected a
fault on fans in both PCUs. This
is the last warning message; the
system will not print out any
more warning messages to
indicate this problem after this
one.
Determine which fans in which
PCU failed; replace the PCU.
E: Disabling
u<n>pcu<m>:AC line fault
The system detects the AC line
has gone out for over 15
seconds. As a result, the
affected PCU is disabled.
Check AC cord and make sure it
is plugged in and has electricity.
E: FATAL: No disks were found
during boot up...
E: FATAL: Check hardware run
diags...
E: FATAL: Fix problem and try
rebooting...
Power and Cooling Unit (PCU)
150
Sun StorEdge 6020 and 6120 Arrays System Manual • May 2003
TABLE 7-3
Error Messages (Continued)
Error Message
Description
Solution
E: Battery management
functions on enclosure <n>
have been disabled due to
down rev hardware. Skipping
health check for this
enclosure.
During the battery health check,
a down rev hardware
(midplane) has been detected.
As a result, the battery
management functions are
disabled and the battery health
check is skipped for this
affected tray.
Use correct revision of
hardware.
E: Skipping battery health
check for enclosure <n>
because power would not be
safe.
During the battery health check,
power has been detected as not
safe. As a result, the battery
health check is skipped for this
affected tray.
Check previous several
messages for the cause and take
appropriate actions.
E: Battery u<n>b<m> needs to
be replaced.
The battery has failed the
battery health check or the
battery warranty check. Check
previous or next messages for
the exact problem.
Replace battery.
E: Battery management
functions on enclosure <n>
have been disabled due to
down rev hardware (midplane).
Skipping warranty and shelf
life checks for this
enclosure.
During the battery warranty
check, a down rev hardware
(midplane) has been detected.
As a result, the warranty and
shelf-life checks for this tray are
skipped.
Use correct revision of
hardware
E: BATTERY: u<n>b<m> battery shelf life exceeded
Battery warranty check detects
battery shelf-life has been
exceeded.
Replace battery.
E: BATTERY: u<n>b<m> battery idle life exceeded
Battery warranty check detects
battery idle life has been
exceeded.
Replace battery.
E: The warranty on battery
u<n>b<m> has expired. Sun
recommends replacement of the
battery for optimal
performance of the system.
Battery warranty check detects
the warranty on battery has
been expired.
Replace battery.
Appendix A
Troubleshooting
151
Warning Message Listing
TABLE 7-4 lists possible warning messages, which are divided into FRU categories
and System.
TABLE 7-4
Warning Messages
Warning Message
Description
Solution
W: u<n>ctr recon failed in
vol (volume name)
Reconstruct operation failed for
this volume.
Verify that the volume is still
mounted and that there is only
one drive disabled. Restart the
reconstruct operation manually,
or reconstruct the data to
another drive. Previous
messages in syslog should
indicate which disk(s) had a
problem.
W: VolGroupAccess{Name|Mode}
has invalid type
The system detects an invalid
group access volume type.
Enter correct group access
volume type. Currently, two
types of group access volume
are supported, name and mode.
W: Failed to set host port fc
speed
The system encounters an error
in trying to change the speed of
the host Fibre Channel interface
port.
Verify the port speed by
examining the “fc_speed”
output of the “sys list”
command, and/or examine the
syslog for other indications of
problems with the port. If none
are found, then there might be a
problem in negotiating the
requested speed with the
attached host. Otherwise, the
port may be defective and the
controller may need to be
replaced.
W: u<n>ctr initialization
failed in vol (volume name)
Volume data initialization to
zero failed.
Check the disk drive status
using the vol stat command.
If any disk has a nonzero status,
either initialize the volume
using the vol init command,
or replace the disk.
System
152
Sun StorEdge 6020 and 6120 Arrays System Manual • May 2003
TABLE 7-4
Warning Messages (Continued)
Warning Message
Description
Solution
W: Existing system banner was
corrupted. Use “set banner”
to set the system banner if
needed.
The existing banner was
corrupted.
Use the set banner command
to set the system banner to the
desire banner. Otherwise, a
default system banner will be
used.
W: During sysInitiatorWWN or
sysInitiatorDescription an
invalid type was used.
The system detects invalid
initiator name or initiator value
used in the management
software layer.
Check the initiator name or
initiator value to ensure correct
name or value is used.
W: Device tree load:
substituted u<n> node wwn
with type 1 wwn.
The system detects an older
format of the WWN on the
midplane and was corrected as
it was loaded into the device
tree.
None. This is down rev
hardware.
W: Device tree load: cannot
access disk id, u<n>id<m>
Unable to access a drive to load
fru id data from Inquiry page.
Hot plugging the drive will
cause the system to attempt to
re-read the data. Don’t hot plug
the drive if it is being
reconstructed.
W: Device tree to FRUID
store: <error>, u<n><fru
name><fru no>, <segment name>
An error occurred while trying
to write to the FRU ID
SEEPROM.
There is not currently any
method for re-trying a failed
write.
W: Device tree load: <error>,
u<n><fru name><fru no>,
segment <segment name>
There was an error loading from
the FRU ID SEEPROM. It may
be an error reading the part, or
with the CRC/checksum.
Hot swapping the FRU will
cause the system to attempt to
re-read the information.
Appendix A
Troubleshooting
153
TABLE 7-4
Warning Messages (Continued)
Warning Message
Description
Solution
Note:
fru name =
l - Current interconnect card
l_other - Other interconnect card
mp - Midplane
pcu - Power Control Unit
b - Battery
segment name =
SD - has the manufacturing data
ED - has the MAC address and possibly WWN
FD - has the battery status and battery warranty records
Error =
seeprom access error
seeprom section header crc error
seeprom segment not found
parse error
record not found
bad offset
no segments available
no space in section
seeprom segment checksum error
unknown section header tag
incompatible section header version
unexpected wwn format
W: u<n>ctrl :Illegal
mp_support mode for explicit
lun fail over request (opcode
0xD0 received) on lun
<lun_no>
The mp_support option is set
to an invalid value.
Use the sys list command
(or Component Manager) to set
the mp_support flag to mpxio
or std.
W: u<n>d<n>:
SVD_PATH_FAILOVER:
path_id = <n>
or
W: SVD_PATH_FAILOVER:
path_id = <n>, lid = <m>
A failover has occurred,
indicating that one of the
system's replaceable units is
faulty.
Troubleshoot and replace the
failed component. You can find
more information in related
syslog messages and by using
the fru stat command.
W: u<n>l<n> LMON predictive
failure threshold exceeded LIP
The Fibre Channel loop is
exhibiting an unexpected
number of LIPs. This problem
can be generated from any of
the FRUs.
In certain cases, running the
ofdg diagnostic may find the
problem. Notify your Sun
authorized service provider.
154
Sun StorEdge 6020 and 6120 Arrays System Manual • May 2003
TABLE 7-4
Warning Messages (Continued)
Warning Message
Description
Solution
W: Could not retrieve header
information of level N
When the id read or fru
stat commands fail to retrieve
header information from the
flash PROM, Level 2 or Level 3
code may be corrupted.
Try the command again. If
problem persists, contact your
Sun authorized service
provider.
W: u<n>ctr cache memory size
is less than 256 M
The cache memory is smaller
than 256 Mbytes. The array
expects a minimum of 256
Mbytes of cache.
Controller Card
W: u<n>ctr: Offline
A controller has stopped
communicating with the rest of
the system. Possibly the
connection between the
controller and the rest of the
system has been disrupted.
Check that the controller card is
connected securely. If its state
becomes disabled, replace the
controller card.
W: u<n>ctr: Inactive
A controller is not
communicating with the rest of
the system. The controller will
be disabled if it does not start
communicating with the rest of
the system within a certain time
period.
W: u<n>ctr: Rebooting
A controller has been rebooted
because it was removed,
disabled, or was offline and is
now re-enabled. Alternatively,
the system was shut down and
restarted.
Check previous messages to
determine if the reboot is an
unexpected event.
W: u<n>ctr: Failed to boot
The system was not able to
reboot a controller successfully,
even after repeated attempts.
Replace the controller.
W: u<n>ctr: Disabled
System disabled a controller.
Check the previous message
queue to determine why the
controller is disabled. Then
enable or replace the controller.
W: u<n>ctr starting lun
<lun_#> failover
A LUN failover has occurred.
Use the sys stat command to
see if the controller is disabled.
Then check the syslog for
possible interconnect, host
adapter, or cable problems.
Appendix A
Troubleshooting
155
TABLE 7-4
Warning Messages (Continued)
Warning Message
Description
Contact your Sun service
provider for further analysis.
W: u<n>ctr BIST: ECC
mechanism verification failed
W: u<n>ctr: ISP<m>[l]
qlcf_i_read_response: Debug
Code - Immediate Notify CCBs
Exhausted
or
W: u<n>ctr: ISP<m>[l] DMA
Error Detected
or
W: u<n>ctr: ISP<m>[l]
Received LOOP DOWN async
event
or
W: u<n>ctr: ISP<m>[l] Bad
request pkt
or
W: u<n>ctr: ISP<m>[l] Bad
request pkt header
156
Solution
Indicates an error in one of the
ISP <m> chips in the controller.
Sun StorEdge 6020 and 6120 Arrays System Manual • May 2003
Notify your Sun authorized
service provider.
TABLE 7-4
Warning Messages (Continued)
Warning Message
Description
Solution
W: u<n>ctr XOR T<test_no> ERR:
ACC should not be zero
or
W: u<n>ctr XOR T<test_no> ERR:
ACC should be zero
or
W: u<n>ctr XOR T<test_no>> ERR:
BUF data not equal to
previously written
or
W: u<n>ctr XOR T<test_no> ERR:
BUF data should be all zeros
or
W: u<n>ctr XOR T<test_no> ERR:
ORed data should be all zeros
or
W: u<n>ctr XOR T<test_no> ERR:
Compare error of BUS and orig
data
or
W: u<n>ctr XOR T<test_no> ERR:
buf data should be all zeros
or
W: u<n>ctr XOR T<test_no> ERR:
Buf check finds all zeros
or
W: u<n>ctr XOR T<test_no> ERR:
Write to data cache mem failed
or
W: u<n>ctr XOR T<test_no> ERR:
Read from data cache mem
failed
or
W: u<n>ctr XOR T<test_no> ERR:
Diag Fail
An XOR Memory POST test
failed. The controller will be
reset.
The controller board might need
to be replaced. Take appropriate
action.
W: u<n>ctr ISP<m>[l]
LUN 0x<lun_no> - INVALID
command count!
The Fibre Channel driver has
gone into an unknown state.
This message might indicate a
bug in the resource
management logic.
Contact your Sun authorized
service provider.
W: u<n>ctr ISP<m>[l]
LUN 0x<lun_no> Out of command
resources!
The Fibre Channel driver
resource management might
need tuning.
Contact your Sun authorized
service provider.
Appendix A
Troubleshooting
157
TABLE 7-4
Warning Messages (Continued)
Warning Message
Description
Solution
W: u<n>ctr ISP<m>[l]
cmd = 0x<cmd_no> - REQUEST
QUEUE FULL !
The Fibre Channel driver is not
able to accept/send more
commands from ISP. The driver
retries automatically.
If this happens frequently,
contact your Sun authorized
service provider.
W: u<n>ctr XOR: Flags=<flags>
Cntr=<error count>
Synd=<syndrome> Addr=<addr>
An ECC soft/hard error is
detected and the error is a
single-bit correctable error.
<flags> - possible values are:
• A - Accumulator VRAM error
• B - Buffer (system cache
SDRAM) DIMM error
• S - Single bit error
• M - Multi-bit error
• V - Accumulator drive out
error
• D - Buffer drive out error
• c - Control signal drive out
error
• a - Address line drive out
error
<error count> - ECC error count
after last report
<syndrome> - ECC error
syndrome
<addr> - Offending address
The ECC error has been
corrected.
W: u<n> cannot read from
thermal sensor
Cannot read the temperature
from the controller thermal
sensor.
This could occur if the
controller <n> has been
disabled by a disable controller
command. Enable the controller
by using the enable command
if necessary. If the problem
persists, replace the controller
card.
W: u<n>ctr warning temperature
threshold exceeded
The controller warning
temperature threshold has been
exceeded.
Check the room temperature
and possible airflow
obstruction. If the problem
persists, replace the controller
card.
158
Sun StorEdge 6020 and 6120 Arrays System Manual • May 2003
TABLE 7-4
Warning Messages (Continued)
Warning Message
Description
Solution
W: u<n>ctr temperature
threshold exceeded
The controller shutdown
temperature threshold has been
exceeded. The controller will be
shutdown if the temperature
remains at or above the
shutdown temperature
threshold.
Check the room temperature
and possible airflow
obstruction. If the problem
persists, replace the controller
card.
Appendix A
Troubleshooting
159
TABLE 7-4
Warning Messages (Continued)
Warning Message
Description
Solution
W: u<n>l<n>: Offline
The system is not able to poll
the interconnect card for
information. If an interconnect
card is disabled, it may cause
other interconnect cards to go
offline.
• If no interconnect card is
disabled, check cable
connections to the
interconnect card and make
sure it is firmly seated.
• If the interconnect card does
not come back online, replace
the interconnect card.
W: u<n>l<n>: Disabled
The system detects that the
interconnect card is disabled.
Check the previous message
queue to determine why the
interconnect card is disabled.
Replace the interconnect card if
necessary.
W: Loop 1 may be bad - Please
run ofdg
or
W: Loop 2 may be bad - Please
run ofdg
The system detects the
possibility of an internal error
in the loop interconnection.
Use the ofdg command to run
the system's built-in loop
diagnostic.
W: u<n>l<n> LMN2 predictive
failure threshold exceeded IO TIMEOUT
A timeout has occurred during
the ondg test.
W: u<n>ctr Loop 1 may be bad
- check interconnect cable or
loopcard
or
W: u<n>ctr Loop 2 may be bad
- check interconnect cable or
loopcard.
The system detects a potential
loop failure.
1. Check the syslog for any
other related messages.
2. Use the fru stat command
to determine the problem
cause.
3. Remove and replace the bad
part.
W: u<n>l<m> :Warning
temperature threshold
exceeded
The interconnect card warning
temperature threshold has been
exceeded.
Check the room temperature
and possible airflow
obstruction. If the problem
persists, replace the
interconnect card.
W: u<n>l<m> :temperature
threshold exceeded
The interconnect card shutdown
temperature threshold has been
exceeded. The interconnect card
will be disabled if the
temperature remains at or
above the shutdown
temperature threshold.
Check the room temperature
and possible airflow
obstruction. If the problem
persists, replace the
interconnect card.
Interconnect (loop) card and Cable
160
Sun StorEdge 6020 and 6120 Arrays System Manual • May 2003
TABLE 7-4
Warning Messages (Continued)
Warning Message
Description
Solution
W: u<n>d<n> could not open
plugged disk
An attempt to open the newly
plugged disk failed.
Unseat the drive and wait a few
seconds before reseating it so
that the system can retry this
operation.
W: u<n>d<n> could not create
system area
An attempt to create a system
area on this disk failed.
1. Unseat the drive and wait a
few seconds before reseating
it so that the system can retry
this operation.
2. If step 1 fails, replace this
drive with a new drive.
W: u<n>d<n> system area is
bad
The system area of the drive has
been corrupted.
1. Unseat the drive and wait a
few seconds before reseating
it so that the system can retry
this operation.
2. If step 1 fails, replace this
drive with a new drive.
W: u<n>d<n> could not open
disk, try unplug then plug
An attempt to bring newly
installed drive online failed.
Unseat the drive and wait a few
seconds before reseating it.
W: u<n>d<n> could not open
disk to be checked
An attempt to open this drive
failed.
1. Unseat the drive, wait a few
seconds, reseat it and retry
the volume add procedure.
2. If step 1 fails, replace the
drive with a new one.
W: u<n>d<n> system area
verify failed
An attempt to verify the data in
the system area failed.
Replace the drive.
• If the volume exists, initialize
the system area to fix the
problem.
• If the volume does not exist,
retry the volume add
procedure.
W: u<n>d<n> write disk
failed, err=<errno>
An attempt to write this disk
failed. The system will
automatically disable this disk.
Check the syslog for any other
related messages. Replace the
failed disk.
W: u<n>d<n> Recon attempt
failed
Disk Reconstruct failed for disk
u<n>d<n>.
Check the syslog for other
related failures. If the disk
under reconstruction failed,
replace the disk.
Disk Drive
Appendix A
Troubleshooting
161
TABLE 7-4
Warning Messages (Continued)
Warning Message
Description
Solution
W: u<n>d<n> Disable attempt
failed
Disk Disable failed for disk
u<n>d<n>.
Check if the disk is already
disabled by using the vol
stat command. If not disabled,
disable it by typing the vol
disable u<n>d<n> command.
W: u<n>d<m> Installing
U<n>D<m> failed, Try
unplugging and then plugging
Disk drive hot plug installation
failed.
Unseat the drive and reseat it.
W: u<n>d<n> Disk Bypassed
A drive is faulty and being
bypassed from the data loop.
W: u<n>ctr read failed during
recon stripe scb=<n>
During reconstruction, another
drive failed in the volume.
Check syslog for a multiple
drive failure. Replace all failed
disk drives.
W: u<n>d<m> hard err in vol
(volume_name) starting auto
disable
A hard error on this disk
prompted a disable operation
on this disk. The system will
auto disable and reconstruct to
the hot spare (standby), if there
is one configured.
If disabled, replace the failed
disk as soon as possible.
W: u<n>ctr disk error during
recon, terminating recon
More than one drive in the
volume might have failed.
Check the syslog file. Replace
all failed disk drives.
W: u<n>d<n> SCSI Disk Error
Occurred (path = 0x<n>, port
= 0x<n>, lun =
0x<n>)
The SCSI disk drive returned an
error status with the
appropriate SCSI Sense Data.
Notify your Sun authorized
service provider.
W: u<n>d<n> SCSI Disk Error
Occurred (path = 0x<n>)
W: Sense Key = 0x<n>, Asc =
0x<m>, Ascq = 0x<l>
If the port has a value from 0
to 7, the message indicates a
transient controller condition,
not an error affecting a disk.
The SCSI disk drive returned an
error status with the
appropriate SCSI Sense Data.
Notify your Sun authorized
service provider.
When the user replaces a drive
which is part of a volume with a
new drive of smaller size.
Check the size of the drives that
constitute the volume, and
replace the new drive with the
same size as the other drives in
the volume.
W: Sense Data Description =
xxxxx
W: Valid Information = 0x<n>
W: u<n>d<n>: Its size is too
small.
162
Sun StorEdge 6020 and 6120 Arrays System Manual • May 2003
TABLE 7-4
Warning Messages (Continued)
Warning Message
Description
Solution
W: Disk u<n>d<m> may be bad too slow
If the ondg mode is passive,
drive n is bad.
Replace the drive.
W: Can't Disable Disk
u<n>d<n> - xxx
When ondg detects a slowly
degrading drive, if the ondg
mode is active, the array will try
to disable that drive. If the array
can't disable the drive, it will
print out this warning message
with the error string.
W: Disable Disk u<n>d<n>
Disk d is disabled.
W: u<n>d<n>: Failed
The system detects a disk
failure and has automatically
disabled the disk drive.
Check the syslog for any other
related messages. Replace the
failed disk.
W: u<n>d<m> TMON warning
temperature threshold
exceeded <curr_temp>
<warn_threshold>
<shutdown_threshold>
The disk drive warning
temperature threshold has been
exceeded.
Check the room temperature
and possible airflow
obstruction. If the problem
persists, replace the disk drive.
W: u<n>d<m> TMON OVER
temperature threshold
exceeded <curr_temp>
<warn_threshold>
<shutdown_threshold>
The disk drive shutdown
temperature threshold has been
exceeded. The disk drive will be
spinning down if the
temperature remains at or
above the shutdown threshold.
Check the room temperature
and possible airflow
obstruction. If the problem
persists, replace the disk drive.
W: u<n>d<m> TMON OVER temp
state exceeded, shutdown disk
drive
The disk drive shutdown
temperature threshold has been
exceeded. The disk drive is
spinning down.
Check the room temperature
and possible airflow
obstruction. If the problem
persists, replace the disk drive.
The system detects a fan fault
on a PCU.
1. Verify that the batteries have
had ample time to charge.
2. Ensure a refresh operation is
not in progress.
3. Replace the PCU.
W: u<n>pcu<m>: DC not OK
System detects that the DC
power source in the PCU is not
functioning properly.
Replace the PCU.
W: u<n>pcu<m>: Disabled
A PCU has been disabled.
Check previous messages to see
why the PCU has been disabled,
and replace the PCU, if
necessary.
Power and Cooling Unit (PCU)
W: u<n>pcu<m>: Fan 1 failed
W: u<n>pcu<m>: Fan 2 failed
Appendix A
Troubleshooting
163
TABLE 7-4
Warning Messages (Continued)
Warning Message
Description
Solution
W: u<n>pcu<m>: Off
A PCU is off.
Check syslog for a fan fault or
PCU overtemp. Replace the
PCU if necessary.
W: u<n>pcu<m>: On battery
The system detects that a PCU
has switched to battery.
1. Make sure that the AC power
cord is attached.
2. If the unit is receiving AC
power, then replace the PCU.
W: u<n>pcu<n>: Switch off
The system detects a PCU has
been powered off.
Power on the unit by pressing
the power switch.
W: Syntax error in
/etc/bat.conf. The value for
"DAY" is not valid.
The value for "DAY" entered in
file /etc/bat.conf is not
within allowed range.
Enter the correct value for
"DAY".
W: Syntax error in
/etc/bat.conf file. The value
for "HOUR" is not valid.
The value for "HOUR" entered
in file /etc/bat.conf is not
within allowed range.
Enter the correct value for
"HOUR".
W: Syntax error in
/etc/bat.conf. The value for
"MINUTE" is not valid.
The value for "MINUTE"
entered in file /etc/bat.conf
is not within allowed range.
Enter the correct value for
"MINUTE".
W: While parsing the
/etc/bat.conf file. An
unknown key was detected.
The system parses the
/etc/bat.conf file for a key
(DAY, HOUR, MINUTE) and
detects an invalid key.
Check the /etc/bat.conf file
and ensure the keys are correct.
W: There was an error parsing
the /etc/bat.conf file. The
default scheduled will be
used instead.
The system parses the
/etc/bat.conf file for a key
(DAY, HOUR, MINUTE) and
detects an invalid key.
None. Day, hour, and minute
will be set to default values.
W: Unable to determine
manufacture date for u<n>b<m>
The system checks the shelf-life
of a newly installed battery and
is unable to determine the
manufacturing date of this
battery. The battery was not
manufactured correctly.
Replace battery.
W: u<n>pcu<m> is margined
high
The PCU margin is too high.
This could occur if the
interconnect card, PCU, or
midplane has failed.
Determine which of the
hardware is bad and replace
appropriate hardware.
W: u<n>pcu<m> is margined low
The PCU margin is too low. This
could occur if the interconnect
card, PCU, or midplane has
failed.
Determine which of the
hardware is bad and replace
appropriate hardware.
164
Sun StorEdge 6020 and 6120 Arrays System Manual • May 2003
TABLE 7-4
Warning Messages (Continued)
Warning Message
Description
Solution
W: u<n>pcu<m> sensor s<l>
:Warning temperature
threshold exceeded
The PCU warning temperature
threshold has been exceeded.
Check the room temperature
and possible airflow
obstruction. If the problem
persists, replace the PCU.
W: u<n>pcu<m> sensor <l>
:Shutdown temperature
threshold exceeded
The PCU shutdown
temperature threshold has been
exceeded. The PCU will be
shutdown if the temperature
remains at or above the
shutdown temperature
threshold.
Check the room temperature
and possible airflow
obstruction. If the problem
persists, replace the PCU.
W: Battery test (recharge)
did not start for u<n>b<m>.
Stopping further tests for
enclosure <l>
The recharge check portion of
the battery health check did not
start. No further battery health
check is performed.
Notify your Sun authorized
service provider.
W: Skipping battery health
checks on enclosure <n> due
to high PCU temperature.
The battery temperature has
exceeded the maximum battery
health check temperature. The
battery health check is skipped.
Check the room temperature
and possible airflow
obstruction. If the problem
persists, replace the PCU.
Appendix A
Troubleshooting
165
Command-Line Error Messages
The array issues a variety of error messages to the command line, indicating an
incorrectly entered command or invalid operation. When you enter a command by
itself, or the error is syntactic (for example, missing an argument or using the wrong
format), the array displays the command synopsis. Otherwise, the array displays an
error message consisting of a name in capital letters, a numerical code in
hexadecimal digits, and a text message.
The following tables list the errors that the array displays. TABLE 7-5 lists the types of
errors and the numerical range associated with each.
TABLE 7-5
CLI Error Message Types
Type of Error
Numerical Range
Description
Logical volume manager
(LVM) driver error codes
0x10001–0x1000A
Disk drive-related errors
Virtual Node ("VN") error
codes
0x200000–0x200025
Errors related to vol and other command-line
operations
Port error codes
0x300000–0x300006
Errors related to the port command
Sys error codes
0x400000
Only one error, indicating an incorrect value
FRU error codes
0x500001–0x500076
Errors related to field replaceable units (FRUs)
pSOS operating system errors
00000001–C000FFFF
pSOS errors (embedded operating system)
RAID Errors and Other Common Errors
Volume-related errors (VN_ERRORs) are the most common error messages
displayed. TABLE 7-6 lists the names and values of these errors.
TABLE 7-6
166
Volume-Related (VN) Errors
Error Name
Numerical
Value
Message
VN_BADUNIT
0x200000
Bad unit number
VN_BADDRIVE
0x200001
Bad drive number
VN_BADPART
0x200002
Bad partition ID
Sun StorEdge 6020 and 6120 Arrays System Manual • May 2003
TABLE 7-6
Volume-Related (VN) Errors (Continued)
Error Name
Numerical
Value
Message
VN_VOLEXISTS
0x200003
Volume already in use
VN_VOLNOTFOUND
0x200004
Volume name not found
VN_PARTHASFS
0x200005
Partition already has file system
VN_FACLOCKED
0x200006
Facility locked by other command
VN_BADATTR
0x200007
Unable to read attributes
VN_MOUNTED
0x200008
Volume already mounted
VN_UNMOUNTED
0x200009
Volume not mounted
VN_MNTINUSE
0x20000A
Mount point in use
VN_NOMEMORY
0x20000B
Could not allocate memory for operation
VN_ALREADYDSBL
0x20000C
Is already a disabled drive
VN_NODSBL
0x20000D
No drives are disabled
VN_ABORTED
0x20000E
Operation aborted
VN_NOTSUP
0x20000F
Operation not supported
VN_UNKVOL
0x200010
Unknown volume
VN_RAIDERR
0x200015
RAID error
VN_NOPART
0x200016
Partition has size 0
VN_PARTSMALL
0x200017
Partition too small
VN_UNKVIF
0x200019
Unknown interface
VN_UNKVIFTYP
0x20001A
Unknown interface type
VN_BADVOLNAME
0x20001B
Bad volume name
VN_BADVOLNAMELEN
0x20001C
Bad volume name too long
VN_CFGNOTSUPPORTED
0x20001D
Unsupported volume configuration
VN_BADSTANDBYUNIT
0x20001E
Standby unit number is wrong
VN_DEVINVALID
0x20001F
Invalid drive specified
VN_LOCVOLBAD
0x200020
Local volume bad
VN_PORTMAPRM
0x200021
Volume still mapped to a port
VN_UNINITIALIZED
0x200022
Volume is uninitialized
VN_PENDING
0x200023
Operation is pending
Appendix A
Troubleshooting
167
TABLE 7-6
Volume-Related (VN) Errors (Continued)
Error Name
Numerical
Value
VN_BADMODE
0x200024
Cache mode must be set to auto for
mirroring
VN_MIRRORON
0x200025
Cannot change cache mode when
mirroring is on
VN_CANTMOUNT
0x200026
Cannot mount volume because multiple
disabled drives
VN_STARTPARAM
0x200027
Slice start parameter invalid or in use
VN_VSLBADNAME
0x200028
Bad slice name
VN_MAXSLICEERR
0x200029
No more slices can be created
VN_VSLNOTFOUND
0x20002A
Slice not found
VN_SIZEPARAM
0x20002B
Incorrect slice size parameter
encountered
VN_VSLBADNAMELEN
0x20002C
Slice name exceeded 12 characters
allowed
VN_VSLEXISTS
0x20002D
Slice name already exists
VN_NOSLICEINVOL
0x20002E
Volume does not have slice(s) to be
removed
VN_VSLRAIDERR
0x20002F
RAID error in volume slicing
Message
Some of these errors are generated more often than others, such as VN_MOUNTED,
VN_UNMOUNTED, VN_MNTINUSE, VN_CFGNOTSUPPORTED, VN_DEVINVALID,
VN_LOCVOLBAD, VN_UNITIALIZED, VN_BADMODE, and VN_MIRRORON. In particular,
VN_RAIDERR, code 0x200015, can result from a variety of scenarios and this warrants
attention. The array uses a specific protocol for carrying out commands, and this
protocol uses the RAID error as a general error message to be sent to the user. As
such, the RAIDERR may result from any of a number of software or hardware
conditions. Some cases involve problems related to the user configuration, which can
be remedied easily. Other cases are more subtle and are related to the function of the
array’s internal software. Detailed information for specific instances of the RAID
error can be found in the syslog; an overview of the scenarios are provided here.
Categories of RAID Errors
The following is a list of the categories that the array’s embedded protocol uses for
RAID errors and a few of the cases within each category. Each category code, which
can be useful in reference to the syslog, is included. Though not exhaustive, this
list provides a general breakdown of common RAID error generators:
168
Sun StorEdge 6020 and 6120 Arrays System Manual • May 2003
1. Command Incomplete (0x1A): The command was not executed correctly
internally. The software responded to the command with too much or too little
information. In certain cases, the command might simply be paused and will
resume.
2. Partial (conditional) Success (0x19): This category includes the following cases:
a. Aborting a nonexistent command: A user has issued a command, then tried to
abort it after the command is executed.
b. Retry error: The command was retried one or more times.
c. Target error: A volume is offline or disabled.
3. Invalid Response (part of the category above; 0x19): The software did not provide
a valid response to the user command. These cases are more specific than the
Command Incomplete category.
a. Invalid information type (parameter): The software responded with the wrong
type of information.
b. Error in information returned: The information returned in response to the
command is erroneous. This case implies an embedded software error.
c. Function failed: The command failed to retrieve the appropriate information.
d. Zero size: The command accessed a volume with zero size.
4. Command Aborted(0x18): The command is aborted, often because of a time-out.
A command aborts when a component in the system freezes or if a connection is
defective.
5. Command Exception (0x17): This category includes cases where the command
cannot be executed. This error type is generated when a disabled, unavailable, or
invalid drive or volume is specified. For example, after using a hot spare
(standby) to reconstruct the data on a drive, you cannot refer to it again as a hot
spare.
a. Invalid name/address: Either the user or the internal software used a volume
or disk drive name that is invalid or does not match the current configuration.
b. Invalid command fields: The command is no longer supported or the internal
software used a command opcode that is unsupported.
c. Missing fields: The user or the internal software issued a command with
missing information.
d. Drive (module) errors: The disk drive referenced may be unattached, disabled,
substituted, or in the process of being reconstructed.
Appendix A
Troubleshooting
169
6. Machine Exception (0x16): This category includes cases where there is a hardware
error, or where other commands are being executed, thereby giving a busy
response.
a. Drive fatal error: There is an error internal to a referenced drive.
b. Auto reconstruct or disable attempted: A drive that is being reconstructed or
disabled is specified.
c. Queue full or busy response: The command cannot be executed because the
system is busy processing other commands.
d. Unknown host: The specified host address is invalid or unreachable.
e. Single drive errors: A drive referenced by the command was not detected, the
connection could not be opened, or the sysarea on the drive could not be
created. This case implies that the drive or the connection to it is faulty.
Alternatively, a retry of a command accessing a disk could fail to execute.
f. Multiple disk failure: An error occurred involving more than one drive.
g. Standby already in use: (This error resembles the one in the Command
Exception category). In this case, the drive is busy processing a previous
command. This case applies when the command is complete and if the drive
configuration has changed as a result.
h. Volume (LUN) errors: A volume may be inaccessible, or its configuration may
be corrupted and represented as nonvalid.
7. Intervention Required (0x14): Here, an error results when a volume is mounted or
unmounted, in contrast to what is expected. Alternatively, a physical connection
might be broken and should be reinstated (by replacing the appropriate FRUs).
RAID errors can result from invalid command arguments or from a system
problem. The error might refer to the configuration of a volume or an individual
drive. For example, you can encounter the error while reconfiguring the array with
volumes that have been added but not mounted, or the problem might be related to
the hardware or an embedded component.
In general, RAID errors can be diagnosed by checking the status of the volumes
mounted on the array. Often, an existing but unmounted volume can trigger the
error. Other times, a conflict occurs when a new version of the binary is downloaded
while previous volumes are still being used.
Investigating RAID Errors
Some guidelines for investigating RAID errors include:
1. Check the state of the current volumes with the vol stat command.
170
Sun StorEdge 6020 and 6120 Arrays System Manual • May 2003
■
If the volumes are unmounted, try remounting them and then resetting the
system using the reset command.
■
If you are unable to remount the volumes, try removing all the volumes, resetting
the system, then adding them back before remounting them.
2. Check the host connection to the array.
On hosts running the Solaris OS, the format command should match the number of
volumes present on the array. If the number of volumes listed do not match, see the
troubleshooting instructions. Specifically, the T400 entries listed by the format
command should be recognized and labeled, and the number of these entries should
equal the number of volumes mounted on the array.
3. If you suspect that a hardware problem is causing the RAID error, use the fru
list and fru stat commands to check the status of the components.
It might also be worthwhile to check the cables and connections between partnergroup units and between the host and the array units.
More detail regarding the error might be available in the syslog, in which case note
the date and time of the error for lookup. However, most common cases can be
handled as described above.
Port Errors
TABLE 7-7 lists the port error messages that can be displayed.
TABLE 7-7
Port Errors
Error Name
Numerical Value
Message
PRT_UNKNOWPORT
0x300000
bad port number
PRT_ALREADYMAPPED
0x300001
port is already mapped unmap first
PRT_INVALIDNAME
0x300002
volume name is not correct
PRT_VOLNOTFOUND
0x300003
volume name not found
PRT_INVALID
0x300004
port number is incorrect
PRT_LUNNOTMAPPED
0x300005
this lun is not mapped
PRT_ACCESSINVALID
0x300006
need to specify the access mode
Appendix A
Troubleshooting
171
Interconnect Card and Other FRU Errors
TABLE 7-8 lists the various FRU-related errors that you can encounter. These include
various power and cooling unit fault conditions, missing disks, and interconnect
card errors.
TABLE 7-8
172
Unit-Related Errors (Interconnect Card and Other FRUs)
Error Name
Numerical Value
Message
PS1_NOTEXIST
0x500001
Power Supply 1 Not Present
PS2_NOTEXIST
0x500002
Power Supply 2 Not Present
PS1_NOBATT
0x500003
Power Supply 1 Battery Not Present
PS2_NOBATT
0x500004
Power Supply 2 Battery Not Present
PS1_DISABLED
0x500005
Power Supply 1 Disabled
PS2_DISABLED
0x500006
Power Supply 2 Disabled
PS1_DISABLE
0x500007
Power Supply 1 Shutting off...
PS2_DISABLE
0x500008
Power Supply 2 Shutting off...
PS1_FAN1FAIL
0x500011
Power Supply 1 Fan 1 Failed
PS2_FAN1FAIL
0x500012
Power Supply 2 Fan 1 Failed
PS1_FAN2FAIL
0x500013
Power Supply 1 Fan 2 Failed
PS2_FAN2FAIL
0x500014
Power Supply 2 Fan 2 Failed
PS1_OVERTEMP
0x500015
Power Supply 1 Over Temperature
PS2_OVERTEMP
0x500016
Power Supply 2 Over Temperature
PS1_SWOFF
0x500017
Power Supply 1 Switch Off
PS2_SWOFF
0x500018
Power Supply 2 Switch Off
PS1_DCNOK
0x500019
Power Supply 1 DC Not OK
PS2_DCNOK
0x50001A
Power Supply 2 DC Not OK
PS1_ONBATT
0x500021
Power Supply 1 On Battery
PS2_ONBATT
0x500022
Power Supply 2 On Battery
PS1_FANHIGH
0x500023
Power Supply 1 Fan High
PS2_FANHIGH
0x500024
Power Supply 2 Fan High
PS1_REFBATT
0x500025
Power Supply 1 Refresh Battery
PS2_REFBATT
0x500026
Power Supply 2 Refresh Battery
DK1_NOTEXIST
0x500031
Disk 1 Not Present
Sun StorEdge 6020 and 6120 Arrays System Manual • May 2003
TABLE 7-8
Unit-Related Errors (Interconnect Card and Other FRUs) (Continued)
Error Name
Numerical Value
Message
DK2_NOTEXIST
0x500032
Disk 2 Not Present
DK3_NOTEXIST
0x500033
Disk 3 Not Present
DK4_NOTEXIST
0x500034
Disk 4 Not Present
DK5_NOTEXIST
0x500035
Disk 5 Not Present
DK6_NOTEXIST
0x500036
Disk 6 Not Present
DK7_NOTEXIST
0x500037
Disk 7 Not Present
DK8_NOTEXIST
0x500038
Disk 8 Not Present
DK9_NOTEXIST
0x500039
Disk 9 Not Present
DK10_NOTEXIST
0x50003a
Disk 10 Not Present
DK11_NOTEXIST
0x50003b
Disk 11 Not Present
DK12_NOTEXIST
0x50003c
Disk 12 Not Present
DK13_NOTEXIST
0x50003d
Disk 13 Not Present
DK14_NOTEXIST
0x50003e
Disk 14 Not Present
DK_NONE
0x50003f
No Disk Present
DK1_BYPASSED
0x500041
Disk 1 Bypassed
DK2_BYPASSED
0x500042
Disk 2 Bypassed
DK3_BYPASSED
0x500043
Disk 3 Bypassed
DK4_BYPASSED
0x500044
Disk 4 Bypassed
DK5_BYPASSED
0x500045
Disk 5 Bypassed
DK6_BYPASSED
0x500046
Disk 6 Bypassed
DK7_BYPASSED
0x500047
Disk 7 Bypassed
DK8_BYPASSED
0x500048
Disk 8 Bypassed
DK9_BYPASSED
0x500049
Disk 9 Bypassed
DK10_BYPASSED
0x50004a
Disk 10 Bypassed
DK11_BYPASSED
0x50004b
Disk 11 Bypassed
DK12_BYPASSED
0x50004c
Disk 12 Bypassed
DK13_BYPASSED
0x50004d
Disk 13 Bypassed
DK14_BYPASSED
0x50004e
Disk 14 Bypassed
DK1_NOTREADY
0x500051
Disk 1 Not Ready
DK2_NOTREADY
0x500052
Disk 2 Not Ready
Appendix A
Troubleshooting
173
TABLE 7-8
174
Unit-Related Errors (Interconnect Card and Other FRUs) (Continued)
Error Name
Numerical Value
Message
DK3_NOTREADY
0x500053
Disk 3 Not Ready
DK4_NOTREADY
0x500054
Disk 4 Not Ready
DK5_NOTREADY
0x500055
Disk 5 Not Ready
DK6_NOTREADY
0x500056
Disk 6 Not Ready
DK7_NOTREADY
0x500057
Disk 7 Not Ready
DK8_NOTREADY
0x500058
Disk 8 Not Ready
DK9_NOTREADY
0x500059
Disk 9 Not Ready
DK10_NOTREADY
0x50005a
Disk 10 Not Ready
DK11_NOTREADY
0x50005b
Disk 11 Not Ready
DK12_NOTREADY
0x50005c
Disk 12 Not Ready
DK13_NOTREADY
0x50005d
Disk 13 Not Ready
DK14_NOTREADY
0x50005e
Disk 14 Not Ready
CT_NOTEXIST
0x500061
Controller Not Present
CT_QLOGNRDY
0x500062
Qlogic Chip Not Ready
CT_SEL_ID
0x500063
Select ID Changed
LP_VSC_ERR
0x500064
VSC7120 Loop Failed
LC1_OFFLINE
0x500065
Interconnect card 1 Offline
LC2_OFFLINE
0x500066
Interconnect card 2 Offline
LP_CABLE1
0x500067
Cable 1 Not Present
LP_CABLE2
0x500068
Cable 2 Not Present
LC1_NSTART
0x500069
Interconnect card 1 Failed to Start
LC2_NSTART
0x50006A
Interconnect card 2 Failed to Start
CT_NOALTLP
0x50006B
No Alternate Loop
LP_SWITCH1
0x500071
Switch to Loop 1
LP_SWITCH2
0x500072
Switch to Loop 2
LP_MUX_ISO
0x500073
Loop Mux Changed to Isolated
LP_MUX_TOP
0x500074
Loop Mux Changed to Top
LP_MUX_MID
0x500075
Loop Mux Changed to Middle
LP_MUX_BOT
0x500076
Loop Mux Changed to Bottom
Sun StorEdge 6020 and 6120 Arrays System Manual • May 2003
Other Errors
You will rarely see other types of errors, such as logical volume manager (LVM)
errors (range 0x10001-0x1000A) and operating system errors (range 00000001–
C000FFFF). The tftp error (numerical values 10060001-10060005) is an exception
that you can see when you try to download a new binary. The tftp errors are
usually generated due to one of the following reasons:
■
The permissions for the file to be downloaded are too restrictive. In general,
binaries should be world readable and executable.
■
The checksum for the binary file to be downloaded is erroneous.
■
The array units have not been recognized by the network. In this case, a system
administrator should make sure that the IP addresses of the arrays are entered in
the network database.
TABLE 7-9 lists pSOS errors.
TABLE 7-9
Embedded Operating System and Driver Errors
Error Type
Numerical Value
pSOS+
0000’0001 0000’0FFF
(reserved)
0000’1000 0000’1FFF
embedded file system
0000’2000 0000’2FFF
pREPC+
0000’3000 0000’3FFF
(reserved)
0000’4000 0000’4FFF
pNA+, pRPC+, pX11+
0000’5000 0000’5FFF
(reserved)
0000’6000 0000’FFFF
Networking libraries
0110’0000 01FF’FFFF
MMUlib
0120’0000 0120’00FF
(reserved)
0120’0100 1000’FFFF
serial driver
1001’0000 1001’FFFF
tick timer driver
1002’0000 1002’FFFF
(reserved)
1003’0000 1003’FFFF
RAM disk driver
1004’0000 1004’FFFF
(reserved)
1005’0000 1005’FFFF
TFTP driver
1006’0000 1006’FFFF
SLIP driver
1007’0000 1007’FFFF
Appendix A
Troubleshooting
175
TABLE 7-9
176
Embedded Operating System and Driver Errors (Continued)
Error Type
Numerical Value
(reserved)
1008’0000 1004’FFFF
SCSI driver
1050’0000 105F’FFFF
(reserved)
1060’0000 FFFF’FFFF
Sun StorEdge 6020 and 6120 Arrays System Manual • May 2003
Examples
This section contains examples for different types of messages.
■
■
■
Error Messages
Warning Messages
Notice
Error Messages
This section provides examples of the types of errors that may be encountered and
the corresponding error message.
FRU Level Errors
■
Example 1
A power and cooling unit (PCU) has an overtemperature condition.
E: u<n>pcu<n>: Over temperature
■
Example 2
The power and cooling unit (PCU) is flagged as not being present.
E: u<n>pcu<n>: Not present
Warning Messages
This section provides examples of the types of errors that may occur and the
corresponding warning messages.
Appendix A
Troubleshooting
177
Unrecoverable Drive Error
Data drive u1d4 error occurred while using interconnect path 0.
Jan 25 00:09:20 ISR1[1]: W: u1d4 SCSI Disk Error Occurred (path = 0x0)
Jan 25 00:09:20 ISR1[1]: W: Sense Key = 0x4, Asc = 0x15, Ascq = 0x1
Jan 25 00:09:20 ISR1[1]: W: Sense Data Description = Mechanical Positioning Error
This example shows the decode of the prior SCSI sense key information (from the
data drive) regarding the drive error. In this case, the drive error was a “Mechanical
Position Error.”
Jan 25 00:09:21 WXFT[1]: W: u1d4 hard err in vol (n1) starting auto disable
This message indicates that drive u1d4 was disabled as a result of the previous
error. The unit will continue to operate with a disabled drive, with possible
performance degradation. A repair action must be planned. However, since the drive
automatically disabled, the repair can be deferred.
Recoverable Drive Error
Feb 04 22:39:11 ISR1[1] : W: u1d1 SCSI Disk Error Occurred (path = 0x1)
■
W: u1d1 indicates the failing drive.
■
path = 0x1 indicates that the error was detected while using the interconnect
served by interconnect card 2 (path 0x0 is interconnect served by interconnect
card 1).
Feb 04 22:39:11 ISR1[1] : W: Sense key = 0x1, Asc 0x47, Ascq = 0x1
Feb 04 22:39:11 ISR1[1] : W: Sense Data Description = Recovered Data With Retries
178
■
Sense key (N (hex)) = RECOVERED ERROR. Indicates that the last command
completed successfully after some recovery action was performed.
■
The meaning of Asc and Ascq is decoded in the second line.
■
Recovered Data With Retries is the decode of the most important
information contained in the Sense key message of the previous line.
Sun StorEdge 6020 and 6120 Arrays System Manual • May 2003
Notice
Feb 25 21:47:03 LPCT[1]: N: u1pcu2: Refreshing battery
■
N: is the Notice level message.
u1pcu2 is unit 1, power and cooling unit 2.
■
Refreshing battery indicates that the battery refresh is in progress.
■
Appendix A
Troubleshooting
179
180
Sun StorEdge 6020 and 6120 Arrays System Manual • May 2003
APPENDIX
B
CLI Commands
This chapter contains descriptions of the commands supported by the array.
Topics in this chapter include:
■
■
■
■
“Displaying Commands” on page 181
“FRU Identifiers” on page 182
“Complete List of CLI Commands” on page 184
“CLI Commands” on page 187
Displaying Commands
Follow these directions to display commands and their syntax.
▼
To Display Commands
● To view the available commands on the array, type help at the prompt.
6120:/:<#> help
arp
cat
cd
head
help
ls
rm
rmdir
tail
abort
boot
df
led
linkstat
port
proc
reset
sim_diag
sun
volslice
ep
cmp
cp
mkdir
mv
touch
disable disk
logger lpc
savecore
sync
sys
refresh route
date
du
netstat ping
enable
more
set
tzset
ofdg
echo
pwd
fru
id
ntp
passwd
shutdown
ver
vol
lun
hwwn
181
▼
To Display Command Syntax
● Type command-name help on the array, to display the syntax of a command.
6120:/:<#>
usage: id
id
id
id
id
▼
id help
read u<encid>
read u<encid>c1
read u<encid>l<1|2>
read u<encid>pcu<1|2>
read u<encid>b<1|2>
To Display Command Summary
● Type help command-name on the array to display a summary of the command.
6120:/:<#> help id
id
- read fru id (not reentrant, not locked)
FRU Identifiers
Many commands use a FRU identifier to refer to a particular FRU in an array. This
identifier contains a unit constant (u), the unit number (encid), the FRU constant
(ctr for controller card, pcu for power and cooling unit, bat for battery, l for
interconnect card, and d for disk drive) and the FRU number (n).
TABLE 7-10
182
FRU Identifiers
FRU
Identifier
Unit Number
Controller card
uencidc
encid = unit number (1-8)
Power and cooling unit
uencidpcu[1|2]
encid = unit number (1-8)
n = pcu number (1, 2)
Sun StorEdge 6020 and 6120 Arrays System Manual • May 2003
TABLE 7-10
FRU Identifiers
FRU
Identifier
Unit Number
Battery
uencidbat[1|2]
encid = unit number (1-8)
n = battery number (1, 2)
Interconnect card
uencidl[1|2]
encid = unit number (1-8)
n = interconnect card number (1, 2)
Disk drive
uenciddn
encid = unit number (1-8)
n = disk drive number (1 to 14)
Note – Commands support 8 units, while 6 are currently being supplied.
Appendix B
CLI Commands
183
Complete List of CLI Commands
TABLE 7-11 lists all the commands described in this chapter. Note that not all
command options are listed separately in this table.
TABLE 7-11
Command
184
CLI Commands Listed in Alphabetical Order for the Array
Command Option
Page Number
abort
“abort” on page 187
arp
“arp” on page 252
boot
“boot” on page 188
cat
“cat” on page 252
cd
“cd” on page 253
cmp
“cmp” on page 253
cp
“cp” on page 253
date
“date” on page 254
disable
“disable” on page 189
disk
“disk” on page 190
du
“du” on page 254
df
“df” on page 254
echo
“echo” on page 254
enable
“enable” on page 191
ep
“ep” on page 191
fru
“fru” on page 192
head
“head” on page 255
help
“help” on page 198
hwwn
“hwwn” on page 198
hwwn list
“hwwn list” on page 199
hwwn listgrp
“hwwn listgrp” on page 199
hwwn add
“hwwn add” on page 200
hwwn rm
“hwwn rm” on page 201
hwwn rmgrp
“hwwn rmgrp” on page 202
Sun StorEdge 6020 and 6120 Arrays System Manual • May 2003
TABLE 7-11
Command
CLI Commands Listed in Alphabetical Order for the Array (Continued)
Command Option
Page Number
id
“id” on page 202
led
“led” on page 205
linkstat
“linkstat” on page 205
logger
“logger” on page 206
lpc
“lpc” on page 206
ls
“ls” on page 255
lun
“lun” on page 208
lun map list
“lun map list” on page 208
lun map add
“lun map add” on page 210
lun map rm
“lun map rm” on page 210
lun map rm all
“lun map rm all” on page 211
lun perm list
“lun perm list” on page 212
lun perm
“lun perm” on page 213
lun default
“lun default” on page 215
lun wwn list
“lun wwn list” on page 216
lun wwn rm
“lun wwn rm” on page 216
lun wwn rm all
“lun wwn rm all” on page 217
mkdir
“mkdir” on page 255
more
“more” on page 256
mv
“mv” on page 256
ofdg
“ofdg” on page 221
netstat
“netstat” on page 256
ntp
“ntp” on page 218
ntp stats
“ntp stats” on page 219
ntp poll
“ntp poll” on page 220
ntp interval
“ntp interval” on page 220
ntp server
“ntp server” on page 221
passwd
“passwd” on page 257
ping
“ping” on page 257
port
“port” on page 222
Appendix B
CLI Commands
185
TABLE 7-11
Command
CLI Commands Listed in Alphabetical Order for the Array (Continued)
Command Option
proc
“proc” on page 224
pwd
“pwd” on page 257
refresh
“refresh” on page 225
reset
“reset” on page 226
rm
“rm” on page 257
rmdir
“rmdir” on page 258
route
“route” on page 258
savecore
“savecore” on page 227
set
“set” on page 228
set timezone
“set timezone” on page 230
shutdown
“shutdown” on page 236
sim_diag
“sim_diag” on page 237
sun
“sun” on page 237
sync
“sync” on page 259
sys
“sys” on page 237
sys fc_topology
186
Page Number
“sys fc_topology” on page 240
tail
“tail” on page 259
tzset
“tzset” on page 241
touch
“touch” on page 260
ver
“ver” on page 242
vol
“vol” on page 242
volslice
“volslice” on page 246
volslice create
“volslice create” on page 247
volslice list
“volslice list” on page 248
volslice remove
“volslice remove” on page 250
Sun StorEdge 6020 and 6120 Arrays System Manual • May 2003
CLI Commands
This section describes the commands supported by the Sun StorEdge 6020 and 6120
arrays. For additional command information, see “Displaying Commands” on
page 181.
Whenever possible, a command is introduced with its summary statement as
provided by entering:
6120:/: help command-name
Commands whose usage is not unique to the array, such as a Solaris OS or a UNIX
command, are documented in “Other Commands” on page 252.
Array-specific commands are accompanied by more detailed usage statements.
Note – Commands are listed as either reentrant commands or as not reentrant. A
reentrant command can be run in multiple telnet sessions, or CLI windows, to the
same array.
abort
Description
Summary: Abort the tray (not reentrant, not locked).
The abort command allows the operator to force a crash dump to be taken on the
current controller, or the controller given by unit number. After the crash dump is
taken, the controller is immediately reset.
Note – This command is to be used by authorized service personnel only!
Usage
abort [-y] [u<1-8>]
Appendix B
CLI Commands
187
Parameters
TABLE 7-12
abort Command Options and Parameters
Parameter
Function
-y
The -y option is used to inhibit the abort confirmation prompt.
This command may be issued from either controller of a high-availability (HA)
configuration.
boot
Description
Summary: Boot system (not reentrant, not locked).
Boots the RAID software according to the boot mode configured with the set
command.
Usage
boot -f disk-no.
boot -i filename.bin
boot -s
boot -w
188
Sun StorEdge 6020 and 6120 Arrays System Manual • May 2003
Parameters
TABLE 7-13
boot Command Options and Parameters
Parameter
Function
-f disk-no.
Verifies the disk boot image in the specified disk; updates the disk
with its current disk position if the boot partition is OK; if the boot
partition is not OK, the command exits, displaying Failed to set
new boot disk position on the console.
-i filename.bin
Copies the level 3 controller firmware image to a reserved area on
disk, which is loaded into flash upon reboot. The filename string can
be a maximum of 11 characters.
Note that the use of the ep_download command is the preferred
procedure for updating the controller FLASH. See “ep” on page 191.
-s
Used when disks in an array are detected as being in the wrong disk
position. If this occurs, a special prompt ADMIN> is displayed. At
this point, use the boot -s command to correct this state and
reboot the array.
-w
Sets the system area and configuration settings to an unspecified set
of values. The boot image and local file system will be retained. Use
to quickly clear all the system and configuration settings. You might
run this command when adding trays to the array to clear all
settings. You must reconfigure the array after running this
command.
CAUTION: Note that LUN and volume information are also lost.
See also ep_download in “ep” on page 191.
disable
Description
Summary: Disable certain FRUs (not reentrant, not locked).
Takes the specified FRU offline. If you disable a disk drive that has a hot spare
configured to it, the hot spare will replace the disabled drive until you replace the
disabled drive. A disabled FRU responds only to an enable command.
Usage
disable uencid
disable uencidl[1|2]
disable uencidd[1-14]
Appendix B
CLI Commands
189
Parameters
TABLE 7-14
disable Command Options and Parameters
Parameter
Function
uencid
Tray. See “FRU Identifiers” on page 182.
l
Interconnect card. See “FRU Identifiers” on page 182.
d
Disk drive. See “FRU Identifiers” on page 182.
disk
Description
Summary: Disk administration (not reentrant, not locked).
Controls, displays, and configures disks.
Usage
disk version drives[1-14]
disk download drives filename
Parameters
TABLE 7-15
190
disk Command Options and Parameters
Parameter
Function
version
Displays the firmware version of the selected drives.
download
Updates the selected drives with new firmware specified by the
filename.
drives
Specifies the disk drive numbers.
filename
Specifies the file to use for drive firmware updates.
Sun StorEdge 6020 and 6120 Arrays System Manual • May 2003
Example
6120:/:<#> disk version u1d3
DISK
VENDOR PRODUCT
REVISION SERIAL_NO FW_REV
ROM_REV
---------------------------------------------------------------------u1d03 SEAGATE ST373307FSUN72G A207
3HZ0AMYN
073004A2
00000000
pass
enable
Description
Summary: Enable certain FRUs (not reentrant, not locked).
Enables specific FRUs. See “disable” on page 189.
Usage
enable uencid
enable uencidl[1|2]
enable uencidd[1-14]
Parameters
TABLE 7-16
enable Command Options and Parameters
Parameter
Function
uencid
Tray. See “FRU Identifiers” on page 182.
l
Interconnect card. See “FRU Identifiers” on page 182.
d
Disk drive. See “FRU Identifiers” on page 182.
ep
Description
Summary: Program the flash eeprom (not reentrant, not locked).
Updates the controller FLASH with new firmware specified by filename. Using this
command is the preferred method for updating controller FLASH.
Appendix B
CLI Commands
191
Usage
ep download filename
Parameters
TABLE 7-17
ep Command Options and Parameters
Parameter
Function
filename
Specifies the new firmware to be loaded into the controller EPROM.
The file must reside in the local file system.
Example
6120:/:<#> ep download t4l3_303.bin
Erasing Flash...done
Programming Flash...........................................done
Done with writing EPROM code of controller 1
Start writing EPROM code of controller 2
Done with writing EPROM code of controller 2
6120:/:<5>
fru
Description
Summary: Display the field-replaceable unit (FRU) information (not reentrant, not
locked).
Usage
fru l[ist]
fru list sys
fru list [u<1-8>]
fru list [u<1-8>]c[1]
fru list [u<1-8>]d[<1-14>]
fru list [u<1-8>]1[<1-2>]
fru list [u<1-8>]pcu[<1-2>]
fru list [u<1-8>]bat[<1-2>]
192
Sun StorEdge 6020 and 6120 Arrays System Manual • May 2003
fru list [u<1-8>]mpn[1]
fru s[tat]
fru stat sys
fru stat [u<1-8>]
fru stat [u<1-8>]c[1]
fru stat [u<1-8>]d[<1-14>]
fru stat [u<1-8>]1[<1-2>]
fru stat [u<1-8>]pcu[<1-2>]
fru st[atistic]
fru statistic sys
fru statistic [u<1-8>]
fru statistic [u<1-8>]d[<1-14>]
fru statistic [u<1-8>]p[1] [clear]
fru statistic [u<1-8>]v[<1-2>] [clear]
fru myuid
Parameters
TABLE 7-18
fru Command Options and Parameters
Parameter
Function
fru list
fru list fruid
Displays fruid type, vendor, model, version, and serial # for
all FRUs, or for a specific fruid.
fru stat
fru stat fruid
Displays hardware status for all FRUs or for a specific fruid.
fru [stat|list] sys
Displays operational status of each unit (u<1-8>).
fru statistic
fru statistic fruid
Displays I/O statistics for all FRUs or for a specific fruid.
fru statistic sys
Displays overall I/O statistics for the array.
fru myuid
Displays the current controller.
u<1-8>, d, l, pcu, bat
See “FRU Identifiers” on page 182.
c[1]
Controller card.
mpn[1]
Midplane card.
Appendix B
CLI Commands
193
TABLE 7-18
fru Command Options and Parameters
Parameter
Function
p[1]
Controller card port.
v[<1-2>]
Volume.
clear
Resets the counter to restart calculating the statistics.
Examples
6120:/:<#> fru myuid
u1
194
Sun StorEdge 6020 and 6120 Arrays System Manual • May 2003
6120:/:<#> fru list
ID
TYPE
------ ----------------u1ctr
controller card
u3ctr
controller card
u1d01
disk drive
- - - - - - (items omitted
u1d14
disk drive
u2d01
disk drive
- - - - - - (items omitted
u2d14
disk drive
u3d01
disk drive
- - - - - - (items omitted
u3d14
disk drive
u4d01
disk drive
- - - - - - (items omitted
u4d14
disk drive
u1l1
loop card
- - - - - - (items omitted
u4l2
loop card
u1pcu1 power/cooling unit
- - - - - - (items omitted
u4pcu2 power/cooling unit
u1bat1 battery
- - - - - - (items omitted
u4bat2 battery
u1mpn
mid plane
- - - - - - (items omitted
u4mpn
mid plane
VENDOR
----------0x301
0x301
SEAGATE
in example)
SEAGATE
SEAGATE
in example)
SEAGATE
SEAGATE
in example)
SEAGATE
SEAGATE
in example)
SEAGATE
0x301
in example)
0x301
0x3AD
in example)
0x3AD
0x076
in example)
0xBEEF
0x301
in example)
0x301
6120:/:<#> fru list u1mpn1
ID
TYPE
VENDOR
------ ----------------- ----------u1mpn
mid plane
0x301
MODEL
----------5405559
5405559
ST373307FSUN
REVISION
------------01
01
A207
SERIAL
-------000192
000662
3HZ0A9LG
ST373307FSUN A207
ST373405FSUN A538
3HZ0AL45
3EK1VYNN
ST373405FSUN A538
ST373307FSUN A207
3EK1VS59
3HZ0AK2V
ST373307FSUN A207
ST373405FSUN A538
3HZ0AGX2
3EK1VRZE
ST373405FSUN A538
5405384
02
3EK1VWC7
000981
5405384
3001562
02
16
000708
Q01331
3001562
3704861
16
01
Q00900
001194
3704861
5016338
01
01
000589
400540
5016338
01
400480
MODEL
----------5016338
REVISION
------------01
SERIAL
-------400540
6120:/:<#> fru list sys
UNIT
STATE
ROLE
---------- -------u1
* ONLINE
master
u2
EXPN UNIT
u3
ONLINE
alt master
u4
EXPN UNIT
Appendix B
CLI Commands
195
6120:/:<#> fru stat
CTLR
STATUS
STATE
------ ------- ---------u1ctr
ready
enabled
u2ctr
missing
u3ctr
ready
enabled
u4ctr
missing
ROLE
---------master
PARTNER
------u3ctr
TEMP
---28
alt master
u1ctr
28
DISK
-----u1d01
- - - u1d14
u2d01
- - - u3d14
u4d01
- - - u4d14
STATUS
STATE
ROLE
------- ---------- ---------ready
enabled
data disk
- - (items omitted in example)
ready
enabled
standby
ready
enabled
data disk
- - (items omitted in example)
ready
enabled
standby
ready
enabled
data disk
- - (items omitted in example)
ready
enabled
standby
PORT1
--------ready
PORT2
--------ready
TEMP
---25
VOLUME
-----v0
ready
ready
ready
ready
24
30
v0
v1
ready
ready
ready
ready
24
29
v2
v3
ready
ready
30
v3
LOOP
-----u1l1
- - - u4l2
STATUS
STATE
MODE
------- ---------- ------ready
enabled
master
- - (items omitted in example)
ready
enabled
slave
CABLE1
---------
CABLE2
--------installed
TEMP
---31
installed
-
33
POWER
-----u1pcu1
- - - u4pcu2
STATUS
STATE
SOURCE OUTPUT
------- -------------- -----ready
enabled
line
normal
- - (items omitted in example)
ready
enabled
line
normal
6120:/:<#> fru stat u1l1
LOOP
STATUS
STATE
------ ------- ---------u1l1
ready
enabled
MODE
------master
BATTERY
------normal
TEMP
-----normal
FAN1
-----normal
FAN2
-----normal
normal
normal
normal
normal
CABLE2
--------installed
TEMP
---31
CABLE1
---------
6120:/:<#> fru stat sys
UNIT
STATE
ROLE
---------- -------u1
* ONLINE
master
u2
EXPN UNIT
u3
ONLINE
alt master
u4
EXPN UNIT
196
Sun StorEdge 6020 and 6120 Arrays System Manual • May 2003
6120:/:<#> fru statistic
SYSTEM CMD RCVD CMD COMP WR REQ
RD REQ
WR BLKS RD BLKS
------ -------- -------- -------- -------- -------- -------t400
11a70389 230523e9 0a018bb4 07801b10 9631a1f8 59aac592
PORT
-----u1p1
u3p1
CMD RCVD
-------11838daf
0000c2fb
CMD COMP
-------11838daf
0000c2fb
WR REQ
-------0a018bb0
00000000
RD REQ
-------07801b10
00000fdc
WR BLKS
-------962fa1f0
00000000
RD BLKS
-------59aac592
000010b1
VOLUME
-----u1vol1
u2vol1
u3vol1
u4vol1
WR REQ
-------03040837
052bb5d4
01590c51
0078c158
RD REQ
-------025d3d2c
03d64c59
0133b65e
0018db2d
WR BLKS
-------2c8ca95b
41adfa3a
15bef312
12380b51
RD BLKS
-------1e0e4a1e
27100d27
0fea719d
04a1fcb0
SOFT ERR
-------00000000
00000000
00000000
00000000
FIRM ERR
-------00000000
00000000
00000000
00000000
DISK
WR REQ
RD REQ
ERROR
RETRY
------ -------- -------- -------- -------u1d01 0098a241 0029174e 00000000 00000001
- - - - - - (items omitted in example)
u1d14 0000c7ae 000799ed 00000000 00000003
u2d01 0058135d 007b3fe2 00000000 00000001
- - - - - - (items omitted in example)
u2d14 00000002 0000000e 00000000 00000001
u3d01 004de640 000dffff 00000000 00000003
- - - - - - (items omitted in example)
u3d14 00000002 0000000e 00000000 00000003
u4d01 000cf21e 00067cb0 00000000 00000003
- - - - - - (items omitted in example)
u4d14 00000002 00000008 00000000 00000003
HARD ERR
-------00000000
00000000
00000000
00000000
NAME
---v0
v1
v2
v3
LOOP UP LOOP DN
-------- -------00000003 00000000
00000003 00000000
00000003 00000000
00000003 00000000
00000003 00000000
00000003 00000000
00000003 00000000
00000003 00000000
6120:/:<#> fru statistic
VOLUME WR REQ
RD REQ
------ -------- -------u1vol1 03040837 025d3d2c
u1v1
WR BLKS RD BLKS SOFT ERR FIRM ERR HARD ERR NAME
-------- -------- -------- -------- -------- ---2c8ca95b 1e0e4a1e 00000000 00000000 00000000 v0
6120:/:<#> fru statistic
SYSTEM CMD RCVD CMD COMP
------ -------- -------t400
11a7074d 230523e9
sys
WR REQ
RD REQ
WR BLKS RD BLKS
-------- -------- -------- -------0a018bb4 07801b10 9631a1f8 59aac592
Appendix B
CLI Commands
197
help
Description
Displays commands with help text explanations.
The help command is a reentrant command. A reentrant command is one that can be
run in multiple telnet sessions (CLI windows) to the same array.
Usage
command help
Parameters
TABLE 7-19
help Command Options and Parameters
Parameter
Function
command
Any valid array CLI command.
hwwn
Note – Each of the commands listed in the usage section of this section is described
in its own section.
Description
Summary: Add or remove grouping of host port WWN (World Wide Name) (not
reentrant, not locked).
Usage
hwwn add grp-name wwn wwn-no. {Add WWN to group named grp-name}
hwwn rm grp-name wwn wwn-no. {Remove WWN from group named grp-name}
hwwn list {list all the WWNs in all the groups}
hwwn list grp-name {list all the WWNs in this group}
hwwn rmgrp grp-name {remove all the WWNs in this group}
hwwn listgrp {list all the registered group names}
198
Sun StorEdge 6020 and 6120 Arrays System Manual • May 2003
hwwn list
Description
Lists all the WWNs in a specified group.
Usage
hwwn list grp-name
Parameters
TABLE 7-20
hwwn list Command Options and Parameters
Parameter
Function
group-name
Specifies a specific group name such as node1 or node2. The group
name has a maximum of 16 alphanumeric characters consisting of
a–z, A–Z, 0–9, and -.
Example
6120:/:<#> hwwn list node1
WWN in this group node1
--------------------------20020678ef345678
20020321ff345678
--------------------------** Total 2 entries **
hwwn listgrp
Description
Lists all the registered group names.
Usage
hwwn listgrp
Note – If all WWNs have been removed from a group, that group is not displayed
in the output of any LUN masking command except this one. An empty group is
always displayed in the output of the hwwn listgrp command.
Appendix B
CLI Commands
199
Example
6120:/:<#> hwwn listgrp
Group Name
----------------------------node1
node2
node3
----------------------------** Total 3 entries **
hwwn add
Description
Adds a WWN to an existing group. If a specified group name does not exist, the
firmware creates a new group with that name and adds the WWN to it.
The maximum number of groups that can exist is 128.
Usage
hwwn add
hwwn add group-name wwn wwn-no.
Note – If you issue the hwwn add command without any parameters, you will be
interactively prompted to specify the parameters.
Parameters
TABLE 7-21
200
hwwn add Command Options and Parameters
Parameter
Function
group-name
Specifies a specific group name such as node1 or node2. The group
name has a maximum of 16 alphanumeric characters consisting of
a–z, A–Z, 0–9, and -.
wwn-no.
Specifies a world wide name. This is a unique 8-byte port WWN of
an HBA Fibre Channel port. The WWN must be exactly 16
alphanumeric characters consisting of a–f, A–F, and 0–9.
Sun StorEdge 6020 and 6120 Arrays System Manual • May 2003
Example
This example shows the interactive and manual methods to add the WWN
20020678ef345678 to group node1.
6120:/:<#> hwwn add
Please enter Group Name: node1
Please enter WWN: 20020678ef345678
Add more WWN? [n]: N
6120:/:<#> hwwn add node1 wwn 200206788ef345678
hwwn rm
Description
Removes one or more WWN(s) from a specific group.
Usage
hwwn rm
hwwn rm group-name wwn wwn-no.
Note – If you issue the hwwn rm command without any parameters, you will be
interactively prompted to specify the parameters.
Parameters
TABLE 7-22
hwwn rm Command Options and Parameters
Parameter
Function
group-name
Specifies a specific group name such as node1 or node2. The group
name has a maximum of 16 alphanumeric characters consisting of
a–z, A–Z, 0–9, and -.
wwn-no.
Specifies a world wide name. This is a unique 8-byte port WWN of
an HBA Fibre Channel port. The WWN must be exactly 16
alphanumeric characters consisting of a–f, A–F, and 0–9.
Appendix B
CLI Commands
201
Example
This example shows the interactive and manual methods to remove the
20020678ef345678 and 20020321ff345678 WWNs from group node1.
6120:/:<#> hwwn rm
Please enter Group Name: node1
Please enter WWN: 20020678ef345678
More WWN [n]: Y
Please enter WWN: 20020321ff345678
More WWN [n]: N
6120:/:<#> hwwn rm node1 wwn 20020678ef345678
6120:/:<#> hwwn rm node1 wwn 20020321ff345678
hwwn rmgrp
Description
Removes a specific group name and all its associated WWNs.
Usage
hwwn rmgrp group-name
Parameters
TABLE 7-23
hwwn rmgrp Command Options and Parameters
Parameter
Function
group-name
Specifies a specific group name such as node1 or node2. The group
name has a maximum of 16 alphanumeric characters consisting of
a–z, A–Z, 0–9, and -.
Example
6120:/:<#> hwwn rmgrp node2
id
Description
Summary: Read FRU id (not reentrant, not locked).
202
Sun StorEdge 6020 and 6120 Arrays System Manual • May 2003
Displays the FRU identification summary.
Usage
id read uencid
id read uencidc1
id read uencidl[1|2]
id read uencidpcu[1|2]
id read uencidb[1|2]
Parameters
TABLE 7-24
id Command Options and Parameters
Parameter
Function
uencid, pcu, l, c
See “FRU Identifiers” on page 182.
b
Battery
c1
Controller card.
Examples
6120:/:<#> id read u1
Description: ASSY, T4 MIDPLANE, 14 SLOT
Short Name: T4-14_MdPn
Serial Number: 400540
Part Number: 5016338
Dash Level: 01
Rev Level: 01
Vendor Name: 0x301
Manufacture Loc: Milpitas,CA,USA
Timestamp: Wed Nov 20 00:48:45 GMT 2002
MAC: 00:03:ba:27:d7:99
WWN: 50:00:3b:a3:00:27:d7:99
Appendix B
CLI Commands
203
6120:/:<#> id read u1b1
Description: ASSY, T4 BATTERY, 14 SLOT
Short Name: T4-14_Bat
Serial Number: 001194
Part Number: 3704861
Dash Level: 01
Rev Level: 01
Vendor Name: 0x076
Manufacture Loc: TIJUANA,MEXICO
Timestamp: Thu Nov 07 22:49:45 GMT 2002
6120:/:<#> id read u1c1
Description: ASSY, T4 CONTROLLER, 14 SLOT
Short Name: T4-14_Ctlr
Serial Number: 000192
Part Number: 5405559
Dash Level: 01
Rev Level: 01
Vendor Name: 0x301
Manufacture Loc: Milpitas,CA,USA
Timestamp: Thu Dec 26 17:33:57 GMT 2002
MAC: 00:03:ba:27:c8:85
204
Sun StorEdge 6020 and 6120 Arrays System Manual • May 2003
led
Description
Summary: Set light-emitting diodes (LED) on FRUs (not reentrant, not locked).
Usage
led [-e encid] [-f fru_str -l led_str [-i index] | -t]
Parameter
TABLE 7-25
led Command Options and Parameters
Parameter
Function
encid
Tray id
fru_str
One of the following: pcu controller drive box
led_str
One of the following: ok busy disabled failed service
locate nolocate
-t
Run in test mode
linkstat
Description
Summary: Report link statistics (not reentrant, not locked).
Usage
linkstat u{1|2}ctr {0|1|2}
Example
6120:/:<#> linkstat u1ctr 0
LINKFAIL LOSSSYNC LOSSSIG PROTOERR INVTXWORD INVCRC
--------------------------------------------------0
1
1
0
0
0
Appendix B
CLI Commands
205
logger
Description
Summary: Log a message to syslog (not reentrant, not locked).
Generates messages to the syslog in the unit.
Usage
logger [-f <file | ->] [-p facility.priority] [message]
Parameters
TABLE 7-26
logger Command Options and Parameters
Parameter
Function
-f
Specifies a particular file or content to be logged. -f <file> specifies
a particular file; if used, only the first 20 lines are logged.
-f - specifies a request to log standard input; if used, the next line
up to Control-c or Control-d followed by a Return is logged.
-p
Specifies the message’s facility and priority level. The default facility
is user and the default priority is notice.
message
Text of message to be logged.
Example
This example shows text being written to the syslog facility as a warning and
writes the following entry into the syslog:
Oct 26 14:44:56 sh01[1]: W: this is a test
6120:/:<#> logger -p syslog.warning this is a test
lpc
Description
Summary: Get interconnect card property (not reentrant, not locked).
Used to display and upgrade interconnect cards.
Usage
lpc version
206
Sun StorEdge 6020 and 6120 Arrays System Manual • May 2003
lpc download uencidl[1|2] filename
lpc reboot uencidl[1|2]
Parameters
TABLE 7-27
lpc Command Options and Parameters
Parameter
Function
version
Displays each interconnect card’s firmware version.
download
Downloads new interconnect card firmware. You must reboot the
card after a download with the lpc reboot command.
reboot
Executes soft reset to the selected interconnect card.
uencid, l
See “FRU Identifiers” on page 182.
filename
File name of new firmware to download.
Example
6120:/:<#> lpc version
LOOP A
Enclosure 1
6.27
Enclosure 2
6.27
Enclosure 3
6.27
Enclosure 4
6.27
6120:/:<#> lpc download
Start Downloading Image
Done
6120:/:<#> lpc download
Start Downloading Image
Done
LOOP B
6.27
6.27
6.27
6.27
u1l1 lpc14_6.27.bin
.............
u2l1 lpc14_6.27.bin
.............
6120:/:<#>lpc reboot u1l1
6120:/:<#>lpc reboot u2l1
Appendix B
CLI Commands
207
lun
Note – Each of the commands listed in the usage statement of this section is
described in its own section.
Description
Summary: Display or modify the lun mapping or access right information (not
reentrant, not locked).
Note – A volume can be made into 64 slices, numbered 0 to 63. LUN numbers
allowed are 0 to 255. Any single LUN number can be mapped to any single slice
number.
Usage
lun map add lun lun-no. slice slice-no.
lun map rm lun lun-no. [slice slice-no.]
lun map rm all
lun map list [lun lun-no. | slice slice-no.]
lun perm <all_lun|lun lun-no.> <rw|ro|none> <all_wwn|wwn wwn|grp
grp_name>
lun perm list [lun lun-no.| wwn wwn | grp grp_name]
lun default <all_lun|lun lun-no.> <rw|ro|none>
lun wwn list
lun wwn rm all
lun wwn rm wwn wwn-no.
lun map list
Description
Without any options, this command lists all current LUN and slice mapping entries.
With an option, it displays the corresponding LUN/slice pair complement for a
specific slice number or for a LUN number.
Usage
208
Sun StorEdge 6020 and 6120 Arrays System Manual • May 2003
lun map list
lun map list slice slice-no.
lun map list lun lun-no.
Parameters
TABLE 7-28
lun map list Command Options and Parameters
Parameter
Function
slice-no.
Specifies the slice number such as 0, 1, 2, 3, ... 63.
lun-no.
Specifies a LUN number such as 0, 1, 2, 3, ... 255.
Example
■
The first example lists all current LUN and slice mapping entries.
6120:/:<#> lun map list
Lun No
Slice No
--------------------------0
0
1
1
2
2
- - - - - - (items omitted in example)
63
63
--------------------------** Total 64 entries **
■
The second example gives the LUN mapping to slice 4.
6120:/:<#> lun map list slice 04
Lun No
Slice No
--------------------------4
4
■
The third example gives the slice mapping to LUN 3.
6120:/:<#> lun map list lun 03
Lun No
Slice No
--------------------------3
3
Appendix B
CLI Commands
209
lun map add
Description
Maps a LUN to a slice number. A slice must be mapped to a corresponding LUN
before it can be accessed by any HBA.
Usage
lun map add lun lun-no. slice slice-no.
Parameters
TABLE 7-29
lun map add Command Options and Parameters
Parameter
Function
lun-no.
Specifies a LUN number such as 0, 1, 2, 3, ... 63.
slice-no.
Specifies the slice number such as 0, 1, 2, 3, ... 63.
Example
The following example maps LUN 8 to slice 3. This assumes LUN 8 has not been
previously assigned.
6120:/:<#> lun map add lun 8 slice 3
lun map rm
Description
Removes the mapping between a specified LUN and its corresponding slice. You are
asked to confirm the removal before the command is executed.
Note – Removing the mapping between LUNs and slices terminates host system
access to the slices.
Usage
lun map rm lun lun-no
lun map rm lun lun-no. slice slice-no.
210
Sun StorEdge 6020 and 6120 Arrays System Manual • May 2003
Parameters
TABLE 7-30
lun map rm Command Options and Parameters
Parameter
Function
lun-no.
Specifies a LUN number such as 0, 1, 2, 3, ... 255.
slice-no.
Specifies the slice number such as 0, 1, 2, 3, ... 63.
Example
■
In the first example, lun 8 is mapped to slice 3. This command removes the
existing LUN mapping to lun 8. You don’t have to specify the slice.
6120:/:<#> lun map rm lun 8
Remove the mapping, are you sure? [N]:
■
Also in the second example, lun 8 is mapped to slice 3. The command removes
LUN mapping from lun 8 to slice 3. If lun 8 is not mapped to slice 3, an error
message is displayed, for example: Error : Current lun 8 maps to slice 8
6120:/:<#> lun map rm lun 8 slice 3
Remove the mapping, are you sure? [N]:
lun map rm all
Description
Removes all current LUN mappings.
Note – Removing the mapping between LUNs and slices terminates host system
access to the slices.
Usage
lun map rm all
Example
6120:/:<#> lun map rm all
Appendix B
CLI Commands
211
lun perm list
Description
Lists the accessibility of LUNs based on specified criteria.
Usage
lun perm list
lun perm list lun lun-no.
lun perm list wwn wwn-no.
lun perm list grp group-name
Parameters
TABLE 7-31
lun perm list Command Options and Parameters
Parameter
Function
lun-no.
Specifies a LUN number such as 0, 1, 2, 3, ... 255.
wwn-no.
Specifies a world wide name. This is a unique 8-byte port WWN of
an HBA Fibre Channel port. The WWN must be exactly 16
alphanumeric characters consisting of a–f, A–F, and 0–9.
group-name
Specifies a specific group name such as node1, node2, etc. The group
name has a maximum of 16 alphanumeric characters consisting of
a–z, A–Z, 0–9, and -.
Example
■
The first example lists all permissions for all LUNs. For each LUN, the default
access permissions are followed by any exceptions.
6120:/:<#> lun perm list
lun
slice
WWN
Group Name
Group Perm
WWN Perm
Effective Perm
-----------------------------------------------------------------------------0
0
default
--rw
rw
1
1
default
--rw
rw
- - - - - - (items omitted in example)
62
62
default
--rw
rw
63
63
default
--rw
rw
------------------------------------------------------------------------------
212
Sun StorEdge 6020 and 6120 Arrays System Manual • May 2003
■
The second example lists all WWNs that can access LUN 0.
6120:/:<#> lun perm list lun 0
List of WWNs and their access right to lun 0
lun
slice
WWN
Group Name
Group Perm
WWN Perm
Effective Perm
-----------------------------------------------------------------------------0
0
default
--rw
rw
■
The third example lists all LUN’s accessibility for WWN 20020678ff345678.
6120:/:<#> lun perm list wwn 20020678ff345678
lun
slice
WWN
Group Name
Group Perm
WWN Perm
Effective Perm
----------------------------------------------------------------------------0
0
20020678ff345678 --rw
rw
1
1
20020678ff345678 --rw
rw
2
2
20020678ff345678 --rw
rw
This WWN is not defined in any group.
■
The fourth example lists all the permissions for members of group G1.
6120:/:<#> lun perm list grp G1
lun
slice
WWN
Group Name
Group Perm
WWN Perm
Effective Perm
----------------------------------------------------------------------------0
0
default
--rw
rw
0
0
20020678ff345678 G1
none
ro
ro
1
1
default
--ro
ro
1
1
20020678ff345678 G1
ro
rw
rw
1
1
20020678ff345678 G1
ro
none
rw
2
2
default
--rw
none
lun perm
Description
By default, no LUN access is given to any HBA. This command is used to grant LUN
access to:
■
A single HBA (specified by its WWN)
■
A group of HBAs
■
All HBAs
Usage
Appendix B
CLI Commands
213
lun perm lun lun-no. rw | ro | none wwn wwn-no.
lun perm lun lun-no. rw | ro | none all_wwn
lun perm lun lun-no. rw | ro | none grp group-name
lun perm all_lun rw | ro | none wwn wwn-no.
lun perm all_lun rw | ro | none all_wwn
lun perm all_lun rw | ro | none grp group-name
Parameters
TABLE 7-32
lun perm Command Options and Parameters
Parameter
Function
lun-no.
Specifies a LUN number such as 0, 1, 2, 3, ... 255.
all_lun
Specifies all LUNs.
rw
Specifies read and write permission.
ro
Specifies read-only permission.
none
Specifies no access permission. The host cannot see the LUN.
wwn-no.
Specifies a world wide name. This is a unique 8-byte port WWN of
an HBA Fibre Channel port. The WWN must be exactly 16
alphanumeric characters consisting of a–f, A–F, and 0–9.
all_wwn
Specifies all world wide names.
group-name
Specifies a specific group name such as node1, node2, etc. The group
name has a maximum of 16 alphanumeric characters consisting of
a–z, A–Z, 0–9, and -.
Example
■
The first example sets up LUN 3 with read/write access to WWN
20020da445678901.
6120:/:<#> lun perm lun 3 rw wwn 20020da445678901
■
The second example sets up LUN 2 with no access to all WWNs.
6120:/:<#> lun perm lun 2 none all_wwn
214
Sun StorEdge 6020 and 6120 Arrays System Manual • May 2003
■
The third example sets up all LUNs with read-only access to group node1.
6120:/:<#> lun perm all_lun ro grp node1
lun default
Description
Sets up the LUN default permission. The default permission for an unregistered
LUN is none.
Usage
lun default lun lun-no. rw
lun default lun lun-no. ro
lun default lun lun-no. none
lun default all_lun rw
lun default all_lun ro
lun default all_lun none
Parameters
TABLE 7-33
lun default Command Options and Parameters
Parameter
Function
lun-no.
Specifies a LUN number such as 0, 1, 2, 3, ... 63.
Example
■
The first example sets up the read and write default permission for LUN 3.
6120:/:<#> lun default lun 3 rw
■
The second example sets up the read-only default permission for all LUNs.
6120:/:<#> lun default all_lun ro
Appendix B
CLI Commands
215
lun wwn list
Description
Lists all registered WWNs.
Usage
lun wwn list
Example
6120:/:<#> lun wwn list
List of all registered WWNs
---------------------------------------2002067890123456
2002078901234567
2002089012345678
2002090123456789
lun wwn rm
Description
Removes the specified WWN from the system database.
Usage
lun wwn rm wwn wwn-no.
Parameters
TABLE 7-34
216
lun wwn rm Command Options and Parameters
Parameter
Function
wwn-no.
Specifies a world wide name. This is a unique 8-byte port WWN of
an HBA Fibre Channel port. The WWN must be exactly 16
alphanumeric characters consisting of a–f, A–F, and 0–9.
Sun StorEdge 6020 and 6120 Arrays System Manual • May 2003
Example
In this example, running the lun wwn list command shows the registered
WWNs. The first WWN is then removed with the lun wwn rm command. The
result is then verified.
6120:/:<#> lun wwn list
List of all registered WWNs
---------------------------------------2002067890123456
2002078901234567
2002089012345678
2002090123456789
6120:/:<#> lun wwn rm wwn 2002067890123456
2002067890123456 will get default access right.
Do you want to remove? (Y/N)[n]:Y
6120:/:<#> lun wwn list
List of all registered WWNs
---------------------------------------2002078901234567
2002089012345678
2002090123456789
lun wwn rm all
Description
Removes all registered WWNs from the system database. The default LUN access
permission applies to all unregistered WWNs.
Usage
lun wwn rm all
Appendix B
CLI Commands
217
Example
In this example, running the lun wwn list command shows the registered
WWNs. The WWNs are then removed with the lun wwn rm all command. The
result is then verified.
6120:/:<#> lun wwn list
List of all registered WWNs
---------------------------------------2002067890123456
2002078901234567
2002089012345678
2002090123456789
6120:/:<#> lun wwn rm all
Are you sure? (Y/N)[n]:Y
6120:/:<#> lun wwn list
List of all registered WWNs
----------------------------------------
ntp
Note – Each of the commands listed in the usage statement of this section is
described in its own section.
Description
Summary: Display or modify NTP settings (not reentrant, not locked).
Displays:
■
The NTP server IP address
■
The polling on/off status
■
The polling interval in minutes
Usage
ntp -v
ntp stats
ntp server [dotted decimal]
ntp poll [off | unicast]
ntp interval [1..60]
218
Sun StorEdge 6020 and 6120 Arrays System Manual • May 2003
Parameters
Parameter
Function
-v
Prints the ntpdate version that was ported from the Solaris OS.
Example
6120:/:<#> ntp
server
nnn.nnn.nnn.nnn
poll
off
interval
5
ntp stats
Description
Displays:
■
The time of the last poll
■
The NTP server IP address
■
The adjustment made to the array internal clock
■
The clock set success statement
Usage
ntp stats
Example
6120:/:<#>
lastpoll
server
offset
status
ntp stats
Tue Feb 19 21:07:32 GMT 2002
nnn.nnn.nnn.nnn
+ 0.00413176
Successfully adjusted the time.
Appendix B
CLI Commands
219
ntp poll
Description
Turns NTP polling on and off.
Usage
ntp poll unicast
ntp poll off
Parameters
TABLE 7-35
ntp poll Command Options and Parameters
Parameter
Function
unicast
Turns polling on.
off
Turns polling off.
Example
6120:/:<#> ntp poll unicast
ntp interval
Description
Sets the polling interval from 1 to 60 minutes. The default is 10 minutes.
Usage
ntp interval time
Parameters
TABLE 7-36
220
ntp interval Command Options and Parameters
Parameter
Function
time
Sets polling interval time in minutes from 1 to 60.
Sun StorEdge 6020 and 6120 Arrays System Manual • May 2003
Example
6120:/:<#> ntp interval 5
ntp server
Description
Establishes the server that is running the Network Time Protocol daemon in the
array firmware.
Usage
ntp server IP_address
Parameters
TABLE 7-37
ntp server Command Options and Parameters
Parameter
Function
IP_address
Specifies the IP address of the server running the NTP daemon.
Example
6120:/:<#> ntp server nnn.nnn.nnn.nnn
ofdg
Description
Summary: Offline loop diagnostics (not reentrant, not locked).
A utility to perform back-end loop diagnostics. All non-u1 disks must be assigned to
a volume to perform this diagnostic. Test output is displayed in the syslog file. This
test does not detect missing interconnect cables.
Note – This command is to be used by authorized service personnel only!
Do not run this command while online. Be sure that the system is offline before
running the ofdg command.
Appendix B
CLI Commands
221
Usage
ofdg [-y] health_check
ofdg [-y] fast_test uencidl[1 | 2]
ofdg [-y] fast_find uencidl[1 | 2]
ofdg [-y] find uencidl[1 | 2]
Parameters
TABLE 7-38
ofdg Command Options and Parameters
Parameter
Function
health_check
Performs a fast test on all detected loops in an HA configuration.
fast_test
Performs a nondisruptive, fast loop test on the specified loop. Disk
path failovers are not performed with this test.
fast_find
Performs a loop test on HA configurations, providing limited
detection of bad FRUs. Use the fast_find option before using the
find option to eliminate interconnect cards, interconnect cables,
and controller cards as possible bad FRUs. This test reconfigures
loops and performs disk path failovers.
find
Performs a loop test on all loops in an HA configuration and
provides loop fault diagnostics, which have the capability to isolate
a FRU problem to a single disk port. Use the find option only after
using the fast_find option. This test reconfigures loops and bypasses disk ports.
-y
Provides an affirmative answer to the command prompt:
WARNING - Volume data will be offline while OFDG is
running. Continue? [N]:
uencid, l
See “FRU Identifiers” on page 182.
port
Description
Summary: Configure the interface port (not reentrant, not locked).
This is a port management utility.
Usage
port list
port set port targetid target-id-value | s[oft]
222
Sun StorEdge 6020 and 6120 Arrays System Manual • May 2003
port host port sun | other
port listmap [port]
Parameters
TABLE 7-39
port Command Options and Parameters
Parameter
Function
list
Displays the configuration of the ports.
set
Modifies port parameters and changes the port target ID value. Any
changes to the target ID require a reset for the changes to take effect.
host
Whenever attaching to a Solaris OS 2.6 host, add the option sun to
the end of the port host command. For example: port host
u1p1
listmap
Shows the current mappings between host interface ports and LUNS
and volumes.
port
Specifies the port. The format is: uarraypportindex. Examples: u1p1,
u2p1
target-id-value
Specifies the target ID (FC-AL ALPA). Valid values are from 0 to 125;
the optional argument s means soft-addressing.
Appendix B
CLI Commands
223
Example
6120:/:<#> port list
port
u1p1
u3p1
targetid
1
3
addr_type
hard
hard
status
online
online
host
sun
sun
wwn
20030003ba27d799
2003000000000003
6120:/:<#> port listmap
port
targetid
addr_type
lun
volume
u1p1
1
hard
0
v0
u1p1
1
hard
1
v0
u1p1
1
hard
2
v0
- - - - - - (items omitted in example)
u3p1
3
hard
60
v3
u3p1
3
hard
61
v3
u3p1
3
hard
62
v3
u3p1
3
hard
63
v3
owner
u1
u1
u1
u1
u1
u1
u1
access
primary
primary
primary
primary
primary
primary
primary
6120:/:<#> port set u1p1 targetid 6
proc
Description
Summary: Display or kill pending vol command (not reentrant, not locked).
Displays the status of outstanding vol processes.
Usage
proc list [cmd-ref | vol-name]
proc kill cmd-ref | vol-name
224
Sun StorEdge 6020 and 6120 Arrays System Manual • May 2003
Parameters
TABLE 7-40
proc Command Options and Parameters
Parameter
Function
list
Displays the command reference number of an active vol init,
vol verify or vol recon command currently in progress.
kill
Terminates the active vol init, vol verify or vol recon
command by specifying its command reference number.
cmd-ref
Specifies the command reference number.
vol-name
Specifies the volume name.
refresh
Description
Summary: Start/stop battery refreshing or display its status (not reentrant, not
locked).
Starts the battery refresh operation on all power and cooling unit 1 batteries,
followed by all power and cooling unit 2 batteries. This operation consists of
discharging and recharging each power and cooling unit battery. Battery refresh
takes several hours for each power and cooling unit.
An automatic battery refresh cycle is performed once every 28 days; the cycle
frequency is specified in the /etc/bat.conf file on the array. A manual battery
refresh cycle is not required. During this cycle, one battery is always fully charged. A
battery refresh cycle will not begin unless both batteries are in optimal condition.
Usage
refresh -c
refresh -s
refresh -i
refresh -k
Appendix B
CLI Commands
225
Parameters
TABLE 7-41
refresh Command Options and Parameters
Parameter
Function
-c
Starts the refresh cycle.
-s
Reports the refresh cycle status.
-i
Directs the scheduler to reload the battery configuration file. For
field service use only.
-k
Kills the current refreshing task.
Example
6120:/:<#> refresh -s
Current Date and Time: Sun Feb 23 11:50:25 GMT 2003
Next Scheduled Refresh: Sun Mar 02 02:00:44 GMT 2003
Battery
------u1b1
u1b2
u2b1
u2b2
u3b1
u3b2
u4b1
u4b2
State
------------------Normal
Normal
Normal
Normal
Normal
Normal
Normal
Normal
Warranty Expiration
---------------------------Sat Jan 01 00:00:00 GMT 2005
Sat Jan 01 00:00:00 GMT 2005
Sat Jan 01 00:00:00 GMT 2005
Sat Jan 01 00:00:00 GMT 2005
Sat Feb 05 12:18:44 GMT 2005
Sat Feb 05 12:18:44 GMT 2005
Sat Jan 01 00:00:00 GMT 2005
Sat Jan 01 00:00:00 GMT 2005
reset
Description
Summary: Reset system (reentrant, not locked).
Use the sync command before a reset command. See “sync” on page 259. This
command can take several minutes to run.
Usage
reset [-y]
226
Sun StorEdge 6020 and 6120 Arrays System Manual • May 2003
Parameters
TABLE 7-42
reset Command Options and Parameters
Parameter
Function
-y
Answers “yes” when prompted to perform reset.
savecore
Description
Summary: Manage crash dump images (not reentrant, not locked).
The savecore command manages dump images, and allows these images to be
uploaded to the external host given by the array’s tftphost variable using the
Trivial File Transfer Protocol (TFTP). In a high-availability configuration, the
savecore command may only be executed from the master controller.
Note – Stage-2 dumps residing on disks in the alternate master are accessible from
the master controller.
Note – This command is to be used by authorized service personnel only!
Usage
savecore list [u<1-8>]
savecore list [u<1-8>]d[<1-9>]
savecore remove u<1-8>
savecore remove u<1-8>d<1-9>
savecore restore u<1-8>
savecore restore u<1-8>d<1-9>
savecore upload u<1-8> [hostname]
savecore upload u<1-8>d<1-9> [hostname]
Appendix B
CLI Commands
227
set
Description
Summary: Display or modify the set information (not reentrant, not locked).
Sets and displays the boot parameters. Without any parameters, the set command
shows the values of the parameters.
6120:/:<#> set
bootmode auto
bootdelay 3
ip
nnn.nnn.nnn.nnn
netmask
255.255.255.0
gateway
nnn.nnn.nnn.nnn
tftphost nnn.nnn.nnn.nnn
tftpfile t4l3_300b19.bin
hostname array00
timezone GMT00
logto
/syslog (* in nvram)
loglevel 3
rarp
on
mac
00:03:ba:27:d7:99
Usage
set bootmode auto | tftp | none
set bootdelay seconds
set ip dotted-decimal
set netmask dotted-decimal
set gateway dotted-decimal
set tftphost dotted-decimal
set tftpfile string39
set hostname string39
set timezone string80
set logto 1 | * | /filename
set loglevel 0 | 1 | 2 | 3 | 4
set rarp on | off
set banner string81 | default
228
Sun StorEdge 6020 and 6120 Arrays System Manual • May 2003
Parameters
Note – If you change the array’s network settings, make sure that your network’s
physical connectivity and settings match these new array settings.
TABLE 7-43
set Command Options and Parameters
Parameter
Function
bootmode
Defines how the array is booted:
• Use auto boot for loading the RAID software from the local
drives. This is the default mode.
• If bootmode is using tftp, use tftphost and tftpfile. (Field
service procedure only.)
• If bootmode is set to none, use system EPROM command line.
(Field service procedure only.)
bootdelay
Specifies the delay time, in seconds, to start a system boot. This
command is used for troubleshooting only.
The default bootdelay parameter for the array is set to a value of 3. To
avoid problems with booting the array, do not reset the bootdelay
parameter to a higher value than the default setting.
ip
Specifies the network IP address. The value is expressed in dotted
decimal notation (for example, nnn.nnn.nnn.nnn).
netmask
The subnet mask for the network. The value is expressed in dotted
decimal notation (for example, 255.255.255.0).
gateway
The default gateway on the network. The value is expressed in
dotted decimal notation (for example, nnn.nnn.nnn.nnn).
tftphost
The IP address of the server from which a tftp boot should be
performed. (Field service procedure only.)
tftpfile
The file name on the tftpboot server that contains the RAID
software. The value is a string of up to 39 characters. (Field service
procedure only.)
hostname
The user-assigned name of the array.
Appendix B
CLI Commands
229
TABLE 7-43
set Command Options and Parameters (Continued)
Parameter
Function
logto
The file where messages are to be logged:
• If logto is set to 1, logging occurs only through the serial port;
log messages are not sent to the /syslog file.
• If logto is set to *, and an /etc/syslog.conf entry specifies
an output file name that already exists, the array appends new log
information to the end of that output file. If the output file
specified in /etc/syslog.conf doesn’t exist, the array creates a
new file with that name. If the output file does not exist and
cannot be created, the entry will be ignored.
Note: If there are changes to the /etc/syslog.conf file, you
must type set logto * for those changes to take effect.
• If logto is set to /filename, and the specified file name does not
exist, the array creates a new file with that name. If the file name
already exists, the array appends new log information to the end
of the existing file. If the file name does not exist and cannot be
created, the array will attempt to open or create the default
syslog file /syslog. If both /filename and /syslog cannot be
opened, logging occurs through the serial port only.
loglevel
The level of messages to be logged (0=none, 1=errors, 2=
warnings/errors, 3=notices/warnings/errors, 4=
informational/notices/warnings/errors).
timezone
See TABLE 7-45 for a list of timezone entries.
rarp
If enabled and connected to a rarp server, sets the IP address.
set timezone
Description
Sets the time zone of the Server that is running the NTP daemon. The time zone
region codes are provided in TABLE 7-45.
Usage
set timezone :region
230
Sun StorEdge 6020 and 6120 Arrays System Manual • May 2003
Parameters
TABLE 7-44
set timezone Command Options and Parameters
Parameter
Function
region
Establishes the timezone for the system. See TABLE 7-45.
Example
6120:/:<#> set timezone :America/Los_Angeles
TABLE 7-45
Olson Time Zone Regions
Africa/Abidjan
Africa/Accra
Africa/
Addis_Ababa
Africa/Algiers
Africa/Asmera
Africa/Bamako
Africa/Bangui
Africa/Banjul
Africa/Bissau
Africa/Blantyre
Africa/Brazzaville
Africa/Bujumbura
Africa/Cairo
Africa/Casablanca
Africa/Ceuta
Africa/Conakry
Africa/Dakar
Africa/
Dar_es_Salaam
Africa/Djibouti
Africa/Douala
Africa/El_Aaiun
Africa/Freetown
Africa/Gaborone
Africa/Harare
Africa/
Johannesburg
Africa/Kampala
Africa/Khartoum
Africa/Kigali
Africa/Kinshasa
Africa/Lagos
Africa/Libreville
Africa/Lome
Africa/Luanda
Africa/Lubumbashi
Africa/Lusaka
Africa/Malabo
Africa/Maputo
Africa/Maseru
Africa/Mbabane
Africa/Mogadishu
Africa/Monrovia
Africa/Nairobi
Africa/Ndjamena
Africa/Niamey
Africa/Nouakchott
Africa/
Ouagadougou
Africa/Porto-Novo
Africa/Sao_Tome
Africa/Timbuktu
Africa/Tripoli
Africa/Tunis
Africa/Windhoek
America/Adak
America/
Anchorage
America/Anguilla
America/Antigua
America/
Araguaina
America/Aruba
America/Asuncion
America/Atka
America/Barbados
America/Belem
America/Belize
America/Boa_Vista
Appendix B
CLI Commands
231
TABLE 7-45
232
Olson Time Zone Regions (Continued)
America/Bogota
America/Boise
America/
Buenos_Aires
America/
Cambridge_Bay
America/Cancun
America/Caracas
America/
Catamarca
America/Cayenne
America/Cayman
America/Chicago
America/
Chihuahua
America/Cordoba
America/
Costa_Rica
America/Cuiaba
America/Curacao
America/
Danmarkshavn
America/Dawson
America/
Dawson_Creek
America/Denver
America/Detroit
America/Dominica
America/Edmonton
America/Eirunepe
America/El_Salvador
America/Ensenada
America/
Fort_Wayne
America/Fortaleza
America/Glace_Bay
America/Godthab
America/
Goose_Bay
America/
Grand_Turk
America/Grenada
America/
Guadeloupe
America/
Guatemala
America/Guayaquil
America/Guyana
America/Halifax
America/Havana
America/
Hermosillo
America/Indiana
America/Indiana/
Indianapolis
America/Indiana/
Knox
America/Indiana/
Marengo
America/Indiana/
Vevay
America/
Indianapolis
America/Inuvik
America/Iqaluit
America/Jamaica
America/Jujuy
America/Juneau
America/Kentucky
America/Kentucky/
Louisville
America/Kentucky
/Monticello
America/Knox_IN
America/La_Paz
America/Lima
America/
Los_Angeles
America/Louisville
America/Maceio
America/Managua
America/Manaus
America/
Martinique
America/Mazatlan
America/Mendoza
America/
Menominee
America/Merida
America/
Mexico_City
America/Miquelon
America/
Monterrey
America/
Montevideo
America/Montreal
America/Montserrat
America/Nassau
America/
New_York
America/Nipigon
America/Nome
Sun StorEdge 6020 and 6120 Arrays System Manual • May 2003
TABLE 7-45
Olson Time Zone Regions (Continued)
America/Noronha
America/
North_Dakota
America/
North_Dakota/
Center
America/Panama
America/
Pangnirtung
America/Paramarib
o
America/Phoenix
America/Port-auPrince
America/Port_of_S
pain
America/
Porto_Acre
America/
Porto_Velho
America/Puerto_Rico
America/
Rainy_River
America/
Rankin_Inlet
America/Recife
America/Regina
America/
Rio_Branco
America/Rosario
America/Santiago
America/
Santo_Domingo
America/Sao_Paulo
America/
Scoresbysund
America/Shiprock
America/St_Johns
America/St_Kitts
America/St_Lucia
America/
St_Thomas
America/St_Vincent
America/
Swift_Current
America/
Tegucigalpa
America/Thule
America/Thunder_Bay
America/Tijuana
America/Tortola
America/
Vancouver
America/Virgin
America/
Whitehorse
America/Winnipeg
America/Yakutat
America/Yellowknife
Antarctica
Antarctica/Casey
Antarctica/Davis
Antarctica/
DumontDUrville
Antarctica/Mawson
Antarctica/
McMurdo
Antarctica/Palmer
Antarctica/South_Pole
Antarctica/Syowa
Antarctica/Vostok
Arctic/
Longyearbyen
Asia/Aden
Asia/Almaty
Asia/Amman
Asia/Anadyr
Asia/Aqtau
Asia/Aqtobe
Asia/Ashgabat
Asia/Ashkhabad
Asia/Baghdad
Asia/Bahrain
Asia/Baku
Asia/Bangkok
Asia/Beirut
Asia/Bishkek
Asia/Brunei
Asia/Calcutta
Asia/Choibalsan
Asia/Chongqing
Asia/Chungking
Asia/Colombo
Asia/Dacca
Asia/Damascus
Asia/Dhaka
Asia/Dili
Asia/Dubai
Asia/Dushanbe
Asia/Gaza
Asia/Harbin
Asia/Hong_Kong
Asia/Hovd
Asia/Irkutsk
Asia/Istanbul
Asia/Jakarta
Asia/Jayapura
Asia/Jerusalem
Asia/Kabul
Asia/Kamchatka
Appendix B
CLI Commands
233
TABLE 7-45
234
Olson Time Zone Regions (Continued)
Asia/Karachi
Asia/Kashgar
Asia/Katmandu
Asia/Krasnoyarsk
Asia/
Kuala_Lumpur
Asia/Kuching
Asia/Kuwait
Asia/Macao
Asia/Magadan
Asia/Manila
Asia/Muscat
Asia/Nicosia
Asia/Novosibirsk
Asia/Omsk
Asia/Phnom_Penh
Asia/Pontianak
Asia/Pyongyang
Asia/Qatar
Asia/Rangoon
Asia/Riyadh
Asia/Riyadh87
Asia/Riyadh88
Asia/Riyadh89
Asia/Saigon
Asia/Sakhalin
Asia/Samarkand
Asia/Seoul
Asia/Shanghai
Asia/Singapore
Asia/Taipei
Asia/Tashkent
Asia/Tbilisi
Asia/Tehran
Asia/Tel_Aviv
Asia/Thimbu
Asia/Thimphu
Asia/Tokyo
Asia/
Ujung_Pandang
Asia/Ulaanbaatar
Asia/Ulan_Bator
Asia/Urumqi
Asia/Vientiane
Asia/Vladivostok
Asia/Yakutsk
Asia/Yekaterinburg
Asia/Yerevan
Atlantic/Azores
Atlantic/Bermuda
Atlantic/Canary
Atlantic/
Cape_Verde
Atlantic/Faeroe
Atlantic/Jan_Mayen
Atlantic/Madeira
Atlantic/Reykjavik
Atlantic/
South_Georgia
Atlantic/St_Helena
Atlantic/Stanley
Australia
Australia/ACT
Australia/Adelaide
Australia/Brisbane
Australia/
Broken_Hill
Australia/Canberra
Australia/Darwin
Australia/Hobart
Australia/LHI
Australia/
Lindeman
Australia/Lord_Howe
Australia/
Melbourne
Australia/NSW
Australia/North
Australia/Perth
Australia/
Queensland
Australia/South
Australia/Sydney
Australia/Tasmania
Australia/Victoria
Australia/West
Australia/
Yancowinna
Brazil/Acre
Brazil/DeNoronha
Brazil/East
Brazil/West
CET
CST6CDT
Canada/Atlantic
Canada/Central
Canada/EastSaskatchewan
Canada/Eastern
Canada/Mountain
Canada/
Newfoundland
Canada/Pacific
Canada/
Saskatchewan
Canada/Yukon
Chile/Continental
Chile/EasterIsland
Sun StorEdge 6020 and 6120 Arrays System Manual • May 2003
TABLE 7-45
Olson Time Zone Regions (Continued)
Cuba
EET
EST
EST5EDT
Egypt
Eire
Etc/GMT
Etc/GMT+0
Etc/GMT+1
Etc/GMT+10
Etc/GMT+11
Etc/GMT+12
Etc/GMT+2
Etc/GMT+3
Etc/GMT+4
Etc/GMT+5
Etc/GMT+6
Etc/GMT+7
Etc/GMT+8
Etc/GMT+9
Etc/GMT-0
Etc/GMT-1
Etc/GMT-10
Etc/GMT-11
Etc/GMT-12
Etc/GMT-13
Etc/GMT-14
Etc/GMT-2
Etc/GMT-3
Etc/GMT-4
Etc/GMT-5
Etc/GMT-6
Etc/GMT-7
Etc/GMT-8
Etc/GMT-9
Etc/GMT0
Etc/Greenwich
Etc/UCT
Etc/UTC
Etc/Universal
Etc/Zulu
Europe/
Amsterdam
Europe/Andorra
Europe/Athens
Europe/Belfast
Europe/Belgrade
Europe/Berlin
Europe/Bratislava
Europe/Brussels
Europe/Bucharest
Europe/Budapest
Europe/Chisinau
Europe/
Copenhagen
Europe/Dublin
Europe/Gibraltar
Europe/Helsinki
Europe/Istanbul
Europe/
Kaliningrad
Europe/Kiev
Europe/Lisbon
Europe/Ljubljana
Europe/London
Europe/
Luxembourg
Europe/Madrid
Europe/Malta
Europe/Minsk
Europe/Monaco
Europe/Moscow
Europe/Nicosia
Europe/Oslo
Europe/Paris
Europe/Prague
Europe/Riga
Europe/Rome
Europe/Samara
Europe/San_Marino
Europe/Sarajevo
Europe/Simferopol
Europe/Skopje
Europe/Sofia
Europe/Stockholm
Europe/Tallinn
Europe/Tirane
Europe/Tiraspol
Europe/Uzhgorod
Europe/Vaduz
Europe/Vatican
Europe/Vienna
Europe/Vilnius
Europe/Warsaw
Europe/Zagreb
Europe/Zaporozhye
Europe/Zurich
GB
GB-Eire
GMT
GMT+0
GMT-0
GMT0
Greenwich
HST
Hongkong
Iceland
Indian/Antananarivo
Indian/Chagos
Indian/Christmas
Indian/Cocos
Indian/Comoro
Indian/Kerguelen
Indian/Mahe
Indian/Maldives
Indian/Mauritius
Indian/Mayotte
Indian/Reunion
Iran
Israel
Appendix B
CLI Commands
235
TABLE 7-45
Olson Time Zone Regions (Continued)
Jamaica
Japan
Kwajalein
Libya
MET
MST
MST7MDT
Mexico/BajaNorte
Mexico/BajaSur
Mexico/General
Mideast/Riyadh87
Mideast/Riyadh88
Mideast/Riyadh89
NZ
NZ-CHAT
Navajo
PRC
PST8PDT
Pacific/Apia
Pacific/Auckland
Pacific/Chatham
Pacific/Easter
Pacific/Efate
Pacific/Enderbury
Pacific/Fakaofo
Pacific/Fiji
Pacific/Funafuti
Pacific/Galapagos
Pacific/Gambier
Pacific/
Guadalcanal
Pacific/Guam
Pacific/Honolulu
Pacific/Johnston
Pacific/Kiritimati
Pacific/Kosrae
Pacific/Kwajalein
Pacific/Majuro
Pacific/Marquesas
Pacific/Midway
Pacific/Nauru
Pacific/Niue
Pacific/Norfolk
Pacific/Noumea
Pacific/Pago_Pago
Pacific/Palau
Pacific/Pitcairn
Pacific/Ponape
Pacific/Port_Moresby
Pacific/Rarotonga
Pacific/Saipan
Pacific/Samoa
Pacific/Tahiti
Pacific/Tarawa
Pacific/Tongatapu
Pacific/Truk
Pacific/Wake
Pacific/Wallis
Pacific/Yap
Poland
Portugal
ROC
ROK
Singapore
SystemV/AST4
SystemV/
AST4ADT
SystemV/CST6
SystemV/CST6CDT
SystemV/EST5
SystemV/EST5EDT
SystemV/HST10
SystemV/MST7
SystemV/MST7MDT
SystemV/PST8
SystemV/PST8PDT
SystemV/YST9
SystemV/YST9YDT
Turkey
UCT
US/Alaska
US/Aleutian
US/Arizona
US/Central
US/East-Indiana
US/Eastern
US/Hawaii
US/Indiana-Starke
US/Michigan
US/Mountain
US/Pacific
US/Pacific-New
US/Samoa
UTC
Universal
W-SU
WET
Zulu
shutdown
Description
Summary: Shutdown system (not reentrant, not locked).
The shutdown command performs a controlled shutdown of the array and any array
connected to it.
236
Sun StorEdge 6020 and 6120 Arrays System Manual • May 2003
Usage
shutdown [-y]
Parameters
TABLE 7-46
shutdown Command Options and Parameters
Parameter
Function
-y
Answers “yes” when prompted to perform a shutdown.
sim_diag
Description
Summary: Display sim_diag Echo/Loopback command information (not reentrant,
not locked).
This is a diagnostic command for use by Sun-authorized personnel.
Usage
sim_diag echo <Primary|Alternate> <fabric_controller> <payload
pattern1> <payload pattern2> <payload size>
sim_diag loopback <Primary|Alternate> <0|1|2> <Loopback path>
<payload pattern1> <payload pattern2> <payload size> <iterations>
sun
Description
Summary: Enable access to Sun-only commands (not reentrant, not locked).
This command provides access to Sun-only commands and requires a password.
This command is used only by Sun-authorized personnel.
sys
Description
Summary: Display or modify the system information (not reentrant, not locked).
This utility manages system information. See “Setting Global Parameters” on
page 17 for more information.
Appendix B
CLI Commands
237
Usage
sys list
sys stat
sys blocksize <4K | 8K | 16k | 32k | 64k>
sys cache <auto | writebehind | writethrough | off>
sys mirror <auto | off>
sys mp_support <none | rw | mpxio | std>
sys naca <off | on>
sys rd_ahead <on | off>
sys recon_rate <high | med | low>
sys fc_topology [<auto | loop | fabric_p2p>]
sys fc_speed [<auto | 1 | 2> <cable | force>]
cable = change speed on cable pullor next link reset
force = change speed now
Parameters
TABLE 7-47
238
sys Command Options and Parameters
Parameter
Function
list
Displays the current controller configuration.
stat
Displays the current controller status.
blocksize
Sets the system block size, which equals the stripe unit size. This is
the amount of data written to each drive when striping data across
drives. The block size can be changed only when there are no
volumes defined.
cache
Sets the system caching policy.
mirror
Turns the cache mirror feature on or off when using dual controllers.
Sun StorEdge 6020 and 6120 Arrays System Manual • May 2003
TABLE 7-47
sys Command Options and Parameters (Continued)
Parameter
Function
mp_support
• If mp_support is set to none, multipathing support is disabled.
• If mp_support is set to rw, multipathing support is enabled. Use
this mode for single-host configurations when using VERITAS
Volume Manager with dynamic multipathing (DMP).
• If mp_support is set to mpxio, this setting supports Sun
StorEdge Traffic Manager software’s multipathing utility in singleor multi-host configurations. This setting is required for all highavailability configurations in Sun Cluster environments. This
setting can be used with VERITAS.
• The std option is reserved.
rd_ahead
Sets the number of sequential read commands before automatically
switching to datablock read ahead. Set to off to always perform
datablock read ahead.
recon_rate
The disk drive reconstruction rate options: high, medium, or low.
Higher recon_rate settings have a greater impact on system
performance, but reconstruction is faster.
naca
Enables IBM/AIX support.
fc_topology
Fibre Channel topology selection, see TABLE 7-48 for options.
fc_speed
If set to auto, the array determines the speed of the Fibre Channel
automatically. If set to 1 or 2, the speed of the array is set to
1Gbit/sec or to 2Gbit/sec. The cable option causes any change in
the fc_speed setting to take effect upon the next cable pull or the
next link reset. The force option forces the speed setting to change
immediately. Note that if you enter sys list, the actual speed is
displayed, not the setting.
Appendix B
CLI Commands
239
Example
This example shows the result of typing sys list.
6120:/:<#> sys list
controller
:
blocksize
:
cache
:
mirror
:
mp_support
:
naca
:
rd_ahead
:
recon_rate
:
sys memsize
:
cache memsize
:
fc_topology
:
fc_speed
:
2.5
16k
auto
auto
mpxio
off
on
med
128 MBytes
1024 MBytes
auto
2Gb
sys fc_topology
Description
Without any parameter, this command displays the current negotiated topology.
With a parameter selected, this command sets the array topology firmware mode.
Usage
sys fc_topology
sys fc_topology auto
sys fc_topology loop
sys fc_topology fabric_p2p
Parameters
TABLE 7-48
240
Fibre Channel Topology Options
Parameter
Function
auto
Enables the controller firmware to automatically determine and set
the topology firmware mode.
loop
Sets the loop topology firmware mode.
fabric_p2p
Sets the point-to-point topology firmware mode.
Sun StorEdge 6020 and 6120 Arrays System Manual • May 2003
Note – When using loop or fabric_p2p modes, make sure that the switches are
set in the same way.
Note – Normally the automatic mode is set. The other modes can be used for special
situations or for troubleshooting.
Example
■
This example displays the current negotiated network topology.
6120:/:<#> sys fc_topology
Host port u1p1 Current Negotiated Topology=Auto
Point to Point, Port ID=100300
■
This example sets up the array topology firmware mode to automatic sense and
set.
6120:/:<#> sys fc_topology auto
tzset
Description
Summary: Display or modify the timezone information (not reentrant, not locked).
This is a standard UNIX or Solaris OS command, but it might not support all the
functionality of the full command. The usage statement shows supported command
options for the array.
Usage
tzset [[+|-]hh00]
Appendix B
CLI Commands
241
ver
Description
Summary: Display software version (not reentrant, not locked).
Displays the current version of controller firmware on an array.
Usage
ver
Example‘
6120 Release 3.0.3 Mon Mar 10 15:47:42 PST 2003 (nnn.nnn.nnn.nnn)
Copyright (C) 1997-2003 Sun Microsystems, Inc.
All Rights Reserved.
vol
Description
Summary: Display or modify the volume information (not reentrant, not locked).
This command manages volumes.
Usage
vol list [name]
vol stat [name]
vol mode [name]
vol add name data drives raid 0 | 1 | 5 [standby drive]
vol init name data | sysarea
vol mount name
vol unmount name
vol [-y] remove name
vol verify name [fix] [rate <1-8>]
vol recon drive [to-standby | from-standby]
vol disable drive [to-standby]
242
Sun StorEdge 6020 and 6120 Arrays System Manual • May 2003
Parameters
TABLE 7-49
vol Command Options and Parameters
Parameter
Function
add
Configures a new volume by assigning it data and hot spare
(standby) drives. The data drives cannot already be assigned to any
other volume. The hot spare (standby) drive can be shared by
multiple volumes.
disable
Marks the specified drive unusable. If the to-standby argument is
included, data is first reconstructed onto the hot spare (standby)
drive (if available), and then it is disabled. The volume must be
mounted for this command.
init
Initializes the volume or system area label.
Initialization takes about 9.6 seconds per gigabyte of physical disk
being configured regardless of RAID level.
Example times required to initialize a volume:
• RAID 5 using five 36Gbyte disks:
Time to Initialize:
(36Gbyte * 5 disks) * 9.6sec/Gbyte * 1min/60sec = 29 minutes
Approximate Volume Capacity:
(36Gbyte * 4 disks w/1 drive used for parity) = 144Gbyte
• RAID 1 using 5 36Gbyte disks:
Time to Initialize:
(36Gbyte * 5 disks) * 9.6sec/Gbyte * 1min/60sec = 29 minutes
Approximate Volume Capacity:
(36Gbyte * 5 disks) / 2 (for mirroring) = 90Gbyte
• RAID 0 using 5 36Gbyte disks:
Time to Initialize:
(36Gbyte * 5 disks) * 9.6sec/Gbyte * 1min/60sec = 29 minutes
Approximate Volume Capacity:
(36Gbyte * 5 disks) = 180Gbyte
This argument specifies the initialize option to be performed on the
selected volume:
• data - Initializes the entire data area. This operation will destroy
all user data on the volume. It will take several minutes to
complete.
• sysarea - Initializes the system area with correct private label
information. This option is only for qualified service providers.
list
Displays the configuration of the currently assigned volumes.
Appendix B
CLI Commands
243
TABLE 7-49
244
vol Command Options and Parameters (Continued)
Parameter
Function
mode
Displays cache and mirror settings, and whether the volume is
mounted.
mount
Mounts the volume so the host can access it.
recon
Rebuilds (reconstruct) the data of the specified drive. If the
to-standby argument is included, data is written to the hot spare
(standby) drive. If the from-standby argument is included, data
is written back from the hot spare (standby). The volume must be
mounted for this command. If necessary, the drive is spun up before
reconstruction occurs. Following successful reconstruction, the
disabled drive is re-enabled.
remove
Deletes a volume by unassigning the data and hot spare (standby)
drives assigned to it. The drives can then be assigned to a different
volume. The volume must be unmounted before it can be removed.
stat
Displays the operational status of a volume.
unmount
Unmounts the volume to disable access from the host.
verify
Enables an array administrator to execute manual parity checks on
existing volumes. The default verification rate is 1 (minimum impact
on data host). The verification rate can be set to a value from 1 to 8.
Run the vol verify command before performing tape-backup
overwrite cycles, approximately once every 30 days.
If the fix option is specified and an error is detected, the vol verify
command will regenerate parity from the existing data on the
volume.
-y remove
Deletes a volume without prompting for verification to remove.
name
Specifies the volume name.
drives
Specifies the set of drives to be assigned to the volume.
Sun StorEdge 6020 and 6120 Arrays System Manual • May 2003
Examples
6120:/:<#> vol list
volume
capacity raid data
v0
204.510 GB
1 u1d01-06
v1
340.851 GB
5 u2d01-06
v2
204.510 GB
1 u3d01-06
v3
340.851 GB
5 u4d01-06
standby
u1d14
u2d14
u3d14
u4d14
6120:/:<#> vol list v0
volume
capacity raid data
v0
204.510 GB
1 u1d01-06
standby
u1d14
6120:/:<#> vol stat
v0: mounted
u1d01: mounted
- - - - - - (items omitted
u1d06: mounted
Standby: u1d14: mounted
v1: mounted
u2d01: mounted
- - - - - - (items omitted
u2d06: mounted
Standby: u2d14: mounted
v2: mounted
u3d01: mounted
- - - - - - (items omitted
u3d06: mounted
Standby: u3d14: mounted
v3: mounted
u4d01: mounted
- - - - - - (items omitted
u4d06: mounted
Standby: u4d14: mounted
in example)
in example)
in example)
in example)
Appendix B
CLI Commands
245
6120:/:<#> vol stat v0
v0: mounted
u1d01: mounted
u1d02: mounted
u1d03: mounted
u1d04: mounted
u1d05: mounted
u1d06: mounted
Standby: u1d14: mounted
6120:/:<#> vol mode
volume
mounted cache
v0
yes
writebehind
v1
yes
writebehind
v2
yes
writebehind
v3
yes
writebehind
mirror
on
on
on
on
6120:/:<#> vol mode v0
volume
mounted cache
v0
yes
writebehind
mirror
on
6120:/:<#> vol add vol-name data u5d1-8 raid 5 standby u5d14
volslice
Note – Each of the commands listed in the usage statement of this section is
described in its own section.
Description
Summary: Display or modify the volume slice info (not reentrant, not locked).
Usage
volslice create [slice-name [-s start] -z size vol-name]
volslice list [slice-name | -v volume-name]
volslice remove slice-name | -v volume-name
246
Sun StorEdge 6020 and 6120 Arrays System Manual • May 2003
volslice create
Description
Creates a volume slice. A maximum of 64 slices is allowed for an array or an array
HA configuration.
Note – If you issue the volslice create command without any parameters, you
will be interactively prompted to specify the parameters.
Note – The default permission of a newly created slice is none. You must set the
permissions before a host can use it.
Note – When you create a slice, the actual size of the slice is rounded to the nearest
stripe boundary.
Usage
volslice create
volslice create slice-name -z size volume-name
volslice create slice-name -s start -z size volume-name
Appendix B
CLI Commands
247
Parameters
TABLE 7-50
volslice create Command Options and Parameters
Parameter
Function
slice-name
Specifies the slice name such as s0, s1, s2, and s3. Can be any 12
(maximum) alphanumeric characters except a blank space.
-z size
Specifies the size of the block in Mbytes or Gbytes.
volume-name
Specifies the volume name such as v0, v1, v2, and v3.
-s start
In addition to the above options, this parameter can be used to
specify the starting block. If it is not specified, the application will
find the best fit for the specified slice size on the specified volume
and create the slice accordingly. Use the volslice list command
to find the starting block of unused space on a slice.
Example
This example shows the interactive and manual methods to create a slice.
6120:/:<#> volslice create
volume
capacity
raid
data
standby
v1
50.020 GB
5
u1d1-4 u1d14
v2
50.020 GB
5
u1d5-8 u1d9
Select the volume to be sliced: v1
Slice
Slice Num
Start Blk
Size Blks
Capacity
Volume
0
143709696
50.020 GB v1
Enter the name of slice to be created : s0
Do you want to specify the start block for slice ? [N]: n
Enter size of slice [ < size >gb ] : 5gb
1 out of Max. 64 slices created, 63 available.
6120:/:<#> volslice create s0 -s 1024 -z 5GB v1
1 out of Max. 64 slices created, 63 available.
volslice list
Description
Lists the details of all or specified volumes. If a slice name is provided, the details of
that slice are displayed. If a volume name is provided, the details of the slices and
unused portion on that volume are shown. With no options specified, the details of
all volumes (slices and unused portion) are shown.
248
Sun StorEdge 6020 and 6120 Arrays System Manual • May 2003
Usage
volslice list
volslice list slice-name
volslice list -v volume-name
Parameters
TABLE 7-51
volslice list Command Options and Parameters
Parameter
Function
slice-name
Specifies the slice name such as s0, s1, s2, and s3.
-v volume-name
Specifies the volume name such as v0, v1, v2, and v3.
Examples
■
The first example lists the details of all slices (slices and unused portion) on all
volumes.
6120:/:<#> volslice list
Slice
Slice Num
s1
0
s2
1
- - - - - - (items omitted in example)
s18
17
s19
18
- - - - - - (items omitted in example)
s33
32
s34
33
- - - - - - (items omitted in example)
s49
48
s50
49
- - - - - - (items omitted in example)
s64
63
-
■
Start Blk
0
26768832
Size Blks
26768832
26768832
Capacity
12.763 GB
12.763 GB
Volume
v0
v0
44666880
89333760
44666880
44666880
21.298 GB
21.298 GB
v1
v1
0
26748288
26748288
26748288
12.753 GB
12.753 GB
v2
v2
0
44666880
44666880
44666880
21.298 GB
21.298 GB
v3
v3
670003200
714813440
44810240
5120
21.367 GB
2.500 MB
v3
v3
The second example lists the details of slice s62.
6120:/:<#> volslice list s62
Slice
Slice Num
Start Blk
s62
61
580669440
Size Blks
44666880
Capacity
21.298 GB
Appendix B
Volume
v3
CLI Commands
249
■
The third example lists the details of the slices and unused portion on volume v1.
6120:/:<#> volslice list -v v0
Slice
Slice Num
Start Blk
s1
0
0
s2
1
26768832
- - - - - - (items omitted in example)
s16
15
401532480
428301312
Size Blks
26768832
26768832
Capacity
12.763 GB
12.763 GB
26768832
589824
12.763 GB
288.000 MB
Volume
v0
v0
v0
v0
volslice remove
Description
Removes a volume slice. If a slice name is provided, the named slice is removed. If a
volume name is provided, all slices of that volume are removed, with the underlying
volume remaining intact.
This command also causes the slice information to be deleted from the disk and the
dynamic data structure. All the Persistent Group Reservations (PGR) and LUN
mapping and masking permissions are also deleted for the slice or for all slices in a
volume if -v volume-name is used.
Usage
volslice remove slice-name
volslice remove -v volume-name
Parameters
TABLE 7-52
250
volslice remove Command Options and Parameters
Parameter
Function
slice-name
Specifies the slice name such as s0, s1, s2, and s3..
-v volume-name
Specifies the volume name such as v0, v1, v2, and v3 for which all
slices are to be removed.
Sun StorEdge 6020 and 6120 Arrays System Manual • May 2003
Example
■
The first example removes slice name s4.
6120:/:<#> volslice remove s4
WARNING - The slice will be deleted.
Continue ? [N]: Y
■
The second example removes all slices from volume v1.
6120:/:<#> volslice remove -v v1
WARNING - All slices in the given volume will be deleted.
Continue? [N]: Y
Appendix B
CLI Commands
251
Other Commands
The array’s telnet CLI includes a number of commands that are very similar to or
identical with the same command in UNIX or Solaris. This section documents these
commands.
If you need additional information about the command, see the UNIX or Solaris man
page.
Note – Commands are listed as either reentrant commands or as not reentrant. A
reentrant command can be run in multiple telnet sessions, or CLI windows, to the
same array.
arp
Description
Summary: Display, set, and delete arp table entries (reentrant, not locked).
This is a standard UNIX or Solaris OS command, but it might not support all the
functionality of the full command. The usage statement shows supported command
options for the Sun StorEdge 6020 and 6120 arrays.
Usage
arp host
arp -a
arp -d host
arp -s host ether_addr [temp]
arp -f filename
cat
Description
Summary: Concatenate and display (reentrant, not locked).
This is a standard UNIX or Solaris OS command, but it might not support all the
functionality of the full command. The usage statement shows supported command
options for the Sun StorEdge 6020 and 6120 arrays.
252
Sun StorEdge 6020 and 6120 Arrays System Manual • May 2003
Usage
cat [-benstv] filename...
Note – Do not use the cat command on a long file because the command cannot be
aborted.
cd
Description
Summary: Change working directory (reentrant, not locked).
This is a standard UNIX or Solaris OS command, but it might not support all the
functionality of the full command.
cmp
Description
Summary: Perform a byte-by-byte comparison of two files (reentrant, not locked).
This is a standard UNIX or Solaris OS command, but it might not support all the
functionality of the full command. The usage statement shows supported command
options for the Sun StorEdge 6020 and 6120 arrays.
Usage
cmp [-ls] file1 file2 [skip1] [skip2]
cp
Description
Summary: Copy files (reentrant, not locked).
This is a standard UNIX or Solaris OS command, but it might not support all the
functionality of the full command. The usage statement shows supported command
options for the Sun StorEdge 6020 and 6120 arrays.
Usage
cp [-i] src target; or: cp [-irR] src1 ... srcN directory
Appendix B
CLI Commands
253
date
Description
Summary: Display or set the date (reentrant, not locked).
This is a standard UNIX or Solaris OS command, but it might not support all the
functionality of the full command. The usage statement shows supported command
options for the Sun StorEdge 6020 and 6120 arrays.
Usage
date [-u] [yyyymmddhhmm[.ss]]
du
Description
Summary: Display disk blocks usage (reentrant, not locked).
This is a standard UNIX or Solaris OS command, but it might not support all the
functionality of the full command. The usage statement shows supported command
options for the Sun StorEdge 6020 and 6120 arrays.
Usage
du [-as] [filename...]
df
Description
Summary: Display sysarea file system usage (not reentrant, not locked).
This is a standard UNIX or Solaris OS command, but it might not support all the
functionality of the full command. The usage statement shows supported command
options for the Sun StorEdge 6020 and 6120 arrays.
Usage
df [-k] [directory]
echo
Description
Summary: Echo arguments to the standard output (reentrant, not locked).
254
Sun StorEdge 6020 and 6120 Arrays System Manual • May 2003
This is a standard UNIX or Solaris OS command, but it might not support all the
functionality of the full command.
Example
6120:/:<#> echo my typing
my typing
qatest:/:<5>
head
Description
Summary: Display the first few lines of the specified files (reentrant, not locked).
This is a standard UNIX or Solaris OS command, but it might not support all the
functionality of the full command. The usage statement shows supported command
options for the Sun StorEdge 6020 and 6120 arrays.
Usage
head [-n] filename...
ls
Description
Summary: List the contents of a directory (reentrant, not locked).
This is a standard UNIX or Solaris OS command, but it might not support all the
functionality of the full command. The usage statement shows supported command
options for the Sun StorEdge 6020 and 6120 arrays.
Usage
ls [-1ACFLRadfgilqrs] [filename...]
mkdir
Description
Summary: Make a directory (reentrant, not locked).
This is a standard UNIX or Solaris OS command, but it might not support all the
functionality of the full command. The usage statement shows supported command
options for the Sun StorEdge 6020 and 6120 arrays.
Appendix B
CLI Commands
255
Usage
mkdir [-p] dirname ...
more
Description
Summary: View file on console (not reentrant, not locked).
This is a standard UNIX or Solaris OS command, but it might not support all the
functionality of the full command. The usage statement shows supported command
options for the Sun StorEdge 6020 and 6120 arrays.
Usage
more filename
mv
Description
Summary: Move or rename files (reentrant, not locked).
This is a standard UNIX or Solaris OS command, but it might not support all the
functionality of the full command. The usage statement shows supported command
options for the Sun StorEdge 6020 and 6120 arrays.
Usage
mv [-if] src target; or: mv [-if] src1 ... srcN directory
netstat
Description
Summary: Show network status (reentrant, not locked).
This is a standard UNIX or Solaris OS command, but it might not support all the
functionality of the full command. The usage statement shows supported command
options for the Sun StorEdge 6020 and 6120 arrays.
Usage
netstat [-airs]
256
Sun StorEdge 6020 and 6120 Arrays System Manual • May 2003
passwd
Description
Summary: Change password file information (not reentrant, not locked).
This is a standard UNIX or Solaris OS command, but it might not support all the
functionality of the full command.
ping
Description
Summary: Send ICMP ECHO_REQUEST packets to network hosts (reentrant, not
locked).
This is a standard UNIX or Solaris OS command, but it might not support all the
functionality of the full command. The usage statement shows supported command
options for the Sun StorEdge 6020 and 6120 arrays.
Usage
ping host [timeout]
ping -s host [count/timeout]
pwd
Description
Summary: Display the pathname of the current working directory (reentrant, not
locked).
This is a standard UNIX or Solaris OS command, but it might not support all the
functionality of the full command.
rm
Description
Summary: Remove (unlink) files (reentrant, not locked).
This is a standard UNIX or Solaris OS command, but it might not support all the
functionality of the full command. The usage statement shows supported command
options for the Sun StorEdge 6020 and 6120 arrays.
Appendix B
CLI Commands
257
Usage
rm [-rif] filename...
rmdir
Description
Summary: Remove (unlink) directories (reentrant, not locked).
This is a standard UNIX or Solaris OS command, but it might not support all the
functionality of the full command. The usage statement shows supported command
options for the Sun StorEdge 6020 and 6120 arrays.
Usage
rmdir directory ...
route
Description
Summary: Manipulate the route table (not reentrant, not locked).
This is a standard UNIX or Solaris OS command, but it might not support all the
functionality of the full command. The usage statement shows supported command
options for the Sun StorEdge 6020 and 6120 arrays.
Usage
route [-cr]
route [-af] path-name
route add [host|net] destination gateway
route delete [host|net] destination gateway
258
Sun StorEdge 6020 and 6120 Arrays System Manual • May 2003
Parameters
Parameter
Function
-c
Clear existing route table
-r
Display existing route table
-a path-name
Read and overwrite existing route table from path-name.
-f path-name
Read commands and modify existing route table.
sync
Description
Summary: Write the memory-cached data to disk (not reentrant, not locked).
The sync command executes the sync system primitive. If the system is to be reset,
sync must be called to insure file system integrity. See “reset” on page 226. The sync
command will flush all previously unwritten system buffers out to disk, thus
assuring that all file modifications up to that point will be saved.
This is a standard UNIX or Solaris OS command, but it might not support all the
functionality of the full command. The usage statement shows supported command
options for the array.
Usage
sync
tail
Description
Summary: Display the last part of a file (reentrant, not locked).
This is a standard UNIX or Solaris OS command, but it might not support all the
functionality of the full command. The usage statement shows supported command
options for the Sun StorEdge 6020 and 6120 arrays.
Usage
tail [+|-number[lc]] filename
Appendix B
CLI Commands
259
touch
Description
Summary: Update the modification time of a file (reentrant, not locked).
This is a standard UNIX or Solaris OS command, but it might not support all the
functionality of the full command. The usage statement shows supported command
options for the Sun StorEdge 6020 and 6120 arrays.
Usage
touch [-cf] filename...
260
Sun StorEdge 6020 and 6120 Arrays System Manual • May 2003
APPENDIX
C
Illustrated Parts
This appendix contains part numbers and illustrations of field-replaceable units
(FRUs) for the Sun StorEdge 6020 and 6120 arrays.
TABLE C-1
Illustrated Parts
FRU
Part Number
Figure
Disk drive in canister:
• 36 Gbyte, 15K rpm, 1-inch FC-AL
• 73 Gbyte, 10K rpm, 1-inch FC-AL
• 146 Gbyte, 1-inch FCAL
F540-5322
F540-5330
F540-5471
FIGURE C-1
Array controller card (version 2.5)
F540-5559
FIGURE C-2
Array interconnect card (loop card)
F540-5384
FIGURE C-3
Power and cooling unit
F300-1562
FIGURE C-4
UPS battery pack
F370-4861
FIGURE C-5
Array chassis and midplane
F540-5318
FIGURE C-6
Array interconnect cable
F530-3211
FIGURE C-7
Array power cable (Y-cord)
F180-2039
n/a
Shielded Ethernet cable (category 5)
• 1 meter
• .3 meter
F530-3205
F530-3206
FIGURE C-7
Array fiber-optic cable .8 meter
F537-1057
FIGURE C-7
261
262
FIGURE C-1
Disk Drive in Canister
FIGURE C-2
Array Controller Card, Version 2.5
FIGURE C-3
Array Interconnect Card (Loop Card)
Sun StorEdge 6020 and 6120 Arrays System Manual • May 2003
FIGURE C-4
Power and Cooling Unit
FIGURE C-5
UPS Battery Pack
Appendix C
Illustrated Parts
263
Front view
Back view
FIGURE C-6
264
Array Chassis and Midplane
Sun StorEdge 6020 and 6120 Arrays System Manual • May 2003
Fiber-optic cable (LC-SFF connectors)
Interconnect cable
Shielded Ethernet cable
(category 5)
FIGURE C-7
Array Cables
Note – The Y-cord power cable is not shown in
FIGURE C-7.
Appendix C
Illustrated Parts
265
266
Sun StorEdge 6020 and 6120 Arrays System Manual • May 2003
Glossary
A
administrative
domain
alternate master
controller unit
auto cache mode
auto disable
HA configurations (interconnected controller units) that share common
administration through a master controller.
Also called “alternate master unit,” the secondary array unit in an HA
configuration that provides failover capability from the master controller unit.
The default cache mode for the Sun StorEdge 6120 array. In a fully redundant
configuration, cache is set to write-behind mode. In a nonredundant
configuration, cache is set to write-through mode. Read caching is always
performed.
The Sun StorEdge 6120 array default that automatically disables a disk drive
that has failed.
B
buffering
Data that is being transferred between the host and the drives.
267
C
command-line interface
(CLI)
controller unit
The interface between the Sun StorEdge 6120 array’s pSOS operating system
and the user in which the user types commands to administer the array.
A Sun StorEdge 6120 array that includes a controller card. It can be used as a
standalone unit or configured with other Sun StorEdge 6120 arrays.
D
Dynamic Multi-Pathing
(DMP)
A VERITAS Volume Manager feature that provides an Alternate Pathing
mechanism for rerouting data in the event of a controller failover.
E
erasable programmable
read-only memory
(EPROM)
expansion unit
Memory stored on the controller card; useful for stable storage for long periods
without electricity while still allowing reprogramming.
A Sun StorEdge 6120 array without a controller card. It must be connected to a
controller unit to be operational.
F
Fibre Channel
Arbitrated Loop
(FC-AL)
field-replaceable unit
(FRU)
268
A 100-Mbyte/s serial channel that enables connection of multiple devices (disk
drives and controllers).
A component that is easily removed and replaced by a field service engineer or
a system administrator.
Sun StorEdge 6020 and 6120 Arrays System Manual • May 2003
FLASH memory device
(FMD)
A device on the controller card that stores EPROM firmware.
G
Gigabit Interface
Converter (GBIC)
gigabyte (GB or
Gbyte)
graphical user interface
(GUI)
An adapter used on an SBus card to convert fiber-optic signal to copper.
One gigabyte is equal to one billion bytes (1Χ109).
A software interface that enables configuration and administration of the Sun
StorEdge 6120 array using a graphic application.
H
host bus adapter
(HBA)
An adapter that resides on the host.
hot spare
A drive in a RAID 1 or RAID 5 configuration that contains no data and acts as
a standby in case another drive fails.
hot-swappable
The ability of a field-replaceable unit (FRU) to be removed and replaced while
the system remains powered on and operational.
I
input/output operations
per second (IOPS)
interconnect cable
interconnect card
A performance measurement of the transaction rate.
An FC-AL cable with a unique switched-loop architecture that is used to
interconnect multiple Sun StorEdge 6120 arrays.
An array component that contains the interface circuitry and two connectors
for interconnecting multiple Sun StorEdge 6120 arrays.
Glossary
269
L
LC
light-emitting diode
(LED)
logical unit number
(LUN)
An industry-standard name used to describe a connector standard. The Sun
StorEdge 6120 array uses an LC-SFF connector for the host FC-AL connection.
A device that converts electrical energy into light that is used to display
activity.
One or more drives that can be grouped into a unit; also called a volume.
M
master controller unit
media access control
(MAC) address
megabyte (MB or
Mbyte)
megabytes per second
(MB/s)
multi-initiator
configuration
Also called a “master unit,” the main controller unit in a partner-group
configuration.
A unique address that identifies a storage location or a device.
One megabyte is equal to one million bytes (1Χ106).
A performance measurement of the sustained data transfer rate.
A supported array configuration that connects two hosts to one or more array
administrative domains through hub or switch connections.
P
parity
power and cooling unit
(PCU)
270
Additional information stored with data on a disk that enables the controller to
rebuild data after a drive failure.
A FRU component in the Sun StorEdge 6120 array. It contains a power supply,
cooling fans, and an integrated UPS battery. There are two power and cooling
units in a Sun StorEdge 6120 array.
Sun StorEdge 6020 and 6120 Arrays System Manual • May 2003
pSOS
An operating system built into the Sun StorEdge 6120 array controller card
firmware, which provides interfaces between the mounted RAID volumes and
the database environment.
Q
quiesce
To halt all drive activity.
R
read caching
redundant array of
independent disks
(RAID)
reliability, availability,
serviceability (RAS)
reverse address
resolution protocol
(RARP)
Data stored for future retrieval, to reduce disk I/O as much as possible.
A configuration in which multiple drives are combined into a single virtual
drive to improve performance and reliability.
A term to describe product features that include high availability, easily
serviced components, and dependability.
A utility in the Solaris operating environment that enables automatic
assignment of the array IP address from the host.
S
SC
Simple Network
Management Protocol
(SNMP)
small form factor
(SFF)
An industry standard name used to describe a connector standard.
A network management protocol designed to give a user the capability to
remotely manage a computer network.
An industry standard describing a type of connector. An LC-SFF connector is
used for the host FC-AL connection to the Sun StorEdge 6120 array.
Glossary
271
synchronous dynamic
random access memory
(SDRAM)
system area
A form of dynamic random access memory (DRAM) that can run at higher
clock speeds than conventional DRAM.
Located on the disk drive label, the space that contains configuration data, boot
firmware, and file-system information.
U
uninterruptable power
source (UPS)
A component within the power and cooling unit. It supplies power from a
battery in the case of an AC power failure.
V
volume
Also called a logical unit or LUN, a volume is one or more drives that can be
grouped into a unit for data storage.
W
world wide name
(WWN)
write caching
272
A number used to identify array volumes in both the array system and Solaris
operating environment.
Data used to build up stripes of data, eliminating the read-modify-write
overhead. Write caching improves performance for applications that are
writing to disk.
Sun StorEdge 6020 and 6120 Arrays System Manual • May 2003
Index
SYMBOLS
/etc/ethers file 118
/etc/hosts file 118
/etc/nsswitch.conf file 119
/usr/sbin/in.rarpd daemon 119
A
access permission 2
array
administration
to display command syntax 182
to display commands 181
characteristics 2
configuration considerations 45
firmware
upgrading 121
monitoring
to check data parity 80
to check the battery 81
to check the drive status 79
to check the hot-spare 79
to determine failover 78
to display FRU information 82
to display FRU status 83
system files
upgrading 121
array cables, illustrated 265
array chassis FRU, illustrated 264
array configuration
for remote system logging
to edit the /etc/hosts file 33
to edit the /etc/syslog.conf file 32
to edit the management host /etc/syslog.conf
file 35
to transfer files back to the array 34
to transfer files to the management host 30
for SNMP notification
to edit the array /etc/hosts file 40
to edit the array /etc/syslog.conf file 39
to transfer files back to the array 41
to transfer the array files to the management
host 37
array system level LEDs 89
B
battery 106
battery FRU, illustrated 263
battery, checking 52, 81
battery, replacing 106
blue SIS LED 89
C
cache
mode, setting 21
read-ahead threshold, setting 24
segment 18
segment size
setting 18
segment size, displaying 19
273
chassis
replacement 114
service 114
chassis FRU, illustrated 264
CLI (command-lind interface) command
descriptions
complete list 184
FRU identifiers 182
command-line interface (CLI) xix
commands
displaying all 181
syntax, displaying 182
configuration considerations 45
configuring the array
for remote system logging
to edit the /etc/hosts file 33
to edit the /etc/syslog.conf file 32
to edit the management host /etc/syslog.conf
file 35
to transfer files back to the array 34
to transfer files to the management host 30
for SNMP notification
to edit the array /etc/hosts file 40
to edit the array /etc/syslog.conf file 39
to transfer files back to the array 41
to transfer the array files to the management
host 37
controller card
offline upgrade 131
service 111
controller card LEDs 96
controller card, illustrated 262
controller card, replacing 112
area 2
disk drive LEDs 91
disk drive, illustrated 262
diskless drive bracket 100
downloading upgrade firmware 124
downloading upgrade patches 130
drive firmware upgrade 133
E
Ethernet cable, illustrated 265
F
fail over, determining 78
fiber-optic cable, illustrated 265
firmware
upgrading 121
firmware upgrade
interconnect card 132
format utility 63
FRU (field-replaceable unit)
information, displaying 82
status, displaying 83
FRU part numbers 261
G
global parameters 17
green SIS LED 88
D
H
data 50
block size definition 18
parity, checking 80
determining channel connection failures 98
determining FRU failures 98
disk drive
firmware upgrade 133
removing and replacing 100
status, checking 79
system
HA configuration multipathing, enabling 20
host multipathing 69
host-generated messages 88
hot spare
checking 79
274
I
interconnect cable, illustrated 265
Sun StorEdge 6020 and 6120 Arrays System Manual • May 2003
interconnect card
firmware upgrade 132
replacing 110
service 109
upgrading firmware 127
interconnect card LEDs 94
interconnect card, illustrated 262
IP address, setting 25
L
LEDs
array system level 89
controller card 96
disk drive 91
interconnect card 94
power and cooling unit 93
light emitting diodes (LEDs) 88
list of CLI commands 184
live firmware upgrades 121
live upgrade
verifying 128
LUN
mapping
to add an entry to the LUN map 66
to display the LUN map 66
to remove an entry from the LUN map 67
masking 2
to change the default LUN permissions 70
to define a host WWN group 71
to find the default LUN permissions and
system-assigned WWNs 68
to remove a WWN from a specific group 74
to remove the registered status of a WWN 73
to set a specific LUN permission 68
to set LUN permission with host multipathing
69
to set the permissions of a LUN for all
members of a group 72
to view all registered WWNs 69
permissions 2
reconstruction rate, setting 22
M
masking a LUN 67
messages
error example 177
notice example 177
warning example 177
midplane
/etc/hosts 118
/etc/nsswitch.conf 119
disk positions 118
HA array configuration 114, 118
replacement 114
service 114
midplane and chassis FRU, illustrated 264
mirrored cache, enabling 21
monitoring the array
to check data parity 80
to check the battery 81
to check the drive status 79
to check the hot-spare 79
to determine failover 78
to display FRU information 82
to display FRU status 83
multipathing software 69
N
notice message
example 179
nsswitch.conf file 119
O
offline firmware upgrades 129
offline upgrade
verifying 134
P
part numbers 261
permission 2
power and cooling unit LEDs 93
power and cooling unit removal 103
power and cooling unit, illustrated 263
power cable, illustrated 265
preparing for live firmware upgrades 122
Index
275
product
description 1
R
RAID level
considerations 46
RAS (reliability, availabillity, and serviceability)
features 1
reconfiguring a volume
creating 49
deleting 48
labeling 62
reconstruction rates 22
related documentation xxii
reliability, availabillity, and serviceability (RAS)
features 1
removal and replacement
chassis and midplane 114
removing and replacing
controller card 112
disk drives 100
interconnect card 110
power and cooling unit 103
UPS battery 106
resetting global parameters
to enable HA configuration multipathing 20
to enable mirrored cache 21
to perform volume verification 23
to set cache read-ahead threshold 24
to set the cache block size 18
to set the cache mode 21
to set the IP address 25
to set the LUN reconstruction rate 22
slicing
a volume 51
limitations 52
Storage Automated Diagnostic Environment 88, 98
stripe unit size
See data block size
Sun StorEdge 6120 array
characteristics 2
sys command
blocksize subcommand 20
determing fail over 78
enabling multipathing 20
mirrored cache 22
read-ahead threshold 25
reconstruction rates 23
syslog error messages
command-line error message descriptions 166
interconncet card and other FRU errors 172
other errors 175
port errors 171
RAID and other errors 166
error message descriptions 145
error message syntax 143
examples 177
message types 144
warning message descriptions 152
system
area 2
logging, configuring 37, 84
T
Telnet 88
transferring upgrade patches to array 124
troubleshooting the array 87
S
service
chassis 114
controller card 111
interconnect card 109
midplane 114
power and cooling units 102
removing and replacing components 99
service indicator standard LEDs 88
SIS LEDs 88
276
U
UNIX commands, using xxiii
upgrade patches
downloading 130
upgrade patches, downloading 124
upgrading array firmware 121
upgrading array system files 121
Upgrading firmware
Sun StorEdge 6020 and 6120 Arrays System Manual • May 2003
offline upgrades 129
upgrading firmware
controller card 131
disk drive 133
interconnect card 132
live upgrades 121
upgrading interconnect card firmware 127
UPS battery 106
UPS battery FRU, illustrated 263
worldwide name (WWN) 120
WWN 120
Y
yellow SIS LED 88
V
verification frequency, setting 23
verifying live upgrade procedure 128
verifying offline upgrade 134
vol command
adding a volume 3, 6, 49
checking data parity 80
initializing volumes 50
list subcommand 19
mounting volume 50
remove subcommand 19
unmount subcommand 19
verification frequency 23
verify subcommand 80
Volume 49
volume
configuration limitations 46
initializing 50
mounting 50
performing verification 23
reconfiguring
creating 49
deleting 48
labeling 62
WWN 120
volume slicing
limitations 52
to create a volume slice 61
to reconfigure a volume by adding slices after
volume slicing has been enabled 52
to remove a volume slice 62
W
white SIS LED 89
Index
277
278
Sun StorEdge 6020 and 6120 Arrays System Manual • May 2003