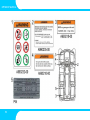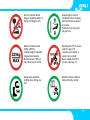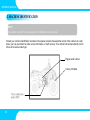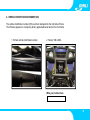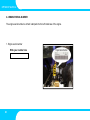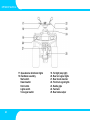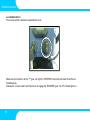
1
Dear Dinli Quad Users:
Before the delivery of each new vehicle from Dinli factory, the fuel in carburetor is drained off to ensure the
excellent performance and safety of the vehicle. Therefore, when first starting a new vehicle, it is normal to take
20~30 seconds. The quality of each Dinli Quad is guaranteed. Study this manual thoroughly and enjoy your riding
Dinli Quad.
WARNING !
STOP! If you have the impression that four wheels give you the stability of a car, you are wrong. If you
have the impression that a quad is simple to drive and similar to those other vehicles, that you are
wrong. The risks involved are at least equal to those faced when riding a motorcycle.
1
OWNER’S MANUAL
POTENTIAL HAZARD
Given the realities of sport quads and/or the limits of your own riding abilities you may lose control.
The limits are impossible to be specific about because of the variation in terrain and rider ability are
nearly unlimited.
WHAT CAN HAPPEN
You could loss control, have an accident and be severely injured, paralyzed or killed.
HOW TO AVOID THE HAZARD
The hazards of quad riding cannot completely avoid. They can be minimized with training, good
judgment, experience, use of helmet, protective gear and development of skills in weight shifting,
throttle and brake control. Reading and understanding this Owner's Manual and warning labels,
and completing a quad training course are essential and can begin your learning process.
2
Experienced Riders Only
All Dinli quads are high performance, sport and/or competition machines and should only be operated by
licensed competition riders in excellent physical condition. Operators should be well-trained and experienced in the
operation of high performance competition vehicles.
● This vehicle is not for beginners or the inexperienced.
● Before you ride this vehicle, read this Owner's Manual thoroughly and understand all of the instructions, warnings,
cautions, and notes presented.
About this manual
The purpose of this manual is to provide the vehicle owner with important safety, service, maintenance, and
tuning information. Read and understand this manual before operating and working on the vehicle. Keep your
Owner's Manual on the vehicle while you ride.
If you lose this manual, contact an authorized Dinli dealer for a replacement.
● Read and understand the entire procedure before performing any work. If you are unfamiliar with or doubt your
own abilities to complete a procedure as described, have an authorized Dinli dealer service your vehicle.
Addenda to this manual
Before you begin reading the manual, go to the “Addenda” section at the end of this manual.
The addenda or “supplements” section provides any additional, replacement, or supplemental information for your
product available at the time of shipment.
3
OWNER’S MANUAL
COMMENTS?
If you have any comments or suggestions about this Owner's Manual, we'd appreciate hearing from you.
Please send to:
DIN LI METAL INDUSTRIAL CO., LTD.
NO.51, Industrial 9th Rd., Tali City, Taichung 412 Taiwan, R.O.C.
Tel: 886 (04) 2491-7666
Fax: 886 (04) 2491-7166
E-mail: [email protected]
4
NOISE REGULATION
TAMPERING WITH NOISE CONTROL SYSTEM PROHIBITED
The CE Directives and U.S. federal law prohibits the following acts or the causing there of;
(1) The removal or rendering inoperative by any person, other than for purposes of maintenance, repair or
replacement, of any device or element of design incorporated into any new vehicle for the purpose of noise
control prior to its sale or delivery to the ultimate purchaser or while it is in use; or (2) the use of the vehicle after
such device or element of design has been removed or rendered inoperative by any person.
AMONG THOSE ACTS PRESUMED TO CONSTITUTE TAMPERING ARE THE ACTS LISTED BELOW:
1. Removing, puncturing, or altering of the muffler, the baffle system, header pipes, or any other component which
conducts exhaust gases.
2. Lack of proper maintenance.
3. Replacing, altering, modifying any moving part of the vehicle or parts of the exhaust, intake (e.g. air filters) with
parts other than those specified by the manufacturer.
Limitations
All information in this Owner's Manual is based upon the latest product data and specifications available at the
time of printing. Dinli Metal Industrial Co., Ltd. reserves the right to make product changes and improvements which
may affect illustrations, photographs and explanations contained in this Owner's Manual. No part of this publication
may be reproduced, stored in a retrieval system, or transmitted in any form or by any means, (electronic mechanical
photocopying, recoding or otherwise), without the prior written permission of Dinli Metal Industrial Co., Ltd. All the
procedures and specifications found in this publication are subject to change with out prior notice and without Dinli
Metal Industrial Co., Ltd. incurring any obligation. The illustrations in this publication are intended for reference use
only and may not depict the actual model or component parts. Your model may differ.
5
OWNER’S MANUAL
II. INTRODUCTION
Dear Users:
Congratulations on your purchase of DINLI ATV. It represents the result of many years of Dinli experience in
the production of fine machines. You can now appreciate our craftsmanship and reliability of the masterpieces.
SAFTY ALTERTS
FAILURE TO FOLLOW THE WARNINGS CONTAINED IN THIS MANUAL CAN RESULT IN SERIOUS INJURY OR
DEATH.
● Keep this Owner's Manual with your vehicle at all times.
6
Messages with the Safety Alert Symbol
!
● Pay special attention to all messages preceded by the Safety Alert Symbol. It means ATTENTION! BECOME
ALERT! YOUR SAFETY IS INVOLVED
DANGER !
Indicates that severe personal injury or DEATH will result if instructions are not followed.
WARNING !
Indicates a potential hazard that could result in serious injury or death.
CAUTION
Indicates a potential hazard which COULD result in vehicle damage if instructions are not followed.
NOTE:
Provides helpful information.
7
OWNER’S MANUAL
III. IMPORTANT SAFETY MESSAGE
● A QUAD IS NOT A TOY AND CAN BE HAZARDOUS TO OPERATE.
● A quad handles differently from other vehicles including motorcycles and cars. A collision or rollover can occur
quickly, even during routine maneuvers such as turning and driving on hills or over obstacles, if you fail to take
proper precautions.
● Severe injury or Death can result if you do not follow these instructions:
01. Read this manual and all labels carefully and follow the operating procedures described.
02. Never operate a quad without proper instruction. Take a training course. Beginners should receive training from
a certified instructor. Contact an authorized quad dealer to find out about the training courses nearest you.
03. Always follow the age recommendation: A child under 16 years old should never operate a quad with engine size
greater than 90cc.
04. Never allow a child under age 16 to operate a quad without adult supervision, and never allow continued use of a
quad by a child if he or she does not have the abilities to operate it safely.
06. Never operate a quad without wearing an approved helmet that fits properly. You should also wear eye
protection (goggles or face shield), gloves, boots, long-sleeved shirt or jacket, and long pants.
07. Never consume alcohol or drugs before or while operating this quad.
08. Never operate at excessive speeds. Always go at a speed that is proper for the terrain, visibility, operating
conditions, and your experience.
09. Never attempt wheelies, jumps or other stunts.
10. Always inspect your quad each time you use it to make sure it is in safe operating condition. Always follow the
inspection and maintenance procedures and schedules described in this manual.
11. Always keep both hands on the handlebars and both feet on the foot pegs of the quad during operation.
12. Always go slowly and be extra careful when operating on unfamiliar terrain. Always be alert to changing terrain
conditions when operating the quad.
8
13. Never operate on excessively rough, slippery or loose terrain until you have learned and practiced the skills
necessary to control the quad on such terrain. Always be especially cautious on these kinds of terrain.
14. Always follow proper procedures for turning at low speeds before attempting to turn at faster speeds. Do not turn
at excessive speed.
15. Never operate the quad on hill too steep for the quad or for your abilities. Practice on smaller hills before
attempting larger hills.
16. Always follow proper procedures for climbing hills as described in this manual. Check the terrain carefully before
you start up any hill. Never climb hills with excessively slippery or loose surfaces. Shift your weight forward.
Never open the throttle suddenly or make sudden gear changes. Never go over the top of any hill at high speed.
17. Always follow proper procedures for going down hills and for braking on hills as described in this manual. Check
the terrain carefully before you start down any hill. Shift your weight backward. Never go down a hill at high
speed. Avoid going down a hill at an angle that would cause the vehicle to lean sharply to one side. Go straight
down the hill where possible
18. Always follow proper procedures for crossing the side of a hill as described in this manual. Avoid hills with
excessively slippery or loose surfaces. Shift your weight to the uphill side of the quad. Never attempt to turn the
quad around in any hill until you have mastered the turning technique described in this manual on level ground.
Avoid crossing the side of a steep hill if possible.
19. Always use proper procedures if you stall or roll backwards when climbing a hill. To avoid stalling, use the proper
gear and maintain a steady speed when climbing a hill. If you stall or roll backwards, follow the special procedure
for braking described in this manual.
20. Always check for obstacles before operating in a new area. Never attempt to operate over large obstacles, follow
proper procedures when operating over obstacles as described in this manual.
21. Always be careful when skidding or sliding. Learn to safely control skidding or sliding by practicing at low speeds
and on level, smooth terrain. On extremely slippery surfaces, such as ice, go slowly and be very cautious in
order to reduce the chance of skidding out of control.
9
OWNER’S MANUAL
22. Never operate a quad in fast flowing water or in water deeper than that specified in this manual. Remember that
wet brakes may have reduced stopping ability. Test you brakes after leaving water. If necessary, apply those
several times to let friction dry out the linings.
23. Always use the size and type of tires specified in this manual. Always maintain proper tire pressure as described
in this manual.
24. Never modify a quad through improper installation or use of accessories.
25. Never install a twist grip throttle on this quad.
26. Never exceed the stated load limits for a quad. Cargo should be properly distributed and securely attached.
Reduce speed and follow instructions in this manual for carrying cargo. Allow greater distance for braking.
This vehicle complies with all applicable CE directives of Europe homologation in effect at the time of
manufacture. You should check your local riding laws and regulations before operating this machine.
● When starting the engine, the battery must be installed to facilitate starting and increase the engine performance.
When reading this manual, remember:
WARNING !
Indicates a potential hazard that could result in serious injury or death.
10
IV. CONTENTS
I. PREFACE--------------------------------------------------------------------------------------------------------------------------------------1
II. INTRODUCTION ----------------------------------------------------------------------------------------------------------------------------6
III. IMPORTANT SAFETY MESSAGE ----------------------------------------------------------------------------------------------------8
IV. CONTENTS --------------------------------------------------------------------------------------------------------------------------------11
1. LOCATION OF THE WARNING AND SPECIFICATION LABELS------------------------------------------------------------15
2. MACHINE IDENTIFICATION------------------------------------------------------------------------------------------------------------18
2-1 Vehicle Identification Number (VIN)-----------------------------------------------------------------------------------------19
2-2 Engine Serial Number----------------------------------------------------------------------------------------------------------20
2-3 Key ID number-------------------------------------------------------------------------------------------------------------------21
3. PARTS AND CONTROL FUNCTIONS-----------------------------------------------------------------------------------------------22
3-1 Seat---------------------------------------------------------------------------------------------------------------------------------25
3-2 Main Switch-----------------------------------------------------------------------------------------------------------------------28
3-3 Headlights-------------------------------------------------------------------------------------------------------------------------30
3-4 Taillight-----------------------------------------------------------------------------------------------------------------------------31
3-5 Front Break Lever---------------------------------------------------------------------------------------------------------------32
3-6 Parking Brake--------------------------------------------------------------------------------------------------------------------33
3-7 Foot Brake Pedal----------------------------------------------------------------------------------------------------------------35
3-8 Footpegs & Footboard----------------------------------------------------------------------------------------------------------36
3-9 Shift Lever-------------------------------------------------------------------------------------------------------------------------37
3-10 Fuel Tank Cap------------------------------------------------------------------------------------------------------------------38
3-11 Handle Grips--------------------------------------------------------------------------------------------------------------------39
3-12 Throttle Lever-------------------------------------------------------------------------------------------------------------------40
3-13 Fuse-------------------------------------------------------------------------------------------------------------------------------42
3-14 Locking Steering ---------------------------------------------------------------------------------------------------------------43
11
OWNER’S MANUAL
3-15 Fuel Valve -----------------------------------------------------------------------------------------------------------------------44
3-16 Speedometer -------------------------------------------------------------------------------------------------------------------45
3-17 Fuel Tank ------------------------------------------------------------------------------------------------------------------------47
3-18 Handlebar Assembly ---------------------------------------------------------------------------------------------------------47
3-19 Clutch Lever (manual) -------------------------------------------------------------------------------------------------------50
4. SAFE OPERATION------------------------------------------------------------------------------------------------------------------------51
4-1 Ride Sensibly---------------------------------------------------------------------------------------------------------------------52
4-2 Crossing Through Shallow Water--------------------------------------------------------------------------------------------53
4-3 Turning-----------------------------------------------------------------------------------------------------------------------------54
4-4 Riding Down Slope--------------------------------------------------------------------------------------------------------------55
4-5 Climbing Hill-----------------------------------------------------------------------------------------------------------------------57
4-6 Modifications----------------------------------------------------------------------------------------------------------------------59
5. PER-RIDE INSPECTION-----------------------------------------------------------------------------------------------------------------60
5-1 Pre- Ride Checklist--------------------------------------------------------------------------------------------------------------61
6. OPERATION--------------------------------------------------------------------------------------------------------------------------------62
6-1 Cold Starting----------------------------------------------------------------------------------------------------------------------63
6-2 Starting a Warm Engine -------------------------------------------------------------------------------------------------------64
6-3 Break-In----------------------------------------------------------------------------------------------------------------------------65
6-4 Manual Shift ----------------------------------------------------------------------------------------------------------------------67
12
7. MAINTENANCE & ADJUSTMENT----------------------------------------------------------------------------------------------------71
7-1 Work safely------------------------------------------------------------------------------------------------------------------------72
7-2 Maintenance schedule---------------------------------------------------------------------------------------------------------78
7-3 Air Filter----------------------------------------------------------------------------------------------------------------------------80
7-4 Frame, Subframe, Swingarm-------------------------------------------------------------------------------------------------81
7-5 Fuel ---------------------------------------------------------------------------------------------------------------------------------84
7-6 Engine Oil--------------------------------------------------------------------------------------------------------------------------87
7-7 Engine Cooling System -------------------------------------------------------------------------------------------------------92
7-8 Brakes -----------------------------------------------------------------------------------------------------------------------------96
7-9 Electrical -------------------------------------------------------------------------------------------------------------------------103
7-10 Air --------------------------------------------------------------------------------------------------------------------------------115
7-11 Exhaust-------------------------------------------------------------------------------------------------------------------------114
7-12 Suspension--------------------------------------------------------------------------------------------------------------------115
7-13 Wheels--------------------------------------------------------------------------------------------------------------------------116
7-14 Tires------------------------------------------------------------------------------------------------------------------------------119
7-15 Vehicle Immersion -----------------------------------------------------------------------------------------------------------122
8. CLEANING---------------------------------------------------------------------------------------------------------------------------------123
9. STORAGE----------------------------------------------------------------------------------------------------------------------------------125
10. TRANSPORTING-----------------------------------------------------------------------------------------------------------------------126
11. TROUBLESHOOTING----------------------------------------------------------------------------------------------------------------127
12. MODEL SPECIFICATION------------------------------------------------------------------------------------------------------------130
12-1 ENGINE------------------------------------------------------------------------------------------------------------------------130
12-2 CHASSIS-----------------------------------------------------------------------------------------------------------------------132
12-3 BATTERY-----------------------------------------------------------------------------------------------------------------------134
13
OWNER’S MANUAL
13. QUAD LIMITED WARRANTY-------------------------------------------------------------------------------------------------------137
13-1 WARRANTY CONDITIONS-----------------------------------------------------------------------------------------------137
13-2 WARRANTY PERIOD-------------------------------------------------------------------------------------------------------137
13-3 WARRANTY TRANSFER--------------------------------------------------------------------------------------------------137
13-4 WARRANTY EXCLUSION-------------------------------------------------------------------------------------------------137
13-5 COMPETITION MODEL EXCLUSION----------------------------------------------------------------------------------137
13-6 PARTS AND LABOR COVERED BY WARRANTY------------------------------------------------------------------138
13-7 PARTS AND LABOR NOT COVERED BY WARRANTY-----------------------------------------------------------138
13-8 WARRANTY LIMITATION--------------------------------------------------------------------------------------------------140
14. MAINTENANCE RECORD-----------------------------------------------------------------------------------------------------------141
ADDENDA-------------------------------------------------------------------------------------------------------------------------------------142
14
1. LOCATION OF THE WARNING AND SPECIFICATION LABELS
Examples of all vehicle warning labels are found in this section. Read and understand the actual ones on your
vehicle. The labels contain information which is important to your safety and that of anyone else who operates the
quad.
● The warning labels should be considered permanent parts of vehicle, they are needed parts for any operator.
● If any label is missing, worn, damaged, or becomes unreadable, be sure to replace it.
Dinli offers replacement labels at no charge. A label's number is printed in the lower right corner of the label and
here parts number in the manual. Contact an authorized Dinli dealer for replacements.
● Label locations are shown in the following illustration. Examples of the labels are shown on the following pages.
● Always replace labels in the correct position. See the illustration for the correct location of the warning labels on
your vehicle.
15
OWNER’S MANUAL
16
Do not consume alcohol,
drugs or cigarettes before or
during operating the ATV
Always stop the vehicle
completely before changing
from forward into reverse or
vice versa.
Failure to do so may harm
the gear box.
Maximum Vehicle Load:
225kg, (495 lbs)
Includes weight of operator,
cargo and accessories.
Never load over 165kg or
may cause loss of control.
Operating this ATV if you are
under the age of 16
increases your chance or
severe injury or death
Never operate this ATV if
you are under age 16.
Always wear protective
clothing when driving your
ATV.
Read the Owner’s Manual
before riding the vehicle.
17
OWNER’S MANUAL
2. MACHINE IDENTIFICATION
NOTE:
Your vehicle may differ from those shown in the illustrations in this manual.
Record your vehicle's identification numbers in the spaces provided. Keep another record of the numbers in a safe
place; you may need them for parts, service information, or theft recovery. Your vehicle's ID numbers identify it from
others of the same model type.
Engine serial number
Factory VIN label
Vehicle identification
number (VIN)
18
2-1 VEHICLE IDENTIFICATION NUMBER (VIN)
The vehicle identification number (VIN) is etched / stamped into the right side of frame.
The VIN also appears on a temporary factory applied adhesive label on the front frame
1. Etched vehicle identification number
2. Factory VIN LABEL
Write your number here
19
OWNER’S MANUAL
2-2 ENGINE SERIAL NUMBER
The engine serial number is etched / stamped into the left crankcase of the engine.
1. Engine serial number
Write your number here
20
2-3 KEY ID NUMBER
Key identification numbers are etched / stamped into key tag.
NOTE:
Keep your spare key in a safe place in case you lose the primary key.
1. Primary key
2. Spare key
3. Tag (With Key ID number)
Write your number here
21
OWNER’S MANUAL
3. PARTS AND CONTROL FUNCTIONS
NOTE:
Your vehicle may differ slightly from those shown in the illustrations in this manual.
1. Clutch lever
2. Main switch
3. Parking brake lock
22
4. Rear brake lever
5. Throttle lever
6. Parking brake lever
1. Rear mirror
2. Headlight assembly
3. Fuel pump
4. Coolant recovery bottle
5. Radiator
6. Front shock absorber
7. Oil tank
8. Shift lever
9. Front wheel
10. Seat
11. Air filter(under seat)
12. Battery
13. Muffler
14. Starter motor
15. Footpeg & Footboard
16. Rear wheel
23
OWNER’S MANUAL
17. Speedometer & Indicator lights
18. Handlebar assembly
Start switch
Hazard switch
Horn button
Lights switch
Turn signal switch
24
19. Tail light (stop light)
20. Rear turn signal lights
21. Rear shock absorber
22. Front turn signal lights
23. Handle grips
24. Fuel tank
25. Rear brake caliper
3-1. SEAT
The entire length of the seat is required so that you can shift body weight / position while riding to maintain vehicle
control and stability. Make sure the seat is in good condition and fastened securely before you ride.
1. To remove the seat, pull away the seat pull rod from the sub-frame.
2. Use your fingertips to lift up the rear of the seat slightly. Then, pull the seat back toward the rear of the vehicle and
lift it off.
Pull rod
25
OWNER’S MANUAL
3. To install the seat, align the receiver on the seat with the catch on the frame.
4. Press down gently on the middle of the seat and slide the seat forward onto the catch of frame.
If correctly aligned, the rear seat pegs will slip easily.
A. Catch
B. Receiver
A
B
26
WARNING
!
POTENTIAL HAZARD
Loose, damaged, or improperly installed seat
WHAT CAN HAPPEN
The seat can shift or come off while you are riding causing you to lose control of the vehicle, you can
be severely injured or death.
HOW TO AVOID THE HAZARD
Always make sure the seat is locked into position on the mounts and secured properly with the
retention bolt, Never ride the quad with a damaged seat. Have it replaced.
CAUTION
Do not force the seat pegs through the holes in the rear fender or sub-frame buffers; you could
damaged the seat.
When reading this manual, remember:
WARNING
!
Indicates a potential hazard that COULD result in serious injury or death.
27
OWNER’S MANUAL
3-2. MAIN SWITCH
The main switch is located between the handlebars. Always remove the key from the switch to help prevent
unauthorized vehicle use or theft.
Ignition switch & Switch positions
28
Functions of the respective switch position are as follows:
Key position
Function
Key
The engine and lighting cannot be operated.
“OFF”
Turning the main switch to the “OFF” position,
Removal
will stop a running engine.
With the brake lever pulled in, the engine started
using the switch.
“ON”
We recommend starting the engine with the
main switch in the “ON” position then switch to
the “
ON
“position.
Lighting (headlights and taillight are activated)
ON
29
OWNER’S MANUAL
3-3. HEADLIGHT
Turn the main switch to the “
before operating the vehicle.
” position to activate the headlights. Test for the proper operation of the headlights
Headlight
30
3-4. TAILLIGHT
Turn the main switch to the “
” position to activate the taillight. Make sure it works before every ride.
Taillight
31
OWNER’S MANUAL
3-5. FRONT BRAKE LEVEL
The front brake lever is located on the right side of the handlebar. Pull it toward the handlebar to apply the front
brakes. Pull the lever harder to increase braking force. Before each ride, make sure the front breaks are operating
properly and can provide braking force when needed.
Roll the vehicle forward and back applying the brake to confirm that braking force is applied to the front brake discs.
Front brake level
32
3-6. PARKING BRAKE
The parking brake is applied with a button switch on the parking brake lever. When the parking brake is applied
(locked), the front brakes temporarily prevent the vehicle from rolling.
Be sure to read the warning about using the parking brake!
Parking brake button
33
OWNER’S MANUAL
WARNING !
POTENTIAL HAZARD (s)
1. Quad rolling away
2. Riding with the parking brake applied.
WHAT CAN HAPPEN
1. A potential decline in fluid pressure can decrease the applied braking force allowing the quad to
begin to roll.
2. Brake system will overheat, cause premature wear, and damage to the brake pads. This can
result in a loss of brake function to injure the rider or bystanders.
HOW TO AVOID THE HAZARD
1. Always block or chock the wheels on your quad immediately after applying the parking brake.
Never apply the parking brake and leave the vehicle unattended.
Always choose firm level ground on which to park your quad.
2. Release the parking brake before you ride.
1. To apply, pull the front lever against the handle grip and hold it. Press and hold the locking button with your index
finger until it is fully depressed-release the lever and remove your index finger from the button.
2. To disengage the parking brake press down on the front brake pedal with your foot, Then, pull the front brake
lever against the handle grip; the locking mechanism with automatically disengage (pop up)
3. Release the front brake lever slowly.
34
3-7. FOOT BRAKE PEDAL
The foot brake pedal is located on the right side of the vehicle. When treaded, braking force is applied to the four
wheels. Make sure the foot brake is operating properly before you ride.
Roll the vehicle forward and back and press the pedal to confirm that braking force is applied to the brake disc.
Foot brake pedal
35
OWNER’S MANUAL
3-8. FOOTPEGS & FOOTBOARD
When riding always keep your feet on the footpegs. Always check the condition of the footpegs and footboard before
every ride. Make sure that they are fastened securely to the vehicle.
The footpegs' teeth should be in good condition (not smooth or worn excessively). The footboard should be free of
any packed soils and they should not be cracked, broken, or damaged in any way. If damage is found, install new
ones.
1. Footpeg (right)
2. Footboard
36
3-9. SHIFT LEVER
The shift lever is located on the left side of the engine in front of the left footpeg.
The vehicle has five forward and one reverse gears (Reverse, 1-down, “NEUTRAL”4-UP).
Place the vehicle on a lever surface. Before every ride, make sure the shift lever operates properly and shifts
through the entire range of gears with the engine turned off; roll the vehicle forward and back as you shift through all
the gears to avoid damaging the transmission.
37
OWNER’S MANUAL
3-10. FUEL TANK CAP
Make sure the fuel cap is tightly secured before every ride. Turn the fuel cap counterclockwise to remove it and
clockwise to tighten it. Always make sure the breather hose is routed from the cap properly
Fuel cap
Breather hose
38
3-11. HANDEL GRIPS
Inspect both (left and right) handlebar grips before every ride. Make sure they are firmly attached and do not twist on
the handlebar. Inspect the grips for wear, tears, or other damage.
Replace the grips with a new set if damage is found. Contact an authorized Dinli dealer for a replacement set.
Handle grip (right)
39
OWNER’S MANUAL
3-12. THROTTLE LEVER
The throttle lever is located on the right side of the handlebar. When pushed, the engine speed will increase. When
released, engine speed will decrease-the lever spring pressure should return the lever to the set idle (engine) speed.
Check for proper operation and specified free play of the throttle before every ride.
Replace the cable if it has become worn or kinked. Lubricate the cable with lubricant to prevent premature wear or
corrosion. Adjustment can be made with the adjuster beside the throttle lever. Loosen the lock nut and turn the
adjuster.
Speed limiter
The speed limiter is on the right handlebar.
The speed limiter keeps the throttle from fully opening,
even when the throttle lever is pushed to the maximum.
Screwing in the adjuster limits the maximum engine power
available and decreases the maximum speed of the vehicle.
Speed limiter
Throttle lever
40
WARNING !
POTENTIAL HAZARD (s)
Improper adjustment of the speed limiter and throttle.
WHAT CAN HAPPEN
The throttle cable could be damaged.
Improper throttle operation could result.
You could lose control, have an accident or be injured.
HOW TO AVOID THE HAZARD
Do not turn the speed adjuster out more than 15 mm.
Always make sure the throttle lever free play is adjusted to 1.0~4.0 mm.
41
OWNER’S MANUAL
3-13. FUSE
The main electrical fuse is under the seat. Always replace the fuse with one of the specified rating.
1. 20A
2. 25A
42
3-14. LOCKING STEERING
The lock insert is on the steering shaft underneath the front fender.
Sitting on the vehicle, turn the steering handlebar right to end and turn the key clockwise, the steering handlebar is
locked. The key can be taken out.
Turn the key to left, the steering handlebar is released automatically. The key can be taken out.
WARNING !
POTENTIAL HAZARD (s)
Improper use of the locking steering.
WHAT CAN HAPPEN
The vehicle could be lost of control or overturned.
HOW TO AVOID THE HAZARD
Always be sure you have released the locking steering
handlebar before you begin to ride.
Never lock the steering handlebar, when the engine is
starting.
43
OWNER’S MANUAL
3-15. FUEL VALVE
The three way fuel valve is on the left side of the vehicle, which control the fuel from the fuel tank to the carburetor
OFF: With the lever in this position,
gasoline cannot flow into the
carburetor. Always turn the
lever to this position when the
engine is not running
44
ON: With the lever in this position,
fuel flows from the tank to the
carburetor. Normal riding is
done with the lever in this
position.
RES: This indicates reserve. If you
run out of fuel while riding,
turn the lever to this position,
then fill the fuel tank at the
first opportunity, after
refueling, return the fuel cock
lever to the “ON” position.
3-16. SPEEDOMETER
45
OWNER’S MANUAL
● Turn signal indicator lights “
”or”
”
When the turn signal switch is operated, this indicator light will blink and the buzzer will sound.
● High beam indicator light “
”
This indicator light will come on when the light switch is switched to high beam and will go out when switched to
low beam.
● Natural indicator light “ N ”
This indicator light comes on when the vehicle transmission is in neutral, always keep the vehicle in neutral if stop
riding.
● Reverse indicator light “ R ”
This indicator light comes on when the transmission is in reverse.
● Hazard indicator light “
”
When the hazard switch is operated and turns signal lights are off, this indicator light will blink while all turn signals
will blink simultaneously.
● Service light “
”
This indicator light will come on when the vehicle running mileage reach to 1000km, please have the vehicle for
regular maintenance. See page141.
● Water temperature light
When the main switch in “ON” if the
contact an authorized Dinli dealer.
46
light comes on automatically, you must stop the vehicle immediately and
3-17. FUEL TANK
Fuel tank capacity is 12 liter including 0.8 liter in the reserve supply.
Automotive gasoline with octane no.95 or higher may be used.
After refueling, be sure to tighten the tank cap firmly.
Do not refuel right after the engine has been running and is still hot.
It is recommended to check the fuel level before you begin to ride
3-18. HANDLEBAR ASSEMBLY
47
OWNER’S MANUAL
3-18-1. LIGHT PUSH BUTTON
Push the switch to the “ ” position to switch on the low beam and the taillight. Push the switch to the “ ” position to
switch on the high beam and the taillight.
3-18-2. INDICATOR SWITCH
Use the indicator switch while turning to another direction or shifting to another lane.
The rear and front turning signal lights will wink when the switch is operated.
“ ” for turning to the left. “ ” for turning to the right.
The instrument turn signal indicator light will also blink when the switch is operated.
Pressing switch inward will cause blinkers to shut off.
CAUTION
The turn signal light will not release automatically, be sure to push the indicator switch to release it,
otherwise it may affect the traffic safety.
The turn signal switch doesn’t work when the main switch is “OFF”
3-18-3. HORN BUTTON
When the main switch is at the “ON” position pressing the horn button will cause the horn to sound.
48
3-18-4. HAZARD SWITCH
“ ” At this position, the front and rear light and the turn signal lights blink together.
“●” At this position, all light will be turned out at the time.
CAUTION
Turn on this switch when parking or there is special condition.
After the hazard switch is turned on, it will not rest. Be sure to push the switch to “●” to release it,
other wise it may affect the traffic safety.
When the signal lights are winkling, the hazard switch does not work.
3-18-5. STARTER SWITCH
The starter motor cranks the engine when this switch “
” is pressed.
NOTE:
The headlight and taillight can be turned on only when the main switch is at the “
” position
The headlight and taillight can be turned on only when the engine is starting.
CAUTION
See starting instructions prior to start engine. (Please see page 61 for details)
49
OWNER’S MANUAL
3-19. CLUTCH LEVER (MANUAL)
The clutch lever is located on the left side of the handlebar. Pull in the clutch lever (quickly) to disengage the clutch,
and release the lever (slowly) to engage the clutch. Check the condition and proper operation of the clutch lever and
cable before every ride. Also make sure the clutch lever free play is proper (2~4 mm)
50
4. SAFE OPERATION
When reading this manual, remember:
WARNING
!
Indicates a potential hazard that COULD result in serious injury or death.
EXPERIENCED RIDERS ONLY!
WARNING !
POTENTIAL HAZARD (s)
Crashing the quad.
WHAT CAN HAPPEN
Dinli ATVs are high-performance machine only by operators who already have substantial skill and
operating experience. Operating without substantial skill and operating experience increases the risk
that you could lose control of the vehicle becoming severely injured or killed in a resulting accident.
HOW TO AVOID THE HAZARD
If you do not have substantial skill and operating experience.
51
OWNER’S MANUAL
4-1. RIDE SENSIBLY
● This quad is an ADULT vehicle only, operation is prohibited for anyone under 16 years of age.
● This quad is high performance vehicle intended for recreation and use by operators with advanced skills and
substantial experience. Beginning and inexperienced riders should complete the certified training course, and
should then regularly practice the skills learned in the course and the operating techniques described in this
Owner’s manual.
● The rider should wear the proper riding apparel which can help reduce the chance of injury in the event of an
accident and make riding more comfortable.
● Riding too fast increase your chance of an accident occurring which could result in a serious injury or death. Do
not ride faster than what is appropriate for your skill level and surrounding conditions.
WARNING !
POTENTIAL HAZARD
Failure to follow the skill and experience recommendations for this quad.
WHAT CAN HAPPEN
The risk of an accident is greatly increased if the operate does not know how to operate the quad
properly in different situations and on different types of terrain.
HOW TO AVOID THE HAZARD
Beginning and inexperienced operators should complete the certified training course.
They should then regularly practice the skills learned in the course and the operating techniques
described in this Owner’s manual.
For more information about the training course, contact an authorized Dinli dealer.
Riding your machine requires skills acquired through practice over a period of time.
Take the time to learn the basic techniques well before attempting more difficult maneuvers.
52
4-2. CROSSING THROUGH SHALLOW WATER
The quad can be used to cross slow moving shallow water up to a maximum of 52 cm (20.5”) in depth. Never
attempt to ride any quad in deep or fast moving water, such as river or streams.
You could quickly lose control and become caught in water currents.
Never enter the water without checking out the area.
Check for any sharp drop off, rocks or other hidden obstacle and holes which may trap disable or resulting the
vehicle become submerged. Travel at reduced speed.
Remember that wet brakes may have reduced stopping ability. Test your brakes after leaving water until you have
regained proper braking ability.
53
OWNER’S MANUAL
4-3. TURNING
It is essential that this skill shall be learned at first at low speed.
The ride must learn to move his weight and control the throttle
to allow the rear tires to get the turn. When turning, the wheel on
the outside of the turn must travel a wider radius and thus a
greater distance than the inside wheel. As the rear axle does
not permit a differential rate of wheel rotation, it is not enough to
merely steer this vehicle into a turn. To turn steer in the direction
of the turn, leaning your body to the inside of the turn, while
supporting your weight on the outer footrest. Use the throttle to
maintain power throughout the turn. Incorrect turning may
cause the front wheels to slide straight ahead. If this should
occur, close the throttle and stop. Avoid barking or accelerating
until you have regained directional control. Be careful to avoid
skids while traveling on slippery terrain.
54
4-4. RIDING DOWN SLOPE
When riding down slope, shift your weight back as far as possible with your arm straight.
Choose a low gear to allow the engine to do most of braking for you. Improper braking may lead to a loss of traction
and vehicle control resulting in an accident.
WARNING !
POTENTIAL HAZARD
Failure to use extra caution when traveling downhill
improperly.
WHAT CAN HAPPEN
Could cause loss of control or overturn.
HOW TO AVOID THE HAZARD
Always be follow proper procedure for traveling down hill
as described in this Owner’s manual
55
OWNER’S MANUAL
NOTE:
A special technique is required when braking as you go down a slope.
Always check the terrain carefully before descending any slope. Shift your weight backward.
Never travel down a slope at high speed.
Avoid traveling down a slope at an angle that would cause the vehicle to lean sharply to one side. Go
straight down the slope when possible.
56
4-5 CLIMBING HILL
Climbing hills is an advanced technique. Before attempting to climb difficult hills, practice on flat round and then
smaller hills to build experience.
Never attempt a hill or slope beyond your skill level and evaluate all hills and slopes carefully to avoid terrain that
may cause the quad to overturn.
WARNING !
POTENTIAL HAZARD
Climbing hill improperly
WHAT CAN HAPPEN
Could cause loss of control or overturn.
HOW TO AVOID THE HAZARD
Always follow proper procedure for climbing hill as
described in this Owner’s manual.
57
OWNER’S MANUAL
NOTE:
Always check the terrain carefully before ascending any hill.
Shift your weight forward.
Never operate the quad on hill steeper than 25°
Never climb hill with excessively slippery or loose surface.
Keep both feet on the footrests, maintain steady and controlled throttle openings.
58
4-6. MODIFICATIONS
Do not modify your quad to carry cargo.
WARNING !
POTENTIAL HAZARD
Operating this quad with improper modifications.
WHAT CAN HAPPEN
Improper installation of accessories or modification of this vehicle may cause changes handing which
could lead to an accident.
HOW TO AVOID THE HAZARD
Never modify this quad through improper installation or use of accessories. All parts and accessories
added to this vehicle should be genuine DINLI or equivalent components designed for use on this
quad and should be installed and used according to approved instructions. If you have question,
consult an authorized DINLI dealer.
59
OWNER’S MANUAL
5. PRE-RIDE INSPECTION
WARNING !
POTENTIAL HAZARD
Failure to inspect vehicle before operating
WHAT CAN HAPPEN
Increases the possibility of equipment failure resulting in an accident.
HOW TO AVOID THE HAZARD
Always inspect this quad before you operate it.
Always follow the inspection and maintenance procedures found in this Owner’s Manual.
Have your vehicle serviced by an authorized Dinli dealer every 20 hours of operation, and per 1,000
Km riding.
When reading this manual, remember:
WARNING
!
Indicates a potential hazard that COULD result in serious injury or death.
60
PRE-RIDE CHECKLIST
ITEM
CHECK
Apparel
Condition of (helmet, eye protection, boots, gloves, long-sleeved shirt and long trousers).
Proper operation, fluid levels, hand break lever free-play, leaks.
Fill with DOT4 brake fluid if necessary.
Proper operation, condition, and lever free-play, actuating arm position
Coolant level, fill with coolant if necessary.
Clean and lubricate the drive chain. Check drive chain slack, sprockets, swing arm buffer, rollers, and
guide block.
*Oil level. Fill with engine oil if necessary.
Brakes
Clutch
Coolant
Drive
Engine
Fuel
Wheels/Tires
Steering
Chassis (frame)
Fuel level. Fill with fuel if necessary.
Wheels (for damage), tire pressures (all four) and condition. Replace if damaged. Add air required.
Handlebars turn freely; no binding of the cables/hoses throughout the full steering range.
Inspect the frame, sub-frame, and swing arm for bending, cracks, or other damage. Don’t ride if
damage is found.
Fenders, covers,
Bolts/Fasteners
Secure, tightness
Lights
Proper operation (headlights, taillight and turning lights).
Throttle
Proper operation, condition lever freeplay
Battery
Check connections
PAGE
-
96 – 102
50
92 – 95
-
87 – 91
47, 84, 85
116 – 121
43
81 – 83
-
28– 31
105, 106
40, 41, 86
107, 108,
134 – 136
※If you have any doubt, not understanding or difficulty in inspection or adjustment with this quad, we
suggest to contact the nearby service point or a Dinli’s dealer.
61
OWNER’S MANUAL
6. OPERATION
WARNING !
POTENTIAL HAZARD
Operating the quad without being familiar with all the control.
WHAT CAN HAPPEN
Losing control which can cause an accident where you can be severely injured or death.
HOW TO AVOID THE HAZARD
Read the owner’s manual carefully and be sure you understand everything in it before operating the
vehicle.
If you don’t understand something, ask a Dinli dealer.
General Starting Tips
CAUTION
Only hold the start switch for 2-3 seconds at a time.
Since a cold engine requires more fuel, repeated and shorter cranking attempts should be used to
deliver the extra fuel needed. If you crank more than 2-3 seconds you’re wasting battery power.
62
6-1. COLD STARTING
1. Make sure the vehicle is on level ground and the transmission is in NEUTRAL.
2. Lock the parking brake and make sure the fuel valve is on.
3. Turn the main switch to the “ON” position
4. Shift transmission into NEUTRAL, the indicator “N” will be visible in green light on the meter, and pull-in and hold
in the rear brake lever.
5. Carefully take up the throttle lever free play, then take up 2 mm more
5mm throttle lever free play
63
OWNER’S MANUAL
6. Press and hold the engine start switch for no more than 2 to 3 seconds at a time. If the engine “pops” or seems to
backfire you're holding the throttle open too much. 1 mm is a very fine lever movement. Back the lever off, wait
briefly, and re-try.
7. When the engine fires, hold the throttle at a fast idle for 10 seconds or until a smooth idle is obtained.
8. Always wait for the engine to reach operating temperature (70℃) before riding; or at idle for 3 minutes before
riding.
9. Release the parking brake before riding
6-2. STARTING A WARM ENGINE
When starting an engine after it has reached operating temperature, do NOT open the throttle while operating the
starter motor. This will make starting very difficult and possible foul the spark plug.
64
6-3. BREAK-IN
The brake-in period is critical to the long term life and reliability of the engine. The break-in period for the engine is at
least 1 hour.
When operating during this period be sure to observe the following cautions:
● Ride at low to medium engine speeds, Keep the speed below 70Km/ hr.
● Do not lug or rev the engine during the break-in period.
● Avoid full-throttle starts and rapid acceleration.
● Do not hold the throttle grip in one position for more than a few seconds. It is better to roll the throttle on and off
and ride on flat terrain.
● Avoid riding up steep hills and in sand because this produces greater engine loads, possibly damaging engine
components.
1. Ride the ATV normally for two 10-minute segments using no more than 1/2 throttle.
Wait for the engine to cool completely between segments.
2. Next, ride three 15-minute segments using no more than 3/4 throttle, again allowing the engine to cool between
rides.
NOTE:
During all rides, it is important to shift gears often so that high rpms are avoided and the engine is not
lugged
65
OWNER’S MANUAL
3. After riding the vehicle, clean it thoroughly and allow it to dry. Then inspect the entire vehicle for damage or loose
fasteners.
4. Repair or tighten any damaged or loose components and lubricate the vehicle.
5. If the vehicle is damaged, it is recommended that you put tape over the main switch to remind you to not start the
vehicle. And write the problem on your Owner's Manual.
6. Complete the break-in period maintenance schedule. See “Maintenance & Adjustment” starting on page78.
66
6-4. MANUAL SHIFT
6-4-1. FORWARD
The gear shift pedal is located in front of the left footpeg. One full stroke of the pedal shift the transmission to the
next gear in the shifting sequence. The pedal automatically returns to a horizontal position when released.
To upshift to a higher gear, place the toe of your boot under the gear shift pedal and raise the pedal one full stroke.
To downshift, place your foot on the gear shift pedal and depress the pedal one full stroke.
67
OWNER’S MANUAL
WARNING !
POTENTIAL HAZARD
Shift without releasing the throttle and disengaging the clutch.
WHAT CAN HAPPEN
Could cause loss of control or vehicle overturn.
HOW TO AVOID THE HAZARD
Always release the throttle and fully squeeze the clutch lever while shifting gears.
NOTE:
Always allow a cold engine to warm up before shift gears.
1. Turn the main switch to the “ON” position, the speedometer will light up.
2. Shift the transmission into “N”, the indicator “N” will light up on the meter.
3. Squeeze and hold the brake lever.
4. Squeeze and hold the left clutch, push the start switch to start the machine
5. Depress the gear shift pedal one full stroke to shift into first gear. Then release the brake lever.
6. Gradually squeeze the throttle lever while slowly releasing the clutch lever.
7. As engine speed increases in first gear, simultaneously release the throttle, disengage the clutch and shift to
second gear by raising the gear shift pedal one full stroke.
68
8. Use the same procedure to change gear pattern as recommended:
Gear
Speed Recommended for shifting gear
st
After start
nd
Approach 30km/h
rd
Approach 50km/h
th
Approach 65km/h
th
Approach 75km/h
1
2
3
4
5
9. To slow or stop the quad, release the throttle lever and apply the brakes smoothly and evenly. As the vehicle
slows and engine RPM decreases, disengage the clutch and shift to a lower gear.
69
OWNER’S MANUAL
6-4.2 REVERSE SWITCH
The reverse switch is located on speedometer cover.
st
Make sure the machine is at the “1 ” gear, turn right the “REVERSE” switch and set down the shift lever.
Simultaneously
Release the “reverse” switch and clutch lever to engage the “REVERSE” gear. The “R” indicator lights on.
70
7. MAINTENANCE & ADJUSTMENT
Regular Maintenance
Periodic inspection, adjustment and lubrication of your vehicle helps keep it safe and reliable to operate. The
maintenance schedule provided in this section is intended as a general guide only. Where you ride (geographic
location), the weather conditions, terrain (e.g. sand, dirt, dusty, wet, etc.), and your riding style all influence how
often a maintenance item should be performed. For example, if you ride in sandy conditions the time (interval)
between servicing will be shortened because sand is very abrasive and will act to wear vehicle components more
quickly.
Your Ability
If you do not feel comfortable or in any way doubt your own abilities to perform a procedure described in this manual,
don't attempt it; have an authorized Dinli dealer perform the servicing
71
OWNER’S MANUAL
7-1. WORK SAFELY
Make sure you read and understand the warnings at the beginning of this section.
Carbon Monoxide
DANGER !
POTENTIAL HAZARD
Running the engine indoors.
Breathing exhausts gases.
WHAT CAN HAPPEN
Running the engine indoors will expose you to
dangerous exhaust gases.
Breathing carbon monoxide gas leads to poisoning,
asphyxiation, and death.
This will happen rapidly and without notice.
HOW TO AVOID THE HAZARD
Never operate the vehicle indoors even for brief periods
of time.
72
Hot Components
WARNING !
POTENTIAL HAZARD
Hot components (e.g., engine, radiator, hoses, bulbs,
exhaust, brakes)
WHAT CAN HAPPEN
The engine and other vehicle systems operate at
extremely high temperatures.
HOW TO AVOID THE HAZARD
Wait for the engine and vehicle systems to cool
completely before starting any work. If the engine must
be running work carefully and avoid hot surfaces.
73
OWNER’S MANUAL
Gasoline
WARNING !
POTENTIAL HAZARD
Improper care when handling fuel.
WHAT CAN HAPPEN
Fuel is highly flammable; spilling it can cause a fire or
explosion.
HOW TO AVOID THE HAZARD
Be sure the fuel cap is closed securely.
Work in a well-ventilated area which is free of sources
that could ignite any spilled fuel accidentally (e.g.
cigarettes, welders, torches, grinders, electric shop
tools, etc.)
74
Protect Your Eyes
WARNING !
POTENTIAL HAZARD
Blindness, eye injury
WHAT CAN HAPPEN
Anytime you work on the vehicle there is a potential that
an accident involving a foreign object, vehicle
component part, fluid, tool, or other maintenance related
item can result in severe injury to your eyes.
HOW TO AVOID THE HAZARD
Always wear safety glasses when working.
75
OWNER’S MANUAL
Moving parts
WARNING !
POTENTIAL HAZARD
Losing a finger, hand or limb or entanglement
WHAT CAN HAPPEN
Moving parts can catch your clothing, fingers or hand
resulting in severe injury.
HOW TO AVOID THE HAZARD
Never perform maintenance procedures with the engine
running.
76
Fluids
WARNING !
POTENTIAL HAZARD
Vehicle fluids (e.g., engine oil, brake fluid, coolant)
WHAT CAN HAPPEN
The fluids in your vehicle are hazardous substances.
Contact with your skin or eyes you can result in serious
injury or irritation.
If swallowed, death can result.
HOW TO AVOID THE HAZARD
Wear hand protecti9on and safety glasses when
working with vehicle fluids.
If you touch a fluid, wash it off immediately with soap
and water. Clean clothes or rags contaminated with
engine oil.
If swallowed seek immediate medical attention.
※KEEP ALL VEHICLE FLUIDS AWAY FROM CHILDREN AND ANIMALS
77
OWNER’S MANUAL
7-2. MAINTENANCE SCHEDULE
Perform a Pre-Ride inspection before every ride and a sch edule maintenance periods.
C=Clean
R=Replace
L=Lubricate
I=Inspect, Verify, Clean, Adjust, Lubricate, Replace if necessary
Interval
Items
▲
○
▲
▲
▲
Regular Maintenance
(Riding Km)
Regular Maintenance Internal (house)
Break in
(1 hour)
Initial
After
10 hr
Every 1
month
Every 3
month
Every 6
month
WARNING LABELS (condition, readable)
I
I
I
I
I
FRAME (mainframe, subframe, swingarm)
I
I
I
FUEL SYSTEM (hoses, tank, level)
I
I
BATTERY (terminals)
I,C
THROTTLE OPERATION
I
I
I
AIR FILTER
I
C
R
AIRBOX DRAIN TUBE
I,C
I
SPARK PLUG
I
R
IDLE SPEED
I
I
EXHAUST (spark arrester)
C
SWITCHES (engine, stop, start, tether, ignition)
I
I
LIGHTING (headlight, tail light, turning lights)
I
I
ENGINE OIL
I
R
R
ENGINE OIL FILTER (s)
C
R
R
▲DINLI dealer service suggested servicing owners should have the proper tools, service data, and be mechanically qualified.
○Operational safety involved. The service should be performed by a DINLI dealer.
★Service more frequently if operation in dusty, sandy or snowy area or conditions.
*Change every 2 years.
78
Interval (whichever comes first)
Note
200 Km
500 Km
1000 Km
I
I
I
I
I
I
I
★
★
I
I
I
I
I
R
Adjust as required
C
★
*
*
R
R
R
R
C=Clean
R=Replace
L=Lubricate
I=Inspect, Verify, Clean, Adjust, Lubricate, Replace if necessary
Interval (whichever comes first)
Interval
Break in
(1 hour)
Items
○
▲
▲
○
▲
▲
Regular Maintenance
(Riding Km)
Regular Maintenance Internal (house)
Initial
After
10 hr
Every 1
month
Every 3
month
Every 6
month
DRIVE CHAIN [sag, stretch, buffer, guide block,
I
I
I
sprockets(condition/tightness), guard]
BRAKE FLUID
I
I
BRAKE SYSTEM (cables, discs, pads, hosed, etc.)
I
I
BRAKE, REAR, DISC CARRIER
I
I
I
CLUTCH (lever, cable and arm position)
I
I
I
COOLANT (radiator, cap, hosed, level, strength)
I
I
R
SUSPENSION (front/rear shocks, condition, setting)
I
I
I
I
NUTS, BOLTS AND FASTENERS
I
I
I
SEAT (condition, wear, damage)
I
WHEELS/TIRES (pressure, condition, wear)
I
I
I
I
SWINGARM (bearings)
I
I
Steering assembly (fasteners, operation)
A-ARM (BUSHINGS ball joint)
I
TIE ROD ENDS
I
I
I
▲DINLI dealer service suggested servicing owners should have the proper tools, service data, and be mechanically qualified.
○Operational safety involved. The service should be performed by a DINLI dealer.
★Service more frequently if operation in dusty, sandy or snowy area or conditions.
Note
200 Km
★
500 Km
1000 Km
I
I
★
*
I
I
I
I
I
★
★
★
★
I
I
I
*Change every 2 years.
79
OWNER’S MANUAL
7-3. AIR FELTER
NOTE:
The air filter is located under the seat
Do not operate with the air filter removed.
You can seriously damage the engine.
1. Cover of air filter
2. Cogs x 4
3. Clip
(1)
(2)
(3)
80
7-4. FRAME, SUBFRAME, SWINGARM
Regular Inspection
The steel chassis components of your quad have a finite, limited useful life. The length of that
life varies depending on the material used in their manufacture, the amount of use they are
subjected to and the care they receive while in service. Regular inspection by a DINLI dealer
is important
● Frame - a main support structure for the engine, various components, and rider.
● Sub frame - adds structural support.
● Swing arm- a suspension component.
● Bumper- mounted on the front of the ATV.
Use in hard and aggressive riding, riding on severe terrain, riding in severe climates and riding fast can dramatically
shorten the life of the steel (frame) components. Any one and/or a combination of these condition may result in an
unpredictable failure.
We recommend that you carefully inspect your quad's chassis components for cracking, bending, deep scratches
and/or other damage before every ride.
If you have crashed or rolled your quad, there could be damage hidden from your view, DO NOT ride a quad with
any crack, even a small one. It must be carefully inspected by an authorized DINLI dealer before it is used again.
Riding a cracked frame could lead to complete frame failure. If you have any questions contact your DINLI dealer.
81
OWNER’S MANUAL
WARNING !
POTENTIAL HAZARD(s)
1. Operating with a bent, corroded/rusted, cracked, dented, or damaged frame, subframe, swingarm
or other steel components.
2. Attempting to repair the frame, subframe, or swingarm on the ATV.
WHAT CAN HAPPEN
1. Riding on a damaged frame can lead to a complete frame failure.
2. Steel frame (and components) are heat treated. Welding, drilling, or modifying the frame,
subframe, or swingarm may weaken the component and result in complete failure leading to a
serious accident with subsequent injury or death.
HOW TO AVOID THE HAZARD
Contact an authorized DINLI dealer for servicing if either the frame, subframe or swingarm is
damaged; never try to repain the frame, subframe, swingarm or other components.
82
1. Frame
2. Rear shock strut
3. Subframe
4. Swingarm
5. Engine rail/skid plate
6. Bumper
83
OWNER’S MANUAL
7-5. FUEL
Always use clean high quality unleaded gasoline. (Octane 95 above is recommended)
WARNING !
POTENTIAL HAZARD
Over filling the fuel tank.
WHAT CAN HAPPEN
Fuel expands due to heat (e.g., engine, sun) and may overflow if the tank is overfilled, resulting in a
fire.
HOW TO AVOID THE HAZARD
Stop adding fuel when the correct level is reached.
CAUTION
If engine “knocking” or pinging occurs, use a different brand of gasoline or a higher octane rating.
Never experiment. Other fuels or additives can severely damage the engine and its supporting
components (e.g. fuel system, sensors, tank, hoses, etc…)
84
7-5-1. ADDING FUEL
1. Make sure the engine is stopped.
2. Remove the main switch key.
3. Remove the fuel cap and fill the fuel tank with the specified fuel to the correct level.
4. Reinstall fuel tank cap and tighten it securely.
5. Make sure the fuel cap hose is routed correctly.
7-5-2. IDLE SPEED ADJUSTMENT
The idle speed adjustment screw is located on the carburetor body. It is accessible from the left side of the vehicle. A
special diagnostic tool is necessary to read (display) the engine rpm.
For this reason, idle adjust should be left to a DINLI service technician.
1. To adjust the idle, allow the engine to reach operating
Temperature 158℉ (60℃)
2. Set the idle speed by turning the adjuster (1) in direction (a)
Increase idle speed, or direction (b) to decrease idle speed.
(1) Adjuster
(a) Increase (clockwise)
(b) Decrease (counterclockwise)
85
OWNER’S MANUAL
7-5-3. THROTTLE LEVER ADJUSTERMENT
Loosen locknut and then turn the adjuster until the specified freeplay is reached. Tighten the locknut.
1. Rubber boot
2. Locknut
3. Adjuster
NOTE:
If the proper adjustment cannot be obtained or the
throttle lever does not operate properly, the cable end
at the throttle body can be adjusted; however, access
to it is difficult and should be left to a qualified service
technician. See your DINLI dealer for servicing.
86
7-6. ENGINE OIL
Engine oil is a significant factor in the service life and performance of the engine.
Change the engine oil in accordance with the maintenance schedule. See “Maintenance & Adjustment” starting on
page78. Service more frequently under severe conditions.
7-6-1. CHECKING ENGINE OIL
Check the oil level before each use of vehicle. The oil level screen is located in the right crankcase cover.
CAUTION
Run the engine for 1 minute before checking or you will take an inaccurate measurement.
Add in small amounts and recheck the level between pours.
87
OWNER’S MANUAL
1. To check the level, start the engine and allow to run for 1 minute at idle speed, then turn off the engine.
2. Remove the dipstick.
1. Engine oil dipstick
2. Markings
3. Wipe the dipstick with a clean rag and screw back in completely. Then remove and inspect the level on the stick.
The oil level should be between the markings on the dipstick. If low, add a sufficient amount of oil to raise it to the
correct level. Do not overfill.
4. Reinstall the dipstick.
If the quad is used year-round, check the oil level frequently. A rising oil level could indicate the accumulation of
contaminates such as water or excess fuel in the bottom of the oil tank.
Water in the bottom of the tank can lead to engine damage and must be drained.
Water accumulation increase as outside temperature decreases.
88
7-6-2. CHANGING ENGINE OIL
Always change the oil at the intervals outlined in the “MAINTENANCE SCHEDULE” see page78. Perform a break-in
oil change after one hour of operation, or after the first tank of fuel, whichever comes first, change the oil more
frequently on vehicles subjected to severe use.
NOTE:
Have a clean shop towel handy to clean up any spilled oil.
1. Start the engine and wait to reach normal operating
temperature 158℉ (70℃) (it takes around 2~3 minutes).
Then, turn the engine off.
2. Place a drain pan beneath the oil tank and remove the
drain plug
1. Drain plug
89
OWNER’S MANUAL
3. Allow the oil to drain completely.
4. Replace the sealing washer and reinstall the plug & torque to 19 Nm.
NOTE:
The sealing surfaces on drain plugs, and crankcase should be clean and free of burrs, nicks or
scratches.
5. Place a drain pan beneath the crankcase and remove the drain plug.
Drain plug
90
1. Bolt 2. Cover 3. O-ring 4. Filter
6. Allow the oil to drain completely.
7. Replace the sealing washer and reinstall the plug & torque to 19 Nm.
8. Place shop towels beneath the oil filter.
9. Remove the three cover bolts and remove the cover.
10. Pull out the oil filter.
11. Using a clean dry cloth, clean the filter sealing surfaces.
12. Replace the o-ring in the cover.
13. Lubricate the gasket on the new filter with a film of fresh engine oil.
14. Reinstall the spring and install the new filter.
15. Install the cover and torque the bolts to 8~9 Nm.
16. Remove the dipstick and fill the oil tank with the recommended oil.
17. Place the transmission in Neutral and set the parking brake.
18. Prime the oil pump using the procedure on page 92.
Then stop the engine and inspect for leaks.
19 Re-check the oil level on the dipstick and add oil as necessary to bring the level to the upper mark on the dipstick.
20. Dispose of the used filter, oil and shop towels properly.
CAUTION
Do not over-tighten the drain plug. You will damage the threads of the filter housing. If the cover leaks,
you may need to replace the cover O-ring or inspect the cover and housing mating surfaces for damage.
91
OWNER’S MANUAL
7-6-3. OIL PUMP PRIMING
This priming procedure must be performed whenever the oil hose connection between the oil tank and pump inlet
has been disconnected.
1. Clamp or pinch off the vent line approximately 2” from the oil tank.
2. Run the engine for 5-10 seconds at idle. Stop the engine and remove the vent line clamp.
If the line is bled properly, you should hear a rush of air, indicating that the line is properly primed and ready for
operation. If you do not hear air, the line has not bled, and you’ll need to repeat the priming procedure.
7-7. ENGINE COOLING SYSTEM
7-7-1. COOLANT LEVEL
The engine coolant recovery bottle is located on the left side of the vehicle under the front fender. Check the coolant
level in the bottle when the engine is cold, the fluid level in the bottle will vary during operation. Maintain coolant at
the “LEVEL” mark on the bottle when the engine is cold. We recommend a 50/50 mixture of high-quality aluminum
compatible anti-freeze/coolant and distilled water.
WARNING !
POTENTIAL HAZARD
Severe burns
WHAT CAN HAPPEN
Coolant can sprayed out under high pressure if the bottle is opened while the system is hot.
HOW TO AVOID THE HAZARD
Wait for the engine to cool completely before removing the cap.
92
1. Coolant bottle
2. Bleed hose
NOTE:
The coolant system on your vehicle is the self bleed type and the hose should be visible.
93
OWNER’S MANUAL
7-7-2. CHECKING THE COOLANT LEVEL
1. Make sure the engine and radiator are completely cold.
2. Observe the coolant level in the recovery bottle without opening the cap. The level should be between “FULL” and
“ADD” mark
“FULL” & “ADD” mark
FULL
ADD
7-7-3. ADDING COOLANT
1. To add coolant, make sure the engine is cold.
2. Place a thick rag over the coolant bottle cap and open it very slowly to allow any residual pressure to escape.
Then, remove cap and slowly add the specified coolant using a clean funnel until it reaches the “FULL” mark.
3. Reinstall the cap and check coolant system for leaks
94
7-7-4. CHANGING THE COOLANT
1. Make sure the coolant system is completely cold and you are wearing safety glasses and protective rubber gloves.
Have a few clean rags handy to wipe up any spills.
2. Remove the clip.
3. Remove coolant recovery bottle tube to allow coolant to drain completely. Reinstall the tube and clip.
4. Add the specified coolant at the bottle until it reaches the LEVEL mark on the bottle.
When reading this manual, remember:
WARNING
!
STOP! If you have the impression that four wheels give you the stability of a car, you are wrong. If you
95
OWNER’S MANUAL
7-8. BRAKES
7-8.1 SYSTEM TEST
1. Squeeze the left hand brake lever and test for proper braking. The lever should feel firm and proportional force
should be applied to the discs preventing the quad from rolling.
If the brake lever feels spongy or weak, or the vehicle is not prevented from rolling have the brakes inspected by a
DINLI dealer.
2. Check for fluid leaks. Inspect the entire length of the hoses paying close attention to the banjo bolts, calipers, and
master cylinders.
3. Check the right foot brake pedal for proper operation by pressing it with your foot.
You should feel firm resistance when braking. As with the foot brakes, force applied to the pedal should be
forward to the front and rear discs preventing the vehicle from rolling.
If the foot brake operates improperly have a DINLI dealer inspect the system.
4. Inspect the rear brake pads for wear.
5. Test both brake systems at slow speed. Make sure that both systems function properly and that there is proper
braking force available always.
6. When riding in wet conditions or after exiting a water crossing, apply the brake lightly a few times so that the heat
of friction will dry the pad and discs. If water remains on the system, you will not have adequate braking power
when needed
96
7-8-2. BRAKE FLUID
WARNING !
POTENTIAL HAZARD
Using contaminated brake fluid, using brake fluid other than DOT4, mixing brake fluid types.
WHAT CAN HAPPEN
Brake performance can be reduced or brakes can fail resulting in a serious accident.
HOW TO AVOID THE HAZARD
Use only DOT4 brake fluid from a sealed container. Fluid from an opened container, even though the
cap has been returned, can absorb moisture and may be contaminated with dust and dirt.
CAUTION
Do not spill brake fluid on painted, plastic or rubber parts or surfaces. Place a shop towel or rag over
these parts when servicing the brake system.
If you do spill fluid on these parts, wash it off immediately.
97
OWNER’S MANUAL
7-8-3. HAND BRAKE
1. To check the hand brake system, place vehicle on a level surface and level the handlebars.
2. Inspect the fluid level through the inspection window in the master cylinder reservoir.
The fluid should be above the “LOWER” make on reservoir body. Add fluid if necessary.
3. To add, wipe any dirt or debris from the master cylinder housing and cover.
4. Remove the hand brake master cylinder cover screws, cover, and diaphragm
(1) Inspection window
(2) “LOWER” mark
98
5. Add the recommended brake fluid from a sealed container until the fluid level is above the “LOWER” mark on the
reservoir body.
6. Reinstall the diaphragm, cover, and cover screws.
NOTE:
The hand brake master cylinder reservoir is located on the left side of the vehicle handlebar. Make sure
the vehicle is on a level surface and the reservoir itself is level when checking. Clean the area
surrounding the reservoir before opening it to help prevent fluid contamination.
99
OWNER’S MANUAL
7-8-4. FOOT BRAKE
1. To check the foot brake fluid level, place vehicle on a level surface and make sure the reservoir itself is level. The
fluid level should be above the “MIN” mark. Add if necessary.
2. To add, clean the cap and surrounding area thoroughly before opening. Pour the specified brake fluid from a clean
container until it reaches over the “MIN” mark. Reinstall the diaphragm, insert, and cap.
3. Be sure to check for proper brake operation before riding the vehicle
“MIN” mark
100
7-8-5. PARKING BRAKE
When parking, squeeze each hand brake lever. While doing this, press the parking brake button on each handlebar
brake set. This will result in locking the brake lever. Make sure that the brake lever is locked to ensure that the ATV
will remain safely immobile while parked. Squeeze the hand brake lever one again and the parking brake will be
released.
Always set the parking brake to help prevent the vehicle from moving, when it is being parked, being started or
idling.
Parking brake (right side)
101
OWNER’S MANUAL
WARNING !
POTENTIAL HAZARD
Riding with improperly operating brakes.
WHAT CAN HAPPEN
You could lose braking ability, which could lead to an accident.
HOW TO AVOID THE HAZARD
Check the brake cable for kinks or signs of wear that could cause sticking or failure.
Lubricate the brake cable with a available cable lubricant to prevent premature wear or corrosion.
Make sure that the brake arm, spring, rod and fasteners are in good condition.
Ask you dealer to inspect brakes when you feel some problems or have doubts.
Ask the maintenance station to replace the pads when they are almost in contact with the disc plate.
102
7-9. ELECTRICAL
Many electrical problems are caused by faulty electrical connectors or couplers. For example, wet terminals/pins,
dirty or corroded terminals/pins, or broken or bent cable pins within multi-plug couplers
7-9-1. COOLANT TEMPERATURE SENSORS
The engine temperature sensor is brass, located on the left side vehicle.
If the engine temperature is too high, the “high-temp” indication located on meter will light on.
You should stop riding/using the vehicle immediately and have the vehicle inspected by authorized DINLI dealer.
Coolant temperature sensor
103
OWNER’S MANUAL
7-9-2. FUSE
The fuse holder is located under the seat. When a fuse blows repeatedly, it usually indicates a short circuit or current
overload in the electrical system. The problem could be intermittent or constant. Don't ride the vehicle in either case
because an electrical fire could lead to a serious accident. If you experience frequent fuse “blows,” have the vehicle
inspected by an authorized DINLI dealer.
WARNING !
POTENTIAL HAZARD
Electrical fire or damage to the quad electrical system
WHAT CAN HAPPEN
A malfunctioning electrical system increases the risk that you may be seriously injured or killed while
operating the vehicle. For example, an electrical fire can develop from a system overload or you
could lose vehicle lighting. Using a fuse with a rating other than specified or using other materials in
place of the fuse will cause damage to system.
HOW TO AVOID THE HAZARD
Always use a replacement fuse of the specified rating.
Never use other mater4ials in place of the fuse.
If a fuse blows immediately after replacement have the electrical circuits checked by an authorized
DINLI dealer. Always turn OFF the main switch when checking or replacing the fuse. Otherwise a
short circuit may occur. Check the condition of the wiring harness and connectors before replacing a
blown fuse.
Make sure the main switch is OFF.
104
7-9-3. LIGHTING
NOTE:
Always wipe off a newly install bulb with alcohol-dampened clean cloth or tissue.
Oils from your fingers can cause premature bulb failure.
Headlight bulb replacement
1. Move the rubber boot [A] & fixture [B] from the headlight housing and remove the bulb.
2. Install a new bulb unit into the housing.
3. Test for proper operation.
105
OWNER’S MANUAL
Taillight bulb replacement
Push and turn the bulb mount counterclockwise to remove it from the housing
1. Move the rubber boot [A] and pull the bulb out from mount and install a new bulb.
2. Push the new bulb into mount and turn clockwise to reinstall it.
3. Test for proper operation.
Bulb
106
7-9-4. BATTERY
All models use a sealed type battery therefore they do not require any maintenance other than routine charging such
as during storage and cleaning. Always have the battery serviced by an authorized DINLI dealer.
CAUTION
Never attempt to add water to a maintenance-free battery.
Never allow a battery to stand in a discharged condition
WARNING !
POTENTIAL HAZARD
Attempting to open the battery, remove the cap strip or add fluids to this maintenance free battery.
WHAT CAN HAPPEN
Could release poisonous gas and corrosive fluid which could injure you severely.
HOW TO AVOID THE HAZARD
Never attempt to open the battery cap strip.
Keep sources of ignition away from the battery (e.g. cigarettes, flames, or sparks).
107
OWNER’S MANUAL
Keep battery terminals and connections free of corrosion. If cleaning is necessary, remove the corrosion with a stiff
wire brush. Wash with a solution of one tablespoon baking soda and one cup water. Rinse well with tap water and
dry off with clean shop towels. Coat the terminals with dielectric grease or petroleum jelly
Battery storage
When the vehicle is placed in storage for three months or more, the battery should be removed and stored out of the
sun in a cool, dry place. Test and recharge the battery monthly and before reusing.
Battery charging
The most important parts if maintaining a sealed battery is keeping it fully charged. The battery included with your
quad is sealed and the sealing strip cannot be removed. USE a voltmeter or multi-meter to measure DC voltage. A
fully charged battery will register 14 V or higher. If the voltage is less than 14 V, recharge it
NOTE:
Always verify battery condition before and 1-2 hours after charging.
108
7-9-5. SPARK PLUG
Use NGK DCPR8E sparks.
Proper electrode gap is 0.8~0.9 mm
Spark plug torque is 250 kgf-cm.
CAUTION
Using non-recommended spark plugs may result in serious engine damage and may void your
emission-related warranty.
Spark plug condition is indicative of engine operation. The spark plug firing end condition should be
read after the engine has been warmed up and the vehicle has been driven at higher speeds.
Immediately check the spark plug for correct color.
Normal
The normal insulator tip is gray, tan or light brown. There will be few combustion deposits.
The electrodes are not burned or eroded. This indicates the proper type an heat range for the engine and the
service.
A white insulator tip indicates overheating.
109
OWNER’S MANUAL
Wet Fouled
The insulator tip is black. A damp oil film covers the firing end. There may be a carbon layer over the entire nose.
General causes of fouling are excessive oil, use of non-recommended oil, improper use of the choke, or incorrect
carburetion adjustments.
Removal and Replacement
NOTE:
Accessing the spark plug requires a moderate degree of mechanical skill and the appropriate tools.
1. Turn off cock of fuel tank.
2. Remove the spark plug coil holder bolt and clip.
3. Clean the area surrounding the coil to prevent dirt from entering the cylinder head when the coil and spark plug
are removed.
4. Use a spark plug socket and long extension to loosen and remove the spark plug from the cylinder head.
NOTE:
Examining the condition of the spark and physical signs produced by various engine conditions (normal
and abnormal) should be left to a qualified service technician.
110
5. Lightly coat the threads with a suitable anti-seize compound; this will allow for easier plug removal in the future.
6. Install the spark plug into the cylinder head and tighten to the specified torque.
7. Reinstall removed components
Cap
111
OWNER’S MANUAL
7-10. AIR
Air filter element cleaning
The air filter is located under the seat
WARNING !
POTENTIAL HAZARD
Fire or explosion, filter damage
WHAT CAN HAPPEN
Using gasoline or other low flash point solvents to clean the air filter can result in a fire or explosion.
HOW TO AVOID THE HAZARD
Use a non-flammable (high-flash point) solvent to clean the air filter elements
CAUTION
Don’t operate the vehicle with the air filter removed.
Unfiltered air entering the engine will cause rapid engine wear and severe damage.
Always clean the area surrounding the air filter before removing it to lessen the chance of
contaminating the airbox with foreign objects, water, dirt or other debris.
112
1. Remove the seat.
2. Release the filter retaining clip and remove it.
3. Push away the cog to remove the filter cover.
4. Remove the air filter from the air filter base plate.
(1) Air filter foam
(1)
5. Clean filter element with an air filter specific cleaning solvent. Rinse the element in warm water and allow drying.
6. Reinstall the removed components.
113
OWNER’S MANUAL
7-11. EXHAUST
Spark arrester cleaning
The spark arrester must be purged of carbon build up at the intervals specified in the maintenance schedule of this
Owner’s Manual.
(1) Screw
(2) Spark arrester
1. Move the vehicle to a suitable outdoor location. Place the
vehicle on a level surface, shift the transmission into
NEUTRAL and apply the parking brake. Make sure the
engine and exhaust system are completely cool.
2. Remove the screws of spark arrester, and take out the
spark arrester.
3. Use a non-synthetic brush to clean the arrester screen.
If necessary, blow debris from the screen with
compressed air.
4. Inspect the screen for wear and damage, replace if
necessary.
5. Reinstall the components securely.
114
7-12. SUSPENSION
The front and rear suspension systems are pre-set at the factory with settings developed for an average rider
(weight & skill). Choosing individual settings will depend on your skill level, weight, and riding style (preferences).
The adjustability of the suspension system varies with the type of shock install.
WARNING !
POTENTIAL HAZARD
Unevenly adjusted front shocks
WHAT CAN HAPPEN
Uneven adjustment will result in pool handing and/or loss of vehicle stability. You can lose control of
the quad and suffer severe injury or death in a resulting accident.
HOW TO AVOID THE HAZARD
Contact DINLI’s dealer or the other professional maintenance station to make adjustment when
required.
CAUTION
Do not turn the adjusters beyond the fully closed position (fully seated). Using too much force when
closing the adjusters will destroy important sealing surfaces.
115
OWNER’S MANUAL
7-13. WHEELS
WARNING !
POTENTIAL HAZARD
(1) Damaged cotter pins (or re-using cotter pins)
(2) Riding on damaged wheel rims
WHAT CAN HAPPEN
(1) A damaged cotter pin can become dislodged allowing the hub nut and wheel to come off
suddenly causing you to lose control.
(2) Damaged rims will allow air pressure to escape resulting in improper tire pressure.
In either case above, you could be seriously injured or killed in the resulting accident.
HOW TO AVOID THE HAZARD
(1) Inspect the condition of the cotter pins regularly and replace if damage is detected.
Never re-use a cotter pin.
(2) Inspect the condition of the wheel rims before every ride if you observe bending, deep scratches,
gouging, or other damage, have the rims replaced with new ones.
116
7-13-1. WHEEL INSPECTION
1. Check the wheel rims for damage.
2. To check the condition of the front wheel bearings, raise the front of the vehicle so that no weight is on the front
wheels.
3. Move the top of the wheel back and front. If excessive lateral freeplay is detected, don't ride the vehicle.
Excessive freeplay could be caused by worn or damaged A-arm bushings, damaged or worn wheel bearings,
incorrectly adjusted or loose tie rod ends, or other damage in the steering assembly. Contact an authorized
DINLI dealer and have the conditions corrected.
Lateral Freeplay Inspection
117
OWNER’S MANUAL
4. Make sure the wheel axle nut cotter pins on each wheel are in good condition before every ride. Make sure the pin
is not broken or damaged. It should have both tabs (or legs) and they should be bent properly.
(1) Cotter pin
118
7-14. TIRES
The air pressure within the tires affects the quad's handing and stability. Check the air pressure and maintain the
recommended tire pressure in each tire before every ride.
Ordinary automotive tire pressure gauges are not capable of accurately reading the pressure in your quad tires.
WARNING !
POTENTIAL HAZARD
(1) Uneven or improper tire pressure
(2) Improper tires
WHAT CAN HAPPEN
The characteristics influence the handing and stability of this quad. Use of tire types/sizes other than
specified (front/rear) in this Owner’s Manual or improper tire pressures can adversely affect the
handing and stability (operation) of this quad increasing your risk of an accident.
HOW TO AVOID THE HAZARD
Maintain proper pressures in each of the tire.
Set pressures when tires are cold.
Maintain equal pressure in both front tires and equal pressure in both rear tires.
Always use the type and size tires specified in the Owner’s Manual for this vehicle.
119
OWNER’S MANUAL
The tire listed below has been homologation approved for this vehicle; other tires combinations are not
recommended.
Homologation
Front: 150 kg (330 lb)
Max load
Type
Rear: 224 kg (495 lb)
Front tires
22 x 8.00 – 10
42L ☆☆☆ Tubeless
Rear tires
22 x 12.00 – 9
56L ☆☆☆ Tubeless
7-14-1. TIRE INSPECTION
Check tire pressure frequently with the air gauge pressure, tires should be inflated to the recommended pressure.
2
Recommended : FRONT : 50kpa, { 0.50kgf/cm , }, 7.0 psi
2
Rear :
50kpa, { 0.50kgf/cm , }, 7.0 psi
120
7-14-2. WEAR LIMIT
1. The pressure should be checked when the tires are cold before running the vehicle.
2. Tire pressure must be equal on both sides.
3. Never set tire pressure below minimum.
4. Higher pressure may cause the tire to burst. Inflate tires very slowly and carefully. Fast inflation could cause the
tire to burst.
5. Inspect the tire tread wear, when decreased to 3 mm, replace the tire.
Tire wear condition
121
OWNER’S MANUAL
7-15. VEHICLE IMMERSION
If your quad has been submerged or overturned in water deeper than the footpeg level, it’s critical to dry it promptly
and properly before starting the engine.
CAUTION
Do not start the engine after a quad has been in water that exceeds the recommended depth. Tow or
trailer the quad to your dealer for service.
Do not perform the following procedures if you do not feel capable completely, or if you suspect that water has
entered the fuel tank. Tow or trail the quad to your dealer for immediately service
1. Turn the fuel valve off.
2. Drain water from the air box and change the air filter.
3. Drain the fuel/water from the carburetor for about 10 seconds.
4. Remove the spark plug.
122
8. CLEANING
Regular cleaning helps to maintain appearance and contributes to overall performance if the quad keeping it free of
damaging dirt, soils, and grime.
● When cleaning, avoid harsh detergents and chemical solvents.
● Use an ordinary garden hose and only enough water pressure to do the job.
● Use mild solutions of ordinary dish soaps and clean water.
● The advertising claims of “power” cleaning products are no substitute for careful and deliberate attention when
cleaning the quad.
CAUTION
Don’t use high-pressure (e.g., coin-operated car washes) or portable steam power washers to clean the
quad. The excessive water pressure will force dirt, water, and other contaminants into important
electrical connectors and devices, bearings, engine seals, wheel bearings, seals promoting rust and
corrosion. Severe damage can result.
123
OWNER’S MANUAL
Before you start cleaning the quad take the following precautions:
● Make sure the vehicle is completely cool before cleaning it.
● Thoroughly dry the vehicle after washing it.
● Cover the rear muffler opening, brake lever and pedals, start and stop switch, throttle with plastic bags
secure with strong rubber bands.
● Make sure all filter and check caps are tightened securely.
After wishing
● Remove all plastics bags.
● Lubricate the front brake lever and rear brake pedal with clean engine oil.
● Lubricate the tie-rod ends using the grease fittings. Use high quality lithium soap-based grease.
● Test the brakes before operation. Wet brake discs and pads reduce braking efficiency.
● Start the engine and allow to run for 5 minutes.
124
9. STORAGE
When the vehicle will not be operated for an extended period of time (e.g., winter months,
45 days or more), it is necessary to perform certain procedures to guard against deterioration and make sure it is in
perfect running condition when the riding season begins.
1. Change the engine oil and clean the filters.
2. Perform all necessary repairs.
3. Either drain the fuel tank completely or fill it with fresh fuel. Add a good quality fuel stabilizer directly to the tank.
Make sure you follow the directions on the product label.
4. Remove the air filter and thoroughly clean the area surrounding the airbox.
5. Start the engine. With the engine idling spray (for 10-20 seconds) a high-quality engine fogging oil into the airbox
base plate directing the spray toward the intake funnel inside the airbox.
6. Shut off the engine and allow to cool.
7. Clean, re-oil and install the air filter.
8. Plug the hole in the muffler with a clean shop towel and cover the towel with a clean plastic bag. Secure the bag
with a rubber band.
9. Thoroughly clean and fry the vehicle.
10 .Remove the battery and store it where it will not be exposed to direct sunlight a clean, dry area.
11. Position the vehicle on a level surface and block the wheels to prevent the wheels from moving.
12. Remove the ignition key.
125
OWNER’S MANUAL
10. TRANSPORTING
It is essential to transport the vehicle in a proper position.
The proper position must be strong and firm to against the quad roll off the truck and trailer.
WARNING !
POTENTIAL HAZARD
Failure to properly secure the ATV.
WHAT CAN HAPPEN
Failure to properly secure the vehicle may cause an accident or damage to the vehicle.
HOW TO AVOID THE HAZARD
When transporting the vehicles, lock the parking brake lever and tie down the vehicle securely with
straps, rope, or some other suitable means. Use extra tie downs when you transport the vehicle in the
standing position.
If you transport the vehicle by truck, you can use one of following loading methods
● Tie ropes around the front and rear carriers at four points and lift the vehicle on to the truck using a hoist, or
● Ride the ATV onto a pallet, secure the vehicle to the pallet and use a forklift to lift the pallet, or
● Using a ramp and winch mounted on the truck; hook the winch cable to the center of ATV front bumper and pull the
vehicle up the ramp onto the truck.
126
11. TROUBLESHOOTING
NOTE:
The troubleshooting items listed here are provided as a rough guide to assist in some of the more
common difficulties. For more complete systems troubleshooting, consult the vehicle service manual.
PROBLEM
POSSIBLE CAUSE
SOLUTION
Fuel deterioration, water in fuel or
Drain fuel and replace with fresh fuel
No fuel in tank.
Turn fuel valve to reserve, refuel
Fouled or defective spark plug
Inspect plug, replace if necessary
Engine turns over but will not start or is Low compression
hard to start.
Piston ring is worn or stuck cylinder is
worn.
See you Dinli dealer.
Low battery voltage.
The terminals are loose or corroded.
Charge and/or clean the battery.
No spark to spark plug
Inspect plug, verify switch is on.
Overuse of chock
Inspect, clean and / or replace spark plug.
Battery voltage is low or the terminals are
Charge the battery or secure the terminals.
loose.
Engine will not turn over.
Fuse blown.
Replace the blown fuse.
Ignition is in the “OFF” position
Turn the ignition to the “ON” position
127
OWNER’S MANUAL
Engine stop and start switches are faulty
Check
Solenoid faulty.
Replace.
Air filter clogged
Clean or replace
Corroded battery terminal
Clean
Fouled spark plug.
Replace.
Faulty solenoid.
Test or replace
Fuel return line blocked
Inspect.
Incorrect calibration file
Replace
Corroded batter terminals
Clean
Engine starts hard when hot
Spark plug fouls repeatedly
Throttle body air boots are loose or
Tighten.
damaged.
Engine lacks power
Overheating
128
Faulty or incorrectly gapped spark plug.
Replace
Faulty ignition coil.
Replace.
Fuel filter clogged.
Clean or replace
Deteriorated or contaminated fuel.
Replace.
Faulty fuel pump.
Repair or replace
Debris lodged in screen
Remove and clean screen
Low coolant level
Add coolant
Coolant leak in engine
Tighten
Engine stalls.
Engine pings or knocks
Engine backfires
Coolant bottle cap loose
Tighten.
Fuel deterioration.
Drain, fill with fresh fuel.
Worn or defective spark plug wire.
See your Dinli dealer
Fouled or defective spark plug
Replace spark plug
Fuel hose clogged.
Clean or replace
Air filter clogged
Clean or replace
Loose ignition connections
Check all connections and tighten
Other mechanical failure.
See your Dinli dealer.
Poor quality or low octane fuel
Replace with recommended fuel
Incorrect ignition timing
See your Dinli dealer
Incorrect spark plug gap or heat range.
Set gap to specs or replace plug
Weak, fouled or defective spark plug.
Inspect, clean if necessary replace.
Incorrect spark plug gap or heat range.
Set gap to specs or replace plug
Incorrect installed plug wire.
See your Dinli dealer
129
OWNER’S MANUAL
12. MODEL SPECIFICATION
NOTE:
Specifications subject to change without notice
12-1 ENGINE
Model
DMX 450
Engine
4-stroke, DOHC
Bore and stroke
94 mm x 64.6mm
Compression ratio
11.6 : 1
Displacement
448 cc
Coolant system
Starting system
Liquid cooled
1:1 water/ anti-freeze [ethylene glycol(containing
inhibitors for aluminum engines and radiators)]
Electric
Carburetor
Mikuni BSR42
Transmission
5-speed with reverse
Final drive
2WD/chain
Clutch type
Wet, multi-disc
Clutch plates
8 plates
Coolant
130
corrosion
Engine idle speed
1600 ± 100 rpm
Spark plug, standard
NGK (DCPR8E)
Spark plug gap
0.8 – 0.9 mm
Lubrication system
Dry sump
Ignition system
CDI
Compression pressure
130 psi
Fuel filter replacement
FRAM G4 164 or equivalent
CAUTION
Be sure to change the engine oil and clean/replace the filters in
accordance with the vehicle maintenance schedule. Service more
frequently when operating under severe conditions.
Engine oil
Recommended viscosity: 15W/40
Synthetic or semi-synthetic
Classification: use only high-detergent
Premium quality motor oils with the
American Petroleum Institute (API)
service classification SF or SG type
displayed on the container.
Engine oil quantity (dry fill)
1800 cc
Fuel
Premium unleaded (Anti-Knock Index 95 or higher)
131
OWNER’S MANUAL
12-2 CHASSIS
132
Model
DMX 450
Frame
Steel
Overall length
1942 mm
Overall width
1129 mm
Overall height
1175.5 mm
Seat height
870 mm
Wheel base
1260 mm
Front tire
22x8-10
Rear tire
Recommended cold tire pressure
(front/rear)
Turning radius
22x12-9
Fuse
20A, 25A
Loading limit
220 kg
Headlight
Philips Duple 12V 35/35W
Taillight
P21 (5W)
Battery
GS, GTX14-BS
Ground clearance, unloaded
310 mm
50kpa / 50kpa
8 ft (2.4 m)
Water crossing maximum depth
520 mm
Front suspension travel
11”
Rear suspension travel
10”
Dry weight (appx KGs)
220
Fuel tank capacity
11.5L
Throttle lever freeplay
1/8 – 5/16 in (3-8 mm)
Air filter
Foam
Brake fluid
DOT4
Brake pad thickness (MIN)
1.0 mm
Brake disc thickness (MIN)
3.5 mm
Clutch lever freeplay
2-4 mm
Drive chain type
DID 520V (O-ring type)
Drive chain slack
1.37 – 1.60 in (35 – 40mm)
Drive chain roller O.D. (STD / MIN)
34.5 mm / 30 mm
133
OWNER’S MANUAL
12-3 BATTERY
Warning notes and safety regulations for lead-acid battery.
● Read instructions carefully.
● Do not use at the places near fire. Hydrogen gas generated from battery may Cause fire and explosion.
● When using the battery, wear safety glasses and rubber gloves. Sulfuric acid may cause blindness or severe burn.
● Keep put of the reach of children.
● Battery solution or electrolyte is a diluted sulfuric acid solution. In case of contact with skin, rinse immediately with
lots of water.
● Batteries generate flammable gases which, if exposed to flames, can cause an explosion.
● Hand in old batteries at a collection point. Never dispose of old batteries as domestic waste.
134
Battery instruction
135
OWNER’S MANUAL
DANGER
EXPLOSIVE GASES keep sparks, flames and cigarettes away. Provide adequate ventilation when
charging or using batteries in an enclosed space.
CHEMICAL HAZARD contains sulfuric acid. Contact with skin even through clothing. May cause
severe burns. Wear a face shield and protective clothing. If electrolyte gets into your eyes, antidote:
flush thoroughly with water for at least 15 minutes and call a physician immediately.
POISON Antidote: EXTERNAL-flush with water. INTERNAL-drink large quantities of water or milk then follow with
milk of magnesia or vegetable oil.
KEEP PUT OF REACH OF CHILDREN.
CAUTION
This battery is a sealed battery requiring no maintenance of fluid level. Do not try to remove the sealing
caps to fill the battery or when charging it; you may damage the battery. To check the state of charge,
use a digital voltmeter: standard voltage should be more than 12.8 V. Please wait for over 20 minutes
after electrolyte is filled up. If the voltage is less than 12.8 V before using, please charge the battery
complying with the instruction.
136
13. QUAD LIMITED WARRANTY
13-1 WARRANTY CONDITIONS
Dinli warrants new Dinli quads that are purchased from and properly assembled, serviced for delivery, and warranty
registered by an authorized Dinli Dealer, to be free from defects in materials and factory workmanship subject to the
following exclusions, obligations, and limitations.
13-2 WARRANTY PERIOD
The warranty period for Dinli begins on the date of purchase and six (6) months from the date of purchase.
13-3 WARRANTY TRANSFER
This warranty applies to the original purchaser and is not transferable
13-4 WARRANTY EXCLUSION
Dinli quad used for commercial, rental, or law enforcement purposes are excluded from warranty coverage.
13-5 COMPETITION MODEL EXCLUSION
Dinli quad used in competition or demonstration are excluded from warranty coverage.
137
OWNER’S MANUAL
13-6 PARTS AND LABOR COVERED BY WARRANTY
The warranty coverage applies only to the main frame welded assembly, the swing arm welded assembly, engine
crankcase, internal engine parts housed within the engine crankcase, cylinder head, and wiring harness, voltage
regulator, starter motor, and battery.
No other components are covered by any warranty, expressed or implied and are sold” as is”. Covered parts and the
labor to repair or replace the covered parts will be provided at no charge to the original purchaser only when
performed by an authorized DINLI dealer. Covered parts used in warranty repairs will be warranted for the balance
of the warranty period. Covered parts replaced under warranty become the property of DINLI
13-7 PARTS AND LABOR NOT COVERED BY WARRANTY
Warranty coverage does not apply to:
● Parts and labor required as a result of, but not limited to, transportation, collisions, misuse, negligence, improper
or abusive operation, alterations, competition, or any other damage that is not a result of a defect in factory
workmanship or materials.
● Parts and labor required due to insufficient or improperly performed maintenance or repairs, improper storage, use
of improper fuels or lubricants, or use of other than DINLI replacement parts or accessories.
● Parts and labor required as a result of normal wear, such as, but not limited to, hoses and rubber components,
clutch components, piston, rings, cylinder liner, valve guides, valve seats, valves, transmission gear engagement
surfaces, seals, and bearings.
● Parts and labor required as a result of piston or cylinder seizures.
● Parts and labor required to perform routine maintenance or scheduled service.
138
PURCHASER'S RESPONSIBILITY
● Maintain and operate the DINLI quad in accordance with the instructions and maintenance schedule printed in the
Owner's Manual.
● Keep records and receipts of the date of purchase of the DINLI quad and all scheduled maintenance performed at
the intervals specified in the Owner's Manual. This will be necessary when requesting warranty repairs to prove
that the DINLI quad is within the warranty period and that required scheduled maintenance was performed.
● Return the DINLI quad to an authorized DINLI dealer within five (5) days after discovery of a suspected warranty
defect.
● If unable to obtain satisfactory warranty service from an authorized DINLI dealer, please contact DINLI Customer
Service at
DIN LI METAL INDUSTRIAL CO., LTD.
NO.51, Industrial 9th Rd., Tali City, Taichung 412 Taiwan, R.O.C.
Tel:886 (04) 2491-7666 Fax:886 (04) 2491-7166
E-mail: [email protected]
DINLI will be glad to locate or assist to perform satisfactory warranty service. When contacting DINLI Customer
Service please provide the following information:[Date purchased, model, vehicle identification number, engine
identification number, number of hours or miles, description of problem, date problem occurred, dealer name, dealer
personnel consulted, and purchase's name, address, and phone number.
139
OWNER’S MANUAL
13-8 WARRANTY LIMITATION
Dinli makes no other presentations or warranties, expressed or implied, with respect to service to owners or
users or to any other person or entity. No one is authorized to assume for Dinli any warranty obligation or
liability in connection with the sale of Dinli quads. Dinli owns the right to change any warranty and service
policy at any time without liability to any person or entity by reason of any such change.
Unless considered unenforceable under applicable law, all implied warranties, including, but not limited to,
implied warranties of merchantability or fitness for a particular purpose, are hereby excluded.
Also excluded from this warranty, unless considered unenforceable under applicable law, are incidental or
consequential damages, such as, but not limited to, transportation to a authorized Dinli dealer, loss of use,
inconvenience, or damage to personal property.
140
14. MAINTENANCE RECORD
It is important to keep accurate records of maintenance service. This data is vital for referencing previous work or
knowing what type of tuning was performed under certain conditions.
DATE
SERVICE
REMARKS
141
OWNER’S MANUAL
ADDENDA
This section is reserved for updates, supplements, and revisions.
142