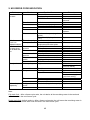
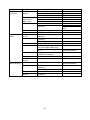
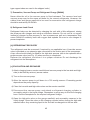
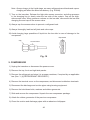
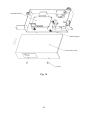
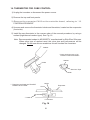
1
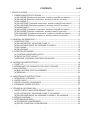
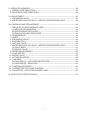
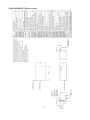
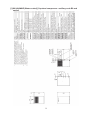
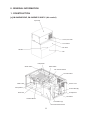
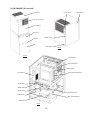
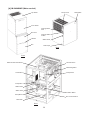
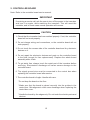
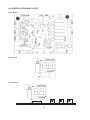
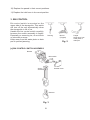
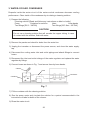
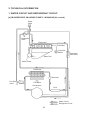
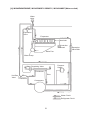
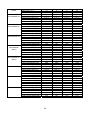
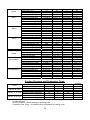
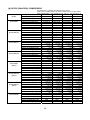
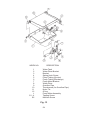
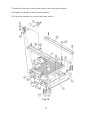
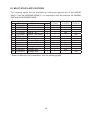
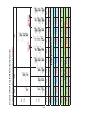
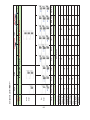
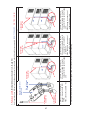
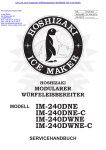
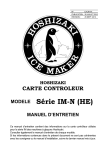
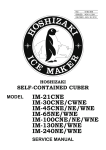
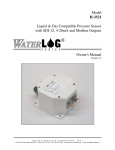
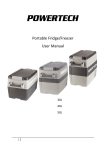
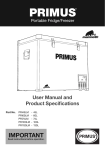
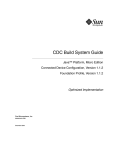
NO.
E1CK-810
ISSUED: JUN. 28, 2010
REVISED: AUG. 18, 2012
HOSHIZAKI
MODULAR CUBER
MODEL IM-240DNE(-C)
IM-240DWNE(-C)
IM-240XNE(-C)
IM-240XWNE(-C)
IM-240ANE
IM-240AWNE
SERVICE MANUAL
CONTENTS
PAGE
I. SPECIFICATIONS--------------------------------------------------------------------------------------1
1. DIMENSIONS/SPECIFICATIONS---------------------------------------------------------------1
[a] IM-240DNE [Copeland compressor: auxiliary code B0 and earlier]----------------1
[b] IM-240DNE [Danfoss compressor: auxiliary code B1 and later]--------------------2
[c] IM-240DNE-C------------------------------------------------------------------------------------3
[d] IM-240DWNE [Copeland compressor: auxiliary code B0 and earlier]-------------4
[e] IM-240DWNE [Danfoss compressor: auxiliary code B1 and later]-----------------5
[f] IM-240DWNE-C----------------------------------------------------------------------------------6
[g] IM-240ANE [Copeland compressor: auxiliary code B0 and earlier]----------------7
[h] IM-240ANE [Danfoss compressor: auxiliary code B1 and later]--------------------8
[i] IM-240AWNE [Copeland compressor: auxiliary code B0 and earlier]--------------9
[i] IM-240AWNE [Danfoss compressor: auxiliary code B1 and later]----------------- 10
II. GENERAL INFORMATION------------------------------------------------------------------------ 11
1. CONSTRUCTION--------------------------------------------------------------------------------- 11
[a] IM-240DNE/XNE, IM-240DNE-C/XNE-C------------------------------------------------ 11
[b] IM-240DWNE/XWNE, IM-240DWNE-C/XWNE-C------------------------------------ 12
[c] IM-240ANE-------------------------------------------------------------------------------------- 13
[d] IM-240AWNE----------------------------------------------------------------------------------- 14
2. CONTROLLER BOARD------------------------------------------------------------------------- 15
[a] CONTROLLER BOARD LAYOUT-------------------------------------------------------- 16
[b] INPUT/OUTPUT LAYOUT------------------------------------------------------------------ 17
[c] BEFORE CHECKING CONTROLLER BOARD--------------------------------------- 18
III. OPERATING INSTRUCTIONS------------------------------------------------------------------- 19
1. START UP------------------------------------------------------------------------------------------- 19
2. PREPARING THE ICEMAKER FOR LONG STORAGE--------------------------------- 20
3. BIN CONTROL------------------------------------------------------------------------------------- 21
[a] BIN CONTROL SWITCH ASSEMBLY--------------------------------------------------- 21
[b] REMOVAL--------------------------------------------------------------------------------------- 22
IV. MAINTENANCE INSTRUCTIONS-------------------------------------------------------------- 23
1. PERIODICAL CLEANING----------------------------------------------------------------------- 23
2. WATER VALVE------------------------------------------------------------------------------------- 25
3. WATER-COOLED CONDENSER------------------------------------------------------------- 26
4. ICEMAKING WATER SYSTEM---------------------------------------------------------------- 27
V. TECHNICAL INFORMATION---------------------------------------------------------------------- 30
1. WATER CIRCUIT AND REFRIGERANT CIRCUIT---------------------------------------- 30
[a] IM-240DNE/XNE, IM-240DNE-C/XNE-C, IM-240ANE------------------------------ 30
[b] IM-240DWNE/XWNE, IM-240DWNE-C/XWNE-C, IM-240AWNE---------------- 31
2. WIRING DIAGRAM------------------------------------------------------------------------------- 32
3. PERFORMANCE DATA-------------------------------------------------------------------------- 33
[a] COPELAND COMPRESSOR-------------------------------------------------------------- 33
[b] SECOP (DANFOSS) COMPRESSOR--------------------------------------------------- 36
i
VI. SERVICE DIAGNOSIS---------------------------------------------------------------------------- 39
1. ERROR CODE INDICATION------------------------------------------------------------------- 39
2. NO ERROR CODE INDICATION-------------------------------------------------------------- 40
VII. ADJUSTMENT-------------------------------------------------------------------------------------- 42
1. EXPANSION VALVE------------------------------------------------------------------------------ 42
2. WATER REGULATING VALVE - WATER-COOLED MODEL ONLY------------------ 43
VIII. REMOVAL AND REPLACEMENT------------------------------------------------------------- 44
1. SERVICE FOR REFRIGERANT LINES----------------------------------------------------- 44
[a] SERVICE INFORMATION------------------------------------------------------------------ 44
[b] REFRIGERANT RECOVERY-------------------------------------------------------------- 45
[c] EVACUATION AND RECHARGE--------------------------------------------------------- 45
2. COMPRESSOR------------------------------------------------------------------------------------ 46
3. DRIER------------------------------------------------------------------------------------------------ 47
4. EXPANSION VALVE------------------------------------------------------------------------------ 48
5. EVAPORATOR------------------------------------------------------------------------------------- 49
6. HOT GAS VALVE---------------------------------------------------------------------------------- 50
7. WATER REGULATING VALVE - WATER-COOLED MODEL ONLY------------------ 51
[a] VALVE BODY---------------------------------------------------------------------------------- 51
[b] WHOLE VALVE-------------------------------------------------------------------------------- 51
8. WATER PAN ASSEMBLY----------------------------------------------------------------------- 53
9. PUMP MOTOR------------------------------------------------------------------------------------- 55
10. WATER VALVE------------------------------------------------------------------------------------ 55
11. ACTUATOR MOTOR----------------------------------------------------------------------------- 56
12. CAM ARM------------------------------------------------------------------------------------------- 56
[a] CAM ARM (A) - ACTUATOR MOTOR SIDE-------------------------------------------- 56
[b] CAM ARM (B) - REAR SIDE--------------------------------------------------------------- 56
13. CONTROLLER BOARD------------------------------------------------------------------------- 59
14. THERMISTOR FOR CUBE CONTROL------------------------------------------------------ 61
15. FAN MOTOR - AIR-COOLED MODEL ONLY---------------------------------------------- 62
IX. MULTI-STACK APPLICATIONS----------------------------------------------------------------- 63
ii
I. SPECIFICATIONS
1. DIMENSIONS/SPECIFICATIONS
[a] IM-240DNE (Air-cooled) [Copeland compressor: auxiliary code B0 and earlier]
1
[b] IM-240DNE (Air-cooled) [Danfoss compressor: auxiliary code B1 and later]
2
[c] IM-240DNE-C (Air-cooled)
3
[d] IM-240DWNE (Water-cooled) [Copeland compressor: auxiliary code B0 and
earlier]
4
[e] IM-240DWNE (Water-cooled) [Danfoss compressor: auxiliary code B1 and later]
5
[f] IM-240DWNE-C (Water-cooled)
6
[g] IM-240ANE (Air-cooled) [Copeland compressor: auxiliary code B0 and earlier]
7
[h] IM-240ANE (Air-cooled) [Danfoss compressor: auxiliary code B1 and later]
8
[i] IM-240AWNE (Water-cooled) [Copeland compressor: auxiliary code B0 and
earlier]
9
[j] IM-240AWNE (Water-cooled) [Danfoss compressor: auxiliary code B1 and later]
10
II. GENERAL INFORMATION
1. CONSTRUCTION
[a] IM-240DNE/XNE, IM-240DNE-C/XNE-C (Air-cooled)
Top Panel
Louver, Air Filter
Front Panel
Bin Door
Handle
Bin
Evaporator
Water Plate
Water Valve
Bin Control Switch
Hot Gas Valve
Water Tank
Power Cord
Pump Motor
Control Box (B)
Compressor
Drain Pan
Fan Motor
Actuator Motor
Control Box (A)
Air-Cooled Condenser
11
[b] IM-240DWNE/XWNE, IM-240DWNE-C/XWNE-C (Water-cooled)
Top Panel
Front Panel
Bin Door
Handle
Bin
Evaporator
Water Valve
Water Plate
Bin Control Switch
Hot Gas Valve
Water Tank
Power Cord
Pump Motor
Water Regulator
Compressor
Drain Pan
Actuator Motor
Control Box (A)
Water-Cooled Condensor
Control Box (B)
12
[c] IM-240ANE (Air-cooled)
Top Panel
Power Cord
Nameplate
Louver, Air Filter
Front Panel
Bin Door
Handle
Water Valve
Bin
Drain Pipe
Rear
Front
Compressor
Hot Gas Valve
Fan Motor
Control Box
Air-Cooled Condenser
Evaporator
Water Plate
Water Tank
Actuator Motor
Pump Motor
Bin Control Switch
Drain Pan
Front
13
[d] IM-240AWNE (Water-cooled)
Top Panel
Power Cord
Nameplate
Front Panel
Cooling Water
Inlet
Bin Door
Handle
Bin
Cooling Water
Outlet
Water Valve
Drain Pipe
Rear
Front
Water-Cooled Condenser
Hot Gas Valve
Water Regulator
Control Box
Compressor
Evaporator
Water Plate
Water Tank
Actuator Motor
Pump Motor
Bin Control Switch
Drain Pan
Front
14
2. CONTROLLER BOARD
Note: Refer to the controller board service manual.
IMPORTANT
If receiving a service call, ask the user to turn off the power to the icemaker
and turn it on again, while watching the icemaker. This will reset the
controller, and in some cases normal operation will resume.
CAUTION
1. Check that the icemaker has been earthed properly. If not, the controller
board will not work properly.
2. Do not change wiring and connections, or the controller board will not
work properly.
3. Do not touch the reverse side of the controller board and tiny electronic
devices on it.
4. Do not repair the electronic devices and parts on the controller board
in the field (except for fuse replacement). Replace the whole board
assembly when it fails.
5. To get static free, always touch the metal part of the icemaker before
servicing. Electrostatic discharge will cause severe damage to the
controller board.
6. The signal ground wire must be connected to the control box when
replacing the controller board after service.
7. The controller board is fragile. Handle with care.
* Do not drop the board on the floor.
* Make sure that the board is placed correctly into the guides in the
control box. Mis-alignment could cause breakage when replacing the
control box cover.
* Handle the board by the edges only. Do not touch the electric parts and
devices.
15
[a] CONTROLLER BOARD LAYOUT
Main Board
Sub Board
Combination
16
[b] INPUT/OUTPUT LAYOUT
Hall IC Input XA Connector (4P)
Bin Control Switch / Pressure Switch /
Condenser Thermistor Input XA Connector (6P)
Cube Control Thermistor Input XA Connector (2P)
7-Segment DoubleDigit Display
Data Input/Output PA Connector (8P)
Reset Button
10.5V AC Input VH Connector (2P)
Close Button
Open Button
AC Low Voltage,
DC Circuit
AC High
Voltage Circuit
Actuator Drive Output VH Connector (3P)
Pump Motor / Hot Gas Valve / Fan Motor / Water Valve /
Compressor AC Relay Drive Output VH Connector (9P)
220-240V AC Input
VYH Connector (3P)
Fuse
P01992-01
6.3A
17
[c] BEFORE CHECKING CONTROLLER BOARD
Check the power source voltage and the components as shown in the table below.
Component
1. Thermistor
(on evaporator)
Holder
Screw
Evaporator
Thermistor
2. Bin Control Switch
Procedure
Normal
CAUTION
Thermistor sensor part is fragile,
glass sealed. Handle with care.
5 -7 kilohms
*Disconnect the connector CN13 on
the board.
*R e m o v e t h e s c r e w a n d t h e
thermistor holder on the evaporator.
*Immerse the sensor part in a glass
containing ice and water for 5
minutes.
*Check the resistance between CN13
connector pins.
*Replace the thermistor in its correct
position.
*Connect CN13.
Manually set the micro switch in the
TRIP and RESET positions, and
check the period.
18
Approx.
TRIP(Closed) 10 sec.
RESET(Open) 80 sec.
III. OPERATING INSTRUCTIONS
WARNING
1.This icemaker is designed to produce and store edible ice. To keep the
icemaker hygienic:
*Wash your hands before removing ice. Use the plastic scoop provided
(accessory).
*The storage bin is for ice use only. Do not store anything else in the
bin.
*C l e a n th e s to r a g e b i n b e fo r e u s e ( s e e “ IV. 1 . PE R IOD IC A L
CLEANING”).
*Keep the scoop clean. Clean it by using a neutral cleaner and rinse
thoroughly.
*Close the door after removing ice to prevent entrance of dirt, dust or
insects into the storage bin.
2.The use of any electrical equipment involves the observance of some
fundamental rules. In particular:
*Instances of high humidity and moisture increase the risk of electrical
short circuits and potential electrical shocks. If in doubt, disconnect the
icemaker.
*Do not pull the power cord in order to disconnect the icemaker from the
feed network.
*This appliance is not suitable for unsupervised use by young children
or aged or infirm persons.
3.All parts are factory-adjusted. Improper adjustments may result in failure.
4.If the unit is turned off, wait for at least 3 minutes before restarting the
icemaker to prevent damage to the compressor.
5.Do not put your hands into the back of the storage bin or the ice chute
on top of the storage bin. Ice may drop off the icemaker, a hard block
of ice may suddenly break down, or the icemaking mechanism may
suddenly move, resulting in injury.
1. START UP
1) Disconnect the power supply.
2) Open the water tap.
3) Connect the power supply and energise.
19
4) The following should occur in sequence:
a) Hot gas valve will open.
b) Compressor will start.
c) Water pan will fully open.
d) Water valve will open.
e) Water pan will start to close (hot gas valve closed).
f) Water pan fully closed - pump motor will start.
g) Water valve will close.
2. PREPARING THE ICEMAKER FOR LONG STORAGE
WARNING
Drain the icemaker to prevent damage to the water supply line at
subfreezing temperatures, using air or carbon dioxide. Shut off the
icemaker until proper air temperature is resumed.
1)Close the water supply tap, and remove the
inlet hose.
[Normal Position]
2)Remove the front panel.
3)Remove the screw located on the front of the
water tank.
4)Move the tank drain pipe to the drain position.
See Fig. 1.
5)Push the reset switch. The water pan will
start to open.
Screw
Tank Drain
Pipe
[Drain Position]
6)Blow out the water supply line immediately
after the water pan has opened.
Note: This procedure is necessary to protect
the icemaker from freezing up at
subfreezing temperature.
7) Unplug the icemaker or disconnect the power
source when the water pan has fully opened.
Fig. 1
8) Move the tank drain pipe to the normal position, and secure it with the screw.
9) Remove all ice from the storage bin, and clean the bin.
20
10) Replace the panels in their correct positions.
11) Replace the inlet hose in its correct position.
3. BIN CONTROL
Bin control switch is mounted on the
upper side of the storage bin. This switch
will turn off the unit automatically when
the storage bin is full of ice.
Handle the bin control switch carefully,
because the switch assembly is fragile.
Running
Bin full
Especially on removing
ice, do not touch
(Tripped)
or poke with a scoop.
Keep away from the water plate or drain
Fig. 2
pan to prevent jamming.
[a] BIN CONTROL SWITCH ASSEMBLY
Bracket
Microswitch
Switch
Actuator
Bracket Cover
Detector
Fig. 3
21
Fragile
Keep away from
water plate or
drain pan.
[b] REMOVAL
BRACKET COVER
Push the two pawls and remove the bracket
cover.
SWITCH
Pull out the switch, holding the rubber leads
cap. Handle with care.
SWITCH ACTUATOR
Insert a flat blade screwdriver and wrench it
slightly to pull out the switch actuator. Handle
with care to prevent damage to the cam
surface of the actuator.
DETECTOR
Push out the detector, holding the switch
actuator.
[c] REASSEMBLING
SWITCH ACTUATOR
Insert the lower shaft and push it along the U
notch. Check that the switch actuator moves
free.
SWITCH & BRACKET COVER
Place the switch lever first, and then attach
the switch in position. Insert the guide and
push the bracket cover to lock.
Fig. 4
22
IV. MAINTENANCE INSTRUCTIONS
WARNING
1. Before carrying out any cleaning or maintenance operations, unplug the
icemaker from the electrical supply network.
2. Before handling or using cleaning solutions, check the guidelines on
the product for advice on suitable personal protective clothing, gloves,
goggles, etc.
3. Clean and sanitize the icemaker water system at least twice a year, and
check and clean the condenser at least once a year.
4. This appliance must not be cleaned by use of a water jet.
1. PERIODICAL CLEANING
[1] Machine and Bin Exterior
Wipe the exterior at least once per week with a clean, soft cloth. Use a damp cloth
containing a neutral cleaner to wipe off grease or dirt.
[2] Scoop and Storage Bin Handle Cleaning/Sanitisation (Daily)
1) Either mix 3 litres of water with 11 ml of 5.25% sodium hypochlorite solution in a
suitable container, or the recommended Hoshizaki sanitiser as directed.
2) Soak the scoop in the solution for more than 3 minutes. Rinse thoroughly, and shake
to remove surplus liquid.
Note: Using a cloth to dry may re-contaminate.
3) Use a neutral cleaner to wash the storage bin handle. Rinse thoroughly.
4) Soak a clean cloth with the sanitising solution, and wipe the handle. Use fresh water
and a clean cloth to rinse/dry.
[3] Storage Bin Interior Cleaning/Sanitisation (Weekly)
1) Open the storage bin door, and remove all ice.
Note:Hoshizaki recommends various types of storage bin for the icemaker which
vary in size and design. The following instructions are therefore for general
guidance only.
23
2) Wash the bin liner, ice deflector and door inner surface with a neutral non-abrasive
cleaner. Rinse thoroughly with a clean cloth and fresh water.
3) Either mix 5 litres of water with 18 ml of 5.25% sodium hypochlorite solution in a
suitable container, or the recommended Hoshizaki sanitiser as directed.
4) Soak a clean sponge or cloth with the solution, and wipe the bin liner, ice deflector
and door inner surface.
5) Rinse thoroughly with fresh water and a clean cloth to wipe off the solution. Close the
bin door.
Note: Some solutions may cause damage to the bin liner surfaces or corrosion on the
metal parts. Always rinse the sanitiser unless directed otherwise by Hoshizaki
guidelines.
[4] Air Filter (Air-Cooled Model Only)
Plastic mesh air filters remove dirt or dust from the air, and keep the condenser from
getting clogged. If the filters get clogged, the icemaker’s performance will be reduced.
Remove and clean the air filters at least twice per month:
1)Slide the air filter off the louver.
2)Clean the air filter by using a vacuum cleaner. When severely clogged, use warm
water and a neutral cleaner to wash the air filter.
3)Rinse and dry the air filter thoroughly, and place it in position.
Air Filter
Louver
Fig. 5
24
2. WATER VALVE
1) Unplug the icemaker or disconnect the power source.
2) Close the water supply tap.
3) Remove the top panel and front panel.
4) Disconnect the inlet hose from the water valve.
5) Remove the mesh filter from the water valve.
6) Clean the mesh using a brush.
7) Replace the mesh and inlet hose in their correct positions.
8) Open the shut-off valve.
9) Plug in the icemaker or connect the power source.
10) Check for leaks.
11) Replace the panels in their correct positions.
Coil
Do not remove
Filter
Packing
Fig. 6
25
Inlet Hose
3. WATER-COOLED CONDENSER
Deposits inside the water circuit of the water-cooled condenser decrease cooling
performance. Clean inside of the condenser by circulating a cleaning solution.
1) Prepare the following:
Cleaning solution [Read and follow any instructions on label or bottle.]
Pump
Container for solution
Hose
Hose bands
Two fittings [R1/2 - 3/8”DIA]
Two fittings [3/8” flare - 3/8”DIA]
CAUTION
Do not use a cleaning solution that will corrode the copper tubing. In case
of contact with the solution, flush with water.
2) Remove the panels and check for leaks from the water line.
3) Unplug the icemaker or disconnect the power source, and close the water supply
tap.
4) Disconnect the cooling water inlet and outlet pipings and attach fittings to connect
hoses.
5) Disconnect the inlet and outlet tubings of the water regulator and replace the water
regulator by fittings.
6) Connect hoses as shown in Fig. 7 and secure them by hose bands.
Cleaner
Hose
Condenser
Container
Fig. 7
7) Fill the container with the cleaning solution.
8) Run the pump motor and circulate the solution for a period recommended in the
instructions on label or bottle of the cleaner.
9) Rinse the water circuit.
26
10) Reverse the above procedure in steps 2) through 6).
11) Check the icemaking capacity referring to “V. 3. PERFORMANCE DATA”.
4. ICEMAKING WATER SYSTEM
To keep the icemaker hygienic, clean and sanitize the icemaking water system at
least once every six months. More frequent cleaning and sanitizing may be required
depending on the water quality.
CAUTION
1.Always wear rubber gloves, eye protectors, apron, etc. for safe handling
of the cleaner and sanitizer.
2.Use the cleaners and sanitizers recommended by Hoshizaki. Contact
your local Hoshizaki office for further details. (The instructions below
give an example of those recommended cleaners and sanitizers.)
3.Never mix cleaning and sanitizing solutions in an attempt to shorten
cleaning time.
4.Wipe off any splashed or spilt cleaner/sanitizer immediately.
5.Do not use any ammonia type cleaners on any part of the icemaker.
6.When the ambient and water temperatures are 10°C or below, the water
pan may remain open. Warm the icemaking compartment up to 20°C
around the thermistor.
7.Be sure to follow the cleaning and sanitizing instructions below.
1)Use a suitable container to dilute 236 ml of the cleaner (“Nickel-Safe Ice Machine
Cleaner” by The Rectorseal Corporation) with 11.4 lit. of water.
2)Open the storage bin door, and remove all the ice to avoid contaminating by the
cleaner.
3)Remove the front and top panels.
4)If the icemaker is in a defrost cycle, wait until a freeze cycle starts.
5)Close the water supply tap.
6)Remove the screw, and move the tank drain pipe to the drain position. See Fig. 1.
27
7)Push the reset switch to open the water pan.
8)Unplug the icemaker or disconnect the power source when the water pan has fully
opened.
9)After the water has completely drained out, plug in the icemaker or connect the
power source. When the 7-segment display on the controller board turns on,
press SW1 on the controller board for 3 seconds to start the flush mode. (See the
controller board service manual for further details.)
10)When the flush mode has started, pour the cleaning solution prepared in 1) carefully
into the water tank within 60 seconds before the pump motor starts. Do not splash or
spill the solution onto the other parts.
11)Circulate the cleaning solution for 30 minutes. Push the reset switch to open the
water pan. Unplug the icemaker or disconnect the power source when the water pan
has fully opened. Wait until the cleaning solution has completely drained out.
12)Open the water supply tap, and repeat the above step 9). Since the water supply tap
is open this time, water is supplied as in the normal freeze cycle.
13)When the water pan closes again, pour clean water into the water pan until it floods
from the overflow pipe, and circulate the water for 5 minutes.
14)Push the reset switch to open the water pan and drain the water. This time the water
does not drain out completely.
15)Repeat the above steps 13) and 14) at least three times to rinse thoroughly. To drain
the rinse water completely, unplug the icemaker or disconnect the power source
when the water pan has fully opened.
SANITIZING INSTRUCTIONS
Note: Sanitizing should always be completed after cleaning or alternately as an
individual procedure if conditions exist to make it necessary.
16)Use a suitable container to dilute 44 ml of 5.25% sodium hypochlorite solution with
11.4 lit. of water.
* Alternatively use the Hoshizaki recommended sanitizer as directed by the relevant
instructions.
17)Close the water supply tap. Plug in the icemaker or connect the power source. When
the 7-segment display on the controller board turns on, press SW1 on the controller
board for 3 seconds to start the flush mode.
28
18)When the flush mode has started, pour the cleaning solution prepared in 16)
carefully into the water tank within 60 seconds before the pump motor starts. Do not
splash or spill the solution onto the other parts.
19)Circulate the sanitizing solution for 15 minutes. Push the reset switch to open the
water pan. Unplug the icemaker or disconnect the power source when the water pan
has fully opened. Wait until the sanitizing solution has completely drained out.
20)Open the water supply tap, and repeat the above step 9). Since the water supply tap
is open this time, water is supplied as in the normal freeze cycle.
21)When the water pan closes again, pour clean water into the water pan until it floods
from the overflow pipe, and circulate the water for 5 minutes.
22)Push the reset switch to open the water pan and drain the water. This time the water
does not drain out completely.
23)Repeat the above steps 21) and 22) at least three times to rinse thoroughly. To drain
the rinse water completely, unplug the icemaker or disconnect the power source
when the water pan has fully opened.
24) Move the tank drain pipe to the normal position, and secure it with the screw. See
Fig. 1.
25)Plug in the icemaker or connect the power source. Check for proper icemaking
operation.
26)Replace the front panel and top panel in their correct positions.
27)Complete storage bin cleaning as detailed in IV. 1. [3].
29
V. TECHNICAL INFORMATION
1. WATER CIRCUIT AND REFRIGERANT CIRCUIT
[a] IM-240DNE/XNE, IM-240DNE-C/XNE-C, IM-240ANE (Air-cooled)
Water
Valve
Expansion
Valve
Evaporator
Thermistor
Controller
Board
Water Pan
Expansion
Valve Bulb
Water Pump
Condenser
Thermistor
Hot Gas
Valve
Strainer
Fan Motor
Compressor
Drier
Water Circuit
Refrigerant Circuit
30
[b] IM-240DWNE/XWNE, IM-240DWNE-C/XWNE-C, IM-240AWNE (Water-cooled)
Water
Valve
Expansion
Valve
Evaporator
Thermistor
Controller
Board
Water Pan
Expansion
Valve Bulb
Water Pump
Pressure
Switch
Water Regulating Valve
Condenser
Hot Gas
Valve
Drier
Strainer
Compressor
Water Circuit
Refrigerant Circuit
31
2. WIRING DIAGRAM
32
3. PERFORMANCE DATA
[a] COPELAND COMPRESSOR
(Ice Production = Capacity when shipped from factory)
(*Values for icemaking water only. Use a cooling tower for cooling water.)
Cube Hole Diameter: 5mm (15mm) for -28, -23, -32 3mm (7mm) for -21
Model
IM-240DNE
IM-240XNE
IM-240DNE-23
IM-240XNE-23
IM-240DNE-21
IM-240XNE-21
IM-240DNE-32
IM-240XNE-32
IM-240DNE
IM-240XNE
(60Hz)
IM-240DNE-23
IM-240XNE-23
(60Hz)
IM-240DNE-21
IM-240XNE-21
(60Hz)
IM-240DWNE
IM-240XWNE
Ambient Temp. (°C)
Water Temp. (°C)
Cube Hole Diameter
Ice Production (kg/d)
Freeze Cycle Time (min)
Defrost Cycle Time (min)
Water Consumption (lit/h)
Electric Consumption (W)
Head Pressure [peak] (bar)
Ice Production (kg/d)
Freeze Cycle Time (min)
Defrost Cycle Time (min)
Water Consumption (lit/h)
Electric Consumption (W)
Head Pressure [peak] (bar)
Ice Production (kg/d)
Freeze Cycle Time (min)
Defrost Cycle Time (min)
Water Consumption (lit/h)
Electric Consumption (W)
Head Pressure [peak] (bar)
Ice Production (kg/d)
Freeze Cycle Time (min)
Defrost Cycle Time (min)
Water Consumption (lit/h)
Electric Consumption (W)
Head Pressure [peak] (bar)
Ice Production (kg/d)
Freeze Cycle Time (min)
Defrost Cycle Time (min)
Water Consumption (lit/h)
Electric Consumption (W)
Head Pressure [peak] (bar)
Ice Production (kg/d)
Freeze Cycle Time (min)
Defrost Cycle Time (min)
Water Consumption (lit/h)
Electric Consumption (W)
Head Pressure [peak] (bar)
Ice Production (kg/d)
Freeze Cycle Time (min)
Defrost Cycle Time (min)
Water Consumption (lit/h)
Electric Consumption (W)
Head Pressure [peak] (bar)
Ice Production (kg/d)
Freeze Cycle Time (min)
Defrost Cycle Time (min)
Water Consumption (lit/h)
Electric Consumption (W)
Head Pressure [peak] (bar)
10
10
5mm(15mm)
230(240)
16.0(14.6)
4.0(3.4)
31.3(33.8)
1120
14.0
180(225)
15.0(11.0)
4.0(3.5)
33.0(41.8)
1120
14.0
190(217)
12.3(8.3)
3.6(3.6)
39.5(52.6)
1120
14.0
180(220)
21.9(16.5)
4.5(4.0)
23.8(29.7)
1120
14.0
235(245)
16.1(14.1)
3.5(3.5)
32.0(35.6)
1150
15.0
185(230)
14.8(10.5)
3.7(3.7)
31.7(41.4)
1150
15.0
200(220)
11.4(8.1)
3.7(3.7)
38.9(49.9)
1150
15.0
230(240)
17.8(16.2)
2.2(1.8)
31.3(34.1)
1250
19.5
33
21
15
5mm(15mm)
220(230)
18.2(16.8)
2.7(2.0)
15.7(16.8)
1200
17.0
175(215)
17.1(12.7)
2.5(2.5)
16.7(21.6)
1200
17.0
180(210)
14.5(10.2)
2.3(2.1)
19.5(26.2)
1200
17.0
175(200)
24.0(19.7)
3.2(3.0)
12.1(14.3)
1200
17.0
210(220)
19.4(17.1)
2.5(2.5)
14.9(16.7)
1200
18.0
180(215)
17.0(13.2)
2.0(2.0)
15.1(18.9)
1200
18.0
210(220)
12.4(9.8)
2.0(2.0)
20.0(24.4)
1200
18.0
215(225)
19.2(17.5)
2.2(1.7)
15.3(17.1)
1260
19.7
32
21
5mm(15mm)
200(210)
21.2(19.1)
1.8(1.5)
14.2(15.7)
1330
21.0
165(195)
19.1(15.1)
1.7(1.7)
15.8(19.6)
1330
21.0
165(190)
16.3(11.9)
2.0(1.7)
17.9(23.5)
1330
21.0
155(190)
28.7(21.9)
2.0(2.0)
10.7(13.7)
1330
21.0
200(210)
21.3(18.9)
1.7(1.7)
14.2(15.9)
1260
22.0
170(195)
18.5(15.1)
1.7(1.7)
14.3(17.2)
1260
22.0
180(190)
15.1(11.9)
1.7(1.7)
17.1(21.1)
1260
22.0
205(215)
20.7(18.5)
1.8(1.6)
14.6(16.2)
1300
19.8
38
32
5mm(15mm)
170(185)
25.4(21.9)
1.7(1.5)
12.1(13.9)
1450
25.0
145(160)
22.0(18.8)
1.6(1.6)
13.9(16.1)
1450
25.0
152(167)
18.1(13.8)
1.8(1.7)
16.5(21.0)
1450
25.0
130(140)
34.8(30.7)
1.8(1.7)
9.0(10.1)
1450
25.0
175(190)
24.6(21.0)
1.7(1.7)
12.5(14.4)
1300
26.0
150(165)
21.1(18.1)
1.7(1.7)
12.6(14.5)
1300
26.0
160(175)
17.2(13.1)
1.7(1.7)
15.2(19.4)
1300
26.0
185(200)
23.1(20.0)
1.8(1.6)
13.2(15.0)
1330
20.0
Model
IM-240DWNE-23
IM-240XWNE-23
IM-240DWNE-21
IM-240XWNE-21
IM-240DWNE-32
IM-240DWNE-32
IM-240DWNE
IM-240XWNE
(60Hz)
IM-240DWNE-21
IM-240XWNE-21
(60Hz)
IM-240ANE
IM-240ANE-23
IM-240AWNE
Ambient Temp. (°C)
Water Temp. (°C)
Cube Hole Diameter
Ice Production (kg/d)
Freeze Cycle Time (min)
Defrost Cycle Time (min)
Water Consumption (lit/h)
Electric Consumption (W)
Head Pressure [peak] (bar)
Ice Production (kg/d)
Freeze Cycle Time (min)
Defrost Cycle Time (min)
Water Consumption (lit/h)
Electric Consumption (W)
Head Pressure [peak] (bar)
Ice Production (kg/d)
Freeze Cycle Time (min)
Defrost Cycle Time (min)
Water Consumption (lit/h)
Electric Consumption (W)
Head Pressure [peak] (bar)
Ice Production (kg/d)
Freeze Cycle Time (min)
Defrost Cycle Time (min)
Water Consumption (lit/h)
Electric Consumption (W)
Head Pressure [peak] (bar)
Ice Production (kg/d)
Freeze Cycle Time (min)
Defrost Cycle Time (min)
Water Consumption (lit/h)
Electric Consumption (W)
Head Pressure [peak] (bar)
Ice Production (kg/d)
Freeze Cycle Time (min)
Defrost Cycle Time (min)
Water Consumption (lit/h)
Electric Consumption (W)
Head Pressure [peak] (bar)
Ice Production (kg/d)
Freeze Cycle Time (min)
Defrost Cycle Time (min)
Water Consumption (lit/h)
Electric Consumption (W)
Head Pressure [peak] (bar)
Ice Production (kg/d)
Freeze Cycle Time (min)
Defrost Cycle Time (min)
Water Consumption (lit/h)
Electric Consumption (W)
Head Pressure [peak] (bar)
10
10
5mm(15mm)
185(210)
16.4(13.4)
2.1(2.1)
33.9(40.5)
1250
19.5
203(215)
12.9(10.1)
2.0(2.0)
42.2(52.1)
1250
19.5
180(215)
23.4(18.1)
3.0(3.0)
23.8(29.8)
1250
19.5
215(240)
19.0(16.4)
2.4(1.6)
29.3(33.4)
1085
20.0
205(215)
12.8(10.2)
2.0(1.9)
42.6(52.1)
1085
20.0
220(240)
15.9(14.0)
5.0(4.0)
30.0(33.1)
1145
14.0
185(225)
14.5(11.0)
4.0(3.5)
32.4(39.9)
1145
14.0
230(240)
17.8(16.2)
2.2(1.8)
31.3(34.1)
1250
19.5
34
21
15
5mm(15mm)
175(202)
17.5(14.0)
2.1(2.1)
16.7(20.4)
1260
19.7
193(207)
13.7(10.5)
2.0(2.0)
20..9(26.2)
1260
19.7
170(195)
25.5(20.8)
2.5(2.5)
11.7(14.1)
1260
19.7
205(220)
20.4(18.0)
2.1(1.6)
14.6(16.3)
1095
20.0
195(210)
13.7(10.5)
1.8(1.8)
21.2(26.6)
1095
20.0
205(230)
19.5(16.1)
3.0(2.7)
14.6(17.2)
1230
17.0
175(215)
17.1(12.7)
2.5(2.5)
13.9(17.9)
1230
17.0
215(225)
19.2(17.5)
2.2(1.7)
15.3(16.6)
1250
19.7
32
21
5mm(15mm)
168(185)
18.4(15.9)
2.0(1.7)
16.1(18.3)
1300
19.8
181(195)
14.7(11.5)
2.0(1.8)
19.6(24.3)
1300
19.8
160(180)
27..2(22.7)
2.5(2.5)
11.0(13.0)
1300
19.8
200(210)
21.1(19.0)
1.9(1.6)
14.2(15.7)
1130
20.5
190(200)
14.1(11.3)
1.8(1.7)
20.6(25.3)
1130
20.5
160(190)
26.8(21.0)
2.0(1.7)
11.4(14.2)
1320
21.0
165(195)
18.8(16.8)
2.0(1.8)
13.1(16.0)
1320
21.0
205(215)
20.7(18.5)
1.8(1.6)
14.6(16.2)
1300
19.8
38
32
5mm(15mm)
150(165)
20.8(18.0)
2.0(1.7)
14.4(16.6)
1330
20
170(185)
15.9(12.3)
1.9(1.7)
18.4(23.4)
1330
20
152(165)
28.8(25.0)
2.5(2.5)
10.5(11.9)
1330
20.0
180(195)
23.8(20.5)
1.8(1.7)
12.8(14.7)
1150
21.0
180(195)
15.0(11.6)
1.8(1.7)
19.5(24.7)
1150
21.0
150(165)
28.7(24.5)
2.0(1.7)
10.7(12.4)
1430
25.0
155(170)
20.2(17.4)
1.9(1.8)
12.3(14.1)
1430
25.0
185(200)
23.1(20.0)
1.8(1.6)
13.2(15.0)
1300
20.0
Model
IM-240AWNE
(60Hz)
IM-240AWNE-23
(60Hz)
IM-240AWNE-21
(60Hz)
Model
IM-240DNE-C
IM-240XNE-C
IM-240DWNE-C
IM-240XWNE-C
Ambient Temp. (°C)
Water Temp. (°C)
Head Pressure [peak] (bar)
Cube Hole Diameter
Ice Production (kg/d)
Freeze Cycle Time (min)
Defrost Cycle Time (min)
Water Consumption (lit/h)
Electric Consumption (W)
Head Pressure [peak] (bar)
Ice Production (kg/d)
Freeze Cycle Time (min)
Defrost Cycle Time (min)
Water Consumption (lit/h)
Electric Consumption (W)
Head Pressure [peak] (bar)
Ice Production (kg/d)
Freeze Cycle Time (min)
Defrost Cycle Time (min)
Water Consumption (lit/h)
Electric Consumption (W)
Head Pressure [peak] (bar)
Head Pressure [peak] (bar)
10
10
19.5
5mm(15mm)
215(240)
19.0(16.0)
2.4(2.0)
29.3(34.1)
1085
20.0
190(220)
15.6(12.9)
2.4(2.0)
34.8(42.3)
1085
20.0
205(215)
12.6(10.1)
2.2(2.0)
42.6(52.1)
1085
20.0
14.0
21
15
19.7
5mm(15mm)
205(220)
20.4(17.7)
2.1(1.9)
14.6(16.5)
1095
20.0
185(200)
16.3(14.5)
2.2(1.8)
17.7(20.1)
1095
20.0
195(210)
13.4(10.3)
2.1(2.0)
21..2(26.6)
1095
20.0
17.0
32
21
19.8
5mm(15mm)
200(210)
20.9(18.8)
2.1(1.8)
14.2(15.9)
1130
20.5
175(190)
17.7(15.4)
1.9(1.8)
16.7(19.1)
1130
20.5
190(200)
13.9(11.1)
2.0(1.9)
20.6(25.3)
1130
20.5
21.0
38
32
20.0
5mm(15mm)
180(195)
23.8(20.5)
1.8(1.7)
12.8(14.8)
1150
21.0
160(175)
19.5(16.9
1.9(1.8)
15.3(17.6)
1150
21.0
180(195)
14.8(11.4)
2.0(1.9)
19.5(24.7)
1150
21.0
25.0
Ambient Temp. (°C)
Water Temp. (°C)
Head Pressure [peak] (bar)
Cube Hole Diameter
Ice Production (kg/d)
Freeze Cycle Time (min)
Defrost Cycle Time (min)
Water Consumption (lit/h)
Electric Consumption (W)
Head Pressure [peak] (bar)
Ice Production (kg/d)
Freeze Cycle Time (min)
Defrost Cycle Time (min)
Water Consumption (lit/h)
Electric Consumption (W)
Head Pressure [peak] (bar)
10
10
19.5
21
15
19.7
32
21
19.8
38
32
20.0
10mm(20mm)
10mm(20mm)
10mm(20mm)
10mm(20mm)
210(240)
18.4(15.4)
4.2(3.2)
27.8(30.3)
1120
14.0
200(235)
21.6(17.2)
2.2(1.8)
26.4(29.7)
1250
19.5
190(220)
22.5(18.3)
2.5(2.0)
13.1(16.2)
1200
17.0
190(200)
23.0(20.5)
2.0(1.8)
13.1(14.7)
1260
19.7
170(190)
25.8(21.5)
2.2(2.0)
11.7(12.2)
1330
21.0
180(190)
24.1(21.4)
2.3(2.1)
12.4(12.2)
1300
19.8
150(165)
29.8(26.9)
1.9(1.8)
10.4(11.4)
1450
25.0
170(185)
26.1(23.8)
1.9(1.8)
11.7(12.8)
1330
20.0
Suction Pressure and Evaporator Temp.
50/60Hz
Model
IM-240 “N” type
IM-240 “N”-21 type
IM-240 “N”-32 type
Ambient Temp. (°C)
Water Temp. (°C)
Suction Pressure Peak (bar)
Evaporator Inlet Temp. (°C)
Suction Pressure Peak (bar)
Evaporator Inlet Temp. (°C)
Suction Pressure Peak (bar)
Evaporator Inlet Temp. (°C)
10
10
3.0
-20
3.0
-13
3.0
-23
21
15
3.5
-19
3.5
-11
3.5
-22
32
21
4.0
-18
4.0
-10
4.0
-21
38
32
5.0
-17
5.0
-9
5.0
-20
Note: The above data are only for reference in servicing. Actual readings may be slightly different
for each product.
Suction Pressure = Peak readings in freezing cycle
Evaporator Inlet Temp. = 5 minutes before completion of freezing cycle
35
[b] SECOP (DANFOSS) COMPRESSOR
(Ice Production = Capacity when shipped from factory)
(*Values for icemaking water only. Use a cooling tower for cooling water.)
Cube Hole Diameter: 5mm (15mm) for -28, -23, -32 3mm (7mm) for -21
Model
IM-240DNE
IM-240XNE
IM-240DNE-23
IM-240XNE-23
IM-240DNE-21
IM-240XNE-21
IM-240DNE-32
IM-240XNE-32
IM-240DNE
IM-240XNE
(60Hz)
IM-240DNE-23
IM-240XNE-23
(60Hz)
IM-240DNE-21
IM-240XNE-21
(60Hz)
IM-240DWNE
IM-240XWNE
Ambient Temp. (°C)
Water Temp. (°C)
Cube Hole Diameter
Ice Production (kg/d)
Freeze Cycle Time (min)
Defrost Cycle Time (min)
Water Consumption (lit/h)
Electric Consumption (W)
Head Pressure [peak] (bar)
Ice Production (kg/d)
Freeze Cycle Time (min)
Defrost Cycle Time (min)
Water Consumption (lit/h)
Electric Consumption (W)
Head Pressure [peak] (bar)
Ice Production (kg/d)
Freeze Cycle Time (min)
Defrost Cycle Time (min)
Water Consumption (lit/h)
Electric Consumption (W)
Head Pressure [peak] (bar)
Ice Production (kg/d)
Freeze Cycle Time (min)
Defrost Cycle Time (min)
Water Consumption (lit/h)
Electric Consumption (W)
Head Pressure [peak] (bar)
Ice Production (kg/d)
Freeze Cycle Time (min)
Defrost Cycle Time (min)
Water Consumption (lit/h)
Electric Consumption (W)
Head Pressure [peak] (bar)
Ice Production (kg/d)
Freeze Cycle Time (min)
Defrost Cycle Time (min)
Water Consumption (lit/h)
Electric Consumption (W)
Head Pressure [peak] (bar)
Ice Production (kg/d)
Freeze Cycle Time (min)
Defrost Cycle Time (min)
Water Consumption (lit/h)
Electric Consumption (W)
Head Pressure [peak] (bar)
Ice Production (kg/d)
Freeze Cycle Time (min)
Defrost Cycle Time (min)
Water Consumption (lit/h)
Electric Consumption (W)
Head Pressure [peak] (bar)
10
10
5mm(15mm)
230(240)
16.8(15.3)
3.2(2.7)
31.3(33.9)
1120
14.0
180(225)
15.0(11.0)
4.0(3.5)
33.0(41.8)
1120
14.0
21
15
5mm(15mm)
220(230)
18.2(16.5)
2.7(2.3)
15.7(17.1)
1200
17.0
175(215)
17.1(12.7)
2.5(2.5)
16.7(21.6)
1200
17.0
32
21
5mm(15mm)
200(210)
21.0(18.5)
2.0(2.1)
14.2(16.0)
1330
21.0
165(195)
19.1(15.1)
1.7(1.7)
15.8(19.6)
1330
21.0
38
32
5mm(15mm)
170(185)
25.2(21.9)
1.9(1.5)
12.1(14.0)
1450
25.0
145(160)
22.0(18.8)
1.6(1.6)
13.9(16.1)
1450
25.0
235(245)
16.1(14.1)
3.5(3.5)
32.0(35.6)
1150
15.0
210(220)
19.4(17.1)
2.5(2.5)
14.9(16.7)
1200
18.0
200(210)
21.3(18.9)
1.7(1.7)
14.2(15.9)
1260
22.0
175(190)
24.6(21.0)
1.7(1.7)
12.5(14.4)
1300
26.0
230(240)
17.8(16.2)
2.2(1.8)
31.3(34.1)
1250
19.5
215(225)
19.2(17.5)
2.2(1.7)
15.3(17.1)
1260
19.7
205(215)
20.7(18.5)
1.8(1.6)
14.6(16.2)
1300
19.8
185(200)
23.1(20.0)
1.8(1.6)
13.2(15.0)
1330
20.0
36
Model
IM-240DWNE-23
IM-240XWNE-23
IM-240DWNE-21
IM-240XWNE-21
IM-240DWNE-32
IM-240DWNE-32
IM-240DWNE
IM-240XWNE
(60Hz)
IM-240DWNE-21
IM-240XWNE-21
(60Hz)
IM-240ANE
IM-240ANE-23
IM-240AWNE
Ambient Temp. (°C)
Water Temp. (°C)
Cube Hole Diameter
Ice Production (kg/d)
Freeze Cycle Time (min)
Defrost Cycle Time (min)
Water Consumption (lit/h)
Electric Consumption (W)
Head Pressure [peak] (bar)
Ice Production (kg/d)
Freeze Cycle Time (min)
Defrost Cycle Time (min)
Water Consumption (lit/h)
Electric Consumption (W)
Head Pressure [peak] (bar)
Ice Production (kg/d)
Freeze Cycle Time (min)
Defrost Cycle Time (min)
Water Consumption (lit/h)
Electric Consumption (W)
Head Pressure [peak] (bar)
Ice Production (kg/d)
Freeze Cycle Time (min)
Defrost Cycle Time (min)
Water Consumption (lit/h)
Electric Consumption (W)
Head Pressure [peak] (bar)
Ice Production (kg/d)
Freeze Cycle Time (min)
Defrost Cycle Time (min)
Water Consumption (lit/h)
Electric Consumption (W)
Head Pressure [peak] (bar)
Ice Production (kg/d)
Freeze Cycle Time (min)
Defrost Cycle Time (min)
Water Consumption (lit/h)
Electric Consumption (W)
Head Pressure [peak] (bar)
Ice Production (kg/d)
Freeze Cycle Time (min)
Defrost Cycle Time (min)
Water Consumption (lit/h)
Electric Consumption (W)
Head Pressure [peak] (bar)
Ice Production (kg/d)
Freeze Cycle Time (min)
Defrost Cycle Time (min)
Water Consumption (lit/h)
Electric Consumption (W)
Head Pressure [peak] (bar)
10
10
5mm(15mm)
21
15
5mm(15mm)
32
21
5mm(15mm)
38
32
5mm(15mm)
205(215)
12.8(10.2)
2.0(1.9)
42.6(52.1)
1085
20.0
195(210)
13.7(10.5)
1.8(1.8)
21.2(26.6)
1095
20.0
190(200)
14.1(11.3)
1.8(1.7)
20.6(25.3)
1130
20.5
180(195)
15.0(11.6)
1.8(1.7)
19.5(24.7)
1150
21.0
220(240)
15.9(14.0)
5.0(4.0)
30.0(33.1)
1145
14.0
205(230)
19.5(16.1)
3.0(2.7)
14.6(17.2)
1230
17.0
160(190)
26.8(21.0)
2.0(1.7)
11.4(14.2)
1320
21.0
150(165)
28.7(24.5)
2.0(1.7)
10.7(12.5)
1430
25.0
230(240)
17.8(16.2)
2.2(1.8)
31.3(34.1)
1250
19.5
215(225)
19.2(17.5)
2.2(1.7)
15.3(16.6)
1250
19.7
205(215)
20.7(18.5)
1.8(1.6)
14.6(16.2)
1300
19.8
185(200)
23.1(20.0)
1.8(1.6)
13.2(15.2)
1300
20.0
37
Model
IM-240AWNE
(60Hz)
IM-240AWNE-23
(60Hz)
IM-240AWNE-21
(60Hz)
Model
IM-240DNE-C
IM-240XNE-C
IM-240DWNE-C
IM-240XWNE-C
Ambient Temp. (°C)
Water Temp. (°C)
Head Pressure [peak] (bar)
Cube Hole Diameter
Ice Production (kg/d)
Freeze Cycle Time (min)
Defrost Cycle Time (min)
Water Consumption (lit/h)
Electric Consumption (W)
Head Pressure [peak] (bar)
Ice Production (kg/d)
Freeze Cycle Time (min)
Defrost Cycle Time (min)
Water Consumption (lit/h)
Electric Consumption (W)
Head Pressure [peak] (bar)
Ice Production (kg/d)
Freeze Cycle Time (min)
Defrost Cycle Time (min)
Water Consumption (lit/h)
Electric Consumption (W)
Head Pressure [peak] (bar)
Head Pressure [peak] (bar)
10
10
19.5
5mm(15mm)
215(240)
19.0(16.0)
2.4(2.0)
29.3(34.1)
1085
20.0
21
15
19.7
5mm(15mm)
205(220)
20.4(17.7)
2.1(1.9)
14.6(16.5)
1095
20.0
32
21
19.8
5mm(15mm)
200(210)
20.9(18.8)
2.1(1.8)
14.2(15.9)
1130
20.5
38
32
20.0
5mm(15mm)
180(195)
23.8(20.5)
1.8(1.7)
12.8(14.8)
1150
21.0
Ambient Temp. (°C)
Water Temp. (°C)
Head Pressure [peak] (bar)
Cube Hole Diameter
Ice Production (kg/d)
Freeze Cycle Time (min)
Defrost Cycle Time (min)
Water Consumption (lit/h)
Electric Consumption (W)
Head Pressure [peak] (bar)
Ice Production (kg/d)
Freeze Cycle Time (min)
Defrost Cycle Time (min)
Water Consumption (lit/h)
Electric Consumption (W)
Head Pressure [peak] (bar)
10
10
19.5
21
15
19.7
32
21
19.8
38
32
20.0
10mm(20mm)
10mm(20mm)
10mm(20mm)
10mm(20mm)
Suction Pressure and Evaporator Temp.
50/60Hz
MODEL
IM-240 “N” type
IM-240 “N”-21 type
IM-240 “N”-32 type
Ambient Temp. (°C)
Water Temp. (°C)
Suction Pressure Peak (bar)
Evaporator Inlet Temp. (°C)
Suction Pressure Peak (bar)
Evaporator Inlet Temp. (°C)
Suction Pressure Peak (bar)
Evaporator Inlet Temp. (°C)
10
10
3.0
-20
3.0
-13
3.0
-23
21
15
3.5
-19
3.5
-11
3.5
-22
32
21
4.0
-18
4.0
-10
4.0
-21
38
32
5.0
-17
5.0
-9
5.0
-20
Note: The above data are only for reference in servicing. Actual readings may be slightly different
for each product.
Suction Pressure = Peak readings in freezing cycle
Evaporator Inlet Temp. = 5 minutes before completion of freezing cycle
38
VI. SERVICE DIAGNOSIS
1. ERROR CODE INDICATION
* See the controller board service manual for detailed diagnosis and remedies.
* The error and caution codes other than E1 and E2 are indicated as “EE” in the 7-segment
display at the time of occurrence. But the error history is recorded as the actual error
codes in parenthesis, and a maximum of five errors are indicated from the latest entry.
Error
E1
E2
EE
(E3)
EE
(E4)
EE
(E5)
EE
(E9)
EE
(EA)
EE
(EC)
EE
(Ed)
Caution
EE
(C2)
Item
Description
Freeze backup timer (45/60 minutes)
counts up before freeze cycle
Freeze error
completes, and evaporator temperature
is 0°C or higher.
Defrost backup timer (30 minutes)
Defrost error
counts up before defrost cycle
completes.
Water pan has not fully opened within 60
seconds, and 3 minutes have passed
Water pan
even with opening failure control.
opening error
Unit resumes operation after 60 minutes
and repeats the above error.
Water pan has not fully closed within 60
seconds, and 3 minutes have passed
Water pan closing
even with closing failure control.
error
Unit resumes operation after 60 minutes
and repeats the above error.
High temperature Evaporator temperature stays 60°C or
error
higher for 5 seconds or more.
Condenser
Condenser thermistor circuit is open or
thermistor error
shorted for 2 seconds.
Model setting data memory IC is
Data error
defective.
Cube control
Cube control thermistor circuit is open or
thermistor error
shorted for 2 seconds.
Cooling water cannot stop by water
Water regulator
regulator error, and thermistor senses
error
set point or lower temperature.
Item
High pressure
Description
[Air-cooled] Condenser thermistor
senses 63°C or higher temperature.
[Water-cooled] Pressure switch senses
2.65MPa or higher pressure.
39
Operation
Reset
Shut down
Press reset switch
Shut down
Press reset switch
Halt
Press reset switch
Shut down
Halt
Press reset switch
Shut down
Shut down
Press reset switch
Shut down
Replace thermistor
Shut down
Replace controller
board
Shut down
Replace thermistor
Continue
Press reset switch
Operation
Compressor
stops
Reset
After 5 minutes,
condensing
temperature 50°C
or lower, pressure
1.96MPa or lower
2. NO ERROR CODE INDICATION
Problem
Icemaker will
not start.
Check
Power source
Possible Cause
Turned off.
Supply voltage too low.
Power failure
Transformer
Power cord
Defective.
Not connected properly.
Open circuit (damaged).
Defective.
Blown out.
Controller board
Fuse
Bin control switch
Slab does not
break into
separate cubes.
Icemaker will
not stop when
bin is filled with
ice.
Extension spring
Water plate
Replace.
Replace.
Remove obstacle.
Cloudy cubes.
Bin control switch
detector
Bin control micro
switch
Controller board
Water quality
Abnormal noise
Ice condition
Pump motor
Slush ice.
Bearing worn out.
Vapor lock.
Fan motor
Bearing worn out.
Fan touching obstacle.
Gear worn out.
Gas leaks (long defrost cycle).
Place in position.
Replace.
Place in position.
Replace.
Place in position.
Replace.
Reconnect.
Replace.
Replace.
Set hard water control.
Switch to full drain flush
(see note below).
Set slush ice control.
Replace.
Clean water valve filter.
Check water supply
cycle time setting.
Replace.
Remove obstacle.
Replace.
Repair.
Worn out.
Replace.
Cubes drop
separately.
Bin control switch
actuator
Bin control switch
Stuck on other parts (e.g. ice
guide).
Short circuit (display shows
“on”).
Over-extended.
Obstacle caught between
evaporator and water plate.
Out of position.
Broken.
Out of position.
Broken.
Out of position.
Broken.
Disconnected from switch box.
Seizing with open contacts.
Defective.
High hardness.
Remedy
Turn on.
Remove cause
Wait until power is
resumed.
Replace.
Reconnect.
Replace.
Replace.
Check for cause.
Replace.
Remove ice.
Actuator motor
Refrigeration
circuit
Cam arm
Note:
Full drain flush - After a freeze cycle ends, the unit drains all the remaining water in the tank and
refills the tank in the next freeze cycle.
Partial drain flush (default setting) - After a freeze cycle ends, the unit leaves the remaining water in
the tank and adds some water to fill the tank in the next freeze cycle.
40
Problem
Imperfect ice
production.
Check
Insufficient water
supply
Water leaks from
water tank or
water plate
Water valve
Large-hole
cubes.
Water plate
Pump motor
Refrigeration
circuit
Condenser
Fan motor
Installation site
Power supply
Freeze cycle
time is too long.
Water valve
Insufficient water
supply
Installation site
Condenser
Fan motor
Refrigeration
circuit
Possible Cause
Water valve filter clogged.
Water supply cycle too short.
Water supply pressure too low.
Water tank broken.
Water plate broken.
Icemaker not level.
Water leaks from valve body.
Water leaks from water supply
pipe joint.
Spray holes clogged.
Defective.
Gas leaks (low refrigeration
capacity).
Not clean (low condensing
capacity).
Filter clogged.
Defective.
No clearance at right side and
rear (air-cooled model only).
Ambient temperature above
40°C.
Supply voltage too low (low
refrigeration capacity).
Water leaks.
Water supply pressure too low.
Ambient temperature too high.
Not clean (low condensing
capacity).
Filter clogged.
Defective.
Gas leaks (low refrigeration
capacity).
41
Remedy
Clean.
Extend.
Remove cause.
Replace.
Replace.
Adjust.
Replace.
Check hose clamp.
Replace connection
hose.
Unclog.
Replace.
Repair.
Clean.
Clean.
Replace.
Ensure clearance.
Ensure ventilation to
lower temperature.
Remove cause.
Replace.
Remove cause.
Ensure ventilation to
lower temperature.
Clean.
Clean.
Replace.
Repair.
VII. ADJUSTMENT
1. EXPANSION VALVE
The expansion valve is factory-adjusted. Do not adjust it except at replacement or
service. Adjust the valve setting, if necessary, as follows:
1)Remove the cap nut.
2)Rotate the adjust screw by using a flat blade screwdriver.
3)Watch holes of ice cubes produced. Standard setting is that evaporator inlet side
and outlet side cubes have almost the same diameters. To make the inlet side larger,
rotate 90 - 180° clockwise. Smaller, counterclockwise. Do not rotate more than 180°
at a time.
CAUTION
Over adjustment of the valve may result in liquid refrigerant return causing
freezing to the suction line and severe damage to the compressor.
Bulb
Adjust Screw
Bottom View
Capillary Tube
Cap Nut
Solder Connection
Fig. 8
42
2. WATER REGULATING VALVE - WATER-COOLED MODEL ONLY
The water regulating valve is factory-adjusted. Do not adjust it except at replacement or
service. Adjust the valve setting, if necessary, as follows:
1)Attach a pressure gauge to high-side line, or prepare a thermometer to check
condenser drain temperature.
2)Rotate the adjust screw using a flat blade screwdriver so that the pressure gauge
shows 19 bar, or the thermometer reads 45 - 50°C, 5 minutes after freeze cycle
starts.
When the pressure or temperature exceeds the above, rotate the adjust screw
counterclockwise.
3)Check that the pressure or temperature holds.
Adjust Screw
Adjust Screw
Valve Body
Top View
Flare
Connection
Bellows
Capillary Tube
Fig. 9
43
VIII. REMOVAL AND REPLACEMENT
1. SERVICE FOR REFRIGERANT LINES
[a] SERVICE INFORMATION
1) Allowable Compressor Opening Time and Prevention of Lubricant Mixture
[R404A]
The compressor must not be opened more than 30 minutes in replacement or service.
Do not mix lubricants of different compressors even if both are charged with the same
refrigerant, except when they use the same lubricant.
2) Treatment for Refrigerant Leak [R404A]
If a refrigerant leak occurs in the low side of an ice maker, air may be drawn in. Even
if the low side pressure is higher than the atmospheric pressure in normal operation,
a continuous refrigerant leak will eventually reduce the low side pressure below the
atmospheric pressure and will cause air suction. Air contains a large amount of moisture,
and ester oil easily absorbs a lot of moisture. If an ice maker charged with R404A has
possibly drawn in air, the drier must be replaced. Be sure to use a drier designed for
R404A.
3) Handling of Handy Flux [R404A]
Repair of the refrigerant circuit needs brazing. It is no problem to use the same handy
flux that has been used for the current refrigerants. However, its entrance into the
refrigerant circuit should be avoided as much as possible.
4) Oil for Processing of Copper Tubing [R404A]
When processing the copper tubing for service, wipe off oil, if any used, by using alcohol
or the like. Do not use too much oil or let it into the tubing, as wax contained in the oil
will clog the capillary tubing.
5) Service Parts for R404A
Some parts used for refrigerants other than R404A are similar to those for R404A.
But never use any parts unless they are specified for R404A because their endurance
against the refrigerant has not been evaluated. Also, for R404A, do not use any parts
that have been used for other refrigerants. Otherwise, wax and chlorine remaining on
the parts may adversely affect the R404A.
6) Replacement Copper Tubing [R404A]
The copper tubes currently in use are suitable for R404A. But do not use them if oily
inside. The residual oil in copper tubes should be as little as possible. (Low residual oil
44
type copper tubes are used in the shipped units.)
7) Evacuation, Vacuum Pump and Refrigerant Charge [R404A]
Never allow the oil in the vacuum pump to flow backward. The vacuum level and
vacuum pump may be the same as those for the current refrigerants. However, the
rubber hose and gauge manifold to be used for evacuation and refrigerant charge
should be exclusively for R404A.
8) Refrigerant Leak Check
Refrigerant leaks can be detected by charging the unit with a little refrigerant, raising
the pressure with nitrogen and using an electronic detector. Do not use air or oxygen
instead of nitrogen for this purpose, or rise in pressure as well as in temperature may
cause R404A to suddenly react with oxygen and explode. Be sure to use nitrogen to
prevent explosion.
[b] REFRIGERANT RECOVERY
The refrigerant must be recovered if required by an applicable law. A low-side access
valve is provided on an extension pipe connected to the suction port of the compressor.
A tap valve should initially be fitted to the high-side process tube to be replaced with a
proper access valve (see Fig. 10) when recovery is completed.
Recover the refrigerant, and store it in a proper container. Do not discharge the
refrigerant into the atmosphere.
[c] EVACUATION AND RECHARGE
1)Attach charging hoses, service manifold and vacuum pump to the low-side and highside (to be fitted by servicer) access valves.
2)Turn on the vacuum pump.
3)Allow the vacuum pump to pull down to a 760 mmHg vacuum. Evacuating period
depends on the pump capacity.
4)Close the low-side and high-side valves on the service manifold.
5)Disconnect the vacuum pump, and attach a refrigerant charging cylinder to
accurately weigh in the liquid charge. Remember to purge any air from the charging
hose. See the nameplate for the required refrigerant charge.
6)Open the high-side valve on the gauge manifold, and accurately measure in the
liquid charge. Close the valve on the charging cylinder before closing the high-side
manifold valve. Any remaining liquid in the line can be charged into the low side.
45
Note: Always charge in the liquid stage, as many refrigerants are blends and vapour
charging will affect the blend consistency (e.g. R404A).
7)Turn on the icemaker. Release the high-side access connector, and allow pressure
in the charging line to slowly enter the low side of the system. Cap off the highside access valve. When pressure reduces on the low side, disconnect the low side
charging line and cap off the access valve.
8)Always cap the access valves to prevent a refrigerant leak.
9)Always thoroughly leak test all joints and valve caps.
10)Avoid charging large quantities of liquid into the low side in case of damage to the
compressor.
Depressed
Cap
Access Valve
OPEN
Fig. 10
2. COMPRESSOR
1)Unplug the icemaker or disconnect the power source.
2)Remove the top, front and right side panels.
3)Recover the refrigerant and store it in a proper container, if required by an applicable
law (See “1. [b] REFRIGERANT RECOVERY”).
4)Remove the terminal cover on the compressor, and disconnect solderless terminals.
5)Disconnect the discharge and suction pipes using brazing equipment.
6)Remove the hold-down bolts, washers and rubber grommets.
7)Slide and remove the compressor. Unpack the new compressor package.
8)Attach the rubber grommets of the previous compressor.
9)Clean the suction and discharge pipes with an abrasive cloth/paper.
46
10)Place the compressor in position, and secure it using the bolts and washers.
11)Remove plugs from the compressor suction and discharge pipes.
12)Braze or solder the access, suction and discharge lines (Do not change this order),
with nitrogen gas flowing at the pressure of 0.2 - 0.3 bar.
13)Install the new drier (See “3. DRIER”).
14)Check for leaks using nitrogen gas (10 bar) and soap bubbles.
15)Evacuate the system and charge it with refrigerant (See “1. [c] EVACUATION AND
RECHARGE”).
16)Connect the solderless terminals and replace the terminal cover in its correct
position.
17)Replace the panels in their correct positions.
18)Plug in the icemaker or connect the power source.
Note:Hoshizaki recommends that compressor starting electrics are always replaced at
the same time as the compressor.
3. DRIER
1)Unplug the icemaker or disconnect the power source.
2)Remove the top, front and right side panels.
3)Recover the refrigerant and store it in a proper container, if required by an applicable
law (See “1. [b] REFRIGERANT RECOVERY”).
4)Remove the drier holder, if any, and pull the drier toward you for easy service.
5)Remove the drier using brazing equipment.
6)Braze or solder the new drier, with the arrow on the drier in the direction of the
refrigerant flow. Use nitrogen gas at the pressure of 0.2 - 0.3 bar when brazing
tubings.
7)Check for leaks using nitrogen gas (10 bar) and soap bubbles.
8)Evacuate the system and charge it with refrigerant (See “1. [c] EVACUATION AND
RECHARGE”).
47
9)Replace the panels in their correct positions.
10)Plug in the icemaker or connect the power source.
Note:Always use a drier of the correct capacity and refrigerant type.
4. EXPANSION VALVE
IMPORTANT
Always install a new drier every time the sealed refrigeration system is
opened. Do not replace the drier until after all other repair or replacement
has been made.
1)Unplug the icemaker or disconnect the power source.
2)Remove the top, front and right side panels.
3)Recover the refrigerant and store it in a proper container, if required by an applicable
law (See “1. [b] REFRIGERANT RECOVERY”).
4)Remove the expansion valve using brazing equipment. Protect the evaporator and
pipes from excessive heat with damp cloths or similar.
5)Remove the expansion valve sensor (bulb).
6)Remove the drier using brazing equipment.
7)Braze in the new expansion valve. Protect the body of the valve from excessive
heat, and use nitrogen at a pressure of 0.2 - 0.3 bar when brazing.
Bulb
8)Braze or solder the new drier (See “3.
DRIER”).
9)Check for leaks using nitrogen gas (10
bar) and soap bubbles.
10)Evacuate the system and charge it with
refrigerant (See “1. [c] EVACUATION
AND RECHARGE”).
11)Attach the bulb to the suction line in
position. Be sure to secure it using a
wire or clamp and replace the insulation.
Low Side
Capillary Tube
Cap Nut
(Adjust Screw inside)
High Side
Fig. 11
48
12) Replace the panels in their correct positions.
13) Plug in the icemaker or connect the power source.
5. EVAPORATOR
IMPORTANT
Always install a new drier every time the sealed refrigeration system is
opened. Do not replace the drier until after all other repair or replacement
has been made.
1) Unplug the icemaker or disconnect the power source.
2) Remove the top, front, right and left side panels.
3) Recover the refrigerant and store it in a proper container, if required by an applicable
law (See “1. [b] REFRIGERANT RECOVERY”).
4) Remove the water pan assembly, referring to “8. WATER PAN ASSEMBLY”.
5) Disconnect the solder connections on the evaporator using brazing equipment.
Protect the expansion valve from excessive heat.
6) Remove four nuts holding the evaporator.
7) Install the new evaporator, and secure it with the bolts, collars (spacer) and nuts.
8) Install the new drier (See “3. DRIER”).
9) Braze pipes, with nitrogen gas flowing at the pressure of 0.2 - 0.3 bar.
10) Check for leaks using nitrogen gas (10 bar) and soap bubbles.
11) Evacuate the system and charge it with refrigerant (See “1. [c] EVACUATION AND
RECHARGE”).
12) Replace the removed panels in their correct positions.
13) Plug in the icemaker or connect the power source.
49
6. HOT GAS VALVE
IMPORTANT
Always install a new drier every time the sealed refrigeration system is
opened. Do not replace the drier until after all other repair or replacement
has been made.
1)Unplug the icemaker or disconnect the power source.
2)Remove the top, front and right side panels.
3)Recover the refrigerant and store it in a proper container, if required by an applicable
law (See “1. [b] REFRIGERANT RECOVERY”).
4)Disconnect the hot gas valve leads.
5)Remove the screw and the solenoid coil.
6)Remove the valve and drier using brazing equipment.
7)Braze the new hot gas valve with nitrogen gas flowing at the pressure of 0.2 - 0.3
bar.
WARNING
Always protect the valve body by using a damp cloth to prevent the valve
from overheating. Do not braze with the valve body exceeding 120°C.
8)Install the new drier (See “3. DRIER”).
9)Check for leaks using nitrogen gas (10 bar) and soap bubbles.
10)Evacuate the system and charge it with refrigerant (See “1. [c] EVACUATION AND
RECHARGE”).
11)Attach the solenoid coil to the valve body, and secure it with the screw.
12)Connect the leads.
13)Replace the panels in their correct positions.
14)Plug in the icemaker or connect the power source.
50
7. WATER REGULATING VALVE - WATER-COOLED MODEL ONLY
[a] VALVE BODY
1) Unplug the icemaker or disconnect the power source.
2) Close the water supply tap.
3) Remove the front panel and right side panel.
4) Disconnect the flare connections of the water regulating valve.
5) Remove the valve from the bracket.
6) Install a new water regulating valve.
7) Connect the flare connections.
8) Open the water supply tap.
9) Check for water leaks.
10) Replace the panels in their correct positions.
11) Plug in the icemaker or connect the power source.
[b] WHOLE VALVE
IMPORTANT
Always install a new drier every time the sealed refrigeration system is
opened. Do not replace the drier until after all other repair or replacement
has been made.
1 Unplug the icemaker or disconnect the power source.
2)Close the water supply tap.
3)Remove the front, top and right side panels.
4)Recover the refrigerant and store it in a proper container, if required by an applicable
law (See “1. [b] REFRIGERANT RECOVERY”).
5)Cut off the copper tube near the capillary tube solder connection, using a pipe cutter.
51
6)Cut off the capillary tubes of the valve and high-pressure switch, using a file and
pliers. Be careful not to damage the capillary tube end.
7)Disconnect the flare connections from the bracket.
8)Remove the screws and the valve from the bracket.
9)Install the new valve, and insert the capillary tubes into the copper tube.
10)Web the copper tube end, and braze or solder the copper tube and capillary tubes
together.
11)Install the new drier (See “3. DRIER”).
12)Check for leaks using nitrogen gas (10 bar) and soap bubbles.
13)Evacuate the system and charge it with refrigerant (See “1. [c] EVACUATION AND
RECHARGE”).
14)Connect the flare connections.
15)Open the water supply tap.
16)Check for water leaks.
17)Replace the panels in their correct positions.
18)Plug in the icemaker or connect the power source.
Adjust Screw
Valve Body
Flare
Connection
Bellows
Capillary Tube
Fig. 12
52
8. WATER PAN ASSEMBLY
1) Remove the top, front and left side panels.
2) Push the reset switch on the control box to open the water pan.
3) Unplug the icemaker or disconnect the power source.
4) Disconnect the pump motor leads in the wiring channel.
5) Remove the two extension springs from the cam arms.
6) Remove the water plate bracket and the water pan assembly.
7) Remove the two spring hook screws from the water tank.
8) Remove the screws and the water plate bracket.
9) Remove the pump suction and discharge tubings.
10)Remove the pump motor bracket from the water plate.
11)Install the new water plate or water tank in the reverse order of the removal
procedure.
12)Replace the panels in their correct positions.
13)Plug in the icemaker or connect the power source.
53
INDEX NO.
1
2
3
4
5
6
7
8
9
10
11
12
J
S1 - 4
S5
DESCRIPTION
Water Tank
Water Plate Bracket
Bracket
Spring Hook Screw
Pump Tubing (Suction)
Pump Tubing (Discharge)
Pump Motor Bracket
Water Plate
Overflow Pipe
Thumbscrew (for Overflow Pipe)
Nylon Tie
O-ring
Pump Motor Assembly
Tapping Screw
Machine Screw
Fig. 13
54
9. PUMP MOTOR
1) Unplug the icemaker or disconnect the power source.
2) Remove the top panel and front panel.
3) Disconnect the pump motor leads in the wiring channel.
4) Unscrew and remove the pump motor from the bracket.
5) Disconnect the pump suction and discharge tubings.
6) Install the new motor in the reverse order of the removal procedure.
7) Plug in the icemaker or connect the power source, and check for leaks.
8) Replace the panels in their correct positions.
10. WATER VALVE
1) Close the water supply tap.
2) Unplug the icemaker or disconnect the power source.
3) Remove the top panel and front panel.
4) Disconnect the receptacle (leads) from the water valve.
5) Remove the valve outlet tubing by releasing the clamp.
6) Remove the inlet hose and water valve.
7) Install the new valve in the reverse order of the removal procedure.
8) Open the water supply tap.
9) Plug in the icemaker or connect the power source.
10) Check for leaks.
11) Replace the panels in their correct positions.
Note: When replacing parts, disassemble as shown in Fig. 6 and replace the defective
parts.
55
11. ACTUATOR MOTOR
1) Remove the top panel and front panel.
2) Push the reset switch on the control box to open the water pan.
3) Unplug the icemaker or disconnect the power source.
4) Remove the extension spring (actuator motor side) from the cam arm.
5) Disconnect the actuator motor leads in the wiring channel.
6) Remove the actuator motor bracket.
7) Remove the spring pin securing the shaft to the cam arm.
8) Remove the actuator motor.
9) Install the new actuator motor in the reverse order of the removal procedure.
10)Check that the cam arm can move in the proper range.
11)Replace the panels in their correct positions.
12)Plug in the icemaker or connect the power source.
12. CAM ARM
[a] CAM ARM (A) - ACTUATOR MOTOR SIDE
Refer to “11. ACTUATOR MOTOR”.
[b] CAM ARM (B) - REAR SIDE
1) Remove the top panel and front panel.
2) Push the reset switch on the control box to open the water pan.
3) Unplug the icemaker or disconnect the power source.
4) Remove the extension spring from the cam arm (B).
5) Remove the split pin from the cam shaft.
6) Remove the cam arm (B).
56
7) Install the new cam in the reverse order of the removal procedure.
8) Replace the panels in their correct positions.
9) Plug in the icemaker or connect the power source.
Fig. 14
57
ICEMAKING ASSEMBLY AND CAM MECHANISM
INDEX NO.
G
1
2
3
4
5
7
9
10
11
13
14
15
16
17
18
19
20
21
22
23
26
27
28
29
30
31
S1 - 5
DESCRIPTION
Water Pan Assembly
Evaporator
Bolt
Collar (Spacer)
Bearing
Actuator Motor
Shaft
Actuator Motor Bracket
Cam Shaft Bearing
Spring Pin
Cam Arm (B)
Cam Shaft
Snap Pin
Split Pin
Spring
Washer (A)
Washer (B)
Washer (C)
Thermistor Holder
Label (for Overflow Pipe)
Thermistor (Cube Control)
Frame
Frame
Wire Saddle
Washer
Cam Arm (A)
Change Lever
Machine Screw
58
13. CONTROLLER BOARD
IMPORTANT
Some adjustment will be required for the controller board to fit the icemaker
models. Do not repair any parts and electronic devices on the controller
board in the field. Replace the whole board with a new service board.
1) Unplug the icemaker or disconnect the power source.
2) Remove the front panel.
3) Unscrew and remove the control box cover.
4) Disconnect all the connectors from the controller board.
5) Remove the controller board from the four board supports for connection to the
control box.
6) Install the new controller board in the reverse order of the removal procedure.
7) Replace the front panel in its correct position.
8) Plug in the icemaker or connect the power source.
9)The icemaker restarts in the model setting mode. Set the model code according to
the controller board service manual.
59
Controller Board
Board Support
Control Box Cover
Screw
Fig. 15
60
14. THERMISTOR FOR CUBE CONTROL
1) Unplug the icemaker or disconnect the power source.
2) Remove the top and front panels.
3) Remove the connector CN13 on the controller board, referring to “13.
CONTROLLER BOARD”.
4) Unscrew and remove the thermistor holder and thermistor, located on the evaporator
(front side).
5) Install the new thermistor in the reverse order of the removal procedure, by using a
sealant (high-thermal conduct type). See Fig. 16.
Note: Recommended sealant is KE4560RTV, manufactured by Shin-Etsu Silicones.
When other type of sealant used, the cube size and performance will be
changed. Do not use silicone sealant as this will insulate the thermistor.
Sealant
* Insert aluminum tape or foil
between holder and sealant.
Sealant
Holder
* Aluminum Tape
Holder
** Thermistor and leads are FRAGILE.
HANDLE WITH CARE.
Holder
Evaporator
Screw
** Leads
** Thermistor
Fig. 16
61
15. FAN MOTOR - AIR-COOLED MODEL ONLY
1) Unplug the icemaker or disconnect the power source.
2) Remove the top, front and right side panels.
3) Disconnect the connector of the fan motor.
4) Remove the fan motor bracket and the fan motor.
5) Cut the leads of the fan motor allowing enough lead length to reconnect using closed
end connectors.
6) Install the new fan motor in the reverse order of the removal procedure.
7) Refit the panels in their correct positions.
8) Plug in the icemaker or connect the power source.
62
IX. MULTI-STACK APPLICATIONS
The following option kits are available for multi-stack applications of IM-240DNE/
XNE(-C) and IM-240DWNE/XWNE(-C) in combination with the previous IM-240DME/
XME and IM-240DWME/XWME.
No
1
2
3
4
5
6
7
8
9
10
11
12
13
Part no
3Y5244A01
4Y5177G01
3Y5245A01
4Y5179G01
4Y5943M01
417323-01
4Y5988A01
2H9615G01
375092L01
3Y5451K01
3Y5452K01
3Y5453K01
Option kit
Part name
Bin switch assy
Cable A - kit
Bin switch assy
Cable B - kit
Bracket - bin switch
Cap
Drain kit assy
Ice chute G
Installation Sheet
Label - package
Package case
Package case
Package case
IMD KIT-AB IMD KIT-BA IMD KIT-BB
S-23452
S-23453
S-23454
Qty
1
Yes
―
Yes
1
Yes
―
Yes
1
―
Yes
―
1
―
Yes
―
1
―
―
Yes
1
―
―
Yes
1
―
Yes
―
1
―
―
Yes
1
Yes
Yes
Yes
1
Yes
Yes
Yes
1
Yes
―
―
1
―
Yes
―
1
―
―
Yes
* Option kit differs by unit combination. See the following pages.
63
64
Part no.
Kit no.
S-23453
IMD KIT-BA
III
S-23453
V
Middle
NEW
VI
Lower
NEW
IV
S-23452
IMD KIT-AB
V
–
–
VI
S-23453
IMD KIT-BA
IM-240D_ME/X_ME: auxiliary code “U-1” or later
IV
Upper
NEW
Replaceable by VI
NEW
NEW
VII
S-23452
IMD KIT-AB
VII
Upper & middle
Triple
VIII
S-23453
IMD KIT-BA
VIII
Middle & lower
NEW
NEW
Replaceable by VII
S-23454
IMD KIT-BB
S-23453
IMD KIT-BA
S-23454
IMD KIT-BB
–
–
S-23453
IMD KIT-BA
S-23454
IMD KIT-BB
S-23453
IMD KIT-BA
IM-240D_ME/X_ME: auxiliary code “U-0” or earlier *Including IM-230D_ME/X_ME or earlier models
II
I
Pattern: B
Old type
S-23452
S-23453
III
Lower
NEW
IMD KIT-BA
Double
IMD KIT-AB
Part no.
Kit no.
IMD KIT-BA
II
I
Pattern: A
Old type
Upper
Add one stack
NEW
NEW
Change
change
After
change
Before
Single
Multi-stack applications are available with the following combinations. Arrange the required kits.
Combinations of Old and New Type IM-240D Models in Multi-stack Applications
–
–
IX
–
–
IX
Upper & lower
NEW
NEW
65
Yes
Yes
*
–
–
–
Yes
Yes
*
*: Not used in pattern A
–
Yes
–
–
IMD KIT-BA
Lower
NEW
III
Yes
IMD KIT-AB
Upper
NEW
II
Double
–
IMD KIT-BA
Kit no.
1) 3Y5244A01
Bin switch assy
2) 4Y5177G01
Cable A - kit
3) 3Y5245A01
Bin switch assy
4) 4Y5179G01
Cable B - kit
5)4Y5988A01
Drain kit assy
Add one stack
NEW
I
Change
change
After
change
Before
Old type
Pattern: A
Single
Components List for IMD KIT-**
V
VI
–
–
–
Yes
Yes
–
Yes
–
Yes
–
–
Middle
NEW
Components of kit
IMD KIT-AB
Upper
NEW
*
Yes
–
–
–
Yes
–
Yes
Yes
IMD KIT-AB
–
IMD KIT-BA
Lower
NEW
NEW
NEW
VII
Upper & middle
Triple
IM-240D_ME/X_ME: auxiliary code “U-1” or later
IV
Replaceable by VI
*
Yes
Yes
–
–
IMD KIT-BA
Middle & lower
NEW
NEW
VIII
Replaceable by VII
–
Yes
Yes
Yes
–
–
Upper & lower
NEW
NEW
IX
66
6) 417323-01
Cap
7) 4Y5988A01
Drain kit assy
8) 2H9615G01
Ice chute G
Bracket - bin switch
III
IV
V
VI
Replaceable by VI
Triple
VII
–
Yes
Yes
–
Yes
–
Yes
Yes
–
Yes
–
Yes
–
Yes
–
Yes
–
–
–
Yes
–
–
IMD KIT-BA
Yes
IMD KIT-BB
Lower
NEW
–
Middle
NEW
Yes
–
Yes
Yes
–
–
Yes
Yes
–
Yes
–
–
–
–
Yes
Yes
–
–
IMD KIT-BA
Lower
NEW
–
–
–
–
–
–
Components of kit
IMD KIT-BB
Upper
NEW
Yes
–
Yes
Yes
–
–
Yes
Yes
IMD KIT-BB
Upper & middle
NEW
NEW
–
Yes
–
–
Yes
Yes
–
–
IMD KIT-BA
Middle & lower
NEW
NEW
VIII
Replaceable by VII
IM-240D_ME/X_ME: auxiliary code “U-0” or earlier *Including IM-230D_ME/X_ME or earlier models
Upper
NEW
II
Double
–
IMD KIT-BA
Kit no.
1) 3Y5244A01
Bin switch assy
2) 4Y5177G01
Cable A - kit
3) 3Y5245A01
Bin switch assy
4) 4Y5179G01
Cable B - kit
5) 4Y5943M01
Add one stack
NEW
I
Change
change
After
change
Before
Old type
Pattern: B
Single
Components List for IMD KIT-**
–
–
–
–
–
–
–
–
–
Upper &lower
NEW
NEW
IX
67
*1
A
NEW
4) 4Y5179G01
Cable B - kit
1. Attach bracket - bin switch.
1. Attach bracket - bin switch.
2. Connect 4) cable B - kit with
2. Connect 4) cable B - kit with
connector for bin switch of upper
connector for bin switch of
unit.
middle unit.
3. No change in connection of
upper and middle units.
A
NEW
Double
*1: Connector for bin switch assy is different. (NEW TYPE: 2P connector, OLD TYPE: 3P connector)
1. Attach 3) bin switch assy to
bracket - bin switch of NEW
TYPE.
Then, connect 4) cable B - kit.
3) 3Y5245A01
Bin switch assy
4) 4Y5179G01
Cable B - kit
*1
Bin switch assy 4) 4Y5179G01
of NEW TYPE
Cable B - kit
Bracket - bin switch of
NEW TYPE
Detail A
1. Attach bracket - bin switch.
2. Connect 4) cable B - kit with
connector for bin switch of upper
unit.
3. No change in connection of
middle and lower units.
A
NEW
NEW
4) 4Y5179G01
Cable B - kit
Triple
As bin switches have different control voltages and cannot be connected, attach bin switch assy separately. (NEW TYPE: 5V DC, OLD TYPE: 100V AC)
1. Patterns A and B - Bin Switch Connections for I, III, VI, and VIII
68
*1
1. Attach 5) bracket - bin switch.
2. Connect 2) cable A - kit with
connector for bin switch of upper
unit.
B
NEW
2) 4Y5177A01
Cable A - kit
Double
*2: Arrangement is not required in pattern A because 5) bracket - bin switch (4Y5943M01) has already been attached.
B
NEW
NEW
2) 4Y5177A01
Cable A - kit
1. Attach 5) bracket - bin switch.
2. Connect 2) cable A - kit with
connector for bin switch of
middle unit.
3. No change in connection of
upper and middle units.
Triple
1. Attach 5) bracket - bin switch.
2. Connect 2) cable A - kit with
connector for bin switch of upper
unit.
3. No change in connection of
middle and lower units.
B
NEW
2) 4Y5177A01
Cable A - kit
*1: Connector for bin switch assy is different. (NEW TYPE: 2P connector, OLD TYPE: 3P connector)
1. Attach 1) bin switch assy to 5)
bracket - bin switch, then
connect 2) cable A - kit.
2. For pattern B, replace with 5)
bracket - bin switch. Also,
replace bin switch assy of OLD
TYPE.
Bin switch assy of
OLD TYPE
5) 4Y5943M01 *2
Bracket - bin switch
*1
1) 3Y5244A01
Bin switch assy
2) 4Y5177A01
Cable A - kit
Detail B
As bin switches have different control voltages and cannot be connected, attach bin switch assy separately. (NEW TYPE: 5V DC, OLD TYPE: 100V AC)
2. Patterns A and B - Bin Switch Connections for II, IV and VII
69
NEW
Double
1. Attach 7) drain kit assy to drain
pan of upper unit as in E.
(Water is drained into drain pan
of lower unit.)
2. Remove drain kit (D) of storage
bin and seal the hole.
3. Lower unit has drain pipe, and
connection is not required.
E
E
Incorporating drain pipe
Drain pan
Drain pan
D
Drain kit
C
1. Attach 7) drain kit assy to drain
pan of upper unit.
(Water is drained into drain pan
of lower unit.)
2. Remove drain kit (D) of storage
bin and seal the hole.
7) 4Y5988A01
Drain kit assy
NEW
OLD
After change
OLD
OLD
Before change
Drain Pipe Connections
NEW
1. Attach 7) drain kit assy to drain
pan of middle unit as in E.
(Water is drained into drain pan
of lower unit.)
2. Remove drain kit (D) of storage
bin and seal the hole.
3. Lower unit has drain pipe, and
connection is not required.
4. For upper and middle units,
make connection as in C, as
before.
E
C
As X type has no drain pipe to connect with drain pan of upper unit, follow the instructions below.
E
NEW
NEW
1. Attach 7) drain kit assy to drain
pan of upper unit as in E.
(Water is drained into drain pan
of middle unit.)
2. Remove drain kit (D) of storage
bin and seal the hole.
3. Middle and lower units have
drain pipes separately, and
connection is not required.
Triple
OLD TYPE (IM-240D_ME/X_ME, auxiliary code “U-1” or later) and NEW TYPE incorporate drain pipe connected with drain pan.
3. Pattern B - Drain Pipe Connections for I, III, VI and VIII
70
Unused
drain pipe
D
Incorporating rain pipe
D
Drain kit
C
*3
1. Attach 7) cap to drain pipe at C
of lower unit.
2. Connect lower unit with drain kit
(D) of storage bin, as before.
3. Upper unit has drain pipe, and
connection is not required.
C
NEW
Double
NEW
*3
C
NEW
NEW
*3
1. Attach 7) cap to drain pipe at C
of lower unit.
2. Connect lower unit with drain kit
(D) of storage bin, as before.
3. Upper and middle units have
drain pipe, and connection is not
required.
Triple
1. Attach 7) cap to drain pipe at C
of middle unit.
2. For middle and lower units,
make connection as in C, as
before.
3. Connect lower unit with drain kit
(D) of storage bin, as before.
4. Upper unit has drain pipe, and
connection is not required.
C
C
*3: When removing unused drain pipe, obtain side panel L (425777G01) (with no drain pipe hole).
When removing drain pipe:
- Remove drain pipe of lower unit.
- Attach side panel L to lower unit.
Attach 7) cap to drain pipe at C of
lower unit.
7) Cap
Old
New
After change
Old
Old
Before change
Drain Pipe Connections
As drain pipe is not required to connect with drain pan of upper unit for X type, follow the instruction below for removal.
OLD TYPE (IM-240D_ME/X_ME, auxiliary code “U-1” or later) and NEW TYPE incorporate drain pipe connected with drain pan.
4. Pattern B - Drain Pipe Connections for II, IV and VII
71
8) 2H9615G01
Ice chute G
Add ice
guide
NEW
2H9615G01 *4
Ice chute G
Accessory for lower unit
Double
NEW
103085G01
Ice chute
Accessory for
middle unit
NEW
NEW
2H9615G01 *4
Ice chute G
Accessory for
lower unit
1. Use ice chute G (accessory for
lower unit) between middle and
lower units.
2. Attach ice chute G (accessory
for lower unit) between upper
and lower units.
2H9615G01
Ice chute G
Accessory for
lower unit
Triple
1. Attach ice chute G (accessory
for lower unit) between upper
and lower units.
2. Use ice chute (accessory for
middle unit) between upper and
middle units.
2H9615G01 *4
Ice chute G
Accessory for
lower unit
*4: Ice chute (103085G01) attached to X-type before replacement is also attachable.
1. Attach ice chute G (accessory for 1. Attach ice chute G (accessory
lower unit) between upper and
for lower unit) between upper
lower units.
and lower units.
103085G01
Ice chute
No space at
drain pan bottom
NEW
Ice Chute Installation
OLD TYPE (IM-240D_ME/X_ME, auxiliary code “U-1” or later) and NEW TYPE come with ice chute G (2H9615G01).
5. Pattern B - Ice Chute Installation for I, III, VI and VIII
72
8) 2H9615G01
Ice chute G
NEW
8) 2H9615G01
Ice chute G
Double
NEW
8) 2H9615G01
Ice chute G
NEW
2H9615G01
Ice chute G
Accessory for
middle unit
1. Use ice chute G (accessory for
lower unit) between middle and
lower units.
2. Attach 8) ice chute G between
upper and middle units.
Ice chute (accessory for lower unit)
is not necessary.
NEW
8) 2H9615G01
Ice chute G
Triple
103085G01
Ice chute
Accessory for
lower unit
1. Attach 8) ice chute G between
1. Attach 8) ice chute G between
1. Use ice chute (accessory for
upper and lower units.
upper and lower units.
lower unit) between middle and
Ice chute (accessory for lower unit) Ice chute (accessory for lower unit)
lower units.
is not necessary.
is not necessary.
2. Attach 8) ice chute G between
upper and middle units.
Ice chute (accessory for middle
unit) is not necessary.
103085G01
Ice chute
Add ice
guide
Space of 100 mm at the
bottom of drain pan
NEW
Ice Chute Installation
the bottom of drain pan. If lower unit is OLD TYPE (IM-240D_ME, auxiliary code “U-0” or earlier), attach ice chute G (2H9615G01).
OLD TYPE (IM-240D_ME/X_ME, auxiliary code “U-1” or later) and NEW TYPE incorporate drain pipe connected with drain pan and have about 100 mm space at
6. Pattern B - Ice Chute Installation for II, IV and VII