1
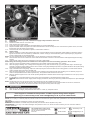
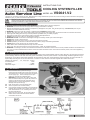
INSTRUCTIONS FOR: cooling system filler MODEL NO: VS0041.V2 Thankyou for purchasing a Sealey Product. Manufactured to a high standard this product will, if used according to these instructions and properly maintained, give you years of trouble free performance. IMPORTANT: PLEASE READ THESE INSTRUCTIONS CAREFULLY. NOTE THE SAFE OPERATIONAL REQUIREMENTS, WARNINGS AND CAUTIONS. USE THIS PRODUCT CORRECTLY AND WITH CARE FOR THE PURPOSE FOR WHICH IT IS INTENDED. FAILURE TO DO SO MAY CAUSE DAMAGE AND/OR PERSONAL INJURY AND WILL INVALIDATE THE WARRANTY. PLEASE KEEP INSTRUCTIONS SAFE FOR FUTURE USE. 1. safety instructions Follow all workshop, Health & Safety rules, regulations and conditions when using this equipment. WARNING! Disconnect from the air supply before changing accessories or servicing. Maintain the equipment in good condition and replace any damaged or worn parts. Use genuine parts only. Unauthorised parts may be dangerous and will invalidate the warranty. WARNING! Check that correct air pressure is maintained and DOES NOT exceed 100psi. Keep air hose away from heat, oil and sharp edges. Check air hose for wear before each use and ensure that all connections are secure. Wear approved safety gloves and eye and ear protection (available from your Sealey supplier). Keep this tool clean and in good working order for best and safest performance. DO NOT use the tool for a task it is not designed to perform. WARNING! DO NOT use the tool if it is damaged or thought to be faulty. Contact your local service agent. DO NOT drop, throw or abuse the tool. DO NOT carry the tool by the air hose, or yank the hose from the air supply. DO NOT operate if you are tired or under the influence of alcohol, drugs or intoxicating medication. DO NOT direct air from the air hose, at yourself or others. Keep children and unauthorised persons away from the work area. When not in use, disconnect from the air supply and store in a safe, dry, childproof location. WARNING! The warnings, cautions and instructions discussed in this instruction manual cannot cover all possible conditions and situations that may occur. It must be understood that common sense and caution are factors which cannot be built into this product, but must be applied by the operator. 2. Introduction & specification Eliminates the introduction of bubbles and air-locks into the cooling system and dramatically reduces system filling time. No more time-consuming system bleeding. Reduces fluid waste and messy spills. Automatically conducts system leak test. Low profile design broadens application range especially for use on MPV's where lower windscreen lip might obstruct other tools. Simple operation requires workshop air supply and does not require fiddly interchange of vacuum and fluid hoses - as found on other versions of this tool. Supplied with 1300mm fluid hose. Operating Air Pressure:. . . . 80 - 100psi (5.5 - 6.9 bar) Air Consumption:. . . . . . . . . . . . . . . . . . . . . . . . . 12cfm Connection:. . . . . . . . . . . . . . . . . . . . . . . . . . . . ¼”BSP Fluid Hose Length: . . . . . . . . . . . . . . . . . . . . . 1300mm 3. Air Supply 3.1. 3.2. 3.3. 3.4. 3.5. Recommended hook-up is shown in fig.2. Ensure that both coolant and vacuum taps are in the ‘off’ position (fully to the left or right) when connecting the air supply. Fig.1. shows both taps in the open position (in-line with the outlet/inlet pipe). WARNING! Ensure that the air supply is clean and does not exceed 100psi. Too high an air pressure or unclean air will shorten the life of the filler due to excessive wear, and may be dangerous, causing damage and/or personal injury. Drain the air tank on the compressor daily. Clean compressor air inlet filter weekly. Line pressure should be increased to compensate for unusually long air hoses (over 8 metres). The minimum hose size should be ¼” I.D. and fittings must have the same internal bore. Keep hose away from heat, oil and sharp edges. Check hose for wear and make certain that all connections are secure. fig.1 fig.2 Original Language Version VS0041.V2 Issue No: 2 - 28/03/12 fig.4 fig.3 4. OPERATING INSTRUCTIONS WARNING! Ensure that you read, understand and apply safety instructions before use. 4.1. Preparation. 4.1.1. Set vehicle heater control to ‘On’ and/or ‘Hot’. 4.1.2. Drain and flush the coolant system. 4.1.3. Inspect all coolant system components and repair/replace any unserviceable items. 4.1.4. Prepare a suitable coolant mix (refer to the vehicle manufacturer's service manual). Mix 10% more than the system's volume, to ensure that the filler hose will always be submerged. 4.1.5. Connect the filler to the compressed air system, as described in Section 3. 4.2. Suction Filling. 4.2.1. Raise the container of coolant level with the filling point. Insert the adaptor (using the appropriate rubber adaptor if required) to obtain a tight fit into the filler neck of the radiator (or header tank, if fitted - see fig.3). Use the extension pipe if required (see fig.4). Support the air line so that the filler is not pulled off-centre. NOTE:On some vehicles fitted with an overflow tank, it may be necessary to clamp the overflow hose. 4.2.2. Place the filler hose into the container of coolant. Ensure that the filter on the end of the hose remains submerged throughout the filling process. 4.2.3. Check that the coolant tap is in the closed (fully to the right or left) position. NOTE:During the following procedure the radiator hoses will collapse under the vacuum being generated - this is normal. 4.2.4. Open the vacuum tap (middle position) and allow the air to evacuate until the gauge reads -20 to -30inHg. 4.2.5. When the gauge is reading -20 to -30inHg and has stopped moving, close the vacuum tap, by pushing the lever fully to the left or right. Continue to check the gauge reading over the next 3 minutes. If the gauge reading drops there is a system leak which will require locating and rectifying before proceeding further. 4.2.6. Apply a downward force during filling. Open the coolant tap fully and coolant will flow into the cooling system. For best results raise the coolant container above the level of the filler neck. 4.2.7. When the gauge reads 0inHg, turn the coolant tap to the off position and remove the filler from the filling point. If necessary top up the coolant to the specified level and refit the pressure cap. The system is filled and free from air locks. 4.2.8. Start the vehicle's engine and run until normal operating temperature is attained. Switch off the engine and allow it to cool. Top-up coolant if necessary. 4.2.9. It is advisable to now pressure test the system and to check the operation of the thermostat and cooling fan(s). WARNING! Disconnect from the air supply before changing accessories, servicing or performing maintenance. Replace or repair damaged parts. NOTE:Use genuine parts only. Non genuine parts may be dangerous and will invalidate the warranty. Air supply faults may cause loss of power or erratic action. Reduced compressor output, excessive drain on the air line, moisture or restrictions in air pipes or the use of hose connections of improper size may reduce air supply. 5. MAINTENANCE 5.1. 5.2. When not in use, disconnect the air supply from the filler. Clean the filler with a slightly dampened cloth and store it in a safe, dry, childproof location. Parts support is available for this product. To obtain a parts listing and/or diagram, please log on to www.sealey.co.uk, email [email protected] or phone 01284 757500. NOTE: It is our policy to continually improve products and as such we reserve the right to alter data, specifications and component parts without prior notice. IMPORTANT: No liability is accepted for incorrect use of this equipment. WARRANTY: Guarantee is 12 months from purchase date, proof of which will be required for any claim. INFORMATION: For a copy of our latest catalogue and promotions call us on 01284 757525 and leave your full name and address, including postcode. Sole UK Distributor, Sealey Group, Kempson Way, Suffolk Business Park, Bury St. Edmunds, Suffolk, IP32 7AR Original Language Version 01284 757500 01284 703534 Web www.sealey.co.uk [email protected] VS0041.V2 Issue No: 2 - 28/03/12