1
SERVICE
EDGE
The Laser Printer Tech Quarterly
Spring 2009
THIS ISSUE!
• OEM HYSTERIA: HOGWASH
• A FIX FOR CLJ 1500/25X0/28X0
• PARTS FOR BUDGET PRINTERS
• $500 PRINTERS NOT SERVICABLE:
BALDERDASH!
LPT's Customer Base
Grew 60% in 2008.
THERE'S NO MATCH FOR
COLOSSAL GROWTH!
Service Edge Page2
COMPANY NEWS
WE CAN DO IT, SO CAN YOU!
We wrote at the beginning of the recession that this is the best
time ever for service companies. New printer sales would drop, we
said, and they did. HP printer sales declined 19% in the first quarter of 2009. Now we are seeing continuing signs of our invigorated
industry.
In March, LPT broke its record of total customers sold for the
sixth consecutive month. We also set a new record for total orders.
There has been a gush of new clients in 2009.
Don’t let the negativity of the media get you down. Lucky for you,
you chose an industry that is recession-proof.
—David K. Reinke, CEO
TECH
RIGHT DIRECTIONS
No one is perfect. Not even the distinguished competition, whose Service
Today has been a useful tool for laser
printer professionals since it began in
1992 (with myself as its humble editor
in those carefree days).
The maintenance reset instructions given for the
LaserJet P4014, P4015, and P4515 in the January
2009 Service Today open the wrong menu. The error
also occurs in the service manual.
The correct way is to enter service mode by selecting Service Menu and entering the correct code. The
LIBERTY PARTS TEAM
RECORDS BROKEN IN 2009
March
•totalorders
•totalcustomers(6th-straightmo.)
February
•invoices(dailyaverage)
•totalcustomers(5th-straightmo.)
January
•totalorders
•totalcustomers(4th-straightmo.)
•packages(dailyaverage)
codes are: 05401408 for the P4014, 05401508 for the
P4015 and 05451508 for the P4515. In this menu
you will find “Maintenance Count=X.” Change the X
to zero by pressing zero on the key pad.
—R. Reinke
Your laser Printer
Parts Vendor
serVICe edGe is the quarterly laser printer tech
bulletin of Liberty Parts Team, Inc.
Editor-in-Chief: David K. Reinke
Editor: Robert Reinke
Writers: Dennis Kosterman, Robert Reinke.
©2009 Liberty Parts Team, Inc.
ForHP,Lexmark,Xerox,SamsungandOkidataprinterparts,callLibertyPartsTeam:888-444-8778.
Service Edge Page3
The fight against
Hogwash and Balderdash
A great man once said the truth shall make you free. In that spirit, Liberty Parts Team is debunking several false and
unprofitable ideas recently brought to our attention. We will thus fulfill our company mission, to promote Liberty — the
freedom to succeed — to our clients. LIBERTY PROMOTES TRUTH!
Liberty promotes truth, not hogwash.
£
RG5-1557: LJ 4V
Kit: C3141A; iD: 3.6 lbs.
Large grey levers.
CB506-67901:
LJ P4014, P4015, P4515
Kit: CB388A; iD: 3.3 lbs. Dark cover.”
RG5-0879: LJ 4+/5
Kit, 4 Plus: C2037A; Kit, 5:
C3916A; iD: 2.7 lbs.
Left corner square.
RG5-2661: LJ 4000/50
Kit: C4118A; iD: 3.1 lbs. Like 4100 but has captive screws
instead of blue lock levers.
RG5-5750:
LJ 9000, 9040/50, M9040/50
RG5-6903: CLJ 1500, 2500
Kit: C9152A; iD: 11.5 lbs.
Very large fuser with distinctive blue handle-strap.
126K10132: DP N2125 iD: 3.6 lbs.
116156700: PHASER 6100 iD: 2.4 lbs.
108R00092: DP N17/4517 iD: 2.3 lbs.
126E02480: PHASER 3450 iD: 2 lbs.
115R00029: 6250 PHASER iD: 3.4 lbs.
iD: 3.1 lbs. NotE: Also SAMSUNG ML 3560
115R00035: C2535/63XX iD: 3 lbs.
108N00515: W/C M15/M15i iD: 1.8 lbs.
iD: 3.3 lbs. White outer cover. Part number on label.
Liberty Parts team
2009 Fuser Chart
RG5-7572: CLJ 2550
LJ 101X, 102x, 30xx
i.D. 3.6 lbs. Part number on label. Flat gray outer cover.
RG5-7602: CLJ 2820/40 AiO
iD: 1.5 lbs. Match release-levers.
Kit: KIT-28xx-MNT; iD: 3.6 lbs. Part number on label. Indented gray
outer cover.
£
RG5-0454: LJ 4
Kit: C2001A; iD: 2.4 lbs.
Left corner angled.
£
5P
RG5-5063: LJ 4100
RM1-2049: LJ 1022
iD: Long release levers.
Kit: C8057A; iD: 3.2 lbs. Like LJ 4000 but has blue lock levers
instead of captive screws.
RG5-4447: LJ 5Si, 8000
{and Lexmark Optra N240/245}
Kit: C3971A; iD: 6.9 lbs. Has two plugs. RG5-1863 is an early version of this fuser which lacks a cleaning roller.
CB457a: CLJ CM6030/40, CP6015 MFP
iD: 10.5 lbs.
RG5-6532: LJ 8100
Kit: C3914A; iD: 7.7 lbs. Has one plug.
LJ 2100, 2200, 2300
iD: 1.8 lbs. Check part number on label. The LJ 2100 lacks a yellow
cable set and its top cover is perforated. The LJ 2200 and 2300 have
smooth tops and yellow cable sets. The LJ 2300 has a green jamclearing knob.
B
A
RM1-0660: LJ 101X
RM1-2086: LJ 1020
iD: Wire (A) is white.
RM1-0013: LJ 4200
RM1-0101: LJ 4300
RM1-1820:
CLJ 2600, 1600
Kit: Q2436A
RM1-1082: LJ 4250, 4350
Kit: Q5421A
iD: 3.2 lbs. Check part number on sticker.
Extra Rollers
RG5-4132: LJ 2100
A
Kit: H3974-60001
RM1-3044:
LJ 3050/52/55 AiO
iD: 3.1 lbs. Part number on label (A).
RM1-2665:
CLJ 2700, 3600, 3800, CP3505
iD: 2.9 lbs.
sEND FusER CoREs to
LIBERTY PARTS TEAM
3517 W. BELTLINE HWY.
MADISON, WI 53713
RM1-1824:
CLJ 2605
iD: 3 lbs. Part number on label.
The simplex version is RM1-1828.
iD: Wire (A) is blue.
RM1-0865:
LJ 3015/20/30 All-in-One
hP
iD: Wire (A) is white.
RM1-1043: LJ 4345, M4345
Kit: Q5998A; iD: 3.3 lbs. Check part number on metal
plate. Has extra rollers clipped onto the delivery guide.
to oRDER
PRiNtER PARts,
CALL (608) 268-7600
to REQuEst BiDs oN
FusER oVERstoCK
CALL (608) 268-7610
Kit: Q2429A
iD: Wire (A) is blue.
126N00286:
PHASER 3500
A
£
6P
RG5-1700: LJ 5P
RG5-0676: LJ 4L/4P
Kit: H3973-60001
iD: 1.7 lbs. Part number on
RG5-4110: LJ 6P
label. Top cover has eight rivetKit: H3966-60001; iD: 1.8 lbs.
like indentations and protrusions.
Part number on label. Top covers
Green lever has a single design are smooth; green lever has both a
on it: a triangle with three hori-- triangle and a printing icon. The 6P
zontal lines.
has one black gear.
XerOX
LeXmarK
How to Identify Lexmark Optra S, Optra T and T-Series Fusers
RM1-0428:
CLJ 3500, 3550, 3700
RM1-4310:
CLJ CM1015/17 MFP
Kit: Q3655A; iD: 3 lbs.
iD: 3.1 lbs. Part number on label. Lacks claw-like guides (B).
1. Does it have a white connector on one end? Optra S series. 2. Does it have two white connectors on one side? Optra T and T620/2. 3. Similar T-Series.
1 Optra S
1
2
2 Optra T & T620/2
RG5-5559: LJ 2200
Kit: H3978-60001
RM1-6405: LJ P2030/50
iD: 2.2 lbs.
B
RM1-3131:
CLJ 4700, 4730, CM4730, CP4005
RM1-0354: LJ 2300
RM1-0715: LJ 1150, 1300
Kit: U6180A
RM1-4430:
CLJ CP1210, CP1510, CM1312 MFP
iD: 1.9 lbs.
Kit: Q7502A; iD: 4.6 lbs.
Kit: KIT-1300-MNT
RG9-1493: LJ 1000, 1200, 3300
Kit: KIT-1200-MNT; iD: 1.9 lbs. Large screws are brass on RG91493, silver on RM1-0715.
RM1-1289:
LJ 1160, 1320, 339X AiO
Kit: KIT-1320-MNT; iD: 2.3 lbs. Lacks extended frame of
RM1-4247.
A
A
Optra S Series
99A1185: Optra S 12xx
iD: 4.2 lbs. “12/16” stamped on the frame (B); lacks solenoid (A).
99A0966 (KIT: 99A0967): Optra S 16xx/18xx
“12/16” stamped on the frame (B), solenoid (A) is present.
99A1190 (KIT: 99A1195): Optra S 24xx
Has “24” stamped on the frame (B), solenoid (A) is present.
99A1192 (KIT: 99A1197): Optra Se 3455
A rare fuser very similar to 99A1190.
A
Optra T
99A1969 (KIT: 99A1970): Optra T610/612
99A1977 (KIT: 99A1978): Optra T614/T616
iD: 4.2 lbs. They have two white connectors (see “2” at top of page) and
have a circuit board on the bottom. This board may be partially covered
by a cover with a warning indication on it (A). Observing the size of the lower pressure roller is not a reliable method of distinguishing Optra T fusers.
Lexmark T620/2
99A2402 (KIT: 99A2408): T620
99A2405 (KIT: 99A2411): T622
iD: 3.9 lbs. These two fusers have two white connectors (see
“2” at top of page) but lack a board on the bottom (A). Observing the size of the lower pressure roller is not a reliable method
of distinguishing the T620 and T622.
3 Similar Lexmark T-Series Fusers
RG5-5455: LJ 5000
Kit: C4110A; iD: 3.7 lbs. See below.
RG5-6493: CLJ 4600
Kit: C9725A
RG5-7450: CLJ 4650, 4610
RG5-5154: CLJ 4500/50
Kit: C4197A; iD: 6.1 lbs. Large blue handles.
Kit
RG5-7060: LJ 5100
Kit: Q1860A; iD: 3.6 lbs. The LJ 5000 and 5100 are interchangeable. To distinguish them, note the location of the holes in
the cover and compare with the photos.
RM1-4247:
LJ P2014/15, M2727 MFP
Kit: KIT-2015-MNT; iD: 2.3 lbs. Has extended frame.
RM1-2075: LJ 3380 All-in-One
iD: 2 lbs. Has white piece in middle of delivery roller.
Kit: Q3676A
iD: 4.8 lbs. To distinguish the 4600 from the 4650, check the
large gear on the bottom of the fuser — see the picture below. The
teeth are cut at an angle on the 4650 and straight on the 4600.
B
B
A
99A2423 (KIT: 99A2420): T520/2
iD: 3.3 lbs. Like 56P1333 but lacks cable (A)
A
A
56P1333 (KIT: 56P1409): T630/2
56P1859 (KIT: 56P1855): T634
iD: 3.8 lbs. Similar to 40X2592 but the largest receptacle in the board
(B) has only eight pins, and the left sensor flag is inaccessible. Has a cable
99A2423 lacks (A). NotEs: 56P1333 is a new p.n., replacing 56P2542.
56P1859 replaces 56P2545.
40X2592 (KIT: 40X0100): T640/2/4
iD: 3.7 lbs. Sensor flag on the left side (A) is accessible;
both sensors are held in by screws. Large receptacle in
board (B) has 11 pins.
12G0074: Optra E310
12G3982: Optra M410
RG5-6848: CLJ 5500
Kit: C9735A
RG5-7691: CLJ 5550
RG5-3060: CLJ 8500/50
Kit: C4155A; iD: 9.2 lbs. Similar to LJ 5Si/8000, but has a
large green lever. Upper and lower fuser rollers are red.
RM1-1535: LJ 24xx
RM1-2522: LJ 5200
iD: 4.7 lbs. Part number on label. No yellow warning sticker.
Kit: H3980-60001; iD: 2.8 lbs. Has green
jam-clearing knob and extended frame. Note
that the label may show the part number
“RM1-1491.”
RM1-6738:
CLJ CP2020 Series
iD: 2.4 lbs
Kit: Q3984A
iD: 7.8 lbs. Similar to 4600 but has blue handles and is longer.
To distinguish the 5500 from the 5550, note the large gear on
the bottom. It is angle-cut on the of the 5550 but straight on the
5500 — see picture below.
56P0648: T420
GEAR DIFFERENCES
FOR 55XX AND 46XX
iD: 1.8 lbs.
iD: 1.8 lbs.
iD: 0.6 lbs.
LPT mailed to clients in January its 2009
Fuser Identification Chart, and if you haven't
checked it out, we'll tell you what you are missing! More than 70 different fusers are covered, including HP, Xerox and Lexmark. For
completeness, usefulness and beauty, there is
nothing to compare with it.
If you didn't get one, call your LPT rep
today!
HP list price does not seem sensible to you, why not give LPT a try?
Your account executive can discuss
the options with you.
RG5-0046: LJ IIISi/4Si
Kit: C2062A; iD: 5 lbs.
Blue-green felt cover.
£
COMPANY NEWS
NEW FUSER CHART
That is what we thought at Liberty when we read Parts Now’s January Service Today. As the hogwash
in question could cost you money
if taken seriously, we felt we should
address it directly.
In “Would the Real OEM Please
Stand Up?” technician Jeremy Mueller states that HP makes the parts
in its printers, which is flat out
wrong: they outsource. Look at a
lamp or a fan and you will see the
name of the factory that made the
part. You won’t see HP inscribed
anywhere because HP itself does
not “make” its parts. Yet the article
says: “When you buy a genuine
OEM part through an authorized
distributor, the product you get is
made by the Original Manufacturer of the printer.” What are they
driving at?
More hogwash follows: “We’re
aware of your concern that the
term ‘OEM’ gets overused and misrepresented in the marketplace.”
Thank your lucky stars for authorized resellers, who are “more than
likely selling the genuine part.” But
beware of bargains, because “if the
price is too good to be true, it probably isn’t the real deal”
The happy reality is that authorized resellers do not have a monopoly on OEM parts. At Liberty,
OEM, second-source OEM and
aftermarket parts are available for
use at your discretion. If paying
£
hOGWash!
RM1-3007: LJ M5025, M5035
Kit: Q7832A; ID: 4.7 lbs. Bright yellow warning sticker.
Part number on label.
RM1-3740:
LJ P3005, M3027 MFP, M3035 MFP
Kit: KIT-3005-MNT; iD: 2.7 lbs. Check for part number on label.
Lacks green knob and extended frame of RM1-1535.
CC519-67901:
HP CLJ CM3530 MFP
iD: 4 lbs. Label says RM1-4955.
RG5-6098: CLJ 9500
Kit: C8556A; iD: 13.2 lbs. Has large pistol-grip handles.
40X4194:
E232/330/332/240/340/342
iD: 2.5 lbs.
12G4484: E320/322
iD: .8 lbs.
1381626, 1381639, 1381640:
4039/4049 iD: 2.2 lbs.
LibertyPartsTeam,Inc.3517WBeltlineHwy.,Madison,WI53713608-268-7600FAX608-268-7619
Service Edge Page 4 EDITORIAL
Balderdash!
We at Liberty Parts Team read with some surprise
Steve Geishirt’s new printer survey “HP & Lexmark:
New Products and Trends,” in the January 2009 Service Today. He repeatedly asserts as an “old rule of
thumb” something that is untrue: that a printer under
$500 “really isn’t serviceable.”
Here are some reasons why sub-$500 printers can
and must be serviced in the years ahead.
1. Cost-per-page contracts will force you to service
them.
2. For many LPT clients, $79-$99 dollar service
calls are their bread and butter. If a power supply fails,
don’t tell the client to buy a new printer — give LPT
a call! We may have a better solution.
3 Market buying trends indicate demand for color
laser printers at lower prices (marketresearch.com).
One popular computer hardware web site publishes a
list of its “Top 10 Color Laser Printers.” Their average
price is $464. New small businesses will gobble them
up and will need your company’s help to maintain
them.
4 Businesses that rely on personal printers may be
unwilling or unable to finance a replacement. They
may be content to have a paid-off printer.
5. Chucking printers in the landfill is not a green
approach to business printing.
We would add that pn has offered repair training on
these allegedly unserviceable printers from the beginning. What did Steve tell students attending the LJ
1500/2500 repair class? “Congratulations. You have
successfully reassembled the printer and have passed
the course. By the way, it is not worth servicing.”
At Liberty, we will help you service whatever printer
you want. This idea of PN’s that you can’t service under-$500 printers is just balderdash.
Liberty Promotes Truth!
—David K. Reinke
SUB-$500 PRINTER PARTS
APPROXIMATE HP LIST PRICE — CALL & SAVE
PART#
NAME
PRICE
1500/25X0
PART#
NAME
PRICE
1600/260x
RG5-6910-N*
CAROUSEL, 2500
$82.65
RC1-5440-N
P/U ROLLER (D SHAPE)
$8.03
RG5-7587-R*
CAROUSEL, 2550
$95.95
RM1-1828-N
FUSER, 2605 NEW (SIMPLEX)
$153.00
RG5-6960-R
HVPS,1500/2500
$142.00
RM1-1885-N
ETB ASM, 2600
$140.00
RB3-0160-N
P/U ROLLER, TRAY 1
$5.70
RM1-1891-N
ETB ASM, 2605 SIMPLEX
$140.00
RF5-4012-N
SEPARATION PAD
$10.36
RM1-1892-N
ETB ASM, 2605DN/DTN
$134.00
C9705-69003-R
PC BOARD, 1500/2500
$160.00
RM1-1922-N
SEPARATION PAD ASM
$8.50
RF5-4040-R
TRANSFER ROLLER, 1500/2500
$22.00
RM1-1820-N
FUSER, 2600/1600 NEW
$129.00
RM1-1975-R
DC CONTROLLER, 2600N
$120.00
*Referred to in tech article which begins on the facing page
For HP, Lexmark, Xerox, Samsung and Okidata printer parts, call Liberty Parts Team: 888-444-8778.
Service Edge Page5
TECH
HP COLOR LASERJET
1500/25X0/28X0
CAROUSEL REPLACEMENT
One of the most common problems in these
printer models is a broken left carousel bushing,
causing the printed image to fade away on the left
side of the page. Replacing the bushing requires removal of the carousel. While not difficult or complicated, this can be a time-consuming procedure. The
service manual's coverage is marred by omissions,
unnecessary steps, and some unclear and mislabeled
figures. Therefore, we will take you through the process step by step.
The 28x0, which has a document scanner on
top, requires many additional steps, the headings of
which we put in red. All indications of "right," "left,"
"back," and so on refer to standing in front of the
printer; much of the work will be done from the rear.
1. Remove the paper cassette, imaging drum, and
toner cartridges. After removing the imaging drum,
make sure to put it in a dark place or cover it, since it
can be damaged by ambient light. If the printer is still
capable of turning the carousel, the easiest way to
remove the cartridges is to have the printer powered
up and use the carousel rotation button to move each
cartridge into position for removal. Otherwise, it is
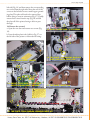
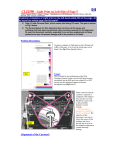
1. ADF: SQUEEZE TABS
2. RIGHT REAR COVER: LEFT LATCH
simplest to leave the cartridges in the carousel until
its removal.
2. Remove the ADF (28x0 only). Open the ADF,
disconnect the connector in the rear (Fig. 1) by
squeezing the tabs together and lifting upward, then
remove the ADF by lifting it upward.
3. Left and Right Covers. 1500/25x0: Remove one
screw from bottom. Grasping by handle and top,
gently lift the cover up and away. 28x0. Open the
document scanner and top cover. For the right cover,
remove two screws and lift the cover up and away
from the printer (pull the lower edge out first). For
the left, remove one screw at the lower edge, disen-
SUB-$500 PRINTER PARTS
APPROXIMATE HP LIST PRICE — CALL & SAVE
PART#
NAME
PRICE
1160/1320
PART#
NAME
PRICE
Q3948-60214-N
ADF PPR INPUT TRAY
$18.50
ADF
$14.25
RM1-1298-N
SEPARATION PAD
$13.00
5851-3580-N
RK2-0418-R
MOTOR
$57.00
P2015
RM1-1281-R
REGISTRATION ASM
$31.50
RL1-1525-N
MP TRAY P/U ROLLER
$9.50
RM1-1289-R
FUSER, REMAN.
$135.00
RM1-4279-A
TRANSFER ROLLER
$14.25
RL1-0540-N
P/U ROLLER
$9.80
305x
RL1-0266-N
P/U ROLLER
$10.36
RL1-1524-N
MP SEP PAD
$9.80
RM1-2048-N
SEP PAD ASM
$9.75
Q7805-69003-N
FORMATTER NETWORK
$80.35
RM1-3044-N
FUSER, NEW
$111.00
Q5931A-ETN-N
TRAY, 250-SHEET
$152.00
LibertyPartsTeam,Inc.3517WBeltlineHwy.,Madison,WI53713608-268-7600FAX608-268-7619
Service Edge Page6
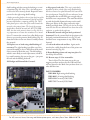
3. RIGHT REAR COVER:
REAR LATCH
4. RIGHT REAR COVER ORIENTATION
5. SCANNER: RETAINING TAB
gage the latch at the front of the left cover (Fig. 6);
finally, pull the bottom of the cover slightly up and
out, and then lift it off of the printer.
4. Right Rear Cover (28x0 only). Disengage latches
on the left (Fig. 2) and rear (Fig. 3), and pull the
cover off from the rear. Fig. 4 should help you to
remember the correct orientation of this piece during
re-assembly.
5. I/O cover (in the right rear of the printer). Open
the rear door, disengage the latch at the top of the
I/O cover, and pull it away from the printer.
6. Scanner Cables (28x0 only). Now you can unplug
the four scanner cables from the top of the formatter
and unroute them from the cable guide so that they
hang free at the rear of the printer. Note the layering
of the cables in the cable guide, and make sure they
are reassembled in the proper order: the long narrow flat cable goes in first, then the short wide flat
cable, then the wire bundles. In the same bundle with
these cables is a ground wire, which you will need to
disconnect at the rear of the printer.
7. Document Scanner (28x0 only). Open the
scanner, disconnect it from the links on each side
by disengaging the retaining tab at the top of each
link (Fig. 5), raise the scanner until it is vertical, and
lift it off of the printer. Note that the scanner is not
secured once the links have been disengaged, so be
careful not to drop it, and when re-assembling, make
sure to re-connect the links before mounting the
6. LEFT COVER
ForHP,Lexmark,Xerox,SamsungandOkidataprinterparts,callLibertyPartsTeam:888-444-8778.
Service Edge Page7
white rod (Fig. 9). [Both the gear and the rod have
lips on them that prevent the gear teeth from completely disengaging. Each piece has one section where
the lip is cut away. See Fig. 9 inset. We suggest you
try reinstalling it immediately to avoid delays later.]
Reinstall: Pull the white rod all the way up and
7. LEFT REAR COVER: ONE LATCH
B
A
C
ADF onto the scanner.
8. Formatter Cage. 1500: remove five screws and
two cables, lift cage off. 25x0, 28x0: Open the
memory door and unplug one cable (you will need
to use a tool to release the retaining tab on the connector), then unplug any remaining cables from the
top (some of these may be easier to unplug later, as
you are removing the cage), then remove four screws
along the edges of the cage, two on each side, and
possibly one screw at the bottom. Finally, lift the cage
to disengage it from the hooks at the top, and pull it
away from the printer. When re-assembling, make
sure to re-engage the hooks.
9. Left Rear Cover (28x0 only). To remove the left
rear cover, disengage one latch (Fig. 7) and pull the
cover away from the rear. Keep the top cover open to
access the screws for the next two covers.
10. Left and Right Upper Covers (28x0 only). To
remove the left upper cover (in the front), remove
one screw at the front and then pull the cover up and
back. Removal of the right upper cover is similar, except that there are two screws. On the 2840 only you
will have to detach two grounding wires. Also, you
will need to press the scanner release button while
pulling the cover off.
11. (Upper) Back Cover. Use a flat-blade screwdriver to loosen two internal tabs, one on either side.
Then rotate the cover away and downward to release
the tabs.
12. Remove the top cover.
a. Screws. With the cartridge door open, remove two
screws at the front, and possibly a third screw on the
right.
b. Observe Link Gear and Lever. Observe the correct orientation of the gear and link lever, comparing
these with Fig. 8. It will speed up reassembly. The
front most gear tooth on the link lever should fit into
the notch on the link gear.
c. Remove Link Gear. Press the latch at the center
of the link gear and pull it off the shaft (Fig. 8). Then
disengage the link lever from the post at its forward
end, and lift the cover off of the printer. Now remove
the gear shaft, to which the link gear was attached. It
will come out only when aligned properly, so rotate
it while pulling it until it comes free from the vertical
8. LINK GEAR (A), LINK LEVER (B),
LINK LEVER TOOTH (ARROW);
RELEASE LATCH (C)
9. LINK GEAR SHAFT POSITION: ONLY
REMOVES WHEN ALIGNED
LibertyPartsTeam,Inc.3517WBeltlineHwy.,Madison,WI53713608-268-7600FAX608-268-7619
Service Edge Page8
10. LEFT SUPPORT: SEVEN SCREWS;
AIR DUCT/FAN: TWO TABS
11. RIGHT SUPPORT: FOUR SCREWS
12. RIGHT SUPPORT: SIX SCREWS
make sure the top door is all the way open. Attach
the link lever, then the link gear and shaft to match
Fig. 8. There may be some resistance as you push the
gear onto the shaft.
13. Remove the left and right supports (CLJ 28x0
only). The left support is easy: remove seven screws
(Fig. 10) and then pull the support up and away
from the printer. The right support comes off in two
pieces. To remove the front piece, remove four screws
(Fig. 11) and lift the piece away from the printer. Although it isn’t mentioned in the service manual, there
was also a piece of thick black tape on our printer
that was securing this piece, and had to be partially
peeled away. Then remove six screws from the main
section of the support (Fig. 12) and lift if off the
printer.
14. Remove the air duct and fan. These are on the
left side of the printer. Unplug the fan cable (black
connector about halfway up the left side of the air
duct) and then unroute this and other cables (with
white connectors) from the air duct. Then release
two retaining tabs near the bottom (Fig. 10) and lift
the air duct and fan assembly straight to release two
other hidden tabs at the top.
15. Remove the face-down cover. Behind the scanner is a gray plastic piece (the face-down cover) with
two gray levers (forming holders) resting on top of
it (Fig. 13). Raise these, rotate the lower part of the
cover toward the front of the printer, and remove it.
16. Remove the rotary-drive assembly. Unplug
all remaining cables from the top edge of the DC
Controller, then remove five screws. Two of these are
shown in Fig. 14 (side view), and the other three in
Fig. 15 (top view). Now you can lift the assembly out
of the printer. When re-installing it later, first insert
the metal protrusion at the back into the slot in the
printer frame, and then lower the assembly into position over the alignment pins.
17. Remove the top plate. Unplug and unroute
all remaining cables from the right edge of the DC
Controller. On the bottom connector, you will need
to press a tab on the side of the connector while
unplugging it. You will also need to unroute a small
cable set (Fig. 18). Also unplug four cables on the left
side of the printer and remove two screws from the
ForHP,Lexmark,Xerox,SamsungandOkidataprinterparts,callLibertyPartsTeam:888-444-8778.
Service Edge Page9
left side (Fig. 16) and then remove the corresponding
two screws from the right side. Note that one of the
screws on the left side secures a small copper grounding plate. This plate will need to be removed, but
before doing so, note its orientation (Fig. 17). Finally,
remove four screws from the top (Fig. 18) and lift
the plate off of the printer, letting a cable set pass
through.
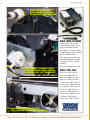
18. Remove the carousel.
a. Open the rear door and remove two screws (Fig.
19).
b. Press the white plastic tab (visible in Fig. 17) on
the left side of the printer to release the left swing-
15. ROTARY DRIVE ASM: 3/5 SCREWS
13. FACE-DOWN COVER: LEVERS
14. ROTARY DRIVE ASM: 2/5 SCREWS;
UPPER CABLES EXCEPT GROUND
16. TOP PLATE: TWO SCREWS ON EACH
SIDE, CABLES ON RIGHT SIDE
17. TOP PLATE: WHITE TAB
18. TOP PLATE: FOUR SCREWS, UNWIND CABLE SET
LibertyPartsTeam,Inc.3517WBeltlineHwy.,Madison,WI53713608-268-7600FAX608-268-7619
Service Edge Page10
shaft bushing and then rotate the bushing to a vertical position (Fig. 20). Note: This is the bushing mentioned earlier that commonly breaks. Repeat the same
process for the right swing-shaft bushing.
c. Before proceeding further, observe from the front of the
printer the position and orientation of the left and right
pressure-shaft holders, comparing with Fig. 24. These
white plastic pieces at the rear of the carousel attach the
carousel to the printer frame. The feet of the pressureshaft holders should be inserted into, NOT COVERING, the slots in the printer’s chassis (see Fig. 24). It is
very important to re-create this orientation on re-installation. To remove the carousel, use a flat-blade screwdriver to pry out the pressure-shaft holders (Fig. 21)
from their niches in the rear frame. Carefully remove
the carousel.
19. Replace one or both swing-shaft bushings if
necessary. The right bushing just slides out of the
carousel assembly (in fact, it will fall out all by itself
if the carousel is tilted that way). The left bushing,
which is more likely to need replacement, is held in
by a small retaining clip next to the gear – just press
this tab and the bushing slides off.
20. Realign and Reinstall the Carousel.
a. Align gears, both sides. This step is particularly
important if either or both of the swing-shaft bushings
have been removed or replaced because their removal allows misalignment. Using Fig. 22 as a reference, locate
the alignment line on the black gear on right side of
the black toner compartment. This mark should line
up with the double alignment bumps on the small
white gear. If they do not align, remove the right
bushing and align them. The left side also has an alignment line, but there are additional lines there that create
confusion, so work with the right one.
b. Reinstall Carousel with gear knob positioned
downward. Put the carousel back in the printer with
the knob positioned downward, as in Fig. 23, and
the Black toner compartment on top, Yellow facing
forward.
c. Lock in the white tabs and feet. Again, make
sure the feet, visible from the front of the printer are
inserted correctly (Fig. 24).
d. Rotate Bushings down and snap into place. Recheck Step 20a and 20c.
21. Reverse steps 1-19 to reassemble.
Tester's Note. The first time you try this, we
suggest you allow one hour for the 1500 and 25x0,
and two hours for the 28x0. One you have done it, it
takes half the time.
PART NUMBERS:
RB2-9808 Right swing-shaft bushing
RB2-9809 Left swing-shaft bushing
RG5-6910 Carousel (1500/2500)
RG5-7587 Carousel (2550/28x0)
19. CAROUSEL: TWO SCREWS
20. CAROUSEL: L. BUSHING, ROTATED UP
21. CAROUSEL: PRESSURE SHAFT
HOLDERS, PRY UP
ForHP,Lexmark,Xerox,SamsungandOkidataprinterparts,callLibertyPartsTeam:888-444-8778.
Service Edge Page11
22. REALIGNMENT: ALIGN TWO
BUMPS ON WHITE GEAR
WITH LINE IN "K" SECTION
OF CAROUSEL ON RIGHT SIDE
ATRIX TONER VACUUMS
23. REALIGNMENT: PRESSURE SHAFT
GEAR WITH KNOB DOWN (ARROW);
ALSO INDICATED: LEFT GEAR SHAFT
HOLDER AND 'FOOT' (DOTTED CIRCLE)
Liberty Parts Team, printer
parts company famous for its
quality remanufactured fusers, offers Atrix International’s
Omega Supreme Toner Vacuum
and its standard filters.
Atrix vacuums and filters are
used and approved in companies such as Xerox, HP and
Lexmark.
For pricing, contact your rep.
DIRECT TOLL-FREE
Gonzo Casas: (866) 540-9171
Dan Cassidy: (866) 650-6771
Bruce Davis: (866) 334-4184
Dave Gress: (866) 540-9168
Richard Jordan: (866) 540-9175
Colleen Longseth: (866) 540-9167
Jason Meyering: (866) 540-9170
Rich Russell: (866) 540-9174
Kas Schafer: (866) 540-9172
John Schuchart: (888) 444-2190
Paul Seibold: (866) 540-9177
Wayne Tougas: (866) 540-9176
24. REALIGNMENT: PRESSURE SHAFT
'FEET' POSITION, CORRECT AND INCORRECT
LibertyPartsTeam,Inc.3517WBeltlineHwy.,Madison,WI53713608-268-7600FAX608-268-7619
It was Liberty
killed the beast!
At Liberty Parts Team,
our quality crushes the
competition ours and yours.
Call toll free: 888-444-8778
PrsrtStd
U.S.Postage
PAID
PermitNo.#2944
Madison,WI
LIBERTY PARTS TEAM, INC.
3517 W. BELTLINE HWY.
MADISON, WI 53713
888-444-8778
WWW.LBRTY.COM