1
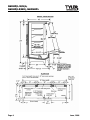
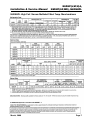
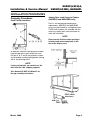
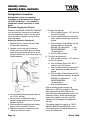
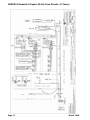
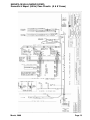
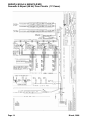
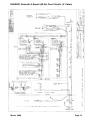
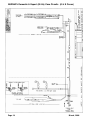
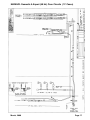
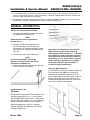
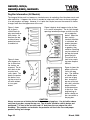
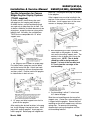
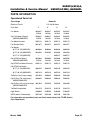
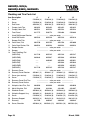
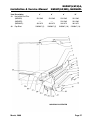
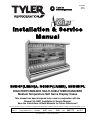
N6DHPMR
YE0637
YE0638
Installation & Service
Manual
N6DHP(L/M/H)A, N6DHP(LR/MR), N6DNHPL
HIGH PERFORMANCE MULTI-SHELF MERCHANDISER
Medium Temperature Self Serve Display Cases
This manual has been designed to be used in conjunction with the
General (UL/NSF) Installation & Service Manual.
Save the Instructions in Both Manuals for Future Reference!!
This merchandiser conforms to the American National Standard Institute & NSF International Health and Sanitation standard ANSI/NSF 7 - 2003.
PRINTED IN Specifications subject to REPLACES
IN U.S.A.
change without notice. EDITION
8/07
ISSUE
DATE
3/08
Tyler Refrigeration * Niles, Michigan 49120
PART
NO.
9037176
REV. G.1
N6DHP(L/M/H)A,
N6DHP(LR/MR), N6DNHPL
CONTENTS
Page
Specifications
N6DHPLA / N6DHPMA / N6DHPHA / N6DHPLR / N6DHPMR
Specification Sheets . . . . . . . . . . . . . . . . . . . . . . . . . . . . . . . . . . . . . . 4
N6DNHPL Specification Sheets . . . . . . . . . . . . . . . . . . . . . . . . . . . . . 7
Pre-installation Responsibilities . . . . . (See General-UL/NSF I&S Manual)
Installation Procedures
Carpentry Procedures . . . . . . . . . . . . . . . . . . . . . . . . . . . . . . . . . . . 9
Case Pull-Up Locations . . . . . . . . . . . . . . . . . . . . . . . . . . . . . . . . . . 9
Joining Rear Load Cases to Coolers . . . . . . . . . . . . . . . . . . . . . . . . . 9
Refrigeration Procedures . . . . . . . . . . . . . . . . . . . . . . . . . . . . . . . . 10
Electronic Thermostat Control . . . . . . . . . . . . . . . . . . . . . . . . . . . . . 10
Electrical Procedures . . . . . . . . . . . . . . . . . . . . . . . . . . . . . . . . . . . 11
Electrical Considerations . . . . . . . . . . . . . . . . . . . . . . . . . . . . . . . . . 11
Case Fan Circuit . . . . . . . . . . . . . . . . . . . . . . . . . . . . . . . . . . . . . . . . 11
Fluorescent Lamp Circuit . . . . . . . . . . . . . . . . . . . . . . . . . . . . . . . . . 11
Plumbing Procedures . . . . . . . . (See General-UL/NSF I&S Manual)
Defrost Information . . . . . . . . . . . . . . . . . . . . . . . . . . . . . . . . . . . . 11
Defrost Control Chart . . . . . . . . . . . . . . . . . . . . . . . . . . . . . . . . . . . 11
Installation Procedure Check Lists (See Gen.-UL/NSF I&S Manual)
Wiring Diagrams . . . . . . . . . . . . . . . . . . . . . . . . . . . . . . . . . . . . . . . . . . . 11
N6DHP(L/M/H)A & N6DHP(LR/MR)
Domestic & Export (50 Hz) Case Circuits . . . . . . . . . . . . . . . . . . 12
N6DNHPL Domestic & Export (50 Hz) Case Circuits . . . . . . . . . 15
Cleaning and Sanitation . . . . . . . . . . . (See General-UL/NSF I&S Manual)
Component Removal and Installation Instructions for Cleaning 18
Shelves and Shelf Brackets . . . . . . . . . . . . . . . . . . . . . . . . . . . . . . 18
Bottom Trays . . . . . . . . . . . . . . . . . . . . . . . . . . . . . . . . . . . . . . . . . . 18
Front Air Ducts . . . . . . . . . . . . . . . . . . . . . . . . . . . . . . . . . . . . . . . . 18
Rear Duct Panels . . . . . . . . . . . . . . . . . . . . . . . . . . . . . . . . . . . . . . 18
Discharge Air Honeycomb . . . . . . . . . . . . . . . . . . . . . . . . . . . . . . . 18
Top Duct . . . . . . . . . . . . . . . . . . . . . . . . . . . . . . . . . . . . . . . . . . . . . 18
Front Cladding . . . . . . . . . . . . . . . . . . . . . . . . . . . . . . . . . . . . . . . . 19
Page 2
June, 2008
Installation & Service Manual
N6DHP(L/M/H)A,
N6DHP(LR/MR), N6DNHPL
Page
Cleaning Instructions . . . . . . . . . . . . . . . . . . . . . . . . . . . . . . . . . . . . 19
Stainless Steel Cleaning Methods . . . . . . . . . . . . . . . . . . . . . . . . . . 19
General Information
NSF Product Thermometer Installation . . . . . . . . . . . . . . . . . . . . . 21
Egg Merchandiser Kit . . . . . . . . . . . . . . . . . . . . . . . . . . . . . . . . . . . 21
Removing Metal Edge Trim . . . . . . . . . . . . . . . . . . . . . . . . . . . . . . . .21
Peg Bar Information . . . . . . . . . . . . . . . . . . . . . . . . . . . . . . . . . . . . 22
Peg Bar Information for Cannon Magna Peg Bar Display
Systems . . . . . . . . . . . . . . . . . . . . . . . . . . . . . . . . . . . . . . . . . . . . . 23
Rear Load Air Close-Off Information (N6DHPLR/N6DHPMR) . . . . . 24
Service Instructions
Preventive Maintenance . . . . . . . (See General-UL/NSF I&S Manual)
Ballast and Lighting Locations . . . . . . . . . . . . . . . . . . . . . . . . . . . . . 24
Parts Information
Operational Parts List . . . . . . . . . . . . . . . . . . . . . . . . . . . . . . . . . . . . 25
Cladding and Trim Parts List . . . . . . . . . . . . . . . . . . . . . . . . . . . . . . 26
Revision Log
. . . . . . . . . . . . . . . . . . . . . . . . . . . . . . . . . . . . . . . . .28
TYLER Warranty . . . . . . . . . . . . . . . . . (See General-UL/NSF I&S Manual)
The following High Performance Medium Temperature, Multi-Shelf Dairy, Deli, Produce and
Juice Merchandiser models are covered in this manual:
MODEL
DESCRIPTION
N6DHPLA
4’, 6’, 8’ & 12’ HIGH PERF. MED. TEMP. MERCHANDISER WITH
18” FRONT
N6DHPMA
4’, 6’, 8’ & 12’ HIGH PERF. MED. TEMP. MERCHANDISER WITH
22” FRONT
N6DHPHA
6’, 8’ & 12’ HIGH PERF. MED. TEMP. MERCHANDISER WITH 26” FRONT
N6DHPLR
8’ & 12’ HIGH PERF. MED. TEMP. MERCHANDISER WITH 18” FRONT
AND REAR DOORS
N6DHPMR
8’ & 12’ HIGH PERF. MED. TEMP. MERCHANDISER WITH 22” FRONT
AND REAR DOORS
N6DNHPL
4’, 6’, 8’ & 12’ HIGH PERF. NARROW MED. TEMP. MERCHANDISER
WITH 18” FRONT
March, 2008
Page 3
N6DHP(L/M/H)A,
N6DHP(LR/MR), N6DNHPL
SPECIFICATIONS
N6DHP(LA, MA, HA, LR, MR) High Perf. Med. Temp. Merchandisers
Page 4
June, 2008
Installation & Service Manual
June, 2008
N6DHP(L/M/H)A,
N6DHP(LR/MR), N6DNHPL
Page 5
N6DHP(L/M/H)A,
N6DHP(LR/MR), N6DNHPL
Page 6
June, 2008
Installation & Service Manual
N6DHP(L/M/H)A,
N6DHP(LR/MR), N6DNHPL
N6DNHPL High Perf. Narrow Multishelf Med. Temp. Merchandisers
March, 2008
Page 7
N6DHP(L/M/H)A,
N6DHP(LR/MR), N6DNHPL
Page 8
March, 2008
Installation & Service Manual
N6DHP(L/M/H)A,
N6DHP(LR/MR), N6DNHPL
INSTALLATION PROCEDURES
Carpentry Procedures
Case Pull-Up Locations
Joining Rear Load Cases to Coolers
(N6DHPLR and N6DHPMR only)
For U.L. and temperature performance
requirements, N6DHPLR and N6DHPMR
cases must be backed by a refrigerated area.
TYLER walk-in coolers are available with the
necessary special parts and instructions to
make the installation.
NOTE
Please ensure that the cooler opening is
insulated and sealed completely to the
rear of the display case.
All N6DHPA, N6DHPR and N6DNHPL models
have four pull-ups at each end of the case.
Pull-ups A, B, C and D are located as shown
and should be installed and tightened starting
with A and finishing with D.
NOTE
If extra pull-up bolts are needed, use the
bolts from the side shipping supports.
See “General-UL/NSF I&S Manual” for
line-up assembly instructions.
March, 2008
Page 9
N6DHP(L/M/H)A,
N6DHP(LR/MR), N6DNHPL
Refrigeration Procedures
Refrigeration system and superheat
instructions can be found in the “General
(UL/NSF) I&S Manual”. Case electronic
temperature control information is listed
below.
Electronic Temperature Control
Whenever an N6DHPA, N6DHPR or N6DNHPL
uses an electronic thermostat and solenoid
valve for temperature control, use the following in-structions to properly set-up the electronic thermostat.
Setting the Electronic Thermostat
1. Remove the four screws and cover from
the electronic thermostat.
2. Connect sensor wires to the common
(COM) and sensor (SEN) terminals of the
terminal strip located at the top left of the
printed circuit board. The sensor leads are
interchangeable.
7. To adjust the setpoint:
a. Push the Menu Button. “SP” will flash
on the LCD display.
b. Push the Menu Button one more time
and a setpoint temperature will be displayed.
c. Push the Up or Down Button until the
desired setpoint is displayed.
N6DHPA (all applications)
= 32°F
N6DHPR/N6DNHPL
= 30°F
(all applications)
d. Push the Menu Button.
8. To adjust the differential:
a. Push the Menu Button. “SP” will flash
on the LCD display.
b. Push the Down Button until “DIF” is
shown on the LCD display.
c. Push the Menu Button one more time
and a differential number will be displayed.
d. Push the Up or Down Button until the
desired differential setting is displayed.
N6DHPA (all applications)
= 1°F
N6DHPR/N6DNHPL
= 2°F
(all applications)
d. Push the Menu Button.
3. Set the Heating/Cooling jumper blocks to
the “COOL” position.
4. Set the Cut-in at Setpoint/Cut-out at
Setpoint jumper blocks to the “Cut-out at
Setpoint” position.
5. Set the keypad Locked/Unlocked jumper
blocks to the “Unlocked” position.
6. Replace the electronic thermostat cover
and secure with four screws.
Page 10
With the cooling mode selected, the
differential is ABOVE the setpoint. The relay
will energize and the LED indicator will
illuminate when the temperature reaches the
differential setting. When the temperature
drops to the setpoint, the relay and LED
indicator will de-energize and refrigeration
will stop.
The settings above are specific to TYLER
N6DHPA, N6DHPR and N6DNHPL cases.
Other applications will require different setpoints and differentials.
March, 2008
Installation & Service Manual
N6DHP(L/M/H)A,
N6DHP(LR/MR), N6DNHPL
Electrical Procedures
Defrost Information
Electrical Considerations
See “General-UL/NSF I&S Manual” for
operational descriptions for each type of
defrost control.
CAUTION
Make sure all electrical connections at
components and terminal blocks are tight.
This will prevent burning of electrical
terminals and/or premature component
failure.
NOTE
Raceway covers will be shipped loose.
See the “General-UL/NSF I&S Manual” for
raceway cover installation and removal
instructions.
Case Fan Circuit
This circuit is to be supplied by an uninterrupted, protected 120V circuit. The case fan
circuit is not cycled.
Fluorescent Lamp Circuit
The standard lighting for the N6DHPA,
N6DHPR and N6DNHPL cases is 2-rows of
T-8 canopy lights. Optional T-8 Nose Lighting
is also avalilable on all these cases. Optional
T-8 shelf lighting and a third-row of T-8
canopy lighting are also available on the
N6DHPA and N6DHPR cases. The N6DNHPL
cases do not offer these options.
Defrost Control Chart
Defrost
Defrost
Defrosts
Duration
Per Day
(Min)
Type
N6DHPA (front load - all applications)
Off Time
4
18*
N6DHPR (rear load - all applications)
Off Time
6
16*
N6DNHPL (front load - all applications)
Off Time
6
20*
*18, 16 or 20 minutes is for EPR only.
Defrost duration increases by 4 minutes
when controller methods do not include
an EPR valve.
WIRING DIAGRAMS
ELECTRICIAN NOTE - OVERCURRENT
PROTECTION
120V circuits should be protected by 15 or 20 Amp
devices per the requirements noted on the cabinet
nameplate or the National Electrical Code, Canadian
Electrical Code - Part 1, Section 28. 208V defrost
circuits employ No. 12 AWG field wire leads for field
connections. On remote cases intended for end to
end line-ups, bonding for ground may rely upon the
pull-up bolts.
The following wiring diagrams on pages 12
through 17 will cover the N6DHPA, N6DHPR
& N6DNHPL case circuits. The defrost and
lighting circuits are covered in the case circuit
diagrams.
March, 2008
Page 11
N6DHPLA Domestic & Export (50 Hz) Case Circuits (4' Cases)
Page 12
March, 2008
N6DHP(L/M/H)A & N6DHP(LR/MR)
Domestic & Export (50 Hz) Case Circuits (6' & 8' Cases)
March, 2008
Page 13
N6DHP(L/M/H)A & N6DHP(LR/MR)
Domestic & Export (50 Hz) Case Circuits (12' Cases)
Page 14
March, 2008
N6DNHPL Domestic & Export (50 Hz) Case Circuits (4' Cases)
March, 2008
Page 15
N6DNHPL Domestic & Export (50 Hz) Case Circuits (6' & 8' Cases)
Page 16
March, 2008
N6DNHPL Domestic & Export (50 Hz) Case Circuits (12' Cases)
March, 2008
Page 17
N6DHP(L/M/H)A,
N6DHP(LR/MR), N6DNHPL
CLEANING AND SANITATION
3. Remove mounting screws from rear duct
panel.
Component Removal and
Installation Instructions for
Cleaning
4. Slowly lift out rear duct panel until the shelf
harness connector near the top of the
panel can be accessed.
Shelves and Shelf Brackets
5. Disconnect shelf harness connector and
complete removing the rear duct panel.
1. Remove product from shelves.
2. If shelf has a light, unplug the light cord
from the socket in the rear duct panel.
Completely insert socket cover in the light
socket to protect the receptacle.
3. Push shelves back and then lift up and out
to remove them from the shelf brackets.
4. Remove shelf brackets from slots in rear
uprights.
WARNING
Rear duct panels with electrical receptacles
can be cleaned without removing the
electrical receptacles. Do not get moisture
on electrical wires when cleaning under
this cover. Moisture on wires could cause
premature product failure and/or personal
injury or death from electrical shock.
Bottom Trays
6. After cleaning, reconnect the shelf harness
connector: install the top socket assembly:
replace and secure rear duct panels in
reverse order.
1. Remove product from bottom of case.
Discharge Air Honeycomb
2. Grasp and lift out each of the bottom trays
from the case interior.
1. Loosen screws securing rear retainer plate.
5. After cleaning, replace in reverse order.
3. After cleaning, replace in reverse order.
Front Air Ducts
1. Remove lower trays, see this page.
2. Lift out front air duct sections.
3. After cleaning, replace in reverse order.
Rear Duct Panels
(w/o Shelf Light Sockets)
1. Remove shelves and bottom trays, see
above.
2. Remove mounting screws and rear duct
panels from case.
3. After cleaning, replace and secure rear
duct panels in reverse order.
(with Shelf Light Sockets)
1. Remove shelves and bottom trays, see
above.
2. For cases with 5 rows of lighted shelves,
remove screw above top shelf socket and
push socket assembly back through the
hole in the rear duct panel.
Page 18
NOTE
Note position of the honeycomb grid during
removal so it can be reinstalled the same
way.
2. Slide rear retainer plate back until the
honeycomb grid sections can be removed
from the top duct.
CAUTION
Improper installation of the honeycomb grid
section could result in improper air flow
and/or poor refrigeration.
3. After cleaning, replace honeycomb grid
sections as they were removed and secure
with the rear retainer plate and screws.
Top Duct
1. Remove shelves and shelf brackets, see
above.
2. Remove screws, rear retainer plate and
honeycomb grid sections from top of case.
3. Remove screws and top duct from case.
4. After cleaning, replace top duct and
remaining components in reverse order.
March, 2008
Installation & Service Manual
N6DHP(L/M/H)A,
N6DHP(LR/MR), N6DNHPL
Front Cladding
1. Remove front kickplate and raceway cover. (See General-UL/NSF I&S Manual.)
2. Remove color band, bumper and bumper retainer from the case. (See General-UL/NSF
I&S Manual.)
3. Remove screws for top and bottom of front cladding and remove cladding.
4. After cleaning, replace front cladding and remaining front components in reverse order.
Cleaning Instructions
WARNING
TYLER Refrigeration does not recommend the use of high pressure cleaning equipment on
display cases!! High pressure cleaners can penetrate and/or damage joint seals. Damaged
seals allow water leaks and/or air leaks that can cause poor case refrigeration.
CAUTION
• When cleaning this case, try not to introduce water into the case faster than it can be
carried away by the waste outlet.
• Liquid chlorine bleach is corrosive to metals. The use of bleach or products containing
bleach will damage metal surfaces and void the case warranty.
• Sanitize the case with Quaternary Ammonium Solutions (ex: KAYQUAT II,
J-512 Sanitizer, SANIQUAT 512, etc...) approved per 21CFR 178.1010, followed by adequate draining and air drying. These solutions may be obtained from Kay Chemical Co.,
Johnson Wax Professional, Coastwide Laboratories, etc....
• Always use a soft cloth or sponge with mild detergent and water to clean any glass.
Never use abrasives or scouring pads to clean glass. They can scratch and/or damage
the glass.
See “General (UL/NSF) I&S Manual” for case cleaning instructions.
Stainless Steel Cleaning Methods
The cleaning data in the following stainless steel cleaning chart was supplied by AISI. The information was supplied by
Prime Metals Division, Alumax Aluminum Corporation.
TYPE OF CLEANING
CLEANING AGENT*
APPLICATION METHOD**
EFFECT ON FINISH
Routine cleaning
Soap, ammonia or detergent and water.
Sponge with cloth, then
rinse with clear water and
wipe dry.
Satisfactory for use on all
finishes.
Smears and fingerprints
Arcal 20, Lac-O-Nu, Lumin
Wash O’Cedar Cream
Polish, Stainless Shine
Rub with cloth as directed
on the package.
Satisfactory for use on all
finishes. Provides barrier film
Apply with damp sponge or
cloth.
Satisfactory for use on all
finishes.
Rub with damp cloth.
Satisfactory for use on all
finishes if rubbing is light.
Grade FFF Italian pumice,
whiting or talc
Rub with damp cloth.
Use in direction of polish lines
on No. 4 (polished) finish.
May scratch No. 2 (mill) and
No. 7 and 8 (polished) finishes.
Liquid NuSteel
Rub with dry cloth. Use a
small amount of cleaner.
Use in direction of polish lines
on No. 4 (polished) finish.
May scratch No. 2 (mill) and
No. 7 and 8 (polished) finishes.
Stubborn spots and
Allchem Concentrated
stains, baked-on
Cleaner
splatter, and other light
discolorations
Samae, Twinkle, or Cameo
Copper Cleaner
March, 2008
Page 19
N6DHP(L/M/H)A,
N6DHP(LR/MR), N6DNHPL
TYPE OF CLEANING
CLEANING AGENT*
APPLICATION METHOD**
EFFECT ON FINISH
Paste NuSteel or DuBois
Temp
Rub with dry cloth. Use a
small amount of cleaner.
Cooper’s Stainless Steel
Cleaner, Revere Stainless
Steel Cleaner
Apply with damp sponge or.
cloth.
Use in direction of polish lines
on No. 4 (polished) finish.
May scratch No. 2 (mill) and
No. 7 and 8 (polished) finishes.
Use in direction of polish lines
on No. 4 (polished) finish.
May scratch No. 2 (mill) and
No. 7 and 8 (polished) finishes.
Use in direction of polish lines
on No. 4 (polished) finish.
May scratch No. 2 (mill) and
No. 7 and 8 (polished) finishes.
Use in direction of polish lines
on No. 4 (polished) finish.
May scratch No. 2 (mill) and
No. 7 and 8 (polished) finishes.
Use in direction of polish lines
on No. 4 (polished) finish.
May scratch No. 2 (mill) and
No. 7 and 8 (polished) finishes.
Use in direction of polish lines
on No. 4 (polished) finish.
May scratch No. 2 (mill) and
No. 7 and 8 (polished) finishes.
Use in direction of polish lines
on No. 4 (polished) finish.
May scratch No. 2 (mill) and
No. 7 and 8 (polished) finishes.
Use in direction of polish lines
on No. 4 (polished) finish.
May scratch No. 2 (mill) and
No. 7 and 8 (polished) finishes.
Excellent removal, satisfactory
for use on all finishes.
Grade F Italian pumice, Steel Rub with a damp cloth.
Bright, Lumin Cleaner, Zud or
Restoro
Heat tint or heavy
discoloration
Burnt-on foods and
grease, fatty acids,
milkstone (where swabbing or rubbing is not
practical)
Tenacious deposits,
rusty discolorations,
industrial atmospheric
stains
Hard water spots
and scale
Grease and oil
Page 20
Penny-Brite or Copper-Brite
Rub with a dry cloth. Use a
small amount of cleaner.
Penny-Brite or Copper-Brite
Rub with a dry cloth.
Paste NuSteel or DuBois
Temp
Rub with dry cloth. Use a
small amount of cleaner.
Revere Stainless Steel
Cleaner
Apply with a damp sponge
or cloth.
Allen Polish, Steel Bright,
Wyandotte or Zud
Rub with a damp cloth.
Easy-Off, De-Grease-It, 4-6%
hot solution of such agents
as trisodium tripolyphospate,
or 5-15% caustic soda
solution
Oakite No. 33, Dilac, Texo 12,
Texo N.Y., Flash-Klenz,
Caddy Cleaner, Turco Scale
4368 or Permag 57.
Apply generous coating.
Allow to stand for 10-15 min.
Repeated application may
be necessary.
Swab and soak with clean
cloth. Let stand 15 minutes
or more according to directions on package. Rinse
and dry.
Vinegar
Swab or wipe with a cloth.
Rinse with water and dry.
5% oxalic acid, 5% sulamic
Swab or soak with a cloth.
acid, 5-10% phospheric acid, Let stand 10-15 minutes.
or Dilac, Oakite No. 33,
Always follow with neutralizer
Texo 12 or Texo N.Y.
rinse, and dry.
Organic solvents such as
Rub with a cloth. Organic
carbon tetrachloride, trisolvents may be flammable
chlorethylene, acetone, kero- and/or toxic. Observe all
sene, gasoline, benzene,
precautions against fire.
alcohol and chlorethane n.u. Do not smoke while vapors
are present. Be sure area
is well ventilated.
Satisfactory for use on all
finishes.
Satisfactory for use on all
finishes.
Satisfactory for use on all
finshes. Effective on tenacious
deposites or where scale has
built up.
Satisfactory for use on all
finishes.
March, 2008
Installation & Service Manual
N6DHP(L/M/H)A,
N6DHP(LR/MR), N6DNHPL
*
Use of proprietary names is intended only to indicate a type of cleaner, and does not constitute an endorsement, nor is
omission of any proprietary cleanser to imply its inadequacy. It should be emphasized that all products should be used
in strict accordance with instructions on package.
**
In all applications a sponge or fibrous brush or pad are recommended. DO NOT use ordinary steel wool, steel brushes,
chlorine bleach or products containing bleach for cleaning or sanitizing stainless steel.
GENERAL INFORMATION
NSF Product Thermometer Installation
1. Unwrap the thermometer and bracket assembly shipped loose with the case.
NOTE
Recommended bottom tray position is
with the lips up.
2. Position bracket in front right corner of
the left-most bottom tray. Making sure
the bracket is flush with the left edge, use the
bracket holes as a template for where to drill
the holes.
3. Drill two .196” holes in the bottom tray.
NOTE
For ease of installation, position the
washers and capnuts on the top side of
the bracket and bottom tray.
4. Mount the bracket to the bottom tray with two
screws, washers and capnuts.
NOTE
Egg shelves are designed to catch and hold
spilled liquids so they can be cleaned up
before getting further into the case. If the tilted
base shelves are used upside down, improper
shelf support will result causing the middle of
each shelves to sag. Upside down usage also
allows drippage to get into the case making
cleaning very difficult. Good sanitation is
essential for egg merchandising.
Removing Metal Edge Trim
For those who have chosen a metal trim option on
Tyler patch ends, the edge trim can be easily
removed and reinstalled, or replaced. The diagrams below show the locations of two screws on
the top and bottom of each piece of metal trim.
Locate and unscrew the fasteners first, then carefully pull the edge trim from the end.
Egg Merchandiser Kit
(All Models)
All egg shelves come galvanized or stainless steel.
The upper egg shelves are 15” x 48” and come
with 82 degree fixed white brackets. The brackets
are available in one position only. The upper egg
shelves assemblies include a rear air close-off.
Tilted base egg shelves come in 4’ modules.
They are designed and notched to fit inside the
existing 2’ bottom trays.
March, 2008
Page 21
N6DHP(L/M/H)A,
N6DHP(LR/MR), N6DNHPL
Peg Bar Information (All Models)
The hang up blister pack has become a standard means of marketing sliced luncheon meats and
other delicacies. It appears that all that is needed to adapt multi-shelf cases for these packages
is to add peg bars and pegs. However, it isn’t quite that simple, because the removal of shelves
changes more than the appearance of the case.
Figure 1 shows
the air flow in
a Multi-Deck display merchandiser
with shelves. Air
flow from the top
and back forms a
protective barrier
to ambient air.
Figure 2 shows
what happens to
the air flow when
the shelves are
removed. The air
drifts back to the
rear duct and
swirls about. This
breaks the protective barrier, causing the case air to
mix with ambient
air to a great
extent.
Figure 3 depicts what happens to the air flow
in a case full of peg bars. The air falls through
openings between packages and fails to main
tain a protective
barrier. When the
bars are fully
stocked, the effect
is minimized, but
product temperatures will not be
as good as they
could be. Sweating
may be noticed on
the top duct panel
above the bars.
The coil will also
frost faster, requiring more frequent
defrosts.
Figure 4 shows the
proper air flow for
cases with peg
bars. The addition
of a baffle above
each row of peg
bars, except the
top row and a bottom shelf, maintains
proper air flows
and temperatures
in the case. Nonload bearing air
baffles should run
the same width as
the peg bars.
CAUTION
Always use one row of shelves below the lowest row of peg bars. Use air baffles above
each row of peg bars, except the top row. The air baffle should be solid in design and
positioned 1” in front of the rear duct and 5.5” back from the rear edge of the card
moulding. This provides and maintains the protective air flow in the case and proper
product cooling and storage.
Page 22
March, 2008
Installation & Service Manual
Peg Bar Information for Cannon
Magna Peg Bar Display Systems
(TYLER supplied)
Air baffle shelves should always be used
with peg bars for hanging meat displays.
Air baffle shelves are non-load bearing and
are used only to help direct the air flow. The
air baffles should be installed above each row
of peg bars, except the top row, along with a
bottom shelf. Air baffles are available from
TYLER that are compatible with 15” offset
support arms.
1. 48” peg bar with 52 holes to accept pegs.
Flat side of holes in peg bar must be down
and to the front of the bar. Attach two hook
brackets to peg bar with two clamp brackets
and four screws. Position and install peg bar
in slotted holes in back of case.
N6DHP(L/M/H)A,
N6DHP(LR/MR), N6DNHPL
points up. Pull peg out until peg sits properly
in the peg bar.
Offset support arms must be installed in the
peg bar so the notches in the air baffle can fit
over them. Install support arms in the same
manner as the pegs (with offset up).
3. Non-load bearing air baffle should run the
same width as the peg bar. Air baffle
rests on the two offset support arms. The
notches in the air baffle must fit over the
support arms. NOTE: The air baffle
should be solid in design and positioned 1” in front of the rear duct and
5.5” back from the rear edge of the
card moulding.
4. Card moulding is offset 2” in front and
3/4” above the pegs.
2. 15” pegs and offset support arms lock in
place on the peg bar.
After marking the desired locations in the peg
bar, install the pegs into peg bar holes. Hold
peg at 90° angle to peg bar. Insert peg into
hole in peg bar. Rotate peg until angled end
March, 2008
Slide the card moulding onto the two offset
support arms. Center the card moulding so it
is aligned with the peg bar. Secure the card
moulding on the offset support arms with two
spring clips. To remove card moulding,
squeeze each spring clip together until the
card moulding releases.
Page 23
N6DHP(L/M/H)A,
N6DHP(LR/MR), N6DNHPL
TYLER 8 and 12 foot cases have four foot
sections for merchandising. 6 foot cases
have three foot sections for merchandising.
Further guidelines for section to section
merchandising are listed below:
There are three basic ways that peg bars
are used in our cases:
All peg bars at the same elevation: TYLER
recommends that peg bar rows in adjacent
sections of a case (including baffles) be
installed at the same elevation. This will
ensure that air flow from the perforated rear
duct panels flows in and around the food
products displayed on the pegs to best
maintain the foods at the desired core
product temperatures.
Peg bars at different elevations: If you
choose this merchandising method, TYLER
recommends that a vertical plexiglas partition
be installed between the adjoining sections.
This will ensure that air flow from the perforated rear duct panels flows in and around the
food products displayed on the pegs to best
maintain the foods at the desired core
product temperatures.
Peg bars adjacent to TYLER shelving:
TYLER recommends a vertical plexiglas
partition be installed between the adjoining
sections. This will ensure that air flow from
the perforated rear duct panels flows in and
around the food products displayed on the
pegs to best maintain the foods at the
desired core product temperatures.
replaced in the proper order. It is necessary
for proper air flow in the case. Omit shelf
shown by dotted line for cases with only
three rows of shelves.
SERVICE INSTRUCTIONS
See “General-UL/NSF I&S Manual” for T-8
lamp, canopy ballast, fan blade and motor,
and color band and bumper replacement
instructions.
Ballast and Lighting Locations
Rear Load Air Close-Off
Information (N6DHPR Models)
NOTE
The air close-off/product stops are
attached to the shelves at the factory.
• 8’ cases use 32 1/2” air close-offs.
• 12’ cases use 32 1/2” RH & LH side
air close-offs and 37 1/4” center air
close-offs.
Shelves are shipped in the proper position.
If shelves are removed, be sure they are
Page 24
All light ballasts are located under the
canopy and mounted above or on the top
of the canopy light channel. This includes
remote ballasts for optional shelf lights and
optional nose lights, (if applicable). The
canopy light(s) are under the canopy light
channel in the top of the case. The optional
shelf lights are mounted under the top
interior liner above each shelf section.
March, 2008
N6DHP(L/M/H)A,
N6DHP(LR/MR), N6DNHPL
Installation & Service Manual
PARTS INFORMATION
Operational Parts List
Case Usage
Domestic
Electrical Circuit
115 Volt 60 Hertz
Case Size
4’
6’
8’
12’
Fan Motors
9329327
16 Watt
9329327
16 Watt
9329327
16 Watt
9329327
16 Watt
Opt. Fan Motor (Export)
(N6DHPA/N6DNHPL)
9458941
16 Watt
9458941
16 Watt
9458941
16 Watt
9458941
16 Watt
Fan Motor Brackets
5205112
5205112
5205112
5205112
Fan Bracket Plate
9041077
9041077
9041077
9041077
Fan Blades
(8.75” 22° 5B)(N6DHPA)
9040683
9040683
9040683
9040683
(8.75” 35° 5B)(N6DNHPL)
5643563
5643563
5643563
5643563
(8.75” 37° 5B)(N6DHPR)
-----
-----
9305517
9305517
Opt. ECM Fan Motors
(N6DHPA/N6DNHPL)
9025003
16 Watt
9025003
16 Watt
9025003
16 Watt
9025003
16 Watt
Opt. ECM Fan Motor Brackets
5205112
5205112
5205112
5205112
Opt. ECM Fan Blades
(8.75” 15° 5B)(N6DHPA)
9302353
9302353
9302353
9302353
9407319
9407319
9407319
9407319
T-8 Ballast (two lamp canopy)
5991029
5966635
5966635
5991030
Opt. Ballast (T-8 shelf lamps)
(N6DHPA/N6DHPR)
5966635
5966635
5966635
5966635
Opt. Ballast (5th row shelf lamp) 5991029
(N6DHPA/N6DHPR)
5991029
5991029
5991030
T-8 Shelf Lampholder
5232279
5232279
5232279
5232279
Light Switch
5100565
5100565
5100565
5100565
NSF Product Thermometer
5967100
5967100
5967100
5967100
(8.75” 30° 5B)(N6DNHPL)
For information on operational parts not listed above contact the TYLER Service
Parts Department.
March, 2008
Page 25
N6DHP(L/M/H)A,
N6DHP(LR/MR), N6DNHPL
Cladding and Trim Parts List
Item Description
4’
6’
8’
12’
1
Screw
5183536 (4)
5183536 (4)
5183536 (6)
5183536 (8)
2
Screw
5183536 (8)
5183536 (8)
5183536 (8)
5183536 (8)
3
End Cover
9026103 (2)
9026103 (2)
9026103 (2)
9026103 (2)
4
Canopy Joint Trim
9029422
9029422
9029422
9029422
5
Canopy Hood, Ptd.
9025221
9025222
9025223
9025224
6
Front Panel
9311775
5636774
5203468
5203469
7
Hand Rail/Bumper Retainer
8
Hand Rail Backer
9
Bumper End Trim
10
Color Band, Ptd.
9023790
9023795
9023798
9023800
11
Color Band Backer, Ptd.
9040223
9040223
9040223
9040223
12
Bumper Backer
---------------------- color per order ----------------------
13
Bumper
---------------------- color per order ----------------------
14
Front Cladding, Ptd.
(N6DHPLA)
9311746
9025135
9025136
9025137
(N6DHPMA)
9304843
9025647
9025648
9025649
(N6DHPHA)
-----
9300395
9025650
9025651
(N6DHPLR)
-----
-----
9025648
9025649
(N6DHPMR)
-----
-----
9025650
9025651
(N6DNHPL)
9311746
9025135
9025136
9025137
---------------------- color per order ---------------------9025316
9025316
9025316
9025316
---------------------- color per order ----------------------
15
Raceway Cover
16
Raceway Cover Retainer
9023841 (2)
9023841 (2)
9023841 (4)
9023841 (6)
17
Screw (per retainer)
5183536 (2)
5183536 (2)
5183536 (2)
5183536 (2)
18
Screw
5183536 (5)
5183536 (7)
5183536 (9)
5183536 (12)
19
Raceway Cover End Trim
---------------------- color per order ----------------------
20
Raceway Cover Backer
---------------------- color per order ----------------------
21
Kickplate Joint Trim, Ptd.
9039020
9039020
9039020
9039020
22
Metal Kickplate, Ptd.
9324388
9324394
9324402
9324407
23
Shoulder Screw
9025833 (8)
9025833 (6)
9025833 (8)
9025833 (8)
24
Kickplate Support Assy.
9043402 (4)
9043402 (3)
9043402 (4)
9043402 (4)
25
Screw
5183536 (4)
5183536 (8)
5183536 (12)
5183536 (16)
26
Raceway Support
9041322 (4)
9041322 (4)
9041322 (6)
9041322 (8)
27
Raceway
9311760
9300242
9300243
9300244
28
Screw, Shoulder
9025833 (8)
9025833 (12)
9025833 (16)
9025833 (24)
Page 26
---------------------- color per order ----------------------
March, 2008
Installation & Service Manual
N6DHP(L/M/H)A,
N6DHP(LR/MR), N6DNHPL
Item Description
4’
6’
8’
12’
5211585
5211585
5211585
5211585
(N6DHPR)
-----
-----
5211585
5211585
(N6DNHPL)
9311972
9311972
9311972
9311972
5105037 (5)
5105037 (5)
5105037 (10)
5105037 (14)
29
30
Horizontal End Trim
(N6DHPA)
Pop Rivet
N6DHPMA ILLUSTRATED
March, 2008
Page 27
N6DHP(L/M/H)A,
N6DHP(LR/MR), N6DNHPL
Revision Log
This log sheet is intended to track both major and minor revisions to this manual, and to describe what the
nature of the revision is. Revision identification is located in the lower right corner of the cover page.
Major revisions are lettered alphabetically, dated accordingly, and require reprinting for inclusion with the
product at shipment. Minor revisions are denoted after the major revision with a “period” followed by a
sequential number, and do not require a printed update. All manuals with any revision changes will be available in electronic PDF format on the Tyler Refrigeration website.
Content changes that determine the type of revisions are decided on a case-by-case basis by Tyler internal
management. This revision log was created in October of 2008.
REVISION TYPE
DATE
Oct 2008
Page 28
MAJOR
MINOR
G.1
DESCRIPTION
Changed wiring diagrams ...
Updated General Information ...
RESULTS
... added terminal blocks to electrical.
... added metal edge trim replacement.
October, 2008