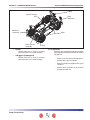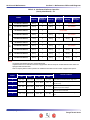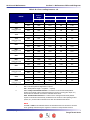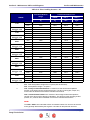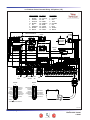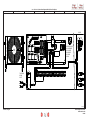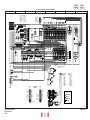
1
MODELS SJ 9241 SJ 9250 Service Manual Full-Size Rough Terrain Series Part No. 143905AD February 2014 This manual is based on Serial Numbers: SJ 9250 ANSI/CSA & AS 50,000,513 TO 50,000,745 SJ 9241 SJ 9250 CE 55,000,001 TO 55,000,032 50,000,513 TO 50,000,745 Please refer to the website www.skyjack.com for older Serial Numbers. Skyjack Service Center Parts & Service (Europe) 3451 Swenson Ave. St. Charles, Illinois, 60174 USA Phone: 630-262-0005 Toll Free: 1-800-275-9522 Fax: 630-262-0006 Email: [email protected] Unit 1 Maes Y Clawdd Maesbury Road Industrial Estate Oswestry, Shropshire SY10 8NN UK Phone: +44-1691-676-235 Fax: +44-1691-676-238 E-mail: [email protected] Parts (North America) Skyjack Brasil Toll Free: 1-800-965-4626 Toll Free Fax: 1-888-782-4825 E-mail: [email protected] Skyjack Australia Pty Ltd. 4 Coates Place Wetherill Park New South Wales 2164 Australia Tel: +61 (0) 28786 3200 Fax: +61(0) 28786 3222 Alameda Júpiter, 710 Loteamento American Park Empresarial Indaiatuba, SP, Brasil 13347-653 Tel: +55 19 3936 0132 SERVICE AND MAINTENANCE Table of Contents Section 1 - Scheduled Maintenance Table of Contents Section 2 - Maintenance Tables Table of Contents Section 3 - Schematics Table of Contents Section 4 - Troubleshooting Table of Contents Section 5 - Procedures Table of Contents Mid Size & Full Size Rough Terrain Series SKYJACK, Page 3 Service and Maintenance Operator’s Responsibility for Maintenance The Safety Alert Symbol identifies important safety messages on aerial platforms, safety signs in manuals or elsewhere. When you see this symbol, be alert to the possibility of personal injury or death. Follow the instructions in the safety message. This Safety Alert Symbol means attention! Become alert! Your safety is involved. DANGER DANGER indicates an imminently hazardous situation which, if not avoided, will result in death or serious injury. WARNING WARNING indicates a potentially hazardous situation which, if not avoided, could result in death or serious injury. CAUTION CAUTION indicates a potentially hazardous situation which, if not avoided, may result in minor or moderate injury. It may also be used to alert against unsafe practices. important IMPORTANT indicates a procedure) essential for safe operation and which, if not followed, may result in a malfunction or damage to the aerial platform. SKYJACK, Page 4 Mid Size & Full Size Rough Terrain Series 1 Section 1 schedule maintenance Table of Contents Operator’s Responsibility for Maintenance Aerial Platform Definition...............................................................................................................................................7 Purpose of Equipment..................................................................................................................................................7 Use of Equipment.........................................................................................................................................................7 Manuals.........................................................................................................................................................................7 Operator........................................................................................................................................................................7 Service Policy and Warranty.........................................................................................................................................7 Optional Accessories....................................................................................................................................................7 Scope of this Manual....................................................................................................................................................8 Operator Safety Reminders..........................................................................................................................................9 Electrocution Hazard....................................................................................................................................................9 Safety Precautions......................................................................................................................................................10 Maintenance and Inspection Schedule......................................................................................................................13 Owner’s Annual Inspection Record............................................................................................................................13 Replacement Parts......................................................................................................................................................13 Maintenance and Service Safety Tips........................................................................................................................13 Hydraulic System & Component Maintenance and Repair.......................................................................................14 Maintenance Hints......................................................................................................................................................14 Service and Maintenance About this Section.......................................................................................................................................................15 Service Bulletins..........................................................................................................................................................15 Maintenance and Inspection......................................................................................................................................15 Maintenance Instructions............................................................................................................................................15 Schedule Maintenance Inspections 1.1 1.2 Scheduled Maintenance Inspections...............................................................................................................18 Function Tests..................................................................................................................................................28 Tables 1.1 Owner’s Annual Inspection Record.....................................................................................................................16 1.2 Maintenance and Inspection Checklist...............................................................................................................17 Mid Size & Full Size Rough Terrain Series SKYJACK, Page 5 Operator’s Responsibility for Maintenance Service and Maintenance SKYJACK is continuously improving and expanding product features on its equipment, therefore, specifications and dimensions are subject to change without notice. Aerial Platform Definition A mobile device that has an adjustable position platform supported from ground level by a structure. Purpose of Equipment The SKYJACK Rough Terrain’s mid and full size aerial platforms are designed to transport and raise personnel, tools and materials to overhead work areas. Use of Equipment The aerial platform is a highly maneuverable, mobile work station. Lifting and driving must be on a flat, level, compacted surface. It can be driven over uneven terrain only when the platform is fully lowered. Manuals Operating The operating manual is considered a fundamental part of the aerial platform. It is a very important way to communicate necessary safety information to users and operators. A complete and legible copy of this manual must be kept in the provided weather-resistant storage compartment on the aerial platform at all times. Service & Maintenance The purpose of this is to provide the customer with the servicing and maintenance procedures essential for the promotion of proper machine operation for its intended purpose. All information in this manual should be read and understood before any attempt is made to service the machine. The updated copy of the manuals are found on the company’s website: www.skyjack.com. Operator The operator must read and completely understand both this operating manual and the safety panel label located on the platform and all other warnings in this manual and on the aerial platform. Compare the labels on the aerial platform with the labels found within this manual. If any labels are damaged or missing, replace them immediately. Service Policy and Warranty SKYJACK warrants each new SJRT series work platform to be free of defective parts and workmanship for the first 24 months. Any defective part will be replaced or repaired by your local SKYJACK dealer at no charge for parts or labor. Contact the SKYJACK Service Department for warranty statement extensions or exclusions. Optional Accessories The SKYJACK aerial platform is designed to accept a variety of optional accessories. These are listed under “Standard and Optional Features” in Table 2.1 of the operating manual. Operating instructions for these options (if equipped) are located in section 2 of the operating manual. For non-standard components or systems, contact the SKYJACK Service Department at North America & Asia: ( : 800 275-9522 7 : 630 262-0006 Europe: ( : 44 1691-676-235 7 : 44 1691-676-239 Include the model and serial number for each applicable aerial platform. Mid Size & Full Size Rough Terrain Series SKYJACK, Page 7 Service and Maintenance Operator’s Responsibility for Maintenance Scope of this Manual a. This manual applies to the ANSI/SIA, CSA and CE versions of the Mid Size and Full Size Rough Terrain aerial platform models listed on Table 2.1. - Equipment identified with “ANSI” meets the ANSI SIA-A92.6-2006 standard. - Equipment identified with “CSA” meets the CSA B354.2-01 standard. - Equipment identified with “CE” meets the requirements for the European countries, i.e., Machinery Directive 98/37/EC and/or 89/392/EE, EMC Directive 89/336/EEC, Directive 2000/14/EC and the corresponding EN standards. b. CSA (Canada) and CE (Europe) Operators are required to conform to national, territorial/provincial and local health and safety regulations applicable to the operation of this aerial platform. c. ANSI/SIA (United States) Operators are required by the current ANSI/SIA A92.6 standards to read and understand their responsibilities in the manual of responsibilities before they use or operate this aerial platform. SKYJACK, Page 8 Mid Size & Full Size Rough Terrain Series Operator’s Responsibility for Maintenance Service and Maintenance WARNING Failure to comply with your required responsibilities in the use and operation of the aerial platform could result in death or serious injury! Operator Safety Reminders A study conducted by St. Paul Travelers showed that most accidents are caused by the failure of the operator to follow simple and fundamental safety rules and precautions. You, as a careful operator, are the best insurance against an accidenvt. Therefore, proper usage of this aerial platform is mandatory. The following pages of this manual should be read and understood completely before operating the aerial platform. Common sense dictates the use of protective clothing when working on or near machinery. Use appropriate safety devices to protect your eyes, ears, hands, feet and body. Any modifications from the original design are strictly forbidden without written permission from SKYJACK. Electrocution Hazard This aerial platform is not electrically insulated. Maintain a Minimum Safe Approach Distance (MSAD) from energized power lines and parts as listed below. The operator must allow for the platform to sway, rock or sag. This aerial platform does not provide protection from contact with or proximity to an electrically charged conductor. DO NOT USE AERIAL PLATFORM AS A GROUND FOR WELDING. DO NOT OPERATE AERIAL PLATFORM DURING LIGHTNING OR STORMS. DANGER Avoid Power Lines Minimum Safe Approach Distance ANSI/SIA A92.6-2006 and CSA B354.2-01 Requirements Voltage Range (Phase to Phase) Minimum Safe Approach Distance (Feet) 0 to 300V Avoid Contact Over 300V to 50KV 10 Over 50KV to 200KV 15 Over 200KV to 350KV 20 Over 350KV to 500KV 25 Over 500KV to 750KV 35 Over 750KV to 1000KV 45 CE Guidance Note “Avoidance of danger from overhead lines” Adhere strictly to the governmental rulings and regulations applicable in your country. FAILURE TO AVOID THIS HAZARD WILL RESULT IN DEATH OR SERIOUS INJURY! 60023AD Mid Size & Full Size Rough Terrain Series SKYJACK, Page 9 Service and Maintenance Operator’s Responsibility for Maintenance Safety Precautions Know and understand the safety precautions before going on to next section. warning Failure to heed the following safety precautions could result in tip over, falling, crushing, or other hazards leading to death or serious injury. • KNOW all national, state/provincial and local rules which apply to your aerial platform and jobsite. • TURN the (emergency) main power disconnect switch off when leaving the aerial platform unattended. Remove the key to prevent unauthorized use of the aerial platform. • WEAR all the protective clothing and personal safety devices issued to you or called for by job conditions. • DO NOT wear loose clothing, dangling neckties, scarves, rings, wristwatches or other jewelry while operating this aerial platform. • AVOID entanglement ropes, cords or hoses. with • AVOID falling. Stay within the boundaries of the guardrails. • DO NOT raise the aerial platform in windy or gusty conditions. • DO NOT increase the lateral surface area of the platform. Increasing the area exposed to the wind will decrease aerial platform stability. • DO NOT drive or elevate the aerial platform if it is not on a firm level surface. Do not drive elevated near depressions or holes of any type, loading docks, debris, drop-offs and surfaces that may affect the stability of the aerial platform. • If operation in areas with holes or dropoffs is absolutely necessary, elevated driving shall not be allowed. Position the aerial platform horizontally only with the platform fully lowered. After ensuring that all 4 wheels or outriggers (if equipped) have contact with level firm surface, the aerial platform can be elevated. After elevation, the drive function must not be activated. • Elevated driving must only be done on a firm level surface. • DO NOT ascend or descend a grade when elevated. When fully lowered, ascending or descending, only grades up to rated maximum listed in Table 2.1 are permissible. • DO NOT operate on surfaces not capable of holding the weight of the aerial platform including the rated load, e.g. covers, drains, and trenches. SKYJACK, Page 10 Mid Size & Full Size Rough Terrain Series Operator’s Responsibility for Maintenance Service and Maintenance Safety Precautions (Continued) Know and understand the safety precautions before going on to next section. • DO NOT operate an aerial platform that has ladders, scaffolding or other devices mounted on it to increase its size or work height. It is prohibited. • DO NOT exert side forces on aerial platform while elevated. • DO NOT lower the platform unless the area below is clear of personnel and obstructions. • ENSURE that there are no personnel or obstructions in the path of travel, including blind spots. • DO NOT use the aerial platform as a crane. It is prohibited. • DO NOT sit, stand or climb on the guardrails. It is prohibited. • BE AWARE of blind spots when operating the aerial platform. • STUNT driving and horseplay are prohibited. • DO NOT climb on scissor arm assembly. It is prohibited. • ENSURE ALL tires are in good condition and lug nuts are properly tightened. • DO NOT alter or disable limit switches or other safety devices. • BE AWARE of overhead obstructions or other possible hazards around the aerial platform when driving or lifting. • DO NOT use the aerial platform without guardrails, locking pins and the entry gate/chain/ bar in place. • DO NOT raise the platform while the aerial platform is on a truck, fork lift or other device or vehicle. • BE AWARE of crushing hazards. Keep all body parts inside platform guardrail. Mid Size & Full Size Rough Terrain Series SKYJACK, Page 11 Service and Maintenance Operator’s Responsibility for Maintenance Safety Precautions (Continued) Know and understand the safety precautions before going on to next section. • DO NOT exceed the rated capacity of the aerial platform. Do make sure the load is evenly distributed on the platform. • DO NOT attempt to free a snagged platform with lower controls until personnel are removed from the platform. • DO NOT position the aerial platform against another object to steady the platform. • DO NOT place materials on the guardrails or materials that exceed the confines of the guardrails unless approved by Skyjack. Fall Protection As per the ANSI A92.6-2006 standard, “The guardrail system of the aerial platform provides fall protection. If occupant(s) of the platform are required to wear personal fall protection equipment (PFPE), occupants shall comply with instructions provided by the aerial platform manufacturer (remanufacturer) regarding anchorage(s).” If additional fall protection is required, by an employer or the authority having jurisdiction, Skyjack recommends the use of a fall restraint system to keep an occupant within the confines of the platform, and thus not expose the occupant to any fall hazard requiring a fall arrest. All personal fall protection equipment must comply with applicable governmental regulations and must be inspected and used in accordance with the manufacturer’s recommendations. All personal fall protection equipment must be attached only to approved anchorage points within the platform of the aerial platform. SKYJACK, Page 12 WARNING Entering and exiting the aerial platform should only be done using the three points of contact. • Use only equipped access openings. • Enter and exit only when the aerial platform is in the fully retracted position. • Do use three points of contact to enter and exit the platform. Enter and exit the platform from the ground only. Face the aerial platform when entering or exiting the platform. • Three points of contact means that two hands and one foot or one hand and two feet are in contact with the aerial platform or the ground at all times during entering and exiting. WARNING An operator should not use any aerial platform that: • does not appear to be working properly. • has been damaged or appears to have worn or missing parts. • has alterations or modifications not approved by the manufacturer. • has safety devices which have been altered or disabled. • has been tagged or blocked out for non-use or repair. Failure to avoid these hazards could result in death or serious injury. Jobsite Inspection • Do not use in hazardous locations. • Perform a thorough jobsite inspection prior to operating the aerial platform, to identify potential hazards in your work area. • Be aware of moving equipment in the area. Take appropriate actions to avoid collision. Mid Size & Full Size Rough Terrain Series Operator’s Responsibility for Maintenance Maintenance and Inspection Schedule The actual operating environment of the work platform governs the use of the maintenance schedule. The inspection points covered in Table 1.2. Maintenance and lnspection Checklist, indicates the areas of the aerial platform to be maintained or inspected and at what intervals the maintenance and inspections are to be performed. Owner’s Annual Inspection Record It is the responsibility of the owner to arrange quarterly and annual inspections of the aerial platform. Table 1.1. Owner’s Annual lnspection Record is to be used for recording the date of the inspection, owner’s name, and the person responsible for the inspection of the work platform. Replacement Parts Use only original replacement parts. Parts such as batteries, wheels, railings, etc. with weight and dimensions different from original parts will affect stability of the aerial platform and must not be used without manufacturer’s consent. All replacement tires must be of the same size and load rating as originally supplied tires; to maintain safety and stability of aerial platform. Consult SKYJACK’s Service Department for optional tires specifications and installation. WARNING Any unit that is damaged or not operating properly must be immediately tagged and removed from service until proper repairs are completed. Mid Size & Full Size Rough Terrain Series Service and Maintenance Maintenance and Service Safety Tips Maintenance and repair should only be performed by personnel who are trained and qualified to service this aerial platform. All maintenance and service procedures should be performed in a well lighted and well ventilated area. Anyone operating or servicing this aerial platform must read and completely understand all operating instructions and safety hazards in this manual and operating manual. All tools, supports and lifting equipment to be used must be of proper rated load and in good working order before any service work begins. Work area should be kept clean and free of debris to avoid contaminating components while servicing. All service personnel must be familiar with employer and governmental regulations that apply to servicing this type of equipment. Keep sparks and flames away from all flammable or combustible materials. Properly dispose of all waste material such as lubricants, rags, and old parts according to the relative law provisions obtaining in the country. Before attempting any repair work, turn Battery Disconnect Switch to the “OFF” position. Preventive maintenance is the easiest and least expensive type of maintenance. SKYJACK, Page 13 Service and Maintenance Operator’s Responsibility for Maintenance Hydraulic System & Component Maintenance and Repair Oil change intervals will depend on the care used in keeping the oil clean, and the operating conditions. Dirt and/or moisture cotamination will dictate that the oil should be changed more often. Under normal use and operating conditions, the hydraulic oil should be changed every two years. Refer to Table 1.2 of this manual. The following points should be kept in mind when working on the hydraulic system or any component: 1. 2. 3. 4. 5. 6. Any structure has limits of strength and durability. To prevent failure of structural parts of hydraulic components, relief valves which limit pressure to safe operating values are included in the hydraulic circuits. Tolerance of working parts in the hydraulic system is very close. Even small amounts of dirt or foreign materials in the system can cause wear or damage to components, as well as general faulty operation of the hydraulic system. Every precaution must be taken to assure absolute cleanliness of the hydraulic oil. Whenever there is a hydraulic system failure which gives reason to believe that there are metal particles or foreign materials in the system, drain and flush the entire system and replace the filter cartridges. A complete change of oil must be made under these circumstances. Whenever the hydraulic system is drained, check the magnets in the hydraulic reservoir for metal particles. If metal particles are present, flush the entire system and add a new change of oil. The presence of metal particles also may indicate the possibility of imminent component failure. A very small amount of fine particles is normal. All containers and funnels used in handling hydraulic oil must be absolutely clean. Use a funnel when necessary for filling the hydraulic oil reservoir, and fill the reservoir only through the filter opening. The use of cloth to strain the oil should be avoided to prevent lint from getting into the system. When removing any hydraulic component, be sure to cap and tag all hydraulic lines involved. Also, plug the ports of the removed components. Note Samples of hydraulic oil should be drawn from the reservoir and tested annually. These samples should be taken when the oil is warmed through normal operation of the system. The sample should be analyzed by a qualified lubrication specialist to determine if it is suitable for continued use. SKYJACK, Page 14 7. All hydraulic components must be disassembled in spotlessly clean surroundings. During disassembly, pay particular attention to the identification of parts to assure proper reassembly. Clean all metal parts in a clean mineral oil solvent. Be sure to thoroughly clean all internal passages. After the parts have been dried thoroughly, lay them on a clean, lint-free surface for inspection. 8. Replace all O-rings and seals when overhauling any component. Lubricate all parts with clean hydraulic oil before reassembly. Use small amounts of petroleum jelly to hold O-rings in place during assembly. 9. Be sure to replace any lost hydraulic oil when completing the installation of the repaired component, and bleed any air from the system when required. 10. All hydraulic connections must be kept tight. A loose connection in a pressure line will permit the oil to leak out or air to be drawn into the system. Air in the system can cause damage to the components and noisy or erratic system operation. Maintenance Hints Three simple maintenance procedures have the greatest effect on the hydraulic system performance, efficiency and life. Yet, the very simplicity of them may be the reason they are so often overlooked. What are they? Simply these: 1. Change filters annually. The filters will need to be changed more often depending on the operating conditions. Dirty, dusty, high moisture environments may cause the hydraulic system to be contaminated more quickly. 2. Maintain a sufficient quantity of clean hydraulic oil of the proper type and viscosity in the hydraulic reservoir. 3. Keep all connections tight. Mid Size & Full Size Rough Terrain Series Section 1 - Scheduled Maintenance About this Section This section contains the maintenance and inspection schedule that is to be performed. References are made to the procedures in section 5 that outline detailed step-by-step instructions for checks and replacements. Service Bulletins Before performing any scheduled maintenance inspection procedure, refer to service bulletins found in our web site: www.skyjack.com for updates related to service and maintenance of this aerial platform. Maintenance and Inspection Death or injury can result if the aerial platform is not kept in good working order. Inspection and maintenance should be performed by competent personnel who are trained and qualified on mantenance of this aerial platform. WARNING Failure to perform each procedure as presented and scheduled may cause death, serious injury or substantial damage. Note Preventive maintenance is the easiest and least expensive type of maintenance. Service and Maintenance Inspections Maintenance Instructions This manual consists of four schedules to be done for maintaining on an aerial platform. Inspection schedule frequency is shown below: Inspection Schedule Daily Frequently Annually Bi-annually A A+B A+B+C A+B+C+D • Make copies of the maintenance and inspection checklist to be used for each inspection. • Check the schedule on the checklist for the type of inspection to be performed. • Place a check in the appropriate box after each inspection procedure is completed. • Use the maintenance and inspection checklist and step-by-step procedures in section 5 to perform these inspections. • If any inspection receives a fail, tag and remove the aerial platform from service. • If any aerial platform component(s) has been repaired, an inspection must be performed again before removing the tag. Place a check in the repair column. Legend P = Pass F = Fail R = Repaired • Unless otherwise specified, perform each maintenance procedure with the aerial platform in the following configuration: - Aerial platform parked on a flat and level surface - Disconnect the battery by turning the main power disconnect switch to the “OFF” position. • Repair any damaged or malfunction components before operating aerial platform. • Keep records on all inspections. Mid Size & Full Size Rough Terrain Series SKYJACK, Page 15 Service and Maintenance Inspections Section 1 - Scheduled Maintenance Table 1.1 Owner’s Annual Inspection Record Model Number: ____________________________ Recording Date Recording Year # Owner’s Name Inspected By 1 2 Serial Number: ____________________________ 3 4 5 6 7 8 9 60564AA As described earlier in this section, this decal is located on the control compartment cowling. It must be completed after an annual inspection has been completed. Do not use the aerial platform if an inspection has not been recorded in the last 13 months. SKYJACK, Page 16 Mid Size & Full Size Rough Terrain Series Section 1 - Scheduled Maintenance Service and Maintenance Inspections Table 1.2 MAINTENANCE AND INSPECTION CHECKLIST Serial Number: Model: Hourmeter Reading: Name (Printed): Date: Time: Signature: Each item shall be inspected using the the appropriate section of the Skyjack service manual. As each item is inspected, write the apropriate grade in the box. Inspection Schedule INSPECTION FREQUENCY Daily A DAILY Frequently*† A+B P - PASS FREQUENTLY Annually† A+B+C F - FAIL ANNUALLY Bi-annually† A+B+C+D R - REPAIRED BI-ANNUALLY Schedule P F Schedule Maintenance Inspections Labels Limit Switches Emergency Lowering Access Rod (If Equipped) Schedule R P A A, B A, B Electrical and Control Components Base Weldment A, B Axles A, B Steer Cylinder Assembly A, B Tie Rod A, B Main Power Disconnect Switch A, B Ladder A, B A, B Outriggers (If Equipped) A, B Battery A, B A, B, C Manual A, B Function Tests Platform Control Console Electrical Panel A, B Tilt Sensor (If Equipped) A, B Test Emergency Stop Load/Tilt Sensor - CE A, B Test Lift Enable A, B Test Platform Raising/Lowering A, B Test Enable Trigger Switch A, B Test Steering A, B Engine Compartment Engine Control Console Radiator A, B A, B, C A, B Muffler and Exhaust A, B Test Horn A, B Engine Tray A, B Test Driving A, B Hydraulic Pump A, B Test Brake A, B Engine Air Filter A, B Test Speed Limit A, B Engine Oil Level A, B Test Lowering Warning - CE A, B Test Powerdeck Enable (If equipped) A, B Test Extension Platform(s) (If equipped) A, B Test Tilt Sensor (If Equipped) A, B Engine Fuel Filter A, B, C Fuel and Hydaulic Oil Supply Fuel Tank A, B Fuel Leaks A, B Hydraulic Tank A, B, C Hydraulic Oil A, B, C Platform Assembly Lanyard Attachment Anchors R A, B Wheel/Tire Assembly Base Control Switches Manifolds F Base Base Control Console Test Emergency Stop A A, B Test Base Lift Enable A, B AC Outlet on Platform A, B Test Lower/Neutral/Raise Switch A, B Platform Control Console A, B Powered Extension Control Console (If Equipped) A, B A, B Test Emergency Lowering (Models 71xx, 8831/41 & 9241) Test Emergency Lowering (Model 8243, 8850 & 9250) A, B A, B A, B Lift Mechanism Scissor Guards (If Equipped) A, B Sliders A, B Maintenance Support A, B Test Emergnecy Powered Extension Platform Retraction Switch (Model 8850 & CE - 9250) Scissor Assembly A, B Test Main Power Discconect Switch Scissor Bumpers A, B Lift Cylinder(s) A, B 110AC A - Perform Visual and Daily Maintenance Inspections & Functions Test. Refer to Section 2.7 of the Operating Manual. B - Perform Scheduled Maintenance Inspection every three months or 150 hrs. Refer to Section 1.0 of this manual. C - Perform Scheduled Maintenance Inspection every year. Refer to Section 1.0 of this manual. D - Perform Scheduled Maintenance Inspection every 2 years. Refer to Section 1.0 of this manual. * Perform scheduled inspection every three months or 150 hours. † Refer to Skyjack's webiste @ www.skyjack.com for latest service bulletins prior to performing quarterly or yearly inspection. Note: Make a copy of this page or visit the Skyjack web site:www.skyjack.com for a printable copy. Mid Size & Full Size Rough Terrain Series SKYJACK, Page 17 Service and Maintenance Inspections Section 1 - Scheduled Maintenance Model 71xx Model 88xx Platform Control Console Platform Assembly Scissor Assembly Limit Switch Outrigger Ladder Electrical/Hydraulic Compartment Base Ladder 1.1 Scheduled Maintenance Inspections Begin the scheduled maintenance inspections by checking each item in sequence for the conditions listed in this section. WARNING To avoid injury, do not operate an aerial platform until all malfunctions have been corrected. WARNING To avoid possible injury, ensure aerial platform power is off during your visual and daily maintenance inspections. Electrical Maintaining the electrical components is essential to good performance and service life of the aerial platform. Inspect the following areas for chafed, corroded and loose wires: • base to platform cables and wiring harness • engine compartment electrical panel • engine wiring harness • hydraulic/electrical wiring harnesses Hydraulic Maintaining the hydraulic components is essential to good performance and service life of the aerial platform. SKYJACK, Page 18 Electrical/Hydraulic Compartment Base Limit Switch Perform a visual inspection around the following areas: • hydraulic tank filter, fittings, hoses, emergency power unit (if equipped) and base surfaces • engine compartment fittings, hoses, main pump, and filter • all hydraulic cylinders • all hydraulic manifolds • the underside of the base • ground area under the aerial platform • outriggers 1.1-1 Labels Refer to the labels section in this manual and determine that all labels are in place and are legible. 1.1-2 Limit Switches Detecting limit switch malfunction is essential to safe aerial platform operation. Ensure limit switches are properly secured with no signs of visible damage and movement is not obstructed. Visually inspect all limit switch located inside the scissor arms and the outrigger assemblies for the following: • broken or missing actuator arm • missing fasteners • loose wiring Mid Size & Full Size Rough Terrain Series Section 1 - Scheduled Maintenance Service and Maintenance Inspections Typical Model 71xx shown Emergency Lowering Access Rod Electrical Panel Main Manifold (Emergency) Main Power Disconnect Switch Load/Tilt Sensor Motion Control Manifold Cushion Cylinder 1.1-3 Emergency Lowering Access Rod (All models except 9250) -- Ensure rod is properly secured and there is no visible damage. 1.1-4 Electrical and Control Components -- Ensure all compartment latches are secure and in proper working order. • Main Power Disconnect Switch -- Turn main power disconnect switch to “ ” off position. -- Ensure all cables are secure and switch is in proper working condition. • Base Control Switches -- Ensure there are no signs of visible damage and all switches are in their neutral positions. • Battery Proper battery condition is essential to good performance and operational safety. Improper fluid levels or damaged cables and connections can result in component damage and hazardous conditions. Brake Manifold Base Control Switches WARNING Battery acid is extremely corrosive - Wear proper eye and facial protection as well as appropriate protective clothing. If contact occurs, immediately flush with cold water and seek medical attention. 1. Check battery case for damage. 2. Clean battery terminals and cable ends thoroughly with a terminal cleaning tool or wire brush. 3. Ensure all battery connections are tight. 4. If applicable, check battery fluid level. If plates are not covered by at least 1/2 in. (13 mm) of solution, add distilled or demineralized water. 5. Replace battery if damaged or incapable of holding a lasting charge. WARNING WARNING Explosion hazard. Keep flames and sparks away. Do not smoke near batteries. Mid Size & Full Size Rough Terrain Series Use original or manufacturer-approved parts and components for the aerial platform. SKYJACK, Page 19 Service and Maintenance Inspections Section 1 - Scheduled Maintenance Typical Model 71xx shown Emergency Lowering Access Rod Electrical Panel Main Manifold Emergency Main Power Disconnect Switch Load/Tilt Sensor Motion Control Manifold Cushion Cylinder Brake Manifold Base Control Switches • Manifolds -- Ensure all fittings and hoses are properly tightened and there is no evidence of hydraulic leakage. -- Ensure there are no loose wires or missing fasteners. • Electrical Panel -- Ensure panel is properly secured and there is no visible damage. -- Ensure there are no loose wires or missing fasteners. • Tilt Sensor (If Equipped) -- Ensure tilt sensor is properly secured and there is no visible damage. • Load/Tilt Sensor - CE -- Ensure load/tilt sensor is properly secure and there is no visible damage. SKYJACK, Page 20 Mid Size & Full Size Rough Terrain Series Section 1 - Scheduled Maintenance Service and Maintenance Inspections Typical Model 71xx shown Muffler and Exhaust Engine Radiator Engine Control Console Engine Air Filter Hydraulic Pump Engine Tray Battery 1.1-5 Engine Compartment WARNING Beware of hot engine components. 1. Pull on the two latches to pull out engine compartment. • Engine Control Console -- Ensure muffler and exhaust system are properly secured, with no evidence of damage. • Radiator -- Ensure radiator is secure. -- Ensure there are no loose or missing parts and there is no visible damage. • Muffler and Exhaust -- Ensure muffler and exhaust system are properly secured, with no evidence of damage. • Engine Tray -- Ensure there are no loose or missing parts and no visible damage to the engine tray. Ensure that both tray-securing bolts are in place. • Hydraulic Pump -- Ensure there are no loose or missing parts and there is no visible damage. -- Ensure all bolts are properly tightened. -- Ensure all fittings and hoses are properly tightened and there is no evidence of hydraulic leakage. -- Check coolant level and add as needed. C - Annual Inspection -- For recommand coolant change, refer to engine manual. Mid Size & Full Size Rough Terrain Series SKYJACK, Page 21 Service and Maintenance Inspections Section 1 - Scheduled Maintenance Typical Model 71xx shown Muffler and Exhaust Engine Radiator Engine Control Console Engine Air Filter Hydraulic Pump Engine Tray Battery • Engine Air Filter -- Ensure there are no loose or missing parts and there is no visible damage. • Enigne Fuel Filter -- Ensure there are no loose or missing parts and there is no visible damage. B - Frequent Inspection -- For engine air filter maintenance procedure, refer to engine manual. C - Annual Inspection -- For engine fuel filter replacement procedure, refer to engine manual. C - Annual Inspection -- For engine air filter replacement procedure, refer to engine manual. • Engine Oil Level -- Maintaining the engine components is essential to good performance and service life of the aerial platform. Check oil level on dipstick -- Oil level should be between the “L” and “H” marks. B - Frequent Inspection -- For recommand oil change, refer to engine manual SKYJACK, Page 22 Mid Size & Full Size Rough Terrain Series Section 1 - Scheduled Maintenance Service and Maintenance Inspections Typical Model 71xx shown Propane Tank Fuel Tank 1.1-6 Fuel and Hydraulic Oil Supply • Fuel Tank IMPORTANT Before using your aerial platform ensure there is enough fuel for expected use. -- Ensure fuel filler cap is secure. -- Ensure tank shows no visible damage and no evidence of fuel leakage. • Fuel Leaks -- Ensure there are no fuel leaks. DANGER Engine fuels are combustible. Inspect the aerial platform in an open, well-ventilated area away from heaters, sparks and flames. Always have an approved fire extinguisher within easy reach. Hydraulic Tank • Hydraulic Tank -- Ensure hydraulic filler cap is secure. -- Ensure tank shows no visible damage and no evidence of hydraulic leakage. • Hydraulic Oil -- Ensure platform is fully lowered, and outriggers retracted, and then visually inspect the sight gauge located on the side of the hydraulic oil tank. Check oil level against label that indicates minimum and maximum oil levels. C - Annual Inspection -- For hydraulic oil replacement procedure, refer to section 5. -- Ensure fuel pump, fuel filter, hoses and fittings show no visible damage and no evidence of fuel leakage. Mid Size & Full Size Rough Terrain Series SKYJACK, Page 23 Service and Maintenance Inspections Section 1 - Scheduled Maintenance Platform Railing Platform Control Console 1.1-7 Platform Assembly WARNING Ensure that you maintain three points of contact to mount/dismount platform. 1. Use the ladder of aerial platform to access platform. 2. Close the gate. -- Ensure there are no loose or missing parts and there is no visible damage. -- Ensure all fasteners are securely in place. -- Ensure all railings are properly positioned and secured. -- Ensure gate is in good working order. • Lanyard Attachment Anchors -- Ensure attachment rings are secure and have no visible damage. Platform Assembly • Platform Control Console -- Ensure all switches and controller are returned to neutral and are properly secured. -- Ensure there are no loose or missing parts and there is no visible damage. • Powered Extension Control Console (If Equipped) -- Ensure all switches are returned to neutral and are properly secured. -- Ensure there are no loose or missing parts and there is no visible damage. WARNING Ensure that you maintain three points of contact to mount/dismount platform. 3. Use the ladder to dismount from platform. • AC Outlet on Platform -- Ensure outlet has no visible damage and free from dirt or obstructions. SKYJACK, Page 24 Mid Size & Full Size Rough Terrain Series Section 1 - Scheduled Maintenance Service and Maintenance Inspections Scissor Assembly Slider Scissor Bumper Maintenance Support Limit Switch Lift Cylinder 1.1-8 Lifting Mechanism • Scissor Guards (If Equipped) -- Ensure there are no loose or missing parts and there is no visible damage. • Scissor Bumpers -- Ensure bumpers are secure and shows no sign of visible damage. • Sliders -- Ensure sliders are secure and there is no visible damage. • Lift Cylinder(s) -- Ensure each lift cylinder is properly secured, there are no loose or missing parts and there is no evidence of damage. -- Ensure sliders’ path of travel are free from -- Ensure all fittings and hoses are properly dirt and obstructions. 1. Raise the platform until there is adequate clearance to swing down the maintenance support. • Maintenance Support -- Ensure maintenance support is properly secured and shows no visible damage. tightened and there is no evidence of hydraulic leakage. 2. Raise the platform until there is adequate clearance to swing up the maintenance support into storage bracket. 3. Fully lower the platform. • Scissor Assembly -- Ensure scissor assembly shows no visible damage and no signs of deformation in weldments. -- Ensure all pins are properly secured. -- Ensure cables and wires are properly routed and shows no signs of wear and/ or physical damage. Mid Size & Full Size Rough Terrain Series SKYJACK, Page 25 Service and Maintenance Inspections Section 1 - Scheduled Maintenance Typical Model 71xx shown - Bottom View Ladder Manual Storage Box Base Weldment Wheel/Tire Assembly Axles Steer Cylinder Assembly Tie Rod 1.1-9 Base • Base Weldment -- Ensure there are no visible cracks in welds or structure and there are no signs of deformation. • Wheel/Tire Assembly The aerial platform is either equipped with air tires or foam-filled tires. Tire and/or wheel failure could result in an aerial platform tipover. Component damage may also result if problems are not discovered and repaired in a timely fashion. WARNING Air filled tires are not permitted on some models. Refer to Table 2.3. WARNING An over-inflated tire can explode and may cause death or serious injury. -- Check all tire treads and sidewalls for cuts, cracks, punctures and unusual wear. -- Check each wheel for damage and cracked welds. -- Check each lug nut for proper torque to ensure none are loose. SKYJACK, Page 26 To maximize stability, it is essential to maintain proper pressure in all air-filled tires. -- Check each tire with an air pressure gauge and add air as needed. Refer to Table 2.3 for wheel/tire specifications. • Axles -- Ensure axles are properly secured, there are no loose or missing parts, all fittings and hoses are properly tightened and there is no evidence of hydraulic leakage. • Steer Cylinder Assembly -- Ensure steer cylinder assembly is properly secured, there are no loose or missing parts, all fittings and hoses are properly tightened and there is no evidence of hydraulic leakage. • Tie Rod -- Ensure there are no loose or missing parts, tie rod end studs are locked and there is no visible damage. Mid Size & Full Size Rough Terrain Series Section 1 - Scheduled Maintenance Service and Maintenance Inspections Typical Model 71xx shown - Bottom View Ladder Manual Storage Box Base Weldment Wheel/Tire Assembly Axles Steer Cylinder Assembly Tie Rod • Ladder -- Ensure there are no loose or missing parts and there is no visible damage. • Outriggers (If Equipped) -- Ensure there are no loose or missing parts and there is no visible damage. 1.1-10 Manuals Ensure a copy of operating manual, and other important documents are enclosed in manual storage box. -- Check to be sure manual storage box is present and in good condition. -- Ensure manuals are legible and in good condition. -- Always return manuals to the manual storage box after use. Mid Size & Full Size Rough Terrain Series SKYJACK, Page 27 Function Tests Section 1 - Scheduled Maintenance Drive/Steer Enable Trigger Switch Rocker Switch Drive/Steer Controller Torque Switch Low/High Throttle Switch Low/High Speed Range Switch Operation Light Horn Pushbutton Raise/Off/Lower Switch Glow Plug/Choke Pushbutton Off/Lift/Drive Key Switch Engine Start Pushbutton Emergency Stop Button Lift Enable Pushbutton 1.2 Function Tests Function tests are designed to discover any malfunctions before aerial platform is put into service. The operator must understand and follow step-by-step instructions to test all aerial platform functions. WARNING Never use a malfunctioning aerial platform. If malfunctions are discovered, aerial platform must be tagged and placed out of service. Repairs to aerial platform may only be made by a qualified service technician. For CE, select off/platform/base key switch to “ platform position. 4. On engine control console, select off/on/start switch to “ ” on position. 5. For ANSI/CSA with dual fuel engine, select fuel supply by moving fuel switch to either “ gasoline or “ 1.2-1 Platform Control Console 1. Turn main power disconnect switch to “ ” on position. 2. On base control console, pull out “ stop button. SKYJACK, Page 28 ” liquid propane gas position. Ensure that you maintain three points of contact when using the ladder to mount/ dismount platform. 6. Use the ladder of aerial platform to access platform. 7. Close the gate. 8. On platform control console, insert key into off/lift/ drive key switch and select “ 9. ” emergency ” WARNING After repairs are completed, operator must perform a pre-operation inspection and a series of function tests again before putting aerial platform into service. Prior to performing function tests, be sure to read and understand Section 2.10 - Start Operation of the operating manual. ” 3. ” lift position. ” emergency stop button. A beeping Pull out “ sound should be audible and light should come on. Mid Size & Full Size Rough Terrain Series Section 1 - Scheduled Maintenance Function Tests Drive/Steer Enable Trigger Switch Rocker Switch Drive/Steer Controller Torque Switch Low/High Throttle Switch Low/High Speed Range Switch Operation Light Horn Pushbutton Raise/Off/Lower Switch Glow Plug/Choke Pushbutton Off/Lift/Drive Key Switch Engine Start Pushbutton Emergency Stop Button Lift Enable Pushbutton WARNING If beeping sound is not audible and light does not come on, aerial platform must be tagged and placed out of service. 10. Select low/high throttle switch to “ position. ” low throttle caution Do not start the engine in the high throttle position. 11. To start the engine: • Test Emergency Stop ” emergency stop button. 1. Push in“ Result: Engine should shut down and aerial platform functions should not operate. • Test Lift Enable 1. Pull out “ ” emergency stop button. 2. Restart the engine. • If (ANSI/CSA) dual fuel engine is cold, depress and hold “ • If engine is not cold, depress and hold “ ” engine start pushbutton to start the engine. ” choke pushbutton (if equipped) with engine “ to start the engine. 3. Select and hold raise/off/lower switch to “ ” start pushbutton ” raise position without pressing lift “ ” enable pushbutton. Result: Platform should not rise. • If diesel engine is cold, select and hold “ ” glow plug pushbutton for 15 to 20 seconds or until indicator light goes off. Depress and hold “ ” engine start pushbutton to start the engine. Mid Size & Full Size Rough Terrain Series SKYJACK, Page 29 Function Tests Section 1 - Scheduled Maintenance Drive/Steer Enable Trigger Switch Rocker Switch Drive/Steer Controller Torque Switch Low/High Throttle Switch Low/High Speed Range Switch Operation Light Horn Pushbutton Raise/Off/Lower Switch Glow Plug/Choke Pushbutton Off/Lift/Drive Key Switch Engine Start Pushbutton Emergency Stop Button Lift Enable Pushbutton • Test Platform Raising/Lowering WARNING Be aware of overhead obstructions or other possible hazards around the aerial platform when lifting. 1. Press and hold lift “ ” enable pushbutton, then select and hold raise/off/lower switch to “ ” raise position and raise the platform to an approximate height of 1 ft. (30.5 cm). Release switch to stop. Result: Platform should rise. 2. Press and hold lift “ ” enable pushbutton, then select and hold raise/off/lower switch to “ ” lower position and lower the platform fully. Release switch to stop. Result: Platform should lower. • Test Enable Trigger Switch 1. Ensure outriggers are fully retracted. 3. Select off/lift/drive key switch to “ drive position. ” 4. Without activating “ ” enable trigger switch, attempt to drive and steer the aerial platform. Result: Drive and steer functions should not operate. • Test Steering 1. Activate and hold enable trigger switch, and then press rocker switch on top of controller to “ ” left and “ ” right. Result: Steer wheels should turn left and right. • Test Horn ” horn pushbutton. 1. Push “ Result: Horn should sound. 2. Ensure path of intended motion is clear. SKYJACK, Page 30 Mid Size & Full Size Rough Terrain Series Section 1 - Scheduled Maintenance Drive/Steer Enable Trigger Switch Function Tests Rocker Switch Drive/Steer Controller Torque Switch Low/High Throttle Switch Low/High Speed Range Switch Operation Light Horn Pushbutton Raise/Off/Lower Switch Glow Plug/Choke Pushbutton Off/Lift/Drive Key Switch Engine Start Pushbutton Emergency Stop Button Lift Enable Pushbutton • Test Brake • Test Driving 1. Ensure path of intended motion is clear. 2. Activate and hold “ switch. WARNING Brake will engage instantly when controller handle is released, causing aerial platform to stop immediately. ”enable trigger 3. Slowly move controller fully ” forward, and then return handle to center position. Result: Aerial platform should move in forward direction, and then come to a stop. 4. Slowly move controller fully “ ” backward, and then return handle to center position. Result: Aerial platform should move in reverse direction, and then come to a stop. 1. Ensure path of intended motion is clear. 2. Activate and hold “ switch. 3. Drive aerial platform “ ” forward. Test brake by releasing controller handle. Result: Aerial platform should come to a stop. 4. Drive aerial platform “ Mid Size & Full Size Rough Terrain Series ” enable trigger ” forward. Test brake again by releasing “ ” enable trigger switch only. Result: Aerial platform should come to an instant and abrupt stop. SKYJACK, Page 31 Function Tests Section 1 - Scheduled Maintenance Drive/Steer Enable Trigger Switch Rocker Switch Drive/Steer Controller Torque Switch Low/High Throttle Switch Low/High Speed Range Switch Operation Light Horn Pushbutton Raise/Off/Lower Switch Glow Plug/Choke Pushbutton Off/Lift/Drive Key Switch Engine Start Pushbutton Emergency Stop Button Lift Enable Pushbutton • Test Speed Limit • Test Lowering Warning - CE WARNING Be aware of overhead obstructions or other possible hazards around the aerial platform when lifting. 1. Ensure path of intended motion is clear. 2. Select off/lift/drive key switch to “ position. ” lift 3. Raise the platform to an approximate height of 13 ft. (4 m). 1. Select off/lift/drive key switch to “ position. ” lift 2. Fully lower the platform. Result: Platform should stop lowering at an approximate height of 2.5 meters and an alarm should sound. 3. Release platform raise/off/lower switch, ensure area around scissor is clear, then continue lowering the platform. 4. Lower the platform fully. • Test Powerdeck Enable (If Equipped) 4. Select off/lift/drive key switch to “ ” drive position and attempt to drive forward or reverse. Result: Aerial platform should move slower than when it was in stowed position. 1. Select and hold extend/retract switch to the “ SKYJACK, Page 32 “ extend position without selecting “ ” enable switch. Result: Platform should not extend. Mid Size & Full Size Rough Terrain Series Section 1 - Scheduled Maintenance Drive/Steer Enable Trigger Switch Function Tests Rocker Switch Drive/Steer Controller Torque Switch Low/High Throttle Switch Low/High Speed Range Switch Operation Light Horn Pushbutton Raise/Off/Lower Switch Glow Plug/Choke Pushbutton Engine Start Pushbutton Lift Enable Pushbutton • Test Extension Platform(s) (If Equipped) 1. Extend each extension platform to about 1 ft. (30.5 cm). Result: Each extension platform should extend. 2. Retract each extension platform fully. Result: Each extension platform should fully retract. Off/Lift/Drive Key Switch Emergency Stop Button 2. Use the ladder to dismount from platform. 3. On base control console, slowly raise the platform. Result: When platform reaches an appropriate height, a warning signal should sound and platform stop raising as lift and drive controls should be disabled. • Test Tilt Sensor (If Equipped) WARNING Be aware of overhead obstructions or other possible hazards around the aerial platform when lifting. WARNING Ensure that there are no personnel or obstructions in the path of travel, including blind spots. 1. Move the aerial platform on to a slope not greater than 4.5°. Mid Size & Full Size Rough Terrain Series SKYJACK, Page 33 Function Tests Section 1 - Scheduled Maintenance Base Control Console Platform Lower/Neutral/ Raise Switch Emergency Stop Button Lift Enable Pushbutton Emergency Lowering Valve • Test Lower/Neutral/Raise Switch 1.2-2 Base Control Console 1. On engine control console, select “ ” start position to start the engine. For ANSI/CSA & AS 1. On base control console, select and hold “ • Test Emergency Stop ” emergency stop button. 1. Push in “ Result: Engine should shut down and aerial platform functions should not operate. ” emergency stop button and 2. Pull out “ restart engine. 2. Select and hold “ For ANSI/CSA & AS 1. On base control console, select and hold ” lift enable switch and fully “ ” lower the platform with lower/neutral/raise switch. Result: Platform should fully lower. off/platform/base key switch to “ ” to raise position without selecting “ lift enable switch. Result: Platform should not rise. ” ” to raise lower/neutral/raise switch “ position without selecting off/platform/base ” ” raise the platform base position and “ with lower/neutral/raise switch. Result: Platform should rise. 2. Select and hold off/platform/base key switch to “ For CE 1. On base control console, select and hold ” raise the platform with lower/neutral/ “ raise switch. Result: Platform should rise. For CE 1. On base control console, select and hold • Test Base Lift Enable lower/neutral/raise switch “ ” lift enable switch and ” base position and fully “ ” lower the platform with lower/ neutral/raise switch. Result: Platform should fully lower. key switch to “ ” base position. Result: Platform should not rise. SKYJACK, Page 34 Mid Size & Full Size Rough Terrain Series Section 1 - Scheduled Maintenance Function Tests Base Control Console Platform Lower/Neutral/ Raise Switch Emergency Stop Button Lift Enable Pushbutton Emergency Lowering Valve • Test Emergency Lowering (Models 71xx, 8831/41 & 9241) WARNING Be aware of overhead obstructions or other possible hazards around the aerial platform when lifting. 1. Raise the platform to an approximate height of 13 ft. (4 m). 2. Locate holding valve manual override knob at the base of each lift cylinder. Depress and turn counterclockwise. If necessary, use emergency lowering access rod that is located on the base of the aerial platform. 3. On hydraulic/electrical compartment, pull out and hold emergency lowering valve to fully lower the platform. Result: The platform should fully lower. Mid Size & Full Size Rough Terrain Series 4. To restore normal operation, depress and turn holding valve manual override knobs clockwise. • Test Emergency Lowering (Model 8243, 8850 & 9250) WARNING Be aware of overhead obstructions or other possible hazards around the aerial platform when lifting. 1. Raise the platform to an approximate height of 13 ft. (4 m). 2. In hydraulic/electrical compartment, depress and hold emergency lowering pushbutton to activate the auxiliary lowering valves. Pull out and hold the emergency lowering valve to fully lower platform. Result: The platform should fully lower. SKYJACK, Page 35 Function Tests Section 1 - Scheduled Maintenance Base Control Console Platform Lower/Neutral/ Raise Switch Emergency Stop Button Off/Platform/Base Key Switch Emergency Lowering Valve • Test Emergency Powered Extension Platform Retraction Switch (Models 8850 & CE - 9250) 1. Extend both powered extension platforms to about 0.5 meter. 1.2-4 Test Main Power Disconnect Switch 1. On hydraulic/electrical compartment, turn main power disconnect switch to “ ” off position. Result: Engine should shut down and aerial platform functions should not operate. ” emergency stop button to 2. Push in “ shut down the engine. 3. Pull out “ ” emergency stop button. WARNING Ensure that you maintain three points of contact when using the ladder to mount/dismount platform. 4. Use the ladder to dismount from platform. 5. On hydraulic/electric tray, push the emergency powered extension platform retraction switch. Result: Extension platforms should retract. SKYJACK, Page 36 Mid Size & Full Size Rough Terrain Series Section 2 maintenance tables and diagrams Table of Contents Tables 2.1a Specifications and Features - ANSI/CSA...........................................................................................................2 2.1b Specifications and Features - CE.......................................................................................................................3 2.1c Specifications and Features - AS.......................................................................................................................4 2.2a Maximum Platform Capacities(Evenly Distributed) - ANSI/CSA........................................................................6 2.2b Maximum Platform Capacities(Evenly Distributed w/ Optional #7 Tires) - ANSI/CSA....................................7 2.2c Maximum Platform Capacities(Evenly Distributed) - CE...................................................................................8 2.2d Maximum Platform Capacities(Evenly Distributed) - AS....................................................................................9 2.3a Tire Specifications - ANSI/CSA........................................................................................................................10 2.3b Tire Specifications - CE....................................................................................................................................11 2.3c Tire Specifications - AS....................................................................................................................................12 2.4a Floor Loading Pressure - ANSI/CSA................................................................................................................15 2.4b Floor Loading Pressure - CE............................................................................................................................16 2.4c Floor Loading Pressure - AS............................................................................................................................17 2.5 Rough Terrain Scissor Fluids...........................................................................................................................18 2.6 Torque Specifications.......................................................................................................................................20 Mid Size & Full Size Rough Terrain Series SKYJACK, Page 1 2 Service and Maintenance Section 2 - Maintenance Tables and Diagrams Table 2.1a Specifications and Features - ANSI/CSA Mid Size RTs MODEL Weight* 7127 7135 8243 8850 8831 8841 9250 8,420 lb. 8,850 lb. 10,600 lb. 11,460 lb. 9,670 lb. 10,570 lb. 14,700 lb. 3819 kg 4014 kg 4808 kg 5198 kg 4386 kg 4794 kg 6668 kg Width Length Platform Size Height Working Platform Elevated Platform Lowered Full Size RTs 71.5” 87” 92” 1.82 m 2.21 m 2.34 m 150” 137.5” 176” 3.81 m 3.5 m 4.47 m 64” x 117” 68” x 133” 74” x 168” 1.63 m x 2.97 m 1.73 m x 3.39 m 1.88 m x 4.27 m 33’ 41’ 49’ 56’ 37’ 47’ 56’ 10.1 m 12.5 m 14.9 m 17.1 m 11.3 m 14.3 m 17.1 m 27’ 35’ 43’ 50’ 31’ 41’ 50’ 8.2 m 10.7 m 13.1 m 15.2 m 9.4 m 12.5 m 15.2 m 60.5” 67.5” 75” 82” 59” 69” 79” 1.54 m 1.71 m 1.91 m 2.08 m 1.5 m 1.75 m 2.01 m Drive Tires Speed 7.9 m Please refer to Table 2-7 for tire specification and usage. Normal Drive Engine (RPM) 26’ Full Elevated Drive 3.5 mph 3.0 mph 2.0 mph 5.6 km/h 4.8 km/h 3.2 km/h 0.35 mph 0.6 mph 0.56 km/h 0.97 km/h Raise (Rated Load) 43 sec. 41 sec. 45 sec. 46 sec. 58 sec. 56 sec. 67 sec. Lower (Rated Load) 46 sec. 44 sec. 58 sec. 52 sec. 44 sec. 53 sec. 72 sec. Kubota (Dual Fuel) 2050 (Low) / 3500 (High) GM (Dual Fuel) Gradeability N/A 1400 (Low) / 2800 (High) Kubota (Diesel) N/A 1400 (Low) / 2800 (High) 900 (Idle) /1400 (Low) / 2800 (High) 30% 30% 25% 60348AG-ANSI-R * Weights are approximate; refer to serial nameplate for specific weight. Values shown are for standard 4WD machines on air tires (except for Model 8850) with a manual extension platform (Mid Size RTs) and no extension platforms (Full Size RTs). SKYJACK, Page 2 Mid Size & Full Size Rough Terrain Series Section 2 - Maintenance Tables and Diagrams Service and Maintenance Table 2.1b Specifications and Features - CE Model Height Weight* Mid Size RTs 7127 7135 8831 8841 9241 9250 3724 kg 4392 kg 4554 kg 4962 kg 6718 kg 7407 kg Width 1.82 m 2.21 m 2.34 m Length 3.81 m 3.5 m 4.55 m Platform Size 1.63 m x 2.97 m 1.73 m x 3.39 m 1.85 m x 4.39 m Working 10.2 m 12.7 m 11.4 m 14.5 m 14.5 m 17.2 m Platform Elevated 8.2 m 10.7 m 9.4 m 12.5 m 12.5 m 15.2 m Platform Lowered 1.54 m 1.73 m 1.50 m 1.75 m 1.68 m 2m Full 7.9 m Full Drive 7.9 m Speed Tires Engine (RPM) Full Size RTs Refer to Table 2.6 for tire specification and usage. Normal Drive 5.6 km/h 4.8 km/h 3.8 km/h Elevated Drive 0.56 km/h 0.97 km/h 0.72 km/h Raise (Rated Load) 31 sec. 38 sec. 58 sec. 56 sec. 62 sec. 64 sec. Lower (Rated Load) 46 sec. 43 sec. 44 sec. 53 sec. 59 sec. 86 sec. Kubota (Diesel) Gradeability 1400 (Low) / 2800 (High) 1400 (Low) / 2800 (High) 30% 30% 25% 25% 60348AI-CE-R * Weights are approximate; refer to serial nameplate for specific weight. Values shown are for standard 4WD aerial platforms on air tires with a manual extension platform (Models 7127 & 7135) and no extension platforms (Models 8831 & 8841). For models 9241 & 9250, values shown are for standard 4WD on foam tires with two powered extension platforms. Mid Size & Full Size Rough Terrain Series SKYJACK, Page 3 Service and Maintenance Section 2 - Maintenance Tables and Diagrams Table 2.1c Specifications and Features - AS Model Height Weight* 7127 7135 8243 8850 8831 8841 9250 4046 kg 4241 kg 4917 kg 5588 kg 4636 kg 5044 kg 6895 kg 2.08 m 2.31 m Width 1.82 m Length 3.81 m Platform Size 1.63 x 2.97 m 2.34 m 3.58 m 3.5 m 4.47 m 1.64 x 2.93 m 1.73 x 3.39 m 1.88 x 4.27 m 10.1 m 12.5 m 15.1 m 17.2 m 11.28 m 14.3 m 17.1 m Platform Elevated 8.2 m 10.7 m 13.1 m 15.2 m 9.4 m 12.5 m 15.2 m Platform Lowered 1.54 m 1.73 m 1.9 m 2.08 m 1.50 m 1.75 m 2.01 m Full Full Tires Speed 2.21 m Working Drive Engine (RPM) Full Size RTs Mid Size RTs Full 7.9 m Refer to Table 2.6 for tire specification and usage. Normal Drive 4.8 km/h 4.8 km/h 5.6 km/h 5.6 km/h 3.2 km/h Elevated Drive 0.58 km/h 0.45 km/h 0.8 km/h 0.8 km/h 0.8 km/h Raise (Rated Load) 31 sec. 38 sec. 48 sec. 47 sec. 58 sec. 56 sec. 67 sec. Lower (Rated Load) 46 sec. 43 sec. 52 sec. 61 sec. 44 sec. 53 sec. 72 sec. 1400 (Low) / 2800 (High) Kubota (Diesel) Gradeability 30% 30% 25% 60348AI-AS * Weights are approximate; refer to serial nameplate for specific weight. Values shown are for standard 2WD aerial platforms on foam-filled tires with a manual extension platform (Mid Size RTs) and no extension platforms (Full Size RTs). SKYJACK, Page 4 Mid Size & Full Size Rough Terrain Series Service and Maintenance Section 2 - Maintenance Tables and Diagrams Table 2.2a Maximum Platform Capacities (Evenly Distributed) - ANSI/CSA Total 9250 8841 8831 8850 8243 7135 7127 MODEL Capacity One Extension Platform 1500 lb. One Extension Platform 1000 lb. One Extension Platform 1000 lb. 681 kg 454 kg 454 kg 800 lb. One Extension Platform 363 kg No Extension Platform 1134 kg 2500 lb. One Extension Platform 2000 lb. Two Extension Platforms 1700 lb. No Extension Platform 1700 lb. One Extension Platform 1500 lb. Two Extension Platforms 1500 lb. No Extension Platform 2000 lb. One Extension Platform 1500 lb. Two Extension Platforms 1500 lb. 908 kg 771 kg 771 kg 681 kg 681 kg 907 kg 681 kg 681 kg First Extension Number of Occupants 5 4 3 3 Capacity 500 lb. 227 kg 350 lb. 159 kg 350 lb. 159 kg 300 lb. 136 kg Number of Occupants 6 5 1 Not Available 1 Not Available 1 Not Available Not Available 500 lb. 227 kg 500 lb. 227 kg 2 2 5 Not Available 500 lb. 2 227 kg Not Available 500 lb. 227 kg 500 lb. 227 kg 2 2 5 5 Number of Occupants Not Available 5 5 Capacity 2 6 6 Second Extension Not Available 500 lb. 2 227 kg Not Available 500 lb. 227 kg 500 lb. 227 kg 2 2 Not Available 500 lb. 227 kg 2 60376AE-ANSI-R NOTE: Occupants and materials are not to exceed rated load. Capacities listed are for standard machines equipped with #6 tires. Refer to capacity label at sides of platform for additional information and for models equipped with options. SKYJACK, Page 6 Mid Size & Full Size Rough Terrain Series Section 2 - Maintenance Tables and Diagrams Service and Maintenance Table 2.2b Maximum Platform Capacities (Evenly Distributed w/ Optional #7 Tires) - ANSI/CSA Total 9250 8841 8831 7135 7127 MODEL One Extension Platform One Extension Platform Capacity 1500 lb. 681 kg 900 lb. 408 kg No Extension Platform 2000 lb. One Extension Platform 1700 lb. Two Extension Platforms 1400 lb. No Extension Platform 1250 lb. One Extension Platform 1250 lb. Two Extension Platforms 1250 lb. No Extension Platform 1500 lb. One Extension Platform 1500 lb. Two Extension Platforms 1500 lb. 908 kg 771 kg 635 kg 567 kg 567 kg 567 kg 681 kg 681 kg 681 kg First Extension Number of Occupants 5 3 Capacity 500 lb. 227 kg 300 lb. 136 kg Number of Occupants 5 5 1 Not Available Not Available 500 lb. 227 kg 500 lb. 227 kg 2 2 5 Not Available 500 lb. 2 227 kg Not Available 500 lb. 227 kg 500 lb. 227 kg 2 2 5 5 Number of Occupants Not Available 5 5 Capacity 2 6 6 Second Extension Not Available 500 lb. 2 227 kg Not Available 500 lb. 227 kg 500 lb. 227 kg 2 2 Not Available 500 lb. 227 kg 2 60376AE-ANSI-R NOTE: Occupants and materials are not to exceed rated load. Refer to capacity label at sides of platform for additional information and for models equipped with options. Mid Size & Full Size Rough Terrain Series SKYJACK, Page 7 Service and Maintenance Section 2 - Maintenance Tables and Diagrams Table 2.2c Maximum Platform Capacities (Evenly Distributed) - CE Total 9250 9241 8841 8831 7135 7127 MODEL First Extension Second Extension Capacity Number of Occupants Capacity Number of Occupants One Extension Platform 681 kg 5 227 kg 2 Not Available One Extension Platform 454 kg 4 159 kg 1 Not Available No Extension Platform 1134 kg 6 One Extension Platform 908 kg 6 227 kg 2 Two Extension Platform 771 kg 6 227 kg 2 No Extension Platform 771 kg 5 One Extension Platform 681 kg 5 227 kg 2 Two Extension Platform 681 kg 5 227 kg 2 227 kg 2 Two Extension Platform 681 kg 5 227 kg 2 227 kg 2 Two Extension Platform 681 kg 5 227 kg 2 227 kg 2 Capacity Number of Occupants Not Available Not Available 227 kg 2 Not Available Not Available 60376AF-CE-R NOTE: Occupants and materials are not to exceed rated load. Capacities listed are for standard machines equipped with #6 tires except for models 9250 and 9241 which are equipped with foam-filled tires. Refer to capacity label at sides of platform for additional information and for models equipped with options. Wind Speed BEAUFORT SCALE m/s km/h ft/s mph 3 3.4 – 5.4 12.5 – 19.4 11.5 – 17.75 5 – 12.0 Papers and thin branches move, flags wave 4 5.4 – 8.0 19.4 – 28.8 17.75 – 26.25 12.0 – 18 Dust is raised, paper whirls up, and small branches sway. 5 8.0 – 10.8 28.8 – 38.9 26.25 – 35.5 18 – 24.25 Shrubs with leaves start swaying. Wave crests are apparent in ponds or swamps. 6 10.8 – 13.9 38.9 – 50.0 35.5 – 45.5 24.5 – 31 Tree branches move. Power lines whistle. It is difficult to open an umbrella. 7 13.9 – 17.2 50.0 – 61.9 45.5 – 65.5 31 – 38.5 Whole trees sway. It is difficult to walk against the wind. Ground Conditions 60338AC SKYJACK, Page 8 Mid Size & Full Size Rough Terrain Series Section 2 - Maintenance Tables and Diagrams Service and Maintenance Table 2.2d Maximum Platform Capacities (Evenly Distributed) - AS Total MODEL First Extension Second Extension Capacity Number of Occupants Capacity Number of Occupants Capacity Number of Occupants 7127 One Extension Platform 681 kg 5 227 kg 2 Not Available 7135 One Extension Platform 454 kg 4 159 kg 1 Not Available 8243 One Extension Platform 454 kg 3 159 kg 1 Not Available 8850 One Extension Platform 363 kg 3 136 kg 1 Not Available No Extension Platform 1134 kg 6 One Extension Platform 908 kg 6 227 kg 2 Two Extension Platforms 681 kg 6 227 kg 2 No Extension Platform 771 kg 5 One Extension Platform 681 kg 5 227 kg 2 Two Extension Platforms 681 kg 5 227 kg 2 No Extension Platform 908 kg 5 One Extension Platform 681 kg 5 227 kg 2 Two Extension Platforms 681 kg 5 227 kg 2 8831 8841 9250 Not Available Not Available 227 kg 2 Not Available Not Available 227 kg 2 Not Available Not Available 227 kg 2 60376AE-AS NOTE: Occupants AND materials are not to exceed rated load. Capacities listed are for standard machines equipped with #6 tires except for model 9250A which is equipped with foam filled tires. Refer to capacity label at sides of platform for additional information and for models equipped with options. Mid Size & Full Size Rough Terrain Series SKYJACK, Page 9 Service and Maintenance Section 2 - Maintenance Tables and Diagrams Table 2.3a Tire Specifications - ANSI/CSA WARNING Air pressure can affect stability. Temperature changes can affect air pressure. It is important to visually inspect all tires for proper tire inflation prior to use. Tires should be checked by end user on a daily basis. Tire inflation pressures must be checked weekly with a calibrated gauge. If the measured pressure is less than the specification, reinflate to the pressure specified below. Tires must not be inflated above the recommended specification. Do not intermix tires of different types on one aerial platform. Use only tires of type originally supplied. Fill Specification #6F #6F #7F 8841 9250 10 8 Foam 8831 Air S S S N/A S S S O O O N/A O O O O O O N/A O O O 75* (517.1)* 75* (517.1)* 45* (310.3)* 10 FULL SIZE 8850 #7A Pressure (Factory) (kPa) 8243 #6A 10-16.5 CARLISLE US LOADER 10-16.5 OTR OUTRIGGER (Non-Marking) 31-15.5-15 GOODYEAR TERRA XTRAC 10-16.5 CARLISLE US LOADER 10-16.5 OTR OUTRIGGER (Non-Marking) 31-15.5-15 GOODYEAR TERRA XTRAC Ply Rating 7135 #6A Fill Type 7127 Tire Size Usage† MID SIZE 10 N/A O O O S O O O 10 N/A O O O O O O O 8 N/A O O O O O O O 60378AE-ANSI-R * Factory preset @ 20°C, Check pressures regularly as tires can lose pressure over time and over different ambient temperatures even under normal conditions. † Usage: (S)tandard Or (O)ptional (N/A) Not Available Backspace Rim Backspace Diagram Inboard A Outboard SECTION A-A Rim Size Serial Number #6 & #6F #7 & #7F A Backspace 7127 Contact Skyjack Service Department 7135 8831 8841 8243 8850 9250 3-3/4” 3-3/4” 4-3/4” 4-3/4” 3-3/4” 3-3/4” 3-3/4” 95 mm 95 mm 121mm 121mm 95 mm 95 mm 95 mm All models are 4-3/8” 60380AC-ANSI SKYJACK, Page 10 Mid Size & Full Size Rough Terrain Series Section 2 - Maintenance Tables and Diagrams Service and Maintenance Table 2.3b Tire Specifications - CE WARNING Air pressure can affect stability. Temperature changes can affect air pressure. It is important to visually inspect all tires for proper tire inflation prior to use. Tires should be checked by end user on a daily basis. Tire inflation pressures must be checked weekly with a calibrated gauge. If the measured pressure is less than the specification, reinflate to the pressure specified below. Tires must not be inflated above the recommended specification. Do not intermix tires of different types on one aerial platform. Use only tires of type originally supplied. † Fill Specification Tire Size #6A #6A #7A #6F #6F #7F Fill Type 10-16.5 CARLISLE US LOADER 10-16.5 OTR OUTRIGGER (Non-Marking) 31-15.5-15 GOODYEAR TERRA XTRAC 10-16.5 CARLISLE US LOADER 10-16.5 OTR OUTRIGGER (Non-Marking) 31-15.5-15 GOODYEAR TERRA XTRAC Usage MID SIZE FULL SIZE Ply Rating Pressure (Factory) (kPa) 7127 7135 8831 8841 9241 9250 10 517.1* S S S S N/A N/A 10 517.1* O O O O N/A N/A 8 310.3* N/A N/A N/A N/A N/A N/A 10 N/A O O O O S S 10 N/A O O O O N/A N/A 8 N/A O O O O N/A N/A Air Foam 60378AF-CE-R * † Factory preset @ 20°C. Check pressures regularly as tires can lose pressure over time and over different ambient temperatures even under normal conditions. Usage: (S)tandard Or (O)ptional (N/A) Not Available Backspace Rim Backspace Diagram A Inboard Outboard SECTION A-A Rim Size #6 & #6F #7 & #7F A Backspace 7127 7135 8831 8841 9241 9250 95 mm 95 mm 121 mm 121 mm 95 mm 95 mm All models are 135 mm N/A 60380AE-CE-R Mid Size & Full Size Rough Terrain Series SKYJACK, Page 11 Service and Maintenance Section 2 - Maintenance Tables and Diagrams Table 2.3c Tire Specifications - AS WARNING Air pressure can affect stability. Temperature changes can affect air pressure. It is important to visually inspect all tires for proper tire inflation prior to use. Tires should be checked by end user on a daily basis. Tire inflation pressures must be checked weekly with a calibrated gauge. If the measured pressure is less than the specification, reinflate to the pressure specified below. Tires must not be inflated above the recommended specification. Do not intermix tires of different types on one aerial platform. Use only tires of type originally supplied. Fill Specification Tire Size #6A Fill Type 10-16.5 CARLISLE US LOADER #6A 10-16.5 OTR OUTRIGGER (Non-Marking) #6F 10-16.5 CARLISLE US LOADER Ply Rating Pressure (Factory) MID SIZE FULL SIZE Psi (kPa) 7127 7135 8243 8850 8831 8841 9250 10 75* (517.1)* O O O O O O O 10 75* (517.1)* O O O O O O O 10 N/A S S S S S S Air Foam Usage† S 60378AE-AS • Factory preset @ 20°C, Check pressures regularly as tires can lose pressure over time and over different ambient temperatures even under normal conditions. † Usage: (S)tandard Or (O)ptional (N/A) Not Available Backspace Rim Backspace Diagram Inboard A Outboard SECTION A-A Backspace Rim Size Serial Number A 7127 Contact Skyjack Service Department #6A & #6F 7135 8243 8850 8831 8841 9250 121mm 95 mm 95 mm 95 mm 95 mm 121mm 121mm 95 mm 4.75 in. 3.75 in. 3.75 in. 3.75 in. 3.75 in. 4.75 in. 4.75 in. 3.75 in. 60380AE-AS SKYJACK, Page 12 Mid Size & Full Size Rough Terrain Series Service and Maintenance Section 2 - Maintenance Tables and Diagrams Floor Loading Pressure Locally Concentrated Pressure (LCP): Overall Uniform Pressure (OUP): Foot Print Area = Length x Width = πr2 Base Area = Length x Width LCP = Weight of Aerial Platform + Capacity Foot Print Area x 4 (Tires) OUP = Weight of Aerial Platform + Capacity Base Area Length Width Width Length Width Diameter Length WARNING Intermixing tires of different types or using tires of types other than those originally supplied with this equipment can adversely affect stability. Therefore, replace tires only with the exact original Skyjack-approved type. Failure to operate with matched approved tires in good condition may result in death or serious injury. SKYJACK, Page 14 Mid Size & Full Size Rough Terrain Series Section 2 - Maintenance Tables and Diagrams Service and Maintenance Table 2.4a Floor Loading Pressure - ANSI/CSA MODEL 7127 7127 Outrigger Pads 7135 7135 Outrigger Pads 8243 8243 Outrigger Pads 8850 8850 Outrigger Pads 8831 8831 Outrigger Pads 8841 8841 Outrigger Pads 9250 9250 Outrigger Pads Total Aerial Platform Load Total Aerial Platform Weight WHEEL LCP ** OUP ** kg/m2 lb. kg lb. kg psi kPa psf min* 7920 3592 3168 1437 101.7 701.2 150.0 732.4 max* 12180 5525 4872 2210 121.1 835.0 230.7 1126.4 min* 9360 4246 3744 1698 47.7 328.8 155.5 759.2 max* 12180 5525 4872 2210 62.1 427.9 202.3 987.9 min* 8850 4014 3540 1606 106.8 736.4 167.6 818.4 max* 11980 5434 4792 2174 120.4 830.1 226.9 1107.9 min* 9790 4441 3916 1776 49.9 343.9 162.6 794.1 max* 12110 5493 4844 2197 61.7 425.5 201.2 982.2 min* 10600 4808 4240 1923 115.0 792.9 169.9 829.5 max* 11980 5434 4792 2174 120.4 830.1 192.0 937.4 min* 10600 4808 4240 1923 54.0 372.4 176.1 859.8 max* 12920 5860 5168 2344 65.8 453.9 214.6 1047.9 min* 11460 5198 4584 2079 118.4 816.3 167.8 819.3 max* 12530 5684 5012 2273 122.3 843.2 183.5 895.8 min* 11460 5198 4584 2079 58.4 402.6 196.2 958.2 max* 12530 5684 5012 2273 63.8 440.2 214.6 1047.6 min* 9670 4386 3868 1754 110.9 764.6 148.8 726.4 max* 13350 6055 5340 2422 125.0 861.8 205.4 1002.9 min* 10540 4781 4216 1912 53.7 370.3 157.1 767.0 max* 14300 6486 5720 2594 72.9 502.4 213.1 1040.6 min* 10570 4794 4228 1918 114.9 792.2 162.6 794.0 max* 13830 6273 5532 2509 126.4 871.5 212.8 1038.9 min* 11440 5189 4576 2076 58.3 401.9 170.5 832.5 max* 14820 6722 5928 2689 75.5 520.7 220.9 1078.4 min* 14700 6668 5880 2667 128.9 888.7 179.5 876.4 max* 17470 7924 6988 3170 135.6 934.9 213.3 1041.5 min* 14700 6668 5880 2667 74.9 516.4 145.5 710.7 max* 18410 8351 7364 3340 93.8 646.8 182.3 890.0 60379AE-ANSI-R * ** min - Total aerial platform weight with no options max - Aerial platform weight + all options + capacity LCP - Locally Concentrated Pressure is a measure of how hard the aerial platform presses on the areas in direct contact with the floor. The floor covering (tile, carpet, etc.) must be able to withstand more that the indicated values above. OUP - Overall Uniform Pressure is a measure of the average load the aerial platform imparts on the whole surface directly underneath it. The structure of the operating surface (beams, etc.) must be able to withstand more than the indicated values above. NOTE: The LCP or OUP that an individual surface can withstand varies from structure to structure and is generally determined by the engineer or architect for that particular structure. Mid Size & Full Size Rough Terrain Series SKYJACK, Page 15 Service and Maintenance Section 2 - Maintenance Tables and Diagrams Table 2.4b Floor Loading Pressure - CE Total Aerial Platform Weight WHEEL LCP ** OUP ** kg kg kPa kg/m2 min* 3592 1437 701 732 max* 5525 2210 835 1126 min* 4246 1698 329 759 max* 5525 2210 428 988 min* 4014 1606 736 818 max* 5434 2174 830 1108 min* 4441 1776 344 794 max* 5493 2197 426 982 min* 4386 1754 765 726 max* 6055 2422 862 1003 min* 4781 1912 370 767 max* 6486 2594 502 1041 min* 4794 1918 792 794 max* 6273 2509 872 1039 min* 5189 2076 402 833 max* 6722 2689 521 1078 min* 6718 2687 1408 887 max* 7448 2979 1495 893 min* 6718 2687 520 700 max* 7448 2979 577 705 min* 7407 2963 1490 969 max* 8137 3255 1576 975 min* 7407 2963 573 765 max* 8137 3255 630 770 MODEL 7127 7127 Outrigger Pads 7135 7135 Outrigger Pads 8831 8831 Outrigger Pads 8841 8841 Outrigger Pads 9241 9241 Outrigger Pads 9250 9250 Outrigger Pads Total Aerial Platform Load 60379AF-CE-R * ** min - Total aerial platform weight with no options max - Aerial platform weight + all options + capacity LCP - Locally Concentrated Pressure is a measure of how hard the aerial platform presses on the areas in direct contact with the floor. The floor covering (tile, carpet, etc.) must be able to withstand more that the indicated values above. OUP - Overall Uniform Pressure is a measure of the average load the aerial platform imparts on the whole surface directly underneath it. The structure of the operating surface (beams, etc.) must be able to withstand more than the indicated values above. NOTE: The LCP or OUP that an individual surface can withstand varies from structure to structure and is generally determined by the engineer or architect for that particular structure. SKYJACK, Page 16 Mid Size & Full Size Rough Terrain Series Section 2 - Maintenance Tables and Diagrams Service and Maintenance Table 2.4c Floor Loading Pressure - AS MODEL 7127 7127 Outrigger Pads 7135 7135 Outrigger Pads 8243 8243 Outrigger Pads 8850 8850 Outrigger Pads 8831 8831 Outrigger Pads 8841 8841 Outrigger Pads 9250 9250 Outrigger Pads min* Total Aerial Platform Load Total Aerial Platform Weight WHEEL LCP ** OUP ** kg kg kPa kg/m2 3592 1437 701.2 732.4 max* 5525 2210 835.0 1126.4 min* 4246 1698 328.8 759.2 max* 5525 2210 427.9 987.9 min* 4014 1606 736.4 818.4 max* 5434 2174 830.1 1107.9 min* 4441 1776 343.9 794.1 max* 5493 2197 425.5 982.2 min* 4808 1923 792.9 829.5 max* 5434 2174 830.1 937.4 min* 4808 1923 372.4 859.8 max* 5860 2344 453.9 1047.9 min* 5198 2079 816.3 819.3 max* 5684 2273 843.2 895.8 min* 5198 2079 402.6 958.2 max* 5684 2273 440.2 1047.6 min* 4386 1754 764.6 726.4 max* 6055 2422 861.8 1002.9 min* 4781 1912 370.3 767.0 max* 6486 2595 502.4 1040.6 min* 4794 1918 792.2 794.0 max* 6273 2509 871.5 1038.9 min* 5189 2076 401.9 832.5 max* 6722 2689 520.7 1078.4 min* 6668 2667 888.7 876.4 max* 7924 3170 934.9 1041.5 min* 6668 2667 516.4 710.7 max* 8351 3340 646.8 890.0 60379AE-AS * ** min - Total aerial platform weight with no options (with air-filled tires) max - Aerial platform weight + all options LCP - Locally Concentrated Pressure is a measure of how hard the aerial platform presses on the areas in direct contact with the floor. The floor covering (tile, carpet, etc.) must be able to withstand more that the indicated values above. OUP - Overall Uniform Pressure is a measure of the average load the aerial platform imparts on the whole surface directly underneath it. The structure of the operating surface (beams, etc.) must be able to withstand more than the indicated values above. NOTE: The LCP or OUP that an individual surface can withstand varies from structure to structure and is generally determined by the engineer or architect for that particular structure. Mid Size & Full Size Rough Terrain Series SKYJACK, Page 17 Service and Maintenance Section 2 - Maintenance Tables and Diagrams Table 2.5 Rough Terrain Scissor Fluids AXLE OIL Axle Type Cushman Front Dana Front / Rear Cushman *Qty. (Liters) *Qty. (Gallons) Oil Type Recommended Equivalent Oil 2.4 0.634 Gear Oil, 80W-90 GL5 - Gear Oil, ESI 80W-90 Chevron Gear Lubricant Delo ESI 80W-90, Caltex Gear Lubricant ESI 80W-90, Caltex RPM Borate EP 80W-90, Texaco Star Gear Lubricant 80W-90 Rear 1 0.264 *All fuel capacity quantities are in standard liter or US gallons (liquid). **Use distilled water and 50/50 mix of anti-freeze/water. Center Drive Type Center Drive *Qty. (Liters) 1 CENTER DRIVE OIL *Qty. Oil Type (Gallons) 0.26 Gear Oil, 80W-90 GL5 Recommended Equivalent Oil - *All fuel capacity quantities are in standard liter or US gallons (liquid). **Use distilled water and 50/50 mix of anti-freeze/water. HYDRAULIC OIL Model *Qty. (Liters) *Qty. (Gallons) SJRT-68XX 86.88 22.95 80.48 21.26 Oil Type SJRT-7127 SJRT-7135 SJRT-8243 SJRT-8850 SJRT-8831 SJRT-8841 SJRT-8831E ATF Dexron III 75.71 20 67.38 17.8 SJRT-8841E SJRT-9241 SJRT-9250 *All fuel capacity quantities are in standard liter or US gallons (liquid). **Use distilled water and 50/50 mix of anti-freeze/water. SKYJACK, Page 18 Mid Size & Full Size Rough Terrain Series Section 2 - Maintenance Tables and Diagrams Service and Maintenance Table 2.5 Rough Terrain Scissor Fluids (Continued) ENGINE OIL Engine Type *Qty. (Liters) *Qty. (Gallons) Kubota D902 3.9 1.03 Kubota D1105 5.1 1.35 Kubota DF972 3.4 0.9 3.5 0.98 Nissan A15 GM 1.6 Oil Type, Viscosity Engine Oil, SAE 10W-30 Recommended Equivalent Oil (Viscosity - API Service Designation) 10W30 - API Service Designation CG-4, CF-4, CF, CD, SH. 10W30 - API Service Designation SF/CC. *All fuel capacity quantities are in standard liter or US gallons (liquid). **Use distilled water and 50/50 mix of anti-freeze/water. Component Type *Qty. (Liters) ENGINE COOLANT *Qty. (Gallons) 3.1 0.82 11.4 3.01 **Coolant Type Kubota D902 Kubota D1105 Anti-freeze / Water Kubota DF972 Nissan A15 GM 1.6 Extended life anti-freeze / Water *All fuel capacity quantities are in standard liter or US gallons (liquid). **Use distilled water and 50/50 mix of anti-freeze/water. ENGINE FUEL Tank Diesel Gasoline / Liquid Propane Model *Qty. (Liters) *Qty. (Gallons) Kubota D902 Kubtoa D1105 SJRT-68xx 86.88 22.95 3 N/A SJRT-7127 SJRT-7135 SJRT-8243 80.48 21.26 49.21 13 64.35 17 SJRT-8850 SJRT-8831 SJRT-8841 SJRT-9241 SJRT-9250 N/A Kubota DF972 GM 1.6 Nissan A15 3 N/A N/A 3 3 *All fuel capacity quantities are in standard liter or US gallons (liquid). **Use distilled water and 50/50 mix of anti-freeze/water. Mid Size & Full Size Rough Terrain Series SKYJACK, Page 19 Service and Maintenance Section 2 - Maintenance Tables and Diagrams Table 2.6 Torque Specifications Directional valve mounting bolts Wheel mounting bolts Center drive sprocket mounting bolts Hydraulic drive motor mounting bolts Positive battery post cable/fuse nut Torque Lbf.ft (max) Lbf.in (max) Nm (max) 08 28-32 lbf.in 135-145 lbf.ft 110-115 lbf.ft (242 LOCTITE) 120 lbf.ft (242 LOCTITE) 90 lb-in Cartridge Size 58 38 20 240 27.12 10 25 300 33.90 3.16 - 3.61 Nm 183 – 196 Nm 149 – 156 Nm 162 Nm 10.2 Nm 12 35 420 47.46 16 50 600 67.80 Coils Size All coils 4 to 5 48 to 60 5.42 to 6.78 SAE Plugs Torque Lbf.ft (max) Lbf.in (max) Nm (max) Torque 2 Lbf.ft (max) 3 Lbf.in (max) 36 Nm (max) 4.07 Newton-meter = Nm 4 10 120 13.56 5 6 Size 15 180 20.34 Pound-force foot = lbf.ft 8 10 12 16 25 30 35 300 360 420 33.90 40.68 47.46 Pound-force inch = lbf.in 60022AC SKYJACK, Page 20 Mid Size & Full Size Rough Terrain Series Section 3 System component identification and schematics Table of Contents Charts 3.1 3.2 Hydraulic Symbol Chart............................................................................................................................ 3 Electrical Symbol Chart............................................................................................................................ 4 Parts List 3.3 3.4 Hydraulic Component Parts List............................................................................................................... 5 Electrical Component Parts List .............................................................................................................. 8 Diagrams and Schematics 3.5 3.6 3.7 3.8 3.9 3.10 3.11 3.12 3.13 3.14 3.15 3.16 3.17 3.18 3.19 3.20 3.21 3.22 3.23 3.24 3.25 3.26 3.27 3.28 3.29 3.30 3.31 3.32 3.33 3.34 3.35 3.36 Platform Control Console Wiring - All Options (ANSI/CSA)................................................................... 15 Platform Control Console Wiring - All Options (CE)............................................................................. 16 Control Cable Assemblies Diagram....................................................................................................... 17 Outrigger & Hydraulic Generator Control Console Wiring.................................................................... 18 Base Control Console Wiring (ANSI/CSA)............................................................................................. 19 Base Control Console Wiring (CE)......................................................................................................... 20 Hydraulic Schematic (Cushman Axles) (Model 9241)........................................................................... 21 Hydraulic Schematic (Cushman Axles) (Model 9250)........................................................................... 22 Hydraulic Schematic (Dana Axles)......................................................................................................... 23 Hydraulic Manifold Components & Port Identifications......................................................................... 24 Main Manifold Wiring Diagram............................................................................................................... 25 Oil Cooler - Electrical Panel Diagram (ANSI/CSA Dual Fuel Engine).................................................... 26 Hydraulic Generator - Electrical Panel Diagram (ANSI/CSA Dual Fuel Engine)................................... 27 Hydraulic Generator - Electrical Panel Diagram (ANSI/CSA Diesel Engine) ........................................ 28 Hydraulic Generator - Electrical Panel Diagram (CE)............................................................................ 29 Emergency Lowering System - Wiring Diagram (ANSI/CSA) (Model 9250)......................................... 30 Emergency Lowering System - Wiring Diagram (CE) (Model 9250)..................................................... 31 Emergency Lowering System - Electrical Wiring Diagram (CE) (Model 9241)..................................... 32 AutoLeveling Outrigger Connection Diagram........................................................................................ 33 Powered Extension Platform - Electrical Wiring Diagram (Model 9250)................................................ 34 Horn, Light & Beeper Wiring Diagram (ANSI/CSA) (Model 9250)......................................................... 35 Horn, Light, Beeper & Load Sensing Wiring Diagram........................................................................... 36 Electrical Inverter Wiring Diagram.......................................................................................................... 37 Engine Wiring Diagram - Kubota Diesel Engine.................................................................................... 39 Engine Harnesses - GM Dual Fuel Engine . ......................................................................................... 40 Electrical Panel Diagram - ANSI/CSA (All Option)................................................................................. 41 Electrical Panel Diagram - CE (All Option)............................................................................................ 42 Electrical Schematic - ANSI/CSA & AS (All Option with Kubota Diesel Engine) .................................. 43 Electrical Schematic - CE (All Option with Kubota Diesel Engine)........................................................ 44 Electrical Schematic - ANSI/CSA & AS (All Options with GM Dual Fuel Engine)................................. 45 Electrical Schematic - ANSI/CSA & AS (No Options with GM Dual Fuel Engine)................................ 46 Interface & Engine Electrical Schematic - GM Dual Fuel Engine ........................................................ 47 Full-Size Rough Terrain Series Models 9241 & 9250 143905 SKYJACK, Page 1 3 3.1 Hydraulic Symbol Chart LINE CROSSING VARIABLE DISPLACEMENT PUMP SHUTTLE VALV VELOCITY FUSE LINE JOINED HAND PUMP ACCUMULATOR, GAS CHARGED SINGLE ACTING CYLINDER HYDRAULIC TANK RELIEF VALVE CUSHION CYLINDER DOUBLE ACTING CYLINDER HYDRAULIC FILTER WITH BYPASS PRESSURE REDUCING VALVE PRESSURE SWITCH ELECTRIC MOTOR FIXED ORIFICE MOTION CONTROL VALVE SPRING APPLIED HYDRAULIC RELEASED BRAKE ENGINE ADJUSTABLE FLOW CONTROL FLOW DIVIDER COMBINER BRAKE CYLINDER FIXED DISPLACEMENT PUMP CHECK VALVE COUNTER BALANCE VALVE ROTARY ACTUATOR THREE POSITION FOUR WAY PROPORTIONAL OIL COOLER SERIES PARALLEL HYDRAULIC MOTOR TWO POSITION TWO WAY NORMALLY CLOSED TWO POSITION TWO WAY NORMALLY OPEN TWO POSITION THREE WAY PRESSURE TRANSDUCER MAIN LINES S SERVO Full-Size Rough Terrain Series Models 9241 & 9250 143905 VALVE COIL TWO POSITION THREE WAY THREE POSITION FOUR WAY CLOSED CENTER CLOSED PORT PILOT LINES D DOUBLE ACTING DOUBLE RODDED BI DIRECTIONAL HYDRAULIC MOTOR THREE POSITION FOUR WAY CLOSED CENTER OPEN PORT THREE POSITION FOUR WAY PROPORTIONAL VARIABLE DISPLACEMENT HYDRAULIC MOTOR UICK DISCONNECT SKYJACK, Page 3 3.2 Electrical Symbol Chart ANGLE TRANSDUCER WIRE CROSSING HOURMETER KEY SWITCH WIRES JOINED LIGHT FOOT SWITCH PRESSURE TRANSDUCER BATTERY HYDRAULIC VALVE COIL TOGGLE SWITCH LIMIT SWITCH N.O. GROUND PROPORTIONAL HYDRAULIC VALVE COIL PUSH BUTTON LIMIT SWITCH N.O. HELD CLOSED FUSE ELECTRIC MOTOR ROTARY SWITCH LIMIT SWITCH N.C. CIRCUIT BREAKER HORN LIMIT SWITCH LIMIT SWITCH N.C. HELD OPEN BATTERY CHARGE INDICATOR EMERGENCY STOP BUTTON CAM OPERATED LIMIT SWITCH SILICON CONTROLLED RECTIFIER CAPACITOR RESISTOR TILT SWITCH PROXIMITY SWITCH POTENTIOMETER LEVEL SENSOR SINGLE POLE SINGLE THROWN RELAY PNP TRANSISTOR SINGLE POLE DOUBLE THROW RELAY DOUBLE POLE SINGLE THROW RELAY DOUBLE POLE DOUBLE THROW RELAY NPN TRANSISTOR TRIPLE POLE DOUBLE THROW RELAY DIODE TRANSISTOR PRESSURE/ VACUUM SWITCH TEMPERATURE SWITCH SKYJACK, Page 4 Full-Size Rough Terrain Series Models 9241 & 9250 143905 3.3 Hydraulic Component Parts List Index No. Skyjack Part No. Qty. 2H-13A 2H-13A-1 2H-13A-2 2H-13A-3 2H-13A-4 2H-14B 2H-17A 2H-17B 2H-18A 2H-25 2H-30A 2H-30A-1 2H-30A-2 2H-86C 2H-98-1 2H-98-2 2H-98-3 2H-98-4 3H-20A 4H-15B 4H-16B 4H-23A 4H-24A 4H-26 4H-26A 4H-27 4H-27A 4H-71 4H-72 4H-73 4H-74 4H-75 4H-76 4H-77 4H-78 BP1 C1 C2 C3 C4 C5 C6 103655 107269 103655 107269 103655 103655 103655 103655 114365 103655 103656 102626 112218 103656 103655 104412 103655 103655 103655 103655 103623 139256 139256 128318 128318 128318 128318 128318 128318 128318 128318 128318 128318 128318 128318 128318 128318 133441 120349 120353 120349 120353 120353 120353 120422 120422 1 1 1 1 1 1 1 1 1 1 1 1 1 1 1 1 1 1 1 1 1 1 1 1 1 1 1 1 1 1 1 1 1 1 1 1 1 1 1 1 1 1 1 1 1 1 Full-Size Rough Terrain Series Models 9241 & 9250 143905 Description VALVE, Main lowering VALVE, Lift cylinder holding (Model 9241) VALVE, Lift cylinder holding (Model 9250) VALVE, Lift cylinder holding (Model 9241) VALVE, Lift cylinder holding (Model 9250) VALVE, Lift cylinder holding (Model 9250) VALVE, Lift cylinder holding (Model 9250) VALVE, Lift VALVE, Large pump dump VALVE, Outrigger holding VALVE, Small pump dump VALVE, Quick brake VALVE, Free-wheeling VALVE, Brake dump VALVE, Brake feed VALVE, Hydraulic generator (option) VALVE, Auxiliary lowering (Model 9250) VALVE, Auxiliary lowering (Model 9250) VALVE, Auxiliary lowering (Model 9250) VALVE, Auxiliary lowering (Model 9250) VALVE, Series/parallel VALVE, Reverse drive (includes 4H-16B) VALVE, Forward drive (includes 4H-15B) VALVE, Right steer (includes 4H-24A) VALVE, Left steer (includes 4H-23A) VALVE ASSEMBLY, Front platform extend (option) (includes 4H-27A) VALVE ASSEMBLY, Rear platform extend (option) (includes 4H-27) VALVE ASSEMBLY, Front platform retract (option) (includes 4H-26A) VALVE ASSEMBLY, Rear platform retract (option) (includes 4H-26) VALVE ASSEMBLY, Left front outrigger retract (includes 4H-75) VALVE ASSEMBLY, Right front outrigger retract (includes 4H-76) VALVE ASSEMBLY, Right rear outrigger retract (includes 4H-77) VALVE ASSEMBLY, Left rear outrigger retract (includes 4H-78) VALVE ASSEMBLY, Left front outrigger extend (includes 4H-71) VALVE ASSEMBLY, Right front outrigger extend (includes 4H-72) VALVE ASSEMBLY, Right rear outrigger extend (includes 4H-73) VALVE ASSEMBLY, Left rear outrigger extend (includes 4H-74) BRAKE PACK (alternate) (Cushman axles) CYLINDER, Lift (Model 9241) CYLINDER, Lift (Model 9250) CYLINDER, Lift (Model 9241) CYLINDER, Lift (Model 9250) CYLINDER, Lift (Model 9250) CYLINDER, Lift (Model 9250) CYLINDER, Brake CYLINDER, Brake Parts list continued on the following page. SKYJACK, Page 5 3.3 Hydraulic Component Parts List (Continued) Index No. Skyjack Part No. Qty. Description Parts list continued from the previous page. C7 C8 C9 C10 C11 C12 C13 C14 CBV1 CBV2 CV1 CV2 CV3 CV4 CV5 CV6 CV7 CV11 CV12 CV13 CV14 DCMI F1 GM1 HP2 M1 MB1 MB2 MB3 MB4 MB5 MB6 MB7 MB8 MB9 MB5 MB6 MB7 MB8 120405 1 133474 1 107752 1 132694 1 132694 1 132694 1 132694 1 120255 1 120255 1 132249 1 132249 1 104624 1 104624 1 104624 1 104415 1 104415 1 104415 1 104415 1 132248 1 132248 1 132248 1 132248 1 300248 109568 1 104254 1 113875 1 110652 1 109311 1 114178 1 103137 1 130443 1 118345 1 130444 1 106688 1 118345 1 118345 1 118345 1 125430 1 125430 1 113494 1 118345 1 118345 1 125430 1 125430 1 SKYJACK, Page 6 CYLINDER, Steer (Dana axles) CYLINDER, Steer (Cushman axles) CYLINDER, Cushion CYLINDER, Front Left outrigger CYLINDER, Front Right outrigger CYLINDER, Rear Right outrigger CYLINDER, Rear Left outrigger CYLINDER, Front extension platform CYLINDER, Rear extension platform COUNTER BALANCE VALVE, Motion control COUNTER BALANCE VALVE, Motion control CHECK VALVE, Small pump CHECK VALVE, Large pump CHECK VALVE, Lift CHECK VALVE, Left front outrigger CHECK VALVE, Right front outrigger CHECK VALVE, Right rear outrigger CHECK VALVE, Left rear outrigger CHECK VALVE, Motion control CHECK VALVE, Motion control CHECK VALVE, Motion control CHECK VALVE, Motion control DC MOTOR, 12V FILTER ASSEMBLY, Return • ELEMENT, Filter GENERATOR MOTOR, Hydraulic (option) PUMP, Cavity hand (Cushman axles) MOTOR, Main 2-Speed hydraulic drive MANIFOLD BLOCK, Main MANIFOLD BLOCK, Emergency lowering MANIFOLD BLOCK, Holding valve (Model 9241) MANIFOLD BLOCK, Holding valve (ANSI/CSA, Model 9250) MANIFOLD BLOCK, Holding valve (CE, Model 9250) MANIFOLD BLOCK, Holding valve (Model 9241) MANIFOLD BLOCK, Holding valve (Model 9250) MANIFOLD BLOCK, Holding valve (Model 9250) MANIFOLD BLOCK, Holding valve (Model 9250) MANIFOLD BLOCK, Lower lift line MANIFOLD BLOCK, Upper lift line (Model 9250) MANIFOLD BLOCK, Controlled lowering MANIFOLD BLOCK, Holding valve (Model 9250) MANIFOLD BLOCK, Holding valve (Model 9250) MANIFOLD BLOCK, Lower lift line MANIFOLD BLOCK, Upper lift line (Model 9250) Parts list continued on the following page. Full-Size Rough Terrain Series Models 9241 & 9250 143905 3.3 Hydraulic Component Parts List (Continued) Index No. Skyjack Part No. Qty. Description Parts list continued from the previous page. MB9 MB10 MB11 MB12 MB13 MB14 MB15 MB16 MC1 O1 O2 O5 O7 OC1 P1 P3 PS1 PT1 QD1 R1 R2 R3 R4 R5 R6 R8 V1 V2 V6 MANIFOLD BLOCK, Controlled lowering MANIFOLD BLOCK, Disc brake (Cushman axles) MANIFOLD BLOCK, Outrigger MANIFOLD BLOCK, Hydraulic generator valve (option) MANIFOLD BLOCK, Front powered platform MANIFOLD BLOCK, Rear powered platform MANIFOLD BLOCK, Free-wheeling valve MANIFOLD BLOCK, Motion control MOTION CONTROL ASSEMBLY ORIFICE, Main (.096 diameter) (Model 9250) ORIFICE, Lift cylinder (Ø 0.094) ORIFICE, Controlled lowering (Ø 0.055) ORIFICE, Lift line (Ø 0.120”) (Model 9241) OIL COOLER, Hydraulic generator (option) PUMP, Hydraulic dual (0.488/0.854) PUMP, Power platform PRESSURE SWITCH (option) (trips at 2400 psi) TRANSDUCER, Pressure QUICK DISCONNECT, System pressure RELIEF VALVE, System RELIEF VALVE, Lift RELIEF VALVE, Lift cylinder (Model 9241) RELIEF VALVE, Cylinder (Model 9250) RELIEF VALVE, Lift cylinder (Model 9241) RELIEF VALVE, Cylinder (Model 9250) RELIEF VALVE, Cylinder (Model 9250) RELIEF VALVE, Cylinder (Model 9250) RELIEF VALVE, Power platform (Set at 500psi) VALVE, Emergency lowering VALVE, Controlled lowering VALVE, Auto reset (Cushman axles) 113494 111943 111970 103137 111291 111291 103615 132261 132244 131927 105501 108721 125244 114284 110460 113173 102863 134432 122419 104534 104534 106557 104534 106557 104534 104534 104534 113286 107271 113556 113752 1 1 1 1 1 1 1 1 1 1 4 1 1 1 1 1 1 1 1 1 1 1 1 1 1 1 1 1 1 1 1 Full-Size Rough Terrain Series Models 9241 & 9250 143905 AB SKYJACK, Page 7 3.4 Electrical Component Parts List RELAY DIAGRAM COMMON COIL CONTROL (B+) 12 VOLT RELAY (SPDT) SINGLE POLE DOUBLE THROW COIL CONTROL (B-) NORMALLY CLOSED CONTACT NORMALLY OPEN CONTACT COMMON COIL CONTROL (B+) COIL CONTROL (B-) 12 VOLT RELAY (DPDT) DOUBLE POLE DOUBLE THROW NORMALLY CLOSED CONTACT NORMALLY CLOSED CONTACT NORMALLY OPEN CONTACT SKYJACK, Page 8 Full-Size Rough Terrain Series Models 9241 & 9250 143905 3.4 Electrical Component Parts List Index No. Skyjack Part No. Qty. 1TD 2D37 9CR2 9CR3 9BCR 9CR1 10ACR1 10ACR2 10BCR1 12BCR 13CR 13DCR 14CR 14DCR 15CR 16CR 17CR 17ACR 17DCR 18CR 20CR 23CR 24CR 28CR 28CR1 28CR2 28ECR1 28ECR2 30CR 31CR 31ACR 32CR 32ACR 34BCR 35CR 49CR 56CR 61CR 65CR 86ACR 86BCR 97ACR-1 97ACR-2 99CR 2002CR 103207 147131 127131 127131 111787 111787 103207 127035 103316 103207 127035 103316 103316 103316 103316 103316 103316 103316 103316 127131 103316 103316 103316 103316 103207 103207 103316 103207 103316 103316 103316 127035 103207 147125 142308 103316 103207 103316 143805 127131 127131 103316 103207 103207 111787 300242 143805 1 1 1 1 1 1 1 1 1 1 1 1 1 1 1 1 1 1 1 1 1 1 1 1 1 1 1 1 1 1 1 1 1 1 1 1 1 1 1 1 1 1 1 1 1 1 1 AB Description RELAY, Drive Time Delay (DPDT) SOLENOID, Stop (Diesel Engines) RELAY, Outrigger enable RELAY, Outrigger enable proof CONTACTOR, Powered Extension 12 Volt (CE) CONTACTOR, 12 Volt (powered extension platform option) RELAY, Engine run RELAY, 12 Volt DPDT (Hydraulic generator/oil cooler) RELAY, Engine On (SPDT) (ANSI/CSA) RELAY, Engine On (DPDT) (CE) RELAY, Joystick Enable Switch RELAY, Down (SPDT) (ANSI/CSA) RELAY, Down (down) (CE) RELAY, Up (SPDT) (ANSI/CSA) RELAY, Up (CE) RELAY, Reverse Drive (DPDT) RELAY, Forward Drive (DPDT) RELAY, 2nd Speed/Large pump (SPDT) RELAY, Small Pump (SPDT) RELAY, Outrigger lift disable RELAY, 3rd Speed (SPDT) RELAY, Series/Parallel (SPDT) RELAY, Right Steer (SPDT) RELAY, Left Steer (SPDT) RELAY, Tilt Switch (DPDT) RELAY, Tilt (CE) RELAY, Down enable (CE) RELAY, Auxiliary tilt (CE) RELAY, Auxiliary down enable (CE) RELAY, Brake (SPDT) RELAY, Choke/Glow Plug (SPDT) RELAY, Kubota Diesel Engine Glow Plug RELAY, Engine Start (DPDT) SOLENOID, Engine starter (Kubota Diesel) RELAY, 12V 40A, Starter (GM) RELAY, Low/High Throttle (SPDT) RELAY, Tilt override (DPDT) RELAY, Horn (SPDT) RELAY, 12V 20A/35A, Fuel pump (GM) RELAY, Outrigger Drive Enable RELAY, Outrigger lift enable (SPDT) RELAY, 12 Volt SPDT (hydraulic generator) RELAY, 12 Volt DPDT (hydraulic generator stop) CONTACTOR, Powered Extension Platform (CE) RELAY, Powered Extension Platform (CE) SOLENOID, Powered Extension Platform Motor RELAY, 20A/35A 12V, Power Parts list continued on the following page. Full-Size Rough Terrain Series Models 9241 & 9250 143905 SKYJACK, Page 9 3.4 Electrical Component Parts List (Continued) Index No. Skyjack Part No. Qty. Description Parts list continued from the previous page. 2H-13A 2H-13A-1 2H-13A-2 2H-13A-3 2H-13A-4 2H-13A-5 2H-14B 2H-17A 2H-17B 2H-18A 2H-25 2H-30A 2H-30A-1 2H-30A-2 2H-86C 2H-98-1 2H-98-2 2H-98-3 2H-98-4 2P-56 3H-20A 4H-15B 4H-16B 4H-23A 4H-24A 4H-26 4H-26A 4H-27 4H-27A 4H-71 4H-72 4H-73 4H-74 4H-75 4H-76 4H-77 4H-78 AT1 B1 B2 BP-29 103613 104410 104410 104410 104410 104410 103613 106272 103613 103613 103613 103613 103613 103613 106272 104410 104410 104410 104410 142324 103613 128321 128321 128321 128321 128321 128321 128321 128321 128321 128321 128321 128321 128321 128321 128321 128321 130440 103295 108789 103056 1 1 1 1 1 1 1 1 1 1 1 1 1 1 1 1 1 1 1 1 1 1 1 1 1 1 1 1 1 1 1 1 1 1 1 1 1 1 1 1 1 COIL, Main Lowering Valve COIL, Lift Cylinder Holding Valve (ANSI/CSA) COIL, Lift Cylinder Holding Valve COIL, Lift Cylinder Holding Valve COIL, Lift Cylinder Holding Valve (Model 9250) COIL, Lift Cylinder Holding Valve (CE, Model 9250) COIL, Lift Valve COIL, Large Pump Dump Valve COIL, Outrigger Holding Valve COIL, Small Pump Dump Valve COIL, 12 Volt brake valve COIL, Free-wheeling Valve COIL, Brake Dump Valve COIL, Brake Feed Valve COIL, Hydraulic generator option valve COIL, Lift Cylinder Auxiliary Holding Valve (Model 9250) COIL, Lift Cylinder Auxiliary Holding Valve (Model 9250) COIL, Lift Cylinder Auxiliary Holding Valve (Model 9250) COIL, Lift Cylinder Auxiliary Holding Valve (Model 9250) SOLENOID, Propane lockoff valve (GM Dual Fuel Engine) COIL, Series/Parallel Drive Valve COIL, Reverse Drive Valve COIL, Forward Drive Valve COIL, Right Steer Valve COIL, Left Steer Valve COIL, Front Powered Extension Extend - 12 Volt (Includes 4H-27) COIL, Rear Powered Extension Extend - 12 Volt (Includes 4H-27A) COIL, Front Powered Extension Retract - 12 Volt (Includes 4H-26) COIL, Rear Powered Extension Retract - 12 Volt (Includes 4H-26A) COIL, 12 Volt front left outrigger up COIL, 12 Volt front right outrigger up COIL, 12 Volt rear right outrigger up COIL, 12 Volt rear left outrigger up COIL, 12 Volt front left outrigger down COIL, 12 Volt front right outrigger down COIL, 12 Volt rear right outrigger down COIL, 12 Volt rear left outrigger down TRANSDUCER, Angle (CE) BATTERY, 12 Volt (starting) BATTERY, 12 Volt (auxiliary) BEEPER (7.5 - 16 VDC) (ANSI/CSA) Parts list continued on the following page. SKYJACK, Page 10 Full-Size Rough Terrain Series Models 9241 & 9250 143905 3.4 Electrical Component Parts List (Continued) Index No. Skyjack Part No. Qty. Description Parts list continued from the previous page. CAP1 CAP2 CB1 CB3 CB4 CEL1 CM1 CPS1 CRD1 CRD2 CRD3 DA1 DA2 DA3 DA4 DA5 DA6 DA7 DA8 DA9 DA10 DA11 DA12 DA13 D02-XX DXX DCM1 ECU1 EGP1 F2 F4 F5 F6 F7 F8 F9 F10 F11 F12 F13 117967 103319 103319 117326 117326 117326 133133 130439 143530 115283 115280 148300 134417 127688 129434 127684 129284 134304 127685 127926 129303 132807 129213 105657 104313 134305 700166 102921 300248 146085 KUBOTA 111282 119469 120658 121504 143806 143809 143808 143807 143808 143808 143810 1 1 1 1 1 1 1 1 1 1 1 1 1 1 1 1 1 1 1 1 1 1 1 1 1 1 AR AR 1 1 1 1 1 1 1 1 1 1 1 1 1 1 BEEPER (XL-600 9-28 VDC) (CE) CAPACITOR, 50 Volt, 1000MFD CAPACITOR, 50 Volt, 1000MFD (CE) CIRCUIT BREAKER, 20 Amp CIRCUIT BREAKER, 20 Amp CIRCUIT BREAKER, 20 Amp (hydraulic generator option) LIGHT, Check engine (GM) MODULE, Load sensing control (CE) SENSOR, Crankshaft position (GM) CABLE ASSEMBLY, 32 pin control console CABLE ASSEMBLY, 32 pin scissor control (Model 9250) CABLE ASSEMBLY, 32 pin scissor control (Model 9241) CABLE ASSEMBLY, 32 pin electrical panel DIODE ASSEMBLY (with 1 diode) (D28A) (ANSI/CSA) DIODE ASSEMBLY (with 1 diode) (D30A) DIODE ASSEMBLY (with 1 diode) (D44) (ANSI/CSA) DIODE ASSEMBLY (with 1 diode) (D10E) (CE) DIODE ASSEMBLY (with 1 diode) (D20A) (CE) DIODE ASSEMBLY (with 1 diode) (D86C-1) (Hydraulic generator option CE) DIODE ASSEMBLY (with 1 diode) (D86C-2) (Hydraulic generator option CE) DIODE ASSEMBLY (with 1 diode) (D14B-2) (Hydraulic generator option CE) DIODE ASSEMBLY (with 2 diodes) (D17A, D18A) DIODE ASSEMBLY (with 2 diodes) (D15A, D16A) (ANSI/CSA) DIODE ASSEMBLY (with 2 diodes) (D15A-2, D16A-2) (CE) DIODE ASSEMBLY (with 4 diodes) (D15A-1, D16A-1, D23A, D24A) (ANSI/CSA) DIODE ASSEMBLY (with 4 diodes) (D15A-1, D16A-1, D23A, D24A) (CE) DIODE, Small DIODE, Common MOTOR, Powered Extension Platform 12 Volt UNIT, Emission Control (GM) PLUG, Engine glow (Diesel Fuel Engines) FUSE, Powered Extension Platform (100 Amp) FUSE, Inverter Option (200 Amp) FUSE, Powered Extension Electrical Panel (10 Amp) FUSE, 20 Amp (Dual Fuel Engines) FUSE, 5 Amp, VSW (GM) FUSE, 20 Amp, ECM (GM) FUSE, 15 Amp, Fuel pump (GM) FUSE, 10 Amp, EPR (GM) FUSE, 15 Amp, Fuel pump (GM) FUSE, 15 Amp, Starter (GM) FUSE, 60 Amp, Alternator (GM) Parts list continued on the following page. Full-Size Rough Terrain Series Models 9241 & 9250 143905 SKYJACK, Page 11 3.4 Electrical Component Parts List (Continued) Index No. Skyjack Part No. Qty. Description Parts list continued from the previous page. FAN FL-22 FL-29 FP G GPL1 GPT1 H1 HTS-34A IGC1 INV1 LED1 LED2 LED3 LS1 LS4 LS5 LS61 LS62 LS63 LS64 LS65 LS66 LS67 LS68 M MS1 OCM1 OL1 OPS1 OXS1 OXS2 PRV1 PS1 PT1 RA1 RL-22 RL-29 115384 126677 103743 142302 142309 137138 132884 132883 146652 106370 143527 124047 123629 147229 147229 147229 119375 115658 119296 115658 115658 115658 115658 115658 115658 115658 115658 142308 147125 143518 132804 133133 102838 142315 142299 142340 102863 134432 - 107098 107098 1 1 1 1 1 1 1 1 1 1 1 1 1 1 1 1 1 1 1 1 1 1 1 1 1 1 1 1 1 1 1 1 1 1 1 1 1 1 - 1 1 FAN, Oil cooler FLASHING LIGHT, 12 Volt FLASHER PUMP, Fuel (GM) ALTERNATOR (Dual Fuel Engines) ALTERNATOR (Diesel Fuel Engines) LIGHT, Glow Plug Indicator (Diesel Fuel Engines) TIMER, Glow Plug (Diesel Fuel Engines) HORN, 12 Volt SOLENOID, High Throttle (Diesel Fuel Engines) COIL, Ignition (GM) INVERTER, 1500 WATT (110/220V) (CE) INVERTER, 1500 WATT (ANSI/SIA & CSA) POWER INDICATOR LIGHT (Platform control console) POWER INDICATOR LIGHT (Base control console) POWER INDICATOR LIGHT (Platform control console) LIMIT SWITCH, 26 Ft. lift Cut-out LIMIT SWITCH, End-of-stroke LIMIT SWITCH, Elevation/High Speed Cut-out LIMIT SWITCH, Outrigger Left Front Up LIMIT SWITCH, Outrigger Right Front Up LIMIT SWITCH, Outrigger Right Rear Up LIMIT SWITCH, Outrigger Left Rear Up LIMIT SWITCH, Outrigger Left Front Down LIMIT SWITCH, Outrigger Right Front Down LIMIT SWITCH, Outrigger Right Rear Down LIMIT SWITCH, Outrigger Left Rear Down MOTOR, Engine starter (Dual Fuel Engines) MOTOR, Engine starter (Diesel Fuel Engines) SENSOR, Manifold Absolute Pressure (GM) MODULE, Outrigger Auto-Level Control LIGHT, Outrigger Indicator OIL PRESSURE SWITCH (Diesel Fuel Engines) SENSOR, Heated exhaust oxygen (GM) SENSOR, Oxygen post-cat (GM) PROPANE REGULATOR/VAPORIZER (GM) PRESSURE SWITCH (option) (trips at 2400 psi) TRANSDUCER, Pressure (CE) ACTUATOR, Throttle Body (Dual Fuel Engines) LIGHT, Optional rotating amber beacon BEACON, Rotating Amber (Option) Parts list continued on the following page. SKYJACK, Page 12 Full-Size Rough Terrain Series Models 9241 & 9250 143905 3.4 Electrical Component Parts List (Continued) Index No. Skyjack Part No. Qty. Description Parts list continued from the previous page. RST2 108788 S1 119726 S2 147054 S3 147054 147053 S4 147053 147053 S5 147054 S6 147053 S7 132537 S7-1 122869 S7-2 122877 S7-3 122877 S7-4 122869 S7-5 122869 S7-6 122869 S7-7 122872 S8 147054 S9 147054 S9A 102853 S9B 127132 S10 147054 147053 S11 102853 S11A 102853 S12 102853 S13 147054 S14 147054 S15 147054 S20 102853 S20A 127132 S21 102853 S21A 127132 S22 102853 S22A 127132 S23 102853 S23A 127132 S24 102853 S29 147054 S30 124446 1 1 2 1 2 1 2 2 1 1 1 1 1 1 1 1 1 1 1 1 1 2 1 1 1 1 1 1 1 1 1 1 1 1 1 1 1 1 1 1 1 RESISTOR, 3 Ohm/100W SWITCH, Main Power Disconnect TOGGLE SWITCH, Up/Off/Down (Base control console) N.O. CONTACT, Off/Lift/Drive select key switch (Platform) N.C. CONTACT, Off/Lift/Drive select key switch (Platform) N.C. CONTACT, Emergency stop switch (Platform) (ANSI/CSA) N.C. CONTACT, Off/Lift/Drive select key switch (Platform) (CE) N.O. CONTACT, Up/Down switch (Platform) N.C. CONTACT, Emergency stop switch (Base control console) CONTROLLER ASSEMBLY, Drive/steer • SWITCH W/ACTUATOR, 2nd Speed • SWITCH, Right steer • SWITCH, Left steer • SWITCH W/ACTUATOR, Reverse drive • SWITCH W/ACTUATOR, Forward drive • SWITCH W/ACTUATOR, 3rd Speed • SWITCH, Enable push button N.O. CONTACT, Horn switch (Platform) N.O. CONTACT, Lift enable switch (Platform) SWITCH, Outrigger enable SWITCH, Outrigger enable SWITCH, N.O. contact (Base control console) (ANSI/CSA) SWITCH, N.O. contact (Base control console) (CE) SWITCH, N.C. contact (Base control console) (CE) TOGGLE SWITCH, Front platform extend/retract (Platform) TOGGLE SWITCH, Rear platform extend/retract (Platform) SWITCH, Hydraulic Generator (Platform) N.O. CONTACT, Choke switch or Glow plug switch (Platform) N.O. CONTACT, Low/high throttle switch (Platform) N.O. CONTACT, Engine start switch (Platform) TOGGLE SWITCH, Left Front Outrigger Up/down SWITCH, Front left outrigger up/down toggle TOGGLE SWITCH, Right Front Outrigger Up/down SWITCH, Front right outrigger up/down toggle TOGGLE SWITCH, Right Rear Outrigger Up/down SWITCH, Rear right outrigger up/down toggle TOGGLE SWITCH, Left Rear Outrigger Up/down SWITCH, Rear left outrigger up/down toggle SWITCH, Auto-Level Outrigger N.O. CONTACT, Low/high range (Platform) SWITCH, Engine off/on (Engine panel) Parts list continued on the following page. Full-Size Rough Terrain Series Models 9241 & 9250 143905 SKYJACK, Page 13 3.4 Electrical Component Parts List (Continued) Index No. Skyjack Part No. Qty. Description Parts list continued from the previous page. S31 S33 S34 S34A S41 S51 S52 TPS1 TPS2 TT 102853 115574 102853 102853 114373 103141 103141 143743 113400 143827 103336 SKYJACK, Page 14 1 1 1 1 1 1 1 1 1 1 1 SWITCH, Engine glow plug (Engine panel) (Diesel Fuel Engines) SWITCH, Gas/Propane Fuel Select Toggle (GM) TOGGLE SWITCH, Front powered platform enable TOGGLE SWITCH, Rear powered platform enable TOGGLE SWITCH, High/Low Torque (Platform) N.O. CONTACT, Emergency lowering switch (CE, Model 9250) N.O. CONTACT, Powered extension emergency retraction switch TEMPERATURE SENSOR, Coolant (Dual Fuel Engines) TEMPERATURE SWITCH, Engine (Kubota Diesel) TEMPERATURE SENSOR, Air intake (Dual Fuel Engines) METER, Hour Full-Size Rough Terrain Series Models 9241 & 9250 143905 3.5 Platform Control Console Wiring - All Options (ANSI/CSA) CONTROL BOX HARNESS 24 BLUE/BLACK 12 BROWN/RED 23 BLACK/WHITE 16 WHITE / BLACK 12A BROWN/RED 15 BLUE 19 ORANGE/BLACK 12A BROWN/RED 18B RED/BLACK PIN # - FUNCTION PIN 1 - LEFT PIN 2 - JOYSTICK VS+ PIN 3 - RIGHT PIN 4 - FORWARD PIN 5 - STEERING VS+ PIN 6 - REVERSE PIN 7 - 2nd SPEED PIN 8 - ENABLE VS+ PIN 9 - 3rd SPEED JOYSTICK HARNESS 24 WHITE/RED 12 WHITE/BLACK 23 WHITE 16 YELLOW 12A WHITE/GREEN 15 GREY 19 BROWN 12A WHITE/BLUE 18B RED/BLACK KEY SWITCH POWER ON LIGHT 00 12A X1 X2 3 4 2 NC 1 10 NO JOYSTICK CONTROL WITH ENABLE 34 10 08 13 4 12 NORM./HIGH TORQUE 14 UP/DOWN EMERGENCY STOP 09 18B 20B HIGH/LOW RANGE 08 00 10 18 20 1 4 NO 3 9A NO 3 X1 4 X2 00 10 NO 3 2 NC 1 7A 5 6 08 02 4 2 NC 1 09 THROTTLE 10 2 3 4 NO 3 12 LIFT ENABLE 31 32 9A START HYDR. GEN 16 7 6 15 14 5 4 13 12 3 2 11 10 1 9 19 20 23 24 31 32 34 49 18GA 18GA 18GA 18GA 18GA 18GA 18 18GA 16 18GA 15 18GA 14 18GA 13 HORN BACK VIEW MALE MALE 8 10 49 NOT USED OR GLOW PLUG OR CHOKE BACK VIEW (16) WHITE BLACK (15) BLUE (14) BLACK (13) ORANGE (10) BLUE WHITE (09) ORANGE RED (7A) RED (02) WHITE 09 7A 18GA 18GA 02 18GA NO 18GA 4 18GA 3 NO 4 00 3 NO 4 18GA 3 NO 18GA 3 4 GREEN WHITE (34) GREEN BLACK (32) RED WHITE (31) BLUE BLACK (24) BLACK WHITE (23) BLACK WHITE RED (20) ORANGE BLACK (19) RED BLACK (18) (77) GREEN BLACK WHITE (76) RED GREEN (75) WHITE RED (74) BLACK RED (73) ORANGE GREEN (72) WHITE BLACK RED (71) BLUE RED (49) GREEN 24 32 23 22 31 30 21 20 29 28 19 18 27 26 17 25 RED BLACK GREEN (NOT USED) WHITE RED GREEN (NOT USED) BLACK RED GREEN (NOT USED) ORANGE BLACK WHITE (85) RED BLACK WHITE (78) GROUND (00) BLUE BLACK WHITE (GROUND) TO TERMINAL STRIP M147234AE Full-Size Rough Terrain Series Models 9241 & 9250 143905 SKYJACK, Page 15 3.6 Platform Control Console Wiring - All Options (CE) CONTROL BOX HARNESS 24 BLUE/BLACK 12 BROWN/RED 23 BLACK/WHITE 16 WHITE /BLACK 12A BROWN/RED 15 BLUE 19 ORANGE/BLACK 12A BROWN/RED 18B RED/BLACK KEY SWITCH 10 12A START HYDR. GEN CHOKE/ GLOW PLUG 16 7 6 15 14 5 4 13 12 3 2 11 10 1 9 4 16GA 34 49 18GA 16GA 16GA 32 18GA 16GA 16GA 31 18GA 18GA 16GA 23 24 18GA 16GA 16GA 20 18GA 18GA 16GA 19 18GA 60 16GA 10D 16GA 7C 18 18GA 16 16GA 15 18GA 16GA 16GA 16GA 00 14 18GA HORN MALE MALE 8 09 7A 18GA 02 BACK VIEW BACK VIEW (16) WHITE BLACK (15) BLUE (14) BLACK (13) ORANGE (10) BLUE WHITE (09) ORANGE RED (7A) RED (02) WHITE 16GA 49 13 18GA 31 16GA 32 10 18GA 9A LIFT ENABLE 20 NO 18GA 4 16GA 3 NO 18GA 3 4 18GA NO 4 16GA 3 NO 4 18GA 3 18 08 10 16GA 10 20B HIGH/LOW RANGE 00 09 18B 1 UP/DOWN EMERGENCY STOP 5 6 4 4 NORM./HIGH TORQUE 14 NO 3 2 NC 1 10D 9A 12 13 34 NO 3 X1 4 X2 7A 10 2 3 60 NO 00 NO 3 2 NC 1 7C JOYSTICK CONTROL WITH ENABLE 3 4 10 X1 X2 2 08 02 10 18GA 2 08 JOYSTICK HARNESS 24 WHITE/RED 12 WHITE/BLACK 23 WHITE 16 YELLOW 12A WHITE/GREEN 15 GREY 19 BROWN 12A WHITE/BLUE 18B RED/BLACK THROTTLE 18GA 4 12 09 POWER ON/LOAD SENSING LIGHT NO 3 NC 1 NC 1 12 PIN # - FUNCTION PIN 1 - LEFT PIN 2 - JOYSTICK VS+ PIN 3 - RIGHT PIN 4 - FORWARD PIN 5 - STEERING VS+ PIN 6 - REVERSE PIN 7 - 2nd SPEED PIN 8 - ENABLE VS+ PIN 9 - 3rd SPEED GREEN WHITE (34) GREEN BLACK (32) RED WHITE (31) BLUE BLACK (24) BLACK WHITE (23) BLACK WHITE RED (20) ORANGE BLACK (19) RED BLACK (18) (77) GREEN BLACK WHITE (76) RED GREEN (75) WHITE RED (74) BLACK RED (73) ORANGE GREEN (72) WHITE BLACK RED (71) BLUE RED (49) GREEN 24 32 23 22 31 30 21 20 29 28 19 18 27 26 17 25 RED BLACK GREEN (7C) WHITE RED GREEN (10D) BLACK RED GREEN (60) ORANGE BLACK WHITE (85) RED BLACK WHITE (78) GROUND (00) BLUE BLACK WHITE (GROUND) TO TERMINAL STRIP M147223AE SKYJACK, Page 16 Full-Size Rough Terrain Series Models 9241 & 9250 143905 3.7 Control Cable Assemblies Diagram 8 16 24 32 1 9 17 25 INSERTS 1-16 INSERTS: 17-32 PIN 1 - WHITE (02) PIN 2 - RED (7A) PIN 3 - ORANGE RED (09) PIN 4 - BLUE WHITE (10) PIN 5 - ORANGE (13) PIN 6 - BLACK (14) PIN 7 - BLUE (15) PIN 8 - WHITE BLACK (16) PIN 9 - RED BLACK (18) PIN 10 - ORANGE BLACK (19) PIN 11 - BLACK WHITE RED (20) PIN 12 - BLACK WHITE (23) PIN 13 - BLUE BLACK (24) PIN 14 - RED WHITE (31) PIN 15 - GREEN BLACK (32) PIN 16 - GREEN WHITE (34) GROUND TERMINAL - BLUE BLACK WHITE PIN 17 - GREEN (49) PIN 18 - BLUE RED (71) PIN 19 - WHITE BLACK RED (72) PIN 20 - ORANGE GREEN (73) PIN 21 - BLACK RED (74) PIN 22 - WHITE RED (75) PIN 23 - RED GREEN (76) PIN 24 - GREEN BLACK WHITE (77) PIN 25 - RED BLACK WHITE (78) PIN 26 - ORANGE BLACK WHITE (85) PIN 27 - BLACK RED GREEN (60) PIN 28 - WHITE RED GREEN (10D) PIN 29 - RED BLACK GREEN (7C) PIN 30 - EMPTY PIN 31 - EMPTY PIN 32 - EMPTY GROUND TERMINAL - EMPTY TO CONTROL BOX BACK VIEW FEMALE 17 25 1 9 8 16 24 32 1 9 17 25 (34) GREEN WHITE (32) GREEN BLACK (31) RED WHITE (24) BLUE BLACK (23) BLACK WHITE (20) BLACK WHITE RED (19) ORANGE BLACK (18) RED BLACK 16 8 15 14 7 6 13 5 12 4 11 3 10 2 9 1 WHITE BLACK (16) BLUE (15) BLACK (14) ORANGE (13) BLUE WHITE (10) ORANGE RED (09) RED (7) WHITE (02) 24 32 8 16 BACK VIEW (GROUND) BLUE BLACK WHITE TO (00) GROUND FEMALE TO CONTROL BOX (7D) RED BLACK GREEN (10D) WHITE RED GREEN (60) BLACK RED GREEN (85) ORANGE BLACK WHITE (78) RED BLACK WHITE 32 24 31 23 30 22 29 21 28 20 27 19 26 18 25 17 GREEN BLACK WHITE (77) RED GREEN (76) WHITE RED (75) BLACK RED (74) ORANGE GREEN (73) WHITE BLACK RED (72) BLUE RED (71) GREEN (49)) M115279AD_M115284AE Full-Size Rough Terrain Series Models 9241 & 9250 143905 SKYJACK, Page 17 86 09 85 1 2 3 79 35D 2 1 70 2 1 35C 35D 35C 3 TO OUTRIGGER ENABLE SWITCH PIN 1 - 35D PURPLE/WHITE PIN 2 - 35C x 3 (WHITE/BLACK, BLUE/WHITE & GREEN/WHITE) PIN 3 - 35D PURPLE/WHITE TO HYDRAULIC GENERATOR SWITCH PIN 1 - 86 WHITE PIN 2 - 09 BLACK PIN 3 - 85 GREEN 35D 35D TO AUTO OUTRIGGER SWITCH PIN 1 - 79 GREEN PIN 2 - 35D PURPLE/WHITE PIN 3 - 70 GREEN/BLACK 3 3.8 Outrigger & Hydraulic Generator Control Console Wiring 35D 70A 02 TO OUTRIGGER LIGHT 70A RED/WHITE 02 WHITE TO ELECTRIC PAN 86 WHITE 09 BLACK 85 GREEN HYDRAULIC GENERATOR CONTROL CABLE 1 2 3 4 5 6 8 9 7 10 11 12 13 14 15 OUTRIGGER CONTROL CABLE M129301AB SKYJACK, Page 18 Full-Size Rough Terrain Series Models 9241 & 9250 143905 TO ELECTRIC PANE PIN 1 - 02 WHITE PIN 2 - 35C WHITE/ PIN 3 - 70 GREEN/B PIN 4 - 70A RED/WH PIN 5 - 71 ORANGE PIN 6 - 72 RED PIN 7 - 73 BLUE PIN 8 - 74 BLACK 3.9 Base Control Console Wiring (ANSI/CSA) 10F-BLUE/WHITE(1.75") 10E-BLUE/WHITE(4") 10E 10E 10E NC 3 NC 3 NC 3 4 4 4 10A 14 13 2 10A X1 X2 02 07 NC 1 7A BASE CONTROL STATION.-6 WIRES 02 - WHITE 07 - RED 7A - RED/WHITE 10A - BLUE/WHITE 13 - ORANGE/RED 14 - BLACK/RED BASE CONTROLS CONTACT ORIENTATION BACK VIEW UP/DOWN SWITCH N.O. CONTACT PIN 4 - 13 ORANGE/RED PIN 3 - 10E BLUE/WHITE 10E 10E ENABLE SWITCH N.O. CONTACT PIN 4 - 10A BLUE/WHITE PIN 3 - 10E BLUE/WHITE(2) 10E NC 3 NC 3 NC 3 4 4 4 7A 10A 02 14 UP/DOWN SWITCH N.O. CONTACT PIN 4 - 14 BLACK/RED PIN 3 - 10E BLUE/WHITE 13 2 NC 1 X2 X1 07 10A E-STOP SWITCH N.C. CONTACT / LED-2 LIGHT PIN 1 - 07 RED PIN 2 - 7A RED/WHITE PIN X1 - 10A BLUE/WHITE PIN X2 - 02 WHITE M147223AC Full-Size Rough Terrain Series Models 9241 & 9250 143905 SKYJACK, Page 19 3.10 Base Control Console Wiring (CE) 7A 10E 10E 10E NO 3 NC 1 NO 3 NO 3 4 2 4 4 14E 10D BASE CONTROLS - 9 WIRES 02 - WHITE 07 - RED 7A - RED/WHITE 7C - RED/GREEN/BLACK 10A - BLUE/WHITE 10D - WHITE/RED/GREEN 10E - BLUE/WHITE 13D - ORANGE/RED 14E - BLACK/RED 13D 07 7C 2 NC 1 X2 X1 10A 02 BASE CONTROLS CONTACT ORIENTATION BACK VIEW 10E PLTF/BASE SWITCH N.O. CONTACT PIN 3 - 10E BLUE/WHITE PIN 4 - 10D WHITE/RED/GREEN 10E NO 3 NC 1 NO 3 NO 3 2 4 4 4 PLTF/BASE SWITCH N.C. CONTACT PIN 1 - 7A RED PIN 2 - 7C RED/GREEN/BLACK 10D UP/DOWN SWITCH N.O. CONTACT PIN 4 - 14E BLACK PIN 3 - 10E BLUE/WHITE 7A 7C 7C 14E 02 UP/DOWN SWITCH N.O. CONTACT PIN 4 - 13D ORANGE PIN 3 - 10E BLUE/WHITE 13D 2 NC 1 X2 X1 10A 07 E-STOP SWITCH N.C. CONTACT / LED-2 LIGHT PIN 1 - 07 RED PIN 2 - 7C RED/WHITE PIN X1 - 10A BLUE/WHITE PIN X2 - 02 WHITE M129301AB SKYJACK, Page 20 Full-Size Rough Terrain Series Models 9241 & 9250 143905 A B C C2 LIFT CYLINDER C1 LIFT CYLINDER MB4 HOLDING VALVE MANIFOLD BLOCK 2H-13A-2 HOLDING VALVE O2 LIFT ORIFICE Ø 0.094 P3 R3 RELIEF VALVE MB7 LIFT LINE MANIFOLD BLOCK MB13 POWERED EXTENSION MANIFOLD BLOCK 4H-27 RETRACT VALVE A B P T P T MB2 MANUAL LOWERING VALVE MANIFOLD MB9 CONTROLLED V2 CONTROLLED LOWERING MANIFOLD BLOCK LOWERING VALVE HYDRAULIC GENERATOR OPTION CV3 CHECK VALVE GM1 GENERATOR MOTOR MB12 HYDRAULIC GENERATOR VALVE MANIFOLD 2H-86C HYDRAULIC GENERATOR VALVE ENGINE LARGE PUMP SMALL PUMP P1 DUAL INLET PUMP OC1 OIL COOLER DUAL FUEL EFI C8 CUSHION CYLINDER CBV2 CASE DRAIN PUMP/MOTOR/TANK UNIT WITH DIRECTIONAL VALVE MB10 DISC BRAKE MANIFOLD BLOCK SIDE EXTENSION DECK 9226 OPTION W ORIFICE Ø 0.030 (QTY 6) A B P T M C15 SIDE EXTENSION FRONT LIFT CYLINDER PILOT OPERATED CHECK VALVES C16 SIDE EXTENSION REAR LIFT CYLINDER P T 2H-30A-1 BRAKE DUMP VALVE C9 LEFT FRONT OUTRIGGER CYLINDER C12 LEFT REAR OUTRIGGER CYLINDER 4H-24A LEFT STEER VALVE CV4 CHECK VALVE A B C10 RIGHT FRONT OUTRIGGER CYLINDER CV5 CHECK VALVE C11 RIGHT REAR OUTRIGGER CYLINDER CV6 CHECK VALVE X CV7 CHECK VALVE MB11 OUTRIGGER MANIFOLD BLOCK 4H-78 LEFT REAR OUTRIGGER EXTEND VALVE P T 4H-15B REVERSE DRIVE VALVE 2H-17A LARGE PUMP DUMP VALVE 2H-18A SMALL PUMP DUMP VALVE V C7 STEER CYLINDER 4H-16B FORWARD DRIVE VALVE P T 2H-30A-2 BRAKE FEED VALVE CV2 CHECK VALVE OC1 OIL COOLER DIESEL OPTION 4H-23A RIGHT STEER VALVE R2 LIFT RELIEF VALVE 2H-14B LIFT VALVE CV14 A B 2H-13A MAIN LOWERING VALVE PRESSURE SWITCH OPTION PS1 PRESSURE SWITCH M1 TWO STAGE HYDRAULIC MOTOR BP1 BRAKE PACK 2H-25 QUICK BRAKE VALVE MB15 FREE WHEEL MANIFOLD 2H-30A FREE WHEEL VALVE 3H-20A SERIES/PARALLEL VALVE 4H-26A EXTEND VALVE HP2 HAND PUMP V6 AUTO RESET VALVE CBV1 CV11 Đ CV13 MB1 MAIN MANIFOLD V1 MANUAL LOWERING VALVE BASE/DRIVE ASSEMBLY R8 RELIEF VALVE O7 LIFT LINE ORIFICE Ø 0.120 O5 CONTROLLED LOWERING ORIFICE Ø 0.055 4H-27A RETRACT VALVE 4H-26 EXTEND VALVE H MC1 MOTION CONTROL VALVE ASSEMBLY CV12 A B G MB16 MOTION CONTROL MANIFOLD BLOCK MB14 REAR POWERED EXTENSION MANIFOLD BLOCK DCM1 M RESERVOIR F C14 REAR EXTENSION CYLINDER C13 FRONT EXTENSION CYLINDER MB3 HOLDING VALVE MANIFOLD BLOCK O2 LIFT ORIFICE Ø 0.094 PT1 PRESSURE OVERLOAD TRANSDUCER R4 RELIEF VALVE POWERED EXTENSION PLATFORM OPTION 2H-13A-1 HOLDING VALVE PRESSURE OVERLOAD TRANSDUCER OPTION AB 3.11 Hydraulic Schematic (Cushman Axles) (Model 9241) D E A B 4H-75 LEFT FRONT OUTRIGGER EXTEND VALVE P T A B 4H-76 RIGHT FRONT OUTRIGGER EXTEND VALVE P T A B 4H-77 RIGHT REAR OUTRIGGER EXTEND VALVE P T A B Y CV1 CHECK VALVE 2H-17B OUTRIGGER HOLDING VALVE R1 SYSTEM RELIEF VALVE 4H-74 LEFT REAR OUTRIGGER RETRACT VALVE 4H-71 LEFT FRONT OUTRIGGER RETRACT VALVE 4H-72 RIGHT FRONT OUTRIGGER RETRACT VALVE 4H-73 RIGHT REAR OUTRIGGER RETRACT VALVE QD1 SYSTEM PRESSURE QUICK DISCONNECT Z F1 FILTER RESERVOIR M148310AD Full-Size Rough Terrain Series Models 9241 & 9250 143905 SKYJACK, Page 21 A B C 3.12 Hydraulic Schematic (Cushman Axles) (Model 9250) D E POWERED EXTENSION PLATFORM OPTION C14 REAR EXTENSION CYLINDER C13 FRONT EXTENSION CYLINDER F G H V MC1 MOTION CONTROL VALVE ASSEMBLY MB16 MOTION CONTROL MANIFOLD BLOCK BASE/DRIVE ASSEMBLY C4 LIFT CYLINDER C3 LIFT CYLINDER MB5 HOLDING VALVE MANIFOLD MB6 HOLDING VALVE MANIFOLD O2 LIFT ORIFICE Ø 0.094 C2 LIFT CYLINDER MB4 HOLDING VALVE MANIFOLD 2H-98-4 AUXILIARY LOWERING VALVE 2H-98-4 AUXILIARY LOWERING VALVE 2H-13A-4 HOLDING VALVE 2H-13A-3 HOLDING VALVE O2 LIFT ORIFICE Ø 0.094 R6 RELIEF VALVE R5 RELIEF VALVE MB3 HOLDING VALVE MANIFOLD 2H-98-2 AUXILIARY LOWERING VALVE 2H-13A-2 HOLDING VALVE O2 LIFT ORIFICE Ø 0.094 R4 RELIEF VALVE 2H-98-1 AUXILIARY LOWERING VALVE PRESSURE OVERLOAD TRANSDUCE OPTION 2H-13A-1 HOLDING VALVE O2 LIFT ORIFICE Ø 0.094 PT1 PRESSURE OVERLOAD TRANSDUCER MB14 REAR POWERED EXTENSION MANIFOLD BLOCK 4H-27 RETRACT VALVE DCM1 P3 A B P T M RESERVOIR MB9 CONTROLLED LOWERING MANIFOLD B P T C8 CUSHION CYLINDER CBV2 W CASE DRAIN MB10 DISC BRAKE MANIFOLD BLOCK 2H-25 QUICK BRAKE VALVE V2 CONTROLLED LOWERING VALVE CV14 BP1 BRAKE PACK V6 AUTO RESET VALVE 2H-30A FREE WHEEL VALVE M1 TWO STAGE HYDRAULIC MOTOR CV13 HP2 HAND PUMP MB15 FREE WHEEL MANIFOLD 3H-20A SERIES/PARALLEL VALVE 4H-26A EXTEND VALVE R8 RELIEF VALVE R3 RELIEF VALVE O5 CONTROLLED LOWERING ORIFICE Ø 0.055 A CBV1 CV11 CV12 4H-27A RETRACT VALVE 4H-26 EXTEND VALVE MB7 LIFT LINE MANIFOLD MB8 LIFT LINE MANIFOLD MB2 MANUAL LOWERING VALVE MANIFOLD MB13 POWERED EXTENSION MANIFOLD BLOCK C1 LIFT CYLINDER C7 STEER CYLINDER MB1 MAIN MANIFOLD 2H-13A MAIN LOWERING VALVE V1 MANUAL LOWERING VALVE O1 MAIN LOWERING VALVE ORIFICE Ø 0.096 HYDRAULIC GENERATOR OPTION CV3 CHECK VALVE GM1 GENERATOR MOTOR MB12 HYDRAULIC GENERATOR VALVE MANIFOLD CV2 CHECK VALVE OC1 OIL COOLER DIESEL OPTION ENGINE LARGE PUMP OC1 OIL COOLER DUAL FUEL EFI P T C12 LEFT REAR OUTRIGGER CYLINDER 4H-24A LEFT STEER VALVE 2H-30A-1 BRAKE DUMP VALVE P A T B CV1 CHECK VALVE CV5 CHECK VALVE X C11 RIGHT REAR OUTRIGGER CYLINDER CV7 CHECK VALVE CV6 CHECK VALVE MB11 OUTRIGGER MANIFOLD BLOCK 4H-15B REVERSE DRIVE VALVE R1 SYSTEM RELIEF VALVE C10 RIGHT FRONT OUTRIGGER CYLINDER C9 LEFT FRONT OUTRIGGER CYLINDER CV4 CHECK VALVE 2H-17A LARGE PUMP DUMP VALVE 2H-18A SMALL PUMP DUMP VALVE SMALL PUMP P1 DUAL INLET PUMP 2H-30A-2 BRAKE FEED VALVE B 4H-16B FORWARD DRIVE VALVE R2 LIFT RELIEF VALVE 2H-14B LIFT VALVE 2H-86C HYDRAULIC GENERATOR VALVE 4H-23A RIGHT STEER VALVE A 2H-17B OUTRIGGER HOLDING VALVE 4H-78 LEFT REAR OUTRIGGER EXTEND VALVE P T A 4H-75 LEFT FRONT OUTRIGGER EXTEND VALVE P A B T B 4H-74 LEFT REAR OUTRIGGER RETRACT VALVE 4H-71 LEFT FRONT OUTRIGGER RETRACT VALVE 4H-76 RIGHT FRONT OUTRIGGER EXTEND VALVE P A 4H-77 RIGHT REAR OUTRIGGER EXTEND VALVE P T B T 4H-72 RIGHT FRONT OUTRIGGER RETRACT VALVE A B Y 4H-73 RIGHT REAR OUTRIGGER RETRACT VALVE QD1 SYSTEM PRESSURE QUICK DISCONNECT Z F1 FILTER RESERVOIR SKYJACK, Page 22 M139727AC Full-Size Rough Terrain Series Models 9241 & 9250 143905 A B 3.13 Hydraulic Schematic (Dana Axles) D E C F C3 LIFT CYLINDER MB5 HOLDING VALVE MANIFOLD MB6 HOLDING VALVE MANIFOLD O2 LIFT ORIFICE Ø 0.094 C2 LIFT CYLINDER 2H-98-4 AUXILIARY LOWERING VALVE 2H-98-4 AUXILIARY LOWERING VALVE 2H-13A-4 HOLDING VALVE 2H-13A-3 HOLDING VALVE O2 LIFT ORIFICE Ø 0.094 R6 RELIEF VALVE R5 RELIEF VALVE 2H-13A-2 HOLDING VALVE O2 LIFT ORIFICE Ø 0.094 R4 RELIEF VALVE PRESSURE OVERLOAD TRANSDUCE OPTION 2H-13A-1 HOLDING VALVE O2 LIFT ORIFICE Ø 0.094 PT1 PRESSURE OVERLOAD TRANSDUCER MB13 POWERED EXTENSION MANIFOLD BLOCK DCM1 P3 MB9 CONTROLLED LOWERING MANIFOLD A B P T M R3 RELIEF VALVE RESERVOIR O5 CONTROLLED LOWERING ORIFICE 0.055 Ø 4H-27A RETRACT VALVE 4H-26 EXTEND VALVE CBV1 CV11 MB15 FREE WHEEL MANIFOLD 3H-20A SERIES/PARALLEL VALVE M1 TWO STAGE HYDRAULIC MOTOR 4H-26A EXTEND VALVE CV13 CV14 2H-30A FREE WHEEL VALVE C8 CUSHION CYLINDER CBV2 R8 RELIEF VALVE W CASE DRAIN C5 BRAKE CYLINDER V2 CONTROLLED LOWERING VALVE CV12 MB14 REAR POWERED EXTENSION MANIFOLD BLOCK 4H-27 RETRACT VALVE MB7 LIFT LINE MANIFOLD MB8 LIFT LINE MANIFOLD MB2 MANUAL LOWERING VALVE MANIFOLD 2H-98-1 AUXILIARY LOWERING VALVE BASE/DRIVE ASSEMBLY C14 REAR EXTENSION CYLINDER C13 FRONT EXTENSION CYLINDER MB3 HOLDING VALVE MANIFOLD 2H-98-2 AUXILIARY LOWERING VALVE V MB16 MOTION CONTROL MANIFOLD BLOCK C1 LIFT CYLINDER MB4 HOLDING VALVE MANIFOLD H MC1 MOTION CONTROL VALVE ASSEMBLY POWERED EXTENSION PLATFORM OPTION C4 LIFT CYLINDER G C7 STEER CYLINDER C6 BRAKE CYLINDER MB1 MAIN MANIFOLD 4H-23A RIGHT STEER VALVE O1 MAIN LOWERING VALVE ORIFICE Ø 0.096 HYDRAULIC GENERATOR OPTION CV3 CHECK VALVE GM1 GENERATOR MOTOR MB12 HYDRAULIC GENERATOR VALVE MANIFOLD OC1 OIL COOLER DIESEL OPTION OC1 OIL COOLER DUAL FUEL EFI C12 LEFT REAR OUTRIGGER CYLINDER 4H-24A LEFT STEER VALVE C10 RIGHT FRONT OUTRIGGER CYLINDER C9 LEFT FRONT OUTRIGGER CYLINDER CV5 CHECK VALVE CV4 CHECK VALVE X C11 RIGHT REAR OUTRIGGER CYLINDER CV6 CHECK VALVE CV7 CHECK VALVE MB11 OUTRIGGER MANIFOLD BLOCK 2H-30A-1 BRAKE DUMP VALVE 4H-78 LEFT REAR OUTRIGGER EXTEND VALVE 4H-15B REVERSE DRIVE VALVE 4H-76 RIGHT FRONT OUTRIGGER EXTEND VALVE 4H-75 LEFT FRONT OUTRIGGER EXTEND VALVE 4H-77 RIGHT REAR OUTRIGGER EXTEND VALVE Y 2H-17A LARGE PUMP DUMP VALVE 2H-18A SMALL PUMP DUMP VALVE SMALL PUMP P1 DUAL INLET PUMP 2H-30A-2 BRAKE FEED VALVE CV2 CHECK VALVE B 4H-16B FORWARD DRIVE VALVE R2 LIFT RELIEF VALVE 2H-14B LIFT VALVE 2H-86C HYDRAULIC GENERATOR VALVE LARGE PUMP A 2H-13A MAIN LOWERING VALVE V1 MANUAL LOWERING VALVE CV1 CHECK VALVE R1 SYSTEM RELIEF VALVE 2H-17B OUTRIGGER HOLDING VALVE 4H-74 LEFT REAR OUTRIGGER RETRACT VALVE 4H-71 LEFT FRONT OUTRIGGER RETRACT VALVE 4H-72 RIGHT FRONT OUTRIGGER RETRACT VALVE 4H-73 RIGHT REAR OUTRIGGER RETRACT VALVE QD1 SYSTEM PRESSURE QUICK DISCONNECT Z F1 FILTER RESERVOIR Full-Size Rough Terrain Series Models 9241 & 9250 143905 M116174AJ SKYJACK, Page 23 A 3.14 Hydraulic Manifold Components & Port Identifications C D E B TO TO OUTRIGGER 2H-17A MANIFOLD RETURN LARGE PUMP FILTER DUMP VALVE 2H-30A-2 BRAKE FEED MANIFOLD VALVE PLUG 4H-24A LEFT STEER VALVE TO LARGE PUMP TO SMALL PUMP R2 LIFT RELIEF VALVE TO BRAKE CYLINDER TO MAIN MANIFOLD TO EMERGENCY LOWERING V TO MOTION CONTROL VALVE TO BRAKE CYLINDER V6 BRAKE RELEASE OVERRIDE VALVE HP2 HAND PUMP (Model 9250) R1 SYSTEM RELIEF VALVE W O1 LOWERING ORIFICE 2H-30A-1 BRAKE DUMP 4H-16B VALVE FORWARD DRIVE VALVE TO OUTRIGGER MANIFOLD TEST PORT 2H - 25 QUICK BRAKE VALVE 2H-18A SMALL PUMP DUMP VALVE CV2 CHECK VALVE TO MOTION CONTROL VALVE H Auto Reset Brake Manifold CV2 CHECK VALVE TO STEER CYLINDER G TO EMERGENCY LOWERING MANIFOLD TO HYDRAULIC TANK CV3 CHECK VALVE 4H-15B REVERSE DRIVE VALVE 4H-23A RIGHT STEER VALVE F 2H-13A LOWERING VALVE MANIFOLD PLUG 4H - 72A OUTRIGGER RIGHT FRONT RETRACT 4H - 71A OUTRIGGER LEFT FRONT RETRACT 4H - 74A OUTRIGGER LEFT REAR RETRACT 4H - 73A OUTRIGGER RIGHT REAR RETRACT X 2H - 17B OUTRIGGER HOLDING VALVE 4H - 78A OUTRIGGER LEFT REAR EXTEND Y 4H - 75A OUTRIGGER LEFT FRONT EXTEND OPTIONAL TEST PORT 2H-14B LIFT VALVE TO LIFT CONTROL LOWERING BLOCK Main Manifold Outrigger Manifold 4H - 77A OUTRIGGER RIGHT REAR EXTEND 4H - 76A OUTRIGGER RIGHT FRONT EXTEND Z OUTRIGGER CYLINDER M50152AB HMC-Pl2 HMC-Pl1 SKYJACK, Page 24 Full-Size Rough Terrain Series Models 9241 & 9250 143905 A B C 3.15 Main Manifold Wiring Diagram D E F G BRAKE DUMP VALVE 30A - BROWN (2x) 02 - WHITE LARGE PUMP DUMP VALVE 17A - BLUE/RED 02 - WHITE MAIN DISCONNECT 03 - BLUE (14 AWG) POWER DECK CONTACTOR 09 - ORANGE/RED 02 - WHITE QUICK BRAKE VALVE 25 - ORANGE/GREEN 02 - WHITE FREE WHEELING VALVE 30A - BROWN 02 - WHITE SMALL PUMP DUMP VALVE 18A - RED/BLACK 02 - WHITE H V TO ELECTRIC PANEL - 14 WIRES 00 - WHITE (14 AWG) 02 - WHITE 03 - BLUE (14 AWG) 09 - ORANGE/RED 13A - ORANGE 14B - BLACK 15B - BLUE 16B - WHITE/BLACK 17A - BLUE/RED 18A RED/BLACK 23A - BLACK/WHITE 24A - BLUE/BLACK 25 - ORANGE/GREEN 30A - BROWN W BRAKE FEED VALVE 30A - BROWN (2x) 02 - WHITE LOWERING VALVE 13A - ORANGE (2x) 02 - WHITE (2x) HOLDING VALVE HARNESS 13A - ORANGE 02 - WHITE FORWARD VALVE BLACK HEIRSHMAN PIN 1 - 16B WHITE/BLACK PIN 2 - 02 WHITE BATTERY NEGATIVE 00 - WHITE (14 AWG) X LIFT VALVE 14B - BLACK 02 - WHITE REVERSE VALVE GREY HEIRSHMAN PIN 1 - 15B BLUE PIN 2 - 02 WHITE RIGHT STEER VALVE BLACK HEIRSHMAN PIN 1 - 23A BLACK/WHITE PIN 2 - 02 WHITE Y LEFT STEER VALVE GREY HEIRSHMAN PIN 1 - 24A BLUE/BLACK PIN 2 - 02 WHITE Z M129218AD Full-Size Rough Terrain Series Models 9241 & 9250 143905 SKYJACK, Page 25 A B 3.16 Oil Cooler - Electrical Panel Diagram (ANSI/CSA Dual Fuel Engine) C D E F G H V 87a D73 10ACR2 W 10 6 7 8 9 3 1 2 3 4 5 6 2 1 2 3 1 11 12 4 OIL COOLER RELAY - 10ACR2 PIN 30 - 85A ORG/BLK/WHT PIN 85 - 10A BLU/WHT PIN 86 - 2A BLK/RED PIN 87 - 86D BLK PIN 87a - N/U 2A 85A 9 5 D76 D71 86D 8 ENABLE 10A D77 D78 D72 7 4 JUMP J17E X 00 D36 61 62 62 63 63 64 64 01 10A 10A 10A 10A 65 CN22 85 30 D75 65CR J17E 17BCR J17D 61CR 87 D74 REAR RIGHT FRONT RIGHT 9CR2 FRONT LEFT 9CR3 35C 78 73 77 74 71 75 72 76 CN20 REAR LEFT D17B-1 17B 02 78 73 77 74 71 75 72 76 CN21 10A D17B-2 86 2A CN14 04 17 86A 10A 09 44 01 02 02 36A 61 36 BACK VIEW TO OIL COOLER FAN 86D - BLACK 00 - WHITE 00 02 02 07 09 10A 13A 29 14B 17A 18A 33 20A 25 30 15A 16A 21 23A 24A 35 02 00 05 03 85A 03 Y 86D 00 Z M134195AC_2 SKYJACK, Page 26 Full-Size Rough Terrain Series Models 9241 & 9250 143905 A 3.17 Hydraulic Generator - Electrical Panel Diagram (ANSI/CSA Dual Fuel Engine) C D E B F G H V HYDRAULIC GENERATOR INTERNAL WIRING OUTRIGGER ELECTRIC PANEL 12 PIN CONNECTOR PLUG - CN14 CN14 04 17 86A 10A 09 44 01 02 02 36A 61 36 BACK VIEW PIN 3 - 86A ORG/BLK/WHT 10 11 12 4 4 5 6 7 8 9 3 1 2 3 4 5 6 2 1 2 3 1 05 41 32 34B CR D76 ENABLE 02 32A GROUND JUMP J17E W LOAD NEUTRAL 86 09 00 00 32 CR 43 34A D14B-3 TO OIL COOLER FAN 86D - BLACK 00 - WHITE R LOAD D36 61 62 62 63 63 64 64 01 10A 10A 10A 10A 65 CN22 41 D75 65CR J17D 17BCR J17E 61CR 43 42 34B 2A 9 2A 86D 8 D71 85A D78 D72 FRONT RIGHT FRONT LEFT 7 NORTH AMERICAN COLOURS BLACK WHITE GREEN 10A D73 D77 D74 REAR RIGHT 35C 78 73 77 74 71 75 72 76 9CR2 04 17 86A 10A 09 35 01 02 02 36A 61 36 9CR3 REAR LEFT 17B 02 78 73 77 74 71 75 72 76 D17B-1 CN20 LOAD LOAD NEUTRAL GROUND 10ACR2 10A D17B-2 D86C-2 CN21 10A 13A 29 14B 17A 18A 33 20A 25 30 15A 16A 21 23A 24A 35 D86 110V 15A GENERATOR 85A 09 86B 14A 10A 17 44 2A 86B 02 86A 02 28 02 35 86B CR 86A CR 28 CR 85 86C 35 CR 28A 14B 85 01 19A RED 02 00 05 03 85A 03 BLK 04 86D D86C-1 85 X 00 GROUND 02 LOAD NEUTRAL LOAD 86C TO HYDRAULIC GENERATOR SOLENOID 86C - BLACK 02 - WHITE 86 87 87a 30 85 OIL COOLER RELAY - 10ACR2 PIN 30 - 85A ORG/BLK/WHT PIN 87 - 86D BLK PIN 87a - N/U PIN 85 - 10A BLU/WHT PIN 86 - 2A BLK/RED 220V 15A GENERATOR RED BLK Y Z M134191AD_1 Full-Size Rough Terrain Series Models 9241 & 9250 143905 SKYJACK, Page 27 A 3.18 Hydraulic Generator - Electrical Panel Diagram (ANSI/CSA Diesel Engine) C D E B AB F G H V BACK VIEW OUTRIGGER ELECTRIC PANEL 12 PIN CONNECTOR PLUG - CN14 10 11 12 4 4 5 6 7 8 9 3 1 2 3 4 5 6 2 1 2 3 1 34A ENABLE 02 GROUND LOAD NEUTRAL W LOAD 32A 110V 15A GENERATOR 86 JUMP J17E 09 00 02 32 CR 43 D14B-3 00 R RED BLK D36 61 62 62 63 63 64 64 01 10A 10A 10A 10A 65 CN22 32 34B CR D76 65CR 42 34B D75 J17D 17BCR J17E 61CR 05 41 10A 9 10A 2A 8 41 D71 85A D78 D72 FRONT RIGHT FRONT LEFT 7 43 NORTH AMERICAN COLOURS BLACK WHITE GREEN 2A D73 D77 D74 REAR RIGHT REAR LEFT 17B 02 78 73 77 74 71 75 72 76 35C 78 73 77 74 71 75 72 76 04 17 86A 10A 09 35 01 02 02 36A 61 36 9CR2 10ACR2 86D D17B-2 CN20 9CR3 TO OIL COOLER FAN 86C - BLACK 00 - WHITE LOAD LOAD NEUTRAL GROUND D86C-2 CN21 D17B-1 PIN 3 - 86A ORG/BLK/WHT HYDRAULIC GENERATOR INTERNAL WIRING 04 17 86A 10A 09 44 01 02 02 36A 61 36 CN14 02 07 09 10A 13A 29 14B 17A 18A 33 20A 25 30 15A 16A 21 23A 24A 35 7A D86 85A 09 86B 14A 10A 17 44 2A 86B 02 86A 02 28 02 35 86B CR 86A CR 28 CR 85 86C 02 35 CR 14B 01 05 19A GROUND LOAD NEUTRAL 28A 85 00 X LOAD 03 220V 15A GENERATOR 04 86C D86C-1 85 85A 03 RED BLK 00 02 86C TO HYDRAULIC GENERATOR SOLENOID 86C - BLACK 02 - WHITE 86 87 87a 30 85 Y HYDR GEN CONTROL CABLE 09 - BLACK 85 - GREEN 86 - WHITE OIL COOLER RELAY - 10ACR2 PIN 30 - 85A ORG/BLK/WHT PIN 85 - 10A BLU/WHT PIN 86 - 2A BLK/RED PIN 87 - 86D BLK PIN 87a - N/U Z M141691AD SKYJACK, Page 28 Full-Size Rough Terrain Series Models 9241 & 9250 143905 A B C AB 3.19 Hydraulic Generator - Electrical Panel Diagram (CE) D E F G H CN14 OUTRIGGER ELECTRIC PANEL 12 PIN CONNECTOR PLUG 04 17 86A 10A 09 44 01 02 02 36A 61 36 BACK VIEW 43 41 05 42 34B 41 32 D74 8 9 4 5 6 7 8 9 3 1 2 3 4 5 6 2 1 2 3 1 4 34B CR D76 43 ENABLE 02 32A 86 JUMP J17E W 09 D14B-2 D17A 16GA 18GA 09 86B 10A 17 10C 2A 86B 02 86A 02 28E 02 35 86A CR 28E CR2 00 02 02 02 09 13D 10A 14D 10D 10E 14E 10A 14B 34B 07 17A 7A 25 33 7C 60 18A 35B 85 19A 13C 02 00 05 03 44 X D18A D14B-1 D14E-1 35 CR 85 86C 86D D86 85A 86B CR D14E-2 NOTE: EACH STRANDED WIRE AT THE TERMINAL STRIP MUST BE TERMINATED WITH A FERRULE TO OIL COOLER FAN 86D - BLACK 00 - WHITE 34A D36 61 62 62 63 63 64 64 01 10A 10A 10A 10A 65 CN22 32 CR D75 65CR J17E 17BCR J17D 61CR R 2A 10 11 12 10A 2A 85A 86D D78 D72 7 V 10A D73 10ACR2 D77 REAR RIGHT FRONT RIGHT FRONT LEFT 04 17 86A 10A 09 35 01 02 02 36B 61 36 9CR2 35C 78 73 77 74 71 75 72 76 CN20 9CR3 REAR LEFT D17B-1 17B 02 78 73 77 74 71 75 72 76 CN21 D71 D17B-2 D86C-2 PIN 3 - 86A ORG/BLK/WHT D86C-1 85 85A 03 00 02 HYDRAULIC GENERATOR INTERNAL WIRING 86C EUROPEAN COLOURS LOAD BROWN LOAD NEUTRAL BLUE GROUND GREEN/YELLOW TO HYDRAULIC GENERATOR SOLENOID 86C - BLACK 02 - WHITE 86 87 87a 30 85 OIL COOLER RELAY - 10ACR2 PIN 30 - 85A ORG/BLK/WHT PIN 85 - 10A BLU/WHT PIN 86 - 2A BLK/RED PIN 87 - 86D BLK PIN 87a - N/U Y HYDR GEN CONTROL CABLE 09 - BLACK 85 - GREEN 86 - WHITE GROUND LOAD NEUTRAL GROUND LOAD NEUTRAL LOAD LOAD 110V 15A GENERATOR 220V 15A GENERATOR RED BLK RED BLK Z M149512AC Full-Size Rough Terrain Series Models 9241 & 9250 143905 SKYJACK, Page 29 A B 3.20 Emergency Lowering System - Wiring Diagram (ANSI/CSA) (Model 9250) C D E F G H V RST2 GRAY GRAY GRAY GRAY W LIFT CYLINDER MANIFOLD TYP (4 PLACES) NOTE: ALL CABTIRES RUN IN TRACK WITH CONTROL CABLE X B1 - MAIN BATTERY TOP VIEW GRAY 98 - BLACK 00 - WHITE Y BLACK B2 - AUX. BATTERY S51 97 - BLACK 98 - WHITE Z BACK VIEW PIN 3 - 97 BLACK PIN 4 - 98 WHITE M11443AA SKYJACK, Page 30 Full-Size Rough Terrain Series Models 9241 & 9250 143905 A 3.21 Emergency Lowering System - Wiring Diagram (CE) (Model 9250) C D E B F G H POWER DECK RETRACT 97A - BLACK 00 - WHITE EMERGENCY POWER DECK RETRACT CONTACTOR 97A - BLACK (2x) 02 - WHITE (2x) EMERGENCY POWER DECK RETRACT RELAY PIN 1 - 100A RED PIN 4 - 9B ORANGE/RED PIN 9 - 100 RED PIN 12 - 09 ORANGE/RED PIN 13 - 02 WHITE PIN 14 - 97A GREEN, BLACK V TO POWER DECK CONTROL BOX - FRONT TO POWER DECK CONTROL BOX - REAR TO POWER DECK DIRECTIONAL VALVES UNDERNEATH PLATFORM POWER DECK CONTACTOR 9B - ORANGE/RED 02 - WHITE (2x) W TO POWER DECK MOTOR CONTACTOR 00 - WHITE 103B - BLACK 99 - GREEN TO ENGINE X RST2 Y GRAY GRAY GRAY GRAY B1 MAIN BATTERY S52 98 - BLACK 00 - WHITE BACK VIEW LIFT CYLINDER MANIFOLD TYP (4 PLACES) EMERGENCY DECK RETRACTION PIN 3 - 97 BLACK PIN 4 - 97A GREEN B2 AUX. BATTERY Z MANUAL LOWERING VALVE S51 97 - BLACK 97A - GREEN 98 - WHITE EMERGENCY LOWERING PIN 3 - 97 BLACK (2x) PIN 4 - 98 WHITE GRAY BLACK Full-Size Rough Terrain Series Models 9241 & 9250 143905 M11442AA SKYJACK, Page 31 A 3.22 Emergency Lowering System - Electrical Wiring Diagram (CE) (Model 9241) C D E B F G H POWER DECK RETRACT 97A - BLACK 00 - WHITE 02 97A 02 09 02 EM RETRACT TO POWER DECK DIRECTIONAL VALVES 9B 103B 100A V TO POWER DECK CONTROL BOX - FRONT TO POWER DECK CONTROL BOX - REAR 97A 100 97A 97 EMERGENCY POWER DECK RETRACT CONTACTOR 97A - BLACK (2x) 02 - WHITE (2x) 103 A NOTE: OPEN UP THE HARNESS AND PULL OUT THE 09 ORANGE/RED WIRE SO THAT IT IS 5" HIGHER. CUT OFF THE RING TERMINAL AND CONNECT TO EMERGENCY P.D. RETRACT RELAY 27 26 09 12A 12D 09 26A 27A 02 26A 27A MANIFOLD 103B UNDERNEATH PLATFORM 27 26 02 02 02 BASE FEED POWER DECK CONTACTOR 9B - ORANGE/RED 02 - WHITE (2x) 02 9B 103A 97A CTRL BOX 10 N 02 120844AB EMERGENCY POWER DECK RETRACT RELAY PIN 1 - 100A RED PIN 4 - 9B ORANGE/RED PIN 9 - 100 RED PIN 12 - 09 ORANGE/RED PIN 13 - 02 WHITE PIN 14 - 97A GREEN, BLACK PMP PWR 02 12D 12A 02 W 103B NOTE: TRIM BATTERY BOOT FOR ADDITIONAL CABLE 103B 103B 00 00 103 103 103 99 103 NOTE: FASTEN TO PUMP BODY 103 103 TO POWER DECK MOTOR CONTACTOR 00 - WHITE 103B - BLACK 99 - GREEN 2 TO ENGINE 00 ENABLE 03 2 96 100A 100 X 00 100 D96 00 00 100 00 97 00 97 Y 97 00 BACK VIEW EMERGENCY DECK RETRACTION PIN 3 - 97 BLACK PIN 4 - 97A GREEN NOT CONNECTED 98 (TIE- WRAP TO THE CABLE) MANUAL LOWERING VALVE Z 97 - BLACK 97A - GREEN 98 - WHITE M148308AA_1 SKYJACK, Page 32 Full-Size Rough Terrain Series Models 9241 & 9250 143905 H LEFT REAR OUTRIGGER: PIN 1 - BLACK (10A) PIN 2 - WHITE (68A) PIN 3 - GREEN (01) PIN 4 - RED (64) BACK VIEW PIN 1 - BLACK ( ) PIN 2 - WHITE ( ) PIN 3 - GREEN ( ) PIN 4 - RED ( ) FEMALE 2 3 1 4 V 5 4 1 2 3 4 5 6 D76 REAR LEFT REAR RIGHT D71 D72 D78 D77 D74 W D73 OUTR MANIFOLD PIN 1 - 78 BLACK/WHITE PIN 1 - 75 ORANGE/BLACK PIN 1 - 76 RED/BLACK PIN 1 - 77 BLUE/BLACK PIN 2 - 02 WHITE PIN 2 - 02 WHITE PIN 2 - 02 WHITE TEN PIN CONNECTOR PLUG CN21 PIN 2 - 02 WHITE PIN 1 - 17B WHITE/BLACK PIN 2 - 02 WHITE PIN 3 - 78 BLACK/WHITE 76 77 78 75 02 02 02 02 PIN 4 - 73 BLUE PIN 5 - 77 BLUE/BLACK GREY GREY GREY GREY PIN 6 - 74 BLACK PIN 7 - 71 ORANGE PIN 8 - 75 ORANGE/BLACK PIN 9 - 72 RED PIN 10 - 76 RED/BLACK 2 6 D75 CN14 1 FRONT LEFT FRONT RIGHT CN21 2 JUMP J17E 3 ENABLE BACK VIEW OUTR CTRL BOX 9 8 7 6 5 4 3 2 1 TO LIMIT SWITCHES PIN 1 - 65 GREEN/BLACK PIN 2 - 65A GREEN/WHITE PIN 3 - 66A BLUE/WHITE PIN 4 - 67A RED/WHITE PIN 5 - 68A WHITE PIN 6 - N/U BACK VIEW J17D J17E 17B 02 78 73 77 74 71 75 72 76 CN20 LEFT REAR TO CONTROL MODULE PIN 1 - 65 GREEN/BLACK PIN 2 - 65A WHITE PIN 3 - 66A WHITE PIN 4 - 67A WHITE PIN 5 - 68A WHITE PIN 6 - N/U D36 04 17 86A 10A 09 44 01 02 02 36A 61 36 9CR2 RIGHT REAR 9CR3 RIGHT FRONT 35C 78 73 77 74 71 75 72 76 65CR LEFT FRONT CN22 SIXTEEN PIN CONNECTOR PLUG INSTALLED TO CABTIRES ON MACHINE CN22 PIN 1 - 61 RED PIN 2 - 62 GREEN PIN 3 - 62 RED PIN 4 - 63 GREEN PIN 5 - 63 RED PIN 6 - 64 GREEN PIN 7 - 64 RED PIN 8 - 01 GREEN PIN 9 - 10A BLACK (2) PIN 10 - 10A BLACK (2) PIN 11 - 10A BLACK (2) PIN 12 - 10A BLACK (2) PIN 13 - (N/U) PIN 14 - (N/U) PIN 15 - (N/U) PIN 16 - 65 GREEN/BLACK D17B-1 D17B-2 17BCR OUTRIGGER LIMIT SWITCHES 61CR 61 62 62 63 63 64 64 01 10A 10A 10A 10A 65 TO OUTRIGGER PCB CN20 PIN 1 - 35C WHITE/BLACK PIN 2 - 78 BLACK/WHITE PIN 3 - 73 BLUE PIN 4 - 77 BLUE/BLACK PIN 5 - 74 BLACK PIN 6 - 71 ORANGE PIN 7 - 75 ORANGE/BLACK PIN 8 - 72 RED PIN 9 - 76 RED/BLACK 1 RIGHT REAR OUTRIGGER: PIN 1 - BLACK (10A) PIN 2 - WHITE (67A) PIN 3 - GREEN (64) PIN 4 - RED (63) 2 RIGHT FRONT OUTRIGGER: PIN 1 - BLACK (10A) PIN 2 - WHITE (66A) PIN 3 - GREEN (63) PIN 4 - RED (62) G 1 LEFT FRONT OUTRIGGER: PIN 1 - BLACK (10A) PIN 2 - WHITE (65A) PIN 3 - GREEN (62) PIN 4 - RED (61) F 2 TO OUTRIGGER LIMIT SWITCHES 3.23 AutoLeveling Outrigger Connection Diagram D E C 1 B 2 A 1 02 02 X 17B 02 17B - WHITE/BLACK 02 - WHITE 7 8 9 4 5 6 7 8 9 3 1 2 3 4 5 6 2 1 2 3 1 10 11 12 4 OCM1 - OUTRIGGER CONTROL MODULE BLACK BLACK 3 2 1 6 5 4 9 8 7 BACK VIEW 3 2 1 6 5 4 9 8 7 12 11 10 CONTROL MODULE - P2 PIN 1 - 68A WHITE PIN 2 - 67A RED/WHITE PIN 3 - 66A BLUE/WHITE PIN 4 - 65A GREEN/WHITE PIN 5 - 70 GREEN/BLACK PIN 6 - 79 GREEN PIN 7 - 70A RED/WHITE PIN 8 - 65 GREEN/BLACK PIN 9 - N/U PIN 10 - 35 BROWN/RED PIN 11 - 02 WHITE (2x) PIN 12 - 10A BLUE/WHITE 1 2 02 TO CONTROL BOX PIN 1 - 02 WHITE PIN 2 - 35C WHITE/BLACK PIN 3 - 70 GREEN/BLACK PIN 4 - 70A RED/WHITE PIN 5 - 71 ORANGE PIN 6 - 72 RED PIN 7 - 73 BLUE PIN 8 - 74 BLACK TO "ELECTRIC PANEL" PIN 1 - 02 WHITE PIN 2 - 35C WHITE/BLACK PIN 3 - 70 GREEN/BLACK PIN 4 - 70A RED/WHITE PIN 5 - 71 ORANGE PIN 6 - 72 RED PIN 7 - 73 BLUE PIN 8 - 74 BLACK PIN 9 - 75 ORANGE/BLACK PIN 10 - 76 RED/BLACK PIN 11 - 77 BLUE/BLACK PIN 12 - 78 BLACK/WHITE PIN 13 - 79 GREEN PIN 14 - 35C WHITE/BLACK PIN 15 - 35C WHITE/BLACK PIN 9 - 75 ORANGE/BLACK PIN 10 - 76 RED/BLACK PIN 11 - 77 BLUE/BLACK PIN 12 - 78 BLACK/WHITE PIN 13 - 79 GREEN PIN 14 - 35C BLUE/WHITE PIN 15 - 35C GREEN/WHITE 74 PIN 1 - 74 BLACK PIN 2 - 02 WHITE 35C WHITE/BLACK 70 GREEN/BLACK 79 GREEN 35D 2 1 5 9 4 6 8 3 3 5 7 6 11 12 7 10 8 13 14 15 9 10 TO ELECTRIC PANEL 02 - WHITE 10A BLUE/WHITE 35 BROWN/RED 79 70 35C 35C 35C BLUE/WHITE 35C GREEN/WHITE 1 71 PIN 1 - 71 ORANGE PIN 2 - 02 WHITE BLACK 2 1 02 72 PIN 1 - 72 RED PIN 2 - 02 WHITE Y 2 02 1 73 PIN 1 - 73 BLUE PIN 2 - 02 WHITE 70A 1 2 4 2 02 BLACK 02 TO CONTROL MODULE - P4 PIN 1 - 78 BLACK/WHITE (2x) PIN 2 - 77 BLUE/BLACK (2x) PIN 3 - 76 RED/BLACK (2x) PIN 4 - 75 ORANGE/BLACK (2x) PIN 5 - 74 BLACK (2x) PIN 6 - 73 BLUE (2x) PIN 7 - 72 RED (2x) PIN 8 - 71 ORANGE (2x) PIN 9 - 35C WHITE/BLACK (2x) BACK VIEW 35D PURPLE/WHITE 70A RED/WHITE 02 WHITE TO "CONTROL BOX" TEN PIN CONNECTOR PLUG PIN 1 - 74 BLACK PIN 2 - 73 BLUE PIN 3 - 78 BLACK/WHITE PIN 4 - 77 BLUE/BLACK PIN 5 - 35D PURPLE/WHITE PIN 6 - N/U PIN 7 - 71 ORANGE PIN 8 - 72 RED PIN 9 - 75 ORANGE/BLACK PIN 10 - 76 RED/BLACK Z M50333AC_1 Full-Size Rough Terrain Series Models 9241 & 9250 143905 SKYJACK, Page 33 SKYJACK, Page 34 TO POWER DECK DIRECTIONAL VALVE F TO CONTACTOR 00 - WHITE 103B - BLACK 99 - GREEN TO POWER DECK MOTOR CONTACTOR TO ENGINE 3.24 Powered Extension Platform - Electrical Wiring Diagram (Model 9250) C D E TO POWER DECK CONTROL BOX - REAR TO POWER DECK CONTROL BOX - FRONT B1 MAIN BATTERY NEGATIVE B POSITIVE A S1 MAIN DISCONNECT SWITCH F2 100 AMP FUSE POWER DECK CONTACTOR 09 - ORANGE/RED 02 - WHITE TO ELECTRIC PANEL G H V W X Y Z M50296AB Full-Size Rough Terrain Series Models 9241 & 9250 143905 A B 3.25 Horn, Light & Beeper Wiring Diagram (ANSI/CSA) (Model 9250) C D E F G H V ROTATING AMBER BEACON OPTION HORN, LIGHT & BEEPER FL-22 LIGHT 00 - WHITE 22 - GREEN DUAL FLASHING LIGHT OPTION FL -22-1 RL - 29 ROTATING BEACON 29 - RED FL-22-2 W X FASTEN THE “00” WIRES ON THIS BOLT WITH HARDWARE SUPPLIED BP - 29 BEEPER 29 - RED 00 - BLACK TO MAIN ELETRICAL PANEL BP - 29 BEEPER 29 - RED 00 - BLACK Y GREEN - 22 WHITE - 02 GREEN - 22 WHITE - 02 TO MAIN ELECTRICAL PANEL H1 - HORN 00 - WHITE 49A - GREEN H1 - HORN 00 - WHITE 49A - GREEN TO MAIN ELECTRICAL PANEL Z M47681AA_S3 Full-Size Rough Terrain Series Models 9241 & 9250 143905 SKYJACK, Page 35 A B C 3.26 Horn, Light, Beeper & Load Sensing Wiring Diagram D E F G H V W X Y Z M134226AF SKYJACK, Page 36 Full-Size Rough Terrain Series Models 9241 & 9250 143905 A B 3.27 Electrical Inverter Wiring Diagram D E C INV1 F G H ELECTRIC PANEL V 34CR VIOLET WIRE W F4 EXISTING CABLE TERMINAL BLOCK (ANSI/CSA) - #33 S1 X D34A TO AC OUTLET 33 Y POSTIVE NEGATIVE TERMINAL BLOCK (CE) - #33 B1 BATTERY Z EXISTING CABLE Full-Size Rough Terrain Series Models 9241 & 9250 143905 M124092AD SKYJACK, Page 37 A B 3.28 Engine Wiring Diagram - Kubota Diesel Engine D E C F G H ENGINE HARNESS FROM ELECTRIC PANEL BLACK (N/U) BLACK/WHITE (N/U) 87 103 103 6 87a 6 86 85 30 91A 31A 103 GLOW PLUG RELAY 02 00" 5.5 6. 6.00 000" 0" MAIN STARTER V 0" PIN 1 - N/U PIN 2 - N/U PIN 3 - 02 WHITE PIN 4 - 91A RED PIN 5 - 32A GREEN/BLACK PIN 6 - 90 RED 91A 02 02 4 1 ELECTRIC PANEL BACK VIEW 1 2 3 4 5 6 DEUTSCH 5.00 GLOW PLUG TIMER ALTERNATOR MAIN PIN 30 - 103 RED PIN 87 - 91A - RED PIN 86 - 31A RED/WHITE PIN 85 - 02 WHITE PIN 87a - N/U 12 11 10 9 8 7 PIN 1 - 31A RED/WHITE PIN 2 - 34A GREEN/WHITE PIN 3 - 02 WHITE PIN 4 - 32A GREEN/BLACK PIN 5 - N/U PIN 6 - N/U PIN 7 - N/U PIN 8 - N/U PIN 9 - 2A BLACK/RED PIN 10 - 37 BLUE/WHITE PIN 11 - 07 RED PIN 12 - 05 PURPLE/WHITE BACK VIEW PIN 1 - 31A ORANGE PIN 2 - 34A WHITE/BLACK PIN 3 - 02 WHITE PIN 4 - 32A ORANGE/BLACK PIN 5 - N/U PIN 6 - N/U PIN 7 - 33 GREEN PIN 8 - 10A GREEN/BLACK PIN 9 - 2A RED/BLACK PIN 10 - 37 BLUE/BLACK PIN 11 - 07 RED PIN 12 - 05 BLUE 5 2 91A 2A - BLACK/RED 2B - WHITE 1 07 57 - BLACK/WHITE 02 - WHITE 31A - RED/WHITE 5A - PURPLE/WHITE 07 07 STARTER MOTOR GLOW PLUG SWITCH 31A 31A 2 37 PRESSURE SWITCH 07 3 103 57 02 91A 103 - RED 57 91A 90 - RED 91A - RED W MAIN STARTER 2A GLOW PLUG LIGHT 90 2B 90 32A 6 3 90 32A STARTER SOLENOID BACK VIEW - FEMALE 37 BLUE/WHITE 07 X 32A - GREEN/BLACK FRONT VIEW - MALE 37 - IG N/U - L IG WHITE "PIGTAIL" WIRE ON STARTER L 4 2 05 1 07 32A 5 4 07 05 32A 05 3 05 5 6 OFF / ON / START SWITCH 6 ALTERNATOR TRIGGER N/U - L 37 BLUE/WHITE 05 - PURPLE/WHITE 07 - RED 32A - GREEN/BLACK TEMPERATURE SWITCH 2B - WHITE 2B Y FUEL VALVE ON ENGINE 37 - BLUE/WHITE 57 - BLACK/WHITE FUEL VALVE GROUND 37 37 57 57 00 00 - WHITE THROTTLE SOLENOID 34A - GREEN/WHITE 02 - WHITE 34A 02 00 Z ENGINE GROUND GLOW PLUG 00 - WHITE 91A - RED 91A M147615AA_1 Full-Size Rough Terrain Series Models 9241 & 9250 143905 SKYJACK, Page 39 A B 3.29 Engine Harnesses - GM Dual Fuel Engine D E C OXS2 GPS1 G H OXS1 2P-56 TPS2 F V TPS1 MS1 OPS1 W X IGC1 F8 CPS1 F12 32ACR F7 F10 Y F13 RA1 2002CR PRV1 F9 56CR Z F11 GI1-4 GI1-3 GI1-2 GI1-1 M142448AA SKYJACK, Page 40 Full-Size Rough Terrain Series Models 9241 & 9250 143905 3.30 Electrical Panel Diagram - ANSI/CSA (All Option) D E CONTROL MODULE - P2 PIN 9 - 28 GREEN/RED PIN 10 - 35 BROWN/RED PIN 11 - 02 WHITE (2x) PIN 12 - 10A BLUE/WHITE 9 5 6 2 3 31 05 34 32 10 2A 13 14 16 15 23 V 03 24 D78 9 10 11 12 4 4 5 6 7 8 9 3 1 2 3 4 5 6 2 1 2 3 1 34B CR 31A 49A 34A 02 10A 05 10A 2A 10A 02 10B 02 13 02 14 02 15 02 16 02 23 02 24 02 30 10B CR1 13 CR 14 CR 15 CR 16 CR 23 CR 24 CR 30 CR 10A 13A 14A 15A 16A 23A 24A 30A 36B 04 R R 32 CR 02 10A CR1 43 41 32A 42 04 R 04 R 04 R 04 R 40 37 30A 1000 uF D14B-1 09 10A 13A B R D13A 29 R 14B D28A D20A D14B-2 B 17A 18A 33 20A B D17A B D18A 31A D15A-2 B D16A-2 B 25 B 30 D30 07 R 15A 16A D15A-1 D16A-1 21 23A 24A 35 34A 32A 10A 15A 16A 18A 18A 17A 44 28 02 40 02 18 02 17A 02 17 02 20 18 CR 17A CR 17 CR 20 CR 10A 20A 28 CR R 07 14B 17A 13A 09 18A 33 1 TD 28A 25 23A 24A 14B 7A 15B 16B R R 17 44 02 35 35 CR 21 01 10A 10A 19A W 02 07 7A 14 13 10A 20 D44 02 7A D23A B D24A B 18 14A 09 02 02 49 CR D71 D76 02 02 00 31 CR R JUMP J17E R 00 32 37 00 02 41 R D75 ENABLE D30A 00 05 42 34B 05 D36 61 62 62 63 63 64 64 01 10A 10A 10A 10A 65 CN22 41 02 49 R 2A 8 D72 29 FRONT RIGHT FRONT LEFT J17D 65CR J17E 17BCR 43 02 31 05 7 D10 10A D73 D77 D74 REAR RIGHT 35C 78 73 77 74 71 75 72 76 REAR LEFT 17B 02 78 73 77 74 71 75 72 76 04 17 86A 10A 09 44 01 02 02 36A 61 36 9CR2 TO FLASHER PIN X - 22 RED PIN L - 29 BLU/YEL 22 D17B-2 D17B-1 CN21 CN20 61CR H 04 17 86A 10A 09 44 01 02 02 36A 61 36 49 D34 9CR3 G 14 8 1 13 7 4 1 2 3 4 5 6 7 8 9 10 11 12 CN14 F 10 11 12 05 OUTRIGGER ELECTRIC PANEL 12 PIN CONNECTOR PLUG - CN14 PIN 7 - 01 RED/BLUE PIN 1 - 04 RED/BLUE PIN 8 - 02 WHITE PIN 2 - 17 BLUE/RED PIN 9 - 02 WHITE PIN 3 - 86A ORG/BLK/WHT PIN 10 - 36A BLACK PIN 4 - 10A BLUE/WHITE PIN 11 - 61 BLACK PIN 5 - 09 ORANGE/RED PIN 12 - 36 BLACK/WHITE PIN 6 - 44 RED 10A C 2A B 00 A 02 00 02 03 05 10A X D19 15B TWO SPEED MOTOR 20A - BLACK 02 - WHITE END OF STROKE 36A - BLACK 36B - BLK/WHT 02 19 16B NOTE: THE 1000uF CAPACITOR IS NOT REQUIRED ON MACHINES EQUIPPED WITH WET BRAKES. 20A 29 HIGH SPEED 10A - BLUE 35 - BROWN 22 49A TO HORN/LIGHT/BEEPER 00 - WHITE 22 - RED 29 - BLACK 49A - GREEN PLATFORM CONTROL BOX CABLE CONNECTOR BACK VIEW FEMALE (34) GREEN WHITE (32) GREEN BLACK (31) RED WHITE (24) BLUE BLACK (23) BLACK WHITE (20) BLACK WHITE RED (19) ORANGE BLACK (18) RED BLACK 16 8 WHITE BLACK (16) 15 14 7 6 BLUE (15) BLACK (14) 13 12 5 4 ORANGE (13) BLUE WHITE (10) (7D) RED BLACK GREEN 11 10 3 2 ORANGE RED (09) RED (7) 9 1 WHITE (02) BACK VIEW TO JOYSTICK BOX 26' LIFT CUTOUT 61 - BLACK 36 - BLK/WHT 00 TO ENGINE 00 MAIN MANIFOLD HARNESS 00 - WHITE (14 AWG) 02 - WHITE 03 - BLUE (14 AWG) 09 - ORANGE/RED 13A - ORANGE 14B - BLACK 15B - BLUE 16B - WHITE/BLACK 17A - BLUE/RED 18A - RED/BLACK 23A - BLACK/WHITE 24A - BLUE/BLACK 25 - ORANGE/GREEN 30A - BROWN ENGINE HARNESS PIN 1 - 31A ORANGE PIN 2 - 34A WHITE/BLACK PIN 3 - 02 WHITE PIN 4 - 32A ORANGE/BLACK PIN 5 - N/U PIN 6 - N/U PIN 7 - 33 GREEN PIN 8 - 10A GREEN/BLACK PIN 9 - 2A RED/BLACK PIN 10 - 37 BLUE/BLACK PIN 11 - 07 RED PIN 12 - 05 BLUE BLACK (TIED BACK) BLACK/WHITE (TIED BACK) Y FEMALE 32 31 30 24 GREEN BLACK WHITE (77) 23 RED GREEN (76) LEGEND: 22 WHITE RED (75) 21 20 BLACK RED (74) MAIN MANIFOLD HARNESS (10D) WHITE RED GREEN 29 28 (60) BLACK RED GREEN (85) ORANGE BLACK WHITE 27 26 19 18 ORANGE GREEN (73) WHITE BLACK RED (72) ENGINE HARNESS (78) RED BLACK WHITE 25 17 BLUE RED (71) GREEN (49) BACK VIEW Z PLATFORM CONTROL BOX BASE CONTROLS (GROUND) BLUE BLACK WHITE TO (00) GROUND M147881AC Full-Size Rough Terrain Series Models 9241 & 9250 143905 SKYJACK, Page 41 9 5 6 2 3 31 05 49 32 15 05 8 1 10A 7 4 H 10 13A 2A 16 15 16 23 V 03 24 4 5 6 7 8 9 3 1 2 3 4 5 6 2 1 2 3 1 ENABLE 41 05 02 49 42 34B 41 32 31 CR 49 CR 34B CR 31A 49A 34A 31A 49A 34A R 05 R R 02 10A 05 05 13A 36B 04 2A 10A 02 10B 02 13D 02 14D 02 15 02 16 04 02 23 04 02 24 02 30 13D CR 14D CR 15 CR 16 CR 23 CR 24 CR 30 CR 10C 13B 14A 15A 16A 23A 24A 30A D15A-1 D16A-1 D23A D24A R R 04 R 04 R 10A CR1 D71 32 CR 02 43 41 32A 42 40 37 32A 10A 37 10C JUMP J17E 23A W 24A 30A D36 61 62 62 63 63 64 64 01 10A 10A 10A 10A 65 CN22 D75 65CR 43 02 31 2A 4 10A 9 D72 8 1000 uF D73 D74 D77 10 11 12 7 D76 FRONT RIGHT FRONT LEFT J17D 17BCR J17E 61CR G 10 11 12 05 D78 35C 78 73 77 74 71 75 72 76 9CR2 REAR RIGHT 04 17 86A 10A 09 44 01 02 02 36B 61 36 17B 02 78 73 77 74 71 75 72 76 D17B-1 CN21 CN20 9CR3 F D10 D17B-2 CN14 REAR LEFT 1 2 3 4 5 6 7 8 9 10 11 12 CONTROL MODULE - P2 PIN 10 - 35 BROWN/RED PIN 11 - 02 WHITE (2x) PIN 12 - 10A BLUE/WHITE 2A OUTRIGGER ELECTRIC PANEL 12 PIN CONNECTOR PLUG - CN14 PIN 1 - 04 RED/BLUE PIN 7 - 01 RED/BLUE PIN 8 - 02 WHITE PIN 2 - 17 BLUE/RED PIN 9 - 02 WHITE PIN 3 - 86A ORG/BLK/WHT PIN 10 - 36B YELLOW PIN 4 - 10A BLUE/WHITE PIN 11 - 61 BLACK PIN 5 - 09 ORANGE/RED PIN 12 - 36 BLACK/WHITE PIN 6 - 44 RED NOTE: ON SJ9241 ONLY, JUMPER WIRE IS BETWEEN 61 & 36 (PIN 11 & 12) 3.31 Electrical Panel Diagram - CE (All Option) D E C 00 B 02 A 04 17 86A 10A 09 44 01 02 02 36A 61 36 28E 28 20 18 D15A-2 D16A-2 D30 60 14A 1B 14B 1B 15A 16A 18A 18A 17A 44 02 28E 02 28 02 40 02 18 02 17A 02 17 02 20 28E CR2 28 CR2 18 CR 17A CR 17 CR 20 CR 13C 13C 10A 20A 28E CR1 28 CR1 15B D14E-2 D17A D10E 13B 02 28 1000 uF 14D 10A 02 28E 14C 10A 14C R 16B 01 R 17 10C 02 35 35 CR 21 10A 35B 19A 00 02 03 05 44 X D19 TWO SPEED MOTOR 20A - BLACK 02 - WHITE 00 00 02 02 02 02 09 09 13D 02 D13 D14 13 14 10D 10E 10A 14B D18A D14B-1 D14E-1 00 02 02 02 09 13D 10A 14D 10D 10E 14E 10A 14B 34B 07 17A 7A 25 33 7C 60 18A 15B D34 07 17A 7A 25 16B 19 35B NOTE: THE 1000uF CAPACITOR IS NOT REQUIRED ON MACHINES EQUIPPED WITH WET BRAKES. D20A 33 7C 60 18A 34 TO JOYSTICK BOX MAIN MANIFOLD HARNESS ENGINE HARNESS 26' LIFT CUTOUT 61 - BLACK 36 - BLK/WHT NOTE: LIMIT SWITCH NOT USED ON SJ9241 PLATFORM CONTROL BOX BASE CONTROL BOX LOAD SENSE CONTROL MODULE ENGINE HARNESS PIN 1 - 31A ORANGE PIN 2 - 34A WHITE/BLACK PIN 3 - 02 WHITE PIN 4 - 32A ORANGE/BLACK PIN 5 - N/U PIN 6 - N/U PIN 7 - 33 GREEN PIN 8 - 10A GREEN/BLACK PIN 9 - 2A RED/BLACK PIN 10 - 37 BLUE/BLACK PIN 11 - 07 RED PIN 12 - 05 BLUE BLACK (TIED BACK) BLACK/WHITE (TIED BACK) LOAD SENSE CONTROL MODULE 02 - WHITE 10C - BLUE/BLACK 10E - BLUE/WHITE 13D - ORANGE 14D - BLACK 15 - BLUE 16 - WHITE/BLACK 28 - GREEN/BLACK 28E - GREEN/WHITE 35B - RED/BLACK 49A - GREEN 60 - BLACK/WHITE RED (TIED BACK) RED/WHITE (TIED BACK) ORANGE/BLACK (TIED BACK) PLATFORM CONTROL BOX CABLE CONNECTOR BACK VIEW BACK VIEW FEMALE FEMALE (34) GREEN WHITE 16 (32) GREEN BLACK 15 (31) RED WHITE 14 (24) BLUE BLACK 13 (23) BLACK WHITE 12 8 WHITE BLACK (16) 32 7 6 BLUE (15) BLACK (14) 31 30 5 4 ORANGE (13) BLUE WHITE (10) (20) BLACK WHITE RED 11 (19) ORANGE BLACK 10 3 2 ORANGE RED (09) RED (7A) 1 WHITE (02) (18) RED BLACK 9 Y (GROUND) BLUE BLACK WHITE TO (00) GROUND (7C) RED BLACK GREEN (10D) WHITE RED GREEN 29 28 24 GREEN BLACK WHITE (77) 23 RED GREEN (76) 22 WHITE RED (75) 21 BLACK RED (74) 20 ORANGE GREEN (73) (60) BLACK RED GREEN (85) ORANGE BLACK WHITE 27 26 19 WHITE BLACK RED (72) 18 BLUE RED (71) (78) RED BLACK WHITE 25 17 GREEN (49)) Z BACK VIEW 1 2 3 4 5 6 LEGEND: MAIN MANIFOLD HARNESS 00 - WHITE (14 AWG) 02 - WHITE 03 - BLUE (14 AWG) 09 - ORANGE/RED 13A - ORANGE 14B - BLACK 15B - BLUE 16B - WHITE/BLACK 17A - BLUE/RED 18A - RED/BLACK 23A - BLACK/WHITE 24A - BLUE/BLACK 25 - ORANGE/GREEN 30A - BROWN 12 11 10 9 8 7 HIGH SPEED 10A - BLACK 35 - BLK/WHT TO ENGINE 20A M147867AC SKYJACK, Page 42 Full-Size Rough Terrain Series Models 9241 & 9250 143905 Full-Size Rough Terrain Series Models 9241 & 9250 143905 08 NO NC NC HELD OPEN 10 DR LFT 09 S3 KEY SWITCH OFF/LIFT/DRIVE (IN OFF POSITION) 12 S7-7 JOYSTICK ENABLE IN OUT IN OUT D26 D26A 02 12BCR 99 00 00 S8 HORN ON 15 23 24 S7-2 RIGHT S7-3 LEFT 18 02 19 20 16 S41 HIGH/LOW TORQUE 09 14 S7-4 REV 18B 20B OFF UP DN 13 S7-5 FWD S7-6 3RD SPEED S7 JOYSTICK CONTROLLER S7-1 2ND SPEED 12 S29 HIGH/LOW RANGE 09 S12 HYDRAULIC GENERATOR SWITCH 9A LEVEL ALL UP 35C 35D S23 S22 S21 S20 DN UP DN UP DN UP DN UP GREEN GREEN/BLACK RED/WHITE WHITE 79 70 70A 02 76 73 77 74 78 RED RED/BLACK BLUE BLUE/BLACK BLACK BLACK/WHITE 75 72 76 73 77 74 78 72 75 ORANGE ORANGE/BLACK 71 71 02 70A 70 79 35C WHITE/BLACK 35C FF 28 EE 09 35 44 09 35 D19 D10 34B 9CR2 35B 09 35C 9CR3 35C 10A HOURMETER 2A 10A TT TILT OVERRIDE/ HIGH DRIVE CUTOUT LIMIT SWITCH NORMALLY OPEN HELD CLOSED LS5 19 05 05 05 05 05 05 07 32 31CR 41 10A 10A HH D18A D86 33 S2 02 02 LEFT REAR 05 9CR1 10BCR1 KK LS63 RIGHT REAR 63 36B GG 1A LS62 RIGHT FRONT 75 71 76 DN DN 75 UP UP 71 S21A FRONT RIGHT 04 04 04 86A 85 72 16 73 78 DN DN 78 CUT J36 2A 86B 74 D78 100B D75 36A J17E 21 D74 10A 66A 68A D73 10A 65A LEFT FRONT LS65 1TD D71 CUT J17D 17B FL-22 00 CAP1 40 4H-15B 2H-25 32 GLOW PLUG RELAY THROTTLE RELAY 51 TIME DELAY #1 REVERSE RELAY RIGHT RIGHT 84 85 OUTRIGGER DRIVE ENABLE RELAY OUTRIGGER LIFT DISABLE RELAY OUTRIGGER CONTROL MODULE 97 98 110 65 = P2-8 AUTO LEVEL 118 119 120 70 = P2-5 70A = P2-7 02 = P2-11 D02-31 D02-30 4H-78 D02-29 4H-74 D02-28 4H-77 D02-27 4H-73 D02-26 4H-76 D02-25 4H-72 D02-24 4H-75 4H-71 AUTO RETRACT 117 79 = P2-6 LEFT FRONT UP OUTRIGGER SOLENOID LEFT FRONT DOWN OUTRIGGER SOLENOID RIGHT FRONT UP OUTRIGGER SOLENOID RIGHT FRONT DOWN OUTRIGGER SOLENOID RIGHT REAR UP OUTRIGGER SOLENOID RIGHT REAR DOWN OUTRIGGER SOLENOID LEFT REAR UP OUTRIGGER SOLENOID LEFT REAR DOWN OUTRIGGER SOLENOID 123 124 125 126 127 128 129 GROUND 122 121 OUTRIGGER ENABLE 116 35C = P4-9 OUTRIGGER LIGHT POWER 115 10A = P2-12 LEFT FRONT DOWN RIGHT FRONT DOWN RIGHT REAR DOWN LEFT REAR DOWN 114 113 112 LIFT ENABLE 65A = P2-4 66A = P2-3 67A = P2-2 111 TILT OVERRIDE/ HIGH DRIVE CUTOUT 109 28 = P2-9 68A = P2-1 LEFT REAR DOWN 108 35 = P2-10 TILT RIGHT REAR DOWN 106 107 78 = P4-1 RIGHT FRONT DOWN LEFT FRONT DOWN LEFT REAR UP RIGHT REAR UP RIGHT FRONT UP 105 104 103 102 101 100 LEFT FRONT UP OUTRIGGER ENABLE RELAY 96 99 OUTRIGGER PROOF RELAY 95 94 93 OUTRIGGER LIFT ENABLE RELAY 91 OUTRIGGER HOLDING SOLENOID 92 90 89 88 87 LEFT RELAY FORWARD RELAY 83 86 3RD SPEED RELAY 82 81 SMALL PUMP DUMP VALVE SOLENOID RIGHT STEERING VALVE SOLENOID LEFT STEERING VALVE SOLENOID 79 80 FORWARD VALVE SOLENOID 78 BRAKE RELAY QUICK BRAKE VALVE (NOTE: FOR MACHINES WITH WET BRAKES ONLY) REVERSE VALVE SOLENOID 77 76 75 74 73 72 CAPACITOR (NOTE: REMOVED ON MACHINES WITH WET BRAKES) 70 71 SERIES/PARELLEL VALVE SOLENOID 2ND SPEED/LARGE PUMP RELAY 69 TILT OVERIDE RELAY SERIES/PARELLEL RELAY 68 LIFT VALVE SOLENOID LARGE PUMP DUMP VALVE SOLENOID SMALL PUMP RELAY HYDR. GENERATOR STOP RELAY HYDR. GENERATOR RELAY HYDR. GENERATOR SOLENOID 67 66 65 64 63 62 61 60 59 58 57 OIL COOLER FAN OIL COOLER RELAY 56 UP RELAY 55 54 53 DOWN RELAY START RELAY 50 52 BEEPER 49 48 ROTATING AMBER BEACON OPTION 47 ENGINE ON RELAY 45 46 BRAKE FEED VALVE SOLENOID 44 FREE-WHEELING VALVE SOLENOID BRAKE DUMP VALVE SOLENOID 43 TILT SW. RELAY 41 42 ALL FUNCTION FLASHING LIGHT MAIN LOWERING VALVE SOLENOID HOLDING VALVE SOLENOID HOLDING VALVE SOLENOID HOLDING VALVE SOLENOID HOLDING VALVE SOLENOID 40 39 38 37 36 35 34 20 A BREAKER HORN 31 33 AUXILIARY 12V BATTERY HORN RELAY 30 AUXILIARY HOLDING VALVE SOLENOID AUXILIARY HOLDING VALVE SOLENOID 28 29 AUXILIARY HOLDING VALVE SOLENOID AUXILIARY HOLDING VALVE SOLENOID 27 BASE CONTACTOR REAR DECK IN SOLENOID REAR DECK OUT SOLENOID FRONT DECK IN SOLENOID FRONT DECK OUT SOLENOID P.M.T. CONTACTOR 26 25 24 23 22 21 20 19 18 17 16 12V BATTERY P.M.T. UNIT MOTOR ALTERNATOR 15 ENGINE STARTER EL. MOTOR 14 TEMPERATURE SWITCH ENGINE STARTER CONTACTOR DIESEL VALVE SOLENOID ENGINE GLOW PLUGS 13 12 11 10 9 8 7 6 GLOW PLUG INDICATOR HIGH THROTTLE SOLENOID 5 4 GLOW PLUG TIMER GLOW PLUG RELAY 3 2 1 NEGATIVE - 77 = P4-2 76 = P4-3 75 = P4-4 74 = P4-5 73 = P4-6 72 = P4-7 71 = P4-8 OCM1 D02-23 2H-17B D02-22 2H-18A D02-21 D02-20 4H-24A D02-19 4H-23A 16B 4H-16B D02-18 II,JJ 1000 MFD D02-17 15B D02-16 3H-20A D02-15 D02-14 2H-14B 2H-17A D02-13 CB3 02 00 00 2H-86C 00 BP-29 D02-12 D02-11 2H-30A-2 D02-10 2H-30A-1 2H-30A 29 D17B-2 PP 67A D72 18A LS67 F D14B-3 RIGHT REAR 10A OUTRIGGERS SHOWN IN RETRACTED POSITION RIGHT FRONT LS66 LEFT REAR 10A LS68 D14B-2 FAN 29 RL-29 D30A FL-29 22 D02-9 2H-13A D02-8 2H-13A-1 D02-7 2H-13A-2 D02-6 2H-13A-3 D02-5 2H-134 H1 HORN D02-4 D02-3 2H-98-4 D02-2 2H-98-3 B1 M INV1 2H-98-1 34A FLASHER 40 17ACR 17A D17B-1 25 12V *104 D02-1 2H-98-2 ALL MOTION ALARM D13A D20A 30A 98 OUTRIGGER DOWN LIMIT SWITCHES NORMALLY CLOSED HELD OPEN D76 D36 65 17E D77 17DCR 17D D23A D34A B2 TPS1 ENGINE TEMPERATURE SWITCH 2B D02-39 57 2D37 EGP1 D02-38 HTS-34A 02 INVERTER OPTION 200 AMP 30CR 30 D30 04 20A 65CR 20CR 20 D14B-1 86C D16A-2 10A 04 13A 12V 97 85A 14B 90 32ACR D57 F4 FUSE 91A GPL1 32A GPT1 S51 AUX. EMERGENCY LOWERING 85 86BCR 37 32A G D28A 13CR D15A-2 D24A 02 103 31ACR 31A 02 09 13 28A D15A-1 74 NN 2A 86D 28CR 10A D16A-1 17CR 36 UP 77 BB 17 10A 10A D96 31A KUBOTA DIESEL ENGINE (*) KUBOTA SUPPLIED WIRE LED-2 POWER ON LIGHT 17A 10ACR2 61 UP 73 100 96 28 10A RST2 3 OHM D86C-1 10A 85A 100 MM S23A REAR LEFT 03 AUXILIARY EMERGENCY LOWERING SYSTEM 103 16A LS1 S31 GLOW PLUG SWITCH S1 MAIN POWER DISCONNECT 26' LIFT CUTOUT NORMALLY CLOSED 16CR 23A 15CR 1A 14A 07 32A 2B D86C-2 15A 14CR 77 15 24A 61CR 61 01 14 86B 23CR 24CR 23 86ACR S22A REAR RIGHT 24 72 03 20A BREAKER CB1 F2 FUSE POWER DECK OPTION 49A 04 04 76 61 04 LEFT FRONT S20A FRONT LEFT 62 LS61 26' DRIVE CUTOUT JUMPER END OF STROKE NORMALLY CLOSED LS4 36A D17A OUTRIGGERS SHOWN IN RETRACTED POSITION 35E 64 05 49CR D02-32 HYDRAULIC GENERATOR OPTION 10B OUTRIGGER UP LIMIT SWITCHES NORMALLY OPEN HELD CLOSED D44 LS64 S9B OUTRIGGER ENABLE 35C 10A 01 18A 18CR 28CR 17 44 10A CC 85A 15A BREAKER CB4 14 UP 01 18 41 42 13 03 10A 49 09 05 02 OPS1 OIL PRESSURE SWITCH S30 MAIN ENGINE SW OFF/ON/START 100 AMP 02 37 37 103A 37 2A 2A 10A 32A 32A 34A 34A 33 31A 31A 05 05 10ACR1 10A 2A DOWN 10E 35CR S10 34A 32A 34BCR 10A 19A 10A 35 10A 10A 02 32CR 34B ENABLE 31 10A 10A 10A 10A 10A 43 31A 07 07 G REAR LEFT 35D FRONT RIGHT 35D REAR RIGHT S24 OL1 OUTRIGGER LIGHT 02 35D FRONT LEFT 35D AUTO MODE 35D 35C 65 BLUE/WHITE 24 BLUE/BLACK 35C 23 BLACK/WHITE 35C 15 BLUE GREEN/WHITE 16 D34 28 7A F 35C 18 RED/BLACK 02 WHITE WHITE/BLACK 19 ORANGE/BLACK 09 20 ORANGE/RED 86 14 BLACK 85 13 ORANGE WHITE 34 GREEN/WHITE GREEN 32 GREEN/BLACK 09 31 RED/WHITE (BLACK) 10 CRD3 BLUE/WHITE CRD2 00 49 00 103B 7A BLACK/WHITE/RED 86 85 09 CRD1 BLUE/BLACK/WHITE GREEN RED S6 EMERGENCY STOP SWITCH 3.32 Electrical Schematic - ANSI/CSA & AS (All Option with Kubota Diesel Engine) C D E S9A OUTRIGGER ENABLE OUTRIGGER OPTION WITH AUTO LEVELLING 09 S5 UP/DOWN 34 S9 LIFT ENABLE 32 S15 ENGINE START 31 10 00 49 00 103B S14 LOW/HIGH THROTTLE 10 LED-3 POWER ON LIGHT 10 D02-37 D02-36 4H-27A D02-35 4H-26A S13 GLOW PLUG SWITCH 10 4H-26 D02-33 103B D02-34 4H-27 99CR LED-1 POWER ON LIGHT D27A 12A D27 JOYSTICK ENABLE RELAY 12B 12 27A 26A 27 26 M 7A BASE B 08 S11A S11 POWER DECK OPTION 103C S34A ENABLE S34 ENABLE 10 AMP 103B 00 7A CONTROL BOX A 103C F5 103C FUSE DCM1 P.M.T. UNIT MOTOR 08 S4 EMERGENCY STOP SWITCH H AB V W X Y Z M148225AD SKYJACK, Page 43 SKYJACK, Page 44 35D 35D FRONT RIGHT 35D REAR LEFT LEVEL ALL UP S23 S22 S21 S20 DN UP DN UP DN UP DN UP 35C 79 70 71 75 WHITE/BLACK GREEN GREEN/BLACK RED/WHITE WHITE ORANGE ORANGE/BLACK 35C 79 70 70A 02 71 75 73 77 74 78 BLUE BLUE/BLACK BLACK BLACK/WHITE 76 73 77 74 78 76 RED RED/BLACK 72 72 02 70A 35C BLUE/WHITE 35C 35 44 09 9CR2 35B 09 35C 9CR3 35C 10A 10A 10A CC 10A 10A 01 HH KK GG LS63 RIGHT REAR 63 LS62 RIGHT FRONT LS61 75 71 76 DN DN 71 UP UP LEFT FRONT S21A FRONT RIGHT 62 S20A FRONT LEFT 75 OUTRIGGERS SHOWN IN RETRACTED POSITION 35E 64 OUTRIGGER UP LIMIT SWITCHES NORMALLY OPEN HELD CLOSED LEFT REAR LS64 S9B OUTRIGGER ENABLE 35C 18CR 18A 10A 18 01 1B 1A 26' DRIVE CUTOUT JUMPER 76 61 61CR 61 01 24CR 72 77 DN UP 77 16CR 16 15A 20A 14A 16A D86C-1 BB NN 36 73 73 78 DN UP S23A REAR LEFT 78 J36 (SJ9241 ONLY) MM 61 LS1 26' LIFT CUTOUT N.C. (SJ9250 ONLY) 1A 74 74 2A 10A 17 86D 10ACR2 85A D86C-2 23A 20CR 15CR 15 24A 23CR 23 S22A REAR RIGHT 24 72 04 04 04 04 04 44 20 36B 14DCR 14D ANGLE TRANSDUCER AT1 28ECR1 28E D78 17E D34A D75 65CR J17E 18A D74 D73 D17B-1 36A 21 30CR 30 D30 LS68 LS66 66A 68A LS67 LS65 65A LEFT FRONT 10A 16A 15A D71 CUT J17D 17B D17B-2 PP 67A RIGHT REAR 10A OUTRIGGERS SHOWN IN RETRACTED POSITION RIGHT FRONT 10A D72 D14B-2 F FAN 40 LEFT REAR 10A 29 BP-29 04 25 22 02 D02-4 22 FL-22 2H-98-3 CB3 02 2H-30A D02-13 3H-20A D02-12 4H-15B 4H-16B THROTTLE RELAY P.M.T. CONTACTOR 35 HORN RELAY HORN 52 PRESSURE TRANSDUCER SERIES/PARELLEL VALVE SOLENOID BRAKE FEED VALVE SOLENOID RIGHT STEERING VALVE SOLENOID RIGHT RIGHT OUTRIGGER DRIVE ENABLE RELAY LIFT ENABLE OUTRIGGER ENABLE AUTO RETRACT AUTO LEVEL OUTRIGGER LIGHT GROUND 128 129 130 131 79 = P2-6 70 = P2-5 70A = P2-7 02 = P2-11 D02-31 D02-30 4H-78 D02-29 4H-74 D02-28 4H-77 D02-27 4H-73 D02-26 4H-76 D02-25 4H-72 D02-24 4H-75 LEFT FRONT UP OUTRIGGER SOLENOID LEFT FRONT DOWN OUTRIGGER SOLENOID RIGHT FRONT UP OUTRIGGER SOLENOID RIGHT FRONT DOWN OUTRIGGER SOLENOID RIGHT REAR UP OUTRIGGER SOLENOID RIGHT REAR DOWN OUTRIGGER SOLENOID LEFT REAR UP OUTRIGGER SOLENOID LEFT REAR DOWN OUTRIGGER SOLENOID 133 134 135 136 137 138 140 141 132 POWER 127 35C = P4-9 4H-71 LEFT FRONT DOWN 126 10A = P2-12 RIGHT FRONT DOWN RIGHT REAR DOWN 125 124 123 65A = P2-4 66A = P2-3 67A = P2-2 LEFT REAR DOWN TILT 121 65 = P2-8 122 TILT OVERRIDE/ HIGH DRIVE CUTOUT 120 N/U = P2-9 68A = P2-1 LEFT REAR DOWN 119 RIGHT REAR DOWN RIGHT FRONT DOWN LEFT FRONT DOWN LEFT REAR UP RIGHT REAR UP RIGHT FRONT UP LEFT FRONT UP OUTRIGGER CONTROL MODULE 35 = P2-10 117 116 115 114 113 112 111 110 OUTRIGGER LIFT DISABLE RELAY OUTRIGGER ENABLE RELAY 108 109 OUTRIGGER PROOF RELAY 107 106 105 OUTRIGGER LIFT ENABLE RELAY 104 OUTRIGGER HOLDING SOLENOID 103 102 101 100 99 LEFT RELAY REVERSE RELAY 97 98 FORWARD RELAY 96 3RD SPEED RELAY SMALL PUMP DUMP VALVE SOLENOID 95 94 93 92 LEFT STEERING VALVE SOLENOID 90 91 89 BRAKE RELAY QUICK BRAKE VALVE (NOTE: FOR MACHINES WITH WET BRAKES ONLY) REVERSE VALVE SOLENOID TIME DELAY #1 CAPACITOR (NOTE: REMOVED ON MACHINES WITH WET BRAKES) FORWARD VALVE SOLENOID 88 87 86 85 84 83 FREE-WHEELING VALVE SOLENOID BRAKE DUMP VALVE SOLENOID 81 2ND SPEED/LARGE PUMP RELAY 82 80 79 78 77 SERIES/PARELLEL RELAY ELEVATION/HI SPD CUTOUT RELAY 75 76 LIFT VALVE SOLENOID LARGE PUMP DUMP VALVE SOLENOID SMALL PUMP RELAY HYDR. GENERATOR STOP RELAY HYDR. GENERATOR RELAY HYDR. GENERATOR SOLENOID 74 73 72 71 70 69 68 67 66 65 OIL COOLER FAN OIL COOLER RELAY 64 UP RELAY DOWN RELAY BEEPER FLASHING LIGHT ROTATING AMBER BEACON OPTION 63 62 61 60 59 58 57 CONTROL MODULE ANGLE TRANSDUCER 55 56 54 53 TILT RELAY 49 51 AUX. TILT RELAY 48 50 MAIN LOWERING VALVE SOLENOID DOWN ENABLE RELAY 45 AUX. DOWN ENABLE RELAY HOLDING VALVE SOLENOID 44 47 HOLDING VALVE SOLENOID 43 46 HOLDING VALVE SOLENOID (SJ9250 ONLY) BASE CONTACTOR HOLDING VALVE SOLENOID (SJ9250 ONLY) 42 ENGINE ON RELAY 41 20 A BREAKER AUXILIARY HOLDING VALVE SOLENOID 40 39 38 37 36 EMERGENCY EXT. DECK RETRACT CONTACTOR EMERGENCY EXT. DECK RETRACT RELAY 34 AUXILIARY HOLDING VALVE SOLENOID AUXILIARY HOLDING VALVE SOLENOID AUXILIARY HOLDING VALVE SOLENOID 33 AUXILIARY 12V BATTERY REAR DECK IN SOLENOID 32 31 30 29 28 FRONT DECK IN SOLENOID REAR DECK OUT SOLENOID 27 FRONT DECK OUT SOLENOID 26 25 24 23 22 12V BATTERY START RELAY 21 19 20 18 17 ALTERNATOR GLOW PLUG RELAY 16 ENGINE STARTER EL. MOTOR TEMPERATURE SWITCH ENGINE STARTER CONTACTOR DIESEL VALVE SOLENOID ENGINE GLOW PLUGS 15 14 13 12 11 10 9 8 7 GLOW PLUG INDICATOR HIGH THROTTLE SOLENOID 6 5 GLOW PLUG TIMER GLOW PLUG RELAY 4 118 II,JJ 1 2 3 78 = P4-1 77 = P4-2 76 = P4-3 75 = P4-4 74 = P4-5 73 = P4-6 72 = P4-7 71 = P4-8 OCM1 D02-23 2H-17B D02-22 2H-18A D02-21 4H-24A D02-20 D02-19 4H-23A 16B D02-18 2H-25 D02-17 15B D02-16 D02-15 2H-30A-2 CAP1 D02-11 2H-14B 2H-17A D02-10 2H-86C D02-9 D02-8 2H-13A D02-7 2H-13A-2 D02-6 2H-13A-3 D02-5 2H-13A-4 2H-13A-5 00 00 D02-14 2H-30A-1 1TD B2 00 D02-3 2H-98-4 H1 HORN RL-22 D20A D02-1 2H-98-2 D02-2 30A D14B-1 98 12V B1 M INV1 2H-98-1 34A 12V *104 04 65 D76 F4 FUSE 200 AMP 17ACR 17A TPS1 INVERTER OPTION OUTRIGGER DOWN LIMIT SWITCHES NORMALLY CLOSED HELD OPEN D77 17DCR 17D D36 10A D24A D16A-2 D16A-1 D23A D15A-2 17CR 17A 2A 86B 13A 97 86C 17 2B D02-40 57 2D37 EGP1 D02-39 HTS-34A 02 ENGINE TEMPERATURE SWITCH S51 AUX. EMERGENCY LOWERING 85A 14B 103 90 GPT1 32ACR D57 GPL1 91A AUXILIARY EMERGENCY LOWERING SYSTEM SJ9250 ONLY 85 10A 37 32A G 09 86BCR 13DCR 13D 13B D15A-1 14C 28CR1 28 28CR2 28 13C 103 31ACR 31A 02 32A NEGATIV - G REAR RIGHT S24 35C OL1 OUTRIGGER LIGHT 02 35D FRONT LEFT 35D AUTO MODE 35D S9A OUTRIGGER ENABLE 35C FF 10A 16 = P2-7 GREEN/WHITE 65 EE TILT OVERRIDE/ HIGH DRIVE CUTOUT LIMIT SWITCH NORMALLY CLOSED LS5 PRESSURE TRANSDUCER PT1 10A D96 28ECR2 28E 96 03 100 31A KUBOTA DIESEL ENGINE (*) KUBOTA SUPPLIED WIRE F 35C 24 35 36B 86B RST2 3 OHM 97 POWER DECK OPTION 97A S52 EMERGENCY DECK RETRACION CB1 103 S1 MAIN POWER DISCONNECT 2B 32A 07 S31 GLOW PLUG SWITCH 3.33 Electrical Schematic - CE (All Option with Kubota Diesel Engine) C D E OUTRIGGER OPTION WITH AUTO LEVELLING BLUE/BLACK 24 23 15 16 18 02 D19 44 17 10C 19A 86ACR END OF STROKE JUMPER 36A D17A 85 86A 35B = P2-10 S7-3 LEFT BLUE BLACK/WHITE WHITE/BLACK 16 23 RED/BLACK 18 15 WHITE 02 19 35B 35 10C 35CR D18A 33 D86 HYDRAULIC GENERATOR OPTION D02-32 9BCR 15 = P2-8 S7-2 RIGHT S7-4 REV S7-5 FWD 18B ORANGE/BLACK 19 20 85A 9B 100A 14D = P2-3 S7-6 3RD SPEED S7 JOYSTICK CONTROLLER S7-1 2ND SPEED BLACK/WHITE/RED 10A CB4 10E = P2-2 20 09 34B 03 15A BREAKER 28 = P3-4 S41 HIGH/LOW TORQUE 85 09 60 = P3-3 86 2A 10A 09 02 = P2-11 ORANGE/RED 86 D14E-1 49A 10C = P2-12 20B 09 GREEN WHITE 85 D14 D13 10C 05 49 05 10C 49CR 05 10A 02 = P3-5 ON 09 14 13 10A 10A 10B 10BCR1 28E = P3-6 OFF (BLACK) BLACK 14 09 ORANGE 60 BLACK/RED/GREEN 60 13 49 05 10B CAP2 100 97ACR-1 97ACR-2 D02-33 97 13D = P2-4 09 S12 HYDRAULIC GENERATOR SWITCH UP DN CRD3 GREEN CRD2 49 CRD1 00 97A 97A 103B 100 AMP 20A BREAKER 05 03 103A OPS1 OIL PRESSURE SWITCH F2 FUSE 02 29 = P3-2 S29 HIGH/LOW RANGE 9A S5 LIFT UP/DOWN 08 S8 HORN BLUE/BLACK/WHITE 97A 00 05 34BCR 42 60A = P4-2 12BCR 00 00 97A 00 103B D14E-2 32CR 34B 41 02 02 37 2A 32A 22 = P3-1 02 12A 12 60 LED-3 POWER ON LIGHT 00 D02-38 D02-37 4H-27A D02-36 4H-26A 103B D34 32 41 LED-2 POWER ON LIGHT-BASE 2A 37 900 = P4-7 ENABLE RELAY S9 LIFT ENABLE 60 4H-26 D02-34 D02-35 4H-27 99CR 103B 34 31CR 31 10A TT 10A 32A 34A 31A S30 MAIN ENGINE SW OFF/ON/START CM1 12B 12 D97A-2 D97A-1 D27A D26A D27 LED-1 POWER ON LIGHT 27A 26A 27 26 99 GREEN/WHITE 34 32 D10E 10ACR1 2A HOURMETER 33 34A 31A 05 07 910 = P4-6 12 JOYSTICK ENABLE 09 IN OUT IN OUT M GREEN/BLACK 32 31 UP 10A 10A 10A 34A 05 07 910A = P4-9 DR 12 S11A S11 D26 00 RED/WHITE 31 D10 10E 10E 43 07 902 = P4-8 NO S34A ENABLE S34 ENABLE 103B 10 S14 LOW/HIGH THROTTLE BLUE/WHITE 10 10E DN 14E 05 13D S2 UP/DOWN SELECTOR SWITCH 05 05 10D 7C S6 EMERGENCY STOP 28B = P4-3 10 F5 FUSE 10 AMP POWER DECK OPTION 103C 103C 103C 10 S15 ENGINE START DCM1 P.M.T. UNIT MOTOR 10 S13 GLOW PLUG SWITCH 10D WHITE/RED/GREEN 10D 10 7C RED/BLACK/GREEN 7C NO 10E NCHO 7A S10 IDLE/PLTF/BASE KEY SWITCH (IN IDLE POSITION) B NC LFT 09 10 7A RED BASE 7A CONTROL BOX A 10 NC HELD OPEN 08 S3 KEY SWITCH OFF/LIFT/DRIVE (IN OFF POSITION) 10D 08 S4 EMERGENCY STOP SWITCH H AB V W X Y Z M147856AD Full-Size Rough Terrain Series Models 9241 & 9250 143905 Full-Size Rough Terrain Series Models 9241 & 9250 143905 08 NO NC NC HELD OPEN DR LFT 09 10 12 S7-7 JOYSTICK ENABLE IN D26 D26A 02 12BCR 99 00 00 S8 HORN ON 19 02 ORANGE/BLACK WHITE 02 15 23 24 BLUE BLACK/WHITE BLUE/BLACK 15 23 24 S7-4 REV S7-2 RIGHT S7-3 LEFT S24 LEVEL ALL UP 35C 35D 35D REAR LEFT S23 S22 DN UP DN UP DN UP DN UP 78 74 77 73 76 72 75 71 72 76 73 77 74 78 RED RED/BLACK BLUE BLUE/BLACK BLACK BLACK/WHITE 02 WHITE 02 75 70A RED/WHITE 70A 71 70 GREEN/BLACK 70 ORANGE 79 GREEN 35C ORANGE/BLACK 35C WHITE/BLACK 35C 79 35C BLUE/WHITE 35 44 09 35 LS5 D19 34B 9CR2 35B 09 35C 9CR3 TILT OVERRIDE/ HIGH DRIVE CUTOUT LIMIT SWITCH NORMALLY OPEN HELD CLOSED 19 D10 35C 10A 02 10A 05 09 9CR1 32 01 10A 10A HH D18A D86 14 33 S2 02 02 KK GG 1A LS63 RIGHT REAR 63 LS62 RIGHT FRONT 62 16 75 71 71 76 72 72 77 73 73 DN 78 DN UP UP UP 74 74 D78 2A 86C 85 D76 D75 36A J17E D73 D17B-1 21 LS68 68A 66A 65A LEFT FRONT 10A LS65 RIGHT REAR 10A LS67 OUTRIGGERS SHOWN IN RETRACTED POSITION RIGHT FRONT 10A LS66 LEFT REAR 10A 29 1TD CAP1 40 D02-23 2H-17B D02-22 D02-21 2H-18A D02-20 4H-24A D02-19 4H-23A 16B 4H-16B D02-18 2H-25 D02-17 FRONT DECK IN SOLENOID AUXILIARY HOLDING VALVE SOLENOID 32 START RELAY THROTTLE RELAY 51 REVERSE RELAY RIGHT RIGHT 86 OUTRIGGER DRIVE ENABLE RELAY OUTRIGGER LIFT DISABLE RELAY OUTRIGGER CONTROL MODULE 98 99 TILT OVERRIDE/ HIGH DRIVE CUTOUT 108 109 110 35 = P2-10 28 = P2-9 65 = P2-8 AUTO LEVEL 118 119 120 70 = P2-5 70A = P2-7 02 = P2-11 D02-31 D02-30 4H-78 D02-29 4H-74 D02-28 4H-77 D02-27 4H-73 D02-26 4H-76 D02-25 4H-72 D02-24 4H-75 4H-71 AUTO RETRACT 117 79 = P2-6 LEFT FRONT UP OUTRIGGER SOLENOID LEFT FRONT DOWN OUTRIGGER SOLENOID RIGHT FRONT UP OUTRIGGER SOLENOID RIGHT FRONT DOWN OUTRIGGER SOLENOID RIGHT REAR UP OUTRIGGER SOLENOID RIGHT REAR DOWN OUTRIGGER SOLENOID LEFT REAR UP OUTRIGGER SOLENOID LEFT REAR DOWN OUTRIGGER SOLENOID 123 124 125 126 127 128 129 GROUND 122 121 OUTRIGGER ENABLE 116 35C = P4-9 OUTRIGGER LIGHT POWER 115 10A = P2-12 LEFT FRONT DOWN RIGHT FRONT DOWN RIGHT REAR DOWN LEFT REAR DOWN 114 113 112 LIFT ENABLE 65A = P2-4 66A = P2-3 67A = P2-2 111 LEFT REAR DOWN 107 78 = P4-1 68A = P2-1 RIGHT REAR DOWN 106 77 = P4-2 TILT RIGHT FRONT DOWN 105 76 = P4-3 LEFT FRONT DOWN LEFT REAR UP RIGHT REAR UP RIGHT FRONT UP 104 103 102 101 LEFT FRONT UP OUTRIGGER ENABLE RELAY 97 100 OUTRIGGER PROOF RELAY 96 95 94 OUTRIGGER LIFT ENABLE RELAY 93 OUTRIGGER HOLDING SOLENOID 92 91 90 89 88 LEFT RELAY FORWARD RELAY 85 87 3RD SPEED RELAY 83 84 82 SMALL PUMP DUMP VALVE SOLENOID RIGHT STEERING VALVE SOLENOID LEFT STEERING VALVE SOLENOID 80 81 FORWARD VALVE SOLENOID 79 BRAKE RELAY QUICK BRAKE VALVE (NOTE: FOR MACHINES WITH WET BRAKES ONLY) REVERSE VALVE SOLENOID TIME DELAY #1 CAPACITOR (NOTE: REMOVED ON MACHINES WITH WET BRAKES) 78 77 76 75 74 73 72 SERIES/PARELLEL VALVE SOLENOID 69 2ND SPEED/LARGE PUMP RELAY TILT OVERIDE RELAY SERIES/PARELLEL RELAY 68 71 LIFT VALVE SOLENOID 67 70 LARGE PUMP DUMP VALVE SOLENOID 66 65 64 SMALL PUMP RELAY HYDR. GENERATOR STOP RELAY 63 HYDR. GENERATOR RELAY 61 HYDR. GENERATOR SOLENOID OIL COOLER RELAY 62 60 59 58 57 56 OIL COOLER FAN UP RELAY 55 DOWN RELAY 53 54 52 BEEPER 49 50 48 ROTATING AMBER BEACON OPTION GLOW PLUG/ CHOKE RELAY 47 ENGINE ON RELAY 45 46 BRAKE FEED VALVE SOLENOID 44 FREE-WHEELING VALVE SOLENOID BRAKE DUMP VALVE SOLENOID 43 TILT SW. RELAY 41 42 ALL FUNCTION FLASHING LIGHT MAIN LOWERING VALVE SOLENOID HOLDING VALVE SOLENOID HOLDING VALVE SOLENOID HOLDING VALVE SOLENOID HOLDING VALVE SOLENOID 40 39 38 37 36 35 34 20 A BREAKER HORN 31 33 AUXILIARY 12V BATTERY HORN RELAY 30 AUXILIARY HOLDING VALVE SOLENOID 28 29 AUXILIARY HOLDING VALVE SOLENOID AUXILIARY HOLDING VALVE SOLENOID 27 BASE CONTACTOR REAR DECK IN SOLENOID REAR DECK OUT SOLENOID 26 25 24 23 22 21 P.M.T. CONTACTOR FRONT DECK OUT SOLENOID 20 12V BATTERY P.M.T. UNIT MOTOR 19 18 17 16 15 14 13 12 11 10 9 8 7 6 5 4 3 2 1 NEGATIV - 75 = P4-4 74 = P4-5 73 = P4-6 72 = P4-7 71 = P4-8 II,JJ 1000 MFD 15B 4H-15B D02-16 3H-20A D02-15 D71 OCM1 CUT J17D 17B 2H-17A D02-14 2H-14B CB3 02 00 00 2H-86C 00 D02-13 29 BP-29 D02-12 D02-11 2H-30A-2 D02-10 2H-30A-1 D17B-2 PP 67A D72 18A 40 17ACR D14B-3 F FAN FL-22 2H-30A 22 D02-9 2H-13A D02-8 2H-13A-1 D02-7 2H-13A-2 RL-29 D30A D02-5 D02-6 2H-13A-3 FLASHER FL-29 INV1 B1 TO ENGINE BLOCK 2H-134 H1 HORN D02-4 D02-3 2H-98-4 D02-2 2H-98-3 D02-1 2H-98-2 2H-98-1 34A D14B-2 ALL MOTION ALARM 17A D20A 25 98 D13A 30A B2 D74 30CR 30 D30 04 20A 65CR D36 65 D34A 200 AMP 100B OUTRIGGER DOWN LIMIT SWITCHES NORMALLY CLOSED HELD OPEN D77 17DCR 17D 10A 17E D23A 2A 86D D14B-1 20CR 20 D16A-2 04 D28A 86BCR 14B 12V 97 12V INVERTER OPTION F4 FUSE S51 AUX. EMERGENCY LOWERING 13A 10ACR2 D16A-1 D24A 02 13CR D15A-2 17A 86B 85A 09 10A 85A 13 28A 10A 28CR D15A-1 17CR 36 NN 78 CUT J36 LS1 61 MM DN DN BB 17 10A D86C-1 26' LIFT CUTOUT NORMALLY CLOSED 16CR 16A UP 77 1A 15A 14A D86C-2 23A 15CR 10A 10A D96 LED-2 POWER ON LIGHT 96 28 RST2 3 OHM HYDRAULIC GENERATOR OPTION S23A REAR LEFT 61CR 61 01 15 24A 86B 23CR 24CR 23 86ACR 14CR 100 S22A REAR RIGHT 24 86A 85 14 100 AUXILIARY EMERGENCY LOWERING SYSTEM 03 S1 MAIN POWER DISCONNECT 103 S21A FRONT RIGHT 76 04 04 04 04 03 POWER DECK OPTION 49A 04 05 CB1 100 AMP 20A BREAKER 103A F2 FUSE TO ENGINE STARTER GM EFI DUAL FUEL ENGINE S20A FRONT LEFT 75 61 04 LEFT FRONT LS61 26' DRIVE CUTOUT JUMPER OUTRIGGERS SHOWN IN RETRACTED POSITION 35E 64 36B 49CR END OF STROKE NORMALLY CLOSED LS4 36A D17A 10BCR1 10B OUTRIGGER UP LIMIT SWITCHES NORMALLY OPEN HELD CLOSED LEFT REAR LS64 S9B OUTRIGGER ENABLE 35C 10A CC 18A 10A 18 85A D44 01 18CR 28CR 17 44 10A 19A CB4 15A BREAKER 03 UP DOWN 10E 35CR S10 10A 35 10A 10A 10A 42 41 34BCR 32CR 34B ENABLE 31 10A 10A 10A 05 49 D02-32 37 37 10A 02 2A 10A 32A 33 10ACR1 2A 10A 32A 34A 31A 34A 10A 31CR 41 43 31A 05 07 G REAR RIGHT FRONT RIGHT 35D S21 S20 OL1 OUTRIGGER LIGHT 02 35D FRONT LEFT 35D AUTO MODE 35D S9A OUTRIGGER ENABLE 28 EE 09 05 HOURMETER 2A 10A TT 07 F 35C FF D34 28 05 05 05 05 05 7A 3.34 Electrical Schematic - ANSI/CSA & AS (All Options with GM Dual Fuel Engine) C D E GREEN/WHITE 35C 16 65 18 S7-5 FWD RED/BLACK 18 20 19 WHITE 20 86 GREEN BLACK/WHITE/RED 85 14 BLACK 09 13 ORANGE (BLACK) 34 GREEN/WHITE 09 86 85 09 32 GREEN/BLACK ORANGE/RED 09 14 31 RED/WHITE WHITE/BLACK 18B 20B S41 HIGH/LOW TORQUE OFF UP DN 13 10 CRD3 BLUE/WHITE CRD2 00 BLUE/BLACK/WHITE CRD1 49 GREEN 00 103B 16 S7-6 3RD SPEED S7 JOYSTICK CONTROLLER S7-1 2ND SPEED 12 S29 HIGH/LOW RANGE 09 S12 HYDRAULIC GENERATOR SWITCH 9A OUTRIGGER OPTION WITH AUTO LEVELLING 09 S5 UP/DOWN 34 S14 LOW/HIGH THROTTLE S9 LIFT ENABLE 32 31 10 00 49 00 103B S15 ENGINE START 10 LED-3 POWER ON LIGHT 10 D02-37 D02-36 4H-27A D02-35 4H-26A S13 GLOW PLUG/CHOKE 10 4H-26 D02-33 103B D02-34 4H-27 99CR LED-1 POWER ON LIGHT D27A 12A D27 JOYSTICK ENABLE RELAY 12B 12 27A 26A 27 26 M 7A S6 EMERGENCY STOP SWITCH B 08 S3 KEY SWITCH OFF/LIFT/DRIVE (IN OFF POSITION) IN OUT S11A OUT POWER DECK OPTION S34A ENABLE S11 00 RED BASE A 103C S34 ENABLE 103B 7A CONTROL BOX Refer to 3.29 103C 10 AMP F5 103C FUSE DCM1 P.M.T. UNIT MOTOR 08 S4 EMERGENCY STOP SWITCH H V W X Y Z M147858AB SKYJACK, Page 45 08 SKYJACK, Page 46 NO NC NC HELD OPEN DR LFT 09 10 12 S7-7 JOYSTICK ENABLE 12BCR WHITE 02 24 LEVEL ALL UP 35C 35D S23 S22 S21 S20 DN UP DN UP DN UP DN UP ORANGE 78 74 77 BLACK/WHITE BLACK BLUE/BLACK BLUE RED/BLACK 76 73 RED ORANGE/BLACK 72 75 71 WHITE RED/WHITE 70A 02 GREEN/BLACK GREEN 70 79 35C 78 74 77 73 76 72 75 71 02 70A 70 79 35C 35C 35C 65 24 23 FF D34 28 28 EE D10 35 44 09 35 LS5 D19 05 10B 10BCR1 10A 9CR2 35B 09 35C 9CR3 TILT OVERRIDE/ HIGH DRIVE CUTOUT LIMIT SWITCH NORMALLY OPEN HELD CLOSED 19 05 07 35C 10A 32 31CR 41 17 44 01 10A 10A S2 LEFT REAR KK GG 1A LS63 RIGHT REAR 63 LS62 RIGHT FRONT 75 71 76 DN DN 71 UP UP 14 05 49 04 04 04 04 03 23CR 61CR 61 01 72 72 77 DN UP 16 73 85A BB 17 10A 78 DN UP 78 74 74 NN CUT J36 36 61 MM LS1 D78 65CR D76 D36 65 D75 36A J17E 30CR 30 D30 04 20A 21 D74 D73 D17B-1 25 LS68 66A 68A LS67 LS65 65A LEFT FRONT 10A D02-5 D71 CUT J17D 00 ENGINE ON RELAY 39 UP RELAY LEFT RELAY OUTRIGGER DRIVE ENABLE RELAY 78 OUTRIGGER LIFT DISABLE RELAY OUTRIGGER CONTROL MODULE 84 94 95 28 = P2-9 65 = P2-8 103 104 105 70 = P2-5 70A = P2-7 02 = P2-11 D02-30 D02-29 4H-78 D02-28 4H-74 D02-27 4H-77 D02-26 4H-73 D02-25 4H-76 D02-24 4H-72 D02-23 4H-75 4H-71 AUTO RETRACT 102 79 = P2-6 LEFT FRONT UP OUTRIGGER SOLENOID LEFT FRONT DOWN OUTRIGGER SOLENOID RIGHT FRONT UP OUTRIGGER SOLENOID RIGHT FRONT DOWN OUTRIGGER SOLENOID RIGHT REAR UP OUTRIGGER SOLENOID RIGHT REAR DOWN OUTRIGGER SOLENOID LEFT REAR UP OUTRIGGER SOLENOID LEFT REAR DOWN OUTRIGGER SOLENOID 108 109 110 111 112 113 114 GROUND OUTRIGGER LIGHT 107 106 OUTRIGGER ENABLE 101 35C = P4-9 AUTO LEVEL POWER 100 10A = P2-12 LEFT FRONT DOWN RIGHT FRONT DOWN RIGHT REAR DOWN LEFT REAR DOWN 99 98 97 LIFT ENABLE TILT 65A = P2-4 66A = P2-3 67A = P2-2 96 LEFT REAR DOWN 93 35 = P2-10 68A = P2-1 RIGHT REAR DOWN 92 78 = P4-1 TILT OVERRIDE/ HIGH DRIVE CUTOUT RIGHT FRONT DOWN 91 LEFT FRONT DOWN LEFT REAR UP RIGHT REAR UP RIGHT FRONT UP 77 = P4-2 89 88 87 86 LEFT FRONT UP OUTRIGGER ENABLE RELAY 83 85 OUTRIGGER PROOF RELAY 81 82 80 79 OUTRIGGER LIFT ENABLE RELAY 77 76 75 74 OUTRIGGER HOLDING SOLENOID RIGHT RIGHT 71 72 73 FORWARD RELAY REVERSE RELAY 70 3RD SPEED RELAY 69 68 67 SMALL PUMP DUMP VALVE SOLENOID RIGHT STEERING VALVE SOLENOID LEFT STEERING VALVE SOLENOID 65 66 FORWARD VALVE SOLENOID 64 BRAKE RELAY QUICK BRAKE VALVE (NOTE: FOR MACHINES WITH WET BRAKES ONLY) REVERSE VALVE SOLENOID TIME DELAY #1 CAPACITOR (NOTE: REMOVED ON MACHINES WITH WET BRAKES) 63 62 61 60 59 58 57 SERIES/PARELLEL VALVE SOLENOID 2ND SPEED/LARGE PUMP RELAY 56 TILT OVERIDE RELAY SERIES/PARELLEL RELAY 53 54 55 LIFT VALVE SOLENOID LARGE PUMP DUMP VALVE SOLENOID SMALL PUMP RELAY OIL COOLER RELAY OIL COOLER FAN 52 51 50 49 48 47 46 45 DOWN RELAY THROTTLE RELAY 44 START RELAY 43 GLOW PLUG/ CHOKE RELAY 42 41 40 BEEPER 37 38 BRAKE FEED VALVE SOLENOID 36 FREE-WHEELING VALVE SOLENOID BRAKE DUMP VALVE SOLENOID 35 TILT SW. RELAY 33 34 ALL FUNCTION FLASHING LIGHT MAIN LOWERING VALVE SOLENOID HOLDING VALVE SOLENOID HOLDING VALVE SOLENOID HOLDING VALVE SOLENOID HOLDING VALVE SOLENOID 32 31 30 29 28 27 26 90 II,JJ 24 20 A BREAKER HORN 23 25 AUXILIARY 12V BATTERY HORN RELAY 22 AUXILIARY HOLDING VALVE SOLENOID AUXILIARY HOLDING VALVE SOLENOID 20 21 AUXILIARY HOLDING VALVE SOLENOID AUXILIARY HOLDING VALVE SOLENOID 12V BATTERY 19 18 17 16 15 14 13 12 11 10 9 8 7 6 5 4 3 2 1 NEGATIV - 76 = P4-3 75 = P4-4 74 = P4-5 73 = P4-6 72 = P4-7 71 = P4-8 OCM1 D02-22 2H-17B D02-21 2H-18A D02-20 D02-19 4H-24A D02-18 4H-23A 16B 4H-16B D02-17 2H-25 D02-16 15B 4H-15B 1000 MFD CAP1 40 3H-20A D02-14 D02-13 2H-14B CB3 02 00 2H-17A 00 BP-29 D02-15 29 D02-12 D02-11 2H-30A-2 D02-10 2H-30A-1 1TD 17B FL-22 2H-30A 22 D02-9 2H-13A D02-8 2H-13A-1 D02-7 2H-13A-2 D02-6 2H-13A-3 D17B-2 PP 40 67A D72 F FAN RIGHT REAR 10A OUTRIGGERS SHOWN IN RETRACTED POSITION RIGHT FRONT 10A LS66 LEFT REAR 10A D14B-2 D30A FL-29 B1 TO ENGINE BLOCK 2H-134 H1 HORN D02-4 D02-3 2H-98-4 D02-2 2H-98-3 FLASHER 18A 17ACR 17A 2H-98-1 12V D02-1 2H-98-2 ALL MOTION ALARM D13A D20A 30A B2 98 OUTRIGGER DOWN LIMIT SWITCHES NORMALLY CLOSED HELD OPEN D77 17DCR 17D 10A 17E D23A 2A 86D D14B-1 20CR 20 D16A-2 04 13A D28A 10ACR2 14B 10A D15A-2 D24A 02 13CR D15A-1 17A 13 28A 85A 28CR 10A D16A-1 17CR 26' LIFT CUTOUT NORMALLY CLOSED 16CR 16A S23A REAR LEFT 73 1A 15A 03 10A 10A 12V 97 S51 AUX. EMERGENCY LOWERING AUXILIARY EMERGENCY LOWERING SYSTEM LED-2 POWER ON LIGHT 96 28 03 RST2 3 OHM 15A BREAKER CB4 100 103 100 S1 MAIN POWER DISCONNECT D96 GM EFI DUAL FUEL ENGINE TO ENGINE STARTER 23A 15CR 77 15 24A 14A 49A 24CR 23 14CR 49CR S22A REAR RIGHT 24 D17A 04 76 61 04 LEFT FRONT S21A FRONT RIGHT 62 LS61 26' DRIVE CUTOUT JUMPER S20A FRONT LEFT 75 OUTRIGGERS SHOWN IN RETRACTED POSITION 35E 64 36B END OF STROKE NORMALLY CLOSED LS4 36A 02 42 D18A 02 41 CB1 20A BREAKER 05 37 02 2A 10A 32A 33 37 33 31A 34A 10ACR1 2A 10A HOURMETER 2A 10A TT 34A OUTRIGGER UP LIMIT SWITCHES NORMALLY OPEN HELD CLOSED HH 14 13 34BCR 34B D44 UP LS64 S9B OUTRIGGER ENABLE 35C 10A CC 18A 10A 18 01 18CR 28CR 35CR S10 10A 19A 10A 35 10A 10A 10A 02 32A 43 DOWN 10E 32CR ENABLE 31 10A 10A 10A 10A 10A 31A 05 07 G REAR LEFT 35D FRONT RIGHT 35D REAR RIGHT S24 OL1 OUTRIGGER LIGHT 02 35D FRONT LEFT 35D AUTO MODE 35D BLUE/WHITE WHITE/BLACK 35C GREEN/WHITE BLUE/BLACK 15 16 18 02 19 20 09 14 13 34 32 31 10 00 49 05 05 05 05 7A 3.35 Electrical Schematic - ANSI/CSA & AS (No Options with GM Dual Fuel Engine) C D E F S9A OUTRIGGER ENABLE 35C 23 S7-3 LEFT BLACK/WHITE BLUE 15 S7-4 REV S7-2 RIGHT RED/BLACK ORANGE/BLACK 19 18 CRD3 BLACK/WHITE/RED ORANGE/RED 09 20 BLACK 14 ORANGE GREEN/WHITE GREEN/BLACK RED/WHITE BLUE/WHITE CRD2 WHITE/BLACK 18B 20B S41 HIGH/LOW TORQUE UP 13 CRD1 BLUE/BLACK/WHITE 16 S7-5 FWD S7-6 3RD SPEED S7 JOYSTICK CONTROLLER S7-1 2ND SPEED 12 S29 HIGH/LOW RANGE 9A OUTRIGGER OPTION WITH AUTO LEVELLING 09 DN S5 UP/DOWN 34 S9 LIFT ENABLE S14 LOW/HIGH THROTTLE 31 32 10 10 S15 ENGINE START S13 GLOW PLUG/CHOKE 12A 02 JOYSTICK ENABLE RELAY 12B 12 00 LED-3 POWER ON LIGHT 10 00 GREEN 7A S6 EMERGENCY STOP SWITCH B 08 S3 KEY SWITCH OFF/LIFT/DRIVE (IN OFF POSITION) 00 49 RED BASE Refer to 3.29 10 S8 HORN 7A CONTROL BOX A LED-1 POWER ON LIGHT 08 S4 EMERGENCY STOP SWITCH H V W X Y Z M147857AB Full-Size Rough Terrain Series Models 9241 & 9250 143905 Full-Size Rough Terrain Series Models 9241 & 9250 143905 37 10A 10A CEL1 S33 1003 PROP 37 10A 32A 1003 50 11 B (PURPLE) A (PINK) F (LT BLUE/PINK) G (GREEN/YELLOW) H (TAN/BROWN) D (PINK/YELLOW) C (BLACK/RED) E (DK BLUE) J (PURPLE/YELLOW) F8 TO MAIN DISCONNECT (RED/TAN) FUSE 15A STARTER F12 FUSE 15A FUEL PUMP F11 (PINK/YELLOW) FUSE 5A VSW F7 6 FUSE 10A EPR F9 2002CR (PINK/DK GREEN) (WHITE) 2 3 PRV1 1 7 (RED/LT BLUE) FUSE 20A ECM (RED) 32ACR 56CR (RED) F13 32BCR (WHITE) FUSE 60A ALTERNATOR (RED) FUSE 15A IGNITION F10 B C A D 4 6 5 4 D S 2P-56 IG TO BATTERY GROUND G M OPS1 C GPS1 A B 3 RA1 2 1 3 MS1 1 2 TPS2 B A TPS1 B A C OXS2 A B B OXS1 C D D IGC1 A GI1-3 GI1-2 GI1-4 GI1-1 5V EXT 1 5V EXT 2 5V RTN FPP1 FPP2/IVS AUX PWM 1 AUX PWM 3 AUX PWM 3 RECIR 19 (LT GREEN/RED) 49 (LT GREEN/PURPLE) 50 (LT GREEN/BLACK) 9 (DK BLUE/ORANGE) 10 (PURPLE/YELLOW) 88 (DK BLUE) 86 (BLACK/RED) 85 (PINK/YELLOW) VSW 5V RTN 20 (BLACK/LT GREEN) 45 (PINK/TAN) CAN 1 - 15 (BLUE/WHITE) (STARTER) AUX PWM4 CAN 1 + 14 (BLUE/PINK) 89 (PINK/BLACK) CAN TERM + 13 (WHITE/ORANGE) MIL (FRP) AUX AND PUD 1 54 (WHITE/LT GREEN) 80 (GREEN/YELLOW) (FRT) AUX ANA PU 3 48 (LT GREEN/WHITE) AUX DIG 1 PC RX 56 (ORANGE) 42 (TAN/BROWN) PC TX 55 (DK GREEN) EGOH 4 TPS 1 5 (PURPLE/LT BLUE) 75 (WHITE/BLACK) 57 TPS 2 6 (LT BLUE/DK BLUE) OIL PRES DBW + 82 (PINK/WHITE) FPUMP DBW - 83 (TAN/ORANGE) 53 (LT BLUE) MAP 7 (LT GREEN) 84 (TAN/BLACK) 56 IAT 68 67 ALTERNATOR ENGINE STARTER EL. MOTOR 66 ENGINE STARTER SOLENOID 65 STARTER RELAY CHECK ENGINE LIGHT GAS/PROPANE SELECTOR SWITCH PROPANE LOCKOFF SOLENOID FUEL PUMP RELAY OIL PRESSURE SWITCH ENGINE START SWITCH FUEL PUMP MAIN ENGINE SWITCH PROPANE REGULATOR/VAPORIZER GASOLINE PRESSURE SENSOR THROTTLE ACTUATOR M.A.P. SENSOR LPG TEMPERATURE SENSOR ENGINE COOLANT TEMPERATURE SENSOR POWER RELAY OXYGEN SENSOR POST-CAT OXYGEN SENSOR PRE-CAT IGNITION COIL GAS INJECTOR CYLINDER #3 64 63 62 61 60 59 58 55 54 53 52 51 50 49 48 47 46 45 44 43 42 41 40 39 38 37 36 35 34 33 32 31 30 29 28 27 39 (YELLOW/GRAY) 26 25 24 EGT SPK COIL 1A 31 (YELLOW) 23 41 (WHITE/RED) SPK COIL 2A 33 (YELLOW/RED) GAS INJECTOR CYLINDER #2 22 GAS INJECTOR CYLINDER #4 21 ECT INJ 2 LS 62 (BROWN/LT GREEN) GAS INJECTOR CYLINDER #1 20 CRANKSHAFT POSITION SENSOR 19 18 VBAT INJ 1 LS 61 (BROWN/LT BLUE) 17 16 40 (TAN/WHITE) CRANK + 21 (PURPLE/WHITE) 15 60 (RED/TAN) CRANK - 22 (WHITE/PURPLE) VBAT GND TEMP 81 (BLACK) 13 14 RELAY GND TEMP 69 (BLACK) 79 (RED/TAN) PWM 5 77 (BROWN/WHITE) 11 12 71 (WHITE/LT BLUE) GOV 1 51 (GRAY/DK BLUE) EGOH 2 GOV 2 52 (GRAY/ORANGE) 9 10 EGO 2 PWM 5 RECIRC 78 (WHITE/BROWN) 8 73 (BLACK/YELLOW) TACH 58 (GRAY) 7 2 (DK GREEN/WHITE) AUX PWM 2 87 (TAN) EGOH 1 AUX ANA PU 2 47 (YELLOW/DK BLUE) 5 6 EGO 1 AUX ANA PU 1 46 (DK BLUE/YELLOW) 4 1 (DK GREEN/ORANGE) AUX DIG 2 43 (TAN/RED) 3 72 (BLACK/WHITE) AUX DIG 3 44 (TAN/BLACK) ECU F 2A 10A 32A 33 34A FP 3002 CONNECTOR 1 32A 07 START ON OFF K (DK BLUE/ORANGE) R (LT GREEN/BLACK) S (LT GREEN/PURPLE) M (LT GREEN/RED) L (BLACK/LT GREEN) N (BLUE/PINK) P (BLUE/WHITE) 7 (BLUE/PINK) 8 (BLUE/WHITE) 3 2 CPS1 1 SPEED - 26 (RED/BLACK) 1 2 3.36 Interface & Engine Electrical Schematic - GM Dual Fuel Engine C D E 10A 05 S30 DIAGNOSTIC 4 (ORANGE) 3 (DK GREEN) 2 (LT GREEN/RED) 1 (BLACK/LT GREEN) A (UNUSED) S (PINK/DK GREEN) E (BLACK) C (BROWN/WHITE) K (GRAY/DK BLUE) J (GRAY/ORANGE) SPEED + 25 (RED/WHITE) NEGATIV - B 05 07 2A 33 B (WHITE/BROWN) D (GRAY) F (TAN) G (YELLOW/DK BLUE) H (DK BLUE/YELLOW) (TWIST WIRES 10 TURNS (360 DEG)/FOOT FULL LENGTH) AUX ANA PD 1 8 (TAN/DK GREEN) ECU1 A 34A CONNECTOR 2 L (TAN/RED) M (TAN/BLACK) N (RED/WHITE) P (RED/BLACK) R (TAN/DK GREEN) GM EFI DUAL FUEL ENGINE G H V W X Y Z M148223AA_1 SKYJACK, Page 47 Section 4 Troubleshooting Information Table of Contents Introduction...................................................................................................................................................................5 Electrical System 4.1-1 4.1-2 4.1-3 4.1-4 4.1-5 4.1-6 4.1-7 4.1-8 4.1-9 4.1-10 4.1-11 4.1-12 4.1-13 4.1-14 4.1-15 4.1-16 4.1-17 4.1-18 4.1-19 4.1-20 4.1-21 4.1-22 4.1-23 4.1-24 4.1-25 4.1-26 4.1-27 4.1-28 4.1-29 4.1-30 4.1-31 4.1-32 4.1-33 4.1-34 4.1-35 4.1-36 4.1-37 4.1-38 4.1-39 4.1-40 4.1-41 All Controls Inoperative....................................................................................................................................6 No Power to Platform (ANSI/CSA)...................................................................................................................6 No Power to Platform (CE)..............................................................................................................................6 All Functions Inoperative from Platform .........................................................................................................7 Engine will Not Crank from Platform...............................................................................................................7 Engine will Not Crank from Platform Controls (Additional for GM Dual Fuel)................................................8 Engine will Not Crank from Base Controls (GM dual fuel)..............................................................................9 Engine will Not Crank from Base Controls (Kubota diesel)............................................................................9 Engine Cranks but Stops Cranking after a few seconds................................................................................9 Glow Plugs Inoperative from Engine Controls ...............................................................................................9 Glow Plugs Inoperative from Platform (Additional).......................................................................................10 Engine Cranks but will Not Start (Kubota diesel)..........................................................................................10 Engine Cranks but will Not Start (GM dual fuel)...........................................................................................10 Mid Throttle Inoperative (on demand) (GM Dual Fuel).................................................................................12 High Throttle Inoperative ..............................................................................................................................12 High Throttle Inoperative (additional for GM dual fuel).................................................................................13 Drive and Steer Inoperative ..........................................................................................................................13 Brakes will Not Release.................................................................................................................................14 Steer Right Inoperative..................................................................................................................................15 Steer Left Inoperative.....................................................................................................................................15 Reverse Drive Inoperative..............................................................................................................................16 Forward Drive Inoperative..............................................................................................................................16 First Drive Speed and Steering Inoperative..................................................................................................17 Second Drive Speed Inoperative...................................................................................................................17 Third Drive Speed Inoperative.......................................................................................................................18 High/Low Range Speed Inoperative.............................................................................................................19 Up Circuit Inoperative from Platform or Base................................................................................................19 Platform will Not Lift from Platform or Base Controls with Outriggers Extended.........................................20 Platform will Not Lift from Platform or Base Controls with Outriggers Retracted (lift operates correctly with outriggers extended)..........................................................................................22 Up Circuit Inoperative from Base (ANSI/CSA)..............................................................................................22 Up Circuit Inoperative from Base (CE)..........................................................................................................22 Down Circuit Inoperative from Platform or Base...........................................................................................23 Down Circuit Inoperative from Base (ANSI/CSA)..........................................................................................24 Down Circuit Inoperative from Base (CE).....................................................................................................24 Powered Extension Platform Inoperative......................................................................................................25 Powered Extension Platform will Not Extend................................................................................................25 Powered Extension Platform will Not Retract................................................................................................26 Hydraulic Generator Inoperative...................................................................................................................26 Hydraulic Generator will Not Shut Off from Generator Switch......................................................................27 All Outriggers Inoperative (Auto-level and manual)......................................................................................27 All Outriggers Inoperative (Auto-level and manual from platform controls).................................................28 Full Size RT’s Engine Powered SKYJACK, Page 1 4 Table of Contents (Continued) 4.1-43 4.1-44 4.1-45 4.1-46 4.1-47 4.1-48 4.1-49 4.1-50 4.1-51 All Outriggers Inoperative (Auto-level) A: Led Power Indicator Light at Outrigger Control Module (OCM1) Not on Constant.................................28 All Outriggers Inoperative (Auto Level) B: Led Power Indicator Light at Outrigger Control Module (OCM1) Flashing..............................................29 Left Front Outrigger Inoperative Manually.....................................................................................................30 Right Front Outrigger Inoperative Manually..................................................................................................30 Right Rear Outriggers Inoperative Manually.................................................................................................30 Left Rear Outriggers Inoperative Manually....................................................................................................31 Individual Outrigger Functions Inoperative (auto-level) ...............................................................................31 Auto-level Inoperative....................................................................................................................................31 Auto All Up Inoperative (Retract)...................................................................................................................32 Hydraulic System 4.2-1 4.2-2 4.2-3 4.2-4 4.2-5 4.2-6 4.2-7 4.2-8 4.2-9 4.2-10 4.2-11 4.2-12 4.2-13 4.2-14 4.2-15 4.2-16 4.2-17 4.2-18 4.2-19 4.2-20 4.2-21 All Functions Inoperative...............................................................................................................................33 Steering Inoperative.......................................................................................................................................33 Steer and First Drive Speed Inoperative.......................................................................................................33 Lift and Second Drive Speed Inoperative......................................................................................................33 Drive Inoperative............................................................................................................................................33 Reverse Drive Inoperative..............................................................................................................................34 Forward Drive Inoperative..............................................................................................................................34 Brakes will Not Release.................................................................................................................................34 Brakes will Not Release (Internal Brake).......................................................................................................34 Brake Slips (Internal Brake)...........................................................................................................................34 Brake Drags or Runs Hot (Internal Brake).....................................................................................................35 Up Circuit Inoperative....................................................................................................................................35 Down Circuit Inoperative...............................................................................................................................35 Powered Extension Platform Inoperative......................................................................................................35 Hydraulic Generator Inoperative...................................................................................................................36 All Outriggers Inoperative..............................................................................................................................36 Left Front Outrigger Inoperative....................................................................................................................36 Right Front Outrigger Inoperative..................................................................................................................36 Right Rear Outrigger Inoperative...................................................................................................................36 Left Rear Outrigger Inoperative.....................................................................................................................36 Outriggers Drift In..........................................................................................................................................36 Load Sensing System 4.3-1 4.3-2 4.3-3 4.3-4 4.3-5 4.3-6 4.3-7 4.3-8 4.3-9 4.3-10 Flash Code F01: Flash Code F02: Flash Code F03: Flash Code F04: Flash Code F05: Flash Code F06: Flash Code F08: Flash Code F09: Flash Code F10: Flash Code F11: SKYJACK, Page 2 Check HWFS.....................................................................................................................37 Not Ground Mode.............................................................................................................37 Not Stopped......................................................................................................................37 Tilted..................................................................................................................................37 Bad Height........................................................................................................................37 Check Elev........................................................................................................................37 Check Elev........................................................................................................................37 Bad Height........................................................................................................................37 Bad Height........................................................................................................................37 Not Up...............................................................................................................................37 Full Size RT’s Engine Powered Table of Contents (Continued) 4.3-11 4.3-12 4.3-13 4.3-14 4.3-15 4.3-16 4.3-17 4.3-18 4.3-19 4.3-20 4.3-21 4.3-22 4.3-23 4.3-24 4.3-25 4.3-26 4.3-27 4.3-28 4.3-29 4.3-30 4.3-31 4.3-32 4.3-33 4.3-34 4.3-35 4.3-36 4.3-37 4.3-38 Flash Code F12: Flash Code F13: Flash Code F14: Flash Code F15: Flash Code F16: Flash Code F17: Flash Code F18: Flash Code F19: Flash Code F20: Flash Code F21: Flash Code F22: Flash Code F23: Flash Code F24: Flash Code F25: Flash Code F26: Flash Code F27: Flash Code F30: Flash Code F31: Flash Code F32: Flash Code F33: Flash Code F34: Flash Code F40: Flash Code F42: Flash Code F43: Flash Code F44: Flash Code F45: Flash Code F46: Flash Code F47: Full Size RT’s Engine Powered Too Many...........................................................................................................................38 Low Height Range............................................................................................................38 Bad Height........................................................................................................................38 Check Elev........................................................................................................................38 Low Elev.open...................................................................................................................38 High Elev.open..................................................................................................................38 Low Elev.close..................................................................................................................38 High Elev.close.................................................................................................................39 Height<>0%.....................................................................................................................39 Height<>0%.....................................................................................................................39 Height<>100%.................................................................................................................39 Height<>100%.................................................................................................................39 Too Many...........................................................................................................................39 Check Elev........................................................................................................................39 Check Elev........................................................................................................................39 Bad Height........................................................................................................................40 Bad Heights......................................................................................................................40 Reject Curve......................................................................................................................40 Reject Curve......................................................................................................................40 Reject Curve......................................................................................................................40 Reject Curve......................................................................................................................40 Reject Delta.......................................................................................................................40 Low Pressure....................................................................................................................41 High Pressure...................................................................................................................41 Low Pressure....................................................................................................................41 High Pressure...................................................................................................................41 Check Elev........................................................................................................................41 Check Elev........................................................................................................................41 SKYJACK, Page 3 Section 4 - Troubleshooting Information Service and Maintenance Introduction The following pages contain a table of Troubleshooting Information for locating and correcting most service trouble which can develop. Careful and accurate analysis of the systems listed in the table of Troubleshooting Information will localize the trouble more quickly than any other method. This manual cannot cover all possible troubles and deficiencies that may occur. If a specific trouble is not listed, isolate the major component in which the trouble occurs, isolate whether the problem is electrical or hydraulic, and then isolate and correct the specific problem. The content of this section is separated into “probable cause” and “remedy.” The information preceded by a number represents the “probable cause.” The following line, noted by a dash represents the “remedy” to the “probable cause” directly above it.See example below for clarification. 1. Probable Cause -- Remedy Full Size RT’s Engine Powered SKYJACK, Page 5 Service and Maintenance Section 4 - Troubleshooting Information Electrical System 4.1-1 All Controls Inoperative 1. Battery disconnected or discharged. -- Reconnect battery. Recharge if discharged. 2. Loose or dirty battery cables. -- Clean and tighten battery cables. 3. Open or defective main power disconnect switch S1. -- Close switch. Replace if defective. 4. Loose or broken wire #03 from main power disconnect switch S1 to circuit breaker CB1. -- Check continuity. Replace if defective. 5. Tripped or defective circuit breaker CB1. -- Reset breaker. Check for defective wiring. Replace breaker if defective. 6. Loose or broken wire #05 from breaker CB1 to relay 10BCR1. -- Check continuity. Replace if defective. 7. Loose or broken wire #05 from relay 31CR to base engine switch S30. -- Check continuity. Replace if defective. 8. Loose or broken wire #00 from battery B1 to base terminal block TB-1. -- Check continuity. Replace if defective. 9. Loose or broken wire #00 from base terminal block TB-1 to circuit breaker CB3. -- Check continuity. Replace if defective. 10. Tripped or defective circuit breaker CB3. -- Reset breaker. Check for defective wiring. Replace breaker if defective. 11. Loose or broken wire #02 from circuit breaker CB3 to base terminal block TB-1. -- Check continuity. Replace if defective. 4.1-2 No Power to Platform (ANSI/CSA) 1. Open or defective base engine switch S30. -- Check switch. Replace if defective. 2. Loose or broken wire #07 from base engine switch S30 to base terminal block TB-1. -- Check continuity. Replace if defective. 3. Loose or broken wire #07 from base terminal block TB-1 to emergency stop switch S6. -- Check continuity. Replace if defective. 4. Open or defective emergency stop switch S6. -- Check switch. Replace if defective. 5. Loose or broken wire #7A from emergency stop switch S6 to base terminal block TB-1. -- Check continuity. Replace if defective. 6. Loose or broken wire #7A from base terminal block TB-1 to emergency stop switch S4. -- Check continuity. Replace if defective. 7. Open or defective emergency stop switch S4. -- Check switch. Replace if defective. 4.1-3 No Power to Platform (CE) 1. Open or defective base engine switch S30. -- Check switch. Replace if defective. 2. Loose or broken wire #07 from engine start switch S30 to base terminal block TB-1. -- Check continuity. Replace if defective. 3. Loose or broken wire #07 from base terminal block TB-1 to emergency stop switch S6. -- Check continuity. Replace if defective. 4. Open or defective emergency stop switch S6. -- Check switch. Replace if defective. SKYJACK, Page 6 Full Size RT’s Engine Powered Section 4 - Troubleshooting Information Service and Maintenance Electrical System (Continued) 5. Loose or broken wire #7C from emergency stop switch S6 to platform/base switch S10. -- Check continuity. Replace if defective. 6. Open or defective platform/base switch S10. -- Select platform on switch. Check switch. Replace if defective. 7. Loose or broken wire #7A from platform/base switch S10 to platform emergency stop switch S4. -- Check continuity. Replace if defective. 8. Open or defective platform emergency stop switch S4. -- Check switch. Replace if defective. 4.1-4 All Functions Inoperative from Platform 1. Loose or broken wire #08 from emergency stop switch S4 to off/lift/drive key switch S3. -- Check continuity. Replace if defective. 2. Open or defective off/lift/drive key switch S3. -- Check switch. Replace if defective. 3. Loose or broken wire #10 from off/lift/drive key switch S3 to platform terminal block. -- Check continuity. Replace if defective. 4. Loose or broken wire #10 from platform terminal block to diode D10 located at relay 10BCR1. -- Check continuity. Replace if defective. 5. Open diode D10 or diode D10 is not connected at relay 10BCR1. -- Check diode. Replace if defective. All Functions Inoperative (Additional for machines with Load Sensing System) (CE) 1. Loose or broken wire #10C from base terminal strip to control module CM1 at pin #P2-12. -- Check for 12 Volts at P2-12. If no voltage present, check wire continuity. Replace if defective. 2. Loose or broken wire #28 from control module CM1 at pin #P3-4 to 28CR1 tilt relay and 28CR2 Down Enable Relay. -- Check for 12 Volts at P3-4. If voltage present, check for 12 Volts at wire #28A on outrigger connector plug CN-14 at pin #1. If voltage present, check for 12 Volts on wire #28A at 28ACR1 Relay and 28ACR2 Relay. If voltage present, check operation of relays. If no voltage present, check wire continuity. Replace if defective. 3. Loose or broken wire #28E from control module CM1 at pin #P3-6 to 28ECR1 auxiliary tilt relay and 28ECR2 auxiliary down enable relay. -- Check for 12 Volts at P3-6. If voltage present, check for 12 Volts at wire #28E at 28ECR1 and 28ECR2 relays. If voltage present, check operation of relays. If no voltage present, check wire continuity. Replace if defective. 4. Defective pressure transducer PT1 or angle transducer AT1 or related wiring. -- Refer to transducer troubleshooting charts. 4.1-5 Engine will Not Crank from Platform 1. Open or defective key switch S3. -- Check switch. Replace if defective. 2. Loose or broken wire #10 from key switch S3 to start switch S15. -- Check continuity. Replace if defective. 3. Defective start switch S15. -- Check switch. Replace if defective. 4. Loose or broken wire #32 from start switch S15 to relay 32CR. -- Check continuity. Replace if defective. 5. Defective relay 32CR. -- Check relay. Replace if defective. Full Size RT’s Engine Powered SKYJACK, Page 7 Service and Maintenance Section 4 - Troubleshooting Information Electrical System (Continued) 6. Loose or broken wire #41 from relay 32CR to relay 10ACR1. -- Check continuity. Replace if defective. 7. Loose or broken wire #02 from relay 10ACR1 to base terminal block. -- Check continuity. Replace if defective. 8. Loose or broken wire #05 from base terminal block to relay 32CR. -- Check continuity. Replace if defective. 9. Loose or broken wire #32A from relay 32CR to starter contactor 32ACR. -- Check continuity. Replace if defective. 10. Defective starter contactor 32ACR. -- Check contactor. Replace if defective. 11. Loose or broken wire #00 from starter contactor 32ACR to engine ground. -- Check continuity. Replace if defective. 12. Loose or broken wire #103 from main power disconnect switch S1 to starter contactor 32ACR. (Kubota Diesel) -- Check continuity. Replace if defective. 13. Loose or broken wire #103 from main power disconnect switch S1 to starter contactor 32BCR. (GM Dual Fuel) -- Check continuity. Replace if defective. 14. Loose or broken wire #104 from starter contactor 32ACR to starter motor. (Kubota Diesel) -- Check continuity. Replace if defective. 15. Defective starter motor. -- Check motor. Repair or replace if defective. 4.1-6 Engine will Not Crank from Platform Controls (Additional for GM Dual Fuel) 1. Loose or broken wire #10A from base terminal block TB1 to engine harness plug. -- Check continuity. Replace if defective. 2. Loose or broken wire #10A from engine harness plug to GM engine connector 1. -- Check continuity. Replace if defective. 3. Loose or broken pink wire from GM engine connector 1 to fuse F7. -- Check continuity. Replace if defective. 4. Defective fuse F7. -- Check fuse. Replace if defective 5. Loose or broken pink/tan wire from fuse F7 to ECU connector pin #45. -- Check continuity. Replace if defective 6. Loose or broken red wire from battery positive to ECU fuse F8. -- Check continuity. Replace if defective. 7. Defective fuse F8. -- Check fuse. Replace if defective. 8. Loose or broken red/tan wire from fuse F8 to ECU connector pin #60 and pin #79. -- Check continuity. Replace if defective. 9. Loose or broken black wire from engine ground to ECU connector pin #69 and #81. -- Check continuity. Replace if defective. 10. Loose or broken light blue/pink wire from GM engine connector 1 to relay 32ACR. -- Check continuity. Replace if defective. 11. Loose or broken pink/black wire from ECU connector pin #89 to relay 32ACR. -- Check continuity. Replace if defective. 12. Defective relay 32ACR. -- Check relay. Replace if defective. 13. Loose or broken red wire from battery positive to starter fuse F12. -- Check continuity. Replace if defective. SKYJACK, Page 8 Full Size RT’s Engine Powered Section 4 - Troubleshooting Information Service and Maintenance Electrical System (Continued) 14. Defective fuse F12. -- Check fuse. Replace if defective. 15. Loose or broken red/tan wire from fuse F12 to relay 32ACR. -- Check continuity. Replace if defective. 16. Loose or broken white wire from relay 32ACR to start solenoid 32BCR. -- Check continuity. Replace if defective. 17. Defective starter solenoid 32BCR. -- Check solenoid. Replace if defective. 18. Loose or broken battery cable from starter solenoid 32BCR to starter motor. -- Check continuity. Replace if defective. 19. Defective starter motor. -- Check motor. Repair or replace if defective. 4.1-7 Engine will Not Crank from Base Controls (GM dual fuel) 1. Loose or broken wire #10A from base terminal block TB1 to engine harness plug. -- Check continuity. Replace if defective. 2. Loose or broken wire #10A from engine harness plug to base start switch S30. -- Check continuity. Replace if defective. 3. Defective base start switch S30. -- Check switch. Replace if defective. 4. Loose or broken wire #32A from base start switch S30 to GM engine connector 1. -- Check continuity. Replace if defective. 4.1-8 Engine will Not Crank from Base Controls (Kubota diesel) 1. Loose or broken wire #05 from base terminal block to base engine switch S30. -- Check continuity. Replace if defective. 2. Loose or broken jumper wire #05 on base engine switch S30. -- Check continuity. Replace if defective. 3. Defective engine start switch S30. -- Check switch. Replace if defective. 4. Loose or broken wire #32A from engine start switch S30 to starter contactor 32ACR. -- Check continuity. Replace if defective. 4.1-9 Engine Cranks but Stops Cranking after a few seconds 1. Loose or broken jumper wire #41 on relay 32CR. -- Check continuity. Replace if defective. 2. Loose or broken wire #02 from relay 32CR to base terminal block TB-1. -- Check continuity. Replace if defective. 4.1-10 Glow Plugs Inoperative from Engine Controls 1. Loose or broken wire #07 from engine start switch S30 to glow plug switch S31. -- Check continuity. Replace if defective. 2. Defective glow plug switch S31. -- Check switch. Replace if defective. 3. Loose or broken wire #31A from glow plug switch S31 to glow plug relay 31ACR. -- Check continuity. Replace if defective. 4. Loose or broken wire #02 from glow plug relay 31ACR to base terminal block TB1. -- Check continuity. Replace if defective. 5. Loose or broken wire #103 from starter solenoid 32ACR to relay 31ACR. -- Check continuity. Replace if defective. Full Size RT’s Engine Powered SKYJACK, Page 9 Service and Maintenance Section 4 - Troubleshooting Information Electrical System (Continued) 6. Loose or broken wire #91A from relay 31ACR to engine glow plugs EGP1. -- Check continuity. Replace if defective. 7. Defective glow plug relay 31ACR. -- Check relay. Replace if defective. 8. Defective glow plugs. -- Check glow plugs. Replace if defective. 4.1-11 Glow Plugs Inoperative from Platform (Additional) 1. Loose or broken wire #10 from key selector switch S3 to glow plug switch S13. -- Check continuity. Replace if defective. 2. Defective glow plug switch S13. -- Check switch. Replace if defective. 3. Loose or broken wire #31 from glow plug switch S13 to glow plug relay 31CR. -- Check continuity. Replace if defective. 4. Loose or broken wire #02 from relay 31CR to base terminal block TB1. -- Check continuity. Replace if defective. 5. Loose or broken wire #05 from base terminal block TB1 to relay 31CR. -- Check continuity. Replace if defective. 6. Loose or broken wire #31A from relay 31CR to glow plug relay 31ACR. -- Check continuity. Replace if defective. 7. Defective relay 31CR. -- Check relay. Replace if defective. 4.1-12 Engine Cranks but will Not Start (Kubota diesel) 1. Loose or broken wire #37 from base terminal block to diesel valve solenoid 2D37. -- Check continuity. Replace if defective. 2. Loose or broken wire #57 from starter contactor 32ACR to diesel valve solenoid 2D37. -- Check continuity. Replace if defective. 3. Defective fuel valve solenoid 2D37. -- Check solenoid. Replace if defective. 4. Defective glow plug circuit. -- See glow plugs inoperative above. Repair if necessary. 4.1-13 Engine Cranks but will Not Start (GM dual fuel) NOTE For additional engine troubleshooting refer to diagnostic trouble codes for use with the check engine light. 1. Loose or broken red wire from battery positive to relay 2002CR. -- Check continuity. Replace if defective. 2. Loose or broken red/tan wire from ECU fuse F8 to relay 2002CR. -- Check continuity. Replace if defective. 3. Loose or broken white/ light blue wire from ECU connector pin #71 to relay 2002CR. -- Check continuity. Replace if defective. 4. Defective relay 2002CR. -- Check relay. Replace if defective. 5. Loose or broken pink/dark green wire from relay 2002CR to ignition fuse F10. -- Check continuity. Replace if defective SKYJACK, Page 10 Full Size RT’s Engine Powered Section 4 - Troubleshooting Information Service and Maintenance Electrical System (Continued) 6. Defective fuse F10. -- Check fuse. Replace if defective 7. Loose or broken pink/dark green wire from fuse F10 to ignition coil IGC1 pin #D. -- Check continuity. Replace if defective. 8. Loose or broken black wire from ignition coil IGC1 pin #C to engine ground. -- Check continuity. Replace if defective. 9. Defective ignition coil IGC1. -- Refer to section 5 of this manual for Ohm specifications. Replace if defective. 10. Loose or broken pink/dark green wire from fuse F10 to gas injectors GI-1, GI-2, GI-3 and GI-4. -- Check continuity. Replace if defective. 11. Loose or broken pink/white wire from ECU connector pin #82 to throttle actuator RA1. -- Check continuity. Replace if defective. 12. Loose or broken tan/orange wire from ECU connector pin #83 to throttle actuator RA1. -- Check continuity. Replace if defective. 13. Loose or broken light green/red wire from ECU connector pin #19 to throttle actuator RA1. -- Check continuity. Replace if defective. 14. Loose or broken black/light green wire from ECU connector pin #20 to throttle actuator RA1. -- Check continuity. Replace if defective. 15. Loose or broken light blue/dark blue wire from ECU connector pin #6 to throttle actuator RA1. -- Check continuity. Replace if defective. FUEL RELATED PROBLEMS (GASOLINE ONLY) 16. Loose or broken pink/tan wire from fuse F7 to fuel pump relay 56CR. -- Check continuity. Replace if defective. 17. Loose or broken red wire from battery positive to fuel pump relay 56CR. -- Check continuity. Replace if defective. 18. Loose or broken tan/black wire from ECU connector pin #42 to fuel pump relay 56CR. -- Check continuity. Replace if defective. 19. Defective fuel pump relay 56CR. -- Check relay. Replace if defective. 20. Loose or broken pink/yellow wire from fuel pump relay 56CR to fuse F11. -- Check continuity. Replace if defective. 21. Defective fuse F11. -- Check fuse. Replace if defective. 22. Loose or broken pink/yellow wire from fuse F11 to fuel pump FP. -- Check continuity. Replace if defective. 23. Loose or broken pink/yellow wire from fuse F11 to ECU connector pin #85. -- Check continuity. Replace if defective 24. Defective fuel pump FP. -- Check fuel pump by putting 12 volts and a ground to it. Replace if defective. 25. Loose or broken wire #3002 from fuel pump FP to GM engine connector 1. -- Check continuity. Replace if defective. 26. Loose or broken black/red wire from GM engine connector to ECU connector pin #86. -- Check continuity. Replace if defective. Full Size RT’s Engine Powered SKYJACK, Page 11 Service and Maintenance Section 4 - Troubleshooting Information Electrical System (Continued) (PROPANE ONLY) NOTE The fuel select switch is defaulted to gasoline. The engine will run on gasoline if propane is selected from the switch and either the switch is bad or a wire is loose or broken from the switch. This is providing there is nothing wrong on the gasoline side of the system. Disconnect fuel pump to test propane side. 27. Loose or broken wire #10A from engine harness plug to fuel select switch S33. -- Check continuity. Replace if defective. 28. Defective fuel select switch S33. -- Check switch. Replace if defective. 29. Loose or broken wire #50 from fuel select switch S33 to GM engine connector 1. -- Check continuity. Replace if defective. 30. Loose or broken tan/brown wire from GM engine connector 1 to ECU connector pin #42. -- Check continuity. Replace if defective. 31. Loose or broken pink/tan wire from fuse F7 to propane lock off 2P-56. -- Check continuity. Replace if defective. 32. Loose or broken white/black wire from ECU connector pin #75 to propane lock off 2P-56. -- Check continuity. Replace if defective. 33. Defective propane lock off 2P-56. -- Check lock off. Replace if defective. 34. Loose or broken pink/dark green wire from fuse F10 to fuse F9. -- Check continuity. Replace if defective. 35. Defective fuse F9. -- Check fuse. Replace if defective. 36. Loose or broken red/light blue wire from fuse F9 to propane regulator PRV1. -- Check continuity. Replace if defective. 37. Loose or broken black wire from engine ground to propane regulator PRV1. -- Check continuity. Replace if defective. 4.1-14 Mid Throttle Inoperative (on demand) (GM Dual Fuel) 1. Open diode D17A or D18A. -- Check diode. Replace if defective 2. Loose or broken wire #33 from base terminal block TB1 to engine harness plug. -- Check continuity. Replace if defective. 3. Loose or broken wire #33 from engine harness plug to GM engine connector 2. -- Check continuity. Replace if defective. 4. Loose or broken gray/dark blue wire from GM engine connector to ECU connector pin #51. -- Check continuity. Replace if defective. 5. Loose or broken purple/light blue wire from ECU connector pin #5 to throttle actuator RA1. -- Check continuity. Replace if defective. 4.1-15 High Throttle Inoperative 1. Loose or broken wire #10 from key switch S3 to high/low throttle switch S14. -- Check continuity. Replace if defective. 2. Defective high/low throttle switch S14. -- Check switch. Replace if defective. SKYJACK, Page 12 Full Size RT’s Engine Powered Section 4 - Troubleshooting Information Service and Maintenance Electrical System (Continued) 3. Loose or broken wire #34 from high/low throttle switch S14 to diode D34 at relay 34BCR. (ANSI/CSA only) -- Check continuity. Replace if defective. 4. Loose or broken wire #34 from high/low throttle switch S14 to diode D34 at base terminal block TB-1. (CE only) -- Check continuity. Replace if defective. 5. Open or loose diode D34. -- Check diode. Replace if defective. 6. Loose or broken wire #34B from base terminal block TB-1 to relay 34BCR. (CE only) -- Check continuity. Replace if defective. 7. Defective relay 34BCR. -- Check relay. Replace if defective. 8. Loose or broken wire #42 from relay 34BCR to relay 10ACR1. -- Check continuity. Replace if defective. 9. Defective relay 10ACR1. -- Check relay. Replace if defective. 10. Loose or broken wire #02 from relay 10ACR1 to base terminal block TB1. -- Check continuity. Replace if defective. 11. Loose or broken wire #05 from base terminal block TB1 to relay 32CR. -- Check continuity. Replace if defective. 12. Defective relay 32CR. -- Check relay. Replace if defective. 13. Loose or broken wire #43 from relay 32CR to relay 34BCR. -- Check continuity. Replace if defective. 14. Loose or broken wire #34A from relay 34BCR to engine harness plug. -- Check continuity. Replace if defective. 15. Loose or broken wire #34A from engine harness plug to high throttle solenoid HTS-34A. (Kubota Diesel) -- Check continuity. Replace if defective. 4.1-16 High Throttle Inoperative (additional for GM dual fuel) 1. Loose or broken wire #34A from engine harness plug to GM engine connector 2. -- Check continuity. Replace if defective. 2. Loose or broken gray/orange wire from GM engine connector 2 to ECU connector pin #52. -- Check continuity. Replace if defective. 3. Loose or broken light blue/dark blue wire from ECU connector pin #6 to throttle actuator RA1. -- Check continuity. Replace if defective. 4. Defective throttle actuator RA1. -- Check actuator. Replace if defective. 4.1-17 Drive and Steer Inoperative 1. Outriggers not fully retracted -- Fully retract outrigger cylinders 2. Key switch S3 in lift position. -- Turn switch to drive position. 3. Defective drive contacts in key switch S3. -- Check contacts. Replace if defective. 4. Loose or broken wire #12 from key switch S3 to joystick enable switch S7-7. -- Check continuity. Replace if defective. Full Size RT’s Engine Powered SKYJACK, Page 13 Service and Maintenance Section 4 - Troubleshooting Information Electrical System (Continued) 5. Defective joystick enable switch S7-7. -- Check switch. Replace if defective. 6. Loose or broken wire #12A from joystick enable relay 12BCR to speed, steer and direction switches S7-1 to S7-6. -- Check continuity. Replace if defective. 7. Loose or broken wire #12B from joystick enable switch S7-7 to joystick enable relay 12BCR. -- Check continuity. Replace if defective. 8. Defective joystick enable relay 12BCR. -- Check continuity. Replace if defective. 9. Loose or broken wire #02 from joystick enable relay 12BCR to controller harness. -- Check continuity. Replace if defective. 10. Loose or broken wire #10A from base terminal block to relay 28CR (ANSI/CSA) or relay 28ECR1 (CE). -- Check continuity. Replace if defective. 11. Defective relay 28CR (ANSI/CSA) or relay 28ECR1 (CE). -- Check relay. Replace if defective. 12. Loose or broken wire #1B from relay 28ECR1 to relay 28CR1. (CE only) -- Check continuity. Replace if defective. 13. Defective relay 28CR1. (CE only) -- Check relay. Replace if defective. 14. Loose or broken wire #1 from relay 28CR (ANSI/CSA) or 28CR1 (CE) to pin #7 on connector CN14 at the outrigger board. -- Check continuity. Replace if defective. 15. Left rear outrigger limit switch LS64 is out of adjustment or defective. -- Check continuity through switch. Adjust switch if out of adjustment. Replace if defective. 16. Right rear outrigger limit switch LS63 is out of adjustment or defective. -- Check continuity through switch. Adjust switch if out of adjustment. Replace if defective. 17. Right front outrigger limit switch LS62 is out of adjustment or defective. -- Check continuity through switch. Adjust switch if out of adjustment. Replace if defective. 18. Left front outrigger limit switch LS61 is out of adjustment or defective. -- Check continuity through switch. Adjust switch if out of adjustment. Replace if defective. 19. Defective drive enable relay 61CR. -- Check relay. Replace if defective. 20. Loose or broken wire #4 from pin #1 on connector CN14 at the outrigger board to relay 30CR. -- Check continuity. Replace if defective. 4.1-18 Brakes will Not Release 1. Loose or broken wire #30 from diodes D15A-2 and D16A-2 to relay 30CR. -- Check continuity. Replace if defective. 2. Defective relay 30CR. -- Check relay. Replace if defective. 3. Loose or broken wire #02 from relay 30CR to base terminal block TB-1. -- Check continuity. Replace if defective. 4. Loose or broken wire #4 from pin #1 on plug CN14 at outrigger board to relay 30CR. -- Check continuity. Replace if defective. 5. Loose or broken wire #30A from relay 30CR to brake dump valve 2H-30A-1 or brake feed valve 2H-30A-2. -- Check continuity. Replace if defective. 6. Defective valve coil brake dump 2H-30A-1 or brake feed 2H-30A-2. -- Check continuity through coil. Replace if defective. SKYJACK, Page 14 Full Size RT’s Engine Powered Section 4 - Troubleshooting Information Service and Maintenance Electrical System (Continued) 7. Loose or broken wire #02 from valve coil brake dump 2H-30A-1 or brake feed 2H-30A-2 to base terminal block TB-1. -- Check continuity. Replace if defective. 8. Loose or broken wire #30 from relay 30CR to diode D30 at base terminal block TB-1. (CE only) -- Check continuity. Replace if defective. 9. Open diode D30. -- Check diode. Replace if defective. 10. Loose or broken wire #25 from diode D30 to base terminal block TB-1. (Internal Brakes only) -- Check continuity. Replace if defective. 11. Loose or broken wire #25 from base terminal block TB-1 to quick brake valve coil 2H-25. (Internal Brakes only) -- Check continuity. Replace if defective. 12. Defective quick brake valve coil 2H-25. (Internal Brakes only) -- Check continuity through coil. Replace if defective. 13. Loose or broken wire #02 from quick brake valve 2H-25 to base terminal block TB-1. (Internal Brakes only) -- Check continuity. Replace if defective. 4.1-19 Steer Right Inoperative 1. Defective steer right switch S7-2 in joystick S7. -- Check switch. Replace if defective. 2. Loose or broken wire #23 from steer right switch S7-2 to platform terminal block. -- Check continuity. Replace if defective. 3. Loose or broken wire #23 from platform terminal block to relay 23CR. -- Check continuity. Replace if defective. 4. Defective relay 23CR. -- Check relay. Replace if defective. 5. Loose or broken wire #04 from base terminal block to relay 23CR. -- Check continuity. Replace if defective. 6. Loose or broken wire #23A from relay 23CR to base terminal block. -- Check continuity. Replace if defective. 7. Loose or broken wire #02 from relay 23CR to base terminal block. -- Check continuity. Replace if defective. 8. Loose or broken wire #23A from base terminal block to steer right valve coil 4H-23A. -- Check continuity. Replace if defective. 9. Defective steer right valve coil 4H-23A. -- Check coil. Replace if defective. 10. Loose or broken wire #02 from steer right valve coil 4H-23A to base terminal block. -- Check continuity. Replace if defective. 11. Open diode D23A. -- Check diode. Replace if defective. 4.1-20 Steer Left Inoperative 1. Defective steer left switch S7-3 in joystick S7. -- Check switch. Replace if defective. 2. Loose or broken wire #24 from steer left switch S7-3 to platform terminal block. -- Check continuity. Replace if defective. 3. Loose or broken wire #24 from platform terminal block to relay 24CR. -- Check continuity. Replace if defective. Full Size RT’s Engine Powered SKYJACK, Page 15 Service and Maintenance Section 4 - Troubleshooting Information Electrical System (Continued) 4. Defective relay 24CR. -- Check relay. Replace if defective. 5. Loose or broken wire #04 from base terminal block to relay 24CR. -- Check continuity. Replace if defective. 6. Loose or broken wire #24A from relay 24CR to base terminal block. -- Check continuity. Replace if defective. 7. Loose or broken wire #02 from relay 24CR to base terminal block. -- Check continuity. Replace if defective. 8. Loose or broken wire #24A from base terminal block to steer left valve coil 4H-24A. -- Check continuity. Replace if defective. 9. Defective steer left valve coil 4H-24A. -- Check coil. Replace if defective. 10. Loose or broken wire #02 from steer left valve coil 4H-24A to base terminal block. -- Check continuity. Replace if defective. 11. Open diode D24A. -- Check diode. Replace if defective. 4.1-21 Reverse Drive Inoperative 1. Defective drive reverse switch S7-4 in joystick S7. -- Check switch. Replace if defective. 2. Defective joystick S7. -- Check joystick. Replace if defective. 3. Loose or broken wire #15 from joystick S7 to platform terminal block. -- Check continuity. Replace if defective. 4. Loose or broken wire #15 from platform terminal block to relay 15CR. -- Check continuity. Replace if defective. 5. Defective relay 15CR. -- Check relay. Replace if defective. 6. Loose or broken wire #02 from relay 15CR to base terminal block. -- Check continuity. Replace if defective. 7. Loose or broken wire #04 from base terminal block to relay 15CR. -- Check continuity. Replace if defective. 8. Loose or broken wire #15A from relay 15CR to time delay relay 1TD. -- Check continuity. Replace if defective. 9. Defective time delay relay 1TD. -- Check relay. Replace if defective. 10. Loose or broken wire #15B from time delay relay 1TD to reverse valve coil 4H-15B. -- Check continuity. Replace if defective. 11. Defective reverse valve coil 4H-15B. -- Check coil. Replace if defective. 12. Loose or broken wire #02 from reverse valve coil 4H-15B to base terminal block. -- Check continuity. Replace if defective. 13. Open diode D15A-1 or D15A-2. -- Check diodes. Replace if defective. 4.1-22 Forward Drive Inoperative 1. Defective drive forward switch S7-5 in joystick S7. -- Check switch. Replace if defective. 2. Defective joystick S7. -- Check joystick. Replace if defective. SKYJACK, Page 16 Full Size RT’s Engine Powered Section 4 - Troubleshooting Information Service and Maintenance Electrical System (Continued) 3. Loose or broken wire #16 from joystick S7 to platform terminal block. -- Check continuity. Replace if defective. 4. Loose or broken wire #16 from platform terminal block to relay 16CR. -- Check continuity. Replace if defective. 5. Defective relay 16CR. -- Check relay. Replace if defective. 6. Loose or broken wire #02 from relay 16CR to base terminal block. -- Check continuity. Replace if defective. 7. Loose or broken wire #04 from base terminal block to relay 16CR. -- Check continuity. Replace if defective. 8. Loose or broken wire #16A from relay 16CR to time delay relay 1TD. -- Check continuity. Replace if defective. 9. Defective time delay relay 1TD. -- Check relay. Replace if defective. 10. Loose or broken wire #16B from time delay relay 1TD to forward valve coil 4H-16B. -- Check continuity. Replace if defective. 11. Defective forward valve coil 4H-16B. -- Check coil. Replace if defective. 12. Loose or broken wire #02 from forward valve coil 4H-16B to base terminal block. -- Check continuity. Replace if defective. 13. Open diode D16A-1 or D16A-2. -- Check diodes. Replace if defective. 4.1-23 First Drive Speed and Steering Inoperative 1. Loose or broken wire #21 from base terminal block to relay 17ACR. (ANSI/CSA only) -- Check continuity. Replace if defective. 1. Loose or broken wire #21 from diode D24A to relay 17ACR. (CE only) -- Check continuity. Replace if defective. 2. Defective relay 17ACR. -- Check relay. Replace if defective. 3. Loose or broken wire #18A from relay 17ACR to small pump dump valve solenoid 2H-18A. -- Check continuity. Replace if defective. 4. Defective small pump dump valve coil 2H-18A. -- Check coil. Replace if defective. 5. Loose or broken wire #02 from small pump dump solenoid 2H-18A to base terminal block. -- Check continuity. Replace if defective. 4.1-24 Second Drive Speed Inoperative 1. Defective second speed switch S7-1 in joystick S7. -- Check switch. Replace if defective. 2. Defective joystick S7. -- Check joystick. Replace if defective. 3. Loose or broken wire #19 from controller S7-1 to platform terminal block. -- Check continuity. Replace if defective. 4. Loose or broken wire #19 from platform terminal block to diode D19 at relay 35CR. -- Check continuity. Replace if defective. 5. Loose or Open diode D19. -- Tighten diode. Check diode. Replace if defective. 6. Loose or broken wire #10A from base terminal block to high drive/tilt override limit switch LS5. -- Check continuity. Replace if defective. Full Size RT’s Engine Powered SKYJACK, Page 17 Service and Maintenance Section 4 - Troubleshooting Information Electrical System (Continued) 7. Misadjusted or defective high drive/tilt override limit switch LS5. -- Adjust switch. Replace if defective. 8. Loose or broken wire #35 from high drive/tilt override limit switch LS5 to base terminal block. -- Check continuity. Replace if defective. 9. Loose or broken wire #35 from base terminal block to relay 35CR. -- Check continuity. Replace if defective. 10. Loose or broken wire #02 from relay 35CR to base terminal block. -- Check continuity. Replace if defective. 11. Defective relay 35CR. -- Check relay. Replace if defective. 12. Loose or broken wire #17 from relay 35CR to relay 17CR. -- Check continuity. Replace if defective. 13. Defective relay 17CR. -- Check relay. Replace if defective. 14. Loose or broken wire #02 from relay 17CR to base terminal block. -- Check continuity. Replace if defective. 15. Loose or broken wire #10A from base terminal block to relay 17CR. -- Check continuity. Replace if defective. 16. Loose or broken wire #17A from relay 17CR to base terminal block. -- Check continuity. Replace if defective. 17. Loose or broken wire #17A from relay 17CR to relay 17ACR. -- Check continuity. Replace if defective. 18. Defective relay 17ACR. -- Check relay. Replace if defective. 19. Loose or broken wire #02 from relay 17ACR to base terminal block. -- Check continuity. Replace if defective. 20. Loose or broken wire #17A from base terminal block to large pump dump valve solenoid 2H-17A. -- Check continuity. Replace if defective. 21. Loose or broken wire #02 from large pump dump valve solenoid 2H-17A to base terminal block. -- Check continuity. Replace if defective. 22. Defective large pump dump valve solenoid 2H-17A. -- Check solenoid. Replace if defective. 4.1-25 Third Drive Speed Inoperative 1. High/Low torque switch S41 in high torque position or defective. -- Turn high/low torque switch to low torque position. Replace if defective. 2. Defective third speed switch S7-6 in joystick S7. -- Check switch. Replace if defective. 3. Defective joystick S7. -- Check joystick. Replace if defective. 4. Loose or broken wire #18B from controller S7-6 to low/high torque switch S41. -- Check continuity. Replace if defective. 5. Loose or broken wire #18 from low/high torque switch S41 to platform terminal block. -- Check continuity. Replace if defective. 6. Loose or broken wire #18 from platform terminal block to relay 18CR. -- Check continuity. Replace if defective. 7. Defective relay 18CR. -- Check relay. Replace if defective. 8. Loose or broken wire #02 from relay 18CR to base terminal block. -- Check continuity. Replace if defective. SKYJACK, Page 18 Full Size RT’s Engine Powered Section 4 - Troubleshooting Information Service and Maintenance Electrical System (Continued) 9. Loose or broken wire #10A from base terminal block to relay 18CR. -- Check continuity. Replace if defective. 10. Loose or broken wire #18A from relay 18CR to small pump dump valve 2H-18A. -- Check continuity. Replace if defective. 11. Loose or broken wire #02 from small pump dump valve 2H-18A to base terminal block. -- Check continuity. Replace if defective. 12. Defective small pump dump valve solenoid 2H-18A. -- Check solenoid. Replace if defective. 4.1-26 High/Low Range Speed Inoperative 1. Loose or broken wire #12 from joystick enable switch S7-7 to high/low range switch S29. -- Check continuity. Replace if defective. 2. Defective high/low range switch S29. -- Check switch. Replace if defective. 3. Loose or broken wire #20B from high/low range switch S29 to high/low torque switch S41. -- Check continuity. Replace if defective. 4. Defective high/low torque switch S41. -- Check switch. Replace if defective. 5. Loose or broken wire #20 from high/low torque switch S41 to relay 20CR. -- Check continuity. Replace if defective. 6. Defective relay 20CR. -- Check relay. Replace if defective. 7. Loose or broken wire #02 from relay 20CR to base terminal block. -- Check continuity. Replace if defective. 8. Loose or broken wire #10A (ANSI/CSA) or wire #10C (CE) from base terminal block to relay 35CR. -- Check continuity. Replace if defective. 9. Defective relay 35CR. -- Check relay. Replace if defective. 10. Loose or broken wire #44 from relay 35CR to relay 20CR. -- Check continuity. Replace if defective. 11. Loose or broken wire #20A from relay 20CR to base terminal block TB-1. -- Check continuity. Replace if defective. 12. Loose or broken wire #20A from base terminal block to series parallel valve coil 3H-20A. -- Check continuity. Replace if defective. 13. Defective series/parallel valve coil 3H-20A. -- Check coil. Replace if defective. 14. Loose or broken wire #02 from series/parallel valve coil 3H-20A to base terminal block. -- Check continuity. Replace if defective. 4.1-27 Up Circuit Inoperative from Platform or Base 1. Lift/Off/Drive switch S3 in drive position or defective. -- Select lift position. Check switch. Replace if defective. 2. Loose or broken wire #09 from lift/off/drive switch S3 to lift enable switch S9. -- Check continuity. Replace if defective. 3. Defective lift enable switch S9. -- Check switch. Replace if defective. 4. Loose or broken wire #9A from enable switch S9 to up/down switch S5. -- Check continuity. Replace if defective. 5. Defective up/down switch S5. -- Check switch. Replace if defective. Full Size RT’s Engine Powered SKYJACK, Page 19 Service and Maintenance Section 4 - Troubleshooting Information Electrical System (Continued) 6. Loose or broken wire #14 from up/down switch S5 to relay 14CR. (ANSI/CSA) -- Check continuity. Replace if defective. 7. Loose or broken wire #14 from up/down switch S5 to diode D14 at base terminal block TB-1. (CE) -- Check continuity. Replace if defective. 8. Loose or Open diode D14. (CE) -- Tighten diode. Check diode. Replace if defective. 9. Loose or broken wire #14D from base terminal block to relay 14DCR (CE). -- Check continuity. Replace if defective. 10. Loose or broken wire #02 from relay 14CR (ANSI/CSA) or 14DCR (CE) to base terminal block. -- Check continuity. Replace if defective. 11. Defective relay 14CR (ANSI/CSA) or 14DCR (CE). -- Check relay. Replace if defective. 12. Loose or broken wire #36A from pin #10 on connector CN14 at the outrigger board to terminal block TB-1. -- Check continuity. Replace if defective. 13. Loose or broken wire #36A from terminal block TB-1 to end of stroke limit switch LS4. -- Check continuity. Replace if defective. 14. Defective end of stroke limit switch LS4. -- Check switch. Replace if defective. 15. Loose or broken wire #36B from end of stroke limit switch LS4 to relay 14CR. -- Check continuity. Replace if defective. 16. Defective relay 14CR. -- Check relay. Replace if defective. 17. Loose or broken wire #14A from relay 14CR to relay 28CR. -- Check continuity. Replace if defective. 18. Loose or broken wire #14B from relay 28CR to base terminal block. -- Check continuity. Replace if defective. 19. Loose or broken wire #14B from base terminal block to lift valve solenoid 2H-14B. -- Check continuity. Replace if defective. 20. Loose or broken wire #02 from lift valve solenoid 2H-14B to base terminal block. -- Check continuity. Replace if defective. 21. Defective lift valve solenoid 2H-14B. -- Check solenoid. Replace if defective. 13. Open diode D14B-1. -- Check diode. Replace if defective. 4.1-28 Platform will Not Lift from Platform or Base Controls with Outriggers Extended 1. Outriggers not extended enough. -- Extend outriggers to take weight off tires (refer to operator section). 2. Loose or broken wire #10A from terminal block TB-1 to pin #4 on connector CN14 at the outrigger board. -- Check continuity. Replace if defective. 3. Loose or broken wire #10A from outrigger board to outrigger limit switch LS68. -- Check continuity. Replace if defective. 4. Defective outrigger limit switch LS68. -- Check switch. Replace if defective. 5. Loose or broken wire #68A from outrigger limit switch LS68 to outrigger control module at pin P2-1. -- Check continuity. Replace if defective. 6. Loose or broken wire #10A from outrigger board to outrigger limit switch LS67. -- Check continuity. Replace if defective. SKYJACK, Page 20 Full Size RT’s Engine Powered Section 4 - Troubleshooting Information Service and Maintenance Electrical System (Continued) 7. Defective outrigger limit switch LS67. -- Check switch. Replace if defective. 8. Loose or broken wire #67A from outrigger limit switch LS67 to outrigger control module at pin P2-2. -- Check continuity. Replace if defective. 9. Loose or broken wire #10A from outrigger board to outrigger limit switch LS66. -- Check continuity. Replace if defective. 10. Defective outrigger limit switch LS66. -- Check switch. Replace if defective. 11. Loose or broken wire #66A from outrigger limit switch LS66 to outrigger control module at pin P2-3. -- Check continuity. Replace if defective. 12. Loose or broken wire #10A from outrigger board to outrigger limit switch LS65. -- Check continuity. Replace if defective. 13. Defective outrigger limit switch LS65. -- Check switch. Replace if defective. 14. Loose or broken wire #65A from outrigger limit switch LS65 to outrigger control module at pin P2-4. -- Check continuity. Replace if defective. 15. Check for power on wire #65 at outrigger control module at pin P2-8. -- If no voltage present, proceed to outrigger control module troubleshooting. 16. Loose or broken wire #65 from outrigger control module at pin P2-8 to outrigger board CN22 pin #16. -- Check continuity. Replace if defective. 17. Defective lift enable relay 65CR. -- Check relay. Replace if defective. 18. Defective lift disable relay 17DCR. -- Check relay. Replace if defective. 19. Loose or broken wire #36A from pin #10 on connector CN14 at the outrigger board to terminal block TB-1. -- Check continuity. Replace if defective. 20. Loose or broken wire #36A from terminal block TB-1 to end of stroke limit switch LS4. -- Check continuity. Replace if defective. 21. Defective end of stroke limit switch LS4. -- Check switch. Replace if defective. 22. Loose or broken wire #36B from end of stroke limit switch LS4 to relay 14CR. -- Check continuity. Replace if defective. 23. Defective relay 14CR. -- Check relay. Replace if defective. 24. Loose or broken wire #14A from relay 14CR to relay 28CR. -- Check continuity. Replace if defective. 25. Loose or broken wire #14B from relay 28CR to base terminal block. -- Check continuity. Replace if defective. 26. Loose or broken wire #14B from base terminal block to lift valve solenoid 2H-14B. -- Check continuity. Replace if defective. 27. Loose or broken wire #02 from lift valve solenoid 2H-14B to base terminal block. -- Check continuity. Replace if defective. 28. Defective lift valve solenoid 2H-14B. -- Check solenoid. Replace if defective. Full Size RT’s Engine Powered SKYJACK, Page 21 Service and Maintenance Section 4 - Troubleshooting Information Electrical System (Continued) 4.1-29 Platform will Not Lift from Platform or Base Controls with Outriggers Retracted (lift operates correctly with outriggers extended) 1. Outriggers not fully retracted. -- Fully retract outrigger cylinders. 2. Loose or broken wire #1 from relay 28CR (ANSI/CSA) or 28CR1 (CE) to pin #7 on connector CN14 at the outrigger board. -- Check continuity. Replace if defective. 3. Loose or broken wire #1 from outrigger board to outrigger limit switch LS64. -- Check continuity. Replace if defective. 4. Defective outrigger limit switch LS64. -- Check switch. Replace if defective. 5. Loose or broken wire #64 from outrigger limit switch LS64 to outrigger board. -- Check continuity. Replace if defective. 6. Loose or broken wire #64 from outrigger board to outrigger limit switch LS63. -- Check continuity. Replace if defective. 7. Defective outrigger limit switch LS63. -- Check continuity. Replace if defective. 8. Loose or broken wire #63 from outrigger limit switch LS63 to outrigger board. -- Check continuity. Replace if defective. 9. Loose or broken wire #63 from outrigger board to outrigger limit switch LS62. -- Check continuity. Replace if defective. 10. Defective Limit Switch LS62. -- Check switch. Replace if defective. 11. Loose or broken wire #62 from outrigger limit switch LS62 to outrigger board. -- Check continuity. Replace if defective. 12. Loose or broken wire #62 from outrigger board to outrigger limit switch LS61. -- Check continuity. Replace if defective. 13. Defective outrigger limit switch LS61. -- Check switch. Replace if defective. 14. Loose or broken wire #61 from outrigger limit switch LS61 to outrigger board . -- Check continuity. Replace if defective. 15. Open diode D36 on outrigger board. -- Check diode. Replace if defective. 4.1-30 Up Circuit Inoperative from Base (ANSI/CSA) 1. Loose or broken wire #10A from base terminal block to base enable switch S10. -- Check continuity. Replace if defective. 2. Defective base enable switch S10. -- Check switch. Replace if defective. 3. Loose or broken wire #10E from base enable switch S10 to base up/down switch S2. -- Check continuity. Replace if defective. 4. Defective base up/down switch S2. -- Check switch. Replace if defective. 5. Loose or broken wire #14 from base up/down switch S2 to base terminal block TB-1. -- Check continuity. Replace if defective. 4.1-31 Up Circuit Inoperative from Base (CE) 1. Loose or broken wire #7C from base emergency stop switch S6 to platform emergency stop switch S4. -- Check continuity. Replace if defective. SKYJACK, Page 22 Full Size RT’s Engine Powered Section 4 - Troubleshooting Information Service and Maintenance Electrical System (Continued) 2. Defective platform emergency stop switch S4. -- Check switch. Replace if defective. 3. Loose or broken wire #10D from platform emergency stop switch S4 to idle/platform/base key switch S10. -- Check continuity. Replace if defective. 4. Defective idle/platform/base key switch S10. -- Check switch. Replace if defective. 5. Loose or broken wire #10E from idle/platform/base key switch S10 to up/down switch S2. -- Check continuity. Replace if defective. 6. Loose or broken wire #14E from up/down switch S2 to base terminal block. -- Check continuity. Replace if defective. 7. Defective up/down switch S2. -- Check switch. Replace if defective. 8. Loose or Open diode D14E-1 or D10E. -- Tighten diode. Check diode. Replace if defective. 9. Loose or broken wire #10E from base terminal block to control module CM1 at pin #P2-2. -- Check continuity. Replace if defective. 4.1-32 Down Circuit Inoperative from Platform or Base 1. Lift/Off/Drive switch S3 in drive position or defective. -- Select lift position. Check switch. Replace if defective. 2. Loose or broken wire #09 from lift/off/drive switch S3 to lift enable switch S9. -- Check continuity. Replace if defective. 3. Defective lift enable switch S9. -- Check switch. Replace if defective. 4. Loose or broken wire #9A from enable switch S9 to up/down switch S5. -- Check continuity. Replace if defective. 5. Defective up/down switch S5. -- Check switch. Replace if defective. 6. Loose or broken wire #13 from up/down switch S5 to relay 13CR. (ANSI/CSA) -- Check continuity. Replace if defective. 7. Loose or broken wire #13 from up/down switch S5 to diode D13 at base terminal block TB-1. (CE) -- Check continuity. Replace if defective. 8. Loose or Open diode D13. (CE) -- Tighten diode. Check diode. Replace if defective. 9. Loose or broken wire #13D to relay 13DCR (CE). -- Check continuity. Replace if defective. 10. Loose or broken wire #02 from relay 13CR (ANSI/CSA) or 13DCR (CE) to base terminal block TB-1. -- Check continuity. Replace if defective. 11. Defective relay 13CR (ANSI/CSA) or 13DCR (CE). -- Check relay. Replace if defective. 12. Loose or broken wire #10A from base terminal block to relay 13CR. (ANSI/CSA only) -- Check continuity. Replace if defective. 13. Loose or broken wire #13A from relay 13CR (ANSI/CSA) or 13DCR (CE) to base terminal block. -- Check continuity. Replace if defective. 14. Loose or broken wire #13A from base terminal block to holding valve solenoid 2H-13A-1 or 2H-13A-2 or 2H-13A-3 or 2H-13A-4. -- Check continuity. Replace if defective. Full Size RT’s Engine Powered SKYJACK, Page 23 Service and Maintenance Section 4 - Troubleshooting Information Electrical System (Continued) 15. Loose or broken wire #02 from holding valve solenoid 2H-13A-1 or 2H-13A-2 or 2H-13A-3 or 2H-13A-4 to base terminal block TB-1. -- Check continuity. Replace if defective. 16. Defective holding valve solenoid 2H-13A-1 or 2H-13A-2 or 2H-13A-3 or 2H-13A-4. -- Check solenoid. Replace if defective. 17. Loose or broken wire #13A from base terminal block to lowering valve solenoid 2H-13A. -- Check continuity. Replace if defective. 18. Loose or broken wire #02 from lowering valve solenoid 2H-13A to base terminal block. -- Check continuity. Replace if defective. 19. Defective lowering valve solenoid 2H-13A. -- Check solenoid. Replace if defective. No Down Function (Additional for machines with Load Sensing System) (CE) 1. Loose or broken wire #02 from base terminal strip TB-1 to down enable relay 28CR2 or auxiliary down enable relay 28ECR2. -- Check continuity. Replace if defective. 2. Defective down enable relay 28CR2 or auxiliary down enable relay 28ECR2. -- Check relay. Replace if defective. 3. Loose or broken wire #28 from control module CM1 at pin #P3-4 to down enable relay 28CR2. -- Check continuity. Replace if defective. 4. Loose or broken wire #28E from control module CM1 at pin #P3-6 to auxiliary down enable relay 28ECR2. -- Check continuity. Replace if defective. 5. Loose or broken wire #10A from base terminal block to auxiliary down enable relay 28ECR2. -- Check continuity. Replace if defective. 6. Loose or broken wire #13C from auxiliary down enable relay 28ECR2 to down enable relay 28CR2. -- Check continuity. Replace if defective. 7. Loose or broken wire #13B from down enable relay 28CR2 to down relay 28DCR. -- Check continuity. Replace if defective. 4.1-33 Down Circuit Inoperative from Base (ANSI/CSA) 1. Loose or broken wire #10A from base terminal block to base enable switch S10. -- Check continuity. Replace if defective. 2. Defective base enable switch S10. -- Check switch. Replace if defective. 3. Loose or broken wire #10E from base enable switch S10 to base up/down switch S2. -- Check continuity. Replace if defective. 4. Defective base up/down switch S2. -- Check switch. Replace if defective. 5. Loose or broken wire #13 from base up/down switch S2 to base terminal block TB-1. -- Check continuity. Replace if defective. 4.1-34 Down Circuit Inoperative from Base (CE) 1. Loose or broken wire #7C from base emergency stop switch S6 to platform emergency stop switch S4. -- Check continuity. Replace if defective. 2. Defective platform emergency stop switch S4. -- Check switch. Replace if defective. SKYJACK, Page 24 Full Size RT’s Engine Powered Section 4 - Troubleshooting Information Service and Maintenance Electrical System (Continued) 3. Loose or broken wire #10D from platform emergency stop switch S4 to idle/platform/base key switch S10. -- Check continuity. Replace if defective. 4. Defective idle/platform/base key switch S10. -- Check switch. Replace if defective. 5. Loose or broken wire #10E from idle/platform/base key switch S10 to up/down switch S2. -- Check continuity. Replace if defective. 6. Loose or broken wire #13D from up/down switch S2 to base terminal block TB-1. -- Check continuity. Replace if defective. 7. Defective up/down switch S2. -- Check switch. Replace if defective. 4.1-35 Powered Extension Platform Inoperative 1. Loose or broken battery cable from main power disconnect switch S1 to fuse F2 (100 Amp). -- Check continuity. Replace if defective. 2. Open fuse F2. -- Check fuse. Replace if open. 3. Loose or broken battery cable #103A from fuse F2 to contactor 9CR1. -- Check continuity. Replace if defective. 4. Defective contactor 9CR1. -- Check contactor. Replace if defective. 5. Loose or broken battery cable #103B from contactor 9CR1 to motor contactor 99CR. -- Check continuity. Replace if defective. 6. Defective motor contactor 99CR. -- Check contactor. Replace if defective. 7. Loose or broken wire #103B from battery cable #103B to fuse F5. -- Check continuity. Replace if defective. 8. Defective fuse F5. -- Check fuse. Replace if defective. 9. Loose or broken wire #103C from fuse F5 to powered platform enable switch S34 or S34A. -- Check continuity. Replace if defective. 10. Loose or broken wire #103D from enable switch S34or S34A to platform extend retract switch S11 or S11A. -- Check continuity. Replace if defective. 11. Defective platform extend/retract switch S11 or S11A. -- Check switch. Replace if defective. 12. Defective platform enable switch S34 or S34A. -- Check switch. Replace if defective. 13. Loose or broken battery cable #00 from platform power unit DCM1 to battery B1. -- Check continuity. Replace if defective. 14. Defective platform power unit DCM1. -- Check power unit. Repair or replace if defective. 4.1-36 Powered Extension Platform will Not Extend 1. Defective platform extend/retract switch S11 or S11A. -- Check switch. Replace if defective. 2. Loose or broken wire #26 or #26A from platform extend/retract switch S11 or S11Ato platform extend valve coil 4H-26 or 4H-26A. -- Check continuity. Replace if defective. Full Size RT’s Engine Powered SKYJACK, Page 25 Service and Maintenance Section 4 - Troubleshooting Information Electrical System (Continued) 3. Open diode D26 or D26A. -- Check diode. Replace if defective. 4. Defective platform extend valve coil 4H-26 or 4H-26A. -- Check coil. Replace if defective. 5. Loose or broken wire #00 from platform extend valve coil 4H-26 or 4H-26A to battery cable #00. -- Check continuity. Replace if defective. 4.1-37 Powered Extension Platform will Not Retract 1. Defective platform extend/retract switch S11 or S11A. -- Check switch. Replace if defective. 2. Loose or broken wire #27 or #27A from platform extend/retract switch S11 or S11A to platform retract valve coil 4H-27 or 4H-27A. -- Check continuity. Replace if defective. 3. Open diode D27 or D27A. -- Check diode. Replace if defective. 4. Defective platform retract valve coil 4H-27 or 4H-27A. -- Check coil. Replace if defective. 5. Loose or broken wire #00 from platform retract valve coil 4H-27 or 4H-27A to battery cable #00. -- Check continuity. Replace if defective. 4.1-38 Hydraulic Generator Inoperative 1. Key switch S3 in drive position. -- Turn switch to lift position. 2. Loose or broken wire #9 from base terminal block TB-1 to generator relay 86BCR. -- Check continuity. Replace if defective. 3. Loose or broken wire #9 from generator relay 86BCR to generator switch S12. -- Check continuity. Replace if defective. 4. Defective generator switch S12. -- Check switch. Replace if defective. 5. Loose or broken wire #85 from generator switch S12 to generator relay 86ACR. -- Check continuity. Replace if defective. 6. Loose or broken wire #85 from generator relay 86ACR to generator relay 86BCR. -- Check continuity. Replace if defective. 7. Loose or broken wire #86B from generator relay 86ACR to generator relay 86BCR. -- Check continuity. Replace if defective. 8. Defective relay 86ACR. -- Check relay. Replace if defective. 9. Defective relay 86BCR. -- Check relay. Replace if defective. 10. Open diode D86C-1. -- Check diode. Replace if defective. 11. Loose or broken wire #17 from diodes D86B-1 to relay 17CR. -- Check continuity. Replace if defective. 12. Loose or broken wire #2A from relays 10ACR2 and 86BCR to relay 10ACR1. -- Check continuity. Replace if defective. 13. Loose or broken wire #85A from circuit breaker CB4 to relay 86BCR. -- Check continuity. Replace if defective. 14. Tripped or defective circuit breaker CB4. -- Reset circuit breaker. Replace if defective. SKYJACK, Page 26 Full Size RT’s Engine Powered Section 4 - Troubleshooting Information Service and Maintenance Electrical System (Continued) 15. Loose or broken wire #3 from circuit breaker CB4 to circuit breaker CB1. -- Check continuity. Replace if defective. 16. Loose or broken wire #86C from relay 86BCR to generator valve coil 2H-86C. -- Check continuity. Replace if defective. 17. Loose or broken wire #02 from base terminal block to generator valve coil 2H-86C. -- Check continuity. Replace if defective. 18. Defective generator valve coil 2H-86C. -- Check coil. Replace if defective. 4.1-39 Hydraulic Generator will Not Shut Off from Generator Switch 1. Defective generator switch S12. -- Check switch. Replace if defective. 2. Loose or broken wire #86 from generator switch S12 to diode D86. -- Check continuity. Replace if defective. 3. Open diode D86. -- Check diode. Replace if defective. 4. Defective relay 86ACR. -- Check relay. Replace if defective. 5. Loose or broken wire #02 from base terminal block to relay 86ACR. -- Check continuity. Replace if defective. 4.1-40 All Outriggers Inoperative (Auto-level and manual) WARNING Scissors lift must be below high speed limit switch for outriggers to function. NOTE For the outriggers to function the upper control console must be in the lift position. 1. No power on wire #44 at relay 35CR. -- If no power is present ensure there is power on wire #35 and relay 35CR operates correctly. 2. Loose or broken wire #44 from relay 35CR to pin #6 on connector CN14 on outrigger board. -- Check for continuity. Replace if defective. 3. No power at wire #9 at pin #5 on connector CN14 on outrigger board. -- If no power is present check for continuity on wire #9 back to base terminal block TB-1. Replace if defective. 4. Defective relay 9CR2 or 9CR3 on outrigger board. -- Check relays. Replace if defective. 5. Defective relay 17DCR on outrigger board. -- Check relay. Replace if defective. 6. Open or broken jumper J17E on outrigger board. -- Check jumper. Replace if defective. 7. Open diode D17B-1 on outrigger board. -- Check diode. Replace if defective. 8. Loose or broken wire #17 from pin #2 on connector CN14 on outrigger board to relay 35CR or relay 17CR. -- Check for continuity. Replace if defective. Full Size RT’s Engine Powered SKYJACK, Page 27 Service and Maintenance Section 4 - Troubleshooting Information Electrical System (Continued) 9. Loose or broken wire #17B from pin #1 or wire #02 from pin #2 on connector CN21 on outrigger board to outrigger holding valve coil 2H-17B. -- Check for continuity. Replace if defective. 10. Defective outrigger holding valve coil 2H-17B. -- Check coil. Replace if defective. 4.1-41 All Outriggers Inoperative (Auto-level and manual from platform controls) 1. Loose or broken wire #35C from pin #1 on connector CN20 on outrigger board through outrigger cables and plugs to the outrigger enable switch S9A in the control console. -- Check for continuity. Replace if defective. 2. Loose or broken wire #35D from outrigger enable switch S9A to pin #5 on the outrigger control console plug. -- Check for continuity. Replace if defective. 3. Defective outrigger enable switch S9A. -- Check switch. Replace if defective. 4.1-42 All Outriggers Inoperative (base controls) 1. Defective outrigger enable switch S9B. -- Check switch. Replace if defective. 4.1-43 All Outriggers Inoperative (Auto-level) A: Led Power Indicator Light at Outrigger Control Module (OCM1) Not on Constant 1. Loose or broken wire #10A from pin #1 of the tilt switch connector to pin P2-12 on the outrigger control module OCM1. -- Check for continuity. Replace if defective. 2. Loose or broken wire #10A from pin #1 of the tilt switch connector to main terminal block TB-1. -- Check for continuity. Replace if defective. 3. Loose or broken wire #02 from pin #3 of the tilt switch connector to pin P2-11 on the outrigger control module OCM1. -- Check for continuity. Replace if defective. 4. Loose or broken wire #02 from pin #3 of the tilt switch connector to main terminal block TB-1. -- Check for continuity. Replace if defective. 5. Defective outrigger control module OCM1. -- Replace. -- SKYJACK, Page 28 Full Size RT’s Engine Powered Section 4 - Troubleshooting Information Service and Maintenance Electrical System (Continued) 4.1-44 All Outriggers Inoperative (Auto Level) B: Led Power Indicator Light at Outrigger Control Module (OCM1) Flashing Flash Code 1/1 1/2 Probable Cause 1. 1. Level the machine. 1. 2. At least one outrigger is not fully retracted. Defective outrigger rod limit switch (LS61, LS62, LS63, LS64) or wiring. Defective diode (D36) on outrigger board. Outriggers are all down and the machine is not fully level. Power on wire #70 or #79 at power on. 1. Lower the scissor stack below high speed limit switch. Check for input voltage on wire #35 at pin P2-10 of the outrigger control module (OMC1). Replace if defective. Fully retract all outriggers. 2. Replace defective or damaged switch(es) or wiring. 3. Check for continuity. Replace if defective. 1. Move machine to less sloped terrain if it will not lift. 1. Power on wire #70 or #79 when manually operating outriggers. Low or no voltage on wire #35c. Loose or broken wire on #35c. 2. Excessive vibration. Defective outrigger control module. Outriggers are being manually controlled. Error occured while self diagnosing the hardware fail safe. 1. 2. 1. Check for power on wire #70 or #79 at pin P2-5 or P2-6 of the outrigger control module. Replace defective component. Check for power on wire #70 or #79 while manually operating an outrigger. Check battery and charging system to ensure minimum 9 volts. Check for input voltage on wire #35c at pin P4-9 of outrigger control module (OCM1). Outrigger control module cannot read tilt sensor. Replace. Indicates function activated. No repair necessary. Low input voltage to outrigger control module. Startup error occurred while self diagnosing. 1. 1. Internal failure of OCM1. 1. 1. Internal failure of OCM1. 1. 1. Internal failure of OCM1. 1. 1. Internal failure of OCM1. 1. 1. Internal failure of OCM1. 1. 1. Internal failure of OCM1. 1. 1. Internal failure of OCM1. 1. 1. Internal failure of OCM1. 1. 1. 2. 1. 2/2 2. 3. 2/1 1. 1. 5/5 5/2 7/1 6/6 7/8 5/1 7/7 7/5 7/2 8/1 8/2 8/3 8/4 8/5 7/6 Remedy Outriggers are all up and machine is tilted. Machine is elevated. Loose or broken wire # 35. 2. 1. 2. 1. 2. 1. 1. 1. 1. 1. 2. 1. 1. Turn off power to reset the outrigger control module. Turn power back on and see if the code has cleared. If problem persists, replace outrigger control module. Check for minimum 9 volts between wire #02 at pin P2-11 and wire #10A at pin P2-12 at outrigger control module. Turn off power to reset the outrigger control module. Turn power back on and see if the code has cleared. If problem persists, replace outrigger control module. Turn off power to reset the outrigger control module. Turn power back on and see if the code has cleared. If problem persists, replace outrigger control module. Turn off power to reset the outrigger control module. Turn power back on and see if the code has cleared. If problem persists, replace outrigger control module. Turn off power to reset the outrigger control module. Turn power back on and see if the code has cleared. If problem persists, replace outrigger control module. Turn off power to reset the outrigger control module. Turn power back on and see if the code has cleared. If problem persists, replace outrigger control module. Turn off power to reset the outrigger control module. Turn power back on and see if the code has cleared. If problem persists, replace outrigger control module. Turn off power to reset the outrigger control module. Turn power back on and see if the code has cleared. If problem persists, replace outrigger control module. Turn off power to reset the outrigger control module. Turn power back on and see if the code has cleared. If problem persists, replace outrigger control module. Turn off power to reset the outrigger control module. Turn power back on and see if the code has cleared. If problem persists, replace outrigger control module. 60416AA Full Size RT’s Engine Powered SKYJACK, Page 29 Service and Maintenance Section 4 - Troubleshooting Information Electrical System (Continued) 4.1-45 Left Front Outrigger Inoperative Manually 1. Defective left front outrigger switch S20 at platform, or S20A at base. -- Check switch. Replace if defective. 2. Loose or broken wire #71 from outrigger control console to pin #6 on connector CN20 at outrigger board (retract), or from wire #75 to pin #7 (extend). -- Check continuity. Replace if defective. 3. Open diode D71 (retract) or D75 (extend) on outrigger board. -- Check diode. Replace if defective. 4. Loose or broken wire #71 from pin #7 on connector CN21 at outrigger board to valve coil 4H-71 (retract) , or wire #75 from pin #8 to 4H-75 (extend). -- Check continuity. Replace if defective. 5. Loose or broken wire #02 from valve coil 4H-71 (retract) or 4H-75 (extend) to pin #2 on connector CN21 at the outrigger board. -- Check continuity. Replace if defective. 4.1-46 Right Front Outrigger Inoperative Manually 1. Defective right front outrigger switch S21 at platform, or S21A at base. -- Check switch. Replace if defective. 2. Loose or broken wire #72 from outrigger control console to pin #8 on connector CN20 at outrigger board (retract), or from wire #76 to pin #9 (extend). -- Check continuity. Replace if defective. 3. Open diode D72 (retract) or D76 (extend) on outrigger board. -- Check diode. Replace if defective. 4. Loose or broken wire #72 from pin #9 on connector CN21 at outrigger board to valve coil 4H-72 (retract), or wire #76 from pin #10 to 4H-76 (extend). -- Check continuity. Replace if defective. 5. Loose or broken wire #02 from valve coil 4H-72 (retract) or 4H-76 (extend) to pin #2 on connector CN21 at the outrigger board. -- Check continuity. Replace if defective. 4.1-47 Right Rear Outriggers Inoperative Manually 1. Defective right rear outrigger switch S22 at platform, or S22A at base. -- Check switch. Replace if defective. 2. Loose or broken wire #73 from outrigger control console to pin #3 on connector CN20 at outrigger board (retract), or from wire #77 to pin #4 (extend). -- Check continuity. Replace if defective. 3. Open diode D73 (retract) or D77 (extend) on outrigger board. -- Check diode. Replace if defective. 4. Loose or broken wire #73 from pin #4 on connector CN21 at outrigger board to valve coil 4H-73 (retract), or wire #77 from pin #4 to 4H-77 (extend). -- Check continuity. Replace if defective. 5. Loose or broken wire #02 from valve coil 4H-73 (retract) or 4H-77 (extend) to pin #2 on connector CN21 at the outrigger board. -- Check continuity. Replace if defective. SKYJACK, Page 30 Full Size RT’s Engine Powered Section 4 - Troubleshooting Information Service and Maintenance Electrical System (Continued) 4.1-48 Left Rear Outriggers Inoperative Manually 1. Defective left rear outrigger switch S23 at platform, or S23A at base. -- Check switch. Replace if defective. 2. Loose or broken wire #74 from outrigger control console to pin #5 on connector CN20 at outrigger board (retract), or from wire #78 to pin #2 (extend). -- Check continuity. Replace if defective. 3. Open diode D74 (retract) or D78 (extend) on outrigger board. -- Check diode. Replace if defective. 4. Loose or broken wire #74 from pin #6 on connector CN21 at outrigger board to valve coil 4H-74 (retract), or wire #78 from pin #3 to 4H-78 (extend). -- Check continuity. Replace if defective. 5. Loose or broken wire #02 from valve coil 4H-74 (retract) or 4H-78 (extend) to pin #2 on connector CN21 at the outrigger board. -- Check continuity. Replace if defective. 4.1-49 Individual Outrigger Functions Inoperative (Auto-level) 1. Loose or broken wire #71- #75 (depending on function not working) at pins 1-8 of outrigger control module plug P4. -- Check connections of outrigger functions not working (refer to Section 5 for pin reference chart). Replace if defective. 2. No output from outrigger control module OCM1 at pins 1-8 of outrigger control module plug P4. -- Turn off power to reset the outrigger control module. Turn power back on and retest. If problem persists, replace outrigger control module. 4.1-50 Auto-level Inoperative 1. Loose or broken wire #35D from outrigger enable switch S9A to auto mode outrigger switch S24. -- Check continuity. Replace if defective. 2. Defective auto mode outrigger switch S24. -- Check switch. Replace if defective. 3. Loose or broken wire #10A at pin #P2-12 on outrigger control module OCM1. -- Check for power at P2-12. If no voltage present, check continuity of wire. Replace if defective. 4. Loose or broken wire #35 at pin #P2-10 on outrigger control module OCM1. -- Check for power at P2-10. If no voltage present, check continuity of wire. Replace if defective. 5. Loose or broken wire #02 at pin #P2-11 on outrigger control module OCM1. -- Check for ground at P2-11. If no ground present, check continuity of wire. Replace if defective. 6. Loose or broken wire #70 from auto mode outrigger switch S24 to pin #P2-5 on outrigger control module OCM1. -- Check continuity. Replace if defective. Full Size RT’s Engine Powered SKYJACK, Page 31 Service and Maintenance Section 4 - Troubleshooting Information Electrical System (Continued) 4.1-51 Auto All Up Inoperative (Retract) 1. Loose or broken wire #35D from outrigger enable switch S9A to auto mode outrigger switch S24. -- Check continuity. Replace if defective. 2. Defective auto mode outrigger switch S24. -- Check switch. Replace if defective. 3. Loose or broken wire #10A at pin #P2-12 on outrigger control module OCM1. -- Check for power at P2-12. If no voltage present, check continuity of wire. Replace if defective. 4. Loose or broken wire #35 at pin #P2-12 on outrigger control module OCM1. -- Check for power at P2-10. If no voltage present, check continuity of wire. Replace if defective. 5. Loose or broken wire #02 at pin #P2-11 on outrigger control module OCM1. -- Check for ground at P2-11. If no ground present, check continuity of wire. Replace if defective. 6. Loose or broken wire #70 from auto mode outrigger switch S24 to pin #P2-5 on outrigger control module OCM1. -- Check continuity. Replace if defective. SKYJACK, Page 32 Full Size RT’s Engine Powered Section 4 - Troubleshooting Information Service and Maintenance Hydraulic System 4.2-1 All Functions Inoperative 1. Hydraulic oil level low. -- Refill tank to proper level. 2. Defective pump P1. -- Check pump. Repair or replace if defective. 3. Broken engine to pump coupler. -- Check coupler. Replace if defective. 4. Open relief valve R1. -- Check valve. Replace if defective. 4.2-2 Steering Inoperative 1. Stuck or defective brake feed valve 2H-30A-2. -- Check valve. Repair or replace if defective. 2. Stuck or defective steer right valve 4H-23A or steer left valve 4H-24A. -- Check valves. Replace if defective. 3. Steer cylinder C7 damaged or bypassing internally. -- Check cylinder. Repair or replace if defective. 4.2-3 Steer and First Drive Speed Inoperative 1. Small pump dump valve 2H-18A stuck open. -- Check valve. Repair or replace if defective. 2. Worn or defective small pump section of pump P1. -- Check pump. Repair or replace if defective. 3. Check valve CV1 or CV2 stuck. -- Check valves. Clean or replace if defective. 4.2-4 Lift and Second Drive Speed Inoperative 1. Large pump dump valve 2H-17A stuck open. -- Check valve. Repair or replace if defective. 2. Worn or defective large pump section of pump P1. -- Check pump. Repair or replace if defective. 3. Check valve CV1 or CV2 stuck. -- Check valves. Clean or replace if defective. 4.2-5 Drive Inoperative 1. Stuck or defective drive reverse valve 4H-15B or drive forward valve 4H-16B. -- Check valves. Repair or replace if defective. 2. Defective motion control valve MC1. -- Check valve. Repair or replace if defective. 3. Missing or defective check balls in series/parallel valve manifold 3H-20A. -- Repair or replace balls. Refer to Section 5 for proper location. 4. Stuck or defective main series/parallel valve spool V3 in drive motor. -- Check valve. Repair or replace if defective. 5. Defective drive motor M1. -- Check motor. Repair or replace if defective. 6. Free wheeling valve 2H-30A stuck. -- Check valve. Repair or replace if defective. 7. Cushion cylinder C8 bypassing internally. -- Check cylinder. Repair or replace if defective. Full Size RT’s Engine Powered SKYJACK, Page 33 Service and Maintenance Section 4 - Troubleshooting Information Hydraulic System (Continued) 4.2-6 Reverse Drive Inoperative 1. Stuck or defective drive valve 4H-15B. -- Check valve. Repair or replace if defective. 2. Stuck or defective check valve in motion control assembly MC1. -- Check valves. Clean or replace if defective. 4.2-7 Forward Drive Inoperative 1. Stuck or defective drive valve 4H-16B. -- Check valve. Repair or replace if defective. 2. Stuck or defective check valve in motion control assembly MC1. -- Check valves. Clean or replace if defective. 4.2-8 Brakes will Not Release 1. Stuck or defective brake feed valve 2H-30A-2. -- Check valve. Repair or replace if defective. 2. Stuck or defective brake dump valve 2H-30A-1. -- Check valve. Repair or replace if defective. 3. Stuck or defective brake valve 2H-25. (If equipped) -- Check valve. Repair or replace if defective. 4. Stuck or defective auto reset valve V6. (If equipped) -- Check valve. Repair or replace if defective. 5. Defective disc brake pack BP1. (Internal brake) -- Check brake pack. Repair or replace if defective. 6. Defective brake cylinder C5 or C6. (External brake cylinders) -- Check cylinder. Repair or replace if defective. 4.2-9 Brakes will Not Release (Internal Brake) 1. Bad o-rings internal to brake. (If release piston will not hold pressure, brake will not release.) -- Check for hydraulic oil in axle. Replace o-rings if defective. 2. Discs frozen. (These brakes are designed for only limited dynamic braking. A severe emergency stop or prolonged reduced release pressure operation may result in this type of damage.) -- Check for abnormal wear. Replace disc stack if defective. 4.2-10 Brake Slips (Internal Brake) 1. Excessive pressure in hydraulic system. (If there is back pressure in the actuation line of the brake, holding torque will be reduced) -- Check filters, hose size, restrictions in other hydraulic components. 2. Oil in brake if designed for dry use. (Wet linings generate 67% of the dry torque rating. If the brake has oil in it, check the type of oil hydraulic or gearbox. i. Gearbox oil ii. Hydraulic oil) -- Replace oil seal in brake. Check motor seal. Check piston seals. NOTE Internal components will need to be inspected, cleaned and replaced as required. 3. Disc plates worn. (The thickness of the disc stack sets the torque level. A thin stack reduces torque.) -- Check brake’s holding torque is sufficient. -- i) Make sure the machine is parked on level ground. -- ii) Locate the brake feed valve (2H30A-2) on the main manifold. Disconnect the electrical connectors from this valve. This will prevent the hydraulic system from releasing the brake. SKYJACK, Page 34 Full Size RT’s Engine Powered Section 4 - Troubleshooting Information Service and Maintenance Hydraulic System (Continued) -- iii) With the engine running, machine in drive mode, engine on high idle, high torque selected and low speed range selected, hold the enable switch on the joystick and push the joystick forward as if you were to drive forward. This provides torque from the drive motor to the unreleased brake. -- v) If the brake slips and the machine starts to move in this condition, either the brake plates are worn or the springs have broken. Both the springs and the brake plates must be replaced to return the brake to its original holding torque. 4.2-11 Brake Drags or Runs Hot (Internal Brake) 1. Low brake pressure. -- Place pressure gauge in brake line. Brakes use system pressure. (Minimum 335 psi required) 2. Bearing failure (If the bearing should fail, a large amount of drag can be generated) -- Replace bearing 4.2-12 Up Circuit Inoperative 1. Stuck or defective lift valve 2H-14B. -- Check valve. Repair or replace if defective. 2. Stuck check valve CV3. -- Check valve. Replace if defective. 3. Misadjusted or defective lift relief valve R2. -- Adjust valve. Replace if defective. 4. Stuck or defective lowering valve 2H-13A. -- Check valve. Repair or replace if defective. 5. Stuck or defective manual lowering valve V1. -- Check valve. Repair or replace if defective. 6. Open or defective brake feed valve 2H-30A-2. -- Check valve. Repair or replace if defective. 7. Open manual override on holding valve 2H-13A-1 or 2H-13A-2 or 2H-13A-3 or 2H-13A-4. -- Depress and turn manual override clockwise to close. Replace if defective. 8. Stuck holding valve 2H13A-1 or 2H13A-2 or 2H-13A-3 or 2H-13A-4. -- Check valves. Repair or replace if defective. 4.2-13 Down Circuit Inoperative 1. Stuck or defective lowering valve 2H-13A. -- Check valve. Repair or replace if defective. 2. Stuck holding valve 2H13A-1 or 2H13A-2 or 2H-13A-3 or 2H-13A-4. -- Check valves. Repair or replace if defective. 3. Plugged lowering orifice O1. -- Clean or replace orifice. 4.2-14 Powered Extension Platform Inoperative 1. Defective powered extension pump P3. -- Check pump. Repair or replace if defective. 2. Misadjusted or defective relief valve R5. -- Adjust valve. Replace if defective. 3. Stuck or defective deck extend valve 4H-26 or 4H-26A or retract valve 4H-27 or 4H-27A. -- Check valves. Repair or replace if defective. 4. Defective powered extension cylinder C13 front or C14 rear. -- Check cylinder. Repair or replace if defective. Full Size RT’s Engine Powered SKYJACK, Page 35 Service and Maintenance Section 4 - Troubleshooting Information Hydraulic System (Continued) 4.2-15 Hydraulic Generator Inoperative 1. Stuck or defective hydraulic generator valve 2H-86C. -- Check valve. Repair or replace if defective. 2. Misadjusted or defective flow control valve FC1. -- Adjust valve. Replace if defective. 3. Stuck or defective large pump dump valve 2H-17A. -- Check valve. Repair or replace if defective. 4. Defective hydraulic generator hydraulic motor GM1. -- Check motor. Repair or replace if defective. 4.2-16 All Outriggers Inoperative 1. Stuck or defective outrigger holding valve 2H-17B. -- Check valve. Repair or replace if defective. 4.2-17 Left Front Outrigger Inoperative 1. Stuck or defective retract valve 4H-71 or extend valve 4H-75. -- Clean valve. Replace if defective. 2. Stuck or defective check valve CV5. -- Check valve. Replace if defective. 3. Bypassing outrigger cylinder C9. -- Repack cylinder. Replace if defective. 4.2-18 Right Front Outrigger Inoperative 1. Stuck or defective retract valve 4H-72 or extend valve 4H-76. -- Clean valve. Replace if defective. 2. Stuck or defective Check valve CV6. -- Check valve. Replace if defective. 3. Bypassing outrigger cylinder C10. -- Repack cylinder. Replace if defective 4.2-19 Right Rear Outrigger Inoperative 1. Stuck or defective retract valve 4H-73 or extend valve 4H-77. -- Clean valve. Replace if defective. 2. Stuck or defective check valve CV7. -- Check valve. Replace if defective. 3. Bypassing outrigger cylinder C11. -- Repack cylinder. Replace if defective 4.2-20 Left Rear Outrigger Inoperative 1. Stuck or defective retract valve 4H-74 or extend valve 4H-78. -- Clean valve. Replace if defective. 2. Stuck or defective check valve CV4. -- Check valve. Replace if defective. 3. Bypassing outrigger cylinder C12. -- Repack cylinder. Replace if defective 4.2-21 Outriggers Drift In 1. Defective check valve left front (CV4), right front (CV5), right rear (CV6) or left rear (CV7) -- Clean valve. Replace if defective. 2. Outriggers cylinder bypassing left front (C9), right front (C10), right rear (C11) or left rear (C12). -- Repack cylinder. Replace if defective SKYJACK, Page 36 Full Size RT’s Engine Powered Section 4 - Troubleshooting Information Service and Maintenance Load Sensing System - CE 4.3-1 Flash Code F01: Check HWFS 1. This message is given if the GP102 startup tests have not completed. -- Check HELP message for more information. 4.3-2 Flash Code F02: Not Ground Mode 1. This message is given if the machine is not in ground mode, P2-2 must be high. -- Calibration can only be carried out in ground mode. 4.3-3 Flash Code F03: Not Stopped 1. This message is given if the machine is not in ground mode, P2-2 must be high. -- Check DIAGNOSTICS / SWITCHES to see which function switch is closed. 4.3-4 Flash Code F04: Tilted 1. This message is given if the machine is tilted. -- Calibration must be carried out with the machine level. If the machine is level, use the SETUPS / TILT SETUPS to set the GP102 level. 4.3-5 Flash Code F05: Bad Height 1. This message is given if the height sensor output P4-3 is out of range at the start of calibration. -- The height sensor output must be between 1.0V and 4.0V. Check DIAGNOSTICS / SENSORS to see the output. A reading of 0V or 5V is probably due to a wiring problem. 4.3-6 Flash Code F06: Check Elev 1. This message is given if the elevation switch P2-10 is open at the start of calibration, when the operator has confirmed the “PLATFORM DOWN?” question. -- If the platform is down, check the elevation switch wiring. 4.3-7 Flash Code F08: Check Elev 1. This message is given if the elevation switch P2-10 is closed at the end of the DYNAMIC lift, when the platform should be fully raised. This message would occur if the UP switch was accidentally opened near the start of the DYNAMIC lift. -- If the platform is fully raised, check the elevation switch wiring. 4.3-8 Flash Code F09: Bad Height 1. This message is given if the height sensor output P4-3 is out of range at the start of the DYNAMIC lift. -- The height sensor output must be between 1.0V and 4.0V. Check DIAGNOSTICS / SENSORS to see the output. 4.3-9 Flash Code F10: Bad Height 1. This message is given if the height sensor output P4-3 is out of range at the end of the DYNAMIC lift. -- The height sensor output must be between 1.0V and 4.0V. Check DIAGNOSTICS / SENSORS to see the output. A reading of 0V or 5V is probably due to a wiring problem. 4.3-10 Flash Code F11: Not Up 1. This message occurs at the start of the DYNAMIC lift if the operator selects a function other than UP. -- Select the UP function. Full Size RT’s Engine Powered SKYJACK, Page 37 Service and Maintenance Section 4 - Troubleshooting Information Load Sensing System - CE (Continued) 4.3-11 Flash Code F12: Too Many 1. This message occurs if the DYNAMIC lift takes too long. This message could occur if the UP switch was not released at the end of the dynamic lift. -- If the machine takes more than two minutes to lift, the GP102 may need modification to avoid this problem. 4.3-12 Flash Code F13: Low Height Range 1. This message occurs at the end of the DYNAMIC lift if the height sensor output did not change sufficiently to give a reasonably accurate platform height estimate. This message could occur if the UP switch was accidentally opened too early (when the platform is not fully raised). This message would occur if the UP switch was accidentally opened near the start of the DYNAMIC lift. -- If the platform is fully raised, check the elevation switch wiring. 4.3-13 Flash Code F14: Bad Height 1. This message occurs if the height sensor output P4-3 is out of range during the DYNAMIC lift. -- The height sensor output must be between 1.0V and 4.0V. Check DIAGNOSTICS / SENSORS to see the output. A reading of 0V or 5V is probably due to a wiring problem. 4.3-14 Flash Code F15: Check Elev 1. This message is given if the elevation switch P2-10 is open when the platform has been fully lowered after the DYNAMIC lift. This message would occur if the DOWN switch was accidentally opened before the platform was fully lowered. -- If the platform is fully lowered, check the elevation switch. 4.3-15 Flash Code F16: Low Elev.open 1. This message is given if the elevation switch P2-10 opened during lift at a too low height (below 5%). -- If it opens below 5%, the pressure is probably too unpredictable to allow reliable detection of an overloaded platform when initially raised. Check CALIBRATIONS / HEIGHT CALS; the “ElevUp” value shows the recorded height where the switch opened. 4.3-16 Flash Code F17: High Elev.open 1. This message is given if the elevation switch P2-10 opened during lift at a too high height (above 25%). -- If it opens above 25%, the platform is too high when the overloaded platform is detected! Check CALIBRATIONS / HEIGHT CALS; the “ElevUp” value shows the recorded height where the switch opened. 4.3-17 Flash Code F18: Low Elev.close 1. This message is given if the elevation switch P2-10 closed during lower at a too low height (below 5%). -- If it closes below 5%, height sensor fault detection is compromised. Check CALIBRATIONS / HEIGHT CALS; the “ElevDown” value shows the recorded height where the switch opened. SKYJACK, Page 38 Full Size RT’s Engine Powered Section 4 - Troubleshooting Information Service and Maintenance Load Sensing System - CE (Continued) 4.3-18 Flash Code F19: High Elev.close 1. This message is given if the elevation switch P2-10 closed during lower at a too high height (above 25%). -- When the switch is closed, overload detection is normally disabled but if the switch closes above 25%, the platform is too high to allow disabled overload. Check CALIBRATIONS / HEIGHT CALS; the “ElevUp” value shows the recorded height where the switch opened. 4.3-19 Flash Code F20: Height<>0% 1. This message occurs if the platform height is not 0% after the platform has been fully lowered during either STATIC lift -- The platform must return to the same height each time it is fully lowered. Check DIAGNOSTICS / SYSTEM to check the height. 4.3-20 Flash Code F21: Height<>0% 1. This message occurs if the platform height is not 0% before the platform is raised during either STATIC lift. -- The platform must be at 0% height when it is fully lowered. Check DIAGNOSTICS / SYSTEM to check the height. 4.3-21 Flash Code F22: Height<>100% 1. This message occurs if the platform height is not 100% after the platform has been fully raised during either STATIC lift. -- The platform must return to the same height each time it is fully raised. Check DIAGNOSTICS / SYSTEM to check the height. 4.3-22 Flash Code F23: Height<>100% 1. This message occurs if the platform height is not 100% before the platform is lowered during either STATIC lift. -- The platform must be at 100% height when it is fully raised. Check DIAGNOSTICS / SYSTEM to check the height. 4.3-23 Flash Code F24: Too Many 1. This message occurs if too many static measurements are taken during either STATIC lift or lower. -- It is likely that there is a problem with the lift cylinder pressure; the GP102 should only need about 10 measurements for most vehicles. The SETUPS / HEIGHT SETUPS / MIN LIFT time could be increased to force a longer time between static measurements, but this should not be necessary. 4.3-24 Flash Code F25: Check Elev 1. This message indicates a problem with the elevation switch P2-10 during the STATIC phases. -- The switch is either staying closed to a higher height, or staying open to a lower height, than that recorded during the DYNAMIC phase. 4.3-25 Flash Code F26: Check Elev 1. This message indicates a problem with the elevation switch P2-10 during the STATIC phases. -- The switch is opening or closing at a different height than that recorded during the DYNAMIC phase. Full Size RT’s Engine Powered SKYJACK, Page 39 Service and Maintenance Section 4 - Troubleshooting Information Load Sensing System - CE (Continued) 4.3-26 Flash Code F27: Bad Height 1. This message indicates a problem with the height sensor output P4-3 during the STATIC phases. -- The height sensor output must be between 1.0V and 4.0V at all times. Check DIAGNOSTICS / SENSORS to see the output. A reading of 0V or 5V is probably due to a wiring problem. 4.3-27 Flash Code F30: Bad Heights 1. This message indicates that the recorded heights are not increasing during either STATIC lift, or are not decreasing during either STATIC lower. -- It may be possible to cause this problem by repeatedly opening and closing the UP or DOWN switch during the STATIC phases. 4.3-28 Flash Code F31: Reject Curve 1. The DYNAMIC pressure curve is unacceptable. -- An initial pressure peak when the platform lifted cannot be found between 0% and 15% height. Check the pressure sensor and lift cylinder hydraulics. 4.3-29 Flash Code F32: Reject Curve 1. The DYNAMIC pressure curve is unacceptable. -- There should be a lowest pressure about halfway through the lift (ie: near 50% height); the lowest pressure measured is at too low a height. Check the pressure sensor and lift cylinder hydraulics. 4.3-30 Flash Code F33: Reject Curve 1. The DYNAMIC pressure curve is unacceptable. -- There should be a lowest pressure about halfway through the lift (ie: near 50% height); the lowest pressure measured is at too high a height. Check the pressure sensor and lift cylinder hydraulics. 4.3-31 Flash Code F34: Reject Curve 1. The DYNAMIC pressure curve is unacceptable. -- There is not enough difference between the initial pressure peak and the minimum pressure. Check the pressure sensor and lift cylinder hydraulics. 4.3-32 Flash Code F40: Reject Delta 1. This message indicates that there is not enough difference between the loaded & empty pressure. This message could also occur if the wrong pressure sensor was fitted (eg: a 5000psi sensor when a 2000psi one is needed). This message could occur if the platform were not properly loaded during the STATIC LOADED phase, or if the platform were not properly empty during the STATIC EMPTY phase. -- Check CALIBRATIONS / HEIGHT CALS; the “Height” indicates the first height at which there was insufficient difference and the “Up” and “Down” values show the loaded pressure (first) and the difference between loaded and empty pressure (second). SKYJACK, Page 40 Full Size RT’s Engine Powered Section 4 - Troubleshooting Information Service and Maintenance Load Sensing System - CE (Continued) 4.3-33 Flash Code F42: Low Pressure 1. This message indicates that the pressure is too low (0.5V or less) when the elevation switch opens during the DYNAMIC lift. This message would occur if the pressure sensor was disconnected, or if there were some other wiring error. -- Check DIAGNOSTICS / SENSORS to check the pressure. 4.3-34 Flash Code F43: High Pressure 1. This message indicates that the pressure is too high (4.5V or more) when the elevation switch opens during the DYNAMIC lift. This message would occur if the pressure sensor was disconnected, or if there were some other wiring error. -- Check DIAGNOSTICS / SENSORS to check the pressure. 4.3-35 Flash Code F44: Low Pressure 1. This message indicates that the pressure is too low (0.5V or less) at a STATIC measurement point. This message would occur if the pressure sensor was disconnected, or if there were some other wiring error. -- Check DIAGNOSTICS / SENSORS to check the pressure. 4.3-36 Flash Code F45: High Pressure 1. This message indicates that the pressure is too high (4.5V or more) at a STATIC measurement point. This message would occur if the wrong pressure sensor was fitted, or if there were some other wiring error. -- Check DIAGNOSTICS / SENSORS to check the pressure. 4.3-37 Flash Code F46: Check Elev 1. This message indicates that the elevation switch opened more than once during the DYNAMIC lift. 4.3-38 Flash Code F47: Check Elev 1. This message indicates that the elevation switch closed more than once during the DYNAMIC lower. Full Size RT’s Engine Powered SKYJACK, Page 41 Section 5 Procedures Table of Contents Service and Maintenance General..........................................................................................................................................................................3 Safety and Workmanship..............................................................................................................................................3 Base 5.1-1 Hydraulic System and BrakeAdjustment Procedure (If Equipped) . ................................................................3 5.1-2 Brake Assembly and Disassembly(If Equipped)...............................................................................................4 5.1-3 Holding Torque Testing Procedure....................................................................................................................6 5.1-4 Winching and Towing Procedures and Brake System......................................................................................6 5.1-5 System Lift and Pressure Adjustment................................................................................................................7 5.1-7 Wheel Bolt/Nut Inspection and Torquing Procedure.........................................................................................9 5.1-8 Wheel Reinstallation and Torquing Procedure..................................................................................................9 5.1-9 Front Axle Hub Procedure................................................................................................................................10 5.1-10Electronic Tilt Switch Setup Procedure............................................................................................................12 Tilt Switch Replacement...................................................................................................................................12 Reprogramming Existing Tilt Switch................................................................................................................14 Test and Verify Tilt Circuit.................................................................................................................................15 Engines 5.2-1 5.2-2 5.2-3 5.2-4 5.2-5 5.2-6 5.2-7 ECU Pin Reference Chart (GM).......................................................................................................................16 Throttle Actuator (GM)......................................................................................................................................17 GM Map and IAT Sensor (GM).........................................................................................................................18 Engine Coolant Temperature Sensor (GM).....................................................................................................19 LPG Temperature Sensor (GM)........................................................................................................................20 Fuse Block Layout (GM)...................................................................................................................................21 Kubota Dual Fuel (DF972) Resistance Checks................................................................................................22 Outriggers Option 5.3-1 5.3-2 5.3-3 5.3-4 5.3-5 5.3-6 5.3-7 Auto-Leveling Outrigger PC Board Layout......................................................................................................23 Outrigger Mechanical Limit Switch Wiring Diagram........................................................................................24 Auto-Leveling Outrigger Setting and Error Codes...........................................................................................25 Auto-Leveling Outrigger Error Code Breakdown.............................................................................................26 Hand Held Calibration/Diagnostic Tool Key Functions....................................................................................27 Outrigger Control Module Instructions............................................................................................................28 Auto-Leveling Outrigger Control Module Pin Reference Chart.......................................................................31 Load Sensing System - CE 5.4-1 5.4-2 5.4-3 5.4-6 5.4-7 5.4-8 Control Module Pin Reference Chart...............................................................................................................32 LED Error Codes - Quick Reference Chart......................................................................................................33 LED Error Codes - Code Breakdown Chart.....................................................................................................34 Control Module Load Calibration - Code Messages & Definitions..................................................................36 Control Module Load Calibration Procedure...................................................................................................40 Curve/Group Codes Chart...............................................................................................................................44 Mid Size & Full Size Rough Terrain Series SKYJACK, Page 1 5 Section 5 - Procedures Service and Maintenance General The following information is provided to assist you in the use and application of servicing and maintenance procedures contained in this chapter. HOLD ACTUATOR ARM TO FULL COUNTER-CLOCKWISE 1/2” Safety and Workmanship Your safety, and that of others, is the first consideration when engaging in the maintenance of equipment. Always be conscious of weight. Never attempt to move heavy parts without the aid of a mechanical device. Do not allow heavy objects to rest in an unstable position. When raising a portion of the equipment, ensure that adequate support is provided. BRAKE ADJUSTER Base 5.1-1 Hydraulic System and Brake Adjustment Procedure (If Equipped) 1. Ensure aerial platform is on a firm level surface and block wheels to prevent rolling in either direction. 2. 3. Turn emergency main power disconnect switch to OFF position. Locate brake manifold in hydraulic/electric side cabinet. 4. Depress and turn red knurled knob on brake valve counter-clockwise to a fully closed position or depress black knob (current manifold). 5. Grasp red plunger and rapidly depress until plunger can no longer be depressed and brake is fully released. 6. 7. Inspect caliper and brake pads for binding. Pads should move freely on the pins. Remove pin from brake cylinder clevis and brake actuating lever. Rotate actuating lever counterclockwise to the end of its stroke. Diagram 5.1 Brake Adjustment 9. Reinstall clevis pin back into the clevis actuating lever. 10. Remove plastic plug located on the end of the caliper shaft. See Diagram 5.2. HOLD ACTUATOR ARM TO FULL COUNTER-CLOCKWISE 1/2” BRAKE ADJUSTER Diagram 5.2 Plug Removal and Replacement 11. Using a 1/4” Allen wrench, turn brake adjuster counter-clockwise until it bottoms out. Turn Allen wrench clockwise 1/2 turn clockwise to set adjustment. 12. Replace plastic plug back into the end of the caliper shaft. 13. Depress red knurled knob on brake valve and turn clockwise to a fully open position. 14. Remove Wheel blocks. Turn emergency main power disconnect switch to ON position. Operate drive several times to seat pads to brake disc. Mid Size & Full Size Rough Terrain Series SKYJACK, Page 3 Service and Maintenance Section 5 - Procedures 5.1-2 Brake Assembly and Disassembly (If Equipped) NOTE This literature services various models in this brake series. The components shown in Diagram 5.3 may appear different than what is found in your brake. Assembly (Refer to Diagram 5.3) 1. Use an alkaline wash to clean parts before assembly. 2. Press new oil seal into cover until it is flush with bearing shoulder. Note direction of seal. 3. Install shaft, dowel pins, spring retainer and new spring in cover. Be sure to install springs according to pattern and color recorded during disassembly. 4. Position new return plate on springs. Pressure plate is under spring tension of approximately 1633 kgf (3600 lb). The two cap screws must be loosened evenly to relieve this force. If a hydraulic press is available, 2041 kgf (4500 lb) minimum, the pressure plate can be held in position while removing the cap screws. NOTE Be careful to avoid contaminating friction surfaces with oil. 5. Install new rotor discs and new stator discs in the same sequence as recorded during disassembly. 2. Remove case seal from cover. 6. 3. Remove piston from pressure plate. Install new back-up rings and new o-rings on piston. Note order of o-rings and back-up rings. Insert piston into pressure plate. 4. Remove o-rings and back-up rings from piston. 7. Install new case seal on cover. 5. Before removing stator discs and rotor discs, record the stacking arrangement for reassembly purposes. Remove stator discs, rotor discs, return plate and shaft from cover. 8. Position pressure plate on cover aligning dowel pins with holes in pressure plate. 9. Install cap screws and tighten evenly to draw pressure plate to cover. Torque cap scerws 74.6 N-m (55 lb-ft). Disassembly (Refer to Diagram 5.3) 1. Remove pressure plate from cover by removing cap screws. CAUTION 6. 7. Before removing springs, record the pattern and color for reassembly purposes. Remove dowel pins, springs and spring retainer from cover. Press oil seal from cover. Spring Chart CAUTION Model Yellow Spring (14) Red Spring (14) Blue Spring (14) 21-100-114 16 0 0 SKYJACK, Page 4 NOTE A hydraulic press will simplify installation of pressure plate on cover. Clamp pressure plate in position while tightening cap screws. If hydrostatic testing is performed on brake assembly, release pressure must not exceed 69 bar (1000 psi) unless six additional bolts are used for supplemental clamping. Mid Size & Full Size Rough Terrain Series Section 5 - Procedures Service and Maintenance Diagram 5.3 Multiple Disc Brake Assembly Oil Seal Cover Dowel Pins Spring Retainer Springs Return Plate Rotor Discs Stator Discs Shaft Back-Up Rings O-Rings Piston Back-Up Rings O-Rings Case Seal Pressure Plate Cap Screws M11512AA Mid Size & Full Size Rough Terrain Series SKYJACK, Page 5 Service and Maintenance Section 5 - Procedures 5.1-3 Holding Torque Testing Procedure 1. Ensure aerial platform is on a firm level surface. 2. Locate brake feed valve (2H30A-2) on main manifold and disconnect electrical connectors from valve. This will prevent the hydraulic system from releasing the brake. 3. With engine running (aerial platform in drive mode, engine on high idle, high torque selected and low speed range selected), hold enable switch on controller and push controller forward as if you were to drive forward. This provides torque from the drive motor to unreleased brake. 4. If brake slips and aerial platform starts to move in this condition, either brake plates are worn or springs have broken. Both brake plates and springs must be replaced to return brake to its original holding torque. WARNING Do not manually disengage parking brakes if work platform is on a slope. 4 Diagram 5.5 Brake Release Hand Pump and Brake Valve Plunger 1. Ensure aerial platform is on a firm level surface. 2. Locate brake feed valve (2H30A-2) on main manifold and disconnect electrical connectors from valve. This will prevent the hydraulic system from releasing the brake. 3. With engine running (aerial platform in drive mode, engine on high idle, high torque selected and low speed range selected), hold enable switch on controller and push controller forward as if you were to drive forward. This provides torque from drive motor to unreleased brake. 4. If brake slips and aerial platform starts to move in this condition, either brake plates are worn or springs have broken. Both brake plates and springs must be replaced to return brake to its original holding torque. 5.1-4 Winching and Towing Procedures and Brake System WARNING When towing, do not drive onto a downward slope or brake the towing vehicle rapidly. Disc Brake System 2 3 5 1 Diagram 5.4 Disc Brake System Disc Brake -This device disengages the brake disc (1) when driving forward or in reverse. A hydraulic brake cylinder (2), linked to a disc caliper (3), engages and disengages a brake disc on the rear axle drive shaft yoke. The brake must be manually disengaged for pushing, towing or winching. Do not push or tow the work platform onto a downward slope or pull the platform down an incline towards the winch. The special procedure for manually disengaging the parking brake is as follows: SKYJACK, Page 6 Mid Size & Full Size Rough Terrain Series Section 5 - Procedures Service and Maintenance 5.1-5 System Lift and Pressure Adjustment All adjustments must be made with a calibrated hydraulic gauge. Refer to the serial number nameplate located on the rear of the aerial platform for system and lift pressure values. Lift Pressure Adjustment System Relief Pressure Adjustment 1. Locate right steer hydraulic line on main manifold. (Refer to Hydraulic Manifold Component and Port Identification found in Section 3 for location.) 1. Locate lift line on main manifold. (Refer to Hydraulic Manifold Component and Port Identification found in Section 3 for location.) 2. Open manual lowering valve with platform fully lowered. Remove lift line from main manifold. 3. Install a 3000 psi gauge into lift line port fitting on main manifold. Plug lift line going to lift cylinders. 4. Loosen locknut on lift relief valve (R2). (Refer to Hydraulic Manifold Component and Port Identification found in Section 3 for location.) 5. Close the manual lowering valve. 6. Using base controls in hydraulic/electric cabinet, depress and hold up pushbutton switch. 7. Observe reading on pressure gauge. Adjust lift relief valve (R2) to pressure listed on the serial number nameplate. 2. Tee in a calibrated 3000 psi gauge into the right steer line. 3. Remove operator’s control console from guardrail and disconnect it from scissors control cable. 4. Locate electrical panel cable plug in hydraulic/electric cabinet. 5. Disconnect scissors control cable and connect operator’s control console cable. 6. At main manifold, loosen locknut on system relief valve (R1). (Refer to Hydraulic Manifold Component and Port Identification found in Section 3 for location.) 7. WARNING Fully lower the platform. On platform control console, select “drive” position with lift/drive switch. 8. Engage right steer switch on top of controller handle and hold. 9. Observe reading on pressure gauge. Adjust system relief valve (R1) to pressure listed on the serial number nameplate. NOTE Turning the stem on relief valve clockwise will increases pressure. Turning the stem counter-clockwise will decreases pressure. 10. Release steer switch and retighten locknut on system relief valve (R1). NOTE Turning the stem on relief valve clockwise will increases pressure. Turning the stem counter-clockwise will decreases pressure. 8. Release up pushbutton and retighten locknut on lift relief valve (R2). 9. Remove gauge from lift line port fitting and reconnect lift line to main manifold. WARNING Ensure aerial platform does not lift more than rated load. 11. Remove gauge from steer line. Mid Size & Full Size Rough Terrain Series SKYJACK, Page 7 Service and Maintenance 5.1-6 Change Hydraulic Oil Note Samples of hydraulic oil should be drawn from the reservoir and tested annually. These samples should be taken when the oil is warmed through normal operation of the system. The sample should be analyzed by a qualified lubrication specialist to determine if it is suitable for continued use. Oil change intervals will depend on the care used in keeping the oil clean, and the operating conditions. Dirt and/or moisture cotamination will dictate that the oil should be changed more often. Under normal use and operating conditions, the hydraulic oil should be changed every two years. Refer to Table 1.2 of this manual. 1. Ensure aerial platform is on a firm level surface, fully lowered, and outriggers (if equipped) fully retracted. Section 5 - Procedures 4. Place suitable container under the hydraulic tank. 5. Remove oil drain plug and allow all hydraulic oil to drain into container. 6. Install oil drain plug with new seal ring and tighten firmly. 7. Refill hydraulic tank with new oil as per specifications. (Refer to section 2 of this manual) 8. Check for leakage. 9. Clean up any oil that may have spilled during this procedure. 10. Check hydraulic oil level. (The hydraulic oil level should be at or slightly above the top mark on the sight gauge) Note Refer to your national/local regulations on how to dispose of used filter and oil.v 2. Allow hydraulic oil to warm up. 3. Turn main power disconnect switch to off position. SKYJACK, Page 8 Mid Size & Full Size Rough Terrain Series Section 5 - Procedures Service and Maintenance 5.1-7 Wheel Bolt/Nut Inspection and Torquing Procedure It is necessary to check the torque on all wheel nuts and wheel bolts at pre-delivery, after 8 hours of operation and at weekly intervals using the following procedure: 1. Confirm that each wheel fastener is torqued to 140 ± 5 ft-lb. All fasteners must be torqued using the tightening sequence shown below. 1 3 1. Inspect wheel fastener threads for damage of defects. Replace if defective. 2. Clean the mounting surfaces of the hub and wheel rim of debris, rust, excess paint, etc. 3. Mount wheel on the hub, centering mounting holes on the wheel studs or bolt holes. Use appropriate lifting device as required. 4. Install wheel nuts or wheel bolts and hand tighten to center the rim. 5. Torque nuts or bolts to approximately 50 ft-lb using the tightening sequence in procedure 5.1-7. 6. Torque again to 100 ft-Ib using the same sequence. 7. Torque again to 140 ft-lb using the same sequence. 8. Repeat the tightening sequence to confirm that none have changed from 140 ft-lb. If any are found below 140 ft-lb, repeat complete sequence until there is no change in torque values. If possible, drive the machine prior to checking torques. 9. Check torque values after 8 hours of operation and then at weekly intervals. 4 5 2 Diagram 5.4 Wheel Fastener Tightening Sequence 2. 5.1-8 Wheel Reinstallation and Torquing Procedure When a wheel/tire assembly has been removed or replaced, it will be necessary to follow the procedure below to ensure proper installation: Again, confirm that each wheel fastener is torqued to the specified tolerance. Re-torque as necessary until all fasteners are properly torqued. Mid Size & Full Size Rough Terrain Series SKYJACK, Page 9 Service and Maintenance Section 5 - Procedures 5.1-9 Front Axle Hub Procedure For front axle hub components, refer to your aerial platform’s parts manual. 7 11 5 10 4 9 8 6 3 2 1 NOTE Keep work area clean and visibly free from contamination at all times. 1. Ensure aerial platform is parked on a firm, level surface. Chock or block the wheels to keep the aerial platform from rolling forward or backward. 2. Fully lower the platform. 3. Using a suitable lifting device or outriggers (if equipped), lift the end of the aerial platform with the steer axle. CAUTION Use a suitably-rated support stand to support aerial platform while performing the following operations. 4. Turn emergency main power disconnect switch to “ ” off position. 5. Remove wheel assembly. 6. Remove dust cap (item 1) to access internal components of hub assembly. Pull cotter pin (item 2) out of spindle arm (item 11) and then remove castle nut (item 3), washer (item 4) and outer bearing cone (item 5). Dispose of dust cap, cotter pin, castle nut, washer, and outer bearing cone. 7. SKYJACK, Page 10 8. Flip hub over and then remove and discard inner bearing cone (item 8) and grease seal (item 10). 9. Remove and discard both inner and outer bearing cups (items 6 & 8) from hub. 10. Remove grease from spindle arm and hub and look for signs of visible damage. If damage is found on the hub or on the spindle arm, contact Service Department immediately using information found in page 2 for further instructions. 11. Press new bearing cups (items 6 & 8) into hub. 12. Pack replacement inner and outer bearings by either pressing wheel bearing grease into each roller by hand or using a bearing packer and grease gun. Ensure that grease is forced into all surfaces of the bearing. NOTE Use only recommended wheel bearing grease - NLGI (National Lubricating Grease Institute) Grade #2 or equivalent. NOTE The bearings must be packed before installing. 13. Install replacement inner bearing in the race and then seat the new grease seal. Flip hub over and install replacement outer bearing. 14. Install hub on the spindle. 15. Install replacement washer and replacement castle flanged nut. Hand tighten the castle flanged nut until it touches the washer. Turn hub by hand to ensure smooth running. No resistance should be felt at this time. 16. Take a torque wrench and set it at 30 ft-lb, and while continuously rotating hub, tighten castle flanged nut. While hub is being turned and nut tightened, resistance will increase. 17. Using an open-ended wrench, loosen castle flanged nut a 1/4 turn while turning the wheel hub. It should turn easily. The nut should not come completely loose. 18. Using a torque wrench set to 15 ft-lb, tighten castle flanged nut. Turn wheel hub and check for smooth turning. Mid Size & Full Size Rough Terrain Series Section 5 - Procedures Service and Maintenance 19. Check for alignment of the castle flanged nut with one of the cross holes in spindle arm. If required, loosen nut to align with nearest hole. Use an open-ended wrench to be able to see the cross holes. The nut should not be turned more than 15 degrees. Secure with new cotter pin. Check again for smooth turning of wheel hub. The wheel hub should turn but with slight resistance. 20. Grab the top and bottom of the hub and check for play. There should be no evidence of play. 21. Install dust cap back on hub assembly. 22. Install wheel assembly. Torque nuts or bolts to 140 ft-lb. 23. Repeat steps 5 to 22 for the other hub assembly. 24. Lower the aerial platform. Mid Size & Full Size Rough Terrain Series SKYJACK, Page 11 Service and Maintenance 5.1-10 Electronic Tilt Switch Setup Procedure The following information is supplied for replacement or reprogramming of the electronic tilt switch. Also included are test and verification instructions. Follow the appropriate procedures below. Tilt Switch Replacement Section 5 - Procedures controls are powered up. 8. Turn main disconnect switch to “ ” ON position. 9. Select off/lift/drive key switch to “ or “ ” lift position ” drive position. 10. Pull out “ ” all emergency stop buttons. 11. Verify switch is powered. (Red or green LED will be continually blinking) Y AXIS X AXIS Red LED Red LED Green LED Green LED 12. Program the Tilt Switch a. Press and release the set up button 3 times. b. c. 1. Ensure aerial platform is parked on a firm level surface. 2. Fully lower the platform. 3. Chock or block wheels to keep the aerial platform from rolling forward or backward. 4. ” emergency stop buttons and turn Push in “ main disconnect switch to “ ” off position. 5. Disconnect tilt switch from 4 pin connector. d. Observe program delay / stabilization time. (Only the red LED will blink for 4 seconds) Both LEDs will flash for 1 second. Results: The switch is learning the new zero position. Both LEDs will turn on solid for 1 second. Results: The new zero position has been learned. Red LED Green LED Red LED Green LED Red LED Green LED Note Ensure part number of old and new tilt switch are the same. 6. Remove old tilt switch from mount. 7. Install new switch to mount (in the same orientation as the old switch) and connect switch plug to 4 pin connector. NOTE The tilt circuit is only powered when SKYJACK, Page 12 Mid Size & Full Size Rough Terrain Series Section 5 - Procedures e. Service and Maintenance The green LED will flash and then the red LED will turn on solid for 2 seconds. 13. Turn main disconnect switch to “ 14. Push in “ Red LED Red LED Green LED Green LED ” off position ” emergency stop buttons. 15. Remove chock or wheel blocks. 16. Proceed to Test and Verify Tilt Circuit. Results: The switch is verifying the new zero position. f. The green LED will turn on solid. Results: The switch is ready for normal operation. Mid Size & Full Size Rough Terrain Series Red LED Green LED SKYJACK, Page 13 Service and Maintenance Section 5 - Procedures Reprogramming Existing Tilt Switch Light Indicators 8. Set up button is located on this face next to harness b. R Gre ed LE en D LE D 1. Reprogram the Tilt Switch a. Press and hold the set up button for 3 seconds. Results: Both LEDs will be OFF. Red LED Green LED Both LEDs will flash. Red LED Green LED IMPORTANT Step “c” must be completed within a 5 second period or the switch will automatically exit program mode and return to normal operation using previously stored data. Ensure aerial platform is parked on a firm level surface. c. Press and release set up button 3 times. 2. Fully lower the platform. d. 3. Chock or block wheels to keep the aerial platform from rolling forward or backward. If 5 second period has expired prior completion, repeat Step “a”, “b” and “c”. e. Observe program delay / stabilization time. (Only the red LED will blink for 4 seconds) NOTE The tilt circuit is only powered when controls are powered up. 4. Turn main disconnect switch to “ ” ON position. 5. Select off/lift/drive key switch to “ or “ f. ” lift position ” drive position. g. ” all emergency stop buttons. 6. Pull out “ 7. Verify switch is powered. (Red or green LED will be continually blinking) h. Red LED Red LED Green LED Green LED Both LEDs will flash for 1 second. Results: The switch is learning the new zero position. Both LEDs will turn on solid for 1 second. Results: The new zero position has been learned. Red LED Green LED Red LED Green LED Red LED Green LED The green LED will flash and then the red LED will turn on solid for 2 seconds. Red LED Red LED Green LED Green LED Results: The switch is verifying the new zero position. SKYJACK, Page 14 Mid Size & Full Size Rough Terrain Series Section 5 - Procedures i. 9. The green LED will turn on solid. Results: The switch is ready for normal operation. Service and Maintenance Test and Verify Tilt Circuit Red LED Turn main disconnect switch to “ position. 10. Push in “ Light Indicators Green LED Set up button is located on this face next to harness ” off R Gre ed LE en D LE D ” emergency stop buttons. 11. Remove chock or wheel blocks. 12. Proceed to Test and Verify Tilt Circuit. Operations of Tilt Switch The following describes the LED’s and what they indicate. Green LED Illuminated whenever both tilt axes are within the specified degrees of the zero/ home learned position. Flashes when transitioning in or out of tilt angle limits, but built in time delay has not fully occurred. Red LED Illuminated whenever tilt on one or more axes is more than the specified degrees out from the zero/ home position. Green & Red LED On together, no blinking when fault detected. Tilt Circuit Test 1. Mid Size & Full Size Rough Terrain Series Refer to section 2 for test tilt sensor procedure. SKYJACK, Page 15 Service and Maintenance Section 5 - Procedures Engines 5.2-1 ECU Pin Reference Chart (GM) 61 75 31 76 45 1 90 46 60 15 16 LOCK TAB 30 Diagnostics Diagnostics Pin # Wire Color Description Pin # Wire Color Description 1 2 3 4 5 6 7 8 9 10 11 12 13 14 15 16 17 18 19 20 21 22 23 24 25 26 27 28 29 30 31 32 33 34 35 36 37 38 39 40 41 42 43 44 45 DK GRN/ORN DK GRN/WHT EMPTY EMPTY PPL/LT BLUE LT BLU/DK BLU LT GRN TAN/DK GRN DK BLU/ORN PPL/YEL EMPTY EMPTY WHT/ORN BLU/PNK BLU/WHT EMPTY EMPTY EMPTY LT GRN/RED BLK/LT GREEN PPL/WHT WHT/PPL EMPTY EMPTY RED/WHT RED/BLK EMPTY EMPTY EMPTY EMPTY YEL EMPTY YEL/RED EMPTY EMPTY EMPTY EMPTY EMPTY YEL/GRY TAN/WHT WHT/RED TAN/BRN TAN/RED TAN/BLK PNK/TAN EGO1 Signal EGO2 Signal 46 47 48 49 50 51 52 53 54 55 56 57 58 59 60 61 62 63 64 65 66 67 68 69 70 71 72 73 74 75 76 77 78 79 80 81 82 83 84 85 86 87 88 89 90 DK BLU/YEL YEL/DK BLU LT GRN/WHT LT GRN/PPL LT GRN/BLK GRY/DK BLU GRY/ORN LT BLU WHT/LT GRN DK GRN ORN EMPTY GRY EMPTY RED/TAN BRN/LT BLU BRN/LT GRN EMPTY EMPTY EMPTY EMPTY EMPTY EMPTY BLK EMPTY WHT/LT BLU BLK/WHT BLK/YEL EMPTY WHT/BLK EMPTY BRN/WHT WHT/BRN RED/TAN GRN/YEL BLK PNK/WHT TAN/ORN TAN/BLK PNK/YEL BLK/RED TAN DK BLU PNK/BLK EMPTY Not used Not used Output to gasoline temp sensor Not used Not used Mid throttle input High throttle input Input from oil pressure switch Signal from gasoline pressure sensor To diagnostic connector (PC) To diagnostic connector (PC) Throttle position 1 signal Throttle position 2 signal MAP Signal Not Used Not Used Not Used Connected to pin #14 below CAN + to propane regulator CAN – from propane regulator 5 volt + from ECU to sensors 5 volt – to ECU from sensors +V from crank position sensor -V from crank position sensor Not used Not used Output to spark coil 1 Output to spark coil 2 Output to IAT (part of MAP) Output to ECT Output to EGT Propane selected Not used Not used 12 volt input Not used Battery positive To injector #1 and #4 To injector #2 and #3 Ground from engine block Negative supply to power relay 2002CR EGO 1 Heater ground EGO 2 Heater ground Negative supply to propane lock off Negative supply to relay 10BCR2 Not used Battery positive To check engine light (MIL) Ground from engine block Positive to throttle actuator motor Negative from throttle actuator motor Negative supply to fuel pump relay 56CR Fuel pump excite wire Negative supply to fuel pump Not used Not used Negative supply to starter relay 32ACR 60594AA SKYJACK, Page 16 Mid Size & Full Size Rough Terrain Series Section 5 - Procedures Service and Maintenance 5.2-2 Throttle Actuator (GM) DBW+ 4 PNK/WHT MOTOR DBW- TPS1 SIGNAL SENSOR GROUND TPS1 SIGNAL 1 6 2 TAN/ORG PPL/LT BLU BLK/LT GRN 5 LT BLU/DK BLU 3 LT GRN/RED 5 VOLTS Mid Size & Full Size Rough Terrain Series SKYJACK, Page 17 Service and Maintenance Section 5 - Procedures 5.2-3 GM Map and IAT Sensor (GM) 1 2 3 4 BLK/LT GRN SENSOR GROUND YEL/GRY 5 VOLTS INTAKE AIR TEMPERATURE SIGNAL (IAT) LT GRN/RED 5 VOLTS LT GRN MANIFOLD ABSOLUTE PRESSURE SIGNAL (MAP) IAT Sensor Resistance TEMPERATURE °F TOLERANCE ±10% OHMS 248 110 239 125 221 162 203 214 185 284 167 383 149 522 131 721 104 1,200 77 2,063 50 3,791 23 7,419 -4 15,614 -22 26,854 -31 35,763 -40 48,153 60597AA SKYJACK, Page 18 Mid Size & Full Size Rough Terrain Series Section 5 - Procedures Service and Maintenance 5.2-4 Engine Coolant Temperature Sensor (GM) A B TAN/WHITE 5 VOLTS BLK/LT GREEN SENSOR GROUND TEMPERATURE SENSOR RESISTANCE Temperature Sensor Resistance TEMPERATURE F TOLERANCE ±10% OHMS 242.4 231.9 211.6 201.4 181.9 163.1 144.9 127.4 102.4 78.9 49.9 23.5 -5.7 -21.7 -30.8 -40 101 121 175 209 302 434 625 901 1,556 2,689 5,576 11,562 28,770 49,715 71,589 99,301 60595AA Mid Size & Full Size Rough Terrain Series SKYJACK, Page 19 Service and Maintenance Section 5 - Procedures 5.2-5 LPG Temperature Sensor (GM) A B WHITE/RED 5 VOLTS BLK/LT GREEN SENSOR GROUND TEMPERATURE SENSOR RESISTANCE Temperature Sensor Resistance TEMPERATURE DEGREES F TOLERANCE ±10% OHMS 220 200 190 180 170 160 140 120 100 80 70 60 40 20 0 -20 -40 153.7 214.6 255.4 305.5 367.3 444.1 660.6 1008 1582 2554 3284 4259 7357 13214 24705 48300 99318 60596AA SKYJACK, Page 20 Mid Size & Full Size Rough Terrain Series Section 5 - Procedures Service and Maintenance 5.2-6 Fuse Block Layout (GM) EMPTY EMPTY F13 60A ALT Mid Size & Full Size Rough Terrain Series 32ACR STARTER RELAY 56CR FUEL PUMP RELAY 2002CR POWER RELAY F7 5 AMP VSW F8 20 AMP ECU F11 15 AMP FUEL PUMP F10 15 AMP IGNITION F9 10 AMP EPR F12 15 AMP STARTER SKYJACK, Page 21 Service and Maintenance Section 5 - Procedures 5.2-7 Kubota Dual Fuel (DF972) Resistance Checks Resistance of Pick-Up Sensor 1. Disconnect connector from sensor. 2. Measure the resistance with an ohmmeter. 3. If resistance is not within factory specifications, replace it. Resistance Factory Specification A-B 1.85 to 2.45kΩ at 20°C Resistance of Ignition Coil 1. Disconnect connector from ignition coil. 2. Measure the resistance with an ohmmeter. 3. If resistance is not within factory specifications, replace it. Resistance Factory Specification B A B C A A-B 1.87 to 2.53Ω at 20°C A-C 10.4 to 15.6Ω at 20°C A: Terminal (+) C: High Tension Cord B: Terminal (-) Resistance of Ignitor 1. Disconnect connector from ignitor. 2. Measure the resistance with an ohmmeter. 3. If resistance is not within the factory specifications, replace it. A C E G B D F H 1 IMPORTANT To replace the ignitor with a service part, make sure the ignitor has the same part cord No / ID mark as the old one. (See the information label #1.) Ignitor Check Chart Negative Positive A A B C D E F G H 10 to 40 kΩ 10 to 40 kΩ 11 to 47 kΩ infinity infinity infinity infinity 0.33 to 1.3 kΩ 1.8 to 7.3 kΩ infinity infinity infinity infinity 1.5 to 6.0 kΩ infinity infinity infinity infinity infinity infinity infinity infinity infinity infinity infinity infinity infinity B 10 to 40 kΩ C 10 to 40 kΩ 0.33 to 1.3 kΩ D 11 to 47 kΩ 1.8 to 7.3 kΩ 1.5 to 6.0 kΩ E infinity infinity infinity infinity 2 megohm (minimum) 2 megohm (minimum) 2 megohm (minimum) 2 megohm (minimum) 2 megohm (minimum) 2 megohm (minimum) 2 megohm (minimum) 2 megohm (minimum) 2 megohm (minimum) 2 megohm (minimum) 2 megohm (minimum) 2 megohm (minimum) F G H infinity infinity infinity infinity infinity infinity infinity 60434AA SKYJACK, Page 22 Mid Size & Full Size Rough Terrain Series Section 5 - Procedures Service and Maintenance Outrigger Option D73 D78 17BCR D72 61CR J17E ENABLE D75 65CR J17D D76 9CR2 D74 REAR RIGHT FRONT RIGHT 9CR3 35C 78 73 77 74 71 75 72 76 CN20 D77 REAR LEFT FRONT LEFT D17B-1 17B 02 78 73 77 74 71 75 72 76 CN21 D71 D17B-2 CN14 04 17 86A 10A 09 44 01 02 02 36A 61 36 5.3-1 Auto-Leveling Outrigger PC Board Layout D36 61 62 62 63 63 64 64 01 10A 10A 10A 10A 65 CN22 M50318AA Mid Size & Full Size Rough Terrain Series SKYJACK, Page 23 Service and Maintenance Section 5 - Procedures 5.3-2 Outrigger Mechanical Limit Switch Wiring Diagram O.R. UP SWITCH (NO) - BLUE & BROWN O.R. UP SWITCH (NO) - BLUE & BROWN BACK VIEW - MALE BACK VIEW - MALE 3 2 4 1 PIN 1 - BLACK PIN 2 - BLACK / WHITE PIN 3 - BLUE PIN 4 - BROWN PIN 1 - BLACK PIN 2 - BLACK / WHITE PIN 3 - BLUE PIN 4 - BROWN BACK VIEW - FEMALE LEFT FRONT OUTRIGGER 3 PIN 1 - BLACK (10A) PIN 2 - BLACK / WHITE (65A) PIN 3 - BLUE (62) 4 PIN 4 - BROWN (61) 2 1 O.R. DOWN SWITCH (NC) - BLACK & BLACK / WHITE LEFT FRONT OUTRIGGER SECTION VIEW (SHOWN IN THE RETRACTED STATE) 2 4 1 RIGHT FRONT OUTRIGGER PIN 1 - BLACK (10A) PIN 2 - WHITE (66A) BACK VIEW - FEMALE PIN 3 - GREEN (63) 2 3 PIN 4 - RED (62) 1 4 O.R. DOWN SWITCH (NC) - BLACK & BLACK / WHITE RIGHT FRONT OUTRIGGER SECTION VIEW (SHOWN IN THE RETRACTED STATE) LEFT FRONT SIXTEEN PIN CONNECTOR PLUG OUTRIGGER PCB ON ELECTRICAL PANEL PIN 1 - 61 RED PIN 2 - 62 GREEN PIN 3 - 62 RED PIN 4 - 63 GREEN PIN 5 - 63 RED PIN 6 - 64 GREEN PIN 7 - 64 RED PIN 8 - 01 GREEN 3 PIN 9 - 10A BLACK (2) PIN 10 - 10A BLACK (2) PIN 11 - 10A BLACK (2) PIN 12 - 10A BLACK (2) PIN 13 - (N/U) PIN 14 - (N/U) PIN 15 - (N/U) PIN 16 - 65 GREEN / BLACK RIGHT FRONT RIGHT REAR LEFT REAR TO CONTROL MODULE PIN 1 - 65 GREEN / BLACK PIN 2 - 65A WHITE PIN 3 - 66A WHITE PIN 4 - 67A WHITE PIN 5 - 68A WHITE PIN 6 - (N/U) O.R. UP SWITCH (NO) - BLUE & BROWN O.R. UP SWITCH (NO) - BLUE & BROWN BACK VIEW - MALE 3 2 4 1 PIN 1 - BLACK PIN 2 - BLACK / WHITE PIN 3 - BLUE PIN 4 - BROWN BACK VIEW - FEMALE 2 1 LEFT REAR OUTRIGGER 3 PIN 1 - BLACK (10A) PIN 2 - WHITE (68A) PIN 3 - GREEN (01) 4 PIN 4 - RED (64) O.R. DOWN SWITCH (NC) - BLACK & BLACK / WHITE LEFT REAR OUTRIGGER SECTION VIEW (SHOWN IN THE RETRACTED STATE) BACK VIEW - MALE PIN 1 - BLACK PIN 2 - BLACK / WHITE PIN 3 - BLUE PIN 4 - BROWN 3 2 4 1 RIGHT REAR OUTRIGGER PIN 1 - BLACK (10A) PIN 2 - WHITE (67A) BACK VIEW - FEMALE PIN 3 - GREEN (64) 2 3 PIN 4 - RED (63) 1 4 O.R. DOWN SWITCH (NC) - BLACK & BLACK / WHITE RIGHT REAR OUTRIGGER SECTION VIEW (SHOWN IN THE RETRACTED STATE) M11449AC SKYJACK, Page 24 Mid Size & Full Size Rough Terrain Series Section 5 - Procedures Service and Maintenance 5.3-3 Auto-Leveling Outrigger Setting and Error Codes Reading the Codes: In order to read the fault codes, a sequence of pauses and flashes can be seen on the LED mounted on the outrigger control module. The codes are continuously displayed by the LED until the fault is cleared, the outrigger control module is reset and no longer detects the fault, or idle timeout becomes active. The sequence is as follows: 1. Half second flashes followed by half second pauses indicate the first digit. 2. A 2.5 second pause. 3. Half second flashes followed by half second pauses indicate the second digit 4. A 5 second pause. Repeat steps 1-4 Since the outrigger control module only reports one error, only one code can be read from the LED per instance. If the error is cleared and another error is present, it will then be presented. LED Error Codes EVERYTHING OK ON VEHICLE TILTED 1/1 OUTRIGGERS CANNOT BE MOVED! 1/2 OUTRIGGERS NOT HOME 2/2 NOT FULLY LEVEL 2/1 RELEASE OUTRIGGER DEMAND! 5/5 CHECK OUTRIGGER SUPPLY (P4-9) 5/2 CANNOT LEVEL : BAD TILT SENSOR 7/1 OUTRIGGERS MANUALLY CONTROLLED! 6/6 TESTING HWFS 7/8 B+ SUPPLY TOO LOW 5/1 STARTUP! 7/7 FAULT: BAD SLAVE MICRO 7/5 FAULT: BAD TILT SENSOR 7/1 FAULT: BAD HWFS 7/2 FAULT: P2-5 FAULTY 8/1 FAULT: P2-6 FAULTY 8/2 FAULT: P2-8 STUCK ON 8/3 FAULT: P2-8 ALWAYS ON 8/4 FAULT: P2-8 ALWAYS OFF 8/5 FAULT: HWFS STALLED! Mid Size & Full Size Rough Terrain Series 7/6 60402AB SKYJACK, Page 25 Service and Maintenance Section 5 - Procedures 5.3-4 Auto-Leveling Outrigger Error Code Breakdown RELEASE OUTRIGGER DEMAND! 5/5 Check inputs on P2 pins 5 & 6 - the “auto-level” or “auto-retract” input is active at power-on or when it is not allowed to carry out the function. OUTRIGGERS CANNOT BE MOVED! 1/2 Check input on P2 pin 10 – “auto-level” or “auto-retract” has been requested but the platform is elevated. NOT FULLY LEVEL 2/1 The outrigger legs are all down (touching the ground) but the platform is not fully level. OUTRIGGERS NOT HOME 2/2 The outrigger legs are not all down (touching the ground) and also are not all home (fully retracted). B+ SUPPLY TOO LOW CHECK OUTRIGGER SUPPLY (P4-9) 5/1 5/2 Check that the battery voltage is not too low. VEHICLE TILTED 1/1 These is not a true fault – move the vehicle to level ground! TESTING HWFS 7/8 STARTUP! 7/7 These are not true faults unless they do not clear – the start-up tests should only occur for a short time. OUTRIGGERS MANUALLY CONTROLLED! 6/6 This is not a true fault – the outriggers are being manually operated (one or more outrigger legs on P4 pins 1-8 is high, when the outrigger control module is not active. CANNOT LEVEL (BAD TILT SENSOR) FAULT: BAD TILT SENSOR FAULT: BAD HWFS FAULT: BAD SLAVE MICRO FAULT: HWFS STALLED! FAULT: P2-5 FAULTY FAULT: P2-6 FAULTY FAULT: P2-8 STUCK ON FAULT: P2-8 ALWAYS ON FAULT: P2-8 ALWAYS OFF 7/1 7/1 7/2 7/5 7/6 8/1 8/2 8/3 8/4 8/5 These are internal faults. If the fault persists after the power has been reset, the outrigger control module may need to be replaced. SKYJACK, Page 26 60412AB Mid Size & Full Size Rough Terrain Series AD 5.3-5 Hand Held Calibration/Diagnostic Tool Key Functions WARNING Only trained and authorized personnel shall be permitted to service an aerial platform. WARNING Read all instructions closely before attempting each phase of this procedure. SYMBOL KEY FUNCTIONS ESC/ENTER BUTTONS To move back and forth between menu and sub-menu LEFT/RIGHT BUTTONS Select menus and setting to be adjusted UP/DOWN BUTTONS Adjust setting values Outrigger Settings Model O.R. Setting Mid Size & Full Size Rough Terrain Series 9241 9250 8 5 SKYJACK, Page 27 Service and Maintenance Section 5 - Procedures 5.3-6 Outrigger Control Module Instructions When EZcal hand-held device is connected to the OCM1 control module, a two line displays shows various menus and settings. At any time the top line of the display describes the currently selected menu and the bottom line shows the currently selected item in that menu. Six buttons on EZcal allow easy navigation through the menus: and change the selected item (the bottom line display) ENTER enters the selected new menu when available (top line display changes) and adjusts the selected item when available ESC exits the current menu back to the previous menu TOP LEVEL MENU OPTIONS HELP Select this menu to see a description of current OCM1 status DIAGNOSTICS Select this menu to see switch input status & logged data ACCESS LEVEL Select this menu & enter correct code to enable adjustments and calibrations ADJUSTMENTS Select this menu to see and adjust OCM1 settings NOTE: this menu provides for adjustments which might be needed for different work activities SETUPS Select this menu to carry out initial set-up of the OCM1 NOTE: this menu provides for set-ups which are needed to configure the OCM1 for a particular vehicle HELP MENU OPTIONS (help message) A message displays current OCM1 status, indicating if everything is OK or if there is an error code (see LED Error Codes - Table 5.3) DIAGNOSTIC MENU OPTIONS SYSTEM Select this menu to see general OCM1 system information SWITCHES Select this menu to see switch input status OUTPUTS Select this menu to see OCM1 output status LOG Select this menu to see logged information DIAGNOSTIC / SYSTEM MENU OPTIONS OUTRIGGERS Displays various status during the auto-level function TILT Displays vehicle tilt in “X” and “Y” orientations measured by integral sensor TILTED Displays whether vehicle is tilted (YES or NO) BATTERY Displays battery supply voltage (on P2-12) DIAGNOSTIC / SWITCHES MENU OPTIONS LR/P2-1 High when the left rear outrigger is in contact with the ground RR/P2-2 High when the right rear outrigger is in contact with the ground RF/P2-3 High when the right front outrigger is in contact with the ground LF/P2-4 High when the left front outrigger is in contact with the ground EXTEND/P2-5 High to activate the auto-level function RETRACT/P2-6 High to activate the auto-retract function ELEV/P2-10 High when the scissor stack is stowed (“elevated” input indicates that the vehicle is stowed). SKYJACK, Page 28 Mid Size & Full Size Rough Terrain Series Section 5 - Procedures Service and Maintenance DIAGNOSTIC / OUTPUTS MENU OPTIONS LAMP/P2-7 Displays state of outrigger control box light STABLE/P2-8 Displays state of stable (all legs touching the ground) output TILT/P2-9 Displays state of tilt LRe/P4-1 Displays state of left rear outrigger extend valve RRe/P4-2 Displays state of right rear outrigger extend valve RFe/P4-3 Displays state of right front outrigger extend valve LFe/P4-4 Displays state of left front outrigger extend valve LRr/P4-5 Displays state of left rear outrigger retract valve RRr/P4-6 Displays state of right rear outrigger retract valve RFr/P4-7 Displays state of right front outrigger retract valve LFr/P4-8 Displays state of left front outrigger retract valve P4-9 MON Displays the voltage to the outrigger valve (can only be seen when operating in auto- level or retract) DIAGNOSTIC / LOG MENU OPTIONS MAX.BATTERY Displays maximum recorded battery supply voltage OCM1 version Displays part number and software version of GP106 EZcal version Displays software version of EZcal ACCESS LEVEL MENU OPTIONS CODE xxxx “ACCESS LEVEL” 3 (allows viewing only) “ACCESS LEVEL” 2 (allows setup on OCM1) ADJUSTMENTS MENU OPTIONS (factory set - not adjustable) Xtilt TRIP Displays the tilt trip point in the “X” orientation Ytilt TRIP Displays the tilt trip point in the “Y” orientation TILT ENTRY Displays the tilt delay time TILT EXIT Displays the tilt delay time Xlevel TRIP Displays the tilt trip point in the “X” orientation during the auto-level function Ylevel TRIP Displays the tilt trip point in the “Y” orientation which applies during the auto-level function MACHINE SETUP MENU OPTIONS (factory set - not adjustable) DEFAULTS Allows all adjustments & machine settings to be set to defaults WARNING: all GP106 settings will be changed; use with caution! CALIBRATE LEVEL Allows levelling of the integral tilt sensor of the GP106, when the vehicle is positioned on level ground (see Appendix Four) TILT MODE Allows configuration of the GP106 tilt output (P2-9): 1 – output turns on to light lamp when tilted 2 – output turns off to cutout functions when tilted 3 – output turns off to cutout functions when tilted AND elevated TILT FILTER Displays the filter applied to the tilt measurements during the auto-level function (used to minimize the effect of vehicle vibrations on the tilt measurement) Xlevel TARGET Displays the tilt in the “X” orientation at which the auto-level function will complete. Ylevel TARGET Displays the tilt in the “Y” orientation at which the auto-level function will complete. tilt SLACK Displays the amount of vehicle tilt exceeding the Xtilt TARGET and/or Ytilt TARGET in which the auto-level function will not attempt to level EXAMPLE: Xtilt TARGET=0.3°, Ytilt TARGET=0.7°, tilt SLACK=0.5° If machine is tilted to 1.0° in the X and Y orientations, the auto-level function will attempt to level the X orientation (0.3+0.5<1.0) but will not attempt to level the Y orientation (0.7+0.5>1.0) RANGE: 0.0° to 1.0°, default 0.3° Mid Size & Full Size Rough Terrain Series SKYJACK, Page 29 Service and Maintenance Section 5 - Procedures IMPORTANT Each phase must be completed before the next phase can be carried out. All phases must be completed before the aerial platform can be operated. Always follow the instructions of the Calibration instrument. 1. Ensure aerial platform is parked on a firm and level surface. 2. Elevate the scissors high enough to lay a level accross the base tubes. Ensure there is no debris on the base and the level sits flat. Do not elevate aerial platform higher than the high speed/tilt override limit switch. 3. Manually operate the outriggers and level the machine in 4 places: left side, right side, front and rear. All 4 outriggers must be firmly placed and all 4 tires are off the ground. 4. Double check that the aerial platform is level at all 4 points. 5. Connect the EZcal tool to the P1 connector on the CONTROL MODULE. 6. The display will show “Help: Press Enter”. By using Left/Right buttons, select the “Access Level (3 )” from the menu and press the ENTER button. 7. The display will show “Access Level: Code (0000)”. By using the Up/Down buttons, enter the Access Level Code (1 1 2 2) followed by pressing the ENTER button. 8. The display will show “Access Level 2”. By using Left/Right buttons, select the “Setups” from the menu and press the ENTER button. 9. The display will show “Setups: Change Defaults”. Select the “Change Defaults” from the menu and press the ENTER button. 10. The display will show “Defaults, 0 = Custom”. By using Up/Down buttons, select the “Defaults: Code Setting for your Model (For Default Code Refer to Table 5-3)” from the menu and press the ENTER button and followed by ESCAPE button. 11. The display will show “Setups Change Defaults”. By using Left/Right buttons, select the “Calibrate Level” from the menu and press the ENTER. 12. The display will show “Calibrate Level: Yes: Enter, No: ESC”. Select the “Yes” from the menu by press the ENTER button. 13. The display will show “Calibrate Level: Tilt 0.0’ , 0.0’”. Select the “ESCAPE” from the menu once. 14. The display will show “Setups Calibrate Level”. Select the “ESCAPE” from the menu once again. 15. The Calibration procedure is complete, unplug and remove the EZ-Cal. 16. Close the hydraulic/electric cabinet. SKYJACK, Page 30 Mid Size & Full Size Rough Terrain Series Section 5 - Procedures Service and Maintenance 5.3-7 Auto-Leveling Outrigger Control Module Pin Reference Chart LED GP106 Control Module PLUG P1 P2 P2 P2 P2 P2 P2 P2 P2 P2 P2 P2 P2 P4 P4 P4 P4 P4 P4 P4 P4 P4 PIN # 1 2 3 4 5 6 7 8 9 10 11 12 1 2 3 4 5 6 7 8 9 WIRE # AND COLOUR 68A White 67A Red/White 66A Blue/White 65A Green/White 70 Green/Black 79 Green 70A Red/White 65 Green/Black 28 Green 35 Green 02 White 10A Black 78 Black/White 77 Blue/Black 76 Red/Black 75 Orange/Black 74 Black 73 Blue 72 Red 71 Orange 35C White/Black WIRE FUNCTION The Calibration Connection Input indicating that the LEFT REAR outrigger is in contact with the ground Input indicating that the RIGHT REAR outrigger is in contact with the ground Input indicating that the RIGHT FRONT outrigger is in contact with the ground Input indicating that the LEFT FRONT outrigger is in contact with the ground Input for AUTO-LEVEL function to extend the outriggers to level the machine Input for AUTO-RETRACT function to retract the outriggers until the switch is released Outrigger Light on Outrigger Control Box STABLE output to indicate that all outriggers are in contact with the ground TILT output to indicate that the machine is level (ANSI/CSA only) Tilt override / High Drive Cutout Negative Input Main Power Input Output used to extend the LEFT REAR outrigger Output used to extend the RIGHT REAR outrigger Output used to extend the RIGHT FRONT outrigger Output used to extend the LEFT FRONT outrigger Output used to retract the LEFT REAR outrigger Output used to retract the RIGHT REAR outrigger Output used to retract the RIGHT FRONT outrigger Output used to retract the LEFT FRONT outrigger Power input for outriggers 60401AB Mid Size & Full Size Rough Terrain Series SKYJACK, Page 31 Service and Maintenance Section 5 - Procedures Load Sensing System - CE 5.4-1 Control Module Pin Reference Chart PLUG P1 P2 P2 P2 P2 P2 P2 P2 P2 P2 P2 P2 P2 P3 P3 P3 P3 P3 P3 P4 P4 P4 P4 P4 P4 P4 P4 P4 PIN # 1 2 3 4 5 6 7 8 9 10 11 12 1 2 3 4 5 6 1 2 3 4 5 6 7 8 9 SKYJACK, Page 32 WIRE # AND COLOUR Not Used 10E Black/White 14D Black 13D Orange Not Used Not Used 16 White/Black 15 Blue Not Used 35B Red/Black 02 White 10C Red 22 Red 29 Black 60 Black/White 28 Green/Black 02 White 28E Green/White Not Used 60A Green 28B Green Not Used Not Used 910 Black 902 White 900 White 910 Black WIRE FUNCTION The Calibration Connection Not Used Input Power From Base Terminal Strip To Confirm Lower Control Is Selected Raise Platform Input Lower Platform Input Not Used Not Used Forward Direction Input Reverse Direction Input Not Used Input From LS1 High Speed Limit Switch To Verify ON/OFF Limits Negative Input From Base Terminal Strip Main Power Input From Base Terminal Strip Output To FL-22 Flashing Light Output To BP-29 Beeper Output To Overload Warning Light On Control Box Output To 28CR1 Tilt Relay And 28CR2 Down Relay Negative for Flashing Light and Beeper Output To 28ECR1 Aux. Tilt Relay And 28ECR2 Aux. Down Relay Not Used Varied Input From Transducer Varied Input From Angle Transducer Not Used Not Used Positive Signal To Angle Transducer Negative Signal To Angle Transducer Negative Signal To Pressure Transducer Positive Signal To Pressure Transducer 60303AD Mid Size & Full Size Rough Terrain Series Section 5 - Procedures Service and Maintenance 5.4-2 LED Error Codes - Quick Reference Chart HELP Message EVERYTHING OK IN GROUND MODE! OVERLOAD FUNCTIONS DISABLED! VEHICLE TILTED VEHICLE OVERLOADED WAITING FOR B+ ON P2-12 ARMGUARD ACTIVE! TOO HIGH - DRIVE PREVENTED TOO HIGH - LIFT UP PREVENTED TESTING HWFS IDLE TIMEOUT ACTIVE! WAITING FOR NEUTRAL ELEVATION SWITCH SHIFTED? ELEVATION SWITCH STUCK? NO LAST CALDATE! LOAD NOT CALIBRATED DRIVE/LIFT INPUTS FAULTY! UP/DOWN SELECT INPUTS ACTIVE TOGETHER INVALID LOAD - CHECK SENSORS HEIGHT NOT CALIBRATED INVALID HEIGHT - CHECK SENSOR EMS INPUTS FAULTY! B+ SUPPLY TOO LOW P4-1 OR P5-1 SHORT TO 0V? P3-4 SHORT TO SUPPLY! P3-4 SHORT TO 0V? P3-4 SHORT TO SUPPLY? P3-6 SHORT TO 0V? P3-6 SHORT TO SUPPLY? FAULT: BAD TILT SENSOR FAULT: BAD HWFS FAULT: BAD SLAVE ANALOGS FAULT: BAD STRAIN MONITORS FAULT: BAD SLAVE MICRO FAULT: HWFS STALLED! STARTUP! FACTORY OVERRIDE LED indication Steady on Steady on 6/6 1/1 1/2 5/2 1/3 1/4 1/5 7/8 Always off 5/5 2/1 2/2 6/3 6/2 5/6 5/4 6/4 6/1 6/5 5/2 5/1 4/1 4/2 4/3 4/4 4/5 4/6 7/1 7/2 7/3 7/4 7/5 7/6 7/7 6/7 60405AA Reading the Codes: In order to read the fault codes, a sequence of pauses and flashes can be seen on the LED mounted on the GP102 module. The codes are continuously displayed by the LED until the fault is cleared, the GP102 reset and no longer detects the fault, or idle timeout becomes active. The sequence is as follows: 1. Quarter second flashes followed by quarter second pauses indicate the first digit. 2. A 1.5 second pause. 3. Quarter second flashes followed by quarter second pauses indicate the second digit 4. A 4 second pause. Repeat steps 1-4 Since the GP102 only reports one error, only one code can be read from the LED per instance. If the error is cleared and another error is present, it will then be presented. Mid Size & Full Size Rough Terrain Series SKYJACK, Page 33 Service and Maintenance Section 5 - Procedures 5.4-3 LED Error Codes - Code Breakdown Chart Diagnostic sequence dependant on LED flash code: No Last Caldate 63 Load Not Calibrated 62 Height Not Calibration An EZcal is required! 61 Waiting For Neutral 55 Drive/Lift Inputs Faulty! 56 Up/Down Select Inputs Active Together 54 EMS Inputs Faulty! Check inputs on P2 pins 1,2,3,4,5,6,7,8. 52 P3-4 Short To Supply! 42 P3-4 Short To Supply? 44 P3-6 Short To Supply? 46 Disconnect plug P3. If fault clears there is a problem with the wiring from P3-4 or P3-6 to the rest of the vehicle. Armguard Active! 23 Elevation Switch Shifted? 21 Elevation Switch Stuck? 22 If the 23 flash code is triggered by armguard, it will occur once then clean. This is not a true fault but just an indication of the reason for the vehicle stop. If the 21 or 22 flash code is triggered by a fault with the elevation switch, it will not clear. Check that the elevation switch correctly opens/closes when the platform is raised/lowered. P3-4 Short To 0V? 43 P3-6 Short To 0V? 45 Disconnect plug P3. If fault clears there is a wiring fault from P3-4 or P3-6 to the rest of the vehicle. Invalid Load - Check Sensors 45 Check the voltage out of the pressure transducer, into P4-2. It should be between 0.5V (zero pressure) and 4.5V (maximum pressure) and should vary as the platform load & position varies. Waiting For B+ on P2-12 52 B+ Supply Too Low 51 P4-1 Or P5-1 Short To 0V? 41 Check that the battery voltage is not too low. Verify battery voltage on P2-12. Disconnect plug P4 – if the fault clears there is a wiring fault from P4-1 to the rest of the vehicle. SKYJACK, Page 34 Mid Size & Full Size Rough Terrain Series Section 5 - Procedures Service and Maintenance 5.4-4 LED Error Codes - Code Breakdown Chart (Continued) Vehicle Tilted 11 Vehicle Overloaded 12 Too High - Drive Prevented 14 Too High - Lift Up Prevented 15 These are not true faults but an indication that vehicle movement is prevented. Remove excessive load from the platform. Lower the platform if close to maximum height. Move the vehicle to level ground. Invalid Height - Check Sensor 65 Check the voltage out of the height transducer, into P4-3. It should be between .4V and 4.6V and should vary as the platform position varies. Testing HWFS 78 Start Up! 77 These are not true faults unless they do not clear – the start-up tests should only occur for a short time. Overload Functions Disabled! 66 Factory Override 67 These are not true faults – the GP102 has been configured to suppress overload functionality. Idle Timeout Active! Always Off Fault: Bad Tilt Sensor 71 Fault: Bad HWFS 72 Fault: Bad Slave Analogs 73 Fault: Bad Strain Monitors 74 Fault: Bad Slave Micro 75 Fault HWFS Stalled! 76 Action a function to clear the idle timeout if it occurred. Ensure the GP102 is correctly mounted – incorrect mounting can cause the “bad tilt sensor” diagnostic to occur. Otherwise there may be an internal problem with the GP102. Mid Size & Full Size Rough Terrain Series SKYJACK, Page 35 Service and Maintenance Section 5 - Procedures 5.4-6 Control Module Load Calibration - Code Messages & Definitions During calibration the following failure message may appear: (Refer to 5.3-6 for hand held calibration/diagnostic tool key functions) F01: Check HWFS -- This message is given if the GP102 startup tests have not completed. Check HELP message for more information. F02: Not Ground Mode -- This message is given if the machine is not in ground mode (P2-2 must be high).Calibration can only be carried out in ground mode. F03: Not Stopped -- This message is given if any function switch is closed. Check DIAGNOSTICS / SWITCHES to see which function switch is closed. F04: Tilted -- This message is given if the machine is tilted. Calibration must be carried out with the machine level. If the machine is level, use the SETUPS / TILT SETUPS to set the GP102 level. F05: Bad Height -- This message is given if the height sensor output (P4-3) is out of range at the start of calibration. The height sensor output must be between 0.9V and 4.1V. Check DIAGNOSTICS / SENSORS to see the output. A reading of 0V or 5V is probably due to a wiring problem. F06: Check Elev -- This message is given if the elevation switch (P210) is open at the start of calibration, when the operator has confirmed the “PLATFORM DOWN?” question. If the platform is down, check the elevation switch wiring. F08: Check Elev -- This message is given if the elevation switch (P2-10) is closed at the end of calibration, when the platform should be fully raised. This message would occur if the UP switch was accidentally opened near the start of the lift. If the platform is fully raised, check the elevation switch wiring. F09: Bad Height -- This message is given if the height sensor output (P4-3) is out of range at the start of calibration. The height sensor output must be between 0.9V and 4.1V. Check DIAGNOSTICS / SENSORS to see the output. F10: Bad Height -- This message is given if the height sensor output (P4-3) is out of range at the end of calibration. The height sensor output must be between 0.9V and 4.1V. Check DIAGNOSTICS / SENSORS to see the output. A reading of 0V or 5V is probably due to a wiring problem. F11: Not Up -- This message occurs at the start of calibration if the operator selects a function other than UP. SKYJACK, Page 36 Mid Size & Full Size Rough Terrain Series Section 5 - Procedures Service and Maintenance F13: Low Height Range -- This message occurs at the end of calibration if the height sensor output did not change sufficiently to give a reasonably accurate platform height estimate. DIAGNOSTICS / SENSORS can be used to check the height sensor output (P43) when the platform is fully lowered and fully raised; a difference of at least 1V is to be expected. This message could occur if the UP switch was accidentally opened too early (when the platform is not fully raised). F15: Check Elev -- This message is given if the elevation switch (P2-10) is open when the platform has been fully lowered at the end of calibration. This message would occur if the DOWN switch was accidentally opened before the platform was fully lowered. If the platform is fully lowered, check the elevation switch. F16: Low Elev.open -- This message is given if the elevation switch (P2 10) opened during lift at a too low height (below 5%). Check CALIBRATIONS / HEIGHT CALS; the “ElevUp” value shows the recorded height where the switch opened. F17: High Elev.open -- This message is given if the elevation switch (P210) opened during lift at a too high height (above 25%).Check CALIBRATIONS / HEIGHT CALS; the “ElevUp” value shows the recorded height where the switch opened. F18: Low Elev.close -- This message is given if the elevation switch (P210) closed during lower at a too low height (below 5%).Check CALIBRATIONS / HEIGHT CALS; the “ElevDown” value shows the recorded height where the switch opened. F19: High Elev.close -- This message is given if the elevation switch (P210) closed during lower at a too high height (above 25%).Check CALIBRATIONS / HEIGHT CALS; the “ElevUp” value shows the recorded height where the switch opened. F20: Height<>0% -- This message occurs if the platform height is not 0% after the platform has been fully lowered at the end of calibration.The platform must return to the same height each time it is fully lowered. Check DIAGNOSTICS / SYSTEM to check the height. F28: Bad Height -- This message indicates a problem with the height sensor output (P43) during calibration. The height sensor output must be between 0.9V and 4.1V during calibration and between 0.4v and 4.6v during normal operation. Check DIAGNOSTICS / SENSORS to see the output. A reading of 0V or 5V is probably due to a wiring problem. F42: Low Pressure -- This message indicates that the pressure is too low (0.5V or less) when the elevation switch opens during calibration. Check DIAGNOSTICS / SENSORS to check the pressure. F43: High Pressure -- This message indicates that the pressure is too high (4.5V or more) when the elevation switch opens during calibration. Check DIAGNOSTICS / SENSORS to check the pressure. Mid Size & Full Size Rough Terrain Series SKYJACK, Page 37 Service and Maintenance Section 5 - Procedures F44: Low Pressure -- This message indicates that the pressure is too low (0.5V or less) at a measurement point. Check DIAGNOSTICS / SENSORS to check the pressure. F45: High Pressure -- This message indicates that the pressure is too high (4.5V or more) at a measurement point. Check DIAGNOSTICS / SENSORS to check the pressure. F46: Check Elev -- This message indicates that the elevation switch opened more than once during calibration lifting. F47: Check Elev -- This message indicates that the elevation switch closed more than once during calibration lowering. F48: Bad Pressure -- This message is given if the pressure sensor output (P4-2) is out of range at the start of calibration. The height sensor output must be between 0.5V and 4.5V. Check DIAGNOSTICS / SENSORS to see the output. A reading of 0V or 5V is probably due to a wiring problem. F52: Too Few! -- This message indicates that not enough measurements were recorded during calibration lifting or lowering. F98: Out of Range -- This message indicates that the “fine tune” calibration is unacceptable. This probably is due to the wrong load being in the platform (i.e: specifying “EMPTY” if the platform is loaded, or the other way round) or (Having the incorrect pressure transducer installed). During calibration the following information messages may appear: Caldate: -- This message is prompting for the date to be entered; it is stored to identify when the machine was calibrated. The last calibrate date can be viewed in DIAGNOSTICS / LOG. Press LEFT & RIGHT to select the flashing digits. Press UP & DOWN to change the flashing digits. Press ENTER when the entry is complete. IMPORTANT: The date 00/00/00 is not allowed! Finished -- This message confirms that calibration is complete and successful. Lift Empty -- This message is displayed while the platform is being raised to the next measurement height, when an EMPTY platform is being calibrated. Lift Loaded -- This message is displayed while the platform is being raised to the next measurement height, when a LOADED platform is being calibrated. Lifting -- This message is displayed while the platform is being raised, during HEIGHT-only calibration. Lower Empty -- This message is displayed while the platform is being lowered to the next measurement height, when an EMPTY platform is being calibrated. SKYJACK, Page 38 Mid Size & Full Size Rough Terrain Series Section 5 - Procedures Service and Maintenance Lower Loaded -- This message is displayed while the platform is being lowered to the next measurement height, when an EMPTY platform is being calibrated. Lowering -- This message is displayed while the platform is being lowered, during HEIGHT-only calibration. Measuring # -- This message is displayed when the platform is stopped during calibration, when the GP102 takes a measurement. There will be a short delay while the machine is allowed to stabilize after movement is stopped. Must Go Down! -- This message occurs if the wrong switch is closed when the GP102 is waiting for the platform to be lowered. Must Go Up! -- This message occurs if the wrong switch is closed when the GP102 is waiting for the platform to be raised. Platform Down? -- This message is prompting for confirmation that the platform is fully lowered. If necessary the DOWN switch can be activated to lower the platform. Press ENTER to confirm when the platform is fully lowered. Platform Empty? -- This message is prompting for confirmation that the platform is completely empty.Press ENTER to confirm if the platform is empty. Platform Loaded? -- This message is prompting for confirmation that the platform is loaded to rated load Press ENTER to confirm if the platform is loaded. Please Lift -- This message is prompting for the platform to be raised. The UP switch should be closed. Please Lower -- This message is prompting for the platform to be lowered. The DOWN switch should be closed. Please Wait -- This message indicates that the GP102 is busy; the delay will be short (no more than 5s). Total Data: -- This message is displayed at the end of each phase, to confirm the number of measurements recorded by the GP102. Mid Size & Full Size Rough Terrain Series SKYJACK, Page 39 Service and Maintenance Section 5 - Procedures 5.4-7 Control Module Load Calibration Procedure 1. Move the aerial platform to a test area where the platform can be elevated to its maximum working height and reach. 2. Ensure the aerial platform is parked on a firm, level surface. IMPORTANT Each phase must be completed before the next phase can be carried out. All phases must be completed before the aerial platform can be operated. IMPORTANT Always follow the instructions of the Calibration instrument. IMPORTANT Make sure the aerial platform is on BASE mode. NOTE To ensure a good and clear contact, clean the wire terminals before attaching the jumper clip. 3. Locate the main manifold inside the hydraulic/electric tray. 4. Disconnect the black wire #14 from the lift coil. 5. Locate the contactor on the electrical panel assembly. 6. The jumper connection must be connected between the contractor (wire #19B) and the lift coil (instead of the black wire #14) 7. Connect the Easy-Cal tool to the P1 connector on the CONTROL MODULE. 8. The display will show “Help: Press Enter”. By using Left/Right buttons, select the “Access Level ( ? )” from the menu and press the ENTER button. Contact Skyjack Service Department at: (44) 1691-676 236 for your Access Level Code Number. 9. The display will show “Access Level Code (xxxx)”. By using the Up/Down buttons, enter the Access Level Code (xxxx) followed by pressing the ENTER button. 10. The display will show “Access Level 2”. By using Left/Right buttons, select the “Setups” from the menu and press the ENTER button. 11. The display will show “Machine Defaults”. Select the “Machine Defaults” from the menu and press the ENTER button. 12. The display will show “Defaults, 0 = Custom”. By using Left/Right buttons, select the “X = Group Code” from the menu and press the ENTER button. SKYJACK, Page 40 Mid Size & Full Size Rough Terrain Series Section 5 - Procedures Service and Maintenance 13. The display will show “X=GROUP CODE”. (Refer to 5.4-8 for group code) By using the Up/Down buttons, enter the “Group Code (?)” then by using Left/Right buttons, select the “Curve” from the menu. 14. The display will show “X=CURVE”. (Refer to 5.4-8 for curve code) By using the Up/Down buttons, enter the “Curve Code (?)” followed by pressing the ESCAPE button. 15. The display will show “Machine Defaults”. By using Left/Right buttons, select the “Tilt Setups” from the menu and press the ENTER button. 16. The display will show “Tilt Setups: Calibrate Level”. Select the “Tilt Setups: Calibrate Level” from the menu and press the ENTER button. 17. The display will show “Calibrate Level: Yes: Enter, No: ESC”. Select the “Yes” from the menu by press the ENTER button. 18. The display will show “Calibrate Level: Tilt 0.0’ , 0.0’”. Select the “ESCAPE” from the menu once. 19. The display will show “Tilt Setups Calibrate Level”. Select the “ESCAPE” from the menu once again. 20. The display will show “Setups Tilt Setups”. By using Left/Right buttons, select the “Load Setups” from the menu and press the ENTER button. 21. The display will show “Load Setups: Calibrate Load”. Select the “Load Setups: Calibrate Load” from the menu and press the ENTER button. 22. At this point, elevate the aerial platform at full height, check the harness and making sure it is not stretched tight, then lower down the platform. 23. The display will show “Calibrate Load: Platform Down?”. Asking for confirmation that the platform is fully lowered? Check that the platform is fully lowered then press the ENTER button to confirm. 24. The display will show “Calibrate: Loaded Empty? No”. Asking for confirmation that the platform is empty? Check that the platform is empty 25. By using the Up/Down buttons, enter the “Yes” followed by pressing the ENTER button. 26. The display will show “Calibrate Load: Please Lift......”. Waiting for the lift switch to be activated. 27. Hold the lift switch and keep holding it until the platform is fully elevated. Mid Size & Full Size Rough Terrain Series SKYJACK, Page 41 Service and Maintenance Section 5 - Procedures IMPORTANT If the lift switch is released earlier than full-height position, the calibration will have to be aborted and repeated from the beginning! 28. When the system detects the lift switch closed, the display will show “Calibrate Load: Lift Empty”. 29. After a delay, the system will stop the platform lifting and will take height & pressure measurements; the display will show “MEASURING # xx” When the measurements have been taken, the platform will resume lifting. NOTE The Lifting......stopping.......measuring....lifting process will continue until the platform reaches full height. 30. When the platform reaches full height release the lift switch. 31. The display will briefly show “TOTAL DATA: 04” to indicate the number of measurements taken. 32. The display will show “Calibrate Load: Please Lower......”. IMPORTANT If the lower switch is released earlier than full-lower position, the calibration will have to be aborted and repeated from the beginning! 33. Hold the lower switch and keep holding it until the platform is fully lowered. 34. When the system detects the lower switch closed, the display will show “Calibrate Load: Lower Empty” 35. After a delay, the system will stop the platform lowering and will take height & pressure measurements; the. display will show “MEASURING #xx”. When the measurements have been taken, the platform will resume lowering. NOTE The lowering......stopping.......measuring....lowering process will continue until the platform is fully lowered. 36. When the platform is fully lowered (and height 0% is displayed), release the lower switch. 37. The display will show briefly “TOTAL DATA: 04” to indicate the number of measurements taken. 38. The display will show “Calibrate Load: Caldate: mm/dd/yy”. It is recommended that the current date be entered here to provide easy taking of the data of last calibration. The current date must be entered using the LEFT/RIGHT and UP/DOWN buttons. 39. Press ENTER to complete date entry (the system will store it). 40. The display will show “Calibrate Load” option. 41. Press the ESC button to exit the “Calibrate Load” option. SKYJACK, Page 42 Mid Size & Full Size Rough Terrain Series Section 5 - Procedures Service and Maintenance 42. Remove the jumper wire and re-connect the black wire #14 to the coil removed earlier. 43. Close the hydraulic/electric tray. NOTE Continuing partially complete load calibration. Once a calibration phase has been successfully completed, it is not required to do it again (unless of course a change to the vehicle such as a replacement sensor requires that calibration be repeated). This is useful if the calibration procedure is interrupted – the remaining phases can be completed at a later time. If a calibration phase has been successfully completed, a “REDO” message is displayed: REDO DYNAMIC: NO REDO LOADED: NO REDO EMPTY: NO If the phase does not need to be repeated, just press ENTER to move on. If the phase does need to be repeated, press UP or DOWN to change “NO” to “YES” then press ENTER. Mid Size & Full Size Rough Terrain Series SKYJACK, Page 43 Service and Maintenance Section 5 - Procedures 5.4-8 Curve/Group Codes Chart Model Number of Extension Decks Curve Code Group Code 7027/7127 1 Manual Extension Deck 24 7 7027/7127 1 Powered Extension Deck 25 7 7135 1 Manual Extension Deck 26 7 7135 1 Powered Extension Deck 27 7 8831 No Extension Deck 30 9 8831 1 Manual Extension Deck 31 9 8831 1 Powered Extension Deck 32 9 8831 2 Manual Extension Decks 33 9 8831 2 Powered Extension Decks 34 9 8841 No Extension Deck 40 10 8841 1 Manual Extension Deck 41 10 8841 1 Powered Extension Deck 42 10 8841 2 Manual Extension Decks 43 10 8841 2 Powered Extension Decks 44 10 9250 No Extension Deck 52 10 9250 1 Powered Extension Deck 53 10 9250 2 Powered Extension Decks 54 10 6832RT 1 Manual Extension Deck 56 15 6826RT 1 Manual Extension Deck 57 15 9241 2 Powered Extension Decks 58 15 60403AD SKYJACK, Page 44 Mid Size & Full Size Rough Terrain Series Reliable lift solutions by people who care. www.skyjack.com