1
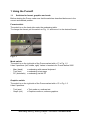
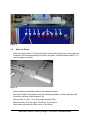
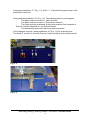
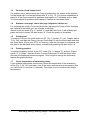
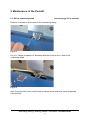
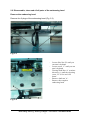
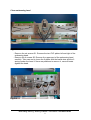
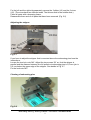
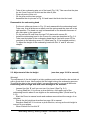
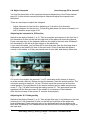
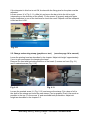
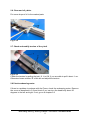
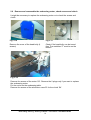
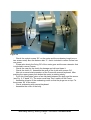
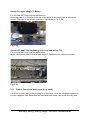
PUMAVI
Embossing machine
Service Manual
Note taking • Writing • Printing in Braille. If it’s Braille...ask BRAILLETEC
Note taking • Writing • Printing in Braille. If it’s Braille...ask BRAILLETEC
Service manual for PumaVI
Using the PumaVI
To do
1.1
1.2
1.3
1.4
1.5
1.6
1.7
page
Switches for format, graphics and mode
Start the Puma
Function of red lamps H1-H3
Emboss a test page, check this page (alignment, thickness)
Printing text
Printing graphic
Check temperature of embossing motor
during embossing
2
3
5
5
5
5
5
Maintenance of the PumaVI
To do
2.1
2.2
2.3
2.4
2.5
2.6
2.7
2.8
2.9
2.10
2.11
page
Oil embossing head
Disassemble, clean and oil embossing head
Adjustment of the dot height
Adjust interpoint
Change embossing stamp (graphics or text)
Clean and oil y-drive
Check and modify tension of the y-belt
Check embossing motor
Remove the embossing motor, check
the screws and clutch, reassemble the motor
Check function of all sensors
Protect Puma from dust (cover if not used)
all 2 weeks
all 6 month
after changing head
if necessary
if necessary
all 6 month
all 6 month
6
7
10
11
12
13
13
13
if necessary
14
16
17
Note taking • Writing • Printing in Braille. If it’s Braille...ask BRAILLETEC
1
1 Using the PumaVI
1.1
Switches for format, graphics and mode
Before starting the Puma, make sure that the switches described below are in the
correct and desired position.
Format switch:
The switch is on the back side under the embossing table.
To change the format, pull the switch on Fig. 1.1 and move it to the desired format.
Fig. 1.1
Mode switch:
The switch is on the right side of the Puma marked with a ‘C’ in Fig. 1.2
It has 3 positions (left, middle, right) Values in brackets for Puma6 before 2005
-
Man (hand)
= embossing with manual keyboard
Test (test)
= embossing a test page
PC (automatic) = embossing via the PC
Graphics switch:
The switch is on the right side of the Puma marked with a ‘G’ in Fig. 1.2
It has 2 positions
-
Text (aus)
Graph (ein)
= Text mode on, emboss text
= Graphics mode on, emboss graphics
Note taking • Writing • Printing in Braille. If it’s Braille...ask BRAILLETEC
2
Fig. 1.2
1.2
-
Start the Puma
Open the plate holder ‘P’ and put the plate so that the fixing pins on the holder are
inserted in the holes previously punched in the plate. Close the plate holder ‘P’ to
lock the plate in position.
Fig. 1.3
-
Switch Graphic and Mode switch to the desired position
-
Move the middle of the plate under the embossing head to avoid a problem with
the safety switches (See chapter 2.10)
-
Move switch ‘A’ (Fig. 1.4) to an upright position (ON)
-
Switch the key ‘B’ to the right. The Lamp ‘C’ must burn
After some seconds you hear a click in the Puma.
Note taking • Writing • Printing in Braille. If it’s Braille...ask BRAILLETEC
3
-
Now press pushbutton ‘F’ (Fig. 1. 2). After 5 – 10 seconds the green lamp in this
pushbutton must burn.
-
Now press the pushbutton ‘N’ (Fig. 1.5). The following actions must happen:
The plate must be moved in Y (line) direction
The plate must be moved in X (Character) direction
The plate must be positioned at the home position (first character in
first line. Position depends on the desired format).
The embossing head must make one slow movement.
-
If this happens correctly, press pushbutton ‘N’ (Fig. 1.5) for a second time.
-
The lamp ‘O’ must burn, and the Puma is ready to emboss in the desired mode.
Fig. 1.4
Fig. 1.5
Note taking • Writing • Printing in Braille. If it’s Braille...ask BRAILLETEC
4
1.3
Function of red lamps H1-H3
If a problem occur while starting the Puma or embossing, the reason of the problem
can be found with 3 red lamps marked with ‘E’ in Fig. 1.2. You find an explanation at
page 14 of the Puma manual for problems that happen in ‘Test Mode’ and on page
15 of the manual for problems that happen in ‘Manual or Automatic Mode’
1.4
Emboss a test page, check this page (alignment, thickness)
For checking the quality of a printed plate after adjusting the Puma or after changing
the material of the plates you can emboss a test page.
Switch to the test mode (Fig. 1.2 switch ‘C’) and start the Puma. It will emboss test
plates as long you press the start button ‘N’. Check the quality of this plates.
1.5
Printing text
To emboss Text, put the mode switch to ‘PC’ (Fig. 1.2 switch ‘C’), put Graphic switch
‘G’ to ‘Text’ and start the Puma. Connect Puma and PC with the serial cable and start
the Puma driver (Puma.exe, RTFC or Duxbury). After the first page is embossed, turn
the plate to the backside and continue embossing by pressing the start button ‘N’.
1.6
Printing graphics
To emboss Graphics switch to the ‘PC’ mode (Fig. 1.2 switch ‘C’) and put Graphic
switch ‘G’ to ‘Graph’. Start the Puma. Connect Puma and PC with the serial cable
and start the Braillegraf windows program. Don’t forget to change the text stamp
against the graphics stamp.
1.7
Check temperature of embossing motor
If you emboss many plates continuously check the temperature of the embossing
motor (Fig. 2.18) You must take a rest, if the motor reached such a temperature that
you can’t touch it more than 10 seconds. This might occur in countries with height
temperature.
Note taking • Writing • Printing in Braille. If it’s Braille...ask BRAILLETEC
5
2 Maintenance of the PumaVI
2.1 Oil the embossing head
(see also page 31 in manual)
Remove 3 screws on front cover of the embossing stamp.
Fig. 2.1
Put 2 or 3 drops of special oil, delivered with the Puma on the 6 dots of the
embossing head.
Fig. 2.2
After fixing the front cover, start Puma in manual mode and write some characters
with each dot.
Note taking • Writing • Printing in Braille. If it’s Braille...ask BRAILLETEC
6
2.2 Disassemble, clean and oil all parts of the embossing head
Remove the embossing head
Remove the 2 plugs of the embossing head (Fig. 2.3).
Fig. 2.3
-
-
Loosen Hex Nut ‘B’ until you
can turn it by hand.
Loosen screw ‘C’ until you can
turn it by hand.
Turning Shaft Nut ‘A’ to minus
direction (-), until the elevating
screw ‘D’ is free and ‘fell
down’.
Remove shaft nut ’A’.
Remove the complete
embossing head.
Fig. 2.4
Note taking • Writing • Printing in Braille. If it’s Braille...ask BRAILLETEC
7
Clean embossing head
Fig. 2.5
- Remove the six screws S1. Remove the two PVC plates left and right of the
embossing head.
- Remove the 4 screws S2. Remove the upper part of the embossing head
carefully. Take care not to loose the 6 plates with the braille dots and the 2
springs under the head. If there are problems to remove it, use soft beats
against the head.
Fig. 2.6
Note taking • Writing • Printing in Braille. If it’s Braille...ask BRAILLETEC
8
For the left and the right side separately remove the 3 slides (U1) and the 3 wires
(U2). (The wires have two different ends. The thinner slide is the middle slide.)
Clean all parts with a cleansing tissue.
Reassemble them and oil all parts that have been removed. (Fig. 2.6)
Adjusting the stripper
Fig. 2.7
If you have to adjust the stripper that is mounted above the embossing pins here the
instructions:
Loosen the two lock nuts ‘M3’. Adjust the two screws ‘S3’ so, that the stripper is
parallel and the distance between the full pulled out embossing pins is 0,5 mm (pin is
0,5 mm below the upper edge of the stripper. See details in Fig. 2.7.
Fix the lock nuts ‘M3’.
Cleaning of embossing pins
Fig. 2.8
Note taking • Writing • Printing in Braille. If it’s Braille...ask BRAILLETEC
9
-
Take all six embossing pins out of the head (Fig. 2.8). Take care that the pins
for dot 2 and 5 are not as thick as the other 4 pins.
Clean all parts of this unit.
Oil the pins and the two springs.
Assemble the six pins as in Fig. 2.8 and insert the block into the head.
Reassemble the embossing head
-
-
Put the six slides as shown in Fig. 2.6 and reassemble the embossing head.
Take care, that all slides move easily and the springs and the pins are in the
right position. The head can only be assembled in one direction because of
two extra pins in the upper half.
Fix the screws S2 and close the two PVC plates with screws S1.
Install the embossing head in the Puma vice versa as described at Fig. 2.4.
Take care that plate of the embossing head that is fixed with screw ‘B’ fits
complete to the elevating screw ‘D’ (detail see Fig. 2.9 at marked position)
To adjust the height of the embossing head with Nut ‘A’ and ‘B’ see next
chapter .
Fig. 2.9
2.3 Adjustment of the dot height
(see also page 18-19 in manual)
Warning!
The adjustment of the dot height is a tricky problem and must therefore be carried out
with a great deal of care. Never adjust the dot height during the embossing process.
To adjust the dots to the correct height, increase/decrease by very small amounts.
Embossing with too high dots will cause damage to the machine.
- Loosen Hex Nut ‘B’ until you can turn it by hand. (See Fig. 2.4)
- Turning Shaft Nut ‘A’ to minus or plus direction, until upper part of the
embossing head is about 2 mm higher as the embossing table. (Detail see Fig.
2.13)
- Start the Puma in manual mode and emboss some dots at the margin of an
old plate.
- Check the dot height as described on page 18 in manual.
- Readjust Shaft Nut ‘A’ to minus or plus direction, as long as the dot height is
correct for your plates.
- When finished fix Hex Nut ‘B’
Note taking • Writing • Printing in Braille. If it’s Braille...ask BRAILLETEC
10
2.4 Adjust interpoint
(see also page 22 in manual)
You find the description of the complete interpoint adjustment in the Puma manual
page 22. In this service manual the steps to check and adjust the interpoint are
described.
There are two steps to adjust the interpoint.
-
Adjust interpoint for the first line. Adjusting in X-direction (line direction)
Adjust interpoint for the last line. The printing plate does not move accurately in Xand Y-direction at an angle of 90°
Adjusting the Interpoint in X-Direction
Switch to the desired format (1 or 2). Take a new plate and emboss in the first line 3
full characters (6 dots) on the left and right side of the plate with manual keyboard.
Press new page key on the keyboard and turn the plate to the back side. Emboss 3
full characters on the left and right margin on the back side.
If you check this plate, you find one dot of each character from the first page that is
embossed in the middle of 4 dots of the back side. Check if that dots are placed
exactly in the middle, or if they are placed more to one side, and destroy other dots.
Fig. 2.10
only one Sensor is on this photo
If it is not in the middle, the sensors F1 or F2 (according which format is chosen)
must be moved a little bit. Before moving this sensors, mark the actual position. The
correction mostly is less than 1/3 mm. So don’t move the sensor too far from the
actual position. Fine adjustment of the sensor-position can be made using the set
screw ‘F’ (Fig. 2.9) after loosening the holding screws ‘S’. This procedure must be
repeated until the dots are exact in the middle of a character of the backside.
After this the screws of the sensor ‘S’ must be fixed properly.
Adjusting the X-Y Orthogonality
Switch to the desired format (1 or 2). Take a plate from step 1 and emboss in the last
(bottom) line 3 full characters (6 dots) on the left and right side of the plate with
manual keyboard. Press new page key on the keyboard and turn the plate to the
back side. Embossing 3 full characters on the last line at the left and right margin on
the back side.
Note taking • Writing • Printing in Braille. If it’s Braille...ask BRAILLETEC
11
If the interpoint in this line is not OK, the bar with the fixing pins for the plate must be
adjusted.
Loosen screw ‘A’ of Fig. 2.11 a little bit, and move the bar a bit to the left or right
(depending on the direction of the offset). Fix the screw ‘A’ properly and print again
some characters in one of the last lines to check the result. Repeat until the interpoint
of the last line is OK.
Fig. 2.11
2.5 Change embossing stamp (graphics or text)
(see also page 14 in manual)
Lower the printing head as described in the chapter ‘Adjust dot height’ approximately
2 mm to get more space for changing the head.
Remove the front and backside protection of the head. (3 screws on front (Fig. 2.1)
and 2 marked screws (Fig. 2.12).
Fig. 2.12
Fig. 2.13
Loosen the marked screw ‘A’ (Fig. 2.13) and remove the stamp. Put a drop of oil to
the shaft of the stamp and insert the new stamp (Text or graphic) Push it as much as
possible to the top. Fix the screw ‘A’ and assemble both protections. Adjust dot
height as described in the chapter 2.3.
Note taking • Writing • Printing in Braille. If it’s Braille...ask BRAILLETEC
12
2.6 Clean and oil y-drive
Put some drops of oil to the marked parts
Fig. 2.14
2.7 Check and modify tension of the y-belt
Fig. 2.15
Check the tension by pulling the belt ‘A’. It is OK, if you are able to pull it about 1 cm.
Otherwise loosen screws ‘B’ a little bit and adjust the tension.
2.8 Check embossing motor
If there is a problem to emboss with the Puma, check the embossing motor. Remove
the cover as described in 2.9 and check if you can turn the head bully about 30
degrees to the left and right. If not, go on at chapter 2.9
Note taking • Writing • Printing in Braille. If it’s Braille...ask BRAILLETEC
13
2.9 Remove and reassemble the embossing motor, check screws and clutch
It might be necessary to replace the embossing motor or to check the screws and
clutch.
Fig. 2.16
Fig. 2.17
Remove the cover of the head bully (4
screws)
Check if the head bully can be turned
free. The metal bar ‘P’ must be on the
bottom.
Fig. 2.18
Remove the screws of the motor ‘S3’. Remove the 2 plugs only if you want to replace
the embossing motor.
Put the motor on the embossing table.
Remove the screws of the aluminium case ‘B’ for the clutch ‘S4’
Note taking • Writing • Printing in Braille. If it’s Braille...ask BRAILLETEC
14
S5
B
C
A
S6
D
S5
Fig. 2.19
- Check the socket screws ‘S5’ on the motor and the embossing head (one or
two screws exist) Also the distance disc 'C' that is included in newer Pumas has
one screw.
- Please also check the fixing 'S6' of the motor gear and the axe extension that
is included in newer Pumas.
- Check the case for the clutch for damage and dirt and clean it.
- Check the clutch ‘A’. Assemble the case of the clutch with screws ‘S4’
- Now do a normal start procedure of the Puma with manual keyboard. After
pushing the upper green push button the motor is rotating slowly.
- Put a thin metal plate (piece of an old plate) between the bully and the sensor
(see Fig. 2.17 detail ‘S’). The motor must stop. Don’t switch off the Puma.
- Assemble all parts of the embossing motor so that the plugs are on top. Fix
the screws ‘S3’ of the motor.
- Check embossing with manual keyboard.
- Assemble the cover of the bully
Note taking • Writing • Printing in Braille. If it’s Braille...ask BRAILLETEC
15
2.10 Check function of all sensors
Sensor of the embossing head bully
For this test the Puma must be switched on. To check the sensor move a thin metal
plate between the bully and the sensor. The light in the sensor must burn. (Fig. 2.17)
Sensor for left limit switch
Move the plate to the left side until the end is reached. Switch on the Puma. After a
while the Lamps H1 and H3 must burn. The sensor is a micro switch placed under
the left side of the embossing table
Fig. 2.20
Sensor for right limit switch
Move the plate to the right side until the end is reached. Switch on the Puma. After a
while the Lamps H1 and H2 must burn. The sensor is a micro switch placed under
the right side of the embossing table.
Fig. 2.21
Note taking • Writing • Printing in Braille. If it’s Braille...ask BRAILLETEC
16
Sensor for upper margin (Y-Motor)
For this test the Puma must be switched on.
Move the plate in Y direction to the top of the plate. If the metal plate is behind the
sensor, The light in the sensor must burn. See details in Fig. 2.22
Fig. 2.22
Sensors F1 and F2 for beginning of line and end of line (F3)
For this test the Puma must be switched on.
Move a thin metal plate in front of each sensor. The light in the sensor must burn.
Fig. 2.23
2.11
Protect Puma from dust (cover if not used)
If the Puma is not used in the evening or on weekend cover the complete machine to
protect it against dust. Otherwise the head and other parts may be blocked by dust
Note taking • Writing • Printing in Braille. If it’s Braille...ask BRAILLETEC
17