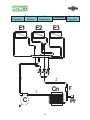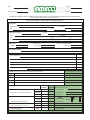
1
S L U S H * I T A L I A N G R A N I T A * F R O Z E N C O F F E E * F R O Z E N M A R G A R I T A *
F R O Z E N Y O G U R T * S O R B E T * D A I Q U I R I S
SERVICE MANUAL
Model#: FirstClass
WWW.
.COM
I
Indice
Una scelta di qualità……………
Istruzioni e avvertenze
generali…………………….…….
Installazione del nuovo
apparecchio……………….…….
Pulizia…………………………….
Comandi e segnalazioni First
Class………………………..……
Come iniziare la produzione di
granita, sorbetto o bibita
fredda………………….…………
Piedino alto………….………..…
Comandi e segnalazione First
Class Millennium..……………....
Come iniziare la produzione di
granita, sorbetto o bibita fredda
First Class Millennium..………...
Regole fondamentali di
sicurezza……………….………...
Smaltimento del vecchio
apparecchio…………….………..
Assistenza tecnica……….……...
Installazione FC acqua……….…
Procedura riarmo
pressostato………………….…..
Procedura sostituzione
coppiglia………………………….
Problem Solving…………….…...
Certificato di garanzia…………..
Impianto elettrico………………..
Impianto elettrico Millennium…..
Impianto frigorifero……………...
Esploso…………………………..
Descrizione Codici……….……..
Garanzia USA e Canada……….
Registration Card………………..
Defrost timer (FC Standard) ..…
GB
2
3
4
5
6
7
8
8
12
12
12
12
13
13
14
15
75
81
82
85
87
88
92
93
95
Index
A quality choice………………….
General instructions and
warnings………………………….
Installing the new
machine…..……………….……..
Cleaning………………………….
First Class controls and
signals……….…………………...
How to start the production
slush, sherbets or cold drinks….
Long feet………….……………...
First Class Millennium controls
and signals .……………………..
How to start the production of
slush, sherbets or cold drinks
with FC Millennium.…….……….
Important security
rules……………………….……...
Old machine disposal…………..
Technical assistance…………...
FCW installation………………...
Pressure switch refit
procedure…..…………………....
Cotter pin
substitution………………………
Problem Solving…………….…..
16
17
18
19
20
21
22
22
25
26
26
26
27
27
28
29
Warranty certificate…….……….
Electric system…………….….…
Millennium electric system …….
Refrigerating system………….…
Exploded view………….………..
Codes description……………….
Warranty USA e Canada……….
Registration Card………………..
Defrost timer (FC Standard) ..…
F
Index
Un choix de qualité……………...
Instructions et remarques
générales………………….……..
Installation de l’appareil………..
Nettoyage……………….……….
Commandes et signaux du First
Class……………………………...
Comment commencer la
production de granité, sorbet ou
boisson froide.......….......………
Commandes et signaux du First
Class Millennium….……………..
Comment commencer la
production de granité, sorbet ou
boisson froide avec First Class
Millennium..……………………...
Règles fondamentales de
sécurité……….……….…………
Mise au rebut du vieil
appareil…………….…………….
Service après-vente…….….…...
Installation des FCW…………....
Procédé mise en marche
pressestat..……………….……...
Remplacement de la
goupille…………………………...
Problem Solving…………….…...
Certificat de garantie…..………..
Installation électrique….………..
Installation électrique
Millennium………………………..
Installation frigorifique…...……..
Vues éclatées……………….…..
Codes et description…..………..
Garantie USA e Canada………..
Registration Card………………..
Defrost timer (FC Standard) ..…
D
76
81
82
85
87
88
92
93
97
30
31
32
33
34
35
37
40
41
41
41
42
42
43
44
77
81
82
85
87
89
92
93
99
Inhaltsverzeichnis
Eine Qualitätswahl……..…….....
Anweisungen und allgemeine
Hinweise………………..……......
Installation der neuen Maschine
……………….…….....................
Reinigung……………….…….....
Bedientasten und Meldungen
First Class..................................
Herstellung von Gramolaten,
Sorbets und eisgekühlten
Getränken.......…........................
Bedientasten und Meldungen
First Class Millennium................
Produktionsbeginn für
Gramolaten, Sorbets oder
Kalten Getränken FC Millennium
-1-
45
46
47
48
49
51
51
55
Grundlegende
Sicherheitsmassnahmen...……..
Entsorgung der alten
Geräts………………..…….........
Technischer
Kundendienst……………….......
Installation der FCW..................
Rückstellung des
Druckwächters…..……………...
Ersetzen des
Splints........………………………
Problem Solving…………….......
Garantieschein………………….
Elektrik…………………..…….....
Elektrik Millennium……..…….....
Kühlanlage………………..…......
Explosions-Darstellung…….......
Beschreibung der
Ersatzteile…………………….....
Garantie USA e Canada………..
Registration Card………………..
Defrost timer (FC Standard) ..…
E
55
55
55
56
56
57
58
78
81
82
85
87
89
92
93
101
Índice
Una elección de calidad…….....
Instrucciones y advertencias
generales…………………..........
Instalación del nuevo
aparato…………...…...………....
Limpieza………………….….......
Mandos y señalizaciones First
Class...................................…...
Cómo iniciar la producción de
granizado, sorbete o bebida
fría...........................…………....
Mandos y señalizaciones First
Class Millennium.....………..…..
Cómo iniciar la producción de
granizado, sorbete o bebida fría
con First Class Millennium……..
Normas fundamentales de
seguridad………..…..………......
Eliminación del viejo
aparato…………..……..……......
Asistencia técnica………....…....
Instalación de FCW..............…..
Procedimiento de
restablecimiento del
presostato..................................
Sustitución del
pasador.............…………………
Solución de Problemas First
Class …………….......
Certificado de garantía………....
Instalación eléctrica……….........
Instalación Eléctrica
Millennium..................................
Aparato Frigorífico………...…....
Despiece……………..……….....
Código Descripción….……........
Garantía USA e Canada………..
Registration Card………………..
Defrost timer (FC Standard) ..…
59
60
61
62
63
64
65
69
69
69
69
70
70
71
72
79
81
82
85
87
90
92
93
103
ENGLISH
A quality choice
Choosing Elmeco, and in
particular First Class, the
new and only
multifunctional machine
with double augers,
demonstrates your attention
to innovation. Thanks for
understanding the
importance of working
with a company that does
not consider “quality” as an
abstract word. For Elmeco
quality is a concrete
commitment. It actually
means to clinch the
attention to the innovation
that characterized us as the
creators of the first slush
machine and that today
confirms our leadership in
the technical forefront. For
our company “Quality”
also means working trying
to always improve from a
management and
organizational point of
view following the Vision
2000 certification, and it
finally means to care about
the customers and to
dedicate investments and
resources to continuously
meet their needs.
On the other hand, for
those who decided to
choose Elmeco, quality
means being able to work
with reliable and lasting
products, to count on a
precise and qualified
assistance in order to work
- 16 -
with increasing satisfaction
and earnings.
ENGLISH
General instruction
and warnings
Before switching on the
machine carefully read the
information in this service
manual; this way you will be
able to install, use and maintain
the machine.
Keep the use and assembly
instructions, even for the next
buyer. The manufacturer
declines any responsibility for
damages deriving from the nonobservance of the following
instructions.
Install the machine according to
the assembly instructions. The
power supply must correspond
to the data on the plate on the
front side of the machine
behind the drip tray (pic. 1).
- 17 -
ENGLISH
During maintenance and
cleaning, or in case of bad
functioning, disconnect the
machine from the power plug
(by pulling the plug and not the
cable) (pic. 2 and 3 pag.17).
Only specialized and
authorized staff can repair the
machine. Not perfect repairing
can be dangerous for the user.
Contact Elmeco for information
concerning the closer
authorized assistance centre.
Installing the new
machine
This machine for the production
of cold drink, slush, and
sherbets the absolute
homogeneity of the product and
the possibility to regulate its
density thanks to an innovative
electronic control. Before
installing the machine, verify
that:
• First Class is not placed by
an heat source;
• The machine has not been
damaged during
transportation. In case of
doubt, contact the supplier;
• The power supply system is
endowed with a grounding
that respects the rules of
law;
• The power supply system
capacity is adequate to the
maximum power of the
machine, as indicated on the
plate (pic. 4 pag.17).
In case of doubt, contact only
qualified staff.
MODEL
HEIGHT
WIDTH
DEPTH
WEIGHT
32 kg
71 lb
54 kg
119 lb
450 w
0,61 hp
900 w
0,61 hp
67 kg
148 lb
1200 w
0,61 hp
In order to install the machine,
carefully read the following
instructions.
#
This machine is only for the use
it has been manufactured for.
Any other usage is to be
considered as improper and
dangerous.
Machine description (pic. 1
pag.17):
•
•
•
•
•
•
•
•
•
•
Top light
Transparent tank
Auger ring nut
Hooks for the tank removal
Control electronic board
Supply outlet
Main switch
Pressure switch light
Drip tray
Plate data
It is suggested that the machine
is installed only by qualified
staff. A wrong installation can
cause damage to people or
things, for which things the
manufacturer declines any
responsibility.
Once the machine is unpacked,
verify the integrity of the
machine. The packaging
elements (plastic bags,
expanded polystyrene, nails,
etc.) must not be left at children
reach as they might be
dangerous.
CAPACITY
POWE R
VOLTAGE HZ
The Supplier is reserved to bring alterations without notice.
The relevant data the power are indicative. To do reference to the data of plate data restored on the machine.
- 18 -
Remove the protection plastic
stripes also from the internal
side of the grids.
ENGLISH
We do not recommend to
connect the machine through
adaptors, multiple plugs and/or
extensions. If necessary, use
only materials that conform to
the safety rules in force, as for
the current intensity up to what
indicated on the plate (pic. 4
pag. 17).
Place the machine so as to
avoid any heat source to be
close to the grids. Verify that
there is a free space of 25 cm
at least around the machine
(pic. 5 in appendix-91).
After connecting the machine to
the power supply and switching
on the main switch, verify that
air comes out from the side
grids (pic. 6 in appendix-91).
$
All refrigerators are equipped
with 2 stickers for each single
lid. The stickers must be
applied as showed in the
pictures:
"
Before switching on the
machine, it is necessary to
clean it as indicated in the
“Cleaning” paragraph.
Cleaning
Cleaning is very important for
the life and maintenance of the
machine; we recommend to
periodically clean the parts that
are in contact with the product
using the following procedure.
Warning!
Switch off the main switch
and disconnect the power
plug (pic. 7 in appendix-91)
before starting any operation.
Use a solution of cold water
and sodium hypochlorite
(bleach) with a 10 grams (1/2
spoon) for 1 liter of water ratio.
Rinse with lukewarm water.
•
•
•
•
•
•
Warning! A greater quantity
of beach could damage the
material of the auger.
Warning! If the plastic parts
are washed in the
dishwashing machine, verify
that the temperature is not
higher than 85°C or 185°F,
because they could be
damaged.
Do not use any abrasive
powder.
%$
See the picture at the end of
this manual.
• Empty the tanks by opening
the outlets and blocking
them (pic. 8 in appendix91), moving the little letter
from the left to the right.
- 19 -
•
•
•
•
Remove the lamp (pic. 9 in
appendix-91), pour water in
the tanks and then empty
them.
Remove the auger ring nut
(pic. 10 and 11 in appendix91).
Remove the tank
unscrewing the hooks grips
(pic. 12 in appendix-91), if
present, and opening the
hooks (pic. 13 in appendix91); lift the tank as shown in
pic. 14 and 15 in appendix91.
Unscrew the ring nut (pic.
16 in appendix-91) in order
to remove the vertical auger
(pic. 17 in appendix-91).
Remove the horizontal
auger; this way the inox
side of the tank is
completely open and ready
to be cleaned (pic. 18 and
19 in appendix-91).
Remove the outlet (pic. 20,
21, 22, 23 in appendix-91)
and the tank gasket (pic. 24
in appendix-91):
• Remove the lever cover
(pic. 20 in appendix-91)
by pushing “PUSH”
downward; and remove
the lever (pic. 21 in
appendix-91);
• Rotate the ring nut
clockwise (pic. 22 e 23
in appendix-91) and pull
the outlet.
Dip the dismantled parts in
the solution of water and
bleach.
Wash and dry.
Wet the gasket before
inserting it in place (pic. 24
in appendix-91), be careful
to place the gasket joint in
one of the back corners of
the tank in the proper
allocation.
Reassemble everything.
ENGLISH
•
When you put the tank back
in its place verify that the
low tension contact wires
are in the guides of the
terminal board. If they are
not, the lamp and the
augers will not work (pic. 25
in appendix-91).
Connect the machine to the
power supply.
accumulation of the
product is more likely to
happen, can be now
removed and washed.
Warning!
Any time the covers (lamp)
are removed, for security
reasons, the augers and the
cooling system will stop
working.
This restriction has some
gaskets (O-ring) that must be
wet with water before inserting
them on the outlet terminal part.
This is to make the introduction
easier and to avoid that O-ring
goes outside their proper
locations.
On the restriction there is the
image of an arrow and of a
glass that, while inserting it,
must face the operator.
First Class controls
and signals
•
Remove the side panel of the 2
or 3 tanks machine, or the back
panel of the one tank machine
by unscrewing the screws on
the bottom and clean the
radiator with a soft brush or (if
possible) with compressed air.
"&&
The light of the lamp can be
turned on and off by pressing
the
button; if you keep the
button pressed and at the
same time you press the
or
buttons, it is possible to
increase or decrease the light
intensity; if you keep the
button pressed, the display will
signal the light status. It will turn
off if the pressure of the button
caused the light to be turned off
and it will show a number that
indicates the level of the lamp
light intensity (2 min - 9 max).
&
If you open the tank lifting the
lamp, the augers will stop.
'
$
&
It is possible to block the
keyboard. You unblock or block
the buttons by lifting the lamp
First Class has an accessory
called Restriction (pic. 28 in
appendix-91), it is a shaped
piece that is applied on the
ending part of the transparent
tank outlet. It has the following
advantages:
• The product, liquid (clod
drink) or semi-liquid (low
density slush), is canalized
directly in the glass;
• The restriction is easy to
pull out, therefore, it is
possible to easy wash the
ending part of the outlet
without having to dismantle
the whole transparent tank,
with a consequent decrease
of the machine cleaning
times. In summary, the only
part which is not
refrigerated, where an
and pressing the
and
buttons at the same time; the
block status is signaled on the
display through the decimal
point lighting.
For technical reason the
keyboard is unlocked when the
machine is switched off.
(
As you already know, for
security reasons, when a tank
is open, the augers stop
turning. However, the augers
stop can be also caused by a
malfunctioning of 1 and/or 2
contacts, or by the accidental
- 20 -
ENGLISH
lost of one of the contact during
the cleaning phase; in this
case, it is possible to activate
the electronic bypass function
by pressing the granita-cold
drink selection button
until
the augers start turning again.
In this situation, if you lift the
cover, the augers keep on
turning and the keyboard block
is deactivated; this is why the
electronic bypass is to be
considered only as a temporary
remedy and not as a definitive
solution which is, instead, the
substitution of the defective
contact or the installation of the
lost one.
Once the contact has been
substituted or installed again,
use the following procedure in
order to deactivate the
electronic bypass:
• Lift the cover: the augers go
on turning;
• Stop the augers pressing the
button;
•
If you press the
button,
press the
button: the
augers will turn;
• Wait for the augers to stop,
and then release the two
buttons;
• Replace the cover: the
auger will start moving
again.
System has been reset.
)
Consult the Problem Solving
Section.
you switch on the machine, the
tank keeps the configuration it
had when you switched it off, a
part from the keyboard lock (as
already said).
All machines are endowed with
a probe that detects the product
minimum level in the tanks.
When the product is below this
level, the light of the lamp starts
blinking. If the product level
does not change, the light will
stop blinking after a minute.
How to start the
production of slush,
sherbets or cold drinks
Clean the machine as
described in the previous
paragraph.
Remove the covers and pour
the mix in the tanks.
Warning: When switching on
the machine, the poured
product must not be lower
than 10 °C in order to allow a
correct calibration of the
electronic kit.
Switch on the main switch (see
pic. 7 in appendix-91).
Switch on the augers switch
.
Press the
button in order
to select “slush” (slush led
lighting ) or “cold drink”
(cold drink led lighting).
In “slush” mode, in order to
increase the product density,
use the
All the functioning modes and
the regulations set are
registered in a non-volatile
memory which is active even
without power; therefore, when
button, in order to
button.
decrease it, use the
In “cold drink” mode, in order to
increase the product
- 21 -
button,
temperature, use the
in order to decrease it, use the
button.
In order to turn on the lamp
light, press the
button.
Here you are the table with the
correspondence between the
values on the display while in
“cold drink” mode and the °C/°F
degrees.
2
3
4
5
°C
2–6
3–7
4–8
5–9
°F
35.6 – 42.8
37.4 – 44.6
39.2 – 46.4
41.0 – 48.2
Warning: in order to have
slush, sherbets or cold drink,
you need a small quantity of
sugar per liter. The
recommended quantity is
generally reported in the
usage instructions. In case of
natural products, we suggest
to use a quantity that goes
from 12 and 22%.
If the horizontal auger is
blocked because of ice blocks
due to a lack of sugar or to
other reasons, such as foreign
bodies in the tank, the vertical
auger can undergo a break.
Warning: If the temperatures
exceed 35°C Elmeco is not
responsible for the
refrigerator performance
(that will be slower) and for
the correspondence between
the temperature selected on
the electronic board and the
drink temperature.
ENGLISH
Long feet
(only for 115Vac/60Hz)
StandBy
Press
First Class Millennium
controls and signals
WARNING: The electronic
board will keep the settings it
had when the machine was
switched off.
The units First class 2 and First
Class 3 with voltage
115Vac/60Hz are equipped
with 4 long feet (4 inches) that
must be installed at the place of
the short 4 feet already
mounted.
This installation is obligatory in
conformity of NSF rules.
This long feet aren’t adjustable
in height.
When the tank is in stand-by
mode, the augers and the
cooling system are off. The
augers and the gear motor can
be turned on by pressing the
button. The screen will
show:
Motor on
Press < <> >
If you press the
button, the
screen will display as follows:
Select / Degrees /
--
YY
When you switch on the
electronic board, the display will
show
ELMECO / ITALIA
(0.15)
Where 0.15 indicates the tank
review number.
FC Millennium has a BASIC
version that only has the
electronic board like the one
shown before, and an
ADVANCED version that ha
san additional electronic kit in
the machine with additional
features connected to time.
Warning: The screen with the
“/” symbol indicates that the
values are shown
alternatively.
After the screen shown above
the initial screen will be
displayed:
- 22 -
(where YY is a variable number
between 02 and 05 for Cold
Drink Mode, which indicates the
temperature in °C at which the
product must be prepared).
and
you can
Using
increase or decrease the
temperature of the product. The
recommended temperature is
4°C .
If you press the
button, the
screen will display as follows:
Select / Density /
*
--
X
(where X is a variable number
between 1 and 9 and indicates
the density of the slush). If you
and
buttons it is
use the
possible to increase or
decrease the slush density
value.
ENGLISH
Warning: If, when the
electronic board is in Slush
Mode, the product
temperature is greater than
5°C, the following screen will
be displayed:
Auto / Setting / Wait
*
In this screen you can activate
or deactivate the bypass
function by pressing the
increase
keys.
X
This screen indicates that the
calibration process is taking
place. The calibration process
will take one minute to
complete.
If you press the
button
(Cooling off- cold drinkslush) you can switch the
machine functioning modes
alternatively. Each time you
press the button, the different
screens of cold drink – slush
and cooling off alternate. In this
latter position only the augers
rotate and no other action is
taken.
If you press the auger rotation
, the display will
key
appear as follows:
StandBy
Press
By holding the
button
for one second you will enter
the selection menu.
Please note that unless you
give any further instruction to
the electronic board in more 10
seconds time, the display will
automatically go back to the
initial screen.
This screen allows you to
activate (LOCK) or deactivate
(UNLOCK) the “keyboard lock”
ByPass
OFF / ON
and
decrease
LowLevel
OFF / ON
This screen allows you to turn
ON or OFF the Low Level
control function (automatic
decrease of slush’s density to
no.1, when the level probe is
not covered with product for
more than 20 minutes); you can
do that by pressing the
increase
key or the
decrease
key. If you add
some product (liquid that
touches the level probe), the
function will be deactivated and
the slush preparation will reach
the density value that was
previously set on the electronic
board. When this function is
active, you will see the
following display:
Please/refill/LOWLEVEL
*
1L
As for the selection menu, the
next screen is like the one
below:
KeyBoard
UNLOCK / LOCK
function by pressing the
or
buttons. This function is
suitable in self-service places,
in order to avoid people from
changing the values set. When
the keyboard is locked, the
electronic board will show a
“dot” on the display as shown
on the screen below:
select/ Density /
*
X
--
Ŷ
If the machine is turned OFF
and ON, the electronic board
will be in LOCK position again.
Warning: The keyboard lock
can be activated if the
electronic board is in
“Standby" or “MotorOn”
mode.
Washing
OFF / ON
Turning OFF and ON of the
washing function. If the function
is active, the electronic board
will show the screen below;
Washing
Ŷ
in this condition all buttons and
the cooling functions are NOT
active, a pat from the MENU
button.
TIME
hh:mm
This screen shows the time set
on the machine. If it is different
from the place where the
machine is installed, you can
change it by following the steps
below:
LAMP
OFF / ON
This screen allows you to turn
ON or OFF the light in the lid,
and
by pressing the
buttons of the electronic board.
- 23 -
ENGLISH
1) press the
button;
2) the first value will start to
blink. If you want to change
the value, you need to press
the
button;
3) if you press the
button;
4) the second value will start to
blink. If you want to change
the value, you need to press
the
button;
button;
5) if you press the
6) the third value will start to
blink. If you want to change
the value, you need to press
the
button;
7) press the
button;
8) the fourth value will start to
blink. If you want to change
the value, you need to press
the
button;
9) press the
button
to exit this function. The time
will be saved.
Warning: During the time
adjustment, the date
(MM/DD/YY) will appear on
the upper line. It can be
different from the date of the
place where the machine is
installed, but the machine
will work without any
problem.
NOTE: First Class Millennium
BASIC does not display this
screen and all other screens
here reported in the dotted
square. These will only be
active in the ADVANCED
version.
DEFROST
T=03°C
ON 00:00
OFF 00:00
Defrost function: On the screen
you can see the defrost ON and
OFF time and the defrost
temperature alternatively. The
first screen indicates the value
of cold drink used in defrost
mode (set to 3°C); this screen
is used only for information.
The second screen (ON – OFF)
indicates the defrost function
start (ON) and stop (OFF) time.
If the two values are the same,
the function is deactivated. In
order to change the ON and
OFF time, follow the steps
below:
button;
1) press the
2) the first value of the upper
line will start to blink. If you
want to change the value,
you need to press the
button;
3) repeat the steps 1) and 2)
until all ON and OFF values
are set;
4) press the
button
to exit the change function.
The time will be then saved.
Max Temp
T= _°C
In this screen you can activate
or deactivate the Critical
Temperature Control function.
When the critical temperature
value is ( _ ), the function is
deactivate; if you want to
activate it, you need to:
1) press the
button;
2) set the value pressing the
button;
3) press the
button
to exit the change function.
When you switch the machine
on, if the product temperature is
- 24 -
greater than the one set, the
display will blink and show:
Product
T>X
The “X” value represent the
critical temperature. In order to
stop the warning signal, please
button.
press the
CLEANING
000d - --In this screen you can activate
or deactivate the Cleaning
warning function. This function
is used if the user wants the
machine to show a clear
warning on the display that
reminds to clean the machine.
If the Cleaning warning function
is on (000d----) it is deactivated.
In order to activate it:
button;
1) press the
2) the first value will start to
blink. If you want to change
the value, you need to press
the
button;
button again;
3) press the
4) the second value will start to
blink. If you want to change
the value, you need to press
the
button;
button;
5) press the
6) the third value will start to
blink. If you want to change
the value, you need to press
the
button;
button
7) press the
to exit the change function.
When the machine is turned on
and the values (---) are zero,
the display will blink showing
the cleaning warning:
ENGLISH
CLEANING
REQUIRED
Clean the tank as described in
the usage manual pag. 19;
In order to stop the warning
signal, press the
button; thus the count down will
start again for the next warning.
000d = time in days for the
cleaning warning to appear
- --- = count down (day to the
warning)
EXEMPLES:
100d = after 100 days the
machine will inform that it must
be cleaned up
050d = after 50 days the
machine will inform that it must
be cleaned up
007d = after 07 days the
machine will inform that it must
be cleaned up.
REFILL
ON / OFF
For machines with auto refill set
up ONLY! (This should be ON
only if the machine has the auto
refill installed). In this screen
you can activate or deactivate
the auto refill control signal.
First Class Millennium is
endowed with a direct signalling
of the problems found. When
the electronic board blinks, it
indicates that there is an active
alarm. To see what alarm is,
please press the
button for 1 second.
In the “Problem Solving”
section, you can see a
complete list of all possible
alarms at pag. 29.
If more than one alarm is
active, these will be indicated
with more messages that
appear alternatively.
select/ Degrees /
--
05
Cold drink.
It is possible to change the
product temperature from +02
or
°C to +05 °C using the
How to start the
production of slush,
sherbets or cold drink
with First Class
Millennium
buttons to increase or
decrease it respectively.
Warning: The recommended
temperature value is 4°C.
select/ Density /
Clean the machine.
Remove the covers and put the
mix in the tanks.
Warning: the temperature of
the poured product must not
be lower than 10 °C in order
to allow a correct calibration
of the electronic kit that will
be indicated as described in
the previous paragraph.
Switch on the main switch (see
pic. 7 in appendix-91).
Switch on the auger switch
The following screen will be
displayed:
.
Motor On
Press < <> >
Press the
button to select
“slush” or “cold drink”.
With the “slush” mode, you can
increase the product density
with the
button and
decrease it with the
button.
With the “cold drink” mode, you
can increase the product
temperature with the
and decrease it with the
button.
- 25 -
button
*
--
5
Slush.
It is possible to change the
product density from 1 to 9
using the
or
buttons to
increase or decrease it
respectively.
ENGLISH
Important security
rules
•
•
•
•
•
•
Do not touch the machine
when you have wet hands
and/or feet.
Do not use the machine
with bare feet.
Do not allow children or
incompetent people to use
the machine.
Do not leave the machine
exposed to atmospheric
agents.
Do not pull the power
supply cable to disconnect
the machine from the
electric power.
Do not remove the panels
before disconnecting the
machine from the electric
power.
Technical assistance
The repairing of the machine
must be carried out by an
authorized service centre, using
only original spare parts.
Old machine disposal
The out-of-use machines must
be disabled. Disconnect the
plug from the electrical network
and cut the cable.
*
All refrigerating machines must
be disposed by the communal
disposal service or by an
equivalent private authorized
company. Take care not to
damage the rigid tubes of the
refrigerator until they are taken
back in order to be carefully
and ecologically disposed.
All packaging materials used
can be disposed without any
danger.
- 26 -
ENGLISH
FCW installation (water
cooling system)
If the First Class you bought is
endowed with the water cooling
system, it is necessary to follow
these instructions.
On the machine front side
(outlet side)
There are some water exit (left)
and entrance pipes (right) as
shown in the pic. f .
Important:
It is not possible to connect the
FCW water entrance with the
input of another machine based
on a water cooling system
(series).
It is not possible to connect
several machines based on the
water cooling system on the
same outlet.
3° Slip the panel.
Pressure switch refit
procedure
When the pressure switch light,
near main switch in ON,
The quantity of water
necessary for the functioning
can change according to the
product cooling phases, with
higher values when starting the
slush production and values
that are close to zero when you
want to keep the slush. We
therefore recommend to
connect the machine to the
water network with the
maximum capacity, thus the
pressure switch valve (pic. g) in
the machine will regulate the
flux according the real
necessity.
4° Press the button on the
pressure switch.
Pressure switch light
this indicates that the pressure
switch intervened to deactivate
the compressor. In order to refit
this device, it is important to
follow the instructions below:
1°
Disconnect the power
cable.
2° Unscrew the crossed screws
at the bottom of the right
side panel from the side of
the condenser.
- 27 -
5° Close the panel and turn on
the machine again.
ENGLISH
Cotter pin substitution
If the machine works but the
augers do not turn, it is possible
that the cotter pin, (item 35 of
the exploded view in appendix91) that connects the gear
motor to the transmission shaft,
broke down.
Disconnect the power
electric cable
After removing the back and
side panels, you can see the
breakdown trying to lift the ring
that fix the vertical auger (item
28 of the exploded view in
appendix-91). It can happen
that it is blocked or that, if you
lift it, it carries away the
transmission shaft with it (item
29 of the exploded view in
appendix-91).
In the second case, the hole in
the gear motor should be
completely empty and some
remnants of the split pin will
certainly lie in the machine.
With the help of a pliers, fold
the two ends of the split pin
downward as indicated by the
arrows in the pic. d;
It is therefore necessary to
install a new split pin.
Place the transmission shaft so
as its hole is aligned with the
one present on the gear motor
exit shaft; it should be evident
when they are aligned;
Then, with a nippers, cut the
extremities in excess in order to
avoid a contact with the gear
motor during the rotation (see
pic. e).
Insert the split pin as shown in
the pic. c;
In the first case, it is necessary
to control that the transmission
shaft base is as high as the
gear motor (exit shaft). The lift
pin could be in the hole of the
gear motor slow shaft but it
should be deformed or broken
(see pic .a)
verify that the head of the split
pin, in its rotation, does not
touch the gear motor and
respects a minimum distance.
Warning: do not reuse, in any
case, the old split pin
- 28 -
ENGLISH
First Class Problem Solving
The electronic board displays "1
blinking"
Verify that the cable connecting the electronic board to the gear motor magnetic revolution counter is
firmly fixed to both elements. In case it needs to be substituted: disconnect the two connectors of the
old cable both from the reader and the electronic board; place the new cable with some insulating tape
or a small band on the existent electric installation.
The electronic board displays "2
blinking"
Replace the cable that connects the thermostat probe to the electronic board verifying that there is not
oxide on it; if so, clean the contacts and if the problem still exists, it is necessary to substitute the
thermostat probe.
The electronic board displays "8
blinking"
The tank does not make cold, the
cooling light is off
The electric power is not linear; there could a fluctuation of the entry tension due to tension changes, to
extensions or to multiple plugs to which First Class is connected. If the power tension is regular,
provide First Class with a single connection in order to solve the problem; if First Class in connected to
an autofill system, it is necessary to switch off and on First Class in order to make it work correctly
again.
1. Switch off the slush machine with the main switch;
2. discharge the product, if it is cold, and put in the tank a product with a temperature higher than
15°C;
3. wait 5 minutes at least and switch on the machine again.
The electronics calibration is automatic.
The augers do not turn in the tank
and the electronic board does not
work properly.
The cotter pin (item 35 of the exploded view in appendix-91) broke down. For the cotter pin substitution
procedure see pag. 28
During the augers rotation you
can hear a creaking.
This noise derives from the vertical and horizontal augers gears. You can avoid this by simply go on
using the machine or putting some Vaseline on the plastic gears.
The machine does not make cold
and the slush and the pressure
switch light is ON.
The pressure switch intervened. In order to refit it see pag. 27
The MILLENNIUM electronic
board blinks. If you press the
MENU button for a second, it
displays : “ALARM THERMAL“
Replace the cable that connects the thermostat probe to the electronic board verifying that there is not
oxide on it; if so, clean the contacts and if the problem still exists, it is necessary to substitute the
thermostat probe.
The MILLENNIUM electronic
board blinks. If you press the
MENU button for a second, it
displays : "ALARM MOTOR"
The MILLENNIUM electronic
board blinks. If you press the
MENU button for a second, it
displays : "ALARM VOLTAGE”
The MILLENNIUM electronic
board blinks. If you press the
MENU button for a second, it
displays : "ALARM LEVEL”
The MILLENNIUM electronic
board blinks. If you press the
MENU button for a second, it
displays : "ALARM REFILL”
The MILLENNIUM electronic
board blinks. If you press the
MENU button for a second, it
displays : "ALARM DATE”
The MILLENNIUM electronic
board blinks. If you press the
MENU button for a second, it
displays: "ALARM SOLVED"
Disconnect
the power electric cable
Disconnect
the power electric cable
Disconnect
the power electric cable
Disconnect
the power electric cable
Disconnect
the power electric cable
Verify that the cable connecting the electronic board to the gear motor magnetic revolution counter is
firmly fixed to both elements. In case it needs to be substituted: disconnect the two connectors of the
old cable both from the reader and the electronic board; place the new cable with some insulating tape
or a small band on the existent electric installation.
The electric power is not linear; there could a fluctuation of the entry tension due to tension changes, to
extensions or to multiple plugs to which First Class is connected. If the power tension is regular,
provide First Class with a single connection in order to solve the problem; if First Class in connected to
an autofill system, it is necessary to switch off and on First Class in order to make it work correctly
again.
Level probe (item 15 of the exploded view in appendix-91) missing or cover contact/level
probe/terminal board (item 37 of the exploded view in appendix-91) not correct.
Disconnect
the power electric cable
Disconnect
the power electric cable
Disconnect
the power electric cable
Disconnect
the power electric cable
You can see this alarm only if the REFILL screen is ON. The alarm appear when the level probe does
not read the presence of the liquid in the tank, for longer than 2 minutes. In order to reset the alarm and
let the level control restart, switch off and on the electronic board with the
button.
Disconnect
the power electric cable
This alarm appear if the electronic board finds a problem on the date setting. In order to adjust the date
you need to use the programmer module.
NOTE. First Class Millennium Basic does not have this alarm.
This window will show up when one or more alarms will be solved.
- 29 -
Disconnect
the power electric cable
Disconnect
the power electric cable
Impianto
Elettrico
Millennium
Millennium
Electric
System
Installation
Electrique
Millennium
- 82 -
Elektrik
Millennium
Instalación
Eléctrica
Millennium
I
1: Interruttore
generale
Pr: Pressostato
LPr: Spia
pressostato
TM: Timer
(Opzionale)
8: Interruttore timer
C: Compressore
FM:
Motoventilatore
TR: Trasformatore
B: Condensatore
rifasamento (FC3
120V/60HZ)
Colori
BRN Marrone
BLU Blu
GRN Giallo-Verde
RED Rosso
BLK Nero
WHI Bianco
GRY Grigio
VIO Viola
ORA Arancione
1: Main switch
9: Fusibile 5x20
mm F315mA
LPr: Pressure
switch light
EV1-2-3:
Elettrovalvola
TM: Timer
(Optional)
M1-2-3:
Motoriduttore
8: Timer switch
EB1-2-3: Modulo
elettronico
EM: Modulo
macchina
H1-2-3: Lettore
ottico o magnetico
L1-2-3: Lampada
cupola
P1-2-3: Sonda
livello
R1-2-3:
Resistenza
100Kohm-0.25W
A: Filtro
antidisturbo
(230V/50HZ)
q1-2-3:
Termostato
9: Fusible 5x20
mm F315mA
R1-2-3: Heating
element 100Kohm0.25W
EV1-2-3:
Électrovanne
A: Suppressor
filter (230V/50HZ)
q1-2-3:
Thermostat
B: Phase
advancing
condenser (FC3
120V/60HZ)
GB
7: Fusibile 5x20
mm (2A-20VA/5A60VA)
P1-2-3: Level
probe
Colors
BRN Brown
BLU Blue
GRN YellowGreen
RED Red
BLK Black
WHI White
GRY Grey
VIO Purple
ORA Orange
Pr: Pressure
switch
C: Compressor
F
FM: Fan motor
M1-2-3:
Motoréducteur
EB1-2-3: Module
électronique
EM: Module
machine
H1-2-3: Lecteur
optique ou
magnétique
L1-2-3: Lampe
coupole
P1-2-3: Sonde de
niveau
R1-2-3:
Résistance
100Kohm-0.25W
A: Filtre
antiparasites
(230V/50HZ)
q1-2-3:
Thermostat
TR: Transformer
1: Interrupteur
général
7: Fuse 5x20 (2A20VA/5A-60VA)
Pr: Pressostat
B: Correction du
facteur de
condensateur
(FC3 120V/60HZ)
9: Fuse 5x20 mm
F315mA
LPr: Voyant
pressostat
Couleurs
EV1-2-3: Solenoid
valve
TM: Temporisateur
(en option)
M1-2-3: Gear
motor
8: Interrupteur
temporisateur
EB1-2-3:
Electronic board
C: Compresseur
FM:
Motoventilateur
EM: Machine
module
TR:
Transformateur
H1-2-3: Magnetic
or Optical reader
7: Fusible 5x20
mm (2A-20VA/5A60VA)
L1-2-3: Top light
- 83 -
BRN Brun
BLU Bleu foncé
GRN Jaune-Vert
RED Rouge
BLK Noir
WHI Blanc
GRY Gris
VIO Violet
ORA Orange
Impianto
Frigorifero
Refrigerating
System
E1
Installation
Frigorifique
E2
Kühlanlage
Aparato
Frigorífico
E3
B
ev1 ev2 ev3
3
2
Cn
1
C
F
Pr
- 85 -
I
F
E
C: Compressore
C: Compresseur
C: Compresor
Cn: Condensatore
Cn: Condensateur
Cn: Condensador
F: Filtro-deidratore
F: Filtre-déshydrateur
F: Filtro deshidratante
B: Boiler
B: Ballon
B: Boiler
ev1: Elettrovalvola
ev1: Électrovanne
ev1: Electroválvula
ev2: Elettrovalvola
ev2: Électrovanne
ev2: Electroválvula
ev3: Elettrovalvola
ev3: Électrovanne
ev3: Electroválvula
E1: Evaporatore
E1: Évaporateur
E1: Evaporador
E2: Evaporatore
E2: Évaporateur
E2: Evaporador
E3: Evaporatore
E3: Évaporateur
E3: Evaporador
1: Linea scarico
1: Ligne évacuation
1: Línea descarga
2: Linea liquido
2; Ligne liquide
2: Línea líquido
3: Linea aspirazione
3: Ligne aspiration
3: Línea aspiración
Pr: Pressostato
Pr: Pressostat
Pr: Presóstato
GB
D
C: Compressor
C: Kompressor
Cn: Condenser
Cn: Kondensator
F: Dryer filter
F: Trockenfilter
B: Accumulator
B: Boiler
ev1: Solenoid valve
ev1: Elektroventil
ev2: Solenoid valve
ev2: Elektroventil
ev3: Solenoid valve
ev3: Elektroventil
E1: Evaporator
E1: Verdampfer
E2: Evaporator
E2: Verdampfer
E3: Evaporator
E3: Verdampfer
1: Discharge line
1: Abflußleitung
2: Liquid line
2: Flüssigkeitsleitung
3: Suction line
3: Ansaugleitung
Pr: Pressure switch
Pr: Druckwächter
- 86 -
- 91 -
ELMECO PRODUCT WARRANTY IN THE U.S.A. AND CANADA
New machines that have been manufactured by Elmeco SRL Italy and all parts thereof are conditionally warranted to the
original user by Elmeco SRL to be free from defects in material and workmanship under normal use
SERVICE AS FOLLOWS:
Freezer/ Slush Machine and all components unless specified below–
2 years parts, 1 year labor (proof of purchase and serial number required), Compressor- 5 years parts, Electronic board - 3 years parts
During the warranty period, Elmeco at its option and after inspection, repair or replace defective unit with
no charge for parts or bench labor. This warranty excludes plastic parts, rubber gaskets or any other wear items. This warranty
period starts from the date of purchase (proof of purchase required).
Bench labor does not include service agent’s travel time, or cost of shipping to and from the service station.
The buyer shall give prompt notice to Elmeco SRL for any claim to be made under warranty via telephone
at 1-877-4ELMECO (1-877-435-6326) .
Customer support will diagnose problem over phone and upon request of Elmeco, the defective parts/equipment shall be
shipped prepaid to Elmeco.
WHAT IS NOT COVERED:
• WARRANTY DOES NOT APPLY TO MACHINES OR ANY PARTS WHICH HAVE BEEN SUBJECT TO ANY
ACCIDENT, MISUSE, NEGLECT, ALTERATION,
• USE ON INCORRECT VOLTAGE, IMPROPER VENTILATION, DAMAGE CAUSED IN TRANSIT, IMPROPER
INSTALLATION OR OPERATION,
• IMPROPER MAINTENANCE OR REPAIR, FIRE, FLOOD OR ACTS OF GOD
• THIS WARRANTY DOES NOT COVER NORMAL PREVENTIVE MAINTENANCE AND CLEANING SUCH AS, BUT
NOT LIMITED TO, CONDENSER CLEANING, HIGH PRESSURE SWITCH RESET, COTTER PIN REPLACEMENT,
O-RINGS, SEALS OR LIGHT BULB REPLACEMENT.
• THIS WARRANTY DOES NOT COVER PLASTIC PARTS, RUBBER PARTS OR ANY OTHER WEAR ITEMS
• THIS WARRANTY DOES NOT COVER ANY SEALED SYSTEM THAT HAS BEEN BROKEN INTO (EX. GEAR
MOTOR, COMPRESSOR)
• THIS WARRANTY DOES NOT COVER ANY PART OR ASSEMBLY THAT HAS BEEN ALTERED, MODIFIED OR
CHANGED
• THIS WARRANTY DOES NOT COVER UNIT WHOSE REFRIGERATION SYSTEM IS MODIFIED
• THIS WARRANTY DOES NOT C OVER THE COSTS OF REPAIRS MADE OR ATTEMPTED BY ANYONE WITHOUT
PRIOR AUTHORIZATION BY ELMECO SRL OR ITS AUTHOROZED PARTNERS SERVICE DEPARTMENT
• THIS WARRANTY DOES NOT COVER MACHINE MAINTAINED WITHOUT THE REQUIRED AIR CLEARANCE
ON ALL SIDES, OR LOCATED IN CLOSE PROXIMITY TO HEAT PRODUCING OR POWDER EQUIPMENT
• THIS WARRANTY DOES NOT COVER UNIT OR PART FAILURE CAUSED BY WATER CONDITIONS
• THIS WARRANTY DOES NOT COVER TEMPORARY NON-FUNCTIONING CONDITIONS WHICH CAN OCCUR
WITH NORMAL USE AND WHICH CAN BE READILY REMEDIED BY THE USER BY REFERRING TO THE USERS
INSTRUCTIONS OR CALLING ELMECO OR ITS AUTHOROZED PARTNERS.
The model and serial number shall be supplied to the service department of Elmeco along with the defective parts or unit.
Please Note: Warranty only valid when warranty registration card is sent in and processed .
The dealers, distributors, employees and agents of Elmeco srl are not authorized to modify this warranty neither written nor oral
or to add warranties that are binding to Elmeco srl.
Elmeco srl
Elmeco srl American Branch Office
Via Circumvallazione Est. 12
Casandrino 80025, Italy
Tel: 0039 081 5055724
7620 Townsend Place
New Orleans, LA 70126
Tel: 1-877-435-4ELMECO
Your e-mail address will not be disclosed to any third party.
www.elmeco.com
7620 Townsend Place, New Orleans, LA 70126, U.S.A., Tel: 1-877-435-4ELMECO
Elmeco srl American Branch Office
If yes, please provide your e-mail address
Telephone
Distributor from which Purchased
May we e-mail you information on other Elmeco products and promotions?
Distributor City and State
Date Purchased
Serial Number
Model Purchased
City/State/Zip
Address
Name
Thank you for choosing Elmeco. To register your warranty for this product, complete the information below,
please send the card to the address noted below.
Warranty Registration Card
Claim #:
Date:
Return Goods #:
Invoice #:
ADVANCED SOLUTIONS FOR COLD BEVERAGE
IMPORTANT: THIS FORM MUST BE COMPLETED AND SIGNED WITHIN 30 DAYS OF SERVICE OR THE CLAIM CANNOT BE PROCESSED,
PRINT LEGIBLY. WHERE NOT APPLICABLE, WRITE NA
Warranty Labor Claim – Return Goods – General Credit Advice
A. Distributor
Address (ASP)
Phone No.
City
State
Zip
Store No.
B. Equipment Location
Address
Phone No.
City
State
Contact Name
Zip
Equipment Location
C. Model No.
Serial No.
Date Installed
Date Service Call Received
Date Failed
Date Repaired
D. Customer Complaint
Hours
(Give specific description of each problem repair and list number of hours for each repair. Bad or defective will not be accepted.)
Service Performed
Give exact location of a problem
E. Return Goods Authorization (Valid for 50 days)
NOTE: Warranty parts must be returned for credit consideration.
Qty
(Green areas for Elmeco use only)
Part Number/Description
Unit Cost
CHARGES
1. Labor Max time allowed is flat rate
Labor Rates – Reasonable & Customary
3. Refrig. max allowed is nameplate charge
4. Refrig. Recovery & Equip. Charges
5. Sales Tax (if applicable) – List Tax %
Date:
hrs
hrs
Restock Change
Labor Rate $
$
Repair Order No.:
Travel Cost $
$
Other Credit
lbs
Total Lb.
lbs
LABOR
CLAIM STATUS
Ref. Cost $
$
Cost $
$
Labor Cost $
$
Send Payment to:
% $
$
Account Number:
$
Credit Memo No.:
TOTAL
F. Authorized Signature:
Reviewed by:
Labor Time
RETURN GOODS DETAILS
APPROVED Parts Received/Inspected
$
Reviewed by:
Approved
Denied
Reason Code:
Cust. #:
Date:
Adjusted
Returned
ESP.
1
2
3
3
4
4
3+4
5
6
7
8
9
10
11
12
12
13
14
14
14
15
17
18
19
20
21
22
24
24
24
24
24
24
26
27
27
27
27
27
27
27
27
27
27
28
29
30
31
*
*
*
*
*
*
*
*
*
*
*
*
*
*
*
*
*
*
FC1
FC2
*
*
*
*
*
*
*
*
*
*
*
*
*
*
*
*
*
*
*
*
*
*
*
*
*
*
*
*
*
*
*
*
*
*
*
*
*
*
*
*
*
*
*
*
*
*
*
*
FC3
*
*
*
*
*
*
*
*
*
*
*
*
*
*
*
*
*
*
*
*
*
*
*
*
*
*
*
*
*
*
*
*
*
*
*
*
*
*
*
*
*
*
*
*
*
*
*
*
115/60
*
*
*
*
*
*
*
*
*
*
*
*
*
*
*
*
*
*
*
*
*
*
*
*
*
*
*
*
*
*
*
*
*
*
*
*
*
*
*
*
*
*
*
*
*
*
*
*
*
*
*
*
*
*
*
*
*
*
*
*
*
*
*
*
*
*
*
*
*
*
*
*
*
*
*
*
2010 First Class Spare Parts List Prices
DESCRIPTION
RING NUT HORIZONTAL AUGER
RING NUT LEVER COVER PISTON
BLACK HANDLE WITH HOLE
BLACK HANDLE "PULL HERE"
BLACK LID HANDLE COVER
BLACK LID HANDLE COVER ICEE MODEL WITH HOLE
COMPLETE BLACK HANDLE-COVER ICEE MODEL WITH HOLE
PIN DRAIN LEVER
O-RING 117
ROD UNIT
DOWEL f 3X28MM
OUTLET BACK GASKET
PISTON SPRING
RING NUT-LEVER-COVER
DISPENSING SPOUT
DISPENSING SPOUT CUP VERSION
GASKET TRANSPARENT TANK
TRANSPARENT TANK COMPLETE OF PIN DRAIN LEVER
TRANSPARENT TANK COMPLETE OF PIN DRAIN LEVER RIGHT AUTOFILL SLUSHIE CODREC
TRANSPARENT TANK COMPLETE OF PIN DRAIN LEVER LEFT-CENTRAL AUTOFILL SLUSHIE CODREC
LOW VOLTAGE CONTACT WIRES KIT
LAMP GLASS
LAMP SOCKET
LAMP 10Watt/12Vac
SCREW TC 2.9X9.5
12V CONTACT FOR TANK
PLASTIC LENS STICKER
GREEN LID NEW
VIOLET LID NEW
GREY LID NEW
BLACK LID NEW
YELLOW LID NEW
BLUE LID NEW
PLASTIC LENS STICKER
GREEN TOP LIGHT COVER COMPLETE
RED TOP LIGHT COVER COMPLETE
GRAY TOP LIGHT COVER COMPLETE
BLACK TOP LIGHT COVER COMPLETE
SLUSH PUPPIE CANADA TOP LIGHT COVER COMPLETE
YELLOW TOP LIGHT COVER COMPLETE
SNOW SHOCK TOP LIGHT COVER COMPLETE 10W
KEY WEST TOP LIGHT COVER COMPLETE 10W
ICEE TOP LIGHT COVER COMPLETE 10W
BLU TOP LIGHT COVER COMPLETE 10W
RING NUT VERTICAL PROPELLER
TRANSMISSION SHAFT WITH NUT
VERTICAL AUGER COMPLETE OF BUSHING
VERTICAL AUGER BUSHING
Pagina 1 di 8
CODICE
M0004109-001
M0003126-001
M0003104-003
M0003125-001
M0003108-003
M0003135-003
M0003136-003
M0003124-001
OR13000117
M0003121-001
PERNO3X28ACCIAI
M0003117-001
M0003106-001
M0003120-001
M0006134-001
M0006134-002
M0000106-001
M0000147-001
M0000148-001
M0000149-001
M0005159-001
M0006108-001
M0005133-001
LAMPADA10W
VTTC2.9X9.5CR
M0005109-001
M0006129-001
M0006193-001
M0006193-002
M0006193-003
M0006193-004
M0006193-005
M0006193-006
M0006129-001
M0006125-001
M0006125-002
M0006125-003
M0006125-005
M0006125-007
M0006125-008
M0006125-009
M0006125-010
M0006125-011
M0006125-012
M0000107-001
M0000108-001
M0004111-001
B06.032INOX
ESP.
32
33
34
35
36
37
37a
38
39
40
41
42
42
42
43
45
46
46a
47
48
49
50
51
52
53
54
55
56
57
58
59
59
60
60
60
60
61
61
61
61
61
61
61X2
61X2
61X2
61X2
61X2
61X2
FC1
FC2
*
*
*
*
*
*
*
*
*
*
*
*
*
*
*
*
*
*
*
*
*
*
*
*
*
*
*
*
*
*
*
*
FC3
115/60
ST_A
ST_W
ML_A
ML_W
*
*
*
*
*
*
*
*
*
*
*
*
*
*
*
*
*
*
*
*
*
*
*
*
*
*
*
*
*
*
*
*
*
ST_A
ST_W
ML_A
ML_W
ST_A
ST_W
ML_A
ML_W
ST_A
ST_W
*
*
*
*
*
*
*
*
*
*
*
*
*
*
*
*
*
*
*
*
*
*
*
*
*
*
*
*
*
*
*
*
*
*
*
*
*
*
*
*
*
*
*
*
*
*
*
*
*
*
*
*
*
*
*
*
*
*
*
*
*
*
*
*
*
*
*
*
*
*
*
*
*
*
*
*
*
*
*
*
*
*
*
*
*
2010 First Class Spare Parts List Prices
DESCRIPTION
PINION VERTICAL AUGER
BUSHING TRANSMISSION SHAFT
TRANSMISSION SHAFT WITH SLEEVE
COTTER PIN
TRANSMISSION SHAFT GASKET
BLACK TERMINAL BOARD COMPLETE
BLACK COVER TERMINAL BOARD
BLACK REAR HINGE
M5 SQUARE NUT
SCREW TE 5X12MM
RING NUT SHAFT FASTENING
RED COMPLETE INOX TANK
BLACK COMPLETE INOX TANK
GREY COMPLETE INOX TANK
ELECTRONIC THERMOSTAT PROBE COMPLETE
HORIZONTAL AUGER GEAR
HORIZONTAL AUGER COMPLETE OF BUSHING
HORIZONTAL AUGER BUSHING
BLACK BASE
BLACK HINGE HOOK
BLACK FRONT HINGE
LOCKING BOLT
GEAR MOTOR
SCREW 6X12
OPTICAL SUPPORT
RIVET 4X10
GRANI 3X5
OPTICAL READER DISK
SCREW 2,9X16
OPTICAL READER
COMPLETE GEAR MOTOR WITH OPTICAL READER
COMPLETE GEAR MOTOR WITH HALL SENSOR
FC1 ACCUMULATOR OLD CONFIGURATION
FC2 ACCUMULATOR (3MTX1.06MM)
FC3 ACCUMULATOR (5MTX1.06MM)
FC1 ACCUMULATOR NEW CONFIGURATION
BACK STAINLESS STEEL PANEL WITH LOUVERS FC1 OLD CONFIGURATION
BACK STAINLESS STEEL PANEL WITH HOLES - FC1 NEW CONFIGURATION
BACK STAINLESS STEEL PANEL WITH LOUVERS
BACK STAINLESS STEEL PANEL WITH LOUVERS
BACK STAINLESS STEEL PANEL WITH LOUVERS
BACK STAINLESS STEEL PANEL WITH LOUVERS
BACK KIT FC2 SLUSH PUPPIE CANADA
BACK KIT FC2 SLUSH PUPPIE CANADA
BACK KIT FC2 SLUSH PUPPIE CANADA
BACK KIT FC2 SLUSH PUPPIE CANADA
BACK KIT FC2 TUTTI FRUTTI
BACK KIT FC2 TUTTI FRUTTI
Pagina 2 di 8
CODICE
M0004104-001
M0000104-001
M0000140-001
M0000117-001
M0000114-001
M0005117-004
M0000113-004
M0006103-003
M0000120-001
M0001101-001
M0000105-001
M0002112-002
M0002112-004
M0002112-005
M0000157-001
M0004105-001
M0004110-001
M0004102-001
M0006116-003
M0006102-003
M0006115-003
M0006119-001
M0005104-001
M0000122-001
M0005119-001
RIV4X7ALL
GRANI3X5
A0005101-001
VTTC2.9X13CR
EOSW-9603
M0005118-001
M0005139-001
BOYLERBMCAP
BOYLERM2CAP
BOYLERM3CAP
M0102112-001
M0006112-001
M0106108-001
M0006112-001
M0006112-001
M0006112-001
M0006112-001
M0206107-001
M0206107-001
M0206107-001
M0206107-001
M0206108-001
M0206108-001
DESCRIPTION
BACK KIT FC2 TUTTI FRUTTI
BACK KIT FC2 TUTTI FRUTTI
BACK KIT FC2 SNOW SHOCK
BACK KIT FC2 SNOW SHOCK
BACK KIT FC2 SNOW SHOCK
BACK KIT FC2 SNOW SHOCK
BACK KIT FC2 ICEE
BACK KIT FC2 ICEE
BACK KIT FC2 ICEE
BACK KIT FC2 ICEE
BACK KIT FC2 NESTLE'
BACK KIT FC2 NESTLE'
BACK KIT FC3 SLUSH PUPPIE CANADA
BACK KIT FC3 SLUSH PUPPIE CANADA
BACK KIT FC3 SLUSH PUPPIE CANADA
BACK KIT FC3 SLUSH PUPPIE CANADA
BACK KIT FC3 TUTTI FRUTTI
BACK KIT FC3 TUTTI FRUTTI
BACK KIT FC3 TUTTI FRUTTI
BACK KIT FC3 TUTTI FRUTTI
BACK FIT KIT FC3 KEY WEST
BACK FIT KIT FC3 KEY WEST
BACK FIT KIT FC3 KEY WEST
BACK FIT KIT FC3 KEY WEST
SCREW 3.9X9.5
KIT PLASTIC PANEL RIGHT\LEFT GREEN
KIT PLASTIC PANEL RIGHT\LEFT VIOLET
KIT PLASTIC PANEL RIGHT\LEFT GREY
KIT PLASTIC PANEL RIGHT\LEFT BLACK
KIT PLASTIC PANEL RIGHT\LEFT YELLOW
KIT PLASTIC PANEL RIGHT\LEFT BLUE
RIGHT SIDE STAINLESS STEEL PANEL WITH LOUVERS
RIGHT SIDE STAINLESS STEEL PANEL WITH LOUVERS
RIGHT SIDE STAINLESS STEEL PANEL (CONDENSER SIDE)
RIGHT SIDE STAINLESS STEEL PANEL (CONDENSER SIDE)
RIGHT SIDE STAINLESS STEEL PANEL SLUSH PUPPIE
RIGHT SIDE STAINLESS STEEL PANEL SLUSH PUPPIE
RIGHT SIDE PANEL WITH HOLES (CONDENSER SIDE) - 42°C
RIGHT SIDE PANEL WITH HOLES (CONDENSER SIDE) - 42°C
RIGHT SIDE STAINLESS STEEL PANEL TUTTI FRUTTI FC2/3
RIGHT SIDE STAINLESS STEEL PANEL TUTTI FRUTTI FC2/3
RIGHT SIDE STAINLESS STEEL PANEL TUTTI FRUTTI FC1
RIGHT SIDE STAINLESS STEEL PANEL TUTTI FRUTTI FC1
RIGHT SIDE STAINLESS STEEL PANEL SNOW SHOCK
RIGHT SIDE STAINLESS STEEL PANEL SNOW SHOCK
RIGHT SIDE STAINLESS STEEL PANEL KEY WEST
RIGHT SIDE STAINLESS STEEL PANEL KEY WEST
RIGHT SIDE STAINLESS STEEL PANEL ICEE
ESP.
61X2
61X2
61X2
61X2
61X2
61X2
61X2
61X2
61X2
61X2
61X2
61X2
61X3
61X3
61X3
61X3
61X3
61X3
61X3
61X3
61X3
61X3
61X3
61X3
62
63
63
63
63
63
63
64
64
64
64
64
64
64
64
64
64
64
64
64
64
64
64
64
Pagina 3 di 8
*
*
ST_TR
ML_TR
*
*
*
*
*
*
*
ST_A
ML_A
FC1
2010 First Class Spare Parts List Prices
FC2
*
*
*
*
*
*
*
ST_W
ML_W
ST_A
ML_A
ST_A
ML_A
ST_TR
ML_TR
ST_A
ML_A
ST_W
ML_W
ST_A
ML_A
ST_A
ML_A
ST_A
ML_A
ML_W
ST_A
ST_W
ML_A
ML_W
ST_A
ST_W
ML_A
ML_W
ST_TR
ML_TR
ST_A
ST_W
ML_A
ML_W
ST_A
ST_W
ML_A
ML_W
ST_A
ST_W
ML_A
ML_W
*
*
*
*
*
*
*
ST_W
ML_W
ST_A
ML_A
ST_A
ML_A
ST_TR
ML_TR
ST_A
ML_A
ST_W
ML_W
ST_A
ML_A
ST_A
ML_A
ST_A
FC3
*
*
*
*
*
*
*
*
*
*
*
*
*
*
*
*
*
*
*
*
*
*
*
*
*
*
*
*
*
*
*
*
*
*
*
*
*
*
*
*
*
*
*
*
*
*
*
*
115/60
CODICE
M0206108-001
M0206108-001
M0206111-001
M0206111-001
M0206111-001
M0206111-001
M0206113-001
M0206113-001
M0206113-001
M0206113-001
M0206115-001
M0206115-001
M0306107-001
M0306107-001
M0306107-001
M0306107-001
M0306108-001
M0306108-001
M0306108-001
M0306108-001
M0306111-001
M0306111-001
M0306111-001
M0306111-001
M0006124-001
M0006192-001
M0006192-002
M0006192-003
M0006192-004
M0006192-005
M0006192-006
M0006113-001
M0006113-001
M0006126-001
M0006126-001
M0006151-001
M0006151-001
M0006159-001
M0006159-001
M0606101-001
M0606101-001
M0106107-001
M0106107-001
M0606103-001
M0606103-001
M0606104-001
M0606104-001
M0606105-001
ESP.
64
64
64
65
66
68
68
68
68
68
68
68
68
68
68
68
68
68
68
68
68
68
68
68
68
68
68
68
68
68
68
68
68
69
70
71
72
73
73
74
74
74
74
74
74
75
76
76
*
*
*
ML_ALL
*
*
*
*
ST_ALL
ML_ALL
ST_ALL
ST_TR
ML_TR
*
*
ST_A
ML_A
FC1
2010 First Class Spare Parts List Prices
DESCRIPTION
RIGHT SIDE STAINLESS STEEL PANEL ICEE
RIGHT SIDE STAINLESS STEEL PANEL NESTLE'
RIGHT SIDE STAINLESS STEEL PANEL NESTLE'
KNOB SIDE PANEL
AIR FILTER
LEFT SIDE PANEL WITH LOUVERS AND MAIN SWITCH+PRESSURE SWITCH LIGHT
LEFT SIDE PANEL WITH LOUVERS AND MAIN SWITCH+PRESSURE SWITCH LIGHT
LEFT SIDE PANEL WITH LOUVERS AND MAIN SWITCH+PRESSURE SWITCH LIGHT
LEFT SIDE PANEL WITH LOUVERS AND MAIN SWITCH+PRESSURE SWITCH LIGHT
LEFT SIDE PANEL - SLUSH PUPPIE CANADA
LEFT SIDE PANEL - SLUSH PUPPIE CANADA
LEFT SIDE PANEL - SLUSH PUPPIE CANADA
LEFT SIDE PANEL - SLUSH PUPPIE CANADA
FC LEFT SIDE PANEL - "TUTTI FRUTTI"
FC LEFT SIDE PANEL - "TUTTI FRUTTI"
FC LEFT SIDE PANEL - "TUTTI FRUTTI"
FC LEFT SIDE PANEL - "TUTTI FRUTTI"
LEFT SIDE PANEL - SNOW SHOCK
LEFT SIDE PANEL - SNOW SHOCK
LEFT SIDE PANEL - SNOW SHOCK
LEFT SIDE PANEL - SNOW SHOCK
LEFT SIDE PANEL WITH HOLES - 42°C - AND MAIN SWITCH / PRESSURE SWITCH LIGHT HOLES
LEFT SIDE PANEL WITH HOLES - 42°C - AND MAIN SWITCH / PRESSURE SWITCH LIGHT HOLES
LEFT SIDE PANEL - KEY WEST
LEFT SIDE PANEL - KEY WEST
LEFT SIDE PANEL - KEY WEST
LEFT SIDE PANEL - KEY WEST
LEFT SIDE PANEL - ICEE
LEFT SIDE PANEL - ICEE
LEFT SIDE PANEL - ICEE
LEFT SIDE PANEL - ICEE
LEFT SIDE PANEL - NESTLE'
LEFT SIDE PANEL - NESTLE'
MAIN SWITCH
DRAIN SILICON TUBE f 8X11MM
DRAIN PLASTIC CONNECTION
COMPRESSOR WARNING LIGHT 115V
TRADITIONAL ELECTRONIC BOARD
MILLENNIUM ELECTRONIC BOARD
TRADITIONAL ELECTRICAL WIRING FC1
TRADITIONAL ELECTRICAL WIRING FC2
TRADITIONAL ELECTRICAL WIRING FC3
MILLENNIUM ELECTRICAL WIRING FC1
MILLENNIUM ELECTRICAL WIRING FC2
MILLENNIUM ELECTRICAL WIRING FC3
SCREW 2.9X9.5
STAINLESS STEEL FRONT PANEL
SLUSH PUPPIE CANADA FRONT STEEL INOX PANEL
Pagina 4 di 8
FC2
*
*
*
*
ST_ALL
ML_ALL
ML_A
FC3
115/60
ML_ALL
*
*
*
ST_ALL
*
*
ST_A
ML_A
ST_W
ML_W
ST_A
ST_W
ML_A
ML_W
ST_A
ST_W
ML_A
ML_W
ST_A
ST_W
ML_A
ML_W
ST_TR
ML_TR
ST_A
ST_W
ML_A
ML_W
ST_A
ST_W
ML_A
ML_W
ML_A
ST_TR
ML_TR
*
*
ST_A
ML_A
ST_W
ML_W
ST_A
ST_W
ML_A
ML_W
ST_A
ST_W
ML_A
ML_W
ST_A
ST_W
ML_A
ML_W
ST_TR
ML_TR
ST_A
ST_W
ML_A
ML_W
ST_A
ST_W
ML_A
ML_W
ST_TR
ML_TR
*
*
*
*
ST_ALL
ML_ALL
ML_ALL
ST_ALL
*
*
*
*
*
*
*
*
*
*
*
*
*
*
*
*
*
*
*
*
*
*
*
*
*
*
*
*
*
*
*
*
*
*
*
*
*
*
*
*
*
*
*
*
*
*
*
*
*
*
*
CODICE
M0606105-001
M0606107-001
M0606107-001
A0006102-001
A0002103-001
M0006135-001
M0006135-001
M0006135-001
M0006135-001
M0006151-002
M0006151-002
M0006151-002
M0006151-002
M0006152-001
M0006152-001
M0006152-001
M0006152-001
M0006158-001
M0006158-001
M0006158-001
M0006158-001
M0006160-001
M0006160-001
M0006165-001
M0006165-001
M0006165-001
M0006165-001
M0006170-001
M0006170-001
M0006170-001
M0006170-001
M0006176-001
M0006176-001
I82L2206165
TSC8X11
B06.031C
A0005105-001
M0005127-001
M0005148-001
M0105101-001
M0205101-001
M0305101-001
M0105103-001
M0205103-001
M0305103-001
M0005135-001
M0006111-002
M0006143-001
76
76
76
76
77
77
77
77
77
78
80
80
80
81
81
81
82
82
82
83
85
86
87
87
87
87
87
87
87
87
87
88
88
89
89
90
91
91
91
92
93
94
95
95
95
95
95
95
ESP.
FRONT PANEL - SNOW SHOCK
FRONT PANEL - KEY WEST
FRONT PANEL - ICEE
FRONT PANEL - NESTLE'
GREEN DRIP TRAY
RED DRIP TRAY
GRAY DRIP TRAY
BLACK DRIP TRAY
YELLOW DRIP TRAY
STAINLESS STEEL DRIP TRAY
RELAY NE2125GK 115V/60Hz
RELAY T2168GK 115V/60Hz
RELAY E2121Z 115V/60Hz
START CAPACITOR T2168GK 115V/60Hz
START CAPACITOR NE2125GK 115V/60Hz
START CAPACITOR E2121Z 115V/60Hz
THERMAL PROTECTOR T2168GK 115V/60Hz
THERMAL PROTECTOR NE2125GK 115V/60Hz
THERMAL PROTECTOR E2121Z 115V/60Hz
POWER CORD 115 V U.L. FOR USA
CONNECTION FOR SUPPLYING WIRING
TRANSFORMER 60VA 115V
COMPRESSOR E2121Z 115V/60HZ
COMPRESSOR E2121Z 115V/60HZ
COMPRESSOR T2168GK 115V/60HZ
COMPRESSOR T2168GK 115V/60HZ
COMPRESSOR T2168GK 115V/60HZ
COMPRESSOR T2168GK 115V/60HZ
COMPRESSOR T2168GK 115V/60HZ
COMPRESSOR T2168GK 115V/60HZ
COMPRESSOR NE2125GK 115V/60HZ
FUSE 5A 5X20
FUSE 5A 5X20
COIL ZB09 110-120V/60HZ UR
COIL R03/R 110/50-60HZ UR
FUSE F315MA 5X20
FC1 BODY VALVE
FC2 BODY VALVE 5934TE1,5S04DM
FC3 BODY VALVE 5935TE1,5S04DM
DRYER
FC PRESSURE SWITCH
PRESSURE SWITCH WITH CUPPER TEE
IRON CONDENSER STFT 16224
IRON CONDENSER STFT 16224
IRON CONDENSER STFT 18224/245
IRON CONDENSER STFT 18224/245
IRON CONDENSER STFT 14T 1R 145A" OLD CONFIGURATION FC1
IRON CONDENSER STFT 14T 2R 145A" OLD CONFIGURATION FC1
DESCRIPTION
Pagina 5 di 8
*
*
*
*
*
*
*
*
*
*
*
*
*
*
*
*
*
*
*
*
*
*
*
*
*
*
*
*
*
*
*
FC1
2010 First Class Spare Parts List Prices
*
*
*
ST_A
ML_A
ST_TR
ML_TR
*
*
*
*
ST_A
ST_W
ST_A
ST_W
ST_TR
ML_A
ML_W
ML_TR
*
*
*
*
ST_A
ML_A
ST_TR
ML_TR
*
*
*
ML_A
ML_W
*
*
*
*
*
*
*
*
*
*
*
*
*
*
*
*
*
*
*
*
*
*
FC3
*
*
*
*
*
*
*
*
*
*
FC2
*
*
*
*
*
*
*
*
*
*
*
*
*
*
*
*
*
*
*
*
*
*
*
*
*
*
*
*
*
*
*
*
*
*
*
*
*
*
*
*
*
*
*
*
*
*
*
*
115/60
CODICE
M0006157-001
M0006164-001
M0006169-001
M0006177-001
M0006110-001
M0006110-002
M0006110-003
M0006110-004
M0006110-005
M0006117-001
CLI2283001
CLI2302005
CLICBM115R134
COND2252084
COND2252096
CONDBM115VR134A
TER2297003
TER2321004
TERMBM115VR134A
CAVOAL.UL15ALAV
M0005112-001
A0005112-001
C219BG0201AD
C219BG0201AD
C906DG2301AE
C906DG2301AE
C906DG2301AE
C906DG2301AE
C906DG2301AE
C906DG2301AE
C971IG7166AE
F11584
F11584
A5105101-001
AA605101-001
A0005103-001
CPM117FS
A0202101-001
A0302101-001
FA032SBMM2M3
A0002101-001
A0002104-001
C082036007
C082036007
M0602103-001
M0602103-001
M0102109-001
M0102111-001
ESP.
96
96
96
96
96
96
96
96
96
97
98
99
99
99
99
99
100
101
102
103
103
104
104
105
107
109
110
111
112
113
114
114
115
116
117
118
119
119
119
119
119
119
150
150
152
152
153
153
*
*
*
*
*
*
*
*
*
*
*
*
*
*
*
*
*
*
*
*
*
*
*
*
FC1
2010 First Class Spare Parts List Prices
DESCRIPTION
ALUMINUM FAN BLADE 172/34°
ALUMINUM FAN BLADE 254/31°
ALUMINUM FAN BLADE 254/31°
ALUMINUM FAN BLADE 254/31°
ALUMINUM FAN BLADE 254/31°
ALUMINUM FAN BLADE 200/34°
ALUMINUM FAN BLADE 200/34°
ALUMINUM FAN BLADE 254/25°
ALUMINUM FAN BLADE 254/25°
TIMER SUPPORT
TIMER 100-240V/50-60HZ
FAN MOTOR 10W 115V/50-60HZ
FAN MOTOR 16W 115-230V/60HZ
FAN MOTOR 16W 115-230V/60HZ
FAN MOTOR 16W 115-230V/60HZ
FAN MOTOR 16W 115-230V/60HZ
DRIP TRAY BRACKET
SMALL RUBBER FEET
U.S.A. FEET
M6 NUT
M8 NUT
SCREW 6X12
SCREW 8X16
BOARD BOX
OUTLET RESTRICTION
WASHER FOR GEAR MOTOR'S SCREW D.6,3
PRESSURE SWITCH CONNECTION WIRES
CONNECTION WIRES COVERING BAG
ELECTRICAL KIT OF CONDENSERS FOR POWER FACTOR IMPROVEMENT
CONDENSER FOR POWER FACTOR IMPROVEMENT
NEGATIVE TEMPERATURE CONTROL TRIMMER
POSITIVE TEMPERATURE CONTROL TRIMMER
MAXIMUM LEVEL STICKERS
SCREW 2.2X9.5
FC1 NEW CONFIGURATION CAPILLARY 0,91MX2,75MT
POWER CORD SCREW TERMINAL BOARD
GREEN TOP LIGHT
RED TOP LIGHT
GRAY TOP LIGHT
BLACK TOP LIGHT
YELLOW TOP LIGHT
BLUE TOP LIGHT
C\BODY PIPE NUT 1\4 COD. PDFG220000
C\BODY PIPE NUT 1\4 COD. PDFG220000
GUM KEEPING JUNCTION
GUM KEEPING JUNCTION
1\4 C\BODY PIPE WITH VALVE COD. 9C050713P1
1\4 C\BODY PIPE WITH VALVE COD. 9C050713P1
Pagina 6 di 8
FC2
FC3
*
*
*
*
*
*
*
ST_A
ST_TR
ML_A
ML_TR
*
*
*
ML_TR
ST_W
ML_W
ST_A
ML_A
*
*
*
*
*
*
*
*
*
*
*
*
*
*
*
ST_A
ST_TR
ML_A
ML_TR
*
*
*
*
*
ST_TR
*
*
*
*
*
*
*
*
*
*
*
ST_REF
ML_REF
ST_REF
ML_REF
ST_REF
ML_REF
ST_A
ST_TR
ML_A
M_TR
ST_W
ML_W
*
*
*
*
*
*
*
ST_REF
ML_REF
ST_REF
ML_REF
ST_REF
ML_REF
115/60
*
*
*
*
*
*
*
*
*
*
*
*
*
*
*
*
*
*
*
*
*
*
*
*
*
*
*
*
*
*
*
*
*
*
*
*
*
*
*
*
*
*
*
*
*
*
*
*
CODICE
M0102110-001
V4012016M3/2
V4012016M3/2
V4012016M3/2
V4012016M3/2
V4012201M3WBM
V4012201M3WBM
V4012255
V4012255
G0005102-001
T027600231
A5005101-001
A5605102-001
A5605102-001
A5605102-001
A5605102-001
M0001104-001
PAR114-ELGR
A5601101-001
DADOD.6ZFL
DADOD.8ZFL
VTTE6X12Z
VTTE8X16Z
M0005134-001
M0003130-001
M0000144-001
A0005110-001
M0000124-001
M0005142-001
M0005141-001
M0005144-001
M0005143-001
A0006103-001
VTTC2.2X9.5CR
A0002105-001
M0005151-001
M0006105-001
M0006105-002
M0006105-003
M0006105-004
M0006105-006
M0006105-007
A0000107-001
A0000107-001
A0000103-001
A0000103-001
A0000102-001
A0000102-001
154
154
155
155
156
156
157
157
158
158
159
159
160
161
161
163
163
164
200
200
200
200
200
201
201
201
202
202
203
203
204
204
205
205
206
206
207
207
208
208
209
209
210
210
211
211
212
212
ESP.
PIPE 6X12 FOR REFILL COD. 797344
PIPE 6X12 FOR REFILL COD. 797344
COIL 115V
COIL 115V
CLIP PFAS13/15
CLIP PFAS13/15
REFILL VALVE 21L1K1V25 120/60 12W UL
REFILL VALVE 21L1K1V25 120/60 12W UL
90° PLASTIC ELBOW FOR SOLENOID VALVE
90° PLASTIC ELBOW FOR SOLENOID VALVE
4X8 PLATED SCREW
4X8 PLATED SCREW
REFILL KIT FOR FIRST CLASS - MACH
NOTCHED WASHER 5.3 E
NOTCHED WASHER 5.3 E
FC2 REFILL TRADITIONAL ELECTRICAL WIRING
FC3 REFILL TRADITIONAL ELECTRICAL WIRING
MOLEX CONNECTOR FOR MAIN SWITCH
KIT COPPER PIPE D.6MM AIR CONDENSER-TEE-FILTER FC1
KIT COPPER PIPE D.6MM AIR CONDENSER-TEE-FILTER FC2/3
KIT COPPER PIPE D.6MM AIR CONDENSER-TEE-FILTER FC2/3
KIT COPPER PIPE D.6MM AIR CONDENSER-TEE-FILTER FC2/3
KIT COPPER PIPE D.6MM AIR CONDENSER-TEE-FILTER FC2/3
COPPER PIPE D.6MM TEE - PRESSOSTAT
COPPER PIPE D.6MM TEE - PRESSOSTAT
COPPER PIPE D.6MM TEE - PRESSOSTAT
KIT COPPER PIPE D.6MM WATER CONDENSER-TEE-FILTER FC2W/3W
KIT COPPER PIPE D.6MM WATER CONDENSER-TEE-FILTER FC2W/3W
WATER CONDENSER
WATER CONDENSER
PRESSURE SWITCH VALVE COPPER PIPE D.8 -AIR CONDENSER
PRESSURE SWITCH VALVE COPPER PIPE D.8 -AIR CONDENSER
PRESSURE SWITCH VALVE WVFX1025
PRESSURE SWITCH VALVE WVFX1025
PRESSURE SWITCH VALVE SUPPORT
PRESSURE SWITCH VALVE SUPPORT
BRASS NIPLES 1/4" D.8MM
BRASS NIPLES 1/4" D.8MM
BRASS ADAPTER 3/8"-1/4"
BRASS ADAPTER 3/8"-1/4"
WATER OUTPUT COPPER PIPE D.8MM
WATER OUTPUT COPPER PIPE D.8MM
WATER INPUT COPPER PIPE D.8MM
WATER INPUT COPPER PIPE D.8MM
SHAFT FASTENING SCREW - PRESSURE SWITCH VALVE
SHAFT FASTENING SCREW - PRESSURE SWITCH VALVE
CAPILLARY COPPER PIPE TEE - PRESSURE SWITCH VALVE
CAPILLARY COPPER PIPE TEE - PRESSURE SWITCH VALVE
DESCRIPTION
Pagina 7 di 8
*
*
*
FC1
2010 First Class Spare Parts List Prices
FC2
FC3
ST_W
ML_W
ST_W
ML_W
ST_W
ML_W
ST_W
ML_W
ST_W
ML_W
ST_W
ML_W
ST_W
ML_W
ST_W
ML_W
ST_W
ML_W
ST_W
ML_W
ST_W
ML_W
ST_A
ST_TR
ML_A
ML_TR
ST_W
ML_W
ST_A
ST_TR
ML_A
ML_TR
ST_W
ML_W
ST_W
ML_W
ST_W
ML_W
ST_W
ML_W
ST_W
ML_W
ST_W
ML_W
ST_W
ML_W
ST_W
ML_W
ST_W
ML_W
ST_W
ML_W
ST_W
ML_W
ST_W
ML_W
ST_REF
*
ST_REF
ML_REF
ST_REF
ML_REF
ST_REF
ML_REF
ST_REF
ML_REF
ST_REF
ML_REF
ST_REF
ML_REF
ST_REF
ST_REF
ML_REF
*
ST_REF
ML_REF
ST_REF
ML_REF
ST_REF
ML_REF
ST_REF
ML_REF
ST_REF
ML_REF
ST_REF
ML_REF
ST_REF
ST_REF
ML_REF
ST_REF
*
*
*
*
*
*
*
*
*
*
*
*
*
*
*
*
*
*
*
*
*
*
*
*
*
*
*
*
*
*
*
*
*
*
*
*
*
*
*
*
*
*
*
*
*
*
*
*
115/60
CODICE
A0000101-001
A0000101-001
A5000103-001
A5000103-001
A0000104-001
A0000104-001
A5000102-001
A5000102-001
A0000106-001
A0000106-001
A0001101-001
A0001101-001
M0005130-001
ROND.D.5.3EDENT
ROND.D.5.3EDENT
M0205102-001
M0305102-001
A0005106-001
M0102118-001
M0602112-001
M0602112-001
M0602112-001
M0602112-001
M0602105-001
M0602105-001
M0102114-001
M0602114-001
M0602114-001
CB5X8M2/3W
CB5X8M2/3W
M0602107-001
M0602107-001
A0602102-001
A0602102-001
A0600101-001
A0600101-001
NIPLES+RACCOR
NIPLES+RACCOR
M0602111-001
M0602111-001
M0602108-001
M0602108-001
M0602106-001
M0602106-001
VTTC5X16CRIN
VTTC5X16CRIN
M0602110-001
M0602110-001
ESP.
213
213
214
214
252
252
252
252
252
253
350
351
*
ML_ALL
ML_ALL
*
*
FC1
2010 First Class Spare Parts List Prices
DESCRIPTION
KIT COPPER PIPE D.6MM COMPRESSOR-TEE-WATER CONDENSER FC2W/3W
KIT COPPER PIPE D.6MM COMPRESSOR-TEE-WATER CONDENSER FC2W/3W
CHARGE VALVE +COPPER PIPE D.6MM 16,5CM FC1
CHARGE VALVE +COPPER PIPE D.6MM 26,5CM FC2/3
COMPRESSOR COPPER PIPE D.6MM - AIR CONDENSER
COMPRESSOR COPPER PIPE D.6MM - AIR CONDENSER
COMPRESSOR COPPER PIPE D.6MM - AIR CONDENSER
COMPRESSOR COPPER PIPE D.6MM - AIR CONDENSER
COMPRESSOR COPPER PIPE D.6MM - AIR CONDENSER
BOYLER COPPER PIPE D.6MM - COMPRESSOR
MACHINE MODULE SHAFT
"MACHINE MODULE" MILLENIUM ELECTRONIC KIT
Pagina 8 di 8
ML_ALL
ML_ALL
ST_A
ST_TR
ML_A
ML_TR
*
ST_W
ML_W
FC2
ML_ALL
ML_ALL
ST_A
ST_TR
ML_A
ML_TR
*
ST_W
ML_W
FC3
*
*
*
*
*
*
*
*
*
*
*
*
115/60
CODICE
M0602113-001
M0602113-001
A0002111-001
A0002112-001
M0102103-001
M0202102-001
M0202102-001
M0202102-001
M0202102-001
M0102107-001
M0000150-001
M0005149-001
ESP.
1
4
5
6
6
7
10
13
19
21
28
28
29
33
37
38
40
41
FirstClass Gear Motor Parts List
DESCRIPTION
ROTOR SHAFT WITH BEARINGS ***FOR ELCO GEAR MOTOR ONLY***
STATOR ***FOR ELCO GEAR MOTOR ONLY***
STATOR BRACKET ***FOR ELCO GEAR MOTOR ONLY***
GEAR WITH BEARINGS ***FOR ELCO GEAR MOTOR ONLY UNTIL PROD. 04-04***
GEAR WITH BEARINGS ***FOR ELCO GEAR MOTOR ONLY FROM PROD. 05-04***
GEAR WITH BEARINGS ***FOR ELCO GEAR MOTOR ONLY***
GEAR WITH OUTPUT SHAFT, O RINGS AND SNAP RING ***FOR ELCO GEAR MOTOR ONLY***
OUTPUT SHAFT BEARING ***FOR ELCO GEAR MOTOR ONLY***
GEAR BOX GASKET ***FOR ELCO GEAR MOTOR ONLY***
GEAR BOX SCREW ***FOR ELCO GEAR MOTOR ONLY***
MAGNET SLEEVE ***FOR ELCO GEAR MOTOR ONLY UNTIL PROD. 39-06***
MAGNET SLEEVE ***FOR ELCO GEAR MOTOR ONLY FROM PROD. 40-06***
PERMANENT MAGNET ***FOR ELCO GEAR MOTOR ONLY***
COMPLETE PLASTIC COVER WITH HALL CELL ***FOR ELCO GEAR MOTOR ONLY***
COVER VIBRATION-DAMPING ***FOR ELCO GEAR MOTOR ONLY***
COVER VIBRATION-DAMPING ***FOR ELCO GEAR MOTOR ONLY***
STATOR SCREW ***FOR ELCO GEAR MOTOR ONLY***
OPTICAL/MAGNETIC READER WIRE
*
*
*
*
*
*
*
*
*
*
*
*
*
*
*
*
*
*
*
*
*
*
*
*
*
*
*
*
*
*
*
*
*
*
*
*
*
*
*
*
*
*
*
*
*
*
*
*
*
*
*
*
*
*
FC1 FC2 FC3 115/60
*
*
*
*
*
*
*
*
*
*
*
*
*
*
*
*
*
*
ITEM#
R30282535
S3295634
C10882540
R3392039
R3392047
R3392040
A3392041
C1067130
G1266019
V1069200
B1071202
B1071234
M1551004
C3072031
G1071129
G1071130
V10023022
C0005101-001
ENGLISH
Notes
- 23 -
ENGLISH
Notes
- 23 -