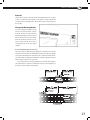
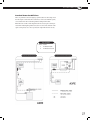
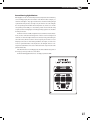
1
A3FE
A3RE
BLUE BIRD
ALL AMERICAN
1
76
41
0
00
2010
10004176
© 2007 Blue Bird Corporation. All rights reserved.
All Blue Bird products sold for use in the United States of America and its insular areas comply with all applicable Federal Motor
Vehicle Safety Standards (FMVSS) adn applicable Federal ADA requirements.
Many of the components of Blue Bird buses are obtained from outside suppliers. Where maintenance and/or service information
conflicts with the component manufacturer’s documentation, the manufacturer’s documentation prevails.
In the event of any conflict between the requirements of this publication an dany applicable legal requirement, the legal requirement prevails. Technical requirements that exceed the legal requirements are not considered to conflict.
Blue Bird Corporation continually endeavors to improve its products and reserves the right to change without notice. Text, illustrations, and specifications in this manual are based on information available at the time of printing.
2
CONTENTS
INTRODUCTION
About This Manual / 7
Reporting Safety Defects / 9
Noise Emissions Warranty / 9
About 2007 Emissions Standards / 10
Regarding Modifications / 11
Before Placing the Bus in Service / 12
ORIENTATION
Vehicle Identification / 13
ENTRANCE AND EXIT
Outward Opening Door / 14
Outward Opening (Air Door) / 14
Power Doors / 14
Emergency Pneumatic Power Door Release / 14
Electric Outward Opening Door / 15
Emergency Electric Power Door Release / 15
Entrance Door Security Lock / 15
Security Lock (Outward Opening Door) / 16
Emergency Door Vandal Lock / 16
Sliding Bolt Vandal Lock / 16
Wheelchair Lifts / 17
ENROUTE EMERGENCIES
EMERGENCY EXITS
Transpec™ Safety Vent / 30
EMERGENCY EQUIPMENT
Fire Extinguisher / 32
First Aid Kit / 32
Body Fluid Cleanup Kit / 32
Fire Axe/Crowbar / 32
Flare Kit / 33
Triangular Warning Devices / 33
TIRE / WHEEL EMERGENCIES
Spare Tire Location And Removal / 34
Damaged Tires / 35
Wheel And Rim Safety / 36
Jacking Instructions / 37
Changing a Flat Tire / 38
Schrader Valve / 39
Releasing Spring Brake Manually / 39
Towing Or Pushing / 40
DRIVER’S AREA
Driver’s Compartment / 18
Dash And Instrument Panel / 19
Warning Bank / 20
Tilt And Telescopic Steering / 21
Switch Panel / 21
Mirrors And Adjustment / 22
SEATING
Standard Driver’s Seat / 24
Deluxe Driver’s Seat / 24
Driver’s Seat Belt Operation / 25
Driver’s Seat Belt With Shoulder Harness (Optional) / 25
Passenger Seat Belts (Optional) / 25
COMPARTMENTS & ACCESS PANELS
All American Front Engine / 26
All American RE / 26
Engine Access; All American Front Engine / 27
Engine Access; All American Rear Engine / 27
Rear Side Engine Compartment Doors / 27
3
ROUTINE OPERATION
PRE-ROUTE INSPECTION
Weekly Inspection / 43
ENGINE OPERATION
Engine Exhaust Caution (Carbon Monoxide) / 44
Diesel Fuel / 44
Diesel Engine Starting Procedure / 45
Starting With Boost Cables / 45
Using The Engine As A Brake / 46
Engine Warning System / 46
Exhaust System / 47
DPF Regeneration In Blue Bird Buses / 48
Levels of Notification / 49
Stationary Regeneration Precautions / 52
COMPRESSED NATUAL GAS
Owner / Operator Responsibilities / 54
National Fire Protection / 54
Fuel System Description / 55
Safety Cautions And Warnings / 56
Compressed Natural Gas Fuel / 58
Compressed Natural Gas Filters / 58
Refueling / 59
Specific Gravity / 60
Fuel Toxicity And Safety / 60
Flammability / 60
Antiknock Properties / 61
Energy Conversions / 61
Vehicle Performance And Emissions / 61
Starting Procedure / 61
Cold Start / 62
Operation And Maintenance OfCNG Vehicle Components
/ 62
TRANSMISSIONS
Allison Automatic Transmission / 64
Allison Model 3000 Bus Series Transmission / 64
Allison Model 2000 Bus Series Transmission / 65
Range Inhibited Light / 67
Check Transmission Light / 67
Allison Automatic Transmission Driving Tips / 68
Electric Retarder (If Equipped) / 69
Transmission Indicators / 70
4
BRAKING
Antilock Braking System (ABS) / 71
Hydraulic Brakes / 71
Air Brakes / 74
HEATERS
Heater Operation / 75
Control Panel Outlet Locations / 75
Defrosting / 76
Heater Defroster Location / 76
Driver / Passenger Comfort / 76
Standard Heater Cut Off Valves / 77
CARE & MAINTENANCE
ELECTRICAL
Interior Lights / 82
Exterior Lights / 82
Doran Warning Light Monitor / 83
Circuit Breakers / 85
DOOR ADJUSTMENT & LUBRICATION
Outward Opening Door Adjustment / 86
Outward Opening (Air Powered) Adjustment / 86
Jackknife Door Adjustment / 87
Power Jackknife Door Adjustment / 88
Sliding Bolt Vandal Lock / 89
Security Lock Lubrication (Outward Opening Door) / 89
Access Doors / 89
HEATER CARE
Filter / 104
Annual Maintenance / 104
Cleaning Auxiliary Fans / 105
MAINTENANCE SCHEDULE
Maintenance Task Schedule, A3FE / 106
Maintenance Task Schedule, A3RE / 121
Maintenance Locations / 135
General Data / 136
SEATING CARE
Seat Belt Inspection And Maintenance / 90
Seat Inspection And Maintenance / 90
SIGNS & SIGNALS
Stop Arms / 94
Destination Signs / 95
ENGINE & RUNNING GEAR
Air Intake System Inspection / 96
Engine Cooling System / 97
Shutters / 99
Transmission / 100
Rear Axle / 101
Hydraulic Brakes / 101
WINDSHIELD WIPERS
Washer Solution Reservoir / 102
Wiper Assembly Replacement / 102
Wiper Refill Replacement / 102
CLEANING
Exterior Cleaning / 103
Floor Cleaning / 103
5
6
INTRODUCTION
T
hank you for selecting the Blue Bird All American. The All American is
the culmination of almost a century of Blue Bird heritage in student
and public transportation which began in1927. As always, the design
and construction of the All American reflects Blue Bird’s concern for
safety, efficiency, and quality.
About This Manual
This Drivers Handbook has been prepared to acquaint you with the operation of the Blue Bird All American, and should be read by
all Drivers before operating the unit. Familiarity with automotive operation and control is assumed to be common knowledge to
all who will be operating this bus. This book does not address all driving situations which may arise, and it is not a substitute for
proper driver training. It will, however, enable a School Bus driver to more quickly feel at home in this model All American.
Your Blue Bird All American may not have all of the equipment described in this manual. You may find information on optional
equipment not installed on your bus. You are encouraged to contact your Blue Bird distributor if additional information or assistance is needed.
For use as a convenient reference, this Handbook also contains some general maintenance information. Although the Driver
will not likely be performing service procedures, this information nonetheless serves to further familiarize the Driver with the
bus. The maintenance information contained herein is provided as a reference for systems and components that require periodic
service. The intervals given are component manufacturers’ recommendations and should be considered maximum intervals; that
is, the very minimum maintenance schedules that will afford reasonable care of this vehicle.Service technicians should refer to
the Service Manual for more complete service information. If this manual does not address your specific questions or concerns,
please contact your Blue Bird distributor. The distributor will answer your questions or put you in contact with the proper factory
personnel.
Throughout this manual are precautions labeled Warnings and Cautions, and set in the style shown here:
[WARNING] The Warning designation is generally used for precautions which, if not properly observed while performing
the related procedures or handling materials, could result in serious personal injury or death.
[CAUTION] The Caution designation is generally used for precautions which, if not properly observed while performing
the related procedures or handling materials, could result in damage to the bus or its equipment.
Blue Bird Corporation offers many items as standard and optional equipment to meet federal, state, and local specifications
and individual customer requirements. This includes, but is not necessarily limited to, stop arms, crossing guards, warning lights,
warning light monitors, mirrors, first aid kits, fire extinguishers, warning reflectors, fuses, directional and brake lights, warning
buzzers, security/vandal locks, emergency exits, and seat belts.
Emergency equipment must be checked for proper operation daily. It is the driver’s responsibility to report any damage to
qualified service technicians, and that the condition be corrected before transporting passengers.
7
DRIVERS HANDBOOK
[WARNING] Vehicle alterations, which may cause non-conformance with the
Emission Control and/or Federal Motor Vehicle Safety Standards (FMVSS), are
expressly not authorized by Blue Bird Body Company. It is the responsibility of
the entity undertaking the modification of this product to ascertain compliance with all applicable regulations. Modification must be accomplished in
accordance with strict government standards. The entity completing modification of this product must certify that all applicable regulations are met. To
certify a modified vehicle, the upfitter must be a licensed vehicle manufacturer, or obtain the services of a licensed vehicle manufacturer for that purpose.
Specifically, Blue Bird does not authorize the following modifications.
•
•
•
•
•
Do not modify the front or rear suspension.
Do not change the wheel base length.
Do not remove any chassis, or body, cross members.
Do not cut or drill the flange of the frame rails.
Do not weld on the engine, radiator, fuel tank/s, transmission, or any component on the engine, radiator, fuel tank/s or transmission.
• Do not modify any body or frame cross member without prior approval of the
Blue Bird Body Company.
• Do not install any equipment or component that will obstruct the flow of air
into, around, or from the cooling system.
• Do not install equipment or components nearer than 2 inches (51 mm) to the
fuel tank/s, rotating components or “jounce” movement of driveline components.
• Do not install any equipment, components, including flooring and/or carpeting, which will obstruct the functioning of the brake and accelerator pedals.
For the terms of the Limited Warranty of this Blue Bird product, refer to the Warranty certificate provided in the owner’s documents that came with the vehicle.
In addition to the safety issues involved in the modification of the unit, any “unauthorized” modification may adversely affect the warranty of this product by Blue
Bird Body Company.
[CAUTION] All Blue Bird products are certified to meet or exceed all applicable motor vehicle regulations and standards in the “as purchased” configuration. Any modifications are the responsibility of the entity making those
modifications. Blue Bird engineering does not authorize any modification that
affects the basic design.
The complete line of Blue Bird Service Parts is available from your Blue Bird distributor. The use of original Blue Bird replacement parts and components will help
ensure that your All American remains true to its original design, best preserving
performance, efficiency, and safety.
8
For replacement parts…
Contact your Blue Bird distributor or Parts Sales at
Blue Bird Body Company.
INTRODUCTION
l
This manual provides you with the most current operation information available.
We welcome your comments and suggestions regarding this manual. Please direct
all correspondence to:
Blue Bird Body Company
Attn: TECHNICAL PUBLICATIONS
P.O. Box 937
Fort Valley, GA 31030
Reporting Safety Defects
If you believe that your vehicle has a defect which could cause a crash or could cause
injury or death, you should immediately informthe National Highway Traffic Safety
Administration (NHTSA) in addition to notifying Blue Bird.
If NHTSA receives similar complaints, it may open an investigation and, if it finds
that a safety defect exists in a group of vehicles, it may order a recall and remedy
campaign. However, NHTSA cannot become involved in individual problems between you, your dealer, or Blue Bird Corporation.
To contact NHTSA, you may call the Vehicle Safety Hotline toll-free at:
1–888–327–4236 (TTY: 1–800–424–9153)
or go to:
http://www.safercar.gov
or write to:
Administrator, NHTSA,
400 Seventh
Street, SW., Washington, DC 20590
You can also obtain other information about motor vehicle safety from:
http://www.safercar.gov.
Noise Emissions Warranty
Blue Bird Body Company warrants to the first person who purchases this vehicle for
purposes other than resale, and to each subsequent purchaser, that this vehicle, as
manufactured by Blue Bird, was designed, built, and equipped to conform to all applicable United States Environmental Protection Agency Noise Control Regulations.
This warranty covers the vehicle as it was designed, built, and equipped by Blue
Bird, and is not limited to any particular part, component, or system of the vehicle
manufactured by Blue Bird. Defects in design or in assembly, or in any part, component, or system of the vehicle as manufactured by Blue Bird, which at the time it left
Blue Bird’s control caused noise emissions to exceed Federal standards, are covered
by this warranty for the life of the vehicle.
9
DRIVERS HANDBOOK
About 2007 Emissions Standards
Buses equipped with 2007 engines are designed to conform to new and stringent
federal emissions standards. These standards affect both the equipment installed at
the factory and the fuel at the pump.
Buses powered by 2007 emissions standards engines are equipped with special
exhaust systems to reduce emissions. The technical details of the systems employed
by various engine manufacturers differ, but share common general principles. The
exhaust muffler is a particulate filter which traps and burns microscopic particles
in a process referred to as “regeneration.” When heat in the exhaust is insufficient
to fully burn the particulates, the system enters an “active” regeneration mode so
the necessary catalytic reaction can take place. During active regeneration events,
exhaust temperatures are elevated, and an indicator light on the instrument panel
illuminates to notify the Driver that regeneration is active. This regeneration mode is
automatic and normal, and requires no special action on the part of the Driver.
As part of the 2007 emissions standards, effective October 15, 2006, the EPA has
required fuel retailers to sell lower-emission fuel, designated “ultra-low-sulfer diesel”.
After that date, all commercially-available number 1 and number 2 highway diesel
fuels are Ultra-low-sulfer diesel. This fuel must be used in all 2008 model buses powered by a 2007 emission standards diesel engine, as indicated by a decal located near
the fuel filler door, reading:
The engine in this vehicle must be operated only with low ash engine oil and
ultra low sulfur diesel fuel (meeting EPA specifications for highway diesel fuel,
including a 15 ppm sulfur cap).
For detailed information on recommended fuels and other fluids, always follow your
engine manufacturer’s guidlines.
10
INTRODUCTION
l
Regarding Modifications
Blue Bird Corporation offers many items as standard and optional equipment to
meet federal, state, and local specifications and individual customer requirements.
Those interested in modification of thisvehicle should consult the Service Manual and Blue Bird Engineering Department for a more complete understanding of
the vehicle.
Vehicle modifications which may cause non-conformance with the emission
control and/or Federal Motor Vehicle Safety Standards ((FMVSS), are expressly not
authorized by Blue Bird Corporation.
It is the responsibility of the entity undertaking the modification to ascertain
compliance of the modified vehicle with any and all applicable regulations. The entity performing modification of this product must certify that all applicable regulations are met. In order to certify a modified vehicle, the upfitter or other entity performing the modification must be a licensed vehicle manufacturer or must objtain
the services of a licensed vehicle manufacturer for that purpose.
Specifically, Blue Bird Corporation does not authorize any modifications to or
such as the following:
• Front or rear suspension
• Wheelbase length
• Body or chassis crossmembers
• Frame rail flanges
• Welding on the engine, radiator, fuel tank(s), transmission or any component
of those items
• Cooling system
• Addition of any equipment or component nearer than 2 inches (51mm) to the
fuel tank(s), rotating components or “jounce” movement of driveline components
11
Before Placing the Bus in Service
It is the responsibility of the bus Owner/Operator to ensure compliance with all federal, state, and local regulations for school bus operation and equipment. As part of a
daily pre-trip inspection, the Driver should consider it his/her responsibility to verify
that the vehicle is in satisfactory working order and that all emergency equipment
is in place, fully stocked (First Aid Kit), up-to-date (Fire Extinguisher), and in proper
working condition.
• Check the suspension U-bolt torque.
• Check the service brake adjustment.
• Check the park brake adjustment on units equipped with hydraulic brake systems.
• Check the torque on all the body “tie-down” capscrews.
• Check the engine oil level.
• Check the transmission fluid level.
• Check the engine coolant level.
• Check the air pressure in all the tires.
• Check the torque on the driveline universal joint straps.
Inspection guidelines from individual state inspection manuals (such as Commercial Driver’s License pre-trip inspection procedures) take precedence over those
found in this manual. Guidelines found herein are in addition to those in your state’s
inspection requirements.
The Driver is responsible for determining that the loading area is clear before
stopping to load passengers. The Driver must ensure that all unloaded passengers
are clear before moving the bus.
12
[WARNING] Emergency
equipment must be checked for
proper operation daily. It is the
Driver’s responsibility to report
any damage to qualified Service
Technicians and to ensure that
the condition is corrected before
transporting passengers.
O R I E N TAT I O N
T
his section is to familiarize the Blue Bird All American Driver wiith the
locations of controls and other bus features with which he will interact daily.
Vehicle Identification
The Vehicle Certification Plate certifies that the vehicle conforms to all applicable Federal Motor Vehicle Safety Standards in effect at the date of manufacture. Do
not remove or deface this plate.
The Body Serial and Service Number Plate is located on
the front upper inner panel above the windshield. Refer to the
data on this plate for registration purposes or for replacement
part information.
The Axle Record and Chassis Service Number Plate is
located on the front upper inner panel above the windshield.
Refer to the data on these plates for registration purposes or
for replacement part information.
BLUE BIRD
FORT VALLEY
FORT VALLEY, GEORGIA
BODY NO.
MODEL YEAR
MFG. BODY DATE
STATE / PROVINCE
EQUIPPED CAPACITY
SPECIFICATION YEAR
MAX. DESIGN CAPACITY
BODY SERVICE NO.
13
DRIVERS HANDBOOK
ENTRANCE AND EXIT
Outward Opening Door
Outward Opening Doors are mounted in a prefabricated framework, which eliminates the effect of body construction variations on door and seal operation. Doors
are suspended completely on sealed ball bearings located at the top corners of the
framework, inside the body. The interlink connection between the doors is a single
assembly with oppositely threaded, spherical bearing rod end connectors at each
end, providing simple link length adjustment without disassembly. The geometry
of the mechanical link between the doors causes the rear door to close well ahead
of the front door, so that the front nosing seal rubber always overlaps the rear. Oil
impregnated bronze bearings in the lower corners of the framework serve as pivots
(not supports). All controls and mechanisms and the complete lower step tread are
sealed inside the bus and out of the weather when the door is closed.
The manual control is the Blue Bird over center locking type with built in Saf
Latch. The door’s ease of operation allows use of a short handle arm, so the handle is
six inches closer to the driver in the open position than with the jack-knife door.
Your bus’s outward opening door may be actuated by an optional electric control
connected to a lever on the front door panel. Mechanically operated switches control
automatic stop positions as well as stepwell and warning lights.
Outward Opening (Air Door)
The pneumatic actuator is a cylinder connected to a lever on each door, located inside the header cover. An interconnecting link between the doors controls the operation sequence. A safety release valve is located over the door. Air switches inside the
header cover operate Stepwell lights. A three position spring loaded switch signals
a valve controling the flow of air to open or close the doors. Air pressure holds the
door either open or closed. The operation speed is adjustable by use of flow control
valves located on the actuator
Power Doors
Power doors have an air cylinder in the header, for operation of jackknife entrance
and exit doors. The door operates with an air, push/pull valve, located in the switch
panel area.
Emergency Pneumatic Power Door Release
An emergency release valve is located above the door in the header cover. To use the
emergency release, push the lever in the direction of the arrow. This valve exhausts
air pressure in the door cylinder, allowing the door to be opened and closed manually.
14
ORIENTATION
l
Electric Outward Opening Door
The electrically operated outward opening door has a linear
actuator that moves a lever attached to the front door. To open
the door, hold the spring-loaded switch in the driver’s area in the
“OPEN” position until the door stops moving. An automatic switch
stops the action of the door. To close the door, move the switch to
the “CLOSE” position; the door will stop automatically when fully
closed. There is a keyed switch on the outside of the body, on the
cowl panel by the door, which operates the door from outside the
bus.
Emergency Electric Power Door Release
With the door in the fully closed position, pull the release lever
in the header panel toward OPEN as far as possible. The linkage
will release and the lever will “snap” into a “park” position so it will
not return forward when released. Push the door open to exit the
bus. To reset the release mechanism, move the lever to its forward
position, and hold the driver operated spring-loaded switch in the
“open” position until it clearly engages, or until door is in the fully
open position.
Manual Security Lock (exterior)
Entrance Door Security Lock
To activate the optional electric entrance door security lock, pull
the door to a fully closed position from outside the vehicle. When
this is done, the security lock is activated. To unlock, insert the key
Manual Security Lock (interior)
into the lock, forward of the door. While turning the key, press
against the center section of the door to open.
The manual security lock release handle is located in the lower kick panel of the
entrance door. It rotates in a counter clockwise direction to latch. It can be locked in
the latched position or in the unlatched position. To use the vandal/security lock, the
hinged stop on the door control
cover must be down to prevent
the door control arm traveling over
center when closing the door.
Manual Security Lock (interior)
15
DRIVERS HANDBOOK
Security Lock (Outward Opening Door)
Outward opening doors have an optional key locking mechanism, accessible from
outside the bus. A key operated bolt slides into a hole in the header when the door
is in the closed position and locked. This option also requires use of the hinged stop
on the door control.
Emergency Door Vandal Lock
The emergency door and the rear emergency window may have an optional vandal
lock feature, which prevents entry through the emergency door. When the vandal
lock cylinder is in the lock position, the engine cannot be started. To start the bus,
the cylinder must be removed from the lock and placed in the receptacle at the side
of the door.
Sliding Bolt Vandal Lock
The sliding bolt vandal lock (for the emergency door and rear emergency window)
is an interior latch that prevents the door from being opened from the outside. The
bolt is connected to an interlock assembly, which prevents the engine from starting
when the door is locked. If the lock is activated after the engine is running, an alarm
sounds in the driver’s area.
[WARNING] The bus must not be operated with the emergency exit locked.
16
ORIENTATION
l
Wheelchair Lifts
Blue Bird All American school buses may be fitted with lifting platforms designed
to aid in loading and unloading passengers. There are two optional wheelchair lifts
available. The units available are the Ricon™ Model S5010 and the Braun™ Model
L919FIB. Both offer a maximum of 48 inches (122 cm) lift from the ground to the level
of the bus floor. For the correct operation and maintenance of the wheelchair lift on
your bus, please refer to the operator’s manual supplied by the OEM.
[WARNING] Operators should familiarize themselves with the lift manufacturer’s operator’s manual prior to loading passengers on the lift. All lifts have
maximum weight limits that should never be exceeded.
These lifts are operated by an independent, electro-hydraulic power system and
are controlled by the operator from outside the bus. There is a master switch located
in the driver’s area that must be activated as well.
The bus electrical system powers a hydraulic pump, internal to the lift, which
moves the lift up. The “down” function is gravity type and is controlled by pressure
release valves. Manual operation of the “down” function requires that the operator
manually control the pressure release valves. To provide for the manual “up” function,
the lift is fitted with a hand operated hydraulic jack, located on the right-hand (from
inside the bus) side of the lift assembly.
A buzzer sounds when the door is unlatched or partially opened. The buzzer
stops if the door is completely open.
17
DRIVERS HANDBOOK
DRIVER’S AREA
Driver’s
Compartment
1.
2.
3.
4.
5.
6.
7.
8.
9.
10.
11.
12.
13.
14.
15.
16.
17.
18
Auxiliary fans.
Radio.
Interior mirror.
Emergency equipment compartment.
Switch panel.
PA system.
Horn button—sounds electric horn.
Instrument panel.
Automatic transmission shift control
range selector or electronic push
button pad location.
Warning light, door, and stop arm
controls.
Hazard light flasher switch.
Tilt/telescopic steering lever.
Parking brake.
Ignition.
Brake pedal or air treadle—applies
service brakes.
Accelerator pedal—controls engine
speed.
Heater and defroster controls.
ORIENTATION
Dash And Instrument Panel
13. Adjust Pedal. Two position momentary switch adjusts
accelerator pedal to desired position.
14. Cruise Control On/Off. Activates or inactivates the cruise
standby mode.
15. Cruise Control Set/Resume. At the desired cruise speed,
set speed by depressing the SET switch. When the brake
pedal is depressed, the cruise returns to standby mode.
To reactivate to preset speed, depress the RESUME
switch after reaching at least 30 mph.
16. Exhaust Brake. Activates the exhaust brake to help slow
the bus during decelleration.
17. Warning Bank. Cluster of indicator lamps. See next
page.
18. Message Display Center. Displays additional information to the vehicle operator.
1. 4 in 1 Gauge. Consist of the following clockwise from
left to right:
Fuel Gauge. Indicates fuel level in tank.
Voltmeter. Indicates electrical system voltage.
Coolant Temperature Gauge. Indicates engine coolant
temperature.
Oil Pressure. Indicates engine oil pressure.
2. Front Air Gauge. Indicates air pressure in front brake
reservoir.
3. Rear Air Gauge. Indicates air pressure in rear brake reservoir.
4. Speedometer. Indicates vehicle speed.
5. Tachometer. Indicates engine speed.
6. Transmission Oil Temperature. Indicates transmission
fluid temperature.
7. Ammeter. Indicates battery charge condition.
8. Headlight Switch. First position activates front park
lights and rear taillights. Second position activates front
park lights, rear taillights, and headlights.
9. Dimmer Switch. Adjusts light level on instrument panel.
10. High Idle Switch. Sets engine at high idle speed.
11. Diagnostic Switch. For use by qualified service personnel for diagnostic purposes only.
12. Tire Chains Switch. Activates on-spot automatic tire
chain device.
6
8
3
9
2
10
7
11
4
17
18
l
5
1
12
13
14
15
16
19
DRIVERS HANDBOOK
Warning Bank
15.
16.
17.
18.
1. Left Turn. Flashes with left turn signal.
2. Brake System. Indicates a brake system failure. Stop
the vehicle and call for assistance.
3. ABS. Indicates fault in the anti-lock brakes system. Service as soon as possible.
4. High Beam. Headlights are in high beam.
5. Stop Engine. The engine ECU has detected a problem
which can lead to engine damage. Stop the engine and
call for assistance.
6. Right Turn. Flashes with right turn signal.
7. Check Trans. The transmission needs service.
8. Trans Temp. The transmission temperature is beyond
normal operating range.
9. Hydraulic Fluid Temperature. The hydraulic fluid temperature is beyond normal operating range.
10. Engine Retard. The engine retarder is engaged.
11. Park. Parking brake is applied.
12. Low Coolant Level. Engine coolant is low.
13. Service Brake. Lights when service brakes are applied.
14. Range Inhibit. The transmission ECU is restricting
shifts.
1
2
3
7
4
8
11
Engine Warn. The engine needs service.
HEST. High Exhaust System Temperature.
MIL. Maintenance Indicator Light.
Wait to Start. Indicates engine preheating. Wait until
indicator goes off before starting engine.
5
9
12
10
13
14
15
16
17
18
20
6
ORIENTATION
l
Switch Panel
1.
2.
3.
4.
5.
6.
7.
8.
Front Dome Lights
Rear Dome Lights
Driver’s Dome Light
Fan, Hi-Off-Lo
Fan, Hi-Off-Lo
Warning Light Master Switch
Defroster
Master Heater Switch
Note
The function of the Master Heater Switch is to turn off all
heaters and radio to allow the driver to hear sounds outside
the bus; for instance, at a railroad crossing. When the switch
is in the up position, heater blowers and the radio will not
operate. When the switch is down (see illustration), these
devices will function in a normal manner.
Tilt And Telescopic Steering
To adjust steering wheel position, use the tilting lever located on the left side of
steering column. Press lever downward to tilt column into desired position.
To raise or lower the steering wheel position, pull up on the tilting lever. This will
enable you to raise or lower the steering wheel to the desired position.
21
DRIVERS HANDBOOK
Mirrors And Adjustment
[WARNING] The vehicle’s mirror system has been designed to comply with
all field-of-view requirements, but it is the operator’s responsibility to adjust
the mirrors properly before placing the vehicle in service and to maintain the
adjustment during the service life of the vehicle. Mirrors provide additional
driver visibility on buses. To be used effectively, mirrors must be properly
adjusted for each driver, and the driver must be aware of the limitations on
viewing area that exist even when mirrors are properly used. Mirrors are not
a substitute for proper driver training and care that should be exercised when
operating the vehicle and loading or unloading passengers. Do not move the
bus until you have accounted for each passenger that has disembarked and
have confirmed that all passengers are clear of the bus. Failure to follow these
procedures could cause serious injury or death.
Interior Mirrors
Inside rearview mirrors can be adjusted by loosening the bolts and nuts in slotted
holes. Adjust the mirror to give the operator a clear view of the bus interior and the
roadway to the rear.
[WARNING] After unloading passengers, do not move the bus until you have
confirmed the location of each disembarked passenger, and you are confident
all of them are clear of the bus.
Exterior Rearview
Standard equipment on all school buses includes four outside rearview driving mirrors (two per side), and two elliptical cross view mirrors (one per side). The outside
rearview driving mirrors include one flat and one convex on each side. The outside
rearview driving mirrors are designed to provide the seated driver a view of the
roadway to the rear and to the sides of the bus. The elliptical cross view mirrors are
designed to allow a seated driver to view all areas around the front of the bus not
directly visible. The elliptical cross view mirrors are designed to be used to view pedestrians while the bus is stopped.
[WARNING] Do not use the elliptical cross view mirrors to observe traffic
while the bus is moving.
[CAUTION] A convex mirror is designed to provide a wide view with minimum distortion. However, persons or objects seen in a convex mirror will appear farther away than when seen in a flat mirror or viewed directly. Use care
judging the size or distance of objects seen in a convex mirror.
22
C
F
I
K
Test cylinders A-O are
1 ft. tall × 1 ft. diameter.
N
O
P
6 ft. from outside body
12 ft. from outside body
Cylinder P is
3 ft. tall × 1 ft. diameter.
1 ft. from outside body
1 ft. from outside body
All mirrors should be cleaned once a week (or
more if needed), preferably with an ammonia
solution. Keep the mounting fasteners tight
so that mirrors will not vibrate. Check weekly
and tighten, if necessary.
6 ft. from outside body
Centerline of bus
Outside of bumper
Proper adjustment is necessary for any mirror system to perform as designed.
The following adjustment sequence should be used to allow the driver maximum
viewing area with the mirror system.
1. Adjust the driver’s seat to the desired position.
2. Adjust the right-side, flat, driving mirror so that the tops of the side windows
are visible in the upper edge of the mirror, and the right side of the bus body
is visible in the inside edge of the mirror.
3. Adjust the right-side, convex, driving mirror so that the view in the top of the
mirror overlaps the view provided by the right-side flat driving mirror, and
the right side of the bus body is visible in the inside edge of the right-side
convex mirror.
4. Adjust the left-side, flat, driving mirror and the left-side, convex, driving
mirrors using the same procedures described for the right-side mirrors. Refer
to Steps 2 and 3 above.
12 ft. from
5. Adjust the elliptical cross view mirrors
A
B
front bumper
by positioning each mirror head so that
the center of its field of view is aimed at
6 ft. from front
the eyes of the driver.
D
E
bumper
FRONT
6. Make a final adjustment to the mirror system so that the seated driver
G
H
can view the areas required by FedFace of front bumper
FRONT
eral Motor Vehicle Safety Standard 111
— including the entire top surface of
Centerline of front axle
cylinders M and N when located as illusJ
trated, and rearward a minimum of 200
feet (measured from the mirror surface)
— using the outside rearview driving
mirrors. The elliptical cross view mirrors
should be adjusted to provide the seated driver a view of the entire surface of
any cylinder A thru P (when located as
Centerline of rear axle
illustrated) not visible by direct view of
L
M
the driver. The view provided by the elliptical cross view mirrors must overlap
the view provided by the outside rearview driving mirror system.
l
Outside of bumper
ORIENTATION
23
DRIVERS HANDBOOK
SEATING
Standard Driver’s Seat
To adjust seat position forward or backward, hold lever (A) to the
left. To adjust the height:
1. Loosen handle in front (B).
2. Lift height adjust handle on side.
3. Slowly sit or stand to position seat at desired height.
4. Release height adjust handle prior to applying full weight.
5. Tighten handle in front.
6. Fasten and adjust seat belt.
To adjust the back angle, lean forward slightly to remove
pressure from seat back. Hold the handle (C) rearward to adjust
to any position within the seat’s range.
Deluxe Driver’s Seat
1. Weight and Height Adjustment—to adjust, push in valve
knob to raise seat and pull out to lower. When adjusted
properly, the seat will not rest against the top, or bottom,
limits of vertical motion under normal driving conditions.
Adjustment position should also provide for driving
visibility and vehicle control.
2. Fore and Aft Adjustment—Hold lever to the left to adjust seat position forward or backward.
3. Back Angle Adjustment—Lean forward slightly to remove pressure from seat back. Hold handle rearward
to adjust to any position within range.
4. Cushion Tilt Adjustment—Rotate seat tilt knob to decrease or to increase seat tilt.
5. Lumbar Adjustment—Rotate knob forward to increase,
or rearward to decrease, the support in the lumbar
area.
[WARNING] Do not attempt to adjust the driver’s seat,
while the vehicle is in motion. Do not adjust height while
sitting in the driver’s seat. Keep feet and other items
away from height adjustment handles and pedals while
vehicle is in motion.
24
ORIENTATION
l
Driver’s Seat Belt Operation
The driver’s seat belt should be worn at all times when the vehicle is being driven.
Blue Bird driver’s seat belts feature automatic locking retractors, which are self adjusting. They feature an anti-cinch device which helps prevent uncomfortable tightening of the belt as you drive. To use, withdraw an adequate length of belt from
the retractor or retractors to allow the buckle to connect. After engaging the buckle,
allow the retractor to withdraw the belt to a snug fit. Verify that the automatic locking mechanism is working properly by pulling the belt sharply against the retractor,
which should resist. The buckle is released by pushing the button in its center.
Driver’s Seat Belt With Shoulder Harness (Optional)
The driver’s seat belt should be worn at all times when the vehicle is being driven.
The driver’s shoulder harness locks during emergency stops; the lap belt may be either emergency locking or automatic locking, depending on the option chosen. The
emergency locking retractor used for all shoulder harnesses and specified lap belts is
dual sensitive. The emergency locking retractor engages when the vehicle tips 15° or
if belt payout speed exceeds a preset rate. Automatic locking retractors for specified
lap belts are self adjusting. Adjust the shoulder belt bracket for driver comfort.
To use, withdraw an adequate length of belt from the retractor or retractors to allow the buckle. After engaging the buckle halves, let the retractor withdraw the belt
to a snug fit. The buckle can be released by pushing the button in its center.
Passenger Seat Belts (Optional)
Individual lap belts for passengers are retractable or non-retractable depending on
option ordered. Insert the catch into the buckle, test for positive latch, and pull the
loose end of strap until the belt fits snugly across the lower hips. The buckle can be
released by pushing the button in its center. The adjustable end can be moved outward on its strap by turning 90° to the strap and pulling.
[WARNING] Be sure the lap belt is fitted snugly around the hips, not the
waist. Failure to do so may increase the chance of injury in the event of a collision. Do not bleach or dye the webbing, because such processing may severely
weaken the assembly.
25
DRIVERS HANDBOOK
COMPARTMENTS & ACCESS PANELS
All American Front Engine
Release the latches on the center panel and allow it to open downward for access to
the heater bleeding valve, radiator fill cap, and to view to the radiator sight glass.
Release press button latches on front access doors to the left and right of the center panel for access to windshield wiper motors, windshield wash reservoir (located
on the entrance door side), and power steering fluid reservoir (located on driver’s
side).
All American RE
On the Rear Engine models, this allows access to windshield wiper motors, windshield wash reservoir, etc. After closing, press in the larger portion of the latch until
it snaps to lock into position.
26
ORIENTATION
l
Engine Access; All American Front Engine
To open the hood, disengage the latch mechanism located in two places on the engine cover. Lift the access cover and allow it to rest fully open on the forward portion
of the hood assembly. This will allow access to engine components, such as the oil
dipstick, engine oil fill, transmission fluid dipstick, etc.
To remove engine cover assembly for better access to the engine components,
loosen the screw type latch mechanisms located at the upper front wall of the engine
hood assembly. Open the hood and locate three latches on the inner wall perimeter
of the hood assembly. One is located at the rear center and one is located on each
side. Releasing these latches will then allow entire hood assembly to be removed for
mechanics access.
[CAUTION] Engine and components can be very hot. If the engine has been
running, be careful to avoid burns during engine access and removal process.
Engine Access; All American Rear Engine
To open, press the release button on the latches located at the edges of the door
(right side shown). Press the upper portion of the handle, located in the lower center
of the door for handle access. When the handle swings around, grip and pull to open
door. After closing, press in the larger portion of the latch until it snaps to lock into
position.
Rear Side Engine Compartment Doors
To open, press release button latches on the top and the bottom of the rear side
access doors. Opening the left side door gives access to the outside of the radiator.
Opening the right side door gives access to the right side of the engine. After closing,
press in the larger portion of the latch until it snaps, to lock into position.
27
28
ENROUTE EMERGENCIES
P
assenger safety is the bus driver’s first priority. In the event of enroute
emergency or roadside hazard, the driver must be confidently familiar with the location and use of safety devices, emergency equipment
and roadside procedures in order to maintain order, guide passengers to
safety, and properly position and secure the bus until assistance arrives.
29
DRIVERS HANDBOOK
EMERGENCY EXITS
Emergency exits are clearly identified by the words “EMERGENCY EXIT.” Operating instructions are printed near each exit. Some units are equipped with an audible alarm
which sounds if an emergency exit is unlatched or open. If a buzzer sounds when
turning on the ignition switch, check emergency exits to see that they are closed.
All emergency exits meet Federal Motor Vehicle Safety Standard 217, “Bus Window
Retention and Release.” These illustrations show various types of emergency exits.
[WARNING] All emergency exits should be checked daily to ensure they are
clearly labeled and operate properly. Exit windows, doors and hatches must
not stick or bind, and must open smoothly and reliably without undue force.
Report any damage or defects immediately and repair before transporting
passengers.
Transpec™ Safety Vent
The roof hatch serves as an important emergency exit. It is important that it is maintained properly and instruction labels are in place and clearly visible. All emergency
exits should be inspected and operated daily to ensure that they are labeled and
operate according to the instructions provided.
Maintenance Cautions
Transpec™ Safety Vents are designed to provide years of reliable service with a minimum amount of maintenance. All components are rustproof with lifetime finishes,
and moving parts are Teflon™ coated to eliminate need for lubrication. Use of lubricants, paints, or other coatings—such as graffiti-deterring spray—is not recommended.
Suggested maintenance includes periodic inspection of attaching fasteners for
evidence of loosening due to tampering, and regular cleaning with mild soap and
water. Although there are more powerful cleaning solutions available, some of them
contain solvents and other chemicals that can attack the high strength materials
used in the production of safety vents. It is the customer’s responsibility to ensure
that cleaning solutions are compatible with the materials used on safety vents.
Graffiti-removing cleaners often contain acetone, ether, lacquer thinner or other
solvents known to destroy the high strength properties of many engineering plastics, and use of these cleaners must be avoided. Graffiti-resisting coatings often leave
a sticky residue that interferes with the operation of the ventilator mechanism. Use
of these types of chemicals should be avoided.
Roof Hatch
Pop up (front or rear) or raise for additional ventilation
30
ENROUTE EMERGENCIES
l
Rear Emergency Window
Rear Emergency Door
Split Sash Pushout Window
Transit Sliding Pushout Window
Side Emergency Door
31
DRIVERS HANDBOOK
EMERGENCY EQUIPMENT
Each state or province has unique laws regarding emergency equipment. Your unit
may have some or all of the items listed below. Because of variations in option packages, the placement of this equipment inside the bus may vary from one unit to
another, but it is important for you to recognize and know the locations of all the
emergency equipment on your bus. It is important that you to read, and understand
all literature, labels, and other written materials supplied by the equipment manufacturers. Be sure you familiarize yourself with all aspects of the emergency equipment before attempting to drive the bus.
Fire Extinguisher
The fire extinguisher is normally located to
the left of the driver’s seat, or on the righthand side of the hood ledge near the stepwell when space is available. Your unit may
be equipped with a 2.75, 4.5, 5, or 6 pound
extinguisher, depending on the laws of
your state or province. Inspect the pressure
gauge every 30 days, or as required by individual state fire laws, to be certain the unit is fully charged. Inspect mounting fasteners periodically to be sure they are secure.
First Aid Kit
The first aid kit is mounted in the front of the
bus body just above the right windshield. Size
and contents of first aid kits vary due to state
specifications. The contents of the kit should be
inspected weekly or as required by local regulation to ensure that all contents comply with state
specifications.
Body Fluid Cleanup Kit
The body fluid cleanup kit is designed to contain
accidental spillage of biological matter, minimizing risk of exposure to potential health hazards. The contents of the kit should be
inspected monthly, or as required by local regulation, to ensure that all contents
comply with state specifications.
Fire Axe/Crowbar
The fire axe and crowbar are located on the electrical panel access cover to the left
of the driver’s seat as near to the front as possible. Every 30 days, inspect installation mounting fasteners to ensure that they are secure. Check fire axe and crowbar
monthly to ensure that they are easily accessible and unobstructed.
32
ENROUTE EMERGENCIES
l
Flare Kit
The flare kit is mounted on the left-hand side panel behind the driver’s seat. Every
30 days or as required by local regulations, ensure that the contents of the flare kit
are in place. Inspect mounting fasteners for flare kit box every 30 days to make sure
they are tight.
Triangular Warning Devices
For states requiring the triangular warning
devices be located in the driver’s compartment, this container is mounted above the
windshield at the upper center near the roof
line. For other states, it is located on the lefthand rear floorboard, under the rear seat.
Inspect contents of the kit every 30 days or
as required by local code to ensure proper
operation.
Recommended Warning Device Positioning
Some states allow a lockable “Emergency Equipment” compartment. This optional
compartment is located above the windshield, toward the center of the bus. Supplies
are organized and labeled in the compartment. The compartment locking mechanism is fitted with a warning buzzer, which will sound if the compartment is locked
while the ignition switch is in the “on” position.
On rear engine units, the emergency equipment is located in the front of the bus.
The compartment is located at the centerline of the bus at floor level, depending on
the options selected at the time of manufacture.
33
DRIVERS HANDBOOK
TIRE / WHEEL EMERGENCIES
Spare Tire Location And Removal
If your unit is equipped with a frame mounted spare tire carrier, follow this procedure
to remove and replace spare:
1. Remove the two securing nuts and rotate tire out of holes.
2. Open the access door, if equipped, through the access hole. Insert the lug
wrench, placing the socket over the hex head on the shaft and turn clockwise; disengage the ratchet.
3. Slowly lower the tire by turning counter clockwise.
[WARNING] Hold the wrench securely while lowering the tire; the weight of
the tire can cause the lug wrench handle to slip.
4. Remove the lifting platform from the tire.
5. To raise tire, reverse procedures, making certain to engage ratchet before
cranking clockwise.
[WARNING] Never move under a vehicle supported
only by hydraulic jacks. Always chock the wheels that are
not being raised in both directions. Do not get under the
tire/wheel while replacing a flat.
If your unit is equipped with a spare tire compartment,
follow this procedure to remove and replace spare:
1. Unlatch the tire compartment door and secure in the
open position with the chain and hook.
2. Pull out the rack.
3. Remove the wheel hold down clamp and lift off the
wheel. Reverse the procedure above to replace the
wheel.
34
ENROUTE EMERGENCIES
l
Damaged Tires
[WARNING] An inflated tire and rim can be very dangerous when misused or
worn out. Many accidents, some fatal, have resulted from improper handling
and operation of bus rims and wheels. To help avoid personal injury and/or
property damage, get expert tire service help if you can. If you must remove
the wheel and change the tire without such help, take the following precautions:
• If the tire seems to contain air under pressure, stand to the side and check
whether the wheel assembly appears normal by comparing it to another
wheel assembly on the vehicle.
• Let the air out of the tire by taking out the valve core. If you have a way
to put air back into a tire, note that it is good safety practice to let the air
out of both tires of a dual assembly before taking off the damaged tire
and rim assembly from the vehicle. After letting out the air, take off the
tire and rim assembly and put on the spare wheel and tire assembly.
• If you are not fully expert on the procedures to follow, and/or are not
equipped with the proper tools and equipment, do not attempt to raise
the vehicle or remove or install the tire and wheel assembly. Obtain
expert tire service help.
• Do not inflate a tire that has been run flat or is seriously low on air without first having the tire taken off the wheel and the tire and tube checked
for damage.
• Note that work on bus wheels requires proper tools, safety equipment,
and special training. You can be badly injured and/or damage can result
from using the wrong service methods. Only trained people using the
proper equipment should service bus tires and wheels.
• When putting air into a tire on the vehicle, stand to the side and use a clip
on chuck and hose extension. Never add to your tires unless an accurate
pressure gauge is also used. In choosing the right tire pressure, be careful
not to go past the maximum pressure capacity shown on the tire.
[WARNING] Tire inflation pressure must not exceed the specifications of the
tire and/or wheel rim manufacturer for the specific load, speed, and application. The inflation pressure embossed on the tire sidewall does not take the
wheel or rim capacities into consideration. Tires should not be inflated above
the pressure listed on the label without consulting your tire/wheel distributor.
35
DRIVERS HANDBOOK
Wheel And Rim Safety
Wheels and wheel components must be properly maintained to avoid adverse effects on the life of the tire and/or wheel. An inflated tire is potentially very destructive. Careless handling and inexperience cause accidents. Safety literature can be obtained from your wheel and rim distributor, a wheel and rim manufacturer, NHTSA,
or OSHA. If you have any questions, consult the distributor or manufacturer directly.
The load carrying requirements of each vehicle should also be determined before
selecting the proper tire/wheel combination. Always remember that the weakest
weight carrying component of the vehicle (i.e., the tires, wheels, axles, bearings, etc.)
determines the load carrying capacity for the vehicle.
[WARNING] Improper handling of wheels and rims has caused many injuries
and deaths. Failure to follow directions is the leading cause of such accidents.
Obtain procedures from wheel and rim manufacturer before working with a
wheel or rim.
The tire and wheel must always be properly matched. For example, do not
mount a 20-inch tire on a 22-1/2-inch wheel. Failure to strictly adhere to these
important instructions may result in an explosive separation and could cause
serious bodily injury or death. It is very important to determine the size of
each component before beginning any assembly operations.
When replacing tires, use the same size, load range, and construction type as
originally installed on the vehicle. When replacing wheels, use original equipment manufacturer’s wheels or equivalent available from your dealer with
equivalent capacity, width, offset, and mounting configuration as those originally installed on your vehicle. Use of improper replacement wheels and tires
may adversely affect ride, handling, load carrying capacity, bearing life, the
clearance to body and chassis components, vehicle ground clearance, vehicle
width, and brake cooling. Do not mix rim, lock ring, and wheel components
from different manufacturers.
36
ENROUTE EMERGENCIES
Jacking Instructions
l
Rear Jack Point
[WARNING] Proper jacking procedures and basic safety
measures must be observed to ensure safety of personnel while
working under the bus. Always check the serviceability of any
lifting equipment prior to use. Ensure that the lifting device is
of sufficient strength to handle the bus, and that the surface
provides the necessary firmness to support the weight of the
bus concentrated on the footprint of the jack. Never move under
a bus supported only by a hydraulic jack.
1. Park the bus on flat, level concrete or a comparable surface,
capable of supporting the jacking device.
2. Apply the parking brakes.
3. Place chocks at the front and rear of the tires opposite the
wheel, or wheels, to be lifted first.
4. Use jacks and jack stands, or blocks of sufficient capacity, to support the vehicle. Following the jack manufacturer’s recommended procedure, place the jack securely under the axle at a spring or
suspension beam nearest the tire/wheel to be repaired.
5. Jack the bus only to the height necessary to service.
Front Jack Point
[WARNING] Ensure any locking device on the jack is in place
and operating properly. Support the vehicle under the main
frame rails with jack stands or blocks before working under or
around the bus.
6. After servicing is complete, lift the bus just enough to remove
the jack stands or blocks.
7. Carefully lower the bus.
[WARNING] Do not work under a bus supported by jacks. Use only appropriate lifts and/or jack stands supporting frame rails when working under bus.
37
DRIVERS HANDBOOK
Changing a Flat Tire
The lug nuts are tightened to a torque value of 450 - 500 Ft lb (610 – 678 Nm). Without the proper power tools, it is very difficult to remove the lug nuts. The lug nuts
must be “broken loose” before lifting the wheel off the ground.
[WARNING] Never work around or under a bus supported only with a bottle
jack.
1. Remove the lug nuts.
2. Position the spare as near to the hub as possible.
3. You will probably need to raise the hub slightly to position the wheel on the
studs (lugs).
4. Hand-tighten all lug nuts.
5. Using the lug wrench, tighten all the lugs about a quarter turn.
6. Remove the blocks or jack stand.
7. Lower the bus enough to lock the wheel in place.
8. Tighten the lug nuts to 50 ft lbs (68 Nm) in the sequence shown.
9. Check the wheel for proper positioning on pilots and proper seating against
the flange.
10. Tighten the nuts to 450–500 ft lbs (610 – 678 Nm) in the sequence shown.
11. Lower the jack and remove it from under the axle. Stow the damaged wheel
and tire assembly, and the tools.
38
ENROUTE EMERGENCIES
l
Schrader Valve
The bus is equipped with a Schrader valve which is located at the end of
the wet tank. It allows the air brake reservoir to be charged with a common type air hose normally used by service stations and garages. Charging the system in this manner is only a means of providing air pressure
for the air brake system with an inoperable air compressor or without
cranking the engine and should only be used for moving the bus while
servicing or in case of emergency.
Releasing Spring Brake Manually
When air pressure fails in the rear service brake chamber, the power spring applies
the rear service brakes. Unless pressure can be re-established, the service brakes
must be released, as follows, to move the bus.
[WARNING] Do not release the spring brake until the bus is secured by wheel
chocks or tow vehicle. Failure to do so may result in bodily injury or property
damage.
1. Remove the release stud tool and nut from the carrying pocket on the brake
chamber assembly.
2. Remove the access plug from the end of the spring chamber.
3. Insert the release stud through the opening in the chamber and into the
spring pressure plate.
4. Turn the release stud one quarter turn to engage the stud tangs with the slot
in the pressure plate.
5. Keep the stud engaged and install the nut on the release stud.
6. Tighten the nut until the spring is fully caged and the brakes are released.
7. Do not loosen or remove the release stud and nut unless the brake chamber
is completely assembled and is securely clamped.
8. When air pressure is restored, remove the release stud and install in carrying
pocket.
39
Towing Or Pushing
[CAUTION] Never tow or push a vehicle equipped with an Allison automatic
transmission unless the drive shaft has been removed, or the rear wheels have
been raised off the ground. Do not tow by the front axle or any frame crossmember. Damage to the wiring and/or the air lines can result. Optional tow
hooks are located at the front and/or rear of the vehicle under the bumper.
Tow hooks are designed to tow or pull with both hooks simultaneously. Do not
pull or tow with an individual hook. Bumpers provided on Blue Bird buses are
designed to protect the vehicle and occupants from front and rear collisions.
They are not designed for towing or jacking up the vehicle. Blue Bird does NOT
recommend towing or jacking the vehicle by the bumpers.
[WARNING] Exercise extreme caution when the drive shaft is removed on
a unit equipped with hydraulic brakes. The parking brake becomes inoperative when the drive shaft is disconnected. Do not leave the bus unattended
until taking appropriate measures to prevent vehicle movement. Do not work
under the bus when supported by bumper jacks. Use only appropriate jack
stands supporting frame rails when under the bus.
[WARNING] Do not lift the bus with the rear tow hooks. These tow hooks
should be used for flat ground maneuvering only.
40
R O U T I N E O P E R AT I O N
A
lthough the controls of a modern bus may appear similar to those
of a regular passenger car or truck, the size and weight of the bus
and its payload require many differences in design, components, and
operating procedures. This section describes special considerations in
operation of the engine, transmission, brakes, and other systems.
Remember: The bus is eight feet wide without outside mirrors and is 25 to 40 feet long. Therefore, it is two feet wider and
two to three times as long as the average automobile. Acceleration will be slower than that of an automobile. The inexperienced
operator may find that steering, brakes, and other systems feel different from what is familiar. In addition, the driver/operator
must ensure that the loading area around the bus is clear of pedestrians before stopping, and that all unloaded passengers are a
safe distance away from the bus before moving. For these reasons it very important, from a safety standpoint, to become familiar
with bus operation through experience before attempting passenger transit.
[WARNING] No one should attempt to operate this bus without: (1) thorough knowledge of all instruments and controls,
(2) supervision, or actual driving experience in this or a similar vehicle under supervision, and (3) the appropriate license or
permit to operate. Do not drive the bus until the space in front, on the sides, and in the rear is unobstructed. Most accidents
occur because the operator did not ensure a clear path before driving.
Inspection guidelines from individual state inspection manuals (such as Commercial Driver’s License pre-trip inspection procedures) take precedence over those found in this manual. Guidelines found herein are in addition to those in your state’s inspection requirements.
41
DRIVERS HANDBOOK
PRE-ROUTE INSPECTION
To keep your bus in the best operating condition, any malfunction or defect should
be corrected before the next trip. Report needed services to responsible maintenance personnel.
Engine/Transmission:
• Check fuel level.
• Drain air tanks.
• Drain fuel/water separator.
• Check engine oil level.
• Check automatic transmission fluid level.
• Inspect engine air intake system, especially the air cleaner service indicator.
See Air Intake System Inspection in the General Maintenane section of this
manual.
• Inspect the engine coolant level at the sight glass.
• Remove any foreign material and dirt from the outside of the radiator core.
Body, outside the bus:
• Clean the windshield, mirrors, front windows, headlights, taillights, directional lights, and brake lights.
• Is the tailpipe clear?
• Does the rear emergency door open and close? Check warning buzzer operation.
• Check the wheelchair lift operation, if so equipped.
• Check tire pressure and the treads. Are the lug nuts in place?
• Drain the air brake tank.
• Is the area under the bus all clear?
• How is the general outside appearance? Is it clean? Is there a clear view of
identifying features (license plate, school name, bus number, etc.)?
• Are the mirrors clean and adjusted?
Body, inside the bus:
• Are the seats and floor clean? Are the steps and aisle clear?
• Verify that all emergency exits open and close properly, and do not stick.
• Check the emergency equipment and the first aid kit.
• Is the fire extinguisher in place?
• Are the windshield and windows around the driver’s area clean?
• Are the mirrors clean and adjusted?
• Are emergency doors/windows unlocked and operating freely?
• Do buzzers activate when exits are not fully latched?
• If so equipped, does the wheelchair chime sound?
42
ROUTINE OPERATION
l
Starting the engine:
• Be sure parking brakes are on.
• Put the transmission in Neutral.
• With the key in the “ON” position, check the fuel gauge. Check the brake warning buzzer or light, and the neutral safety switch.
• Start the engine. Look and listen for trouble signs; check the gauges.
• Does the wheelchair lift interlock function properly, if so equipped?
With the engine running, check (from driver’s seat):
• Mirrors, interior and stepwell lights, service door seal.
• Does the steering feel OK? Is there any unusual noise?
• Check the horn, defroster and heater blower, and windshield wiper operation.
• Does the brake pedal have the right height and feel? Is the gauge reading
OK?
• If so equipped, does the wheelchair interlock function properly?
Outside checks required before driving away:
• Check turn signals in front and rear. Are they clean and flashing?
• Are flasher warning lights in front and rear clean and flashing?
• Is stop arm clean and working?
• Check high and low beam headlights.
• Are brake lights and taillights clean and working?
• Is hazard flasher working?
Final check while moving the bus:
• Is seat belt fastened?
• Do brakes stop and hold?
• Does steering feel OK? Are there any unusual noises? Is bus under control and
tracking straight?
• Brake to a stop. Are all gauges OK?
Remember: Safety on the road depends on you. Observe weather and road conditions and drive accordingly. Be physically and mentally alert. When backing up
near pedestrians or in congested areas, use someone outside to monitor or direct
your movements. Look around before driving away from where you are parked and
observe all traffic rules and regulations.
Weekly Inspection
• Perform all the Daily Inspection procedures.
• Drain air tanks.
• Check tires. Look for weather checks, worn areas and tread. Check the air pressure.
• Inspect seat cushion attachments for tightness.
• Inspect seat belts and buckles.
• Inspect outside lights for proper operation.
43
DRIVERS HANDBOOK
ENGINE OPERATION
Engine Exhaust Caution (Carbon Monoxide)
[WARNING] Never idle the engine in a confined area. Never sit in a parked or
stopped vehicle with the engine running. Exhaust gases, particularly carbon
monoxide, can build up. These gases are harmful and potentially lethal.
Carbon monoxide is colorless and odorless, but can be present with all other
exhaust fumes. Do not drive with exhaust fumes present.
If you suspect exhaust fumes are entering the bus, have the system inspected to
determine the source, and make the appropriate corrections immediately.
The best protection from carbon monoxide entry into the bus is a properly maintained engine exhaust system, body, and body ventilation system. It is recommended that the exhaust system and body be inspected by a competent mechanic:
• Each time the vehicle is raised for an oil change.
• Whenever a change is noticed in the sound of the exhaust system.
• Whenever the exhaust system under the body or the rear of the vehicle is
damaged.
• Whenever there is an inspection of piping and joints. Replace clamps that are
leaking.
Exhaust system clamps are not reusable. Seal with exhaust sealant and install
new clamp. Do not run the engine in a confined area (such as garages) longer than
necessary to move the vehicle in or out of the area. When your bus is stopped in an
open area with engine running for more than a short period, and if it is equipped
with combination heating and external ventilation, then adjust the heating or ventilation system to force outside air into bus with the blower set at medium or high
speed.
Keep the air inlet grille clear of snow or other obstructions at all times to assure
proper operation of the ventilation system. Sitting in a parked vehicle with engine
running for an extended period, in either a confined or open environment, is dangerous.
Diesel Fuel
All American units should take advantage of the high energy content and generally
lower cost of No. 2 diesel fuel. Experience has shown that diesel engines will operate
satisfactorily on No. 1 fuel. The engine in this vehicle must be operated only with
ultra low sulfur diesel fuel (meeting EPA specifications for highway diesel fuel, including a 15 ppm sulfur cap).
[WARNING] Use caution when filling the fuel tank(s) with a high delivery
nozzle to prevent spillage. Fuel spray can cause serious injury; vent slowly. Do
not fill to more than 95% capacity.
44
[CAUTION] In 2007 diesel engines, use only diesel fuel labeled
Ultra Low Sulfer, per the engine
manufacturer’s specifications.
In Caterpillar, use oils meeting
API CJ-4 or Caterpillar ECF-3
compliant. See Caterpillar Operation and Maintenance Manual
SEBU8083-08 for details.
In Cummins, use oils meeting API
CJ-4/SL and Cummins Engine
Standard CES-20081. See Cummins Owners Manual ISB 6.7L
CM2150 for details.
ROUTINE OPERATION
l
Diesel Engine Starting Procedure
See the appropriate engine manufacturers operating manual for proper starting
procedures. Starting procedures vary from different engine manufacturers and also
varies with temperature.
1. Apply the parking brake.
2. Place the transmission shift lever in the neutral position.
3. Insert the ignition key and turn it to the ON position. All the instrument panel
lights will come on momentarily. Depending upon conditions, the Wait To
Start light may remain on. If so, wait until it goes off before trying to start the
engine. This gives the engine grid heaters enough time to warm the combustion chambers for efficient starting.
4. After the engine starts, turn on the high idle switch (1,000-1,200 rpm) until
the engine is fully warmed up.
[CAUTION] Do not engage the starter longer than 30 seconds without allowing the engine 120 seconds rest.
If the engine fails to start after a reasonable time, determine the cause of the
failure. Pumping the accelerator will not assist in starting the engine. Refer to the
engine manufacturer’s recommended procedures.
[CAUTION] Do not race the engine during the “Warmup” period.
Starting With Boost Cables
[WARNING] Batteries can emit corrosive and potentially explosive fumes.
Prevent sparks near the batteries. Do not allow battery cable ends to contact
each other or the engine. Do not smoke when observing the battery electrolyte levels. Electrolytes are corrosive and can cause personal injury if they contact skin or eyes. Always wear protective glasses when working with batteries.
The Blue Bird All American bus has a 12-volt starting system. Use only 12 volts for
boost starting. The use of a higher voltage will damage the electrical system.
Always connect the boost cables in parallel with the bus battery cables, negative
(-) to negative (-) and positive (+) to positive (+). Do not reverse the battery cables.
The alternator can be damaged.
Attach the ground cable last and remove it first.
1. Fasten the positive (+) clamp of the boost cable to the positive (+) post of the
battery.
2. Fasten the negative (-) clamp of the boost cable to the negative (-) post of the
battery.
3. Start the engine.
4. After the engine starts, disconnect the negative (-) boost cable from the battery.
5. Disconnect the positive (+) boost cable from the battery.
45
DRIVERS HANDBOOK
Using The Engine As A Brake
While going down a steep or long grade, it is a good practice to use the engine to
retard vehicle speed. Reduce speed before the grade and shift into a lower gear (with
either automatic or manual transmissions), being careful to select a gear which will
slow the vehicle without over speeding the engine. Under such conditions, use the
brakes sparingly, to prevent overheating. Overheating will cause the brakes to “fade”;
that is, be less effective.
[WARNING] Do not take transmission out of gear when the bus is moving.
You may not be able to get the transmission back in gear, and the drastic slowing of engine speed could reduce air pressure supply to the air brake system,
and result in a reduction of brake capacity.
Engine Warning System
Your All American bus may have an optional alarm system to signal low oil pressure
and high engine temperature. If the engine temperature exceeds the manufacturer’s
recommendations, or if the oil pressure drops below the manufacturer’s recommendations, a buzzer sounds and an indicator light glows.
[CAUTION] If the alarm system sounds, shut the engine off immediately.
Operation of the engine after the alarm sounds could cause serious engine
damage.
46
ROUTINE OPERATION
l
Exhaust System
New federally mandated emission standards affect all buses equipped with 2007 or
newer diesel engines. The exhaust systems of both Caterpillar and Cummins engines
in Blue Bird buses are aftertreatment systems which incorporate Diesel Particulate Filters (DPF) instead of ordinary mufflers. These sophisticated exhaust systems reduce
emissions by trapping exhaust-borne particulates (soot) in a filter built into the DPF.
Over time, soot accumulates in the DPF, and must be removed by a process referred to as regeneration. Regeneration is conceptually similar to the cleaning mode
of a self-cleaning oven in that heat is required to remove the soot.
The rate at which soot accumulates is dependent upon multiple conditions including the quality of the diesel fuel, type of engine oil, and ambient temperature,
engine load, and other factors. Regeneration occurs in three ways:
• Some regeneration occurs “naturally” whenever operating conditions (speed,
engine load, etc.) result in exhaust system temperatures high enough to oxidize accumulated soot. This unassisted regeneration process can generically
be referred to as “passive” regeneration.
• Regeneration can be caused by raising the temperature of the exhaust system.
Both Caterpillar and Cummins engines are equipped with systems designed
to increase exhaust temperature when the ECM senses that regeneration is
needed, and when certain requirements, including a minimum travel speed,
are met. This automatic “heat assisted” mode can be generically referred to as
“active” regeneration.
• Regeneration can be manually activated by means of a switch. This procedure
is generically referred to as “stationary” regeneration, and should only
be performed by or under the direction of a qualified service technician, and in a controlled environment to avoid the potential for human injury or fire hazards.
The need for regeneration is communicated to the driver by a set of visual
and audible signals in the instrument panel. An additional alert, the High
Exhaust System Temperature (HEST) indicator, notifies the driver whenever exhaust system temperature is high due to recent regeneration.
Eventually, the normal ash accumulation which results from the regeneration
process must be removed from the DPF, using equipment designed for the purpose
at qualified engine service facilities. Refer to the engine manufacturer’s documentation for these service intervals. The engine operator’s manual provided with your bus
contains additional information about exhaust system regeneration, and should be
read and understood by the driver.
The exhaust systems of 2007 and newer engines incorporate
engine-specific Diesel Particulate Filters, which operate
at higher temperatures during their Regeneration cycles.
The front exhaust pipes are insulated, and heat shields are
installed at locations along the exhaust tubing. (Caterpillar
shown.)
47
DRIVERS HANDBOOK
DPF Regeneration In Blue Bird Buses
As with most new mechanical processes, the introduction of more sophisticated exhaust systems in 2007 emission standards-compliant engines has generated some
degree of initial confusion. Engine manufacturers have designed their own methods
to accomplish the regeneration (cleaning) of the DPF, and therefore describe the process in somewhat differing terms.
Whether your Blue Bird bus is equipped with a Caterpillar or Cummins engine,
neither system is complicated. Nor should the regeneration process be regarded with
alarm. Both Drivers and service technicians should be at least conceptually familiar
with the regeneration process.
As soot builds up in the DPF filter, the driver is notified in several stages by visual
and audible alerts. The alert system is designed to provide reasonable and comfortable fore-warning and adequate opportunity for the needed regeneration. As the
need for regeneration becomes more severe, the alerts become increasingly imperative; and the penalty for postponing the needed regeneration also increases.
When the earliest alerts occur, there is typically ample time to complete a route
and then have a Stationary Regeneration procedure performed at a proper facility. If
early alerts are ignored, and the condition is allowed to worsen, the engine will eventually de-rate automatically, and performance will reduce noticeably. If the condition
is allowed to become severe, a Stationary Regeneration may not be possible, and the
DPF may require removal and treatment using specialized equipment. Therefore, to
minimize disruption of your bus operation, the regeneration-related alerts should be
heeded and responded to at their early stages as a matter of routine.
Aftertreatment Terms
The following summarizes some of the terms associated with the exhaust systems of
Blue Bird buses equipped with 2007 emission standards compliant engines. Both the
driver and technician should become familiar with the following terms:
Aftertreatment. The process of highly filtering engine exhaust in order to reduce
emissions, and of purging the exhaust system of accumulated exhaust residue.
DPF (Diesel Particulate Filter). A component in the exhaust system which takes the
place of a traditional muffler. A DPF contains a special dissimilar metals filter which
traps particulate accumulation (soot), which is then converted to carbon dioxide by
the aftertreatment process. The Cummins DPF also contains a catalytic converter.
Regeneration. The process of cleaning accumulated soot from the filtering components inside the DPF. Regeneration occurs at high exhaust system temperatures to
turn the soot into carbon dioxide gas. Regeneration can be thought of as conceptually similar to the clean cycle of a self-cleaning oven.
ARD (Aftertreatment Regeneration Device). A component of the Caterpillar Regeneration System, located on the right side of the engine, at the outlet of the turbocharger. The ARD is controlled by the engine’s ECM and is activated when regenera-
48
[WARNING] Postponing
regeneration beyond the early
indications may result in the
engine being automatically
de-rated, and reduction of power
while driving.
[WARNING] The aftertreatment
regeneration process can cause
extremely high exhaust gas temperatures hot enough to ignite or
melt common materials, and to
burn people.
Carefully read, understand,
and abide by all instructions,
warnings, and cautions in the
engine manufacturer’s operator’s
manual (and other related
engine manufacturer’s literature)
regarding safe operation when
the HEST indicator is on.
Carefully read, understand,
and abide by all instructions,
warnings, and cautions in the
engine manufacturer’s operator’s
manual (and other engine manufacturer’s literature) regarding
safety conditions when performing Stationary regeneration.
ROUTINE OPERATION
l
tion needs to occur and the necessary conditions are met. When not in regeneration
mode, the ARD is simply a chamber through which the exhaust flows. During regeneration, a charge of fuel and air is ignited in the ARD, and the resulting combustion
creates additional heat to facilitate regeneration.
HEST Indicator (High Exhaust System Temperature). An instrument panel indicator which appears when the exhaust temperature is unusually high due to recent
regeneration. This is a normal behavior of the aftertreatment system, intended to
notify the driver and technician that the exhaust system temperature is high and that
caution should be observed around the exhaust system.
DPF Indicator. An instrument panel indicator which displays when particulate accumulation has reached a preset level in the DPF, and regeneration is needed. The
bus should either be operated with a more demanding duty cycle until the indicator
goes off, or it should be scheduled for a Stationary Regeneration at a service facility.
Levels of Notification
Regeneration—the process which clears soot accumulation in the DPF—occurs automatically as the bus is operated, as long as certain operating conditions (such as
minimum speed thresholds) are met. When bus operating conditions do not provide
adequate opportunity for the regeneration system to keep the DPF clear, soot begins to accumulate. A system of driver alerts keeps the driver informed of when the
exhaust system is in need of regeneration, and of high exhaust temperature associated with regeneration. Several levels of regeneration alerts occur in sequence, each
indicating a more imperative warning.
High Exhaust Temperature Notification
The High Exhaust System Temperature (HEST) indicator appears to alert the driver
when exhaust temperature is unusually high and that prudent judgement should
be applied regarding the proximity of people or combustibles to the exhaust system. For example, the bus should not be parked on a surface of grass or weeds. The
conditions under which the HEST indicator appears differ between Caterpillar- and
Cummins-equipped buses:
With Caterpillar engine, the HEST indicator appears whenever the exhaust temperature is high (842°F or above), and the bus is either stopped or moving at a slow
speed (approximately 5 MPH).
With Cummins engine, the HEST indicator appears whenever the exhaust temperature is high (752°F or above), regardless of moving speed.
The driver should be familiar with and abide by all instructions, warnings, and
cautions in the engine manufacturer’s operator’s manual regarding safe operation
when the HEST indicator is on.
HEST Notification
The HEST alert appears in the instrument
panel’s warning bank.
The audible alert
sounds one beep.
• The HEST alert appears in the instrument panel.
• The audible alarm sounds one beep.
49
DRIVERS HANDBOOK
Level 1 Regeneration Notification: DPF Indicator Appears
In low-demand operating conditions, it is possible that the regeneration system does
not have sufficient opportunity to prevent particulate build-up in the DPF. The ECM
senses that accumulation is occurring and that regeneration is needed. The driver is
notified as follows:
• The DPF Regeneration alert activates.
• The audible alert sounds one beep.
The above indicates that regeneration of the DPF is needed at the earliest convenience. The regeneration can be accomplished in either of two ways: If practical, the
bus could simply be operated for a while at a speed above the automatic regeneration threshold; or the bus could be taken to a suitable location to have a Stationary
Regeneration procedure performed.
If the bus is operated at a minimum highway driving speed (20 mph Caterpillar; 40 mph Cummins), the automatic regeneration system will activate. If minimum
speed is maintained long enough (usually 20-30 minutes), the automatic regeneration mode can likely reduce the soot sufficiently to cause the DPF Icon to go off.
Therefore, the first appearance of the DPF icon should be perceived by the driver
as a normal notification of action that needs to be taken, but not as an emergency
situation. Typically, even if the bus route does not afford immediate opportunity for
higher-speed operation, there is sufficient time to finish the bus route and return to
the bus maintenance shop before the higher level of notification occurs. Exactly how
much “warning time” the first appearance of the DPF indicator represents is dependant upon specific operating conditions. However, current data from Cummins suggest that, at this level of notification, the DPF needs to undergo regeneration within
the next two to six hours of bus operation. If regeneration does not begin, a more
imperative notification will activate.
Level 2 Notification: DPF Indicator Blinks
If the bus continues to be operated without taking the measures indicated by a Level
1 Notification (described above), particulate accumulation continues, and a more
imperative notification occurs:
• The DPF Regeneration alert begins to flash.
• The audible alarm sounds continuously.
• The engine may be automatically de-rated.
The above indications should be interpreted as a more imperative alert that the exhaust system is in need of regeneration soon. As soon as practical, the bus should be
operated at or above the minimum speed needed to allow automatic regeneration to
activate, or a Stationary Regeneration must be performed. Again, situation-specific
variables apply. Current data from Cummins suggest that at this level of notification,
the DPF needs to be regenerated within the next one to two hours of bus operation.
Otherwise, the third level of notification will occur.
50
Level 1
Regen Needed
The DPF Regeneration alert appears in the Message
Display.
The audible alert
sounds one beep.
Level 2
Regen Needed
Regen Needed
The DPF Regeneration alert flashes in the
Message Display.
The audible alert
sounds continuously.
ROUTINE OPERATION
Level 3 Notification: Check Engine Indicator Appears
If the bus continues to be operated without taking the measures indicated by a Level
2 Notification, particulate accumulation worsens. These indicators are activated:
•
•
•
•
The DPF Regeneration alert continues to flash.
The audible alert sounds continuously.
The engine is automatically de-rated.
The Check Engine alert appears.
The above indicates that a Manual Regeneration must be performed as soon as possible. Because the engine is automatically de-rated it may not be possible to drive at
sufficient speed to cause active regeneration to occur.
With Cummins engine, depending upon the severity of the accumulation, the
regeneration switch may not be allowed to initiate a regeneration without use of
Cummins’s PC-based diagnostic software, Insite.
Level 4 Notification: Stop Engine Indicator Appears
If the bus continues to be operated without taking the measures indicated by a Level
3 Notification, particulate accumulation reaches a critical level. Engine power is automatically further de-rated by the ECM. The indicators differ slightly between Caterpillar- and Cummins-equipped buses:
Cummins:
• The DPF Regeneration alert deactivates.
• The audible alert sounds continuously.
• The engine is further de-rated.
• The Check Engine alert deactivates.
• The red Stop Engine alert appears.
Caterpillar:
• The DPF Regeneration alert continues to flash.
• The audible alert sounds continuously.
• The engine is further de-rated.
• The Check Engine alert remains on.
• The red Stop Engine alert appears.
The above indicates that accumulation has progressed to critical levels and the bus
should be stopped with the engine off as soon as it is safe to do so. The bus should
remain shut down until the aftertreatment system has been serviced.
With Cummins engine, the regeneration switch will not be allowed to initiate a
regeneration without use of Cummins’s PC-based diagnostic software, Insite.
With Caterpillar engine, depending upon the severity of the accumulation, the
regeneration switch may not be allowed to initiate a regeneration without the use of
Caterpillar’s PC-based diagnostic software, Electronic Technician.
With either Caterpillar or Cummins engine, removal and cleaning of the DPF using specialized equipment may be required.
l
Level 3
Regen Needed
Regen Needed
The DPF Regeneration alert flashes in the
Message Display.
The audible alert
sounds continuously.
The Check Engine alert
appears in the
warning bank..
Level 4, Cummins
The audible alert
sounds continuously.
The Stop Engine alert
appears in the
warning bank.
Level 4, Caterpillar
Regen Needed
Regen Needed
The DPF Regeneration alert flashes in the
Message Display.
The audible alert sounds continuously.
The Check Engine alert
appears in the
warning bank..
The Stop Engine alert
appears in the
warning bank.
51
DRIVERS HANDBOOK
Stationary Regeneration Precautions
During active regeneration, the exhaust system can reach extremely high temperatures. Automatic active regeneration, which occurs while driving the bus, is programmed to occur only when the bus is moving at a minimum speed, and it stops
when the vehicle slows or stops.
With Caterpillar engine, if the exhaust is still unusually hot from recent regeneration when the bus slows or stops, the HEST indicator appears to remind the driver of
the high temperature condition.
With Cummins engine, the HEST indicator appears whenever the high temperature condition exists.
When performing a Stationary Regeneration, the entire process occurs for an
extended period while the bus is stopped. It is therefore critical that prudent human
safety and fire hazard precautions are followed. Those precautions include:
• Read, understand, and abide by all the precautions pertaining to regeneration
procedures in the engine manufacturer’s Operator’s Manual.
• If at all possible, the Stationary Regeneration procedure should be conducted
at a service facility by trained technicians.
• The Driver’s first priority is the safety of the passengers. If a Stationary Regeneration must unavoidably be done by the Driver under a qualified technician’s
direction, alternate transportation should be arranged first, or passengers
should be removed under proper supervision to a location away from the
bus.
• Select an appropriate location to park the vehicle.
• Choose a surface that will not burn or melt under high temperature,
such as clean concrete or gravel, not grass or asphalt.
• Ensure that nothing that can burn, melt, or explode (gasoline, wood,
paper, plastics, fabric, compressed gas containers, hydraulic lines) is
near the exhaust outlet. Abide by all instructions, warnings, and cautions in the engine manufacturer’s operator’s manual regarding safe
operation when performing a Stationary Regeneration.
• Park the bus securely.
• Set the parking brake. Put the transmission in Neutral. Chock the
wheels.
52
ROUTINE OPERATION
l
• Secure the exhaust area.
• If bystanders might enter the area, set up barriers to keep people
safely away from the exhaust outlet.
• If the procedure is performed indoors at a service facility, attach an
exhaust discharge pipe rated for at least 1500°F.
• Keep a fire extinguisher nearby.
• Check exhaust system surfaces to confirm that no tools, rags, grease, debris or
any other objects are on or near the exhaust system.
• Start the engine.
• Operate the Regeneration Switch to begin the regeneration process.
• Monitor the process. If any unsafe condition occurs, shut off the engine immediately. During the regeneration process, the engine may change speed, and
the turbocharger may whistle. When the process is complete, the engine will
return to normal idle speed. Exhaust gas and exhaust surface temperatures
will remain elevated until they have had time to cool to normal levels.
53
DRIVERS HANDBOOK
COMPRESSED NATUAL GAS
[WARNING] Due to the dangerous potential of high pressure cylinders, it
important that anyone involved in their use be completely familiar with the
Department of Transportation “Code of Federal Regulations Title 49” and the
various Compressed Gas Association pamphlets that are available covering
the care and use of high pressure cylinders. Regulations do not permit filling
Natural Gas Vehicle (NGV) cylinders with an overcharge.
The compressed natural gas (CNG) fuel system consists of DOT-certified CNG
storage tanks (which replace the fuel tank), a structure to hold and protect the storage tanks, metallic fuel lines to deliver the fuel, high and low pressure regulators to
reduce the pressure entering the throttle body, a fuel shutoff solenoid, and the throttle body which delivers the CNG/air mixture to the engine. The regulator includes an
integral heater to preheat the CNG for anti-icing control.
A pressure relief system is part of the fuel system. This system is designed to vent
the tank contents when pressure and temperature become excessive.
A fill connection is located near the entrance of the bus. If so equipped, the engine powering this bus is engineered specifically for use with CNG. Operation and
maintenance procedures are similar to those used on gasoline or diesel engine vehicles. Differences identified are obvious.
Owner / Operator Responsibilities
The owner/operator should be aware of the code requirements and be familiar with
applicable codes which apply to the area of operation. The owner/operator should
be aware that fuel cylinders for CNG (Compressed Natural Gas) must be inspected every three years in accordance with NGV-2 specifications. The owner/operator should
be aware that cylinder expiration date is fifteen years after the date of the cylinder
manufacture. Compressed gas cylinders must be replaced at that time.
Testing and recertification of the compressed gas cylinders is not covered by Blue
Bird warranty. Replacement of compressed gas cylinders, at the end of their service
life, is not covered by Blue Bird warranty.
National Fire Protection
Association #52 States: Cylinders shall be manufactured, inspected, marked, tested,
retested, equipped and used in accordance with U.S. Department of Transportation
(DOT) or Canadian Transport Commission (CTC) regulations, exemptions or special
permits specifically for CNG service and shall have a rated service pressure of not less
than 2400 psig at 70° F (16.5 MPa at 21.1° C).
Pressure vessels shall be manufactured, inspected, marked and tested in accordance with the rules for construction of unfired pressure vessels, Section VIII (Division 1), ASME Boiler and Pressure Vessel Code.
When a vehicle is involved in an accident or fire causing damage to the CNG
container, the CNG container shall be replaced or removed, inspected and tested in
accordance with the document under which it was originally manufactured before
being returned to service.
54
ROUTINE OPERATION
l
When a vehicle is involved in an accident or fire causing damage to any part of
the CNG fuel system, the system shall be retested before being returned to service.
Damaged supply lines must be replaced, not repaired.
The owner or user, or both, shall maintain all containers, container appurtenances, piping systems, venting systems and other components in a safe condition.
As a precaution to keep pressure relief devices in reliable operating condition,
care shall be taken in the handling or storing of compressed natural gas containers
to avoid damage. Care shall also be exercised to avoid plugging by paint or other dirt
accumulation of pressure relief device channels or other parts that could interfere
with the functioning of the device. Only qualified personnel shall be allowed to service pressure relief devices. Only assemblies or original manufacturer’s parts shall be
used in the repair of pressure relief devices unless the interchange of parts has been
proved by suitable tests.
CODE OF FEDERAL REGULATIONS #49 states: In addition to the requirements of
this paragraph, cylinders marked DOT-3HT must be qualified in accordance with CGA
pamphlet C-8 and must comply with the following:
Cylinders built prior to implementation of FMVSS 304 must be subjected, at least
once in three years, to a test by hydrostatic pressure in a water jacket, for the determination of the expansion of the cylinder. A cylinder must be condemned if the elastic
expansion exceeds the marked rejection elastic expansion.
Cylinder service life must not exceed fifteen years.
Each cylinder must be inspected and hydrostatically tested every three years in
accordance with 49 CFR 173.34(e) as prescribed for DOT-8HT cylinders, except that
the rejection elastic expansion criteria does not apply, permanent volumetric expansion must not exceed 5 percent of total volumetric expansion at test pressure and
retest dates must be imbedded in the epoxy coatings in a permanent manner other
than stamping. Retest dates may be steel stamped on the shoulder of the top head
in accordance with 178.BB-15(c). Re-heat treatment or repair of cylinders is not authorized.
Fuel System Description
The fuel system begins with DOT-certified tanks designed to hold compressed natural gas (CNG) up to 3,600 psi at standard day temperature (70° F, or 21° C). The tanks
are high strength steel wrapped with fiberglass for additional strength.
The fuel flows from the tank to the engine through manually controlled shutoff
valves. These include an integral pressure relief valve consisting of a combination
rupture disk (for pressure) and fuse plug (for temperature) to vent the contents of
the tank should high pressure and high temperature occur, such as in a fire. The rated
temperature for relief is 212° F.
From the valve, fuel flows into a common fuel line through high pressure stainless steel compression fittings. The tanks are joined to the common line through high
pressure stainless steel Tees and crosses. Any open tank is connected to any other
open tank, so for fueling, the fuel flows through the common line to all tanks. The
tank shutoff valves isolate the tanks; the Tees on the valves still have the high line
pressure.
55
DRIVERS HANDBOOK
Do not uncouple fittings until all tanks are closed and pressure has been purged
from the line. The lines are high pressure rated 3/8 stainless steel seamless tubing
which carries the fuel to the high pressure regulator.
In refilling, the fuel enters the fill valve on the entrance side of the bus and then
flows through a check valve into the common tubing before reaching the tanks.
From the high pressure regulator, the fuel flows to the shutoff solenoid. The ignition switch, engine operation, and the fire suppression system activate the shutoff
solenoid. The loss of any of these will shut off fuel supply to the low pressure regulator (LPR).
The fuel gauge is proportional to the pressure when corrected to 70° F. Fuel level
is only accurate for the tanks that are open.
Safety Cautions And Warnings
Both gasoline and CNG are volatile, flammable fuels, yet they are safe to work around
when necessary precautions are taken. As on a gasoline fueled system, carelessness
with CNG can lead to a fire or explosion when a leak occurs. CNG will not pool and
spread like gasoline. It has a narrower range of flammability than gasoline, as well as
a higher ignition temperature. Despite these relative safety advantages, fire potential does exist. CNG is lighter than air, so it can collect in the higher regions of a room
and possibly go undetected, creating fire potential.
Since the fuel system is a very high pressure system employing a flammable gas,
all safety issues normally considered in these situations should be applied. Some of
the more obvious precautions are listed below. This list is not necessarily intended to
be complete, and responsibility for assuring full safety is that of the person(s) doing
the work or operating the system.
[WARNING] Handle natural gas with care. Compressed natural gas is a
volatile fuel stored under high pressure. If fuel storage or delivery components
are installed, serviced, or operated improperly, fire, explosion, and/or serious
injury could result. Do NOT smoke while working on or around natural gas
equipment. Avoid flames, sparks, and operation of electrical devices in or
around a vehicle with a possible natural gas leak. Properly tighten all connections and thoroughly check for leaks after servicing fuel system. Natural gas
fumes may cause sickness or death. Work in a well ventilated area.
[WARNING] Protect against high pressure CNG. Compressed natural gas is
stored and routed to the engine at a pressure up to 3,600 psi. Do NOT attempt
to remove or disassemble any fuel system component while it is pressurized.
Explosive separation of components and escaping natural gas can cause serious injury. Avoid the hazard by relieving pressure before disconnecting any
CNG fitting or line. Properly tighten all connections and thoroughly check for
leaks before applying pressure. Never attempt to over pressurize the system.
56
ROUTINE OPERATION
l
[WARNING] Protect against extremely cold escaping CNG. Compressed
natural gas is stored at an extremely high pressure. If compressed natural gas
escapes from a leak, it will expand into an extremely cold (-260° F) gas. Severe
frostbite may occur from contact with escaping natural gas or its associated
components. Avoid the hazard by relieving the pressure before disconnecting
any CNG fitting or line. Properly tighten all connections and thoroughly check
for leaks before applying pressure.
[WARNING] Storage tanks must be tested according to specified procedures
at required dates. Failure to do so relieves the manufacturer of all responsibility and is a violation of federal law. See the manufacturer’s label.
[WARNING] After an accident, all tanks, lines, and fittings should be thoroughly checked by qualified personnel before the vehicle is used again.
All valves are closed when turned fully clockwise (viewed from the top of the
valve handle), and open when turned counterclockwise (viewed from the top of the
valve handle).
[WARNING] Always provide good ventilation, including near the roof and/or
the ceiling. Avoid working in noisy environments, because the sound of leaking gas may go undetected.
[WARNING] Never attempt to find a leak with your hands. A large leak can
freeze burn the skin. Never place your hands, or any other part of your body,
on a leak.
Always have the properly rated fire extinguishers at hand. Be that certain automatic fire suppression equipment is in place and in operating condition.
[WARNING] Avoid heat near pressure relief valves. The manufacturer’s rating is 212° F for the relief valve. If it vents, the area will be filled with natural
gas.
[WARNING] Rust or corrosion on tanks, lines, fittings, and valves can be a
serious problem. Any part with serious corrosion should be replaced. Fiberglass coating on tanks should be in excellent condition. Any cracks or serious
scrapes may require tank replacement. Contact the manufacturer.
[WARNING] Tanks cannot be filled to more than 3,000 psi or 3,600 psi
temperature-corrected. Use only authorized refueling stations with adequate
pressure controls and venting capacity. Venting contents of tanks should follow any federal and state guidelines, including EPA.
57
DRIVERS HANDBOOK
[WARNING] Use only fuel connections designed for use with that on the bus.
Do not attempt to force damaged fittings. Keep sources of heat and ignition
away from fuel system and refueling apparatus.
For more information, see drawing #1589001 in the owner’s information package supplied with the vehicle.
Compressed Natural Gas Fuel
The performance and reliability of a natural gas vehicle is dependent upon the quality of fuel used. BTU content of natural gas can vary depending on locale. Excessive
moisture can cause loss of power, and regulator freezing. Other contaminants, specifically lubricants and oil, can cause serious damage which is not covered by the
engine manufacturer’s warranty. In addition, poor quality fuel can affect emission
certification.
[CAUTION] It is the owner’s/operator’s responsibility to ensure that clean,
quality fuel is used to prevent damage to the fuel system components and
power plant. Damage caused by poor quality fuel is not covered by Blue Bird
warranty.
Fuel control systems used on engines fueled by compressed natural gas contain
electronic sensors and other delicate components that are not tolerant of contaminants. Vehicle performance is dependent upon clean fuel and a regular schedule of
vehicle maintenance.
Compressed natural gas is expected to be delivered from the compressor station
and storage cascade free of contaminants including oil, water, and particulates. Conditions exist in some CNG fill stations that cause inferior fuel to load into the vehicle’s
fuel storage system.
Compressed Natural Gas Filters
Particulate and coalesce type filters are installed in Blue Bird CNG fuel systems. The
primary filter is of stainless steel construction and is located at the fill point. This filter
can be checked for contamination by closing the main shutoff valve on the frame
and then relieving pressure which is trapped between the check valve in the fill nozzle and the main system check valve. The owner/operator should establish a service
interval based on quality of gas from the compressor station. It is recommended that
the filter sump be checked after the initial fill and every fifth fill thereafter, or on a
schedule based on need.
The secondary filter has a black anodized housing and is adjacent to the fuel shutoff solenoid close to the engine. The secondary filter can be checked after relieving
system pressure. This is best accomplished by closing the main shutoff on the frame
and running the engine until the fuel supply is depleted and pressure is zero. Contamination of the secondary filter should not occur if a proper maintenance schedule
has been followed at the fill point primary filter. Contamination of the secondary filter
indicates that the CNG storage cylinders on the vehicle are contaminated. The owner/
operator should insist that fuel from a compressor station be clean and dry.
58
ROUTINE OPERATION
l
Replacement filter elements are available through the Blue Bird Service Department.
[WARNING] Compressed natural gas is highly flammable, and pressurized
gas can cause serious personal injury or death.
Refueling
[WARNING] Refueling must be conducted in well-ventilated areas to prevent
accumulation of dangerous gas levels.
The National Fire Protection Association has recommended guidelines for CNG
refueling systems. State and local regulation regarding NGV refueling may preclude
economic feasibility of indoor refueling (such as in New York City). However, the significance of this issue may diminish if increased experience with fuel leads to less
stringent regulations.
CNG refueling transfers natural gas under pressure and may be set up as either
slow fill or fast fill. Slow fill generally uses overnight refueling and requires less costly
refueling station equipment than fast fill. However, fast fill refueling time is only
slightly longer than gasoline refueling time. LNG refueling transfers a cold ( 260° F)
liquid under pressure (around 15 psi) and generally takes slightly longer than conventional refueling because a greater volume of liquid is transferred to compensate
for its lower energy content.
The refueling station has a supply connection hose and a coupling that must
be properly attached to the fuel system fill valve. The supply side is regulated for
maximum pressure and uses a proper purge valve when decoupling from the filler.
The regulators and relief valves of the fill station must be checked for proper values
and operation.
Fuel enters the bus coupling from the filler connection, travels through a one-way
check valve into the fuel lines, and then into any open tanks. Any tank that is open is
in communication with any other open tank through the common fuel lines.
[WARNING] Do not refill with the engine running or any source of ignition
or heat nearby. The refueling station must be in a safe working condition with
approved operable relief and vent valves.
A ground stud is provided for attachment of the grounding cable at the compressor station. Check that the tank shutoff valves are open. Any tank with an open valve
will be filled; any tank with a closed valve will not. If the bus has been operating with
some tanks closed, it is preferable to fill the empty tanks first and then fill the remainder. Fill to the desired pressure. Maximum is 3,600 psi at 70°F. (Most fill stations
have a dome valve to make the temperature correction automatically.) When fueling
is complete, open the fill connector purge valve. Use only fuel filling couplings designed for use with the CNG. Do not force damaged couplings together.
[CAUTION] A check valve is included in the system behind the fill connector
to prevent backflow of fuel when purging and disconnecting the fuel nozzle.
59
DRIVERS HANDBOOK
The tanks are full at 3,000 psi, or 3,600 psi at 70° F. The pressure will vary with
temperature, decreasing with lower temperature and increasing with higher temperatures. Filling apparatus compensates for the temperature effect.
[WARNING] Never fill to more than permissible pressure. Contact the manufacturer if an accidental overfill occurs.
Specific Gravity
The specific gravity of natural gas relative to air (air = 1.00) is 0.56 to 0.62, depending
on gas composition. This means that natural gas is lighter than air. In the event of a
natural gas leak, the gas will rise and dissipate given open conditions. There is no
possibility of CNG accumulating in pools on the ground beneath a spill.
Odorants have been added that allow natural gas to be detected before reaching
dangerous concentrations.
In the case of LNG releases, the cold vapor is initially heavier than the surrounding
warmer air, so it stays low near the ground (a visible vapor cloud is often formed from
the condensation of water in the cold air gas mixture). As the vapor cloud warms, it
will increase in volume, rapidly rise and dissipate in an open environment.
Fuel Toxicity And Safety
Natural gas is a nontoxic gas. However, it is flammable under proper conditions. Also,
it can cause suffocation if it displaces enough oxygen. LNG has the added safety concern of being a cold ( 260° F) liquid under pressure. Contact with LNG or associated
cold components may cause severe frostbite. Furthermore, many common materials
change their strength characteristics when exposed to LNG temperatures, thus presenting additional hazards.
[WARNING] LNG tanks have the potential for explosions under circumstances such as those described for LPG explosions.
Although natural gas has odorants to aid in detection of leaks, these odorants
are removed during liquefaction; thus LNG vapors cannot be detected by smell. LNG
odorants have been developed but are not commonly used due to the relatively restricted use of LNG at this time.
Flammability
Auto-ignition temperature for natural gas at atmospheric pressure is 1,004° F compared to an auto-ignition temperature range of 442° to 880° F for gasoline and approximately 500° F for diesel fuel. The risk of fire in the presence of an ignition source
exists when the ratio of air to fuel is within flammability limits (i.e., fuel can not ignite
if it is mixed with too much or too little oxygen). The flammability limits for natural
gas are 5.3 to 15 % volume of gas in air. For comparison, the flammability limits of
unleaded gasoline are 1 to 7.6 % volume of gasoline in air. As a practical matter, there
is no oxygen present in CNG cylinders or LNG tanks, therefore ignition within the
60
ROUTINE OPERATION
l
cylinder or tank is not possible. In the event of a fuel leak, there will be a small area in
which the air/fuel ratio is within the flammability limits. In a closed garage, or within
the passenger compartment, ignition conditions are more likely to be met. Odorants
used in CNG allow its detection before the lower flammability limit is reached.
Antiknock Properties
Natural gas has a research octane rating of about 130, making it relatively resistant
to engine knock. The antiknock property is a result of the high ignition temperature,
resistance to auto-ignition, and the relatively low flame speed of natural gas. Antiknock properties allow the use of engine compression ratios in the range of 15:1
(compared to 8:1 to 10:1 for gasoline). The low flame speed of natural gas results in
a longer duration of combustion. To compensate for the lower flame speed, ignition
timing is advanced. As with other fuels, knock may occur with advanced ignition
timing, prolonged combustion (i.e., too lean a mixture), and excessively high compression ratios.
Energy Conversions
100-125 cubic feet NG
114,000 Btu
136 cubic feet NG
83,700 Btu
1 cubic foot NG
=
=
=
=
=
1.0 gallon gasoline
1.0 gallon gasoline
1.0 gallon diesel
1.0 gallon LNG
1,000 Btu
Vehicle Performance And Emissions
NGV performance, fuel economy, and emissions can be significantly altered with vehicle tuning (i.e., ignition timing, air/fuel ratio). Appropriate tuning adjustments can
optimize performance, fuel economy, and emissions. Alternatively, a compromise
tuning may be effected. Tuning optimization for power generally increases emissions. Substantial improvements in performance and emissions can be obtained
using natural gas conversion kits specially designed for a given vehicle make and
model. Further improvements can be achieved with factory-built, dedicated NGVs.
Starting Procedure
Make sure that the main shutoff valve and at least one tank valve are open. The fuel
gauge shows empty if no fuel is available to the mixer. Check the tank and main fuel
shutoff valves if no fuel is indicated on the fuel gauge. (Note that fuel gauge takes
time to register after turning the key.)
Starting procedures are the same as for starting a gasoline engine vehicle. With
the vehicle in neutral, turn the key until the engine catches. Do not press the accelerator. If the engine has trouble starting, depress the accelerator slightly and
release when the engine catches. Pumping the accelerator does not help start the
engine. Engine operation and characteristics should be similar to those of a gasoline
engine.
61
DRIVERS HANDBOOK
Cold Start
For cold starts, in low ambient temperatures, natural gas has an advantage over liquid fuels because it is already in the vapor phase. With correct conversion kit installation and vehicle maintenance, cold start ability is better with natural gas than with
gasoline.
Operation And Maintenance Of
CNG Vehicle Components
CNG vehicles require Department of Transportation (DOT)-certified cylinders for
the storage of pressurized (maximum 3,600 psi) natural gas. Refueling port and lines
with pressure safety valves must also be installed. High pressure fuel lines from the
storage cylinder lead to a pressure regulator/reducer, which reduces gas pressure
in one or two steps. In a fuel-injected converted vehicle, a mixer/carburetor must
be added for the injection of natural gas. In carbureted fuel systems, a specialized
mixer/carburetor for natural gas may be installed. LNG vehicles require insulated,
pressurized (10 to 35 psi) fuel tanks. LNG is vaporized in the fuel line and warmed
in the heat exchanger, generally located under the hood. The pressure regulator reduces pressure before the vapors are transported to the mixer/carburetor.
[CAUTION] Do not use CNG pressure lines or vent lines to clamp, hang, connect, or attach any items, including harnesses, hoses, power steering hose,
refrigerant hoses, or any other item.
62
ROUTINE OPERATION
l
63
DRIVERS HANDBOOK
TRANSMISSIONS
Allison Automatic Transmission
Important: Allison supplies far more detailed information about your particular
transmission than space allows in this manual. Although we try to cover the most important points here, it is imperative that you read and understand the Allison Transmission Operator’s Manual for more details about operation, care, and maintenance.
If you did not receive this manual with your bus, please contact the transmission
supplier. Both Blue Bird Body Company and Allison Transmissions continually strive
to improve the quality and performance of their respective products. For this reason,
information and instructions in the Allison Transmission Operator’s Manual supplied
with the bus will take precedence over the general information in this publication.
Allison Model 3000 Bus Series Transmission
The Allison electronic transmission provides five forward speeds and one reverse.
Fourth gear is a 1-to-1 ratio while the fifth gear is an overdrive with a 0.75-to-1 ratio.
The push-button shift selector is located on the right area of the dash. The transmission and selector must be in neutral to start the engine.
The service brake must be applied before the transmission will shift from neutral to drive or reverse. If an attempt is made to shift the transmission into drive or
reverse without applying the service brake it will remain in neutral, an audible alarm
will sound, and the Range Inhibit light on the instrument panel will come on. If this
occurs, apply the service bake and then select the desired gear.
Transmission and shift selector will return to “N” when engine is stopped and
power switched off. If it does not return to “N” or if it starts in any other gear, the unit
has malfunctioned. Seek service immediately.
The push-button shift selector has “R”, “N”, “D”, down arrow, up arrow, a “MODE”
button, and a digital display. When a range button is pressed, a tone sounds, the
“SELECT” indicator displays the chosen operation (if the Electronic Control Unit [ECU]
determines the shift is acceptable), and the transmission shifts to the starting range
as indicated on the monitor display. In “DRIVE”, selection of a specific gear can be
accomplished by pressing the “UP” or “DOWN” arrow buttons. Conditions resulting in
the “CHECK TRANSMISSION” light, located in the instrument cluster, will disable the
pad and no tones will sound (see Check Transmission Light).
The “MODE” button, located on the push-button shift selector, activates an alternate shift schedule. By default, the start up is in primary or power mode. Pressing the
“MODE” button causes the transmission to enter the economy mode. The display will
indicate the economy mode is engaged. In economy mode, the transmission shifts
to higher gear at lower engine rpm.
64
ROUTINE OPERATION
l
Allison Model 3000 Bus Series Transmission Gear Selection
[WARNING] When leaving the vehicle while the engine is running, the operator must ensure the transmission is in “Neutral”, the parking brake is engaged,
and the wheels are chocked. The vehicle may move unexpectedly without
these precautions.
R—Reverse. The vehicle must be completely stopped before shifting from forward
to reverse or from reverse to forward. The select indicator and the monitor will display “R” when the vehicle is in reverse.
N—Neutral. Use neutral to start the engine, to check vehicle accessories, and
for extended periods of engine idle operation. Under normal operation, the transmission is directed by the ECU to neutral during the startup procedure. This occurs
automatically with the push-button selector. If the vehicle starts in any range except
neutral, seek service immediately.
[WARNING] Do not allow your vehicle to coast in neutral. This practice can
result in transmission damage. Engine retard and braking assistance is not
available when the transmission is in neutral. It may not be possible to get the
transmission back into gear while the bus is moving.
D—Drive. When “D” is selected, the vehicle will start to move in first gear and
the transmission will upshift automatically through each gear as the speed increases.
As the vehicle slows down, the transmission will downshift automatically. The select
indicator will display the highest gear available and the monitor will display the current operating gear.
2, 3, 4, 5 Gears. Occasionally, the road conditions, load, or traffic conditions will
make it desirable to restrict the automatic shifting to a lower gear. Positions “5”, “4”,
“3”, and “2” provide progressively greater engine braking for going down grades (the
lower the gear, the greater the braking effect). Push the “Up” or “Down” arrow to the
desired gear. The select indicator will display your choice and the monitor will display
the gear the bus is operating in.
1 Gear. Use position “1” gear when pulling through mud and deep snow, when
maneuvering in tight spaces, or while driving up or down grades. Low gear provides
the vehicle maximum power and maximum engine braking power.
The transmission incorporates a hold feature to prohibit upshifting beyond the
gear selected during normal driving. For downhill operation, however, the transmission may upshift beyond the selected gear when the engine’s governed speed is exceeded, and damage to the engine is possible.
Allison Model 2000 Bus Series Transmission
The Allison transmission provides four forward speeds and one reverse. The transmission is controlled with the selector lever located to the driver’s right. The selector
lever must be in the “N” position (neutral) to start the engine. If the engine starts in
any other position, the neutral start switch is malfunctioning and should be repaired
immediately. Use “D” (drive) for all normal driving conditions. The service brake must
be applied before the transmission will shift from neutral to drive or reverse. If an
65
DRIVERS HANDBOOK
attempt is made to shift the transmission into drive or reverse without applying the
service brake it will remain in neutral, an audible alarm will sound, and the Range Inhibit light on the instrument panel will come on. If this occurs, apply the service bake
and then select the desired gear. The vehicle will begin to move in first gear, and as
you press the accelerator, the transmission will upshift automatically. As the vehicle
slows down, the transmission will automatically downshift to the correct gear. Use
“3” and “2” when the road, load, or traffic conditions make it desirable to restrict the
automatic shifting to a higher range. When the conditions improve, return the range
selector to the normal driving position D. These positions also provide progressively
greater engine braking power (the lower the gear range, the greater the braking effect). Use “1” when pulling through mud or snow or driving up steep grades. This
position provides maximum engine braking power. Use “R” (reverse) for backing the
bus. The bus should be completely stopped before shifting from a forward gear to
reverse. Reverse gear provides the greatest traction.
Allison 2000 Bus Series Transmission Gear Selection
[WARNING] When leaving the vehicle while the engine is running, the operator must be sure the transmission is in Neutral, the parking brake is engaged,
and the wheels are chocked. The vehicle may move unexpectedly without
these precautions.
R—Reverse. Use reverse to back up the vehicle. The vehicle must stop completely,
with the engine returning to idle speed, before shifting from forward to reverse or
from reverse to forward. If your bus is equipped with a reverse warning signal, it will
activate when shift selector is in reverse.
[CAUTION] Do not idle in “R” (reverse) for more than five minutes. Extended
idle time in “R” (reverse) may cause transmission overheating and damage.
Always select “N” (neutral) whenever time at idle exceeds five minutes.
N—Neutral. Use neutral to start the engine, to check vehicle accessories, and for
extended periods of engine idle operation. If the vehicle starts in any other range,
seek service immediately.
[WARNING] Do not allow your vehicle to coast in neutral. This practice can
result in transmission damage. Engine retard and braking assistance is not
available when the transmission is in neutral. It may not be possible to get the
transmission back into gear while the bus is moving.
D—Drive. When “D” is selected, the vehicle will begin to move in first gear and the
transmission will upshift automatically through each gear as speed increases. As the
vehicle slows down, the transmission will downshift automatically.
[CAUTION] Do not idle in “D” (drive) for more than five minutes. Extended
idle time in “D” (drive) may cause transmission overheating and damage.
Always select “N” (neutral) whenever time at idle exceeds five minutes.
66
ROUTINE OPERATION
l
2, 3, 4 Gears. Occasionally, the road conditions, load, or traffic conditions will make
it desirable to restrict shifting to a higher gear. Positions “4”, “3”, and “2” provide progressively greater engine power and braking for going down grades (the lower the
gear, the greater the braking effect).
1 Gear. Use position “1” gear when pulling through mud and deep snow, when maneuvering in tight spaces, or while driving up or down grades. Low gear provides the
vehicle with its maximum power and maximum engine braking power.
Park. If your bus is equipped with a “Park” selection, use it only after coming to a
complete stop, and then apply the parking brake. Do not rely upon the transmission
park pawl position alone to prevent the bus from rolling.
Range Inhibited Light
Under certain operating conditions, the Transmission Control Module (TCM) may determine that it is necessary to restrict gear selection to protect the transmission from
damage and provide safer operating conditions. When this happens, the “RANGE
INHIBITED” warning light will activate, and the transmission may not respond to the
operator’s commands. Please see the Range Inhibited Light and Shift Inhibits section
of the Allison Transmission operator’s manual for more information.
Check Transmission Light
The “CHECK TRANSMISSION” light is located in the instrument panel. The electronic
control system is programmed to inform you if operating parameters have been exceeded and to automatically take action to protect the transmission. A diagnostic
code will be registered when the “CHECK TRANSMISSION” light is on.
When the engine is started, the “CHECK TRANSMISSION” light turns on for a few
seconds. This momentary indication shows that the lighting circuit is working properly.
If the light illuminates after startup, a problem has been detected. A diagnostic
code will be recorded and shifts may be restricted. Depending on the problem’s severity, the operator may continue driving to reach service assistance. The TCM may
restrict upshifts and downshifts. Please see your Allison Transmission operator’s
manual for more details on how shifts may be inhibited.
[CAUTION] If the transmission
will not shift into “D” (drive), or
“R” (reverse), it may be because
of an adverse operating condition
such as; engine RPM too high or
service brakes not applied when
attempting to shift from neytral.
Check for the illumination of
the “RANGE INHIBITED” light or
“CHECK TRANS” light. See the
appropriate section of the Allison
transmission manual.
67
DRIVERS HANDBOOK
Allison Automatic Transmission Driving Tips
Accelerator Control
The pressure of your foot on the accelerator pedal influences the automatic shifting. An electronic signal tells the ECU how far the driver has depressed the pedal.
This provides the accurate shift spacing and control necessary for maximum performance.
Downshift or Reverse Inhibitor Feature with Allison 3000 PTS Transmission
Although there is no limitation on upshifting, there is a limit on downshifting and
shifts from neutral into drive or reverse. If a downshift or neutral-to-range shift is
selected when the engine speed or throttle position is too high, the ECU/TCM will
not allow the shift until reaching a lower speed. If idle speed is too high, shifts to
range are prohibited. A continuous “beep” tone sounds when reverse is selected during forward movement or if a neutral-to-range shift is selected at too high an engine
speed.
Cold Weather Starts
Most Allison transmissions are programmed to restrict operation until operating
temperature is reached. When the transmission fluid temperature is below -25°
F (-32° C), the transmission will not shift into an operating range and the “Check
Transmission” light will be illuminated. When the transmission fluid temperature is
between -24° F and 20° F (-31° C to -7° C), the transmission will operate in 1st, 2nd,
or Reverse only. If there is no other problem with the transmission, the “Check Transmission” light will not be illuminated. For transmission fluid temperatures above 20°
F (-7° C), the transmission will shift and operate in a normal manner. Be sure to read
and understand the cold weather operation instructions in the Allison Transmission™
Operator’s Manual supplied with the bus.
Using the Engine to Slow the Vehicle
To use the engine as a braking force, shift the range selector to the next lower
range. If the vehicle is exceeding the maximum speed for a lower gear, use the service brakes to slow the vehicle to an acceptable speed where the transmission may
be downshifted safely. After reaching the lower speed, the ECU will automatically
downshift the transmission. Engine braking provides good speed control for going
down grades. When the vehicle is heavily loaded, or the grade is steep, it may be desirable to select a lower range before reaching the grade. If engine-governed speed
is exceeded, the transmission will upshift automatically to the next range.
[CAUTION] The transmission incorporates a hold feature to prohibit upshifting above the range selected during normal driving. For downhill operation,
select a lower transmission range. However, if engine governed speed is exceeded, the transmission may upshift to the next higher range. Use the vehicle
brakes to prevent exceeding engine governed speed in the held range.
68
ROUTINE OPERATION
l
[WARNING] If you only downshift or only use the service brakes when driving down a steep grade, you can lose control. To maintain control, combine
downshifting, braking, and other retarding devices. Downshifting to a lower
transmission range increases engine braking and helps maintain control. The
transmission has a feature to prevent automatic up shifting above the lower
range selected. However, during downhill operation, if the engine governed
speed is exceeded in the lower range, the transmission may upshift to the
next higher range. This will reduce braking and could cause a loss of control.
Apply the vehicle brakes or other retarding device to prevent exceeding engine
governed speed in the lower range selected.
Electric Retarder (If Equipped)
• The electric retarder control switch is mounted on the vertical panel, left of
the driver. It has five positions (one “off ” and four retard positions). Each higher number increases the amount of retardation to slow the vehicle.
• Remember the retarder is a vehicle slowing device, not a stopping device. A
full stop must be accomplished with the service brakes.
• Always release the accelerator completely before applying the retarder.
• Do not use the retarder when road surfaces are slippery.
• Consult the retarder manufacturer’s Owner’s or Operator’s Manual for additional information.
69
DRIVERS HANDBOOK
Transmission Indicators
Check Transmission Indicator
While driving, be alert to any abnormal shifting, unusual sounds or vibrations, smells,
or frequent illumination of the “CHECK TRANSMISSION” light. If you experience any of
these, get service immediately.
Transmission Oil Temperature Gauge
An optional gauge on the instrument panel indicates the transmission oil temperature. Extended operations at low vehicle speeds with the engine at full throttle can
cause excessive oil temperatures. These temperatures may overheat the engine cooling system and lead to engine and/or transmission damage.
If excessive temperature is indicated by the engine coolant temperature gauge,
stop the vehicle and check the cooling system. If the cooling system appears to be
functioning properly, shift to neutral and accelerate the engine to 1,200–1,500 rpm.
This will reduce the transmission temperature to operating level within two or three
minutes. If high temperature persists, stop the engine and have the overheating condition investigated by service personnel.
If the transmission oil temperature gauge indicates excessive temperature, check
the oil level in transmission (refer to the Oil Check Procedure in your Allison Transmission Operator’s Manual). Stop the vehicle and shift to neutral. Accelerate the engine
to 1,200–1,500 rpm. The temperature should return to normal within two or three
minutes before the vehicle resumes operation. Normal temperature for both on and
off-highway operation is 160° to 200° F. Oil temperature should never exceed 250° F.
In units equipped with electronic transmissions, if the sump oil temperature reaches
250° F, the TCM will inhibit operation in the higher gears and turn on the “OIL TEMP”
light, located on the shifter cover.
If high temperature in either engine or transmission persists, stop the engine and
have the overheating conditions investigated by maintenance personnel.
[CAUTION] The engine should never be operated for more than 30 seconds
at full throttle with the transmission in gear and the vehicle not moving.
Prolonged operation of this type will cause the transmission oil temperature
to become excessively high and will result in damage to the transmission.
70
ROUTINE OPERATION
l
BRAKING
Antilock Braking System (ABS)
In a vehicle equipped with an antilock braking system (ABS), motion sensors detect
the speeds at which the wheels move. These sensors transmit this information to an
Electronic Control Unit (ECU). If the wheels start to lock, the ECU signals the modulator assembly to regulate the brake pressure of each locking wheel.
An ABS indicator lamp on the dash (see “Indicator Light Panel” in Instrument
Panel section) warns the driver of possible system faults and provides blink code
information to diagnose the system. If this light is activated during normal vehicle
operation, the driver may complete the trip, but the vehicle must be serviced as
quickly as possible.
Hydraulic Brakes
[WARNING] Do not tap into the brake system or the power steering system
to provide pressure for accessories. Tampering with either of these systems
could result in loss of braking ability and/or steering ability.
[CAUTION] Hydraulic brake systems are power-assisted. Braking capacity is
reduced without engine assist. Do not move bus with dead engine.
The electric power backup pump will operate whenever the engine is not operating and the key switch is in the ON position, or when the key is in the “OFF” position
and the brake pedal is depressed. Test daily by feeling for the electric motor operation while applying the brakes with the engine not operating, or when the key switch
is in the “ON” positions and the engine is not operating. Initially, the pedal will be
hard to push, but will become softer as the electric motor starts.
[WARNING] Do not drive the bus when the electric backup pump does not
operate properly.
Dual Brake System
The dual brake system allows the driver diminished brake capacity in case either the
front or the rear brake circuit fails.
[CAUTION] When one section of the dual system fails, the following conditions will exist.
1. Bus stopping distance will increase. Drive the bus only with extreme caution. Service immediately!
2. The brake pedal will be softer to push.
3. The brake pedal will travel farther than normal.
71
DRIVERS HANDBOOK
Brake Warning System
The brake warning system includes a buzzer and a dash-mounted red light labeled
“BRAKE SYSTEM”. The light and buzzer will activate during the following conditions:
• Engine is running, brakes not applied, with a loss of electrical power to the
electric backup pump motor.
• Engine is running, brakes not applied, with a loss of power assist from the
power steering pump.
• Engine is running, brakes are applied, and either the front or rear section of
the system has failed. The backup pump, buzzer, and light will remain on even
after the brake pedal has been released.
• Engine is not running, brakes are not applied, but ignition key is “ON”. This
condition should happen every time the driver starts the bus. The bus should
not be driven if the backup pump system is not working. The backup system
should go off when the engine starts.
• Engine is not running, brakes are applied, and ignition is in ON position. This is
a method for checking the backup pump.
With the engine not running and the ignition “OFF”, a depressed brake pedal will
cause the backup motor to run with no light and buzzer. The backup system should
go off when the pedal is released. Without the assist of the power steering pump and
without the assist of the backup pump, the master cylinder will allow the brakes to
be applied. However, brake capacity will be very limited and the bus should not be
driven under these conditions.
Parking Brake (Hydraulic Brakes)
The parking brake is designed to hold the loaded bus up to a 20 percent grade. The
parking brake is not to be used as a normal service brake, but can be used to help
stop in an emergency situation.
[WARNING] The parking brake is designed to hold on a 20% grade, on a
clean, dry, and smooth road surface. Parking on wet, icy, or snow-covered
grades is not recommended. Chocking the wheel(s) is recommended when
parking on any grade.
When the parking brake is applied, and the ignition switch is “ON”, a dash-mounted yellow light labeled “PARK” will warn the driver that the brake is applied. The bus
should not be driven when the parking brake is applied. Doing so will prematurely
wear the parking brake or damage other drive train components.
[WARNING] Improper adjustment of the parking brake can significantly
reduce the holding ability of the parking brake system.
72
ROUTINE OPERATION
l
Hydraulic Brake/Throttle Interlock System (Optional)
The hydraulic brakes system of some All Americans include an optional Brake/Throttle Interlock feature which, when active, automatially applies the brakes and disables
the throttle when the vehicle ignition is on and the lift door is open.
An on/off switch in the Driver’s left switch panel enables the Driver to activate or
deactivate the interlock system. When active, the interlock applies the service brakes.
An audible alarm sounds in the event of an interlock malfunction.
When used with the existing vehicle parking brake, the brake interlock uses the
vehicle’s service brake system to provide additional brake holding action.
[WARNING] The brake interlock is a safety device and is not intended to be
used a parking brake. The Interlock system should never be used to stop the
bus. Do not open the bus door(s) while the vehicle is in motion.
The following are decals along with WARNINGS located forward of the switch
panel below the driver’s side window, on All Americans with hydraulic brakes.
73
DRIVERS HANDBOOK
Air Brakes
All Americans equipped with air brakes employ separate systems for the front and
rear service brakes. A separate reservoir and air gauge is provided for each of these
systems. A dual treadle valve is provided for operating the service brake system. In
the event there is a failure in the air reserve for the front brakes, the rear service
brakes can still be applied using the treadle valve, since the two service brake systems operate independently. If there is a failure in the air reserve for the rear service brake system, the front service brakes and the rear spring brakes can be applied through the treadle valve. This allows the operator to use a normal method
of braking even though part of the system is malfunctioning. However, in the case
of an air reserve failure, the low air pressure warning buzzer will activate, indicating
trouble, and the respective air gauge on the dash will show which system has lost air
pressure. The bus must not be operated under those conditions, but repaired before
continuing operation.
The rear spring brakes can also be controlled by a dash-mounted valve located
on the lower portion of the instrument panel. The spring brakes cannot be fully released until the air reserve pressure is above 60 psi. These brakes are in the released
position when the control valve is pushed in, and in the applied position when the
control valve is out. In the event there is a loss in air pressure, the valve will automatically move to the brake applied position and cannot be released until the air reserve
pressure has been replenished.
Air Brake/Throttle Interlock System (Optional)
All Americans equipped with air brakes may include an optional Brake/Throttle Interlock feature which, when active, automatially applies the service brake and disables
the throttle when the vehicle ignition is on and the lift door is open.
An Interlock Override switch in the Driver’s left switch panel enables the Driver
to temporarily override the interlock system. When used with the existing vehicle
parking brake, the brake interlock uses the vehicle’s service brake system to provide
additional brake holding action.
[WARNING] The brake interlock is a safety device and is not intended to be
used a parking brake. The Interlock system should never be used to stop the
bus. Do not open the bus door(s) while the vehicle is in motion.
Parking
Use the dash mounted valve to apply the rear spring brake when parking the bus.
When the parking brake is applied, and the ignition switch is ON, a dash-mounted
yellow light labeled PARK will warn the driver that the brake is applied.
[CAUTION] Do not attempt to move bus before spring brakes are released.
Draining Air Tanks
Condensation must be drained from the air tanks daily. To drain tanks properly, leave
cocks open until all air escapes and draining stops.
74
ROUTINE OPERATION
l
HEATERS
Blue Bird heaters depend on engine generated heat to function. Heat from the engine is picked up by the engine coolant, which is pumped through the heater cores
inside the bus, and then back into the engine. A typical heater inside the bus includes
a heat exchanger coil, (core) and fans which move air across the coil. Air moving
across the core picks up heat from the engine coolant and transfers it into the bus.
Satisfactory performance of the heaters is dependent upon:
• Adequate engine (coolant) temperature, which is controlled by the thermostat rating (which should never be higher than recommended by the engine
manufacturer). Some All Americans feature optional shutters on the radiator
that help to regulate engine coolant temperature.
• Coolant flow, which varies with engine speed. It can be increased, if necessary,
with the use of an auxiliary water pump. The heaters are rated at six gallons
per minute.
• Blower motors have multiple speeds and can be checked by operating the
motors individually, while listening for variations in speed.
Heater Operation
Be sure the engine radiator is full and all coolant flow
valves are open. See charts on valve location.
[CAUTION] Do not leave the engine running while
opening or closing valves.
Warm the engine to operating temperature, running at up to 1,800 rpm if possible, and then turn on
the heater fans and the auxiliary water pump if so
equipped.
During extremely cold weather, operating the
heater fans will cause the engine temperature to drop noticeably as heat from the
engine is transferred into the bus. Also, the engine will
generate more heat as it works under load. When the
engine reaches operating temperature, the driver can
control heater blower speeds for optimal defrosting
and overall passenger comfort.
Control Panel Outlet Locations
The heater control panel is located on the dash to the
right of the instruments. The indicated switches and levers control the motors and air outlets as shown.
The heater is located in the right front corner, forward of the entrance door. An auxiliary unit is located
under the driver’s seat. Electrical switches and mechanical diffusers control the volume and direction of airflow.
The main heater has a three-speed control switch for
Outlet Locations
1. Foot Warmer
2. Main
3. Defrost
4. Fresh Air
75
DRIVERS HANDBOOK
manual low or high speed operation, and an additional maximum output position
for flash defrosting or extreme conditions. All the air from the main heater blower is
directed to defrosting when the main outlet and foot warmer outlet are closed.
The Heater Master Switch turns off all heaters and radio to allow the driver to
hear sounds outside the bus; for example, at a railroad crossing. When the switch is
in the “on” position, neither the heater blowers nor the radio will operate.
Defrosting
Windshield fogging and frosting is caused by warm, humid air coming into contact
with a colder windshield, which causes the moisture in the air to condense and
freeze if the windshield is cold enough. The warmer the windshield, the less moisture will condense. During initial warmup, the defroster blowers should be operated
at low speed to preheat the inside of the windshield glass. If the defrosters are not
turned on until after condensation starts, it is more difficult to heat the glass and
drive moisture away.
As passengers are loaded, the moisture content of the air inside the bus increases. This moisture content tends to be lowered by opening the heater fresh air inlet.
Conditions will be especially difficult when large passenger loads stay on board for
extended periods of time, such as on a charter or over-the-road activity trip. Traveling at highway road speeds causes heat to dissipate through the windshield glass,
and each passenger’s breath continually adds to the air’s moisture content. To reduce
fogging, open the forward driver’s window slightly to let the moist air escape.
Heater Defroster Location
The blower in the front main heater contributes to keeping the driver’s area glass
clear of fog and frost. See OUTLET LOCATION diagram. For best results, fresh air
should be flowing into the heater. To inspect the fresh air intake and make sure it is
working properly, open the front access panel on the driver’s side of bus.
Driver / Passenger Comfort
When the windows are defrosted, the other openings can be set as necessary for
comfort. The adjustable diffusers on the dash can be directed toward the driver and/
or passengers as desired. The auxiliary unit under the driver’s seat has a two-speed
electrical switch and it directs air upward for the driver’s left side and forward around
the steering column area.
76
ROUTINE OPERATION
l
Standard Heater Cut Off Valves
Valves are provided in the heater piping to permit isolation of the heating circuit
from the engine coolant circuit. This is useful in case a leak occurs within the system,
or to restrict the flow of hot water through the bus during warm weather.
When Valves No. 1 and No. 2 in the diagrams below are closed, engine coolant is prevented from circulating through the heaters. (This does not restrict circulation of the
engine cooling circuit, so it is safe to opeartate the engine with the valves closed.)
Engine: Caterpillar C7
VALVE NO. LOCATION
1
2
All American Rear Engine
AT THERMOSTAT HOUSING
AT TRANSMISSION OIL COOLER
All American Forward Engine
77
78
CARE & MAINTENANCE
A
lthough in most transportation operations, maintenance tasks will
be performed by service technicians, familiarity with the basic technical data in this section will enhance the Driver’s overall understanding of the vehicle, and may serve as a convenient reference for service
technicians rendering roadside assistance. This section also contains
general cleaning and care guidelines. For thorough service information
and procedures, refer to the All American Service Manual.
Actual operating conditions must be considered and maintenance intervals adjusted accordingly. If at any time a system does
not perform satisfactorily, corrective service should be performed at once. It is important that personnel attempting the repair or
maintenance of this vehicle have access to, and a thorough knowledge of, the appropriate Blue Bird Service Manual.
79
DRIVERS HANDBOOK
ELECTRICAL
[CAUTION] Repair and/or modification of the electrical system, including
adding components, should be referred to a trained, experienced technician.
The following guideline must be observed when working on the vehicle electrical
system. Be particularly cautious when adding components that they do not exceed
the ability of the electrical system as designed and manufactured.
1. Disconnect the battery before beginning any repair or modification to the
electrical system.
[WARNING] Always disconnect the battery negative NEG (-) terminal first to
avoid sparks/arcing.
2. Use only the proper gauge wiring with high temperature insulation, compliant with SAE J-1128 (150° C).
3. Be certain any added component is fitted with an adequate fuse, and that
it does not exceed the capability of the electrical system as designed and
manufactured.
4. Any “push on” type connectors must be insulated.
5. When installing or repairing wiring, always observe the following precautions:
• Install clamps and ties to prevent chafing and contact with sharp edges.
• Support wiring with insulated clamps at least every 30 inches (76 cm).
• When the wiring must flex (i.e., when connected to moving parts like the
engine), be certain to provide adequate slack loops.
• Be certain to provide adequate length to prevent tension on the wires or
connectors.
• Be certain wiring is secured at least 4 inches (10 cm) from high heat sources
(i.e., engine, exhaust system, transmission etc.).
• Always use an appropriate rubber grommet when the wires must pass
through a hole.
• Protect all “hot” primary and ignition wires with an appropriate loom.
• Never route a wire in contact with a fuel line.
• Do not route wires in contact with plastic components.
6. Always be certain that all ground connections are replaced when wiring is
performed on engine components.
• The alternator ground strap must be a minimum 6 gauge wire.
• The engine must have a ground strap that connects to the transmission
housing. Use a bolt that connects the engine and transmission to ground to
the frame. Use a “star” lock washer to make this connection. Allow adequate
slack for motion between the engine/transmission and the frame.
7. Do not splice into existing wires when adding components. Run new wiring
full length to an appropriate source connection and provide proper fuses.
8. When accessories are added, check installation guides very carefully. You
may need to install a control relay for proper operation.
80
CARE
&
MAINTENANCE
l
• Use a blank circuit breaker in the electrical panel if possible. If the accessory
must be on during cranking, connect directly to the “hot bar”. Always install
the appropriate fuse in the circuit.
9. Always install insulating rubber boots on 6 gauge “hot” connections whether
to the alternator, ammeter shunt, or another junction.
[WARNING] To avoid sparks and arcing, always connect the negative NEG (-)
battery terminal last.
Wiring Circuit Color Code Major Circuits
FUNCTION
LEFT REAR DIRECTIONAL LIGHT
RIGHT REAR DIRECTIONAL LIGHT
STOP LIGHTS
BACKUP LIGHTS
TAILLIGHTS
COLOR
YELLOW
DK.GREEN
RED
BLUE
BROWN
GROUND
WHITE
IGNITION FEED, PRIMARY FEED
BLACK
Refer to the master wiring diagram for wire colors for other circuits.
81
DRIVERS HANDBOOK
Interior Lights
Lamp Description
Trade Name
Trade No.
Color
Bulb No.
Weldon™
8005
(Standard)
89
Weldon™
8010
(Deluxe)
93
Arrow™
35
67
Weldon™
8025
67
Cole Hersee™
PL19
53
Dial™
41204-1211
68
1314962
53
KD™
772-9105
1156
Weldon™
1010 Series
Plain, w/Arrow™
Signal Stat™
1604
1156
Arrow™
B-776-A12
4433A
B-776-RR
4433R
Dome
Stepwell
Emergency Door Light
Switch Panel Pilots
Switch Panel Illumination
Exterior Lights
Directional
Warning Light
Weldon™
1020-Series
Warning Light Halogen
Weldon™
H3 12V 55W
Cluster and Marker
Weldon™
5050
Amber and Red
409
Peterson™
122
Amber and Red
194
Truck Lite™
120034
non-replaceable
Arrow™
059-9900021CP
1073
Grote™
01-5085-88
1157
Signal Stat™
2103
1157
KD™
854-5301
1156
Weldon™
7-1010-1
1156
Weldon™
1010
Arrow™
438
1157
Signal Stat™
1605
1156
KD™
772-9105
1156
Side Directional
Stop-Tail/Tag
Backup
Stop
82
Red, Amber
1156
Red and Amber
4636
H3
Red
1156
Destination Sign
89
School Bus Sign
TS93
CARE
&
MAINTENANCE
l
Doran Warning Light Monitor
Warning lights are such an essential safety feature, it is important to know when they
are not working properly. This is the function of the Doran monitor. Its display is a
schematic of the lights as they appear outside the bus. If current is flowing through
a particular bus lamp circuit (i.e., the light is on), the monitor senses this and lights
the corresponding monitor bulb. If the bus lamp burns out, current ceases and the
corresponding monitor bulb goes out, indicating a fault. Once the defective lamp
is replaced, and the warning lights are working normally again, this also should be
shown by the monitor.
The Doran monitor is a reliable, long life device, but as with most electrical instruments, it can be overheated and damaged if an overload occurs in a bus light. Such
overloads can exist if a bus light circuit becomes shorted, forcing current through a
coil in the monitor, which exceeds the coil’s rated capacity. Short circuits can occur
if improper connections are made during installations, bus repairs, etc. If the monitor has an optional thermistor overload protection, the tail light circuits are overload protected (thermistors are located on the bottom of the component side of the
printed circuit board).
If the Doran monitor is not working properly, check the troubleshooting chart on
the next page to find a possible cause and solution.
The Doran Warning Light Monitor™ does not display any indicator LEDs:
83
DRIVERS HANDBOOK
• An overload situation has created an open circuit. Check the system fuses.
• An overload or physical damage has burned or broken a conductor on the
printed circuit board:
• Extra lights have been added to the circuit; i.e., trailer lights, etc.:
• Remove the extra lights from the circuit
• Replace the damaged printed circuit board
• Excessive vibration or abuse has resulted in a damaged monitor. Replace
the printed circuit board
A particular LED on the Doran Warning Light Monitor™ does not display, but the
bus running lights are operating properly:
• There is an open coil in the monitor
• The coil is burned due to an overload. Replace the coil kit.
• A solder joint has weakened (a cold solder joint). Flow new solder on the
connection.
• The reed switch has failed. The reed has broken or the contacts have failed.
Replace the reed switch kit.
• The printed circuit board is broken or burned. Replace the printed circuit
board.
• There is an open in the LED circuit. Replace the LED.
A monitor LED indicator is on but, the bus running light indicated is not operating, or the bus running light switch is in the off position and the monitor indicates
the running lights are operating:
• Replace the coil and reed switch kit.
Neither the bus running lights nor the Doran Warning Light Monitor™ operate
properly:
• The running light bulb may be burned out. Replace the light bulb.
2. The overload thermistor has protected the circuit from overload. Remove the
overload condition.
• A short
• Incorrect light bulb/s
• Extra lights; i.e., trailer lights, etc.
84
[CAUTION] Do not attempt
to check a light emitting diode
(LED) with an ohmmeter. Some
digital volt meters (DVM) have a
diode checking position, which
is acceptable to test LEDs. Any
repair of the Doran Warning Light
Monitor™ should be referred to a
qualified technician.
CARE
&
MAINTENANCE
l
Circuit Breakers
The electrical system is protected by circuit breakers located in a side mounted electrical box below the driver’s window. If a current overload or “short” should occur
in any body circuit, it will trip the circuit breaker. If a short occurs and the circuit
breaker breaks, the circuit breaker will reset when the element cools; usually in about
15 seconds. A short may be indicated by blinking lights or fluctuating gauges. The
shorted circuit should be corrected immediately. Refer to body or chassis master wiring diagrams. A complete wiring diagram is available from Blue Bird Body Company
Technical Publications.
To access the electrical panel, open the access door located outside the bus below the driver’s window. Use of appropriate amperage circuit breakers is required.
ACCESSORIES AND ADDED COMPONENTS
When adding accessories and aftermarket components, it is important to consider
the results very carefully.
• Does the component over burden the electrical system?
• Does the accessory interfere with any of the driver’s controls?
• Does the accessory interfere with the driver’s field of vision?
• Heavy components and accessories must be mounted near, or below, the
floor line to avoid raising the vertical center of gravity.
• Will passenger safety and comfort be adversely affected?
85
DRIVERS HANDBOOK
DOOR ADJUSTMENT & LUBRICATION
Maintenance procedures for entrance doors must be performed by qualified technicians at intervals of one month or 1,000 miles, whichever occurs first.
Continuing Maintenance Requirements
• Keep working parts of control tightened.
• Lubricate all working parts periodically, including hinges and overhead controls.
• Repair or replace worn seals.
• Maintain proper door opening and closing adjustment.
Outward Opening Door Adjustment
Outward Opening Doors are mounted in a prefabricated framework, which eliminates the effect of body construction variations on door and seal operation. Doors
are suspended completely on sealed ball bearings located at the top corners of the
framework, inside the body. The interlink connection between the doors is a single
assembly with oppositely threaded, spherical bearing rod end connectors at each
end, providing simple link length adjustment without disassembly. Loosen the lock
nut, turn the tube, and retighten the nut when satisfactorily adjusted. The geometry
of the mechanical link between the doors causes the rear door to close well ahead
of the front door, so that the front nosing seal rubber always overlaps the rear. Oil
impregnated bronze bearings in the lower corners of the framework serve as pivots
(not supports). All controls and mechanisms and the complete lower step tread are
sealed inside the bus and out of the weather when the door is closed.
Outward Opening (Air Powered) Adjustment
The pneumatic actuator is a cylinder connected to a lever on each door, located inside the header cover. An interconnecting link between the doors controls the operation sequence. A safety release valve is located over the door. Air switches inside the
header cover operate Stepwell lights. A two way manually operated valve manages
the driver’s door control. Air pressure holds the door either open or closed, depending upon the position of that valve. The operation speed is adjustable by use of flow
control valves located on the actuator.
86
CARE
&
MAINTENANCE
l
Jackknife Door Adjustment
1. Loosen the roller bracket at the top of the rear door.
2. Adjust the length of rod (between the door control and the door) and the
location of the rod end bracket on the door for proper open and closed position.
2.1 Lengthen the rod if the door opens too far and does not close against
the top seal.
2.2 Shorten the rod if the door closes too hard and does not open far
enough.
2.3 Move the rod end bracket forward if the door does not close against
the seal and does not open far enough.
2.4 Move the rod end bracket rearward if the door opens and closes too
far.
3. Attach the roller bracket to the rear door and adjust.
• If the rear door hangs in the track when starting to close the door, move the
bracket to the rear.
• If the rear door does not open to the front
enough, move the roller forward.
4. Perform the following adjustments and maintenance for ease of operation. The top of door
should be approximately ³/₈ inch below the door
header.
4.1 Move the door upwards so that the rubber
door sweeps do not drag on the stepwell
treads. Adjust door height by loosening the
bolts and nuts that attach the front door
panel to the front hinge. Holes in the hinge
are slotted. This permits vertical adjustment
of the door.
Roller Bracket
4.2 Ensure that the top edge of the door nosing rubber does not drag on the doorstop
header rubber. Remove the first three upper
screws in the inner and outer nosing rubber
retainer strips and force the nosing rubber
downwards. Replace the screws after the
rubber nosing has been adjusted.
4.3 The rear upper corner of the rear door panel
should not drag on the rubber door stop on
the header. To provide the required clearance, move the door roller bracket towards
Rod End Bracket
87
DRIVERS HANDBOOK
the rear of the bus. This will effectively move the door panel away
from the doorstop rubber.
4.4 Clean the stepwell rubber treads and lower the door rubber sweeps
regularly. Cleaning these surfaces will reduce friction as the door is
operated.
5. Ensure that the door control rod end bracket is mounted squarely on the
door. If it is not, the yoke end pivot pin will bind. Adjust it by loosening screws
and tightening after the bracket has been squared up.
6. Inspect the pivot nut on the rod end bracket for burrs or other surface irregularities. Grind or file the pivot nut so that its upper and lower surface is
smooth.
7. Lubricate the door hinge pin with a spray type lubricant (LPS No. 1, or equivalent). Lubricant should penetrate behind each hinge lug. Door hinges will
operate quietly if properly lubricated.
Power Jackknife Door Adjustment
The following adjustments and lubrications should be performed on the power jackknife door to ensure its proper operation.
1. Lubricate the center hinge with LPS No. 1, or equivalent, lubricant.
2. Adjust the actuator yoke so when the cylinder rod is fully extended, the door
is not forced beyond its normal stopping point at the front stepwell band.
Adjust the actuator mounting bracket when required. Improper adjustment
of the cylinder yoke can cause premature failure of door components.
3. Adjust the switch striker plate on the actuator to prevent binding in the
closed position.
4. Ensure that the roller bracket is installed squarely on the rear door panel.
5. Ensure that the center hinge barrel is not binding against the outer skin of
the rear door panel.
6. Adjust opening and closing speed of the door with the valves located on
cylinder. Air pressure should be at normal operating range (100 to 125 psi)
during this adjustment.
7. Torque the upper pivot bracket retaining screw at the lever assembly to 20 Ft.
lbs. (27 N•m).
Sliding Bolt Vandal Lock
Lubricate the sliding bolt mechanism of the Sliding Bolt Vandal Lock every six months
or 6,000 miles (whichever occurs first). Use LPS-1 spray lubricant, or equivalent.
88
CARE
&
MAINTENANCE
l
Security Lock Lubrication (Outward Opening Door)
If the Outward Opening Door Security Lock becomes difficult to operate, remove the
access plate on the inner door panel and lubricate with No. 2 lithium grease. (Access
plate shown removed in illustration.)
Lubricate security locks every six months or 6,000 miles, whichever occurs first.
Using LPS-1 or Apply™ lubricant (or equivalent), spray into the bushing and shaft in
the center at the base of the lock handle. Also spray lubricant into key lock mechanism. Rotate the lock handle to ensure smooth operation.
Manual Security Lock (interior)
Access Doors
Periodic maintenance is necessary to prolong the life of access door latches, locks,
and hinges. Each week, clean and inspect the door hinges and latch mechanisms.
Clean with a nonabrasive degreaser or cleanser as required. Every three months, lubricate with either a graphite-type lubricant or a spray-type lubricant such as LPS.
Following is a list of access doors for which these maintenance procedures are recommended:
• Battery Compartment Door
• Luggage Compartment Door
• Tire Compartment Door
• Fuel Fill Door
• Radiator Fill Door
• Side Electrical Panel Door
• Left and Right Hand Front Access Doors
Glove compartment and emergency equipment doors should be inspected on a
daily basis. Open and close to ensure proper operation. If necessary, follow the same
lubrication procedure as outlined above.
89
DRIVERS HANDBOOK
SEATING CARE
Seat Belt Inspection And Maintenance
Inspect seat belts and their attachments, at least weekly. Check seat belt buckles
and adjustability to ensure proper operation. If necessary, lubricate the buckle with a
graphite lubricant. When a buckle is found to be inoperable, replace it immediately.
If there are any defects in the webbing (i.e., torn or frayed), the seat belt must be
replaced immediately to ensure passenger safety. Hand wash webbing with warm
water and mild soap. Rinse thoroughly and dry in the shade. Do not bleach or re-dye,
because such processing may severely weaken the assembly.
[WARNING] Do not bleach or dye the webbing. Such processing may severely
weaken the assembly.
Seat Inspection And Maintenance
Blue Bird seats are built to meet Federal Motor Vehicle Safety Standards. In order
to provide a greater margin of safety during passenger transportation, follow these
guidelines:
• Inspect and, if necessary, tighten seat leg and wall side mounting bolts every
90 days.
• Inspect and, if necessary, tighten cushion attachments weekly.
• Inspect upholstery for cuts and tears every 90 days. If upholstery is torn, remove it by taking out the staples at the bottom front of seat back or bottom of
cushion and pulling the cover away. For installation of new cover, reverse this
procedure.
• School bus seats are equipped with a special foam back pad. If the pad becomes damaged, it should be replaced with an approved part. Aftermarket
suppliers should be checked for compliance with Federal standards.
DRIVER’S SEAT LUBRICATION
Moving parts of the driver’s seat require lubrication for ease of operation, as well as
longevity of the seat and prevention of excessive wear.
Currently available is white lithium-based grease in an aerosol can. It gives excellent coverage when carefully directed into moving part joints. The very light coating
of lubrication provided by aerosol-carried solvent-type solution works very well for
penetrating into a joint and cleaning away dirt, but it should only be depended on
for lubrication if it is applied frequently. A common 10W30 or 10W40 motor oil will
provide good lubrication.
Remember that all moving part joints, tilt pivots, slide forward/back adjustment,
and vertical motion pivots (four in all) require lubrication. This should be done every
six months or 6,000 miles, whichever occurs first. The use of lithium-based grease in
aerosol form is recommended.
90
CARE
&
MAINTENANCE
l
SEAT CARE AND CLEANING
It is imperative that the interior of the bus be kept clean; seats are an important part
of this maintenance. Regular cleaning and care will prolong the life of the seats and
improve the general appearance of the bus.
Everyday dirt and soil. Most everyday soil and dirt may be removed with a soap
and water solution. If the stain is persistent, a stiff bristle brush may be used. Fabric
covered seats should be rinsed with clean water after the stain is removed.
Paint, tar, and asphalt. Remove the stain immediately using a damp cloth and
kerosene. Rub gently, using small strokes. Rinse thoroughly. This type of stain may
become permanent if not cleaned immediately.
Nail polish and lacquer based stains. Soak up as much as possible with dry cloth
immediately. Any remaining stain may be removed with a non-flammable cleaning
fluid such as “Tuff Stuff™” or “Armor All™” cleanser. Rinse thoroughly with clean water.
Gum, grease, and shoe polish. Remove as much as possible immediately. If left
for any length of time, shoe polish will stain permanently. Clean any remaining stain
with “Tuff Stuff™” or “Armor All™” cleanser.
Ink. Remove stain immediately using a damp cloth and alcohol.
SEAT CUSHION REMOVAL AND INSTALLATION—DOT SEATS
[WARNING] If seat cushions are removed for maintenance, they must be reinstalled using the following instructions. Failure to comply with these instructions
could result in injury from unattached seat cushions in the event of an accident.
Removal
1. Loosen the two front swivel-type clamps at the front underside of the cushion with a screwdriver. Caution: Do not remove clamps.
2. Rotate the swivel clamps 180° to clear the front retaining channel frame.
3. Lift the forward edge of the cushion 2 to 3 inches (5 to 8 cm) and pull forward.
Installation
1. Place the rear edge of the cushion down on the base portion of the seat
frame. Lifting the forward edge 2 to 3 inches (5 to 8 cm), slide the cushion to
the rear to engage the positive type clamp into the rear retaining channel.
2. Lower the forward edge to the frame, making sure the swivel clamps are inside the frame and the positive type clamps are secure on the rear retaining
channel.
3. Rotate the swivel clamp to engage the forward retaining channel frame.
4. Tighten with a screwdriver until clamps do not rotate.
SEAT CUSHION REMOVAL AND INSTALLATION—DOT SEAT BELT SEATS
Removal
1. Loosen the two front swivel-type clamps at the front underside of the cushion with a screwdriver. Caution: Do not remove clamps.
2. Rotate the swivel clamp located at the rear underside of seat cushion.
3. While lifting the rear edge of the cushion, pull the cushion to the rear and
remove.
Installation
91
DRIVERS HANDBOOK
1. Place the forward edge of the cushion two inches (5 cm) to the rear of the
front retaining channel. Slide the cushion forward, engaging the positive
clamps onto the forward retaining channel.
2. Lower the rear edge to the frame and rotate the swivel clamps so they engage the square tube cross member.
3. Tighten screws in front and rear clamps with a screwdriver until clamps do
not rotate.
TRACK MOUNTED PASSENGER SEATS
If your bus is equipped with track mounted passenger seats and you relocate
the seats or remove them to accommodate wheelchairs, you must follow rules of
spacing and placement to comply with Federal Motor Vehicle Safety Standard 222
“School Bus Passenger Seating and Crash Protection” and Federal Motor Vehicle
Safety Standard 217 “Bus Window Retention and Release”. A decal printed with these
rules (as shown below) is installed on the interior body panel above the windshield.
[WARNING] The federal rules governing passenger seating, spacing, and
placement are explicit. When the seats are moved, the entity moving or rearranging the seating assumes responsibility for compliance with FMVSS 222
“School Bus Passenger Seating and Crash Protection” and FMVSS 217, “Bus
Window Retention and Release”.
All passenger seats must have a seat or barrier in front of it to provide compartmentalization required by Federal Motor Vehicle Safety Standards. As you reconfigure your bus, you may need additional barriers, which are available from Blue Bird
Body Company Part Sales.
92
CARE
&
MAINTENANCE
l
93
DRIVERS HANDBOOK
SIGNS & SIGNALS
Stop Arms
Stop arms are required on Blue Bird All American school buses by, and in accordance
with, Federal Motor Vehicle Safety Standard 131. Stop arm assemblies are purchased
as a kit to meet state requirements. The stop arm is located on the left-hand side of
the body under the driver’s window. A manual switch on the switch panel most commonly operates stop arms.
For pneumatically operated stop arms, the manual switch activates an electric solenoid valve controlling the flow of air. Optionally, the solenoid valve may be activated by the warning lamp system. This system is operated by the air system on the chassis. No
special preventive maintenance procedures are required with these
systems; however, the air pressure may occasionally require adjustment to ensure proper opening and closing of the stop arm. The
air regulator is accessible through the outside electrical panel door
under the driver’s window. To regulate the air pressure, remove the
wire retaining clip below the regulator knob and pull the red lock
ring. Turn the knob counterclockwise to decrease the pressure, and
then slowly increase the pressure (turn knob clockwise) until the stop arm hinge is
extended to approximately 90°. Lock the knob into position by pushing in the red
lock ring and installing the wire retaining clip.
Electrically operated stop arms may be activated by a manual switch or, optionally, by the warning lamp system.
The “STOP” sign must extend, and if equipped with lights, the lights must be operating any time the red lights of the warning light system are flashing. For statedesigned warning light/stop arm systems which allow the stop arm to withdraw
while warning lights are operating, an audible alarm sounds to alert the driver of
the condition.
Monthly Maintenance
• Oil the dual action breakaway hinge at its pivot points with a high performance, penetrating lubricant. Tri-Flow™ (duPont™) with Teflon™ is recommended.
• Check that the breakaway portion of hinge is freely movable.
• Check that fasteners are secure.
Quarterly Maintenance
• Perform the “Monthly” procedures, above.
• Remove front and rear covers of base and check that fasteners are secure.
94
CARE
&
MAINTENANCE
l
Destination Signs
Hinged Sign Front
Mounted on the outside of the front roof cap, with internal control for changing the
display. Periodically lubricate hinges and lever assembly with lightweight lubricating
oil.
Hinged Sign Rear
Mounted on the outside of the rear roof cap, manually changed from outside. Periodically lubricate hinges with lightweight lubricating oil.
One Station Lighted Curtain
Replace bulbs as needed. Because of vibration, the curtain can loosen. To tighten the
curtain, loosen the bolts, pull the curtain taught and then tighten the bolts.
Roller Destination Sign with Lighted Curtain
Replace bulbs as needed. Curtain may occasionally require same adjustment as One
Station Sign. Periodically lubricate the roller gears with light grease, such as White
Lube™. Lubricate the hinges on the access door with lightweight lubricating oil. To
change the display, turn the crank located on the front, upper, inner panel above the
windshield.
Two Station Sign
Front lighted with lettering on both sides. Lubricate the interior door hinge on the
front, upper, inner panel with lightweight lubricating oil.
Lighted “School Bus” Sign
Back lighted yellow Plexiglas™ sign. Replace bulbs as needed. Lubricate the interior
door hinge on the front, upper, inner panel with lightweight lubricating oil
95
DRIVERS HANDBOOK
ENGINE & RUNNING GEAR
Air Intake System Inspection
Intake air must be filtered to prevent dirt and debris from entering the engine and
causing premature wear. Air intake piping should be checked daily, as should chargeair piping and engine air cleaner service indicator, if equipped. Repair any leaks in the
system before operating the bus. Never operate the engine without an air cleaner.
Intake Air Restriction Indicator (Cat C7 and John Deere 8.1L).
Some engines are equipped with a gauge which displays the difference in air pressure before and after the air cleaner. As the air cleaner element becomes dirty, the
pressure differential rises. The air cleaner element must be replaced when the difference is 25 inches on the Cat C7, and 15 inches on the John Deere 8.1L. If your engine
is equipped with a different type of service indicator, follow the manufacturer’s recommendations to service the indicator.
[CAUTION] Leaks in the intake system will prevent the Air Restriction Indicator from reading accurately. Always check the attendant piping for leaks,
especially between the indicator and the engine intake.
Maximum intake restriction (clean air filter element): 10.0 inches water (254
mm)
Maximum intake restriction (dirty air filter element): 25.0 inches water (635
mm)
Cat C7. Replace the engine air cleaner every 12 months, or when the air cleaner
service indicator shows restriction of 25 inches of water. Do not rely completely on
the restriction indicator. A leak in the system will prevent the restriction indicator
from operating properly. Always look at the piping to ensure there are no leaks.
John Deere 8.1L. Inspect the air intake system every 12 months or 25,000 miles;
whichever comes first. Replace the air cleaner if it is damaged or torn, or when air the
restriction indicator shows restriction of 15 inches of water. Do not reply completely
on the air restriction indicator. A leak in the air intake piping could cause a false indication. Always visually inspect the system to ensure there are no leaks.
If the vehicle is operated in extremely dusty conditions, more frequent air cleaner
maintenance may be necessary.
Air Intake Piping
Inspect the intake piping daily for wear points and damage to piping, loose clamps,
or punctures that can cause damage the engine. Replace damaged pipes, and tighten loose clamps; replace if necessary, to prevent the air system from leaking. Check
for corrosion under the clamps and hoses of the intake system piping. Corrosion can
allow corrosive products and dirt to enter the intake system. Disassemble and clean
as required.
ChargeAir Piping
Inspect the chargeair piping and hoses daily for holes, cracks, or loose connections.
Tighten the hose clamps as necessary.
96
CARE
&
MAINTENANCE
l
Charge-Air Cooler (CAC) Maintenance
Check this system every 3 months or 7,500 miles. Inspect the charge-air cooler (CAC)
for dirt and debris blocking the fins. Check for cracks, holes, or other damage. If damage is found, refer to the manufacturer’s dealer.
Engine Cooling System
In today’s modern engine designs, accurate maintenance of the cooling system is
critically important to engine life. Simply maintaining coolant level and performing
occasional coolant changes does not adequately ensure that the cooling system is
healthy. The chemical balance of engine coolant must always be correct. This requires dilligent adherance to the engine manufacturer’s coolant specifications, maintenance schedules, and procedures. Accurate coolant system maintenance records
should be kept.
The engine coolant level in the reservoir should be checked daily as a part of
routine pre-trip inspection. But whenever the coolant level is low, it must be replenished with only pre-mixed coolant of the same type and brand installed. Never top
off coolant with plain water.
Careful pre-trip inspection and a program of routine maintenance checks of the
condition of the cooling system by service technicians should ensure against enroute
emergencies such as worn hoses or loose clamps resulting in coolant loss. In the case
of such an emergency, however, if anything other than original premixed coolant is
added in order to allow the bus to proceed to a service facility, the coolant system
must be completely drained, flushed, and properly refilled with approved coolant
before being returned to routine service. Any enroute event requiring topping off
of the coolant should be reported to service personnel responsible for maintenance
of the bus.
[WARNING] Exercise extreme care when removing the cap from the engine
coolant reservoir. Always allow time for the engine to cool before removing
the cap. The pressurized coolant may be very hot and can spray out, causing
serious burn injuries.
Coolant Types
Engine coolant is generically divided between two types; “standard” and “long-life”
(or “extended-life”). Extended-life coolants generally allow longer intervals between
coolant changes (sometimes requiring additives to be added near the midpoint of
their service life, and/or for special testing to be performed at certain intervals). Engine manufacturers, however, differ somewhat in regards to specificaitions for coolants which they recognize as “long-life” when used in their respective engines.
Blue Bird buses built as of August, 2006 come from the Blue Bird factory with one
of three types of coolant. The standard coolant is John Deere Cool-Gard 50/50 premix, which is green in color. This coolant is considered extended life when installed
in John Deere engines. It is to be considered standard-life coolant when installed in
Caterpillar or Cummins engines.
97
DRIVERS HANDBOOK
Caterpillar equipped buses purchased with a long-life coolant option have been
filled with Shell Rotella ELC 60/40 premix, which is red in color.
Cummins equipped buses purchased with a long-life coolant option have been
filled with Fleetguard ES Optimax 60/40 premix, which is red in color.
Blue Bird installs decals on or near the deairation tank filler which state the type
of coolant installed at the factory. The decal states the approved premixed coolant
and coolant manufacturer’s part number for one gallon quantities. The decal also
lists the manufacturer’s part number for the concentrate which is approved for mixing with the premix for stronger glycol concentration.
[CAUTION] When replenishing or replacing coolant, only use coolant of the
same type already installed. Never mix coolants of different color, type, or
brand. Plain water is corrosive at engine operating temperatures. Never add
plain water to the system. When using concentrated coolant to raise the glycol
concentration for extreme temperature environments, Blue Bird recommends
only mixing the concentrate with pre-mixed coolant of the same type; not
mixing with water.
Coolant Testing and Replacement
Each engine manufacturer has its own specific requirements for coolant testing and
maintenance. Therefore, refer to the engine Operator’s Manual for your bus and follow the engine manufacturer’s maintenance specifications.
Blue Bird recommends that Caterpillar cooling systems with red extended life
Shell Rotella ELC coolant should be tested according to the Caterpillar Operation and
Maintenance Manual.
Blue Bird recommends that Cummins cooling systems with red extended life
Fleetguard ES Optimax coolant should be tested by sending samples to a Fleetguard
lab for a monitor C test as specified in the Cummins Operator’s Manual.
The John Deere Cool-Gard coolant may be tested by sending a sample to John
Deere for a Cool Scan test, or may be manually tested by qualified service technicians
using a John Deere Three Way test strip, which is included in John Deere 3-Way Heavy
Duty Coolant Test Kit TY6175.
Follow the engine manufacturer’s procedure for draining, flushing, and refill.
Blue Bird buses equipped with Caterpillar or Cummins engines may also be
equipped with an optional coolant filter. The coolant filter element installed at the
Blue Bird factory is compatible with all three of the above-described coolants:
BLUE BIRD NUMBER 0064641
VENDOR (WIX) PART NUMBER 24070
98
CARE
&
MAINTENANCE
l
Shutters
The optional radiator shutters assist in maintaining a constant engine temperature
by limiting the air flow through the radiator. The shutter blades are powered by air
pressure from the brake system on the vehicle. The shutters are controlled automatically by an Alarmstat which is located in the upper radiator hose and an electric solenoid in the air line controlling the shutters. The shutters require no lubrication but
must be cleaned as required or at least every two years or 24,000 miles, whichever
occurs first. See the shutters installation diagrams provided with vendor maintenance information for plumbing, wiring, and parts requirements.
99
DRIVERS HANDBOOK
Transmission
Transmission Breather
The transmission has a self-contained breather at the top left rear of the transmission main housing. The breather provides a passage for normal expansion and contraction of air and fluid within the transmission. Be careful to avoid plugging this
breather with paint, undercoating, or any other material. A small amount of oil mist
comes out of the breather during normal operation. If an excessive amount of oil is
found in this area, the cause should be investigated.
[CAUTION] When cleaning the transmission, do not spray steam, water, or
cleaning solution directly at the breather. This may contaminate the transmission fluid.
Transmission Fluid Level
Transmission fluid cools, lubricates, and transmits hydraulic power. Always maintain
proper fluid level. If fluid level is too low, the torque converter and clutches do not
receive an adequate supply of fluid and the transmission will overheat. If the level is
too high, the fluid aerates, causing the transmission to shift erratically and overheat.
Fluid may be expelled through the breather or dipstick tube when the fluid level is
too high. Please see your Allison Transmission Operator’s Manual for information on
how to check fluid levels at both cold and hot engine temperatures. Allison recommends a transmission fluid that meets DEXRON®-III specifications.
Transmission Fluid And Filter Changes
Please see your Allison Transmission Operator’s Manual for procedures to change
transmission fluid and filters, and the intervals at which these should be done.
100
CARE
&
MAINTENANCE
l
Rear Axle
All drive axles have a vent on the top of the axle housing that allows the axle to
breathe as the axle temperature changes. The vent must remain open to prevent seal
failures. It is normal for the vent to ooze a small amount of lubricant.
Hydraulic Brakes
The brakes self-adjust for lining wear. Brake fluid in the reservoir, located behind the
driver’s seat, must be maintained to the correct level. As the brake linings wear, fluid
level in the reservoir will go down, displacing the lining loss.
[CAUTION] Use only DOT brake fluid in this reservoir.
[WARNING] Put only brake fluid in the brake fluid reservoir and only power
steering fluid in the power steering system. Mixing fluids or failure to use the
proper fluid, could result in loss of braking or steering.
Parking Brake Adjustment
On All Americans with hydraulic brakes, the parking brake is adjusted by turning the
knob on the parking brake lever. The knob is held in place with a set screw, and can
be adjusted when the parking brake is released. When the parking brake is properly
adjusted, 90–100 pounds of force—as measured 2” from the end of the lever—is
required to set the brake.
2”
90–100 lbs. force
101
DRIVERS HANDBOOK
WINDSHIELD WIPERS
Washer Solution Reservoir
Periodically check the windshield washer solution reservoir, located behind the driver’s side front access panel of the All American Rear Engine. It is located behind the
front access panel on the entrance door side of the Front Engine
model. Be sure there is an adequate supply of fluid at all times.
The solution used is a 50/50 mixture of methanol and water.
Figure 1
Wiper Assembly Replacement
To replace wiper assembly (Figure 1), loosen lock nut, remove
screw, and pull wiper assembly loose from wiper arm. Replace the
wiper assembly and use original screw and lock nut. Tighten lock
nut securely, but do not tighten enough to compress the saddle.
Blade must be free to move on the axis (machine screw) and
within the saddle. Threading the lock nut until flush with the machine screw end will give a secure and serviceable installation.
Figure 2
Wiper Refill Replacement
To remove wiper refills, follow the procedure outlined below.
1. Lift end clip with screwdriver as shown in Figure 2. This releases locking indentations (A in Figure 3) and allows end
clip retainers (B in Figure 3) to be removed through blade
claw.
2. Repeat procedure on the opposite end of the wiper.
3. New end clips (Figure 3) are provided with replacement
Anco™ refills. To install, remove one clip and slide the refill
through all claws until the end clip locks in position.
4. Install the second end clip, and snap-lock devices A and B
into place to secure refill.
102
Figure 3
CARE
&
MAINTENANCE
l
CLEANING
Exterior Cleaning
The best way to preserve your vehicle’s finish is to keep it clean by washing frequently. Wash the vehicle in lukewarm or cold water. Do not use hot water or wash in the
direct rays of the sun. Do not use strong soap or chemical detergents. All cleaning
agents should be promptly flushed from the surface and not allowed to dry on the
finish. Polishing with nonabrasive wax is recommended to remove accumulated residue and eliminate any “weathered” appearance.
[CAUTION] Pressure washing may cause damage to finish. Pre-test pressure
washer on a similar surface before applying pressure and chemicals to your
vehicle. Pressure washers that recirculate should filter the water to remove
abrasive grit.
Calcium chloride and other salts, ice melting agents, road oil and tar, tree sap, bird
droppings, chemicals from industrial chimneys, and other foreign matter may damage vehicle finishes if allowed to remain on painted surfaces. Prompt washing may
not completely remove all of these deposits. Additional cleaners may be needed.
When using chemical cleaners developed for this purpose, be certain they are safe
for use on painted surfaces.
Any stone chips, fractures, or deep scratches in the finish should be repaired
promptly. Exposed metal will corrode quickly and may develop into a major repair
expense.
Floor Cleaning
Regular cleaning and care will prolong the life of floor covering and improve the general appearance. Floor coverings should be swept daily and mopped weekly with a
mild detergent and water. Do not use floor sweeping compounds. Be sure to remove
dirt, pencils, paper, and any other debris that may cause the emergency door to seal
improperly. Do not use harsh detergents or excessive amounts of water. Do not use a
water hose to wash out the bus. Deterioration and damage to the wood floor could
occur.
[CAUTION] Petroleum products, such as oil and grease, quickly deteriorate the floor covering. These types of products should be removed from the
surface as soon as possible. Continuous care must be exercised in the stepwell
area, where foreign objects can create a safety hazard. The accumulation of
dirt and foreign material in the stepwell area creates a hazard for passengers
and could prevent the doors from operating properly. Ensure that screws for
floor trims and aisle trims are seated tightly.
103
DRIVERS HANDBOOK
HEATER CARE
The front heater can be accessed from the curbside access panel outside the bus at the front,
and from the inside, on the dash near the stepwell. To access the heater core and filter inside
the bus, remove the interior heater access panel
shown.
Filter
The main heater core is protected by an air filter,
which prevents dirt and dust from collecting on
the heat exchange surfaces and thereby lowering heater efficiency. Care should be taken to
keep the filter clean. A dirty filter restricts airflow
and reduces heater output. To clean or replace
the filter, remove the filter access panel. The
operating conditions of your bus will determine
how frequently the filter should be serviced.
Annual Maintenance
Hoses
Check all water hoses for kinks that can prevent water flow or chafing that can cause
failure. Look and feel for hardening of rubber or cracks that result from aging. Hoses
should be replaced when cracks first appear. Hoses under the bus and in the engine area will deteriorate faster than those inside the bus. Exposed hoses should be
checked more frequently.
Cores
The heater will be most efficient when the core is clean. The core should be cleaned
carefully with compressed dry air or vacuum and a soft bristle brush. Damaged fins
should be straightened with a fin comb to prevent airflow restrictions. The forward
heater core can be accessed through the right front inside access panel. Under seat
heaters are accessed by removing the passenger seat cushions that are over them.
Motors, Switches, Blowers, and Fans
Maintenance free motors are used and do not require lubrication or cleaning over
their operating life. However, excessive vibration caused by damaged blower wheels
or fans can cause motor damage. Inspect wheels and fans for obstruction or damage
by running each fan individually, listening and feeling for irregularities. Replace damaged wheels or fans to prevent damage to parts, fasteners, and motors.
Switches are also maintenance free; however, loose wiring connections to
switches or motors can cause excessive resistance and overheating damage. Wires
104
CARE
&
MAINTENANCE
l
to switches can be checked or repaired by removing the switch mounting panel next
to the driver’s seat.
Panels and Housings
Fasteners should be checked and tightened as necessary. A loose screw may allow
a panel to vibrate, resulting in excessive noise, more loose screws, and/or metal fatigue.
Cleaning Auxiliary Fans
Auxiliary fan motor bearings are lifetime-lubricated, and do not require maintenance.
Clean the blade and guard occasionally, with a soft bristle brush and a vacuum cleaner or compressed air, to help maintain efficiency. As with any other fan, if the blade
is damaged or unbalanced, vibration damage can occur to the motor or surrounding
components. If this is the case, the blade should be replaced immediately.
[WARNING] Do not operate a fan without the fan guard properly installed.
Procedure:
1. Remove the front half of the fan guard by gently separating the plastic tabs
with a screwdriver or other hard instrument. Be careful not to damage the
tabs, as these connect the front half of the fan guard to the rear half.
2. To remove the fan blade, use a 3/32-inch Allen wrench in the setscrew located directly behind the fan. This should loosen the fan blade for removal.
3. The rear half of the fan guard can also be removed if necessary. After pulling
away the fan, remove the two nuts and washers on either side of the center
point and lift off the rear piece.
105
DRIVERS HANDBOOK
MAINTENANCE SCHEDULE
Maintenance Task Schedule, A3FE
Ensure that the Safety Information, warnings and instructions are read and understood before operation or maintenance procedures are performed. Use whichever
interval listed (time, mileage, engine hours) occurs first. Engines operated in severe
operating conditions may require more frequent maintenance. See engine manufacturer’s specifications for more information.
First Month Then Every 3 Months or 3000 Miles
Cooling System
Inspect & Tighten Hose Clamps
Tighten radiator hose clamps to 90 in lb. Tighten heater
hose clamps to 45 in lb.
First 100 Miles Then Every 10,000 Miles
Tires & Wheels
Inspect & Tighten Lug Nuts
Torque to 450-500_ft lb with calibrated torque wrench. Do
not over-tighten. Do not lubricate nuts or studs. Operating
conditions may require more frequent checks.
First 1000 Miles Then Every 3 Months or 6000 Miles
Frame
Inspect & Tighten Body Tie Downs Body
Inspect for missing, damaged rubber pads. Tighten clamps
Tie Down Clamps
to 37–41 ft lb.
Inspect & Tighten Body Tie Downs Rear
Inspect rubber discs for cracking or damage. Inspect spring
Isolator Mounts
& fastener for damage. Tighten bracket to 70–80 ft lb.
Tighten Isolator to 54–58 ft lb.
First 1000 Miles Then Every 6 Months or 6000 Miles
Axle & Suspension, Front
Lubricate Parabolic Spring Suspension
NLGI #2 Grease.
Spring Pins
Axle & Suspension, Rear
Inspect Comfort Air Suspension Ride
Shock length, eye-to-eye: 22.68" +- .25"
Height
First 1000 Miles Then Every 6 Months or 10,000 Miles
Axle & Suspension, Rear
106
Inspect & Tighten Comfort Air Suspension
Tighten 7/8" U-Bolts to 400–450 ft lb. Tighten 3/4" U-Bolts
U-Bolts
to 260–320 ft lb.
CARE
&
MAINTENANCE
l
First 1000 Miles Then Every 12 Months or 12,000 Miles
Heaters & Defrosters
Inspect Front Heater Hoses & Clamps
Inspect for evidence of leaks or deterioration. replace with
proper parts.
Axle & Suspension, Front
Inspect & Tighten Parasteer Suspension
Torque to 260–320 ft lb.
Axle-To-Suspension Fasteners
First 5000 Miles Then Every 12 Months or 24,000 Miles
Transmission
Replace Transmission Sump Filter
First 5000 Miles Then Every 24 Months or 24,000 Miles
Transmission
Replace Transmission Main Fluid Filter
First 11,000 Miles Then Every 3 Months or 5000 Miles or 250 Engine Hours
Engine
Inspect All Belts
Inspect condition and tension of belt.
First 11,000 Miles Then Every 6 Months or 250 Engine Hours
Brakes
Replace Air Brakes Air Compressor Filter
First 11,000 Miles Then Every 6 Months or 6000 Miles
Cooling System
Inspect Charge Air Cooler
Inspect for clogging debris.
As Specified by Engine Manufacturer
Cooling System
Replace Coolant
See your Engine Ooperator's Manual. Use only premixed
coolant(s) approved by the engine manufacturer. Never
mix different types or brands of coolant.
Engine
Replace Oil & Filter
See Engine operators manual for oil and filter specifications
and maintenance interval.
Adjust Valves
See Engine manufacturer's Service Manual for interval.
107
DRIVERS HANDBOOK
As Specified by Transmission Manufacturer
Transmission
Adjust Transmission Shift Cable
See Transmission Chapter.
Every Day
Doors
Test Wheelchair Lift
Follow the manufacturers recommendations.
Emergency Equipment
Inspect Fire Extinguisher Charge
Ensure that Extinguisher Charge is not expired.
Inspect Fire Extinguisher Mounting Bracket
Ensure that Extinguisher bracket is secure and operates
correctly.
Inspect First Aid Kit Contents
Ensure that kit supplies are fully replenished, clean, and
not expired.
Inspect First Aid Kit Mounting Bracket
Ensure that mounting bracket is secure and operates
correctly.
Emergency Exits
Inspect All Emergency Exits
Test all emergency exits for proper operation, including
warning buzzer.
Warning Devices & Signs
Test Stop Arms & Crossing Arms
Windows
Inspect All Mirrors
Clean, adjust mirrors.
Inspect All Windows
Clean Windshield, door glass, driver's window, rear vision
windows, rear door windows.
Brakes
Inspect Air Brakes Air Lines & Fittings
Inspect for leaks or physical damage.
Drain Air Brakes Air Tanks
Drain daily in cold weather; weekly in warm weather.
Inspect Air Brakes Brake Chambers
See Air Brakes Chapter for inspection criteria.
Inspect Air Brakes Brake Shoes
Wear depends upon application environment. See Meritor
Cam Brakes Appendix in Air Brakes Chapter for guidelines.
108
CARE
&
MAINTENANCE
l
Cooling System
Inspect Coolant Level
Top off with premixed coolant of same type as installed.
Never mix coolants of different colors, types, or brands.
See engine Operator's Manual for details.
Inspect Entire Cooling System
Visually inspect for any signs of leakage.
Electrical
Inspect All Lights
Check all running, stop, marker, hazard, and warning lights
for proper operation.
Engine
Inspect Oil Level
See Engine operators manual for oil specifications.
Fuel System
Inspect Fuel Cap
Inspect Water Separator Petcock Drain
Check for water contamination.
Intake System
Inspect Intake Tract Duct & Elbow
Visually inspect for proper fit and sealing, cuts, abarsions,
signs of dirt contamination.
Inspect Intake Tract Restriction Indicator
Replace filter element if indicator is red.
Steering
Inspect Power Steering Fluid Level
Replinish to full mark. Dextron III.
Tires & Wheels
Inspect All Tires & Wheels
Check air pressure. Visually inspect tires, tread wear, lug
nuts, including spare.
Transmission
Inspect Transmission Fluid Level
Check production order for proper type of fluid to be
added.
109
DRIVERS HANDBOOK
Every Week
Seats
Inspect & Tighten Passenger Seats Cusion
Inspect for loose cushions clips.
Screws
Inspect Passenger Seats Seat Belts
Lubricate buckles, clean webbing as required. Replace any
damaged webbing straps.
Inspect Passenger Seats Upholstery
Inspect for cuts, tears, wear and soiled areas.
Brakes
Inspect Hydraulic Brakes Pads
110
Replace if worn to within 1/8" lining remaining.
CARE
&
MAINTENANCE
l
Every Month or 3000 Miles
Doors
Clean & Lubricate All Doors Rubber Seals
Lubricate with Silicon Spray or protectant.
Lubricate All Doors Vandal Locks
Spray Apply lubricant into key locks. Use LPS #1 for sliding
bolt locks.
Adjust Jack Knife Door Air Pressure
See Body Construction / Doors / Jack Knife Door
Adjust Jack Knife Door Control Rod
Adjust for proper open/closed position.
Adjust Jack Knife Door Control Rod
Adjust to prevent pivot pin binding.
Bracket
Lubricate Jack Knife Door Hinge Pins
LPS 1
Adjust Jack Knife Door Roller Bracket
Adjust for proper open/closed position.
Adjust Jack Knife Door Switch
See Body Construction / Doors / Jack Knife Door
Adjust Outward Opening Door Control Rod
Adjust Outward Opening Door Control Rod
Adjust for full and secure closure without binding.
Bracket
Adjust & Lubricate Outward Opening Door
Adjust linkage for firm closure, and to ensure rear panel
Linkage
closes first.
Lubricate Outward Opening Door Pivots
Lubricate pivot pins with LPS 1.
Adjust Outward Opening Door Roller
Adjust for full and secure closure without binding.
Bracket
Lubricate Power Jack Knife Door Air
LPS #1
Pressure & Switch
Lubricate Power Jack Knife Door Hinge
LPS #1
Lubricate Wheelchair Lift Lube Points
See model-specific literature provided with lift.
111
DRIVERS HANDBOOK
Emergency Exits
Lubricate All Emergency Exits Hinges
LPS #1
Lubricate Rear Emergency Door Hinges
Lubricate at hinge grease fittings.
Lubricate Rear Emergency Door Hold-Open
Apply ASTM D4950 GC-LB Grade 2
Lubricate Roof Hatch Hatch Seal and Latch
Silicone lubricant to prevent sticking of rubber seal.
Spray silicon lubricant into latch mechanism.
Floor
Inspect Floor Drains
Check drawin hole in each body section under window for
debris obstruction.
Seats
Lubricate Driver's Seat
Lubricate per manufactuers recommendation.
Inspect & Tighten Passenger Seats
Use standard torque for bolt size , tread type and grade.
Mountings
Warning Devices & Signs
Lubricate Stop Arm, Electric 4-Point Pivot
Lubricate four hinge pivot ponts with Try-Flow lubricant
Inspect & Tighten Stop Arm, Electric
Check interior and exterior fasteners for loosening.
Fasteners
Windows
Lubricate Passenger Windows Latches &
Use silicone lubricant.
Slides
Electrical
Inspect Battery Electrolyte Level
Replenish with distilled water.
Every Month or 6000 Miles
Warning Devices & Signs
Adjust Stop Arm, Air Air Pressure
Adjust for full deployment and retraction
Every Month or 10,000 Miles
Axle & Suspension, Rear
Inspect Rear Axle Lubricant Level
If low, refil to bottom of filler opening. Use same lubricant
type as already installed.
Every Month or 300,000 Miles
Brakes
Inspect Hydraulic Brakes Fluid
112
DOT-3 brake fluid.
CARE
&
MAINTENANCE
l
Every 3 Months or 3000 Miles
Cooling System
Inspect Radiator Fins
Clean debris from fins.
Inspect Water Pump Belt
Inspect condition and tension of belt.
113
DRIVERS HANDBOOK
Every 3 Months or 5000 Miles
Brakes
Lubricate Air Brakes S-Cam
See Meritor Cam Brakes Appendix in Air Brakes Chapter for
guidelines.
Lubricate Hydraulic Brakes Calipers
Lube per meritor specs.
Driveline
Lubricate Driveshafts Slip Joint
NLGI Grade #1 or #2 multipurpose grease.
Lubricate Driveshafts U-Joint Bolts
NLGI Grade #1 or #2 multipurpose grease.
Inspect & Tighten Driveshafts U-Joint Bolts
Tighten to 45–50 ft lb.
Electrical
Inspect Alternator Connections
Inspect for loose wires, damaged terminals, damaged
insulators.
Inspect Battery Ground Strap
Check for solid connection, tight fasteners and absense of
corrosion.
Fuel System
Inspect Fuel Lines
Inspect for leaks or signs of abrasion.
Lubricate Fuel Stop Solenoid
Inspect Fuel Tank Vent
Inspect for obstruction.
Intake System
Inspect Air Cleaner Filter Element
Inspect for proper seating, secure lid. Replace if soiled,
wet, or damaged.
Inspect Intake Tract All Fasteners
Inspect for signs of contaminate infiltration, loose clamps,
wear spots, holes in piping
Inspect Intake Tract Charged Air Tubing
Inspect for signs of contaminate infiltration, loose clamps,
wear spots, holes in piping
Inspect & Tighten Intake Tract Hose
Tighten to 10 in lb.
Clamps
Inspect & Tighten Intake Tract Spring
Tighten to near full spring compression.
Loaded Clamps
Inspect Intake Tract Support Bracket
114
Visual inspection. Repair damaged parts immediately.
CARE
Inspect & Tighten Intake Tract T-Bolt
&
MAINTENANCE
l
Tighten to 50 in lb.
Clamps
Inspect & Tighten Intake Tract Worm Gear
Tighten to 38–42 in lb.
Clamps
Steering
Lubricate Axle Steering Linkage Drag Link
NLGI #2 EP multipurpose grease rated GC-LB or
equivalent.
Lubricate Axle Steering Linkage King Pins
NLGI #2 EP multipurpose grease rated GC-LB or
equivalent.
Lubricate Axle Steering Linkage Tie Rod
NLGI #2 EP multipurpose grease rated GC-LB or
Ends
equivalent.
Lubricate Intermediate Steering Shaft Slip
Lubricate splines with multipurpose grease.
Joint
Every 3 Months or 24,000 Miles
Brakes
Inspect Air Brakes Air Dryer
See Bendix appendix for specific model in Air Brakes
Chapter.
Inspect Hydraulic Brakes Booster & Master
Inspect for signs of leakage or physical damage.
Cylinder
115
DRIVERS HANDBOOK
Every 6 Months or 6000 Miles
Warning Devices & Signs
Lubricate Destination Sign Hinges
Lubricate Destination Sign Roller Gears
Lightweight grease such as White Lube.
Axle & Suspension, Rear
Inspect & Tighten Comfort Air Suspension
Inspect for signs of leakage, wear, or damage. Tighten
Shock Absorbers
upper shock mounts to 50–70 ft lb. Tighten lower shock
mounts to 150–180 ft lb.
Inspect Comfort Air Suspension Whole
Visually inspect for damage.
Assmebly
Brakes
Replace Air Brakes Air Compressor Filter
Clean Air Brakes Check Valves
Clean & Lubricate Air Brakes Treadle Valve
See Bendix Treadle Valve Appendix in Air Brakes Chapter.
Clean Air Compressor Governor
Inspect Hydraulic Brakes Calipers
Inspect for signs of leakage or physical damage.
Adjust Hydraulic Brakes Park Brake Lever
Adjust engagement pressure at the lever to achieve 120
-125lbs. at break over center.
Electrical
Inspect Battery Battery Posts
Clean and apply anti corrosion agent.
Exhaust System
Inspect Exhaust Pipe Joints
Inspect for loose clamps, leaks, damage.
Fuel System
Replace Fuel Filter Filter Element
Clean Fuel Filter Inlet Screen
Clean. Replace if damaged.
Steering
Lubricate Steering Gear Pitman Arm Pivot
NLGI #2 EP multipurpose grease rated GC-LB or
equivalent. Use hand-operated grease gun.
116
CARE
&
MAINTENANCE
l
Every 6 Months or 10,000 Miles
Axle & Suspension, Rear
Inspect & Tighten Comfort Air Suspension
Tighten to 20–30 ft lb.
Air Spring Anchor Bolts
Inspect & Tighten Comfort Air Suspension
Torque to 30–35 ft lb.
Air Spring Fasteners
Inspect & Tighten Comfort Air Suspension
Tighten to 60–85 in lb.
Leveling Valve Mount Bolt
Inspect & Tighten Comfort Air Suspension
Tighten to 100–150 in lb.
Lever Linkage Locknut
Inspect & Tighten Comfort Air Suspension
Tighten to 260–320 ft lb.
Lower Shock Mount
Inspect & Tighten Comfort Air Suspension
Tighten to 525–575 ft lb.
Quick Align Bolts
Brakes
Lubricate Air Brakes Cam Shaft Housing
NLGI #2 EP multipurpose grease rated GC-LB or
equivalent. Use hand-operated grease gun.
Lubricate Air Brakes Haldex Slack
See Haldex lubricant specs in Air Brakes chapter.
Adjusters
Lubricate Air Brakes Meritor Slack
See Meritor lubricant specs in Air Brakes chapter.
Adjusters
Steering
Lubricate Steering Column
Vision manual says to lubricate steering column. Where?
With what? Check model applicability
Every 12 Months
Intake System
Test Intake Tract Restriction Indicator
Test indicator with vaccuum gauge and pump.
117
DRIVERS HANDBOOK
Every 12 Months or 12,000 Miles
Heaters & Defrosters
Tighten Front Heater Fasteners
All fasteners holding such heaters in place in unit. For
details on fasteners check installation prints.
Clean Front Heater FIlter & Core
Clean dust from cores. Replace filter elements.
Bleed Heater System
Bleed air from heater circulation system. This procedure is
done to keep system operating correctly.
Clean Underseat Heaters Filter Elements
Clean dust from cores.
Axle & Suspension, Front
Inspect Parabolic Spring Suspension Entire
Visually inspect for damage or misalignmnent.
Assembly
Inspect & Tighten Parabolic Spring
Tighten to 75–85 ft lb.
Suspension Hangar Bracket Bolts
Inspect Parabolic Spring Suspension Shock
Visually inspect for leakage or damage.
Absorbers
Inspect & Tighten Parasteer Suspension
Torque to 20–30 ft lb.
Air Spring Fasteners
Inspect & Tighten Parasteer Suspension
Torque to 450–480 ft lb.
Front Pivot Bolts
Inspect & Tighten Parasteer Suspension
Shock Length, eye-to-eye: 18.5" +- .25"
Ride Height
Inspect & Tighten Parasteer Suspension
Inspect for leakage or damage. Torque upper and lower
Shock Absorbers
mount bolts to 50–70 ft lb.
Inspect & Tighten Parasteer Suspension
Torque to 138–159 ft lb.
Transverse Rod Bolts
Axle & Suspension, Rear
Inspect Comfort Air Suspension Ride
Shock length, eye-to-eye: 24.68" +- .25"
Height
Inspect Comfort Air Suspension Ride
Height
118
Shock length, eye-to-eye: 21.75" +- .25"
CARE
&
MAINTENANCE
Inspect & Tighten Comfort Air Suspension
Inspect for leakage or damage. Torque upper mount bolts
Shock Absorbers
to 50–70 ft lb. Torque lower mount bolts to 160–180 ft lb.
Inspect & Tighten Comfort Air Suspension
Torque to 150–205 ft lb.
l
Torque Arm Bolts
Inspect & Tighten Comfort Air Suspension
Torque 7/8" bolts to 400–450 ft lb. Torque 3/4" bolts to
U-Bolts
260–320 ft lb.
Cooling System
Test Entire Cooling System
Pressure Test Cooling system.
Engine
Test Engine Starting Aid Block Heater
Steering
Inspect Hydraulic Pump Body & Seals
Inspect for leaks.
Inspect Steering Gear Body & Seals
Inspect for leaks.
Every 12 Months or 24,000 Miles
Brakes
Clean Air Brakes Pop Off Valves
Steering
Replace Hydraulic Reservoir Filter Element
Replace element and fluid. Replace more frequently in
severe operating conditions. Dextron III.
Transmission
Replace Transmission Fluid
Use Dextron III fluid.
Inspect Transmission Shift Cable
Inspect Transmission Vent
Clear vent hose of debris or obstruction.
Every 12 Months or 50,000 Miles
Axle & Suspension, Rear
Replace Rear Axle Petroleum Based
Hypoid Gear Oil. Viscosity depends upon operating climate.
Lubricant
See Viscosity/Temperature chart.
Every 12 Months or 100,000 Miles
Axle & Suspension, Rear
Replace Rear Axle Synthetic Lubricant
Viscosity depends upon operating climate. See
Viscosity/Temperature chart.
119
DRIVERS HANDBOOK
Every 18 Months or 20,000 Miles
Cooling System
Lubricate Shutters Pivots
Use Never Seize spray lubricant.
Every 24 Months or 24,000 Miles
Brakes
120
Clean Air Brakes Parking Brake Valve
See Bendix Appendixes in Air Brakes Chapter.
Clean Air Brakes Quick Release Valves
See Bendix Appendixes in Air Brakes Chapter.
Clean Air Brakes Relay Valves
See Bendix Appendixes in Air Brakes Chapter.
Clean Air Brakes Spring Brake Valve
See Bendix Appendixes in Air Brakes Chapter.
CARE
&
MAINTENANCE
l
Maintenance Task Schedule, A3RE
Ensure that the Safety information, warnings and instructions are read and understood before operation or maintenance procedures are performed. Use whichever
interval listed (time, mileage, engine hours) occurs first. Engines operated in severe
operating conditions may require more frequent maintenance. See engine manufacturer’s specifications for more information.
First Month Then Every 3 Months or 3000 Miles
Cooling System
Inspect & Tighten Hose Clamps
Tighten radiator hose clamps to 90 in lb. Tighten heater
hose clamps to 45 in lb.
First 100 Miles Then Every 10,000 Miles
Tires & Wheels
Inspect & Tighten Lug Nuts
Torque to 450-500_ft lb with calibrated torque wrench. Do
not over-tighten. Do not lubricate nuts or studs. Operating
conditions may require more frequent checks.
First 1000 Miles Then Every 3 Months or 6000 Miles
Frame
Inspect & Tighten Body Tie Downs Body
Inspect for missing, damaged rubber pads. Tighten clamps
Tie Down Clamps
to 37–41 ft lb.
Inspect & Tighten Body Tie Downs Rear
Inspect rubber discs for cracking or damage. Inspect spring
Isolator Mounts
& fastener for damage. Tighten bracket to 70–80 ft lb.
Tighten Isolator to 54–58 ft lb.
First 1000 Miles Then Every 6 Months or 6000 Miles
Axle & Suspension, Front
Lubricate Parabolic Spring Suspension
NLGI #2 Grease.
Spring Pins
Axle & Suspension, Rear
Inspect Comfort Air Suspension Ride
Shock length, eye-to-eye: 22.68" +- .25"
Height
First 1000 Miles Then Every 6 Months or 10,000 Miles
Axle & Suspension, Rear
Inspect & Tighten Comfort Air Suspension
Tighten 7/8" U-Bolts to 400–450 ft lb. Tighten 3/4" U-Bolts
U-Bolts
to 260–320 ft lb.
121
DRIVERS HANDBOOK
First 1000 Miles Then Every 12 Months or 12,000 Miles
Heaters & Defrosters
Inspect Front Heater Hoses & Clamps
Inspect for evidence of leaks or deterioration. replace with
proper parts.
Axle & Suspension, Front
Inspect & Tighten Parasteer Suspension
Torque to 260–320 ft lb.
Axle-To-Suspension Fasteners
First 5000 Miles Then Every 12 Months or 24,000 Miles
Transmission
Replace Transmission Sump Filter
First 5000 Miles Then Every 24 Months or 24,000 Miles
Transmission
Replace Transmission Main Fluid Filter
First 11,000 Miles Then Every 3 Months or 5000 Miles or 250 Engine Hours
Engine
Inspect All Belts
Inspect condition and tension of belt.
First 11,000 Miles Then Every 6 Months or 250 Engine Hours
Brakes
Replace Air Brakes Air Compressor Filter
First 11,000 Miles Then Every 6 Months or 6000 Miles
Cooling System
Inspect Charge Air Cooler
Inspect for clogging debris.
As Specified by Engine Manufacturer
Cooling System
Replace Coolant
See your Engine Ooperator's Manual. Use only premixed
coolant(s) approved by the engine manufacturer. Never
mix different types or brands of coolant.
Engine
Replace Oil & Filter
See Engine operators manual for oil and filter specifications
and maintenance interval.
Adjust Valves
122
See Engine manufacturer's Service Manual for interval.
CARE
&
MAINTENANCE
l
As Specified by Transmission Manufacturer
Transmission
Adjust Transmission Shift Cable
See Transmission Chapter.
Every Day
Doors
Test Wheelchair Lift
Follow the manufacturers recommendations.
Emergency Equipment
Inspect Fire Extinguisher Charge
Ensure that Extinguisher Charge is not expired.
Inspect Fire Extinguisher Mounting Bracket
Ensure that Extinguisher bracket is secure and operates
correctly.
Inspect First Aid Kit Contents
Ensure that kit supplies are fully replenished, clean, and
not expired.
Inspect First Aid Kit Mounting Bracket
Ensure that mounting bracket is secure and operates
correctly.
Emergency Exits
Inspect All Emergency Exits
Test all emergency exits for proper operation, including
warning buzzer.
Warning Devices & Signs
Test Stop Arms & Crossing Arms
Windows
Inspect All Mirrors
Clean, adjust mirrors.
Inspect All Windows
Clean Windshield, door glass, driver's window, rear vision
windows, rear door windows.
Brakes
Inspect Air Brakes Air Lines & Fittings
Inspect for leaks or physical damage.
Drain Air Brakes Air Tanks
Drain daily in cold weather; weekly in warm weather.
Inspect Air Brakes Brake Chambers
See Air Brakes Chapter for inspection criteria.
Inspect Air Brakes Brake Shoes
Wear depends upon application environment. See Meritor
Cam Brakes Appendix in Air Brakes Chapter for guidelines.
123
DRIVERS HANDBOOK
Cooling System
Inspect Coolant Level
Top off with premixed coolant of same type as installed.
Never mix coolants of different colors, types, or brands.
See engine Operator's Manual for details.
Inspect Entire Cooling System
Visually inspect for any signs of leakage.
Electrical
Inspect All Lights
Check all running, stop, marker, hazard, and warning lights
for proper operation.
Engine
Inspect Oil Level
See Engine operators manual for oil specifications.
Fuel System
Inspect Fuel Cap
Inspect Water Separator Petcock Drain
Check for water contamination.
Intake System
Inspect Intake Tract Duct & Elbow
Visually inspect for proper fit and sealing, cuts, abarsions,
signs of dirt contamination.
Inspect Intake Tract Restriction Indicator
Replace filter element if indicator is red.
Steering
Inspect Power Steering Fluid Level
Replinish to full mark. Dextron III.
Tires & Wheels
Inspect All Tires & Wheels
Check air pressure. Visually inspect tires, tread wear, lug
nuts, including spare.
Transmission
Inspect Transmission Fluid Level
Check production order for proper type of fluid to be
added.
Every Week
Seats
Inspect & Tighten Passenger Seats Cusion
Inspect for loose cushions clips.
Screws
Inspect Passenger Seats Seat Belts
Lubricate buckles, clean webbing as required. Replace any
damaged webbing straps.
Inspect Passenger Seats Upholstery
Inspect for cuts, tears, wear and soiled areas.
Brakes
Inspect Hydraulic Brakes Pads
124
Replace if worn to within 1/8" lining remaining.
CARE
&
MAINTENANCE
l
Every Month or 3000 Miles
Doors
Clean & Lubricate All Doors Rubber Seals
Lubricate with Silicon Spray or protectant.
Lubricate All Doors Vandal Locks
Spray Apply lubricant into key locks. Use LPS #1 for sliding
bolt locks.
Adjust Jack Knife Door Air Pressure
See Body Construction / Doors / Jack Knife Door
Adjust Jack Knife Door Control Rod
Adjust for proper open/closed position.
Adjust Jack Knife Door Control Rod
Adjust to prevent pivot pin binding.
Bracket
Lubricate Jack Knife Door Hinge Pins
LPS 1
Adjust Jack Knife Door Roller Bracket
Adjust for proper open/closed position.
Adjust Jack Knife Door Switch
See Body Construction / Doors / Jack Knife Door
Adjust Outward Opening Door Control Rod
Adjust Outward Opening Door Control Rod
Adjust for full and secure closure without binding.
Bracket
Adjust & Lubricate Outward Opening Door
Adjust linkage for firm closure, and to ensure rear panel
Linkage
closes first.
Lubricate Outward Opening Door Pivots
Lubricate pivot pins with LPS 1.
Adjust Outward Opening Door Roller
Adjust for full and secure closure without binding.
Bracket
Lubricate Power Jack Knife Door Air
LPS #1
Pressure & Switch
Lubricate Power Jack Knife Door Hinge
LPS #1
Lubricate Wheelchair Lift Lube Points
See model-specific literature provided with lift.
125
DRIVERS HANDBOOK
Emergency Exits
Lubricate All Emergency Exits Hinges
LPS #1
Lubricate Rear Emergency Door Hold-Open
Apply ASTM D4950 GC-LB Grade 2
Lubricate Roof Hatch Hatch Seal and Latch
Silicone lubricant to prevent sticking of rubber seal.
Spray silicon lubricant into latch mechanism.
Floor
Inspect Floor Drains
Check drawin hole in each body section under window for
debris obstruction.
Seats
Lubricate Driver's Seat
Lubricate per manufactuers recommendation.
Inspect & Tighten Passenger Seats
Use standard torque for bolt size , tread type and grade.
Mountings
Warning Devices & Signs
Lubricate Stop Arm, Electric 4-Point Pivot
Lubricate four hinge pivot ponts with Try-Flow lubricant
Inspect & Tighten Stop Arm, Electric
Check interior and exterior fasteners for loosening.
Fasteners
Windows
Lubricate Passenger Windows Latches &
Use silicone lubricant.
Slides
Electrical
Inspect Battery Electrolyte Level
Replenish with distilled water.
Every Month or 6000 Miles
Warning Devices & Signs
Adjust Stop Arm, Air Air Pressure
Adjust for full deployment and retraction
Every Month or 10,000 Miles
Axle & Suspension, Rear
Inspect Rear Axle Lubricant Level
If low, refil to bottom of filler opening. Use same lubricant
type as already installed.
Every Month or 300,000 Miles
Brakes
Inspect Hydraulic Brakes Fluid
126
DOT-3 brake fluid.
CARE
&
MAINTENANCE
l
Every 3 Months or 3000 Miles
Cooling System
Inspect Radiator Fins
Clean debris from fins.
Inspect Water Pump Belt
Inspect condition and tension of belt.
127
DRIVERS HANDBOOK
Every 3 Months or 5000 Miles
Brakes
Lubricate Air Brakes S-Cam
See Meritor Cam Brakes Appendix in Air Brakes Chapter for
guidelines.
Lubricate Hydraulic Brakes Calipers
Lube per meritor specs.
Driveline
Lubricate Driveshafts Slip Joint
NLGI Grade #1 or #2 multipurpose grease.
Lubricate Driveshafts U-Joint Bolts
NLGI Grade #1 or #2 multipurpose grease.
Inspect & Tighten Driveshafts U-Joint Bolts
Tighten to 45–50 ft lb.
Electrical
Inspect Alternator Connections
Inspect for loose wires, damaged terminals, damaged
insulators.
Inspect Battery Ground Strap
Check for solid connection, tight fasteners and absense of
corrosion.
Fuel System
Inspect Fuel Lines
Inspect for leaks or signs of abrasion.
Lubricate Fuel Stop Solenoid
Inspect Fuel Tank Vent
Inspect for obstruction.
Intake System
Inspect Air Cleaner Filter Element
Inspect for proper seating, secure lid. Replace if soiled,
wet, or damaged.
Inspect Intake Tract All Fasteners
Inspect for signs of contaminate infiltration, loose clamps,
wear spots, holes in piping
Inspect Intake Tract Charged Air Tubing
Inspect for signs of contaminate infiltration, loose clamps,
wear spots, holes in piping
Inspect & Tighten Intake Tract Hose
Tighten to 10 in lb.
Clamps
Inspect & Tighten Intake Tract Spring
Tighten to near full spring compression.
Loaded Clamps
Inspect Intake Tract Support Bracket
128
Visual inspection. Repair damaged parts immediately.
CARE
Inspect & Tighten Intake Tract T-Bolt
&
MAINTENANCE
l
Tighten to 50 in lb.
Clamps
Inspect & Tighten Intake Tract Worm Gear
Tighten to 38–42 in lb.
Clamps
Steering
Lubricate Axle Steering Linkage Drag Link
NLGI #2 EP multipurpose grease rated GC-LB or
equivalent.
Lubricate Axle Steering Linkage King Pins
NLGI #2 EP multipurpose grease rated GC-LB or
equivalent.
Lubricate Axle Steering Linkage Tie Rod
NLGI #2 EP multipurpose grease rated GC-LB or
Ends
equivalent.
Lubricate Intermediate Steering Shaft Slip
Lubricate splines with multipurpose grease.
Joint
Every 3 Months or 24,000 Miles
Brakes
Inspect Air Brakes Air Dryer
See Bendix appendix for specific model in Air Brakes
Chapter.
Inspect Hydraulic Brakes Booster & Master
Inspect for signs of leakage or physical damage.
Cylinder
129
DRIVERS HANDBOOK
Every 6 Months or 6000 Miles
Warning Devices & Signs
Lubricate Destination Sign Hinges
Lubricate Destination Sign Roller Gears
Lightweight grease such as White Lube.
Axle & Suspension, Rear
Inspect & Tighten Comfort Air Suspension
Inspect for signs of leakage, wear, or damage. Tighten
Shock Absorbers
upper shock mounts to 50–70 ft lb. Tighten lower shock
mounts to 150–180 ft lb.
Inspect Comfort Air Suspension Whole
Visually inspect for damage.
Assmebly
Brakes
Replace Air Brakes Air Compressor Filter
Clean Air Brakes Check Valves
Clean & Lubricate Air Brakes Treadle Valve
See Bendix Treadle Valve Appendix in Air Brakes Chapter.
Clean Air Compressor Governor
Inspect Hydraulic Brakes Calipers
Inspect for signs of leakage or physical damage.
Electrical
Inspect Battery Battery Posts
Clean and apply anti corrosion agent.
Exhaust System
Inspect Exhaust Pipe Joints
Inspect for loose clamps, leaks, damage.
Fuel System
Replace Fuel Filter Filter Element
Clean Fuel Filter Inlet Screen
Clean. Replace if damaged.
Steering
Lubricate Steering Gear Pitman Arm Pivot
NLGI #2 EP multipurpose grease rated GC-LB or
equivalent. Use hand-operated grease gun.
130
CARE
&
MAINTENANCE
l
Every 6 Months or 10,000 Miles
Axle & Suspension, Rear
Inspect & Tighten Comfort Air Suspension
Tighten to 20–30 ft lb.
Air Spring Anchor Bolts
Inspect & Tighten Comfort Air Suspension
Torque to 30–35 ft lb.
Air Spring Fasteners
Inspect & Tighten Comfort Air Suspension
Tighten to 60–85 in lb.
Leveling Valve Mount Bolt
Inspect & Tighten Comfort Air Suspension
Tighten to 100–150 in lb.
Lever Linkage Locknut
Inspect & Tighten Comfort Air Suspension
Tighten to 260–320 ft lb.
Lower Shock Mount
Inspect & Tighten Comfort Air Suspension
Tighten to 525–575 ft lb.
Quick Align Bolts
Brakes
Lubricate Air Brakes Cam Shaft Housing
NLGI #2 EP multipurpose grease rated GC-LB or
equivalent. Use hand-operated grease gun.
Lubricate Air Brakes Haldex Slack
See Haldex lubricant specs in Air Brakes chapter.
Adjusters
Lubricate Air Brakes Meritor Slack
See Meritor lubricant specs in Air Brakes chapter.
Adjusters
Steering
Lubricate Steering Column
Vision manual says to lubricate steering column. Where?
With what? Check model applicability
Every 12 Months
Intake System
Test Intake Tract Restriction Indicator
Test indicator with vaccuum gauge and pump.
131
DRIVERS HANDBOOK
Every 12 Months or 12,000 Miles
Heaters & Defrosters
Tighten Front Heater Fasteners
All fasteners holding such heaters in place in unit. For
details on fasteners check installation prints.
Clean Front Heater FIlter & Core
Clean dust from cores. Replace filter elements.
Bleed Heater System
Bleed air from heater circulation system. This procedure is
done to keep system operating correctly.
Clean Underseat Heaters Filter Elements
Clean dust from cores.
Axle & Suspension, Front
Inspect Parabolic Spring Suspension Entire
Visually inspect for damage or misalignmnent.
Assembly
Inspect & Tighten Parabolic Spring
Tighten to 75–85 ft lb.
Suspension Hangar Bracket Bolts
Inspect Parabolic Spring Suspension Shock
Visually inspect for leakage or damage.
Absorbers
Inspect & Tighten Parasteer Suspension
Torque to 20–30 ft lb.
Air Spring Fasteners
Inspect & Tighten Parasteer Suspension
Torque to 450–480 ft lb.
Front Pivot Bolts
Inspect & Tighten Parasteer Suspension
Shock Length, eye-to-eye: 18.5" +- .25"
Ride Height
Inspect & Tighten Parasteer Suspension
Inspect for leakage or damage. Torque upper and lower
Shock Absorbers
mount bolts to 50–70 ft lb.
Inspect & Tighten Parasteer Suspension
Torque to 138–159 ft lb.
Transverse Rod Bolts
Axle & Suspension, Rear
Inspect Comfort Air Suspension Ride
Shock length, eye-to-eye: 24.68" +- .25"
Height
Inspect Comfort Air Suspension Ride
Height
132
Shock length, eye-to-eye: 21.75" +- .25"
CARE
&
MAINTENANCE
Inspect & Tighten Comfort Air Suspension
Inspect for leakage or damage. Torque upper mount bolts
Shock Absorbers
to 50–70 ft lb. Torque lower mount bolts to 160–180 ft lb.
Inspect & Tighten Comfort Air Suspension
Torque to 150–205 ft lb.
l
Torque Arm Bolts
Inspect & Tighten Comfort Air Suspension
Torque 7/8" bolts to 400–450 ft lb. Torque 3/4" bolts to
U-Bolts
260–320 ft lb.
Cooling System
Test Entire Cooling System
Pressure Test Cooling system.
Engine
Test Engine Starting Aid Block Heater
Steering
Inspect Hydraulic Pump Body & Seals
Inspect for leaks.
Inspect Steering Gear Body & Seals
Inspect for leaks.
Every 12 Months or 24,000 Miles
Brakes
Clean Air Brakes Pop Off Valves
Steering
Replace Hydraulic Reservoir Filter Element
Replace element and fluid. Replace more frequently in
severe operating conditions. Dextron III.
Transmission
Replace Transmission Fluid
Use Dextron III fluid.
Inspect Transmission Shift Cable
Inspect Transmission Vent
Clear vent hose of debris or obstruction.
Every 12 Months or 50,000 Miles
Axle & Suspension, Rear
Replace Rear Axle Petroleum Based
Hypoid Gear Oil. Viscosity depends upon operating climate.
Lubricant
See Viscosity/Temperature chart.
Every 12 Months or 100,000 Miles
Axle & Suspension, Rear
Replace Rear Axle Synthetic Lubricant
Viscosity depends upon operating climate. See
Viscosity/Temperature chart.
133
DRIVERS HANDBOOK
Every 18 Months or 20,000 Miles
Cooling System
Lubricate Shutters Pivots
Use Never Seize spray lubricant.
Every 24 Months or 24,000 Miles
Brakes
134
Clean Air Brakes Parking Brake Valve
See Bendix Appendixes in Air Brakes Chapter.
Clean Air Brakes Quick Release Valves
See Bendix Appendixes in Air Brakes Chapter.
Clean Air Brakes Relay Valves
See Bendix Appendixes in Air Brakes Chapter.
Clean Air Brakes Spring Brake Valve
See Bendix Appendixes in Air Brakes Chapter.
CARE
&
MAINTENANCE
l
Maintenance Locations
1.
2.
3.
4.
5.
6.
7.
8.
9.
10.
11.
12.
13.
14.
Spring Pins
Rear Axle Lubricant
Axle Vent
King Pin
Tie Rod
Drag Rod
Steering Gear
Not Applicable
Brake Camshaft
Brake Slack Adjusters
Automatic Transmission
Universal Joints
Driveline
Intake Air Restriction Indicator
All American Front Engine
All American Rear Engine
135
DRIVERS HANDBOOK
General Data
Dimensions
HEADROOM:
74 TO 77 INCHES
EXTERIOR HEIGHT: APPROXIMATELY 118 TO 121 INCHES
EXTERIOR HEIGHT W/AC: ADD 16 INCHES
EXTERIOR WIDTH:
INTERIOR WIDTH:
96 INCHES
90.75 INCHES
Fluid Capacities (In Quarts)
Crankcase Oil
w/Filter w/o Filter
Caterpillar C7 22.0
20.0
Cummins ISC 24.0
20.0
John Deere 6.826.0
24.0
John Deere 8.132.0
30.0
Engine Coolant
Auto Trans. Fluid
41.0
38.0
30.0
42.0
20.0
19.0
20.0
20.0
Engine Oil Pressure
CATERPILLAR C7:
48 PSI @ 210° F
CUMMINS ISC: 40–50 PSI @ 2,500 RPM, WARM
JOHN DEERE 6.8: 14–40 PSI, IDLE TO RATED
JOHN DEERE 8.1: 20–58 PSI, IDLE TO RATED
136
l
NOTES
137
DRIVERS HANDBOOK
NOTES
138
l
NOTES
139
DRIVERS HANDBOOK
NOTES
140
A3FE
A3RE
BLUE BIRD
ALL AMERICAN
1
76
41
0
00
2010