1
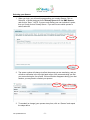
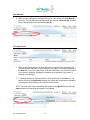
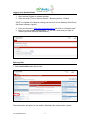
Logging In to QuestionPoint
1. Open Internet Explorer or another browser.
2. Clear the cache (Tools > Internet Options > Browsing History > Delete).
NOTE: A complete list of browser settings can be found on the AskAway Staff Portal:
http://www.askaway.org/staff
3. Point your browser to http://www.questionpoint.org and click on “Librarian Login”.
4. Enter your login number and password. (If you aren’t sure what your login is,
contact your local AskAway administrator.)
Opening Chat
1. Click Launch Chat under Quick Links..
The chat monitor will open in a new window. Maximise this window when it opens.
Last updated 2014/01
-1-
Selecting your Queues
1. When you login, you will see this page asking you to select Queue. Click on
Select All, or check the boxes for the Primary Queue AND the BME Queues,
and click on “Save.” NOTE: If you are only staffing your own institution’s queue,
then you’ll only click on Primary Queue. If you are not sure which queues to
select, select all.
2. The queue number will change to reflect the queues you are monitoring, and you
will see a notification in the top right hand corner of the screen advising you that
you are monitoring the live queues. If this notification disappears during your chat
session, you may need to reselect your queues.
3. To resubmit (or change) your queues at any time, click on “Queues” and repeat
the steps above.
Last updated 2014/01
-2-
Settings
1. Click on “Settings” to check or alter your settings.
2. The two sound alert settings MUST be turned to on. You can choose your own
preferences for visual alerts, and the font size.
NOTE: Can’t hear the sound alert? Check the volume settings on your computer.
Are your speakers plugged in?
Don’t have speakers? Make sure you choose EITHER Flash based pop-up alert
or Browser based pop-up alert instead.
These two settings
must be turned on.
3. Make sure you click on “Save” when you have selected your preferences. The
software will remember your settings in the future.
Last updated 2014/01
-3-
Chat Monitor
1. While you are waiting for a new patron to arrive, your screen will show New (0)
as below. You can also see how many staff are working Librarians (#), and how
many calls other librarians are handling All (#).
Incoming Patron
1. When a new patron arrives, an alert will sound or a pop-up box will appear on
your screen (this depends on your settings). The patron’s information appears in
the New tab. If you hover the mouse over this information, you will see a preview
of the patron’s question. [Qwidget] will appear in the question if the patron is
chatting via a Qwidget.
2. To retrieve the patron, click anywhere on their information in the New tab. The
patron will move into My Active tab and you will be able to see their information,
including their home library, in the Info box at the bottom.
NOTE: All of the calls YOU are handling will appear in the My Active tab; the calls
other librarians are handling will appear in the All tab.
Last updated 2014/01
-4-
Chatting
These are the main features you will need to use when chatting:
My Active tab:
YOUR current
sessions.
Multiple patrons
appear as a list.
When you click on
Scripts, you can view
the system-wide
scripts, scripts for
your library, and your
personal scripts.
Message box.
Type messages
to the patron
here.
Buttons to transfer
the call to another
librarian, or end the
session.
Full transcript
of your
current chat
session.
Sending Chat Messages
1. Move the curser into the Message Box.
2. Type the message you want to send into the Message Box.
3. Press Enter or click Send.
4. If chatting with a Qwidget patron, remember to keep your messages short or
broken up into smaller pieces. Use scripts labelled Qwidget for shorter options.
Last updated 2014/01
-5-
Using Prescripted Messages
1. Click on the Scripts tab to view the script options.
2. Click on your selected script to view the full text in the lower box.
3. There are 3 types of scripts:
Service-wide scripts will appear in both Patron Library and My Library
lists.
Institution Scripts specific to the Patron’s Library will appear in the
Patron Library list.
Scripts specific to your library, and any personal scripts that you have
created, will appear in the My Library list.
NOTE: See the AskAway Staff Portal for instructions on creating institutional or
personal scripts.
4. Modify the text as needed, then click >> to transfer to the Message Box. Press
Enter or click Send.
NOTE: You can also view the full list of service-wide scripts on the AskAway Staff
Portal.
Last updated 2014/01
-6-
Pushing Web Pages
1. Enter the URL you want to push to the patron in the Message Box.
NOTE: Always include the http:// to ensure that the page you send will show up
on the patron’s screen.
2. Press Enter or click Send.
NOTE: Always check that the patron can see the page the first time you push
one to them during the session.
Staff view of a pushed page:
Patron view of a pushed page:
Last updated 2014/01
-7-
Patron Connectivity and Status Indicators
The patron connectivity indicator shows you whether your patron is still connected to the
session.
1. A live connection shows as a green square. The QuestionPoint server has been
able to connect to the patron’s browser window every 5 seconds.
2. A yellow diamond indicates that the patron is still connected, but the
QuestionPoint server has not been able to connect to the patron’s browser
window for more than 15 seconds.
3. A red circle indicates that the QuestionPoint server has not been able to connect
to the patron’s browser window for more than 30 seconds. The patron may have
disconnected or navigated away from the page. There is still a chance that they
will return to the page.
The patron status indicator is in brackets beside the patron’s screen name.
What the symbols mean:
()
(+)
(!)
>
Last updated 2014/01
-8-
Librarian sent the last msg
Patron sent the last msg
Patron is typing
Patron was transferred to you
Ending a call
1. Confirm that the patron has all the information they need, and that they have no
further questions.
2. Click End Session.
3. At the patron’s end, they will be prompted to enter their email address for a copy
of the transcript.
4. Add a resolution code: only use Answered, Lost Call or Practise. Using either of
the Follow Up codes will prevent the call from being counted in the statistics.
To add the codes, click to select the code and then click Add.
Choose a resolution for the
call, e.g. Answered, Lost
Call, or Practise. (Note: DO
NOT use either of the
Followup codes as this will
prevent the call from being
counted in the statistics.)
Last updated 2014/01
Add a note that will
only be visible to
librarians who view
the patron’s
transcript.
Add a note which will be
seen by the patron as part
of their complete transcript
when it is emailed to
them/viewed at the end of
the call.
-9-
Choose a
description for the
nature of the
reference question
i.e. Directional,
Ready Reference,
or Reference.
Transferring a call to another librarian
NOTE: Before transferring a call, always confirm with the librarian you are transferring to
via Campfire or IM. NEVER transfer a call to a librarian that is only staffing 1 queue,
unless they specifically ask for it.
1. Click the Transfer button.
2. A list of librarians currently online will appear. Click on the name of the librarian you
want to take the call.
3. Click on Transfer again, and the call will be transferred to that librarian. They will see
a message telling them the call has transferred successfully to their My Active tab.
Last updated 2014/01
- 10 -
Multiple Patrons
If you have more than one chat session ongoing, the patrons will appear as a list in the
My Active tab (the All tab lists calls other librarians are working on). The patron you are
currently working on will be highlighted in blue.
1. Hover the mouse over “Library Patron” to see a preview of the patron’s last
message.
2. Click on the patron’s name (“Library Patron”) to move between patrons. The blue
highlight will move and the transcript will appear on the right of the screen.
Policy Pages
1. To see ready reference information about a patron’s home library, click on the
Policies link.
2. The policy page (which may take the form of a link) will open in a new window.
Last updated 2014/01
- 11 -