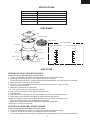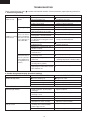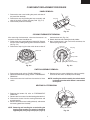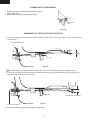
1
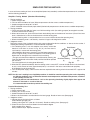
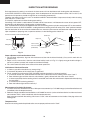
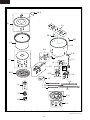
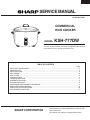
KSH-777DW
SERVICE MANUAL
SY307KSH777DW
COMMERCIAL
RICE COOKER
COOK
MODEL
KSH-777DW
In the interests of user-safety (Required by safety regulations in some
countries) the unit should be restored to its original condition and only
parts identical to those specified should be used.
TABLE OF CONTENTS
Page
IMPORTANT SAFEGUARDS ............................................................................................................................ 2
PRECAUTIONS ................................................................................................................................................. 2
SPECIFICATIONS ............................................................................................................................................. 3
PART NAMES .................................................................................................................................................... 3
HOW TO USE .................................................................................................................................................... 3
COOKING CHART ............................................................................................................................................. 4
CLEANING AND CARE ..................................................................................................................................... 4
SCHEMATIC DIAGRAM .................................................................................................................................... 5
TROUBLE SHOOTING ..................................................................................................................................... 6
COMPONENT REPLACEMENT PROCEDURE ................................................................................................ 7
SIMPLIFIED TESTING METHOD ...................................................................................................................... 9
INSPECTION AFTER REPAIRING ................................................................................................................. 10
REPLACEMENT PARTS LIST ........................................................................................................................ 11
This document has been published to be used for after
sales service only.
The contents are subject to change without notice.
SHARP CORPORATION
1
KSH-777DW
IMPORTANT SAFEGUARDS
When using electrical appliances, basic safety precautions should always be observed, including the following:
1. Read all instructions.
2. Do not touch hot surfaces. Use handles or knobs.
3. To protect against electrical shock, do not immerse cord, plug, and body in water or other liquid.
4. Close supervision is necessary when the appliance is used by or near children.
5. Unplug from outlet when not in use and before cleaning. Allow to cool before putting on or taking off parts.
6. Do not operate the appliance with a damaged cord or plug or after the appliance malfunctions or has been damaged in
any manner.
7. The use of accessory attachments not recommended by SHARP may cause injuries.
8. Do not use outdoors.
9. Do not let cord hang over edge of table or counter or touch hot surfaces.
10.Do not place on or near heat sources such as gas or electric ranges or in a heated oven.
11.Extreme caution must be used when moving an appliance containing hot food, water or other hot liquids.
12.Do not use the appliance for other than intended use.
A. A short power supply cord is provided to reduce the risk of becoming entangled in or tripping over a longer cord.
B. Extension cords are available and may be used if care is exercised in their use.
C. If an extension cord is used:
(1) The marked electrical rating of the extension cord should be at least as great as the electrical rating of the appliance.
(2) The cord should be arranged so that it will not drape over the counter top or table top where it can be pulled on by
children or tripped over unintentionally.
PRECAUTIONS
1. Use the rice cooker on a 15 ampere, 120 volt, 60Hz, AC only protected electrical supply.
Insert the plug firmly to ensure safe operation.
2. Do not use the rice cooker on a wet floor, an unstable surface or near flammable materials.
3. Use the inner bowl only in the rice cooker; never on the range top or in the microwave oven.
4. Do not turn the rice cooker on without both rice and water in the inner bowl. Avoid using the rice cooker to heat just water.
5. Never connect the plug or touch the switch or body with wet hands.
6. Do not bend or hit the inner bowl as the cooking results may be affected. Replace the inner bowl if it gets damaged.
7. The cooking switch should be depressed only once for the entire cook/keep warm cycle.
Never insert any object into the switch.
8. Always keep the bottom of the inner bowl, the heating plate and the thermostat clean so that no rice or other foreign
matter accumulates.
2
KSH-777DW
SPECIFICATIONS
Rated voltage
Power Consumption
Outside dimensions
Weight
Plug
Receptacle
120V, 60Hz, AC only
1700 W
19 11/16”(W) X 17 11/16”(D) X 13 3/4”
Approx. 20 lb.
3-Prong Plug (5-15P)
3-Prong Receptacle (5-15R)
PART NAMES
Knob
Lid
Inner Bowl Marking
Silicone Sheet
Inner bowl marking
Inner Bowl
Use for short grain rice
Kg
Handle
Body
Use for other kinds of rice
Lb
Cups water
12
40
10
30
5
Heating Plate
4
Indicator Light
Thermostat
8
COOK
20
Power Supply
Cord
3
6
10
Cooking Switch
2
HOW TO USE
METHOD FOR SHORT GRAIN RICE COOKING
To ensure success with short grain rice, be sure to:
1. Put the silicone sheet on the bottom of inner bowl to prevent sticking and browning.
2. Check that outside of inner bowl is dry and then put into the rice cooker.
To ensure that the inner bowl is correctly positioned on the heating plate, turn the inner bowl left and right.
3. Measure desired amount of rice to be cooked.
4. Carefully wash rice in separate bowl under running water until the water is clear; not cloudy.
Drain. Put rice into inner bowl.
5. Add water to appropriate inner bowl level.
If you use 8 pounds of rice, add water to the 8 lb level.
6. Cover with the lid and let rice soak approximately 30 minutes.
7. Plug into outlet.
8. Press down on the cooking switch. The indicator light will come on and cooking will start.
9. When cooking is finished, the switch pops up and the indicator light goes out.
10.After the cooking cycle ends, leave the lid closed for at least 15 minutes to steam the rice.
Then stir well being careful not to dislodge the silicone sheet.
11.Serve rice or recover to keep warm. See below for keep warm suggestions.
12.After using, unplug from the outlet.
METHOD FOR OTHER KINDS OF RICE COOKING
To ensure success with other kinds of rice, be sure to:
1. Put the silicone sheet on the bottom of inner bowl to prevent sticking and browning.
2. Check that outside of inner bowl is dry and then put into the rice cooker.
To ensure that the inner bowl is correctly positioned on the heating plate, turn the inner bowl left and right.
3
KSH-777DW
3. Check chart on page 4 for rice/water ratio or follow package or recipe directions to determine the water amount. Pour
the water until the correct amount is indicated on the Cups Water marking on the inner bowl.
4. Measure rice using a standard cup measure and put rice into the water that was measured in the inner bowl in step 3.
Stir well being careful not to dislodge the silicone sheet.
5. Cover with the lid and let rice soak approximately 30 minutes.
6. Plug into outlet.
7. Press down on the cooking switch. The indicator light will come on and cooking will start.
8. When cooking is finished, the switch pops up and the indicator light goes out.
9. After the cooking cycle ends, leave the lid closed for at least 15 minutes to steam the rice.
Then stir well being careful not to dislodge the silicone sheet.
10.Serve rice or recover to keep warm. See below for keep warm suggestions.
11.After using, unplug from the outlet.
KEEP WARM
• If the rice cooker is left plugged in, the indicator light will come on occasionally to keep the rice at a serving temperature.
• Rice quality is optimum at the end of the cooking and 15 minute standing time and should be served as soon as possible.
• Do not keep warm for more than five hours.
COOKING CHART
Kind of Rice
Short grain
Medium grain
Long grain
Converted long grain
Brown
•
•
•
•
Quantity of Raw
Rice Cups
10 – 28 cups
10 – 24 cups
10 – 24 cups
10 – 24 cups
10 – 24 cups
Rice Water Ratio
1 cup rice to 11/4 cups water
1 cup rice to 11/4 cups water
1 cup rice to 11/4 cups water
1 cup rice to 11/4 cups water
1 cup rice to 11/2 cups water
Cooking Time Range
Approximately in Minutes
25 – 55
30 – 45
30 – 45
45 – 65
45 – 85
Always measure accurately.
Adding too much water may cause the rice to boil over.
If boil over occurs, it may be necessary to reduce rice and water quantity in the future.
Cooking time will vary depending on the kind and/or volume or rice as well as added ingredients, room temperature,
water temperature, voltage etc.
CLEANING AND CARE
• Always keep the rice cooker clean.
• Always unplug from outlet and allow the rice cooker to cool completely before cleaning.
Body
* Do not immerse the rice cooker in water.
* Clean the outside with a damp cloth and polish dry with a soft cloth.
* Do not use any harsh cleanser or a scrubbing brush as it could crack the surface and rusting could occur.
Lid
* Wash thoroughly with warm soapy water, rinse and polish dry with a soft cloth.
Heating Plate / Thermostat
* Clean with a damp cloth and polish dry with a soft cloth.
* Should there be any remainder, use fine sandpaper to polish very lightly.
Inner Bowl
* Remove the cooked rice as soon as possible using a utensil that will not scratch or mar.
* Remove the bowl from the body of the cooker.
* Soak the bowl in hot water to loosen any remaining rice.
* Wash in hot soapy water, rinse well with clear water and polish dry. Do not use an abrasive cleaner or steel wool.
Silicone Sheet
* Remove any remaining rice using a rubber/plastic spatula.
* Soak in warm soapy water and gently squeeze to be sure that sheet is clean.
* Rinse thoroughly with cool water and lay flat to dry.
4
KSH-777DW
SCHEMATIC DIAGRAM
Cook Lamp (Indicator Light)
Heater
Protection
Thermostat
Warming
Thermostat
Micro Switch
(Action by Cooking Thermostat)
Warming Thermostat
Protection Thermostat
Stop ring
Cooking Thermostat
Heating Plate Terminal
Lever of Switch Assembly
Micro Switch
5
KSH-777DW
TROUBLESHOOTING
Those marked with black spots ( ) are often confused with troubles. Give the customers proper operating instructions.
1. Trouble during Cooking
PROBLEM
Unable to cook
Indicator light will not
go ON.
Indicator light will go
ON.
Poor finish of cooked
rice (Local unevenCapable of cooking ness of cooked rice is
excessive. Core is left
but insufficient.
in rice grain due to
early switch OFF.
Excessively overdone bottom layer or
rice mass. (Overdone
layer in light brown is
not regarded as abnormal.)
POSSIBLE CAUSE
CORRECTIVE ACTION
Cooking switch kept "OFF".
Cooking switch "ON".
Disconnected plug cap.
Broken power cord assembly.
Plugged into the outlet.
Repair or replace power cord assembly.
Faulty or loose wiring.
Repair or replace faulty parts.
Maladjustment switch assembly.
Repair or replace it.
Burn out of heating plate wire.
Replace heating plate.
Faulty wiring.
Repair or replace faulty parts.
Improper quantity of rice or water.
Advise proper operating instruction.
Replace inner bowl or faulty parts.
Faulty tightness due to deformed
heating plate or inner bowl bottom.
Faulty tightness due to contaminants,
etc. deposited on heating plate or inner
bowl bottom.
Remove contaminants or replace parts
having contaminant deposits.
Faulty in setting lid.
Faulty thermostat
Advise proper operating instruction.
Replace thermostat.
Malfunction of thermostat due to
vibration or impact.
Advise proper operating instruction.
Faulty interlocking of switch assembly
and thermostat.
Repair.
Insufficient maintenance of inner bowl
or washing of rice.
Advise proper operating instruction.
Improper operating temperature of
thermostat.
Replace thermostat. (No adjustment of
operating temperature is made possible.)
Maladjustment switch assembly
(Cooking will not go OFF.)
Repair or replace faulty parts.
Cooking has been carried on by
depressing the switch button forcibly
with chopsticks, etc.
Advise proper operating instruction.
2. Trouble during Warm-keeping (Capable of cooking)
PROBLEM
Unable to keep warm
3. Other Trouble
Indicator light flickers.
Affected by electric shock from cooker
body at a touch
POSSIBLE CAUSE
CORRECTIVE ACTION
Disconnected plug cap.
Plug into the outlet.
Maladjustment switch assembly.
Repair or replace.
Faulty or loose wiring.
Repair or replace faulty parts.
Faulty warm thermostat assembly.
Replace warm thermostat assembly.
Faulty receptacles. (Contact failure
with plugs).
Repair receptacles.
Nearly broken or contact after
breakage of cord.
Replace power cord supply.
Loose wiring.
Repair.
Faulty indicator light or resistor.
Replace faulty parts.
Maladjustment switch assembly.
Adjustment switch assembly.
Faulty insulation of heater plate
assembly, micro switch assembly,
power supply cord, etc.
Replace faulty parts.
Water soaked, cooker body, etc.
Replace faulty parts after drying.
6
KSH-777DW
COMPONENT REPLACEMENT PROCEDURE
PANEL REMOVAL
1. Remove the one screw holding the panel and take off
the panel from the body.
2. Remove the stop ring holding the lamp assembly and
take off the lamp assembly from the panel. (Fig. C-1)
4. Remove the panel from the body.
Stop ring
Panel
Fig. C-1
COOKING THERMOSTAT REMOVAL
After removing the thermostat, when the thermostat is rethe thermostat rod. (Fig. C-3)
moved, the inner bowl should be set.
3. Stretch the three tabs holding the body holder.
1. Remove the one screw holding the bottom lid. Remove
4. Now, the thermostat is free, and at the same time, the
the two screws holding the leg, then remove the bottom
thermo spring will be free.
lid. (Fig. C-2)
2. Remove the stop ring from the switch lever to take off
Stop ring
Bottom lid
Tab
Body holder
Tab
Tab
Tab
Fig. C-2
Lever of
switch assembly
Fig. C-3
SWITCH ASSEMBLY REMOVAL
1. Remove the panel, refer to "PANEL REMOVAL".
2. Remove the thermostat (spring), refer to "THERMOSTAT
REMOVAL".
3. Remove the two wire leads from the terminal of micro
switch.
4. Remove the four screws holding the switch assembly,
and take off the switch assembly from the body.
NOTE Installing the switch assembly, the switch should
be placed so that the switch button is not touched
to the panel.
HEATING PLATE REMOVAL
1. Remove the bottom lid, refer to "THERMOSTAT
REMOVAL".
2. Remove the four screws from the heating plate terminal.
3. Remove the screws from the warning thermostat and
ground terminal.
4. Remove the three screws holding the body, and remove
the heating plate from the body.
Heating plate terminal
NOTE Removing and installing the screw holding the
heating plate terminal, the terminal should be
nipped tightly using long-nose player. (Fig C-4)
Fig. C-4
7
KSH-777DW
POWER SUPPLY CORD REMOVAL
1. Remove the three nuts from the terminal of the fixed for
power supply cord.
2. Remove the cord stopper holder from the body.
Cord stopper
holder
Fig. C-5
ADJUSTMENT OF SWITCH LEVER AND CONTACTS
1. Turn over the outer pot with inner bowl inside, disclose its bottom cover. Push "Cook" switch, adjust switch lever and
switch contacts.
PUSH THE COOK SWITCH
GAP
A
GAP
Fig. C-6
A Thermostat rod must not be pressed or drew up by switch lever. It should be moving up and down easily.
2. As soon as inner bowl is lifted up from outer pot, switch lever must spring-up. Without inner pot, switch contacts must
touch each other when push switch "Cook".
NO GAP
THERMOSTAT SPRING BACK
SWITCH SPRING BACK
Fig. C-7
3. Ensure the capability of up-down movement of switch lever.
8
KSH-777DW
SIMPLIFIED TESTING METHOD
In case satisfactory cooking of rice is not accomplished (excessively overdone), conduct the temperature test in accordance
with the following procedure.
Simplified Testing Method (Simulated Rice-Cooking)
1. Testing conditions
a. Power voltage 120V.
b. Fill inner bowl with 500 ml of water (Water temperature to be the same as ambient temperature.)
c. Ambient temperature to be 20˚C to 30˚C.
d. RICE COOKER to be sufficiently kept cooled (Cooker body temperature to be the same as ambient temperature.)
2. Testing procedure
a. Fill the inner bowl with 500 ml of water, turn ON the cooking switch (for cooking purpose) to energize the cooker,
and measure the time for cooking.
b. When steam comes out, open the lid and check the bubbling state on the bottom of inner bowl. (Check if the inner
bowl is allowed to be in close and stable contact with the heating plate.
Conduct checking within a short period of time so as not to influence be over the operating time.)
c. Where the bubbling state is satisfactorily, close the lid again and energize the cooker.
3. Judgement criteria
During the course of the simulated cooking with water conducted under the conditions as above, the rice cooker, if
meeting the following requirements, will be considered acceptable.
a. If the bubbling state is such that bubbles occur evenly around the
Bowl Bottom
bottom of inner bowl as shown in Fig. S-1(A), the inner bowl is
satisfactorily in contact with the heating plate.
Where bubbles do not occur more than 1/3 of the bottom periphery as
shown in Figure S-1(B), contaminant deposits on the heating plate or
deformation or damage on the inner bowl may be existing.
Bubbles
(Though such contaminant deposits can be removed by cleaning, the
Poor state of Bubbling
inner bowl deformed to the extent hardly rectified should be replaced Good State of Bubbling
(A)
(B)
with new one.
The same applies to the heating plate deformed.)
Fig. S-1
b. When the lid is opened immediately after the cooking switch is turned OFF, no water should remain in the inner bowl,
or only a small amount of water (approximately 20 cc) is to remain in the recess around the outer periphery
of the bottom face of the inner bowl.
c. Turn ON the power supply, and ensure that the time required for the cooking switch to be turned OFF is approx. 20
minutes.
NOTE: As this test is nothing but a simplified procedure, it should be noted that operating time varies depending
on different conditions such as difference between water temperature and ambient temperature, variations
in the quantity of water, etc.
Where any delicate non-conformance such as the operating time being slightly higher than approx. 20
minutes is observed as a result of the test.
It is recommended to conduct practical rice-cooking test.
Practical Rice-Cooking Test
1. Testing conditions
a. Power voltage 120V.
b. Cooking 10 - 24 cups of rice.
c. Ambient temperature to be 20˚C to 30˚C
d. Water to be maintained at standard level on the level gauge. Based on how to use (See page 3)
2. Judgement criteria
a. Indicator light and switch will turn as follows.
Cook indicator light goes ON.
Cooking switch goes OFF (after 30 - 45 minutes). Based on cooking chart. (See page 4)
b. Check the rice layer on the bowl bottom for the overdone degree.
Light overdone layer: Normal.
Heavy overdone layer: Replace thermostat.
9
KSH-777DW
INSPECTION AFTER REPAIRING
Basic requirement for cooking is to maintain the close contact of inner bowl bottom with heating plate and thermostat.
As the RICE COOKER is of direct heating type, when the temperature of inner bowl bottom reaches 145˚C to 155˚C, the
thermostat wick operate to provide change-over to warm-keeping automatically.
Therefore, the cooker can be put in use in an excellent condition if the bowl bottom is kept contact closely with the heating
plate and put in a stable, state.
It is the basic requirement for direct heating type cooking.
Accordingly, if the cooker is used under the unstable state of close contact, it will become the causes of early power OFF,
discoloration and deformation of heating plate, or other troubles.
Also, any deformed or contaminant-deposited inner bowl and heating plate may lead to early power OFF or other troubles.
Further to the above, this RICE COOKER is so designed that the cooking switch will not be put in "Cook" position whenever
the inner bowl taken off or not set into the cooker before use, hence this point must be well noted when adjusting the switch.
Upon completion of preparing work, inspect the cooker as to the following points without fail.
Inner bowl to be normally in contact with the heating plate
Switch lever
Stop ring
Body hole
Inner bowl
Switch lever
Center of body
Heating plate
Lever to be swing
symmetrically
Thermo-rod
Thermo-rod
Thermostat
Fig. I-1
Fig. I-2
Fig. I-3
Center adjustment and confirmation of lever
1. For the center adjustment, align not with the thermo rod, but with the hole of the body. (Carry out this work with the
greatest care).
2. Adjust in such a manner that, when the switch lever held by hand as in Fig. I-2 is lightly swung to the left and right, it
moves in a perfect symmetry with respect to the hole of the body.
3. This switch button should be at the center of the control panel hole.
Verification of Work and Function
1. Is there any part left uninstalled or any wrong wiring ?
2. Is the center adjustment of the switch lever as specified ?
3. Finally, energize for confirmation (RICE COOKER should be checked in a horizontal position)
a. Is the state "Switch-Off" achieved when the inner bowl is detached, with the cooking switch set to "Cook" ?
b. Does indicator light not flicker when the switch button is gently vibrated, with the switch set to "Cook"?
c. Is there no possibility that the cooking switch is turned ON, even when the switch button is depressed without placing
the inner bowl ?
d. Is the thermostat functioning perfectly ?
e. Does the indicator light come on normally ?
Measurement of Insulation Resistance
1. Insulation resistance should be more than 1MΩ upon measurement by a D.C.500V merger (to be effected before and
immediately after the temperature test).
2. Dielectric strength should be free from defects at AC 1000V for one min. (to be carried out after the insulation resistance
measurement which is taken immediately after the temperature test).
Stop to be measured with the cooking switch set to "Cook", take measurements on the blades of the plug socket and
heating plate.
Temperature Test
Based on the testing method explained earlier, ensure proper performance for "Cook".
10
KSH-777DW
REPLACEMENT PARTS LIST
REF. NO.
PART NO.
DESCRIPTION
Q'TY
CODE
1
1
1
1
1
1
1
1
2
1
1
1
1
AY
BL
AK
BM
AN
AT
AS
AG
AF
AG
AH
AG
AF
1
1
1
2
1
1
1
1
3
1
1
1
BD
BM
BG
AM
AM
AF
AF
AD
AN
AH
AH
AL
1
1
1
1
1
1
1
1
1
AG
AT
AD
AF
AD
AY
AL
AF
AF
ELECTRICAL PARTS
1- 1
1- 2
1- 3
1- 4
1- 5
1- 6
1- 7
1- 8
1- 9
1-10
1-11
1-12
1-13
99Y1K417U////
99Y1K251USET/
99Y1K2021SET/
99Y1K212UASY/
99Y1K491UASY/
99Y1K213UASY/
99Y7D2101ASY/
99Y1R111SET//
99YB13A060GG/
99YB13A120GB/
99YB13A240GB/
99YB13A130GG/
99YB13A050GG/
Power supply cord
Heater plate set
Thermostat Set
Warm thermostat Set
Neon lamp assembly
Protection thermostat assembly
Micro switch assembly
Ground conductor set
Heater plate lead wire 1 assembly
Heater plate lead wire 2 assembly
Micro switch lead wire assembly
Warm thermostat lead wire 1 assembly
Warm thermostat lead wire 2 assembly
5- 1
5- 2
5- 3
5- 4
5- 5
5- 6
5- 7
5- 8
5- 9
5-10
5-11
5-12
99Y1K103UASY/
99Y1K105U////
99Y1K401UASY/
99Y1K402UASY/
99Y1K403UASY/
99Y1K429U////
99Y1B203/////
99Y1K220/////
99Y1K411UASY/
99Y1K415UASY/
99Y1K391ASET/
99Y1K4101ASY/
Lid assembly
Inner bowl
Outer pot set
Handle assembly
Panel assembly
Cord stopper holder
Thermostat spring
Body holder
Leg assembly
Terminal assembly
Switch set
Bottom lid assembly
909090909090909090-
99Y1K507U////
99Y1K603U////
99Y1K412U////
99Y1K611U////
99Y1K615U////
99Y1K701U////
99Y1K609/////
99Y1K6051////
99Y1K672U////
MECHANICAL PARTS
MISCELLANEOUS, ACCESSORIES AND PACKING
1
2
3
4
5
6
7
8
9
Operation manual
Packing case
Name plate
Outer pot caution label
Lid caution label
Silicone sheet
Upper pad
Bottom pad
Inner bowl protection sheet
HOW TO ORDER REPLACEMENT PARTS
To have your order filled promptly and correctly, please furnish the following information.
1. MODEL NUMBER
2. REF. NO.
3. PART NO.
4. DESCRIPTION
Order Parts from the authorized SHARP parts Distributor for your area.
Defective parts requiring return should be returned as indicated in the Service Policy.
11
KSH-777DW
2
1
4
3
6
5
90-5
A
A
5-1
5-4
B
B
90-4
90-3
C
C
5-2
5-3
5-5
D
D
5 -6
1-5
1-2
1-1
1-6
E
1-8
E
5-11
90-6
5-10
1-4
1-7
F
F
1-10
1-9
1-12
1-13
1-3
1-11
G
G
5-7
5-12
5-8
5-9
H
1
2
4
3
5
H
6
2004SHARP CORP. (1S0.20_E)
12