1
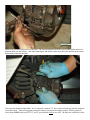
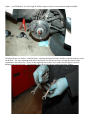
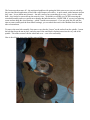
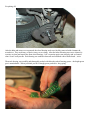
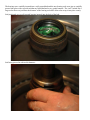
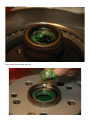
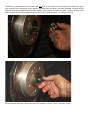
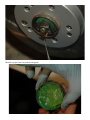
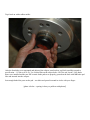
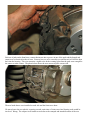
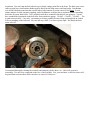
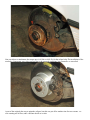
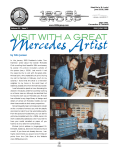
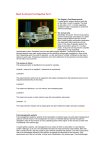
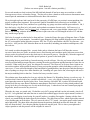
560SL Brake Job
[Failure was not an option – but still a distinct possibility]
For several months our local section of the MB club had planned off and on to stage an event that we called
Samstageautowerkstatt, or Saturday Garage. The idea was to have a hands-on tech session to demonstrate some
actual repairs & maintenance to interested Mercedes Benz club members.
I'll say this right up front: had it not been for the generosity of Jeff Klepac, our section's current president, this
project would not have happened. His experience [and his formidable tool collection] was invaluable. He
offered his garage for the event, and that was a good thing: my garage was short on both space and tools. Oh, I
have the basics: a big floor jack, jack stands, and a pathetic assortment of metric tools. Jeff, however, is a
player: multiple tool boxes, an even bigger jack, a compressor and...to my great delight...impact tools! I knew
that we'd be dealing with nuts & bolts that had been in place since the car left Stuttgart in June of '87 and that
they would not go quietly.
I did a lot of research on what had to be done and how. I printed off page after page of diagrams from a CD that
I have with the 107 repair manuals. I assembled a parts shopping list using both the Mercedes repair manual for
the 107 series and the online Mercedes resource: EPC Net. If you're not familiar with EPC Net, trust me – you
need to be. ANY part for ANY Mercedes Benz can be researched, including part numbers and diagrams, with
this web site.
So I started an online shopping blitz: ceramic brake pads to eliminate the bane of all Mercedes owners:
excessive brake dust; new rotors, new brake hoses, wheel bearing seals and those pesky little rotor screws that
always need to be replaced because they don't survive the removal process. I bought only “Mercedes approved”
brake fluid, wheel bearing grease and the special packets of grease for the brake pads.
After getting the new parts lined up, I started stressing over the old ones. How do you loosen caliper bolts and
rotor screws that had been torqued down to exacting Mercedes specifications and had remained so since the car
was built? What could I do to “prep” the old parts for removal? The Ghost of Car Projects Past visited me on
one restless night to inflict painful memories of auto projects that ground to a halt when things would just not
come apart. I went cold at the thought of the humiliation of getting halfway into the project and then having to
take everything to a shop to have them finish the job. Installing new parts can be fun; removing the old ones is
the major stumbling block to that fun. I had to find a way to make it easier.
The solution came from another local car guy website: the Kansas City Wrenching Society (www.kcws.org) . It
was there that I found a lead to buy a product called Kroil – a very, very effective chemical to loosen frozen or
rusted parts that comes in liquid or spray form. From what they said on KCWS, it makes WD-40 and Liquid
Wrench look like tap water. Kano Laboratories manufactures Kroil and a variety of other related products, and
just my luck, they were having a two-fer sale on the Kroil spray. I ordered two cans and I started spraying the
target bolts, nuts & screws the day it arrived.
When the day came, we started early. We had the car in Jeff’s garage and had it on the jack stands, wheels off,
by 8:30. I was glad that I had taken the time to read all the technical pages from the repair manual, but there is
no substitute for digging in and seeing for yourself just how everything fits together. Starting with the front
wheels, we started taking the brakes apart by the numbers. The pads came out first, which required the removal
of two holding pins on each caliper. They are removed with a 3/32” punch – just tap the punch with a hammer
and a light touch. The photo shows the punch but not the position: push them out from the front side – they
slide out from the back. Save the pins and that clip that sits atop the pads. This is where you might need a
caliper spreader to take the pressure off the old pads for removal.
Remove the old brake pad sensors at this time. The booted end pulls out of the sensor cable head (remove the
bolt that holds it to the caliper) – this takes both fingers and maybe needle-nose pliers for the tabs on the sensor
that actually insert into the pads.
Next came the dreaded caliper bolts. As we expected, a normal 1/2” drive socket wrench was just not enough to
crack them loose. Time to start up the compressor and we resorted to the impact wrench. What a great tool.
Just a short BRRRRAAAAAATTTTTT and 23 year-old bolts yield to our will! The bolts are on the back of the
caliper – you'll find them. It's still a tight fit with the impact wrench, so an extension might be helpful.
The photo above is a “before” of the left front – showing the lipped old rotor and the invaluable impact wrench
on the floor. We were replacing brake hoses all around, so it was not necessary to hang the caliper on the
suspension work with a wire. If you are not replacing hoses, take care to make sure the caliper is not left
hanging from the brake hose. I recommend a flare nut wrench for use on the brake hose fittings:
The front rotors then came off – the anticipated problem with getting the little rotor screws out was solved by
the previous liberal application of Kroil and a small impact screwdriver. A quick smack with a hammer and out
they came. It was almost anti-climactic – but still a treat to have something go so easy. Next were the wheel
hubs – they had to be removed from the rotors by force. We did this on a bench vice AFTER removing the
rotor-hub assembly and were careful not to damage the hubs themselves. HOWEVER, if you are just replacing
rotors and not doing the wheel bearings – which I would not recommend – if you are going this far, take the
time to remove and repack the front wheel bearings), you can whack the rotors with a hammer from the back
side to loosen them.
To remove the rotor-hub assembly, first remove cap, then the “keeper” nut & washer from the spindle – loosen
the bolt that keeps the nut in place, and also remove the small brass clip that inserts into the very end of the
spindle. This makes contact with the wheel hub cover – save it for reassembly.
Here is the old rotor, new rotor, and the removed hub:
Everything off:
After the hubs and rotors were separated, the wheel bearing seals were forcibly removed with a hammer &
screwdriver. They are history so don't even try to save them. After the hubs & bearing races were cleaned, it
was time to clean and repack the front wheel bearings. Jeff’s expertise again came into play and we learned
what “clean” really means. Each bearing was soaked in kerosene and scrubbed with a bristle brush…twice.
Then each bearing was carefully and thoroughly packed with Mercedes wheel bearing grease – the bright green
goo is unmistakable. When you think you have enough grease packed in...keep going.
The bearings were carefully inserted into a well-greased hub and the new bearing seals were just as carefully
pressed into place with a special tool that my friend had and a very gentle hammer. The “tool” looked like a
large socket that was just about the diameter of the bearing seal and it allowed us to tap it into place evenly.
Seal positioned over a well-greased bearing inserted into the back of the hub:
Seal being pressed in with tool & hammer:
All pressed in – nice & level:
Insert packed front bearing into hub:
The hubs were mounted to the new rotors with new rotor screws [don't re-use the old ones no matter how good
they look] and were remounted on the spindle. Adjusting the play on the front wheel bearings was done by the
book; the outer nut is tightened until the hub washer can just barely be turned by hand. [It says to do this on the
MB tech manual CD and I double-checked on this with my MB mechanic – it's the way to do it]
Remember that little brass clip for the end of the spindle? Replace it how...with more grease:
Then the cap goes back on; packed with grease:
Tap it back on with a rubber mallet:
After the front hubs were remounted and adjusted, the calipers went back on; each bolt carefully torqued to
specification – 115 Nm or 85 ft. lb. Use Loctite Blue on the caliper bolts-- NOT the red Loctite! New brake
hoses were installed and the new IFK ceramic brake pads were properly greased on the back with MB brake pad
lube and inserted into the calipers.
Just enough brake lube paste on the pad – two dabs and spread it around in circles with your finger:
[photo is below – spacing is always a problem with photos!]
Once the pads were seated the holding clamp and caliper pins were re-inserted and driven home with a light tap
of a hammer:
Below: The last tricky thing to do was to install the new brake sensors. Re-attach the sensor housing/cable prior
to installing the sensors:
Each set of pads on the front have a sensor that inserts into a groove in one of the pads and the booted end
connects to an electrical socket of sorts. You may have to use a screwdriver or similar tool to EASE the boot
back into the housing. This wire transmits a signal to the brake warning light when the pads wear enough for
the sensor to make contact. The photo below shows the new sensors in place on one side.
The new brake hoses were installed on each side and the fronts were done.
We moved on to the rear wheels, expecting a much easier time of it since no wheel bearing work would be
involved. Wrong. The calipers were harder to reach due to the cramped and immobile nature of the rear
suspension. You can’t turn the back wheels to get a better vantage point like in the front. The little rotor screws
came out with just a small ratchet, thanks again to Kroil, but the dang rotors would not budge. Kurt Bednar
over at KH Auto had warned me that it would take a hefty hammer to get the rotors off, but damn. It took
twenty minutes of solid, energetic pounding with a big hammer, an impact driver and more hammer pounding
before the first rotor broke loose. Jeff’s neighbors must have wondered what the hell was going on – it must
have sounded like Quasimodo in the bell tower from outside the garage. CLANG…CLANG….CLANG… The
second rotor took only…I say only…ten minutes to loosen; probably because I kept spraying Kroil on it when
Jeff was pounding on the first rotor. My ears still ring a little. It was not a pretty sight – but finally the back
rotors were off:
I recommend thoroughly cleaning the rear hubs and emergency brake shoes, etc. Lube it all up prior to
reassembly. Use anti-seize compound on the face of the rear hubs. You, your mechanic, or the next owner will
be grateful the next time those back rotors have to come off. Believe it.
Note on caliper re-attachment: the torque spec is 90 Nm or 66 ft. lb. for the caliper bolts.The installation of the
rear brake components was a slow process due to the cramped conditions, but eventually, we prevailed:
A part of the original plan was to paint the calipers, but this was put off to another time for two reasons: we
were running out of time, and I could not decide on a color.
By about 6 PM fatigue had set in and the photography stopped. We had lost all of our spectators by this time as
well. The last remaining task was to fill the system with new brake fluid and bleed the air out. Brake fluid
absorbs moisture over time, so it’s really important to change the fluid every two years, minimum. The older
the fluid gets, the more moisture it retains and the less effective it becomes. Always use MB fluid too – accept
no substitutes!!
We bled the brakes the old fashioned way – I would pump up the pedal while Jeff would loosen the small
bleeder screws on each caliper (the fronts have two, by the way) and watch the fluid output. After we did all
four wheels the pedal felt good, but when the car was started, it went mushy. Something wasn’t right, but we
could not imagine what. It was getting late, so rather than tear into the system again, I carefully drove the car
home; downshifting to slow the car whenever possible to avoid having to use a brake pedal that was not being
completely cooperative. The car would stop – it just took planning. I got honked at…a lot.
I took the car to KH Auto the following week (another slow, deliberate drive with much honking and waving…
by others.) to have them check & bleed the system. The Keen Eye of Kurt revealed the reason that we could
not get all of the pedal back – something that we could not have anticipated. When Kurt started bleeding the
rear brakes with a power-bleeder, he knew right away that something was amiss – no fluid was coming out. He
traced the problem right away to the brake fluid reservoir. He removed it and showed me how the nozzle that
fed the front brake lines passed fluid just fine, but that the one that fed the rear lines did not. Nothing came out.
There was some baffling inside the unit that was faulty – the reservoir needed to be replaced. Kurt could not
speculate how long it had been this way. [A rare factory defect??] Immediately I thought of how new the old
brake pads looked on the rear wheels when we took everything apart. The rear brakes do nowhere near the
work of the fronts, but the pads that we replaced could have easily been reused in another 107….at least for
someone that does not mind clouds of brake dust! It made me wonder if the rear brakes had ever really worked
properly. We’ll never know.
The system is now 100% and the ceramic pads are settled in. I went through an elaborate “bedding” procedure
that involved extensive acceleration and deceleration – without ever stopping completely – that heats up the
pads and rotors and makes for a better bond. The bedding process is best done (and more fun) on a back road in
a rural area – doing this on I-35 or K-10 will get you arrested.
The car now stops on the proverbial dime and I definitely don’t miss the brake dust. I just have to thank Jeff
Klepac again for his hospitality and automotive expertise. Our “Samstageautowerkstatt” was a big success - a
very hands-on and intensive learning experience.
See section 42 of the Mercedes-Benz service manual library CD for the diagrams and instructions for the front
and rear brakes. Print off all the pages to refer to during the process. It helps.
There are bound to be things that I forgot to include. Feel free to contact me if something is missing or just
does not seem right. Send a PM to slik560 and I'll get back to you as soon as I can.
Good luck!!!