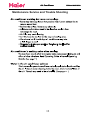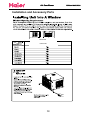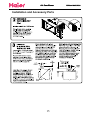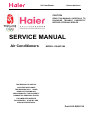
1
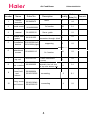
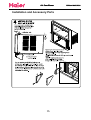
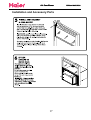
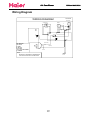
Air Conditioner Edition:2005/12/28
CAUTION
READ THIS MANUAL CAREFULLY TO
DIAGNOSE TROUBLE CORRECTLY
BEFORE OFFERING SERVICE .
SERVICE MANUAL
Air Conditioners
MODEL: ESAX3186
THIS MANUAL IS USED BY
QUALIFIED APPLIANCE
TECHNICIANS ONLY. HAIER
DOES NOT ASSUME ANY
RESPONSIBILITY FOR PROPERTY
DAMAGE OR PERSONAL INJURY
FOR IMPROPER SERVICE
PROCEDURES DONE BY ONE
UNQUALIFIED PERSON.
Part # AC-8888-126
Air Conditioner
Edition:2005/12/28
IMPORTANT INFORMATION
Features
Thermostat
3 Fan speed
A/C Dehumid Fan Only
Energy saver
Timer
4 way Air Flow
Main Specification
Cooling Capacity 17000BTU/h
Rated Power/Current(cooling)
EER: 10.7
Air Volume(Indoor/outdoor): 300 m3/h
Power:
115V~ 60 Hz
1500W /12.0A
Air Conditioner Edition:2005/12/28
Safety Information
General Information
This Service Manual describes the operation,disassembly,troubleshooting,and repair of Haier Room Air
Conditioners,etc. It is intended for use by authorized servicers who troubleshoot and repair these units.
NOTE:It is assumed that users of this manual are familiar with the use of tools and equipment used to
troubleshoot and repair electrical,mechanical,and refrigeration systems;and understand the terminology
used to describe and discuss them.
Haier urges you read and follow all safety precautions and warnings contained in this manual. Failure
to comply with safety information may result in severe personal injury or death.
Related Publications
This is a base service manual,covering a range of similar models.It is intended to be used in
conjunction with the Parts Manual and Technical Sheet covering specific model being serviced.
General Precautions and Warnings
WARNING
To avoid risk of personal injury or death due to electrical shock,disconnect electrical power to unit
before attempting to service the unit.
WARNING
To avoid risk of personal injury or death due to electrical shock,DO NOT,under any circumstances,alter
the grounding plug .Air conditioner must be grounded at all times.Do not remove warning tag from power
cord.If a two-prong (non-grounding) wall receptacle is encountered,contact a qualified electrician and
have the receptacle replaced with a properly grounder wall receptacle in accordance with the National
Electrical Code.
WARNING
To avoid risk of personal injury or death due to electrical shock,grounding wires and wires colored like
grounding wires are NOT to be used as current carrying conductors.The standard accepted color coding
for ground wires is green or green with a yellow stripe.Electrical components such as the compressor
and fan motor are grounded through an individual wire attached to the electrical component and to
another part of the air conditioner.Grounding wires should not to be removed from individual components
while servicing,unless the component is to be removed and replaced.It is extremely important to replace
all removed grounding wires before completing service.
WARNING
To avoid risk of heat exposure,which may cause death or severe illness,air conditioner must be
monitored when malfunctions or shuts down.
Air Conditioner
Edition:2005/12/28
CONTENTS
1..SPECIFICATION...............................................................................1
2.ACCESSORIES.
................................................................................... ..3
2..OPERATION......................................................................................5
3..TROUBLE SHOOTING...................................................................11
4. INSTALLA TION...............................................................................13
5.. WIRING DIAGRAM...........................................................................18
Air Conditioner Edition:2005/12/28
SPECIFICATION
1
Air Conditioner
ESAX3186
Model
Cooling
haier
Brand Mark
Cooling Capacity
17000BTU/h
Frequency Range
Rated Power/Current
1500W/12.0A
__________
Power
Max Power/Current
EER
Heating Capacity
Heating
Edition:2005/12/28
10.7BTU/h.W
__________ Rated Power/Current
__________
Max Power/Current
__________
__________
COP
Power/Current of
1PH
Power Cord
SANYO/C-R105H2A
manufacturer/Type
Compressor
__________
Oil charge
25 C-35 C
O
O
Refrigerant
L
920 50RPM
__________
__________
Additional Charge for
Lenth×Internal/External
(High) Outdoor
Capacitor of Fan Motor
Class of electric Shock Protection
Class of Water Proof
Moisture Removal
Remote
Model
Controller
Refer. No.
Remote Controller Bracket
Appearance
Climate Type
Installation Bracket Type
Area available for clooling/heating
Height of rising
radiator slice
Weight
300CFM
Outdoor Weight
__________
Indoor
Outdoor
__________
__________
__________
Pipe
__________
__________
Net
__________
Gross
inches
standard Lenth
Max Lenth
Max. pressure at warm side
America standard
Max.pressure at cool side
___
Plug Type(spec.)
m
2
Ammeter spec.
Max.running
Dry/Wet ball(indoor) 32.2 O C/22.8O C Max.running
temperature(cooling):
Dry/Wet ball(outdoor) 43.3 C/25.6OC
O
2
temperature(heating):
18 21/32x26 9/16x24 13/32
22 3/8x29 13/16x 29
__________
liquid /Gas pipe Diametre
Lenth/Diametre of Drain Hose
__________
mm
148lbs
Outdoor Packaging dimension(L×W×H)
Refrigerant
1.37
Gross
Outdoor Dimension (L×W×H)
IP24
__________
mm
129lbs
Packaging Dimension(L×W×H)
__________
1.60
Net
Dimension(L×W×H)
10uf/250v 12-18
2.7*0.55*1000 mm
Diametre
Refer No.
__________
Volume Indoor
__________
Pipe length
Capilary
Air
__________
exhausting air.
Charge if over Standrad
40RPM
970 50RPM
Velocity H
R22/42.3Oz
ype/Net Charge
Velocity M
Outdoor
__________
Compressor
Indoor
H
H
__________
Refer. No.
__________
1040
H
115V~60 Hz
Model×Sectional Area
Electric Heating
Operating temp. range
__________
__________
__________
__________
__________
__________
380psig
170psig
__________
__________
Dry/Wet ball(indoor)
___ / ___
Dry/Wet ball(outdoor) ___ / ___
Air Conditioner Edition:2005/11/18
ACCESSORIES
3
Air Conditioner
Number
Name
Refer No.
1
remote
controller
0010403473
2
wood screw
3
manual
0010555512
4
window seal
gasket
0010101353
installation 0010100390 (left)
bracket
0010100391(right)
6
curtain
attachment
screws
8
top rail
left and right
side curtains
None
0010203054
0010203055
Failure
Remark
Rate(%)
0.2
10
0.1
1
0.1
Prevent that water
permeates through chink
1
0.1
supporting
2
0.1
fix function
10
0.1
1
0.1
2
0.1
fix function
Serve guide
001A5002115
0010100724
Quality
1
001A5002292
5
7
Description
Edition:2005/12/28
Install top rail with four
curtain attachment
screws
slide left-hand curtain
assenbly into left end
of top and bottom rails
9
long flat
head bolt
and
locknut
0010600034
001A5102003
connecting
2
0.1
10
long screw
and locknut
001A5102046
001A5002125
connecting
4
0.1
4
*
Air Conditioner Edition:2005/12/28
OPERATION
5
Air Conditioner Edition:2005/12/28
Remote control and control panel operations
ON/OFF
MODE
SPEED
TEMP/TIME
6
TIMER
Air Conditioner Edition:2005/12/28
Having set the temperature you will set the function of the air conditioner.
ON/OFF
MODE
SPEED
TIMER
TEMP/TIME
Every time you press the MODE button, it will change between FAN, COOL, ENERGY
SAVER and DEHUM. (See Fig. # 3)
7
Air Conditioner Edition:2005/12/28
ON/OFF
MODE
SPEED
TIMER
TEMP/TIME
Once the function mode is decided you will have to set the fan speed.(See fig. #4)
Every time you press the SPEED button, fan speed will change between LOW,
HIGH,MED.
1) If you choose the COOL mode you can run the fan in one of the 3 speeds HIGH,
MED, LOW.
2) For cool days you may want to run the "FAN" function. The fan can be set to run at
3 speeds (HIGH fan, MED fan, LOW fan)as desired by you.
3) If you choose to use the Dehumid function. This will remove excess moisture
from the air on excessively humid days.
Tr: temperature inside the room.
Ts: the set temperature.
o
1 ) When Tr>Ts+3 F, the compressor will run continuously the fan at the
selected speed.
o
o
2)When Ts-1 F¡ Tr¡ Ts+3 F the compressor will cycle for 10 minutes on
and 6 minutes off.
o
3)When Tr<Ts-1 F, the compressor will shut off.
The dehumidification process takes place between the set temperature -1
o
and 3 F above the set temperature.
4)Energy Saver : The unit runs the same as COOL setting in the ENERGY SAVER
mode. But the fan will be off 3 minutes after the compressor cycle off.
8
Air Conditioner Edition:2005/12/28
Edition:2005/12/28
ON/OFF
MODE
SPEED
TIMER
TEMP/TIME
Timer on or Timer off mode is used to pre-start or shut off your unit in
advance. You can program this up to 24 hours in advance. You can use
the Timer in 4 functions i.e. COOL, Energy saver, Dehumid or Fan .
Timer on (See Fig. # 5)
Unit must be on to set the timer. Unit will shut down automatically after it
accepts the settings in 5 seconds. Use this mode to pre-set the start time of
the unit 24 hours in advance.
a) Press TIMER ON, LED display will show "XX" (time set last time) when power
is connected first time, LED display will show "01".
b) Set desired number of hours by pressing the ( ) pad of the Temp/Time
buttons, one for each hour. If you passed the desired time use the ( ) pad
key to lower the selection.
c) After set TIMER ON, LED display will show the time. This time displayed:
unit will starts after X hours.
Timer off (See Fig. # 5)
Unit must be running to set the timer off. Use this to preset the time you
would like the unit to shut off.
a) Press TIMER OFF, LED display will show "XX" (time set last time) when power
is connected first time, LED display will show "01".
b) Set desired number by pressing the ( ) pad of the Temp/Time buttons.
One for each hour. If you passed the desired time, use the ( ) pad key to
lower the selection.
c) After set TIMER OFF, LED display will show the room temperature about 5 seconds
later.
When using the timer the unit will use/revert to the last COOL and fan
settings when activated. The timer must be reset every time you choose to
use it.
9
Air Conditioner Edition:2005/12/28
Fig. # 5
ON/OFF
MODE
SPEED
TIMER
TEMP/TIME
Adjusting the Air Flow Direction
Airflow can be adjusted by changing the direction of the air conditioner's louvers.
This can also increase the cooling efficiency of the air conditioner.
Adjusting Horizontal Air Flow
Direction
Adjusting the vertical louvers left and
right will change horizontal airflow.
Adjusting Horizontal Air Flow
Adjusting Vertical Air Flow Direction
Adjusting the Horizontal vane up and down will
change vertical airflow. The vane can be adjusted
by nudging the back or up and down of the vane.
Adjusting Vertical Air Flow
Recommended orientation of louvers
Adjust louvers to face upwards when cooling to maximize cooling efficiency.
10
Air Conditioner Edition:2005/12/28
TROUBLESHOOTING
11
Air Conditioner
Edition:2005/12/28
Maintenance Service and Trouble Shooting
6
16
12
Air Conditioner Edition:2005/12/28
INSTALLATION
13
Air Conditioner Edition:2005/12/28
Installation and Accessory Parts
ESAX3186
ESAX3186
14
Air Conditioner Edition:2005/12/28
Installation and Accessory Parts
15
Air Conditioner Edition:2005/12/28
Installation and Accessory Parts
16
Air Conditioner Edition:2005/12/28
Installation and Accessory Parts
17
Air Conditioner Edition:2005/12/28
WIRING DIAGRAM
18
Air Conditioner Edition:2005/12/28
Wiring Diagram
WIRING DIAGRAM
0010553905
COMPRESSOR
TRANSFORMER
FAN
MOTOR
M
~
W
M
~
LM H
BR
C R S
HEAT
PROTECTOR
BR
R BL B
R BL B
CAPACITOR
CAPACITOR
R
N L M H
CN7
CN20
CN6
4
3
COMP. RELAY
CN3
CN2
BR: BROWN
BL: BLUE
R: RED
B: BLACK
W: WHITE
Y/G: YELLOW/GREEN
G: GREEN
B(NO RIBBED)
G(Y/G)
W(RIBBED)
POWER SUPPLY
NOTE:
AMBIENT
TEMP.
SENSOR
BECAUSE OF DIFFERENT COMPRESSOR,
THE DOTTED PART MAY NOT BE USED.
19
Air Conditioner Edition:2005/12/28
Sincere Forever
20