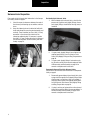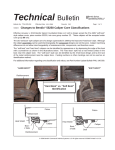
1
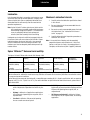
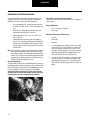
Spicer Driveshafts
®
Service Manual
DSSM3264
September 2007
Table of Contents
Safety . . . . . . . . . . . . . . . . . . . . . . 1
Lubrication . . . . . . . . . . . . . . . . . . .11
General Safety . . . . . . . . . . . . . . . . . . . . . . . . . . 1
Component Safety . . . . . . . . . . . . . . . . . . . . . . 2
Driveline . . . . . . . . . . . . . . . . . . . . . . . . . . . 2
End Fitting . . . . . . . . . . . . . . . . . . . . . . . . . . 2
Universal Joint . . . . . . . . . . . . . . . . . . . . . . 2
Slip Member . . . . . . . . . . . . . . . . . . . . . . . . 2
Yoke (Includes Slip Yoke, Yoke Shaft,
and Tube Yoke) . . . . . . . . . . . . . . . . . . . . . . 2
Tubing . . . . . . . . . . . . . . . . . . . . . . . . . . . . . 3
Midship Nut . . . . . . . . . . . . . . . . . . . . . . . . 3
Center Bearing . . . . . . . . . . . . . . . . . . . . . . 3
Foreign Material . . . . . . . . . . . . . . . . . . . . . 3
Hardware . . . . . . . . . . . . . . . . . . . . . . . . . . 3
Lubrication (When Applicable) . . . . . . . . . . 4
Spicer 10 Series™ Universal Joint and
Slip Members Lubrication Intervals . . . . . .11
Lubrication for Universal Joints . . . . . . . . . . . .12
Grease Compatibility . . . . . . . . . . . . . . . . .12
Lubrication Procedure for Universal Joints 12
Quick Disconnect™ (Half Round)
Universal Joints . . . . . . . . . . . . . . . . . . . . .13
Bearing Plate (Full Round) Universal
Joints . . . . . . . . . . . . . . . . . . . . . . . . . . . . .14
Snap Ring Universal Joints . . . . . . . . . . . .14
Lubrication for Slip Members . . . . . . . . . . . . .15
Lubrication of Center Bearing Assemblies . . . .15
Inspection . . . . . . . . . . . . . . . . . . . 5
End Fitting Inspection . . . . . . . . . . . . . . . . . . . . 5
Bearing Plate (Full Round) Yoke
Inspection . . . . . . . . . . . . . . . . . . . . . . . . . . 6
Quick Disconnect™ (Half Round) End
Yoke Inspection . . . . . . . . . . . . . . . . . . . . . 7
Universal Joint Inspection . . . . . . . . . . . . . . . . . 8
Re-lubable Style Universal Joints . . . . . . . . 8
Permanently Greased Plug Style
Universal Joints . . . . . . . . . . . . . . . . . . . . . 8
Slip Member Assembly . . . . . . . . . . . . . . . . . . . 9
Tubing . . . . . . . . . . . . . . . . . . . . . . . . . . . . . . . . 9
Center Bearings . . . . . . . . . . . . . . . . . . . . . . . 10
Midship End Fitting . . . . . . . . . . . . . . . . . . 10
Disassembly and Reassembly . . . . .16
Universal Joint . . . . . . . . . . . . . . . . . . . . . . . . .16
Disassembly - Snap Ring Design . . . . . . . .16
Reassembly - Snap Ring Design . . . . . . . .17
Disassembly - Bearing Plate Style . . . . . . .18
Reassembly - Bearing Plate Style . . . . . . .18
Center Bearing Assembly . . . . . . . . . . . . . . . . .20
Disassembly - Inboard Slip Style . . . . . . . .20
Midship Nut Specifications Table . . . . . . . .22
Disassembly - Outboard Slip Style . . . . . . .23
Reassembly - Inboard Slip Style . . . . . . . .24
Recommended Center Bearing
Lubricants . . . . . . . . . . . . . . . . . . . . . . . . .24
Midship Nut Installation Procedure . . . . . .24
Reassembly - Outboard Slip Style . . . . . . .25
Recommended Center Bearing
Lubricants . . . . . . . . . . . . . . . . . . . . . . . . .25
Grease Zerk (Nipple) Fittings or Plugs . . . . . . .26
Universal Joints and Slip Member
Assembly . . . . . . . . . . . . . . . . . . . . . . . . . .26
Universal Joint Grease Zerk (Nipple)
Fitting and Plug Torque . . . . . . . . . . . . . . .26
Glossary . . . . . . . . . . . . . . . . . . . .27
Safety
Safety
General Safety
The following WARNINGS and CAUTIONS should be read and
understood before attempting any service or repair on the various components of the driveshaft assembly.
CAUTION
Spicer 10 Series™ Driveshaft assemblies can weigh in
excess of 100 pounds (46 kilograms). Be sure to use proper
lifting techniques when handling Spicer 10 Series™ Driveshaft assemblies. More than one person may be needed
when handling driveshaft assemblies.
8.
CAUTION
Under no circumstances should individuals attempt to perform driveline service and/or maintenance procedures for
which they have not been trained or do not have the proper
tools or equipment.
WARNING
Failure to take common sense, precautionary measures
when working on a vehicle or other machinery could result
in property damage, serious personal injury, or death. To
avoid property damage, serious personal injury, or death,
please follow basic safety rules as noted below.
1.
ALWAYS wear safety glasses when performing
maintenance or service. Failure to do so can result in
personal injury and/or partial or complete vision
loss.
2.
NEVER perform service or maintenance tasks underneath a vehicle while the engine is running. Be sure
the vehicle engine is off and the keys are removed
from the ignition.
3.
NEVER perform service or maintenance tasks underneath a vehicle that is not on a level or flat surface.
4.
NEVER work on a driveshaft without blocking the
vehicle wheels and releasing all parking brakes.
5.
ALWAYS wear gloves when handling parts with
sharp edges or abrasive surfaces.
6.
NEVER lift a vehicle without the appropriate weightrated vehicle-lift equipment. Always properly support
the vehicle with appropriate weighted support equipment.
7.
NEVER remove a driveshaft from a vehicle without
keeping the transmission in neutral.
ALWAYS use support straps to prevent the driveshaft
from falling out of the vehicle during the removal and
installation process.
Note: This manual does not discuss the removal and installation of Spicer 10 Series™ Driveshaft assemblies from
the vehicle. It only covers the disassembly and reassembly of component parts of the driveshaft assembly.
Please refer to the original-equipment manufacturer’s
service documentation for removal and installation procedures.
9.
NEVER heat components, and never use sledgehammers or floor jacks to remove the driveshaft from the
vehicle.
Note: For driveshaft applications that have pillow blocks,
dampers, parking brakes, or retarders, refer to these component manufacturers’ or the original equipment manufacturer’s
service manuals for the proper procedures. NEVER perform
any unauthorized procedures that will change the disconnected properties of Spicer products.
WARNING
ROTATING DRIVESHAFTS
•
Rotating auxiliary driveshafts are dangerous. You
can snag clothes, skin, hair, hands, etc. This can
cause serious injury or death.
•
Do not go under the vehicle when the engine is running.
•
Do not work on or near an exposed shaft when
engine is running.
•
Shut off engine before working on power take-off or
driven equipment.
•
Exposed rotating driveshafts must be guarded.
1
Safety
Note: Spicer 10 Series™ Driveshafts are found on vehicles
throughout the world. Therefore, this manual includes
worldwide terminology.
Safety
Component Safety
Driveline
WARNING
Failure to replace damaged driveline components can cause
driveline failure, which can result in separation of the driveline
from the vehicle. A separated driveline can result in property
damage, serious personal injury, or death.
Reassembly of a driveline out of original phase can cause
vibration and failure of the driveline and attaching components. Driveline failure can result in separation of the driveline
from the vehicle, resulting in property damage, serious personal injury, or death.
Driveshaft assemblies can weigh in excess of 100 pounds (46
kilograms). Be sure to use proper lifting techniques when
handling driveshafts. More than one person may be needed
when handling driveshaft assemblies.
CAUTION
Never heat components, never use sledge hammers, and
never use floor jacks to disassemble driveshafts. This can
result in damaged, weakened, or bent components.
End Fitting
WARNING
A loose end-fitting can result in driveline failure, which can in
turn lead to separation of the driveline from the vehicle. A separated driveline can lead to property damage, serious personal injury, or death.
Universal Joint
WARNING
Excessive looseness across the end of universal joint bearing
cup assemblies can cause imbalance or vibration in the driveshaft assembly. Imbalance or vibration can cause component
wear, which can result in separation of the driveline. A separated driveline can lead to property damage, serious personal
injury, or death.
DO NOT reuse bolts or use inferior grade bolts. Reuse of bolts
and/or use of inferior grade bolts can cause driveline failure,
which can result in separation of the driveline from the vehicle. A separated driveline can result in property damage, serious personal injury, or death.
2
Failure to torque bolts to specification can cause driveline failure, which can result in separation of the driveline from the
vehicle. A separated driveline can result in property damage,
serious personal injury, or death.
CAUTION
Use a journal locator to avoid nicking journal cross trunnions
or damaging oil seal slingers.
If a bearing assembly or journal cross is worn or damaged,
the universal joint assembly must be replaced.
Be sure the snap rings are properly seated in the snap ring
grooves.
Slip Member
WARNING
Excessive radial looseness in the slip member assembly can
cause imbalance or vibration in the driveshaft. Imbalance or
vibration can cause components to wear, which in turn can
result in separation of the driveline from the vehicle. A separated driveline can cause property damage, serious personal
injury or death.
Yoke (Includes Slip Yoke, Yoke Shaft, and Tube
Yoke)
WARNING
A loose or damaged slip yoke seal allows contaminants to
invade the slip member assembly. Invasion of contaminants
into the slip member assembly can degrade the grease, and
damage slip member components, which can result in driveline separation. A separated driveline can result in property
damage, serious personal injury, or death.
DO NOT deform yoke cross holes by removing excessive
metal. Raised metal or deformed yoke cross holes can be a
cause of cross and bearing failure, which can result in separation of the driveline from the vehicle. A separated driveline can
result in property damage, serious personal injury, or death.
Yoke shaft assemblies can weigh in excess of 50 pounds
(23 kilograms). Be sure to use proper lifting techniques when
handling yoke shafts.
Safety
Tubing
Center Bearing
WARNING
CAUTION
Do not bend or dent the tube when handling or servicing
driveshaft.
Midship Nut
Loose center bearing bracket bolts can result in driveline failure, which can result in separation of the driveline from the
vehicle. A separated driveline can result in property damage,
serious personal injury, or death.
Damaged center bearings or center bearing components can
cause imbalance or vibration in the driveshaft assembly.
Imbalance or vibration can cause component wear, which can
result in separation of the driveline from the vehicle. A separated driveline can result in property damage, serious personal injury, or death.
Foreign Material
WARNING
WARNING
DO NOT reuse the midship nut. Reuse of the midship nut can
cause driveline failure, which can result in separation of the
driveline from the vehicle. A separated driveline can result in
property damage, serious personal injury, or death.
DO NOT touch or disturb the micro-encapsulated adhesive
found on the midship nut threads. Doing so may initiate the
curing process and impair the installation of the nut. Premature curing of the micro-encapsulated adhesive will result in
the improper installation of the midship nut. Improper installation of this nut can cause driveline failure, which can result
in a separation of the driveline from the vehicle. A separated
driveline can result in property damage, serious personal
injury, or death.
Failure to torque the midship nut to required specifications
can cause driveline failure, which can result in separation of
the driveline from the vehicle. A separated driveline can result
in property damage, serious personal injury, or death.
A loose midship nut can result in driveline failure, which can
result in separation of the driveline from the vehicle. A separated driveline can result in property damage, serious personal injury, or death.
Build-up of foreign material, excessive paint, or undercoating
on a driveshaft can cause imbalance or vibration in the driveshaft assembly. Imbalance or vibration can cause component
wear, which can result in separation of the driveline from the
vehicle. A separated driveline can result in property damage,
serious personal injury, or death.
A contaminated slip member can result in separation of the
driveline from the vehicle. A separated driveline can result in
property damage, serious personal injury, or death.
Hardware
WARNING
Loose, missing, or damaged bearing retainers or stamped
straps, retaining bolts, nuts, end fitting tangs, snap rings, or
rotating bearing cups can result in driveline failure. A separated driveline can lead to property damage, serious personal
injury, or death.
DO NOT reuse bolts, straps, nuts, or damaged bearing retainers, or use inferior grade bolts. Reuse of bolts, straps, nuts,
or damaged bearing retainers, or use of inferior grade bolts,
can cause driveline failure, which can result in separation of
the driveline from the vehicle. A separated driveline can result
in property damage, serious personal injury, or death.
CAUTION
If loosening or removing bolts, always install a new strap and
bolts and torque bolts to specification.
3
Safety
Bent or dented tubing can cause imbalance or vibration in the
driveshaft assembly. Imbalance or vibration can cause component wear, which can result in separation of the driveline
from the vehicle. A separated driveline can result in property
damage, serious personal injury, or death.
WARNING
Safety
Lubrication (When Applicable)
WARNING
A missing, loose, or fractured grease zerk (nipple) fitting or
plug eliminates the ability to lubricate the universal joint.
Improper or inadequate lubrication can cause driveline failure,
which can result in separation of the driveline from the vehicle. A separated driveline can result in property damage, serious personal injury, or death.
Improper lubrication techniques can cause driveline failure,
which can result in separation of the driveline from the vehicle. A separated driveline can result in property damage, serious personal injury, or death.
A missing, loose, damaged, or fractured plug or grease zerk
(nipple) fitting can allow contaminants to invade the universal
joint. Invasion of contaminants into the universal joint can
degrade grease and cause universal joint damage, which can
result in separation of the driveline from the vehicle. A separated driveline can result in property damage, serious personal injury, or death.
4
Incompatible greases that are applied to universal joints and/
or slip members can result in driveline failure and can result in
separation of the driveline from the vehicle. A separated driveline can result in property damage, serious personal injury, or
death.
Hand tightening of grease zerk (nipple) fittings or plugs is
NOT recommended. Failure to torque grease zerk (nipple) fittings to specifications can result in separation of the driveline
from the vehicle. A separated driveline can cause property
damage, serious personal injury, or death.
CAUTION
In cold temperatures, be sure to drive the vehicle immediately
after lubrication. This activates the slip spline and removes
excess grease. Failure to do so could cause excess grease to
stiffen in the cold weather and force the plug out. The end of
the spline would then be open to collect contaminants and
cause the spline to wear and/or seize.
All slip yoke and universal joint seals should be completely
purged.
Inspection
Inspection
Spicer 10 Series™ Driveshafts should be carefully inspected
at recommended original-equipment manufacturer’s service
intervals and/or at Spicer recommended lubrication intervals
as shown in the Lubrication section on page 11.
3.
Grasp the end fitting with both hands and rotate left
to right, feeling for play and backlash. There should
not be any movement in the end fittings relative to
the output or input shafts to which they are connected. If looseness is evident, consult transmission,
axle, or transfer case original-equipment manufacturer’s service and maintenance manuals for proper
end fitting to shaft specifications.
4.
Visually inspect for:
End Fitting Inspection
This information refers to axle, transmission, transfer case,
and center bearing end fittings. Please refer to the End Fitting
information in Component Safety on page 2.
Visually inspect all end-fitting retaining nuts or bolts
for any gaps or looseness between mating surfaces.
If gaps are present, consult transmission, axle, or
transfer case original-equipment manufacturer’s service and maintenance manual for proper fastener
specifications. If looseness is evident between the
nut, yoke, or center bearing, take the driveshaft to a
qualified driveshaft facility for further inspection and
repair.
2.
Check all end fittings for looseness. Grasp the end
fitting with both hands and try to move it vertically
and horizontally to feel any looseness.
Inspection
1.
•
damaged half round bearing straps
•
loose bearing strap bolts
•
loose companion flange bolts and nuts
•
damaged or worn tangs on end fittings
•
damaged or missing snap rings
•
rotating bearing cups
If any of these conditions are present, component replacement is necessary. Refer to the original-equipment manufacturer’s recommendations for removal instructions.
5
Inspection
Bearing Plate (Full Round) Yoke Inspection
Please refer to the End Fitting information in the Component
Safety section on page 2.
1.
Refer to original-equipment manufacturer for
removal of the driveshaft from the vehicle.
2.
Place the driveshaft in v-blocks to remove the cross
and bearing assemblies. Completely remove the
cross and bearings from the yokes at both ends of
the driveshaft using a universal joint removal tool.
Next, disassemble the bearing assemblies from the
slip yoke (and flange yoke, where applicable), using
a tool kit.
4.
Check the yoke lug cross holes with a No-Go Wear
Gauge, and then use a Spicer Alignment Bar to
inspect for damage by sliding through both cross
holes simultaneously.
The alignment bar will identify yoke lugs that have
taken a set because of excessive torque. The raised
metal or distorted lugs can be a cause of premature
cross and bearing problems.
5.
3.
Clean the cross holes on the yoke, and inspect the
cross hole surfaces for damage or raised metal.
Raised metal or fretting can be removed from yoke
cross holes with a fine-toothed file and/or emery
cloth.
WARNING
DO NOT deform yoke cross holes by removing excessive
metal. Raised metal or deformed yoke cross holes can
cause cross and bearing failure, which can result in separation of the driveline from the vehicle.
6
If, after proper cleaning of the cross holes, the alignment bar will not pass through both cross holes
simultaneously, the yoke lugs are distorted, and the
yoke or yokes should be replaced.
Inspection
Quick Disconnect™ (Half Round) End Yoke Inspection
Please refer to the End Fitting information in the Component
Safety section on page 2.
1.
Remove the universal joint assembly from the end
yoke, and clean the cross hole surfaces for inspection.
2.
Inspect the cross hole surfaces for damaged or
raised metal. Raised metal or fretting can be
removed from yoke cross holes with a fine-toothed
file and/or emery cloth.
4.
Assemble bearing straps and bolts, tightening bolts
a minimum of 30 lbs. ft. (41 N•m). Insert the alignment bar into one bushing. If the bar enters and
passes through the opposite bushing, alignment is
correct. If the alignment bar will not enter the opposite bushing, re-inspect for yoke seat burrs.
5.
If, after proper cleaning, the alignment bar still does
not pass through both bushings, the yoke lugs are
distorted, and the yoke should be replaced.
WARNING
Inspection
DO NOT deform yoke cross holes by removing excessive
metal. Raised metal or deformed yoke cross holes can
cause cross and bearing failure, which can result in separation of the driveline from the vehicle.
Inspect the bearing caps for any indication of rotation within the cross holes. If rotation is apparent,
the yoke should be replaced.
3.
Check the yoke for cross hole alignment using the
Spicer alignment gauge. Place the correct bushing in
each lug ear, allowing a .030" (.75 mm) to .060"
(1.5 mm) clearance between the tang and the bushing.
7
Inspection
Universal Joint Inspection
Please refer to the Universal Joint information in the Component Safety section on page 2.
1.
Check for excessive looseness between the ends of
the universal joint bearing cup assemblies and trunnions.
2.
Grasp the inboard yoke on the driveshaft with both
hands and attempt to move the yoke horizontally and
vertically. There should be less than .006" (.15 mm)
movement in the universal joint relative to the
inboard or outboard yokes. If looseness is greater
than .006" (.15 mm) in either direction, the universal
joint must be replaced. See Disassembly and Reassembly on page 16.
Re-lubable Style Universal Joints
1.
With re-lubable style universal joints, check for the
presence of all grease zerk (nipple) fittings. Grease
zerk (nipple) fittings should not be missing, loose, or
fractured.
2.
If a grease zerk (nipple) fitting is loose, tighten it to
required specifications. See the Universal Joint
Grease Zerk (Nipple) Fitting and Plug Torque table on
page 26.
3.
If a grease zerk (nipple) fitting is fractured or missing, the entire universal joint must be replaced. Refer
to Disassembly and Reassembly on page 16 for
removal and replacement instructions.
Permanently Greased Plug Style Universal Joints
Please refer to the Universal Joint information in Component
Safety on page 2.
8
1.
Permanently greased plug style universal joints have
a plug rather than grease zerk (nipple) fittings. Make
sure the plug is not missing, loose, or fractured. If
the plug is loose, tighten it to required specifications.
See the Universal Joint Grease Zerk (Nipple) Fitting
and Plug Torque table on page 26.
2.
If a plug is missing or fractured, the entire universal
joint must be replaced. Refer to recommendations in
the Disassembly and Reassembly on page 16 for
removal and replacement instructions.
Inspection
Slip Member Assembly
Tubing
This information refers to slip yokes and tube shaft assemblies. Please refer to the Slip Member information in the Component Safety section on page 2.
Please refer to the Tubing information in the Component
Safety section on page 2.
1.
Check all slip yoke assemblies to be sure the slip
yoke plug is not loose, missing, or damaged. If any
of these situations are evident, replacement of the
yoke assembly is necessary.
1.
Check the driveshaft for bent or dented tubing or
missing balance weights. If any of these conditions
is evident, replacement of the complete driveshaft
assembly or tube is necessary.
2.
Make certain there is no build-up of foreign material
on the driveshaft. If found, build-up should be
removed carefully to avoid damaging the driveshaft.
CAUTION
2.
Visually inspect for the presence of the grease zerk
(nipple) fitting, if applicable, on the slip yoke. Grease
zerk (nipple) fittings should not be missing, loose, or
fractured.
3.
If a grease zerk (nipple) fitting is loose, tighten it to
required specifications. See the Universal Joint
Grease Zerk (Nipple) Fitting and Plug Torque table on
page 26.
4.
If a grease zerk (nipple) fitting is missing or damaged, the slip member assembly must be replaced.
5.
Check the slip yoke seals and dust caps. Make sure
the seal is properly attached to the slip yoke and is
not loose or damaged. If any of these situations are
evident, replacement of the slip member and/or seal
may be necessary.
6.
For an inboard and outboard slip yoke assembly
design, check to be sure the slip yoke welch plug is
not loose, missing, or damaged.
7.
If there is excessive looseness between the mating
components, with the presence of vibration, all slip
assembly components should be replaced.
9
Inspection
Do not allow solvents to come in contact with seals or
greasible areas of the driveshaft assembly. If foreign material cannot be removed without complete assurance that the
driveshaft will not be damaged, the complete driveshaft
should be replaced with a new OEM driveshaft.
Inspection
Center Bearings
Please refer to the Center Bearing information in the Component Safety section on page 2.
1.
2.
Inspect the center bearing bracket bolts for looseness. If looseness is evident, re-tighten the center
bearing bracket bolts. Consult the vehicle manufacturer’s documentation for proper bolt torque. Check
the alignment of the bracket before tightening the
bolt. Bracket should not be skewed more than 3° in
relation to the centerline of the driveshaft.
Visually inspect the center bearing rubber cushion
for damage. Make sure the slingers are not rubbing
against the rubber cushion. Verify that the rubber
cushion is properly seated in the metal bracket. If
any of these conditions are evident, replacement of
the center bearing assembly is necessary. Refer to
recommendations in the Disassembly and Reassembly on page 16 for proper center bearing replacement procedures.
Midship End Fitting
Please refer to the safety information in the General Safety
section and the Midship Nut information in the Component
Safety section on page 2.
1.
Inspect the center bearing end fitting and bolt hole
threads for damage. If the bolt hole threads are damaged, the end fitting must be replaced.
2.
Check the center bearing end fitting and fitting nut
washer for any looseness. Grasp the end fitting with
both hands, and try to move it both vertically and
horizontally to feel for looseness. There should NOT
be any movement in the center bearing end fitting
relative to the midship tube shaft to which it is connected. If any of these conditions are present, the
center bearing end fitting and midship tube shaft
must be replaced as a pair.
3.
Refer to the End Fitting Inspection section on page 5
for proper procedures.
Note: Repeat the same inspection steps for all center bearings
within the driveline.
10
Lubrication
Lubrication
Lack of proper lubrication is among the most common causes
of universal joint and slip member problems. Properly sized
Spicer universal joints that are adequately lubricated at recommended intervals will normally meet or exceed vehicle
operation requirements.
Note: Spicer 10 Series™ relube style universal joints contain
only enough grease to provide needle roller bearing protection during storage and shipment. It is therefore necessary to completely lubricate each replacement
universal joint after assembly into the end fitting.
Inadequate service intervals and failure to properly lubricate
the universal joints will cause universal joint failures. Proper
lubrication purges all universal joint seals, thus removing
abrasive contaminants from the bearing assemblies. Slip
members must also be adequately lubricated to prevent slip
member failure.
Members Lubrication Intervals
1.
Carefully review the lubrication specifications found
in this manual.
2.
Be sure to lubricate at the recommended intervals.
See the table below.
3.
Be sure to use only recommended greases that meet
the listed criteria. See “Lubrication for Universal
Joints” on page 12.
4.
Carefully follow driveshaft inspection procedures as
outlined in this manual.
Note: It is essential that all bearing seals be completely
purged of old grease and contaminants. If only fresh
grease can be seen at all seals, the purging process is
complete, and the universal joint is properly lubricated.
Spicer 10 Series™ Universal Joint and Slip
The Spicer 10 Series™ Driveshafts include 1310 through 1880.
Highway
Line Haul
On/Off Highway
Off-Highway
and Industrial*
5,000/8,000 Miles
(8,000/12,000Km)
or
3 months
(whichever comes first)
10,000/15,000 Miles
(16,000/24,000Km)
or
3 months
(whichever comes first)
10,000/15,000 Miles
(16,000/24,000Km)
or
30 days
(whichever comes first)
500/200 Hrs.
5,000/8,000 Miles
(8,000/12,000Km)
or
3 months
(whichever comes first)
Lubrication
City
*Grease cycles for off-highway and industrial uses vary depending on the application and operating conditions. In general, to
obtain maximum life, lubrication should occur every 500 hours for normal service and every 200 hours for continuous service
or severe environmental conditions.
Spicer Driveshaft recommends lubricating with a compatible grease meeting N.L.G.I. Grade 2 specifications with an operating
range of +325° F to -10° F (163° C to -23° C). For more information on Spicer Driveshaft lubrication intervals, please refer to
Form #3283-SDD.
•
City is defined as all applications requiring a minimum of 90 percent of operation time within city limits.
•
Highway is defined as all applications requiring less
than 10 percent of operating time on gravel, dirt, or
unpaved roads.
•
Line Haul is defined as 100 percent of operating
time on smooth concrete or asphalt.
•
On/Off Highway is defined as all applications operating primarily on paved roads but requiring more than
10 percent of operating time on gravel, dirt, or
unpaved roads.
•
Off-Highway and Industrial is defined as 100 percent on gravel, dirt, or unpaved roads, or stationary
applications.
11
Lubrication
Lubrication for Universal Joints
Spicer recommends the following requirements be met for
any grease used to service most vehicular and industrial
applications and all auxiliary driveshaft applications:
•
Use a good quality E.P. (extreme pressure) grease
(Timken Test Load - 50 lbs. / 23 kg. minimum), and
that
•
Meets N.L.G.I. (National Lubricating Grease Institute) Grade 2 specifications, and has an
•
Operating range of +325° F to -10° F (163° C to 23° C), which is
•
Compatible with commonly used multi-purpose
greases. For information about grease compatibility,
see the Grease Compatibility section below. Consult
your local grease source for greases that meet these
specifications.
Note: There are instances when special lubrication is required
due to original-equipment manufacturer specifications
or customer requests. The lubrication recommendations
listed in this manual are authorized by Spicer Driveshaft
engineering. Any alternate greases or lubrication procedures are the responsibility of the user.
Grease Compatibility
To help reduce the effects of incompatible greases, be sure to
thoroughly purge all four bearing seals on each universal joint
with the new grease. Purge seals until the fresh grease is visible on the outside of all four bearing seals. It is recommended that all purged grease be wiped clean to prevent
discharge into the general environment. Contact your local
grease supplier for grease compatibility information.
12
Lubrication Procedure for Universal Joints
Please refer to the Lubrication information in the Component
Safety section.
Required Materials:
•
N.L.G.I. Grade-2, E.P. Grease
•
Grease gun
May Need If Bearing(s) Will Not Purge:
•
C-Clamp
•
New straps
•
New bolts
1.
Use the proper grease to purge all four seals of each
universal joint. This flushes abrasive contaminants
from each bearing assembly and assures all four
bearings are filled. Purge the seals. Spicer seals are
made to be purged. Make sure fresh grease is evident at all four universal joint bearing seals.
2.
If any of the seals fail to purge, try to push the driveshaft away from the seal that will not purge, while
applying grease gun pressure. There will occasionally be one or more bearing assemblies that will not
purge.
Lubrication
Quick Disconnect™ (Half Round) Universal Joints
Series
Strap Kit
Assemblies
Recommended
Bolt Torque
N•m
1310
2-70-18X
13-18 lbs. ft.
17.6 - 24.4
1330
2-70-18X
13-18 lbs. ft.
17.6 - 24.4
1350
3-70-18X
30-35 lbs. ft.
40.7 - 46.5
1410
3-70-18X
30-35 lbs. ft.
40.7 - 46.5
1480
3-70-28X
45-60 lbs. ft.
61 - 81.3
1550
3-70-28X
45-60 lbs. ft.
61 - 81.3
1610
5-70-28X
45-60 lbs. ft.
61 - 81.3
1710
6.5-70-18X
115-135 lbs. ft.
162.7 - 183
1760
6.5-70-18X
115-135 lbs. ft.
162.7 - 183
1810
6.5-70-18X
115-135 lbs. ft.
162.7 - 183
The bolt torque specifications refer to Spicer bearing straps and bearing plates only. If using original-equipment bearing straps
and bearing plates, refer to manufacturer’s service manual for proper bolt torque specifications.
Note: Unless otherwise noted all recommended bolt torques are with dry threads.
If any of the bearing assemblies fail to purge removal
of the driveshaft is necessary. See the originalequipment manufacturer for proper driveshaft
removal procedures.
2.
Place the driveshaft in v-blocks and apply a C-clamp
across the half round bearings. Apply grease gun
pressure. Completely purge both bearings.
3.
If outboard bearings fail to purge, slightly loosen Cclamp and reapply grease gun pressure until both
half round bearings purge.
4.
After all four bearings purge fresh grease, re-tighten
the C-clamp to squeeze out excess grease and wipe
clean. This will ease installation of universal joint kit
back into yoke. Install universal joint kit in the yoke
using new straps and bolts, and torque bolts to the
required specifications. Reference bolt torque specifications in the above table.
5.
If the bearings still will not purge, complete removal
of the universal joint kit is needed to determine the
cause of blockage. Refer to original-equipment manufacturer's service manual for removal procedures.
13
Lubrication
1.
Lubrication
Bearing Plate (Full Round) Universal Joints
Series
Bolt
Part Number
Recommended
Bolt Torque
N•m
1610
5-73-709
26-35 lbs. ft.
35.3 - 47.5
1710
6-73-209
38-48 lbs. ft.
51.5 - 65.1
1760
6-73-209
38-48 lbs. ft.
51.5 - 65.1
1810
6-73-209
38-48 lbs. ft.
51.5 - 65.1
1880
7-73-315
60-70 lbs. ft.
81.3 - 94.9
The bolt torque specifications refer to Spicer bearing straps and bearing plates only. If using original-equipment bearing straps
and bearing plates, refer to manufacturer’s service manual for proper bolt torque specifications.
Note: Unless otherwise noted all recommended bolt torques are with dry threads.
1.
There will occasionally be one or more bearing
assembly seals that will not purge. Release seal tension by loosening the bolts holding the bearing
assembly that does not purge. It may be necessary
to loosen the bearing assembly approximately 1/16"
minimum. If loosening it does not cause purging,
remove the bearing assembly to determine the cause
of blockage.
Note: It is essential that all seals be completely purged of old
grease and contaminants. If fresh grease can be seen at
these seals, the purging process is complete, and the
universal joint is properly lubricated.
Note: Spalling and/or brinelling can be caused if contaminants (water, air, etc.) are left in the universal joint and/
or the bearing seals. Purge old grease thoroughly.
2.
14
Install new bolts, and torque to specifications in the
above table.
Snap Ring Universal Joints
1.
There will occasionally be one or more bearing
assembly seals that will not purge. If any of the seals
will not purge, replacement of the universal joint kit
is necessary. See the Reassembly - Inboard Slip
Style under “Center Bearing Assembly” on page 20
for proper replacement procedures.
Lubrication
Lubrication for Slip Members
Please refer to the Lubrication information in the Component
Safety section on page 2.
The grease used for universal joints is satisfactory for slip
members. Glidecote® and steel splines both use a high quality E.P. grease meeting N.L.G.I. Grade 2 specifications.
Lubrication of Center Bearing Assemblies
Spicer center bearings are lubricated for life. No attempt
should be made to add to or change grease within the bearing
itself.
Grease splines at the intervals recommended in the Lubrication Intervals table page 11.
1.
Apply grease gun pressure to the grease zerk (nipple) fitting until grease appears at the pressure relief
hole in the plug.
Note: For pillow blocks, use original-component manufacturer’s recommended greases and lubrication intervals.
Lubrication
2.
Now cover the pressure relief hole with your finger
and continue to apply pressure until grease appears
at the slip yoke seal.
Note: Use caution to prevent seal damage when using high
pressure lubrication systems.
15
Disassembly and Reassembly
Disassembly and Reassembly
For procedures used in the removal and installation of Spicer
Driveshafts from the vehicle, please consult the vehicle manufacturer’s service manual. This manual concerns itself only
with the disassembly and reassembly of driveshaft components.
2.
Universal Joint
Set the yoke in the arbor press with a piece of tube
stock beneath it. Position the yoke with the universal
joint grease zerk (nipple) fitting pointing up to prevent interference during disassembly. Place an
appropriate push rod on the upper bearing assembly,
and press it through to release the lower bearing
assembly.
Disassembly - Snap Ring Design
Please refer to the Universal Joint information in the Component Safety section on page 2.
With the driveshaft removed, the following procedure should
be followed:
1.
Using snap ring pliers, remove the snap rings from
the yoke ears.
CAUTION
Do not distort yoke ears with excessive force while in the
arbor press.
16
3.
If the bearing assembly will not pull out by hand after
pressing, grip the bearing cup and pull from the
yoke.
4.
Place the yoke in the arbor press with the remaining
bearing cup face down. Using an appropriate push
rod, press on the end of the journal cross trunnion.
Continue to press down on the journal cross trunnion until the shoulder of the journal cross makes
contact with the inside of the yoke ear.
5.
Repeat steps three and four on the remaining bearing assemblies to remove the cross from the yoke.
6.
Inspect all yoke cross hole surfaces for damage.
Raised metal or fretting can be removed from yoke
cross holes with a fine-toothed file and/or emery
cloth.
Disassembly and Reassembly
1.
Using a high quality N.L.G.I., grade 2 extreme pressure (E.P.) grease, apply adequate grease to each
bearing cup assembly. Fill all the cavities between
the needle rollers, and also apply a liberal coating of
grease in the bottom of each bearing cup and on the
lip of the seal. Be careful not to get grease on the
outside machined surface of the bearing cup.
2.
Position the journal cross in the yoke cross holes
with the grease zerk (nipple) fitting inward toward
the tubing. Failure to properly position the universal joint may result in the inability to lubricate the
universal joint. If using an arbor press, proceed to
Step 3. If using a universal joint installation tool, follow the tool manufacturer’s instructions.
3.
Move one end of the journal cross to cause a trunnion to project through the cross hole beyond the
outer machined face of the yoke ear. Check the bearings for skewed or dropped needle rollers. Place the
bearing cup assembly over the protruding trunnion
diameter and align it to the yoke cross hole. Align the
yoke in an arbor press with the bearing assembly
resting on the base of the press. Cover the yoke ear
with a metal plate that has .150" (6.4 mm) minimum
thickness. Push the yoke onto the bearing cup
assembly until it is flush with the cross hole face.
4.
Place a push rod that is smaller than the diameter of
the bearing cup assembly under the bearing cup
assembly, and continue pressing into the yoke cross
hole until a snap ring can be installed.
5.
Remove the yoke from the arbor press. Install a snap
ring using snap ring pliers.
17
Disassembly and
Reassembly
Reassembly - Snap Ring Design
Please refer to the Universal Joint information in the Component Safety section on page 2.
Disassembly and Reassembly
6.
7.
18
Flip the yoke 180°. Check the bearings for skewed or
dropped needle rollers. Place another bearing cup
assembly over trunnion diameter, and align it to the
yoke cross holes. Align the yoke in arbor press with
previously installed bearing cup assembly resting on
the base of the press. Place a push rod that is
smaller than the bearing cup assembly on top of the
bearing cup assembly. Press bearing cup assembly
into the yoke cross hole until a snap ring can be
installed.
Remove the yoke from the arbor press. Install a snap
ring using snap ring pliers.
8.
Ensure snap rings are seated into the snap ring
grooves.
9.
Flex the journal cross to make sure it moves freely
by hand. Some resistance is acceptable. If it does
not move freely, tap the yoke ear as shown.
Disassembly - Bearing Plate Style
Please refer to the Universal Joint information in the Component Safety section on page 2.
With the driveshaft removed, see “Inspection” on page 5 for
Bearing Plate (Full Round) Yoke Inspection disassembly procedures.
Reassembly - Bearing Plate Style
Please refer to the Universal Joint information in the Component Safety section on page 2.
1.
Remove the cross and bearings from the box and
remove all four bearing assemblies. Rotate the cross
to inspect for the presence of a positive purging
valve in each grease hole of all four trunnions. Then
position the cross into the end yoke with its grease
fitting in line as near as possible with the slip spline
grease fitting. Keep the grease fitting on the inboard
side.
2.
Using a high quality N.L.G.I., grade 2 extreme pressure (E.P.) grease, apply adequate grease to each
bearing cup assembly. Fill all the cavities between
the needle rollers, and also apply a liberal coating of
grease in the bottom of each bearing cup and on the
lip of the seal. Be careful not to get grease on the
outside machined surface of the bearing cup.
3.
Position one end of the cross to cause a trunnion to
project through the hole beyond the outer machined
face of the yoke lug.
Disassembly and Reassembly
Place a bearing assembly over the trunnion diameter
and align it to the cross hole.
7.
When the bearing assembly is completely seated,
put the lock plate tab (if used) in place and use the
"Grade 8" cap screws furnished with the universal
joint and insert them through the cap screw holes in
both the lock strap and/or the bearing plate assembly. Thread by hand or with a wrench into the tapped
holes in the yoke. Do not torque down the bolts.
Note: The self-locking bolt design for full round yokes uses
serrated bolts with lock patch and does not require a
lock strap. DO NOT reuse any retaining bolt. If loosening
or removal of a bolt is necessary, replace it with a new
one.
5.
Holding the trunnion in alignment with the cross
hole, install the bearing assembly by hand until it is
flush with the face of the end yoke. If the universal
joint bearing cap is pressed into place, the bearings
and bearing surfaces could be damaged.
6.
If the bearing assembly binds in the cross hole, tap it
with a soft-faced hammer directly on the center
bearing assembly. Do not tap the outer edges of the
bearing assembly.
8.
Move the cross laterally to the opposite side and
through the cross hole, beyond the machined surface of the yoke lug. Place a bearing assembly over
the cross trunnion and slide it into the cross hole,
seating the plate to the face of the lug. Thread the
bolts by hand or with a wrench into tapped holes in
the yoke.
Note: Projecting the trunnion through a cross hole beyond the
machined surface of the lug will provide a surface to
help align the bearing assembly with the cross hole.
9.
For flange yoke applications, install the flange yoke,
bearing assemblies, and bolts at this time.
CAUTION
Exact fit of all driveline components is extremely important.
The correct parts and clean mating services are essential
for safe operation, long life, and good repair.
19
Disassembly and
Reassembly
4.
Disassembly and Reassembly
Center Bearing Assembly
3.
Mark the counterbore of the coupling shaft end yoke
to midship “nose” with a marking stick, paint marker
or other legible marking device. This assures proper
reassembly of the coupling shaft end yoke in its original phased position.
4.
Using a puller, follow the tool manufacturer’s
instructions to remove the end fitting. The end fitting
has a press fit and should NOT be removed with a
hammer. If the end fitting is loose enough to be
removed by hand, the entire coupling shaft must be
replaced. Remove and discard the slinger from the
yoke.
5.
Visually inspect the splines of the center bearing end
yoke. If the yoke splines are damaged, missing or
twisted, the yoke must be replaced. If the yoke hub
has cracked, the yoke must be replaced.
6.
Visually inspect the midship splines and threads. If
the splines or threads are damaged, missing or
twisted, replacement of the entire coupling shaft is
necessary.
Disassembly - Inboard Slip Style
Please refer to the Center Bearing information in the Component Safety section on page 2.
This information includes procedures for disassembling SAE,
DIN, and T-Type Companion Flange / Flange Yoke, Quick Disconnect, and Bearing Plate Styles.
1.
Remove the midship nut. Reference the midship nut
specification in the Midship Nut Specifications table.
Discard the nut. If the washer is damaged, discard
and replace it. Otherwise, reuse the washer.
Note: The midship nut can be removed when the coupling
shaft is still in the vehicle. For coupling shaft removal,
please refer to original-equipment manufacturer’s service document.
2.
20
Remove driveshaft per original-equipment manufacturers instructions, and then place the driveshaft in
v-blocks.
Disassembly and Reassembly
On some Spicer center bearing assemblies, a metal
retainer spans the outside center bearing bracket. If
the metal retainer is present, remove it and discard.
10. Using a puller, follow the tool manufacturer’s
instructions to remove the bearing assembly from
the midship. Discard the center bearing.
8.
Remove and discard the center bearing bracket.
11. Inspect the midship for wear on the bearing diameter. If the midship is damaged from a seized bearing,
replacement of the entire coupling shaft is necessary.
9.
Remove and discard the rubber cushion.
Disassembly and
Reassembly
7.
12. If no damage is apparent, remove the slinger, and
proceed to the installation of the center bearing,
described in the "Reassembly - Inboard Slip Style"
section.
21
Disassembly and Reassembly
Midship Nut Specifications Table
Series
Nut
Nut
Washer
Head Size
Part Number
Catalog Color
Part Number
1310
231781
cadium plate
& wax
230123-12
230123-14
1310
(Toyota Only)
10-74-101
cadium plate
& wax
1410
16-74-101
1480
Nut Torque
N•m
lbs. ft.
15/16"
136-163
100-120
230123-12
230123-14
15/16"
136-163
100-120
silver
230123-15
1-5/16"
373-440
275-325
16-74-101
black
230123-15
1-5/16"
542-610
400-450
1480
16-74-101
silver
230123-15
1-5/16"
373-440
275-352
1550
231502
black
none
1-5/8"
644-712
475-530
1610
231502
black
none
1-5/8"
644-712
475-525
1710
20-74-91
black
230123-6
1-5/8"
644-712
475-525
1710
231502
black
none
1-5/8"
644-712
475-525
1760
20-74-91
black
230123-6
1-5/8"
644-712
475-525
1810
20-74-91
black
230123-6
1-5/8"
644-712
475-525
Disassembly - Outboard Slip Style
1.
22
5.
Remove and discard the center bearing bracket.
6.
Remove and discard the rubber cushion.
Mark the slip yoke barrel and midship tube shaft with
a marking stick, paint marker, or other legible marking device. This ensures proper reassembly of the
mating components in their original phased position.
2.
Refer to original-equipment manufacturer's instructions for removal of the coupling shaft.
3.
Visually inspect midship tube shaft, looking for wear
on spline surface. If splines are damaged, missing or
twisted, or Glidecote® is missing, replacement of
entire coupling shaft is necessary.
4.
On some Spicer center bearing assemblies, a metal
retainer spans the outside center bearing bracket. If
the metal retainer is present, remove it and discard.
Disassembly and Reassembly
Using a puller, follow the tool manufacturer’s
instructions to remove the bearing assembly from
the midship. Discard the center bearing.
Reassembly - Inboard Slip Style
Please refer to the Center Bearing information in the Component Safety section on page 2.
This information pertains to SAE, DIN, and T-Type Companion
Flange/Flange Yoke, Quick Disconnect, and Bearing Plate
styles.
8.
9.
Inspect the midship for wear on the bearing diameter. If the midship is damaged from a seized bearing,
replacement of the entire coupling shaft is necessary.
If no damage is apparent, remove the slinger and
proceed to the installation of the center bearing,
described in the "Reassembly - Outboard Slip Style"
section.
1.
Wipe the bearing surface of the midship tube shaft
with a fine emery cloth.
2.
Install a new slinger (included in the center bearing
replacement parts kit) on the midship tube shaft. Use
a section of tubing to avoid damaging the slinger.
Make sure the slinger is completely seated against
the midship tube shaft shoulder.
3.
Before installing the new center bearing assembly,
be sure to fill the entire cavity around the bearing
with a waterproof lubricant.
Enough lubricant must be applied to fill the cavity to
the extreme edge of the slinger surrounding the
bearing. Lubricants must be waterproof.
Recommended Center Bearing Lubricants
Lubricants
Source
Rykon Premium No. 3
Amoco Oil Company
Amolith 8516
Amoco Oil Company
Van Talgar No. 4
Exxon Company
23
Disassembly and
Reassembly
7.
Disassembly and Reassembly
4.
Carefully align the new center bearing assembly with
the ground surface of the midship tube shaft. Install
the center bearing onto the midship tube shaft. Minimal force should be necessary to push the center
bearing onto the midship tube shaft, provided the
shaft and bearing are in alignment.
5.
Install the remaining slinger on the end yoke using a
section of tubing to avoid damaging the slinger.
6.
7.
Make sure that the phasing marks from driveshaft
removal are aligned, and using an installation tool,
press the yoke onto the midship tube shaft. Do not
strike yoke with hammer or use midship nut to
install yoke.
Installation of the driveshaft onto the vehicle can
now proceed. Refer to the vehicle manufacturer’s
documentation for installation procedures. See the
Midship Nut information in the Component Safety
section on page 2.
1.
Visually inspect the midship washer (if applicable)
for flatness, corrosion, or cracks. If the washer is
bent, corroded, or cracked, the washer must be
replaced.
2.
Thoroughly clean midship threads with mineral spirits. Wipe the midship threads dry with a clean, dry
rag. Do not use a wire brush to clean threads. This
may distort the midship threads and result in the
midship not being able to properly retain the midship
nut.
3.
Thoroughly clean the midship washer (if applicable)
and the inboard, machined face of the end fitting
with mineral spirits. Wipe components with a clean,
dry cloth.
4.
Do not apply any additional compounds to midship
threads, washer (if applicable), or nut. These compounds may interfere with the adhesive that is preapplied to the midship nut and will be detrimental to
its effectiveness. Unacceptable compounds include,
but are not limited to:
Midship Nut Installation Procedure
Only work on components when they are cool to the touch.
Installing the midship nut onto a threaded midship which is
above the ambient temperature will cause the adhesive to cure
too rapidly, and the midship nut may not install correctly.
Do not use the midship nut to pull the end fitting onto the
midship. This may result in improper seating of the end fitting
and will begin the curing of the midship nut adhesive. As a
result, the midship nut may not install correctly.
24
•
thread lockers, such as Loctite.™
•
anti-seizing compounds, such as Never-Seez.™
•
lubricants, such as oil, grease, silicone, graphite, or soap.
5.
Install the midship washer (if applicable) onto the
midship and up against the machined surface of the
end fitting.
6.
By hand, start the midship nut onto the midship
threads until it will no longer spin freely. Use a
socket and a torque wrench with a suggested range
of 600 lbs. ft. (800 N•m) or equivalent device capable of installing the midship nut to a final torque at a
maximum rate of 120 rpm. (Refer to the Midship Nut
Specifications table for proper socket size and
torque specs.)
Disassembly and Reassembly
1.
Wipe the bearing surface of the midship tube shaft
with a fine emery cloth.
2.
Install a new slinger (included in the center bearing
replacement parts kit) on the midship tube shaft,
using a section of tubing to avoid damaging the
slinger. Make sure the slinger is completely seated
against the midship tube shaft shoulder.
3.
When replacing a center bearing assembly, be sure
to fill the entire cavity around the bearing with a
waterproof lubricant. Enough lubricant must be
applied to fill the cavity to the extreme edge of the
slinger surrounding the bearing. Refer to the below
table.
Disassembly and
Reassembly
Reassembly - Outboard Slip Style
Recommended Center Bearing Lubricants
Lubricants
Source
Rykon Premium No. 3
Amoco Oil Company
Amolith 8516
Amoco Oil Company
Van Talgar No. 4
Exxon Company
4.
Carefully align the new center bearing assembly with
the ground surface of the midship tube shaft. Physically push the center bearing onto the midship tube
shaft. Minimal force should be necessary to push the
center bearing onto the midship tube shaft provided
the shaft and bearing are in alignment.
5.
Press the remaining slinger on the midship tube
shaft using a section of tubing to avoid damaging the
slinger.
6.
Installation of the driveshaft onto the vehicle can
now proceed. Refer to the vehicle manufacturer's
documentation for installation procedures. Ensure
phasing marks are aligned on mating components.
25
Disassembly and Reassembly
Grease Zerk (Nipple) Fittings or Plugs
For procedures used in the removal and installation of Spicer
Driveshafts from the vehicle, please consult the vehicle manufacturer’s service manual.
Once the driveshaft has been removed or the defective grease
zerk (nipple) fitting or plug is accessible, follow the steps
listed in the Disassembly - Universal Joint section on page 16
for replacement. Please refer to the Lubrication information in
the Component Safety section page 2.
Universal Joints and Slip Member Assembly
1.
Tilt the universal joint or flange yoke and universal
joint to allow access to the defective grease zerk
(nipple) fitting or plug. Using pliers or an openended wrench, turn the grease zerk (nipple) fitting or
plug counter-clockwise until it is removed from the
journal cross or slip member assembly. Discard the
grease zerk (nipple) fitting or plug.
2.
Check the threads in the journal or slip member. If
threads are damaged, replacement of the universal
joint or slip member is necessary. See disassembly
procedures for universal joints and slip member in
the Disassembly and Reassembly section on
page 16.
3.
Thoroughly wipe the grease zerk (nipple) fitting or
plug threaded hole.
4.
Install the new grease zerk (nipple) fitting or plug.
Tighten to a minimum 40-55 lbs. in. (4.5 - 6.2 N•m).
Continue to turn only until the grease zerk (nipple)
fitting is correctly positioned.
Universal Joint Grease Zerk (Nipple) Fitting and Plug
Torque
Minimum Zerk Torque
Part Number
Description
N•m
lbs. in.
500174-1
.250-28 NF
Tapered Thread
4.5 - 6.2
40 - 55
500168-2
.125-27 PTF
4.5 - 6.2
40 - 55
26
Glossary
Glossary
A device (gauge) used to check yoke cross hole alignment.
Ball Yoke
See Tube Yoke.
Bearing Cross Hole
See Cross Hole.
Bearing Cup Assembly
Consists of a bearing cup with needle rollers, generally held in place by a seal guard and bearing seal. Sometimes the assembly includes a thrust washer.
Bearing Cup
A cup-shaped member used as the bearing bore of a bearing cup assembly and for positioning
a thrust end of a cross trunnion.
Bearing Seal
A flexible member of a bearing cup assembly that prevents the escape of grease from or entry
of foreign matter into a bearing.
Bearing Strap
A narrow, stamped metal plate used to retain a bearing cup assembly in a half round end yoke
or flange yoke design.
Center Bearing
Consists of a rolling element bearing isolated in rubber and a bracket configuration for attachment to the vehicle frame.
Companion Flange
A fixed flange member that attaches a driveshaft to another drivetrain component.
Coupling Shaft
The coupling member or members of a multiple-piece driveline, which consists of a universal
joint, tube, center bearing, and a slip or fixed spline shaft.
Coupling Shaft Length
(Centerline to Centerline)
The distance between the outermost universal joint centers on a driveshaft. On coupling shafts
with fixed centers, it is the nominal dimension.
Cross
See Journal Cross.
Cross Hole
A through hole in each lug ear of a yoke used to locate a bearing assembly.
Deflector
See Slinger.
Driveline
An assembly of one or more coupling shafts and a driveshaft with provisions for axial movement, which transmits torque and/or rotary motion at a fixed or varying angular relationship
from one drivetrain component to another.
Driveshaft
An assembly of one or two universal joints connected to a tubular shaft member, which
accommodates axial movement.
Driveshaft Length
(Centerline to Centerline)
The distance between the outermost universal joint centers on a driveshaft. On driveshafts with
variable length centers, driveshaft length is usually measured in the compressed or installed
lengths.
Ear
One of two projecting parts of a yoke symmetrically located with respect to the rotation axis of
the yoke.
End Fitting
An end yoke or companion flange (including SAE, DIN, and T-Type styles) that attaches a
driveshaft to another drivetrain component.
End Yoke
A half round yoke that attaches a driveshaft to another drivetrain component.
Flange Yoke
A full round or half round style yoke that attaches a driveshaft to a companion flange.
Flinger
See Slinger.
Glidecote®
The blue, nylon, wear-resistant coating on Spicer yoke shafts and tube shafts.
Grease Zerk (Nipple) Fitting
The fitting on the shoulder or center of a journal cross or on a greaseable slip spline that allows
for lubrication.
27
Glossary
Alignment Bar
Glossary
Half Round Cross Hole
A semicircular hole located on the end of each lug ear of some end yoke and flange yoke
designs used to locate a bearing cup assembly.
Inboard Bearing Assembly
Contained in inboard yoke.
Inboard Yokes
Yokes that make up the ends of a driveshaft or coupling shaft assembly, i.e. tube yokes, slip
yokes, yoke shafts, and center bearing end yokes.
Journal Cross
The core component of a universal joint, which is an intermediate drive member with four
equally spaced trunnions in the same plane.
Lug Ear
See Ear.
Midship Shaft
A machined element consisting of spline teeth, a pilot for a center bearing, and a piloting hub
that attaches to the tube of a coupling shaft assembly.
Needle Rollers
One of the rolling elements of a bearing cup assembly.
Nib
See Tang.
Outboard Bearing Assembly
Contained in an outboard yoke.
Outboard Yokes
Yokes that are not a part of a driveshaft or coupling shaft assembly, i.e. transmission, axle,
transfer case end yokes.
Phase Angle
The relative rotational position for each yoke on a driveshaft or driveline.
Pillow Block
Consists usually of a rolling element bearing and a bracket configuration for attachment.
Pressure Relief Hole
A hole in the welch plug of Spicer slip yokes that allows air to escape from the slip member
assembly.
Purge
The act of flushing old grease and contaminants from universal joints and slip member assemblies with fresh grease.
Retaining Ring
See Snap Ring.
Retaining Ring Groove
See Snap Ring Groove.
Round Bearing Assembly
See Bearing Cup Assembly.
Seal Guard
A covering member used to protect a bearing seal on the bearing cup assembly.
Serrated Flange
See T-Flange.
Shaft Support Bearing
See Center Bearing.
Slinger
A stamped metal or non-metal ring, which prevents the entry of foreign matter into a center
bearing, transmission, axle, or transfer case.
Slip
The total permissible length of axial travel.
Slip Yoke
A yoke that accommodates axial movement.
Slip Yoke Plug
See Weld Plug.
Slip Yoke Seal
Pop-on or threaded ring that contains a seal that protects the slip member assembly from environmental contaminants and retains grease.
Snap Ring
A removable member used as a shoulder to retain and position a bearing cup assembly in a
yoke cross hole.
Snap Ring Groove
A groove used to locate a snap ring.
Spline
A machined element consisting of integral keys (spline teeth) or keyways (spaces) equally
spaced around a circle or portion thereof.
28
Glossary
See Tube Shaft.
Tang
A nib of metal found on half round end yoke and/or flange yoke style cross holes, used to
locate a bearing cup assembly.
T-Flange
A companion flange and flange yoke design, which has a serrated flange face. Found most
often in European applications.
T-Type Flange
See T-Flange.
Thrust Washer
A washer found in the bottom of a bearing cup assembly that reduces needle roller friction and
bearing heat, and guards against end galling on the journal cross trunnions.
Tube
The tubular connecting member of a driveshaft. Pipe or piping is not an equivalent.
Tubing
See Tube.
Tube O.D.
The outside diameter (O.D.) of a tube.
Tube Yoke
An inboard yoke with a piloting hub for attachment to a tube or spline sleeve.
Tube Shaft
A machined element consisting of spline teeth and a piloting hub that attaches to the tube of a
driveshaft assembly.
Trunnion(s)
Any of four projecting journals of a cross.
Universal Joint
A mechanical device that can transmit torque and/or rotary motion from one shaft to another at
fixed or varying angles of intersection of the shaft axes. Usually consisting of a journal cross,
grease zerk (nipple) fitting, and four bearing cup assemblies.
U-Joint
See Universal Joint.
Welch Plug
A plug in the slip yoke face that seals off one end of the spline opening. Also known as a slip
yoke plug.
Weld Yoke
See Tube Yoke.
Yoke Lug Ear Cross Hole
See Cross Hole.
Yoke Shaft
A slip member yoke with a male machined spline used for axial movement.
29
Glossary
Stub Shaft
For spec‘ing or service assistance, call 1-877-777-5360 or visit our website at www.dana.com
Dana Commercial Vehicle Products Group
3939 Technology Drive
Maumee, Ohio, USA 43537
www.dana.com
All applications must be approved by the Application Engineering Department. Specifications and/or design are subject to change without notice or obligation.
Printed in USA
DSSM-3264 09/06