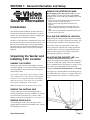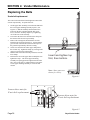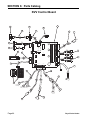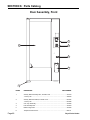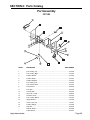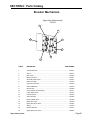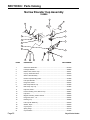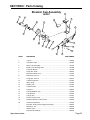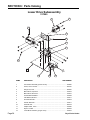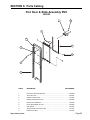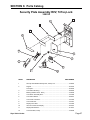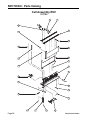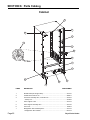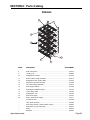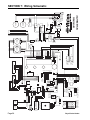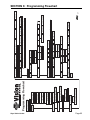
1
Royal
Vendors,
Inc.
RVV
Royal Vision V
ender
Ve
Operation
Manufactured by
and
Service
Manual
Customer Service:
800 931 9214
+1 304 728 7056
Technical Service Fax: +1 304 725 6579
Parts Fax: +1 304 725 4016
R
Royal Vendors, Inc.
Bardane Industrial Park
426 Industrial Boulevard
Kearneysville WV 25430-2776 USA
Royal Vision Vender
E-mail: [email protected]
[email protected]
Website: www.royalvendors.com
Page 1
Royal Vendors, Inc. • 426 Industrial Boulevard • Kearneysville WV 25430-2776 • USA
Customer Service: +1 (304) 728-7056 or Toll Free (800) 931-9214 • Fax (304) 725-6579
E-mail: [email protected]
[email protected]
Website: www.royalvendors.com
Page 2
Royal Vision Vender
TABLE OF CONTENTS
SAFETY SEGMENT ....................................................................... 5
SECTION 1: General Information and Setup .............................. 7
Introduction .................................................................................... 7
Unpacking the Vender and Installing It On Location ......................... 7
Voltage Requirements and Vender’s Power Cord .......................... 8
Setting Up the Cells........................................................................ 8
Programming the Vender ............................................................... 8
Specifications ................................................................................ 8
Warranty Information ...................................................................... 9
Important Note on Transporting the RVV ......................................... 9
Vender Identification ...................................................................... 9
SECTION 2: Vender Component Explanation ......................... 10
Vender Control Board (including pinouts) ..................................... 10
Keypad ........................................................................................ 13
Delivery Sensor ............................................................................ 13
Door Switch ................................................................................. 13
Vacuum Fluorescent Display (VFD) ............................................. 13
Low-Voltage Transformer ............................................................. 13
Product Shelves ........................................................................... 14
Refrigeration System ................................................................... 14
Ballast .......................................................................................... 16
Credit Peripherals ........................................................................ 16
TriTeq Electronic Door Lock......................................................... 16
SECTION 3: Vender Programming........................................... 17
Internal (Service) Menu ................................................................ 18
Errors Were Detected (or No Errors Found) ............................... 18
Coin Dispense / Insert ................................................................ 20
Diagnostics................................................................................ 20
Cash Collected .......................................................................... 21
Number of Vends ....................................................................... 21
Free Vend Count........................................................................ 22
Set Prices .................................................................................. 22
Product Location ........................................................................ 22
Space to Sales .......................................................................... 23
Set Configuration ....................................................................... 24
Door Password .......................................................................... 25
Lighting ...................................................................................... 26
Royal Vision Vender
Page 3
TABLE OF CONTENTS (Continued)
Set Refrigeration ........................................................................ 27
Set Internal Clock ....................................................................... 29
Set Language ............................................................................ 29
Set Block 1 / 2 / 3 ....................................................................... 30
Discount..................................................................................... 31
Override Options ........................................................................ 33
Return ........................................................................................ 34
SECTION 4: Vender Maintenance ............................................ 35
What to Clean ............................................................................. 35
What to Lubricate ........................................................................ 35
Preventive Maintenance .............................................................. 35
Replacing the Belts ..................................................................... 36
Product Location Setup Procedure .............................................. 38
SECTION 5: Troubleshooting .................................................... 40
SECTION 6: Parts Catalog ........................................................ 44
RVV Control Board ..................................................................... 44
Door Assembly, Rear ................................................................... 46
Door Assembly, Front .................................................................. 48
Port Assembly .............................................................................. 49
Elevator Mechanism ..................................................................... 50
Narrow Elevator Cup Assembly .................................................... 52
Elevator Cup Assembly ................................................................ 53
Lower Drive Subassembly ........................................................... 54
Port Door & Slide Assembly RVV ................................................ 55
Security Plate Assembly RVV, T-handle Lock............................... 56
Security Plate Assembly RVV, TriTeq Lock .................................. 57
Cell Assembly RVV ...................................................................... 58
Shelf Assembly RVV .................................................................... 60
Evaporator Section ...................................................................... 61
Cabinet ........................................................................................ 62
SECTION 7: Wiring Schematic .................................................. 64
SECTION 8: Programming Flowchart ....................................... 65
CREDIT AND REPLACEMENT POLICY ..................... Back Cover
Page 4
Royal Vision Vender
SAFETY SEGMENT
ROYAL VENDORS’
COMMITMENT TO SAFETY
Royal Vendors is committed to safety with all of
our product designs. We are committed to
notifying the user of a possible danger involving
the improper handling or maintenance of our
venders. The servicing of any electrical or
mechanical device involves potential dangers,
both to those servicing the equipment and to
users of the equipment. These dangers can occur
because of improper maintenance or usage. The
purpose of this safety segment is to alert everyone servicing Royal equipment of potentially
dangerous areas, and to provide basic safety
guidelines for proper upkeep.
The service manual contains various warnings
that should be carefully read to minimize the risk
of personal injury. This manual also contains
service information to insure that proper methods
are followed to avoid damaging the vender or
making it unsafe. It is also important to understand these warnings provide general guidance
only. Royal could not possibly know, evaluate, or
advise of all of the conceivable ways in which
service might be done. Consequently, Royal
cannot predict all of the possible dangerous
results. These outlined safety precautions are the
basis for an effective safety program. Use these
safety measures, along with the service bulletins,
helpful hints and product specification sheets,
when installing or servicing Royal equipment.
We recommend that persons servicing our
equipment maintain a similar commitment to
safety. Only personnel properly trained should
have access to the interior of the vender. This will
minimize the potential dangers that are inherent in
electrical and mechanical devices. Royal has no
control over the vender once it leaves the
premises. It is the owner or lessor’s responsibility
to maintain the vender in a safe condition. See
installation insert located in the coin box of a new
vender for proper installation procedures and refer
to the service manual for recommended maintenance procedures. If you have any questions,
please contact the Technical Services Department
at 1.800.931.9214.
Royal Vision Vender
SAFETY REGULATIONS
·
·
·
·
·
·
·
·
·
Read the safety segment before installation or
service.
Test for proper grounding before installing to
reduce the risk of electrical shock and fire.
Turn off or disconnect power cord from wall
outlet before servicing.
Only fully trained service technicians should
service vender when vender has power.
Remove any product before moving a vender.
Use appropriate equipment when moving a
vender.
Always wear eye protection, and protect your
hands, face, and body when working near the
refrigeration system.
Use only authorized replacement parts.
Be aware of inherent dangers in rocking or
tipping a vender.
SECTION I: ELECTRICAL
HAZARDS GENERAL ADVICE
Careless or improper handling of electrical circuits
can result in injury or death. Anyone installing,
repairing, loading, opening, or otherwise servicing
a vender should be aware of this precaution.
Apply all of the normal precautions when handling
electrical circuits, such as:
· Refrigeration servicing to be performed by
qualified personnel only.
· Unplug the vender before servicing
· Replace electrical cords if there is any
evidence of fraying or other damage.
· Keep all protective covers and ground wires
in place.
· Plug equipment into outlets that are properly
grounded and polarized (where applicable),
and protected with fuses or circuit breakers of
the correct size.
· All electrical connections must be dry and free
of moisture before applying power.
WARNING:
ALWAYS TEST TO VERIFY PROPER GROUNDING PRIOR TO INSTALLATION IN ORDER TO
REDUCE THE RISK OF ELECTRICAL SHOCK
AND FIRE
Page 5
SAFETY SEGMENT
SECTION II: ELECTRICAL
HAZARDS
A. Servicing with “Power Off”
For maximum safety, unplug the power cord from the
wall outlet before opening the vender door. This will
remove power from the equipment and avoid
electrical hazards. Service personnel should remain
aware of possible hazards from hot components
although electrical power is off.
B. Servicing with “Power On”
Some service situations may require access with
power on. Only fully qualified service technicians
should perform power-on servicing. Particular
caution is required in servicing assemblies that
combine electrical power and mechanical movement.
Sudden movement (to escape mechanical action)
can result in contact with live circuits and vice
versa. It is therefore important to maintain maximum
clearances from both moving parts and live circuits
when servicing.
WARNINGS:
1. ONLY FULLY TRAINED PERSONNEL SHOULD
ACCOMPLISH “POWER-ON” SERVICING.
SUCH SERVICE BY UNQUALIFIED INDIVIDUALS CAN BE DANGEROUS.
2. LIGHTING CIRCUITS CAN BE HAZARDOUS.
ALWAYS DISCONNECT FROM POWER SUPPLY
BEFORE REPLACING A BULB OR SERVICING THE
VENDER IN THAT AREA.
3. NEVER USE A HOSE, PRESSURE WASHER OR
ANY CLEANING METHOD THAT COULD WET
ELECTRICAL COMPONENTS. SEE CLEANING
SECTION OF MANUAL FOR SUGGESTED
CLEANING METHODS. IF WATER CONTAMINATION OF ELECTRICAL COMPONENTS IS SUSPECTED, USE QUALIFIED ELECTRICAL TESTING
EQUIPMENT AND TEST METHODS TO ASSURE
THAT VENDER IS NOT A HAZARD BEFORE
APPLYING POWER FOR ANY REASON.
Page 6
Royal Vision Vender
SECTION 1: General Information and Setup
REMOVE THE INTERIOR PACKING
General Information
Introduction
This manual contains installation, operation, and service
instructions for the Royal Vision Vender (RVV), by Royal
Vendors, Inc. This manual also contains a complete parts
catalog and electrical schematic for the RVV.
The RVV is a microprocessor-controlled glass-front vender
that permits pricing per selection from $0.00 to $99.99. The
RVV provides electronic space-to-sales programmability,
and it will collect, store, and transfer MIS data fields to a
hand-held computer (HHC) or on-line device through a
DEX port.
Unpacking the Vender and
Installing It On Location
UNWRAP THE VENDER
Unwrap the vender and remove the padding. Check for
any signs of damage. If the vender is damaged, contact the
carrier immediately. They will instruct you on the procedure for filing a claim.
If the vender is being stored, remove the plastic stretch
wrap, cardboard cover, and styrofoam cushioning first.
The plastic stretch wrap and styrofoam cushioning can
adhere to the exterior of the vender over an extended
period of time, damaging the vender’s finish.
Before plugging in the vender’s power cord, remove the
interior packing. Failure to remove this packing before
plugging in the vender could result in damage to the vend
mechanisms.
• Remove the styrofoam blocks in the front of each cell,
which are used to secure the pushers.
• Remove the packing tape which secures the case
supports.
• Remove the binder clips that secure each of the two
belts, located approximately in the middle of the belts’
runs.
• Remove the styrofoam block located below the elevator
arm, above the motor cover.
PLACING THE VENDER ON LOCATION
When placing the vender on location, allow for a minimum
of four inches (4”) of space at the back of the vender. This
will ensure proper ventilation of the refrigeration system.
To level the vender, close and latch the vender’s door.
Using a spirit level, adjust the four leveling legs until the
top of the vender is level left-to-right and front-to-back.
Make sure all leveling legs are in contact with the floor
(including the support leg - see below).
ADJUSTING THE SUPPORT LEG (Serial
number 200412MA00005 and after only)
The RVV is equipped with a support leg that is designed to
prevent the vender from tipping. Always ensure that this
leg is extended all the way to ground level. Failure to do so
may result in the vender tipping forward, potentially
resulting in broken bones, dismemberment, or even death!
The support leg is located under the bottom hinge plate of
the vender’s main door. Using a 1½” (38 mm) wrench, turn
the leg counterclockwise until it is extended to ground
level.
Note: The vender’s keys are located in the coin cup.
REMOVE THE SHIPPING SKID
Separate (split) each section of the shipping skid by
inserting a claw hammer, crowbar, or similar device into the
slot of each section to break it apart. Tilt the vender
slightly to remove the separated pieces. (See Figure 1.1.)
REMOVE DOOR BLOCK
After opening the vender’s door, locate the wooden
shipping block at the bottom right under the door. Lift the
block straight up to remove it.
Figure 1.1
Royal Vision Vender
Page 7
SECTION 1: General Information and Setup
Voltage Requirements and
Vender’s Power Cord
The vender is designed to operate at a voltage of 115 volts
AC, 60 Hertz. It requires the minimum of a 15 amp service,
and it should be on a dedicated circuit. The service outlet
voltage must not exceed 129 VAC or fall below 103 VAC.
The vender has a three-wire grounding cord. The vender
must be plugged into a grounded electrical outlet to protect
customers from electrical shock. If the outlet is not
equipped with a grounded socket, have one installed by a
qualified electrician. Do not use an extension cord, unless
it has been authorized by a certified electrician. Extension
cords are not recommended.
After plugging the vender’s power cord into the AC
voltage source, the following should be observed:
1.
2.
3.
The fluorescent lights will come on;
The refrigeration compressor will start to run after
approximately 5-7 minutes (with the door closed); and
The Vacuum Fluorescent Display will light.
The control board is equipped with a battery back-up for
use in the event of a power loss. The battery is used to
retain important programming information, such as spaceto-sales, prices, etc., so that it will not be erased if power is
lost or the vender is unplugged.
Setting Up the Cells
The cells must be set up correctly in order to ensure
reliable vending. Note: Some packages may require
slightly different adjustments depending on the location of
manufacture of the package.
CELL SETUP INSTRUCTIONS:
1. Serial number 200412MA00005 and after: Unlock
the cell by sliding the cell locking mechanism all the
way to the left. Push the cell to the right slightly, and
pull it out about 6 to 8 inches (15 - 20 cm).
Prior to serial number 200412MA00005: Place the
shelf locking mechanism in the correct position for the
shelf which holds the cell to be adjusted. (See Figure
1.3.) Then, slide the cell locking mechanism all the
way to the left. Lift the product cell straight up, and
pull it out about 6 to 8 inches (15 - 20 cm).
2. Loosen the wing nut on the bottom of the cell that
secures the cell wall.
3. Push down on the strap locking mechanisms of the
center support assembly.
4. Move the cell wall inward or outward to the desired
setting, using the cell setup decals as a guide.
5. Once the cell is at the correct setting, release the strap
locking mechanism.
6. Tighten the nut on the bottom of the cell to secure the
cell wall in position.
7. Push the cell back into place, and lock the shelf.
Programming the Vender
Cell locking mechanism
All programming of the vender is done in the Service
Mode. To enter the Service Mode, open the vender’s main
door, and press and release the Service Mode Button,
located on the controller board. For programming instructions, see the section entitled “Vender Programming,” later
in this book.
Specifications
Dimensions (280 cap.) .................... 72”H x 37”W x 35.5”D
Approximate Empty Weight ........... 760 lbs.
Operating Voltage ........................... 115 VAC, 60 Hz
Amperage Rating ........................... 12 Amp
Charge ............................................ 8.0 oz. R134a
Construction .................................. Steel cabinet, plastic
cells, glass front
Configuration ................................. 5 shelves, 40 columns
Figure 1.2
Page 8
Royal Vision Vender
SECTION 1: General Information and Setup
WARRANTY INFORMATION IMPORTANT NOTE ON
TRANSPORTING THE RVV
Royal Vendors, Inc. warrants (to the original purchaser)
vend motors and product cells for five years and three
months. The warranty of the refrigeration system, consisting of the motor, compressor, evaporator, “clean-flo”
condenser, and the refrigerant tubing, will be for five years
and three months, and will follow the serial number on the
original cooling unit. If the unit fails while under warranty,
the same serial number will be put on the replacement unit
to track warranty status. Any unauthorized tampering with
or cutting (tapping) into the unit will void the warranty.
The control board, touch pad, vacuum fluorescent display,
and Precision Delivery System® are all warranted for three
years. All other parts, except the light bulbs and finish, are
warranted for one year.
Notes:
1. Do not use the vender serial number for the cooling
deck and control board. These parts carry their own
warranty.
2. All stock refrigeration units and control boards will
be labelled with a date code (the date the part was
shipped to the customer).
Royal Vendors’ obligation under warranty is limited to
repairing or replacing the subject part at our discretion,
when upon examination it was determined by Royal
Vendors to be defective. Royal Vendors will pay shipping
charges on all parts covered under this warranty when
transportation has been made the most economical way.
The warranty is voided when a cabinet or any part thereof
has been subject to misuse or alteration without proper
authorization. Accident or damage caused by fire, flood,
transportation, civil disorder, or acts of God are not
covered under warranty.
All shelves locked
First (top) shelf unlocked
Second shelf unlocked
Third shelf unlocked
Fourth shelf unlocked
Fifth (bottom) shelf unlocked
Before transporting the RVV, always ensure that the
protective transport packaging is replaced, including:
• Styrofoam blocks in the front of all cells, to secure the
pushers;
• Styrofoam blocks on the cell locking mechanism lever;
• Packing tape to secure the case support;
• Styrofoam block on top of the motor cover, below the
elevator arm;
• Binder clips to secure each belt, placed approximately in
the middle of each belt’s run; and
• Cardboard to protect the glass.
Improper packaging before shipping could cause damage.
Vender Identification
VENDER SERIAL PLATE — The vender’s main serial plate
is loacted on the exterior left side of the vender’s main door
and has the following information:
•
•
•
•
•
Vender model code
Vender serial number
Amps required by the vender
Unit charge of R134a
Refrigeration design pressures
The vender’s model code contains useful information: the
machine type, such as RVRVV (Royal Vendors Royal Vision
Vender); the model number, such as 400; and the number 1,
which designates that the vender has a keypad.
The vender’s serial number contains several important
pieces of information as well. The serial number currently
in use consists of the following:
• The first four numbers represent the year the vender
was produced;
• The fifth and sixth digits represent the week within that
year the vender was produced;
• The first letter represents the style of the vender;
• The second letter represents the location where the
vender was built; and
• The last five digits represent the number of that vender
built within that week.
REFRIGERATION SERIAL PLATE: The Refrigeration
Serial Plate is located on the front of the vender’s refrigeration unit, mounted on the kick plate. It looks similar to the
Vender Serial Plate with the exception that the model
number specified is the refrigeration unit model. There is
currently one model in use:
Model
8000V
Compressor size
Super 1/3 Horsepower
Usage
All RVV
Figure 1.3
Royal Vision Vender
Page 9
SECTION 2: Vender Component Explanation
Vender Component
Explanation
Vender Control Board
(including pinouts)
The control board is responsible for most vender operations. It is located in the upper left corner of the inside of
the door. The control board is protected by a cover.
Removing this cover will expose the control board, along
with all wiring connections to the board.
IDENTIFICATION: The RVV control board can be easily
identified by noting the software revision number printed
on the board in white letters in the upper-right corner.
OPERATION REQUIREMENTS: The control board
requires approximately 24 volts AC from the low-voltage
transformer. This will allow the control board to function
and to supply power to all the vender’s components listed
below.
OPERATION: Upon receiving the appropriate voltage from
the transformer, the control board issues information to
some components, receives information from some
components, and communicates both ways with some
components.
• The control board issues instructions (and / or
voltage) to:
Vacuum Fluorescent Display (VFD)
Vend mechanisms
Relays (refrigeration, evaporator, and
lights)
CONTROL BOARD PINOUTS: The RVV has several
electrical pinouts, a set-up mode button, and various other
electronic components (all of which have designated
position codes). The following section outlines all the
control board’s pinouts.
The word key refers to the small plastic insert plugged into
a position of the connector. The purpose of the key is to
prevent connecting the harnessing backwards or upsidedown. The “keyed position” is a blank position within the
pinout (no pin) in which a key is inserted. Some pinouts
may have several blank positions with a key plugged into
one or more of the positions. You can use the key to
determine which end of the pinout is Pin 1.
Temperature Sensors (Position P1): The wiring harness
connected to this pinout travels from the temperature
sensor to the control board. This harness is molded into
the temperature sensor and should never be cut, pinched,
or spliced together if cut. If the harness is cut, pinched, or
improperly grounded, the sensor may give the control
board false temperature readings.
PIN
NUMBER
1
2
3
4
5
6
7
8
9
10
WIRE
COLOR
Green
Black
White
Red
Black
White
Red
FUNCTION
Ground
Health Sensor signal
Health Sensor ground
Health Sensor signal ground
Temperature signal
Temp. sensor ground
Temp. signal ground
• The control board receives information (and / or
voltage) from:
Keypad (logic level)
Door switch (logic level)
Delivery sensor
Temperature sensor
• The control board communicates both ways
with:
Coin mechanism
Bill validator (optional)
Card reader (optional)
Hand-held computer (optional)
Page 10
Royal Vision Vender
SECTION 2: Vender Component Explanation
Refrigeration (Position P2): The wiring harness connecting to this pinout powers the refrigeration relay. It also
sends power to the door switch and to the delivery switch.
The board powers the relay by providing a constant 24
VDC to it. Upon activation, the control board also provides a neutral to the relay. For the door switch and the
delivery switch, the board provides a constant 5 VDC.
When the switches are pressed in, they complete a circuit
to the control board.
PIN
NUMBER
1
2
3
4
5
6
7
8
9
10
WIRE
COLOR
Black
Orange
Red
Green
Blue
-
FUNCTION
Delivery switch return
5 VDC door switch
Door switch return
not used
24 VDC refrigeration relay
Refrigeration relay
not used
not used
not used
not used
Selection Switches (Position P3): This pinout is not
currently used.
Electronic Keypad (Position P3b): The RVV uses a keypad,
which utilizes a matrix wiring system. Upon pressing a
particular button, a signal circuit is completed. Because
each output wire carries a different signal, the controller
will determine which key has been pressed based on which
input wire receives the output signal.
PIN
NUMBER
1
2
3
4
5
6
7
8
9
10
11
12
13
14
WIRE
COLOR
Red
-
Royal Vision Vender
FUNCTION
24 VAC
24 VAC
Ground
5 VDC VCC
CO1
CO2
CO3
CO4
not used
not used
RW2
RW3
RW4
not used
Delivery Sensor (Position P4): The harness connecting to
this pinout should never be cut, pinched, or spliced if cut.
The delivery sensors are located in the port area of the
vender’s main door. The emitter is located above the port;
the receiver is located below the port.
PIN
NUMBER
1
2
3
4
WIRE
COLOR
Red
White
Black
FUNCTION
Delivery sensor power
Key
Delivery detection signal
Ground
X-Axis (Position P5): The X-axis is the left and right
movement of the product elevator.
PIN
NUMBER
1
2
3
4
5
6
7
8
WIRE
COLOR
Black
White
Red
Green
Violet
Grey
FUNCTION
X-axis Phase A
Key
X-axis Phase B
X-axis Phase C
X-axis Phase D
Home signal
Home switch return
Y-Axis (Position P6): The Y-axis is the up and down
movement of the product elevator.
PIN
NUMBER
1
2
3
4
5
6
7
8
WIRE
COLOR
Black
Green
Red
White
Violet
Grey
FUNCTION
Y-axis Phase A
Y-axis Phase B
Y-axis Phase C
Key
Y-axis Phase D
Home signal
Home switch return
Page 11
SECTION 2: Vender Component Explanation
Z-Axis (Position P7): This harness is for the delivery door
switch. The delivery door switch signals to the control
board when the port slide door is opened.
PIN
NUMBER
1
2
3
4
5
6
7
8
9
10
11
WIRE
COLOR
Orange
Blue
-
FUNCTION
not used
not used
not used
not used
not used
5 VDC sliding port door switch
not used
not used
Return sliding port door switch
not used
not used
Multi-Drop Bus (Position P8): The five-wire serial harness
connecting to this pinout provides power and communications to and from the control board for the coin mechanism,
the optional 34 VDC bill validator, and/or the optional debit
card reader. If this harness is cut, pinched, or disconnected, you will noticeably lose power to these items.
PIN
NUMBER
1
2
3
4
5
6
7
WIRE
COLOR
Black
Brown
Red
Orange
Yellow
-
FUNCTION
34 VDC
Return
Key
Receive
Transmit
Common
Key
DEX / UCS (Position P9): The optional three-wire harness
connecting to this pinout comes from the optional HandHeld Computer (HHC) jack. (Note: There is also a
standard DEX / UCS jack located on the vender’s control
board at Position P9A.) The HHC plugs into this jack to
read and write information from the vender’s control board.
If the HHC is not operating properly, check this harness for
bad connections at the solder joints. Also check to ensure
the insulator is not cracked from over tightening.
PIN
NUMBER
1
2
3
4
Page 12
WIRE
COLOR
Black
Red
Brown
FUNCTION
Common (sleeve)
Receive (ring)
Key
Transmit (tip)
Display (Position P10): This pinout is not currently used.
Display (Position JP1): The harness from this connection
leads to the Vacuum Fluorescent Display. If the display
does not work, check this connection and harness.
PIN
NUMBER
1
2
3
4
WIRE
COLOR
Red
Black
Brown
Orange
FUNCTION
5 VDC
Clock
Data
Ground
24 VAC Power (Position P11): The three-wire harness
connecting to this pinout comes from the low-voltage
transformer. If this harness is not connected (or if power is
lost to this connection), you will noticeably lose all vender
functions (except main door lighting), including power to
the Vacuum Fluorescent Display. The coin mechanism will
not accept coins, and the refrigeration system will not run.
PIN
NUMBER
1
2
3
4
WIRE
COLOR
Black
White
Green
FUNCTION
24 VAC
Neutral
Key
Ground
Encoders (Position P14): The motor encoders, for the Xaxis and Y-axis stepper motors, ensure that the motors have
run the correct distance to reach a certain point. If the Xaxis (left and right motion of the elevator cup) or Y-axis (up
and down movement of the elevator arm) are incorrect,
check the harness leading to this connection. Note: The
encoder is part of the motor assembly and cannot be
removed separately.
PIN
NUMBER
1
2
3
4
5
6
7
8
9
WIRE
FUNCTION
COLOR
White / Orange 5 VDC Y-axis
Grey
X-axis forward message
Pink
X-axis backward message
White / Pink Y-axis backward message
White / Grey Y-axis forward message
Key
Orange
5 VDC X-axis
Violet
Ground X-axis
White / Violet Ground Y-axis
Royal Vision Vender
SECTION 2: Vender Component Explanation
Electronic Door Lock (Position P15): Some venders may
be equipped with an electronic door lock system. In the
event of a power loss to the electronic door lock system, it
will rely on power from the optional battery backup, located
in the vend port area. This pinout is also used for the
optional override switch, which works in conjunction with
the control board to modify certain vending functions.
PIN
NUMBER
1
2
3
4
5
6
7
8
WIRE
COLOR
Red
Black
White
Green
Red
Black
-
The VFD, a two-line 32-character display, is located above
the keypad. All information to the programmer and to the
customer is conveyed on the VFD.
FUNCTION
32 VDC door lock
Key
Ground
Door signal
Ground
Override switch
Ground
Key
Keypad
The 12-button keypad is located on the right side of the
door front. The keypad contains the numbers 0-9, plus the
* key and the # key. All programming and sales selections
are done by way of the keypad.
Delivery Sensor
The delivery sensor actually consists of two separate
components which work in conjunction with one another.
The emitter, above the product delivery cup, emits an
infrared beam. The receiver, below the delivery cup,
receives the infrared beam. When a product falls into the
delivery cup, the infrared beam is broken, signalling to the
control board that a vend has been made.
Door Switch
The vender’s door switch is mounted on the top of the
door above the vender’s control board. The door switch is
actuated by the door each time it is opened or closed. The
following functions are performed each time the vender
door is closed:
1. All sold-out selections are cleared;
2. The greeting scrolls on the display;
3. If door switch reset is enabled in programming,
the resettable MIS counters will be reset if at
least one selection has been read; and
4. A 5-8 minute delay begins after which the
refrigeration unit will come on.
Royal Vision Vender
Vacuum Fluorescent
Display (VFD)
Low-Voltage Transformer
The Royal Vision Vender uses a low-voltage (75 VA)
transformer which reduces 115 volts AC (conventional
domestic voltage) to 24 volts AC, to power the vender’s
control board. The transformer is a major contributor to the
vender’s operation. Without the transformer, the control
board cannot function.
LOCATION OF TRANSFORMER: The transformer is
located in the bottom of the vender’s door. It is contained
in a metal tray which also holds the light ballast and the
fusebox assembly. To remove this metal tray, unscrew the
nut from the carriage bolt that holds the tray in place with a
7/16” wrench. Note: Before removing this tray, remove
power from the vender by unplugging the main power
cord from the AC voltage source (wall outlet)!
CHECK THE TRANSFORMER AND FUSE: If upon
arriving at the vender the display is not lit and the coin
changer does not take coins or payout coins, make sure the
vender is plugged in. Next, check the transformer’s external
3-amp fuse for visual damage. Check for continuity across
the fuse with a voltage meter or similar device. If defective,
replace the external fuse.
1. Check the power going into the transformer at the
connected red and black wires. It should register 115
volts AC. If not, check all wiring leading up to this
point from the bottom of the vender’s door. The
transformer may not be the problem. There may be a
broken wire or bad connection.
2. If 115 volts is registered in Step 1, measure voltage at
the other end of the transformer. The two-pin connector at the control board connected to position P11
should register approximately 24 volts AC. If so, check
the control board; the transformer is good.
Page 13
SECTION 2: Vender Component Explanation
3. If 115 volts is registered in Step 1 and 24 volts is NOT
registered in Step 2, the transformer is probably bad.
Unplug the vender, and unplug the connections at the
transformer (115-volt side). Then, unplug the transformer from the control board and from the connector at
the fuse box. Remove the transformer from the door.
Replace it with a new transformer.
Refrigeration System
Product Shelves
OPERATION REQUIREMENTS
The RVV has five product shelves, each capable of holding
eight different products, for a total of forty products in the
vender. Each shelf contains four cells, with each cell
having two product columns.
Between each column is a mechanism. An actuation lever
that operates the mechanism extends from the shelf and is
operated by the elevator cup moving the lever. When the
cup moves the lever to the left, a product from the right
column is pushed into the cup. Conversely, when the
elevator cup moves the lever to the right, a product from
the left column is pushed into the cup.
The vender’s refrigeration system is responsible for the
cooling of the cabinet and the products loaded within it.
The refrigeration system comes as a completely sealed unit
and should never be cut or tapped into, or the warranty will
be voided.
The refrigeration system requires 115 volts AC from the
main wiring harness for it to operate. The main wiring
harness will get its voltage for the unit from the refrigeration relay.
REFRIGERATION COMPONENTS
The refrigeration system is a sealed system. Described in
this section are explanations of the refrigeration system’s
major components.
Compressor - The compressor is a hermetically-sealed unit
located beneath (outside) the cooling compartment. The
compressor is a pump, driven by the compressor motor
which draws low-pressure vapor (refrigerant) from the
evaporator coil, compresses it, and forces it into the
condenser under high pressure. The motor is started and
controlled by the refrigeration relay.
REFRIGERATION SYSTEM
EVAPORATOR
Expansion
Valve
CONDENSOR
Drier
Condensor
Fan Motor
Evaporator
Fan Motor
Suction
Accumulator
Figure 2.1
Refrigeration System Flow
Page 14
Discharge
COMPRESSOR
Legend
Direction of
Refrigerant
Flow
Royal Vision Vender
SECTION 2: Vender Component Explanation
Condenser - The condenser is located beneath (outside)
the cooling compartment next to the compressor. It can be
seen from the front with the door open. The condenser
removes heat from the high-pressure vapor discharged
from the compressor and condenses it to a high-pressure
liquid. The condenser and evaporator coils have aluminum
fins attached to effectively increase heat exchange
surfaces.
Starting Relay - The starting relay is mounted on the side
of the compressor housing. The compressor motor has
two windings (start winding and run winding). To give the
motor torque when it first starts, the starting relay switches
in the additional start winding. After the motor gets up to
speed, the relay opens the start winding and the motor
continues using only the run winding.
Thermal Overload - The thermal overload is a heatsensitive device mounted on the side of the compressor
housing. If the compressor motor gets too hot or draws an
excessive amount of current, the thermal overload will
open, breaking the circuit to the compressor. After the
compressor cools to a safe operating temperature, the
thermal overload will close, allowing the compressor and
condenser fan motors to restart.
Condenser Fan and Motor - The condenser fan and motor,
located beneath the cooling department, are a forced-air
device using outside ambient air to cool the surface of the
condenser coil. The condenser fan and motor run while the
compressor operates.
Evaporator Coil - The evaporator coil is located in the
cooling compartment. As low pressure liquid passes
through the evaporator coil, it absorbs and removes heat
from the compartment as it changes to vapor. The condenser and evaporator coil have aluminum fins attached to
effectively increase their heat exchange surfaces.
Evaporator Fan and Motor - The evaporator fan and motor
are a forced-air device circulating air throughout the
cooling compartment and over the heat exchange surface
of the evaporator coil.
Expansion Valve - The expansion valve is located in the
refrigerant line between the condenser and evaporator
coils. The expansion valve is used as a metering device to
control the flow of liquid refrigerant to the evaporator coil.
This creates a low pressure causing the refrigerant to
vaporize and absorb heat as it passses through the
evaporator.
Royal Vision Vender
Drier - The drier is located in the refrigerant line between
the capillary tube and condenser. It traps and removes
moisture from the refrigeration system while allowing oil
and refrigerant to pass through the system.
Accumulator - The accumulator is located in the refrigerant
line between the evaporator coil and the compressor. The
accumulator traps any liquid refrigerant which did not
vaporize before it reaches the compressor.
Refrigeration Relay - The refrigeration relay is located in
the lower section of the vender’s cabinet near the main
wiring harness. The refrigeration relay is responsible for
powering the compressor and condenser fan motors. The
refrigeration relay consists of a coil powered by the control
board (24 VDC) and a switch. When the control board
completes the circuit to the refrigeration relay, the relay will
energize, closing the contact between the common and the
normally-open positions. When this happens, power (110
VAC) travels from the refrigeration relay to the main wiring
harness for the refrigeration unit.
REFRIGERATION CYCLE
1. The rising temperature in the cooling compartment is
reported to the control board through the temperature
sensor.
2. The control board registers the current temperature
inside the vender’s cabinet. When it rises equal to or
above the pre-programmed cut-in temperature, the
control board will complete the circuit to the refrigeration relay to energize its coil.
3. The refrigeration relay coil closes the contact between
the common and normally-open positions, allowing 110
volts to travel to the main wiring harness to start the
compressor.
4. The compressor circulates refrigerant throughout the
system by pulling low-pressure refrigerant vapor from
the evaporator coil, compressing it, and forcing it into
the condenser. The condenser, aided by the condenser
fan motor, removes heat from the refrigerant as it flows
through the condenser and releases it to the outside
environment. The dropping of the refrigerant temperature changes the vapor to liquid.
5. The evaporator coil allows the liquid refrigerant to
absorb heat from the cooling compartment as it
evaporates in the coil.
6. The falling temperature in the cooling compartment is
caused by the continual circulation of refrigerant
through the system, removing heat from the cooling
compartment and transporting it to the outside environment. When the temperature drops, the temperature
sensor reports this to the vender’s control board.
7. When the temperature drops below the preset cut-out
temperature, the control board will disable the refrigeration relay, thus killing power to the refrigeration unit.
Page 15
SECTION 2: Vender Component Explanation
TESTING THE REFRIGERATION SYSTEM
1. The sealed refrigeration unit can be tested by unplugging it from the top of the main wiring harness and
plugging it directly into a power source. If the unit still
does not operate, a problem exists within the sealed
unit.
2. If the sealed unit runs when plugged into an external
power source, the problem more than likely lies between
the control board, the refrigeration relay, and the main
wiring harness.
Ballast
The ballast acts as a transformer to convert conventional
voltage (115 VAC) to a higher voltage required to energize
the vender’s fluorescent lights (upwards of 600 VAC). The
ballast is located in a metal tray in the bottom of the
vender’s door, along with the low-voltage transformer and
the fusebox assembly. To remove this metal tray, unscrew
the nut from the carriage bolt that holds the tray in place
with a 7/16” wrench. Note: Before removing this tray,
remove power from the vender by unplugging the main
power cord from the AC voltage source (wall outlet)!
Credit Peripherals
There are three possible credit peripherals for the RVV: the
coin changer, bill acceptor, and debit card reader. The coin
changer determines the validity and value of each coin that
is inserted into the vender and sends the coin information
to the vender controller. The coin changer also continuously informs the vender controller if coins are available in
the change tubes to be used for change payout. The bill
acceptor determines the validity and value of each bill that
is inserted and sends that information to the vender
controller. The debit card reader allows customers to
purchase a product using a debit or credit card. For
detailed information on any of the credit peripherals, refer
to the separate operation and service manual provided by
the peripheral’s manufacturer.
TriTeq Electronic Door
Lock
Some venders may be equipped with the TriTeq electronic
door lock system. The TriTeq electronic door lock provides the control board with one signal line to determine
the status of the door and lock. It consists of a motordriven bolt (mounted on the door), an electronic nut
receptacle (mounted on the cabinet), an infrared signal
receiver, and an infrared key. The infrared code for this
lock cannot be decoded if the key is lost or stolen. If the
key is lost or stolen, it will be necessary to change the lock
code as soon as possible. It is not necessary to replace the
lock in order to re-key it.
Loss of power to the electronic door lock will prevent entry
to the vender, unless it has been equipped with an optional
battery. With the battery installed, it will be possible to
open the vender’s door in the event of a power loss.
The TriTeq electronic door lock system is not available for
purchase from Royal Vendors. To order any component of
the electronic door lock system or for more information,
contact:
TriTeq Lock and Security
701 Gullo Avenue
Elk Grove Village IL 60007
Tel. 847-640-7002
Fax 847-640-7008
E-mail: [email protected]
Website: www.triteqlock.com
OPENING THE RVV DOOR
Make sure power is applied to the electronic door lock,
either by way of a standard 115 VAC receptacle or by the
battery. Aim the infrared key at the detector hole (below
the VFD), about 1-3 inches (about 3-8 cm) away from it, and
press the button on the key. The VFD will display “Door
Opening,” and the door will begin to unlock. After the
door is opened, the display will show “Door Unlocked.”
CLOSING THE RVV DOOR
Gently push the door to the cabinet. Do not slam the door.
The lock motor will begin to run, and the VFD will display
“Door Closing.” Hold the door firmly until the nut has
grasped the bolt. The motor will continue to run until the
door is closed tightly. Check to make sure the door is
secure.
Page 16
Royal Vision Vender
SECTION 3: Vender Programming
Vender Programming
PRECAUTIONS TO TAKE WHEN
WORKING WITH CONTROL BOARD
As with any printed circuit board, our electronics are very
sensitive to Electrostatic Discharge (ESD). Simply walking
across a tile or carpeted floor can generate a range of
30,000 to 50,000 volts of electricity. One ESD can be
enough to seriously damage your control board or at least
weaken it enough that erratic problems could occur in the
future. Even a discharge surge under 100 to 200 volts is
enough to create problems within the circuitry of the
electronics. It is advised when storing the electronics that
they be kept in anti-static bags, even if the electronics are
thought to be defective. If a control board is thought to be
defective and is really not, it soon will be after being
charged with ESD. The ideal prevention against ESD is to
use anti-static conductive wrist straps which ground you
to the machine before touching the electronic boards. If it
is not possible to use these, at least ground yourself before
handling the electronic boards. Whatever method you use,
always handle the electronic boards by the edges. Be
careful not to touch the components on the control board.
KEYPAD PROGRAMMING
It is very important that the RVV is programmed properly.
All programming of the vender options is done in the
Service Mode. To enter the Service Mode, open the
vender door, and press and release the yellow mode button
located on the control board.
The vender’s keypad consists of 12 buttons. Four of these
buttons (see Figure 3.1, below left) are used to program the
vender and navigate through the service routines, plus two
are used to move the elevator cup (in “Product Location”),
as follows:
Button
2
4
6
8
*
#
Meaning
FORWARD
LEFT
RIGHT
BACKWARD
EXIT
ENTER
Usage
Increase, next, up
Move elevator cup left
Move elevator cup right
Decrease, previous, down
Escape, cancel, exit
OK, accept, save
The controller will automatically return to the Sales Mode
if:
• No response from the keypad is received for approximately five minutes;
• The service mode button is pressed a second time;
• The “Return” mode is activated; or
• The door is actually closed.
If credit exists, the credit amount will be displayed after
returning to the Sales Mode.
1
4
7
*
EXIT
2
5
8
0
MENU SYSTEM
3
6
9
#
ENTER
When programming, you must first use the programming
buttons listed above to maneuver through menus and submenus before you will be allowed to accomplish your task.
Each menu consists of various items, or modes, such as
“Set Prices” Mode or the “Set Internal Clock” Mode.
There are two menus:
1. INTERNAL (Service) MENU - This menu is available
only with the vender’s door open. It is accessed upon
pressing the control board’s mode button.
2. EXTERNAL MENU - This menu is available with the
vender’s door closed. From this menu, cash / sales
counts and vender errors can be read (but not cleared).
Note: Programming flowchart located in rear of manual.
Figure 3.1
Keypad
Royal Vision Vender
Page 17
SECTION 3: Vender Programming
Internal (Service) Menu
•
Errors Were Detected (or
No Errors Found
Found)
If <enter> is pressed at the “Errors Were Detected”
prompt, the controller will enter the error display mode. (If
no errors have occurred since the last error reset, the
display will show “No Errors Found.”) If an error has been
detected since the last error reset, the display will show the
first summary error code that has occurred, such as
“Vend,” which would indicate a vend error. Pressing <up>
or <down> will allow you to cycle through all of the
summary error codes that are present. Pressing <enter> at
the displayed summary error code will allow you to view
the detailed error codes beneath the summary error heading
(see below). Pressing <up> or <down> at this point will
allow you to cycle through all of the detailed error codes
that are present beneath the summary error code. If the
<exit> button is pressed at anytime during this operation,
the controller will return to the “Errors Were Detected”
prompt. Press the <up> button to proceed to the next
prompt, “Coin Dispense / Insert.”
After taking corrective action to fix the “Miscellaneous” errors, the errors may be cleared manually
through the service mode by pressing and holding the
<enter> button for two seconds or electronically via a
hand-held device.
•
Control
By pressing <enter> at the “Control” prompt, the
controller will display:
1. “Door,” indicating the door switch has been open
for more than an hour;
2. “RAM,” indicating the machine setup information
has been corrupted;
3. “AC Under Voltage,” indicating that the average
rectified voltage was under 22VAC for more than
30 seconds;
4. “AC Over Voltage,” indicating that the average
rectified voltage was over 42VAC for more than 30
seconds;
5. “System Scale Factor,” indicating one of the credit
peripherals has introduced an incompatible
scaling factor; or
6. “Lost XY Position,” indicating that the controller
is unable to establish where the elevator mechanism is located in the matrix.
•
Select Switch
Select Switch error indicates that a key on the keypad
has been stuck in the “on” position for more than 5
minutes. This error will automatically clear when the
stuck-key condition is removed. To locate the stuck
key, use the keypad test diagnostic in service mode.
If the <enter> button is pressed and held for two seconds
during the display of any detailed error code, that error will
be cleared. If other errors exist that fall under the currently
accessed detail type, the next error would be displayed. If
no other errors of the current type exist, the next error
summary code will be displayed, or “No Errors Found” will
be displayed if no other errors exist.
The error summary codes and their corresponding detailed
error codes are as follows:
Page 18
Miscellaneous
By pressing <enter> at the “Miscellaneous” prompt,
the controller will display either:
1. “Vertical Home Switch,” indicating a problem with
the vertical home switch;
2. “Horiz. Home Switch,” indicating a problem with
the horizontal home switch;
3. “Sliding Port Switch,” indicating that there is a
problem with the switch that detects the position
of the vertical sliding door;
4. “Product Undelivered,” indicating that there is a
problem with the optical delivery detection
system, or perhaps a product has been left in the
delivery bin; or
5. “Unknown,” indicating that an error has occurred
which is of unknown cause.
Royal Vision Vender
SECTION 3: Vender Programming
•
•
Coin Changer
By pressing <enter> at the “Coin Changer” prompt,
the controller will display either:
1. “Communication,” indicating no communication
with the changer for more than 2 seconds;
2. “Tube Sensing,” indicating a tube sensor error;
3. “Inlet,” indicating no coins sensed by acceptor
for over 96 hours:
4. “Tube Jam XX,” indicating a tube jam error for
coin type XX;
5. “ROM,” indicating a changer ROM checksum
error;
6. “Excesses,” indicating more than 255 escrow
attempts since the last coin was accepted;
7. “Coin Jam,” indicating a coin jam;
8. “Low Coin Acceptance,” indicating a low acceptance rate (more than 20% of the last 255 coins
were slugs);
9. “Disconnected Acceptor,” indicating an unplugged acceptor; or
10. “Misrouted Coin,” indicating a coin had been
improperly routed.
•
Card Reader
By pressing <enter> at the “Card Reader” prompt, the
controller will display either:
1. “Communication,” indicating no card reader
communications for more than 5 seconds; or
2. “Card Reader Error XY,” indicating that a particular type of card reader malfunction occurred where
“XY” indicates the error type.
The “Communications” error will be cleared when
proper communications are re-established. The “Card
Reader Error XY” errors may be reset via the hand-held
device or through the service mode by pressing and
holding the <enter> button for two seconds.
The “Communications” error will be cleared when
proper communications are re-established. After
taking corrective action to manually fix the other
“Changer” problems, the errors may be cleared
electronically via a hand-held device or through the
service mode by pressing and holding the <enter>
button for two seconds.
Refrigeration
By pressing <enter> at the “Refrigeration” prompt, the
controller will display either:
1. “Temperature Sensing,” indicating an unplugged
temperature sensor error;
2. “Too Cold,” indicating temperatures 3º F (1.5º C)
below the compressor cut-out setting;
3. “Too Hot,” indicating temperatures 3º F(1.5º C)
above the compressor cut-in setting;
4. “No Cooling,” indicating that the compressor is
not cooling at 1º F (0.5º C) per hour or better while
on; or
5. “No Heating,” indicating that the heating system
is not heating at 1º F (0.5º C) per hour or better
while on.
Bill Validator
By pressing <enter> at the “Bill Validator” prompt, the
controller will display either:
1. “Communication,” indicating no bill validator
communications for more than 5 seconds;
2. “Full,” indicating a full bill stacker;
3. “Motor,” indicating a defective motor;
4. “Jam,” indicating an bill jam error;
5. “ROM,” indicating a bill acceptor ROM check sum
error;
6. “Sensing” indicating a bill sensor error; or
7. “Open,” indicating that the stacker is open.
The “Temperature Sensing” error will be cleared if the
sensor is detected. The “Too Cold” error will be
cleared when the temperature rises above the cut-out
limit. The “Too Hot” error will be cleared when the
temperature falls below the cut-in limit. The “No
Cooling” error will be cleared when the system cools at
1º F (0.5º C) per hour or better. The “No Heating” error
will be cleared when the system heats at 1º F (0.5º C) or
better. All “Refrigeration” errors can also be cleared
via the hand-held device or through service mode by
pressing and holding the <enter> button for two
seconds.
•
The “Communication” error will be cleared when
proper communications are re-established. After
taking corrective action to manually fix the other “Bill
Validator” problems, the errors may be cleared
electronically via a hand-held device or through the
service mode by pressing and holding the <enter>
button for two seconds.
Royal Vision Vender
Page 19
SECTION 3: Vender Programming
Coin
Dispense
/
Insert
E.
This mode is used to keep inventory of the exact coin tube
levels in the coin mechanism, as well as allowing you to
pay out coins from the changer through the control board.
This mode tests proper communication between the control
board and the coin mechanism. When dispensing coins,
the control board will remember the coin mechanism’s coin
tube levels and automatically deduct a coin each time a
coin is paid out.
F.
Each routine operates similarly and will allow the user
to test the respective range of selections. For example,
“One Selection Only” will allow the user to select any
one product in the matrix to vend. The product
selection number and the X-Y coordinates are shown
on the display. During the vend, the display will show
the message “Attempting Sel XX,” where XX is the
selection that is being vended. If the test vend fails
anywhere in the process of vending, the error will be
shown on the display.
OPERATION: If <enter> is pressed when the display
shows “Coin Dispense / Insert,” the display will then show
the following:
Coin dispense X
Coin inventory Y
where X = the lowest coin value for the coin mechanism
(normally 0.05), and Y = the exact number of that coin in the
coin mechanism, starting with “1” when the first coin of
this value is inserted. Pressing <enter> at this point will
cause the coin mechanism to dispense one coin, and the
value of Y will be lowered by one. Pressing <up / down>
will move the display to the next higher coin value (normally 0.10). To return to “Coin Dispense / Insert,” press
<exit>. From “Coin Dispense / Insert, ” press <up> to
proceed to the next prompt, “Diagnostics.”
Vends made while in this routine will not be added to
the “Cash Collected” or “Number of Vends” mode
totals. If <exit> is pressed at any time when “Column
XX” is displayed, the controller will return to the “Test
Vending” prompt.
Note: Test vending should only be performed with the
vender’s door closed tightly.
•
Test Cruise
Cruise, Test Speed
Speed, Test Collision
lision, Test Diagonal Moves
Moves, and
est Accel Values (certain software
Test
revisions only)
These items are for internal use at the factory. Do not
enter into these menu items! Functional errors can
occur!
•
Test Keypad
If <enter> is pressed at the “Test Keypad” prompt, the
controller will enter the keypad test mode. The display
will show “Pressed Key #,” which indicates that the
pound (#) key was pressed last. When any key is
pressed, it will be represented by the numbers shown
after the words “Pressed Key.” The last key pressed
will remain on the display until the service mode timer
expires or the <exit> button is pressed and held for
two seconds. This will return the controller to the
“Test Keypad” prompt. Press the <up> button to
proceed to the next prompt, “Test Display.”
Diagnostics
If <enter> is pressed at the “Diagnostics” prompt, the
controller will enter the test mode by displaying “Test
Vending”. Pressing <enter> will allow enter you into the
test vending mode. If <exit> is pressed at any time, the
controller will return to the “Diagnostics” prompt. Use
<up> to proceed to the next prompt, “Cash Collected.”
•
Test Vending
Pressing <enter> at the “Test Vending” prompt will
cause the controller to enter into the test vend
function. The RVV allows many types of test vending
including:
A. “One Selection Only,” where one individual
selection can be vended;
B. “One With Prod Det,” which functions similar to
“One Selection Only” except that a product must
be delivered to consider the vend successful;
C. “One Without Prod Det,” similar to “One With
Prod Det,” but the delivery requirement is
removed;
D. “Four Corners,” which causes a vend of all the
extreme corners of the matrix (selections 11, 12, 17,
18, 51, 52, 57, and 58);
Page 20
“All With Prod Det,” where all selections are
vended in order; and
“All Without Prod Det,” similar to “All With Prod
Det,” but the delivery requirement is removed.
Royal Vision Vender
SECTION 3: Vender Programming
•
•
•
•
Test Relay
Pressing <enter> at the “Test Relay” prompt will cause
the controller to enter the relay test routine. This
routine allows you to test the compressor relay. Upon
entry into this routine, the display will show the state
of the compressor relay, “Compressor X,” where X =
“On” or “Off.” Pressing <enter> will toggle the state
of the compressor relay. Note: To prevent equipment
malfunctions, the relay state should not be toggled
more than once every 10 seconds. If <exit> is pressed
at any time during this mode, the controller will return
to the “Test Relay” prompt.
Test Temperature Sensors
Pressing <enter> at the “Test Temperature Sensors”
prompt will cause the controller to enter the test
temperature sensors routine. The current temperatures
of the evaporator and cabinet sensors will be displayed. (Most RVV machines will be equipped with
the evaporator sensor only. The cabinet sensor is
only used for vending perishable products, such as
milk.) Press <exit> to return to the “Test Temperature
Sensors” prompt.
Test Display
Pressing <enter> at the “Test Display” prompt will
cause the controller to enter the display test routine.
Upon entry into this routine, the display will cycle
through a series of several test patterns, including all
segments on and all segments off. The test will
continue for ten seconds or until the <exit> button is
pressed. This will return the controller to the “Test
Display” prompt. Press the <up> button to proceed to
the next prompt in the test mode, “Test Home Sensors.”
Test Home Sensors
Pressing <enter> at the “Test Home Sensors” prompt
will cause the controller to enter into the test home
sensors display. This display shows the current state
of all of the home sensors. The state of the sensors is
updated in real time; thus, you can see the switch or
sensor change state if the respective switch or sensor
is manipulated. The interpretation of the display is as
follows:
X - Yes/No, where yes indicates that the X axis home
switch is in its home position;
Y - Yes/No, where yes indicates that the Y axis home
switch is in its home position;
G - Yes/No, where yes indicates that the slide door
switch is in its home position;
Dt - Yes/No, where yes indicates that the optical
delivery detection system is blocked;
Royal Vision Vender
Pr - Yes/No, where yes indicates that the product
present switch is in its normal position; and
Ov - Yes/No, where yes indicates that an override key
switch is activated.
Press <exit> to return to the “Test Home Sensors”
prompt.
•
Test Encoders
Pressing <enter> at the “Test Encoders” prompt will
cause the controller to enter into the test encoders
routine. This display shows the current X-Y position
of both encoders. The position of the encoders is
updated in real time; thus if the arm is lifted or the cup
moved the X and Y positions should change correspondingly. It should be noted that lifting the arm will
cause the X and Y encoders to change. Movements in
the X (horizontal) axis will only cause the X position to
change.
•
Exercise Gantry
Pressing <enter> at the “Exercise Gantry” prompt will
cause the controller to enter into the exercise gantry
routine. In this mode the arm (or gantry) will trace out
a rectangular pattern starting at the X and Y home
positions. This routine will continue until the <exit>
button is pressed.
Cash
Collected
If <enter> is pressed at the “Cash Collected” prompt, the
controller will enter the non-resettable cash counter display
mode by displaying “All Selects $XX.XX,” where the X’s
will represent total cash over the life of the vender’s control
board. Using <up> or <down> will cycle through each
selection as “Selection #N $X.XX,” where “N” represents
the appropriate selection number and the X’s represent the
resettable cash count for that selection. If <exit> is
pressed at any time during this operation, the controller will
return to the code level. Press the <up> button to proceed
to the next prompt, “Number of Vends.”
Number
of
Vends
If <enter> is pressed at the “Number of Vends” prompt, the
controller will enter the non-resettable sale count display
mode displaying “All Selects XXX,” where the X’s
represent the number of all paid vends over the life of the
vender’s control board. Using <up> or <down> will cycle
through each selection as “Selection #N XXX,” where “N”
represents the appropriate selection number and the X’s
represent the resettable number of vends for that selection.
If <exit> is pressed anytime during this operation, the
controller will return to the “Number of Vends” prompt.
Press the <up> button to proceed to the next prompt, “Free
Vend Count.”
Page 21
SECTION 3: Vender Programming
Free
Vend
Count
If <enter> is pressed at the “Free Vend Count” prompt, the
controller will enter the free vend counters mode. The
controller will display “View Price. ” If <exit> is pressed,
the controller will return to the code level. From “Free Vend
Count, ” press <up> to proceed to the next prompt, “Set
Price. ”
•
•
•
View Price
If <enter> is pressed at the “View Price” prompt, the
controller will enter the view price mode. The controller will display “All Selections,” for a universal
selection price; or “Selection,” if the controller is set
for multiple pricing. Selection prices can only be
viewed, not changed, from this mode. If <exit> is
pressed at any time during this operation, the controller will return to the “View Price” prompt. Press the
<up> button to proceed to the next prompt, “Value of
Free Vends.”
Value of Free Vends
If <enter> is pressed at the “Value of Free Vends”
prompt, the controller will enter the non-resettable
free-vend cash counter display mode by displaying
“All Selects $XX.XX,” where the X’s will represent
total monetary value of free vends over the life of the
vender’s control board. Using <up> or <down> will
cycle through each selection as “Selection #N
$X.XX,” where “N” represents the appropriate
selection number and the X’s represent the resettable
free-vend cash count for that selection. If <exit> is
pressed at any time during this operation, the controller will return to the “Value of Free Vends” prompt.
Press the <up> button to proceed to the next prompt,
“Number of Free Vends.”
Number of Free Vends
If <enter> is pressed at the “Number of Free Vends”
prompt, the controller will enter the non-resettable
free-vend count display mode displaying “All Selects
XXX,” where the X’s represent the number of all free
vends over the life of the vender’s control board.
Using <up> or <down> will cycle through each
selection as “Selection #N XXX,” where “N” represents the appropriate selection number and the X’s
represent the resettable number of free vends for that
selection. If <exit> is pressed anytime during this
operation, the controller will return to the “Number of
Free Vends” prompt. Press the <exit> button to return
to the “Free Vend Count” prompt.
Page 22
Set
Prices
If <enter> is pressed at the “Set Price” prompt, the
controller will enter the selection price setting mode. If
multiple prices are enabled, the controller will display “All
Selections,” for a universal selection price. If <up> is
pressed, the controller will display “Shelf All,” which is
used for pricing an entire shelf to the same price. If <up>
is pressed again, the display will show “Selection,” which
is used to set prices for individual selections.
If <enter> is pressed while “All Selections” is displayed,
the display will show “All Selections Y.YY, ” where “Y.YY”
is the current price for all selections in the machine. Use
<up> or <down> to increase or decrease the price.
If <enter> is pressed while “Selection” is displayed, the
display will show “Selection XX Y.YY, ” where “X” is the
current selection number and “Y.YY” is the selection price.
Use the <up> or <down> keys to sequence through the list
of available selections, or press <enter> to edit the price of
the selection that is currently shown on the display. Use
the <up> or <down> to increase or decrease the price.
If <enter> is pressed while “Shelf All” is displayed, the
display will show “Shelf X Y.YY, ” where “X” is the current
shelf number and “Y.YY” is the price for any of the
products on that particular shelf. Use the <up> or <down>
keys to sequence through the list of available shelves, or
press <enter> to edit the price of the shelf that is currently
shown on the display. Use the <up> or <down> to increase
or decrease the price.
In all cases, when the desired price is on the display,
pressing <enter> will save that price and return to the
previous service mode function level. Pressing <exit> will
return the controller to the “Set Price” prompt. Press <up>
to proceed to the next prompt, “Product Location.”
Product
Location
If <enter> is pressed at the “Product Location” prompt, the
display will show “Enter Password 0000,” and the first “0”
will be flashing. It will be necessary to enter the nonresettable password (9-8-7-6) in order to enter into the
Product Location mode. To enter the password, press
<up> or <down> to enter the first digit, then press <enter>.
The second “0” will then begin to flash. Repeat this
procedure to enter all four digits. After the fourth digit has
been entered, the controller will enter the product location
control mode. This mode is used to accurately set the stop
locations for the vender’s elevator cup, allowing precision
vending. Only the positions of four selections (12, 18, 52,
and 58) and the port are here adjusted; the controller will
determine the positions of the rest of the selections based
on the settings of the four mentioned above. Using <up>
Royal Vision Vender
SECTION 3: Vender Programming
or <down> will allow you to scroll through the adjustable
locations. If <exit> is pressed at any point, the elevator
cup’s current setting for that location will be saved, and the
controller will return to “Product Location.” Press <up> to
proceed to the next prompt, “Set Configuration.”
•
•
•
•
END X=NNNN Y=NNNN
Upon first entry into “Product Location,” the controller will display “END X=NNNN Y=NNNN,” where the
N’s represent the X-axis coordinates and the Y-axis
coordinates. If <enter> is pressed, the elevator cup
will go to the port, as if it were vending a product. At
that exact point, it will stop, and the X-axis and Y-axis
coordinates will begin to flash. If any adjustment is
needed to correct the alignment of the elevator cup for
proper delivery into the port, use <left> and <right> to
correct the X-axis location, or <up> and <down> to
correct the Y-axis location. Once the elevator cup is in
the correct location, press <exit> to save that setting.
Press <up> to proceed to the next prompt, “Sel=Z.”
Sel=Z X=NNNN Y=NNNN
At this point, the controller will display “Sel=Z
X=NNNN Y=NNNN,” where “Z” represents a selection
number (either 12, 18, 52, or 58), and the N’s represent
the X-axis and Y-axis coordinates. If <enter> is
pressed, the elevator cup will go to the lever for that
selection number. At that point, it will stop, and the Xaxis and Y-axis coordinates will begin to flash. If any
adjustment is needed to correct the alignment of the
elevator cup to properly trip the release lever, use
<left> and <right> to correct the X-axis location, or
<up> and <down> to correct the Y-axis location. Once
the elevator cup is in the correct location, press <exit>
to save that setting. Press <up> to proceed to the next
prompt, “Test Vend Sel=Z.”
Test Vend Sel=Z
If <enter> is pressed while “Test Vend Sel=Z” is
displayed, the vender will test-vend the selection
number here represented by “Z” (either 12, 18, 52, or
58). The purpose of this test-vend is to ensure that
the X-axis and Y-axis coordinates set for this selection
are correct. Once the test-vend is complete, press
<down> to return to the “Sel=Z” prompt to adjust that
selection’s coordinates (if needed), or press <up> to
continue to the next selection or to “Jog Even=XXX.”
Jog Even=XXX and Jog Odd=XXX
These items are for internal factory use. Press <exit>
to return to the “Product Location” prompt.
Royal Vision Vender
Space
to
Sales
If <enter> is pressed at the “Space to Sales” prompt, the
display will show the vender’s current space-to-sales
setting (either “Option 1,” “Option 2,” “Option 3,” or
“Custom”).
•
To use a preset option, scroll to the desired option
number and press <enter>. After pressing <enter>,
the display will return to “Space to Sales.” Press <up>
to continue to the next prompt, “Set Configuration.”
The three available options are:
Option 1:
Option 2:
Option 3:
•
One for one (each individual selection
number will only vend that column
number);
By shelf (each selection number will
vend all products on the same shelf in
sequence); and
All selections tied together.
To use a custom setting, scroll to “Custom” and press
<enter>. After pressing <enter>, the display will
show “Clear Settings?.” To delete all current space-tosales settings, press <enter>. The display will then
show “Settings Cleared.” Press <up> to go to the first
selection. The display will show “Selection 11 Sel:
None,” meaning that no columns are currently
assigned to this selection.
To assign columns to the selection, press <enter>.
The display will show “Selection 11 Sel: 11 Assign:
No.” To assign this column, press <enter> to make
the “No” flash, and press <up> to change the “No” to
“Yes.” Press <enter> to save the change. To add
more columns to the selection, press <up> to go to the
desired column number, and repeat the previous steps.
Once all desired columns have been assigned to this
selection, press <exit>. The display will then show
“Selection 11 Sel: X,” where “X” represents the
assigned column numbers. Press <up> to continue to
the next selection.
Once all space-to-sales settings are complete, press
<exit>. The display will show “Selections: All Save
Settings? Yes.” Press <enter> to save the space-tosales settings. (Note: If <enter> is not pressed at this
point, no changes will be recorded to the space-tosales settings.) The display will automatically return
to “Space to Sales.” Press <up> to continue to the
next prompt, “Set Configuration.”
Page 23
SECTION 3: Vender Programming
Set
Configuration
If <enter> is pressed at the “Set Configuration” prompt,
the controller will enter the machine configuration mode.
This mode is used to set vender options dealing with
pricing, vending, payback, and a few other features. While
in Configurations mode, the display will show the configuration followed by the current setting (“On” [enabled] or
“Off” [disabled]). Using <up> or <down> will allow you to
cycle through all available configuration options. If <exit>
is pressed at any time during this operation the controller
will return to the “Configurations” prompt. If <enter> is
pressed the display will flash “X” (the current status).
Pressing <up> or <down> will cause the flashing status to
toggle between “On” and “Off.” When the desired status
is displayed, pressing <enter> will save that status.
•
If X = Off, only errors will be displayed when the door
is open.
If X = On, sales and cash totals will be displayed and
“Errors Were Detected” or “No Errors Detected” will
replace the error codes when the door is open.
•
Multi Price
This option is used to toggle between the single-price
and multi-price modes. In the single-price mode, the
price of selection 1 will be used for all selections. In
the multi-price mode, each shelf or each selection can
be set to a different price.
•
If X = Off, single pricing is used.
If X = On, multi pricing is used.
•
Hide Menu
This option is used to disable or hide certain menu
items.
If X = Off, all menu items will appear.
If X = On, certain menu items will not appear.
•
POS Disable
This configuration is used to disable the Point of Sales
(POS) greeting (i.e., “Ice Cold Drinks,” etc.).
Reset Counts
This option is used to allow the door switch to reset all
resettable MIS (cash and sales counts, etc.).
If X = Off, all resettable MIS registers are reset only
when the “CF” command is received from the handheld device (HHC).
If X = On, all resettable MIS registers are reset when
the door switch is sensed as open and at least one of
the resettable MIS registers has been read (i.e.,
individual cash and sales counts).
The following information describes the various machine
configuration options.
•
Open Door Totals
This option is used to turn on the display of the total
machine sales and total machine cash values in the
open-door mode.
No Cheat Mode
This option is used to prevent vending with insufficient change to pay back correct change after a
purchase. If disabled and the correct change cannot
be paid back, the vend is aborted and the deposited
credit is returned if possible.
If X = Off, the cheat mode is disabled.
If X = On, the cheat mode is enabled.
•
Save Credit
This configuration is used to determine how long
credit will be displayed.
If X = Off, established credit will be erased after five
minutes of no activity.
If X = On, credit will be displayed indefinitely.
If X = Off, no POS greeting will be shown.
If X = On, the greeting will be shown in Sales mode.
Page 24
Royal Vision Vender
SECTION 3: Vender Programming
•
Forced Attempt
This option prevents the machine from becoming a
change maker. When this mode is enabled, escrow of
coins is allowed until the maximum vend price is met or
exceeded.
Once this condition is met, any accumulated credit
must be used toward a vend attempt, and coins will
not be dispensed for credit in response to an escrow
request. If a sold out selection, or if a valid selection
that becomes sold out, is made, this option will be
over-ridden and an escrow will be honored.
If X = Off, forced vend attempt is disabled.
If X = On, forced vend attempt is enabled.
Note that Forced Attempt has no effect on the card
reader; once a card is inserted it can always be
returned to the customer via the escrow lever on the
changer or return button on the card reader.
•
Multi Vend
This option will allow multiple purchases without reentering coins. If enabled, instead of immediately
returning the change after a vend, the credit will remain
on the display to be used for another selection. An
escrow request will be honored at any time. This
option will take precedence over the force vend option
after the first vend has been completed.
•
DEX Auto Reset
This option will allow all cash and sales counts to be
reset after they are read using a hand-held computer
(HHC).
If X = Off, cash and sales counts will accumulate.
If X = On, cash and sales counts can be reset.
•
Debug Enable
This configuration is used for special factory test
modes. It should be left in the “Off” state.
Door
Password
If <enter> is pressed at the “Door Password” prompt, the
controller will display the current password for the external
menu. The first digit of the number will be flashing.
Pressing <up> or <down> will adjust the currently flashing
digit up or down. Pressing <enter> will save the currently
flashing digit and cause the next digit of the password to
begin flashing. All digits may be modified in this manner.
Pressing <exit> at any point in the procedure will save the
currently displayed password and return you to the “Door
Password” prompt. From the “Door Password” prompt,
use <up> to proceed to the next prompt, “Lighting.”
Note: The factory pre-set password is 1-3-2-4.
If X = Off, multi-vend is disabled.
If X = On, multi-vend is enabled.
•
Bill Escrow
This option will allow escrowing of bills. If enabled,
and the current bill value inserted takes the accumulated credit over the maximum price, the bill will be held
in the escrow position. If the rule is disabled, bills will
always go to the cash box.
If X = Off, Bill Escrow is disabled.
If X = On, Bill Escrow is enabled.
Royal Vision Vender
Page 25
SECTION 3: Vender Programming
Lighting
If <enter> is pressed at the “Start Hour” prompt, the
controller will enter the start time setting routine. The
display will show the current four-digit hour and
minute setting, in 24-hour format. The hour setting will
be flashing to indicate that it can be modified. Pressing <up> or <down> will increase or decrease the hour.
Pressing <enter> will stop the hour from flashing and
cause the minutes to flash, indicating they can be
modified. Pressing <up> or <down> will increase or
decrease the minutes value. Pressing <enter> again
will save the displayed setting and return you to the
“Start Hour” prompt. Pressing <exit> while in editing
mode will return to the “Start Hour” prompt without
saving changes.
If <enter> is pressed at the “Lighting” prompt, the
controller will enter the lighting control mode. Using <up>
or <down>, the board will rotate through the various
lighting control settings (“Enable Timer,” “Start Time,” and
“Stop Time”). If <exit> is pressed, the controller will return
to the “Lighting” prompt. Press <up> to proceed to the
next prompt, “Set Refrigeration.”
•
•
Enable Timer
Upon first entry into “Lighting,” the controller will
display “Enable Timer.” The lighting timer is used to
enable or disable the main door lights. Press <enter>
to show the current setting (“On” or “Off”). If set to
“On,” the lighting control will be enabled. If set to
“Off,” the lighting control will be disabled, and the
lights will always be on. Toggle between “On” or
“Off” by pressing <up> or <down>. Pressing <enter>
will save the displayed setting and return the controller to the non-editable “Enable Timer” prompt. Use
<up> to proceed to the next prompt, “Start Time.”
Start Time
If <enter> is pressed at the “Start Time” prompt, the
controller will enter the start lighting control time
setting routing. Upon entry into this routine, the
display will show one of the two start time setting
modes, “Start Day” or “Start Hour.” Pressing <up> or
<down> will cycle between the two. Pressing <exit> at
this point will return to the “Start Time” prompt
without saving any changes. Use <up> to proceed to
the next prompt, “Stop Time.”
If <enter> is pressed at the “Start Day” prompt, the
controller will enter the day of the week setting
routine. The display will show “YY X”, where “YY” is
the day of the week (Monday, Tuesday, Wednesday,
Thursday, Friday, Saturday, Sunday, or Every Day) and
“X” is either “On” or “Off.” Pressing <up> or <down>
will cycle through the days of the week. If <enter> is
pressed at the “YY X” prompt, “X” will flash indicating
that it can be changed. Pressing <up> or <down> will
toggle “X” between “On” (enabled) and “Off”
(disabled). Pressing <enter> again will save the
displayed setting and return you to the non-flashing
“YY X” prompt. Pressing <exit> will return to the
“Start Day” prompt.
Page 26
•
Stop Time
If <enter> is pressed at the “Stop Time” prompt, the
controller will enter the stop lighting control time
setting routing. Upon entry into this routine, the
display will show one of the two stop time setting
modes, “Stop Day” or “Stop Hour. Pressing <up> or
<down> will cycle between the two. Pressing <exit> at
this point will return the controller to the “Stop Time”
prompt without saving any changes. From “Stop
Time,” use <exit> to return to the “Lighting” prompt.
If <enter> is pressed at the “Stop Day” prompt, the
controller will enter the day of the week setting
routine. The display will show “YY X”, where “YY” is
the day of the week (Monday, Tuesday, Wednesday,
Thursday, Friday, Saturday, Sunday, or Every Day) and
“X” is either “On” or “Off”. Pressing <up> or <down>
will cycle through the days of the week. If <enter> is
pressed at the “YY X” prompt, “X” will flash, indicating that it can be changed. Pressing <up> or <down>
will toggle “X” between “On” (enabled) and “Off”
(disabled). Pressing <enter> again will save the
displayed setting and return you to the non-flashing
“YY X” prompt. Pressing <exit> will return to the
“Stop Day” prompt.
If <enter> is pressed at the “Stop Hour” prompt, the
controller will enter the stop time setting routine. The
display will show the current four-digit hour and
minute setting, in 24-hour format. The hour setting will
be flashing to indicate that it can be modified. Pressing <up> or <down> will increase or decrease the hour.
Pressing <enter> will stop the hour from flashing and
cause the minutes to flash, indicating they can be
modified. Pressing <up> or <down> will increase or
decrease the minutes value. Pressing <enter> again
will save the displayed setting and return you to the
“Stop Hour” prompt. Pressing <exit> while in editing
mode will return the controller to the “Stop Hour”
prompt without saving changes.
Royal Vision Vender
SECTION 3: Vender Programming
Set
Refrigeration
display will show the current four-digit hour and
minute setting, in 24-hour format. The hour setting will
be flashing to indicate that it can be modified. Pressing <up> or <down> will increase or decrease the hour.
Pressing <enter> will stop the hour from flashing and
cause the minutes to flash, indicating they can be
modified. Pressing <up> or <down> will increase or
decrease the minutes value. Pressing <enter> again
will save the displayed setting and return you to the
“Start Hour” prompt. Pressing <exit> while in editing
mode will return to the “Start Hour” prompt without
saving changes.
If <enter> is pressed at the “Set Refrigeration” prompt, the
controller will enter the refrigeration control mode. Using
<up> or <down>, the board will rotate through the various
refrigeration control settings (“Enable Timer,” “Start Time,”
“Stop Time,” “Degree,” “Setpoint,” “Storage,” “Display,”
“Health Safety,” “Temp Testing,” and “X Hrs till Defrost”).
If <exit> is pressed, the controller will return to the “Set
Refrigeration” prompt. Press <up> to proceed to the next
prompt, “Set Internal Clock.”
•
•
Enable Timer
Upon first entry into “Set Refrigeration,” the controller
will display “Enable Timer.” The energy conservation
timer is used to enable or disable the energy conservation mode. Press <enter> to show the current setting
(“On” or “Off”). If set to “On,” the cabinet temperature will be allowed to raise to the “Storage” programmed time blocks. If set to “Off,” the energy
conservation timer will be disabled, and the refrigeration unit will operate as normal to maintain the
“Setpoint” temperature. Toggle between “On” or
“Off” by pressing <up> or <down>. Pressing <enter>
will save the displayed setting and return the controller to the non-editable “Enable Timer” prompt. Use
<up> to proceed to the next prompt, “Start Time.”
Start Time
If <enter> is pressed at the “Start Time” prompt, the
controller will enter the start energy conservation time
setting routing. Upon entry into this routine, the
display will show one of the two start time setting
modes, “Start Day” or “Start Hour.” Pressing <up> or
<down> will cycle between the two. Pressing <exit> at
this point will return to the “Start Time” prompt
without saving any changes. Use <up> to proceed to
the next prompt, “Stop Time.”
If <enter> is pressed at the “Start Day” prompt, the
controller will enter the day of the week setting
routine. The display will show “YY X”, where “YY” is
the day of the week (Monday, Tuesday, Wednesday,
Thursday, Friday, Saturday, Sunday, or Every Day) and
“X” is either “On” or “Off.” Pressing <up> or <down>
will cycle through the days of the week. If <enter> is
pressed at the “YY X” prompt, “X” will flash indicating
that it can be changed. Pressing <up> or <down> will
toggle “X” between “On” (enabled) and “Off”
(disabled). Pressing <enter> again will save the
displayed setting and return you to the non-flashing
“YY X” prompt. Pressing <exit> will return to the
“Start Day” prompt.
If <enter> is pressed at the “Start Hour” prompt, the
controller will enter the start time setting routine. The
Royal Vision Vender
•
Stop Time
If <enter> is pressed at the “Stop Time” prompt, the
controller will enter the stop energy conservation time
setting routing. Upon entry into this routine, the
display will show one of the two stop time setting
modes, “Stop Day” or “Stop Hour. Pressing <up> or
<down> will cycle between the two. Pressing <exit> at
this point will return the controller to the “Stop Time”
prompt without saving any changes. Use <up> to
proceed to the next prompt, “Degrees.”
If <enter> is pressed at the “Stop Day” prompt, the
controller will enter the day of the week setting
routine. The display will show “YY X”, where “YY” is
the day of the week (Monday, Tuesday, Wednesday,
Thursday, Friday, Saturday, Sunday, or Every Day) and
“X” is either “On” or “Off”. Pressing <up> or <down>
will cycle through the days of the week. If <enter> is
pressed at the “YY X” prompt, “X” will flash, indicating that it can be changed. Pressing <up> or <down>
will toggle “X” between “On” (enabled) and “Off”
(disabled). Pressing <enter> again will save the
displayed setting and return you to the non-flashing
“YY X” prompt. Pressing <exit> will return to the
“Stop Day” prompt.
If <enter> is pressed at the “Stop Hour” prompt, the
controller will enter the stop time setting routine. The
display will show the current four-digit hour and
minute setting, in 24-hour format. The hour setting will
be flashing to indicate that it can be modified. Pressing <up> or <down> will increase or decrease the hour.
Pressing <enter> will stop the hour from flashing and
cause the minutes to flash, indicating they can be
modified. Pressing <up> or <down> will increase or
decrease the minutes value. Pressing <enter> again
will save the displayed setting and return you to the
“Stop Hour” prompt. Pressing <exit> while in editing
mode will return the controller to the “Stop Hour”
prompt without saving changes. From “Stop Time,”
pressing <up> will proceed you to the next prompt,
“Degree.”
Page 27
SECTION 3: Vender Programming
•
Degree
If <enter> is pressed at the “Degree X” prompt, the
controller will display “Degree X,” where “X” will be
flashing. If X = F, the controller is currently in
Fahrenheit mode; if X = C, the controller is currently in
Celsius mode. Pressing <up> or <down> will toggle
“X” between “F” and “C.” Pressing <enter> at this
point will save the displayed temperature mode and
return you to the “Degree X” prompt. Pressing <exit>
will return you to the “Degree X” prompt without
saving changes. Use <up> to proceed to the next
prompt, “Setpoint.”
•
Setpoint
The setpoint default is 36º F (2.0º C). If <enter> is
pressed at the “Setpoint” prompt, the controller will
display the current set point temperature setting “xx F”
or “xx.x C,” depending on the “Degree” setting. Using
<up> or <down> will increase or decrease the number
by 1º F (0.5º C). Pressing <enter> will save the set
point and return you to the “Setpoint” prompt.
Pressing <exit> will return to the “Setpoint” prompt
without saving changes. From “Setpoint,” press <up>
to proceed to the next prompt, “Storage.”
•
Storage
The storage temperature is the maximum temperature
the cabinet is allowed to reach when the timer mode is
in use. The storage default is 45º F (7º C). If <enter>
is pressed at the “Storage” prompt, the controller will
display the current storage temperature setting “xx F”
or “xx.x C,” depending on the “Degree” setting. Using
<up> or <down> will increase or decrease the number
by 1º F (0.5º C). Pressing <enter> will save the storage
temperature and return you to the “Storage” prompt.
Pressing <exit> will return to the “Storage” prompt
without saving changes. From “Storage,” press <up>
to proceed to the next prompt, “Display.”
Page 28
•
Display
If <enter> is pressed at the “Display” prompt, the
controller will display “Display X,” where “X” will be
flashing. If X = “On”, the controller will display the
temperature immediately following the POS. If X =
“Off”, the controller will not display the temperature.
Pressing <up> or <down> will toggle “X” between
“On” and “Off.” Pressing <enter> will save the
currently displayed setting and return you to the
“Display” prompt. Pressing <exit> will return you to
the “Display” prompt without saving changes. From
“Display,” press <up> to proceed to the next prompt,
“Health Safety.”
•
Health Safety
This submode is used to enable a timer used in
conjunction with an optional health sensor. If <enter>
is pressed at the “Health Safety X” prompt, the “X”
will begin to flash. If X = Off, this indicates that the
health timer will be disabled. If X = On, the timer is
enabled. Using <up> or <down> will toggle the value
of “X.” If <enter> is pressed at this point, the
currently displayed value of “X” will be saved, and the
display will return to the non-editable “Health Safety”
prompt. Press <up> to proceed to the next prompt,
“Temp Testing.”
•
Temp Testing
This item is used for special factory test modes. It
should be left in the “Off” state. Press <up> to
proceed to the next prompt, “X Hrs till Defrost.”
•
X Hrs till Defrost
This submode is used to determine how often the
vender will go into defrost mode. (X = the current
setting for defrost mode.) If <enter> is pressed at the
“X Hrs till Defrost” prompt, the “X” setting will flash.
Use <up> or <down> to change the current setting.
Once set, press <enter> to save this setting. From “X
Hrs till Defrost,” use <exit> to return to the “Set
Refrigeration” prompt.
Royal Vision Vender
SECTION 3: Vender Programming
Set
Internal
Clock
•
If <enter> is pressed at the “Set Internal Clock” prompt,
the controller will enter the current time setting mode by
displaying “Enable.” Using <up> or <down> will allow you
to cycle through all available time setting options. If <exit>
is pressed any time during this operation, the controller will
return to the “Set Internal Clock” prompt. Use <up> to
proceed to the next prompt, “Set Language.”
•
•
•
Enable
If <enter> is pressed at the “Enable X” prompt, the
current value of X (either “On” or “Off”) will flash.
This function is used to enable or disable the real-time
clock. Use <up> or <down> to toggle between “On”
and “Off.” Pressing <enter> will save the value of X
and return the controller to the “Enable” prompt.
Date
If <enter> is pressed at the “Date” prompt, the current
date setting (as known by the controller) is displayed
in DD-MMMM-YYYY fashion (for example, “31January-2003”). If <enter> is pressed again, the
current day will begin to flash. Use <up> or <down> to
change the day setting. Once it is set, press <enter>
again to move to the month. Pressing <enter> again
will cause the year to flash. After the year has been
set, press <enter> once more to save the changes.
After saving the change, press <exit> to return to the
non-resettable “Date” prompt. Press <up> to move to
the next prompt, “Time.”
Time
If <enter> is pressed at the “Time” prompt, the current
time (as known by the controller) is displayed in a 24hour format. The left two digits of the display show
the current hour setting; the right two digits show the
current minutes. The hour setting will be flashing.
Pressing <up> or <down> at this point will increase or
decrease the hour setting. If <enter> is pressed, the
minute setting will flash. Pressing <up> or <down> at
this point will increase or decrease the minutes setting.
Pressing <enter> again will save the displayed hour
and minutes setting and return you to the “Time”
prompt. Pressing <exit> while in editing mode will
return you to the “Hour” prompt without saving
changes. Use <up> to proceed to the next prompt,
“DST.”
Royal Vision Vender
DST
If <enter> is pressed at the “DST” prompt, the display
will show the current daylight saving time code. Using
<up> or <down> will rotate through the available
options listed below. Pressing <enter> when the
desired saving time code is displayed will save that
code and return you to the “DST” prompt. Pressing
<exit> at any time in this options list will return you to
the “DST” prompt without saving any changes. Use
<up> to proceed to the next prompt, “Display Time.”
“OFF”:
No daylight savings time changes
made.
“Australia”: Australian rules
Set forward 1 hour at 1:00 a.m. on
first Sunday in October
Set back 1 hour at 1:00 a.m. on last
Sunday in March
“Europe”: European rules
Set forward 1 hour at 1:00 a.m. on last
Sunday in March
Set back 1 hour at 1:00 a.m. on last
Sunday in October
“N. Am.”:
North American rules
Set forward 1 hour at 2:00 a.m. on first
Sunday in April
Set back 1 hour at 2:00 a.m. on last
Sunday in October
•
Display Time
If <enter> is pressed at the “Display Time X” prompt,
the display will show “Display Time X”, where “X”
will be flashing. If X = Off, this indicates that the
current time will not be displayed with the POS
message in sales mode. If X = On, the time will be
displayed in sales mode. Using <up> or <down> will
toggle the value of “X.” If <enter> is pressed at this
point the currently displayed value of “X” will be
saved, and you will be returned to the non-editable
“Display Time” prompt. Use <exit> to return to the
“Set Internal Clock” prompt.
Set
Language
If <enter> is pressed at the “Set Language” prompt, the
controller will display the current language setting.
Pressing <up> or <down> will sequence through the
available language settings: English, French, German,
Italian, Portuguese, Spanish, Slovene, Finnish, Norwegian,
and Custom. Pressing <enter> at any point in the procedure will save the currently displayed language setting and
return you to the “Set Language” prompt. Custom
language is present only if custom language has been
uploaded using DEX. From the “Set Language” prompt,
use <up> to proceed to the next prompt, “Select Block 1.”
Page 29
SECTION 3: Vender Programming
Select Block 1 / 2 / 3
If <enter> is pressed at the “Start Hour” prompt, the
controller will enter the start time setting routine. The
display will show the current four-digit hour and
minute setting, in 24-hour format. The hour setting will
be flashing to indicate that it can be modified. Pressing <up> or <down> will increase or decrease the hour.
Pressing <enter> will stop the hour from flashing and
cause the minutes to flash, indicating they can be
modified. Pressing <up> or <down> will increase or
decrease the minutes value. Pressing <enter> again
will save the displayed setting and return you to the
“Start Hour” prompt. Pressing <exit> while in editing
mode will return to the “Start Hour” prompt without
saving changes.
If <enter> is pressed at the “Select Block X” prompt (where
X = 1, 2, or 3), the controller will enter the selection
blocking control mode. Using <up> or <down>, you can
cycle through the various selection blocking timer settings
(“Enable Timer,” “Start Time,” “Stop Time,” “Select,” and
“Light Control”). If <exit> is pressed, the controller will
return to the “Selection Blocking X” prompt. Use <up> to
proceed to the next prompt, “Discount.”
•
•
Enable Timer
Upon first entry into “Selection Blocking X,” the
controller will display “Enable Timer X.” If <enter> is
pressed at “Enable Timer X,” “X” will begin to flash,
indicating that it can be edited. If X = On, selection
blocking will be enabled. This means that active
programmed selections will not be allowed to vend
during programmed time blocks and a “No Sale Until
xx:xx” message will be displayed. The “xx:xx” will be
replaced with the time vends will be allowed again (12hour format if using “North American” or “OFF”
daylight savings time settings; 24-hour format
otherwise). If X = Off, selection blocking will be
disabled. Pressing <up> or <down> will allow the user
to toggle “X” between “On” and “Off”. Pressing
<enter> will save the displayed setting and return you
to the non-editable “Enable Timer” prompt. Use <up>
to proceed to the next prompt, “Start Time.”
Start Time
If <enter> is pressed at the “Start Time” prompt, the
controller will enter the start selection blocking time
setting routing. Upon entry into this routine, the
display will show one of the two start time setting
modes, “Start Day” or “Start Hour.” Pressing <up> or
<down> will cycle between the two. Pressing <exit> at
this point will return to the “Start Time” prompt
without saving any changes. Use <up> to proceed to
the next prompt, “Stop Time.”
If <enter> is pressed at the “Start Day” prompt, the
controller will enter the day of the week setting
routine. The display will show “YY X”, where “YY” is
the day of the week (Monday, Tuesday, Wednesday,
Thursday, Friday, Saturday, Sunday, or Every Day) and
“X” is either “On” or “Off.” Pressing <up> or <down>
will cycle through the days of the week. If <enter> is
pressed at the “YY X” prompt, “X” will flash indicating
that it can be changed. Pressing <up> or <down> will
toggle “X” between “On” (enabled) and “Off”
(disabled). Pressing <enter> again will save the
displayed setting and return you to the non-flashing
“YY X” prompt. Pressing <exit> will return to the
“Start Day” prompt.
Page 30
•
Stop Time
If <enter> is pressed at the “Stop Time” prompt, the
controller will enter the stop selection blocking time
setting routing. Upon entry into this routine, the
display will show one of the two stop time setting
modes, “Stop Day” or “Stop Hour. Pressing <up> or
<down> will cycle between the two. Pressing <exit> at
this point will return the controller to the “Stop Time”
prompt without saving any changes. Use <up> to
proceed to the next prompt, “Select.”
If <enter> is pressed at the “Stop Day” prompt, the
controller will enter the day of the week setting
routine. The display will show “YY X”, where “YY” is
the day of the week (Monday, Tuesday, Wednesday,
Thursday, Friday, Saturday, Sunday, or Every Day) and
“X” is either “On” or “Off”. Pressing <up> or <down>
will cycle through the days of the week. If <enter> is
pressed at the “YY X” prompt, “X” will flash, indicating that it can be changed. Pressing <up> or <down>
will toggle “X” between “On” (enabled) and “Off”
(disabled). Pressing <enter> again will save the
displayed setting and return you to the non-flashing
“YY X” prompt. Pressing <exit> will return to the
“Stop Day” prompt.
If <enter> is pressed at the “Stop Hour” prompt, the
controller will enter the stop time setting routine. The
display will show the current four-digit hour and
minute setting, in 24-hour format. The hour setting will
be flashing to indicate that it can be modified. Pressing <up> or <down> will increase or decrease the hour.
Pressing <enter> will stop the hour from flashing and
cause the minutes to flash, indicating they can be
modified. Pressing <up> or <down> will increase or
decrease the minutes value. Pressing <enter> again
will save the displayed setting and return you to the
“Stop Hour” prompt. Pressing <exit> while in editing
mode will return the controller to the “Stop Hour”
prompt without saving changes.
Royal Vision Vender
SECTION 3: Vender Programming
•
•
Select
If <enter> is pressed at the “Select” prompt, the
controller will display “Selection N X”, where “N”
represents the selection number and “X” indicates
whether that selection will be blocked or not. Using
<up> or <down> will allow you to cycle through each
individual selection. If <enter> is pressed at “Selection N X”, the display will flash “X” (block status) for
the displayed selection. Pressing <up> or <down> will
toggle “X” between “On” (enabled) or “Off” (disabled). When the desired setting is on the display,
pressing <enter> will save the setting and return to
the selection level, where the block status no longer
flashes. If the “All Selections X” is set and saved, all
the selections will be set at once. Use <exit> to return
to the “Blocked Selections” prompt. From the
“Blocked Selections” prompt, use <up> to proceed to
the next prompt, “Light Control.”
Light Control
If <enter> is pressed at the “Light Control X” prompt,
the “X” will begin to flash. If X = “On”, the controller
will turn off the main door lights while the selections
are blocked. If X = “Off”, the controller will not affect
the operation of the lights. Pressing <up> or <down>
will toggle “X” between “On” and “Off.” Pressing
<enter> will save the currently displayed setting and
return you to the “Light Control” prompt. Pressing
<exit> will return you to the “Light Control” prompt
without saving changes. From “Light Control,” press
<exit> to return to the “Select Block X” prompt.
Discount
If <enter> is pressed at the “Discount” prompt, the
controller will enter the discount timer mode. Using <up>
or <down>, you can cycle through the various discount
timer settings (“Enable Timer,” “Start Time,” “Stop Time,”
“Select,” and “Less Amount”). If <exit> is pressed, the
controller will return to the “Discount” prompt. Use <up>
to proceed to the next prompt, “Override Options.”
•
Enable Timer
Upon first entry into “Discount,” the controller will
display “Enable Timer X.” If <enter> is pressed at
“Enable Timer X,” “X” will begin to flash, indicating
that it can be edited. If X = On, the discount timer will
be enabled. This means that active programmed
selections will be discounted during programmed time
blocks. If X = Off, the discount timer will be disabled.
Pressing <up> or <down> will allow the user to toggle
“X” between “On” and “Off”. Pressing <enter> will
save the displayed setting and return you to the noneditable “Enable Timer” prompt. Use <up> to proceed
to the next prompt, “Start Time.”
•
Start Time
If <enter> is pressed at the “Start Time” prompt, the
controller will enter the start discounting time setting
routing. Upon entry into this routine, the display will
show one of the two start time setting modes, “Start
Day” or “Start Hour.” Pressing <up> or <down> will
cycle between the two. Pressing <exit> at this point
will return to the “Start Time” prompt without saving
any changes. Use <up> to proceed to the next prompt,
“Stop Time.”
If <enter> is pressed at the “Start Day” prompt, the
controller will enter the day of the week setting
routine. The display will show “YY X”, where “YY” is
the day of the week (Monday, Tuesday, Wednesday,
Thursday, Friday, Saturday, Sunday, or Every Day) and
“X” is either “On” or “Off.” Pressing <up> or <down>
will cycle through the days of the week. If <enter> is
pressed at the “YY X” prompt, “X” will flash indicating
that it can be changed. Pressing <up> or <down> will
toggle “X” between “On” (enabled) and “Off”
(disabled). Pressing <enter> again will save the
displayed setting and return you to the non-flashing
“YY X” prompt. Pressing <exit> will return to the
“Start Day” prompt.
Royal Vision Vender
Page 31
SECTION 3: Vender Programming
If <enter> is pressed at the “Start Hour” prompt, the
controller will enter the start time setting routine. The
display will show the current four-digit hour and
minute setting, in 24-hour format. The hour setting will
be flashing to indicate that it can be modified. Pressing <up> or <down> will increase or decrease the hour.
Pressing <enter> will stop the hour from flashing and
cause the minutes to flash, indicating they can be
modified. Pressing <up> or <down> will increase or
decrease the minutes value. Pressing <enter> again
will save the displayed setting and return you to the
“Start Hour” prompt. Pressing <exit> while in editing
mode will return to the “Start Hour” prompt without
saving changes.
•
Stop Time
If <enter> is pressed at the “Stop Time” prompt, the
controller will enter the stop discounting time setting
routing. Upon entry into this routine, the display will
show one of the two stop time setting modes, “Stop
Day” or “Stop Hour. Pressing <up> or <down> will
cycle between the two. Pressing <exit> at this point
will return the controller to the “Stop Time” prompt
without saving any changes. Use <up> to proceed to
the next prompt, “Select.”
If <enter> is pressed at the “Stop Day” prompt, the
controller will enter the day of the week setting
routine. The display will show “YY X”, where “YY” is
the day of the week (Monday, Tuesday, Wednesday,
Thursday, Friday, Saturday, Sunday, or Every Day) and
“X” is either “On” or “Off”. Pressing <up> or <down>
will cycle through the days of the week. If <enter> is
pressed at the “YY X” prompt, “X” will flash, indicating that it can be changed. Pressing <up> or <down>
will toggle “X” between “On” (enabled) and “Off”
(disabled). Pressing <enter> again will save the
displayed setting and return you to the non-flashing
“YY X” prompt. Pressing <exit> will return to the
“Stop Day” prompt.
•
Select
If <enter> is pressed at the “Select” prompt, the
controller will display “Selection N X”, where “N”
represents the selection number and “X” indicates
whether that selection will be discounted or not.
Using <up> or <down> will allow you to cycle through
each individual selection. If <enter> is pressed at
“Selection N X”, the display will flash “X” (discount
status) for the displayed selection. Pressing <up> or
<down> will toggle “X” between “On” (enabled) or
“Off” (disabled). When the desired setting is on the
display, pressing <enter> will save the setting and
return to the selection level, where the discount status
no longer flashes. If the “All Selections X” is set and
saved, all the selections will be set at once. Use <exit>
to return to the “Select” prompt. Use <up> to proceed
to the next prompt, “Less Amount.”
•
Less Amount
If <enter> is pressed at the “Less Amount” prompt,
the controller will enter the discount amount setting.
The first display will show the current four-digit
discount amount (00.00 - 99.95). For example, if the
discount amount is set to 0.10, every price set in the
price mode will be reduced by 0.10 during the discount
time. Using <up> or <down> will allow the user to
increase or decrease the amount in increments of the
least coin tube amount. Press <enter> to save the
setting and return the controller to the “Less Amount”
prompt. Press <exit> to return the controller to the
“Less Amount” prompt without saving any changes.
Pressing <exit> at the “Less Amount” prompt will
bring the controller back to the “Discount” prompt.
If <enter> is pressed at the “Stop Hour” prompt, the
controller will enter the stop time setting routine. The
display will show the current four-digit hour and
minute setting, in 24-hour format. The hour setting will
be flashing to indicate that it can be modified. Pressing <up> or <down> will increase or decrease the hour.
Pressing <enter> will stop the hour from flashing and
cause the minutes to flash, indicating they can be
modified. Pressing <up> or <down> will increase or
decrease the minutes value. Pressing <enter> again
will save the displayed setting and return you to the
“Stop Hour” prompt. Pressing <exit> while in editing
mode will return the controller to the “Stop Hour”
prompt without saving changes.
Page 32
Royal Vision Vender
SECTION 3: Vender Programming
Override
Options
•
If the controller is equipped with a key switch, it can be
used to override some of the settings stored for normal
operation of the vendor. The key switch can be programmed to control one or several features simultaneously.
If a feature is enabled in this menu, that feature will
override normal machine operation when the switch is
activated.
If <enter> is pressed at the “Override Options” prompt the
controller will enter the override configuration setting mode
by displaying “Free Vend”. Using <up> or <down> will
allow you to cycle through all available override configuration options. If <exit> is pressed at any time during this
operation, the controller will return to the “Override
Options” prompt. From the “Override Options” prompt,
press <up> to proceed to the final prompt, “Return to
Sales.”
The following options can be selected in the override
selection level:
•
If X = Off, no vend will be disabled when the key
switch is activated.
If X = On, no vend will be enabled when the key
switch is activated.
Note: If both “Free Vend” and “No Vend” are
enabled, “No Vend” will be given priority (no
vending will be allowed).
•
Free Vend
If <enter> is pressed at the “Free Vend X” prompt,
where “X” is the current status (either “On” or “Off”),
the display will flash the current status. Pressing <up>
or <down> will cause the flashing status to toggle
between “On” and “Off.” When the desired status is
displayed, pressing <enter> will save that status and
return you to the “Free Vend X” display (status no
longer flashing). If “Free Vend” is enabled, “Free” will
be displayed immediately after the POS message.
Blocking 1 / 2 / 3
If <enter> is pressed at the “Blocking N X” prompt,
where “N” = 1, 2, or 3 and where “X” is the current
status (either “On” or “Off”), the display will flash the
current status. Pressing <up> or <down> will cause the
flashing status to toggle between “On” and “Off.”
When the desired status is displayed, pressing
<enter> will save that status and return you to the
“Blocking N X” display (status no longer flashing).
If X = Off, selection blocking will be disabled when the
key switch is activated.
If X = On, selection blocking will be enabled when the
key switch is activated.
If X = Off, free vend will be disabled when the key
switch is activated.
If X = On, free vend will be enabled when the key
switch is activated.
Note: All free vends will increase free vend MIS
counters (VA3).
No Vend
If <enter> is pressed at the “No Vend X” prompt,
where “X” is the current status (either “On” or “Off”),
the display will flash the current status. Pressing <up>
or <down> will cause the flashing status to toggle
between “On” and “Off.” When the desired status is
displayed, pressing <enter> will save that status and
return you to the “No Vend X” display (status no
longer flashing). If “No Vend” is enabled, no selections will be allowed to vend and a “No Sale” message
will be displayed.
Note: “Blocking” is used in conjunction with
“Selection Blocking X” programming menus.
•
Vend Discount
If <enter> is pressed at the “Vend Discount X”
prompt, where “X” is the current status (either “On” or
“Off”), the display will flash the current status.
Pressing <up> or <down> will cause the flashing status
to toggle between “On” and “Off.” When the desired
status is displayed, pressing <enter> will save that
status and return you to the “Vend Discount X”
display (status no longer flashing).
If X = Off, discounting will be disabled when the key
switch is activated.
If X = On, discounting will be enabled when the key
switch is activated.
Royal Vision Vender
Page 33
SECTION 3: Vender Programming
•
Lighting
If <enter> is pressed at the “Lighting X” prompt,
where “X” is the current status (either “On” or “Off”),
the display will flash the current status. Pressing <up>
or <down> will cause the flashing status to toggle
between “On” and “Off.” When the desired status is
displayed, pressing <enter> will save that status and
return you to the “Lighting X” display (status no
longer flashing).
If X = Off, lighting control will be disabled when the
key switch is activated.
If X = On, lighting control will be enabled when the
key switch is activated.
•
Refrigeration
If <enter> is pressed at the “Refrigeration X” prompt,
where “X” is the current status (either “On” or “Off”),
the display will flash the current status. Pressing <up>
or <down> will cause the flashing status to toggle
between “On” and “Off.” When the desired status is
displayed, pressing <enter> will save that status and
return you to the “Refrigeration X” display (status no
longer flashing).
If X = Off, refrigeration control will be disabled when
the key switch is activated.
If X = On, refrigeration control will be enabled when
the key switch is activated.
Return
If <enter> is pressed at the “Return” prompt, the controller
will return to the idle condition of the sales mode, unless
there is established credit. If credit exists, the credit
amount will be displayed after returning to sales mode.
Page 34
Royal Vision Vender
SECTION 4: Vender Maintenance
Vender Maintenance
What to Clean
CAUTION: Electrical and electronic components should
NEVER be subjected to water.
Belts: The belts should always be kept clean and free of
debris to ensure efficient operation, as well as to extend the
life of the belts.
Cells: Make sure the cells are free of dirt, syrup, and
What to Lubricate
Latch Strike Nut: The latch strike nut should not be
lubricated.
Refrigeration Unit: The refrigeration unit is a
sealed system that does not require any lubrication. Also,
the condenser and evaporator fan motors do not require
any lubrication.
Preventive Maintenance
debris. Build-up of foreign material, especially syrup from
busted or leaking packages, can cause the cell to stick and
adversely affect the cell’s performance. Use warm soapy
water or other food grade cleaning agents to maintain a
clean smooth surface. Also make sure that the cells are
level and seated properly in the tracks that they slide into.
If the back of the cell is elevated it is possible that the cup
will not engage the release lever properly or the cup may
hit these levers on the way to other cells.
Vender Leveling: Make sure that the vender is
Condenser and Evaporator Coils: For
Vender Support Leg: The RVV is equipped with a
efficient operation, the condenser and evaporator coils
must be kept clear of any dirt or foreign materials. Clean
dirt and debris from the condenser and evaporator coils
with a small light-bristled brush, vacuum cleaner, or
compressed air. This will help to ensure an extended unit
life.
Control Board: The vender’s control board should
always be enclosed by its cover to protect it. Routine
cleaning is not necessary but, if desired, the controller’s
area may be blown out with compressed air.
level when placed on site. If the vender is not properly
leveled it can begin to accumulate standing water, which
over a period of time may begin to freeze and will eventually freeze the evaporator. Another problem that may occur
from an unleveled vender will be improper vending, which
would include but not be limited to product not vending
from cell, product vending slow from cell, product not
being delivered to the delivery bin, or product jamming.
vender support leg. This leg is similar to the leveling legs
but is longer and is located in the bottom door hinge. It is
very critical that after the vender is placed on location and
is leveled that this support leg is brought down even with
the ground, floor, or whatever surface the vender is placed
on. If the support leg is not making contact with the
ground surface there is a possibility of the vender tipping
over when the door is opened, possibly resulting in broken
bones, dismemberment, or even death.
Lighting System: The lighting system contains
extremely high voltage (upwards of 600 volts), and power
Delivery Bin: Make sure that the delivery bin remains should always be disconnected when working with or
clean and free of any debris or other objects that may block
the optic sensors. Bottles sometimea have a tendency to
lose their labels, which may be left in the delivery bin. If
objects are left in the bin and the sensors are blocked, the
board will assume there is a package in the bin and will not
deliver product to the bin.
Elevator Arm and Cup Tracks: The elevator
arm and cup assemblies travel in aluminum tracks that
guide these components. Make sure that these tracks are
kept clean and free from foreign material such as dirt,
syrup, or other debris. Use a wet cloth to wipe these tracks
clean. Avoid using any type of silicone or lubricant, as
they may tend to collect dirt and will adversely affect
performance.
Royal Vision Vender
around this portion of the vender. Light bulbs should be
replaced whenever one or more of the bulb ends are
blackened or discolored, or when the lights are flickering or
are not lit, and it has been determined that the ballast is
good. Replace these bulbs as soon as it is determined they
are bad. If it is decided not to use the lighting system, the
ballast MUST be unplugged. DO NOT remove the bulbs
and leave the ballast plugged in. Doing so can cause the
ballast to generate a very high amount of electrical noise,
which can cause problems with or permanently damage
electronic components.
Page 35
SECTION 4: Vender Maintenance
Replacing the Belts
X-axis belt replacement
The X-axis belt controls the left and right movement of the
elevator cup assembly. To replace this belt:
1.
2.
3.
4.
5.
6.
On the upper idler assembly, loosen the nuts that hold
the X-axis upper mounting assembly in place. (See
Figure 4.2.) Pull the assembly downward to loosen
tension on the belt. Ensuring that the belt is now
loose, secure the assembly in place by retightening
one of the nuts on the assembly.
Loosen the nuts that secure the belt in the clamps on
the bottom of the elevator cup assembly.
Remove the existing belt, then install the new belt.
Route the belt as shown in Figure 4.1. Ensure that the
grooved side of the belt faces inward with respect to
the general loop formed by the belt’s routing.
Secure one end of the belt in the upper clamp below
the elevator cup. Tighten the clamp by screwing in the
upper set of nuts between the clamps.
Pull the other end of the belt firmly, and secure it in the
lower clamp.
Reloosen the nut on the upper idler assembly that was
tightened in step 1. The X-axis upper mounting
assembly will spring upward to tighten tension on the
belt. Once it has done so, tighten all three nuts on the
X-axis upper mounting assembly to secure the belt
tension.
Insert and tighten top
first, then bottom.
Note: Some parts not
shown for clarity.
Figure 4.1
Loosen these nuts for
X-axis belt replacement.
Loosen these nuts for
Y-axis belt replacement.
Figure 4.2
Page 36
Royal Vision Vender
SECTION 4: Vender Maintenance
Y-axis belt replacement
The Y-axis belt controls the up and down movement of the
elevator arm assembly. To replace this belt:
1.
2.
3.
4.
5.
6.
On the upper idler assembly, loosen the nuts that hold
the Y-axis upper mounting assembly in place. (See
Figure 4.2.) Pull the assembly downward to loosen
tension on the belt. Ensuring that the belt is now
loose, secure the assembly in place by retightening
one of the nuts on the assembly.
Loosen the nuts that secure the belt in the upper and
lower clamps. (See Figure 4.3.) These nuts are located
behind the clamps.
Remove the existing belt, then install the new belt.
Ensure that the grooved side of the belt faces inward.
Secure one end of the belt in one of the clamps, and
tighten the clamp by screwing in the nuts.
Pull the other end of the belt firmly, and secure it in the
other clamp.
Reloosen the nut on the upper idler assembly that was
tightened in step 1. The Y-axis upper mounting
assembly will spring upward to tighten tension on the
belt. Once it has done so, tighten all three nuts on the
Y-axis upper mounting assembly to secure the belt
tension.
Upper clamp
Lower clamp
Note: Some parts not
shown for clarity.
Figure 4.3
Royal Vision Vender
Page 37
SECTION 4: Vender Maintenance
Product Location Setup
Procedure
Make sure the adjustment nuts are tight (see Detail C) prior
to setting up the 4 corners.
Selection 12
Set X to 370 (do not change this setting) and set Y so that
the top of the cup lip is level with the bottom of the pusher
track (see Detail A). The lever should be centered within
the cup cutout (see Detail B and D). Remove cells 11/12
and 13/14 to gain access to the adjustment bolt (see Detail
C). Loosen the nut with a 7/16” wrench. Adjust the bolt
with a flat head screwdriver in order to center lever with the
cutout. Tighten the nut against the arm to lock the shelf
into place. Note: one full turn of the bolt is equal to .050”.
Selection 18
Set X to 2864 (2860 for non wide door venders) and set Y
so that the top of the cup lip is level with the bottom of the
pusher track (see Detail A). The lever should be centered
within the cup cutout (see Detail B and D). The cup hard
stop should not hit the wall of the door (see Detail G). If
so, back off the X setting until the interference is corrected.
If the lever is not centered within the cutout, split the
difference with Selection 12 (see Detail E and F) by
adjusting the adjustment bolt mentioned above.
Selection 52
Set X to 370 (do not change this setting) and set Y so that
the top of the cup lip is level with the bottom of the pusher
track (see Detail A). The lever should be centered within
the cup cutout (see Detail B and D). Remove cells 51/52
A
and 53/54 to gain access to the adjustment bolt (see Detail
C). Loosen the nut with a 7/16” wrench. Adjust the bolt
with a flat head screwdriver in order to center lever with the
cutout. Tighten the nut against the arm to lock the shelf
into place. Note: one full turn of the bolt is equal to .050”.
Selection 58
Set X to 2864 (2860 for non wide door venders) and set Y
so that the top of the cup lip is level with the bottom of the
pusher track (see Detail A). The lever should be centered
within the cup cutout (see Detail B and D). The cup hard
stop should not hit the wall of the door (see Detail G). If
so, back off the X setting until the interference is corrected.
If the lever is not centered within the cutout, split the
difference with Selection 52 (see Detail E and F) by
adjusting the adjustment bolt mentioned above. Note: the
X setting should be the same for both Selection 18 and 58.
End
X should be set to the same setting as Selections 18 and 58
(approximately 2864). Set Y so that when the cup is
engaged with the hook, the wall of the cup and cup floor
are parallel to each other. Note: vend test a sold out
column to ensure the magnet on the cup is making proper
contact with the hall effect sensor.
Note: Selections 12, 18, 52 and 58 and End are all
located under Product Location in the Service Menu of
the software. The following steps should be followed in
addition to those previously listed.
Selection 31
Test vend the selection. Place a package in the port once
the cup leaves home in order to keep the cup at the cell.
The lever should be centered within the cup cutout (see
Detail B and D). The cup lip should be level with the
bottom of the pusher track (see Detail A). Remove cells 31/
32 and 33/34 to gain access to the adjustment bolt (see
B
ALIGN TOP EDGE OF CUP
WITH BOTTOM EDGE OF
PUSHER TRACK (DO NOT
GO BELOW THIS POINT)
CENTER LEVER IN CUTOUT
DETAIL A
Page 38
DETAIL B (TOP VIEW)
Royal Vision Vender
SECTION 4: Vender Maintenance
Detail C). Loosen the nut with a 7/16” wrench. Adjust the
bolt with a flat head screwdriver in order to center the lever
with the cutout. Tighten the nut against the arm to lock the
shelf into place. Note: one full turn of the bolt is equal to
.050”.
Selection 38
Test vend the selection. Place a package in the port once
the cup leaves home in order to keep the cup at the cell.
The lever should be centered within the cup cutout (see
Detail B and D). The cup lip should be level with the
bottom of the pusher track (see Detail A). The cup hard
stop should not be hitting the wall of the door (see Detail
G). If the lever is not centered within the cutout, split the
difference with Selection 31 (see Detail E and F) by
adjusting the adjustment bolt mentioned above. Note: the
X setting should be the same for Selections 18, 58 and 38.
Selection 11
Test vend the selection. Place a package in the port once
the cup leaves home in order to keep the cup at the cell.
The cup lip should be level with the bottom of the pusher
track (see Detail A). The lever should be positioned within
the cup cutout the same as Selection 12. Check to ensure
that the brake on the home switch cover is in the same
vertical plane as the home switch (see home switch view).
Selection 51
Test vend the selection. Place a package in the port once
the cup leaves home in order to keep the cup at the cell.
The cup lip should be level with the bottom of the pusher
track (see Detail A). The lever should be positioned within
the cup cutout the same as Selection 52. Check to ensure
that the brake on the home switch cover is in the same
vertical plane as the home switch (see home switch view).
D
CENTER LEVER IN CUTOUT
C
DETAIL D (BOTTOM VIEW)
HOME SWITCH COVER BRAKE
SHOULD BE IN THE SAME
VERTICAL PLANE AS THE
SWITCH
ADJUSTMENT BOLT (NUT IS
HIDDEN BEHIND SHELF ARM)
DETAIL C
SPLIT THE DIFFERENCE
(OFF CENTER)
E
G
Royal Vision Vender
EDGE OF HARDSTOP
SHOULD NOT HIT WALL
F
DETAIL E
DETAIL F
DETAIL G
Page 39
SECTION 5: Troubleshooting
Troubleshooting
The RVV is equipped with a self-diagnostic feature to aid in the repair and maintenance of the vender. When servicing the
vender, pay close attention to the digital display. When the vender door is opened, the display will begin showing any
error codes that are stored in memory. If there are no errors, the display will show “No Errors Found.”
To enter the Service Mode, press and release the Service Mode Button located on the controller. The display will show
“Errors Were Detected” if there are recorded errors. If <enter> is pressed at the “Errors Were Detected” prompt, the
controller will enter the error display mode. The display will show the first error summary code that has occurred.
If <enter> is pressed, the controller will display the detailed error for the summary code. The <up> and <down> buttons
will cycle through any remaining error detail codes. If <exit> is pressed while displaying any detailed code, the controller
will return to the summary code. If <exit> is pressed while displaying any summary code, the controller will return to the
code level (“No Errors Found” or “Errors Were Detected”).
NOTE: When troubleshooting errors with peripherals, the appropriate peripheral service manual(s) should also be
consulted for further tests and corrective actions.
Error Type
Coin Changer
(Coin Acceptor
error)
Page 40
Detailed Error Code
Test Procedure
Corrective Action
Com m unication = Indicating no
Replace any harnessing found to be
communication w ith changer for
Check serial changer and MDB harnes
defective.
more than 2 seconds.
Clear tube blockage if found. If no
Tube Sensing = Indicating a tube
Check changer tubes for blockage.
error.
blockage found replace changer.
Clear inlet chute blockage. If no
Check inlet chute for blockage. Drop blockage found, replace the changer.
Inlet = Inlet chute blocked error
coins in Sales mode or Tube Fill mode If acceptance rate is acceptable,
(no coins sensed in the acceptor
to test acceptance. Manually clear
system is probably OK. If acceptance
for over 96 hours).
the error.
rate is low or changer w ill not accept
coins, replace changer.
If no obstructions are apparent and
Check changer / acceptor for
the acceptance appears to be OK,
Low Acceptance Rate =
obstruction or dirt.
this may be and indication of cheating
Indicating more than 20% of the
attempts.
last 255 coins w ere rejected as
If no obstruction are apparent and
slugs.
Drop coins in Sale mode or Tube Fill coins do not accept or acceptance
mode to test acceptance.
rate is poor replace the changer /
acceptor.
Clear blockage, if found. If no
Tube Jam XX = Indicating a tube Check changer tubes and payback
jam for coin type XX.
for blockage.
blockage found, replace changer.
Unplug machine and w ait at least 5
If error does not clear, replace the
ROM = Indicating a changer ROM
seconds, replug machine. Manually
checksum error.
changer.
clear error.
If vendor returns to Sales mode from
Check escrow lever and associated
open door mode w ithout input,
Excesses = Indicating more than mechanisms.
replace changer / acceptor.
255 attempts since the last coin
If it stays in the Open Door mode and
w as accepted.
Go to open door mode and w ait for
the manually cleared error does not
30 seconds. Manually clear the error.
reoccur, system may be OK.
Check changer / acceptor for jammed If no obstructions are found, replace
Coin Jam = Indicating a coin jam.
coins or other obstructions.
the coin acceptor.
Disconnected Acceptor =
Indicating an unplugged acceptor
or harnessing.
Misrouted Coin = Indicating a
coin had been improperly routed.
Royal Vision Vender
SECTION 5: Troubleshooting
Error Type
Bill Validator (Bill
Acceptor error)
Detailed Error Code
Test Procedure
Com m unication = Indicating no
bill validator communications for
more than 5 seconds.
Check serial changer and MDB
harnessing.
Full = Indicating a full bill stacker.
Ensure bill cash box is empty and that
If cash box appears to be OK,
the cash box is properly closed and
replace the bill acceptor.
in place.
Motor = Indicating a defective
motor.
No test available.
Check bill acceptor for obstruction or
dirt.
Unplug machine and w ait at least 5
ROM = Indicating a bill acceptor
seconds, then replug machine.
ROM checksum error.
Manually clear error.
Open = Indicating that the stacker Check that bill cash box is closed and
is open.
in correct position.
Sensor = Indicating a bill sensor Check bill acceptor for obstruction or
error.
dirt.
Com m unication = Indicating no
card reader communication for
more than 5 seconds.
Jam = Indicating a bill jam error.
Card Reader (Card
Card Reader Error XX =
Reader error)
Indicating that a particular type of
No test available.
card reader malfunction occurred,
w here XX indicates the error type.
Replace bill acceptor.
If no obstructions are apparent,
replace the bill acceptor.
If error does not clear, replace the bill
acceptor.
If cash box appears to be OK,
replace the bill acceptor.
If no obstructions are apparent,
replace the bill acceptor.
Refer to card reader manual for
corrective action.
If the sensor is unplugged, replug it.
If it is misw ired, replace the
temperature sensor. If the
connections are bad, attempt to
repair them or replace sensor.
If upon unplugging the w hite w ires
the unit stops:
1. Check the temperature sensor's
reading.
2. Check SetP (set point) settings.
3. Check the w hite w ires for shorts
from the control board.
1. Check the refrigeration unit before 4. If upon unplugging one of the w hite
w ires the unit still runs, unplug one of
opening the vendor's main door to
the black w ires. If the unit stops,
see if it's running.
replace the refrigeration relay. If
2. Open the main door to see if the
Too Cold = Indicating
optional heater relay kit is not
temperatures 3 degrees below the unit cuts off.
installed, one may be required.
3. Make sure the vendor's door
compressor cut-out setting.
5. If heater kit is installed and heater
sw itch is w orking properly.
4. Unplug one of the tw o w hite w ires does not turn on (heater relay does
not click upon energizing in heater
plugged into the refrigeration relay.
relay test mode), check the tw o
w hite w ires from the board to the
heater relay for 24VDC. Check the
other w ire for continuity betw een the
control boad and the relay. If voltage
is OK, replace the relay; otherw ise,
replace control board.
Too Hot = Indicating temperatures Proceed w ith normal refrigeration
3 degrees above compressor cut- troubleshooting. Refer to the
in setting.
refrigeration flow chart.
Tem perature Sensing =
Indicating an unpluggged
temperature sensor.
Refrigeration
(Refrigeration
errors)
Corrective Action
Royal Vision Vender
Check the temperature sensor
connection at the control board to
make sure it is plugged in. Check that
it is w ired properly and the pins are
making contact.
Page 41
SECTION 5: Troubleshooting
Error Type
Detailed Error Code
Test Procedure
Corrective Action
Proceed w ith normal refrigeration
No Heating = Indicating heating
system not heating at 1 degree per troubleshooting. Refer to the
hour or better w hen on.
refrigeration flow chart.
Refrigeration
(Refrigeration
errors)
No Cooling = Indicating that the
compressor is not cooling at 1
degree per hour or better w hen
on.
1. Check the refrigeration unit before
opening the vendor's main door to
see if the unit is running.
2. Open the vendor's main door, and
check the display to see that the door
sw itch is w orking as normal.
3. Access the Refrigeration Mode,
and check the Set Point settings.
4. While in the Refrigeration Mode,
change 'dSP' to 1 to show the
temperature on the display during the
greeting to see if it's correct.
5. While in the Test Mode, access the
Test Relays Mode, and turn
compressor on.
Check the vendor's door sw itch to
see if it's sticking or misw ired. If
Door = Indicating the door sw itch
nothing is found at the door sw itch,
has been open for more than one
check the tw o w ires from the door
hour.
sw itch to the control board to see if
they are pinched or shorted.
RAM = Indicating the machine
No test available.
setup information has been
corrupted
Check for low voltage at the w all
AC Under Voltage = Indicating
that the average rectified voltage outlet at unit startup w ith all else on
w as under 22VAC for more than circuit running in an "extreme"
Control (Controller
30 seconds.
condition.
errors)
AC Over Voltage = Indicating that Check for high voltage at the w all
the average rectified voltage w as outlet at the startup w ith all else on
over 32VAC for more than 30
circuit running in an "extreme"
seconds.
condition.
System Scale Factor = Indicating
Check the connections of the
one of the credit peripherals has
changer harness. Make sure
introduced an incompatible scaling
changer is plugged up and w orking.
factor.
Lost XY Position = Indicating that
the controller is unable to establish
w here the elevator mechanism is
located in its matrix.
Page 42
1. If the unit is running, clear the error
to see if it reoccurs.
2. If the display does not function as
normal, check the door sw itch circuit.
3 & 4. Change any setting if
necessary and check temperature
sensor operation.
5. If the unit does not run
(refrigeration relay not clicking upon
energizing w ith the relay test mode),
check the tw o w hite w ires from the
board to the refrigeration relay for
voltage (should be 24VDC on one of
the tw o w ires). Check the other w ire
for continuity betw een the control
board and relay.
Note: The compressor relay must be
on to check voltage.
Replace the door sw itch, if defective.
Repair or replace the door sw itch
harness to the control board.
If error show s up frequently, replace
the control board and contact Royal
Vendors.
If low voltage can't be found on the
w all outlet in an extreme condition,
check for shorts in the vendor.
Make connections to the harness or
replace the changer, if necessary.
Royal Vision Vender
SECTION 5: Troubleshooting
Error Type
Detailed Error Code
Horiz. Hom e Sw itch = Indicating
a problem w ith the horizontal home
sw itch.
Miscellaneous
Sliding Port Sw itch = Indicating
that there is a problem w ith the
sw itch that detects the position of
the sliding door.
Product Undeliverable =
Indicating that there is a problem
w ith the optical delivery detection
system, or perhaps a product has
been left in the delivery bin.
Test Procedure
Corrective Action
1. If 5 volts DC is found, replace the
home sw itch.
2. If voltage is not present, check
Check for 5 volts DC to the violet and pins 7 & 8 at pinout 5 on the control
board for 5 volts DC. If no voltage is
grey w ires at the vertical home
sw itch. Check that the terminals are found, replace the board.
3. If voltage is found from the board,
connected to the Com and the NO
check the w iring from the board to
positions on the home sw itch.
the home sw itch for cut or broken
w ires. Replace the w iring harness, if
needed.
1. If 5 volts DC found, replace the
slide sw itch.
2. If no voltage is found, check for 5
Check for 5 volts DC from the orange volts DC at pins 6 and 9 at pinout 7 on
the control board. If none found,
and blue w ires going to the sliding
port sw itch. Check that the teminals replace the control board.
3. If 5 volts DC found at the control
are connected to the COM and NC
board check the w iring from the
positions on the sw itch.
board to the sw itch for cut or broken
w ires. Replace the harnessing to the
sw itch, if needed.
Remove any obstruction found in the
Check delivery bin for obstruction.
delivery bin.
Check that the w iring from the board
to the delivery detection board and
Reconnect the w iring properly.
the emitter board are connected
properly.
Unknow n = Indicating that an
error has occurred w hich is of
unknow n cause.
Royal Vision Vender
Page 43
SECTION 6: Parts Catalog
RVV Control Board
20
1
18
21
19
17
2
3
1
JP1
JP1
1
NC
NO
M
CO
16
U5
1
Delivery
Sensor P4
4
1
Z-Axis P7
1
DEX P9
1
Temp Sensors P1
10
15
U6
11
P9A
13
Y-Axis P6
P12
16
JTAG1
Display P10
5
X-Axis P5
1
P3a
Selection Switches P3
11
1
8
P13
1
10
4
1
1
1
8
S1
Power P11
14
Encoders P14
1
10
Refrigeration P2
1
7
MDB P8
1
4
1
6
1 23 4 56 7 8
1
2
3
1
2
3
4
5
6
4
5
6
7
8
9
7
8
9
*
0
#
0
#
9
7
8
12
to Evaporator
Fan Relay
to Refrigeration
Relay
CO
M
NO
NC
to Light
Relay
10
Page 44
22
Royal Vision Vender
SECTION 6: Parts Catalog
RVV Control Board
ITEM #
DESCRIPTION
PART NUMBER
1
RVV Control Board .................................................................................... 836151
2
Delivery Bin Harness ................................................................................. 842485
3
Gate Switch ................................................................................................ 835022
4
Y-Axis Motor Harness ................................................................................ 842488
5
X-Axis Motor Harness ................................................................................ 842487
6
24 VAC Power Harness ............................................................................. 842477
7
MDB Harness - RVV .................................................................................. 842480
8
Split MDB Harness .................................................................................... 842116
9
Refrigeration Harness .............................................................................. 842482
10
Door Switch ............................................................................................... 835001
11
Keypad Harness ....................................................................................... 842478
Touchpad Harness ......................................................... Not available separately
12
Keypad ....................................................................................................... 842476
Touchpad (includes harness) ................................................................... 842500
13
Display Harness, Serial ............................................................................ 842498
14
Vacuum Fluorescent Display, Serial (VFD) ............................................... 836162
15
Health Safety Sensor (optional) ................................................................ 842497
16
Temp / Health Sensor Harness ................................................................ 842481
17
Delivery Detection Harness ...................................................................... 842484
18
Detector Board .......................................................................................... 842426
19
Del. Detection Emitter Harness ................................................................ 842483
20
Emitter Board ............................................................................................. 842427
21
Motor Encoder Harness - RVV .................................................................. 842486
22
Product Sensor (Hall Effect) ...................................................................... 842515
- Old-style Product Sensing Switch ........................................................... 835001
•
Electronic Door Lock Harness, Door Side (if equipped) .......................... 842496
•
Electronic Door Lock Harness, Cabinet Side (if equipped) ..................... 842465
Royal Vision Vender
Page 45
SECTION 6: Parts Catalog
Door Assembly, Rear
2
1
3
4
15
5
14
6
19
13
7
8
12
9
11
20
Page 46
21
10
Royal Vision Vender
SECTION 6: Parts Catalog
Door Assembly, Rear
Ballast Box
10
16
18
17
ITEM #
DESCRIPTION
PART NUMBER
1
Door Foamed Assembly RVV, T-handle Lock ........................................... 337530
- TriTeq Lock .............................................................................................. 350520
2
Rain Guard RVV ........................................................................................ 337581
3
Top Door Hinge Assembly RVV ................................................................. 810120
4
Lampholder RVV ....................................................................................... 842475
5
Glass Retainer, Left ................................................................................... 337593
- Right ........................................................................................................ 337594
6
Main Door Gasket RVV .............................................................................. 815483
7
Glass Retainer Top & Bottom ................................................................... 337547
8
Elevator Cup Assembly ............................................................................. 337897
9
Bottom Hinge W/A ..................................................................................... 337599
10
Ballast Box ................................................................................................. 337588
11
Door Vandal Panel RVV ............................................................................. 337539
12
Coin Box RVV, T-handle ............................................................................. 337566
13
Stud Brace RVV .......................................................................................... 337532
14
Harness Retainer RVV .............................................................................. 337584
15
Control Board Housing ............................................................................. 337592
- TriTeq Lock .............................................................................................. 350550
- Board Cover ............................................................................................. 337578
16
Electronic Ballast ....................................................................................... 838033
17
Transformer Assembly .............................................................................. 842147
18
Fusebox Assembly .................................................................................... 842219
19
Y-Axis Belt .................................................................................................. 337865
20
X-Axis Belt .................................................................................................. 337864
21
Product Slide, Bottom Door RVV ............................................................... 995330
•
Lock Housing, TriTeq only ......................................................................... 350590
•
Coin Box Housing RVV, TriTeq only .......................................................... 350504
•
Wiring Diagram ......................................................................................... 931525
•
Programming Label RVV .......................................................................... 931540
•
Harness, EMI Filter to Ballast and Transformer ....................................... 842389
Royal Vision Vender
Page 47
SECTION 6: Parts Catalog
Door Assembly, Front
1
6
2
3
4
5
ITEM #
DESCRIPTION
PART NUMBER
1
Security Plate Assembly RVV, T-handle Lock ............................................ 337570
- TriTeq Lock .............................................................................................. 350530
2
Security Plate Decal RVV, T-handle Lock .................................................. 831535
- TriTeq Lock .............................................................................................. 831588
Page 48
3
Coin Cup Assembly ................................................................................... 337589
4
Port Assembly RVV .................................................................................... 337550
5
Bottom Hinge W/A ..................................................................................... 337599
6
Tempered Glass Panel ............................................................................. 849171
Royal Vision Vender
SECTION 6: Parts Catalog
Port Assembly
337550
1
2
4
3
5
6
7
8
9
10
17
11
12
16
15
14
13
ITEM #
DESCRIPTION
PART NUMBER
1
Port Housing Top ....................................................................................... 337553
2
Port Housing Right .................................................................................... 337522
3
Port Box Bottom ......................................................................................... 337595
4
Port Box Ramp .......................................................................................... 337527
5
Port Box Wrapper ....................................................................................... 815536
6
Port Housing Left ....................................................................................... 337521
7
Port Housing Back .................................................................................... 337531
8
Nut, Port RVV ............................................................................................. 803079
9
Port Latch ................................................................................................... 337576
10
Carriage Bolt ............................................................................................. 901007
11
Rivet, 1/8” x 0.328 ...................................................................................... 908007
12
Shoulder Screw ......................................................................................... 901073
13
Port Housing Bottom ................................................................................. 337524
14
Weight Bracket .......................................................................................... 337598
15
Screw, 8-32 x 3/8” ...................................................................................... 901011
16
Port Box Weight ......................................................................................... 337528
17
Keps Nut .................................................................................................... 905001
•
Detector Board .......................................................................................... 842426
•
Emitter Board ............................................................................................. 842427
Royal Vision Vender
Page 49
SECTION 6: Parts Catalog
Elevator Mechanism
350898
1
12
13
11
2
3
10
4
9
8
Page 50
7
6
5
Royal Vision Vender
SECTION 6: Parts Catalog
Elevator Mechanism
Upper Idler Subassembly
337894
6
15
14
16
17
18
19
ITEM #
DESCRIPTION
PART NUMBER
1
Vertical Track RVV ...................................................................................... 813034
2
Switch ........................................................................................................ 835012
3
Belt Clamp ................................................................................................. 337808
4
Motor Cover RVV ........................................................................................ 337841
5
Secondary Motor Cover ............................................................................. 337857
6
Bottom Arm Stop ........................................................................................ 337842
7
Horizontal Track RVV ................................................................................. 813035
8
Grooved Belt Idler ...................................................................................... 337878
9
Elevator Arm ............................................................................................... 337868
10
Arm Endpiece Stud Assembly ................................................................... 337871
11
Lower Bottle Kicker .................................................................................... 337843
12
Locator Bracket .......................................................................................... 337836
13
Arm End Guide .......................................................................................... 337869
14
Upper Adapter Plate .................................................................................. 337886
15
Upper Idler Cage ....................................................................................... 337830
16
Upper Idler Mount, Rear ............................................................................ 337884
17
Spring ......................................................................................................... 914038
18
Smooth Belt Idler ....................................................................................... 337877
19
Upper Idler Mount, Front ............................................................................ 350885
Royal Vision Vender
Page 51
SECTION 6: Parts Catalog
Narrow Elevator Cup Assembly
350896
1
2
19
20
21
3
18
4
17
5
16
15
14
6
7
13
Page 52
12
11
10
9
8
ITEM #
DESCRIPTION
PART NUMBER
1
Anti-friction Sheet RVV ............................................................................... 815560
2
Package Stabilizer ..................................................................................... 350809
3
Bottom Plate, Narrow Cup ........................................................................ 350811
4
Cup Lip, Extended Travel .......................................................................... 350812
5
Wheel / Stud Assembly .............................................................................. 337879
6
Elevator Cup Mounting Plate ..................................................................... 337888
7
Port Open Bracket ..................................................................................... 337822
8
Flange Nut, #8-32 ...................................................................................... 905035
9
Belt Clamp Bottom Cup ............................................................................ 337806
10
Belt Clamp Top Cup .................................................................................. 337805
11
Keps Nut, #6-32 ........................................................................................ 905018
12
Product Sensing Lever, Narrow Cup ......................................................... 350807
13
Pop Rivet ................................................................................................... 908004
14
Magnet Assembly, Product Sensor ........................................................... 350899
15
Flange Nut, 5/16” - 18 ................................................................................ 905034
16
Rotating Cup ............................................................................................. 350808
17
Palnut (Push Retainer) .............................................................................. 905039
18
Washer, Nylon ........................................................................................... 904029
19
Cup Trip Arm .............................................................................................. 350810
20
Spring Hinge .............................................................................................. 912156
21
Cup Tilt Brace ............................................................................................ 337825
Royal Vision Vender
SECTION 6: Parts Catalog
Elevator Cup Assembly
1
350897
19
18
2
20
16
13
3
17
15
4
14
12
11
5
10
9
6
8
7
ITEM #
DESCRIPTION
PART NUMBER
1
Cup Lip ...................................................................................................... 350805
2
Cup Bottom Plate ...................................................................................... 337887
3
Wheel / Stud Assembly .............................................................................. 337879
4
Elevator Cup Mounting Plate ..................................................................... 337888
5
Port Open Bracket ..................................................................................... 337822
6
Flange Nut, #8-32 ...................................................................................... 905035
7
Belt Clamp Bottom Cup ............................................................................ 337806
8
Belt Clamp Top Cup .................................................................................. 337805
9
Flange Nut, 5/16”-18 ................................................................................. 905034
10
Cup Rivet Plate RH .................................................................................... 337854
11
Spring Hinge .............................................................................................. 812382
12
Rotating Cup ............................................................................................. 337823
13
Cup Rivet Plate .......................................................................................... 337854
14
Pop Rivet ................................................................................................... 908004
15
Package Stabilizer Cup ............................................................................. 815549
16
Cup Tilt Brace ............................................................................................ 337825
17
Cup Trip Arm .............................................................................................. 337821
18
Product Sensing Lever .............................................................................. 337839
19
Magnet Assembly, Product Sensor ........................................................... 350899
20
Anti-friction Sheet RVV ............................................................................... 815560
•
Keps Nut, #6-32 (secures Magnet Assembly) .......................................... 905018
•
Blind Rivet, 1/8” .......................................................................................... 908026
•
Washer, Nylon ........................................................................................... 904029
•
Palnut (Push Retainer) .............................................................................. 905039
Royal Vision Vender
Page 53
SECTION 6: Parts Catalog
Lower Drive Subassembly
337895
2
1
13
3
4
5
6
12
11
7
10
Page 54
9
8
ITEM #
DESCRIPTION
PART NUMBER
1
X-Axis Motor Assembly (shorter motor) ..................................................... 355805
2
Screw, 10-24 x 0.5 SS ................................................................................ 901081
3
Flange Nut, 8-32 ........................................................................................ 905035
4
Motor Mount, Cup Drive ............................................................................. 337816
5
Motor Mount, Arm Drive .............................................................................. 337815
6
Vertical Motor Stabilizer .............................................................................. 337838
7
Idler Bracket, Bottom ................................................................................. 337817
8
Grooved Belt Idler ...................................................................................... 337878
9
Smooth Belt Idler ....................................................................................... 337877
10
Shoulder Bolt ............................................................................................. 901078
11
Adapter Plate, Lower ................................................................................. 337890
12
Nylon Lock Nut .......................................................................................... 905032
13
Y-Axis Motor Assembly (longer motor) ...................................................... 337876
Royal Vision Vender
SECTION 6: Parts Catalog
Port Door & Slide Assembly RVV
350553
1
2
9
8
3
7
4
6
5
ITEM #
DESCRIPTION
1
Port Door Latch Assembly RVV ................................................................. 350583
2
Screw, #6 x 3/8” .......................................................................................... 902027
3
Gasket, Port Door RVV .............................................................................. 815562
4
Bushing, Delivery Door RVV ...................................................................... 803092
5
Delivery Door Slide RVV ............................................................................ 350549
6
Screw, Sheet Metal, #4 x 5/8” ..................................................................... 902009
7
Gate Switch ................................................................................................ 835022
8
Spring Extension, Port Door RVV .............................................................. 914037
9
Delivery Door RVV ..................................................................................... 815545
Royal Vision Vender
PART NUMBER
Page 55
SECTION 6: Parts Catalog
Security Plate Assembly RVV, T-handle Lock
337570
17
2
1
16
15
14
13
12
11
3
5
10
4
6
8
7
9
ITEM #
DESCRIPTION
PART NUMBER
1
Security Plate Weld Assembly RVV, T-handle Lock .................................. 337590
2
T-handle Assembly RVV ............................................................................ 812370
3
T-bolt, 1/4-20 x 1 ........................................................................................ 901037
4
Keypad ....................................................................................................... 842476
Touchpad ................................................................................................... 842502
Page 56
5
Coin Return Bushing ................................................................................. 803059
6
Coin Return Button .................................................................................... 803031
7
Bushing Retainer RVV, T-handle Lock ...................................................... 337556
8
T-handle Housing ...................................................................................... 812190
9
Coin Return Assembly RVV ....................................................................... 337580
10
Keps Nut .................................................................................................... 905002
11
T-handle Brace RVV .................................................................................. 337583
12
Coin Chute Cover RVV, T-handle .............................................................. 337562
13
Coin Chute RVV, T-handle ......................................................................... 337561
14
Display Cover RVV .................................................................................... 337582
15
Vacuum Fluorescent Display (VFD) .......................................................... 836144
16
Display Window RVV ................................................................................. 815515
17
Coin Plate RVV, T-handle Lock .................................................................. 337559
Royal Vision Vender
SECTION 6: Parts Catalog
Security Plate Assembly RVV, TriTeq Lock
350530
1
12
11
10
9
8
2
3
7
4
6
ITEM #
DESCRIPTION
5
PART NUMBER
1
Security Plate Weld Assembly RVV, TriTeq Lock ....................................... 350540
2
Keypad ....................................................................................................... 842476
3
Coin Return Bushing ................................................................................. 803059
4
Bushing Retainer RVV, TriTeq ................................................................... 350509
5
Coin Return Assembly RVV ....................................................................... 337580
6
Coin Return Button .................................................................................... 803031
7
Coin Chute Cover RVV .............................................................................. 337562
8
Coin Chute RVV ......................................................................................... 337561
9
Display Cover RVV .................................................................................... 337582
Touchpad ................................................................................................... 842502
10
Vacuum Fluorescent Display .................................................................... 836144
11
Display Window RVV ................................................................................. 815515
12
Coin Plate RVV, TriTeq .............................................................................. 350508
Royal Vision Vender
Page 57
SECTION 6: Parts Catalog
Cell Assembly RVV
337755
2
1
24
3
23
4
22
5
6
21
7
20
8
9
19
18
10
11
17
12
16
Page 58
15
14
13
Royal Vision Vender
SECTION 6: Parts Catalog
Cell Assembly RVV
337755
ITEM #
DESCRIPTION
PART NUMBER
1
Negator Drum, Bottom Slide RVV ............................................................. 803089
2
Pusher, Bottom .......................................................................................... 815553
3
Track, Pusher ............................................................................................ 815554
4
Cell Wall Tie Strap ..................................................................................... 337771
5
Cell Wall Assembly, Right ......................................................................... 337748
6
Cell Wall Assembly, Left ............................................................................ 337749
7
Nylon Washer ............................................................................................ 904029
8
Cell Base ................................................................................................... 815544
9
Slide-Tilt Wire ............................................................................................ 811059
10
Elastic Stop Nut ......................................................................................... 905004
11
Wire Cover RVV ......................................................................................... 337709
12
Sold-Out Spring RVV ................................................................................. 914033
13
Actuation Cover .......................................................................................... 815500
14
Rotator Bushing RVV ................................................................................. 815531
15
Cell Rotator ................................................................................................ 815498
16
Wing Nut #8-32 .......................................................................................... 905027
17
Product Release Lever RVV ...................................................................... 810218
18
Washer, Cell Wall RVV .............................................................................. 337719
19
Center Support Assembly RVV .................................................................. 337743
20
Cell Setup Decal, Left ................................................................................ 931578
21
Stop Gate ................................................................................................... 815499
22
Pivot Pin ..................................................................................................... 811062
23
Cell Setup Decal, Right ............................................................................. 931579
24
Negator Spring RVV ................................................................................... 914043
Royal Vision Vender
Page 59
SECTION 6: Parts Catalog
Shelf Assembly RVV
337710
5
6
4
3
2
1
Page 60
ITEM #
DESCRIPTION
PART NUMBER
1
Shelf Arm ................................................................................................... 337701
2
Modified Shelf Extrusion RVV .................................................................... 337724
3
Shelf Extrusion .......................................................................................... 813032
4
Shelf Lock .................................................................................................. 337706
5
Shelf Slide, Right ....................................................................................... 815501
6
Shelf Slide, Left .......................................................................................... 815502
Royal Vision Vender
SECTION 6: Parts Catalog
Evaporator Section
1
16
2
15
3
14
4
13
5
6
11
12
10
9
8
7
ITEM #
DESCRIPTION
PART NUMBER
1
Top Air Guide ............................................................................................. 337007
2
Inner Door Channel, Right RVV ................................................................ 337009
3
Inner Door Channel, Top / Bottom RVV ..................................................... 337020
4
Strike Adjustment Channel, TriTeq Lock ................................................... 337024
5
Strike Mounting Bracket, TriTeq Lock ........................................................ 337023
6
Latch Strike, T-handle Lock ....................................................................... 281002
7
Evaporator Cover RVV ............................................................................... 337004
8
Bottom Air Guide ........................................................................................ 337008
9
Evaporator Fan Housing RVV ................................................................... 337001
10
Evaporator Air Guide, Side ........................................................................ 337003
11
Evaporator Air Guide, Top .......................................................................... 337002
12
Cabinet Baffle RVV .................................................................................... 337013
13
Rear Cabinet Baffle Bracket RVV .............................................................. 337012
14
Evaporator Slide RVV ................................................................................ 337006
15
Top Cabinet Baffle Bracket RVV ................................................................ 337014
16
Sensor Bracket .......................................................................................... 810085
Royal Vision Vender
Page 61
SECTION 6: Parts Catalog
Cabinet
1
2
14
3
13
4
5
6
7
8
12
10
9
11
ITEM #
DESCRIPTION
PART NUMBER
1
Shelf Bracket (left & right sides) ................................................................ 337705
2
Vandal Panel Channel 72” ........................................................................ 282201
3
Inner Door Assembly RVV, T-handle Lock ................................................ 337610
4
Case Support Latch .................................................................................. 337102
5
Case Support Assembly RVV .................................................................... 337120
6
Fan Cover .................................................................................................. 811052
7
Refrigeration Door Assembly RVV ............................................................ 337410
- TriTeq Lock .............................................................................................. 337620
- Refrigeration Door Gasket ...................................................................... 815519
Page 62
Royal Vision Vender
SECTION 6: Parts Catalog
Cabinet
20
1
19
18
15
17
16
ITEM #
DESCRIPTION
PART NUMBER
8
Roller Hat Section ..................................................................................... 337579
9
Leveling Leg .............................................................................................. 803002
10
Refrigeration Unit RVV .............................................................................. 337420
11
Bottom Cabinet Hinge Assembly .............................................................. 810119
12
Refrigeration Door Support Plate .............................................................. 337100
13
Evaporator Fan Motor Assembly ............................................................... 231060
14
Top Cabinet Hinge Assembly .................................................................... 810118
15
Shelf Support, Bottom ............................................................................... 337758
16
Shelf Alignment Bracket, Right .................................................................. 337752
17
Center Strap Locker ................................................................................... 337769
18
Shelf Bracket, Left ...................................................................................... 337756
19
Shelf Center Strap ..................................................................................... 337767
20
Mount, Shelf Center Support ..................................................................... 337717
•
Condensate Pan ....................................................................................... 815368
•
Latch Strike Assembly ............................................................................... 281002
•
Main Wiring Harness (inside cabinet bottom) .......................................... 842424
•
Main Wiring Cord (to wall outlet) ............................................................... 842413
•
Relay .......................................................................................................... 836130
•
EMI Filter .................................................................................................... 842061
Royal Vision Vender
Page 63
1 2 3 4 5 6 7 8 9 10 11 12
RED
BLK
BLK
9
#
8
0
7
*
ELECTRONIC
KEYPAD (P3b)
6
5
4
3
2
1
1 2 3 4 5 6 7 8 9 10 11 12 13 14
P15 P5 GREEN
BROWN
KEY
RED
BLACK
(GND) GREEN
RED
WHITE
BLACK
RED
WHITE
BLACK
16
1
10
1
3
2
1
5V
DC
S1
GREEN
BLACK
RED
COM
NC
NO
1
4
5V
DC
1
24V
AC
24V
DC
5V
DC
1
5V
DC
1
BLACK
BROWN
RED
ORANGE
YELLOW
MULTI-DROP BUS
CHANGER
VALIDATOR
1 2 3 4 5 6
9
JTAG1
P14
U6
7
32V
DC
MDB P8
1
34V
DC
KEY
OVERRIDE BLK
OVERRIDE RED
DR LOCK P2 GRN
DR LOCK P8 WHT
DR LOCK P12 BLK
KEY
DR LOCK P6 RED
ENCODERS
MANUAL
OVERRIDE
SWITCH
PLUG
GREEN
3 3
BLACK
2 2
RED
1 1
CAP
1
14
RED
BLACK
WHITE
GND
1
8
JP2
X-AXIS
HOME
SWITCH
Y-AXIS
HOME
SWITCH
1
DELIVERY EMITTER
JP1
NC
NO
NC
NO
NEUTRAL
24V
AC
4
1
8
1
8
1
11
1
GND
GREEN
BLACK
WHITE
VIOLET
GREY
WHITE
RED
GREEN
BLACK
VIOLET
GREY
WHITE
BLACK
GREEN
RED
BLUE
ORANGE
COM
COM
1 2 3 4 5 6
1 2 3 4 5 6
PHASE
X-AXIS MOTOR
STEPPER
1 2 3 4 5
Y-AXIS MOTOR
STEPPER
1 2 3 4 5
COM
NC
NO
DELIVERY DOOR
SWITCH
BLACK
B-
RED
REFRIGERATION P2
10
RIBBON CABLE
RED
DC
P12
WHITE/VIOLET
GREEN
RED
JP1
R86
DELIVERY
SENSOR P4
R88
DISPLAY JP1
1 5V
5V
DC
HALL EFFECT SENSOR
RED
ORANGE
1
DEX
JACK
P9A
4
1
10
DOOR
SWITCH
DOOR LOCK
RECEPTACLE
RED
RIBBON
CABLE
P15 P4 WHITE
RED
BLACK
BROWN
ORANGE
BATTERY BACKUP
PHONEJACK LOCATED
IN VEND PORT
+
-
1
2
3
4
INTERNAL / EXTERNAL
DEX / U.C.S. PHONEJACK
2-LINE VFD
DISPLAY
SLEEVE
RED
BLACK
BROWN
ELECTRONIC
DOOR LOCK (P15)
TIP
RING
TEMP
SENSOR
RED
RED
P15 P1 RED
RED
BLACK
BLACK
P15 P3 BLACK
TEMP SENSORS P1
DEX P9
DISPLAY
P10
SELECTION SWITCHES P3
YELLOW
ELECTRONIC KEYPAD P3b
WHITE/PINK
WHITE/ORANGE
WHITE/GREY
WHITE
A
B
A-
BROWN
BLACK
PROGRAMMERS
KEYPAD P3a
VIOLET
GREEN
B-
ORANGE
GREY
VIOLET
BLUE
GREEN
BLACK
A
DELIVERY
DETECTOR
ELECTRONIC DOOR LOCK P15
PINK
ORANGE
GREY
RED
WHITE
B
ARED
BLUE
BLUE
ELECTRONIC
BALLAST
PLUG
CAP
BLK
WHT
1
2
24 VAC (LOAD)
1
2
1
2
220/
110V
240V
AC
AC
DOMESTIC
EXPORT
PLUG CAP
1
2
CAP PLUG
24 VOLT
TRANSFORMER
110VAC (LINE)
PLUG
CAP
1 1
2 2
3A / 250VAC
SLOW-BLOW
FUSE
WHITE / ORANGE
GREY
PINK
WHITE / PINK
WHITE / GREY
KEY
ORANGE
VIOLET
WHITE / VIOLET
RED
ORANGE
GREEN
RED
Z-AXIS P7
Y-AXIS P6
X-AXIS P5
POWER P11
FERRITE
BEAD
RED
BLK
BLK
1
2
1
2
1
2
3
1
2
3
RED
LAMP
BLUE
RED
LAMP
24V
DC
GREEN
VIOLET
GREEN
GREY
L1
N
REFRIGERATION
RELAY
LAMP
RELAY
FAN
RELAY
N
L1
L1
N
MAIN WIRING
HARNESS
COMPRESSOR
COMPRESSOR
FAN MOTOR
EVAPORATOR
FAN MOTOR
WIRING
SCHEMATIC
RED
BLACK
BLUE
GREEN
BLUE
1
LOAD
HEALTH
SAFETY
SENSOR
LINE
Page 64
FILTER
ENCODERS
SECTION 7: Wiring Schematic
Royal Vision Vender
Royal Vision Vender
Test Display
Number of Free Vends
Value of Free Vends
View Price
Scroll through all selections
Shelf All
All Selections
Free Vend Count
Scroll through all selections
All selects XXX
Scroll through all selections
All selects XX.XX
Exercise Gantry
Test Encoders
Test Home Sensors
Number of Vends
Set Price
Test Relay
Test Keypad
Test Vending
Test Temp Sensors
Cash Collected
Diagnostics
Coin dispense / Insert
Errors were Detected
Programming Flowchart
Option 1
Option 2
Option 3
Custom
Enable
Date
Time
DST
Return
Free Vend
Blocking 1/2/3
Stop Hour
Stop Day
No Vend
Start Hour
Start Day
Select
Stop Hour
Stop Day
Stop Time
Stop Time
Start Hour
Start Day
Start Time
Start Time
Enable Timer
Enable Timer
Override Options
Discount
Select Block 1/2/3
Setpoint
Health Safety
Vend Discount
Lighting
Light Control
Less Amount
Select
Refrigeration
R
X Hrs till Defrost
Display
Temp Testing
Storage
Spanish Slovene Finnish Norwegian
Display Time
Stop Hour
Stop Day
Set Language English French German Italian Portuguese
Set Internal Clock
Start Hour
Start Day
Degree
Multi Vend Bill Escrow DEX Auto Reset Debug Enable
Stop Time
Stop Hour
Stop Day
Start Time
Start Hour
Start Day
Stop Time
Forced Attempt
Start Time
Set Refrigeration Enable Timer
Lighting Enable Timer
Door Password
Save Credit
Set Configuration Multi Price Hide Menus POS Disable Open Door Totals Reset Counts No Cheat Mode
Space to Sales
12-04
Rev. D
Product Location END X=NNNN Y=NNNN Sel=Z X=NNNN Y=NNNN Test Vend Sel=Z Jog Even=XXX Jog Odd=XXX
SECTION 8: Programming Flowchart
Page 65
CREDIT AND REPLACEMENT POLICY
Credits or replacements will be issued on warranty items if the proper procedures are followed:
1. ROYAL VENDORS will pay shipping charges on all parts covered under this warranty when
transportation has been made the most economical way. (Example: within the continental USA,
regular ground UPS). An A.R.S. (Authorized Return Service) sticker will be sent with all warranty parts.
This method of shipping is preferred for returning parts to Royal.
2. Credits will only be issued to warranty parts that have been ordered in advance, not for parts ordered as
stock. (NO EXCEPTIONS)
3. When ordering warranty parts in advance, please have the full vender, refrigeration unit, and / or control
board serial numbers.
4. A copy of the Packing Slip, the correct serial number and complete Return Material Tag (provided with
part) are required for sending back parts. Please fill out the Return Material Tag completely, keeping the
white copy for your records and sending the yellow tag back with the attached part. Make sure you
have your company name, address, phone number, serial number, and model number, along with a brief
explanation of the problem.
5. If the item returned is not under warranty, it will be sent back to you at your expense along with a
US$10.00 handling fee or it will be scrapped.
6. All warranty parts should be properly wrapped and packed securely to avoid further damage. Parts that
are returned from the field and have been tapped into, tampered with, not packaged properly or have
had the serial plate or label removed, will void the warranty.
7. If parts are not returned within 15 working days, the invoice will be due in full.
R
Page 66
Royal Vendors’ Publication
833073 Rev. B3
6-05
Printed in the United States of America
Royal Vision Vender