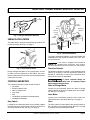
1
28634-G01-PT
OWNER’S MANUAL
AND SERVICE GUIDE
MANUAL DE PROPRIETÀRIO
E GUIA DE SERVIÇO
ELECTRIC POWERED THREE WHEEL
SERVICE VEHICLE
Veículos eléctricos de serviço
a três rodas
STARTING MODEL YEAR: 2001
Começo do modelo do ano: 2001
SAFETY
Read and understand all labels located on the vehicle. For any questions on any of the information, contact a representative for clarification.
Always replace any damaged or missing labels.
On steep hills it is possible for vehicles to coast at greater than normal speeds encountered on a flat surface. To prevent loss of vehicle control and possible serious injury, speeds should be limited to no more than the maximum speed
on level ground. (See vehicle specification.) Limit speed by applying the service brake.
Catastrophic damage to the drive train components due to excessive speed may result from driving the vehicle above
specified speed. Damage caused by excessive speed may cause a loss of vehicle control, is costly, is considered
abuse and will not be covered under warranty.
If the vehicle is to be used in a commercial environment, signs similar to the ones illustrated should be used to warn of
situations that could result in an unsafe condition.
BATTERY WARNING
Battery posts,
terminals and related
accessories contain
lead and lead compounds,
chemicals known
to cause cancer and
reproductive harm.
BATTERIES
CONTAIN LEAD
AND RELATED PARTS
WASH HANDS
AFTER HANDLING!
WASH HANDS
AFTER HANDLING!
WARNING: Battery posts, terminals and related
accessories contain lead and lead compounds,
chemicals known to cause cancer and reproductive harm.
Be sure that this manual remains as part of the permanent service record should the vehicle be resold.
NOTES, CAUTIONS AND WARNINGS
Throughout this guide NOTE, CAUTION and WARNING
will be used.
A NOTE indicates a condition that should be
observed.
A CAUTION indicates a condition that
may result in damage to the vehicle.
!
injury or death.
!
A WARNING indicates a
hazardous condition that
could result in severe
Please observe these NOTES, CAUTIONS and WARNINGS; be aware that servicing a vehicle requires
mechanical skill and a regard for conditions that could be
hazardous. Improper service or repair may damage the
vehicle or render it unsafe.
Battery posts, terminals
and related accessories
contain lead and lead
compounds. Wash hands after handling.
!
!
(NOTES, CAUTIONS AND WARNINGS CONTINUED ON INSIDE OF BACK COVER)
OWNER’S MANUAL
AND SERVICE GUIDE
ELECTRIC POWERED
THREE WHEEL
SERVICE VEHICLE
VEHICLES
E-Z-GO INDUSTRIAL 640
CUSHMAN STOCK CHASER
TEXTRON Golf, Turf & Specialty Products reserves the right to make design changes without obligation to make these changes on units previously sold and the
information contained in this manual is subject to change without notice.
TEXTRON Golf, Turf & Specialty Products is not liable for errors in this manual or for incidental or consequential damages that result from the use of the material
in this manual.
CUSTOMER SERVICE DEPARTMENT IN USA PHONE: 1-800-241-5855 FAX: 1-800-448-8124
OUTSIDE USA PHONE: 010-1-706-798-4311, FAX: 010-1-706-771-4609
TEXTRON GOLF, TURF & SPECIALTY PRODUCTS, P.O.BOX 388, AUGUSTA, GEORGIA USA 30903-0388
Owner’s Manual and Service Guide
Page i
NOTES
To obtain a copy of the limited warranty applicable to the vehicle, call or write a local
Distributor, an authorized Branch or the Warranty Department with vehicle serial number
and manufacturer code.
The use of non Original Equipment Manufacturer (OEM) parts may void the warranty.
Overfilling of batteries may void the warranty.
BATTERY PROLONGED STORAGE
All batteries will self discharge over time. The rate of self discharge varies depending on the
ambient temperature and the age and condition of the batteries.
A fully charged battery will not freeze in winter temperatures unless the temperature falls
below -75° F (-60° C).
For winter storage, the batteries must be clean, fully charged and disconnected from any
source of electrical drain, such as the battery charger. Disconnect the battery charger cable
from the vehicle batteries when not charging.
As with all electric vehicles, the batteries must be checked and recharged as required or at a
minimum of 30 day intervals.
Refer to the ‘Prolonged Storage’ section within the BATTERIES AND CHARGING section of
this manual.
Page ii
Owner’s Manual and Service Guide
TABLE OF CONTENTS
SAFETY .................................................................................................................. Inside Covers
NOTES .........................................................................................................................................ii
SAFETY INFORMATION ............................................................................................................ v
BEFORE INITIAL USE ............................................................................................................... 1
Fig. 1 Initial Service Chart ...................................................................................................................... 1
On Board Charger ............................................................................................................................................... 1
Portable Charger Installation (if equipped) .......................................................................................................... 1
Fig. 2 Charger Installation ...................................................................................................................... 2
Lift Out Battery Trays (if equipped) ...................................................................................................................... 2
Fig. 3 Charger Distribution Harness ......................................................................................................3
SERIAL PLATE LOCATION ....................................................................................................... 3
Fig. 4 Serial Plate Location .................................................................................................................... 3
CONTROLS AND METERS ....................................................................................................... 3
Key Switch ........................................................................................................................................................... 3
Fig. 5 Controls and Meters .................................................................................................................... 3
Direction Selector ................................................................................................................................................3
State of Charge Meter ......................................................................................................................................... 3
Hour Meter ........................................................................................................................................................... 3
Horn .....................................................................................................................................................................3
Accelerator and Brake Combination .................................................................................................................... 4
Fig. 6 Combination Accelerator and Brake Pedal .................................................................................. 4
Headlights and Taillight ....................................................................................................................................... 4
BEFORE ENTERING VEHICLE ................................................................................................. 4
OPERATING THE VEHICLE ...................................................................................................... 4
STARTING THE VEHICLE ......................................................................................................... 5
COASTING ................................................................................................................................. 5
SERVICING THE ELECTRIC VEHICLE .................................................................................... 5
TOWING ..................................................................................................................................... 6
LIFTING THE VEHICLE ............................................................................................................. 6
Fig. 7 Lifting the Vehicle ........................................................................................................................ 6
ROUTINE MAINTENANCE ........................................................................................................ 7
Fig. 8 Lubrication Points ........................................................................................................................ 7
REAR AXLE ............................................................................................................................... 7
Checking the Lubricant Level .............................................................................................................................. 7
Fig. 9 Rear Axle Lubricant Check and Fill ............................................................................................. 8
BRAKES ..................................................................................................................................... 8
Test Method ......................................................................................................................................................... 8
Fig. 10 Periodic Brake Performance Test .............................................................................................. 8
TIRES ......................................................................................................................................... 9
Tire Repair ........................................................................................................................................................... 9
Wheel Installation ................................................................................................................................................9
Fig. 11 Wheel Installation ...................................................................................................................... 9
LIGHT BULB REPLACEMENT ................................................................................................ 10
CARE AND CLEANING OF THE VEHICLE ............................................................................. 10
VEHICLE CARE PRODUCTS .................................................................................................. 10
TRAILERING ............................................................................................................................ 11
Owner’s Manual and Service Guide
Page iii
TABLE OF CONTENTS
HARDWARE .............................................................................................................................11
Fig. 12 Bolt Grades ............................................................................................................................. 11
TORQUE SPECIFICATIONS .................................................................................................. 11
Fig. 13 Torque Specifications .............................................................................................................. 11
PERIODIC SERVICE SCHEDULE .......................................................................................... 12
Fig. 14 Periodic Service Schedule ...................................................................................................... 12
BATTERIES AND CHARGING ................................................................................................. 14
Safety ................................................................................................................................................................ 14
BATTERY ................................................................................................................................. 14
BATTERY MAINTENANCE ...................................................................................................... 14
At Each Charging Cycle .................................................................................................................................... 14
Monthly ............................................................................................................................................................. 15
Electrolyte Level and Water .............................................................................................................................. 15
Fig. 15 Correct Electrolyte Level ......................................................................................................... 15
Fig. 16 Water Purity Table .................................................................................................................. 15
Cleaning Batteries ............................................................................................................................................. 16
Fig. 17 Automatic Watering Gun ......................................................................................................... 16
Fig. 18 Preparing Acid Neutralizing Solution ....................................................................................... 16
Battery Replacement ........................................................................................................................................ 16
Fig. 19 Battery Connections ................................................................................................................ 17
Prolonged Storage ............................................................................................................................................ 17
Fig. 20 Freezing Point of Electrolyte ................................................................................................... 17
Battery Charging ............................................................................................................................................... 18
AC Voltage ........................................................................................................................................................ 18
TROUBLESHOOTING .............................................................................................................. 19
Hydrometer ....................................................................................................................................................... 19
Fig. 21 Hydrometer ............................................................................................................................. 19
Using A Hydrometer .......................................................................................................................................... 19
Fig. 22 Hydrometer Temperature Correction ...................................................................................... 20
GENERAL SPECIFICATIONS...................................................................................................21
ELECTRIC POWERED THREE WHEEL SERVICE VEHICLE.......................................................................... 22
Fig. 23 Vehicle Dimensions and Incline Specifications ......................................................................... 23
Fig. 24 Vehicle Turning Clearance Diameter and Intersecting Aisle Clearance ................................... 24
Page iv
Owner’s Manual and Service Guide
SAFETY INFORMATION
This manual has been designed to assist the owner-operator in maintaining the vehicle in accordance with procedures
developed by the manufacturer. Adherence to these procedures and troubleshooting tips will ensure the best possible
service from the product. To reduce the chance of personal injury and/or property damage, the following instructions
must be carefully observed:
GENERAL
Many vehicles are used for a variety of tasks beyond the original intended use of the vehicle; therefore it is impossible
to anticipate and warn against every possible combination of circumstances that may occur. No warnings can take the
place of good common sense and prudent driving practices.
Good common sense and prudent driving practices do more to prevent accidents and injury than all of the warnings
and instructions combined. The manufacturer strongly suggests that the owner-operator read this entire manual paying
particular attention to the CAUTIONS and WARNINGS contained therein. It is further recommended that employees
and other operators be encouraged to do the same.
If you have any questions, contact your closest representative or write to the address on the back cover of this publication, Attention: Product Service Department.
TEXTRON Golf, Turf & Specialty Products reserves the right to make design changes without obligation to make these
changes on units previously sold and the information contained in this manual is subject to change without notice.
TEXTRON Golf, Turf & Specialty Products is not liable for errors in this manual or for incidental or consequential damages that result from the use of the material in this manual.
This vehicle conforms to the current applicable standard for safety and performance requirements.
These vehicles do not conform to Federal Motor Vehicle Safety Standards and are not equipped for operation on public
streets.
With electric powered vehicles, be sure that all electrical accessories are grounded directly to the battery (-) post.
Never use the chassis or body as a ground connection.
Refer to GENERAL SPECIFICATIONS for vehicle seating capacity.
Never modify the vehicle in any way that will alter the weight distribution of the vehicle, decrease its stability
or increase the speed beyond the factory specification. Such modifications can cause serious personal injury
or death. Modifications that increase the speed and/or weight of the vehicle will extend the stopping distance and may
reduce the stability of the vehicle. Do not make any such modifications or changes. The manufacturer prohibits and
disclaims responsibility for any such modifications or any other alteration which would adversely affect the safety of the
vehicle.
GENERAL OPERATION
Always use the vehicle in a responsible manner and maintain the vehicle in safe operating condition.
Always read and observe all warnings and operation instruction labels affixed to the vehicle.
Always follow all safety rules established in the area where the vehicle is being operated.
Always reduce speed to compensate for poor terrain or conditions.
Always apply service brake to control speed on steep grades.
Owner’s Manual and Service Guide
Page v
SAFETY INFORMATION
Always maintain adequate distance between vehicles.
Always reduce speed in wet areas.
Always use extreme caution when approaching sharp or blind turns.
Always use extreme caution when driving over loose terrain.
Always use extreme caution in areas where pedestrians are present.
MAINTENANCE
Always maintain your vehicle in accordance with the manufacturer’s periodic service schedule.
Always ensure that mechanics performing repairs are trained and qualified to do so.
Always follow the manufacturer’s directions if you do any maintenance on your vehicle. Be sure to disable the vehicle
before performing any maintenance. Disabling includes removing the key from the key switch and removal of a battery
wire.
Always insulate any tools used within the battery area in order to prevent sparks or battery explosion caused by shorting the battery terminals or associated wiring. Remove the batteries or cover exposed terminals with an insulating
material.
Always check the polarity of each battery terminal and be sure to rewire the batteries correctly.
Always use specified replacement parts. Never use replacement parts of lesser quality.
Always use recommended tools.
Always determine that tools and procedures not specifically recommended by the manufacturer will not compromise
the safety of personnel nor jeopardize the safe operation of the vehicle.
Always support the vehicle using wheel chocks and safety stands. Never get under a vehicle that is supported by a
jack. Lift the vehicle in accordance with the manufacturer’s instructions.
Never attempt to maintain a vehicle in an area where exposed flame is present or persons are smoking.
Always be aware that a vehicle that is not performing as designed is a potential hazard and must not be operated.
The manufacturer cannot anticipate all situations, therefore people attempting to maintain or repair the vehicle must
have the skill and experience to recognize and protect themselves from potential situations that could result in severe
personal injury or death and damage to the vehicle. Use extreme caution and, if unsure as to the potential for injury,
refer the repair or maintenance to a qualified mechanic.
Always test drive the vehicle after any repairs or maintenance. All tests must be conducted in a safe area that is free of
both vehicular and pedestrian traffic.
Always replace damaged or missing warning, caution or information labels.
Always keep complete records of the maintenance history of the vehicle.
Page vi
Owner’s Manual and Service Guide
SAFETY INFORMATION
VENTILATION
Hydrogen gas is generated in the charging cycle of batteries and is explosive in concentrations as low as 4%. Because
hydrogen gas is lighter than air, it will collect in the ceiling of buildings necessitating proper ventilation. Five air
exchanges per hour is considered the minimum requirement.
Never charge a vehicle in an area that is subject to flame or spark. Pay particular attention to natural gas or propane
gas water heaters and furnaces.
Always use a dedicated circuit for each battery charger. Do not permit other appliances to be plugged into the receptacle when the charger is in operation.
Chargers must be installed and operated in accordance with charger manufacturers recommendations or applicable
electrical code (whichever is more restrictive).
Owner’s Manual and Service Guide
Page vii
SAFETY INFORMATION
Notes:
Page viii
Owner’s Manual and Service Guide
SAFETY INFORMATION
Read all of manual to become thoroughly familiar with this vehicle. Pay particular attention to all Notes, Cautions and Warnings
GENERAL
The following text is provided as recommended by part II
of ASME/ANSI B56.8-1988. E-Z-GO strongly endorses
the contents of this specification.
manual without the manufacturer’s prior written authorization. Where authorized modifications have been made,
the user shall ensure that capacity, operation, warning,
and maintenance instruction plates, tags, or decals are
changed accordingly.
PART II
FOR THE USER
4.3.3 As required under paras. 4.3.1 or 4.3.2, the
manufacturer shall be contacted to secure new nameplates, warnings, or instructions which shall then be
affixed in their proper place on the carrier.
4 GENERAL SAFETY PRACTICES
4.4
4.1
Introduction
4.1.1 Like other machines, carriers can cause injury
if improperly used or maintained. Part II contains broad
safety practices applicable to carrier operations. Before
operation, the user shall establish such additional specific safety practices as may reasonably be required for
safe operation.
4.2
Stability
4.2.1
Experience has shown that this vehicle, which
complies with this standard, is stable when properly
operated and when operated in accordance with specific
safety rules and practices established to meet actual
operating terrain and conditions. However, improper
operation, faulty maintenance, or poor housekeeping
may contribute to a condition of instability and defeat the
purpose of the standard. Some of the conditions which
may affect stability are failure of the user to follow safety
practices; also, ground and floor conditions, grade,
speed, loading, the operation of the carrier with improper
loads, battery weight, dynamic and static forces, and the
judgement exercised by the carrier operator.
(a) The user shall train carrier operators to adhere
strictly to the operating instructions stated in this Standard.
(b) The user shall survey specific operating conditions
and environment, and establish and train carrier operators to comply with additional, specific safety practices.
4.3
Nameplates, Markings, Capacity, and Modifications
4.3.1 The user shall maintain in a legible condition
all nameplates, warnings, and instructions which are
supplied by the manufacturer.
4.3.2 The user shall not perform any modification or
addition which affects capacity or safe operation, or
make any change not in accordance with the owner’s
Fuel Handling and Storage
4.4.1 The user shall supervise the storage and handling of liquid fuels (when used) to be certain that it is in
accordance with appropriate paragraphs of ANSI/NFPA
505 and ANSI/NFPA 30.
4.4.2 Storage and handling of liquefied petroleum
gas fuels shall be in accordance with appropriate paragraphs of ANSI/NFPA 505 and ANSI/NFPA 58. If such
storage or handling is not in compliance with these standards, the user shall prevent the carrier from being used
until such storage and handling is in compliance with
these standards.
4.5
Changing and Charging Storage Batteries for
Electric Personnel and Burden Carriers
4.5.1 The user shall require battery changing and
charging facilities and procedures to be in accordance
with appropriate paragraphs of ANSI/NFPA 505.
4.5.2 The user shall periodically inspect facilities
and review procedures to be certain that appropriate
paragraphs of ANSI/NFPA 505, are strictly complied with,
and shall familiarize carrier operators with it.
4.6
Hazardous Locations
4.6.1 The user shall determine the hazard classification of the particular atmosphere or location in which
the carrier is to be used in accordance with ANSI/NFPA
505.
4.6.2 The user shall permit in hazardous areas only
those carriers approved and of the type required by
ANSI/NFPA 505.
4.7
Lighting for Operating Areas
4.7.1 The user, in accordance with his responsibility
to survey the environment and operating conditions, shall
determine if the carrier requires lights and, if so, shall
equip the carrier with appropriate lights in accordance
with the manufacturer’s recommendations.
Owner’s Manual and Service Guide
Page ix
SAFETY INFORMATION
Read all of manual to become thoroughly familiar with this vehicle. Pay particular attention to all Notes, Cautions and Warnings
4.8
Control of Noxious Gases and Fumes
turer;
4.8.1 When equipment powered by internal combustion engines is used in enclosed areas, the atmosphere shall be maintained within limits specified in the
American Conference of Governmental Industrial
Hygienists publication, “Threshold Limit Values for
Chemical Substances and Physical Agents in the Workroom Environment”. This shall be accomplished by ventilation provided by the user, and/or the installation, use,
and proper maintenance of emission control equipment
recommended or provided by the manufacturer of the
equipment.
(b) emphasis on safety of passengers, material loads,
carrier operator, and other employees;
4.9
(e) operational performance tests and evaluations during, and at completion of, the program.
Warning Device(s)
4.9.1 The user shall make periodic inspections of
the carrier to be certain that the sound-producing and/or
visual device(s) are maintained in good operating condition.
(c) general safety rules contained within this Standard
and the additional specific rules determined by the user
in accordance with this Standard, and why they were formulated;
(d) introduction of equipment, control locations and
functions, and explanation of how they work when used
properly and when used improperly, and surface conditions, grade, and other conditions of the environment in
which the carrier is to be operated;
5.3
Personnel and Burden Carrier Operator
Responsibility
4.9.2 The user shall determine if operating conditions require the carrier to be equipped with additional
sound-producing and/or visual devices and be responsible for providing and maintaining such devices, in accordance with the manufacturer’s recommendations.
5.3.1 Operators shall abide by the following safety
rules and practices in paras. 5.4, 5.5, 5.6, and 5.7.
5 OPERATING SAFETY RULES AND
PRACTICES
5.4.2 Riding on the carrier by persons other than the
operator is authorized only on personnel seat(s) provided
by the manufacturer. All parts of the body shall remain
within the plan view outline of the carrier.
5.1
Personnel and Burden Carrier Operator
Qualifications
5.1.1 Only persons who are trained in the proper
operation of the carrier shall be authorized to operate the
carrier. Operators shall be qualified as to visual, auditory,
physical, and mental ability to safely operate the equipment according to Section 5 and all other applicable
parts of this Standard.
5.2
Personnel and Burden Carrier Operators’
Training
5.2.1 The user shall conduct an operators’ training
program.
5.2.2 Successful completion of the operators’ training program shall be required by the user before operation of the carrier. The program shall be presented in its
entirety to all new operators and not condensed for those
claiming previous experience.
5.2.3 The user should include in the operators’ training program the following:
(a)
Page x
instructional material provided by the manufac-
5.4
General
5.4.1 Safeguard the pedestrians at all times. Do not
drive carrier in a manner that would endanger anyone.
5.4.3 When a carrier is to be left unattended, stop
carrier, apply the parking brake, stop the engine or turn
off power, turn off the control or ignition circuit, and
remove the key if provided. Block the wheels if machine
is on an incline.
5.4.4 A carrier is considered unattended when the
operator is 25 ft. (7.6 m) or more from the carrier which
remains in his view, or whenever the operator leaves the
carrier and it is not within his view. When the operator is
dismounted and within 25 ft. (7.6 m) of the carrier still in
his view, he still must have controls neutralized, and the
parking brake(s) set to prevent movement.
5.4.5 Maintain a safe distance from the edge of
ramps and platforms.
5.4.6 Use only approved carriers in hazardous locations, as defined in the appropriate safety standards.
5.4.7 Report all accidents involving personnel,
building structures, and equipment.
5.4.8
rier.
Operators shall not add to, or modify, the car-
Owner’s Manual and Service Guide
SAFETY INFORMATION
Read all of manual to become thoroughly familiar with this vehicle. Pay particular attention to all Notes, Cautions and Warnings
5.4.9 Carriers shall not be parked or left unattended
such that they block or obstruct fire aisles, access to
stairways, or fire equipment.
5.5
Traveling
5.5.1 Observe all traffic regulations, including authorized speed limits. Under normal traffic conditions keep
to the right. Maintain a safe distance, based on speed of
travel, from a carrier or vehicle ahead; and keep the carrier under control at all times.
5.5.2 Yield the right of way to pedestrians, ambulances, fire trucks, or other carriers or vehicles in emergency situations.
5.5.3 Do not pass another carrier or vehicle traveling in the same direction at intersections, blind spots, or
at other dangerous locations.
5.5.4 Keep a clear view of the path of travel,
observe other traffic and personnel, and maintain a safe
clearance.
5.5.5 Slow down or stop, as conditions dictate, and
activate the sound-producing warning device at cross
aisles and when visibility is obstructed at other locations.
5.5.6
Ascend or descend grades slowly.
5.5.7 Avoid turning, if possible, and use extreme
caution on grades, ramps, or inclines; normally travel
straight up and down.
5.5.8 Under all travel conditions the carrier shall be
operated at a speed that will permit it to be brought to a
stop in a safe manner.
5.5.9 Make starts, stops, turns, or direction reversals in a smooth manner so as not to shift the load,
endanger passengers, or overturn the carrier.
5.5.10 Do not indulge in dangerous activities, such as
stunt driving or horseplay.
5.5.11 Slow down when approaching, or on, wet or
slippery surfaces.
5.5.12 Do not drive carrier onto any elevator unless
specifically authorized to do so. Approach elevators
slowly, and then enter squarely after the elevator car is
properly leveled. Once on the elevator, neutralize the
controls, shut off power, and set parking brakes. It is
advisable that all other personnel leave the elevator
before a carrier is allowed to enter or exit.
5.5.13 Avoid running over loose objects, potholes,
and bumps.
5.5.14 To negotiate turns, reduce speed to improve
stability, then turn hand steering wheel or tiller in a
smooth, sweeping motion.
5.6
Loading
5.6.1 Handle only stable and safely arranged loads.
When handling off-center loads which cannot be centered, operate with extra caution.
5.6.2 Handle only loads within the capacity of the
carrier as specified on the nameplate.
5.6.3 Handle loads exceeding the dimensions used
to establish carrier capacity with extra caution. Stability
and maneuverability may be adversely affected.
5.7
Operator Care of Personnel and Burden
Carriers
5.7.1 At the beginning of each shift during which the
carrier will be used, the operator shall check the carrier
condition and inspect the tires, warning devices, lights,
battery(s), speed and directional controllers, brakes, and
steering mechanism. If the carrier is found to be in need
of repair, or in any way unsafe, the matter shall be
reported immediately to the designated authority and the
carrier shall not be operated until it has been restored to
safe operating condition.
5.7.2 If during operation the carrier becomes unsafe
in any way, the matter shall be reported immediately to
the designated authority, and the carrier shall not be
operated until it has been restored to safe operating condition.
5.7.3 Do not make repairs or adjustments unless
specifically authorized to do so.
5.7.4 The engine shall be stopped and the operator
shall leave the carrier while refueling.
5.7.5 Spillage of oil or fuel shall be carefully and
completely absorbed or evaporated and fuel tank cap
replaced before starting engine.
5.7.6 Do not operate a carrier with a leak in the fuel
system or battery(s).
5.7.7 Do not use open flames for checking electrolyte level in storage battery(s) or liquid level in fuel tanks.
6 MAINTENANCE PRACTICES
6.1
Introduction
6.1.1 Carriers may become hazardous if maintenance is neglected. Therefore, maintenance facilities,
trained personnel, and procedures shall be provided.
Such facilities may be on or off the premises.
Owner’s Manual and Service Guide
Page xi
SAFETY INFORMATION
Read all of manual to become thoroughly familiar with this vehicle. Pay particular attention to all Notes, Cautions and Warnings
6.2
Maintenance Procedures
6.2.1 Maintenance and inspection of all carriers
shall be performed in conformance with the manufacturer’s recommendations and the following practices.
(a) A scheduled preventive maintenance, lubrication,
and inspection system shall be followed.
(b) Only qualified and authorized personnel shall be
permitted to maintain, repair, adjust, and inspect carriers.
(c) Before undertaking maintenance or repair, follow
the manufacturer’s recommendations for immobilizing
the carrier.
(d) Block chassis before working underneath it.
(e) Before disconnecting any part of the engine fuel
system of a gasoline or diesel powered carrier with gravity feed fuel systems, be sure shutoff valve is closed, and
run engine until fuel system is depleted and engine stops
running.
(f) Before disconnecting any part of the engine fuel
system of LP gas powered carriers, close the LP gas cylinder valve and run the engine until fuel in the system is
depleted and the engine stops running.
(g) Operation to check performance of the carrier shall
be conducted in an authorized area where safe clearance exists.
prevent the use of the carrier until the leak has been
eliminated.
(o) The carrier manufacturer’s capacity, operation, and
maintenance instruction plates, tags, or decals shall be
maintained in legible condition.
(p) Batteries, motors, speed and directional controllers, limit switches, protective devices, electrical conductors, and connections shall be inspected and maintained
in conformance with manufacturers recommended procedures.
(q) Carriers shall be kept in a clean condition to minimize fire hazards and facilitate detection of loose or
defective parts.
(r) Modifications and additions which affect capacity
and safe machine operation shall not be performed by
the customer or user without manufacturer’s prior written
authorization; where authorized modifications have been
made, the user shall ensure that capacity, operation,
warning, and maintenance instruction plates, tags, or
decals are changed accordingly.
(s) Care shall be taken to ensure that all replacement
parts are interchangeable with the original parts and of a
quality at least equal to that provided in the original
equipment.
(h) Before commencing operation of the carrier, follow
the manufacturer’s instructions and recommended procedures.
(i) Avoid fire hazards and have fire protection equipment present in the work area. Do not use an open flame
to check level or leakage of fuel, battery electrolyte, or
coolant. Do not use open pans of fuel or flammable
cleaning fluids for cleaning parts.
(j) Properly ventilate the work area.
(k) Handle LP gas cylinders with care. Physical damage, such as dents, scrapes, or gouges, may dangerously weaken the tank and make it unsafe for use.
(l) Brakes, steering mechanisms, speed and directional control mechanisms, warning devices, lights, governors, guards, and safety devices shall be inspected
regularly and maintained in a safe operating condition.
(m)
Special carriers or devices designed and
approved for hazardous area operation shall be
inspected to ensure that maintenance preserves the original approved safe operating features.
(n) Fuel systems shall be checked for leaks and condition of parts. If a leak is found, action shall be taken to
Page xii
Owner’s Manual and Service Guide
ELECTRIC THREE WHEEL SERVICE VEHICLE
Read all of manual to become thoroughly familiar with this vehicle. Pay particular attention to all Notes, Cautions and Warnings
Thank you for this purchase. The vehicle is equipped
with an electronic speed control unit that is the most
advanced in the industry. Before driving the vehicle, we
ask you to spend some time reading this Owner’s Manual and Service Guide. This guide contains information
that will assist you in maintaining your highly reliable
vehicle. Some illustrations may show items that are
optional for your vehicle.
Most of the service procedures in this guide can be
accomplished by an individual using common automotive
hand tools. Refer to an authorized service representative
for information on servicing the vehicle in accordance
with the Periodic Service Schedule.
To facilitate maintenance, a Service Parts Manual and a
Technician’s Repair and Service Manual is available from
a local Distributor, an authorized Branch or the Service
Parts Department. When ordering parts or requesting
information for your vehicle, provide vehicle model, serial
number and manufacture code.
BEFORE INITIAL USE
Read, understand and follow safety label on the instrument panel. The vehicle has been designed to operate in
a warehouse or factory environment with semi-smooth
floors, road and ramps.
Be sure you understand the vehicle, its equipment and
how to use it safely. Although the vehicle has been
designed to provide safe and reliable operation, maintaining good performance depends to a large extent on
the operator.
Vehicle batteries must be fully charged before initial use.
Hydrogen gas is generated as a natural part of the
lead acid battery charging process. A 4% concentration of hydrogen gas is
explosive and could cause severe injury or death.
Charging must take place in an area that is adequately ventilated (minimum of 5 air exchanges per hour).
!
!
To reduce the chance of battery explosion that could
result in severe injury or death, never smoke around
or charge batteries in an area that has open flame or
electrical equipment that could cause an electrical
arc.
Hydrogen gas is generated in the charging cycle of batteries and is explosive in concentrations as low as 4%.
Because hydrogen gas is lighter than air, it will collect in
the ceiling of buildings necessitating proper ventilation.
Five air exchanges per hour is considered the minimum
requirement.
Never charge a vehicle in an area that is subject to flame
or spark. Pay particular attention to natural gas or propane gas water heaters and furnaces.
Before a new vehicle is put into operation, it is recommended that the items listed in the INITIAL SERVICE
CHART be performed (Ref Fig. 1 on page 1).
ITEM
SERVICE OPERATION
Batteries Charge batteries
Backrest Remove protective plastic covering
Brakes
Check operation and adjust if necessary
Tires
Check air pressure (see SPECIFICATIONS)
Fig. 1 Initial Service Chart
On Board Charger
The on board charger is wired directly to the batteries,
only requiring it be plugged into a dedicated 15 amp AC
outlet to be operational. When charge cycle is complete,
replace cord in appropriate area under instrument panel.
Portable Charger Installation (if equipped)
To prevent overheating
that may cause serious
damage to the charger
and create the potential for fire, do not block or
obstruct the airways. Portable chargers must be
mounted on a platform above the ground or in such a
manner as to permit the maximum air flow underneath and around the charger.
!
!
Portable chargers are shipped with the vehicle. Prior to
vehicle or charger operation, chargers must be removed
and mounted on a platform or wall above the ground to
permit maximum air flow around and underneath the
charger. If the charger is operated in an outdoor location,
rain and sun protection must be provided (Ref Fig. 2 on
page 2).
A dedicated circuit is required for the charger. Refer to
label on side of charger for appropriate circuit protection.
The charger may remain plugged in to the AC outlet. To
charge the vehicle, refer to the instruction labels on the
charger. Insert the DC plug completely into the vehicle
receptacle. The receptacle is located on the side of the
instrument panel to the left of the steering wheel (Ref Fig.
5 on page 3). After inserting the polarized DC plug, wait a
Owner’s Manual and Service Guide
Page 1
ELECTRIC THREE WHEEL SERVICE VEHICLE
Read all of manual to become thoroughly familiar with this vehicle. Pay particular attention to all Notes, Cautions and Warnings
Lift Out Battery Trays (if equipped)
Provide Protection From Elements
The vehicle may be equipped with lift out battery trays.
Lift out battery trays permit the vehicle to operate on one
set of batteries while another set is charging.
Before separating the
battery connector,
always turn off any electrical accessories or options. Breaking a live circuit
will result in an electrical arc that could cause a battery explosion.
Be sure that any hoist used to remove batteries has a
working rating that exceeds the weight of the batteries and battery tray. The hoist must be capable of lifting the battery tray without allowing the batteries to
tip.
To eliminate the possibility of battery explosion, batteries must be covered to prevent the possibility of
shorting live battery terminals which could result in
an explosion.
!
Do Not Block Louvered Airways
NEMA 15 - 5R Grounded AC Receptacle
110 - 120 VAC. Dedicated 15 AMP Circuit
Locations outside the US and Canada: Reference
appropriate local electrical code and charger manufacturer recommendations for AC power requirements
Fig. 2 Charger Installation
few seconds and observe ammeter on charger to make
sure it moves indicating that charger is charging.
The charger will automatically start a few seconds after
plug insertion. The charger will automatically stop when
batteries are fully charged and the DC plug can be
removed to permit use of the vehicle.
Looping the DC cord through the steering
wheel when charging, serves as a good
reminder to store the cord out of the way when finished with
charging. The DC plug can be damaged by driving over or
catching the cord on the vehicle when driving away.
To prevent a physical
hazard that could result
in an electrical shock or
electrocution, be sure that the charger plug is not
damaged and is inserted into a grounded receptacle.
!
!
The power (AC) cord is equipped with a grounded
plug, do not attempt to pull out, cut or bend the
ground post.
To disconnect charger before the charging cycle is completed, disconnect the AC cord from the AC outlet first
and then disconnect the DC cord from the vehicle.
The charging (DC) cord is equipped with a polarized connector which fits into a matching receptacle on the vehicle.
The power (AC) cord is equipped with a ground plug, do
not attempt to pull out, cut or bend the ground plug.
If vehicle is to be charged with a non Original
Equipment Manufacturer (OEM) charger, refer
to the instructions supplied with the charger.
Page 2
!
Battery posts, terminals and related accessories contain lead and lead compounds. Wash hands after handling.
Turn the key and any accessories to the "OFF" position
in order to remove any electrical load from the batteries.
To gain access to the battery trays, the cargo deck must
be removed. The vehicle has a total of four batteries separated into a left and right side tray containing two batteries each. Unplug the two large battery wire connectors
from the receptacles mounted on the vehicle frame.
Use a hoist with a minimum working rating of 150 lbs. (70
kg). The hoist must be fitted with insulated lifting hook
and chain or cable to prevent any possibility of shorting
exposed battery terminals or connections. As an added
precaution, cover the batteries to further prevent the possibility of shorting battery terminals or connections. Each
tray has a lift point to attach the hoist to. Lift out only one
tray at a time and lower to floor.
The left side of the cargo deck frame is notched
to allow the left side battery tray to clear the
steering linkage.
Install the trays of charged batteries, plug in the large
battery wire connectors and replace the cargo deck.
Connect the charger distribution harness to the discharged battery set and then plug the portable charger
into the small connector of the charger distribution harness (Ref Fig. 3 on page 3).
Owner’s Manual and Service Guide
ELECTRIC THREE WHEEL SERVICE VEHICLE
Read all of manual to become thoroughly familiar with this vehicle. Pay particular attention to all Notes, Cautions and Warnings
To
Charger
Horn
Button
Hour
Meter
To
Batteries
Fig. 3 Charger Distribution Harness
SERIAL PLATE LOCATION
The plate with the serial and manufacturing numbers are
located as shown (Ref Fig. 4 on page 3).
Direction
Selector
State of
Charge
Meter
F
Light
Switch
N
R
Charger
Receptacle
Key Switch
Fig. 5 Controls and Meters
To prevent inadvertent operation of the vehicle when left
unattended, the key should be turned to the ‘OFF’ position and removed.
If the vehicle is equipped with manufacturer
installed custom accessories, some accessories remain operational with the key switch in the ‘OFF’ position.
Fig. 4 Serial Plate Location
Direction Selector
Design changes take place on an ongoing basis. In order
to obtain correct components for the vehicle, the manufacturing date and serial number must be provided when
ordering service parts.
The direction selector is located on the instrument panel
(Ref Fig. 5 on page 3). This lever permits the selection of
forward (F), neutral (N) or reverse (R). It should be left in
(N) when the vehicle is unattended.
CONTROLS AND METERS
To prevent component damage, the
vehicle must be completely stopped
before moving the direction selector.
The controls and meters on the vehicle consist of:
• key switch
• direction selector lever
• state of charge meter
• hour meter
• horn
• combination accelerator and brake pedal
• headlights and taillight
State of Charge Meter
Located on the instrument panel, the state of charge
meter indicates the amount of usable power in the batteries (Ref Fig. 5 on page 3).
Hour Meter
Located on the instrument panel, the hour meter indicates total hours of operation (Ref Fig. 5 on page 3).
Key Switch
Horn
Located on the instrument panel, the key switch enables
the basic electrical system of the vehicle to be turned on
and off by turning the key (Ref Fig. 5 on page 3).
The horn button is located behind the steering wheel on
the right side of the instrument panel (Ref Fig. 5 on page
3). Activate horn by pressing the button.
Owner’s Manual and Service Guide
Page 3
ELECTRIC THREE WHEEL SERVICE VEHICLE
Read all of manual to become thoroughly familiar with this vehicle. Pay particular attention to all Notes, Cautions and Warnings
Accelerator and Brake Combination
If unfamiliar with this type of operation,
it is recommended that the vehicle be
operated in a non-congested area at low speed until the operator
becomes more familiar with the vehicles characteristics.
Removing partial pressure from the foot pedal
reduces the speed but
does not engage the service brake system. The service brake is activated only when foot pressure is
COMPLETELY removed. Depressing the rear (heel)
portion of the pedal further activates the service
brake.
Removing foot pressure from the pedal while traveling at high speed will engage the service brake and
result in sudden deceleration as the brake engages.
Always hold on during vehicle operation.
!
!
To prevent inadvertent movement when the vehicle is
to be left unattended, release pedal completely, move
direction selector to neutral position, turn key to
‘OFF’ position and remove key.
The vehicle is equipped with a combination accelerator
and service brake incorporated into one pedal (Ref Fig. 6
on page 4). When at rest, the pedal keeps the brakes
applied to prevent the vehicle from moving when parked.
Applying pressure to the toe of the pedal releases the
brakes and causes the vehicle to accelerate. Decreasing
pressure on the toe of the pedal reduces speed but does
not apply the brakes. Completely releasing the pedal
activates the brakes. Apply pressure to the heel of the
pedal to stop more quickly.
When vehicle is to be left unattended, release pedal
completely, move direction selector to neutral position,
turn key to ‘OFF’ position and remove key.
Headlights and Taillight
The light switch is located on the left side of the instrument panel and operates independent of the key switch
(Ref Fig. 5 on page 3). Pull the switch out to turn the
lights on.
BEFORE ENTERING VEHICLE
1. Check for correct tire inflation.
2. Inspect for fluid leaks.
3. Be sure everything is properly stored and secured.
Front of
Vehicle
Depress toe to accelerate
Release pressure - Engages service brake
If vehicle has on board charger, unplug power cord from
electrical outlet and properly store cord under instrument
panel prior to moving vehicle. If vehicle has a portable
charger, remove charger plug from vehicle receptacle
and properly store cable prior to moving vehicle.
OPERATING THE VEHICLE
Improper use of the vehicle or the lack
of proper maintenance may result in
decreased performance or damage to the vehicle.
Depress heel to brake rapidly
Read and understand the following warnings before
attempting to operate the vehicle:
To reduce the possibility
of severe injury or death
resulting from loss of
vehicle control, the following warnings must be
observed:
Drive the vehicle only as fast as terrain and safety
considerations allow. Consider the terrain, traffic
conditions and the environmental factors which
effect the terrain and the ability to control the
vehicle.
!
Heel
Toe
Fig. 6 Combination Accelerator and Brake Pedal
Page 4
Owner’s Manual and Service Guide
!
ELECTRIC THREE WHEEL SERVICE VEHICLE
Read all of manual to become thoroughly familiar with this vehicle. Pay particular attention to all Notes, Cautions and Warnings
Use extra care and reduced speed when driving
on poor surfaces, such as loose dirt, wet grass,
gravel, etc.
Avoid extremely rough terrain.
Avoid driving fast down hill. A sudden stop or
change of direction may result in loss of control.
Use service brake to control speed when traveling
down an incline.
Slow down before and during turns. All turns
should be executed at reduced speed.
All travel should be directly up or down hills.
Use extra care when driving the vehicle across
any incline.
Do not permit anyone to ride on cargo deck.
Stay in designated areas and avoid steep slopes. To
reduce the possibility of severe injury or death resulting from improper vehicle operation, the following
warnings must be observed:
Refer to GENERAL SPECIFICATIONS for capacity.
Depressing accelerator pedal will release brakes
and may cause inadvertent vehicle movement.
Turn the key to the ‘OFF’ position whenever the
vehicle is parked.
Make sure that the direction selector is in correct
position before attempting to start the vehicle.
Do not take vehicle out of ‘gear’ while in motion
(coast).
Always bring the vehicle to a complete stop
before shifting the direction selector.
Check the area behind the vehicle before operating in reverse.
Always remain standing with back against backrest and hold on while the vehicle is in motion.
Keep feet, legs, hands and arms inside the vehicle
at all times.
Check stability of vehicle when using optional
ladder for reaching or placing cargo on shelves.
Do not overextend reach.
To prevent inadvertent movement when the vehicle is to be left unattended, release pedal completely, move direction selector to neutral
position, turn key to ‘OFF’ position and remove
key.
STARTING THE VEHICLE
To start the vehicle: Place the key in the key switch and
turn to the ‘ON’ position. Move the direction selector to
the direction desired and press the toe of the pedal to
start the motor.
When the direction selector is in the reverse
position, a warning signal will sound. This is a
device to indicate the vehicle is ready to run in reverse.
The motor stops and the brake is applied when the toe of
the pedal is completely released. To stop the vehicle
more quickly, press the heel of the pedal.
To avoid component damage, the vehicle must be brought to a complete stop
before shifting the direction selector.
Do not hold vehicle on hill by using accelerator and motor. Leaving motor in a stalled condition for more than 3-4 seconds will
cause permanent damage to motor.
COASTING
To prevent injury or
death result ing from
coasting at above recommended speeds, limit speed with service brake.
!
!
On steep hills, it is possible for vehicles to coast at faster
than normal speeds that may be encountered on a flat
surface. To prevent loss of vehicle control, speeds should
be limited to no more than the maximum speed on level
ground (see GENERAL SPECIFICATIONS). Limit speed
by releasing the toe of the pedal and applying pressure
to the heel of the pedal. Severe damage to the drive train
components due to excessive speed may result from
driving the vehicle above specified speed. Damage
caused by excessive speed may cause a loss of control,
is costly, is considered abuse and will not be covered
under warranty.
SERVICING THE ELECTRIC VEHICLE
To prevent severe injury
or death, resulting from
improper servicing techniques, observe the following Warnings:
Do not attempt any type of servicing operations
before reading and understanding all notes, cautions and warnings in this manual.
!
Owner’s Manual and Service Guide
!
Page 5
ELECTRIC THREE WHEEL SERVICE VEHICLE
Read all of manual to become thoroughly familiar with this vehicle. Pay particular attention to all Notes, Cautions and Warnings
Any servicing requiring adjustments to be made
to the powertrain while the motor is running must
be made with the entire vehicle raised.
Wear eye protection when working on
the vehicle. In particular, use care
when working around batteries, or
using solvents or compressed air.
To reduce the possibility of causing an electrical
arc, which could result in a battery explosion, turn
off all electrical loads from the batteries before
removing any heavy gauge battery wires.
To prevent the possibility of motor disintegration,
never operate vehicle at full throttle for more than
4 - 5 seconds while vehicle is in a “no load” condition.
Battery posts, terminals and related accessories
contain lead and lead compounds. Wash hands
after handling.
It is in the best interest of both vehicle owner and servicing dealer to carefully follow the procedures recommended in this manual. Adequate preventative
maintenance, applied at regular intervals, is the best
guarantee for keeping the vehicle both dependable and
economical.
Never attempt to raise the rear wheels of a three
wheel vehicle without first raising the front of the
vehicle and supporting on jack stands.
When lifting vehicle, position jacks and
jack stands only on the areas indicated.
Due to the low ground clearance and short wheel base,
the vehicle should only be raised enough to remove the
front axle or the rear wheels. Servicing that requires
access to the underside of the vehicle should be accomplished by raising the front of the vehicle with a chain
hoist attached to the front frame members. Always use
an additional safety chain to prevent injury should the
hoist malfunction.
Turn wheel as shown
to permit jack placement
Detail
TOWING
!
from a jack, be sure the vehicle is on a firm and level
surface. Never get under a vehicle while it is supported by a jack. Use jack stands and test the stability of
the vehicle on the stands. Always place chocks in
front and behind the wheels not being raised. Use
extreme care since the vehicle is extremely unstable
during the lifting process.
!
This vehicle is not
designed to be towed.
It is recommended that this vehicle be moved by placing
the entire vehicle on a trailer, flatbed truck or other suitable transport.
1
2
2
Place jack along
the flat edge of
footrest
LIFTING THE VEHICLE
Tool List
Qty. Required
(See detail)
Floor jack..................................................................... 1
Jack stands ................................................................. 2
Chocks ........................................................................ 4
Chain hoist .................................................................. 1
Some servicing operations may require the vehicle be
raised.
!
Page 6
!
To prevent possible injury or death resulting
from a vehicle falling
3
4
4
View from underside of vehicle
Fig. 7 Lifting the Vehicle
Owner’s Manual and Service Guide
ELECTRIC THREE WHEEL SERVICE VEHICLE
Read all of manual to become thoroughly familiar with this vehicle. Pay particular attention to all Notes, Cautions and Warnings
To remove a wheel or the front axle, loosen the hardware
and turn the front wheel to the position indicated (Ref Fig.
7 on page 6). Position a jack in the location indicated and
carefully raise the front of the vehicle. Position the jack
stands as shown. Use care not to place the jack or
stands where they could interfere with wiring or linkages.
Slowly lower the jack and test the stability of the vehicle.
Grease Fitting
To raise the rear of the vehicle, first raise the front of the
vehicle as previously described and support on jack
stands. Then position the jack in the position shown at
the rear of the vehicle. Carefully raise the rear of the
vehicle with the jack and place two jack stands in the
position shown. Slowly lower the jack and check that the
vehicle is securely supported by the jack stands before
proceeding.
Grease Fitting
4 Ball Joints
Lower the vehicle by reversing the lifting sequence.
Steering with steering wheel and
cover removed for clarity
ROUTINE MAINTENANCE
This vehicle will give years of satisfactory service, providing it receives regular maintenance. Refer to the Periodic
Service Schedule for appropriate service intervals (Ref.
Fig. 14 on page 12). Refer to Lubrication Points for
appropriate lubrication locations (Ref Fig. 8 on page 7).
Wheel bearings
and fork pivot
Some maintenance items must be serviced
more frequently on vehicles used under severe
driving conditions.
Use maximum of three pumps of grease
for each grease fitting - Overgreasing
may damage grease seals.
Putting more than three pumps of grease in a grease fitting could damage grease seals and cause premature
bearing failure.
REAR AXLE
Rear axle
check and
fill
The only maintenance required for the first five years is
the periodic inspection of the lubricant level. The rear
axle is provided with a lubricant level check/fill plug
located on the bottom of the differential. Unless leakage
is evident, the lubricant need only be replaced after five
years.
Checking the Lubricant Level
With the vehicle on level ground, clean the area around
the check/fill plug and remove plug (Ref Fig. 9 on page
8). The correct lubricant level is just below the bottom of
the threaded hole. If lubricant is low, add as required.
Add lubricant slowly until lubricant starts to seep from the
View from underside of vehicle
Fig. 8 Lubrication Points
Owner’s Manual and Service Guide
Page 7
ELECTRIC THREE WHEEL SERVICE VEHICLE
Read all of manual to become thoroughly familiar with this vehicle. Pay particular attention to all Notes, Cautions and Warnings
hole. Install the check/fill plug. In the event that the lubricant is to be replaced, the vehicle must be elevated and
the oil pan removed or the oil siphoned out through the
check/fill hole.
Dry, Level, Clean, Paved Surface
Check/Fill Plug
Accelerate To
Maximum Speed
Fig. 9 Rear Axle Lubricant Check and Fill
BRAKES
Service brakes in accordance with the Periodic Service
Schedule (Ref Fig. 14 on page 12). After the vehicle has
been put into service, it is recommended that the brakes
be checked by performing the following test:
Test Method
To prevent severe injury
or death resulting from
operating a vehicle with
improperly operating brake system, the braking system must be properly maintained. All driving brake
tests must be done in a safe location with regard for
the safety of all personnel.
!
Release
Accelerator Pedal
to Engage
Service Brake
!
Acceptable
Stopping 4 ft. (1.2 m)
Distance
Determine the braking performance of the vehicle by
engaging the service brake (release accelerator pedal
only) at a common point on a flat, dry, clean paved surface while traveling at maximum speed (Ref Fig. 10 on
page 8). Observe the vehicle stopping location. If the
vehicle stops in a significantly greater distance than normal or pulls to one side, it should be tested again.
If the vehicle fails the second test, it should immediately
be removed from service. The vehicle needs to be
inspected by a qualified mechanic.
Line or Marker
Normal Range of
Stopping Distance
Any vehicles that stop
more than 4 ft. (1.2 m)
beyond the Acceptable
Stopping Distance or
pulls to one side should
be removed from service
and inspected by a
qualified mechanic
Over time, a subtle loss of performance may
take place. Therefore, it is important to establish the normal braking distance with a new vehicle.
Page 8
Line or Marker
Fig. 10 Periodic Brake Performance Test
Owner’s Manual and Service Guide
ELECTRIC THREE WHEEL SERVICE VEHICLE
Read all of manual to become thoroughly familiar with this vehicle. Pay particular attention to all Notes, Cautions and Warnings
TIRES
Tools List
Tire Repair
Qty. Required
Impact wrench, 1/2" drive............................................ 1
Impact socket, 3/4", 1/2" drive..................................... 1
Torque wrench, 1/2" drive, ft. lbs. ................................ 1
Wrench, 1 1/8" ............................................................ 2
To prevent injury caused
!
! by a broken socket, use
only sockets designed
for impact wrench use. Never use a conventional
socket.
Tire condition should be inspected per the Periodic Service Schedule (Ref. Fig. 14 on page 12). Inflation pressures should be checked when the tires are cool. When
removing wheels with an impact wrench, use only impact
sockets. Regular sockets are not designed for impact
pressures exerted by power tools.
A t i r e e xp lo s i o n ca n
!
! cause severe injury or
death. Never exceed
inflation pressure rating on tire sidewall.
To prevent tire explosion, pressurize tire with
small amount of air applied intermittently to seat
beads. Never exceed the tire manufacturer’s recommendation when seating a bead. Protect face
and eyes from escaping air when removing valve
core.
Use caution when inflating tires. Due to the low
volume of these small tires, overinflation can
occur in a matter of seconds. Overinflation could
cause the tire to separate from the wheel or cause
the tire to explode, either of which could cause
personal injury.
Use caution when inflating tires. Due to the low volume of
these small tires, overinflation can occur in a matter of
seconds. Overinflation could cause the tire to separate
from the rim or cause the tire to explode, either of which
could cause personal injury.
See GENERAL SPECIFICATIONS section for recommended tire inflation pressure. Under no condition
should inflation pressure be higher than recommended
on tire sidewall. All three tires should have the same
pressure for optimum handling characteristics. Be careful
not to overinflate. Due to the low volume of these small
tires, overinflation can occur in a matter of seconds. Be
sure to install the valve dust cap after checking or inflating.
The vehicle is fitted with tubeless tires mounted on one
piece rims.
Generally, the most cost effective way to repair a flat tire
resulting from a puncture in the tread portion of the tire is
to use a commercial tire plug.
Tire plug tools and plugs are available at most
automotive parts outlets and have the advantage of not requiring the tire be removed from the rim.
If the tire is flat, remove the wheel and inflate the tire to
the maximum recommended pressure for the tire.
Immerse the tire in water to locate the leak and mark with
chalk. Insert tire plug in accordance with manufacturer’s
specifications.
If tire is to be removed from or mounted on rim, the tire
changing machine manufacturer’s recommendations
must be followed to reduce possibility of personal injury.
To prevent injury, be
sure mounting/demounting machine is anchored
to floor. Wear OSHA approved safety equipment when
mounting/demounting tires.
!
!
Follow all instructions and safety warnings provided by
the mounting/demounting machine manufacturer.
Wheel Installation
Do not tighten lug nuts to more than 85
ft. lbs. (115 Nm) torque.
It is important to follow the ‘cross sequence’
pattern when installing lug nuts. This will
assure even seating of the wheel against the hub.
With the valve stem to the outside, mount the wheel onto
the hub with lug nuts. Finger tighten lug nuts in a ‘cross
sequence’ pattern (Ref Fig. 11 on page 9). Then, tighten
lug nuts to 50 - 85 ft. lbs. (70 - 115 Nm) torque in 20 ft.
lbs. (30 Nm) increments following the same ‘cross
sequence’ pattern.
'Cross Sequence'
3
1
Tire style
may vary
4
2
Fig. 11 Wheel Installation
Owner’s Manual and Service Guide
Page 9
ELECTRIC THREE WHEEL SERVICE VEHICLE
Read all of manual to become thoroughly familiar with this vehicle. Pay particular attention to all Notes, Cautions and Warnings
LIGHT BULB REPLACEMENT
VEHICLE CARE PRODUCTS
To replace the headlight bulb, pivot the headlight forward
and remove the two Phillips head screws from back side
and separate light assembly. Place new light bulb in
place and secure with screws previously removed.
To help maintain the vehicle there are several products
available through local Distributors, authorized
Branches, or the Service Parts Department.
• Touch-up paint specially formulated to match vehicle colors for use on metal bodies. (P/N 28140G** and 28432-G**)
• Multi-purpose Battery Protectant formulated to
form a long-term, flexible, nontacky, dry coating
that will not crack, peel or flake over a wide temperature range. (P/N 75500-G01)
• White Lithium Grease designed to provide lubrication protection in areas where staining or discoloring is a problem, or in areas of extreme
temperature ranges. (P/N 75502-G01)
• Penetrant/Lubricant, a 4-in-1 product that penetrates the most stubborn of frozen parts, lubricates
leaving a light lubricating film, prevents corrosion
by adhering to wet or dry surfaces and displaces
moisture, sealing against future moisture return.
(P/N 75503-G01)
• Multi-purpose Cleaner and Degreaser that contains natural, environmentally safe solvents. (P/N
75504-G01)
• Multi-purpose Hand Cleaner is an industrial
strength cleaner containing no harsh solvents, yet
gently lifts grease off hands. May be used with or
without water. (P/N 75505-G01)
• Battery Cleaner that promotes easy, non-violent
neutralization of battery acids and battery acid
crystals. The resulting sodium salts are water soluble and easily washed away. (P/N 75506-G01)
• Battery Maintenance Kit for complete battery
cleaning and watering, with battery maintenance
instructions. (P/N 25587-G01)
• Biodegradable Cleaner that cleans the toughest
dirt and heavy soils by breaking down grease to
be easily wiped or rinsed away. (P/N 75507-G01)
• Multi-purpose Value Pack sampler package
including 4 ounce (118 ml) aerosol cans of Battery
Protector, Penetrant/Lubricant, White Lithium
Grease, and Carburetor and Choke Cleaner. (P/N
75508-G01)
To replace the taillight bulb, remove hardware securing
lens and remove lens. Install replacement bulb.
CARE AND CLEANING OF THE VEHICLE
clean plastic parts.
To prevent cosmetic damage, do not
use any abrasive or reactive solvents to
It is important that proper techniques and cleaning materials be used.
Normal cleaning of the vinyl backrest and plastic or rubber trim requires the use of a mild soap solution applied
with a sponge or soft brush and wipe with a damp cloth.
Removal of oil, tar, asphalt, shoe polish, etc. will require
the use of a commercially available vinyl/rubber cleaner.
The painted surfaces of the vehicle provide attractive
appearance and durable protection. Frequent washing
with lukewarm or cold water is the best method of preserving the painted surfaces.
Do not use hot water, strong soap or harsh chemical
detergents.
Rubber parts should be cleaned with nonabrasive household cleaner.
Occasional cleaning and waxing with nonabrasive products designed for ‘clear coat’ automotive finishes will
enhance the appearance and durability of the painted
surfaces.
Corrosive materials used for dust control can collect on
the underbody of the vehicle. These materials will accelerate corrosion of underbody parts. It is recommended
that the underbody be flushed occasionally with plain
water. Thoroughly clean any areas where mud or other
debris can collect. Sediment packed in closed areas
should be loosened to ease its removal, taking care not
to chip or otherwise damage paint.
Page 10
Owner’s Manual and Service Guide
ELECTRIC THREE WHEEL SERVICE VEHICLE
Read all of manual to become thoroughly familiar with this vehicle. Pay particular attention to all Notes, Cautions and Warnings
TRAILERING
HARDWARE
To prevent personal inju!
! ry to occupants of other
highway vehicles, be
sure that the vehicle and contents are adequately
secured to trailer.
Periodically, the vehicle should be inspected for loose
fasteners. Fasteners should be tightened in accordance
with the Torque Specifications table (Ref Fig. 13 on page
11). Use care when tightening fasteners and refer to the
Technician’s Repair and Service Manual for specific
torque values.
Do not ride on vehicle being trailered.
Always check that the vehicle and contents are adequately secured before trailering the vehicle. The rated
capacity of the trailer must exceed the weight of the vehicle and load plus 400 pounds (see GENERAL SPECIFICATIONS section for vehicle weight). Secure the vehicle
to the trailer using ratchet tie downs.
Generally, two grades of hardware are used in the vehicle. Grade 5 hardware can be identified by the three
marks on the hexagonal head. Unmarked hardware is
Grade 2 (Ref Fig. 12 on page 11).
Grade 2
Grade 5
Fig. 12 Bolt Grades
TORQUE SPECIFICATIONS
ALL TORQUE FIGURES ARE IN FT. LBS. (Nm)
Unless otherwise noted in text, tighten all hardware in accordance with this chart.
This chart specifies 'lubricated' torque figures. Fasteners that are plated or lubricated when
installed are considered 'wet' and require approximately 80% of the torque required for 'dry' fasteners.
BOLT SIZE
1/4"
5/16"
3/8"
7/16"
1/2"
9/16"
5/8"
3/4"
7/8"
1"
Grade 2
4
(5)
8
(11)
15
(20)
24
(33)
35
(47)
55
(75)
75
(102)
130
(176)
125
(169)
190
(258)
Grade 5
6
(8)
13
(18)
23
(31)
35
(47)
55
(75)
80
(108)
110
(149)
200
(271)
320
(434)
480
(651)
Fig. 13 Torque Specifications
Owner’s Manual and Service Guide
Page 11
ELECTRIC THREE WHEEL SERVICE VEHICLE
Read all of manual to become thoroughly familiar with this vehicle. Pay particular attention to all Notes, Cautions and Warnings
PERIODIC SERVICE SCHEDULE
✓
Check
♦
Clean, Adjust, etc.
▲ Replace
NOTE: Some maintenance items must be serviced more frequently on vehicles used under severe driving conditions
DAILY
BODY
♦
Clean body components as required
REVERSE WARNING DEVICE
✓
Check operation when direction selector is in reverse
TIRES
✓
Examine for cuts, excessive wear and pressure
(See GENERAL SPECIFICATIONS)
WHEELS
✓
Check for bent rims, missing or loose lug nuts
BATTERIES
♦
Recharge to full state of charge after each day’s use
CHARGER / RECEPTACLE
✓
Inspect connector system at each charge
MONTHLY - 20 HOURS (includes items listed in previous table & the following)
BATTERIES
Clean batteries & terminals with 1/4 cup (60 ml) baking soda to 1 1/2 gallons (6 liters)
water solution, rinse with clear water
✓ Check charge condition and all connections
SERVICE BRAKE
✓ Check brake performance, smooth operation
♦ Adjust if required
WIRING
✓
Check all wiring for loose connections and broken/missing insulation
CHARGER / RECEPTACLE
♦
Clean connections, keep receptacles free of dirt and foreign matter
ACCELERATOR
✓
Check for smooth movement
DIRECTION SELECTOR
✓
Check attachment, tighten if required
STEERING AND LINKAGES
✓
Check for excessive play, tightness of all hardware and bent or loose components
REAR AXLE
✓
Check for oil leakage, add lubricant (SAE 30 oil) as required
♦
QUARTERLY - 50 HOURS (includes items listed in previous tables & the following)
FRONT FORK
✓
Check for damage to axle and loose or missing hardware
CHARGER / RECEPTACLE
♦
Spray with P/N 27934-G02
FRONT WHEEL ALIGNMENT
✓
Check for unusual tire wear, align if required
SERVICE BRAKE
✓
✓
Check for bent/binding linkage rods
Check for damage or wear
Fig. 14 Periodic Service Schedule
Page 12
Owner’s Manual and Service Guide
ELECTRIC THREE WHEEL SERVICE VEHICLE
Read all of manual to become thoroughly familiar with this vehicle. Pay particular attention to all Notes, Cautions and Warnings
SEMI-ANNUAL - 125 HOURS (includes items listed in previous tables & the following)
DIRECTION SELECTOR
✓
Check for wear and smooth movement (lubricate shaft with light oil if required)
SERVICE BRAKES
♦ Clean and adjust, see Technician’s Repair and Service Manual
✓ Check brake shoe linings, see Technician’s Repair and Service Manual
BODY
♦
Clean body components and wax all painted surfaces
STEERING AND LINKAGES
♦
Lubricate, use wheel bearing grease
ANNUAL - 250-300 HOURS (includes items listed in previous tables & the following)
Adjust, see Technician’s Repair and Service Manual
Pack, use wheel bearing grease
FRONT WHEEL BEARINGS
♦
♦
REAR AXLE
✓ Check lubricant, add lubricant (SAE 30 oil) as required
▲ Replace lubricant after 5 years
Fig. 14 Periodic Service Schedule
Owner’s Manual and Service Guide
Page 13
ELECTRIC THREE WHEEL SERVICE VEHICLE
Read all of manual to become thoroughly familiar with this vehicle. Pay particular attention to all Notes, Cautions and Warnings
BATTERIES AND CHARGING
Wr a p w r enc h e s w i th
vinyl tape to prevent the
possibility of a dropped
wrench from ‘shorting
out’ a battery, which could result in an explosion
and severe personal injury or death.
Aerosol containers of battery terminal protectant
must be used with extreme care. Insulate metal
container to prevent can from contacting battery
terminals which could result in an explosion.
Safety
Always observe the following warnings when
working on or near batteries:
To prevent burns or battery explosion that could
result in severe personal
injury or death, keep all smoking materials, open
flame or sparks away from the batteries.
Hydrogen gas is formed when charging batteries.
Do not charge batteries without adequate ventilation. A 4% concentration of hydrogen gas is
explosive.
Be sure that the key switch is off and all electrical
accessories are turned off before starting work on
vehicle.
Never disconnect a circuit under load at a battery
terminal.
Batteries are heavy. Use proper lifting techniques when moving them.
Always lift the battery with a commercially available battery lifting
device. Use care not to tip batteries
when removing or installing them;
spilled electrolyte can cause burns
and damage.
The electrolyte in a storage battery is an acid
solution which can cause severe burns to the skin
and eyes. Treat all electrolyte spills to the body
and eyes with extended flushing with clear water.
Contact a physician immediately.
Always wear a safety shield or approved
safety goggles when adding water or charging batteries.
!
!
Any electrolyte spills should be neutralized with a
solution of 1/4 cup (60 ml) sodium bicarbonate
(baking soda) dissolved in 1 1/2 gallons (6 liters)
of water and flushed with water.
Overfilling batteries may result in electrolyte
being expelled from the battery during the charge
cycle. Expelled electrolyte may cause personal
injury and damage to the vehicle and storage
facility.
Page 14
BATTERY
A battery is defined as two dissimilar metals immersed in
an acid. If the acid is absent or if the metals are not dissimilar, a battery has not been created. The batteries
most commonly used in these vehicles are lead acid.
A battery does not store electricity, but is able to produce
electricity as the result of a chemical reaction which
releases stored chemical energy in the form of electrical
energy. The chemical reaction takes place faster in warm
conditions and slower in cold conditions. Temperature is
important when conducting tests on a battery and test
results must be corrected to compensate for temperature
differences.
As a battery ages, it still performs adequately except that
its capacity is diminished. Capacity describes the time
that a battery can continue to provide its design amperes
from a full charge.
A battery has a maximum life, therefore good maintenance is designed to maximize the available life and
reduce the factors that can reduce the life of the battery.
BATTERY MAINTENANCE
Tool List
Qty. Required
Insulated wrench, 9/16" ...............................................1
Battery carrier ..............................................................1
Hydrometer ..................................................................1
Battery maintenance kit P/N 25587-G01 .....................1
At Each Charging Cycle
To reduce the possibility
of fire, never attach a
battery charger to a vehicle that is to be unattended beyond the normal charging cycle. Overcharging could cause damage to the
vehicle batteries and result in extreme overheating.
!
Owner’s Manual and Service Guide
!
ELECTRIC THREE WHEEL SERVICE VEHICLE
Read all of manual to become thoroughly familiar with this vehicle. Pay particular attention to all Notes, Cautions and Warnings
The charger should be checked after 24 hours and
unplugged after the charge cycle is complete.
Before charging the batteries, inspect all plugs/receptacles of the battery charging system for dirt or debris.
Charge the batteries after each days use.
Monthly
• Inspect all wiring for fraying, loose terminations,
•
•
corrosion or deterioration of insulation.
Check that the electrolyte level is correct and add
suitable water as required.
Clean the batteries and wire terminations.
Electrolyte Level and Water
The correct level of the electrolyte is 1/2" (13 mm) above
the plates in each cell (Ref Fig. 15 on page 15).
Vent Cap
sulfuric acid droplets will be carried out of the battery
vents by the hydrogen gas; however, this loss is minimal.
If the battery electrolyte level is too high, the electrolyte
will block the vent tube and the gas will force it out of the
vent tube and battery cap. The water will evaporate but
the sulfuric acid will remain where it can damage vehicle
components and the storage facility floor. Sulfuric acid
loss will weaken the concentration of acid within the electrolyte and reduce the life of the battery.
Over the life of the battery, a considerable amount of
water is consumed. It is important that the water used be
pure and free of contaminants that could reduce the life
of the battery by reducing the chemical reaction. The
water must be distilled or purified by an efficient filtration
system. Water that is not distilled should be analyzed
and if required, filtration installed to permit the water to
meet the requirements of the water purity table (Ref Fig.
16 on page 15).
Impurity
Parts Per
Million
Expansion
Space
1/4" to 3/8"
(6 to 10 mm)
Gas Vent
Vent
Color ............................................................................... Clear
Suspended...................................................................... Trace
Total Solids .......................................................................100
Calcium & Magnesium Oxides...........................................40
1/2" (13 mm)
Plates
Electrolyte level should
be at least 1/2" (13 mm)
above the plates and
1/4" to 3/8" (6 to 10 mm)
below vent
Iron......................................................................................5
Ammonia.............................................................................8
Organic & Volatile Matter ...................................................50
Nitrites.................................................................................5
Nitrates ..............................................................................10
Chloride ..............................................................................5
Fig. 15 Correct Electrolyte Level
This level will leave approximately 1/4" - 3/8" (6 - 10 mm)
of space between the electrolyte and the vent tube. The
electrolyte level is important since any portion of the
plates exposed to air will be ruined beyond repair. Of
equal importance is too much water which will result in
electrolyte being forced out of the battery due to gassing
and the increase in volume of the electrolyte that results
from the charging cycle.
component damage.
Do not overfill batteries. The charging
cycle will expel electrolyte and result in
A battery being charged will ‘gas’ with the majority of the
gassing taking place at the end of the charging cycle.
This gas is hydrogen which is lighter than air. Water and
Fig. 16 Water Purity Table
Even if the water is colorless, odorless, tasteless and fit
for drinking, the water should be analyzed to see that it
does not exceed the impurity levels specified in the table.
Automatic watering devices such as the one included in
the Battery Maintenance Kit can be used with an
approved water source (Ref Fig. 17 on page 16). These
watering devices are fast and accurate to use and
maintain the correct electrolyte level within the battery
cells.
The watering device should only be used if the
electrolyte level is less than 1/2" (13 mm)
above top of plates.
Owner’s Manual and Service Guide
Page 15
ELECTRIC THREE WHEEL SERVICE VEHICLE
Read all of manual to become thoroughly familiar with this vehicle. Pay particular attention to all Notes, Cautions and Warnings
Watering gun similar to the type included in the
E-Z-GO Battery Maintenance Kit
1 1/2 gallons
(6 liters)
Clear Water
1/4 Cup (60 ml)
Sodium Bicarbonate
(Baking Soda)
Valve consistently
fills to a
predetermined
level
Non Metalic
Wand
2 gallon (7.5 liter)
Garden Sprayer
Electrolyte
Level
Pure Water
Single Battery Cell
Fig. 17 Automatic Watering Gun
Cleaning Batteries
When cleaning the outside of the batteries and terminals,
do not use a water hose without first spraying with a solution of sodium bicarbonate (baking soda) and water to
neutralize any acid deposits.
Use of a water hose without first neutralizing any acid,
will move acid from the top of the batteries to another
area of the vehicle or storage facility where it will attack
the metal structure or the concrete/asphalt floor. After
hosing down the batteries, a residue will be left on the
batteries which is conductive and will contribute to the
discharge of the batteries.
To prevent battery damage, be sure that
all battery caps are tightly installed.
The correct cleaning technique is to spray the top and
sides of the batteries with a solution of sodium bicarbonate (baking soda) and water. This solution is best applied
with a garden type sprayer equipped with a non metallic
spray wand. The solution should consist of 1/4 cup (60
ml) of sodium bicarbonate (baking soda) mixed with 1 1/2
gallons (6 liters) of clear water (Ref Fig. 18 on page 16).
In addition to the batteries, special attention should be
paid to metallic components adjacent to the batteries
which should also be sprayed with the sodium bicarbonate (baking soda) solution.
Allow the solution to sit for at least three minutes; use a
soft bristle brush or cloth to wipe the tops of the batteries
Page 16
Fig. 18 Preparing Acid Neutralizing Solution
in order to remove any residue that could cause the self
discharge of the battery. Rinse the entire area with low
pressure clear water. All of the items required for complete battery cleaning and watering are contained in the
Battery Maintenance Kit.
Cleaning should take place once a month or more often
under extreme conditions.
Battery Replacement
Remove battery hold downs and cables. Lift out batteries
with a commercially available lifting device.
If the batteries have been cleaned and any acid in the
battery rack area neutralized as recommended, no corrosion to the battery racks or surrounding area should be
present. Any corrosion found should be immediately
removed with a putty knife and a wire brush. The area
should be washed with a solution of sodium bicarbonate
(baking soda) and water and thoroughly dried before
priming and painting with a corrosion resistant paint.
The batteries should be placed into the battery racks and
the battery hold downs tightened to 45 - 55 in. lbs. (5 - 6
Nm) torque, to prevent movement but not tight enough to
cause distortion of the battery cases.
Inspect all wires and terminals. Clean any corrosion from
the battery terminals or the wire terminals with a solution
of sodium bicarbonate (baking soda) and brush clean if
required.
Owner’s Manual and Service Guide
ELECTRIC THREE WHEEL SERVICE VEHICLE
Read all of manual to become thoroughly familiar with this vehicle. Pay particular attention to all Notes, Cautions and Warnings
To prevent battery explo!
! sion that could result in
severe personal injury or
death, extreme care must be used with aerosol containers of battery terminal protectant. Insulate the
metal container to prevent the metal can from contacting battery terminals which could result in an
explosion.
Use care to connect the battery wires as shown (Ref Fig.
19 on page 17). Tighten the battery post hardware to 50 70 in. lbs. (6 - 8 Nm) torque. Protect the battery terminals
and battery wire terminals with a commercially available
protective coating.
Front of Vehicle
RED to Fuse inside Console
+
-
Prolonged Storage
Battery charger and controller must be
disconnected since they will contribute
to the premature discharge of batteries. Other electronic devices
may need to be disconnected.
During periods of storage, the batteries will need attention to keep them maintained and prevent discharge.
In high temperatures the chemical reaction is faster,
while low temperatures cause the chemical reaction to
slow down. A vehicle that is stored at 90° F (32° C) will
lose .002 of specific gravity each day. If a fully charged
battery has a specific gravity of 1.275, and the battery is
allowed to sit unused, it will become partially discharged.
When it reaches 1.240, which it will do in less than
twenty days, it should be recharged. If a battery is left in
a discharged state, sulfating takes place on and within
the plates. This condition is not reversible and will cause
permanent damage to the battery. In order to prevent
damage, the battery should be recharged. A hydrometer
can be used to determine the specific gravity and therefore the state of charge of a battery.
+
-
+
+
-
BL- to WHT to BL+ to
ESC
Charger Solenoid
BLK to
Charger
Front of Vehicle with Lift Out Battery Tray
+
-
+
-
+
-
+
BL-
BL+
+-
-+
Connector
Connector
Fig. 19 Battery Connections
OF OC
E
L
E +15 -9
C +5 -15
T
R -5 -21
O
L -15 -26
Y
T -25 -32
E
-35 -37
T
E -45 -43
M -55 -48
P
E -65 -54
R
A -75 -60
T
U -85 -65
R
-95 -71
E
1.100 1.140 1.180 1.220 1.260 1.300
1.120 1.160 1.200 1.240 1.280
SPECIFIC GRAVITY ELECTROLYTE FREEZING POINT
Fig. 20 Freezing Point of Electrolyte
In winter conditions, the battery must be fully charged to
prevent the possibility of freezing (Ref Fig. 20 on page
17). A fully charged battery will not freeze in temperatures above -75° F (-60° C). Although the chemical reac-
Owner’s Manual and Service Guide
Page 17
ELECTRIC THREE WHEEL SERVICE VEHICLE
Read all of manual to become thoroughly familiar with this vehicle. Pay particular attention to all Notes, Cautions and Warnings
tion is slowed in cold temperatures, the battery must be
stored fully charged, and disconnected from any circuit
that could discharge the battery. For portable chargers,
disconnect the charging plug from the vehicle receptacle.
For on-board chargers, disconnect the charging harness
from the batteries. The batteries must be cleaned and all
deposits neutralized and removed from the battery case
to prevent self discharge. The batteries should be tested
or recharged at thirty day minimum intervals.
Battery Charging
The battery charger is designed to fully charge the battery set. If the batteries are severely deep cycled, some
automatic battery chargers contain an electronic module
that may not activate and the battery charger will not
function. Automatic chargers will determine the correct
duration of charge to the battery set and will shut off
when the battery set is fully charged. Always refer to the
instructions of the specific charger used.
Before charging, the following should be observed:
component damage.
Do not overfill batteries. The charging
cycle will expel electrolyte and result in
• The electrolyte level in all cells must be at the recommended level and cover the plates.
Page 18
• The charging must take place in an area that is
well ventilated and capable of removing the hydrogen gas that is generated by the charging process. A minimum of five air exchanges per hour
is recommended.
• The charging connector components are in good
condition and free from dirt or debris.
• The charger connector is fully inserted into the
vehicle receptacle.
• The charger connector/cord set is protected from
damage and is located in an area to prevent injury
that may result from personnel running over or
tripping over the cord set.
• The charger is automatically turned off during the
connect/disconnect cycle and therefore no electrical arc is generated at the DC plug/receptacle
contacts.
AC Voltage
Battery charger output is directly related to the input voltage. If multiple vehicles are receiving an incomplete
charge in a normally adequate time period, low AC voltage could be the cause and the power company should
be consulted.
Owner’s Manual and Service Guide
ELECTRIC THREE WHEEL SERVICE VEHICLE
Read all of manual to become thoroughly familiar with this vehicle. Pay particular attention to all Notes, Cautions and Warnings
TROUBLESHOOTING
In general, troubleshooting will be done for two distinct
reasons. First, a battery that performs poorly and is outside of the manufacturers specification should be identified in order to replace it under the terms of the
manufacturer’s warranty. Different manufacturers have
different requirements. Consult the battery manufacturer
or a service representative for specific requirements.
Cylinder
A cost effective way to identify a poorly performing battery is to use a hydrometer to identify a battery in a set
with a lower than normal specific gravity. Once the particular cell or cells that are the problem are identified, the
suspect battery can be removed and replaced. At this
point there is nothing that can be done to salvage the
battery; however, the individual battery should be
replaced with a good battery of the same brand, type and
approximate age.
Hydrometer
A hydrometer (P/N 50900-G1) is used to test the state of
charge of a battery cell (Ref Fig. 21 on page 19). This is
performed by measuring the density of the electrolyte,
which is accomplished by measuring the specific gravity
of the electrolyte. The greater the concentration of sulfuric acid, the more dense the electrolyte becomes. The
higher the density, the higher the state of charge.
To prevent battery explosion that could result in
severe personal injury or
death, never insert a metal thermometer into a battery. Use a hydrometer with a built in thermometer
that is designed for testing batteries.
!
!
Specific gravity is the measurement of a liquid that is
compared to a baseline. The baseline is water which is
assigned a base number of 1.000. The concentration of
sulfuric acid to water in a new golf car battery is 1.280
which means that the electrolyte weighs 1.280 times the
Float
1100
1125
Add to Float
Reading
The second reason is to determine why a particular vehicle does not perform adequately. Performance problems
may result in a vehicle that runs slowly or in a vehicle that
is unable to operate for the time required.
A new battery must mature before it will develop its maximum capacity. Maturing may take up to 100 charge/discharge cycles. After the maturing phase, the older a
battery gets, the lower the capacity. The only way to
determine the capacity of a battery is to perform a load
test using a discharge machine following manufacturer’s
recommendations.
Bulb
Subtract
from Float
Reading
32
28
24
20
16
12
8
4
0
4
8
12
16
20
24
28
32
36
1150
1175
1200
1225
1250
1275
1100
1125
1300
1150
1200
1225
1250
1275
1300
32
28
24
20
16
12
8
4
0
4
8
12
16
20
24
28
32
36
Weight
Thermometer
Fig. 21 Hydrometer
weight of the same volume of water. A fully charged battery will test at 1.275 - 1.280 while a discharged battery
will read in the 1.140 range.
Do not perform a hydrometer test on a battery
that has just been watered. The battery must
go through at least one charge and discharge cycle in order to
permit the water to adequately mix with the electrolyte.
The temperature of the electrolyte is important since the
hydrometer reading must be corrected to 80° F (27° C).
High quality hydrometers are equipped with an internal
thermometer that will measure the temperature of the
electrolyte and will include a conversion scale to correct
the float reading. It is important to recognize that the
electrolyte temperature is significantly different from the
ambient temperature if the vehicle has been operated.
Using A Hydrometer
1. Draw electrolyte into the hydrometer several times to
permit the thermometer to adjust to the electrolyte
temperature and note the reading. Examine the color
of the electrolyte. A brown or gray coloration indicates
a problem with the battery and is a sign that the battery is nearing the end of its life.
Owner’s Manual and Service Guide
Page 19
ELECTRIC THREE WHEEL SERVICE VEHICLE
Read all of manual to become thoroughly familiar with this vehicle. Pay particular attention to all Notes, Cautions and Warnings
2. Draw the minimum quantity of electrolyte into the
hydrometer to permit the float to float freely without
contacting the top or bottom of the cylinder.
3. Hold the hydrometer in a vertical position at eye level
and note the reading where the electrolyte meets the
scale on the float.
4. Add or subtract four points (.004) to the reading for
every 10° F (6°C) the electrolyte temperature is
above or below 80° F (27° C). Adjust the reading to
conform with the electrolyte temperature, e.g., if the
reading indicates a specific gravity of 1.250 and the
electrolyte temperature is 90° F (32° C), add four
points (.004) to the 1.250 which gives a corrected
reading of 1.254. Similarly if the temperature was 70°
F (21° C), subtract four points (.004) from the 1.250
to give a corrected reading of 1.246 (Ref Fig. 22 on
page 20).
5. Test each cell and note the readings (corrected to 80°
F or 27° C). A variation of fifty points between any two
cell readings (example 1.250 - 1.200) indicates a
problem with the low reading cell(s).
As a battery ages the specific gravity of the electrolyte
will decrease at full charge. This is not a reason to
replace the battery, providing all cells are within fifty
points of each other.
Since the hydrometer test is in response to a vehicle
exhibiting a performance problem, the vehicle should be
recharged and the test repeated. If the results indicate a
weak cell, the battery or batteries should be removed
and replaced with a good battery of the same brand, type
and approximate age.
Electrolyte
Temperature
˚F ˚C
160 71
150
66
140
60
130
54
120
49
110
43
100
38
90
32
80
27
70
21
60
16
50
10
40
4
30
–1
2
–7
10
–12
+.032
+.030
+.028
+.026
+.024
+.022
+.020
+.018
+.016
+.014
+.012
+.010
+.008
+.006
+.004
+.002
0
–.002
–.004
–.006
–.008
–.010
–.012
–.014
–.016
–.018
–.020
–.022
–.024
–.026
–.028
Electrolyte Temperature
Above 80˚ F (27˚ C)
Electrolyte temperature
90˚ F (32˚ C)
Hydrometer reading 1.250
1.250 + .004 = 1.254
corrected specific gravity
EXAMPLE #1:
EXAMPLE #2:
Electrolyte Temperature
Below 80˚ F (27˚ C)
Electrolyte temperature
70˚ F (21˚ C)
Hydrometer reading 1.250
1.250 - .004 = 1.246
corrected specific gravity
Fig. 22 Hydrometer Temperature Correction
Page 20
Owner’s Manual and Service Guide
GENERAL SPECIFICATIONS
GENERAL SPECIFICATIONS
Owner’s Manual and Service Guide
Page 21
GENERAL SPECIFICATIONS
ELECTRIC POWERED THREE WHEEL SERVICE VEHICLE
BATTERIES....................................................................... Four 6 volt deep cycle (105 minute minimum, 220 amp-hour @ 20 hour discharge
rate)
SPEED CONTROLLER..................................................... Solid state, 275 amp capacity with potentiometer throttle sensor
MOTOR ............................................................................. 24 VDC, series wound 1.5 hp (1.1 kW) @ 2800 rpm & 4.3 hp (3.2 kW) @ 1200
rpm, brazed armature and solid copper windings
TRANSAXLE ..................................................................... 14.78:1 helical geared with input pinion shaft directly connected to motor shaft
BRAKES............................................................................ Dual rear wheel, mechanical drum brakes
PARKING BRAKE ............................................................. Automatic
FRONT SUSPENSION ..................................................... One piece front axle
REAR SUSPENSION........................................................ Coil springs over hydraulic shock absorbers
STEERING ........................................................................ Chain & linkage
STEERING WHEEL .......................................................... Dual handgrips
SEATING ........................................................................... None
CAPACITY......................................................................... Operator
TOTAL LOAD CAPACITY.................................................. 1000 lbs. (454 kg) including operator, accessories & cargo
SPEED .............................................................................. 9 mph (15 kph)
CHASSIS........................................................................... Welded tubular steel; powder coated (Durashield™)
VEHICLE PROTECTION .................................................. None
BODY ................................................................................ Bolt-on diamond pattern body panels with Durashield™ Industrial Yellow powder
coat paint
STANDARD COLOR(S) .................................................... Industrial Yellow
LOAD BED ........................................................................ 29" (74 cm) W x 48" (122 cm) L
LOAD BED FEATURES .................................................... Removable for powertrain access
LIGHTING/HORN (Standard) ............................................ Rear brake light, horn
TIRES (Standard) .............................................................. 4.80 x 8 Industrial Load Range B
TIRE PRESSURE ............................................................. 60 psi (415 kPa)
WEIGHT (without batteries) .............................................. 490 lbs. (225 kg)
OPERATING CONTROLS & INSTRUMENTATION .......... Removable key, ‘deadman’ accelerator control, direction selector, audible reverse
warning
BATTERY CHARGER ....................................................... Total Charge® III on-board 24 V, 120 VAC, fully automatic, line compensating, 21
amp DC output at 24 volts, 6.5 amps input, 60 Hz, UL recognized, CSA certified
OPTIONS/ACCESSORIES ............................................... Audible forward motion indicator
Batteries 145 minute 250 amp-hour @ 20 hour discharge rate
Beacon light
Bolt-on 4 step ladder
Bolt-on 6 step ladder (includes counterweight)
Differential scuff guard
‘E’ hitch
Front counterweight
Galvanized steel cargo deck
Headlights and taillight
Hour meter
Lift out battery tray with batteries
Lift out battery tray with batteries, 145 minute 250 amp-hour @ 20 hour discharge
rate
Lift out battery tray without batteries
Paint color (custom)
Pintle hitch
Stainless steel cargo deck
State of Charge meter (LED)
Tires 4.80 x 8 (6 ply rated) Industrial Load Range B (Foam Filled)
Total Charge® III portable 24 V, 120 VAC, fully automatic, line compensating, 21
amp DC output at 24 volts, 6.5 amps input, 60 Hz
UL listed, CSA certified
Tubular steel side rails
UL approved ‘EE’ classification
Specifications subject to change without notice
Page 22
Owner’s Manual and Service Guide
GENERAL SPECIFICATIONS
17.5 in.
(44 cm)
29 in.
(74 cm)
48 in. (122 cm)
98 in.
(248 cm)
78 in.
(198 cm)
48 in.
(122 cm)
22.5 in. 21.5 in.
(57 cm) (55 cm)
29.5 in.
(75 cm)
5 in. (13 cm)
48 in. (122 cm)
77.5 in. (197 cm)
84 in. (213 cm)
RECOMMENDED MAXIMUM RAMP GRADE
25% or 14˚ MAXIMUM
RECOMMENDED MAXIMUM SIDE TILT
25% or 14˚ MAXIMUM
Fig. 23 Vehicle Dimensions and Incline Specifications
Owner’s Manual and Service Guide
Page 23
GENERAL SPECIFICATIONS
TURNING CLEARANCE
DIAMETER
10.5 ft. (3.2 m)
56 in.
(142 cm)
INTERSECTING
AISLE CLEARANCE
56 in.
(142 cm)
Fig. 24 Vehicle Turning Clearance Diameter and Intersecting Aisle Clearance
Page 24
Owner’s Manual and Service Guide
Read and understand the following warnings
before attempting to operate the vehicle:
!
To prevent personal
injury or death, observe
the following:
When vehicle is to be left unattended, release pedal completely, move direction selector to neutral,
turn key to ‘OFF’ position and remove key.
Drive vehicle only as fast as terrain and safety
considerations allow. Consider the terrain and
traffic conditions. Consider environmental factors
which effect the terrain and the ability to control
the vehicle.
Avoid driving fast down hill. Sudden stops or
change of direction may result in a loss of control.
Use service brake to control speed when traveling
down an incline.
Use extra care and reduced speed when driving
on poor surfaces, such as loose dirt, wet grass,
gravel, etc.
All travel should be directly up or down hills.
Use extra care when driving the vehicle across an
incline.
Stay in designated areas and avoid steep slopes.
Use the parking brake whenever the vehicle is
parked.
Keep feet, legs, hands and arms inside vehicle at
all times.
Avoid extremely rough terrain.
Check area behind the vehicle before operating in
reverse.
Make sure the direction selector is in correct position before attempting to start the vehicle.
Slow down before and during turns. All turns
should be executed at reduced speed.
Always bring vehicle to a complete stop before
shifting the direction selector.
See GENERAL SPECIFICATIONS for standard
vehicle load and occupant capacity.
!
Read and understand the following text and
warnings before attempting to service vehicle:
In any product, components will eventually fail to perform
properly as the result of normal use, age, wear or abuse.
It is virtually impossible to anticipate all possible component failures or the manner in which each component
may fail.
Be aware that a vehicle requiring repair indicates that the
vehicle is no longer functioning as designed and therefore should be considered potentially hazardous. Use
extreme care when working on any vehicle. When diagnosing, removing or replacing any components that are
not operating correctly, take time to consider the safety of
yourself and others around you should the component
move unexpectedly.
Some components are heavy, spring loaded, highly corrosive, explosive or may produce high amperage or
reach high temperatures. Battery acid and hydrogen gas
could result in serious bodily injury to the technician/
mechanic and bystanders if not treated with the utmost
caution. Be careful not to place hands, face, feet or body
in a location that could expose them to injury should an
unforeseen situation occur.
!
To prevent personal
injury or death, observe
the following:
Before working on the vehicle, remove all jewelry
(rings, watch, necklaces, etc.).
Be sure no loose clothing or hair can contact
moving parts.
Use care not to touch hot objects.
Raise entire vehicle and support on jack stands
before attempting to run or adjust powertrain.
Wear eye protection when working on or around
the vehicle. In particular, use care when working
around batteries, using solvents or compressed
air.
Hydrogen gas is formed when charging batteries.
Do not charge batteries without adequate ventilation.
Do not permit open flame or anyone to smoke in
an area that is being used for charging batteries.
A concentration of 4% hydrogen gas or more is
explosive.
!
SEGURANÇA
Ler e compreender as etiquetas coladas no veículo. Para qualquer questão sobre a informação fornecida, contacte o
representante para esclarecimento.
Sempre trocar etiquetas que estjam danificadas ou estajam em falta.
Em zonas que sejam a pic é possível que os veiculos andem em ponto morto a uma velocidade maior do que a normal
nas zonas planas. Para previnir a perda do controlo do veiculo e a possibilidade de acidentes que resultem em ferimentos graves, as velocidades devem ser limitadas a não mais do que a velocidade máxima permitida em solo normal.
(Ver especificação do veiculo.) O limite de velocidade aplicando a trabagem de serviço.
Estrágos catastroficos ao motor podem ser causados por exesso da velocidade especificada. Estragos causados por
acelaração excessiva podem provocar perca do controlo do veiculo, o que sai caro, é considerado um abuso e não
será coberto por garantia.
Se o veiculo for usado num ambiente comercial, sinais como os estes abaixo devem ser assinalados para o aviso de
situações que possam resultar em casos não seguros..
Deve ser verificado que este manual fiqye como parte e permantente serviço no caso do veiculo seja novamente vendido.
AVISO DEWARNING
BATERIA
BATTERY
Os postos, terminais e
Battery
posts,
acessórios
relacionados
terminals
and contêm
related
com
a bateria
chumbo e contain
seus
accessories
estes
leadcompósitos;
and lead compounds,
químicosknown
são
chemicals
conhecidos por causar
to cause
cancer andao
cancro
e problemas
reproductive
harm.
sistema
reprodutivo.
LAVAR
AS MÃOS
DEPOIS
WASH
HANDS
DE MANUSEÁ-LOS!
AFTER HANDLING!
AS BATERIAS
BATTERIES
CONTÊM CHUMBO
CONTAIN
LEAD
E PEÇAS
ELAS RELACIONADAS
ANDCOM
RELATED
PARTS
AVISO
AVISO
AVISO
AVISO
!
LAVAR AS MÃOS DEPOIS DE
MANUSEÁ-LOS!
WASH HANDS
AFTER HANDLING!
ATENÇÃO: Os postos, terminais e acessórios
relacionados com a bateria contêm chumbo e
seus compósitos; estes químicos são
conhecidos
causar
cancro
e problemas
WARNING:por
Battery
posts,
terminals
and related ao
sistema
reprodutivo.
accessories
contain lead
and lead compounds,
chemicals known to cause cancer and reproductive harm.
CURVA APERTADA
CURVA APERTADA
APLICAR OS TRAVÕES
PARA REDUZIR
A VELOCIDADE
APLICAR OS TRAVÕES
PARA REDUZIR
A VELOCIDADE
CUESTA EMPINADA
APLICAR OS TRAVÕES
PARA REDUZIR
A VELOCIDADE
< 14˚ 25%
NOT EM
NÃODO
UTILIZAR
DRIVE
ACROSS
RAMPAS
COM
SLOPES
MAIS
DE 14°IN
DE
INCLINAÇÃO
EXCESS
OF 14˚
NOTAS, PRECAUÇÔES E AVISOS
Ao longo deste guia NOTA, PRECAUÇÂO e AVISO
serão usados.
NOTA
!
A NOTA indica uma condição que deve ser verificada.
CUIDADO !
A PRECAUÇÂO indica umaa condição que pode levar ao estrago
do veiculo.
!
AVISO
!
è favor estar atento às NOTA, PRECAUÇÔES e AVISOS; estar atento que arranjar um veiculo requer engenhos mecanicos e sensibilidade para os estragos e
perigos que dái podem resultar. O arranjo imprório do
veiculo pode estragar o mesmo ou deixá-lo imprópriopara ser utilizado.
!
AVISO
!
As postagens das baterias e acessórios relacionados
contêm residuos. Lavar as mãoes depois do arranjo.
Um AVISO indica uma condição terrivel que pode
levar a ferimentos graves e até morte.
(OS MENSAGENS DE NOTA, DE CUIDADO E DE AVISO SÃO COMPLEMENTADOS NO INTERIOR DA CONTRACAPA)
MANUAL DE UTILIZADOR
E GUIA DE SERVIÇO
VIATURA DE SERVIÇO
DE TRÊS RODAS ELECTRICO
VIATURAS:
E-Z-GO INDUSTRIAL 640
CUSHMAN STOCK CHASER
TEXTRON Golf, Turf & Specialty Products Reserva o direito de poder fazer alterações de modelos sem obrigação de fazer essas modificações em unidades
previamente produzidos e vendidos e a informação aqui contida está sujeita a mudança sem aviso nem notificação.
TEXTRON Golf, Turf & Specialty Products não se responsabiliza por erros neste manual ou por estragos que estejam na origem da utilização do material ditado
neste manual.
Serviço de atendimento ao cliente nos Estados Unidos TELEFONE: 1-800-241-5855 FAX: 1-800-448-8124
Fora dos Estados Unidos TELEFONE: 010-1-706-798-4311, FAX: 010-1-706-771-4609
TEXTRON GOLF, TURF & SPECIALTY PRODUCTS, P.O.BOX 388, AUGUSTA, GEORGIA USA 30903-0388
Manual do Proprietário
Page i
NOTA
Para obter uma garantia limitada aplicável à viatura, ligar ou escrever a um Distribuidor,
uma empresa autorizada ou ao departamento de garantia com o número serial e p código do
fabricador.
O uso de equipamento não original do fabricador pode por em risco a garantia da viatura.
O vício das baterias põe em risco a garantia.
Guarda da Bateria
Todas as baterias acabaram com a carga durante o decorrer do tempo. Este tempo depende
das condições de temperatura e a idade das baterias.
Uma bateria completamente carregada não congelará no inverno, a não ser que as
temperaturas estejam abaixo dos -60º C.
Para guardar as baterias no inverso, estas devem estar completamente carregadas limpas e
desligadas de qualquer corrente, como por exemplo o carregador. Desconectar o cabo do
carregador da bateria quando este não estiver a ser utilizado.
Assim como todas a viaturas eléctricas, as baterias devem ser revistas e carregadas no
mínimo de 30 em 30 dias.
Ver secção “Grada Prolongada” na secção de BATERIAS E CARGA deste manual.
Page ii
Manual do Proprietário
TABLE OF CONTENTS
Segurança ...........................................................................................................Capas Interiores
NOTAS .........................................................................................................................................ii
IINFORMAÇÃO DE SEGURANÇA ............................................................................................. v
ANTES DO USO INICIAL ........................................................................................................... 1
Fig. 1 Informação de serviço inicial ....................................................................................................... 1
Carregador Abordo .............................................................................................................................................. 1
Instalação de carregador Portátil (se equipado) .................................................................................................. 1
Fig. 2 Instalação do Carregador ............................................................................................................ 2
Levantar Tabuleiros da Bateria (se equipado)......................................................................................................2
Fig. 3 Distribuidor do Carregador .......................................................................................................... 3
LOCALIZAÇÃO DA PLAQUETA SERIAL .................................................................................. 3
Fig. 4 Localização da Plaqueta Serial ................................................................................................... 3
CONTROLOS E AFINS .............................................................................................................. 3
Ligação da Chave ................................................................................................................................................3
Fig. 5 Controlos e Afins .........................................................................................................................3
Seleccionador de Direcção .................................................................................................................................. 3
Estado de Carga ..................................................................................................................................................3
Medidor de Hora ..................................................................................................................................................3
Buzina .................................................................................................................................................................. 3
Combinação de Acelerador e Travão .................................................................................................................. 4
Fig. 6 Pedal de Combinação de Acelerador e Travão ........................................................................... 4
Luzes Frontais e Traseiras .................................................................................................................................. 4
ANTES DE ENTRAR NO VEÍCULO .......................................................................................... 4
OPERAR O VEÍCULO ................................................................................................................ 4
PEGAR O VEÍCULO .................................................................................................................. 5
CUSTOS .................................................................................................................................... 5
SERVIR O VEÍCULO ELECTRICO ............................................................................................ 5
REBOCAÇÃO ............................................................................................................................ 6
LEVANTAR O VEÍCULO ............................................................................................................ 6
Fig. 7 Levantar o Veículo ....................................................................................................................... 6
ROTINA DE MANITENÇÃO ....................................................................................................... 7
Fig. 8 Pontos de Lubrificação ................................................................................................................. 7
TRASEIRO ................................................................................................................................. 7
Verificar o nível de Lubrificação ...........................................................................................................................7
Fig. 9 Verificação do Traseiro e Nível de Lubrificação .......................................................................... 8
TRAVÕES .................................................................................................................................. 8
Método de Teste ..................................................................................................................................................8
Fig. 10 Teste Periodico dos Travões ..................................................................................................... 8
PNEUS ....................................................................................................................................... 9
Reparação de Pneu ............................................................................................................................................. 9
Instalação de Pneu .............................................................................................................................................. 9
Fig. 11 Instalação de Pneu .................................................................................................................... 9
SUBSTITUIÇÃO DE LUZ ......................................................................................................... 10
CUIDADO E MANUTENÇÂO DO VEÍCULO ............................................................................ 10
PRODUTOS DE CUIDADO (PARA A VIATURA) .................................................................... 10
Reboque ................................................................................................................................... 11
Owner’s Manual and Service Guide
Page iii
TABLE OF CONTENTS
HARDWARE .............................................................................................................................11
Fig. 12 Grades de Voltagem ............................................................................................................... 11
ESPECIFICAÇÔES DE TURQUE ........................................................................................... 11
Fig. 13 ESPECIFIcaÇÕES de TURQUE ............................................................................................. 11
TABELA PERIODICA DE SERVIÇO ....................................................................................... 12
Fig. 14 TABELA PERIODICA DE SERVIÇO ....................................................................................... 12
BATERIAS E CARREGAMENTO.............................................................................................. 14
Segurança ......................................................................................................................................................... 14
BATERIA ..................................................................................................................................14
MANUTENÇÃO DE BATERIA .................................................................................................. 14
A cada ciclo de Carregamento .......................................................................................................................... 14
Mensal .............................................................................................................................................................. 15
Nível de Electrolyte e Água ............................................................................................................................... 15
Fig. 15 Nível Correcto de Electrolyte ................................................................................................... 15
Fig. 16 Tabela de Água Purificada ...................................................................................................... 15
Limpeza de Baterias ......................................................................................................................................... 16
Fig. 17 Pistóla Automática de Água .................................................................................................... 16
Fig. 18 Preparação de uma Solução de Áçido Neutralizante .............................................................. 16
Substituição de Baterias .................................................................................................................................... 16
Fig. 19 Conecxões de Bateria.............................................................................................................. 17
Espaço Prolongado ........................................................................................................................................... 17
Fig. 20 Ponto de gelo de Electrolyte ................................................................................................... 17
Carregamento da Bateria .................................................................................................................................. 18
AC Voltagem ..................................................................................................................................................... 18
TROUBLESHOOTING (Iniciar o Veículo) ................................................................................. 19
Hidrómetro ........................................................................................................................................................ 19
Fig. 21 Hidrómetro .............................................................................................................................. 19
Utilização de um Hidrómetro ............................................................................................................................. 19
Fig. 22 Correcção da Temperatura do Hidrómetro ............................................................................. 20
Especificações Gerais ............................................................................................................... 21
VEÍCULO DE TRÊS RODAS ELECTRICO ....................................................................................................... 22
Fig. 23 Dimensões do Veículo e Especificações da Inclinação ............................................................ 23
Fig. 24 Diâmetro de Rotação da Viatura e Intersecção ........................................................................ 24
Page iv
Owner’s Manual and Service Guide
SAFETY INFORMATION
Este manual foi feito para assistir o utilizador na manutenção do veículo de acordo com os procedimentos desenvolvidos pelo fabricador. Apoio a estes procedimentos de acção fornecendo ajuda que ajudará a fornecer o melhor desempenho do produto. Para reduzir a possibilidade deferimento pessoal ou causar danos a propriedade, os seguintes
cuidados devem ser cuidadosamente tomados em conta:
GERAL
Muitos veículos são utilizados para uma grande variedade de tarefa para além dos quais foi originalmente produzido
para fazer. Daí, é impossível antecipar e avisar tudo o que possa acontecer e todas as circunstâncias que podem
ocorrer. Nenhum aviso pode tomar o lugar o senso comum e prudente da boa condução.
O bom senso comum e prudência na condução fazem mais por evitar acidentes e ferimentos do que propriamente os
sinais de aviso e as instruções dadas. O fabricador sugere fortemente que o utilizador leia este manual todo, prestando atenção em especial para as PRECAIUÇÔES e os AVISOS. É ainda recomendado que os empregados e outros operados sejam encorajados a fazer o mesmo.
Se tiver alguma dúvida, contacte o seu representativo ou escreva para a morada atrás da capa desta publicação,
“Attention: Product Service Department”.
“TEXTRON Golf, Turf & Specialty Products” reserva o direito à alteração do modelo sem obrigação de fazer estas
modificações em unidades previamente sólidas e a informação contida neste manual é sujeito a mudança sem aviso.
“TEXTRON Golf, Turf & Specialty Products” não é legalmente responsável por erros neste manual ou acidentes ou
consequentes falhas que possam resultar no uso do que está neste manual.
Este veículo confere com as actuais regras de segurança e execução.
Estes veículos não conformem com os Estandartes e Segurança Federal Motor e não são equipados para funcionamento em estradas públicas.
Com veículos eléctricos, verificar que todos os acessórios eléctricos estão ligados directamente à bateria (-) Nunca
usar chassis como corpo de conexão.
Ir para Especificações Gerais para ver a capacidade de assentos do veículo.
Nunca modificar o veículo de modo a que consequentemente seja afectado a distribuição do peso do mesmo,
diminuir a sua estabilidade ou aumentar a velocidade para além da qual o veículo foi produzido. Tais mudanças podem resultar em ferimentos graves ou morte. Modificações que aumentem a velocidade e/ou peso da viatura aumentaram a distância de paragem e podem reduzir a estabilidade do veículo. Não fazer este tipo de
modificações. O fabricador proíbe e não se responsabiliza por tais modificações ou outras alterações que possam
influenciar o desempenho da viatura.
Operação Geral
Utilizar sempre a viatura de uma forma responsável e manter o mesmo em boas condições de operacionalidade.
Ler sempre e observar os sinais de aviso e as etiquetas coladas na viatura.
Sempre seguir todas as regras de segurança estabelecidas na área onde a viatura esteja a ser utilizada.
Reduzir sempre a velocidade em solos de má qualidade.
Aplicar sempre o travão de serviço para controlar a velocidade em áreas inclinadas.
Owner’s Manual and Service Guide
Page v
SAFETY INFORMATION
Manter sempre uma distancia adequada ente os veículos.
Reduzir sempre a velocidade em zonas de piso molhado.
Ter sempre cuidado extra quando se vira em sítios muito estreitos e de pouca visão.
Ter sempre cuidado ao conduzir em zonas de solo não fixo.
Ter sempre muito cuidade nas zonas com piões.
Manutenção
Manter sempre a viatura de acordo com as datas das inspecções de verificação fornecidas pelo fabricador.
Verificar sempre que os mecânicos a fazerem as reparações nas viaturas são qualificados.
Seguir sempre as instruções do fabricador se fizer alguma manutenção na viatura. Ter a certeza que se tem a viatura
imóvel durante o decorrer da manutenção. Isto requer tirar a chave da viatura e remover o arame da bateria.
Isolar qualquer ferramenta utilizada na reparação da bateria para evitar explosão da mesma. Remover a bateria ou
cobrir as ferramentas.
Verificar sempre a polaridade de cada terminal da bateria e ter certeza de voltar a colocar os arames da forma correcta.
Utilizar sempre partes de substituição específicas. Nunca utilizar partes de qualidade inferior.
Utilizar ferramentas recomendadas.
Sempre verificar se as ferramentas e os procedimentos que não são especificamente recomendados pelo fabricador
não ponham em causa a segurança pessoal e nem ponha em causa a boa operação da viatura.
Sempre suportar bem a viatura com paradores nas rodas. Nunca ir para baixo de uma viatura suportada apenas por
um macaco. Levantar a viatura de acordo com as instruções dadas pelo fabricador.
Nunca tentar manter uma viatura numa área com chamas ou pessoas constantemente a fumar.
Sempre ter em conta que uma viatura que não esteja a desempenhar bem a sua função pode ser um perigo e não
deve ser utilizado.
O fabricador não consegue antecipar todas as sitiuações, daí que as pessoas que tentem manter a viatura ou reparála devem ser especializados e ter experiência para reconhecer eles próprios as situações que podem resultar em ferimentos ou morte e os estragos que possam ser sofridos pela viatura. Ser extremamente cuidadoso e não tiver a
certeza do estrago, referir a viatura a um bom mecânico.
Sempre fazer um teste drive à viatura depois de reparações e manutenções. Todos os testes devem ser feitos em
zonas seguras sem piões nem outras viaturas em circulação.
Substituir sempre etiquetas estragadas.
Ter sempre um histórico das manutenções feitas à viatura.
Page vi
Owner’s Manual and Service Guide
SAFETY INFORMATION
VENTILAÇÂO
O gás hidrogénio é causado na carga das baterias e é explosivo em concentrações tão baixas como 4%. Porque o
hidrogénio é mais leve que o ar, ele vai concentrar-se nos tectos de edifícios que necessitem ventilação. Cinco trocas
de ar por hora são consideradas o mínimo.
Nunca carregar uma viatura numa zona sujeita a chamas ou fricção. Ter atenção particular ao gás natural ou g+as
propano, aquecedores etc.
Utilizar sempre um circuito dedicado para cada carregador de bateria. Não permitir que outras aplicações sejam postas dentro na bateria durante o carregamento do mesmo.
Carregadores devem ser instalados e utilizados de acordo com as recomendações do fabricador ou os códigos eléctricos (aquele que seja mais restritivo e rigoroso).
Owner’s Manual and Service Guide
Page vii
SAFETY INFORMATION
Notes:
Page viii
Owner’s Manual and Service Guide
INFORMAÇÃO DE SEGURANÇA
Ler todo o manual para ficar a conhecer integralmente o veículo. Prestar particular atenção às mensagens de Nota, de Cuidado e de Aviso
GENERAL
O texto seguinte contem como recomendado pela parte
II do ASME/ANSI B56.8-1988. E-Z-GO fortes compenentes desta especificação.
PARTE II
PARA O UTILIZADOR
4 PRATICAS DE SEGURANÇA SGERAL
4.1
Introdução
4.1.1 Como outras maquinas, estes veiculos podem
causar lesões se forem usados imprópriamente ou mal
mantidos. Parte II contém práticas aplicáveis na operação destes veiculos. Antes da operação, o utilizador
deve estabelecer mais praticas seguras que possam ser
requeridas para uma operação segura.
4.2
Estabilidade
4.2.1 A experiencia tem demonstado que este veiculo, é estável quam é utilizado de forma apropriada e de
acordo com regras especificas e práticas estabelecidas
para ser utilizado no terreno e condições. Porém, a utilização imprória, manutenção imprória, ou falta de cuidade podem contribuir para a instabilidade e pode
prejudicar o desempenho do standard. Algumas das
ccoisas que podem afectar a estabilidade são a falha por
parte do utilizador em seguir práticas seguras; assim
como as condições do solo, a velocidade, a carga, a
operação do veiculo com cargas impróprias, o peso da
bateria, dimanicas e forças estatisticas, e as decições
tomadas pelo mesmo.
(a) O utilizador deve treinar operações com o veiculo
para melhorar a especificade das manobras que estaão
neste Standard.
(b) O utilizador deve pesquisar a zona especifica
onde utilizará o veiculo e estabelecer regrars e estudar
bem o espaço de modo a praticar operaçõies seguras.
4.3
Plaquetas, Marcas, Capacidade e Modificações
4.3.1 O utilizador deve manter sempre visiveis as
plaquetas de identificação do veiculo, assim como os
avisos e as instruções fornecidas pelo fabricador.
4.3.2 O utilizador não deve modificar ou acrescentar nada que afecte a capacidade ou a segurança da
operação,assim como não deve fazer qualquer modificação que não esteje de acordo com o manual de utilizador
Onde forem permitidas alterações, o utilizador deve asegurar a capacidade das operações, avisos e sustenbilidade, plaqutas, sinais, que devem ser modificados
acordamente.
4.3.3 Como requerido nos parágrafos 4.3.1 ou
4.3.2, o fabricador deve ser contactado para poder oefecer vovas plaquetas, avisos, ou instruções que serão
posteriormente afixados propriamente no veiculo.
4.4
Fuél e Guarda
4.4.1 O utilizador deve supervisionar o espaço de
guarda e a aplicação dos fluéis (quando utilizados) para
se certificr que estão de acordo com as normas ANSI/
NFPA 505 e ANSI/NFPA 30.
4.4.2 A ulitização e guarda do petróleo gasificado
liquido deve estar de acordo com os paragrafos ANSI/
NFPA 505 e ANSI/NFPA 58. Se a guarda e utilização
não estiverem de acordo com estes estandartes, o utilizador deve prevenir o veiculo de ser utilizador de ser
utilizado só e quando estiver num stio com as condições
que sejam pedidas e compram estes parametros.
4.5
Mudar e Carregar Baterrias para Veiculos Electricos
4.5.1 O utilizador deve requerer facilidades onde
poça fazer a troca e carga de baterias e os procedimentos devem estar de acordo com os paragrafos ANSI/
NFPA 505.
4.5.2 O utilizador deve preodicamente verificar as
facilidades e rever as operações para se certificar se
estão de acordo com os paragrafos ANSI/NFPA 505,
verificar se está tudo de acordo e informar tudo aos
operadores do veiculo.
4.6
Locais Perigosos
4.6.1 O tilizador deve determinar a classificação
dos perigos de cada local em que o veiculo deve estar
de acordo com ANSI/NFPA 505.
4.6.2 O utilizador deve permtir que em areas perigosas somente andem veiculo aprovados pelos requerimentos por ANSI/NFPA 505.
4.7
Luz para as Areas de Orepação
4.7.1 O utilizador, de acordo com a responsabilidade de pesquisar o ambiente e as condições de operação, deve detreminar se os veiculos requerem luzes e se
sim, deve equipar o mesmo com luzes aporpriadas e
recomendadas pelo manual .
Manual do Proprietário
Page ix
INFORMAÇÃO DE SEGURANÇA
Ler todo o manual para ficar a conhecer integralmente o veículo. Prestar particular atenção às mensagens de Nota, de Cuidado e de Aviso
4.8
Controlo Gases Nocivos e Fumos
4.8.1 Quando o equipamento é utilizado por combustao interna dos motores e em espaços fechado, a
atmosfera deve ser mantida nos limites do "American
Conference of Governmental Industrial Hygienists publication", “Threshold Limit Values for Chemical Substances ND Physical Agents in the Workroom
Environment”. Isto deve ser conseguido por ventilação
frnecida por parte do utilizador, e/ou a instação, uso, e
manutenção própria da emissão e controlo do equipamento recomendado ou requerido pelo fabricador do
mesmo.
4.9
Instrumentos de aviso
4.9.1 O utilizador deve fazer periodicas inspecções
ao veiculo para se certificar que o som emitido e/ou
visual dos instrumentos em trabalho (motor) são mantidos em boa preservação.
4.9.2 O utilizador deve determinar se as condições
de utilização do veiculo requerem que o mesmo seja
equipado com equipamento sonoro e visual adicional,
responsáveis pela manutenção, de acordo com o manual de utilizador.
5 Regras e práticas de operação seguras
5.1
Qualificações e Cargos que o operador do
veiculo deve possuir
5.1.1 Somente pessoas que são treinadas especificamente na utilizadao destes veiculos podem ser autorizados a manobrar-lhes. Estes operadores devem ouvir
e ver bem, estar fisicamente e mentalmente aptos para
poder manobrar o veiculo de acordo com a secção 5 e
todas as outras partes deste Standard.
5.2
Treino pessoal e carga dos oepradores do
veiculo
5.2.1 O utilizador deve seguir um programa de treino de utilizador.
5.2.2 O completar de forma correcta o programa de
treino requerido pelo utilizador deve ser feito antes da
utilização do veiculo. O programa de treino deve estar
acessivel a todos os novos utilizadores e não condisionada apenas aos utilizadores em expriencia.
5.2.3 O utilizador deve incluir no progrma de oeprador o seguinte:
(a) material instrucional fornecido pelo fabricador.
Page x
(b) enfase na segurança dos passageiros, materiais
de carga, condutor, e outros empregados
(c) Regras de segurança nerais contidas neste Standarte e regras adicionais determinadas pelo utilizador de
acordo com este Standarte, e o porquê delas seram formuladas.
(d) Apresentação do equipamento, controlo e funções, e explicação de como trabalham quando usados
de forma própria e de forma imprópria, as condições do
solo, e outras condições e caracteristicas do espaço
onde será utilizado o veiculo.
(e) teste de performance operacional e avaliações
durante a execução do programa.
5.3
Responsabilidade pessoal e cargo do operador
de veiculo
5.3.1 Os operadores devem cumprir com as regras
de segurança estabelecidas nos paragrafos . 5.4, 5.5,
5.6, e 5.7.
5.4
Geral
5.4.1 Salvaguardar a segurança dos piões sempre.
Não conduzir o veiculo de forma alguma a por em risco
alguem.
5.4.2 A presença que potras pessoas no veiculo
para alem do condutor será somente nos brancos fornecido melo fabricador. Todas as partes do corpo do
mesmo devem permanecer dentro do veiculo.
5.4.3 Quando o veiculo for deixado sem supervição,
deve-se aplicar o travão, parar o motor ou desligar a
energia, desligar o circuito da egnição, e remover a
chave. Bloquear os peneus do veiculo, se estiver zona
area inclinada.
5.4.4 Um veiculo considera-se sem supervisao
quando o condutor estiver certa de 7,6 metros ou mais
afastado do memso, ou quando o cundutor deixa o veiculo e não o consegue ver. Quando o condutor estiver
menos de 7,6 metros afastado do veiculo u ainda conseguir ter visão do mesmo, ele deve ter os controlos
neutralizados, e os travões ligados de modo a prevenir
movimento.
5.4.5 Manter uma distancia segura de rampas e de
plataformas.
5.4.6 Utilizar veiculos apropriados em sitios perigosos, como definido nas condições apropriadas pela
segurança.
5.4.7 Reportar todos os acidentes envolvendo pessoas, edificios e quipamentos.
Manual do Proprietário
INFORMAÇÃO DE SEGURANÇA
Ler todo o manual para ficar a conhecer integralmente o veículo. Prestar particular atenção às mensagens de Nota, de Cuidado e de Aviso
5.5.14 Para virar, reduzir velocidade para ajudar na
estabilidade, depois virar suavemente.
5.5
Carregar (cargas)
5.6.1 Carregar apenas cargas estáveis e seguras.
Quando ao carregar cargas que não se podem centrar,
ter extra cuidado.
5.6.2 Carregar apenas cargas que estajam na
capacidade do veiculo como indicado na matricula do
mesmo.
5.6.3 Cargas que excedam a capacidade máxima
com extra cuidado. A estabilidade e movimentação do
veiculo podem ser afectados.
5.6
Cuidados do Operador do veiculo
5.7.1 No começo de cada turno em que será utilizado o veiculo, o condutor deve verificar o estado do
veiculo e inspeccionar as rodas, os sinais de aviso,
luzes, bateria(s), controladores de velocidade e
direcção, travões e o volante. Se o veiculo precisar de
arranjo ou estiver inseguro a ser utilizado, isto deve ser
emitido imediatamente à auturodade devida e o veiculo
não derevá ser utilizado até ser arranjado.
5.7.2 Se durante a operação o veiculo se tornar
inseguro, isto deverá ser transmitido imediatamente à
utoridade devida, e o veiculo não será utilizado até ser
arranjado.
5.7.3 Não se deve fazer repaações se nao for qualificaddo para isso.
5.7.4 Quando se depositar a gasolina, o motor deve
ser desligado e o condutor deve deve sair do veiculo.
5.7.5 O entornar gasosina requer a evaporação ou
limpeza do mesmo antes de se voltar a ligar o motor.
5.7.6
fugas.
Não se deve utilizar um veiculo que estje com
5.7.7 Nõ utilizar chamas para verificação o armazenamento da bateria ou o nivel do liquido (gasolina).
6 Práticas de Manutenção
6.1
Introducão
6.1.1 Os veiculos podem se tornar perigosos se nao
forem bem cuidados. Por isso, a manutenção das facilidades, pessoas treinadas, e acções devem ser satisfeitas. As facilidades podem estar ou não do local de
trabalho.
6.2
Procedimentos de manutenção
6.2.1 A manutenção e inspecção de todos os
veiculos deve ser feito em comformidade com as recomendações do fabricador e as seguintes práticas.
(a)
Uma manutenção agendada, lubrificação e
inspecção do sistema deve ser cumprido.
(b) Somente pessoas qualificadas poderão manter,
reparar, ajustar, e inspeccionar os veiculos.
(c) Antes de qualquer especie de reparação ou
manuteção, devem-se seguir as recomendações do fabricador para a imobilização do veiculo.
(d)
dele.
Bloquiar o chassis antes de trabalhar debaixo
(e) Antes de desconectar qualquer parte do sistema
de oleo de gasolina ou diesil do veiculo, revericar se a
válvula está fechada, e ligar o motor até o consumo do
veiculo acabe e o motor desligue.
(f) Antes de desligar qualquer parte do sistema LP do
motor, a veiculos a gás, fechar a válvula do cilindro do
gás LP até este esgotar e o motor desligue.
(g) A operação para verificação do desempenho do
veiculo deve ser feita numa aera autorizada e segura
para o mesmo.
(h) Before commencing operation of the carrier, follow
the manufacturer’s instructions and recommended procedures.
(i) Evitar fogos e ter sempre extintores no local de trabalho. Não utilizar chama para verificar o nivel de derrame se o veiculo estiver com buracos. Não utilizar liquidos de limpeza que sejam flamáveis..
(j) Ventilar bem a area de trabalho.
(k) Utilizar os cilindros de gás LP com cuidado. Danos
fisicos a compomentes do veiculo podem enfraquecer o
motor e fazê-lo inseguro para utilização.
(l) Travões, volantes, velocidade e direcção, sinaisde
aviso, luzes, guardar e instrumentos de segurança
devem ser inspecionados regularmente e mantidos
seguramente operacionais.
(m) veiculos especiais ou instrumentos aprovados
para operar em areas perigosas devem ser inspecionadas para garantir a manutenção e preservação das
regras de segurança iniciais.
(n) Os sistemas de fluél (gasolina) devem ser verificados para perdas de liquido e a condição das mesmas.
Se for encontrada uma fuga, acções devem ser tomadas
para garantir que o veiculo seja usado até o concerto do
Manual do Proprietário
Page xi
INFORMAÇÃO DE SEGURANÇA
Ler todo o manual para ficar a conhecer integralmente o veículo. Prestar particular atenção às mensagens de Nota, de Cuidado e de Aviso
memso.
(o) As plaquetas de manutenção fornecidas peo fabricador devem ser mantidas de forma a srem legiveis
sempre.
(p) Baterias, motores, controladores de velocidade e
direcção, botões de limite, instrumentos de protecção, e
conecções dvem ser inspecionados e mantidos conforme as recomendações do fabricador.
(q) Os veiculos devem ser guardados num sitio limpo
para minimizar os riscos de perigo e falicitar a detectação de problemas.
(r) Modificações que afectem a capacidade e segurança da máquina não devem ser efectuados pelo utilizador sem uma autorização escrita por parte do
fabricador. Onde as modificações feitas, assegurem que
a capacidade do veioculo e segurança sejam as mesmas, e que as plaquedas de aviso sejam modadas de
acordo.
(s) Será verificado que a troca de partes seja possivel
com os originais e com uma qualidade pelo menos igual
à original.
Page xii
Manual do Proprietário
ELECTRIC THREE WHEEL SERVICE VEHICLE
Read all of manual to become thoroughly familiar with this vehicle. Pay particular attention to all Notes, Cautions and Warnings
Obrigado por esta compra. A viatura é equipada com
unidade de controlo de velocidade que é a mais avançada da indústria. Antes de conduzir a viatura, pedimos
que leia este manual de utilizador e guia de serviço. Este
guia contem informação que o ajudará a manter a sua
viatura rentável Algumas ilustrações podem mostrar
partes que são opcionais para a sua viatura.
A maior parte dos procedimentos neste guia podem ser
tomados por uso explosivo de ferramentas normais de
uso individual (ligeiras). Contactar um serviço de representação autorizado para informação sobre as datas de
manutenção e verificação da viatura (de quanto em
quanto tempo deve ser feita uma inspecção)
Para facilitar a manutenção, um manual de serviço de
partes, e um manual de serviço e reparação técnica,
estão disponíveis no local de distribuição, um departamento de serviço de partes autorizado. Ao encomendar
partes ou pedir informação sobre a viatura, fornecer o
modelo da viatura, o número da viatura e o código de
fabricação.
O gás de hidrogénio é gerado pela troca de baterias e é
explosivo em concentrações tão baixas como os 4%.
Porque este gás é mais leve do que o ar, ele vai concentrar-se nos tectos dos edíficios que necessitem ventilação adequada. Cinco trocas de ar por hora é
consideradas o mínimo pedido.
Nunca carregar uma bateria num local sujeito a chamas
ou fricção. Prestar atenção particular ao gás natural, gás
propano e aquecedores de água a gás.
Antes de cada viatura ser posta em operação, é recomendado que os equipamentos listados no início deste
manual sejam verificados. (Ref, Fif 1, pagina 1)
ITEM
Batteries Charge batteries
Backrest Remove protective plastic covering
Brakes
Check operation and adjust if necessary
Tires
Check air pressure (see SPECIFICATIONS)
ANTES DO USO INICIAL
Fig. 1 Serviço inicial de manual
Ler, perceber e cumprir a etiqueta de segurança que
está no painel de instrumento. A viatura foi modelada
para ser operada em fábricas ou armazéns, em chãos
semi-suaves e em estradas e rampas.
Perceber bem a viatura, o seu equipamento, e como se
usa de forma segura. Apesar da viatura ter sido feita
para providenciar segurança durante a operação, manter
um bom desempenho depende também em grande parte
do utilizador.
Baterias da viatura devem ser completamente carregadas antes do uso inicial.
G ás d e h id ro géni o é
gerado naturalmente por
parte do ácido vindo da
troca de baterias. A concentração de 4% deste gás é
explosiva e pode causar ferimentos ou morte. A
mudança de baterias deve ser feita num local adequado e bem ventilado (mínimo de 5 trocas de ar por
hora).
!
SERVICE OPERATION
!
Para reduzir o risco de explosão de bateria que pode
resultar em ferimento nunca fumar perto das baterias,
nem fazer a troca num local propício a chamas ou
num local com equipamento eléctrico que possa
causar curto-circuito.
Carregador abordo
O carregador abordo é ligado directamente às baterias
apenas necessitando de ser ligados a uma ficha de 15
amp AC. Quando a carga estiver completa, colocar a
corda apropriadamente debaixo do painel de instrumento.
Instalação de carregador portátil (se equipado)
Para evitar sobreaquecimento que pode causar
danos graves ao carregador e crias possibilidade de chama, não cobrir as
abstracções de ar. Carregadores portáteis devem ser
colocadas numa plataforma acima do chão ou de uma
forma que o máximo de ar possível circule entre o
chão e o carregador.
!
!
Carregadores portáteis são enviados com a viatura.
Antes de operar a viatura ou carregar a bateria, os carregadores devem ser removidos e colocados numa plataforma acima do chão para permitir que o ar circule por
baixo do carregador. Se o carregador for utilizado num
local descoberto, a protecção contra o sol e a chova
devem ser providenciados. (Ref Fig. 2 on page 2).
É requerido um bom circuito para o carregador Ver a etiqueta colocada ao lado do carregador para protecção
Owner’s Manual and Service Guide
Page 1
ELECTRIC THREE WHEEL SERVICE VEHICLE
Read all of manual to become thoroughly familiar with this vehicle. Pay particular attention to all Notes, Cautions and Warnings
Provide Protection From Elements
A energia AC, corda, é equipada com uma ficha, não
tente cortá-la, puxá-la, ou dobrá-la.
Se a viatura for para ser carregada com um
produto não original do fabricador, ler as
instruções do produto.
Levantar os tabuleiros da bateria (se equipado)
Do Not Block Louvered Airways
NEMA 15 - 5R Grounded AC Receptacle
110 - 120 VAC. Dedicated 15 AMP Circuit
Locations outside the US and Canada: Reference
appropriate local electrical code and charger manufacturer recommendations for AC power requirements
Fig. 2 Charger Installation
apropriada do cirtuito. O carregador pode permanecer
numa saída de AC. Para carregar a viatura, ver as ilustrações das etiquetas no carregador. Inserir o DC no
receptor da viatura. O receptor está localizado ao lado
do painel de instrumento, à esquerda do volante (Ref
Fig. 5 on page 3). Depois de inserir a ficha DC polarizado, espere uns segundos e verificar que o carregador
está de facto a carregar.
O carregador começará a carregar automaticamente
depois de ligado à ficha. O carregador para de carregar
quando a bateria estiver cheia e a ficha do DC pode ser
retirada para a viatura ser utilizada.
Por a corda DC pelo volante durante o carregamento, serve tão bem como uma lembrança
para guardar a corda quando a carga estiver completa. A ficha
DC pode ser danificada quando esta for pisada ou enrolada ao
conduzir.
Para prevenir um perigo fisico
!
! que possa resultar em choque
eléctrico, verificar que o carregador não está danificado e esta bem ligado ao receptor.
A energia (AC) corda é equipada com uma ficha, não
tente cortar puxar ou dobrar a ficha.
Para desligar o carregador antes do processo estar concluído, desliguem a corda ACT da saída AC primeiro e
depois desligue a corda DC da viatura.
A corda DC de carregamento é equipada por um conector polarizado que cabe dentro de muitos receptores da
viatura.
Page 2
A viatura pode estar equipada com tabuleiros de bateria
que saíam. Isto permite que a viatura opere numa bateria enquanto as outras estão a ser carregadas.
Antes de separar o
conector de bateria, desligar sempre acessórios
eléctricos ou opções. Criar um circuito pode resultar
em um curto-circuito ou numa explosão da bateria.
Verificar que qualquer levantamento utilizado para a
remoção das baterias tenha capacidade de conseguir
suportar o peso das baterias. Deve ser capaz de
levantar as baterias sem as deixar tombar.
Para eliminar a possibilidade de explosão da bateria,
estas devem ser cobertas para prevenir a possibilidade de terminais que podem resultar em explosão.
!
!
Colocação de baterias, terminais, e outros acessórios
relacionados contém líquidos nocivos. Lavar as mãos
depois de arranjo.
Desligar a chave e todos os acessórios de modo a retirar
carga eléctrica das baterias. Para aceder aos tabuleiros
da bateria, o convés deve ser retirado. A viatura o total
de quatro baterias separadas em tabuleiros à direita e
esquerda contendo duas cada. Desligur os dois conectores de bateria dos receptores montados na viatura.
Use um levantador com o mínimo de 70 kg. Este deve
possuir um gancho e uma corrente ou cabo para prevenir a possibilidade de terminais de bateria ou conectores
expostos. Como precaução, cobra as baterias para prevenir a possibilidade de encurtar ternimais de bateria e
conectores. Cada tabuleiro tem um ponto de levantamento para ser apanhado. Levante apenas um de cada
vez e leve ao chão.
A parte esquerda do convés está cortada para
permitir que a parte esquerda do tabuleiro da
bateria se abstenha de perda de liquido.
Instale os tabuleiros de baterias carregadas, ligue o cabo
largo da bateria e substitua o deco.
Owner’s Manual and Service Guide
ELECTRIC THREE WHEEL SERVICE VEHICLE
Read all of manual to become thoroughly familiar with this vehicle. Pay particular attention to all Notes, Cautions and Warnings
Ligue o carregador de distribuição à bateria descarregada e depois ligue o carregador portátil no conector de
distribuição.(Ref Fig. 3 on page 3).
To
Charger
Horn
Button
Hour
Meter
Direction
Selector
State of
Charge
Meter
To
Batteries
F
Light
Switch
N
R
Fig. 3 Distribuição de carregador
Charger
Receptacle
Localização da matricula
Key Switch
A chapa com o número serial de fabricação está localizado como abaixo mostrado (Ref Fig. 4 on page 3).
Fig. 5 Controlos e afins
Botão de chave
Localizado no painel de instrumento, o botão de chave
permite que o sistema eléctrico da viatura se ligue e desligue ao virar a chave.(Ref Fig. 5 on page 3).
Para prevenir movimento do veículo quando estiver estacionado, a chave deve ser removida e retirada.
Fig. 4 Localização da Chapa com numero
Modificação de modelos está sempre a acontecer. De
modo a conseguir componentes correctas da viatura, a
data de fabricação e o número serial de fabrico devem
ser fornecidas quando se fizerem encomendas para
peças da viatura.
Controlos e afins da viatura
Os controlos e afins da viatura consistem de:
• botão de chave
• seleccionador de direcção
• situação de cargas
• contador de hora
• buzina
• combinação de acelerador e travão de pedal
• Luzes frontais e luzes traseiras
Se a viatura estiver equipada com acessórios
instalados pelo fabricador, alguns desses
acessórios permanecem ligados mesmo com a chave desligada.
Seleccionador de Direcção
O seleccionador de direcção está localizado no painel de
instrumento (Ref Fig. 5 on page 3). Este permite a
selecção de Frente (F), Neutro (N) ou Atrás (R). Deve
ser deixado em Neutro (N) quando não estiver a ser utilizado.
Para prevenir estragos, a viatura deve
ser completamente parada antes de
mudar a direcção do seleccionador.
Medidor do Estado de carga
Localizado no painel de instrumento, o medidor de
estado de carga indica a quantidade de bateria ainda
disponível (Ref Fig. 5 on page 3).
Owner’s Manual and Service Guide
Page 3
ELECTRIC THREE WHEEL SERVICE VEHICLE
Read all of manual to become thoroughly familiar with this vehicle. Pay particular attention to all Notes, Cautions and Warnings
Medidor de hora
Localizado no painel instrumental, o medidor de horas
indica o número total de horas de utilização.(Ref Fig. 5
on page 3).
Depress toe to accelerate
Buzina
O botão de buzina está localizado por trás do volante do
lado esquerdo no painel de instrumento (Ref Fig. 5 on
page 3). Activar a buzina pressionando o botão.
Front of
Vehicle
Release pressure - Engages service brake
Combinação de acelerador e travão
Se não estiver familiarizado com este
tipo de operação, é recomendado que a
viatura seja utilizada numa área não congestionada e a uma
velocidade pequena até o condutor se familiarizar com as características da viatura.
Remover pressão parcial do pedal reduz a
velocidade mas não trava activa o sistema de paragem. O travão só é activado quando a pressão do pedal for completamente
nula. Deixando de pressionar a parte final do pedal
activa o serviço de travagem.
A remoção de pressão do pedal durante uma grande
velocidade fará com que a travagem dispare e daí
resulta uma desaceleração. Agarrar-se sempre durante a condução da viatura.
!
Depress heel to brake rapidly
!
Para prevenir movimentação quando a viatura é deixada sozinha, deixar o pedal completamente, mudar o
seleccionador de direcção para neutro, desligar a
chave e remover a chave.
A viatura está equipada com uma combinação de acelerador e travão incorporado num só pedal(Ref Fig. 6 on
page 4). Quando em descanso, o pedal mantém a travagem para evitar que a viatura se movimente enquanto
estacionada. Aplicar pressão sobre a ponta do pedal
deixa o travão e acelera a viatura. Decrescer a pressão
no pedal reduz a velocidade mas não põe em serviço os
travões. Deixar o pedal completamente activa os
travões.
Heel
Toe
Fig. 6 Combinação de travão e acelerador
ligação da chave.(Ref Fig. 5 on page 3). Puxe o botão e
ligue as luzes.
ANTES DE ENTRAR NA VIATURA
1. Verificar pressão dos pneus.
2. Verificar fugas líquidas.
3. Ter a certeza que tudo está bem segura.
Se a viatura tiver um carregador abordo, desligue a
corda de da tomada e e arrume apropriadamente antes
de movimentar a viatura.
Conduzir a viatura
Quando a viatura for deixada sem visão, deixar o pedal
completamente, mover o seleccionador de direcção em
neutro, desligar a chave e retirar a chave.
O uso impróprio da viatura pode resultar num decrescimento da sua prestação ou estrago da mesma.
Luzes frontais e luzes traseiras
Leia e perceba bem os seguintes avisos antes de tentar
conduzir a viatura:
O botão da luz está localizado do lado esquerdo no painel de instrumento e trabalha independentemente da
Page 4
Owner’s Manual and Service Guide
ELECTRIC THREE WHEEL SERVICE VEHICLE
Read all of manual to become thoroughly familiar with this vehicle. Pay particular attention to all Notes, Cautions and Warnings
Para reduzir a possibili!
! dade de ferimento ou
morte resultante da perda de controlo da viatura, os seguintes avisos devem
ser tidos em conta:
Conduzir a viatura à velocidade que as condições
do solo permitirem. Considerar o terreno, a movimentação, o estado de tempo, que afectam o solo
e a capacidade de controlo da viatura.
Ter cuidado extra e velocidade reduzida quando
estiver a conduzir em solos pobres, tais como a
lama, relva molhada, granizo, etc.
Evitar chuva extremamente forte.
Evitar conduzir depressa ao descer colinas. Uma
súbita paragem ou mudança de direcção pode
resultar em perda do controlo. Utilizar o travão
para controlar a velocidade ao descer uma colina.
Reduza a velocidade antes e durante as viragens.
Todas as viragens devem ser feitas a velocidade
reduzida.
A viagem deve ser para cima ou para baixo da
colina.
Ter cuidado extra ao conduzir a viatura em
qualquer solos inclinados.
Não deixar ninguém andar/viajar na zona das cargas.
Ficar em áreas designadas para evitar descidas bruscas. Para reduzir a possibilidade que ferimento ou
morte resultante do uso impróprio da viatura, os
seguintes avisos devem ser tidos em conta:
Ver ESPECIFICAÇÔES GERAIS para capacidade
Ao deixar de pressionar o acelarador, os travões
serão aplicados, o que pode causar movimento
estranho da viatura. Desligue sempre a chave
quando estiver estacionado.
Ter a certeza que o seleccionador de direcção
está correcto antes de usar a viatura.
Não use a viatura em movimento em ponto morto.
Parar sempre a viatura completamente antes de
mudar o seleccionador de direcção.
Verificar a zona atrás da viatura antes de efectuar
a marcha-atrás.
Permanecer sempre com o assento no seu devido
locar durante a moção. Manter pés, pernas, mãos
e braços dentro a viatura.
Verificar a estabilidade da viatura quando utilizar
escada opcional para chegar a a sítios da carga.
Não estenda demais.
Para prevenir movimentação da viatura enquanto
estiver estacionada, deixe o pedal completamente, mude a direcção do seleccionador de
direcção para a posição neutra, desligue a chave,
e remova a chave.
Pegar a viatura
Para pegar a viatura: Coloque a chave na posição ‘ON’.
Mude a direcção do seleccionador para onde desejar e
pressione um pouco o pedal para ligar o motor.
Quando o seleccionador de direcção estiver na
posição de marcha-atras, um sinal de aviso
fará barulho. Este é um aparelho que indica que a viatura está
pronta para efectuar a marcha-atras.
O motor pára e o travão é aplicado quando o pedal for
completamente deixado. Para parar a viatura mais rápido, pressione a ultima parte do pedal (ponta).
Para evitar estrago da componente, a
viatura deve ser parada completamente
ante da mudança do seleccionador de direcção.
Não aguente a viatura nas subidas ou descias utilizando o acelerador e o motor. Deixar o motor nessa condição durante 3-4
segundos provocará danos permanentes ao motor.
Custos
Para prevenir ferimento
ou morte resultante das
velocidades acima das
recomendadas, limite a velocidade com o serviço de
travagem.
!
!
Em grandes inclinações, é possível que a viatura ande a
velocidades maiores do que em solo plano. Para prevenir perda do controlo da viatura, velocidades devem ser
limitadas ao máximo daquilo que é permitido em solos
planos (ver especificações gerais). Limite a velocidade
da viatura ao deixar o pedal e fazendo pressão na ponta
do pedal. Estragos às componentes podem ser devidas
ao excesso de velocidade. Danos provocados por
excesso de velocidade podem resultar em perda de controlo, tem custos, e é considerado um abuso e não será
cobrado pela garantia.
Owner’s Manual and Service Guide
Page 5
ELECTRIC THREE WHEEL SERVICE VEHICLE
Read all of manual to become thoroughly familiar with this vehicle. Pay particular attention to all Notes, Cautions and Warnings
Utilizar a viatura eléctrica
Grua.............................................................................1
Para prevenir ferimento
!
! ou morte, resultante o
uso impróprio de técnicas, tenha em conta os seguintes avisos.
Não tente qualquer tipo de serviço antes de ler e
perceber todas anotas neste manual.
Algumas reparações podem requerer que a viatura seja
levantada.
Qualquer serviço que requeira ajustamentos à
parte inferior da viatura enquanto o motor estiver
a trabalhar, deve ser feito com a viatura ‘no ar’ levantada.
Usar protecção nos olhos quando
estiver a trabalhar na viatura.Em especial, quando estiver a trabalhar com
as baterias, ou a usar ar pressionado.
Para reduzir a possibilidade de curto-circuito, que
pode levar a uma explosão de bateria, desligue
todas as ligações eléctricas da bateria antes de
remover cabos electricos da bateria.
Para prevenir desinteregração do motor, nunca
utilize a viatura no máximo por mais de 4-5 segundos enquanto estiver na condição ‘não carga’.
Colocagens de bateria, terminais e acessórios relativos contem tóxicos nocivos. Lavar as mãos
depois de usar.
Está no interesse do dono da viatura assim como do distribuidor para seguir bem as recomendações feitas neste
manual. Adequada manutenção, aplicada em intervalos
regulares, é a melhor garantia para manter a viatura boa.
Reboque
!
!
A viatura não foi modelada para ser rebocada.
É recomendado que esta viatura seja colocada completamente num camião ou outro transporte adequado.
Qt requerida
macaco........................................................................ 1
Jack stands ................................................................. 2
Chocks ........................................................................ 4
Page 6
!
Nunca tentar levantar as rodas de trás da viatura de
três rodas sem primeiro erguer a parte frontal da viatura e suportá-la bem.
Ao levantar a viatura, colocar macaco(s) nas áreas indicadas.
Devido à viatura ser muito baixa e as rodas serem muito
próximas do chão, a viatura só deve ser erguida o suficiente para remover as rodas. Este serviço que requer a
elevação da viatura deve ser feita elevando a parte da
frente da viatura com a corrente de elevação atada às
partes da frente da viatura. Usar sempre corrente extra
como precaução, caso haja uma complicação.
Para remover as rodas ou o eixo de rodas, desaperte o
hardware e rode o pneu da frente como indicado (Ref
Fig. 7 on page 7). Posicione o macaco no local indicado
e cuidadosamente levante a parte frontal da viatura. Ter
cuidado para ver se não coloca o macaco onde ele
possa interferir com ligações ou possa fazer furos nos
depósitos. Lentamente baixe o macaco e teste a estabilidade da viatura.
Para levantar a parte de trás da viatura, primeiro levante
a parte frontal da viatura como descrito anteriormente
com os macacos. Depois coloque o macaco como
mostrado no traseiro da viatura. Cuidadosamente
levante a parte traseira da viatura com o macaco e
coloque dois paradores no local indicado. Lentamente
baixe o macaco e verifique que a viatura está bem
assente antes de prosseguir.
Baixe a viatura, fazendo o processo contrariamente.
Levantar a viatura
Lista de ferramentas
Para prevenir ferimento
ou morte resultante da
quebra dos seguradores, verificar que a viatura está bem firme e nivelada com o chão Nunca ir para debaixo da viatura
enquanto não estiver bem erguida. Colocar sempre
choques à frente e atrás das rodas que não estao a
ser erguidas. Usar cuidado extremo uma vez que a
viatura se encontra erguida.
!
Manutenção de Rotina
Esta viatura fornecerá anos de serviço satisfatório, se
receber manutenção regular. Ver o esquema das datas
de intervalos de verificação da manutenção (Ref. Fig. 14
Owner’s Manual and Service Guide
ELECTRIC THREE WHEEL SERVICE VEHICLE
Read all of manual to become thoroughly familiar with this vehicle. Pay particular attention to all Notes, Cautions and Warnings
Turn wheel as shown
to permit jack placement
Grease Fitting
Detail
1
2
2
Grease Fitting
Place jack along
the flat edge of
footrest
4 Ball Joints
(See detail)
Steering with steering wheel and
cover removed for clarity
3
4
4
Wheel bearings
and fork pivot
View from underside of vehicle
Fig. 7 Erguer a viatura
on page 12). Ver os locais de Lubrificação designados
(Ref Fig. 8 on page 7).
Alguns itens de manutenção devem ser vistos
mais frequentemente em viaturas usadas
sobre condições severas.
pode causar danos.
Utilizar no máximo 3 ‘apertos’ de lubrificação por cada vez, lubrificação a mais
Rear axle
check and
fill
Por mais do que 3 ‘apertos’ de lubrificação pois pode
causar danos e falha prematura.
Eixo das Rodas traseiras
A única manutenção requerida para os primeiros 5 anos
é de uma inspecção periódica do nível de lubrificante. O
eiro de rodas traseiro é providenciado com uma ficha de
confirmação de lubrificante em baixo do diferencial. A
não ser que haja perdas liquidas, o lubrificante só precisa de ser susbstítuido passado 5 anos.
View from underside of vehicle
Fig. 8 PONtos de lubrificação
Owner’s Manual and Service Guide
Page 7
ELECTRIC THREE WHEEL SERVICE VEHICLE
Read all of manual to become thoroughly familiar with this vehicle. Pay particular attention to all Notes, Cautions and Warnings
Verificar o nível de lubrificante
Com a viatura em nível do solo, limpar a área em volta
do sítio de aplicação e desligar a ficha e removê-la.(Ref
Fig. 9 on page 8). O nível correcto de lubrificante está
abaixo do buraco, devidamente indicado. Por lubrificante
lentamente até começar a sair do buraco. Coloque a
ficha. Na SITUAÇÃO DE SUBSTITUIÇÃO DE LUFRIFICANTE, a viatura deve estar erguida e o óleo bem
removido.
Dry, Level, Clean, Paved Surface
Accelerate To
Maximum Speed
Check/Fill Plug
Fig. 9 Verificação traseira de lubrificante
TRAVÕES
Manter os travões de acordo com a tabela periódica de
manutenção. (Ref Fig. 14 on page 12). Depois da viatura
ser posta em serviço, é recomendado que os travões
sejam verificados pelo teste seguinte:
Método do teste
Para prevenir ferimentos
!
! graves ou morte resultante pa ra utili zação
imprópria do sistema de travões da viatura, este
sistema deve se bem mantido. Todos os testes de
travões devem ser efectuados numa localização
segura tendo em conta a segurança de todos.
Release
Accelerator Pedal
to Engage
Service Brake
Acceptable
Stopping 4 ft. (1.2 m)
Distance
Page 8
Line or Marker
Normal Range of
Stopping Distance
Any vehicles that stop
more than 4 ft. (1.2 m)
beyond the Acceptable
Stopping Distance or
pulls to one side should
be removed from service
and inspected by a
qualified mechanic
Com o passar do tempo, uma pequena perda
de potência pode ocorrer. Daí ser importante
estabelecer a distância de travagem normal com uma viatura
nova.
Determine a prestação de travagem da viatura utilizando
os travões (deixar o pedal do acelerador) num sitio liso,
seco, limpo enquanto a velocidade de condução máxima
(Ref Fig. 10 on page 8). Registe o local de paragem
Line or Marker
Fig. 10 Teste Periodico de Travões
Owner’s Manual and Service Guide
ELECTRIC THREE WHEEL SERVICE VEHICLE
Read all of manual to become thoroughly familiar with this vehicle. Pay particular attention to all Notes, Cautions and Warnings
completa da viatura. Se a viatura parar a uma distancia
significativa do que a normal ou acaba por tender a ir
para o lado, deve ser testada novamente.
deve estar superior à recomendada.Todos os 3 pneus
devem ter a mesma pressão para uma boa manobra da
viatura. Ter o cuidado de repor a rosquilha depois da
colocação de ar.
Se a viatura falhar o segundo teste, deve ser imediatamente removido de serviço. A viatura precisa de ser
inspeccionada por um mecânico qualificado.
Reparação de pneus
Pneus
Geralmente, a forma mais efectiva de reparar um pneu
furado é utilizar a ferramenta adequada.
Lista de ferramentas
Qty. Required
Rancho de impacto, 1/2" drive .................................... 1
Soquete de impacto, 3/4", 1/2" drive........................... 1
Turque de impacto, 1/2" drive, ft. lbs........................... 1
Ranche, 1 1/8" ............................................................ 2
Para prevenir ferimentos
!
! causados por um
soquete partido, utilizar
apenas os que forem para rancho de impacto. Nunca
usar o soquete convencional.
A inspecção das rodas deve ser feita de acordo com a
tabela de inspecção. (Ref. Fig. 14 on page 12). Pressões
de inflação devem ser verificadas quando as rodas estiverem frias. Ao remover rodas, utilizar ferramentas apropriadas. Soquetes regulares não são designados para o
impacto exercido por ferramentas.
Uma explosão de pneu
pode resultar em ferimento grave ou morte.
Nunca exceder a pressão que deve ter um pneu.
Para prevenir uma explosão de pneu, pressione o
pneu com uma pequena quantidade de ar aplicada nas bordas do pneu. Nunca exceder a pressão
recomendada pelo fabricador. Proteger cara e
olhos do ar que escapa ao remover a válvula de
ar.
Ter cuidado ao por ar nos pneus. Devido ao pouco volume dos pneus, a pressão em demasia
pode ocorrer em segundos. Isto pode causar a
separação da roda com o pneu ou causar uma
explosão, ambas as coisas podem causar ferimento.
!
A viatura está equipada com 3 pneus.
!
Ter cuidado ai encher os pneus. Devido ao volume baixo
destes pneus, a sobrepressão pode ocorrer em segundos. Isto pode causar que o pneu e a roda se separem,
ou uma explosão, ambos podem resultar em ferimentos.
Ver especificações gerais para recomendações da inflação de pneus. Sobre nenhum efeito a pressão do pneu
As ferramentas de reparação de pneus estão
disponíveis em todas as lojas de mecânica.
Se o pneu estiver vazio, remova a roda e ponha ar até
ao recomendado. Emersa o pneu em ar para detectar a
fuga e marque com um marcador. Arranje o pneu conforme as especificações do fabricador.
Se o pneu estiver para ser removido da roda, a sugestão
de máquina de mudança de pneus pelo fabricador deve
ser seguida para reduzir a possibilidade de ferimento.
Para prevenir ferimento,
!
! ter a certeza que a
maquina está bem
pousada no chão. Usar equpamento de segurnça
aporvado pela OSHA ao efectuar a operação.
Seguir todas as instruções de segurança fornecidas pelo
fabricador.
Instalação de roda
Não apertar os nòs mais do que (115
Nm) turque.
É importante seguir a sequencia na instalação
dos nòs. Isto fará com que a roda fique bem
assente.
Com a válvula do lado de fora, monte a roda com os nòs.
Primeiro aperte com os dedos na sequência referida
(Ref Fig. 11 on page 9). Depois aperte com o turque (70 115 Nm) seguindo o padrão se sequência.
'Cross Sequence'
3
1
Tire style
may vary
4
2
Fig. 11 Instalação de roda
Owner’s Manual and Service Guide
Page 9
ELECTRIC THREE WHEEL SERVICE VEHICLE
Read all of manual to become thoroughly familiar with this vehicle. Pay particular attention to all Notes, Cautions and Warnings
Substituição de luzes
• Protector de Múltiplo Uso de Bateria, formulado
Para substituir uma luz, remova os dois parafusos Phillips de trás para desmontar a luz. Coloque a nova lâmpada e volte a colocar os parafusos retirados.
•
•
Cuidado e limpeza da viatura
Para prevenir estragos cós, não usar
quaisquer produtos tóxicos ou corrosivos para limpar partes plásticas.
•
É necessário que técnicas próprias de limpeza sejam
usadas.
•
A limpeza normal de vinil ou plástico ou borracha requer
o uso se sabão líquido aplicado com esponja ou uma
escova suave e depois limpo com um pano.
A remoção de óleo, alcatrão, verniz, etc, requer o uso de
limpador de vinil/borracha.
As partes pintadas da viatura fornecem aparência atractiva e protecção durável. A lavagem frequente com água
fria é o melhor metodo para preservar as áreas pintadas.
Não usar água quente, sabão forte nem detergentes.
•
•
As partes de borracha devem ser limpas com produtos
apropriados.
•
Limpeza ocasional e engraxe com produtos não abrasivos aumentará a aparência e a durabilidade das superfícies pintadas.
•
Materiais corrosivos usados para o controlo de pó,
podem fazer sofrer a parte interna da viatura Estes materiais aceleram a corrosão. É recomendado que de vez
em quando as áreas sejam sujeitas a levar com agua
normal. Limpar bem qualquer área com lama ou outras
coisas. Sedimentos entranhados devem ser removidos,
para prevenir o estrago da viatura.
para formar a um prazo longo, flexível,seco que
não parte, escamagem sobre uma grande variedade térmica. (P/N 75500-G01)
Lubrificante Branco Lithium, formulado para providenciar protecção lubrificante nas áreas onde o
enroscamento seja um problema, ou áreas de
aquecimento extremo (P/N 75502-G01).
Penetrant/Lubricante, um 4-em-1 produto, que
penetra nas partes mais difíceis, lubrifica deixando uma camada fina de lubrificação, previne a
corrosão (P/N 75503-G01)
Limpador-múltiplo e deslubrificante, que contém
propriedades naturais e ambientalistas (P/N
75504-G01)
Limpador-múltiplo de mãos, é um limpador industrial que não contem compostos muito fortes,
porém, remove suavemente a gordura das mãos.
Pode ser usado com ou sem água. (P/N 75505G01)
Limpador de Bateria, que é de fácil utilização, não
neutraliza os ácidos cristalinos da bateria. Os
resultantes são agua sal e são fáceis de limpar. .
(P/N 75506-G01)
Kite de Manutenção da Bateria, para uma limpeza
completa da bateria, com instruções de manutenção. (P/N 25587-G01)
Limpador Biodegrádavel que limpa a sujidade
mais pesada e difícil ao corroer a gordura.(P/N
75507-G01)
Pack múltiplo de Valor, pack incluindo (118 ml)
aerossol latas de Protector de Baterias , Penetrant/Lubricante, Lubrificante Branco de Lithium, e
Limpador de Carborador. (P/N 75508-G01)
Reboque
Para prevenir ferimento a
qualquer ocupante da
viatura, ter a certeza de
que a viatura e os seus componentes estão bem
seguros ao reboque.
!
Produtos de cuidado da viatura
Para ajudar a manter a viatura existem vários produtos
disponíveis no local de distribuidores, ou departamento
de partes.
• Tinta Touch-up, especialmente formada para imitar a cor da viatura (P/N 28140-G** e 28432-G**)
Page 10
!
Não estar na viatura enquanto rebocada.
Verificar sempre que a viatura e os seus componentes
estão devidamente seguros antes da rebocação. A
capacidade de carga do reboque deve exceder o peso
Owner’s Manual and Service Guide
ELECTRIC THREE WHEEL SERVICE VEHICLE
Read all of manual to become thoroughly familiar with this vehicle. Pay particular attention to all Notes, Cautions and Warnings
da viatura (ver especificações gerais para saber peso da
viatura). Segurar bem a viatura ao reboque.
HARDWARE
Geralmente, duas grades de hardware são usadas na
viatura. Grade 5 hardware pode ser identificada pelas 3
marcas de tem na cabeça. Hardware não marcado é
Grade 2 (Ref Fig. 12 on page 11).
Periodicamente, a viatura deve ser inspeccionada para
ver as coisas desapertadas. Estes devem ser apertados
de acordo com as especificações da tabela da Turque
(Ref Fig. 13 on page 11). Ter cuidado ao apertar, e ver o
manual de serviço e reparação técnica.
Grade 2
Grade 5
Fig. 12 Bolt Grades
ESPECIFICAÇÕES DE TURQUE
ALL TORQUE FIGURES ARE IN FT. LBS. (Nm)
Unless otherwise noted in text, tighten all hardware in accordance with this chart.
This chart specifies 'lubricated' torque figures. Fasteners that are plated or lubricated when
installed are considered 'wet' and require approximately 80% of the torque required for 'dry' fasteners.
BOLT SIZE
1/4"
5/16"
3/8"
7/16"
1/2"
9/16"
5/8"
3/4"
7/8"
1"
Grade 2
4
(5)
8
(11)
15
(20)
24
(33)
35
(47)
55
(75)
75
(102)
130
(176)
125
(169)
190
(258)
Grade 5
6
(8)
13
(18)
23
(31)
35
(47)
55
(75)
80
(108)
110
(149)
200
(271)
320
(434)
480
(651)
Fig. 13 Turque especificaçoes
Owner’s Manual and Service Guide
Page 11
ELECTRIC THREE WHEEL SERVICE VEHICLE
Read all of manual to become thoroughly familiar with this vehicle. Pay particular attention to all Notes, Cautions and Warnings
Calendário periodico de serviço
✓
Verificar? Limpar? Substituir? etc
NOTE: Algumas manutenções devem ser feitas mais nas viaturas que são usadas em condições mais exigentes.
Diariamente
CORPO
♦
Limpar componentes do corpo
REVERTER SINAIS DE AVISO
✓
Ver quando a operação do seleccionador de direcção e estiver em marcha-atrás
PNEUS
✓
Examinar para cortes, pressão excessiva (Ver especificações gerais)
RODAS
✓
Ver coisas desapertadas
BATERIAS
♦
Recarregar ao máximo depois do uso diário
CAREGADORES
✓
Inspeccionar o sistema de conexão
MENSAL - 20 HORAS (inclui itens listados na tabela anterior e ainda:)
BATERIAS
Limpar baterias com 1/4 cup (60 ml) de soda até(6 litros) de agua solucionada, enxaguar com água limpa
✓ Verificar todas as conexões e condições de carregamento
TRAVOES DE SERVIÇO
✓ Verificar empenho do travão
♦ Ajustar se necessário
CABOS
✓
Verificar se existem cabos soltos
CAREGADORES
♦
Limpar connexões
ACELARADORES
✓
Verificar se os movimentos são suaves
SELECCIONADOR DE DIRECÇAO
✓
Apertar se necessário
VOLANTE E DERRAMES
✓
verificar se está solto, ou apertado demais
TRASEIRO
✓
Ver se exige fuga de óleo, e por lubrificante
♦
QUARENTENALMENTE - 50 HORAS (inclui itens listados previamente e ainda:)
FRONTE
✓
Verificar de existem estragos ou algo solto
CARREGADOR
♦
Spray com P/N 27934-G02
✓
Verificar alinhamento
✓
✓
Ver se não está nada dobrado
Ver se há danos
ALINHAMENTRO
RODAS
TAVAO DE SERVIÇO
FORNTAL
DAS
Fig. 14 Tabela de serviço periodica
Page 12
Owner’s Manual and Service Guide
ELECTRIC THREE WHEEL SERVICE VEHICLE
Read all of manual to become thoroughly familiar with this vehicle. Pay particular attention to all Notes, Cautions and Warnings
SEMI-ANUAL - 125 HORAS (inclui itens referidos previamente e ainda:)
SELECCIONADOR DE DIRECÇÃO
✓
Ver se existe movimento suave (lubrificar se necessário)
TRAVÕES DE SERVILO
♦ Limpar e ajustar
✓ Ver se está bem
CORPO
♦
Limpar corpo e engraxar as áreas pintadas
VOLANTE E DERRAMES
♦
Lubrificar
ANUAL - 250-300 HORAS (inclui o referido previamente e ainda:)
Ajustar
Usar lubrificante
RODAS DA FRENTE
♦
♦
TRASEIRO
✓ Ver lubrificação
▲ Substituir lubrificante 5 em 5 anos
Fig. 14 Tabela de serviço periodica
Owner’s Manual and Service Guide
Page 13
ELECTRIC THREE WHEEL SERVICE VEHICLE
Read all of manual to become thoroughly familiar with this vehicle. Pay particular attention to all Notes, Cautions and Warnings
BATERIAS E CARGAS
Segurança
Observar sempre os seguintes avisos ao trabalhar com baterias:
Para prevenir queimaduras ou explosões de bateria que possam resultar
em ferimento ou morte, manter chamas e cigarros
afastados.
!
!
.
As baterias são pesadas. Use técnicas apropriadas de as levantar.
Levantar sempre a bateria com um
sistema próprio. Ter cuidado para
não deixar cair quando instalar, o
líquido nas baterias provoca danos
graves.
O líquido nas baterias é um acido que pode provocar queimaduras à pele e aos olhos. Se contactar com este produto ir o mais rápido possível ao
médico.
Usar sempre óculus protectores ao adicionar agua ou mudar baterias.
Manutenção da Bateria
Lista de ferramentas
Qty. Required
Rancha, 9/16" ..............................................................1
Guardador de Bateria ..................................................1
Hidrómetro...................................................................1
Kite de Bateria de manutenção P/N 25587-G01 .........1
A cada carregamento
Para reduzir a possibilidade de fogo, nunca carregar um carregador a
uma viatura que não está a ser vigiada. O sobre-carregamento pode causar danos às baterias da viatura
resultar em sobreaquecimento. O carregador deve
ser visto depois de 24 horas e desligado depois do
carregamento estar completo.
!
!
Antes de mudar as baterias, inspeccionar o sistema de
bateria todo para ver se há sujidade.
Carregar baterias todos os dias depois de utilização.
Sobrecarregar a bateria pode resultar em ferimentos ou danos provocados à viatura.
Enrole as chaves de fendas com fita-cola para
prevenir a possibilidade
de choque, que pode
resultar numa explosão, ferimento ou morte
Page 14
Nível de Electrolyte e água
O nível correcto de electrolyte é (13 mm) sobre as placas
de cada célula. (Ref Fig. 15 on page 15).
Este nível deixará aproximadamente (6 - 10 mm) de
espaço entre a electrolyte e o tubo de ventilação.
Owner’s Manual and Service Guide
ELECTRIC THREE WHEEL SERVICE VEHICLE
Read all of manual to become thoroughly familiar with this vehicle. Pay particular attention to all Notes, Cautions and Warnings
Vent Cap
Expansion
Space
1/4" to 3/8"
(6 to 10 mm)
Gas Vent
Vent
1/2" (13 mm)
Plates
Electrolyte level should
be at least 1/2" (13 mm)
above the plates and
1/4" to 3/8" (6 to 10 mm)
below vent
Watering gun similar to the type included in the
E-Z-GO Battery Maintenance Kit
Fig. 15 Nivel correcto de Electrolyte
Valve consistently
fills to a
predetermined
level
Electrolyte
Level
Single Battery Cell
Pure Water
Fig. 16 Pistola automática
O acessório de agua deve ser usado se os
níveis de electrolyte estiverem, a menos do
nível 13 mm)
Limpeza de Baterias
Ao limpar o exterior das baterias e terminais, não usar
mangueira de pressão sem por antes com bicarbonato
de sódio e água para neutralizar os ácidos.
O uso de uma mangueira de pressão sem neutralizar os
ácidos primeiro, removerá o ácido de cima das baterias
para outra área da viatura onde o ácido vai corroer a
estrutura de metal ou o chão da viatura. Depois de lavar
a s baterias, um resíduo aparecerá nas baterias que contribuirá para a descarga da bateria.
da, segura e apertada.
Owner’s Manual and Service Guide
Para prevenir estragos à bateria, ter a
certeza que a bateria está bem instala-
Page 15
ELECTRIC THREE WHEEL SERVICE VEHICLE
Read all of manual to become thoroughly familiar with this vehicle. Pay particular attention to all Notes, Cautions and Warnings
A técnica de limpeza correcta é limpar a parte de cima e
os lados das baterias com uma solução de bicarbonato
de sódio e água. Esta solução é a melhor aplicada em
equipamento com um produto spray não metálico. A
solução deve consistir em (60 ml) de bicarbonato de
sódio misturado com 6 litros de água (Ref Fig. 17 on
page 16). Em adição às baterias, especial atenção deve
ser prestada às componentes metálicas adjacentes à
bateria que também devem ser limpos com a solução de
bicarbonato de sódio.
Baterias devem ser posicionadas nas suas posições e
apertadas com a turque a. (5 - 6 Nm), para prevenir movimento mas não apertar muito porque pode causar distorção da bateria.
Inspeccionar cabos e terminais. Limpar qualquer corrosão das terminais da bateria ou dos cabos com uma
solução de bicarbonato de sódio e uma escova limpa se
necessário.
Para prevenir a explosão
de bateria que pode
resultar em ferimento
grave ou morte, deve ser usado cuidado extremo com
os contentores de aerossol do terminal de protecção
da bateria. Isole o contentor de metal para prevenir
que a lata de metal de contactar com terminais da bateria que pode resultar em explosão.
!
1 1/2 gallons
(6 liters)
Clear Water
1/4 Cup (60 ml)
Sodium Bicarbonate
(Baking Soda)
!
Seja cuidadoso ao conectar os cabos da bateria como
mostrado (Ref Fig. 18 on page 17). Aperte o hardware
da bateria a (6 - 8 Nm) com a turque. Proteja os terminais da bateria e os cabos da bateria com uma cobertura
de protecção disponível comercialmente.
Non Metalic
Wand
2 gallon (7.5 liter)
Garden Sprayer
Espaço Prolongado
Fig. 17 Preparing Acid Neutralizing Solution
Deixar que a solução assente pelo menos três minutos,
use uma escova suave ou pano para limpar as baterias
ou remover qualquer resíduo que possa provocar a descarga da bateria. No final passar por água com pouca
pressão. Todos os itens requeridos para a limpeza estão
incluídos no Kit de Manutenção de Bateria.
A limpeza deve ser feita uma vez por mês, ou se achar
mais vezes.
Substituição de Bateria
Remover bateria de cabos. Levantar bateria com um
sistema de elevação disponível comercialmente.
Se as baterias foram limpas e os ácidos neutralizados
como recomendado, nenhuma corrosão à bateria será
provocada. Qualquer corrosão encontrada deve ser imediatamente removida com uma faca própria e uma
escova de arame. A área deve ser lavada com uma
solução de bicarbonato de sódio e água e seco muito
Page 16
bem antes de pintar com uma tinta de resistência contra
a corrosão.
O carregador de bateria e controlador
devem ser desligados uma vez que
podem contribuir para uma descarga prematura das baterias.
Outros acessórios eléctricos podem necessitar de ser desligados.
Durante períodos de colocação, as baterias precisarão
de atenção para manter a manutenção das mesmas e
prevenir a descarga.
Em temperaturas altas a reacção química é mais rápida,
enquanto que temperaturas mais baixas causam que a
reacção seja mais lenta. A viatura que é guardada a 32°
C perderá .002 de gravidade específica cada dia. Se
uma bateria completamente carregada tiver a gravidade
específica de 1.275, e a bateria é deixada assentar
enquanto não usada, ficará parcialmente descarregada.
Quando chegar aos 1.240, que chegará em menos de
vinte dias, deve ser recarregada. Se uma bateria for
deixada descarregada, o consumo das plaquetas será
causado. Esta condição não é reversível e causará
danos permanentes à bateria. Para prevenir danos, a
bateria deve ser carregada. O hidrómetro pode ser
usado para determinar a gravidade específica e daí o
estado de carga da bateria.
Owner’s Manual and Service Guide
ELECTRIC THREE WHEEL SERVICE VEHICLE
Read all of manual to become thoroughly familiar with this vehicle. Pay particular attention to all Notes, Cautions and Warnings
OF OC
E
L
E +15 -9
C +5 -15
T
R -5 -21
O
L -15 -26
Y
T -25 -32
E
-35 -37
T
E -45 -43
M -55 -48
P
E -65 -54
R
A -75 -60
T
U -85 -65
R
-95 -71
E
1.100 1.140 1.180 1.220 1.260 1.300
1.120 1.160 1.200 1.240 1.280
SPECIFIC GRAVITY ELECTROLYTE FREEZING POINT
Front of Vehicle
RED to Fuse inside Console
+
+
-
+
+
-
BL- to WHT to BL+ to
ESC
Charger Solenoid
BLK to
Charger
Front of Vehicle with Lift Out Battery Tray
+
-
+
-
Fig. 19 Freezing Point of Electrolyte
O Carregamento das Baterias
-
+
-
+
BL-
BL+
+-
-+
Connector
Connector
Fig. 18 Battery Connections
Durante o inverno, a bateria deve ser completamente
carregada para prevenir a possibilidade de congelamento (Ref Fig. 19 on page 17). Uma bateria completamente carregada não congelará em temperaturas acima
dos (-60° C). Apesar da reacção química ser mais lenta
em temperaturas frias, a bateria deve ser completamente carregada, e desligada de qualquer circuito que
possa descarregar a bateria. Para carregadores portáteis, desligue a ficha de carga da viatura. Para carregadores abordo, desligue as conexões da bateria. As
baterias devem ser limpas e todos os depósitos neutralizados e removidos da bateria para prevenir a descarga
própria. As baterias devem ser testadas ou recarregadas
em intervalos mínimos de trinta em trinta dias.
O carregador de bateria é feito para carregar completamente a bateria. Se as baterias forem severamente
cicladas, alguns carregadores de bateria contém um
módulo electrónico que pode não activar e a bateria não
funcionará. Carregadores automáticos determinaram a
duração correcta de carga à bateria e desligam-se
quando a carga estiver completa. Sempre ver as
instruções específicas do carregador.
Antes de carregar, deve ser tomado em conta o
seguinte:
Não encher demais as baterias. O cíclo
de carga expulsará o electrolyte e
resultará em estragos às componentes.
• O nível de electrolyte em todas as células deve
•
•
estar a um nível recomendado para cobrir as placas.
A carga deve ser efectuada num local que seja
ventilado e capaz de remover hidrogénio que é
gerado pelo processo de carregamento. É recomendado o mínimo de cinco trocas de ar por
hora.
Os componentes conectores de carga estão limpos e livres de sujidade.
Owner’s Manual and Service Guide
Page 17
ELECTRIC THREE WHEEL SERVICE VEHICLE
Read all of manual to become thoroughly familiar with this vehicle. Pay particular attention to all Notes, Cautions and Warnings
• O conector de carga é completamente inserido no
•
•
receptor da viatura.
A corda de carga está protegida de estragos e
está localizado numa área para prevenir ferimento
que pode resultar em atropelamento ou queda por
tropeçar na corda.
O carregador é automáticamente desligado
quando o ciclo de carga está completo.
Page 18
AC Voltagem
O output do carregador de bateria está completamente
relacionado com uma voltagem de input. Se viaturas
múltiplas estão a receber carga incompleta no tempo
normal de carga, baixe a voltagem de AV que pode ser a
causa e a companhia de energia deve ser contactada.
Owner’s Manual and Service Guide
ELECTRIC THREE WHEEL SERVICE VEHICLE
Read all of manual to become thoroughly familiar with this vehicle. Pay particular attention to all Notes, Cautions and Warnings
Problemas em pegar (iniciar) a viatura
No geral, está dificuldade acontecerá por duas razões
distintas. A primeira, problemas de bateria e isto encontra-se fora do alcance das previsões do fabricador. Fabricadores diferentes têm requerimentos diferentes.
Consulte o fabricador da sua bateria para ter recomendações específicas.
A segunda razão é determinar o porquê da viatura estar
a causar problemas. Problemas de desempenho podem
resultar na viatura ficar mais lenta e incapaz de operar
no tempo normal pretendido.
Uma nova bateria deve maturar antes de desenvolver a
capacidade máxima. A maduração pode demorar cerca
de 100 cargas/descargas de ciclos. Depois desta fase, o
mais velho que a bateria fica, menor capacidade tem. A
única forma de determinar a capacidade da bateria se
empenhar é fazer um teste usando uma máquina de
descarga seguindo as recomendações do fabricador.
Uma forma de identificar o desempenho de uma bateria
use um hidrómetro para identificar uma bateria com
gravidade específica baixa. Uma vez a célula problemática for identificada, a bateria suspeita deve ser substítuido. Neste ponto não há nada que pode ser feito
para salvar a bateria, porém, a bateria individual deve
ser substíuida por uma bateria da mesma marca, tipo e
idade aproximada.
Hidrómetro
Um hidrómetro (P/N 50900-G1) é usado para medir o
estado de carga de uma célula da bateria (Ref Fig. 20 on
page 19).
Para prevenir a explosão
de bateria que possa
resultar em ferimentos
ou corte, nunca insira um termómetro metal na bateria. Use um hidrometro com um termómetro incorporado que seja próprio para testar baterias.
!
!
A gravidade especifica é a medição de um liquido que é
comparado à vaselina. A linha de base é agua que é
assinada ao numero de 1.000. A concentração de acido
sulfúrico a agua numa bateria de um acrte de golf é de
1.280 o que significa que a electrolyte pesa 1.280 vais
vezes o mesmo volume de agua. um bateria completamente carregada a 1.275 - 1.280 enquanto descarregada lerá uma abragência de 1.140.
Não faça um teste hidriometrico a uma bateria
que tenha sido acabado de ser enchido com
agua. A bateria deve ter sido pelo menos uma vez carregada e
Cylinder
Bulb
Float
1100
1125
Add to Float
Reading
Subtract
from Float
Reading
32
28
24
20
16
12
8
4
0
4
8
12
16
20
24
28
32
36
1150
1175
1200
1225
1250
1275
1100
1125
1300
1150
1200
1225
1250
1275
1300
32
28
24
20
16
12
8
4
0
4
8
12
16
20
24
28
32
36
Weight
Thermometer
Fig. 20 Hidrometro
descarregada para permitir que a agua se misture com o electrolyte.
A temperatura do electrolyte é importante uma vez que
a leitura do hidrometro deve ser corrigida (27° C).
Hidrometros de muito boa qualidade são equipados com
um termometro interno que medirá a temperatura do
electrolyte e incluirá a conversao para a escala de leitura. É importante reconhecer que a temperatura do
Ielectrolyte é significativamente diferente à do ambiente
se a viatura tiver sido utilizada.
Utilizar um hidrometro
1. Desenhe electrolyte no hidrometro varias vezes para
permitir que o termometro se ajuste à temperatura do
electrolyte e anote a leitura. Examine a cor do electrolyte. Uma coloração castanha ou cinzenta indica
um problema com a bateriai e é um sinal de que a
bateria está a morrer.
2. Desenhe o maximo de quantidade de electrolyte noie
hidrometro para permitir a flotuação livre sem contacto com o topo ou o baixo do cilindro.
3. Segurar no hirdrometro numa posição vertical ao
Owner’s Manual and Service Guide
Page 19
ELECTRIC THREE WHEEL SERVICE VEHICLE
Read all of manual to become thoroughly familiar with this vehicle. Pay particular attention to all Notes, Cautions and Warnings
nivel do olho e anote o que vir onde o electrolyte
estiver.
4. Adicione ou subtraia quatro pontos (.004) à leitura for
cada (6°C) a temperatura do electrolyte é superior a
(27° C). Adjuste a leitura para confirmar com a temperatura do electrolyte, ex, se a leitura indicar uma
especifica gravidade de 1.250 e a temperatura do
electrolyte for (32° C), adicione quatro pontos (.004)
aos 1.250 o que dá uma correcta leitura de 1.254. O
mesmo se a temperatura foi (21° C), subtraia quatro
pontos(.004)dos 1.250 para obter uma correcta leitura de 1.246 (Ref Fig. 21 on page 20).
Electrolyte
Temperature
˚F ˚C
160 71
150
66
140
60
130
54
120
49
110
43
100
38
90
32
80
27
70
21
60
16
50
10
40
4
30
–1
2
–7
10
–12
+.032
+.030
+.028
+.026
+.024
+.022
+.020
+.018
+.016
+.014
+.012
+.010
+.008
+.006
+.004
+.002
0
–.002
–.004
–.006
–.008
–.010
–.012
–.014
–.016
–.018
–.020
–.022
–.024
–.026
–.028
5. Teste cada cecula e anote as leituras (corrigidas para
27° C). A variaão de cinquanta pondos antre duas
leuturas (exemplo 1.250 - 1.200) indica um problema
com a leitura baixa da celula(s).
Com o envelhecer de uma bateria, a graviadade especifica do electrolyte vai descrescendo. Isto não é razão
para substituir uma bateria, uma vez se as celulas estiverem dentro dos ciquanta pontos uns dos outros.
Uma vez que o hidrometro está em resposta a uma viatura que está a exibir um problema, o veiculo deve ser
recarregado e o teste repetido. Se os resultados indicarem uma celula fraca, a bateria ou batarias devem ser
substituidas com uma boa bateria da mesma marca, tipo
e proximidade de ano.
Electrolyte Temperature
Above 80˚ F (27˚ C)
Electrolyte temperature
90˚ F (32˚ C)
Hydrometer reading 1.250
1.250 + .004 = 1.254
corrected specific gravity
EXAMPLE #1:
EXAMPLE #2:
Electrolyte Temperature
Below 80˚ F (27˚ C)
Electrolyte temperature
70˚ F (21˚ C)
Hydrometer reading 1.250
1.250 - .004 = 1.246
corrected specific gravity
Fig. 21 Termometro de correcção de Hidrometro
Page 20
Owner’s Manual and Service Guide
CARACTERÍSTICAS GERAIS
GENERAL SPECIFICATIONS
Manual do Proprietário
Page 21
CARACTERÍSTICAS GERAIS
Veiculo de tres rodas electrico
Baterias ............................................................................. Para 6 volts de ciclo(105 minutos minimo, 220 amp-hora a 20 horas discarga)
Controlador de velocidade ................................................ Estado sólido, 275 amp capacidade com sensor potenciamitro
MOTOR ............................................................................. 24 VDC, series wound 1.5 hp (1.1 kW) @ 2800 rpm & 4.3 hp (3.2 kW) @ 1200
rpm, brazed armature and solid copper windings
TRANSAXLE ..................................................................... 14.78:1 helical geared with input pinion shaft directly connected to motor shaft
Travões.............................................................................. Dual rear wheel, mechanical drum brakes
PARKING BRAKE ............................................................. Automatic
FRONT SUSPENSION ..................................................... One piece front axle
REAR SUSPENSION........................................................ Coil springs over hydraulic shock absorbers
STEERING ........................................................................ Chain & linkage
STEERING WHEEL .......................................................... Dual handgrips
SEATING ........................................................................... None
CAPACITY......................................................................... Operator
TOTAL LOAD CAPACITY.................................................. 1000 lbs. (454 kg) including operator, accessories & cargo
SPEED .............................................................................. 9 mph (15 kph)
CHASSIS........................................................................... Welded tubular steel; powder coated (Durashield™)
VEHICLE PROTECTION .................................................. None
BODY ................................................................................ Bolt-on diamond pattern body panels with Durashield™ Industrial Yellow powder
coat paint
STANDARD COLOR(S) .................................................... Industrial Yellow
LOAD BED ........................................................................ 29" (74 cm) W x 48" (122 cm) L
LOAD BED FEATURES .................................................... Removable for powertrain access
LIGHTING/HORN (Standard) ............................................ Rear brake light, horn
TIRES (Standard) .............................................................. 4.80 x 8 Industrial Load Range B
TIRE PRESSURE ............................................................. 60 psi (415 kPa)
WEIGHT (without batteries) .............................................. 490 lbs. (225 kg)
OPERATING CONTROLS & INSTRUMENTATION .......... Removable key, ‘deadman’ accelerator control, direction selector, audible reverse
warning
BATTERY CHARGER ....................................................... Total Charge® III on-board 24 V, 120 VAC, fully automatic, line compensating, 21
amp DC output at 24 volts, 6.5 amps input, 60 Hz, UL recognized, CSA certified
OPTIONS/ACCESSORIES ............................................... Audible forward motion indicator
Batteries 145 minute 250 amp-hour @ 20 hour discharge rate
Beacon light
Bolt-on 4 step ladder
Bolt-on 6 step ladder (includes counterweight)
Differential scuff guard
‘E’ hitch
Front counterweight
Galvanized steel cargo deck
Headlights and taillight
Hour meter
Lift out battery tray with batteries
Lift out battery tray with batteries, 145 minute 250 amp-hour @ 20 hour discharge
rate
Lift out battery tray without batteries
Paint color (custom)
Pintle hitch
Stainless steel cargo deck
State of Charge meter (LED)
Tires 4.80 x 8 (6 ply rated) Industrial Load Range B (Foam Filled)
Total Charge® III portable 24 V, 120 VAC, fully automatic, line compensating, 21
amp DC output at 24 volts, 6.5 amps input, 60 Hz
UL listed, CSA certified
Tubular steel side rails
UL aprovado ‘EE’ classifição
Esfecificações sujeitas a mudança sem aviso
Page 22
Manual do Proprietário
CARACTERÍSTICAS GERAIS
17.5 in.
(44 cm)
29 in.
(74 cm)
48 in. (122 cm)
98 in.
(248 cm)
78 in.
(198 cm)
48 in.
(122 cm)
22.5 in. 21.5 in.
(57 cm) (55 cm)
29.5 in.
(75 cm)
5 in. (13 cm)
48 in. (122 cm)
77.5 in. (197 cm)
84 in. (213 cm)
RECOMMENDED MAXIMUM RAMP GRADE
25% or 14˚ MAXIMUM
RECOMMENDED MAXIMUM SIDE TILT
25% or 14˚ MAXIMUM
Fig. 23 Dimenções do veiculo e especificações da incinação
Manual do Proprietário
Page 23
CARACTERÍSTICAS GERAIS
TURNING CLEARANCE
DIAMETER
10.5 ft. (3.2 m)
56 in.
(142 cm)
INTERSECTING
AISLE CLEARANCE
56 in.
(142 cm)
Fig. 24 Como a viragem do veiculo deve ser efectuado
Page 24
Manual do Proprietário
NOTA
!
Leia e compreenda estes avisos antes de tentar operar a viatura
Para prevenir ferimentos
ou morte, ter em conta:
Quando a viatura estiver
para ser deixada sozinha, deixar o pedal completamente, deixá-la em neutro, desligar a chave e
remove-la.
Conduzir viatura de acordo com as velocidades
seguras de cada área e terreno. Considerar sempre o terreno e a movimentação. Considerar factos ambientais factores que afectam o solo e o
controlo da viatura.
Evitar conduzir depressa nas descidas. Paragens
e viragens repentinas podem resultar na perda de
controlo da viatura. Utilizar o travão de serviço
para controlar a velocidade em zonas de inclinação. Ter cuidado extra e diminuir a velocidade
quando conduzir em superfícies pouco
favoráveis, sujos, molhados, pouco fixos, etc.
Todas as viagens devem ser directamente para
cima ou baixo em áreas montanhosas.
Ter cuidado extra quando estiver a conduzir em
zonas de inclinação.
Ficar em áreas designadas e evitar zonas muito
inclinadas. Utilizar sempre o travão de estacionamento quando estcionar.
Manter pés, pernas, mãos, e braços dentro da viatura a toda hora.
Evitar terreno extremamente duro.
Verificar zona de trás da viatura antes de fazer
marcha-atrás.
Certificar que o volante está bem direccionado
antes de ligar a viatura.
Abrandar antes e durante viragens. Todas as viragens devem ser efectuadas a velocidades mais
baixas.
Parar sempre a viatura antes de mudar a direcção
o seleccionador.
Ver ESPECIFICAÇÕES GERAI
NOTA
AVISO
!
Em qualquer produto, as componentes acabaram poder falhar eventualmente como resultado do uso normal, idade, uso, e abuso.
É virtualmente impossível antecipar todas as falhas componentes de carácter que podem falhar.
Saber que a viatura necessitando de arranjo indica que a
mesma já não funciona como antes e daí deve ser considerado perigoso. Ser muito cuidadoso no uso da viatura. Ao diagnosticar, remover, ou substituir
componentes que não estão em funcionamento, ter em
conta a sua segurança assim como a dos que o rodeiam.
Algumas componentes são pesadas, lotadas, corrosivas,
explosivas, ou podem produzir temperaturas altas. Acido
de bateria e hidrogénio podem ferir quem estiver a arranjar a viatura (mecânico/técnico) Ter cuidado para não
colocar mãos, cara, pés ou corpo num local que possa
ferir a pessoa caso ocorra algo mal.
!
Para prevenir ferimentos
ou morte, ter em conta:
Antes de trabalhar a viatura, remover todas as jóias (anéis, relógio,
colares, etc.)
Verificar que não tem cabelo solto ou roupa que
entre em contacto com partes da viatura.
Cuidado em tocar objectos quentes.
Levantar a viatura e suportar com macaco antes
de ajustar o powertrain.
Utilizar protecção dos olhos. Em particular quando trabalhar nas baterias, utilizando ar compresso.
O gás hidrogénio é formado quando se efectua a
troca de baterias. Não trocar baterias sem ventilação adequada.
Não permitir chamas ou pessoas que fumem no
local onde se fará a troca das baterias. A concentração de hidrogénio a 4% resulta em explosão.
AVISO
!
E-Z-GO Division of TEXTRON Inc.
P.O. Box 388 Augusta, Georgia 30903-0388 USA
Inside USA Phone: 1-800-241-5855, FAX: 1-800-448-8124
Outside USA Phone: 010-1-706-798-4311, FAX: 010-1-706-771-4609
Copyrighted Material
This manual may not be reproduced in whole or
in part without the express permission of
E-Z-GO Division of TEXTRON Inc.
Technical Communications Department