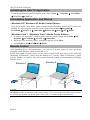
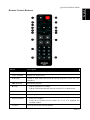
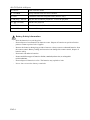
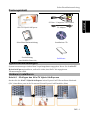
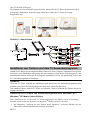
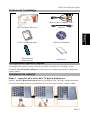
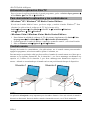
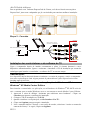
1
AVerTV Hybrid AirExpress
Quick Installation Guide
English
Deutsch
Français
Español
Italiano
Português
Nederlands
Ελληνική
European Community Compliance Statement
Class B (EMC)
This product is herewith confirmed to comply with the requirements set
out in the Council Directives on the Approximation of the laws of the
Member States relating to Electromagnetic Compatibility Directive
2004/108/EC.
DISCLAIMER
No warranty or representation, either expressed or implied, is made with respect to the
contents of this documentation, its quality, performance, merchantability, or fitness for a
particular purpose. Information presented in this documentation has been carefully
checked for reliability; however, no responsibility is assumed for inaccuracies. The
information contained in this documentation is subject to change without notice.
In no event will AVerMedia be liable for direct, indirect, special, incidental, or
consequential damages arising out of the use or inability to use this product or
documentation, even if advised of the possibility of such damages.
TRADEMARKS
AVerMedia is registered trademarks of AVerMedia TECHNOLOGIES, Inc. IBM PC is
a registered trademark of International Business Machines Corporation. Macintosh is a
registered trademark of Apple Computer, Inc. Microsoft is a registered trademark and
Windows is a trademark of Microsoft Corporation. All other products or corporate
names mentioned in this documentation are for identification and explanation purposes
only, and may be trademarks or registered trademarks of their respective owners.
COPYRIGHT
© 2008 by AVerMedia TECHNOLOGIES, Inc. All rights reserved. No part of this
publication may be reproduced, transmitted, transcribed, stored in a retrieval system, or
translated into any language in any form by any means without the written permission of
AVerMedia TECHNOLOGIES, Inc.
THE MARK OF CROSSED-OUT WHEELED BIN INDICATES THAT
THIS PRODUCT MUST NOT BE DISPOSED OF WITH YOUR OTHER
HOUSEHOLD WASTE. INSTEAD, YOU NEED TO DISPOSE OF THE
WASTE EQUIPMENT BY HANDING IT OVER TO A DESIGNATED
COLLECTION POINT FOR THE RECYCLING OF WASTE ELECTRICAL AND
ELECTRONIC EQUIPMENT. FOR MORE INFORMATION ABOUT WHERE TO
DROP OFF YOUR WASTE EQUIPMENT FOR RECYCLING, PLEASE
CONTACT YOUR HOUSEHOLD WASTE DISPOSAL SERVICE OR THE SHOP
WHERE YOU PURCHASED THE PRODUCT.
Please pull out
the cable horizontally
from the device.
Please don't bend
the cable, or the connector
may be broken.
Be careful!
The connector may be
broken upon collision.
IMPORTANT SAFETY INSTRUCTIONS
•
Read Instructions - All the safety and operating instructions should be read when
connecting and operating your TV Tuner to help ensure your own personal safety and to
protect your product from potential damage.
•
Retain Instructions - The safety and operating instructions should be retained for future
reference.
•
Heed Warnings - All warnings on the product and the operating instructions should be
adhered to.
•
Grounding - For continued protection against risk of electric shock and fire, this accessory
should be installed only to the products (such as, computer) equipped with a three-wire
grounding plug, a plug having a third (grounding) pin. This plug will only fit into a
grounding-type power outlet. This is a safety feature. If you are unable to insert the plug
into the outlet, contact your electrician to replace the obsolete outlet. Do not defeat the
safety purpose of the grounding-type plug.
•
Lightning - For added protection for this product during a lightning storm, or when it is left
unattended and unused for long periods of time, unplug the host system (Ex. computer)
from the wall power outlet, and disconnect the antenna or cable system. This will prevent
damage to the product due to lightning and power-line surges.
•
Never insert anything metallic into the TV Tuner openings. Doing so may create the
danger of electric shock.
•
Openings in the TV Tuner cabinet are provided for ventilation. To prevent overheating,
these openings should not be blocked or covered. Avoid using the TV Tuner on a bed,
sofa, rug, or other soft surface, as doing so may block the ventilation openings in the
cabinet. If you place the TV Tuner in a bookcase or an enclosed space, be sure to provide
adequate ventilation and air flow.
•
Power Lines - An outside antenna system should not be located in the vicinity of
overhead power lines or other light or power circuits, or where it can fall into such power
lines or circuits.
•
Antenna Installation - When installing an outside antenna system, extreme care should
be taken to keep it from touching such power lines or circuits, as contact with them may be
fatal.
•
Outdoor Antenna Grounding - If an outside antenna is connected to the product, be sure
that the antenna system is grounded so as to provide some protection against voltage
surges and built up static charges. Article 810.21 of the National Electric Code,
ANSI/NFPA No.70, provides information with regard to proper grounding of the mast and
supporting structure, grounding of the lead-in wire to the antenna discharge unit, size of
grounding conductors, location of antenna-discharge unit, connection of grounding
electrodes, and requirements for the grounding electrode.
•
NOTE to CATV System Installer-This reminder is provided to call the CATV systems
installer's attention to Section 820.93 of the National Electric Code, ANSI/NFPA 70:2005
(for US/Canada) and/or EN60728-11:2005 standard (for Europe), which provide guidelines
for proper grounding and, in particular, specify that the Coaxial cable shield shall be
connected to the grounding system of the building, as close to the point of cable entry as
practical.
Quick Installation Guide
S-Video/ Composite and audio input Cable
AVerTV Hybrid AirExpress
RF Cable
Deutsch
English
Package Contents
ess
xpr
irE
id A de
ybr
Gui
V H allation
erT
AV Quick Inst
ish
sch
Deut
s
çai
Fran
ñol
Espa
no
s
Italia
uguê
ds
Port
rlan
Français
Engl
Nede
Installation CD
Remote control
(Batteries included)
Stabilizer
System requirements are described in detail on the package box. Before installing AVerTV
Hybrid AirExpress, verify that your PC meets the described requirements.
Hardware Installation
Step 1 : Inserting AVerTV Hybrid AirExpress
Insert the AVerTV Hybrid AirExpress into the ExpressCard™ slot on your laptop. (The 34 mm
Ελληνική
Nederlands
cards fit into both 34 mm and 54 mm ExpressCard™ slots.)
Português
System Requirements
Italiano
Español
Quick Installation Guide
ENG-1
AVerTV Hybrid AirExpress
For the laptop with 54 mm ExpressCard slot, you may insert the device with the accompanying
stabilizer to firm up the installation.
Step 2 : Making the Connections
Hi-Gain TV
Antenna
Mini Antenna / FM Radio Antenna
RF Cable
TV Antenna(75Ω)
Installing Drivers and the TV Software Utility
After the card is installed properly, turn on the computer. The system will automatically detect
the new device. Simply skip the wizard, and insert the accompanying installation CD to install
the driver and TV software utility simultaneously.
NOTE:
If the device cannot be detected during the installation and running program, please keep the device
inserted and restart the laptop. Some laptops can only detect the ExpressCard when it is inserted before
booting.
Installing Drivers and the Application in Windows XP / Windows XP
Media Center Edition
To install the driver and application, Windows XP MCE users need to exit and switch to
Windows mode if they are in Media Center Edition mode.
1. The “Found New Hardware Wizard” dialog box will appear. Just click Cancel to skip the
Wizard installation procedures.
2. Place the installation CD into the CD-ROM drive.
3. When the installation main screen appears, choose Install AVerTV.
ENG-2
Deutsch
Français
Installing Drivers and the Application in Windows Vista™/ Windows
Vista™ Media Center Edition
English
Quick Installation Guide
4. Click Next to continue the installation process.
5. Read the license agreement and if you agree to the terms, select “I accept the terms of the
license agreement” and then click Next.
6. Choose Complete to install all the necessary softwares, including AVerTV 6, Acrobat
Reader, DirectX 9.0c and Driver. Then click Next. For advanced users, it is recommended
to choose Custom to select the software you want. To choose a different destination folder,
click Browse.
7. In the “InstallShield Wizard” dialog box, if you are instructed to restart your computer, select
Yes.
8. Then click Finish to complete the installation.
9. For Windows XP MCE users, if you want to use the Media Center as the TV application,
start Media Center and follow the on-screen instruction to complete the configuration.
* We recommend to exit the Media Center mode before activating the AVerTV 6.
1. If DirectX 9.0c or above is not installed in your system, usually the installation CD will
automatically install it during the process of installation. Make sure your system has DirectX 9.0c
or above installed so that the TV software utility can function properly.
2. If your system is not equipped with Acrobat Reader, the installation wizard will automatically be
called up during the process of installation.
3. AVerTV Hybrid AirExpress can watch both Digital and Analog TV on MCE platform.
4. MCE “Video Gaming Plug In” support is for Vista MCE only. After installing the driver, you can
access it through the program library in Online Media. This function enables you to watch
composite/S-Video signal source in Vista MCE.
ENG-3
Italiano
Português
Nederlands
NOTE:
Ελληνική
to Windows mode if they are in Media Center Edition mode.
1. The “Found New Hardware Wizard” dialog box will appear. Just click Cancel to skip
the Wizard installation procedures.
2. Place the installation CD into the CD-ROM drive.
3. When the “AutoPlay” dialog box appears, select Run Autorun.exe.
4. When the installation main screen appears, choose Install AVerTV.
5. If the “User Account Control” dialog box appears, select Allow to continue the process.
6. Click Next to continue the installation process.
7. Read the license agreement and if you agree to the terms, select “I accept the terms of
the license agreement” and then click Next.
8. Choose Complete to install all the necessary softwares, including AVerTV 6, Acrobat
Reader, DirectX 9.0c and Driver. Then click Next. For advanced users, it is
recommended that you choose Custom to select the software you want. To choose a
different destination folder, click Browse.
9. Then click Finish to complete the installation.
Español
To install the driver and application, Windows Vista™ MCE users need to exit and switch
AVerTV Hybrid AirExpress
Activating the AVerTV Application
To run the application from the Programs menu, choose Start Æ Programs Æ AVerMedia
Æ AVerTV 6 Æ AVerTV 6.
Uninstalling Application and Drivers
--Windows XP / Windows XP Media Center Edition-If you are in Media Center Mode, please exit and switch to Windows mode first. To remove the
installed TV software utility from the system, simply choose Start Æ Programs Æ
AVerMedia Æ AVerTV 6 Æ Uninstaller Æ Remove All Æ Next Æ OK Æ Finish.
--Windows Vista™ / Windows Vista™ Media Center Edition-1. To remove the installed TV software utility from the system, simply choose Start Æ All
Programs Æ AVerMedia Æ AVerTV 6Æ Uninstaller.
2. When the “User Account Control” dialog box appears, select Allow.
3. Select Remove All Æ NextÆ OK Æ Finish.
Remote Control
After installing drivers and applications, you can use a remote control to turn on/off the
programs, select channels, adjust volume and so on.
For the best signal reception, please use the remote control in the area shown in the following
illustration. In Situation 1, please keep the distance in 1.5 meters. While in Situation 2, please
keep the distance in 5 meters. Also, the position of remote control is recommended to be higher
than the device.
Situation 1
Situation 2
90O
1.5m
5m
75O
90O
NOTE:
AVerQuick launcher is important for the remote control. If it is not activated, the remote control feature
is automatically disabled. For details, please refer to the User Manual on the installation CD.
ENG-4
Quick Installation Guide
Italiano
Español
Français
Deutsch
English
Remote Control Buttons
Display TV in full screen.
3. ● (Record)
Switch to PVR mode and record the current program or video into your
hard drive.
4.
(Rewind)
5. ■ (Stop)
Rewind the playback.
- End the Playback or recording.
- End the TimeShift mode and return to real-time TV or Radio mode.
6. DISPLAY
Display information.
7. VOL+/-
Volume up/down.
8. Numeric Buttons
- Select a TV channel.
- Under the 16-Channel preview mode, use 2 4 6 8 to highlight the
intended channel.
9. CH RTN
Go to the previously selected channel.
ENG-5
Nederlands
Switch between available signal sources.
2. FULL SCREEN
Português
Description
1. SOURCE
Ελληνική
Button
AVerTV Hybrid AirExpress
10. MUTE
Turn on/off the sound.
11. CH ▲/▼
Go up or down to the next active channel.
12. EPG
Launch the Electronic Program Guide. (DVB-T only)
13. ► (Play) / PAUSE
Play the last recorded or played file. / Freeze the playback.
14.
Advance the playback.
(Forward)
15. AUDIO
Switch between available audio modes.
16. POWER
Turn on/off the application
Battery Safety Information:
-
-
Store the batteries in a cool dry place.
Do not dispose of used batteries in domestic waste. Dispose of batteries at special collection
points or return to point of sale if applies.
Remove the batteries during long periods of non-use. Always remove exhausted batteries from
the remote control. Battery leakage and corrosion can damage this remote control, dispose of
batteries safely.
Do not mix old and new batteries.
Do not mix different types of batteries: alkaline, standard (carbon-zinc) or rechargeable
(nickel-cadmium).
Do not dispose of batteries in a fire. The batteries may explode or leak.
Never short circuit the battery terminals.
ENG-6
Schnellinstallationsanleitung
English
Packungsinhalt
AVerTV Hybrid AirExpress
Deutsch
S-Video / Composite 2-in-1 Kabel
TV-Adapter
ess
xpr
irE
id A de
ybr
Gui
V H allation
erT
AV Quick Inst
ish
sch
Deut
s
çai
Fran
ñol
Espa
no
s
Italia
uguê
ds
Port
rlan
Français
Engl
Nede
Installations-CD
Fernbedienung
(einschließlich Batterien)
Stabilisator
Systemvoraussetzungen sind auf dem Verpackungskarton angegeben. Bevor Sie die AVerTV
Hybrid AirExpress installieren, stellen Sie sicher, dass Ihr PC die angegebenen
Voraussetzungen erfüllt.
Hardware installieren
Schritt 1 : Einfügen des AVerTV Hybrid AirExpress
Stecken Sie die AVerTV Hybrid AirExpress in den ExpressCard™ Slot an Ihrem Notebook.
Ελληνική
Nederlands
(Die 34 mm Karte passt in die 34 mm und 54 mm ExpressCard Einschübe (Slots)
Português
Systemvoraussetzungen
Italiano
Español
Schnellinstallationsanleitung
DEU-1
AVerTV Hybrid AirExpress
Für Laptops mit einem 54mm ExpressCard Slot, können Sie die TV Karte zusammen mit dem
beiliegenden Stabilisator in Ihrem Laptop einstecken, sodass die TV Karte im Laptop
festgehalten wird.
Schritt 2 : Anschlüsse
Hi-Gai n TV
Antenna
/
Installieren von Treibern und dem TV-Anwenderprogramm
Sobald Sie die Karte korrekt eingebaut haben, können Sie ihren Computer einschalten. Das System
wird beim ersten Hochfahren automatisch das neu installierte Gerät finden. Überspringen Sie den
Installationsassistenten und legen die beiliegende Installations-CD ein, um gleichzeitig Treiber und
TV-Anwenderprogramm zu installieren.
HINWEIS:
Wenn die TV Karte während des Installierens und Aktivierens des Anwendersprogramms nicht
gefunden wird, lassen Sie bitte die Karte im Laptop und starten Sie ihn erneut.
Auf manchen Laptops wird die TV Karte nur gefunden, wenn sie während des Startens bereits im
Laptop einsteckt ist.
Installieren von Treibern und Anwenderprogramm unter Windows ® XP /
Windows ® XP Media Center Edition
Zum installieren der Treiber und TV-Anwendung muss die Media Center Anwendung
beendet werden und der Rechner im Windows ® Modus gestartet werden.
1. Die Dialogbox “Assistent für das Suchen neuer Hardware” erscheint. Klicken Sie auf
Abbrechen, um den Installationsassistenten zu beenden.
DEU-2
Installieren von Treibern und Anwenderprogramm unter Windows
Vista ® / Windows Vista ® Media Center Edition
Um die Treiber und die Applikation zu installieren müssen Anwender von Windows Vista® MCE
Deutsch
Français
Español
Geben Sie die Installations-CD in das CD-ROM-Laufwerk ein.
Wenn das Installationsfenster erscheint, wählen Sie Installieren AVerTV.
Klicken Sie auf Weiter um mit dem Installationsprozess fortzufahren.
Lesen Sie bitte die Lizenzbestimmungen und wenn Sie diesen zustimmen, wählen Sie „Ich
akzeptieren die Lizenzbestimmungen“ und klicken dann auf Weiter.
6. Wählen Sie Vollständig um alle benötigten Softwarekomponenten zu installieren, inclusive
AVerTV 6, Acrobat Reader, DirectX 9.0c und Treiber. Dann klicken Sie auf Weiter.
Erfahrenen Anwendern wird empfohlen, Individuell anzuklicken und so die gewünschte
Software auszuwählen. Um ein anderes Installationsverzeichnis zu wählen, klicken Sie auf
Durchsuchen.
7. Wenn Sie in der Dialogbox “Installationsassistent” angewiesen werden, den Computer neu
zu starten, klicken Sie auf Ja.
8. Klicken Sie dann auf Beenden, um mit der Installation fortzufahren.
9. Für Windows XP MCE Nutzer, wenn Sie die Media Center Anwendung als
TV-Anwendung nutzen wollen, starten Sie die Media Center Anwendung und folgen Sie
den Anweisungen.
* Wir empfehlen Ihnen, den Media Center zu schließen, ehe Sie AVerTV 6 aktivieren.
English
Schnellinstallationsanleitung
2.
3.
4.
5.
HINWEIS:
1. Falls DirectX 9.0c oder eine neuere Version nicht in Ihrem System installiert ist, wird dieses
Programm in der Regel während des Installationsvorgangs automatisch von der Installations-CD
aus installiert. Stellen Sie sicher, dass in Ihrem System DirectX 9.0c oder eine neuere Version
installiert ist, so dass die TV-Software-Utility korrekt funktionieren kann.
DEU-3
Português
Nederlands
Ελληνική
1. Die Dialogbox “Assistent für das Suchen neuer Hardware” erscheint. Klicken Sie auf
Abbrechen, um den Installationsassistenten zu beenden.
2. Geben Sie die Installations-CD in das CD-ROM-Laufwerk ein.
3. Wenn die “AutoPlay” Anwendung erscheint, wählen Sie Run Autorun.exe.
4. Wenn das Installationsfenster erscheint, wählen Sie Installieren AVerTV.
5. Wenn das “Nutzer Zugangskontrolle” Fenster erscheint, wählen Sie „Zulassen“ um fort zu
fahren.
6. Klicken Sie auf Weiter um mit dem Installationsprozess fortzufahren.
7. Lesen Sie bitte die Lizenzbestimmungen und wenn Sie diesen zustimmen, wählen Sie „Ich
akzeptieren die Lizenzbestimmungen“ und klicken dann auf Weiter.
8. Wählen Sie Vollständig um alle benötigten Softwarekomponenten zu installieren, inclusive
AVerTV 6, Acrobat Reader, DirectX 9.0c und Treiber. Dann klicken Sie auf Weiter.
Erfahrenen Anwendern wird empfohlen, Individuell anzuklicken und so die gewünschte
Software auszuwählen. Um ein anderes Installationsverzeichnis zu wählen, klicken Sie auf
Durchsuchen.
9. Klicken Sie dann auf Beenden, um mit der Installation fortzufahren.
Italiano
auf den Windows ® Modus wechseln.
AVerTV Hybrid AirExpress
2. Wenn kein Acrobat Reader installiert ist, werden Sie während der Installation gefragt, ob diese
automatisch installieren wollen.
3. Mit der AVerTV Hybrid AirExpress können Sie sowohl analoges als auch digitales Fernsehen
über MCE schauen.
4. MCE “Video Gaming Plug In” wird nur bei Vista MCE unterstützt. Nach der Treiberinstallation
können Sie auf dieses über die Programmbibliothek in Online Media zugreifen. Diese Funktion
ermöglicht es Ihnen, Signale über Composite/S-Video in Vista MCE anzusehen.
Aufrufen des AVerTV-Anwenderprogramms
Um die TV-Applikation aus dem Programm Menü heraus zu starten, klicken Sie auf Start Æ
Programme Æ AVerMedia Æ AVerTV 6 Æ AVerTV 6.
Deinstallation von Anwendung und Treibern
--Windows XP / Windows XP Media Center Edition-Wenn Sie im Media Center Modus sind, beenden Sie diesen und wechseln in den Windows
Modus. Um das installierte Programm von Ihrem System zu entfernen, wählen Sie Start Æ
Programme Æ AVerMedia Æ AVerTV 6 Æ Uninstaller Æ Alles entfernen Æ Weiter Æ
OK Æ Beenden.
--Windows Vista™ / Windows Vista™ Media Center Edition-1. Um die TV-Software von Ihrem System zu deinstallieren, wählen Sie Start Æ Programme
Æ AVerMedia Æ AVerTV 6 Æ Uninstaller.
2. Wenn das “Nutzer Zugangskontrolle” Fenster erscheint, wählen Sie „Zulassen“.
3. Wählen Sie Alles entfernen Æ Weiter Æ OK Æ Beenden.
Fernbedienung
Nach Installation der Treiber und Anwendungen können Sie die Fernbedienung verwenden, um
Programme ein- und auszuschalten, Sender auszuwählen, die Lautstärke zu regeln usw.
Um das bestmögliche Signal ihrer Fernbedienung zu erhalten, benutzen Sie die Fernbedienung
wie gezeigt. In dieser ersten Situation halten Sie bitte die Distanz von 1.5 Meter ein. In der
zweiten Situation halten Sie bitte die Distanz von 5 Meter ein. Zusätzlich empfehlen wir Ihnen,
die Fernbedienung ein bisschen höher als die TV Karte zu halten.
Situation 1
Situation 2
90O
1.5m
5m
75O
90O
DEU-4
Der AVerQuick Launcher ist wichtig für die Nutzung der Fernbedienung. Wenn dieser nicht aktiviert
ist, sind die Funktionen für und von der Fernbedienung nicht ausführbar. Detailierte Informationen
hierzu finden Sie im Handbuch auf der Installations-CD.
English
Schnellinstallationsanleitung
HINWEIS:
4.
(Zurückspulen)
5. ■ (Stop)
6. DISPLAY
7. VOL+/-
Beschreibung
Umschalten zwischen verschiedenen Signalquellen.
Zeigen Sie TV- oder Video-Vollbildschirm an.
Wechseln Sie zum PVR-Modus und nehmen Sie das aktuelle Programm
oder Video auf Ihre Festplatte auf.
Spulen Sie die Wiedergabe zurück.
- Beenden Sie die Wiedergabe oder Aufnahme.
- Beenden Sie den TimeShift-Modus und kehren Sie zum Echtzeit-TVoder Radio-Modus zurück
Zeigt die Informationen an.
Lauter/leiser.
DEU-5
Nederlands
1. SOURCE
2. FULL SCREEN
3. ● (Aufnahme)
Ελληνική
Taste
Português
Italiano
Español
Français
Deutsch
Fernbedienungstasten
AVerTV Hybrid AirExpress
8. Zifferntasten
9. CH RTN
10. MUTE
11. CH ▲/▼
12. EPG
13. ► (Wiedergabe /
PAUSE)
- Wählen Sie einen TV-Sender.
- Während Sie sich im 16-Sender-Vorschaumodus befinden, verwenden
Sie 2 4 6 8, um den gewünschten Sender auszuwählen.
Gehen Sie zum zuvor ausgewählten Sender zurück.
Schalten Sie den Ton ein/aus.
Gehen Sie zum nächsten aktiven Sender herauf oder herunter.
Starten Sie den elektronischen Programmführer. (nur für DVB-T)
Geben Sie die zuletzt aufgenommene oder wiedergegebene Datei wieder. /
Halten Sie die Wiedergabe an.
14.
(Vor)
15. AUDIO
16. POWER
Spulen Sie die Wiedergabe vor.
Wechseln Sie zwischen den verfügbaren Sprachen.
Anwendung ein-/ausschalten
DER SICHERE UMGANG MIT BATTERIEN:
-
-
-
-
DEU-6
Achtung! Im Lieferumfang befinden sich Batterien. Batterien gehören nicht in den
Hausmüll. Sie werden vom Hersteller, Händler oder deren Beauftragten kostenlos
zurückgenommen, um sie einer Verwertung bzw. Entsorgung zuzuführen.
Wenn Sie Fragen zur Entsorgung haben, wenden Sie sich bitte an Ihre Verkaufsstelle
oder an unseren Service.
Batterien können brennbare Stoffe enthalten. Bei unsachgemäßer Behandlung
können Batterien auslaufen, sich stark erhitzen, entzünden oder gar explodieren, was
Schäden für Ihr Gerät und ihre Gesundheit zur Folge haben könnte.
Bitte befolgen Sie unbedingt folgende Hinweise:
Vermeiden Sie Hitze und werfen Sie die Batterien nicht ins Feuer.
Zerlegen oder verformen Sie die Batterien nicht. Ihre Hände oder Finger könnten
verletzt werden oder Batterieflüssigkeit könnte in Ihre Augen oder auf Ihre Haut
gelangen. Sollte dies passieren, spülen Sie die entsprechenden Stellen mit einer
großen Menge klaren Wassers und informieren Sie umgehend Ihren Arzt.
Vermeiden Sie starke Stöße und Erschütterungen.
Entfernen Sie die Batterie aus der Fernbedienung, wenn dieses über einen längeren
Zeitraum nicht benutzt wird.
Guide d’installation rapide
English
Contenu de l’emballage
AVerTV Hybrid AirExpress
Deutsch
Câble S-Vidéo/ Composite 2-en-1
Câble RF
ess
xpr
irE
id A de
ybr
Gui
V H allation
erT
AV Quick Inst
ish
sch
Deut
s
çai
Fran
ñol
Espa
no
s
Italia
uguê
ds
Port
rlan
Français
Engl
Nede
Cédérom d’installation
Télécommande
(Piles incluses)
stabilisateur
Installation du matériel
Etape 1 : Insertion de la carte AVerTV Hybrid AirExpress
Insérez l’ AVerTV Hybrid AirExpress dans le port ExpressCard™ de votre ordinateur portable.
Ελληνική
(Les cartes au format 34mm sont compatibles avec les slots ExpressCard™ 34mm et 54mm)
Português
La configuration système requise est décrite en détails sur la boîte de l’emballage. Avant
d’installer AVerTV Hybrid AirExpress, vérifiez que votre ordinateur possède la configuration
requise donnée.
Nederlands
Configuration système requise
Italiano
Español
Guide d’installation rapide
FRA-1
AVerTV Hybrid AirExpress
Pour les ordinateurs portables équipés d'un port 54mm, nous vous conseillons d'insérer la carte
34 accompagnée de son stabilisateur, afin de sécuriser l'installation.
Etape 2 : Les connexions
Hi-Gai n TV
Antenna
/
Installation des pilotes et du logiciel utilitaire TV
Une fois la carte correctement installée, mettez l’ordinateur sous tension. Le système détectera
automatiquement le nouveau périphérique. Passez simplement l’assistant, et insérez le CD
d’installation fourni pour installer simultanément le pilote et l’utilitaire de logiciel TV.
REMARQUE:
Si la carte ne peut être détectée pendant l'installation et le lancement du programme, merci de laisser la
carte dans l'appareil et de redémarrer votre ordinateur portable. Pour information, certains ordinateurs
détectent uniquement la présence d'une expresscard lorsqu'elle est insérée avant le démarrage du PC.
Installation des pilotes et Application sous Windows ® XP / Windows ® XP
Media Center Edition
Pour installer le pilote and l’application, les utilisateurs de Windows® XP MCE doivent
quitter l’application et passer sous Windows s’ils sont en mode Media Center Edition.
1. La boîte de dialogue “Assistant du nouveau matériel trouvé” apparaît. Cliquez simplement
sur Annuler pour passer les procédures d’installation de l’assistant.
2. Placez le cédérom d’installation dans le lecteur de CD-ROM.
3. Lorsque l’écran d’installation apparaît, choisissez Installer AVerTV.
4. Cliquez sur Suivant pour poursuivre le processus d’installation.
FRA-2
REMARQUE:
1. Si DirectX 9.0c ou supérieur n’est pas installé sur votre système, le cédérom l’installera
automatiquement pendant le processus d’installation. Assurez-vous que votre système possède
DirectX 9.0c ou supérieur installé pour que le logiciel utilitaire de télévision puisse fonctionner
correctement.
2. Si votre système n’est pas équipé d’Acrobat Reader, le wizard d’installation sera automatiquement
activé au cours de la procédure d’installation.
3. AVerTV Hybrid AirExpress permet de regarder à la fois la TV analogique et la TNT sur
plateforme MCE.
FRA-3
Deutsch
Français
Español
Italiano
Português
1. La boîte de dialogue “Assistant du nouveau matériel trouvé” apparaît. Cliquez simplement
sur Annuler pour passer les procédures d’installation de l’assistant.
2. Placez le cédérom d’installation dans le lecteur de CD-ROM.
3. Lorsque la boîte de dialogue “AutoPlay” apparaît, sélectionnez Run Autorun.exe.
4. Lorsque l’écran d’installation apparaît, choisissez Installer AVerTV.
5. Si la boîte de dialogue “Paramètres du Compte Utilisateur” apparaît, choissisez “Autoriser”
pour continuer la procedure.
6. Cliquez sur Suivant pour poursuivre le processus d’installation.
7. Lisez l’accord de licence et si vous êtes d’accord avec ses termes, sélectionnez « J’accepte
les termes de l’accord de licence » et cliquez ensuite sur Suivant.
8. Choisissez Complète pour installer tous les composants nécessaires, AVerTV 6, Acrobat
Reader, DirectX9.0c et les Drivers. Cliquez ensuite sur Suivant. Pour les utilisateurs
expérimentés, il est recommandé de choisir « Personnalisé » pour sélectionner les
composants désirés. Pour choisir un répertoire de destination différent, cliquez sur
Parcourir.
9. Puis cliquez sur Terminer pour achever l’installation.
Nederlands
Pour installer le pilote and l’application, les utilisateurs de Windows Vista® MCE doivent
quitter l’application et passer sous Windows s’ils sont en mode Media Center Edition.
Ελληνική
Installation des pilotes et Application sous Windows Vista ® / Windows
Vista ® Media Center Edition
English
Guide d’installation rapide
5. Lisez l’accord de licence et si vous êtes d’accord avec ses termes, sélectionnez « J’accepte
les termes de l’accord de licence » et cliquez ensuite sur Suivant.
6. Choisissez Complète pour installer tous les composants nécessaires, AVerTV 6, Acrobat
Reader, DirectX9.0c et les Drivers. Cliquez ensuite sur Suivant. Pour les utilisateurs
expérimentés, il est recommandé de choisir « Personnalisé » pour sélectionner les
composants désirés. Pour choisir un répertoire de destination différent, cliquez sur
Parcourir.
7. Dans la boîte de dialogue “Assistant InstallShield ”, si vous êtes invité à redémarrer votre
ordinateur, sélectionner Oui.
8. Puis cliquez sur Terminer pour achever l’installation.
9. Pour les utilisateurs de Windows XP MCE, si vous souhaitez utiliser Media Center comme
application TV, démarrez Media Center et suivez les instructions à l’écran pour terminer la
configuration.
* Nous recommandons de quitter le mode Media Center avant d’activer l’AVerTV 6.
AVerTV Hybrid AirExpress
4. La compatibilité MCE “Video Gaming Plug In” concerne Vista MCE uniquement. Après avoir
installé le pilote, vous pouvez y accéder au travers de la bibliothèque des programmes sur Media
Online. Cette fonction vous permet de regarder une source conposite/S-Vidéo sous Vista MCE.
Activation de l’Application AVerTV
Pour lancer l’application depuis le menu Programmes, cliquez sur Démarrez Æ
Programmes Æ AVerMedia Æ AVerTV 6 Æ AVerTV 6.
Désinstallation de l’application et des pilotes
--Windows ® XP / Windows ® XP Media Center Edition-Si vous êtes en mode Media Center, veuillez d’abord quitter et passer sous Windows.
Pour désinstaller le logiciel TV de votre système, choisissez simplement Démarrer
Æ Programmes ÆAVerMedia Æ AVerTV 6 Æ Désinstaller Æ Supprimer ToutÆ
SuivantÆ OK Æ Terminer.
--Windows Vista ® / Windows Vista ® Media Center Edition-1. Pour désinstaller l’application TV installée de votre système, choisissez
simplement Démarrer Æ Tous les programmes Æ AVerMedia Æ AVerTV 6Æ
Désinstaller..
2. Lorsque la fenêtre “Paramètres du Compte Utilisateur” apparaît, choisissez
Autoriser.
3. Choisissez simplement Supprimer ToutÆ SuivantÆ OK Æ Terminer.
Télécommande
Après avoir installé les pilotes et les applications, vous pouvez utiliser la télécommande pour
activer/désactiver les programmes, sélectionner les chaînes, ajuster le volume, etc.
Pour faciliter la réception du signal de la télécommande, nous vous recommandons d'utiliser la
télécommande comme dans le dessin d'illustration. Dans la situation 1, merci de garder une
distance d'environ 1,5 mètre. Dans la situation 2, merci de garder une distance d'environ 5 mètres.
Nous vous recommandons également d'utiliser la télécommande au dessus de la carte.
Situation 1
Situation 2
90O
1.5m
5m
75O
90O
FRA-4
L’îcone de lancement rapide AVerQuick est importante pour l’utilisation de la télécommande. Si elle
n’est pas active, la télécommande est automatiquement désactivée. Pour plus de détails, reportez-vous
au Manuel d’Utilisations sur le CD d’installation.
English
Guide d’installation rapide
REMARQUE:
4.
(Retour)
5. ■ (Arrêt)
6. DISPLAY
7. VOL+/-
Description
Permet de basculer d’une source à une autre.
Affiche la TV en plein écran
Basculer en mode enregistreur PVR et enregistrer le programme en
cours sur votre disque dur.
Revenir en arrière dans l’enregistrement
- Mettre fin à la relecteur ou à l’enregistrement
- Mettre fin au mode TimeShift et retourner en mode TV temps reel
ou radio.
Afficher des informations
Augmenter/diminuer le volume
FRA-5
Nederlands
1. SOURCE
2. FULL SCREEN
3. ● (Enregistrer)
Ελληνική
Boutons
Português
Italiano
Español
Français
Deutsch
Boutons de la télécommande
AVerTV Hybrid AirExpress
8. Numeric Buttons
9.
10.
11.
12.
13.
14.
15.
16.
CH RTN
MUTE
CH ▲/▼
EPG
► (Lecture) / PAUSE
(Avance)
AUDIO
POWER
- Sélectionner une chaîne de TV
- Avec le mode prévisualisation de 16 Chaîne, utilisez 2 4 6 8 pour
préselectionner la chaîne de votre choix.
Se Rendre sur la la chaîne sélectionnée auparavant
Augmenter/Baisser le son
Passer d’une chaîne à l’autre
Lancer le guide électronique des programmes (TNT uniquement)
Jouer le dernier fichier enregistrée/faire une pause dans la lecture
Avancer dans l’enregistrement.
Passer d’un mode audio à un autre
Ouvrir/Fermer l’application
Informations sur la sécurité des piles:
- Stockez les piles dans un endroit frais et sec.
- Ne jetez pas les piles avec les ordures ménagères. Mettez les piles au rebut dans les points de
récupération des piles ou, éventuellement, ramenez-les chez le détaillant.
- En cas de non utilisation prolongée, sortez les piles. Sortez toujours les piles épuisées de la
télécommande. Les fuites des piles et la corrosion risqueraient d'endommager la télécommande,
mettez les piles au rebut en toute sécurité.
- Ne pas mélanger piles usagées et neuves.
- Ne pas mélanger des piles de types différents : alcaline, standard (carbone-zinc) ou
rechargeables (nickel-cadmium).
- Ne pas jeter les piles au feu. Les piles risquent d'exploser ou de fuir.
- Ne jamais court-circuiter les terminaux des piles.
FRA-6
Guía de instalación rápida
English
Contenido del paquete
AVerTV Hybrid AirExpress
Deutsch
Cable S-Vídeo/ Compuesto 2 en 1
Cable RF
ess
xpr
irE
id A de
ybr
Gui
V H allation
erT
AV Quick Inst
ish
sch
Deut
s
çai
Fran
ñol
Espa
no
s
Italia
uguê
ds
Port
rlan
Français
Engl
Nede
CD de instalación
Control remoto
(pilas incluidas)
estabilizador
Los requisitos del sistema están descritos con detalle en el paquete de embalaje. Antes de instalar
AVerTV Hybrid AirExpress, verifique si su PC cumple los requisitos descritos.
Instalación del Hardware
Paso 1 : Inserción de la tarjeta AVerTV Hybrid AirExpress
Inserte la tarjeta AVerTV Hybrid AirExpress en la ranura ExpressCard™ del equipo portátil.
Português
Requisitos del sistema
Italiano
Español
Guía de instalación rápida
Nederlands
(Las tarjetas de 34mm pueden ser conectadas en ranuras ExpressCardTM de 34 y 54 mm
Ελληνική
respectivamente)
ESN-1
AVerTV Hybrid AirExpress
Si tiene un portátil con slot ExpressCard de 54 mm. debe insertar nuestra tarjeta con el
estabilizador que la acompaña para hacer más firme su sujección.
Paso 2 : Cómo hacer la conexión
Hi-Gai n TV
Antenna
/
Instalando los drivers y el programa de utilidades de TV
Después de la correcta instalación de la tarjeta, encienda su PC. El sistema detectará
automáticamente el nuevo dispositivo. Simplemente cancele el asistente e inserte el CD de
instalación para instalar el controlador y el programa de utilidades de TV al mismo tiempo.
NOTA:
Si el dispositivo no es detectado durante la instalación y ejecución del programa, reinicie el
ordenador sin extraer la tarjeta. Algunos portátiles sólo pueden detectar la ExpressCard si se
inserta antes de encenderlos.
®
®
Instalando los drivers y la aplicación en Windows XP / Windows XP
Media Center Edition
®
Para instalar los controladores y la aplicación, los usuarios de Windows XP MCE
deben salir del modo Media Center Edition y cambiar al modo Windows.
1. Aparecerá el “Asistente de Nuevo Hardware encontrado”. Simplemente presione Cancelar
para omitir el asistente de instalación.
2. Inserte el CD de instalación en la unidad de CD-ROM.
3. Cuando la pantalla principal de instalación aparezca, elija Instalar AVerTV.
4. Pulse en Siguiente para continuar con el proceso de instalación.
ESN-2
1. Aparecerá el “Asistente de Nuevo Hardware encontrado”. Simplemente presione Cancelar
para omitir el asistente de instalación.
2. Inserte el CD de instalación en la unidad de CD-ROM.
3. Cuando aparezca el cuadro de diálogo de “reproducción automática” (“Autoplay”),
seleccione ejecutar Autorun.exe.
4. Cuando la pantalla principal de instalación aparezca, elija Instalar AVerTV.
5. Si el cuadro de diálogo “control de cuentas de usuario” aparece, seleccione Permitir para
continuar el proceso.
6. Pulse en Siguiente para continuar con el proceso de instalación.
7. Lea los términos de licencia y si está de acuerdo seleccione: “Acepto los términos de
licencia” y pulse en Siguiente.
8. Elija “completa” para instalar todo el software necesario, incluido AVerTV 6, Acrobat
Reader, DirectX 9.0c y los controladores. Después pulse en siguiente, para usuarios
avanzados, es recomendable seleccionar Personalizada para elegir los programas que desea.
Para elegir un directorio diferente de instalación, elija Explorar.
9. Luego, haga clic en Finalizar para completar la instalación.
Deutsch
Français
®
Para instalar los controladores y la aplicación, los usuarios de Windows Vista MCE
deben salir del modo Media Center Edition y cambiar al modo Windows.
Español
Vista Media Center Edition
Italiano
®
Português
®
Instalando los drivers y la aplicación en Windows Vista / Windows
English
Guía de instalación rápida
5. Lea los términos de licencia y si está de acuerdo seleccione: “Acepto los términos de
licencia” y pulse en Siguiente.
6. Elija “completa” para instalar todo el software necesario, incluido AVerTV 6, Acrobat
Reader, DirectX 9.0c y los controladores. Después, pulse en siguiente, para usuarios
avanzados, es recomendable seleccionar Personalizada, para elegir los programas que desea.
Para elegir un directorio diferente de instalación elija Explorar.
7. Si fuera necesario reiniciar el PC, seleccione Sí en el cuadro de diálogo “Asistente
InstallShield”.
8. Luego, haga clic en Finalizar para completar la instalación.
9. Si es usuario de Windows XP MCE, si desea utilizar la aplicación Media Center como
programa para ver la TV, inicie la aplicación Media Center y siga los pasos para completar
la configuración.
* Le recomendamos salir del modo Media Center antes de activar AVerTV 6.
ESN-3
Ελληνική
1. Si DirectX 9.0c o superior no está instalado en su sistema, el CD de instalación lo instalará
automáticamente durante el proceso de instalación. Asegúrese de que el sistema tiene DirectX 9.0c
o superior para que el software de TV pueda funcionar de manera apropiada.
2. Si su sistema no tiene instalado Acrobat Reader, el proceso de instalación le abrirá el diálogo de
instalación automáticamente.
3. AVerTV Hybrid AirExpress puede sintonizar a la vez TV Analógica y Digital en MCE.
4. MCE “Video Gaming Plug In” es soportado únicamente para Vista MCE. Después de instalar el
controlador, puede acceder a través del program library en Online Media. Esta función habilita
la entrada de video compuesto/S-video en Vista MCE.
Nederlands
NOTA:
AVerTV Hybrid AirExpress
Activando la aplicación AVerTV
Para ejecutar la aplicación desde el menú programas, pulse en InicioÆprogramas Æ
AVerMedia Æ AVerTV 6 Æ AVerTV 6.
Para desinstalar la aplicación y los controladores
®
®
--Windows XP / Windows XP Media Center Edition-®
Si está en el modo Media Center, por favor salga y cambie al modo Windows . Para
eliminar la aplicación de software de TV del sistema elija,
InicioÆProgramasÆAVerMediaÆAVerTV 6 ÆUnistallerÆEliminar
todoÆSiguiente Æ OK ÆFinalizar.
®
®
--Windows Vista / Windows Vista Media Center Edition-1. Para eliminar la utilidad de software de TV del sistema, simplemente elija InicioÆTodos
los programasÆAVerMediaÆAVerTV 6Æ Unistaller (Desinstalador).
2. Cuando aparezca el cuadro de diálogo “control de cuentas de usuario”, seleccione Permitir.
3. Pulse en Eliminar todoÆSiguiente Æ OK ÆFinalizar.
Control remoto
Después de instalar los controladores y las aplicaciones, use el control remoto para encender /
apagar los programas, seleccionar canales, ajustar el volumen, etc.
Para una mejor recepción de señal, por favor utilice el mando de control remoto en el área que se
muestra en la siguiente ilustración. En la situación 1, por favor mantenga una distancia no
superior a 1,5 metros En la situación 2, por favor mantenga una distancia no superior a 5
metros Además se recomienda que el mando esté en una posición más alta que el dispositivo.
Situación 1
Situación 2
90O
1.5m
5m
75O
90O
NOTA:
La aplicación AVerQuick es muy importante para el mando a distancia. Si no está activado, el mando a
distancia no funcionará. Para más detalles consulte el manual de usuario, en el CD de instalación.
ESN-4
Guía de instalación rápida
6. DISPLAY
7. VOL+/-
- Terminar la reproducción o la grabación.
- Finalizar el modo Time Shift y volver al modo TV o radio en tiempo
real.
Muestra la información.
Subir/bajar el volumen.
ESN-5
Nederlands
4.
(Retroceder)
5. ■(Parar)
Descripción
Cambia entre las fuentes de señal disponibles.
Mostrar TV o vídeo en pantalla completa.
Alterna al modo PVR y graba el programa o el vídeo actual en el disco
duro.
Retrocede la reproducción.
Ελληνική
Botón
1. SOURCE
2. FULL SCREEN
3. ● (Grabar)
Português
Italiano
Español
Français
Deutsch
English
Botones del control remoto
AVerTV Hybrid AirExpress
8. Numeric Buttons
9. CH RTN
10. MUTE
11. CH ▲/▼
12. EPG
13. ► (Reproducir)
PAUSE
14.
(Avanzar)
15. AUDIO
16. POWER
- Seleccionar un canal de TV.
- Bajo el modo de vista previa de 16 canales, use 2 4 6 8 para resaltar el
canal deseado.
Ir al canal seleccionado anteriormente.
Anula/Activa el sonido.
Avanza o retrocede un canal.
Va al canal activo anterior o siguiente.
/ -Reproduce el último archivo grabado o reproducido. / Congela la
reproducción.
Avanzar la reproducción.
Cambia entre los modos de sonido disponibles.
Activa/Desactiva la aplicación
Información acerca de la seguridad de las pilas:
-
Almacene las pilas en un lugar fresco y seco.
-
No tire las pilas usadas junto a los desperdicios domésticos. Tire las pilas en lugares especiales
acondicionados para ello o devuélvalas al lugar donde las compró, si procede.
-
Quite las pilas en periodos largos en los que no utilice el mando a distancia. Quite siempre las
pilas gastadas del mando a distancia. Si las pilas gotean, la corrosión podría dañar el mando a
distancia, guárdelas en lugar seguro.
-
No mezcle pilas viejas y nuevas.
-
No mezcle diferentes tipos de pilas: alcalinas, estándar (carbono-zinc) o recargables
(níquel-cadmio).
-
No tire las pilas al fuego. Las pilas podrías explotar o derramar líquidos.
-
Nunca haga cortocircuitos en los terminales de las pilas.
ESN-6
Guida di installazione rapida
English
Contenuto della confezione
AVerTV Hybrid AirExpress
Deutsch
Cavo 2 in 1 S-Video/ Composito
Cavo RF
ess
xpr
irE
id A de
ybr
Gui
V H allation
erT
AV Quick Inst
ish
sch
Deut
s
çai
Fran
ñol
Espa
no
s
Italia
uguê
ds
Port
rlan
Français
Engl
Nede
CD di installazione
Español
Guida di installazione rapida
Requisiti di sistema
I requisiti di sistema sono descritti dettagliatamente nella scatola della confezione. Prima di
installare AVerTV Hybrid AirExpress, verificare che il computer soddisfi i requisiti necessari.
Installazione dell’Hardware
Fase 1 : Inserimento AVerTV Hybrid AirExpress
Inserire il AVerTV Hybrid AirExpress nella fessura ExpressCard™ del proprio portatile. (Le
Ελληνική
Nederlands
schede da 34 si adattano all’alloggio ExpressCard™ da 34 mm e da 54 mm.)
Italiano
stabilizzatore
Português
Telecomando
(Batterie incluse)
ITA-1
AVerTV Hybrid AirExpress
Per il noteboook dotato di slot ExpressCard da 54 mm, è possibile inserire il dispositivo con lo
stabilizzatore in dotazione per stabilizzare l’installazione.
Fase 2 : Creazione di una connessione
Hi-Gai n TV
Antenna
/
Installazione dei driver e delle utility TV
Dopo che la scheda è installata in modo corretto, accendete il computer. Il sistema
automaticamente riscontra il nuovo dispositivo. È sufficiente ignorare la procedura guidata, e
inserire il CD di installazione allegato per installare simultaneamente il driver e le utility TV.
NOTA:
Se il dispositivo non può essere rilevato durante l’installazione e l’esecuzione del programma, lasciarlo
inserito e riavviare il notebook. Alcuni notebook rilevano ExpressCard solo se inserito prima
dell’avvio.
®
Installazione dei driver e dell’applicazione in Windows XP / Windows
®
XP Media Center Edition
®
Per installare il driver e l’applicazione, gli utenti Windows XP MCE devono uscire e
passare alla modalità Windows dalla modalità Media Center Edition.
1. Appare la finestra di dialogo “Installazione guidata nuovo hardware”. Basta fare clic su
Annulla per ignorare le procedure di installazione guidate.
2. Inserire il CD di installazione nell’unità CD-ROM.
3. Quando lo schermo principale dell'installazione compare, scelga installano AVerTV.
4. Fare clic su Avanti per continuare con la procedura d'installazione.
ITA-2
1. Appare la finestra di dialogo “Installazione guidata nuovo hardware”. Basta fare clic su
Annulla per ignorare le procedure di installazione guidate.
2. Inserire il CD di installazione nell’unità CD-ROM.
3. Quando appare la finestra di dialogo “AutoPlay” (Esecuzione automatica), selezionare
Run Autorun.exe (Esegui Autorun.exe).
4. Quando lo schermo principale dell'installazione compare, scelga installano AVerTV.
5. Se appare la finestra di dialogo “User Account Control” (Controllo account utente),
selezionare Allow (Consenti) per continuare la procedura.
6. Fare clic su Avanti per continuare con la procedura d'installazione.
7. Leggere il contratto di licenza, selezionare “Accetto i termini dell'accordo di licenza” e poi fare clic
su Avanti.
8. Scelga completo installare tutti i softwares necessari, compreso AVerTV 6, Acrobat Reader,
DirectX 9.0c and Drivers. Poi scatta Avanti. Per utenti avanzati, si raccomanda di scegliere
Personalizza per selezionare il software desiderato. Per scegliere un’altra cartella di
destinazione, fare clic su Sfoglia.
9. Fare clic su Fine per completare l’installazione.
Deutsch
Français
®
Per installare il driver e l’applicazione, gli utenti Windows Vista MCE devono uscire e
passare alla modalità Windows dalla modalità Media Center Edition.
Español
Vista Media Center Edition
Italiano
®
Português
®
Installazione dei driver e dell’applicazione in Windows Vista / Windows
English
Guida di installazione rapida
5. Leggere il contratto di licenza, selezionare “Accetto i termini dell'accordo di licenza” e poi fare
clic su Avanti.
6. Scelga completo installare tutti i softwares necessari, compreso AVerTV 6, Acrobat
Reader, DirectX 9.0c and Drivers. Poi scatta Avanti. Per utenti avanzati, si raccomanda di
scegliere Personalizza per selezionare il software desiderato. Per scegliere un’altra cartella
di destinazione, fare clic su Sfoglia.
7. Se nella finestra di dialogo “Installazione guidata InstallShield” viene chiesto di riavviare il
computer, scegliere Sì.
8. Fare clic su Fine per completare l’installazione.
9. Utenti Windows XP MCE: per usare Media Center (Centro multimediale) come
applicazione TV, avviare Media Center (Centro multimediale) e seguire le istruzioni su
schermo per completare la configurazione.
* Si raccomanda di uscire dalla modalità Media Center prima di attivare AVerTV 6.
ITA-3
Ελληνική
1. Generalmente DirectX 9.0c o le versioni successive vengono installati automaticamente durante il
processo di installazione se non vengono trovati sul computer. Per il corretto funzionamento
dell’utilità software TV, accertarsi che sul sistema sia installato DirectX 9.0c o versione
successiva.
2. Se il vostro sistema non ci sia Acrobat Reader, il wizard dell'installazione sarà chiamato
automaticamente in su durante il processo di installazione.
3. La AVerTV Hybrid AirExpress consente di guardare sia programmi televisivi in digitale che
analogico su piattaforma MCE.
4. Il supporto di MCE “Video Gaming Plug In” è solo per Vista MCE. Dopo avere installato il driver,
è possibile accedervi dalla libreria dei programmi in Online Media (Media in linea). Questa
funzione consente di guardare programmi con sorgente composita/S-Video in Vista MCE.
Nederlands
NOTA:
AVerTV Hybrid AirExpress
Come lanciare l’applicazione AVerTV
Per eseguire l’applicazione dal menu Programmi, fare clic su Start Æ Programs (Programmi)
Æ AVerMedia, AVerTV 6 Æ AVerTV 6.
Rimozione dell’applicazione e dei driver
®
®
--Windows XP / Windows XP Media Center Edition-Se si è in modalità Media Center (Centro multimediale), uscire e passare a Windows.
Per rimuovere dal sistema l’utilità software TV installata, scegliere Start Æ
Programs (Programmi) Æ AVerMedia Æ AVerTV 6 Æ Uninstaller (Rimozione)
Æ Remove All (Rimuovi tutto) Æ Next (Avanti) Æ OK Æ Finish (Fine).
®
®
--Windows Vista / Windows Vista Media Center Edition-1. Per rimuovere dal sistema l’utilità software TV installata, scegliere Start Æ All
Programs (Tutti i programmi) Æ AVerMedia Æ AVerTV 6Æ Uninstaller
(Rimozione).
2. Quando appare la finestra di dialogo “User Account Control” (Controllo account
utente), selezionare Allow (Consenti).
3. scegliere Remove All (Rimuovi tutto) Æ Next (Avanti) Æ OK Æ Finish (Fine).
Telecomando
Dopo aver installato i driver e le applicazioni, è possibile utilizzare il telecomando per attivare o
disattivare i programmi, selezionare i canali, regolare il volume e così via.
Per una migliore ricezione del segnale, usare il telecomando nell’area mostrata dall’immagine.
Nella Situazione 1, mantenere una distanza di 1,5 m. Nella situazione 2, mantenere una distanza
di 5 metri. Si raccomanda di tenere il telecomando più in alto rispetto al dispositivo.
Situazione 1
Situazione 2
90O
1.5m
5m
75O
90O
NOTA:
AVerQuick è importante per il telecomando. Se non è attivato, la funzione del telecomando è
disabilitata automaticamente. Fare riferimento al Manuale d’uso del CD per i dettagli.
ITA-4
Guida di installazione rapida
Descrizione
4.
Eseguire la commutazione tra le sorgenti di segnale disponibili.
Visualizza i programmi televisivi o il video a schermo intero.
Attiva la modalità PVR per registrare il programma o il video corrente
nell’unità disco rigido.
Riavvolge la riproduzione.
6. DISPLAY
7. VOL+/-
- Termina la riproduzione o la registrazione.
- Disattiva la modalità Differita e torna alla modalità Radio o TV in
tempo reale.
Visualizza le informazioni.
Volume up/down. (Volume su/giù.)
(Riavvogimento
rapido)
5. ■ (Interrompi)
ITA-5
Nederlands
1. SOURCE
2. FULL SCREEN
3. ● (Registra)
Ελληνική
Pulsante
Português
Italiano
Español
Français
Deutsch
English
Pulsanti del telecomando
AVerTV Hybrid AirExpress
8. Pulsanti numerici
9. CH RTN
10. MUTE
11. CH ▲/▼
12. EPG
13. ► (Riproduci) /
PAUSE
14.
(Avanzamento
rapido)
15. AUDIO
16. POWER
- Seleziona un canale TV.
- In modalità di anteprima a 16 canali, utilizzare 2 4 6 8 per evidenziare
il canale desiderato.
Va al canale precedentemente selezionato.
Spegne/accende il suono.
Passa al canale attivo successivo verso l’alto o verso il basso.
Avvia la Guida ai programmi elettronica. (solo DVB-T)
Riproduce l’ultimo file riprodotto o registrato. / Sospende la
riproduzione.
Va avanti ad intervalli
Cambia tra le modalità audio disponibili.
Attivazione/Disattivazione dell’applicazione
Informazioni sulla sicurezza della batteria:
-
Conservare le batterie in un luogo fresco asciutto.
-
Non gettare le batterie usate tra i rifiuti domestici. Gettare le batterie nei punti di raccolta
predisposta o riportarle, se possibile, al luogo di vendita.
-
Rimuovere le batterie in caso di inutilizzo prolungato. Ricordarsi di rimuovere le batterie
scariche dal telecomando. Fuoriuscite o corrosione delle batterie potrebbero danneggiare
il telecomando, procedere correttamente allo smaltimento.
-
Non utilizzare congiuntamente batterie nuove e usate.
-
Non utilizzare congiuntamente batterie di tipo diverso: alcaline, standard (zinco-carbonio)
o ricaricabili (nickel-cadmio).
-
Non gettare le batterie nel fuoco. Le batterie potrebbero esplodere o causare fuoriuscite.
-
Non mettere in corto circuito i terminali della batteria.
ITA-6
Guia de instalação rápida
English
Conteúdo do Pacote
AVerTV Hybrid AirExpress
Deutsch
Cabo tudo-em-um
Cabo RF
ess
xpr
irE
id A de
ybr
Gui
V H allation
erT
AV Quick Inst
ish
sch
Deut
s
çai
Fran
ñol
Espa
no
s
Italia
uguê
ds
Port
rlan
Français
Engl
Nede
Cd de instalação
Controle remoto
(Pilhas incluídas)
Adaptador
Os requisitos do sistema estão descritos em detalhes na embalagem. Antes de instalar o AVerTV
Hybrid AirExpress, verifique se seu computador atende aos requisitos indicados.
Instalação de hardware
Etapa 1 : Introduzir o AVerTV Hybrid AirExpress
Insira o AVerTV Hybrid AirExpress na ranhura da placa ExpressCard™ do seu portátil. (A
placa de 34 mm serve tanto nas ranhuras ExpressCard™ de 34 mm, como nas ranhuras
Ελληνική
Nederlands
ExpressCard™ de 54 mm)
Português
Requisitos do sistema
Italiano
Español
Guia de instalação rápida
PTG-1
AVerTV Hybrid AirExpress
Para os portáteis com ranhuras ExpressCard de 54 mm, você deverá inserir a nossa placa
ExpressCard junto com o adaptador que já vem incluído para encaixar melhor a instalação..
Etapa 2 : Conexão
Exemplo:
Cab o 2-em- 1 pa ra
S-V Íde o / Compo sto
Hi-Gai n TV
Antenna
Cab o S-V íde o
(nã o forne cido)
Mini-an ten a/Anten a Rádi o FM
Ca bo RF
Anten a de TV(75Ω)
SAÍDA
OU
VCR
Cab o de Víde o
(nã o forne cido)
Câmara de vídeo
portátil
Cab o de Audi o
(nã o forne cido)
Cab o de Audi o
(nã o forne cido)
Video Game
Instalação dos controladores e do software de TV
Ligue o computador depois de instalar corretamente a placa. O sistema detectará o novo
dispositivo automaticamente. Ignore o assistente e introduza o CD de instalação que consta da
embalagem para instalar o controlador e o software de TV ao mesmo tempo.
OBSERVAÇÃO:
Se o dispositivo não for detectado durante a instalação e execução do programa , reinicie o computador
sem retirar a placa Express Card. Alguns portáteis só podem detectar a placa ExpressCard se forem
inseridas antes de iniciá-los.
®
Instalação dos controladores e da aplicação do Windows XP /
®
Windows XP Media Center Edition
®
Para instalar o controlador e a aplicação, os utilizadores do Windows XP MCE terão de
sair e comutar para o modo Windows caso se encontrem no modo Media Center Edition.
1. Aparecerá a caixa de diálogo “Assistente para adicionar novo hardware”. Clique em
Cancelar para ignorar o assistente de instalação.
2. Coloque o CD de instalação no CD-ROM.
3. Quando visualizar o ecrã principal, escolha Instalar AVerTV.
4. Clique em Seguinte para prosseguir a instalação.
5. Leia o contrato relativo à licença e, caso esteja de acordo, seleccione “Aceito os termos do
contrato de licença”. A seguir, clique em Seguinte.
PTG-2
Deutsch
English
Guia de instalação rápida
6. Escolha Concluir para instalar todo o software necessário, incluindo AVerTV 6, Acrobat
Reader, DirectX 9.0c e os controladores. A seguir, clique em Seguinte. Aos utilizadores
avançados, recomendamos a opção Personalizada para selecção do software a instalar. Para
escolher uma pasta de destino diferente, clique em Pesquisar.
7. Na caixa de diálogo “InstallShield Wizard Complete” (Assistente do InstallShield concluído), se
for solicitado a reiniciar seu computador, selecione Sim.
8. Em seguida clique em Concluir para finalizar a instalação.
9. Para os utilizadores do Windows XP MCE: caso pretenda utilizar o Media Center como
aplicação de TV, inicie o Media Center e siga as instruções no ecrã de forma a completar a
configuração.
* Recomendamos-lhe que saia do modo Media Center antes de activar o AVerTV 6.
®
OBSERVAÇÃO:
1. Se o DirectX 9.0c ou superior não estiver instalado em seu sistema, normalmente o CD de
instalação o fará automaticamente durante processo de instalação. Certifique-se de que seu sistema
tenha o DirectX 9.0c ou superior instalado para que o software utilitário de TV possa funcionar
corretamente.
2. Caso o seu sistema não esteja equipado com Acrobat Reader, o assistente de instalação será
activado automaticamente durante o processo de instalação.
3. A placa AVerTV Hybrid AirExpress possibilita ver TV Digital e TV Analógica na plataforma do
MCE.
4. O suporte MCE “Video Gaming Plug In” é só para o Vista MCE. Uma vez instalado o controlador,
pode aceder-lhe através da program library (biblioteca de programas), em Online Media
(Meios em linha). Esta função permite ver uma fonte de sinal composto/S-Vídeo no Vista MCE.
PTG-3
Español
Italiano
1. Aparecerá a caixa de diálogo “Assistente para adicionar novo hardware”. Clique em Cancelar
para ignorar o assistente de instalação.
2. Coloque o CD de instalação no CD-ROM.
3. Quando surgir a caixa de diálogo “AutoPlay” seleccione Run Autorun.exe.
4. Quando visualizar o ecrã principal, escolha Instalar AVerTV.
5. Caso surja a caixa de diálogo “User Account Control” (“Controlar Conta de Utilizador”),
seleccione Allow (Permitir) para continuar o processo.
6. Clique em Seguinte para prosseguir a instalação.
7. Leia o contrato relativo à licença e, caso esteja de acordo, seleccione “Aceito os termos do
contrato de licença”. A seguir, clique em Seguinte.
8. Escolha Concluir para instalar todo o software necessário, incluindo AVerTV 6, Acrobat
Reader, DirectX 9.0c e os controladores. A seguir, clique em Seguinte. Aos utilizadores
avançados, recomendamos a opção Personalizada para selecção do software a instalar. Para
escolher uma pasta de destino diferente, clique em Pesquisar.
9. Em seguida clique em Concluir para finalizar a instalação.
Português
®
Para instalar o controlador e a aplicação, os utilizadores do Windows Vista MCE terão
®
de sair e comutar para o modo Windows caso se encontrem no modo Media Center
Edition.
Nederlands
Windows Vista Media Center Edition
Ελληνική
®
Français
Instalação dos controladores e da aplicação do Windows Vista /
AVerTV Hybrid AirExpress
Activação da aplicação AVerTV
Para executar a aplicação a partir do menu Programas, clique em Início Æ
Programas Æ AVerMedia Æ AVerTV 6 Æ AVerTV 6.
Desinstalação do aplicativo e dos drivers
®
®
--Windows XP / Windows XP Media Center Edition-®
Se estiver no Modo Media Center deverá sair e comutar primeiro para o modo Windows . Para
remover do sistema o software utilitário de TV instalado, basta escolher Início Æ Programas
ÆAVerMedia Æ AVerTV 6Æ Desinstalador Æ Remover Tudo Æ SeguinteÆ OK Æ
Terminar.
®
®
--Windows Vista / Windows Vista Media Center Edition-1. Para remover do sistema a utilidade do software de TV basta escolher InícioÆ Todos os
ProgramasÆ AVerMedia Æ AVerTV 6Æ Desinstalar.
2. Quando surgir a caixa de diálogo “User Account Control” (“Controlar Conta de
Utilizador”), seleccione Permitir (Allow).
3. Basta escolher Remover Tudo Æ SeguinteÆ OK Æ Terminar.
Controle remoto
Após a instalação dos drivers e aplicativos, você pode usar o controle remoto para abrir e fechar
os programas, selecionar canais, ajustar o volume e assim por diante.
Para uma melhor recepção de sinal, por favor utilize o controle remoto na área em que se mostra
a seguinte ilustração. Na situação 1, por favor mantenha uma distância não superior a 1,5
metros. Na situação 2, por favor mantenha uma distancia não superior a 5 metros. Também
recomendamos que o controle remoto esteja em uma posição mais alta que o dispositivo.
Situação1
Situação2
90O
1.5m
5m
75O
90O
OBSERVAÇÃO:
A barra de lançamento AVerQuick é importante para o funcionamento do telecomando, pois caso não
esteja activada, a função de telecomando será automaticamente desabilitada. Para mais informações
consulte o Manual do Utilizador no CD de instalação.
PTG-4
Guia de instalação rápida
4.
(Retroceder)
5. ■ (Parar)
6. DISPLAY
7. VOL+/-
8. Botões numéricos
9. CH RTN
Descrição
Mudar entre fontes de sinais disponíveis.
Exibe informações.
Alterna para o modo PVR e grava o programa ou vídeo atual em seu
disco rígido.
Retrocede a reprodução.
-
Para a reprodução ou a gravação.
- Para o modo TimeShift e retorna ao modo TV ou rádio em tempo real.
Exibe informações.
Subir volume / Descer volume.
-
Selecionar um canal de TV.
- No modo de visualização de 16 canais, use as teclas 2 4 6 8 para
realçar o canal desejado.
Ir ao canal selecionado anteriormente.
PTG-5
Nederlands
1. SOURCE
2. FULL SCREEN
3. ● (Gravar)
Ελληνική
Botão
Português
Italiano
Español
Français
Deutsch
English
Botões do controle remoto
AVerTV Hybrid AirExpress
10. MUTE
11. CH ▲/▼
12. EPG
13. ► (Reproduzir) /
PAUSE
14.
(Avançar)
15. AUDIO
16. POWER
Desligar/ligar o som.
Sobe ou desce para o próximo canal ativo.
Inicia o Guia Eletrônico de Programação. (Só DVB-T )
Reproduz o último arquivo reproduzido ou gravado. / Congela a
reprodução.
Avança a reprodução.
Alternar entre os línguas disponíveis.
Ligar/desligar a aplicação.
Informação de segurança relativa às pilhas:
-
Guarde as pilhas num local fresco e seco.
-
Não deposite as pilhas gastas juntamente com o lixo doméstico. Deposite as pilhas nos pontos
de recolha próprios para o efeito ou entregue-as nos pontos de venda, se for o caso.
-
Retire as pilhas quando se prevejam períodos longos de não utilização. Retire sempre as pilhas
gastas do comando a distância. O derramamento a corrosão das pilhas poderão danificar o
comando a distância.
-
Não misture pilhas novas com pilhas já gastas.
-
Não misture tipos de pilhas diferentes: alcalinas, standard (carvão-zinco) ou recarregáveis
(níquel-cádmio).
-
Não lance as pilhas nas chamas, pois poderão ocorrer explosões ou derramamentos.
-
Nunca provoque curto-circuitos nos terminais da pilha.
PTG-6
Snelle installatiehandleiding
English
Inhoud van de verpakking
AVerTV Hybrid AirExpress
Deutsch
S-Video/ Composite 2-in-1 kabel
RF Kabel
ess
xpr
irE
id A de
ybr
Gui
V H allation
erT
AV Quick Inst
ish
sch
Deut
s
çai
Fran
ñol
Espa
no
s
Italia
uguê
ds
Port
rlan
Français
Engl
Nede
Installation CD
Afstandsbediening
(inclusief batterijen)
stabilisator
De systeemvereisten zijn gedetailleerd beschreven op de doos. Voordat u AVerTV Hybrid
AirExpress installeert, controleert u of uw PC voldoet aan de beschreven vereisten.
Hardware installatie
Stap 1: Plaatsen van de AVerTV Hybrid AirExpress
Steek de AVerTV Hybrid Express in de ExpressCard™-gleuf van de schootcomputer. (De 34
Português
Systeemvereisten
Italiano
Español
Snelle installatiehandleiding
Ελληνική
Nederlands
mm-kaarten passen in een ExpressCard™-gleuf van 34 of 54 mm.)
NLD-1
AVerTV Hybrid AirExpress
Voor laptop met 54 mm express card slot ,u kunt de product installeren met behulp van
Begeleidende stabilisator.
Stap 2 : Verbinding maken
Hi-Gai n TV
Anten na
/
Stuurprogramma’s en televisiesoftware installeren
Nadat de kaart gemonteerd is, zet u de computer weer aan. Het systeem zal een nieuw apparaat
detecteren. Sla de wizard over en leg de meegeleverde installatie-cd in de computer om tegelijk
het stuurprogramma en de televisiesoftware te installeren.
OPMERKING:
Als de product niet kunnen detecteren tijdens installatie en starten van programma ,laat de product in
staan en restart de laptop. Sommige laptop kan alleen detecteren
®
Stuurprogramma’s en toepassing installeren onder Windows XP /
®
Windows XP Media Center Edition
®
Om de driver en software te installeren, Windows XP MCE gebruikers moeten naar
Windows modus heen gaan en overschakelen indien zij in Mediacenter modus zijn.
1. Het dialoogvenster “Wizard Nieuw hardware gevonden” verschijnt. Klik op Cancel
(Annuleren) om de installatieprocedures van de wizard over te slaan.
2. Plaats de installatie-CD in het CD-ROM station.
3. Wanneer de installatie hoofd scherm verschijnt,kies Install AVerTV.
4. Klik op Volgende om verder te gaan met installatie proces.
5. Lees de licentieovereenkomst en indien u akkoord selecteer "ik accepter de voorwaarden
van de licentieovereenkomst " en klik dan op Volgende
NLD-2
Deutsch
English
Snelle installatiehandleiding
6. Kies volledig installatie van alle noodzakelijke softwares inclusief AVerTV 6, Acrobat
Reader, DirectX 9.0c en Drivers. Dan klik op volgende. Het word aangeraden Custom te
selecteren en dan de software selecteren en installeren. Om een andere folder te kiezen , klik
op Browse.
7. In het dialoogvenster “InstallShield Wizard” selecteert u Ja wanneer u de instructie ziet uw
computer opnieuw op te starten
8. Klik vervolgens op Voltooien om de installatie te voltooien.
9. Voor Windows® XP MCE gebruikers indien u het Mediacenter als de TV toepassing wilt
gebruiken, start Mediacenter en volg de instructie op het scherm om de configuratie te
volgen.
* We adviseren u Media Centre af te sluiten voordat u AVerTV 6 start.
®
OPMERKING:
1. Wanneer DirectX 9.0c of hoger niet geïnstalleerd is op uw systeem, installeert de installatie-CD dit
automatisch tijdens het installeren. Zorg dat op uw systeem DirectX 9.0c of hoger is geïnstalleerd
zodat de TV software utility correct kan functioneren.
2. Indien uw systeem niet over Acrobat Reader beschikt , zal de installatie wizard automatisch tijdens
het proces van installatie opgeroepen worden.
3. AVerTV Hybrid AirExpress kan zowel digitale als analoge TV bekijken op een MCE-platform.
4. MCE “Video Gaming Plug In” ondersteunt alleen Vista MCE. Nadat het stuurprogramma is
geïnstalleerd, kunt u het programma openen via de programmabibliotheek in Online Media. Met
deze functie kunt u een composiet/S-videosignaalbron bekijken in Vista MCE.
NLD-3
Español
Italiano
Português
1. Het dialoogvenster “Wizard Nieuw hardware gevonden” verschijnt. Klik op Cancel
(Annuleren) om de installatieprocedures van de wizard over te slaan.
2. Plaats de installatie-CD in het CD-ROM station.
3. Waneer de “AutoPlay” verschijnt, select Run Autorun.exe.
4. Wanneer de installatie hoofd scherm verschijnt,kies Install AVerTV
5. Als de “User Account Control” verschijnt, select volgende om verder te gaan
6. Klik op Volgende om verder te gaan met installatie proces.
7. Lees de licentieovereenkomst en indien u akkoord selecteer "ik accepter de voorwaarden van
de licentieovereenkomst " en klik dan op Volgende
8. Kies volledig installatie van alle noodzakelijke softwares inclusief AVerTV 6, Acrobat
Reader, DirectX 9.0c en Drivers. Dan klik op volgende. Het word aangeraden Custom te
selecteren en dan de software selecteren en installeren. Om een andere folder te kiezen, klik
op Browse.
9. Klik vervolgens op Voltooien om de installatie te voltooien.
Nederlands
Windows Vista Media Center Edition
Om de driver en software te installeren, Windows Vista® MCE gebruikers moeten naar
Windows modus heen gaan en overschakelen indien zij in Mediacenter modus zijn.
Ελληνική
®
Français
Stuurprogramma’s en toepassing installeren onder Windows Vista /
AVerTV Hybrid AirExpress
Activeren AVeTV Applicatie
Om de toepassing te starten via Programma's menu, klik Start Æ Programma's Æ
AVerMedia Æ AVerTV 6 Æ AVerTV 6.
Het verwijderen van het TV Software
®
®
--Windows XP / Windows XP Media Center Edition-Als u in Media center mode bevind ,switch eerst naar de windows mode. Om
geinstallerd TV software te verwijderen vanuit de systeem, Kies Start Æ Programs
ÆAVerMedia Æ AVerTV 6 Æ Uninstaller Æ Remove All Æ NextÆ OK Æ Finish.
®
®
--Windows Vista / Windows Vista Media Center Edition-1. Verwijder de geinstallerde Tv software van de system ,kies Start Æ All
Programs Æ AVerMedia Æ AVerTV 6Æ Uninstaller.
2. Wanneer de “User Account Control” venster verschijnt, select Volgende.
3. Kies Remove All Æ NextÆ OK Æ Finish.
Afstandsbediening
Na het installeren van stuurprogramma en toepassingen, kunt u de afstandsbediening gebruiken
om de programma’s aan/uit te schakelen, kanalen te selecteren, volume te wijzigen, enzovoort.
Voor de beste signal ontvangst,s.v.p gebruik de afstandbediening in de ruimte in het volgende
situatie. In situatie 1 s.v.p houd de afstand in 1.5 meter. In situatie 2 s.v.p houd de afstand in 5
meter. Ook ,de positie van afstandbediening is geadviseerd hoger te plaatsen dan de apparaat.
Situatie 1
Situatie 2
90O
1.5m
5m
75O
90O
OPMERKING:
AVerQuick is belangrijk voor de afstand bediening . als die niet geactiverd is dan kunt u de
afstandbedienings functie niet gebruiken, voor uitgebreide beschrijving kunt u vinden in de gebruikers
aanwijzing in de installatie cd,
NLD-4
Snelle installatiehandleiding
6. DISPLAY
7. VOL+/-
8. Numerieke toetsen
9. CH RTN
10. MUTE
NLD-5
Nederlands
4.
(Terugspoelen)
5. ■ (Stop)
Beschrijving
Zet de TV of Radio modus aan.
Geeft TV of video weer op het volledige scherm.
Schakel naar PVR modus en neem het huidige programma of video op,
op de harde schijf.
Spoel het afspelen terug.
- Stop het afspelen of opnemen.
- Stop de modus Time Shift en ga terug naar real-time TV of Radio
modus.
Weergave-informatie.
Volume up/down. (Volume hoger/lager.)
- Selecteer een TV kanaal.
- Gebruik 2 4 6 8 in de 16-kanaals voorbeeldmodus om het gewenste
kanaal te markeren.
Ga naar het vorige geselecteerde kanaal.
Schakelt het geluid aan/uit.
Ελληνική
Toets
1. SOURCE
2. FULL SCREEN
3. ● (Opnemen)
Português
Italiano
Español
Français
Deutsch
English
Toetsen Afstandsbediening
AVerTV Hybrid AirExpress
11. CH ▲/▼
Ga omhoog of omlaag naar het volgende actieve kanaal.
12. EPG
Open de Electronische Programmagids. (Alleen voor DVB-T)
13. ► (Afspelen)) / PAUSE Speel het laatst opgenomen of afgespeelde bestand af. / Pauzeert het
afspelen.
14.
(Vooruit)
Spoel het afspelen vooruit.
15. AUDIO
Schakelt tussen beschikbare talen.
16. POWER
Schakelt de toepassing aan/uit
Informatie over veiligheid van batterij:
-
-
Bewaar de batterijen op een koele, droge plaats.
Gooi de batterijen niet bij het huisvuil. Breng ze naar de darvoor bestemde
inzamelpunten of naar een verkooppunt.
Verwijder de batterijen als ze langere tijd niet worden gebruikt. Verwijder
uitgeputte batterijen altijd uit de afstandbediening. Door lekkende batterijen en
corrosie kan de afstandbediening beschadigd worden. Gooi de batterijen op de
voorgeschreven manier weg.
Gebruik niet oude en nieuwe batterijen tegelijk.
Gebruik niet verschillende typen batterijen tegelijk: alkaline, standaard
(koolstof-zink) of oplaadbare (nikkel-cadmium).
Gooi batterijen niet in het vuur. Ze zouden kunnen exploderen of lekken.
Sluit de contacten van de batterijen niet kort.
NLD-6
Οδηγός γρήγορης εγκατάστασης
Καλώδιο S-Video/ Composite 2-σε-1
AVerTV Hybrid AirExpress
Καλώδιο RF
Deutsch
English
Περιεχόμενα Συσκευασίας
ess
xpr
irE
id A de
ybr
Gui
V H allation
erT
AV Quick Inst
ish
sch
Deut
s
çai
Fran
ñol
Espa
no
s
Italia
uguê
ds
Port
rlan
Français
Engl
Nede
CD εγκατάστασης
Τηλεχειριστήριο
(οι μπαταρίες περιλαμβάνονται)
σταθεροποιητή
Οι απαιτήσεις συστήματος περιγράφονται αναλυτικά στη συσκευασία. Πριν εγκαταστήσετε
τηνAVerTV Hybrid AirExpress, σιγουρευτείτε ότι ο υπολογιστής σας διαθέτει τις
απαιτούμενες προδιαγραφές.
Εγκατάσταση Υλικού
Βήμα 1:Εισαγωγή της AVerTV Hybrid AirExpress
Português
Απαιτήσεις Συστήματος
Italiano
Español
Οδηγός γρήγορης εγκατάστασης
Nederlands
Εισάγετε τηνAVerTV Hybrid AirExpress στη θύρα ExpressCard™ του φορητού υπολογιστή
Ελληνική
σας. (Οι κάρτες των 34 mm χωράνε σε θύρες 34 mm και 54 mm ExpressCard™.)
ELL-1
AVerTV Hybrid AirExpress
Για το lap-top με 54 χιλ. ExpressCard, μπορείτε να παρεμβάλετε τη συσκευή με το συνοδευτικό
σταθεροποιητή για την εγκατάσταση.
Βήμα 2: Συνδέσεις
Hi-Gai n TV
Antenna
/
Κεραία Ραδιοφωνικού Δέκτη FM
Εγκατάσταση των Οδηγών και του Βοηθητικού Λογισμικού TV
Μετά από την κατάλληλη τοποθέτηση της κάρτας, ενεργοποιήστε τον Η/Υ. Το σύστημα θα
ανιχνεύσει τη νέα συσκευή αυτομάτως. Απλά παρακάμψτε τον οδηγό και τοποθετήστε το
συνοδευτικό CD εγκατάστασης για ταυτόχρονη εγκατάσταση του προγράμματος οδήγησης και
του βοηθητικού προγράμματος τηλεόρασης.
Σημείωση:
Εάν η συσκευή δεν μπορεί να ανιχνευθεί κατά τη διάρκεια της εγκατάστασης και του τρέχοντας
προγράμματος, παρακαλώ κρατήστε τη συσκευή και ξαναξεκινήστε το lap-top. Μερικά lap-top
μπορούν μόνο να ανιχνεύσουν την ExpressCard όταν παρεμβάλλεται πρίν το Booting.
®
®
Εγκατάσταση Οδηγών και Εφαρμογής στα Windows XP / Windows XP
Media Center Edition
Για την εγκατάσταση του προγράμματος οδήγησης και της εφαρμογής, οι χρήστες των
®
®
Windows XP MCE πρέπει να τα κλείσουν και να μεταβούν σε λειτουργία Windows αν
είναι σε λειτουργία Media Center Edition.
1. Θα εμφανιστεί το πλαίσιο διαλόγου του "Οδηγού εύρεσης νέου υλικού". Απλά κάντε κλικ στο
Ακύρωση για παράλειψη της διαδικασίας του Οδηγού εγκατάστασης.
2. Τοποθετήστε το CD Εγκατάστασης στη μονάδα CD-ROM.
ELL-2
ELL-3
Deutsch
Français
Español
Italiano
Português
Nederlands
Για την εγκατάσταση του προγράμματος οδήγησης και της εφαρμογής, οι χρήστες
®
®
τωνWindows Vista MCE πρέπει να τα κλείσουν και να μεταβούν σε λειτουργία Windows
αν είναι σε λειτουργία Media Center Edition.
1. Θα εμφανιστεί το πλαίσιο διαλόγου του "Οδηγού εύρεσης νέου υλικού". Απλά κάντε κλικ στο
Ακύρωση για παράλειψη της διαδικασίας του Οδηγού εγκατάστασης.
2. Τοποθετήστε το CD Εγκατάστασης στη μονάδα CD-ROM.
3. Όταν εμφανιστεί το πλαίσιο διαλόγου “Αυτόματης Εκτέλεσης”, επιλέξτε το Run
Autorun.exe (Εκτέλεση του Autorun.exe).
4. Όταν εμφανιστεί η κύρια οθόνη εγκατάστασης, επιλέξτε Install AVerTV (Εγκατάσταση
AVerTV).
5. Αν εμφανιστεί το πλαίσιο διαλόγου “Έλεγχος Λογαριασμού Χρήστη”, επιλέξτε το
Allow (Να Επιτραπεί) για να συνεχίσετε τη διαδικασία.
6. Κάντε κλικ στο Next (Επόμενο) για να συνεχίσετε τη διαδικασία εγκατάστασης..
7. Διαβάστε τη Συμφωνία Άδειας και εάν συμφωνείτε με τους όρους, επιλέξτε «I accept the
terms of the license agreement (Αποδέχομαι τους όρους της Άδειας Χρήσης)» και στη
συνέχεια κάντε κλικ στο Next (Επόμενο).
8. Επιλέξτε Complete (Πλήρης) για να εγκαταστήσετε όλα τα απαραίτητα προγράμματα
συμπεριλαμβανομένων των AVerTV 6, Acrobat Reader, DirectX 9.0c και των Drivers
(Οδηγών). Στη συνέχεια κάντε κλικ στο Next (Επόμενο). Για προχωρημένους χρήστες,
συνίσταται να επιλέξετε Custom (Προσαρμοσμένη) για να διαλέξετε το πρόγραμμα που
επιθυμείτε. Για να επιλέξετε διαφορετικό φάκελο προορισμού, κάντε κλικ στο Browse
(Αναζήτηση).
9. Κάντε κλικ στο Finish (Τέλος) για να ολοκληρώσετε την εγκατάσταση.
Ελληνική
®
Εγκατάσταση Οδηγών και Εφαρμογής στα Windows Vista / Windows
®
Vista Media Center Edition
English
Οδηγός γρήγορης εγκατάστασης
3. Όταν εμφανιστεί η κύρια οθόνη εγκατάστασης, επιλέξτε Install AVerTV (Εγκατάσταση
AVerTV).
4. Κάντε κλικ στο Next (Επόμενο) για να συνεχίσετε τη διαδικασία εγκατάστασης.
5. Διαβάστε τη Συμφωνία Άδειας και εάν συμφωνείτε με τους όρους, επιλέξτε «I accept the
terms of the license agreement (Αποδέχομαι τους όρους της Άδειας Χρήσης)» και στη
συνέχεια κάντε κλικ στο Next (Επόμενο).
6. Επιλέξτε Complete (Πλήρης) για να εγκαταστήσετε όλα τα απαραίτητα προγράμματα
συμπεριλαμβανομένων των AVerTV 6, Acrobat Reader, DirectX 9.0c και των Drivers
(Οδηγών). Στη συνέχεια κάντε κλικ στο Next (Επόμενο). Για προχωρημένους χρήστες,
συνίσταται να επιλέξετε Custom (Προσαρμοσμένη) για να διαλέξετε το πρόγραμμα που
επιθυμείτε. Για να επιλέξετε διαφορετικό φάκελο προορισμού, κάντε κλικ στο Browse
(Αναζήτηση).
7. Στο πλαίσιο διαλόγου “InstallShield Wizard”, αν σας ζητηθεί να επανεκκινήσετε τον
υπολογιστή σας, επιλέξτε τοYes(Ναι).
8. Κάντε κλικ στο Finish (Τέλος) για να ολοκληρώσετε την εγκατάσταση.
9. Για τους χρήστες των Windows XP MCE, αν θέλετε να χρησιμοποιήσετε τα Media Center
ως την εφαρμογή τηλεόρασης, εκκινήστε τα Media Center και ακολουθήστε τις οδηγίες
στην οθόνη για να ολοκληρώσετε τη διαμόρφωση.
*Συνιστούμε να κλείσετε τη λειτουργία Media Center πριν να ενεργοποιήσετε το AVerTV 6.
AVerTV Hybrid AirExpress
Σημείωση:
1. Αν δεν είναι εγκαταστημένο το DirectX 9.0c ή νεότερο στο σύστημά σας, το CD της εγκατάστασης
συνήθως θα το εγκαταστήσει αυτόματα κατά τη διάρκεια της εγκατάστασης. Βεβαιωθείτε πως το
σύστημά σας έχει εγκαταστημένο το DirectX 9.0c ή νεότερο ώστε να μπορεί να λειτουργήσει
σωστά το βοηθητικό πρόγραμμα του λογισμικού τηλεόρασης.
2. Αν το σύστημα σας δεν διαθέτει Acrobat Reader, ο οδηγός εγκατάστασης θα ανακληθεί αυτόματα
κατά τη διάρκεια της διαδικασίας εγκατάστασης.
3. ΗAVerTV Hybrid AirExpress μπορεί να παρακολουθήσει τόσο Ψηφιακή όσο και Αναλογική
Τηλεόραση στην πλατφόρμα MCE platform.
4. ΤοMCE “Video Gaming Plug In” υποστηρίζει μόνο Vista MCE. Μετά την εγκατάσταση του
προγράμματος οδήγησης, μπορείτε να αποκτήσετε πρόσβαση σε αυτό μέσω της βιβλιοθήκης
προγραμμάτων στο Online Media. Η λειτουργία αυτή σας επιτρέπει να παρακολουθείτε από
πηγές σήματος composite/S-Video στο Vista MCE.
Ενεργοποίηση της εφαρμογής AVerTV 6 Application
Για να τρέξετε την εφαρμογή AVerTV 6 από την επιλογή του μενού Programs,
επιλέξτε Start (Έναρξη)Æ Programs (Προγράμματα)Æ AVerMedia Æ AVerTV 6Æ
AVerTV 6.
Κατάργηση της εγκατάστασης της εφαρμογής και των
προγραμμάτων οδήγησης
®
®
--Windows XP / Windows XP Media Center Edition-Αν είστε σε λειτουργία Media Center, παρακαλούμε κλείστε την και αλλάξτε πρώτα
®
σε λειτουργία Windows . Για να αφαιρέσετε το εγκατεστημένο βοηθητικό
πρόγραμμα TV από το σύστημα, απλώς επιλέξτε Start (Έναρξη)Æ Programs
(Προγράμματα) Æ AVerMedia Æ AVerTV 6 Æ Uninstaller (Κατάργηση
εγκατάστασης) Æ Remove All (Κατάργηση όλων) Æ Next (Επόμενο)Æ OK Æ
Finish (Τέλος.).
®
®
--Windows Vista / Windows Vista Media Center Edition-1. Για να αφαιρέσετε το εγκατεστημένο βοηθητικό πρόγραμμα TV από το σύστημα,
απλώς επιλέξτε Start (Έναρξη)Æ Programs (Προγράμματα) Æ AVerMedia Æ
AVerTV 6 Æ Uninstaller (Απεγκατάσταση)
2. Όταν εμφανιστεί το παράθυρο "User Account Control" (Έλεγχος Λογαριασμού
Χρήστη), διαλέξτε Allow (Επιτρεπτό).
3. Διαλέξτε Remove All -> Next -> OK -> Finish (Αφαίρεση όλων -> Επόμενο ->
ΟΚ -> Τέλος).
Τηλεχειριστήριο
Μετά την εγκατάσταση των προγραμμάτων οδήγησης και των εφαρμογών, μπορείτε να
χρησιμοποιήσετε το τηλεχειριστήριο για να ανάψετε/σβήσετε τα προγράμματα, να επιλέξετε
κανάλια, να ρυθμίσετε την ένταση του ήχου και ούτω καθεξής.
Για την καλύτερη υποδοχή σημάτων, παρακαλώ χρησιμοποιήστε τον τηλεχειρισμό στην περιοχή
που παρουσιάζεται στην ακόλουθη απεικόνιση. Στην κατάσταση 1, παρακαλώ κρατήστε την
απόσταση σε 1.5 μέτρα. Στην κατάσταση 2, παρακαλώ κρατήστε την απόσταση σε 5
μέτρα. Επίσης, η θέση του τηλεχειρισμού συστήνεται για να είναι υψηλότερη από τη συσκευή.
ELL-4
Οδηγός γρήγορης εγκατάστασης
English
κατάσταση 2
Deutsch
κατάσταση 1
90O
1.5m
5m
75O
Σημείωση:
Η εφαρμογή AVerQuick Launcher είναι πολύ σημαντική για την χρήση του τηλεχειριστηρίου. Εάν
δεν ενεργοποιηθεί, τότε η χρήση του τηλεχειριστηρίου δεν είναι εφικτή. Για περισσότερες
λεπτομέρειες, παρακαλώ συμβουλευτείτε τον Οδηγό Χρήσης που βρίσκεται στο CD εγκατάστασης.
Ελληνική
Nederlands
Português
Italiano
Español
Πλήκτρα Τηλεχειριστηρίου
Français
90O
ELL-5
AVerTV Hybrid AirExpress
Κουμπί
Περιγραφή
1. SOURCE
2. FULL SCREEN
3. ● (Καταγραφή)
4.
(Προηγούμενο Αρχείο)
5. ■ (Διακοπή)
6. DISPLAY
7. VOL+/-
8. Πλήκτρα αριθμών
9.
10.
11.
12.
CH RTN
MUTE
CH ▲/▼
EPG
13. ► (Αναπαραγωγή) / PAUSE
14.
(Εμπρός)
15. AUDIO
16. POWER
Εναλλαγή ανάμεσα στις διαθέσιμες πηγές σήματος.
Εμφανίστε την TV σε πλήρη οθόνη.
Μετακίνηση σε λειτουργία PVR και καταγραφή του τρέχοντος
προγράμματος ή βίντεο στο σκληρό δίσκο.
Τύλιγμα της ταινίας αναπαραγωγής πίσω.
- Διακοπή της Αναπαραγωγής ή της καταγραφής.
- Τερματίστε την κατάσταση λειτουργίας TimeShift και
επιστρέψτε στην κατάσταση λειτουργίας TV σε πραγματικό
χρόνο ή Ραδιόφωνο.
Απεικόνιση πληροφοριών.
Αύξηση/Μείωση έντασης.
- Επιλογή καναλιού TV.
- Κάτω από την κατάσταση προεπισκόπησης 16-Καναλιών,
χρησιμοποιήστε 2 4 6 8 για να επισημάνετε το κανάλι που
θέλετε.
Πηγαίνετε στο προηγούμενο επιλεγμένο κανάλι.
Ενεργοποίηση/απενεργοποίηση ήχου.
Μετακίνηση στο επόμενο ή προηγούμενο ενεργό κανάλι.
Εκκινήστε τον Οδηγό Ηλεκτρονικού Προγράμματος. (μόνο
DVB-T)
Αναπαραγωγή του τελευταίου αρχείου που έχει καταγραφεί ή
αναπαραχθεί. /Πάγωμα της αναπαραγωγής.
Προώθηση της αναπαραγωγής.
Μετακίνηση μεταξύ διαθέσιμων λειτουργιών ήχου.
Ενεργοποίηση/απενεργοποίηση της εφαρμογής
Πληροφορίες Ασφάλειας Μπαταρίας
-
-
-
ELL-6
Φυλάσσετε τις μπαταρίες σε ένα δροσερό, ξηρό μέρος.
Μην απορρίπτετε τις χρησιμοποιημένες μπαταρίες μαζί με τα οικιακά σκουπίδια.
Απορρίπτετε τις μπαταρίες σε ειδικά σημεία συλλογής ή επιστρέφετέ τις στο μέρος
που τις αγοράσατε, αν τις δέχονται εκεί για απόρριψη.
Αφαιρείτε τις μπαταρίες αν δε θα χρησιμοποιήσετε το προϊόν για παρατεταμένη
χρονική περίοδο. Αφαιρείτε πάντα τις τελειωμένες μπαταρίες από το τηλεχειριστήριο.
Η διαρροή της μπαταρίας και η διάβρωση μπορούν να προκαλέσουν ζημιά σε αυτό το
τηλεχειριστήριο, οπότε να απορρίπτετε τις μπαταρίες με ασφάλεια.
Μη χρησιμοποιείτε μαζί παλιές και καινούριες μπαταρίες.
Μη χρησιμοποιείτε μαζί διαφορετικούς τύπους μπαταριών: αλκαλικές, κανονικές
(άνθρακα-ψευδάργυρου) ή επαναφορτιζόμενες (νικελίου-καδμίου).
Μη πετάτε τις μπαταρίες στη φωτιά. Μπορεί να εκραγούν ή να υποστούν διαρροή.
Ποτέ μη βραχυκυκλώνετε τους ακροδέκτες της μπαταρίας.
P/N 300AH968-CXJ
Made in Taiwan