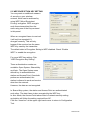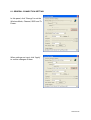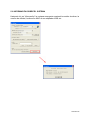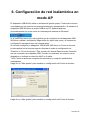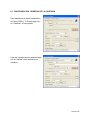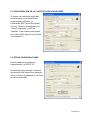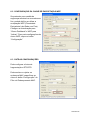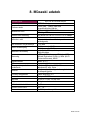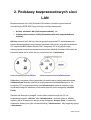
1
W-LAN USB-Adapter WLA-54L BENUTZERHANDBUCH USER’S MANUAL Manual del Usario Manual do Utilizador Kezikönyv Podręcznik VERSION 1.7 2007/01/10 © Alle Rechte vorbehalten. Die in diesem Handbuch erwähnten Marken sind eingetragene Warenzeichen der jeweiligen Hersteller. Dieses Handbuch darf ohne schriftliche Genehmigung des Urhebers in keiner Form vervielfältigt werden. Seite 2/145 Deutsch…………………………..P. 4 – P.27 English……………………………P. 28 – P.52 Espanol…………………………...P.53 – P.76 Portuguese……………………….P. 77 – P.100 Magyar…………………………….P.101 – P.121 Polski………………………………P.122 – P.145 Seite 3/145 Inhaltsverzeichnis 1. Einleitung ................................................................................... 5 2. W-LAN-Grundlagen ...................................................……………7 3. IP-ADRESSE ............................................................………..…..8 4. Treiber/Hilfsprogramm installieren................................……….…9 5. W-LAN für den stationären Betrieb konfigurieren…....................11 5.1 Allgemeine Verbindungseinstellungen.........................….. 12 5.2 Einstellung der WEP-Verschlüsselung.......................…….13 5.3 Einstellung der WPA-Verschlüsselung..........................…..14 5.4 Profil .............................................................……………….15 5.5 Erweiterte Einstellungen............................................……..16 5.6 Systeminformationen.................................................……..17 6. W-LAN für den AP-Modus konfigurieren………………………..…18 6.1 Allgemeine Verbindungseinstellungen....................…..….. 19 6.2 Einstellung der WEP-Verschlüsselung.....................….……20 6.3 Andere Einstellungen.....................................................…..20 7. VISTA-Treiber installieren......................................................…….21 8. Technische Daten ................................................................….….24 9. Wichtige Hinweise………………………………………..….………..25 9.1 LUTEC Service ………………………....................……….…25 9.2 Konformitätserklärung.....................….………………………27 Seite 4/145 1. Einleitung Herzlichen Glückwunsch zum Kauf dieses LUTEC W-LAN USB-Adapters! Der W-LAN USB Adapter ermöglicht einen drahtlosen Austausch von Daten und ist sowohl für große als auch für kleinere Netzwerke geeignet. Der Adapter ist so konzipiert, dass Sie je nach Bedarf Ihr Netzwerk problemlos um weitere Benutzer und Eigenschaften erweitern können. LEISTUNGSMERKMALE * Unterstützt Microsoft Windows 98SE, Me, 2000, XP und XP x64, Vista. * Unterstützt die Funktion WMMTM (Wi-Fi MultiMedia) * Bis zu 200 m Reichweite (unbebautes Gelände). * Datenübertragungsraten 54/48/36/24/18/12/11/9/6/5,5/2/1 Mbps. * Geeignet für USB 2.0. * WEP-Verschlüsselung (Wired Equivalent Privacy) mit 64, 128 oder 256 Bit; WPA (Wi-Fi Protected Access), WPA2 und TKIP/AES. * Lizenzfreies ISM-Frequenzband 2,400 GHz ~ 2,4835 GHz. * Modulationsmethode IEEE 802.11b: DSSS (Direct Sequence Spread Spectrum). IEEE 802.11g: OFDM (Orthogonal Frequency Division Multiplexing). * Einfache Installation und Bedienung. SYSTEMANFORDERUNGEN * Betriebssystem: Windows 98SE, Me, 2000, XP oder XP x64, Vista. * Auf dem Computer muss ein Gerätetreiber installiert sein, um die Kommunikation mit dem W-LAN USB-Adapter zu ermöglichen. Seite 5/145 VOR DEM START 1. Überprüfen Sie, ob die Lieferung vollständig ist. (in deutsch oder englisch) W-LAN USB-ADAPTER AN DEN PC ANSCHLIESSEN Kurzanleitung - Schließen Sie den W-LAN USB- Adapter an Ihren PC an. Installieren Sie den Treiber. ERSTE SCHRITTE MIT DEM W-LAN USB-ADAPTER LED - Die LED leuchtet, wenn der W-LAN USB-Adapter mit Strom versorgt wird und blinkt, wenn der PC über den Adapter Daten überträgt. Seite 6/145 2. W-LAN-Grundlagen Ein gemäß IEEE 802.11b/g eingerichtetes Funknetzwerk (W-LAN) kann wie folgt konfiguriert werden: Als Ad Hoc W-LAN oder als Infrastruktur W-LAN. Ein Ad-Hoc-Netzwerk besteht aus einer Gruppe von Computern, die mit W-LANKarten ausgestattet sind. Diese Gruppe wird auch BSS (Basic Service Set) genannt. Die Rechner dieser Gruppe können über ihre W-LAN-Karten miteinander kommunizieren, jedoch keine Verbindung zum Internet aufbauen. Ad-Hoc-Funknetzwerk Infrastruktur-Funknetzwerk Der wesentliche Unterschied zwischen einem Infrastruktur- und einem Ad-HocFunknetzwerk besteht darin, dass die PCs sich beim erst genannten Typ über den Zugangspunkt (Access Point) mit dem Internet verbinden können. Sie können Ihr Netzwerk daher je nach Bedarf entweder als Ad-Hoc- oder als Infrastruktur-Funknetzwerk einrichten. Im Allgemeinen empfehlen wir, das Netzwerk als Infrastruktur-Funknetzwerk einzurichten (sofern es über einen Zugangspunkt verfügt), um Zugang zum Internet zu erhalten. Seite 7/145 3. IP-Adresse Damit Sie den W-LAN Mini USB-Adapter an Ihrem Computer verwenden können, muss dieser über eine USB-1.1- oder USB-2.0-Schnittstelle verfügen. Im nächsten Schritt müssen dann alle Treiber und die Adapter-Software installiert und konfiguriert werden. Halten Sie die folgenden Informationen bereit (bei Bedarf den Systemadministrator fragen), die bei der Installation des Treibers ggf. anzugeben sind: - Name Ihres W-LAN-Clients. - Ihre Wireless SSID (Service Set Identifier; Kennung für die Datenübertragung). - Eindeutigen, unverwechselbaren Client-Namen Ihres Computers sowie den Namen der Arbeitsgruppe, zu der Ihr Computer gehört. - Ihr Benutzername und Passwort für den Netzwerkzugang. - Ihre IP-Adresse, Gateway-Adresse und Subnet-Maske, wenn Sie keinen DHCP-Server verwenden. Zu jedem Computer eines Netzwerks gehört eine eindeutige Netzwerkadresse. Eine Netzwerkadresse kann dem Computer eines TCP/IP-Netzwerks auf zweierlei Art zugewiesen werden: - Statische IP-Zuweisung Dynamische IP-Zuweisung (DHCP). In Netzwerken mit statischer IP-Zuweisung, weist der Netzwerkadministrator jedem Computer manuell eine IP-Adresse zu. Nachdem ein Computer eine statische IPAdresse erhalten hat, verwendet er diese bei jedem Neustart und bei jeder NetzwerkAnmeldung. Sie können die IP-Adresse im Dialogfenster Netzwerkeigenschaften manuell ändern. Ein Netzwerk mit statischer IP-Adresse ist einfach herzustellen. Hierfür ist keine zusätzliche Software zur Netzwerkeinrichtung erforderlich. In Netzwerken mit dynamischer IP-Zuweisung weist ein DHCP-Server allen Clients jedes Mal eine neue IP-Adresse zu, wenn diese sich im Netzwerk anmelden. In diesem Fall muss zunächst ein DHCP-Server eingerichtet werden. Seite 8/145 4. Installation des Gerätetreibers, der Wireless Geräte-Managementsoftware Ab Windows XP: Bitte überprüfen Sie ob Ihr PC über eine eigene Wireless Geräte- Managementsoftware verfügt. Ist dies der Fall installieren Sie bitte nur den Gerätetreiber. Sie finden ein möglicherweise vorhandenes Tool, in dem Sie unter Start Systemsteuerung den Punkt Software wählen. Für den VISTA Treiber bitte gleich zu Punkt 7. Nachdem Sie die Treiber- und Installations-CD in das CD-Laufwerk eingelegt haben, startet die Autorun-Funktion Ihres Rechners automatisch die Installation. Schritt 1: Legen Sie die Treiber- und Installations-CD in Ihr CD-ROM-Laufwerk. Schritt 2: Klicken Sie auf Next (Weiter), um fortzufahren. Schritt 3: Klicken Sie auf Next (Weiter), um die Software im angegebenen Ordner zu installieren. Sie können auch auf Browse (Durchsuchen) klicken und einen anderen Ordner für die Installation auswählen. Seite 9/145 Schritt 4: Der Rechner beginnt mit dem Installieren der Setup-Dateien. Schritt 5: Klicken Sie zum Abschließen der Installation auf Finish (Beenden). Schritt 6: Bitte schließen Sie den W-LAN USB-Adapter nach Beendigung der Installation an einen USB-Anschluss Ihres Rechners an. Die Hardware-Erkennung von Windows XP/2000 erkennt den W-LAN USB-Adapter automatisch. Falls Ihr Betriebssystem (z.B. Microsoft Vista©) nicht über eine Tool zur Managementsoftware verfügt, installieren Sie diese Software jetzt und fahren Sie bitte mit Punkt 5, „Konfiguration des Wireless Netzwerkes“ fort. Sie finden ein möglicherweise vorhandenes Tool, in dem Sie unter Start Systemsteuerung den Punkt Software wählen. Seite 10/145 5. W-LAN für den stationären Modus konfigurieren Der W-LAN USB-Adapter verwendet eine eigene Managementsoftware. Diese enthält alle Funktionen, die vom Benutzer gesteuert werden können. Wenn Sie den W-LAN USB-Adapter an einen USB-Anschluss Ihres Rechners anschließen, sollte automatisch ein neues Symbol in der Windows-Systemablage erscheinen. Wird dieses Symbol in Rot angezeigt, ist die Konfiguration des W-LAN USB-Adapters fehlgeschlagen oder unvollständig. Doppelklicken Sie auf das Symbol, um das unten gezeigte Konfigurationsfenster aufzurufen. Im Fenster wird die SSID (Service Set Identifier; Kennung für die Datenübertragung) des verfügbaren Netzwerks angezeigt. Wählen Sie das gewünschte Netzwerk aus. Dieses wird anschließend zusammen mit der Signalstärke und der Verbindungsqualität angezeigt. Eine Reihe von Balken zeigt die Signalstärke und die Verbindungsqualität an. Das Diagramm erscheint jedoch nur dann, wenn sich der W-LAN USB Adapter im Infrastrukturmodus befindet und bezieht sich auf die Verbindungsqualität zwischen dem W-LAN USB Adapter und Zugangspunkt. Die Verbindungsqualität bezieht sich sowohl auf den drahtlosen Empfang als auch die Übertragung von Daten. Unter "Tx/Rx Frame" wird der aktuelle Durchsatz an drahtlos gesendeten bzw. empfangenen Daten angezeigt. Das Konfigurationsprogramm enthält mehrere Eingabefelder, in denen die Betriebsparameter des Treibers angezeigt bzw. geändert werden können. Änderungen an den Parametern werden sofort vom Treiber übernommen, ohne dass der Computer neu gestartet werden muss. Unter Current Network Information (Aktuelle Netzwerkinformationen) wird die aktuelle Netzwerkkonfiguration angezeigt. Klicken Sie auf More Setting (Weitere Einstellungen), wenn Sie diese ändern möchten. Seite 11/145 5.1 ALLGEMEINE VERBINDUNGSEINSTELLUNGEN In diesem Fenster können Sie die allgemeinen Einstellungen der Netzwerkverbindung ändern, die WEPVerschlüsselung aktivieren bzw. deaktivieren, ein Profil hochladen bzw. ändern und weitere Einstellungen bearbeiten. Über dieses Fenster können Sie außerdem auf das firmeneigene Funknetzwerk (W-LAN) zugreifen oder sich mit einem Hotspot verbinden (z. B. in Hotels, Flughäfen und Konferenzräumen). Klicken Sie auf Change (Ändern), wenn Sie Einstellungen ändern oder eingeben möchten. Zu den Einstellungen gehört: - SSID. - Netwerktyp. - Übertragungsrate - Verschlüsselung - Authentifizierungsmodus Klicken Sie anschließend auf Apply (Übernehmen), um die geänderten bzw. neu eingegebenen Einstellungen zu übernehmen. Seite 12/145 5.2 WEP-VERSCHLÜSSELUNG EINSTELLEN Sie können die WEP-Verschlüsselung (Wired Equivalent Privacy) verwenden, um Ihr drahtloses Netzwerk zusätzlich zu schützen. Die Verschlüsselung erfolgt entsprechend der eingegeneben Codes. Das WEP-Protokoll verwendet den RC4-Algorithmus als Pseudozufallszahlengenerator (PRNG) bei der Erzeugung eines Keyframes, der einen Schlüssel und einen Initialisierungsvektor als Eingabe erhält. Wird ein verschlüsselter Frame empfangen, dann wird dieser nur dann akzeptiert, wenn er korrekt entschlüsselt werden kann. Dies geschieht nur dann, wenn der Empfänger über denselben WEP-Schlüssel verfügt wie der Absender. Die Voreinstellung des Programms für die Verschlüsselung ist WEP disabled (WEP deaktiviert). Klicken Sie auf Enable WEP (WEP aktivieren), um die Verschlüsselung zu aktivieren. Klicken Sie auf WEP Encryption Key Setting (WEP-Verschlüsselung Einstellungen), um Zugang zu weitere WEP-Einstellungen zu erhalten. Es stehen drei Authentifizierungsmodi zur Verfügung: Open System, Shared Key und Auto. Die Open System Authentication ist die StandardAuthentifizierung zum Freischalten von Station und Zugangspunkt. Nach der Authentifizierung beider Seiten kann die Station Daten versenden bzw. über das Netzwerk empfangen. Die Daten werden hierbei jedoch nicht verschlüsselt. Bei der Shared Key Authentication authentifizieren sich Station und Zugangspunkt wechselseitig. Der Daten-Frame wird ebenfalls WEP-verschlüsselt. Im Auto Mode übernimmt der Zugangspunkt automatisch die Seite 13/145 Netzwerksicherheitseinstellung, wobei sich die Station nach der vom Zugangspunkt angeforderten Einstellung richtet. Klicken Sie auf das [X] in der oberen rechten Ecke, um zum Konfigurationsprogramm zurückzukehren. 5.3 WPA-VERSCHLÜSSELUNG EINSTELLEN Wi-Fi Protected Access (WPA) ist eine Verschlüsselungsmethode für Funknetzwerke (W-LAN). WPA enthält die Architektur von WEP (Wired Equivalent Privacy), bringt jedoch zusätzlichen Schutz und eine bessere Authentifizierung. Hierzu verwendet WPA dynamische Schlüssel, die auf dem Temporal Key Integrity Protocol (TKIP) basieren. TKIP bietet wesentliche Verbesserungen bei der Verschlüsselung von Daten, darunter eine Schlüsselmischfunktion pro Paket, eine Meldungsintegritätsprüfung (Message Integrity Check; auch MIC oder Michael genannt), einen erweiterten Initialisierungsvektor (IV) mit Sequenzierungsregeln und einen Re-Keying-Mechanismus zur Neuverschlüsselung. Unter WPA-PSK (WPA Pre-Shared Key) versteht man eine vereinfachte, aber dennoch effektive Form von WPA, die sich besonders für private Wi-Fi-Netzwerke eignet. Um WPAPSK zu verwenden, wird wie bei WEP ein statischer Schlüssel bzw. eine Passphrase (d. h. eine Passwortkette) eingestellt. Bei der Verwendung von TKIP werden die Schlüssel von WPA-PSK jedoch automatisch in voreingestellten Zeitintervallen verändert. Somit wird es für Hacker wesentlich schwieriger, diese Schlüssel auszuspähen und zu knacken. Der PSK (Pre-shared key) besteht aus Zahlen, Buchstaben sowie Satzzeichen und Leerstellen und kann zwischen 8 und 63 Zeichen umfassen. Wenn W-LAN Clients über den korrekten PSK-Schlüssel verfügen, kann eine sichere Verbindung aufgebaut werden. Weitere Informationen zu WPA-Einstellungen erhalten Sie, wenn Sie auf WPA Seite 14/145 Encryption Setting (WPA-Verschlüsselung Einstellungen) klicken. 5.4 PROFIL Unter Profil versteht man eine Gruppe bestimmter Einstellungen des USBAdapters. Sie können Einstellungen zu einem Profil zusammenfassen. Wenn Sie Einstellungen des USB-Adapters ändern möchten, brauchen Sie lediglich das gewünschte Profil auszuwählen. Seite 15/145 5.5 ERWEITERTE EINSTELLUNGEN Klicken Sie auf Advanced Setting (Erweiterte Einstellungen), um den Stromversorgungsmodus zu ändern bzw. einzustellen. Sie können zwischen drei Modi wählen. Sie können in diesem Fenster außerdem die Einstellungen zur Sprache der Benutzeroberfläche (User Interface) sowie zum Roaming in verschiedenen Ländern (Country Roaming) auswählen. Außerdem können Sie die Schwellenwerte für die Fragmentierung und RTS/CTS einstellen. Seite 16/145 5.6 SYSTEMINFORMATIONEN Klicken Sie auf Information, um ein Fenster zu öffnen, das die Versionsnummern von Treiber und Hilfsprogramm, die MAC-Adresse des betreffenden USB-Adapters und weitere Angaben enthält. Seite 17/145 6. W-LAN für den AP-Modus konfigurieren Der W-LAN USB-Adapter verwendet eine eigene Managementsoftware. Diese enthält alle Funktionen, die vom Benutzer gesteuert werden können. Wenn Sie den W-LAN USB-Adapter an einen USB-Anschluss Ihres Rechners anschließen, sollte automatisch ein neues Symbol in der Windows-Systemablage erscheinen. Wird dieses Symbol in Rot angezeigt, ist die Konfiguration des W-LAN USB-Adapters fehlgeschlagen oder unvollständig. Doppelklicken Sie auf das Symbol, um das unten gezeigte Konfigurationsfenster aufzurufen. Wenn Sie Ihren W-LAN USB-Adapter als Zugangspunkt (Access Point) einrichten möchten, können Sie oben rechts im Fenster den Konfigurationmodus von Station in Access Point ändern. Das Fenster enthält eine Übersicht der Verbindungsstationen, die mit dem USB-Adapter verbunden sind. Wenn sich ein Computer mit Ihrem Dongle verbindet, wird dessen MAC-Adresse in der Tabelle angezeigt. Unter "Tx/Rx Frame" wird der aktuelle Durchsatz an drahtlos gesendeten bzw. empfangenen Daten angezeigt. Klicken Sie auf More Setting (Weitere Einstellungen), um die Konfiguration Ihres Zugangspunktes zu ändern. Seite 18/145 6.1 ALLGEMEINE VERBINDUNGSEINSTELLUNGEN Klicken Sie in diesem Fenster auf Change (Ändern), um W-LAN-Modus, Kanal, SSID und Tx Power einzustellen. Klicken Sie nach der Eingabe auf Apply (Übernehmen), um die Änderungen zu übernehmen. Seite 19/145 6.2 WEP-VERSCHLÜSSELUNG EINSTELLEN Sie können die WEP-Verschlüsselung (Wired Equivalent Privacy) verwenden, um Ihr drahtloses Netzwerk zusätzlich zu schützen. Wählen Sie für die Authentifizierung die Einstellung Shared Key und für WEP Enable (Aktivieren). Sie können weitere WEP-Einstellungen vornehmen, wenn Sie auf Setting (Einstellungen) klicken. 6.3 WEITERE EINSTELLUNGEN Sie können ferner die Schwellenwerte für die Fragmentierung und RTS/CTS einstellen. Sie können bestimmte MACAdressen annehmen oder ablehnen; klicken Sie hierzu auf die Schaltfläche Setting (Einstellungen) des MACAdressfilters. Seite 20/145 Wählen Sie einen Brückenadapter (Bridge Adapter), über den die Verbindung mit dem W-LAN USB-Adapter erfolgen soll. 7. VISTA-Treiber installieren Schließen Sie Ihren USB-Adapter an einen USB-Anschluss Ihres Rechners an. Windows Vista sucht zum Installieren automatisch nach einem kompatiblen Treiber. Schritt 1: Klicken Sie auf Locate and install the driver software (Treibersoftware suchen und installieren). Windows führt Sie anschließend durch die Installation der Treibersoftware für Ihren Adapter. Schritt 2: Legen Sie die Installations-CD in das CDLaufwerk Ihres Computers und klicken Sie auf Next (Weiter), um die Installation fortzusetzen. Seite 21/145 Schritt 3: Windows Vista installiert danach selbsttätig die Software. Schritt 4: Klicken Sie nach der Installation mit der rechten Maustaste auf das Netzwerksymbol in der Systemablage von Windows Vista. Klicken Sie dann auf Connect to a network (Mit Netzwerk verbinden). Schritt 5: Wählen Sie ein Netzwerk aus und klicken Sie auf Connect (Verbinden). Seite 22/145 Schritt 6: Klicken Sie auf Connect Anyway (Trotzdem verbinden), wenn es sich um ein ungesichertes Netzwerk handelt. Schritt 7: Nachdem der USB-Adapter erfolgreich an das Netzwerk angeschlossen ist, klicken Sie auf Close (Schließen). Hinweis: Unter Win98SE, Win2000, ME, XP, XP x64 wird der Adapter mit dem folgenden Namen bezeichnet: "(ZD1211)IEEE 802.11b+g USB Adapter" Windows Vista verwendet die folgende Bezeichnung: "Atheros AR5007UG Wireless Network Adapter" Seite 23/145 8. Technische Daten Produktbezeichnung Standard Frequenzband WLA-54L W-LAN USB-Adapter IEEE802.11b/g Lizenzfreies ISM-Band 2,400 GHz ~ 2,4835 GHz 802.11b: QPSK/BPSK/CCK Modulationsmethode Datenübertragungsrate 802.11g: OFDM 54/48/36/24/18/12/11/9/6/5,5/2/1 Mbps Ad hoc Betriebsmodus Ausgangsleistung des Senders Infrastruktur (Zugangspunkte erforderlich) < 15 dBm Betrieb mit 11 Mbps: bei -80 dBm Empfangsempfindlichkeit Reichweite Sicherheit E/A-Schnittstelle LED Betrieb mit 54 Mbps: bei -70 dBm Max. 200 m (von der Umgebung abhängig) WEP (Wired Equivalent Privacy) mit 64, 128 oder 256 Bit; WPA (Wi-Fi Protected Access), WPA2 USB 2.0/1.1 Verbindung/aktiv Unterstützte Betriebssysteme Windows 98Se, Me, 2000, XP und Windows XP x64, Vista Steuerung Auf Windows basierendes Hilfsprogramm zur Konfiguration und Statusüberwachung Zulassung FCC für Nordamerika CE/ETSI für Europa Abmessungen Gewicht Betriebstemperatur Lagertemperatur Relative Luftfeuchtigkeit 58 (L) x 23 (B) x 9 (H) mm 9.6 g 0 ~ 50 ℃ -20 ~ 70 ℃ 5 ~ 90 % (nicht kondensierend) Seite 24/145 9. Wichtige Hinweise 9.1 LUTEC Service Wir gewähren 24 Monate Garantie. Vielen Dank, dass Sie sich für ein LUTEC Produkt entschieden haben! Ganz sicher werden Sie - wie viele Tausende zufriedener Kunden vor Ihnen - von der Qualität unseres Produktes begeistert sein. Garantieerklärung / Bedingung 1. Die Garantie beträgt 24 Monate und beginnt mit dem Verkaufsdatum an den Endverbraucher. Das Kaufdatum und der Gerätetyp sind durch eine maschinelle erstellte Kaufquittung zu belegen. Bitte bewahren Sie Ihren Kaufbeleg daher für die Dauer der Garantie auf, da er Vorraussetzung für eventuelle Reklamation ist. 2. Innerhalb der Garantiezeit werden alle Mängel, wahlweise durch den Hersteller, entweder durch Instandsetzung, Austausch mangelhafter Teile oder im Austausch behoben. Die Ausführung der Garantieleistung bewirkt weder eine Verlängerung noch einen Neubeginn der Garantiezeit. 3. Eine Garantieleistung entfällt für Schäden oder Mängel die durch unsachgemäße Handhabung oder durch äußere Einwirkung (Sturz, Schlag, Wasser, Staub, Verschmutzung oder Bruch) herbeigeführt wurden. Verschleißteile (z.B. die Akkus) sind von der Garantie ausgenommen. 1) Handbuch: Lesen Sie beiliegendes Handbuch sorgfältig durch. 2) Webpage: Unter www.lutec.eu können Sie sich über häufig gestellte Fragen, aktuellste Kompatibilitätslisten etc. Informieren 3) Endkunden-Hotline: Sie können Sie uns per Email unter [email protected] erreichen. Seite 25/145 Sollten Sie telefonische Unterstützung benötigen, so steht Ihnen unsere EndkundenHotline von Montag-Freitag von 9:00 bis 18:00 zu Verfügung. 4) Direct Exchange: Wenn Ihnen die Hotline mitteilt, dass Ihr Car Kit ausgetauscht werden muß, bekommen Sie von der Hotline eine Authorisierungsnummer (RMA-Nr.) mitgeteilt. Bitte senden Sie Ihr Gerät unter Angabe dieser RMA-Nr. inkl. Zubehör und einer Kopie des Kaufbelegs an unser Service-Center. Sie erhalten dann umgehend einen Austausch von uns. Endkunden-Hotline: aus Deutschland: 0180 5 – 00 33 23* *: EURO 0,14/ Min. aus Österreich 08 20 – 50 08 02* *: EURO 0,145/ Min. Endkunden-Email: [email protected] Service-Center: Einsendungen an unser Service-Center sind nur nach Authorisierung durch unsere Hotline unterAngabe der RMA-Nr. möglich, ansonsten kann die Rücksendung nicht angenommen werden. Schiffer Service GmbH c/o Lutec RMA-Nr. : xxx (hier bitte die von der Hotline genannte RMA Nr. eintragen) Industriestr. 16 D-52134 Herzogenrath-Kohlscheid Seite 26/145 9.2 Konformitätserklärung Das Produkt wurde getestet und entspricht den wesentlichen Schutzanforderungen gemäss Richtlinie des Rates in Annäherung an die Gesetze der Mitgliedstaaten bezüglich EMC Directive 89/366/EEC und Low Voltage Directive 73/23 EEC. R&TTE-Richtlinie (Radio & Telecommunications Terminal Equipment) Das Produkt entspricht den nachfolgend genannten Richtlinien / Spezifikationen - ETS 300-826 – Allgemeine EMV-Anforderungen für Funkgeräte - ETS 300-328 – Technische Anforderungen an Funkgeräte - EN 60950 – Sicherheitsanforderungen an Funkgeräte Sofern Sie keinen Adobe© Acrobat Reader installiert haben, können Sie sich dieses Programm unter www.adobe.com/de kostenlos herunterladen. Weitere Informationen über Microsoft Vista© finden Sie unter www.microsoft.com Weitere Informationen über LUTEC finden Sie unter www.lutec.eu. Alle in dieser Kurzanleitung genannten Marken sind Eigentum ihrer jeweiligen Besitzer. Alle Angaben ohne Gewähr. Druckfehler vorbehalten. Die Garantie erlischt, wenn das Gerät unsachgemäß bedient oder manipuliert wird oder wenn das Sicherheitssiegel beschädigt oder entfernt wird. Copyright 2007 by LUTEC, keine unerlaubte Vervielfältigung. Seite 27/145 Table of contents 1. Introduction .........................................................…............. 29 2. Wireless LAN Basics ................................................…....…..31 3. IP ADDRESS ................................................................……..32 4. Install Driver/Utility ...............................................……...........33 5. Wireless Network Configuration in Station Mode ...................35 5.1 General Connection Setting ................................…......36 5.2 WEP Encryption Key Setting ...............................…... ..37 5.3 WPA Encryption Setting ....................................…….....38 5.4 Profile ..........................................................…...............39 5.5 Advanced Setting ............................................…...…....40 5.6 System Information .........................................…….......41 6. Wireless Network Configuration in AP Mode…………….........42 6.1 General Connection Setting ................................…..........43 6.2 WEP Encryption Key Setting ...............................…......44 6.3 Other Setting...................................................…............44 7. Install VISTA Driver.........................................................….....45 8. Technical Specifications ..................................................…....48 9. Important notes ............................................................……....49 Seite 28/145 1. Introduction Thank you for your purchase of the WLAN Mini USB Adapter. Featuring wireless technology, this wireless networking solution has been designed for both large and small businesses, and it is scalable so that you can easily add more users and new network features depending on your business scale. FEATURES • • • Support Microsoft Windows 98SE, Me, 2000 ,XP and XP x64, Vista. Support WMMTM (Wi-Fi MultiMedia) function Operating distance of up to 200 meters in free space. • • • 54/48/36/24/18/12/11/9/6/5.5/2/1 Mbps selectable Data Rate. Support USB 2.0 interface. 64-bit, 128-bit or 256-bit WEP (Wired Equivalent Privacy); WPA (Wi-Fi Protected Access),WPA2 • • 2.400GHz ~ 2.4835GHz unlicensed ISM Frequency Band. Modulation Method : IEEE 802.11b : DSSS (Direct Sequence Spread Spectrum). IEEE 802.11g : OFDM (Orthogonal Frequency Division Multiplexing). • Easy operation and setting up. SYSTEM REQUIREMENTS • Windows System : Windows 98SE, Me, 2000, XP or XP x64, Vista • PCs must have a device driver installed. It allows you to communicate with WLAN Mini USB Adapter. Seite 29/145 BEFORE YOU START 2. Confirm Box Contents CONNECTING YOUR WLAN USB ADAPTER TO PC Quick Start Guide • Connect your WLAN USB Adapter to your PC. • Install driver. GETTING TO KNOW WIRELESS LAN USB ADAPTER LED • ED turns on when POWER is applied to the WLAN Mini USB L Adapter. LED is blinking when PC is sending data through WLAN Mini USB Adapter. Seite 30/145 2. Wireless LAN Basics Wireless LAN network defined by IEEE 802.11b/g standard committee could be configured as : • • Ad Hoc wireless LAN, or Infrastructure wireless LAN. Ad Hoc network is a group of PCs installed with wireless LAN cards, this group of PCs is called a BSS (Basic Service Set). PCs in this group can use their wireless LAN cards to communicate with each other, but can not connect to the Internet. Ad Hoc Wireless Network Infrastructure Wireless Network The most obvious difference between Infrastructure wireless network and Ad Hoc wireless network is that the PCs in Infrastructure wireless network can access the resource in the Internet through Access Point. Depending on your requirement, you can easily set up your PC’s network to be a “Ad Hoc” or “Infrastructure” wireless network. Generally speaking, if in your network, there is an Access Point in it, we recommend you to set your network as an “Infrastructure”, so it can connect to the Internet. Seite 31/145 3. IP Adress To use the WLAN Mini USB Adapter with a computing device, the WLAN Mini USB Adapter must be equipped with an USB 1.1 or 2.0 Interface. All drivers and supporting software for the WLAN Mini USB Adapter must be installed and configured first. Ask your system administrator for the following information, which you may need to provide during driver installation : • • • Your Wireless Client Name. Your Wireless SSID. Your computer’s unique client name and workgroup name. • • For your network account, your user name and password. Your IP address, gateway address, and subnet mask if you’re not using a DHCP server. Any computer on a network is identified by a unique network address. There are two methods to assign a network address to a computer on a TCP/IP network : • • Static IP addressing. Dynamic IP addressing (DHCP). In network with static IP addressing, the network administrator manually assigns an IP address to each computer. Once a static IP address is assigned, a computer uses the same IP address every time it reboots and logs on to the network. You may manually change the IP address in the Network Properties dialog box. Network using static IP address is easy to set up and do not require additional network management software. In network with dynamic IP addressing, a DHCP server in the network dynamically assigns IP addresses to all clients every time they log on to the network. Network using dynamic IP address requires setting up and running a DHCP Server. Seite 32/145 4. Install Driver / Utility For Windows XP: Please check if your PC/Notebook contains a wireless device management software. In this case please only install the device driver. You can find a probably installed tool when you choose “Software” under Start system control. For Vista drivers please go ahead to point 7. The installation & driver CD will automatically activate the autorun installation program after you insert the disk into your CD drive. Step 1 : Insert the installation & driver DC into your CD-ROM. Step 2 : Click Next to continue. Step 3 : Click Next to install at the designated folder. Or, click “Browse” to select different folder. Seite 33/145 Step 4 : Start copying files until it finishes the installation. Step 5 : Click Finish to complete installation. Step 6 : After finished install driver and utility on your system, plug the USB adapter into the USB port of your PC. Windows XP/2000 will automatically detect the USB Adapter. If your operating system (e.g. Microsoft Vista©) doesn`t contain a tool for management software, please install the software now and cintinue with point 5 “Wireless network configuration”. You can find a probably installed tool when you choose “Software” under Start system control. Seite 34/145 5. Wireless Network Configuration in Station Mode WLAN USB Adapter uses its own management software. All functions controlled by users are provided by this application. When you insert the WLAN USB Adapter into the USB port of your PC, a new icon should appear in the Windows System Tray automatically. If the icon is in red, it means that WLAN USB Adapter configuration is invalid or incomplete. Double click on that icon and the configuration window will pop up as shown below. It shows the SSID of available network. Once a network is chosen, the signal strength and link quality are displayed. The Link Quality and Signal Strength bar chart is only active when the node is in Infrastructure Mode. The bar graph displays the quality and strength of the link between the node and its Access Point. Link Quality is a measurement of receiving and transmitting performances over the radio. Tx/Rx Frame displays the instantaneous wireless Transmit and Receive counts. The Configuration Tool contains several fields where operating parameters of the driver can be viewed or changed. Changes to any of the parameters in this panel can be applied to the driver without a need to restart the computer. Current Network Information displays the current network configuration. If you want to change network configuration, click “More Setting”. Seite 35/145 5.1 GENERAL CONNECTION SETTING In this panel, you can modify the general network connection setting, enable/disable the WEP, load/ modify profile and other setting. Through this control panel, you will be able to access the corporate wireless LAN or hot spots such as hotel, airport, and conference hall. Click “Change” to start input of settings. The settings include : • SSID. • • • • Network Type. Transmit Rate. Encryption. Authentication Mode. When settings are input, click “Apply” to confirm changes of them. Seite 36/145 5.2 WEP ENCRYPTION KEY SETTING You may want an additional measure of security on your wireless network, which can be achieved by using WEP (Wired Equivalent Privacy) encryption. WEP encrypts each frame transmitted from the radio using one of the Keys entered in this panel. When an encrypted frame is received it will only be accepted if it decrypts correctly. This will only happen if the receiver has the same WEP Key used by the transmitter. The default state in Encryption Setting is WEP disabled. Check “Enable WEP” to enable the encryption. For more WEP key setting, Click “WEP Encryption Key Setting”. Three authentication modes are available: Open System, Shared Key and Auto. The Open System uses default key to authenticate the station and Access Point. Once both parties are authenticated, the station is allowed to send and receive data from the network. However, the data are not encrypted. In Shared Key system, the station and Access Point are authenticated each other. The data frame is also encrypted by the WEP key. In Auto Mode, the Access Point takes control of network security setting and station will follow the setting required from AP. Click the “close box” at the upper right hand corner to return to Configuration Tool. Seite 37/145 5.3 WPA ENCRYPTION SETTING WPA (Wi-Fi Protected Access) is a security technology for wireless networks. WPA improves on the authentication and encryption features of WEP (Wired Equivalent Privacy). To improve data encryption, WPA utilizes its Temporal Key Integrity Protocol (TKIP). TKIP provides important data encryption enhancements including a per-packet key mixing function, a message integrity check (MIC, named Michael), an extended initialization vector (IV) with sequencing rules, and a rekeying mechanism. WPA Pre-Shared Key (WPA-PSK) is a simplified but still powerful form of WPA most suitable for home Wi-Fi networking. To use WPA-PSK, a person sets a static key or “passphrase” as with WEP. But, using TKIP, WPA-PSK automatically changes the keys at a preset time interval, making it much more difficult for hackers to find and exploit them. The pre-shared key is consisting of alpha-numeric characters including punctuation and spaces between 8 and 63 characters long.Wireless clients are only required to enter the pre-shared key.If the pre-shared keys match, secure wireless communications can begin to take place. For more WPA setting, Click “WPA Encryption Setting” Seite 38/145 5.4 PROFILE Each profile represents specific settings of the USB adapter. You can set the settings for each profile. Next time when you want to change the USB adapter settings, you can just select the profile you want to use. Seite 39/145 5.5 ADVANCED SETTING Click “Advanced Setting” to select power consumption setting that has 3 different modes. In this panel, you can select different user interface and country roaming. It also allows you to set the threshold of fragmentation and RTS/CTS. Seite 40/145 5.6 SYSTEM INFORMATION Click “Information” and the pop-up window will show the Driver Version, Utility Version, MAC address of this USB adapter and so on. Seite 41/145 6. Wireless Network Configuration in AP mode WLAN USB Adapter uses its own management software. All functions controlled by users are provided by this application. When you insert the WLAN USB Adapter into the USB port of your PC, a new icon should appear in the Windows System Tray automatically. If the icon is in red, it means that WLAN USB Adapter configuration is invalid or incomplete. Double click on that icon and the configuration window will pop up as shown below. If you need to set your WLAN USB Adapter as an Access Point, you can change the configuration mode to “Access Point” on the top right corner instead of “Station” Mode. It shows the Connection Station List that connect to your USB Adapter. While a computer connects to your Dongle, its MAC Address will be shown in the table. Tx/Rx Frame displays the instantaneous wireless Transmit and Receive counts. Click “More setting” for changing your Access Point configuration. Seite 42/145 6.1 GENERAL CONNECTION SETTING In this panel, click “Change” to set the Wireless Mode, Channel, SSID and Tx Power. When settings are input, click “Apply” to confirm changes of them. Seite 43/145 6.2 WEP ENCRYPTION KEY SETTING You may want an additional measure of security on your wireless network, which can be achieved by using WEP (Wired Equivalent Privacy) encryption. Set Authentication to “Shared Key” and WEP to “Enable”. For more WEP key setting, Click “Setting” button . 6.3 OTHER SETTING You can set the threshold of fragmentation and RTS/CTS. You can choose to accept or reject specific MAC Addresses, click “Setting” button of MAC Address Filter Seite 44/145 Choose a bridge adapter that you want to bridge with wireless USB adapter. 7. Install Vista Driver Plug your USB Adapter into USB interface, windows Vista will search for compatible driver to install. Step 1 : Select “Locate and install the driver software”, Windows will guide you through the process of installing driver software for your device. Step 2 : Insert the installation disc into the CD-ROM and click “next” to continue installation. Seite 45/145 Step 3 : Windows Vista search for the software and it will be installed successfully. Step 4 : After installation, right click the network icon on the Windows Vista System Tray, and click “Connect to a network”. Step 5 : Select a network to connect to and click “Connect”. Seite 46/145 Step 6 : Click “Connect Anyway” if the network is an unsecured network. Step 7: USB Adapter successfully connected to network, Click “Close” Note : In Win98SE, Win2000, ME, XP, XP x64, the Device name is: “(ZD1211)IEEE 802.11b+g USB Adapter” In Windows Vista, the Device name is: “Atheros AR5007UG Wireless Network Adapter” Seite 47/145 8. Technical specifications Product Name Standard Regulation WLA-54L WLAN USB Adapter IEEE802.11b/g 2.400GHz ~ 2.4835GHz unlicensed ISM band 802.11b : QPSK/BPSK/CCK 802.11g : OFDM 54/48/36/24/18/12/11/9/6/5.5/2/1Mbps Ad hoc Infrastructure (Access Points is needed) < 15 dBm Operating at 11Mbps: @ –80dBm Operating at 54Mbps: @ –70dBm Up to 200 m, depending on surrounding environment 64-bit, 128-bit or 256-bit WEP (Wired Equivalent Privacy); WPA (Wi-Fi Protected Access),WPA2 USB 2.0/1.1 Link/Active Windows 98Se, Me, 2000, XP and Windows XP x64, Vista Windows-based configuration utility and status monitoring FCC for North America Dimension CE/ETSI for European 58(L) x 23(W) x 9(H) mm Frequency Band Modulation method Data Rate Operation mode Transmitter Output Power Receive Sensitivity Operating Range Security I/O Interface LED Operating system supported Management Weight Operating Temperature Storage Temperature Humidity 9.6 g 0 ~ 50 -20 ~ 70 5 ~ 90% (non-condensing) Seite 48/145 9. Important Notes 9.1 LUTEC service We offer you a warranty period of 24 months. We are pleased that you have decided in favor of a LUTEC product! Certainly you will be enthusiatic about the quality of our product like thousands of satisfied customers before you. Warranty / conditions 1. The warranty period is 24 months and begins with the sale to the end user. The receipt must clearly list the date of purchase and the type of device. In addition, the receipt must be machine printed. Keep the purchase receipt for the entire warranty period, since it is required for all warranty claims. 2. During the warranty period, all defects shall be adjusted or replaced at the manufacturer’s expense, either by repairing or replacing the defective part or the entire device. Work carried out under warranty does neither extend the warranty period nor does it start a new warranty period. 3. The manufacturer reserves the right to void any warranty claim for damages or defects due to misuse, abuse or external impact (falling down, impact, ingress of water, dust, contamination or break). Wearing parts (e. g. rechargeable batteries) are excluded from warranty. Do you need further information? Please use the following four sources of information: 1. Manual Read this Manual carefully. 2. Webpage You can find further information about this and other LUTEC products on the webpage www.lutec.eu. Seite 49/145 3. End customer Support LUTEC offers a free of charge Email support. You can get in contact to us by the mail adress [email protected]. 4. Direct Exchange When the Email support ells you that your Bluetooth Adapter has to be exchanged you will get an authorisation number (RMA number). Please send the device with the the RMA number incl. all accessories and a copy of your proof of purchase to our service center. Afterwards your device will be exchanged. In event of a service circumstance please contact: In case you are not satisfied with a LUTEC product or you need further information please catch up on our homepage www.lutec.eu and contact afterwards our service team. By this way you will get a competent support/advice and in case of a necessary exchange you will get your RMA number. The adress of our service center ist (Transmittals are only accepted when you got a valid RMA number!!!!) Schiffer Service GmbH Industriestraße 16 D-52134 Herzogenrath-Kohlscheid Germany 9.2 Declaration of conformity This device has been tested and found to comply with the requirements set upon the council directive on the approximation of the law of member states relating to EMC Directive 89/336/EEC and Low Voltage Directive 72/23/EEC. R&TTE-Directive (Radio & Telecommunications Terminal Equipment) This product comply with the following directives and specifications: - ETS 300-826 – Generel EMV requirements for wireless equipments ETS 300-328 – Technical requirements for wireless equipments EN 60950 – Safety requirements for wireless equipments Seite 50/145 In case you haven`t got the Adobe© Acrobat Reader you can download the software under www.adobe.com. All trademarks in this Quick start Guide are property of their owners. No responsibility is taken for the correctness of this information. Errata reserved. The warranty expires when the device is handled improperly or the security label is damaged or deleted. Copyright 2007 by LUTEC, no unauthorized duplication. Seite 51/145 Indice 1. Introducción ................................................................................... 54 2. Aspectos básicos sobre redes LAN inalámbricas ........……………56 3. Dirección IP …..............................................................………..…..57 4. Instalación del driver / de la utilidad................................……….…58 5. Configuración de red inalámbrica en Modo de Estación …...........60 5.1 Configuración General de la Conexión.........................….. .61 5.2 Configuración de la Clave de Codificación WEP........……..62 5.3 Configuración de la Codificatión WEP...........................…..63 5.4 Perfil .............................................................……………….64 5.5 Configuración Avanzada............................................……..65 5.6 Información Sobre el Sistema....................................……..66 6. Configuración de red inalámbrica en modo AP ………………..…67 6.1 Configuración General de la Conexión....................…..….. 68 6.2 Configuración de la Clave de Codificación WEP.....….……69 6.3 Otras Configuraciones....................................................…..69 7. Instalación del driver para Vista............................................…….70 8. Especificaciones técnicas….................................................….….73 9. Informaciones importantes …………………………………………..74 Seite 52/145 1. Introducción Gracias por la compra del Mini Adaptador USB WLAN. Equipado con tecnología inalámbrica, esta solución de red inalámbrica ha sido diseñada tanto para empresas grandes como pequeñas, y es escalable, de forma que puede añadir fácilmente más usuarios y nuevas características de red dependiendo de la escala de su empresa. LEISTUNGSMERKMALE CARACTERÍSTICAS • Soporta Microsoft Windows 98SE, Me, 2000 ,XP y XP x64, Vista. • • • Soporta la función WMMTM (Wi-Fi MultiMedia) Alcance de hasta 200 metros en campo libre. Tasa de datos seleccionable de 54/48/36/24/18/12/11/9/6/5.5/2/1 Mbps. • • Soporta interfaz USB 2.0. WEP de 64-bit, 128-bit o 256-bit (Wired Equivalent Privacy); WPA (Wi-Fi Protected Access),WPA2 • Banda de frecuencia ISM sin licencia de 2.400GHz ~ 2.4835GHz. • Método de modulación: IEEE 802.11b : DSSS (Direct Sequence Spread Spectrum). IEEE 802.11g : OFDM (Orthogonal Frequency Division Multiplexing). • Fácil manejo y configuración. REQUISITOS DEL SISTEMA • • Sistema Windows: Windows 98SE, Me, 2000, XP o XP x64, Vista Los ordenadores deben tener instalado un driver de dispositivos. Éste permite la comunicación con el Mini Adaptador USB WLAN. Seite 53/145 ANTES DE COMENZAR 3. Controle el contenido de la caja CONEXIÓN DE SU ADAPTADOR USB WLAN AL PC Guía de inicio rápido • Conecte su dispositivo USB WLAN USB a su PC. • Instale el driver. INFORMACIONES SOBRE EL LED DEL ADAPTADOR INALÁMBRICO USB LAN • El LED se enciende cuando se aplica CORRIENTE al Mini Adaptador USB WLAN. El LED parpadea cuando el PC está enviando datos a través del Mini Adaptador USB WLAN. Seite 54/145 2. Aspectos básicos sobre redes LAN inalámbricas Una red LAN inalámbrica según la definición del comité de estandarización IEEE 802.11b/g puede estar configurada como: • Red LAN inalámbrica ad hoc, o • Red LAN inalámbrica de infraestructura. Una red ad hoc es un grupo de ordenadores instalado con tarjetas LAN inalámbricas que es denominado BSS (Basic Service Set). Los ordenadores de este grupo pueden usar las tarjetas LAN para comunicarse entre sí, pero no para conectarse a Internet. LAN inalámbrica ad hoc LAN inalámbrica de infraestructura La diferencia más obvia entre una red inalámbrica de infraestructura y una red inalámbrica ad hoc es que en una red inalámbrica de infraestructura los ordenadores pueden acceder a la fuente en Internet a través de un Punto de Acceso. Dependiendo de sus necesidades puede configurar fácilmente su red de ordenadores como red inalámbrica “Ad Hoc” o de “Infraestructura”. Por regla general, si su red dispone de un Punto de Acceso, le recomendamos configurar su red como una “Infraestructura” de forma que pueda conectarse a Internet. Seite 55/145 3. Dirección IP Para usar el Mini Adaptador USB WLAN con un dispositivo de computación, el Mini Adaptador USB WLAN debe estar equipado con una interfaz USB 1.1 o 2.0. Todos los drivers y el software de soporte del Mini Adaptador USB WLAN deben ser instalados y configurados primeramente. Solicite a su administrador de sistema la siguiente información que quizá deba facilitar durante la instalación del driver: • • Su nombre de cliente inalámbrico. Su SSID inalámbrico. • • • El nombre único de cliente de su ordenador y el nombre del equipo de trabajo. Su nombre de usuario y contraseña para su cuenta de red. Su dirección IP, dirección de puerta de enlace, y máscara de subred si no utiliza un servidor DHCP. Todo ordenador en una red es identificado por una dirección de red única. Hay dos métodos para asignar una dirección de red a un ordenador en una red TCP/IP: • • Direccionamiento IP estático. Direccionamiento IP dinámico (DHCP). En una red con direccionamiento IP estático, el administrador de red asigna manualmente una dirección IP a cada ordenador. Una vez asignada la dirección IP estática, el ordenador utiliza la misma dirección IP cada vez que se reinicia y se registra en la red. Puede cambiar la dirección IP manualmente en la caja de diálogo Propiedades de Red. Una red que utiliza una dirección IP estática es fácil de configurar y no requiere software adicional de gestión de red. En una red con direccionamiento IP dinámico, un servidor DHCP asigna dinámicamente en la red direcciones IP a todos los clientes cada vez que se registran en la red. Una red que utiliza una dirección IP dinámica requiere la configuración y ejecución de un servidor DHCP. Seite 56/145 4. Instalación del driver / de la utilidad A partir de Windows XP: Compruebe si su PC dispone de un software de gestión de dispositivos inalámbricos propio. Si éste es el caso, instale solamente el driver de dispositivos. Posiblemente encontrará una herramienta disponible seleccionando el punto Software en Inicio Panel de control. Para el driver de VISTA pase directamente al Punto 7. Una vez que haya introducido el CD del driver y de instalación en la unidad de CDs, la función de autoejecución de su ordenador iniciará automáticamente la instalación. Paso 1: Introduzca el CD de instalación y del driver en su unidad de CD-ROM. Paso 2: Haga clic en Siguiente para continuar. Paso 3: Haga clic en Siguiente para realizar la instalación en la carpeta designada, o en “Hojear” para seleccionar una carpeta diferente. Seite 57/145 Paso 4: Inicie la copia de los archivos hasta que se termine la instalación. Paso 5: Haga clic en Finalizar para concluir la instalación. Paso 6: Una vez concluida, instale el driver y la utilidad en su sistema, conecte el adaptador USB en el puerto USB de su PC. Windows XP/2000 detectará automáticamente el adaptador USB. Si su sistema operativo (p. ej. Microsoft Vista©) no dispone de una herramienta de gestión de software, instale ahora este software y prosiga con el Punto 5, "Configuración de la red inalámbrica". Posiblemente encontrará una herramienta disponible seleccionando el punto Software en Inicio Panel de control. Seite 58/145 5. Configuración de red inalámbrica en Modo de Estación El adaptador USB WLAN utiliza su software de gestión propio. Todas las funciones controladas por los usuarios son proporcionadas por esta aplicación. Al introducir el adaptador USB WLAN en el puerto USB de su PC, debería aparecer automáticamente un icono nuevo en la bandeja de sistema de Windows. Si el icono tiene color rojo, esto significa que la configuración del adaptador USB WLAN es inválida o incompleta. Haga doble clic sobre este icono y la ventana de configuración emergerá como se muestra abajo. Ésta muestra la SSID de la red disponible. Una vez elegida una red, se mostrarán la fuerza de la señal y la calidad del enlace. El gráfico de barras de Calidad de Enlace y Potencia de Señal sólo está activado si el nodo se encuentra en Modo de Infraestructura. El gráfico de barras muestra la calidad y potencia del enlace entre el nodo y su Punto de Acceso. La Calidad de Enlace es una medición del rendimiento de recepción y transmisión a través de radio. Tx/Rx Frame muestra los cómputos de transmisión y recepción inalámbricos instantáneos. La Herramienta de Configuración contiene varios campos donde pueden verse o cambiarse los parámetros de funcionamiento del driver. Los cambios realizados en este panel pueden aplicarse al driver sin necesidad de reiniciar el ordenador. Información Actual de Red muestra la configuración de red actual. Si desea cambiar la configuración de red, haga clic en “Más ajustes”. Seite 59/145 5.1 CONFIGURACIÓN GENERAL DE LA CONEXIÓN En este panel puede modificar la configuración general de conexión de la red, habilitar/deshabilitar el WEP, cargar/modificar el perfil y hacer otros ajustes. A través de este panel de control podrá acceder al LAN inalámbrico de su empresa o a hot spots en hoteles, aeropuertos y salas de congresos. Haga clic en “Cambiar” para iniciar la entrada de ajustes. Los ajustes incluyen: • • SSID Tipo de red. • • • Tasa de transmisión. Codificación. Modo de autentificación. Una vez introducidos los ajustes, haga clic en “Aplicar” para confirmar los cambios. Seite 60/145 5.2 CONFIGURACIÓN DE LA CLAVE DE CODIFICACIÓN WEP Si desea una medida de seguridad adicional para su red inalámbrica, puede lograrla utilizando la codificación WEP (Wired Equivalent Privacy). WEP codifica todos los marcos transmitidos por radio usando una de las claves introducidas en este panel. Si se recibe un marco codificado sólo será aceptado si se decodifica correctamente. Esto sólo sucederá si el receptor utiliza la misma clave WEP que el transmisor. El estado por defecto en la Configuración de Codificación es WEP deshabilitado. Marque “Habilitar WEP” para habilitar la codificación. Para realizar más ajustes de la clave WEP haga clic en “Configuración de la clave de codificación WEP”. Se dispone de tres modos de autentificación: Sistema Abierto, Clave Compartida y Auto. El Sistema Abierto utiliza una clave por defecto para autentificar la estación y el Punto de Acceso. Una vez autentificadas ambas partes, la estación recibe el permiso de enviar y recibir datos de la red. No obstante, los datos no están codificados. En el sistema de Clave Compartida la estación y el Punto de Acceso se autentifican recíprocamente. El marco de datos es también codificado por la clave WEP. En el Modo Auto el Punto de Acceso asume el control de la configuración de la seguridad de red y la estación seguirá la configuración requerida desde aquél. Haga clic en “cerrar caja” en la esquina superior derecha para volver a la Herramienta de Configuración. Seite 61/145 5.3 CONFIGURACIÓN DE LA CODIFICACIÓN WPA WPA (Wi-Fi Protected Access) es una tecnología de seguridad para redes inalámbricas. WPA supera las características de autentificación y codificación de WEP (Wired Equivalent Privacy). Para mejorar la codificación de datos, WPA utiliza su Protocolo de Integridad de Clave Temporal (TKIP). TKIP proporciona importantes mejoras en la codificación de datos, incluyendo una función de mezcla de claves por paquete, un control de integridad del mensaje (MIC, llamado Michael), un vector de inicialización extendido (IV) con reglas de secuenciación y un mecanismo de recodificación. WPA con clave precompartida (WPA-PSK) es una forma simplificada pero todavía potente de WPA, muy adecuada para redes Wi-Fi en hogares. Para utilizar WPA-PSK se debe establecer una clave estática o “passphrase” como con WEP. Pero si se utiliza TKIP, WPA-PSK cambia automáticamente las claves a intervalos de tiempo predeterminados, haciendo mucho más difícil a los hackers encontrarlas y usarlas. La clave recompartida consta de caracteres alfanuméricos incluyendo signos de puntuación y espacios y es de una longitud entre 8 y 63 caracteres. A los clientes inalámbricos se les requiere solamente la introducción de la clave precompartida. Si las claves precompartidas concuerdan, puede iniciarse una comunicación inalámbrica segura. Para hacer más ajustes WPA, haga clic en “Configuración de codificación WPA”. Seite 62/145 5.4 PERFIL Cada perfil representa ajustes específicos del adaptador USB. Puede establecer los ajustes para cada perfil. La próxima vez que desee cambiar los ajustes del adaptador USB, puede seleccionar el perfil que quiera usar. Seite 63/145 5.5 CONFIGURACIÓN AVANZADA Haga clic en “Configuración avanzada” para seleccionar el ajuste de consumo de potencia. Se dispone de 3 modos de ajuste diferentes. En este panel puede seleccionar diferentes interfaces de usuarios e itinerancia internacional. También le permite establecer el umbral de fragmentación y el RTS/CTS. Seite 64/145 5.6 INFORMACIÓN SOBRE EL SISTEMA Haciendo clic en “Información” la ventana emergente mostrará la versión de driver, la versión de utilidad, la dirección MAC de su adaptador USB, etc. Seite 65/145 6. Configuración de red inalámbrica en modo AP El adaptador USB WLAN utiliza su software de gestión propio. Todas las funciones controladas por los usuarios son proporcionadas por esta aplicación. Al introducir el adaptador USB WLAN en el puerto USB de su PC, debería aparecer automáticamente un icono nuevo en la bandeja de sistema de Windows. Si el icono tiene color rojo, esto significa que la configuración del adaptador USB WLAN es inválida o incompleta. Haga doble clic sobre este icono y la ventana de configuración emergerá como se muestra abajo. Si necesita configurar su adaptador USB WLAN USB como un Punto de Acceso, puede cambiar en la esquina superior derecha el modo de configuración de “Estación” a “Punto de Acceso”. Éste muestra la Lista de Estaciones de Conexión que se conectan a su adaptador USB. Cuando un ordenador se conecte con su dispositivo se indicará su dirección MAC en la tabla. Tx/Rx Frame muestra los cómputos de transmisión y recepción inalámbricos instantáneos. Haga clic en “Más ajustes” para cambiar su configuración del Punto de Acceso. Haga clic en “Más ajustes” para cambiar su configuración del Punto de Acceso. Seite 66/145 6.1 CONFIGURACIÓN GENERAL DE LA CONEXIÓN Para establecer el Modo Inalámbrico, el Canal, SSID y Tx Power haga clic en “Cambiar” en este panel. Una vez introducidos los ajustes haga clic en “Aplicar” para confirmar los cambios. Seite 67/145 6.2 CONFIGURACIÓN DE LA CLAVE DE CODIFICACIÓN WEP Si desea una medida de seguridad adicional para su red inalámbrica, puede lograrla utilizando la codificación WEP (Wired Equivalent Privacy). Ajuste la autentificación en “Clave Compartida” y WEP en “Habilitar”. Para realizar más ajustes de la clave WEP haga clic en el botón “Configuración”. 6.3 OTRAS CONFIGURACIONES Puede establecer el umbral de fragmentación y el RTS/CTS. Puede elegir entre aceptar o rechazar direcciones MAC específicas haciendo clic en el botón “Configuración” del Filtro de Direcciones MAC. Seite 68/145 Puede elegir un adaptador puente que desee puentear con el adaptador inalámbrico USB. 7. Instalación del driver para Vista Conecte su dispositivo USB a la interfaz USB. Windows Vista buscará un driver compatible para instalar. Paso 1: Seleccione “Localizar e instalar el software de driver”, Windows le guiará a través del proceso de instalación del software de driver para su dispositivo. Paso 2: Introduzca el disco de instalación en la unidad de CD-ROM y haga clic en “siguiente” para continuar la instalación. Seite 69/145 Paso 3: Windows Vista buscará el software y se instalará con éxito. Paso 4: Después de la instalación haga clic con la tecla derecha sobre el icono de red en la bandeja de sistema de Windows de Vista y pinche seguidamente en “Conectar a una red”. Paso 5: Seleccione la red a la que desea conectarse y haga clic en “Conectar”. Seite 70/145 Paso 6: Haga clic en “Conectar de todos modos” si se trata de una red no asegurada. Paso 7: Cuando el dispositivo USB esté conectado con éxito a la red, haga clic en “Cerrar” Nota: En Win98SE, Win2000, ME, XP, XP x64, el nombre del dispositivo es: “(ZD1211)IEEE 802.11b+g USB Adapter” En Windows Vista, el nombre del dispositivo es: “Atheros AR5007UG Wireless Network Adapter”. Seite 71/145 8. Especificaciones técnicas Nombre del producto Estándar Banda de frecuencia Método de modulación Tasa de datos Modo de operación Potencia de salida del transmisor Sensibilidad de recepción Alcance Seguridad Interfaz I/O LED Sistemas operativos soportados Gestión Regulación WLA-54L WLAN USB Adaptador IEEE802.11b/g 2.400GHz ~ 2.4835GHz banda ISM sin licencia 802.11b : QPSK/BPSK/CCK 802.11g : OFDM 54/48/36/24/18/12/11/9/6/5.5/2/1Mbps Ad hoc Infraestructura (se precisa Punto de Acceso) < 15 dBm Operando a 11Mbps: @ –80dBm Operando a 54Mbps: @ –70dBm Hasta 200 m, dependiendo del entorno WEP de 64-bit, 128-bit o 256-bit (Wired Equivalent Privacy); WPA (Wi-Fi Protected Access),WPA2 USB 2.0/1.1 Enlace/Activo Windows 98Se, Me, 2000, XP y Windows XP x64, Vista Utilidad de configuración basada en Windows y control de estado FCC para Norteamérica CE/ETSI para Europa Dimensiones 58(L) x 23(An) x 9(Al) mm Peso Temperatura de funcionamiento Temperatura de almacenamiento Humedad 9.6 g 0 ~ 50 -20 ~ 70 5 ~ 90% (no condensante) Seite 72/145 9. Informaciones importantes 9.1 Servicio LUTEC Concedemos 24 meses de garantía. ¡Muchas gracias por haberse decidido por un producto LUTEC! Estamos seguros de que - al igual que muchos miles de clientes satisfechos con anterioridad a usted quedará entusiasmado por la calidad de nuestro producto. Declaración de garantía / Condiciones 1. El periodo de garantía es de 24 meses a contar de la fecha de venta al consumidor final. La fecha de compra y el tipo de aparato se deben documentar mediante un comprobante de compra hecho a máquina. Conserve por tanto, por favor, su justificante de compra durante el plazo de duración de la garantía, ya que es requisito indispensable para una eventual reclamación. 2. Durante el periodo de garantía serán corregidos por el fabricante todos los defectos facultativamente, ya sea mediante reparación, cambio de las piezas defectuosas o mediante la sustitución del aparato. La prestación de garantía no tiene como efecto ni una prolongación ni un nuevo comienzo del periodo de garantía. 3. La prestación de garantía no se extiende a daños o defectos producidos por un manejo inadecuado o por influencias externas (caídas, golpes, agua, polvo, suciedad o roturas). Las piezas de desgaste (p. ej. la batería) están excluidas de la garantía. 1) Manual del usuario: Lea atentamente este manual adjunto. 2) Página Web: Bajo www.lutec.eu puede informarse sobre preguntas frecuentemente puestas, listas de compatibilidades actuales etc. 3) Hotline para clientes finales: Puede contactarnos vía la dirección siguiente de correo electrónico: [email protected]. Seite 73/145 Si necesita asistencia telefónica estaremos a su disposición con nuestra hotline de cliente final de lunes a viernes de las 9.00 hasta las 18.00 horas 4) Direct Exchange: Cuando la hotline le comunica que su kit de coche deberá ser cambiado, la hotline le transmitirá un número de autorización (n° RMA). Rog amos envíe su equipo indicando este número RAM incluso los accesorios y una copia del comprobante de compra a nuestro Centro de servicio. Le mandaremos lo más pronto posible un recambio. Hotline para clientes finales: de Espana: 800 300 100* *:EURO 0,23/minuto E-mail para clientes finales: [email protected] Centro de servicio: Envíos a nuestro Centro de Servicio se permiten solamente tras autorización por nuestra hotline indicando el número RMA, en caso contrario no se puede aceptar la devolución. Schiffer Service GmbH c/o n° Lutec RMA: xxx (rogamos anote áquí el número RMA indicado por la hotline) Industriestr. 16 D-52134 Herzogenrath-Kohlscheid 9.2 Declaración de conformidad Este aparato ha side probado y cumple los requisitos de seguridad esenciales establecidos según la Directiva del Consejo en materia de armonización de las legilaciones de los Estados miembros relativa a la Directiva EMC 89/366/CEE, Directiva de bajo voltaje 73/23/CEE. Directiva R&TTE (Radio & Telecommunications Terminal Equipment) El producto cumple las directivas / especificaciones indicadas a continuación - ETS 300-826 – Requisitos generales de CEM para equipos de radio Seite 74/145 - ETS 300-328 – Requisitos técnicos para equipos de radio EN 60950 – Requisitos de seguridad para equipos de radio Si es que Ustedes no Adobe© Acrobat Reader instalar, Ustedes bajar el programma gratis bajo www.adobe.com. Bajo www.microsoft.com puede informarse sobre Microsoft Vista© Bajo www.lutec.eu puede informarse sobre LUTEC. Todos marcas son propriedad el possedor. Los datos sin garantia. La errata reservar. La prestación de garantía no se extiende a daños o defectos producidos por un manejo inadecuado o por influencias externas (caídas, golpes, agua, polvo, suciedad o roturas). Las piezas de desgaste (p. ej. la batería) están excluidas de la garantía. Copyright 2007 by LUTEC, no ilegal multiplicacion Seite 75/145 Conteudo 1. Introdução ................................................................................... 78 2. Conceitos Básicos da LAN Sem Fios..........................……………80 3. Endereço IP..................................................................………..….81 4. Instalar Controlador / Utilitário........................................……….…82 5. Configuração da Rede Sem Fios em Modo Estação ....................84 5.1 Configuracao da Ligacao geral....................................….. ..85 5.2 Configuracao da chave de Encriptacacao WEP..............….86 5.3 Configuracao da Encriptacao WPA...........................………87 5.4 Perfil .............................................................………………..88 5.5 Configuracao avancada..............................................……..89 5.6 Informacao de Sistema.................................................……90 6. Configuração da Rede Sem Fios em Modo AP.………………..…91 6.1 Configuracao da Ligacao geral................................…..….. 92 6.2 Configuracao da chave de Encriptacao WEP..........….……93 6.3 Outras Configuracoes....................................................…..93 7. Instalar o Controlador do Vista.............................................……..94 8. Especificações Técnicas......................................................….….97 9. Importante anúncio ………………………………………..….………98 Seite 76/145 1. Introdução Agradecemos-lhe por ter adquirido o Adaptador Mini USB WLAN. Componente de tecnologia sem fios, esta solução de rede sem fios foi desenvolvida tanto para negócios de grande como de pequena dimensão e é expansível de modo a que possa facilmente adicionar mais utilizadores e novas características de rede, dependendo do seu volume de negócios. CARACTERÍSTICAS * Suporta o Microsoft Windows 98SE, Me, 2000, XP e XP x64, Vista. * Suporta a função WMMTM (Wi-Fi MultiMedia) * Alcance, em funcionamento, de mais de 200 metros em espaço aberto. * Taxa de transmissão de dados seleccionável 54/48/36/24/18/12/11/9/6/5.5/2/1 Mbps. * Suporta uma interface USB 2.0. WEP (Privacidade Equivalente à Rede com Fios) de 64 bits, 128 bits ou 256 bits; WPA (Acesso Protegido Wi-Fi),WPA2 Frequência de banda ISM não autorizada 2.400GHz ~ 2.4835GHz. Método de Modulação: IEEE 802.11b : DSSS (Sistema de espalhamento espectral por sequência directa). IEEE 802.11g : OFDM (Multiplexação por Divisão de Frequência Ortogonal) Funcionamento e preparação fáceis. REQUISITOS DO SISTEMA Sistema Windows: Microsoft Windows 98SE, Me, 2000, XP ou XP x64, Vista. Os computadores têm de ter um controlador instalado. Este permite-lhe comunicar com o Adaptador Mini USB WLAN. Seite 77/145 ANTES DE COMEÇAR 4. Confirme o conteúdo da embalagem (in deutsch oder englisch) LIGUE O SEU ADAPTADOR USB WLAN AO COMPUTADOR Guia de Início Rápido Ligue o seu dongle USB WLAN ao seu computador. Instalar o controlador. CONHECER MELHOR O ADAPTADOR USB LAN SEM FIOS LED O LED acende-se quando o Adaptador Mini USB WLAN é LIGADO. O LED fica intermitente quando o computador está a enviar dados através do Adaptador Mini USB WLAN. Seite 78/145 2. Conceitos Básicos da LAN Sem Fios A rede LAN Sem Fios definida pelo comité de normalização IEEE 802.11b/g pode ser configurada como: LAN sem fios Ad Hoc, ou LAN sem fios de infra-estruturas. A rede Ad-hoc é um grupo de computadores instalados com placas LAN sem fios, este grupo de computadores é chamado um BSS (Conjunto Básico de Serviços). Neste grupo, os computadores podem usar as suas placas LAN sem fios para comunicar entre si, mas não é possível ligarem-se à Internet. A rede Ad-hoc A rede Infra-estruturas A diferença mais óbvia entre a rede sem fios de Infra-estruturas e a rede Ad-hoc sem fios é que os computadores na rede sem fios de Infra-estruturas podem aceder a recursos na internet através de um Ponto de Acesso. Dependendo das suas necessidades, pode configurar facilmente a sua rede para ser uma rede se “Ad-hoc” ou “Infra-estrutura”. Normalmente, se existir um Ponto de Acesso na sua rede, recomendamos que configure a sua rede como “Infraestrutura”, para assim poder ter ligação à Internet. Seite 79/145 3. Endereço IP Para utilizar o Adaptador Mini USB WLAN com um dispositivo informático, o adaptador deve estar equipado com uma Interface USB 1.1 ou 2.0. Todos os controladores e software de suporte para o Adaptador Mini USB WLAN devem ser, em primeiro lugar, instalados e configurados. Peça ao seu administrador de sistema as seguintes informações que poderá necessitar durante a instalação do controlador: O seu Nome de Cliente Sem Fios. O seu SSID Sem Fios. O seu nome de cliente único do computador e nome do grupo de trabalho. A sua conta de rede, o nome de utilizador e palavra-passe. O seu endereço IP, endereço de portal e a sua máscara sub-rede, se não estiver a utilizar um servidor DHCP. Todos os computadores ligados a uma rede são identificados por um endereço de rede único. Existem dois métodos para atribuir um endereço de rede a um computador numa rede TCP/IP: • Endereçamento IP estático. • Endereçamento IP dinâmico (DHCP). Numa rede com endereçamento estático dinâmico, o administrador de rede atribui manualmente um endereço IP a cada computador. Assim que um endereço IP estático é atribuído, um computador utiliza o mesmo endereço IP sempre que se reinicia ou liga à rede. Pode alterar manualmente o endereço IP na caixa de diálogo Propriedades da rede. A rede que utiliza um endereço IP estático é fácil de configurar e não necessita de software de gestão de rede adicional. Na rede com endereçamento IP dinâmico, um servidor DHCP atribui dinamicamente na rede endereços IP a todos os clientes, sempre que iniciam a sessão nessa rede. A rede que utiliza um endereço IP dinâmico necessita de uma configuração e execução de um servidor DHCP. Seite 80/145 4. Instalar Controlador / Utilitário Para Windows XP: Verifique se o seu PC dispõe de um software de gestão de aparelhos wireless. Se sim, instale apenas o programa de controlo. É possível que encontre uma ferramenta se aceder a Iniciar Painel de Controlo e seleccionar o ponto Software. Para o programa de controlo para VISTA, ver já o ponto 7. Após ter inserido o CD do controlador e de instalação na unidade de CD, a função de autorun do seu computador inicia automaticamente a instalação. Passo 1: Insira o CD de instalação & controlador no seu CD-ROM. Passo 2: Clique em Próximo para continuar. Passo 3: Clique em Seguinte para instalar na pasta designada. Ou, clique “Procurar” para seleccionar pastas diferentes. Seite 81/145 Passo 4: Inicie a cópia de ficheiros até a instalação estar concluída. Passo 5: Clique em Terminar para concluir a instalação. Passo 6: Depois de terminar a instalação do controlador e utilitário no sistema, ligue o adaptador USB à porta USB do seu computador. O Windows XP/2000 detectará automaticamente o Adaptador USB. Se o seu sistema operativo (p. ex., Microsoft Vista©) não dispuser de uma ferramenta de acesso ao software de gestão, instale este software agora e prossiga com o ponto 5 "configuração da rede wireless". É possível que encontre uma ferramenta se aceder a Iniciar Painel de Controlo e seleccionar o ponto Software. Seite 82/145 5. Configuração da Rede Sem Fios em Modo Estação O Adaptador USB WLAN utiliza o seu próprio software de gestão. Todas as funções controladas pelos utilizadores são fornecidas por esta aplicação. Ao inserir o Adaptador USB WLAN na porta USB do seu computador, deverá aparecer automaticamente um novo ícone na barra de sistema do Windows. Se o ícone estiver a vermelho, significa que a configuração do Adaptador USB WLAN é inválida ou está incompleta. Clique duas vezes nesse ícone e a janela de configuração será apresentada da seguinte forma. Apresenta o SSID da rede disponível. Uma vez escolhida a rede, são apresentadas a força do sinal e a qualidade da ligação. O diagrama de barras da Qualidade da Ligação e da Força do Sinal só está disponível quando o nó está no Modo Infra-estrutura. O gráfico de barras apresenta a qualidade e força da ligação entre o nó e o seu Ponto de Acesso. A Qualidade de Ligação é uma medição do desempenho de recepção e transmissão no rádio. O Sistema Tx/Rx apresenta a contagem instantânea de Transmissão e Recepção sem fios. A Ferramenta de Configuração contém vários campos onde os parâmetros operativos da componente podem ser visualizados ou alterados. Alterações a qualquer um dos parâmetros neste painel podem ser aplicadas à componente sem que seja necessário reiniciar o computador. A Informação de Rede Actual apresenta a configuração de rede actual. Se quiser alterar as configurações de rede, clique em “Configurações adicionais" Seite 83/145 5.1 CONFIGURAÇÃO DA LIGAÇÃO GERAL Neste painel, pode modificar a configuração de rede geral, activar/desactivar o WEP, carregar/modificar o perfil ou outras configurações. Através deste painel de controlo, poderá aceder à LAN sem fios de classe empresarial ou a pontos centrais como hotéis, aeroportos e salas de conferências. Clique em “Alterar” para inserir as configurações. As configurações incluem: • • SSID. Tipo de Rede. • • Taxa de Transmissão. Encriptação.Modo de Autenticação. Quando tiver inserido as configurações, clique em “Aplicar” para confirmar as alterações das mesmas. Seite 84/145 5.2 CONFIGURAÇÃO DA CHAVE DE ENCRIPTAÇÃO WEP Se pretender uma medida de segurança adicional na sua rede sem fios, poderá obtê-la ao utilizar a encriptação WEP (Privacidade Equivalente à da Rede com Fios). O WEP encripta cada pacote transmitido via rádio usando para isso uma das chaves inseridas neste painel. Quando é recebido um pacote encriptado, só será aceite se for decriptado correctamente. Isto apenas acontecerá se o receptor tiver a mesma chave WEP utilizada pelo transmissor. Na Configuração de Encriptação, o estado predefinido é WEP desactivado. Configure para “Activar WEP” para permitir a encriptação. Para mais configurações da chave WEP, clique em “Configuração da Chave de Encriptação WEP”. Estão disponíveis três modos de autenticação: Sistema Aberto, Chave Partilhada e Automático. O Sistema Aberto utiliza a chave predefinida para autenticar a estação e o Ponto de Acesso. Após a autenticação de ambas as partes, a estação pode enviar e receber dados a partir da rede. Contudo, os dados não são encriptados. Num Sistema de Chave partilhada, a estação e o Ponto de Acesso são reciprocamente autenticados. Os dados do pacote também são encriptados pela chave WEP. No Modo Automático, o Ponto de Acesso assume o controlo da configuração de segurança da rede e a estação seguirá a configuração pedida pelo AP. Clique em “fechar caixa” no canto superior direito para voltar à Ferramenta de Configuração. Seite 85/145 5.3 CONFIGURAÇÃO DA ENCRIPTAÇÃO WPA WPA (Acesso Protegido Wi-Fi) é uma tecnologia de segurança para redes sem fios. O WPA melhora os métodos de autenticação e encriptação do WEP (Privacidade Equivalente à da Rede com Fios). Para melhorar a encriptação de dados, o WPA utiliza o Protocolo de Integridade de Chave Temporária (TKIP). O TKIP fornece melhoramentos importantes na encriptação de dados incluindo uma função de mistura de chaves por pacote, uma verificação da integridade da mensagem (MIC, designada por Michael), um vector de inicialização alargado (IV) com regras sequenciais e um mecanismo de recodificação. O WPA - Chave pré-partilhada (WPA-PSK) é uma forma de WPA simplificada, mas ainda assim poderosa, mais adequada para redes Wi-Fi de casa. Ao utilizar WPAPSK, está definir uma chave estática ou uma “passphrase” (frase-passe) como com o WEP. Mas ao utilizar o TKIP, o WPA-PSK modifica automaticamente a chave num intervalo de tempo predefinido, dificultando a sua descoberta e exploração por parte dos hackers. A chave pré-partilhada é composta por caracteres alfanuméricos incluindo pontuação e espaços, tendo entre 8 a 63 caracteres. Só é pedido aos clientes Sem Fios que introduzam a chave predefinida. Se esta coincidir, as comunicações sem fios seguras podem ser iniciadas. Para mais configurações do WPA, clique em “Configuração da encriptação WPA”. Seite 86/145 5.4 PERFIL Cada perfil representa as configurações específicas do adaptador USB. Pode definir as configurações para cada perfil. Na próxima vez que quiser alterar as configurações do adaptador USB, terá apenas de seleccionar o perfil que quer utilizar. Seite 87/145 5.5 CONFIGURAÇÃO AVANÇADA Clique em “Configurações Avançadas” para seleccionar a configuração de consumo de energia que possui três modos diferentes. Neste painel, pode seleccionar as diferentes interfaces de utilizador e o roaming do país. Este também lhe permite configurar o limiar de fragmentação e o RTS/CTS. Seite 88/145 5.6 INFORMAÇÃO DE SISTEMA Clique em “Informação” e a janela popup mostrar-lhe-á a Versão do Programa de Controlo, a Versão do Utilitário, o endereço MAC deste adaptador, entre outros. Seite 89/145 6. Configuração da Rede Sem Fios em Modo AP O Adaptador USB WLAN utiliza o seu próprio software de gestão. Todas as funções controladas pelos utilizadores são fornecidas por esta aplicação. Ao inserir o Adaptador USB WLAN na porta USB do seu computador, deverá aparecer automaticamente um novo ícone na barra de sistema do Windows. Se o ícone estiver a vermelho, significa que a configuração do Adaptador USB WLAN é inválida ou está incompleta. Clique duas vezes nesse ícone e a janela de configuração será apresentada da seguinte forma. Se necessitar de configurar o seu Adaptador USB WLAN como um Ponto de Acesso, pode alterar, no canto superior direito, o modo de configuração para “Ponto de Acesso”, em vez de Modo “Estação”. Apresenta a Lista de Estações de Ligação que estão ligadas ao seu Adaptador USB. Enquanto um computador estiver ligado ao Dongle, o endereço MAC dele será apresentado na tabela. O Sistema Tx/Rx apresenta a contagem instantânea de Transmissão e Recepção sem fios. Clique em “Configurações adicionais” para alterar as configurações do seu “Ponto de Acesso”. Seite 90/145 6.1 CONFIGURAÇÃO DA LIGAÇÃO GERAL Neste painel, clique em “Alterar” para configurar o Modo Sem Fios, Canal, SSID e Potência Tx. Quando tiver inserido as configurações, clique em “Aplicar” para confirmar as alterações das mesmas. Seite 91/145 6.2 CONFIGURAÇÃO DA CHAVE DE ENCRIPTAÇÃO WEP Se pretender uma medida de segurança adicional na sua rede sem fios, poderá obtê-la ao utilizar a encriptação WEP (Privacidade Equivalente à da Rede com Fios). Configure a Autenticação para “Chave Partilhada” e WEP para “Activar”. Para mais configurações da chave WEP, clique no botão “Configuração”. 6.3 OUTRAS CONFIGURAÇÕES Pode configurar o limiar de fragmentação e RTS/CTS. Pode aceitar ou rejeitar os endereços MAC específicos ao clicar no botão “Configuração” do Filtro do Endereçamento MAC. Seite 92/145 Seleccione um adaptador de ligação que queira ligar ao adaptador USB sem fios. 7. Instalar o Controlador do Vista Ligue o seu dongle USB à interface USB, o Windows Vista procurará a componente compatível a instalar. Passo 1 : Seleccione “Localizar e instalar o software da componente”, o Windows orientá-lo-á durante o processo de instalação do software da componente no seu aparelho. Passo 2: Insira o CD de instalação no CD-ROM e clique em “seguinte” para continuar a instalação. Seite 93/145 Passo 3 : O Windows Vista procura pelo software e será instalado com êxito. Passo 4 : Após a instalação, clique no ícone da rede na barra de sistema do Windows Vista e seleccione “Ligar à rede”. Passo 5 : Seleccione a rede com a qual quer estabelecer ligação e clique em “Ligar”. Seite 94/145 Passo 6 : Clique em “Continuar a ligação”, mesmo se a rede é uma rede insegura. Passo 7 : Dongle USB ligado à rede com sucesso, clique em “Fechar” Nota: Em Win98SE, Win2000, ME, XP, XP x64, o nome do Aparelho é: “(ZD1211)IEEE 802.11b+g Adaptador USB” No Windows Vista, o nome do Aparelho é: “Atheros AR5007UG Adaptador de Rede Sem Fios” Seite 95/145 8. Especificações Técnicas Nome do Produto Norma Frequência de Banda Método de modulação Transmissão de Dados Modo de funcionamento Potência de Saída do Transmissor WLA-54L WLAN USB Adaptor IEEE802.11b/g 2.400GHz ~ 2.4835GHz banda ISM não autorizada 802.11b : QPSK/BPSK/CCK 802.11g : OFDM 54/48/36/24/18/12/11/9/6/5.5/2/1Mbps Ad-hoc Infra-estrutura (São necessários Pontos de Acesso) < 15 dBm Regulação Funcionamento a 11Mbps: @ –80dBm Funcionamento a 54Mbps: @ –80dBm Mais de 200 m, dependendo da área circundante WEP (Privacidade Equivalente à Rede com Fios) de 64 bits, 128 bits ou 256 bits; WPA (Acesso Protegido Wi-Fi), WPA2 USB 2.0/1.1 Ligação/Activa Windows 98Se, Me, 2000, XP e Windows XP x64, Vista Configuração do utilitário baseada no Windows e controlo do estado FCC para a América do Norte Dimensões CE/ETSI para a Europa 58(A) x 23(L) x 9(P) mm Sensibilidade de Recepção Alcance Operacional Segurança Interface I/O LED Sistema operativo suportado Gestão Peso Temperatura de Operação Temperatura de Armazenamento Humidade 9,6 g 0 ~ 50 ℃ -20 ~ 70 ℃ 5 ~ 90% (não condensação) Seite 96/145 9. Importante anúncio 9.1 Assistência Técnica LUTEC Asseguramos 24 meses de garantia. Muito obrigado por ter optado por um produto LUTEC! Com toda a certeza, tal como milhares de clientes antes de si, também ficará maravilhado com a qualidade do nosso produto. Declaracao/ Condicoes da Garantia 1. A garantia tem a duracao de 24 meses, com inicio a partir da data de compra do comprador final. A data de compra e o tipo a aparelho sao comprovados por um talao de compra emitido por uma maquina. Por favor, conserve a seu comprovativo de compra durante toda a duracao da garantia, o qual devera ser apresentado no caso de uma eventual reclamacao. 2. Dentro do prazo de garantia, todos os defeitos serao tratados mediante reparacao, troca de peca defeituosa ou troca do aparelho. Consoante a opcao do fabricante. A elaboracao da prestacao da garantia nao contempla nem um prolongamento, nem uma nova data de inicio para a garantia. 3. Uma prestacao de garantia nao cobre danos ou avarias causados por uma manipulacao impropria ou por factores externos (desabamentos, choques, agua, po, suijdade ou cortes de energia). As pecas de desgaste (por ex, a bateria) estao excluidas da garantia. 1) Manual: Leia cuidadosamente o manual em anexo e o Guia de Iniciacao Rapida 2) Webpage: Em www.lutec.eu, pode informar-se sobre variadas questoes, tais como listas de compatibilidade actuais, etc. 3) Hotline para clientes finais: Pode contacta-nos por e-amil, para [email protected]. Seite 97/145 4) Direct Exchange: Se a Hotline o informar de que terá de proceder à substituição do seu Car Kit, a Hotline atribuir-lhe-á um número de autorização (n.º RMA) . Envie este aparelho sob a referência deste nº RMA, incl. acessório e uma cópia do recibo de compra para o nosso Centro de Assistência Técnica. O seu aparelho será trocado de imediato. Hotline para clientes: em Portugal (9h-18h): 707 200 925 0,10€/min 0,25€/min mobil E-mail para clientes: [email protected] Centro de Assistência Técnica: Os envios para o nosso Centro de Assistência Técnica só podem ser realizados com autorização da nossa hotline sob a referência do nº RMA. De outra forma, o reenvio não pode ser assumido. Schiffer Service GmbH a/c Lutec nº RMA: xxx (inserir nº RMA mencionado pela hotline) Industriestr. 16 D-52134 Herzogenrath-Kohlscheid 9.2 Declaracao de conformidade O producto foi testado e esta em conformidade com os requisitos da Directica do Conselho para aproxmacao a Lei dos Estados membros, em relacao a Directiva EMC Directive 89/366/EEC e Directiva sobre Baixa Voltagem 73/23 EEC. Directiva R&TTE (Radio & Telecommunications Terminal Equipment) O produto está de acordo com as directivas / especificações abaixo mencionadas - ETS 300-826 – Requisitos gerais de CEM para equipamentos de rádio - ETS 300-328 – Requisitos técnicos de equipamentos de rádio EN 60950 – Requisitos de segurança de equipamentos de rádio Seite 98/145 Todo marca seja propriedade seu donoi. Todo justo reservar. Todo declaracao menos caucao. Errata reservar. A garantia fim ao tempe que aparelho opere erro e manejar e seguranca etiqueta afastar. Copyright 2007 by LUTEC, no nao permitir copia. Seite 99/145 Tartalomjegyzek 1. Bevezetés.................................................................................... 102 2. Vezeték nélküli LAN alapismeretek.................................…………104 3. IP-cím ............................................................………..…................105 4. Meghajtóprogram / segédprogram telepítése.......................……..106 5. Vezeték nélküli hálózat konfigurálása állomás módban.................108 5.1 Általanos Csatlakozasi Beallitas............................................109 5.2 WEP Titkositasi Kulcs Beallitasa...............................……......110 5.3 WPA Titkositasi Beallitasaok.............................................…..111 5.4 Profilok .............................................................………………111 5.5 Fejlett Beallitasok.........................................................………112 5.6 Rendszerinformaciok.................................................………..113 6. Vezeték nélküli hálózat konfigurálása AP módban......…………..….114 6.1 Általanos Csatlakozasi Beallitasok..............................….……115 6.2 WEP Titkositasi Kulcs Beallitasai.....................….…………….116 6.3 Egyeb Beallitasok............................................................…….116 7. Vista meghajtóprogram telepítése.............................................……117 8. Mőszaki adatok... ................................................................….…….120 9. Fontos utalás ………………………………………..….…………….....121 Seite 100/145 1. Bevezetés Köszönjük, hogy megvásárolta a WLAN mini USB adaptert. Ez a vezeték nélküli technológiát alkalmazó hálózati megoldás mind nagy-, mind pedig kisvállalkozások részére készült, és skálázható, így az üzleti igények függvényében könnyen további felhasználókat, illetve hálózati szolgáltatásokat lehet hozzáadni. JELLEMZİK • • A következı operációs rendszereket támogatja: Microsoft Windows 98SE, Me, 2000 ,XP és XP x64, Vista. Támogatja a WMMTM (Wi-Fi MultiMedia) funkciót • • A mőködési távolság szabad térben akár 200 méter lehet. Választható, 54/48/36/24/18/12/11/9/6/5.5/2/1 Mbps értékő adatátviteli sebesség. • • Támogatja az USB 2.0 felületet. 64 bites, 128 bites vagy 256 bites WEP (Wired Equivalent Privacy); WPA (Wi-Fi Protected Access),WPA2 • • 2.400GHz ~ 2.4835GHz nem engedélyköteles ISM frekvenciasáv. Modulációs eljárás: IEEE 802.11b : DSSS (Direct Sequence Spread Spectrum). IEEE 802.11g : OFDM (Orthogonal Frequency Division Multiplexing). • Könnyő kezelés és beállítás. RENDSZERKÖVETELMÉNYEK • • Windows rendszer: Windows 98SE, Me, 2000, XP vagy XP x64, Vista A számítógépen eszközmeghajtó programot kell telepíteni, amely lehetıvé teszi a WLAN mini UBS adapterrel való kommunikációt. Seite 101/145 MIELİTT ELKEZDI 1. Ellenırizze a csomag tartalmát A WLAN USB ADAPTER CSATALAKOZTATÁSA A SZÁMÍTÓGÉPHEZ Gyors üzembehelyezési útmutató: • Csatlakoztassa a WLAN USB csatlakozót a számítógéphez. • Telepítse a meghajtóprogramot. ISMERKEDÉS A VEZETÉK NÉLKÜLI LAN USB ADAPTER LED-JÉVEL • A LED akkor kapcsol be, amikor a WLAN mini USB adapter áramot kap. Miközben a számítógép adatot küld a WLAN mini USB adapteren keresztül, a LED villog. Seite 102/145 2. Vezeték nélküli LAN alapismeretek Az IEEE 802.11b/g szabványbizottság által meghatározott vezeték nélküli hálózatokat az alábbiakként lehet konfigurálni: • • Ad Hoc vezeték nélküli LAN, vagy Infrastruktúra vezeték nélküli LAN. Az Ad Hoc hálózat vezeték nélküli LAN kártyával felszerelt számítógépek csoportja, mely csoportot BSS-nek (Basic Service Set) neveznek. A csoport számítógépei vezeték nélküli LAN kártyájuk segítségével kommunikálhatnak egymással, azonban az internetre nem csatlakozhatnak. Ad Hoc vezeték Infrastruktúra vezeték A legszembeötlıbb különbség az Infrastruktúra vezeték nélküli hálózat és az Ad Hoc vezeték nélküli hálózat között az, hogy az elıbbibe kapcsolt számítógépek internetes erıforrásokhoz is hozzá tudnak férni egy hozzáférési ponton keresztül. Az igényeknek megfelelıen a számítógép hálózata könnyen beállítható Ad Hoc, illetve Infrastruktúra vezeték nélküli hálózatra. Általában ha egy hálózatban van hozzáférési pont, akkor az internet-csatlakozás érdekében célszerő azt Infrastruktúra hálózatként beállítani. Seite 103/145 3. IP-cím Ahhoz, hogy a WLAN mini USB adaptert számítógépes eszközzel lehessen használni, az adott WLAN mini USB adapternek USB 1.1 vagy 2.0 illesztıfelülettel kell rendelkeznie. Elıször telepíteni és konfigurálni kell a WLAN mini USB adapter valamennyi meghajtóprogramját és támogató szoftverét. Kérdezze meg a következı adatokat a rendszergazdától, mert elıfordulhat, hogy a meghajtóprogram telepítése során ezeket is meg kell adnia: Kérdezze meg a következı adatokat a rendszergazdától, mert elıfordulhat, hogy a meghajtóprogram telepítése során ezeket is meg kell adnia: A vezeték nélküli ügyfél neve. A vezeték nélküli SSID. A számítógép egyedi ügyfélneve és munkacsoportjának neve. A hálózati fiókhoz a felhasználói név és a jelszó. Az IP-cím, az átjáró címe, valamint az alhálózati maszk, amennyiben nem DHCP kiszolgálót használ. A hálózaton minden számítógépet egy-egy egyedi hálózati cím azonosít. TCP/IP hálózatok esetén két módszerrel lehet hálózati címet számítógéphez rendelni: Statikus IP címzés. Dinamikus IP címzés (DHCP). Statikus IP címzéső hálózatnál a hálózati rendszergazda minden egyes számítógéphez kézileg rendel hozzá egy-egy címet. Ha megtörtént az IP-cím hozzárendelése, a számítógép minden egyes alkalommal ugyanazt az IP-címet használja, amikor újraindul és bejelentkezik a hálózatra. Az IP-címet kézileg a Hálózati tulajdonságok párbeszédpanelen lehet megváltoztatni. A statikus IPcímeket alkalmazó hálózatokat könnyő beállítani, és nem igényelnek további hálózatkezelı szoftvert. Dinamikus IP címzést használó hálózatnál a hálózaton található DHCP kiszolgáló dinamikusan oszt ki IP-címeket az összes ügyfélgép részére, amikor azok bejelentkeznek a hálózatra. A dinamikus IP-címeket alkalmazó hálózatok beállítást, valamint egy DHCP kiszolgáló futtatását igénylik. Seite 104/145 4. Meghajtóprogram / segédprogram telepítése Windows XP: Ellenırizze, hogy a számítógép rendelkezik-e wireless kezelıszoftverrel. Ha igen, csak a készülék meghajtóját telepítse. A lehetséges rendelkezésre álló eszköz megjelenik, ebben válassza ki a Szoftver pontot a Start Rendszervezérlı alatt. A VISTA meghajtót lásd a 7. pontban. A telepítı és meghajtóprogramokat tartalmazó CD automatikusan elindítja a telepítıprogramot, amikor a lemezt behelyezi a CD-meghajtóba. 1. lépés: Helyezze be a telepítı és meghajtóprogramokat tartalmazó CD-t a CDmeghajtóba. 2. lépés: A folytatáshoz kattintson a Tovább gombra. 3. lépés: A kijelölt mappába történı telepítéshez kattintson a Tovább gombra. Ha pedig más mappát szeretne választani, kattintson a Tallózás gombra. Seite 105/145 4. lépés: Ekkor megkezdıdik a fájlok másolása, ami a telepítés befejezéséig tart. 5. lépés: A telepítés befejezéséhez kattintson a Befejezés gombra. 6. lépés: A meghajtóprogram és segédprogram számítógépre történı telepítésének befejeztével csatlakoztassa az USB adaptert a számítógép egyik USB csatlakozójába. A Windows XP/2000 automatikusan észleli az USB adaptert. Amennyiben az operációs rendszer (pl. Microsoft Vista©) nem rendelkezik a szoftverkezeléshez megfelelı eszközzel, telepítse most a szoftvert és olvassa el a 5. pontot „A wireless hálózat konfigurálása“ címmel. Megtalálja a rendelkezésre álló eszközöket, amelyben a Start Rendszervezérlı alatt kiválasztja a Szoftver pontot. Seite 106/145 5. Vezeték nélküli hálózat konfigurálása állomás módban A WLAN USB adapter saját kezelıszoftvert használ. Az alkalmazás biztosít minden, a felhasználók által vezérelt funkciót. Amikor a WLAN USB adaptert a számítógép egyik USB portjához csatlakoztatja, automatikusan meg kell jelennie egy új ikonnak a Windows tálcán. Ha ez az ikon piros, az azt jelzi, hogy a WLAN USB adapter konfigurációja érvénytelen vagy még nem teljes. Ilyenkor kattintson duplán az ikonra, hogy megjelenítse a lent látható konfigurációs ablakot. Itt jelenik meg az elérhetı hálózat SSID-je. Ha kiválasztotta a hálózatot, megjelenik a térerı és a kapcsolat minısége. A kapcsolat minısége (Link Quality) és a térerı (Signal Strength) jelzık csak akkor aktívak, ha az adott gép Infrastruktúra módban van. Ez a jelzı a számítógép és a hozzáférési pont közti kapcsolat minıségét és erejét mutatja. A kapcsolat minısége a rádióadás és -vétel teljesítményének mért értéke. A Tx/Rx keretek (Tx/Rx Frame) valós idıben megjeleníti az elküldött és fogadott keretek számát. A konfigurációs eszköz (Configuration Tool) több mezıt tartalmaz, melyekben meg lehet tekinteni, illetve változtatni a meghajtóprogram mőködési paramétereit. Ezen a panelen anélkül meg lehet változtatni bármelyik paramétert, hogy újra kellene indítani a számítógépet. A jelenlegi hálózati információk (Current Network Information) a jelenlegi hálózati konfigurációt jeleníti meg. Ha meg szeretné változtatni a hálózati konfigurációt, kattintson a További beállítások (More Setting) gombra. Seite 107/145 5.1 ÁLTALÁNOS CSATLAKOZÁSI BEÁLLÍTÁS Ezen a panelen módosítani lehet az általános hálózati beállításokat, engedélyezni lehet, illetve le lehet tiltani a WEP-et, profilt lehet betölteni és módosítani, valamint egyéb beállításokat lehet elvégezni. Ezen a panelen keresztül lehet hozzáférni a vállalati LAN-hoz, illetve hot spotokhoz, például szállodában, repülıtéren vagy konferenciateremben. A beállítások megadásának megkezdéséhez kattintson a Módosítás (Change) gombra. A következı beállítások állnak rendelkezésre: SSID. Hálózat típusa. Átviteli sebesség. Titkosítás. Hitelesítési mód. Ha megadta a beállításokat, akkor a módosítások megerısítéséhez kattintson az Alkalmaz (Apply) gombra. Seite 108/145 5.2 WEP TITKOSÍTÁSI KULCS BEÁLLÍTÁSA Ha valaki további biztonsági óvintézkedést akar tenni a vezeték nélküli hálózaton, ezt a WEP (Wired Equivalent Privacy) titkosítással érheti el. A WEP minden, rádión át továbbított keretet az ezen a panelen megadott kulcsok egyikével titkosít. Titkosított keret vételekor az csak akkor kerül elfogadásra, ha visszafejtése sikerül. Ez csak akkor fordulhat elı, ha a vevınek megvan ugyanaz a WEP kulcsa, mint az adónak. A titkosítási beállítás alapértelmezett állapotban le van tiltva. A titkosítás engedélyezéséhez kattintson a WEP engedélyezése (Enable WEP) gombra. További WEP kulcs beállításokhoz kattintson a WEP titkosítási kulcs beállításai (WEP Encryption Key Setting) gombra. Három hitelesítési mód áll rendelkezésre: a nyílt rendszer (Open System), a megosztott kulcs (Shared Key) és az automatikus (Auto). A nyílt rendszer alapértelmezett kulcs segítségével hitelesíti az állomást és a hozzáférési pontot. Ha megtörtént mindkét fél hitelesítése, akkor az állomás adatokat küldhet és fogadhat a hálózaton. Ezek az adatok azonban nincsenek titkosítva. Megosztott kulcsú rendszerben az állomás és a hozzáférési pont hitelesítik magukat egymásnak. Az adatkeretek a WEP kulccsal vannak titkosítva. Automatikus módban pedig a hozzáférési pont vezérli a hálózati biztonsági beállítást, az állomás pedig követi az általa megkövetelt beállítást. A konfigurációs eszközhöz való visszatéréshez kattintson a jobb felsı sarokban látható bezárás gombra. Seite 109/145 5.3 WPA TITKOSÍTÁSI BEÁLLÍTÁSOK A WPA (Wi-Fi Protected Access) egy, a vezeték nélküli hálózatok részére kifejlesztett biztonsági technológia. A WPA továbbfejleszti a WEP (Wired Equivalent Privacy) hitelesítési és titkosítási szolgáltatásait. Az adattitkosítás javítása érdekében a WPA a Temporal Key Integrity Protocolt (TKIP) használja. A TKIP kibıvíti az adattitkosítási lehetıségeket, többek között csomagonkénti kulcskeverési funkciót, üzenetintegritási ellenırzést (MIC, más néven Michael), sorrendszabályokkal rendelkezı, kiterjesztett inicializálási vektort (IV), valamint kulcslecserélési mechanizmust biztosít. A WPA Pre-Shared Key (WPA-PSK) a WPA egyszerősített, ám mégis hatékony formája, amely az otthoni Wi-Fi hálózatokhoz a legalkalmasabb. A WPA-PSK használatához a felhasználó ugyanúgy statikus kulcsot, vagyis “passphrase”-t állít be, mint a WEP-nél. A TKIP használatakor azonban a WPA-PSK a kulcsokat elıre beállított idıközönként automatikusan megváltoztatja, így megnehezíti, hogy hackerek megtalálják és kiaknázzák. Ez a kulcs alfanumerikus karakterekbıl, valamint írásjelekbıl és szóközökbıl áll, és 8-63 karakter hosszúságú lehet. A vezeték nélküli ügyfeleknek csak ezt a kulcsot kell megadniuk. Ha ez megegyezik, akkor sor kerülhet a biztonságos, vezeték nélküli kommunikációra. További WPA beállításokhoz kattintson a WPA titkosítás beállításai (WPA Encryption Setting) gombra. 5.4 PROFILOK Minden profil az USB adapter egy adott beállításcsoportját tartalmazza. Minden profilban meg lehet adni a beállításokat. Amikor pedig legközelebb meg szeretné változtatni az USB adapter beállításait, akkor elég kiválasztani a használni kívánt profilt. Seite 110/145 5.5 FEJLETT BEÁLLÍTÁSOK Kattintson a Fejlett beállítások (Advanced Setting) gombra az áramfelhasználás kiválasztásához, amelynek három módja van. Ezen a panelen választhat különbözı felhasználói felületeket, illetve roamingot különbözı országokban. Lehetıvé teszi még a fragmentáció küszöbének és az RTS/CTS beállítását is. Seite 111/145 5.6 RENDSZERINFORMÁCIÓK Kattintson az információ (Information) gombra, ekkor a megjelenı ablakban láthatóvá válik a meghajtóprogram verziója, a segédprogram verziója, az UB adapter MAC címe, és egyebek. Seite 112/145 6. Vezeték nélküli hálózat konfigurálása AP módban A WLAN USB adapter saját kezelıszoftvert használ. Az alkalmazás biztosít minden, a felhasználók által vezérelt funkciót. Amikor a WLAN USB adaptert a számítógép egyik USB portjához csatlakoztatja, automatikusan meg kell jelennie egy új ikonnak a Windows tálcán. Ha ez az ikon piros, az azt jelzi, hogy a WLAN USB adapter konfigurációja érvénytelen vagy még nem teljes. Ilyenkor kattintson duplán az ikonra, hogy megjelenítse a lent látható konfigurációs ablakot. Ha a WLAN USB adaptert hozzáférési pontként kell beállítani, akkor a konfigurációs módot a jobb felsı sarokban változtathatja állomás (Station) módról hozzáférési pont (Access Point) módra. Itt jelenik meg az USB adapterhez csatlakozó állomások listája is. Amikor a készülékhez egy számítógép csatlakozik, akkor megjelenik annak MAC címe a táblázatban. A Tx/Rx keretek (Tx/Rx Frame) valós idıben megjeleníti az elküldött és fogadott keretek számát. A hozzáférési pont konfiguráció megváltoztatásához kattintson a További beállítások (More setting) gombra. Seite 113/145 6.1 ÁLTALÁNOS CSATLAKOZÁSI BEÁLLÍTÁSOK Ezen a panelen a Módosítás (Change) gombra kattintva lehet beállítani a vezeték nélküli módot (Wireless Mode), a csatornát (Channel), az SSID-t, valamint az adatküldés erejét (Tx Power). A beállítások megadása után megerısítésükhöz kattintson az Alkalmazás (Apply) gombra. Seite 114/145 6.2 WEP TITKOSÍTÁSI KULCS BEÁLLÍTÁSAI Ha valaki további biztonsági óvintézkedést akar tenni a vezeték nélküli hálózaton, ezt a WEP (Wired Equivalent Privacy) titkosítással érheti el. A Hitelesítést (Authentication) állítsa megosztott kulcs (Shared Key) értékre, a WEP-et pedig Engedélyezés (Enable) értékre. További WEP kulcs beállításokhoz kattintson a Beállítás (Setting) gombra . 6.3 EGYÉB BEÁLLÍTÁSOK Itt lehet beállítani a fragmentáció küszöbét, valamint az RTS/CTS-t. Be lehet állítani adott MAC címek elfogadását, illetve elutasítását, ehhez kattintson a MAC cím szőrı beállítás gombra (MAC Address Filter). Seite 115/145 Válassza ki azt a bridge adaptert, amelyet a vezeték nélküli USB adapterrel át szeretne hidalni. 7. Vista meghajtóprogram telepítése Csatlakoztassa az USB csatlakozót az USB portra, ekkor a Windows Vista a telepítéshez kompatibilis meghajtóprogramot keres. 1. lépés: Válassza a Meghajtóprogram megkeresése és telepítése (Locate and install the driver software) lehetıséget. A Windows ekkor végigvezeti a felhasználót az eszközhöz való meghajtóprogram telepítési folyamatán. 2. lépés: Helyezze be a telepítılemezt a CD-ROMba, majd a telepítés folytatásához kattintson a Tovább gombra. Seite 116/145 3. lépés: Ekkor a Windows Vista megkeresi, majd telepíti a szoftvert. 4. lépés: Telepítés után kattintson a jobb gombbal a Windows Vista tálcán található hálózat ikonra, majd itt kattintson a Csatlakozás hálózathoz (Connect to a network) menüelemre. 5. lépés: Válassza ki a csatlakoztatni kívánt hálózatot, majd kattintson a Csatlakozás (Connect) gombra. Seite 117/145 6. lépés: Ha nem biztonságos hálózatról van szó, akkor kattintson a Csatlakozás mégis (Connect Anyway) gombra. 7. lépés: Ekkor megtörtént az USB eszköz sikeres csatlakoztatása a hálózathoz. Kattintson a Bezárás gombra. Megjegyzés: Win98SE, Win2000, ME, XP és XP x64 operációs rendszereknél az eszköz neve “(ZD1211)IEEE 802.11b+g USB Adapter”. Windows Vista esetén az eszköz neve “Atheros AR5007UG Wireless Network Adapter”. Seite 118/145 8. Mőszaki adatok Termék neve Szabvány Frekvenciasáv Modulációs mód Adatátviteli sebesség Mőködési mód Adó kimeneti teljesítménye Vételi érzékenység Mőködési tartomány Biztonság Illesztıfelület LED Támogatott operációs rendszerek Kezelés Törvényi megfelelés Méretek Súly Mőködési hımérséklet Tárolási hımérséklet Páratartalom WLA-54L W-LAN USB-Adapter IEEE802.11b/g 2,400 GHz – 2,4835 GHz nem engedélyköteles ISM sáv 802.11b: QPSK/BPSK/CCK 802.11g: OFDM 54/48/36/24/18/12/11/9/6/5.5/2/1Mbps Ad hoc Infrastruktúra (hozzáférési pontok szükségesek) < 15 dBm 11 Mbps-on: @ –80dBm 54 Mbps-on: @ –70dBm Legfeljebb 200 m, a környezet függvényében 64 bites, 128 bites vagy 256 bites WEP (Wired Equivalent Privacy); WPA (Wi-Fi Protected Access),WPA2 USB 2.0/1.1 Kapcsolat/aktív Windows 98Se, Me, 2000, XP és Windows XP x64, Vista Windows alapú konfigurációs segédeszköz és állapotfigyelés Észak-Amerika: FCC Európa: CE/ETSI 58 (H) x 23 (Sz) x 9 (M) mm 9,6 g 0 - 50 -20 - 70 5 - 90% (nem kicsapódó Seite 119/145 9. Fontos utalás 9.1 LUTEC szerviz A garancia idıtartama 24 hónap. Nagyon köszönjük, hogy LUTEC terméket vásárolt! Ön is csatlakozhat a több ezer ügyfélhez, akik elégedettek a termék minıségével. Garancianyilatkozat / Feltétel 1. A garancia 24 hónapig érvényes, a végfelhasználó vásárlásának napjától érvényes. A vásárlás dátumát és a készülék típusát gépileg kiállított vásárlási bizonylattal kell igazolni. Kérjük, ırizze meg a vásárlási bizonylatot a garancia teljes ideje alatt, mivel ez feltétele az esetleges reklamációnak. 2. A garanciaidın belül a gyártó választása szerint vagy helyreállítja a hiányosságot, vagy kicseréli a hibás részeket ill. a teljes készüléket. A garanciális teljesítésekkel a garancia ideje nem növekszik ill. nem indul újra. 3. Szakszerőtlen kezelés vagy külsı behatás (leesés, ütés, folyadék, por, szennyezıdés vagy törés) miatt keletkezı károk vagy hibák megszőntetik a garancia érvényességét. A kopó részek (pl. akkumulátorok) nem tartoznak a garancia hatálya alá. 1) Kézikönyv: Gondosan olvassa el a mellékelt kézikönyvet. 2) Weboldal: A www.lutec.eu címen információkat talál a gyakran feltett kérdésekrıl, aktuális kompatibilitási lehetıségekrıl stb. 3) Végfelhasználó támogatás: A következı e-mail címen érhet el bennünket: [email protected]. 4) Közvetlen csere: Amennyiben a gyorssegély vonalon azt az információt kapja, hogy ki kell cserélni a Car Kit-et, a Hotline központ hivatkozási számot (RMA számot) küld Önnek. Kérjük, a Seite 120/145 készüléket tartozékokkal együtt a hivatkozási szám megadásával és a vásárlási bizonylat másolatával együtt küldje el a szervizközpontba. Hamarosan megkapja a cserekészüléket tılünk. Végfelhasználói e-mail cím: [email protected] Szervizközpont: A szervizközpontba történı beküldés csak a Hotline központ felhatalmazása után lehetséges, az RMA szám megadásával, egyéb esetben a küldeményt nem fogadjuk el. Schiffer Service GmbH c/o Lutec RMA-Nr. : xxx (ide írja be a gyorssegélytıl kapott RMA számot) Industriestr. 16 D-52134 Herzogenrath-Kohlscheid 9.2 Megfelelıség magyarázat Ez termek virrad tesztel és a következı irányelveknek / specifikációknak felel meg: EMC Directive 89/366/EEC és Low Voltage Directive 73/23 EEC. R&TTE-irányelv (Rádió & Telekommunikációs Terminál Berendezés) A termék a következı irányelveknek / specifikációknak felel meg: - ETS 300-826 – Általános EMV követelmények rádiókészülékekhez - ETS 300-328 – Mőszaki követelmények rádiókészülékekhez - EN 60950 – Biztonsági követelmények rádiókészülékekhez Copyright 2007 by LUTEC, egyik tilos masolat. Seite 121/145 Spis 1. Wstęp ................................................................................... ……122 2. Podstawy bezprzewodowych sieci LAN.............................……… 124 3. Adres IP.......... ............................................................………..…..125 4. Instalacja sterownika / usługi (Driver / Utility).......................………126 5. Konfiguracja bezprzewodowej sieci komputerowej w trybie stacyjnym (Station Mode)...........................................................128 5.1 Ogolne Ustawiania Polaczenia......................................….. …129 5.2 Ustawienie Klawisza Kodowania WEP (WEP Encryption Key)......……………………………………….130 5.3 Ustawienie Kodowania WPA Encryption Setting...............…..131 5.4 Profil .............................................................………………….132 5.5 Ustawienia Zaawansowane – Advanced Setting.....................133 5.6 Informacja Systemowa.................................................…….....134 6. Konfiguracja sieci bezprzewodowej - Wireless Network Configuration w trybie AP mode …………............……………..…...135 6.1 Ogolne Ustawienia Polaczenia...............................…..….. …136 6.2 Ustawienie Klawisza WEP Encryption Key..................….…..137 6.3 Inne Ustawianie..............................................................…….137 7. Zainstaluj sterownik - Vista Driver.............................................……138 8. Dane techniczne.... ................................................................….….141 9. WaŜny wskazując ............................................................................142 Seite 122/145 1. Wstęp Dziękujemy za zakup przejściówki WLAN Mini USB Adapter. Z charakterystyczną technologią bezprzewodową (radiową), to rozwiązanie dla sieci bezprzewodowej zostało zaprojektowane dla duŜych i małych jednostek gospodarczych i jest skalowalne, a więc łatwo moŜna dodawać nowych uŜytkowników i nowe funkcje sieci, zaleŜnie od skali Waszej działalności. FUNKCJE • • • Dopuszcza Microsoft Windows 98SE, Me, 2000 ,XP and XP x64, Vista. Dopuszcza funkcję WMMTM (Wi-Fi MultiMedia) function Odległość robocza do 200 metrów na wolnej przestrzeni. • 54/48/36/24/18/12/11/9/6/5.5/2/1 Mbps – wybierana szybkość danyc (Data Rate). • • Dopuszcza interfejs USB 2.0. 64-bit, 128-bit lub 256-bit WEP (Wired Equivalent Privacy); WPA (Wi-Fi Protected Access), WPA2 • • 2.400GHz ~ 2.4835GHz pasmo częstotliwości ISM nielicencjonowane. Metoda modulacji: IEEE 802.11b : DSSS (Direct Sequence Spread Spectrum). IEEE 802.11g : OFDM (Orthogonal Frequency Division Multiplexing). • Łatwa obsługa i ustawianie. WYMAGANIA SYSTEMOWE • • Windows System : Windows 98SE, Me, 2000, XP lub XP x64, Vista Komputery PCs muszą mieć zainstalowany sterownik urządzenia. Pozwoli to Wam na komunikację z przejściówką WLAN Mini USB Adapter. Seite 123/145 PRZED PRZYSTĄPIENIEM DO PRACY 1. Potwierdź zawartość pudełka. ŁĄCZENIE WASZEJ PRZEJŚCIÓWKI Z KOMPUTEREM PC Wskazówki dla szybkiego uruchomienia • Połączyć Wasz klucz WLAN USB do Waszego komputera PC. • Zainstalować sterownik. ZAZNAJAMIANIE SIĘ Z DIODĄ LED PRZEJŚCIÓWKI LOKALNEJ SIECI BEZPRZEWODOWEJ WIRELESS LAN USB ADAPTER LED • LED zapala się, gdy do przejściówki WLAN Mini USB Adapter zostanie podane zasilanie. LED pulsuje, gdy komputer PC przesyła dane poprzez przejściówkę WLAN Mini USB Adapter. Seite 124/145 2. Podstawy bezprzewodowych sieci LAN Bezprzewodowa sieć LAN (Wireless LAN network) określona przez komitet normalizacyjny IEEE 802.11b/g moŜe być skonfigurowana jako: • Ad Hoc wireless LAN (sieć bezprzewodowa), lub • Infrastructure wireless LAN (infrastrukturalna sieć bezprzewodowa lokalna). Ad Hoc network (sieć Ad hoc) stanowi grupę komputerów PC zainstalowanych z kartami bezprzewodowej sieci lokalnej (wireless LAN cards); ta grupa komputerów PC nazywa się BSS (Basic Service Set). Komputery PC w tej grupie mogą wykorzystywać swoje karty bezprzewodowej sieci lokalnej (wireless LAN cards) do komunikowania się ze sobą, ale nie mogą łączyć się z Internetem. siecią bezprzewodową Ad Hoc siecią bezprzewodową Infrastructure Najbardziej oczywistą róŜnicą pomiędzy infrastrukturalną siecią bezprzewodową (Infrastructure wireless network) a siecią bezprzewodową Ad Hoc jest to, Ŝe komputery PC w bezprzewodowej sieci Infrastructure wireless network mogą uzyskiwać dostęp do zasobów w Internecie poprzez punkt dostępowy (Access Point). ZaleŜnie od Waszych wymagań, moŜna łatwo ustawić swoją sieć PC na bezprzewodową sieć “Ad Hoc” albo “Infrastructure” wireless network. Mówiąc ogólnie, jeśli w Waszej sieci istnieje punkt dostępowy Access Point, to zalecamy ustawienie Waszej sieci jako infrastrukturalnej “Infrastructure”, aby mogła się łączyć z Internetem. Seite 125/145 3. Adres IP Aby uŜywać przejściówki WLAN Mini USB Adapter z urządzeniem obliczeniowym, ta przejściówka WLAN Mini USB musi być wyposaŜona w interfejs USB 1.1 lub 2.0 Interface. Wszystkie sterowniki i programy obsługujące dla przejściówki WLAN Mini USB Adapter muszą być wcześniej zainstalowane i skonfigurowane. Poproście swojego administratora systemu o następujące informacje, jakich moŜecie potrzebować do dostarczenia podczas instalacji sterownika: • Wasza nazwa klienta bezprzewodowego Wireless Client Name. • Wasz bezprzewodowy identyfikator Wireless SSID. • Wasza jednoznaczna nazwa klienta i nazwa grupy roboczej. • Dla Waszego konta sieciowego, nazwa uŜytkownika i hasło. • Wasz adres IP, adres bramy (gateway ) i maska podsieci, jeśli uŜywacie serwera DHCP. Dowolny komputer w sieci jest identyfikowany przez jednoznaczny adres sieciowy. Istnieją dwie metody przydzielania adresu sieciowego do komputera w sieci TCP/IP network: • Statyczne adresowania IP. • Dynamiczne adresowanie IP (DHCP). W sieci z adresowaniem statycznym IP, administrator sieci ręcznie przydziela adres IP do kaŜdego komputera. Po przydzieleniu adresu statycznego, komputer uŜywa tego samego adresu IP za kaŜdym razem, gdy ładuje się i loguje do sieci. MoŜna ręcznie zmieniać adres IP w skrzynce dialogowej Network Properties dialog box. Sieć uŜywająca statycznych adresów IP jest łatwa do ustawiania i nie wymaga dodatkowego oprogramowania zarządzania siecią. W sieci z dynamicznym adresowaniem IP, serwer DHCP w sieci dynamicznie przydziela adresy IP dla wszystkich klientów za kaŜdym razem, gdy rejestrują się oni do sieci. Sieć korzystająca z dynamicznych adresów IP wymaga ustawiania i pracy serwera DHCP Server. Seite 126/145 4. Instalacja sterownika / usługi (Driver / Utility) Windows XP i wyŜej: Prosimy o sprawdzenie, czy Państwa komputer jest wyposaŜony we własne oprogramowanie do zarządzania urządzeniami bezprzewodowymi. Jeśli tak, naleŜy zainstalować tylko sterowniki do urządzenia. Prawdopodobnie znajdą Państwo dostępne narzędzie po wybraniu w menu Start Panel sterowania punktu Dodaj lub usuń programy. W przypadku sterownika do systemu Vista podobnie w punkcie 7. Dysk instalacyjny i sterownika automatycznie uaktywni program instalacyjny uruchamiany automatycznie po włoŜeniu dysku do napędu CD. Krok 1 : WłoŜyć dysk instalacyjny i sterownika do swojego napędu CD-ROM. Krok 2: Kliknąć Next w celu kontynuowania. Krok 3: Kliknąć Next w celu zainstalowania do wyznaczonego folderu, albo kliknąć “Browse” w celu wybrania innego folderu. Seite 127/145 Krok 4: Rozpocząć kopiowanie plików aŜ do zakończenia instalowania. Krok 5: Kliknąć Finish dla zakończenia instalowania. Krok 6: Po zakończeniu, zainstalować sterownik i usługę w swoim systemie, włoŜyć przejściówkę USB adapter do portu USB swojego komputera PC. Windows XP/2000 wykryje automatycznie przejściówkę USB Adapter. Jeśli Państwa system operacyjny (np. Microsoft Vista©) nie jest wyposaŜony w narzędzie do zarządzania oprogramowaniem, prosimy o zainstalowanie teraz tego oprogramowania i kontynuowanie punktu 5, „Konfiguracja sieci bezprzewodowej”. Prawdopodobnie znajdą Państwo dostępne narzędzie po wybraniu w menu Start Panel sterowania punktu Dodaj lub usuń programy. Seite 128/145 5. Konfiguracja bezprzewodowej sieci komputerowej w trybie stacyjnym (Station Mode) Przejściówka WLAN USB Adapter uŜywa własnego oprogramowania zarządzającego. Aplikacja ta dostarcza wszystkich funkcji sterowanych przez uŜytkowników. Gdy wstawicie przejściówkę WLAN USB Adapter do portu USB na swoim komputerze PC, to na pasku Windows System Tray powinna się automatycznie pojawić ikona. Jeśli ta ikona ma kolor czerwony, to oznacza, Ŝe konfiguracja przejściówki WLAN USB Adapter jest niepoprawna albo niepełna. Dwukrotnie kliknąć w tę ikonę, a wyskoczy okno konfiguracji, pokazane poniŜej. Pokazuje ono identyfikację SSID dostępnej sieci. Po wybraniu sieci, wyświetlona zostanie moc sygnału i jakość łącza. Wykres kreskowy jakości łącza (Link Quality) i mocy sygnału (Signal Strength) jest aktywny tylko wtedy, gdy węzeł znajduje się w trybie infrastrukturalnym (Infrastructure Mode). Ten wykres kreskowy wyświetla jakość i moc łącza pomiędzy węzłem a jego punktem dostępowym (Access Point). Jakość łącza jest miarą osiągów odbiorczych i nadawczych poprzez radio. Ramka Tx/Rx Frame wyświetla chwilowe zawartości liczników nadawania i odbioru bezprzewodowego (wireless Transmit and Receive counts). Narzędzie konfiguracji (Configuration Tool ) zawiera kilka pól, w których moŜna oglądać parametry ruchowe sterownika i zmieniać je. Zmiany dowolnych parametrów w tym panelu moŜna stosować do sterownika bez konieczności restartu komputera. Aktualna informacja sieciowa (Current Network Information) wyświetla bieŜącą konfiguracje sieci. Jeśli chcecie zmienić konfigurację sieciową, to naleŜy kliknąć w dalsze ustawianie (“More Setting”). Seite 129/145 5.1 OGÓLNE USTAWIANIA POŁĄCZENIA Na tym panelu moŜna modyfikować ogólne ustawienia połączenia sieciowego, zezwalać/zakazywać WEP, ładować/modyfikować profil i inne ustawienia. Poprzez ten panel sterowania moŜna uzyskiwać dostęp do bezprzewodowej sieci lokalnej przedsiębiorstwa (korporacyjnej) (corporate wireless LAN) lub gorących punktów, jak hotel, lotnisko albo sala konferencyjna. Kliknąć zmień (“Change”) w celu rozpoczęcia wprowadzania ustawień. Ustawienia obejmują: • • • Identyfikator SSID. Typ sieci - Network Type. Szybkość transmisji - Transmit Rate. • • Kodowanie - Encryption. Tryb uwierzytelniania - Authentication Mode. Po wprowadzeniu ustawień, kliknij zastosuj (“Apply”) w celu potwierdzenia ich zmiany. Seite 130/145 5.2 USTAWIENIE KLAWISZA KODOWANIA WEP (WEP ENCRYPTION KEY) MoŜecie potrzebować dodatkowego środka bezpieczeństwa na swojej sieci bezprzewodowej, co moŜna uzyskać przez wykorzystanie kodowania WEP (Wired Equivalent Privacy). WEP koduje kaŜdą ramkę nadawaną z radia przy wykorzystaniu jednego z klawiszy (Keys) wprowadzanych na tym panelu. Gdy zostanie odebrana zakodowana ramka, to zostanie ona zaakceptowana jedynie wtedy, gdy odkoduje się prawidłowo. Nastąpi to tylko wówczas, gdy odbiornik otrzyma ten sam klawisz WEP (WEP Key), jaki jest uŜywany przez nadajnik. Stanem domyślnym ustawienia kodowania (Encryption Setting ) jest zakaz WEP. NaleŜy zaznaczyć zezwolenie dla WEP (“Enable WEP”), aby zezwolić na kodowanie. Dla dalszego ustawiania klawisza WEP, kliknij w ustawianie klawisza kodowania WEP (“WEP Encryption Key Setting”). Dostępne są trzy tryby uwierzytelniania: Open System (system otwarty), Shared Key (klawisz współuŜytkowany) i Auto. Tryb Open System uŜywa klawisza domyślnego do uwierzytelniania stacji i punktu dostępu - Access Point. Od razu po uwierzytelnieniu obu stron, stacja uzyskuje moŜliwość nadawania i odbioru danych z sieci. Jednak dane nie będą kodowane. W systemie klawisza współuŜytkowanego (Shared Key system), stacja i punkt dostępu (Access Point) uwierzytelniają się wzajemnie. Ramka danych jest równieŜ kodowana przez klawisz (WEP key). W trybie Auto Mode, punkt dostępu (Access Point) przejmuje sterowanie nad ustawianiem bezpieczeństwa sieci i będzie postępować według ustawienia wymaganego z punktu dostępu AP. Kliknij w okienko zamykania (“close box”) w górnym prawym rogu, aby wrócić do narzędzia konfiguracji (Configuration Tool). Seite 131/145 5.3 USTAWIENIE KODOWANIA WPA ENCRYPTION SETTING WPA (Wi-Fi Protected Access) jest technologią bezpieczeństwa dla sieci bezprzewodowych. WPA poprawia się na funkcjach uwierzytelniania i kodowania WEP (Wired Equivalent Privacy). Aby poprawić kodowanie danych, WPA wykorzystuje swój protokół integralności klawisza tymczasowego - Temporal Key Integrity Protocol (TKIP). Protokół TKIP zapewnia waŜne rozszerzenia, w tym funkcję mieszania klawisza według pakietu, kontrolę integralności komunikatów (MIC, o nazwie Michael), z rozszerzonym wektorem inicjalizacji (IV) z regułami sekwencjonowania i mechanizmem ponownego kluczowania. WPA Pre-Shared Key (WPA-PSK) jest uproszczoną, ale nadal mocną postacią WPA, bardzo odpowiednią do sieci w domu. Aby uŜywać WPA-PSK, człowiek ustawia klucz statyczny czyli “passphrase” (fraza hasłą), jak dla WEP. Ale uŜywając TKIP, WPA-PSK automatycznie zmienia klucze na ustawionym odcinku czasowym, utrudniając hakerom ich znalezienie i wykorzystanie. Wstępnie współuŜytkowany klucz składa się ze znaków alfanumerycznych, zawierających znaki interpunkcyjne oraz spacje i ma długość od 8 do 63 znaków. Klienci bezprzewodowi muszą wprowadzić jedynie klawisz wstępnie współuŜytkowany. Jeśli klawisze współuŜytkowane są zgodne, to bezpieczna komunikacja moŜe się rozpocząć. Odnośnie dalszego ustawiania WPA, kliknij w ustawienia kodowania WPA (“WPA Encryption Setting”). Seite 132/145 5.4 PROFIL KaŜdy profil reprezentuje konkretne ustawienia przejściówki USB adapter. MoŜna ustawiać ustawienia dla kaŜdego profilu. Za następnym razem, gdy zechcecie zmienić ustawienia przejściówki USB adapter, moŜna po prostu wybrać profil, jaki pragniecie uŜywać. Seite 133/145 5.5 USTAWIENIA ZAAWANSOWANE - ADVANCED SETTING Kliknąć w ustawienia zaawansowane (“Advanced Setting”), aby wybrać ustawienie zuŜycia energii, które posiada 3 róŜne tryby. Na tym panelu moŜna wybierać róŜny interfejs uŜytkownika i roaming kraju. Pozwala teŜ na ustawienie progu fragmentacji oraz RTS/CTS. Seite 134/145 5.6 INFORMACJA SYSTEMOWA Kliknij na “Information”, a okienko wyskakujące pokaŜe wersję sterownika - Driver Version, wersję usługi - Utility Version, adres MAC - MAC tej przejściówki USB adapter, i tak dalej. Seite 135/145 6. Konfiguracja sieci bezprzewodowej Wireless Network Configuration w trybie AP mode Przejściówka WLAN USB Adapter wykorzystuje własne oprogramowanie zarządzania. Wszystkie funkcje sterowane przez uŜytkowników są dostarczane przez tę aplikację. Gdy wstawicie przejściówkę WLAN USB Adapter do portu USB swojego komputera PC, to nowa ikona powinna pojawić się automatycznie na tray’u systemu Windows - Windows System Tray. Jeśli potrzebujecie ustawić swoją przejściówkę WLAN USB Adapter jako punkt dostępu - Access Point, to moŜecie zmienić tryb konfiguracji do punktu dostępu (“Access Point”) w górnym prawym rogu, zamiast trybu stacji - “Station” Mode. Pokazuje ona listę stacji połączeniowych (Connection Station List), które łączą się z Waszą przejściówką USB Adapter. Gdy komputer połączy się z Waszym kluczem sprzętowym Dongle, to jego adres MAC Address zostanie pokazany w tabeli. Ramka Tx/Rx Frame wyświetla chwilowe stany liczników nadawania i odbioru Transmit i Receive counts. Kliknij w dalsze ustawianie (“More setting”) dla zmiany konfiguracji swojego punktu dostępu (Access Point configuration). Seite 136/145 6.1 OGÓLNE USTAWIENIA POŁĄCZENIA Na tym panelu naleŜy kliknąć na zmianę (“Change”) w celu ustawienia trybu bezprzewodowego - Wireless Mode, kanału - Channel, identyfikatora SSID i zasilania nadawania - Tx Power. Po wprowadzeniu ustawień naleŜy kliknąć zastosuj - “Apply”, aby potwierdzić ich zmiany. Seite 137/145 6.2 USTAWIENIE KLAWISZA WEP ENCRYPTION KEY MoŜecie zechcieć dodatkowego środka bezpieczeństwa na swojej sieci bezprzewodowej, co moŜna uzyskać przez uŜycie kodowania WEP (Wired Equivalent Privacy). Ustaw uwierzytelnianie (Authentication) na klawisz współuŜytkowany (“Shared Key”), a WEP na zezwolenie (“Enable”). Dla dalszego ustawiania klawisza WEP naleŜy kliknąć w przycisk ustawiania (Click “Setting”). 6.3 INNE USTAWIANIE MoŜna ustawić próg fragmentacji i RTS/CTS. MoŜna wybrać przyjęcie albo odrzucanie konkretnych adresów MAC; kliknij w przycisk ustawianie (“Setting”) filtra adres MAC - MAC Address Filter. Seite 138/145 Wybierz przejściówkę mostkową, jaką chcesz mostkować bezprzewodową przejściówką USB adapter. 7. Zainstaluj sterownik - Vista Driver Schließen Sie Ihren USB-Adapter an einen WłoŜyć swój klucz sprzętowy USB dongle do interfejsu USB; Windows Vista wyszuka kompatybilny sterownik do zainstalowania. Krok 1 : Wybrać “Locate and install the driver software” (zlokalizuj i zainstaluj oprogramowanie sterownika); Windows poprowadzi Cię poprzez proces instalowania oprogramowania sterownika dla Waszego urządzenia. Krok 2 : WłoŜyć dysk instalacyjny do CD-ROM i kliknąć dalej (“next”) w celu kontynuowania instalacji. Seite 139/145 Krok 3 : Windows Vista wyszuka oprogramowanie i będzie je kolejno instalować. Krok 4 : Po zainstalowaniu, kliknąć prawym klawiszem myszy w ikonę sieciową na tray’u systemu Windows Vista System Tray, i kliknąć połącz z siecią - “Connect to a network”. Krok 5 : Wybrać sieć do podłączenia się – („Select a network to connect”) i kliknąć w podłącz “Connect”. Seite 140/145 Krok 6 : Kliknąć w podłącz niezaleŜnie od tego “Connect Anyway”, jeśli sieć jest siecią niezabezpieczoną. Krok 7: Klucz sprzętowy - USB Dongle – podłączony do sieci z wynikiem pozytywnym; kliknąć w zamknij “Close”. Uwaga : W Win98SE, Win2000, ME, XP, XP x64, nazwą urządzenia - Device name jest przejściówka: “(ZD1211)IEEE 802.11b+g USB Adapter” W Windows Vista, nazwą urządzenia - („Device name”) jest przejściówka sieci bezprzewodowej: “Atheros AR5007UG Wireless Network Adapter”. Seite 141/145 8. Dane techniczne Nazwa wyrobu Standard WLA-54L W-LAN USB-Adapter Przepisy IEEE802.11b/g 2.400GHz ~ 2.4835GHz, nielicencjonowane pasmo ISM band 802.11b : QPSK/BPSK/CCK 802.11g : OFDM 54/48/36/24/18/12/11/9/6/5.5/2/1Mbps Ad hoc Infrastructure (Access Points is needed) < 15 dBm Ruchowa przy 11Mbps: @ –80dBm Ruchowa przy 54Mbps: @ –70dBm Do 200 m, zaleŜnie od środowiska otaczającego 64-bit, 128-bit lub 256-bit WEP (Wired Equivalent Privacy); WPA (Wi-Fi Protected Access),WPA2 USB 2.0/1.1 Łącze/Aktywna Windows 98Se, Me, 2000, XP i Windows XP x64, Vista Usługa programowa konfiguracji dla usługi opartej na Windows i monitorowanie statusu FCC dla Ameryki Północnej Wymiary CE/ETSI dla Europy 58(D) x 23(Sz) x 9(W) mm Pasmo częstotliwości Metoda modulacji Szybkość danych Tryb roboczy Moc wyjściowa nadajnika Czułość odbioru Zakres roboczy Bezpieczeństwo Interfejs We / Wy LED Obsługiwany system operacyjny Zarządzenie CięŜar Temperatura robocza Temperatura przechowywania Wilgotność 9.6 g 0 ~ 50 -20 ~ 70 5 ~ 90% (bez kondensacji) Seite 142/145 9. WaŜny wskazując 9.1 Serwis LUTEC Udzielamy 24-miesięcznej gwarancji. Bardzo dziękujemy za to, Ŝe zdecydowali się Państwo na produkt LUTEC! Na pewno będą Państwo - jak tysiące zadowolonych klientów przed Państwem – zachwyceni jakością naszego produktu. Gwarancja / Warunki 1.Okres gwarancji wynosi 24 miesiące i liczony jest od dnia sprzedaŜy urządzenia uŜytkownikowi. Data sprzedaŜy i typ urządzenia powinny zostać potwierdzone na sporządzonym maszynowo dowodzie zakupu. Proszę zachować dowód zakupu do czasu zakończenia okresu gwarancyjnego, gdyŜ stanowi on podstawę ewentualnej reklamacji. 2. W okresie gwarancyjnym wszelkie usterki, w tym zawinione przez producenta, usuwane są przez naprawę, wymianę wadliwych części lub wymianę urządzenia. Wykonanie usługi objętej gwarancją nie powoduje przedłuŜenia okresu gwarancji ani teŜ rozpoczęcia nowego okresu gwarancyjnego. 3. Usługi gwarancyjne nie obejmują usterek spowodowanych niewłaściwym uŜytkowaniem lub działaniem czynników zewnętrznych (upadek, uderzenie, woda, kurz, brud czy pęknięcie). Podzespoły zuŜywalne (np. akumulatorki) nie są objęte gwarancją. 1) Instrukcja: Proszę dokładnie zapoznać się z dołączoną instrukcją. 2) Strona internetowa: Na stronie www.lutec.eu mogą zapoznać się Państwo z najczęściej zadawanymi pytaniami oraz listą kompatybilności. 3) "Gorąca linia” dla uŜytkowników: Mogą się Państwo z nami skontaktować pisząc na adres [email protected]. Jeśli potrzebują Państwo porady telefonicznej, nasza "gorąca linia” dla uŜytkowników jest do Państwa dyspozycji od poniedziałku do piątku w godzinach od 9:00 do 18:00. Seite 143/145 4) Bezpośrednia wymiana: Jeśli konsultanci "gorącej linii” poinformują o konieczności wymiany Państwa głośnomówiącego zestawu samochodowego Car-Kit, otrzymają Państwo od nich numer autoryzacji (nr RMA). Prosimy o przesłanie Państwa urządzenia wraz z informacją o numerze RMA, akcesoriami i kopią dowodu zakupu do naszego Centrum Serwisowego. Nowe urządzenie otrzymają Państwo od nas natychmiast. "Gorąca linia" dla uŜytkowników: min. Adres poczty elektronicznej dla uŜytkowników: 0 0800 1212594* *: EURO 0,17/ [email protected] Centrum Serwisowe: Przesyłanie przesyłek adresowanych do naszego Centrum Serwisowego moŜliwe jest jedynie po autoryzacji przez "gorącą linię" i uzyskaniu numeru RMA, w przeciwnym wypadku wysyłka zwrotna nie jest moŜliwa. Schiffer Service GmbH c/o Lutec RMA-Nr. : xxx (tu proszę wpisać nadany przez "gorącą linię” numer RMA) Industriestr. 16 D-52134 Herzogenrath-Kohlscheid Seite 144/145 9.2 Oświadczenie zgodności Produkt został poddany testom i odpowiada najwaŜniejszym wymogom bezpieczeństwa zgodnie z wytycznymi Rady Europy i przepisami krajów członkowskich w zakresie EMC Directive 89/366/EEC, Low Voltage Directive 73/23 EEC. Dyrektywa R&TTE (Radio & Telecommunications Terminal Equipment) Produkt odpowiada wymienionym poniŜej dyrektywom/ specyfikacjom • ETS 300-826 – Ogólne wymogi EMV dla urządzeń radiowych • • ETS 300-328 – Techniczne wymogi wobec urządzeń radiowych EN 60950 – Wymogi bezpieczeństwa wobec urządzeń radiowych Się tu wymienione marka istnienie własność pana właściciel. Się informacja bez gwarancja. Błąd zastrzeŜone. Nie Gwarancja kończyć jeśli nie sprzęt błędny obsługiwać albo manipulować Copyright 2007 by LUTEC, nie niedozwolony powielanie. Seite 145/145