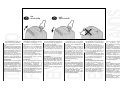
1
CLIMATIZZATORE BITUBO
Istruzioni
per l’installazione,
uso e manutenzione
CLIMATISEUR À TUYAU
DOUBLE
Instructions
pour l’installation,
l’emploi et l’entretien
ZWEIROHR-KLIMAANLAGE
Handbuch
für Installation,
Gebrauch und Wartung
CLIMATIZADOR TUBO
DOBLE
AIRCONDITIONER MET
TWEE LEIDINGEN
Instrucciones
para la instalación,
uso y mantenimiento
Aanwijzingen voor de
installatie, het gebruik
en het onderhoud
ITALIANO
FRANÇAIS
ENGLISH
DEUTSCH
ESPAÑOL
NEDERLANDS
3
ON
AUTO OPEN
Questo climatizzatore è dotato di un
sistema automatico di apertura e
chiusura della griglia di uscita dell'aria.
Per mettere in funzione l'apparecchio
è sufficiente premere il tasto di stand
by per ottenere l'apertura della griglia di uscita dell'aria e, dopo pochi
istanti, l'accensione del climatizzatore come da voi impostato.
Nello stesso modo, per spegnerlo,
basta premere di nuovo il tasto di
stand by e, dopo pochi secondi, la
griglia si chiuderà automaticamente.
Ce climatiseur est équipé d’un dispositif
automatique d’ouverture et de
fermeture de la grille d’évacuation de
l’air.
Pour mettre en service l’appareil il suffit
de presser la touche de “veille” pour
obtenir l’ouverture de la grille
d’évacuation de l’air et, après quelques
instants, la mise en route du climatiseur
comme vous le souhaitez.
Pour l’arrêter, il suffit de presser à
nouveau la touche de “veille” et, après
quelques instants, la grille se fermera
automatiquement.
ATTENZIONE!
SELEZIONANDO IL MODO STAND
BY IN FASE DI SPEGNIMENTO, IL
CLIMATIZZATORE CONTINUA A
FUNZIONARE PER CIRCA 15 SECONDI
(SEGNALATO
DAL
LAMPEGGIO DEL RELATIVO LED)
PRIMA CHE SI CHIUDA LA GRIGLIA DI USCITA DELL'ARIA.
NON FORZATE MAI L'APERTURA
O LA CHIUSURA DELLA GRIGLIA.
ATTENTION !
EN SÉLECTIONNANT LE MODE
“VEILLE” EN PHASE D’ARRÊT, LE
CLIMATISEUR
CONTINUE
À
FONCTIONNER PENDANT 15
SECONDES ENVIRON (SIGNALÉ
PAR LA CLIGNOTEMENT DE LA
DIODE CORRESPONDANTE) AVANT
LA FERMETURE DE LA GRILLE
D’ÉVACUATION DE L’AIR.
NE FORCEZ JAMAIS L’OUVERTURE
OU LA FERMETURE DE LA GRILLE.
OFF
AUTO CLOSE
This air conditioner is equipped with an
automatic system for opening and
closing the air outlet grille.
To start the appliance simply press the
stand-by key to open the air outlet grille
and a few seconds later the air
conditioner will turn on as you have set
it.
Likewise, to turn it off, simply press the
stand-by key again and a few seconds
later the grille will close automatically.
ATTENTION!
BY SELECTING THE STAND-BY
MODE IN THE TURNING OFF PHASE,
THE AIR CONDITIONER WILL CONTINUE WORKING FOR ABOUT 15
SECONDS (SIGNALLED BY THE
FLASHING OF THE RELATIVE LED)
BEFORE THE AIR OUTLET GRILLE
CLOSES.
NEVER FORCE THE GRILLE OPEN
OR SHUT.
Dieses Klimagerät ist mit einem
automatischen System zum Öffnen und
Schließen des Luftablaßgitters
ausgestattet.
Zur Inbetriebsetzung des Gerätes
genügt es, die Stand-by Taste zu
drücken; hierdurch wird zuerst das
Gitter geöffnet und nach einigen
Augenblicken das Gerät in der
vorgegebenen Betriebsweise gestartet.
Auch zum Abschalten ist die Stand-by
Taste zu betätigen; in diesem Fall wird
zuerst das Gerät stillgesetzt und nach
einigen Sekunden das Luftablaßgitter
automatisch geschlossen.
ACHTUNG!
BEI DER STAND-BY ABSCHALTUNG
WIRD DER BETRIEB DES GERÄTES
NOCH
CA.
15
SEKUNDEN
FORTGESETZT (WÄHREND DIESER
ZEIT BLINKT DIE ENTSPRECHENDE
LED),
BEVOR
SICH
DAS
LUFTABLASSGITTER SCHLIESST.
DIESES GITTER DARF NIE
ZWANGSWEISE GEÖFFNET ODER
GESCHLOSSEN WERDEN.
Este climatizador está provisto de un
sistema automático de apertura y cierre
de la rejilla de salida del aire.
Para poner en funcionamiento el
aparato es suficiente presionar la tecla
de stand by para obtener la apertura
de la rejilla de salida del aire, y
transcurridos pocos segundos, el
encendido el aclimatizador como Uds.
lo habían programado.
Del mismo modo, para apagarlo, basta
presionar nuevamente la tecla de stand
by, y al cabo de pocos segundos, la
rejilla de cerrará automáticamente.
¡ATENCIÓN!
SELECCIONANDO EL MODO STAND
BY EN FASE DE APAGADO, EL
CLIMATIZADOR
CONTINÚA
FUNCIONADO DURANTE UNOS 15
SEGUNDOS (INDICADO POR EL
DESTELLO DEL RELATIVO LED)
ANTES DE QUE SE CIERRE LA
REJILLA DE SALIDA DEL AIRE.
NO FUERCEN NUNCA LA APERTURA O LE CIERRE DE LA REJILLA.
Deze airconditioner is uitgerust met
een
systeem
om
het
luchtuitlaatrooster automatisch open
en dicht te doen.
Om het apparaat in werking te stellen
hoeft u slechts op de stand-by toets
te drukken om het luchtuitlaatrooster
open te doen en om de airconditioner
binnen enkele seconden op de door
u ingestelde stand aan te zetten.
Hetzelfde geldt als u de
airconditioner uit wilt zetten, u hoeft
slechts opnieuw op de stand-by toets
te drukken en na enkele seconden
zal
het
luchtuitlaatrooster
automatisch dichtgaan.
LET OP!
ALS U TIJDENS HET UITZETTEN
DE STAND-BY STAND KIEST
BLIJFT DE AIRCONDITIONER
ONGEVEER GEDURENDE 15
SECONDEN FUNCTIONEREN (DIT
BLIJKT UIT HET FEIT DAT DE
BETREFFENDE LED GAAT
KNIPPEREN) VOORDAT HET
L U C H T U I T L A AT R O O S T E R
DICHTGAAT.
FORCEER NOOIT HET OPEN- OF
DICHTGAAN
VAN
HET
LUCHTUITLAATROOSTER.
3
2
7
4
6
5
1
Fig 1
IDENTIFICAZIONE
DELLE PARTI
PART IDENTIFICATION
DESIGNATION
DES COMPOSANTS
BESCHREIBUNG DER
BESTANDTEILE
IDENTIFICACIÓN
DE LAS PARTES
IDENTIFICATIE
VAN DE ONDERDELEN
1) Pannello comandi
1) Control panel
1) Panneau des commandes
1) Bedienungsfeld
1) Cuadro de mandos
1) Bedieningspaneel
2) Griglia di uscita dell’aria
2) Air outfeed grille
2) Grille de sortie de l’air
2) Lutfaustrittsgitter
2) Rejila de salida del aire
2) Luchtuitlaatrooster
3) Filtro dell’aria con griglia
3) Air filter with grille
3) Filtre de l’air avec grille
3) Luftfilter mit Gitter
3) Filtro del aire con rejilla
3) Luchtfilter met rooster
4) Tappo per lo svuotamento dell’acqua
di condensa
4) Condensation drainage plug
4) Bouchon pour la vidange de la
condensation
4) Stöpsel zur Entleerung des
Kondenswassers
4) Tapa para el vaciado del agua
de
condensación
4) Dop om het condenswater af te
tappen
5) Entrée de l’air externe
5) Eintritt der Außenluft
5) Outside air infeed
5) Entrata dell’aria esterna
6) Outside air outfeed
6) Uscita dell’aria esterna
6) Sortie de l’air externe
6) Austritt der Außenluft
7) End conveyors
7) Convogliatori terminali
5) Buitenluchtinlaat
5) Entrada del aire del exterior
6) Buitenluchtuitlaat
6) Salida del aire al exterior
7) Convoyeurs d’extrémité
7) Leitblech
7) Eindgeleiders
1
Grazie
Thank you
Merci
Wir danken
Gracias
Hartelijk dank
per la fiducia.
for your trust
pour la confiance que
für Ihr Vertrauen.
por la confianza
voor uw vertrouwen
Avete acquistato
and confidence.
vous nous avez accordé.
Sie haben eine
demostrada.
U heeft één van de
uno dei migliori
You have bought
Vous avez acheté
der besten Klimaanlagen
Vd. acaba de comprar
meest betrouwbare
climatizzatori
one of the best
un des meilleurs
erworben,
uno de los mejores
airconditioners gekocht
del mercato.
air conditioners
climatiseurs se trouvant
die der Markt
climatizadores
die er op de markt is.
Le istruzioni
available today.
sur le marché.
zur Zeit bietet.
existentes
Dankzij de aanwijzingen
di questo fascicolo
Follow the instructions
Les instructions données
Die Anleitungen
en el mercado.
die in deze handleiding
vi permettono
given in this booklet
dans ce fascicule
im vorliegenden
Las instrucciones
staan kunt u uw
di utilizzare al meglio
to obtain the very best
vous permettront
Handbuch helfen Ihnen
del presente manual
apparaat op de meest
il vostro apparecchio
performance from your
d’utiliser au mieux
beim sachgemäßen
le permitirán utilizar
geschikte manier
e di godere
air conditioner
votre appareil
Einsatz des Gerätes,
de la mejor manera
gebruiken en van een
un’estate fresca
and to enjoy a fresh,
et de jouir d’un été
damit Sie den Sommer
su aparato y disfrutar
koele en aangename
e confortevole,
comfortable Summer
frais et confortable,
angenehm gekühlt
de un verano fresco
zomer en van een wel-
e del benessere
in complete well-being.
avec tout le bien être
und wohlverdient
y confortable,
verdiend
que vous méritez.
behaglich verbringen.
y del bienestar
comfort genieten.
che meritate.
que Vd. se merece.
,,,,,,,,,,,,,,,,,,,,,,,,
,,,,,,,,,,,,,,,,,,,,,,,,
,,,,,,,,,,,,,,,,,,,,,,,,
,,,,,,,,,,,,,,,,,,,,,,,,
,,,,,,,,,,,,,,,,,,,,,,,,
,,,,,,,,,,,,,,,,,,,,,,,,
,,,,,,,,,,,,,,,,,,,,,,,,
,,,,,,,,,,,,,,,,,,,,,,,,
,,,,,,,,,,,,,,,,,,,,,,,,
,,,,,,,,,,,,,,,,,,,,,,,,
,,,,,,,,,,,,,,,,,,,,,,,,
,,,,,,,,,,,,,,,,,,,,,,,,
,,,,,,,,,,,,,,,,,,,,,,,,
2
Fig 2
Montaggio scorretto
Incorrect assembly
Montage non correct
Falsche Montage
Montaje incorrecto
Onjuiste montage
Richtige Montage
Montaje correcto
Juiste montage
Fig 3
Montaggio corretto
Correct assembly
Montage correct
3
AVVERTENZE
WARNINGS
CONSEILS
HINWEISE
OBSERVACIONES
• Assicuratevi che tende o altri
oggetti non ostruiscano il filtro di
aspirazione (fig 1 - 3) posto sullo
schienale.
• Check that the suction filter
(fig. 1-3) on the back is not
obstructed by curtains or other
objects.
• Always connect the air
conditioner to a grounded socket.
• Achten Sie darauf, daß weder
Vorhänge noch andere
Gegenstände den Saugfilter an
der Rückseite (Abb. 1-3)
verdecken.
• Asegurarse que cortinas u
otros objetos no obstruyan el
filtro de aspiración (fig. 1 - 3)
situado en la parte trasera.
• Collegare il climatizzatore solo
a prese dotate di messa a terra;
• Vous assurer que le filtre
d’aspiration (Fig.1 - 3) se
trouvant à l’arrière ne soit pas
bouché par des rideaux ni pas des
objets quelconques.
• L’efficienza del climatizzatore
è garantita da una pulizia effettuata annualmente da un Centro
di assistenza.
• To assure maximum efficiency
of your air conditioner have it
cleaned once a year by a Service
Center.
• Brancher le climatiseur à des
prises équipées de mise à la terre
uniquement;
• Die Klimaanlage darf nur an
Steckbuchsen mit Schutzleiter
angeschlossen werden.
• Se il climatizzatore, nonostante sia normalmente alimentato, si
arresta completamente, prima di
rivolgervi a un Centro di assistenza, provate a drenare l’acqua
togliendo il tappo di svuotamento
della condensa (fig 1 - 4). Se l’inconveniente si ripete rivolgetevi a
un Centro di assistenza.
• If the air conditioner is
connected correctly to the mains
but stops completely, remove the
condensation drainage plug (fig
1-4) to drain any water before
calling the Service Center. If the
problem persists, call the Service
Center.
• Un nettoyage effectué tous les
ans par un Centre SAV garantit le
bon fonctionnement du
climatiseur.
• Zur Erhaltung der
Betriebstüchtigkeit der
Klimaanlage ist eine jährliche
Reinigung durch einen
technischen Kundendienst
erforderlich.
• Il climatizzatore non deve
essere utilizzato in locali adibiti a
lavanderia.
• Installare il climatizzatore solo
in locali asciutti (protezione IP
20).
• Il climatizzatore non deve
essere messo in funzione in presenza di materiali, vapori o liquidi
pericolosi.
Attenzione!
Pericolo di esplosione o incendio.
• Installare il climatizzatore su
superfici piane.
• Se si decide di non utilizzare
più il climatizzatore si raccomanda di staccare la spina dalla presa
di corrente e tagliare il cavo di alimentazione. Si raccomanda inoltre di rendere innocue le parti che
possono costituire pericolo per i
bambini, che potrebbero essere
indotti a giocare con esse.
Attenzione!
Il climatizzatore contiene sostanze che danneggiano l’ozono
atmosferico. Alla fine del suo utilizzo deve essere consegnato agli
appositi centri di raccolta (informarsi presso azienda della nettezza urbana di zona).
• The air conditioner must not
be used in laundries.
• The air conditioner must be
installed in a dry place only
(protection rating IP10).
• Never start the air conditioner
in areas containing hazardous
materials, vapors or liquids.
Warning!
Danger of explosion or fire.
• Always install the conditioner
on a flat surface.
• If you decide not to use the air
conditioner any longer, pull the
plug out of the socket and cut
the power cable. Any parts of the
appliance that could be a source
of danger, in particular for
children who may be tempted to
play with these, must be
rendered harmless.
Warning!
This product contains substances
that damage the ozone layer. At
the end of its useful life, it must
be taken to a specific collection
center. Ask your local council
garbage disposal services for
further information.
• Dans le cas où le climatiseur
s’arrêterait complètement bien
que son alimentation soit
correcte, éliminer la condensation
en enlevant le bouchon de
vidange (Fig.1 - 4) avant de vous
adresser au SAV. Si l’inconvénient
se répète, vous adresser au SAV.
• Le climatiseur ne doit pas être
utilisé dans des locaux servant de
buanderie.
• Installer le climatiseur
uniquement dans des locaux secs
(protection IP 10).
• Le climatiseur ne doit pas mis
en marche en présence de
matériaux, vapeurs ou liquides
dangereux.
Attention!
Danger d’explosion ou d’incendie.
• Installer le climatiseur sur des
surfaces planes.
• Si vous décidez de ne plus
utiliser le climatiseur, vous devez
débrancher la fiche de la prise de
courant et couper le câble
d’alimentation. De plus, il est
recommandé de rendre
inoffensives les parties pouvant
constituer un danger pour les
enfants qui pourraient être tentés
de jouer avec.
Attention!
Ce produit contient des
substances qui attaquent l’ozone
stratosphérique; il faut donc
porter le climatiseur dans un des
centres spéciaux de ramassage
lorsqu’il n’est plus utilisable. Vous
informer auprès des services de
gestion du ramassage des ordures
de votre commune.
• Sollte sich das Gerät trotz
Stromversorgung ausschalten,
leeren Sie vorerst das
Kondenswasser, indem Sie den
Stöpsel abnehmen (Abb. 1-4).
Bleibt dieser Versuch ohne
positives Ergebnis, muß der
technische Kundendienst gerufen
werden.
• Die Klimaanlage darf nicht in
Waschräumen installiert werden.
• Die Klimaanlage darf nur in
trockenen Räumen installiert
werden (Schutzgrad IP 10).
• Die Klimaanlage darf in
Gegenwart von gefährlichen
Materialien, Dämpfen oder
Flüssigkeiten nicht in Betrieb
genommen werden.
Achtung!
Explosions- oder Brandgefahr.
• Die Klimaanlage ist auf glatter
Oberfläche aufzustellen.
• Wird die Klimaanlage außer
Betrieb genommen, muß der
Stecker gezogen und das
Versorgungskabel abgetrennt
werden. Außerdem müssen jene
Teile, die für Kinder
Gefahrenquellen darstellen,
unschädlich gemacht werden. Sie
dürfen nicht als Spielzeug
verwendet werden.
Achtung!
Dieses Gerät enthält Substanzen,
die für die Ozonschicht schädlich
sind; das Gerät muß an den
vorgesehenen Stellen entsorgt
werden; wenden Sie sich dazu an
die städtische Behörde Ihrer
Stadt.
• Conectar el climatizador sólo
en tomas con protección de
tierra.
• La eficiencia del climatizador
está garantiza por una limpieza
efectuada anualmente en un
Centro de asistencia.
• Si el climatizador, no obstante
una normal alimentación, se para
completamente, antes de dirigirse
a un Centro de Asistencia,
evacuar el agua quitando la tapa
de vaciado de la condensación
(fig. 1 - 4). Si el inconveniente se
repite dirigirse a una Centro de
Asistencia.
• El climatizador no tiene que
ser utilizado en locales destinados
a lavandería.
BELANGRIJKE
AANWIJZINGEN
• Ga na dat de gordijnen of
andere voorwerpen het
aanzuigfilter (fig. 1 - 3) aan de
achterkant van het apparaat niet
kunnen belemmeren.
• Sluit de airconditioner alleen
aan op geaarde stopcontacten.
• De goede werking van de
airconditioner wordt
gegarandeerd door een jaarlijkse
reiniging door een Servicedienst.
• Als de airconditioner ondanks
het feit dat de stroom
ingeschakeld is, volledig afslaat,
probeer dan voordat u contact
opneemt met de Servicedienst
eerst het water weg te laten
lopen door de dop van de
condensafvoer (fig. 1 - 4) eraf te
halen. Als de storing opnieuw
optreedt dan moet u contact
opnemen met de Servicedienst.
• Instalar el climatizador sólo en
locales secos (protección IP 10).
• De airconditioner mag niet in
vertrekken gebruikt worden die
als wasruimte dienen.
• El climatizador no tiene que
ser puesto en funcionamiento en
presencia de materiales, vapores
o líquidos peligrosos.
• Installeer de airconditioner
uitsluitend in droge vertrekken (IP
beschermingsgraad 10).
Atención!
Peligro de explosión o incendio
• Instalar el climatizador en una
superficie plana.
• Si se decide no utilizar más el
climatizador se recomienda
desenchufar el aparato de la toma
de corriente y cortar el cable de
alimentación. Se recomienda
además volver inocuas las piezas
que puedan constituir peligro para
los niños, que podrían ser
inducidos a jugar con las mismas.
Atención!
Este producto contiene
sustancias que dañan el ozono
estratosférico; al final de su
empleo debe ser entregado a los
expresos centros de recogida;
pedir informaciones a los servicios
de gestión de la limpieza urbana
del propio municipio.
• De airconditioner mag niet in
werking gesteld worden als er
gevaarlijk materiaal, dampen of
vloeistoffen in de buurt zijn.
Let op!
Ontploffings- of brandgevaar.
• Zet de airconditioner op een
vlakke ondergrond.
• Als u de airconditioner niet
meer gebruikt dan adviseren wij u
eerst de stekker uit het
stopcontact te halen en het
elektrische snoer door te knippen.
Wij adviseren u verder de delen
die gevaarlijk kunnen zijn voor
kinderen die er mee kunnen gaan
spelen onschadelijk te maken.
Let op!
Dit produkt bevat stoffen die
schadelijk zijn voor de ozonlaag;
als u dit produkt niet meer
gebruikt dan moet het bij de
betreffende instanties ingeleverd
worden; vraag om informatie bij
de gemeentelijke reinigingsdienst.
4
200 mm
min 700 mm
110 mm
Fig 4
Montaggio a muro
Wall and window mounting
Installation murale
Installation an Mauer
Instalación en la pared
Montage aan de muur
INSTALLAZIONE
Il climatizzatore deve essere installato in ambiente adeguato.
Vi raccomandiamo di ridurre l’irraggiamento solare tramite tapparelle, tende, veneziane e di tenere
chiuse porte e finestre.
INSTALLATION
The air conditioner must be
installed in a suitable
environment.
Use shutters, curtains, venetian
blinds to reduce sunlight and
keep doors and windows closed.
• Posizionare il climatizzatore
davanti a una finestra o a una
portafinestra.
• Position the air conditioner in
front of a window or French
window
INSTALLATION
Le climatiseur doit être installé
dans un local approprié.
Il est recommandé de réduire au
minimum le rayonnement solaire
au moyen de volets roulants, de
rideaux, de stores vénitiens et de
maintenir les portes et les
fenêtres fermées.
INSTALLATION
Die Klimaanlage muß in einem
geeigneten Raum installiert
werden. Direkte
Sonnenbestrahlung muß durch
Rolläden, Vorhänge und
dergleichen verhindert werden,
Fenster und Türen sind
geschlossen zu halten.
INSTALACIÓN
El climatizador debe ser instalado
en un ambiente adecuado.
Le recomendamos reducir el
efecto de los rayos solares
usando persianas, cortinas,
persianas venecianas y mantener
cerradas las puertas y ventanas.
INSTALLATIE
De airconditioner moet in een
geschikte ruimte geïnstalleerd
worden.
Wij adviseren u het zonlicht
zoveel mogelijk met rolluiken, gordijnen, jaloezieën te beperken en
de deuren en de ramen dicht te
houden.
• Collocare i convogliatori terminali
(fig 1-7) inserendoli nei tubi flessibili.
• Position the end conveyors
(fig. 1-7) inserting these in the
hoses.
• Positionner le climatiseur
devant une fenêtre ou bien une
porte-fenêtre.
• Die Klimaanlage vor einem
Fenster oder einer Fenstertür
aufstellen.
• Installer les convoyeurs
d’extrémité (Fig.1-7) en les
emboîtant dans les tuyaux
flexibles.
• Die Leitbleche in die Schläuche
stecken (Abb. 1-7)
• Inserire i tubi nei raccordi (fig
1-5/6).
• Insert the hoses in the fittings
(fig 1-5/6)
• Estendere i tubi solo per il
necessario in modo che i convogliatori dell’aria rimangano chiusi
tra i battenti dell’infisso.
• Stretch the hoses only to the
extent required to assure that
the end conveyors remain closed
between the sections of the
door/window.
INSTALLAZIONE MONOTUBO
Installare il solo tubo di scarico
aria (fig 1-6).
La resa frigorifera è inferiore.
SINGLE-HOSE INSTALLATION
Install the single air outfeed hose
(fig 1-6)
Cooling performance is lower
INSTALLAZIONE FISSA
Il climatizzatore può essere installato anche con fori fissi a vetro o
a muro. Il flusso dell’aria non deve
essere impedito da griglie di protezione o altro. Eventuali protezioni devono avere una sezione
totale di passaggio dell’aria non
2
inferiore a 100 cm .
FIXED INSTALLATION
The air conditioner can also be
installed with fixed holes in
windows or walls. Air flow must
not be obstructed by protective
mesh or similar. Any forms of
protection must have a total
cross-section for air flow of not
2
less than 100 cm .
• Introduire les tuyaux dans les
raccords (Fig.1-5/6).
• Tendre les tuyaux uniquement
de ce qui est nécessaire pour que
les convoyeurs de l’air restent
coïncés entre les battants.
INSTALLATION
AVEC UN SEUL TUYAU
Installer sulement le tuyau
d’évacuation de l’air (Fig.1-6).
Le rendement réfrigérant est
inférieur.
INSTALLATION FIXE
Le climatiseur peut aussi être
installé sur des trous fixes
pratiqués dans une vitre ou bien
dans un mur. Le flux de l’air ne
doit pas être entravé par des
• Die Schläuche in die
Verbindungsstücke stecken (Abb.
1-5/6)
• Die Schläuche nur so weit
dehnen, wie erforderlich, damit
die Luftleitbleche zwischen den
Fensterflügeln eingeschlossen
bleiben
EINROHR-INSTALLATION
Nur den Entlüftungsschlauch
installieren (Abb. 1-6).
Die Kühlleistung ist geringer.
FESTE INSTALLATION
Die Klimaanlage kann auch an
Mauer- oder Glaswänden fix
montiert werden.
Der Luftstrom darf nicht durch
Schutzgitter oder ähnliches
behindert werden. Eventuelle
Schutzgitter müssen einen freien
• Poner en posición el
climatizador delante de una
ventana o de una puerta ventana.
• Colocar los conductores
terminales (fig. 1-7)
introduciéndolos en los tubos
flexibles.
• Introducir los tubos en los
racores
(fig. 1-5/6)
• Extender los tubos solamente
lo necesario de manera que los
conductores del aire permanezcan
cerrados entre las hojas de las
puertas o ventanas.
INSTALACIÓN
DE UN SOLO TUBO
Instalar el tubo único de descarga
del aire (fig. 1-6).
El rendimiento frigorífico es
inferior.
INSTALACIÓN FIJA
El climatizador puede ser
instalado incluso con los orificios
fijos en cristales o en la pared. El
paso del aire no debe ser
• Zet de airconditioner voor een
raam of voor een terras-/balkondeur.
• Doe de luchtgeleiders (fig. 1 7) in de slangen.
• Doe de slangen in de fittingen
(fig. 1 - 5/6).
• Trek de slangen slechts zover
uit dat de luchtgeleiders tussen
de vleugels van het kozijn zitten.
INSTALLATIE VAN HET MODEL
MET ÉÉN SLANG
Installeer de enkele luchtafvoerslang
(fig. 1 - 6).
Het koelrendement is minder.
VASTE INSTALLATIE
De airconditioner kan ook met
gaten vast aan het raam of aan
de muur geïnstalleerd worden. De
luchtstroom mag niet belemmerd
worden door beschermende roosters e.d. Eventuele beschermende roosters e.d. moeten een totale doorsnede voor de luchtdoor-
5
ALLACCIAMENTO
ELETTRICO
Prima di collegare il climatizzatore
assicurarsi che:
• La linea di alimentazione sia di
220-240V/50Hz.
• La linea di alimentazione sia
dotata di messa a terra e dimensionata per una corrente di spunto di 20A e protetta da un fusibile da 10AT.
• La presa abbia una portata di
almeno 10A a 250V.
Qualora non fosse compatibile
con la spina del climatizzatore
sostituirla con una a norme CEI.
• Il cavo di un’eventuale prolunga abbia sezione almeno di 1,5
2
m m.
• Il climatizzatore sia installato
secondo le normative nazionali.
• L’assorbimento del climatizzatore (1.000W), sommandosi a
quello degli altri elettrodomestici,
può provocare l’interruzione dell’impianto elettrico.
INTERRUZIONE
DI CORRENTE
Se durante il funzionamento
dovesse mancare la corrente elettrica, viene memorizzato l’ultimo
modo di funzionamento nel quale
si trovava il climatizzatore.
Al ritorno della corrente l’apparecchio riprende a funzionare come
impostato.
Attenzione!
l’interruzione di energia elettrica
provoca l’azzeramento del timer.
Se il climatizzatore era impostato
in tale funzione, si accenderà
immediatamente al ritorno dell’energia elettrica.
La perdita dell’impostazione dell’ora corrente è segnalata dal lampeggio di due trattini sul display
superiore.
CONNECTION TO THE MAINS
Before connecting the air
conditioner, make sure that:
BRANCHEMENT ELECTRIQUE
Avant de brancher le climatiseur,
vous assurer que:
ELEKTRISCHER ANSCHLUß
Vor Anschluß an das Stromnetz
ist zu kontrollieren:
CONEXION ELÉCTRICA
Antes de conectar el climatizador
asegurarse que:
ELEKTRISCHE AANSLUITING
Voordat u de airconditioner
aansluit moet u controleren of:
• The power supply is 220240V/50Hz.
The power line is grounded and
rated for a take-off current of
20A and protected by a 10AT
fuse.
• la ligne d’alimentation ait une
tension de 220-240V/50Hz.
• Die Versorgungsleitung muß
220-240V/50Hz sein
• La línea de alimentación sea de
220V-240V/50 Hz.
• de voedingslijn een spanning
heeft van 220-240V/50Hz
• La ligne d’alimentation soit
équipée d’une mise à la terre,
qu’elle soit dimensionnée pour un
courant de pic de 20A et
protégée par un fusible de 10AT.
• Die Versorgungsleitung muß
mit Schutzleiter versehen, für
Stromspitzen von 20A ausgelegt,
sowie mit einer 10At-Sicherung
geschützt sein.
• La línea de alimentación conste
de protección de tierra y con
capacidad para una corriente
inicial de 20A y protegida por un
fusible de 10AT.
• de voedingslijn geaard is en
berekend is op een
aanloopstroom van 20A en
beveiligd is met een zekering van
minimaal 10AT
• La prise ait une portée d’au
moins 10A à 250V.
Dans le cas où la prise ne serait
pas compatible avec la fiche du
climatiseur, la remplacer par une
autre aux normes CEI.
• Die Steckdose muß für
mindestens 10A und 250V
ausgelegt sein.
Sollte die Steckdose mit dem
Stecker der Klimaanlage nicht
übereinstimmen, ist diese mit
einer den EU-Vorschriften
entsprechenden zu ersetzen.
• La toma tenga una capacidad
de por lo menos 10A a 250V.
En caso de que no fuera
compatible con el enchufe del
climatizador sustituirla con una
según normas CEI.
• het stopcontact een capaciteit
heeft van minimaal 10A bij 250V
Als de stekker niet geschikt is
met het oog op het stopcontact
dan moet de stekker vervangen
worden door een stekker die aan
de CEI voorschriften voldoet.
• The socket must have a rating
of at least 10A at 250V.
If the socket and the plug of the
conditioner are not compatible,
replace the socket with one
complying with CEI standards.
• The conductor of any
extension must have a cross2
section of at least 1.5 mm .
• The air conditioner must be
installed in compliance with
national regulations.
• The total power requirement
of the air conditioner and other
household appliances must not
cause interruption of the
electrical system.
POWER FAILURE
In the case of a power failure
while the conditioner is
functioning, the last operating
mode of the conditioner is stored.
When the power is restored, the
air conditioner will restart in the
mode set.
Warning!
Power failures cause clearing of
the timer. If the conditioner has
been set for this function, this
will switch on again as soon as
power is restored.
Loss of the current time setting
is highlighted by flashing of two
bars on the upper display.
• Le fil conducteur d’une
éventuelle rallonge ait une section
2
d’au moins 1,5 mm .
• Le climatiseur soit installé
conformément aux normes
nationales.
• L’absorption du climatiseur
ajoutée à celle des autres
appareils électroménagers ne
provoque pas l’interruption du
circuit électrique.
COUPURE DE COURANT
Si le courant électrique vient à
manquer pendant le
fonctionnement du climatiseur, le
dernier mode de fonctionnement
pendant lequel l’interruption s’est
produite est mémorisé.
Au retour du courant, l’appareil
reprend à fonctionner comme
programmé.
Attention!
L’interruption du courant
électrique provoque la mise à
zéro du timer. Si le climatiseur est
programmé dans cette fonction, il
s’allume immédiatement dès que
le courant revient.
La perte de programmation de
l’heure courante est signalée par
le clignotement de deux traits sur
l’affichage supérieur.
• Das Kabel einer eventuellen
Verlängerung muß einen
2
Querschnitt von 1,5 mm
aufweisen.
• Die Klimaanlage muß
entsprechend der ortsgegebenen
Vorschriften installiert sein.
• Die Leistungsaufnahme der
Klimaanlage darf bei Zuschaltung
der anderen Haushaltsgeräte nicht
die Unterbrechung der
Stromzufuhr auslösen.
STROMUNTERBRECHUNG
Wird während des Betriebs der
Strom unterbrochen, wird die
letzte Betriebsart der Klimaanlage
gespeichert.
Bei Wiedereintreten der
Stromzufuhr nimmt das Gerät die
eingestellte Betriebsart
automatisch wieder auf.
Achtung!
Die Stromunterbrechung stellt
den Timer auf null. Wenn das
Gerät auf diese Funktion
eingestellt war, startet es
unmittelbar nach Rückkehr der
Stromzufuhr.
Der Verlust der eingestellten
Uhrzeit wird durch Blinken von
zwei Strichlinien auf dem oberen
Display angezeigt.
• El conductor de una eventual
prolongación tenga una sección
2
de por lo mneos 1,5 mm .
• El climatizador esté instalado
según las normativas nacionales.
• El consumo del climatizador
sumándose al de otros
electrodomésticos, no cause la
interrupción de la instalación
eléctrica.
INTERRUPCIÓN DEL
SUMINISTRO ELÉCTRICO
Si durante el funcionamiento
faltara la corriente eléctrica se
memoriza el último modo en el
cual se encontraba el
climatizador.
Al volver la corriente el aparato
vuelve a funcionar como se lo
programe.
Atención!
La interrupción de la energía
eléctrica causa la puesta en cero
del timer. Si el climatizador
estaba programado en esta
función se enciende
inmediatamente al volver la
energía eléctrica.
La pérdida de la programación de
la hora corriente está indicada por
los destellos de dos pequeñas
rayitas en el display superior.
• de leiding van een eventueel
verlengsnoer een doorsnede van
2
minimaal 1,5 mm heeft
• door het stroomverbruik van
de airconditioner opgeteld bij het
stroomverbruik van andere
elektrische apparatuur de stroom
niet uitvalt
ALS DE STROOM UITVALT
Als het apparaat in werking is en
de stroom valt uit dan wordt de
laatste stand waarop de
airconditioner op stond in het
geheugen opgeslagen.
Zodra er weer stroom is begint
het apparaat weer op de
ingestelde stand te functioneren.
Let op!
Als de stroom uitvalt dan wordt
de timer op nul gezet. Als de
airconditioner op die stand stond
dan zal de timer zodra de stroom
terugkeert onmiddellijk weer gaan
functioneren.
Het ontregeld zijn van de
tijdinstelling wordt gesignaleerd
doordat er aan de bovenkant van
de display twee streepjes gaan
knipperen.
6
Fig 5
1
2
PANNELLO COMANDI
CONTROL PANEL
PANNEAU DES COMMANDES
BEDIENUNGSFELD
PANELES DE MANDO
BEDIENINGSPANEEL
1) Stand-by
1) Stand-by
1) Stand-by
1) Stand-by
1) Stand-by
1) Stand-by
2) Diminuire la temperatura
2) To lower the temperature
2) Diminuer la température
2) Temperatur senken
2) Disminuir la temperatura
2) Een lagere temperatuur instellen
3) Aumentare la temperatura
3) To increase the temperature
3) Augmenter la température
3) Temperatur erhöhen
3) Aumentar la temperatura
4) Diminuire le ore di programmazione
4) To reduce programming hours
4) Diminuer les heures de
programmation
4) Programmierte Stundenzahl
senken
4) Disminuir las horas de
programaciín
5) Augmenter les heures de
programmation
5) Programmierte Stundenzahl
erhöhen
5) Aumentar las horas de
programación
6) Sélectionner la période de
programmation
6) Programmierte Zeitspanne
wählen
6) Seleccionar el período de
programación
7) Enclencher la programmation
horaire
7) Zeitplan eingeben
7) Programar los horarios
8) Display
8) Display luminoso
9) Wahl der automatischen
Betriebsart
9) Seleccionar el modo de
funcionamiento automático
10)Wahl der
Ventilatorgeschwindigkeit
10)Seleccioanr la velocidad de
ventilación
11)Automatischer Nachtbetrieb
11)Modo Automático nocturno
12)Heizbetrieb
12)Modo Calefacción
13)Entfeuchtunsgbetrieb
13)Modo Deshumidificación
14)Kühlbetrieb
14)Modo Refrigeración
15)Anzeige Filter verstopft
15)Señal de filtro sucio
5) Aumentare le ore di programmazione
6) Selezionare il periodo di programmazione
7) Inserire la programmazione
oraria
5) To increase programming
hours
6) To select the programming
period
7) To set programming of the
time
8) Display
8) Display luminoso
9) Selezionare il modo di funzionamento automatico
8) Affichage lumineux
9) To select automatic functioning
9) Sélectionner le mode de
fonctionnement automatique
10)To select ventilation speed
10)Selezionare la velocità di ventilazione
11)Modo Automatico notturno
12)Modo Riscaldamento
13)Modo Deumidificazione
14)Modo Raffreddamento
15)Segnalazione filtro sporco
11)Night-time automatic mode
12)Heating mode
13)Dehumidification mode
14)Cooling mode
15)Filter dirty readout
10)Sélectionner la vitesse de
ventilation
4) De programmeringsuren verminderen
5) De programmeringsuren vermeerderen
6) De programmeringsperiode
kiezen
7) De urenprogrammering
inschakelen
8) Verlichte display
9) De automatische stand kiezen
10)De ventilatiesnelheid kiezen
11)Mode Automatique nocture
11)Automatische nachtfunktie
12)Verwarmingsfunktie
12)Mode Chauffage
13)Ontvochtigingsfunktie
13)Mode déshumidification
14)Mode Refroidissement
15)Signalisation filtre sale
3) Een hogere temperatuur
instellen
14)Koelfunktie
15)Signalering filter vuil
7
SELEZIONE FUNZIONI
FUNCTION SELECTION
SELECTION DES FONCTIONS
FUNKTIONSWAHL
SELECCION FUNCIONES
PRIMA ACCENSIONE
Appena inserita la spina sulla
parte inferiore del display (8)
compare la temperatura impostata.Sulla parte superiore due trattini lampeggianti indicano che non
è impostata l’ora corrente, per il
funzionamento in Timer del climatizzatore.
INITIAL START-UP
As soon as the plug has been
inserted, the temperature set is
shown in the lower part of the
display (8).
Two flashing bars in the upper
part indicate that the current
time has not been set for
conditioner functioning in Timer
mode.
PREMIERE MISE EN MARCHE
Une fois la fiche introduite dans la
prise, la température programmée
apparaît en bas de l’affichage (8).
Sur la partie supérieure, deux
traits qui clignotent indiquent que
l’heure courante n’est pas
programmée pour le
fonctionnement avec Timer du
climatisateur.
BEI ERSTEM EINSCHALTEN
Nach Einstecken des Steckers
wird auf dem unteren Feld des
Display (8) die eingestellte
Temperatur angezeigt. Auf dem
oberen Feld zeigen zwei blinkende
Strichlinien an, daß die Uhrzeit für
den Timer-Betrieb der Klimaanlage
noch nicht eingestellt ist.
PRIMER ENCENDIDO
Apenas se enchufa el aparato en
la parte inferior del display (8)
aparece la temperatura
programada. En la parte superior
dos rayitas emiten destellos
indicando que no ha sido
programada la hora corriente para
el funcionamiento en Timer del
climatizador.
STAND-BY
Key (1):
All functions are bypassed in
order to set the functions
required.
Once you have selected the
functions, press the key again to
restart the conditioner.
STAND-BY
Touche (1).
Toutes les fonctions sont exclues
pour permettre de programmer
les fonctions désirées.
Une fois la sélection terminée,
pour remettre le climatiseur en
marche il suffit d’appuyer à
nouveau sur la touche.
STAND-BY
Tasto (1).
Tutte le funzioni vengono escluse
per poter impostare le funzioni
desiderate.
Terminata la selezione per riattivare il climatizzatore è sufficiente
premere di nuovo il tasto.
Attenzione!
Selezionando il modo Stand-by il
climatizzatore continua a funzionare per 15 secondi (segnalato
dal lampeggio del relativo led)
prima che si chiuda la griglia di
uscita dell’aria.
Non forzate mai l’apertura o la
chiusura della griglia.
SELEZIONE
DELLA TEMPERATURA
Tasto (2), aumentare.
Tasto (3), diminuire.
Il display (8) visualizza la temperatura impostata.
Per variarla agire sui tasti (2) e
(3).
Le temperature consigliate sono
comprese tra i 22-25°C in estate
e tra i 18-22°C in inverno.
RAFFREDDAMENTO
Tasto (14).
Prima di selezionare questa funzione si deve impostare la temperatura.
La funzione è sempre abbinata
alla velocità di ventilazione (10).
Avvertenza:
Nel modo Raffreddamento il climatizzatore deumidifica l’aria
ambientale.
Non è quindi necessario attivare
la funzione Deumidificazione per
ridurre l’umidità.
Avvertenza:
Per impedire daneggiamenti al
compressore ogni partenza è
ritardata di tre minuti dal momento in cui viene selezionata la funzione.
Warning!
When Stand-by mode has been
selected, the conditioner
continues to operate for 15
seconds (indicated by flashing of
the related light) before closing
of the air outfeed grille.
Never force opening or closing of
the grille.
TEMPERATURE SELECTION
Key (2) to increase.
Key (3) to reduce.
The temperature set is shown on
the display (8).
Use keys (2) and (3) to modify
the temperature.
The recommended temperature
range is between 22-25°C in the
Summer and 18-22°C in the
Winter.
COOLING
Key (14).
Set the temperature before
selecting this function.
This function is always combined
with ventilation speed (10).
Warning:
In cooling mode, the conditioner
dehumidifies ambient air.
There is no need therefore to
activate the dehumidification
function to reduce humidity.
Warning:
There is a three minute delay
between selection of the function
and start-up in order to avoid
damage to the compressor.
Attention!
Lorsque le mode Stand-by est
sélectionné, le climatiseur
continue à fonctionner pendant
15 secondes (signalé par le
clignotement du LED
correspondant) avant que la grille
de sortie de l’air se ferme.
Ne jamais forcer l’ouverture ou la
fermeture de la grille.
SELECTION DE LA
TEMPERATURE
Touche (2), augmenter.
Touche (3), diminuer.
L’affichage (8) indique la
température programmée. Pour la
varier, agir sur les touches (2) et
(3).
Les températures conseillées sont
comprises entre 22 et 25°C en
été et 18 et 22°C en hiver.
STAND-BY
Taste (1)
Alle Funktionen des Geräts
werden ausgeschlossen, damit die
gewünschte Betriebsart
eingestellt werden kann
Um die Klimaanlage wieder
einzuschalten genügt es, nach
Ausführung der Einstellungen
diese Taste erneut zu drücken.
STAND-BY
Tecla (1).
Todas las funciones se excluyen
para poder programar las
funciones deseadas.
Una vez que se ha terminado la
selección para reactivar el
climatizador es suficiente apretar
de nuevo la tecla.
Achtung!
Nach Drücken der Stand-by Taste
bleibt die Klimaanlage noch für 15
Sekunden in Betrieb (das
entsprechende Led blinkt), dann
schließt sich die Luftklappe.
Die Luftklappe darf niemals durch
Kraftaufwand geöffnet oder
geschlossen werden.
Atención!
Seleccionando el modo Stand-by
el climatizador sigue funcionando
durante 15 segundos (indicado
por los destellos del led
correspondiente) antes de que se
cierre la rejilla de salida del aire.
No forzar nunca la abertura o el
cierre de la rejilla.
TEMPERATURWAHL
Taste (2), erhöhen
Taste (3), senken.
Display (8) zeigt die eingestellte
Temperatur.
Die Temperatur wird mit den
Tasten (2) und (3) geändert.
Empfohlene Temperaturwerte
liegen zwischen 22-25°C im
Sommer und zwischen 18-22°C
im Winter.
SECCIÓN DE LA
TEMPERATURA
Tecla (2), aumentar
Tecla (3), disminuir
El display (8) visualiza la
temperatura programada.
Para cambiarla usar las teclas (2)
y (3).
Las temperaturas aconsejadas
están comprendidas entre los 2225°C en verano y entre los 1822°C. en invierno.
REFROIDISSEMENT
Touche (14).
Avant de sélectionner cette
fonction, programmer la
température.
La fonction va toujours de paire
avec la vitesse de ventilation
(10).
KÜHLUNG
Taste (14)
Vor dem Einstellen dieser
Funktion, muß der
Temperaturwert eingegeben
werden.
Diese Funktion ist immer mit der
Geschwindigkeit des Ventilators
(10) kombiniert.
Information:
Lorsque le climatiseur fonctionne
en mode Refroidissement, il
déshumidifie aussi l’air ambiant.
Il n’est donc pas nécessaire
d’enclencher la fonction
Déshumidification pour réduire
l’humidité.
Hinweis:
Während des Kühlbetriebs wird
die Raumluft gleichzeitig
entfeuchtet.
Es ist daher überflüssig, die
Funktion Entfeuchtung zur
Reduzierung der Luftfeuchtigkeit
einzuschalten.
Information:
Hinweis:
REFRIGERACIÓN
Tecla (14)
Antes de seleccionar esta función
hay que programar la
temperatura.
La función siempre está
relacionada con la velocidad de
ventilación (10).
Observaciones:
En el modo Refrigeración el
climatizador deshumidifica el aire
del ambiente.
Por tanto no es necesario activar
la función Deshumidificación para
reducir la humedad.
Observaciones:
Para impedir daños al compresor
KEUZE FUNKTIES HET
APPARAAT
EERSTE KEER AANZETTEN
Zodra u de stekker erin gedaan
heeft dan wordt op het onderste
gedeelte van de display (8) de
ingestelde temperatuur
weergegeven. Op het bovenste
gedeelte van de display geven
twee knipperende streepjes aan
dat de huidige tijd niet ingesteld
is voor de werking van de timer
van de airconditioner.
STAND-BY
Toets (1)
Alle funkties worden
uitgeschakeld om de gewenste
funkties in te kunnen stellen.
Na afloop van de instelling hoeft
u slechts opnieuw op de toets te
drukken om de airconditioner in
werking te stellen.
Let op!
Als u de Stand-by stand kiest dan
blijft de airconditioner 15
seconden funktioneren (dit wordt
gesignaleerd aan de hand van het
knipperen van de betreffende led)
voordat het luchtuitlaatrooster
dichtgaat.
Forceer het open- of het
dichtgaan van het rooster in geen
geval.
DE TEMPERATUUR INSTELLEN
Toets (2) om een hogere
temperatuur in te stellen
Toets (3) om een lagere
temperatuur in te stellen
De display (8) geeft de ingestelde
temperatuur weer.
Om de temperatuur te veranderen
moet u op de toetsen (2) en (3)
drukken.
De geadviseerde temperaturen
variëren tussen de 22-25°C in de
zomer en tussen de 18-22°C in
de winter.
KOELFUNKTIE
Toets (14).
Voordat u deze funktie kiest
moet u eerst de temperatuur
instellen.
De funktie is altijd gekoppeld aan
de ventilatiesnelheid (10).
Let op:
Op de koelstand ontvochtigt de
airconditioner de omgevingslucht.
Het is dus niet nodig de
8
RISCALDAMENTO
Tasto (12).
Prima di selezionare questa funzione si deve ipostare la temperatura.
Avvertenza:
• Il kit per il riscaldamento
elettrico è fornito a richiesta.
Deve essere installato da
personale specializzato
ottemperando le norme vigenti.
• Durante il funzionamento in
Riscaldamento mantenere il
climatizzatore a una distanza di
almeno 30 cm dalle pareti.
AUTOMATICO NOTTURNO
Tasto (9).
La temperatura ambientale è controllata automaticamente.
Durante l’attivazione di questo
modo il corrispondente led lampeggia.
Questa funzione deve essere
abbinata a uno degli altri seguenti
modi: Raffreddamento, Riscaldamento, Deumidificazione.
La velocità di ventilazione rimane
indipendente e può essere opportunamente selezionata. Per il
massimo comfort acustico, tuttavia, si consiglia quella minima.
DEUMIDIFICAZIONE
Tasto (13).
Questa funzione elimina l’umidità
ambientale senza abbassare
eccessivamente la temperatura.
La selezione di questa funzione
esclude automaticamente il
Riscaldamento e il Raffreddamento e porta la ventilazione alla
velocità minima.
In Deumidificazione il climatizzatore funziona in modo intermittente.
Se la temperatura dell’aria è
uguale o inferiore a quella ipostata, il climatizzatore non deumidifica. questa condizione è segnalata
dall’intermittenza del led corrispondente.
VELOCITA’ DI VENTILAZIONE
Tasto (10).
Le velocità sono due, quella massima assicura il massimo rendimento e un grande ricambio dell’aria, alla minima la maggior silenziosità.
HEATING
Key (12)
Set the temperature before
selecting this function.
Warning:
When the conditioner is set to
heating mode, it must always be
kept at a distance of at least 30
cm from the walls.
NIGHT-TIME AUTOMATIC
Key (9).
Ambient temperature is
controlled automatically.
When the conditioner is activated
in this mode, the matching light
flashes.
This function must be combined
with one of the following modes:
cooling, heating, dehumidification.
Ventilation speed remains
independent and can be selected
as required. For maximum
comfort as regards noise,
minimum speed is recommended.
DEHUMIDIFICATION
Key (13).
This function eliminates ambient
humidity without excessive
reduction of the temperature.
Selection of this function
automatically excludes heating
and cooling and sets ventilation
to minimum speed.
In dehumidification mode, the
conditioner operates in on/off
mode.
If the temperature of the air is
equal to or below that set, the
conditioner does not perform the
dehumidification function. This
condition is indicated by flashing
of the matching light.
VENTILATION SPEED
Key (10).
There are two possible speeds:
top speed assures maximum
performance and thorough air
exchange while minimum speed
assures more silent operation.
CHAUFFAGE
Touche (12).
Avant de sélectionner la fonction
désirée, programmer la
température.
HEIZBETRIEB
Taste (12)
Vor dem Einstellen dieser
Funktion muß die Temperatur
eingegeben werden.
CALEFACCION
Tecla (12)
Antes de seleccionar esta función
hay que programar la
temperatura.
VERWARMINGSFUNKTIE
Toets (12).
Voordat u deze funktie kiest
moet u eerst de temperatuur
instellen.
Conseil:
Lors du fonctionnement du
climatiseur en mode Chauffage, le
maintenir à une distance d’au
moins 30 cm des murs.
Hinweis:
Während des Heizbetriebs muß
das Klimagerät mit mindestens 30
cm Abstand von der Wand
aufgestellt werden.
Observaciones:
Durante el funcionamiento en
Calefacción mantener el
climatizador a una distancia de
por lo menos 30 cm. de las
paredes.
Let op:
Tijdens de werking op de
verwarmingsstand moet u de
airconditioner minimaal 30 cm
vanaf de wanden houden.
AUTOMATIQUE NOCTURNE
Touche (9).
La température ambiante est
contrôlée automatiquement.
Lorsque ce mode de
fonctionnement est activé, le LED
correspondant clignote.
Cette fonction doit être
accouplée à un des modes de
fonctionnement suivants:
Refroidissement, Chauffage,
Déshumidification.
La vitesse de ventilation reste
indépendante et peut être
sélectionnée. Il est toutefois
conseillé de la régler au minimum
pour obtenir un maximum de
confort acoustique.
AUTOMATISCHER
NACHTBETRIEB
Taste (9)
Die Raumtemperatur wird
automatisch kontrolliert.
Während dieser Funktion blinkt
das entsprechende Led.
Diese Funktion muß immer mit
der Kühl-, Heiz - oder
Entfeuchtungsfunktion kombiniert
werden.
Die Geschwindigkeit der
Ventilation bleibt unabhängig und
kann entsprechend gewählt
werden. Um die Nachtruhe zu
schützen, empfiehlt es sich
jedoch, die niedrigste
Geschwindigkeit einzustellen.
DESHUMIDIFICATION
Touche (13).
Cette fonction élimine l’humidité
ambiante sans abaisser
excessivement la température. La
sélection de cette fonction exclut
automatiquement le Chauffage et
le Refroidissement et met la
ventilation à la vitesse minimum.
Le climatiseur fonctionne d’une
manière intermittente lorsqu’il se
trouve en mode
Déshumidification.
Si la température de l’air est
égale ou inférieure à celle
programmée, le climatiseur ne
déshumidifie pas. Cette condition
est alors signalée par le
clignotement du LED
correspondant.
ENTFEUCHTEN
Taste (13)
Diese Funktion ermöglicht das
Entfeuchten der Raumluft, ohne
die Temperatur zu stark zu
senken.
Diese Funktion schließt
automatisch den Kühl- und
Heizbetrieb aus. Die Ventilation
wird automatisch auf die
geringste Geschwindigkeit
eingestellt. Beim
"Entfeuchtungsbetrieb"
funktioniert die Klimaanlage
intermittierend, d.h. es wechseln
sich Betrieb und Pausen ab.
Wenn die Lufttemperatur gleich
der eingestellten Temperatur ist
oder unter dieser liegt, setzt der
Entfeuchtungsbetrieb nicht ein.
Dieser Zustand wird durch das
Aufblinken des entsprechenden
Leds angezeigt.
VITESSE DE VENTILATION
Touche (10).
Il y a deux vitesses: la maximum
qui garantit un rendement
maximum et un grand
déplacement d’air, la minimum
pour un plus grand silence.
VENTILATIONS
GESCHWINDIGKEIT
Taste (10)
Es stehen zwei Geschwindigkeiten
zur Wahl, bei der
Höchstgeschwindigkeit erreicht
die Klimaanlage auch die größte
Leistung und eine große
Luftumwälzung.
AUTOMATICO NOCTURNO
Tecla (9)
La temperatura del ambiente está
controlada automáticamente.
Durante la activación de esta
modo el led correspondiente
emite destellos.
Esta función debe estar
combinada con uno de los otros
modos siguientes: Refrigeración,
Calefacción, Deshumidificación.
La velocidad de ventilación
permanece independiente y puede
ser oportunamente seleccionada.
De todos modos para el máximo
comfort acústico se aconseja la
mínima.
DESHUMIDIFICACION
Tecla (13)
Esta función elimina la humedad
ambiente sin bajar excesivamente
la temperatura. La selección de
esta función excluye
automáticamente la Calefacción y
la Refrigeración y pone la
ventilación en la velocidad
mínima.
En Deshumidificación el
climatizador funciona de manera
intermitente.
Si la temperatura del aire es igual
o inferior a la programada, el
climatizador no deshumidifica.
Esta condición está señalada por
los destellos del led
correspondiente.
VELOCIDAD DE VENTILACIÓN
Tecla (10)
Las velocidades son dos, la
máxima asegura rendimiento y un
gran recambio del aire, la mínima
una mayor silenciosidad.
AUTOMATISCHE
NACHTFUNKTIE
Toets (9).
Op deze stand wordt de
omgevingstemperatuur
automatisch gecontroleerd.
Als deze funktie ingeschakeld
wordt dan gaat de betreffende
led knipperen.
Deze funktie moet met één van
de volgende funkties
gecombineerd worden: de
koelfunktie, de
verwarmingsfunktie of de
ontvochtigingsfunktie.
De ventilatiesnelheid is
onafhankelijk en kan naar wens
gekozen worden. Om een zo
geruisloos mogelijke werking te
hebben adviseren wij u de laagste
ventilatiesnelheid in te stellen.
ONTVOCHTIGINGSFUNKTIE
Toets (13).
Deze funktie heft de
omgevingsvochtigheid zonder dat
de temperatuur te veel daalt.
Als u deze funktie kiest dan
wordt de verwarmings- of de
koelfunktie automatisch
uitgeschakeld en dan wordt de
laagste ventilatiesnelheid
ingesteld.
Op de ontvochtingsstand heeft
de airconditioner een
intermitterende werking.
Als de temperatuur van de lucht
gelijk is aan of minder is dan de
ingestelde temperatuur dan
ontvochtigt de airconditioner niet.
Dit wordt gesignaleerd doordat de
betreffende led intermitterend
gaat branden.
VENTILATIESNELHEID
Toets (10).
Er zijn twee ventilatiesnelheden.
Op de hoogste ventilatiesnelheid
bent u verzekerd van het
maximale rendement en een
enorme luchtverversing. Op de
laagste ventilatiesnelheid is de
9
AUTO
Tasto (9).
Funzionamento automatico.
Il climatizzatore sceglie autonomamente le funzioni necessarie a
mantenere il comfort ambientale.
Con temperature inferiori a 18°C
si attiva il modo Riscaldamento,
attivo fino al raggiungimento di
20°C.
Con temperature superiori a 26°C
funziona il modo Raffreddamento
fino al raggiungimento di 24°C.
AUTO
Key (9).
Automatic operation.
The conditioner automatically
selects the functions required to
maintain comfortable ambient
conditions.
If the temperature drops below
18°C, heating mode is activated
to bring the temperature to 20°C.
If the temperature is above 26°C,
cooling mode is activated to
lower the temperature to 24°C.
FILTRO
Dopo circa 200 ore di funzionamento l’accensione della scritta Filter (15) segnala la possibile necessità di pulire il filtro dell’aria.
Se verificate l’effettiva necessità
di pulizia attivate il tasto Standby (1) e pulite il filtro come indicato nell’apposito paragrafo.
Dopo averlo rimontato riattivate il
climatizzatore premendo il tasto
Stand-by. Il led Filter si spegne
automaticamente.
FILTER
After around 200 hours of
operation, the Filter caption (15)
lights up to indicate that the air
filter may need cleaning.
If the filter is to be cleaned, use
the Stand-by key (1) and clean
the filter following the
instructions given in the specific
paragraph. After replacing the
filter, press the Stand-by key to
restart the conditioner. The Filter
light switches off automatically.
PROGRAMMAZIONE
Il climatizzatore può essere attivato da due distinti programmi.
Per fruire di queste funzioni si
deve impostare l’orario esatto,
poi i programmi di funzionamento
agli orari voluti.
PROGRAMMING
The air conditioner can be
activated by two separate
programs.
To use these functions, set the
correct time and then the times
at which the programs are to be
activated/deactivated.
Impostazione dell’orario
esatto
a) Premere i tasti (4) o (5) per
far apparire sul display l’indicazione dei minuti e impostare quelli
esatti.
b) Premere una volta il tasto (6);
sul display appare l’indicazione
delle ore (Hr).
c) Agendo sui tasti (4) e (5)
impostare l’ora esatta.
Impostazione degli orari del
1° e del 2° programma di
funzionamento
(Progr.1 e Progr.2)
d) dopo aver impostato l’ora
esatta premere una volta il tasto
(6) per far apparire l’indicazione
PROGR. 1 ON (orario d’attivazione
1° programma).
e) Tramite i tasti (4) o (5) fissare l’orario in cui si vuole inizi il 1°
programma.
How to set the correct time
a) Press key (4) or (5) to
display the minutes and set the
precise time in minutes.
b) Press key (6) once; the hours
will be shown on the display (Hr).
c) Use key (4) or (5) to set the
time.
How to set the times of the
1st and 2nd program.
(Progr.1 and Progr.2)
d) Once you have set the
correct time, press key (6) once
to display the indication PROGR.1
ON (time at which you want the
1st program to switch on).
e) Use key (4) or (5) to set the
time at which you want the 1st
program to switch on.
f) Press key (6) again once to
display the indication PROGR.1 OF
(time at which you want the 1st
AUTO
Touche (9).
Fonctionnement automatique.
Le climatiseur choisit
automatiquement les fonctions
nécessaires à maintenir un
environnement confortable. Lorsque
la température est inférieure à 18°C,
il se met en marche en mode
Chauffage jusqu’à ce que la
température atteigne 20°C. Si la
température est supérieure à 26°C,
le mode Refroidissement fonctionne
jusqu’à ce que la température
atteigne 24°C.
FILTRE
Après environ 200 heures de
fonctionnement, l’illumination de
l’inscription Filter (15) signale qu’il
est peut être nécessaire de
nettoyer le filtre. Pour effectuer
cette vérification, enfoncer d’abord
la touche Stand-by (1) puis
nettoyer le filtre de la façon
indiquée dans le paragraphe
correspondant. Une fois le filtre
remonté, remettre le climatiseur en
marche en appuyant à nouveau sur
la touche Stand-by. Le LED Filter
s’éteint alors automatiquement.
PROGRAMMATION
Le climatiseur peut être activé par
deux programmes distincts. Pour
pouvoir utiliser ces fonctions, il faut
introduire l’heure exacte puis
ensuite les programmes de
fonctionnement aux horaires
désirés.
Introduction de l’heure
exacte
a) Appuyer sur les touches (4) ou
(5) pour faire apparaître les minutes
sur l’affichage et y introduire les
minutes exactes.
b) Appuyer une fois sur la touche
(6): les heures apparaissent alors
sur l’affichage (Hr).
c) Au moyen des touches (4) ou
(5), introduire l’heure exacte.
Introduction des horaires du
1er et du 2ème programme
de fonctionnement.
(Progr.1 et Progr.2)
d) Après avoir introduit l’heure
exacte, appuyer une fois sur la
touche (6) pour faire apparaître
l’indication PROGR.1 ON (heure
AUTO
Taste (9)
Automatischer Betrieb.
Die Klimaanlage steuert
unabhängig alle für das räumliche
Wohlbefinden erforderlichen
Funktionen. Bei
Raumtemperaturen unter 18°C
setzt automatisch der Heizbetrieb
ein, bis 20°C erreicht werden. Bei
Temperaturen über 26°C setzt
der Kühlbetrieb ein, bis eine
Temperatur von 24°C erreicht ist.
FILTER
Nach etwa 200 Betriebsstunden
wird durch die Leuchtschrift Filter
(15) das eventuell erforderliche
Reinigen des Luftfilters angezeigt.
Stellen Sie tatsächlich fest, daß
der Filter zu reinigen ist, drücken
Sie die Taste Stand-by (1) und
reinigen den Filter nach den
Anleitungen im entsprechenden
Kapitel. Nach dem Wiedereinbau
drücken Sie die Taste Stand-by
zur Fortsetzung des Betriebs. Das
Led Filter erlischt automatisch.
PROGRAMMIERUNG
Auf der Klimaanlage können zwei
unterschiedliche Programme
abgespeichert werden.
Dazu müssen die genaue Uhrzeit
und die Betriebsprogramme zu
den gewünschten Zeiten
eingegeben werden.
Eingabe der genauen
Uhrzeit
a) Durch Betätigung der Tasten
(4) oder (5) werden auf dem
Display die Minuten zur
Einstellung angezeigt.
b) Taste (6) einmal drücken; auf
dem Display wird die Stunde (Hr)
angezeigt.
c) Durch Drücken der Tasten
(4) und (5) die genaue Stunde
einstellen.
Einstellung der Zeitspannen
für das 1. Und 2.
Betriebsprogramm
(Progr. 1 und Progr.2)
d) Nach Eingabe der Stunde
einmal die Taste (6) drücken. Es
erscheint die Anzeige PROGR.1
ON (gewünschte Uhrzeit für den
Start des 1. Programms).
e) Mit den Tasten (4) oder (5)
AUTO
Tecla (9)
Funcionamiento automático.
El climatizador selecciona
autónomamente las funciones
necesarias para mantener el
comfort ambiental.
Con temperaturas inferiores a
18°C se activa el modo
Calefacción, activo hasta que
alcanza los 20°C.
Con temperaturas superiores a
26°C funciona el modo
Refrigeración hasta que alcanza
los 24°C.
AUTOMATISCHE FUNKTIE
Toets (9).
Automatische werking.
De airconditioner kiest automatisch
de funkties die nodig zijn om het
omgevingscomfort te handhaven. Als
de temperatuur onder de 18°C daalt
dan wordt de verwarmingsfunktie
ingeschakeld, die ingeschakeld blijft
totdat er een temperatuur van 20°C
wordt bereikt. Als de temperatuur
boven de 26°C stijgt dan wordt de
koelfunktie ingeschakeld, die
ingeschakeld blijft totdat er een
temperatuur van 24°C wordt bereikt.
FILTRO
Después de unas 200 horas de
funcionamiento el encendido de la
leyenda “Filter” (15) señala la
posible necesidad de limpiar el
filtro de aire.
Se se comprueba la necesidad
efectiva de realizar una limpieza
hay que activar la tecla “Standby” (1) y limpiar el filtro como se
indica en el párrafo
correspondiente. Después de
haberlo montado nuevamente,
reactivar el climatizador
apretando la tecla “Stand-by”. El
led “Filter” se apaga
automáticamente.
FILTER
Als na circa 200 uur dat het apparaat
in werking is geweest het opschrift
filter (15) gaat branden dan kan het
nodig zijn om het luchtfilter te
reinigen. Als het filter inderdaad
gereinigd moet worden moet u de
Stand-by toets (1) indrukken en het
filter reinigen zoals aangegeven in de
betreffende paragraaf. Als u het filter
opnieuw gemonteerd heeft moet u de
airconditioner weer in werking stellen
door op de Stand-by toets te
drukken. De led filter zal automatisch
uitgaan.
PROGRAMACIÓN
El climatizador puede ser activado
por dos programas distintos. Para
usar estas funciones hay que
programar el horario exacto,
luego los programas de
funcionamiento en el horario
deseado.
PROGRAMMERING
De airconditioner kan door middel van
twee verschillende programma’s in
werking gesteld worden.
Om van deze funkties gebruik te
maken moet u de juiste tijd instellen
en daarna programmeren op welke
tijden u het apparaat wilt laten
funktioneren.
De juiste tijd instellen
Programación del horario
exacto
a) Apretar las teclas (4) ó (5)
para hacer aparecer en el display
la indicación de los minutos y
programar los exactos.
b) Apretar una vez la tecla (6);
en el display aparece la indicación
de las horas (Hr.).
c) Con las teclas (4) y (5)
programar la hora exacta.
Programación de los horarios
del 1° y 2° programa de
funcionamiento.
(Progr. 1 y Progr. 2)
d) Después de haber programado
la hora exacta apretar una vez la
tecla (6) para hacer aparecer la
indicación Progr. 1 ON (horario de
activación 1° programa)
a) Druk op toets (4) of toets (5)
om de indicatie van de minuten op de
display te laten verschijnen en om de
juiste tijd in te stellen.
b) Druk één keer op toets (6); op
de display worden dan de uren
aangegeven (Hr).
c) Druk op de toetsen (4) en (5)
om de exacte tijd in te stellen.
De tijden van het 1e en het 2e
werkingsprogramma instellen
(Progr. 1 en Progr. 2)
d) Nadat u de juiste tijd ingesteld
heeft moet u één keer op toets (6)
drukken om de indicatie Progr. 1 ON
op de display te laten verschijnen
(tijd waarop het 1e programma
10
i
) Tramite i tasti (4) o (5) fissare l’orario in cui si vuole inizi il 2°
programma.
i
) Use key (4) or (5) to set the
time at which you want the 2nd
program to switch on.
l
) Premere ancora una volta il
tasto (6) per far apparire l’indicazione PROGR. 2 OF (orario di
disattivazione 2° programma).
l
) Press key (6) again once to
display the indication PROGR.2 OF
(time at which you want the 2nd
program to switch off).
m ) Tramite i tasti (4) o (5) fissare
l’orario in cui si vuole disattivare il
2° programma.
m ) Use key (4) or (5) to set the
time at which you want the 2nd
program to switch off.
n) Per tornare al funzionamento
normale premere una volta il
tasto (6).
n) To restore normal functioning,
press key (6) once.
Attivazione e disattivazione
dei programmi di funzionamento
Una volta impostati i programmi
di funzionamento possono essere
attivati, singolarmente o entrambi, a piacimento.
Ogni volta che si preme il tasto
(6) la situazione cambia come
segue:
• Attivazione del solo 1° programma.
• Attivazione del solo 2° programma.
• Attivazione del 1° e del 2°
programma.
Per attivare la programmazione
oraria impostata si prema il tasto
(7). L’inserimento del Timer è
segnalato dall’accensione del led
giallo.
How to switch operating
programs on/off.
Once the operating programs
have been set, they can be
activated individually or both
together, as required.
Once key (6) has been pressed,
the situation changes as follows:
• Activation of the 1st program
only.
• Activation of the 2nd program
only.
• Activation of the 1st and 2nd
program.
Press key (7) to activate the
time programming set. The yellow
light switches on to indicate that
the Timer has been activated.
h) Appuyer encore une fois sur
la touche (6) pour faire
apparaître l’indication PROGR.2
ON (heure d’activation 2ème
programme)
i
) Au moyen des touches (4) ou
(5), fixer l’heure à laquelle le
2ème programme doit
commencer.
l
) Appuyer encore sur la touche
(6) pour faire apparaître
l’indication PROGR.2 OF (heure de
fin du 2ème programme).
m ) Au moyen des touches (4) ou
(5), fixer l’heure à laquelle le
2ème programme doit terminer.
n) Pour revenir au fonctionnement
normal, appuyer une fois sur la
touche (6).
Activation et désactivation
des programmes de
fonctionnement.
Une fois que les programmes de
fonctionnement sont introduits,
ils peuvent être activés
individuellement ou tous les deux,
au choix.
A chaque fois que l’on appuie sur
la touche (6), la situation change
de la façon suivante:
• Activation du 1er programme
seulement
• Activation du 2ème
programme seulement
• Activation du 1er et du 2ème
programme.
Pour activer la programmation
horaire introduite, il faut appuyer
sur la touche (7).
g) Con las teclas (4) ó (5) fijar
el horario en que se desea
desactivar el 1° programa.
g) Stel met behulp van toets (4) of
(5) de tijd in waarop u wilt dat het
1e programma stopt.
h) Apretar nuevamente una vez
la tecla (6) para hacer aparecer la
indicación Progr. 2 ON (horario de
activación del 2° programa).
h) Druk nogmaals op toets (6) om
de indicatie Prog. 2 ON op de display
te laten verschijnen (tijd waarop het
2e programma start).
i
) Con las teclas (4) ó (5) fijar
el horario en que se desea que
comience el 2° programa.
i) Stel met behulp van toets (4) of
(5) de tijd in waarop u wilt dat het
2e programma begint.
m) Mit den Tasten (4) oder (5)
die gewünschte Uhrzeit für das
Ende des 2. Programms einstellen
l) Apretar nuevamente una vez
la tecla (6) para hacer aparecer la
indicación Progr. 2 OFF (horario
de desactivación del 2°
programa).
l) Druk nogmaals op toets (6) om
de indicatie Progr. 2 OF op de display
te laten verschijnen (tijd waarop het
2e programma stopt).
n) Für die Wiederaufnahme des
normalen Betriebs einmal Taste
(6) drücken.
m) Con las teclas (4) ó (5) fijar
el horario en que se desea
desactivar el 2° programa.
Ein-und Ausschalte
der Betriebsprogramme
Nach Einstellung der
Betriebsprogramme können diese
wahlweise einzeln oder beide
aktiviert werden.
Durch jedes Drücken der Taste
(6) ändert sich die Situation wie
folgt:
n) Para volver al funcionamiento
normal apretar una vez la tecla
(6).
h) Erneut Taste (6) drücken. Es
erscheint die Anzeige Progr.2 ON
(gewünschte Uhrzeit für den Start
des 2. Programms).
i
) Mit den Tasten (4) oder (5)
die gewünschte Uhrzeit für den
Beginn des 2.Programms
einstellen.
l) Erneut Taste (6) drücken. Es
erscheint die Anzeige Progr.2 OFF
(gewünschte Uhrzeit für das Ende
des 2. Programms)
•
nur 1. Programm aktiviert
•
nur 2. Programm aktiviert
•
1. und 2. Programm aktiviert
Zur Aktivierung des
Stundenprogramms Taste (7)
drücken. Das Einschalten des
Timers wird durch Aufleuchten
des gelben Leds angezeigt.
Activación y desactivación
de los programas de
funcionamiento.
Una vez que se han determinado
los programas de funcionamiento
pueden ser activados, uno o los
dos, según se desee.
Cada vez que se aprieta la tecla
(6) la situación cambia de la
siguiente manera:
• Activación sólo del 1°
programa
• Activación sólo del 2°
programa
3
4
m ) Stel met behulp van toets (4) of
(5) de tijd in waarop u wilt dat het
2e programma stopt.
n) Druk één keer op toets 86) om
naar de gewone werking terug te
gaan.
De werkingsprogramma’s in- en
uitschakelen
Als de werkingsprogramma’s
ingesteld zijn dan kunnen zij naar
wens afzonderlijk of samen
ingeschakeld worden.
Telkens als u op toets (6) drukt dan
verandert de situatie als volgt:
• Inschakeling van alleen het 1e
programma.
• Inschakeling van alleen het 2e
programma.
• Inschakeling van het 1e en het 2e
programma.
Om de programmering van de
ingestelde tijd in te schakelen moet u
op toets (7) drukken. Het feit dat de
timer ingeschakeld is wordt
gesignaleerd doordat de gele led gaat
branden
Fig 6
11
TRASPORTO DEL
CLIMATIZZATORE
Deve avvenire in posizione verticale.
In caso di trasporto in posizione
orizzontale attendere almeno
un’ora prima di riavviarlo.
Prima di effettuare il trasporto
scaricare completamente l’acqua
di condensa aprendo il tappo (fig
6/4).
MANUTENZIONE
PERIODICA
Prima di eseguire qualsiasi operazione di manutenzione scollegare
sempre la presa.
PULIZIA DEI FILTRI
DELL’ARIA
Il filtro trattiene le impurità dell’aria (polvere, pollini, batteri), per
questo deve essere pulito settimanalmente.
• Premere le due linguette della
griglia posteriore ed estrarla (fig
6/3).
• Sfilare il filtro dalla griglia e
pulirlo con un getto d’acqua.
Prima di riposizionarlo attendere
che sia asciutto.
PULIZIA DEL
CLIMATIZZATORE
Prima di pulire il climatizzatore
scollegare sempre la presa.
Per la pulizia esterna utilizzare
solo detergenti e non benzina,
gasolio o prodotti affini.
Utilizzare un panno umido per evitare che l’acqua penetri all’interno.
RIPORRE
IL CLIMATIZZATORE
A FINE STAGIONE
•
Scollegare la presa.
•
Pulire il filtro dell’aria.
• Scaricare completamente l’acqua di condensa aprendo il tappo
(fig 1/4).
HOW TO TRANSPORT
THE CONDITIONER
The conditioner must be kept
upright during transport.
If it is transported in a horizontal
position, wait at least one hour
before starting it.
Prior to transport, always open
the plug (fig. 6/4) and drain all
the condensation.
ROUTINE MAINTENANCE
Always remove the plug from the
socket before carrying out any
type of maintenance.
HOW TO CLEAN
THE AIR FILTERS
The filter traps any impurities in
the air (dust, pollen) and must
therefore be cleaned once a
week.
• Press the two tabs of the rear
grille and remove it (fig. 6/3).
• Remove the filter from the
grille and clean it with a jet of
water. Make sure it is perfectly
dry before replacing it.
HOW TO CLEAN
THE AIR CONDITIONER
Always pull out the plug from the
socket before cleaning the
conditioner.
Use detergents to clean the
outside. Never use gasoline, fuel
oil or similar products.
Use a moist cloth to avoid water
leaking into the conditioner.
STOWING THE CONDITIONER
AT THE END OF THE SEASON
•
Pull out the plug
•
Clean the air filter
• Remove the specific plug and
drain all the condensation (fig.
1/4).
TRANSPORT DU CLIMATISEUR
Il doit se faire en position
verticale.
Dans le cas de transport en
position horizontale, attendre au
moins une heure avant de le
mettre en marche.
Avant d’effectuer le transport,
vidanger complètement la
condensation en enlevant le
bouchon (Fig.6/4).
ENTRETIEN PERIODIQUE
Avant d’effectuer une opération
d’entretien quelconque,
débrancher toujours la fiche de la
prise de courant.
NETTOYAGE
DES FILTRES A AIR
Le filtre retient les impuretés de
l’air (poussières, pollens) et doit
donc être nettoyé toutes les
semaines.
• Appuyer sur les deux
languettes de la grille arrière et la
sortir (Fig.6/3).
• Sortir le filtre de la grille et le
nettoyer avec un jet d’eau.
Attendre qu’il soit sec avant de le
remettre en place.
NETTOYAGE DU CLIMATISEUR
Débrancher toujours la fiche de la
prise de courant avant de
nettoyer le climatiseur.
Utiliser uniquement des
détergents et non pas de
l’essence, du gazole ni des
produits semblables pour
effectuer le nettoyage extérieur
du climatiseur.
Employer un chiffon humide pour
éviter que l’eau pénètre à
l’intérieur.
RANGER LE CLIMATISEUR
EN FIN DE SAISON
• Débrancher la fiche de la prise
de courant
•
Nettoyer le filtre à air
• Vidanger complètement l’eau
de condensation en enlevant le
bouchon
(Fig. 1/4).
TRANSPORT DER
KLIMAANLAGE
Die Klimaanlage muß in aufrechter
Stellung transportiert werden.
Wird sie in liegender Stellung
transportiert, muß vor dem ersten
Einschalten mindestens eine
Stunde abgewartet werden.
Vor dem Transport erst das
Kondenswasser vollständig
ablassen. Dazu den Stöpsel
entfernen (Abb. 6/4).
REGELMÄßIGE WARTUNG
Vor jedem Wartungseingriff stets
den Netzstecker ziehen.
REINIGUNG DER LUFTFILTER
Der Filter fängt die
Schmutzpartikeln in der Luft auf
(Staub und Pollen) und muß
wöchentlich gereinigt werden.
• Die zwei Federkeile des
hinteren Gitters drücken und das
Gitter herausziehen (Abb. 6/3).
• Filter aus dem Gitter ziehen
und mit einem Wasserstrahl
reinigen. Vor dem Wiedereinbau
erst trocknen lassen.
TRANSPORTE DEL
CLIMATIZADOR
Hay que realizar el transporte en
posición vertical.
En caso de transporte en posición
horizontal esperar al menos una
hora antes de ponerlo en marcha.
Antes de efectuar el transporte
vaciar completamente el agua de
la condensación abriendo la tapa
(fig. 6/4).
MANTENIMIENTO PERIÓDICO
Antes de realizar cualquier
operación de mantenimiento
desenchufar siempre el aparato.
LIMPIEZA DE LOS FILTROS
DE AIRE
El filtro retiene las impurezas del
aire (polvo, polen, etc.) por eso
es necesario limpiarlo cada
semana.
• Apretar las dos lengüetas de
la rejilla trasera y sacarla (fig.
6/3).
• Sacar el filtro de la rejilal y
limpiarlo con un chorro de agua.
Antes de volver a colocarlo
esperar a que esté seco.
REINIGUNG
DER KLIMAANLAGE
Vor der Reinigung stets den
Netzstecker ziehen.
Zur äußeren Reinigung nur seifige
Lösungen benützen. Kein
Reinigungsbenzin, Leichtöl oder
ähnliche Produkte zur Reinigung
verwenden.
Nur mit feuchtem Tuch
abwischen. Es darf kein Wasser in
das Gerät gelangen.
LIMPIEZA DEL
CLIMATIZADOR
Antes de limpiar el climatizador
desenchufarlo siempre.
Para la limpieza exterior utilizar
solamente detergentes y no
gasolina, gasoil o productos
afines.
Utilizar un paño húmedo para
evitar que el agua penetre en el
interior.
AUFBEWAHRUNG
DER KLIMAANLAGE
FÜR LÄNGEREN STILLSTAND
COMO GUARDAR EL
CLIMATIZADOR AL FINAL
DE LA TEMPORADA
•
Netzstecker ziehen
•
Desenchufarlo
•
Luftfilter reinigen
•
Limpiar el filtro de aire
• Stöpsel ziehen und
Kondenswasser vollständig leeren
(Abb.1/4)
• Vaciar completamente el agua
de condensación quitando la tapa
(fig. 1/4).
TRANSPORT
VAN DE AIRCONDITIONER
De airconditioner moet rechtop
verplaatst worden.
Als de airconditioner liggend
verplaatst wordt dan moet u
minimaal één uur wachten
voordat u de airconditioner in
werking kunt stellen.
Alvorens de airconditioner te
gaan verplaatsen moet u het
condenswater eerst helemaal weg
laten lopen door de dop (fig. 6 4) open te draaien.
PERIODIEK ONDERHOUD
Alvorens
onderhoudswerkzaamheden aan
de airconditioner te gaan
verrichten moet u altijd eerst de
stekker uit het stopcontact halen.
REINIGING VAN HET
LUCHTFILTER
Het filter houdt de
verontreinigingen die in de lucht
zitten (stof, pollen e.d.) tegen,
daarom moet het filter één keer
in de week gereinigd worden.
• Duw de beide lipjes van het
rooster aan de achterkant in en
haal het rooster (fig. 6/3) eruit.
• Haal het filter uit het rooster
en maak het filter met stromend
water schoon. Voordat u het filter
weer plaatst moet u wachten
totdat het filter droog is.
REINIGING VAN DE
AIRCONDITIONER
Voordat u de airconditioner gaat
reinigen moet u altijd eerst de
stekker uit het stopcontact halen.
Om de buitenkant schoon te
maken mag u uitsluitend
reinigingsprodukten gebruiken en
geen benzine, diesel of
soortgelijke produkten.
Gebruik een vochtige doek om te
voorkomen dat er water aan de
binnenkant terechtkomt.
DE AIRCONDITIONER AAN
HET EINDE VAN HET SEIZOEN
OPBERGEN
• Haal de stekker uit het
stopcontact.
12
MANIFESTAZIONI
Il climatizzatore non funziona
CAUSE
RIMEDI
SYMPTOMS
CAUSES
WAIT.
Manca la corrente.
Attendere;
The conditioner does not
work.
No power.
Plug in the conditioner.
La spina è disinserita.
Inserire la spina
The plug has not been inserted.
M A N CA
Il timer è inserito.
Disinserire il timer.
Switch off the timer.
The timer is on.
Il climatizzatore funziona solo
per poco tempo
La temperatura impostata è
troppo vicina alla temperatura ambiente.
Abbassare la temperatura
impostata.
Vi sono ostacoli sull’aspirazione dell’aria esterna.
Togliere gli ostacoli.
Lower the temperature set.
The conditioner works only
for a short period.
The temperature set is too
close to ambient temperature.
Remove the obstructions.
Suction of outside air is
obstructed.
Call the Service Center.
Chiamare il Centro assistenza.
Il climatizzatore fa intervenire
spesso l’interruttore generale
del contatore
Il climatizzatore funziona ma
non rinfresca la stanza
Spegnerlo e interpellare il
Centro assistenza
The conditioner causes
frequent tripping of the
mains switch of the meter.
Finestra aperta.
Chiudere la finestra.
The conditioner works but
does not refresh the room.
Nella stanza sta funzionando
qualche fonte di calore (bruciatore, lampade ecc) oppure
vi sono molte persone.
Eliminare la fonte di calore.
La temperatura impostata è
troppo alta.
Abbassare la temperatura
impostata.
Switch off and call the Service Center.
Close the window.
Eliminate sources of heat.
Window open
Some source of heat is operating in the room (burner,
lamps, etc.) or the room is
crowded.
Lower the temperature set.
Clean the filter.
The temperature set is too
high.
Filtro dell’aria intasato.
Pulire il filtro.
Durante lo spostamento del
climatizzatore esce acqua
Il climatizzatore ha una
potenza non adeguata alle
condizioni o alle dimensioni
dell’ambiente.
Il climatizzatore viene inclinato o coricato.
Il pannello comandi è spento,
il climatizzatore non funziona
e il display segnala l’allarme
A1
Il pannello comandi è spento,
la macchina non funziona e il
display segnala l’allarme A3
Accumulo eccessivo di acqua
all’interno del climatizzatore.
Before transporting the conditioner, open the plug (fig.
1/4) and drain the water.
The air filter is clogged.
Prima degli spostamenti svuotare l’acqua contenuta aprendo il tappo (fig 1/4)
Scaricare l’acqua contenuta
aprendo il tappo (fig 1/4).
Se questo allarme è troppo
frequente chiamare il Centro
assistenza.
Filtro posteriore sporco.
Pulire il filtro.
Ventilatore guasto.
Chiamare il Centro assistenza.
Open the plug (fig. 1/4) and
drain the water.
Water leaks from the
conditioner during transport.
The power of the conditioner
is not suitable for ambient
conditions or dimensions.
The control panel is off, the
conditioner does not work
and the display shows alarm
A1
The conditioner has been tilted or laid flat.
If these alarms occur too frequently, call the Service Center.
Excess accumulation of water
inside the conditioner.
Clean the filter.
The control panel is off, the
conditioner does not work
and the display shows alarm
A3
Call the Service Center.
Rear filter is dirty.
Call the Service Center.
13
MANIFESTATIONS
CAUSES
SOLUTIONS
STÖRUNGEN
URSACHEN
ABHILFEN
Le climatiseur ne fonctionne
pas.
Il n’y a pas de courant
Attendre
Die Klimaanlage funktioniert
nicht.
Stromversorgung unterbrochen.
Abwarten.
La fiche n’est pas introduite dans
la prise
Mettre la fiche dans la prise
Netzstecker gezogen.
Stecker in die Steckdose
stecken.
Timer in Betrieb
Timer ausschalten.
Die eingestellte Temperatur
liegt zu nahe an der Raumtemperatur.
Eingestellte Temperatur
senken.
Hindernisse an der Ansaugvorrichtung der Ausseneinheit.
Eventuelle Hindernisse entfernen.
Débrancher le timer
Le timer est enclenché
Le climatiseur fonctionne uniquement pendant peu de
temps.
La température programmée
est trop proche de la température ambiante
Abaisser la température programmée
Die Klimaanlage funktioniert
nur über einen kurzen Zeitraum
Oter les obstacles
Il y a des obstacles sur l’aspiration de l’air externe.
Appeler le S.A.V.
L’éteindre et appeler le
S.A.V.
Le climatiseur fait intervenir
souvant l’interrupteur général
du compteur.
Le climatiseur fonctionne
mais ne rafraîchit pas la
pièce.
Fenêtre ouverte
Fermer la fenêtre
Une source de chaleur fonctionne dans la pièce (brûleur,
lampe, etc..) ou bien il y a
beaucoup de personnes
Eliminer la source de chaleur
La température programmée
est trop élevée
Filtre de l’air bouché
Kundendienst rufen.
Die Klimaanlage ruft häufig
ein Eingreifen der Sicherung
am Stromzähler hervor.
Die Klimaanlage funktioniert,
kühlt jedoch den Raum nicht.
Abaisser la température programmée
Nettoyer le filtre
- Die Klimaanlage ausschalten
und den Kundendienst rufen.
Offenes Fenster.
Fenster schließen.
Im Zimmer sind Wärmequellen
eingeschaltet (Brenner, Lampen, usw) oder es sind viele
Personen anwesend.
Wärmequelle eliminieren.
Die eingestellte Temperatur
ist zu hoch.
Eingestellte Temperatur
senken.
Verstopfter Luftfilter.
Filter reinigen.
Le climatiseur a une puissance non appropriée aux conditions et aux dimensions du
local
De l’eau sort du climatiseur
lors de son déplacement.
Le panneau de commandes
est éteint, le climatiseur ne
fonctionne pas et l’affichage
signale l’alarme A1.
Le panneau des commandes
est éteint, la machine ne
fonctionne pas et l’affichage
signale l’alarme 3.
Le climatiseur est incliné ou
couché
Accumulation excessive d’eau
de condensation à l’intérieur
du climatiseur
Filtre arrière sale
Die Leistungsfähigkeit der Klimaanlage ist nicht der Größe
des Raumes angemessen.
Avant de déplacer le climatiseur, vider l’eau qu’il contient
en ôtant le bouchon
(Fig.1/4)
Vidanger l’eau qu’il contient
en ôtant le bouchon (Fig.
1/4)
Si cette alarme est trop fréquente, appeler le S.A.V.
Nettoyer le filtre
Während des Bewegens der
Klimaanlage tritt Wasser aus.
Das Bedienungsfeld ist ausgeschaltet, die Klimaanlage ist
außer Betrieb und das Display
zeigt die Störung A1
Das Bedienungsfeld ist ausgeschaltet, die Klimaanlage ist
außer Betrieb und das Display
zeigt die Störung A3
Die Klimaanlage wird geneigt
oder umgelegt
Zu hohe Wasseransammlung
im Klimagerät.
Das Wasser vor dem Bewegen durch Herausziehen des
Stöpsels ablassen (Abb. 1/4)
Rückwärtiger Filter verstopft
Das Wasser durch Herausziehen des Stöpsels ablassen
(Abb. 1/4). Wiederholt sich
diese Störung häufig, den
Kundendienst rufen.
Ventilator defekt
Filter reinigen
14
MANIFESTACIONES
CAUSAS
SOLUCIONES
STORINGEN
OORZAKEN
OPLOSSINGEN
El climatizador no funciona
Falta la corriente
Esperar
De airconditioner doet het
niet.
Er is geen stroom.
Wacht even.
Está desenchufado
Enchufar
De stekker zit niet in het
stopcontact.
Doe de stekker in het
stopcontact.
El timer está activado
Desactivar el timer
De timer is ingeschakeld.
Schakel de timer uit.
La temperatura programada
está muy cerca de la
temperatura ambiente
Bajar la temperatura
programada
De ingestelde temperatuur is
te dichtbij de
omgevingstemperatuur.
Verlaag de ingestelde
temperatuur.
De aanzuiging van de
buitenlucht wordt belemmerd.
Verwijder de obstakels.
El climatizador funciona sólo
poco tiempo
Hay obstáculos en la
aspiración del aire del exterior
De airconditioner doet het
alleen gedurende korte tijd.
Quitar los obstáculos
Llamar al Centro de asistencia
El climatizador activa a
menudo el interruptor general
del contador
Apagarlo y llamar al Centro
de asistencia
Neem contact op met de
Servicedienst.
De airconditioner laat de
hoofdschakelaar van de
meter vaak inschakelen.
Schakel het apparaat uit en
neem contact op met de
Servicedienst.
Hay una ventana abierta
El climatizador funciona pero
no refresca el ambiente
Cerrar la ventana
En la habitación está
funcionando alguna fuente de
calor (quemador, lámparas,
etc.) o hay muchas personas.
La temperatura programada
es demasiado alta
De airconditioner doet het
maar koelt het vertrek niet.
In de kamer is een andere
warmtebron in werking (een
brander, een lamp e.d.) of er
zijn veel mensen.
Al moverlo el climatizador
pierde agua
El climatizador está inclinado
u horizontal.
El cuadro de mandos está
apagado, el climatizador no
funciona y el display señala la
alarma A1
Acumulación excesiva de
agua dentro del climatizador
Filtro trasero sucio
El cuadro de mandos está
apagado, la máquina no
funciona y el display señala la
alarma A3.
De ingestelde temperatuur is
te hoog.
Limpiar el filtro
Schakel de warmtebron uit.
Verlaag de ingestelde
temperatuur.
Het luchtfilter is verstopt.
Antes de moverlo vaciar el
agua contenida quitando la
tapa (fig. 1/4)
Vaciar el agua contenida
quitando la tapa (fig. 1/4). Si
esta alarma es demasiado
frecuente llamar al Centro de
asistencia.
Ventilador averiado
Limpiar el filtro
Sonda evaporador averiada
Doe het raam dicht.
Bajar la temperatura
programada
Filtro de aire obstruido
El climatizador tiene una
potencia no adecuada para
las condiciones o al tamaño
del ambiente
Er staat een raam open.
Eliminar la fuente de calor.
Tijdens het verplaatsen van
de airconditioner komt er
water uit.
Het bedieningspaneel is uit,
de airconditioner doet het
niet en de display geeft de
alarmmelding A1 weer.
Het bedieningspaneel is uit,
de airconditioner doet het
niet en de display geeft de
alarmmelding A3 weer.
De capaciteit van de airconditioner
is niet geschikt met het oog op de
omstandigheden of de grootte van
het vertrek.
De airconditioner wordt
schuin gehouden of op zijn
kant gelegd.
Er heeft zich teveel water in
de airconditioner gevormd.
Het filter aan de achterkant is
Reinig het filter.
Voordat u de airconditioner gaat
verplaatsen moet u het water dat
erin zit eruit laten lopen door de dop
eraf te draaien (fig. 1/4).
Laat het water dat erin zit eruit lopen
door de dop eraf te draaien (fig.
1/4). Als deze alarmtoestand te
vaak optreedt dan moet u contact
opnemen met de Servicedienst.
15
DATI TECNICI
TECHNICAL DATA
DONNEES TECHNIQUES
TECHNISCHE DATEN
DATOS TÉCNICOS
TECHNISCHE GEGEVENS
Potenza refrigerante
Cooling power
Puissance réfrigérante
Kühlleistung
Potencia de refrigeración
Koelcapaciteit
8.000 BTU/2.000 W
Potenza riscaldamento
Heating element power
Puissance élément
chauffant
Wärmeleistung Heizelement
Potencia del elemento de
calefacción
Capaciteit van het verwarmingselement
1.750 W
Capacità di deumidificazione
Dehumidification capacity
Capacidad de
deshumidificación
Ontvochtigingscapaciteit
Assorbimento in raffreddamento
Power requirement during
cooling
Assorbimento in riscaldamento
Power requirement during
heating
Aria trattata
Air treated
Entfeuchtungskapazität
Capacité de
déshumidification
Absorption en mode de
Refroidissement
Absorption en mode de
Chauffage
Leistungsaufnahme im
Kühlbetrieb
0,5 l/h
Consumo en refrigeración
Leistungsaufnahme im
Heizbetrieb
Consumo en calefacción
Behandelte Luftmenge
Aire tratado
1.075 W
Stroomverbruik op de koelstand
Stroomverbruik op de verwarmingsstand
1.900 W
350 m3/h
2
Behandelde lucht
Velocità di ventilazione
Ventilation speed
Volume d’air traité
Ventilationsgeschwindigkeit
Velocidad de ventilación
220-240V/50Hz
Ventilatiesnelheid
Tensione di alimentazione
Power supply
Vitesse de ventilation
Versorgungsspannung
Voltaje de alimentación
870 x 470 x 460 mm
Voedingsspanning
Dimensione (lxhxp)
Dimensions (wxhxd)
Tension d’alimentation
Abmessungen (LxHxT)
Medida (l x h x p)
19 AT
Afmetingen (lxhxb)
Fusibile
Fuse
Dimensions (lxhxp)
Sicherung
Fusible
40 kg
Zekering
Peso
Weight
Fusible
Gewicht
Peso
32°C/23°C
Gewicht
Condizioni di funzionamento
massimo
bulbo secco/bulbo umido
Condizioni di funzionamento
minimo
bulbo secco/bulbo umido
Maximum operating conditions
dry bulb/wet bulb
Minimum operating conditions
dry bulb/wet bul
Poids
Conditions de
fonctionnement maximum
bulbe sec/bulbe humide
Conditions de
fonctionnement minimum
bulbe sec/bulbe humide
Betriebsbedingungen bei
Höchstleistung
Thermometerkugel
trocken/feucht
Betriebsbedingungen bei
Niedrigstleistung
Thermometerkugel
trocken/feucht
Condiciones de
funcionamiento máximo
bulbo seco/bulbo húmedo
Condiciones de
funcionamiento mínimo
bulbo seco/bulbo húmedo
Maximum
werkingsomstandigheden
droge voeler/natte voeler
Minimum
werkingsomstandigheden
droge voeler/natte voeler
18°C/16°C
16
PE
M4
E1
M
~
N
1/N/PE AC
50HZ 22OV
L
1
X1
2 X4
B3
X5
3
1
2
4
3
5
4
6
1
2 X2
1
2
F1
Z1
X6
M1
A1
2
4
3
1
220V prim.
K4
Z3
sec.
M
~
K6
K5
K3 K2
12V 12V
T1
K1
A2
Z2
gn gn gn gn gn gn gn
B1
V.V
D
RA
B2
RI
T
SB
M
~
M2
M
~
M3
M5
M
17
A1) Carte électronique
(puissance)
A1) Elektronische Platte
(Leistung)
B1)Thermostat probe
A2) Carte électronique
(commande)
A2) Elektronische Platte
(Steuerung)
B1)Sonda termostato
A2) Elektronische plaat
(stuurstroom)
B2)Evaporator probe
B1)Sonde thermostat
B1)Fühler Temperaturwächter
B2) Sonda evaporador
B1)Thermostaatvoeler
B3)Condensation level sensor
B2)Sonde évaporateur
B2)Fühler Verdampfer
B3) Sensor de nivel agua de
condensación
B2)Verdampervoeler
F1) Compressor thermal cut-out
B3)Capteur niveau eau
condensation
B3)Wasserstandfühler
Kondenswasser
F1) Protector térmico compresor
F1) Hitzeschutz Kompressor
K1) Tecla de Stand-by
K2)Condensation pump control
F1) Protecteur thermique
compresseur
K1)Taste Stand-by
K3)Relay for compressor
K1)Touche de Stand-by
K2)Mando bomba agua de
condensación
K4)Condensation battery fan control
K2) Commande pompe eau
condensation
K5)Evaporation battery fan control
K3)Relais pour compresseur
A1) Scheda elettronica (potenza)
A1) Electronic card (power)
A2) Scheda elettronica (comando)
A2) Electronic card (control)
A1) Ficha electrónica (potencia)
A1) Elektronische plaat
(vermogensstroom)
A1) Ficha electrónica (mando)
B1)Sonda termostato
B2)Sonda evaporatore
B3)Sensore livello acqua condensa
F1) Protettore termico compressore
K1)Stand-by key
K1)Tasto di Stand-by
K2)Comando pompa acqua condensa
K6)Relay for electric resistor
K5)Comando per ventilatore
evaporatore
K4)Commande pour ventilateur
batterie
de
condensation
M 1 Motocompressor
K6)Relais per resistenza elettrica
M2) Condenser fan
M1) Motocompressore
M3) Evaporator fan
M2) Ventilatore condensatore
K2)Pumpensteuerung
Kondenswasser
K3)Kompressorrelais
K3) Relais per compressore
K4)Comando per ventilatore
climatizzatore
B3)Condenswaterniveausensor
M4) Condensation disposal pump
K5)Commande pour ventilateur
batterie
d’évaporation
K6)Relais pour résistance
électrique
K4)Ventilatorsteuerung
Wärmetauscher
Kondensator
K5)Ventilatorsteuerung
Wärmetauscher
Verdampfer
K6)Relais für elektrischen
Widerstand
K3)Relé para compresor
K4)Mando para ventilador
intercambiador térmico de
condensación.
K5)Mando para ventilador
intercambiador térmico de
evaporación.
K6)Relé para resistencia eléctrica
M1) Motocompresor
M5) Step motor (air grille)
M1) Motocompresseur
M4) Pompa smaltimento condensa
T1)Transformer
M2) Ventilateur condensateur
X1)Power supply terminal strip
M3) Ventilateur évaporateur
X2)2-pin connector
T1)Trasformatore
X3)6-pin connector
M4) Pompe évacuation
condensation
K2)Besturing van de
condenswaterpomp
K3)Relais voor de compressor
K4)Besturing van de ventilator
van de
condensatiebatterij
K5)Besturing van de ventilator
van de
verdampingsbatterij
K6)Relais voor het elektrische
verwarmingselement
M1) Motorcompressor
M3) Ventilador evaporador
M2) Kondensatorlüfter
M5) Motore passo-passo griglia
aria)
K1)Stand-by toets
M2) Ventilador condensador
M1) Kompressoraggregat
M3) Ventilatore evaporatore
F1) Thermische
compressorbeveiliging
M2) Ventilator van de
condensator
M3) Verdampferlüfter
M4) Bomba eliminación
condensación
M4) Pumpe zur
Kondenswasserabfuhr
M5) Motor paso a paso (rejilla
aire)
M4) Condensafvoerpomp
M5) Antrieb (Luftgitter)
T1)Transformador
M5) Stappenmotor (luchtrooster)
T1)Transformator
X1)Caja de bornes alimentación
T1)Transformator
X1) Versorgungsklemmenleiste
X2)Conector de 2 polos
X1)Voedingsklemmenstrook
X2) 2-Pol-Stecker
X3)Conector de 6 polos
X2)2-polige connector
X3) 6-Pol-Stecker
X4)Conector de 2 polos
X3)6-polige connector
X4) 2-Pol-Stecker
X5)Conector de 4 polos
X4)2-polige connector
X5) 4-Pol-Stecker
X6)Conector de 2 polos
X5)4-polige connector
X6) 4-Pol-Stecker
Z1) Condensador compresor
X6)4-polige connector
Z1) Kompressorkondensator
Z2) Condensador ventilador
intercambiador térmico de
condensación
Z1) Condensator van de
compressor
M3) Ventilator van de verdamper
M5) Moteur pas-à-pas (grille air)
X1)Morsetteria alimentazione
X4)2-pin connector
T1)Transformateur
X2)Connettore 2 poli
X5)4-pin connector
X1)Bornier alimentation
X3)Connettore 6 poli
X6)4-pin connector
X2)Connecteur 2 pôles
X4)Connettore 2 poli
Z1) Compressor condenser
X3)Connecteur 6 pôles
X5)Connettore 4 poli
Z2) Condensation battery fan condenser
X4)Connecteur 2 pôles
X6)Connettore 4 poli
Z1) Condensatore compressore
Z3) Evaporation battery fan condenser
X5)Connecteur 4 pôles
X6)Connecteur 4 pôles
Z2) Condensatore ventilatore
climatizzatore
Z3) Condensatore ventilatore
evaporatore
E1) Heating electrical resistor
(optional)
Z1) Condensateur compresseur
Z2) Condensateur ventilateur
batterie de
Z2) Ventilatorkondensator
Wärmetauscher Kondensator
Z3) Condensador ventilador
intercambiador térmico de
Z2) Condensator van de ventilator
van de
condensatiebatterij
OLIMPIA SPLENDID SpA
via Guido Rossa
I - 42044 Gualtieri (RE)
tel (0522) 828741 - 829543
fax (0522) 828745