1
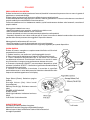
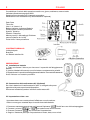
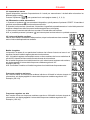
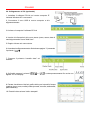
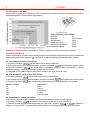
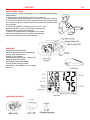
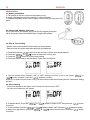
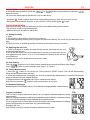
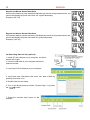
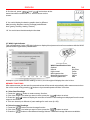
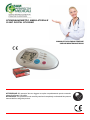
SFIGMOMANOMETRO AMBULATORIALE
CLINIC DIGITAL SPHYGMO
MANUALE D’USO E MANUTENZIONE
USE AND MAINTENANCE BOOK
ATTENZIONE: Gli operatori devono leggere e capire completamente questo manuale
prima di utilizzare il prodotto.
ATTENTION: The operators must carefully read and completely understand the present
manual before using the product.
0476
ITALIANO
2
PRECAUZIONI DI SICUREZZA
Evitare la misurazione della pressione di neonati, bambini in tenera età o persone che non sono in grado di
esprimere un eventuale disagio.
Evitare inoltre la misurazione di persone affette da grave arteriosclerosi.
Il valore della pressione sanguigna può variare in caso di gravidanza. Le donne incinte devono consultare il
proprio medico prima di effettuare una misurazione.
L’auto misurazione non è un trattamento medico, quindi se dovessero risultare valori anomali, consultare il
proprio medico.
Maneggiare le batterie con cura:
- Appena le batterie sono scariche, sostituirle con delle nuove.
- Non utilizzare insieme batterie nuove e vecchie.
- Inserire le batterie nel verso corretto prestando attenzione alla polarità.
- Quando il dispositivo non viene usato per più di 3 mesi, rimuovere le batterie onde evitare che eventuali
perdite delle stesse possano danneggiare il dispositivo stesso.
Maneggiare il trasformatore AC con cura:
- Non maneggiare il cavo di alimentazione con le mani bagnate.
- Utilizzare unicamente il trasformatore AC originale progettato per questo dispositivo.
GUIDA RAPIDA
Evitare di fumare, mangiare o compiere esercizio fisico nei 30 minuti
precedenti la misurazione.
1. Sedersi eretti su una sedia con i piedi appoggiati al suolo.
2. Rimuovere capi di abbigliamento aderenti o pesanti dal braccio.
3. Tirare l’estremità del bracciale fino a che esso non aderisce
correttamente al braccio. Posizionare il braccio su un tavolo in modo
che il bracciale si venga a trovare alla stessa altezza del cuore.
4. Premere sul pulsante “ON/OFF” per accendere il dispositivo, quindi
premere il pulsante “START”. Il bracciale si gonfierà automaticamente
e la misurazione avrà inizio.
5. Quando la misurazione è terminata, il bracciale si sgonfierà
automaticamente e i valori delle pressioni sistolica e diastolica e della
frequenza cardiaca appariranno sul display.
Page Select (Down): Selezione pagina
(basso)
Average Values (Set): Valori medi
(impostazione)
Memory Recall (Up): Richiamo memoria
(alto)
POWER: ACCENSIONE
START: AVVIO
WHO Light Indicator: Indicatore luminoso
WHO
Cuff Outlet: Uscita bracciale
CARATTERISTICHE
Rivelatore di battito cardiaco irregolare
Modalità Pressione Sanguigna e Modalità Orologio
Memoria per 4 Utenti e Memoria Totale di 396 misurazioni
4 sveglie impostabili
3
ITALIANO
5 modalità per il calcolo della pressione media: ora, giorno, settimana, mese e totale
Indicatore pressione sanguigna WHO
Spegnimento automatico per il risparmio energetico
Alimentazione con 4 batterie AA (Trasformatore AC Optional)
Date: Data
Time: Ora
User 1~4: Utente 1~4
Battery Indicator: Indicatore Batteria
Pulse Symbol: Simbolo pulsazione
Systolic: Sistolico
Diastolic: Diastolico
Memory recall (1~99 readings): Richiamo
memoria (letture da 1 a 99)
Pulse Value: Valore pulsazione
CONTENUTO IMBALLO
Unità principale
Bracciale
4 x Batterie alcaline AA
PREPARAZIONE
2.1 Installazione batterie
1. Tirare e sollevare il blocco per rimuovere il coperchio dell’alloggiamento
batterie.
2. Inserire 4 batterie AA avendo cura di orientare correttamente le polarità.
3. Riposizionare il coperchio dell’alloggiamento batterie. Premere delicatamente
finché il blocco non scatta in posizione.
2.2 Connessione del trasformatore AC (Optional)
Se si ha in dotazione il trasformatore AC da 6 V, collegarlo alla presa
apposita sulla parte superiore del dispositivo.
Rimuovere le batterie quando si utilizza il trasformatore AC.
2.3 Impostazione data e ora
- Impostare data e ora corrette prima di effettuare una misurazione.
- Data e ora vengono resettate dopo la sostituzione delle batterie.
” finchè l’anno non inizia a lampeggiare.
1. Premere e mantenere premuto per pochi secondi il pulsante “
”o“
” per selezionare l’anno corrente.
2. Premere i pulsanti “
” per confermare l’impostazione.
3. Premere il pulsante “
4. Seguire i medesimi passi per l’impostazione di mese, data, ora e minuti.
ITALIANO
4
5. E’ possibile impostare su “ON” o “OFF” la funzione orologio quando il monitor non è in uso. Premere i
”o“
” per effettuare tale impostazione. Premere il pulsante “
” per confermare.
pulsanti “
N.B.: se la funzione orologio è attiva, l’impostazione continua nella sezione di regolazione della sveglia. In
caso contrario la procedura di impostazione termina.
2.4 Impostazione sveglia
- Non è possibile impostare la sveglia se la funzione orologio è impostata su “OFF”.
- Possono essere impostate un massimo di 4 sveglie.
”o“
” per selezionare “OFF” e premere il
6. Per disabilitare l’allarme, premere i pulsanti “
pulsante “
” per confermare.
”o“
” per selezionare “ON” e premere
7. Per impostare il primo allarme, premere i pulsanti “
” per confermare.
il pulsante “
”o“
” per selezionare l’ora desiderata.
8. Quando lampeggia la cifra dell’ora, premere i pulsanti “
Premere il pulsante “
” per confermare.
”o“
” per selezionare i minuti
9. Quando lampeggia la cifra dei minuti, premere i pulsanti “
” per confermare.
desiderati. Premere il pulsante “
10. Seguire la medesima procedura per impostare le altre tre sveglie.
- Premere il pulsante “ ” in Qualsiasi momento durante l’impostazione di orologio e allarmi per ricominciare
nel caso si fosse commesso un errore.
- Ogni allarme dura 45 secondi se non viene spento premendo il pulsante “ ”.
MISURAZIONE
N.B.: Evitare di fumare, mangiare o compiere esercizio fisico nei 30 minuti precedenti la misurazione.
- Non muoversi o parlare durante la misurazione.
- La misurazione può essere effettuata su entrambe la braccia.
3.1 Sedersi correttamente
1. Rilassarsi.
2. Sedersi eretti su una sedia con i piedi appoggiati al suolo.
3. Rimuovere capi di abbigliamento aderenti o pesanti dal braccio. Non arrotolare la manica se è stretta.
4. Posizionare il braccio su un tavolo in modo che il bracciale si trovi allo stesso livello del cuore.
3.2 Applicare il bracciale
1. Posizionare il gomito su un tavolo mantenendo il palmo della mano verso l’alto
e avvolgere il bracciale attorno al braccio sinistro.
2. Tirare l’estremità del bracciale fino a che esso non aderisce correttamente al
braccio. Non stringere esageratamente il bracciale. Lasciare 1 - 2 cm tra l’orlo
inferiore del bracciale e la piega del gomito.
3. Assicurarsi che il bracciale sia alla medesima altezza del cuore.
5
ITALIANO
3.3 Impostazioni utente
Questo dispositivo permette l’impostazione di 4 utenti per memorizzare i risultati delle misurazioni su
differenti pagine utente.
” per spostarsi tra le varie pagine utente (1, 2, 3, 4).
Premere il pulsante “
3.4 Effettuazione della misurazione
1. Premere sul pulsante “ ” per accendere il dispositivo, quindi premere il pulsante “START”. Il bracciale si
gonfierà automaticamente e la misurazione avrà inizio.
2. Quando la misurazione è terminata, il bracciale si sgonfierà automaticamente e i valori delle pressioni
sistolica e diastolica e della frequenza cardiaca appariranno sul display.
3. Rimuovere il bracciale dal braccio e annotarsi i risultati della misurazione.
N.B.: e’ possibile premere il pulsante “ ” per interrompere la misurazione in qualsiasi momento.
3.5 Lettura del battito cardiaco
Oltre ai valori sistolico e diastolico della pressione, dopo la misurazione viene mostrato
anche il valore della pulsazione cardiaca.
Battito irregolare
Il dispositivo è dotato di una particolare funzione che informa l’utente nel caso in cui
dovesse rilevare il battito irregolare durante la misurazione.
N.B.: Un battito irregolare viene definito come un ritmo cardiaco che ha una variazione di
più del 25% rispetto al ritmo medio rilevato durante la misurazione.
Se un battito irregolare viene individuato due o più volte durante la stessa misurazione,
sul display apparirà il valore delle frequenza cardiaca seguito da “HI”.
Esempio: (90 / HI)
N.B.: Consultare il medico se il battito irregolare viene individuato frequentemente.
Frequenza regolare ma bassa
Se il monitor rileva una frequenza cardiaca inferiore a 60 battiti al minuto durante la
misurazione, sul display apparirà il valore delle frequenza cardiaca seguito da “LO”.
Esempio: (58 / LO)
Frequenza regolare ma alta
Se il monitor rileva una frequenza cardiaca superiore a 100 battiti al minuto durante la
misurazione, sul display apparirà il valore delle frequenza cardiaca seguito da “HI”.
Esempio: (102 / HI)
ITALIANO
6
3.6 Collegamento al PC (opzionale)
1. Installare il software PC-link sul vostro computer. E'
richiesto Windows XP o successivi.
2. Connettere il cavo USB al vostro computer e allo
sfigmomanometro.
3. Avviare sul computer il software PC-link
4. Inserire le informazioni del nuovo utente (nome, sesso, data di
nascita) premendo l'icona "Add User".
5. Doppio-cliccare sul nome utente.
6. Accendere lo sfigmomanometro. Selezionare pagina “1” premendo
”
il pulsante “
7. Premere il pulsante “transfer data” sul
software.
8. Sull’unità, premere i pulsanti “
appaia “PC” sul display.
”e “
” contemporaneamente fino a che non
9. Potrete visualizzare i dati sul grafico diviso per intervalli di tempo
(mattina, giorno, sera, media) e date (annuale, mensile, settimanale,
personalizzato).
10. Potetei inoltre salvare i dati o stamparli.
7
ITALIANO
3.7 Indicatore a LED WHO
Il dispositivo è dotato di un indicatore a LED che evidenzia il livello di pressione sanguigna secondo la
classificazione WHO (World Health Organization).
Classificazione a Colori WHO:
Ottimale
Blu
Normale
Azzurro cielo
Alta-Normale
Verde
Ipertensione lieve
Viola
Ipertensione moderata
Giallo
Ipertensione grave
Rosso
Esempio: Se il risultato della misurazione è 122/75, l’indicatore a LED visualizzerà il colore blu.
FUNZIONI DI MEMORIA
Dopo la misurazione, gli ultimi valori misurati vengono memorizzati automaticamente quando il dispositivo
viene spento premendo il pulsante “ ” o all’intervento dello spegnimento automatico dopo 3 minuti.
4.1 Visualizzazione letture precedenti
” per accedere alla funzione di memoria.
1. Premere il pulsante “
” per selezionare quella corretta.
2. Se la pagina utente non è quella desiderata, premere il pulsante “
” per visualizzare il successivo gruppo di valori memorizzato. Le letture
3. Premere il pulsante “
precedenti vengono visualizzate dalla più recente alla più vecchia.
4. Il dispositivo è in grado di memorizzare fino a 99 letture per ogni utente (4 x 99).
4.2 Visualizzazione della media delle letture
” per accedere alla funzione della media.
1. Premere il pulsante “
” per selezionare quella corretta.
2. Se la pagina utente non è quella desiderata, premere il pulsante “
” per visualizzare i diversi valori medi. Sono disponibili 5 valori medi:
3. Premere il pulsante “
Simbolo a Display
1h
1d
7d
30 d
ALL
Valori medi in
1 ora
1 giorno
1 settimana
1 mese
Tutte le letture
4.3 Cancellazione letture precedenti
L’utente può cancellare tutte le letture precedenti memorizzate in ciascuna pagina utente.
” per selezionare la pagina utente che si vuole cancellare.
1. Premere il pulsante “
”e“
”. Apparirà a
2. Premere e tener premuti simultaneamente per 5 secondi i pulsanti “
display la scritta “ALL EE” e tutte le letture memorizzate in quella pagina utente saranno cancellate.
ITALIANO
8
DIAGNOSI
SINTOMO
CAUSA
RIMEDIO
Il display non si Le batterie sono scariche.
accende premendo il
pulsante O/I.
La polarità delle batterie è invertita.
Sostituire le batterie.
Messaggio “Err P”
Gonfiaggio del bracciale fallito.
Controllare se il bracciale è collegato
correttamente.
Sostituire il tubo dell’aria se è
danneggiato.
Messaggio “Err 1”
Sgonfiaggio troppo rapido.
Rivolgersi al rivenditore per
l’assistenza tecnica.
Messaggio “Err 2”
Movimento durante la misurazione.
Presenza interferenze sul segnale.
Rimanere fermi durante la
misurazione.
Rimuovere
la
sorgente
dell’interferenza (es. telefoni cellulari,
magneti, ecc).
Risultati errati.
Ripetere la misurazione.
Messaggio “Err 3”
Inserire correttamente la batteria.
SPECIFICHE TECNICHE
Codice modello
Metodo di misurazione
Intervallo di misurazione
32797
Oscillometrico
Pressione: 20 – 280 mmHg
Frequenza: 40 – 195 battiti/min
Precisione
Pressione: +/- 3 mmHg
Frequenza: +/- 5%
Gonfiaggio
Tramite pompa
Rilevatore pressione
Semi-conduttore
Alimentazione
4 batterie AA o trasformatore AC/DC
Spegnimento automatico
3 minuti dopo l’ultima operazione
Temperatura e umidità di lavoro
da -20°C a 60°C, da 10% a 95%
Temperatura e umidità di conservazione
da 10°C a 40°C, da 30% a 85%
Dimensioni esterne
195 (L) x 126(W) x 62 (H) mm
Peso netto
380g (batterie escluse)
Dimensioni bracciale
Per braccio con circonferenza tra i 22 e i 34 cm
(dimensioni speciali ordinabili separatamente)
Contenuto imballo
Bracciale, manuale di istruzioni, batterie
N.B.: Tutte le specifiche possono essere soggette a modifiche senza preavviso.
MANUTENZIONE, CONSERVAZIONE, RIPARAZIONE E RECICLO
1. E’ necessario proteggere il dispositivo da umidità, luce diretta del sole, colpi, solventi, alcool e benzina.
2. Rimuovere la batteria se non si utilizza il dispositivo per un lungo periodo di tempo e mantenere le
batterie lontano dalla portata dei bambini.
3. Proteggere il bracciale e la pompetta da oggetti taglienti e non stirare o torcere il bracciale.
4. Utilizzare solo un panno morbido e asciutto per pulire il dispositivo.
5. Il bracciale è delicato e deve essere maneggiato con cura. E’ possibile pulirlo con un panno umido.
ATTENZIONE: In nessun caso si deve lavare la camera d’aria interna!
6. E’ necessario consultare annualmente uno specialista per controllare le condizioni tecniche del dispositivo.
Consultare il rivenditore per maggiori informazioni.
9
ITALIANO
7. Dal momento che nè il dispositivo nè le batterie sono normali rifiuti casalinghi, seguire per lo smaltimento
le disposizioni locali.
Smaltimento: Il prodotto non deve essere smaltito assieme agli altri rifiuti domestici. Gli
utenti devono provvedere allo smaltimento delle apparecchiature da rottamare portandole al
luogo di raccolta indicato per il riciclaggio delle apparecchiature elettriche ed elettroniche. Per
ulteriori informazioni sui luoghi di raccolta, contattare il proprio comune di residenza, il servizio
di smaltimento dei rifiuti locale o il negozio presso il quale è stato acquistato il prodotto. In
caso di smaltimento errato potrebbero venire applicate delle penali, in base alle leggi nazionali.
CONDIZIONI DI GARANZIA GIMA
Ci congratuliamo con Voi per aver acquistato un nostro prodotto.
Questo prodotto risponde a standard qualitativi elevati sia nel materiale che nella fabbricazione. La garanzia
è valida per il tempo di 12 mesi dalla data di fornitura GIMA.
Durante il periodo di validità della garanzia si provvederà alla riparazione e/o sostituzione gratuita di tutte le
parti difettose per cause di fabbricazione ben accertate, con esclusione delle spese di mano d’opera o
eventuali trasferte, trasporti e imballaggi.
Sono esclusi dalla garanzia tutti i componenti soggetti ad usura. La sostituzione o riparazione effettuata
durante il periodo di garanzia non hanno l’effetto di prolungare la durata della garanzia.
La garanzia non è valida in caso di: riparazione effettuata da personale non autorizzato o con pezzi di
ricambio non originali, avarie o vizi causati da negligenza, urti o uso improprio.
GIMA non risponde di malfunzionamenti su apparecchiature elettroniche o software derivati da agenti esterni
quali: sbalzi di tensione, campi elettromagnetici, interferenze radio, ecc.
La garanzia decade se non viene rispettato quanto sopra e se il numero di matricola (se presente) risulti
asportato, cancellato o alterato. I prodotti ritenuti difettosi devono essere resi solo e soltanto al rivenditore
presso il quale è avvenuto l’acquisto. Spedizioni inviate direttamente a GIMA verranno respinte.
ENGLISH
SAFETY PRECAUTIONS
Babies, young children or individuals who cannot express their consent are not suitable to take blood
pressure measurement.
Individuals with serious arteriosclerosis are not suitable to take blood pressure measurement.
Blood pressure readings may change in case of pregnancy. Pregnant women can consult their doctor
before taking measurement.
Self-measurement is not medical treatment. If there are unusual values, please consult your doctor.
Handling batteries properly:
- As soon as old batteries run out, replace with new batteries.
- Do not use old and new batteries together.
- Align the polarities of batteries correctly.
- When the unit will not be used for more than 3 months, remove the batteries. Otherwise, batteries may
leak and cause damage to the unit.
Handling AC adapter properly:
- Never unplug the power cord with wet hands.
- Use only the original AC adapter designed for this unit.
ENGLISH
QUICK START GUIDE
Avoid smoking, eating or exercising for 30 minutes before taking
measurement
1. Sit upright in a chair with your both feet on the floor.
2. Remove tight fitting clothing from you upper arm and thick clothing.
3. Pull on the end of the cuff until it wraps securely around your upper
arm. Place your arm on a table so that the cuff will be at the same level
as your heart.
4. Press the “ON/OFF” button to turn on the unit. Then
press the “START” button. The cuff will automatically
inflate and the measurement will start.
5. When the measurement is complete, the cuff will
automatically deflate and your systolic and diastolic
pressure values and pulse rate will display.
FEATURES
Irregular Heartbeat Detector
Blood Pressure Mode and Clock Mode
4 User / 396 Total Memory
4 Alarm Clock Settings
5 Mode Averaging Function – Hour, Day,
Week, Month, and Overall
WHO Blood Pressure Indicator
Auto-off Power Saving Feature
Operated by 4 AA batteries (AC Adapter
optional)
PACKAGE CONTENTS
10
11
ENGLISH
PREPARATION
2.1 Battery Installation
1. Pull and lift on the lock to remove the battery cover.
2. Insert 4 AA batteries with the polarities in correct direction.
3. Replace the battery cover. Press it lightly until the lock securely clicks into
place.
2.2 Connect AC Adaptor (Optional)
If you have the AC 6V adaptor, plug it into the AC adaptor jack at the
top of the device. Remove batteries when using the AC adaptor.
2.3 Date & Time Setting
- Set the correct date and time before taking a measurement.
- Date and time should be reset after replacing new batteries.
” button for a few seconds until the Year display flashes.
1. Press and hold the “
” or “
” button to select the current year.
2. Press the “
3. Press the “
” button to confirm Year Setting.
4. Follow the same steps to set the Month, Date, Hour and Minute.
” or
5. You can choose Clock Function “ON” or “OFF” while the monitor is not in use. Press “
” button to select. Press the “
” button to confirm.
“
Noted: If you select Clock Function “ON”, you will continue at the Alarm Setting section. Otherwise, setting
will end.
2.4 Alarm Setting
- You will not be able to set alarm clock if Clock Function is set to “OFF”.
- You can set a maximum of 4 alarms.
” or “
” button to select “OFF” and press the “
” button
6. To disable Alarm, Press the “
to confirm.
” or “
” button to select “ON”. Press the “
” button to confirm.
7. To set 1st Alarm, Press the “
” or “
” button to select Hour. Press the “
” button
8. When Hour digit flashes, press the “
to confirm.
ENGLISH
9. When Minute digit flashes, press the “
” or “
” button to select Minute. Press the “
button to confirm.
10. Follow the same steps to set the 2nd, 3rd, and 4th Alarm
12
”
- Press the “ ” button anytime during clock setting/alarm setting to start over if an error occurs.
- Each alarm clock lasts 45 seconds, or you can turn it off by pressing the “ ” button.
TAKING MEASUREMENT
Note: Avoid smoking, eating or exercising for 30 minutes before taking measurement.
- Do not move or talk during measurement.
- Measurement can be taken on either arm.
3.1 Sitting Correctly
1. Relax
2. Sit upright in a chair with your both feet on the floor.
3. Remove tight fitting clothing from you upper arm and thick clothing. Do not roll up your sleeve if it is too
tight.
4. Place your arm on a table so that the cuff will be at the same level as your heart.
3.2 Applying the Arm Cuff
1. Place your elbow on a table and palm facing upward, and wrap the arm cuff
around the upper left arm.
2. Pull on the end of the cuff until it wraps securely around your upper arm. Do not
over tighten the cuff. Allow 1-2 cm or ½ inch between the bottom of the cuff and
your elbow joint.
3. Make sure the cuff is at the same level as your heart.
3.3 User Setting
This unit allows a maximum of 4 users to store measurement records in different User Pages.
” button to switch between User Page 1, 2, 3 and 4.
Press “
3.4 Taking Measurement
1. Press the “ ” button to turn on the unit. Then press the “START” button. The cuff will automatically
inflate and the measurement will start.
2. When the measurement is complete, the cuff will automatically deflate and your systolic and diastolic
pressure values and pulse rate will display.
3. Remove the arm cuff and take note of your measurement results.
Note:You can press the “ ” button to stop measurement at any time.
3.5 Heartbeat Readings
Besides Systolic and Diastolic values, Pulse will also be displayed after a measurement
Irregular Heartbeat
This unit has a unique feature that alerts user of irregular heartbeat detection during
measurement.
Note: An irregular heartbeat is defined as a heartbeat rhythm that has a variation of more
than 25% from the average rhythm detected during measurement.
If such irregular rhythm occurs twice or more during the same measurement, the display
screen will show the pulse value and “IH” symbol alternately.
Example: (90 / IH)
Note:Please consult your doctor if irregular heartbeat occurs often.
13
ENGLISH
Regular but Below Normal Heartbeat
If the monitor detects a pulse rate below 60 beats per minute during measurement, the
monitor will display the pulse value and “LO” symbol alternately.
Example: (58 / LO)
Regular but Above Normal Heartbeat
If the monitor detects a pulse rate above 100 beats per minute during measurement, the
monitor will display the pulse value and “HI” symbol alternately.
Example: (102 / HI)
3.6 Retrieving Data via PC (optional)
1. Install PC-link software to your computer. It suits for
window XP or later.
2. Connect USB cable to your computer and blood
pressure monitor.
3. Lauch the PC-link software on your computer.
4. Input New User information like name, sex, date of birth by
pressing “Add User” icon.
5. Double-click the user name.
6. Turn on the blood pressure monitor. Choose Page “1” by press
” button.
the “
7. Press the “transfer data” button on the
software.
ENGLISH
14
8. On the unit, press “
” and “
” two buttons at the
same time without release till “PC” word is shown on the
screen.
9. You could display the data in graphic chart in different
date (morning, daytime, evening, average) and different
time (yearly, monthly, weekly, custom).
10. You could save the data and print the data.
3.7 WHO Light Indicator
This unit features a 6-color LED light indicator to display blood pressure level in accordance with the WHO
(World Health Organization) classification.
WHO Classification Color
Optimal
Normal
High-normal
Mild hypertension
Moderate hypertension
Severe hypertension
Blue
Sky Blue
Green
Purple
Yellow
Red
Example: If your measurement reading is 122/75, the LED light will display the color in blue.
MEMORY FUNCTIONS
After measurement, the last set of measured values will be saved automatically after measurement when
the unit is turned off by pressing “ ” button or by automatic power-off after 3 minutes.
4.1 View Past Readings
” button to enter memory function.
1. Press the “
” button to select.
2. If the User Page is not what you want to view, press the “
3. Press the “
” button to display the next sets of values. Past readings are displayed from the most
recent to the oldest.
4. This can stored up to 99 sets of past readings for each user (4 x 99).
4.2 View Average Readings
” button to enter Average function.
1. Press the “
” button to select.
2. If the User Page is not what you want to view, press the “
” button to view different Average Values. 5 different Average Values are available:
3. Press the “
15
ENGLISH
Symbol on Display
1h
1d
7d
30 d
ALL
Average Values of
One Hour
One Day
One Week
One Month
All Readings
4.3 Delete Past Readings
User can delete all the past readings stored in each User Page.
” button to select the User Page you want to delete.
1. Press the “
”&“
” button simultaneously for 5 seconds. Symbol of “ALL EE” will
2. Press and hold the “
be displayed and all past readings stored in that User Page will be deleted.
TROUBLESHOOTING
PROBLEM
CAUSE
SOLUTION
No display when you Have the batteries run out?
press the Power/Start
button
Are the battery polarities wrong?
Replace new batteries.
“Err P” displayed
Check if the cuff is properly
connected.
Fail to inflate
Re-align batteries in correct polarities.
Replace the air tube if it is broken.
“Err 1” displayed
Deflate too rapidly
Return for servicing.
“Err 2” displayed
Movement during measurement
Do not move during measurement.
Signal interference
Remove interfering source e.g. mobile
phones, magnets.
Incorrect results
Measure again.
“Err 3” displayed
SPECIFICATIONS
Model No.
Measurement Method
Measurement Range
32797
Oscillometric
Pressure: 20 – 280 mmHg
Pulse Rate: 40 – 195 beats/min
Pressure: +/- 3 mmHg
Accuracy
Pulse Rate: +/- 5%
Inflation
Pump driven
Pressure Detection
Semi-conductor
Power Supply
4 x AA batteries or AC/DC adaptor
Auto Power Off
3 minutes after last operation
Storage Environment
-20°C to 60°C, 10% to 95% RH
Operation Environment
10°C to 40°C, 30% to 85% RH
External Dimensions
195 (L) x 126(W) x 62 (H) mm
Net Weight
380g (batteries excluded)
Cuff Dimensions
For arm circumference of 22-34 cm (Special size to be ordered separately)
Package Content
Cuff, Instruction Manual, Battery Set, Warranty Card
Note: Subject to modification without prior notice.
ENGLISH
16
STORAGE & MAINTENANCE
Keep away the unit from direct sunlight, extreme temperatures, humidity or moisture.
Use a dry, soft cloth to clean the unit, or if desired, use a cloth lightly dampened with water.
Do not use alcohol, benzene, thinner or other volatile liquids to clean the unit.
Do not wash or expose the arm cuff to liquid.
Remove batteries from the unit when it will not be used for more than 3 months.
Disposal: The product must not be disposed of along with other domestic waste. The users
must dispose of this equipment by bringing it to a specific recycling point for electric and
electronic equipment.
For further information on recycling points contact the local authorities, the local recycling
center or the shop where the product was purchased. If the equipment is not disposed of
correctly, fines or penalties may be applied in accordance with the national legislation and
regulations.
GIMA WARRANTY CONDITIONS
Congratulations for purchasing a GIMA product.
This product meets high qualitative standards both as regards the material and the production. The warranty
is valid for 12 months from the date of supply of GIMA.
During the period of validity of the warranty, GIMA will repair and/or replace free of charge all the defected
parts due to production reasons. Labor costs and personnel traveling expenses and packaging not included.
All components subject to wear are not included in the warranty.
The repair or replacement performed during the warranty period shall not extend the warranty.
The warranty is void in the following cases: repairs performed by unauthorized personnel or with non-original
spare parts, defects caused by negligence or incorrect use.
GIMA cannot be held responsible for malfunctioning on electronic devices or software due to outside agents
such as: voltage changes, electro-magnetic fields, radio interferences, etc.
The warranty is void if the above regulations are not observed and if the serial code (if available) has been
removed, cancelled or changed.
The defected products must be returned only to the dealer the product was purchased from. Products sent
to GIMA will be rejected.