1
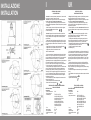
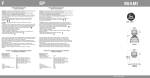
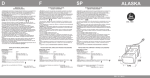
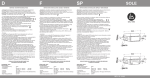
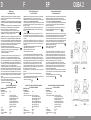
D
F
SP
CUBA 2
MONTAGE- UND
WARTUNGSANLEITUNG
INSTRUCTIONS D’INSTALLATION,
USAGE ET ENTRETIEN
INSTRUCCIONES DE INSTALACION,
EMPLEO Y MANUTENCION
- Achtung! Die Sicherheit des Strahlers kann nur bei Befolgung der folgenden
Anweisungen und ihrer strikten Einhaltung gewährleistet werden. Bitte bewahren
Sie diese Hinweise auf.
- Achtung! Bevor Sie die Netzanschlüsse durchführen, und während der Montage
oder des Leuchtmittelwechsels, vergewissern Sie sich, dass die Anlage ausgeschaltet ist.
- Beim Einsetzen des Leuchtmittels oder beim Leuchtmittelwechsel befolgen Sie
die Anweisungen des Leuchtmittelherstellers, die dem Leuchtmittel selber
beigelegt sind. Verwenden Sie nur Leuchtmittel mit UV-Schutz.
- Wenn der Strahler eingeschaltet ist, stellen Sie sicher, dass der Abstand
zwischen dem Strahler und der zu beleuchtenden Fläche mindestens
1m
1 m beträgt, wie es in dem Symbol (Bild 1) angezeigt ist.
- Attention! La sécurité de l’appareil est garantie seulement avec l'usage approprié des instructions suivantes, donc il est nécessaire de les conserver.
- Attention! Avant d'exécuter les connexions au réseau, pendant l'assemblage ou
substitution de la lampe, s'assurer d'avoir enlevé tension.
- Pour l'assemblage ou substitution de la lampe, exécuter les instructions données
par le constructeur, jointes à la lampe même. Utiliser seulement lampes avec protection anti-UV incorporée.
- Dans l'usage de l’appareil, s'assurer que la distance entre la lampe et l'objet
embrasé ne soit pas inférieure à 1 mètre, comme indiqué dans le symbole
relatif (ill. 1).
1m
- Atención! La seguridad del aparato es garantizada sólo con el empleo apropiado de las siguientes instrucciones, por tanto es necesario conservarlas.
- Atención! Antes de ejecutar las conexiones de red, durante el montaje o sustitución de la lámpara, cerciorarse de haber sacado tensión.
- En el montaje o sustitución de la lámpara, ejecutar las instrucciones dadas por
el constructor, juntas a la lámpara misma. Utilizar solamente lámparas con
protección anti-UV incorporada.
- En el empleo del aparato, cerciorarse que la distancia entre la lámpara y el
objeto iluminado no sea inferior a 1 metro, como indicado
1m
en el relativo símbolo (figura 1) .
- Attention! L’appareil doit être utilisé seulement si complet de son verre de
protection. Il s’agit d’un verre plan trempé, type sodique-calcique, 5 mm d’épaisseur (ill. 3A/B/C/D/E – référez-vous au dessin relatif au diamètre du reflecteur que
vous utilisez).
- L’appareil peut être fixé directement au plafond au moyen d'un crochet en acier
à être inseré dans le piton en dotation. S'assurer que le crochet soit parfaitement
fixé dans le mur du plafond et que sa section soit min. de 28mm2 (par exemple:
vis/goujon M6).
- Appareil apte à l'assemblage sur surfaces normalement inflammables .
- Appareil apte à l'usage extérieur et intérieur.
- Appareil non pas apte à la liaison en cascade.
- Hauteur d’installation: n’importe quelle.
- Atención! El aparato se puede utilizar solamente con su cristal de protección.
Es un vidrio llano templado, tipo sódico-cálcico, 5 mm de espesor (fig.3A/B/C/D/E
hacer referencia al dibujo con diámetro del reflector en vuestra posesión).
- El aparato puede ser instalado directamente a techo sobre gancho de acero, por
medio de la argolla incorporada. Cencionarse que el gancho esté bien enclavado
al techo. Sección mínima del gancho 28 mm2 (ejemplo clavija/tornillo M6).
- Aparato idóneo al montaje sobre superficies normalmente inflamables.
- Aparato apto al empleo exterior y interior.
- Aparato no idóneo al enlace en catarata.
- Altura de instalación: cualquiera.
- Achtung! Dieser Strahler darf nur mit Abdeckglas verwendet werden. Bei dem
Glas handelt es sich um ein temperaturwechselbeständiges Sicherheitsglas mit
einer Stärke von 5mm (Bild 3A/B/C/D/E – entsprechend dem Reflektordurchmesser).
- Die Leuchte kann mit Hilfe eines Deckenhakens direkt an der Decke befestigt
werden, indem Sie die Leuchte an der Ringöse des Leuchtenkopfes aufhängen.
Stellen Sie sicher, dass der Haken fest in der Decke verankert ist.
Minimumhakenquerschnitt 28mm2 (ex. Schraube M6).
- Der Strahler kann auf normal entzündbaren Oberflächen befestigt werden.
- Der Strahler ist für den Einsatz im Innen- und Aussenbereich geeignet.
- Der Strahler ist nicht für eine „Tandem-Installation“.
- Unbegrenzte Installationshöhe.
- Zum Anschluss der Leuchte benutzen Sie ein 3 adriges Kabel ( incl. PE ) vom
Typ H05 RN-F D. 7÷12mm und einem Minimum Querschnitt von 3x1mm2.
Schliessen Sie es an der Anschlussklemme an, wie in Abbildung 2 beschrieben.
Ziehen Sie die Kabelverschraubung fest an, um die Wasserdichtigkeit zu gewährleisten. Die Kabelverschraubung ist geeignet für einen Kabeldurchmesser von 7 –
12mm. Ziehen Sie die 4 Schrauben M4 des Abdeckdeckels der Anschlussbox mit
einem Drehmoment von 1,2Nm fest, wie im Bild 4 beschrieben.
- Befestigen Sie den Reflektor am Leuchtenkörper mithilfe der 4 M6 –Schrauben.
Achten Sie darauf, dass die Dichtung genau zwischen Reflektor und Körper sitzt,
dann ziehen Sie die Schrauben kreuzweise mit einem Drehmoment von 2 Nm an
(Bild 5). Achten Sie darauf, dass die 3 Befestigungsbolzen, die den unteren und
oberen Teil des Gehäuses zusammenhalten, fest angezogen sind. Hängen Sie die
Kette des Glases in den Ring ein, der sich am unteren Teil des Leuchtenkopfes
befindet.
- Achten Sie darauf, dass die Leuchte unter Beachtung der Mindestabstände, wie
im Bild 1 angegeben, installiert und betrieben wird.
- Verwenden Sie nur Leuchtmittel ohne eingebauten Zünder.
- Hochspannung im Leuchtengehäuse.
STRAHLER FÜR METALLDAMPF UND
HOCHDRUCK-NATRIUM LAMPEN
BASISSERIE: CUBA 2
Eigenschaften:
- Versorgungsspannung:
230V~
- Schutzklasse:
I
- Lichtleistung:
125W E27 HG (QE) 1,2A
250W E40 HPS/MH (SE/ME) 3A
250W E40 MH (ME) 2,15A PHILIPS
250W E40 HG (QE) 2,15A
400W E40 HPS/MH (SE/ME) 4,4A
400W E40 MH (ME) 3,25A PHILIPS
400W E40 HG (QE) 3,25A
1000W E40 MH (ME) 9,5A
0,9
- Cos ϕ:
- Fassung:
E40 / E27
IP65
- Schutzart:
0,16 m2
- Max. Windangriffsfläche:
- Gewicht:
15 kg
- Pour la connexion d'alimentation il est nécessaire d'utiliser un câble 2-poles
+terre type H05 RN-F ayant diamètre Ø=7÷12mm et section de min. 1mm2 pour
chaque conducteur. Le réunir aux bornes comme montré en ill.2 et ensuite le
bloquer sous la bandelette. Après avoir terminé les operations de câblage, serrer
le presse-étoupe pour assurer l’imperméabilité à l'eau. Le presse-étoupe doit être
apte aux câbles avec Ø=7÷12mm. Visser progressivement les 4 vis M4 du
couvercle de la boîte aux équipements avec torsion de 1,2 Nm, selon ill.4.
- Réunir réflecteur et corps en utilisant 4 vis M6. S’assurer que la garniture soit
parfaitement positionnée entre corps et réflecteur et, ensuite, serrer les vis d’une
façon progressive, selon ill.5, jusqu’à 2 Nm torque.
S’assurer toujours que les 3 vis qui unissent le corps supérieur à l’inférieur soient
bien serrées.
Réunir la queue de la chaîne du verre à l’anneaux positionné sur le corps
inférieur.
- Pendant l’installation et l’utilisation respecter les distances min. spécifiées en ill.1.
- Utiliser seulement lampes sans amorceur incorporé.
- Haute tension dans l’appareil.
APPAREIL POUR LAMPES AUX VAPEURS D'HALOGENURES
ET SODIUM HAUTE PRESSION
SÉRIE BASE: CUBA 2
Caractéristiques:
- Tension d'alimentation:
230V~
- Classe d'isolement:
I
- Puissance et courant de lampe: 125W E27 HG (QE) 1,2A
250W E40 HPS/MH (SE/ME) 3A
250W E40 MH (ME) 2,15A PHILIPS
250W E40 HG (QE) 2,15A
400W E40 HPS/MH (SE/ME) 4,4A
400W E40 MH (ME) 3,25A PHILIPS
400W E40 HG (QE) 3,25A
1000W E40 MH (ME) 9,5A
0,9
- Cos ϕ:
- Douille:
E40 / E27
- Degré de protection:
IP65
- Max. surface exposée au vent: 0,16 m2
Kg 15
- Poids:
DAL 1960
- Para la conexión de alimentación es necesario utilizar un cable de 2 polos
+tierra tipo H05 RN-F con Ø=7÷12mm y con sección min. 1mm2 para cada
conductor. Conectarlo con el tablero porta-bornes según fig.2 y pararlo con el
sujeta-cable. Después de las operaciones de conexión, apretar el prensa-cable
para asegurar la impermeabilidad al agua. El prensa-cable tiene que ser apto
para cables con Ø=7÷12mm. Atornillar progresivamente los 4 tornillos M4 de la
tapadera de la caja porta équipo con torsión 1,2 Nm, según pic.4.
- Unir el reflector y el cuerpo utilizando 4 tornillos M6. Cerciorarse que la
guarnición sea insertada perfectamente entre cuerpo y reflector, luego atornillar
progresivamente los tornillos, como descrito en fig.5, hasta 2 Nm de torsión.
Cerciorarse siempre que los 3 tornillos que tienen unidos cuerpo inferior y
superior, sean atornillados perfectamente.
Conectar la cola de la cadena del vidrio al anillito situado sobre el cuerpo inferior.
- Durante la instalación y el empleo, respetar los requisitos mínimos de distancia
indicados en figura 1.
- Utilizar solamente lámparas sin arrancador incorporado.
- Alta tensión al interior del aparato.
APARATO POR LÁMPARAS A VAPORES DE ALOGENUROS
Y SODIO ALTA PRESIÓN
SERIE BASE: CUBA 2
Características:
- Tensión de alimentación:
230V~
- Clase de aislamiento:
I
- Potencia y corriente de lámpara: 125W E27 HG (QE) 1,2A
250W E40 HPS/MH (SE/ME) 3A
250W E40 MH (ME) 2,15A PHILIPS
250W E40 HG (QE) 2,15A
400W E40 HPS/MH (SE/ME) 4,4A
400W E40 MH (ME) 3,25A PHILIPS
400W E40 HG (QE) 3,25A
1000W E40 MH (ME) 9,5A
0,9
- Cos ϕ:
- Portalámpara:
E40 / E27
- Clase de protección:
IP65
- Superficie expuesta al viento: 0,16m2
Kg 15
- Peso:
REV. 00 11/01
INSTALLAZIONE
INSTALLATION
I
UK
ISTRUZIONI DI INSTALLAZIONE
USO E MANUTENZIONE
INSTALLATION, USE AND
MAINTENANCE INSTRUCTIONS
- Attenzione! La sicurezza del proiettore é garantita solo con, l’osservanza delle
seguenti istruzioni, pertanto é necessario conservarle.
- Attenzione! Prima di eseguire le connessioni di rete, durante il montaggio o
sostituzione della lampada, assicurarsi di aver tolto tensione.
- Per il montaggio o sostituzione della lampada, eseguire le istruzioni date dal
costruttore allegate alla lampada stessa. Utilizzare solo lampade con la protezione
UV incorporata.
- Nell’uso del proiettore, assicurarsi che la distanza tra la lampada e l’oggetto
illuminato non sia inferiore a 1m come indicato
1m
nel relativo simbolo (fig.1).
- Warning! Safety of this floodlight is guaranteed only if the following instructions
are properly respected. It is therefore necessary to preserve them.
- Warning! Before connecting to the main network, during positioning or replacement of lamps, ensure the tension has been disconnected.
- For positioning or replacement of lamps, follow the instructions given by the
lamp’s manufacturer, which should be supplied with the lamp itself. Use only
lamps with anti-UV protection.
- When the floodlight is on, ensure that a minimum distance of 1m between the
lamp and the illuminated surface is respected, as indicated by the relative symbol
(pict. 1).
1m
- Attenzione! L’apparecchio deve essere utilizzato solo se completo del suo
schermo di protezione. Trattasi di vetro float temperato sodico-calcico spessore
=5mm (Fig. 3A/B/C/D/E, riferirsi al disegno inerente il diametro di parabola in
proprio possesso).
- L’apparecchio può essere fissato direttamente a plafone mediante un gancio in
acciaio che si inserisca nell’apposito golfare predisposto. Accertarsi che il gancio
sia ben fissato a plafone ed abbia una sezione di almeno 28mm2 (es. un tassello
a vite M6).
- L’apparecchio è idoneo al fissaggio su superfi normalmente infiammabili.
- L’apparecchio é idoneo al funzionamento in esterni ed interni.
- L’apparecchio non é idoneo al funzionamento in cascata.
- Altezza di installazione qualsiasi.
- Warning! The fitting can be used only with its protective diffuser. It’s a float
tempered glass, sodic-calcic type, 5mm thick (pic. 3A/B/C/D/E – refer to the
drawing of reflector’s diameter in your hands).
- This fitting can be installed directly on the ceiling through a steel hook to be
inserted into the eyebolt supplied. Ensure that the hook is safely fixed into the
concrete ceiling. Minimum hook’s section 28 mm2 (ex: screw dowel M6).
- The floodlight is suitable for installation on normally inflammable surfaces.
- This fitting is suitable for either indoor or outdoor use.
- This fitting is not suitable for “tandem” installation.
- Installation height: any.
- Per la connessione alla rete di alimentazione attenersi alle seguenti indicazioni:
Utilizzare un cavo 2 poli + terra tipo H05 RN-F avente sezione minima di 1mm2
per ogni conduttore e diametro esterno compreso tra Ø7÷12mm, connetterlo alla
morsettiera di alimentazione come indicaro in fig. 2, quindi bloccarlo sotto
l’apposito dispositivo serracavo. A cablaggio ultimato serrare a fondo il pressacavo
per garantire la tenuta all’acqua. Pressacavo idoneo per cavi Ø7÷12mm.
Serrare le n°4 viti M4 del coperchio vano cablaggio con un momento torcente di
1,2Nm in modo progressivo e secondo lo schema indicato in fig.4.
- Fissare la parabola al corpo dell’apparecchio mediante le n°4 viti da M6 ad esso
pre-avviate. Assicurarsi che la guarnizione in dotazione sia adeguatamente
posizionata fra corpo e parabola, indi avvitare progressivamente le viti come
indicato in fig.5 fino ad una coppia di serraggio pari a 2Nm. Assicurarsi sempre
che le n°3 viti a galletto che uniscono corpo superiore e corpo inferiore siano
serrate a fondo. Fissare l’estremità libera della catenella del vetro all’apposito
anello fissato al corpo inferiore.
- Durante l’installazione e l’uso attenersi alle posizioni di funzionamento ed alle
distanze minime indicate in fig. 1.
- Utilizzare solo lampade senza l’accenditore incorporato.
-Presenza di alta tensione nell’apparecchio.
APPARECCHIO PER LAMPADE A VAPORI DI ALOGENURI
E SODIO ALTA PRESSIONE
SERIE BASE: CUBA 2
Caratteristiche:
- Tensione di alimentazione:
230V~
- Classe di isolamento:
I
- Potenza lampada:
125W E27 HG (QE) 1,2A
250W E40 HPS/MH (SE/ME) 3A
250W E40 MH (ME) 2,15A PHILIPS
250W E40 HG (QE) 2,15A
400W E40 HPS/MH (SE/ME) 4,4A
400W E40 MH (ME) 3,25A PHILIPS
400W E40 HG (QE) 3,25A
1000W E40 MH (ME) 9,5A
0,9
- Cos ϕ:
E40 / E27
- Attacco lampada :
- Grado di protezione:
IP65
- Superficie esposta al vento:
0,16 m2
- Peso:
15Kg
- For wire connections of the floodlight make use of 2-pole+earth cable type H05
RN-F with diameter Ø=7÷12mm and a minimum section of 1mm2 for each lead-in
wire. Connect it to the terminal board as described in pic.2 and fasten it with the
cable clamp. After wiring operations, tighten the cable gland to ensure water
proofness. The cable gland must be suitable for cables with Ø 7÷12mm. Tighten
progressively the 4 screws M4 of the gear box cover with 1,2 Nm torque, as per
picture 4.
- Couple the reflector and the housing using the 4 screws M6 supplied. Ensure
that the gasket is perfectly matching between housing and reflector, then tighten
the screws progressively, as described in pic.5, up to 2 Nm torque.
Always ensure that the 3 finger nuts holding upper and lower parts of the housing
are deeply tightened.
Connect the tail of the glass chain to the suitable ring on the lower part of the
housing.
- During installation and use respect the minimum distance requirements indicated
in pic.1.
- Use only lamps without built-in ignitor.
- High-tension inside the floodlight.
FITTING FOR METAL HALIDE AND
HIGH-PRESSURE SODIUM LAMPS
BASIC SERIES: CUBA 2
Characteristics:
- Feeding tension:
230V~
- Insulation class:
I
- Lamp’s power and current:
125W E27 HG (QE) 1,2A
250W E40 HPS/MH (SE/ME) 3A
250W E40 MH (ME) 2,15A PHILIPS
250W E40 HG (QE) 2,15A
400W E40 HPS/MH (SE/ME) 4,4A
400W E40 MH (ME) 3,25A PHILIPS
400W E40 HG (QE) 3,25A
1000W E40 MH (ME) 9,5A
- Cos ϕ:
0,9
- Lampholder:
E40 / E27
- Protection degree:
IP65
0,16 m2
- Surface exposed to the wind:
Kg 15
- Weight: