1
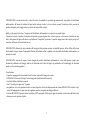
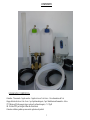
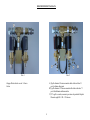
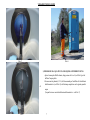
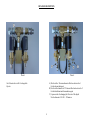
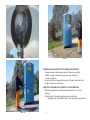
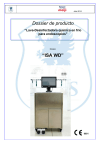
DOSAFACILE
(IN FASE DI BREVETTO)
MANUALE D’USO E MANUTENZIONE
COMMERCIALE SICULA SRL
ISTRUZIONI PER L’ASSEMBLAGGIO
(CE001 – AV – VER 2.0 FEB. 2012)
C/DA S. ELENA BAFURDO
94013 LEONFORTE (ENNA) ITALIA
+ 39 (0) 935 901585
[email protected]
www.commercialesicula.biz
ITALIANO
Il DOSAFACILE è un sistema innovativo, in fase di brevetto, che semplifica le operazioni per immissione di acqua pulita e di disinfettante
antifermentativo all’interno dei serbatoi dei bagni mobili ecologici. Inoltre, lo stesso sistema, consente l’irrorazione ad alta pressione di
profumo-detergente per il lavaggio interno ed esterno dei bagni mobili ecologici.
Infatti, per gli operatori del settore, l’erogazione del disinfettante-antifermentativo è sempre stato un grande disagio.
L’operatore è costretto a prendere il contenitore del prodotto; erogarne la giusta dose; evitare di sporcare o di rovesciare il prodotto sul copri
water, sulla pedana del bagno, sulle mani o sugli indumenti. Completata l’operazione, l’operatore impiega ancora altro tempo per riporre il
contenitore all’interno del cassonetto del mezzo.
Il DOSAFACILE sfruttando la stessa conduttura del lavaggio ad alta pressione consente, su input dell'operatore, di fare defluire dalla stessa
lancia-cannula usata per irrorare l'acqua pulita all'interno del serbatoio reflui, la quantità esatta di prodotto disinfettante antifermentativo, in
pochissimi secondi.
Il DOSAFACILE consente di erogare l’esatto dosaggio di prodotto disinfettante antifermentativo, voluto dall’operatore; quindi viene
eliminata la problematica del dosaggio inferiore che determina cattivi odori del bagno e la problematica del sovradosaggio che determina
sprechi e costi economici aggiuntivi.
Come funziona:
- l'operatore equipaggiato di telecomando aziona il sistema scegliendo il dosaggio da erogare;
- il DOSAFACILE consente di elargire l'esatto dosaggio di disinfettante antifermentativo;
- il prodotto defluisce dalla lancia–cannula;
- circa 27 secondi per erogarne ben 75 grammi;
- un segnalatore visivo e un segnalatore acustico avvisano l'operatore del corretto funzionamento del sistema DOSAFACILE ed inoltre a ogni
colore del lampeggiante ed a ogni suono del segnalatore acustico corrisponde un dosaggio differente;
- il sistema DOSAFACILE permette anche di sanificare il WC impiegando del detergente oppure del profumo così da lasciare all'interno della
cabina un piacevole profumo di pulito.
2
COMPONENTI
IL DOSAFACILE E’ COMPOSTO DA:
- Centralina – Telecomando – Segnale acustico – Segnale visivo con 5 mt. di cavo – Cavo alimentazione da 5 mt.
- Gruppo di elettrovalvole con 5 mt. di cavo: 1 per il profumo-detergente, 2 per il disinfettante antifermentativo - Iettore
- N° 2 Bidoni con filtri di pescaggio (tappo verde per il profumo-detergente) – N. 3 Ugelli
- Mt. 10 di tubo PTFE per collegare i bidoni alle elettrovalvole
- Contenitore cilindrico graduato per una corretta regolazione dei prodotti.
3
DESCRIZIONE DETTAGLIATA
Foto 1
Foto 2
- Gruppo Elettrovalvole con mt. 5 di cavo
- Iettore
A) Ugello diametro 90 micron montato sulla elettrovalvola n° 1
per il profumo-detergente
B) Ugello diametro 125 micron montato sulla elettrovalvola n° 2
per il disinfettante antifermentativo
C) N° 3 ugelli a corredo, necessari per variare la portata del liquido
Diametro ugelli 80 -100 – 150 micron
4
Foto 3
Foto 4
DOVE MONTARE IL GRUPPO ELETTROVALVOLE:
D) Contenitore cilindrico graduato per controllare la portata del
disinfettante antifermentativo
E) N° 2 bidoni per profumo-detergente e per disinfettante antiferm.
F) Filtro per il disinfettante antifermentativo
G) Filtro per il profumo-detergente
Fare attenzione! Il gruppo elettrovalvole deve essere montato tra la
pompa ad alta pressione ed il tubo che va collegato alla lancia.
Rispettare la direzione del flusso dell’acqua (vedi Foto 1 lettera F
freccia dello Iettore)
5
CENTRALINA
ALIMENTAZIONE
La Centralina può essere alimentata a 12 V oppure a 24 V. Normalmente è alimentata a 12 V.
Se si vuole alimentare a 24 V spostare il filo colore marrone + (positivo) alla morsettiera 24 V.
Il filo colore blu – (negativo) deve rimanere sempre allo stesso posto.
COLLEGAMENTO GRUPPO ELETTROVALVOLA ALLA CENTRALINA
Filo colore marrone alla morsettiera E4 (vedi freccia B) per elettrovalvola 1 profumo-detergente
Filo colore blu alla morsettiera E1 (vedi freccia B) per elettrovalvola 2 disinfettante antifermentativo
Filo colore giallo-verde alla morsettiera COM (vedi freccia B).
SINCRONIZZAZIONE DEL RICEVITORE AL TELECOMANDO
1) Resettare il ricevitore, procedendo come segue:
a) Premere uno qualsiasi dei 4 pulsati del Ricevitore, indicati dalle freccette, fino a quando tutti
e 4 i led si accendono.
b) Rilasciare il pulsante, ed aspettare lo spegnimento dei led.
2) Premere per 4 secondi il pulsante N.l del ricevitore. Al rilascio del pulsante il led del canale N. 1
si accenderà. A questo punto premere per 4 secondi il tasto N. l del telecomando.
3) Effettuare la medesima procedura indicata nel punto 2 per i canali N. 2, N. 3 e N. 4 del Ricevitore.
REGOLAZIONE DEL TIMER
1) a) Premere e lasciare premuto il pulsante N. 1 del telecomando. I1 led del canale N. l del Ricevitore
si accenderà.
b) Premere il pulsante del canale N. l del Ricevitore e rilasciarlo dopo 4 secondi. A questo punto il
led comincerà a lampeggiare a intervalli di l secondo. Rilasciare immediatamente il pulsante N. 1
del telecomando.
c) Trascorso il tempo desiderato, premere nuovamente il pulsante N. 1 del Ricevitore.
2) Effettuare la stessa procedura per i canali N. 2, N. 3 e N. 4 del Ricevitore.
MODIFICA DI UN SOLO CANALE DEL TIMER
Per variare la temporizzazione di un solo canale del timer, bisogna anzitutto resettare il canale
considerato. Facendo riferimento al canale N. 1, operare come segue:
1) a) Premere e lasciare premuto il pulsante N. l del telecomando. Il led del canale N. l del Ricevitore
si accenderà.
b) Premere il pulsante del canale N.1 del Ricevitore e rilasciarlo dopo 4 secondi. Subito dopo
rilasciare anche il tasto del telecomando.
2) Verificare che il canale N. 1 risulta inizializzato, cioè premendo il pulsante N. 1 del telecomando
il led del canale N. l del ricevitore si accende e rilasciando il pulsante del telecomando il led si
spegne.
3) A questo punto procedere come indicato nella REGOLAZIONE DEL TIMER.
REGOLAZIONE VOLUME DEL SEGNALE ACUSTICO
Con un piccolo cacciavite girare a dx oppure a sx (vedi freccia A)
6
VERSAMENTO DEI LIQUIDI
Foto 5
Foto 6
1) IMMISSIONE DI ACQUA PULITA E DI LIQUIDO ANTIFERMENTATIVO
- Aprire la manopola B della lancia, dopo premere la leva A (vedi foto 6) per far
defluire l’acqua pulita.
- Premere uno dei pulsanti (1-2-3) del telecomando per far defluire il disinfettante
Antifermentativo (vedi Foto 5); nel frattempo completare con la giusta quantità
di
acqua
(l’acqua fuoriesce senza disinfettante antifermentativo - vedi foto 7).
Foto 7
7
Foto 8
Foto 9
2) PREPARAZIONE PER EROGARE IL PROFUMO-DETERGENTE
- Se si preme il pulsante 4 del telecomando, dopo circa 6 secondi il
Profumo detergente arriva nella cannula della lancia pronto per essere
spruzzato (vedi foto 8).
- Appena si nota il prodotto fuoriuscire dalla cannula, rilasciare la leva A
(vedi foto 10), e chiudere la manopola B.
3) IRRORAZIONE DEL PROFUMO-DETERGENTE AD ALTA PRESSIONE
- Posizionare la lancia in direzione del bagno, premere la leva A per iniziare
a spruzzare. (vedi Foto 9)
- Si hanno circa 15 secondi a disposizione per completare l’erogazione del
prodotto sul bagno. Riprendere dal punto 2) con manopola B aperta se si
vuole erogare ulteriore prodotto.
Foto 10
8
DOSAFACILE
(AWAITING PATENT APPROVAL)
USER AND MAINTENANCE MANUAL
COMMERCIALE SICULA SRL
ASSEMBLY INSTRUCTIONS
(CE001 – AV – VER 2.0 FEB. 2012)
C/DA S. ELENA BAFURDO
94013 LEONFORTE (ENNA) ITALY
+ 39 (0) 935 901585
[email protected]
www.commercialesicula.biz
ENGLISH
DOSAFACILE is an innovative system, awaiting patent approval, for simplifying the introduction of clean water and anti-fermentation agents
/ disinfectant into the tanks of eco-friendly portable toilets. Moreover, the same system can also be applied to the high-pressure odorantdetergent spraying systems used to clean the portable toilets internally and externally.
Finding a way of suitably feeding the disinfectant and anti-fermentation fluid, in fact, has always been a problem.
Cleaners, in fact, are required to measure the proper dose of the product into the container, being careful not spill any on the toilet cover or
floor, or over themselves, and then waste yet more time to place the container inside the toilet tank.
DOSAFACILE exploits the high-pressure spraying hose, so that exactly the right quantity of anti-fermentation disinfectant can be made to
flow directly from the hose used to spray clean water into the wastewater tank, in the space of just a few seconds.
DOSAFACILE measures the exact dose of anti-fermentation disinfectant required by the cleaner, thus eliminating the problem of both underdosing, which leads to a foul smell in the toilet, and over-dosing, which leads to waste and extra costs.
How does it work?
- the cleaner activates the system with a remote control, selecting the required dose;
- DOSAFACILE measures the exact dose of anti-fermentation disinfectant;
- the product flows through the spraying hose;
- 75 grammes of the product can be fed in about 27 seconds;
- a light signal and sound signal inform the cleaner that the DOSAFACILE system is working properly; each dose features a different
light/sound signal;
- the DOSAFACILE system can also be used to sanitize the WC, using a detergent or odorant, to leave a pleasant fragrance in the interior of
the toilet.
2
COMPONENTS
DOSAFACILE COMPRISES THE FOLLOWING COMPONENTS:
- Central Control Unit – Remote Control – Sound Signal – Light Signal with 5 m cable – Power Cable 5 m long.
- Set of electrovalves with 5 m long cable: 1 for the odorant-detergent, 2 for the anti-fermentation disinfectant - Ejector
- 2 containers equipped with suction filter (green cap for the odorant-detergent) – 3 Nozzle
- 10 m of PTFE pipe for connecting the containers and electrovalves
- Graduated cylinder for properly measuring the product.
3
DETAILED DESCRIPTION
Photo 1
Photo 2
- Set of electrovalves with 5 m long cable
- Ejector
A) Nozzle with a 90 micron diameter fitted on electrovalve 1
for the odorant-detergent
B) Nozzle with a diameter of 125 micron fitted on electrovalve 2
for the disinfectant-anti-fermentation agent
C) 3 spare nozzles for changing the flow rate of the liquid
Nozzle diameters: 80 -100 – 150 micron
4
Photo 3
Photo 4
WHERE TO INSTALL THE SET OF ELECTROVALVES:
D) Graduated cylinder for measuring the disinfectant /
anti-fermentation agent
E) 2 containers for the odorant-detergent and disinf./anti-ferm.
F) Filter for the disinfectant and anti-fermentation agent
G) Filter for the odorant-detergent
Be careful! The set of electrovalves should be installed between the
High-pressure pump and the tube connected to the spraying hose.
Observe the direction of flow of the water (see Photo 1 letter F
Ejector arrow)
5
CENTRAL CONTROL UNIT
POWER SUPPLY
The Central Control Unit can be powered at 12 or 24 V. The default power supply is 12 V.
If you wish to power the CCU at 24 V, move the brown wire + (positive) to the 24 V terminal.
The blue wire – (negative) should not be touched.
CONNECTING THE ELECTROVALVES TO THE CENTRAL CONTROL UNIT
Brown wire to terminal E4 (see arrow B) for electrovalve 1 odorant-detergent
Blue wire to terminal E1 (see arrow B) for electrovalve 2 disinfectant – anti-fermentation agent
Yellow-green wire to terminal COM (see arrow B).
SYCHRONISING RECEIVER AND REMOTE CONTROL
1) Reset the receiver, as follows:
a) Press any one of the 4 Receiver buttons indicated by the arrows, until all 4 leds are switched on.
b) Release the button and wait for the leds to switch off.
2) Press button 1 on the Receiver for 4 seconds. When you release the button the channel 1 led switches
on. Now press button 1 on the remote control for 4 seconds.
3) Perform the same procedure as in (2) for the Receiver channels 2, 3 and 4.
REGULATING THE TIMER
1) a) Press and keep pressed button 1 on the remote control. The channel 1 led on the Receiver switches
on.
b) Press the channel 1 button on the Receiver and release after 4 seconds. The led will start flashing
at 1 second intervals. Immediately release button 1 on the remote control.
c) After the desired time has lapsed, press button 1 on the Receiver again.
2) Perform the same procedure for Receiver channels 2, 3 and 4.
CHANGING A SINGLE TIMER CHANNEL
To change the timing of a single timer channel you must first of all reset the channel in question.
Assuming this is channel 1, operate as follows:
1) a) Press and keep pressed button 1 on the remote control. The channel 1 led on the Receiver switches
on.
b) Press the channel 1 button on the Receiver and release after 4 seconds. Immediately after, release
the remote control button as well.
2) Check that channel 1 has been initialised, i.e. pressing button 1 on the remote control; the channel 1
led on the receiver switches on, and if you release the button on the remote control it switches off.
3) At this point continue as in REGULATING THE TIMER.
REGULATING THE VOLUME OF THE SOUND SIGNAL
Turn right or left with a small screwdriver (see arrow A)
6
POURING THE LIQUIDS
Photo 5
Photo 6
1) INTRODUCING CLEAN WATER AND ANTI-FERMENTATION FLUID
- Open the knob B on the spraying hose then press the lever A (see photo 6) to
open
the flow of clean water.
- Press one of the buttons (1-2-3) on the remote control to start the disinfectant
and anti-fermentation liquid (see photo 5); meanwhile, complete with the right
amount of water
(the water flows out without disinfectant / anti-fermentation agent - see photo 7).
Photo 7
7
Photo 8
Photo 9
2) PREPARATION FOR SPRAYING THE ODORANT-DETERGENT
- If you press button 4 on the remote control, after about 6 seconds the
odorant – detergent reaches the spraying hose and is ready to be
sprayed (see photo 8).
- As soon as you notice the product flowing out of the hose, release the lever A
(see photo 10) and close the knob B.
3) SPRAYING THE ODORANT-DETERGENT AT HIGH PRESSURE
- Direct the spraying hose towards the toilet and press the lever A to start
spraying.
- You have about 15 seconds to spray the product onto the toilet.
Start again from 2), with knob B open, if you want to spray more product.
Photo 10
8