1
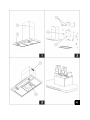
i-HOOD 230-240 Vac 50 Hz cod. 395.268.3 I ISTRUZIONI PER L’INSTALLAZIONE, USO E MANUTENZIONE DELLA CAPPA MOD. i-HOOD 230-240 Vac - 50 Hz Cappa aspirante per cucina. L’apparecchio è costruito in conformità alle Norme Europee ed alle richieste delle Direttive: 2006/95 CEE (Sicurezza elettrica Bassa tensione), 2004/108 CEE (Compatibilità elettromagnetica). PRESENTAZIONE L’apparecchiatura (Fig. 1) è così composta: 1) Corpo cappa. 2) Camino telescopico. AVVERTENZE Questo libretto è parte integrante della cappa e di conseguenza deve essere conservato con cura e deve SEMPRE accompagnarlo,anche in caso di sua cessione ad altro proprietario o utente,oppure di trasferimento su un’altra installazione. Assicurarsi che la tensione (V) e la frequenza (Hz) indicate sulla targa matricola all’interno dell’apparecchio corrispondano a quelle disponibili nel luogo di installazione. Ogni eventuale modifica che si rendesse necessaria all’impianto elettrico per installare la cappa dovrà essere eseguita solo da persone competenti. Le riparazioni effettuate da persone non competenti possono provocare danni. Per eventuali interventi rivolgersi ad un Centro Assistenza Tecnica autorizzato ad eseguire la sostituzione delle parti di ricambio. Controllare sempre che tutte le parti elettriche (luci, aspiratore), siano spente quando l’apparecchio non viene usato. Durante i temporali posizionare l’interruttore generale dell’impianto su “spento”. L’utilizzo della cappa non può essere diverso da quello di aspiratori di fumi di cottura su cucine domestiche. E’ esclusa qualsiasi responsabilità del costruttore per danni causati a persone,animali o cose, da errori di installazione , di manutenzione o da usi impropri. Ricordiamo che l’utilizzo di prodotti che impiegano energia elettrica comporta l’osservanza di alcune regole fondamentali di sicurezza: Questo apparecchio non è destinato all’uso da parte di persone (inclusi i bambini) con ridotte capacità psichiche o motorie, con mancanza di esperienza e conoscenza, a meno che ci sia una supervisione o istruzione sull’uso dell’apparecchio da parte di una persona responsabile per la loro sicurezza. I bambini devono essere sorvegliati per assicurarsi che non giochino con l’apparecchio. E’ vietata qualsiasi operazione di pulizia, prima di aver scollegato l’apparecchio dalla rete di alimentazione elettrica posizionando l’interruttore generale dell’impianto su “spento”. Esiste la possibilità di incendio qualora le operazioni di pulizia non vengano effettuate secondo quanto indicato nelle istruzioni. E’ vietato tirare,staccare,torcere i cavi elettrici fuoriuscenti dall’apparecchio anche se questo è scollegato dalla rete di alimentazione elettrica. E’ vietato spruzzare o gettare acqua direttamente sull’apparecchio. E’ vietato introdurre oggetti appuntiti attraverso le griglie di aspirazione e mandate aria. E’ vietato togliere i filtri per accedere alle pareti interne dell’apparecchio,senza aver prima posizionato l’interruttore generale dell’impianto su “spento”. E’ vietato cucinare alla fiamma sotto la cappa. Per friggere tenere sotto costante controllo l’operazione in quanto l’olio può incendiare. INSTALLAZIONE Leggere tutto il libretto istruzioni prima di installare e/o utilizzare la cappa. L’apparecchiatura messa in opera dovrà distare dal piano di cottura non meno di 65 cm. Se le istruzioni di installazione del dispositivo di cottura a gas specificano una distanza maggiore, bisogna tenerne conto. Non deve essere sovrapposta a stufe con piastra radiante superiore. Bisogna rispettare tutte le normative relative allo scarico dell’aria. L’aria non deve essere scaricata in un condotto utilizzato per scaricare i fumi di scarico prodotti da apparecchi a combustione di gas o di altri combustibili (non si applica alle cappe utilizzate in modalità filtrante). Il locale deve disporre di sufficiente ventilazione quando la cappa viene utilizzata contemporaneamente ad altri apparecchi che impiegano gas o altri combustibili. Si consiglia di spostare eventuali mobili sottostanti l’area di installazione per una migliore accessibilità. Installazione della cappa a parete. La cappa e dotata di tutti i fissaggi necessari alla sua installazione e idonei per la maggior parte delle superfici. Verificare comunque che la superficie di installazione sia adeguatamente robusta. L’installazione deve essere eseguita da installatori competenti e qualificati e secondo le norme in vigore. Per prima cosa provvedere all’installazione degli speakers come in Fig. 4. Dopo aver tracciato e forato la parete come in Fig.2, utilizzare i fissaggi necessari per l’installazione Tasselli di bloccaggio (A) Tasselli di sospensione e livellamento (B) Staffa e viti di fissaggio camino al muro (C) COLLEGAMENTO ELETTRICO Questo apparecchio deve essere collegato ad un impianto dotato di messa a terra. Sono possibili due tipi di collegamento alla rete: 1) Mediante l’uso di una spina normalizzata alla quale va collegato il cavo di alimentazione ed inserita in una presa dell’impianto che deve risultare accessibile (per scollegare in caso di manutenzione). Assicurarsi che la spina sia accessibile anche dopo l’installazione completa dell’apparecchio. 2) Mediante allacciamento fisso alla rete, interponendo un interruttore bipolare che assicuri la disconnessione della rete, con una distanza di apertura dei contatti che consenta la disconnessione completa nelle condizioni della categoria di sovratensione III, conformemente alle regole di installazione. Il collegamento di terra (cavetto giallo-verde) non va interrotto. Per tensioni di linea e frequenza consultare la targa matricola posta all’interno dell’apparecchio. UTILIZZO Questa cappa può essere utilizzata in modo aspirante o filtrante. Aspirante (evacuazione esterna). I fumi della cucina vengono espulsi all’esterno attraverso una tubazione collegata al raccordo di scarico. In nessun caso la tubazione deve essere collegata a condotti di scarico di combustione (stufe, caldaie, bruciatori, ecc.). Filtrante (riciclo interno). In questo caso è indispensabile installare sul motore i filtri a carbone attivo. I fumi passano attraverso i filtri di carbone attivo ( D – Fig.3) per essere depurati e riciclati nell’ambiente cucina attraverso le feritoie (E) per l’uscita dell’aria depurata. Questi fori devono essere liberi e comunicanti con l’ambiente cucina. In questo caso è consigliabile installare una tubazione di scarico senza curva. I filtri di carbone attivo non vanno applicati alla cappa nella versione aspirante. FUNZIONAMENTO ASPIRAZIONE (VENTILATION) La cappa è provvista di un motore a più velocità. Si consiglia di usare la bassa velocità nelle condizioni ordinarie e le altre velocità nei casi di forte concentrazione di odori e vapori. Si consiglia inoltre di mettere in funzione la cappa quando si inizia a cucinare e di mantenerla in funzione fino alla scomparsa degli odori. I comandi sono dotati di tasti per l’accensione della lampada , per l’accensione del motore e la selezione della velocità di funzionamento Alla pressione del tasto si accende il motore alla 1a velocità. I tasti accendono il motore rispettivamente alla 2 a alla 3a ed alla velocità intensiva. Per spegnere il motore premere : una volta, se utilizzato in 1 a velocità; due volte se utilizzato in 2 a,3 a, velocità intensiva. Con il tasto si seleziona la velocità intensiva dell’aspiratore che resterà attiva per 5 minuti (tasto lampeggiante), dopo i quali l’aspiratore passerà automaticamente alla 3 a velocità. Attivazione Autospegnimento Ritardato Regolabile Premendo per tre secondi si accendono lampeggiando i tasti velocità che corrispondono alla scelta di 5-10-15 minuti di autospegnimento. Premendo uno dei tasti lampeggerà la scelta effettuata e tornerà ad essere acceso il tasto corrispondente alla velocità in essere. uguale a 5 minuti uguale a 10 minuti LED si accenderanno a luce lampeggiante per 30 sec. a ricordare la sostituzione dei filtri a carbone attivo (se presenti). Per azzerare il timer è sufficiente tenere premuto il tasto con aspiratore spento, altrimenti il dispositivo darà nuovamente l’allarme al successivo spegnimento della cappa. uguale a 15 minuti Durante il tempo dell’auto spegnimento è possibile modificare la velocità impostata. Nel caso si scelga la velocità massima, dopo 5 min si passa automaticamente alla 3^ velocità e l’autospegnimento averrà a tale velocità. MUSICA (MUSIC) Tasto : Bluetooth. Premere tre secondi per attivare il Bluetooth (il tasto inizia a lampeggiare). Attivare il Bluetooth sul dispositivo esterno e ricercare la cappa (iniziali RN52- .......). Una volta collegato la spia smette di lampeggiare e rimane accesa, il display visualizza BT. Usare il dispositivo esterno per gestire musica e telefonate. Usare il tasto (volume) per regolare il volume; il display visualizza il livello del volume Per accettare o terminare una chiamata, premere il tasto . Nel corso di una telefonata, il display indicherà "CALL". Durante una telefonata è possibile regolare il volume con il tasto Per scollegare il dispositivo esterno, tenere premuto per tre secondi il tasto , il dispositivo sarà disconnesso e l'intensità della retroilluminazione del pulsante si riduce in modalità stand-by. Tasto : Radio. Premere tre secondi per attivare la radio. Il pulsante di retroilluminazione si accende, il display visualizza la frequenza della stazione radio. Per cambiare la frequenza premere i tasti . Usare il tasto per regolare il volume; il display visualizza il livello del volume Per spegnere la radio, premere il tasto per tre secondi. La radio si spegne e l'intensità della retroilluminazione del pulsante si riduce in modalità stand-by. La radio non funziona quando la cappa è già collegata con Bluetooth e riceve la musica dal dispositivo esterno o quando c'è una chiamata telefonica attiva. Le telefonate e la trasmissione dei brani musicali hanno la priorità rispetto alla radio. In ogni caso, dopo 10 secondi di non utilizzato, il display visualizza il livello del volume. Avviso manutenzione filtri Filtri antigrasso in alluminio Ogni 30 ore di funzionamento della cappa, allo spegnimento della medesima, tutti i LED si accenderanno con luce fissa per 30 sec. ad avvisare la necessaria pulizia dei filtri in alluminio. Per azzerare il timer è sufficiente tenere premuto il tasto con aspiratore spento, altrimenti il dispositivo darà nuovamente l’allarme al successivo spegnimento della cappa. Filtri carbone attivo Ogni 120 ore di funzionamento, allo spegnimento della cappa, tutti i MANUTENZIONE Prima di ogni operazione di manutenzione o pulizia, staccare l’alimentazione elettrica dalla cappa. Una cura particolare va rivolta ai filtri antigrasso metallici, i quali hanno la funzione di trattenere le particelle grasse contenute nei vapori. I filtri antigrasso metallici devono essere lavati almeno ogni mese in acqua calda e detersivo (anche in lavastoviglie). I filtri possono scolorirsi dopo alcuni lavaggi. Questo è normale e non significa che devono essere sostituiti. ATTENZIONE: il grasso trattenuto dai filtri metallici è facilmente infiammabile. E’ pertanto necessario provvedere regolarmente alla pulizia dei filtri come da istruzioni. I filtri di carbone attivo hanno la funzione di trattenere gli odori presenti nei fumi di cottura. L’aria viene immessa in ambiente depurata. I filtri di carbone attivo non devono essere lavati e vanno sostituiti 2 o 3 volte all’anno in conformità all’uso della cappa. Richiedere i filtri alla Ditta costruttrice. Per sostituire i filtri a carbone attivo si devono prima togliere i filtri metallici antigrasso . A questo punto si possono togliere i filtri a carbone attivo posti alle estremità dell’aspiratore. Ruotare gli stessi fino a sganciamento dall’aspiratore (Fig. 3 - D). Per reinstallare i nuovi filtri a carbone attivo invertire le operazioni. La cappa deve essere pulita immediatamente dopo l’installazione e l’asportazione del protettivo al fine di eliminare qualsiasi residuo di collante o altre impurità di qualsiasi genere. La cappa deve essere pulita frequentemente sia internamente che esternamente (almeno una volta al mese) Non lasciare accumulare sporcizia nelle superfici esterne ed interne della cappa. Per la pulizia della scocca esterna della cappa non usare assolutamente prodotti acidi o basici o spugne abrasive. Pulire la cappa con una spugna inumidita con acqua calda ed una modesta quantità di sapone neutro (es. sapone per stoviglie) al fine di eliminare le particelle di grasso eventualmente depositate sulla stessa. Risciacquare con un panno umido asportando con cura tutto il sapone, seguendo la direzione di satinatura della superficie dell’acciaio. Particolarmente importante risulta l’asciugatura soprattutto nelle zone dove l’acqua ha un’elevata durezza e lascia depositi di calcare. La cappa è dotata di illuminazione a LED che oltre ad offrire una buona illuminazione e un notevole risparmio energetico, garantiscono una durata media 10 volte superire rispetto alle lampade tradizionali. Nel caso di sostituzione rivolgersi al servizio assistenza. NL INSTRUCTIES VOOR INSTALLATIE, GEBRUIK EN ONDERHOUD VAN DE DAMPKAP MOD. i-HOOD 230-240 Vac - 50 Hz Keukendampkap. Het apparaat is ontworpen in overeenstemming met de Europese normen en eisen van de richtlijnen: 2006/95 CEE (Elektrische veiligheid - Low Voltage), 2004/108 CEE (elektromagnetische compatibiliteit). PRESENTATIE Het apparaat (Fig. 1) es als volgt samengesteld: 1) Lichaam van de dampkap. 2) Telescopische schouw voor de dampen WAARSCHUNWINGER Dit boekje is een integraal onderdeel van de dampkap en moet daarom goed bewaard worden. Indien de dampkap wordt overgedragen aan een andere eigenaar of een andere gebruiker of voor overdracht naar een andere installatie, geef het boekje ALTIJD mee. Controleer of de spanning (V) en frequentie (Hz) op het identificatieplaatje dat zich in de binnenkant van het apparaat bevindt, overeenkomt met die op de plaats van installatie. Elke eventuele wijziging van de elektrische installatie die nodig zou zijn voor het installeren van de dampkap mag alleen worden uitgevoerd door gekwalificeerd personeel. Reparaties uitgevoerd door onbevoegden kan schade veroorzaken. Voor elke interventie, raadpleeg een geautoriseerde technische helpdesk voor de vervanging van onderdelen. Controleer altijd dat alle elektrische onderdelen (lampen, afzuiging) uitgeschakeld zijn wanneer het apparaat niet in gebruik is. In geval van onweer, zet u de hoofdschakelaar van de installatie in de positie "off". De dampkap kan enkel gebruikt worden als afzuiging van kookdampen boven een fornuis voor huishoudelijk gebruik. In geval van twijfel, neem contact op met de fabrikant. De fabrikant wijst elke aansprakelijkheid af voor schade aan personen, dieren of eigendommen als gevolg van fouten in de installatie, onderhoud of veroorzaakt door onjuist gebruik. Wij herinneren u eraan dat het gebruik van elektrisch aangedreven producten het respecteren van een paar fundamentele veiligheidsvoorschriften met zich meebrengt zoals: • Dit toestel kan niet worden gebruikt door personen (inclusief kinderen) met verminderde mentale of fysieke capaciteiten, met een gebrek aan ervaring of kennis, behalve in de aanwezigheid van een verantwoordelijke persoon die hen kan begeleiden en hen de nodige instructies kan geven voor het gebruik van het toestel. Zorg ervoor dat kinderen niet met het toestel spelen. • Reiniging of onderhoud van het toestel is verboden indien het toestel niet eerst werd losgekoppeld van het elektriciteitsnet door het plaatsen van de hoofdschakelaar van de installatie op positie "off". Indien het reinigen niet wordt uitgevoerd zoals vermeld in de handleiding, bestaat het gevaar van brand. • Het is verboden aan de elektrische kabels die uit het apparaat komen te trekken, twisten of beschadigen zelfs wanneer deze losgekoppeld is van het elektriciteitsnet. • Het is verboden water direct op het apparaat te spuiten of gieten. • Het is verboden scherpe voorwerpen in de afzuigroosters en ventilatieopeningen te steken. • Het is verboden om de filters te verwijderen om toegang te krijgen tot de binnenwanden van het apparaat, zonder eerst de hoofdschakelaar van de installatie op "off" te zetten. • Het is verboden voedsel te flamberen onder de dampkap. Bij het frituren, blijf dit voortdurend bewaken, omdat de olie vuur kan vatten. INSTALLATIE Lees het volledige instructieboekje voor installatie en / of gebruik van de dampkap. Eens geïnstalleerd, moet de minimumafstand tussen het apparaat en het kookfornuis 65 cm zijn. Als de installatie-instructies voor het gasfornuis een grotere afstand aangeven, moet hiermee rekening worden gehouden. Deze apparatuur mag niet worden geïnstalleerd over vuren met elektrische bovenplaten die warmte uitstralen. Alle normen met betrekking tot de evacuatie van de lucht moeten worden gerespecteerd. De lucht mag niet worden afgevoerd door een leiding die wordt gebruikt voor het evacueren van dampen geproduceerd door apparaten met verbrandingsgas of andere brandstoffen (dit geldt niet voor de dampkappen gebruikt in filtermodus). De ruimte moet over een afdoende ventilatie beschikken wanneer de dampkap gelijktijdig wordt gebruikt met andere apparaten die gas of andere brandstoffen gebruiken. We raden aan om meubels, die zich eventueel boven de installatieruimte bevinden, te verplaatsen om de toegang te vergemakkelijken. Wandmontage van de dampkap De dampkap is voorzien van alle bevestigingselementen die noodzakelijk zijn voor de installatie en die geschikt zijn voor de meeste oppervlakken. Controleer of het installatieoppervlak sterk genoeg is. De installatie moet worden uitgevoerd door competent en gekwalificeerd personeel in overeenstemming met de geldende normen. Vooraleer u begint, installeer eerst de luidsprekers zoals aangegeven in Fig. 4. Gebruik, na het markeren en doorboren van de wand zoals aangegeven in Fig. 2, de vereiste bevestigingen voor de installatie. • blokkeerpluggen (A) • haak- en uitlijnpluggen (B) • stijfbeugel en bevestigingsschroef voor wandmontage van de schouw (C) ELEKTRISCHE AANSLUITING Dit apparaat moet worden aangesloten op een installatie met aarding. Er zijn twee types netwerkverbindingen mogelijk: 1. Door het gebruik van een gestandaardiseerde stekker waaraan het netsnoer aangesloten wordt en die in een stopcontact van de installatie gestoken wordt. Dit stopcontact moet toegankelijk zijn (om te kunnen uittrekken bij onderhoud). Controleer of de stekker nog steeds toegankelijk is na de volledige installatie van het apparaat. 2. Door een vaste verbinding met het netwerk, door het tussenplaatsen van een tweepolige schakelaar die de stroomonderbreking garandeert, met een openingsafstand tussen de contacten die de volledige ontkoppeling van het net toelaat in het geval van overspanning categorie III, volgens de installatienormen. De aansluiting van de aarding (geel-groene draad) mag niet worden onderbroken. Voor werkingsspanningen en frequentie, controleer het typeplaatje aan de binnenzijde van het apparaat. GEBRUIIK Deze dampkap kan gebruikt worden in afzuigings- of filtermodus. Afzuiging (evacuatie naar buiten). De kookdampen worden afgevoerd naar buiten door een leiding die aangesloten is aan een afvoeraansluiting. De leiding mag in geen geval aangesloten worden aan afvoerleidingen van verbrandingsstoffen (kachels, boilers, branders, etc.). Filter (interne recyclage). De dampen gaan door actiefkoolfilters (D – Fig. 3) om gezuiverd te worden en gerecycleerd in de keukenruimte door de uitgangssleuven (E) van de gezuiverde lucht. Deze openingen moeten vrij zijn en in verbinding met de keukenruimte. In dit geval raden we de installatie aan van een afvoerbuis zonder bocht. Koolstoffilters moeten niet worden gebruikt in de dampkap in de afzuigversie. WERKING AFZUIGING (VENTILATIE) De dampkap is voorzien van een multispeed motor. Wij raden de laagste snelheid aan in normale omstandigheden en andere snelheden in geval van een hoge concentratie van geuren en dampen. We raden ook aan de dampkap aan te schakelen wanneer u begint te koken en pas uit te schakelen wanneer alle geuren weg zijn. De sturingen zijn voorzien van toetsen voor het aanschakelen van de lamp , voor het aanschakelen van de motor 0-1 en voor het selecteren van de werksnelheid 2-3-4. Wanneer u op de toets 0-1 drukt, start de motor in 1ste snelheid. De 23-4-toetsen zetten de motor in 2de, 3de en 4de versnelling. Om de motor te stoppen, druk op 0-1: één keer bij gebruik in de eerste snelheid; twee keer voor de 2de, 3de en intensieve versnelling. De toets 4 laat toe een intensieve afzuigkracht te selecteren die actief blijft gedurende 5 minuten (knippertoets), dan gaat de snelheid van de afzuiging terug naar 3e versnelling. Instelbaar aanschakelen van de vertraagde automatische stop Druk gedurende drie seconden op de toets 0-1. De snelheidstoetsen knipperen. Deze toetsen komen overeen met de selectie van 5-10-15 minuten automatische afzuiging. Door op een van deze toetsen te drukken, zal de keuze knipperen en de toets die overeenstemt met de gebruikte snelheid licht opnieuw op. 0 – 1 staat voor 5 minuten 2 staat voor 10 minuten 3 staat voor 15 minuten Tijdens de automatische stoptijd kunt u de ingestelde snelheid veranderen. Indien de maximale snelheid is geselecteerd, wordt na 5 minuten automatisch overgeschakeld naar de 3e versnelling en de automatische stop gebeurt bij deze snelheid. MUSIEK (MUSIC) Toets : Bluetooth. Druk gedurende drie seconden op deze toets om Bluetooth te activeren (de toets begint te knipperen). Activeer Bluetooth op het externe apparaat en zoek de dampkap (initialen RN52-........). Eenmaal aangesloten, stopt de toets met knipperen en blijft verlicht en op het scherm verschijnt BT. Gebruik het externe apparaat om de muziek en oproepen te beheren. Gebruik de toets (volume) om het volume te regelen; op het scherm verschijnt het volumeniveau + Om een oproep te beantwoorden of beëindigen, druk op de toets . Tijdens een oproep, toont het scherm « CALL ». Het is mogelijk om tijdens een oproep het volume te regelen door de toets + - te gebruiken. Om het externe apparaat uit te schakelen, druk gedurende drie seconden op de toets ; het apparaat wordt uitgeschakeld en de intensiteit van de achtergrondverlichting van de toets neemt af in standby-modus. Toets : Radio. Druk gedurende drie seconden op deze toets om de radio te activeren. De achtergrondverlichting licht op, het scherm toont de radiofrequentie. Om de frequentie te wijzigen, gebruik de toetsen + Gebruik de toets het volume te regelen; op het scherm verschijnt het volumeniveau + Om de radio uit te schakelen, druk gedurende drie seconden op de toets . De radio wordt uitgeschakeld en de intensiteit van de achtergrondverlichting van de toets neemt af in stand-by-modus. De radio werkt niet wanneer de dampkap al aangesloten is via Bluetooth en muziek ontvangt via het externe apparaat of tijdens een telefoonoproep. De oproepen en de muziektransmissies hebben voorrang op de radio. In alle gevallen toont het scherm het volumeniveau na 10 seconden zonder gebruik. Waarschuwing voor onderhoud van de filters Antivetfilter in aluminium Om de 30 werkuren van de dampkap. Wanneer deze wordt uitgeschakeld, lichten alle LED’s van de snelheidstoetsen gedurende 30 sec op om te waarschuwen dat de aluminium antivetfilters dienen te worden gereinigd. Om de filtertimer terug op nul te zetten, volstaat het de toets 0-1 ingedrukt te houden met uitgeschakelde afzuiging, anders zal het apparaat opnieuw een alarm geven wanneer de dampkap terug aangeschakeld wordt. Actiefkoolfilter Om de 120 werkuren van de dampkap. Wanneer deze wordt uitgeschakeld, knipperen alle LED’s gedurende 30 sec. om eraan te herinneren dat de actiefkoolfilters dienen te worden vervangen (indien ze geïnstalleerd zijn). Om de filtertimer terug op nul te zetten, volstaat het de toets 0-1 ingedrukt te houden met uitgeschakelde afzuiging, anders zal het apparaat opnieuw een alarm geven wanneer de dampkap terug aangeschakeld wordt. ONDERHOUD Voor elk onderhoud of reiniging, haal altijd de stekker uit het stopcontact. De metalen antivetfilters vereisen speciale zorg. Ze dienen om het vet in de dampen te vangen. De metalen antivetfilters moeten minstens een keer per maand worden gewassen met afwasmiddel in warm water (zelfs in de vaatwasmachine). De filters kunnen verkleuren na enkele wasbeurten. Dit is normaal en betekent niet dat ze dienen te worden vervangen. OPGELET: Het vet gevangen door de metalen antivetfilters is licht ontvlambaar. Het is daarom noodzakelijk deze regelmatig te reinigen zoals beschreven in de handleiding. De functie van actiefkoolfilters is het vangen van de geuren van de kookdampen. De lucht wordt na zuivering opnieuw in de omgeving gebracht. De actiefkoolfilters moeten nooit worden gewassen en dienen 2 of 3 keer per jaar te worden vervangen naargelang het gebruik van de dampkap. Vraag filters aan de fabrikant. Om de actiefkoolfilters te vervangen, moeten eerst de metalen antivetfilters verwijderd worden. Vervolgens is het mogelijk om de actiefkoolfilters te verwijderen die in de uiteinden van de afzuiging zitten. Draai eraan tot ze uit de afzuiging loskomen (Fig. 3 - D). Om de nieuwe actiefkoolfilters te plaatsen, ga omgekeerd te werk. De dampkap moet onmiddellijk na de installatie en na het weghalen van de bescherming worden gereinigd om eventuele lijmresten of andere onzuiverheden te verwijderen. De dampkap moet regelmatig worden gereinigd, zowel de binnen- als de buitenkant (minstens eenmaal per maand). Laat geen vuil ophopen op de binnen- en buitenoppervlakken van de dampkap. Voor het reinigen van buitenkant van de dampkap gebruik geen zure of basische producten of schuursponsjes schoon te maken. Reinig de dampkap met een vochtige spons, warm water en een kleine hoeveelheid neutrale zeep (bijv. afwasmiddel) om eventuele vetdeeltjes op de dampkap te verwijderen. Spoelen met een vochtige doek, en zorg ervoor dat alle zeepresten verwijderd zijn en in de richting van de gesatineerde stalen oppervlakken. Het drogen is bijzonder belangrijk zeker in de zones waar het water zeer hard is en kalkaanslag achterlaat. De dampkap heeft een LED-verlichtingssysteem, dat een goede verlichting en een aanzienlijke energiebesparing biedt en een gemiddelde levensduur garandeert die 10 keer langer is in vergelijking met traditionele lampen. Voor vervanging kunt u contact opnemen met de helpdesk . GB INSTALLATION, OPERATING AND MAINTENANCE INSTRUCTIONS FOR COOKER HOOD MOD. i-HOOD 230-240 Vac - 50 Hz Exhausting cooker hood. The equipment is constructed in accordance with European Standards and with the requirements included in the following Directives: 2006/95EC ( Low Voltage Directive), 2004/108 (Electromagnetic Compatibility). PRESENTATION The equipment (Picture 1 ) is made of the following items : 1) Cooker hood body 2) Telescopic chimney WARNINGS The present instruction manual is an integral part of the appliance itself, therefore it must be carefully kept and ALWAYS accompany it, even in case of its assignment to another owner or user or in case the cooker hood is moved to another installation plant. Any eventual adjustment to the electrical system, which may be necessary to install the cooker hood, must be carried out only by competent people. Any repair carried out by no competent people may cause damages. For any repair or needed technical action make reference to a Technical Assistance Center, which is authorized to carry out the replacement of the spare parts. Always make sure that all the electrical parts (lights, exhaustion unit) are disconnected when the appliance is not in use. By storms take off the main switch of the house electrical system. The using of the cooker hood must not be other than the use of exhausting units for cooking damps on domestic kitchens. The manufacturer does not accept any liability for damages caused by people, animals or things, by installation and maintenance mistakes or by any illegitimate use. Make sure that the voltage (V) and the frequency (Hz) ratings indicated on the plate inside the cooker hood correspond to the ones available in the installation place. We remind that the use of products functioning with electrical energy implies the observance of some essential security rules, as follows: This equipment is not intended for people (children included) with reduced mental or motor capacities, with lack of experience or knowledge, unless they are supervised or unless a person responsible for their security, gives them instructions regarding the use of the equipment. Children must be supervised in order to be sure that they do not play with the equipment. Any cleaning action is forbidden if the appliance hasn’t been disconnected from the main power supply and if the main switch of the house electrical system is not off. If cleaning is not carried out according to these instructions, a fire may break out. Do not pull, take off or twist the cable coming out from the appliance, even though this has been disconnected from the main power supply. Do not sprinkle or throw any water directly on the appliance. Do not stick any sharp tool inside the exhausting holes and into the air discharge. Do not take out the filters in order to reach the internal sides of the appliance in case the main switch of the house electrical system is not off. Do not singe or flambé directly underneath the cooker hood. Take particular care when frying to ensure that the oil does not catch fire INSTALLATION Read the instruction manual before installing and/or using the hood. The unit must be fitted at a distance of at least 65 cm. from the cooking hob. If the mounting instructions of the gas cooker indicate a wider distance, respect it. The unit must not be mounted above cookers fitted with top radiant plate. Respect all the air discharge regulations. The air must not be discharged in a pipe used to discharge exhaust fumes produced by gas-fed equipments or fuel-fed equipments (this does not apply to filtering hoods). The room must be adequately ventilated when the hoods is used together with other gas- fed or fuel-fed equipments. For an easy access, it is advisable to move possible furniture under the installation area. Brackets and screws for fixing the chimney to the wall (C) ELECTRICAL CONNECTION This equipment must be connected to a grounding plant. Two types of electrical connection can be used: 1) Using a standard plug to be connected to the power cable and inserted in a mains socket which must be accessible (so that the plug can be disconnected when servicing is carried out). Make sure that the plug is accessible also after the complete installation of the equipment. 2) By means of a fixed mains connection, fitting a bipolar switch, which ensures the disconnection, with an opening distance of the contacts allowing a complete disconnection on the conditions of the overvoltage III category, according to installation regulations. The ground connection (yellow-green wire) must not be interrupted. Refer to the plate inside the hood for the mains voltage and frequency ratings. USE This cooker hood can be employed as exhausting or filtering. Exhausting (external evacuation). Kitchen smokes are driven outside through a flue joined to the exhaust pipe flue connector. This pipe must not under any circumstances be connected to cooker, boiler or burner exhaust pipes, etc. Filtering (inside recycling). In this case it is essential to install the activated carbon filters on the motor Smokes pass through the activated charcoal filter (Picture 3 –D) to be cleaned and recycled in the kitchen environment by means of holes (E) from which the purified air will come out. These holes have to be free and communicating with the kitchen environment. In this case you should not install the exhaust pipe without curve. OPERATION VENTILATION The hood is supplied with a multispeed motor. The hood should be run at low speed under normal conditions and at higher speeds only when there is a heavy build-up of fumes or odours. Ideally, the hood should be switched on as soon as cooking is started and then kept on until all odours have been eliminated. The controls consist of these commands. Press to turn on the light, press to swich on the hood at first speed and to switch off the aspirator, press to select functioning speeds. By pressing of the command the motor starts running at the 1 st speed. The commands switch the motor on respectively at the 2nd, 3rd and intensive speed. In order to switch the motor off press once if set at the 1 st speed, twice if set at the 2nd, 3rd and intensive speed. With the button , select the maximum speed of the extraction fan for 5 minutes (button blinking), after which the extraction fan will automatically switch to the 3rd speed. Adjustable and delayed self switching off Pressing for three seconds the speed keys start blinking. The speeds correspond now to the choice of 5-10-15 minutes of self switching off. Pressing one of these buttons, it will blinks showing you the chosen time and the key corresponding to the current speed will light on. corresponds to 5 minutes Installation of the hood onto the wall. The hood is equipped with all the necessary fastenings for its installation, which are suitable for most surfaces. Anyway ask a professional to verify that the installation surface is strong. Installation must be carried out by qualified installers according to present regulations. First, provide for the installation of the speakers as shown in (Picture 4). After having drawn and drilled the wall as in (Picture 2), use the following fastenings for installation: Blocking dowels (A) Suspending and levelling dowels (B) corresponds to 10 minutes corresponds to 15 minutes While the self switching off is in function, it is possible to modify the speed previously set. If you select the maximum speed, after 5 minutes the extraction fan switches to the 3rd speed and will automatically turn off at such speed. MUSIC key: Bluetooth. Press three seconds to activate the Bluetooth (the button starts flashing). Enable the Bluetooth on the external device and research the hood (initials RN52- .......). Once connected the button light stops blinking and stays on, the display will show BT. Use the external device to manage music and phone calls. Use the key (volume) to adjust the volume, the display will show the volume level To accept or end a call press the key. During a phone call, the display will show “CALL”. During a phone call you can adjust the volume using the key To disconnect the external device, hold for three seconds the key, the device will be disconnected and the backlight intensity of the button will reduce in stand-by mode. key: Radio. Press three seconds to activate the radio. The backlight button lights up, the display will show the radio station frequency. To change frequency press the keys Use the key to adjust the volume, the display will show the volume level To turn off the radio press the radio key for three seconds, the radio turns off and the backlight intensity of the button will reduce in stand-by mode. The radio does not work when the hood is already connected with Bluetooth and is receiving music from the external device or when there is an active phone call. Phone calls and the transmission of music tracks has priority over the radio. In any case, after 10 seconds of unused, the display will show the volume level. Filters maintenance reminder Aluminium anti-grease filters Once the hood is switched off, after 30 hour functioning, all the LEDs of the speed buttons switch on with a fixed light for 30 seconds to remind that aluminium anti-grease filter need cleaning. To reset the timer keep pressed the buttons with the aspirator switched off, otherwise the reminder will occur again when the hood is switched off. Charcoal filter (for filtering hoods) Once the hood is switched off, after 120 hour functioning, all LEDs blink for 30 seconds to remind that the charcoal filters (if present) need to be replaced. To reset the timer keep pressed the buttons with the aspirator switched off, otherwise the reminder will occur again when the hood is switched off. MAINTENANCE Always disconnect the hood from the mains before carrying out any maintenance or cleaning operation. Particular attention should be paid to the metallic anti-grease filters that are designed to trap particles of fat contained in the fumes. The metallic anti-grease filters must be washed at least once a month with detergent in hot water (or in the dish-washer). The filters may discolour after a few washes. This is normal and does not mean they have to be replaced. ATTENTION: the grease collected in the filters can easily catch fire and it is therefore extremely important to clean the metallic filters on a regular basis as per instructions. The activated charcoal filters are designed to collect unpleasant odours in the cooking fumes. The air is then released purified in the environment. The charcoal filters must not be washed, but replaced 2 or 3 times a year, depending on how much the hood is used. New filters are to be requested directly to the manufacturer. In order to replace the activated charcoal filters, you should remove the anti-grease filters. Your are then to take off the activated charcoal filters placed at the two ends of the aspirator. Turn the filters until they unfasten from aspirator (Picture 3 - D). Invert the operation in order to install the new charcoal filters. In order to remove the remaining glue or any impurity, the cooker hood must be cleaned immediately after installation and after having removed the protective film. The cooker hood must be cleaned frequently both internally and externally (at least once a month). Do not let dirt gather on the inner and outer surfaces of the hood. To clean the exterior of the hood do not use either acid or basic products, or abrasive sponges. Clean the hood with a sponge dampen in warm water and a little quantity of neutral detergent (for example dishwasher detergent), in order to remove possible particles of grease. Rinse with a damp cloth, removing all the detergent carefully, following the satin finish direction on the steel surface. Drying is very important, especially in areas where water is particularly hard and leaves limestone. The hood features a LED light that, in addition to offering a good lighting and a significant energy savings, are guaranteed to last on average 10 times more than traditional lights. For replacement, contact the Assistance Service. 4 3