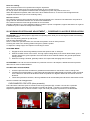
1
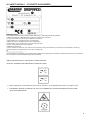
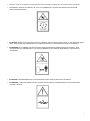
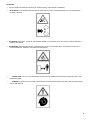
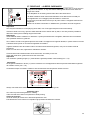
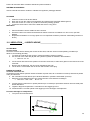
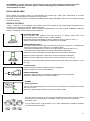
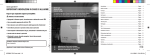
DEBORA IT EN - USO E MANUTENZIONE - USE AND MAINTENANCE Cod. EBE0007OM 2010-01 1 FERABOLI MAKE SURE THAT EVERYONE WHO OPERATES THIS MACHINE HAS READ THIS MANUAL COMPLETELY! LEGGERE ATTENTAMENTE IL MANUALE PRIMA DI INIZIARE IL LAVORO! CONTENTS - INDICE 01..Safety - Sicurezza……………………..……………….. ………………..…..page 3 02..Safety decals – Etichette di sicurezza………………………………….…...page 6 03..Technical features – Caratteristiche tecniche…………………………..…..page 9 04..Assembly instructions – Istruzioni di montaggio……………………….…. page 10 05..General information – Informazioni generali ..……………..……………... page 10 06..Attaching to the tractor – Accoppiamento al trattore………….............…..page 11 07..Driveline – Cardano.…..........................…………………………........…… page 12 08..Working position and adjustment – Posizione in lavoro e regolazioni .... page 13 09..Transportation and storage – Trasporto e deposito……………. …….….. page 14 10..Lubrication – Lubrificazione…………………….. ………………………….. page 15 11..Adjustaments and maintenance – Regolazioni e manutenzione………… page 16 12..Conditioner – Condizionatore………..………………………………………..page 18 13..Troublesshooting - Problemi e rimedi………………………………………..page 19 14..Warranty conditions – Condizioni di garanzia…………… …………………page 20 2 1. SAFETY_- SICUREZZA_______________________________ The disc mowers should only be uses for the work they were designed for, which is cutting to obtain forage for animal feed.The manufacturer is not responsible for any damage caused by improper use of the machine, nor for equipment used for any purpose other than the above mentioned one.Most accidents can be avoided by observing the safety instructions. Always observe the safety instructions in this manual and on the decals. Always replace damaged or illegible decals immediately. Le falciatrici devono essere impiegate per l’uso per cui sono state concepite, che è il taglio del foraggio destinato alla nutrizione animale. Il costruttore non è responsabile dei danni causati da un uso improprio della macchina, e neppure se l’attrezzo viene utilizzato per scopi diversi da quelli sopra menzionati. La maggior parte degli incidenti può essere evitata osservando le regole di sicurezza. Rispettare sempre le norme di sicurezza espresse in questo manuale ed evidenziate nelle etichette di sicurezza (colore giallo). Sostituire le etichette qualora risultino consumate o illeggibili. General points: Always observe the highway code when on roads or in public places. Rispettare sempre il Codice della Strada quando si transita su strade o in aree pubbliche. Never mow along the roadside, along railway lines, in public places such as schools or parks, and not on very stony ground to avoid the risk of accidents caused by materials or objects thrown up by the machine. Non falciare lungo I cigli delle strade, lungo le linee ferroviarie, o in luoghi pubblici quali scuole o parchi, o in zone particolarmente sassose per evitare il rischio di incidenti causati dalla proiezione di materiali od oggetti contundenti. Before starting work make sure the operator is familiar with the machine and with the tractor controls. Do it while working it will be too late. Prima di iniziare il lavoro assicurarsi che l’operatore abbia familiarizzato con la macchina e con i comandi del trattore. Farlo durante il lavoro sarebbe troppo tardi. The operator should not wear loose clothing to avoid the risk of entanglement on rotating parts of the implement. L’operatore non deve indossare vestiti fluttuanti per evitare il rischio di impigliarsi sulle parti rotatati dell’attrezzo. We recommend using a tractor with cab for added operator safety. E’ consigliato l’uso di trattori con cabina per maggiore sicurezza dell’operatore. Make sure the area around the mower is clear of bystanders (Risk of projections of objects!) Assicurarsi che l’area circostante alla falciatrice sia sgombra di personale estraneo alle manovre (rischio di proiezione di oggetti) Never let anyone ride on the mower at any time. Non permettere a nessuno di salire sopra la falciatrice. The mower must be attached to the tractor using the 3 point linkage. La falciatrice deve essere applicata ad un trattore utilizzando l’attacco a 3 punti. Make sure the tractor can take the weight of the mower before attaching. Assicurarsi che il trattore possa sostenere il peso della falciatrice prima dell’applicazione. 3 Never leave the machine unattended when running. Non lasciare mai la falciatrice incustodita mentre è in funzione. Make sure that forward speed is suited to the terrain. Never make sudden changes in direction. Assicurarsi che la velocità di avanzamento sia adeguato al tipo di terreno. Non effettuare mai bruschi cambiamenti di direzione. Be extremely careful when changing direction bearing in mind weight, length and height of the machine. Prestare estrema cautela nei cambi di direzione, tenendo sempre in considerazione il peso, la lunghezza e l’altezza della macchina. Before starting work make sure that the mower is in good condition, that all guards are in place and in good condition. Always replace damaged guards immediately. Prima di iniziare il lavoro assicurarsi che la falciatrice sia in buone condizioni. Sostituire le protezioni danneggiate immediatamente. Before each use check that all bolts are tight, especially the knife bolts. Tighten if necessary. Prima di ciascun utilizzo controllare che tutte le viti siano fissate, in particolare I portacoltelli. Fissare se necessario. Make sure that the area around the mower is free from bystanders when manoeuvring. Assicurarsi che non ci sia personale estraneo nell’area di manovra. Always make sure that all moving parts have a complete standstill before working on the machine. Assicurasi che tutte le parti rotanti siamo in perfette condizioni prima di iniziare il lavoro. Never run the machine when it is in the transport position. Non azionare la falciatrice in posizione di trasporto Work - Lavoro: 1 . Keep a safe distance from the machine at work as the rotating parts can throw up objects. Mantenere una distanza di sicurezza dalla falciatrice mentre è in lavoro, poiché le parti rotanti possono proiettare oggetti. 2 . Periodically inspect all parts subject to wear and replace worn parts with original FERABOLI parts. Ispezionare periodicamente tutte le parti soggette ad usura e sostituire le parti consumate con ricambi originali . 3 . Always use the mower with the safety tarp in lowered position. Utilizzare sempre la falciatrice con il telo di protezione abbassato. 4 . Be extremely careful when changing the position of the mower from the transport to the working position and make sure that there are no bystanders. 4 Usare estrema cautela nel cambiare dalla posizione di lavoro a quella in trasporto e viceversa, ed assicurasi che non ci siano estranei nelle vicinanze. 5 . Worn or missing blades should be replaced, always replace the complete set to avoid the danger of the machine being out of balance. Sostituire le lame consumate o mancanti, sostituire sempre il set completo per evitare sbilanciamenti nella macchina. 6. When replacing knives or discs always check the fastening carefully. Controllare il fissaggio delle viti quando vengono sostituiti dischi o perni portacoltello. 7 . Keep a regular check on the tarp guard. Worn or damaged tarps must be replaced immediately. Controllare periodicamente il telo di protezione. Teli danneggiati o consumati devono essere sostituiti immediatamente. 8 . The guards, such as tarps, pipes, metal covers, are designed to avoid stones or objects being thrown up. They also guard from access to potentially dangerous parts of the machine and must therefore be in place and functioning correctly before the machine is used. Tutte le protezioni, tubi, teli, coperture metalliche, sono concepite per evitare la proiezione di sassi o altri oggetti contundenti. La loro funzione è anche quella di prevenire l’accesso a parti che potrebbero essere potenzialmente pericolose, perciò devono essere sempre installate correttamente e sempre in funzione prima che la macchina inizi il lavoro. Maintenance – Manutenzioni : 1 . Shut off the engine, remove the key and wait until all moving parts come to a complete standstill before undertaking any maintenance, adjustment or repairs. Spegnere il motore del trattore, rimuovere la chiave e attendere l’arresto completo di tutte le parti rotanti prima di eseguire qualsiasi manutenzione, regolazione o riparazione. 2 . Before carrying out any maintenance or repairs make sure that the machine can not accidentally be starter up. Prima di effettuare qualsiasi manutenzione o riparazione assicurasi che la macchina non possa innestarsi accidentalmente. 3 . All maintenance and repair work should only be carried out by competent and trained personnel who are familiar with the features and use of the machine. They must be aware of the safety instructions regarding the machine. Tutte le riparazioni devono essere eseguite da personale competente ed addestrato che abbia già familiarizzato con le caratteristiche e l’uso della macchina. Il personale deve essere a conoscenza delle istruzioni di sicurezza che riguardano la macchina. 5 02. SAFETY DECALS - ETICHETTE DI SICUREZZA _____________________ IDENTIFICATION Each individual machine has an identification plate (Fig. 1) indicating the following details: 1) Mark and address of the Manufacturer;Nome e indirizzo del costruttore 2) Type and model of machine;Tipo e modello di macchina 3) Unloaded mass, in Kilograms;Peso in chilogrammi 4) Mass full load, in Kilograms;Peso max in chilogrammi 5) Registration of the machine;num. Di serie della macchina 6) Year of manufacture;anno di produzione 7) CE mark.marchio CE You are advised to note down your data on the form below, along with the date of purchase (8) and the dealer’s name (9). Scrivere la data di consegna (8) e il nome del rivenditore (9) 8) ____________________ 9) ____________________ This information must always be quoted whenever assistance or spare parts are needed. Queste informazioni sono necessarie per una futura richiesta di assistenza per parti di ricambio. SPEED AND DIRECTION OF ROTATION OF POWER TAKEOFF. VELOCITA’ E SENSO DI ROTAZIONE DELLA PRESA DI FORZA. BEFORE CARRYING OUT ANY OPERATION, WAIT UNTIL ALL THE PARTS OF THE MACHINE HAVE COME TO A COMPLETE STOP. ATTENDERE L’ARRESTO COMPLETO DI TUTTI GLI ELEMENTI DELLA MACCHINA PRIMA DI EFFETTUARE QUALSIASI OPERAZIONE. 6 KEEP WELL CLEAR OF THE MOWER CUTTERS WHILE THE TRACTOR ENGINE IS RUNNING AND THE POWER TAKEOFF IS ENGAGED. ATTENDERE L’ARRESTO COMPLETO DI TUTTI GLI ELEMENTI DELLA MACCHINA PRIMA DI EFFETTUARE QUALSIASI OPERAZIONE. ATTENTION: OBJECTS MAY BE EJECTED WITH FORCE BY THE ROTATING DRIVE PARTS OF THE MACHINE. KEEP WELL AWAY FROM THE MOWER WHILE IT IS BEING OPERATED. ALWAYS RESPECT SAFETY DISTANCES. ATTENZIONE: GLI ELEMENTI ROTANTI POSSONO PROVOCARE ESPULSIONE VIOLENTA DI OGGETTI. NON SOSTARE NELLE VICINANZE DELLA FALCIATRICE MENTRE E’ IN FUNZIONE. MANTENERE LA DISTANZA DI SICUREZZA. ATTENTION: ENTANGLEMENT WITH ROTATING DRIVE PARTS CAN CAUSE INJURY OR DEATH. ATTENZIONE: IL RESTARE IMPIGLIATI NELLE PARTI ROTANTI DELLA TRASMISSIONE PUO’ CAUSARE GRAVI LESIONI O MORTE. 7 ATTENTION DO NOT OPEN OR REMOVE PROTECTIVE COVERS WHILE THE ENGINE IS RUNNING. ATTENZIONE: IL RESTARE IMPIGLIATI NELLE PARTI ROTANTI DELLA TRASMISSIONE PUO’ CAUSARE GRAVI LESIONI O MORTE. ATTENTION: KEEP WELL CLEAR OF THE MOWER WHEN IT IS LOWERED TO START WORK. ALWAYS RESPECT SAFETY DISTANCES. ATTENZIONE: NON SOSTARE NELLE VICINANZE DELLA FALCIATRICE MENTRE E’ IN MANOVRA. RISCHIO DI SCHIACCIAMENTO. TENERE LA DISTANZA DI SICUREZZA. SOUND LEVEL: BY LAW, THE EARS MUST BE PROTECTED WHEN THE TRACTOR IS OPERATED WITH THE WINDOWS OPEN. RUMORE: E’ OBBLIGATORIO USARE I PROTETTORI AURICOLARI QUANDO SI OPERA CON LE FINESTRE DEL TRATTORE APERTE . 8 03. TECHNICAL FEATURES__- DATI TECNICI_________________ Cutting Discs Blade/Disc Drive Weight PTO speed width N. N. shaft Kg. rpm 3pointhitchcat. Oil cutter bar Oil Gearbox l. l. 215 2.05m 5 2 1 750 540/1000 II 2.5L 0.75L 246 2.40m 6 2-3 1 800 540/1000 II 3L 0.75L 287 2.80m 7 2 1 860 540/1000 III 3.5L 0.75L 9 04. ASSEMBLY INSTRUCTIONS - ISTRUZIONI DI MONTAGGIO ____________ General Generally nuts and screws of demounted pieces are already pre-assembled. Grease always all threaded parts and shafts while mounting. For safety’s sake mount the mower with two people using a fork lift or tackle. I dadi e le viti dei pezzi da montare generalmente sono pre-assemblate. Utilizzare sempre una quantità sufficiente di grasso quando si montano parti filettate ed alberi. Per ragioni di sicurezza effettuare il montaggio della falciatrice con due persone utilizzando un carrello elevatore a forca o un paranco. Mounting blades Check the direction of rotation of the discs and install the blades as indicated in the drawing. For longer service life, carefully check discs, blades and bolts daily. When replacements are needed, use only original parts. Use not approved parts could void the warranty. ATTENTION! A BENT BLADE CAN SERIOUSLY EFFECT THE OPERATION OF THE MACHINE AND THROW OBJECTS. REPLACE BENT BLADES AT ONCE. Montaggio lame Controllare il senso di rotazione dei dischi ed installare le lame come indicato nel disegno. Per una maggiore durata, controllare giornalmente attentamente i dischi, le lame ed i perni portacoltello.Se è necessaria una sostituzione, usare unicamente ricambi originali. L’utilizzo di parti non approvate può annullare la garanzia. ATTENZIONE! UNA LAMA PIEGATA PUO’ DANNEGGIARE SERIAMENTE IL FUNZIONAMENTO DELLA MACCHINA E PUO’ CAUSARE PROIEZIONE DI OGGETTI. SOSTITUIRE IMMEDIATAMENTE LE LAME PIEGATE. 05. GENERAL INFORMATION - INFORMAZIONI GENERALI _________ If the power of the tractor is not enough, it is possible that the mower is not performing at the best. Mowers are conceived to couple with tractors working at 540 or 1000 rpm. All our models are equipped with hydraulic lifting. Se la potenza del trattore non è sufficiente, è possibile che la falciatrice non funzioni al meglio. Le falciatrici mod. Debora 215 – 246 – 287 sono concepite per accoppiarsi a trattori che lavorano a 540 o 1000 giri/min. sulla presa di forza. Tutti I nostri modelli sono dotati di sollevamento idraulico. Misure degli attacchi a 3 punti - 3-Point-hitch’s sizes: 10 6. ATTACHING TO TRACTOR - ACCOPPIAMENTO AL TRATTORE _______________ Note: The disc mower require 540/1000 rpm PTO power and are designed to mount on 3 point hitches. 1. 2. 3. 4. Connect the mower’s 3 point frame to the lower links of the tractor’s 3 point hitch and secure. Connect the tractor’s top link to the mower’s 3 point frame and secure. Connect the hydraulic cylinder hose to the appropriate port of the tractor hydraulic system. Install the IID shaft on the tractor and mower. Nota: La falciatrice a dischi richiede un regime di 540/1000 giri alla presa di forza ed è concepita per essere apllicata ad un attacco a 3 punti. Collegare l’attacco a 3 punti della falciatrice alle barre inferiori dell’attacco a 3 punti del trattore e fissarlo. Collegare la barra superiore dell’attacco a 3 punti del trattore al terzo punto della falciatrice e fissarlo con perno e spina di sicurezza. Collegare la valvola del cilindro idraulico nell’apposita sede, per la connessione al circuito idraulico del trattore. Installare l’albero cardanico dalla falciatrice alla scatola di trasmissione. Installare il secondo albero cardanico dalla falciatrice al trattore. ATTENTION! KEEP HANDS AND BODY PARTS AWAY FROM PRESSURIZED HYDRAULIC LINE. HYDRAULIC FLUID UNDER PRESSURE CAN CAUSE SERIOUS INJURY. DAMAGED OR WORN HOSES MUST BE REPLACED IMMEDIATELY. ATTENZIONE! IL CIRCUITO IDRAULICO E’ SOTTO PRESSIONE, TENERE A DISTANZA MANI E CORPO. IL FLUIDO DEL CIRCUITO IDRAULICO SOTTO PRESSIONE PUO’ PERFORARE LA PELLE E CAUSARE GRAVI DANNI. I TUBI FLESSIBILI DANNEGGIATI O CONSUMATI DEVONO ESSERE SOSTITUITI IMMEDIATAMENTE. After attaching the mower to the tractor and raising the mower with the tractor’s 3 point hitch, raise the mower’s parking stand and lock it in place. Adjust the lower link of the tractor’s 3 point hitch until level. Lower the mower and lay it on the ground. In working position the lifting spring must be in tension, otherwise adjust it screwing nuts. Connect the chain with 20 rings to the tractor’s 3 point hitch, and adjust to maintain always the same height from the ground. Adjust the mowing height by adjusting the top link of the 3 point linkage to move the front portion of the cutter bar up or down. Dopo aver attaccato la falciatrice al trattore al trattore ed averla sollevata con l’attacco a tre punti del trattore, sollevare i piedi di supporto e bloccarli. Regolare le barre inferiori dell’attacco a 3 punti del trattore affinché siano alla stessa altezza. Abbassare la falciatrice fino a farla aderire al terreno. In posizione di lavoro si deve notare che la molla sia in tensione, altrimente agire sui dadi. Connettere la catena con 20 anelli, al trattore e regolarla in modo che l’altezza dell’attacco sia costante per tutta la durata del taglio. Regolare l’altezza di taglio agendo sulla barra superiore dell’attacco a 3 punti per muovere l’esterno della barra di taglio in alto o in basso. IMPORTANT: do not allow the disc blades to touch the ground during operation. IMPORTANTE: non permettere ai coltelli di toccare il terreno durante lo sfalcio. 11 07. DRIVELINE - ALBERO CARDANICO __________ The drive shaft supplied with the mower usually is of the right size to couple with the most part of the tractors. In any case before starting work the first time check the length of the shaft. If an adaptation is necessary please follow the instructions below: Gli alberi cardanici forniti insieme alla falciatrice sono della misura corretta per l’accoppiamento con la maggior parte dei trattori in commercio. In ogni caso prima di iniziare il lavoro per la prima volta si consiglia di verificarne la lunghezza. Qualora si rendesse necessario un adattamento, procedere nel modo seguente: Important! Use only the indicated or accompanying drive shaft, use of not approved parts could void warranty. If the drive shaft is too long, open the shaft and hold the two halves side by side, in this way it will be possible to determine exactly the exceeding length of the shaft. Importante! Usate soltanto l’albero cardanico in dotazione o quello preventivamente consigliato, altrimenti verrà considerato nullo qualsiasi reclamo in garanzia. Se il cardano eccede in lunghezza aprire le due metà e sovrapporle una opposta all’altra, in questo modo si riuscirà a determinare di quanti cm. Eccede la lunghezza del cardano. Tagliare entrambi I tubi del cardano interno ed esterno della stessa lunghezza, così pure le relative cuffie di protezione. Pulire con una lima i tubi, ingrassarli e richiudere il cardano. Cut both internal and external tubes of the same size, and safety covers too. Clean with a file tubes, grease and close the drive shaft. Important! The maximum operating length (L1) must allow the greatest possible shaft overlap (min. ½ X) Importante! La lunghezza massima in lavoro (L1) deve consentire una sovrapposizione dei tubi pari alla metà della lunghezza del cardano chiuso (min. ½ X). Controllare sempre che l’albero cardanico sia correttamente serrato prima di iniziare il lavoro. Always check that drive shaft locks are securely engaged before starting work. Retaining chain Use chain to prevent tube guard from rotating. Take care that chain does not impede drive shaft pivoting. Catena di sostegno Usate la catena per evitare che il tubo della protezione ruoti. Fate attenzione che la catena non impedisca gli spostamenti laterali del cardano. 12 Rules for working Never exceed maximum PTO speed when using the implement. When the PTO is switched off, the implement hitched up may not stop at once. Do not go close to the implement until all motion as stopped, only then may work be done on it. When the implement is parked, either remove the drive shaft and store it, or secure it with the apposite hook supplied with the mower (do not use retaining chain). Nozioni in lavoro Non superare il numero di giri massimi del PTO mentre la falciatrice è in funzione. Fate attenzione che quando si spegne la PDF del trattore l’attrezzo non si ferma immediatamente. Non sollevare l’attrezzo finché tutti gli elementi si sono arrestati. Quando la falciatrice non viene utilizzata, togliere il cardano e riporlo in magazzino, oppure assicurarlo con il gancio in dotazione (non la catena di sostegno del cardano). 08. WORKING POSITION AND ADJUSTMENT_-_ POSIZIONE DI LAVORO E REGOLAZIONI ATTENTION!: Do not allow people to approach the operating area, while you are moving the mower from working or transport position. Make sure the parking stand is up and secure. Pull the rope and lift the hook. Note: To make this operation easier, be sure that the hydraulic circuit is under pressure. Lowering the cutter bar in working position using the hydraulic cylinder. To adjust the cutting height, see chapter 6 connecting to tractor. STARTING WORK 1. Engage the PTO drive and gradually increase the speed to 540 or 1000 rpm. 2. Start the forward motion of the tractor. The high speed cutting ability of the mower allows faster ground speeds. Reduce the ground speed if the mower leaves uncut material. Reduce the ground speed when turning corners. 3. When the mowing is finished, gradually reduce PTO speed and disengage the PTO drive . ATTENZIONE!: Prima di muovere la falciatrice in posizione di lavoro o di trasporto, allontanare tutte le persone dalla zona di manovra della falciatrice. UTILIZZO DELLA FALCIATRICE 1. Avviare la presa di forza del trattore e gradualmente aumentare la velocità fino a 540 o 1000 gir./min. 2. Innestare la marcia del trattore. L’alta velocità di funzionamento della falciatrice permette un’alta velocità al suolo. Ridurre la velocità se la falciatrice lascia del prodotto non tagliato. Ridurre la velocità nei cambi di direzione. 3. Terminata l’operazione di sfalcio, ridurre gradualmente la velocità della presa di forza e disinnestare il PTO. Istruzioni centralina di Galleggiamento: CARICAMENTO CIRCUITO (dove presente): Prima di iniziare a lavorare aprire la valvola da chiusa (A) ad aperta (B), caricare il circuito fino a quando il manometro raggiunge 40/50 bar come da figura. Chiudere la valvola . Il circuito è in pressione ed attivo. Ripetere l’operazione solo se durante il lavoro o dopo una sosta prolungata, la pressione si sia abbassata. 13 ATTENTION! Before starting operation, make sure there are no people in the area of the mower. ATTENZIONE! Prima di iniziare a falciare assicurarsi che non ci siano persone in prossimità dell’area di sfalcio. ATTENTION! Before starting operation, make sure the cover sheet is in good shape and in the lowered position. Do not operate the mower without the cover sheet in place. ATTENZIONE! Prima di iniziare lo sfalcio, assicurarsi che le protezioni siano in buono stato e siano abbassate. Non operare se la falciatrice è senza il telo di protezione. ATTENTION! Do not operate the mower in extremely rocky conditions. ATTENZIONE! Non falciare in zone estremamente sassose o con pietre. Working advices: 1. 2. 3. 4. Adapt the forward motion to working conditions. Reduce the speed when working in humid conditions or grass layed down. Be careful while working in slopes or in hard conditions. Keep protection covers lowered and in good shape to avoid risk of projection of objects and reduce the inclination of the discs to increase the cutting height. 5. Be sure that blades can turn freely around the pins, when they meet an obstacle. 6. Check locking of external and internal disc convey covers and replace them immediately if they are worn, damaged or missing. Consigli sull’utilizzo: 1. 2. 3. 4. La velocità di avanzamento deve essere adattata alle condizioni di lavoro. Ridurre la velocità di avanzamento in caso di terreni umidi. Prestare particolare attenzione nelle zone in pendenza o di terreni accidentati. Evitare il rischio di proiezione di sassi adeguando la velocità, tenendo il telo di protezione abbassato e naturalmente in buono stato di conservazione, diminuire l’inclinazione dei dischi per aumentare l’altezza di taglio. 5. Verificare che I coltelli possano ruotare liberamente se dovessero incontrare qualche ostacolo. 6. Verificare il fissaggio dei coperchi dei dischi convogliatori esterni ed interni, e sostituirli immediatamente se fossero danneggiati o mancanti. ATTENTION! DO NOT REMOVE OBSTRUCTIONS WHILE THE DISCS ARE ROTATING. DO NOT LEAVE THE TRACTOR UNTIL THE DISCS HAVE STOPPED RUNNING. ATTENZIONE! NON RIMUOVERE OSTRUZIONI MENTRE I DISCHI STANNO RUOTANDO. NON ABBANDONARE IL TRATTORE PRIMA CHE GLI ELEMENTI ROTANTI SISIANO COMPLETAMENTE FERMATI. 09. TRANSPORTATION AND STORAGE_- TRASPORTO E DEPOSITO ________ TRANSPORT Wait until the discs have stopped spinning. Lift the mower in tsport position using the hydraulic cylinder until the bar is locked by the safety shaft. Check the locking of the hook before moving. (see illustration) TRASPORTO Sollevare la macchina in posizione di trasporto. 14 Portare la macchina dietro al trattore azionando il pistone idraulico. SISTEMA DI SICUREZZA Inserire l’asta di sicurezza e chiudere i rubinetti che regolano il passaggio dell’olio. STORAGE 1. Clean the mower of all dirt and debris. 2. Drain the oil from the cutter bar and gearbox and replace with fresh SAE 80W90 gear oil. 3. Store the mower on a clean, dry surface in the down (working) position. 4. Loosen the drive belts or remove the belts and store in a dry place. DEPOSITO 1. Pulire la falciatrice di tutti I residui di erba e di terra. 2. Svuotare la barra e la scatola di trasmissione dell’olio contenuto e sostituirlo con olio nuovo, tipo SAE 80W90. 3. Depositare la falciatrice in un luogo pulito e in una superficie asciutta in posizione orizzontale (posizione in lavoro) 10. LUBRICATION__- LUBRIFICAZIONE_____________________ CUTTER BAR Oil level check Check the oil levels before starting the mower the first time, and then under normal operating conditions (in absence of oil leaking) annually. 1. To check the oil level put the mower in horizontal position (working position) 2. Lift one side of the cutter bar (B) with the hydraulic cylinder as showed in the illustration. Mod.: B= cm. 30 3. Let the mower bar stand in this position for at least 15 minutes, to allow oil to gather in the lower area of the cutter bar. 4. Remove the oil filling plug, the oil level in indicated by the hole. 5. The oil level is correct when the oil arrives until the hole of this plug. BARRA FALCIANTE Controllo livello dell’olio Controllare il livello dell’olio prima di iniziare a falciare la prima volta, ed in condizioni normali (in assenza di perdite d’olio) annualmente. 6. Per controllare il livello dell’olio porre la barra falciante in posizione orizzontale (in lavoro). 7. Sollevare un lato della barra (B) con il pistone idraulico come indicato nel disegno. Mod. 215 – 246 – 287 : B= cm. 15 8. Lasciare ferma la macchina in questa posizione per 15 minuti per permettere all’olio di ritornare nella parte bassa della barra. 9. Togliere il tappo di riempimento e controllare se l’olio raggiunge il foro. 10. Il livello dell’olio è corretto quando l’olio raggiunge il foro del tappo di riempimento. Posizione del tappo di riempimento: Tra il primo ed il secondo disco. 15 Changing oil Change oil after the first 50 operating hours, or after 100 ha at the latest. Raise the cutter bar to vertical position. Remove the oil plug located in the lowest part of the cutter bar, let run out and duly dispose waste oil. Change oil when at operating temperature. Too much old oil remains stuck to the gearwheels and because of this any suspended matter present cannot be removed from the gearing. Lock the drain plug and refill from the oil filling plug. When adding or replacing the cutter bar oil usa SAE 80W90 gear oil. Sostituzione olio La sostituzione completa dell’olio va effettuata dopo le prime 50 ore di lavoro, o almeno 100 ettari tagliati. Sollevare la barra in posizione verticale. Togliere il tappo di scarico che si trova nella parte inferiore della barra e lasciare fuoriuscire l’olio, avendo cura di raccoglierlo e smaltirlo debitamente. La sostituzione dell’olio deve essere fatta con olio caldo (verificare che non sia troppo caldo per evitare ustioni), in quanto in questo caso l’olio vecchio molto più viscoso rimanga all’interno della barra senza fuoriuscire. Svitare il tappo e riempire da quella posizione. Utilizzare olio tipo SAE 80W90 Oil quantity: Quantità di olio Mod. 215 : 2.5 litre Mod. 246 : 3 litre Mod. 287 : 3.5 litre NOTE : while working it is normal an oil heating in the cutter bar and gear box, there are no problems if discs and gear turn freely by hands. GEAR BOX: check the gear box oil with the cutter bar horizontal on the ground. Remove the dip stick from the top of the box and check the oil level. When adding or replacing the gear box oil use SAE 80W90 gear oil. Quantity: 0,75 litre. NOTA : durante il lavoro è normale un riscaldamento dell’olio della vasca e della scatola di trasmissione, non ci sono problemi se I dischi girano liberamente facendoli ruotare a mano. LUBRIFICAZIONE ALBERO CARDANICO: ingrassare l’albero cardanico ed attenersi alle istruzioni di sicurezza fornite dalla casa costruttrice. DRIVE SHAFT LUBRICATION: grease the drive shaft according to the instructions supplied by the manufacturer. ATTENTION! The operator must maintain proper shielding. Do not approach revolving shafts when in operation. ATTENZIONE! L’operatore deve mantenere efficiente l’idonea protezione. Non avvicinarsi al cardano mentre è in movimento. 11. ADJUSTEMENTS AND MAINTENANCE_-_ REGOLAZIONI E MAUTENZIONI _____ HYDRAULIC CONTROL VALVE The hydraulic cylinder is equipped with a valve which stops movements of cylinder in case of breakage of an hydraulic tube. This valve can also reduce the cutter bar speed of drop. ATTENTION! The hydraulic circuit is under pressure (the oil in the circuit can pierce the skin). Check the hydraulic hoses regularly. Damaged or worn hoses must be replaced immediately. VALVOLA DI SICUREZZA Il pistone idraulico della falciatrice è equipaggiato con una valvola che blocca il movimento del pistone in caso di rottura accidentale di un tubo idraulico. Può anche bloccare una troppa rapida discesa della falciatrice. 16 ATTENZIONE! Il circuito idraulico è sotto pressione, l’olio del circuito idraulico può perforare la pelle. Controllare regolarmente i flessibili idraulici. I flessibili danneggiati o consumati devono essere immediatamente sostituiti. DISCS AND BLADES Discs, blades and locking screws are manufactured with special high quality steel heat-treated to increase performances and durability and resistance to wear and tear. Damaged or worn pieces must be replaced immediately with original FERABOLI parts, use of not approved parts could void warranty. DISCHI E COLTELLI I dischi, i coltelli e le viti di fissaggio sono prodotti con acciaio speciale di alta qualità trattati termicamente per aumentarne le prestazioni di durata e resitenza all’usura. I pezzi usati o danneggiati devono essere sostituiti immediatamente con pezzi originali FERABOLI, altrimenti verranno considerati nulli eventuali reclami in garanzia. INS KNIFE SUPPORT Check regularly knife supports, and every 50 hours of working. Check them more frequently if you are working in rocky or hard conditions. Check knife support immediately in case of collisions (stones, pieces of wood,…). Replace knife support immediately if it is deformed or damaged. PERNI PORTACOLTELLI Controllare regolarmente lo stato dei portacoltelli ogni 50 ore di lavoro, e controllarli più spesso se si lavora su terreni sassosi o in condizioni difficili. Controllarli immediatamente in caso di urti violenti (pietre o pezzi di legno, ecc.). Sostituire il perno portacoltello se si dimostra deformato o deteriorato. Sostituire il perno portacoltello se la testa della vite è consumata o deteriorata. Replace pin knife support if the head of the screw is deformed or damaged. Replace pin knife support if the body of the screw is less than 13-15 mm. (D). Sostituire il perno portacoltello quando il diametro del corpo della vite è inferiore a 13-15 mm. (D) LOCKING NUTS Replace locking nut when the washer looses its springiness. Replace locking nut if worn (see illustration) DADI DI FISSAGGIO Sostituire il dado quando la rondella di bloccaggio ha perso la sua elasticità. Sostituire il dado se dimostra un consumo evidente BLADES Replacing blades: Turn the disc perpendicularly to the cutter bar and screw off the nut located over the disc with a key mm. 19. Slip the pin knife support under the disc and remove the blade. Check the sense of rotation of discs and mount blades with the same sense of rotation (as indicated in the arrow printed on the blade). Every disc mount the same blade. Use original parts. For your safety and for a good quality of cut, check methodically conditions of blades every time before starting work. 17 COLTELLI Sostituzione dei coltelli: Ruotare il disco perpendicolarmente rispetto alla barra e svitare il dado che sporge sopra il disco con una chiave da 18. Sfilare il perno portacoltello da sotto il disco e rimuovere il coltello. Fare attenzione al senso di rotazione del disco e montare il coltello con lo stesso senso di rotazione (come indicato sulla freccia stampata sul coltello). I coltelli sullo stesso disco sono uguali. Usare ricambi originali FERABOLI Replace immediately damaged blades, because if you are working in particularly hard conditions, there is an higher risk of accident due to thrown of objects, quality of cut is worse and vibrations can damage disc support too. Replace immediately worn blades: the length’s blades must be at least mm. 90 (A) and the width 30 mm. (B). Replace blade if the hole is oversized more than 4 mm. (L). Per la vostra sicurezza e per una migliore qualità di taglio, controllare sistematicamente lo stato di usura dei coltelli prima di ogni utilizzo della falciatrice. Sostituire i coltelli immediatamente quando risultino danneggiati, perché se si lavora occasionalmente in condizioni difficili, aumenta il rischio di incidenti e si riduce la qualità del taglio, e la vibrazione può danneggiare anche il supporto del disco. Sostituire immediatamente I colte,lli quando risultino consumati: I coltelli dovrebbero essere lunghi almeno mm. 90 (A) e larghi mm. 30 (B) Sostituire il coltello se il foro si è ovalizzato più di mm. 40 (L). 12. CONDITIONER__ CONDIZIONATORE ________________________ The conditioning effect can be modified: By adjusting the distance between the two rollers. It is possible to increase the distance adjusting the nut ref. 37. Grease daily the connecting rod ref. 12 through the grease nipple. Clean rollers if they are dirty, because the revolving speed can imbalance rotors and vibrations can damage the mower. Be careful not to cut over the swaths laying on the ground (danger of jamming!). In case of jamming of the conditioner stop the tractor immediately, disengage the PTO and pull out the crimping material from the roller by turning discs with hands in the opposite sense of rotation. La regolazione del condizionatore può essere effettuata: Regolando la distanza tra i due rulli. E’ possibile aumentare la distanza regolando il dado rif. 37. Ingrassare giornalmente la biella rif. 12 tramite l’apposito ingrassatore. Pulire I rulli se sono sporchi, perché la velocità di rotazione può sbilanciare I rotori e creare delle vibrazioni che possono danneggiare la falciatrice. Fare attenzione a non tagliare nuovamente sopra il fieno andanato appena tagliato (Pericolo di ingolfamento!) In caso di ingolfamento del condizionatore, fermare il trattore immediatamente, disinnestare la presa di forza del trattore e estrarre il materiale accumulato nei rulli facendo ruotare I dischi con le mani nel corretto senso di rotazione. 18 13.TROUBLESHOOTING TROUBLES Does not cut properly PROBABLE CAUSE SOLUTION Wrong inclination of the cutter bar Reduce inclination of the cutter bar Inadequate PTO speed Increase PTO speed Reversed blade direction Check sense of rotation of the disc, with the arrow printed on the blade. Inadequate discs speed Check belt tension Damaged or worn blades Replace blades Too high cutting width Inadequate inclination of the cutter bar Increase inclination of the cutter bar Dragging of round on skids Humid working conditions Adjust chain to reduce the Mower to much heavy to the ground pressure to the ground Bad adaptation to the ground Improper adjustment of the frame Check adjustment of chains The safety break release without Improper tension of the rubber Increase the tension of the meeting obstacles spring spring 13 .PROBLEMI E RIMEDI PROBLEMI PROBABILI CAUSE RIMEDI Barra di taglio troppo inclinata Ridurre falciatrice Velocità della PDF insufficiente Aumentare la velocità Coltelli montati in modo sbagliato Verificar il senso di rotazione del disco, con il senso di rotazione indicato nella freccia del coltello Coltelli consumati o danneggiati Sostituire i coltelli Taglio troppo alto Non corretta inclinazione della barra Increase inclination of the cutter bar Accumulo di terra sulle slitte Condizioni di lavoro umide. Falciatrice troppo pesante Regolare le catene per ridurre la pressione al suolo Non si adatta al terreno Cattiva regolazione del telaio Controllare la regolazione delle catene Cattiva qualità di taglio Lo sgancio di sicurezza si apre La tensione della molla non è corretta frequentemente l’inclinazione della Aumentare la tensione della molla 19 SPARE PARTS ORDER: An order of spare parts must be given either by letter, fax or e-mail. Orders made by phone are valid only when confirmed in writing. When placing a spare parts order, the following must be specified: 1. Type of machine 2. Code number and name of part being ordered. The manufacturer decides on the best way of shipment. Spare parts are always sold on a cash basis. The manufacturer has the right to determine the method of payment. 13. GENERAL WARRANTY CONDITIONS________________________________________ a) b) c) d) e) f) g) h) The company FERABOLI s.p.a. , states that, as far as the products they manufacture are concerned, the general warranty conditions are as follows: The warranty covers our material for one whole year from the date of delivery to the operator (the valid document which proves delivery is the invoice, and warranty starts from invoice’s date) and during this period up to a maximum of 500 hours. The warranty is limited to the replacement of the parts or reimbursement thereof (and not labour costs). The parts in question shall be acknowledged as faulty by our firm and by our technicians. Pieces which are part of the composition of the machine, but not manufactured by FERABOLI (like gear boxes and drive shafts), are subject to warranty conditions of the manufacturer. The warranty is valid neither for parts normally subject to wear, likeblades, knife supports, wings, discs …. Nor for faults which are the resul of improper use of the mower due to lack of maintenance. Any modification made without the FERABOLI’s approval voids warranty. The FERABOLI company is not liable for damages occurred to the machine or its accessories during transportation. Machine and accessories travel at the customer’s risk. The claim must be made within 60 days of the verification of the fault and the parts must be returned at the claimant’s expense, together with a description of the failure to our firm. After the usual checks and inspections have been made, our company will decide whether or not the claim falls within the scope of the warranty. Customer has to bear the transport expenses to return pieces and the labour to demount and mount parts. The purchaser undertakes to accept the decision made regarding the alleged fault, replacement of parts and reimbursement. Our firm reserves the right to modify the design of its machines without any prior notice and without any obligation to modify the machines already sold and in use. ORDINAZIONI PARTI DI RICAMBIO: Un ordine di parti di ricambio deve essere inviato per lettera, fax o e-mail. Gli ordini telefonici diventano validi dopo la conferma scritta. Per ordinazioni di parti di ricambio è necessario indicare esattamente: 3. Tipo di macchina 4. N. di codice e denominazione del pezzo desiderato. Le spedizioni verranno effettuate con il mezzo da noi ritenuto più idoneo. La ditta si ritiene tacitamente autorizzata ad effettuare il relativo incasso nella forma che riterrà più opportuna. 14. CONDIZIONI GENERALI DI GARANZIA_______________________________________ La ditta FERABOLI s.p.a., dichiara che, relativamente ai prodotti di sua fabbricazione, le condizioni generali di garanzia sono le seguenti: La garanzia copre il ns. materiale per la durata di un anno a partire dal giorno della consegna all’utilizzatore finale (il documento che giustifica la consegna è la fattura e la data della fattura indica la data dell’inizio della garanzia) e durante questo periodo fino ad massimo di 500 ore. j) La garanzia è limitata alla sostituzione o al rimborso dei pezzi (non alla manodopera), che verranno riconosciuti difettosi dal ns. servizio tecnico. k) I pezzi che entrano nella composizione della macchina, ma che non sono di fabbricazione FERABOLI (quali le scatole di rinvio ed i cardani), sono soggetti alle condizioni di garanzia della casa costrittrice. l) La garanzia non si applica per i particolari di usura normale, quale i coltelli, i portacoltelli, le alette, i dischi …. o se i difetti sono causati da un non corretto uso della falciatrice o per mancanza di manutenzione. i) 20 m) La garanzia diventa nulla se vengono apportate delle modifiche alla falciatrice senza l’espresso assenso della FERABOLI s.p.a. n) La FERABOLI s.p.a.non può essere ritenuta responsabile dei danni subiti dalla macchina o dai suoi accessori durante il trasporto. La macchina e gli accessori viaggiano a rischio e pericolo del destinatario. o) Il reclamo deve essere formulato entro 60 gg. Dalla verifica del difetto, inviando a proprie spese i pezzi, ed una descrizione della presunta avaria presso la nostra ditta, che dopo le verifiche ed il controllo d’uso valuterà se concedere o meno la garanzia. p) Restano a carico del cliente le spese di trasporto per la restituzione ed il ritorno al suo domicilio dei pezzi, la manodopera per smontare e rimontare i pezzi. L’acquirente si impegna ad accettare la decisione sia per quanto riguarda il difetto, sia la sostituzione od il rimborso dei pezzi. La FERABOLI s.p.a. si riserva di modificare i disegni delle sue macchine senza preavviso alcuno e senza per questo essere tenuta a modificare le macchine in servizio già vendute.lia, dichiara che, relativamente ai prodotti di sua fabbricazione, le condizioni generali di garanzia sono le seguenti: q) La garanzia copre il ns. materiale per la durata di un anno a partire dal giorno della consegna all’utilizzatore finale (il documento che giustifica la consegna è la fattura e la data della fattura indica la data dell’inizio della garanzia) e durante questo periodo fino ad massimo di 500 ore. r) La garanzia è limitata alla sostituzione o al rimborso dei pezzi (non alla manodopera), che verranno riconosciuti difettosi dal ns. servizio tecnico. s) I pezzi che entrano nella composizione della macchina, ma che non sono di fabbricazione FERABOLI s.p.a. (quali le scatole di rinvio ed i cardani), sono soggetti alle condizioni di garanzia della casa costrittrice. t) La garanzia non si applica per i particolari di usura normale, quale i coltelli, i portacoltelli, le alette, i dischi …. o se i difetti sono causati da un non corretto uso della falciatrice o per mancanza di manutenzione. u) La garanzia diventa nulla se vengono apportate delle modifiche alla falciatrice senza l’espresso assenso della FERABOLI s.p.a.. v) La FERABOLI s.p.a. non può essere ritenuta responsabile dei danni subiti dalla macchina o dai suoi accessori durante il trasporto. La macchina e gli accessori viaggiano a rischio e pericolo del destinatario. w) Il reclamo deve essere formulato entro 60 gg. Dalla verifica del difetto, inviando a proprie spese i pezzi, ed una descrizione della presunta avaria presso la nostra ditta, che dopo le verifiche ed il controllo d’uso valuterà se concedere o meno la garanzia. x) Restano a carico del cliente le spese di trasporto per la restituzione ed il ritorno al suo domicilio dei pezzi, la manodopera per smontare e rimontare i pezzi. L’acquirente si impegna ad accettare la decisione sia per quanto riguarda il difetto, sia la sostituzione od il rimborso dei pezzi. La FERABOLI s.p.a. si riserva di modificare i disegni delle sue macchine senza preavviso alcuno e senza per questo essere tenuta a modificare le macchine in servizio già vendute. 21 USATE SEMPRE RICAMBI ORIGINALI ALWAYS USE ORIGINAL SPARE PARTS IMMER DIE ORIGINAL-ERSATZTEILE VERWENDEN EMPLOYEZ TOUJOURS LES PIECES DE RECHANGE ORIGINALES UTILIZAR SIEMPRE REPUESTOS ORIGINALES Servizio Assistenza Tecnica - After Sales Service +39 0372 564650 Servizio Ricambi - Spare Parts Service +39 0372 564690 DEALER: Off. Mecc. Ing. A. FERABOLI S.p.A. Via Bredina, 6 - 26100 Cremona - Italy Tel. +39 0372 564610 Fax +39 0372 564625 [email protected] www.feraboli.com FERABOLI CIS Moscow Office Ostapovsky proezd 5 of 104/107 109316 Moscow City Russian Federation Tel. +7 495 7818634 Fax +7 495 7812460 [email protected] MASCHIO GASPARDO Poland sp z.o.o. Ul. Wapienna 6/8 - 87 – 100 Torun Poland Tel. +48 56 6506051 Fax +48 56 6506053 www.gaspardo.pl MASCHIO FRANCE Sarl 1, Rue de Mérignan ZA F - 45240 La Ferte St. Aubin France Tel. +33 (0) 2.38.64.12.12 Fax +33 (0) 2.38.64.66.79 [email protected] MASCHIO-GASPARDO ROMANIA S.R.L. Strada Înfrátirii, F.N. 315100 Chisineu-Cris (Arad) - România Tel. +40 257 307030 Fax +40 257 307040 [email protected] MASCHIO GASPARDO NORTH AMERICA, Inc. 112 3rd Avenue East Dewitt IA 52742 - USA Tel. +1 563 6596400 Fax +1 563 6596405 [email protected] MASCHIO IBERICA S.L. MASCHIO DEUTSCHLAND GMBH MASCHIO-GASPARDO UCRAINA GASPARDO-MASCHIO TURCHIA MASCHIO-GASPARDO CINA MASCHIO-GASPARDO INDIA Research & Development FERABOLI S.p.A.